Loading ...
Loading ...
Loading ...
POTS AND PANS
Only use pots and pans made from ferromagnetic
material which are suitable for use with induction hobs:
tenamelled steel
tcast iron
tspecial pots and pans in stainless steel, suitable
for induction cooking
To determine whether a pot is suitable, check for the
symbol (usually
stamped on the bottom). A magnet may be used to check whether pots are
magnetic.
The quality and the structure of the pot base can alter cooking performance.
Some indications for the diameter of the base do not correspond to the
actual diameter of the ferromagnetic surface.
Some pots and pans have only a part of the bottom in ferromagnetic
material, with parts in another material that is not suitable for induction
cooking. These areas may heat up at different levels or with lower
temperatures. In certain cases, where the bottom is made mainly of
non-ferromagnetic materials, the hob might not recognise the pan and
therefore not switch on the cooking zone.
To ensure optimum efficiency, always use pots and pans with a flat bottom
that distributes the heat evenly. If the bottom is uneven, this will affect
power and heat conduction.
NOOK
Empty pots or pots with a thin base
Do not use empty pots or pans when the hob is on. The hob is equipped with
an internal safety system that constantly monitors the temperature, activating
the ”automatic off” function where high temperatures are detected. When
used with empty pots or pots with thin bases, the temperature may rise very
quickly, and the ”automatic off” function may not be triggered immediately,
damaging the pan or the hob surface. If this occurs, do not touch anything,
and wait for all components to cool down.
If any error messages appear, call the service centre.
ADAPTER FOR POTS/PANS UNSUITABLE FOR INDUCTION
Using this accessory makes it possible to use pots and pans that are not
suitable for induction hobs. It is important to bear in mind that using it
affects efficiency and consequently the time needed to heat food. Its
use should be limited because the temperatures reached on its surface
depend significantly on the pot/pan used, its flatness and the type of
food being cooked. Using a pot or pan with a smaller diameter than the
adapter disc may cause heat to build up that is not transmitted to the
pot or pan and this could blacken both the hob and the disc. Adapt the
diameter of your pots/pans and the hob to the diameter of the adapter.
Minimum diameter of pot/pan base for the different cooking areas
To ensure that the hob functions properly, the pot must cover one or
more of the reference points indicated on the surface of the hob, and
must be of a suitable minimum diameter.
Always use the cooking zone that best corresponds to the diameter of
the bottom of the pan.
EN
The number and type of accessories may vary depending on which model
is purchased. Other accessories that are not supplied can be purchased
separately from the After-sales Service.
The number and type of accessories may vary depending on which model
is purchased. Other accessories that are not supplied can be purchased
separately from the After-sales Service.
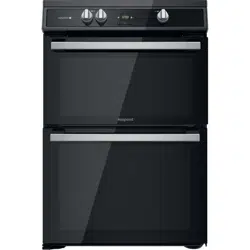
ACCESSORIES
STANDARD TRAY
FIRST TIME USE
100 mm
120 mm
220
mm
150 mm
POWER MANAGEMENT
At the time of purchase, the hob is set to the maximum possible power.
Adjust the setting in relation to the limits of the electrical system in your
home as described in the following paragraph.
N.B: Depending on the power selected for the hob, some of the cooking
zone power levels and functions (e.g. boil or quick reheating) could be
automatically limited, in order to prevent the selected limit from being
exceeded.
To set the power of the hob:
Once you have connected the device to the mains power supply, you
can set the power level within 60 seconds.
Press the far right timer “+“ button for at least 5 seconds. The display shows
.
Press the
3 sec
OK
button until the last power level selected appears.
Use the “+“
and
“−“
buttons to select the desired power level. The power
levels available are: 2.5 kW – 4.0 kW – 6.0 kW – 7.2 kW.
Conrm by pressing
3 sec
OK
.
The power level selected will stay in the memory even if the power supply
is interrupted.
To change the power level, disconnect the appliance from the mains for at
least 60 seconds, then plug it back in and repeat the steps above.
If an error occurs during the setting sequence, the
symbol will appear,
and you will hear a beep. If this happens, repeat the operation.
If the error persists, contact the After-Sales Service.
ACOUSTIC SIGNAL ON / OFF
To switch the acoustic signal on/o:
•Connect the hob to the power supply;
•Wait for the switch-on sequence;
•Press the “P“ button of the rst keypad at the top left for 5 seconds.
Any alarms set will remain active.
DEMO MODE
To switch the demo mode on and o:
•Connect the hob to the power supply;
•Wait for the switch-on sequence;
•Within the rst minute, press the quick heating button “P“ of the
bottom left keypad for 5 seconds (as shown below).
•”DE” will show on the display.
OFF
OFF
OFF
OFF
OK
3 sec
P
P
P
P
8
ANTISTICKANTISTICKANTISTICK
GRID
KIT GRILL PAN
Loading ...
Loading ...
Loading ...