_&com
o_
Safety Instrudions ............. 2-5
Operating Instructions
Broiling ........................ 14
Clock, Kitchen Timer and
Control l[z)ck .................... 17
Com_ction Oven ............. 19-23
Roasting Guide ................ 23
Timed Feaulres ............. 21,22
Cookware ....................... 7
l[zmer Oxen .................... 1,3
Oven Controls ............... 10, 11
Probe .......................... 16
Sabbath Feature ................. 30
Self:Cleaning ................. 26, 27
Slow Cook, Pizza
and Wanning Features ......... 24.-25
Special Features .............. 28-29
Surfi_ce Units .................. 6-9
Thermostat Adjustment--
Do It Yourself ................... 18
Timed Baking and
Roasting Features ................ 15
Upper Oven .................... 12
Care and Cleaning .......... 31-37
Troubleshooting Tips ........ 38-41
Accessories .................... 46
Consumer Support
Consumer Support ...... Back Co_r
Product Registration .......... 43, 44
Warranty ...................... 47
PB970
PB975
Write the model and serial
numbers here:
Model #
Serial #
You can lind them on a label
behind the storage drawer
on the range fl'ame.
49-80444-1 03-07 Jfl
iMPORTANTSAFETYiNFORMATiON.
READALLiNSTRUCTIONSBEFOREUSING.
A '!
For your safeN the information in this manual must be followed to minimize the risk of fire, electric
shock, or to prevent property damage, personal injury, or loss of fife.
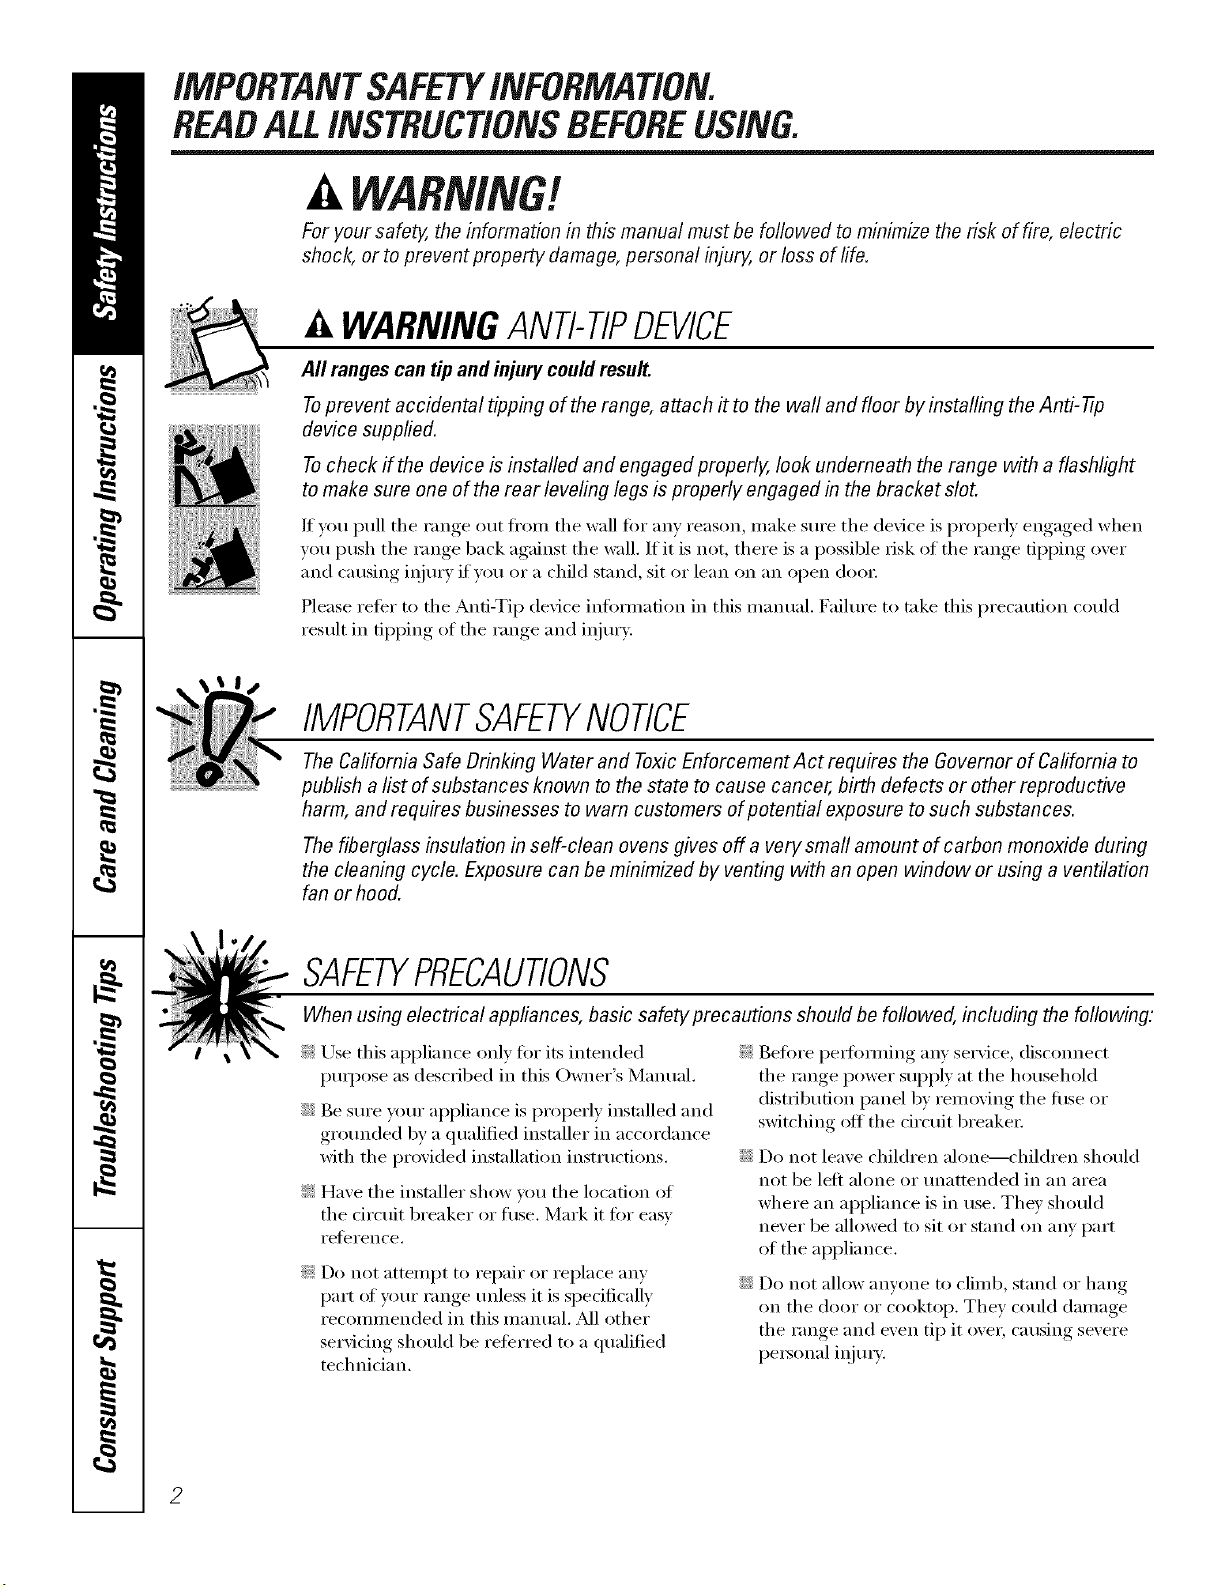
A WARNINGANti-TIPDEVICE
All ranges can tip and injury could result.
Topre vent accidental tipping of the range, attach it to the wall and floor by installing the Anti--tip
device supplied.
To check if the device is installed and engaged properly, look underneath the range with a flashlight
to make sure one of the rear leveling legs is properly engaged in the bracket slot.
If you pull the range out fl'om the wall fin" any reason, make sure the device is properly engaged when
you push the range back against the wall. If it is not, there is a possible dsk of the range tipping over
and causing iqiury if you or a child stand, sit or lean on an open dam:
Please relier to the Anti-Tip device infimnation in this manual. Failm'e to take this precaution could
result in tipping of the range and iqiury.
IMPORTANTSAFETYNOtiCE
The California Safe Drinking Water and ToxicEnforcement Act requires the Governor of California to
publish a list of substances known to the state to cause cancer, birth defects or other reproductive
harm, and requires businesses to warn customers of potential exposure to such substances.
The fiberglass insulation in self-clean ovens gives off a very smafl amount of carbon monoxide during
the cleaning cycle. Exposure can be minimized by venting with an open window or using a ventilation
fan or hood.
SAFETYPRECAUtiONS
When using electrical appflances, basic safety precautions should be followed, including the following:
_: Use this appliance only fin" its intended
pml)ose as described in this Owner's Manual.
::Ji::Be sm'e w>m"appliance is properly installed and
gr()tmded by a qualified installer in accordance
with the provided installati(m instructions.
_: Have the installer show u)u the location of
the drcuit breaker ()r Rise. Mark it fin" easy
reference.
_: Do not attempt to repair or replace any
part of your range unless it is spedfically
recomn_ended in this malmal. _M1other
servicing should be reterred to a qualified
technidan.
_: Deft)re pedomfing any service, discom_ect
the range power supply at the household
distribution panel by removing the fllse or
switching off the circuit breakei:
::Ji::Do not leave children aloi_e---childrei_ should
not be left alone or tmattended in an area
where an appliance is in use. They should
never be allowed to sit or stand on any part
of the appliance.
::Ji::Do not allow anyone to climb, stand or hang
on the door or cooktop. They could damage
the range and even tip it (),,'el',causing severe
personal injm>
2
_e.com
WARNING'!
SAFETYPRECAUTIONS
Donot operate the oven or cooktop controls ff the glass is broken. Food splatter or cleaning solution
may penetrate a broken control panel or cooktop and create a risk of electrical shock. Contact a
qualified technician immediately should your glass control panel or cooktop become broken.
_: Do IIOt stoI'e flalllI/lable Illatellals iI1 _lIl ()veil
OF IleaI" tile cooktop.
CAUTION:]teIllSofinteresttochildren
should not be stored in cabinets above a range
or on tile back of a rang_hiMi'en cliinbing
on tile range to reach iten/s could be seriously
ii_jui'ed.
_: Never wear loose-fitting or hanging gamlents
while using the appliance. Be carefli1 when
reaching for iteins stored over the range.
Flanlnlable inatefial couM be ignited if
brought in contact with hot suibfhce units or
heating eleinents and nlav cause severe burns.
::J?::Use only dry pot holdei_--nloist or dan/p
pot holdeIs Oil hot SUll'ilces nlav result in
burns ti'oin steanl. Do not let pot holdeis
touch hot sui_i_ce units or heating elenlents.
Do not use a towel or other bulky cloth in
place of pot holdei_.
_: Do IIOt rise water Oil grease fires. Never pick
up a flanling pan. Turn tile controls off.
Sinother a flanling pan on a suF[ilce unit
by covering tile pan coinpletely with
a well-fitting lid, cookie sheet or fiat tray:
Use a inulti-puil)ose dry chenlical or
fi)an/-t,ipe fire exfinguishei:
Flan/ing grease outside a pan can be put
out by covering it with baking soda oi; if
a*:filable, by using a n/ulti-puil)ose dry
chen/ical or ti)ain-type fire extinguishei:
Name in the oven can be sn/othered
con/plemly by closing tile oven door and
turning tile oven off or by using a inulti-
puq)ose (li T chen/ical or fi)an/-type fire
extinguishei:
N For your s'alb'Q:,never use your appliance
for wam/ing or heating tile roonl.
_: Do not let cooking grease or other flanmlable
inaterials accunlulate in or near the range.
::Ji::Do not touch tile sui_i_ce units, tile heating
elen/ents or tile interior suiqfi_ce of tile oven.
These surli_ces nlav be hot enough to burn
even though tile*' are dark in coloi: During and
atter use, do not touch, or let clothing or other
flanmlable inaterials contact tile suil'_lce units,
areas nearby tile surfi_ce units or anv interior
area of tile ()veil; allow sufficient dine for
cooling fii_t.
Potentially hot sudhces inchide the cooktop,
areas fi_cing the cooktop, oven vent opening,
sudi_ces near the opening, crevices around the
ovell dooi:
REMEMBER:Tile inside suI{hce (ff tile oven
n/av be hot when tile door is opened.
::Ji::Do not store or use conlbustible inateiJals,
gasoline or other flanlnlable vapoi_ and liquids
in tile vicinity of this or any other appliance.
_: Keep tile hood and grease filtei_ clean
to nlaint;fin good venting and to avoid
grease fires.
::Ji::Teach children not to play with tile controls
or any other part of tile range.
::Ji::Mways kee I) dish towels, dish cloths, pot
holdeI_ and other linens a safi _distance
fi'oIll your range.
_: Mwa D kee I) wooden and plastic utensils and
canned food a sale distance fl'onl p)ur range.
::Ji::Mways kee I) con/bustible wall coverings,
curtains or drapes a safe distance fl'onl
VO/lI" KIIlge.
COOKMEATANDPOULTRYTHOROUGHLY...
Cookmeat and poultry thoroughly--meat to at least an INTERNAL temperature of 160°Fand poultry to at least
an iNTERNAL temperature of 180°E Cooking to these temperatures usually protects against foodbome illness.
3

iMPORTANTSAFETYiNFORMATiON.
READALLiNSTRUCTiONSBEFOREUSING.
RADIANTSURFACEUNITS
Useproper pan size--select cookware having flat bottoms largo enough tocover the surface unit heating
element.Theuse ofundersized cookware will exposeaportion ofthe surface unit todirect contact andmav
result in ignition of clothing. Proper relafionship of cookware tosurface unit will also improve efficiencv.
_: Never leave the surfl_ce units unattended at
high heat settings. Boilove_ cause smoking
and greasy spillove_ that may catch on fire.
_: Only certain b'pes of glass, glassX eramic,
earthenware or other glazed containe_ are
suitable for cooktop service; othe_ may break
because of the sudden change in temi)eratm'e.
_: To minin/ize the possibiliQ' of burns, ignition
of flammable materials and spillage, the handle
of a container should be turned toward the
center of the range without extending over
nearby SUll'ilce units.
_: Mwavs turn the surIilce units off before
i'ei/loving cookware.
::Ji::X4]_en preparing flaming foods under the
hood, turn the tim oil.
::Ji::LIse care when touching the cooktop.
The glass stwIilce of the cooktop will retain
heat after the controls have been turned ofk
_: Kee I) an eve on foods being fl_ied at high or
mediunl high heat settings.
_: Foods for fiTing should be as di_' as possible.
Frost on [i'ozen [0o(ls or IllOiStuI'e on ti'esh
foods can cause hot lilt to bubble tip and
over the sides ot the pan.
::Ji::Use little elt t0r effective shallow or deep
lilt ti'ying. Filling the pan too flfll of elt can
cause spilh)veIs when food is added.
N If a combination of oils or fats will be used
in flying, stir together before heating, or
as lilts melt slowly.
::Ji::Alwm:s heat lilt slowly, and watch as it heats.
::J?::Use a deep tilt themlometer whenever
possible to prevent oveit_eating tilt beyond
the smoking point.
_: Avoid scratching the glass cooktop. The
cooktop can be scratched with imms such
as shaq) instrmnents, rings or otherjeweh T,
and rivets (m ch)thing.
_: I_lIge scratches or impacts to glass dooI_ or
cooktops can lead to broken or shattered glass,
_: Do not operate tile radiant surlilce units if the
glass is broken. Spillovei_ or cleaning solution
may penetram a broken cooktop and cream a
risk of electrical shock. Cont;ict a qualified
technician immediately should your glass
cooktop 1)ec()me broken.
_: Never use tile glass cooktop SUll'ilce as a
cutting board.
::Ji::Do not place or store items that can melt or
catch fire on the glass c()()ktop, even when it
is not being used.
N Be careful when placing spoons or other stin_ing
utensils oil glass cooktop surtilce when it is in ttse.
They may become hot and could cause bums.
::Ji::Clean the cooktop with caution. If a wet
sponge or cloth is used to wipe spills on a hot
surfilce unit, be carefifl to a\_fid steam burns.
Soiile cleanei_ can l)i'o(hice noXiO/IS liliiles i[
applied to a hot surface.
NOTE'. We reconmlend that vou avoid wilting
any surfilce unit areas until they have cooled
and the indicator light has gone off. Sugar
spills are the exception to this. Please see the
Cleaning the glass cooktop section.
_: _l_en the cooktop is cool, use only the
CEIL_dMA BRYTE ': Ceramic Cooktop Cleaner
and the CEIL_4A BRYTE Ceramic Cooktop
Cleaning Pad to clean the cooktop.
_: To avoid possible danmge to the cooking
stlrfilce, do not apply cleaning creanl to
the glass surth(e when it is hot.
_: _Mier cleaning, use a (hw cloth or paper towel
to remove all cleaning cream residue.
::Ji::Read and follow all instructions and warnings
oil the cleaning cream labels.
::Ji::Do not use plastic wrap to cover rood. Plastic
may melt onto the surface and be very difficult
to i'eillove.
4
ge.com
WARNING!
OVEN
Stand away from the range when opening the oven door. Hot air or steam which escapes can cause
bums to hands, face and/or eyes.
_: Do not heat unopened food ('ontaine_.
Pressure could build up and the container
could bmst, causing an iqjmy:
!_:iKeep the oven vent unobstructed.
_: Keep the oven fl'ee fl'om grease buildup.
::Ji::Place the oven rack in the desired position
while the oven is cool. If racks IlltIst be handled
when hot, do not let pot holder contact the
heating elements.
_: \._]_en using cooking or roasting bags in the
oven, fi)llow the inanuthcturer's directions.
_: Pulling out the rack to the stop-lock is a
convenience in litfing heavy toods. It is also
a precaution against burns fl'om touching
hot stmfhces of the door or oven walls.
::Ji::Do not use the oven to (li T ne_vspapeis.
If overheated, they can catch on fire.
_: Do not use the oven fi)r a storage area. Items
stored in an oven can ignite.
::Ji::Do not leave paper products, cooking utensils
or food in the oven when not in use.
::Ji::Do not use aluminum toil to line oven bottoms,
except as suggested in this manual, hnproper
installation of ahuninum foil may result in a
risk of electric shock or riie.
SELF-CLEANINGUPPEROVENANDLOWEROVEN
Do not use oven cleaners. No commercial oven cleaner or oven liner protective coating of any kind
should be used in or around any part of the oven. Residue from oven cleaners will damage the inside
of the oven when the self-clean cycle is used.
_: Do not clean the door gasket. The door gasket
is essential fi)r a good seal. Care should be
taken not to rub, damage or move the gasket.
::Ji::Befi)re selfk'leaning the oven, remove shin>
silvei_colored oven racks (oil some Inodels)
and all other cookware.
::Ji::Gray porcelain-coated oven raclcs (on some
models) may be cleaned in the oven during
the self:clean cycle.
_: Be sure to Mpe up excess spillage before
starting the sell:cleaning operation.
_: If the self_cleaning mode malfunctions, mrn
the oven off and disconnect the power supply.
Have it serviced by a qualified technician.
_: Clean only parts listed in this Owner's Manual.
READANDFOLLOWTHISSAFETYINFORMATIONCAREFULLY.
SAVETHESEINSTRUCTIONS
Abouttheradiantsurfaceunits.
NOTE:Throughoutthismanual,featuresand appearancemay varyfromyourmodel
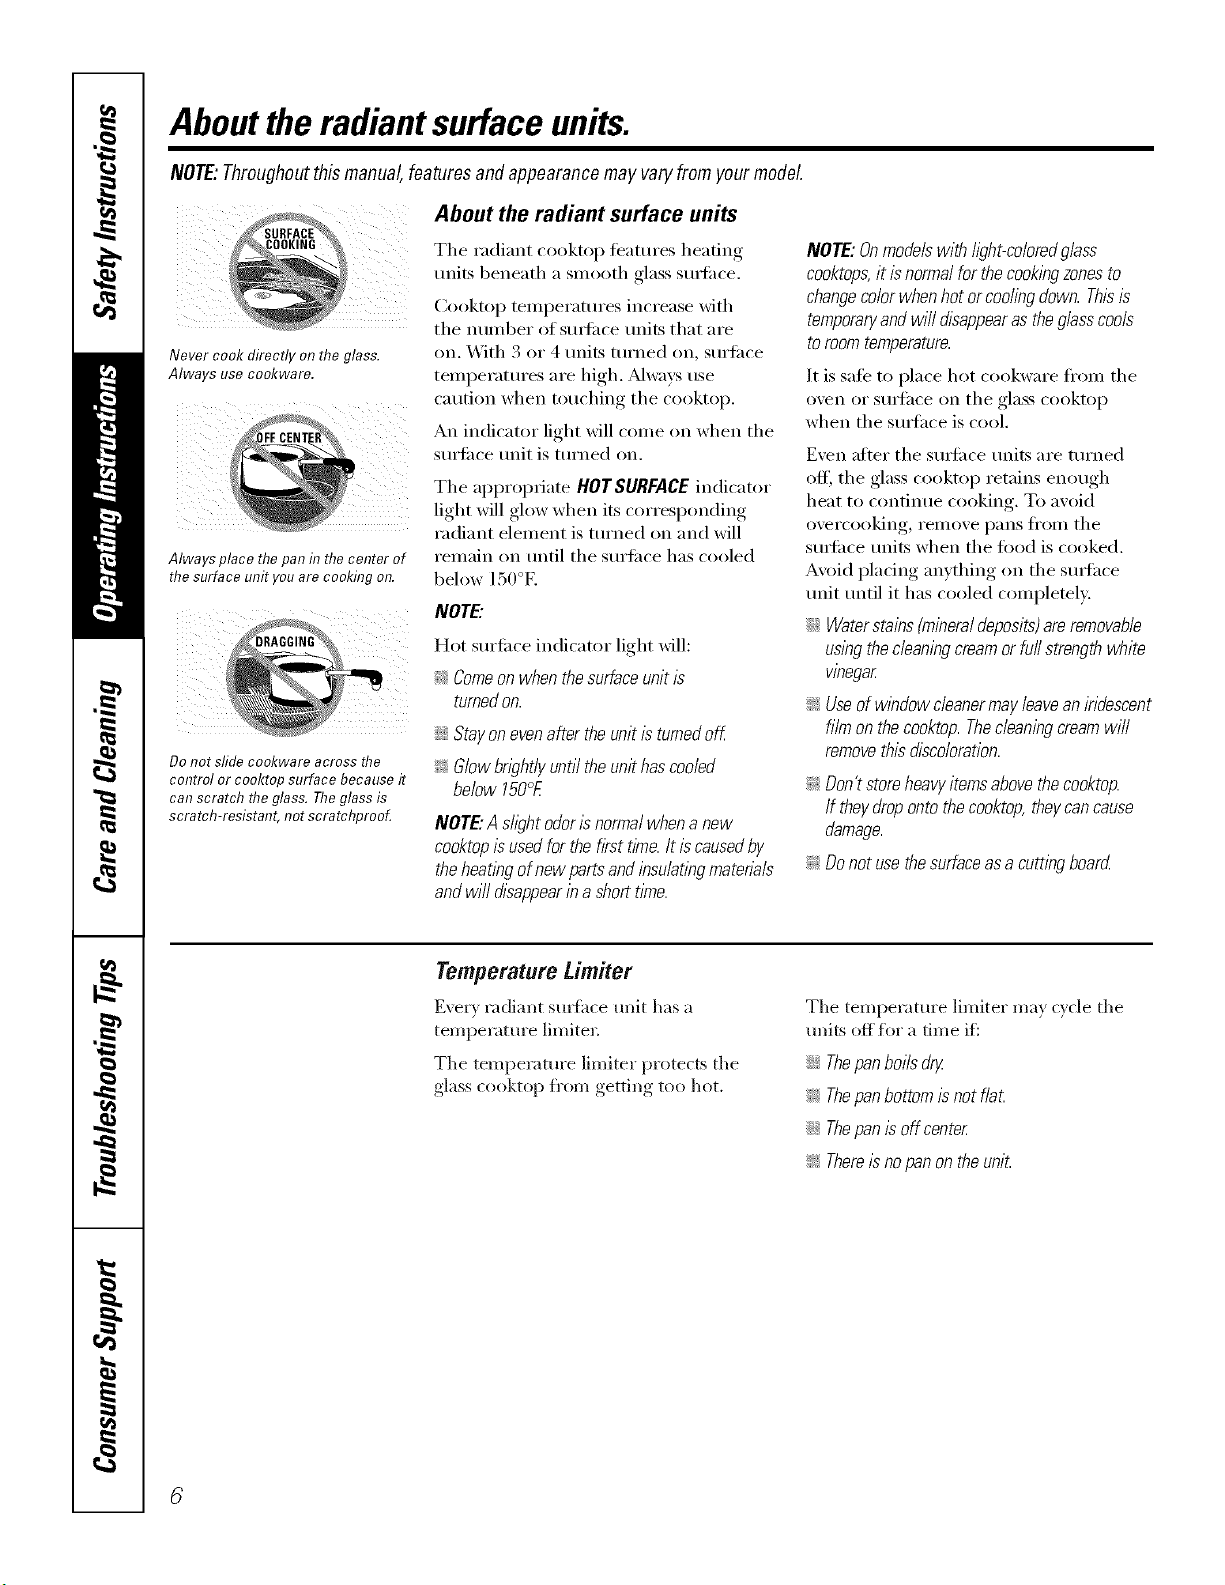
;URFAC_?_
;OOKING _,
Never cook directly on the glass.
Always use co&ware.
Always place thepan in thecenter of
the surface unit youare cooking on.
About the radiant surface units
The radiant cooktop features heating
milts beneath a smooth glass surli_ce.
Cooktop temperatures increase with
the number of surli_ce units that are
on. With 3 or 4 units turned on, surti_ce
temperatures are high. _wavs use
caution when touching the cooktop.
An indicator light will come on when the
surti_ce unit is turned on.
The appropriate HOTSURFACEindicator
light will glow when its corresponding
radiant element is turned on and will
remain on until the surti_ce has cooled
below 150°E
iIi:
Do not sfideco&ware across the
control or cooktop surface because it
can scratch theglass. Theglass is
scratch-resistant, not scratchprooL
NOTE."
Hot surti_ce indicator light will:
_'_Comeon when the surfaceunit is
turnedon.
;;Ji:_Stay onevenafter theunit is turnedoff
_ Glow brightly until theunit has cooled
below 150°£
NOTE."AshghtodorIsnormalwhenanew
cooktopisusedforthefirsttime.It iscausedby
theheatlbgofnewpartsandinsu/atlbgmatena/s
andwi//disappearina shorttime.
NOTE:Onmodels with/ighbcoloredg/ass
cooktops,it is normalfor thecook/bgzonesto
changecolor when hot or coding down. Thisis
temporaryand wi// disappearas the glasscools
to roomtemperature.
It is safe to place hot cookware ti'om the
oven or surface on the glass cooktop
when the surlhce is cool.
Even after the surli_ce units are turned
off, the glass cooktop retains enough
heat to continue cooking. To avoid
overcooking, remove pans fl'om the
surIi_ce units when the toed is cooked.
Avoid placing anything on the surlhce
unit until it has cooled completel>
::Ji::Waterstains (mineraldeposits)areremovable
us/bgthecleaningcream orfu// strength white
vinegar
_ Useof window cleanermay leavean iridescent
film on the cooktop. Thecleaningcreamwill
removethis discoloration.
_; Don'tstoreheavyitemsabovethecooktop.
If theydropontothecooktop,theycancause
damage.
_ Donotusethesurfaceasa cuttingboard
Temperaturetimiter
Every radiam sm_hce unit has a
temperature limiter.
The temperature limiter protects the
glass cooktop fl'om getdng too hot.
The temperature limiter may cycle the
units off flw a tim e if_
_Ji::Thepan boils dry.
_ Thepanbottom is not f/a£
;;Ji::Thepan is off center
_ Thereisno panon the unit.
ge.com
Thefoflowing information will help you choose cookware which will give good performance on glass cooktops.
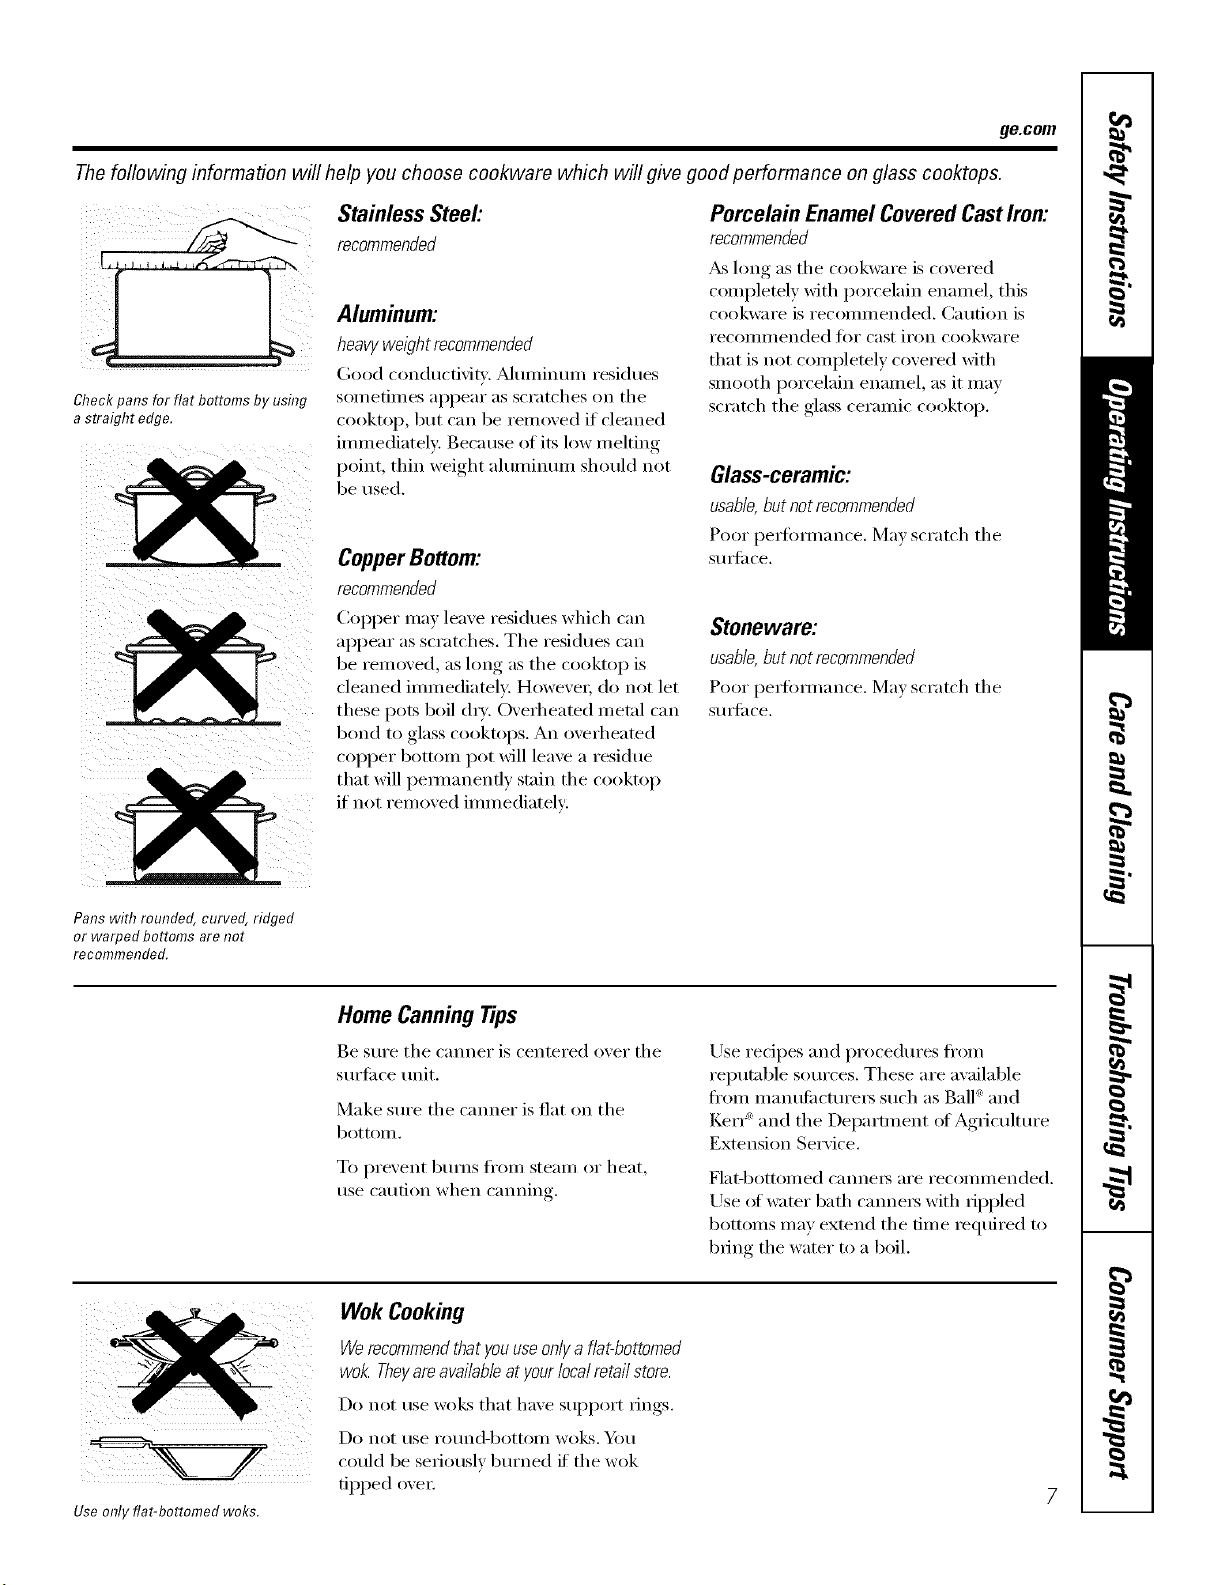
Stainless Steel:
, recommended
Aluminum:
heavy weight recommended
(;god conducfidq'. Muminun/ residues
Check pans for flat bottoms by using SOlUetilnes appear ;is scratches on the
a straight edge. cooktop, but can be removed if cleaned
immediately. Because of its low melting
point, thin weight aluminum should not
be used.
CopperBottom:
recommended
Copper ma) leaxe residues which can
appear as scratches. The residues can
be remoxed, as hmg as the cooktop is
cleaned imlnediatelv: Howevei, do not let
these pots boil (h). O\ erheated metal can
bond to glass cooktops. An oxerheated
copper bottom pot will leaxe a residue
that will pemmnenfl) stain the cooktop
if not remoxed immediately:
Porcelain EnamelCoveredCastIron:
recommended
_ hmg as the cookware is covered
completely with porcelain enamel, this
cookware is recommended. Caution is
recollllilended tor cast ii'on cookware
that is not completely covered with
smooth porcelain enamel, as it may
scratch the glass ceramic cooktop.
Glass-ceramic:
usable,butnotrecommended
Poor pe_bmmnce. IMa_ scratch the
StllS_il ce,
Stoneware;
usable, but not recommended
Poor perlimnance. Mm scratch the
StlIS_il ce.
Pans with rounded, curved, ridged
or warped bottoms are not
recommended.
Home Canning Tips
Be sure the canner is centered oxer the
surtilce unit.
Make sure the canner is fiat on the
bottOIll.
To prexent bui_ns ti'om stealn or heat,
use caution when canning.
Use redpes and procedures fl'om
reputable sources. These are a\_filable
fl'om n/anttfilcturei_ such as Ball®and
Ker_ _ and the Department of Agriculture
Extension Service.
Flat-bottoi/led cannels ai'e recollllllended.
Use _ff wamr bath canne_ with rippled
bottoms may extend the time required to
bring the water to a boil.
Use only flat-bottomed woks.
Wok Cooking
Werecommendthatyouuseonlya flat-bottomed
wok.Theyareavailableatyourlocalretailstore.
Do not rise wolds that have support rings.
Do not rise i'otlnd-bottoill wo]Ls. _J_)tl
could be seriously burned if the wok
tipped ovei:
Usingthesurface units.
i¸ ; :
LO HI
i 9
8
3
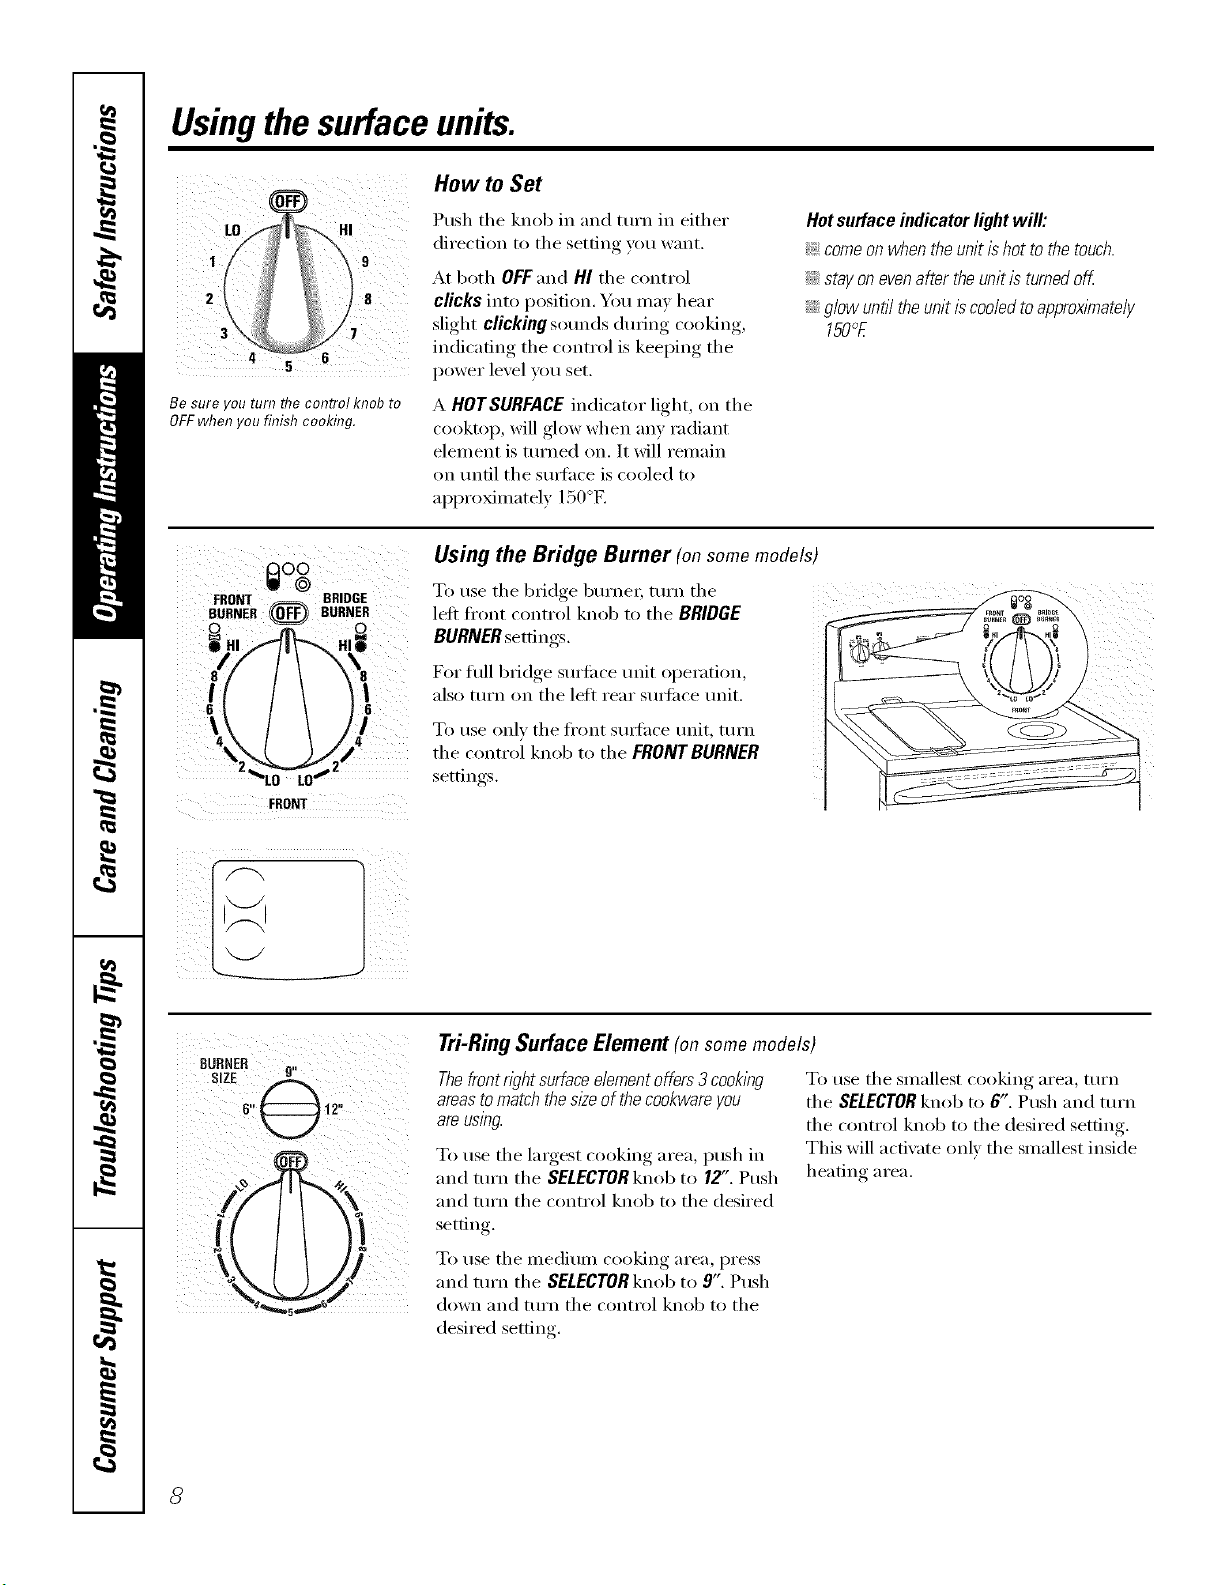
Be sure you turn flTecontrol knob to
OFF when you finish cooking.
How to Set
Push the knob in and turn in either
direction to tile setting you want.
At both OFF and HI the control
clicks into position. You may hear
slight clicking sounds during cooking,
indicating the control is keeping the
power level you set.
A HOTSURFACEindicator light, on tile
cooktop, will glow when any radiant
element is turned on. It will remain
on tmfil tile sm_hce is cooled to
approximately 150°E
Hot surface indicator light will:
_ comeon when the unit ishot to the touch.
_Ji::stay on evenafter the unit is turnedoff
::Ji::glow until the unit is cooledto approximately
150°E
I_lO0
W @
FRONT _ BRIDGE
BURNER (0_,_ BURNER
I
FRONT
Using the Bridge Burner (on somemodels)
W,.,l_etheb_dgeb/.'.e_;t,.'. the
leli fl'ont cont_x)l knob to tile BRIDGE ....
BURNER settings.
For fifll bridge surti_ce unit operation,
also mrn on tile left rear smti_ce unit.
To use only tile fl'ont sm_hce unit, turn
the control knob to the FRDllrrBURNER
settings.
Tri-RingSurface Element(onsomemodels)
Thefront right surfaceelementoffers 3 cooking
areasto match thes/2eof the cookwareyou
areusing.
To use tile largest cooking area, push in
and turn tile SELECTOR knob to 12". Push
and tt/rn tile control knob to tile desired
setfin ,
To use tile smallest cooking area, turn
tile SELECTORknob to 6". Push and turn
tile control knob to tile desired setting.
This will activate only the smallest inside
heating area.
To use tile medium cooking area, press
and tt/Fn tile SELECTORknob to 9". Push
down and tt/rn tile control knob to tile
desired setting.
8
ge.com
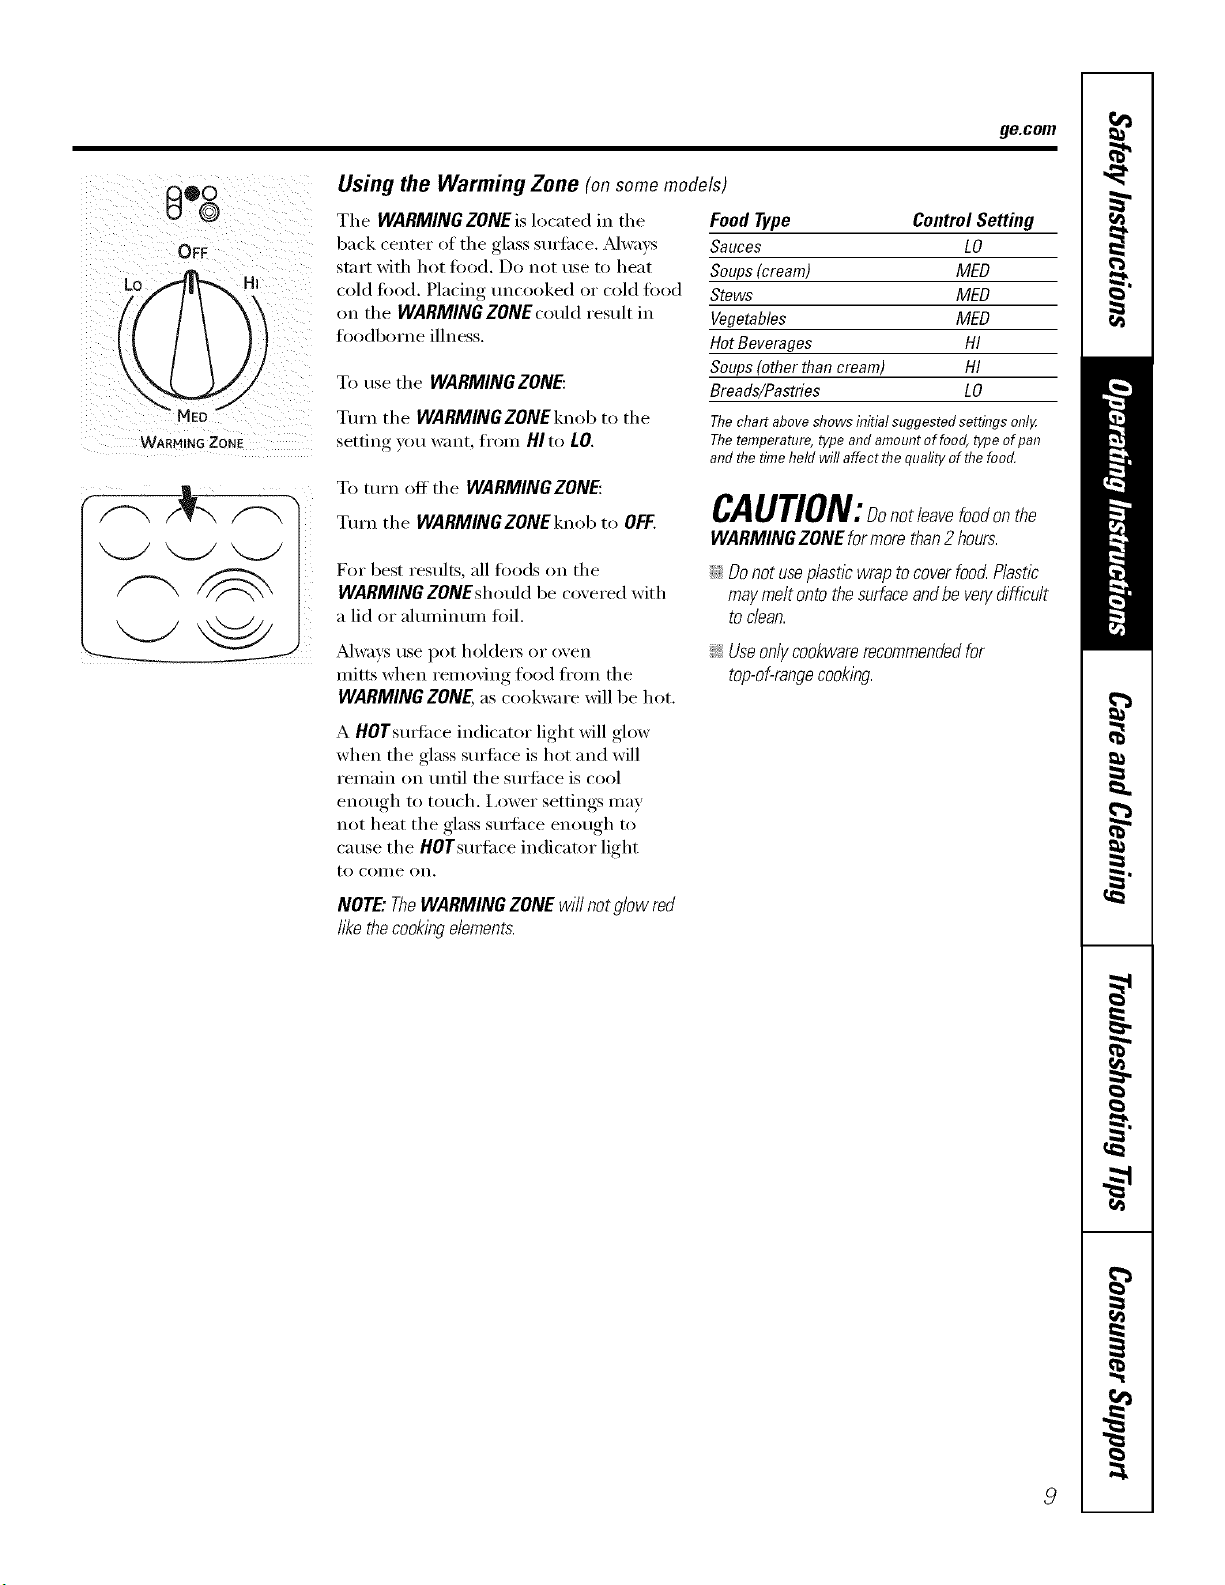
0%
OFF
WARNING ZONE
Using the Warming Zone (onsomemodels)
Tile WARMING ZONE is located in tile
back center of the glass smii_ce. _Mways
start with hot tood. Do not use to heat
cold food. Placing uncooked or cold food
on the WARMING ZONE could result in
ioodborne illness.
To use tile WARMINGZONE:
Turn tile WARMING ZONE knob to tile
setting you want from HIto tO.
Food Type Control Setting
Sauces LO
Soups (cream) MED
Stews MED
Vegetables MED
Hot Beverages HI
Soups (other than cream) HI
Breads/Pastries LO
Thechartabove showsinitial suggestedsettings onl,/
Thetemperature,type and amountoffoog type ofpan
and flTetimeheld will affect flTequafityofflTefood.
To mrn off the WARMING ZONE:
Turn the WARMINGZONEknob to OFF.
CAUTION:Donotleavefoodonthe
WARMINGZONEformorethan2 hours.
For best results, all fi)ods on the
WARMING ZONEshould be co',ered with
a lid or aluminum foil.
iJi:_Donot useplastic wrap to coverfood Plastic
may melt ontothe surfaceand be ven/difficult
todean.
_ways use pot holders or oven
mitts when removing fl)od fl'om tile
WARMINGZONE,as cookware will be hot.
A HOTsmti_ce indicator light will glow
when tile glass smii_ce is hot and will
remain on lmtil tile smii_ce is cool
enough to touch. I,ower settings may
not heat tile glass smti_ce enough to
cause the HOTsurti_ce indicator light
to COllie on,
!i>Useonlycookwarerecommendedfor
top-of-rangecooking.
NOTE"TheWARMINGZONEwillnotglowred
likethecookingelements.
Usingtheovencontrols.
NOTE:Throughoutthismanual,featuresandappearancemayvary fromyourmodel
/0
OvenControl ClockandTimerFeaturesandSettings
0
0
@
0
0
0
0
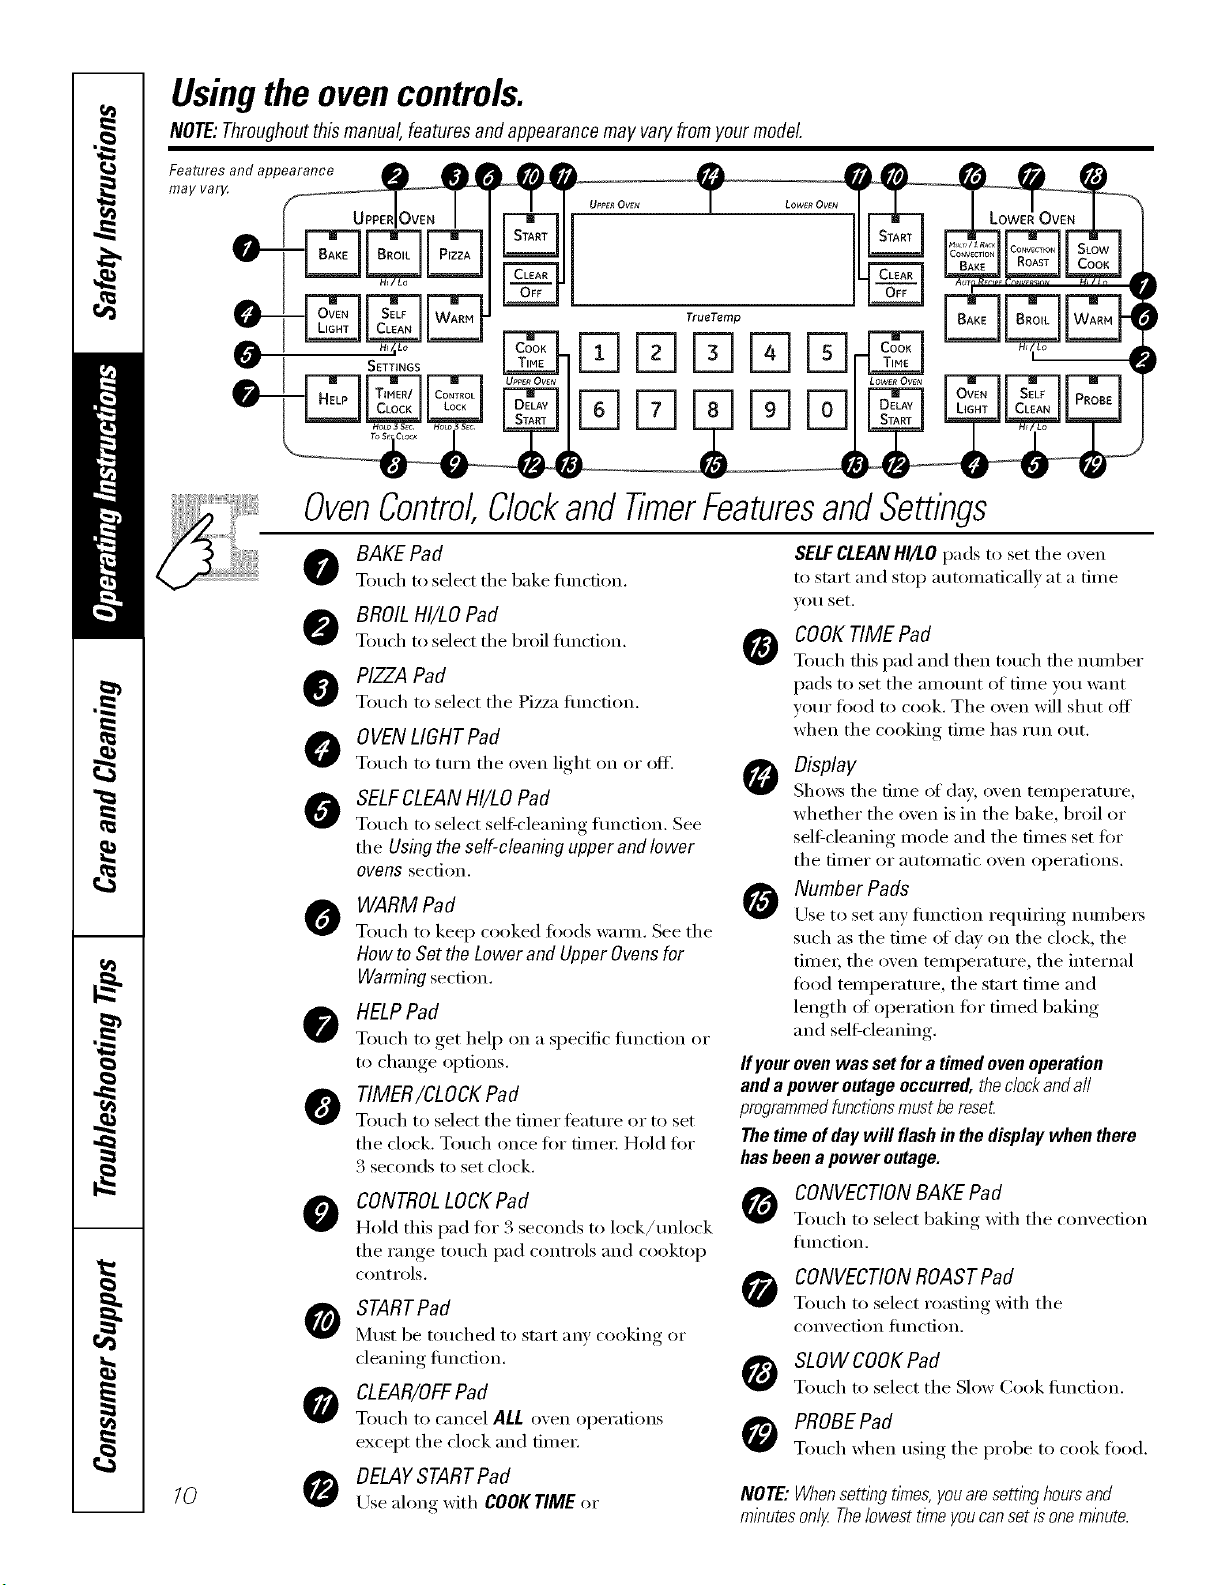
BAKE Pad
Touch to sdect tile bake flulction.
BROIL HI/LOPad
Touch to select tile broil flulction.
PIZZAPad
Touch to select tile Pizza flulction.
0 YENLIGHTPad
Touch to turn tile oven light oil or off'.
SELFCLEANHI/tO Pad
Touch to select sel6cleaning flulcfion. See
tile Using the self-cleaning upper and lower
ovens section.
WARM Pad
Toud/to kee I) cooked fi)ods waml. See tile
How to Set the Lower and Upper Ovens for
Warming section.
HELPPad
Touch to get hel I) on a spedfic flulcfion or
to change options.
TIMER/CLOCK Pad
Touch to select tile diner featuI'e or to set
tile clock. Touch once fi)r tinier. Hold fi)r
3 seconds to set clock.
CONTROLLOCKPad
Hold this I)ad fi)r 3 seconds to lock/unlock
tile range touch l)ad controls and cooktop
controls.
STARTPad
Must be touched to start [llly cooking or
cleaning flinction.
CLEAR/OFF Pad
Touch to cancel ALL oven operations
except tile clock and fiIneI:
DELAYSTARTPad
Use along with COOKTIME or
SELFCLEANHI/tO pads to set tile oven
to start and stop autoinaficallx at a fin/e
VO// set.
COOKTIME Pad
Totlch this l)ad and then totlch the ntli//bei"
pads to set tile anlount of tiine yiiu want
your flied to cook. Tile oven will shut off
when the cooking tinIe has run out.
Display
Show_ tile dine of (la}; oven teilll)ei'attli'e ,
whether tile ()veil is in tile bake, broil or
selfXcleaning inode and tile dines set fi)r
tile [iI/ler or atltOillatic ()veil ol)ei'ations.
Number Pads
Use to set }lily {illl('{ion I'eq/lilJng n/llllbei's
such as the dine of day oil the clock, the
tiIneI; tile ()veil tenil)erature, tile internal
flied tenll)erature , tile start tiIne and
length of oi)eration fin" finied baking
and self-cleaning.
ffyour oven was set for a timed oven operation
and a power outage occurred, theclockand a//
programmedfunctionsmust be reseL
The time of day will flash in the display when there
has been a power outage.
CONVECTIONBAKE Pad
Touch to select baking with tile con',ection
flulction.
CONVECTIONROASTPad
Touch to select roasting with tile
con'_ ection [ilnction.
SLOWCOOKPad
Touch to select tile Slow (look fiulcfion.
PROBEPad
Touch when using tile l)robe to cook flied.
NOTE:Whensem)_gt#nes,youaresemnghoursand
minutesonly Thelowestt/meyoucansetisoneminute.
ge.com
OvenControl,Clockand TimerFeaturesandSettings
0
@
@
0
0
O
0
0
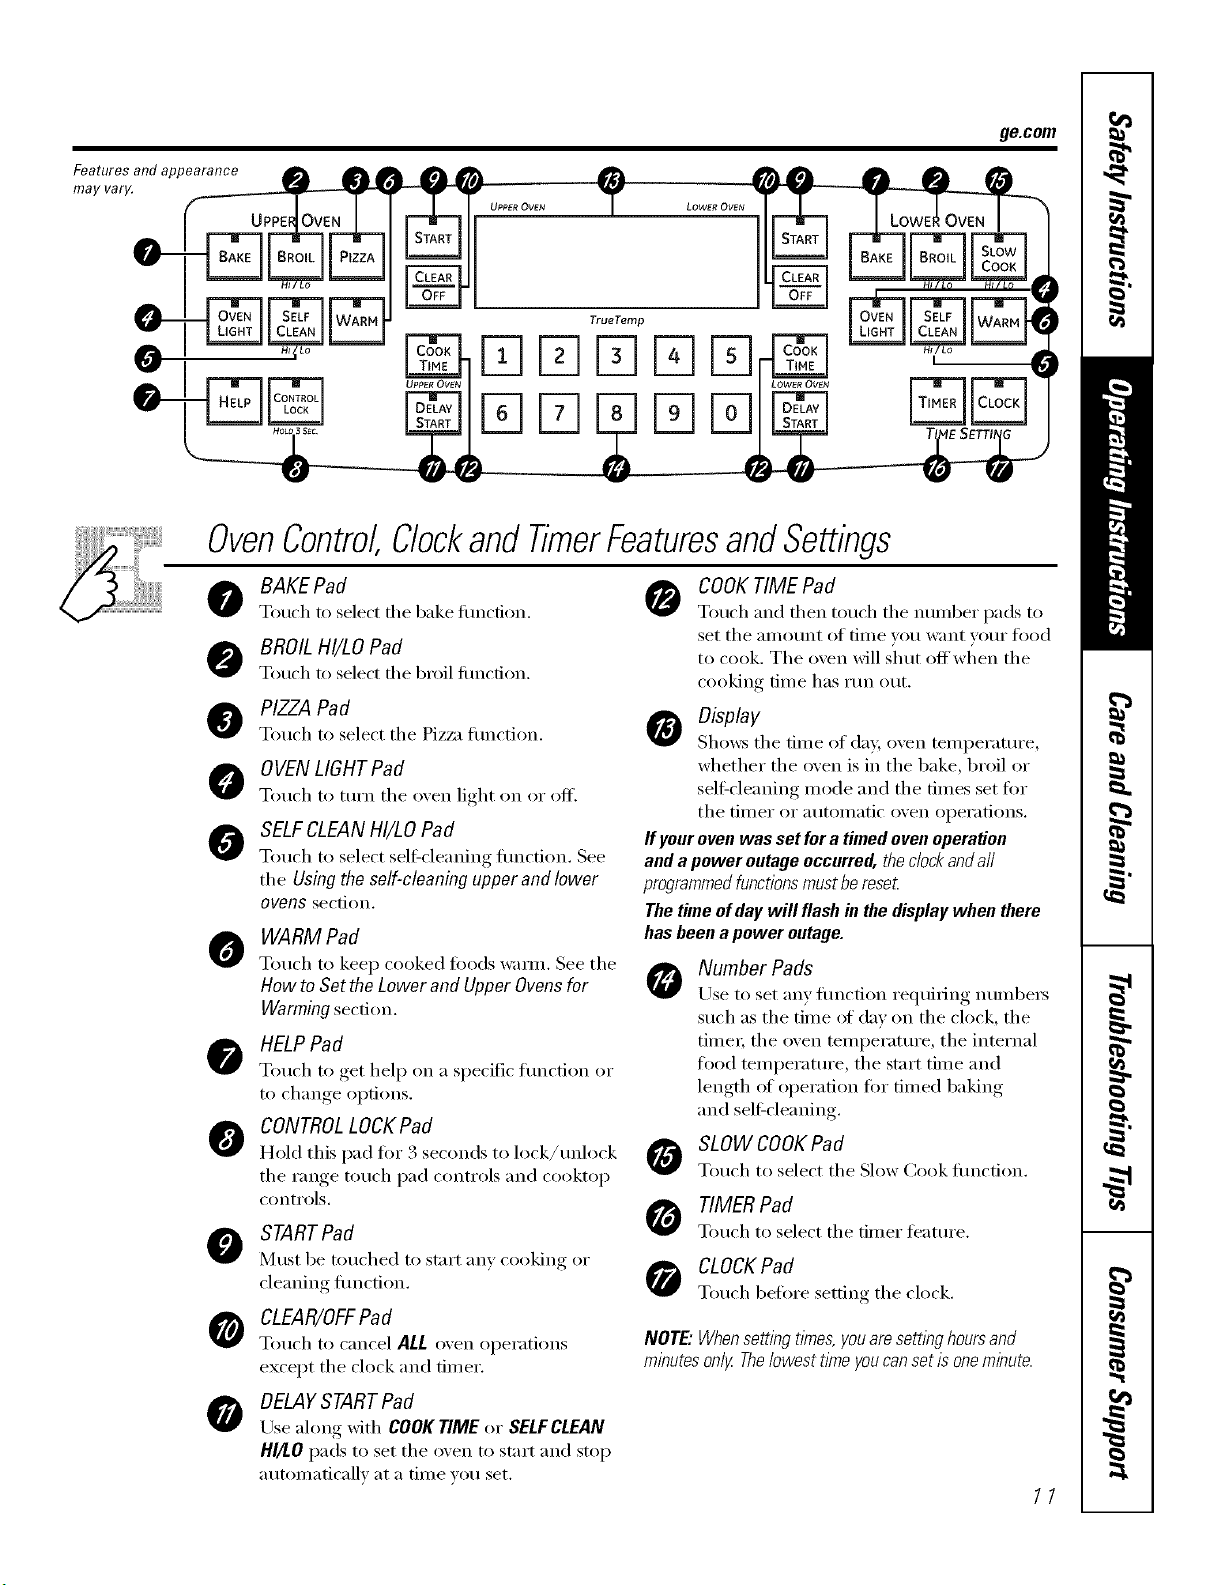
BAKE Pad
Touch to select the bake timcfion.
BROILHI/LO Pad
Touch to select file Ix'oil fimcfion.
PIZZA Pad
Touch to select tile Piz/_l tunction.
OVENLIGHTPad
Touch to turn tile oven light (m or off.
SELFCLEANHI/LO Pad
Touch to select selGcleaning flmcdon. See
the Using the self-cleaning upper and lower
ovens section.
WARM Pad
Touch to kee I) cooked foods wamL See tile
How to Set the Lower and Upper Ovens for
Warming section.
HELPPad
Touch to get hel I) on a specific flmction or
to change options.
CONTROLLOCKPad
Hold this pad for 3 seconds to lock/tmlock
the range touch pad controls and cooktop
controls.
STARTPad
Must be touched to start any cooking or
cleaning flmction.
CLEAR/OFF Pad
Touch to cancel ALL oven operations
except the clock and timer.
OELAYSTARTPad
Lrse along with COOKTIME or SELFCLEAN
HI/I.O pads to set the oven to start and stop
automatically at a time you set.
COOKTIME Pad
Touch _lIl(l then touch tile ntlIllbeI" pads to
set tile _lI//O/lnt of tiIlle _O/l W_IIIt VO/II" i()()d
to cook. The o',en will shut offwhen the
cooking time has run out.
Display
Sho_:s tile tiIlle of day, oven tei/ipei'attli'e,
whether the oven is in the bake, broil or
self:cleaning mode and the times set fi:,r
the tii/ler or atltoIllatic oven opei'ations.
If your oven was set for a timed oven operation
and a power outage occurred, the clockanda//
programmedfunctionsmust be reset
The time of day will flash in the display when there
has been apower outage.
Number Pads
Use to set any flmcfion requiring numbe_
such as the time of day on the clock, the
time_; the oven temperatm'e, the internal
ti)o(1 temperature, the start time and
length of operation fin" timed baking
and self:cleaning.
SLOW COOKPad
Touch to select tile Slow Cook flmcfion.
TIMER Pad
Touch to select tile tinier feature.
CLOCK Pad
Touch before setting tile clock.
NOTE."Whensetting t#nes,youaresettl))g hoursand
minutes only Thelowest ttme youcan set is oneminute.
11
Usingtheupperoven.
Toavoid possible bums, place the racks in the desired position before you turn the oven on.
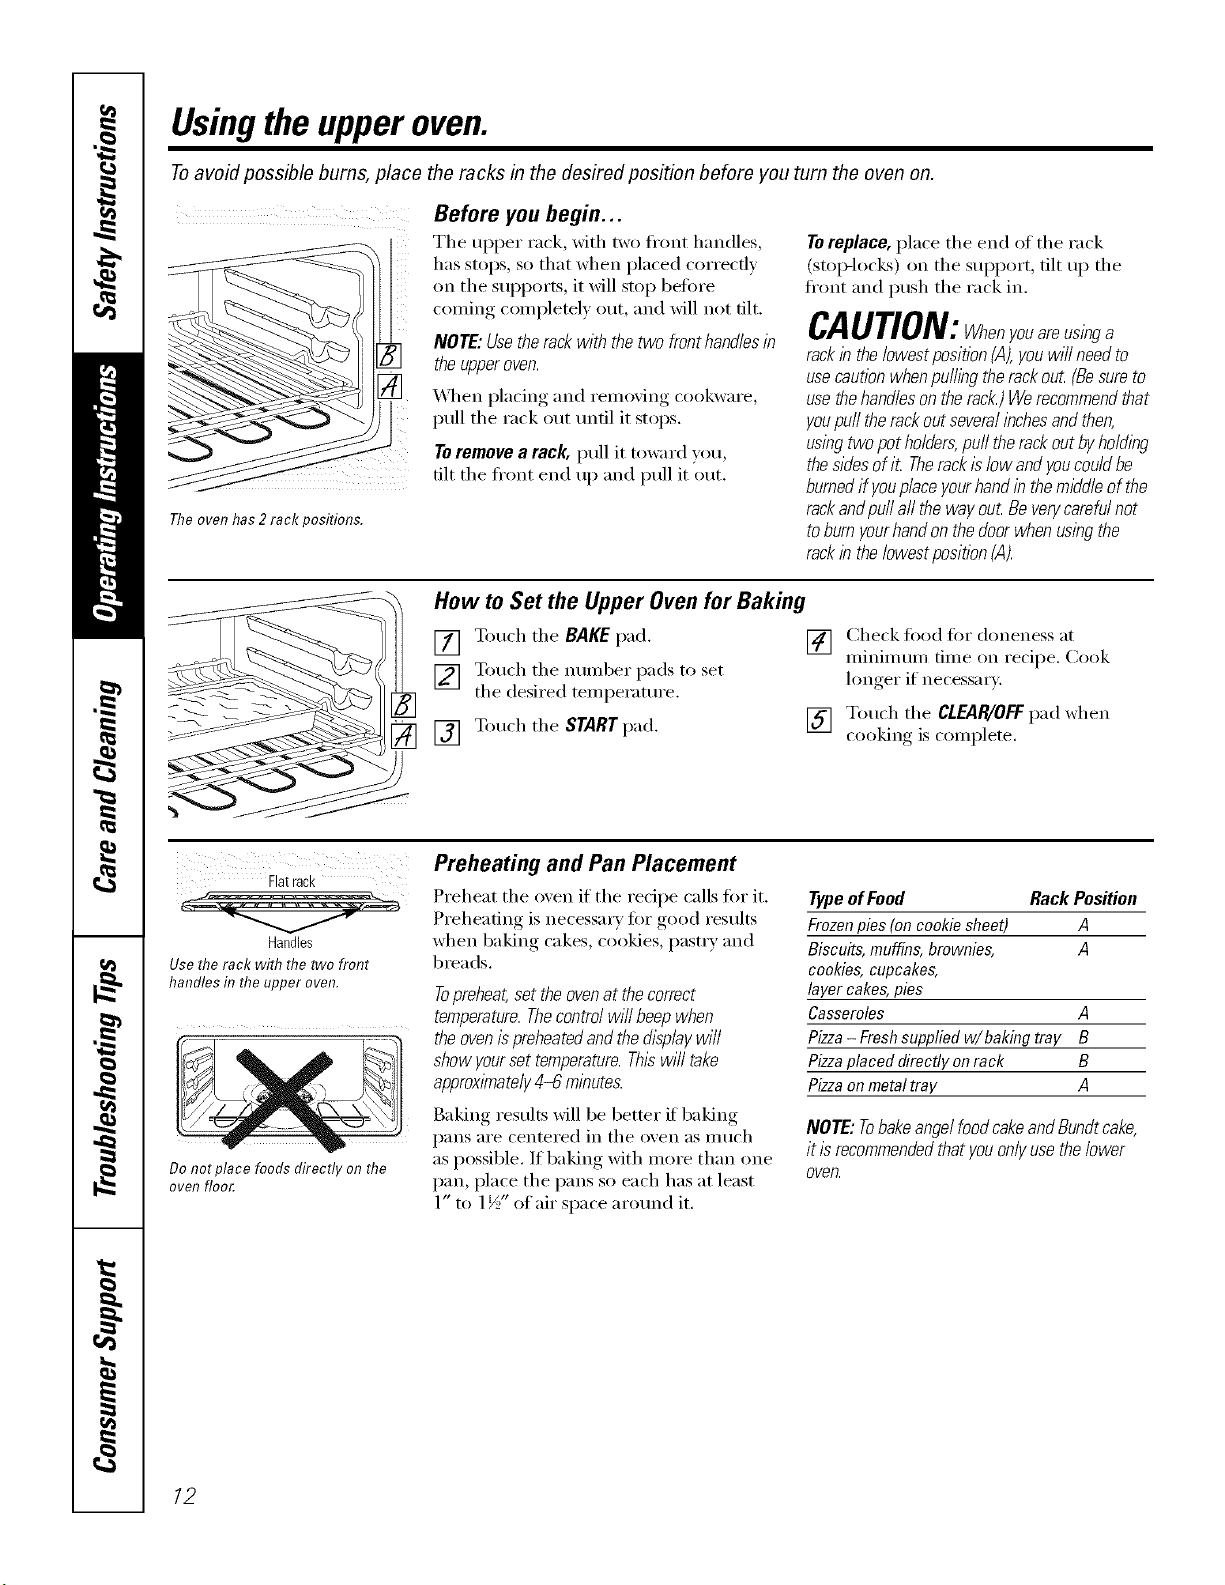
Before you begin...
Tile upper rack, with two ti'ont handles,
has stops, so that when placed correctly
on tile supports, it will stop befi)re
coming, coml)leteE, out, and will not tilt.
NOTE: Usethe rack with the two fronthandles in
the upperoven.
_\]/ell placing and removing cookware,
pull the rack out tmtil it stops.
Toremove a rack, pull it toward you
tilt the ti'ont end up and pull it out.
The oven has 2 rack positions.
To replace, place tile end of tile rack
(stop-locl_s) on tile support, flit up tile
ti'ont and push the rack in.
CAOTlON:whenyouarausinga
rack in the lowest position (A),you will need to
use cautionwhen pu/hhgtherack ou£ (Besureto
use thehandles on therack.) Werecommendthat
youpuffthe rackout severalinchesand then,
using two pot holders,puff therack out byholding
thesides ofiL Therackis low andyoucould be
burnedif youplace yourhandin the middle of the
rack andpu// aft the way ou_Be verycarafu/not
toburn yourhand on the doorwhen using the
rack in the/owestposition (A).
How to Set the Upper Oven for Baking
[] Touch tile BAKE pad.
[] Touch the number pads to set
the desired temperature.
[] Touch the START pad.
[] Check fi)od fin" doneness at
minimum time on recipe. Cook
hmger if necessar).
[] Touch the CLEAR/OFFpad when
cooking is colnplete.
Flatrack
Handles
Use the rack with the two front
handles in the upper oven.
Do not place foods directly on the
oven floo£
Preheating and Pan Placement
Preheat tile oven if tile recipe calls fin" it.
Preheating is necessary for good results
when baking cakes, cookies, pastry and
breads.
Topreheat,set theovenatthecorrect
temperature.Thecontrolwillbeepwhen
theovenispreheatedandthefllsplaywill
showyoursettemperature.Thiswilltake
approximately4-6 minutes.
Baking results Mll be better if baking
pans are centered in tile oven as nluch
as possible. If baking with more than one
pan, place the pans so each has at least
1" to 1½" of air space aro/md it.
TypeofFood Rack Position
Frozenpies(oncookie sheet) A
Biscuits,muffins,brownies, A
cookies,cupcakes,
layer cakes,pies
Casseroles A
Pizza- Freshsuppliedw/baking tray B
Pizzaplaceddirectly onrack B
Pizzaonmetaltray A
NOTE: Tobake angelfoodcakeandBundtcake,
it is recommendedthat youonlyuse thelower
oven.
12
Usingthe lower oven. gecom
Toavoid possible bums, place the racks in the desired position before you turn the oven on.
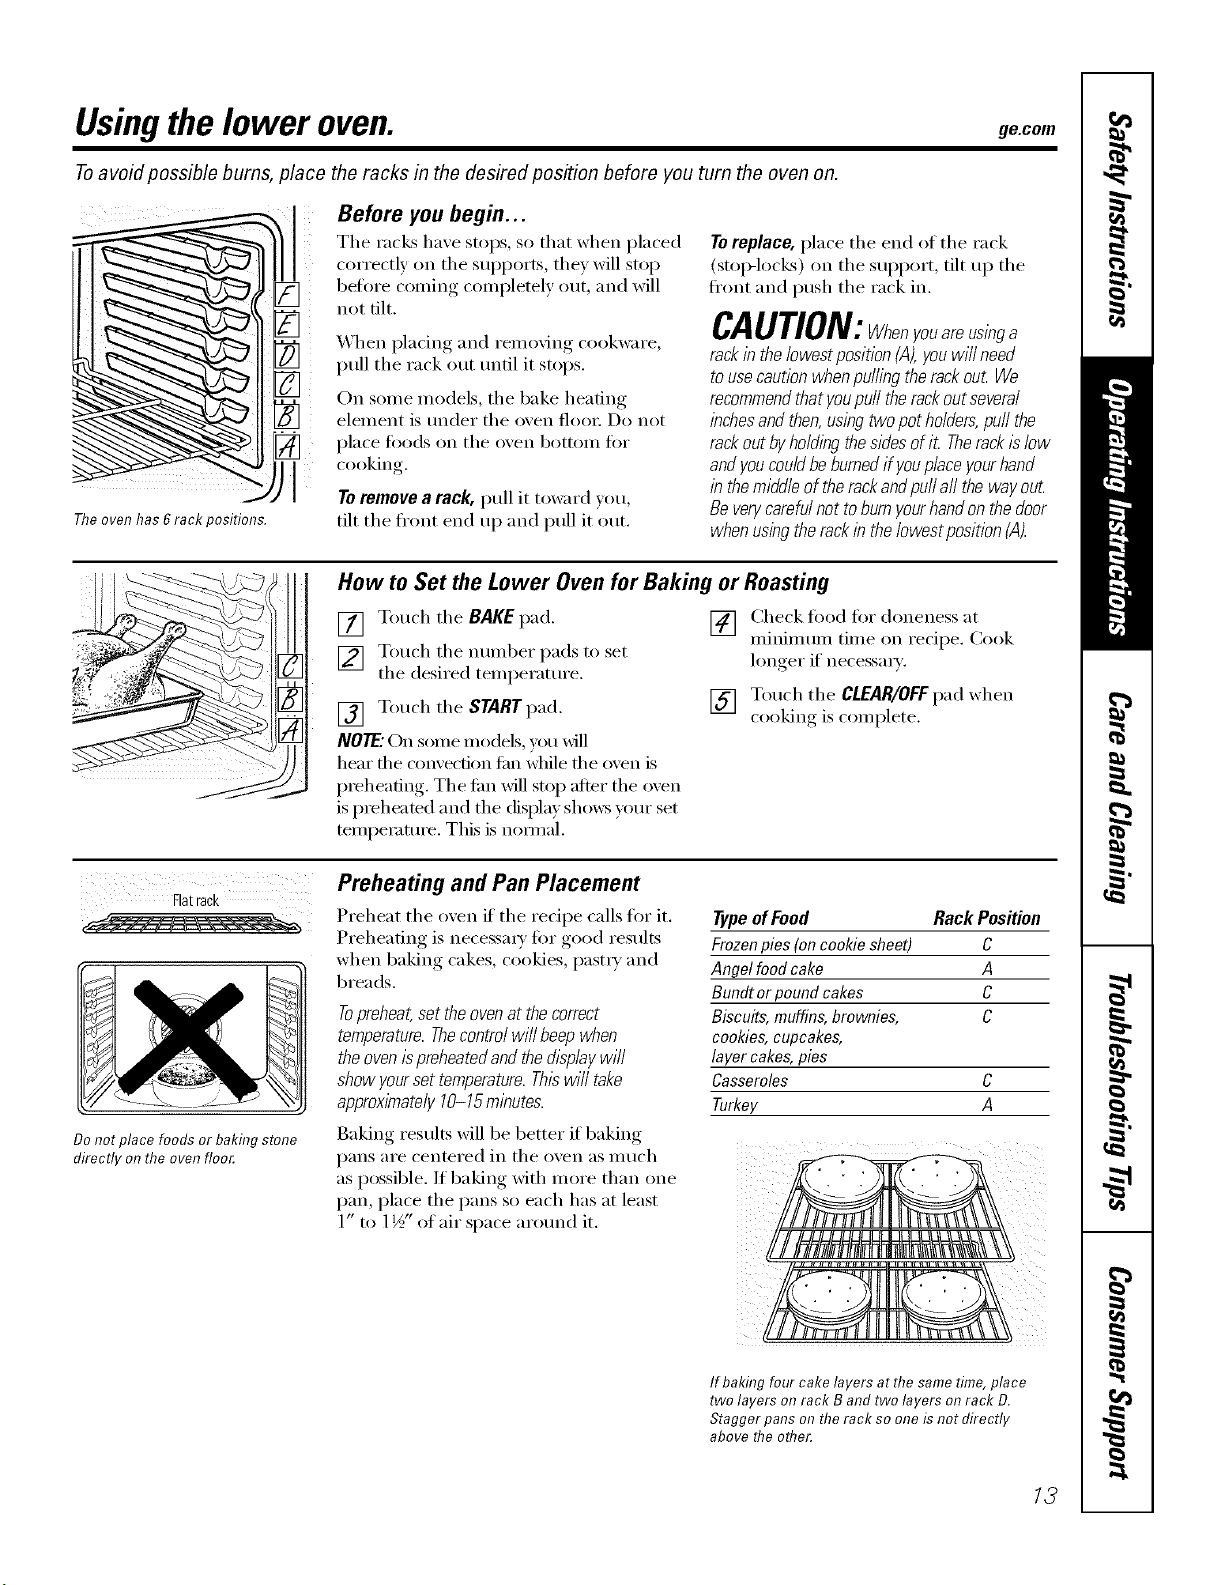
Theovenhas6rack oosifions.
Before you begin...
The racks have stops, so that when placed
correctly oil the supports, they will stop
beflwe coming colnpletely out, and will
not tilt.
_Ahen I)lacim"_ and removing, cookware,
pull the rack ()tit until it stops.
Oil some models, the bake heating
element is under the o;en flooi: D0 not
place foods on the o;en bot[oii1 [i)I"
cooking.
Toremove a rack, pull it toward ;ou
tilt the fl'ont end up and pull it out.
Toreplace, place tile end of tile rack
(Stol>locl<s) oil tile support, tilt up tile
fi'ont and push tile rack in.
CAUTION:Whenyouareusinga
rack in the lowest position (,4),youwi// need
tousecaution when puffing therack ou_ We
recommendthat youpuff the rackout several
inchesand then,using twopot holders,puff the
rack out byholding thesides ofi_ Therackis low
andyoucould be burnedif youplace yourhand
in the middleof the rack andpuff aft the way ouL
Be verycarefulnot toburn yourhandon thedoor
when usingthe rack inthe/owestposition (A).
How to Set the Lower Oven for Baking or Roasting
[] Touch the RAKE pad.
[] Touch tile munber pads to set
the desired teml)erature.
[] Touch the STARTpad.
NOTE."Oil some models, you _dll
hear tile c'_mvection £m while tile oven is
preheating. Tile tim will stop after tile oven
is I)reheated and tile (fisl/lay sl/o_:s your set
temi)emture. This is hernial.
[] Check fi)od fin" doneness at
nfininmm time on recipe. Cook
longer if' necessaD'.
[] Touch the CLEAR/OFFpad when
cooking is coinplete.
Flatrack
Do not place foods or baking stone
directly on tlTeoven floo_
Preheating and Pan Placement
Preheat the oven it the recipe calls for it.
Preheating is necessai y fi)r good results
when baking cakes, cookies, l)astiy and
breads.
Topreheat,set the ovenat the correct
temperature.Thecontrol will beep when
the ovenispreheated andthe &splay will
show yourset temperature. Thiswill take
approximately 10-15minutes.
Baking results will be better if baking
Type of Food Rack Position
Frozen pies (on cookie sheet) C
Angel food cake A
Bundt or pound cakes C
Biscuits, muffins, brownies, C
cookies, cupcakes,
layer cakes, pies
Casseroles C
Turkey A
l)}lns ai'e centered in tile o;en as illtich
as possible. If baking with more than one
pan, place the pans so each has at least
1 If - ,
1" to 1½ of mr space around it.
If baking four cake layers at the same time, place
two layers on rack B and two layers on rack D.
Stagger pans on the rack so one is not directly
above the other.
13
Usingtheupperand lower ovens.
If yourrangeis connectedto208volts,
raresteaksmaybebroiledbypreheating
thebroiler andpositioning theovenrack
oneposition higher
How to Set the Upper and Lower Ovensfor Broiling
Leavethe dooropen to thebroil stopposition.
Thedoorstays openby itself, yet theproper
temperatureis maintained in the oven.
[] Place the meat (rr fish on a broiler
grid in a broiler pan.
[] Follow su_gested_, rack positions in
the Broiling Guide.
[] Touch the BROILHI/LO pad once fi)r
HI Broil
Use LO Broil to cook fi)ods such as
poultx T or thick cuts of meat thoroughly
without ove_4)rowning them.
[] Touch the START pad.
[] "_'_hen broiling is finished, touch the
CLEAR/Off pa d.
NOTE:Broil andself-cleansettings will not work
if the temperatureprobeisplugged in.
To change to LOBroil,touch the
BROILHI/LOpad again.
Broiling Guide
Food
UpperCavity Lower Cavity
Back Time Time Back Time Time
Position_ide 1 Side2 Positian Side 1 Side2 Comments
GroundBeef
Beef Steaks
Clficken
LobsterTails
FisllFillets
Ham Slices
(precooked)
Pork Chops
LambChops
WellDone
Raret
Medium
WellDone
Raret
Medium
WellDone
WellDone
WellDone
83/4" patties A
1" thick 1 lb. A 9
1" thick 1 lb. A 11
1" thick 1 lb. A 13
1W'thick 2 Ibs. A 15
11//'thick2 Ibs. A 17
11//'thick2 Ibs. A 20
1whole 3 4 Ibs A 20
split leogtbwise
2_4 A
10to 12oz.each
1/4to 1/2" thick A
1" thick A
19 21
B
6
WellDone 2(1/U thick) A 10
WellDone 2(I" thick) A 14
Medium 2(1" thick) A 9
WellDone 2(1" thick) A 11
Medium 2 (1W'thick) A 13
WellDone 2 (11//'tbick) A 16
The size, weight, thickness, starting temperature
is based on meats at reii-igerator temperature.
9 10 F 10 6 7
_6 F 7 4 5
5_ F 9 5_
79 F 11 79
6 8 F 14 5_
79 F 16 68
8 10 F 19 8 10
R 13 D 25 10 15
Do riot
turn.
45
67 F 9 56
78 F 13 79
67 F 10 89
7 R F 12 9 10
9 10 F 14 11 12
10 12 F 17 12 14
Spaceevenly•Upto 8 patties takesabouttbe
sametime.
Steakslessthan1" thick cookthroughbefore
browning.Panfrying is recommended.Slashfat.
REDUCETIMEABOUT2 3 MINUTESPERSIDEFOR
CUT-UPCHICKEN•Brusheachsidewith melted
butter•Broilskimside-dowofirst•
D 18_0 Donot Cutthroughbackof shell•Spreadopen•
turn. Brushwith meltedbutterbeforebroilingandafter
half of broilingtiroe,if desired.
F 5 4 5 Handleandturnverycarefully•Brushwith lemon
butterbeforeandduringcooking,if desired•
E 6 6 Increasetime 2 5minutesper sidefor 11/z"thick
ham.
Slashfat.
Slashfat.
and )our preference of doneness will affect broiling times. This guide
+ 7h_, l:.',. l)_jmmm, nt oJAgricullum scOs "t,_an, I)_e/i._/_o]mlm; but )ou should know llml cooking it lo onl_ 14t)°F m_an_ wine/ood /_oiwnin_, m2ani_m_, mc9
sul,,_ (_. (5oul_¢,.Saje l'ood Bootc. }i)ur Kilctu n (;uide. [ '_l)AR_*,,J..]UlI¢,I g_55.)
14
Usingthe timedbakingand mastingfeatures.(o,somemodels) go.corn
NOTE" Foods that spoil easily--such as milk, eggs, fish, stufings, poultry and pork--should not be allowed to sit for
more than 1hour before or after cooking. Room temperature promotes the growth of harmful bacteria. Be sure that
the oven light is off because heat from the bulb will speed harmful bacteria growth.
iir-qFqFqrq E]
iiFqE] %E] Fq
iFqFqFq rq
[-qFqFqFqiFqi
How to Set an Immediate Start and Automatic Stop
Theoven will turnon/nTmed/atelyandcookfor
a selectedlengthof t/riTe.At the end of the
cook/)_gt/?netheoven will turnoff automatically.
[] Touch tile BAKEpad.
] Touch tile munber pads to set tile
desired o_en temperature.
[] Touch tile COOKTIME pad.
NOTE.."/fyour rocl)gemqukes preheatlk_g, you may
need toadd additiona/ t/?neto the length of the
cook/)_gt/?ne.
] Touch tile munber pads to set tile
desired length of cooking time. Tile
Illilli/ll[[Ill CO(}ldllg tiI//e }oil Call set
is 1 minute.
Tile oven tenlperatm'e that }ou set
and tile cooldng dine that )ou
entered will be in tile display.
The oven will turn ON, and file display will
show tile cooking time cotmtdown and tile
changSng tempemtm'e starting at 100°E
(Tile tempeIamIe (fisplay will start to
change once tile oven tempen|ture reaches
100°El _'_]len tile o\vn reaches file
temperature you set, 3 beeixs will sound.
The oven will continue to cook fiw
tile set amount oi time, then turn off
automatically, mfless tile _]k[_2_] tbature
was set. See tile HOWtOSet theOvenfor
Warml)lgsection.
[] Touch tile CLEAR/OFFpad to clear
tile displa} if necessal T. Remove tile
food fl'om tile oven. I),emenlbel;
even though tile oven turns off
automatically, fi)od lett in tile oven
will continue cooldng alter tile o\vn
[[IFnS (}l_.
[] Touch tile STARTpad.
NOTE"Anattent/bntonew/7/soundifyouareus/by
tbTedbakbganddonottouchtheSTARTpad
iii%D 18-1D D ¸
ii[E]D D IEID
How to Set a Delayed Start and Automatic Stop
Theoven will turnon at the t/kneof dayyouset,
cook foraspecificlength of time and thenturn off
automatically
Make stlI'e tile clock sho_:s tile correct
time ot dav.
[] Touch tile BAKEpad.
[] Touch tile nunlber pads to set tile
desired o_en teinperature.
[] Touch tile COOKTIME pad,
NOTE."If yourreciperequirespreheating,youmay
need toadd additiona/ time to the length of the
cookbg time.
[] Touch tile nunlber pads to set tile
desired length of cooking tiine. The
II/inil/ltllIl cooking tilI/e yell can set
is ] nlinute.
Tile oven teinperature that you set
and tile cooking tiIne that you
entered will be in tile display:
[] Touch tile DELAYSTARTpad.
[] Touch tile nunlber pads to set tile
tiIne of day )ou want tile o_en to
tt/Yn on and st;lI't cooking.
[] Touch tile STARTpad.
NOTE"Anattentiontonewff/soundif youareusbg
timedbakIw anddonottouchtheSTARTpad
NOTE."Ifyouwould117_etocheckthetlknesyou
haveset,touchtheDELAYSTARTpadtocheck
thestarttimeyouhavesetor touchtheCOOK
TiMEpafltocheckthelengthofcookbgtime
youhaveseL
_'_]leI1 tile oven turns ONat tile tiine
of day you set, the display will show the
ct)oking tiIne countdown and tile
changing teinpeiamre starting at 100°E
(Tile tenlperature display will start to
change once tile ()veil tellll)eI';IttlI'e
reaches 100°El X&l/eI1 tile oven reaches
tile tenlperature )_)u set, beeps will sound.
The oven will continue to cook tor
tile set an/ount ot tilne, then turn off
autoinaficall> unless tile _,\;&RM featuI'e
was set. See tile How to Set theOvenfor
Warml}?gsection.
[] Touch tile CLEAR/OFFpad to clear
tile displa) if' necessary. Reinoxe tile
food ti'oin tile oven. I_einenfl)ei;
even though tile oven turns off
aut/Ânlaticall 5 filed lett in tile oven
will continue cooking after tile oven
ttlI'ns Off'. _ 5
Usingtheprobe onthe lower convectionoven.(onsomemodels)
Formany foods, especially roasts and poultry, internal food temperature is the best test for doneness. The
temperature probe takes the guesswork out of roasting by cooking foods to the exact doneness you want.
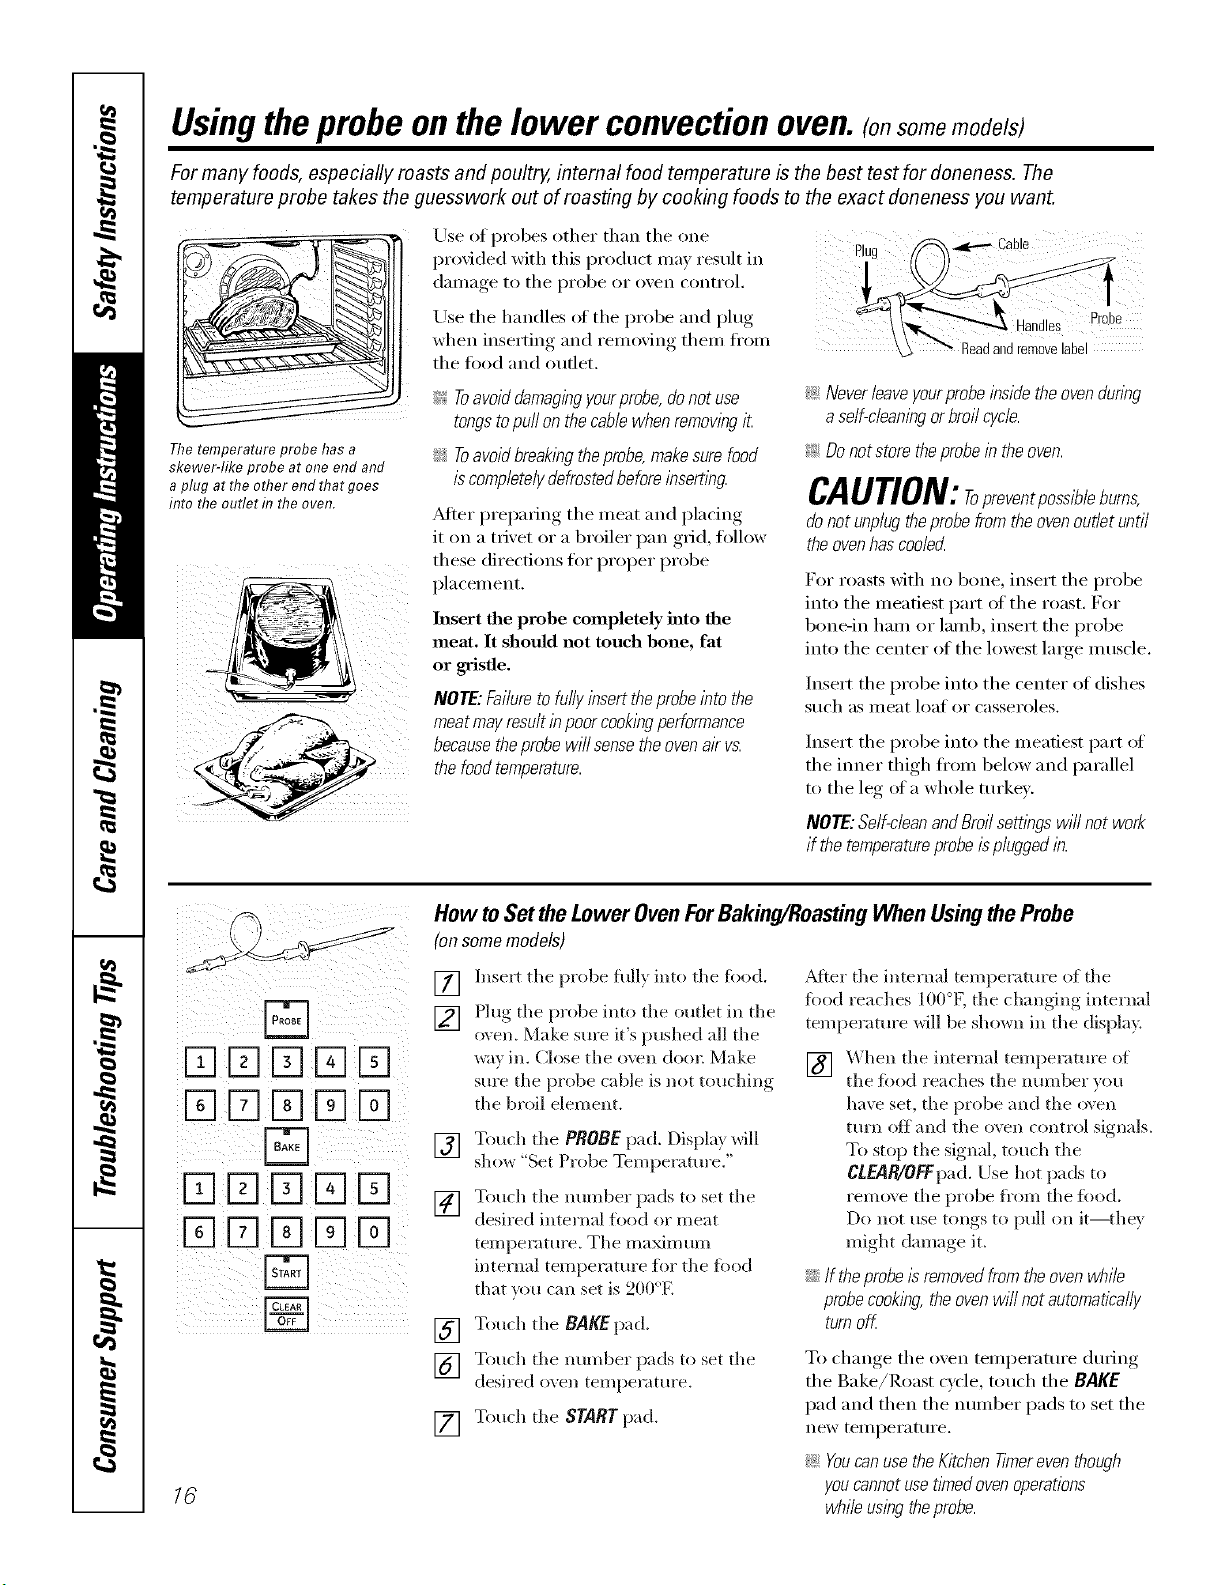
The temperature probe has a
skewer-like probe at one end and
a plug at the other end that goes
into the outlet f17the oven.
Use of probes other than the one
provided with this product Inay result in Plug
dainaoe to the pi'obe (1I" oxen control,
Use the handles of the probe and plug
xd_en inserting and remoxing them fl'om
tile fi)od and outlet.
_!_:Toavoiddamagingyea probe,donot use
tongsto puffon the cablewhen removingit.
:_; Toavoidbreak/bgthe probe,makesure food
is completelydefrosted beforeinsert/bg.
Alter preparing the meat and placing
it on a trivet or a broiler pan grid, follow
these directions for proper probe
placemelm
Insert the probe completely into the
meat. It should not touch bone, fat
or gristle.
NOTE: Failureto fully insert theprobeinto the
meat mayresult in poor cooklbgperformance
becausethe probe will sense the ovenair vs.
the foodtemperature.
_ Never &ave your probe inside the oven dunbg
a self-cleaninga broil cycle.
_ Do not store the probe in the oven.
CAUTION:repreventpossibleburns,
do not unplug the probe from the oven outlet until
theovenhascooled
For roasts Mth no bone, insert the probe
into the ineatiest part of the roast. For
bone-in haln or lamb, insert the probe
into the center of the lowest large 11/uscle,
Insert the probe into the center of dishes
such as llleat loat oi" casseroles.
Insert the probe into the ineatiest part of
the iimer thigh fl'oln below and parallel
to the leg of a whole turkex.
NOTE:Self-cleanandBroilsembgs will not work
if the temperatureprobeisplugged lb.
16
How to Set the Lower Oven ForBaking/Roasting When Using the Probe
(on some models)
] Insert the probe full} into the fi)od. _Mter the internal temperature oi the
food reaches 100°K the changing internal
[]
[]
[]
[]
[]
[]
Plug the probe into tile outlet in the
oven. Make sure it's pushed all the
',_a'_ in, Close the o_en door_ Make
stlle the probe cable is not touching
the broil element.
Touch tile PROBEpad. Displa} Mll
sho_,_ "Set Probe Temperature."
Touch tile number pads to set the
desired internal food or meat
temperature. The ma_mum
internal temperature for the ibod
that xou can set is 200°E
Touch the BAKEpad.
temperature Mll be shown in the display.
] _hen tile internal temperature of
tile food reaches the mm_ber ,ou
have set, tile probe and tile oxen
turn off and the oven control signals.
To stq) the signal, touch tile
CLEAR/OFFpad. Use hot pads to
remo\ e the probe fi'om the ibod.
Do not use tongs to pull on it--they
might damage it.
iJi::If theprobeIs removedfrom the oven while
probecooking,the ovenwill not automatically
turnoK
Touch the ram/beT pads to set the
desired ovell teI//})el';tttll'e,
Touch the START pad.
To change the oven tetnperature dtuJng
the Bake/Roast cycle, touch the BAKE
pad and then the nunlber pads to set the
new telnperature.
!i>YoucanusetheKitchenTimereventhough
youcannotuset/Ynedovenoperations
whileusingtheprobe.
Usingthe clock,kitchen timerand controllock. gecom
(on some models)
(onsomemodels)
Makesuretheclockis settothe
correctt#neofda_
ToSet the Clock
The clock must be set to the correct time
of day fin" the autonmfic oven timing
fimctions to _x)rk properly. The time of
day cannot be changed during a timed
baking or self-cleaning cycle,
] On somemodels, touch the
TIMER/CLOCKpad and hold for
3 seconds. On other models, touch the
CLOCKpad.
[] Touch the number pads.
[] Touch the STARTpad,
(onsomemodels)
(on some models)
The Kitchen 77meris f17hours and
minutes.
The Kitchen Timer does not control
oven operations. The maximum
se#ing on the Kitchen Timer is
9 hours and 59 mhn_tes.
To Set the Kitchen Timer
[] T(>uch the TIMER/CLOCKer TIMER
pad (depending on model).
[] Touch the number pads until the
_lIllOtlnt ()t [lille Veil want shows
in the displa); For example, to set
2 hom_ and 45 minutes, much 2, 4
and 5 in that order: If you make a
mistake touch the TIMER/CLOCKer
TIMER pad (depending on model)
and begin again.
[] Touch the STARTpad,
After touching the STARTpad, SETdisappears,
thistells youthe time iscountl#g down, although
the displaydoesnot change until onemlEutehas
passed SecondswH/not beshown i# the display
until the/astml#ute is counflw down.
[] _,_3_enthe I_Jtchen Timer readies .90,
the control will beep 3 times fi)llowed
b)' one beep every 6 seconds tmti]
the TIMER/CLOCKer TIMER pad
(depending on model) is touched.
The&second tonecanbecanceledby following
thesteps in the Specialfeaturesof youroven
control sectionunderTonesat the Endof a
TimedCycle.
ToReset the Kitchen Timer
If the display is st.ill showing the
time remaining, you may change it by
touching the TIMER/CLOCKer TIMER pad
(depending on model), then touch the
ntli/lbei" pads tmtil the time you want
appea_ in the display.
If the remaining time is not in the
display (clock, delay start or cooking
time are in the display), recall the
remaining time by touching the
TIMER/CLOCKer TIMER pad (depending
on model) and then touching the
ntli/lber pads to enter the new
[lille Veil W;lllt,
ToCancel the Kitchen timer
Touch the TIMER/CLOCKor TIMER pad
(depending on model) twice.
Control Lock (on some models)
Yourcontrol wi// a/low you to lockout the touch
padsand the cooktopsothey cannotbe activated
when touched
To l(>(k/unl(>d¢ the controls and cooktop:
[] Touch and hold the CONTROLLOCK
p_d fi)I 3 seconds.
The oven display will show "Oven
controls and burners locked" fl>r
several seconds, then "Range
Locked."
[] To unlock the control, touch and
hokl CONTROL LOCKfor .,'2seconds.
!;>TheCONTROLLOCKmodeaffectsall
touchpads.Notouchpadswi//workwhen
thisfeatureisactivatecL
17
Adjust the upper or lower oven thermostat--Do it yourself!
Youmay find that your new oven cooks differently than the one # replaced. Use your new oven for a few weeks to
become more familiar with it. If you still think your new oven is too hot or too cold, you can adjust the thermostat
yourself.
Do not use thermometers, such as those found in grocery stores, to check the temperature setting of your oven.
These thermometers may vary 20_40 degrees.
NOTE"This adjustment will only affect baking and roasting temperatures; # will not affect broiling, convection or
self-cleaning temperatures. The adjustment will be retained in memory after a power failure.
i!!/ //4¸i i i i
iirq FqFqrq Fq
iD Fq[] FqFq¸
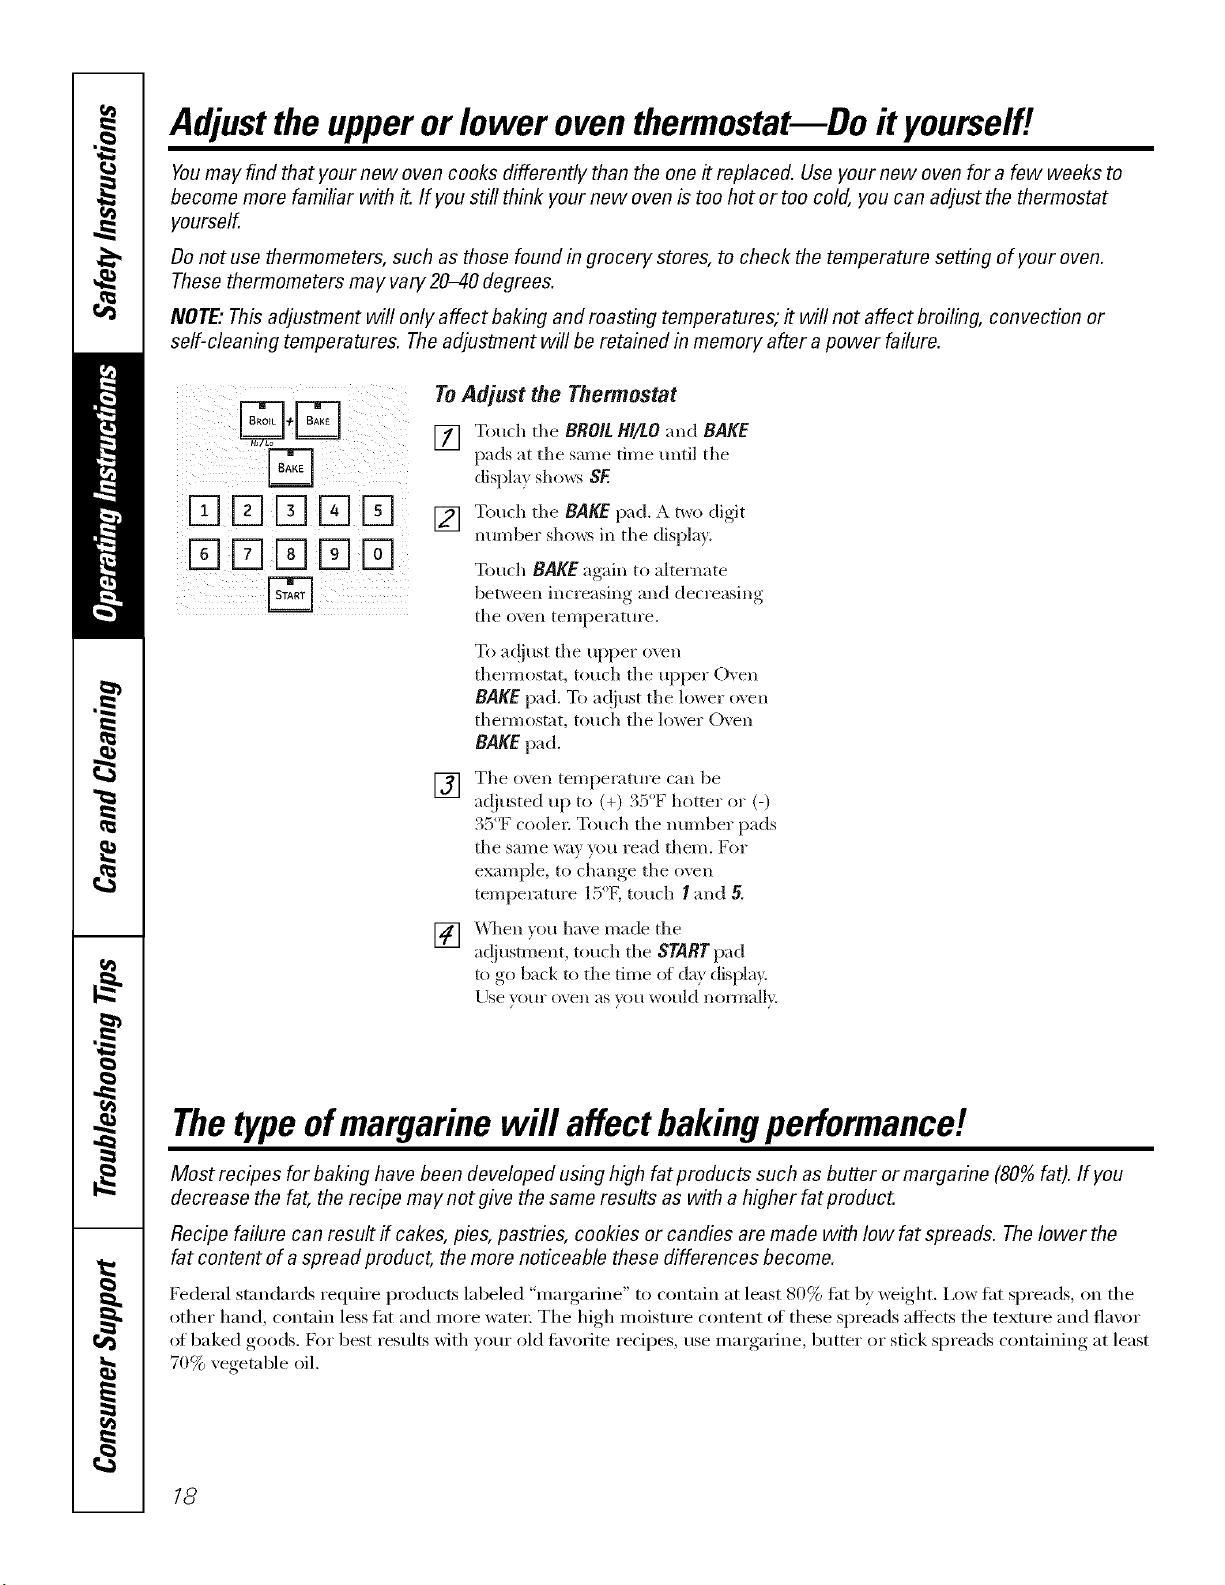
To Adjust the Thermostat
[] Touch the BROIL HI/LO and BAKE
pads at tile same time until tile
displa? sho_s SE
[] Touch tile BAKE pad, _a,t_o clioit
nmnber shm_s in the display.
Touch BAKE again to akernate
between increasing and decreasing
the ()_,e_l temperature.
To ac!iust the upper o\vn
them/ostat, touch tile upper Oxen
BAKE pad. To ac!iust the lower oxen
them)ostat, touch the lower Oven
BAKE pad.
[]
Tile ()veil ten/pel';ttHl'e c;lIl be
a(!iusted up to (+) . :) I_ hottel ol (-)
35°F coole_: Touch the munber pads
tile same way you iead them. For
example, to change the o_vn
temperature l_'_°Ktouch I and 5.
[]
_qlen }ou hme made the
ac!jusunent, touch the STARTpad
to go back to the time of da} displa_
Llse }our oven as ?ou woukl nora/all}
Thetypeofmargarine will affect bakingperformanc!!
Most recipes for baking have been developed using high fat products such as butter or margarine (80%fat). If you
decrease the fat, the recipe may not give the same results as with a higher fat product.
Recipe failure can result if cakes, pies, pastries, cookies or candies are made with low fat spreads. Thelower the
fat content of a spread product, the more noticeable these differences become.
Federal standards require products labeled "margarine" to contain at least 80% tat by weight. I,ow tat spreads, on tile
other hand, contain less tat and more water: The high moisture content (ff these spreads affects tile textm'e and flavor
at baked goods. For best results with veto" old tm'orite recipes, use margarine, butter or stick spreads containing at least
70% vegetable oil.
18
Usingthe convectionoven.(onsome models) ge.com
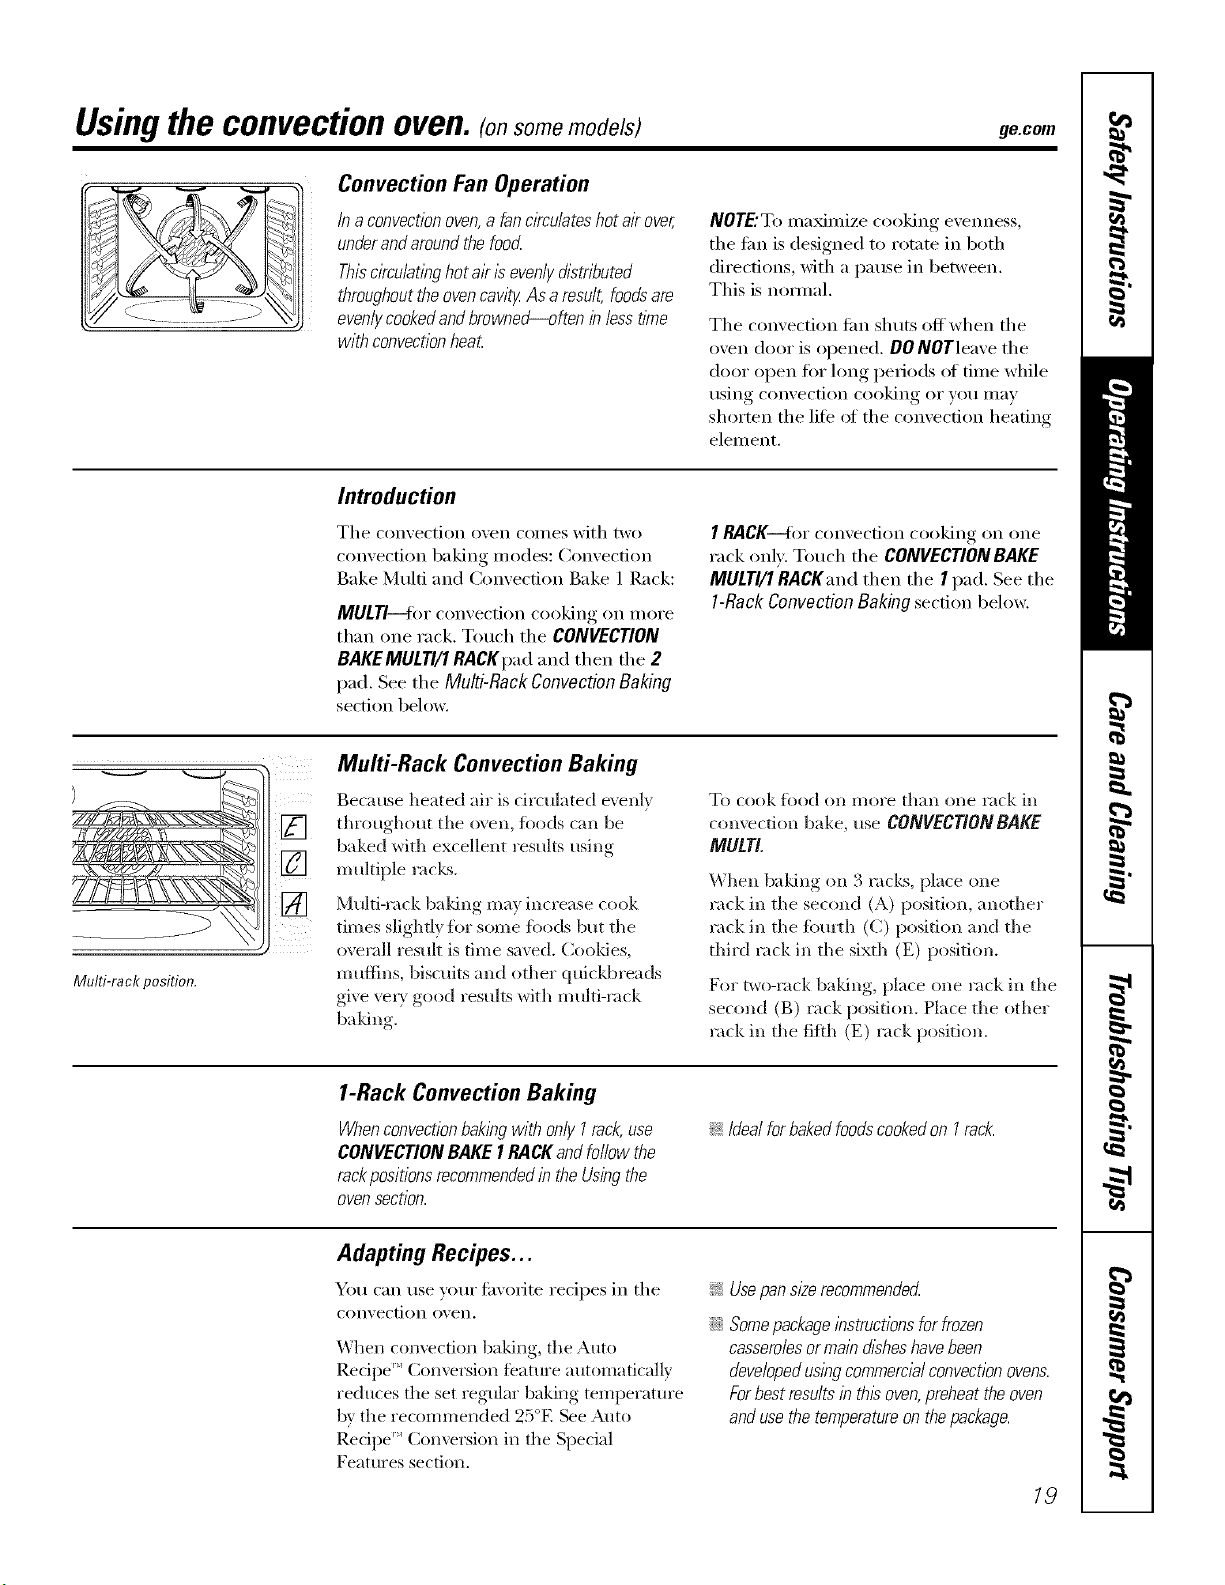
Convection Fan Operation
In aconvectionoven,a fan c/Tculateshot air over,
underand aroundthe foocL
Thiscirculatinghot al?is evenly distributed
throughoutthe ovencavity As aresult, foodsare
evenlycookedandbrowned_often inless time
with convectionheat
NOTE'T(> ina_inize cooking evenness,
tile fire is designed to rotate in both
directions, with a pause in between.
This is nomml.
Tile convection tim shuts offwhen tile
oven door is opened. DO NOTleave tile
door open for long periods of time while
using convection cooking or you may
shorten the lif0 ot the convection heating
element.
Introduction
Tile convection oven coi//es with two
convection baking inodes: Convection
Bake Multi and Convection Bake 1 Rack:
MULTI--for convection cooking on more
than one rack. Touch tile CONVECTION
BAKEMULTI/1RACKpad and then tile 2
pad. See tile Multi-Rack Convection Baking
section below.
I RACK---for convection cooking on one
rack onk Touch tile CONVECTION BAKE
MULTI/1 RACKand then tile I pad. See tile
1-Rack Convection Baking section below.
Multi-rack position.
Multi-Rack Convection Baking
Because heated air is circulated evenly
throughout tile oven, foods can be
baked with excellent results using
multiple m c)<s.
Multi-rack baldng may increase cook
times slighdy ti)r some foods but tile
overall result is time saved. C(>oMes,
muflins, biscuits and other quickbreads
give vexT good results with multi-rack
baldng.
To COOk ]_k)od OlX n/ol'e thall ()lie rack ill
comecti(>n bake, use CONVECTIONBAKE
MULTI.
When baldng (>n 3 racks, place one
rack in tile second (A) positi(>n, another
rack in tile fourth (C) position and tile
third rack in tile sixth (El position.
For two-rack baMng, place one rack in tile
second (B) rack position, Place tile other
rock in tile fifth (E) rock position,
1-Rack Convection Baking
Whenconvectionbaklbgwith only I rack,use
CONVECTIONBAKE IRA CKand follow the
rackpositions recommendedin the Usingthe
oven section.
!i>Idealforbakedfoodscookedon I rack.
Adapting Recipes...
You can use your fi_orite recipes in tile
con_, ection o_, ei1.
When convection baking, the Auto
Recipe _'_Conversion teatm'e automatically
reduces the set regular baking temperature
b\' the recommended 25°E See Auto
Recipe _ Conversion in tile Special
Features section.
_: Usepan size recommendec{
::Ji::Somepackage instructions for frozen
casserolesormain disheshavebeen
developedusingcommercialconvectionovens.
Forbest results in this oven,preheat the oven
andusethe temperatureon thepackage.
19
Usingtheconvectionoven.(o,some models)
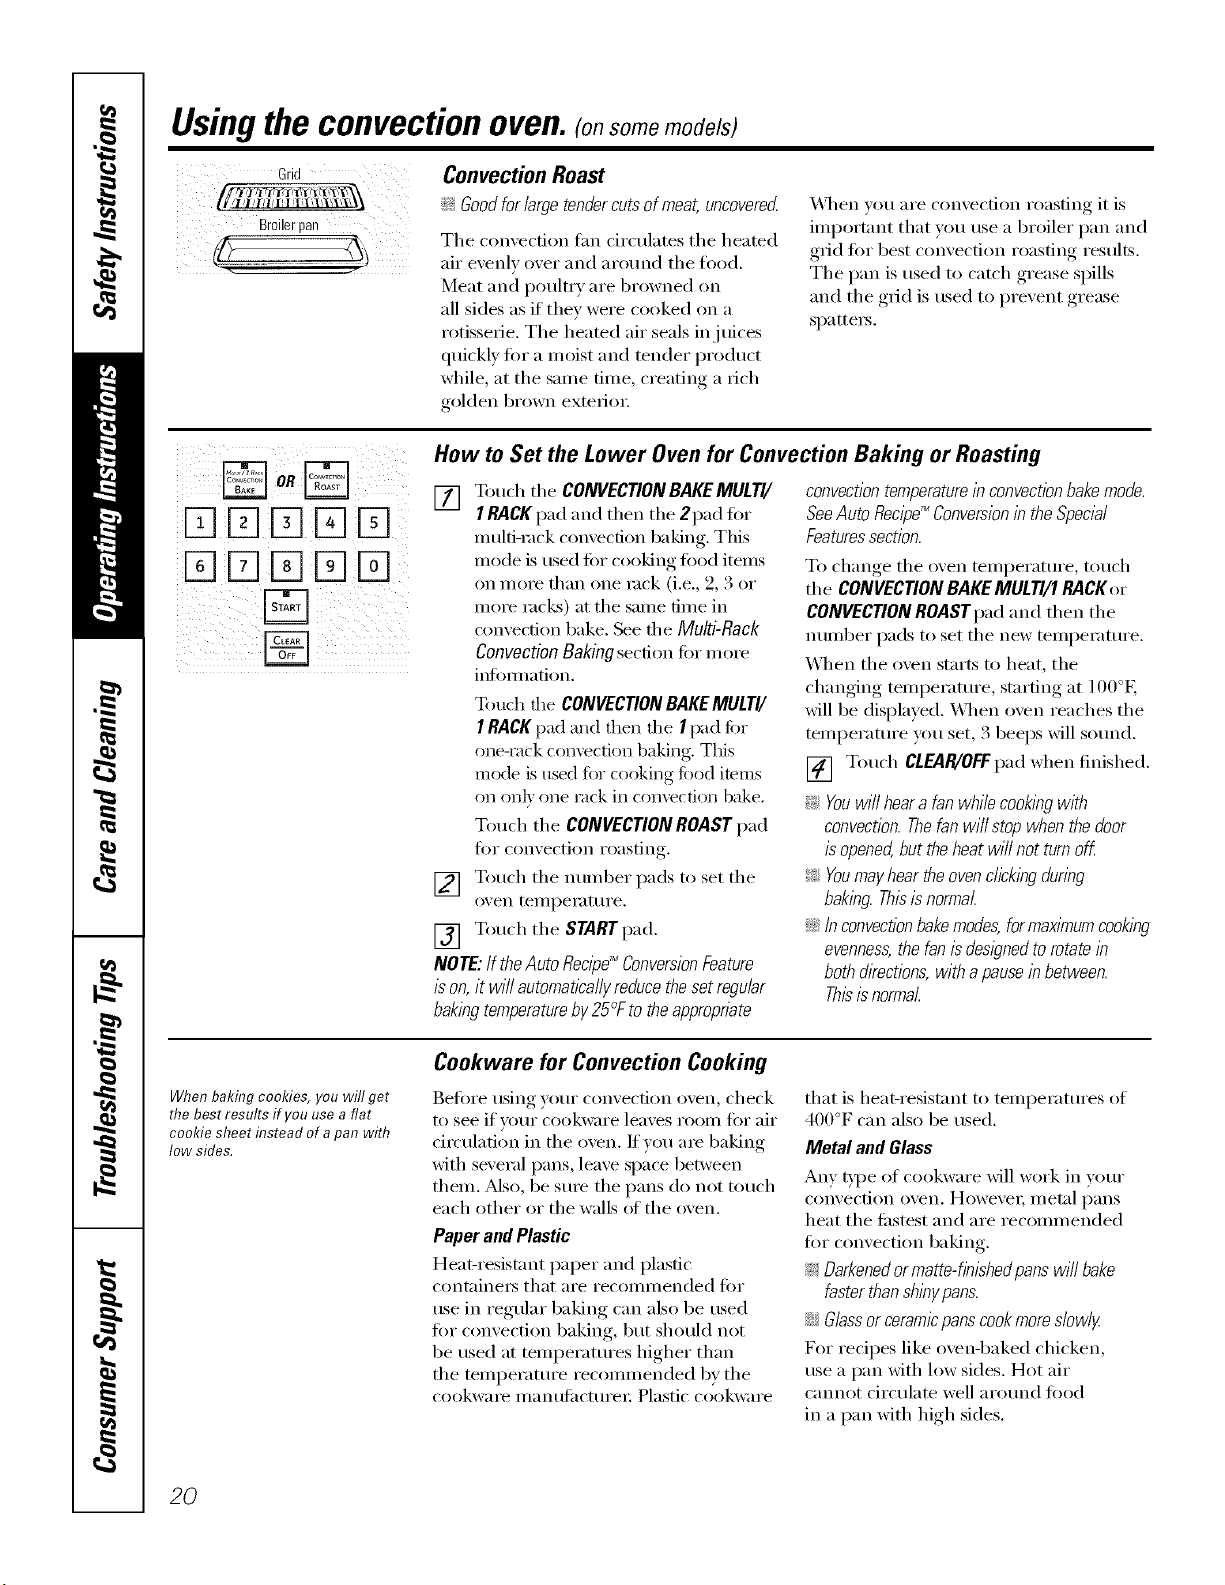
Grid
Broilerpan
Convection Roast
i_ Goodfor large tendercutsof meat, uncovered
Tile convection tim circulates tile heated
air evenly over and around the filed.
Meat and i)oulttT are browned on
all sides as if they were cooked on a
rotisserie, Tile heated air seals in juices
quickly fin" a moist and tender product
while, at tile same time, creating a rich
golden brown exterior.
X,_]/en volt are convection roasting it is
important that you use a broiler pan and
grid fi)r best convection roasting results,
The pan is used to catch grease spills
and the grid is used to prevent grease
sl)attet_.
DE][E]E]E]
DE]K]E]E]
B
How to Set the Lower Oven for Convection Baking or Roasting
[] Touch tile CONVECTIONBAKEMULTI/
I RACKpad and then tile 2pad fin.
multi-rock convection baking. Tiffs
mode is used fi)r cooking fi)od items
on morn tban one rock (i.e., 2, 3 or
more rocks) at tile same time in
con;'ection bake. See file Multi-Rack
Convection Baking section fi)r more
infommfion.
To uch the CONVECTIONBAKEMULTI/
I RACKI/ad and then tile I pad fi)r
one-rack convectkm baking. This
mode is used fbr cooking fi)od items
on on b one tack in COIl\rectiott bake,
Touch the CONVECTION ROAST pad
fi)r convection roasting,
[] Touch tile nmnber pads to set tile
oven tellll)et_lttt t'e.
[] Touch tile STARTpad.
NOTE: Ifthe Auto Recipe_ ConversionFeature
is on, it wi// automaticallyreducethe setregular
bakingtemperatureby25°F to theapproprbte
convection temperaturein convectionbake mode.
SeeAuto Recipe_ Conversionin the Specbl
Featuressection.
To change tile oven teml)erature , touch
tile CONVECTIONBAKEMULTI/I RACKor
CONVECTIONROASTpad and then tile
mmlber pads to set tile new teml)emmre.
_._]/en tile oven starts to beat, tile
changing teml)eramre, starting at 100°E
will be displayed. X._l/en oven reaches the
teml)erature you set, 3 beeps will so/md.
[] Touch CLEAR/OFFpad when finished.
_: Youwi// heara fan while cookingwith
convection.Thefan will stop when the door
isopened,but theheat will not turn off.
_ Youmay hear the ovenclicking during
baking. Thisisnormal.
iJGInconvectionbake modes,formaxlknumcooking
evenness,the fan is designed torotate in
both dkections, with apausein between.
Thisis normal.
When bakflTgcookies, you will get
the best results if you use a flat
cookie sheet hTsteadof apan with
low sides.
Cookware for Convection Cooking
Befiwe using yore" convection oven, check
to see if your cookware leaves i'OOtll [()t"air
circulation in tile oven. If volt are baking
with several pans, leave space between
them. Mso, be sine tile pans do not touch
each other or the walls ot the oven.
Paper and Plastic
Heat-resistant paper and plastic
container's that at'e t'eCOllll//ended ]'()t"
use in regular baking can also be used
for convection baking, but should not
be used at teml)eratures lfigher than
tile teml)eramre recommended by tile
cookware t/lantL[ilCttll'ei'. Plastic cookware
that is beat-resistant to temperatm'es of
400°F can also be used.
Metal and Glass
Any t)'l)e of cookware Mll work in wmr
convection oven, However; ii/etal l)ans
heat tile filstest and are recommended
fi:,r convection baking.
_ Darkenedor matte-finishedpans will bake
faster thanshinypans.
iJGGlassor ceramicpans cookmoreslowly
For recipes like ovenq)aked cbicken,
use a pan with low sides. Hot air
cannot circulate well aro/md food
in a pan with lfigh sides.
20

Usingthe timedfeaturesforconvectioncooking.(o,somemodels)gecom
Youwill hear a fan while cooking with these features. Thefan will stop when the door is opened, but the heat
will not turn off.
NOTE"Foods that spoil easily--such as milk, eggs, fish, stuffings, poultry and pork--should not be allowed to s#
for more than 1hour before or after cooking. Room temperature promotes the growth of harmful bacteria. Be sure
that the oven light is off because heat from the bulb will speed harmful bacteria growth.
DDDD%
DD[]DD
DDDDD
%D[]DD
How to Set an Immediate Start and Automatic Stop
Thelower ovenwill turnon immediatelyandcook
fora selectedlengthof time.At the endofthe
cookingtime,theovenwill turnoffautomatical/F
Make sure die clock sho_:_ the correct
time of da}.
[] Touch the CONVECTION BAKE
MULTI/I RACK pad and then the
2pad lbr multi-nak coll\re(tion
baking. This mode is used _br
cooking food items on more than
one rack (i.e., 9 3 or more racks)
at the same time in convection bake.
See Multi-Rack Baking section for
l/_ ol'e ill_ )l'l/l;ltiolL
[]
[]
Touch the CONVECTIONBAKEMULTI/
I RACK pad and then the I pad %I"
one-rack convection baking. This
mode is used fi)r cooking %od imms
on on]} one rack in convection bake.
Touch the CONVECTIONROAST pad
fk)r convection roasting.
Touch the number pads to set the
oven [eii/l)eF_t [tire.
Touch the COOK TIME pad.
NOTE:tf Fourreciperequirespreheating,youmay
needtoaddadditionaltimeto thelengthofthe
cookingtime.
] Touch the number pads to set the
desired length of cooking time. The
minimum cooking time you can set
is 1 minute. The o\en temi)elature
that you set and the cooking dine that
}ou entered will be in the displa}.
[] Touch the SNRT pad.
The o_en will mrn ON, and the displa? will
show the cooking time cotlntdo_,_l and the
changing mmperature starting at 100°E
(The teml)eramre displ W will start to
change once the o\en temprature reaches
100°E) When the oven leaches the
temperature U)u set, 3 beeps will sound.
NOTE"IfNe Auto Recipe" ConversbnFeature
/_on, it will automat/bullyreducethe set regular
bak/bgtemperatureby25°F to the appropnate
convectiontemperature/n convectionbake mode.
SeeAuto Rec/pd_Conversion/b the Special
Featuressection.
The o_en will condnue to cook %r die set
amount of time, then mrn off automatical]},
unless the \_;_RJ\,I tbature _:ls set. See the
How to Setthe Ovenfor Warmingsection.
_Mter the o_en turns off; die end-of_ycle
tone will sound.
[] Touch the CLEAR/OFFpad to clear
the displa) if necessal 3 Remove
the food fi'om the o\en. Remembei;
e_en thoug]l the oxen turns off
automaticall}, food left in the oven
will contJntle cooking after the oven
21
Usingthetimed featuresforconvectioncooking.(onsomemode/s)
oR
DDDDD
[]DDDD
DD[]DD
DD%DD
DDDDD
DD%DD
B
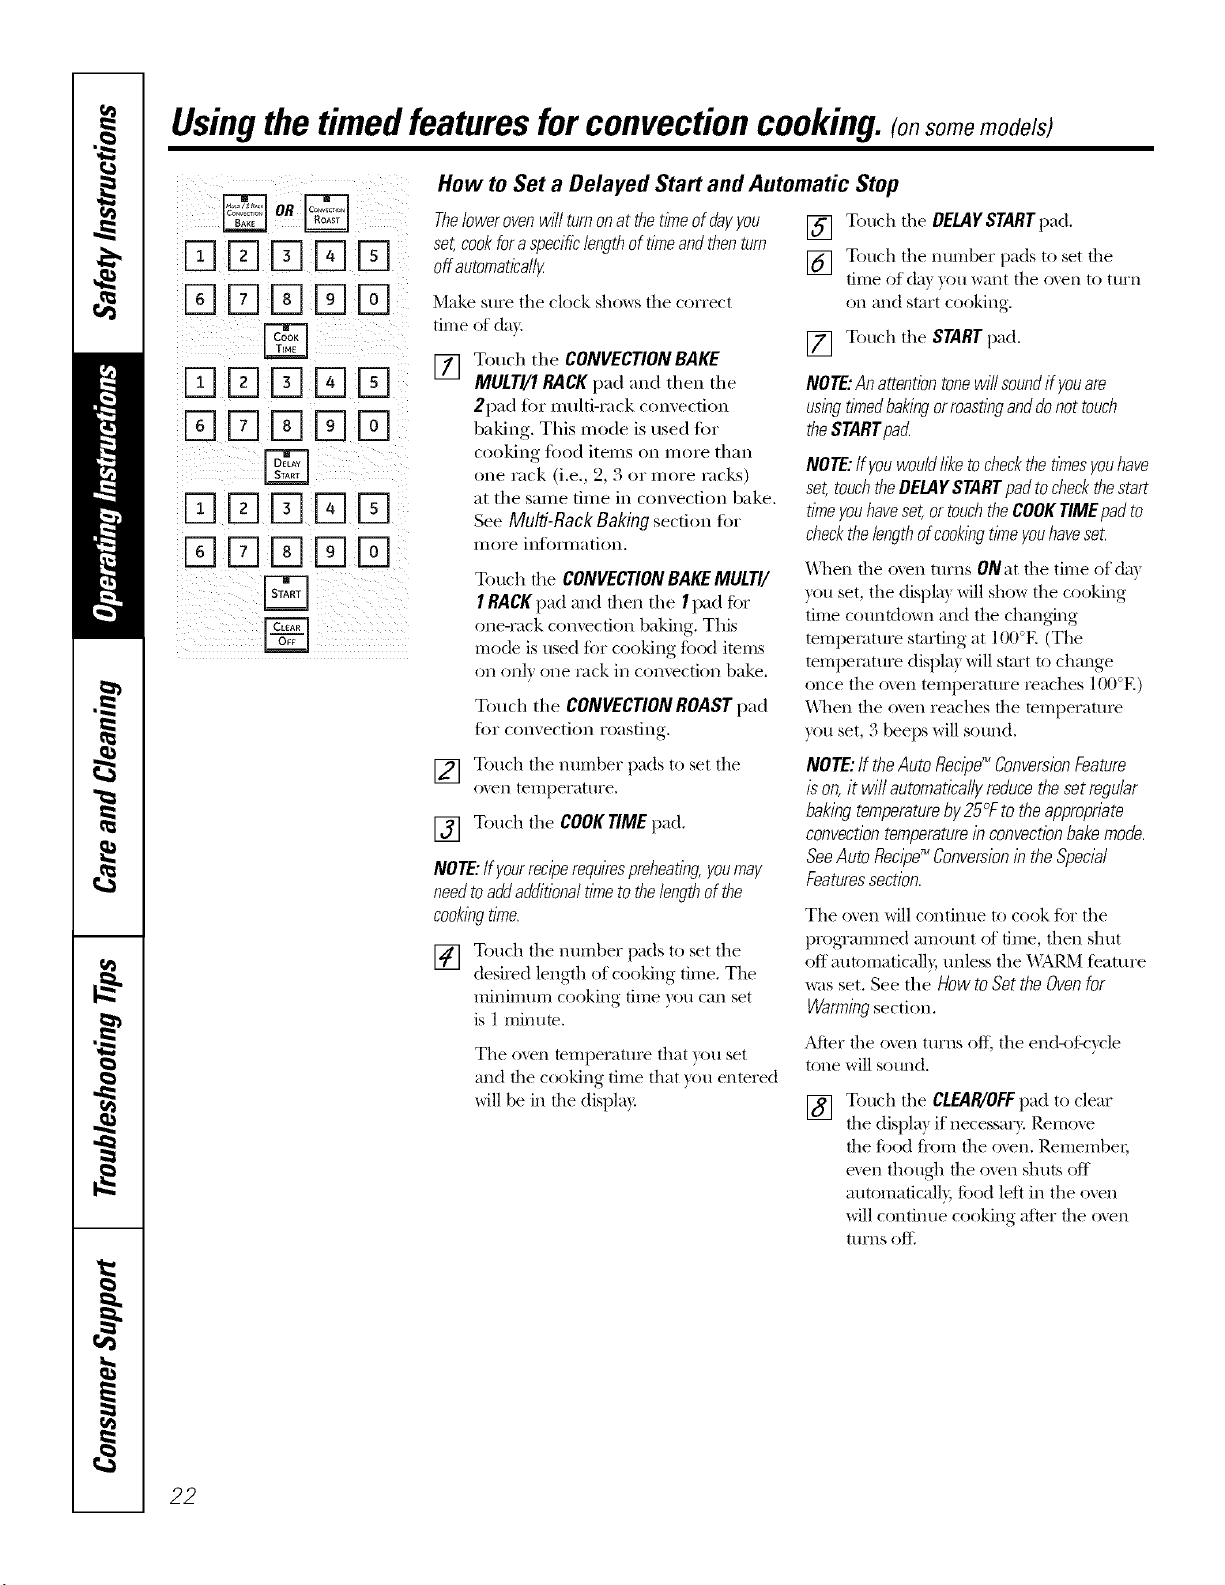
How to Set a Delayed Start and Automatic Stop
Thefowerovenwill turnonat thetimeof dayyou
set,cookfora specificlengthof timeandthenturn
off automatically
Make sure tile clock shows tile correct
time of day.
[] Touch the CONVECTION BAKE
MULTI/1 BACK pad and then the
2pad tbr multi-rack convection
baking. Tiffs mode is used liar
cooking fixId items oil more than
one rack (i.e., 2, 3 or more racks)
at the same time in convection bake.
See Multi-Rack Baking section for
illOi'e inf()illlation.
Touch die CONVECTIONBAKEMULTI/
I RACKpad and allen tile I pad ti)r
one-rock convection baking, This
mode is used ti)r cooking tbod items
on ()Ill) one Iack in convection bake,
Touch the CONVECTIONROAST pad
J(_I" convection i'oasting.
[] Touch tile DELAYSTARTpad.
[] Touch tile ntli))ber pads to set tile
time of da)}ou want tile oven to ttlrn
on and start cooking,
[] Touch tile STARTpad,
NOTE:Anattentiontonewill soundif youare
usingtimedbakingorroastinganddonot touch
theSTARTpac_
NOTE:if youwouldlike tocheckthe timesyouhave
set, touchtheDELAYSTARTpadtocheckthestart
timeyouhaveset,or touchthe COOKTIMEpadto
checkthe lengthofcookingtimeyouhaveset.
_\llen the ()veil turns ONat the time of da)
you set, tile displa) will show tile cooking
time countdown and tile changing
temI)eIature starting at 100°R (The
temI)eIature displa) will start to change
once the oven temperature reaches 100°E)
When file ()veil reaches file teml)eratnre
you set, 3 beeps will sound.
[] Touch tile number pads to set tile
oven tei))perattlre,
[] Touch tile COOKTIME pad,
NOTE:Ifyourreciperequirespreheating,youmay
needtoaddadditionaltimeto thelengthof the
cookingtime.
[] Totl('h tile ntli))ber l)ads to set tile
desired length of cooking time, The
mininmm cooking dine you can set
is 1 minum.
Tile oven temperatm'e that }ou set
and the cooking time that )ou entered
will be in the display.
NOTE:If theAutoRecipe_ConversionFeature
/son,it wi//automaticallyreducethesetregular
bakingtemperatureby25_Ftotheapproprbte
convectiontemperaturein convectbnbakemode.
SeeAutoRecipe_ ConversionintheSpecial
Featuressection.
Tile oven will continue to cook ti)r tile
prog_'ammed amount of time, then shut
off autonmticall}, unless tile _\ARM f_'ature
was set. See the How to Set the Oven for
Warmingsection.
AJter file oven turns off, tile end-of:_'ycle
tone will sound.
[] Touch tile CLEAR/OFFpad to clear
tile displa) if necessai3'. Remoxe
the tbod fl'on-i tile ()veil. Remen-lbei;
even thoug]l the ()veil shuts off
automaficall), toed left in tile ()veil
will continue cooking after the ()veil
turns oftl
22
Usingthe convectionoven.(onsome models) ge.com
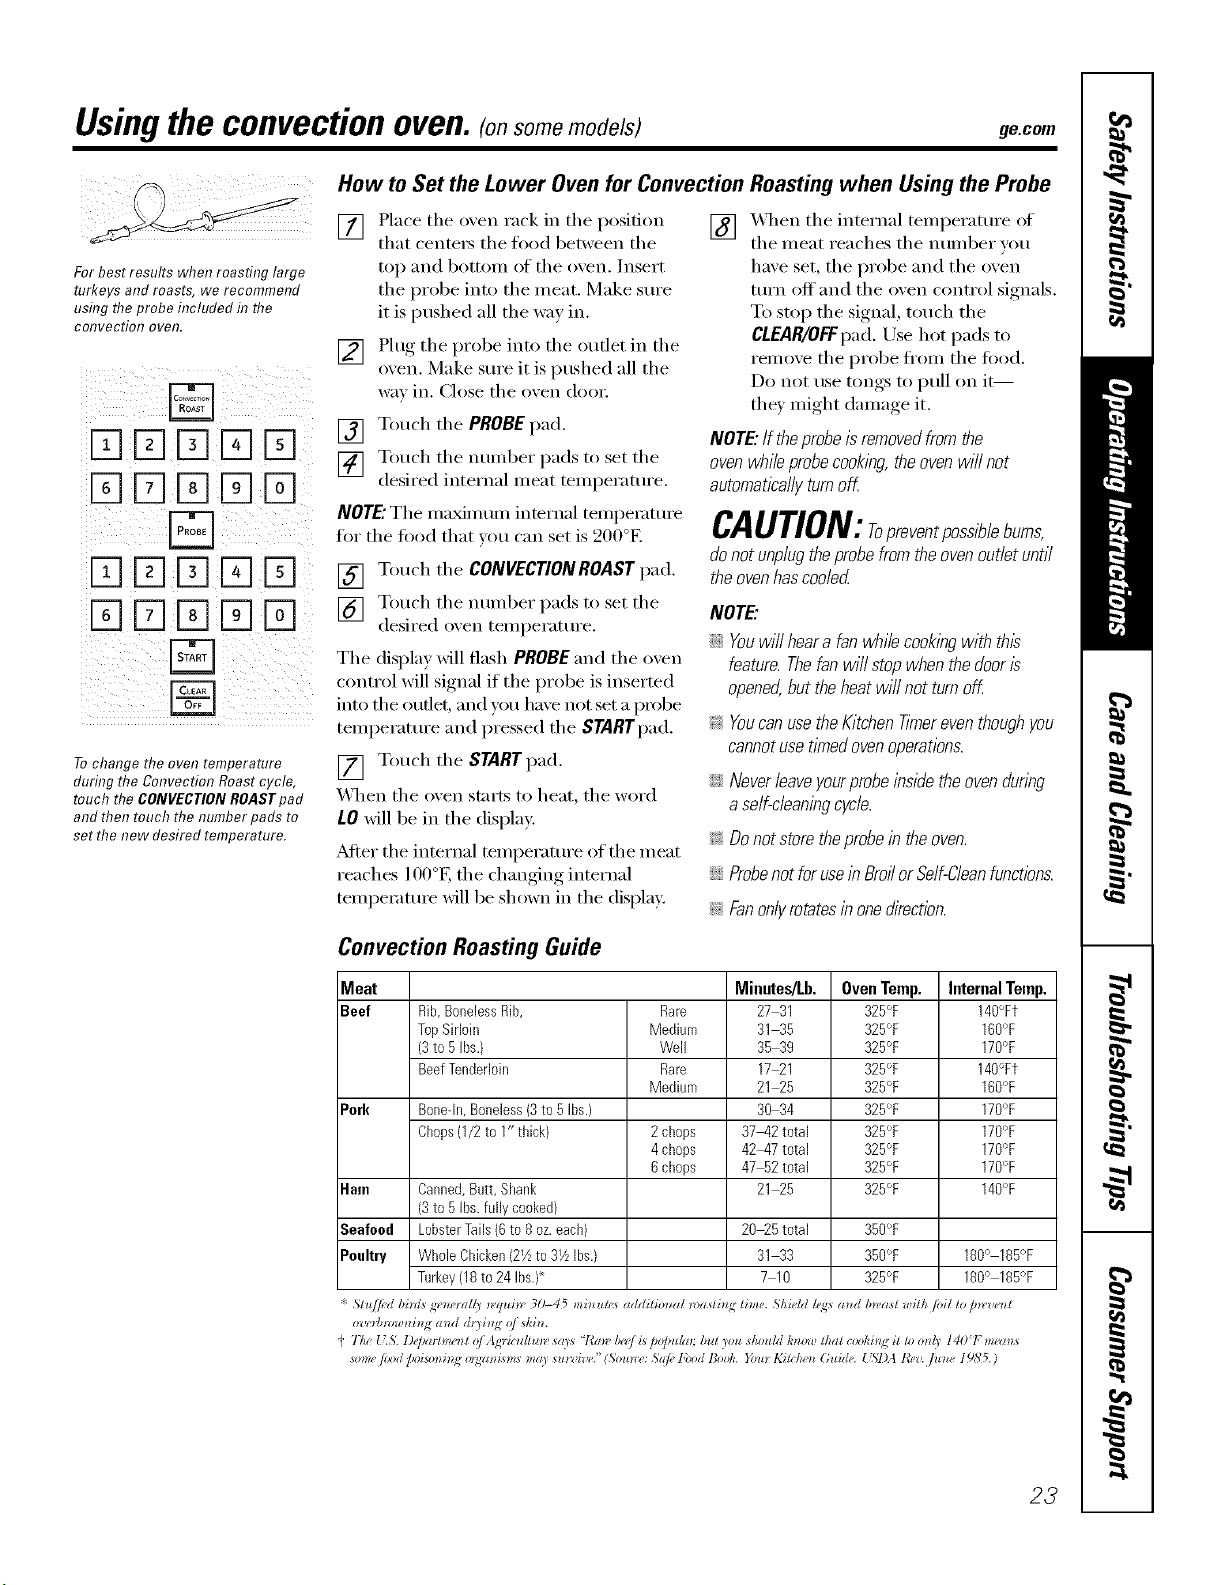
For best results when roasting large
turkeys and roasts, we recommend
usflTgtheprobe included d7the
coITvectioI7 oveR,
D
DDDDD
%D%[]D
DDD[]D
DD%DD
Tochange the oven temperature
during the Convection Roast cycle,
touch the CONVECTIONROASTpad
and then touch the numberpads to
set the new desired temperature.
How to Set the Lower Oven for Convection Roasting when Using the Probe
[] Place the oven rack in the position
that centei_ the food between the
top and bottom of the oven. Insert
the probe into the meat. Make sure
it is pushed all the way in.
[] Plug the probe into the outlet in the
oxen. Make sure it is pushed all the
way in. Close the oven dooi:
[] Touch the PROBEpad.
[] Touch the number pads to set the
desired internal meat temperature.
NOTE."The ina_ln um interlml temperature
tor the fi)od that you can set is 200°F.
[] Touch the CONVECTIONROAST pad.
[] Touch the number pads to set the
desired oxen tenlperature.
The display will flash PROBE and the oven
control will signal if the probe is inserted
into the outlet, and y_u have not set a probe
ten_perature and pressed the STARTpad.
[] Touch the STARTpad.
When the oven starts to heat, the word
lO will be in the display,
_MteI"the interlml temperature of the in eat
reaches 100°g the chai_ging internal
telnpei_lture will be shown ill the display.
Convection Roasting Guide
[] X_q_en the internal temperature of
the meat reaches the i_umber you
have set, the probe and the oven
turn off' and the oven control signals.
To stop the signal, touch the
CLEAR/OFFpad.Use hot pads to
remove the probe ti'om the food.
Do not use tongs to l)ull on it--
they lnight dalnage it.
NOTE."/f the probeis removed from the
oven while probe cooking, the oven wi// not
automatically turn off.
CAUTION:ropreventpoesiblebume,
do not unplug the probe from the oven outlet until
the oven has coded
NOTE."
iJi::Youwi// heara fan while cookingwith this
feature. Thefan will stop when the dooris
opened,but theheat will not turn off.
_ Youcan usethe Kitchen Timereventhoughyou
cannotuse t_medovenoperations.
iJi::Neverleaveyourprobe lbside the ovendunbg
aself-cleaningcycle.
_ Do not store theprobein the oven.
iJi::Probenotfor usein Broffor Self-Cleanfunctions.
!;>Fanonlyrotatesin onedirectbn.
Meat Minutes/Lb. Oven Temp. Internal Temp.
Beef Rib,BonelessRib, Rare 27 31 325°F 140°Ft
TopSirloin Medium 31 35 325°F 160'_F
(3to 5Ibs.) Well 35 39 325°F 170°F
BeefTenderloin Rare 17_I 325°F 14O°Ft
Medium 21 25 325°F 160°F
Pork Bone-in,Boneless(3to 5Ibs.) 30 34 325°F 170°F
Chops(1/2 to 1" thick) 2chops 37_42total 325°F 170°F
4chops 42_47total 325°F 170°F
6chops 47_2 total 325% 170°F
Ham Canned,Butt, Shank 21 25 325% 140°F
(3to 5Ibs.fully cooked)
Seafood LobsterTails(6to 8 oz.each) 20_5 total 350°F
Poultry WholeChicken(2Vzto 31/zIbs.) 31 33 350°F 180° 185°F
Turkey(18to24 Ibs.}* 7 10 325% 180° 185°F
"!' St*{/fi'd bini* g* _*'_all 3 _vquin" 30-45 mi_ *m,* addilimzal n)_zsli_ g lime. ShieM h_<s a_ d bn,asl wilh /oil lo D*z,re)_t
o'l,_Hmmmi_Jg mM (h3i_l_ oj ski_.
t' 77w _kS. l)@mhm'n { oj Ag_'ic_d/*l_v *a)'s "l_a_" I_'_J L*DoJmlm; b, It )ou shouhI k_lo,l! lha{ (:oold_l,g il tl_ o_(_ 1401 me(ms
mm_" px)d /,oim_i_g o_gzm_sm* may su*v hw." (5ou*_ (,: Sdp, l'ood Bo_k. You* 1,2i>/,4 _*Guide. t'5,7)A tO,zz fit_*e 19N5.)
23
Usingtheslow cook,pizzaand warming features.
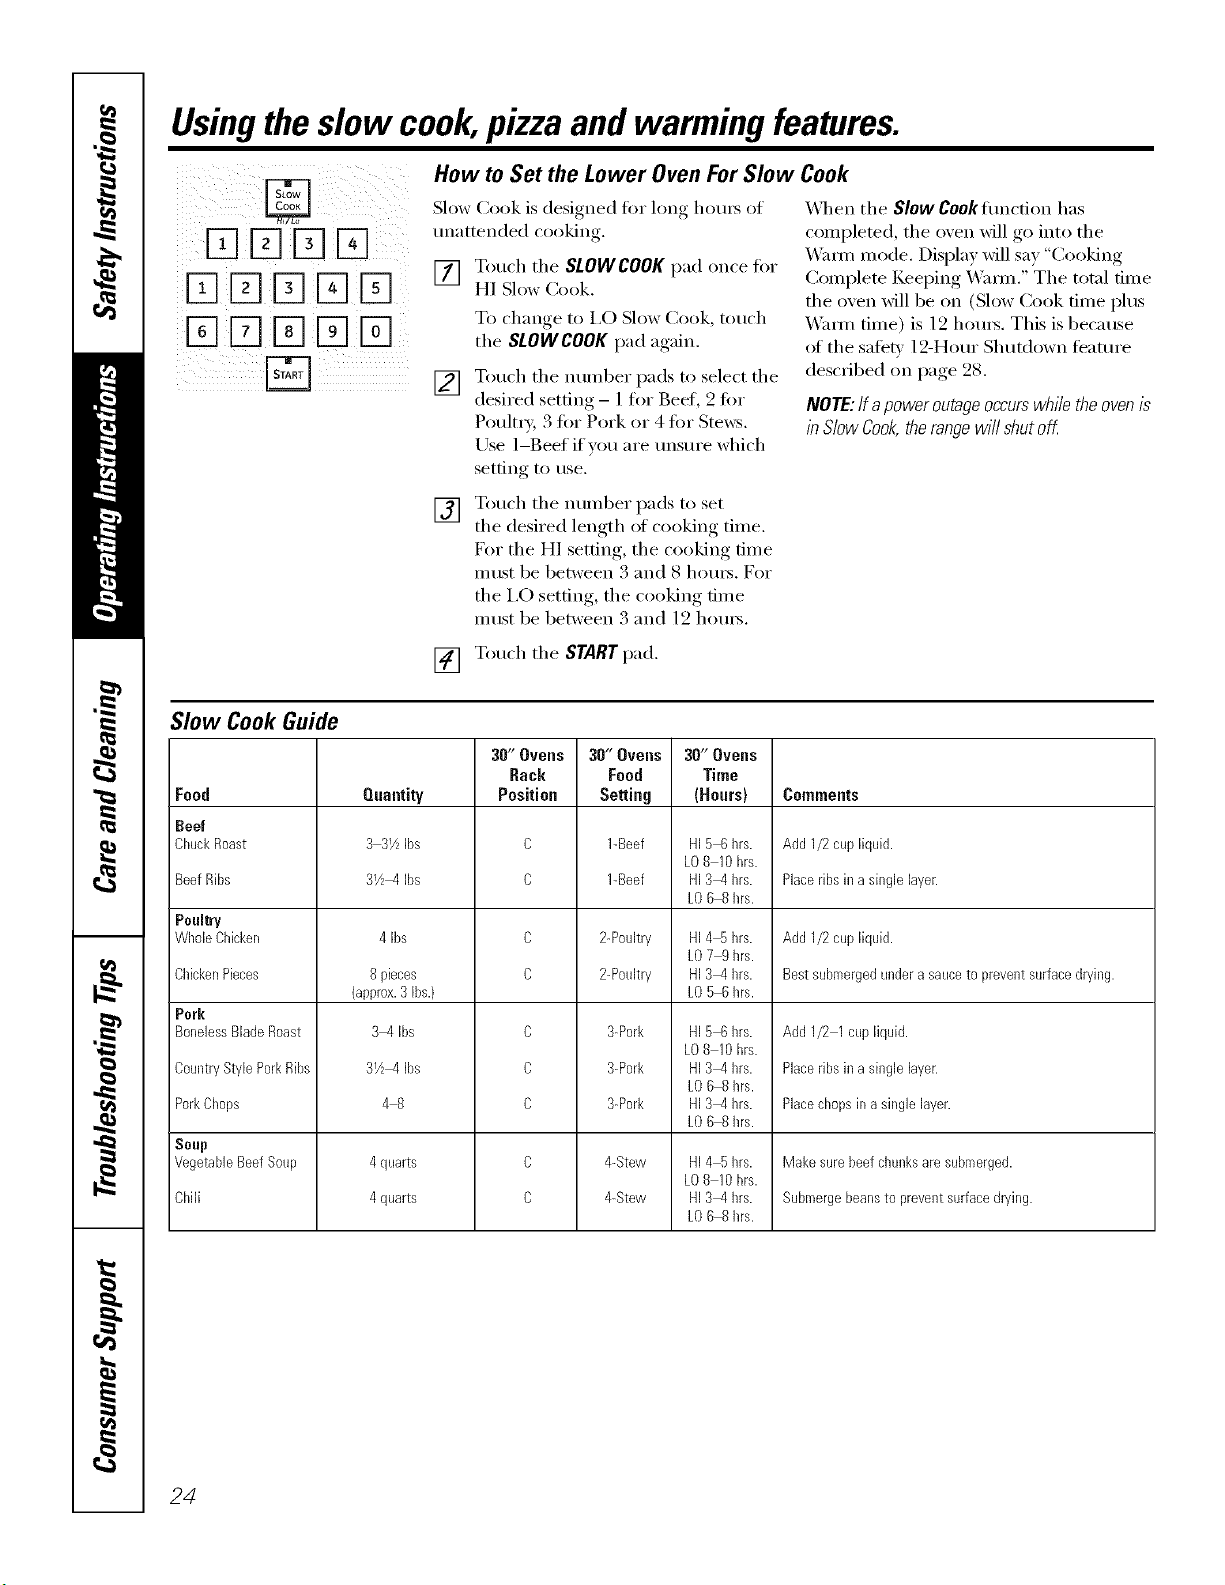
How to Set the Lower Oven For Slow Cook
iiD DD DD ¸¸
Slow Cook is designed for long horn3 of
unattended cooking.
[] Touch the SLOWCOOK pad once fi)r
HI Slow Cook.
To change to i,O Slow Cook, touch
the SLOWCOOK pad again.
[] Touch the number pads to select the
desired setting - 1 for Beef, 2 fin.
Poulmi, 3 fin" Pork or 4 fin" Steers.
Use 1-Beef if you are unsure which
setting to use.
[] Touch the nunlber pads to set
the desired length of cooking time.
D)r the HI setting, the cooking time
must be between 3 and 8 hom_. For
the I,O setting, the cooking time
must be between 3 and 12 hom_.
X_]_en the Slow Cook flmction has
completed, the oven will go into the
X4hxm mode. Display will say "Cooking
Complete Keeping WamL" The total time
the oven will be on (Slow Cook time plus
X4hm/time) is 12 hom_. This is because
ot the sati_P,' 12-Hour Shtltdown teature
described on page 28.
NOTE:If apower outageoccurswhile the oven is
in Slow Cook,the rangewi// shut off
[] Touch the START pad.
Slow Cook Guide
30" Ovens 3O"Ovens 30" Ovens
Rack Food Time
Quantity Position Setting (Hours) Comments
33Yz Ibs C 1-Beef HI56 brs. Add1/2cup liquid.
LO810 hrs.
3Yzq Ibs C 1-Beef HI3q brs. Placeribs ina singlelayen
kO68 brs.
C 2-Poultry HI4% hrs. Add 1/2cup liquN.
LO79 hrs.
C bPoultry HI3_4brs. Bestsubmergedunderasauceto preventsurfacedrying.
kO56 brs.
Food
Beef
ChuckRoast
Beef Ribs
Poultry
WboleCbicken
CbickenPieces
Pork
BonelessBladeRoast
CountryStyle PorkRibs
PorkChops
Soup
VegetableBeefSoup
Chili
4 Ibs
8 pieces
{approx.3Ibs.)
3M Ibs
3V2M Ibs
48
4quarts
4quarts
C
C
C
C
C
3-Pork
3-Pork
3-Pork
4-Stew
&Stew
HI5 6brs.
LO8 10hrs.
HI3q brs.
LO6 8 brs.
HI3q brs.
LO6 8 brs.
HI4 5brs.
LO8 10hrs.
HI3_4brs.
LO6 8 brs.
Add 1/2 1cup liquid.
Placeribs ina singlelayer.
Placechopsin a singlelayer.
Makesure beefchunksare submerged.
Submergebeansto preventsurfacedrying.
24
Fq
DD
XI[][][]D
E]XIE]E][N
Fq
ge.com
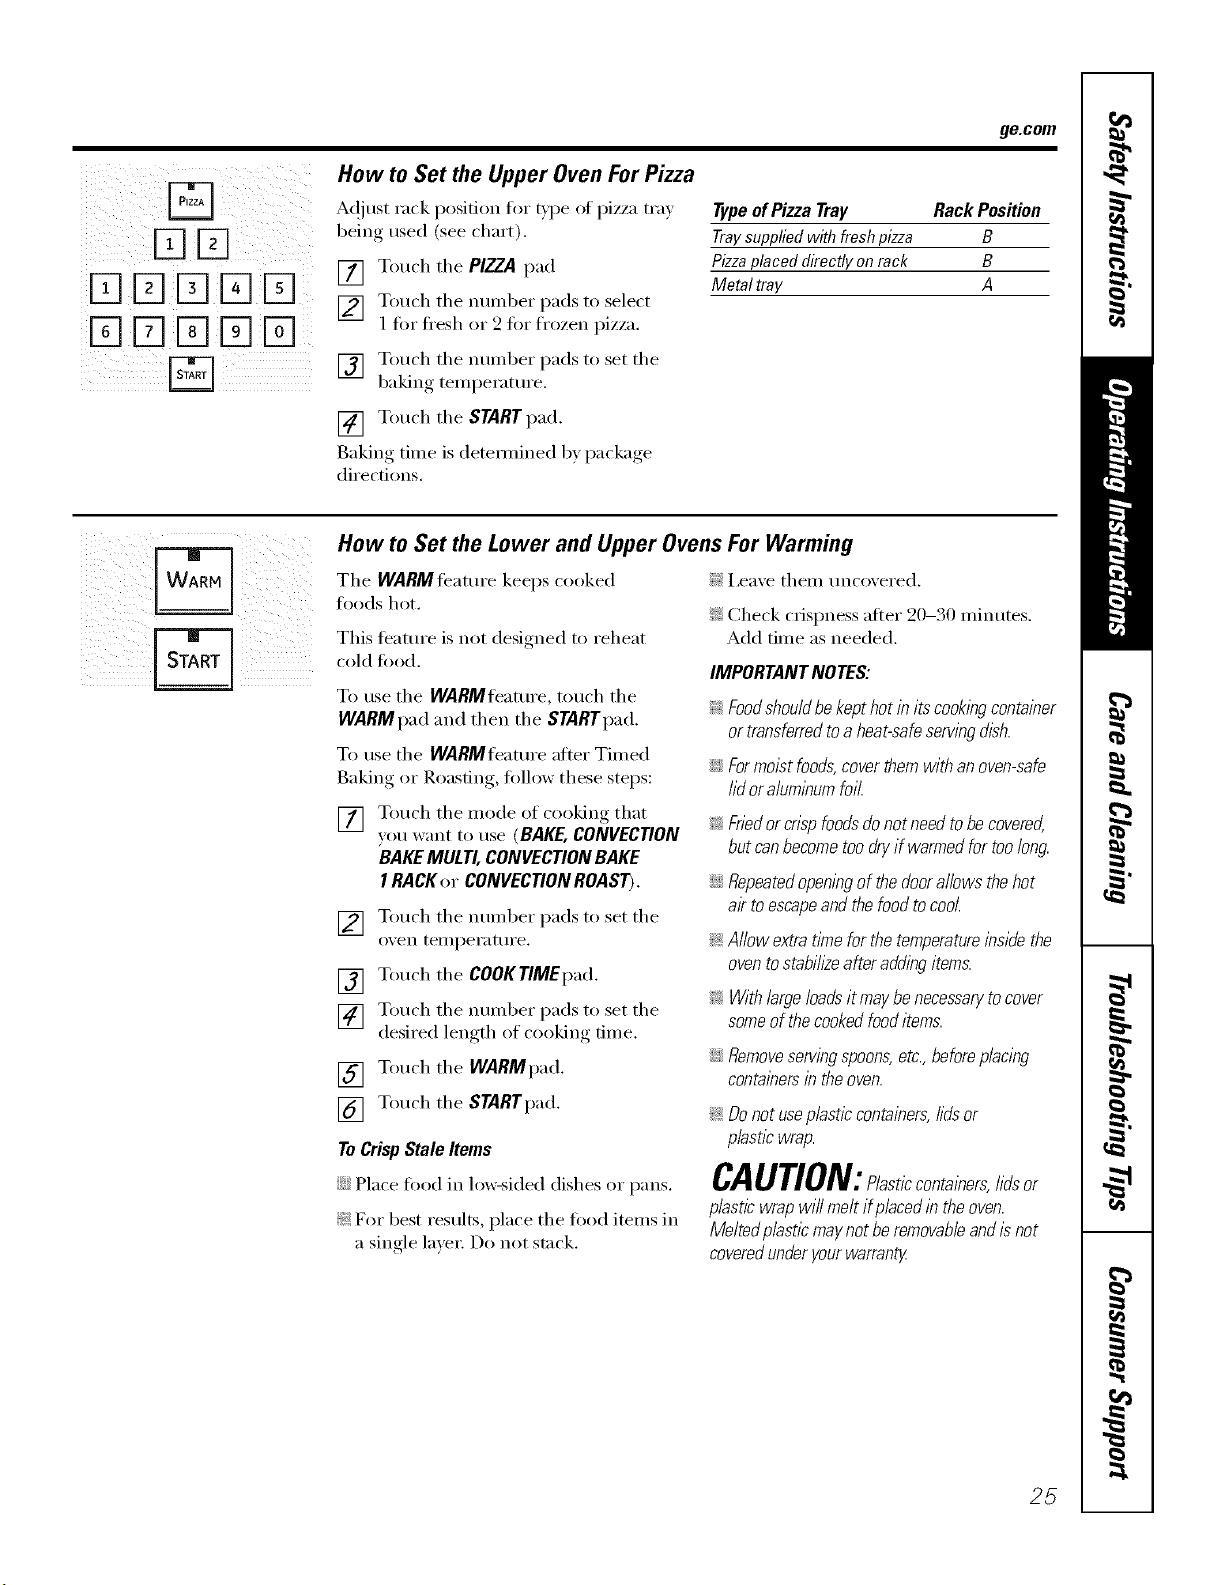
How to Set the Upper Oven For Pizza
A(!just rack position for type at pizza tray
being used (see chart).
[] Touch tile PIZZA pad
[] Touch the munber pads to select
1 fin" ti'esh or 2 fin" frozen pizza.
[] Touch the number pads to set the
baking temperatm'e.
[] Touch tile STARTpad.
Baking time is detemfined by package
directions.
Typeof Pizza Tray Rack Position
Traysuppliedwith freshpizza B
Pizzaplaced directly on rack B
Metal tray A
How to Set the Lower and Upper Ovens For Warming
The WARMteature keeps cooked
foods hot.
This teatm'e is not designed to reheat
cold toocl.
To use tile WARMflmmre, touch tile
WARMpad and then tile STARTpad.
To use tile WARMfeature after Timed
Baking or Roasting, fi_llow these steps:
[] Touch the mode of cooking that
you want to use (BAKE, CONVECTION
BAKEMULTI, CONVECTION BAKE
I RACKer CONVECTIONROAST).
[] Touch tile number pads to set tile
oven teilll)ei'attli'e.
[] Touch the COOKTIMEpad.
[] Touch tile number pads to set tile
desired length of cooking time.
[] Touch tile WARMpad.
[] Touch tile STARTpad.
ToCrispStaleItems
::Ji::Place fi_od in lo_sided dishes or pans.
_: For best results, l)lace tile food items in
a single layex: Do not stack.
!1!i,ea'_e them tmcoxered.
}i_:Check crispness after 20-30 minutes.
Add time as needed.
IMPORTANTNOTES:
Foodshouldbekepthotinitscookingcontainer
ortransferredtoaheat-safeservingdish.
Formoistfoods,coverthemwithanoven-safe
lidoraluminumfoil.
_: Friedorcrisp foodsdonot need tobe covered,
but can becometoo dryif warmedfor too long.
::Ji::Repeatedopeningof the doorallows thehot
ak toescapeand the food tocool.
_: Allow extratime forthe temperatureinside the
ovento stabih2eafter adding items.
_: With largeloads it may benecessarytocover
someof the cookedfooditems.
iJi::Removeservingspoons,etc.,beforeplacing
containersin theoven.
_: Donot useplastic containers,lids or
plastic wrap.
CAUTION: lasticcontainers,lidsor
plastic wrap will melt if placefl in the oven.
Melted p/astlc maynot be removableand is not
coveredunderyourwarranty
25
Usingtheself-cleaning upperand lower ovens.
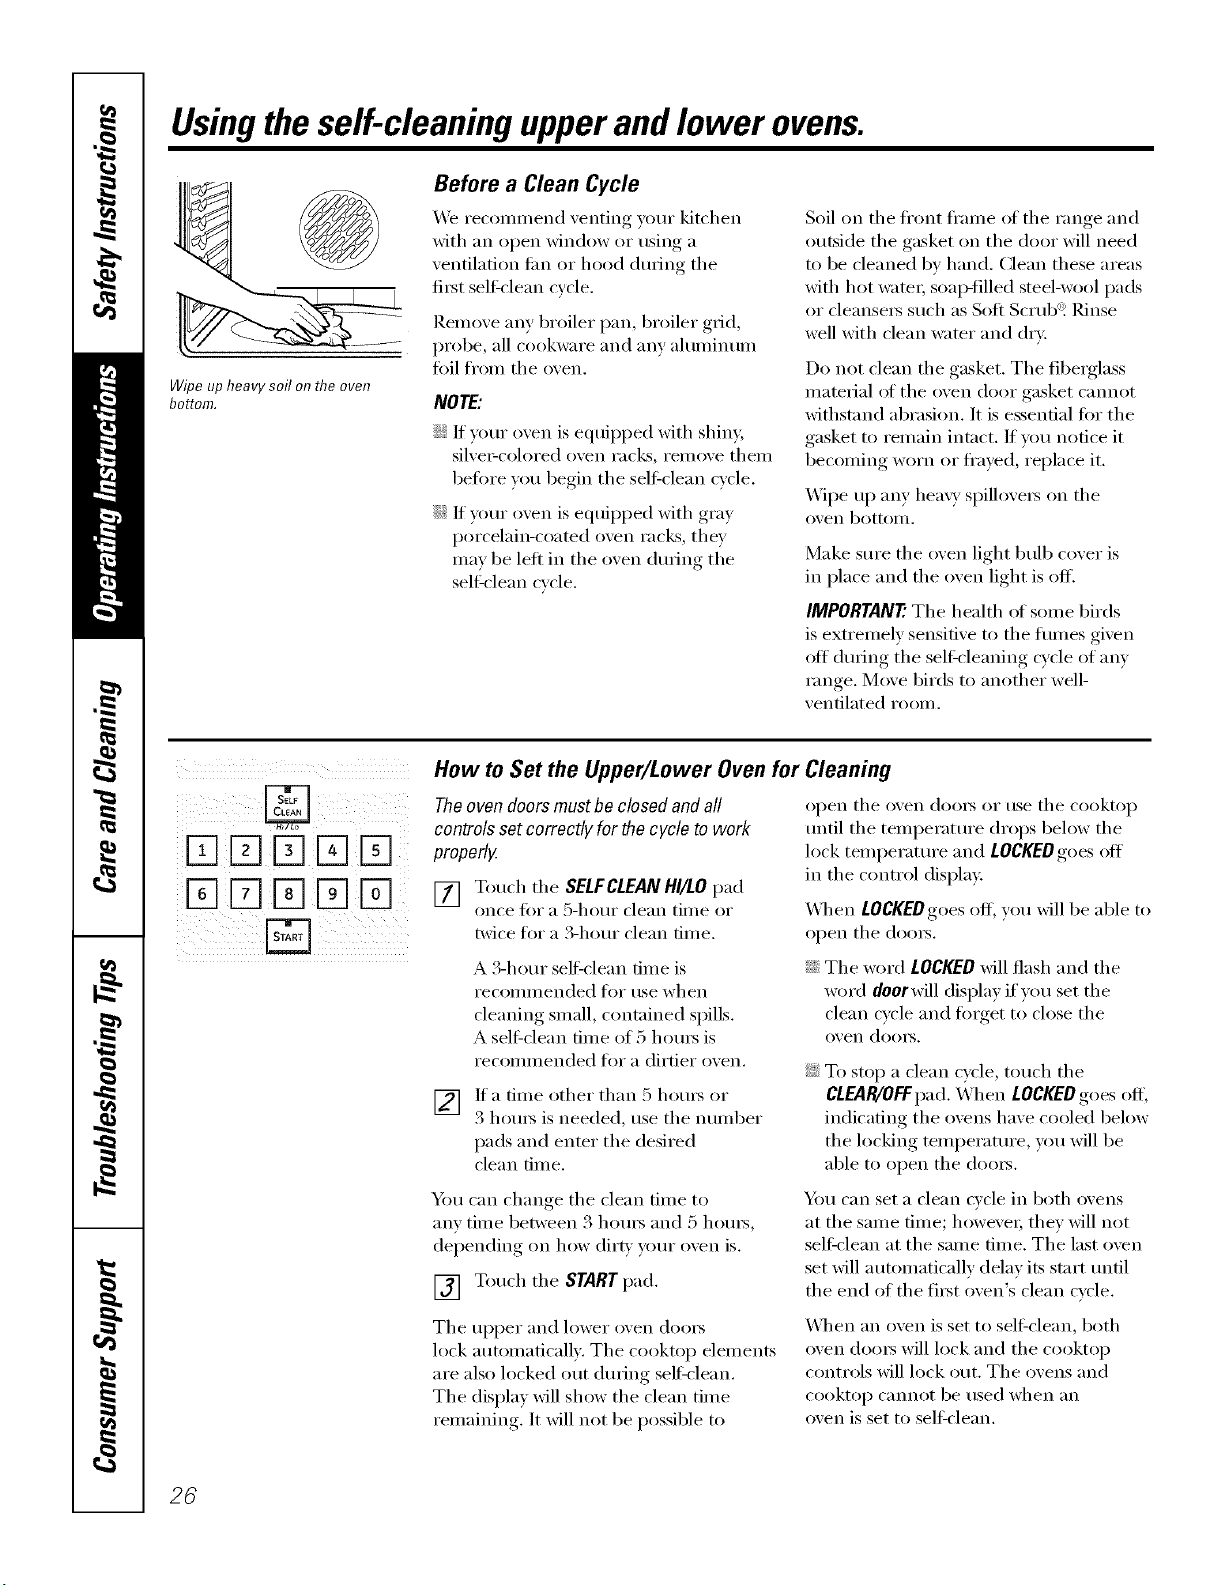
WipeupheavysoilonflTeoven
bottom.
Before a Clean Cycle
_4'e recommend _enting }our kitchen
with an oi)en window or using, a
ventilation tim or hood dtwing the
fii3t self=clean cycle,
Remo_e any broiler pan, broiler grid,
probe, all cookware and am' ahmfinum
fifil from the men.
NOTE:
::Ji::If your oven is equipped with shiny,
silve>colored oven racks, remove them
before you begin tile sell:clean cycle.
::Ji::If your oven is equipped with gray
porcelain-coamd oven racks, they
Inav be left ill tile oven during tile
sel6clean cycle.
Soil on tile fl'ont fl'anle of tile range and
outside the gasket on the door will need
to be cleaned by hand. Clean these areas
with hot watei; soap-filled steel-wool pads
or cleansei_ such as Soft Scrub _Rinse
_vll with clean _;IteI" and dry.
Do not clean tile gasket. Tile fibeiglass
material ot the oven door gasket cannot
withstand abrasion. It is essential t0r the
gasket to remain intact. If you notice it
becoming worn or fl'ayed, replace it.
Wipe up any hea\y spillovei_ on tile
( )x,,ei1 bottom.
Make sure tile oven light bulb cover is
ill place and the oven light is off.
IMPORTANT'. The health ot some birds
is extremely sensitive to the flunes given
off durhlg tile self cleaning cycle of any
range. Move birds to another well-
ventilated room.
iiX]K]D E] !
How to Set the Upper/Lower Oven for Cleaning
The oven doors must be closed and all
controls set correctly for the cycle to work
properly.
[] Toud/tile SELFCLEAN HI/LO pad
once tor a 5-hour clean tiine or
twice fl_I"a B-hour clean dine.
A 3-hour sell=clean time is
l'eCOllllllended ]'or tlse when
cleaning small, contained spills.
A sel6clean fiine of 5 houI_ is
recolnlnended tor a dirtier oven.
[] If a time other than 5 hom_ or
3 houI_ is needed, use tile nulnber
pads and enter tile desired
clean dine.
Y_m can change, tile clean time to
any tilne between 3 houi_ and 5 houI_,
dei)ending, on how dirp,, your oxen is.
[] Touch tile START pad.
open tile oven (looI_ or use tile cooktop
until the temperature drops below the
lock tenlperature and LOCKEDgoes off
ill the control display.
_41/eIl LOCKEDgoes off; you will be able to
open tile dome.
::Ji::Tile word LOCKEDwill flash and tile
word doorwill display if you set the
clean cycle and finget to close the
oven (lomb.
::Ji::To stop a clean cycle, touch tile
CLEAR/OFFpad. When LOCKEDgoes off',
indicating the ovens have cooled below
tile locking teml)eramre , you will be
able to open tile (looi_.
Ym can set a clean cycle ill both ovens
at tile same time; howe\'eI; thev will not
sel6clean at the same time. The last oven
set will autonmticallv delay its start until
the end of the fiist oven's clean cycle.
Tile upper and lower oven (looI_
lock autolnaticallv. Tile cooktop elelnents
are also locked out durhlg sel6clean.
Tile display will show tile clean tilne
relnaining. It will not be possible to
When an oven is set to sel6clean, both
oven doms will lock and the cooktop
controls will lock out. The ovens and
cooktop cannot be used when }Ill
oven is set to self-clean.
26
ge.com
Theoven doors must be closed and all controls set correctly for the cycle to work properly.
iFqFqFqFq
iFqFqFqFqFq
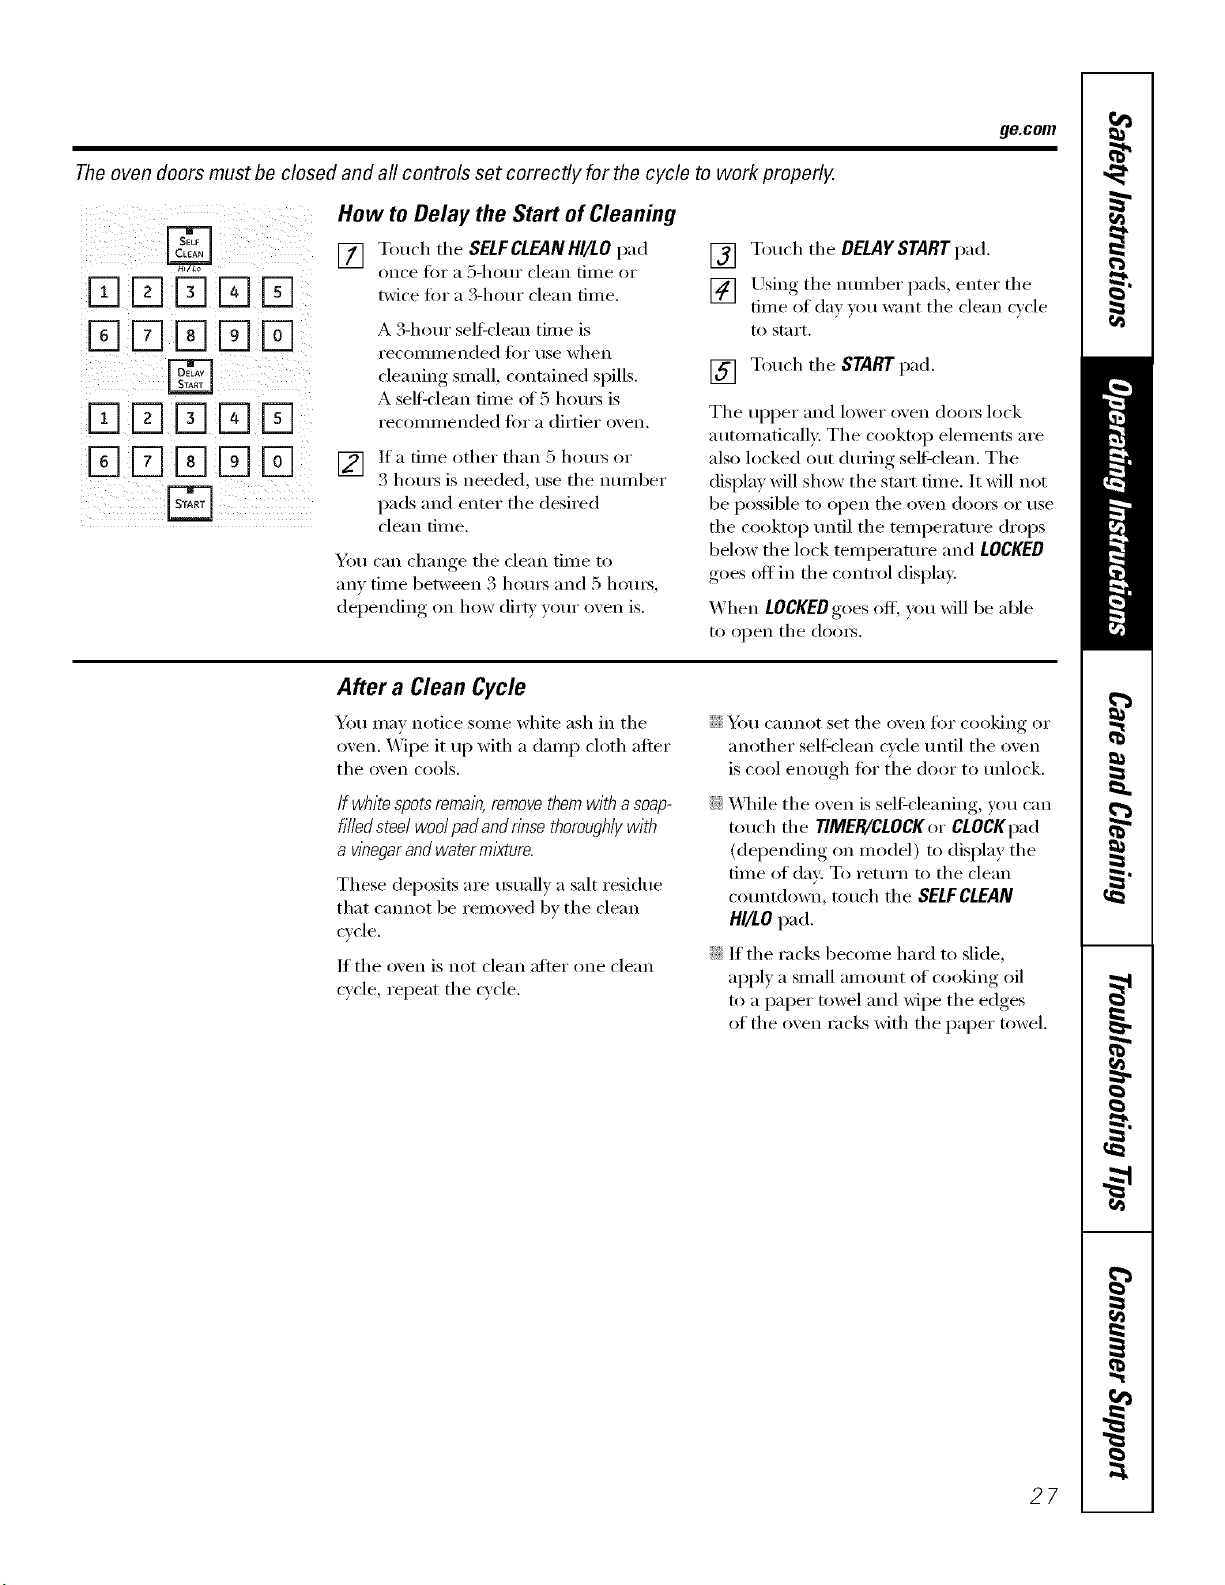
How to Delay the Start of Cleaning
[] Touch the SELFCLEANHI/LOpad
once for a 5-hour clean time or
twice fm a 3-horn clean time.
A 3-horn" sel6clean time is
recommended t0r use when
cleaning small, contained spills.
A self'clean time of 5 hom_ is
recommended t0r a dirtier oven.
[] If a time other than 5 horn5 or
3 horn5 is needed, use tile nmnber
pads and enter tile desired
clean time.
You can change the clean time to
any time between 3 hom_ and 5 hom_,
dei)ending, on how dirt_, _our, oxen is.
[] Touch tile DELAYSTARTpad.
[] Using the number pads, enter the
time of day _ou want tile clean c_cle
to start.
[] Touch the START pad.
The upper and lower oven dom_ lock
automatically. Tile cooktop elements are
also locked out during sel6clean. The
display will show the start time. It will not
be possible to open tile oven doot_ or use
tile cooktop tmtil tile temperature drops
below the lock temperature and LOCKED
goes off in tile control display.
When tOCgEOgoes off', you will be able
to ol)en tile dome.
After a Clean Cycle
You may notice some white ash in the
o_en. Wipe it up with a damp cloth after
the o_,en cools.
If white spots remal); removethem with asoap-
filledsteel wool pad and rinse thoroughlywith
a vt))egarand water mixture.
These deposits are usualh' a salt residue
that cannot be removed bv tile clean
cycle.
If tile oven is not clean after one clean
c_cle repeat tile c_cle.
::_i::_)/I C}lIlIlOt set tile oven _()I" cooking or
another self-clean cycle until tile oven
is cool enough for tile door to tmlock.
::Ji::_]/ile tile oven is self cleaning, you can
touch tile TIMER/CLOCKor CLOCKpad
(depending on model) to display the
time of day. To return to tile clean
countdown, touch tile SELFCLEAN
HI/LOpad.
::Ji::If tile racks become hard to slide,
apply a small amo/mt of cooking oil
to a paper towel and wipe tile edges
of the oven racks with the paper towel.
27
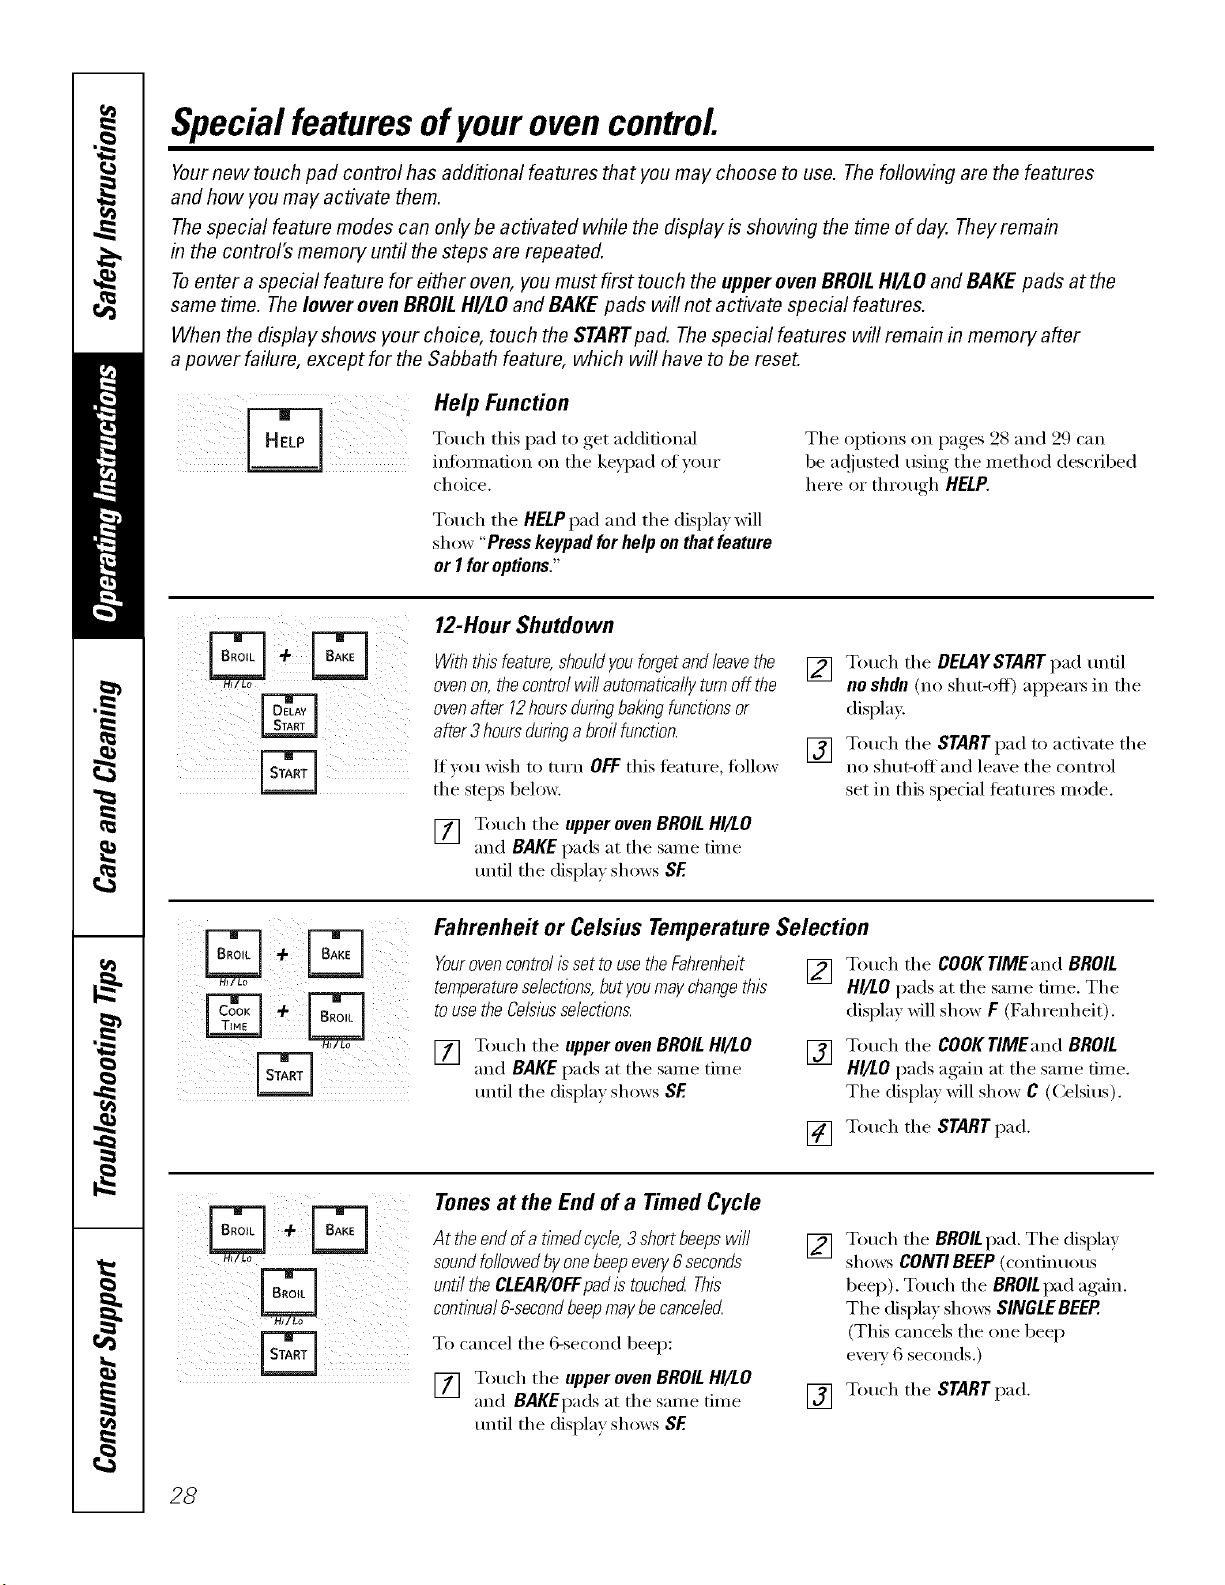
Special featuresofyourovencontrol.
Yournew touch pad control has additional features that you may choose to use. The following are the features
and how you may activate them.
Thespecial feature modes can only be activated while the display is showing the time of day. They remain
in the control's memory until the steps are repeated.
Toenter a special feature for either oven, you must first touch the upper oven BROILHI/LO and BAKE pads at the
same time. The lower oven BROIL HI/LO and BAKEpads will not activate special features.
When the display shows your choice, touch the STARTpad. Thespecial features will remain in memory after
a power failure, except for the Sabbath feature, which will have to be reset.
Help Function
Touch this pad to get additional
infinmation on the keypad of _our
choice.
Touch the HELPpad and the displa)will
show "Press keypad for help on that feature
or I foroptions."
The oi)dons, on I)a°es_. 98 and 99 can
S o" (
be a(!iusted mm_ the meth ,d desc_ibed
here or throuoh HELP.
12-Hour Shutdown
Withthisfeature,shouldyouforgetandleavethe
ovenon,thecontrolwillautomaticallyturnoff the
ovenafter12hoursdunbgbaklbgfunctionsor
after3hoursduringa broilfunction.
If x, Otl wish to ttlI'n OFFthis le'attli'e, fl)llow
the steps belong.
[] Touch the upper oven BROILHI/LO
and BAKEpads at the same time
tmfil the display shows SE
[] Touch the DELAYSTART pad until
no shdn (no shut-off) appea_ in the
displa);
[] Touch the START pad to acfixate the
no shut-off and leave the control
set in this special teatm'es mode.
Fahrenheit or Celsius Temperature Selection
Yourovencontrol isset to usethe Fahranhelt
temperatureselections,but youmay changethis
touse the Celsiusselections.
[] Touch the upper oven BROILHI/LO
and BAKEpads at the same time
until the displa) shows SE
[] Touch the COOKTIMEand BROIL
HI/LO pads at the same time. The
display will show F (Fahrenheit).
[] Touch the COOKTIMEand BROIL
HI/LO pads again at the same time.
The displa_ will show C ((:elsius).
[] Touch the STARTpad.
z
_ii! ii i
Tonesat the End of a Timed Cycle
At theendofa timedcycle,3shortbeepswill
soundfollowedbyonebeepevery6seconds
untiltheCLEAR/OFFpadis touchedThis
continual6-secondbeepmaybecanceled
To cancel the 6-second beep:
[] Touch the upperovenBROILHI/LO
and BAKEpadsat the same time
until the display shows SE
[] Touch the BROILpad. The display
shows CONTI BEEP(continuous
1)eep). Touch dte BROILpad again.
The display shows SINGLEBEER
(This cancels the one beep
eve U 6 seconds.)
[] Touch the START pad.
28
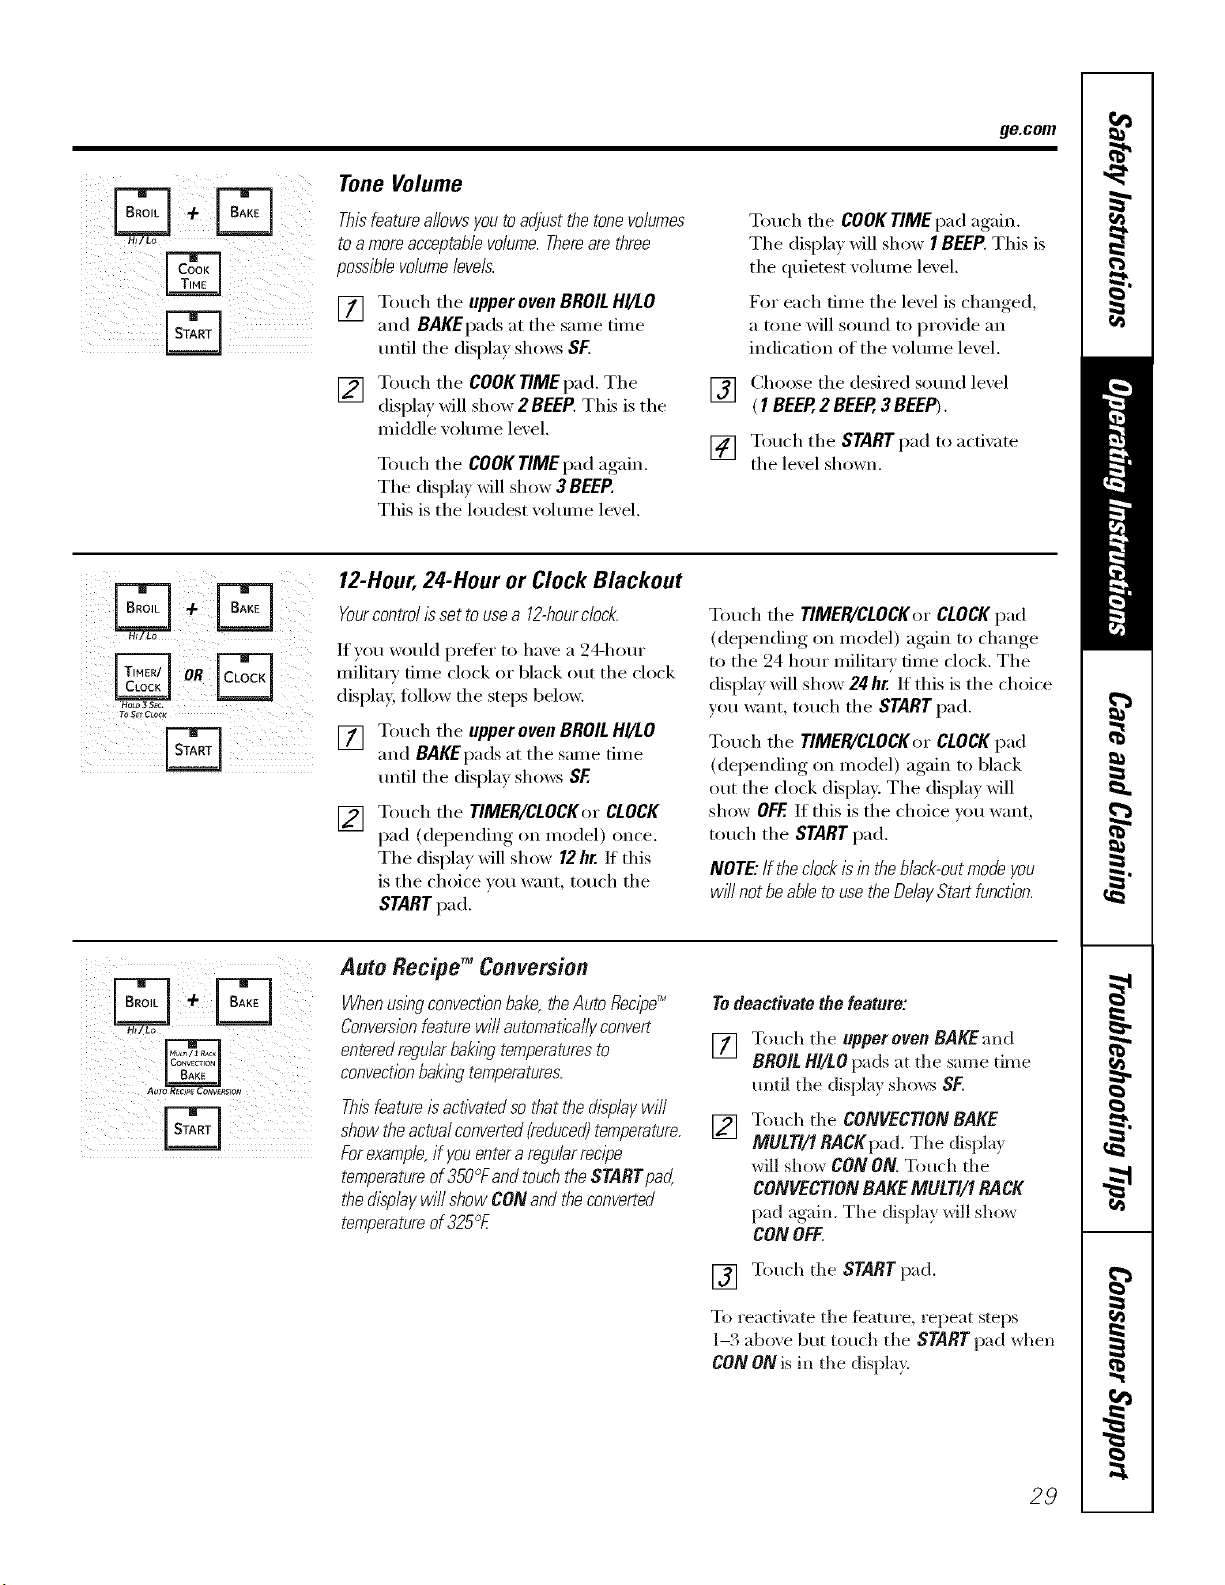
ge.com
Tone Volume
Thisfeatureallows you toadjust the tonevolumes
toa moreacceptablevolume. Thereare three
possiblevolumelevels.
[] Touch the upper oven BROIL HI/LO
and BAKEpads at the same time
until the display sho_s SF.
[] Touch the COOK TIME pad. The
display will show 2 BEEP. This is the
middle xolume lexel.
Touch the COOKTIME pad again.
The displa_ will show 3 SEEP.
This is the loudest _olume level.
Touch the COOKTIME pad again.
The display will show I SEEP.This is
the quietest w_lume level.
For each time the level is changed,
a tone will sotmd to provide an
indication of the vohm_e level.
V_] Choose the desired sotmd level
(1 BEEP,2 BEEP,3 BEEP).
[] Touch the STARTpad to activate
the le',el shown.
To$_Cto¢_
12-Hour, 24-Hour or Clock Blackout
Yourcontrol/ssettousea 12-hourclock.
If you wotfld prefer to have a 24-hour
milit;u_ time clock or black out the clock
displa), fi_llow the steps below.
[] Touch the upper oven BROIL HI/LO
and BAKEpads at the same time
tmtil the display sho_s SE
[]
Touch the TIMER/CLOCKor CLOCK
pad (depending on model) once.
The displa) will show 12hr. If this
is the choice _ou want touch the
START pad.
Touch the TIMER/CLOCKerCLOCKpad
(depending on model) again to change
to the 24 hem" military time clock. The
display will show 24hr. If this is the choice
w)u _mt, touch the STARTpad.
Touch the TIMER/CLOCK,n"CLOCKpad
(depending on model) again to black
out the clock display. The display will
show OFf. If this is the choice you want,
touch the START pad.
NOTE."Ifthe clock # in the black-out modeyou
wff/not be able to usethe Delay Start function.
Auto Recipe TM Convemion
Whenus/bgconvectionbake,theAuto flec/))e_
Conversionfeature will automaticallyconvert
enteredregularbaklbg temperaturesto
convectionbaklagtemperatures.
ThisfeatureIsactivatedso that the d/splaywill
show the actualconverted(reduced)temperature.
Forexample,if youenter a regularrec/))e
temperatureof 350°Fand touchthe STARTpad,
the d/splay will show CONand the converted
temperatureof 325°£
Todeactivate the feature:
[]
[]
Touch the tipper oven BAKE and
BROIL HIlL 0 pa ds a t tll e sa n_ e tirn e
until the displa,_ shows SF.
Touch the CONVECTIONBAKE
MULTI/1RACKpad.The (lispla_
will show CONON.Touch the
CONVECTIONBAKEMULTI/IRACK
pad again. The display will show
CONOFF.
[] Touch the STARTpad.
To reactixate the teatm'e, repeat steps
1-3 abo\e but touch the STARTpad _hen
CON ON is in the display,
29
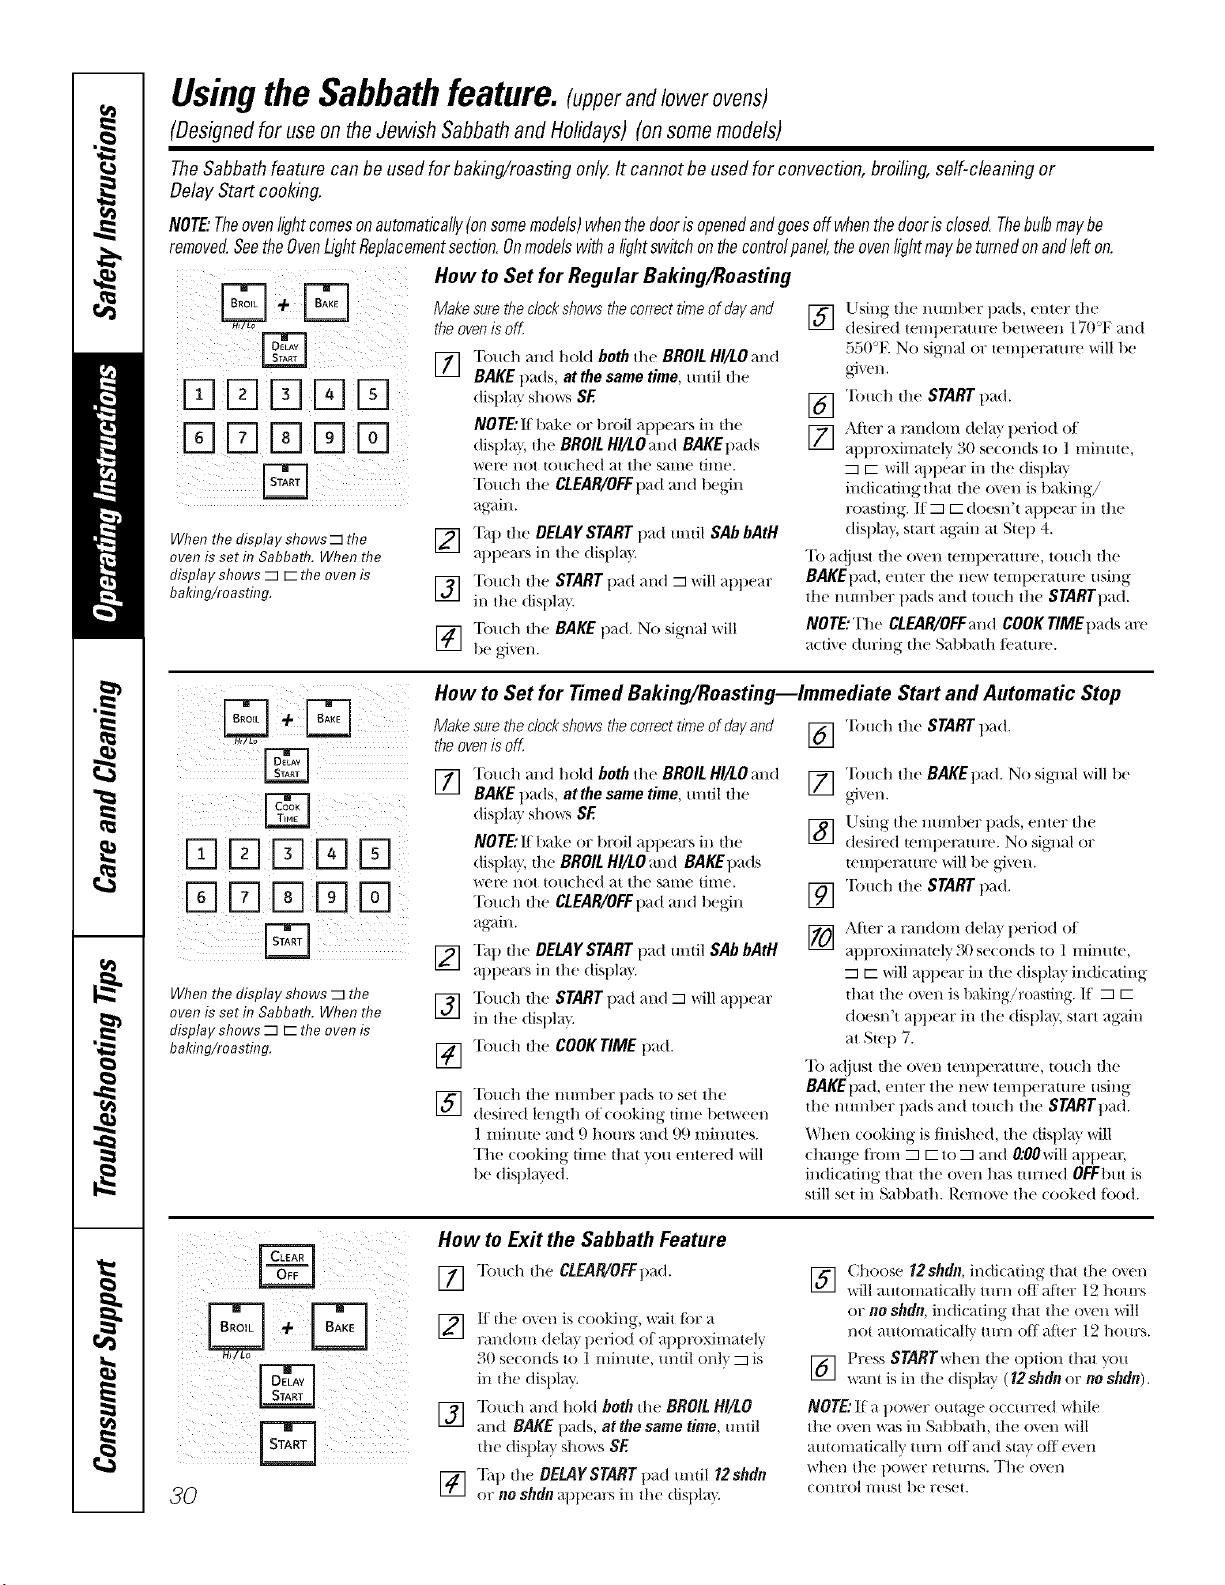
Usingthe Sabbathfeature.!.mrandlowerovens)
(Designed for use on theJewish Sabbath and Holidays) (on some models)
TheSabbathfeature canbe usedfor baking/roastingonlgIt cannotbeusedfor convection,broiling,self-cleaningor
DelayStartcooking.
NOTE:Theovenfightcomesonautomatically(onsomemodels)whenthedoorisopenedandgoesoffwhenthedoorisclosed.Thebulbmaybe
removed•SeetheOvenLightReplacementsection.Onmodelswithalightswitchonthecontrolpanel,theovenlightmaybeturnedonandlefton.
When the display shows _ the
oven is set h7Sabbath. When the
display shows _ r- the oven is
baiting/roasting.
How to Set for Regular Baking/Roasting
Make sure the clockshows thecorrect time of day and [_]
theoven is off
FT] Touch and hold both the BROIL HI/LO and
Ill
BAKE t)ads, at the same time, mltil the
disl)lay sho_'_ SE
NOTE: II bak(' or broil _lptlcars in dl,.'
(tist)la }, dw BROIL HI/LOmld BAKE1)ads
were not touched ;,t the s;une time.
Tou(h dw CLEAR/OFFt)_Id and b('gin
a_dn.
12] Tall dm DELAYSTART 1lad mldl SAb bAtH
atlt)em:s ill the (tist)l m
] "['ou(hthe STARTt)ad and _ willai)tlear
ill the dist)la }
] "[bu(h dw BAKE pad. No signal will
b(! gJ'_ (_l/,
[]
[]
Using the numl)er pads, enter the
desired temllerature t)(_|W(_(i?l}17()°F and
55(1°E No signal or wmt)eramre will 1)e
gT_ (!l/,
"lbu(h dw START t)ad.
After a rim(tom dcla} t)eriod ot
atltll oximately 3(1 st//mds to 1 minute,
r-- will appear ill tlle (tistll_ ff
indicating that the oven is baking/
roasting. If _ r- (toesn't atltlear ill the
(list)Ira'. stun ag_fin at SWl) 4.
To a(!iust the o_ell temperature, touch the
BAKEpa(t, enter the new temperatm'e using
the number pads mid touch the STA/_q'lla(/.
NOTE: The CLEAR/OFFand COOK rlME t)ads ar_"
a(tivc during the Sabl)_lth/;_,amr(,.
When the display shows _ the
oven is set h7Sabbath. When the
display shows _ r- the oven is
baldng/roasting.
How to Set for Timed Baking/Roasting--Immediate Start and Automatic Stop
Make sure the clockshows thecorrect time of day and
theoven is off,
FT] "['oucll and hol(t both tim BROIL HI/LO and
Ill
BAKE pads, atthe same time, umil dw
display sho_:'_ SE
NOTE: g bake or klroil aptlears ill the
display, the BROILHI/LOandBAKEtla(ls
were not touched at the same time.
Touch die CLEAR/OFFt)ad and 1)egin
ag_dn.
12] "lhll die OEMYSTART 1lad ulltil SAb bAtH
i,r.- i
atlt)em:s ill the dist)la }.
] "['ou(hthe STARTt)ad and _ willal)tlear
ill the dist)la }
] "['oudl die COOK TIME t)ad.
[]
Touch the number pads to set the
desired length of looking- time ll(ftW(f(fl/
] II/illtl|(_ _tl/d 9 l//)tlfN _tl/(t (.)(.) IIlilltlt(_S•
The cooking dine tllat "_ou entered will
be dislll_ue(t.
] "lbu(h the START pad.
] "lbu(h the BAKEtrad. No si_,mal will l)(!
Using the numl)(_r pads, enter the
] desired teml)el_mlre. No sig_ml or
t(!lllt)(!T'_lttll?(_will 1)e _,4xen.
] "lbuch the START pad.
[]
Ai_er a random (tcla'_ period ot
atltlroxhnawly 30 seconds t() 1 minme,
r-will appear ill tl/e disl)l m indicating
|hat the oven is baking/roasting. If _ r-
doesn't _l)tlear ill tile (tist)la}, start ag_fin
at Siep 7.
"Ib a(ljust tile oven teml)erature, touch tile
BAKE1)ad, enter the new teml)eraum' using
the nmnl)er pads and touch the STARTtlad.
When cooking is finished, the (tisl)la } will
change {i'om _ r-to _ and O:OOwillat)tlem;
indicating that the o\en has turned OFFbut is
still set ill Sabbath. R('n/ov(' the cooked {i)()(t.
iiiiii!! ii!!iii;!
30
How to Exit the Sabbath Feature
[_] "lbuch dw CLEAPdOFFllad.
I., I
] If die oxel/ is (x)oldl/g, wait tbr a
rm( om(_lt) 1)efio( of llll)roxim _.ely
30s((:ondslo] nn c, tn loll) _is
in the dJsi)la ?.
[] "limch and hold both die BROIL HI/LO
and BAKE llads, at the same time, unlil
h( ( is t 1t? sho'xvs SE
[] Tall the OEUIYSTART pad mldl 12shdn
or no shdn q/1)e ti's i / he ( isl) _}
] Choose 12shdn, indicating dmt lhe ov(n
will auminad( all', mrn off after 12 hours
or no sbdn, in(lic_ting that the oxen will
not amomaticallv mrn off al_er 12 hirers.
] Pr(ss SrARrwl'mn the OIltion {hal }ou
%_r_{iS ill die displa} (12shdn or noshdn).
NOTE:II _tl)()_r(']:oumg( occmT('d whil('
the o_en was in Sal)l)ath, th( ox(n will
automaticalN mrn otl and stm off ('_en
wheil the i)ower £(qtl£11S• The o\eI/
control l/l/ISt b( Feset.
Careand cleaning oftherange, gecom
Be sure all controls are off and all surfaces are cool before cleaning any part of the range.
If your range is removed for cleaning, servicing or any reason, be sure the anti-tip
device is re-engaged properly when the range is replaced. Failure to take this
precaution could result in tipping of the range and cause injury.
How toRemoveProtectiveShippingFilmand Packaging Tape
Caretully grasp a corner at tile protective
shipping fihn with your finge_ and slowly
peel it fl'on/ tile appliance sm_i_ce. Do not
use any shaq) items to remove tile fihn.
Remove all of tile fihn betore using tile
appliance fi)r tile fi_t time.
To _lSStlI'e no d_lIll_lge is done to tile
finish of tile product, tile safest way to
remove tile adhesive ti'om packaging tape
on new appliances is an application (ff a
household liquid dishwashing dem_gent.
Apply with a sott cloth and allow to soak.
NOTE."Theadhesivemustbe removed fromall
paris. Itcannotbe removedif it is bakedon.
Control Knobs
Thecontrolknobsmay be removed for easier
cleaning.
Make sure tile knobs are in tile OFF
positions and pull them straight off tile
stems ti)r cleaning.
Tile knobs can be cleaned in a
dishwasher or tile}' may also be washed
with soap and water: Make sure tile inside
of tile knobs are dry before repladng.
Replace tile knobs in tile OFFposition to
ensure proper placement.
Oven Vent
Theloweroven ventis locatedabovethe n)ht
rear surfaceunit Theupperovenventis located
abovethe left rearsurface unit
These areas could become hot dm_ing
o'_en rise.
It is nof///_ll t()I" ste}llll to COIlle o[It of
tile vent.
Thevent is lYnportantforproperair circulation.
Neverblock this vent
Control Panel
If desired,thetouchpadsmaybedeactivated
beforecleaning.
See tile ControlLockintom/adon in tile
Usingthe clock,kitchentimer and control
lock secdon in this manual.
Clean up splatte_ with a damp cloth.
_Otl ill,iv also rise a glass cleaner
Remove heavier soil with wmm soapy
wateI: Do not use abrasives of any kind.
Reactivatethe touchpads after cleaning.
3/
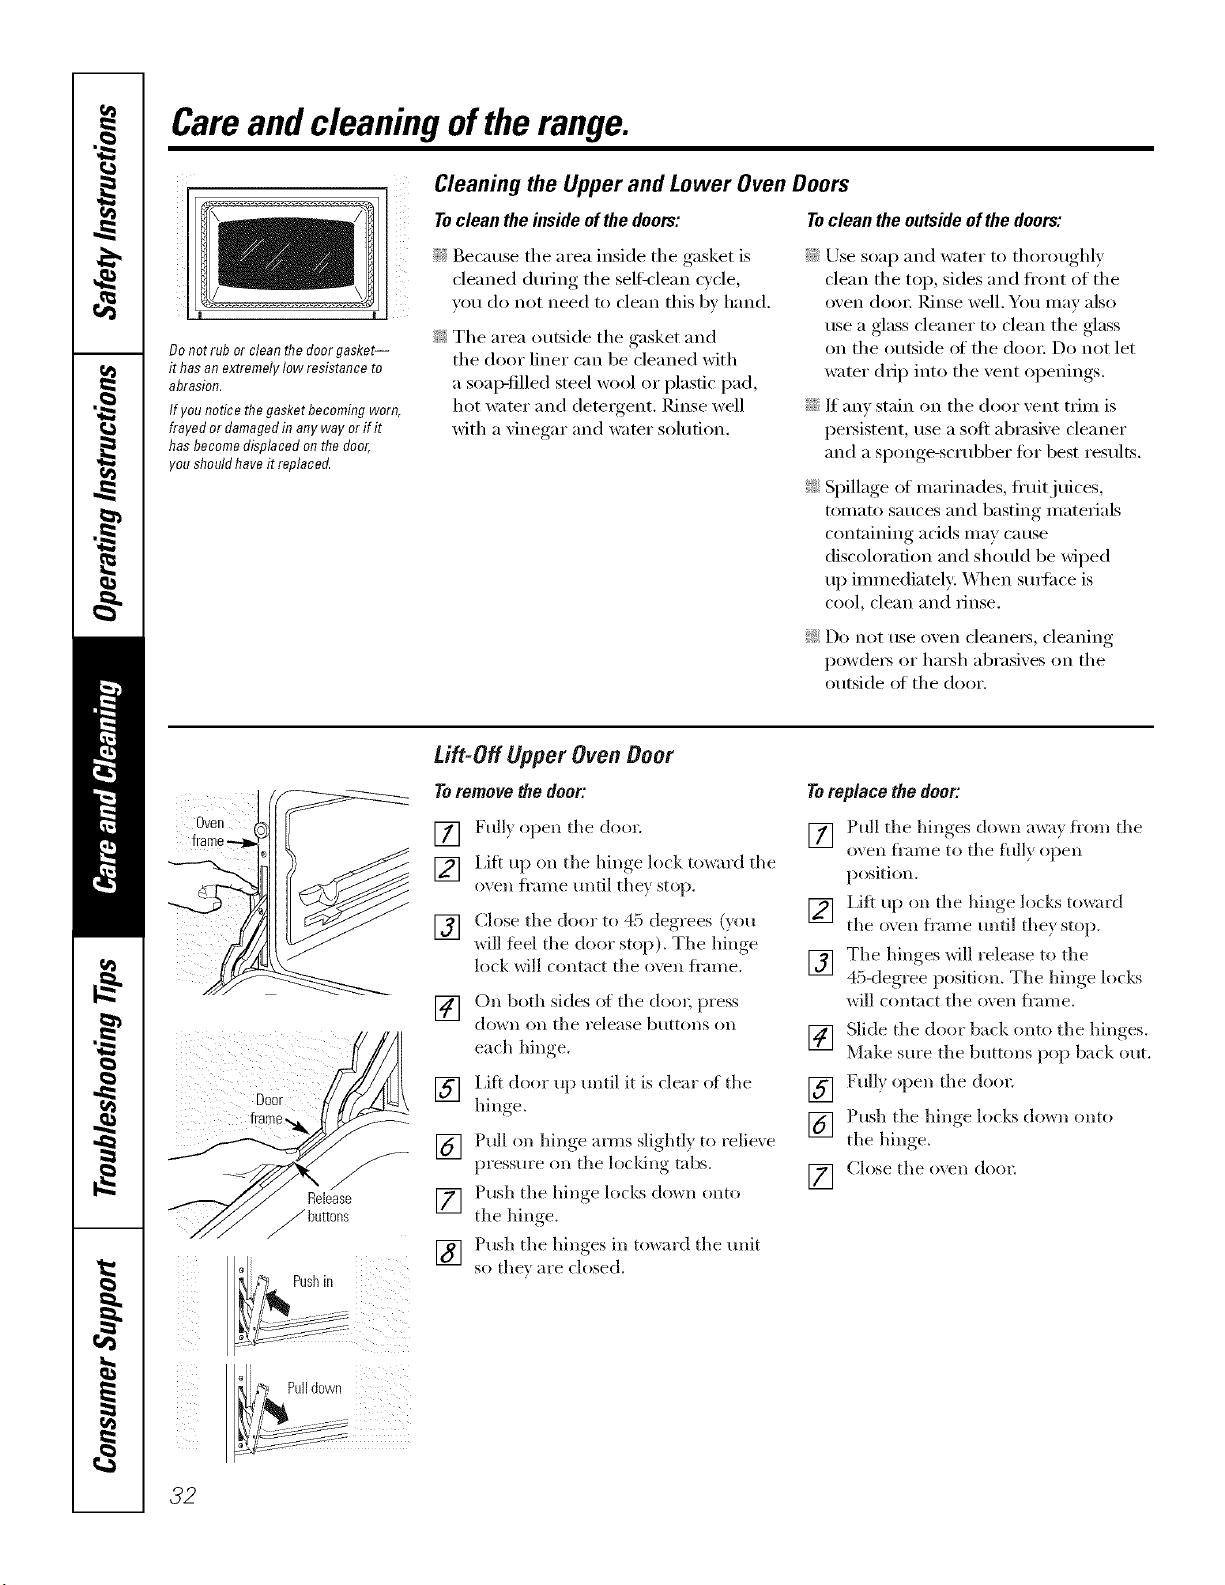
Careand cleaning oftherange.
Donotrubor cleanthedoorgasket--
it hasan extremelylowresistanceto
abrasion.
If younoticethegasketbecomingworn,
frayedor damagedin anywayor ifit
hasbecomedisplacedonthe door,
youshouldhaveit replaced.
Cleaning the Upper and Lower Oven Doors
To clean the inside of the doors: To clean the outside of the doors:
!q{Because the area inside the gasket is
cleaned during the selfk'lean c',cle
you do not need to clean this b_ hand.
_: The area outside the gasket and
the door liner can be cleaned with
a soap-filled steel wool or plastic pad,
hot water and detergent. Rinse well
with a vinegar and water solution.
::Ji::Use soap and water to thoroughly
clean the top, sides and ti'ont of the
oven dooi: Rinse well. Yo/I Ill}IV also
use a glass cleaner to clean the glass
on the outside of the dora: Do not let
wamr drip into the vent openings.
::Ji::If any stain on the door vent trim is
persistent, use a soft abrasive cleaner
and a si)onge-scrubber tot best results.
_: Spillage ot marinades, fl'uitjuices,
tomato sauces and basting materials
containing acids may cause
discoloration and should be wiped
up immediately: _4]_en sm_i_ce is
coo L €lean and iJnse.
!;>Do not use oxen cleanei_, cleaning
powde_ or ha_h abrasixes on the
outside of the door.
Oven
o
0sh, ii
Pulldown
Lift-Off Upper Oven Door
Toremovethedoor:
[] Fully open the doo_:
[] Lift up on the hinge lock toward the
oven fl'ame until the} stop.
[] Close the door to 45. deorees_, (}ou
_dll feel the cloo_ stop). The hinge
lock will contact the oven fl'ame.
[] On both sides of the doo_; press
(lo_n on the I'elease btlttolls Oll
each hill re
[] Lift door up until it is clear of the
hill<re
[] Pull on hinge amls slighfl} to relieve
pressm'e on tile locldng tabs.
[] Push tile hinge locks do,_n onto
the bin ,e
[_] Push the hinges in to,</rd the unit
so thex are closed.
Toreplacethedoor:
[] Pull the hinges (l()_n awa) flora the
oven fl'ame to the flflly open
position.
[] I,ifl up on the hinge locks to*_ard
the oven fl'ame until the} stop.
[] The hinges will release to tile
45-degt ee position. The hinge locks
will contact the oven ti'ame.
[] Slide the door back onto the hinges
Make sure the buttons pop back out,
[] Full) open the door.
[] Push the hinge locks (lo_n onto
the hin ,e
[] Ch)se the oven (lore;
32
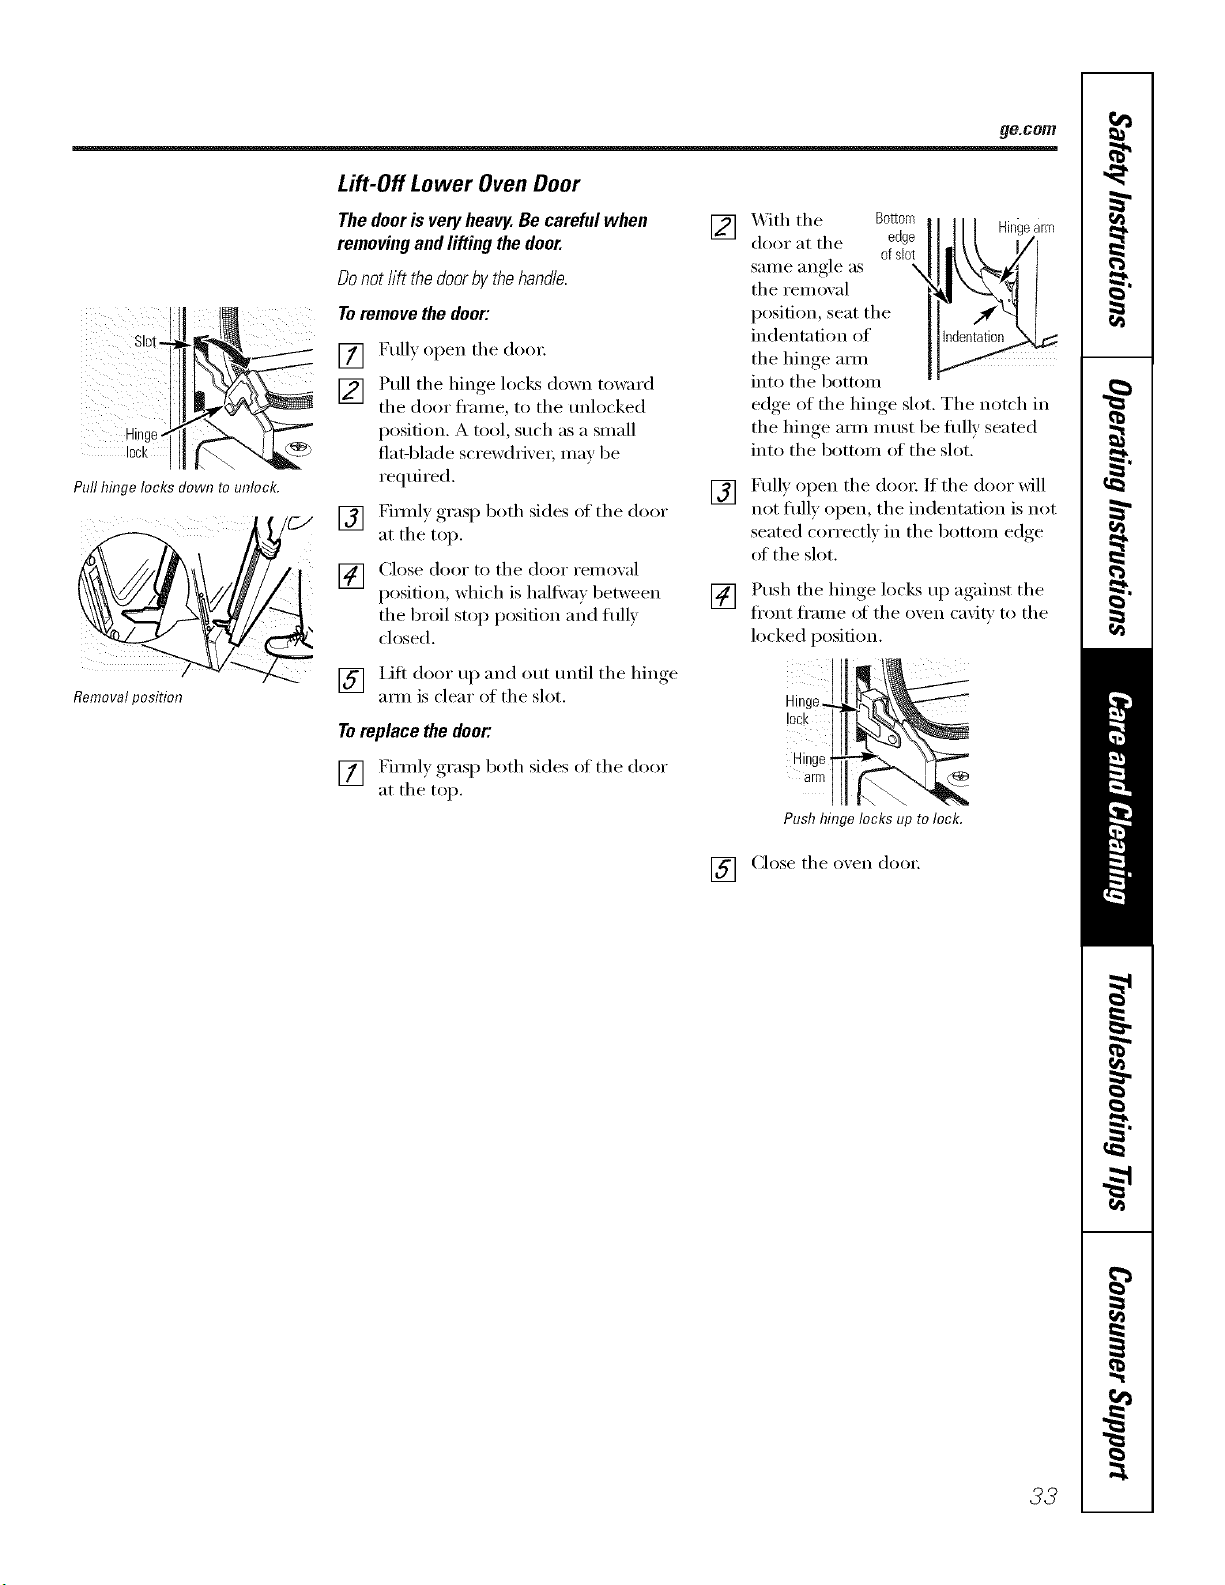
ge.com
Pull hinge locks down to unlock.
Removalposition
Lift-Off Lower Oven Door
Thedoorisveryheavy.Becarefulwhen
removingandliftingthedoor.
Donotlift thedoorbythehand&.
Toremovethedoor:
[] Fully open tile (loo_:
[] Pull tile hinge locks down toward
tile door fl'ame, to tile unlocked
position. A tool, such as a small
7._ flat-blade screwdri'_e_; may be
required.
_/C-/ [] Fimflv oraso both sides of tile door
at tile top.
[] Close door to tile door remoxal
position, which is halt_vm 1)etween
the broil stop position and fldly
ch)sed.
[] Lift door up and out tmfil tile hinge
am_ is clear of tile slot.
[]
[]
[]
_itl/ tile Bottom
door at tile edge
ofsbt
same angle as \
tile removal
position, seat the
indentation of
tile hinge am_
into tile bottom
] / | Hingearm
edge of tile hinge slot. Tile notch in
tile hinge mm must be fldlv seated
into tile bottom of tile slot.
Fully open tile do(n: If tile door will
not flflly open, tile indentation is not
seated correctly in tile bottom edge
of tile slot.
Push the hinge locLs up against tile
fl'ont fl'ame of tile oxen cavi_ to tile
locked position.
To replace the door:, lock
] Firefly both sides ot tile door Hinge
( Y]F_i _,x)
• _ ' I arm
at tile top. -
Push hinge locks up tolock.
[] (3ose tile oven door.
33
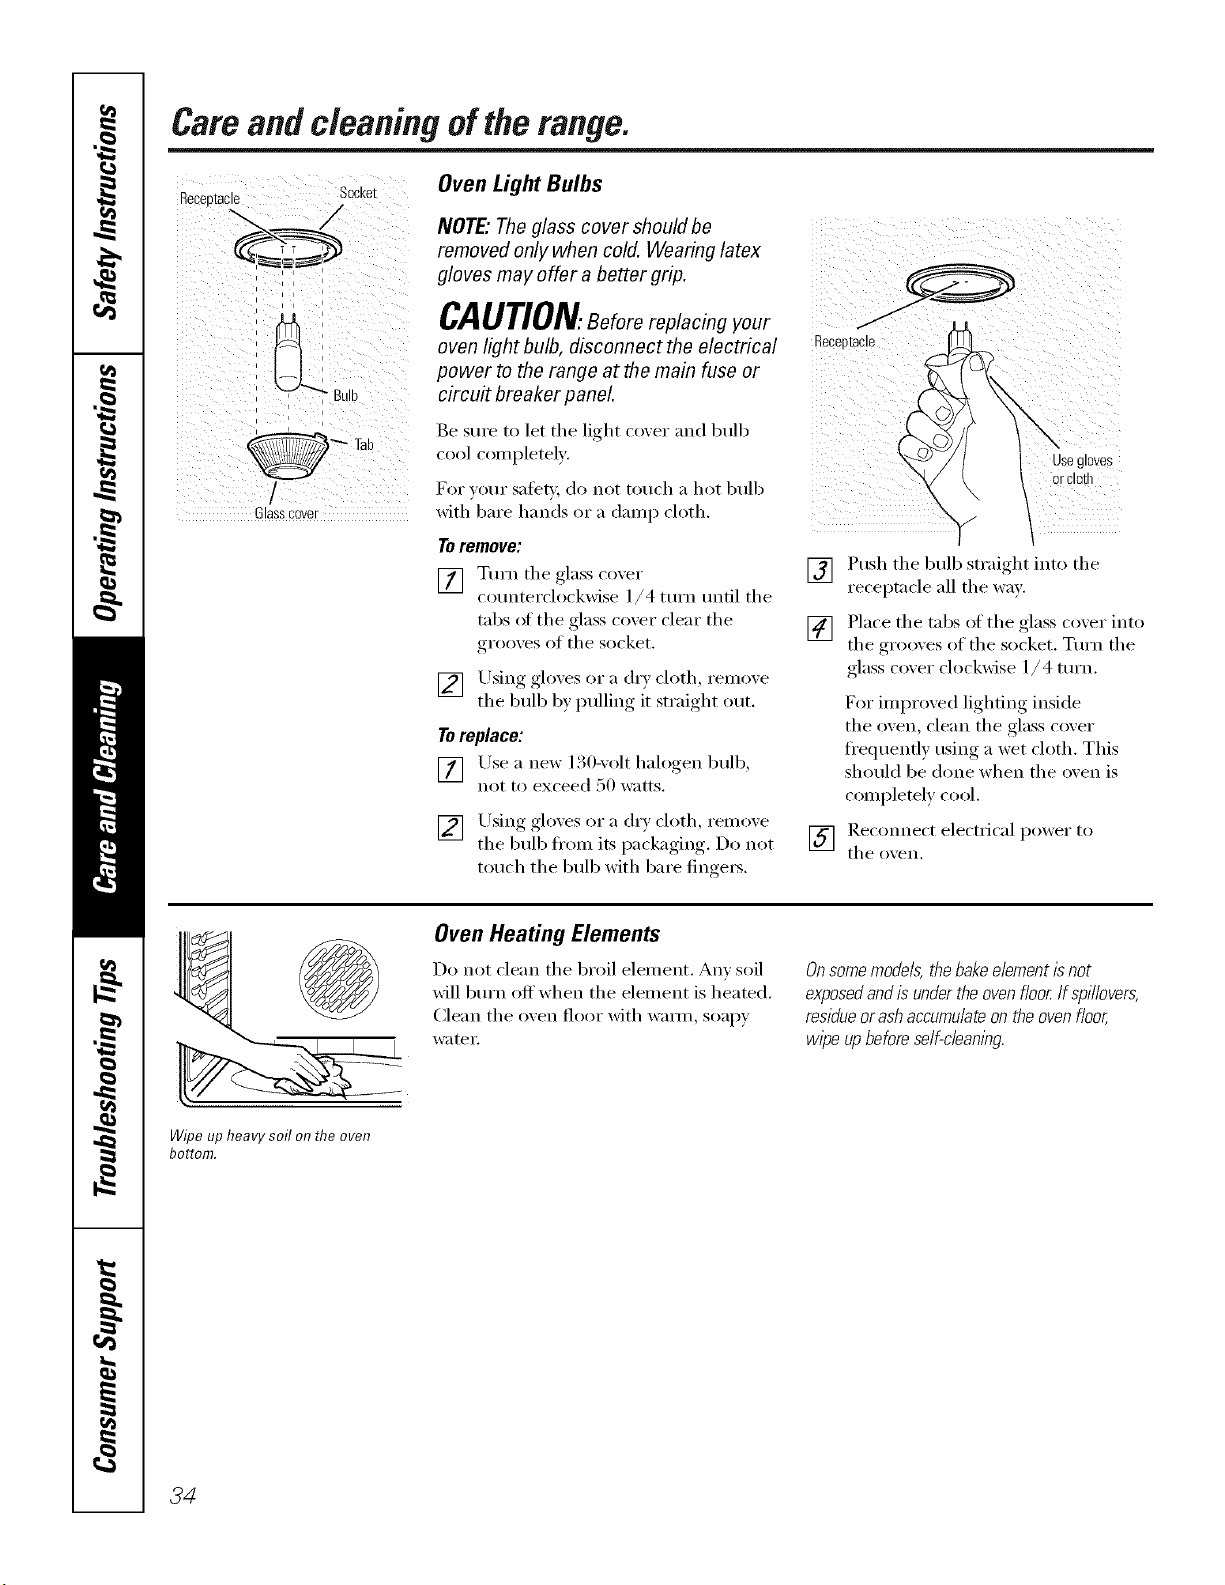
Camand cleaningofthe range.
Oven Light Bulbs
= = =
= =
, i i i
Glasscover
NOTE"Theglass cover should be
removed only when cold. Wearing latex
gloves may offer a better grip. a_ce//_'v_CAUTION.Beforereplacingyour
oven light bulb, disconnect the electrical _eceDt
power to the range at the main fuse or
circu# breaker panel
Be sure to let the light cover and bulb
cool completely.
For your safer,i, do not touch a hot bulb
with bare hands or a damp cloth.
Toremove:
[] Turn the glass coxer
cotmterchx'kwise 1/4 mrn tmfil the
tabs ot the glass cover clear the
grooves of the socket.
[] Using gloves or a dr} cloth, reinoxe
the bulb b) pulling it straight out.
Toreplace:
)
[] Lrse a new 130-\olt halogen bulb,
not to exceed 50 watts.
[] Using_, _,loxes or a (hw, cloth reinoxe
the bulb ti'om its packa ,ino Do not
touch the bulb with bare finge_s.
\
usegloves
orcloth
"v /
[] Push the bulb straight into the
receptacle all the wax'.
[] Place the tabs of the glass cover into
the grooves of the socket. Turn the
glass c_)x'er clockwise 1/ 4 turn.
F()r imlm)ved lighting inside
the oven, cle:m the glass cover
fl'equenfly using a wet ch)th. This
should be done when the oven is
c_)mpletely c_)_)l.
] Reconnect electlJcal powel" to
the ()Veil.
Wipeupheavysoilon theoven
bottom.
Oven Heating Elements
Do not clean the broil element. Am soil
will btlrn off'when the element is heated.
Clean the oxen floor with wmm, soapy
water.
Onsomemodels, the bakeelement isnot
exposedand is under the ovenfloor If sp/llovers,
residueor ash accumulateon theoven floor,
wipe up beforeself-c/eanlbg.
34
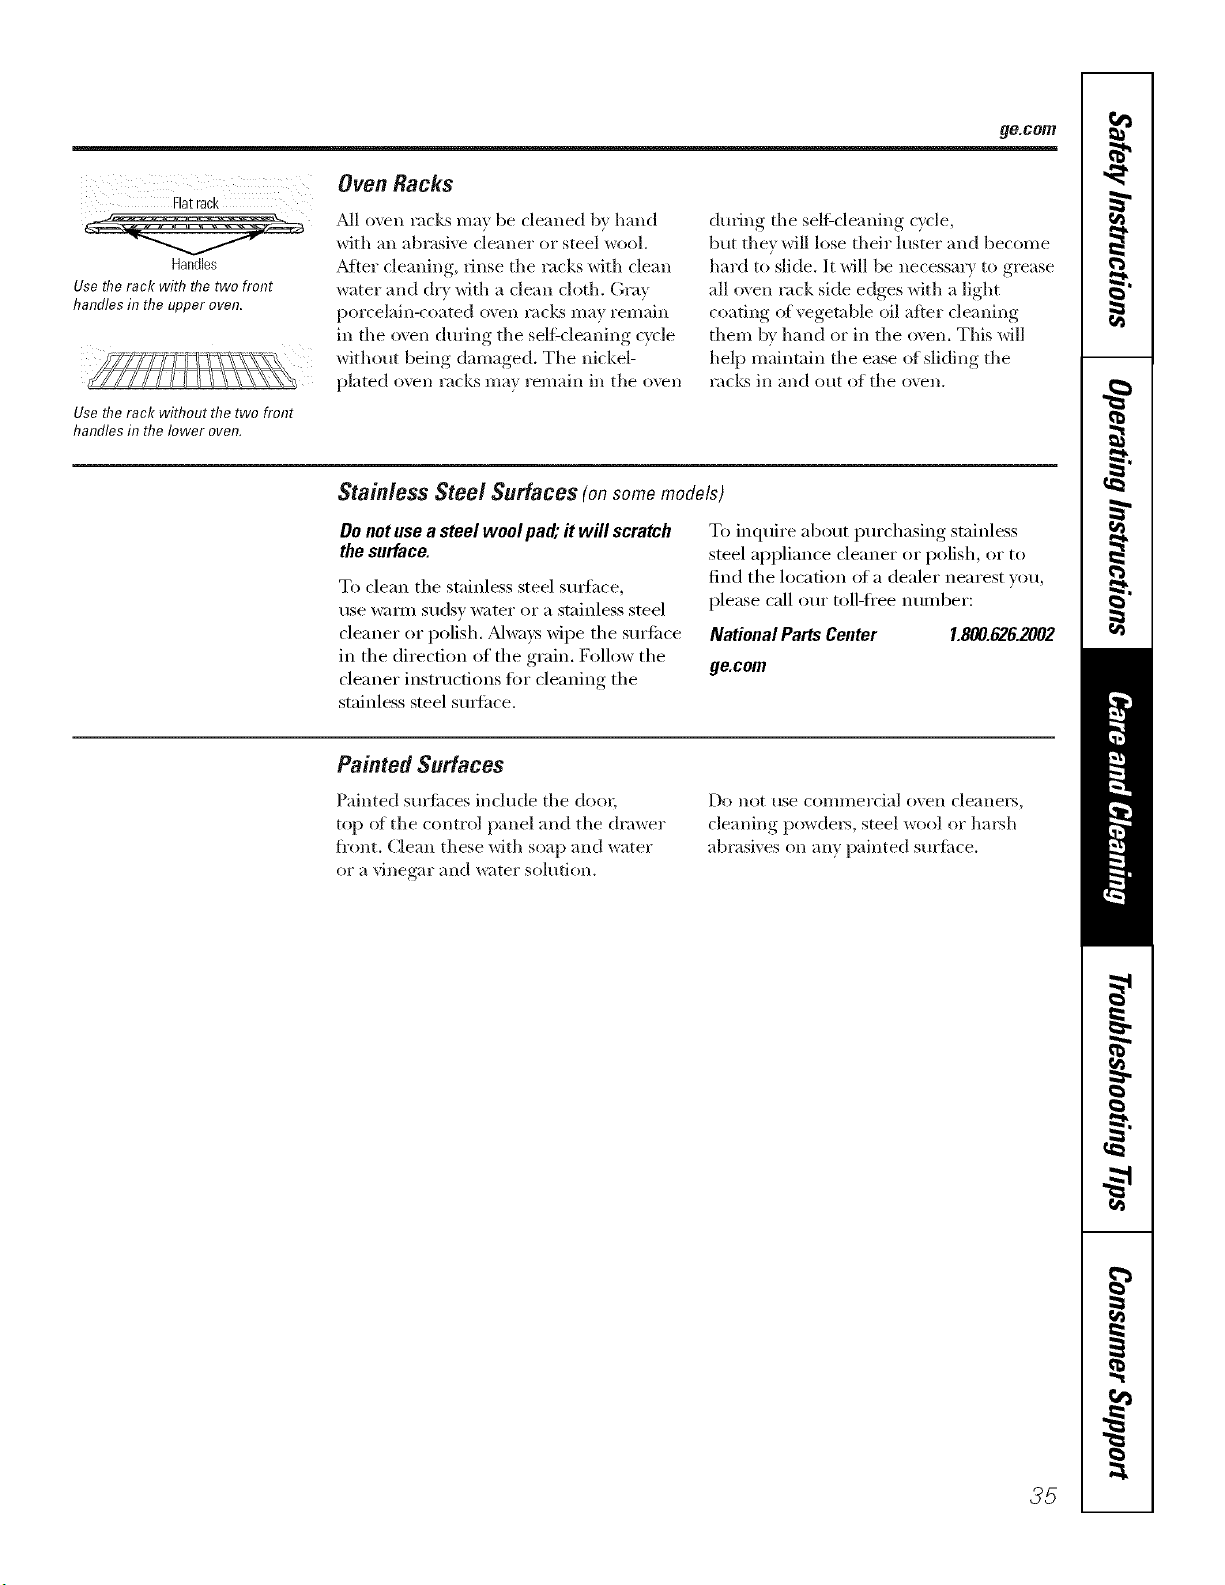
ge.com
Flatrack
Handles
Use the rack with the two front
handles in the upper oven.
Use the rack without the two front
handles in the lower oven.
OvenRacks
.M1 oven racks ma_ be cleaned b} hand
with an abrasive cleaner or steel wool.
.Mter cleaning, rinse the racks with cle_m
w_lter _md dry with a clean cloth. Gray
porcelain-coated oven r:mks may remain
in the oven during tile selfZcleaning cycle
without being damaged. The nickel-
plated ()\vn racks may remain in tlle ()\vn
during tile sell'cleaning cycle,
but they will lose their hlster and become
hard to slide. It will be llecessm? to grease
all oven rack side edges with a light
coating oi vegetable oil after cleaning
them by hand or in the oxen. This will
help maintnin the ease ()t sliding tile
racks in and out of the oxen.
Stainless Steel Surfaces (onsomemodels)
Donotusea steelwool pad;# will scratch
thesurface.
To clean the stainless steel surfhce,
use wam_ sudsy water oi" a stainless steel
cleaner or polish. ,Mways wipe the sm'ii_('e
in the direction of the grain. Follow the
cleaner instructions fi)r cleaning the
stainless steel sm_fh('e.
To inquire about pro'chasing stainless
steel appliance cleaner or polish, oi" to
find the location of a dealer nearest you,
please call ore" toll-li'ee nmnber:
National Parts Center 1.800.626.2002
ge.com
Painted Surfaces
Painted surfi_ces include tile dool;
top ot tile control panel and tile drawer
fi'ont. Clean these with soap and water
ol a vinegar and w;ffel" sohltion.
DO Iiot rise coI//lllel'cial ()veil cle;_nei's,
cle;ming powders, steel wool or hm'sh
_lbrasives on any painted suriilce.
35
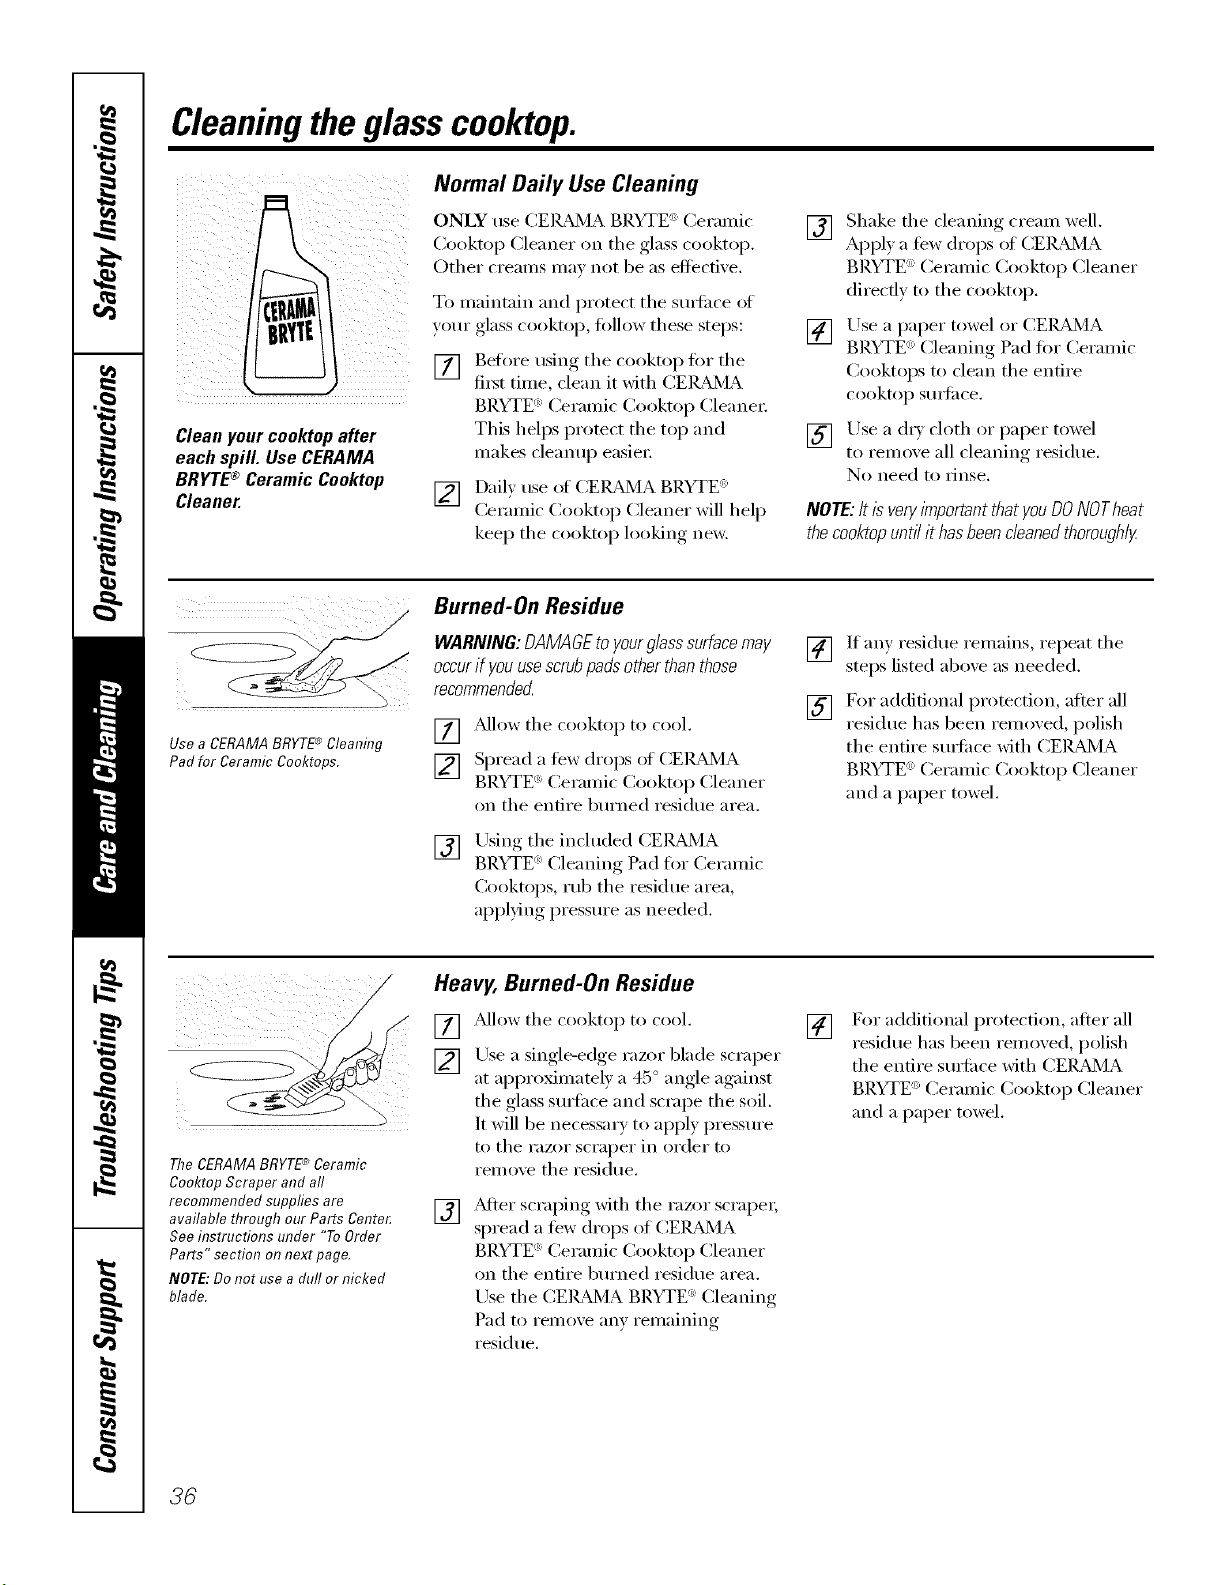
Cleaningtheglasscooktop.
Normal Daily Use Cleaning
ONLY use CEIL&MA_BRYTE" Cermnic
(2)okto I) Cleanel" on tile glass cooktol}.
Other creams may not be as eflocfive.
To maintain m_d protect the surlilce of
your glass cooktop, fi)llow these steps:
[] Before using the cooktop lot the
fiist time, clean it with CEIL_2dA
Cleanyourcooktopafter
each spill. UseCERAMA
BRYTE®CeramicCooktop
Cleaner.
[]
BRYTE <':Ceramic Cooktop Cleane_:
This helps protect the top and
makes cleanup easier:
Dail) use of (;EIL_dVIA BRYTE <_'
Ceramic Cooktop Cleaner will help
kee I) tile cooktop looking new.
[] Shake tile cleaning cream well.
Apply a few drops of CEILz_dMA
BRYTE ':Ceramic Cooktop Cleaner
directly to the cooktop.
[] Use a paper towel or CEIL_dMA
BP.YTE <_>Cleaning Pad fin" Ceramic
Cooktops to clean the entire
cooktop S/lI]il ce.
[] Use a (h)' cloth or paper towel
to relnove all cleaning residue,
No need to rinse,
NO_: ItisveryimportantthatyouDONOTheat
thecooktopuntilithasbeencleanedthoroughly
Use a CERAMABRYTE'_ Cleaning
Pad for Ceramic Cooktops.
Burned-On Residue
WARNING:DAMAGEtoyourglasssurfacemay
occurif youusescrubpadsotherthanthose
recommendecL
] Pdlow tile cooktop to cool.
[] Spread a tew drops ol CEIL_dVIA
BRYTE _>Ceramic Cooktop Cleaner
on tile entire bm'ned residue area.
[]
Using tile included CERAMA
BRYTE <_:'Cleaning Pad for Ceramic
Cooktops, rub tile residue area,
ali,) )lying, pressm'e as needed.
[] If any residue remains, repeat the
steps listed above as needed.
[] For additional protection, alter all
residue has been remoxed, polish
the entire stwfi_ce with CEI_U_dVIA
BRYTE ':Ceramic Cooktop Cleaner
and a paper towel.
The CERAMABRYTE'*_Ceramic
Cooktop Scraper and all
recommended supplies are
available through our Parts Cente_
See instructions under "ToOrder
Parts" section on next page.
NOTE:Do not use a dull or nicked
blade.
Heavy, Burned-On Residue
[] _Mlow tile cooktop to cool.
[] Use a single-edge razor blade scraper
at approximately a 45 ° angle against
the glass stwlhce and scrape the soil.
It will be necessary to apply pressm'e
to tile razor scraper in order to
remove the residue.
[]
_Mter scrai)ing, with tile razor scrape_;
spread a few drops of CEIL&MA
BRYTE <':Ceramic Cooktop Cleaner
on tile entire bm'ned residue area.
Use the CEIL_dVIA BRYTE ': Cleaning
Pad to remove any remaining
residue.
[]
For additional protection, after all
residue has been remoxed, polish
the entire stwfi_ce with CEIL_dMA
BRYTE _>Ceramic Cooktop Cleaner
and a paper towel.
36
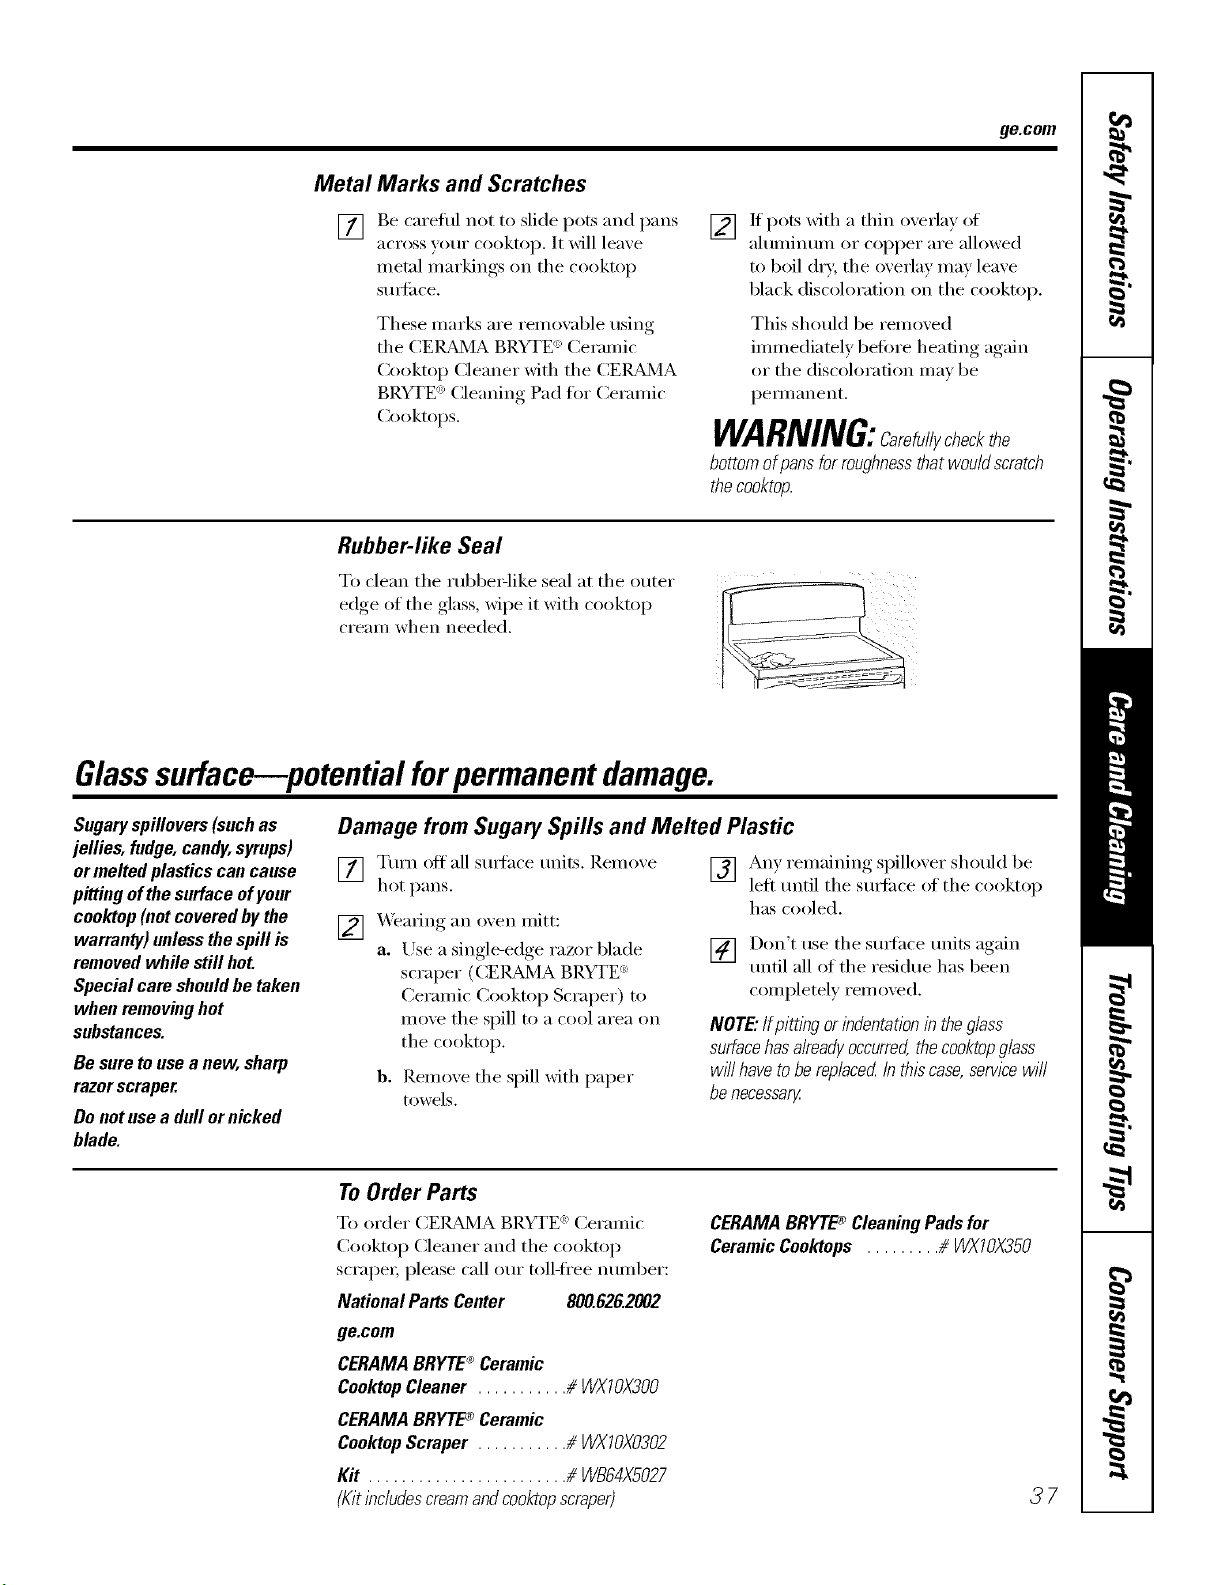
ge.com
Metal Marks and Scratches
[]
Be careflll not to slide pots and pans
across your cooktop. It will lea_e
metal markings, on tile cooktoI _
StlIS[ilce.
These marl_s are remox:d)le using
tile CEI_d_JlA BRYTE <':Ceramic
Cooktop (:leaner with the CER_d_qA
BRYTE <')(:leaning Pad tot Ceramic
Cooktops.
[] If pots xfitl/ a thin oxerla) of
ahmfinum or copper are allowed
to boil dry, the overlay may leave
black discoloration on the cooktop.
This should be relnoved
immediately betore heating again
or tile discoloration may be
peli//allellt.
WARNING:Care ullycheckthe
bottom ofpans for roughnessthat would scratch
thecooktop.
Rubber-like Seal
To clean tile rubbe>like seal at tile outer
edge of the glass, wipe it with cooktop
crealn when needed.
Glasssurface potential forpermanent damage.
Sugary spillovers (such as
jellies, fudge, candy,syrups)
or melted plastics can cause
pitting of the surface ofyour
cooktop (not covered by the
warranty) unless the spill is
removed while still hot.
Special care should be taken
when removing hot
substances.
Be sure to use a new, sharp
razor scraper.
Do not use a dull or nicked
blade.
Damage from Sugary Spills and Melted Plastic
[] Turn off all surthce units. Remove
hot pans.
[] _.Veming an oven mitt:
a. Use a single-edge razor blade
scraper (CE]_d_4A BRYTE <:
Ceramic Cooktop Scraper) to
move the spill to a cool area on
tile cooktop.
b. Remove tile spill with paper
towels.
[] Any remaining spillover should be
left until the stmfiace of the cooktop
has cooled.
] Don't use tile surfhce units again
until all of the residue has been
completely removed.
NOTE" IfpittliTgor indentation in the glass
surfacehas alreadyoccurred,the cooktopglass
will have tobe replaced Inthiscase, semce will
be necessary
To Order Parts
To order CE/_d'dA BRYTE _ Ceramic
Cooktop Cleaner and tile cooktop
scrape_; please call our toll-fl'ee IltllllbeF:
National Parts Center 800.826.2002
ge.com
CERAMA BRYTE®Ceramic
CooktopCleaner ........... _ WXTOX300
CERAMA BRYTE®Ceramic
CooktopScraper ........... # WXTOX0302
Kit ........................ # WB64XS027
(Kit includescreamand cooktopscraper)
CERAMABRYTE_ CleaningPadsfor
CeramicCooktops ......... # WXIOX350
37

Beforeyoucall forservice...
Troubleshooting -tips
Save time and money/. Review the charts on the following
pages first and you may not need to call for service.
Possible Causes What To Do
Surface units will not hnproper cookwaxe • Use pans which are flat and match the diameter of
maintain a rolling boil being used. the surtace unit selected.
or cooking is not
fast enough In some areas, the power * Coxer pan with a lid until desired heat is obtained.
(voltage) may be low.
Surfaceunilsdo A fuse in your home may be * ]_el)lace the filse or reset the circuit breaker.
not work properly blown or the circuit breaker
tripped.
Cooktop controls * Check to see the correct control is set for the surtace
improperly set. trait xou are usin ,
Surface unit stops This is normal. The refit
glowing when turned is still on and hot.
to a lower setting
Scratches(mayappear
as cracks)oncooktop
glasssurface
i i ii i
i ii i ii ii ii ii ii ii ii ii ii iii
Incorrect dem_hlg
methods being used.
Cookware with rough bottoms
being used or com'se partides
(salt or sand) were between
the cookware and the surface
of the cooktop.
Cookware has been slid
across the cooktop surface.
• Scratches are not remoxzd)le. Tinv scratches will become
less visible in time as a result of cleaning.
• To aw)id scratches, use the recomlnended cleaning
procedures. Make sure bottoms (ff cookware are clean
belore rise, alld rise cookware with SUlooth bottou/s.
Areas of discoloration Food spillovers not cleaned • See the Cleaning the glass cooktop section.
on the cooktop before next use.
Hot surface on a model • This is normal. The surface may appear discoh)red
with a light-colored cooktop, when it is hot. This is temporary and will disappear
as the glass cools.
Plastic melted to Hot cooktop came into • See the Glass surface--potential for permanent damage
the surface contact with plastic placed section in the Cleaning the glass cooktop section.
on the hot cooktop.
Pitting (or indentation) Hot sugar mixture spilled • Call a qualified technician for replacement.
of the cooktop on the cooktop.
Frequent cycling hnproper cookwaxe • Use only flat cookware to minimize c)cling.
Off and on of being used.
surface units
Oven light does Light bulb is loose. • Tighten or replace the 1)ulb.
not work
Oven will not work Plug on range is not completely • Make sure electrical l)lu"_is l)lugged,, into a lixe, properly
inserted in the electrical outlet, grounded outlet.
A fuse in your home may be • ]_eplace the filse or reset the circuit breaker.
blown or the circuit
pped
Oven controls improperly set. • See the Using the oven section.
_ Oven too hot. • Allow the oxen to cool to beh)w h)cking tern )erature
, I

ge.com
Possible Causes What ToDo
Fooddoesnotbake Oven controls improperly set. * See tile Usingtheoven sectiou.
orroastproperly
Rack position is incorrect * See tile Usingtheoven section.
or the rack is slot level.
Incorrect cookware or * See tile Usingtheoven section.
cookware of improper
size being used.
Oven thermostat needs * See tile Adjust the oven thermostat--Do it yourself[
adjustment, secti(m.
Fooddoes not Oven controls hnproperly set. * Make sure you touch the BROILHI/tOpad.
broilproperly
Improper rack position * See tile Broiling Guide.
being used.
Cookware slot suited • I?or best results, use a pau designed fl)r broiling.
for broiling.
The probe is plugged into the • Unplug and reinove tile probe fl'om tile oven.
outlet in the oven.
(on some models)
In some areas the power • Preheat tile broil element for 10 minutes.
(voltage) may be low. • Broil for tile low_est_, period of time recommended in
tile Broiling Guide.
Oven temperature
too hot or too cold
Oven thermostat
needs adjustment.
• See the Adjust the oven thermostat--Do it yourself[
section.
39
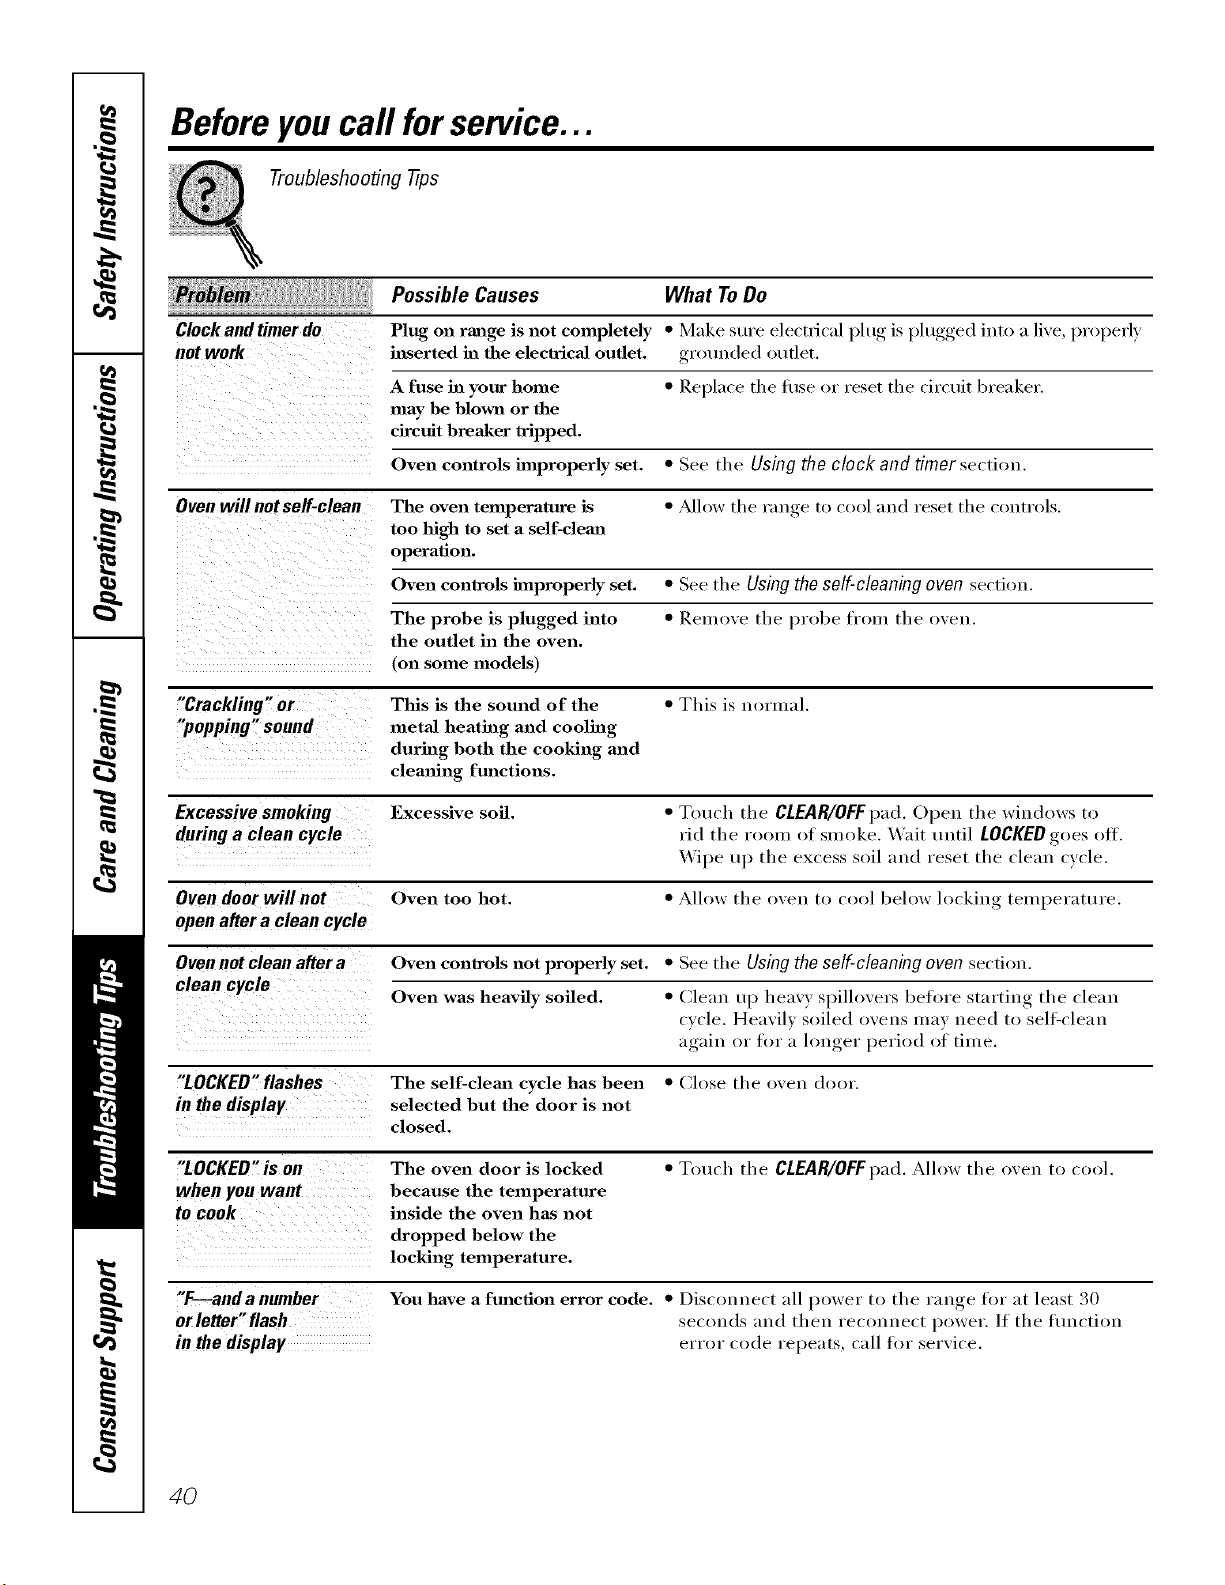
Beforeyoucall forservice...
Troubleshooting -tips
Possible Causes What To Do
Clock and timer do Plug on range is not completely * Make sure electrical [)lu,_ is l)lugged,, into a live, properly
not work inserted ha the electrical outlet, gr_)uuded outlet.
A fuse ha your home * Replace tl/e ti/se or reset tl/e circuit breaker.
may be blown or the
circuit breaker tripped.
Oven controls improperly set. * See the Using the clock and timer section.
Oven will notseff-clean The oven temperature is * ,Mlow the range to cool and reset the controls.
too high to set a self-cleaJa
operation.
Oven controls improperly set. * See the Using the self-cleaning oven section.
The probe is plugged into * Remove the probe from the oven.
the outlet in the oven.
(on some models)
"Crackling" or This is the sound of the * This is normal.
"popping" sound metal heating and cooling
during both the cooking and
clemfing functions.
Excessivesmoking Excessive soil. * Touch the CLEAR/OFF pad. Opeu the wiudows to
during a clean cycle rid the room of smoke. Wait until LOCKED goes off.
Wipe up the excess soil and reset the clean cycle.
Oven door will not Oven too hot. * Allow the oveu to cool below hwkiug temperatt/re.
open after a clean cycle
Oven not clean after a Oven controls not properly set. * See the Using the self-cleaning oven section.
clean cycle Oven was heavily soiled. * Clean up heavy spilh>vers before starting the clean
cycle. Heavily soiled ovens may need to sellZcleau
again, or for a longer, }_eriod of time.
"LOCKED"flashes The self-clema cycle has been * (]lose the oven door.
in the display selected but the door is not
closed.
"LOCKED"is on The oven door is locked * Touch the CLEAR/OFFpad. Allow the oven to cool.
when you want because the temperature
to cook inside the oven has not
dropped below the
locking temperature.
"F---anda number You have a function error code. * Disconnect all power to the range for at least 30
orleffer"flash seconds ;and then reconnect power. If the tiu]ction
in thedisplay error code repeats, call for serxice.
4O
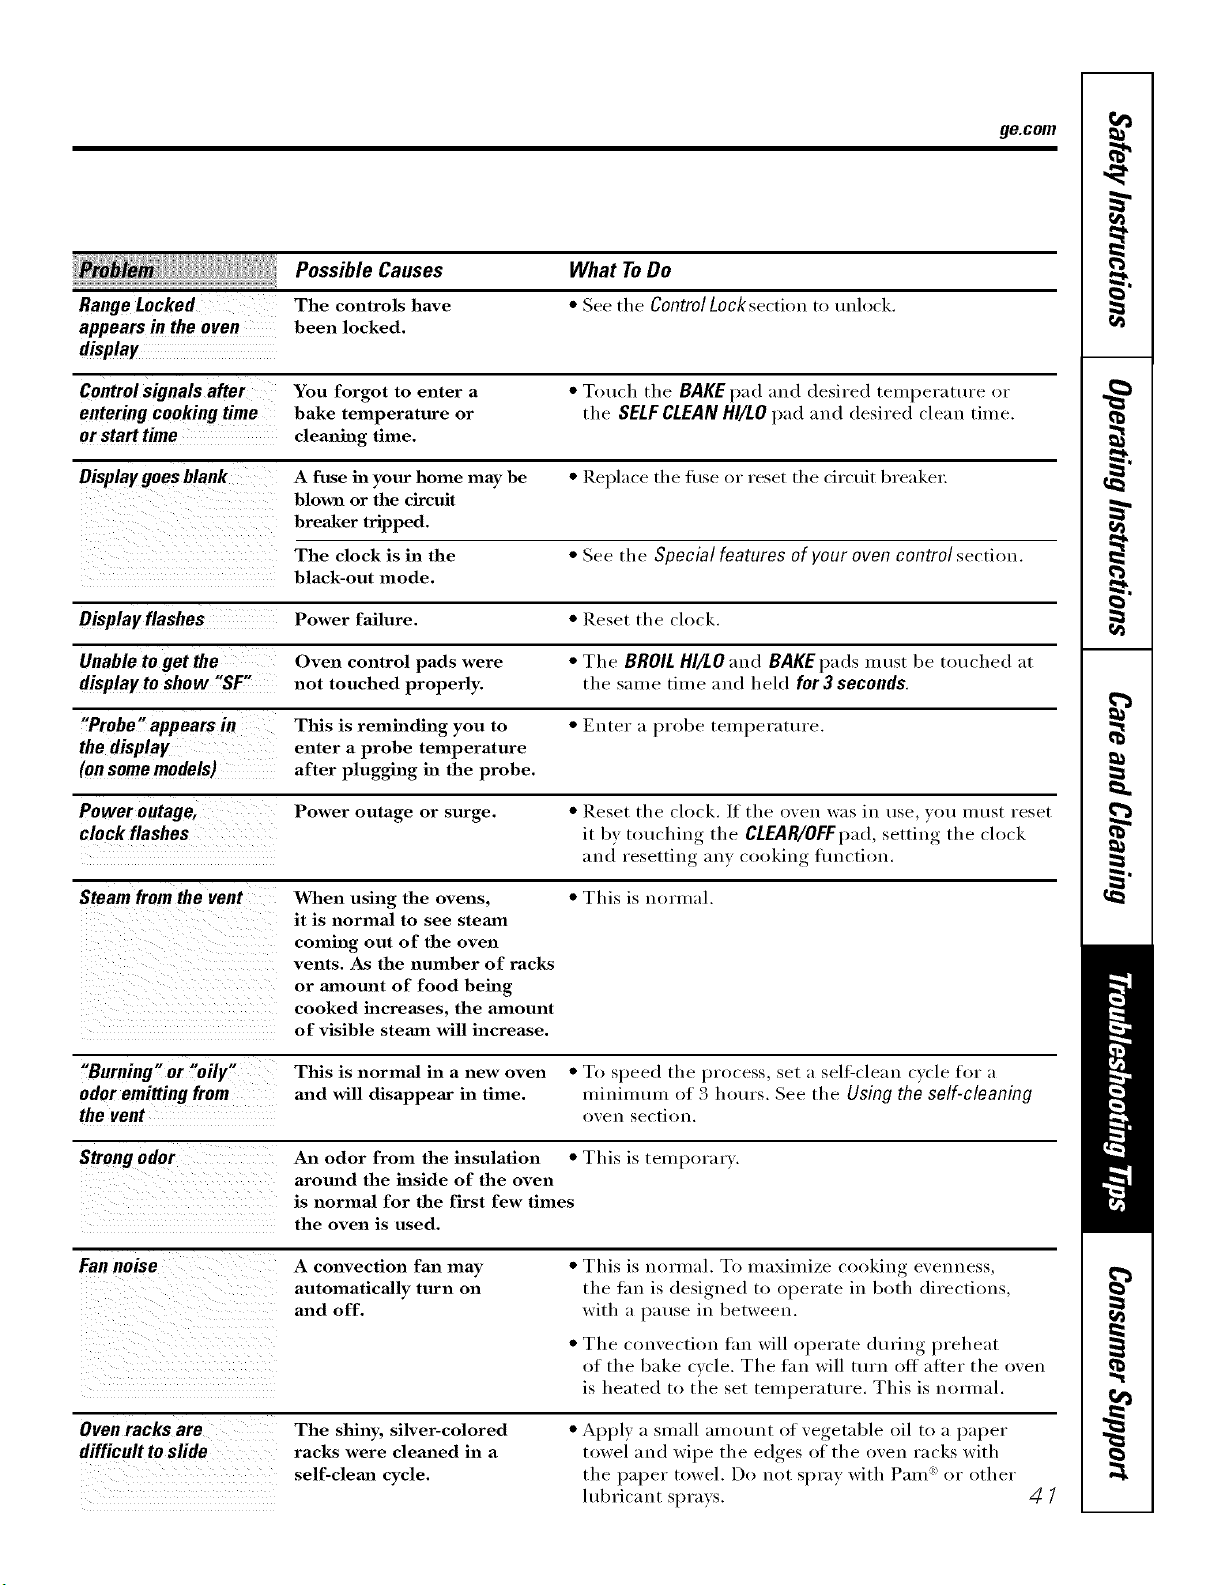
ge.com
Range Locked
appears in the oven
display
Possible Causes
The controls have
been locked.
What ToDo
• See tile ControlLock section to unlock.
Control signals after You forgot to enter a • Touch tile BAKE pad and desired temperature or
enteringcookingtime bake temperature or the SELFCLEANHI/LO}lad and desired clean time.
or starttime cleaning time,
Display goes blank A fttse in your home may be • Replace tile fi/se or reset tile circuit breaker:
blown or the circuit
breaker tripped.
The clock is in the • See the Special features of your oven control section.
black-out mode.
Displayflashes Power failure. • Reset the clock.
Unable to get the Oven control pads were • The BROIL HI/LO and BAKE pads must be touched at
displaytoshow "SF" not touched properly, the same time and held for3 seconds.
"Probe" appears in Tiffs is relninding you to • Euter a probe teUll/erature.
the display enter a probe temperature
(on some models) after plugging in the probe.
Power outage, Power outage or surge. • Reset the clock./f the oven was in use you must reset
clock flashes it by touching the CLEAR/OFFpad,,settiu,_ the clock
and resetting an) cooking flmction.
Steam from the vent When using the ovens, • This is normal.
it is normal to see steam
coming out of the oven
vents. As the number of racks
or amount of food being
cooked increases, the amount
of visible steam will increase.
"Burning" or "oily"
odor emitting from
the vent
Tiffs is normal in a new oven • To speed tile process, set a sel6clean cycle for a
and will disappem" in time. minimtun of 3 hours. See tile Using the self-cleaning
oxen section.
Strongodor An odor from the insulation • This is temporai 3.
around the inside of the oven
is normal for the first few times
the oven is used.
Fan noise
A convection fan may
automatically turn on
and off.
• This is normal. To maximize cooking evenness,
tile thn is designed to operate in both directions,
with a pause in between.
• Tile convection tan will operate durino,_ preheat
of the bake cycle, The tan will turn off atter the oxen
is heated to the set temperattu'e, This is nomlal,
Ovenracksare
difficulttoslide
The shiny, silver-colored
racks were cleaned in a
self-clema cycle.
• Apply a small amount of vegetable oil to a paper
towel and wipe the edges of the oven racks with
tile paper towel. Do not spray with Pare _ or other
lul)ricant sprays.
41
€_
--o
€_
€_
m
_o
m_
m
_4m
I
r i
NOteS_
42
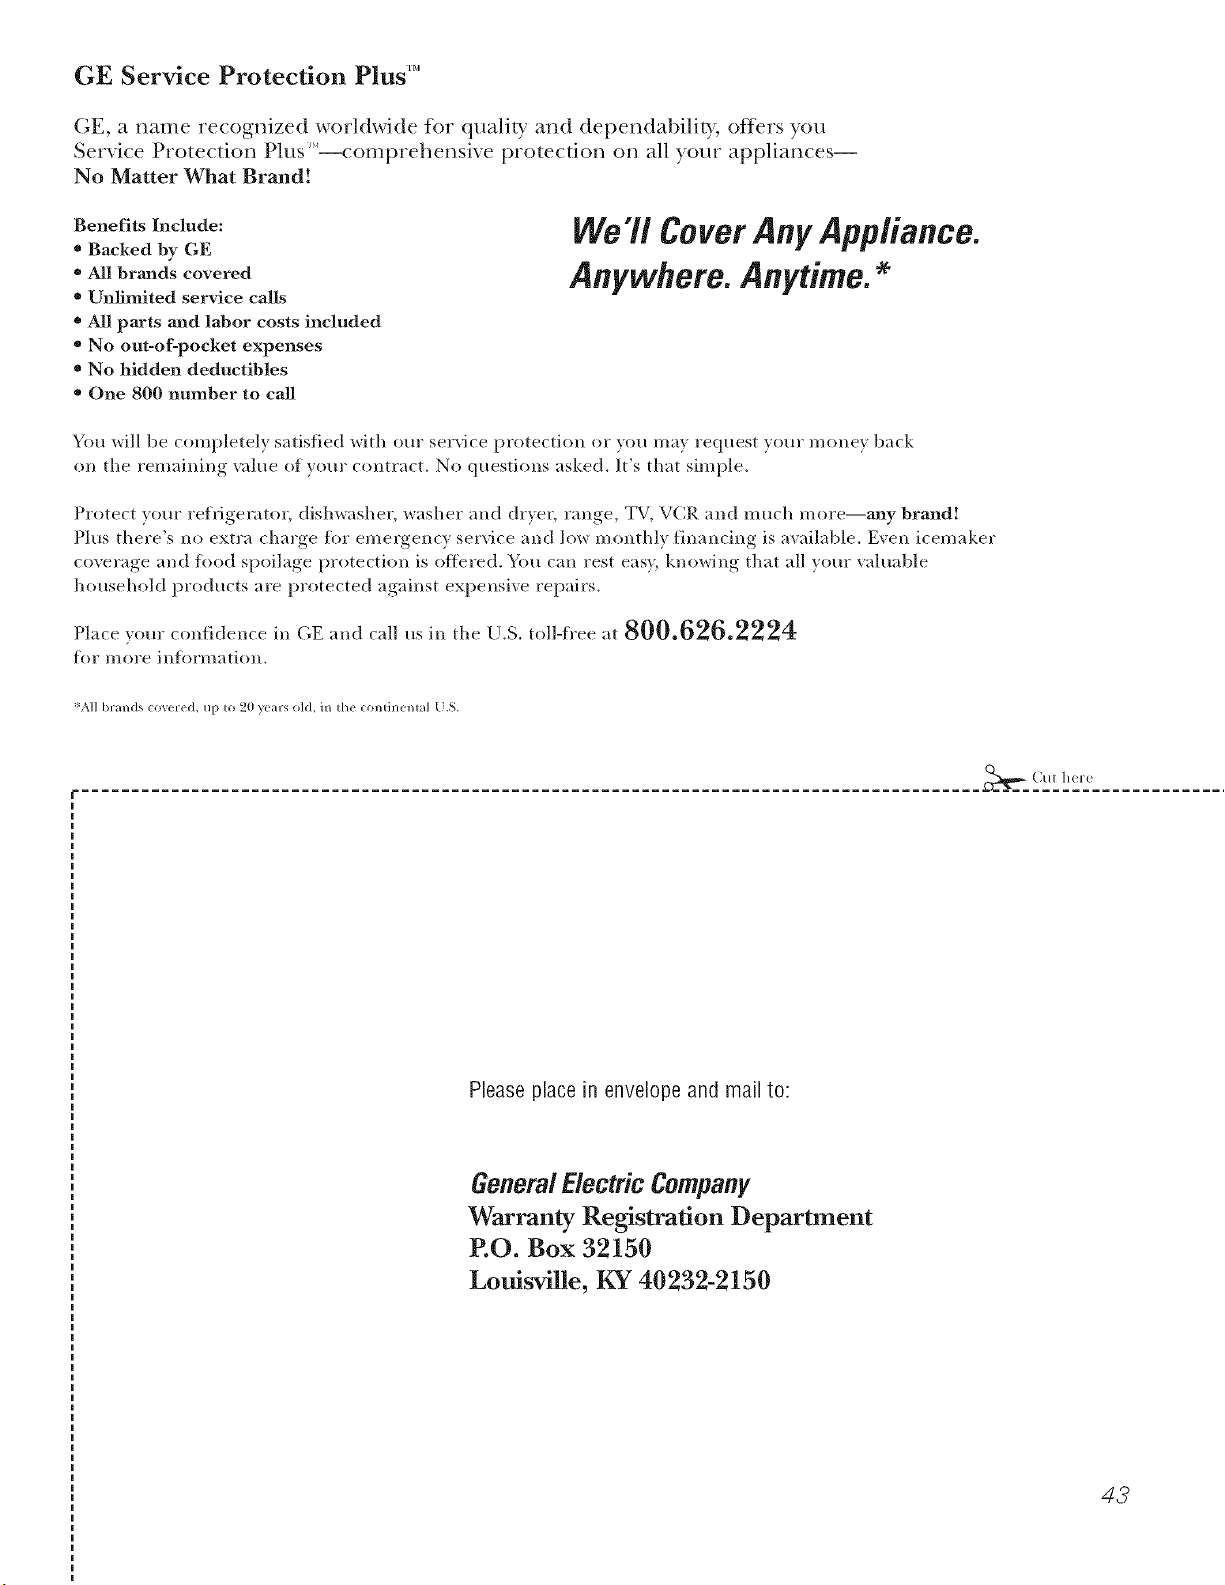
GE Service Protection Plus 'M
GE, a name recognized worldwide fbr quality and dependability, of;_ers you
Service Protection Plus'_'--comprehensive protection on all yore appliances--
No Matter What Brand!
Benefits Include:
* Backed by GE
* All brands covered
* Unlimited service calls
. All parts and labor costs included
o No out-of-pocket expenses
o No hidden deductibles
o One 800 number to call
We 71Cover Any Appliance.
Anywhere. Anytime.
You will be completel) satisfied with our service protection or )ou ma) request your mone) back
on the remaining value of your contract. No questions asked. It's that simple.
Protect yore" refrigerator, dishwasher, washer and dryer, range, TV_ VCR and much more--aaay brand!
Plus there's no extra charge flw emergency service and low monthly financing is available. Even icemaker
coverage and fl)od spoilage protection is offered. You can rest easy, knowing that all your valuable
household products are protected against expensive repairs.
Place ,our confidence in GE and call us in the U.S. toll-free at _UU._Z_.ZZZ_
for n/ol'e in_ol'I-t/atiOll.
:i,k*]l I)l?}ln(/s (o_.(tl_(%L tip to _0 )eltl?S ill(I, ]11 the (ontillenl tl [.S.
_ (]tll here
Please place in envelope and mail to:
GeneralElectricCompany
Warranty Registration Department
P.O. Box 32150
Louisville, KY 40232-2150
43
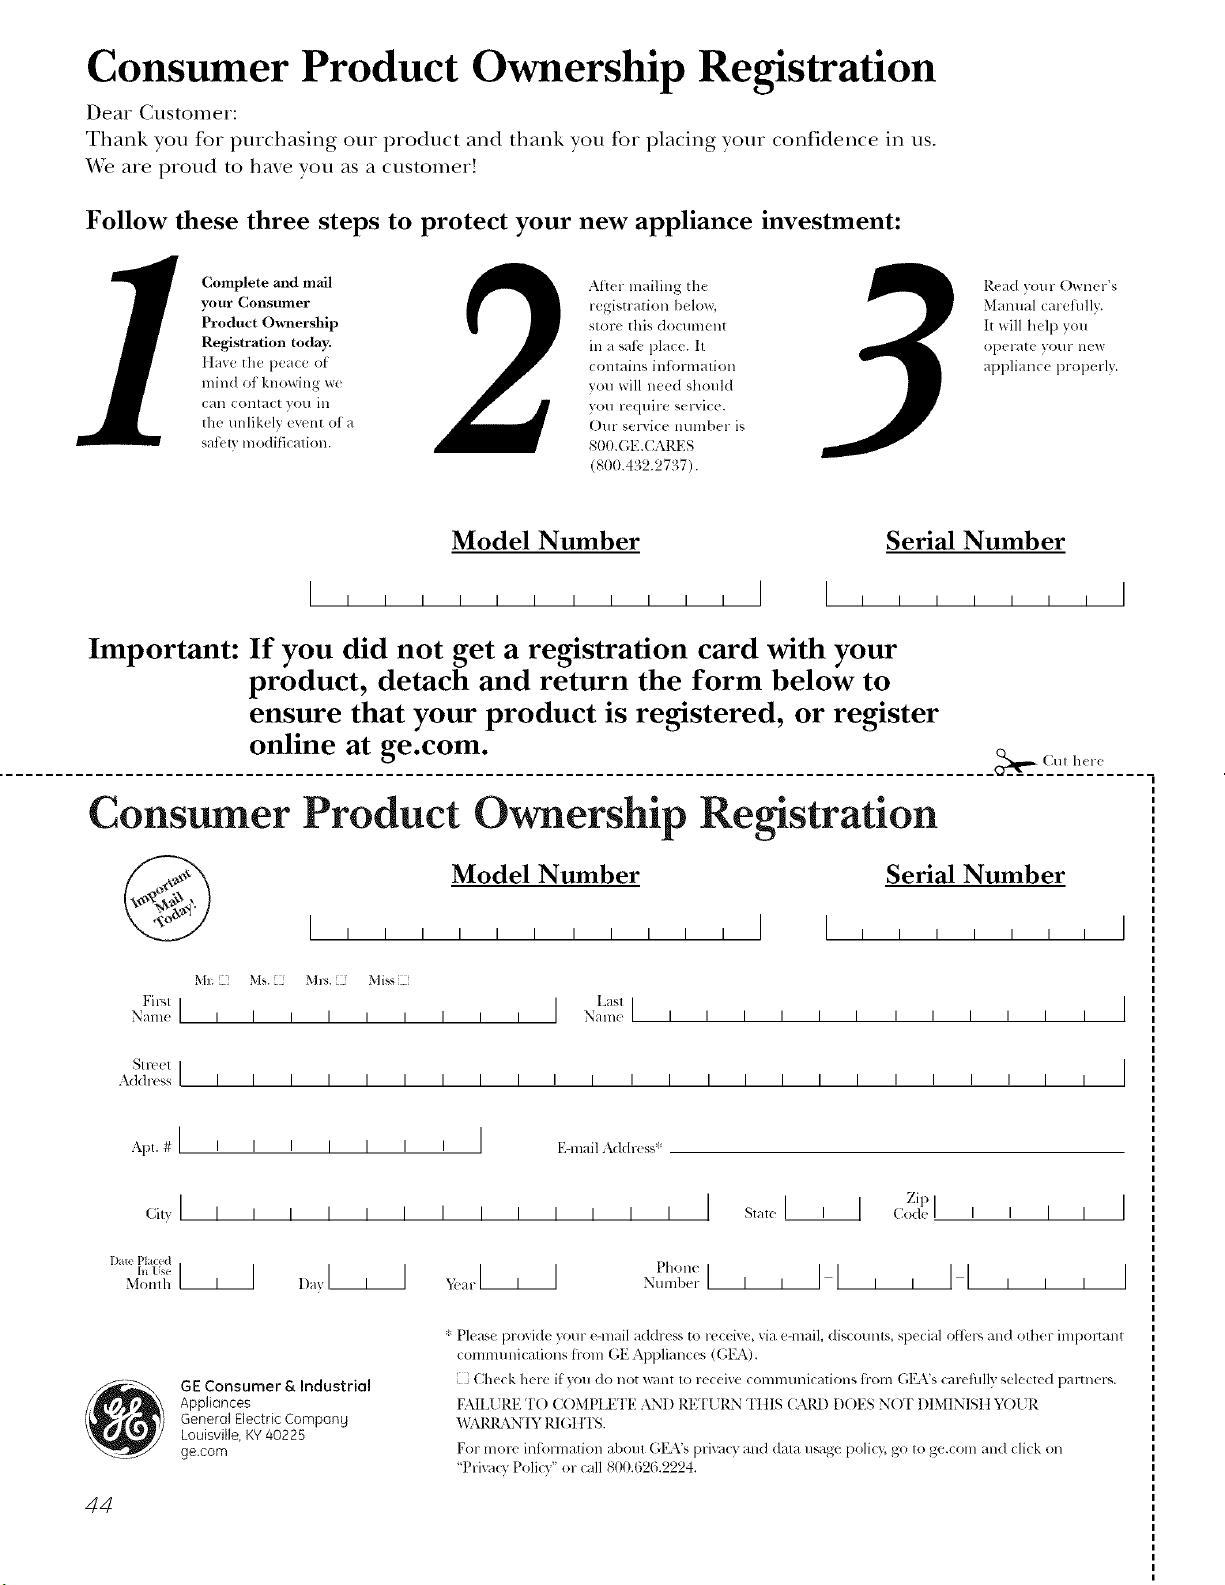
Consumer Product Ownership Registration
Deal Customer:
Thank you for purchasing our product and thank you for placing your confidence in us.
Vi/e are proud to haxe you as a customer'.
Follow these three steps to protect your new appliance investment:
Complete and mail
your Consunler
Product Ownership
Registration today.
ttavc tim pca(u of
mind of knowing w_
Call (olltact VOll ill
the unlikely (vcnt of a
satbl 7,modificalion.
Alter mailing tile
registration below,
store this dOClllllellt
in a sati place. It
contains inlormation
you will need should
you require service.
Our selvice mnnber is
800.GE.CARES
(800.432.2737).
Read your Owner's
Manual carefully.
It will help you
operate yollr llew
appliance properly.
Model Number Serial Number
I I I I I I
Important: If you did not get a registration card with your
product, detach and return the form below to
ensure that your product is registered, or register
online at ge.com.
._,_ (MI ll(lx
Consumer Product Ownership Registration
Model Number Serial Number
Ms. M*>,. Mi_s
Fir"l I I L_slI
Name I I I I I I I I I Nain(! I I I I I I I I I I I I
_11-( (!1 I
Addr(ss I I I I I I I I I I I I I I I I I I I I I I I I
, I
I
I
Ap_.#I, , , , , , , I E-lllail,\ddress*
Zip
1Ill(, Pla_ ed
Nulnl)(!r I I I I I I I
.,,o,,l_ II II i I
GE Consumer& Industrial
Appliances
General Electric Company
Louisville,KY40225
ge.com
44
* Please pro',ide your e-lnail address to r,:ceive, via eqnail, discounts, special otlbr_ and other impoltant
commmficafions from GE Appliances ((;1_\).
[ Check herc if you do not want to recei',e COlnlmmications fl-om G1LVs carcfillly selecto:l paltner_,.
FAILI JRE TO COMPLETE AND REFI JRN TIIIS (_ \Pd) DOES NOT DIMINISII Y()I R
_,)\1_ \N'IY RI(;lfFS.
For mort* intormation about G1LVs privacy and daIa usage polic), go to ge.com and click on
'Privacy Policy" or call 800.626.2224.
NOteS.
rJ_
I
rJ_
€_
m
m_
rp,
w
u_
w
rbr]
mlmh
m
45
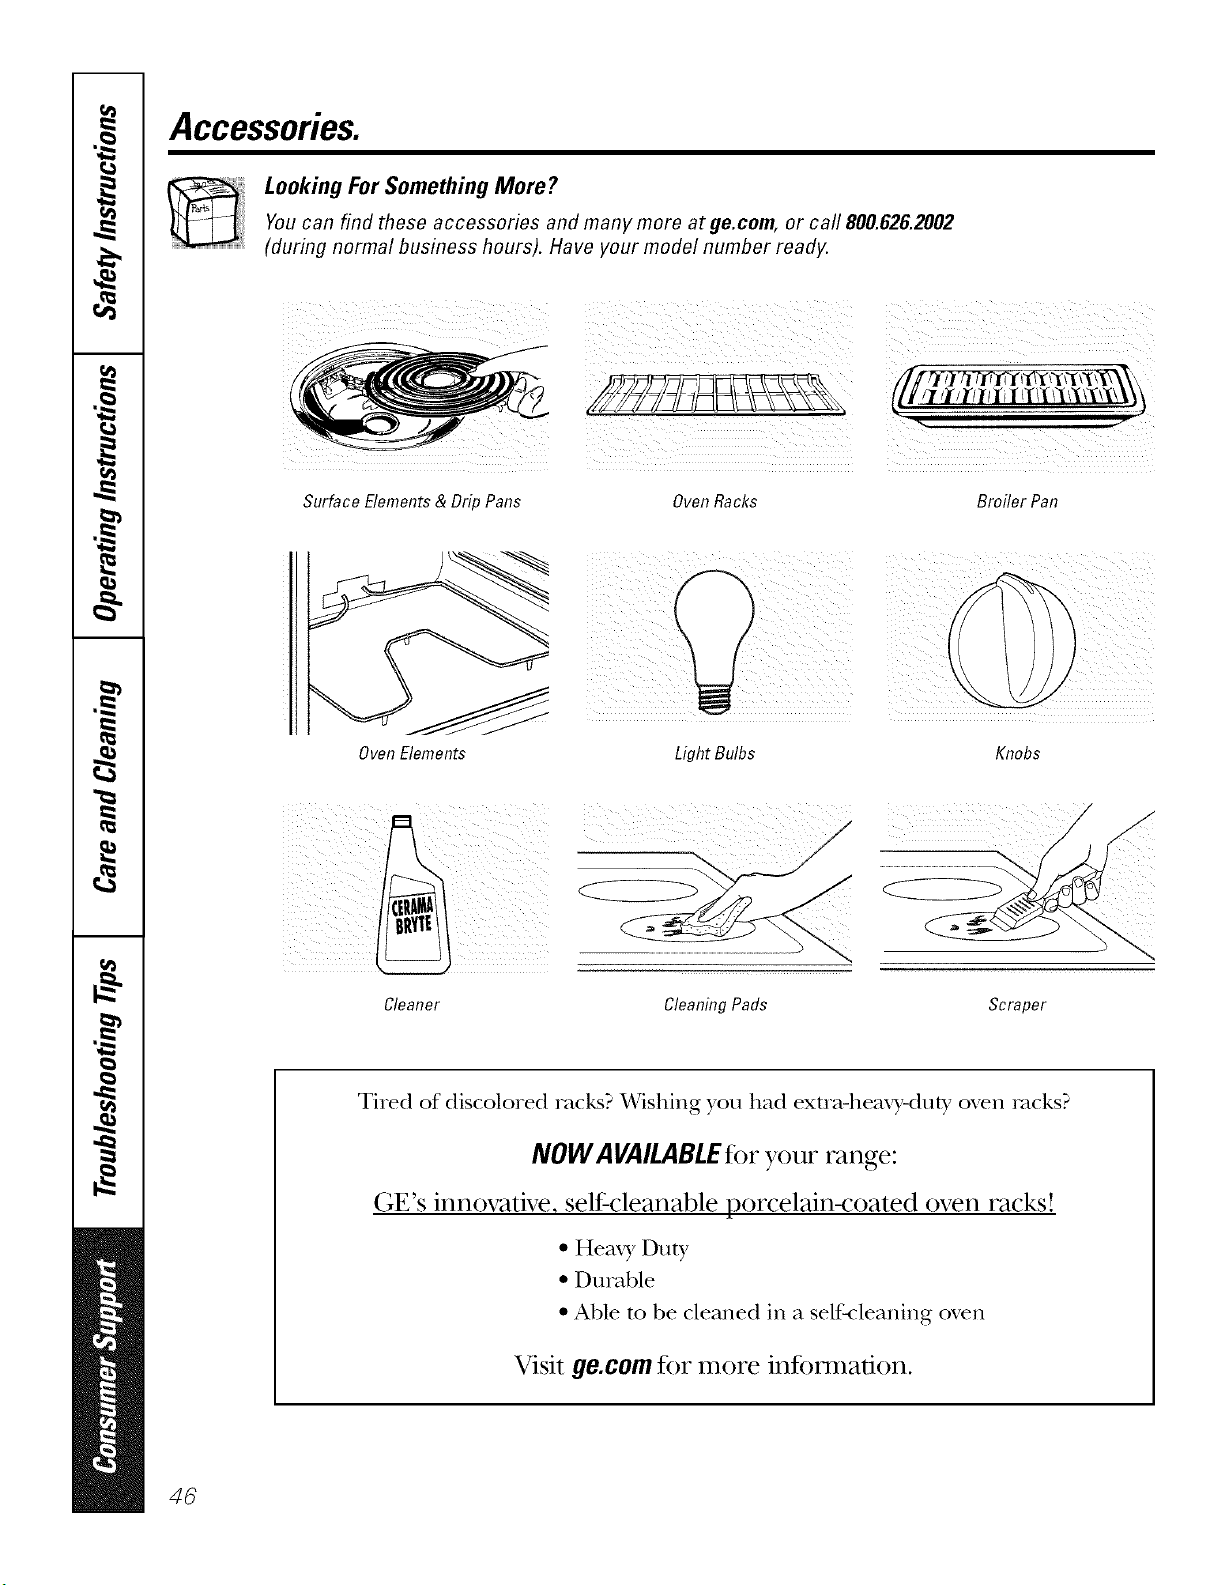
Accessories.
Looking For Something More?Youcan find these accessories and many more at ge.com, or call 800.626.2002
(during normal business hours). Have your model number ready.
Surface Elements & Drip Pans
OvenRacks Broiler Pan
Oven Elements
Light Bulbs Knobs
/) jj ))i ¸
Cleaner Cleaning Pads Scraper
Tired of discolored racks? Wishing you had exm_-hemo_-duty oven rocks?
NOWA VAILABLEfor your range:
(;V's innovative, self-cleanable porcelain-coated oven racks!
• Hem), Duty
• Durable
• Able m be cleaned in a self-cleaning oven
Visit go.corn for more information.
46
GEElectricRangeWarranty.
All warranty service provided by our Factory Service Centers,
or an authorized Customer Care®technician. Toschedule
service, on-line, 24 hours a day, vis# us at ge.com, or call
800.GE.CARES (800.432.2737).Please have serial number and
model number available when calling for service.
Staple your receipt here.
Proof of the original purchase
date is needed to obtain service
under the warranty.
GE Will Provide:
Any partof the range which tifils due to a detect in materials or workmanship. During this
From the date of the lim#ed one-year warranty, (;E will also proxide, free ofcharge, all labor and in-home service
originalpurchase t(>replace the defective part.
::Ji::Service trips to your home to teach you how to use
the product.
iJi::Improper installation, delivery or maintenance.
_: Failure of the product if it is abused, misused,
or used for other thmi the intended purpose or
used commercially.
::Ji::Dmnage to the glass cooktop caused by use of clemlers
other than the recommended clemlhig cretans mad
pads.
_: Dmnage to the glass cooktop caused by hardened
spills of sugaxy materials or melted plastic that
awe not clemied according to the directions hi
the Owner's MmmaJ.
iJi::Replacement of house fuses or resetting of circuit
breakers.
iJi::Damage to the product caused by accident, fire, floods
or acts of God.
_: hicidentaJ or consequential damage caused by possible
defects with this appfimlce.
::Ji::Damage caused after delivery.
:t::::Product not accessible to provide required service.
I XCLDSIONOFIMPLIED WARRANTIES--Your sole and exclusive remedy isproduct repair asprovided in this Limited
Warranty.Any implied warranties, including the implied warranties of merchantability or fituessfor aparticular purpose,
are limited to one year or the shortestperiod allowed by law.
This warranty is extended to the original purchaser and any succeeding owner for products purchased for
home use within the USA. If the product is Iocated in an area where service by a GEAuthorized Servicer is not
available, you may be responsible for a trip charge or you may be required to bring the product to an Authorized GE
Service location for service. In Alaska, the warranty excludes the cost of shipping or service calls to your home.
Some states do not aflow the exclusion or limitation of incidental or consequential damages. This warranty
gives you specific legal rights, and you may also have other rights which vary from state to state. Toknow
what your legal rights are, consult your local or state consumer affairs office or your state's Attorney General
Warrantor: General Electric Company.Louisville, KY40225
47
ConsumerSupport
gEAppliancesWebsite ge.com
Haxe a question or need assistance with your appliance? Try tile (;E Appliances _.Vebsite 24 hours a day
' any day of the }ear'. For greater convenience and taster service, you can now download Owner's Manuals,
order parts or exert schedule serxice on-line.
ScheduleService
Expert (;E repair setsice is onl) one step away fl'om xom" door Get on-line and schedule your set\ice at
xom', comenience 24 hours any (lax of tile year! Or call 800.GE.CARES (800.432.2737) dining n{mnal
business hems.
ge.com
RealLifeDesignStudio ge.com
GE SUl)ports tile Universal Design concept--l)roducts, services and environments that can be used by
people of all ages, sizes and capabilities. We recognize tile need to design fin" a wide range of physical and
mental abilities and impaim/ents. For details of GE's Universal Design applications, including kitchen
design ideas tot people with disabilities, check out our Websim today. For the headng impaired, please call
800.TDD.GEAC (800.833.4322).
ExtendedWarranties ge.com
Pro'chase a (;E extended warrant_ and learn about special discom_ts that are axailable while _our, warrant_,
is still in effect. You can i)m'chase it on-line an) time, or call 800.626.2224 dining nomml business hours.
(;E (_onsuiner Home Ser\ices will still be there Mter your warrant} expires.
[
PartsandAccessories
ge.com
Individuals qualified to selMce their own appliances can have parts or accessolies sent directly to their
homes (VISA, MasterCard and Discover cards are accepted). Order on-line today, 24 hem's eve_* day or
by phone at 800.626.2002 dining nomml business hours.
Instructions contained in this manual cover procedures tobe performed by any user. Other servicing generally
should be referred to qualified service personnel. Cautionmust be exercised, since improper servicing may cause
unsafe operation.
ContactUs
ge.com
If you are not satisfied with the service you receive fl'om GE, contact us on our _.Vebsite with all the details
including yore" phone ntlIllbeI; oI" wlite to: General Manage_; Ctlstoillei" Relations
GE Al)pliances, Appliance Park
I,ouisville, KY 40225
q
"1 RegisterYourApplbnce
Register your new applimlce on-line--at your convenience! Timel) product registration will allow fin,
enhanced commtmication and prompt service trader tile terms of)ore" warranty shotfld tile need a_ise.
You may also mail in the prep_inted registration card included in the I)ackin°_ material.
ge.com
Printed in flTeUnited States

