Owner' s Man_
Vacuum Cleaner
Model 116.31079
116.38079
116.39079
CAUTION:
Read and follow all
safety and operating
instructionsbefore first
use of this product°
Sears, Roebuck and Co., Hoffman Estates, IL 60179 U.S.A.
www.sears.com
Part NooCO1ZAUC20UO_-4371388_ Printed in USoA.
Before Using Your New Vacuum ....... 2
Kenmore Vacuum Cleaner Warranty ... 2
Important Safety Instructions ............ 3
Parts and Features ................... 4
Assembly Instructions ............. 5-6
Operating Instructions ................ 7
Releasing the Handle ................... 7
ON/OFF Switch ...................... 7
Attachments ......................... 8
Attachment Use Chart .................... 8
Vacuuming Tips ......................... 9
Vacuum Cleaner Care .................. 9
Vacuum Storage ......................... 9
Cleaning Exterior and Attachments ..... 10
Dust Bag Changing ................ t0-11
Motor Safety Filter Cleaning .............. 11
Belt Chang{ng, Brush Changing,
and Brush Cleaning .............. t2-14
Clog Removal ............................ 15
Motor Protector .......................... 15
Troubleshooting ..................... 16
Requesting Assistance Or Service .... 17
Please read this guide, It will help you assemble and operate your new Kenmore vacuum in
the safest and most effective way.
For more information about the care and operation, call your nearest Sears store. You will
need the complete model and serial numbers when requesting information_ Your vacuum's
model and serial numbers are located on the Model and Serial Number Plate.
Use the space below to record the model number and serial number of your new Kenmore
vacuum,,
Model No.
Serial No.
Date of Purchase
Keep this book and your sales check (receipt) in a safe place for future reference.
LIMITED ONE YEAR WARRANTY ON KENMORE VACUUM CLEANER
This warranty is for one year from the date of purchase, and includes only private household
vacuum cleaner use° During the warranty year, when this vacuum cleaner is operated and
maintained according to the owner's manual instructions, Sears will repair any defects in
material or workmanship free of charge.
This warranty excludes vacuum bags, belts, light bulbs, and filters, which are expendable parts
and become worn during normal use.
For warranty service, return this vacuum cleaner to the nearest Sears Service Center in
the United States.
This warranty applies only while this product is in use in the United States. This warranty gives
you specific legal rights, and you may also have other rights which vary from state to state.
Sears, Roebuck and Co., D/617 WA, Hoffman Estates, 1L60179
WARNING
Your safety is important to us.To reduce the risk of fire, electrical shock, injury
to persons or damage when using your vacuum cleaner, follow basic safety pre-
cautions including the following:
Read this manual before assembling or
using your vacuum cleaner_
Use your cleaner only as described in
this manual. Use only with Sears recom-
mended attachments°
To reduce the risk of electrical shock -
Do not use outdoors or on wet surfaces.
Disconnect electrical supply before any
servicing or cleaning° Failure to do so
could result in electrical shock or person TM
at injury.
Always turn cleaner off before unplug-
ging.
Do not unplug by pulling on cord. To
unplug, grasp the plug, not the cord.
Do not use with damaged cord or plug. If
cleaner is not working as it should, has
been dropped, damaged, left outdoors, or
dropped into water, return it to a Sears
Service Center/Department.
Do not pull or carry by cord, use cord as
a handle, close door on cord, or pull cord
around sharp edges or corners,, Do not
run cleaner over cord. Keep cord away
from heated surfaces°
Do not leave cleaner when plugged in.
Unplug from outlet when not in use and
before servicing.
Do not allow to be used as a toy° Close
attention is necessary when used by or
near children_
Do not handle plug or cleaner with wet
hands.
Do not use with any opening blocked;
keep free of dust, lint, hair and anything
that may reduce air flowo
Keep hair, loose clothing, fingers, and all
parts of body away from openings and
moving parts.
Do not use cleaner without dust bag
and/or filters in place.
Always change the dust bag after vacu-
uming carpet cleaners or freshener, pow-
ders and fine dust° These products clog
the bag, reduce airflow and can cause
the bag to burst. Failure to change bag
could cause permanent damage to the
cleaner.
Do not use the cleaner to pick up sharp
hard objects, small toys, pins, paper
clips, etc. They may damage the cleaner
or dust bag
Do not pick up anything that is burning
or smoking, such as cigarettes, matches,
or hot ashes.
Do not use cleaner to pick up flammable
or combustible liquids (gasoline, cleaning
fluids, perfumes, etc,), or use in areas
where they may be present. The fumes
from these substances can create a fire
hazard or explosion.
Use extra care when cleaning on stairs_
Do not put on chairs, tables, etc. Keep
on floor°
You are responsible for making sure that
your vacuum cleaner is not used by any-
Do not put any objects into openings, one unable to operate it properly.
SN]E rHESE NSTRUCTIONS
Proper assembly and safe use of your vacuum cleaner are your responsibitities_ Your
cleaner is intended only for household use. Read this Owner's Manual carefully for
important use and safety information. This guide contains safety statements under
warning and caution symbols. Please pay special attention to these boxes and follow
any instructions given_ WARNING statements alert you to such dangers as fire, electri-
cal shock, burns and personal injury. CAUTION statements alert you to such dangers
as personal injury andlor property damage,
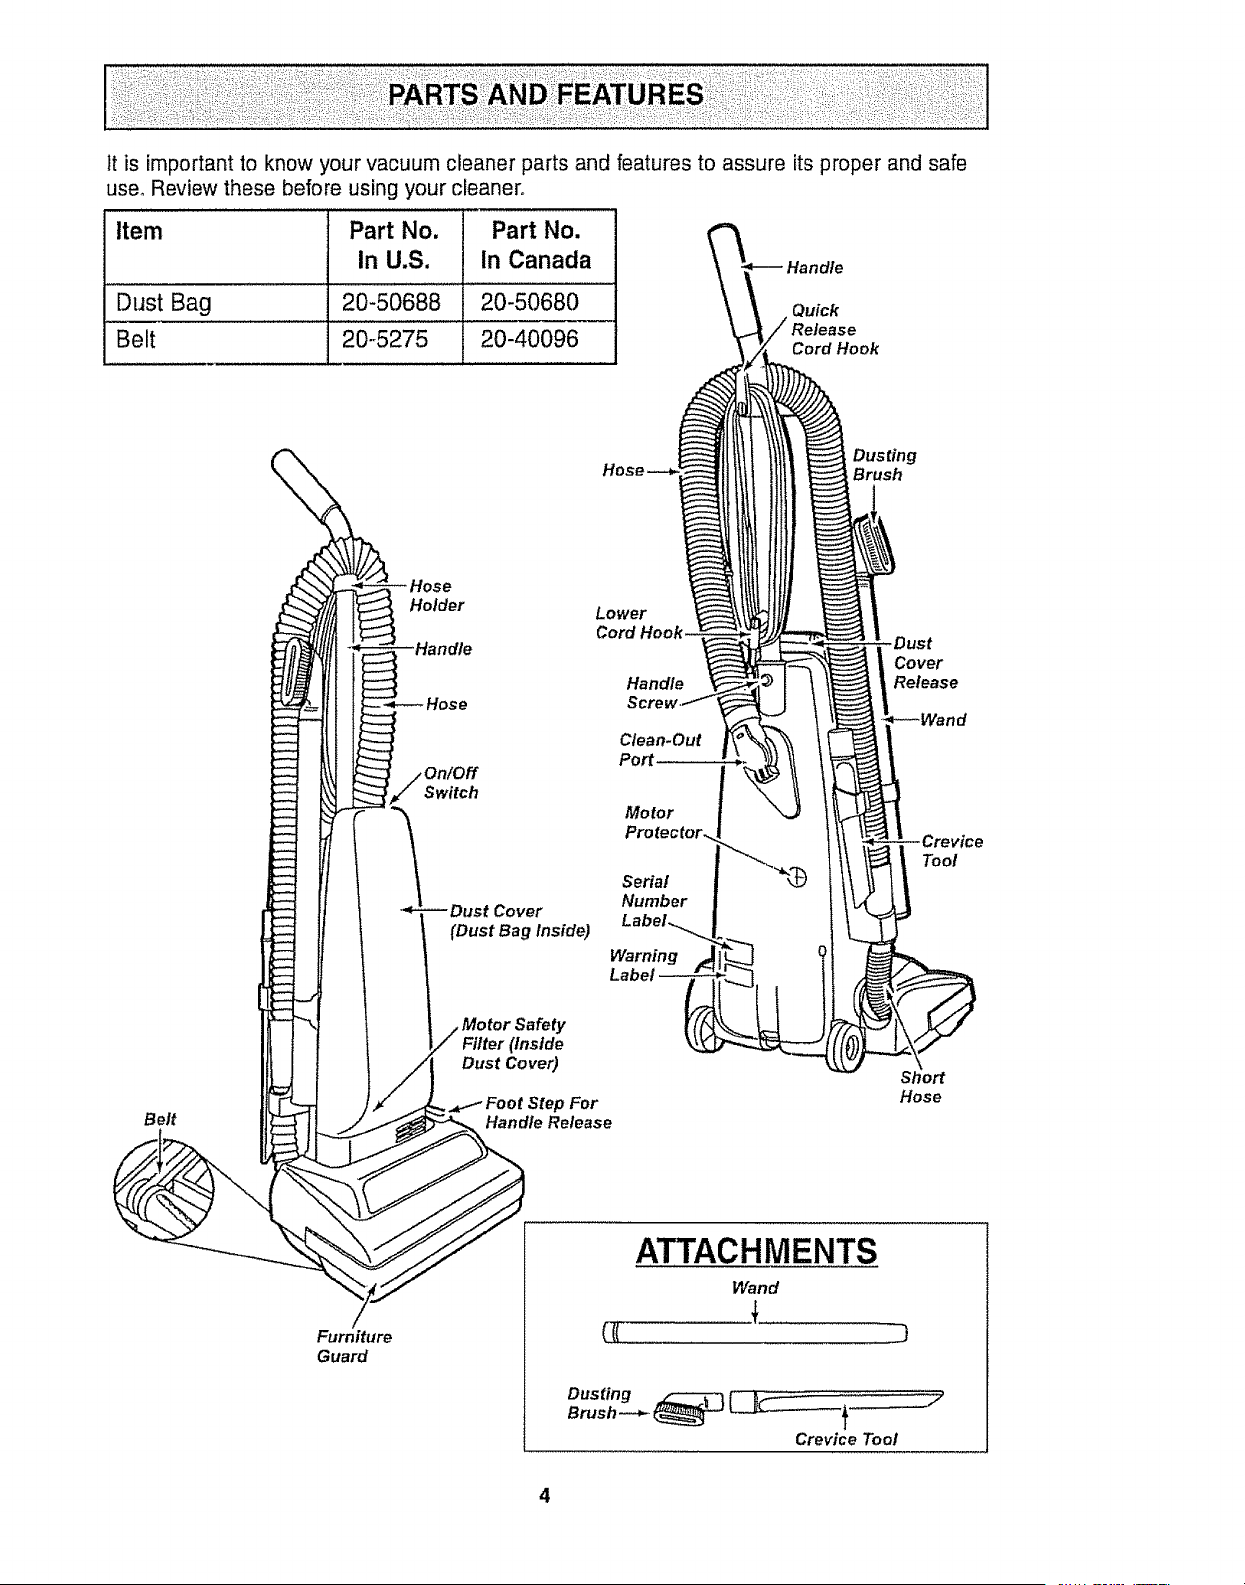
Itis important to know your vacuum cleaner parts and features to assure its proper and safe
use° Review these before using your cleaner,,
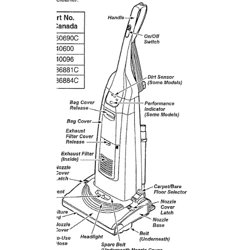
Item Part No. Part No.
In U.S. In Canada
Dust Bag 20-50686 20-50680
_Belt ................20o-5275...... 20-40096
Belt
Holder
Switch
(Dust Bag Inside)
,Motor Safety
Filter (Inside
Dust Cover)
Step For
Handle Release
Lower
Cord
Handle
Clean.Out
Port
Motor
Serial
Number
Warning
Lal
Dusting
Brush
Cover
Release
Tool
Short
Hose
Furniture
Guard
ATTACHMENTS
Wand
t
Crevice Tool
.....i/
4
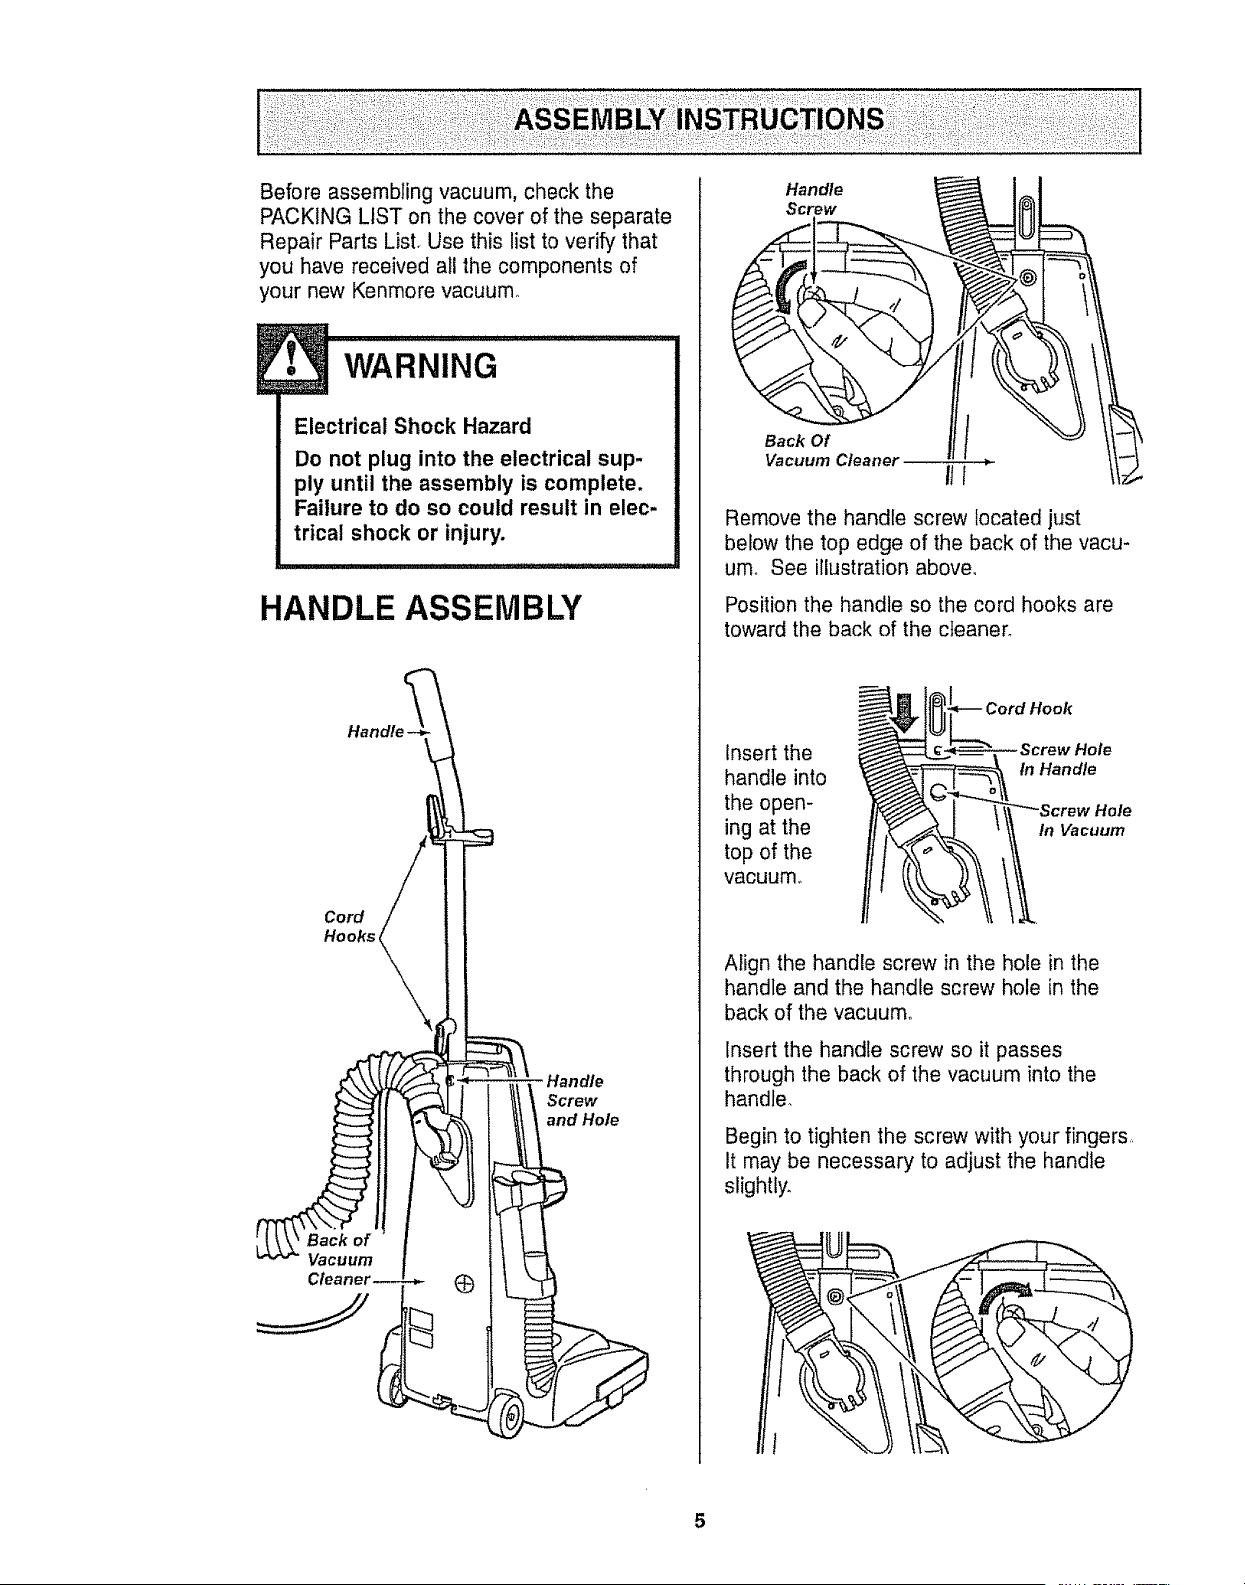
Beforeassemblingvacuum,checkthe
PACKINGLISTonthecoveroftheseparate
RepairPartsList.Usethislisttoverifythat
youhavereceivedallthecomponentsof
yournewKenmorevacuum.
• wA.NNG
Electrical Shock Hazard
Do not plug into the electrical sup-
ply until the assembly is complete.
Failure to do so could result in elec-
trical shock or injury.
HANDLE ASSEMBLY
Cord
Hooks q
Back of
Vacuum
Screw
and Hole
Handle
Screw
Back Of
Vacuum Cleaner
Remove the handle screw located just
below the top edge of the back of the vacu-
umo See illustration above,
Position the handle so the cord hooks are
toward the back of the cteaner_
Insert the ---Screw Hole
handle into _ In Handle
the open- \\_i-__Screw Hole
ing at the \ill)lL In Vacuum
top of the
vacuum°
Align the handle screw in the hole in the
handle and the handle screw hole in the
back of the vacuum,
Insert the handle screw so it passes
through the back of the vacuum into the
handle.
Begin to tighten the screw with your fingers..
It may be necessary to adjust the handle
slightly.
5
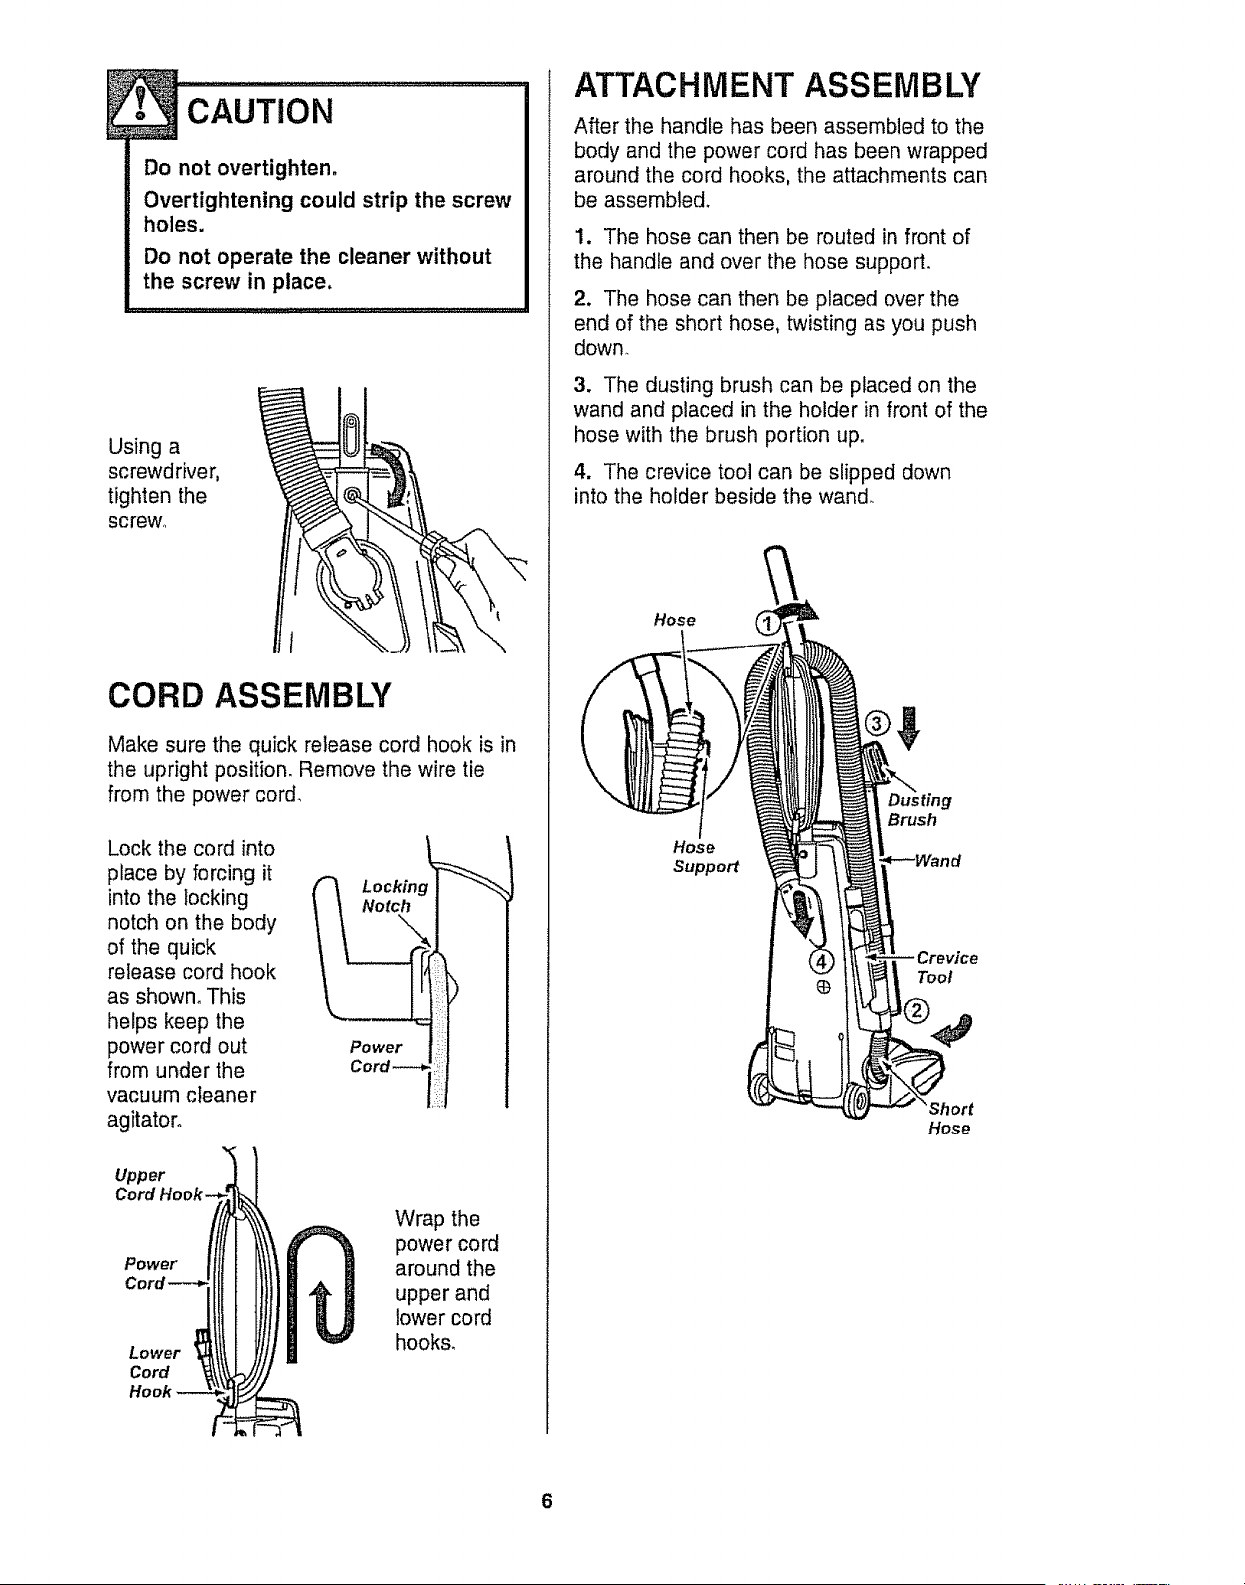
Donotovertighteno
Overtighteningcouldstrip thescrew
holes.
Donotoperatethe cleanerwithout
thescrew in place.
Using a
screwdriver,
tighten the
screw.
CORD ASSEMBLY
Make sure the quick release cord hook is in
the upright position. Remove the wire tie
from the power cord_
Lock the cord into
place by forcing it
into the locking
notch on the body
of the quick
release cord hook
as shown° This
helps keep the
power cord out
from under the
vacuum cleaner
agitator.
Notch
Power
Upper
Power
Lower
Cord
Wrap the
power cord
around the
upper and
lower cord
hooks.
ATTACHMENT ASSEMBLY
After the handle has been assembled to the
body and the power cord has been wrapped
around the cord hooks, the attachments can
be assembled.
1, The hose can then be routed in front of
the handle and over the hose support.
2, The hose can then be placed over the
end of the short hose, twisting as you push
down.
3. The dusting brush can be placed on the
wand and placed in the holder in front of the
hose with the brush portion up.
4. The crevice tool can be slipped down
into the holder beside the wand.
Hose
Hose
Support
Dus ring
Brush
Hose
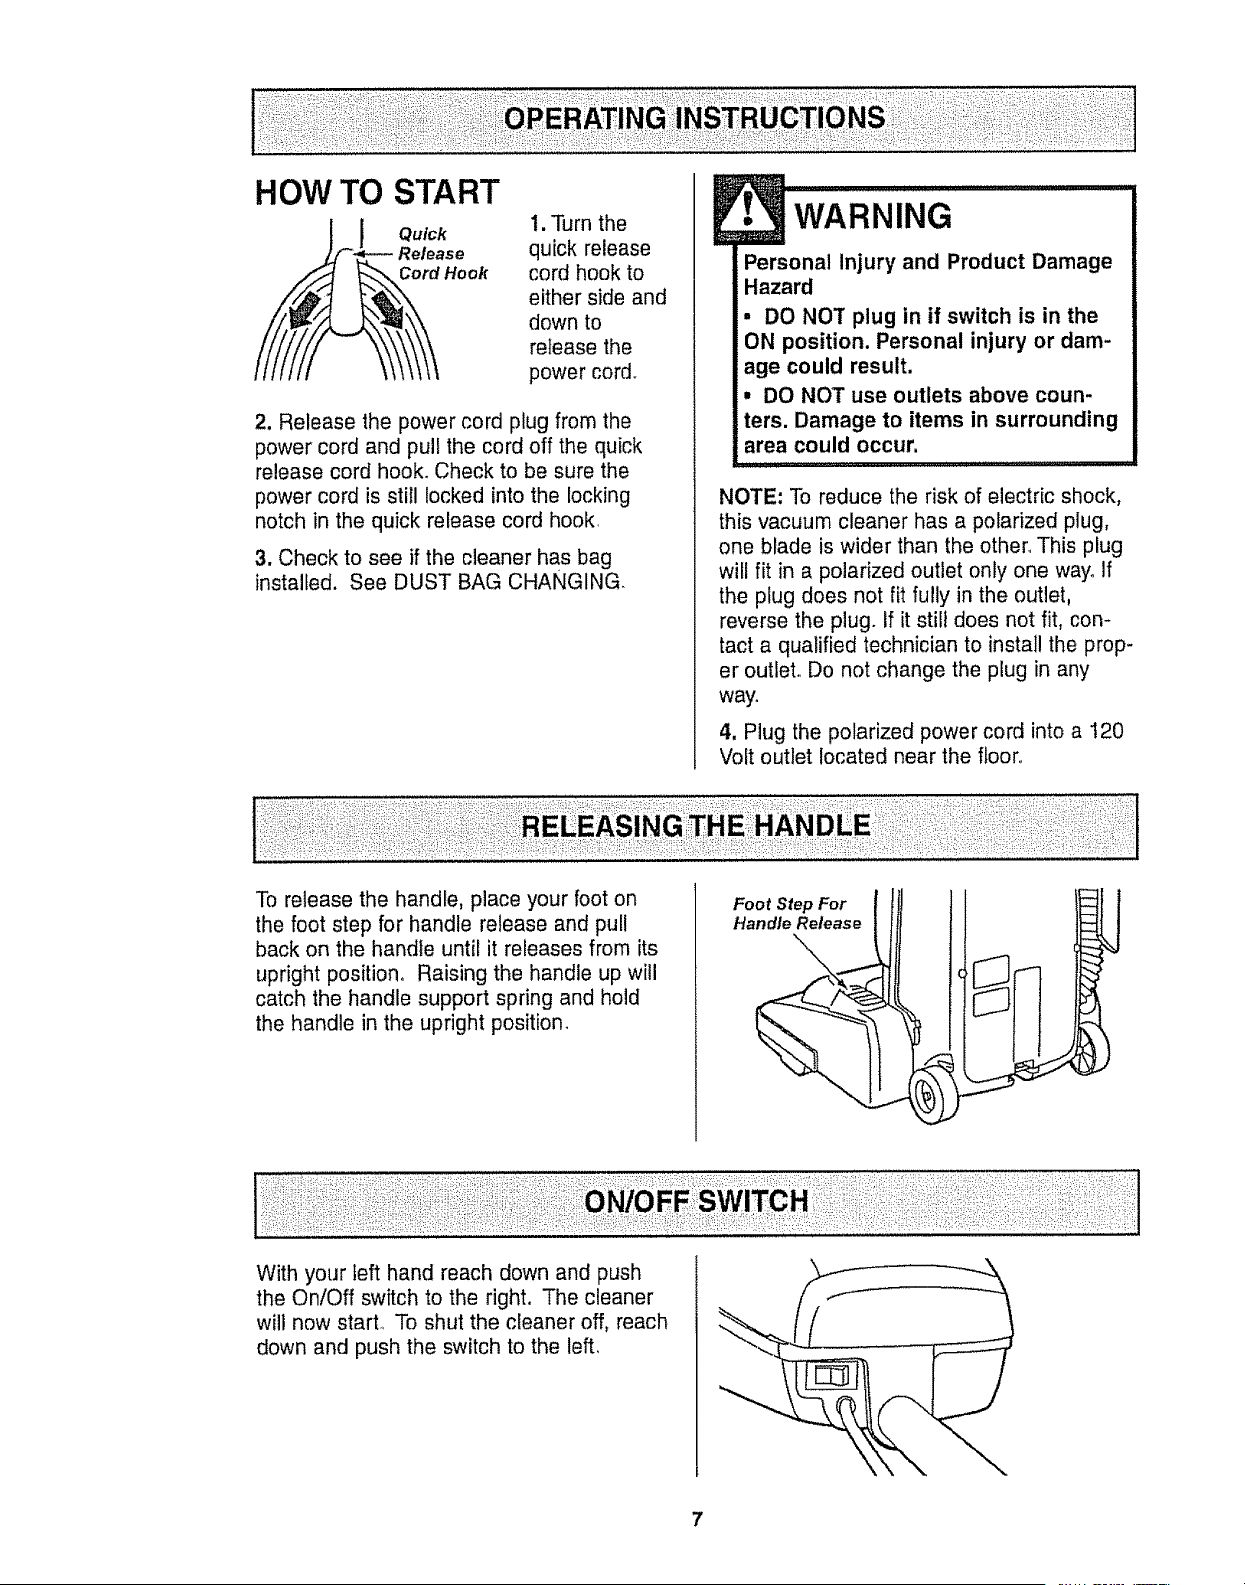
HOW TO START
1 ou,o
Release
Hook
1. Turn the
quick release
cord hook to
either side and
down to
release the
power cord+
2, Release the power cord plug from the
power cord and pull the cord off the quick
release cord hook. Check to be sure the
power cord is still locked into the locking
notch in the quick release cord hook
3. Check to see if the cleaner has bag
installed. See DUST BAG CHANGING.
WARNING
Personal Injury and Product Damage
Hazard
• DO NOT plug in if switch is in the
ON position. Personal injury or dam-
age could result.
• DO NOT use outlets above coun-
ters. Damage to items in surrounding
area could occur.
NOTE: To reduce the risk of electric shock,
this vacuum cleaner has a polarized plug,
one blade is wider than the other_ This plug
will fit in a polarized outlet only one way+If
the plug does not fit fully in the outlet,
reverse the plug. If it still does not fit, con-
tact a qualified technician to install the prop-
er outleL Do not change the plug in any
way+
4, Plug the polarized power cord into a 120
Volt outlet located near the floor,
To release the handle, place your foot on
the foot step for handle release and pull
back on the handle until it releases from its
upright position° Raising the handle up will
catch the handle support spring and hold
the handle in the upright position.
Foot Step For
Handle Release
With your left hand reach down and push
the On/Off switch to the right. The cleaner
will now start To shut the cleaner off, reach
down and push the switch to the left.

E_ wARNiNG
Personal Injury Hazard
DO NOT place hands or feet under-
neath the unit when inserting the
hose. When using the attachments,
the agitator begins rotating. Do not
allow the cleaner to remain in just
one place for a period of time, as
the agitator may damage the floor
surface. Avoid placing the cleaner
on furniture, the fringed area of
rugs, deep pile carpeting, or carpet-
ed stairs. The ideal position for the
cleaner when using attachments is
for the unit to be on a level area
with the handle in the FULL
UPRIGHT position.
TO USE ATTACHMENTS:
Place the cleaner on a flat surface.
The hose can be pulled off the short hose
by grasping the cuff and twisting while
pulling up.
The attachments can be added to the hose
if the item to be cleaned is not far from the
cleaner_
If more reach is needed, the wand can be
attached to the hose and the attachments
can be added to the wand
! 0N I
When using attachments, be careful
not to overextend the hose length
when reaching. Trying to reach
beyond the hose reach could cause
the cleaner to tip over.
If the dusting brush is being used and more
distance is needed, the crevice tool can be
added to the wand, then the dusting brush
can be added to the crevice tool
C,ovi!eTool l
Dusting Brush Wand
TO STORE ATTACHMENTS
Return the hose to its position on the short
hose and the attachments to their holders.
•_ CAUTION .....
Attachments used in dirty areas,
such as under a refrigerator, should
not be used on other surfaces until
they are washed. They could leave
marks,
CLEANING AREA
ATTACHMENT Furniture*
ou ,NOO.us, x
CREVICE TOOL _;_ X
Between
Cushions*
X
Drapes* Stairs
..............t .............................
x x
X
Wails
x
The motor protector may open when using attachments or whencleaning new carpet due to reduced air flow by the
attachments themselves or by new carpet fuzz filting the bag quickly
*Always ctean atlachments before using on fabrics
! WARNING ..............
Personal Injury Hazard
Use care if vacuum cleaner is
placed on stairs. If it falls, personal
injury or property damage could
result.
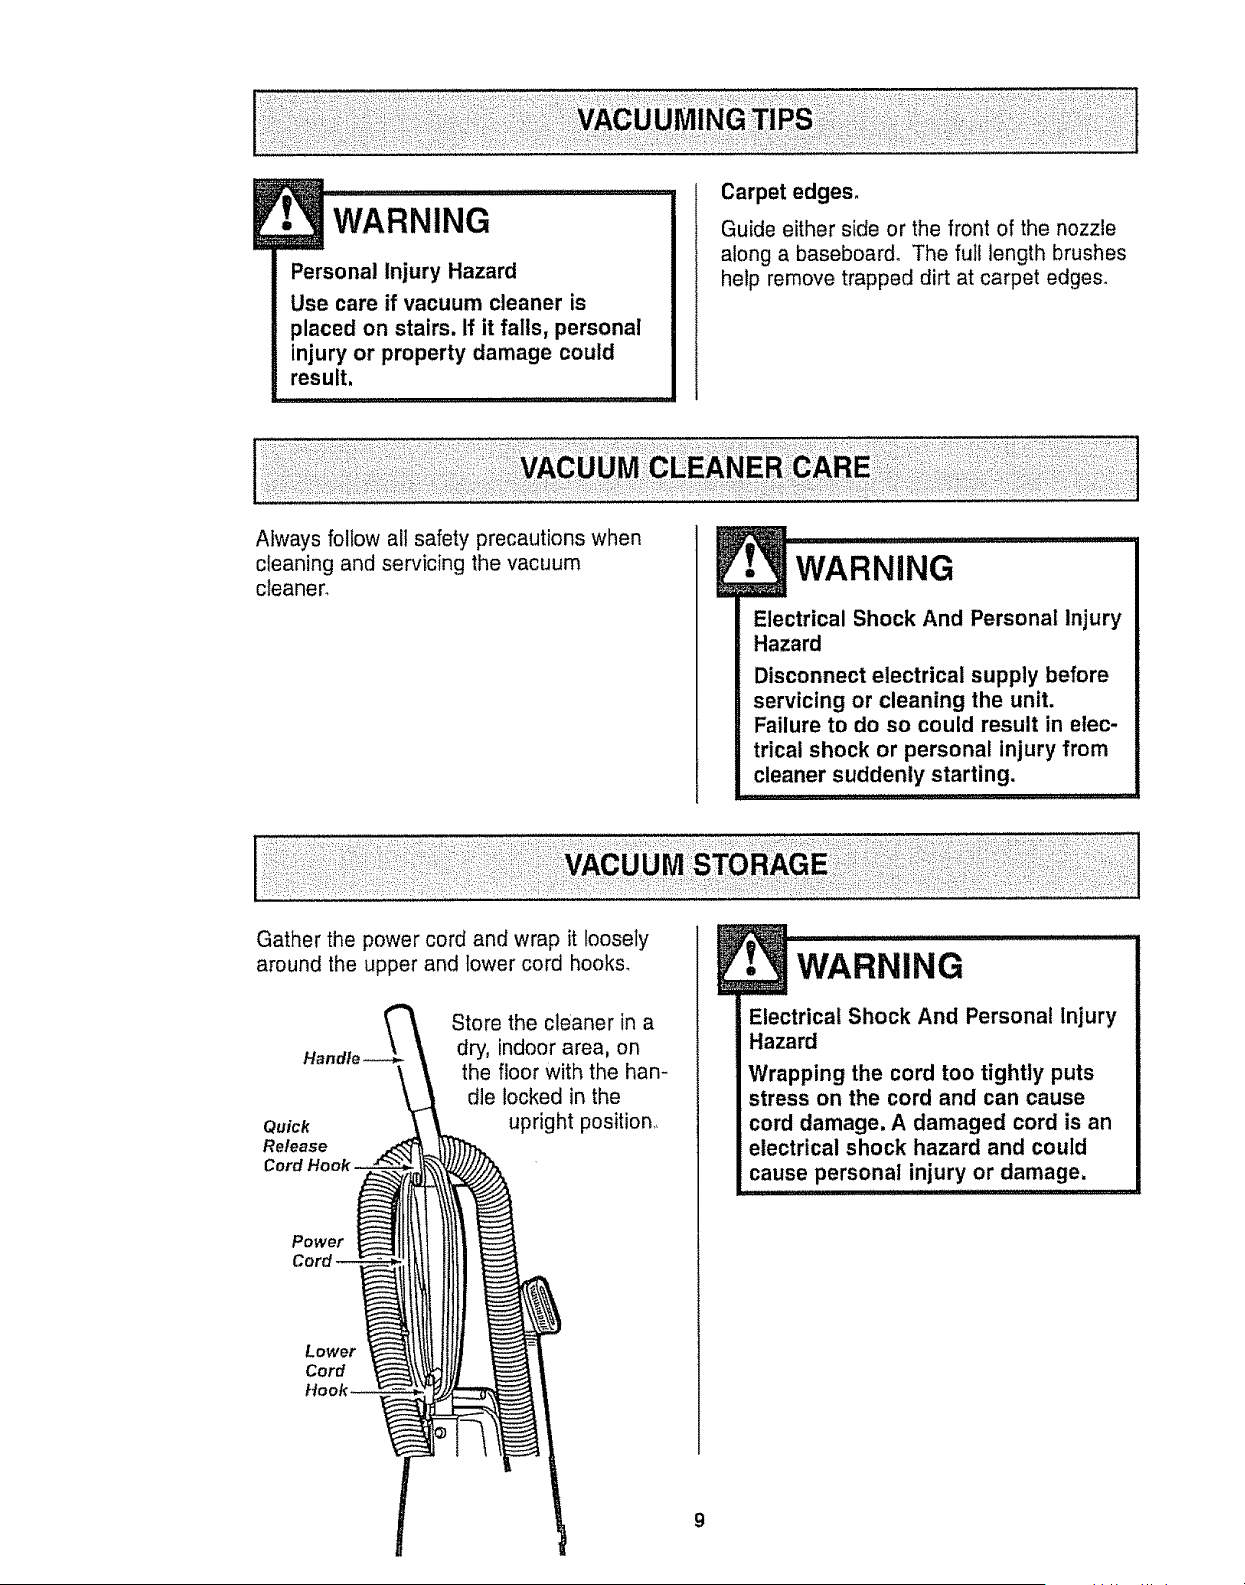
Carpet edges.
Guide either side or the front of the nozzle
along a baseboard. The full length brushes
help remove trapped dirt at carpet edges.
Always follow all safety precautions when
cleaning and servicing the vacuum
cleaner.
• WARNING
Electrical Shock And Personal Injury
Hazard
Disconnect electrical supply before
servicing or cleaning the unit.
Failure to do so could result in elec-
trical shock or personal injury from
cleaner suddenly starting.
Gather the power cord and wrap it loosely
around the upper and lower cord hooks.
Quick
Release
Cord
Store the cleaner in a
indoor area, on
the floor with the han-
dle locked in the
upright position.
Power
Lower
Cord
E WARNiNG .......
Electrical Shock And Personal Injury
Hazard
Wrapping the cord too tightly puts
stress on the cord and can cause
cord damage, A damaged cord is an
electrical shock hazard and could
cause personal injury or damage.
9
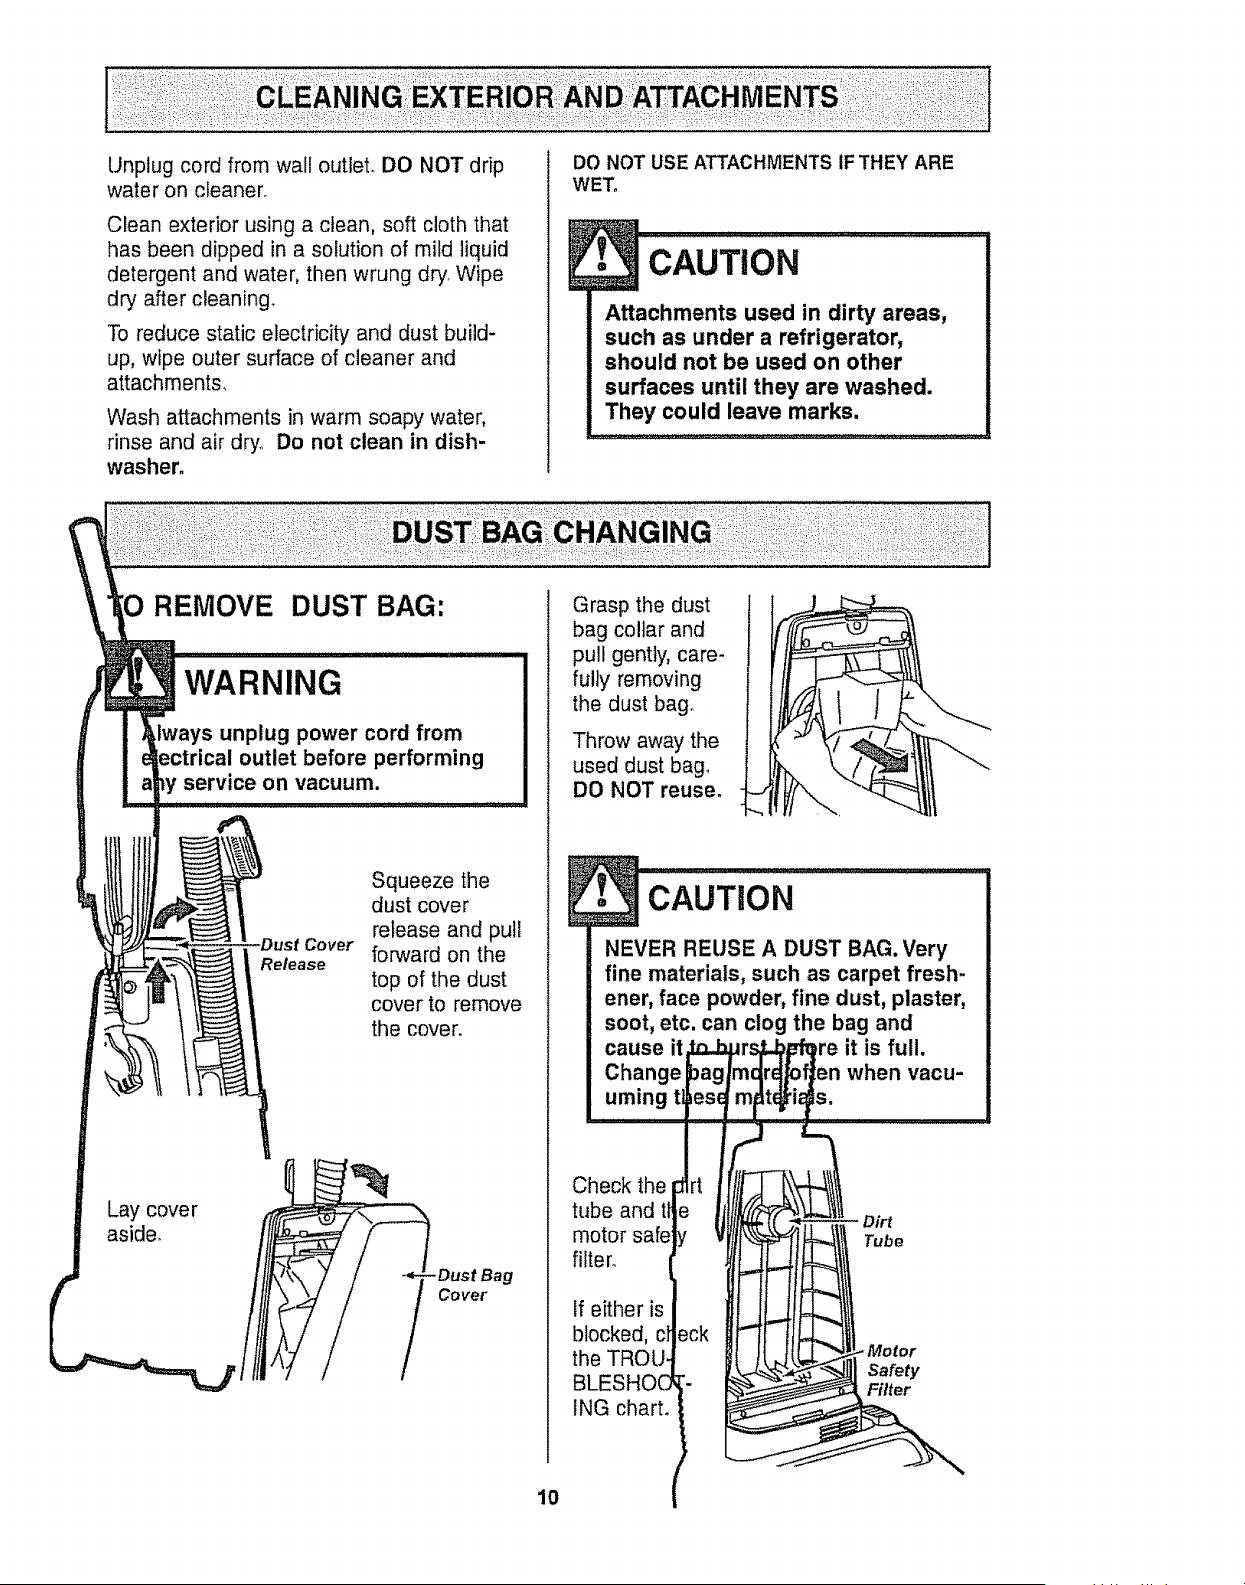
Unplug cord from wall outlet° DO NOT drip
water on cleaner.
Clean exterior using a clean, soft cloth that
has been dipped in a solution of mild liquid
detergent and water, then wrung dry. Wipe
dry after cleaning,
To reduce static electricity and dust build-
up, wipe outer surface of cleaner and
attachments,
Wash attachments in warm soapy water,
rinse and air dry,. Do not clean in dish-
washer.
DO NOT USE ATTACHMENTS IF THEY ARE
WET,
ii i i _!, i,,,
• CAUTION
Attachments used in dirty areas,
such as under a refrigerator,
should not be used on other
surfaces until they are washed.
They could leave marks.
REMOVE DUST BAG:
Lay cover
aside.
WARNING
Iways unplug power cord from
outlet before performing
service on vacuum.
Squeeze the
dust cover
release and pull
forward on the
top of the dust
cover to remove
the cover.
-Dust Bag
Cover
Grasp the dust
bag collar and
pull gently, care-
fully removing
the dust bag.
Throw away the
used dust bag°
DO NOT reuse.
10
cause it
Change
uming tl
NEVER REUSE A DUST BAG. Very
fine materials, such as carpet fresh-
ener, face powder, fine dust, plaster,
soot, etc. can clog the bag and
_reit is full.
when vacu-
Check the
tube and t_
motor safe!
filter_
If either is
blocked, cl
the TROU.
BLESHOC
ING chart,
Tube
Safety
Filter
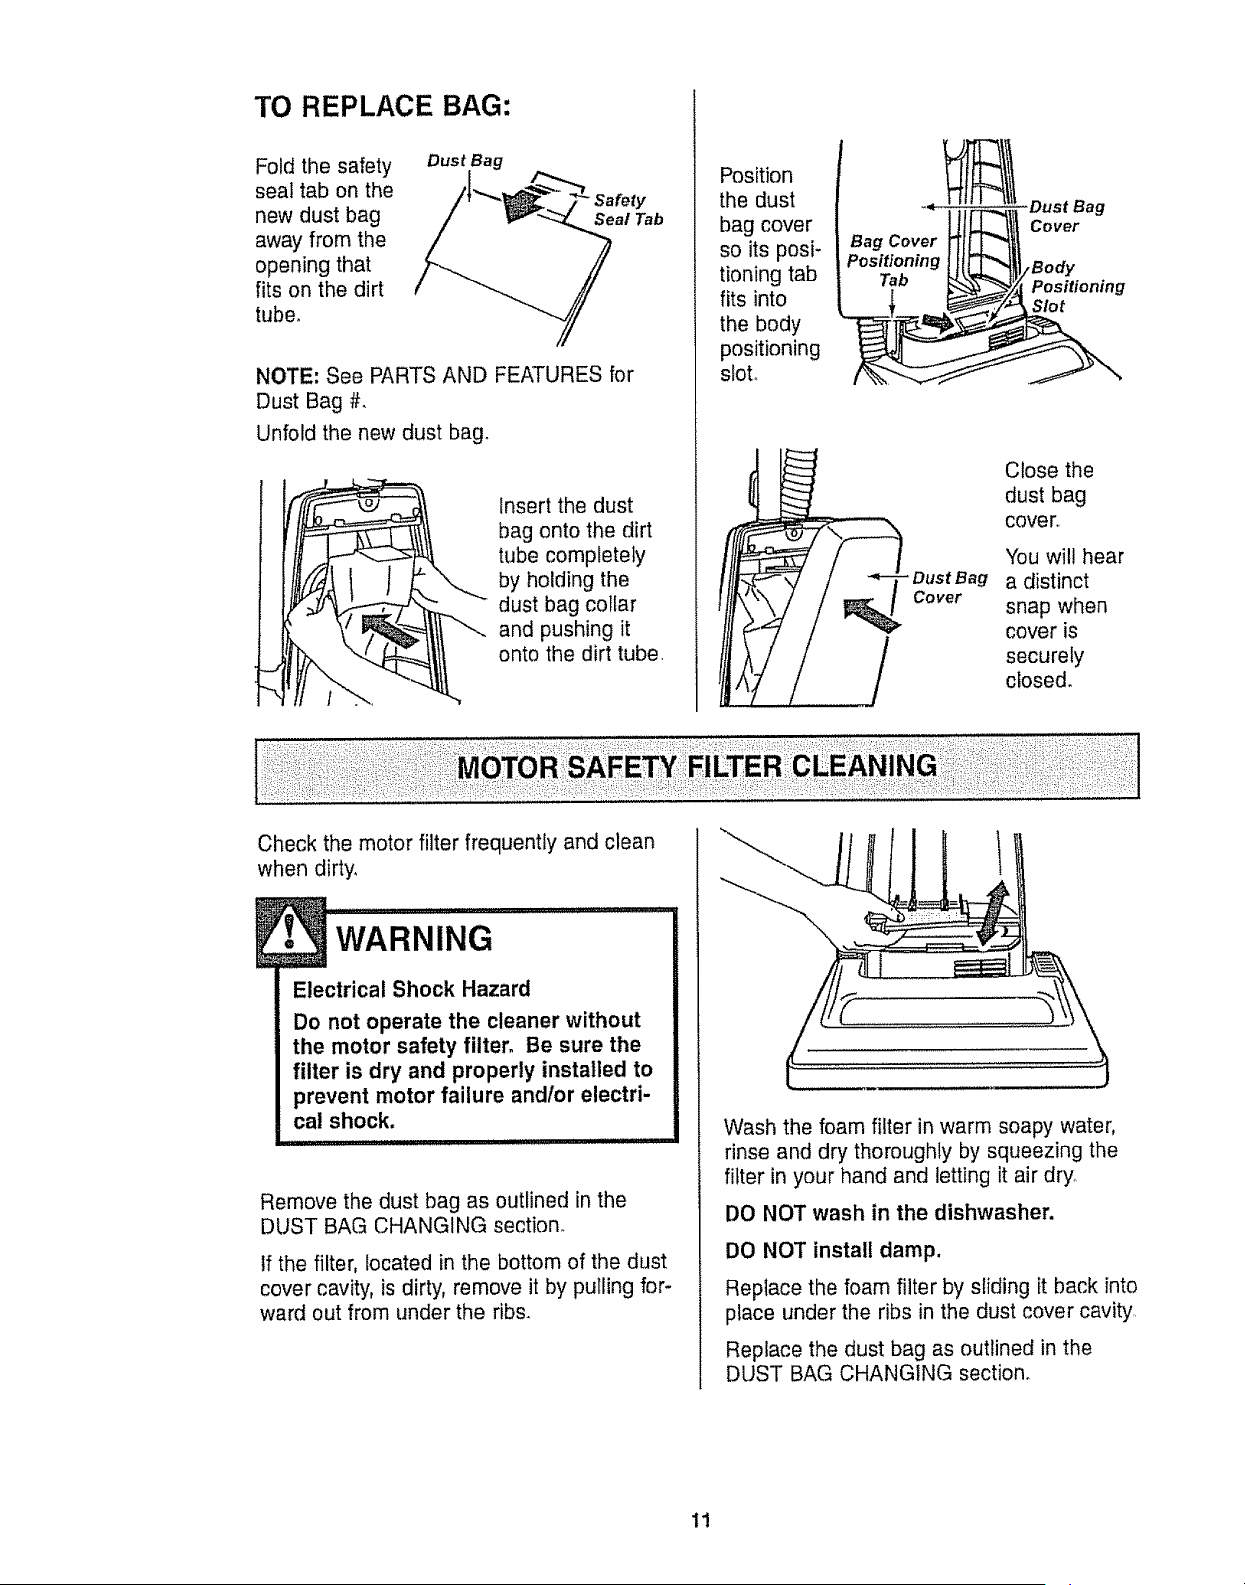
TO REPLACE BAG:
Fold the safety
seal tab on the
new dust bag
away from the
opening that
fits on the dirt
tube°
NOTE: See PARTS AND FEATURES for
Dust Bag #.
Unfold the new dust bag.
Insert the dust
bag onto the dirt
tube completely
"_...... by holding the
dust bag collar
and pushing it
onto the dirt tube
Position
the dust
bag cover
so its posi-
tioning tab
fits into
the body
positioning
slot.
a ! r-'osidoning
_ _ Dust Bag
/ _ cover
/
Close the
dust bag
cover,
You will hear
a distinct
snap when
cover is
securely
closed.
Check the motor filter frequently and clean
when dirty,
WARNING
Electrical Shock Hazard
Do not operate the cleaner without
the motor safety filter° Be sure the
filter is dry and properly installed to
prevent motor failure andlor electri-
cal shock.
Remove the dust bag as outlined in the
DUST BAG CHANGING section.
tf the filter, located in the bottom of the dust
cover cavity, is dirty, remove it by pulling for-
ward out from under the ribs.
Wash the foam filter in warm soapy water,
rinse and dry thoroughly by squeezing the
filter in your hand and letting it air dry-
DO NOT wash in the dishwasher.
DO NOT install damp.
Repiace the foam filter by sliding it back into
place under the ribs in the dust cover cavity
Replace the dust bag as outlined in the
DUST BAG CHANGING section.
11
. WAR.INa
Electrical Shock Or Personal Injury
Hazard
Disconnect electrical supply before
servicing or cleaning the unit.
Failure to do so could result in elec-
trical shock or personal injury from
cleaner suddenly starting.
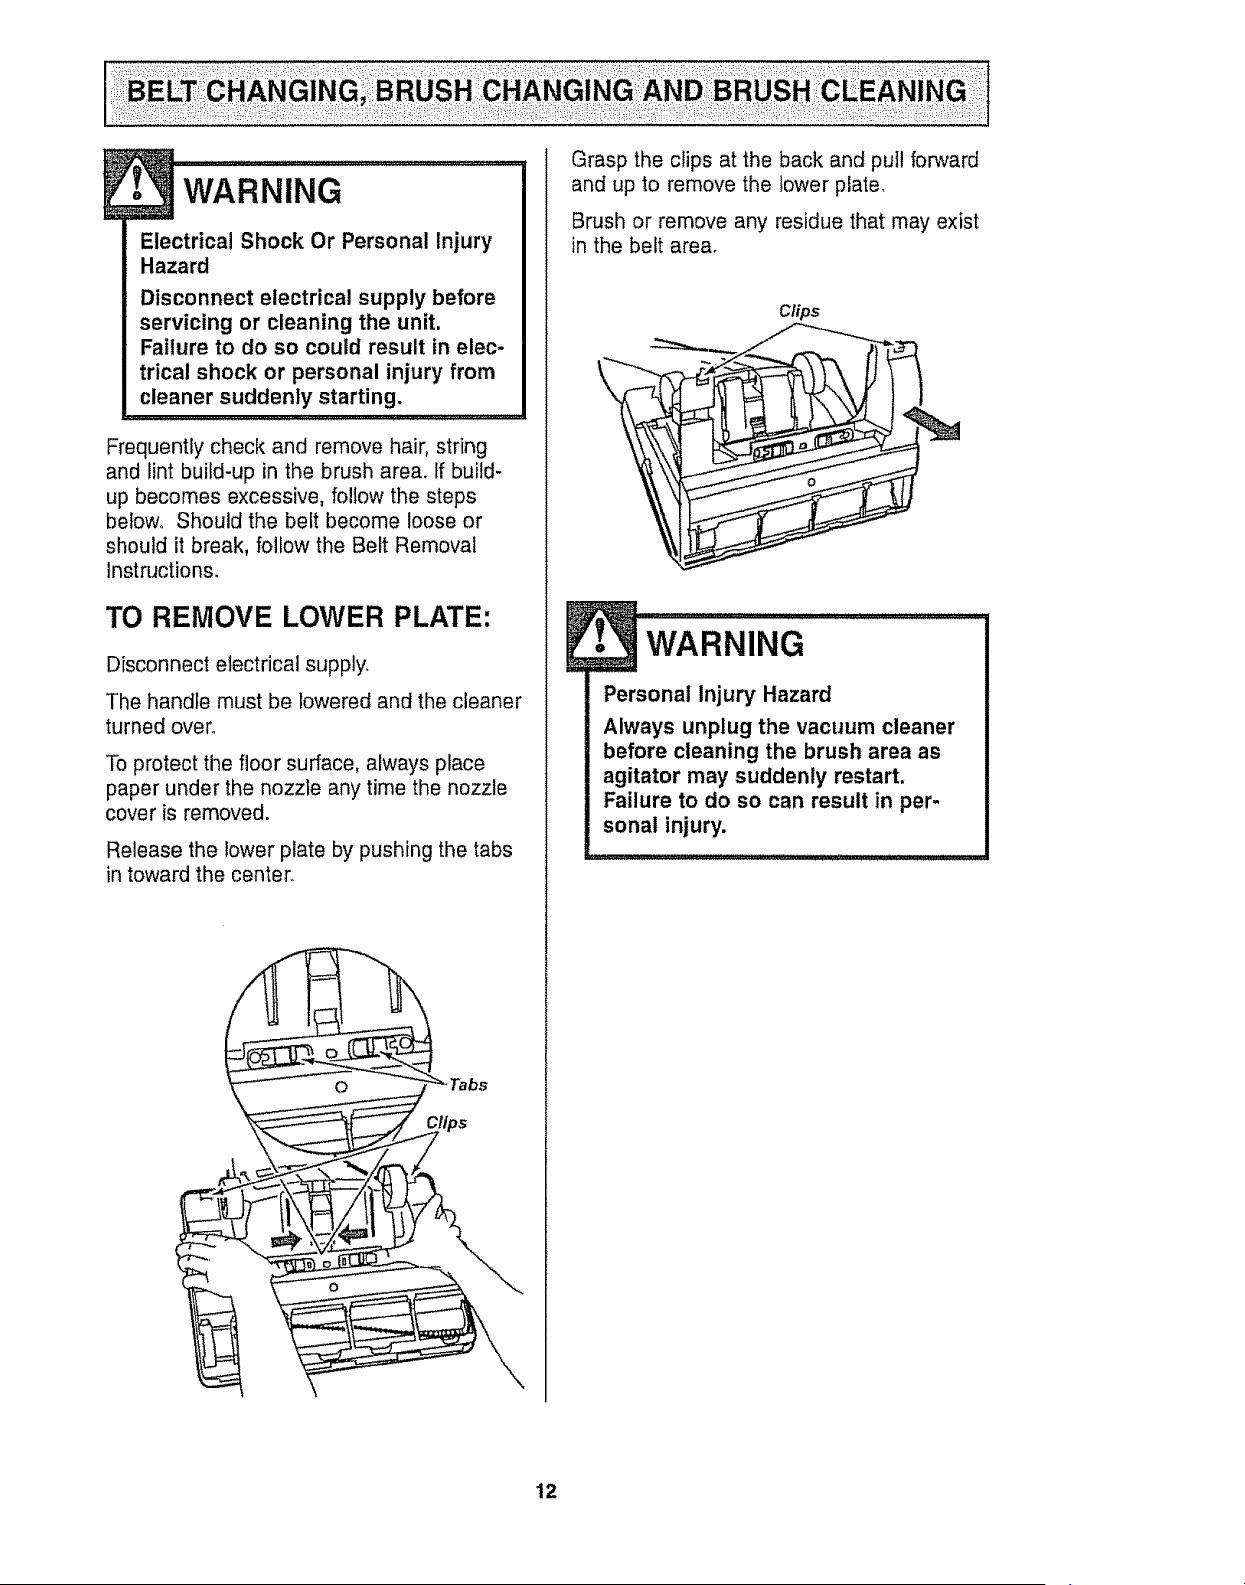
Frequently check and remove hair, string
and lint build-up in the brush area. If build-
up becomes excessive, follow the steps
below. Should the belt become loose or
should it break, follow the Belt Removal
Instructions.
TO REMOVE LOWER PLATE:
Disconnect electrical supply.
The handle must be lowered and the cleaner
turned over°
To protect the floor surface, always place
paper under the nozzle any time the nozzle
cover is removed.
Release the lower plate by pushing the tabs
in toward the center.
Grasp the clips at the back and pu]l forward
and up to remove the lower plate.
Brush or remove any residue that may exist
in the belt area.
clips
• wARNING
Personal Injury Hazard
Always unplug the vacuum cleaner
before cleaning the brush area as
agitator may suddenly restart,
Failure to do so can result in per-
sonal injury.
12
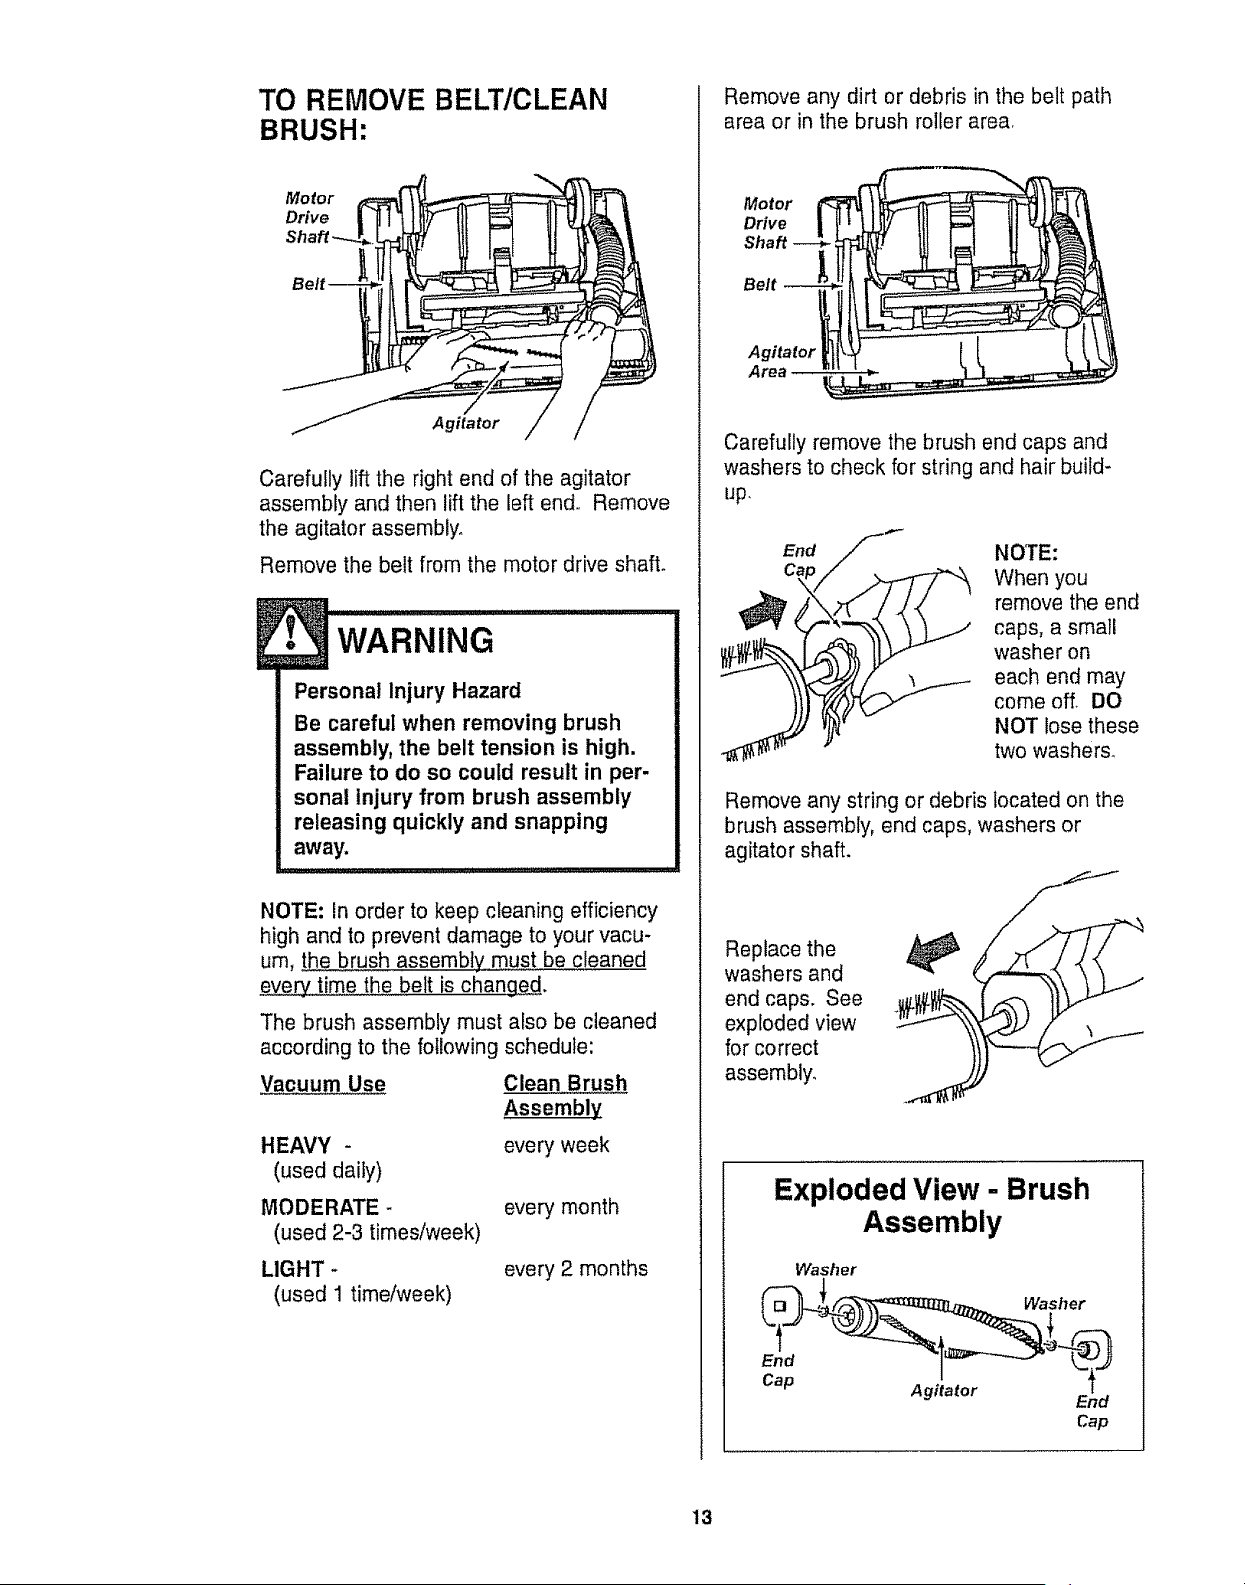
TO REMOVE BELT/CLEAN
BRUSH:
Motor
Drive
Agitator
Carefully lift the right end of the agitator
assembly and then lift the left end.. Remove
the agitator assembly°
Remove the belt from the motor drive shaft.
l. WARNING..........................
Personal Injury Hazard
Be careful when removing brush
assembly, the belt tension is high.
Failure to do so could result in per-
sonal injury from brush assembly
releasing quickly and snapping
away.
NOTE: In order to keep cleaning efficiency
high and to prevent damage to your vacu-
um, the brush assembly must be cleaned
eveR,_time the belt is chana.e..d...
The brush assembly must also be cleaned
according to the following schedule:
Vacuum Use Clean Brush
Assembly
HEAVY - everyweek
(used daily)
MODERATE - every month
(used 2-3 times/week)
LIGHT -
(used 1 time/week)
every 2 months
Remove any dirt or debris in the belt path
area or in the brush roller area,
Motor
Drive
Shaft
Belt
Agitator
Carefully remove the brush end caps and
washers to check for string and hair build-
up.
c When you
_ removetheend
caps, a small
washer on
each end may
come off. DO
NOT lose these
two washers.
Replace the
washers and
end caps. See
exploded view
for correct
assembly.
Remove any string or debris located on the
brush assembly, end caps, washers or
agitator shaft.
Exploded View - Brush
Assembly
Washer
E.d -1=_--_-- _,_
Cap Agitator E_nd
Cap
13
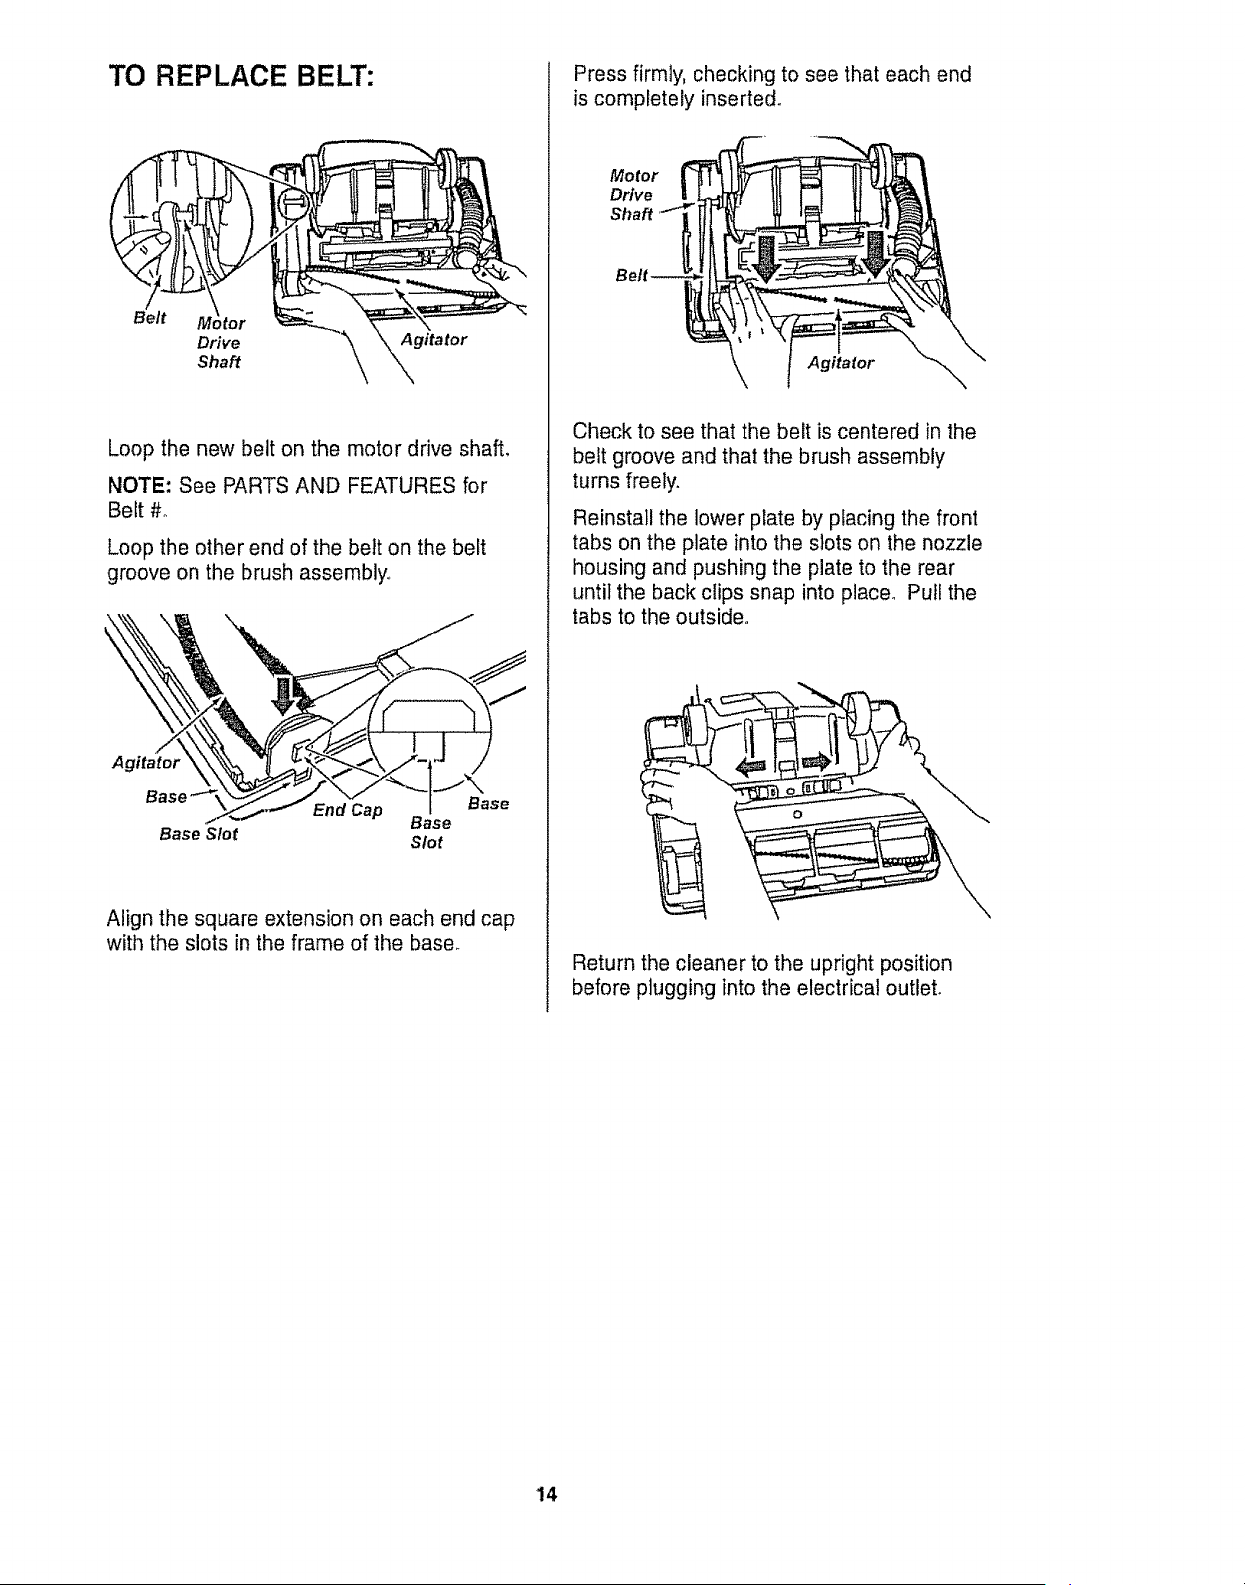
TO REPLACE BELT:
Drive
Shaft
Loop the new belt on the motor drive shaft,
NOTE: See PARTS AND FEATURES for
Belt #o
Loop the other end of the belt on the belt
groove on the brush assembly..
Agitator
Base Slot
Slot
Align the square extension on each end cap
with the slots in the frame of the base_
Press firmly, checking to see that each end
is completely inserted.
Motor
Drive
Shaft
Agitator
Check to see that the belt is centered in the
belt groove and that the brush assembly
turns freely,
Reinstall the lower plate by placing the front
tabs on the plate into the slots on the nozzle
housing and pushing the plate to the rear
until the back clips snap into place_ Pull the
tabs to the outside°
\
Return the cleaner to the upright position
before plugging into the electrical outlet.
14

! WARN.,JG "
Electrical Shock Or Personal Injury
Hazard
Disconnect electrical supply before
servicing or cleaning the unit.
Failure to do so could result in elec-
trical shock or personal injury from
cleaner suddenly starting.
For best cleaning
results, keep the
airflow passage
clear.,
Unplug the power
cord from the
outlet before
checking the
airflow passage.
Check each
starred area occa-
sionally for clogs.
Disconnect
and check th_
tom the nozzle hose
,rclogging.
While running the vacuum cleaner with the
wand disconnected, stretch the hose in and
out to remove the clog.
Pull down on
the clean-out
port cover
and check for
clogging in
this area..
If the clog still exists, turn the vacuum OFF
and unplug the power cord° -PJrn the vacu-
um cleaner over, exposing the underside.
Remove the short nozzle hose from the
housing by lifting it straight up. Inspect the
hose end and clear it of any obstructions°
Reinstall the short nozzle hose and lower
plate.
Motor
This vacuum has a motor protector by-pass
valve which automatically opens to provide
cooling air to the motor when a clog
prevents the normal flow of air. If the by-
pass valve opens to prevent motor
overheating and possible damage to the
vacuum, a change of sound will be noticed
as air rushes through the valve opening. If
this occurs, turn the vacuum off and unplug
the power cord from the outlet° Then check
for clogs as described under the CLOG
REMOVAL section_
The motor protector by-pass valve may open
when using attachments or when cleaning
new carpet, due to reduced air flow by the
attachments themselves or by new carpet
fuzz filling the bag quickly.
15
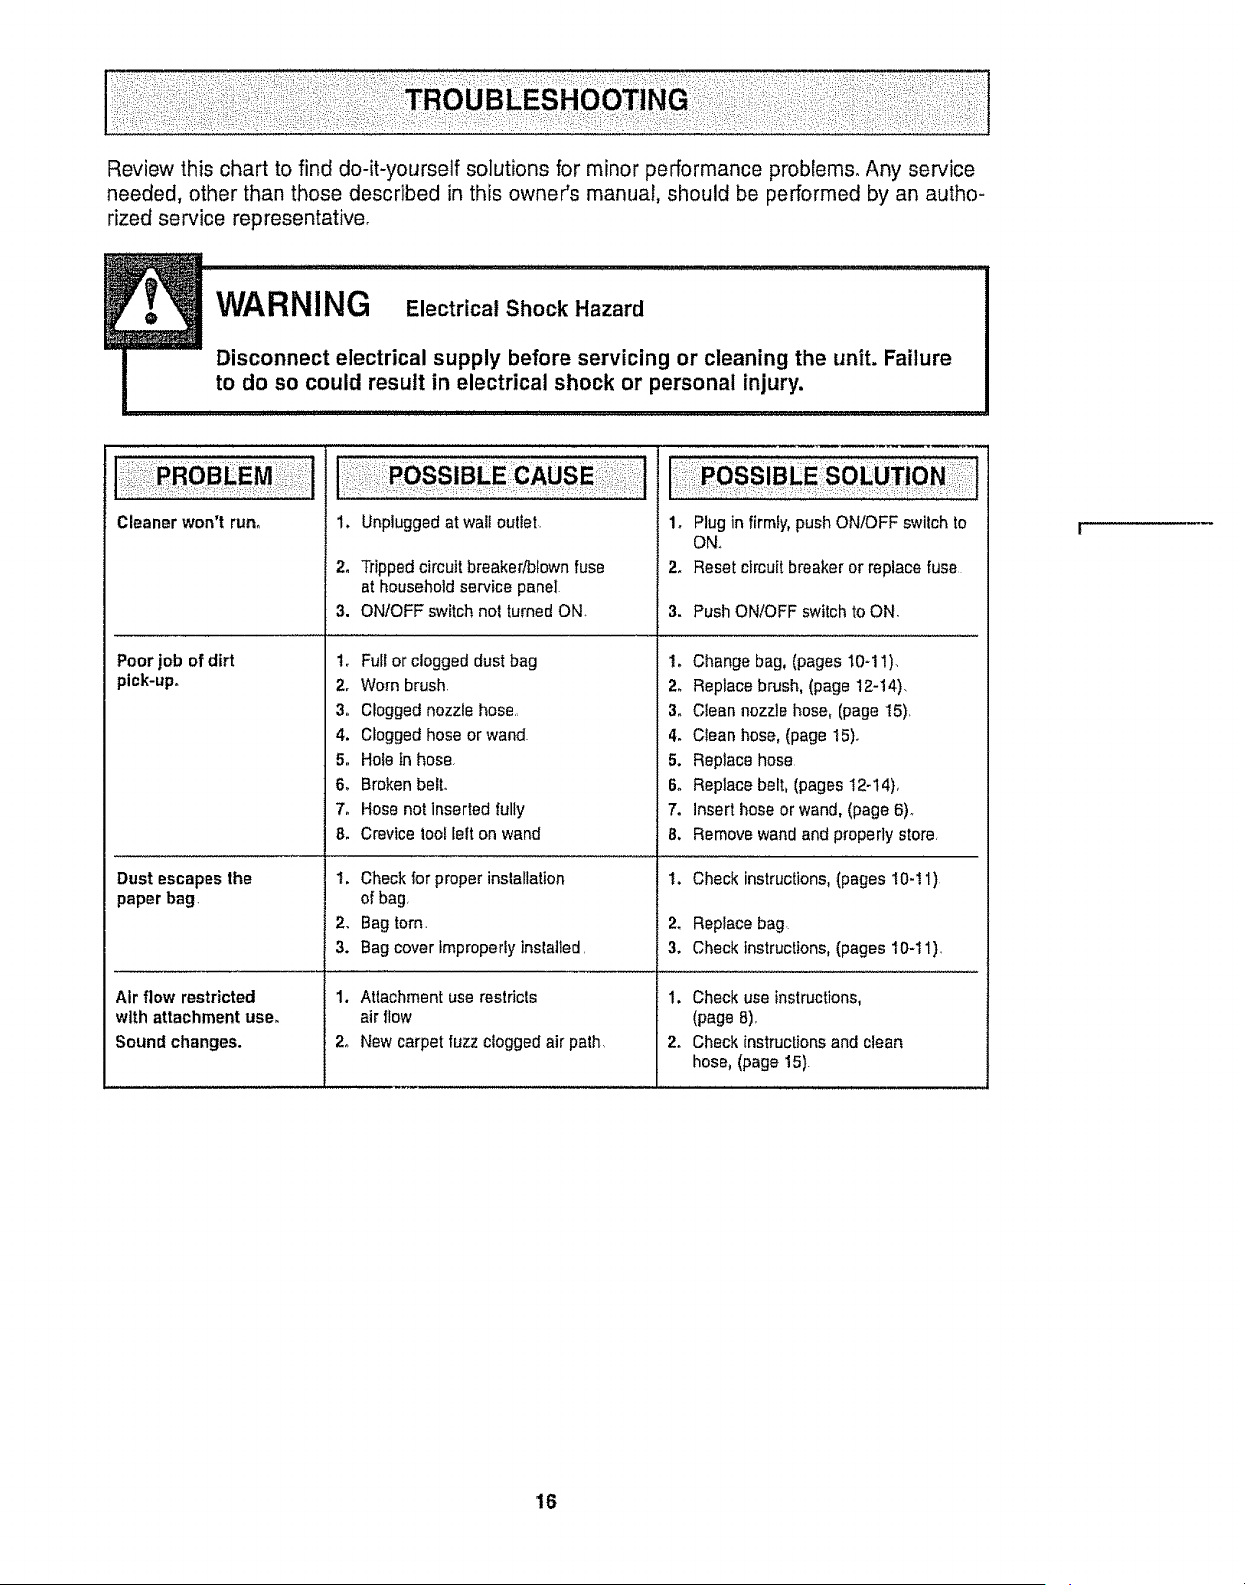
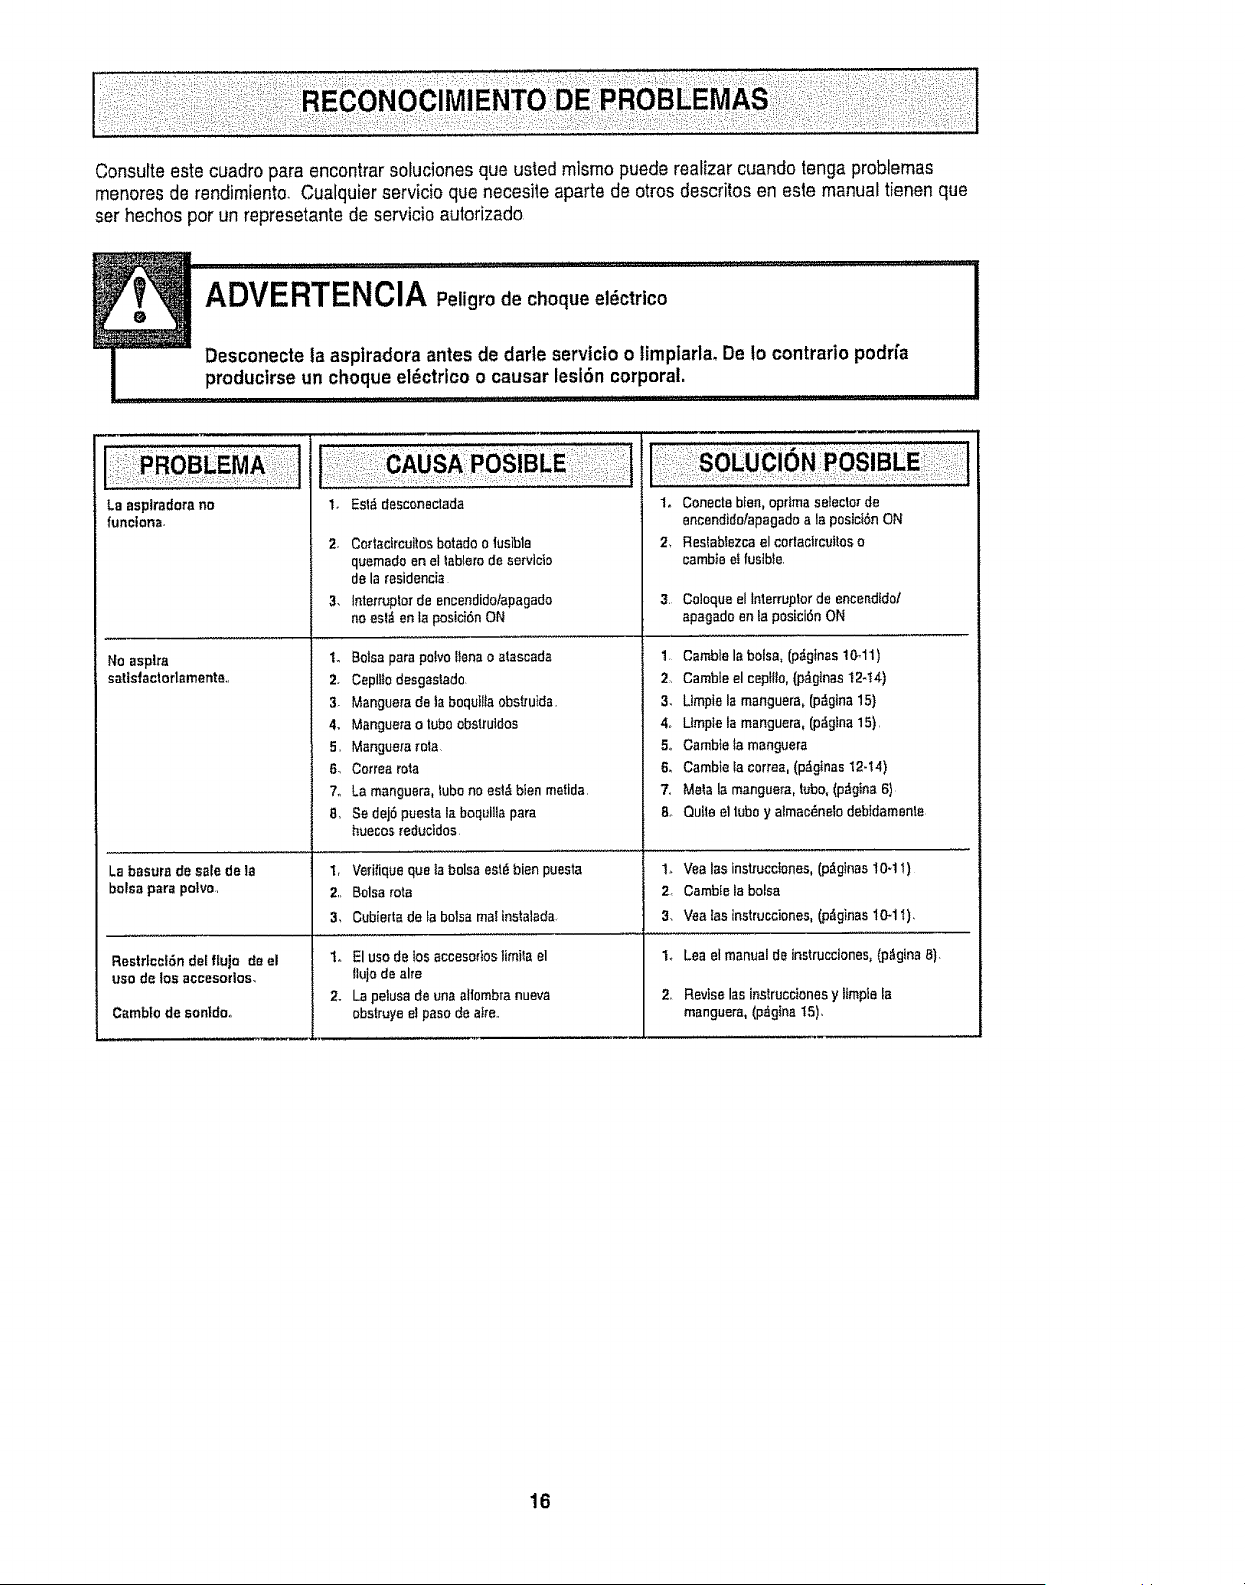
Reviewthischarttofinddo-it-yourselfsolutionsforminorperformanceproblems.Anyservice
needed,otherthanthosedescribedinthisowner'smanual,shouldbe performedbyanautho-
rizedservicerepresentative.
tliii =i o = E iiiii! iiill
1. Unplugged at walt outlet
Cleaner won't run°
Poor job ofdirt t,
pick-up. 2,
3_
4.
5o
6,
7.
8,
Dust escapes the 1.
paper bag,
2.
3.
Air flow restricted
with attachment use.
Sound changes.
2o Tripped circuit breaker/blown fuse
at household service panel
3. ON/OFF switch not turned ON.
Full or clogged dust bag
Worn brush
Clogged nozzle hose_
Clogged hose or wand
Hole In hose,
Broken belt.
Hose not insertedfully
Crevice tool Ieft on wand
1. Attachment use restricts
air flow
2,, New carpet fuzz clogged air path,
1. Plug in firmly, pushON/OFF switch to
ON.
2. Reset circuit breaker or replace fuse
3. Push ON/OFF switchto ON.
1. Change bag, (pages t0-11)_
2. Replace brush, (page 12-14)_
3o Clean nozzle hose, (page 15).
4. Clean hose,(page t5).
5. Replace hose
6. Replacebelt, (pages I2-t4),
7. insert hose or wand,(page 6)_
8. Remove wand and properly store,
Check for proper installation 1. Check instructions,(pages 10-11)
of bag,
Bag tom 2. Replace bag
Bag cover Improperly installed 3. Check instructions, (pages 10-I 1)
1. Check use instructions.
(page 8)
2. Check instructions and clean
hose, (page 15)
16
[ .... i
il_ii_!i;!i_ii_iii!!
i!_i!iii,:!:i!!
i_,!ili:!_ii;i!i
i:_i _;:i: ,:_¸ ,
i'ii!,_!iii?i:!
_i::__i !:_:
_!i%:i?i
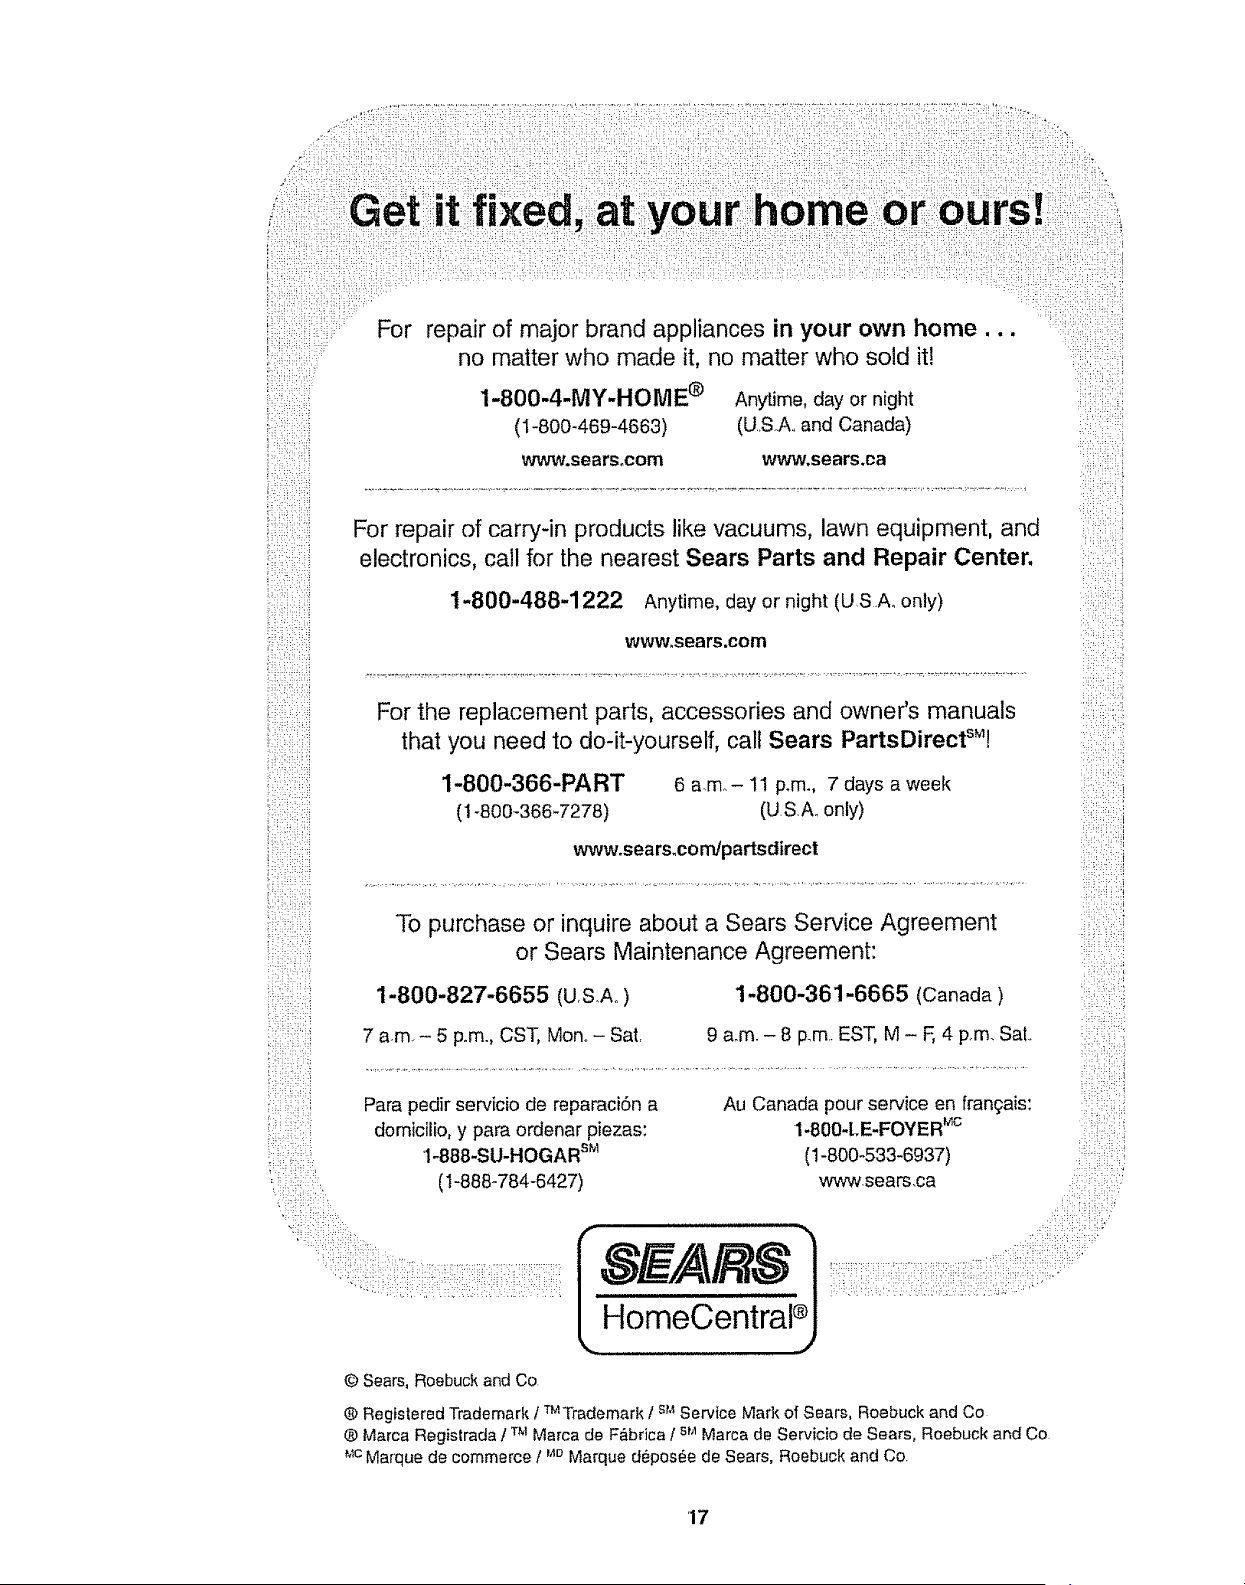
For repair of major brand appliances in your own home ...
no matter who made it, no matter who sold it!
1-800-4-MY-HOME ® Anytime, day or night
(1-800-469-4663) (USA.. and Canada)
www.sears°com www.sears.ca
For repair of carry-in products like 'vacuums, lawn equipment, and
electronics, call for the nearest Sears Parts and Repair Center.
1-800-488-1222 Anytime, day or night (U S.A, only)
www,sears,com
For the replacement parts, accessories and owner's manuals
that you need to do-it-yourself, call Sears PartsDirectSM!
1-800-366-PART 6 a.m_- 11 p.m., 7 days a week
(t -800-366-7278) (US A_only)
www,sears.corrdpartsdirect
To purchase or inquire about a Sears Service Agreement
or Sears Maintenance Agreement:
1-800-827-6655 (U,SAo) 1-800-361-6665 (Canada)
7 a.m- 5 pom.,CST, Mono- Sat, 9 a.m.- 8 p_m.EST, M - F,4 p.m. Sat,
Para pedir servicio de reparaci6n a Au Canada pour service en fran_ais:
domicilio, y para ordenar piezas: I-SO0-LE-FOYER Mc
1-888-SU-HOGAR sM (1-800-533-6937)
(I-888-784-6427) wwwsears.ca
[ HomeCen{ral I
i i i
!i_:i,:ii!!_;ii!i
!:_i!::!_i:i_IL_¸
•¸:2:1 :J L:I i_ i.
_i_ii_i_i_!_,_i_!__i_,i_!_i!i__!i_!i_ii_i_ill_i_iH!_,_i_!__'_
© Sears, Roebuck and Co
® Registered Trademark / m Trademark / s_,_Service Mark of Sears, Roebuck and Co
® Marca Registrada t'rM Marca de F&brica / s_ Marca de Servicio de Sears, Roebuck and Co.
_,_cMa[que de commerce / _'_Marque depos6e de Sears, Roebuck and Co.
17

ManualDelPrcpietario
Aspiradora
®
Modelo 116.31079
116.38079
116.39079
CUIDADO:
Lea y sigue todas las
instrucciones de operaci6n
y seguridad antes del usode
este producto.
Sears, Roebuck and Co., Hoffman Estates, IL 60179 U.S.A.
www.sears.com
Pieza N°-CO1ZAUC20UOQ-4370880 Impreso en EUA
Antes de usar su aspiradora nueva ..... 2
Garantia de la aspiradora de Kenmore, r2
instrucciones importantes de
seguridad .......................... 3
Piezas y caracteristicas ................ 4
Instrucciones de ensamblamiento ...... 5-6
Instrucciones de operaci6n .............. 7
Desprendimientodel mango ............... 7
Interruptorde encendido/apagado ......... 7
Accesofios ............................ 8
Cuadrode usode los accesorios .......... 8
Sugerenciaspara aspirar ................ 9
Cuidado de la aspiradora ................ 9
Almacenamiento de ta asptradora ......... 9
Limpieza del exterior y de los accesorios o.. 10
Cambio de la boisa para polvo ......... 10-11
Limpieza detfiltro de seguddad del
motor ................................... t 1
Cambio de }a correa cambio del cepilto
y limpiezadetcepillo .............. 12-14
C6mo eliminarlos residuos de basura
en los conductos ...................... I5
Protectordemotor .................... 15
Reconocimiento de problemas ........ t6
Informaci6n de assistancia
o servicio ................................. 17
Potfavor lea estaguia que le ayudaraa assemblary operar su aspiradoranuevade Kenmoreen una manera
m_s segura y effectiva.
Para mas informaci6nacercade! cuidadoy operaci6nde esta aspirador,Ilame a sutienda Sears mascercana
Cuandoprequnte por informaci6n usted necisitar_el n_merocompfetode serie y modelo de la aspiradora que
est_locado en la placa de los nSmerosde modetoy serie.
Use el espacio de abajo para registrar el numerode modelo y serie para su nueva aspiradorade Kenmore_
Numero de Modeto
N0mero de Serie
Fecha de Compra
Matenga este libro y su recibo en u tugarseguro para referenciasfuturas_
GARANT/ALIMITADADE UN A_'40DELA ASPIRADORAKENMORE
Esta garantfa espor un a_o desde la fecha decompra, e incluyesolamenteel usode la aspiradoraen hogares
privados.Durante el aSode garantfa, cuando la aspiradoraes operaday mantenida de acuerdoal manual de
instruccionesdel dueSo,Sears reparar_ cualquierdefectoen materiales o fabricaci6n fibredecargo°
Esta garantfaexcluyelas bolsas de coiecci6n,correas, lamparillas,yfiltros, lascuales son partes gastablesque
sedeterioran coneruso normal.
Parael serviclo degaranffa,retorne esta asptradora al Centrode Servlcio Searsm_s cercanoen los
EstadosUnidos°
Esta garantfase aplicasolamente mientras esteproductoest_en usoen los EstadosUnidos.Esta garantfa le
da a usted derechos legales espeUficos, y ustedpuedetener tambi6n otros derechos tos cuales varfan de
estado a estado.
Sears,Roebuck and Co,,,D/817 WA,Hoffman Estates, IL 60179

ADVERTENCIA
Su segurldad es muy lmportantepara nosotros,Para reductrel riesgo de incend|o,cheque
e!_ctrtco,lesl6n corporal o dafios al utillzar su aspiradora, act_e deacuerdo con precauclones
b_sicas de seguridad,entre elias:
Lea este manual antes de arrnar o utilizar su
aspiradora.
Use su aspiradoraLinicarnenteen laforma
descrita en este manual,Use unicamentecon
accesorios recomendadosper Sears.
Para reducir el riesgo de cheque el6ctrico,no use
su aspiradora al aire libre ni sobresuperficies
mojadas,
Desconecte la fuente de electricdadantes de
dar servicio o iimpiar_De1ocontrariopodrfa
causar un chequeelectrico o lesi6n corporal.
Slempre debe apagar su aspiradoraantes de
desconectarla.
No desconecte la aspiradoratirandodel cord6n
el_ctrico.Para desconectarla,hateel enchufe,no
el cord6n.
No usela aspiradorasi el cord6no el enchufe
est,. dafiado Si la aspiradorano est&
funcionando adecuadamenteo si se ha dejado
caer, est_ dafiada, se ha dejadoexpuesta ata
tntemperieo se ha dejado caeren agua,devu_l-
vala a un Centre/Departamento de servicio de
Sears°
No hale ni transportela aspiradoraper el cord6n;
no useel cord6ncome mango; no cierre puertas
sobre etcord6n; no hale el cord6n sobre rebor-
des agudos ni esquinas Nopase laaspiradora
sobre el cord6n. Mantenga el cord6nalejado de
superficies catientes.
No abandone la aspiradoracuando est_ conec-
tada. Descon_ctelacuando no la est_ usandoy
antes de darle servicioo
No permita que sea utilizada comejuguete.Se
requiere tener mayorcuidadocuandosea
utilizada en la proximidadde nifios o pernifios,.
No toque la aspiradorani el enchufe conlas
manes mojadas.
No coloqueobjetos en ]as aberturas,
No utilice laaspiradora si algunaabertura est,_
bloqueada;mant6ngalalibre de poivo, pelusa,
cabetlosy cualquieracosa que podr[a disminuir
el flujo de aire.
Mantenga el cabello, ropa suelta, dedosy todas
las partes del cuerpoalejados de tas aberturas y
piezas mec_nicas
No use la aspiradorasin tener instalada la bolsa
para polvo y!o losfiltros,
Cambie siempre la bolsa para polvo despu_s de
aspirar limpiadoresde alfombraso desodorantes,
talcos y pelvesfines..Estosproductosatascan la
bolsa, reducenel ftujo de aire y pueden causar
que _sta serompa. Si nocambia la bolsa podrfa
ocasionar dafio permanente a la aspiradora,
No usela aspiradorapara levantarobjetos agu-
dos, juguetespequefios, affiteres,sujetapapeies,
etc.Pedrian dafiar la aspiradorao la bolsa para
polvo.
No levanteninguna cosa que seest_ quemando
o emitiendo humo, come cigarrillos,ceritfoso
cenizascalientes.
No use taaspiradorapara aspirar Ifquidos
inftamableso combustibles(gasolina, lfquidos
para timpieza,perfumes, etc.) ni la use en
lugaresdonde _stos podrfan estar presentes.Los
vaporesde estas sustanciaspueden crear un
peligro de incendioo explosi6n,
Tenga cuidado especial al utilizar la aspiradora
en escalones.No la;coloque sobre sillas,mesas,
etc,Mant_ngala en el pisoo
Usted es responsablede asegurarque suaspira-
dora no seautilizada per ninguna personaque no
pueda manejarla correctamente,
GUARDE ESTAS INSTRUCClONES
El armado y useseguro de su aspiraderason su responsaloilidad.Estaaspiradora ha sidedisefiada
exclusivamentepara use dorn_stico La aspiradoradeber& almacenarseen un lugar seco yen el inte-
rior,Lea este Manualdel propietario detenidamente,pues contiene informaci6nimportante sobre segu_
ridad y use. Estaquia contiene informaci{Snsobreseguridad debajode simbolosde advertiencia
cuidado_Per favorponga atencl6n especial a estas instruccionesdadas. Advertencia" Este
informaci6nle alertar_,con el poligro de fuego, cheques electricos,quemadasy tesiones Cuidado:
Este informaci6nle alertaraa peligroscome lesiones y dafios de propiedad.
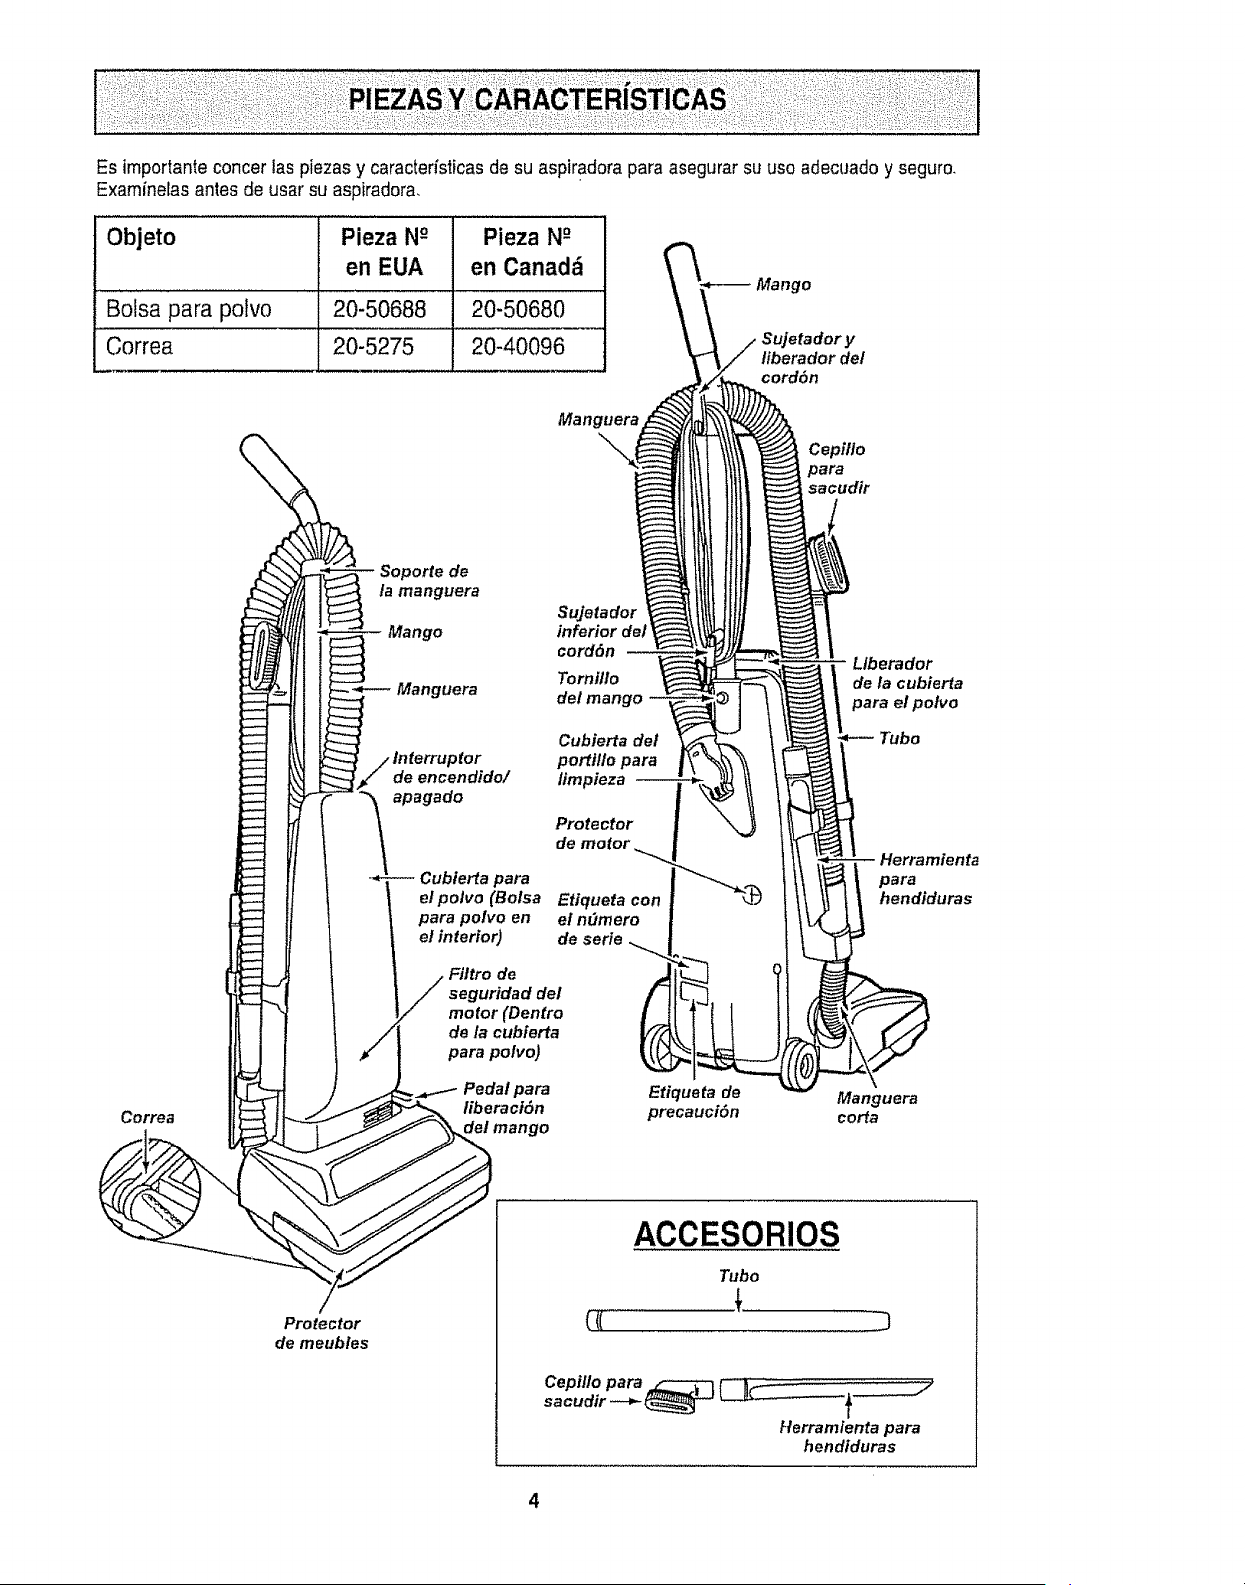
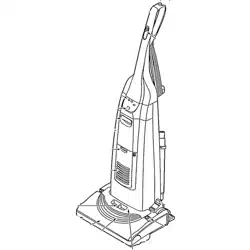
Es importante concer las piezas y caracteristicas de su aspiradora para asegurar su uso adecuado y seguro,
Examinelas antes de usar su aspiradora,
Objeto Pieza N-° Pieza N-°
en EUA en Canadd
Bolsa para polvo 20-50688 20-50680
Correa 20-5275 20-40096
Manguera
Cepillo
para
sacudtr
Correa
Soporte de
la manguera
Sujetador
Mango inferior del
cord6n
Tornlllo
Manguera del man
de encendido/
apagado
Cubierta del
porttllo para
limpieza
Protector
de motor
Cublerta para
el polvo (Balsa Etiqueta con
para polvo en el n_tmero
el interior) de serie
de
seguridad del
motor (Dentro
de la cubierta
para polvo)
Pedal para
tiberaci6n
Etiqueta de
precauci6n
Llberador
de la cubierta
para el polvo
Tubo
Herramien ta
para
hendiduras
Manguera
corfa
Protector
de meubles
({(
ACCESORIOS
Tubo
Cepfl/o para _--_-q
sacudir--_ _ _
Herramlenta para
hendiduras
4
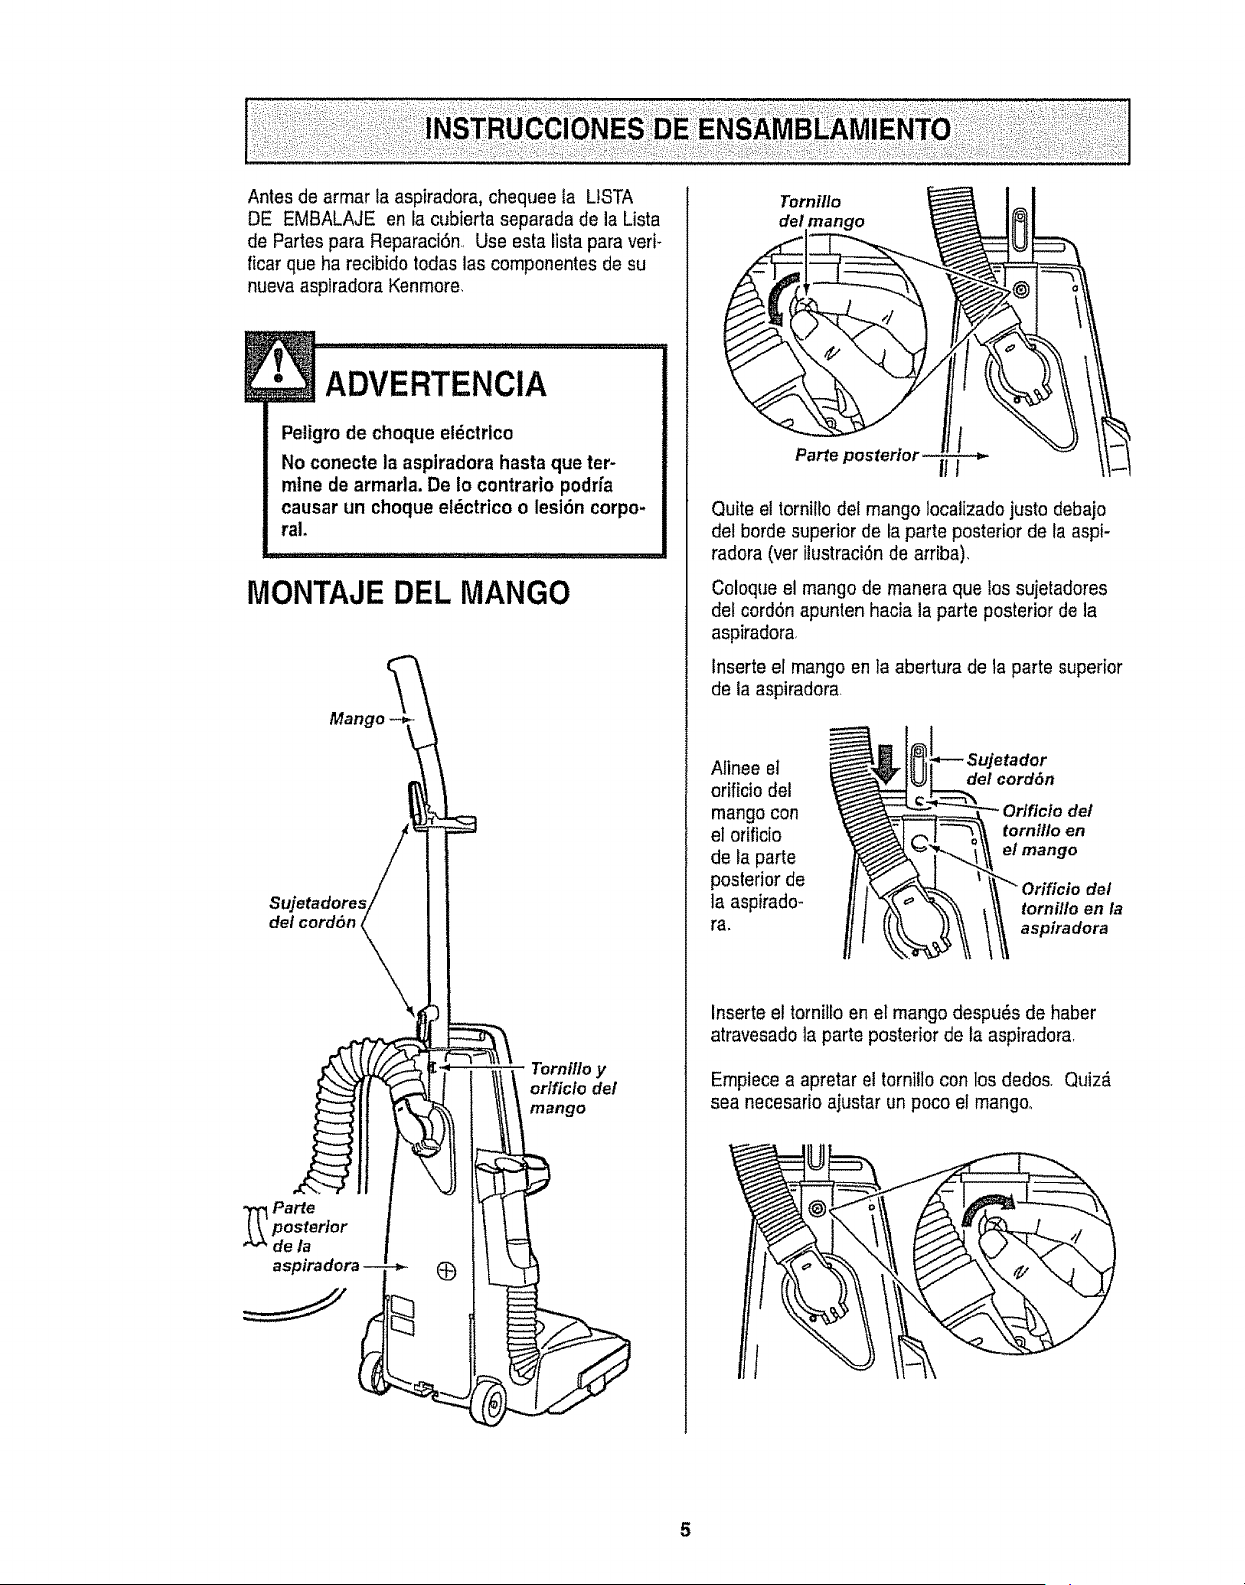
Antes de armar ta aspiradora, chequee ta L1STA
DE EMBALAJE en la cubieda separadade la Lista
de Partes para Reparaci6n. Use esta lista para veri-
ficar que ha recibidotodas las cornponentesde su
nueva aspiradoraKenmore.
1 ADvERTENCIA
Peligrode cheque el_ctrlco
No conecte la aspiradora hasta que ter-
mine de armada.De io contrario podrfa
causar un choque el_ctrico o lesi6n corpo-
raL
MONTAJE DEL MANGO
Sujetadores/
del cord6n _ kk
Parte
posterior
de la
aspiradora
Torni//o y
orlficlo del
mango
Tornitlo
del mango
Parte
Quite el tornittodel mango Iocalizadojustedebaio
del horde superior de taparteposterior de la aspi-
radora (verilustraci6n de arriba).
Coloque el mangode manera que los sujetadores
del cord6napunten hacia la parteposterior de la
aspiradora.
Inserte el mango enta abertura de taparte superior
de laaspiradora.
Alinee el
orificio del
mango con
el orificio
de la parte
posteriorde
la aspirado-
ra.
del cord6n
Orlficto del
torniUo en
el mango
aspiradora
Inserte el tornillo enel mango despu_s de haber
atravesadola parte posterior de la aspiradora.
Empiece a apretar e!tornillocon los dedos. Quiz_,
sea necesario ajustar un poco el mango..

• CUIDADO ....
No aprlete demasiado el tornillo.
St 1oaprteta demasiado podrfa arruinar los
orlficios para el tornitlo.
No opere la aspiradora sin tener fnstalado
el tornltto_
Apriete el tornillo
con un destornil-
lador,
COLOCAClON DEL CORDON
Asegurese de que el sujetador superiordel cordon
de liberaciOnr_pidase encuentre en posiciOnverti-
cal. Quiteel alambrecon etque est,, atadoel cordon
el_ctdco
Fijeel cordon en
posiciOn,forz&ndolo
en taranura de
bloqueo ubicadaen el
cuerpo de1sujetador
de liberaciOnr,_pida
del cord6n, como se
muestra.Esto ayudaa
que el cordonno se
enrede debajodel
agitaderde la
aspiradorao
/'_l Cordon \_
Sujetador
superior del
cord6n
CordOn
Sujetador !
inferior
de/cordon
Quite el alarnbre
con el que est,.
atado e! cordon
ei_ctrlcooEnrolle
el cord6n en los
sujetadoressuperi-
or y inferior.
COLOCAClON DE LOS
ACCESORIOS
Unavez que se hayacolocado el mango a fa unidad
y el cordon et_ctrico hayasido enrolfadoen los
sujetadores, sepodr_ procedera colocar laspiezas.
1. El manguerapueden entonces pasarse pot ei
frente del mangopara que descansen sobre el so-
porte de la rnanguera
2. A continuaci6n,se puede meter el manguera en
el extremode la mangueracorta, girando a rnedida
que seva introduciendo
3. La boquilla para poivose puede colocar enel
tubey puedesujetador al frente del manguera, con
el cepiIfoapuntandohacia arriba
4. La boquitlapara huecos reducidos secoloca en
el soporte correspondientejuntoattubo_
Manguera
Cepillo
para
Soporte sacudir
de/a (Algunos
manguera modelos)
Herramienta
para hendiduras
Manguera
corta
6
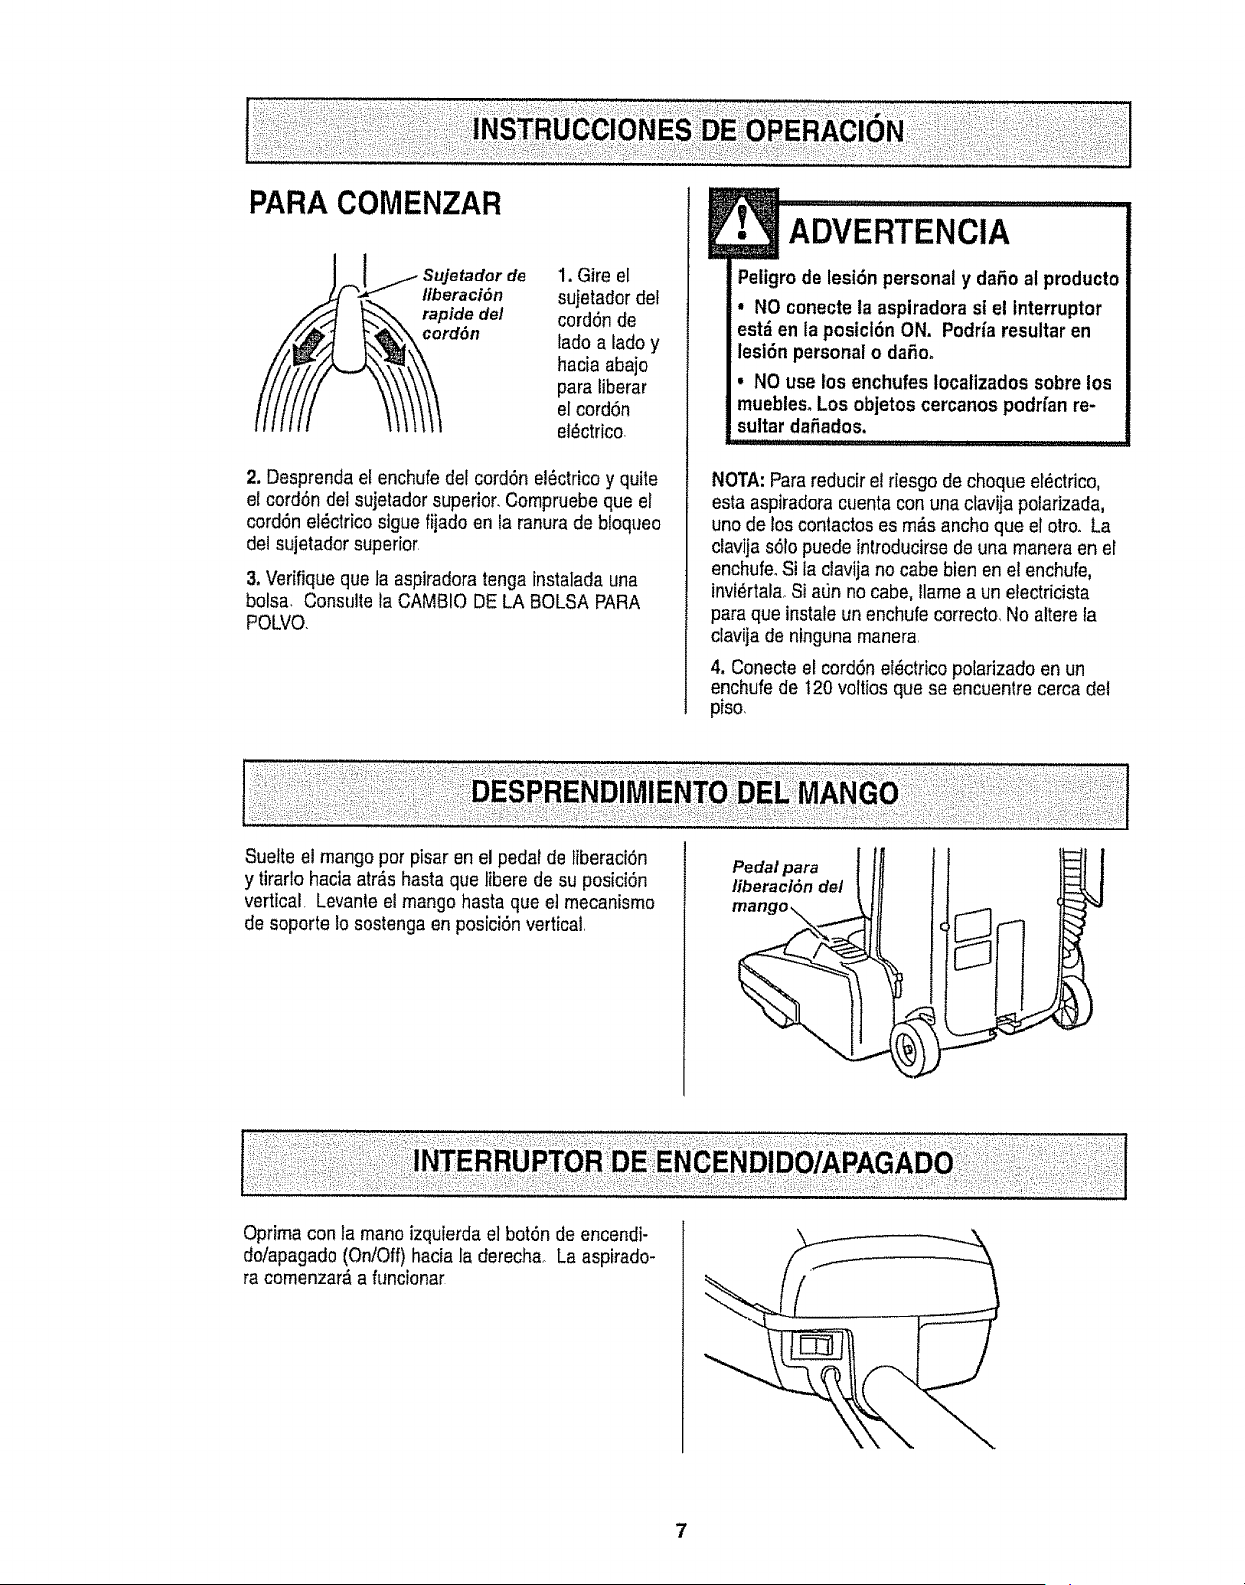
_,_1 / Sujetadorde
Ifberaci6n
_ rapide de!
1. Gire el
suietador del
cord6n de
lado a ladoy
hacia aloajo
para liberar
el cord6n
et_ctrico
2. Desprenda el enchufe del cord6n el6ctricoy quite
el cord6n dot sujetador superior.Compruebe que el
cord6n el_ctdcosigue fijado en la ranura de bfoqueo
del sujetador superior
3.Verifique que fa aspiradoratenga instalada una
bolsa, Consulte la CAMBIO DE LA BOLSA PARA
POLVO.
Peligrode lesl6n personaly dafioal producto
• NO conecteta aspiradora stel interruptor
est_ en la posicl6n ON. Podriaresultar en
lesi6n personalo dafioo
, NO use los enchufesIocalizadossobre los
muebles. Los objetos cercanospodrfanre-
sultardafiados.
NOTA: Parareducirel riesgo de choque el_ctrico,
esta aspiradoracuenta conuna cfavijapolarizada,
uno de loscontactos esmrs anchoque el otro. La
ciavija s6ropuede introducirsede una maneraen et
enchufe,Si ia ciavija no cabe bien en e!enchufe,
invi_rtalaoSi a_Jnnocabe, Ilamea un electricista
para que instaleun enchufe correcto, Noaltere la
clavija de ninguna manera.
4, Conecteel cord6n el_ctricopolarizado enun
enchufe de t20 vottios que se encuentrecerca del
piso,
Suefte el mangopor pisar en el pedal de tiberaciOn
y tirarlo hacia arrashasta que tiberede su posici6n
vertical Levanteel mangohasta que e] mecanismo
de soporte Io sostengaen posici6nvertical
Pedal para
fiberaci6n del
mangos,
J
Optima con ta manoizquierda el bot6n de encendi-
do/apagado (On/Off)hacia la derech& La aspirado-
ra comenzar,_a funcionar
7
•_ ADVERrTENCIA .................
Peligro de lesi6n personal
No ponga las manos olos pies debajo de la
m_iquinacuando afiade lamaguera.
Mtentrasse usan los accesortos,la
agitadora empiezaa girar. No deje que la
aspiradora se quedeen un s61olugar por
un periodoextendido, porquela agitadora
puedehacer dafio ala superficiedel sueto.
No ponga la aspfradoraencima de
muebles, enel fleco dela alfombra,en una
alfombrade pelo largo,ni en escateras
alfombradas.La postci6n idealpara la
aspiradora cuandose usan los accesorios
est_ en un _rea planacon el mango en la
posici6n vertical
JtL : :: : : ,_
COMO UTILIZAR LOS
ACCESORIOS
Coloquela aspiradora en una supeflicie plane.
La manguerapueden sacarse de fa mangueracorta
tom_ndoios por el extremo ytirando hacia arriba
Losaccesorios se puedenconectara la manguerasi
el objetoque se desea limpiarno est_ lejos de la
aspiradora,
CUIDADO
Si deseam_s extensi6n, puede conectar el tubo a Ea
mangueray losaccesorios al tubo
E CUIDADO..........................I
AI utillzar los accesorios para limpiar,tenga
culdadode no sobrepasarel alcance de la
manguera.Si Io hace, podriaocasionar que
laasplradora se calga.
Si utiliza elcepillo pare polvoy necesita m_s alcan-
ce, puede conectarla boquilla pare huecos reduci-
dos al tuboy el cepil!o pare polvo en ta boquillapare
huecos reducidos,
Cepillopara Herramienta
sacudir para hendiduras Tubo
ALMACENAJE DE LOS
ACCESORIOS
Devuelvala mangueraa su lugar en la manguera
corta y tasherramientasa su soporte,
. cuioAoo...........................................
Asegraresede limplar los accesortos
despu_s de utilizarios en _,reassuclas,
debaJodei refrigerador, antes de usarios
en otras superficies, ya que podrfan dejar
marcas.
ACCESORIO
c,,,.,_o,.,,s.cuo,,i .
HERRAMIENTA PARA
HENDIDURAS
= ......................
Muebles*
X
X
AREA A LIMPIAR
Entre
coijlnes*
Cortlnas* Escalones
X X
X
Paredes
X
La v_lvulade desviaci6npuede esterabterta mientrasse usan los accesorlosopara ltmpiarunaalfombranuevaa causede un
flujoreducldode afre pot losaccesoriosmismosoporla pelusade Ia atfombraque {lenela boise rapidamente,
' Siemprelimpie losaccesorios antesde usersobre telas,
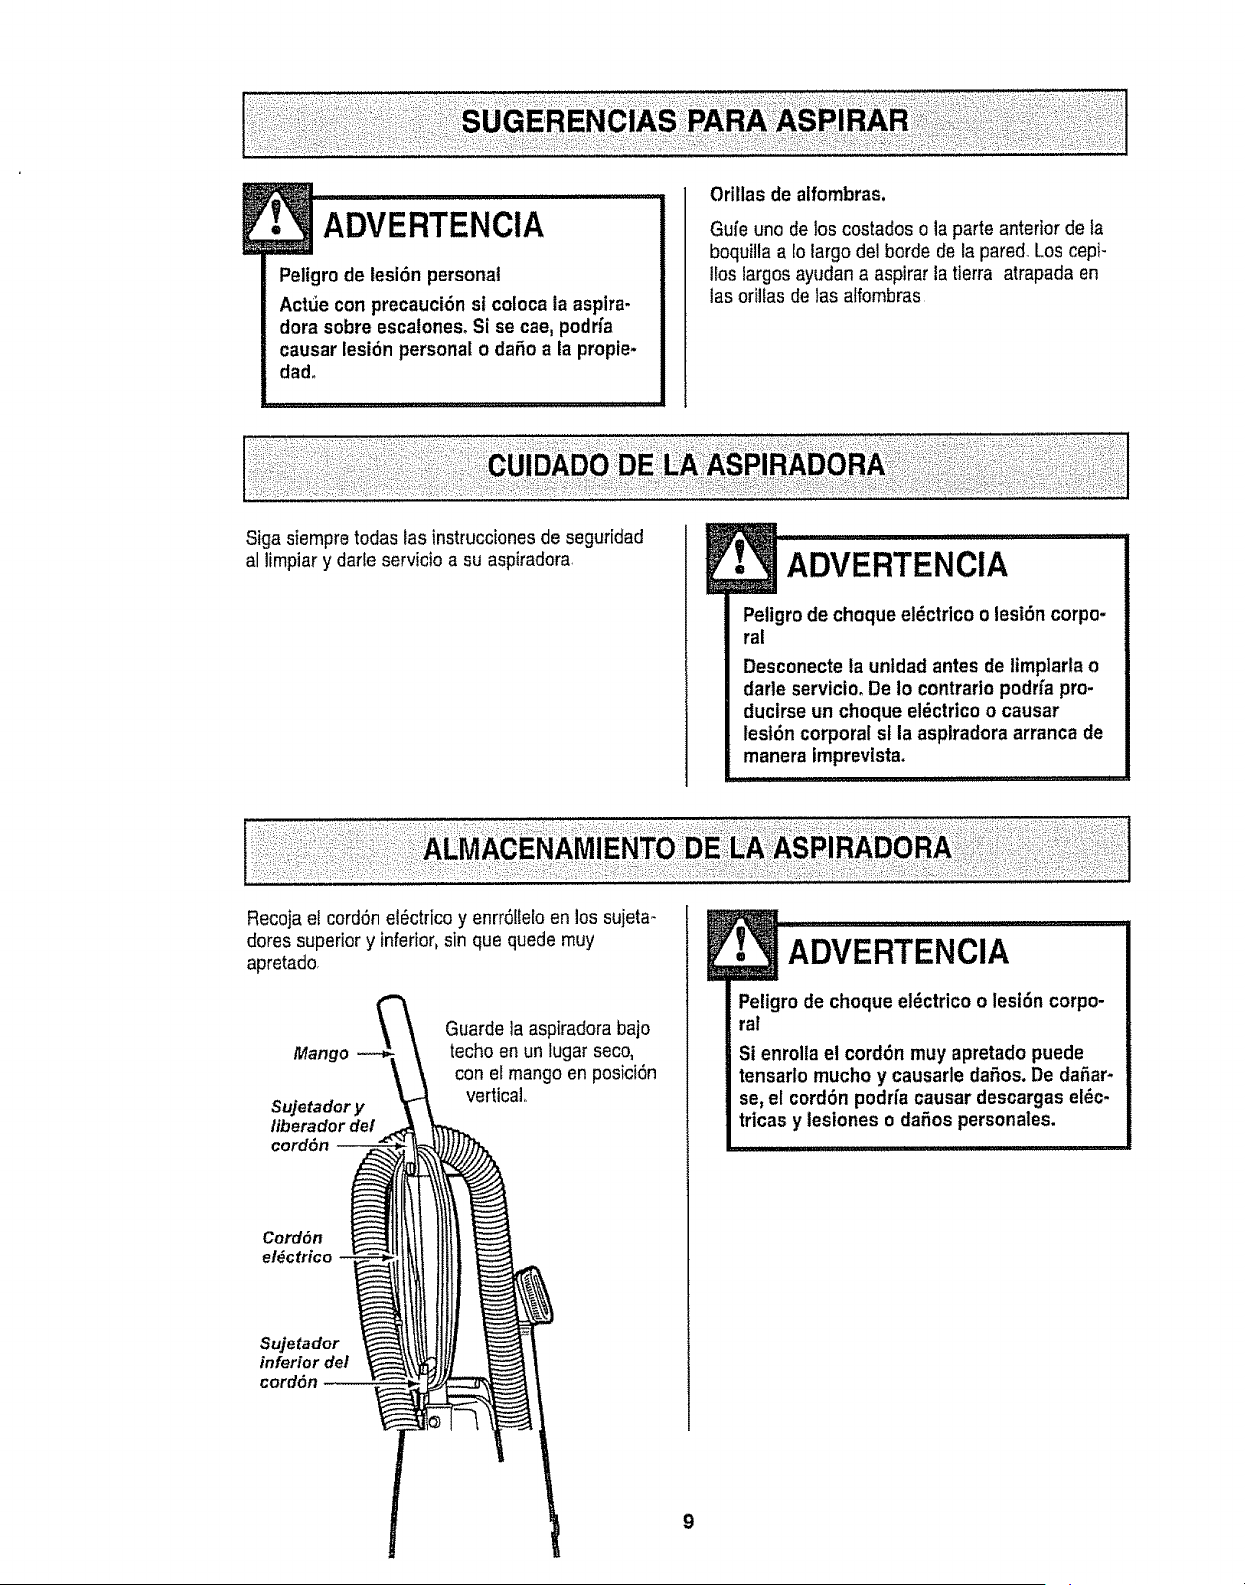
ADVERTENClA ...............................
Peligro de iesi6n personal
Acttie con precauci6n st coloca la aspira-
dora sobreescalonesoSi se cae, podfia
causar lesi6n personal o da_o a la propie-
dad_
Orillas de alfombras.
Gufe unode los costados o la parteanterior de la
boquilla a Iolargo de! borde de la pared. Los cepi-
Ilos largosayudan a aspirarta tierra atrapada en
las orilias de las alfombras
Siga siempre todaslas instruccionesde seguridad
al limpiar y darle servicio a su aspiradora
• ADvERTENClA
Peligrode choque el_ctrico o lesi6n corpo-
ral
Desconecte ta untdad antes de limplarla o
darle servicio_De Io contrario podrfa pro-
ducirse un choque el_ctrlco o causar
lest6n corporal st la asplradora arranca de
manera lmprevista.
Recoja et cord6nel_ctricoy enrr61ieloenlos sujeta-
dores superiory inferior, sin que quede muy
apretado,
Mango
Sujetador y
/iberador del
cord6n
Guarde ta aspiradorabajo
techo en un lugar seco,
con el mangoen posici6n
vertical.
Cord6n
el_ctrico
Sujetador
inferior del
cord6n
ADVERTENCiA
Peligrode choque el_ctrico o lesi6n corpo-
ral
Si enrollael cord6n muyapretado puede
tensarlo mucho y causarle dafios. De dafiar-
se, el cord6n podrfacausar descargasel_c-
tricas y tesiones o dafiospersonales.
9
Desconecteel cord6nel_ctrico de la ctavijade la
pared.NO choree agua sobre la aspiradora,
Limpie el exterior con untrapo suave y Iimpio,que
ha sido exprimidodespu_s de remojar en una solu-
ci6n de ague y detergente lfquido ligero Sequeel
exterior conun traposeco despu_s de fimpiar.
Limpie la superficieexterior dei recept_culoy de los
accesorios para reducir la electricidadest_tica y ta
acumWaci6ndepolvo,
Lavelosaccesoriosenaguatibiajabonosa,
enjuague y deje secar al aire. No los lave en lava-
dora deplates.
NO USE LOS ACCESORIOSSl EST_,NMOJA-
DOS.
cUIDADO ....
Los accesorios que se utilicenen _reas
suctas, debajo del refrtgerador, no deben
usarse en otras superficiessin antesser
lavados, Podriandejar marcas.
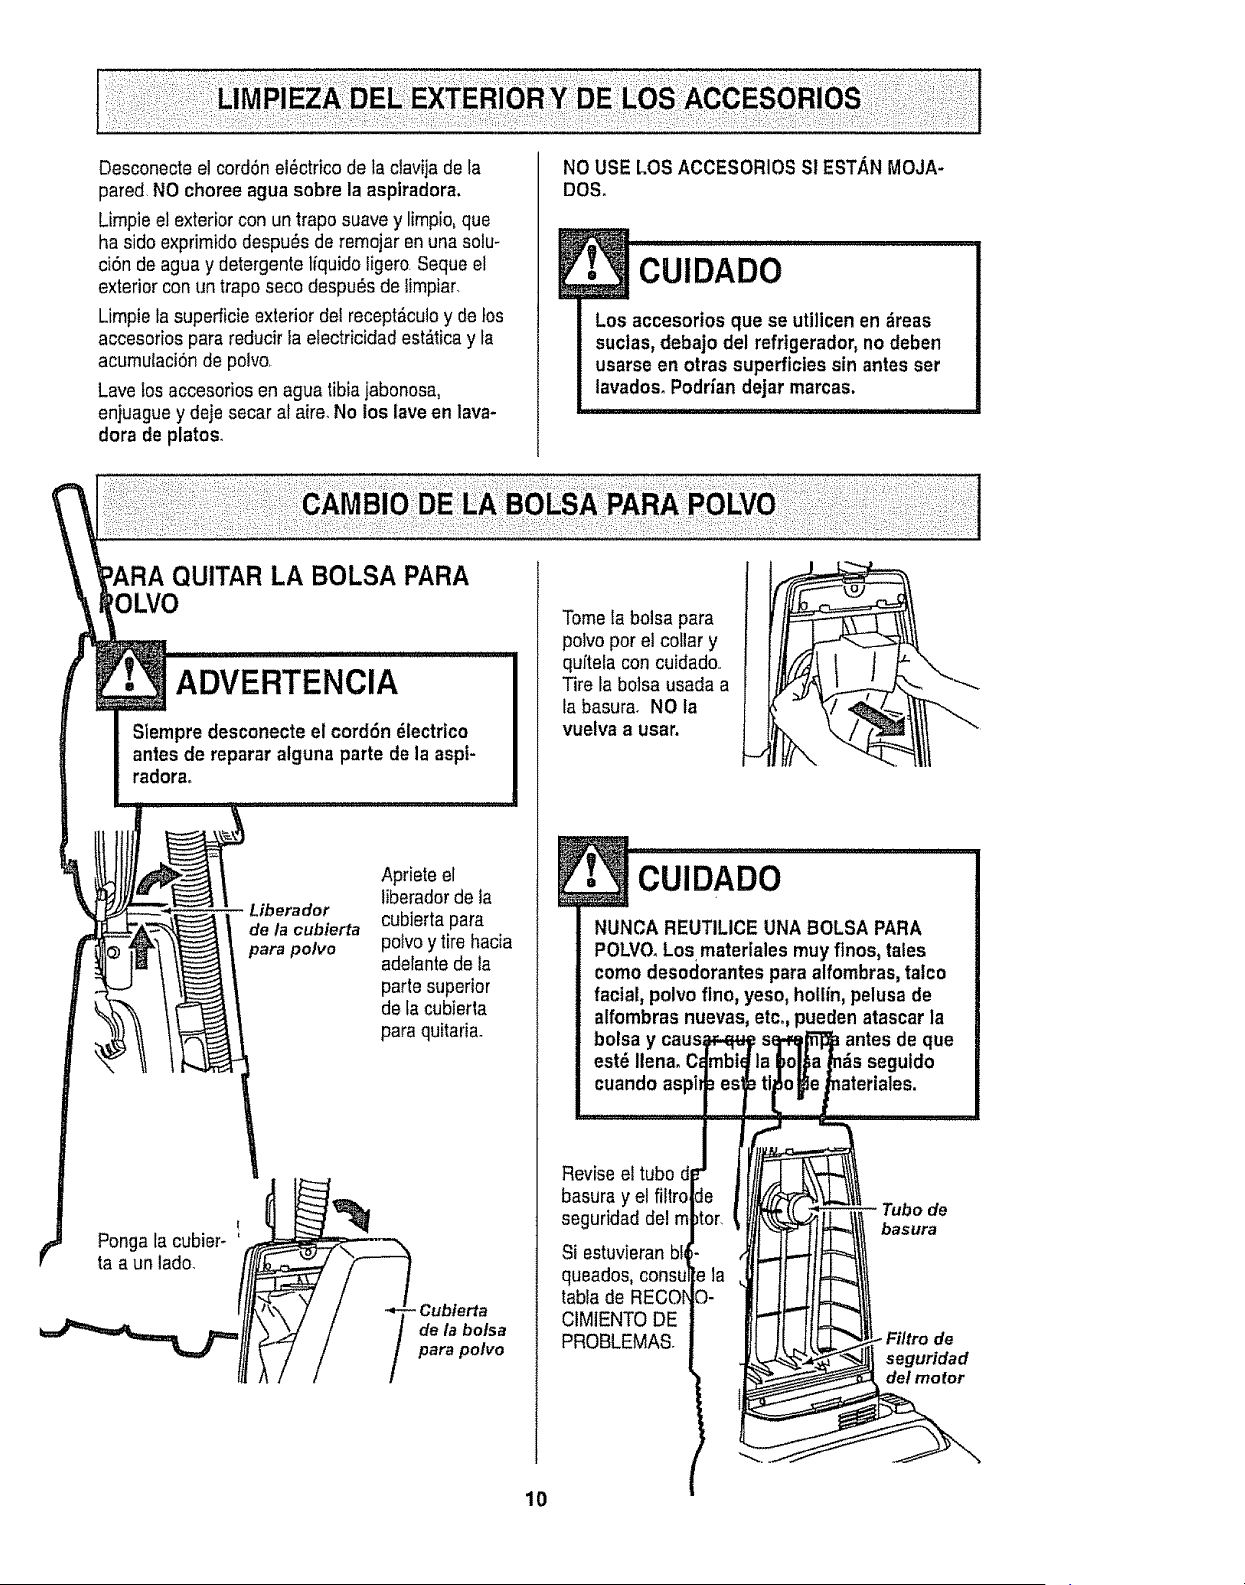
QUITARLA BOLSAPARA
'OLVO
ADVERTENCIA
Slempredesconecte el cord6n _iectrtco
antes de reparar alguna parte de la aspf-
radora.
de la cubierta
pare polvo
Apriete el
liberador de la
cubierta pare
potvoy tire hacia
adelantede la
parte superior
de lacubierta
pare quitaria.
|
Ponga la cubier- '
ta a un lado.
,Cubierta
de la boise
pare polvo
Tomela bolsa pare
polvopor el collar y
quftetacon cuidado..
Tire tabolsa usada a
la basura. NO ta
vuelva a user.
E
NUNCA REUTILICEUNA BOLSA PARA
POLVO.Los matertalesmuy flnos, tales
come desodorantes pare alfombras, talco
facial, polvo flno, yeso, hotlin, pelusa de
alfombras nuevas, etco,pueden atascar la
bolsa y antes de que
Reviseel tubo
basura y el
seguridad del
Siestuvieranbf
queados, consu
table de
CIM1ENTODE
PROBLEMAS
Tubo de
basura
Filtro de
seguridad
de/motor
10
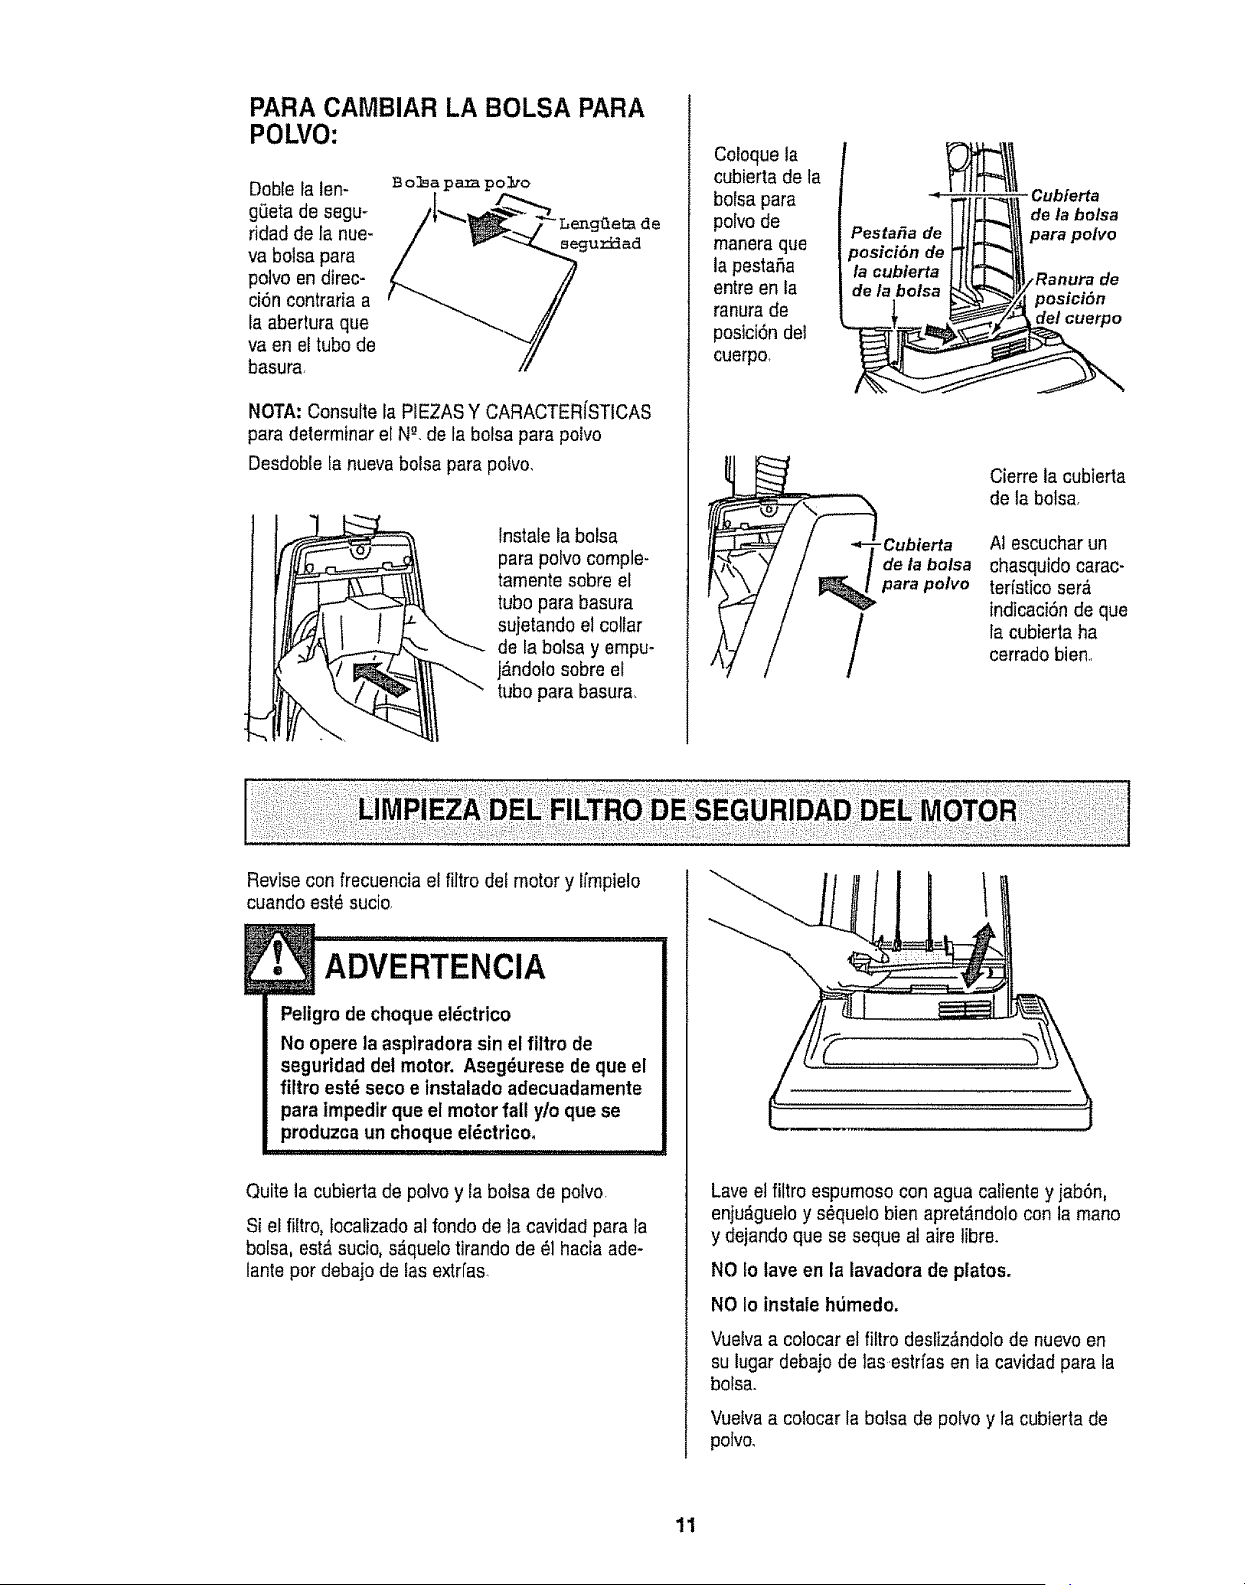
PARA CAMBIAR LA BOLSA PARA
POLVO:
Doble falen-
gQetade segu-
ridad de la nue-
va bolsa para
polvo en direc-
ci6n contraria a
taabertura que
va en eEtubo de
basura.
Bolsapazapolro
NOTA: Consultela P1EZASY CARACTERfSTICAS
para determinar elN°-.de la bolsa parapolvo
Desdoble fanuevabolsa para polvo.
Instale la bolsa
para polvo comple-
tamente sobre el
tubo para basura
sujetando el collar
de la bolsa y empu-
j_.ndolosobre el
tubo para basura.
Coloquela
cubierta de la
bolsa para
polvode
manera que
la pestaSa
entre en la
ranura de
posici6n del
cuerpo,
Cubierta
detabolsa
Pesta_a de parapolvo
posici6n de
la cubierta de
defa bolsa posici6n
cuerpo
para polvo
/
Cierre la cubierta
de la botsa.
AJescucharun
chasquido carac-
terfstico ser,_
indicaci6n de que
la cubierta ha
cerradobien,
Revisecon frecuencia elfiltro del motor y ffmpielo
cuando est_ sucio,
E• ADVERTENCIA
Peligro de choqueel_ctrico
No opere la asplradora sin el filtro de
segurtdaddel motor. Aseg4urese deque el
filtro est_ secoe instaladoadecuadamente
para Impedirque et motor fall ylo que se
produzca un choqueel_ctricoo
Quite la cubierta de polvo y la bolsa de polvo.
Si el _tro, focalizadoat rondode la cavidad para ta
bolsa, est_ sucie, s_quelotirando de _1haciaade-
lantepor debajo de las extri'as
Laveetfiltro espumoso con agua caliente yiab6n,
enju,_gueloy s_queto bien apret_ndolo con la mano
y dejando que seseque a! aire libre.
NO Io lave en la lavadora de platos.
NO Io instale h_medo.
Vuelvaa colocar el fittro desliz_ndolo de nuevo en
su lugar debajo de 1as.estrfasen la cavidad para la
bolsa.
Vuefvaa cotocarla bolsa de pofvo y la cubierta de
pofvo.
11
ADVERTENClA
!
Peligrode choque el_ctrico o lesl6ncorpo-
ral
Desconectela unidadantes de llmplarla o
darte servictoo De Io contrartopodr{aprodu-
clrse un choqueei_ctrico o causar lesi6n
corporal si la asplradoraarranca demanera
imprevista,
Frecuentementerevise el ,_readel cepittoy quite
todo pelo, cord6n o pelusa que se hayaacumulado.
Si la acumulaci6n es excesiva,siga las instruc-
clones a continuaci6n Si la correa se aflojara o
rompiera, siga las instruccionespara quitar la cor-
rea.
PARAQUITAR LA PLACAR
INFERIOR
Desenchufe launidad do lacorriente el_ctrica
Ponga elmango de ta aspiradoraenposici6n
horizontal y voltee la unidaddo cabeza.
Paraproteger la superficiedel suelo, siempre ponga
papel debajo de la boca de tam_quina cuandoso
saca la placa inferior_
Libere la placainferiorhaciendopresi6nsobre las
pesta_,asen direcci6n atcentro.
Tome laspresilfasde la parte posterior y tire hacia
adelatey haciaarriba para quitar la piaca inferior
Cepilleoquite cualquierresiduoque est_en al area
de correaso
Pestafias
E ADVERTENClA ...........
Peligro de lesi6n personal
Stempre desenchufela aspiradoraantes de
ltmpiarel _rea del cepillo, ya que _ste
podr_aempezara funclonar repentlna-
mente° No hacerlo podfia resuttaren una
lesi6n personal.
12
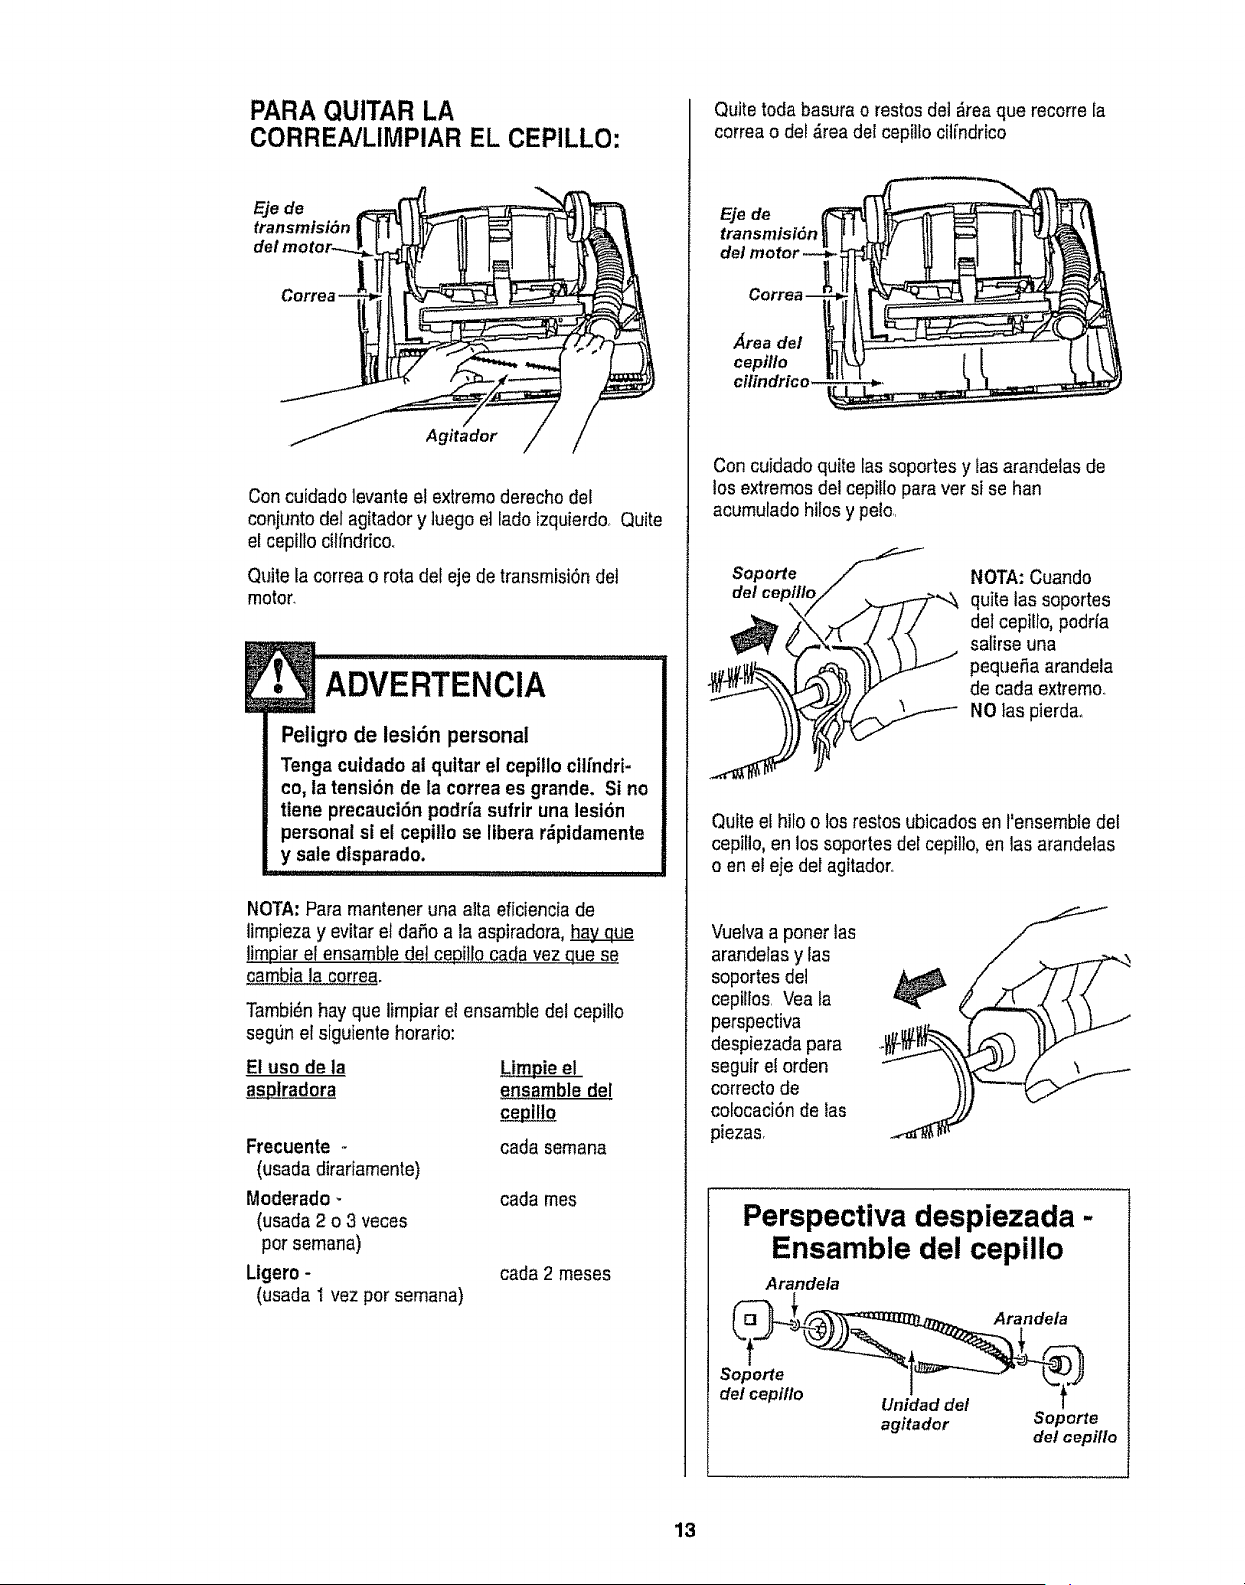
PARA QUITAR LA
CORREA/LIMPIAR EL CEPILLO:
Eje de
transmisi6n
del m_
Concuidado]evanteel extremoderechodel
conjuntodel agitadory tuegoel lado izquierdo. Quite
el cepillocilfndrico.
Quite la correa o rota del eje de transmisi6ndet
motor.
• ADVERTENClA
Peligro de lesi6n personal
Tengacutdado ai quttar el cepillo cilfndri-
co, ta tensi6n de la correaes grande. Si no
tiene precauci6n podrfasufrir una lesi6n
personal si el cepi!lo se libera r_pidamente
y sate dlsparado.
ii I'I'I'I"MIHI,' i' ii...............
NOTA:Para mantener una alta eficienciade
limpieza y evitar eldaSoa la aspiradora,
limpiaret ensamble detcepillo cada vez que se
cambia la correa.
Tambi_nhayque limpiar el ensambie del cepillo
segunef siguiente horatio:
E! uso de la Limpie el
asplradora ensambledel
Frecuente - cada semana
(usadadirariamente)
Moderado _ cada met
(usada2 o 3 veces
pot semana)
Ligero - cada2 meses
(usada 1 vez por semana)
Quitetodabasurao restosdet _reaque recorre la
correaodel _rea del cepilto cilfndrico
Ejede
transmlsi6n
det
_rea de/
cepillo
Con cuidadoquite las soportesy lasarandelasde
los extremosdel cepiilo para ver sise han
acumulado hilosy pe!O.r
Soporte "-'/_"_ NOTA:Cuando
de/cepill_i/_,,_ quitelas soportes
__,,_ detcepitfo,podrfa
salirse una
pequefia arandela
de cadaextremo.
'_ NOtas pierdao
Quite ethilo o los restosubicados en I'ensembledel
cepillo, en los soportes detcepillo, en las arandelas
o en el eje deragitador.
Vuelvaa poner las
arandelasy las
soportes del
cepillos. Vea ta
perspectiva
despiezada para
seguirel orden
correctode
colocaci6nde las
piezas.
Perspectiva despiezada-
Ensamble del cepillo
Arandela
_.! Arandela
agitador Soporte
det cepillo
13
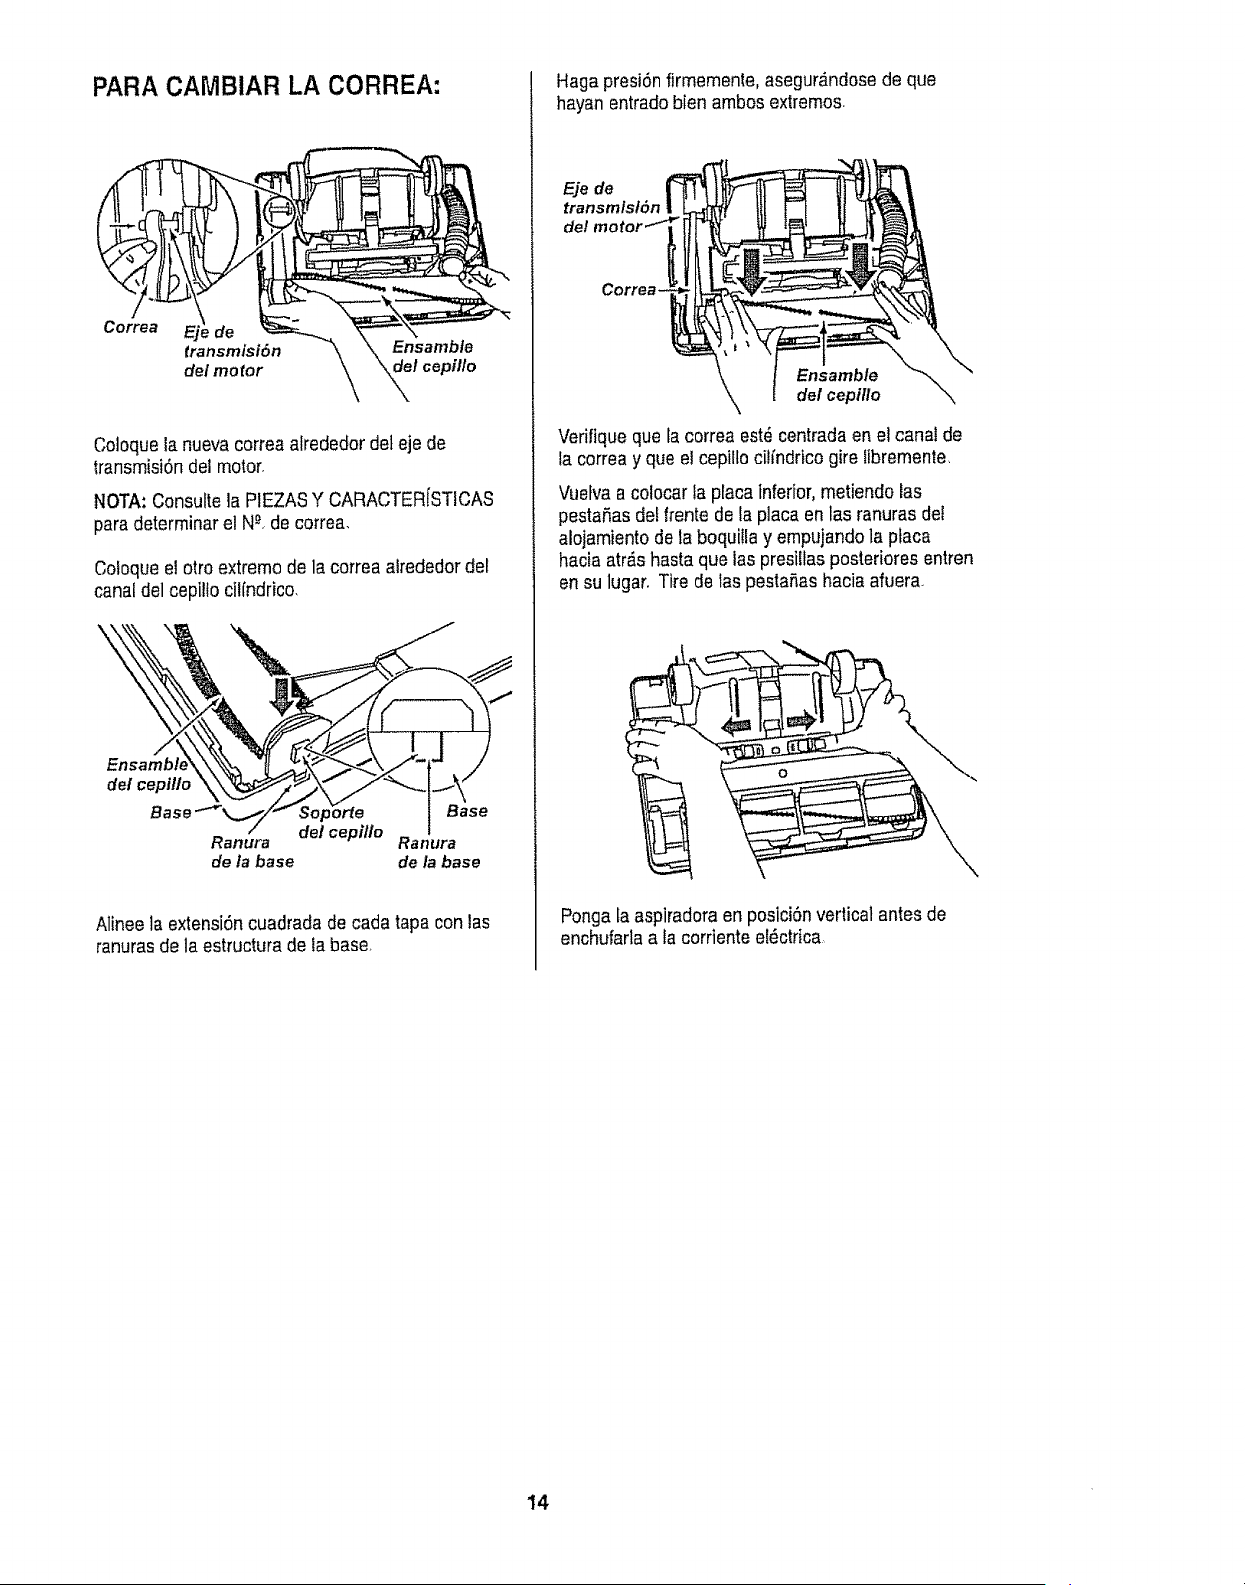
PARA CAMBIAR LA CORREA:
Coloquela nuevacorreaalrededor deleje de
transmisiSndei motor,
NOTA:Consultela PIEZASY CARACTERfSTICAS
paradeterminar el N&de correa,
Cotoqueel otroextremo de la correaalrededor del
canaldel cepillo cilfndrico,
del cepi!lo
Rarlura
de la base
del cepillo Ranlra
de la base
Alinee la extensiSncuadradade cada tapa con las
ranurasde la estructura de la base
HagapresiSnfirmemente, asegur,_ndosede que
hayanentradobien ambos extremos.
Ejede
transmlst6n
del
Ensamble
del cepillo
Verifique que la correa est_ centradaen e]canal de
la correa yque el cepiltocilfndrico gire fibremente,
Vuefvaa colocar la placainferior, metiendo las
pestaSasde!frente de la placa en las ranurasdet
alojamiento de la boquilla y empujandola ptaca
hacia atr_sbasra que las presillasposteriores entren
en su lugar, Tire de laspesta5as haciaafuera
Ponga la aspiradoraen posiciSnverlica! antes de
enchufarla a la corriente e!_ctrica,
14
ADVERTENCIA
Petigrode choque el_ctrico o lesion corpo-
ral
Desconectela untdad antesde limpiarla o
darle serviclo,De io contrario podrfa produ-
cirse un choqueeldctricoo causar lesiSn
corporal sl la aspiradora arranca de manera
imprevtsta.
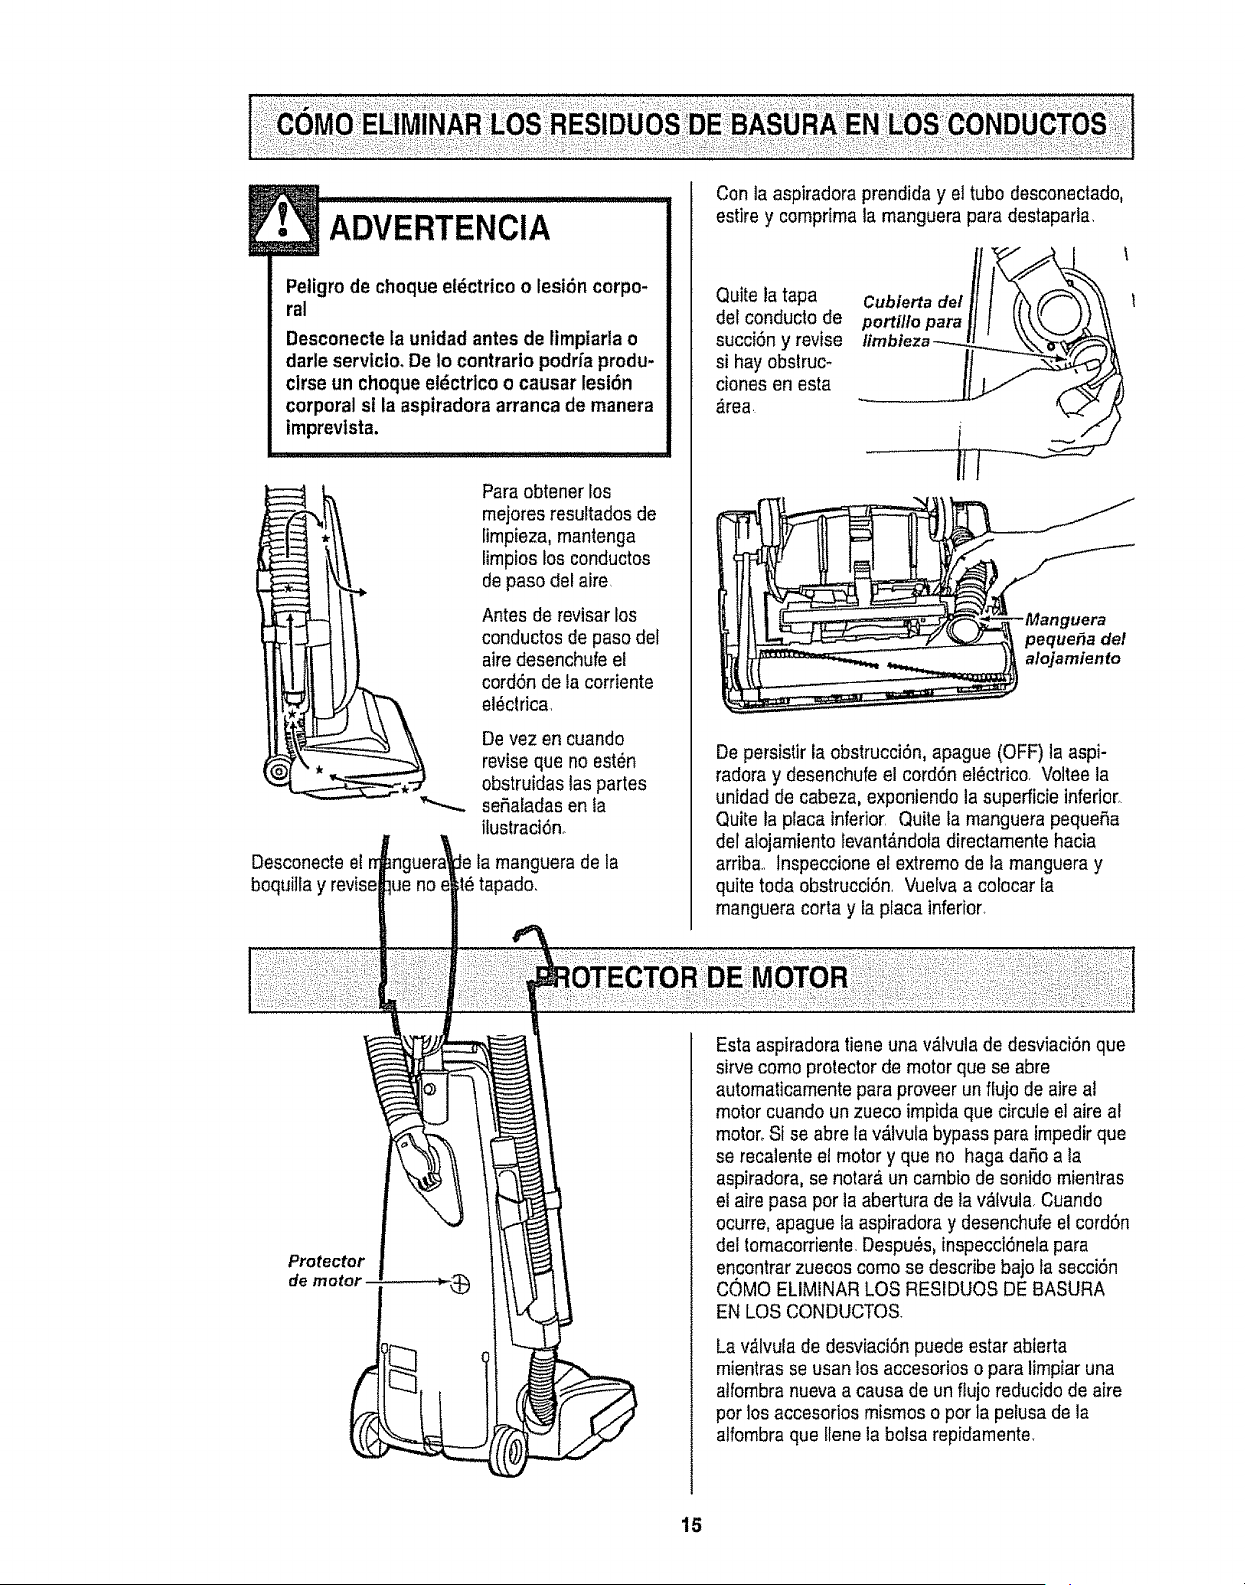
Paraobtener los
rnejoresresultadosde
limpieza,mantenga
limpios los conductos
depaso del aire
Antes de revisar los
conductos de pasodel
aire desenchufeel
cordSnde la corriente
el_clrica,
Devez en cuando
reviseque no est_n
obstruidas tas partes
sefialadas en ta
ilustraci6n_
Desconectee!
boquilla y
Jela manguera de la
_ado,
Conla aspiradoraprendiday eltubo desconectado,
estire y comprima la manguera para destaparla,
Quite la tapa
del conducto de
succi6n y revise
si hayobstruc-
ciones en esta
_rea.
Cubierta del
portillo para
Depersistirla obstrucci6n, apague (OFF) la aspi-
radora y desenchufeel cord6n el_ctrico, Volteela
unidad de cabeza, exponiendola superficieinferior,
Quite la placa inferior Quite la manguera pequefia
del alojamiento tevant_ndoladirectamente hacia
arriba, lnspeccione el extremode la mangueray
quite toda obstrucciSn, Vuelvaa colocar la
manguera corta y la placa inferior
Protector
de motoJ
Esta aspiradoratieneuna v_fvulade desviaciSnque
sirve como protectorde motor que se abre
automaticamente para proveerun flujo de aire at
motor cuandoun zueco impidaque circule el aire al
motor°Si se abre la v_lvula bypasspara impedir que
se recalente e! motor y que no haga daSoa la
aspiradora, se notar_ un cambio de sonido mientras
el aire pasa por laabertura de lav_lvula,Cuando
ocurre, apague la aspiradoray desenchufeel cordSn
def tomacorriente,Despu_s,inspecci6nelapara
encontrarzuecos como se describe bajo tasecciSn
COMO ELIMINARLOS RESIDUOS DE BASURA
ENLOS CONDUCTOS,
La v,_lvutade desviaciSnpuede estarabierta
mientrasse usanlos accesorios o para limpiar una
atfombranuevaa causa de un flujo reducidode aire
por losaccesorios mismos o por la pelusade la
alfombraque ffenela bolsa repidamente_
15
Consulteestecuadroparaencontrarsolucionesquaustedmismopuedereafizarcuanclotengaproblemas
menoresderendimiento.Cualquierservicioquanecesitespartadeotrosdescritosenestemanualtienenqua
serhechosperunrepresetantedeservicioautorizado
La asplradora no
funclona,
1. Est_desconectada
2, Cortactrcuitosbotadoo fuslble
quemadoenel tablerodeservicto
de la residencia
,3, Interrupterde encendidolapagado
no esl_en la posicidnON
No aspire 1.
sattsfactorlamertte,, 2.
3.
4,
5,
5.,
7,,
8,
La basura de sagede la
boisepars potvo,,
RestdcelTndelftujo deel
use de los accesorios.
Cambtede son|do,,
Bolsa pars polvo lfenao at_scada
Ceplffodesgastado,
Mangueradela boquIllaobstzuida.
Manguerao tubeobstruidos
Manguerarata
Correa rots
La manguera,tubenoest,_bienmetida.
Se dej6puestala boquillapars
huecosredueidos
1, VerHiquequalabolsa est6bien puesta
2. Bolsarote
3, Cubiertade la boiserealinstalada.
t_ Elusode losaccesorloslimila el
tlujodesire
2o Lapeiusadeunaallombranueva
obstruyeelpaso deatre.
1. Conectebten, opdmaselector de
eneendido/apagadoata posiclTnON
2_ Restablezcael cortacircuitoso
cambteeifuslbfe.
3.
Co!oqueel Interrupterde encendtdol
apagadoenlaposici6nON
1 Camblela boise,(p_g}nas11Tll)
2, Cambleel ceptito,(p_gtnas12-'_4)
3. Utopia la manguera,(p6gtna15)
4, Umple tamanguera,(p_gina15},
5,, Camblela manguera
6. Cambteia cortes,(p>nas12-14)
7, Metala manguera,tube,(p_gina6)
8_ Quite el tubey almac6nelodebtdamente
1. Vea lasinstrucctones,(p_ginas10.t 1)
2, Camblela boise
3_ Yea lasinstrucciones,(p_ginas10-1I),
1_ Lea elmanualdeinstrucciones,(p_gina8).
2,, Reviselasinslruccionesy ltmplala
manguera,(pagtnat5),
16
For
repair of major brand appliances in your own home...
no matter who made it, no matter who sold it!
1-800-4-MY-HOME ® Anytime, day or night
(1-800-469-4663) (US A and Canada)
www°sears.com www.sears.ca
For repair of carry-in products like vacuums, lawn equipment, and
electronics, call for the nearest Sears Parts and Repair Center.
:'_iliiLi!i_:::i:i
/,
r:_ :: ::':::: ;r
'1-800-488-1222 Anytime, day or night (USA. only) i;_;_i:'::i.
For the replacement parts, accessories and owner's manuals _::::,i:i
that you need to do-it-yourself, call Sears PartsDirectSM! :i:!i: :_!
1-800-366-PART 6 am, - 11 p.m., 7 days a week i' !.. :!
(1-800-366-7278) (U.SA only) ; '.
i
................................................................................................................................................................................................i;!;i : ,i
To purchase or inquire about a Sears Service Agreement _:i!::_:",::
or Sears Maintenance Agreement:
1-800-827-6655 (USA.) 1-800-361-6665 (Canada) i::":!:;;
7 a.m - 5 p.m, CST, Mon_- SaL 9 a.m. - 8 pro. EST, M - F, 4 pm. SaL i:::::::::::
: i
Pard pedir servicio de reparacidn a Au Canada pour service en fran_ais: , :
dornicilio, y pard ordenar piezas: 1-800-LE-FOYER Mc ,:
1-888._SU,_HOGARaM (!-800-533-6937) _!_'i:i:i
(1-888-784-6427) www.sears ca
S /AN
__::!::_,:_,/::::::'_i:_:::i.::!_!:_:, I HomeCentral I ....
@ Sears, Roebuck and Co..
® Registered Trademark t TMTrademarkt st._Service Marl{ of Sears, Roebuck and Co,
st_
® Marca Registrada / TMMarca de F,Sbrtca/ Marca de Servicio de Sears, Roebuck and Co
McMarque de commerce / MoMarque d_.posde de Sears, Roebuck and Co
17