Owner's Manual
Vacuum Cleaner
Model 116.38412
CAUTION:
Read and follow all
safety and operating
instructions before first
use of this product.
Sears, Roebuck and Co., Hoffman Estates, IL 60179 U.S.A.
Part No, CO1ZAPYOOU00-4370481 Printed in U.S,A.
Before UsingYour New Vacuum ..... 2
Kenmore Vacuum Cleaner Warranty _, 2
Important Safety Instructions ........ 3
Parts and Features ................. 4
Assembly instructions .............. 5
Operating instructions ............... 6
Pile Height Selection and Setting ........ 7
Carpet/Bare Floor Selector ............. 7
Releasing the Handle ................. 8
On/Off Switch ........................ 8
Attachments ..................... 8-10
Attachment Use Chart ............... I0
Vacuuming Tips .................... 11
Performance Features ............. 11-12
Vacuum Cleaner Care ................ 12
Vacuum Storage .................... 12
Cleaning Exterior and Attachments ....... 12
Bag Changing ..................... 13
Motor Safety Filter Changing ........ 14-15
Exhaust Filter Cleaning .............. t5
Belt Changing and Brush Cleaning ...16-18
Clog Removal ....................... 19
Ltght Bulb Changing ................. 20
Brush Servicing .................... 21
Agitator Assembly .................. 2t
Troubleshooting .................... 22
Requesting Assistance Or Service ., ,23
Please read this guide, it will help you assemble and operate your new Kenmore vacuum in
the safest and most effective way.
For more information about the care and operation, call your nearest Sears store. You will
need the complete model and serial numbers when requesting information° Your vacuum's
model and serial numbers are located on the Model and Serial Number Plate,
Use the space below to record the model number and sedal number of your new Kenmore
vacuum°
Model No.
Serial No.
Date of Purchase
Keep this book and your sales check (receipt) in a safe place for future reference.
LIMITED ONE YEAR WARRANTY ON KENMORE VACUUM CLEANER
This warranty is for one year from the date of purchase, and includes only private household
vacuum cleaner use. During the warranty year, when this vacuum cleaner is operated and
maintained according to the owner's manual instructions, Sears will repair any defects in
material or workmanship free of charge.
This warranty excludes vacuum bags, belts, light bulbs, and filters, which are expendable parts
and become worn during normal use.
For warranty service, return this vacuum cleaner to the nearest Sears Service Center in
the United States.
This warranty applies only while this product is in use in the United States_ This warranty gives
you specific legal rights, and you may also have other rights which vary from state to state°
Sears, Roebuck and Co., D/817 WA, Hoffman Estates, IL 60179
Your safety is important to us. To reduce the risk of fire, electrical shock, injury
to persons or damage when using your vacuum cleaner, follow basic safety pre-
cautions including the following:
Read this manual before assembling or
using your vacuum cleaner,
Use your cleaner only as described in
this manual. Use only with Sears recom-
mended attachments.
To reduce the risk of electrical shock -
Do not use outdoors or on wet surface&
Disconnect electrical supply before any
servicing or cleaning Failure to do so
could result in electrical shock or person-
al injury
Always turn cleaner off before unplug-
ging.
Do not unplug by pulling on cor& To
unplug, grasp the plug, not the cord.
Do not use with damaged cord or plug_ if
cleaner is not working as it should, has
been dropped, damaged, left outdoors, or
dropped into water, return it to a Sears
Service Center/Department,
Do not pull or carry by cord, use cord as
a handle, close door on cord, or pull cord
around sharp edges or corner& Do not
run cleaner over cord. Keep cord away
from heated surfaces
Do not leave cleaner when plugged in,
Unplug from outlet when not in use and
before servicing.
Do not allow to be used as a toy. Close
attention is necessary when used by or
near children°
Do not handle plug or cleaner with wet
hands°
Do not put any objects into openings.
Do not use with any opening blocked;
keep free of dust, lint, hair and anything
that may reduce air flow.
Keep hair, loose clothing, fingers, and all
parts of body away from openings and
moving parts.
Do not use cleaner without dust bag
and/or filters in place
Always change the dust bag after vacu-
uming carpet cleaners or freshener, pow-
ders and fine dust. These products clog
the bag, reduce airflow and can cause
the bag to bursL Failure to change bag
could cause permanent damage to the
cleaner.
Do not use the cleaner to pick up sharp
hard objects, small toys, pins, paper, etc.
They may damage the cleaner or dust
bag.
Do not pick up anything that is burning
or smoking, such as cigarettes, matches,
or hot ashes.
Do not use cleaner to pick up flammable
or combustible tiquids (gasoIine, cleaning
fluids, perfumes, etc.), or use in areas
where they may be present, The fumes
from these substances can create a fire
hazard or explosion,
Use extra care when cleaning on stairs.
Do not put on chairs, tables, etc. Keep
on floor.
You are responsible for making sure that
your vacuum cleaner is not used by any-
one unable to operate it properly.
SAVE THESE INSTRUCTIONS
Proper assembly and safe use of your vacuum cleaner are your responsibilities° Your
cleaner is intended only for household use. Read this Owner's Manual carefully for
important use and safety information. This guide contains safety statements under
warning and caution symbols. Please pay special attention to these boxes and follow
any instructions given, WARNING statements alert you to such dangers as fire, electri-
cal shock, burns and personal injury_ CAUTION statements alert you to such dangers
as personal injury andlor property damage°
3
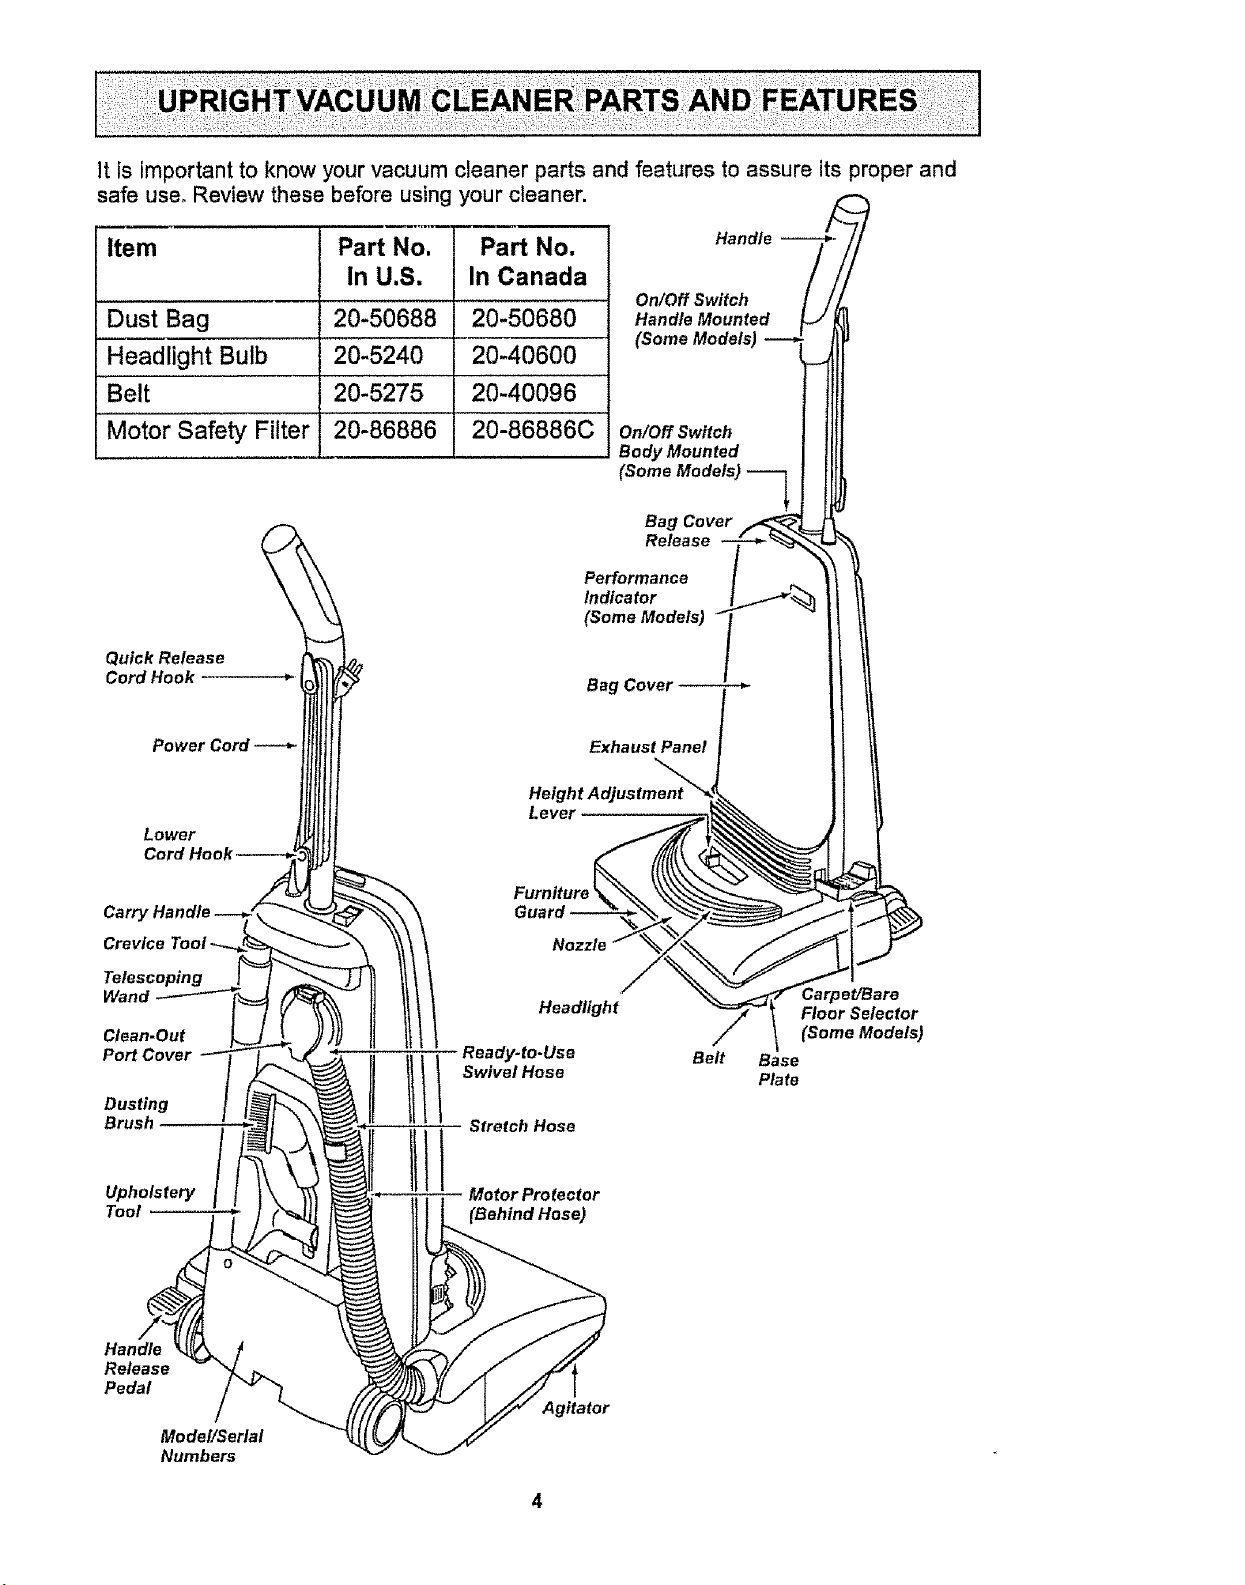
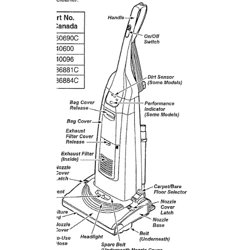
It is important to know your vacuum cleaner parts and features to assure its proper and
safe user Review these before using your cleaner.
Item
Dust _ag
Headlight Bulb
Part No,
In U.S.
20-50688
20-5240
Belt 20-5275
Motor Safety Filter 20-86886
Part No.
In Canada
20-50680
20-40600
2O-40096
20-86886C
Quick Release
Cord Hook ÷
Power Cord
Handt _.
On/Off Switch
Handle Mounted
(Some Models)
On/Off Switch
Body Mounted
(Some Models)
Bag Cove_
Release
Performance
Indicator
(Some Models)
Bag Cover -- -,-
Exhaust Panel
Height Adjustment
Lever
Lower
Cart}
Crevice
Telescoping
Wand
Clean.Out
Port Cover
Dusting
Brush
Upholstery
Tool
Headfight
Ready-to-Use
1 I Swivel Hose
Stretch Hose
1ttoo,
Belt
Carpet/Bare
Floor Selector
(Some Models)
Base
Plate
Handle
Release
Pedal
Model/Serial
Numbers
Agitator
Before assembling vacuum, check the
PACKING LIST on the cover of the separate
Repair Parts List. Use this list to verify that
you have received all the components of
your new Kenmore vacuum°
• WARNING
Electrical Shock Hazard
Do not plug Into the electrical sup-
ply until the assembly is complete.
Failure to do so could result in
electrical shock or injury.
HANDLE ASSEMBLY
Before assembling your vacuum cleaner
be sure you have all the parts shown.
Cord
Hooks
Hole
Opening
for Handle
Screw
Hole
Back of
Vacuum
Cleaner
Carry Handle
Screw
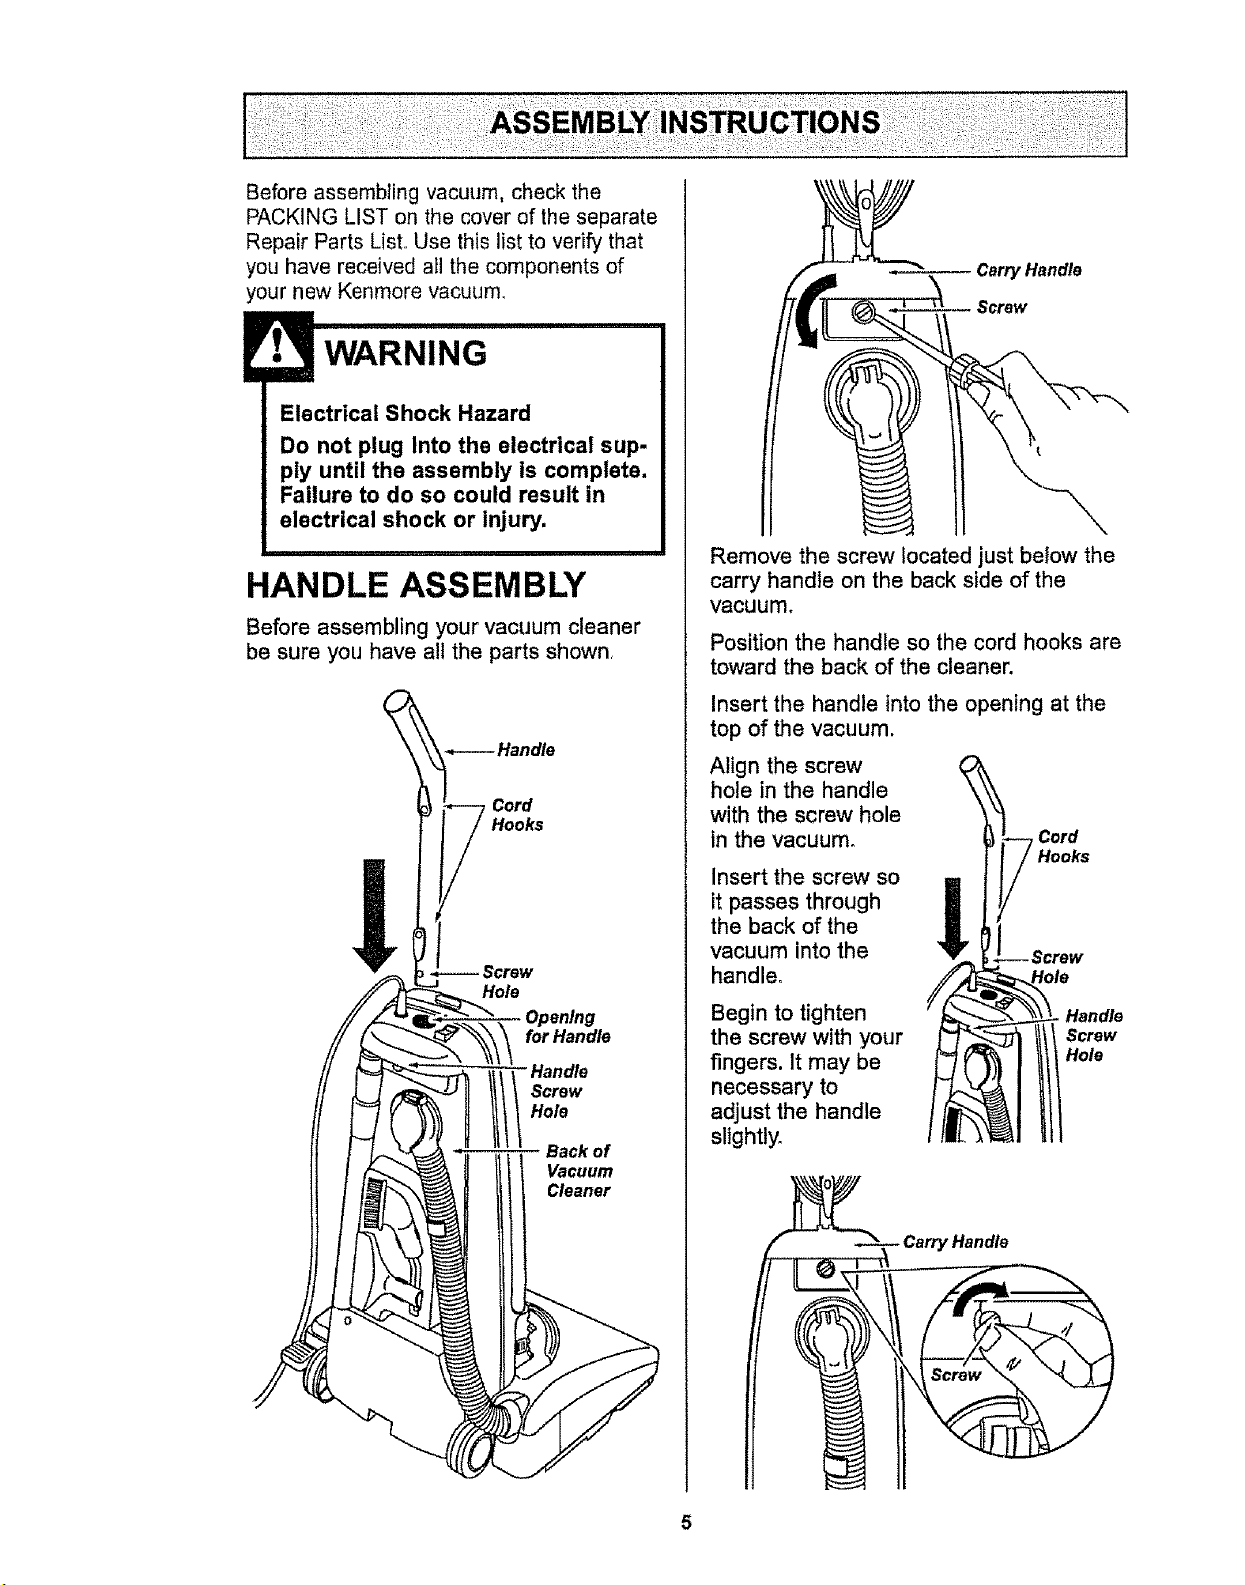
Remove the screw located just below the
carry handle on the back side of the
vacuum,
Position the handle so the cord hooks are
toward the back of the cleaner.
Insert the handle Into the opening at the
top of the vacuum.
Align the screw
hole in the handle
\
with the screw hole
in the vacuum°
Insert the screw so
Ill
it passes through
the back of the
vacuum into the
handle.
Begin to tighten Handle
the screw with your Screw
fingers. It may be Hole
necessary to
adjust the handle
slightly.
__ Carry Handle
/
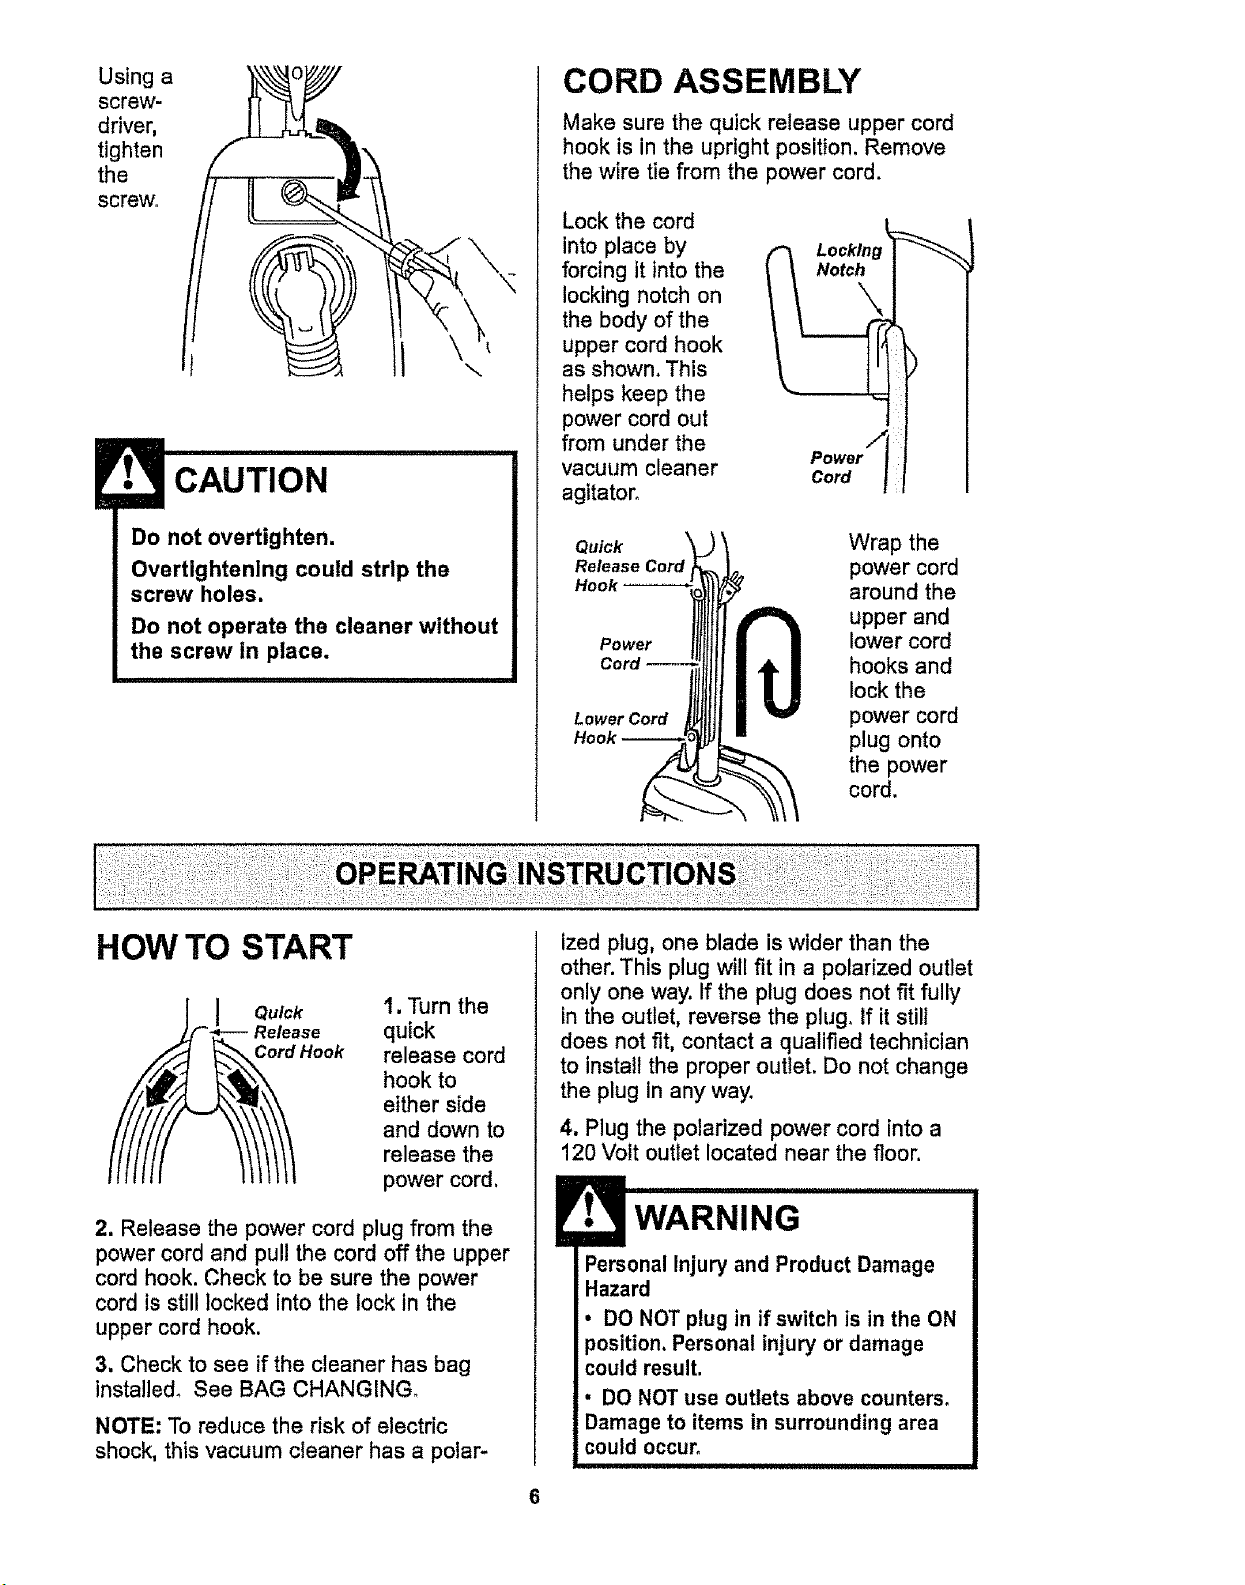
Using a
screw-
driver,
tighten
the
screw.
\
Do not overtighten.
Overtightening could strip the
screw holes,
Do not operate the cleaner without
the screw in place.
CORD ASSEMBLY
Make sure the quick release upper cord
hook is in the upright position. Remove
the wire tie from the power cord,
Lock the cord
into place by
forcing it into the
locking notch on
the body of the
upper cord hook
as shown. This
helps keep the
power cord out
from under the
vacuum cleaner
agitator,
Cord
Quick
Release
Hook
Power
Cord --
Lower Cord
Wrap the
power cord
around the
upper and
lower cord
hooks and
lock the
power cord
plug onto
the power
cord.
HOW TO START
1. Turn the
quick
release cord
hook to
either side
and down to
release the
power cord,
2. Release the power cord plug from the
power cord and pull the cord off the upper
cord hook. Check to be sure the power
cord is still locked into the lock in the
upper cord hook.
3, Check to see if the cleaner has bag
installed, See BAG CHANGING_
NOTE: To reduce the risk of electric
shock, this vacuum cleaner has a polar-
ized plug, one blade is wider than the
other. This plug will fit in a polarized outlet
only one way. If the plug does not fit fully
in the outlet, reverse the plug, If it still
does not fit, contact a qualified technician
to install the proper outleL Do not change
the plug in any way.
4. Plug the polarized power cord into a
120 Volt outlet located near the floor.
Personal Injury and Product Damage
Hazard
• DO NOT plug in if switch is in the ON
position, Personal injury or damage
could result.
, DO NOT use outlets above counters,
Damage to items in surrounding area
could occur,
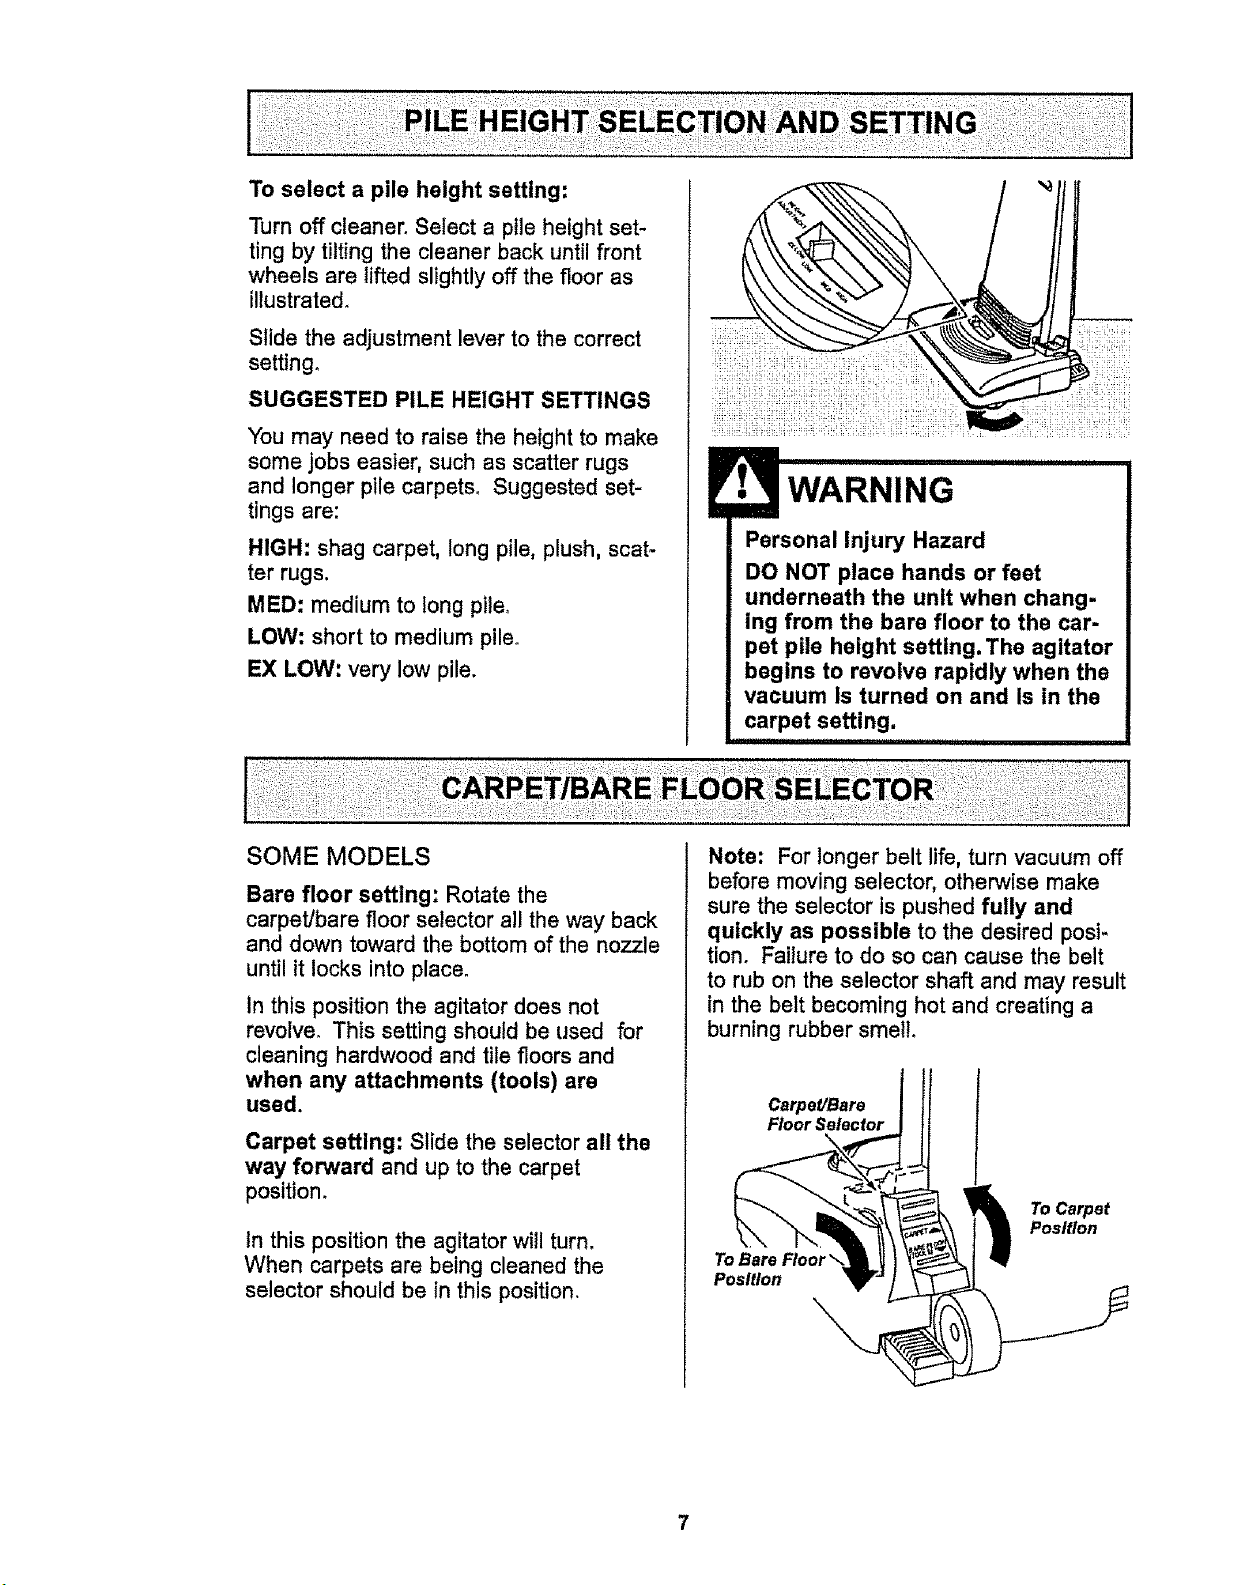
Toselect a pile height setting:
Turn off cleaner. Select a pile height set-
ting by tilting the cleaner back until front
wheels are lifted slightly off the floor as
illustrated_
Slide the adjustment lever to the correct
setting_
SUGGESTED PILE HEIGHT SETTINGS
You may need to raise the height to make
some jobs easier, such as scatter rugs
and longer pile carpets. Suggested set-
tings are:
HIGH: shag carpet, long pile, plush, scat-
ter rugs.
MED: medium to tong pile.
LOW: short to medium pile_
EX LOW: very low pile.
.............................
WARNING
Personal Injury Hazard
DO NOT place hands or feet
underneath the unit when chang-
Ing from the bare floor to the car-
pet pile height setting. The agitator
begins to revolve rapidly when the
vacuum is turned on and Is in the
carpet setting,
SOME MODELS
Bare floor settlng: Rotate the
carpet/bare floor selector al! the way back
and down toward the bottom of the nozzle
untilit locks into place.
In this position the agitator does not
revolve. This setting should be used for
cleaning hardwood and tile floors and
when any attachments (tools) are
used.
Carpet setting: Slide the selector all the
way forward and up to the carpet
position,
tn this position the agitator will turn.
When carpets are being cleaned the
selector should be in this position,
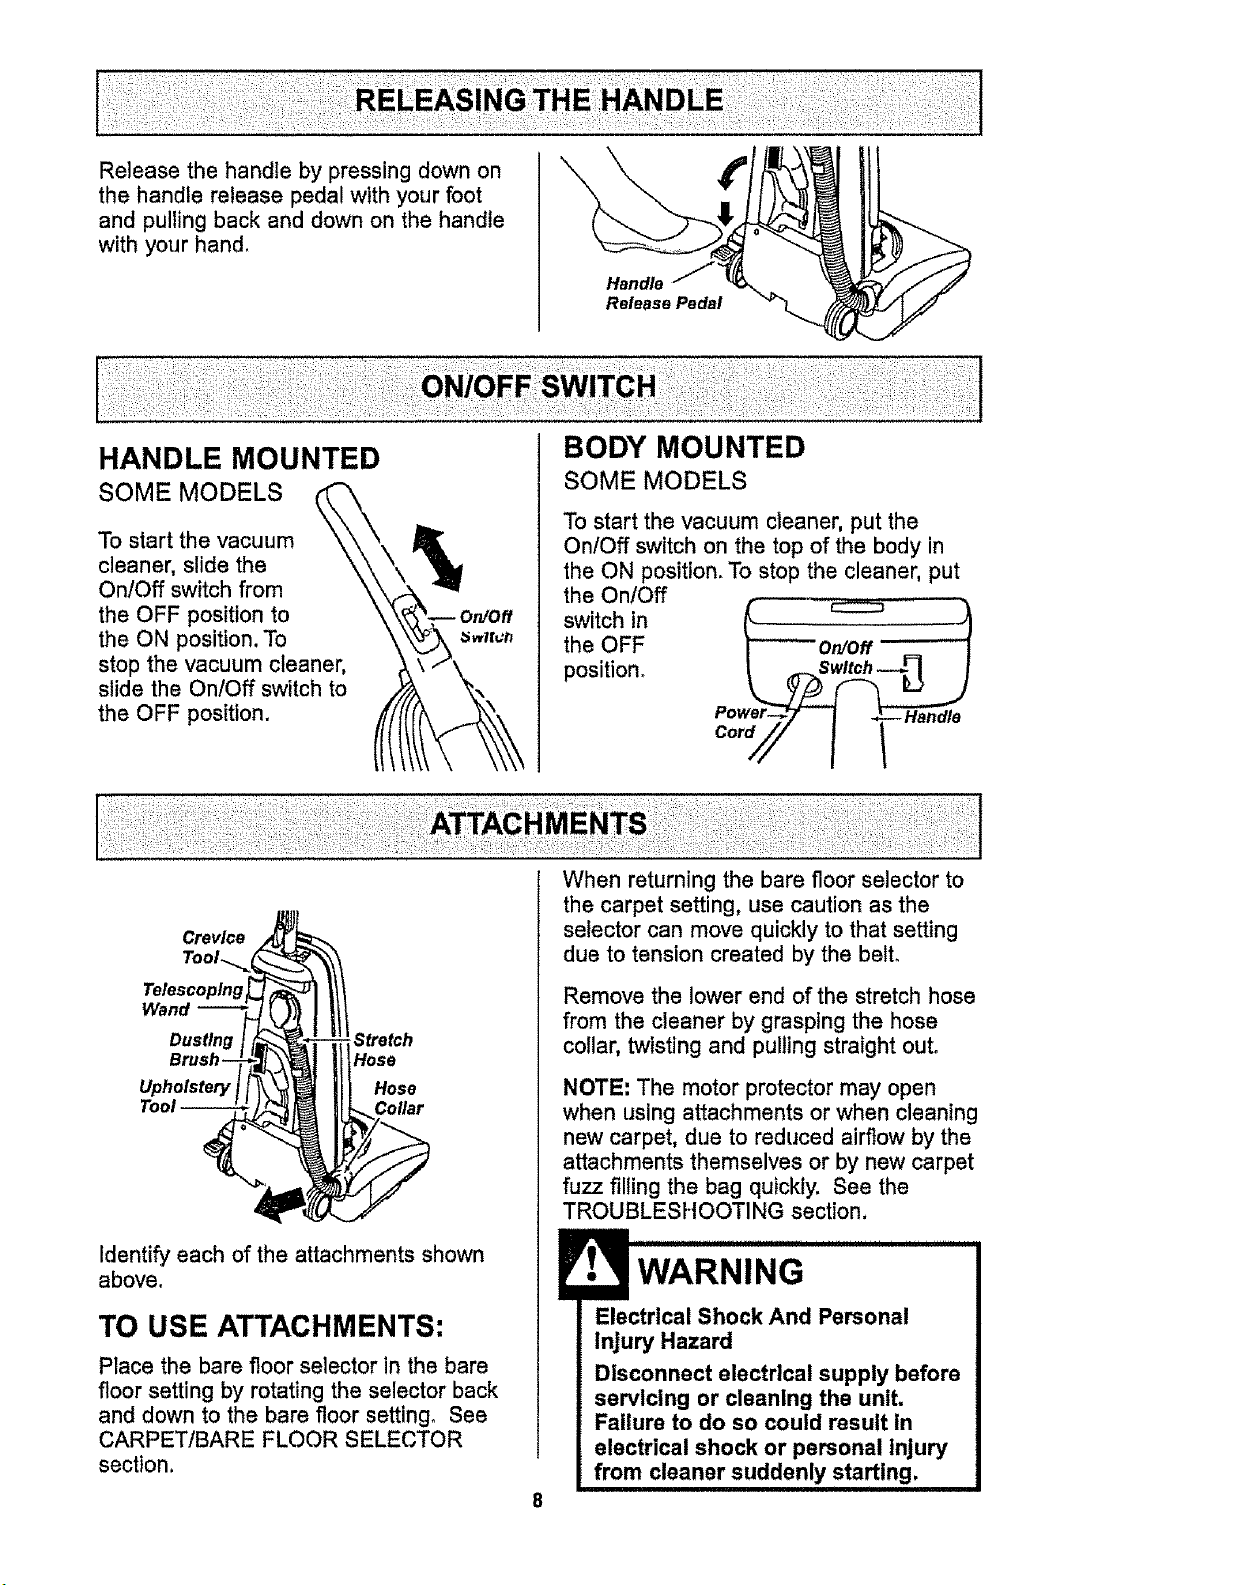
Note: For longer belt life, turn vacuum off
before moving selector, otherwise make
sure the selector is pushed fully and
quickly as possible to the desired posi-
tion. Failure to do so can cause the belt
to rub on the selector shaft and may result
in the belt becoming hot and creating a
burning rubber smell
Carpet/Bare
Floor Selector
To Carpet
Position
Position
Release the handle by pressing down on
the handle release pedal with your foot
and pulling back and down on the handle
with your hand.
Handle
Release Pedal
HANDLE MOUNTED
SOME MODELS
To start the vacuum
cleaner, slide the
On!Off switch from
the OFF position to
the ON position. To
stop the vacuum cleaner,
slide the On/Off switch to
the OFF position.
BODY MOUNTED
SOME MODELS
To start the vacuum cleaner, put the
On/Off switch on the top of the body in
the ON position. To stop the cleaner, put
theswitchOn/Offin _-_ i'
F---'-'On!Off I
the OFF
position.
Pewer-_. 7 I _ Handle
Crevice
Tool....
Telescoping
Dusting Stretch
Hose
Upholstery Hose
Collar
Identify each of the attachments shown
above.
TO USE ATTACHMENTS:
Place the bare floor selector in the bare
floor setting by rotating the selector back
and down to the bare floor setting° See
CARPET/BARE FLOOR SELECTOR
section.
When returning the bare floor selector to
the carpet setting, use caution as the
selector can move quickly to that setting
due to tension created by the belt.
Remove the lower end of the stretch hose
from the cleaner by grasping the hose
collar, twisting and pulling straight out.
NOTE: The motor protector may open
when using attachments or when cleaning
new carpet, due to reduced airflow by the
attachments themselves or by new carpet
fuzz filling the bag quickly. See the
TROUBLESHOOTING section.
WARNING
Electrical Shock And Personal
Injury Hazard
Disconnect electrical supply before
servicing or cleaning the unit.
Failure to do so could result in
electrical shock or personal Injury
from cleaner suddenly starting.
The attached
hose end swivels
to make cleaning
easier in every
direction_
Swivel
Telescoping
Wand
Remove the
telescoping
wand from
its storage
position°
Remove the crevice tool from its storage
position in the wand. Turn the locking ring to
the UNLOCK position. Extend the wand to
its full length, Turn the locking ring to the
LOCK position, Attach the extension wand
onto the open end of the hose,
[-_,_Wand -[_._,_ Control
\ Un_ock_."y Upper
Wand
TO OPERATE SUCTION CONTROL
SLIDE
TELESCOPING WAND
When using attachments for cleaning
draperies, sma!l rugs with low pile and other
delicate items, twist the suction control slide
to the open position. This slide is located on
the telescoping wand, close to the hose
This will reduce suction for ease of
cleaning.
NOTE - Return the suction control slide to
the closed position for normal cleaning,
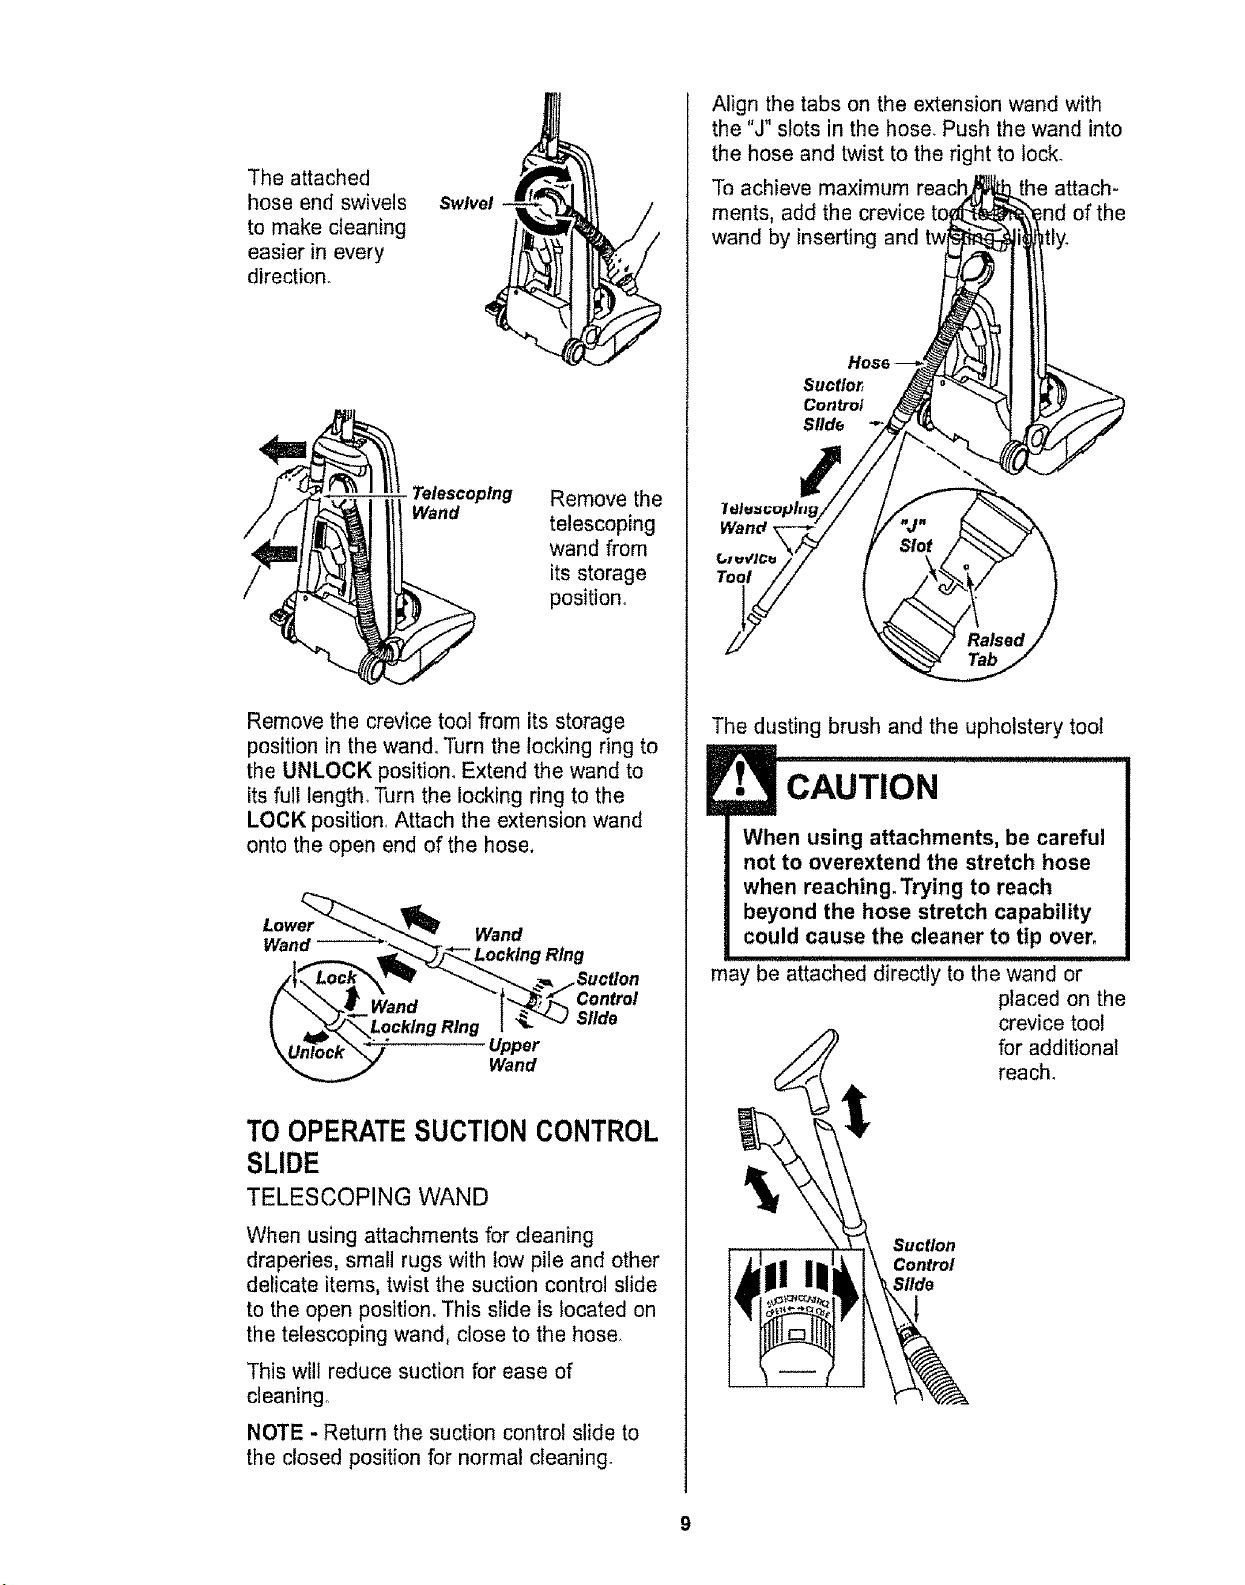
Align the tabs on the extension wand with
the "J" slots in the hose. Push the wand into
the hose and twist to the right to Iocko
To achieve maximum reach the attach-
ments, add the crevice of the
wand by inserting and ttly.
Suctlor,
Control
Slide
Wand,
f_e u¢lC_
Tool
The dusting brush and the upholstery tooI
When using attachments, be careful
not to overextend the stretch hose
when reaching, Trying to reach
beyond the hose stretch capability
could cause the cleaner to tip over,
may be attached directly to the wand or
placed on the
crevice too!
for additional
reach.
Suction
Control
Slide
TO STORE ATTACHMENTS:
Remove dusting brush or upholstery tool.
Snap into appropriate storage location.
Remove crevice tool from the wand by
twisting. Lay aside.
Remove the extension wand from the
hose. Twist the wand to the left and pull
from the hose end.
Unlock the wand by turning the wand
locking ring to the UNLOCK position.
Slide the lower wand into the upper wand.
Turn the wand locking ring to the LOCK
position.
Place the crevice tool down into the com-
pressed wand° Snap into the appropriate
storage location.
Be sure the unit is turned off. Reinsert the
hose fully into the opening on the lower
body from which it was removed. Press
firmly to assure connection.
! wARNING
Personal Injury Hazard
DO NOT place hands or feet under-
neath the unit when Inserting the
hose, The agitator begins to
revolve rapidly when the vacuum is
turned on.
iiiiii ii i iiiiiiiiii i i
!B CAUTiON
DO NOT pull the vacuum cleaner
around the room by the hose.
Property damage could result.
TO USE EXTENSION HOSE:
SOME MODELS
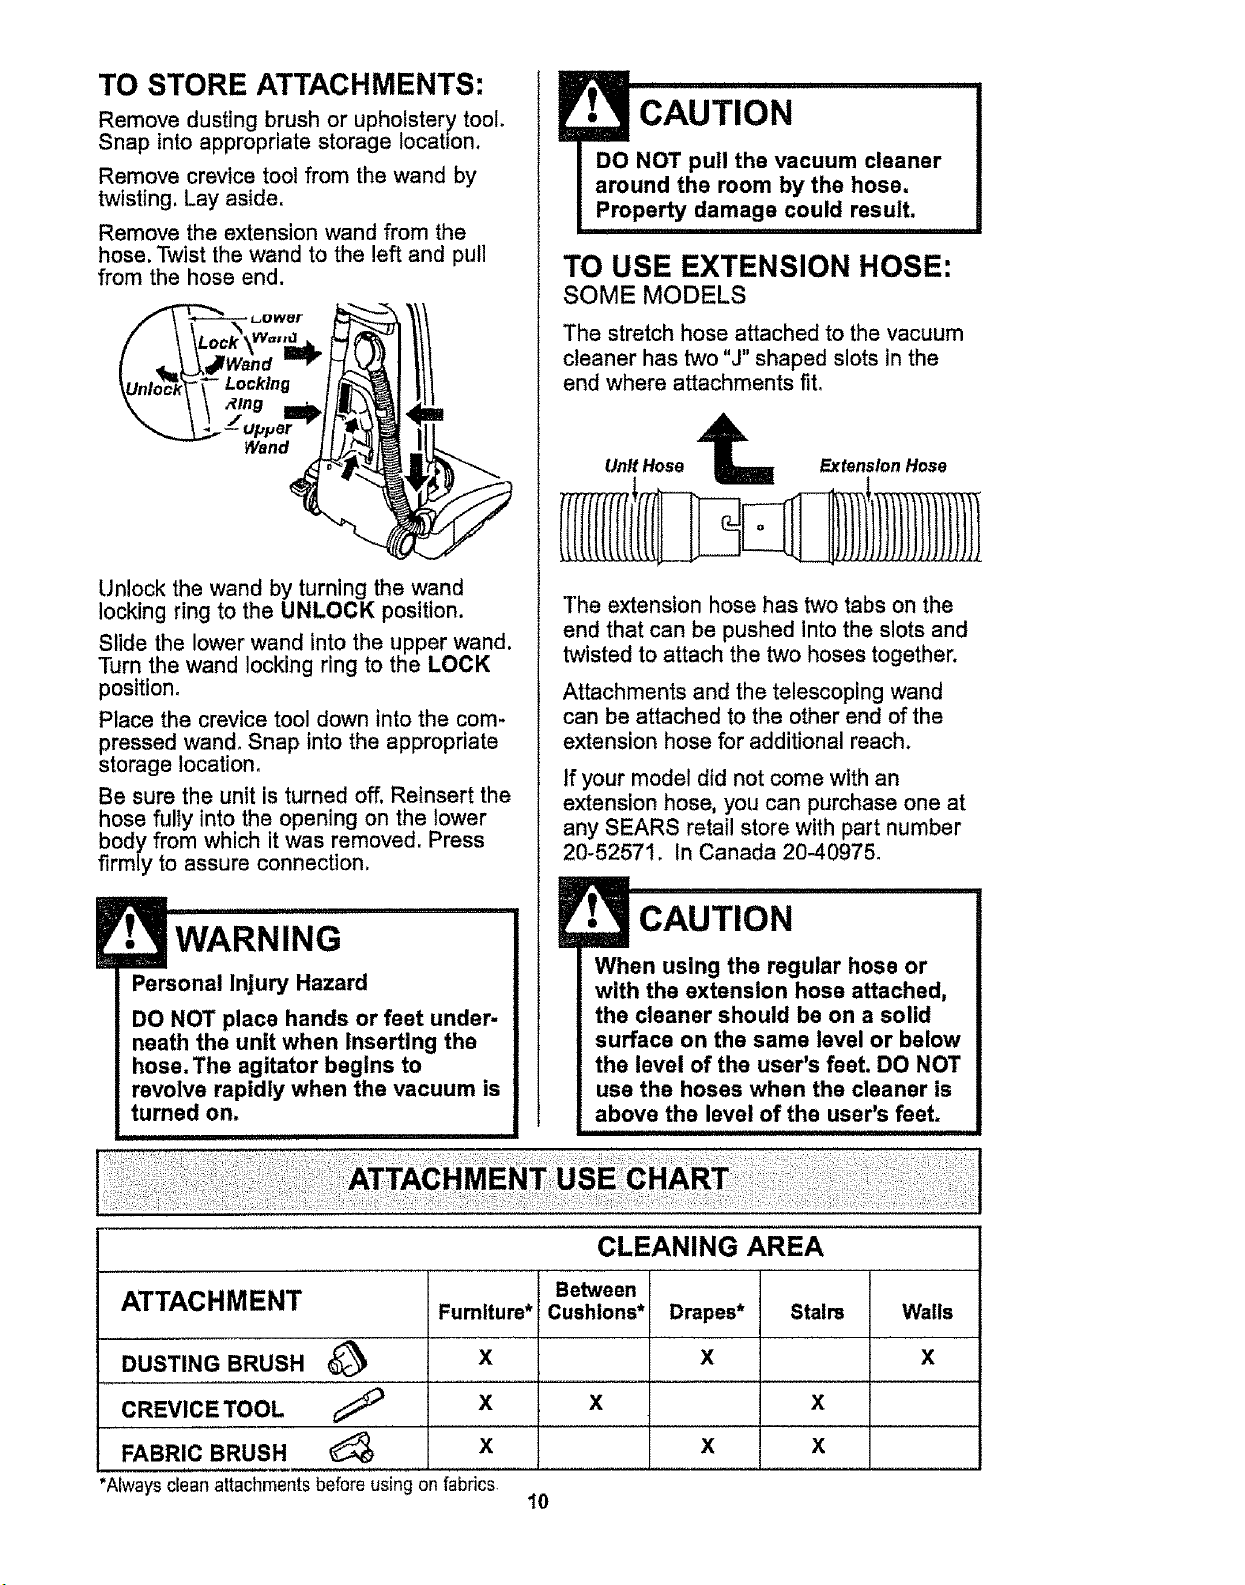
The stretch hose attached to the vacuum
cleaner has two "J" shaped slots in the
end where attachments fit.
Unit Hose _ Extension Hose
The extension hose has two tabs on the
end that can be pushed into the slots and
twisted to attach the two hoses together.
Attachments and the telescoping wand
can be attached to the other end of the
extension hose for additional reach.
if your model did not come with an
extension hose, you can purchase one at
any SEARS retail store with part number
20-52571. In Canada 20-40975.
!
• CAUTION
When using the regular hose or
with the extension hose attached,
the cleaner should be on a solid
surface on the same level or below
the level of the user's feet. DO NOT
use the hoses when the cleaner is
above the level of the user's feet.
CLEANING AREA
Between
ATTACHMENT Furniture* Cushions* Drapes* Stairs Walls
X X X
DUSTING BRUSH
X X X
CREVICE TOOL
X X X
FABRIC BRUSH
*Always clean attachmentsbefore using on fabrics,
10
Carpet edges.
Guide either side or the front of the noz-.
zle along a baseboard. The full length
brushes help remove dirt at carpet edges.
Stairs.
Put handle in full upright position. Use the
crevice too! or fabric brush°
Personal Injury Hazard
Use care If vacuum cleaner is
placed on stairs. If it falls, person-
al Injury or property damage could
result.
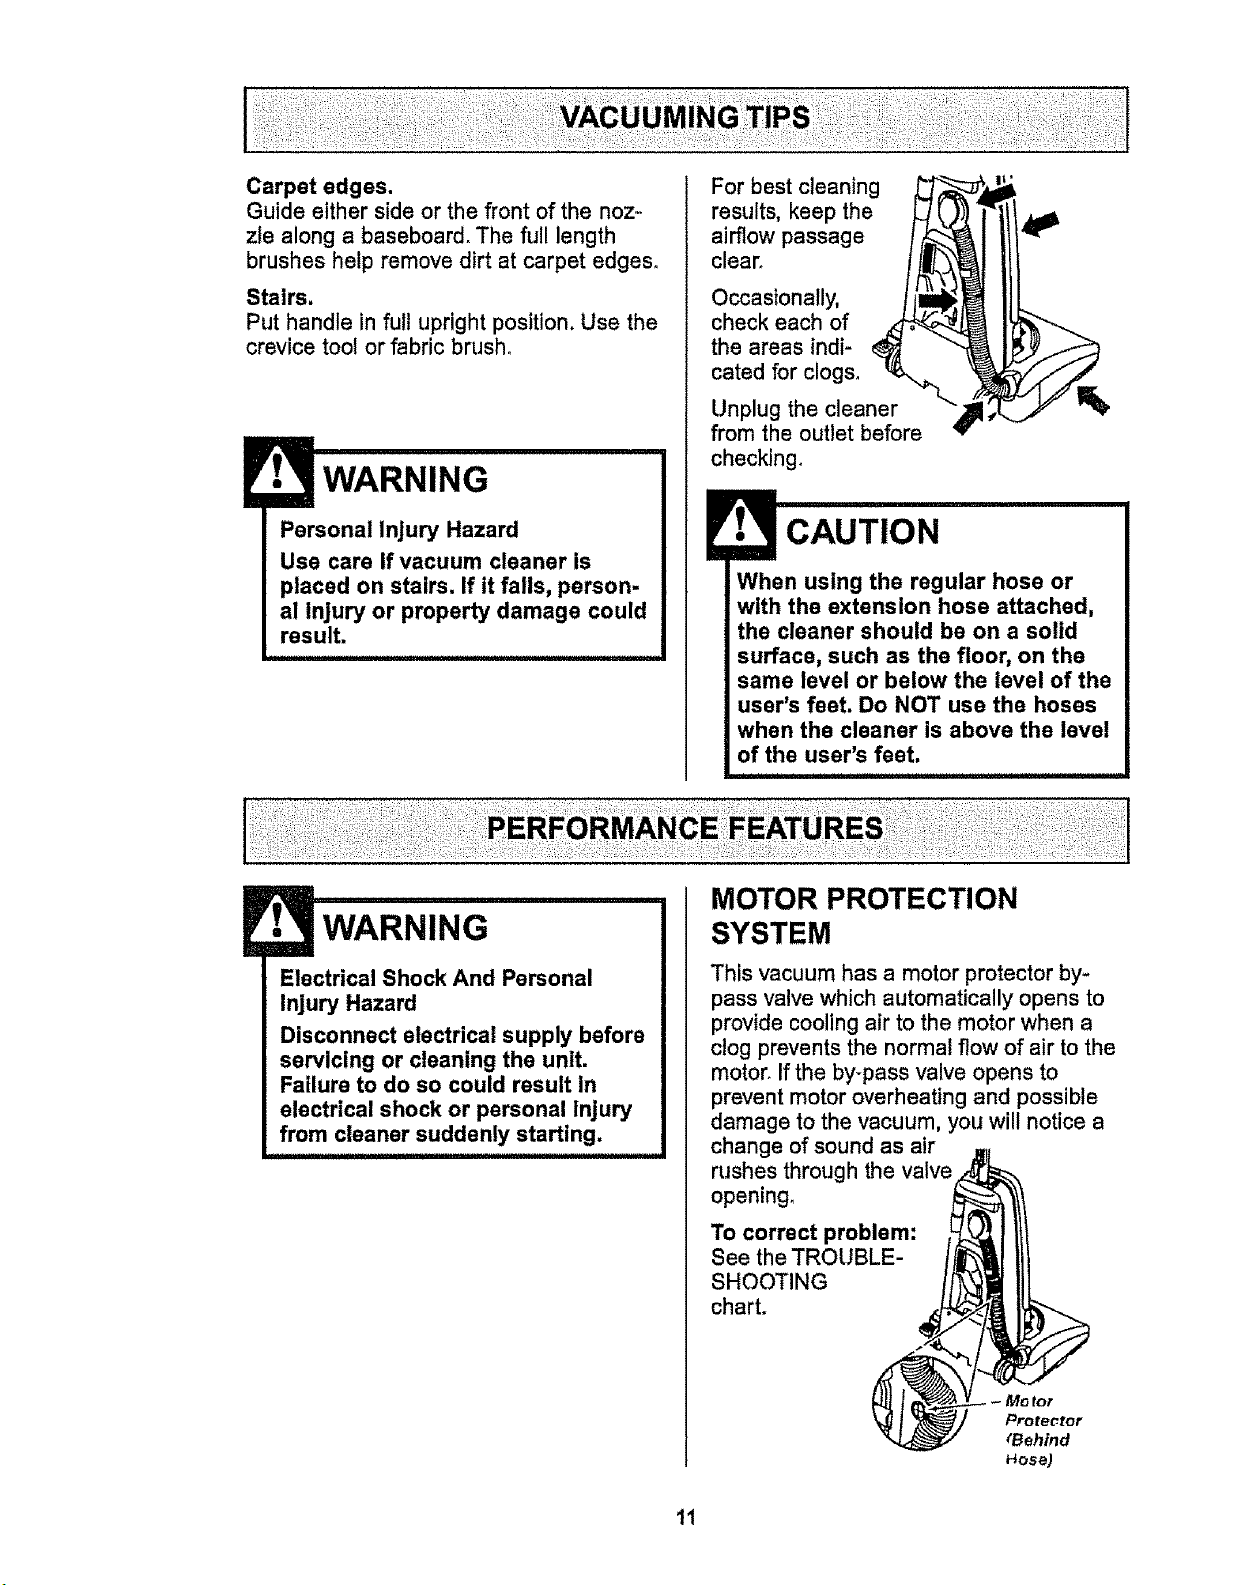
For best cleaning
results, keep the
airflow passage
clear.
Occasionally,
check each of
the areas indi-
cated for clogs_
Unplug the cleaner
from the outlet before
checking.
When using the regular hose or
with the extension hose attached,
the cleaner should be on a solid
surface, such as the floor, on the
same level or below the level of the
user's feet. Do NOT use the hoses
when the cleaner is above the level
of the user's feet.
! ' i i i
WARNING
Electrical Shock And Personal
Injury Hazard
Disconnect electrical supply before
servicing or cleaning the unit.
Failure to do so could result in
electrical shock or personal Injury
from cleaner suddenly starting.
MOTOR PROTECTION
SYSTEM
This vacuum has a motor protector by-
pass valve which automatically opens to
provide cooling air to the motor when a
clog prevents the normal flow of air to the
motor. If the by-pass valve opens to
prevent motor overheating and possible
damage to the vacuum, you will notice a
change of sound as air
rushes through the valve
opening_
To correct problem:
See the TROUBLE-
SHOOTING
chart.
11
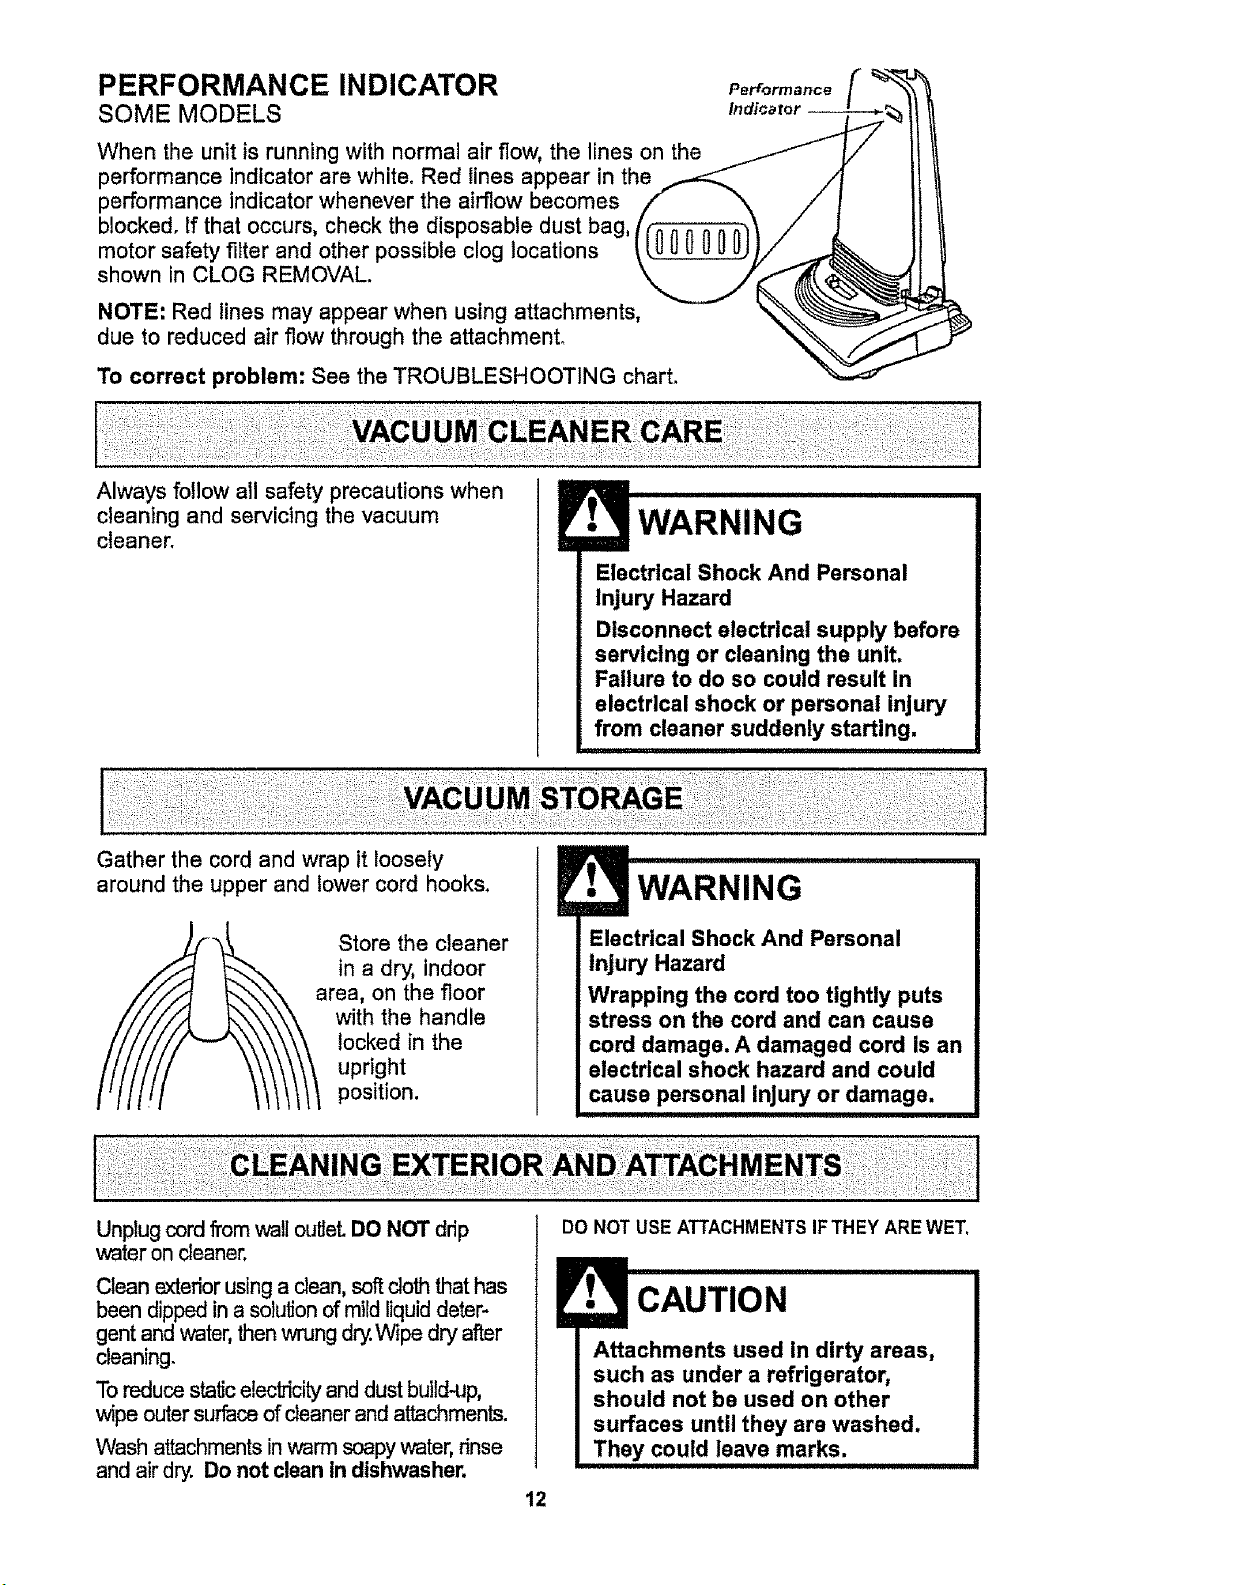
PERFORMANCE INDICATOR Po o..a.oo
SOME MODELS Indt_ror
When the unit is running with normal air flow, the lines on the
performance indicator are white. Red lines appear in the
performance indicator whenever the airflow becomes
blocked, if that occurs, check the disposable dust bag, /
motor safety filter and other possible clog locations ..
shown in CLOG REMOVAL. (
NOTE' Red lines may appear when using attachments, %
due to reduced air flow through the attachment. \
To correct problem: See the TROUBLESHOOTING chart.
Always follow all safety precautions when
cleaning and servicing the vacuum
cleaner.
Gather the cord and wrap it loosely
WARNING
Electrical Shock And Personal
Injury Hazard
Disconnect electrical supply before
servicing or cleaning the unit.
Failure to do so could result in
electrical shock or personal injury
from cleaner suddenly starting.
around the upper and lower cord hooks.
Store the cleaner
in a dry, indoor
area, on the floor
with the handle
locked in the
upright
position,
WARNING
Electrical Shock And Personal
Injury Hazard
Wrapping the cord too tightly puts
stress on the cord and can cause
cord damage. A damaged cord is an
electrical shock hazard and could
cause personal injury or damage.
Unplug cord from wall oulJet.DO NOT drip
water on cleaner.
Clean exteriorusing a clean,softcloth that has
been dipped ina solulion of mildliquid deter-
gent andwater,thenwrung dry.Wipe dry after
cleaning.
To reduce static electricityand dustbuild-up,
wipe outer surface of cleanerand attachments.
Wash attachments in warm soapywater, rinse
and airdry. Do not clean In dishwasher.
DONOT USE ATTACHMENTSIFTHEY AREWET.
CAUTION
Attachments used in dirty areas,
such as under a refrigerator,
should not be used on other
surfaces until they are washed.
They could leave marks.
12
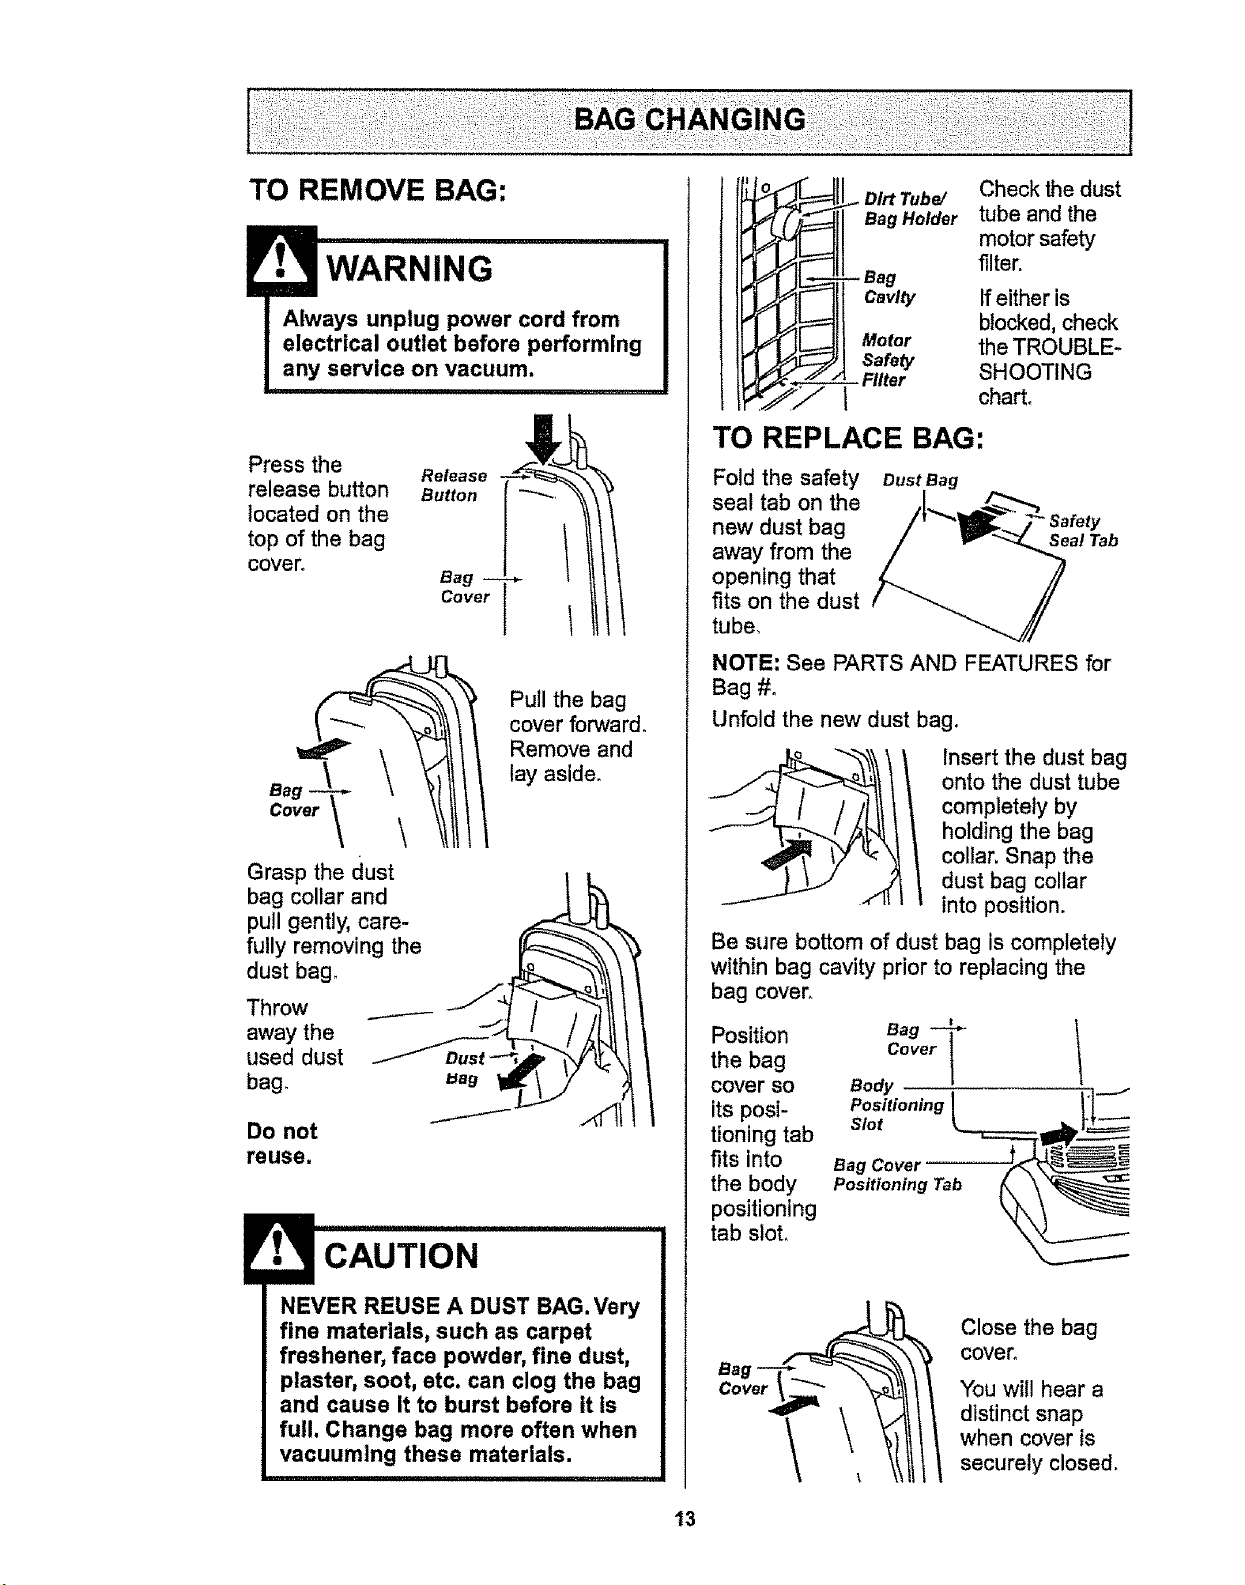
TO REMOVE BAG:
WARNING
Press the
release button
located on the
top of the bag
cover°
Release
Button
Bag
Cover
Grasp the dust
bag collar and
pull gently, care-
fully removing the
dust bag_
Throw
away the
used dust
bag.
Do not
reuse.
Pull the bag
cover forward.
Remove and
lay aside.
CAUTION
NEVER REUSE A DUST BAG. Very
fine materials, such as carpet
freshener, face powder, fine dust,
plaster, soot, etc. can clog the bag
and cause It to burst before it is
full, Change bag more often when
vacuuming these materials.
Bag Holder
Check the dust
tube and the
motor safety
filter.
If either is
blocked, check
the TROUBLE-
SHOOTING
chart°
TO REPLACE BAG'
Fold the safety
seal tab on the
new dust bag
away from the
opening that
fits on the dust
tube.
Dust Bag
Seal Tab
NOTE: See PARTS AND FEATURES for
Bag #,
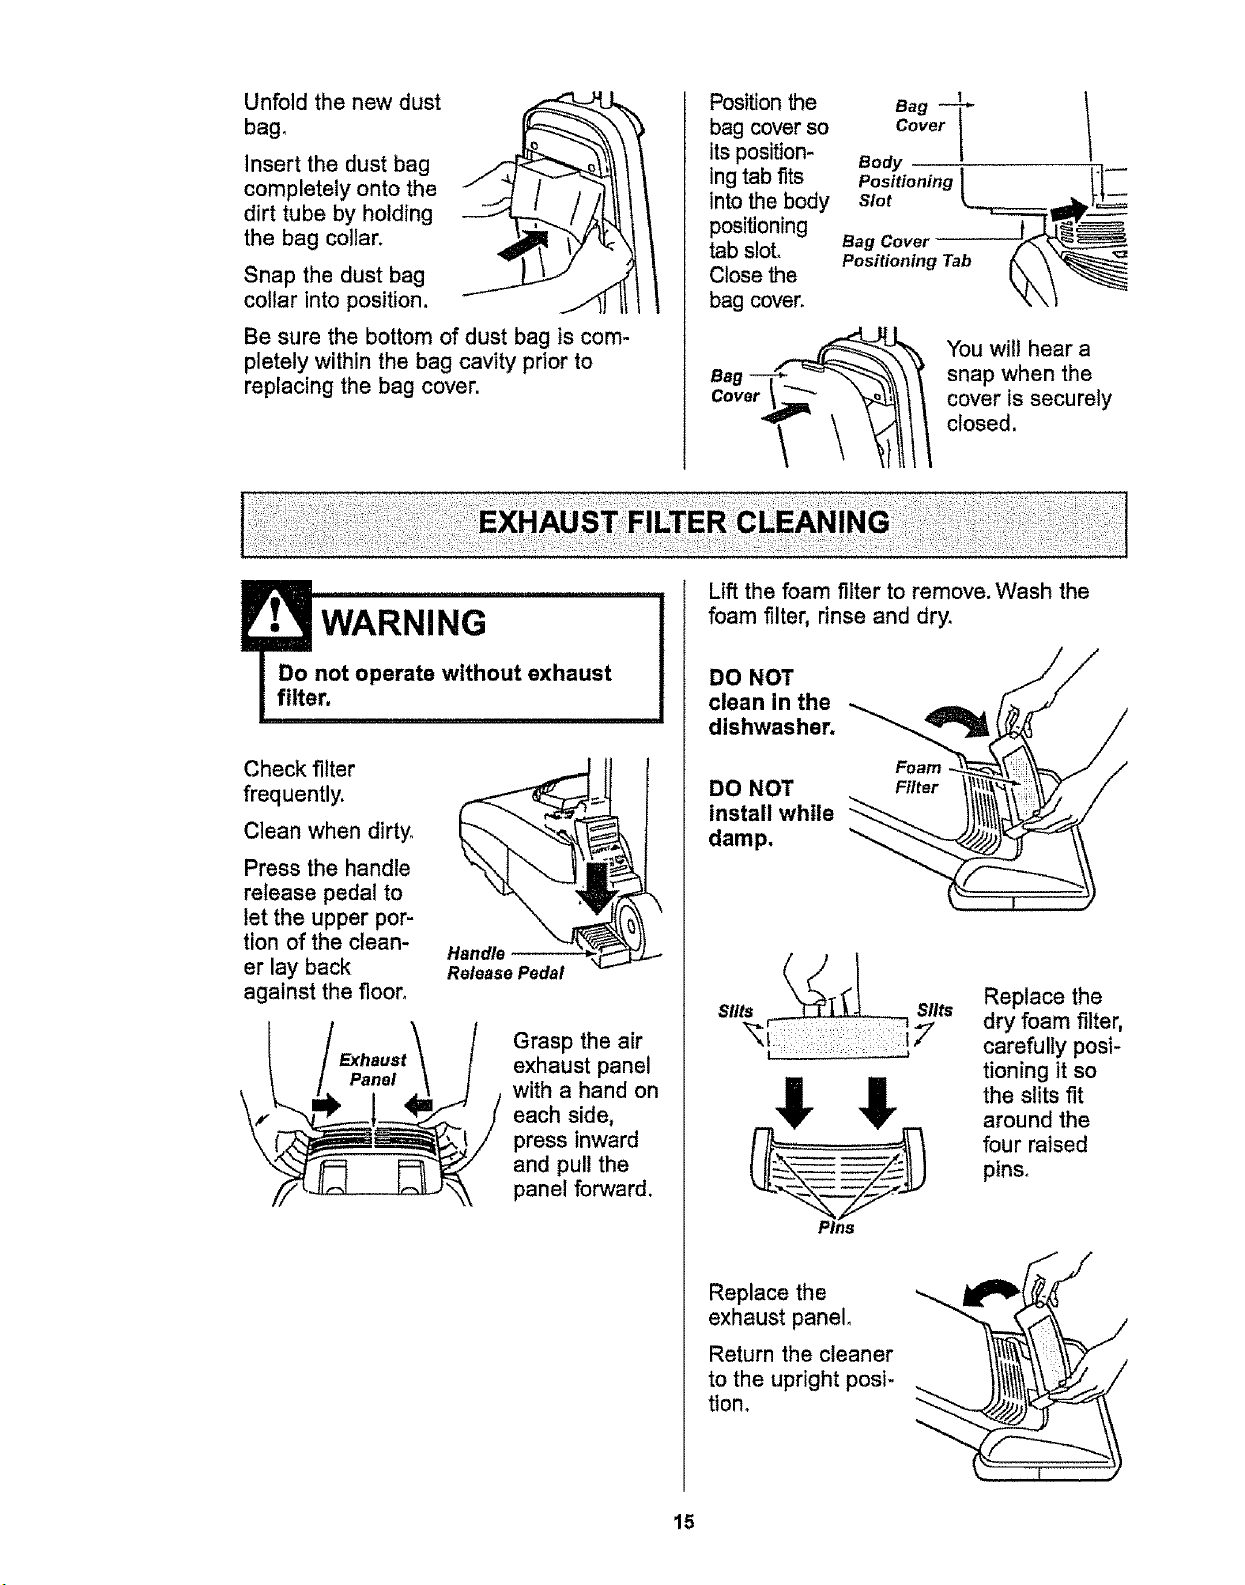
Unfold the new dust bag.
jl
Insert the dust bag
onto the dust tube
completely by
holding the bag
collar, Snap the
dust bag collar
into position.
Be sure bottom of dust bag is completely
within bag cavity prior to replacing the
bag cover.
Ba ---L'_.
Position g 1
the bag Cover
cover so Body
its posi- Positioning
tioning tab slot
fits into Bag Cover
the body PositioningTab
positioning
tab slot,
Bag --T'_F_
Close the bag
cover,
You will hear a
distinct snap
when cover is
securely closed.
13
Check motor safety filter frequently and
change when dirty_
Electrical Shock Hazard
Do not operate the cleaner without
the motor safety filter. Be sure the
filter is dry and properly installed
to prevent motor failure and/or
electrical shock.
Always unplug power cord from
electrical outlet before performing
any service on vacuum.
J Ii'll JIlljl III IHI
TO REMOVE BAG:
Press the release Release
button located on Button
the top of the bag
cover.
Grasp the dust
bag collar and
pull gently, care-
fully removing
the dust bag.
Pull the bag
cover forward.
Remove and lay
aside.
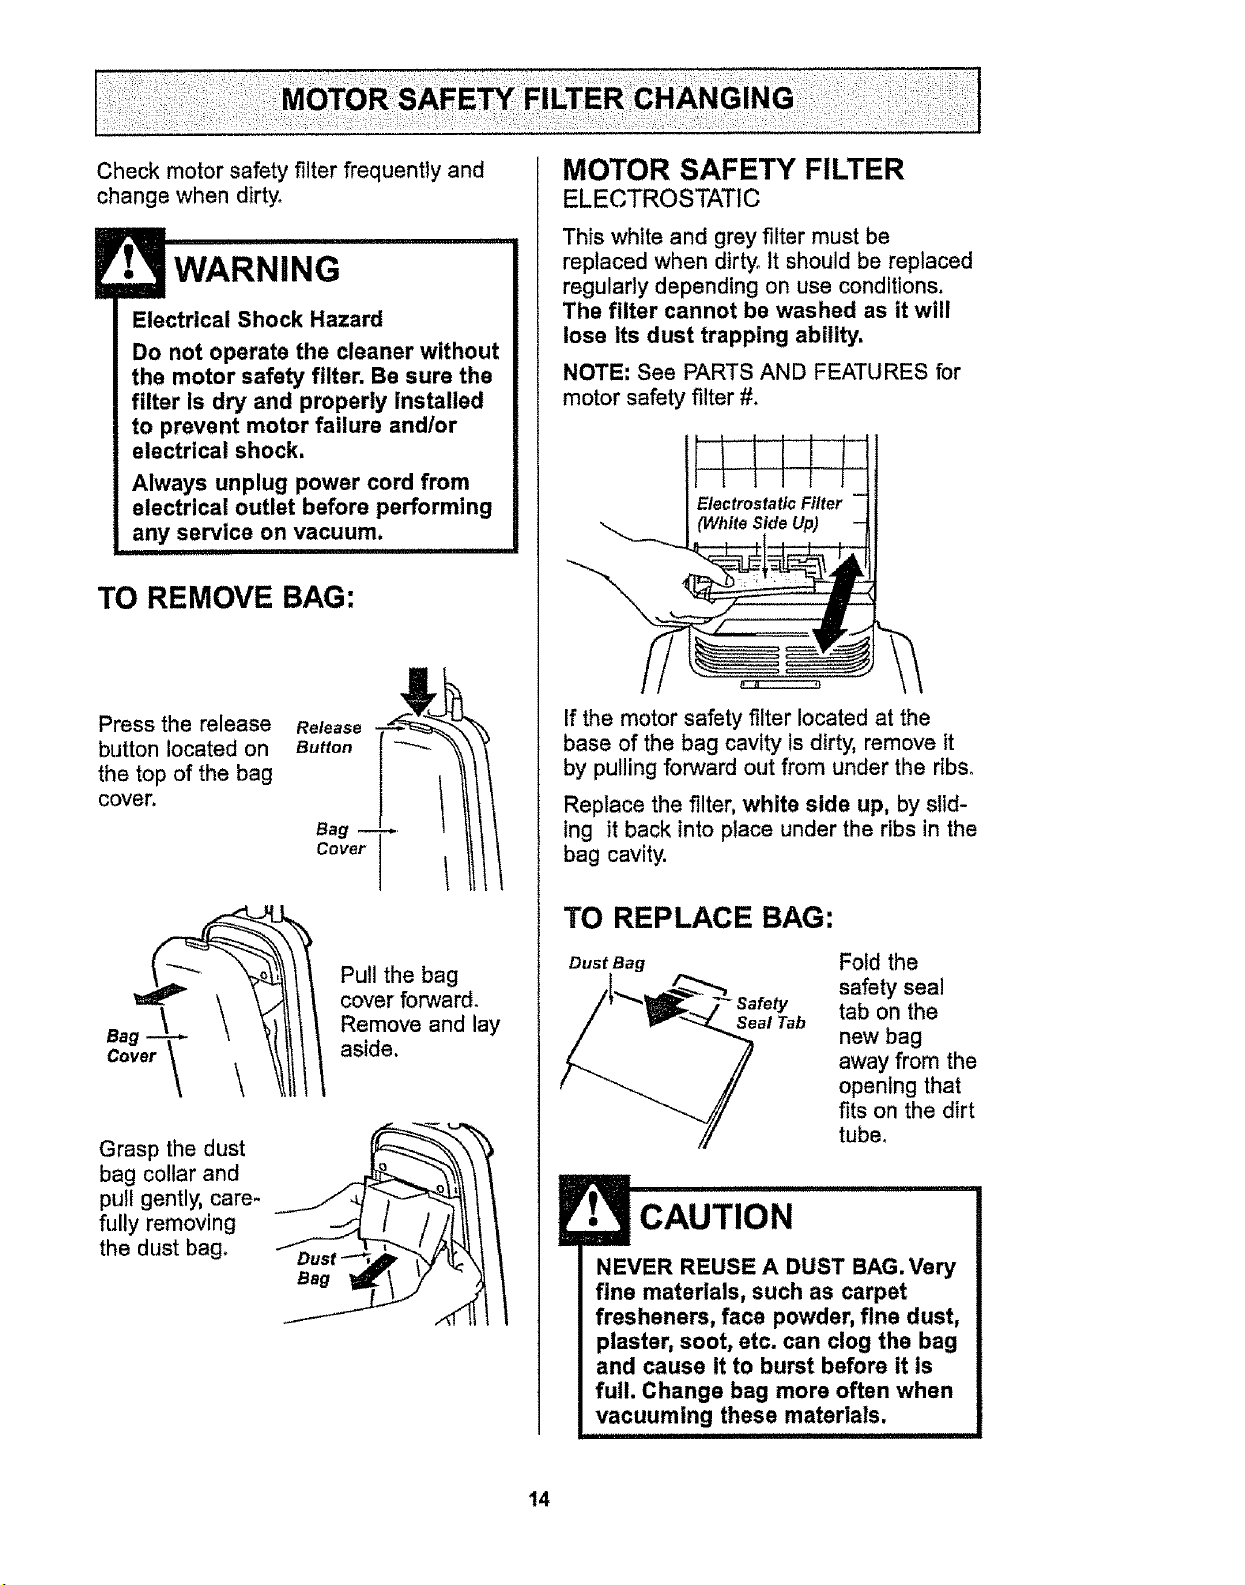
MOTOR SAFETY FILTER
ELECTROSTATIC
This white and grey filter must be
replaced when dirty. It should be replaced
regularly depending on use conditions.
The filter cannot be washed as it will
lose Its dust trapping ability,
NOTE: See PARTS AND FEATURES for
motor safety filter #.
If the motor safety filter located at the
base of the bag cavity is dirty, remove it
by pulling forward out from under the ribso
Replace the filter,white side up, by slld-
ing it back into place under the ribs in the
bag cavity.
TO REPLACE BAG:
Dust Bag
Seal Tab
Fold the
safety sea!
tab on the
new bag
away from the
opening that
fits on the dirt
tube.
CAUTION
NEVER REUSE A DUST BAG.Vary
fine materials, such as carpet
freshenars, face powder, fine dust,
plaster, soot, etc. can clog the bag
and cause it to burst before it is
full. Change bag more often when
vacuuming these materials.
i iiii,11111
14
Unfold the new dust
bag,
Insert the dust bag
completely onto the _/
dirt tube by holding ---1
the bag collar.
Snap the dust bag
collar into position.
Be sure the bottom of dust bag is com-
pletely within the bag cavity prior to
replacing the bag cover.
Position the Bag
bag cover so Cover 1
its position- Body
I
ing tab fits Positioning
into the body Slot
positioning
tab slot. Bag Cover
Close the Positioning Tab
bag cover,
You will hear a
snap when the
cover is securely
closed,
WARNING
not operate without exhaust
r,
Check filter
frequently.
Clean when dirty,
Press the handle
release pedal to
let the upper por-
tion of the clean-
er lay back
against the floor,
Panel
Handle --
Release Pedal
Grasp the air
exhaust panel
with a hand on
each side,
press inward
and pull the
panel forward.
Lift the foam filter to remove. Wash the
foam filter, rinse and dry,
DO NOT
clean in the
dishwasher. "_
Foam _.
DO NOT Filter
install while _
damp.
Replace the
dry foam filter,
carefully posi-
tioning it so
the slits fit
around the
four raised
pins°
Replace the _
exhaust panel,
Return the cleaner
to the upright posi-
tion.
15
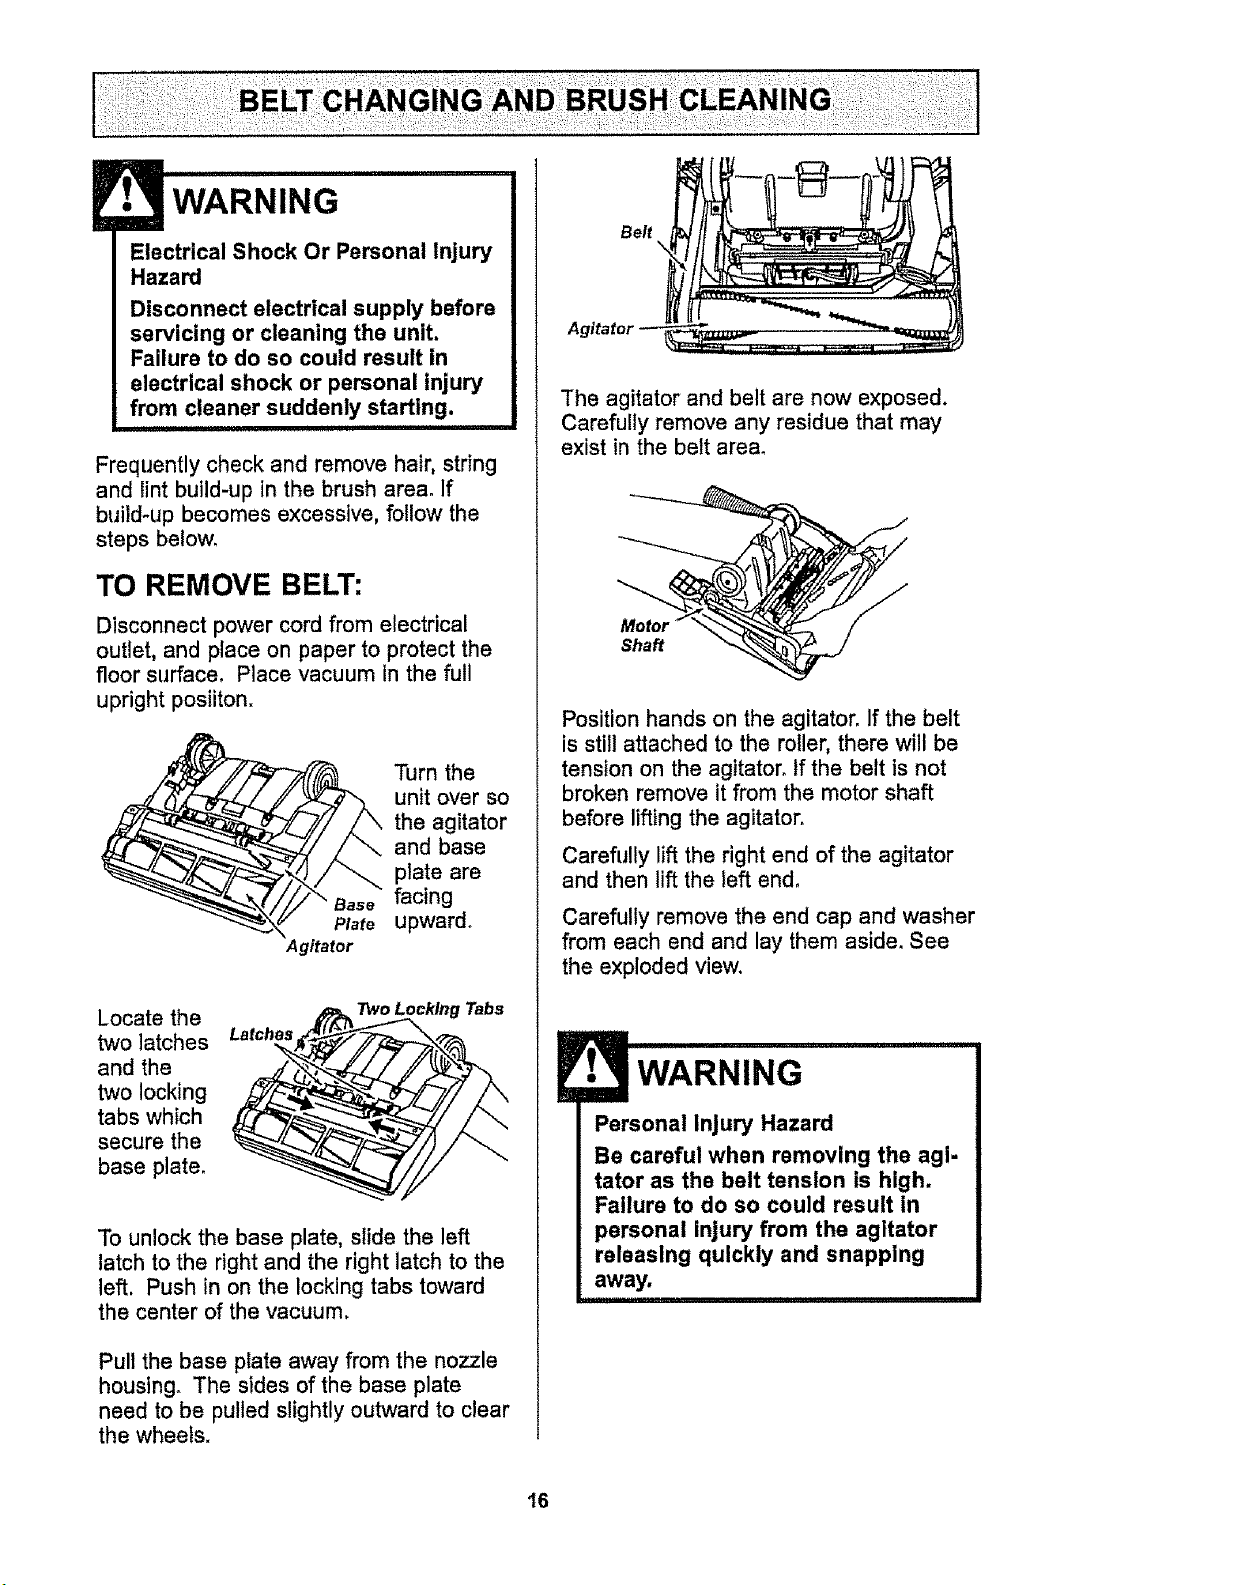
!• WARNING
Electrical Shock Or Personal Injury
Hazard
Disconnect electrical supply before
servicing or cleaning the unit.
Failure to do so could result in
electrical shock or personal injury
from cleaner suddenly starting.
Frequently check and remove hair, string
and lint build-up in the brush area. If
build-up becomes excessive, follow the
steps be!ow.
TO REMOVE BELT:
Disconnect power cord from electrical
outlet, and place on paper to protect the
floor surface, Place vacuum in the full
upright posiiton.
Turn the
unit over so
the agitator
and base
plate are
Base facing
Plate upward.
Agitator
Locate the
two latches
and the
two locking
tabs which
secure the
base plate_
Latches
TWo Locking Tabs
To unlock the base plate, slide the left
latch to the right and the right latch to the
left. Push in on the locking tabs toward
the center of the vacuum,
Pull the base plate away from the nozzle
housing. The sides of the base plate
need to be pulled slightly outward to clear
the wheels.
Belt
The agitator and belt are now exposed.
Carefully remove any residue that may
exist in the belt area°
Motor _
Shaft
Position hands on the agitator. If the belt
is stillattached to the roller, there will be
tension on the agitator, tf the belt is not
broken remove it from the motor shaft
before lifting the agitator.
Carefully lift the right end of the agitator
and then lift the left end.
Carefully remove the end cap and washer
from each end and lay them aside. See
the exploded view.
WARNING
Personal Injury Hazard
Be careful when removing the agi-
tator as the belt tension is high.
Failure to do so could result in
personal injury from the agitator
releasing quickly and snapping
away.
iii
16
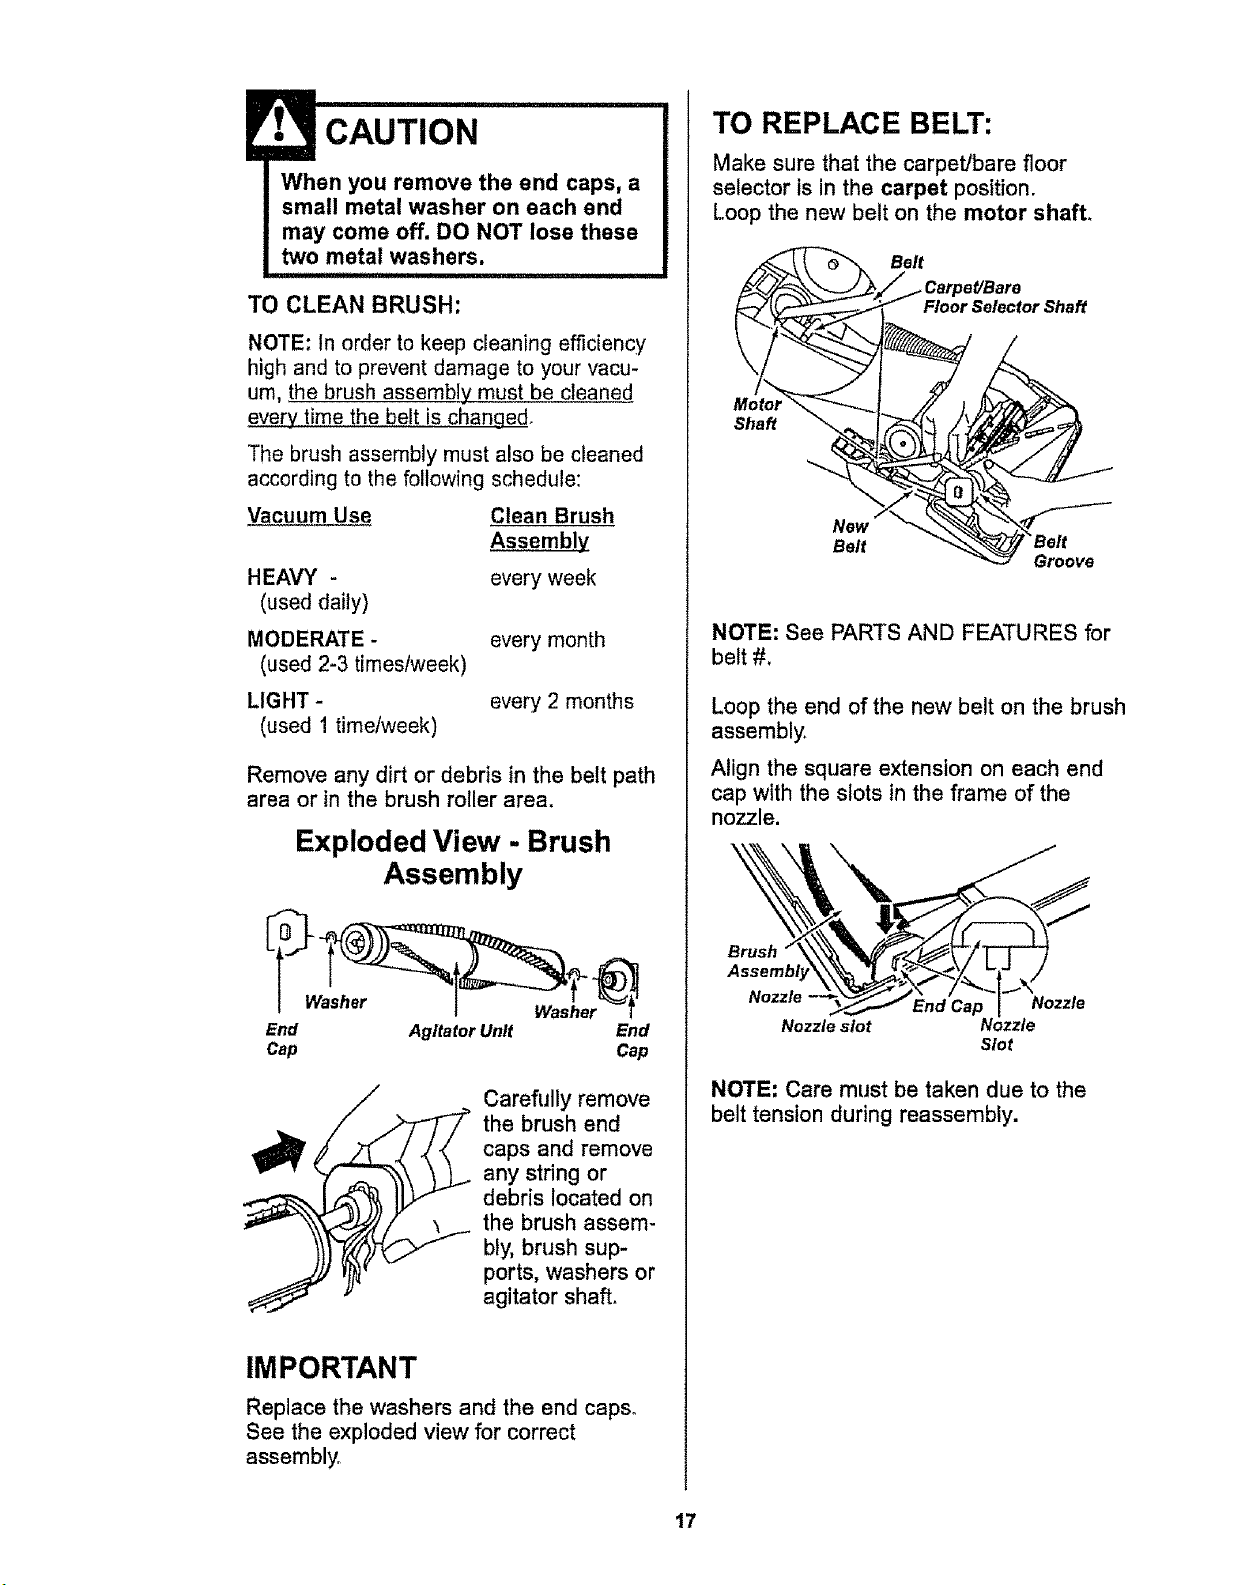
When you remove the end caps, a
small metal washer on each end
may come off. DO NOT lose these
two metal washers.
TO CLEAN BRUSH:
NOTE: In order to keep cleaning efficiency
high and to prevent damage to your vacu-
um, the brush assembly must be cleaned
every time the belt is changed.
The brush assembly must also be cleaned
according to the following schedule:
Vacuum Use Clean Brush
HEAVY -
(used daily)
MODERATE -
(used 2-3 times/week)
LIGHT -
(used 1 time/week)
Assembly
every week
every month
every 2 months
Remove any dirt or debris in the belt path
area or in the brush roller area.
Exploded View - Brush
Assembly
End Agitator Unit End
Cap Cap
,/ Carefully remove
the brush end
caps and remove
any string or
debris located on
the brush assem-
bly, brush sup-
ports, washers or
agitator shaft.
IMPORTANT
Replace the washers and the end caps°
See the exploded view for correct
assembly=
TO REPLACE BELT:
Make sure that the carpet/bare floor
selector is in the carpet position.
Loop the new belt on the motor shall
Belt
Floor Selector Shaft
Shaft
Belt
Groove
NOTE: See PARTS AND FEATURES for
belt #.
Loop the end of the new belt on the brush
assembly.
Align the square extension on each end
cap with the slots in the frame of the
nozzle.
Nozzle -
Nozzle slot
Slot
NOTE: Care must be taken due to the
belt tension during reassembly.
17
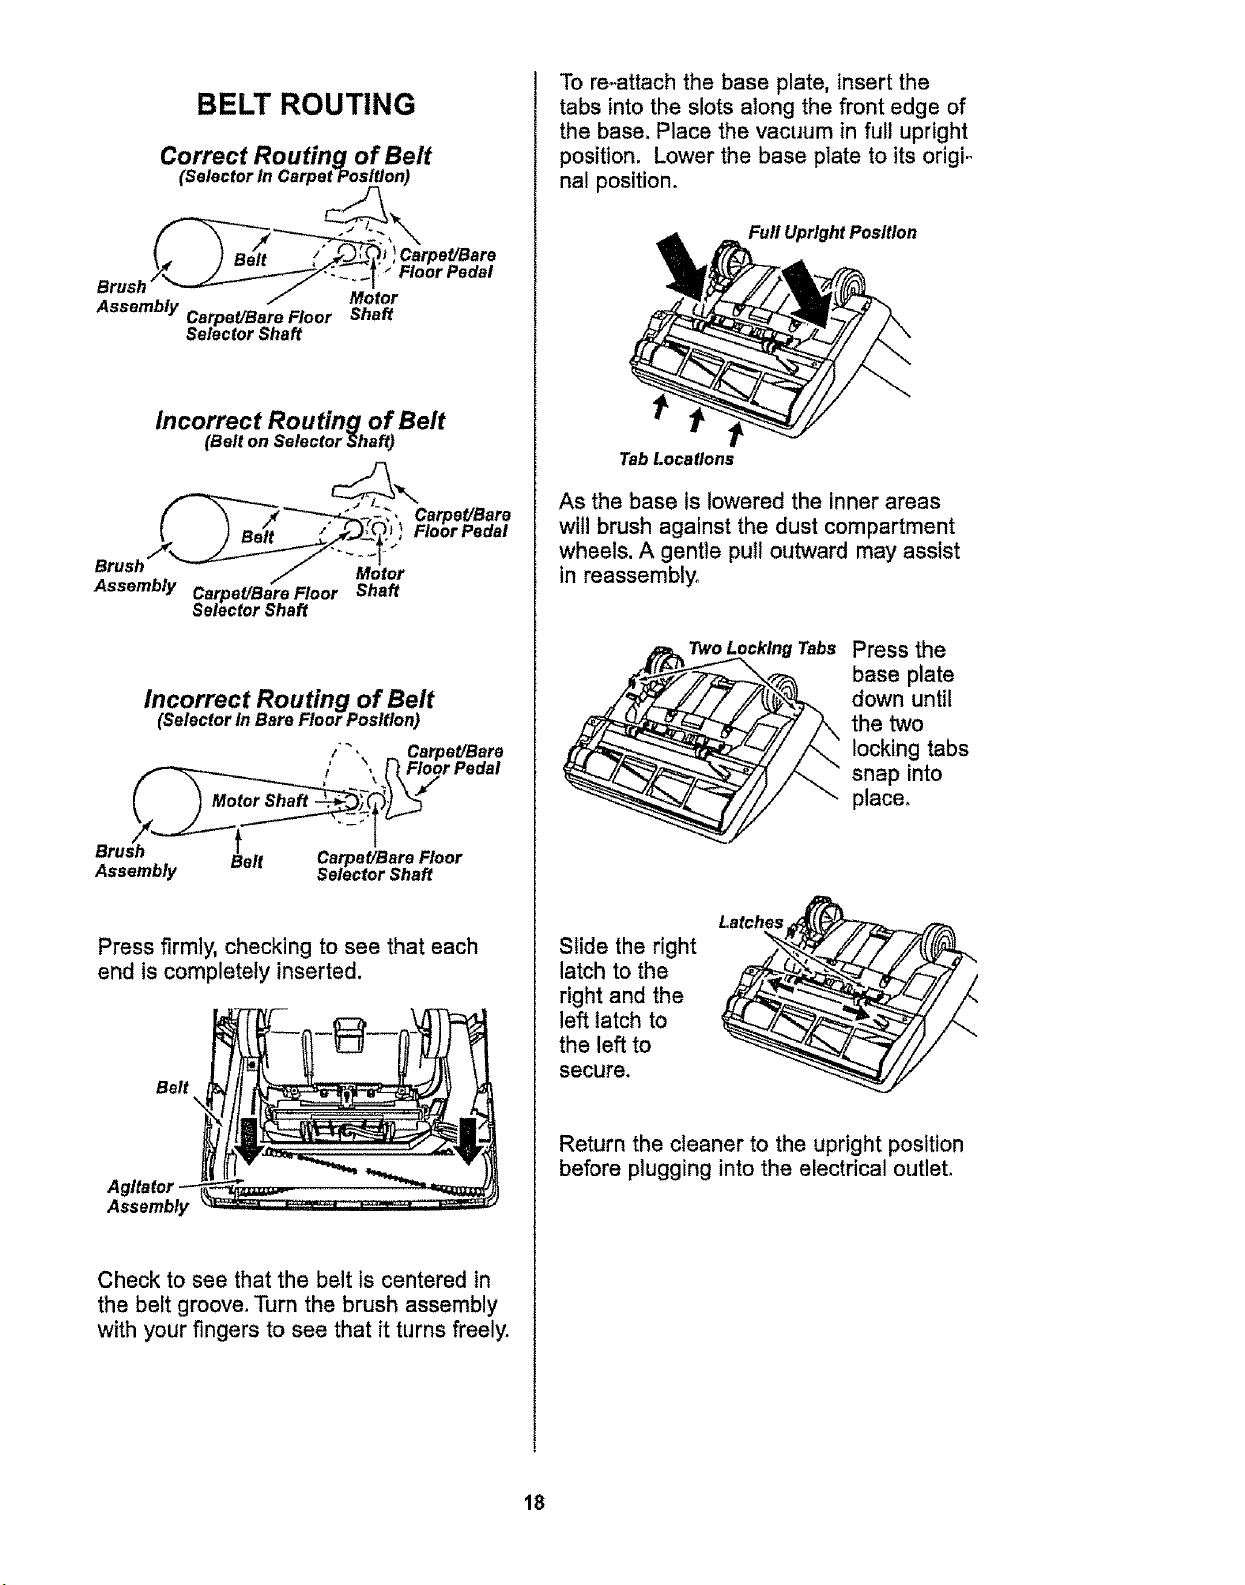
BELT ROUTING
Correct Routing of Belt
(Selector In Carpet Position)
( I =-f. /°_(_,-_'J, Carpet/Bare
Brush" _ / -'_I.
I" MOlOr
Assembly Carpet/Bare Floor Shaft
Selector Shaft
Incorrect Routing of Belt
(Belt on Selector Shaft)
" " Carpet/Bare
Floor Pedal
Brush Motor
Assembly Carpet/Bare Floor Shaft
Selector Shaft
Incorrect Routing of Belt
(Selector In Bare Floor Position)
/ _, Carpet[Bare
i 't? Fl°°rPedal
Assembly Belt Carpet/Bare Floor
Selector Shaft
Press firmly, checking to see that each
end is completely inserted.
Belt
A
Assembly
Check to see that the belt is centered in
the belt groove. Turn the brush assembly
with your fingers to see that itturns freely.
To re..attach the base plato, insert the
tabs into the slots along the front edge of
the base. Place the vacuum in full upright
position. Lower the base plate to its origi-
nal position.
Furl Upright Position
Tab Locations
As the base ls lowered the inner areas
will brush against the dust compartment
wheels. A gentle pull outward may assist
in reassembly.
Two Locking Tabs Press the
base plate
down until
the two
locking tabs
snap into
place.
Slide the right
latch to the
right and the
left latch to
the left to
secure.
Return the cleaner to the upright position
before plugging into the electrical outleL
18
Always follow all safety precautions when
cleaning and servicing the vacuum
cleaner.
WARNING
Electrical Shock Or Personal Injury
Hazard
Disconnect electrical supply before
servicing or cleaning the unit.
Failure to do so could result in
electrical shock or personal Injury
from cleaner suddenly starting.
If the cleaner does not seem to have ade-
quate suction, first check for a full bag or
filter which is clogged. See instructions in
BAG CHANGING and MOTOR SAFETY
FILTER CHANGING.
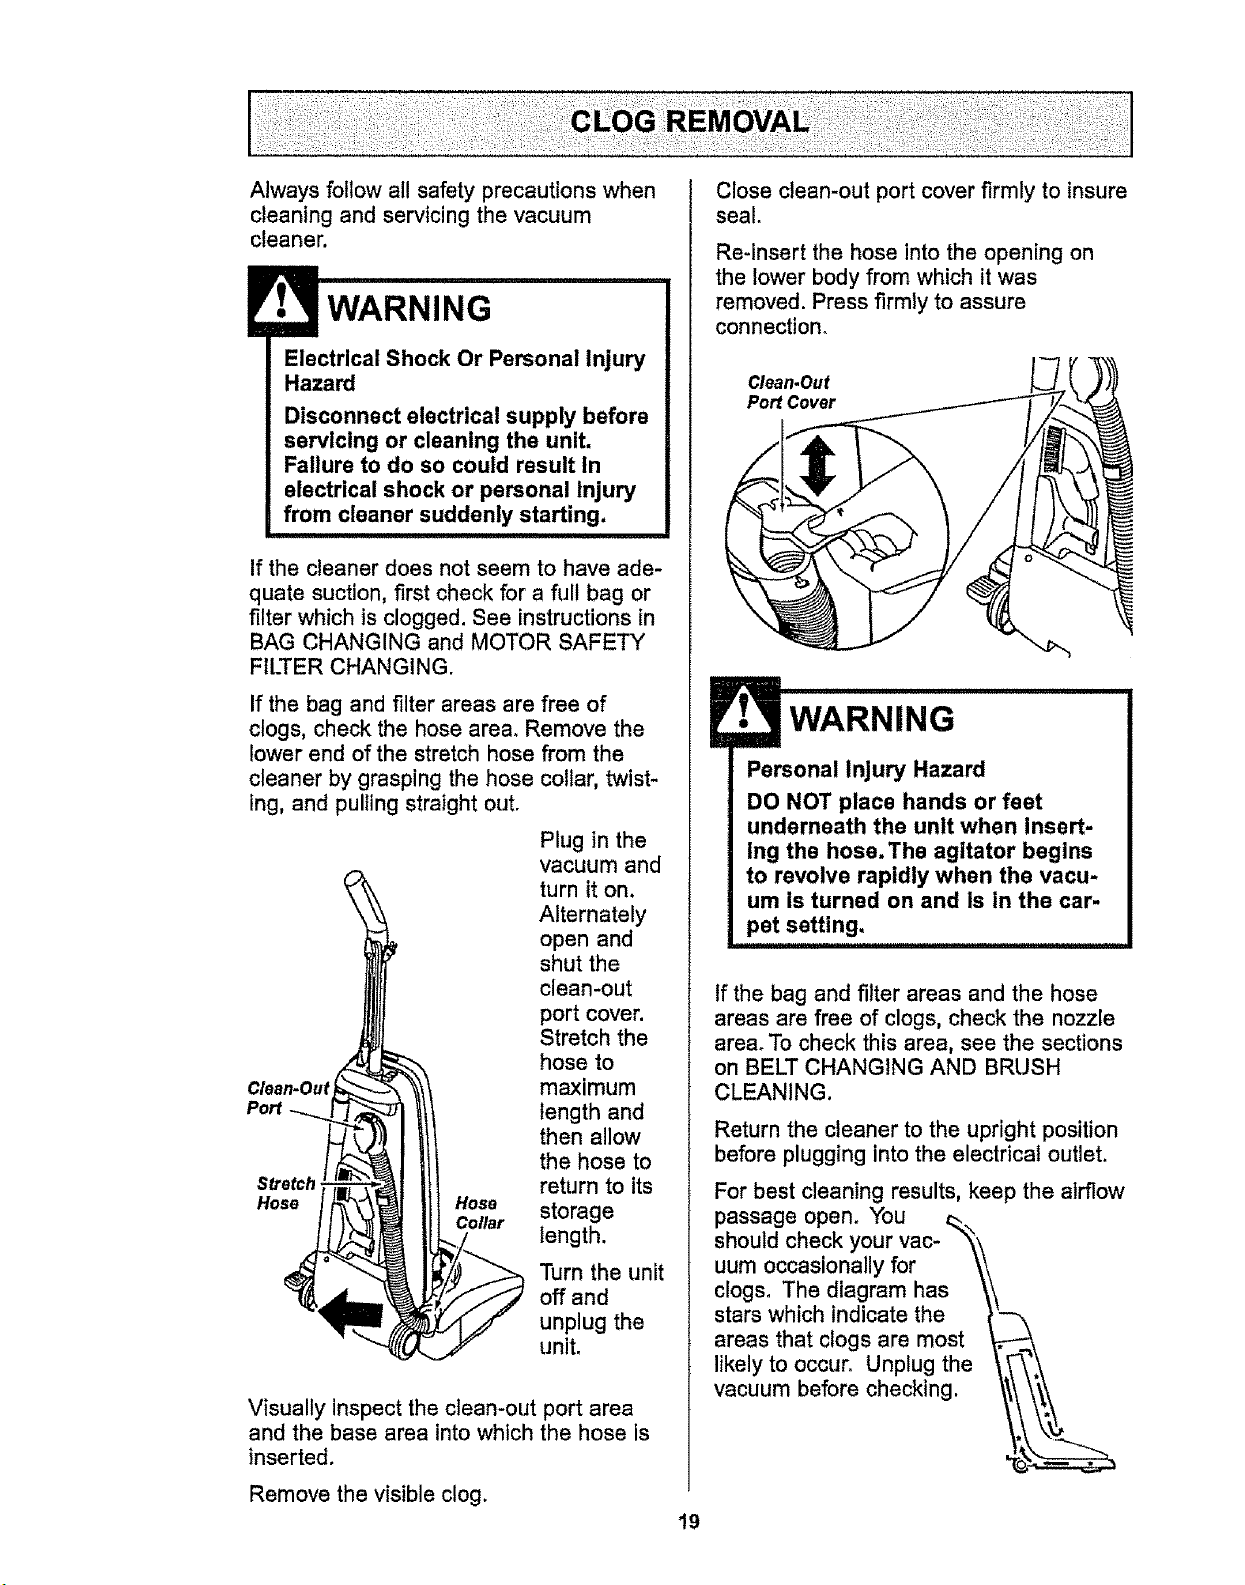
If the bag and filter areas are free of
clogs, check the hose area_ Remove the
lower end of the stretch hose from the
cleaner by grasping the hose
lng, and pulling straight out.
Clean-Out
Pot
Stretch
Hose Hose
Collar
collar, twist-
Plug in the
vacuum and
turn it on,
Alternately
open and
shut the
clean-out
port cover.
Stretch the
hose to
maximum
length and
then allow
the hose to
return to its
storage
length.
Turn the unit
off and
unplug the
unit.
Visually inspect the clean-out port area
and the base area into which the hose is
inserted.
Remove the visible clog.
Close clean-out port cover firmly to insure
seal.
Re-insert the hose into the opening on
the lower body from which it was
removed. Press firmly to assure
connection.
Clean.Out
Port Cover
WARNING
Personal injury Hazard
DO NOT place hands or feet
underneath the unlt when Insert-
lng the hose. The agitator begins
to revolve rapidly when the vacu-
um is turned on and is in the car-
pet setting.
If the bag and filter areas and the hose
areas are free of clogs, check the nozzle
area_To check this area, see the sections
on BELT CHANGING AND BRUSH
CLEANING,
Return the cleaner to the upright position
before plugging into the electrical outlet.
For best cleaning results, keep the airflow
passage open. You _
should check your vac-
uum occasionally for
clogs. The diagram has
stars which indicate the
areas that clogs are most
likely to occur. Unplug the
vacuum before checking.
19
WARNING
Electrical Shock Or Personal Injury
Hazard
Disconnect electrical supply before
servicing or cleaning the unit.
Failure to do so could result in
electrical shock or personal Injury
from cleaner suddenly starting.
Disconnect the power cord from the elec-
trical outlet.
Press the handle release pedal to let the
upper portion of the cleaner lay back
against the floor.
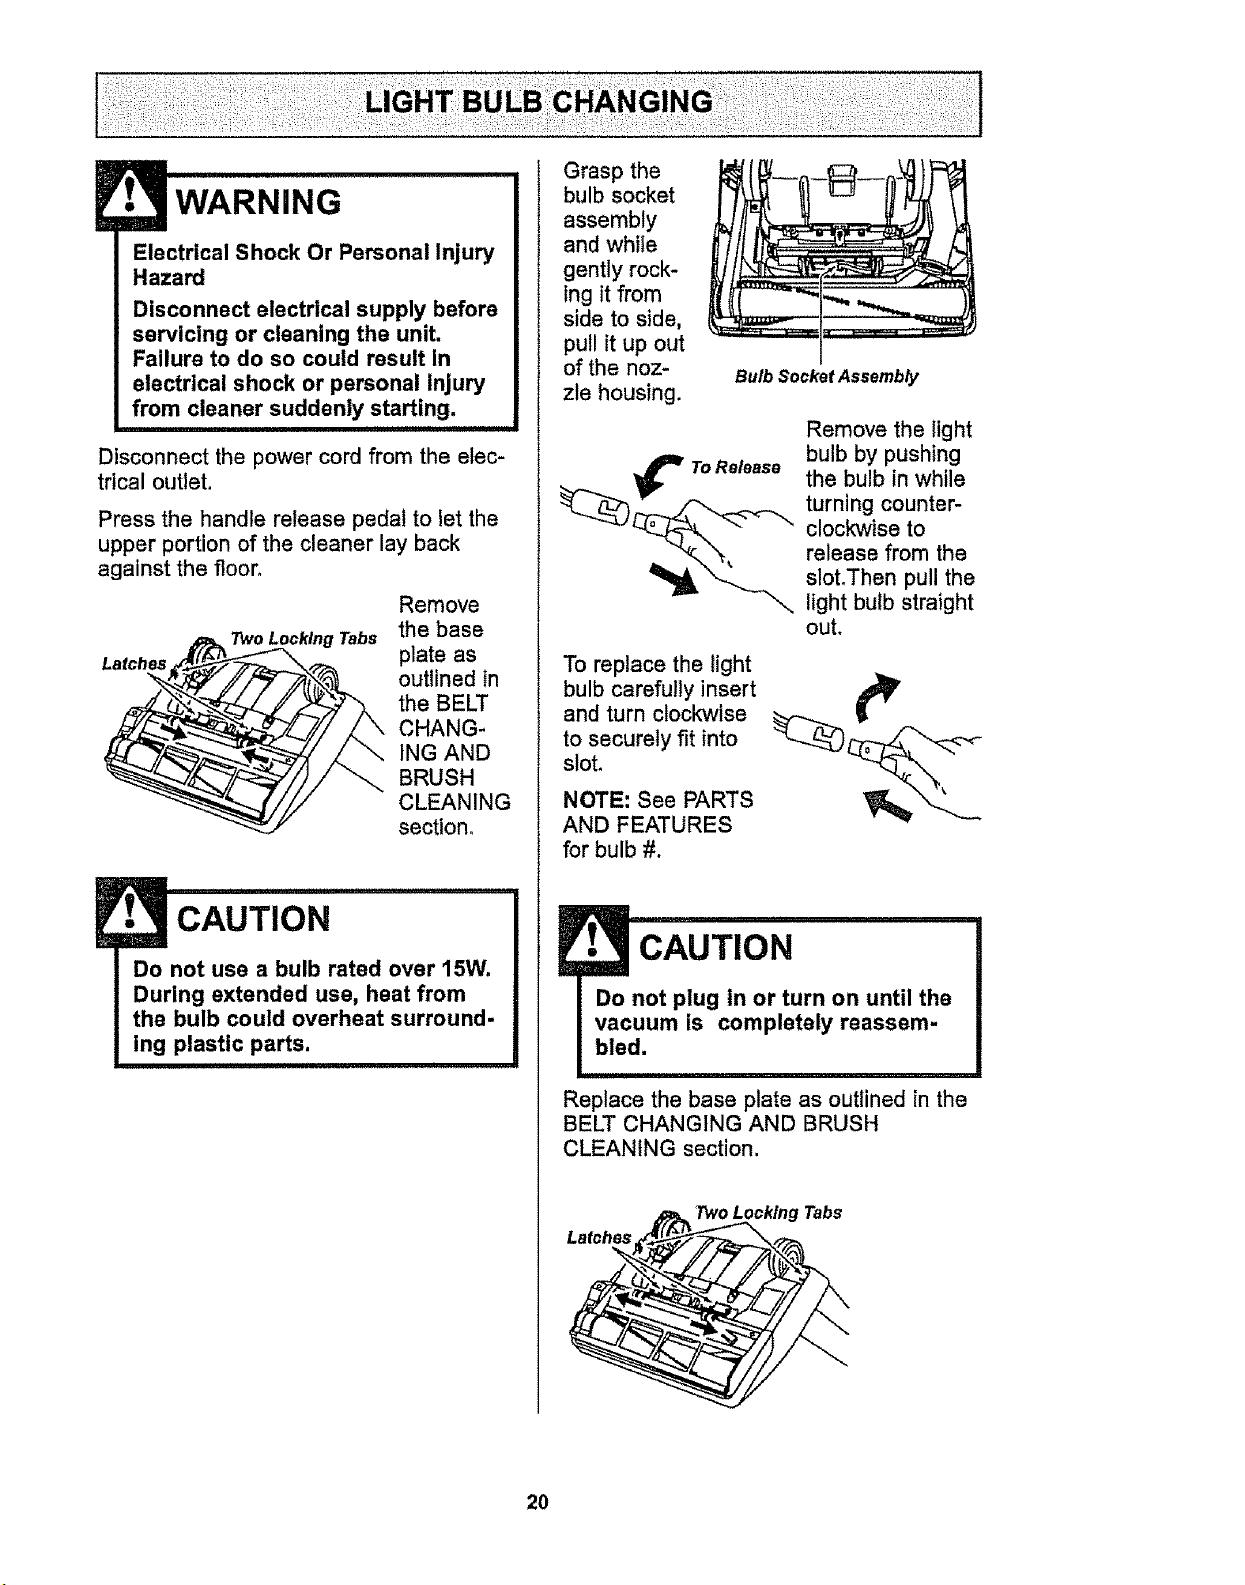
Remove
Two Locking Tabs the base
Latches plate as
outlined In
the BELT
CHANG-
ING AND
BRUSH
CLEANING
section°
CAUTION
Do not use a bulb rated over 15W.
During extended use, heat from
the bulb could overheat surround-
ing plastic parts,
Grasp the
bulb socket
assembly
and while
gently rock-
ing it from
side to side,
pull it up out
of the noz-
zle housing.
Bulb Socket Assembly
Remove the light
ToReleaso bulb by pushing
_E
the bulb in while
_) __, turning counter-
clockwise to
release from the
slot.Then pull the
light bulb straight
out.
To replace the light
bulb carefully insert ,_
and turn clockwise !I
to securely fit into
slot.
NOTE: See PARTS
AND FEATURES
for bulb #.
E CAUTION
Do not plug in or turn on until the
vacuum is completely raassem-
bled.
i i ,
Replace the base plate as outlined in the
BELT CHANGING AND BRUSH
CLEANING section.
Latches
Two Locking Tabs
20
Electrical Shock Or Personal Injury
Hazard
Disconnect electrical supply before
servicing or cleaning the unit.
Failure to do so could result in
electrical shock or personal Injury
from cleaner suddenly starting.
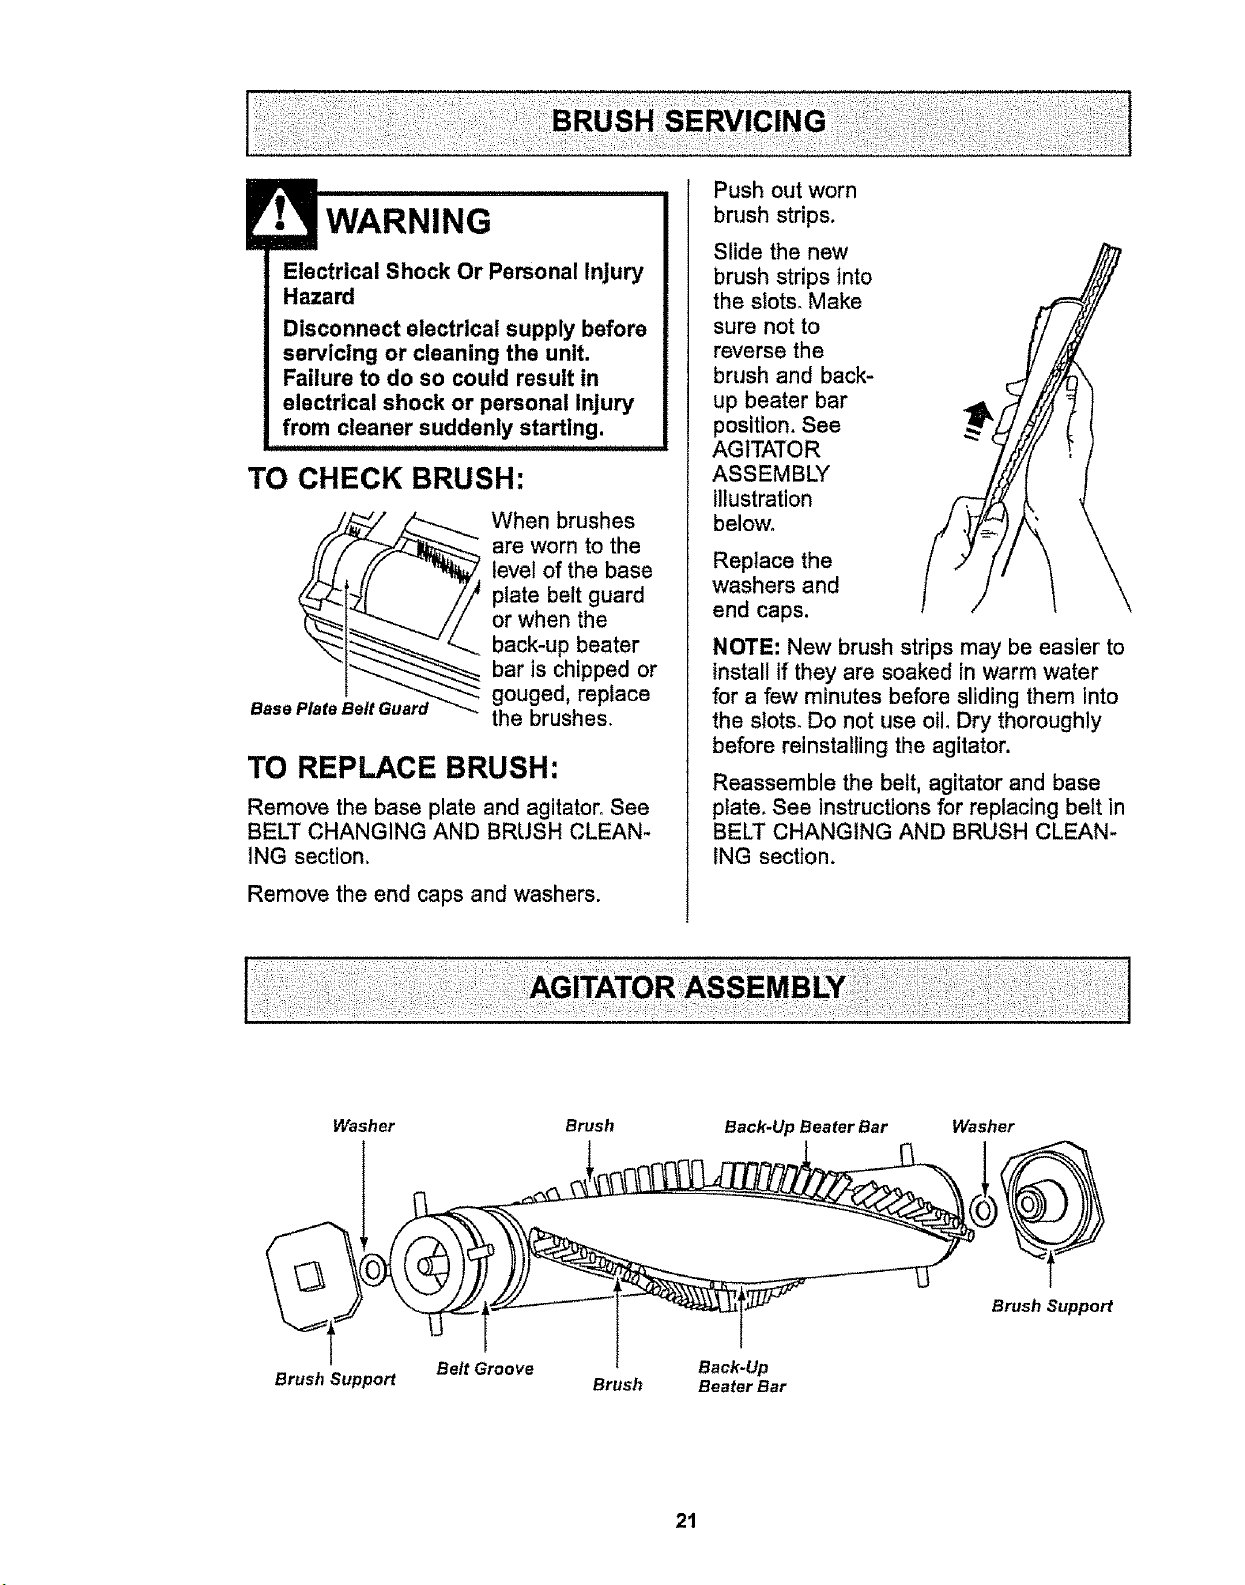
TO CHECK BRUSH:
Base Plate Belt Guard
When brushes
are worn to the
level of the base
plate belt guard
or when the
back-up beater
bar is chipped or
gouged, replace
the brushes,
TO REPLACE BRUSH:
Remove the base plate and agitator°See
BELT CHANGING AND BRUSH CLEAN-
ING section.
Remove the end caps and washers.
Push out worn
brush strips.
Slide the new
brush strips into
the slots, Make
sure not to
reverse the
brush and back-
up beater bar
position. See
AGITATOR
ASSEMBLY
illustration
below.
Replace the
washers and
end caps.
NOTE: New brush strips may be easier to
install if they are soaked in warm water
for a few minutes before slidingthem into
the slots_Do not use oil, Dry thoroughly
before reinstalling the agitator.
Reassemble the belt, agitator and base
plate. See instructions for replacing belt in
BELT CHANGING AND BRUSH CLEAN-
ING section.
Washer Brush
Back-Up Beater Bar Washer
Brush Support
Belt Groove
Brush Support Brush
Back-Up
Beater Bar
21
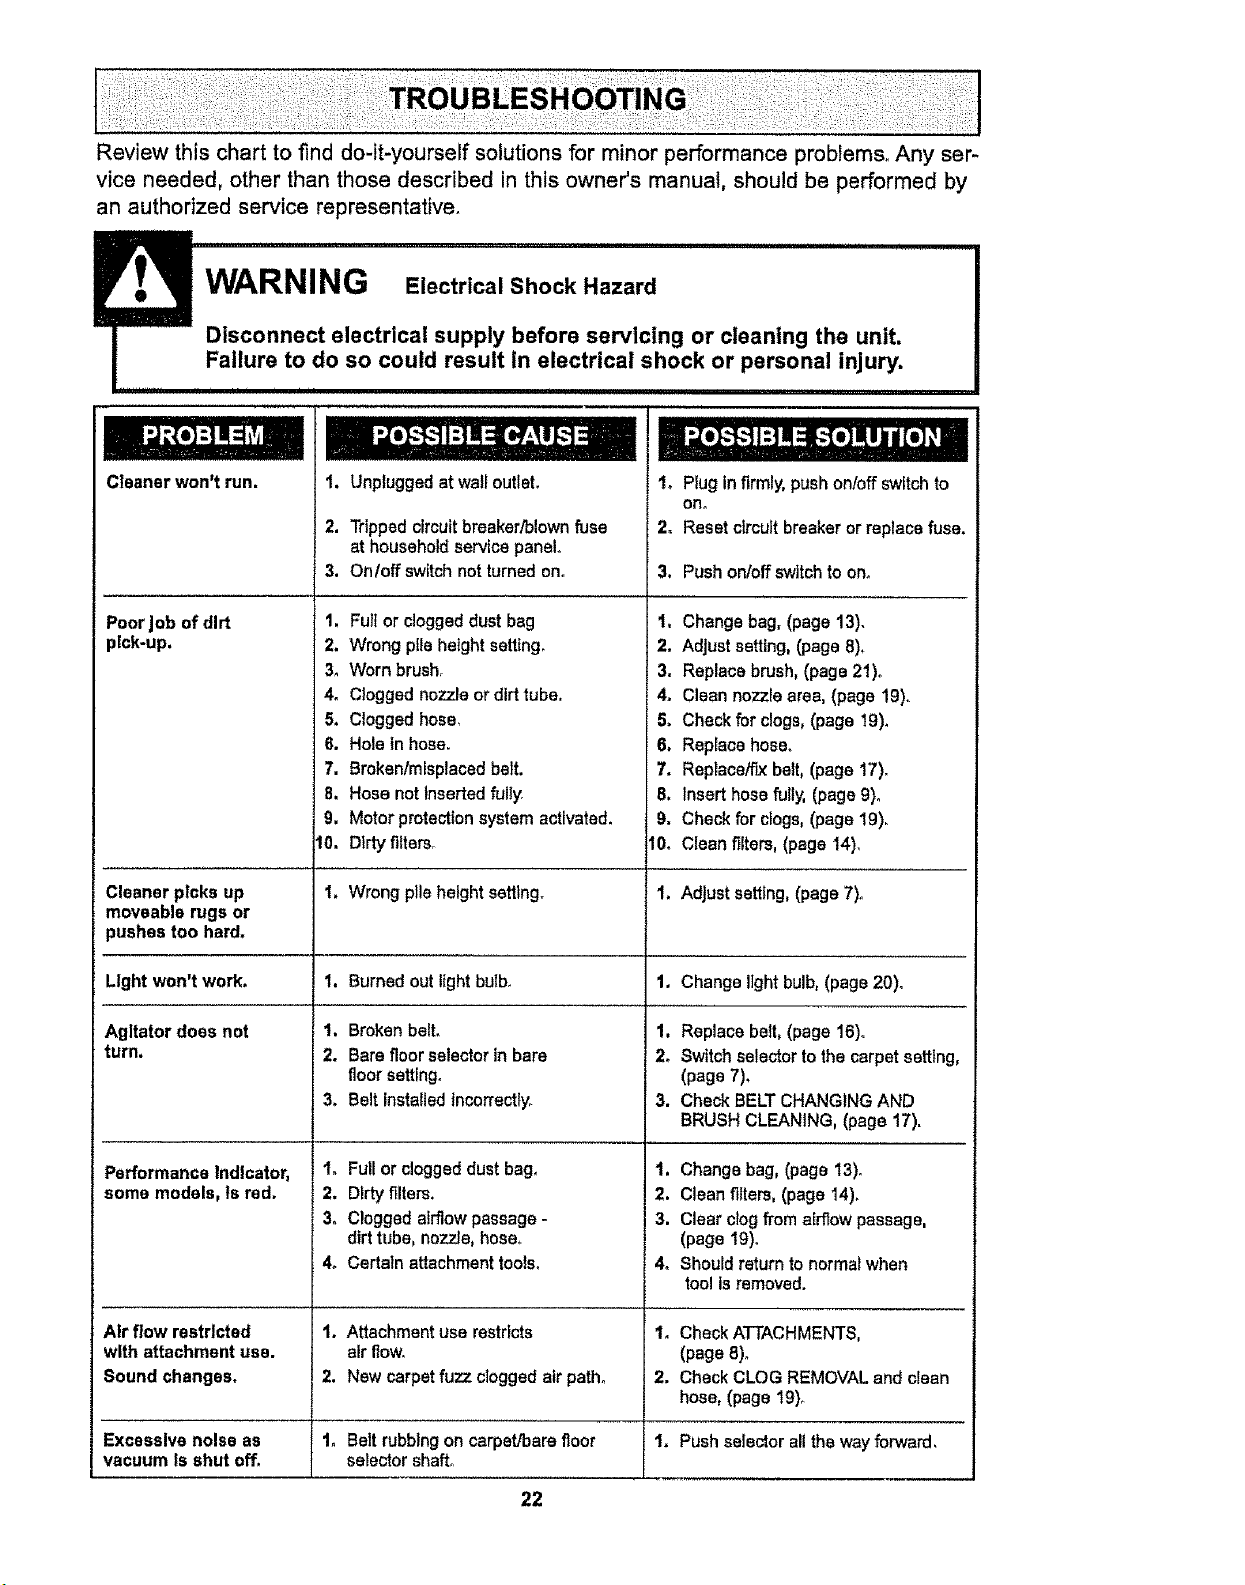
Review this chart to find do-it-yourself solutions for minor performance problems. Any ser-
vice needed, other than those described in this owner's manual, should be performed by
an authorized service representative.
_r cleaning the unit.
.-Failuretodo_ so could result in electrical shock or personal injury.
Cleaner won't run.
Poor Job of dirt
pick-up.
Cleaner picks up
moveable rugs or
pushes too hard.
1. Unplugged at wall outlet.
2.
3,
Tripped circuitbreaker/blown fuse
at household service panel.
On/off switchnot turned on.
Io Plug in firmly, push on/offswitch to
On.
2o Reset circuit breaker or replace fuse.
6. Hole in hose. 6.
7. Broken/misplaced belt. 7.
8. Hose not Inserted fully 8.
9. Motor protection system activated. 9.
I0, Dlrty filters_ tO,
I. Wrong pile height setting. 1,
Agitatordoes not
turn.
Performance Indicator,
some models, Is red.
Air flow restricted
with attachment usa.
Sound changes.
1. Broken belt.
2. Bare floor selector in bare
floor setting.
3. Belt installedincorrectly.
I. Full or clogged dust bag°
2. Dirty filters.
3. Clogged airflow passage -
dirt tube, nozzle, hose,
4. Certain attachment toots,
1. Attachment use restricts
air flow.
Light won't work. 1. Burned out light bulb. 1.
1.
2. New carpet fuzz clogged air path°
Excessive noise as 1. Bert rubbing on carpet/bare floor
vacuum Is shut off. selector shaft°
22
II
2.
3,
4.
5,
Change bsg, (page 13).
Adjust setting, (page 8).
Replace brush, (page 21)o
Clean nozzle area, (page 19).
Check for clogs, (page 19).
Replacshose,
Replace/f'L_belt,(page17),
Insert hose fully, (page 9).
Check for ciogs, (page 19).
Clean filters, (page 14),
Adjust setting,(page 7)°
Change fightbulb, (page 20).
Replace belt, (page 16)o
2. Switch selectorto the carpet setting,
(page 7),
3. Check BELT CHANGING AND
BRUSH CLEANING, (page 17).
1. Change bag, (page 13)o
2. Clean filters, (page 14).
3. Clear clog from airflow passage.
(page 19).
4. Should return to normalwhen
tool isremoved.
1. Check ATTACHMENTS.
(page 8).
2. Check CLOG REMOVAL and clean
hose, (page 19)o
1. Push selector all the way forward.
1, Full or clogged dust bag
2. Wrong pileheight setting,
3. Worn brush,
4o Clogged nozzle or dirt tube,
5. Clogged hose.
3. Push on/off switchto om
For repair of major brand appliances in your own home...
no matter who made it, no matter who sold it!
1-800-4-MY-HOME ® Anytime, day or night
(1-800-469-4663) (U,S.A. and Canada)
www,sea rs.com
www.sears.ca
For repair of carry-in products like vacuums, lawn equipment, and
electronics, call for the nearest Sears Parts and Repair Center.
1-800-488-1222 Anytime, day or night (U.SA only)
www.sears.com
For the replacement parts, accessories and owner's manuals
that you need to do-it-yourself, call Sears PartsDirectSM!
1-800-366-PART
(1-800-366-7278)
6 a.m - 11 pro., 7 days a week
(U.S°A.only)
www,sears,com/partsdirect
To purchase or inquire about a Sears Service Agreement
or Sears Maintenance Agreement:
1-800-827-6655 (USA) 1-800-361-6665 (Canada)
7 aom.- 5 p_m°,CST, Mort.- Sat. 9 a.m - 8 p_m,EST, M - F,4 p.rn_Sat.
Para pedir servicio de reparaci6n a
domicilio, y para ordenar piezas:
1-888-SU-HOGAR sM
(1-888-784-6427)
Au Canada pourservice en fran_ais:
1-800-LE=FOYERMc
(1-800-533-6937)
_.sears,ca
© Sears, Roebuck and Co
fsJ, ]
L H°meCentral®
® Registered Trademark / "rMTrademark / sMService Mark o! Sears, Roebuck and Co
® Marca Registrada/-m Marca de F_,brica/SM Marca de Servicio de Sears, Roebuck and Co
McMarque de commerce / MDMarque d_pos_e de Sears, Roebuck and Co
23
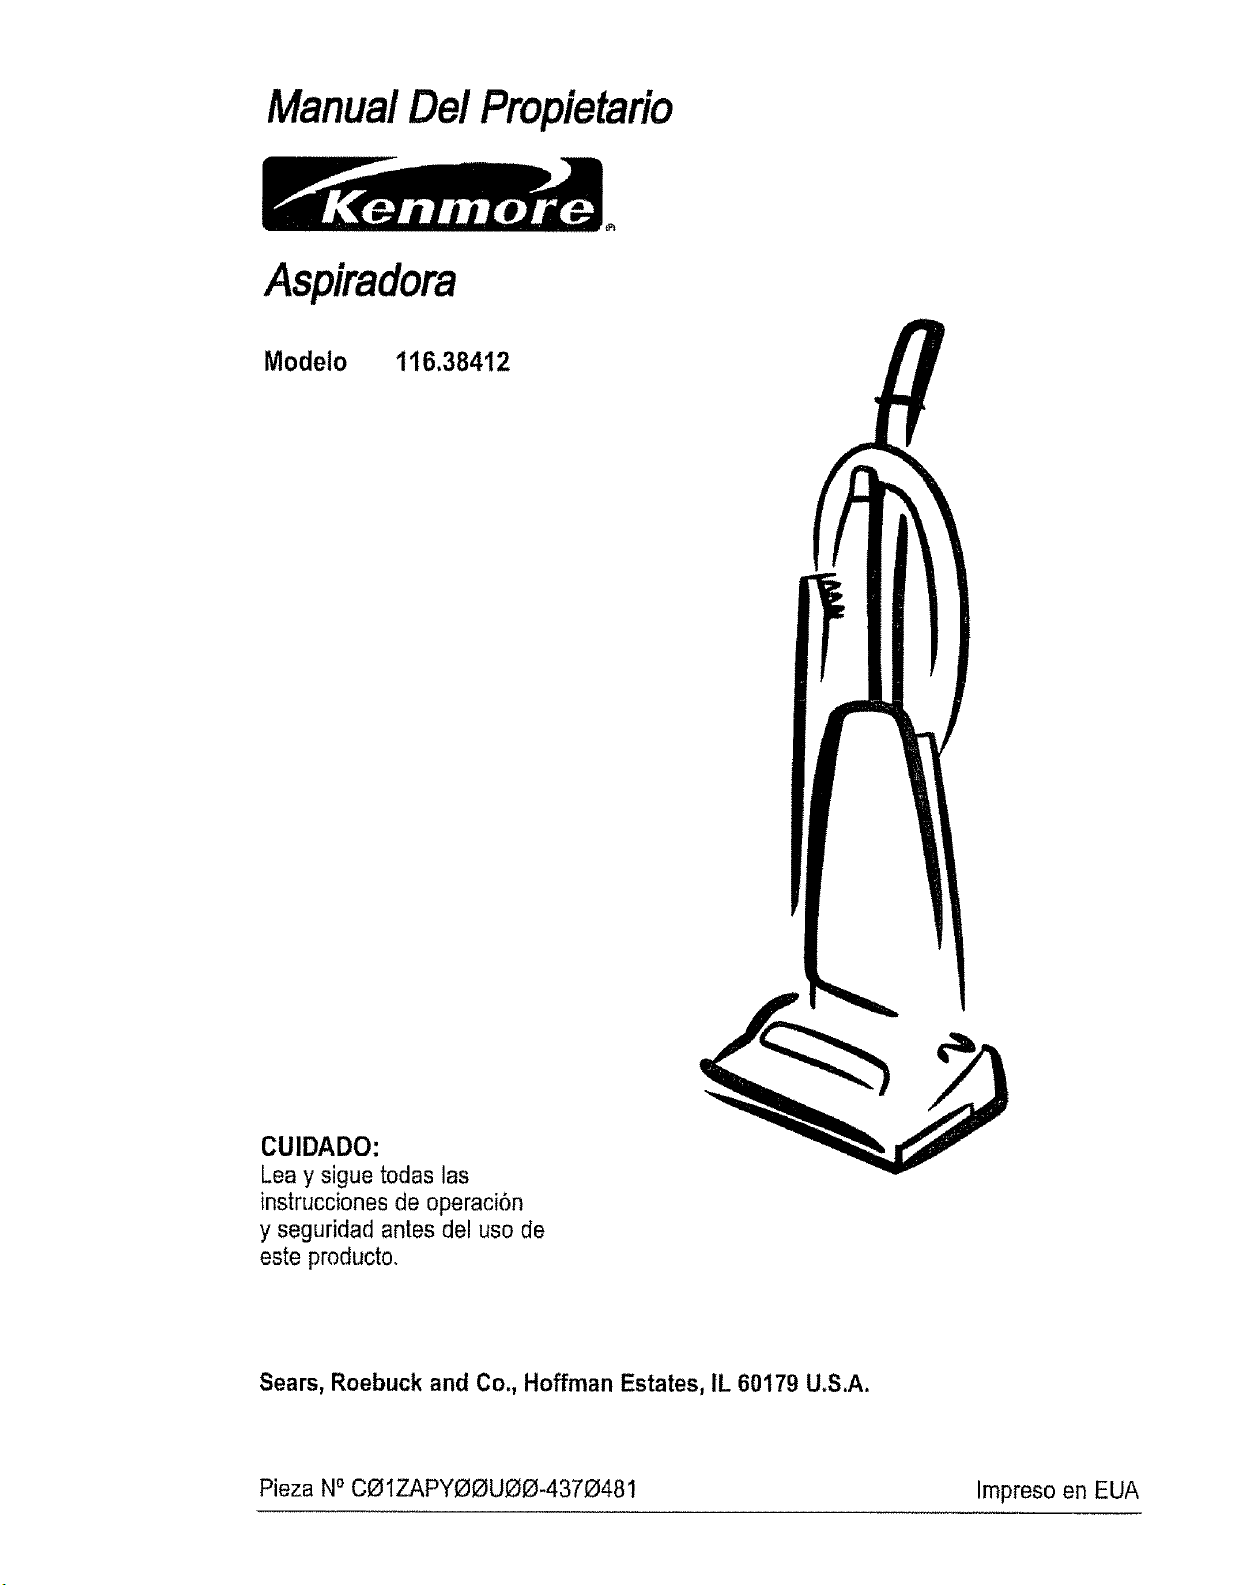
Manual Del Propietario
Aspiradora
Modelo 116.36412
CUIDADO:
Lea y sigue todas las
instrucciones de operaciSn
y seguridad antes del uso de
este producto.
Sears, Roebuck and Co., Hoffman Estates, IL 60179 U.S.A.
Pieza NOCO1ZAPY00U00-4370481 Impreso en EUA
Antes de usar su aspiradora nueva •, 2
Garantia de la aspiradora de
Kenmore ........................... 2
lnstrucciones importantes de
seguridad .......................... 3
Piezas y caracteristicas ............. 4
Instrucciones de ensamblamiento ooo 5
Instrucciones de operacibn ......... 6
AJuste y selecci6n de nivel de pelo
de la alfombra ..................... 7
Selector de pisos con alfombra y
sin alfombra ........................ 7
Desprendimiento del mango ........... 8
Baton de encendido/apagado .......... 8
Accesorios ..................... 8_!0
Cuadro de usa de los accesorios ...... 10
Sugerencias para aspirar ............ 11
Caracterlsticas de rendimiento ..... 11-12
Cuidado de la aspiradora .......... 12
Cuadro de usa de los accesorios ...... 12
Limpieza del exterior y de los accesorios o12
Cambio de la balsa ................ 13
Cambio del filtro de seguridad
del motor ...................... 14-t5
Limpieza de] filtro de escape ......... 15
Cambio de la correa y limpieza del
cepillo ........................ 16-18
C6mo eliminar los residuos de basura
en los conductos .................. 19
Cambio de la bombilta .............. 20
Cuidado del cepillo ................. 21
Ensamble del agltador ............. 21
Solucibn de problemas ............ 22
Informacion de assistancia
o servicio ........................ 23
Par favor lea esta guia qua le ayudara a assemblar y operar su aspiradora nuevade Kenmore en una manera
m_s segura y effectiva.
Para mas informaciSnacerca del cuidadoy operaciSnde esta aspirador, llamaa su tiendaSears mas cercana
Cuando prequnte per informaciSnusted necisitar_el n_merocomp_etode seriey modelo de laaspiradoraqua
est_ locadoen la ptacade los n_3merosde modeloy serie.
Use etespacio de abajo para registrar elnOmerode modeloy serie para su nuevaaspiradora de Kenmore.
NQmerode Modelo
N_mero de Serie
Fecha de Compra
Matenga este libra y su recibo en u lugar seguropara referenciasfuturas.
GARANTiALIMITADADE UNANO DE LAASPIRADORA KENMORE
Esta garantlaes par un aSodesde la fechade compra,e incluyesotamente el usa de ia aspiradoraen hogares
privadas.Duranteel aSode garantia,cuando laaspiradoraes operada y mantenida de acuerdoal manualde
instruccionesdet dueSo,Searsreparar_ cualquierdafectoen materialeso fabricaci6n libra de cargo.
Esta garantia exctuyeIas balsas de colecci6n, correas,Iampadllas,y fiitros,las cualesson pades gastablesqua
se deteriorancon el usa normal.
Para el servicio de garantia,retorne esta aspiradoraal Centro de Servicio Sears m_s cercanoen los
Estados Unidos,
Esta garantia se aplicasolamente mientraseste productoest& en use en los Estados Unidos Esta garantlale
da a usted derechos fegalesespecificos, y usted puede tenettambi_narrasderechos loscuales varian de
estado a estado.
Sears, Roebuckand Con,D/817WA,HoffmanEstates,IL 60179

ADVERTENCIA
Su seguridades muyimportante para nosotros.Para reducir el riesgo de tncendlo,cheque
eldctrico, lesi6n corporal o daSos al utilizar su aspiradora,act_e de acuerdo con precauciones
b,'_sicasde seguridad,entre elias:
Lea este manualantes dearmar o utilizar su
aspkadora.
Use su aspiradora_nicamenteen la forma
descrita en este manual_Useenicamente con
accesorios recomendadosper Sears_
Para reducirel riesgode chequeel_ctrico,no use
su aspiradora alaire librani sabresuperficies
mojadas.
Desconecte la fuente de electricdadantes de
dar servicioo limpiar. Delo contrario podria
causar un chequeel6ctricoo lesi6ncorporal.
Stempre debe apagar suaspiradoraantes de
desconectarta.
No desconecte laaspiradoratirandodel cord6n
e_6ctr]coParadesconectarla,hale el enchufe, no
el cord6n.
No use la aspiradorasi el cord6no el enchufe
est_ dafiado.Si faaspiradorano ast_
funcionandoadecuadamenteo si se ha dejado
caer, est_daSada,seha de}ado expuestaa Ia
intemperieo se ha dejado caeren agua, devu61-
vala aun Cenko/Departamento de serviciode
Sears
No hale ni transportela aspiradoraper el cord6n;
no use el cord6n come mango;no cierre puertas
sobreel cord6n; nohale el cord6n sobre rebor-
des agudosni esquinas.No pasela aspiradora
sobreel cord6n Mantenga el cord6nalejado de
superficies calientes.
No abandone la aspiradoracuando est6conec-
tada Descon6ctelacuando no taest6 usandoy
antes de darle servicio
No permitaque seautitizadacomejuguete.Se
requiere tenet mayorcuidadocuandosea
utilizadaen la proximidadde niSoso per niSos
Notoquetaaspiradorani el enchufecon las
manes mojadas
No coloqueobjetos en lasaberturas
No utiticela aspiradorasi alguna abertura est_
bloqueada;mant6ngaralibrade polvo,petusa,
cabeilosy cuatquieracesa qua podda disminuir
el flujo de aim.
Mantengael cabello,ropa suelta, dedosy todas
las partes del cuerpo aiejadosde lasaberturas y
piezas mec_nicas
No use la aspiradorasin tenerinstaladalabalsa
para pobo y/o losfiltros
Cambie slempre la boisepara poivodespu6s de
aspirartimpiadoresde alfombraso desodorantes,
talcosy pelves finOSoEstos productosatascanla
bolsa, reducenel flujode airey pueden causar
que 6sta se rompa Si no cambia la bolsa pedrla
ocasionardaSo permanentea la aspiradora_
No usela aspiradorapara levantarobjetos agu-
dos, juguetes pequenos,aIfileres, papel,etc.
PodrtandaSarlaaspiradoraofa bolsa para polvo.
No levanteningunacosaque se est6 quemando
o emitiendo humo, come cigarrillos,cerillos o
cenizascalientes,
No usela aspiradorapara aspirar liquidos
inflamableso combustibles(gasoiina, tiquidos
para limpieza,perfumes,etc) ni lause en
lugaresdonde _stos podrianestar presentes Los
vapores de estas sustanciaspueden crear un
peligro de incendioo explosi6n.
Tenga cuidado especialat utilizar taaspiradora
en escalones.Nola cotoquesobresillas, mesas,
etc. Mant6ngalaen el piso
Usted es responsablede asegurar que su aspira-
dora nosea utilizada per ninguna personaque no
pueda manejarlacorreclamente.
GUARDE ESTAS INSTRUCCIONES
El armado y usesegurode su aspiradorason su responsabilidad Esta aspiradoraha side diseSada
exclusivamentepara usedom6stico.La aspiradoradebera almacenarseen un lugar seco yen el inte-
rior Lea este Manualdetpropietario detenidamente, puescontiene informaci6nimpertantesobresegu-
ridad y use Esta quiacontiene inbrmaci6n sobre seguridaddebajo de simbotosde advertiencia
cuidado Perfavor pongaatenci6n especial a estas{nstruccionesdadas Advertencia: Este
informaci6nIealertar_con el poligro de fuego, cheques electricos,quemadas y _esienes.Cuidado:
Este informaci6nle atedara a peiigros come Iesionesy daSosde propiedad.

Esimportanteconcerlaspiezasycaracteristicasdesuaspiradoraparaasegurarsuuseadecuado
yseguro.Examlnelasantesdeusarsuaspiradora,
Objeto Pieza N°
en EUA
Bolsa para polvo 20-50688
Bombia de farol 20-5240
Correa 20-5275
Filtro de seguridad
del motor 20-86886
Pieza No
en Canad._ _go--
20-50680 Interrupter de
en cendido/apaga do
' ' Montado en el mango
20-40600 (AIg.nosmodelos)
20-40096
tnterruptor de
20-86886C encendido/apagado
Montado en et cuerpo
' ' ' (Algunos modelos) ---7
Seguro de ta
cubierta de
la bolsa
Sujetador
de liberaci6n
rapida de/
cord6n
Cord6n
el_ctrico
tndicador de
rendimiento
(Algunos modelos)
Cubierta
de la bolsa
Panel de
Sujetador
inferior del
Mango para
Herramienta para
hendiduras
Tube
Cubierta del
limpteza
Cepitlo
para
Herramienta
para tapices
Palanca para ajustar
la altura
Protector
de muebles,
Farol Boqui#a
giratoria
list para usar
expansible
Protector de motor
de la manguera)
Correa
Selector de pisos
con alfombra y
sin alfombra
(Algunos modelos)
Pedal de
Iiberaci6n
del mango
N_meros de
series del modeto
Agitador
4
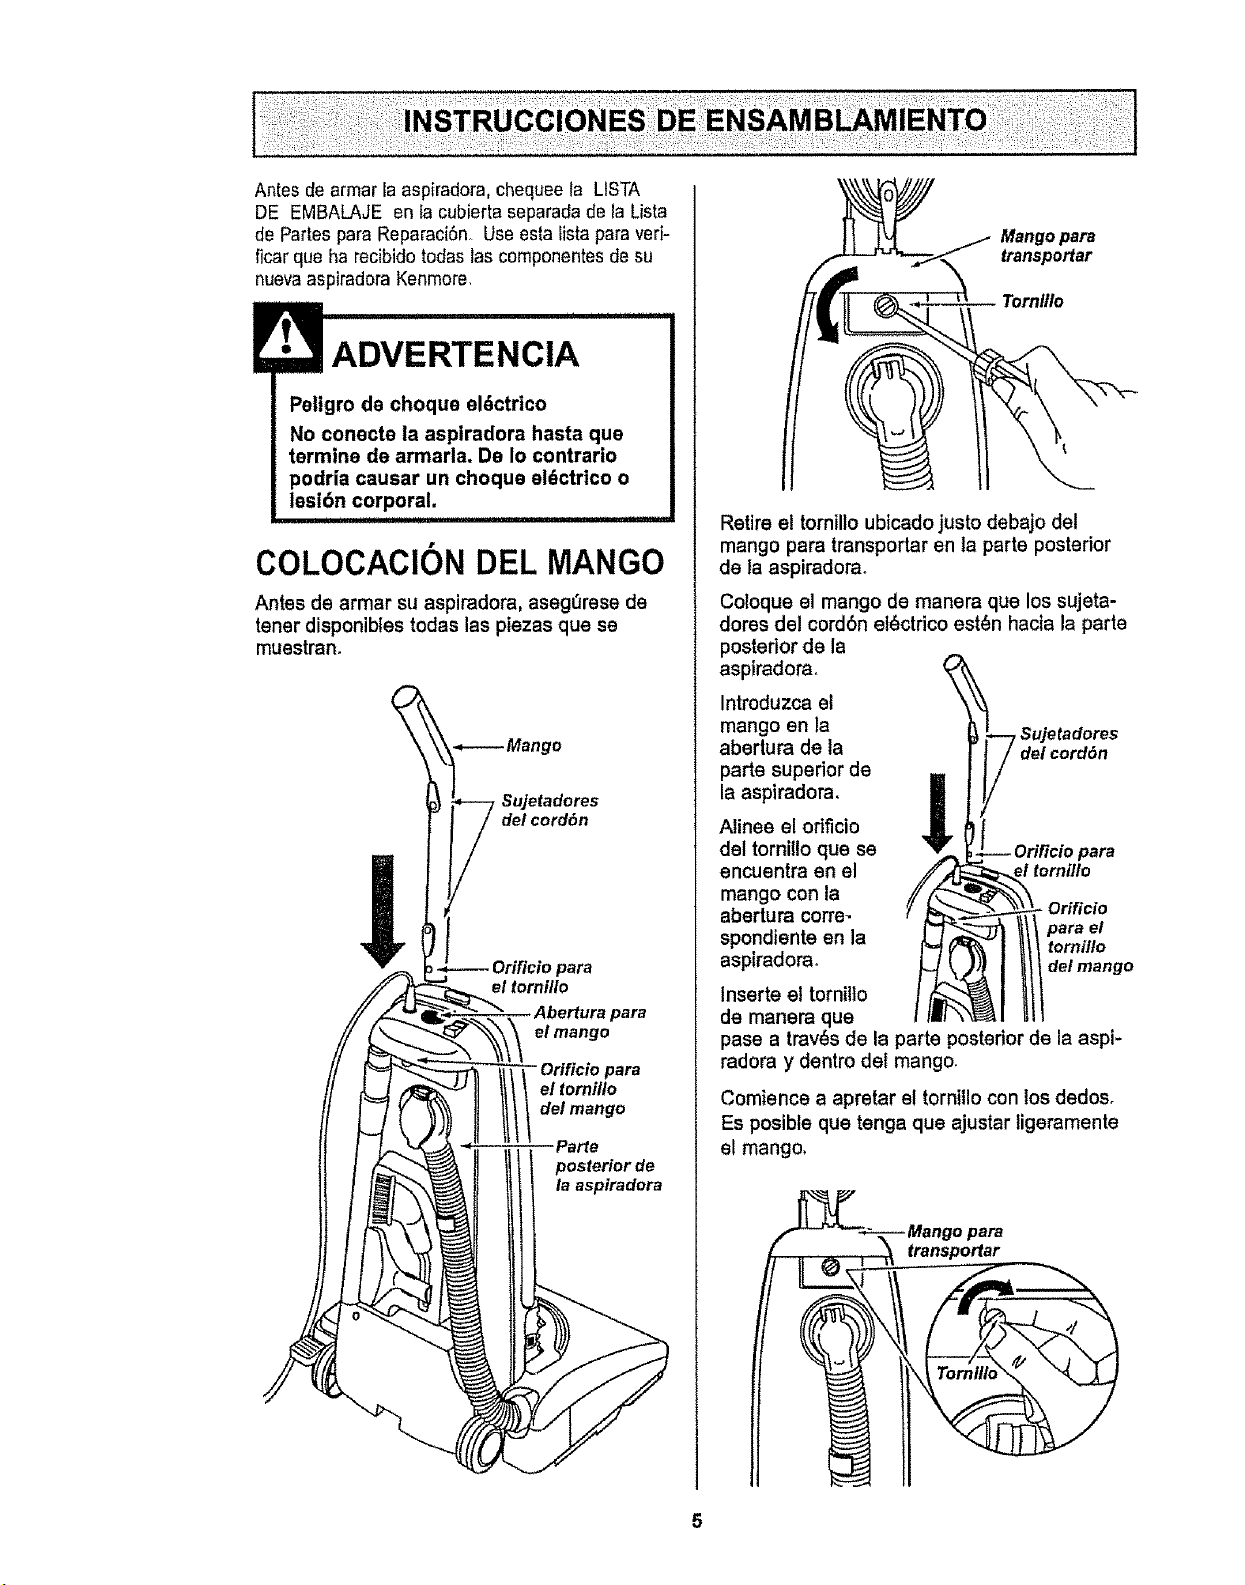
Antes de armar la aspiradora, chequee la LtSTA
DE EMBALAJE en la cubierta separadade la Lista
de Partes para Reparaci6n_ Use esta Listaparaved-
ficar que ha recibidotodas las componentesde su
nuevaaspiradora Kenrnore.
ADVERTENCIA
Peligro de choque el_ctrlco
No conecte la aspiradora hasta que
termine de armarla. De Io contrario
podria causar un choque eldctrtco o
lesi6n corporal,
COLOCAClON DEL MANGO
Antes de armar su aspiradora, asegOrese de
tener disponibles todas las plazas qua se
muestran.
!
, Sujetadores
del cord6n
para
el tornillo
Abertura para
el mango
para
el torniflo
del mango
Parte
posterior de
la aspiradora
Mango para
transporfar
Tornlllo
Retire e! tornilloubicado justo debajo del
mango para transportar en la parte posterior
de la aspiradorao
Coloque el mango de manera qua los sujeta-
dores del cordbn el_ctrico est_n hacia la parte
posterior de la
asplradora°
Introduzca et
mango en la
abertura de ta
parte superior de
la aspiradora, !
Alinee el orificio
del tornillo qua se
encuentra en el
mango con la
abertura corre-
spondiente en la
aspiradora.
Inserte e! tornilto
de manera qua
_..--7 Sujetadores
_///del corddn
_LOrificiopara
tornfllo
Orifieio
para el
tornilto
del mango
pase a tray, s de la parte posterior de la aspi-
radora y dentro del mango.
Comience a apretar el tornillocon los dedos.
Es posibte que tenga que ajustar ligeramente
el mango,
Mango para
transportar
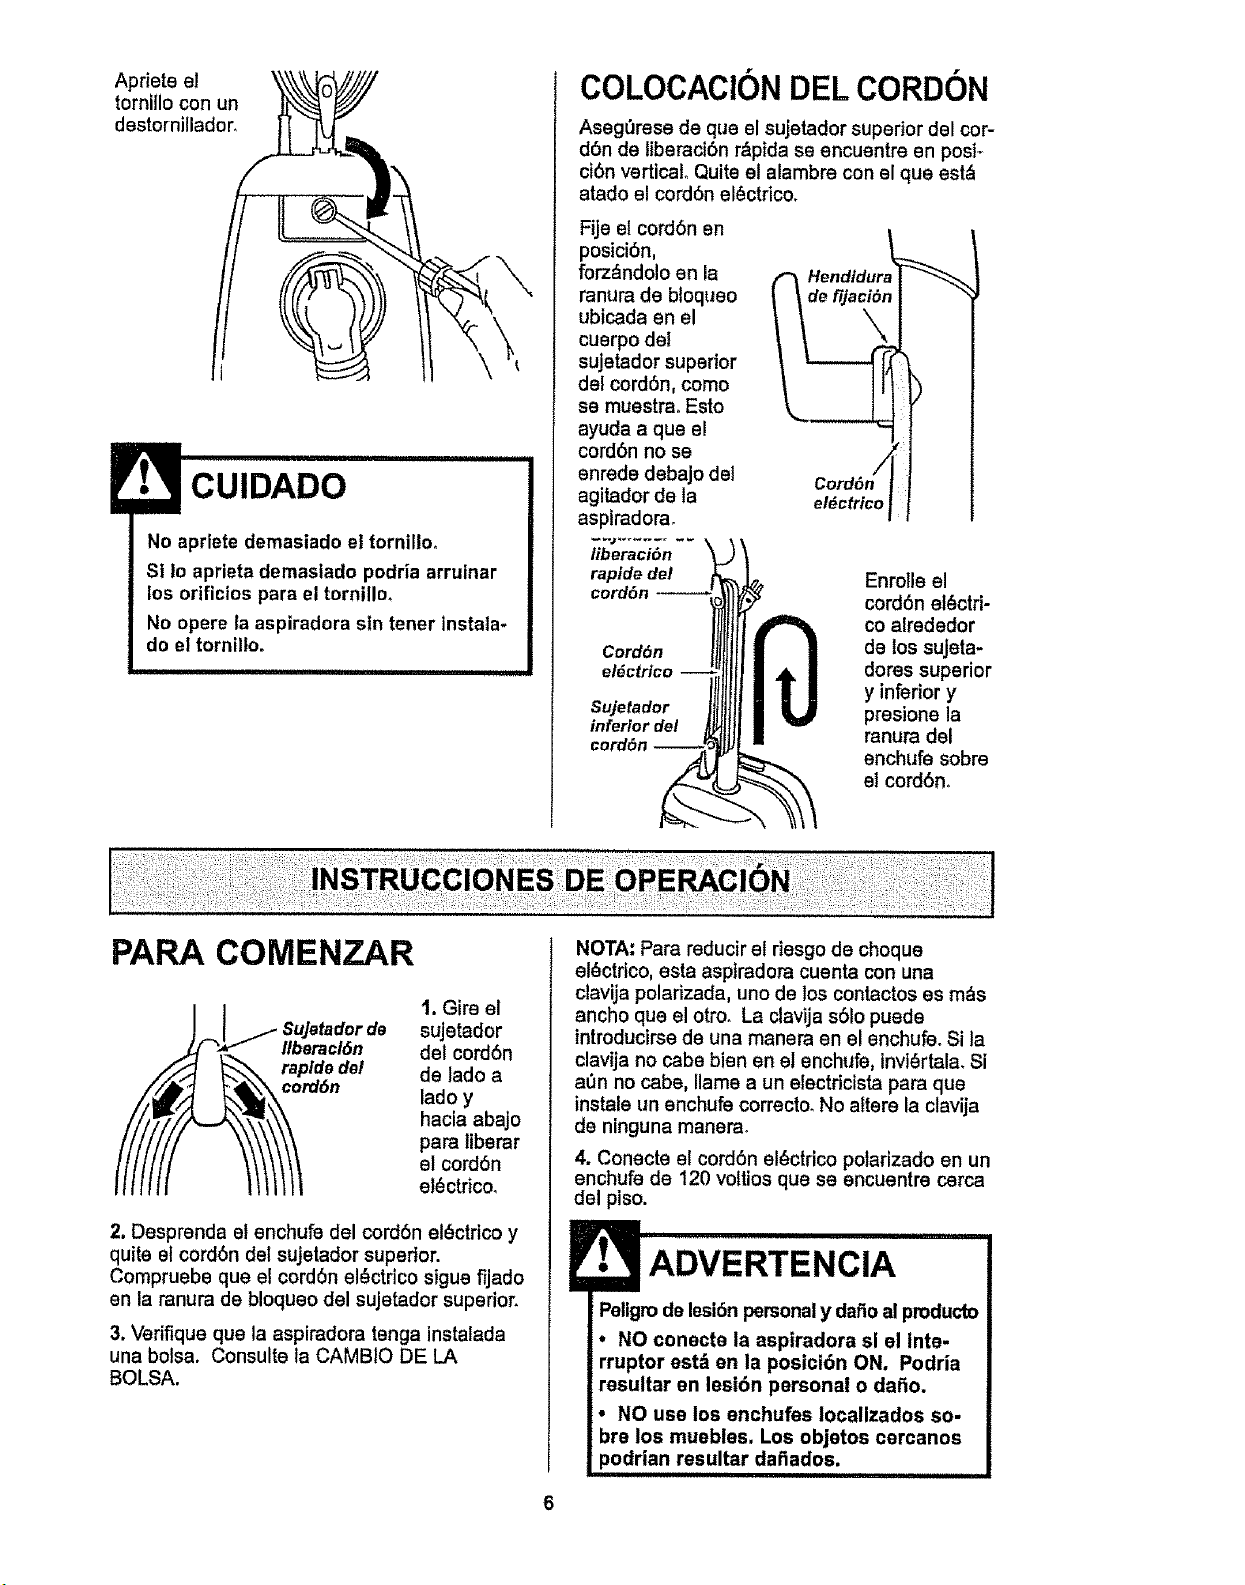
Apriete el
tornillo con un
destornilladoro
No apriete demasiado el tornillo_
St lo aprieta demasiado podria arruinar
los orificios para el tornillm
No opere la aspiradora sin tener instala-
do el torniltoo
COLOCACION DEL CORDON
AsegQrese de qua el sujetador superior del cor-
d6n de liberaci6n rdpida se encuentre en posi-.
ct6n vertical. Quite el alambre con el qua estd
atado el cord6n el_ctrico.
Fije el cord6n en
posici6n,
forz&ndolo en la
ranura de bloqueo
ubicada en el
cuerpo det
sujetador superior
del cord6n, como
se muestrao Esto
ayucla a que el
cord6n no se
enrede debajo del
agitador de la
aspiradora,
Hendtdun
el_cfrico
liberaci6n
rapids del
cord6n--
Cordbn
el_ctrtco
Sujetador
inferior de!
Enrolls el
cord6n el_ctri-
co alrededor
de los sujeta-
dotes superior
y inferior y
presione la
ranura del
enchufe sobre
el cordbn.
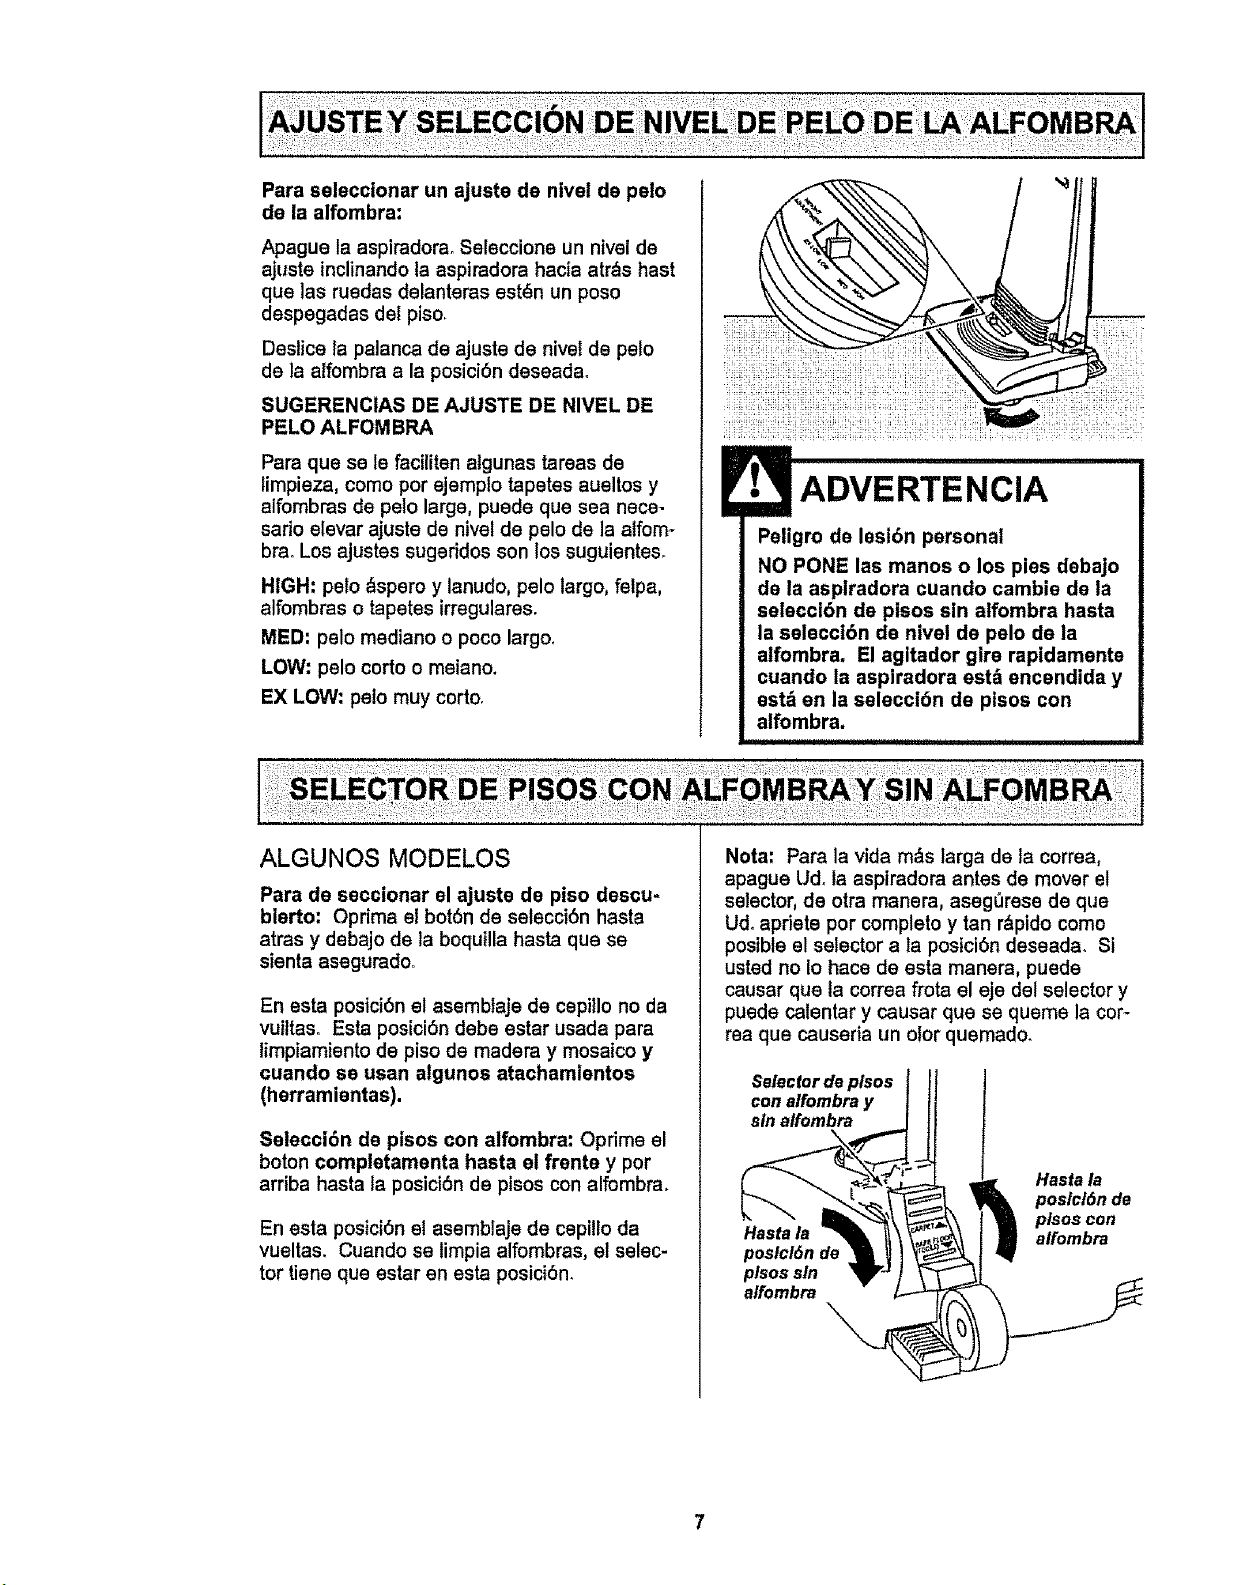
PARA COMENZAR
SuJatador de
llberacl6n
rapida dal
cord&n
1. Gire el
sujetador
del cord6n
de lade a
lade y
hacia abajo
para liberar
el cord6n
el_ctrico,
2. Desprenda el enchufe del cord6n el_ctrico y
quite el cord6n del sujetador superior.
Compruebe que el cordbn el_ctfico sigue fijado
en la ranura de bloqueo del sujetador superior.
3. Vefifique qua la aspiradora tenga instalada
una bolsa. Consulte la CAMBIO DE LA
BOLSA.
NOTA: Para reducir el riesgo de cheque
el_ctrico, esta asptradora cuenta con una
clavija polarizada, uno de los contactos es m_s
ancho qua el otto. La clavija s61opuede
introducirsede una manera en el enchufe° Si la
clavija no cabe bienen el enchufe, invi_rtala. Si
a_n no cabs, llama a un electrieista para qua
instale un enchufe correcto_ No altere la clavija
de ninguna manera.
4. Conecte el cord6n el_ctrico polarizado en un
enchufe de 120 voltios qua se encuentre cerca
del piso.
, "ADVERTENOIA
Peligrodelesi6n pemonaly dafioal producto
* NO conecte la aspiradora si el inte-
rrupter est_ en la posici6n ON. Podria
resultar en lesl6n personal o dafio.
, NO use los enchufes Iocallzados so-
bre los muebles. Los objetos cercanos
podrian resultar daflados.
Para seleccionar un ajuste de nivel de pelo
de la alfombra:
Apague la aspimdora. Seleccione un nivel de
ajuste inclinando la aspiradora hacia arras hast
que las ruedas delanteras est_n un poso
despegadas det piso.
Deslice la palanca de ajuste de nivel de pelo
de la alfombra a la posici6n deseadao
SUGERENCIAS DE AJUSTE DE NIVEL DE
PELO ALFOMBRA
Para qua se le faciliten atgunas tareas de
limpieza, como por ejemplo tapates aueltos y
alfombras de peto large, puede qua sea nece-
sarlo elevar ajuste de nivel de pelo de la atfomo
brao Los ajustes sugeridos son los suguientes.
HIGH: pelo &spero y lanudo, pelo largo, felpa,
alfombras o tapetes irregulares.
MED: pelo mediano o poco largo,
LOW: pelo corto o meiano.
EX LOW: pelo muy corto,
Peligro de lesibn personal
NO PONE las manos o los pies debajo
de la asplradora cuando cambie de la
selecci6n de plsos sin atfombra hasta
la selecct6n de nivel de pelo de la
atfombra. El agltador glre rapidamente
cuando la aspiradora estb encendida y
est_ en la seleccibn de pisos con
alfombra.
ALGUNOS MODELOS
Para de secclonar el ajuste de piso descu-
bierto: Oprima el bot6n de selecci6n hasta
atras y debajo de ta boquIIla hasta que se
sienta aseguradoo
En esta posici6n e! asemblaje de cepillo no da
vuiltas° Esta posici6n debe estar usada para
limpiamiento de piso de rnadera y mosaico y
cuando se usan algunos atachamientos
(herramientas).
Salecci6n de pisos con alfombra: Oprime el
boton completamenta hasta el frente y pot
arriba hasta la posici6n de pisos con alfombra.
En esta posici6n el asemblaje de cepillo da
vualtas. Cuando se limpia alfombras, el selec-
tor tiene que estar en esta posicibn.
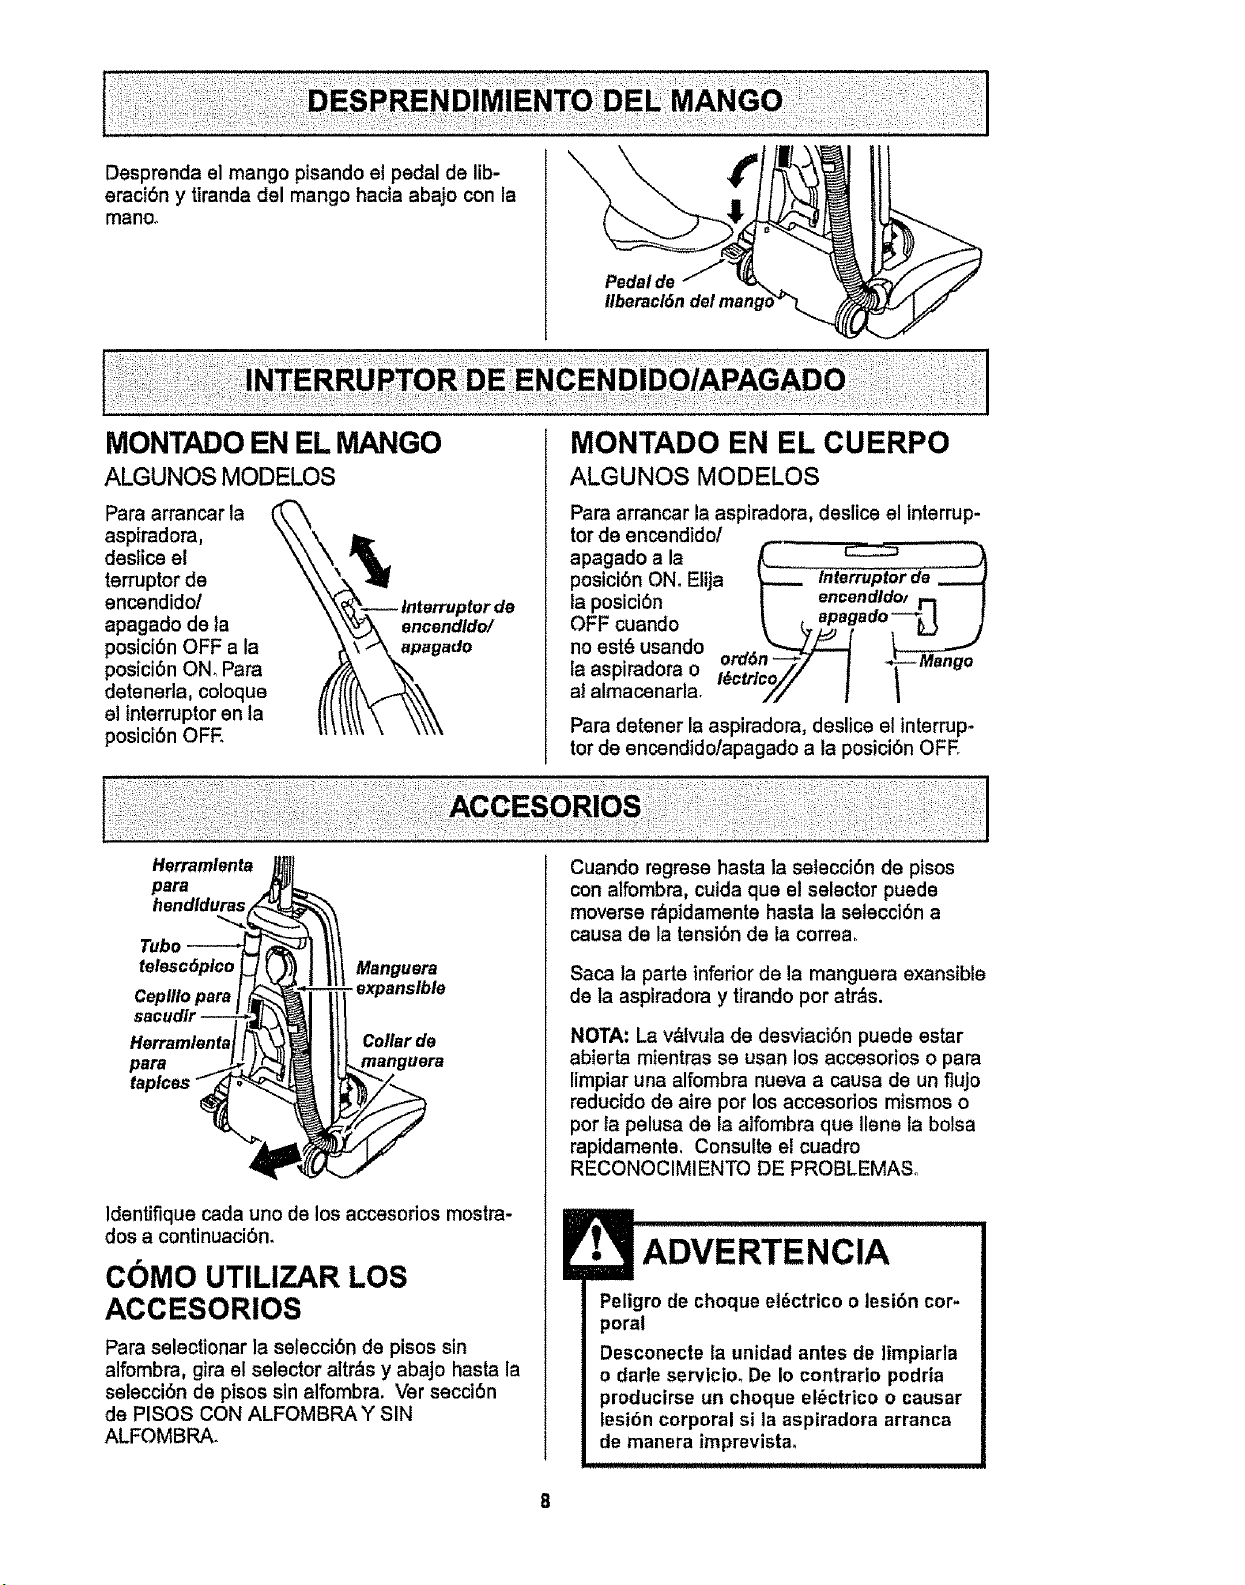
Nota: Para la vida m&s larga de la correa,
apague Ud. la aspiradora antes de mover el
selector, de otra manera, asegerese de qua
Ud. apdete por completo y tan r&pido como
posible el selector a la posici6n deseada. Si
usted no Io hace de esta manera, puede
causar qua la correa frota el eje del selector y
puede calentar y causar qua se queme la cor-
tea qua causeria un olor quemado.
Selectordeplsos
sln alfombra_ t
Hastala
Hastala
poslcl6nde ]
plsossin
affombra
Desprenda el mango pisando el pedal de lib-
eraci6n y Uranda del mango hacia abajo con la
manoo
Pedal de
MONTADO EN EL MANGO
ALGUNOS MODELOS
Para arrancar la
aspiradora,
desfice el
terruptor de
encendido/
apagado de la
posicibn OFF a la
posiciOnON_Para
detenerta, coloque
el interrupter en la
posiciSnOFE
MONTADO EN EL CUERPO
ALGUNOS MODELOS
Para arrancar la aspiradora, deslice el interrup-
ter de encendido!
apagado a la __- _
posici6n ON, Elija _ Interrupter de
' • encendldo/
la posicl6n / m|
OFF cuando _ (, apagado_"_d }
no est_ usando ,,_
. ordOn ._-- Mango
laasplradora o i,e_no_i I I
a! almacenarla. -)'/ ] |
Para detener la aspiradora, deslice el interrup-
ter de encendidolapagado a la posici6n OFE
Harramlenta
para
telescOplco Manguera
Ceplllo para - expansible
para
Collar de
Identifique cada uno de los accesorios mostra-
dos a continuaci6n.
COMO UTILlZAR LOS
ACCESORIOS
Para selectionar la selecciOnde pisos sin
alfombra, gira el selector altr&s y abajo hasta la
selecci6n de pisos sin alfombra. Ver secciOn
de PISOS CON ALFOMBRAY SIN
ALFOMBRA.
Cuando regrese hasta la selecciOn de pisos
con alfombra, cuida qua e! selector puede
moverse r_pidamente basra la selection a
causa de la tension de la correa.
Saca la parte infedor de la manguera exansible
de la aspiradora y tirando per atr&s.
NOTA: La v_tvula de desviaciOn puede estar
abierta mientras se usan los accesorios o para
limplar una alfombra nueva a causa de un flujo
reducido de aire per los accesorios mismos o
per la pelusa de la alfombra qua liana la bolsa
rapidamente. Consulte el cuadro
RECONOCIMIENTO DE PROBLEMASo
ADVERTENCIA
Peligro de cheque el_ctrico o lesi6n cor-
poral
Desconecte la unidad antes de limpiarla
o darle serviclooDe Io contrario podria
producirse un cheque el_ctrico o causar
lesion corporal si la aspiradora arranca
de manera imprevista.
La manguera
incorporada gira
para facilitar la
limpieza en cual-
quier direcci6n.
Tubo Saque el tubo
telesc6plco telesc6pico
de su lugar
de alma
cenamiento.
Retire la herramienta para hendiduras de su
tugar de almacenamiento dentro del tubo°Gire
el aro de bloqueo hasta la posici6n UNLOCK,
Despliegue el tubo completamente. Gire el aro
de bloqueo del tubo hasta la posici6n LOCK,
Instals el tubo de extensi6n en el extremo
ablerto de la manguera.
_._ _ Deslfzadorde
Tubo _-._._ controlde
\ A_ "_"1 Tubo
superior
PARA OPERAR EL DESLIZA
DOR DE CONTROL DE
ASPIRAClON
TUBO TELESC6PICO
Cuando usa accesorios para limpiar cortinas,
tapetes pequefios de pelo corto y otrosartlcu-
los delicados, gire el selector de controlde
aspiraci6n a la posicibn abisrta. Este selector
se encuentra en el tubo telesc6pico, cerca de la
manguera.
Esto reducir_ la potencia de aspiraci6n para
facilitar la limpieza.
NOTA - Coloque el selector de controlde aspi-
raci6na la posici6n cerrada para la limpieza
normal
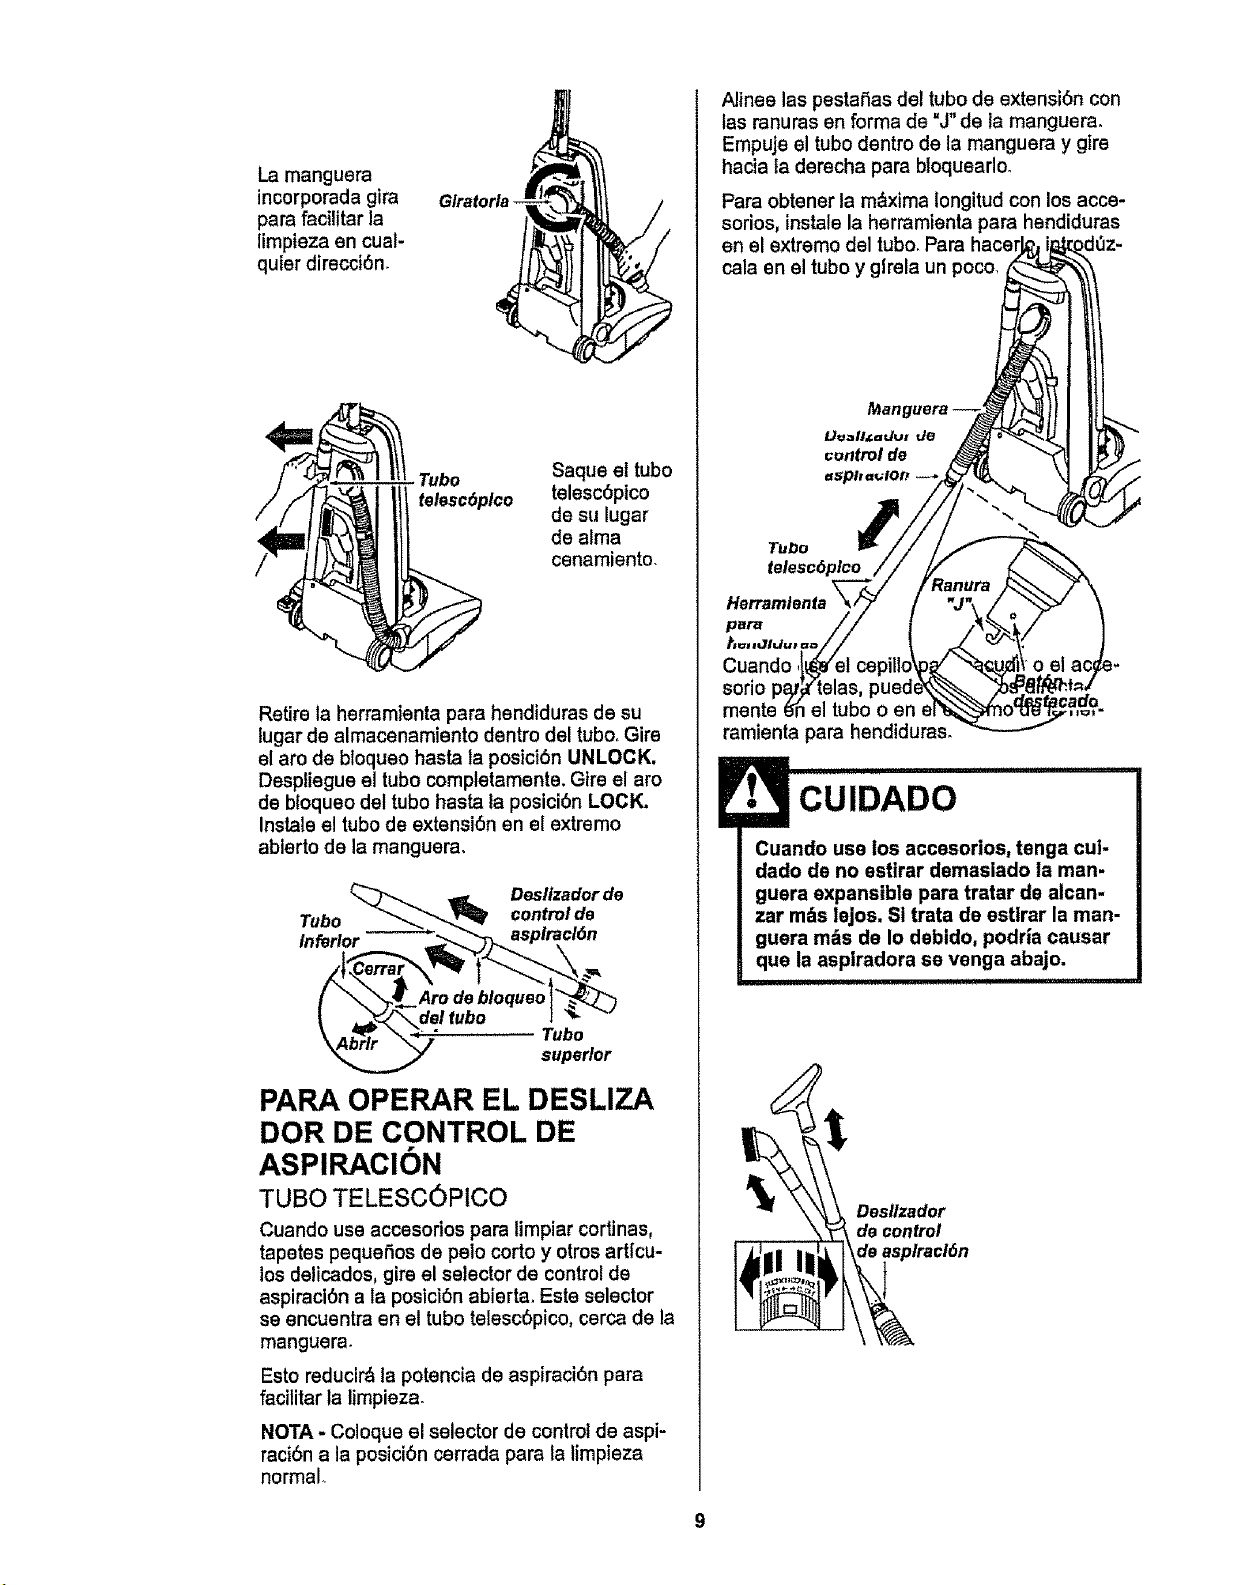
Alines las pestafias de! tubo de extensi6n con
las ranuras en forma de "J" de la manguera.
Ernpuje el tubo dentro de la manguera y gire
hacia la derecha para bioquearlo.
Para obtener la m_xima longitud con losacce-
sorios, instals la herramienta para hendiduras
en el extremo del tubo, Para hacer
calaen el tubo y glrela un poco,
Tul3o
telesc6plco
p_r_
t_=_v,,vldu_ =a
Cuando
sofio
=el tubo
ramienta para hendiduraso
CUIDADO
Cuando use los accesorios, tenga cul-
dado de no estirar demasiado la man-
guera expansible pare tratar de alcan-
zar m_s lejos. SI trata de estlrar la man-
guera m&s de Io debido, podrfa causar
qua la asplradora se venga abajo.
Desllzador
de control
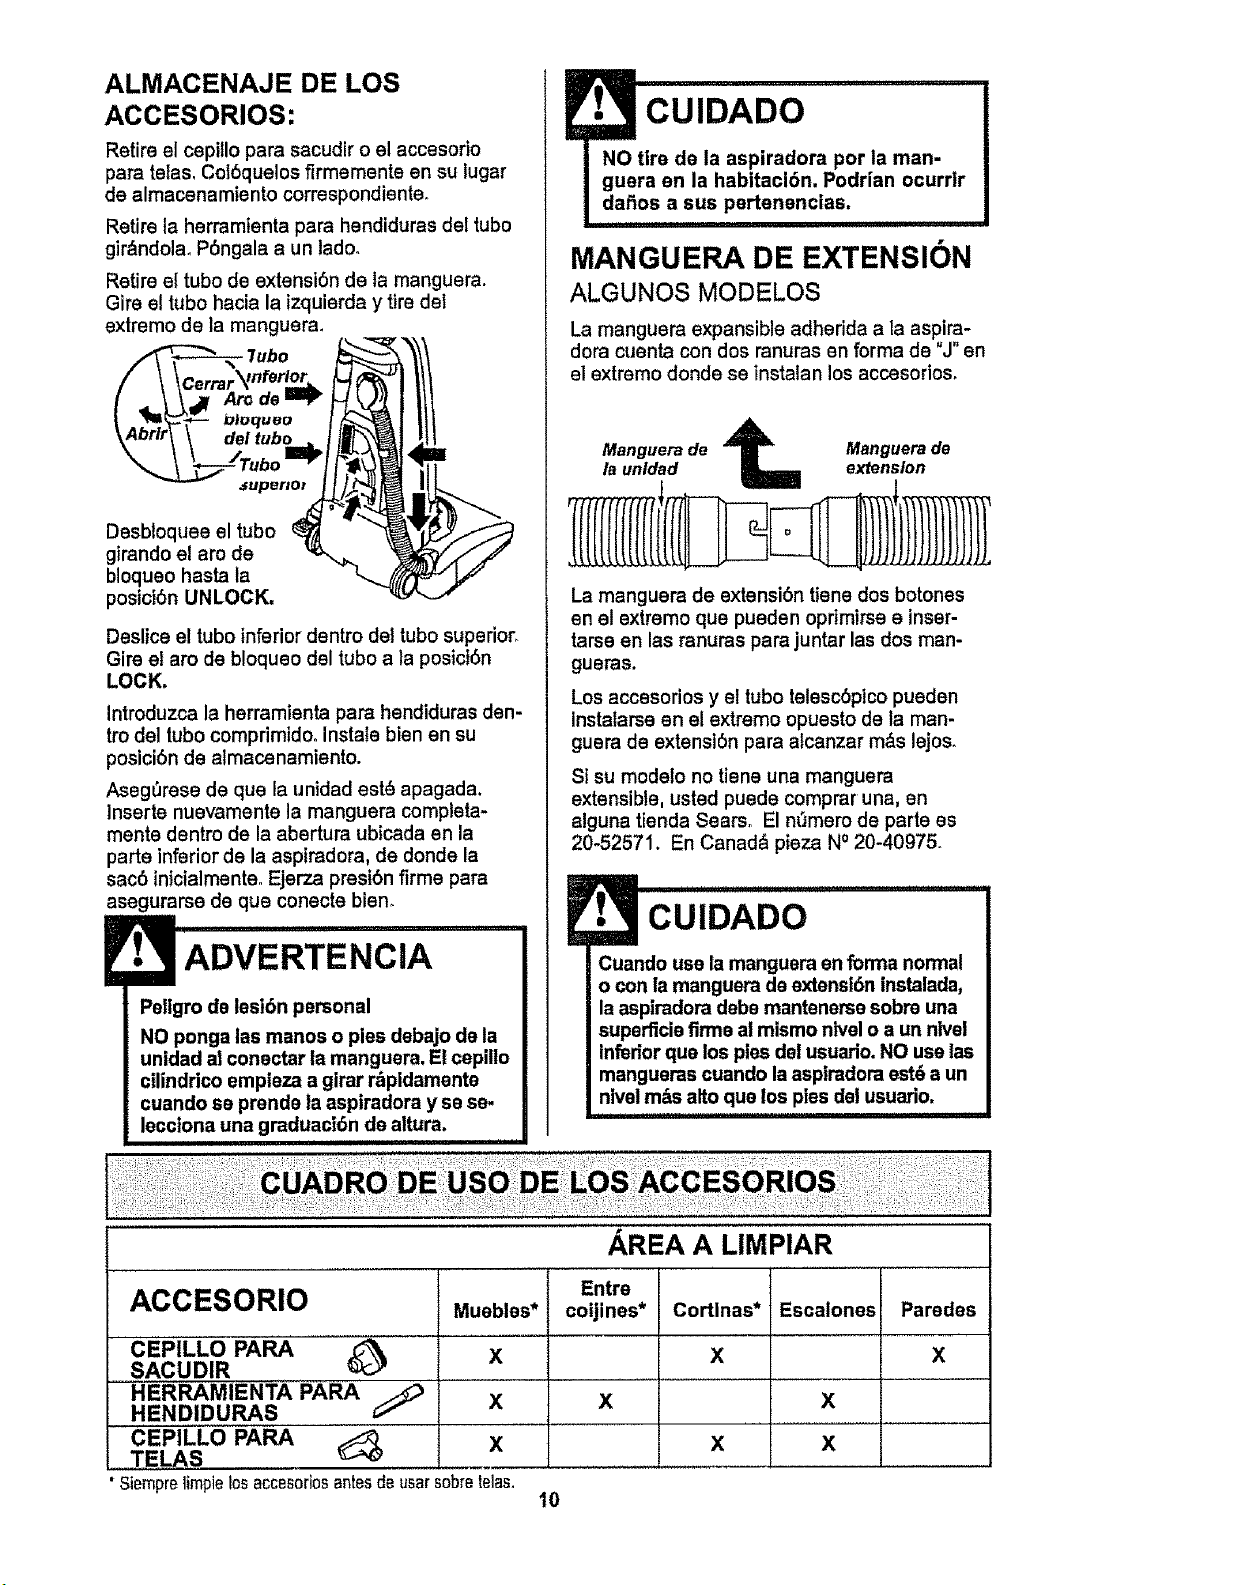
ALMACENAJE DE LOS
ACCESORIOS:
Retire el cepiflo para sacudir o el accesorio
para telas, Cot6quelos firmaments en su lugar
de almacenamiento correspondiente.
Retire la herramtenta para hendiduras del tubo
gir&ndolao P6ngala a un lado.
Retire el tubo de extensi6n de la manguera.
Gire el tubo hacia la izquierda y tire det
extremo de la manguera.
.,, lubo
_errar_mferlor,
Aro de I_
Desbloquee el tubo
girando el am de
bloqueo hasta la
poslci6n UNLOCK.
Deslice el tubo inferior dentro del tubo superior_
Gire el aro de bloqueo del tuboa la posicI6n
LOCK.
Introduzca la herramienta para hendiduras den-
trodel tubo comprimidoo Instals bien en su
posici6n de almacenamiento.
AsegDrese de qua la unidad est_ apagada.
Inserts nuevamente la manguera completa-
manta dentro de la abertura ubicada en la
parte inferior de la aspiradora, de donde la
sac6 inicialmente° Ejerza presi6n firms para
asegurarse de qua conecte bien.
!• CUIDADO
NO tire de la aspiradora por la man-
guera en la habitaci6n, Podrian ocurrlr
dafios a sus pertenencias.
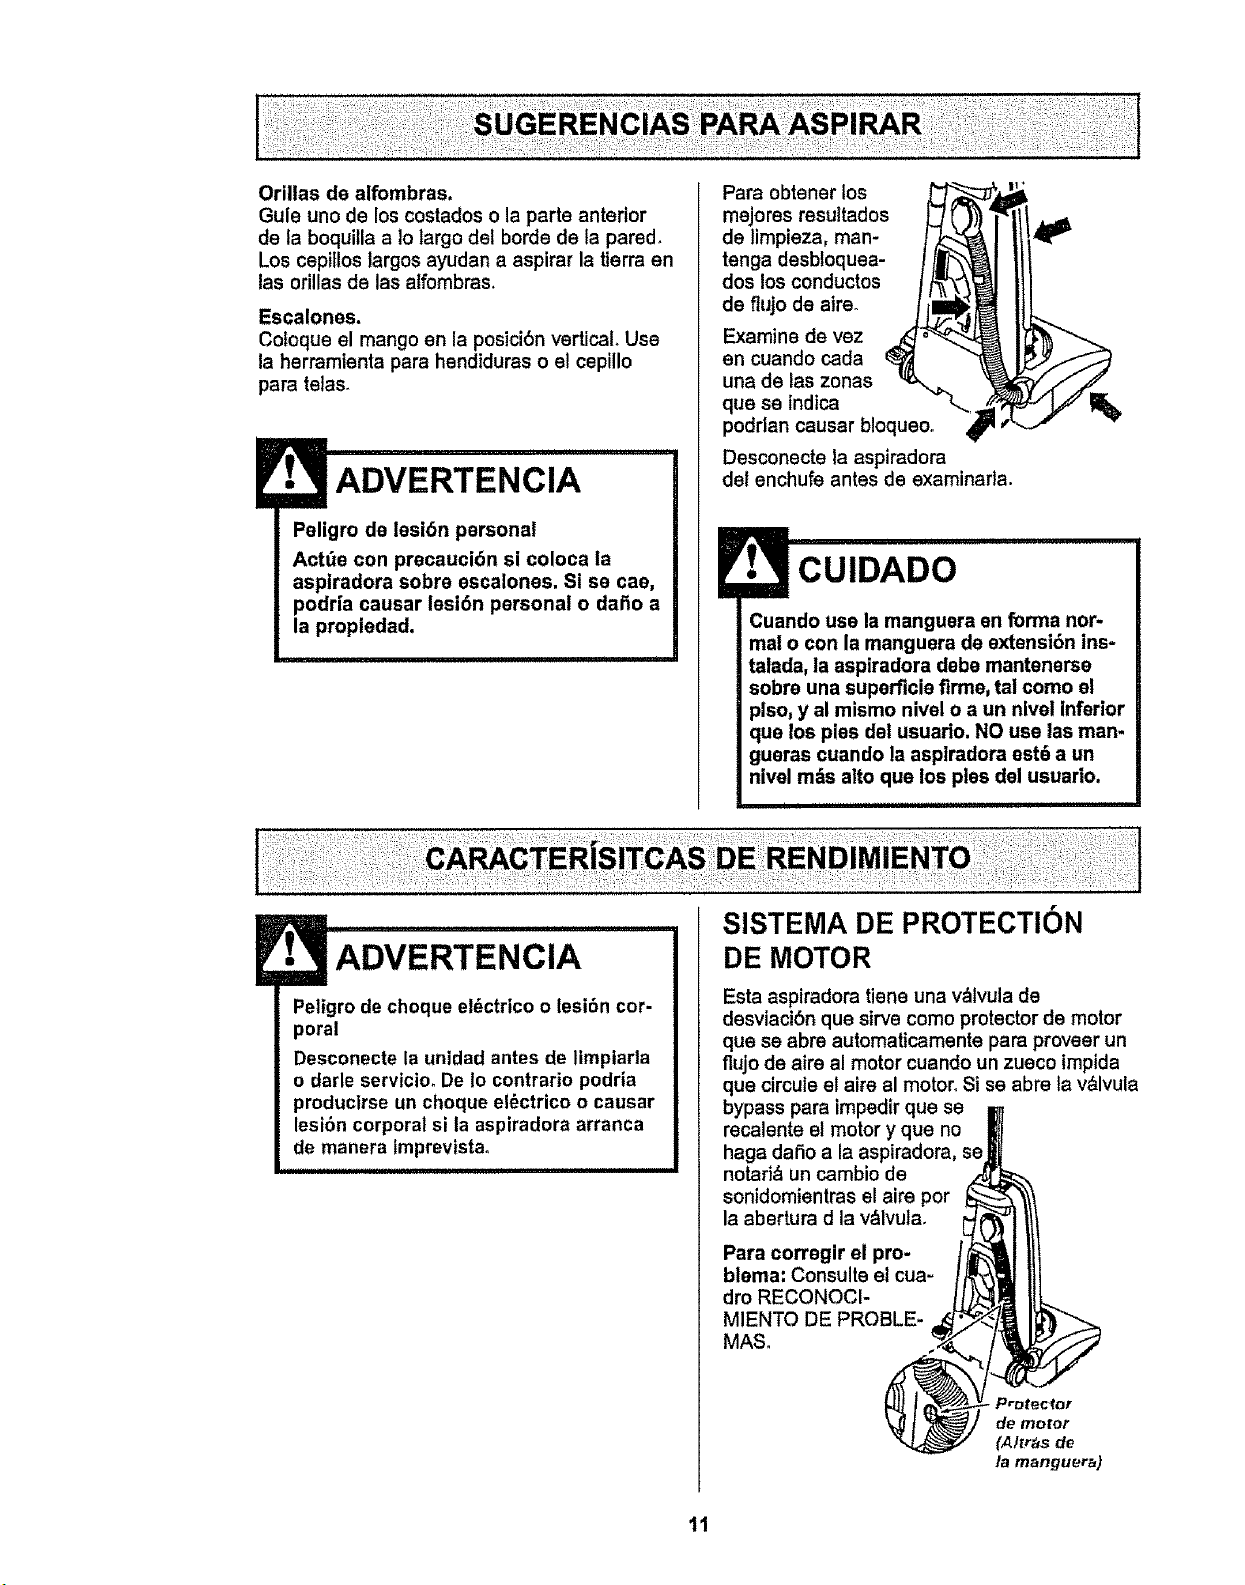
MANGUERA DE EXTENSION
ALGUNOS MODELOS
La manguera expansible adherida a la aspira-
dora cuenta con dos ranuras en forma de "J"en
el extramo donde se tnstalan los accesorios.
La manguera de extensibn tiene dos botones
en el extremo qua pueden opflmtrse e inser-
tarse en las ranuras para juntar las dos man-
gueras.
Los accesorios y el tubo telesc6pico pueden
instatarse en el extreme opuesto de la man-
guam de extensiSn para atcanzar m&s lejos.
St su modelo no tiene una manguera
extensible, usted puede comprar una, en
alguna tienda Seara. El re'imam de parte es
20-52571. En Canad& pieza NO20-40975.
=_ .......... CUIDADO
• _ =========== •
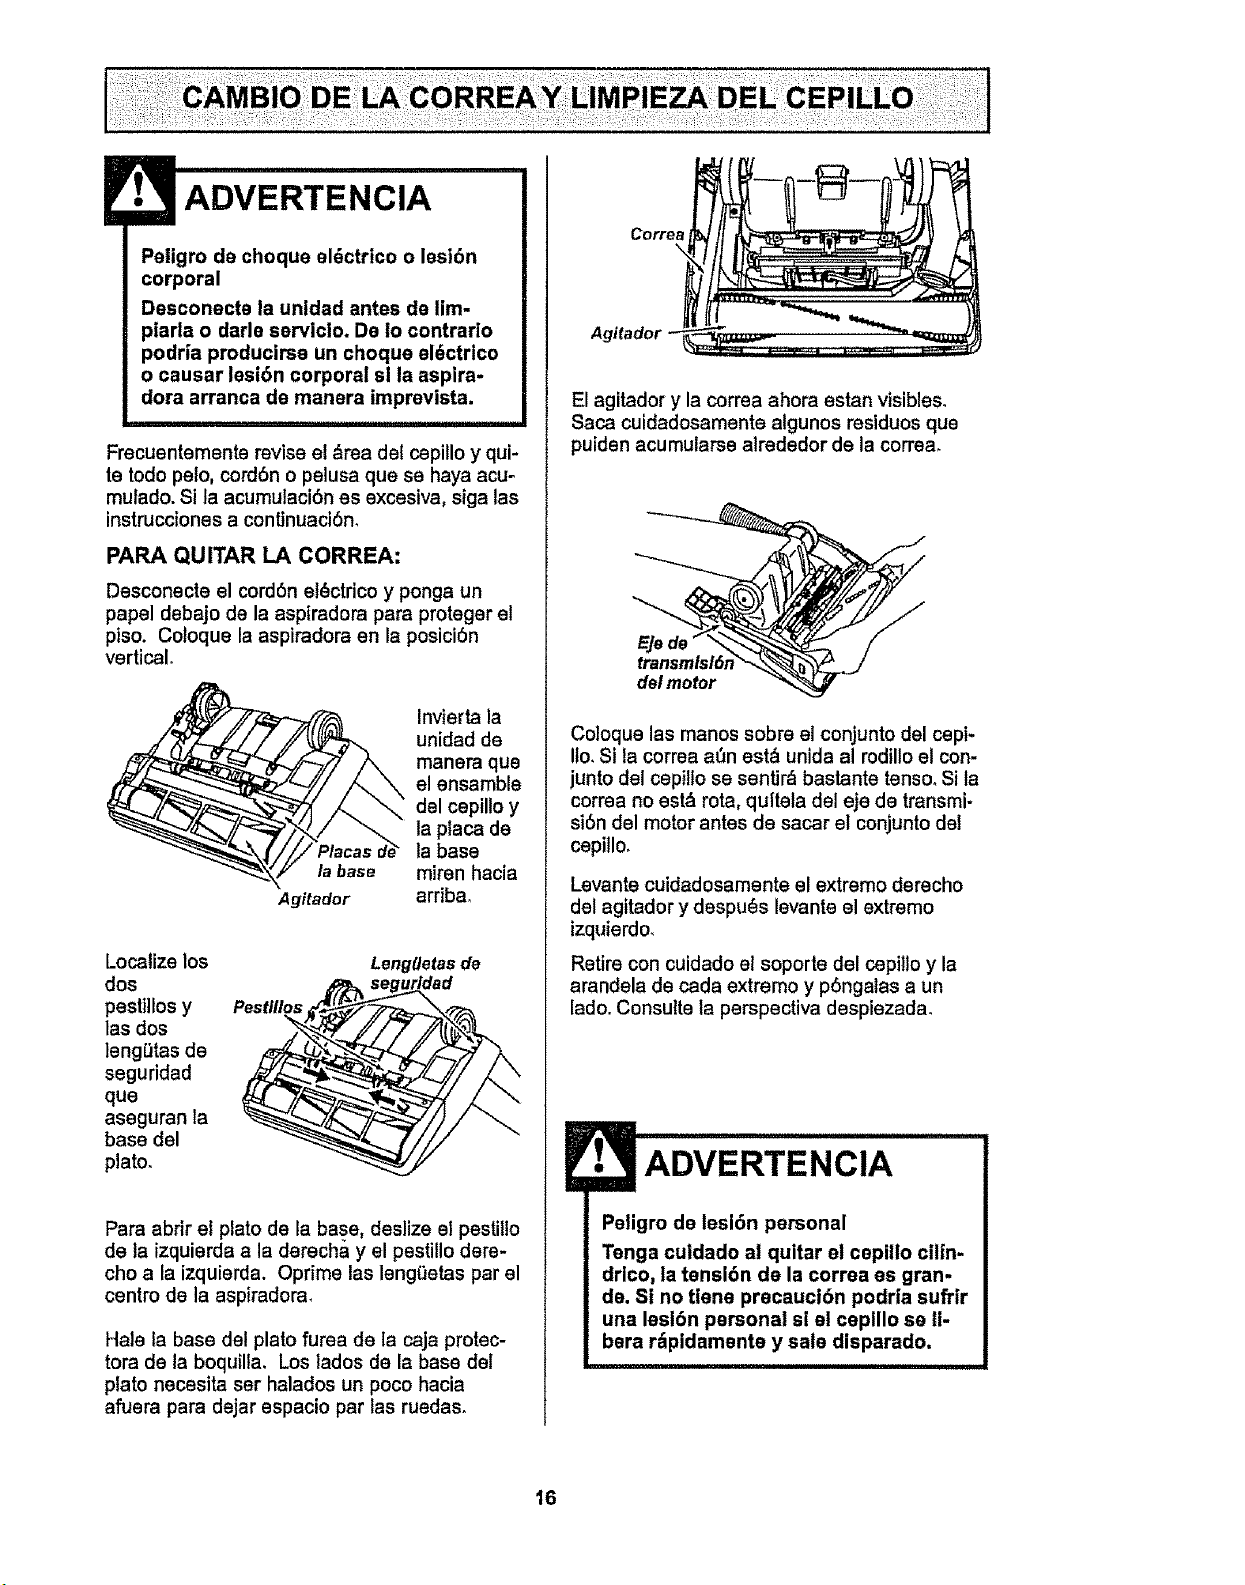
ADVE RTENCIA Cuando use la manguera enforma normal
_m= o con la manguera de extensi6n instalada,
Peligro de lesi6n personal
NO ponga las manos o pies debajo de la
unidad al conectar la manguera. El cepillo
cilindri¢o empieza a girar r_pidamente
cuando se prende la aspiradora y se se-
lecctona una gmduacl6n de altura.
la aspiradora debe mantenerae sobre una
superficis firms ai mismo nivel o a un nlvel
inferior qua los pies detusuario. NO use les
manguerss cuando la asptradora est_ a un
nivelmbs alto qua los pies del usuario,
ACCESORIO
cEPiLLO PARA
SACUDIR
-HERRAMIENTA PARA
X
HENDIDURAS
cEPiLLO PARA
X
TEl.AS
Siemprelimpialosaccesofiosantesdeusarsobratelas.
Muebles*
X
i ,,, ,,,,, ,,, ,J,,, ,,,,,,,,,,,,,,,,,,,,,,
AREA A LIMPIAR
Entre
coijines* Cortlnas* Escalones
X
X
X
L
i
i
I
i Parades
x
x
10
Orillas de alfombras.
Guts uno de los costados o la parts anterior
de la boquillaa Io largo del bords de la pared,
Los cepitloslargos ayudan a aspirar la tierra en
las orillasde las alfombras.
Escalones.
Coioque el mango en la posicibn vertical. Use
la herramtenta para hendiduras o el cepillo
para tetas.
Peligro de lesi6n personal
Act_e con precauci6n si coloca la
aspiradora sobre escalones. Si se cae,
podria causar lesi6n personal o daf_o a
la propiedad.
Para obtener los
mejores resultados
de limpieza, man-
tenga desbloquea-
dos los conductos
de flujo do aire_
Examine de vaz
on cuando cada
una de las zonas
qua so indica
poddan causar bloqueoo
Desconecte la aspiradora
del enchufe antes de examinada.
Cuando use la manguera en forma nor-
mal o con la manguera de extensi6n ins-
talada, la aspiradora deba mantenerse
sobre una superflcia firme, tai como el
plso, y al mismo nivel o a un nivel inferior
qua los pies dei usuado. NO use ias man-
gueras cuando la asplradora est6 a un
nivel m_s alto qua los pies del usuario,
ADVERTENClA
Peligro de choque el_ctrico o lesi6n cor-
poral
Desconecte la unidad antes de limptada
o darle servicio. De Io contrario podria
producirse un choque el_ctrico o causar
lesi6n corporal si la aspiradora arranca
de manera lmprevista,
SISTEMA DE PROTECTION
DE MOTOR
Esta aspiradora tiene una v_lvula de
desviaciOn quo sirve como protector de motor
qua se abre automaticamente para provoer un
flujo de aire al motor cuando un zueco impida
qua circule el airs al motor° Si sa abre ta v&lvula
bypass para impedir que se
recalente el motor y qua no
haga daSo a la aspiradora, se
notarig un cambio de
sonidomientras el airs por
la abertura d la v&lvula.
Para corregir el pro.
blema: Consults el cua-
dro RECONOCI-
MIENTO DE PROBLE-
MAS.
1t
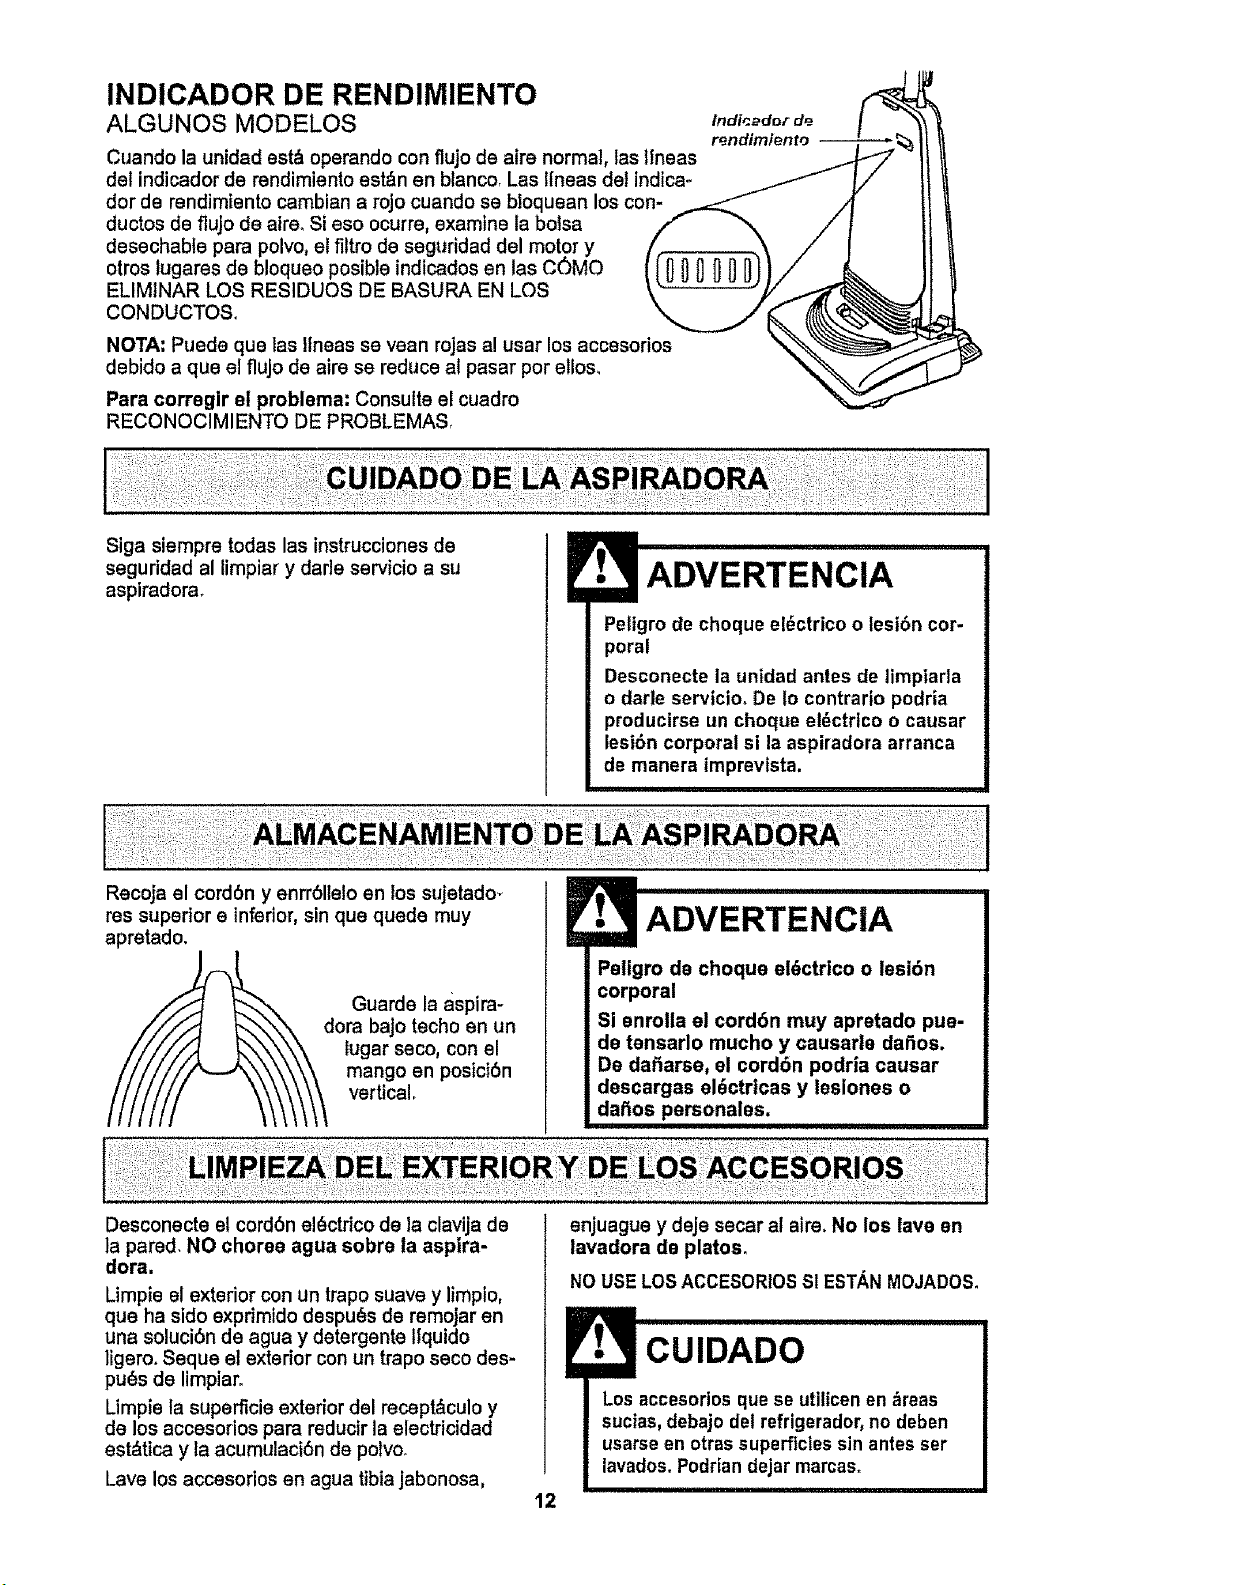
INDICADOR DE RENDIMIENTO
ALGUNOS MODELOS
Cuando la unidad eat&operando con flujo de aire normal, las llneas
del indicador de rendimiento est&n en blanco, Las l[neas del indica-
dor de rendimiento cambian a rojo cuando se btoquean los con-
ductos de flujo de aire. Si eso ocurre, examine la bolsa
desechable para polvo, el filtro de seguridad del motor y
otros lugares de bloqueo posible indicados en las COMO
ELIMINAR LOS RESIDUOS DE BASURA EN LOS
CONDUCTOS.
NOTA: Puede que las IIneas se vean rojasa! usar los accesorios
debido a qua el flujo de aire se reduce al pasar por ellos_
Para corregir el problems: Consulte el cuadro
RECONOClMIENTO DE PROBLEMAS,
Siga siempre todas las instrucciones de
seguridad al limpiar y darle servicio a su
aspiradorao
Recoja el cord6n y enrrSIlelo en los sujetado_
ADVERTENCIA
Peligro de choque el6ctrico o lesibn cor-
poral
Desconecte la unidad antes de limpiarla
o darle servtcio. De Io contrario podria
producirse un choque el_ctrlco o causar
lesi6n corporal si la aspiradora arranca
de manera imprevista.
res superior e inferior,sin qua quede muy
apretado.
Guarde la aspira-
dora bajo techo en un
lugar seco, con el
mango en posici6n
vertical.
ADVERTENClA
Paligro de choque el6ctrico o lesi6n
corporal
Si enrolls el cord6n muy apretado pue-
de tansarlo rnucho y causarle daSos.
De dafisrse, el cord6n podria causar
descargas el6ctrtcas y lesiones o
daftos personales.
i
Desconecte el cord6n el_ctrico de la clavijs de
la pared. NO choree agua sobre la ssplra-
dora.
Limpie el exterior con un trapo suave y limpio,
que ha sido expdmido despu_s de remojar en
una soluci6n de agua y detergente Itquido
ligero. Seque el exterior con un trapo seco des-
pu_s de limpiaro
Limpie Is superficie exterior del recept_culo y
de los accesodos para reducir la electricidad
est&tica y la acumulaci6n de polvo_
Lave los accesorios en agua tibiajabonosa,
enjuague y deje secar at aire. No los lave en
lavadora de platos.
NOUSELOSACCESORIOSSI ESTANMOJADOS.
CUIDADO
12

PARA QUITAR LA BOLSA:
ADVERTENClA
Optima el bot6n
de liberaciSn ubi-
cado en la parte
superior de la
cubierta de la
bolsao
Bot6n de •
llberacl6n
Cublerta
de la boisa
Cubierta _--_
dela bo/sa \
\ \
Tire de la
cubierta de la
bolsa hacla el
frente. Retlrela
y d_jela a un
lado.
Tome el collar de la
bolsa para polvo y
tire con cuidado
para retirar la bolsa
para polvo.
Tire la bolsa usada
a la basura. No la para __1 Y _
vuelva a usar. _ ,_t
CUIDADO
NUNCA REUTILICE UNA BOLSA PARA
POLVO. Los materiales muy finos, tales
como desodorantes para alfombras, talco
facial, polvo fino, yeso, hollin, pelusa de
alfombrae nuevas, etc., pueden atascar la
bolsa y causar que se rompa antes de que
est_ IlenaoCambie la bolsa mbs seguido
cuando aspire este tipo de materiales.
13
_1/I Tubo de
|._'_ I11 Sujefadorde
'°°°"
Revise el tubo
de basura y el
filtro de seguri-
dad del motor°
Si estuvieran
bl0queados,
consulte la
cuadra de RE-
CONOClMIEN-
TO DE PROB-
LEMASo
PAPA CAMBIAR LA BOLSA:
Bot_a para polvo Doble la len-
g_eta de seguri- /1
dad de la nueva/
bolsa para / segJri_a_
_/polvo en direc-
ci6n contraria/":"-...._ ....._ ,rtura
que va en el tubo de basurao
NOTA: Consulte las PI_ZAS Y
CARACTERISTICAS para determinar el N°, de
la bolsa para polvo.
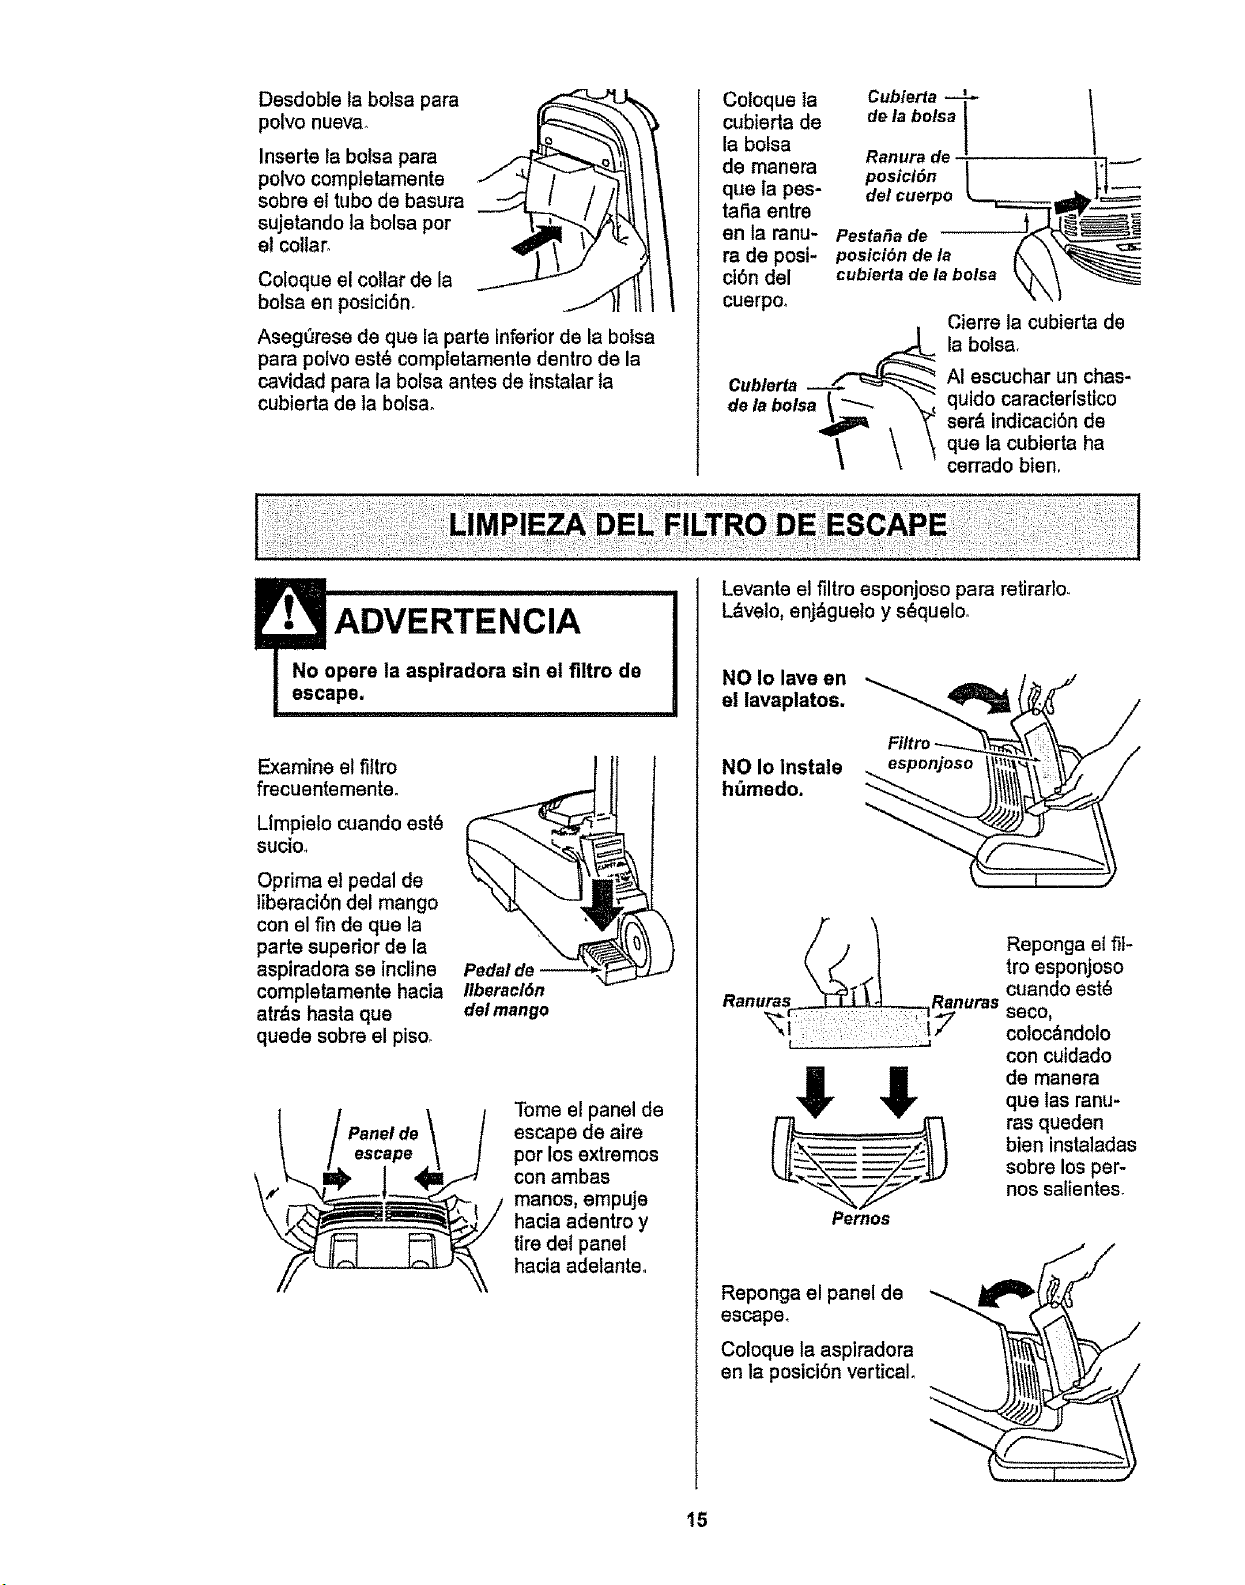
Desdoble la boisa para
_ polvo nueva.
Inserte la bolsa para polvo
completamente sobre el
tubo de basura sujetando
la bolsa por e! coltar.
Coloque el collar de ta
botsa en posicibno
Aseg_Jrese de que ta parte inferior de la bolsa
para potvo est_ completamente dentro de la
cavidad para la bolsa antes de instalar la
cubierta de la bolsa,
Coloque la Cublerta
cubierta de de la bolsa
la bolsa de
I
manera que _ii_!!_ __--
la pestafia
entre en la
ranura de Pesta_a de
posici6n del postcf(_n de la k \
cuerpo, cubiertade/abo/sa _ 1
__1_ Cierrelacu-
bierta de la bol-
Cublerta sa. AI escuchar
delabolsa_ "_ll 1 unchasquidocaracterlstico
\, Itt
de que la cu-,
bierta ha cerra-
do bien°
Reviseconfrecuenciaelfiltrodemotorycam-
btarcuandoest_sucio.
Peligro de choque el_ctrico
No opere la aspiradora sin el flltro de
seguridad del motor. Aseg_urese de
que el filtro est6 seco e instalado
adecuadamente para impedir que el
motor falls ylo que se produzca un
cheque el_ctrico.
Siempre desconecte el cord6n _lectri-
co antes de reparar alguna parte de la
aspiradora.
PARA QUITAR LA BOLSA:
Opdma el bot6n de
liberacibn ubicado
en la parle superior
de la cubierta de la
bolsa.
Bot6n de
Ilberacl6n
Cublerta _,
delabolsa l
1
ooo,o.o\,\
delabolsa
Tire de la
cubierta de la
bolsa hacia el
frente. Retlrela
y d_jela a un
lado°
Tome el collar [,,--_--_..._ \ _
de la bolsa y
tire cuidadosa-
mente para reti-
rar la bolsa para
polvo.
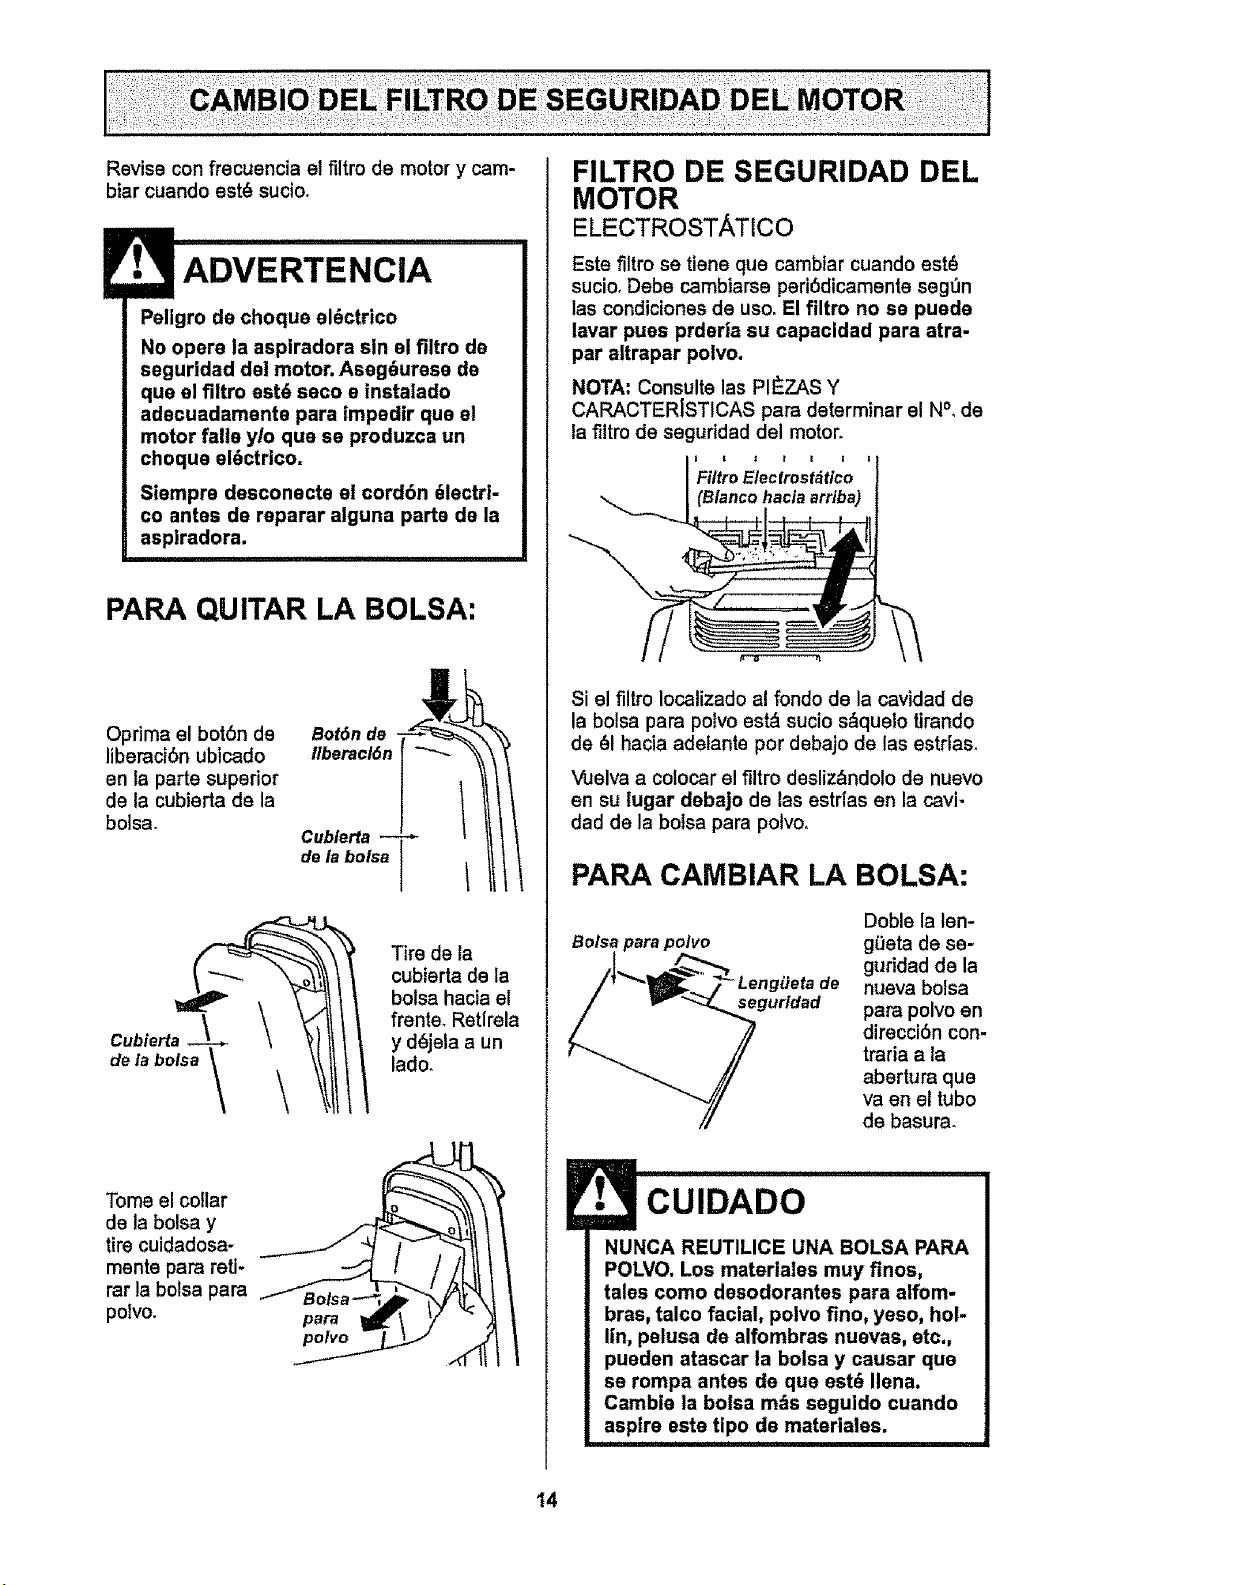
FILTRO DE SEGURIDAD DEL
MOTOR
ELECTROSTATICO
Este filtro se tiene que cambiar cuando est_
sucio. Debe cambiarse ped6dicamente segt_n
las condiciones de uso. El flltro no se puede
lavar pues prderla su capacldad para atra-
par altrapar polvo.
NOTA: Consulte las PI_ZAS Y
CARACTERISTICAS para determinar el N°, de
la filtro de seguridad del motor.
FiltroEleclrostdtico
(Blancohaciaarriba)
Si el fillro localizado al fondo de la cavidad de
la bolsa para polvo est,. sucio s&quelo tirando
de 61hacia adelante por debajo de las estrlaso
Vuelva a colocar el flltro desliz&ndoto de nuevo
en su lugar debajo de las estdas en Is cavi.
dad de la bolsa para polvo.
PARA CAMBIAR LA BOLSA:
Bolsapara polvo
/' _2 } Lengiieta de
__V_gurldad
Doble la len-
g_eta de se-
guridad de la
nueva bolsa
para polvo en
direcci6n con-
traria a la
abertura que
va en el tubo
de basura.
CUIDADO
NUNCA REUTILICE UNA BOLSA PARA
POLVO. Los materlales muy finos,
tales como desodorantes para alfom-
bras, talco facial, polvo fino, yeso, hol-
lin, pelusa de alfombras nuevas, etc.,
pueden atascar la bolsa y causar que
se rompa antes de que est_ Ilena.
Cambie Is bolsa m_s seguido cuando
aspire este tipo de materiales.
i i i i iii i i ii i i , i i
14
Desdoble la bolsa para
polvo nueva_
Inserte la bolsa para
polvo completamente
sobre el tubo de basura
sujetando la bolsa por
e! collar.
Coloque el collar de la
bolsa en posici6n.
Asegerese de que la parte inferior de la botsa
para polvo est_ complelamente dentro de la
cavidad para la bo!sa antes de instalar la
cubierta de la bolsao
Coloque la Cubierta
cubierta de de la bolsa t
la bolsa Ranura de |"
de manera posici6n I _'1--_
que la pes- del cuerpo _ll_rv_=
taCiaentre _ =
en la ranu- Pesta_a de --
posici6nde la (_ _ _
ra de posi- cubiertade labo/sa _,X_/
ci6n del
cuerpo,
Cubletta __
delaboisa_
Cierre la cubierta de
la botsa,
AI ascuchar un chas-
quido caracterlstico
ser& indicacibn de
que la cubierta ha
cerrado bien.
ADVERTENCIA
pere la aspiradora sin et filtro de
pe.
Examine el filtro
frecuentementeo
Llmpielo cuando est6
sucio_
Optima el pedal de
liberaci6n del mango
con el fin de que la
parte superior de la
aspiradora se incline
completamente hacia
atr_s hasta que
quede sobre el piso,
Pedal de --
Ilberacl6n
del mango
Tome el panel de
escape de aire
pot los extremos
con ambas
manos, empuje
hacia adentro y
tire det panel
hacia adelanteo
Levante el filtro esponjoso para retiraflo.
L&velo, enj&guelo y s_quelo.
NO Io lave en
el lavaplatos.
NO Io instale
hi_medo.
Ranura _Ranuras
t
!
Pernoa
Reponga el ill-
fro esponjoso
cuando est_
seco,
coloc_ndolo
con cuidado
de manera
que las ranu-
ras queden
bien instaladas
sobre los per-
nos salienteso
Reponga el panel de
escape.
Coloque la aspiradora
en la posiclSn vertical.
t5
Peligrodechoqueel_ctricoolesi6n
corporal
Desconectelaunldadantesdelim-
piadao darleservicio.De!ocontrario
podriaproducirseunchoqueel_ctrico
ocausarlesi6ncorporalsllaaspira-
doraarrancademaneraimprevista.
Frecuentemente revise el &readet cepillo y qui-
te rode pelo, cord6n o pelusa que se haya acu-
mulado. Si la acumulaci6n es excesiva, siga las
instrucciones a continuaci6n,
PARA QUITAR LA CORREA:
Desconecte el cord6n el_ctrico y ponga un
papel dabajo de la aspiradora para proteger et
piso. Coloqua la aspiradora en la posici6n
vertical.
Agitador
Invierta la
unidad de
manera qua
el ensamble
del cepillo y
la placa de
ta base
miren hacia
arriba,
Localize los
dos
pesttllos y
las dos
lengOtas de
seguridad
que
aseguran la
base del
plato.
LengOetas de
segurldad
Para abrir et plato de la base, deslize a! pestiflo
de la izquierda a la derecha y el pestillo dere-
cho a la izquierda. Oprima las leng,3etas par el
cantro de la aspiradora,
Hale la base del plato furea de la caja protec-
tora de la boquilla, Los lades de la base del
plato necasita ser halados un poco hacia
afuam para dejar espacio par las ruedas.
El agitador y la correa ahora estan visibles,
Saca cuidadosamente algunos residues qua
puiden acumularsa alrededor de la correa,
Coloque las manes sobra el conjunto del capi-
Ito,Si la correa ann est& unida al rodillo el con-
junto del cepillo se sentir& baslante tenso. Si la
correa no est_ rota, qultela del eje de transmi-
si6n del motor antes de sacar el conjunto del
capilloo
Levante cuidadosamente el extremo derecho
del agitador y despu6s levante el extremo
izquierdo.
Retire con cuidado el soporte del capillo y la
arandela de cada extremo y pbngaias a un
lado. Consulta ta perspectiva despiezada.
BADVERTENCIA
Petigro de lesi6n personal
Tenga culdado al quitar el cepillo cilin-
drico, la tansi6n de la correa es gran-
de. Si no tiene precauct6n podria sufrir
una lesi6n personal si el cepillo se t|-
bera r_ipidamente y sale disparado,
16
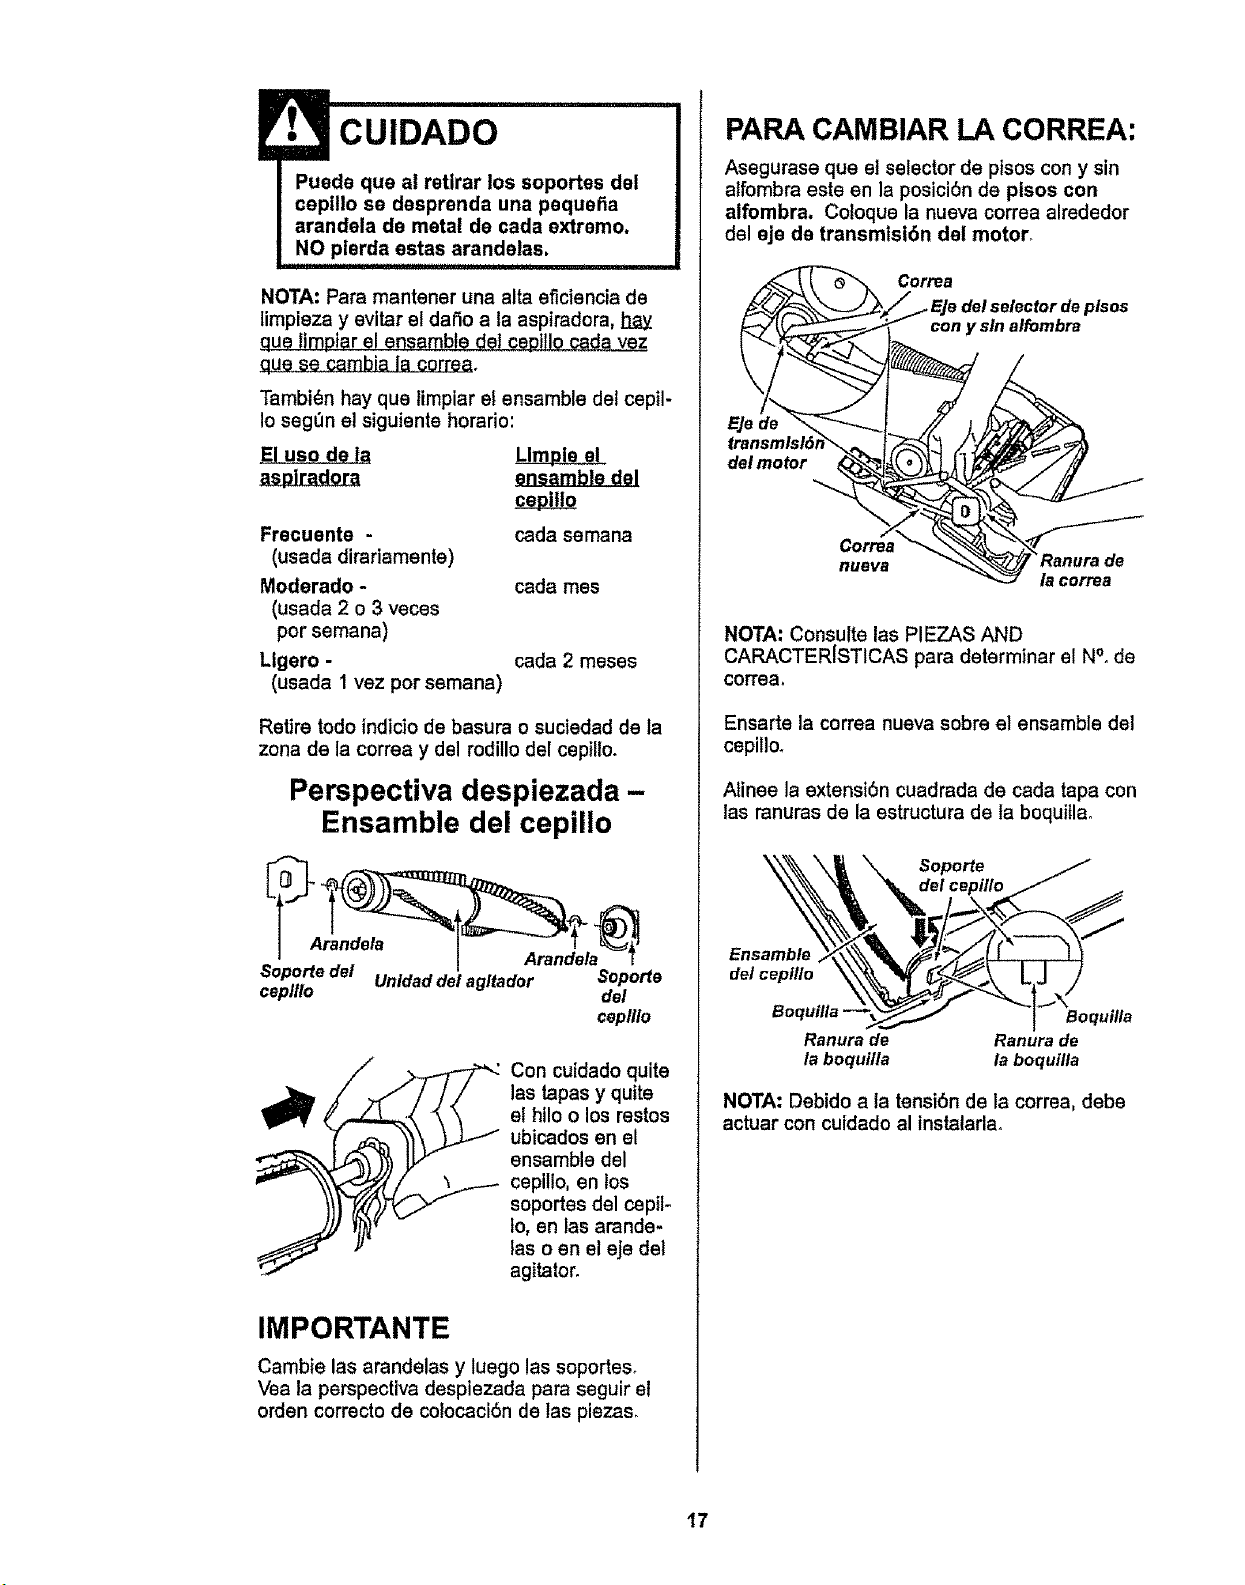
CUIDADO
NOTA: Para mantener una alia eficiencia de
limpieza y evitar el dafio a la aspiradora,
que limpiar el ensamb!e del cep!f!Q
que se cambia la correa,o
Tambi_n hay que timpiar el ensamble del cepil-
Io seg_n el siguienta horario:
El use de la Llmple el
_lsamble del
Frecuente -
(usada dirariamente)
Moderado -
(usada 2 o 3 veces
per semana)
Llgero -
(usada 1 vez per semana)
cada semana
cada rues
cada 2 meses
Retire todo indicio de basura o suciedad de la
zona de la correa y del rodillo del cepillo.
Perspectiva despiezada-
Ensamble del cepillo
Soportedel
ceplllo Unldaddelagltador Soporte
del
ceplllo
/
Con cuidado quite
las tapas y quite
el bile o los restos
ubicados en el
ensamble del
cepillo, en los
soportes del cepil-
Io, en las arande-
las o en el eje del
agitator.
IMPORTANTE
Cambie las arandelas y luego las soportes.
Vea la perspectiva despiezada para seguir el
orden correcto de colocaciOn de las plezas_
PARA CAMBIAR LA CORREA:
Asegurase que el selector de pisos con y sin
alfombra este en la posiciOnde pisos con
alfombra. Coloque la nueva correa alrededor
del eje de transmlsiOn del motor,
EJe de
del motor
Correa
plsos
con y sin alfombra
_ ia correa
NOTA: Consulte las PIEZAS AND
CARACTERISTICAS para determinar e! Ne,de
correa,
Ensarte la correa nueva sobre el ensamble del
cepillo.
Atinee la extension cuadrada de cada tapa con
las ranuras de la estructura de fa boquitlao
__1__8,_ _ sopo_e
"_ del cepillo
Ranura de Ranura de
laboquilla la boqutlla
NOTA: Debido a la tension de la correa, debe
actuar con cuidado al instalarla.
17
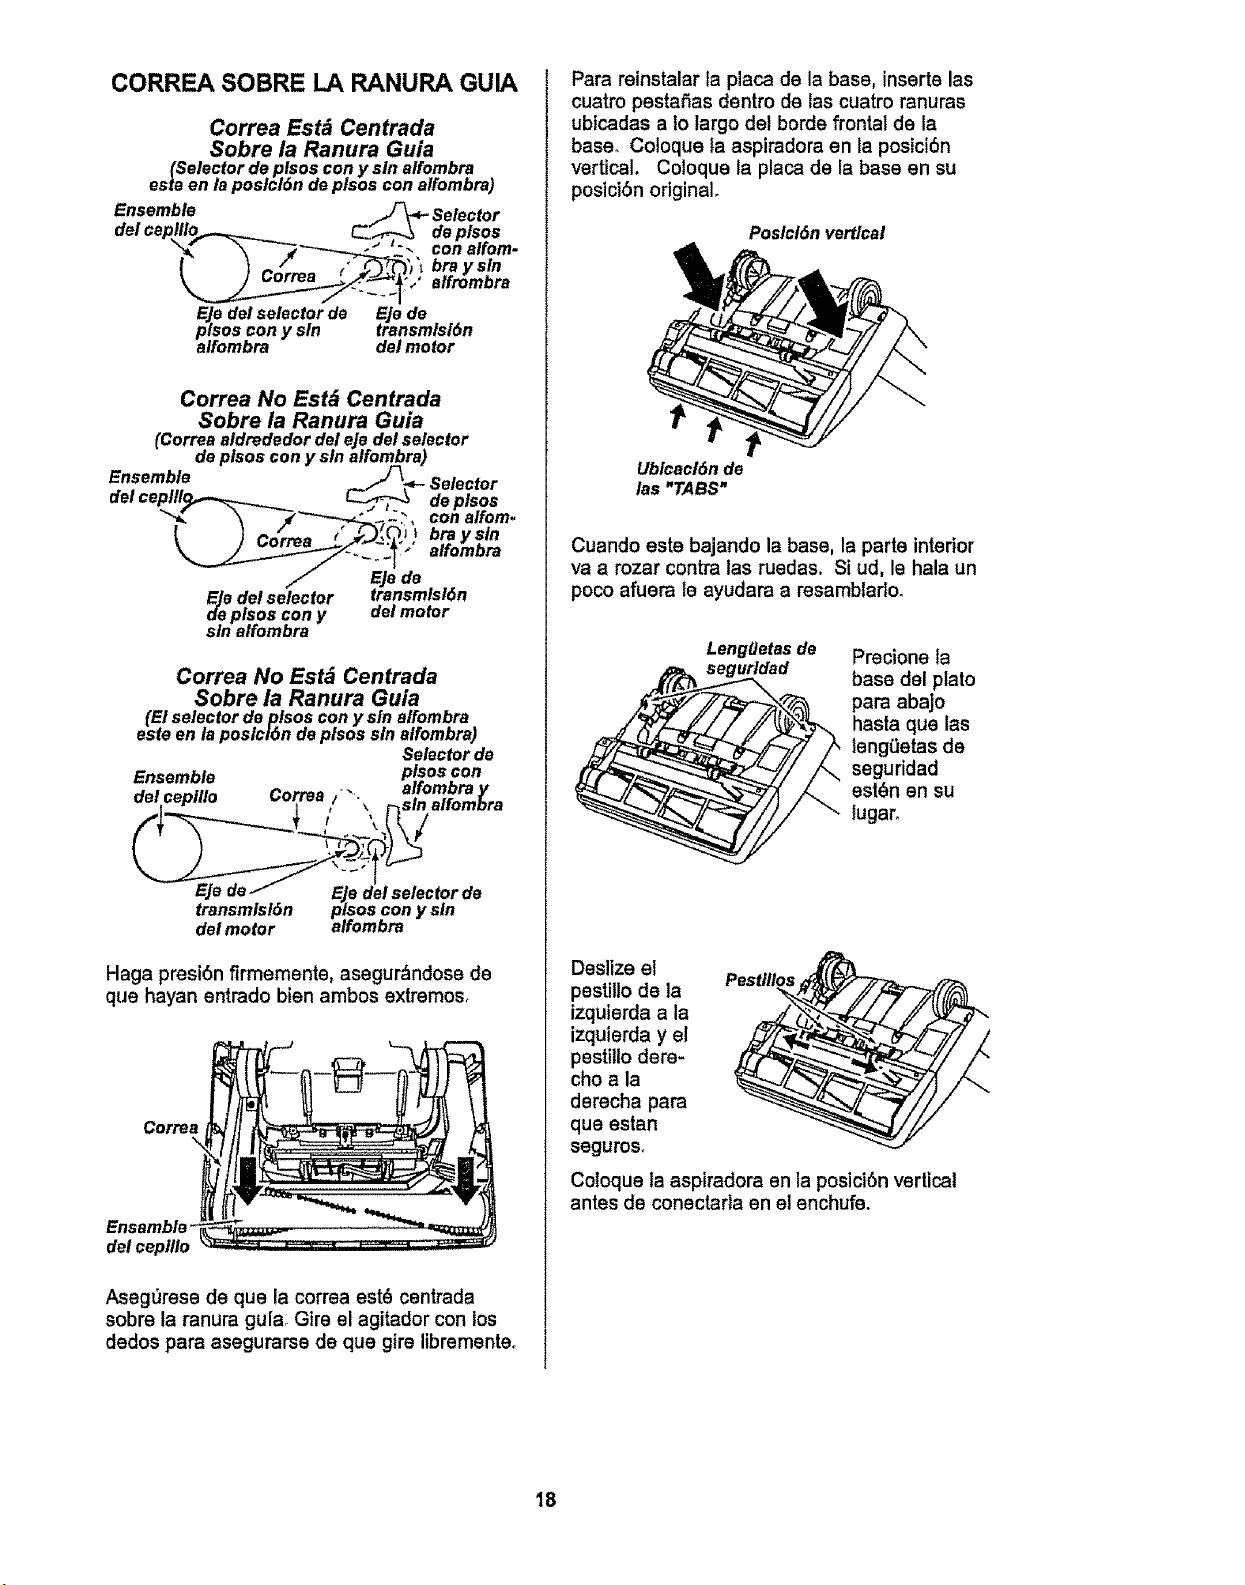
CORREA SOBRE LA RANURA GUIA
Correa Estd Centrada
Sobre la Ranura Guia
(Selectordeplsos cony sin alfombra
esteen laposlcl6n deplsoscon atfombra)
Ensemble _ Selector
del ceplllo,.,.._,.__ _-_ deplsos
"_," \ --"_-'-_'--- J ". con alfom-
E]edel selectorde Eje de
plsoscon y sin trensmlsl6n
alfombra del motor
Correa No Estd Centrada
Sobre ia Ranura Guia
(coffee aidrededordeleJedelselector
deplsoscon y sin alfombra)
Ensemble 4_
• . F/_, Selector
oet ceplllq,,-.._ _ deplsos
_",_ -'\ _"'-2_"------;_",_-_' ".", con alfom.
Correa -" "/ 1 -
J EJede
Eledel selector transmlsl6n
tie plsos con y del motor
sin alfombra
Correa No Est_ Centrada
Sobre ia Ranura Guia
(Elselectordeplsos cony sin alfombra
esteen laposlci6n deplsossin alfombra)
Selectorde
Ensemble plsos.con
ceplllo co, .i-",
; ',ttd
o,o,o ;ooo,.,oo,o,,o
transmlsldn olses cony sin
del motor alfombra
Haga presibn firmemente, asegur._ndose de
que hayan entrado bien ambos extremos,
del ceplllo
Asegerese de que la correa est_ centrada
sobre la ranura gula. Gire el agitador con los
dedos para asegurarse de que gire librementeo
Para reinstalar la placa de la bass, inserts las
cuatro pestaSas dentro de las cuatro ranuras
ubicadas a lo largo del borde frontal de la
bass° Coloque la aspiradora en la posiciSn
vertical. Coloque laplaca de la base en su
posiciSn original.
Poslcl6n vertical
Ublcecl6nde
las "TABS"
Cuando este bajando la base, la parts interior
va a rozar contra las ruedas. Si ud, le hale un
poco afuera is ayudara a resamblario_
LengQetas de
,gurldad
Precione la
bass del plato
pare abajo
hasta que las
lengLietas de
seguridad
est_n en su
lugar.
Deslize el
pestillo de la Pestlllos
izquierda ala
izquierda y el
pestillo dere-
cho ala
derecha pare
que estan
seguroso
Coloque ta aspiradora en la posici6nvertical
antes de conectarla en el enchufe.
18
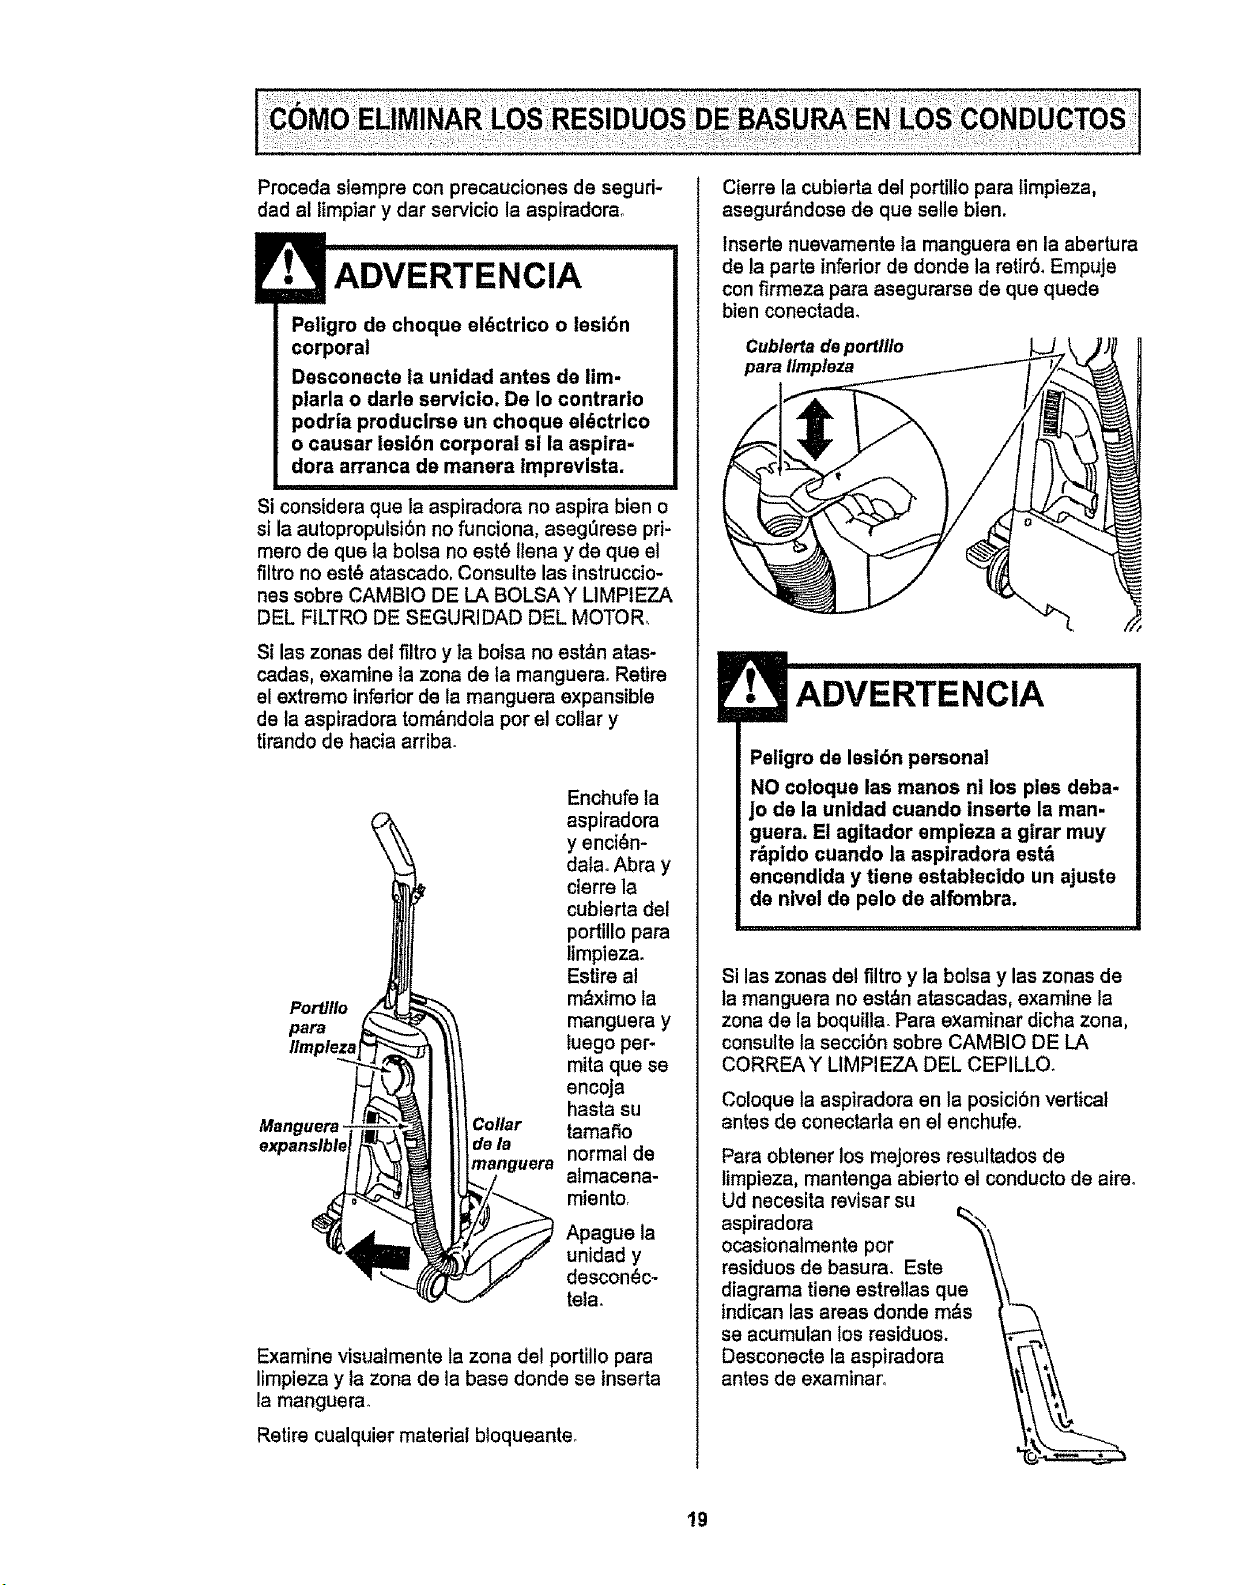
Proceda siempre con precauciones de seguri-
dad al limpiar y dar servicio la aspiradorao
ADVERTENCIA
Paligro de cheque el6ctrico o lesi6n
corporal
Desconacte la unidad antes de lim-
ptarla o darle servicio, De Io contrarlo
podria produclrse un cheque el6ctrico
o causar lesl6n corporal si la asplra-
dora arranca de manera imprevista.
Si considera que la aspiradora no aspira bien o
si la autopropulst6nno funciona, aseg_rese pri-
mere de qua la bolsa no est6 Ilena y de que el
filtro no est6 atascado, Consulte lasinstruccio-
nes sobre CAMBIO DE LA BOLSAY LIMPtEZA
DEL FILTRO DE SEGURIDAD DEL MOTOR_
Si las zonas del filtro y la bolsa no est&n atas-
cadas, examine la zona de la manguerao Retire
el extreme inferior de la manguera expansible
de la aspiradora tom&ndola per el collar y
tirando de hacia arriba.
PorfJIlo
para
Ilmpleza
Manguera.
Collar
dela
manguera
Enchufe la
aspiradora
y enci6n-
dala. Abra y
cierre la
cublerta del
portillo para
limpieza.
Estire al
m_ximo la
manguera y
tuego per-
mira que se
encoja
hasta su
tamaSo
normal de
almacena-
miento,
Apague la
unidad y
descon6c-
tela.
Examine visualmente la zona del portillo para
limpieza y la zona de la base donde se inserta
la manguera.
Retire cualquier material bloqueanteo
Cierre la cubierta del portillo para timpieza,
asegur_ndose de que selle bien.
Inserts nuevamente la manguera an la abertura
de la parts inferior de donde la reUrS.Empuje
con firmeza para asegurarse de que quede
bien conectadao
Cublerta de portlllo
para Ilmpleza
Peligro de Isstbn personal
NO coloque las manes nl los pies deba-
Jo de la unidad cuando inserts la man-
guera, El agitador empieza a glrar muy
r&pido cuando la asplradora est6
encendida y tiene establecido un ajuste
de nivel de pelo de alfombra.
Si las zonas del filtro y la bolsa y las zonas de
la manguera no est,_natascadas, examine la
zona de la boquilla. Para examinar dicha zona,
consulte la seccibn sobre CAMBIO DE LA
CORREA Y LIMPI EZA DEL CEPILLO.
Coloque la aspiradora en la posici6n vertical
antes de conectarla en el enchufe.
Para obtener los mejores resultados de
limpieza, mantenga abierto el conducto de aireo
Ud necesita revisar su
aspiradora
ocasionalmente per
residues de basura_ Este
diagrama tiene estrellas que
indican las areas deride m&s
se acumulan los residues.
Desconacte la aspiradora
antes de examinaro
19
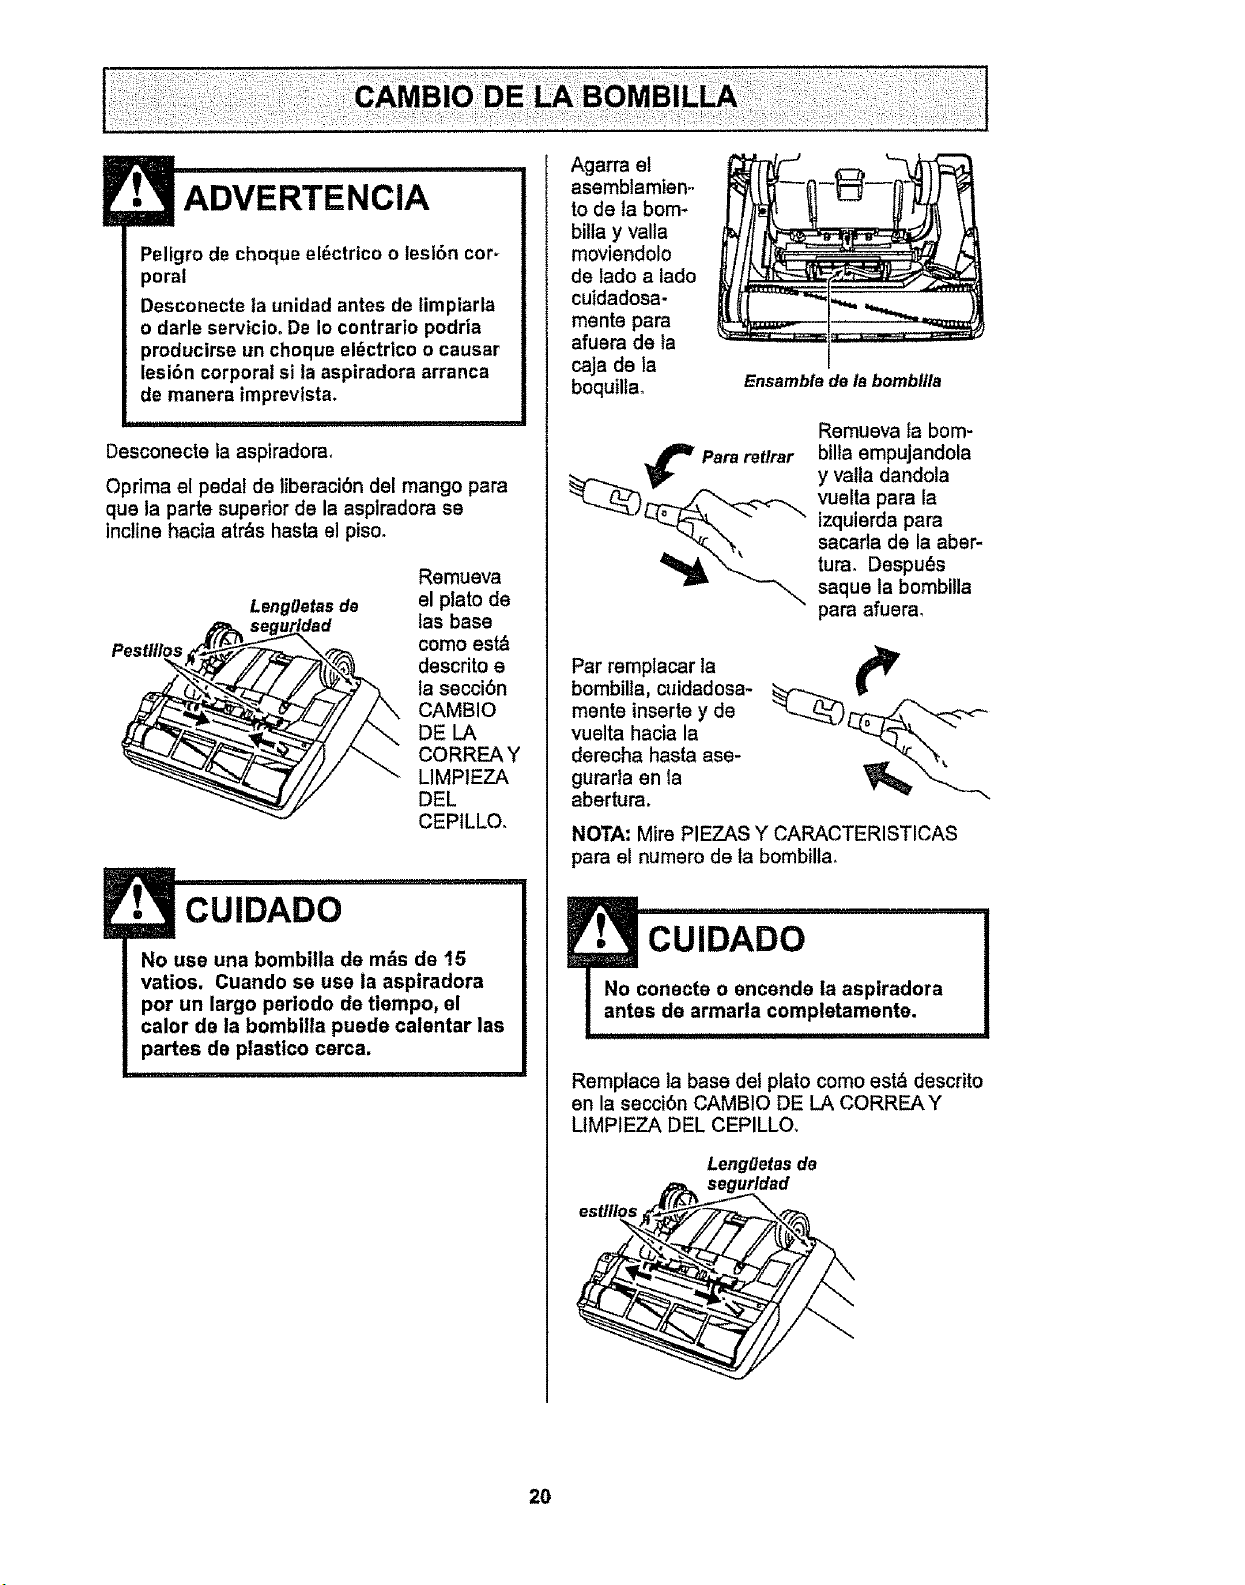
ADVERTENCIA
Peligro de choque el_ctrico o lesi6n cor-
poral
Desconecte la unidad antes de limpiarla
o darle serviciooDe Io contrario podria
producirse un choque el_ctrico o causar
lesi6n corporal si la aspiradora arranca
de manera imprevtsta.
Desconecte la aspiradorao
Oprima el pedal de liberacibn del mango para
que la parts superior de la asplradora se
incline hacia arras hasta el piso.
Pesttllos
LengOetas de
Remueva
el plato de
leo base
como est_
descrito e
la secci6n
CAMBIO
DE LA
CORREA Y
LIMP1EZA
DEL
CEPILLO.
!• CUIDADO .........
No use una bombilla de m_s de 15
vatios. Cuando so use ta aspiradora
por un largo periodo de tiempo, el
calor de la bombilta puede calentar las
partes de plastico cerca.
!
Agarra el
asemblamien-
to de la bom-
billa y valla
moviendolo
de lado a lado
cuidadosa-
monte pare
afuera de la
caja de la
boquilta_
Ensambla de ia bombllla
Para ret/rar
Remueva la bom-
billa empujandola
y valla dandola
vuelta para la
izquierda pare
sacada de la aber-
tura, Despu_s
saque la bombilla
pare afuera,
Par rempiacar la
bombilla, cuidadosa- _
monte inserte y de
vuelta hacia la
derecha hasta ase-
gurarla en la
abertura.
NOTA: Mire PIEZAS Y CARACTERISTICAS
para el numero de la bombilla.
onecte o encende la aspiradora
s de armada completamente.
Remplace la base del plato como est_ descrito
on la secci6n CAMBIO DE LA CORREAY
LtMPIEZA DEL CEPILLO,
Leng/Jetas de
urldad
20
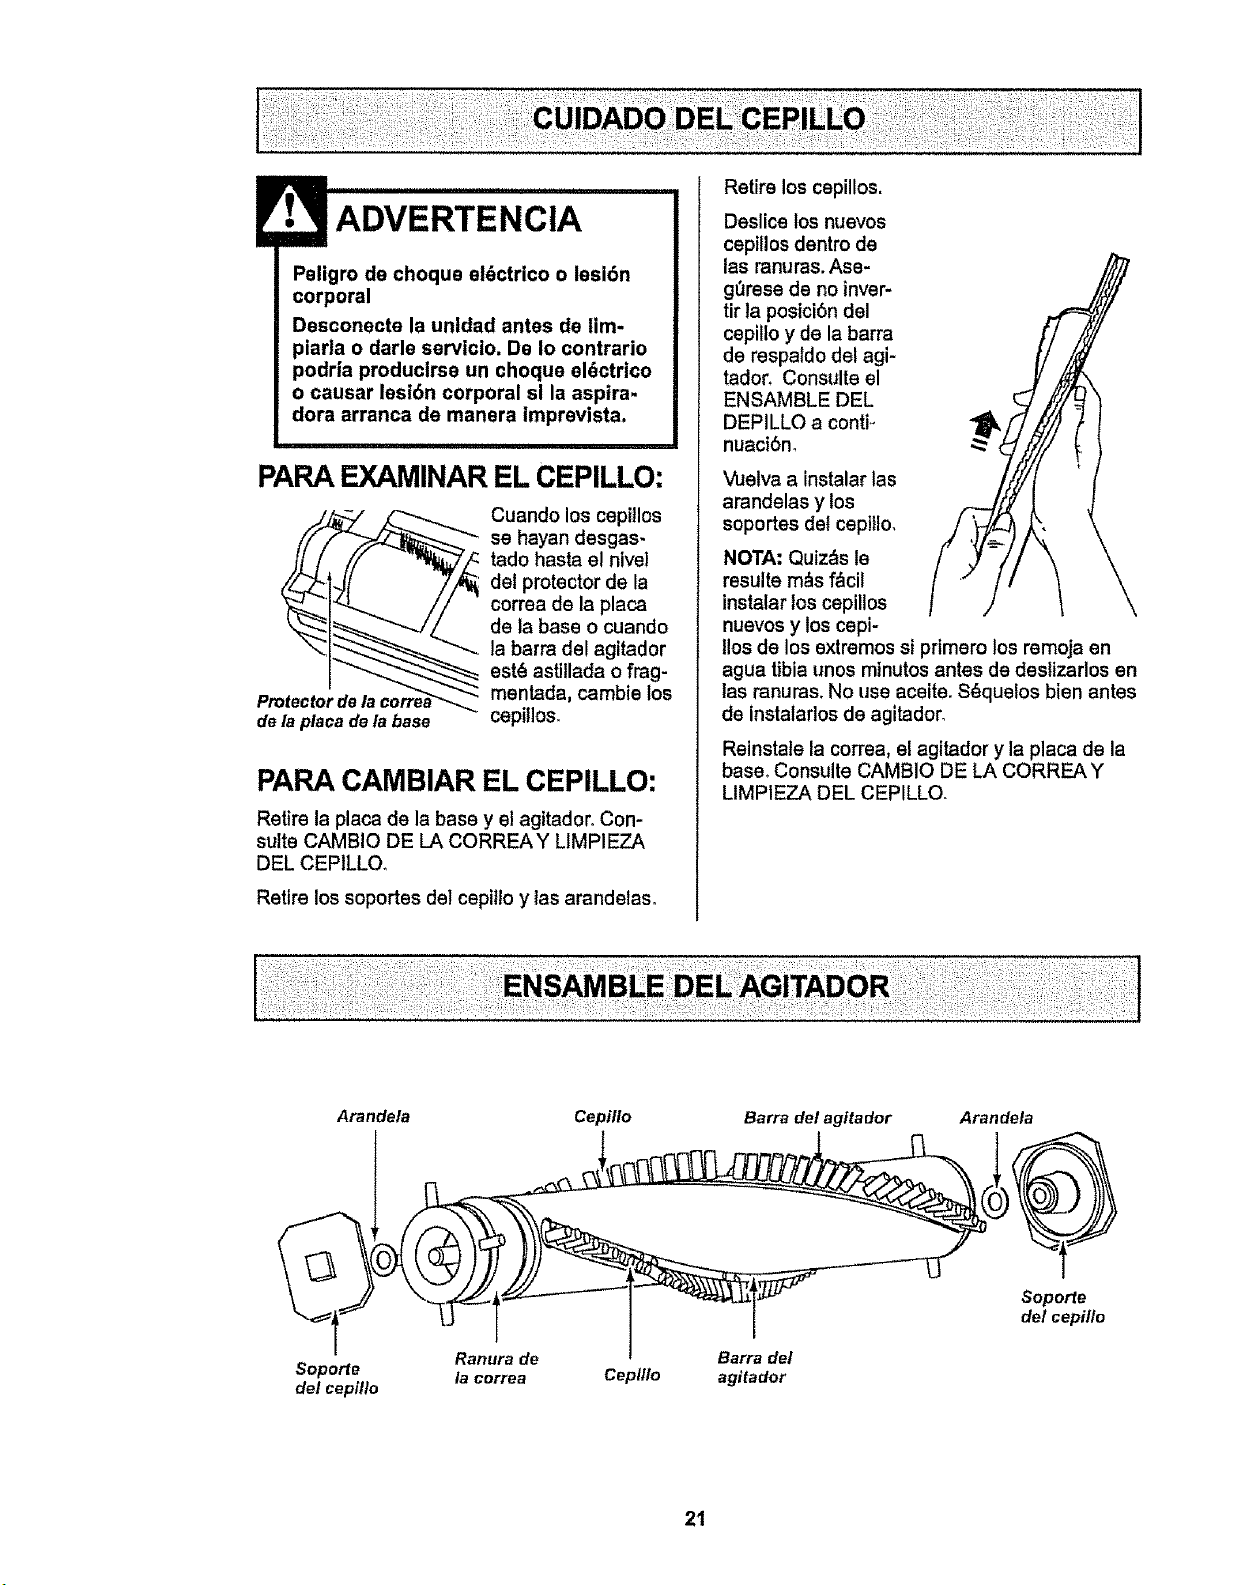
! ADVERTENc{A
Peligro de choque eidctrico o lesl6n
corporal
Desconecte la unldad antes de lim-
piada o darle servicio. De Io contrario
podrla producirse un choque eldctrico
o causar lesi6n corporal sl la asptra-
dora arranca de manera imprevista.
PARAEXAMINAREL CEPILLO:
delaplata delabase
Cuando los cepillos
se hayan desgas-
tado hasta el nivel
del protector de la
correa de la placa
de la base o cuando
la barra del agitador
est(_asUilada o frag-
mentada, cambie los
cepitlos.
PARA CAMBIAR EL CEPILLO:
Retire la placa de la base y el agitador. Con-
suite CAMBIO DE LA CORREAY LIMPIEZA
DEL CEPILLO,
Retire los soportes del cepillo y las arandelas.
Retire los cepillos,
Deslice los nuevos
cepillos dentro de
las ranuras. Ase-
g0rese de no inver-
tir ]a posicibn del
cepillo y de la barra
de respaldo del agi-
tador. Consulte el
ENSAMBLE DEL
DEPILLO a contF
nuaci6m
Vuelva a instalar las
arandelas y los
soportes det cepillo,
NOTA: Quizds le
resulte m_s fdcil
instalar los cepillos
nuevos y los cepi-
llos de los extremos si primero los remoja en
agua tibia unos minutos antes de desfizarlos en
tas ranuras. No use aceiteoS_quelos bien antes
de instalarlos de agitador_
Reinstate la correa, el agitador y la placa de la
base_Consulte CAMBIO DE LA CORREAY
LIMPIEZA DEL CEPILLO.
!!!iii:i_i!i!:_!i;i
Arandela
Cepillo
Barra del agltador Arandela
Soporte
del cepillo
Ranura de
la correa
Ceplllo
Barra de/
agltador
Soporte
del cepillo
21

Consulte este cuadro para encontrar soluciones qua usted mismo puede realizar cuando tonga pro-
blemas menores do rondimiento, Cuatquier servicio qua necesite aparte de otros descritos en este
manual tienen qua ser hechos par un represetante de servicio autodzado,
I Des_arla. De io contrario
podria producirse un cheque ek@ctricoo causar lesi6n corporal.
i1,11111111 i I ! I I I I ii I ,i
Le asp|fedora no
funclonm
1o Est_desconectade
2. Cortaclrcultosbotado o fustbte
quemedo an e| teblero de servlcio
de la resldencfa.
3. Interrupter de ancendldotepagade
ne Bald an ta poslcl6n on
No aaptre 1,
setiefactodemente, 2.
Le asplradora levante
tepetee o as dlfloul
empuJer.
Balsa pera polvo flsneo atascada.
AJuste Incorrecto de ntvel de pelode
le aifombra.
Gepillodesgastado.,
Boquflfa,o tuba de poIw, etescade.
5. Manguera ab_scado.
6. Manguera rote.
7. Certes rote.
8. Le manguera no es_ blen ]nsertada.
9. A_vac._n dot slstema de protec'J6n
del motor
t0, Ffltros de segudded.
1.
2,
AjustaIncorrectode nlveIde pale
de laalfombra,
Le luz no funclona. Bomblfla fundlde.
E1agltador no glra.
El Ind!o_dor de rendl-
miento, algenos
modeloa, est_ mJo°
3,
CoiTearot&
Selector de plea con alfombra y
pleasin affombra en la seleccl6n
de pleaslnalfombra
Correa Instalada lecorrectamente
1. Balsa para polvo ilena o atascada_
2. Flitroede seguddad,
3. Conduclo de fluje de aim atascado
Tuba pare tlerra, boquilia, manguera,
4_ Glades acoasorlos
Restrlccl6n de| fluJo de
elusa de los acceeorloe,
Cemblo de eontdo.
1. El usa de toeeccesodes Ilmltael
fluJode sire
2. La pelusa de una alfbmbra nusva
obstruye e_peso de airs.
Ruldo exeselvo euando se I. Selector de plso/aifombra no eat& t.
apege la asplredorao empuJando completamanle at frente.
I. Conecteblen,opdma selectorde
ancendldelapagadoala pos_ci6non.
2, Restablezca el cortaclmultoso
Gambleelfusible,
& Coloqueel Interrupterde encendldol
epegedo on laposlcl6none
I. Camb]e Is balsa, (p&glna 13)
2. AJusta nlve!,(p&g]ne 8).
3o Camb!e el cepllIo,(p_glna 21),
4. Umplar _ree de la boqullia,
(p_g{na 19),
5. Determine s| exlsten bloquees,
(p_g_na19).
6. Gamble Ia manguera.
7, Gamble lecortes, (p&glna 17),
& Insertebten is manguera, (p_glna 9),
9. Determine 81exlstenbloqueos,
(p_gtne 19).
f0. Limpsel flltros, (p_glna 14)_
t, AJustoel alva|, (p6glne 7)_
1. Cambie ia bomb|lie,(p_glna 20),
fo GambleIa cortes, (p_gtna16),
2, Gamble el selector on le eeleoct6n
con elfombra, (p_glna 7).
3. Revise CAMBIO DE LA CORREAY
LIMP1EZADEL CEPILLO, (peglna 17),
1. Cembleieboisa, (p>na 13)_
2. Limple el flltros,(p_glne i4),
3, Retire o_meterlai bloqueante dei
conducto de aim, (p&glna19).
4, Retornar_ al funclonamlento normal
cuando remuevaafgunahorramlentm
I. ReviseUSO DE LOS
ACCESORIOS, (p_glna B).
2. Revise COMa ELEMINAR LOS RES-
IDUOS DE BASURA ENLOS CON-
DUCTOS y itmple la manguera, (p_gtne 19).
Optima el baton completamanta
haste o{fronts,
22
i!i!!i!ji!i;E!iiii!i!ili!iiiiTi!iii!iiii_iiiiiii!ii!{!!ii!iiiii!i!ii_ii_:_!_!i_!_i_i_!!_i_:!!_i!i_!i_i:!_!_i_!;!i_i!!i_!!!_i?_i_i_!_!i:i?!_;!,i!iii!iili_!i!;_ili!i!'iil!:_ii_i:ii_::_:ii_ii_:_ir_iiiii!i_!ii;i!_ii:i_i_!iiiii!i_;!_i_il;i!iii'ililili_!ii!i!_ii'i!i!:i_iii_iiii_;i!ii:ilizil;iiii:ii_i_,i_
,!i!:_:ii:iy,!iiii!!_ii:_i_ii!:_,__: ,,:,_,:i_iiii_!ili,ii_i_ii_ii_iiii_ii_iiiil
For repair of major brand appliances in your own home... ,,,,,,,,,...........,,
no matter who made it, no matter who sold it!
1-800-4-MY-ROME® An me,dayorn ght
(1-800-469-4663) (U,S,A. and Canada) ::
H •
wwwosears.com www,sears.ca
For repair of carry-in products like vacuums, lawn equipment, and ;::,
electronics, call for the nearest Sears Parts and Repair Center.. :
1-800-488-'1222 Anytime, day or night (UoS.Aoonly)
www.sears.com
For the replacement parts, accessories and owner's manuals
that you need to do-it-yourself, call Sears PartsDirectSM!
1-800-366-PART
(1*800-366-7278)
6 a.m. - 11 pro., 7 days a week
(U.S.A, only)
www,sears.com/partsdirect
To purchase or inquire about a Sears Service Agreement
or Sears Maintenance Agreement:
1-800-827-6655 (USA)
7 am.- 5 p.mo,CST, Mon,,- Sat.
1-800-361-6665 (Canada)
9 am,,- 8 p.m. EST, M - F,4 p_m.Sat.
Pars pedir servicio de reparaci6n a
domicilio, y pars ordenar piezas:
1-888-SU-HOGAR sM
(1-888-784-6427)
Au Canada pour service en franqais:
1-800-LE-FOYER uc
(1-800-533-6937)
W_VVVr, Sea_'S. ca
....... :k •••:' •:•_i :i• i••.,_
I HomeCentral®] :?: :•-i
@Sears, Roebuck and Co,
"I'M SM
® Registered Trademark / Trademark / Service Mark of Sears, Roebuck and Co
®Marca Reglstrada / _MMarca de F_brtca / sMMarca de Servicfo de Sears, Roebuck and Co,
Mc Marque de commerce / _o Marque d_pos6e de Sears, Roebuck and Co
23