Loading ...
Loading ...
Loading ...
- 7 -
05/2021
© 2021
EN
Microwave oven
User'smanual
■ Prior to using this appliance, please read the user'smanual thoroughly, even in cases,
when one has already familiarised themselves with previous use of similar types of
appliances. Only use the appliance in the manner described in this user’smanual.
Keep this user'smanual in asafe place where it can be easily retrieved for future use.
■ We recommend saving the original cardboard box, packaging material, purchase
receipt and responsibility statement of the vendor or warranty card for at least the
duration of the legal liability for unsatisfactory performance or quality. In the event
of transportation, we recommend that you pack the appliance in the original box
from the manufacturer.
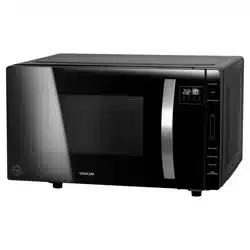
DESCRIPTION OF THE APPLIANCE
A1 Safety door closing mechanism
A2 Door window
A3 Internal area of the oven
A4 Control panel
DESCRIPTION OF THE DISPLAY
B1 Button MICROWAVE – serves to set
the microwave power level.
B2 Button CLOCK – serves to set the
clock
B3 Button WEIGHT DEFROST– serves
to select the defrosting program
based on weight
B4 Button +
B5 Button –
B6 Button TIME DEFROST– serves to
select the defrosting program based
on time
B7 Button KITCHEN TIMER – serves to
set the kitchen timer
B8 Button STOP/CLEAR – serves
to pause the operation of the
microwave oven / to delete setting
or to cancel operation
B9 Button START/+30 SEC/CONFIRM –
serves to start the microwave oven
/ to start quick heating / to confirm
settings
BEFORE FIRST USE
■ Before first use, take the appliance and its accessories out of the packaging material
and remove all promotional labels and stickers. Check that neither the appliance nor
any of its parts is damaged.
INSTALLATION
1. Make sure that you have taken all packaging materials, such as plastic bags,
polystyrene, etc. out from inside the oven.
Note:
Do not remove the cover of the magnetron, which is located on the right
side of the inside area of the oven.
Warning:
Check whether the oven is damaged in any way, e.g. whether the
oven door is incorrectly attached or dinted, whether the door
gasket seal is damaged or whether the hinges or locks are loose.
If you discover any damage, do not use the oven and contact
aqualified service technician.
2. The microwave oven must be placed on an even, stable surface, that can bear its
weight even with the food inside.
3. Do not locate the oven near sources of heat, in locations with increased humidity or
near flammable materials.
4. This appliance is designed to be used in open space, it is not designed to be built-in.
Therefore, ensure sufficient free space around the oven. Leave at least 30 cm of free
space above the top of the oven and at least 20 cm around its sides. The rear side of
the oven may be positioned against awall. Do not cover or block the vents. Do not
remove the feet of the microwave oven.
5. Make sure that the power cord is not underneath the oven or in contact with hot or
sharp surfaces.
6. The power socket must be easily accessible to enable the power plug to be quickly
disconnected if necessary.
7. Do not use the microwave oven outdoors
Note:
When the microwave oven is turned on for the first time, you may register
aslight odour and smoke. This is anormal event that will disappear with
use. When using it for the first time, we recommend that you place abowl
of water in the oven, set the oven to the maximum power level and run
the oven for several minutes. The odour is easily eliminated in this way.
GROUNDING INSTRUCTIONS
■ This microwave oven must be grounded. The microwave oven is equipped with
a power cord, which has a grounding wire with a grounded power plug. The
power plug must be connected to apower socket, which is properly installed and
grounded. Grounding reduces the risk of electrical shock. In the case of a short
circuit the electric current is conducted though the grounding wire. We recommend
that the oven be connected to an independent electrical circuit.
Warning:
An incorrectly grounded power socket may present adanger of
electrical shock.
Note:
If you have any questions regarding grounding or electrical instructions,
consult all such matters with aqualified electrician or repair person.
Neither the manufacturer nor the vendor take any responsibility for
whatever damage to the oven or injury resulting from an incorrect
electrical connection.
RADIO WAVE INTERFERENCE
■ The operation of the oven may cause interference to aradio, television or similar
devices. If you register any interference, perform the following steps to limit or
entirely eliminate the interference:
1. Clean the door and the door gasket seals.
2. Move the radio or television antenna to adifferent location.
3. Point the microwave oven away from the receiver.
4. Move the microwave oven farther away from the receiver.
5. Connect the power plug of the microwave oven into adifferent power socket so that
the oven and the receiver have their own separate electrical circuits.
USING THE MICROWAVE OVEN
■ There will be a beep when the appliance's power plug is connected to a power
socket. Set the clock. Proceed according to the instructions in section "Setting
the clock" below in this user'smanual. Nevertheless, it is also possible to control
the microwave oven without the clock being set, however, in order to use certain
programs in real time, it is necessary to set the actual time.
■ In the event that you need to check the status of the cooking / heating process
while the microwave oven is in operation, open the door of the microwave oven.
The operation of the microwave oven will be paused. To continue cooking / heating,
short press button START/+30 SEC/CONFIRM B9, to cancel the cooking / heating
process, press button STOP/CLEAR B8 again.
■ In the event that you perform an incorrect step while setting the microwave oven,
press button STOP/CLEAR B8 to cancel the setting.
■ In the event that you do not press the button START/+30 SEC/CONFIRM B9 within
1 minute of making asetting, then the setting will not be saved and the clock will
appear on the display.
■ Abeep is made each time abutton is pressed.
Setting the clock
■ The clock may be set after inserting the power plug into apower socket, or also
during use.
1. While the microwave oven is in the stand-by mode, short press button CLOCK B2.
The numerical hour value will start flashing on the display.
2. Use the +/- buttons to set the hours.
3. Short press button CLOCK B2. The numerical minutes value will start flashing on the
display.
4. Use the +/- buttons to set the minutes.
5. Short press button CLOCK B2 to confirm, and the set time will be shown on the
display.
Kitchen timer
1. While the microwave oven is in the stand-by mode, short press button KITCHEN
TIMER B7. The display will show "00:00".
2. Use buttons +/- buttons to set the duration of the kitchen timer. You can set up to 95
minutes.
3. Short press button START/+30 SEC/CONFIRM B9 and the countdown will start.
4. Abeep is made when the set time elapses.
Quick heating / cooking
■ The quick heating / cooking function is intended for rapidly heating food at the
maximum power level of the microwave oven.
■ While the microwave oven is in the stand-by mode, press button START/+30 SEC/
CONFIRM B9 and the microwave oven will start running at the maximum power
level for atime of 30 seconds. Each time the button START/+30 SEC/CONFIRM B9
is pressed the cooking / heating time is extended by 30 seconds. The maximum
cooking / heating time is 95 minutes.
Microwave cooking
■ The microwave cooking function is suitable for cooking and heating food.
1. While the oven is in the stand-by mode, press button MICROWAVE B1 and "P100"
will appear on the display.
2. Repeatedly press button MICROWAVE B1 or buttons +/- to select the microwave
power level in the following order: P100 – P80 – P50 – P30 – P10. The set power level
will appear on the display.
3. Press button START/+30 SEC/CONFIRM B9 to confirm the set power level.
4. Use buttons +/- to set the desired duration of cooking / heating in the range 0:05 –
95:00.
Press button START/+30 SEC/CONFIRM B9 to confirm the set duration of cooking /
heating and the microwave oven will start.
Note:
Buttons +/- are used to set the heating / cooking time in the following
steps:
Loading ...
Loading ...