
Loading ...
Loading ...
Loading ...
11
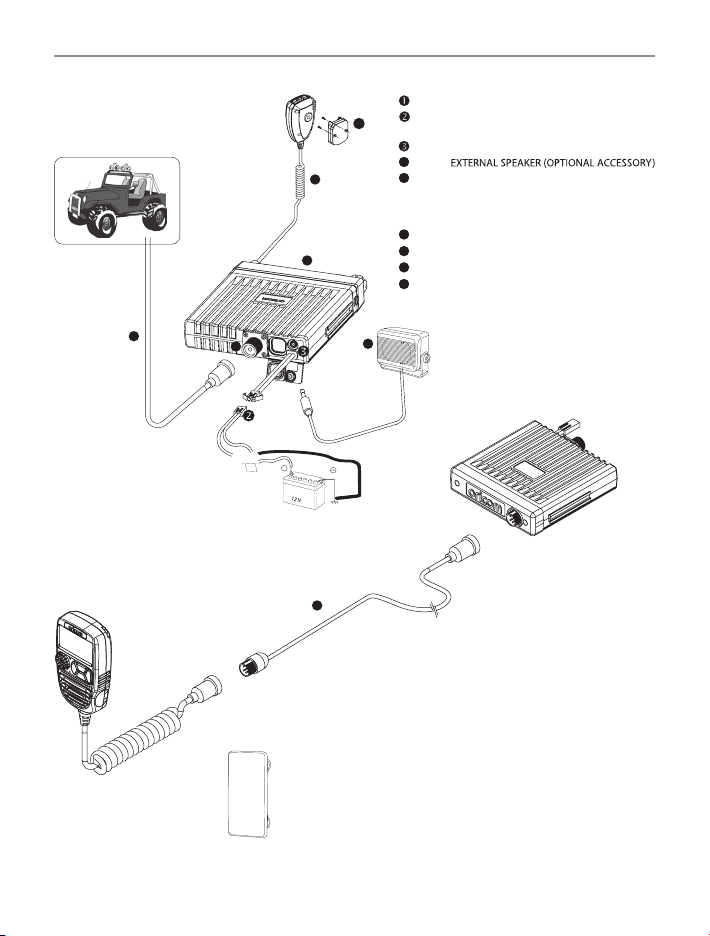
Controls and Indicators
9
RED:
+
BLACK:
BATTERY
TO CHASSIS
FUSE
(OPTIONALACCESSORY)
SPE85 EXTERNAL SPEAKER
- - - - - - - - - - - - - - - -
O
5
1
4
6
8
7
ANTENNA CONNECTOR
4
EXTERNAL SPEAKER JACK
5
MICROPHONE HANGER - Fit the supplied
microphone hanger in the desired location.
(Optional Magnetic microphone mount is
available online - Model no. MMM100)
DC POWER CABLE-Connects to 12V.
Pay attention to polarities.
6
CONTROLLER SPEAKER MIC
7
ANTENNA CABLE NOT INCLUDED
8
TRANSCEIVER
SPE85
9
EXTENSION CABLE
Installation Diagram
If you wish to install the transceiver behind the dash, read our below blanking plate
install guide (Blanking plate not included)
NOTE: The below instructions provide general guidance around this method of install.
1) When installing the transceiver behind the dash of a vehicle, the spare blanking
plate should be removed from the vehicle.
A suitable hole should be carefully drilled into the desired location of the spare
blanking plate to the size of extension lead microphone connection, as above
reference image (9).
2) Before the extension lead is afxed behind the new hole in the blanking plate,
the nut should be unscrewed from the extension cable and removed.
3) Once the nut is removed, the extension lead can be installed into the hole,
and the nut can be secured on the front to keep the cable in position.
4) Transceiver can then be mounted behind the dash, and blanking plate placed into
position in the vehicle.
5) Microphone can then be plugged into the extension lead in the centre of the
blanking plate.
Loading ...
Loading ...
Loading ...