Loading ...
Loading ...
Loading ...
555555
IMPORTANT: If this product is connected to a GFCI (Ground
Fault Circuit Interrupter) equipped outlet, nuisance tripping of the
power supply may occur, resulting in loss of cooling. Ice quality
may be affected. If nuisance tripping has occurred, and if the
condition of the ice appears poor, dispose of it.
Recommended Grounding Method
The ice maker must be grounded. The ice maker is equipped with
a power supply cord having a 3 prong grounding plug. The cord
must be plugged into a mating, 3 prong, grounding-type wall
receptacle, grounded in accordance with the National Electrical
Code and local codes and ordinances. If a mating wall receptacle
is not available, it is the personal responsibility of the customer to
have a properly grounded, 3 prong wall receptacle installed by a
qualified electrician.
Water Supply Requirements
Check that the water supply lines are insulated against freezing
conditions. Ice formations in the supply lines can increase water
pressure and damage your ice maker or home. Damage from
frozen supply lines is not covered by the warranty.
A cold water supply with water pressure of between 30 and
120 psi (207 and 827 kPa) is required to operate the ice maker.
If you have questions about your water pressure, call a licensed,
qualified plumber.
If a reverse osmosis water filtration system is connected to your
cold water supply, the water pressure to the reverse osmosis
system needs to be a minimum of 40 to 60 psi (276 to 414 kPa).
NOTE: The reverse osmosis system must provide 1 gal. (3.8 L)
of water per hour to the ice maker for proper ice maker operation.
If a reverse osmosis system is desired, only a whole-house
capacity reverse osmosis system, capable of maintaining the
steady water supply required by the ice maker, is recommended.
Faucet capacity reverse osmosis systems are not able to
maintain the steady water supply required by the ice maker.
If the water pressure to the reverse osmosis system is less than
40 to 60 psi (276 to 414 kPa):
■ Check to see whether the sediment filter in the reverse
osmosis system is blocked. Replace the filter if necessary.
■ Allow the storage tank on the reverse osmosis system to refill
after heavy usage.
If you have questions about your water pressure, call a licensed,
qualified plumber.
Vacation or Extended Time Without Use
■ When you will not be using the ice maker for an extended
period of time, turn off the water and power supply to the
ice maker.
■ Check that the water supply lines are insulated against
freezing conditions. Ice formations in the supply lines can
increase water pressure and cause damage to your ice maker
or home. Damage from freezing is not covered by the
warranty.
Connect Water Supply
Read all directions before you begin.
IMPORTANT:
■ Plumbing shall be installed in accordance with the
International Plumbing Code and any local codes and
ordinances.
■ Use copper tubing or Whirlpool supply line Part Number
8212547RP, and check for leaks.
■ Install tubing only in areas where temperatures will remain
above freezing.
Tools Needed
Gather the required tools and parts before starting installation:
■ Flat-blade screwdriver
■ ⁷⁄₁₆" and ¹⁄₂" open-end wrenches or 2 adjustable wrenches
■ ¹⁄₄" nut driver
NOTE: Do not use a piercing-type or ³⁄₁₆" (4.76 mm) saddle valve
which reduces water flow and clogs more easily.
Connecting the Water Line
1. Turn off main water supply. Turn on nearest faucet long
enough to clear line of water.
2. Using a ¹⁄₂" copper supply line with a quarter-turn shut-off
valve or the equivalent, connect the ice maker as shown.
NOTE: To allow sufficient water flow to the ice maker a
minimum ¹⁄₂" diameter home supply line is recommended.
3. Now you are ready to connect the copper tubing. Use
¹⁄₄" (6.35 mm) O.D. soft copper tubing for the cold water
supply.
■ Ensure that you have the proper length needed for the
job. Be sure both ends of the copper tubing are cut
square.
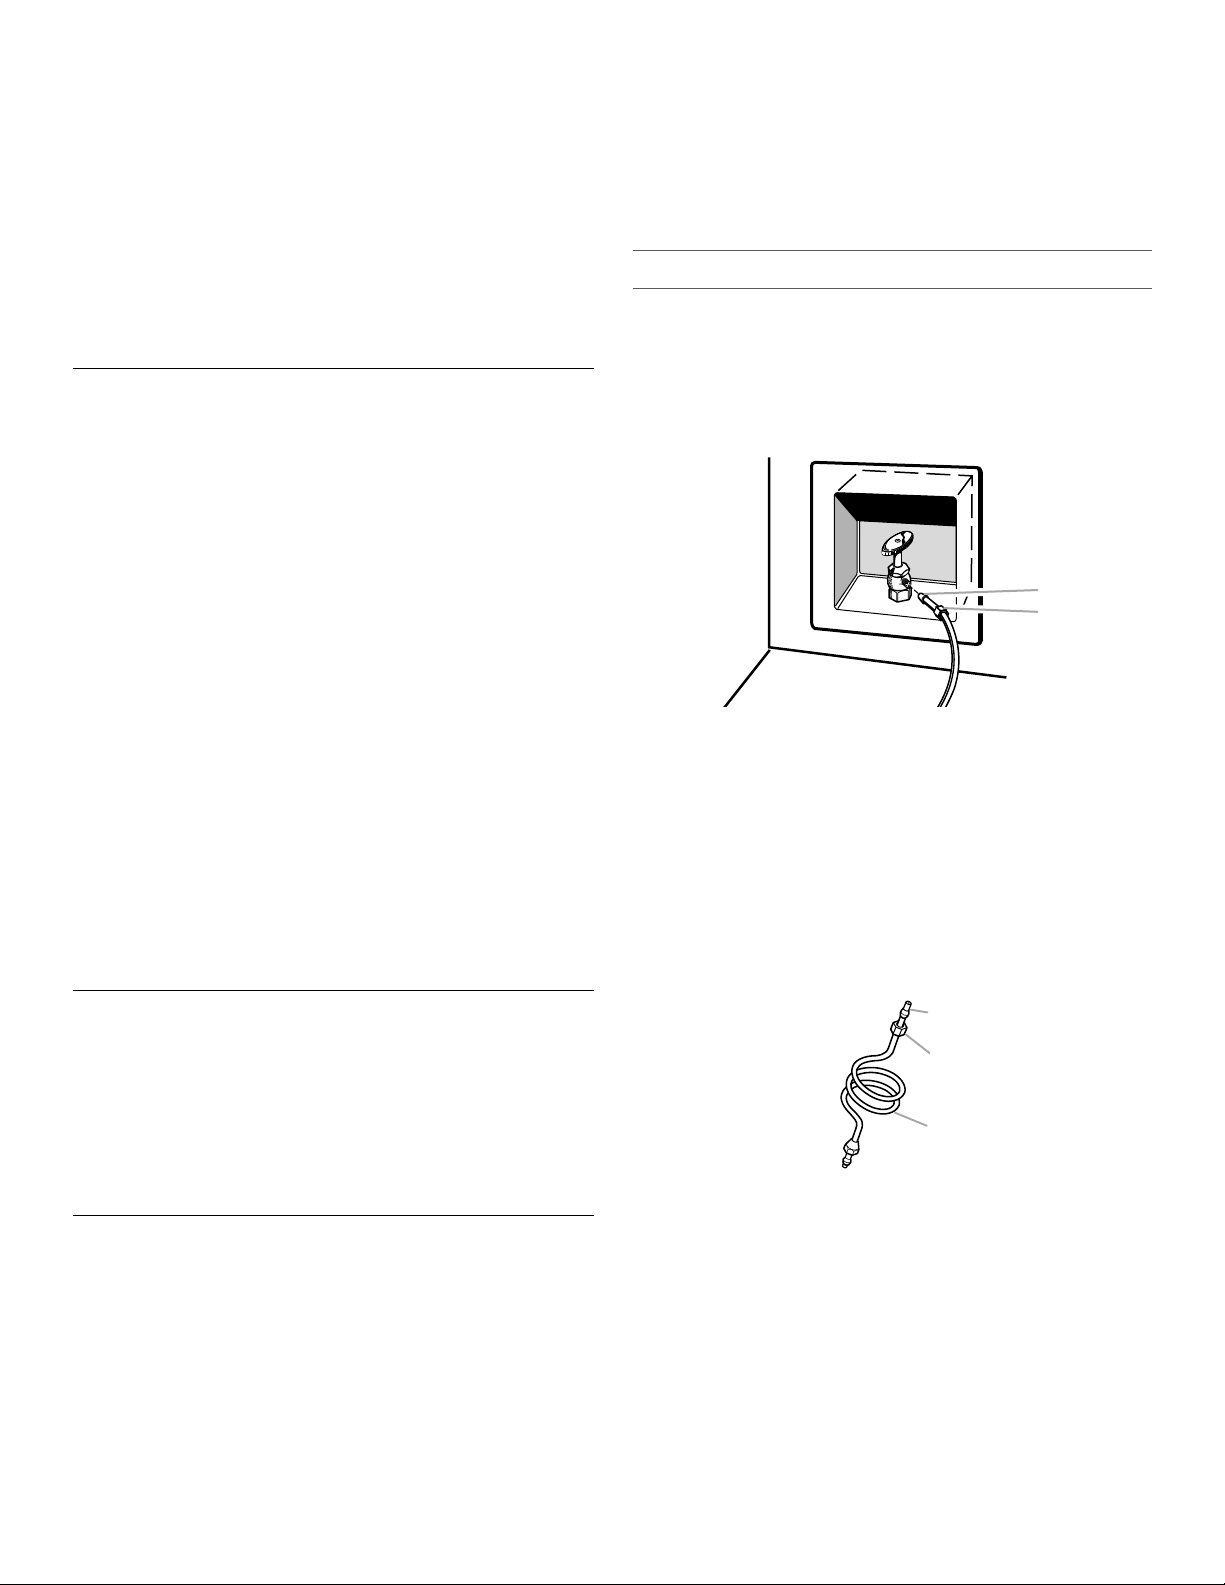
■ Slip compression sleeve and compression nut on copper
tubing as shown. Insert end of tubing into outlet end
squarely as far as it will go. Screw compression nut onto
outlet end with adjustable wrench. Do not overtighten.
4. Place the free end of the tubing into a container or sink, and
turn on main water supply and flush out tubing until water is
clear. Turn off shut-off valve on the water pipe.
IMPORTANT: Always drain the water line before making
the final connection to the inlet of the water valve to avoid
possible water valve malfunction.
5. Bend the copper tubing to meet the water line inlet which
is located on the back of the ice maker cabinet as shown.
Leave a coil of copper tubing to allow the ice maker to be
pulled out of the cabinet or away from the wall for service.
A. Bulb
B. Nut
A. Compression sleeve
B. Compression nut
C. Copper tubing
A
B
B
C
A
Loading ...
Loading ...
Loading ...