Operator's Manual
J€:RAFTSMA#°J
40cc/2.4 cu.in. 4-Cycle
GASOLINE WEEDWAOKER ®
Model No.
358.796160
• Safety
• Assembly
• Operation
• Maintenance
• Parts List
• Espar_ol, p. 26
WARNING:
Read and follow all Safety Rules and Operating
Instructions before first use of this product.
For answers to your questions about this product:
Call 7 am-7 pm, Mon.-Sat., or 10 am-7 pm, Sun.
1-800-235-5878 (Hours listed are Central Time)
Sears, Roebuck and Co., Hoffman Estates, IL 60179 U.S.A.
545082938 9/12/06
Warranty Statement 2 Storage 18
Identification of Symbols 2 Troubleshooting Table 19
Safety Rules 3 Emissions Statement 20
Assembly 8
Operation 10 Parts List 23
Maintenance 15 Spanish 26
Service & Adjustments 17 Parts and Ordering Back Cover
TWO YEAR FULL WARRANTY ON CRAFTSMAN ® GAS WEEDWACKER ®
When used and maintained according to the operator's manual, if this product fails
due to a defect in material orworkmanship within one year from the date of purchase,
return it to any Sears store, Sears Service Center, or other Craftsman outlet in the
United States for free repair (or replacement if repair proves impossible).
This warranty excludes cutting line, spark plug and air filter, which are expendable
parts that can wear out from normal use in less than two years.
This warranty applies for only 30 days from purchase date if this product is used for
commercial or rental purposes.
This warranty gives you specific legal rights, and you may also have other rights
which vary from state to state.
Sears, Roebuck and Co., Hoffman Estates, IL 60179
WARNING! This trimmer
can be dangerous! Careless or
improper use can cause
serious or even fatal injury.
Read and understand the
operator's manual before
using the trimmer.
Always wear appropriate ear protection, eye protection and head protection.
mlWARNING: When using gar-
dening appliances, basic safety pre-
cautions must always be followed to
reduce the risk of fire and serious
injury. Read and follow all instructions.
This power unit can be dangerous! Op-
erator is responsible for following
instructions and warnings on unit and in
manual. Read entire operator's manual
before using unit! Be thoroughly familiar
with the controls and the proper use of
the unit. Restrict the use of this unit to
persons who have read, understand,
and will follow the instructions and
warnings on the unit and in the manual.
Never allow children to operate this unit.
OPERATOR'S SAFETY INFORMATION
MANUAL ON THE UNIT
DANGER: Never use blades
with line trimmer attachment. Never
use flailing devices with any attach-
ment. This unit (when used with sup-
plied line trimmer attachment) is de-
signed for line trimmer use only. Use
of any other accessories with line trim-
mer attachment will increase the risk
of injury.
QO0
_.WARNING: Trimmer line throws
objects violently. You and others can be
blinded/injured. Wear eye and leg
protection. Keep body parts clear of ro-
tating line.
oteo ,o
lm4oots
_WARNING: Hazard zone for
thrown objects. Trimmer line can
throw objects violently. Others can be
blinded or injured. Keep children, by-
standers, and animals 50 feet (15 me-
ters) away. Stop unit immediately if ap-
proached.
If situations occur which are not cov-
ered in this manual, use care and
good judgment. If you need assis-
tance, contact your Sears Service
Center or call 1-800-235-5878.
OPERATOR SAFETY
• Dress properly. Always wear safety
glasses or similar eye protection
when operating, or performing main-
tenance, on your unit (safety glasses
are available). Eye protection should
be marked Z87.
• Always wear face or dust mask if op-
eration is dusty.
• Always wear heavy, long pants, long
sleeves, boots, and gloves. Wearing
safety leg guards is recommended.
• Always wear foot protection. Do not
go barefoot or wear sandals. Stay
clear of spinning line.
• Secure hair above shoulder length.
Secure or remove loose clothing or
clothing with loosely hanging ties,
straps, tassels, etc. They can be
caught in moving parts.
• Being fully covered also helps protect
you from debris and pieces of toxic
plants thrown by spinning line.
• Stay Alert. Do not operate this unit
when you are tired, ill, upset or under
the influence of alcohol, drugs, or
medication. Watch what you are do-
ing; use common sense.
• Wear hearing protection.
• Never start or run inside a closed
room or building. Breathing exhaust
fumes can kill.
• Keep handles free of oil and fuel.
• Always keep engine on the right hand
side of your body.
• Hold the unit firmly with both hands.
• Keep trimmer head (or other optional
attachment) below waist level and
away from all parts of your body. Do
not raise engine above your waist.
• Keep all parts of you r body away from
muffler and spinning line (or other op-
tional attachment). Keep engine be-
low waist level. A hot muffler can
cause serious burns.
• Keep firm footing and balance. Do not
overreach or use from unstable sur-
faces such as ladders, trees, steep
slopes, rooftops, etc.
• Use only in daylight or good artificial
light.
• Use only for jobs explained in this
manual (or manuals for optional at-
tachments).
3
UNIT / MAINTENANCE SAFETY
_.WARNING: Disconnect the
spark plug before performing mainte-
nance except carburetor adjustments,
• Look for and replace damaged or
loose parts before each use. Look for
and repair fuel leaks before use. Keep
in good working condition,
• Replace trimmer head parts that are
chipped, cracked, broken, or dam-
aged in any other way before using
the unit,
• Maintain unit according to recom-
mended procedures. Keep cutting
line at proper length,
• Use only CraftsmanCR_ brand line.
Never use wire, rope, string, etc.
• Install required shield properly before
using the unit. Use only specified trim-
mer head; make sure it is properly
installed and securely fastened.
• Make sure unit is assembled correctly
as shown in this manual.
• Make carburetor adjustments with
lower end supported to prevent line
from contacting any object.
• Keep others away when making car-
buretor adjustments.
• Use only recommended Craftsman
accessories and replacement parts.
• Have all maintenance and service not
explained in this manual performed
by a Sears Service Center.
FUEL SAFETY
• Pour fuel outdoors.
• Keep away from sparks or flames.
• Use a container approved for fuel.
• Do not smoke or allow smoking near
fuel or the unit.
• Avoid spilling fuel or oil. Wipe up all
fuel spills.
• Move at least 10 feet (3 meters) away
from fueling site before starting en-
gine. Stop engine and allow to cool
before removing fuel cap.
• Empty the fuel tank before storing or
transporting the unit. Use up fuel left in
the carburetor by starting the engine
and letting it run until it stops.
• Store unit and fuel in area where fuel
vapors cannot reach sparks or open
flames from water heaters, electric
motors or switches, furnaces, etc.
• Always store gasoline in a container
approved for flammable liquids.
TRANSPORTING AND STORAGE
• Stop the unit before carrying.
• Allow engine to cool before storing or
transporting in vehicle.
• Empty the fuel tank before storing or
transporting the unit. Use up fuel left in
the carburetor by starting the engine
and letting it run until it stops.
• Store or transport unit with spark plug
facing up.
• Do not store or transport unit with
spark plug facing down (see STOR-
AGE section for additional informa-
tion).
• Store unit and fuel in area where fuel
vapors cannot reach sparks or open
flames from water heaters, electric mo-
tors or switches, furnaces, etc.
• Store unit so line limiter blade cannot
accidentally cause injury.
• Store unit out of reach of children.
This unit is not equipped with an anti-
vibration system and is intended for
occasional use only.
SAFETY NOTICE: Exposure to vibra-
tions through prolonged use of gasoline
powered hand tools could cause blood
vessel or nerve damage in the fingers,
hands, and joints of people prone to cir-
culation disorders or abnormal swell-
ings. Prolonged use in cold weather
has been linked to blood vessel dam-
age in otherwise healthy people. If
symptoms occur such as numbness,
pain, loss of strength, change in skin
color or texture, or loss of feeling in the
fingers, hands, or joints, discontinue the
use of this tool and seek medical atten-
tion. An anti-vibration system does not
guarantee the avoidance of these prob-
lems. Users who operate power tools
on a continual and regular basis must
monitor closely their physical condition
and the condition of this tool.
SPECIAL NOTICE: This unit is
equipped with a temperature limiting
muffler and spark arresting screen
which meets the requirements of Cali-
fornia Codes 4442 and 4443. All U.S.
forest land and the states of California,
Idaho, Maine, Minnesota, New Jersey,
Oregon, and Washington require by
law that many internal combustion en-
gines be equipped with a spark arrest-
ing screen. If you operate in a locale
where such regulations exist, you are
legally responsible for maintaining the
operating condition of these parts.
Failure to do so is a violation of the
law. For normal homeowner use, the
muffler and spark arresting screen will
not require any service. After 50 hours
of use, we recommend that your muf-
fler be serviced or replaced by a
Sears Service Center.
z_
_WARNING:Theengineexhaust
fromthisproductcontainschemicals
knowntotheStateofCaliforniato
causecancer,birthdefects,orother
reproductiveharm.
LINE TRIMMER SAFETY
WARNING: Inspect the area to
be trimmed before each use. Remove
objects (rocks, broken glass, nails,
wire, etc.) which can be thrown by or
become entangled in line. Hard ob-
jects can damage the trimmer head
and be thrown causing serious injury.
• Only use the trimmer attachment for
trimming, scalping, mowing and
sweeping. Do not use the trimmer at-
tachment for edging, pruning or hedge
trimming.
• Cut only from your left to your right.
Cutting on right side of the shield will
throw debris away from the operator.
ADDITIONAL SAFETY RULES
FOR OPTIONAL ATTACHMENTS
'_WARNING: For each optional
attachment used, read entire opera-
tors manual before use and follow all
warnings and instructions in manual
and on attachment.
_WARNING: Ensure handlebar is
installed when using edger or brush-
cutter attachments. Attach handlebar
above arrow on safety label on the up-
per shaft (engine end of unit). If your
edger or brushcutter attachment does
not include a handlebar, a handlebar
accessory kit (#530071451 ) is avail-
able from your Sears Service Center.
i '
__ebar
EDGER SAFETY
WARNING: inspect the area to
be edged before each use. Remove
objects (rocks, broken glass, nails,
wire, etc.) which can be thrown by the
blade or can wrap around the shaft.
• Blade rotates momentarily after the
trigger is released. The blade can se-
riously cut you or others.
• Allow blade to stop before removing it
from the cut.
Bladerotates Allowbladeto stop
beforeremovingit #
after the fromthe cut. J
td_lgeris _/
release_
• Throw away blades that are bent,
warped, cracked, broken or damaged
in any other way. Replace parts that
are cracked, chipped, or damaged
before using the unit.
• Do not attempt to remove cut material
nor hold material to be cut when the
engine is running or when cutting
blade is moving.
• Always keep the wheel and depth ad-
justing skid in contact with the ground.
• Always push the unit slowly over the
ground. Stay alert for uneven side-
walks, holes in the terrain, large roots,
etc.
• Always use the handlebar when using
edger attachment.
BLOWER/VACUUM SAFETY
_,WARNING: Inspect area before
starting unit. Remove all debris and
hard objects such as rocks, glass,
wire, etc. that can ricochet, be thrown,
or otherwise cause injury or damage
during operation.
• Do not set unit on any surface except
a clean, hard area while engine is run-
ning. Debris such as gravel, sand,
dust, grass, etc., could be picked up
by the air intake and thrown out
through discharge opening, damag-
ing unit, property, or causing serious
injury to bystanders or operator.
• Never place objects inside the blower
tubes, vacuum tubes or blower outlet.
Always direct the blowing debris away
from people, animals, glass, and solid
objects such as trees, automobiles,
walls, etc. The force of air can cause
rocks, dirt, or sticks to be thrown or to
ricochet which can hurt people or ani-
mals, break glass, or cause other dam-
age.
• Never run unit without the proper
equipment attached. When using
your unit as a blower, always install
blower tubes.
• Check air intake opening, blower tubes
or vacuum tubes frequently, always
with engine stopped and spark plug
disconnected. Keep vents and dis-
charge tubes free of debris which can
accumulate and restrict proper air flow.
• Neverplaceanyobjectinairintake
openingasthiscouldrestrictproper
airflowandcausedamagetotheunit.
• Neveruseforspreadingchemicals,
fertilizers,orothersubstanceswhich
maycontaintoxicmaterials.
• Toavoidspreadingfire,donotuse
nearleaforbrushfires,fireplaces,
barbecuepits,ashtrays,etc.
BRUSHCUTTER SAFETY
_.DANGER: Blade can thrust vio-
lently away from material it does not cut.
Blade thrust can cause amputation of
arms or legs.
_WARNING: Do not use trimmer
head as a fastening device for the
blade.
_WARNING: Only use brushcut-
ter attachments that provide a metal
shield with protruding nose.
Prootruding
• Use only specified blade and make
sure it is properly installed and se-
curely fastened.
• Cut from your right to your left.
• Always usethe handlebar and a prop-
erly adjusted shoulder strap with
blade (see ASSEMBLY instructions in
brushcutter attachment operator's
manual).
CULTIVATOR SAFETY
_kWARNING: Rotating tines can
cause serious injury. Keep away from
rotating tines. Stop the engine and
disconnect the spark plug before un-
clogging tines or making repairs.
_WARNING: The blade contin-
ues to spin after the throttle is re-
leased or engine is turned off. The
coasting blade can throw objects or
seriously cut you if accidentally
touched. Stop the blade by contacting
the left hand side of the coasting
blade with material already cut.
Stop coasting _'_
blade by contact _, __,_
with cut material. __ ,,_4._
®
WARNING: Inspect the area to
be cut before each use. Remove ob-
jects (rocks, broken glass, nails, wire,
etc.) which can be thrown or become
entangled in the blade or trimmer line.
• Throw away and replace blades that
are bent, warped, cracked, broken or
damaged in any other way.
• Install required shield properly before
using the unit. Use the metal shield for
all metal blade use.
.it
4E_WARNING: Inspect the area to
be cultivated before starting the unit.
Remove all debris and hard and sharp
objects such as rocks, vines, branch-
es, rope, string, etc.
• Avoid heavy contact with solid objects
that might stop the tines. If heavy con-
tact occurs, stop the engine and in-
spect the unit for damage.
• Never operate the cultivator without
the tine cover in place and properly
secured.
• Keep the tines and guard clear of de-
bris.
• After striking a foreign object, stop the
engine, disconnect the spark plug
and inspect the cultivator for damage.
Repair before restarting.
• Disconnect attachment from the drive
engine before cleaning the tines with
a hose and water to remove any
build-up. Oil the tines to prevent rust.
• Always wear gloves when servicing
or cleaning the tines. The tines be-
come very sharp from use.
• Do not run unit at high speed unless
cultivating.
6
HEDGE TRIMMER SAFETY
_.DANGER: RISK OF CUT; KEEP
HANDS AWAY FROM BLADE - Blade
moves momentarily after the trigger is
released. Do not attempt to clear away
cut material when the blade is in motion.
Make sure the switch is in the OFF posi-
tion, the spark plug wire is discon-
nected, and the blade has stopped
moving before removing jammed mate-
rial from the cutting blade. Do not grab
or hold the unit by the cutting blade.
Blades move
momentarily
after the
trigger is
_WARNING:
Allow blades to stop
before removing
them from the cut.
Inspect the area be-
fore starting the unit. Remove all de-
bris and hard objects such as rocks,
glass, wire, etc. that can ricochet, be
thrown, or otherwise cause injury or
damage during operation.
• Do not use a cutting blade that is bent,
warped, cracked, broken or damaged
in any other way. Have worn or dam-
aged parts replaced by your Sears
Service Center.
• Always keep unit in front of your body.
Keep all parts of your body away from
the cutting blade.
• Keep the cutting blade and air vents
clear of debris.
POLE PRUNER SAFETY
_WARNING: The reciprocating
blade/rotating chain can cause severe
injury. Inspect the unit before use. Do
not operate unit with a bent, cracked
or dull blade or dull chain. Keep away
from the blade/chain.
WARNING: The reciprocating
blade/rotating chain is sharp. Do not
touch. To prevent serious injury, always
stop engine and ensure blade/chain
has stopped moving, disconnect spark
plug, and wear gloves when changing
or handling the blade or chain.
AI_WARNING: A coasting blade/ro-
tating chain can cause injury while it
continues to move after the engine is
stopped. Maintain proper control of the
unit until the blade/chain has completely
stopped moving. Keep hands, face and
feet at a distance from all moving parts.
Do not attempt to touch or stop the
blade or chain when it is moving.
_WARNING: Falling objects can
cause severe head injury. Wear head
protection when operating this unit
with a pole pruner attachment.
_WARNING: To prevent serious
injury, do not use more than one boom
extension with a pole pruner attach-
ment.
_,WARNING: Keep the pruner
away from power lines or electrical
wires.
• Only use for pruning limbs or
branches up to 4 inches in diameter.
• Do not operate the unit faster than the
speed needed to prune. Do not run the
unit at high speed when not pruning.
• Always stop the unit when work is
delayed or when walking from one
cutting location to another.
• Ifyou strike or become entangled with
a foreign object, stop the engine im-
mediately and check for damage.
Have any damage repaired by a
Sears Service Center before attempt-
ing further operations. Discard blades
that are bent, warped, cracked or bro-
ken.
• Stop the unit immediately if you feel
excessive vibration. Vibration is a
sign of trouble. Inspect thoroughly for
loose nuts, bolts or damage before
continuing. Contact Sears Service for
repair or replacement of affected
parts as necessary.
SNOW THROWER SAFETY
AO&WARNING: Keep hands and feet
away from the rotor when starting or
running the engine. Never attempt to
clear the rotor with the engine/motor
running. Stop engine and disconnect
spark plug before unclogging snow or
debris from discharge chute or when
adjusting vanes.
7
z_
•tlWARNING:Neverleanoverdis-
chargechute.Rocksordebriscould
bethrownintotheeyesandfaceand
causeseriousinjuryorblindness.
_IWARNING:Inspectthearea
wheretheunitistobeused.Remove
objectsthatcouldbethrownordam-
agetheunit.Someobjectsmaybe
hiddenbyfallensnow- bealertfor
thepossibility.
• Directmaterialdischargeawayfrom
glassenclosures, automobiles, etc.
• Do not run engine at high speed while
not removing snow.
• Be attentive when using the snow-
thrower, and stay alert for holes in the
terrain and other hidden hazards.
• Make sure the rotor will spin freely be-
fore attaching the snowthrower to the
powerhead.
• If the rotor will not rotate freely due to
frozen ice, thaw the unit before thor-
oughly before attempting to operate
under power.
• Keep the rotor clear of debris.
• Do not throw snow near other people.
The snow thrower could propel small
objects at high speed causing injury.
• After striking a foreign object, stop the
engine, disconnect spark plug and in-
spect the snowthrower for damage
and repair ifnecessary before restart-
ing unit.
• Never operate the snowthrower near
glass enclosures, automobiles and
trucks.
• Never attempt to use the snowthrow-
er on a roof.
• Never operate the snowthrower near
window wells, dropoffs, etc.
• Never discharge snow onto public
roads or near moving traffic.
• Clear snow from slopes by going up
and down; never across. Use caution
when changing directions. Never
clear snow from steep slopes.
• Let snowthrower run for a few minutes
after clearing snow so moving parts
do not freeze.
• Look behind and use care when
backing up. Exercise caution to avoid
slipping or falling, especially when op-
erating in reverse.
• Know how to stop quickly.
CARTON CONTENTS
Check carton contents against the fol-
lowing list.
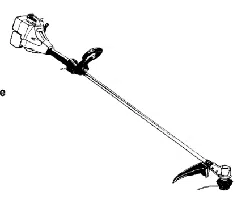
Model 358.796160
• Trimmer
• Shield
• Wing Nut (screwed onto shield)
• Shoulder strap
• Container of line
• Container of oil
Examine parts for damage. Do not
use damaged parts.
NOTE: If you need assistance or find
parts missing or damaged, call
1-800-235-5878.
It is normal for the fuel filter to rattle in
the empty fuel tank.
Finding fuel or oil residue on muffler is
normal due to carburetor adjustments
and testing done by the manufacturer.
ASSEMBLY
,_.WARNING: Always stop unit
and disconnect spark plug before per-
forming any assembly procedures.
A _______
IINIWARNING: If received as-
sembled, read and use this ASSEMBLY
section to verify that your unit is properly
assembled and that all fasteners are
tightened securely.
INSTALLING TRIMMER
ATTACHMENT
CAUTION: When installing trimmer
attachment, place the unit on a flat
surface for stability.
1. Loosen the coupler by turning the
knob counterclockwise.
Coupler
Shipping
protector
\
Knob
TIGHTEN
2. Remove shipping protector from
coupler.
8
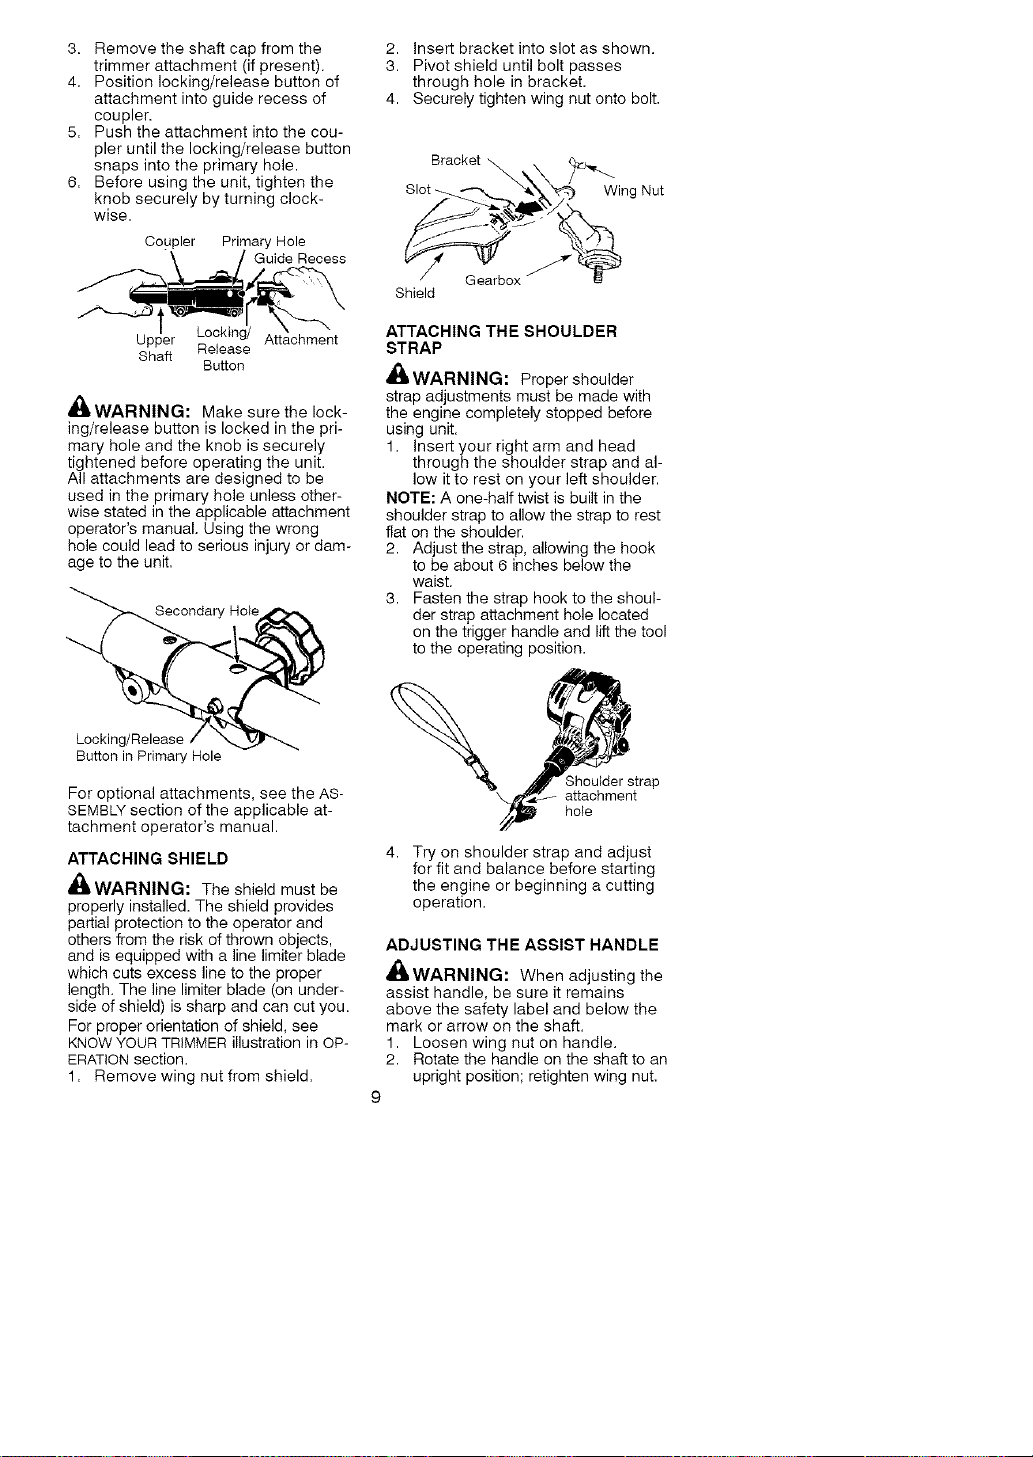
3. Removetheshaftcapfromthe
trimmerattachment(ifpresent).
4. Positionlocking/releasebuttonof
attachmentintoguiderecessof
coupler.
5. Pushtheattachmentintothecou-
pleruntilthelocking/releasebutton
snapsintotheprimaryhole.
6. Beforeusingtheunit,tightenthe
knobsecurelybyturningclock-
wise.
Coupler Primary Hole
___'_ Guide Recess
Upper Relea_ge/ Attachment
Shaft
Button
_f_,WARNING" Make sure the lock-
ing/release button is locked in the pri-
mary hole and the knob is securely
tightened before operating the unit.
All attachments are designed to be
used in the primary hole unless other-
wise stated in the applicable attachment
operator's manual. Using the wrong
hole could lead to serious injury or dam-
age to the unit.
Secondary Hole
2. Insert bracket into slot as shown.
3. Pivot shield until bolt passes
through hole in bracket.
4. Securely tighten wing nut onto bolt.
Bracket "_ ?j._,........
Slot __'_/_ Wing Nut
Shield
ATTACHING THE SHOULDER
STRAP
WARNING: Proper shoulder
strap adjustments must be made with
the engine completely stopped before
using unit.
1. Insert your right arm and head
through the shoulder strap and al-
low it to rest on your left shoulder.
NOTE: A one-half twist is built in the
shoulder strap to allow the strap to rest
flat on the shoulder.
2. Adjust the strap, allowing the hook
to be about 6 inches below the
waist.
3. Fasten the strap hook to the shoul-
der strap attachment hole located
on the trigger handle and lift the tool
to the operating position.
Locking/Release
Button in Primary Hole
For optional attachments, see the AS-
SEMBLY section of the applicable at-
tachment operator's manual.
ATTACHING SHIELD
_,WARNING: The shield must be
properly installed. The shield provides
partial protection to the operator and
others from the risk of thrown objects,
and is equipped with a line limiter blade
which cuts excess line to the proper
length. The line limiter blade (on under-
side of shield) is sharp and can cut you.
For proper orientation of shield, see
KNOWYOUR TRIMMER illustration in OP-
ERATION section.
1. Remove wing nut from shield.
_houtder strap
\ attachment
hole
4. Try on shoulder strap and adjust
for fit and balance before starting
the engine or beginning a cutting
operation.
ADJUSTING THE ASSIST HANDLE
_,WARNING: When adjusting the
assist handle, be sure it remains
above the safety label and below the
mark or arrow on the shaft.
1. Loosen wing nut on handle.
2. Rotate the handle on the shaft to an
upright position; retighten wing nut.
9
KNOW YOUR TRIMMER
READ THIS OPERATOR'S MANUAL AND SAFETY RULES BEFORE OPERATING YOUR
UNIT. Compare the illustrations with your unit to familiarize yourself with the location
of the various controls and adjustments. Save this manual for future reference.
Assist Handle
Trimmer Head
Coupler
Shaft
Line __,_//
Limiter Blade
ON/OFF Switch
Fuelfill
Throttle S Starter Handle
Trigger
ON/OFF SWITCH
Tile ON/OFF switch is located on the
trigger handle and is used to stop the
engine. Move the switch to the OFF
position to stop the engine.
CHOKE
Tile CHOKE helps to supply fuel to the
engine to aid in cold starting. Activate the
choke by moving the red choke lever to
the FULL CHOKE position.
Choke Spark Plug
Lever _/
Muffler
/
Primer Bulb Dipstick
PRIMER BULB
The PRIMER BULB removes air from
the carburetor and fuel lines and fills
them with fuel. This allows you to start
the engine with fewer pulls on the
starter rope. Activate the primer bulb
by pressing it and allowing itto return
to its original form.
COUPLER
The COUPLER enables optional at-
tachments to be installed on the unit.
BEFORE STARTING ENGINE
_,WARNING: Be sure to read
the fuel information in the safety rules
before you begin. If you do not under-
stand the safety rules, do not attempt
to fuel your unit. Call 1-800-235-5878.
OIL CAPACITY
The engine holds approximately 3
ounces of oil. Use only high quality
detergent oil rated with API service
classification SJ-SL Select the oil's
SAE viscosity grade according to your
expected operating temperature. For
most applications, SAE-30 oil is rec-
ommended. Do not use special addi-
tives.
,_.,_--. NOTE: Synthetic oil meet-
'\_
_ ing ILSAC GF-2, API certifi-;," '" cation mark and API ser-
,<._o,_j vice symbol (shown at left)
with "SJ/CF ENERGY CON-
O SERVING" or higher, is an
acceptable oil at all temper-
atures. Use of synthetic
oil does not alter required
oil change intervals.
SAE Viscosity Grades
i t I
>r 2+0 ._o 70 7o _ J ;_
S+AR I iftO I E%I_ERATURE RA_IGE AN I CIPA ED P:mro_ E I,E_ OIL C_AN6F
lO
CAUTION: Air cooled engines run
hotter than automotive engines. The
use of non-synthetic multi-viscosity
oils (5W30, 10W30, etc.) in tempera-
tures above 40"F (4"C) will result in
higher than normal oil consumption.
When using a multi-viscosity oil,
check oil level more frequently to
avoid possible engine damage from
running low on oil.
*CAUTION: Synthetic oil must be
used when operating engine under
40"F (4"C) or engine damage will oc-
cur.
**CAUTION: SAE 30 oil, if used be-
low 50°F (10°C), will result in hard
starting and possible engine damage
due to inadequate lubrication.
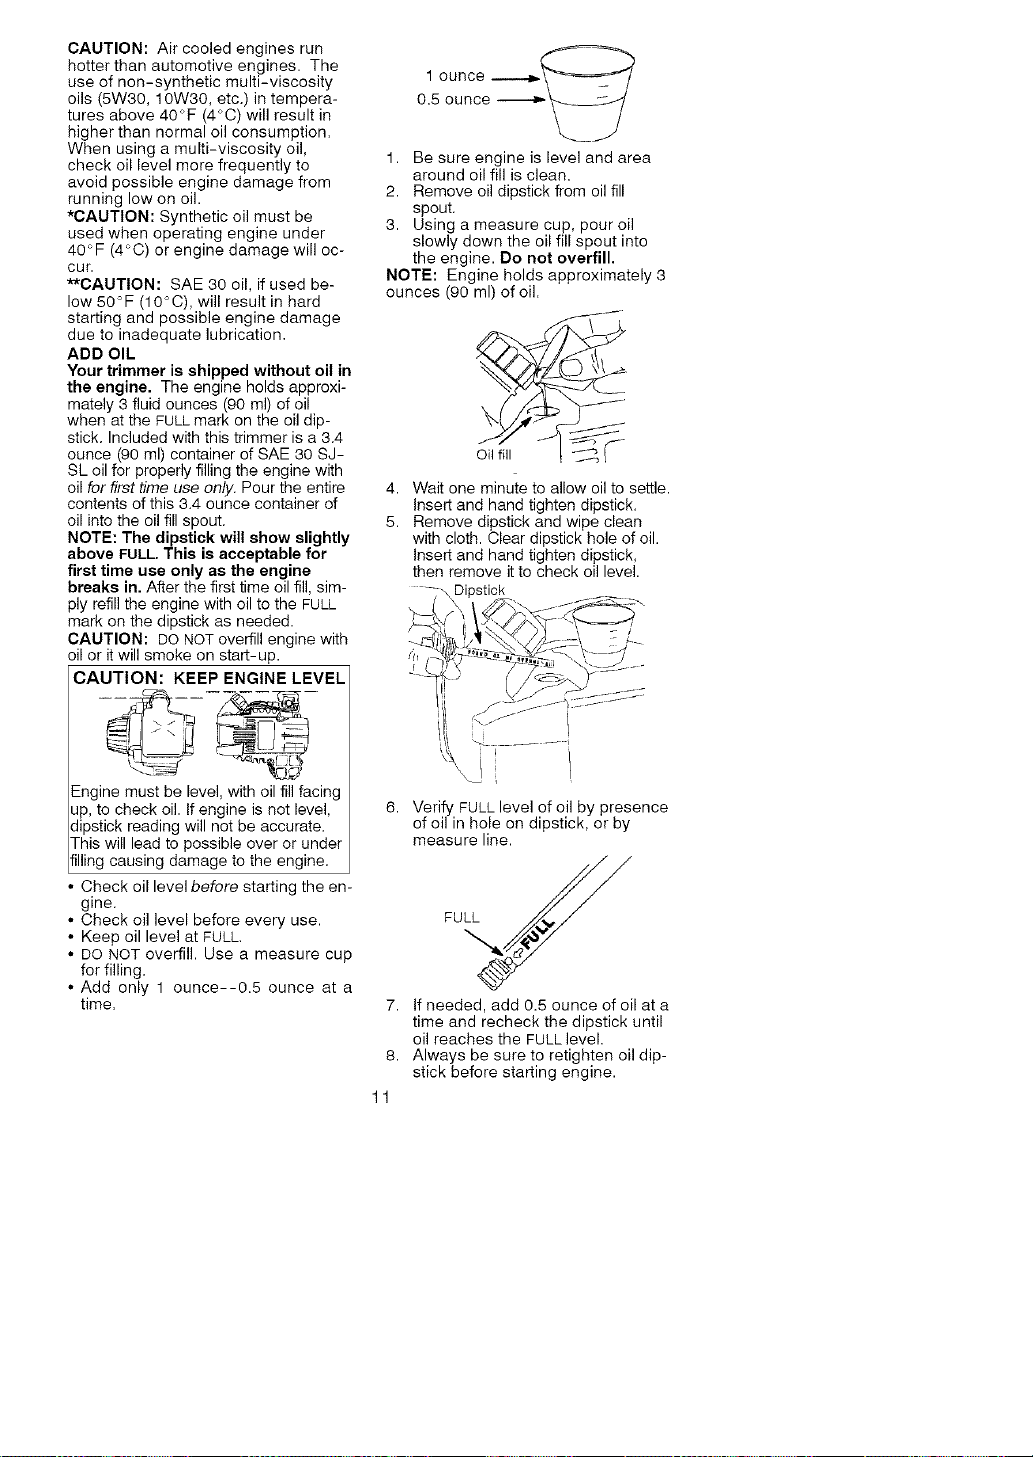
ADD OIL
Your trimmer is shipped without oil in
the engine. The engine holds approxi-
mately 3 fluid ounces (90 ml) of oil
when at the FULL mark on the oil dip-
stick. Included with this trimmer is a 3.4
ounce (90 ml) container of SAE 30 SJ-
SL oil for properly filling the engine with
oil for first time use only. Pour the entire
contents of this 3.4 ounce container of
oil into the oil fill spout.
NOTE: The dipstick will show slightly
above FULL. This is acceptable for
first time use only as the engine
breaks in. After the first time oil fill, sim-
ply refill the engine with oil to the FULL
mark on the dipstick as needed.
CAUTION: DO NOT overfill engine with
oil or it will smoke on start-up.
CAUTION: KEEP ENGINE LEVEL
---- r ------ ....
Engine must be level, with oil fill facing
up, to check oil. If engine is not level,
dipstick reading will not be accurate.
This will lead to possible over or under
filling causing damage to the engine.
Check oil level before starting the en-
gine.
• Check oil level before every use.
• Keep oil level at FULL.
• DO NOT overfill. Use a measure cup
for filling.
• Add only 1 ounce--0.5 ounce at a
time.
1 ounce ---.,__
0.5 ounce __
1. Be sure engine is level and area
around oil fill is clean.
2. Remove oil dipstick from oil fill
spout.
3. Using a measure cup, pour oil
slowly down the oil fill spout into
the engine. Do not overfill.
NOTE: Engine holds approximately 3
ounces (90 ml) of oil.
Oilfill
4.
5.
Wait one minute to allow oil to settle.
Insert and hand tighten dipstick.
Remove dipstick and wipe clean
with cloth. Clear dipstick hole of oil.
Insert and hand tighten dipstick,
then remove it to check oil level.
\Dipstick.. f_-
%
6. Verify FULL level of oil by presence
of oil in hole on dipstick, or by
measure line.
FULL _._._
7. If needed, add 0.5 ounce of oil at a
time and recheck the dipstick until
oil reaches the FULL level.
8. Always be sure to retighten oil dip-
stick before starting engine.
11
Check oil level before each use. Add
oil if needed. Fill to FULL line on dip-
stick. Change oil after first 4 hours of
use, then every 8 hours of operation
or each season (see CHANGE ENGINE
OIL in the MAINTENANCE section).
Change oil every 4 hours when oper-
ating the engine under heavy load or
in high temperatures. You may need
to change the oil more often under
dusty, dirty conditions.
ADD GASOLINE
Use fresh, clean, regular unleaded gas-
oline with a minimum of 87 octane. Do
not mix oil with gasoline. Purchase
fuel in quantities that can be used within
30 days to assure fuel freshness.
IMPORTANT
Alcohol blended fuels (called gaeohol
or using ethanol or methanol) can at-
tract moisture which leads to separa-
tion and formation of acids during stor-
age. Acidic gas can damage the fuel
system of an engine while in storage.
To avoid engine problems, empty the
fuel system before storage for 30 days
or longer. Drain the gas tank, start the
engine and let it run until the fuel lines
and carburetor are empty. Use fresh
fuel next season.
Never use engine or carburetor cleaner
products in the fuel tank or permanent
damage may occur.
See the STORAGE section for additional
information.
_WARNING: Fill to bottom of gas
tank filler neck. DO NOT overfill. Wipe
off any spilled fuel. Do not store, spill
or use gasoline near an open flame.
,AI_WARNING: Allow engine to cool
for 2 minutes before removing fuel cap
for refueling. Remove fuel cap slowly.
1. Tilt engine in angle shown to prop-
erly fill fuel tank.
_'F'FFuelfill
2. Remove fuel cap by turning coun-
terclockwise. Fill tank to bottom of
tank filler neck.
3. Replace fuel cap before starting.
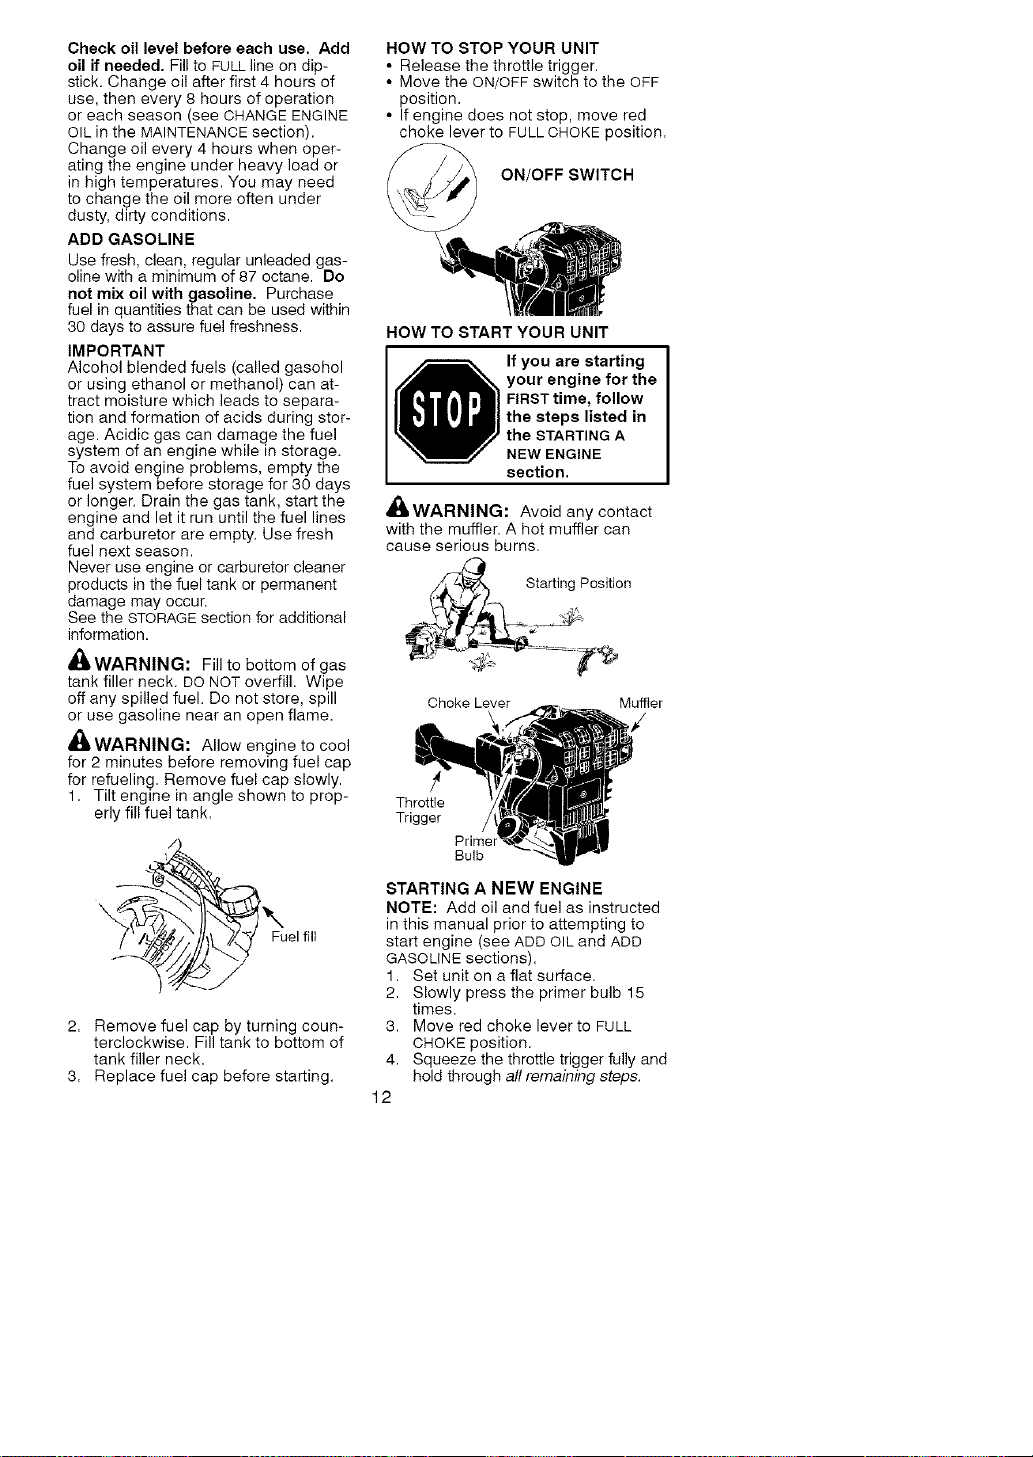
HOW TO STOP YOUR UNIT
• Release the throttle trigger.
• Move the ON/OFF switch to the OFF
position.
• If engine does not stop, move red
choke lever to FULL CHOKE position.
ON/OFF SWITCH
HOW TO START YOUR UNIT
O f you are starting
your engine for the
FIRST time, follow
the steps listed in
the STARTING A
NEW ENGINE
section.
A _______
all, WARNING: Avoid any contact
with the muffler. A hot muffler can
cause serious burns.
Starting Position
Choke Lever Muffler
Throttle
Trigger
Prime
Bulb
STARTING A NEW ENGINE
NOTE: Add oil and fuel as instructed
in this manual prior to attempting to
start engine (see ADD OIL and ADD
GASOLINE sections),
1. Set unit on a flat surface.
2. Slowly press the primer bulb 15
times,
3. Move red choke lever to FULL
CHOKE position.
4. Squeeze the throttle trigger fully and
hold through all remaining steps.
12
5. Pullstarterropehandlesharplyuntil
engineruns.
6. Oncetheenginestarts,allowitto
runamaximumof10secondsat
FULLCHOKE.Then,slowlymove
theredchokelevertotheHALF
CHOKEposition.
7. Allowtheunittorunaminimumof
20moresecondsatHALFCHOKE
(coldertemperaturesmayrequire
longerwarm-upperiodsbefore
theenginewillacceptaloadand
accelerateproperly).
8. MoveredchokelevertoOFF
CHOKEpositionandallowtheunitto
runaminimumof20moreseconds
atOFFCHOKE.Releasethethrottle
trigger.
STARTING ENGINE
NOTE: Check oil level before starting.
Oil level should be at the FULL mark
on the dipstick. If not, add oil (see
ADD OIL section).
1. Set unit on a flat surface.
2. Slowly press the primer bulb 8
times.
3. Move red choke lever to FULL
CHOKE position.
4. Squeeze the throttle trigger fully and
hold through all remaining steps.
5. Pull starter rope handle sharply until
engine runs.
6. Once the engine starts, allow it to
run a maximum of 10 seconds at
FULL CHOKE. Then, slowly move
the red choke lever to the HALF
CHOKE position.
7. Allow the unit to run a minimum of
20 more seconds at HALF CHOKE
(colder temperatures may require
longer warm-up periods before
the engine will accept a load and
accelerate properly).
8. Move red choke lever to OFF
CHOKE position and allow the unit to
run a minimum of 20 more seconds
at OFF CHOKE. Release the throttle
trigger.
RESTARTING A WARM ENGINE
Follow steps listed in the STARTING
ENGINE section without squeezing
throttle trigger.
If the unit will not start, refer to the
TROUBLESHOOTING TABLE or call
1-800-235-5878.
CRAFTSMAN ®
CONVERTIBLE TM FEATURE
This model is equipped with a coupler
which enables optional attachments to
be installed. The optional attach-
ments are:
Edger ............... 358.79240
Cultivator ............ 358.79241
Blower .............. 358.79242
Brushcutter .......... 358.79244
Pruner .............. 358=79245
_&WARNING: Always stop unit
and disconnect spark plug before re-
moving or installing attachments.
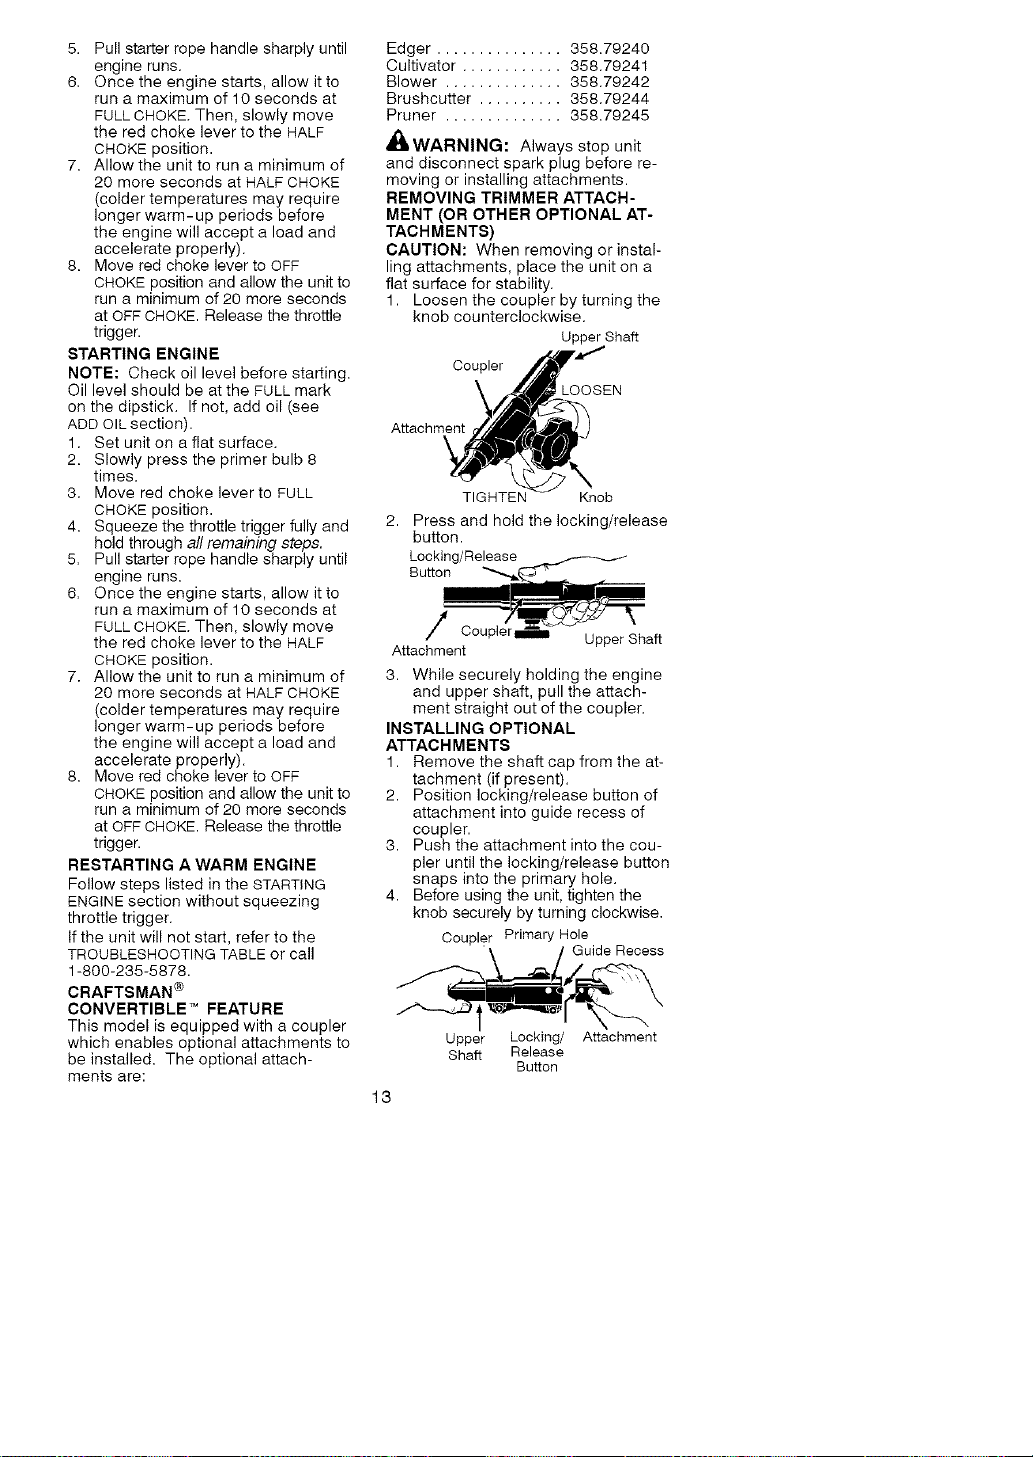
REMOVING TRIMMER ATTACH-
MENT (OR OTHER OPTIONAL AT-
TACHMENTS)
CAUTION: When removing or instal-
ling attachments, place the unit on a
flat surface for stability.
1. Loosen the coupler by turning the
knob counterclockwise.
Upper Shaft
Coupler
Attachment
TIGHTEN Knob
2. Press and hold the locking/release
button.
Locking/Release
Button
/ cup er_== Upper Shaft
Attachment
3. While securely holding the engine
and upper shaft, pull the attach-
ment straight out of the coupler=
INSTALLING OPTIONAL
ATTACHMENTS
1. Remove the shaft cap from the at-
tachment (if present).
2. Position locking/release button of
attachment into guide recess of
coupler.
3. Push the attachment into the cou-
pler until the locking/release button
snaps into the primary hole.
4. Before using the unit, tighten the
knob securely by turning clockwise=
Coupler Primary Hole
Guide Recess
13
Upper Locking/
Shaft Release
Button
Attachment
_WARNING:Makesurethelock-
ing/releasebuttonislockedinthepri-
maryholeandtheknobissecurely
tightenedbeforeoperatingtheunit.All
attachmentsaredesignedtobeusedin
theprimaryholeunlessotherwise
statedintheapplicableattachmentop-
erator'smanual.Usingthewronghole
couldleadtoseriousinjuryordamage
totheunit.
Secondary Hole
Locking/Release
Button in Primary Hole
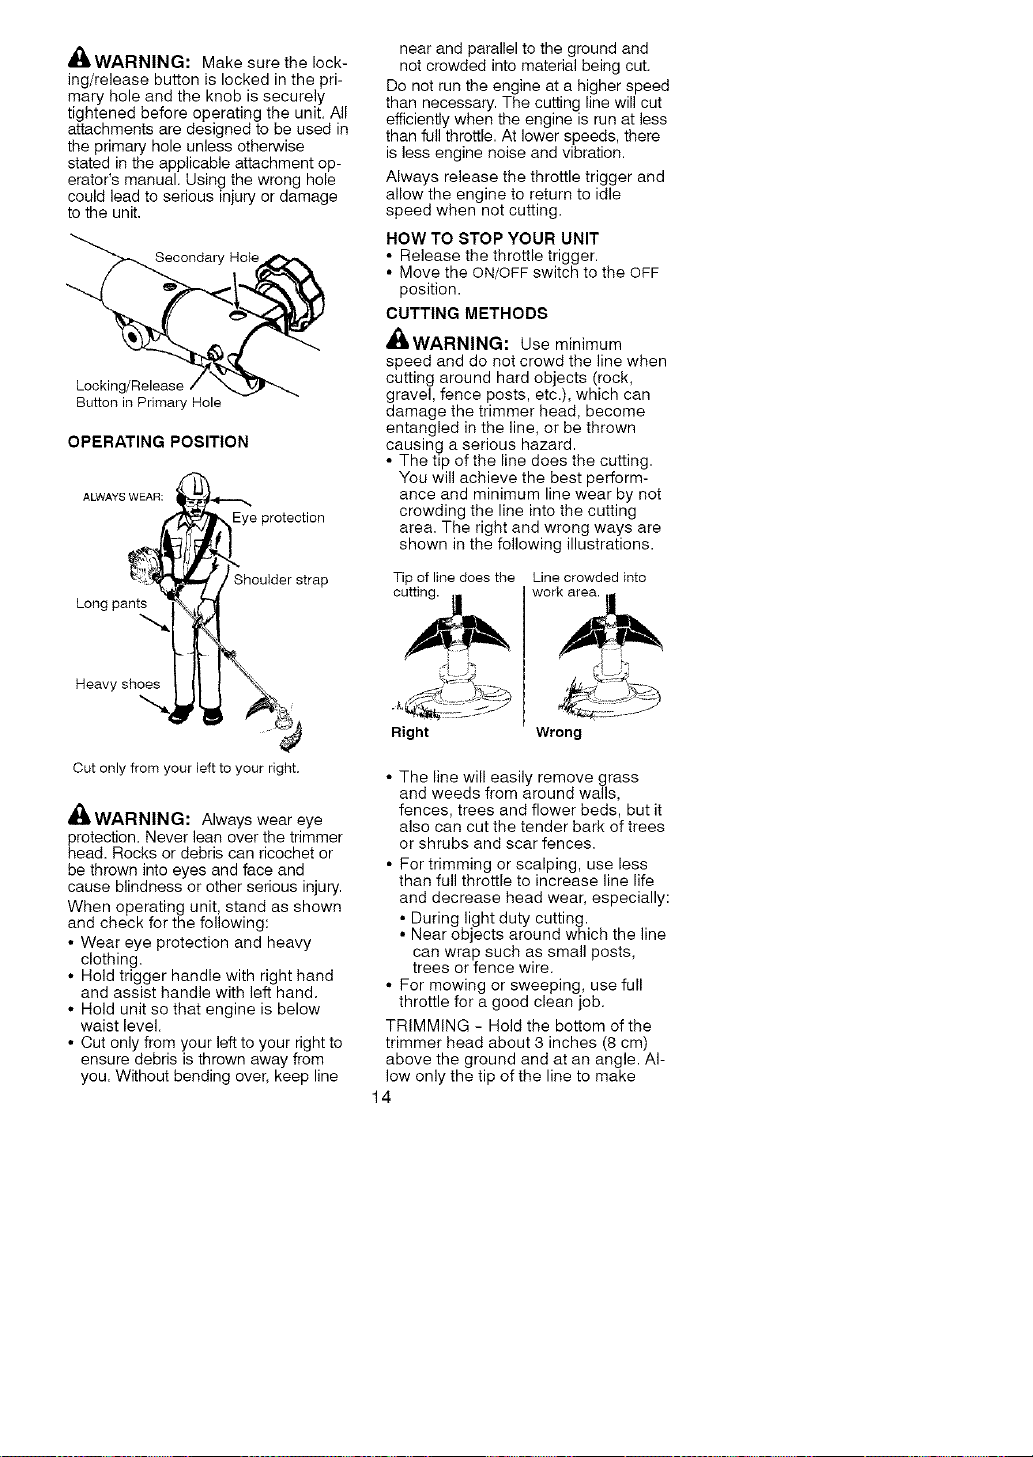
OPERATING POSITION
l
ALWAYS WEAR: _ |*'t---'-_
_ heye protlection
r strap
./
Long pa
Cut only from your left to your right.
,_LWARNING: Always wear eye
protection. Never lean over the trimmer
head. Rocks or debris can ricochet or
be thrown into eyes and face and
cause blindness or other serious injury.
When operating unit, stand as shown
and check for the following:
• Wear eye protection and heavy
clothing.
• Hold trigger handle with right hand
and assist handle with left hand.
• Hold unit so that engine is below
waist level.
• Cut only from your left to your right to
ensure debris is thrown away from
you. Without bending over, keep line
near and parallel to the ground and
not crowded into material being cut.
Do not run the engine at a higher speed
than necessary. The cutting line will cut
efficiently when the engine is run at less
than full throttle. At lower speeds, there
is less engine noise and vibration.
Always release the throttle trigger and
allow the engine to return to idle
speed when not cutting.
HOW TO STOP YOUR UNIT
• Release tile throttle trigger.
• Move the ON/OFF switch to the OFF
position.
CUTTING METHODS
'_&WARNING: Use minimum
speed and do not crowd the line when
cutting around hard objects (rock,
gravel, fence posts, etc.), which can
damage the trimmer head, become
entangled in the line, or be thrown
causing a serious hazard.
• The tip of the line does the cutting.
You will achieve the best perform-
ance and minimum line wear by not
crowding the line into the cutting
area. The right and wrong ways are
shown in the following illustrations.
Tip of line does the Line crowded into
work area.
Right Wrong
• The line will easily remove grass
and weeds from around walls,
fences, trees and flower beds, but it
also can cut the tender bark of trees
or shrubs and scar fences.
• For trimming or scalping, use less
than full throttle to increase line life
and decrease head wear, especially:
• During light duty cutting.
• Near objects around which the line
can wrap such as small posts,
trees or fence wire.
• For mowing or sweeping, use full
throttle for a good clean job.
TRIMMING - Hold the bottom of the
trimmer head about 3 inches (8 cm)
above the ground and at an angle. Al-
low only the tip of the line to make
14
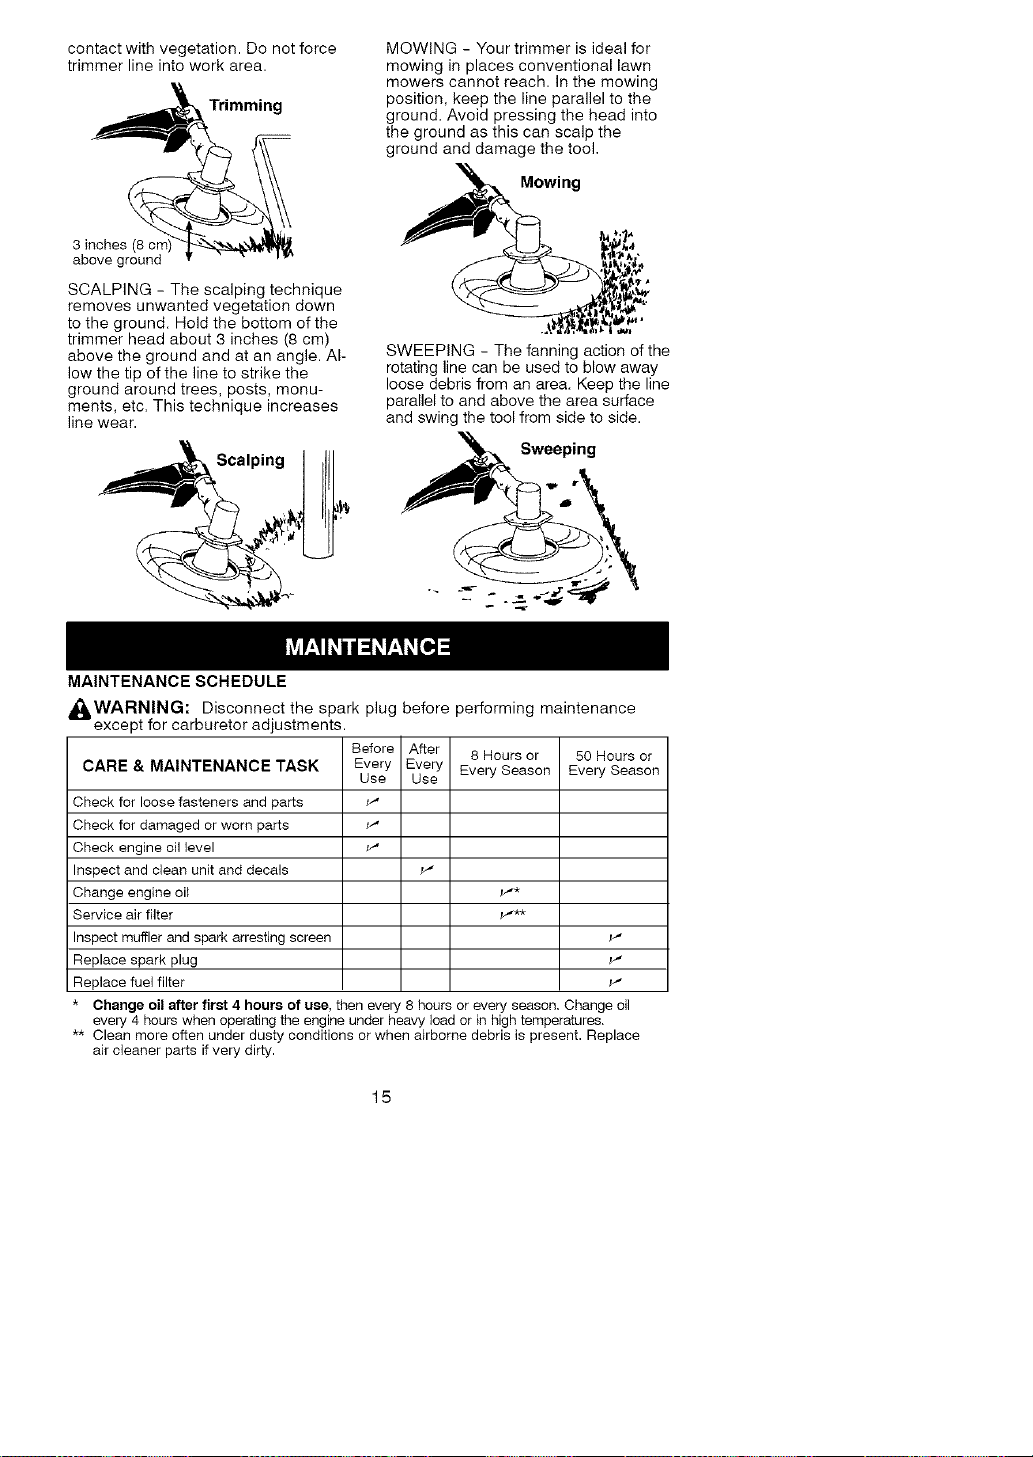
contactwithvegetation.Donotforce
trimmerlineintoworkarea.
Trimming
3 inches (8 cm
above ground
SCALPING - The scalping technique
removes unwanted vegetation down
to the ground. Hold the bottom of the
trimmer head about 3 inches (8 cm)
above the ground and at an angle. Al-
low the tip of the line to strike the
ground around trees, posts, monu-
ments, etc. This technique increases
line wear.
Scalping
MOWING - Your trimmer is ideal for
mowing in places conventional lawn
mowers cannot reach. In the mowing
position, keep the line parallel to the
ground. Avoid pressing the head into
the ground as this can scalp the
ground and damage the tool.
Mowing
SWEEPING - The fanning action of the
rotating line can be used to blow away
loose debris from an area. Keep the line
parallel to and above the area surface
and swing the tool from side to side.
j_ Sweeping
MAINTENANCE SCHEDULE
,_WARNING: Disconnect the spark plug before performing maintenance
except for carburetor adjustments.
CARE & MAINTENANCE TASK
Check for loose fasteners and parts
Check for damaged or worn parts
Check engine oil level
Inspect and clean unit and decals
Change engine oil
Service air filter
Inspect muffler and spark arresting screen
Replace spark plug
Replace fuel filter
Before After
Every Every
Use Use
8 Hours or
Every Season
50 Hours or
Every Season
Change oil after first 4 hours of use, then every 8 hours or every season, Change oil
every 4 hours when operating the engine under heavy load or in high temperatures,
** Clean more often under dusty conditions or when airborne debris is present. Replace
air cleaner parts ifvery dirty.
15
GENERAL RECOMMEN DATIONS
The warranty on this unit does not
cover items that have been subjected
to operator abuse or negligence. To
receive full value from the warranty,
the operator must maintain unit as
instructed in this manual. Various ad-
justments will need to be made peri-
odically to properly maintain your unit.
Some adjustments will need to be
made periodically to properly maintain
your unit. All adjustments in the SER-
VICE AND ADJUSTMENTS section of
this manual should be checked at
least once each season,
• Once each year, replace the spark
plug and air filter. A new spark plug
and clean/new air filter assure proper
air-fuel mixture and help your engine
run better and last longer.
• Follow the maintenance schedule in
this manual.
CHECK FOR LOOSE
FASTENERS AND PARTS
• Spark Plug Boot
• Air Filter
• Housing Screws
• Assist Handle Screw
• Debris Shield
CHECK FOR DAMAGED OR
WORN PARTS
For replacement of damaged or worn
parts, contact Sears Service or call
1-800-235-5878.
• ON/OFF Switch - Ensure ON/OFF
switch functions properly by moving
the switch to the OFF position. Make
sure engine stops. Restart engine
and continue.
• Fuel System - Discontinue use of
unit if fuel lines, tank, or cap show
signs of damage or leaks.
• Debris Shield - Discontinue use of
unit if debris shield is damaged.
CHECK ENGINE OIL LEVEL
• See ADD OIL in the OPERATION sec-
tion.
INSPECT AND CLEAN UNIT AND DE-
CALS
• After each use, inspect complete
unit for loose or damaged parts.
Clean the unit and decals using a
damp cloth with a mild detergent.
• Wipe off unit with a clean dry cloth.
CHANGE ENGINE OIL
To prolong the useful life of your trim-
mer, change engine oil as recom-
mended in this section.
• Change oil after first 4 hours of
use, then every 8 hours or every
season. Change oil every 4 hours
when operating the engine under
heavy load or in high temperatures.
Change the oil after every 8 hours of
operation or at least once a year if the
unit is not used for 25 hours in one
year. Check the crankcase oil level be-
fore each start. Tighten oil dipstick se-
curely each time you check the oil level.
CHANGING OIL AND CHECKING
LEVEL
CAUTION: Used oil is a hazardous
waste product. Dispose of used oil
properly. Do not discard with house-
hold waste. Contact Sears Service for
information regarding safe disposal/re-
cycling facilities.
Change oil while engine is OFF, but
still warm. Ensure fuel cap is tightened
securely.
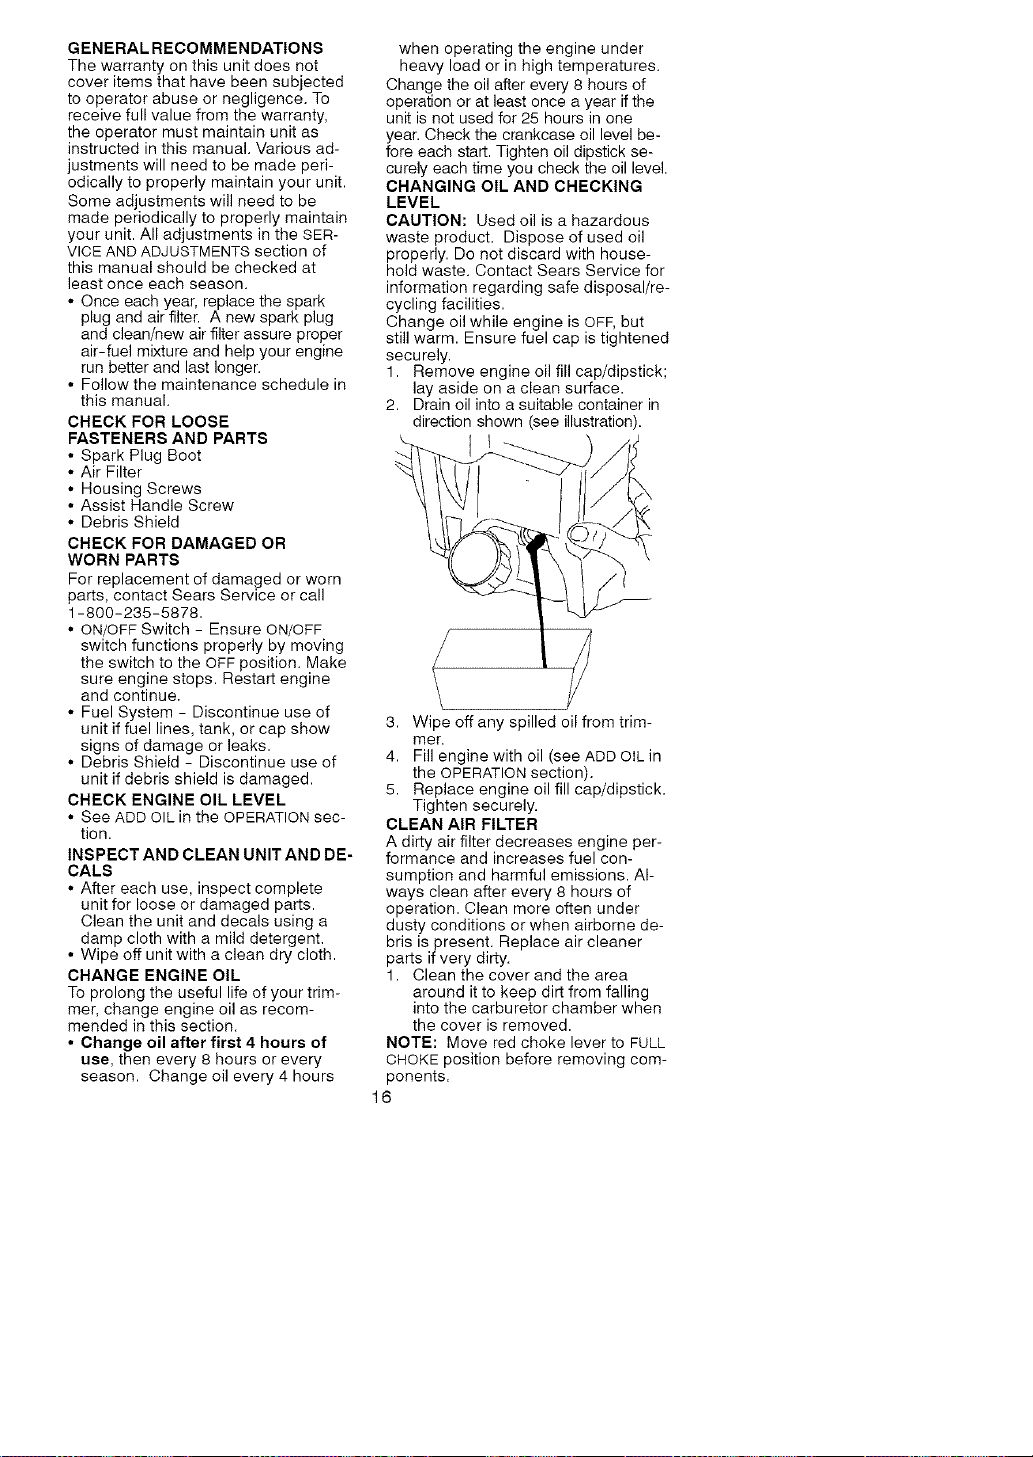
1. Remove engine oil fill cap/dipstick;
lay aside on a clean surface.
2. Drain oil into a suitable container in
direction shown (see illustration).
L_
3. Wipe off any spilled oil from trim-
mer.
4. Fill engine with oil (see ADD OIL in
the OPERATION section).
5. Replace engine oil fill cap/dipstick.
Tighten securely.
CLEAN AIR FILTER
A dirty air filter decreases engine per-
formance and increases fuel con-
sumption and harmful emissions. Al-
ways clean after every 8 hours of
operation. Clean more often under
dusty conditions or when airborne de-
bris is present. Replace air cleaner
parts if very dirty.
1. Clean the cover and the area
around it to keep dirt from falling
into the carburetor chamber when
the cover is removed.
NOTE: Move red choke lever to FULL
CHOKE position before removing com-
ponents.
16
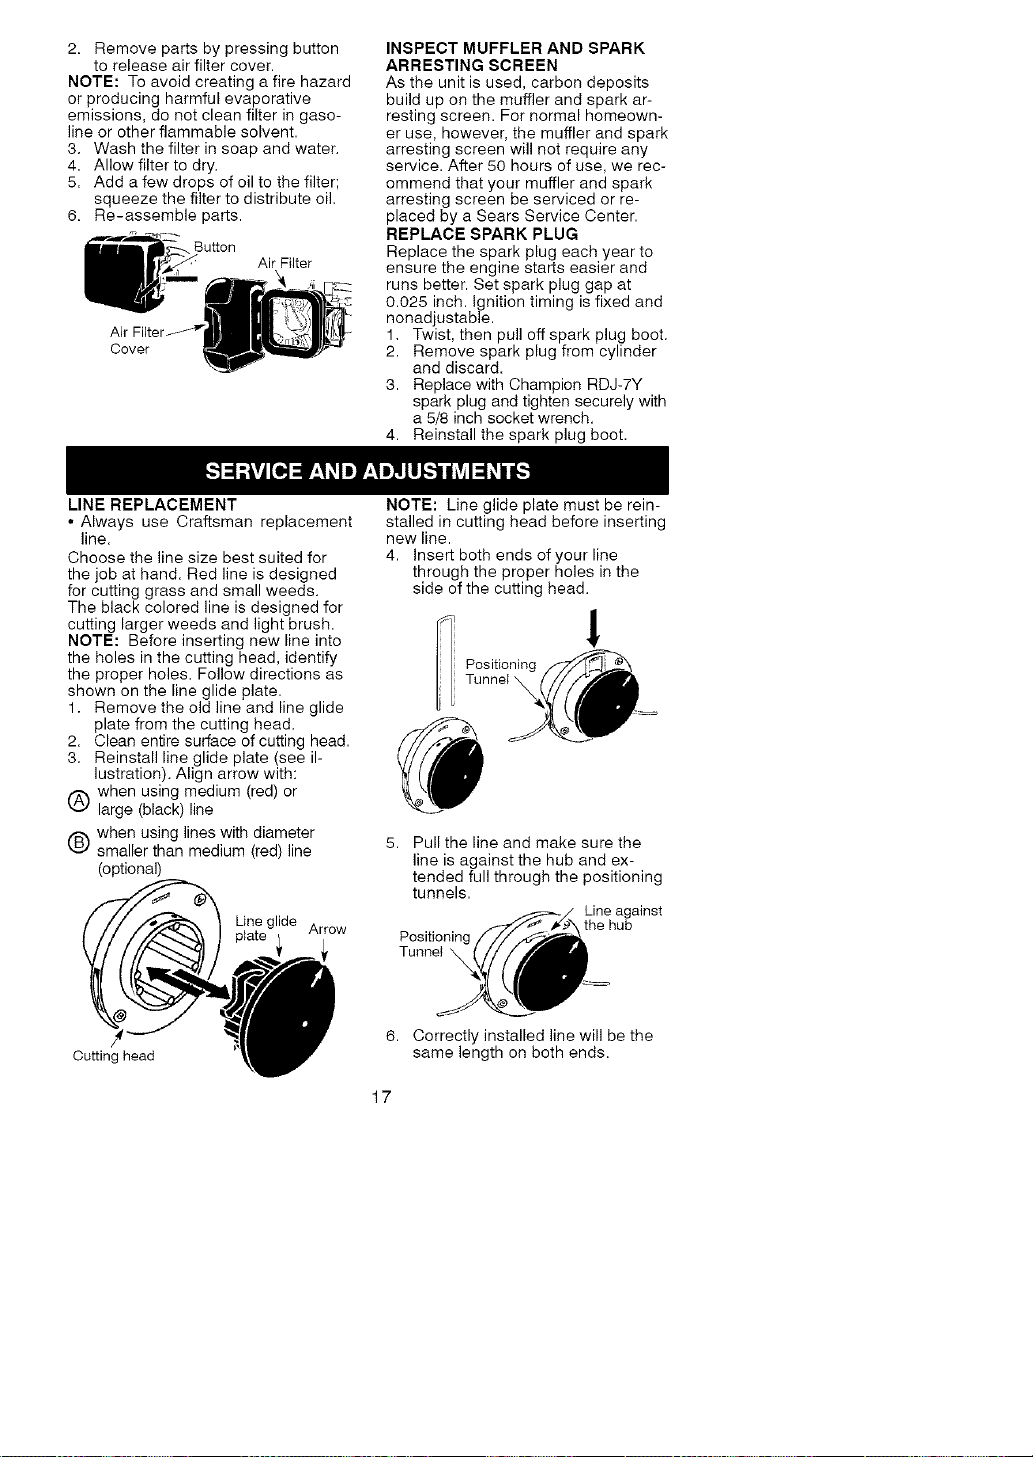
2. Removepartsbypressingbutton
toreleaseairfiltercover.
NOTE:Toavoidcreatingafirehazard
orproducingharmfulevaporative
emissions,donotcleanfilteringaso-
lineorotherflammablesolvent.
3. Washthefilterinsoapandwater.
4. Allowfiltertodry.
5. Addafewdropsofoiltothefilter;
squeezethefiltertodistributeoil.
6. Re-assembleparts.
Button
Air Filter
Cover
INSPECT MUFFLER AND SPARK
ARRESTING SCREEN
As the unit is used, carbon deposits
build up on the muffler and spark ar-
resting screen. For normal homeown-
er use, however, the muffler and spark
arresting screen will not require any
service. After 50 hours of use, we rec-
ommend that your muffler and spark
arresting screen be serviced or re-
placed by a Sears Service Center.
REPLACE SPARK PLUG
Replace the spark plug each year to
ensure the engine starts easier and
runs better. Set spark plug gap at
0.025 inch. Ignition timing is fixed and
nonadjustable.
1. Twist, then pull off spark plug boot.
2. Remove spark plug from cylinder
and discard.
3. Replace with Champion RDJ-7Y
spark plug and tighten securely with
a 5/8 inch socket wrench.
4. Reinstall the spark plug boot.
LINE REPLACEMENT
• Always use Craftsman replacement
line.
Choose the line size best suited for
the job at hand. Red line is designed
for cutting grass and small weeds.
The black colored line is designed for
cutting larger weeds and light brush.
NOTE: Before inserting new line into
the holes in the cutting head, identify
the proper holes. Follow directions as
shown on the line glide plate.
1. Remove the old line and line glide
plate from the cutting head.
2. Clean entire surface of cutting head.
3. Reinstall line glide plate (see il-
lustration). Align arrow with:
when using medium (red) or
large (black) line
when using lines with diameter
f6_
k,_ smaller than medium (red) line
(optional)
Line glide Arrow
NOTE: Line glide plate must be rein-
stalled in cutting head before inserting
new line.
4. Insert both ends of your line
through the proper holes in the
side of the cutting head.
Positioning
Tunnel
5. Pull the line and make sure the
line is against the hub and ex-
tended full through the positioning
tunnels.
Line against
the hub
Positioning
Tunnel \
Cutting head
6. Correctly installed line will be the
same length on both ends.
17
CARBURETOR ADJUSTMENT
Adjusting the carburetor is a compli-
cated task. Carburetor adjustment is
critical and if done improperly can per-
manently damage the engine as well as
the carburetor. We recommend that you
take your unit to a Sears Service Center
for any necessary adjustments.
mlWARNING: Perform the follow-
ing steps after each use:
• Allow engine to cool before storing
or transporting.
• Store unit and fuel in a well venti-
lated area where fuel vapors cannot
reach sparks or open flames from
water heaters, electric motors or
switches, furnaces, etc.
• Store unit with all guards in place.
Position unit so that any sharp ob-
ject cannot accidentally cause injury.
• Store unit and fuel well out of the
reach of children.
• Store the unit in a horizontal position
with the spark plug facing up.
• DO NOT store or transport the unit
with the spark plug facing down.
SEASONAL STORAGE
Prepare unit for storage at end of sea-
son or if it will not be used for 30 days
or more.
If your unit is to be stored for a period
of time:
• Clean the entire unit before lengthy
storage.
• Store in a clean dry area.
• Lightly oil external metal surfaces.
• We highly recommend that you drain
the fuel tank prior to lengthy storage
(30 days or more). Drain all fuel from
the fuel tank into the proper recep-
tacles for storage.
• Press purge bulb 15 times to re-
move all fuel from carburetor and
fuel line. Drain this fuel into proper
receptacles. If fuel is to be disposed,
please refer to local rules for proper
disposal.
• Remove spark plug.
• Place 5cc of oil into spark plug hole.
Do not overfill.
• Pull the starter rope slowly 8 - 10
times to properly coat the cylinder
bore and piston for storage. Replace
plug and tighten. Any residual oil
may burn off in subsequent starts
which may result in white smoke
from the muffler.
• Store the unit in a horizontal position
with the spark plug up. DO NOT store
or transport the unit with the spark
plug down.
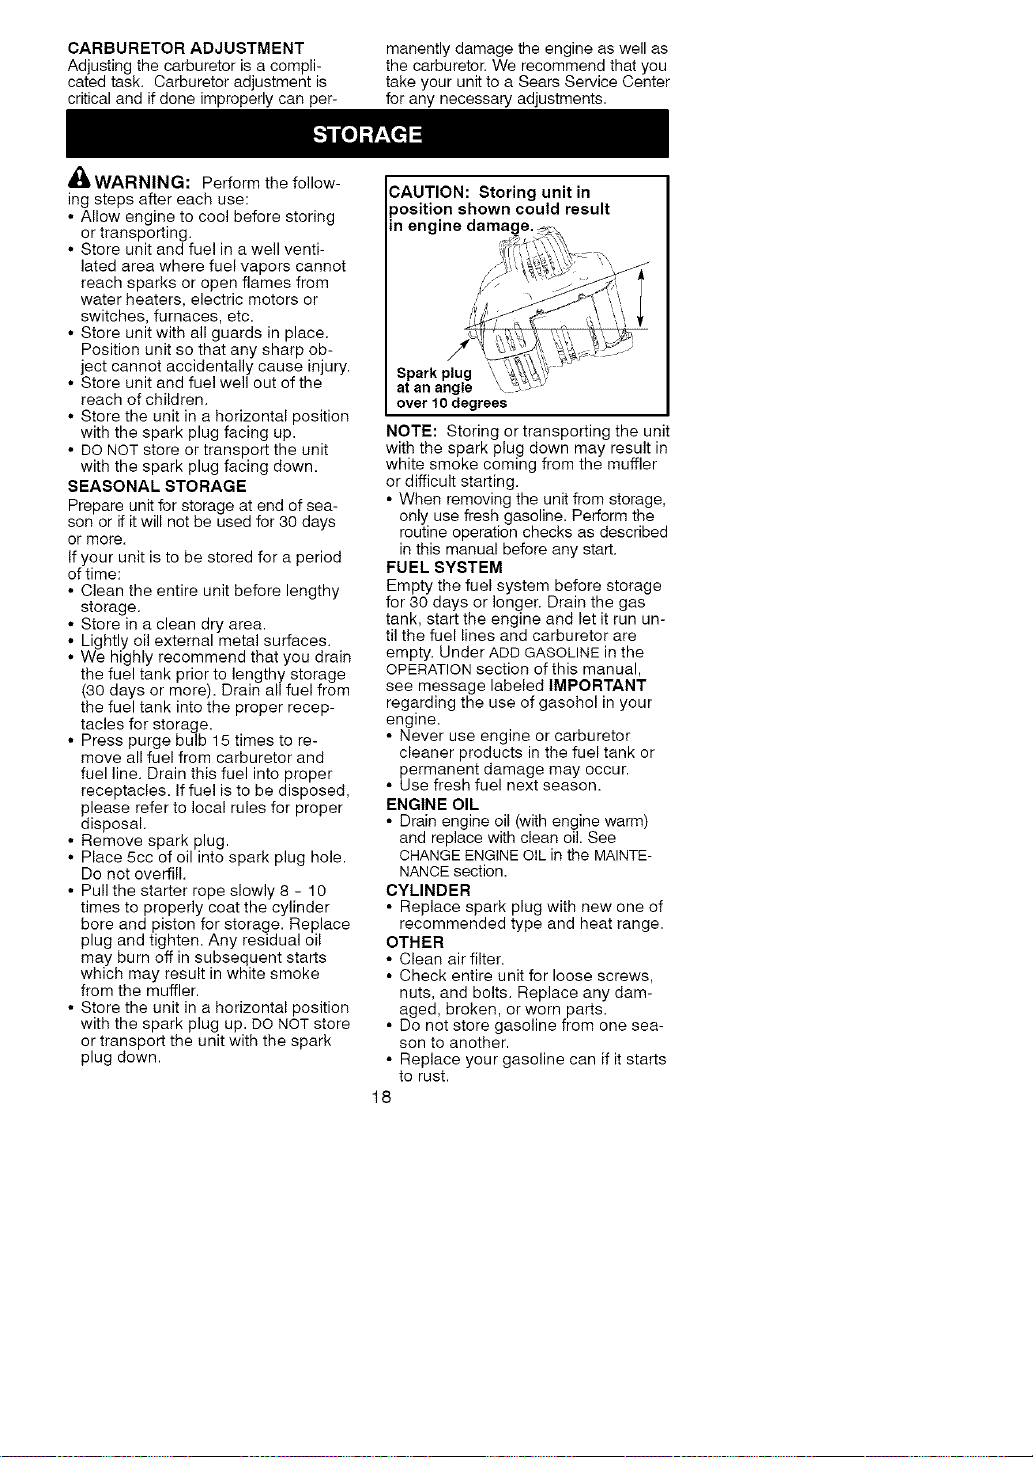
CAUTION: Storing unit in
over 10 degrees
NOTE: Storing or transporting the unit
with the spark plug down may result in
white smoke coming from the muffler
or difficult starting.
• When removing the unit from storage,
only use fresh gasoline. Perform the
routine operation checks as described
in this manual before any start.
FUEL SYSTEM
Empty tile fuel system before storage
for 30 days or longer. Drain the gas
tank, start the engine and let it run un-
til the fuel lines and carburetor are
empty. Under ADD GASOLINE in the
OPERATION section of this manual,
see message labeled IMPORTANT
regarding the use of gasohol in your
engine.
• Never use engine or carburetor
cleaner products in the fuel tank or
permanent damage may occur.
• Use fresh fuel next season.
ENGINE OIL
• Drain engine oil (with engine warm)
and replace with clean oil. See
CHANGE ENGINE OIL in the MAINTE-
NANCE section.
CYLINDER
• Replace spark plug with new one of
recommended type and heat range.
OTHER
• Clean air filter.
• Check entire unit for loose screws,
nuts, and bolts. Replace any dam-
aged, broken, or worn parts.
• Do not store gasoline from one sea-
son to another.
• Replace your gasoline can if it starts
to rust.
18
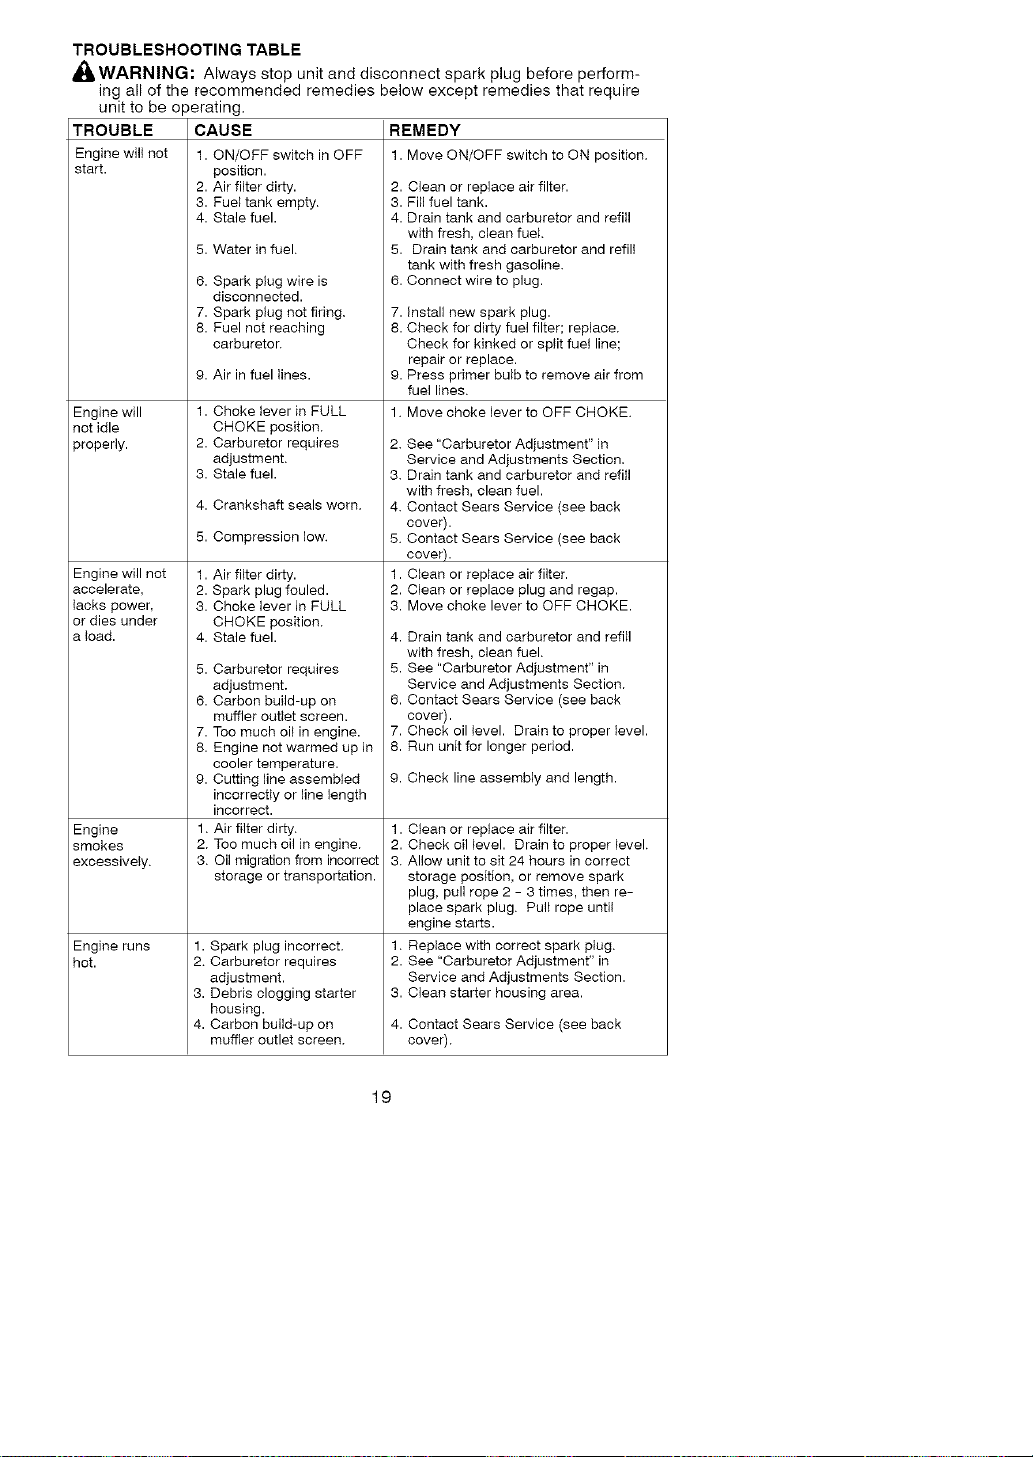
TROUBLESHOOTING TABLE
_,WARNING: Always stop unit and disconnect spark plug before perform-
ing all of the recommended remedies below except remedies that require
TROUBLE
Engine will not
start.
Engine will
not idle
properly.
Engine will not
accelerate,
lacks power.
or dies under
a load.
Engine
smokes
excessively.
Engine runs
hot.
unit to be operating.
CAUSE
1. ON/OFF switch in OFF
position.
2. Air filter dirty.
3. Fuel tank empty.
4. Stale fuel.
5. Water in fuel.
6. Spark plug wire is
disconnected.
7. Spark plug not firing.
8. Fuel not reaching
carburetor.
9. Air in fuel lines.
1. Choke lever in FULL
CHOKE position.
2. Carburetor requires 2.
adjustment.
3. Stale fuel. 3.
4. Crankshaft seals worn. 4.
5. Compression low. 5.
1. Air filter dirty. 1.
2. Spark plug fouled. 2.
3. Choke lever in FULL 3.
CHOKE position.
4. Stale fuel. 4.
5. Carburetor requires 5.
adjustment.
6. Carbon build-up on 6.
muffler outlet screen.
7. Too much oil in engine. 7.
8. Engine not warmed up in 8.
cooler temperature.
9. Cutting line assembled 9.
incorrectly or line length
incorrect.
1. Air filter dirty. 1.
2. Too much oil in engine. 2.
3. Oil migration from incorrect 3.
storage or transportation.
1. Spark plug incorrect. 1.
2. Carburetor requires 2.
adjustment.
3. Debris clogging starter 3.
housing.
4. Carbon build-up on 4.
muffler outlet screen.
REMEDY
1. Move ON/OFF switch to ON position,
2. Clean or replace air filter.
3. Fill fuel tank.
4. Drain tank and carburetor and refill
with fresh, clean fuel.
5. Drain tank and carburetor and refill
tank with fresh gasoline.
6. Connect wire to plug.
7. Install new spark plug.
8. Check for dirty fuel filter; replace.
Check for kinked or split fuel line;
repair or replace.
9. Press primer bulb to remove air from
fuel lines.
1. Move choke lever to OFF CHOKE.
See "Carburetor Adjustment" in
Service and Adjustments Section.
Drain tank and carburetor and refill
with fresh, clean fuel.
Contact Sears Service (see back
cover).
Contact Sears Service (see back
cover).
Clean or replace air filter.
Clean or replace plug and regap.
Move choke lever to OFF CHOKE.
Drain tank and carburetor and refill
with fresh, clean fuel.
See "Carburetor Adjustment" in
Service and Adjustments Section.
Contact Sears Service (see back
cover).
Check oil level. Drain to proper level.
Run unit for longer period.
Check line assembly and length.
Clean or replace air filter.
Check oil level. Drain to proper level.
Allow unit to sit 24 hours in correct
storage position, or remove spark
plug. pull rope 2 - 3 times, then re-
place spark plug. Pull rope until
engine starts.
Replace with correct spark plug.
See "Carburetor Adjustment" in
Service and Adjustments Section.
Clean starter housing area.
Contact Sears Service (see back
cover).
19

YOUR WARRANTY RIGHTS AND OB-
LIGATIONS: EMISSION CONTROL
WARRANTY COVERAGE IS APPLI-
CABLE TO CERTIFIED ENGINES
PURCHASED IN CALIFORNIA IN 1995
AND THEREAFTER WHICH ARE
USED IN CALIFORNIA, AND TO CER-
TIFIED MODEL YEAR 1997 AND LAT-
ER ENGINES WHICH ARE PUR-
CHASED AND USED ELSEWHERE IN
THE UNITED STATES (AND AFTER
JANUARY 1,2001, IN CANADA).
CALIFORNIA AND UNITED STATES
EMISSION CONTROL DEFECTS
WARRANTY STATEMENT: The U.S.
Environmental Protection Agency/Cali-
fornia Air Resources Board and Sears,
Roebuck and Co., U.S.A., are pleased
to explain the emissions control system
warranty on your year 2000 and later
small off-road engine (SORE). In Cali-
fornia, all new small off-road engines
must be designed, built, and equipped
to meet the State's stringent anti-smog
standards. Elsewhere in the United
States, new non-road, spark-ignition
engines certified for model year 1997
and later, must meet similar standards
set forth by the U.S. EPA. Sears must
warrant the emission control system for
the periods of time listed below provided
there has been no abuse, neglect, or
improper maintenance of your small off-
road engine engine. Your emission con-
trol system includes parts such as the
carburetor, air cleaner, ignition system,
muffler and catalytic converter. Also in-
cluded may be connectors and other
emissions-related assemblies. Where a
warrantable condition exists, Sears will
repair your small off-road engine en-
gine at no cost to you. Expenses cov-
ered under warranty include diagnosis,
parts and labor. MANUFACTURER'S
EMISSION CONTROL DEFECTS
WARRANTY COVERAGE: Small off-
road engines are warranted relative to
emission control parts defects for a peri-
od of two years, subject to these provi-
sions. If any covered part on your en-
gine is defective, the part will be
repaired or replaced by Sears. OWN-
ER'S WARRANTY RESPONSIBILI-
TIES: As the small off-road engine en-
gine owner, you are responsible for the
performance of the required mainte-
nance listed in your operating and
maintenance instructions. Sears recom-
mends that you retain all receipts cover-
ing maintenance on your small off-road
engine, but Sears cannot deny warranty
solely for the lack of receipts or for your
failure to ensure the performance of all
scheduled maintenance. As the small
off-road engine engine owner, however,
you should be aware that Sears may
deny you warranty coverage ifyour
small off-road engine or a part has
failed due to abuse, neglect, improper
maintenance or unapproved modifica-
tions. You are responsible for presenting
your small off-road engine to an ap-
proved Sears Service Center as soon
as a problem exists. The undisputed
warranty repairs should be completed in
a reasonable amount of time, not to ex-
ceed 30 days. If you have any ques-
tions regarding your warranty rights and
responsibilities, you should contact your
nearest approved service center or call
Sears Service at 1-800-469-4663. The
emission warranty is a defects warranty.
Defects are judged on normal engine
performance. The warranty is not re-
lated to an in-use emission test.
SEARS EMISSION CONTROL
DEFECTS WARRANTY PROVISIONS
The following are specific provisions
relative to your Emission Control De-
fects Warranty Coverage. It is in addi-
tion to the Sears engine warranty for
non-regulated engines found in the
operating and maintenance instruc-
tions.
1. Warranted Parts
Coverage under this warranty ex-
tends only to the parts listed below
(the emission control systems
parts) to the extent these parts
were present on the engine pur-
chased.
a. Fuel Metering System
• Cold start enrichment system
• Carburetor and internal parts
• Fuel pump
b. Air Induction System
• Air cleaner
• Intake manifold
c. Ignition System
• Spark plug(s)
• Magneto ignition system
d. Catalyst System
• Catalytic converter
• Exhaust manifold
• Air injection system or pulse
valve
20

e. Miscellaneous Items Used in
Above Systems
• Vacuum, temperature, posi-
tion, time sensitive valves
and switches
• Connectors and assemblies
2. Length of Coverage
Sears warrants to tile initial owner
and each subsequent purchaser
that the Warranted Parts shall be
free from defects in materials and
workmanship which caused the
failure of the Warranted Parts for a
period of two years from the date
the engine is delivered to a retail
purchaser.
3. No Charge
Repair or replacement of any War-
ranted Part will be performed at no
charge to the owner, including
diagnostic labor which leads to the
determination that a Warranted
Part is defective, if the diagnostic
work is performed at an approved
Sears Service Center.
4. Claims and Coverage Exclusions
Warranty claims shall be filed in
accordance with the provisions of
the Sears warranty policy. Warran-
ty coverage shall be excluded for
failures of warranted parts which
are not original Sears parts or be-
cause of abuse, neglect or improp-
er maintenance as set forth in the
Sears Engine Warranty Policy.
Sears is not liable to cover failures
of Warranted Parts caused by the
use of add-on, non-original, or
modified parts.
5. Maintenance
Any Warranted Part which is not
scheduled for replacement as re-
quired maintenance or which is
scheduled only for regular inspec-
tion to the effect of "repair or re-
place as necessary" shall be war-
ranted as to defects for the
warranty period. Any Warranted
Part which is scheduled for re-
placement as required mainte-
nance shall be warranted as to de-
fects only for the period of time up
to the first scheduled replacement
for that part. Any replacement part
that is equivalent in performance
and durability may be used in the
performance of any maintenance
or repairs. The owner is responsi-
ble for the performance of all re-
quired maintenance, as defined in
the operating and maintenance in-
structions.
6. Consequential Coverage
Coverage hereunder shall extend to
the failure of any engine compo-
nents caused by the failure of any
Warranted Part still under warranty.
In the U.S.A. and Canada, a 24-hour
hot line, 1-800-469-4663, has a
menu of pre-recorded messages of-
fering you engine maintenance infor-
mation=
21
LOOK FOR RELEVANT EMISSIONS DURABILITY PERIOD AND AIR INDEX
INFORMATION ON YOUR ENGINE EMISSIONS LABEL
Engines that are certified to meet the
California Air Resources Board
(CARB) Tier 2 Emissions Standards
must display information regarding the
Emissions Durability Period and Air
index. Sears makes this information
available to the consumer on our
emission labels and hang tags.
The Emissions Durability Period de-
scribes the number of hours of actual
running time for which the engine is
certified to be emissions compliant,
assuming proper maintenance in ac-
cordance with the operating and main-
tenance instructions. The following
categories are used:
Moderate: Engine is certified to be
emission compliant for 50 hours of ac-
tual engine running time.
Intermediate: Engine is certified to
be emission compliant for 125 hours
of actual engine running time.
Extended: Engine is certified to be
emission compliant for 300 hours of
actual engine running time.
For example, a typical consumer
string trimmer is used 5 to 10 hours
per year. Therefore, the Emissions
Durability Period of an engine with
an moderate rating would equate to 5
to 6 years.
The Air Index is a calculated number
describing the relative level of emis-
sions for specific engine family. The
lower the Air Index, the cleaner the
engine. This information is displayed
in graphical form on the emissions la-
bel or hang tag.
AFTER JULY 1, 2000, LOOK FOR
EMISSIONS COMPLIANCE PERIOD
ON ENGINE EMISSIONS COM-
PLIANCE LABEL
After July 1, 2000, certain Craftsman
engines will be certified to meet the
United States Environmental Protec-
tion Agency (U.S. EPA) Phase 2 Class
IV emissions standards. For Phase 2
Class IV certified engines, the Emis-
sions Compliance Period referred to
on the emissions compliance label in-
dicates the number of operating hours
for which the engine has been shown
to meet federal emission require-
ments. For engines equal to or great-
er than 20 cc, and less than 50 cc dis-
placement, Category C = 50 hours, B
= 125 hours, and A = 300 hours.
The displacement of Model Series
21000 engines is 34 cc, 21100 en-
gines is 40 cc.
This is a generic represen-
tation of the emissions
compliance label typically
found on a certified engine:
This engine is certified to be emissions compliant for the following use:
[] Moderate (50 hours)
[] Intermediate (125 hours)
[] Extended (300 hours)
22
Declaraci6n de Garantia 26 Servicio y Ajustes 43
Identificaci6n de Simbolos 26 Almacenaje 44
Reglas de Seguridad 27 Tabla Diagn6stica 46
Montaje 33 Declaraci6n de Emision 47
Usa 35 Lista de Piezas 23
Mantenimiento 41 Repuesto y Encargos Contratapa
DOS AI_IOS COMPLETO DE GARANT{A PARA CORTADORA DE LiNEA A
GASOLINA WEEDWACKER ® DE CRAFTSMAN ®
Si este producto falla por un defecto en el material o de mano de obra dentro de dos
a_os a partir de la fecha de compra y este se ha utilizado y mantenido de acuerdo al
manual del usuario, envielo a cualquier tienda Sears, Centre de Servicios Sears u otra
tienda Craftsman en los Estados Unidos para su reparaci6n gratuita (o reemplazo si no
es posible repararlo).
Esta garantia excluye la linea de corte, las bujias y el filtro de aire, que son partes
desechables y pueden desgastarse al usarlas normalmente en menos de un a_o.
Esta garantia es aplicable per s61o 30 dias desde la fecha de compra si este produc-
to se usa con fines comerciales o se usa para arriendo.
Esta garantia le otorga derechos legales especificos, y usted tambi6n puede tener
otros derechos que varian de estado a estado.
Sears, Roebuck and Co., Hoffman Estates, IL 60179
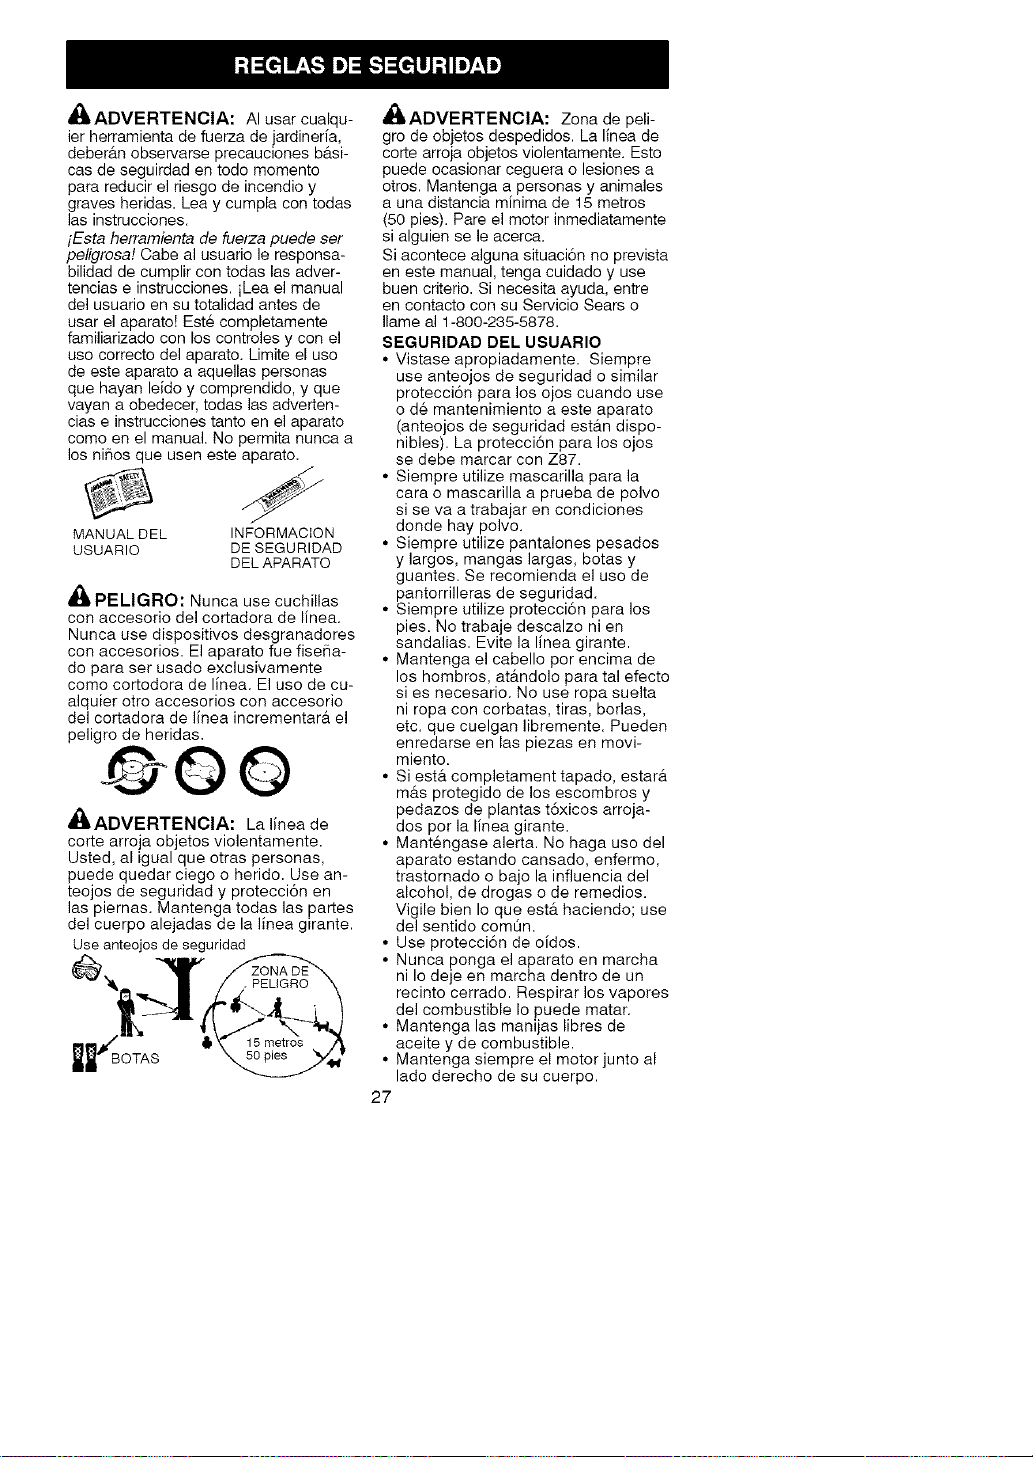
ADVERTENCIA: iEsta D
cortadora de hierbas puede ser
peligrosa! El uso descuidado o
indebido de esta herramienta
puede causar graves o aOn
heridas fatales!
Lea y comprenda el
manual de1 usuario
antes de usar la corta-
dora de hierbas.
Use siempre la proteccion de oidos apropiada, Ia proteccion de
ojos y la protecci6n de la cabeza.
26
,_ADVERTENClA: AI usar cualqu-
ier herramienta de fuerza de jardineria,
deber&n observarse precauciones b_tsi-
cas de seguirdad en redo momento
para reducir el riesgo de incendio y
graves heridas. Lea y cumpla con todas
las instrucciones.
iEsta herramienta de fuerza puede ser
peligrosa! Cabe al usuario le responsa-
bilidad de cumplir con todas las adver-
tencias e instrucciones, iLea el manual
del usuario en su totalidad antes de
usar el aparato! Est6 completamente
familiarizado con los controles y con el
uso correcto del aparato. Limite el uso
de este aparato a aquellas personas
que hayan leido y comprendido, y que
vayan a obedecer, todas las adverten-
cias e instrucciones tanto en el aparato
como en el manual. No permita nunca a
los niSos que usen este aparato.
MANUAL DEL INFORMACION
USUARIO DE SEGURIDAD
DEL APARATO
A
PELIGRO: Nunca use cuchillas
con accesorio del cortadora de linea.
Nunca use dispositivos desgranadores
con accesorios. El aparato fue fiseSa-
do para ser usado exclusivamente
como cortodora de linea. El uso de cu-
alquier otto accesorios con accesorio
del cortadora de linea incrementar_t el
peligro de heridas.
@00
,_ADVERTENClA: La linea de
corte arroja objetos violentamente.
Usted, al igual que otras personas,
puede quedar ciego o herido. Use an-
teojos de seguridad y protecci6n en
las piernas. Mantenga todas las partes
del cuerpo alejadas de la linea girante.
Use anteojos de seguridad
_,ADVERTENClA: Zona de peli-
gro de objetos despedidos. La linea de
corte arroja objetos violentamente. Esto
puede ocasionar ceguera o lesiones a
otros. Mantenga a personas y animales
a una distancia minima de 15 metros
(50 pies). Pare el motor inmediatamente
si alguien se le acerca.
Si acontece alguna situaci6n no prevista
en este manual, tenga cuidado y use
buen criterio. Si necesita ayuda, entre
en contacto con su Servicio Sears o
Ilame al 1-800-235-5878.
SEGURIDAD DEL USUARIO
• Vistase apropiadamente. Siempre
use anteojos de seguridad o similar
protecci6n para los ojos cuando use
o d6 mantenimiento a este aparato
(anteojos de seguridad est_tn dispo-
nibles). La protecci6n para los ojos
se debe marcar con Z87.
• Siempre utilize mascarilla para la
cara o mascarilla a prueba de polvo
si se va a trabajar en condiciones
donde hay polvo.
• Siempre utilize pantalones pesados
y largos, mangas largas, botas y
guantes. Se recomienda el uso de
pantorrilleras de seguridad.
• Siempre utilize protecci6n para los
pies. No trabaje descalzo ni en
sandalias. Evite la linea girante.
• Mantenga el cabello per encima de
los hombros, at_tndolo para tal efecto
si es necesario. No use ropa suelta
ni ropa con corbatas, tiras, borlas,
etc. que cuelgan libremente. Pueden
enredarse en las piezas en movi-
miento.
• Si est& completament tapado, estar&
m_.s protegido de los escombros y
pedazos de plantas t6xicos arroja-
dos pot la linea girante.
• Mant6ngase alert& No haga uso del
aparato estando cansado, enfermo,
trastornado o bajo la infiuencia del
alcohol, de drogas o de remedies.
Vigile bien Io que ester haciendo; use
del sentido com0n.
• Use protecci6n de oidos.
• Nunca ponga el aparato en marcha
ni Io deje en marcha dentro de un
recinto cerrado. Respirar los vapores
del combustible Io puede matar.
• Mantenga las manijas libres de
aceite y de combustible.
• Mantenga siempre el motor junto al
lado derecho de su cuerpo.
27
• Sostengasiempreelaparatocon
ambasmanosmientrasest6enfun-
cionamiento.
• Mantengaelcabezaldecorte(o
otrasaccesoriosopcional)perdeba-
jodelacinturaylejosdetodaslas
partesdesucuerpo.Nolevanteel
motorporencimadesucintura.
• Mantengatodaslaspartesdelcuer-
pcalejadasdelsilenciadorydela
lineagirante(ootrasaccesorioop-
cional).Mantengaelmotorpordeba-
jodelniveldelacintura.Elsilencia-
dorpuedecausargravesquema-
durascuandoest&caliente.
• Mantengaelequilibrio,conlospies
enunasuperficieestable.Noseex-
tiendademasiadoouseelaparato
desdesuperficiesinestablescomo
escalerasmanuales,&rboles,
cuestasempinadas,techos,etc.
• Useelaparato0nicamentedediao
enluzartificialfuerte.
• Useexclusivementeparatrabajos
descritosenestemanual(oelmanu-
alparaaccesoriosopcional).
SEGURIDAD DEL APARATO Y EN
EL MANTENIMIENTO
_ADVERTENCIA: Desconecte la
bujia antes de hacer cualquier man-
tenimiento menos los ajustes al carbu-
rador.
• Inspeccione el aparato y cambie las
piezas daiTadas o flojas antes de
cada uso. Repare toda fuga de com-
bustible antes de usar el aparato.
Mantenga el aparato en buenas con-
diciones de uso.
• Cambie todas las piezas del cabezal
que est6n descantilladas, resquebra-
jadas, quebradas o daSadas de cu-
alquier otro modo, antes de usar el
aparato.
• Haga el mantenimiento del aparato
de acuerdo a los procedimientos re-
comendados. Mantenga la linea de
corte el largo aprodiado.
• Use solamente linea de la marcha
Craffsman_R_. Nunca use alambre,
soga, hilo, etc.
• Instale la protector requerida antes
de usar su aparato. Use la bobina
especificada. Aseg0rese que la bobi-
na est6 correctamente instalada y
este bien fijo.
• AsegOrese que el aparato est6 cor-
rectamente armado come se mues-
tra en el manual.
• Haga los ajustes al carburador con
el cabezal apoyado de modo que la
linea no pueda tocar nada.
• Mantenga alejadas alas dem&s per-
sonas siempre que haga ajustes al
carburador.
• Use exclusivamente los accesorios y
repuestos Craftsman recomendados.
• Todo servicio y mantinimiento no expli-
cado en este manual deber_t ser efec-
tuado por un Centre de Servicio
Sears.
SEGURIDAD CON EL COMBUSTIBLE
• Vierta el combustible al aire libre.
• Mant6ngalo alejado de las chispas y
de las llamas.
• Use recipiente aprobado para el
combustible.
• No fume ni permita que se fume cer-
ca del combustible ni del aparato ni
mientras 6ste est6 en uso.
• Evite derramar el combustible o el
aceite. Limpie todo el combustible der-
ramado.
• AI6jese a por Io menos 3 metros (10
pies) del lugar de abastecimiento
antes de porter en marcha el motor.
Pare el motor y permita que se enfrie
el aparato antes de retirar la tapa del
tanque.
• Antes de guarder el aparato, vacie el
dep6sito de combustible. Arranque
el motor y d6jelo en marcha hasta
que se detenga con el fin de agotar
el combustible que pueda quedar en
el carburador.
• Guarde el aparato y el combustible
en un lugar donde los vapores del
combustible no puedan alcanzar
chispas ni llamas provenientes de
los termotanques, los motores o in-
terruptores el6ctricos, los calefac-
tores centrales, etc.
• Almac6ne siempre combustible en
un recipiente aprobado para los
liquidos inflamables.
TRANSPORTE Y ALMACENAMIENTO
• Antes de proceder a su transporte,
detenga el aparato.
• Espere que el motor se enfrie y fije
bien el aparato antes de quardarlo o
de transportado en un vehiculo.
• Vacie el tanque de combustible antes
de guardar el aparato o de transpor-
tarlo. Consuma todo el combustible
restante en el carburador poniendo el
motor en marcha y dej&ndolo en mar-
cha hasta que le motor se pare solo.
• AImacene o transporte el aparato
con la bujia hacia arriba.
• No almacene ni transporte el aparato
con la bujia hacia abajo (vea la sec-
ci6n ALMAOENAJE para la informa-
ci6n adicional).
28
• Guarde el aparato y el combustible
en un lugar donde los vapores del
combustible no puedan alcanzar
chispas ni llamas provenientes de
los termotanques, los motores o in-
terruptores el6ctricos, los calefac-
tores centrales, etc.
• Guarde el aparato de modo que el
cuchilla limitadora de linea no pueda
causar heridas accidentales. Se
puede colgar el aparato por la caja el
eje de propulsi6n.
• Guarde el aparato fuera del alcance
de los ni_os.
Este aparato no esta equipado con un
sistema de anti-vibraci6n y se dise_a
si es usado ocasionalmente.
AVlSO SPECIAL: El estar expuesto a
las vibraciones a traves del uso pro-
Iongado de herramientas de fuerza a
gasolina puede cuasar da5os a los va-
sos sanguineos o a los nervios de los
dedos, las manos y las coyunturas en
aquellas personas que tienen propen-
sidad a los trastomos de la circulaci6n
o alas hinchazones anormales. El uso
prolongado en tiempo frio ha sido aso-
ciado con daSos a los vasos sna-
guineos de personas que pot otra
parte se encuentran en perfecto esta-
do de salud. Si ocurren sintomas tales
como el entumecimiento, el dolor, la
falta de fuerza, los cambios en el color
o la textura de la piel o falta de sentido
en los dedos, las manos o las coyun-
turas, deje de usar esta m&quina in-
mediatamente y procure atenci6n
m6dica. Los sistemas de anti-vibra-
ci6n no garantizan que se eviten tales
problemes. Los usuarios que hacen
uso continuo y prolongando de las
herramientas de fuerza deben fiscali-
zar atentamente su estado fisico y el
estado del aparato.
AVlSO ESPECIAL: Su aparato viene
equipada con silenciador limitador de
temperatura y con rejilla antichispa que
cumpla los requisitos de los C6digos de
California 4442 y 4443. Todas las tierras
forestadas federales, m&s los estados
de California, idaho, Maine, Minnesota,
Nueva Jersey, Washington y Oreg6n,
requieren pot ley que muchos motores
de combusti6n intema est6n equipados
con rejilla antichispa. Si usted el aparato
en un estado y otra Iocalidad donde ex-
isten tales reglamentos, usted tiene la
responsabilidad juridica de mantener
estas piezas en correcto estado de fun-
cionamiento. De Io contrario, estar& en
infracci6n de la ley. Para el uso normal
del dueSo de la casa, el silenciador y la
rejilla antichispa no requerir&n ningOn
servicio. Despu6s de 50 horas de uso,
recomendamos que al silenciador se le
de servicio o sea substituido por un
Centro de Servicio Sears.
,_ADVERTENCIA: Las emisiones
del motor de este producto contienen
substancias quimicas que el Estado
de California reconoce como cau-
santes de c&ncer, defectos de naci-
miento u otros daSos reproductivos.
SEGURIDAD AL RECORTAR
,_ADVERTENClA: Inspeccione el
firea antes de cada uso. Retire los ob-
jetos (piedras, vidrio roto, clavos,
alambre, etc.) que se puedan enredar
en la linea o que 6sta pueda arrojar.
Los objetos duros pueden daSar el ca-
bezal y 6ste los puede arrojar, causan-
do graves heridas.
• Use _nicamente el accesorio de corta-
dora para recortar, para cortar c6sped
y para barter. No use el accesorio
para cortar bordes, para podar o re-
cortar setos.
• Corte siempre de izquierda a derecha.
Si se corta con la linea del lado dere-
cho del protector, los escombros vo-
lar&n en sentido opuesto al usuario.
REGLAS ADIClONALES DE SE-
GURIDAD PARA ACCESORIOS
OPClONAL
_&ADVERTENCIA: Para cada ac-
cesorio opcional usada, lea a manual
del usuario enteros antes de uso y
siga todas las advertencias e instruc-
clones en manual yen la accesorio.
,_ADVERTENClA: Aseg_rese el
mango est& instalado al usar las acce-
sodos al cortar hordes o al cortadora
de malezas. Instale el mango sobre la
flecha de la etiqueta de seguridad del
eje superior (extremo con el motor del
aparato). Si su accesorios del cortar
hordes o del cortadora de malezas no
incluye un mango, un kit de accesorios
del mango (#530071451) est& dispon-
ible de su Centro de Servicio Sears.
"Zo
SEGURIDAD AL CORTAR BORDES
'_ADVERTENCIA: Inspeccione el
&tea a ser cortada antes de cada uso.
29
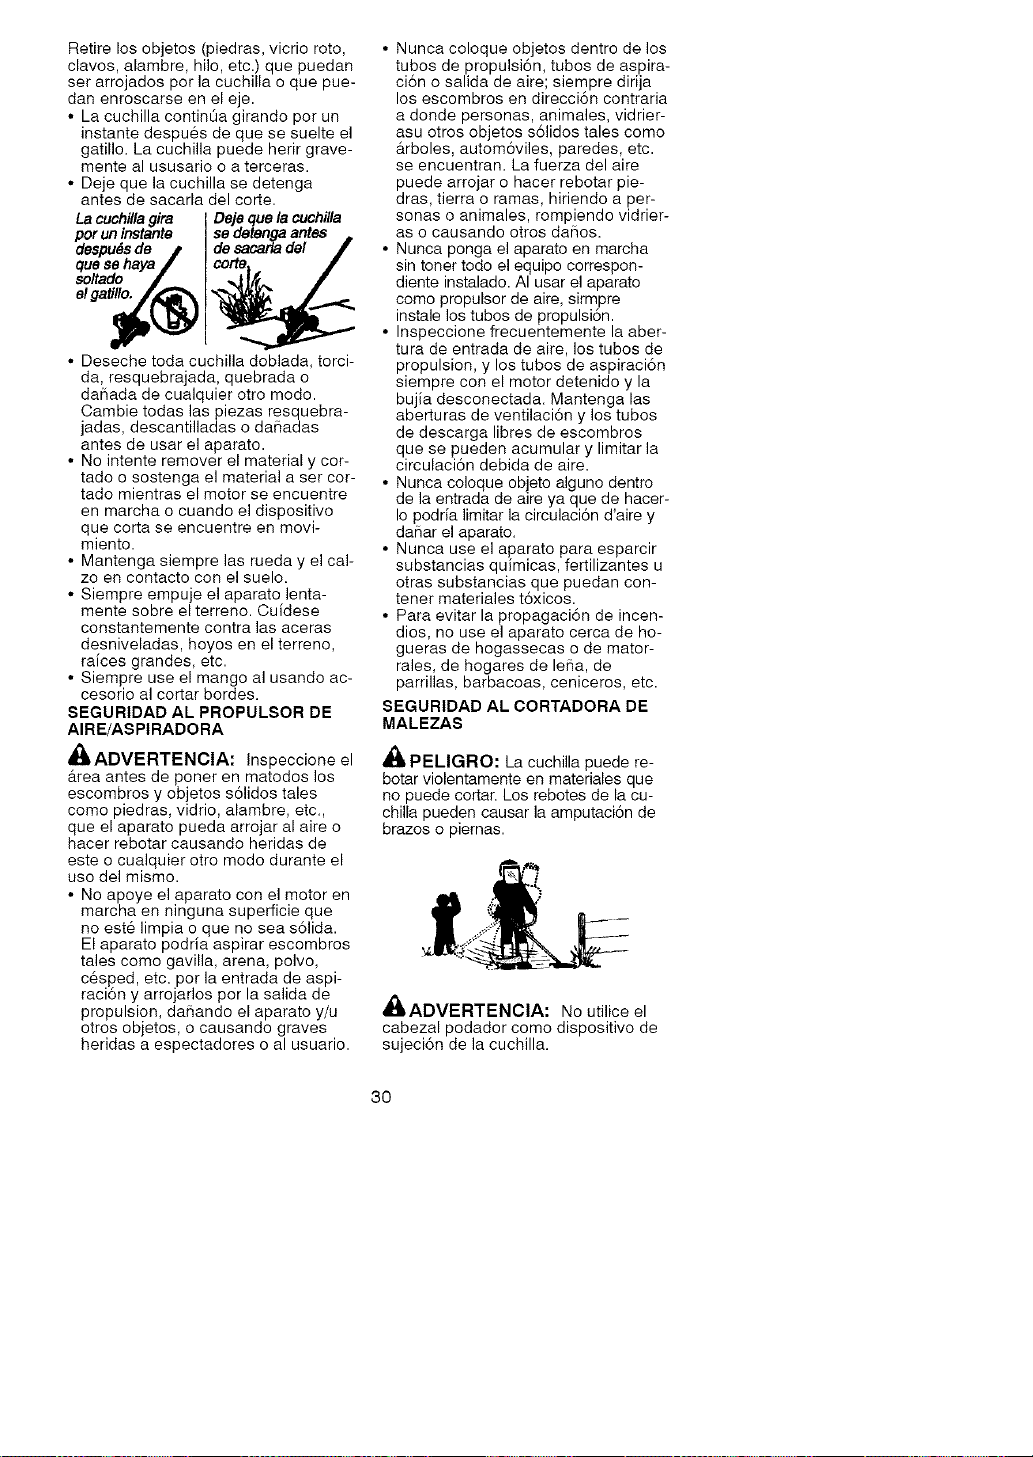
Retire los objetos (piedras, vicrio roto,
clavos, alambre, hilo, etc.) que puedan
set arrojados por la cuchilla o que pue-
dan enroscarse en el eje.
• La cuchilla continOa girando pot un
instante despues de que se suelte el
gatillo. La cuchilla puede herir grave-
mente al ususario o a terceras.
• Deje que la cuchilla se detenga
antes de sacarla del corte.
La cuchilla gila
por uninstante
despu_,
clues
elgatillo.
• Deseche toda cuchilla doblada, torci-
da, resquebrajada, quebrada o
da_ada de cualquier otto mode.
Cambie todas las piezas resquebra-
jadas, descantilladas o da_adas
antes de usar el aparato.
• No intente remover el material y cor-
tado o sostenga el material a ser cor-
tado mientras el motor se encuentre
en marcha o cuando el dispositivo
que corta se enouentre en movi-
miento.
• Mantenga siempre las rueda y el cal-
zo en oontacto con el suelo.
• Siempre empuje el aparato lenta-
mente sobre el terreno. Cuidese
constantemente contra las aceras
desniveladas, hoyos en el terreno,
raices grandes, etc.
• Siempre use el mango al usando ac-
cesorio al cortar bordes.
SEGURIDAD AL PROPULSOR DE
AIRE/ASPIRADORA
_ADVERTENCIA: Inspeccione el
&rea antes de poner en matodos los
escombros y objetos s61idos tales
como piedras, vidrio, alambre, etc.,
que el aparato pueda arrojar al aire o
hacer rebotar causando heridas de
este o cualquier otto modo durante el
uso del mismo.
• No apoye el aparato con el motor en
marcha en ninguna superficie que
no est6 limpia o que no sea s61ida.
El aparato podria aspirar escombros
tales como gavilla, arena, polvo,
c6sped, etc. pot la entrada de aspi-
racien y arrojados por la salida de
propulsion, daSando el aparato y/u
otros objetos, o causando graves
heridas a espectadores o al usuario.
• Nunca coloque objetos dentro de los
tubos de propulsi6n, tubos de aspira-
ci6n o salida de aire; siempre dirija
los escombros en direcci6n contraria
a donde personas, animales, vidrier-
asu otros objetos s61idos tales como
&rboles, autom6viles, paredes, etc.
se encuentran. La fuerza del aire
puede arrojar o hacer rebotar pie-
dras, tierra o ramas, hiriendo a per-
sonas o animales, rompiendo vidrier-
as o oausando otros da_os.
• Nunca ponga el aparato en marcha
sin toner todo el equipo correspon-
diente instalado. AI usar el aparato
como propulsor de aire, sirmpre
instale los tubos de propulsi6n.
• Inspeccione frecuentemente la aber-
tura de entrada de aire, los tubes de
propulsion, y los tubos de aspiraci6n
siempre con el motor detenido y la
bujia desconectada. Mantenga las
aberturas de ventilaci6n y los tubos
de descarga libres de escombros
que se pueden acumular y limitar la
circulaci6n debida de aire.
• Nunca coloque objeto alguno dentro
de la entrada de aire ya que de hacer-
Io podria limitar la circulaci6n d'aire y
da_ar el aparato.
• Nunca use el aparato para esparcir
substancias quimicas, fertilizantes u
otras substancias que puedan con-
tenet materiales t6xicos.
• Para evitar la propagaci6n de incen-
dies, no use el aparato cerca de ho-
gueras de hogassecas o de mator-
rales, de hogares de lena, de
parrillas, barbacoas, ceniceros, etc.
SEGURIDAD AL CORTADORA DE
MALEZAS
,_ PELIGRO: La cuchilla puede re-
botar violentamente en materiales que
no puede cortar. Los rebotes de la cu-
chilla pueden causar la amputaci6n de
brazos o piernas.
_ILADVERTENClA: No utilice el
cabezal podador como dispositivo de
sujeci6n de la cuchilla.
30
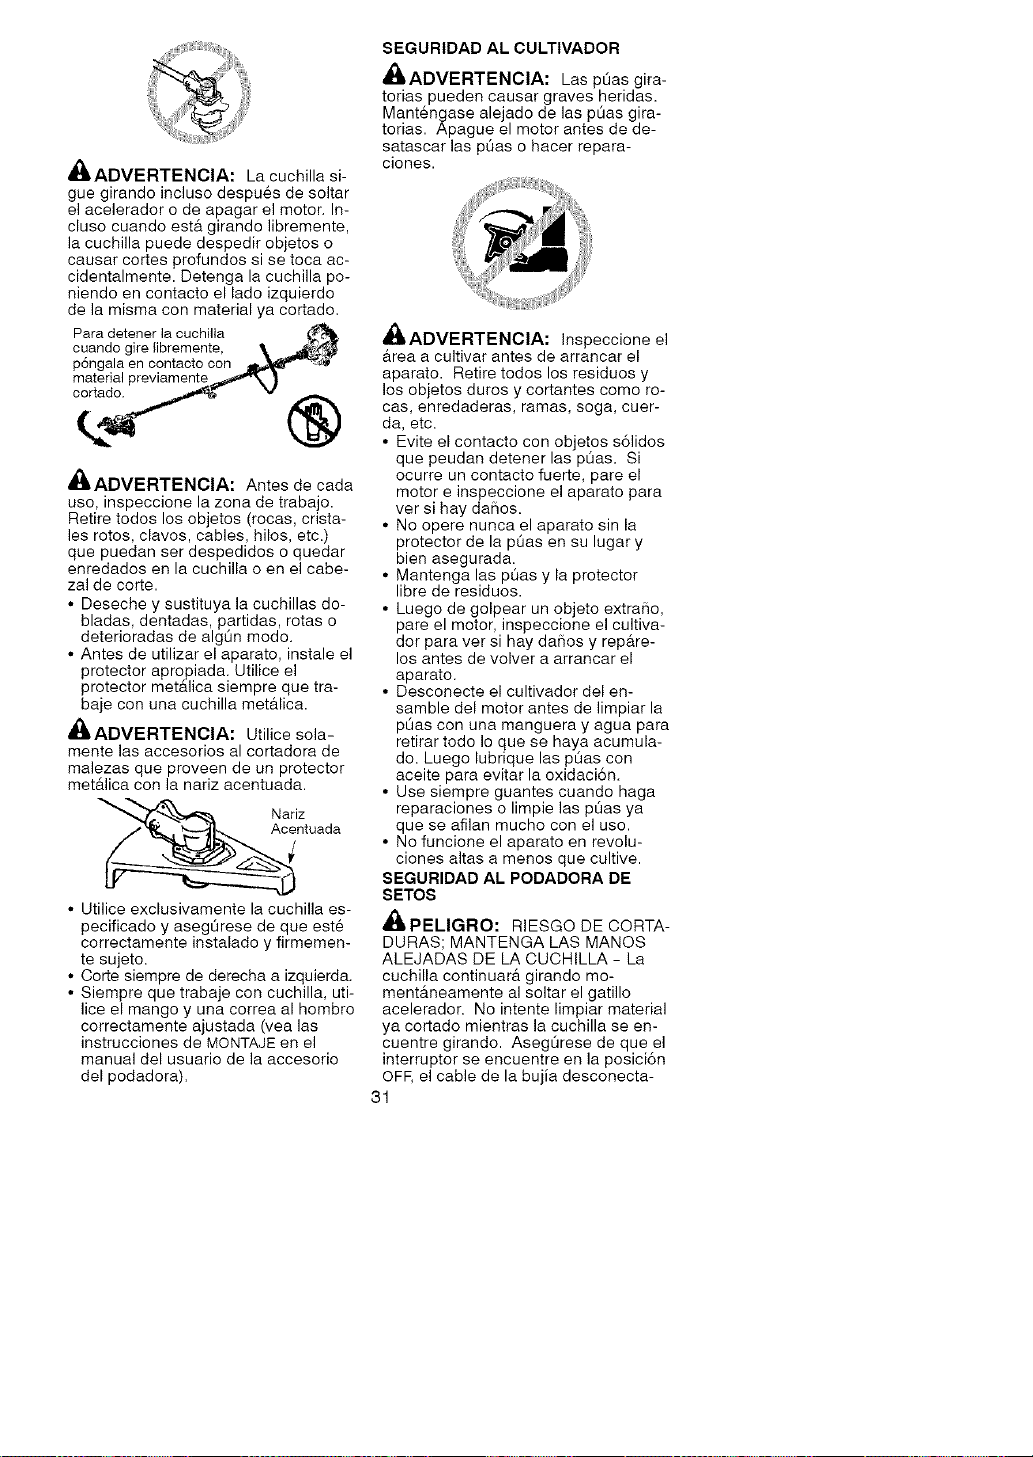
_IADVERTENClA: La cuchilla si-
gue girando incluso despu@s de soltar
el acelerador o de apagar el motor. In-
cluso cuando est& girando libremente,
la cuchilla puede despedir objetos o
causar cortes profundos si se toca ac-
cidentalmente. Detenga la cuchilla po-
niendo en contacto el lado izquierdo
de la misma con material ya cortado.
Para detener la cuchilla f_l[_
cuando gire libremente, _, _
p6ngala en contacto con Iib,_ -'_'
material previamente _"_
,t%
mIADVERTENClA: Antes de cada
uso, inspeccione la zona de trabajo.
Retire todos los objetos (rocas, crista-
les rotos, clavos, cables, hilos, etc.)
que puedan ser despedidos o quedar
enredados en la cuchilla o en el cabe-
zal de corte.
• Deseche y sustituya la cuchillas do-
bladas, dentadas, partidas, rotas o
deterioradas de algOn modo.
• Antes de utilizar el aparato, instale el
protector apropiada. Utilice el
protector met&lica siempre que tra-
_ADVERTENOIA: Utilice sola-
mente las accesorios al cortadora de
malezas que proveen de un protector
met_tlica con la nariz acentuada.
__ AcNariz
entuada
• Utilice exclusivamente la cuchilla es-
pecificado y aseg_rese de que est@
correctamente instalado y firmemen-
te sujeto.
• Corte siempre de derecha a izquierda.
• Siempre que trabaje con cuchilla, uti-
lice el mango y una correa al hombro
correctamente ajustada (vea las
instrucciones de MONTAJE en el
manual del usuario de la accesorio
del podadora).
SEGURIDAD AL CULTIVADOR
_bADVERTENCIA: Las p5as gira-
torias pueden causar graves heridas.
Mant@ngase alejado de las pOas gira-
torias. Apague el motor antes de de-
satascar las pQas o hacer repara-
clones.
,_IIADVERTENCIA: Inspeccione el
_trea a cultivar antes de arrancar el
aparato. Retire todos los residuos y
los objetos duros y cortantes como ro-
cas, enredaderas, ramas, soga, cuer-
da, etc.
• Evite el contacto con objetos s61idos
que peudan detener las p_as. Si
ocurre un contacto fuerte, pare el
motor e inspeccione el aparato para
ver si hay daSos.
• No opere nunca el aparato sin la
protector de la pOas en su lugar y
bien asegurada.
• Mantenga las pOas y la protector
libre de residuos.
• Luego de golpear un objeto extra/]o,
pare el motor, inspeccione el cultiva-
dor para ver si hay daSos y rep&re-
los antes de volver a arrancar el
aparato.
• Desconecte el cultivador del en-
samble del motor antes de limpiar la
p_as con una manguera y agua para
retirar todo Io que se haya acumula-
do. Luego lubrique las pOas con
aceite para evitar la oxidaci6n.
• Use siempre guantes cuando haga
reparaciones o limpie las p_as ya
que se afilan mucho con el uso.
• No funcione el aparato en revolu-
ciones altas a menos que cultive.
SEGURIDAD AL PODADORA DE
SETOS
_PELIGRO: RIESGO DE CORTA-
DURAS; MANTENGA LAS MANOS
ALEJADAS DE LA CUCHILLA - La
cuchilla continuar_t girando mo-
ment_.neamente al soltar el gatillo
acelerador. No intente limpiar material
ya cortado mientras la cuchilla se en-
cuentre girando. Aseg_rese de que el
interruptor se encuentre en la posici6n
OFF, el cable de la bujia desconecta-
31
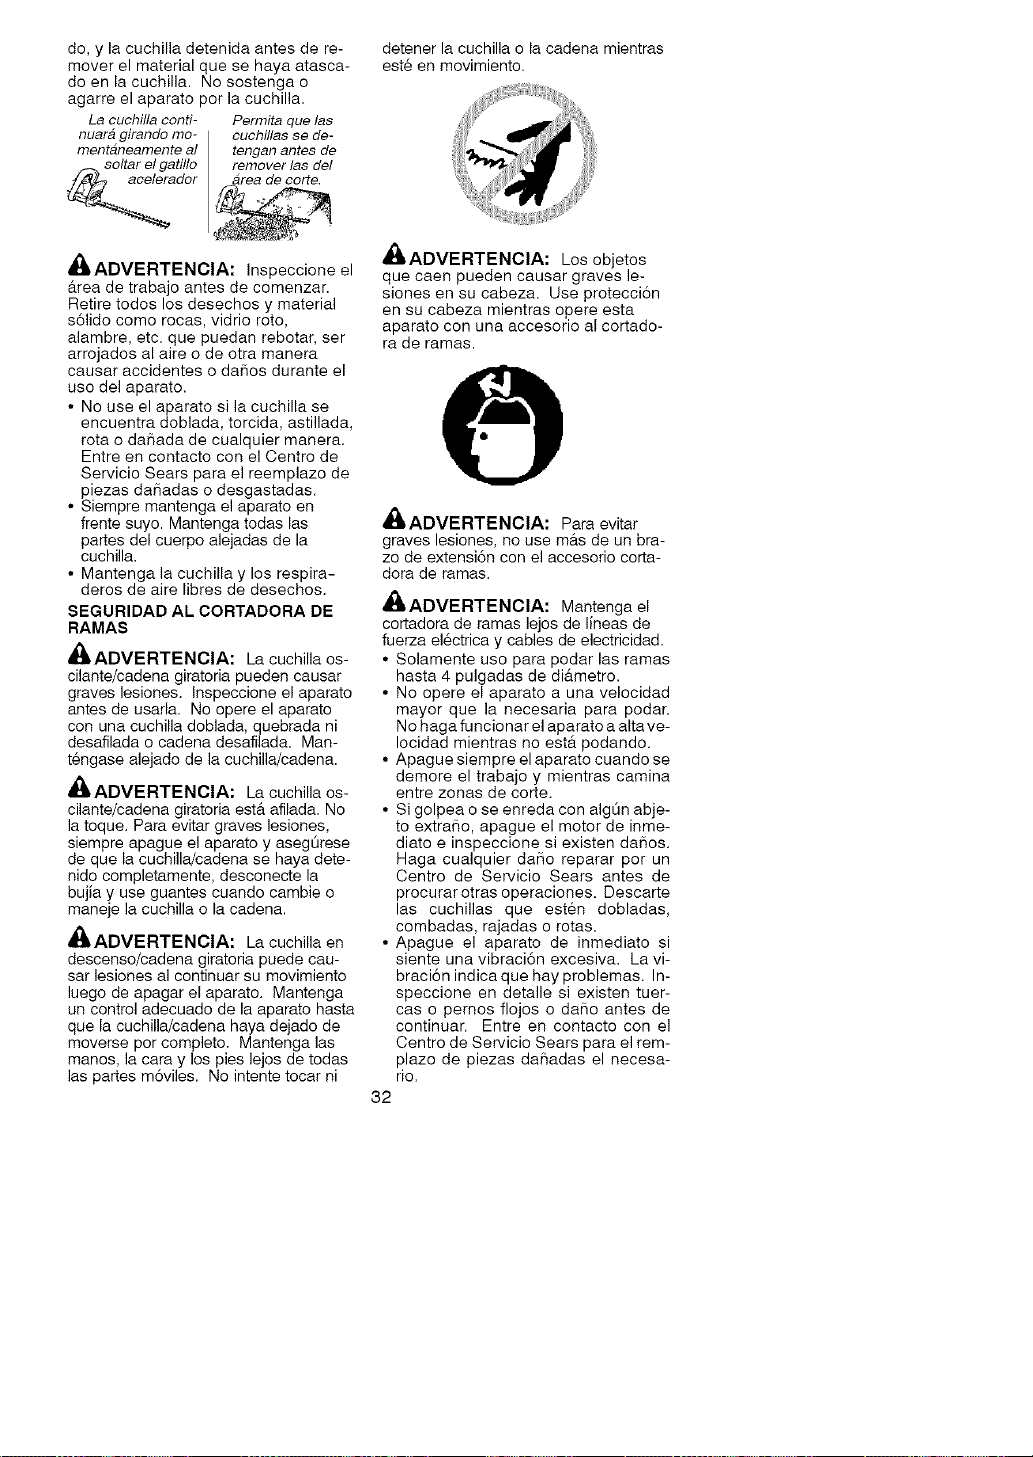
do,ylacuchilladetenidaantesdere-
moverelmaterialquesehayaatasca-
doenlacuchilla.Nosostengao
agarreelaparatoporlacuchilla.
La cuchilla conti-
nuara girando mo-
mentaneamente al
Oltar el gatiflo
dor
Permita que las
cuchillas se de-
tengan antes de
remover las del
_IADVERTENClA: Inspeccione el
&tea de trabajo antes de comenzar.
Retire todos los desechos y material
s61ido como rocas, vidrio roto,
alambre, etc. que puedan rebotar, ser
arrojados al aire o de otra manera
causar accidentes o daflos durante el
uso del aparato.
• No use el aparato si la cuchilla se
encuentra doblada, torcida, astillada,
rota o daflada de cualquier manera.
Entre en contacto con el Centro de
Servicio Sears para el reemplazo de
piezas dafladas o desgastadas.
• Siempre mantenga el aparato en
frente suyo. Mantenga todas las
partes del cuerpo alejadas de la
cuchilla.
• Mantenga la cuchilla y los respira-
deros de aire libres de desechos.
SEGURIDAD AL CORTADORA DE
RAMAS
_IADVERTENCIA: La cuchilla os-
cilante/cadena giratoria pueden causar
graves lesiones. Inspeccione el aparato
antes de usarla. No opere el aparato
con una cuchilla doblada, quebrada ni
desafilada o cadena desafilada. Man-
tengase alejado de la cuchilla/cadena.
_IADVERTENOIA: La cuchilla os-
cilante/cadena giratoria est& afilada. No
la toque. Para evitar graves lesiones,
siempre apague el aparato y aseg0rese
de que la cuchilla/cadena se haya dete-
nido completamente, desconecte la
bujia y use guantes cuando cambie o
maneje la cuchilla o la cadena.
_ADVERTENCIA: La cuchilla en
descenso/cadena giratoria puede cau-
ear lesiones al continuar su movimiento
luego de apagar el aparato. Mantenga
un control adecuado de la aparato hasta
que la cuchilla/cadena haya dejado de
moverse por completo. Mantenga las
manos, la cara y los pies lejos de todas
las partes m6viles. No intente tocar ni
detener la cuchilla o la cadena mientras
est_ en movimiento.
_IADVERTENCIA: Los objetos
que caen pueden causar graves le-
siones en su cabeza. Use protecci6n
en su cabeza mientras opere esta
aparato con una accesorio al cortado-
ra de ramas.
A
ADVERTENCIA: Para evitar
graves lesiones, no use m&s de un bra-
zo de extensi6n con el accesorio corta-
dora de ramas.
_&ADVERTENClA: Mantenga el
cortadora de ramas lejos de lineas de
fuerza el6ctrica y cables de electricidad.
• Solamente uso para podar las ramas
hasta 4 pulgadas de di_.metro.
• No opere el aparato a una velocidad
mayor que la necesaria para podar.
No haga funcionar el aparato a altave-
Iocidad mientras no estA podando.
• Apague siempre el aparato cuando se
demore el trabajo y mientras camina
entre zonas de corte.
• Si golpea o se enreda con aig0n abje-
to extraSo, apague el motor de inme-
diato e inspeccione si existen daflos.
Haga cuaiquier daflo reparar por un
Centro de Servicio Sears antes de
procurar otras operaciones. Descarte
las cuchillas que est6n dobladas,
combadas, rajadas o rotas.
• Apague el aparato de inmediato si
siente una vibraci6n excesiva. La vi-
braci6n indica que hay problemas. In-
speccione en detalle si existen tuer-
cas o pernos flojos o daflo antes de
continuar. Entre en contacto con el
Centro de Servicio Sears para el rem-
plazo de piezas dafladas el necesa-
rio.
32
SEGURIDAD AL SOPLADOR DE
NIEVE
_'ADVERTENCIA: Mantenga las
manos y pies alejadas del rotor al ar-
rancar or funcionar el motor. Nunca
trate de limpiar el rotor cuando el mo-
tor est6 en marcha nuevamente. Apa-
gue el motor y desconecte la bujia
antes de limpiar la nieve o escombros
del dispositivo de descarga o cuando
ajuste los defiectores.
_,ADVERTENCIA: Nunca este
cerca de la apertura de la descarga.
Rocas o escombros se puedan lanzar
en los ojos y la cara, el resultado le
causarua kesu6n o ceguera seria.
_I_ADVERTENOIA: Inspeccione el
&rea donde se utilizar& el aparato. Re-
tire todos los objectos que puedan ser
despedidos o puede haber daSos en
la aparato. AIgunos objetos se pue-
den ocultar por la nieve ca[da -- est6
alerta para la posibilidad.
• Nunca haga funcionar el soplador de
nieve cerca de recintos de vidrio, au-
tom6viles, etc.
• No funcione el aparato en revolu-
clones altas a menos que remueva
nieve.
• Ponga atenci6n cuando est6 usando
el soplador de nieve y est6 alerta si
hay hoyos en el terreno u otros ries-
gos escondidos.
• AsegOrese de que el rotor gira libre-
ment antes de instalar el soplador de
nieve en el aparato motriz.
• Si el motor no gira libramente debido
a hielo congelado, descongele la
herramienta antes de intentar usada
bajo corriente.
• Mantenga el rotor limpio de basuras.
• No sople nieve cerca de otras perso-
nas. El soplador de nieve puede lan-
zar objetos pequeSos a alta veloci-
dad, causando lesiones.
• Despu6s de golpear un objeto extra-
50, pare el motor, desconecte la
bujia e inspeccione si el soplador de
nieve ha sufrido daSo y rep&relo
antes de volver a usarlo.
• Nunca haga funcionar el soplador de
nieve cerca de recintos de vidrio, au-
tom6viles y camiones.
• Nunca utilice el soplador de nieve
sobre un techo.
• Nunca haga funcionar el soplador de
nieve cerca de ventanas, bajadas,
etc.
• Nunca lance la nieve hacia caminos
pOblicos o cerca del tr&fico.
• Limpie la nieve de las pendientes
yendo hacia arriba y hacia abajo;
nunca de manera horizontal. Tenga
cuidado cuando cambie de direc-
ci6n. Nunca limpie la nieve de pen-
dientes demasiado empinadas.
• Deje que el soplador de nieve fun-
clone durante unos minutos antes de
comenzar a limpiar la nieve para que
las piezas m6viles no se congelen.
• Mire detr&s suyo y tenga cuidado
cuando retroceda. Tenga cuicado
para evitar resbalarse o caerse.
• Aprenda a detener la herramienta en
forma r&pida.
CONTENIDO DE LA CAJA
Use la siguiente lista para verificar que
todas la piezas hayan side incluidas:
Modelo 358.796160
• Cortadora
• Protector
• Tuerca Mariposa (atornillada en la
protector)
• Correa para el hombro
• Recipiente de linea
• Recipiente de aceite
Examine las piezas para verificar que
no haya daSos. No use piezas daSa-
das.
AVI$O: Si necesita ayuda, si faltan
piezas o si hay piezas daSadas, flame
al nOmero 1-800-235-5878.
Es normal escuchar que el filtro de com-
bustible golpetee en el tanque vac[o.
Es normal encontrar residues de aceite
o de gasolina en el silenciador, debido a
los ajustes al carburador y a las pruebas
efectuadas per el fabricante.
MONTAJE
,I_ADVERTENOIA: Siempre de-
tenga el aparato y desconecte la bujia
antes de realizar procedimientos de
montaje.
33
z_
dBbADVERTENClA:Sirecibi6el
aparatoyaensamblado,leayuse
eecci6nMONTAGEparaasegurarque
elmismoseencuentrecorrectamente
ensambladoyquetodoslosfijadores
seencuentrenaprietanfirmemente.
INSTALAClONDELAACCESORIO
DELCORTADORA
PRECAUClON:AIinstalarlasacceeo-
riodelcortadora,pongael aparato en
una superficie plana pare estabilidad.
1. Afloje el acoplador dando vuelta a
la perilla ala izquierda.
\
Protector de
emberque
Perilla
APRIETAN
2. Remueva el protector de embar-
que del acoplador.
3. Retire la tapa de eje del accesorio
del cortadora (si presente).
4. Coloque el bot6n de conexi6n/des-
conexi6n del accesorio en el aguj-
ero de la guia del acoplador.
5. Empuje el accesorio en el acopla-
dor hasta que el bot6n de conex-
i6n/desconexi6n se encaje en el
primer agujero.
6. Antes de usar el aparato, apriete la
perilla firmemente dando vuelta a
la derecha.
Primer
Acoplador Agujero Agujero de
la Guia
Agujero
Secundario
Boton de
Conexion/Desconexi6n
en el Primer Agujero
Para las accesorios opcional, vea la
secci6n MONTAGE de la aplicables
manual del usuario de la accesorio.
INSTALACION DE LA PROTECTOR
_ADVERTENCIA: El protector
deber& set instalado correctamente. El
protector provee protecci6n parcial hacia
el usuario y otrae personas contra el
riesgo de los objetos arrojadoe, y viene
equipado con un cuchilla limitadora de
linea que corta el exceso de line& El
cuchilla limitadora de linea (en la parte
inferior del protector) es filoso y puede
cortar.
Para conseguir la orientaci6n apropiada
para el protector, vea la ilustraci6n CON-
OZOA SU APARATO que se encuentra en
la secci6n de USO.
1. Remueva la tuerca mariposa de la
protector.
2. Introduzca el soporte dentro de la
ranura como se muestra.
3. Haga girar la protector hasta que el
tornillo pase a trav6s del hueco en
el soporte.
4. Apriete firmemente la tuerca mari-
posa en el tornillo.
Soporte,
Tuerca
Mariposa
Eje Boton de Accesorio
Superior Conexion/
Desconexi6n
_ADVERTENCIA: Antes de oper-
ar este aparato, asegOrese de que el
bot6n de conexi6n/desconexi6n est6
asegurado en el primer agujero y la per-
ilia este bien ajustada antes de operar el
aparato. Todos los accesorios han sido
diseSados para ser utilizados en el prim-
er agujero a menos que este indicado
de otra manera en el manual de instruc-
ci6n aplicable del accesorio. Usar el
agujero incorrecto podria causar graves
heridas o da_os a el aparato.
Cajetin de
Protector engranajes
MONTAJE DE LA CORREA AL
HOMBRO
_IJADVERTENCIA: Antes de hacer
algun ajuste de la correa o el mango, ee
imprescindible que el motor eete
completamente detenido.
1. Introduzca el braze derecho y la
cabeza por el arco de la correa y
apoye 6sta en el hombro izquierdo.
AVISO: La correa puede giraree media
vuelta pare garantizar que quede apo-
yada en toda su anchura sobre el hom-
bro.
34
2. Ajustelacorreaparapermitirqueel
enganchequedeaunos15cm(6
pulgadas)pordebajodelacintura.
3. Fijeelenganchedelacorreaporel
huecoparaelmontajedelacorrea
alhombrosituadaenelmangodel
aceleradorylevantelaherramienta
hastalaposici6ndetrabajo.
\
Hueco para
el montaje de
la correa at
hombro
4. Antes de poner en marcha el motor
o iniciar cualquier tarea de corte,
p6ngase la correa en el hombro y
aj_stela a su medida de modo que
le permita mantener el equilibrio.
AJUSTE DEL MANGO AUXILIAR
_ADVERTENCIA: AI ajustar la
manija auxiliar, asegOrese que 6ste se
mantenga sobre la etiqueta de seguri-
dad y debajo la marca o la flecha en el
eJe,
1. Afloje la tuerca mariposa en el
mango.
2. Gire el mango en posici6n vertical.
Vuelva a apretar la tuerca maripo-
sa firmemente.
CONOZCA SU APARATO
LEA ESTE MANUAL DEL USUARIO Y LAS REGLAS DE SEGURIDAD ANTES DE PONER
ELAPARATO EN MAROHA. Compare las ilustraciones con su aparato para familiari-
zarse con la ubicaci6n de los diversos controles y ajustes. Guarde este manual
para uso futuro.
Cabezal
de Corte Acopiador
Eje X_
/
Mango Auxiliar
Protector
Bujia
Silenciador
Varilla
medidora
de aceite
INTERRUPTOR ON/OFF
El interruptor ON/OFF est& situado en la
mango del gatillo acelerador y se usa el
interruptor para detener el motor. Colo-
que el interruptor ON/OFF en la posici6n
OFF para detener el motor.
BOMBEADOR
El BOMBEADOR retira el aire de el car-
burador y de las lineas de combustible
y las Ilena de mezcla de combustible,
permitiendole poner el motor en mar-
cha con menos tirones de la cuerda de
arranque. Accione el bombeador opri-
mi_ndolo y luego dejando que este re-
cobre su forma original.
CEBADOR
El CEBADOR ayuda a suministrar com-
bustible al motor para facilitar el arran-
que cuando el motor est& frio. Acione
el cebador colocando la palanca en la
posici6n FULL CHOKE.
ACOPLADOR
El ACOPLADOR permite la instalaci6n
de accesorios opcionales.
35
ANTES DE PONER EN MARCHA EL
MOTOR
_'ADVERTENCIA: Lea atenta-
mente la informaci6n sobre el
combustible en laae reglas de seguridad
antes de comenzar Si no comprende
las reglas de seguridad, no intente
abaetecer el aparato de combustible.
Uame al nfimero 1-800-235-5878.
CAPACIDAD DEL ACEITE
El motor requiere aproximadamente 90
ml (3 onzae fl0idae) de aceite. Use sola-
mente aceite de detergente de alta cali-
dad clasificado con la clasificaci6n SJ-
SL de servicio API. Seleccione la
calidad de viscosidad SAE seg0n su
temperaturea de operaci6n esperada.
Para la mayoria de las aplicaciones, se
recomienda el aceite SAE-30. No use
los afladidos especiaies.
/. = X-_
@
AVISO: El aceite sint6tico
ILSAC GF-2 debe moetrar,
marca de certificaci6n de API
y el simbolo de servicio
(mostrado a la izquierda) con
la "CONSERVACION DE EN-
ERGiA SJ/CF" o m_ts alto, es
un aceite aceptable en todae
lae temperaturae. El uso del
aceite sint6tico no se altera
requirere intervalos en el
cambio de aceite.
SAE Viscosity Grades
r -----_'_._', _f_._','_.,,--- }_
I I I
STAqllNG _EEtpERAll R RANG AN-ICI_#*TEDBEFORE NEX OI CHANGE
PRECAUCION: Los motores de 2
tiempos enfriados a aire funcionan
m&s caliente que los motores de au-
tom6viles. El uso de aceites multivis-
cosidad no sint6ticos (5W30, 10W30,
etc.) a temperaturas superiores a 40°F
(4°C) producir& m&s alto consume de
aceite del normal. Verifique el nivel del
aceite del motor m&s a menudo, para
evitar un posible daflo en el motor, de-
bido a que no tiene suficiente aceite.
*PRECAUCION: El aceite sint6tico
debe ser usando cuando se opere el
motor bajo una temperatura de 40"F
(4°C) o de Io contrario occurrirb, un
daSo en el motor.
**PRECAUClON: El uso de aceite de
viscosidad SAE 30, si es usando a
una temperatura inferior a 50"F
(10"C), producirfi difficultad de arran-
que y un posible daSo en el bloque del
motor debido a una iubricaci6n inade-
cuada.
AGREGUE ACEITE
Este aparato fue enviado sin aceite
en el motor. El motor requiere aproxi-
madamente 90 ml (3 onzae fl6idas) de
aceite cuando marca FULL en la varilla
medidora de aceite. Se incluye con esta
aparato un recipiente de 100 ml (3,4 on-
zas) de aceite SAE 30 SJ-SL para Ile-
nar correctamente el motor antes de
set usado por primera vez eolamente.
Adiera todo el contenido de este reci-
piente de 100 ml (3,4 onzae) de aceite
en el tubo de echar el aceite
AVlSO: La varilla medidora de
aeeite se mostrara levemente sobre
la marea FULL. Eeto es aeeptable
para el uso por la primera vez sola-
mente ya que el motor 1o requiere
para ajustarce. Despu6s de la prim-
era vez que es ilenado de aceite, sim-
plemente Ilene el motor asta la marca
FULL en la varilla medidora come sea
necesario.
PRECAUClON: NO sobrellene el mo-
tor con aceite, o producirfi humo cuan-
do arranca.
PRECAUCION: EL MOTOR DEBE
ESTARA NIVEL
Para comprobar el aceite, el motor
debe estar a nivel, con el tubo de ile-
nado de aceite hacia arriba. Si no se
encuentra a nivei, la lectura de ia va-
rilla medidora de aceite no ser& la
correcta y podria conducir a un llena-
do de aceite excesivo o insuficiente.
Esto puede ocasionar un posible
daflo en el motor.
• Comprobar el nivel del aceite antes de
arrancar el motor.
• Comprobar el nivel del aceite antes de
cada uso.
• Mantenga el nivel del aceite en la
marca FULL.
• NO sobrellene el motor con aceite.
Use una taza de medici6n de aceite
para Ilenar.
• Agregue solamente 1 onza a 0,5 onza
a la vez.
36
1.Aseg0resequeelmotorest@nive-
ladayqueel&reaalrededordel
tubadeIlenadodeaceiteest@lim-
pia.
2. Remuevalavarillamedidorade
aceitedeltubadeIlenadode
aceite.
3. Usarunatazademedici6ndeacei-
te,viertalentamentedeaceiteen
eltubodeIlenadodelmotor.NO
sobrelleneelmotorconaceite.
AVlSO:Elmotorrequiereaproxima-
damente90ml(3onzasflOidas)de
aceite.
Tubo de Ilenado de
aceite del motor
4. Permite que el aceite se asiente.
Inserte y apriete la varilla medidora
de aceite.
5. Remueva la varilla medidora de
aceite y limpie con el paso limpio.
Remueva el aceite del agujero en la
varilla medidora de aceite. Inserte y
con la mano aprieta la varilla medi-
dora de aceite, despu@s la remueva
para comprobar el nivel de aceite.
Varilla medidora
_ de aceite
6. Verifique el nivel FULL (lleno) del
aceite con la presencia del aceite en
el agujero con la varilla medidora de
aceite, o por la linea de medidora.
7. Si ester necesitado, agregue 0,5
onza de aceite a la vez. Vuelva a
inspeccionar la varilla medidora
hasta que lea Ileno.
8. AsegOrese de apretar la varilla me-
didora del aceite antes de arrancar
el motor.
Verifique el nivel del aceite antes de
cada uso. Agregue aceite si esta ne-
cesitado. Cambie el aceite despu@s
de las primeras 4 horas de operaci6n,
despu@s cada 8 horas de operaci6n o
una vez par temporada (vea CAMBIE
ELACEITE DEL MOTOR en la secci6n
MANTENIMIENTO). Cambie el aceite
cada 4 horas al usar el motor en carga
pesada o en altas temperaturas.
Puede necesitar cambiar el aceite m_.s
a menudo cuando las condiciones son
polvoriento o sucias.
AGREGUE GASOLINA
Use gasolina regular, sin plomo, nueva
y limpia con el minimo de 87 octanos.
No mezcle el aceite con la gasolina.
Para asegurar que la gasolina utiliza-
da sea fresca compre estanques los
cuales puedan set utilizados durante
los primeros 30 dias.
IMPORTANTE
Los combustible mezclados con alcohol
(los Ilamados gasohol o los que contie-
nen etanol o metanol) pueden atraer la
humedad, Io que puede causar la sepa-
raci6n y la formaci6n de @.cidosdurante
el almacenaje. La gasolina b,cida puede
daSar el sistema de combustible del mo-
tor durante el almacenaje.
Para evitar problemas con el motor,
deber_, vaciarse el sistema de combus-
tible antes de almacenar el aparato par
30 dias o m_ts. Vacie el tanque de com-
bustible, ponga el motor en marcha y
d@jeloen marcha hasta que las lineas
de combustible y el carburador queden
vacios. Use combustible fresco para la
pr6xima temporada.
Nunca use productos de limpieza de
motor o carburador en el tanque de
combustible ya que de hacerla puede
provocar da_os permanentes.
Vea la secci6n de ALMACENAJE para
informaci6n adicional.
37
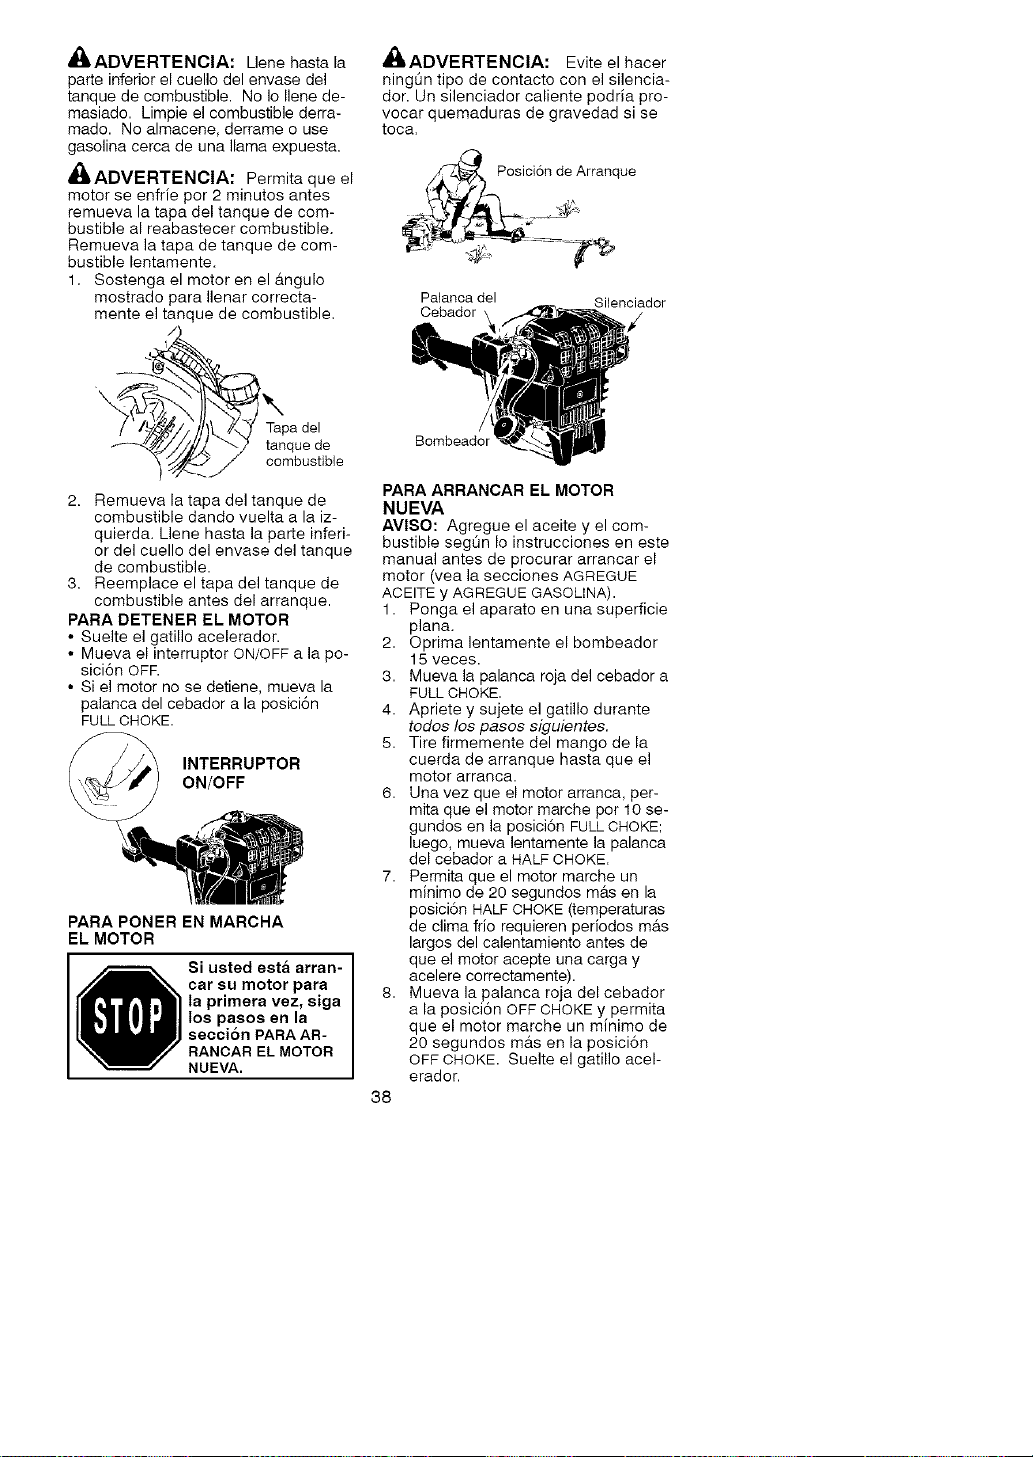
_ADVERTENClA:Llenehastala
parteinferiorelcuellodelenvasedel
tanquedecombustible.NoIoIlenede-
masiado.Limpieelcombustiblederra-
made.Noalmacene,derrameouse
gaeolinacercadeunallamaexpuesta.
_ADVERTENClA: Permita que el
motor ee enfrie por 2 minutos antes
remueva la tapa del tanque de com-
bustible al reabaetecer combustible.
Remueva la tapa de tanque de com-
bustible lentamente.
1. Soetenga el motor en el &ngulo
mostrado para Ilenar correcta-
mente el tanque de combustible.
Tapa del
//j/_. "_/' tanque de
_i_.'J combustible
2. Remueva la tapa del tanque de
combustible dando vuelta a la iz-
quierda. Llene hasta la parte inferi-
or del cuello del envase del tanque
de combustible.
3. Reemplace el tapa del tanque de
combustible antes del arranque.
PARA DETENER EL MOTOR
• Suelte el gatillo acelerador.
• Mueva el interruptor ON/OFF a la po-
sici6n OFF.
• Si el motor no se detiene, mueva la
palanca del cebador a la posici6n
FULL CHOKE.
INTERRUPTOR
ON/OFF
PARA PONER EN MARCHA
EL MOTOR
o i usted esta arran-
car su motor para
la primera vez, siga
los pasos en la
seccion PARA AR-
RANCAR EL MOTOR
NUEVA.
,_ADVERTENCIA: Evite el hacer
ningOn tipo de contacto con el silencia-
dor. Un silenciador caliente podria pro-
vocar quemaduras de gravedad si se
toca.
Posici6n de Arranque
Palanca del
Cebador
Silenciador
Bombeador
PARA ARRANCAR EL MOTOR
NUEVA
AVISO: Agregue el aceite y el com-
bustible seg0n Io inetrucciones en este
manual antes de procurar arrancar el
motor (vea la secciones AGREGUE
ACEITE y AGREGUE GASOLINA).
1. Ponga el aparato en una superficie
plana.
2. Oprima lentamente el bombeador
15 veces.
3. Mueva la palanca roja del cebador a
FULL CHOKE.
4. Apriete y sujete el gatillo durante
todoa los paaoa eiguientea.
5. Tire firmemente del mango de la
cuerda de arranque hasta que el
motor arranca.
6. Una vez que el motor arranca, per-
mita que el motor marche por 10 se-
gundos en la posici6n FULLCHOKE;
luego, mueva lentamente la palanca
del cebador a HALF CHOKE.
7. Permita que el motor marche un
minimo de 20 segundos m&s en la
posici6n HALF CHOKE (temperaturas
de clima frio requieren periodos m&s
largos del calentamiento antes de
que el motor acepte una carga y
acelere correctamente).
8. Mueva la palanca roja del cebador
a la posici6n OFF CHOKE y permita
que el motor marche un minimo de
20 segundos m&s en la posici6n
OFF CHOKE. Suelte el gatillo acel-
erador.
38
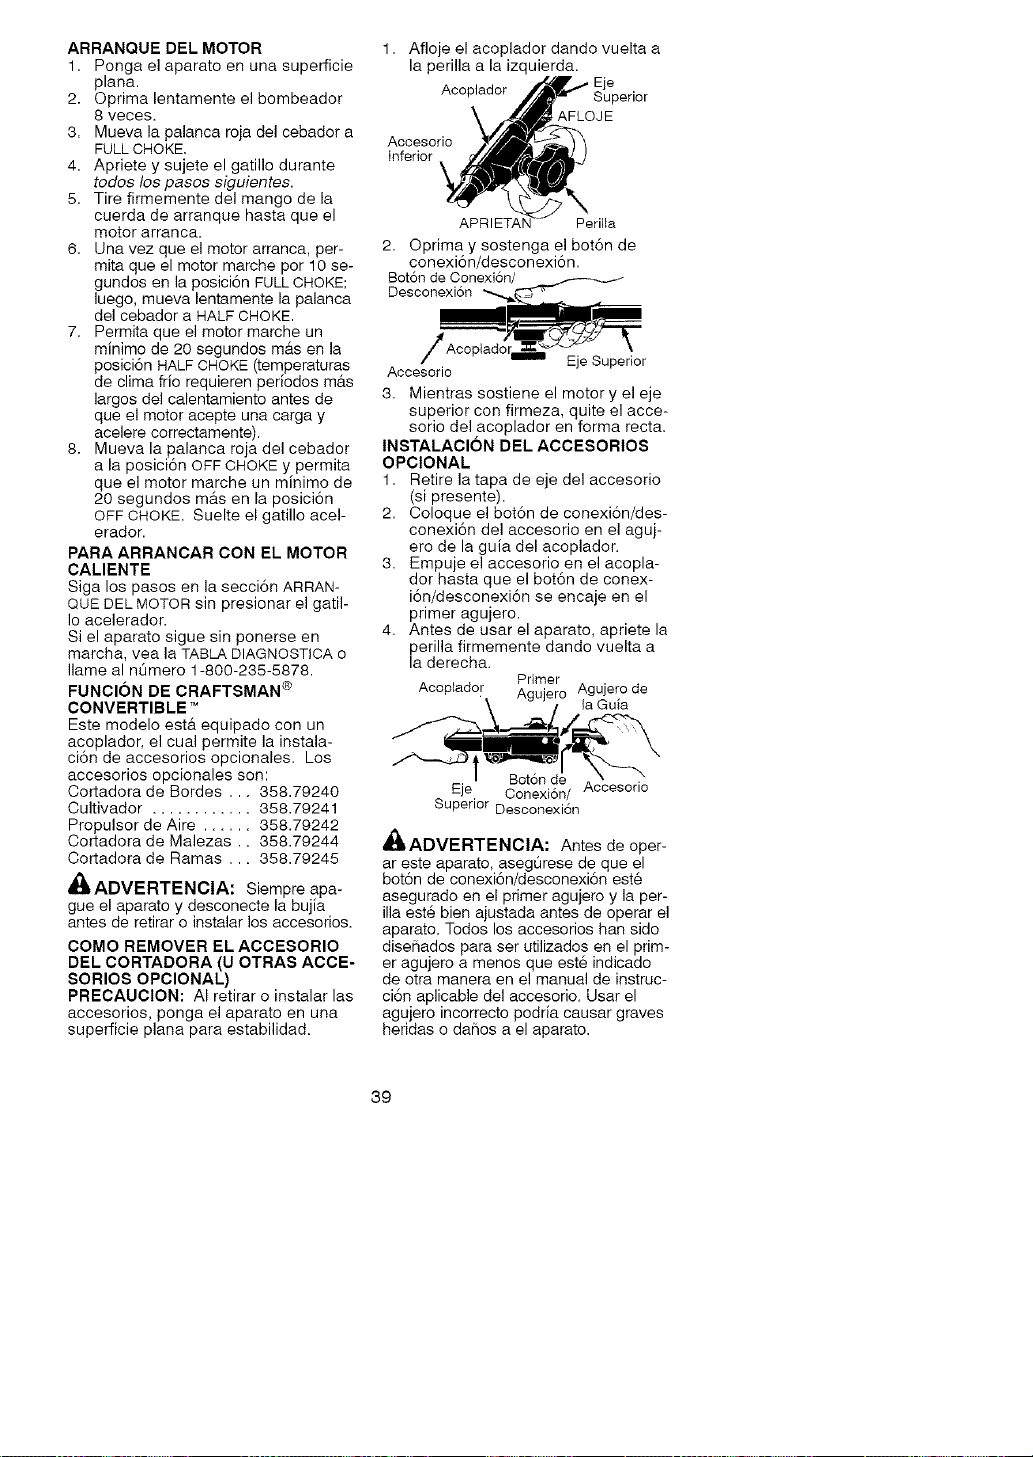
ARRANQUE DEL MOTOR
1. Ponga el aparato en una superficie
plana.
2. Oprima lentamente el bombeador
8 veces.
3. Mueva la palanca roja del cebador a
FULL CHOKE.
4. Apriete y sujete el gatillo durante
todos los pasoe siguientee.
5. Tire firmemente del mango de la
cuerda de arranque hasta que el
motor arranca.
6. Una vez que el motor arranca, per-
mita que el motor marche per 10 se-
gundos en la posici6n FULL CHOKE;
luego, mueva lentamente la palanca
del cebador a HALF CHOKE.
7. Permita que el motor marche un
minima de 20 segundos m&s en la
posici6n HALF CHOKE (temperaturas
de clima frio requieren periodos m&s
largos del calentamiento antes de
que el motor acepte una carga y
acelere correctamente).
8. Mueva la palanca roja del cebador
a la posici6n OFF CHOKE y permita
que el motor marche un minimo de
20 segundos m&s en la posici6n
OFF CHOKE. Suelte el gatillo acel-
erador.
PARA ARRANCAR CON EL MOTOR
CALIENTE
Siga los pasos en la secci6n ARRAN-
QUE DEL MOTOR sin presionar el gatil-
Io acelerador.
Si el aparato sigue sin ponerse en
marcha, vea la TABLA DIAGNOSTICA o
Ilame al n_mero 1-800-235-5878.
FUNCION DE CRAFTSMAN ®
CONVERTIBLE
Este modelo est& equipado con un
acoplador, el cual permite la instala-
ci6n de accesorios opcionales. Los
accesorios opcionales son:
Cortadora de Bordes ... 358.79240
Cultivador ............ 358.79241
Propulsor de Aire ...... 358.79242
Cortadora de Malezas.. 358.79244
Cortadora de Ramas ... 358.79245
ADVERTENCIA: Siempre apa-
gue el aparato y desconecte la bujia
antes de retirar o instalar los accesorios.
COMO REMOVER EL ACCESORIO
DEL CORTADORA (U OTRAS ACCE-
SORIOS OPCIONAL)
PRECAUClON: AI retirar o inetalar lae
accesorios, ponga el aparato en una
superficie plana para estabilidad.
1. Afloje el acoplador dando vuelta a
la perilla a la izquierda.
Acoplador Superior
AFLOJE
Accesorio
Inferior
APRIETAi' Perilla
2. Oprima y sostenga el bot6n de
conexi6n/desconexi6n.
Botch de Conexi6n/
Desconexion
/Aeoplad_ Eje Superior
Accesorio
3. Mientras sostiene el motor y el eje
superior con firmeza, quite el acce-
sorio del acoplador en forma recta.
INSTALACION DEL ACCESORIOS
OPCIONAL
1. Retire la tapa de eje del accesorio
(si presente).
2. Coloque el bot6n de conexi6n/des-
conexi6n del accesorio en el aguj-
ero de la guia del acoplador.
3. Empuje el accesorio en el acopla-
dor hasta que el bot6n de conex-
i6n/desconexi6n se encaje en el
primer agujero.
4. Antes de usar el aparato, apriete la
perilla firmemente dando vuelta a
la derecha.
Primer
Aeoplado[ Agujero Agujero de
la Guia
Botch d
Eje Conexion/ Aceesorio
Superior Desconexi6n
Ai_ADVERTENCIA: Antes de oper-
ar eete aparato, aeegOrese de que el
bot6n de conexi6n/deeconexi6n est6
asegurado en el primer agujero y la per-
ilia est6 bien ajustada antes de operar el
aparato. Todoe los accesorios han side
diseSados para ser utilizadoe en el prim-
er agujero a menos que este indicado
de otra manera en el manual de instruc-
ci6n aplicable del acceeorio. Usar el
agujero incorrecto podria causar graves
heridae o daSos a el aparato.
39
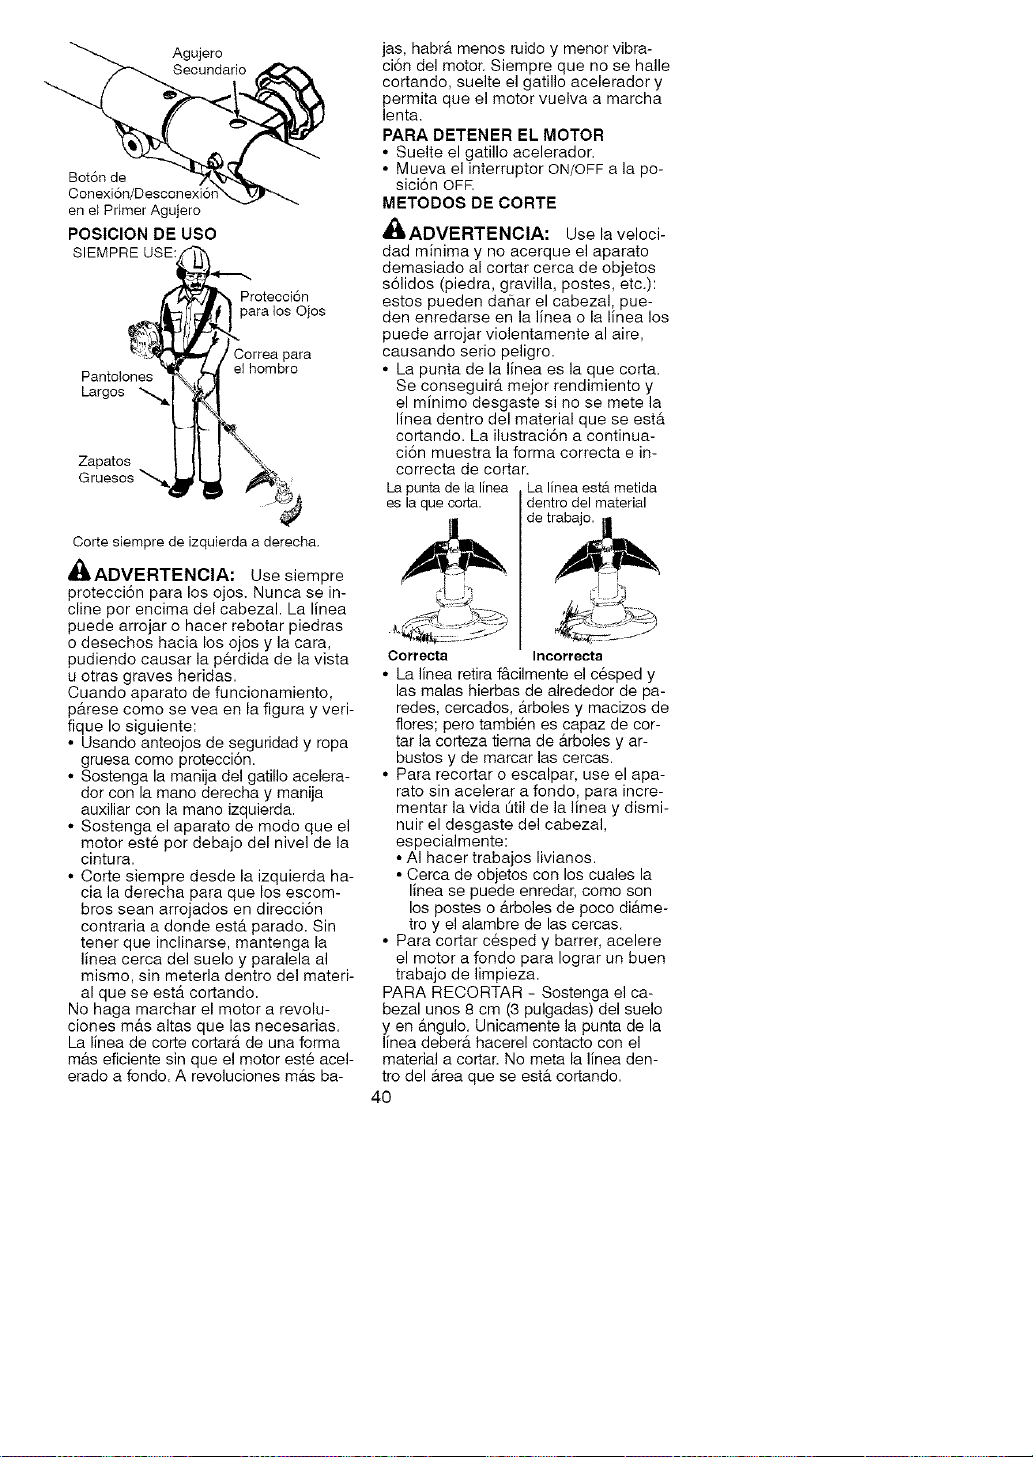
Agujero
Secundario
Boton de
en el Primer Agujero
POSICION DE USO
SIEMPRE USE:_ I_.-.--_
1-, P oteeei n
_1 para los Ojos
_'J%orrea para
o
Zapatos i I}
Groesos'-.
Corte siempre de izquierda a derecha.
_ADVERTENCIA: Use siempre
protecci6n para los ojos. Nunca se in-
cline por encima del cabezal. La linea
puede arrojar o hacer rebotar piedras
o desechos hacia los ojos y la cara,
pudiendo causar la p6rdida de la vista
u arras graves heridas.
Cuando aparato de funcionamiento,
p&rese como se vea en la figura y veri-
fique Io siguiente:
• Usando anteojos de seguridad y ropa
gruesa coma protecci6n.
• Sostenga la manija del gatillo acelera-
dor con la mane derecha y manija
auxiliar con la mane izquierda.
• Sostenga el aparato de mode que el
motor est6 par debajo del nivel de la
cintura.
• Corte siempre desde la izquierda ha-
cia la derecha para que los escom-
bros sean arrojados en direcci6n
contraria a donde est& parado. Sin
tener que inclinarse, mantenga la
linea cerca del suelo y paralela al
mismo, sin meteda dentro del materi-
al que se est& cortando.
No haga marchar el motor a revolu-
clones m&s altas que las necesarias.
La linea de corte cortar_t de una farina
m&s eficiente sin que el motor est6 acel-
erado a fondo. A revoluciones m&s ba-
jas, habr& menos ruido y menor vibra-
ci6n del motor. Siempre que no se halle
cortando, suelte el gatillo acelerador y
permita que el motor vuelva a marcha
lenta.
PARA DETENER EL MOTOR
• Suelte el gatillo acelerador.
• Mueva el interruptor ON/OFF a la po-
sici6n OFR
METODOS DE CORTE
_&ADVERTENOIA: Use la veloci-
dad minima y no acerque el aparato
demasiado al cortar cerca de objetos
s61idos (piedra, gravilla, postes, etc.):
estos pueden daflar el cabezal, pue-
den enredarse en la linea o la finea los
puede arrojar violentamente al aire,
causando serio peligro.
• La punta de la linea es la que corta.
Se conseguir& mejor rendimiento y
el minimo desgaste si no se mete la
linea dentro del material que se est&
cortando. La ilustraci6n a continua-
ci6n muestra la forma correcta e in-
correcta de cortar.
La punta de la linea La linea est&.metida
es laquecorta, dentro del material
Correcta Incorrecta
• La linea retira f&cilmente el cesped y
las malas hierbas de alrededor de pa-
redes, cercados, &rboles y macizos de
flores; pero tambien es capaz de cor-
tar la corteza tierna de &rboles y ar-
bustos y de marcar las cercas.
• Para recortar o escalpar, use el apa-
rato sin acelerar a fondo, para incre-
mentar la vida Otil de la linea y dismi-
nuir el desgaste del cabezal,
especialmente:
• AI hacer trabajos livianos.
• Cerca de objetos con los cuales la
linea se puede enredar, como son
los pastes o &rboles de pace di&me-
troy el alambre de las cercas.
• Para cortar c6sped y barrer, acelere
el motor a fondo para Iograr un buen
trabajo de limpieza.
PARA RECORTAR - Sostenga el ca-
bezal unos 8 cm (3 pulgadas) del sued
yen &ngulo. Unicamente la punta de la
linea deber& hacerel contacto con el
material a cortar. No meta la linea den-
tro del &tea que se est& cortando.
40

Para Recortar
8 cm (3 pulga-
das) del suelo
PARA ESCALPAR - La t@cnica del as-
calpado retira la vegetaci6n no desea-
da abajo a la tierra. Sostenga el cabe-
zal unos 8 cm (3 pulgadas) del suelo y
en @.ngulo. Deje que la punta de la
linea golpee contra el suelo cerca de
los _.rboles, los postes, los monumen-
tos, etc. Esta t@cnica incrementa el
desgaste de la linea.
Para Escalpar
PARA CORTAR CESPED - Este para-
to es ideal para cortar c@sped en lu-
gates donde las cortadoras conven-
cionales no Ilegan. En posici6n de
CRONOGRAMA DE MANTENIMIENTO
cortar c@sped, mantenga la linea para-
lela al suelo. Evite presionar el cabezal
contra el suelo, ya que de hacerlo
podria escalpar la vegetaci6n y da_ar
el aparato.
Para Cortar Cesped
PARA BARRER - Se puede usar la
acci6n ventiladora de la linea girante
determinada. Mantenga la linea para-
lela al suelo directamente encima de
las superficies que se quiera barter y
meuva el aparato de un lado al otro
r_.pidamente.
Para Barrer
_IkADVERTENCIA: Desconecte la bujia antes de hacer cualquier manten-
imiento, con la excepci6n de los ajustes al carburador.
TAREA DE
CUlDADO Y MANTENIMIENTO
Comprobar que no haya piezas ni
fijadores sueltos
Comprobar que no haya piezas
dai_adas o gastadas
Comprobar el nivel de aceite
Inspeccione y limpie el aparato y
sus placas
Cambiar el aceite del motor
Limpiar el filtro de aire
Inspeccione el silenciador y la
rejilla antichispa
Cambiar la bujia
Cambiar el filtro de combustible
Antes de Despu@s
Cada de Cada
Uso Uso
8 horas o
cada
temporada
p4_
50 horas
o cada
temporada
41
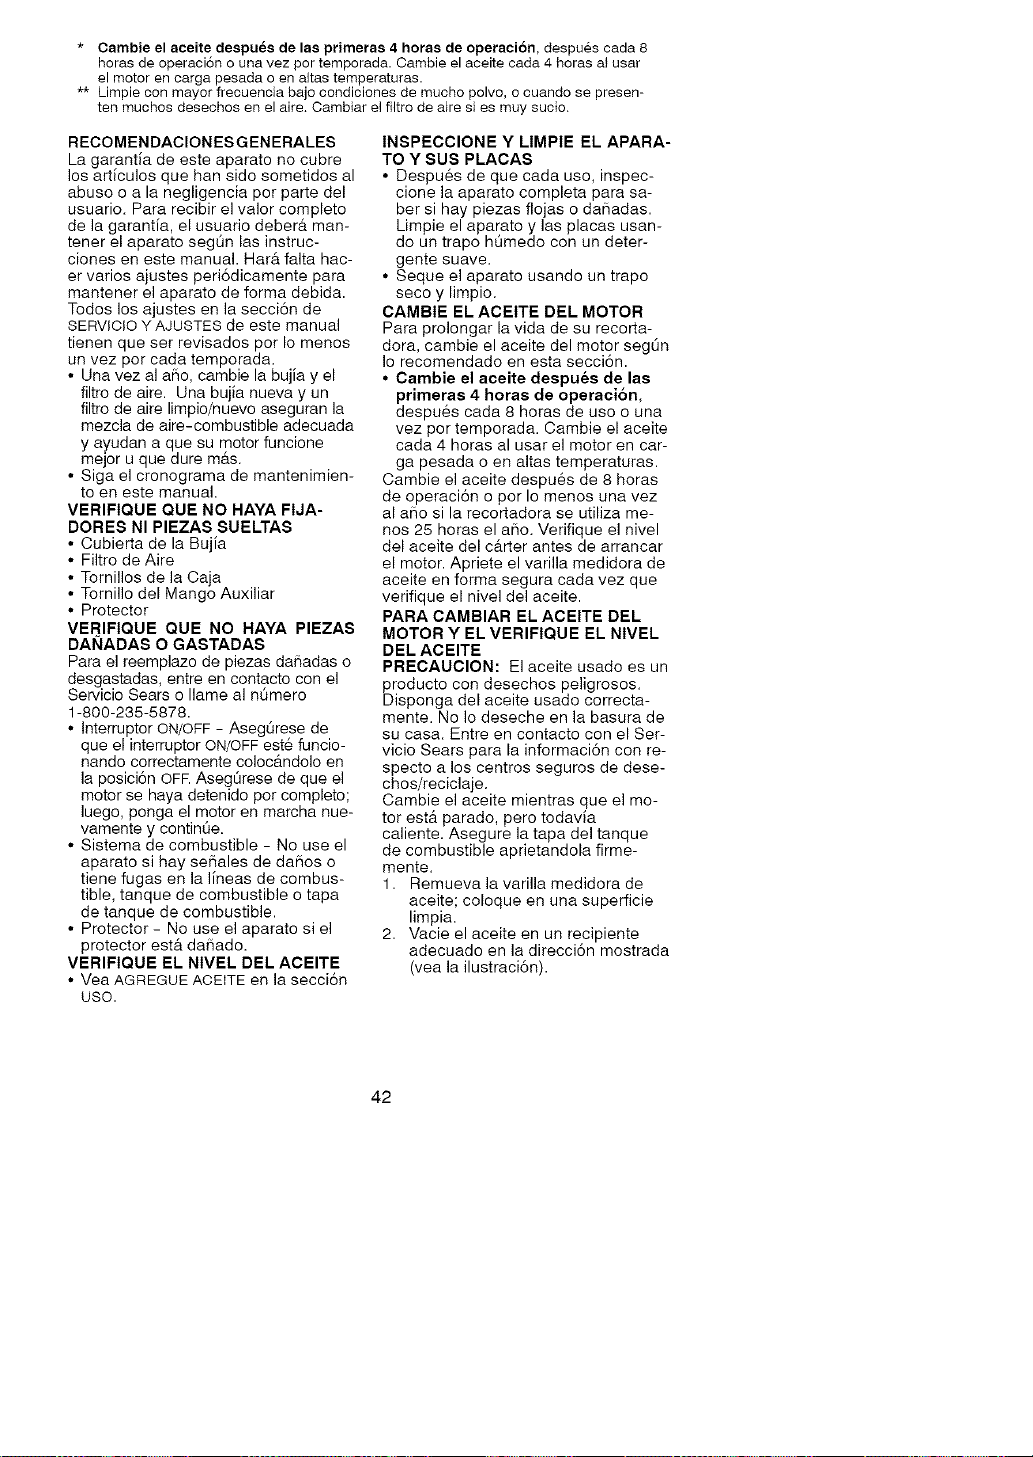
* Carnbie el aceite despues de las primeras 4 horas de operacion, despues cada 8
horas de operacion ouna vez por temporada. Cambie el aceite cada 4 horas ai usar
el motor en carga pesada o en altas temperaturas.
** Limpie con mayor frecuencia bajo condiciones de mucho polvo, o cuando se presen-
ten muchos desechos en el aire. Cambiar el flltro de aire si es muy sucio.
RECOMENDAClONES GENERALES
La garantia de este aparato no cubre
los articulos que ban sido sometidos al
abuso o a la negligencia por parte del
usuario. Para recibir el valor completo
de la garantia, el usuario deber& man-
tenet el aparato seg0n las instruc-
ciones en este manual. Har& falta hac-
er varios sjustes peri6dicamente para
mantener el aparato de forma debida.
Todos los ajustes en la secci6n de
SERVICIO Y AJUSTES de este manual
tienen que set revisados pot Io menos
un vez por cada temporada.
• Una vez al aflo, cambie la bujia y el
filtro de aire. Una bujia nueva y un
filtro de aire limpio/nuevo aseguran la
mezcla de aire-combustible adecuada
y ayudan a que su motor funcione
mejor u que dure m&s.
• Siga el cronograma de mantenimien-
to en este manual.
VERIFIQUE QUE NO HAYA FIJA-
DORES NI PIEZAS SUELTAS
• Cubierta de la Bujia
• Filtro de Aire
• Tornillos de la Caja
• Tornillo del Mango Auxiliar
• Protector
VERIFIQUE QUE NO HAYA PIEZAS
DANADAS O GASTADAS
Para el reemplazo de piezas dafladas o
desgastadas, entre en contacto con el
Servicio Sears o Ilame al n0mero
1-800-235-5878.
• Interruptor ON/OFF - AsegOrese de
que el interruptor ON/OFF est6 funcio-
nando correctamente coloc&ndolo en
la posici6n OFR AsegOrese de que el
motor se haya detenido por completo;
luego, ponga el motor en marcha nue-
vamente y continOe.
• Sistema de combustible - No use el
aparato si hay seflales de daflos o
tiene fugas en la lineas de combus-
tible, tanque de combustible o tapa
de tanque de combustible.
• Protector - No use el aparato si el
protector est& daflado.
VERIFIQUE EL NIVEL DEL ACEITE
• Vea AGREGUE ACEITE en la secci6n
USO.
INSPECCIONE Y LIMPIE EL APARA-
TO Y SUS PLACAS
• Despu6s de que cada uso, inspec-
clone la aparato completa para sa-
ber si hay piezas flojas o dafladas.
Limpie el aparato y las placas usan-
do un trapo hQmedo con un deter-
gente suave.
• Seque el aparato usando un trapo
seco y limpio.
CAMBIE EL ACEtTE DEL MOTOR
Para prolongar la vida de su recorta-
dora, cambie el aceite del motor segOn
Io recomendado en esta secci6n.
• Gamble el aceite despues de las
prirneras 4 horas de operaci6n,
despues cada 8 horas de uso o una
vez pot temporada. Cambie el aceite
cada 4 horas al usar el motor en car-
ga pesada o en altas temperaturas.
Cambie el aceite despu6s de 8 horas
de operaci6n o pot Io menos una vez
al aflo si la recortadora se utiliza me-
nos 25 horas el aflo. Verifique el nivel
del aceite del c&rter antes de arrancar
el motor. Apriete el varilla medidora de
aceite en forma segura cada vez que
verifique el nivel del aceite.
PARA CAMBIAR EL ACEITE DEL
MOTOR Y EL VERIFIQUE EL NIVEL
DEL ACEITE
PRECAUCION: El aceite usado es un
producto con desechos peligrosos.
Disponga del aceite usado correcta-
mente. No Io deseche en la basura de
su casa. Entre en contacto con el Ser-
vicio Sears para la informaci6n con re-
specto a los centros seguros de dese-
chos/reciclaje.
Cambie el aceite mientras que el mo-
tor est& parado, pero todavia
caliente. Asegure la tapa del tanque
de combustible aprietandola firme-
mente.
1. Remueva la varilla medidora de
aceite; coloque en una superficie
limpia.
2. Vacie el aceite en un recipiente
adecuado en la direcci6n mostrada
(vea la ilustraci6n).
42
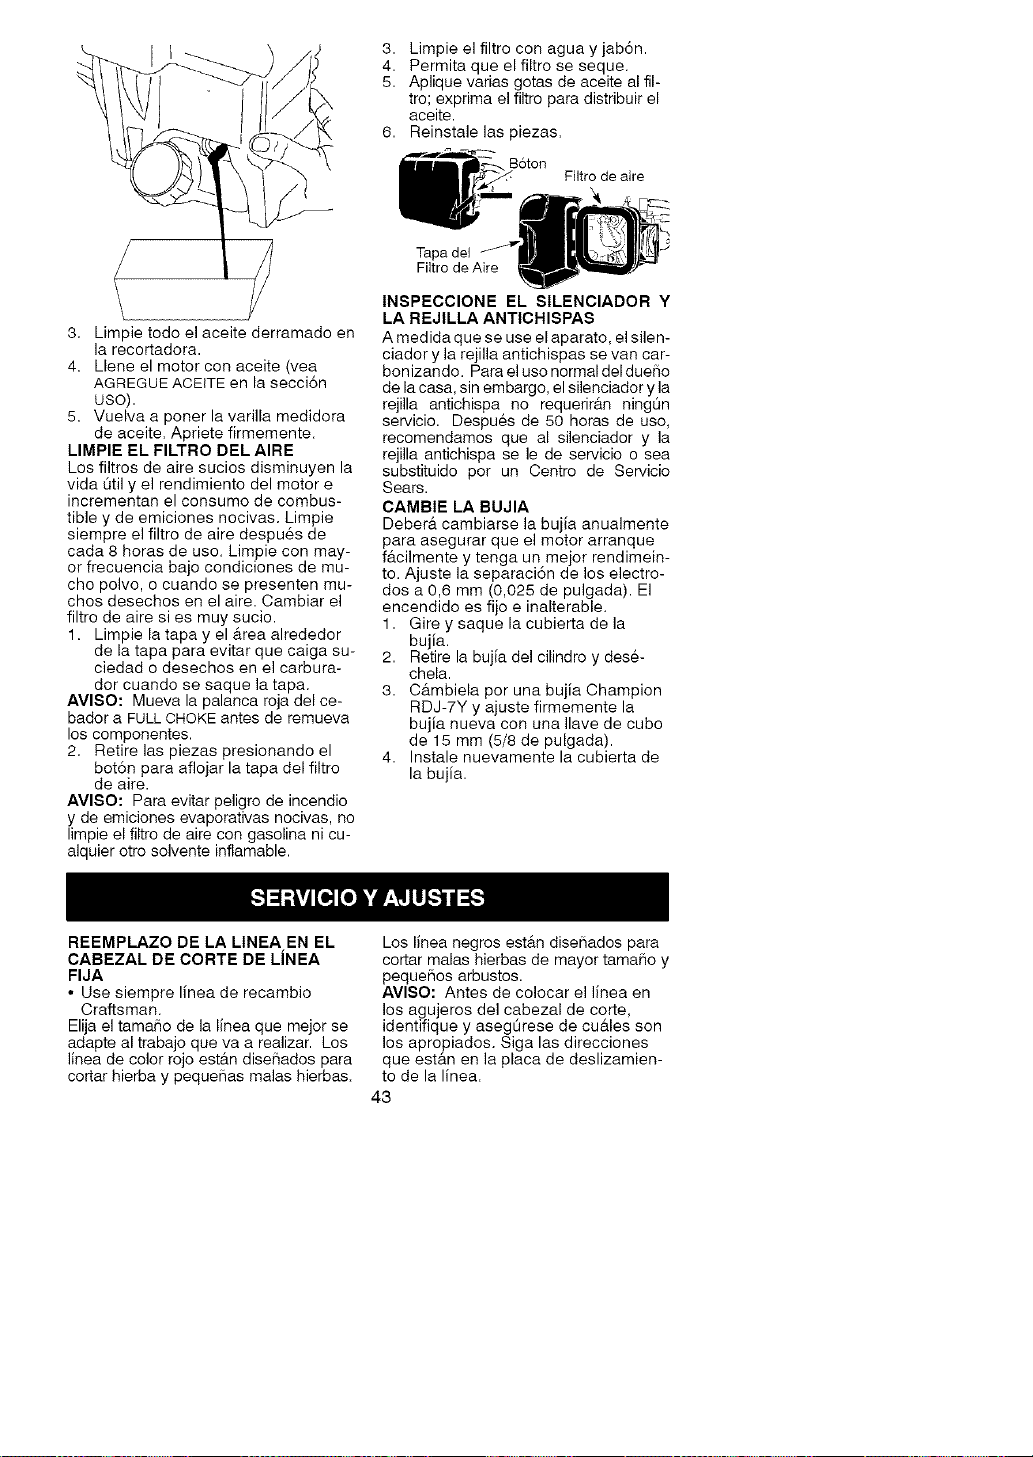
3. Limpie el filtro con agua y jab6n.
4. Permita que el filtro se seque.
5. Aplique varias gotas de aceite al ill-
tro; exprima el filtro para distribuir el
aceite.
6. Reinstale las piezas.
Boton
Filtro de aire
3. Limpie todo el aceite derramado en
la recortadora.
4. Llene el motor con aceite (vea
AGREGUE ACEITE en la secci6n
uso).
5. Vuelva a poner la varilla medidora
de aceite. Apriete firmemente.
LIMPIE EL FILTRO DEL AIRE
Los filtros de aire sucios disminuyen la
vida Otil y el rendimiento del motor e
incrementan el consumo de combus-
tible y de emiciones nocivas. Limpie
siempre el filtro de aire despu@s de
cada 8 horas de use. Limpie con may-
or frecuencia bajo condiciones de mu-
cho polvo, o cuando se presenten tou-
ches desechos en el aire. Cambiar el
filtro de aire si es muy sucio.
1. Limpie la tapa y el _.rea alrededor
de la tapa para evitar que caiga su-
ciedad o desechos en el carbura-
dor cuando se saque la tapa.
AVlSO: Mueva la palanca roja del ce-
bador a FULL CHOKE antes de remueva
los componentes.
2. Retire las piezas presionando el
bot6n para aflojar la tapa del filtro
de aire.
AVlSO: Para evitar peligro de incendio
y de emiciones evaporativas nocivas, no
limpie el filtro de aire con gasolina ni cu-
alquier otto solvente inflamable.
Tapa del
Filtro de Aire
INSPECCIONE EL SILENCIADOR Y
LA REJILLA ANTICHISPAS
A medida que se use el aparato, el silen-
ciador y la rejilla antichispas se van car-
bonizando. Para el uso normal del due_o
de la casa, sin embargo, el silenciador y la
rejilla antichispa no requerir_.n ningQn
servicio. Despu@s de 50 horas de uso,
recomendamos que al silenciador y la
rejilla antichispa se le de servicio o sea
substituido pot un Centro de Servicio
Sears.
CAMBIE LA BUJIA
Deber@.cambiarse la bujia anualmente
para asegurar que el motor arranque
to. Ajuste la separaci6n de los electro-
dos a 0,6 mm (0,025 de pulgada). El
encendido es fijo e inalterable.
1. Gire y saque la cubierta de la
bujia.
2. Retire la bujia del cilindro y des@-
chela.
3. C_.mbiela por una bujia Champion
RDJ-7Y y ajuste firmemente la
bujia nueva con una Ilave de cubo
de 15 mm (5/8 de pulgada).
4. Instale nuevamente la cubierta de
la bujia.
REEMPLAZO DE LA LINEA EN EL
CABEZAL DE CORTE DE LiNEA
FIJA
• Use siempre linea de recambio
Craftsman.
Elija el tama_o de la linea que mejor se
adapte al trabajo que va a realizar. Los
cortar hierba y peque_as malas hierbas.
Los linea negros est_.n dise_iados para
cortar malas hierbas de mayor tamaSo y
peque_os arbustos.
AVlSO: Antes de colocar el linea en
los agujeros del cabezal de corte,
identifique y aseg_rese de cu_.les son
los apropiados. Siga las direcciones
que est_.n en la placa de deslizamien-
to de la linea.
43
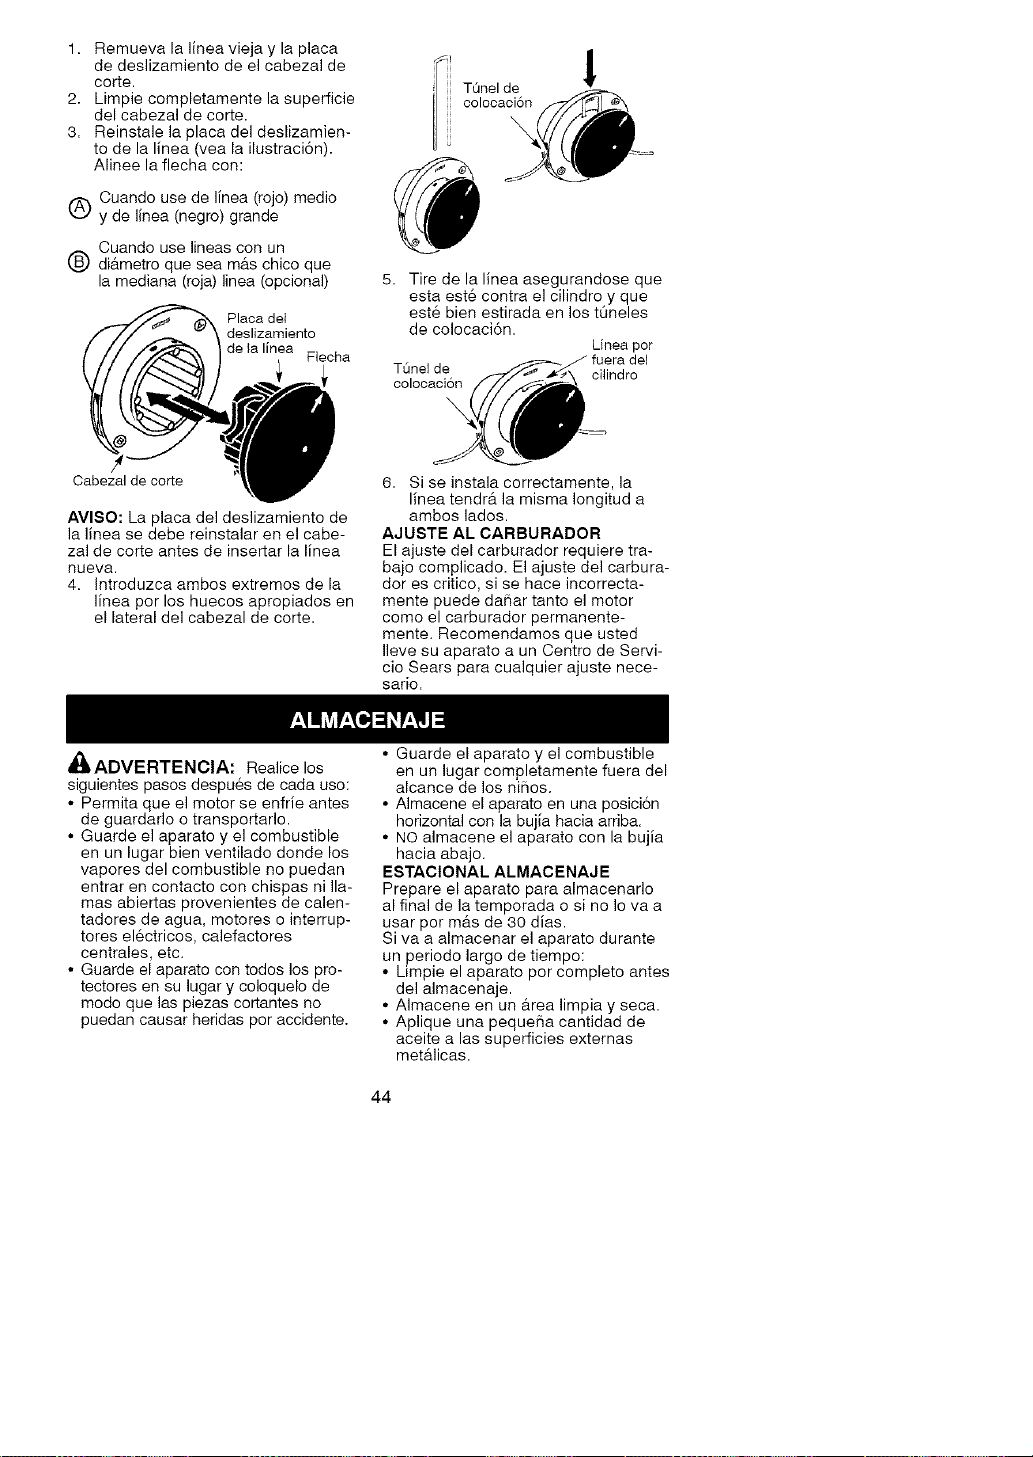
1. Remuevalalineaviejaylaplaca
dedeslizamientodeelcabezalde
corte.
2. Limpiecompletamentelasuperficie
delcabezaldecorte.
3. Reinstalelaplacadeldeslizamien-
todelalinea(vealailustraci6n).
Alineelaflechacon:
Cuandousedelinea(rojo)medio
ydelinea(negro)grande
Cuandouselineasconun
(_ di&metroqueseam&schicoque
lamediana(roja)linea(opcional)
Placa deI
deslizamiento
de la linea
Flecha
I" TOnel de !
colocacion
5. Tire de la linea asegurandose que
esta est6 contra el cilindro y que
est6 bien estirada en los tOneles
de colocaci6n.
Linea por
TQnelde cilindro
colocacion
\
Cabezalde co_e
AVlSO: La placa del deslizamiento de
la linea se debe reinstalar en el cabe-
zal de corte antes de insertar la linea
nueva.
4. Introduzca ambos extremos de la
linea per los huecos apropiados en
el lateral del cabezal de corte.
6. Si se instala correctamente, la
linea tendr& la misma Iongitud a
ambos lados.
AJUSTE AL CARBURADOR
El ajuste del carburador requiere tra-
bajo complicado. El ajuste del carbura-
dor es critico, si se hace incorrecta-
mente puede daBar tanto el motor
como el carburador permanente-
mente. Recomendamos que usted
Ileve su aparato a un Centro de Servi-
cio Sears para cualquier ajuste nece-
sario.
_ADVERTENCIA: Realice los
siguientes pasos despu6s de cada uso:
• Permita que el motor se enfrie antes
de guardado o transportarlo.
• Guarde el aparato y el combustible
en un lugar bien ventilado donde los
vapores del combustible no puedan
entrar en contacto con chispas ni lla-
mas abiertas provenientes de calen-
tadores de agua, motores o interrup-
tores electricos, calefactores
centrales, etc.
• Guarde el aparato con todos los pro-
tectores en su lugar y coloquelo de
mode que las piezas cortantes no
puedan causar heridas por accidente.
• Guarde el aparato y el combustible
en un lugar completamente fuera del
alcance de los niflos.
• AImacene el aparato en una posici6n
horizontal con la bujia hacia arriba.
• NO almacene el aparato con la bujia
hacia abajo.
ESTACIONAL ALMACENAJE
Prepare el aparato para almacenarlo
al final de la temporada o si no Io va a
usar por m&s de 30 dias.
Siva a almacenar el aparato durante
un periodo largo de tiempo:
• Limpie el aparato por complete antes
del almacenaje.
• AImacene en un &rea limpia y seca.
• Aplique una peque_a cantidad de
aceite alas superficies externas
met&licas.
44
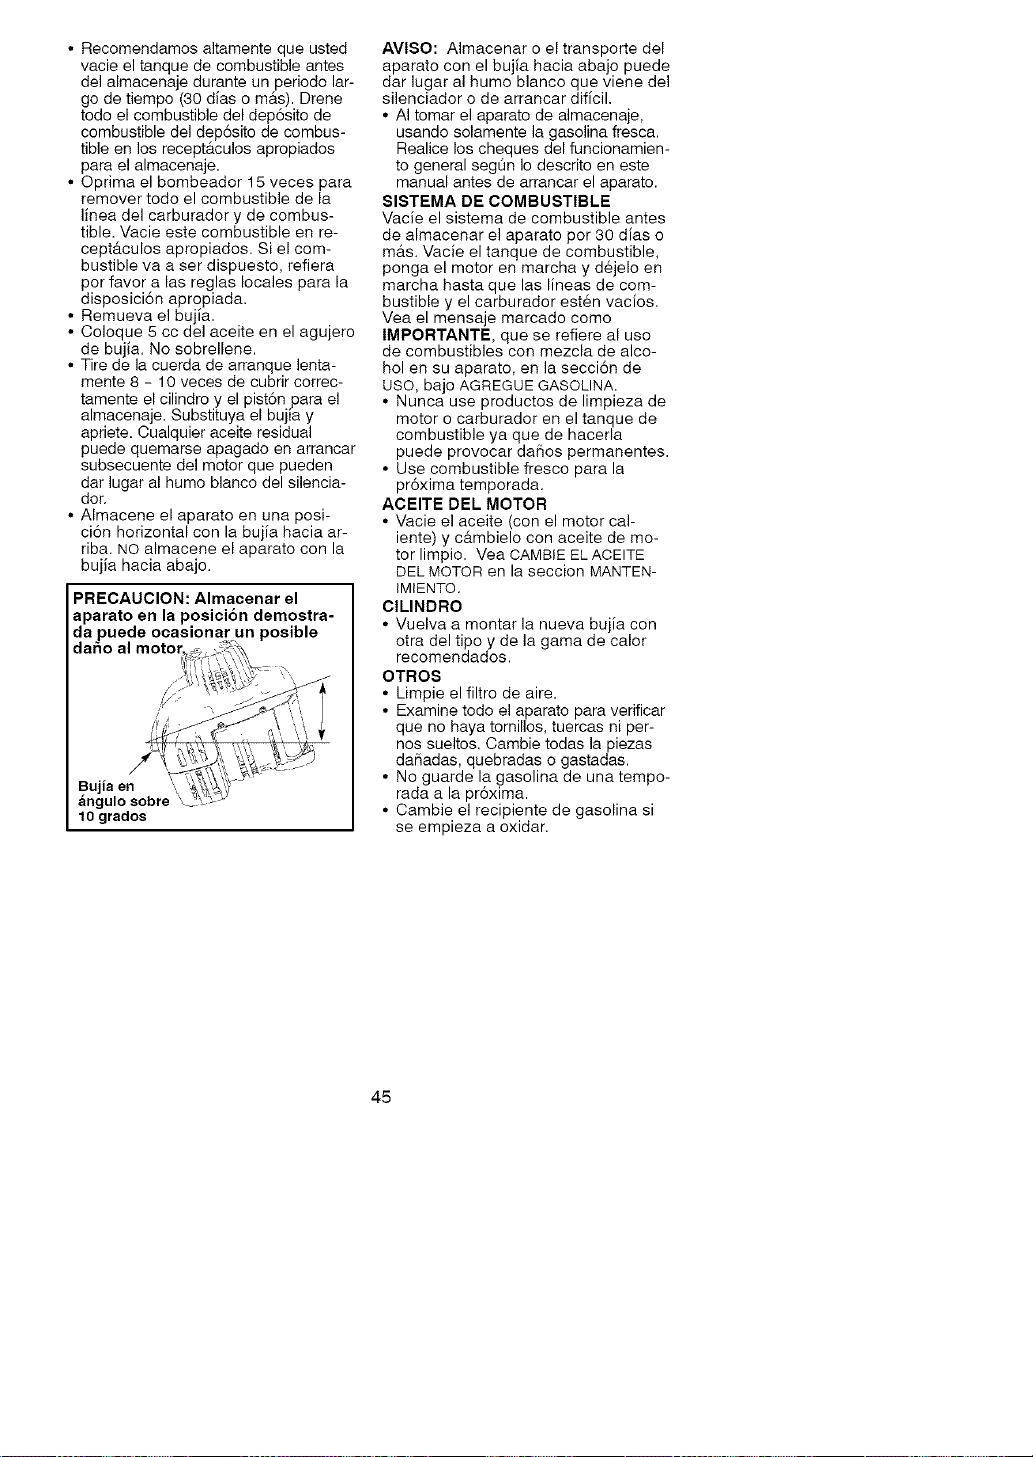
• Recomendamos altamente que usted
vacie el tanque de combustible antes
del almacenaje durante un periodo lar-
go de tiempo (30 dias o m_.s). Drene
todo el combustible del dep6sito de
combustible del dep6sito de combus-
tible en los recept_.culos apropiados
para el almacenaje.
• Oprima el bombeador 15 veces para
remover todo el combustible de la
linea del carburador y de combus-
tible. Vacie este combustible en re-
cept_tculos apropiados. Si el com-
bustible va a ser dispuesto, refiera
par favor alas reglas locales para la
disposici6n apropiada.
• Remueva el bujia.
• Coloque 5 cc del aceite en el agujero
de bujia. No sobrellene.
• Tire de la cuerda de arranque lenta-
mente 8 - 10 veces de cubrir correc-
tamente el cilindro y el pist6n para el
almacenaje. Substituya el bujia y
apriete. Cualquier aceite residual
puede quemarse apagado en arrancar
subsecuente de1 motor que pueden
dar lugar al humo blanco del silencia-
dot.
• Almacene el aparato en una posi-
ci6n horizontal con la bujia hacia ar-
riba. NO almacene el aparato con la
bujia hacia abajo.
PRECAUCION: Almacenar el
aparato en la posicion demostra-
da puede ocasionar un posible
daflo al motoJ
Bujia en ',
angulo sobre
10 grados
AVlSO: AImacenar o el transporte del
aparato con el bujia hacia abajo puede
dar lugar al humo blanco que viene del
silenciador o de arrancar dificil.
• AI tomar el aparato de almacenaje,
usando solamente la gasolina fresca.
Realice los cheques del funcionamien-
to general segOn Io descrito en este
manual antes de arrancar el aparato.
SISTEMA DE COMBUSTIBLE
Vacie el sistema de combustible antes
de almacenar el aparato par 30 dias o
m_ts. Vacie el tanque de combustible,
ponga el motor en marcha y d6jelo en
marcha hasta que las lineas de com-
bustible y el carburador est6n vacios.
Yea el mensaje marcado come
IMPORTANTE, que se refiere al usa
de combustibles con mezcla de alco-
hol en su aparato, en la secci6n de
uso, bajo AGREGUE GASOLINA.
• Nunca use productos de limpieza de
motor o carburador en el tanque de
combustible ya que de hacerla
puede provocar daSos permanentes.
• Use combustible fresco para la
pr6xima temporada.
ACEITE DEL MOTOR
• Vacie el aceite (con el motor cal-
iente) y c_.mbielo con aceite de mo-
tor limpio. Vea CAMBIE ELACEITE
DEL MOTOR en la seccion MANTEN-
IMIENTQ.
CILINDRO
• Vuelva a montar la nueva bujia con
otra del tipo y de la gama de calor
recomendados.
OTROS
• Limpie el filtro de aire.
• Examine todo el aparato para verificar
que no haya tornillos, tuercas ni per-
nos sueltos. Cambie todas la piezas
da_adas, quebradas o gastadas.
• No guarde la gasolina de una tempo-
rada a la pr6xima.
• Cambie el recipiente de gasolina si
se empieza a oxidar.
45
TABLA DIAGNOSTICA
ADVERTENCIA: Siempre apague el aparato y desconecte la bujia antes
de hacer cualquiera de las reparaciones recomendadas a continuaci6n que
SINTOMA
El motor no
arranoa.
El motor no
anda en
marcha lenta
como debe.
El motor no
acelera, le
falta
potencia o
se para bajo
carga.
El motor
humea
exoesiva-
mente.
no requieran que el aparato funcionar.
CAUSA
1. El interruptor ON/OFF ester
en posici6n OFR
2. Filtro de aire sucio.
3. El tanque de combustible
est#t vacio.
4. Combustible rancio.
5. Agua en el combustible.
6. Alambre de la bujia
desconectado.
7. La bujia no est#t haciendo
chispa.
8. El combustible no ester
Ilegando al carburador.
9. Aire en lineas de
combustible.
1. Palanca del cebador en la
posici6n FULL CHOKE.
2. EI carburador requier
ajuste.
3. Combustible rancio.
4. Las lunas del cigueSal
est_tn gastadas.
5. La compresi6n est&. baja.
1. El filtro de aire estA sucio.
2. La bujia ester carbonizada.
3. Palanca del cebador en la
posicion FULL CHOKE.
4. Combustible rancio.
5. El carburador requiere
ajuste.
6. Acumulacion de carb6n.
7. Demasiado aceite en el
motor.
8. Motor no permitido catentar
en una temperatura frio.
9. Linea del corte montada
incorrectamente o la Iongi-
tud de la linea es incorrect&
1. El filtro de aire estA sucio.
2. Demasiado aceite en el
motor.
3. Migraci6n del aceite
causada por el almacenaje
o el transporte incorrecto.
SOLUCION
1. Cotoque el interruptor ON/OCC a la
posici6n ON.
2. Umpie o cambie el filtro de aire.
3. Uene el tanque de combustible.
4. Drene el tanque de combustible
y vuelva a Ilernarlo con combustible
limpio y nuevo.
5. Drene el tanque de combustible y el
carburador y vuelva a Ilenar el tanque
de combustible con gasolina nueva.
6. Contecte el alambre a la bujia.
7. Instale una bujia nueva.
8. Verifique si el filtro de combustible no
este sucio; cAmbieto. Verifique si hay
dobleces en la linea de combustible
o si estA partida; reparela o c&.mbiela.
9. Oprima bombeador para remueva
el aire de lineas de combustible.
1. Mueva la palanca del cebador a
OFF CHOKE.
2. Vea "Ajuste al Carburador" en la
secci6n Servicio y Ajustes.
3. Drene el tanque de combustible
y vuelva a Ilernarlo con combustible
limpio y nuevo
4. Entre en contacto con el Servicio
Sears (vea parte trasera del manual).
5. Entre en contacto con el Servicio
Sears (vea parte trasera del manual).
1. Umpie o cambie el filtro de aire.
2. Umpie o cambie la bujia y calibre
la separaci6n.
3. Mueva la palanca del cebador a
OFF CHOKE.
4. Drene el tanque de combustible
y vuelva a Ilernarlo con combustible
limpio y nuevo.
5. Vea "Ajuste al Carburador" en la
secci6n Servicio y Ajustes.
6. Entre en contacto con el Servicio
Sears (vea parte trasera del manual).
7. Verifique el nivel del aceite.
8. Opere el aparato por un tiempo m_ts
largo.
9. Verifique el montaje y la Iongitud de
la linea.
1. Umpie o cambie el filtro de aire.
2. Verifique el nivel del aceite.
Permita que el aparato siente 24 horas
en la posici6n de almacenaje correcta,
o remueva el bujia, tire de la cuerda de
arranque 2 - 3 veoes, entonces re-
instale et bujia. Tire de la cuerda hasta
que el motor arranoa.
46
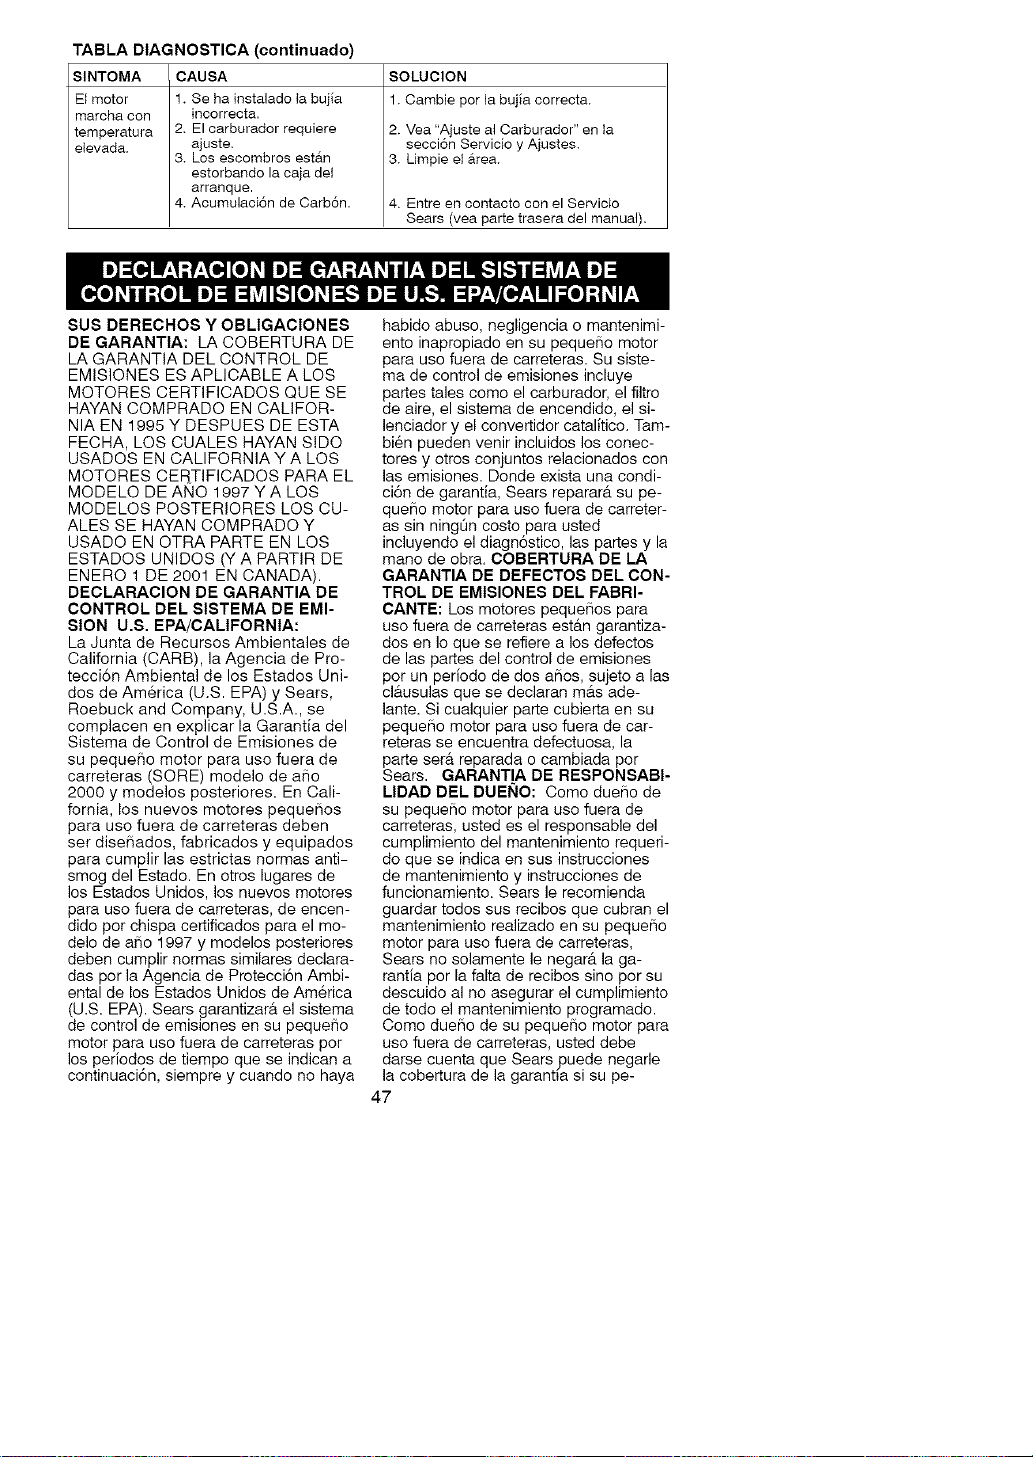
SlNTOMA
El motor
marcha con
temperatura
elevada>
TABLA DIAGNOSTICA (continuado)
CAUSA
1. Se ha instalado ta bujia
inoorreota.
2> El carburador requiere
ajuste>
3. Los escombros estan
estorbando la caja del
arranque.
4. Acumulaci6n de Carb6n.
SOLUCION
1. Cambie por la bujia correcta,
2. Vea "Ajuste al Carburador" en la
secci6n Servicio y Ajustes.
3. Umpie el Area.
4. Entre en contacto con el Servicio
Sears (vea parte trasera del manual).
SUS DERECHOS Y OBLIGAClONES
DE GARANTIA: LA COBERTURA DE
LA GARANTIA DEL CONTROL DE
EMISIONES ES APLICABLE A LOS
MOTORES CERTIFICADOS QUE SE
HAYAN COMPRADO EN CALIFOR-
NIA EN 1995 Y DESPUES DE ESTA
FECHA, LOS CUALES HAYAN SIDO
USADOS EN CALIFORNIA Y A LOS
MOTORES CERTIFICADOS PARA EL
MODELO DE ANO 1997 YA LOS
MODELOS POSTERIORES LOS CU-
ALES SE HAYAN COMPRADO Y
USADO EN OTRA PARTE EN LOS
ESTADOS UNIDOS (Y A PARTIR DE
ENERO 1 DE 2001 EN CANADA).
DECLARACION DE GARANTIA DE
CONTROL DEL SlSTEMA DE EMI-
SlON U.S. EPA/CALIFORNIA:
La Junta de Recursos Ambientales de
California (CARB), la Agencia de Pro-
tecci6n Ambiental de los Estados Uni-
dos de Am6rica (U.S. EPA) y Sears,
Roebuck and Company, U.S.A., se
complacen en explicar la Garantfa del
Sistema de Control de Emisiones de
su pequeSo motor para uso fuera de
carreteras (SORE) modelo de at_o
2000 y modelos posteriores. En Cali-
fornia, los nuevos motores pequef_os
para uso fuera de carreteras deben
set diseSados, fabricados y equipados
para cumplir las estrictas normas anti-
smog del Estado. En otros lugares de
los Estados Unidos, los nuevos motores
para uso fuera de carreteras, de encen-
dido por chispa certificados para el mo-
delo de aSo 1997 y modelos posteriores
deben cumplir normas similares declara-
das pot la Agencia de Protecci6n Ambi-
ental de los Estados Unidos de Am6rica
(U.S. EPA). Sears garantizar& el sistema
de control de emisiones en su pequeSo
motor para uso fuera de carreteras por
los perfodos de tiempo que se indican a
continuaci6n, siempre y cuando no haya
habido abuso, negligencia o mantenimi-
ento inapropiado en su pequeSo motor
para uso fuera de carreteras. Su siste-
ma de control de emisiones incluye
partes tales como el carburador, el filtro
de aire, el sistema de encendido, el si-
lenciador y el convertidor catalftico. Tam-
bi6n pueden venir incluidos los conec-
tores y otros conjuntos relacionados con
las emisiones. Donde exista una condi-
ci6n de garantia, Sears reparar& su pe-
queSo motor para uso fuera de carreter-
as sin ningOn costo para usted
incluyendo el diagn6stico, las partes y la
mano de obra. COBERTURA DE LA
GARANTIA DE DEFECTOS DEL CON-
TROL DE EMISlONES DEL FABRI-
CANTE: Los motores pequeSos para
uso fuera de carreteras est&n garantiza-
dos en Io que se refiere a los defectos
de las partes del control de emisiones
por un perfodo de dos ahos, sujeto alas
cl&usulas que se declaran m&s ade-
lante. Si cualquier parte cubierta en su
peque#io motor para uso fuera de car-
reteras se encuentra defectuosa, la
parte set& reparada o cambiada por
Sears. GARANTIA DE RESPONSABI-
LIDAD DEL DUEI_IO: Como dueho de
su pequeho motor para uso fuera de
carreteras, usted es el responsable del
cumplimiento del mantenimiento requeri-
do que se indica en sus instrucciones
de mantenimiento y instrucciones de
funcionamiento. Sears le recomienda
guardar todos sus recibos que cubran el
mantenimiento realizado en su pequef_o
motor para uso fuera de carreteras,
Sears no solamente le negarA la ga-
rantfa pot la falta de recibos sino pot su
descuido al no asegurar el cumplimiento
de todo el mantenimiento programado.
Como dueho de su pequeSo motor para
uso fuera de carreteras, usted debe
darse cuenta que Sears puede negarle
la cobertura de la garantia si su pe-
47
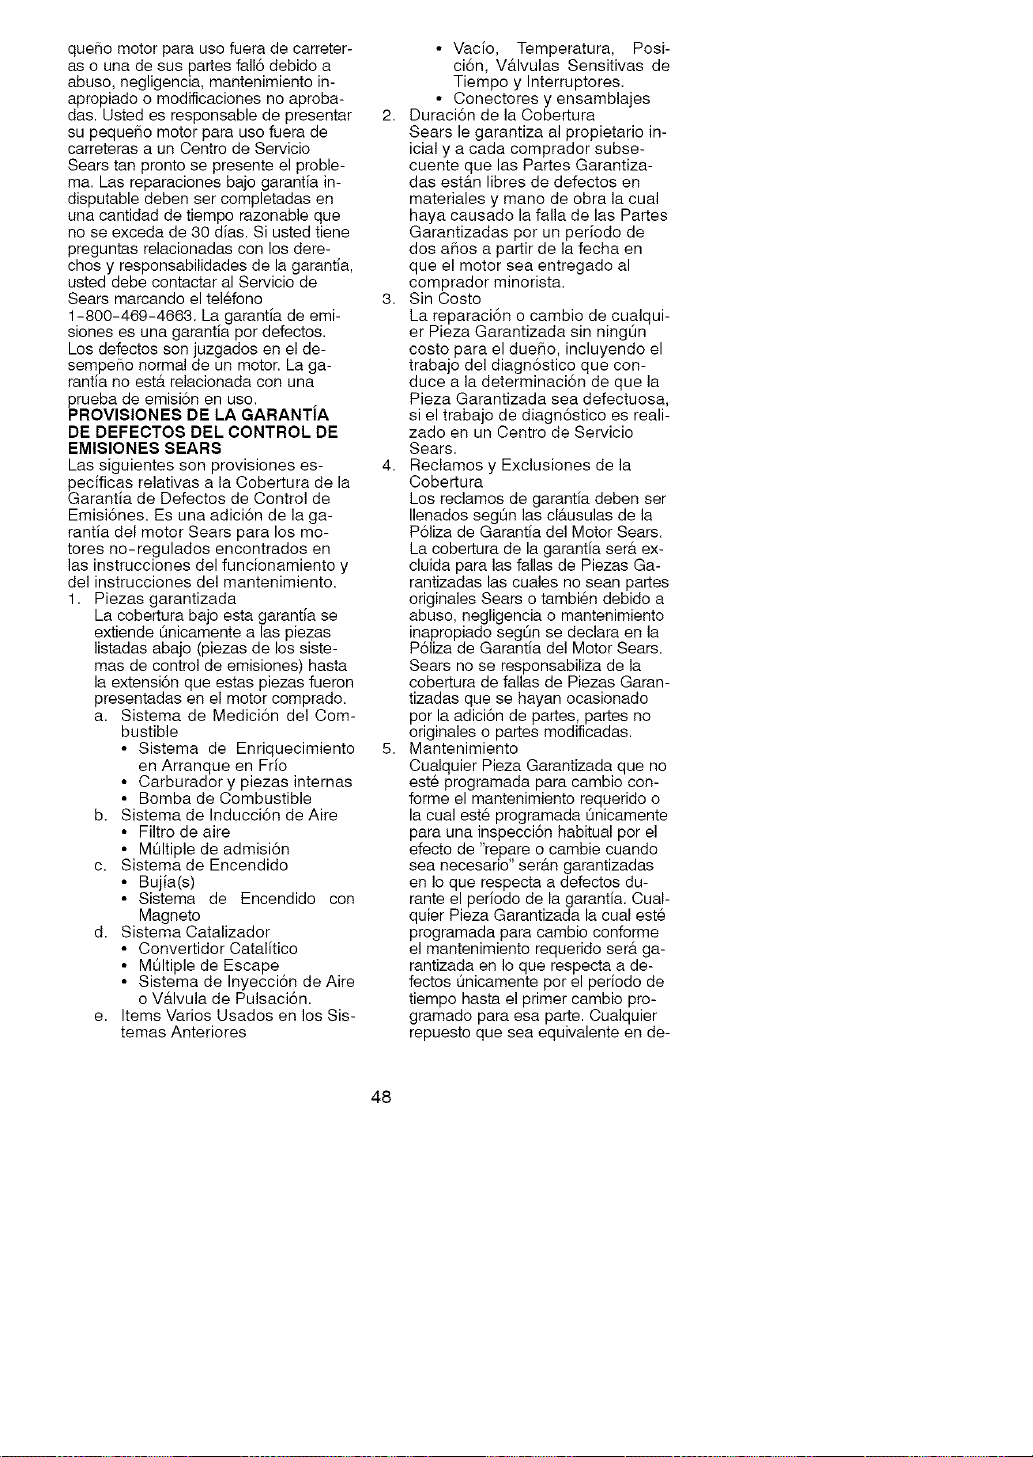
queSomotorparausefueradecarreter-
asounadesuspartesfall6debidoa
abuse,negligencia,mantenimientoin-
apropiadoomodificacionesnoaproba-
das.Ustedesresponsabledepresentar
supequeSomotorparausefuerade
carreterasaunCentrodeServicio
Searstanprontosepresenteelproble-
ma.Lasreparacionesbajogarantiain-
disputabledebensercompletadasen
unacantidaddetiemporazonableque
noseexcedade30dias.Siustedtiene
preguntasrelacionadasconlosdere-
chosyresponsabilidadesdelagarantia,
usteddebecontactaralServiciode
Searsmarcandoeltel6fono
1-800-469-4663.Lagarantiadeemi-
sionesesunagarantiaperdefectos.
Losdefectossonjuzgadosenelde-
sempe_onormaldeunmotor.Laga-
rantianoest,.relacionadaconuna
pruebadeemisi6nenuse.
PROVISIONES DE LA GARANTiA
DE DEFECTOS DEL CONTROL DE
EMISIONES SEARS
Las siguientes son provisiones es-
pecificas relativas a la Cobertura de la
Garantia de Defectos de Control de
Emisi6nes. Es una adici6n de la ga-
rantia del motor Sears para los mo-
tores no-regulados encontrados en
las instrucciones del funcionamiento y
del instrucciones del mantenimiento.
1. Piezas garantizada
La cobertura bajo esta garantia se
extiende 0nicamente alas piezas
listadas abajo (piezas de los siste-
mas de control de emisiones) hasta
la extensi6n que estas piezas fueron
presentadas en el motor comprado.
a. Sistema de Medici6n del Com-
bustible
• Sistema de Enriquecimiento
en Arranque en Frio
• Carburador y piezas internas
• Bomba de Combustible
b. Sistema de Inducci6n de Aire
• Filtro de aire
• MOltiple de admisi6n
c. Sistema de Encendido
• Bujia(s)
• Sistema de Encendido con
Magneto
d. Sistema Catalizador
• Convertidor Catalitico
• M_ltiple de Escape
• Sistema de Inyecci6n de Aire
o V_.lvula de Pulsaci6n.
e. Items Varios Usados en los Sis-
temas Anteriores
• Vac[o, Temperatura, Posi-
ci6n, V_tlvulas Sensitivas de
Tiempo y Interruptores.
• Conectores y ensamblajes
2. Duraci6n de la Cobertura
Sears le garantiza al propietario in-
icial y a cada comprador subse-
cuente que las Partes Garantiza-
das est_.n libres de defectos en
materiales y mano de obra la cual
haya causado la falla de las Partes
Garantizadas pot un periodo de
dos aSos a partir de la fecha en
que el motor sea entregado al
comprador minorista.
3. Sin Costo
La reparaci6n o cambio de cualqui-
er Pieza Garantizada sin ning0n
costo para el due_o, incluyendo el
trabajo del diagn6stico que con-
duce a la determinaci6n de que la
Pieza Garantizada sea defectuosa,
si el trabajo de diagn6stico es reali-
zado en un Centro de Servicio
Sears.
4. Reclamos y Exclusiones de la
Cobertura
Los reclamos de garantia deben ser
Ilenados segOn las cl_.usulas de la
P61iza de Garantia del Motor Sears.
La cobertura de la garantia ser_. ex-
cluida para las fallas de Piezas Ga-
rantizadas las cuales no sean partes
originales Sears o tambi6n debido a
abuse, negligencia o mantenimiento
inapropiado segOn se declara en la
P61iza de Garantia del Motor Sears.
Sears no se responsabiliza de la
cobertura de fallas de Piezas Garan-
tizadas que se hayan ocasionado
per la adici6n de partes, partes no
originales o partes modificadas.
5. Mantenimiento
Cualquier Pieza Garantizada que no
este programada para cambio con-
forme el mantenimiento requerido o
la cual est6 programada Onicamente
para una inspecci6n habitual por el
efecto de "repare o cambie cuando
sea necesario" ser_.n garantizadas
en Io que respecta a defectos du-
rante el periodo de la garantia. Cual-
quier Pieza Garantizada la cual este
programada para cambio conforme
el mantenimiento requerido ser_. ga-
rantizada en Io que respecta a de-
fectos Onicamente por el periodo de
tiempo hasta el primer cambio pro-
gramado para esa parte. Cualquier
repuesto que sea equivalente en de-
48
sempe_o y durabilidad puede ser
usado en la realizaci6n de cualquier
mantenimiento o reparaci6n. El
due_o es responsable del cumpli-
miento de todo el mantenimiento re-
querido,como ester definido en las
instrucciones de funcionamiento y
instrucciones de mantenimiento.
6. Cobertura Consecuente
La cobertura aqui descrita se ex-
tender,, a la falla de cualquiera de
los componentes del motor que se
haya ocasionado por la falla de cu-
alquier Pieza Garantizada que aQn
se encuentre bajo garantia.
En los Estados Unidos y el Canada.,
un telefono de ayuda al consumidor de
24 horas,1-800-469-4663, tiene un
menQ de los mensajes previos de an-
temano que le ofrecen la informaci6n
del mantenimiento del motor.
BUSQUE LA INFORMACION RELEVANTE DEL PERIODO DE LA DURABILI-
DAD DE LAS EMISIONES Y DEL INDICE DEL AIRE EN LA ETIQUETA
DE LAS EMISIONES DEL MOTOR
Los motores que se certifican para cum-
plir con los requisitos de las emisiones
de la Tier 2 de la Junta de Recursos
Ambientales de California (CARB) de-
ben dar informaci6n de visualizaci6n
con respecto al el periodo de la durabili-
dad de las emisiones e indice del aire.
Sears hace posible esta informaci6n dis-
ponible al consumidor en nuestras eti-
quetas yen la etiqueta colgante. El Per-
iodo de la Durabilidad de las
Emisiones describe el n_mero de las
horas de marcha actual para las cuales
el motor se certifica para set aprovado
por las emisiones de conformidad, man-
tenimiento apropiado de acuerdo con
las instrucciones del funcionamiento e
instrucciones de mantenimiento. Se utili-
zan las categorias siguientes:
Moderado: El motor esta certifica y
satisface los requisitos de emisi6n
para el uso de 50 horas de marcha ac-
tual.
Intermedio: El motor esta certifica y
satisface los requisitos de emisi6n
para el uso de 125 horas de marcha
actual.
Extendido: El motor esta certifica y
satisface los requisitos de emisi6n
para el uso de 300 horas de marcha
actual.
Por ejemplo, un recortadora comun el
consumidor la utiliza entre 5 a 10 ho-
ras por a_o. Por Io tanto, el periodo de
la durabilidad de las emisiones de un
motor con un grado moderado se
compararia a 5 a 6 a_os.
El indice del aire es un nOmero calcu-
lado que describe el nivel relativo de
las emisiones especificas de algunos
motores comunes. Cuanto m&s bajo
es el indice del aire, mas limpio esta
el motor. Esta informaci6n de emi-
siones se visualiza en forma gr&fica en
las etiquetas y en la etiqueta colgante.
DESPUES DEL EL 1 DE JULIO DEL
2000, BUSQUE EL PERIODO DE LA
CONFORMIDAD DE LAS EMI-
SIONES DEL MOTOR EN LA ETI-
QUETA
Despu6s del 1 de Julio del 2000, al-
gunos motores de la marca Craftsman
ser_.n certificados para satisfacer los
requisitos de las emisiones de la
Clase IV de la Fase 2 de la Agencia
de Protecci6n Ambietal de los Estados
Unidos (los U.S. EPA). Para motores
certificados de la Clase IV, Fase 2, el
Periodo de la Conformidad de las
Emisiones esta referido en la etiqueta
de la conformidad e indica el nOmero
de las horas de funcionamiento para
las cuales el motor se ha aprovado
para rsatisfacer los requisitos feder-
ales de la emisi6n. Para los motores
iguales o mayor de 20 cc, y menos de
50 cc del cilindro del motor, categoria
C = 50 horas, B = 125 horas, y A =
300 horas.
El cilindro del motor de la serie mode-
Io 21000 son de 34 cc, los 21100 son
de 40 cc.
49

Esta es una representaci6n
gen6rica de una etiqueta
de emisiones tipicamente
encontrada en un motor
certificado:
Se certifica este motor para satisfacer los requisitos de emisi6n para los uso
siguientes:
[] Moderado (50 horas)
[] Intermedio (125 horas)
[] Extendido (300 horas)
50