___ Operator's Manual
CRFIFTSMFIN
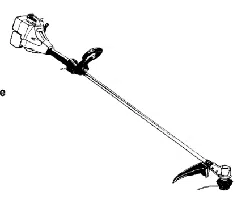
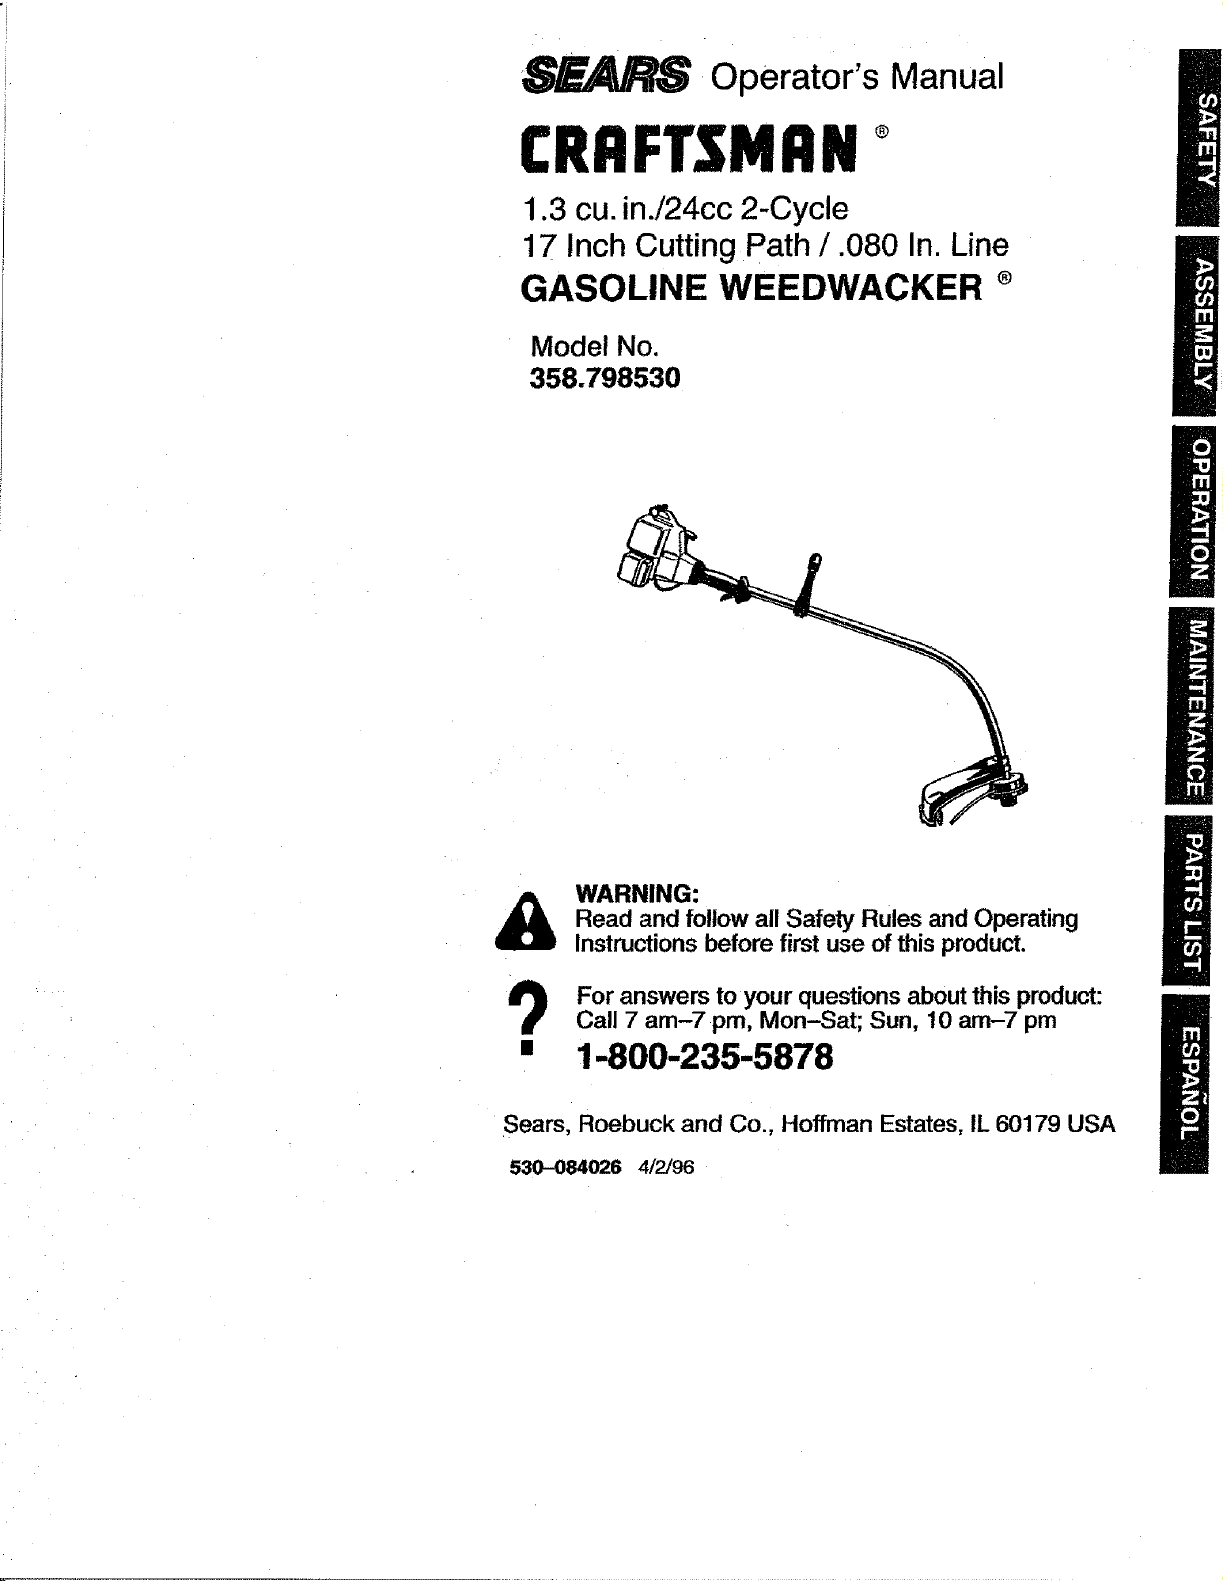
1.3 cu. in./24cc 2-Cycle
17 Inch Cutting Path / .080 In. Line
GASOLINE WEEDWACKER ®
Model No.
358.798530
&
WARNING:
Read and follow all Safety Rules and Operating
Instructions before first use of this product.
For answers to your questions about this product:
Call 7 am-7 pm, Mon-Sat; Sun, 10 am-7 pm
1-800-235-5878
Sears, Roebuck and Co., Hoffman Estates, IL 60179 USA
530-084026 4/2/96
Warranty Statement 2 Service & Adjustments 10
Safety Rules 2 Storage 11
Assembly 4 Troubleshooting Chart 12
Operation 5 Spanish 16
Maintenance 9 Parts and Ordering Back
FULL ONE YEAR WARRANTY ON CRAFTSMAN GAS POWERED
WEEDWACKER ® LINE TRIMMER.
For one year from the date of purchase, when this Craftsman Gas Powered
Weedwacker® Line Trimmer is maintained, lubricated, and tuned up according to
the operating and maintenance instructions in the Operator's Manual, Sears will
repair, free of charge, any defect in matedals or workmanship.
This warranty exctudes nylon line, spark plug, and air filter, which are expendable
parts and become worn during normal use.
If this Weedwacker® Line Trimmer is used for commercial purposes, this warran-
ty applies for only g0 days from the date of purchase. If this Weedwacker® Line
Trimmer is used for rental purposes, this warranty applies for only 30 days from
the date of purchase. This warranty applies only while this product is in use in the
United States.
WARRANTY SERVICE tSAVAILABLEBY RETURNING THE WEEDWACKER® UNE
TRIMMER TO THE NEARESTSEARS SERVICECENTER INTHE UNITEDSTATES.
This warranty gives you specific legal rights, and you may also have other rights
which vary from state to state.
Sears, Roebuck and Co. D/817 WA Hoffman Estates, IL 60179
WARNING: When using gardening
appliances, basic safety precautions
must always be followed to reduce the
risk of fire and serious injury. Read and
follow al! instructions.
This power unit can be dangerous!
Operator is responsible for following
instructions and warnings on unit and
in manual. Read entire Operator's
Manual before using unit! Be thorough-
ly familiar with the controls and the
proper use of the unit. Restrict the use
of this unit to persons who have read,
understand, and will follow the instruc-
tions and warnings on the unit and in
the manual. Never allow children to
operate this unit.
Safetyinformationonthe unit
DANGER: Never use blades or flail-
ing devices. This unit is designed for
line trimmer use only. Use of any other
accessories or attachments will in-
crease the risk of injury.
@@@
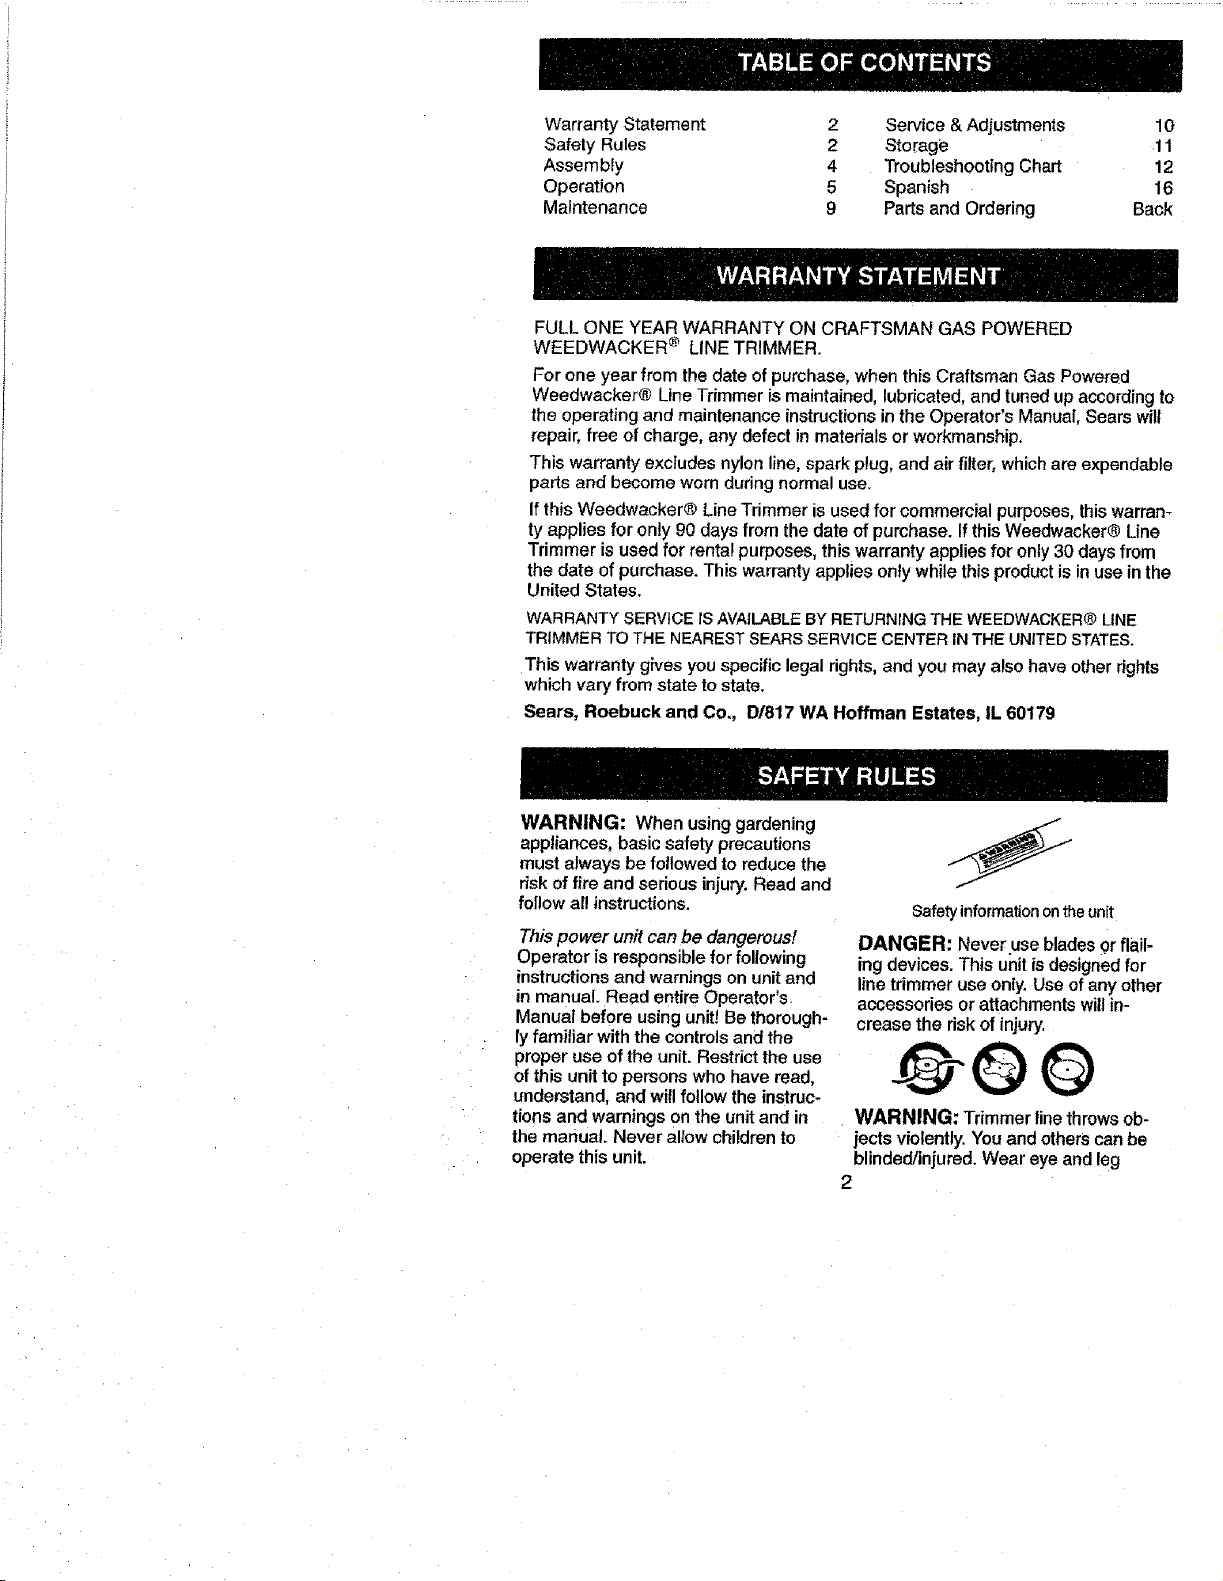
WARNING: Trimmerline throwsob-
jects violently. Youand otherscanbe
blinded/injured.Weareye andleg
2
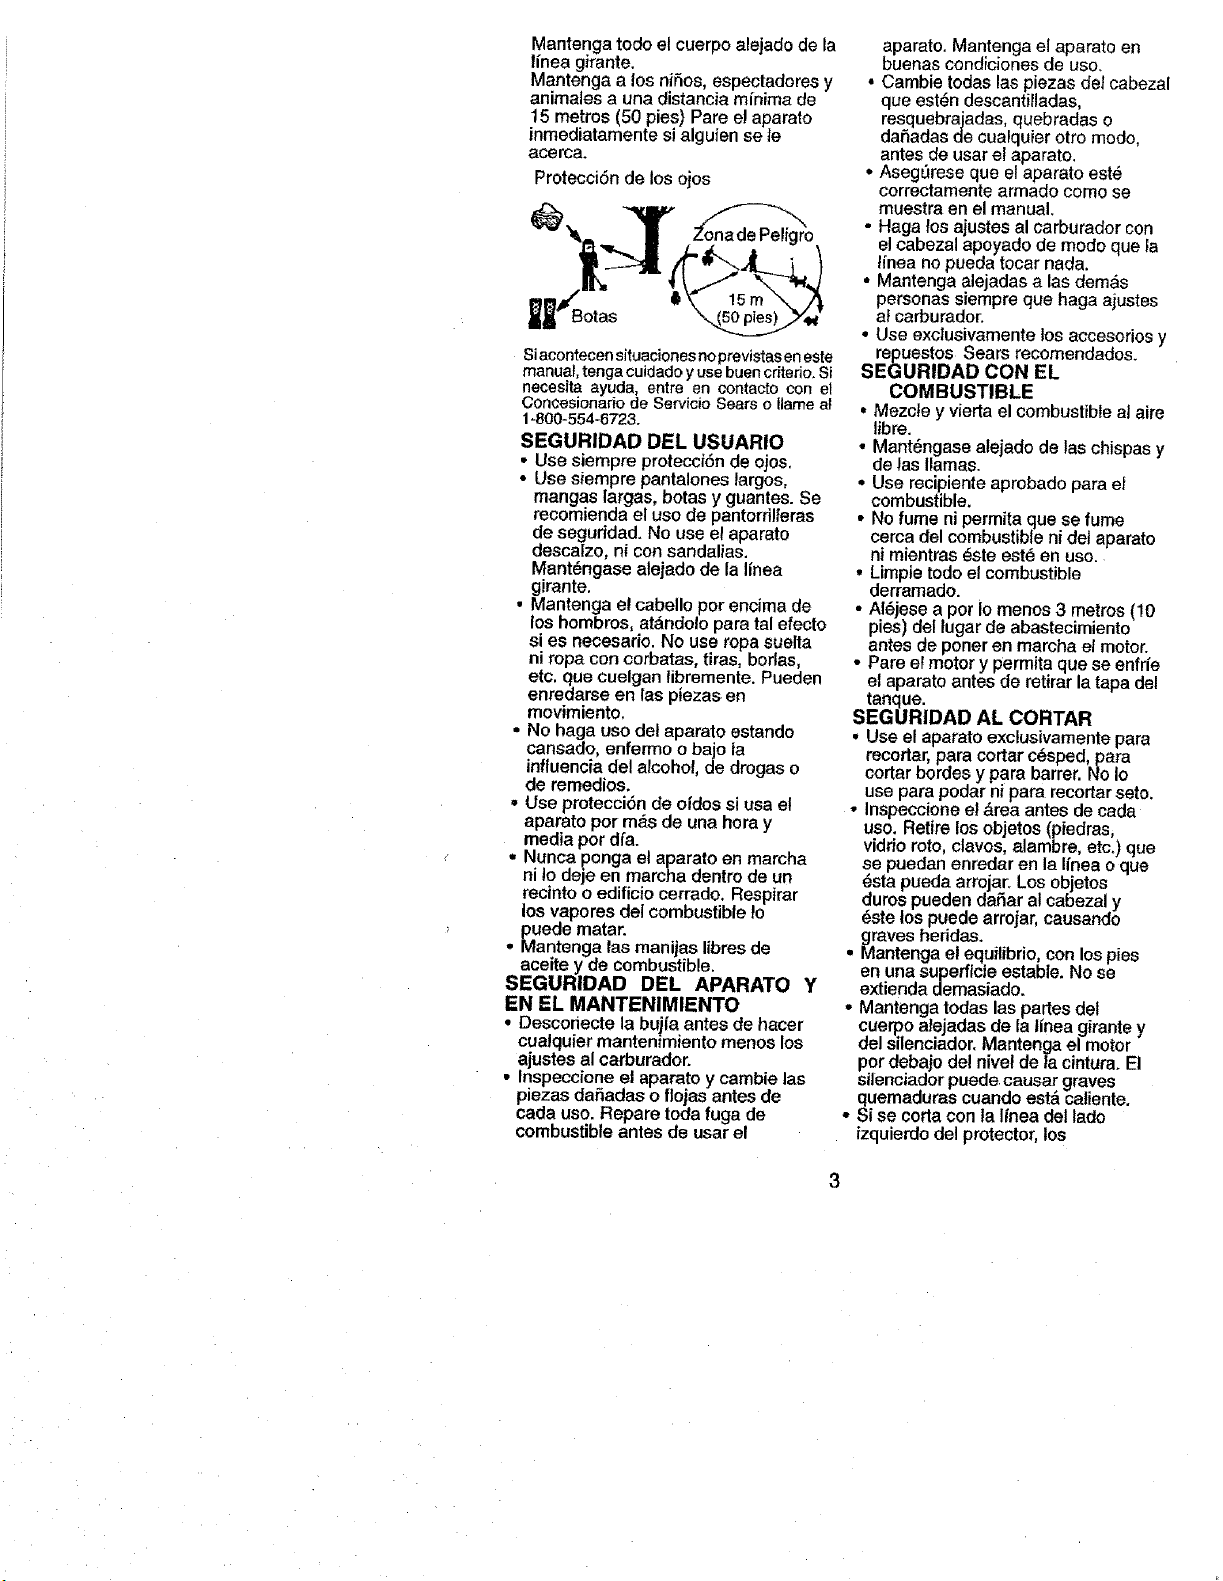
protection. Keep body parts clear of
rotating line. Keep chitdren, bystand-
ers, and animals 50 feet (15 meters)
away. If approached stop unit immedi-
ately.
If situations occur which are not
covered in this manual, use care and
good judgement. If you need
assistance, contact your Authorized
Service Dealer or ca!l 1-800-235-5878.
OPERATOR SAFETY
• Always wear safety eye protection.
• Always wear long pants, long
sleeves, boots, and gloves. Wearing
safety leg guards is recommended.
Do not go barefoot or wear sandals.
Stay clear of spinning line.
• Secure hair above shoulder length.
Secure or remove loose clothing or
clothing with loosely hanging ties,
straps, tassels, etc. They can be
caught in moving parts. Being fully
covered also helps protect you from
debds and pieces of toxic plants
thrown by spinning line.
• Do not operate when you are tired,
ill, or under the influence of alcohol,
drugs, or medication.
• Wear hearing protection ifyou use
unit for more than 1-1/2 hours per
day,
- Never start or run inside a closed
room or building. Breathing exhaust
fumes can kill.
- Keep handles free of oil and fuel.
UNIT / MAINTENANCE SAFETY
• Disconnect the spark plug before
performing maintenance except car-
buretor adjustments.
• Look for and replace damaged or
loose parts before each use. Look
for and repair fuel leaks before use.
Keep in good working condition.
° Replace trimmer head parts that are
chipped, cracked, broken, or dam-
aged in any other way before using
the unit.
• Make sure unit is assembled correct-
ly as shown in this manual.
• Make carburetor adjustments with
lower end supported to prevent line
from contacting any object.
• Keep others away when making car-
buretor adjustments.
• Use only recommended Craftsman
accessories and replacement parts.
FUEL SAFETY
• Mix and pour fuel outdoors.
• Keep away from sparks or flames.
• Use a container approved for fuel.
• Do not smoke or allow smoking near
fuel or the unit.
• Wipe up all fuel spills.
• Move at least !0 feet (3 meters)
away from fueling site before starting
engine.
• Stop engine and allow to cool before
removing fuel cap.
CUTTING SAFETY
.,_ Use only for trimming, mowing, and
sweeping, Do not use for pruning or
hedge trimming.
• Inspect the area before each use.
Remove objects (rocks, broken
glass, nails, wire, etc.) which can be
thrown by or become entangled in
line. Hard objects can damage the
trimmer head and be thrown causing
serious injury.
• Keep firm footing and balance. Do
not overreach.
• Keep all parts of your body away
from muffler and spinning fine. Keep
engine below waist level: A hot muf-
fler can cause serious bums.
• Cutting on left side of the shield will
throw debris away from the operator.
TRANSPORTING AND STORAGE
• Allow engine to coo!; secure unit be-
fore storing or transporting in vehicle,
• Empty the fue! tank before storing or
transporting the unit. Use up fuel left
in the carburetor by starting the en-
gine and letting it run until it stops.
• Store unit and fuel in area where fuel
vapors cannot reach sparks or open
flames from water heaters, electric
motors or switches, furnaces, etc.
• Store unit so line limiter cannot acci-
dentally cause injury. The unit can be
hung by the tube.
• Store unit out of reach of children.
3
* If situations occur which are not cov-
ered in this manual, use care and
good judgment. If you need assis-
tance, call 1-800-235-5878.
SPECIAL NOTICE: This unit isnot
equipped with a temperature limiting
muffler and spark arresting screen
which meets the requirements of Call-
fornia Codes 4442 and 4443. All U.S.
forest land and the states of California,
Idaho, Maine, Minnesota, New Jersey,
Oregon, and Washington require by
law that many internal combustion en-
gines be equipped with a spark arres-
tor screen. If you operate in a locale
where such regulations exist, you are
legally responsible for installing and
maintaining the operating condition of
these parts. Failure to do so is a viola-
tion of the law. Refer to the MAINTE-
NANCE section in this manual.
SPECIAL NOTICE: Exposure to
vibrationsthrough prolonged use of
gasoline powered hand tools could
cause blood vessel or nerve damage
in the fingers, hands, and joints of
people prone to circulationdisorders or
abnormal swellings. Prolonged use in
coldweather has been linked to blood
vessel damage in otherwise healthy
people. Ifsymptoms occur such as
numbness, pain, loss of strength,
change in skin color or texture, or loss
offeeling inthe fingers, hands, or
joints, discontinue the use of this tool
and seek medical attention. An anti-
vibration system does not guarantee
the avoidance of these problems. Us-
ers who operate power tools on a con-
tinual and regular basis must monitor
closely their physical condition and the
condition ofthistool.
CARTON CONTENTS
Check carton contents against the fol-
lowing list.
Model 358.798530
• Trimmer
• Shield
• Wing Nut (screwed onto shield)
• Container of Oil
Examine parts for damage. Do not use
damaged parts.
NOTE= If you need assistance or find
parts missing or damaged, calf
1-800-235-5878.
It is normal for the fuel filter to rattle in
the empty fuel tank.
Finding fuel or oil residue on muffler is
normal due to carburetor adjustments
and testing done by the manufacturer.
ASSEMBLY
WARNING: If received assembled,
repeat all steps to ensure your unit is
properly assembled and all fasteners
are secure.
ADJUSTING THE HANDLE
WARNING: Whenadjusting thehan-
dle,besure it remains between the
trigger and the safetylabel.
• Loosen wing nut or knob on handle.
° Rotate the handle on the tube to an
upright position; retighten wing nut.
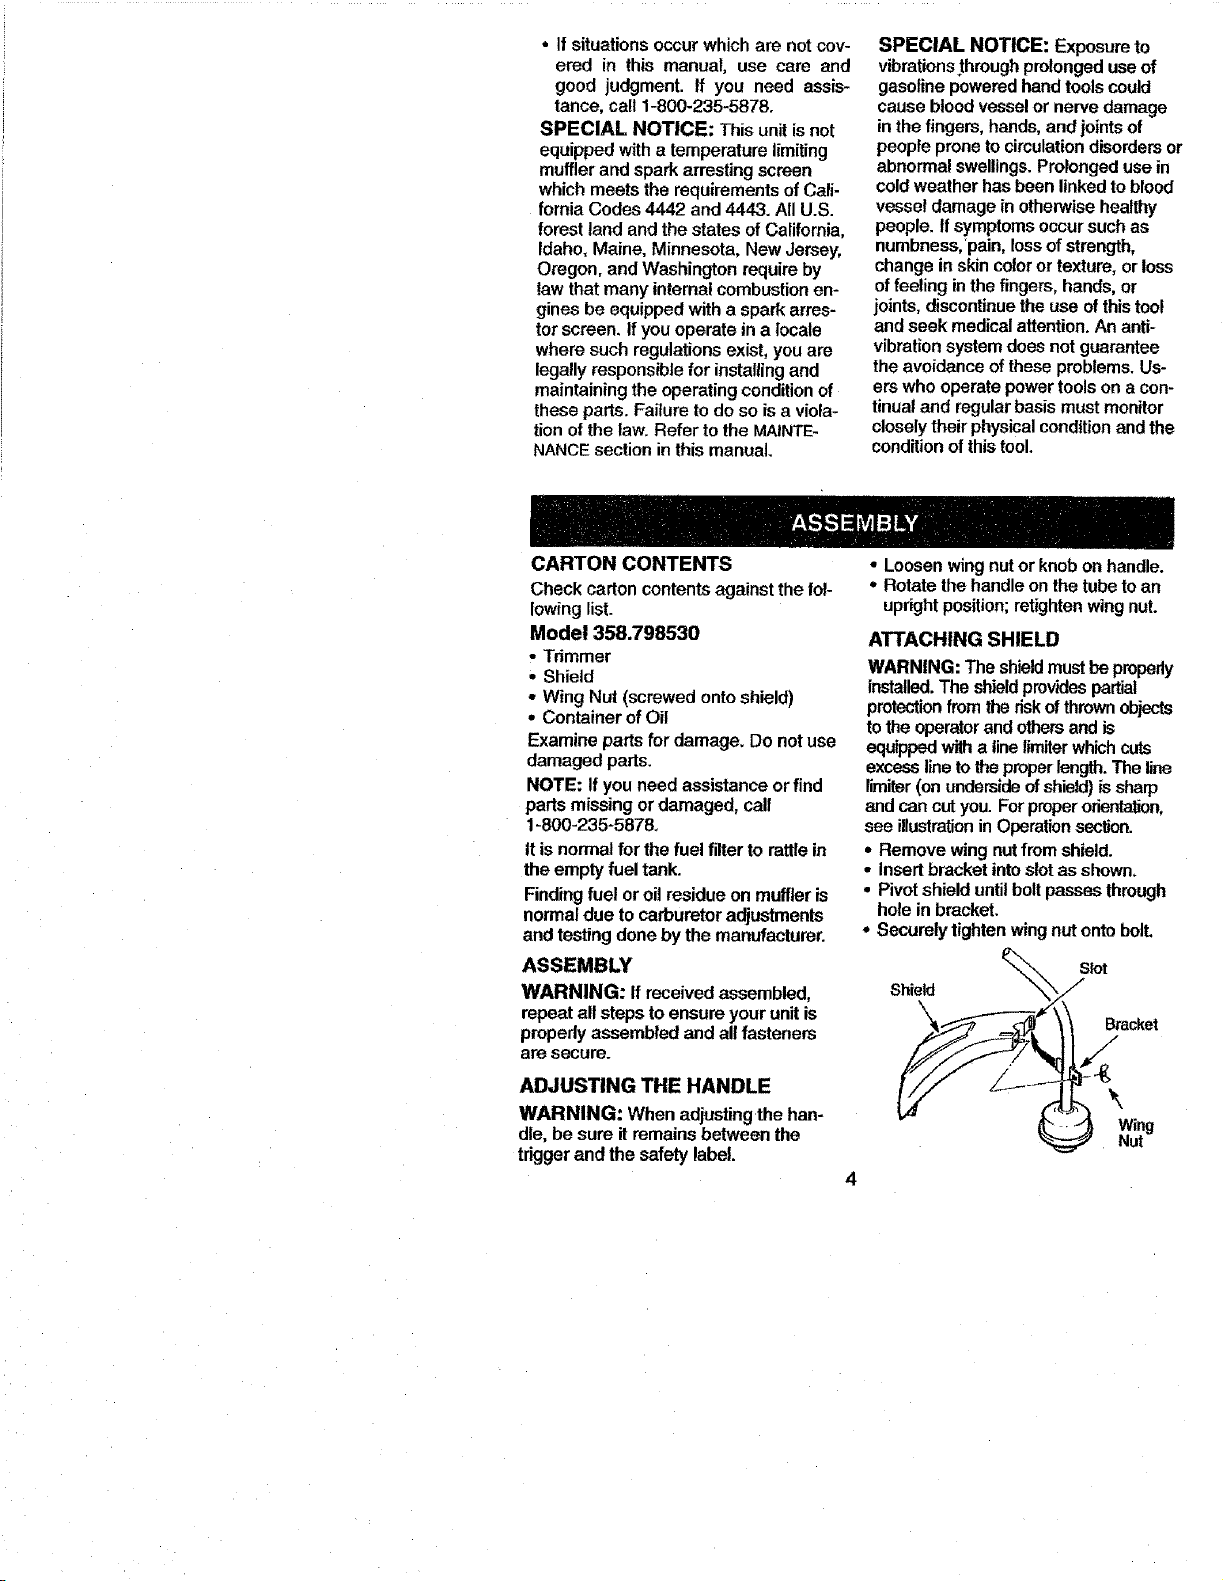
ATTACHING SHIELD
WARNING: The shieldmust be propedy
installed. The shieldprovidespartial
protectionfrom the riskofthrownobjects
tothe operator and others and is
equippedwith a line limiterwhich cuts
excess lineto the properlength.The line
fimiter(on underside of shield) is sharp
and can cut you. For properorientation,
see illustrationin Operation section.
• Remove wing nutfrom shield.
• Insert bracket into slot as shown.
• Pivot shield until boltpasses through
hole in bracket.
• Securely tighten wing nut onto boll
_\ Slot
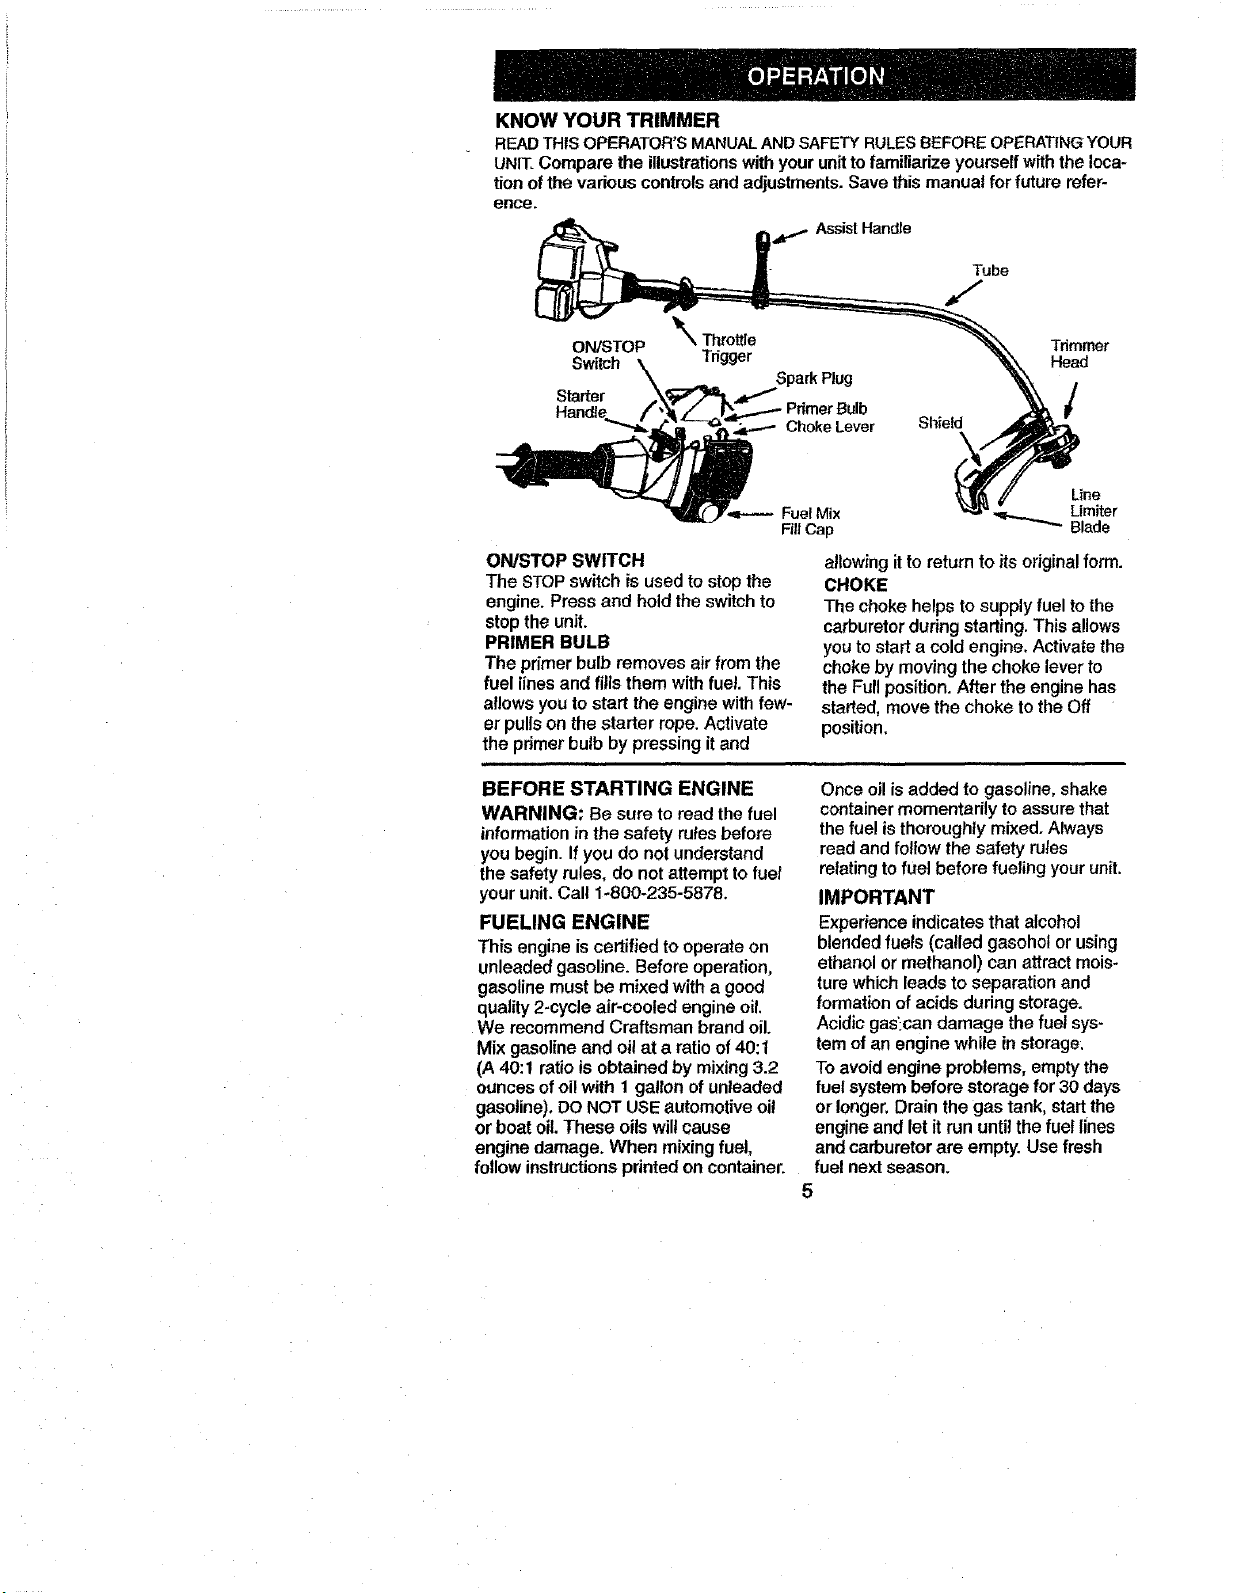
KNOW YOUR TRIMMER
READ THISOPERATOR'S MANUALAND SAFETY RULESBEFORE OPERATINGYOUR
UNIT.Compare the illustrations with your unit to familiarize yourself with the loca-
tion of the vadous controls and adjustments. Save this manual for future refer-
ence.
AssistHandle
Tube
ON/STOP \ ThroWe Tdmmer
Switch Head
Starter
Choke Lever Shield
FuelMix
FIllCap
ON/STOP SWITCH
The STOP switch is used to stop the
engine. Press and hold the switch to
stop the unit.
PRIMER BULB
The primer bulb removes air from the
fuel lines and fitls them with fuel. This
allows you to start the engine with few-
er pulls on the starter rope. Activate
the pdmer bulb by pressing it and
Line
Limiter
•4_,.._...,... Blade
allowing it to return to its original form.
CHOKE
The choke helps to supply fuel to the
carburetor during starting. This allows
you to start a cold engine. Activate the
choke by moving the choke lever to
the Full position. After the engine has
started, move the choke to the Off
position,
BEFORE STARTING ENGINE
WARNING: Be sure to read the fuel
information in the safety rules before
you begin. If you do not understand
the safety rules, do not attempt to fuel
your unit. Call 1-800-235-5878.
FUELING ENGINE
This engine iscertified to operate on
unleaded gasoline. Before operation,
gasoline must be mixed with a good
quality 2-cycle air-cooled engine oil.
We recommend Craftsman brand oil.
Mix gasoline and oil at a ratio of 40:1
(A 40:1 ratio is obtained by mixing 3.2
ounces of oil with 1 gallon of unleaded
gasoline). DO NOT USE automotive oil
or boat oil.These oils wilt cause
engine damage. When mixing fuel,
Once oi! is added to gasoline, shake
container momentarily to assure that
the fue! is thoroughly mixed. Always
read and follow the safety rules
relating to fuel before fueling your unit.
IMPORTANT
Experience indicates that alcohol
blended fuels (called gasohol or using
ethanol or methanol) can attract mois-
turo which leads to separation and
formation of acids during storage.
Acidic gas;can damage the fuel sys-
tem of an engine while in storage:
To avoid engine problems, empty the
fuel system before storage for 30 days
or longer, Drain the gas tank, start the
engine and let it run until the fuel lines
and carburetor are empty. Use fresh
follow instructions printed on container, fuel next season.
5
Never use engine or carburetor clean-
er products in the fue! tank or perma-
nent damage may occur.
See the STORAGE section for addi-
tionaf information.
STOPPING YOUR ENGINE
* Press and hold the OntStop switch in
the STOP position.
• If engine does not stop, move choke
lever to full position.
Choke Lever
Engine
Stop
Switch
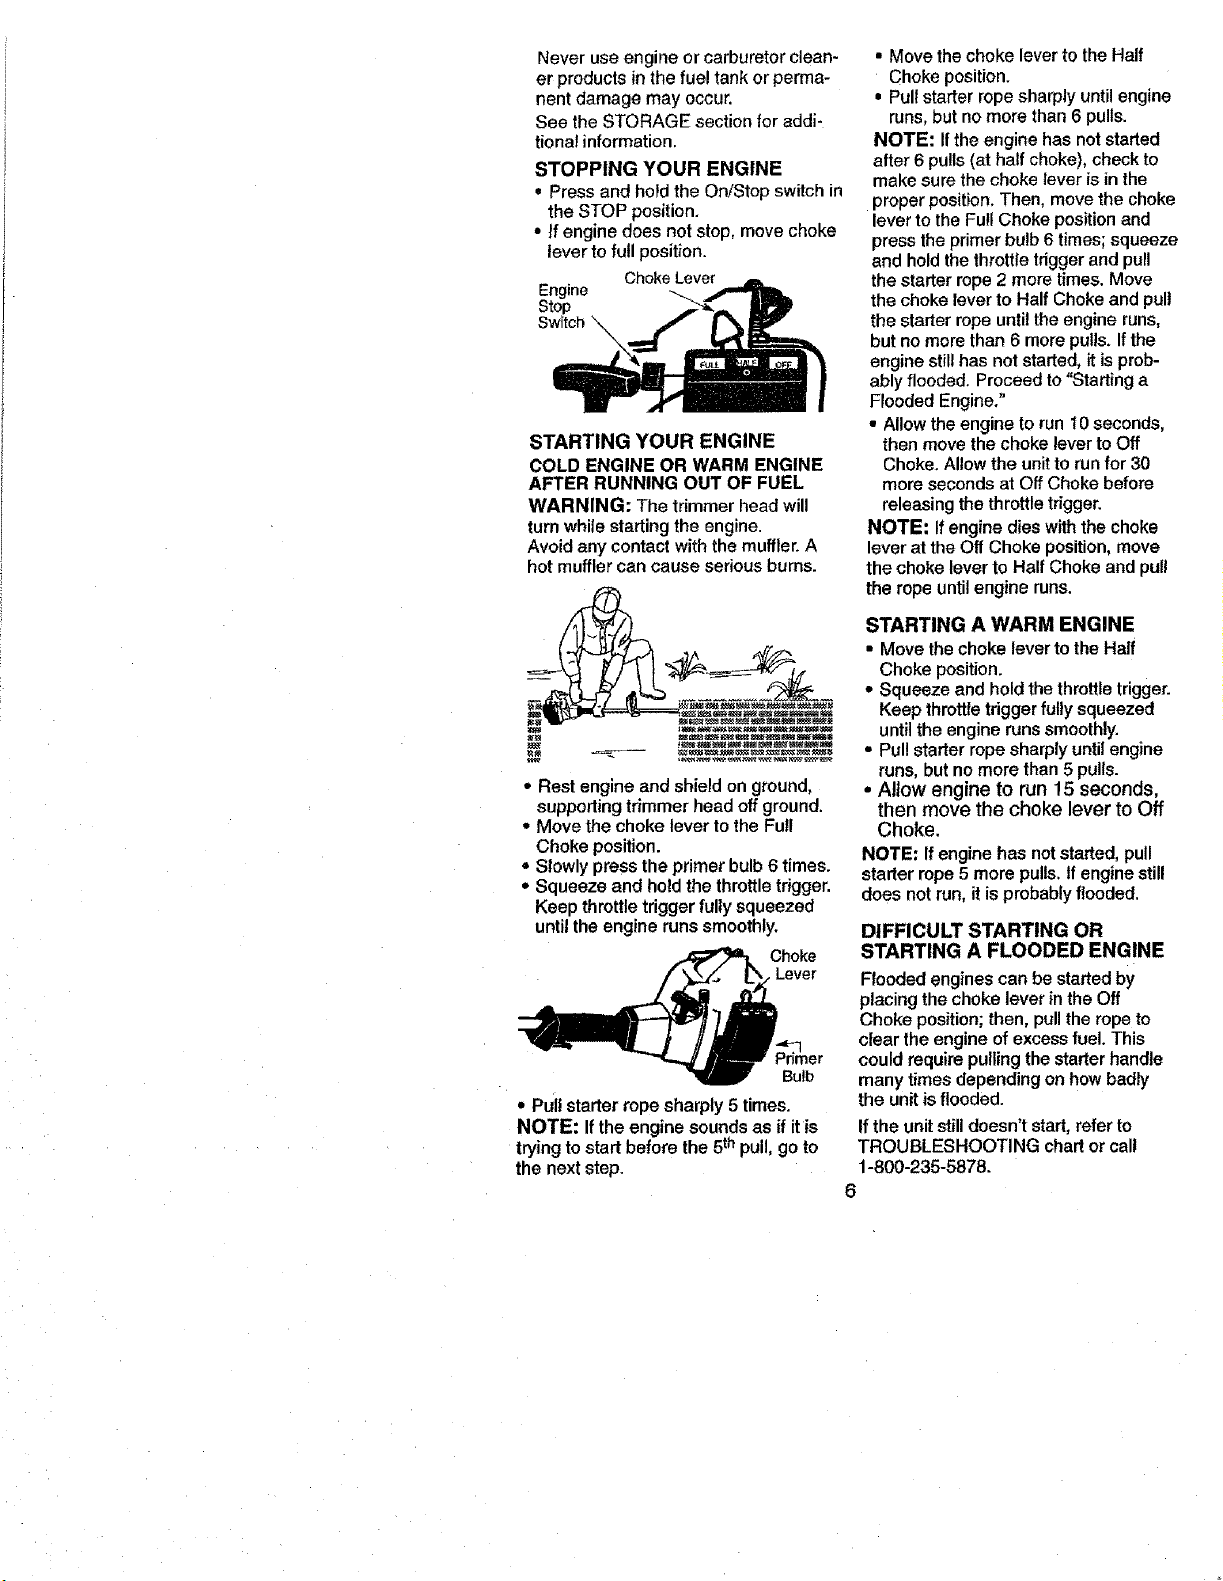
STARTING YOUR ENGINE
COLD ENGINE OR WARM ENGINE
AFTER RUNNING OUT OF FUEL
WARNING: The trimmer head will
turn while starting the engine.
Avoid any contact with the muffler. A
hot muffler can cause serious bums.
• Rest engine and shield on ground,
supporting trimmer head off ground.
o Move the choke lever to the Full
Choke position.
• Slowly press the primer bulb 6 times.
• Squeeze and hold the throttle trigger.
Keep throttle trigger fully squeezed
until the engine runs smoothly.
_ Choke
Lever
_h_mer
Bulb
• Pult starter rope sharply 5 times.
NOTE: If the engine sounds as if it is
trying to start before the 5th pull, go to
the next step.
• Move the choke lever to the Half
Choke position.
• Pull starter rope sharply until engine
runs, but no more than 6 pulls.
NOTE: Ifthe engine has not started
after 6 pulls(at half choke), check to
make sure the choke lever is in the
proper position, Then, move the choke
lever to the Full Choke position and
press the primer bulb 6 times; squeeze
and hold the throttle trigger and pull
the starter rope 2 more times. Move
the choke lever to Half Choke and pull
the starter rope until the engine runs,
but no more than 6 more pulls. If the
engine still has not started, it is prob-
ably flooded. Proceed to "Starting a
Flooded Engine."
• Allow the engine to run 10 seconds,
then move the choke lever to Off
Choke. Allow the unit to run for 30
more seconds at Off Choke before
releasing the throttle trigger.
NOTE; If engine dies with the choke
lever at the Off Choke position, move
the choke lever to Half Choke and pull
the rope until engine runs.
STARTING A WARM ENGINE
• Move thechoke levertothe Half
Chokeposition.
* Squeezeand holdthethrottletrigger.
Keep throttletriggerfully squeezed
untiltheenginerunssmoothly.
• Pul!starter ropesharplyuntilengine
runs,butnomore than5 pulls.
• Allow engine to run 15 seconds,
then move the choke lever to Off
Choke.
NOTE: Ifenginehasnotstarted,pull
stafferrope5 morepulls.Ifengine still
does notrun,itisprobablyflooded.
DIFFICULT STARTING OR
STARTING A FLOODED ENGINE
Flooded engines can be started by
placing the choke lever in the Off
Choke position; then, pull the rope to
clear the engine of excess fuel. This
could require pulling the starter handle
many times depending on how badly
the unit is flooded.
If the unit still doesn't start, refer to
TROUBLESHOOTING chaff or call
1-800-235-5878.
6
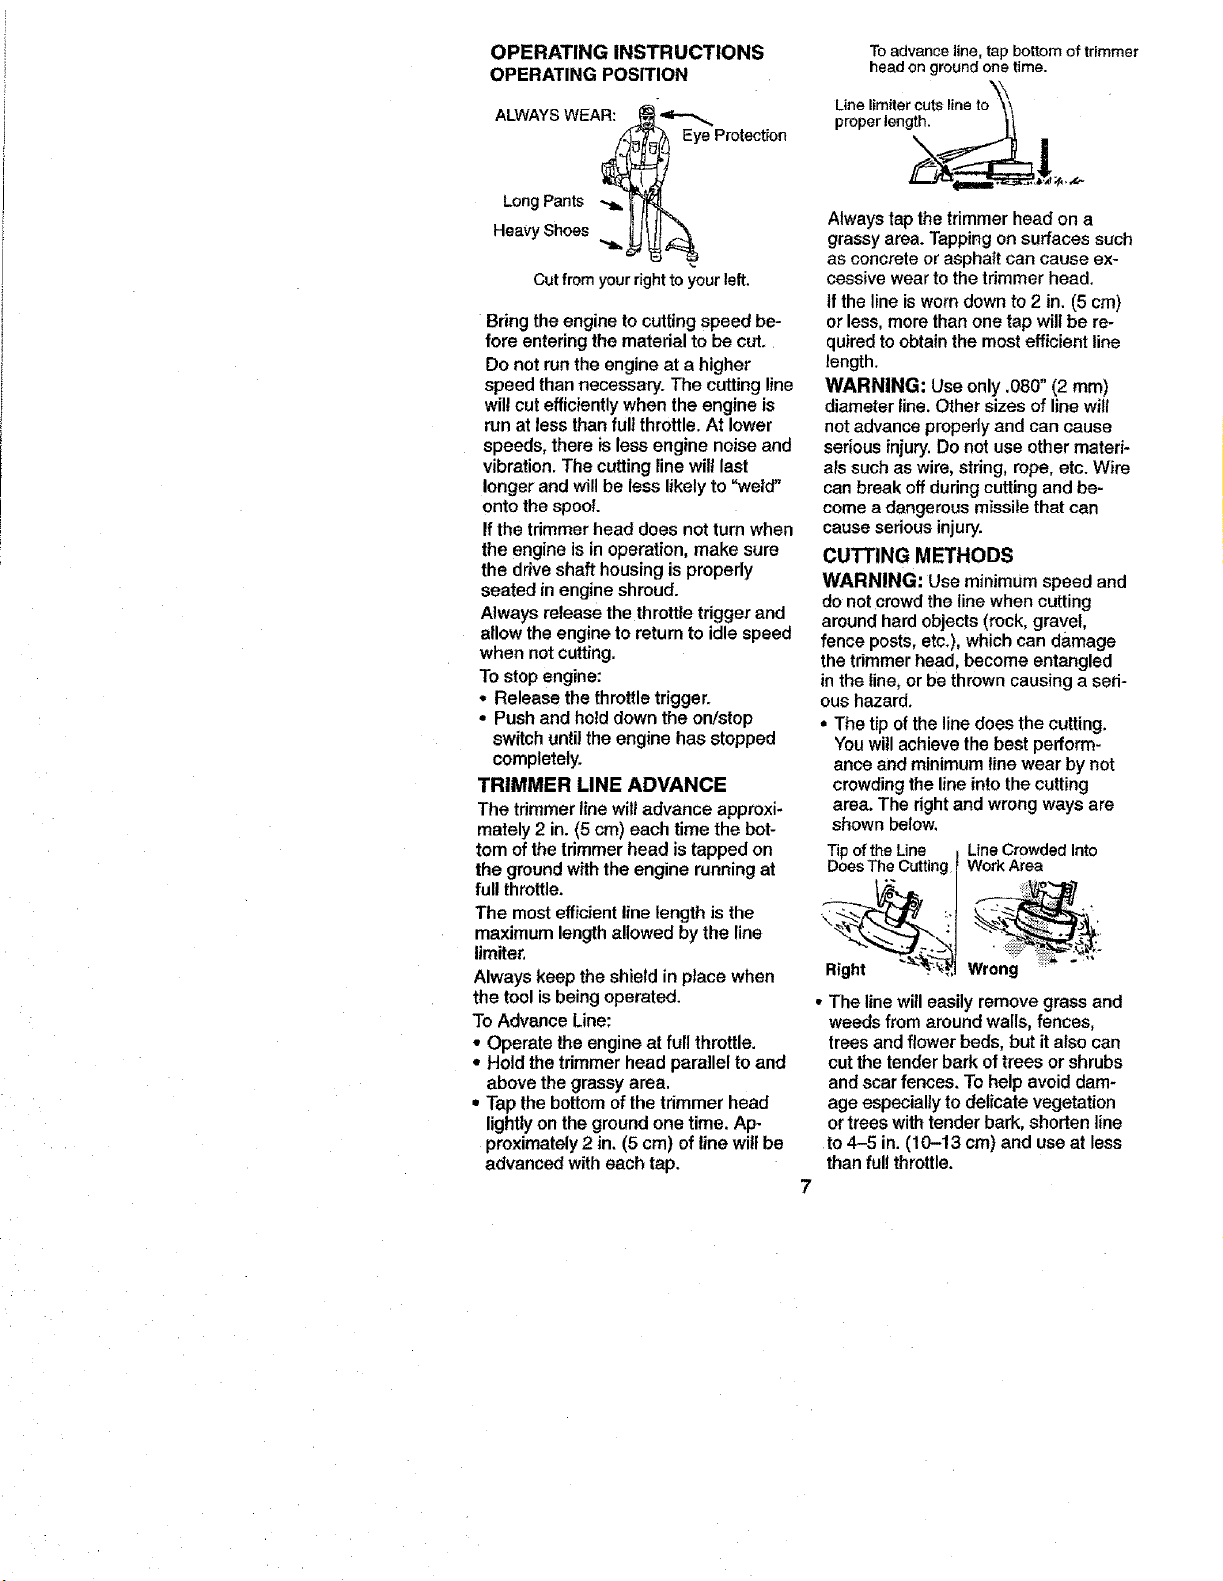
OPERATING INSTRUCTIONS
OPERATING POSITION
ALWAYS WEAR: "_
Eye Protection
Long Pants -._
Heavy Shoes
Cut from your rightto your left.
Bring the engine to cutting speed be-
fore entering the material to be cut.
Do not run the engine at a higher
speed than necessary. The cutting line
will cut efficiently when the engine is
run at less than full throttle. At lower
speeds, there is less engine noise and
vibration. The cutting line will last
longer and will be less likely to "weld"
onto the spool.
If the trimmer head does not turn when
the engine is in operation, make sure
the drive shaft housing is properly
seated in engine shroud.
Always release the throttle trigger and
allow the engine to return to idle speed
when not cutting.
To stop engine:
o Release the throttle trigger.
• Push and hold down the on/stop
switch untilthe engine has stopped
completely.
TRIMMER LINE ADVANCE
The trimmer line will advance approxi-
mately 2 in. (5 cm) each time the bot-
tom of the trimmer head is tapped on
the ground with the engine running at
full throttle.
The most efficient line length is the
maximum length allowed by the line
ltmiter,
Always keep the shield in place when
the tool isbeing operated.
To Advance Line:
• Operate the engine at full throttle.
• Hold the trimmer head parallel to and
above the grassy area.
• Tap the bottom of the trimmer head
lightlyon the ground one time. Ap-
proximately 2 in. (5 cm) of line will be
advanced with each tap.
Toadvance line, tap bottom of trimmer
headonground onetime.
Line lirnitercutslineto '_'_
pr°per leng__, =._t _,.x_
Always tap the trimmer head on a
grassy area. Tapping on surfaces such
as concrete or asphalt can cause ex-
cessive wear to the trimmer head.
tf the line is worn down to 2 in. (5 cm)
or less, more than one tap will be re-
quired to obtain the most efficient line
length.
WARNING: Use only ,080" (2 ram)
diameter line. Other sizes of line will
not advance properly and can cause
serious injury. Do not use other materi-
als such as wire, string, rope, etc. Wire
can break off during cutting and be-
come a dangerous missile that can
cause serious injury.
CUTTING METHODS
WARNING: Use minimum speed and
do not crowd the line when cutting
around hard objects (rock, gravel,
fence posts, etc.), which can damage
the trimmer head, become entangled
in the line. or be thrown causing a sed-
ous hazard.
• The tip of the line does the cutting.
You will achieve the best perform-
ance and minimum line wear by not
crowding the line into the cutting
area. The rightand wrong ways are
shown below
Tipofthe Line j Line CrowdedInto
DoesThe CuttingI WorkArea
]
__t wrong
• The line will easily remove grass and
weeds from around walls, fences,
trees and flower beds, but italso can
cut the tender bark of trees or shrubs
and scar fences. To help avoid dam-
age especially to delicate vegetation
or trees withtender bark, shorten line
to 4-5 in. (10-13 cm) and use at less
than full throttle.
• Fortrimmingorscalping,useless
than full throttle to increase line life
and decrease head wear, especially:
• During light duty cutting.
• Near objects around which the line
can wrap such as small posts,
trees or fence wire.
• For mowing or sweeping, use full
throttle for a good clean job.
WARNING: Always wear eye protec-
tion. Never lean over the trimmer head.
Rocks or debris can ricochet or be
thrown into eyes and face and cause
blindness or other serious injury.
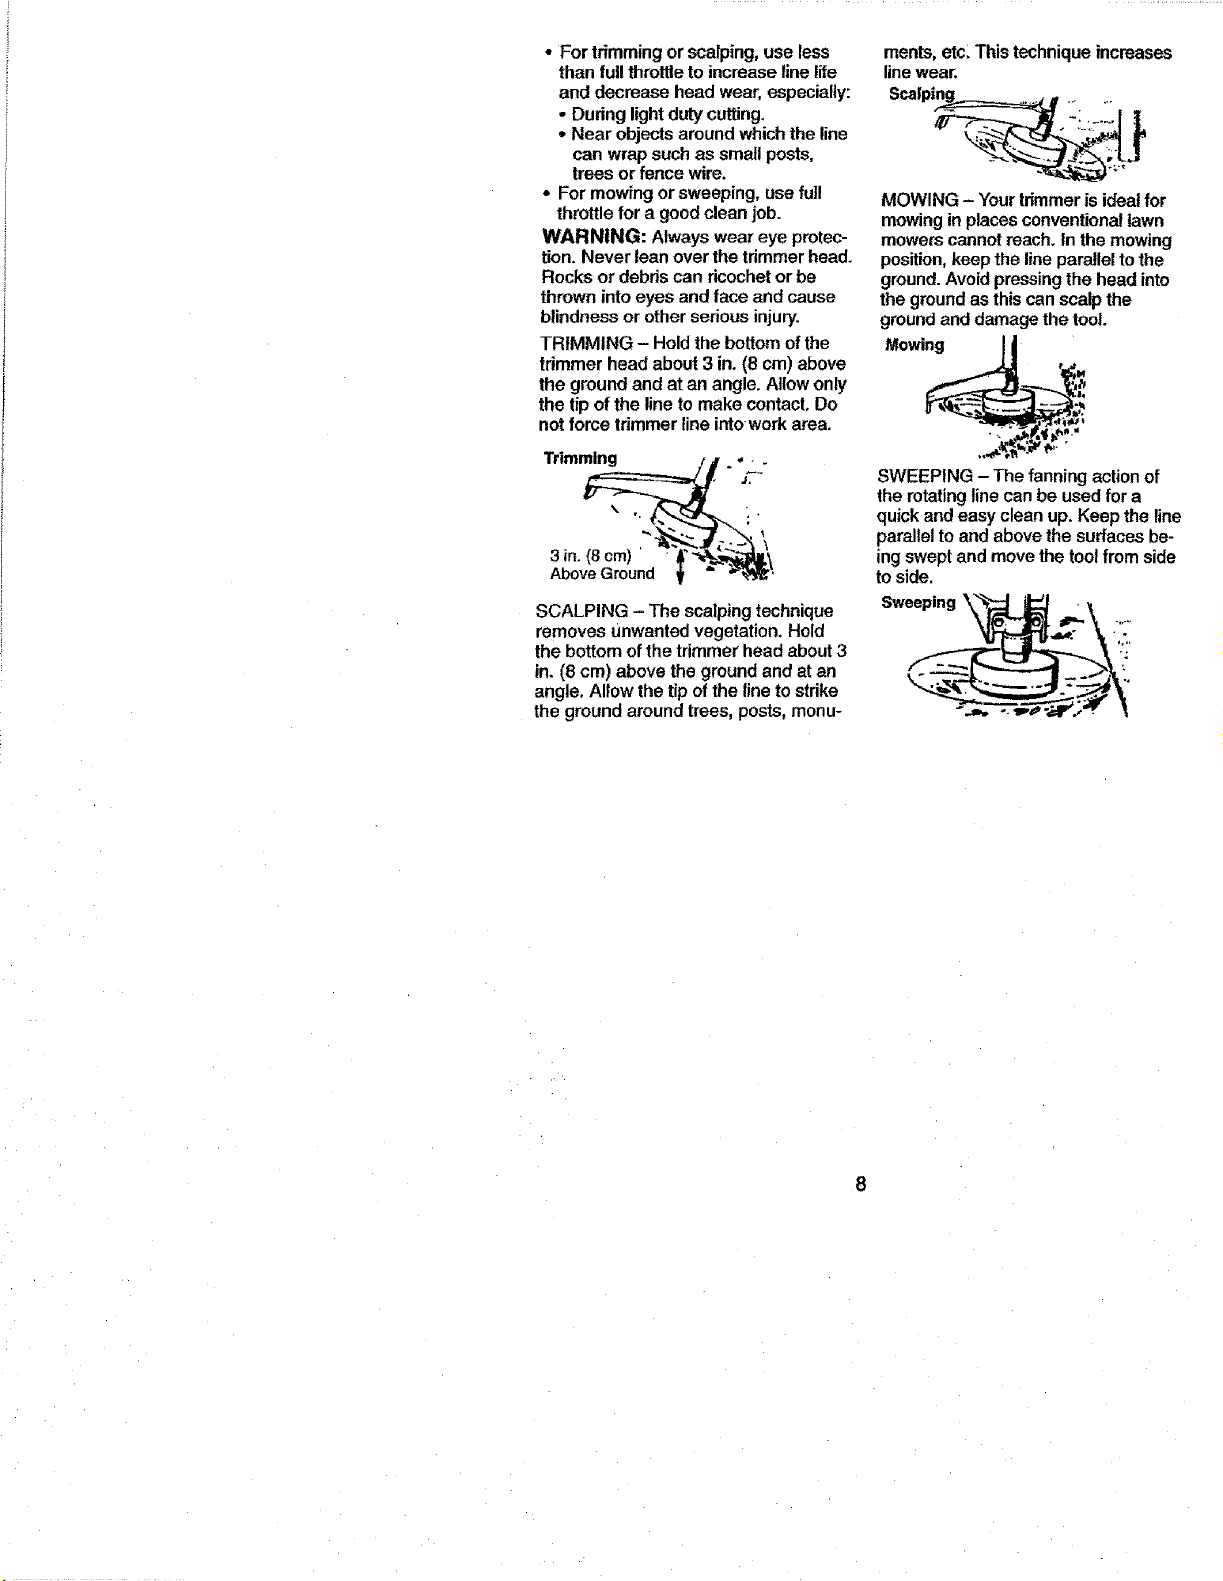
TRIMMING - Hold the bottom of the
trimmer head about 3 in. (8 cm) above
the ground and at an angle. Allow only
the tip of the line to make contact. Do
not force trimmer line into work area.
Trimming /. _
%. • • •
3in._\
Above Ground _ '= _;'
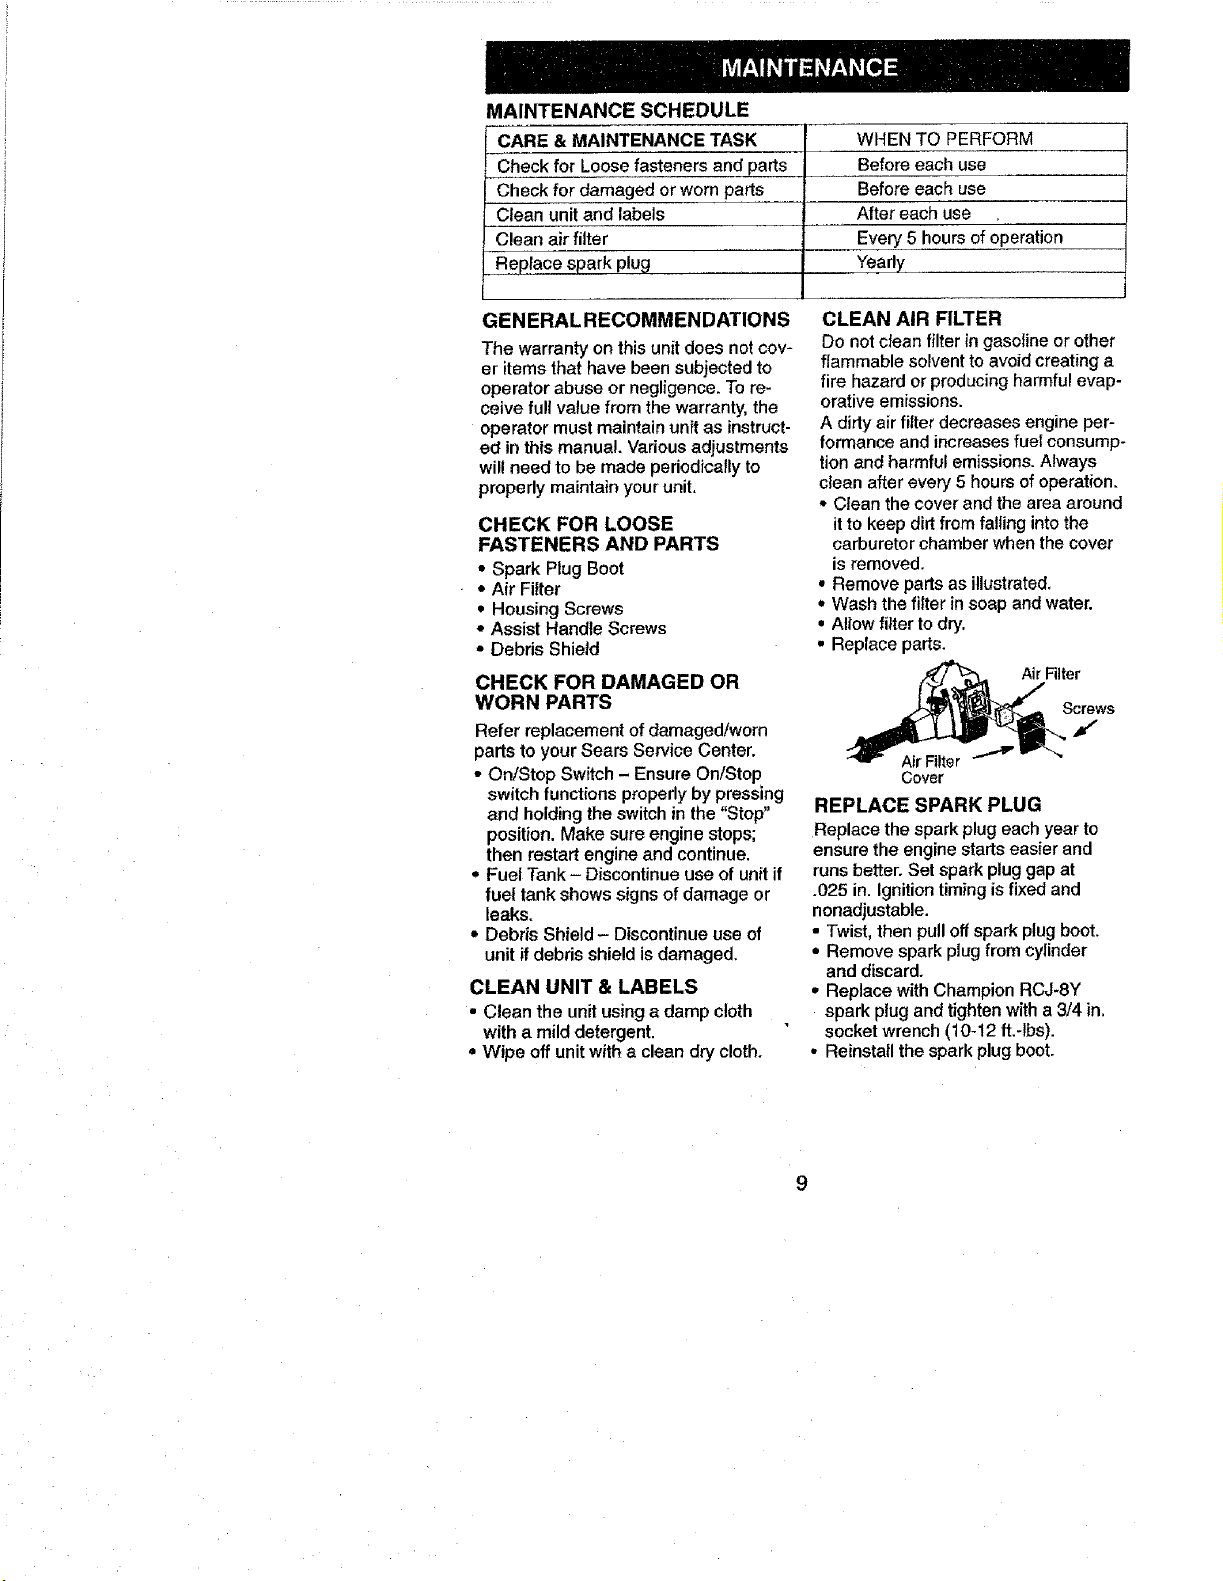
SCALPING - The scalping technique
removes unwanted vegetation. Hold
the bottom of the trimmer head about 3
in. (8 cm) above the ground and at an
angle. Allow the tip of the line to strike
the ground around trees, posts, monu-
merits, etc. This technique increases
line wear.
Scalpi_. _ ...
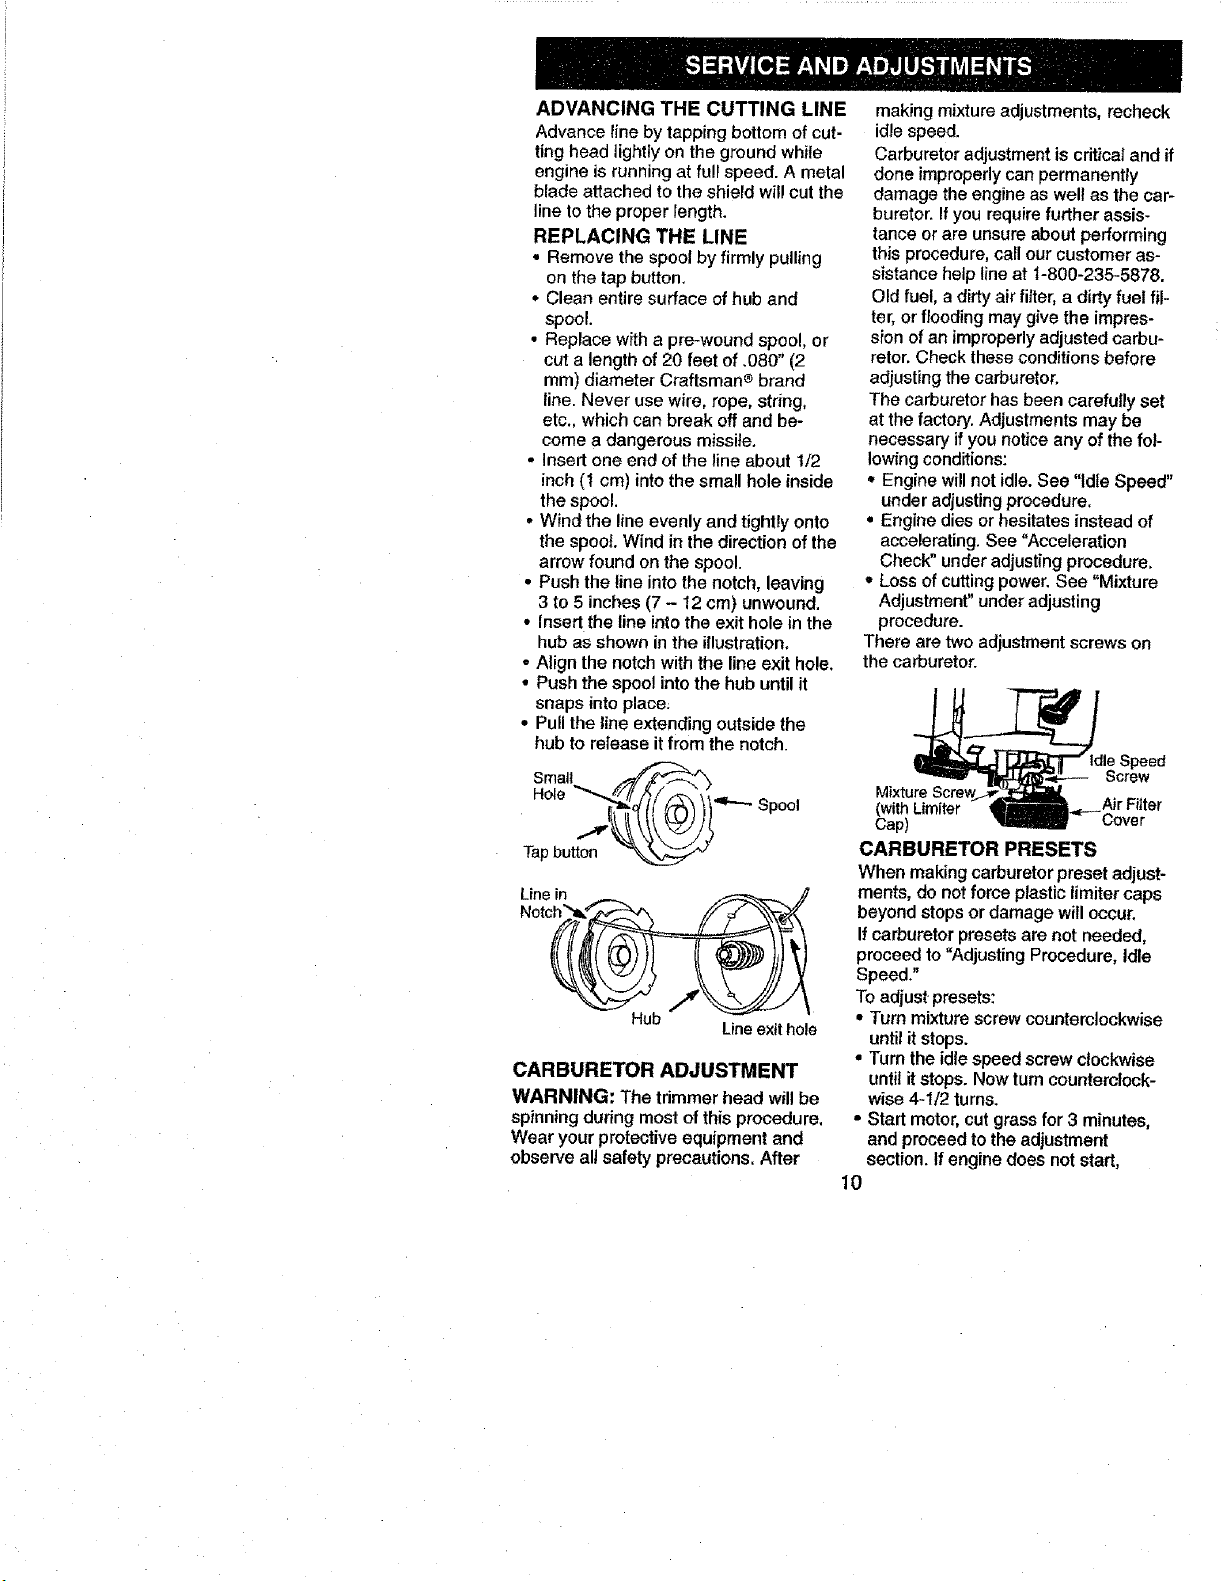
MOWING - Your trimmer is ideal for
mowing in places conventional lawn
mowers cannot reach. In the mowing
position, keep the line parallel to the
ground. Avoid pressing the head into
the groundas this can scalp the
ground and damage the tool.
Mowing I_
.
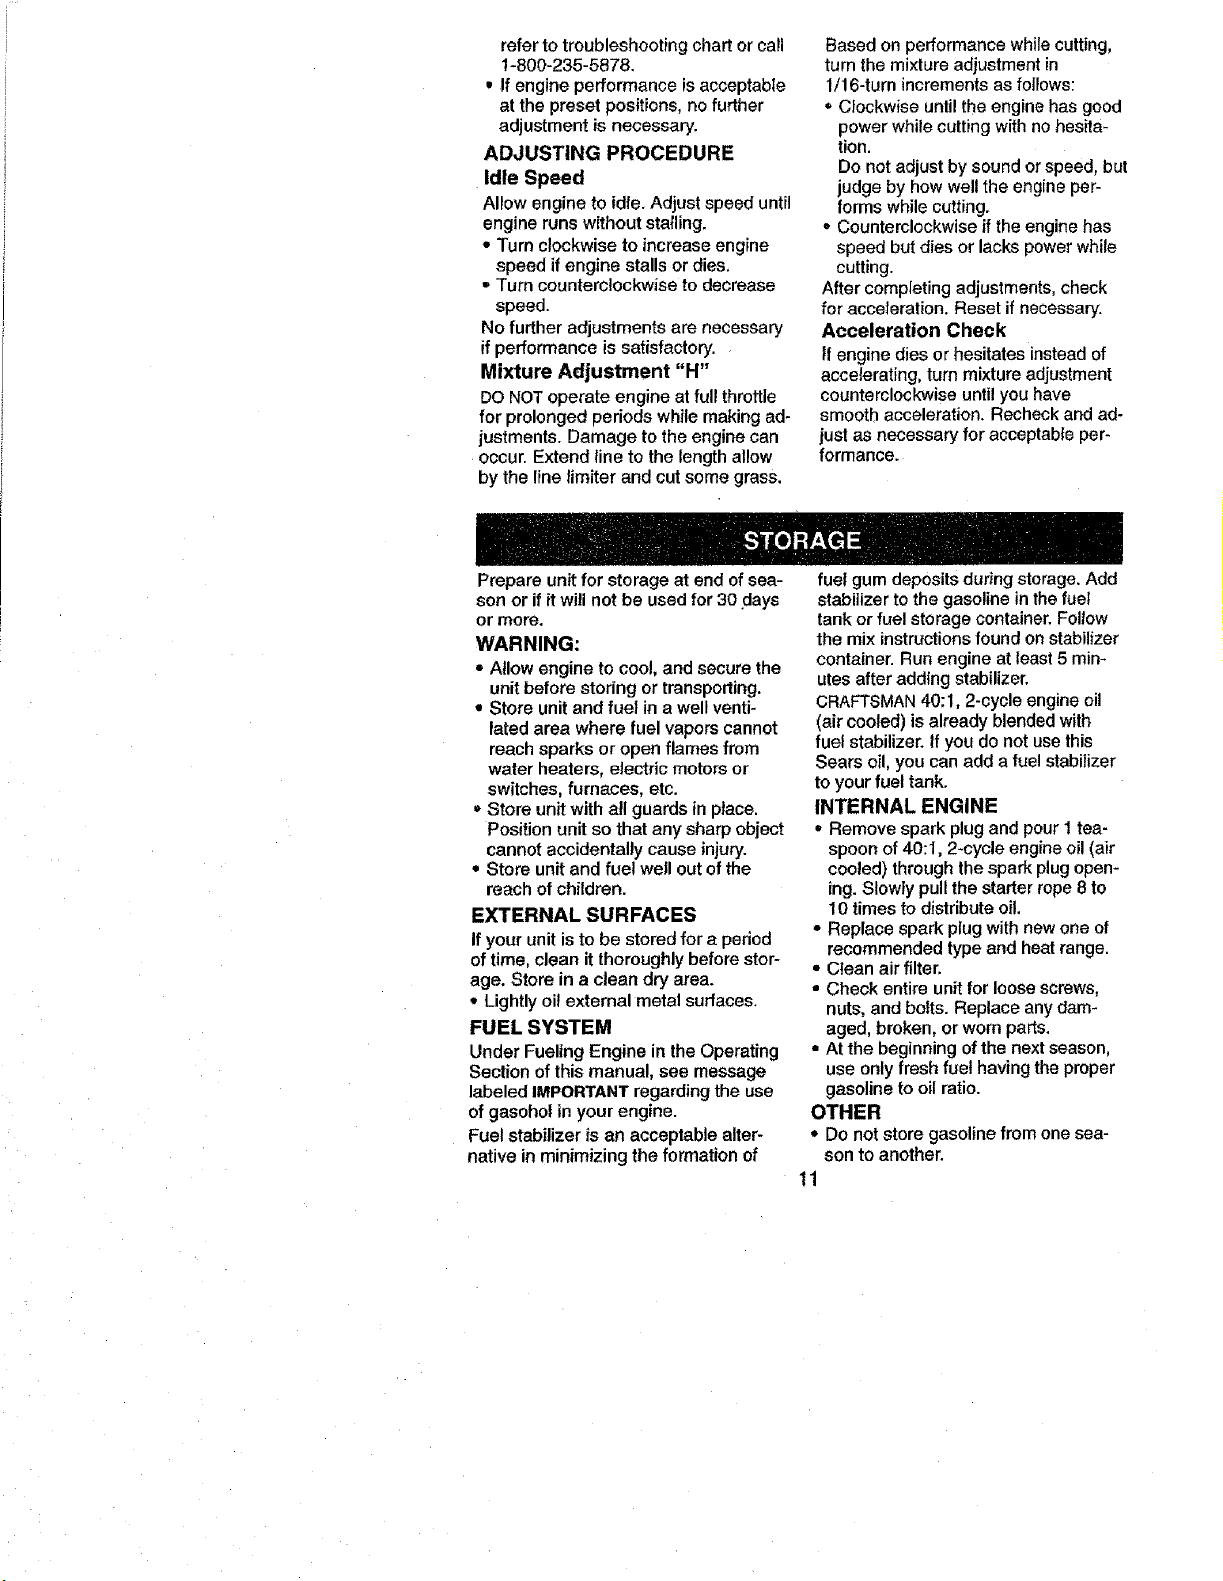
SWEEPING - The fanning action of
the rotating line can be used for a
quick and easy clean up. Keep the line
parallel to and above the surfaces be-
ing swept and move the tool from side
to side.
swo :;
MAINTENANCE SCHEDULE
CARE & MAINTENANCE TASK
Check for Loose fasteners and parts
Check for damaged or worn parts
Clean unit and labels
Clean air filter
Replace spark plug
WHEN TO PERFORM
Before each use
Before each use
After each use
Every 5 hours of operation
Yearly
GENERAL RECOMMENDATIONS
The warranty on this unit does not cov-
er items that have been subjected to
operator abuse or negligence. To re-
ceive full value from the warranty, the
operator must maintain unit as instruct-
ed in this manual. Various adjustments
will need to be made periodically to
properly maintain your unit.
CHECK FOR LOOSE
FASTENERS AND PARTS
• Spark Plug Boot
Air Filter
• Housing Screws
• Assist Handle Screws
• Debris Shield
CHECK FOR DAMAGED OR
WORN PARTS
Refer replacement of damaged!worn
parts to your Sears Service Center.
• On/Stop Switch - Ensure On/Stop
switch functions properly by pressing
and holding the switch in the "Stop"
position. Make sure engine stops;
then restart engine and continue.
,, Fuel Tank - Discontinue use of unit if
fuel tank shows signs of damage or
leaks.
• Debris Shield - Discontinue use of
unit ifdebris shield isdamaged.
CLEAN UNIT & LABELS
• Clean the unit using a damp cloth
with a mild detergent.
• Wipe off unit with a clean dry cloth.
CLEAN AIR FILTER
Do notclean filter in gasoline or other
flammable solvent to avoid creating a
fire hazard or producing harmful evap-
orative emissions.
A dirty air filter decreases engine per-
formance and increases fuel consump-
tion and harmful emissions. Always
clean after every 5 hours of operation.
• Clean the cover and the area around
it to keep dirt from falling intothe
carburetor chamber when the cover
is removed.
• Remove parts as illustrated,
• Wash the filter in soap and water.
= Allow filter to dry.
• Replace parts.
Cover
REPLACE SPARK PLUG
Replace the spark plug each year to
ensure the engine starts easier and
runs better. Set spark plug gap at
.025 in. Ignition timing is fixed and
nonadjustable.
• Twist, then pull off spark plug boot.
• Remove spark plug from cylinder
and discard.
° Replace with Champion RCJ-8Y
spark plug and tighten with a 3/4 in.
socket wrench (10-12 ff.-Ibs).
• Reinstall the spark plug boot.
9
ADVANCING THE CUTTING LINE
Advance line by tapping bottom of cut-
ting head lightlyon the ground while
engine is running at full speed. A metal
blade attached to the shield wil! cut the
line to the proper length.
REPLACING THE LINE
• Remove the spool by firmly pulling
on the tap button.
• Clean entire surface of hub and
spool.
• Replace with a pre-wound spool, or
cut a length of 20 feet of .080" (2
mm) diameter Craftsman ® brand
line. Never use wire, rope, string,
etc., which can break off and be-
come a dangerous missile.
• Insert one end of the line about 1/2
inch (t cm) into the small hole inside
the spool.
• Wind the line evenly and tightly onto
the spool Wind in the direction of the
arrow found on the spool.
• Push the line into the notch, leaving
3 to 5 inches (7 - 12 cm) unwound.
• Insert the line into the exit hole in the
hub as shown in the illustration.
o Align the notch with the line exit hole.
• Push the spool into the hub until it
snaps into place;
• Pull the line extending outside the
hub to release it from the notch.
Smait _"\
.o,o ----spoo,
Linein __ _ //
Lineexit hole
CARBURETOR ADJUSTMENT
WARNING: The trimmer head will be
spinning during most of this procedure,
Wear your protective equipment and
observe all safety precautions. After
making mixture adjustments, recheck
idle speed.
Carburetor adjustment is critical and ff
done improperly can permanently
damage the engine as well as the car-
buretor. If you require further assis-
tance or are unsure about performing
this procedure, call our customer as-
sistance help line at 1-800-235-5878.
Old fuel, a dirty air rifler, a dirty fuel fil-
ter, or flooding may give the impres-
sion of an improperly adjusted carbu-
retor. Check these conditions before
adjusting the carburetor.
The carburetor has been carefully set
at the factory. Adjustments may be
necessary if you notice any of the fol-
lowing conditions:
,, Engine will not idle. See "Idle Speed"
under adjusting procedure.
• Engine dies or hesitates instead of
accelerating. See "Acceleration
Check" under adjusting procedure,
• Loss of cutting power. See "Mixture
Adjustment" under adjusting
procedure.
There are two adjustment screws on
the carburetor.
(with Limiter Air F_tter
Cap) Cover
CARBURETOR PRESETS
When making carburetor preset adjust-
ments, do not force plastic limiter caps
beyond stops or damage will occur.
If carburetor presets are not needed,
proceed to "Adjusting Procedure, Idle
Speed."
To adjust presets:
• "rum mixture screw counterclockwise
until it stops.
• Turn the idle speed screw clockwise
until it stops. Now turn counterclock-
wise 4-1/2 turns.
• Start motor, cut grass for 3 minutes,
and proceed to the adjustment
section. If engine does not start,
10
refertotroubleshootingchartorcall
1-800-235-5878.
•If engine performance is acceptable
at the preset positions, no further
adjustment is necessary.
ADJUSTING PROCEDURE
Idle Speed
Allow engine to idle, Adjust speed until
engine runs without stalling.
•Tum clockwise to increase engine
speed if engine stalls or dies.
• Turn counterclockwise to decrease
speed.
No further adjustments are necessary
if performance is satisfactory.
Mixture Adjustment "H"
DO NOT operate engine at full throttle
for prolonged periods while making ad-
justments. Damage to the engine can
occur. Extend tine to the length allow
by the line limiter and cut some grass.
Based on performance while cutting,
turn the mixture adjustment in
1/16-turn increments as follows:
• Clockwise until the engine has good
power while cutting with no hesita-
tion.
Do not adjust by sound or speed, but
judge by how well the engine per-
forms while cutting.
• Counterclockwise if the engine has
speed but dies or lacks power while
cutting.
After completing adjustments, check
for acceleration. Reset if necessary.
Acceleration Check
tf engine dies or hesitates instead of
accelerating, turn mixture adjustment
counterclockwise until you have
smooth acceleration. Recheck and ad-
just as necessary for acceptable per-
formance.
Prepare unit for storage at end of sea-
son or if it will not be used for 30 days
or more.
WARNING:
• Allow engine to coo!, and secure the
unit before storing or transporting.
• Store unit and fuel in a well venti-
lated area where fuel vapors cannot
reach sparks or open flames from
water heaters, electric motors or
switches, furnaces, etc.
• Store unit with all guards in place.
Position unit so that any sharp object
cannot accidentally cause injury.
• Store unit and fuel well out of the
reach of children.
EXTERNAL SURFACES
If your unit is to be stored for a period
of time, clean it thoroughly before stor-
age. Store in a clean dry area.
• Lightly oil external metal surfaces.
FUEL SYSTEM
Under Fueling Engine in the Operating
Seclion of this manual, see message
labeled IMPORTANT regarding the use
of gasohol in your engine.
Fuel stabilizer is an acceptable alter-
native in minimizing the formation of
fuel gum deposits during storage. Add
stabilizer to the gasoline in the fuel
tank or fuel storage container. Follow
the mix instructionsfound on stabilizer
container. Run engine at least 5 min-
utes after adding stabilizer.
CRAFTSMAN 40:1, 2-cycle engine oil
(air cooled) is already blended with
fuel stabilizer. If you do not use this
Sears oil, you can add a fuel stabilizer
to your fuel tank.
INTERNAL ENGINE
• Remove spark plug and pour I tea-
spoon of 40:I, 2-cycle engine oil (air
cooled) through the spark plug open-
ing. Slowly pull the starter rope 8 to
10 times to distribute oil,
• Replace spark plug with new one of
recommended type and heat range.
• Clean air filter.
= Check entire unit for loose screws,
nuts, and bolts. Replace any dam-
aged, broken, or worn parts.
• At the beginning of the next season,
use only fresh fuel having the proper
gasoline to oil ratio.
OTHER
• Do not store gasoline from one sea-
son to another.
11
• Replaceyourgasotinecanifitstarts
torust.
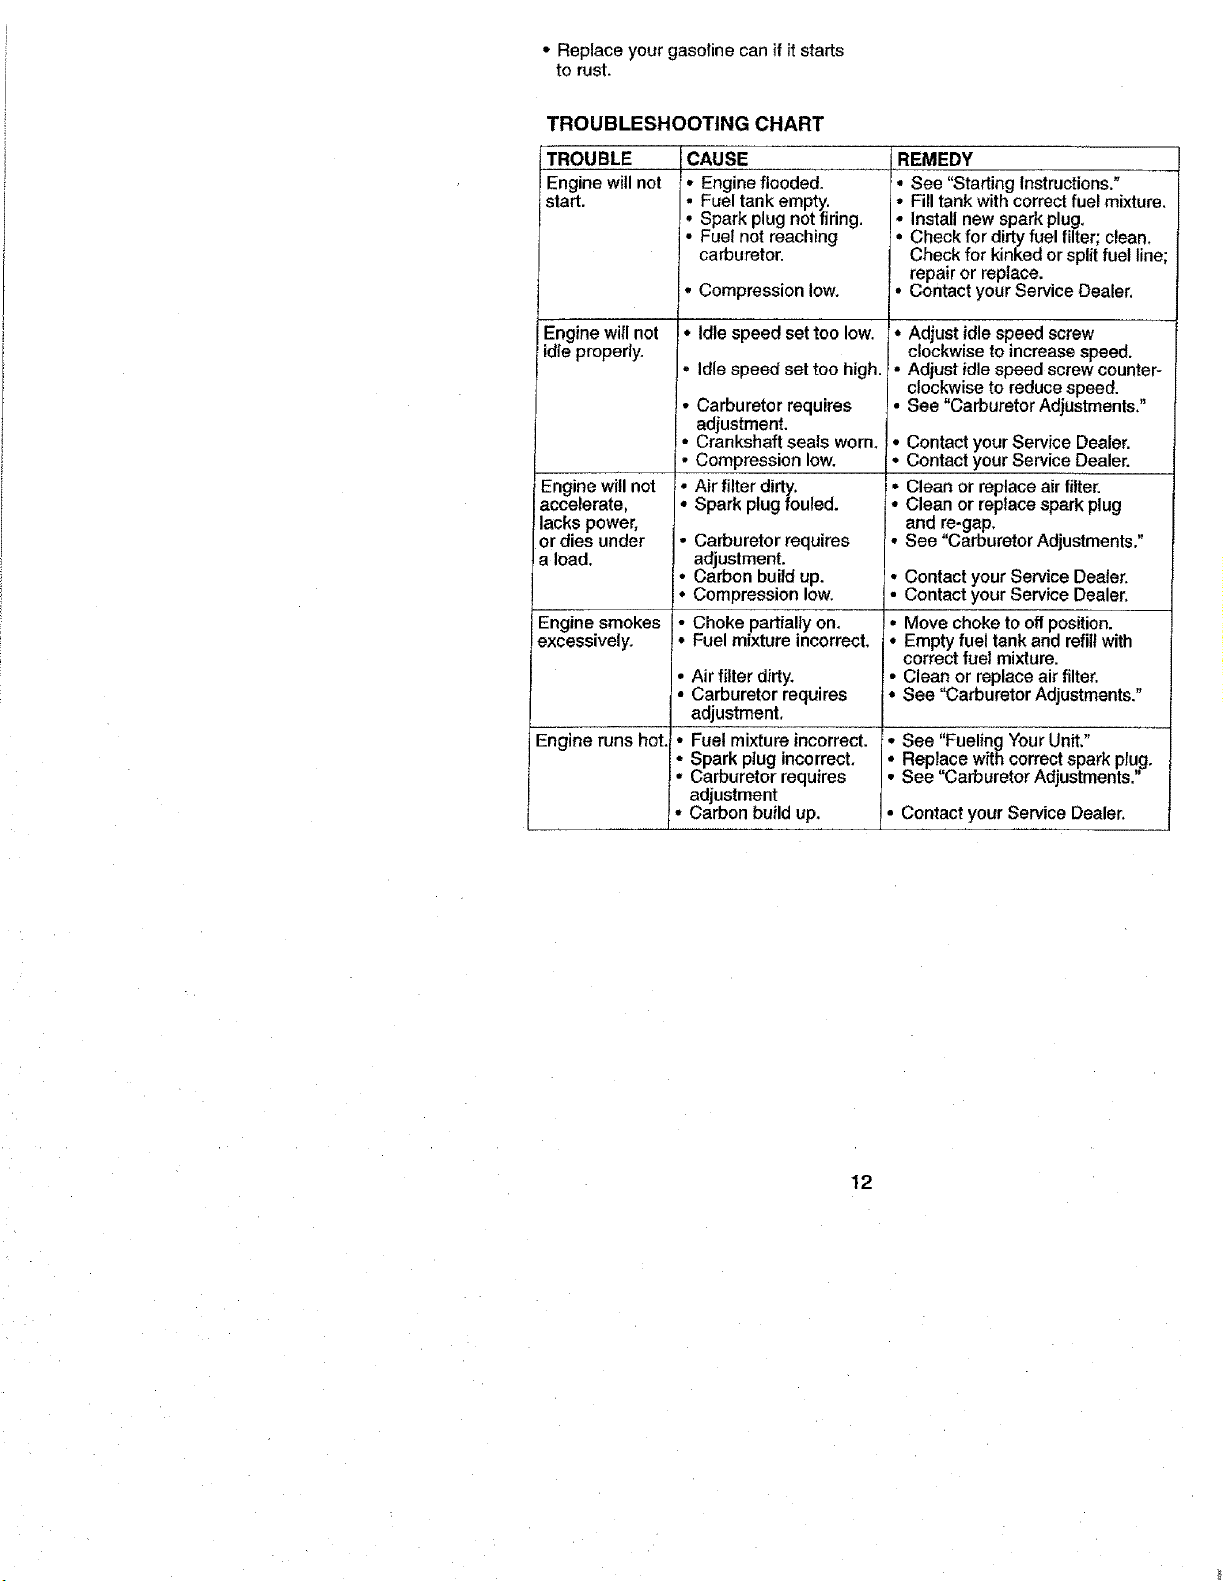
TROUBLESHOOTING CHART
TROUBLE
Engine will not
start.
Engine will net
idle properly.
Engine will not
accelerate,
lacks power.
or dies under
a load.
Engine smokes
excessively.
I Engine runs hot.
CAUSE
• Engine flooded.
• Fuel tank empty.
• Spark plug not firing.
• Fuel not reaching
carburetor.
• Compression low.
!• Idle speed set too low.
, Idle speed set too high.
• Carburetor requires
adjustment.
• Crankshaft seals worn.
• Compression low.
: Air filter dirty.
Spark plug fouled.
• Carburetor requires
I, adjustment.
Carbon build up.
° Compression low.
Choke partially on.
: Fuel mixture incorrect.
• Air filter dirty.
• Carburetor requires
adjustment.
• Fuel mixture incorrect.
: Spark plug incorrect.
Carburetor requires
adjustment
• Carbon build up.
REMEDY
• See "Starting Instructions."
• Fill tank with correct fuel mixture.
Install new spark plug.
: Check for dirty fuel filter; clean.
Check for kinked or split fuel line;
repair or replace.
• contact your Service Dealer.
• Adjust idle speed screw
clockwise to increase speed.
• Adjust idle speed screw counter-
clockwise to reduce speed.
• See "Carburetor Adjustments."
• Contact your Service Dealer.
• Contact your Service Dealer.
: Clean or replace air filter.
Clean or replace spark plug
and re-gap.
• See "Carburetor Adjustments."
• Contact your Service Dealer.
• Contact your Service Dealer.
• Move choke to off position.
° Empty fuel tank and refill with
correct fuel mixture.
• Clean or replace air filter.
• See "Carburetor Adjustments."
• See "Fueling Your Unit."
• Replace with correct spark plug.
• See "Carburetor Adjustments."
• Contact your Service Dealer.
12
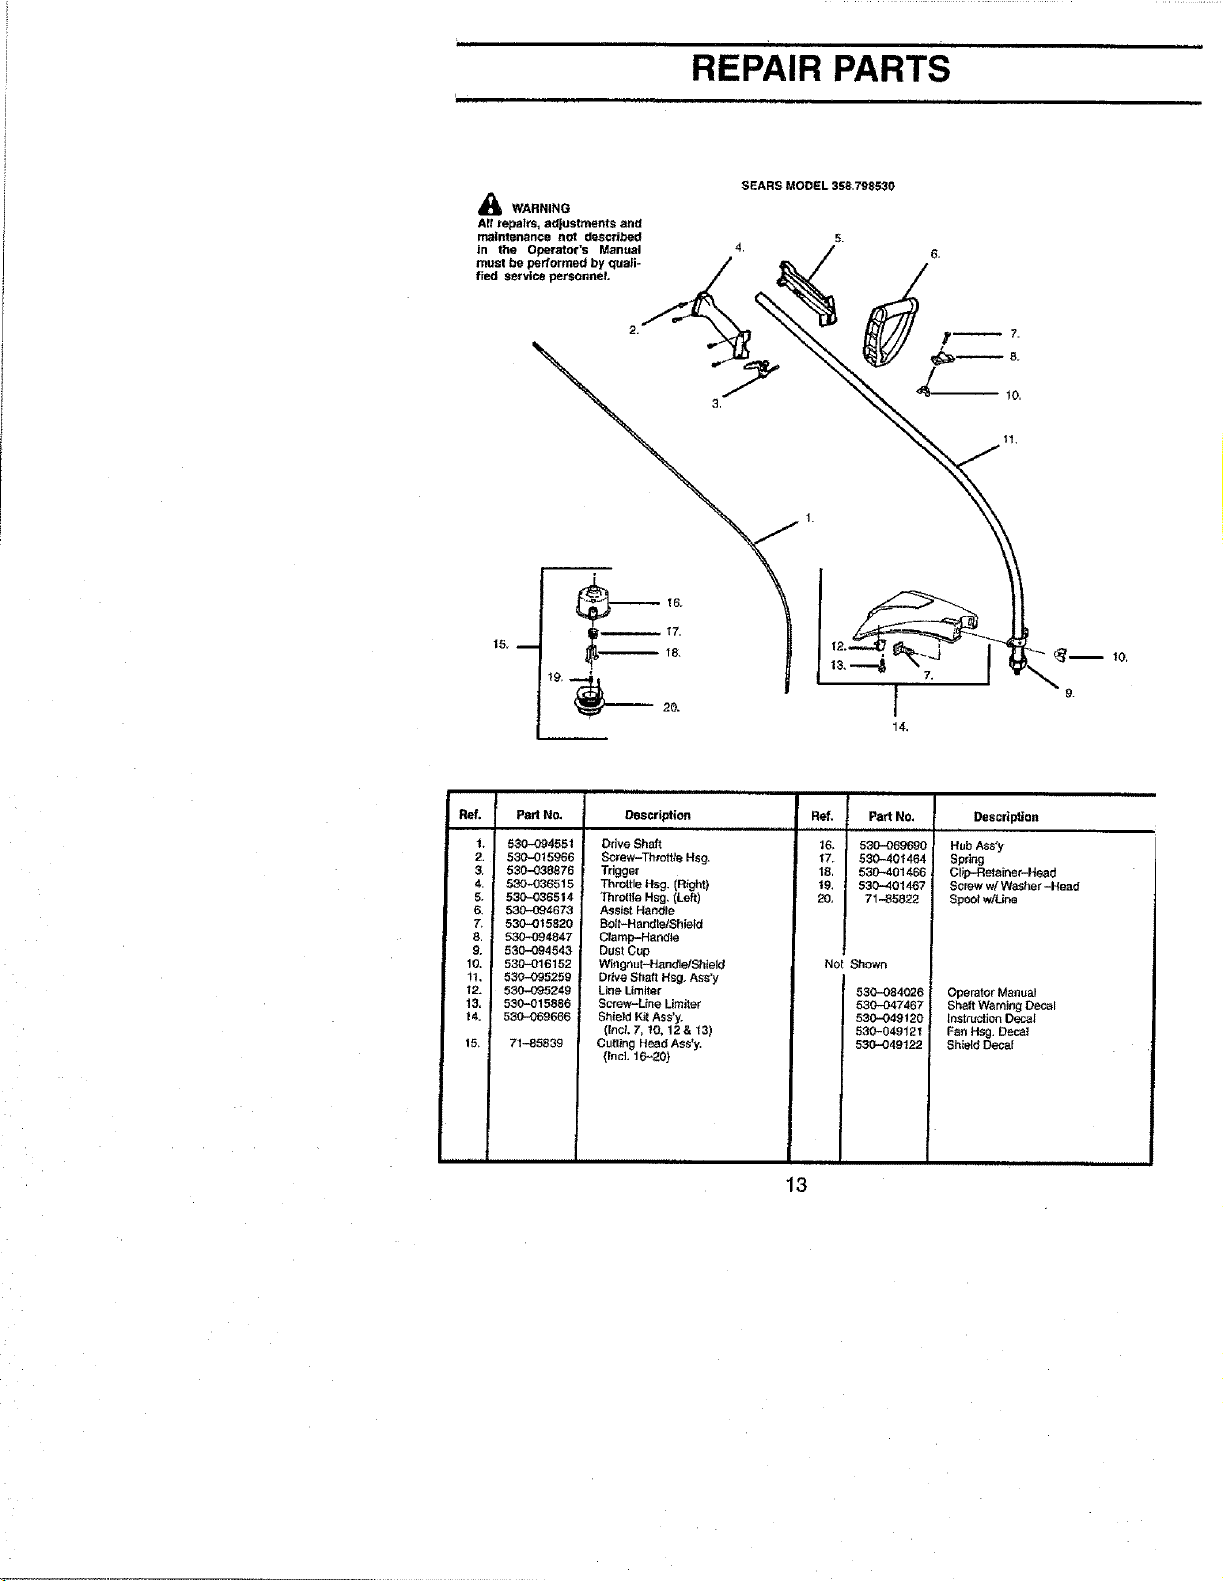
REPAIR PARTS
SEARS MODEL 358,798530
WARNING
Af! rebels, adjustments and
maintenance not described 5.
in the Operator's Manual 4,
must be performed by quali-
fied service personnel
9.
Ref. Part No.
1. 530-094551
2. 530-015966
S. 530-038876
4. 530--036515
5. 580-O365t 4
6. 53C--094673
7, 530-015820 i
8. 530-094847
9, 530-094543
10. 530-016152
11, 530-095259
12. 530-0_5249
13. 530-015886
t4. 530-069666
15, 71-85839
Des¢_p_on
Drive Shaft
Screw-Threttte Hsg.
Trigger
Thretpe Hsg. (Right)
Thmltle Hsg, CLeft)
Assist Handle
So;t-HandlelShie[d
Cramp-Handle
Dust CUp
Wingnut--Handle/shield
Drive Shaft Hsg. Ass'y
Line Limiter
Screw-Line Limiter
Shield Kit Ass'y.
([net, 7, tO, 12& 13)
Cutting Head Aes'y.
{fncL 16"-20}
Ref.
16,
18,
t9.
20,
Part No.
530--069690
530-401464
530-401466
530-401467
71-85822
Not Shown
530-084026
530-047467
530-049120
530-049121
530-049122
DeecHptton
HubAss'y
Spdng
Clip-Retainer-Head
Screww[ Washer-Head
Spoolw/Line
Operator Manual
Shaft Warning Decal
Instruction Decal
Fan Hsg. Deca_
Shield Decal
13
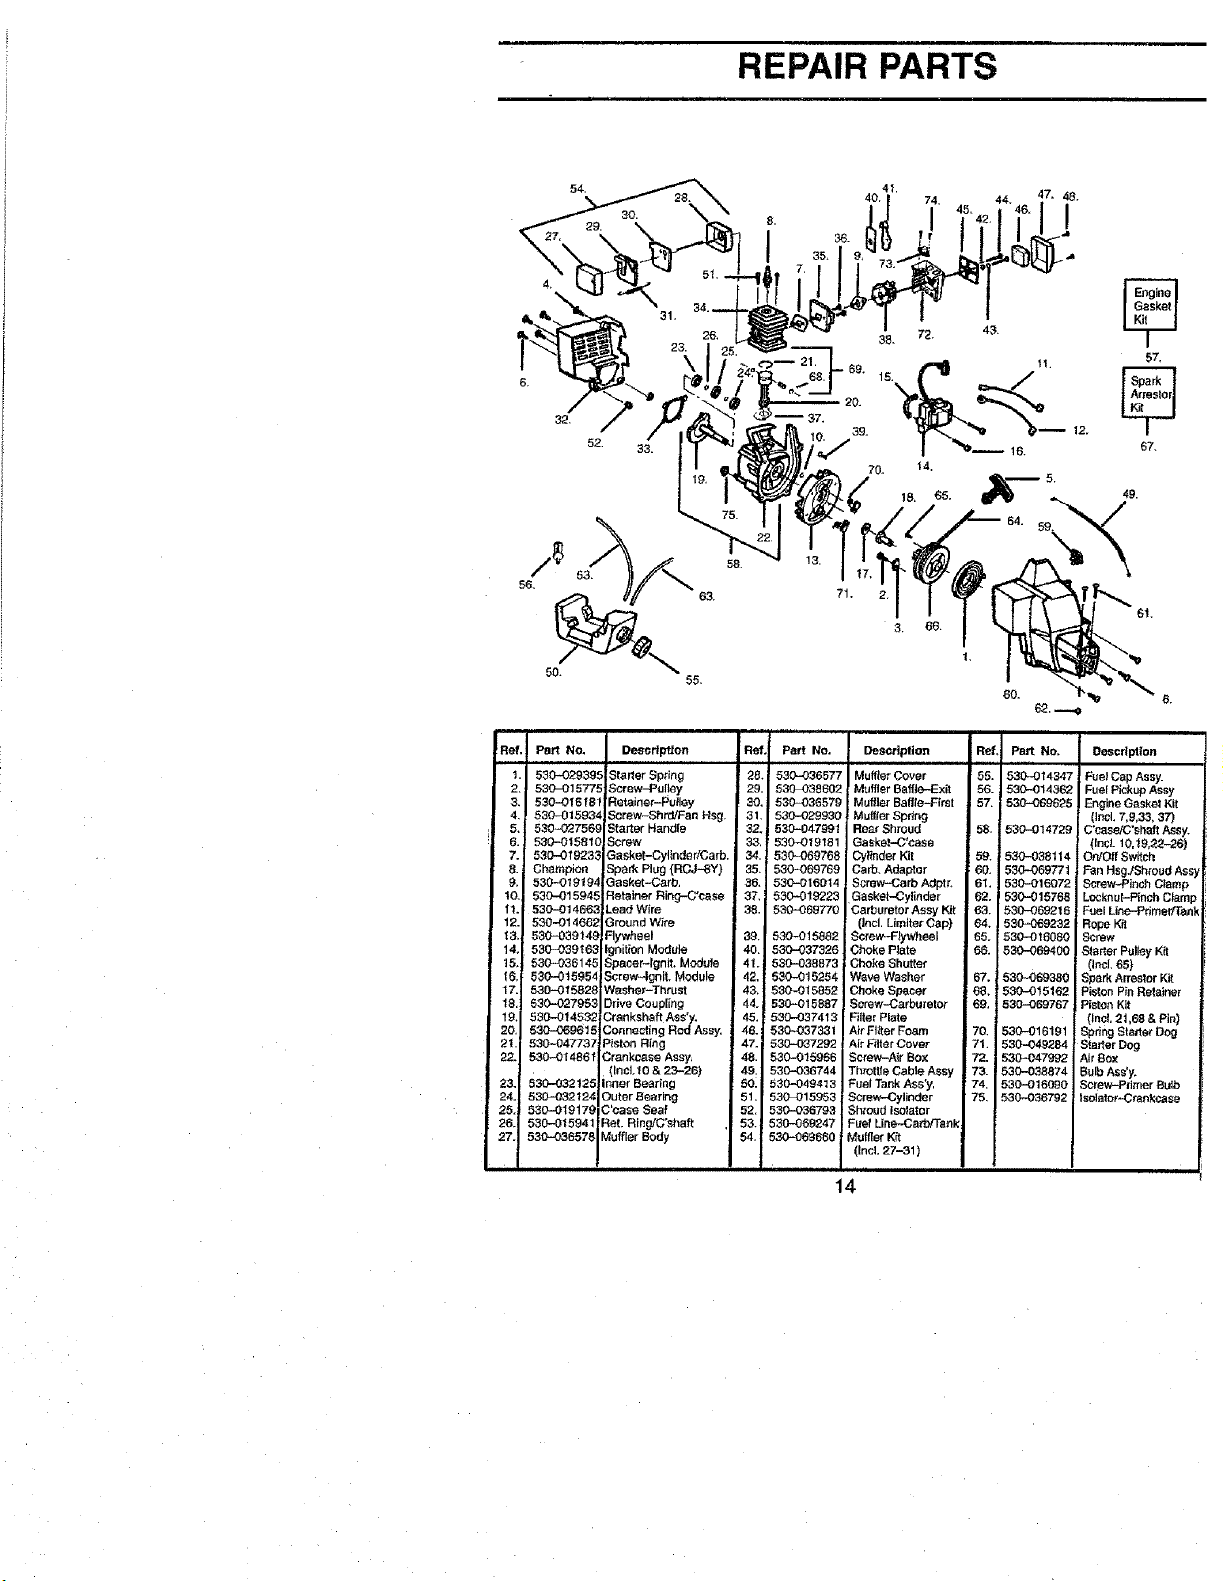
REPAIR PARTS
ii, , , i i , in
6.
32.
52
71. 2
57,
67.
49.
62, ,...-_
Ref.
t.
2.
3. 530-016 f81
4, ! 530-01593_
5. 5304}2756_
6. 530-'-0158 ?C
7. 530-01923,3
8. Champion
9. 530--019194
t0. 530-015945
I1. 530-014663
12. 530-014662
13. 530-039149
14. 530-039168
15.: 530..036145
16,J 530-015954
17 530-015828
18 530-027953
19, 530-9t4532_
20, 530-06961 _=
gt. 530*047732
22. 530.-014861
23. 530-032125
24. 530_032_24 Outer Bearing
25, 530.019179 C'eaea Sea!
26. 530-015941 ReL Ring/C'shaft
27. 530-03657_ Muffler Body
Pert No. Desorlption
530-029395 Starter Spring
530_315775 Screw-Pulley
Retalner-Putley
Screw-Shrd/Fen Hag.
Starter Handle
Screw
3 eeket-Cylindo r/Garb.
Spark Plug {RCJ-gY)
Gesket-Oarb,
Retainer R_ng-_case
.ead Wire
Ground W_re
Flywheel
Ignition Module
Spaser-|gnit. Module
Screw-lgnit. Module
Washer-Thrust
Drive Coupling
Crankshaft Ass'y.
Connecting Rod Ass F
Piston Ring
C,renkc,_se Assy.
IncLt0 & 23-26)
nner Bearing
Ref, Pert No. Description
28. 530--936577 Muffler Cover
29. 530-038602 MuffierBaff]e-Exit
30. 530-036579 Muffler Bafl{e-F;rst
31. 530-029930 MulflorSp#ng
32. 530-047991 Roe_ Shroud
3& 530-019181 Gaakel--O'¢aae
34. 530-069768 Cyt_nderKit
35. 530-069769 Carb. Adaptor
36. 530-016014 Screw-Cerb Adptr.
37. i 530K)19'223 Gasket-Cylinder
38. 530-069770 Car#uretorAssyKit
(Incl.Limiter Cap)
39. 5_15882 Screw-F_ywheel
40. 530-037326 Choke Ptote
41. 530-0388731 Choke Shutter
42, 530-015254 Wave Washer
43, 530-015852 ChokeSpeear
44. 530=015837 Screw-Carburetor
45. 530-037413 F_lterPlate
46. 530-037331 Air FI/ter Foam
! 47. 530-037292 Air F_lter Cover
48. 530-015966 Screw.-AirBox
49. 530-036744 Thrott(e Cable Aesy
50. 530-049413 Fu_JTankAae'y,
51. 530-015953 Screw-Cylinder
52, 530-036793 Shroud Isolator
53. 530-069247 Fuef Liee-..Ca_fTank
54, 530-069660 Muter Kit
(Incl. 27-31 )
14
Ref.; PaR No,
55.
56.
57,
58.
5_
6_
6_.
62.
:63.
64.
65.
66.
67.1
6&i
69, i
70,
71,
72.
73.
74.
75,
0esedptlon
530-014347 i Fuel Cop Ass},.
530-014362 Fuel Piskup Assy
530-069625 ! Engine Gasket Kit
(IrtcL 7,9,33, 37)
530-014729 C'cese/C'shaft Assy.
([ncL 10,19,2_-26)
530-038114 OWOff Switch
530.-069771 Fen HsgJShtoud Ass
530-016072 Scrow4Diesh Clamp
530-015768 Locknut-Pinoh C_mp
530-069,316 Fuel Line-F'dmer/Tan}l
530_069232 Rope Kit
530--016080 Scow
530-069400 Starter Pulley Kit
(l_l, aS)
530-069380 Spark Arrestor Kit
5304)15162 Piston Pin Retaioer
530-069767 Piston Kil
(lncL 21,68 & Pin)
530-016191 Sp_fng Starter Dog
530-049284 Stealer Dog
530-4347992 Air Box
530-038874 Bulb Ass'y.
530-016090 Screw-Palmer Bulb
530.4336792 ! Isolator--O_nkcaae
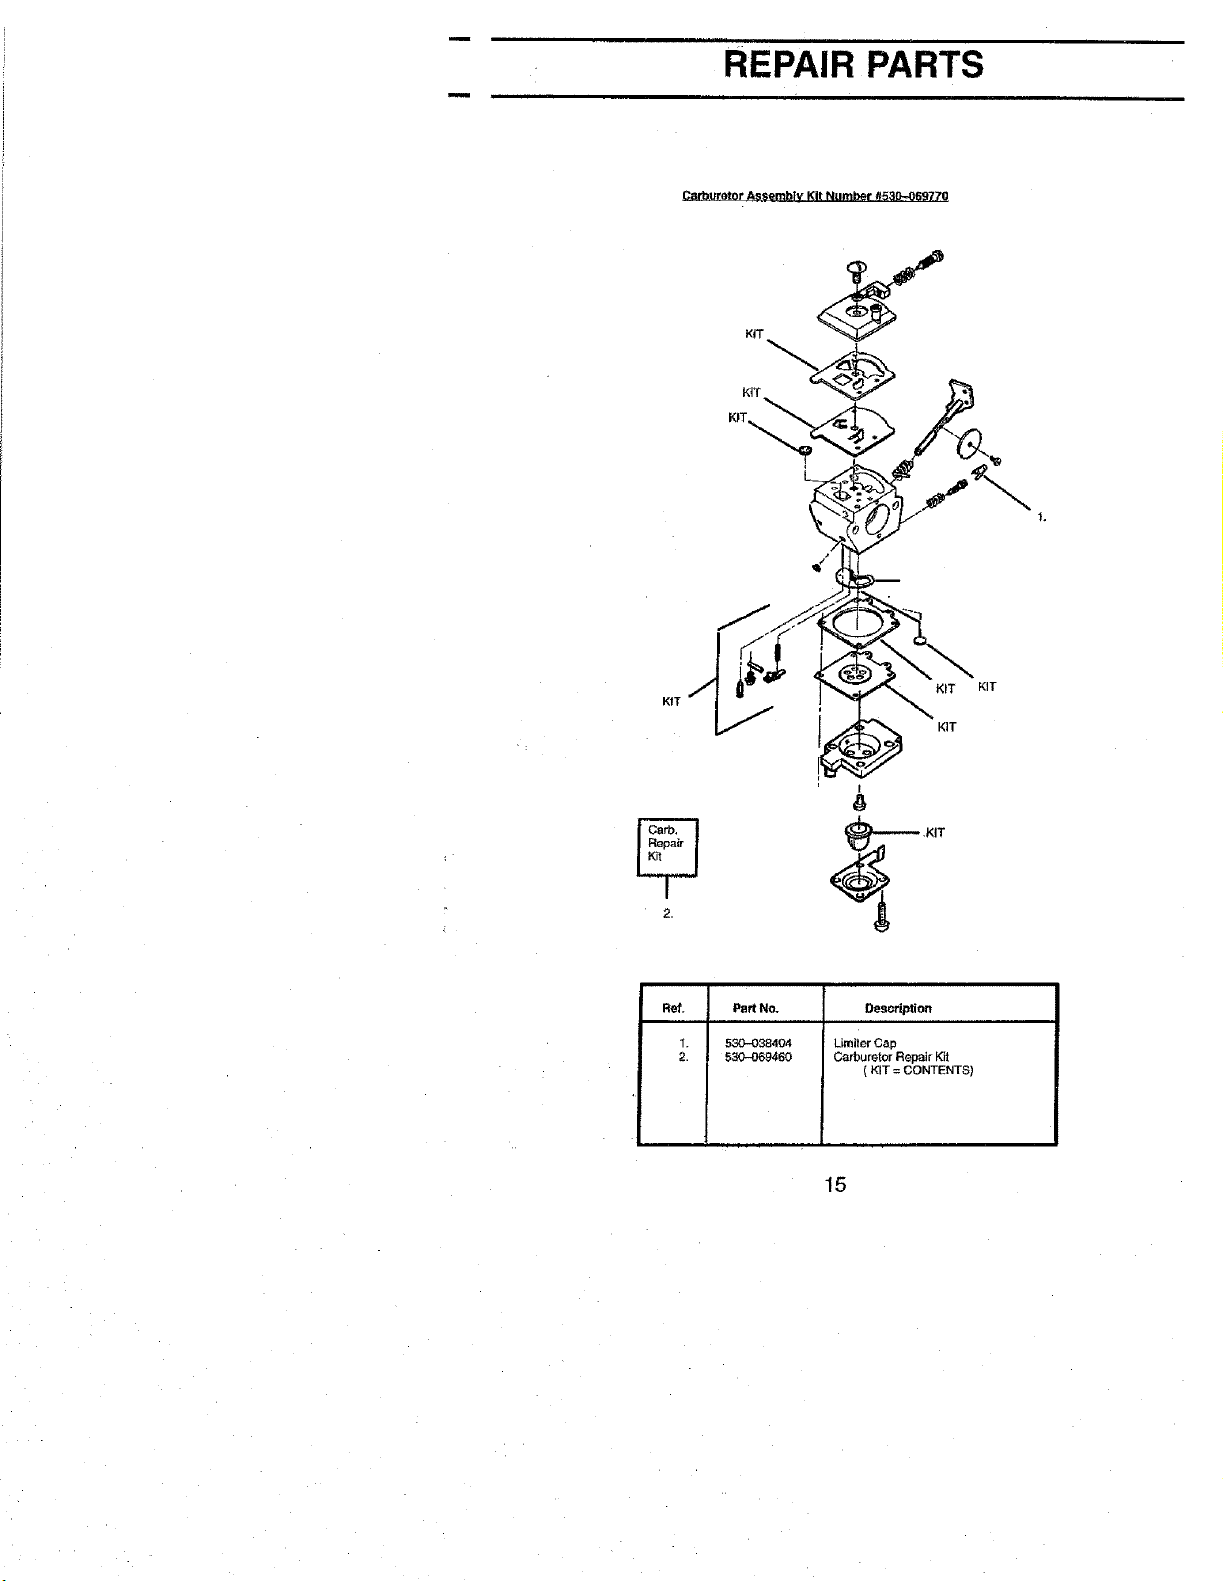
REPAIR PARTS
Carburetor Assembly Kit Numbe[ #5313_069770
KIT
K,T
Refr
1.
2.
Part No.
530-038404
530-069460
Description
Limiter Cap
Carburetor Repair Kit
{ KIT = CONTENTS)
15
Declaraci6n de Garantfa 2 Servicio y Ajuste 10
Reglas de Seguridad 2 Atmacenamiento 11
Montaje 4
Use 5 Tabla DiagnSstica 13
Mantenimiento 9 Repuestos y Encargos Contratapa
GARANTIA DE UN AI;IO PARA EL CRAFTSMAN GASOLINA
WEEDWACKER ®
Pot un afio desde la fecha de cempra cuando esta unidad a gasolina Craftsman
Weedwacker ® es mantenida lubricada y puesta a puesta a punto de acuerdo
con as instruccfones de operaci6n y mantenimiento en el manual del operario,
Sears repreparar& libre de consto cuaiquier defecto de material o de mano de
obra.
Esta garantfa excluye la cuerda de nylon, bujla y filtro de aim, las cuales son
partes descarteables que se desgastan durante el uso normal.
Si este Weedwacker ® se usa para fines comerciales, esta garantfa se aplica
durante 90 aliassolamente a partir de la fecha de compra. Si este Weedwacker ®
se usa para fines de alquiier, esta garantfa se aplica durante 30 dias solamente a
partir de ]a fecha de compra. Esta garantfa se aplica sSIo mentras este producto
se uso en los Estados Unidos
EL SERVICIO DE GTARANTIA ESTA DISPONIBLE DEVOLVtENDO EL
WEEDWACKER ® AL CENTRO O DEPARTAMENTO DE SRVlCIO DE SEARS
MAS CERCANO EN LOS ESTADOS UNIDOS.
Esta garantfa te otorga derechos legales especificos y usted puede tambi_n
tener otros derechos que varfan de Estado a Estado.
SEARS_ROEBUCK AND CO, DEPT.DI817WA HOFFMAN ESTATES,IL 60179
ADVERTENCIA: AI usar aparatos
de jardinefia, es necesario siempre
observar precauciones bdsicas de
seguridad para reducir el riesgo de
incendio y de graves heridas. Lea y
siga todas las instrucciones, iEste
aparato de fuerza puede ser peligroso!
El usuario tiene la responsabilidad de
cumplir con las advertencias e
instrucciones de seguridad que se
encuentran en ei aparato yen el
manual.iLea el Manual del Usuario en
su totalidad antes de hacer uso del
aparato! Est_ totalmenta familiadzado
con los contrles yes use correcto del
aparato. Limite el use de este aparato
a aquellas personas que hayan lefdo y
comprendido tas advertencias e
instrucciones en el aparato yen el
manual y que _asvayan a cumplir.
Nunca permita que los nifios usen
este aparato.
InformaciSn de Seguridad en el
aparato
PELIGRO: Nunca use cuchillas ni
dispositivos desgranadores. Este
aparato fue diseSado exctusivamente
para ser usado como cortador a Ifnea.
El uso de cualquier otro accesorio o
pieza adicional incrementar& el petigro
de heridas.
@©@
ADVERTENCIA: La Ifnea de corte
arroja objetos violentamente, pudiendo
herir al usuario o a terceros. Use gafas
de seguridad y protecciSn de piernas.
2
Mantenga todo el cuerpo alejado de la
ffnea girante.
Mantenga a los niSos, espectadores y
animaies a una distancia minima de
15 metros (50 pies) Pare e! apara{o
inmediatamente si alguien sete
ace rca.
Protecci6n de los oios
RRBe,as
Siacontecensituacionesnoprevistas eneste
manual,tenga cuidado y usebuen¢rfferio.Si
necesita ayuda, entre en eontacto con el
Ooncesionaf_ode Servicio Sears o Uamea_
1-800-554-6723.
SEGURIDAB DEL USUARIO
• Use siempre proteccf6n de ojos.
• Use siempre pantalones largos,
mangas largas, betas y guantes. Se
recomienda el use de pantorrilleras
de seguridad. No use el aparato
descalzo, ni con sandalias.
Mant_ngase alejado de la linea
girante.
• Mantenga et cabello per encima de
los hombres, at_ndolo para tal efecto
si es necesario. No use ropa euelta
ni ropa con corbatas, tiras, boflas,
etc. que cuelgan {ibremente. Pueden
enredarse en las piezas en
movimiento.
• No baga use del aparato estando
cansado, enfeEno o bajo la
inffuencia del alcohol, de drogas o
de remedies.
• Use protecci6n de ofdos si usa e!
aparato per m,_s de una hera y
media per dfa.
• Nunca ponga elaparato en marcha
ni Io deje en marcha dentro de un
recinto o edificio cerrado. Respirar
los vapores dei combustible Io
puede matar.
• Mantenga las manijas libres de
aceite y de combustible.
SEGURIDAD DEL APARATO Y
EN EL MANTENIMIENTO
• Descoriecte la bujfa antes de hacer
cualquier mantenimiento menos los
ajustes al carburador.
• Inspeccione el aparato y cambie las
piezas daSadas o flojas antes de
cads use. Repare toda fuga de
combustible antes de usar el
aparate. Mantenga el aparato en
buenas condiciones de use.
• Cambie todas las plazas del cabezal
que est_n descantilladas,
resquebrajadas, quebradas o
dafiadas de cualquier otto mode,
antes de usar el aparato.
• Aseg_rese que el aparato est_
correctamente armado come se
muestra en el manual.
• Haga los ajustes al carburador con
el cabezal apoyado de mode que ia
linea no pueda tocar nada.
• Mantenga alejadas alas dem&s
personas siempre que haga ajustes
ai carburador.
• Use exclusivamente los accesorios y
repuestos Sears recomendados.
SEGURIBAD CON EL
COMBUSTIBLE
• Mezcte y vierta el combustible at aire
libre.
• Mant6ngase alejado de las chispas y
de las llamas.
• Use recipiente aprobado para el
combustible.
• No fume ni permita que se fume
cerca del combustible ni dot aparato
ni mientras _ste est(_en use.
• Limpie todo el combustible
derramado.
• Al_jese a per Io menos 3 metros (!0
pies) del lugar de abastecimiento
antes de poner en marcha el motor.
• Pare el motor y permita qua se enfr{e
el aparato antes de retirar la tapa del
tanque.
SEGURIDAD AL CORTAR
• Use el aparato exclusivamente para
recodar, para cortar c_sped, para
cortar bordes y para barrer. No Io
use para podar ni para recortar sate.
• Inspeccione el &rea antes de cada
use. Retire los objetos (piedras,
vidno rote, clavos, alambre, etc.) qua
se puedan enredar en la t{nea o qua
_sta pueda arrojar. Los objetos
duros pueden dafiar al cabezal y
_ete los puede arrojar, causando
graves heridas.
• Mantenga el equilibrio, con los pies
en una superficie estabie. No se
extienda demasiado.
• Mantenga todas las partes dot
cue_o atejadas de Ix linea girante y
del silenciador. Mantenga el motor
per debajo del nivel de la cintura° El
si]enciador puede causar graves
quemaduras cuando est& caliente.
• Si se corta con la linea del lade
izquierdo del protector, los
3
escombros volar&n en sentido
opuesto al usuado.
TRANSPORTE Y
ALMACENAMIENTO
• Espere qua et motor se enfde y fije
bien el aparto antes de guardar!o o
de transportarlo en un vahfculo.
• Vacfe el tanque de combustible
antes de guardar el aparato o de
transportarlo. Consuma todo et
combustible restante en el
carburador poniendo el motor en
marcha y dej&ndolo en marcha
hasta qua el motor se pare solo.
• Guarde el aparato y el combustible
en un lugar donde los vapores del
combustible no puedan alcanzar
chispas nf tlamas provenientes de
los termotanques, los motores o
interruptores el_ctricos, los
calefactores centrales, etc.
• Guarde e! aparato de modo que el
limitador de ifnea no puec!a causar
heridas accidentales. Se puede
• colgar el aparato por el tubo.
Guarde e! aparato fuera del alcance
de los ni_os+
- Si aeontece atguna situaci6n no
prevista en este manual, tenga
cuidado y use buen criterio. Si
necesita ayuda, Ilame al
1-800-235-5878
AVISO ESPECIAL: Este aparato no
viene equipado con silenciador
limitador de temperatura ni con rejilla
antichispa que cumpla los requisitos
de los C6digos de California 4442 y
4443. Todas las Uerras forestadas
federales, m_s los estados de
California, Idaho, Maine, Minnesota,
CONTENIDO DE LA CAJA
Nueva Jersey, Oreg6n y Washington,
requieren por ley que muchos motores
de combusti6n interna est_n
equipados con rejilla antichispa. Si
usted utUizael aparato donde exfsten
tales reglamenteos, usted tiene la
responsabilidad jurfdica de instalar y
mantener estas piezas en correcto
estado de funclonarniento. De Io
contrario, estard en infracci6n de la
ley. Vea la secci6n de
MAINTENtM]ENTOen este manual.
AVISO ESPECIAL: Et estar expuesto
alas vibraciones a tray,s del uso
prolongado de herram/entas de fuerza
a gasolina puede causar da_os a los
vasos sangufneos o a los nervios de
los dedos, las manos y las coyunturas
en aquellas personas que tienen
propensidad a lostrastornos de la
circulaci6n o a tas hinchazones
anormales. El uso prolongado en
tlempo fr_oha sido asociado con
dafios a los vasos sangufneos de
personas qua per otra parte se
encuentran en perfecto estado de
salud. Si ocurren sintomas tales como
el entumecimiento, el dolor, la falta de
fuerza, los cambios en el color o la
textura de la piel o falta de sentido en
los dedos, las manos o las coyunturas,
deje de usar esta mdquina
inmediatamente y procure atenci6n
m_dica. Los sistemas de
anti-vibraci6n no garantizan que se
eviten tales problemas. Los usuarios
que hacen uso continue y
prolongando de las herramientas de
uerza deben fiscalizar atentamente su
estado fisico y e! estado dal aparato+
Verifique qua est6n incluidas todas las
piezas qua figuran en la lista a
continuaciOn+
Modelo 358.798530
• Cortadora
• Protector
• Tuerca Mariposa
Examine las piezas para verificar qua
no est_n da_adas. No use plazas
da£mdas.
Si necesita ayuda, faltan piezas o hay
plazas dadadas, flame al
1-800-235+5878.
AVISO: Es normal escuchar qua
golpetee el filtrode combustible en el
tanque vacfo.
Es normal encontrar residuos de
combustible o aceite en e! silenciador
debido a los ajustes al carburador y a
las pruebas efctuadas por el
fabdcante.
MONTAJE
ADVERTENCIA: Si recibi5 el
aparato ya montado, repitatodos los
pasos para asegurar que est6
correctamente armado y qua todos los
fijadores est_n fijos y seguros.

AJUSTE DE LA MANIJA
ADVERTENClA: A1ajustar la
manija, asegdrese que quede entre el
gatillo y la placa de seguridad.
Afloje Ia tuerca madposa o la perilla
en la manija.
• Gire la manija en el tube hasta que
quede en posici6n vertical; vuelva a
ajustar la tuerca mariposa.
INSTALACION DEL CABEZAL Y
DEL PROTECTOR
ADVERTENClA: Es imprescindibte
que el protector est_ debidamente
instalado. Provee protecci6n partial
contra el peligro de objetos arrojados
hacia et usuario o hacia terceros y
vlene equipado de un limitador de
I_neaque corta el exceso de Ifnea para
que quede de! largo que corresponde.
El limitador de linea (debajo del
protector) es _oso y corta.
• Introduzca la m6nsuta per la ranura
come se ilustra.
• Gire el protector hasta que el pemo
paso per el orificio en la m_nsula.
• Enrosque ta tuerca marJposa al
pemo y ajdstela bien.
Protector _ /Ranura
M_nsula
4
\
Tuerca
Mariposa
CONOZCA SU APARATO
LEA ESTE MANUAL DEL USUARIO Y LAS REGLAS DE SEGURIDAD ANTES
DE PONER EN MARCHA EL APARATO. Compare las itustraciones a su aparato
para familiarizarse con la ubicaci6n de los diversos controles y ajustes. Guarde
este manual para use future.
Manija Auxiliar
Interrupter
Soga de
Arranque
\
Palanca del
Cebador
Tube
/
Protector
Cabezal
Bornbeador
Limitador
Tapa del Tanque de Linea
de Combustible
INTERRUPTOR
Se utiliza e! interrupter para parar el
motor. El interrupter deber& estar en la
posiciSn ON para poner el motor en
rnarcha. Para pararlo, ponga el
interrupter en la posici6n STOP.
BOMBEADOR
El bombeador retira aire de las lineas
de combustible y las Ilena de
combustible. Esto le permite que
ponga et motor en funcionamiento con
menos tirones a la soga de arranque.
Accione el bombeador apret&ndolo y
dejando que retome su forma original.
CEBADOR
Elcebadorayuda a proveer
combustiblea|carburadordurantee!
arranque.Esto le permiteal usuario
ponerun motorfrioen funcionamtento.
Accioneelcebadorcolocandola
palancaen taposici6nFULL.Despu6s
deque elmotorse hayapuestoen
mamha,coloqueelcebadoren la
posiciSnOFF.
ANTES DE PONER EL MOTOR
EN MARCHA
ADVERTENCIA: Asegtirese de
haberlefdola informaci6nsobreel
5
combustible en las reglas de
seguridad antes de comenzar. Si no
comprende las reglas de seguridad,
no intente abastecer el aparato de
combustible. Llame 1-800-235-5878.
ABASTECIMIENTO DEL MOTOR
Este motor est_ habilitado para
funcionar con gasofina sin plomo.
Antes de usar, se deber& mezclar la
gasolina con un aceite de buena
calidad para motores de 2 tiempcs
enfriados a aire. Recomendamos el
aceite marca Craftsman. Mezcle la
gasolina con et aceite en la proporciSn
de 40:1. (Se obtiene una proporci6n
de 40:1 mezclando 3,2 onzas de
aceite con cada gal6n de gasotina sin
plomo). NO USE aceite para
autom6viles ni para barcos. Estos
aceites da5ar&n el motor. A! mezclar
combustible, siga las instrucciones
impresas en e! recipiente. Una vez
que haya a_adido el aceite a la
bgasolina, agite el recipiente
revemente para asegurar que el
combustible est_ completamente
mezclado. Lea siempre y siga las
reglas de seguridad que tienen que
ver con el combustible antes de
abastecer el aparato.
IMPORTANTE
La experiencia indica que los
combustibles mezclados con atcohor
(los Ilamados gasohol o los que
contienen etanol o metanol) pueden
atraer humedad, Io que puede causar
la separaci6n y la formaci6n de _cidos
durante e! almacenamiento. La
gasolina acfdica puede dafiar el
sistema de combustible del motor
durante el almacenamiento.
Para evitar probtemas con el motor,
deber_, vaciarse el sistema de
combustible antes de almacenar el
aparato por 30 d_as o m&s.
Vacfe el tanque de combustible, ponga
el motor en marcha y d_jelo en
marcha hasta que las Ifneas de
combustible y el carburador queden
vacfos. Cuando vaya a usar el aparato
nuevamente, use combustible freco.
Vea las instrucciones de
ALMACENAMIENTO para obtener
m_s informaciones.
Nunca use productos de limpieza de
motor o carburador en el tanque de
combustible ya que hacerlo pul
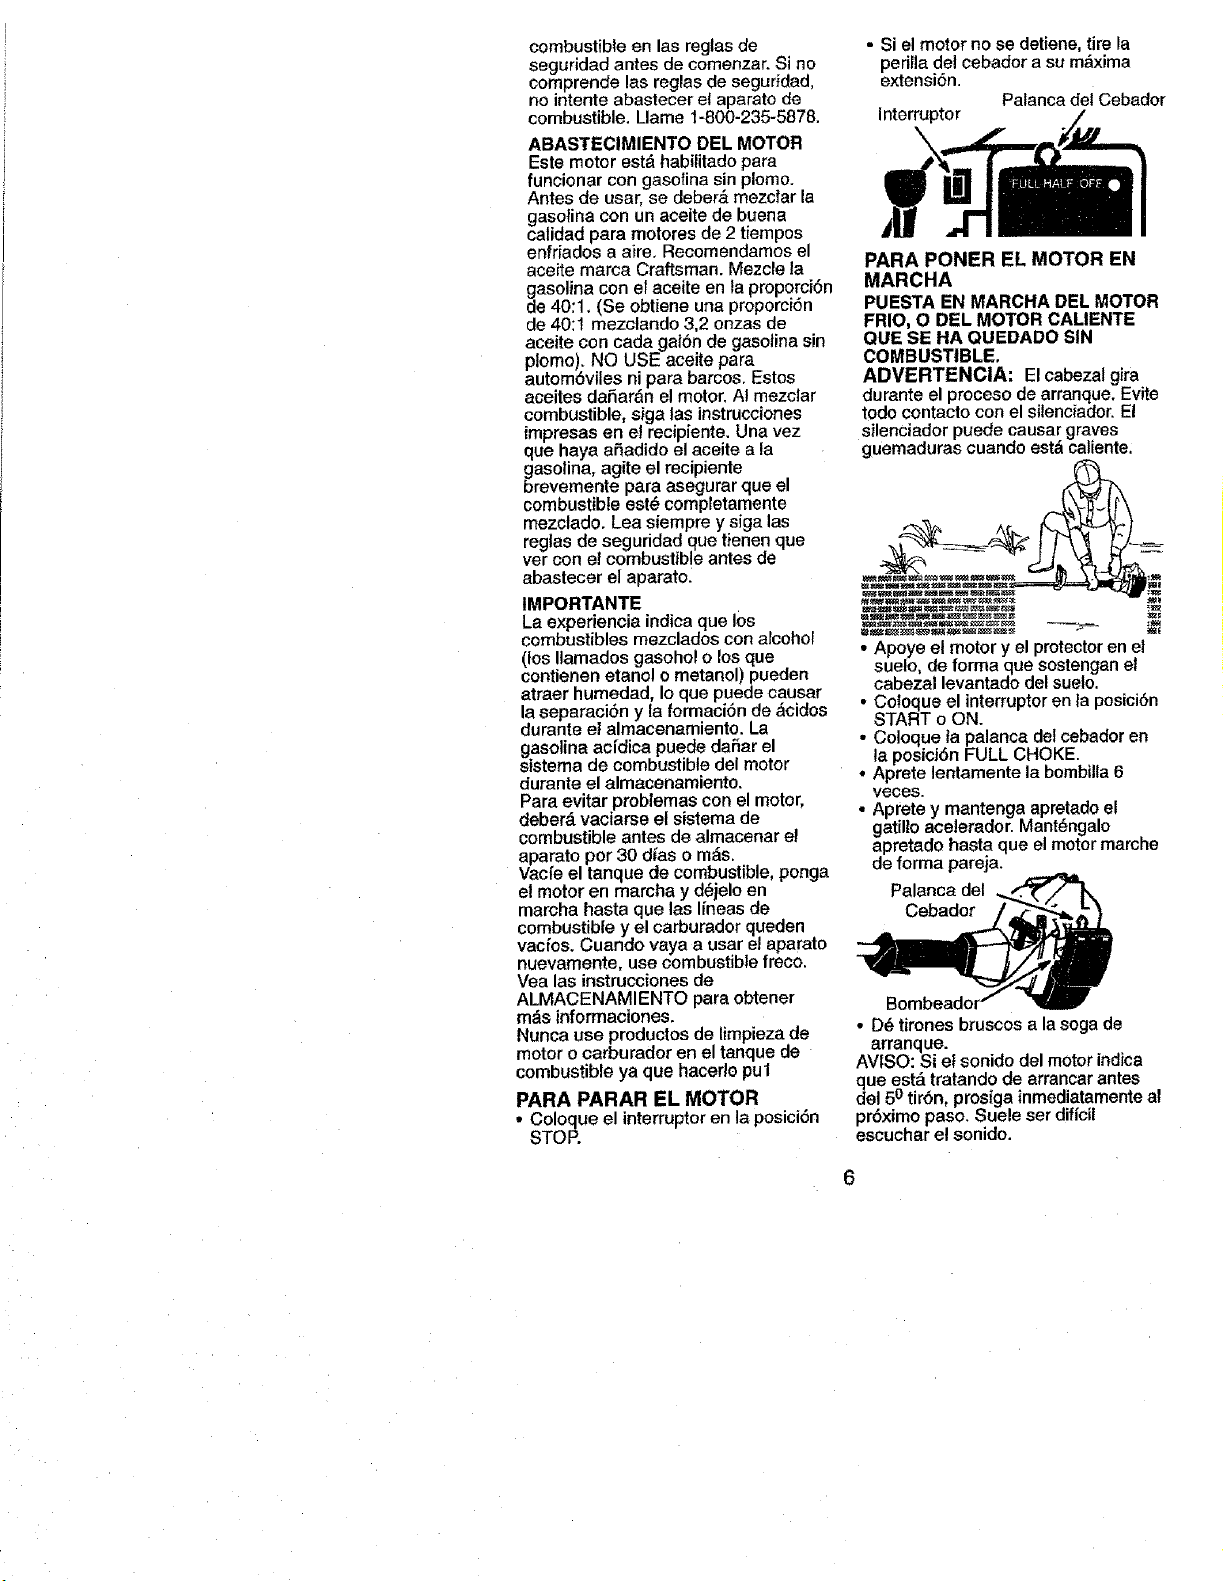
PARA PARAR EL MOTOR
• Coloque el interruptor en la posici6n
STOP.
• Si el motor no se detiene, tire la
perilla del cebador a su m&xima
extensi6n.
Palanca dei Cebador
Interrupter
PARA PONER EL MOTOR EN
MARCHA
PUESTA EN MARCHA DEL MOTOR
FRIO, O DEL MOTOR CAUENTE
QUE SE HA QUEDADO SIN
COMBUSTIBLE.
ADVERTENCIA: El cabezal glra
durante el proceso de arranque. Evite
todo contacto con el sitencfador. El
silenciador puede causar graves
guemaduras cuando esta caliente,
• Apoye el motor y el protector en et
suelo, de forma que sostengan el
cabezal levantado del suelo.
• Coloque el interruptor en la posici6n
START o ON.
• Coloque ta palanca del cebador en
la posicJ6nFULL CHOKE.
• Aprete lentamente la bombilla6
votes.
• Aprete y mantenga apretado el
gatillo acelerador. Mant_ngalo
apretado hasta que el motor marche
de forma pareja.
Palanca del =
Bombeador"
• D_ timnes bruscos a lasoga de
arranque.
AVISO: Si el sonido del motor indica
que estd tratando de arrancar antes
del 50tir6n, prosiga inmediatamente al
pr6ximo paso. Suele set diffcil
escuchar el sonido.

_ oloque la patanca del cebador en
la posicien HALF CHOKE.
D_ tirones bruscos a la soga de
arranque hasta que el motor se
ponga en marcha, pore no m&s de 6
veoes.
AVISO: Si el motor no se ha puesto
en marcha despu_s de 6 tirones (en
posicien "Half Choke"), verifique que la
palanca del cebador este en su
posicien corespondiente. Despu_s,
coloque la palanca del cebador a la
posicien HALF CHOKE y de tirones
bruscos a la soga de arranque hasta
que el motor no se ha puesto en
marcha, probablemente est_ ahogado.
Presiga a "Arranque de Motor
Aho_ado".
• Dole el motor en marcba per 10
segundos, despu_s coloque la
Poalancade! cebador en la posioiSn
FF CHOKE. Deje que el motor
marohe etros 30 segundos en
posicien OFF CHOKE antes de
soltar el gatilto acelerador.
AVISO: si el motor se para con ta
palanoa del cebador en la posicien
OFF CHOKE, ponga la palanca en la
posicien HALF CHOKE y d_ tirones a
la soga hasta que el motor arranque.
PARA PONER EN MARCHA EL
MOTOR CALIENTE
* Coloque la palanca del cebador en
la posicien HALF CHOKE.
• Aprete y mantenga apretado el
gati!lo acelerador. Mantenga el gatillo
apretado a fondo hasta que el motor
marche de forma pareja.
• DOtirones bruscos a la soga de
arranque hasta que el motor se
ponga en mamha, pere no m&s de 5
veces.
• Deje el motor marchar per 15
segundos, despues cotoque ]a
PCalancadel oebador en OFF
HOKE.
AVISO: Si el motor no ha arancado, d_
5 tirones mds a la soga de arranque.
Si el motor aun asf no arranca, es
probable que est_ ahogado.
ARRANQUE DIFICIL O
ARRANQUE DE MOTOR
AHOGADO
Se puede poner en marcha los
motores ahogados colocando la
palanca del cebador en la posicien
OFF CHOKE; aoto seguido tire la soga
para despejar el exceso de
combustible del motor. Esto podrd
requerir que se tire la manija de
arranque muchas veces, dependiendo
de la cantidad de combustible que
estd ahogando el aparato.
Si el motor no arranca a0n, yea ta
TABLA DtAGNOSTICA o llame al
1-800-235-5878.
INSTRUCCIONES DE use
POSIClON DE use
USE StEMPRE _,,=..-,_
_ R"_(_ Proteccien
_ de los Ojos
Pantalones"_
Largos --_a,, 1_., _
Zapatos Ht_J! ..'_,
Gruesos "_ _%
Corte desde su derecha hacia su
izquierda.
Lleve el motor a la velocidad de corte
antes de introducir ta Ifnea al material
que se ha de certar. No haga marchar
e! motor a velocidades m_s altas que
la necesaria. La Ifnea de corte corta
eficientemente con el motor
marchando a una velooidad menor
que la m_xima, produciendo asf
menos ruido y vibracien. La linea de
oorte durard per rods tiempo y tendrd
menos probabilidad de ffundirse" a la
bobina.
Si el cabezal no gira cuando el motor
est& en marcha, aseg0rese que el eje
de propulsien est_ debidamente
calzado dentro de la caja del motor.
Siempre suette el acelerador y deje
que el motor baje a marcha lenta
cuando no est_ corlando.
Para parar el motor:
• Suelte e! gatillo aceterador.
• Aprete y mantenga apretado el
interrupter momentdneo hasta que el
motor se haya detenido per
complete.
AVANCE DE LA LINEA DE
CORTE
La Hnea de corte avanza
aproximadamente 5 cm (2 putgadas)
cada vez que se tooa el cabezat
contra el suelo con el motor aceterado
a fondo,
El largo m_s eficiente de linea es el
largo mdximo permitido per el limitador
de llnea.
Siempre mantenga el protector
debidamente instalado al utilizar el
aparato.
• Para haoer avanear la Ifnea:
• Acelere el motor a fondo.
• Sostenga el cabezal encima de un
espacio de tierra con o_sped y
paralelo al mismo.
7
/
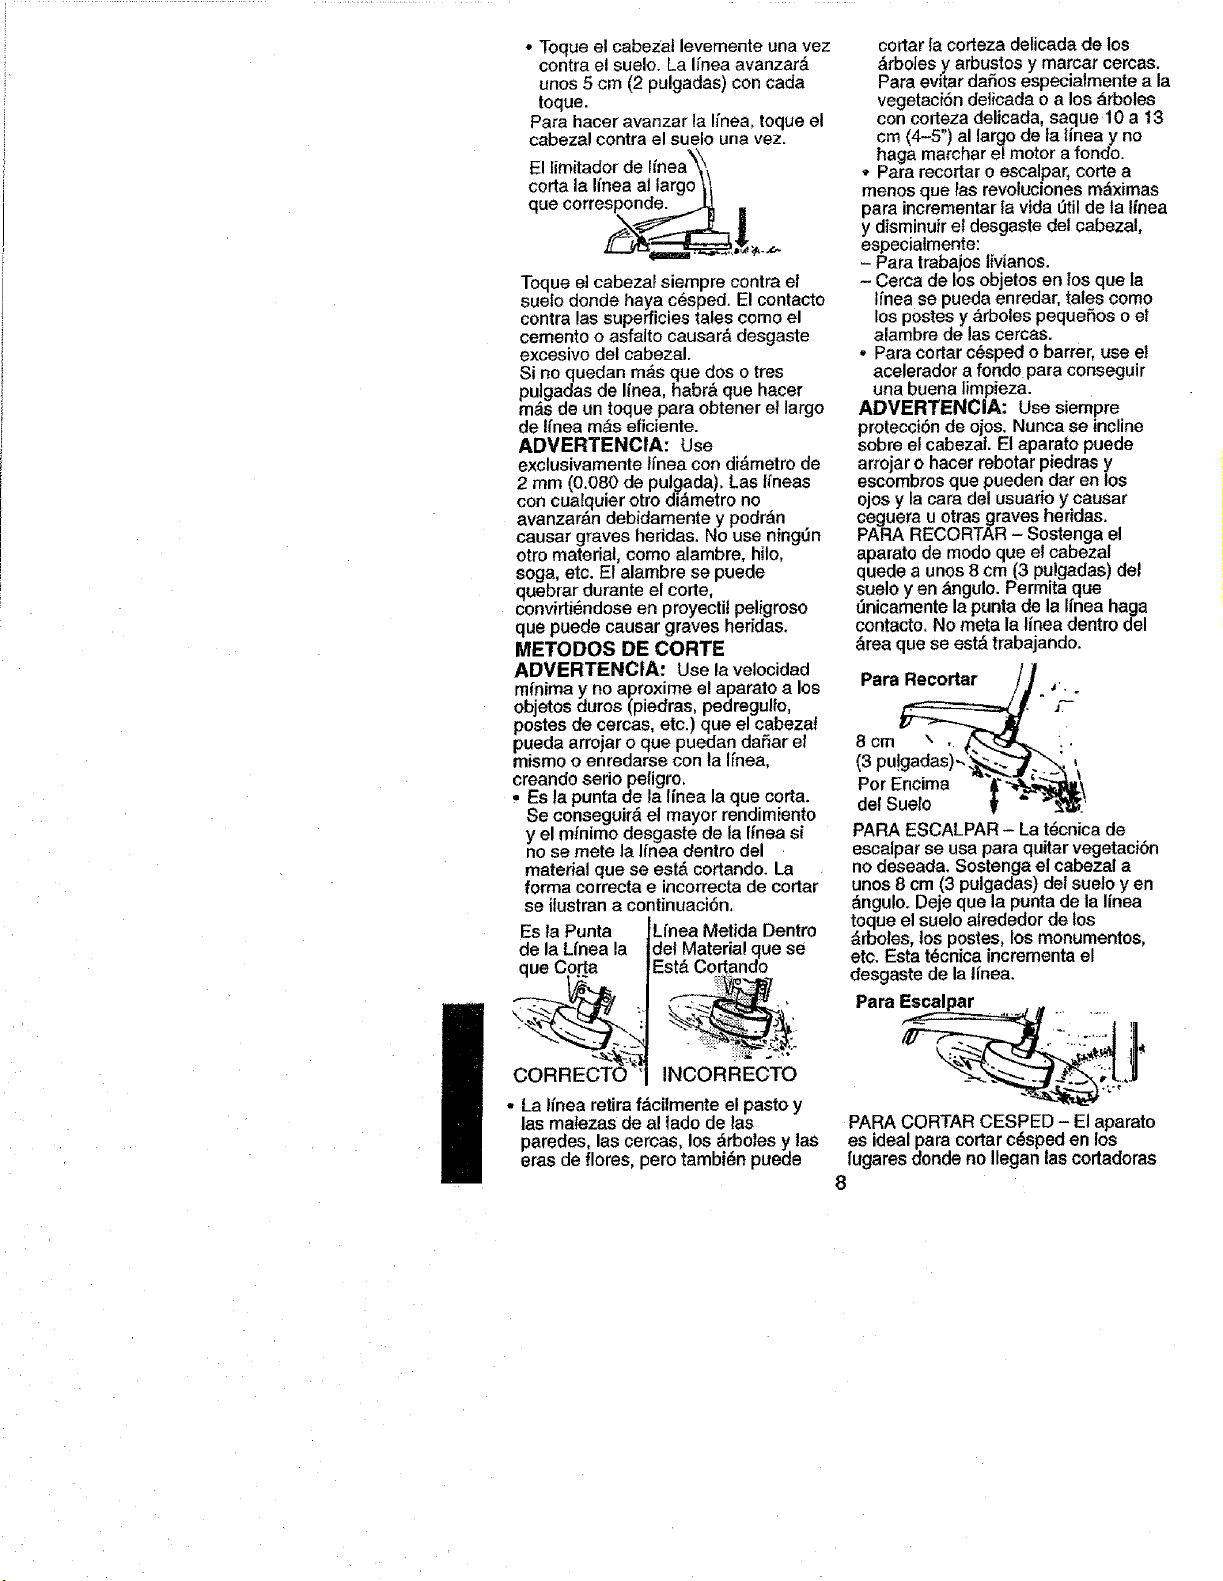
• Toque el cabezal levemente una vez
contra el suelo. La I_nea avanzar__
unos 5 cm (2 pulgadas) con cada
toque.
Para hacer avanzar la llnea, toque el
cabeza! contra el suelo una vez.
El limitador de Ifnea'_,
corta la Ifnea al largo \/
que corresponde. _ ,,
Toque el cabezal siempre contra el
suelo deride haya c_sped. El contacto
contra las superficies tales come el
cemento e asfalto causar& desgaste
excesivo del cabezal.
Si no quedan m_s que dos o tres
pu]gadas de Ifnea, habr& que hacer
m,_s de un toque para obtener et largo
de I_nea m&s eficiente.
ADVERTENCIA: Use
exelusivamente Ifnea con di_rnetro de
2 mm (0,080 de pulgada). Las I_'neas
con cualquier otro di_lmetro no
avanzar_n debidamente y podran
causar graves heridas. No use ning_n
otto material, come alambre, hilo,
soga, etc. El alambre se puede
quebrar durante el corte,
convirti_ndose en proyectil peligroso
que puede causar graves heddas.
METODOS DE CORTE
ADVERTENCIA: Use la velocidad
mfnima y no aproxime el aparato a los
objetos duros (piedras, pedregullo,
postes de cercas, etc.) que el cabezat
pueda arrejar o que puedan daSar ef
mismo o enredarse con la Ifnea,
creando serio pefigro.
• Es la punta de la Ifnea la que corta.
Se conseguir_ el mayor rendimiento
y el minimo desgaste de la I_neasi
no se mete la Ifnea dentro del
material que se est& cortando. La
forma correcta e incorrecta de cortar
se ilustran a continuaci6n.
Es la Punta ILfnea Metida Dentro
de la Lfnea la ldel Material que se
ue Corta lEst& Cortando
CORRECTO INCORRECTO
• La Ifnea retira f&cilmente el pasto y
las malezas de a! lado de las
paredes, las cercas, los _rbotes y las
eras de flores, pero tambi_n puede
cortar {acorteza delicada de los
_irboies y arbustos y marcar cercas.
Para evitar dafios especialmente a la
vegetaci6n deiicada o a los _rboles
con corteza delicada, saque 10 a t3
crn (4-5") al largo de la lfnea y no
haga marchar el motor a fondo.
* Para recortar o escalpar, corte a
menos que las revoluciones m_ximas
para incrementar la vida 0til de la Ifnea
y disminuir et desgaste del cabezal,
especialmente:
- Para trabajos tivianos.
- Cerca de los objetos en los que la
Iinea se pueda enredar, tales come
los postes y _rboles pequeSos o el
alambre de las cercas.
, Para cortar c_sped o barter, use el
acelerador a fondo para conseguir
una buena limpieza.
A[)VERTENClA" Use siempre
protecci6n de ojos. Nunca se incline
sobre el cabezal. El aparato puede
arrojar o hacer rebotar piedras y
escombros que pueden dar en los
ojos y la cara del usuario y causar
ceguera u otras graves heridas.
PARA RECORTAR - Sostenga el
aparato de mode que e! cabezal
quede a unos 8 cm (3 pulgadas) del
suelo yen _mgulo. Permita que
t_nicamente la punta de la Ifnea haga
contacto. No meta la Ifnea dentro del
&rea que se est,_ trabajando.
(3 pu!gadas )-.\_.=_._,
del Sueto _ " "_'-_.."
PARA ESCALPAR - La t_cnica de
escalpar se usa para quitar vegetaci6n
no deseada. Sostenga el cabezal a
unos 8 cm (3 pulgadas) del suelo yen
&ngulo. Deje que la punta de la linea
toque el suelo atrededor de los
&tholes, los posies, los monumentos,
etc. Esta tOcnica incrementa el
desgaste de la linea.
Para Escalpar
PARA CORTAR CESPED - El aparato
es ideal para cortar c_sped en los
lugares donde no Ilegan las cortadoras
8
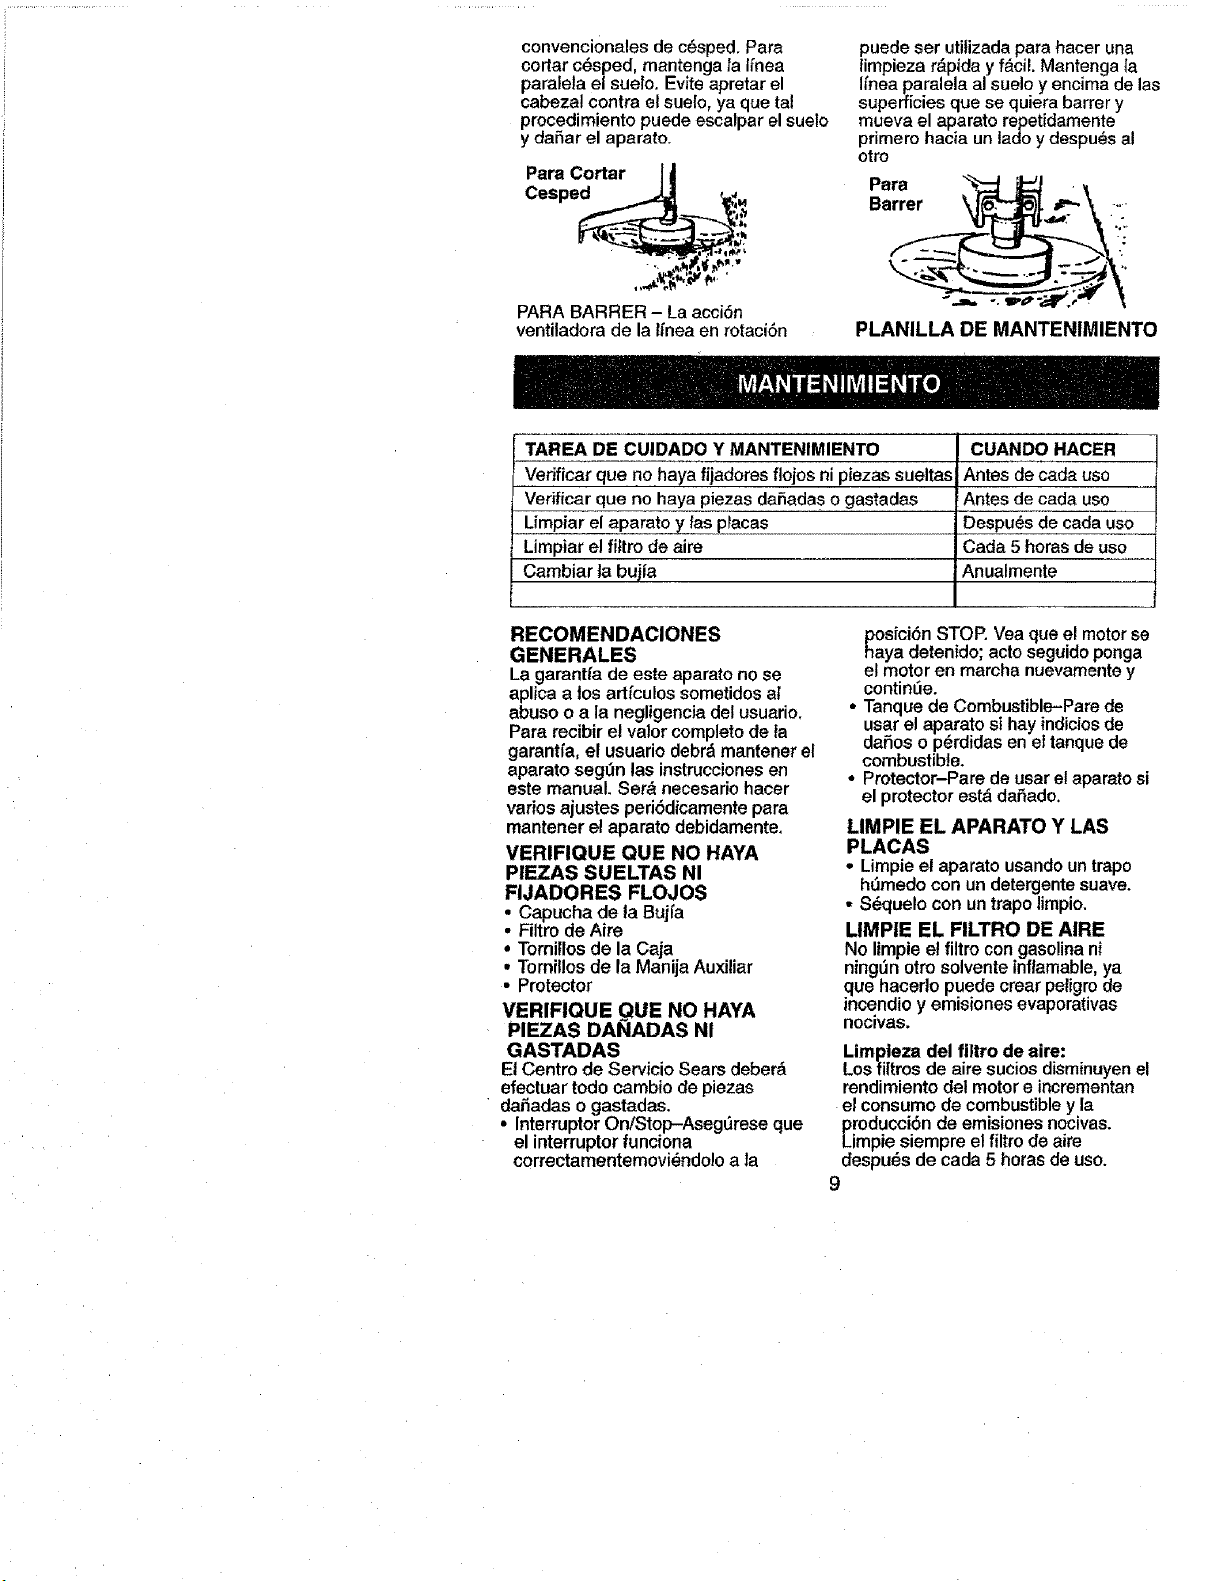
convenci0nalesdec6sped.Para
cortarc6sped,mantengala I{nea
paralela el suelo. Evite apretar el
cabeza! contra el suelo, ya que tal
procedimiento puede escalpar el suelo
y dafiar el aparato.
Para Cortar
Cesped
puede ser utilizada para hacer una
timpieza r&pida y f&cil. Mantenga fa
linea paralela al suelo y encima de las
superficies que se quiera barrer y
mueva el aparato repetidamente
primero hacia un lado y despu6s al
otro
Para
Barrer
PARA BARRER - La acci6n
ventiladorade la I_neaen rotaci6n PLANILLA DE MANTENIMIENTO
TAREA DE CUIDADO Y MANTENIMIENTO
Verificar que no haya fijadores flojos ni piezas sueltas
Verificar que no haya piezas dafadas o gastadas
Limpiar el aparato y las pracas
Limpiar el fittro de aim
Cambiar la bujia
CUANDO HACER
Antes de cada uso
Antes de cada uso
D_espu6s de cada uso
Cada 5 horas de uso
Anualmente
RECOMENDACIONES
GENERALES
La garant_a de este aparato no se
aplica a los articulos sometidos al
abuso o a la negligencia del usuario,
Para recibir el valor completo de la
garantfa, el usuario debr_ mantener el
aparato seg=3nlas instrucciones erl
este manual. Ser& necesario hacer
ratios ajustes peri6dicamente para
mantener el aparato debidamente.
VERIFIQUE QUE NO HAYA
PIEZAS SUELTAS NI
FIJADORES FLOJOS
Capucha de la Bujfa
Filtro de Aire
Tornitlos de la Caja
Tornillos de la Manija Auxiliar
• Protector
VERIFIQUE QUE NO HAYA
PIEZAS DANADAS NI
GASTADAS
El Centre de Servicio Sears deber&
efectuar todo cambio de piezas
daSadas o gastadas.
• Interruptor On/Stop-Aseg_rese que
el interruptor funciona
correctamentemovi_ndo!o a la
_osici6n STOP, Vea que el motor se
aya detenido; acto seguido ponga
el motor en marcha nuevamente y
continde.
• Tanque de Combustible-Pare de
usar el aparato si hay indicios de
dafios o p_rdidas en et tanque de
combustible.
° Protector-Pare de usar e!aparato si
el protector est_ daSado.
LIMPIE EL APARATO Y LAS
PLACAS
• Limpie el aparato usando un trapo
hSmedo con un detergente suave.
• S6quelo con un trapo limpio.
LIMPIE EL FILTRO DE AIRE
No limpie el filtro con gasolina ni
ningdn otro solvente inflamable, ya
que hacedo puede crear peligro de
incendio y emisiones evaporativas
rlOCIVaS.
Limpieza del filtro de aire:
Los filtros de aire sucios disminuyenel
rendimiento del motor e incrementan
el consumo de combustible y la
_roducci6n de emisiones nocivas.
impie siempre el filtro de aire
despu_s de cada 5 horas de uso.
9
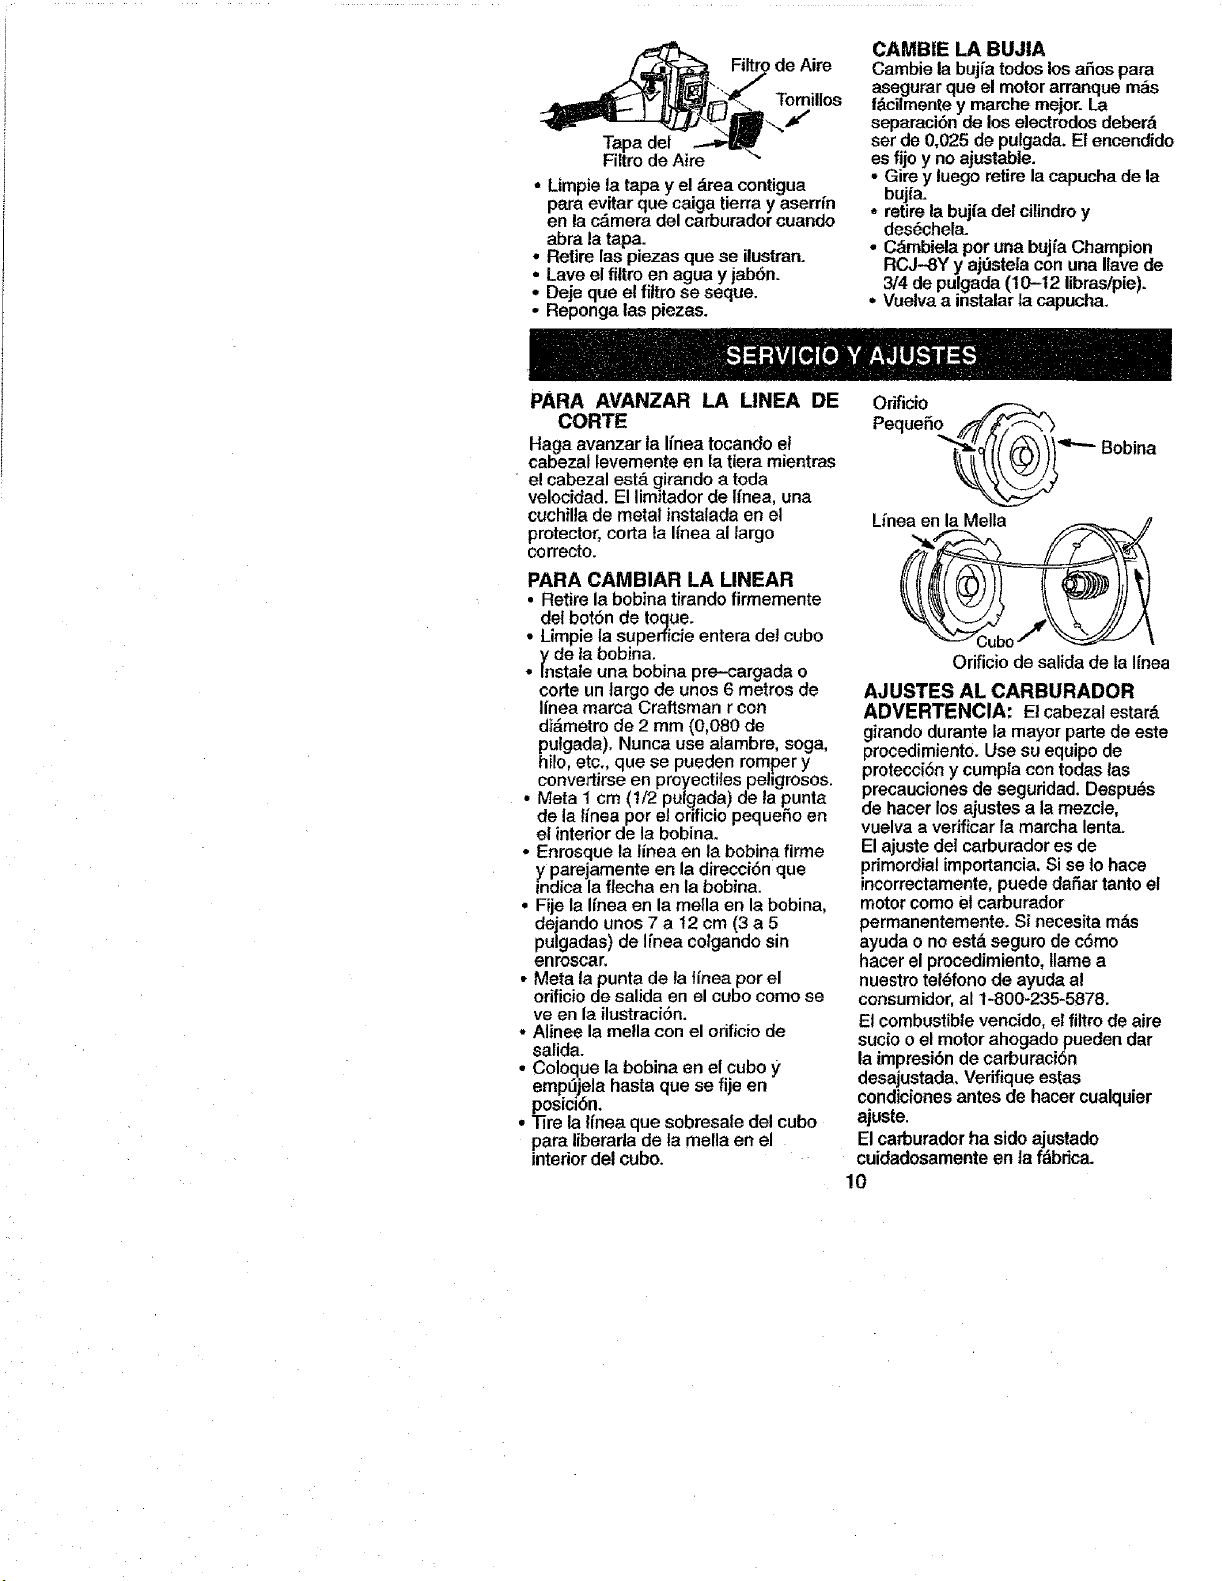
Tomillos
• Limpiela tapa y e! __reacontigua
para evitar que caiga tierra y aserrin
en la c_mera del carburador cuando
abra la tapa.
• Retire las piezas que se ilustran.
• Lave el _tro en agua y jabSn.
• Deje que el filtro se seque.
- Reponga las piezas.
CAMBIE LA BUJIA
Cambie la bujfa todos los afios para
asegurar que el motor arranque m_s
f&cilmente y marche mejor. La
separaci6n de los electredos deber&
set de 0,025 de pulgada. Et encendido
est fijo y no ajustable.
Gire y luego retire la capucha de la
bujia.
o retire la bujfa del cilindro y
des6chela.
• C_mbiela por una bujfa Champion
RCJ-8Y y ajr3ste|a con una Ilave de
314de pulgada (10-12 libraslpie).
• Vuelva a instalar la capucha.
PARA AVANZAR LA LINEA DE
CORTE
Haga avanzar la Ifnea tocando el
cabezal levemente en la tiera mientras
el cabezal est,_girando a toda
velocidad. El limitador de Ifnea, una
cuchiUa de metal instalada on el
protector, corta la Ifnea al largo
correcto.
PARA CAMBIAR LA LINEAR
• Retire la bobina tirando firmemeote
del bot6n de toque.
Limpie la superficie entera del cubo
_y la bobina.
de
Instale una bobina pre-cargada o
corte un largo de unos 6 metros de
Ifnea marca Craftsman r con
di&metro de 2 mm (0,080 de
pulgada), Nunca use alambre, soga,
hilo, etc,, que se pueden romper y
convertirse en prcyectifes peligrosos.
• Meta 1 cm (1/2 pulgada) de la punta
de la linea per el orificio pequefio en
el intedor de la bobina.
- Enrosque la linea en la bobina firme
y parejamente en la direcci6n que
indica la flecha en la bobina.
• Fije la tinea en la mella en la bobina,
dejando unos 7 a 12 cm (3 a 5
pulgadas) de Ifnea colgando sin
enroscar,
• Meta la punta de la tinea por el
orificio de salida en el cubo como se
ve en la ilustraci6n.
- Alinee la rnella con el odficio de
salida.
• Coloque la bobina en el cube y
emp0jela hasta que se fije en
posici6n.
• Tire la tfnea que sobresale del cube
para liberada de la mella en el
interior del cubo.
Orificio
Pequefio _€"_'_"_
'q"'- Bobina
Linea en la Mella _ /1
Orificio de salida de la I[nea
AJUSTES AL CARBURADOR
ADVERTENCIA: El cabezal estard
girando durante la mayor parte do este
procedimiento. Use su equipo de
pmtecciSn y cumpla con todas las
precauciones de seguridad. Despu_s
de hacer los ajustes a la mezcle,
vuelva a verlflcar la marcha lenta.
El ajuste del carburador es de
primordial importancia, Si se !o bace
incorrectamente, puede dafiar tanto el
motor como el carburador
permanentemente. Si necesita m&s
ayuda o no est_ seguro de c6mo
hacer el procedimiento, llarne a
nuestre tet_fono de ayuda al
consumidor, al 1-800-235_5878.
El combustible vencido, el filtre de aire
sucio o el motor ahogado pueden dar
la impresi6n de carburaci6n
desajustada, Verifique estas
condiciones antes de hacer cualquier
ajuste.
Elcarburador ha side ajustado
cuidadosamente en la f_bdca.
10

Posiblemente se hagan necesarios
ajustes si se nota cualquiera de las
diguientes condiciones:
• El motor no anda a marcha lenta.
Vea "Marcha Lenta" bajo el
procedimiento de ajuste.
• El motor se para o so ahoga cuando
debe acelerar. Vea "Ajuste de la
Aceleraci6n" bajo el procedimiento
de ajuste.
• Falta de potencia para cortar. Vea
"Ajuste de la Mezcla" bajo el
procedimiento de ajuste.
Hay dos tomiUosde ajuste en el
carburador. Estdn marcados con H y
"T". Estdn ubicados arriba del
bombeador.
PUNTOS DE PRECALIBRACION
AI hacer pmc_libracion ajustes ne
fuerce las tapas limitadoras de pldstico
rods alld de los rotentores o puede
haber dafios. Si no se necesitan los
puntos de precal_raci6n, pase a la
secci6n.
AJUSTES PRECALIBRACION
• Gire el tomille de mezcla a la
izquierda (en contra del sentido del
reloj) hasta que se detenga.
• Gire el tomillo de marcha lenta a la
derecha (en el sentido del reloj)
hasta que se detenga. Ahora girelo
hacia la izquierda 4 vueltas y media.
• Ponga el motor an marcha y corte
pasto pot 3 minutos, luego proceda
a la secci6n de ajustes. Si el motor
no arranca, yea la table dlagn6stica
o flame al 1-800-235-5878.
• Si el funcionamiento del motor es
aceptable con las posiciones de
precalJbraci6n, no hard falta hacer
mds ajustes.
PROCEDIMIENTO DE AJUSTE
Marcha Lenta
Deje el motor en mamha lenta. Ajuste
las revotucioneshasta que el motor se
mantenga en marcha sin ahogarse.
• Gim el tornilloa la derecha (en el
sentido del reloj) para aumentar tas
revoluciones si el motor se ahoga o
se para.
• Gire el tomillo a ta izquierda (en
contradel sentido del reloj) para
bajar las revoluciones.
No hace falta ningDn otro ajuste si el
rendimiento es satisfactorio.
Ajuste de Mezcla
NO HAGA MARCHAR EL MOTOR
con el acelerador a fondo pot tiempo
prolongado mientras hace los ajustes.
El motor puede quedar daSado.
Extienda la linea al largo permitido por
el limitador de linea y corte algo de
pasto. De acuerdo al rendimiento del
motor al cortar, gire el tomillo de ajuste
de rnezcla en incrementos de 1/16 de
vuelta del tomillo, como se detalta a
continuaci6n:
° A la derecha (en el sentide del reloj)
hasta que el motor tonga buena
potencia para collar sin ahogarse.
No haga losajustes por sonido ni
pot revoluciones, sino pot el
rendimiento del motor al corral.
• A ta izquierde (en contra del sentido
del reloj) si el motor tiene velocidad
de revoluciones pero se para o le
falta potencia al eortar.
Despu6s de completar estos ajustes,
verifique la aceleraci6n. Ajuste
nuevamente si es necesario.
Verificaci6n de la Aceleraci6n
Si el motor se para o hesita en vez de
acolerar, gire el tomillo de ajuste de la
mezcla a la izquierda (en contra del
sentido del reloj) hasta conseguir una
aceleraci6n pareja. Verifique
nuevamente y haga los ajustes
necesarios para conseguir un
funcionamiento aceptable.
Prepare el aparato para el
almacenamiento a! final de la
temporada o siva a estar sin usar pot
mds de 30 dias.
ADVERTENCIA:
• Deje que el motor se enfr_e y fije
bien el aparato antes de guardado o
de transportado.
• Guarde el aparato y el combustible
en un local bien ventilado deride los
vapores de combustible no puedan
entrar en contacto con chispas ni
llamas abiertas provenientes de los
termotanques, los motores o
interruptores el_ctricos, los
calefactores centrales, etc.
11
• Guarde el aparato con todas los
protectores en su tugar y cetoque el
aparato de mode que las piezas
filosas no puedan causar heridas per
accidente.
• Guarde el aparato y el combustible
bien fuera del alcance de los nifios.
SUPERFICIES EXTERNAS
Siva a guardar el aparato durante
mucho tiempo, Ifmpie!o rigurosamente
primero. Gu&rdelo en un lugar limpio y
seco.
• Aplique una pequefia cantidad de
aceite alas superficies extefiores
met&licas.
SISTEMA DE COMBUSTIBLE
Bajo Abastecimiento del Motor, en {a
secci6n de Use en este manual, yea el
mensaje marcado IMPORTANTE
acerca del use de combustibles
mezclados con alcohol en et motor de
su aparato,
Los estabilizadores de combustible
son una alternativa aceptable para
minimizar la formaci6n de dep6sitos
de goma durante et almacenamiento.
Afiada estabilizador a la gasolina en el
tanque de combustible o en el
r'eclpiente de almacenamiento de
combustible. Siga lae instrucciones de
mezcla que se encuentran en los
envases de estabilizador, Ponga el
motor en marcha y d6jelo en marcha
per Io menos 5 minutes despu_s de
ponerle estabilizador.
El aceite CRAFTSMAN 40:1 para
motores de 2 tiempos (enfriados a
aire) viene mezclado con estabifizador
de combustible. Si no usa este aceite
de Sears, entonces puede afiadir un
estabilizador al tanque de
combustible.
INTERIOR DEL MOTOR
• Retire la bujfa la bujfa y vierta una
cucharada de las de t_ de aceite
40:1 para motores de 2 tiempos
(enfriados a aire) per la abertura
para la buj_a.Tironee lentamente de
ia soga de arranque 8 a 10 veces
para distribuir el aceite.
• Reemplace la buj(a con otra del tipo
y de la gama de calor
recomendados.
• Limpie e! filtro de aire.
• Examine todo el aparato para
verificar que no haya torniltos,
tuercas ni pernos sueltos. Cambie
todas las piezas dafiadas,
quebradas o gastadas.
• AI principle de la pr6xima temporada,
use exclusivamente combustible
nuevo con la proporciSn correcta de
gasolina a aceite.
OTRO
No guarde gaso_ina de una
i temporada a siguiente.
la
Cambie el recipiente de gasolina si
se empieza a oxidar.
12
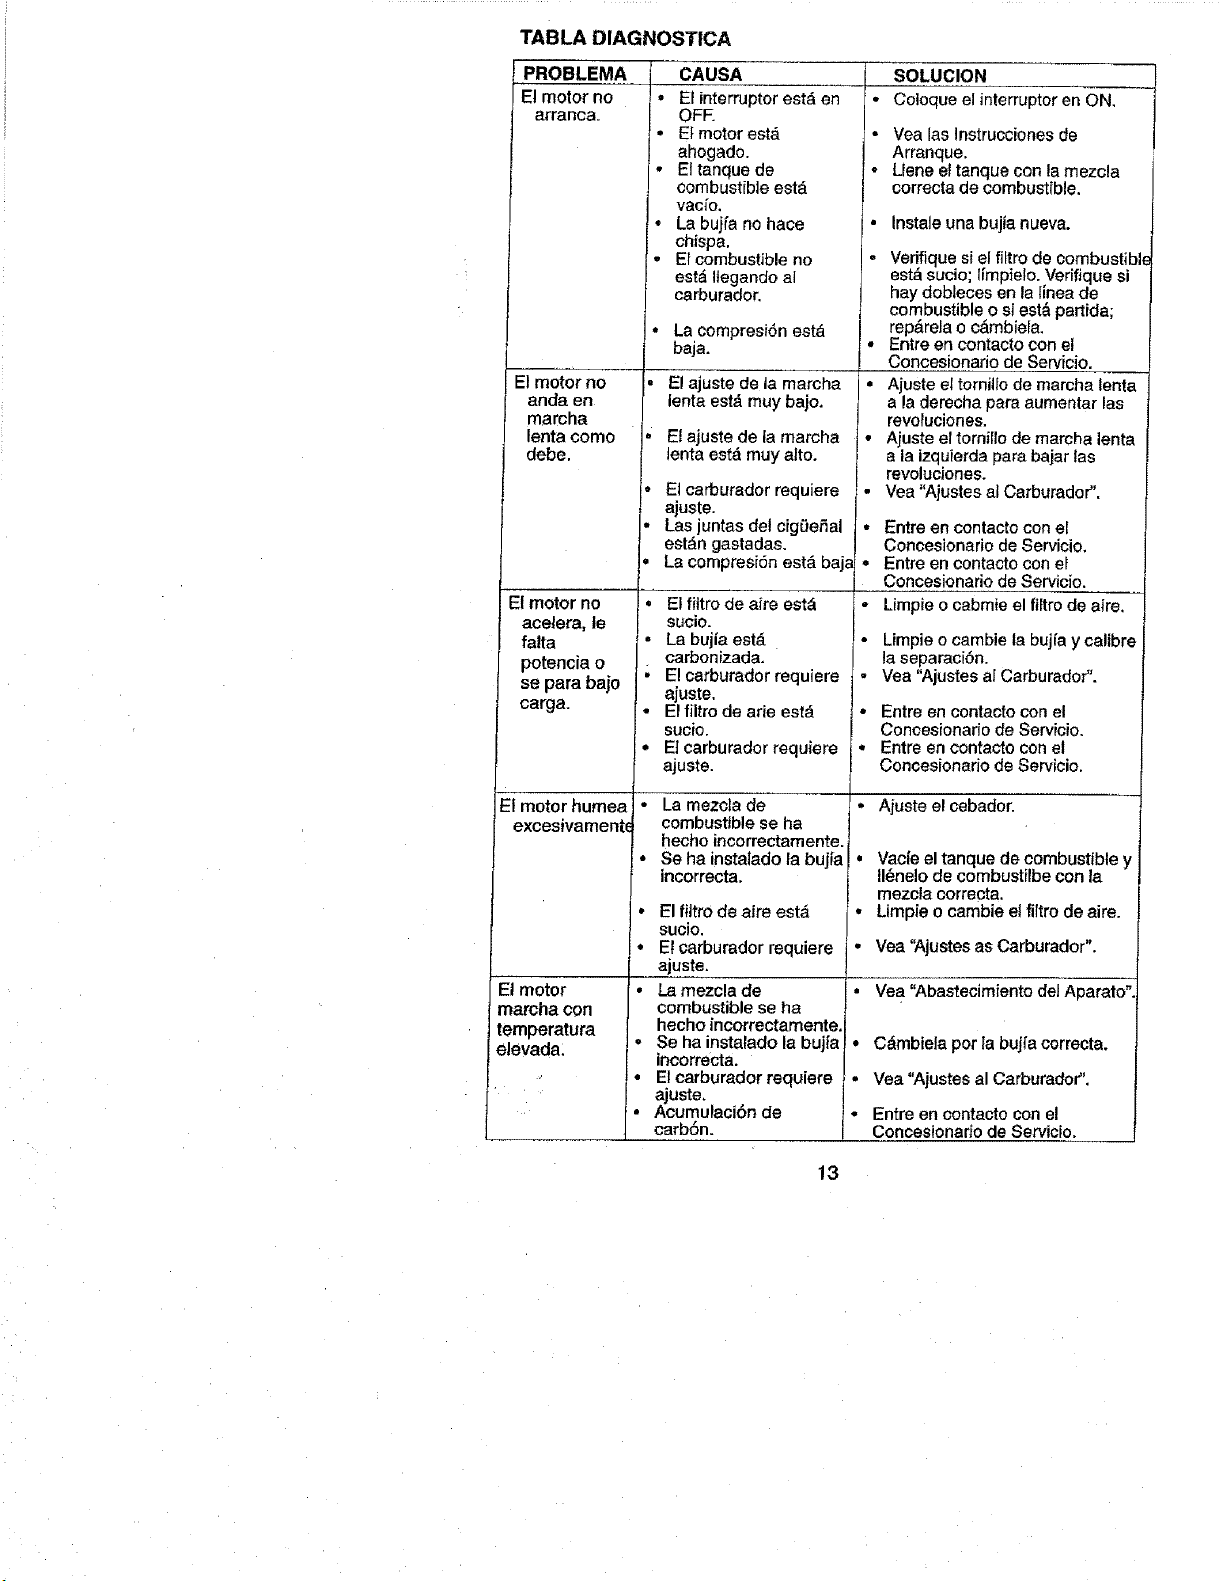
TABLA DIAGNOSTICA
PROBLEMA
El motor no
arranca.
El motor no
anda en
marcha
lenta come
debe.
El motor no •
acelera, le
falta
O
se para bajo
carga.
El motor humea °
El motor •
maroha con
temperatura
elevada:
CAUSA
EFinterrupterestd en
OFF
• Ef motor estd
ahogado.
• Eltanque de
combustible est,i
vac_'o,
• La bujfa no hace
chispa.
Etcombustible no
estd Uegando al
carburador.
La compresiSn est_
baja.
E! ajuste de la marcha
lenta est_i muy bajo.
El ajuste de [a marcha
ienta est_ muy alto,
El carburador requiere
ajuste.
Las juntas del cig0e5al
est_n gastadas.
La compresiOn estd baja
E1fittro de afro estd
sucio.
La bujia estd
carbonizada.
E! carburador requiere
ajuste.
Erfiltro de arie est_
sucio.
Etcarburador requiem
ajuste.
La mezcta de
combustible se ha
hecho incorrectamente.
SOha instalado la buj|a
incorrecta.
Elfiltrode aire estd
sucio.
El carburador requiere
ajuste.
La mezcla de
combustible se ha
hecho incorrectamente.
Se ha instatado la bujia
incorrecta.
El carburador requiere
,_juste.
cumulaci6n de
carb6n.
SOLUCION
• Coloqueel interrupteron ON,
• Yea las Instrucciones de
Arranque.
- Llene el tanque con la mezcla
correctade combustible.
Instale una bujia nueva.
• Verifiquesi el filtro de combustibl.
est& sucio; limpielo. Verifique si
hay dobleces en la tinea de
combustible o si est& partida;
rep&rela o c&mbiela.
• Entre en contacto con el
Concesionario de Servicio.
• Ajuste el tornillo de marcha lenta
a la derecha para aumentar las
revoruciones.
• Aiuste el torniflo de marcha lenta
a la izquierda para bajar las
revoluciones.
• Vea "Ajustesal Carburador".
• Entre en contacto con el
Concesionario de Servicio.
• Entre en contacto con el
Concesionario de Servicio.
- Limpie o cabmie el firtro de aire.
• Limpie ocambie ta bujia y calibre
la separaci6n.
• Vea "Ajustes al Carburador _.
• Entre en contacto con el
Concesionado de Servicio.
• Entre on contacto con el
Concesionado de Servicio.
• Ajuste el cebador,
Vacie el tanque de combustible y
II_nelo de combustilbe con la
mezcla correota,
Limpie o cambie el filtro de aire.
Vea '_,justesas Carburador".
• Vea "Abastecimiento del Aparato'.
• Cdmbiela por la bujfa correcta.
• Vea "Ajustes al Carburador".
- Entre en contacto con el
Concesionado de Servicio.
13

For the repair or replacement parts you need
delivered directly to your home
Cat! 7 am - 7 pm, 7 days a week
1-800-366-PART
(1-800-366-7278)
Para ordenar piezas con entrega a
domicilio - 1-800-659-7084
For in-house major brand repair service
Call 24 hours a day, 7 days a week
1-800-4-REPAIR
(1-800-473-7247)
Para pedir servic|o de reparacibn a
domicilio - 1-800-676-5811
For the location of a Sears Parts and
Repair Center in your area
Call 24 hours a day, 7 days a week
1-800-488-1222
For information on purchasing a Sears
Maintenance Agreement or to inquire
about an existing Agreement
Call 9 am - 5 pm, Monday-Saturday
1-800-827-6655
When requesting service or ordering
parts, always provide the following
information:
• Product Type • Part Number
• Model Number ° Part Description
America'sRepairSpecialists