
1 CYM 42873 - 200605
www.KALORIK.com
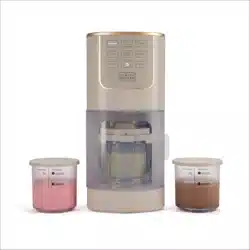
3-IN-1 S’MORES AND CANDY MAKER
APPAREIL 3-EN-1 POUR S’MORES ET
BONBONS
120V~60Hz 200W
CYM 42228
EN………..3
FR…........16

2 CYM 42228 – 200813
www.KALORIK.com
PARTS DESCRIPTION / DESCRIPTION DES ÉLEMENTS
ENGLISH :
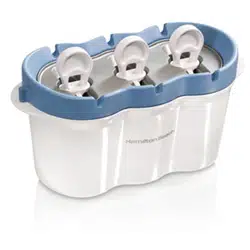
1. Dual function food tray /
Holder for the candy trays
2. Heater’s enclosure
3. Melting bowl
4. Cover of the heater’s
enclosure
5. Silicone molds (x4)
6. Candy tray (x4)
7. Fondue/S’mores fork (x4)
8. Heat/Power adjustment dial
with on/off light
FRANCAIS:
1. Base double fonction (plateau
pour aliments + porte plateau
à bonbons)
2. Boitier pour élément chauffant
3. Bol à fondre
4. Couvercle du boitier pour
l’élément chauffant
5. Moule en silicone (x4)
6. Plateau à bonbons (x4)
7. Fourchette à fondue / S’more
(x4)
8. Cadran de réglage de la
puissance/chaleur avec
voyant lumineux marche/arrêt
6
5
7
1
2
3
4
8

3 CYM 42228 – 200813
www.KALORIK.com
IMPORTANT SAFEGUARDS
When using electrical appliances, basic safety precautions should
always be followed, including the following:
1. READ ALL INSTRUCTIONS BEFORE USE
2. Check that your mains voltage corresponds to that stated on the
appliance.
3. Do not touch the hot surfaces. Use handles or knobs. Use oven mitts.
4. To protect against electrical shock, do not immerse cord, plugs, or
the housing of the appliance in water or any other liquid.
5. In case this appliance falls into water or liquids, DO NOT try to reach
the unit. Make sure the main power is switched off and plug is
disconnected first.
6. Close supervision is necessary when the appliance is used by or
near children.
7. Please keep out of reach of children and pets. This product is not
intended for use by children, by persons with reduced physical,
sensory or mental capabilities, or lacking experience or knowledge,
unless they have been given supervision or instruction concerning
the use of the product, by a person responsible for their safety. Extra
caution is always necessary when using this product.
8. Do not operate any appliance with a damaged cord or plug, or
after the appliance malfunctions or has been damaged in any
manner. Return appliance to the nearest authorized service facility
for examination, repair, or adjustment.
9. The use of accessories or attachments not recommended by the
appliance’s manufacturer may cause injuries, fire or electric shock.
10. Do not move the appliance while it is still hot.
11. Do not use outdoors.
12. Do not use appliance for other than intended use.
13. Do not let cord hang over edge of table or counter or touch hot
surfaces.
14. Do not place on or near a hot gas or electric burner, or in a heated
oven.
15. To disconnect, turn any control to off, then remove plug from wall
outlet. Do not unplug by pulling on the cord. To unplug, grasp the
plug, not the cord.

4 CYM 42228 – 200813
www.KALORIK.com
16. Never place anything else than the intended ingredients in the
base bowl.
17. Do not leave unit unattended while in use or when plugged into an
outlet.
18. Unplug from the outlet when not in use, before removing or fixing
parts and before cleaning. Allow to cool before putting on or taking
off parts and before cleaning the appliance.
19. Never melt chocolate or any other items directly on the appliance’s
heating element. Always use the forks or a heat-resistant bowl or
saucepan and / or forks.
20. This appliance is not intended to be operated by means of an
external timer or separate remote-control system.
SAVE THESE INSTRUCTIONS
HOUSEHOLD USE ONLY
POLARIZED PLUG INSTRUCTIONS
This appliance is equipped with a polarized plug (one blade is wider
than the other). To reduce the risk of electric shock, this plug will fit into
the polarized outlet only one way. If the plug does not properly fit into
the outlet at first, reverse it. If it still does not fit, contact a competent
qualified electrician. Do not attempt to modify the plug in any way.
SHORT CORD INSTRUCTIONS
A short power supply cord is provided to reduce the hazards resulting
from becoming entangled in, or tripping over a longer cord. Extension
cords may be used if care is exercised in their use.
• The electrical rating of the extension cord should be at least that of
the appliance. If the electrical rating of the extension cord is too
low, it could overheat and burn.
• The resulting extended cord should be arranged so that it will not
drape over the countertop or tabletop where it can be pulled on
by children or tripped over.

5 CYM 42228 – 200813
www.KALORIK.com
ASSEMBLY
Refer to “Parts Descriptions” for guides regarding items numbers and
diagrams.
1. S’mores maker: no assembly required. Simply place the ingredients
(Chocolate, marshmallows, Graham Crackers) in the
compartments of the food tray.
2. Chocolate Candy / Gummies maker: place each silicone mold (5)
into the candy tray (6), and place each candy tray over the
compartment in the food tray (1).
3. Always make sure the cover (4) is firmly in place before using the
appliance.
4. Before the first use, clean all the removable parts in warm soapy
water. Dry thoroughly. Caution: Do not submerge the base (1) or the
heating part (2) in water or any other liquid!
BEFORE THE FIRST USE
Remove all packaging from the appliance.
• Place on a dry, flat, level, and heat-resistant surface and close to
an electric socket.
• For proper ventilation provide at least 4-6 in (10-15 cm) of space
above and around the appliance.
• Make sure the top cover is in place and that the dial is set to “0”.
• Plug into a wall outlet.
• Turn the knob to select the S’mores function. Then, let the appliance
heat up for approximately 10 minutes, without using food. This will
allow the 3-in-1 S’mores and candy maker to burn off any dust that
may have accumulated during assembly.
• After 10 minutes, set the dial back to “”off” and unplug the
appliance. Let the appliance cool down completely.
S’MORES MAKING
1. Place the appliance on a flat, horizontal, level and heat resistant
surface.
2. Fill the compartments of the food tray with crackers, biscuits,

6 CYM 42228 – 200813
www.KALORIK.com
marshmallows, chocolate or other accompaniments.
3. Plug the appliance into a wall outlet.
4. Turn the switch on the front of the appliance to the “S’mores”
setting (200 W). The power indicator should light up. We
recommend preheating the appliance for at least 5 to 10 minutes
for best results.
Note: After a short while, the quartz heating element inside the
enclosure (2) will glow red hot.
5. Prepare cracker sandwiches with a chocolate bar between 2
crackers / biscuits.
6. Pick a marshmallow using one of the 4 forks provided, a fondue
fork, or a long wooden stick for example.
7. Holding the fork by the handle, place the marshmallow above the
heater, taking care to not touch the stainless steel cover (4).
8. Rotate frequently until the marshmallow gets brown and starts to
melt.
9. When the marshmallow gets golden brown and starts to swell,
place it on the chocolate bar and place a cracker on top. The
“sandwich” created is a perfect s’more. Enjoy!
10. Once you are finished using the s’mores maker, turn the control dial
to “off” and unplug the appliance from the wall outlet.
WARNINGS!
1. Do not overcook the marshmallow, as it may melt completely and
fall on the stainless steel cover, causing smoke or fire, and stain
marks.
2. In case food or an object falls on the cover, always switch off and
unplug the unit. Then wait until it cools (at least 20 minutes) before
cleaning it.
3. Never touch the stainless steel cover with your hands after switching
on the unit. It gets very hot! Always use oven mitts or gloves.
4. Do not touch the stainless steel cover after switching off the unit.
Wait at least 20 minutes until it cools down before touching the unit,
the cover, or attempting to move or clean the appliance.

7 CYM 42228 – 200813
www.KALORIK.com
TIPS AND RECIPES FOR S’MORES MAKING
1. For the original s’more taste, use original “Graham crackers”, which
are more like cookies than crackers.
2. Get the crackers and chocolate ready before you toast the
marshmallows.
3. Marshmallows are ready when slightly brown outside and runny
inside.
4. Sandwich chocolate with a toasted marshmallow between a
halved cracker and squeeze together gently.
5. You can also use variations on the traditional s’more:
• The Peanut Roll s’more: cut a flour tortilla, spread with crunchy
peanut butter in 1 ½ inch wide stripes, add chocolate chips and
marshmallow, and roll.
• The Banana s’more: spread peanut butter on the Graham
cracker, add the chocolate, and a slice of banana with the
toasted marshmallow.
• The cookies & s’more: replace each cracker with ½ of an oreo
cookie, and use large marshmallows.
MAKING CHOCOLATE CANDY OR GUMMIES
1. Place the appliance on a flat, horizontal, level and heat resistant
surface.
2. Place the silicone molds (5) into the candy trays (6), and place the
candy trays into the compartments in the base (1).
3. Plug the appliance into a wall outlet.
4. Place the mixture to melt into the melting bowl (3).
5. Turn the dial on the front of the appliance to the “Bear” setting
(160W for gummies melting), or on the “Chocolate” symbol (120W
for chocolate melting). The power indicator should light up.
6. Place the melting bowl on the cover plate (4) above the heating
element (2).
Note: After a short while, the heating element inside the enclosure (2)
will glow red hot.

8 CYM 42228 – 200813
www.KALORIK.com
7. Once the mixture of chocolate or gummy has completely melted
and is thin, using oven mitts, carefully grab the bowl by its handles
and start pouring it into each cavity of the silicone mold (5).
8. Once you are finished using the appliance for melting, turn the
control dial to “OFF” and unplug the appliance from the wall
outlet.
9. Let the gummies or chocolate candy cool down at ambient
temperature or in the refrigerator. For this, leave the silicone molds
in the candy trays to leave the preparation undisturbed, and
place the whole trays in the refrigerator to cool.
10. Let the preparation set fully before attempting to turn it out of the
molds.
Tips:
• Take the time to perfectly melt and heat the gummy preparation.
You will get much clearer and more transparent gummies,
otherwise they could turn out cloudier. Stir well to avoid clumps.
• Do not hesitate to adjust the power and heat using the power dial
(8), if you see that the heating is too much or not enough. You can
also keep the preparation warm once the preparation has melted
by selecting a lower wattage (“LOW” setting, for example).
• This keep warm function is especially useful when making chocolate
candies, or chocolate fondue, as you can maintain the chocolate
at the perfect temperature without burning it.
• You can also use the appliance with a preparation of chocolate,
soft caramel or candy melts, and dip fruit, cake, or any delight in it,
for delicious treats. Melt the preparation using the melting bowl and
use like a mini-fondue set!
• Important: the unit is not thermostatically controlled, so the heating
will always be on, when a certain power is selected. Adjust the
power carefully to manage the best results. To decrease the
power/temperature, turn the power dial counterclockwise, and to
increase the power/temperature, turn it clockwise.
• You should hear a click sound when turning the power on, or off.
• Never overfill the melting bowl, avoid spills when stirring.
• Do not use oversized kitchen utensils for stirring.

9 CYM 42228 – 200813
www.KALORIK.com
• It is often preferable to let the gummies cool in their molds in the
refrigerator, and keep them stored in the refrigerator after
unmolding them.
GUMMIES RECIPES
See below for a few examples of our favorite gummies recipes:
Basic & Sour Gummies
½ Cup of cold water
1 packet of flavored gelatin
4 packets of unflavored gelatin
Instructions:
• Mix the flavored and unflavored gelatin in the melting bowl.
• Add the cold water and stir, then turn the knob on the heating
base to heat and stir until mixture is thin.
• Carefully pour the mixture into the molds and let it chill.
NOTE: For sour gummies, add 1/2 packet of flavored drink mix to the dry
gelatin mix.
• Please note: you can add liquid vitamins to this recipe for
gummy vitamins
Fruit Juice Gummies
1/2 Cup of fruit juice
1 Tbsp. of lemon juice
1/4 tsp. of liquid stevia
3 packets of unflavored gelatin
Instructions:
• Combine the ingredients in melting bowl and stir.

10 CYM 42228 – 200813
www.KALORIK.com
• Turn the knob on the heated base on a higher setting than usual
to melt
• Continuously stir the mixture until it is thin.
• Remove from heat and carefully pour into the molds.
Vitamin Gummies
4 packets of unflavored gelatin (1 full box)
1/2 cup juice
2 Tbsp. honey (optional)
Vitamins/minerals of your choice (vitamin C, multi vitamins, probiotics,
magnesium, etc.)
Instructions:
• Preheat the unit. Whisk together the juice, honey and gelatin in
pot.
• Continue to heat and stir until mixture is thin.
• Remove from heat and stir in the amount of vitamins of your
choosing.
• Carefully pour mixture into molds and let chill.
Energy Gel Gummies
4 Packets of unflavored gelatin
¼ Cup of energy drink
¼ Cup of fruit juice
Vitamins of your choice (optional)
Instructions:
• Preheat the unit. Whisk or stir together the juice, energy drink
and the gelatin in the melting bowl.
• Continue to heat and stir until the mixture is thin.
• Remove from heat and stir in the amount of vitamins of your
choosing.
• Carefully pour the mixture into the molds and let it chill

11 CYM 42228 – 200813
www.KALORIK.com
Sugar Free Gummies
2 tea bags
2/3 cup hot boiling water
4 packets of gelatin
1 packet of stevia or similar sweeteners
1 tsp. of pure fruit extract
Instructions
• Steep tea bags in hot boiling water for about six minutes.
• Squeeze tea out of tea bags and discard bags.
• Pour the 1/2 cup of tea into the melting bowl.
• Whisk gelatin and sweetener into the tea.
• Continue to heat and stir until the mixture is thin.
• Remove the melting bowl from heat and stir in the fruit
extract.
• Pour into the silicone molds.
• Place the filled molds into refrigerator for at least 15 minutes.
• Remove the gummy candies from the molds. Keep them
stored in the refrigerator.
Applesauce Gummies
1 ½ cups of applesauce
1 packet of flavored gelatin
2 packets of unflavored gelatin
1 tsp. of lemon juice
¼ cup of sugar
Instructions
• Combine sugar, applesauce, flavored gelatin, unflavored
gelatin and lemon juice in a separate bowl.
• Pour some of the mix into the melting bowl and keep stirring
over heat, until thin.
• Remove the melting bowl from heat.
• Pour into the silicone molds.

12 CYM 42228 – 200813
www.KALORIK.com
• Place the filled molds into the refrigerator, for at least 15
minutes.
Remove the gummy candies from mold. Keep stored in the
refrigerator
CLEANING AND MAINTENANCE
Note: Make sure the appliance is unplugged before cleaning.
1. Turn control dial to OFF. Unplug the s’mores and candy maker
from the outlet.
Caution: The stainless steel cover will be hot to the touch. Allow to cool
for at least 20 minutes before cleaning. DO NOT touch until cool.
2. If dirty, remove the stainless steel cover (4) from the enclosure (2)
by turning it clockwise.
3. The base of the s’mores maker should only be cleaned by wiping
with a damp, non-abrasive cloth. The quartz heating element can
be cleaned with precaution with a small soft cleaning brush or
toothbrush.
Caution: Do not submerge the base (1) in water or any other liquid!
4. Dry the base thoroughly before storage.
5. The forks, meting bowl and the stainless steel cover should be
hand-washed in warm, soapy water. Do not put in the dishwasher.
Rinse well and dry after cleaning.
6. The candy trays (6) and the silicone molds (5) can be hand-
washed or are dishwasher safe
Note:
• Never use abrasive cleaners on the base or cover
• Any other servicing shall be performed by an authorized service
representative.

13 CYM 42228 – 200813
www.KALORIK.com
GET MORE OUT OF YOUR PRODUCT
Browse Chef-created recipes specifically made for your Kalorik
product. Visit our website www.kalorik.com to see our extensive recipe
library and start cooking. Sign up for the Kalorik email mailing list to
receive special offers and recipes, and connect with us on social
media for daily inspiration.

14 CYM 42228 – 200813
www.KALORIK.com
WARRANTY
We encourage you to promptly complete and return the enclosed Product
Registration Card to facilitate verification of the original purchase date.
However, return of the Product Registration Card is not a condition of these
warranties. You can also fill out this warranty card online at the following
address: www.KALORIK.com
This KALORIK product is warranted in the U.S.A. and Canada for one year
from the date of purchase against defects in material and workmanship.
This warranty is non-transferrable. Please keep the original sales receipt.
Proof of purchase is required to obtain warranty performance.
During this period, if the KALORIK product is proven defective upon
inspection by KALORIK, it will be repaired or replaced at KALORIK’s option,
without charge to the customer. If a replacement product is sent, it will
carry the remaining warranty of the original product.
This warranty does not apply to any defect arising from a buyer or user's
misuse of the product, negligence, failure to follow KALORIK instructions
noted in the user’s manual, use on current or voltage other than that
indicated on the product, wear and tear, alteration or repair not
authorized by KALORIK, or use for commercial purposes. There is no
warranty for glass parts, glass containers, filter basket, blades and agitators,
and accessories in general. There is also no warranty for parts lost by the
user.
ANY WARRANTY OF MERCHANTABILITY OR FITNESS WITH RESPECT TO THIS
PRODUCT IS ALSO LIMITED TO THE ONE YEAR LIMITED WARRANTY PERIOD.
Some states do not allow limitation on how long an implied warranty lasts,
or do not allow the exclusion of incidental or consequential damages.
Therefore the above limitations may not apply to you. This warranty gives
you specific legal rights, and you may also have other rights which vary
from state to state.
If the appliance should become defective within the warranty period and
more than 30 days after date of purchase, do not return the appliance to
the store: often, our customer service representatives can help solve the
problem without having the product serviced. If servicing is needed, a
representative can confirm whether the product is under warranty and
direct you to the nearest service location.

15 CYM 42228 – 200813
www.KALORIK.com
If this is the case, bring the product, or send it by postage prepaid by
customer. All KALORIK customers are responsible for the initial shipment
back to the warranty center), along with proof of purchase and the return
authorization number indicated on the outer packaging given by our
customer service representatives. Send to the authorized KALORIK Service
Center by visiting our website www.KALORIK.com or by calling our
customer service department to obtain the address of our authorized
KALORIK Service Center.
When sending the product, please include a letter explaining the nature of
the claimed defect.
If you have additional questions, please call our customer service
department (see below for complete contact information), Monday
through Thursday from 9:00AM - 5:00PM (EST) and Friday from 9:00AM -
4:00PM (EST). Please note hours are subject to change.
If you would like to write, please send your letter to:
KALORIK Customer Service Department
Team International Group of America Inc.
16175 NW 49th Avenue
Miami Gardens, FL 33014 USA
Or call:
Toll Free: +1 888-521-TEAM / +1 888-KALORIK
Only letters can be accepted at this address above. Shipments and
packages that do not have a return authorization number will be refused.

16 CYM 42228 – 200813
www.KALORIK.com
CONSIGNES DE SÉCURITÉ
Pour utiliser un appareil électrique, des précautions élémentaires sont à
respecter, telles que celles énumérées ci-dessous :
1. LISEZ L’ENSEMBLE DES INSTRUCTIONS AVANT L’UTILISATION.
2. Avant d'utiliser l'appareil, vérifiez que la tension du réseau
corresponde bien à celle de l'appareil.
3. Ne touchez pas les surfaces chaudes. Manipulez les poignées et les
boutons. Utilisez des gants de cuisine ou des maniques.
4. Pour écarter les risques d’électrocution, n'immergez pas le cordon,
la fiche ou le corps de l’appareil dans l'eau ou dans tout autre
liquide.
5. Si l’appareil devait tomber dans l’eau ou un autre liquide, ne tentez
pas d’attraper l’appareil. Coupez d’abord le courant et
débranchez l’appareil avant de le sortir de l’eau.
6. Faites particulièrement attention lorsque l’appareil est utilisé par ou
en présence d’enfants.
7. Gardez hors de portée des enfants et des animaux domestiques.
Cet appareil n’est pas conçu pour être utilisé par des enfants, ou
par des personnes ayant des capacités physiques, sensorielles ou
mentales réduites, ou sans expérience ; à moins qu’une personne
responsable pour leur sécurité leur donne des instructions ou les
supervise pour l’utilisation de l’appareil. Faites extrêmement
attention lors de l’utilisation de cet appareil.
8. Ne faites pas fonctionner l'appareil si son cordon ou sa fiche est
endommagé ou si l'appareil a présenté un dysfonctionnement ou
est endommagé. Retournez l’appareil au centre de service autorisé
pour le faire vérifier ou réparer.
9. L'utilisation d’accessoires non recommandés par le fabricant
présente des risques d’incendie, d’électrocution ou de blessure.
10. Ne déplacez pas l’appareil quand il est encore chaud.
11. N'utilisez pas l'appareil à l'extérieur.
12. N'utilisez pas cet appareil à des fins autres que celles pour lesquelles
il est conçu.
13. Ne laissez pas le cordon pendre de la table ou d'un comptoir et
évitez qu’il touche une surface chaude.

17 CYM 42228 – 200813
www.KALORIK.com
14. Ne placez pas l'appareil sur ou près d'un brûleur à gaz ou électrique
ou dans un four chaud.
15. Pour déconnecter l'appareil, placez tous les boutons sur la position
« OFF » (ARRÊT) et débranchez l'appareil de la prise murale. Pour
débrancher, tirez sur la fiche, pas sur le cordon.
16. Ne mettez jamais dans les plateaux amovibles d’autres aliments
que ceux prévus et décrits dans ce manuel.
17. Ne laissez pas l’appareil sans surveillance quand il est en fonction
ou reste branché.
18. Débranchez l'appareil de la prise murale lorsqu’il n’est pas utilisé ou
avant de le nettoyer. Laissez l'appareil refroidir avant d'insérer ou
retirer des pièces, ou de le nettoyer.
19. Ne faites jamais fondre du chocolat ou autres aliments directement
en contact avec la base elle-même, utilisez toujours les fourchettes,
un bol résistant à la chaleur ou une casserole.
20. Ne tentez pas de faire fonctionner cet appareil en utilisant un
système de minuterie externe, ou de contrôle à distance.
CONSERVEZ CES INSTRUCTIONS
USAGE DOMESTIQUE UNIQUEMENT
INSTRUCTIONS POUR LES FICHES POLARISÉES
Cet appareil a une fiche polarisée (une des deux tiges métalliques est
plus longue que l’autre). Pour réduire le risque de choc électrique,
cette prise ne peut être introduite que d’une seule façon dans la fiche
murale. Si cette prise ne rentre pas correctement dans la fiche,
retournez-la. Si elle ne rentre toujours pas, contactez un électricien
qualifié et reconnu. N’essayez jamais de modifier vous-même la prise
polarisée.
CONSIGNES CONCERNANT LE CORDON
Le cordon d’alimentation de l’appareil est un cordon de type court, et
ce afin de diminuer les risques d’accidents (chute si vous marchez sur le

18 CYM 42228 – 200813
www.KALORIK.com
cordon...). Vous pouvez toutefois utiliser une rallonge si nécessaire mais
:
• Assurez-vous que l'ampérage de la rallonge soit égal ou supérieur à
celui de l'appareil. Une rallonge avec un ampérage inférieur à celui
de l'appareil risquerait de surchauffer et de brûler.
• La rallonge ne doit pas pendre du plan de travail ou de la table
afin d'éviter que les enfants ne le tirent ou trébuchent.
ASSEMBLAGE
1. Fonction S’mores : pas d’assemblage requis. Placez simplement les
aliments (carrés de chocolat, biscuits, marshmallows) dans les
compartiments du plateau.
2. Appareil à bonbons gélifiés / en chocolat : placez chaque moule
en silicone (5) dans les plateaux à bonbons (6), puis placez les
plateaux sur les compartiments de la base (1).
3. Assurez-vous toujours que le couvercle du boitier de l’élément
chauffant (4) est fermement an place avant d’utiliser l’appareil.
4. Avant la première utilisation, nettoyez toutes les parties amovibles
dans de l’eau chaude savonneuse. Séchez soigneusement.
Attention : N’immergez jamais la base (1) ou l’élément chauffant
(2) dans de l’eau ou tout autre liquide !
AVANT LA PREMIERE UTILISATION
Retirez tous les emballages de l’appareil.
• Placez l’appareil sur une surface plate, sèche, résistante à la
chaleur et à proximité d’une prise électrique.
• Pour une ventilation correcte, veuillez laisser 4 à 6 in. (10 – 15cm.)
d’espace
FAIRE DES S’MORES
1. Placez l’appareil sur une surface plane, horizontale et résistante à la
chaleur.
2. Remplissez les compartiments sur le plateau avec des crackers,
biscuits, des marshmallows, des barres ou carrés de chocolat et

19 CYM 42228 – 200813
www.KALORIK.com
autres ingrédients.
3. Branchez l’appareil sur une prise murale.
4. Placez l’interrupteur sur le devant de l’appareil en position
« S’mores » (200W). Le voyant lumineux s’allumera. Laissez
l’appareil préchauffer pendant au moins 5 à 10 minutes.
Note : après une courte période, l’élément chauffant dans le boitier (2)
va commencer à rougeoyer de chaleur.
5. Préparez des sandwiches en plaçant un carré de chocolat entre
deux biscuits.
6. Avec une des fourchettes fournie (ou une fourchette à fondue, ou
une pique à brochette en bois), piquez un marshmallow.
7. En tenant la fourchette (7) par sa poignée, placez le marshmallow
au-dessus de l’élément chauffant, en prenant soin de ne pas entrer
en contact avec le couvercle en acier.
8. Tournez le marshmallow fréquemment pour que toutes les faces
dorent et qu’il commence à chauffer.
9. Quand le marshmallow est brun-doré, et commence à fondre,
placez-le sur le carré de chocolat et pressez légèrement l’autre
partie de biscuit sur le marshmallow. Vous venez de réaliser un
s’more ! Dégustez !
10. Quand vous avez fini d’utiliser l’appareil, placez l’interrupteur sur «
OFF » (« ARRET ») et débranchez l’appareil de la prise murale.
Attention !
1. Ne cuisez pas trop le marshmallow car si il commence à fondre
complètement et tombe sur le couvercle en métal, il pourrait
dégager de la fumée, prendre feu et laisser des marques sur le
couvercle !
2. Si quelque chose tombe sur le couvercle en acier pendant le
fonctionnement, éteignez l’appareil et débranchez-le de la prise
murale. Laissez-le refroidir au moins 20 minutes avant de le nettoyer.
3. Ne touchez jamais le couvercle en acier avec vos mains, une fois
mis sous tension. Il devient brulant ! Utilisez des gants de cuisine ou
des maniques pour utiliser cet appareil.
4. Ne touchez pas non plus le couvercle en acier ou l’appareil après
l’avoir éteint. Attendez au moins 20 minutes pour lui laisser le temps

20 CYM 42228 – 200813
www.KALORIK.com
de refroidir, avant de toucher l’appareil, ou de le déplacer.
CONSEILS ET RECETTES POUR FAIRE DES
S’MORES
1. Pour la recette du s’more original, utilisez les crackers « Graham »,
qui sont plus des biscuits que des crackers (un équivalent pourrait
être le « Petit Beurre »)
2. Préparez les biscuits et le chocolat avant de commencer à
chauffer les marshmallows.
3. Un marshmallow est prêt quand il est légèrement doré et est sur le
point de se liquéfier.
4. Faites un sandwich de chocolat et marshmallow entre deux
biscuits, et pressez légèrement.
5. Vous pouvez créer des variations du s’more original, comme par
exemple :
• S’more enroulé au beurre de cacahuète : coupez une galette de
farine en lanières 4 centimètres, après l’avoir étalée avec du beurre
de cacahuète, ajoutez des pépites de chocolat et le marshmallow
et roulez la galette autour.
• S’more Banane : étalez du beurre de cacahuète sur un des biscuits,
ajoutez une rondelle de banane sur le chocolat avent de rajouter
le marshmallow chauffé.
• Le Cookie & s’more : remplacez chaque biscuits par une demie
galette Oreo et utilisez des marshmallows plus gros.
LES BONBONS GELIFIES OU EN CHOCOLAT
1. Placez l’appareil sur une surface plane, horizontale et résistante à la
chaleur.
2. placez chaque moule en silicone (5) dans les plateaux à bonbons
(6), puis placez les plateaux sur les compartiments de la base (1).
3. Branchez l’appareil sur une prise murale.
4. Placez le mélange à faire fondre dans la bol (3).
5. Tournez le cadran sur le devant de l’appareil en position « Ours »
(160W pour les bonbons gélifiés) ou « Chocolat » (120W pour fondre
le chocolat). Le voyant lumineux s’allume.
6. Placez le bol (3) sur le couvercle du boitier (4) au-dessus de

21 CYM 42228 – 200813
www.KALORIK.com
l’élément chauffant (2).
Note : après une courte période, l’élément chauffant au quartz dans le
boitier (2) va commencer à rougeoyer.
7. Une fois que la mixture à complètement fondu et est bien liquide,
avec de gants de cuisine, prenez le bol par ses poignées et
commencez à la verser dans chaque alvéole des moules en
silicone (5). Laissez la refroidir complètement.
8. Quand vous avez fini d’utiliser l’appareil pour fondre la préparation,
placez l’interrupteur sur « OFF » (« ARRET ») et débranchez l’appareil
de la prise murale.
9. Laissez refroidir à température ambiante ou au réfrigérateur. Pour
cela, laissez les moules en silicone dans leur plateau pour ne pas
déranger la préparation, et placez les plateaux directement au
réfrigérateur.
10. Laissez la préparation prendre complètement avant de tenter de
démouler les bonbons.
Conseils :
• Prenez le temps de bien laisser fondre et chauffer la préparation.
Vous obtiendrez des gélifiés plus transparents, sinon ils peuvent finir
plus opaques. Mélangez bien.
• N’hésitez pas à ajuster la puissance/température en ajustant le
cadran régulateur (8), si vous constatez que la chauffe est trop
forte, ou pas assez. Vous pouvez aussi ajuster l’élément chauffant
pour maintenir la préparation au chaud, une fois qu’elle a fondu,
en sélectionnant une puissance plus basse (Position « Low » par
exemple).
• Cette fonction de garde au chaud est particulièrement utile pour
faire du chocolat fondu, ou des bonbons au chocolat, car vous
pouvez ainsi maintenir le chocolat fondu à la température parfaite
sans risque de le bruler.
• Vous pouvez utiliser l’appareil avec une préparation au chocolat,
ou au caramel mou, ou encore avec des enrobages fondants, et y
tremper des fruits ou des biscuits, pour des desserts délicieux. Utilisez
le bol pour fondre la préparation et l’appareil comme mini-appareil

22 CYM 42228 – 200813
www.KALORIK.com
à fondue !
• Important : l’appareil n’est pas régulé par un thermostat, donc il va
chauffer en permanence une fois qu’une certaine puissance est
sélectionnée. Ajustez soigneusement la puissance pour obtenir les
meilleurs résultats. Pour diminuer la puissance, tournez le cadran
dans le sens inverse des aiguilles d’une montre, et pour
l’augmenter, tournez dans le sens des aiguilles d’une montre.
• Vous entendrez un click quand vous tournerez le cadran pour
allumer ou éteindre l’appareil.
• Ne remplissez pas le bol à ras bord ; évitez de renverser la
préparation hors du bol en mélangeant.
• N’utilisez pas des accessoires surdimensionnés pour mélanger dans
le bol.
• Il est souvent préférable de laisser la préparation refroidir dans les
moules au réfrigérateur. Conservez les bonbons gélifiés au
réfrigérateur après les avoir démoulés.
RECETTES POUR BONBONS GELIFIES
Voir ci-dessous pour quelques exemples de nos recettes
favorites :
Recette de base for bonbons gélifiés
120ml d’eau
1 sachet de gélatine parfumée
4 sachets de gélatine non-parfumée
Instructions :
• Mélangez la gélatine en poudre parfumée et non-parfumée dans
le bol.
• Ajoutez l’eau froide et commencez à mélanger, puis tournez le
cadran sur la base chauffante pour chauffer la préparation ;
continuez à mélanger jusqu’à ce que la préparation soit
parfaitement lisse.
• Versez précautionneusement la préparation dans les moules, et

23 CYM 42228 – 200813
www.KALORIK.com
laissez la refroidir.
NOTE : pour des gélifiés acidulés, ajoutez un demi sachet pour
boisson en poudre avec la gélatine en poudre.
• Vous pouvez aussi ajouter des vitamines à cette recette pour
obtenir des bonbons gélifiés vitaminés.
Bonbons gélifiés au jus de fruit
120ml de jus de fruit
1 cuillère à soupe de jus de citron
¼ de cuillère à café d’édulcorant (Stevia, …)
3 sachets de gélatine non-parfumée
Instructions :
• Mélangez les ingrédients dans le bol et mélangez.
• Tournez le cadran sur la base chauffante pour chauffer la
préparation
• Continuez à mélanger jusqu’à ce que la préparation soit
parfaitement lisse.
• Retirez du feu et versez précautionneusement la préparation dans
les moules.
Bonbons gélifiés aux vitamines
4 sachets de gélatine non-parfumée
120ml de jus de fruit
2 cuillères à soupe de miel (optionnel)
Vitamines et sels minéraux de votre choix (Vitamine C, multi-vitamines,
magnésium, etc…)
Instructions :
• Préchauffez l’appareil. Mélangez le jus, la gélatine et le miel dans le
bol.
• Tournez le cadran sur la base chauffante pour chauffer la
préparation.
• Continuez à mélanger jusqu’à ce que la préparation soit

24 CYM 42228 – 200813
www.KALORIK.com
parfaitement lisse et ajoutez la quantité de vitamines choisies.
• Retirez du feu et versez précautionneusement la préparation dans
les moules ; laissez refroidir.
Bonbons gélifiés énergétiques
60ml de jus de fruit
60 ml de boisson énergétique
4 sachets de gélatine non-parfumée
Vitamines de votre choix (optionnel)
Instructions :
• Préchauffez l’appareil. Mélangez le jus, la boisson énergétique et la
gélatine dans le bol.
• Tournez le cadran sur la base chauffante pour chauffer la
préparation.
• Continuez à mélanger jusqu’à ce que la préparation soit
parfaitement lisse.
• Retirez du feu et ajoutez la quantité de vitamines choisies.
• Versez précautionneusement la préparation dans les moules ;
laissez refroidir.
Bonbons gélifiés sans sucre
2 sachets de thé
150 ml d’eau
4 sachets de gélatine non-parfumée
1 sachet d’édulcorant (Stevia ou autre)
1 cuillère à café de pur extrait de fruit
Instructions :
• Infusez les sachets de thé dans l’eau bouillante pendant environ 6
minutes.
• Pressez le thé hors des sachets puis jetez les sachets.
• Placez environ 120ml de thé dans le bol e l’appareil.
• Mélangez l’édulcorant et la gélatine avec le thé. Tournez le cadran

25 CYM 42228 – 200813
www.KALORIK.com
sur la base chauffante pour chauffer la préparation.
• Continuez à mélanger jusqu’à ce que la préparation soit
parfaitement lisse.
• Retirez du feu et ajoutez l’extrait de fruit.
• Versez précautionneusement la préparation dans les moules.
• Placez les moules au réfrigérateur et laissez refroidir pendant au
moins 15 minutes.
• Retirez les bonbons gélifiés des moules et conservez les au
réfrigérateur.
Bonbons gélifiés à la compote de pomme
350g de compote de pomme
2 sachets de gélatine non-parfumée
1 sachet de gélatine parfumée
1 cuillère à café de jus de citron
25g de sucre en poudre
Instructions :
• Mélangez le sucre, la compote, les deux types de gélatine et le jus
de citron dans un bol séparé.
• Versez une partie du mélange dans le bol de l’appareil et chauffez
la préparation, jusqu’à ce qu’elle soit lisse.
• Retirez le bol du feu.
• Versez dans les moules en silicone.
• Placez les moules au réfrigérateur et laissez refroidir pendant au
moins 15 minutes.
• Retirez les bonbons gélifiés des moules et conservez les au
réfrigérateur.

26 CYM 42228 – 200813
www.KALORIK.com
NETTOYAGE ET ENTRETIEN
Note : assurez-vous du fait que l’appareil est bien débranché et
refroidi avant de le nettoyer.
1. Tournez le bouton de contrôle en position « OFF » (ETEINT).
Débranchez l’appareil de la prise murale. Laissez refroidir pendant
au moins 20 minutes avant de nettoyer. Ne touchez pas à l’appareil
avant qu’il ne soit refroidi.
Attention : Le couvercle en acier peut-être brulant au toucher !
2. S’il est sale, retirez le couvercle (4) du boitier (2) an le tournant dans
le sens des aiguilles d’une montre.
3. La base (1) et la partie chauffante (2) ne doivent être nettoyées
qu’avec un chiffon non-abrasif légèrement humide. L’élément
chauffant au quartz peut être nettoyé avec précaution à l’aide
d’une brosse de nettoyage souple, ou une brosse à dent si de la
nourriture est tombé dessus.
Attention : n’immergez jamais la base dans l’eau ou tout autre liquide.
4. Séchez la base soigneusement avant de la ranger.
5. Les fourchettes, le bol et le couvercle en acier peuvent être lavés à
la main dans de l’eau chaude savonneuse. Ne les mettez pas au
lave-vaisselle.
6. Les plateaux à bonbon (6) et les moules en silicones (5) peuvent
être lavés à l’eau chaude savonneuse ou au lave-vaisselle.
Remarques :
• N’utilisez pas de nettoyants abrasifs pour nettoyer le couvercle ou
la base.
• Toute autre maintenance de l’appareil doit être effectuée par un
service technique qualifié.

27 CYM 42228 – 200813
www.KALORIK.com
OBTENEZ PLUS DE VOTRE PRODUIT
Découvrez des recettes de chef spécialement conçues pour votre
produit Kalorik. Visitez notre site Web www.kalorik.com pour accéder à
nos recettes et commencer à cuisiner. Inscrivez-vous à la liste de
diffusion Kalorik pour recevoir des offres spéciales et des recettes, et
suivez-nous sur les réseaux sociaux pour votre dose d'inspiration
quotidienne.

28 CYM 42228 – 200813
www.KALORIK.com
GARANTIE
Nous vous suggérons de remplir et de nous renvoyer rapidement la Carte
d’Enregistrement Produit ci-jointe afin de faciliter la vérification de la date
d’achat. Cependant, le renvoi de la Carte d’Enregistrement Produit n’est
pas une condition indispensable à l’application de la présente garantie.
Vous pouvez aussi remplir cette carte de garantie en ligne à l’adresse
suivante : www.KALORIK.com.
A compter de la date d’achat, ce produit KALORIK est garanti un an, sur
les territoires des Etats-Unis et du Canada, contre les défauts matériels et de
fabrication. Cette garantie n’est pas transférable. Conservez la preuve
d’achat originelle. Une preuve d’achat est exigée pour obtenir
l’application de la garantie.
Durant cette période, le produit KALORIK qui, après inspection par
KALORIK, s’avère défectueux, sera réparé ou remplacé, au choix de
KALORIK, sans frais pour le consommateur. Si un produit de remplacement
est envoyé, c’est la garantie restante du produit originel qui s’appliquera.
La présente garantie ne s’applique pas aux défauts dus à une mauvaise
utilisation de la part de l’acheteur ou de l’utilisateur, à une négligence, au
non-respect des consignes du manuel d’utilisation KALORIK, à une
utilisation sur un circuit électrique au voltage différent de celui renseigné
sur le produit, à une usure normale, à des modifications ou réparations non
autorisées par KALORIK, ou par un usage à des fins commerciales. Il n’existe
pas de garantie pour les parties en verre, récipients en verre, filtres, paniers,
lames et accessoires en général. Il n’existe également pas de garantie
pour les pièces perdues par l’utilisateur.
Toute garantie de valeur commerciale ou d’adaptabilité à ce produit est
également limitée à la garantie d’un an.
Certains états ne limitent pas la longueur de la garantie tacite ou
n’autorisent pas l’exclusion de dommages-intérêts accessoires ou indirects,
les restrictions ci-dessus peuvent donc ne pas s’appliquer à vous. Cette
garantie vous donne des droits légaux particuliers, et certains droits
peuvent varier d’un état à l’autre.
Si l’appareil devait présenter un défaut durant la période de garantie et
plus de 30 jours après l’achat, ne ramenez pas l’appareil au magasin :
souvent, notre Service Clientèle peut aider à résoudre le problème sans

29 CYM 42228 – 200813
www.KALORIK.com
que le produit ne doive être réparé. Si une réparation est nécessaire, un
représentant peut confirmer si le produit est sous garantie et vous rediriger
vers notre centre de réparation.
Le cas échéant, ramenez le produit (ou envoyez-le, dûment affranchi),
ainsi qu’une preuve d’achat, en mentionnant le numéro d’autorisation de
retour, indiqué par notre service clientèle, au service après-vente KALORIK
agrée (visitez notre site internet www.KALORIK.com ou appelez notre
département Service Clientèle pour obtenir l’adresse du service après-
vente KALORIK agréé).
Si vous envoyez le produit, veuillez y joindre une lettre expliquant la nature
du défaut.
Si vous avez des questions complémentaires, veuillez appeler notre
département Service Clientèle (voyez plus bas pour les coordonnées
complètes), du Lundi au Jeudi de 9h à 17h (EST) et le Vendredi de 9h à 16h
(EST). Veuillez noter que les heures sont sujettes à modification.
Si vous souhaitez nous écrire, adressez votre courrier à :
KALORIK Customer Service Department
Team International Group of America Inc.
16175 NW 49th Avenue
Miami Gardens, FL 33014 USA
Ou appelez (Gratuitement des Etats-Unis): +1 888-521-TEAM ou +1 888-
KALORIK.
Seules les lettres seront acceptées à l’adresse ci-dessus. Les envois et colis
n’ayant pas de numéro d’autorisation de retour seront refusés.

30 CYM 42228 – 200813
www.KALORIK.com
Model CYM 42228
For questions please contact:
Pour toute question, veuillez contacter:
KALORIK Customer Service / Service Après-Vente
Team International Group of America Inc.
16175 NW 49th Avenue
Miami Gardens, FL 33014 USA
Toll Free / Numéro Gratuit:
+1 888-521-TEAM / +1 888-KALORIK
www.KALORIK.com
User manual content and recipes courtesy of Team International Group – Do not reproduce
without consent of the authors - All rights reserved.
Contenu du guide d'utilisation et recettes fournis par Team International Group - Ne pas
reproduire sans le consentement des auteurs - Tous droits réservés.