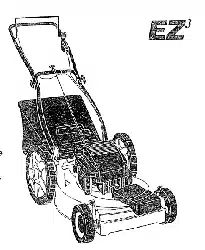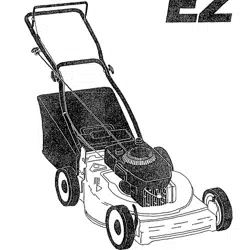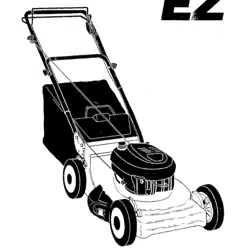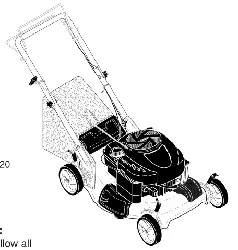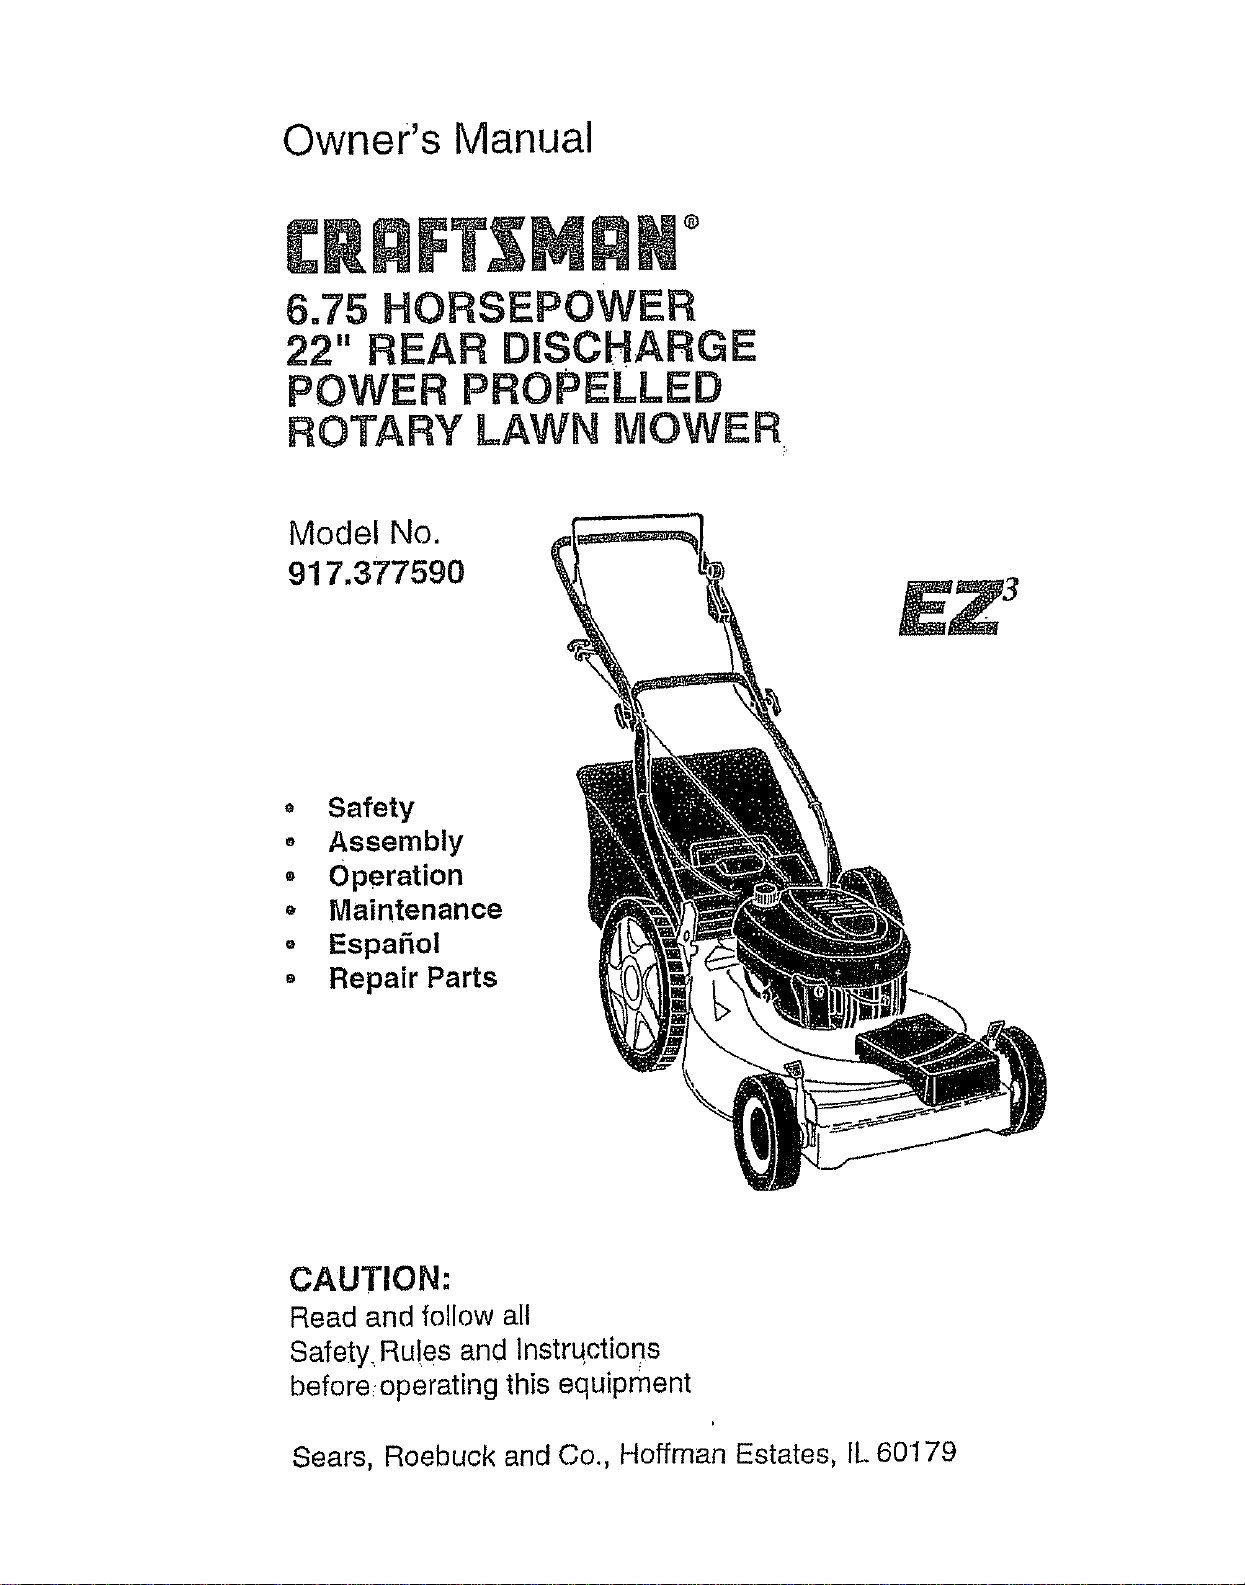
Owner's Manual
I:RnFT, M N °
6=75 HORSEPOWER
22" REAR DISCHARGE
POWER PROPELLED
ROTARY LAWN MOWER
Model No.
917.377590
* Safety
, Assembly
Operation
o Maintenance
o Espadoi
= Repair Parts
CAUTION:
Read and follow all
Safety Rules and Instructions
before=operating this equipment
Sears, Roebuck and Co., Hoffman Estates, 1/.60179
Warranty 2 Product Specifications 11
Safety Rules 2 Service and Adjustments 14
Assembly 4 Storage 15
Operation 6 Troubleshooting 16
Maintenance Schedule 10 Repair Parts 35
Maintenance 10 Parts Ordering Back Cover
LIMITED TWO YEAR WARRANTY ON CRAFTSMAN POWER MOWER
For two years from date of purchase, when this Craftsman Lawn Mower is maintained,
lubricated, and tuned up according to the operating and maintenance instructions in the
owner's manual, Sears will repair free of charge any defect in material or workmanship.
If this Craftsman Lawn Mower is used for commercial or rental purposes, this warranty
applies for only 90 days from the date of purchase.
This Warranty does not cover:
• Expendable items which become worn during normal use, such as rotary mower
blades, blade adapters, belts, air cleaners and spark plug.
• Repairs necessary because of operator abuse or negligence, including bent crank-
shafts and the failure to maintain the equipment according to Ihe instructions con-
tained in the owner's manual.
Warranty service Is available by returning the craftsman power mower to the nearest
sears service center/department in the united states. This warranty applies only while
this product is in use in the united states.
This Warranty gives you specific legal rights, and you may also have other rights which
vary from state to state.
SEARS, ROEBUCK AND CO., D/817 WA, HOFFMAN ESTATES, ILLINOIS 60179
TRAINING:
,, Read this operator's manual carefully.
Become familiar with the controls and
know how to operate your mower
propedy. Learn how to quickly stop
mower.
o Do not allow children to use your mower:
Never allow adults to use mower without
proper instructions.
• Keep the area of operation clear of all
persons, especially small children and
pets.
, Use mower only as the manufacturer
intended and as described in this manual.
,, Do not operate mower if it has been
dropped or damaged in any manner.
Always have damage repaired before
using your mower.
• Do not use accessory attachments that
are not recommended by the manufac-.
lurer. Use of such attachments may be
hazardous,
• The blade turns when the engine Is
running.
PREPARATION:
Always thoroughly check the area to be
mowed and clear it of all stones, sticks,
wires, bones, and other foreign objects.
These objects will he thrown by the blade
and can cause severe injury.
° Always wear safety glasses or eye
shields when starting and while using
your mower.
, Dress properly. Do not operate mower
when barefoot or weadng open sandals.
Wear only solid shoes with good traction
when mowing.
= Check fuel tank before starting engine.
Do not fill gas tank Indoors, when the
engine is running or when the engine is
2
hot.Allowtheenginetocoolforseveral
minutesbeforefillingthegastank,Clean
offanyspilledgasolinebeforestartingthe
engine,
,, Alwaysmakewheelheightadjustments
before starting your mower. Never
attempt to do this while the engine is
running,
. Mow only in daylight or good artificial
light.
OPERATION:
Keep your eyes and mind on your mower
and the area being cut, Do not let other
interes!s distract you,
. Do not mow wet or slippery grass, Never
run while operating your mower, Always
be sure of your tooting -- keep a firm
hold on the handles and walk,
• Do not put hands or feet near or under
rotating parts. Keep clear of the discharge
opening at all times.
• Always stop the engine whenever you
leave or are not using your mower, or
before crossing driveways, walks, roads,
and any gravel---covered areas.
° Never direct discharge of material toward
bystanders nor allow anyone near the
mower while you are operating it.
• Before cleaning, inspecting, or repairing
your mower, stop the engine and make
absolutely sure the blade and el! moving
parts have stopped, Then discen_oect the
spark Plug wire and keep it away from the
spark plug to prevent accidental starting,
o Do not continue to run your mower if you
hit a foreign object, Follow the procedure
outlined above, then repair any damage
before restarting and operating you
mower.
• DO not change the governor settings or
overspeed the engine. Eidgine damage or
personal injury may resulL
° Do not operate your mower if It vibrates
abnormally. Excessive vibration is an
indication of damage; stop the engine,
safely check for the cause of vibration
and repair as required,
. Do not run the engine indoors. Exhaust
fumes ere dangerous,
° Never cut grass by pulling the mower
towards you, Mow across the face of
slopes, never up and down or you might
lose your footing. Do not mow exces-
sively steep slopes, Use caution when
operating the mower on uneven terrain
or when changing directions _--,maintain
good footing.
° Never operate your mower without
proper guards, plates, grass catcher or
other safety devices in place.
MAINTENANCE AND STORAGE:
° Check the blade and the engine mount-
ing bolts often to be sure they are
tightened propedy,
• Check all bolts, nuts and screws at
frequent intewals for proper tightness to
be sure mower Is In safe working
condition.
° Keep all safety devices In place and
working.
° To reduce fire hazard, keep the engine
free of grass, leaves or excessive grease
and oil.
• Check grass catcher of!on for deteriora-
tion and wear and replace worn bags.
Use only replacement bags that are
recommended by and comply with
specifications of the manufacturer of your
mower.
° Always keep a sharp blade on your
mower,
• Allow engine to cool before storing in any
enclosure,
o Never store mower with fuel in the tank
inside a building where fumes may reach
an open flame or an ignition sol.]rce such
as a hot water heater, space heater,
clothes dryer, etc,
CAUTION: Always disconnect spark plug
wire and place wire where it cannot contact
spark plug in order to prevent ac,cldental
starting when setting up, transporting,
adjusting or making repairs.
WARNING
The engine exhaust from this product
contains chemLcals known to the State of
California to cause cancer, birth defects, or
other reproductive harm.
3
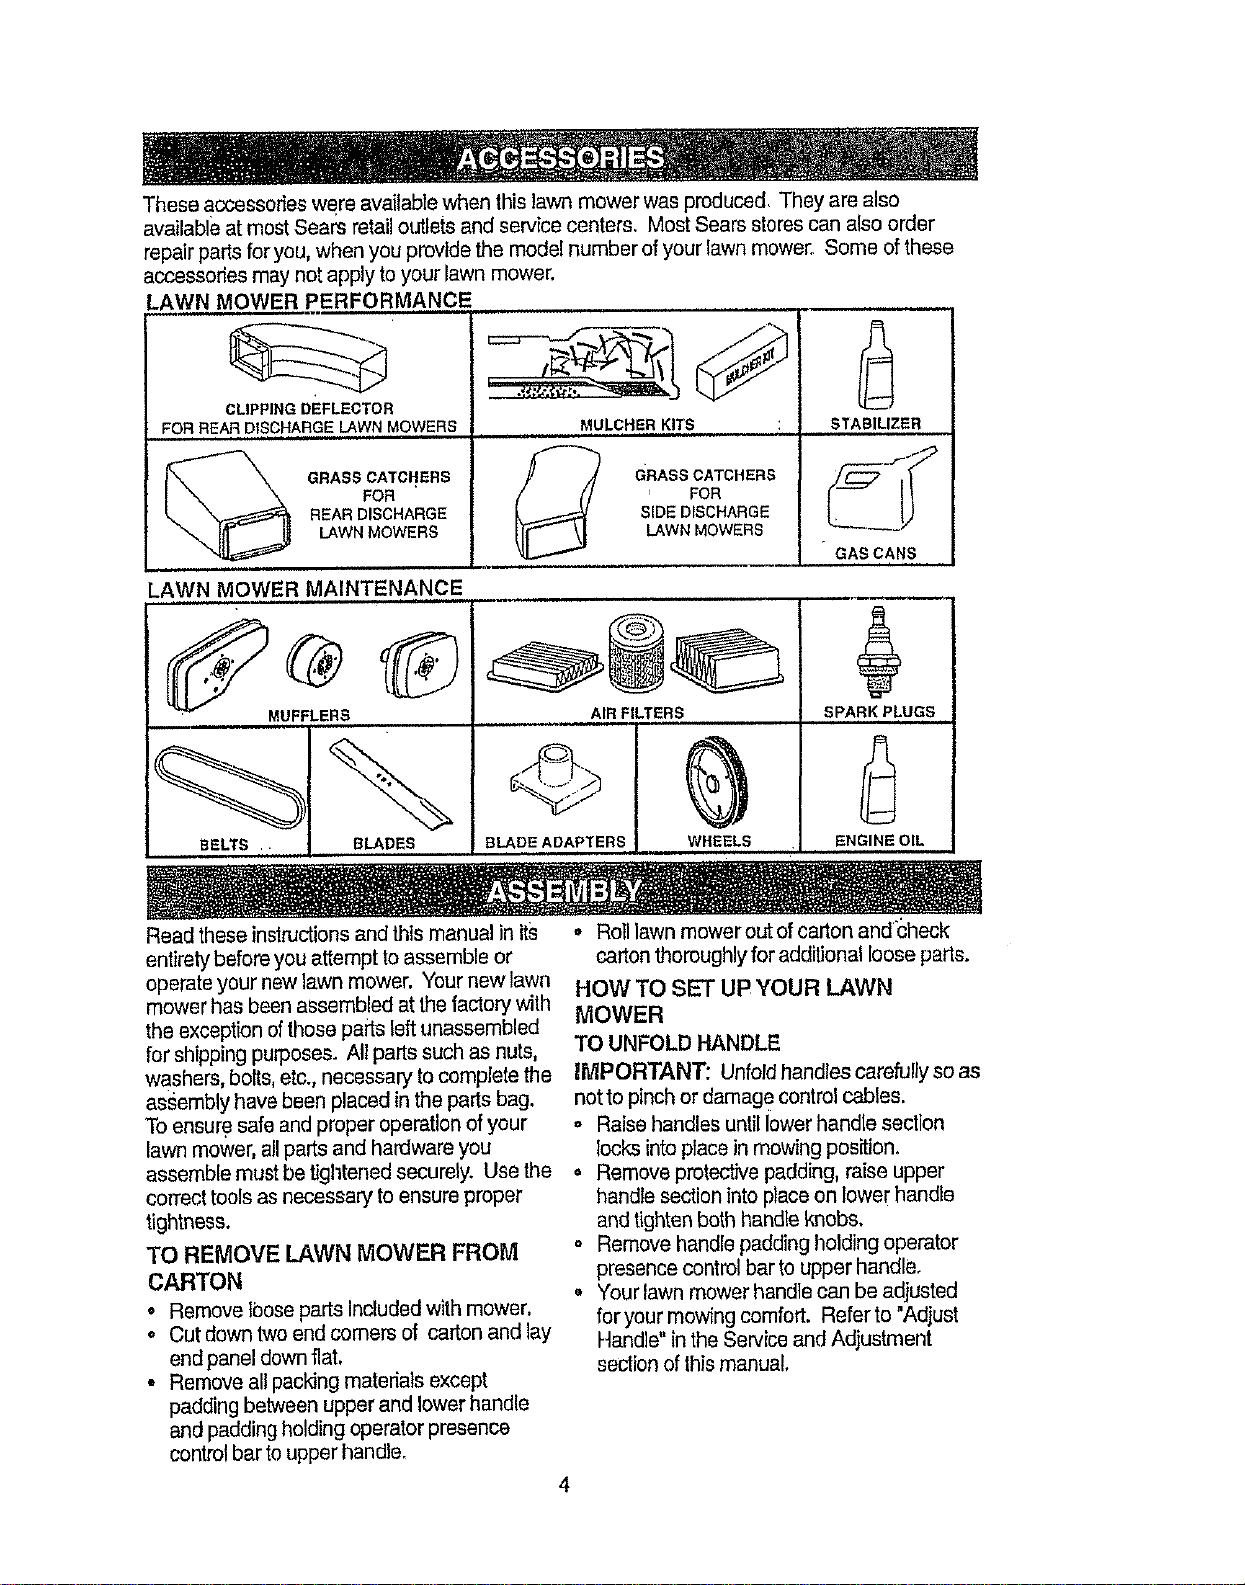
These accessories were available when this lawn mower was produced, They are also
available at most Sears retail outlets and service centers, Most Sears stores can also order
repair parts for you, when you provide the model number of your lawn mower. Some of these
accessories may not apply to your lawn mower.
LAWN MOWER PERFORMANCE
CLIPPING DEFLECTOR
FOR REAR DISCHARGE LAWN MOWERS
GRASS CATCHERS
FOR
REAR DISCHARGE
LAWN MOWERS
MULCHER KITS
GRASS CATCHERS
FOR
SIDE DISCHARGE
LAWN MOWERS
STABILIZER
GAS CANS
LAWN MOWER MAINTENANCE
AIR FILTERS
SPARK, PLUGS,,
BELTS • BLADES BLADE ADAPTERS WHEELS ENGINE OIL
, , L •
Read these instructionsand this manual in its ,, Roll lawn mower out ofcarton and'check
entirety before you attempt to assemble or
operate your new lawn mower. Your new lawn
mower has been assembled at the factory with
the exception of those parts left unassembled
for shipping purposes. All parts such as nuts.
washers, bolts, etc., necessary tocomplete the
as§embly have been placed in the parts bag.
To ensure safe and proper operation of your
lawn mower, all parts and hardware you
assemble must be tightened securely. Use the
correct tools as necessary to ensure proper
tightness.
TO REMOVE LAWN MOWER FROM
CARTON
• Remove lbose parts Included with mower.
o Cut down two end comers of carton and lay
end panel down flat.
° Remove all packing matedals except
padding between upper and lower handle
and padding holding operator presence
control bar to upper handle,
carton thoroughly for additional loose parts.
HOW TO SET UP YOUR LAWN
MOWER
TO UNFOLD HANDLE
iMPORTANT: Unfold handles carefuUy so as
not to pinch or damage control cables.
,, Raise handles until iower handle section
locks into place in mowing position.
• Remove protective padding, raise upper
handle section intoplace on lower handle
and tighten both handle knobs,
o Remove handle padding holding operator
presence control bar to upper handle,
• Your lawn mower handle can be adjusted
foryour mowing comfort. Refer to "Adjust
Handle" in the Service and Adjustment
sectionof thismanual.
4
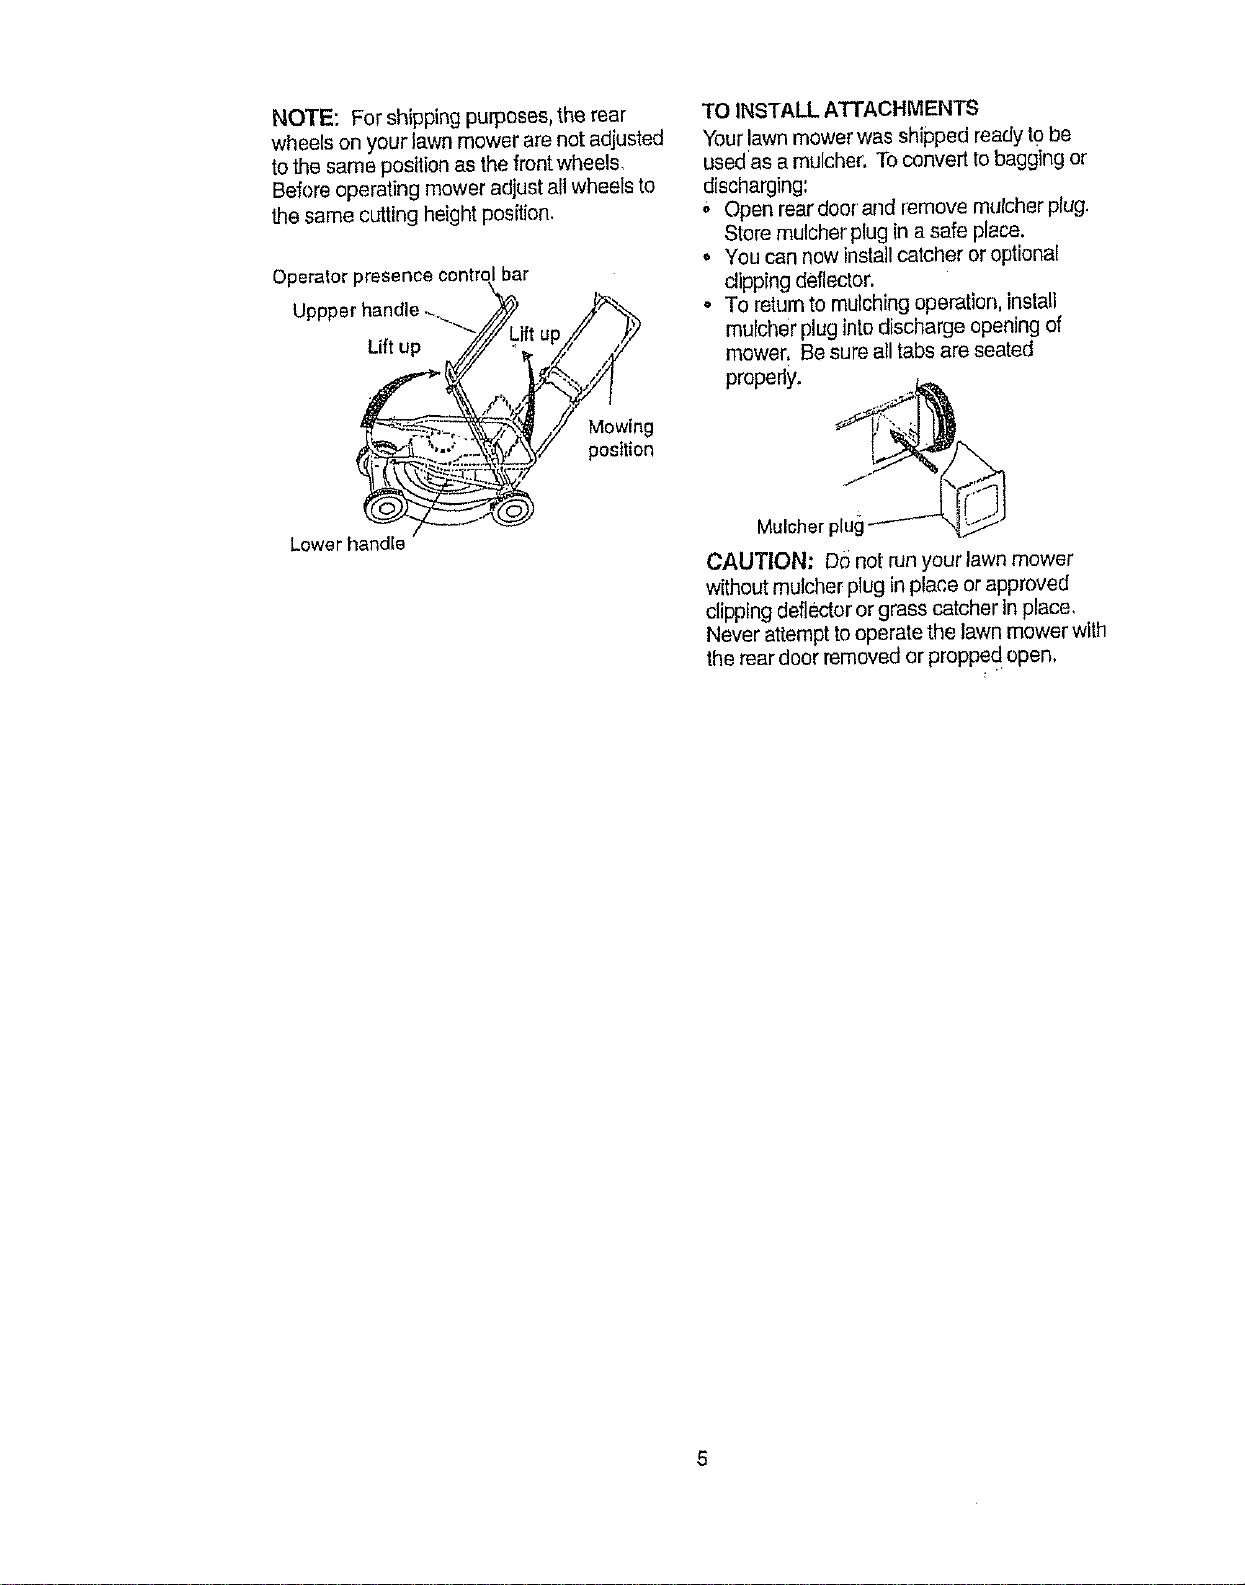
NOTE: Forshippingpurposes,therear
wheelsonyourlawnmowerarenotadjusted
tothesamepositionasthefrontwheels.
Beforeoperatingmoweradjustallwheelsto
thesamecuttingheightposition.
Operator presence centreIbar
Uppper handle ..._+,....
Lift up
Mowing
position
Lower handle
TO INSTALL ATTACHMENTS
Your lawn mower was shipped ready tObe
used as a mulcher, To convert to bagging or
discharging:
+ Open rear dool and remove mutcher plug.
Store mulcher plug in a safe place.
• You can now install catcher or optional
dipping deflector.
. To retum to mulching operation, install
mulcher plug into discharge opening of
mower, Be sure all tabs are seated
propedy.
Mulcher plug_
CAUTION: D_Jnot run your lawn mower
without mulcher plug in place or approved
dipping deflector or grass catcher in place,
Never attempt to operate the lawn mower with
the rear door removed or propped open+
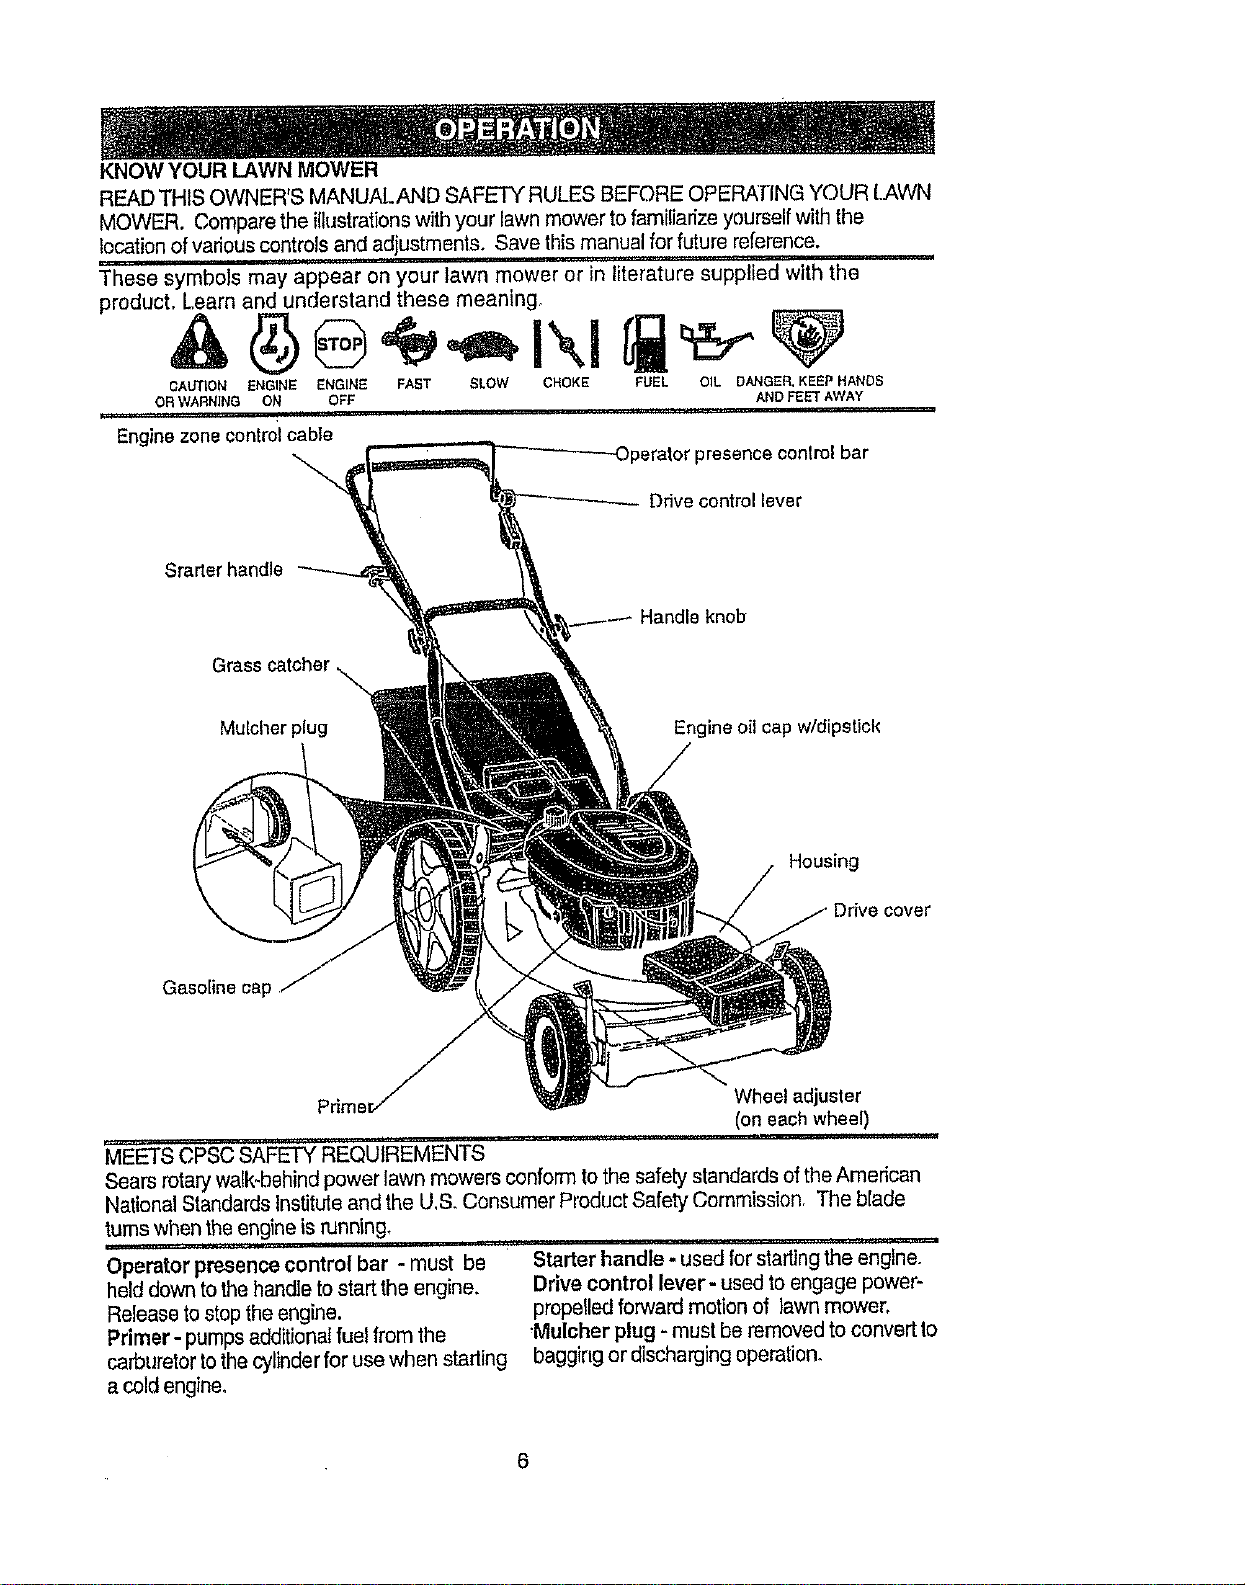
KNOWYOURLAWNMOWER
READTHISOWNER'SMANUALANDSAFETYRULESBEFOREOPERATINGYOURLAWN
MOWER.Comparetheillustrationswith your lawn mower to familiarize yourself with the
location of various controls and adjustments, Save this manual for future reference,
These symbols may appear on your lawn mower or in literature supplied with the
producL Learn and understand these meaning,
CAUTION ENGINE ENGINE FAST SLOW CHOKE FUEL OIL DANGER. KEEP HANDS
OR WARNING ON OFF AND FEET AWAY
Engine zone control cable
-_ presence control bar
Drive control lever
Starter handle
Handle knob
Mulcher plug Engine oil cap w/dipstick
Housing
t cover
Gasoline cap
F Wheel adjuster
(on each wheel)
'MEETS CPSC SAFETY REQUIREMENTS ..........
Sears rotary walk-behind power lawn mowers conform to the safety standards of the American
National Standards Institute and the U,S, Consumer Product Safety Commission, The blade
turnswhen the engineis running_
()perator presence control bar - must be
helddown tothe handletostart the engine.
Releaseto stoptheengine.
Primer- pumpsadditionalfuel from the
carburetortothe cylinderfor usewhen starting
a coldengine,
Starter handle-used for starting the engine.
Drive control lever- used to engage power-
propetled forward motion of lawn mower.
Mulcher plug - must be removed to convert to
bagging or discharging operation.
6
Tileoperationof any lawn mower can
result in foreign objects thrown Into the
eyes, which can result in severe eye
damage, Always wear safety glasses or
eye shields while operating your lawn
mower or performing any adjustments or
repairs. We recommend a Wide vision
safety mask over the spectacles or
standard safety glasses.
HOW TO USE YOUR LAWN MOWER
CAUTION: Do not run your lawn mower
without rnulcher plate in place and door closed
or without an approved clipping deflector or
grasscatcher in place. Never attemptto
operate the lawn mower with the rear door
removed or propped open.
ENGINE SPEED
'The eng!ne speed was set at the factory
for optimum performance, Speed is not
adjustable,
ENGINE ZONE CONTROL
CAUTION; Fedora! _egulations require an
engine control to be installed on th[s lawn
mower in order to minimize the risk of blade
contact injury Do not under any circumstances
attempt to defeat the function of the operator
control, The blade turns when the engine is
running,
o Your lawn mower is equipped with an
opei'at6r pre_ence control bar which
requires the operator to be positioned
behind the lawn mower handle to start and
operate the lawn mower.
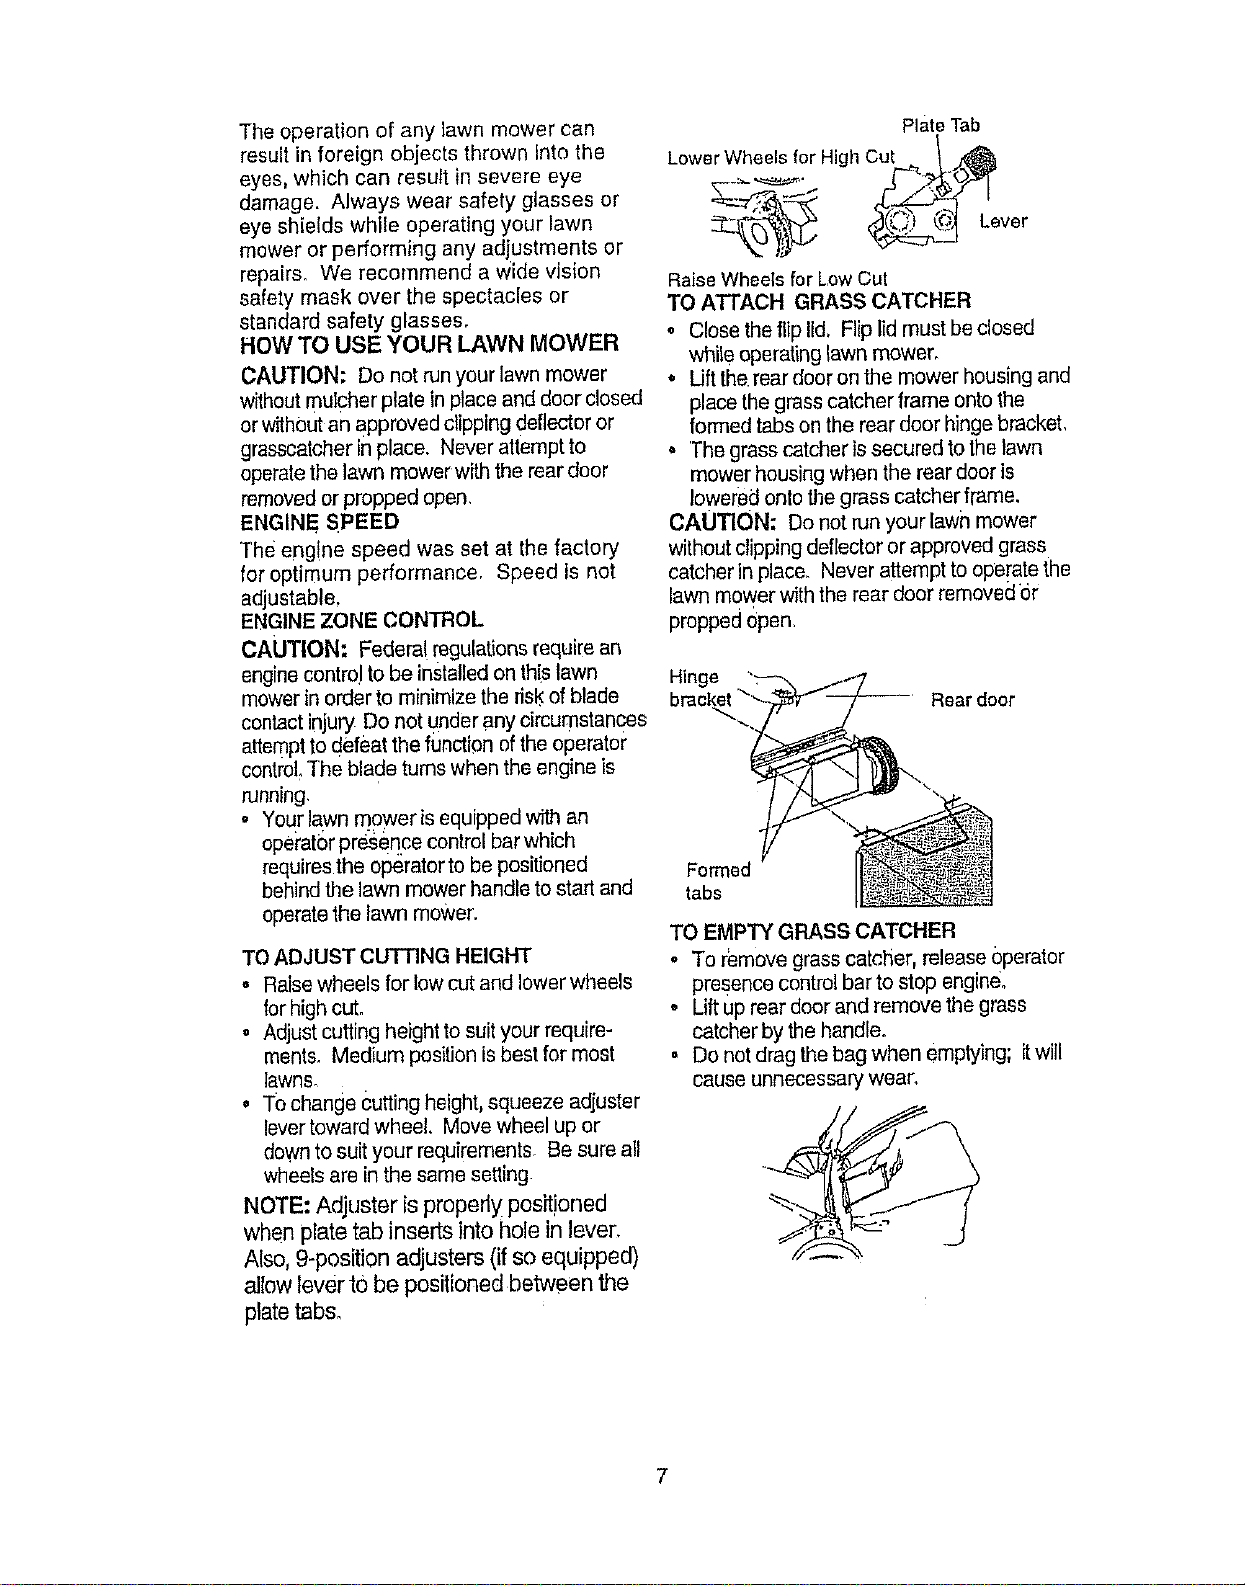
TO ADJUST CUTTING HEIGHT
• Raisewheels for lowcut and lower wheels
for highcut.
. Adjustcutting heightto suityour require-
ments. Medium positionis best for most
lawns,
= Tochange Cuttingheight,squeeze adjuster
levertowardwheel, Movewheel up or
downto suit your requirements Be sure all
wheelsare inthe same setting
NOTE: Adjuster is properly positioned
when plate tab inserts into hole in lever,
Also, 9-position adjusters (if so equipped)
allow lever t0 be positioned between the
plate tabs,
Plate Tab
Lower Wheels for High Cut _ ,_
ver_ ' ' i"'_t
Raise Wheels for Low Cut
TO ATTACH GRASS CATCHER
o Close the flip lid. Flip lid must be closed
while operating lawn mower.
• Lift the rear door on the mower housing and
place the grass catcher frame onto the
formed tabs on the rear door hinge bracket,
° The grass catcher is secured to the lawn
mower housing when the rear door is
lowere d onto the grass catcher frame.
CAUTION: Do not run your lawn mower
without clipping deflector or approved grass
catcher in place. Never attempt to operate the
lawn mower with the rear door removed or
propped Open,
Hinge
Reardoor
Formed
tabs
TO EMPTY GRASS CATCHER
. To remove grass catcSer, release Operator
presence control bar to stop engine.
• Lift up rear door and remove the gress
catcher by the handle.
= Do not drag the bag when emptying; itwill
cause unnecessary wear.
7
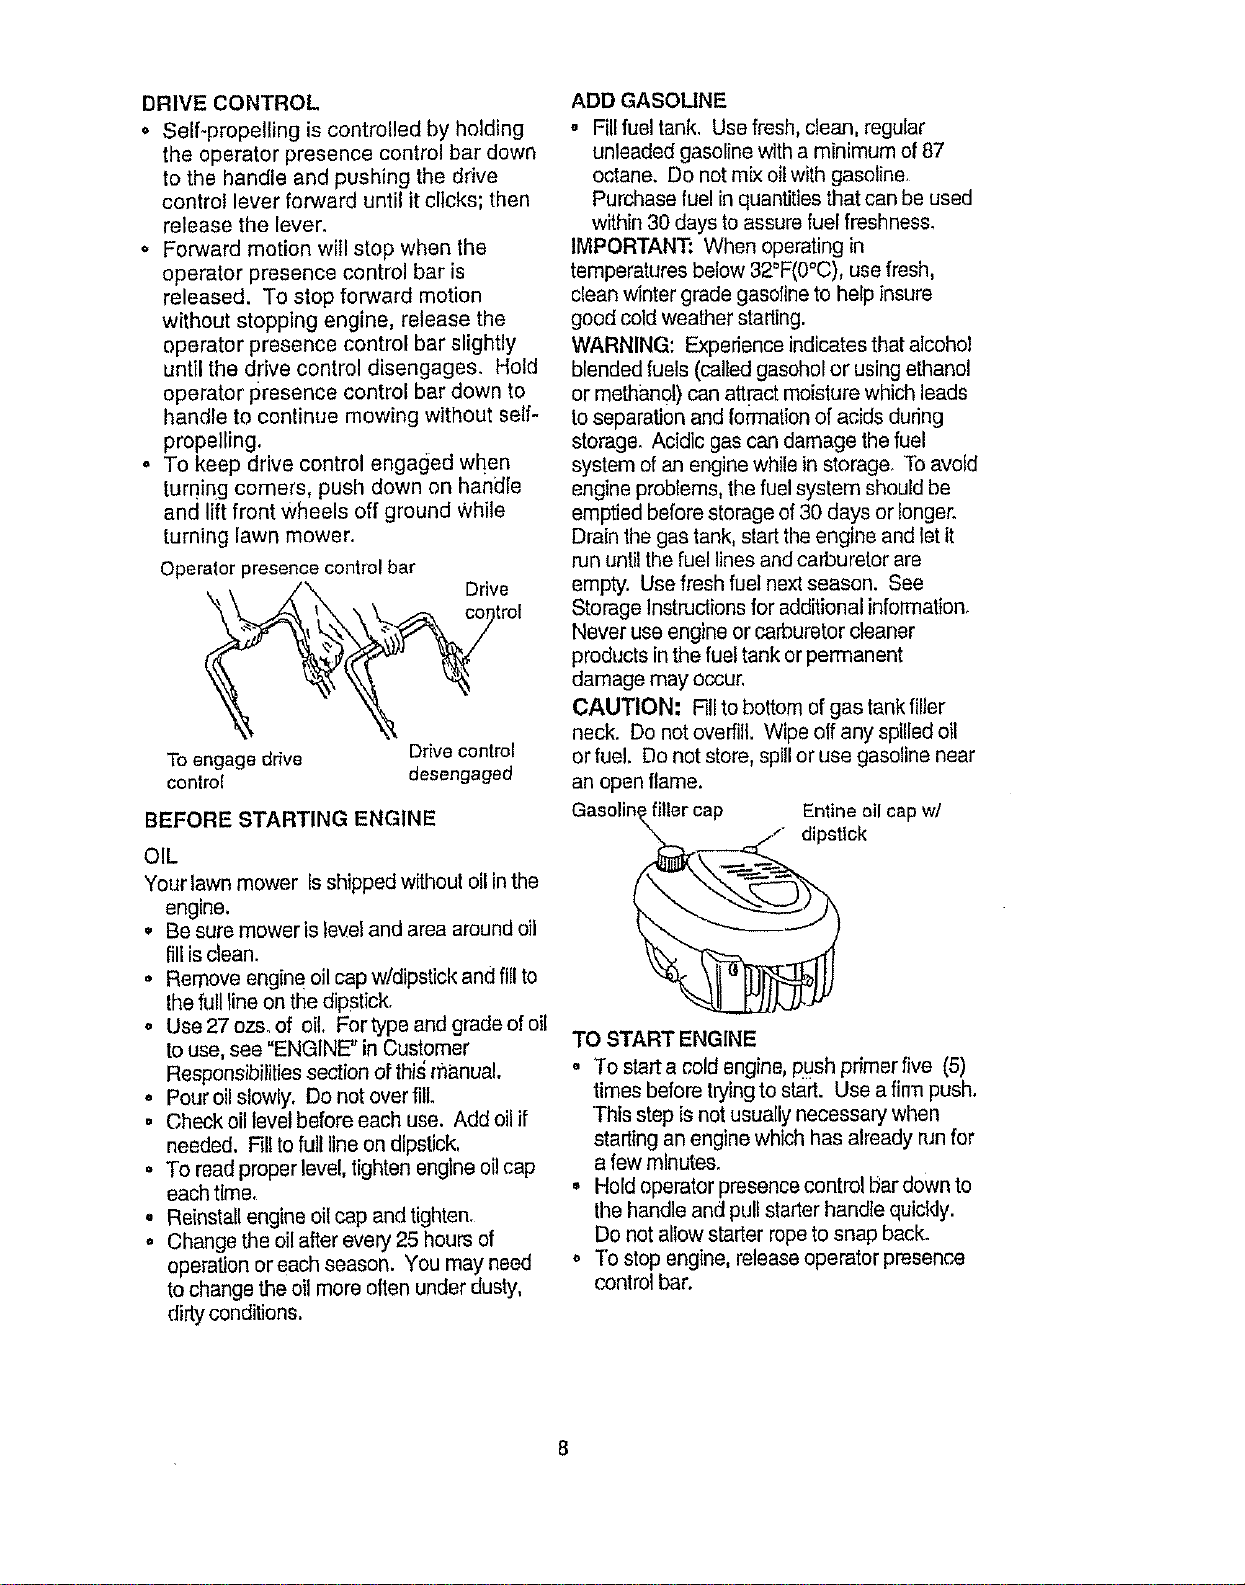
DRIVECONTROL
o Self-propellingiscontrolledbyholding
theoperatorpresencecontrolbardown
tothehandleandpushingthedrive
controlleverforwarduntilit clicks; then
release the lever.
o Forward motion will stop when the
operator presence control bar is
released. To stop forward motion
without stopping engine, release the
operator presence control bar slightly
until the drive control disengages. Hold
operator presence control bar down to
handle to continue mowing without self-
propeiting,
° To keep drive control engaged when
turning comers, push down on handle
and lift front wheels off ground While
turning lawn mower.
Operator presence control bar
Drive
To engage drive
control
Ddve cont_l
desengaged
BEFORE STARTING ENGINE
OIL
Your lawn mower Is shipped without oil in the
engine,
* Be sure moweris level and area around oil
fill is clean.
o Remove engine oil cap w/dipstick and fill to
the full line on the dipstick.
o Use 27 ozs. of oil. For type and grade of oil
to use, see "ENGINE" in Customer
Responsibilities section of thi._manual.
o Pour oil slowly, Do not over fill.
= Check oil level before each use. Add oil if
needed, Fill to full line on dipstick,
. To read proper level, tighten engine oil cap
each time,
. Reinstall engine oil cap and tighten.
o Change the oil after every 25 hours of
operation oreach season. You may need
to change the oil more often under dusty,
dirty conditions,
ADD GASOUNE
,, Fill fuel tank, Use fresh, clean, regular
unleaded gasoline with a minimum of 87
octane. Do not mix oil with gasoline.
Purchase fuel in quantities that can be used
within 30 days to assure fuel freshness,
IMPORTANT_ When operating in
temperatures below 32°F(0°C), use fresh,
clean winter grade gasoflne to help insure
good cold weather starting,
WARNING: Experience indicates that alcohol
blended fuels (called gasohol or using ethanol
or methan01) can attract moisture which leads
to separation and formation of acids dudng
storage. Acidic gas can damage the fuel
system of an engine while in storage. ]b avoid
engine problems, the fuel system should be
emptied before storage of 30 days or longer.
Drain the gas tank, start the engine and let it
run until the fuel lines and carburetor are
empty. Use fresh fuel next season. See
Storage Instructions for additional information.
Never use engine or carburetor cleaner
products in the fuel tank or permanent
damage may occur,
CAUTION: RII to bottom of gas tank filler
neck. Do not overfill. Wipe off any spilled oil
or fuel, Do not store, spill or use gasoline near
an open flame.
filler cap Entine oil cap w/
dipstick
TO START ENGINE
• To start a cold engine, push prfmer five (5)
times before trying to start. Use a fin'n push.
]his step is not usually necessary when
starting an engine which has already runfor
a few minutes.
• Hold operator presence control bar down to
the handle and pull starter handle quicldy.
Do not allow starter rope to snap back.
o To stop engine, release operator presence
control bar.
8
NOTE: Incoolerweatheritmaybeneces-
sarytorepeatprimingsteps Inwarmer
weatheroverprimingmaycausefloodingand
enginewillnotstart.Ifyoudofloodengine,
waitafewminutesbeforeattemptingtostart
anddenotrepeatprimingsteps,
MOWINGTIPS
. Undercertainconditions,suchasverytall
grass,Itmaybenecessarytoraisethe
heightofcuttoreducepushingeffortandto
keepfromoverloadingtheengineand
leavingclumpsofgrassclippings,
o Forextremelyheavycutting,rec[ucethe
widthofcutandraisetherearofthelawn
mowerhousingone(1)wheeladjuster
settinghigherthanthefrontforbetter
dischargeofgrass°
• Whenusingareardischargelawnmowerin
moist,heavygrass,clumpsofcutgrass
maynotenter'thegrasscatcher.Reduce
groundspeed(pushingspeed)and/orrun
lhelawnmowerovertheareaasecond
time,
o Ifatrailofgrassclippingsisleftontheright
sideofareardischargelawnmower,mow
inaclockwisedirectionwithasmalloverlap
tocollecttheclippingsor1thenextpass.
• Keeptopofenginearoundstarterclearand
cleanofgrassclippingsandchaff.Thiswill
helpengineairflowandextendenginelife.
, Poresinclothgrasscatcherscanbecome
filledwithdirtanddustwithuseand
catcherswillcollectlessgrass,Toprevent
this,regulariyhosecatchersoffwithwater
andletdrybeforeusing
MULCHING MOWING TIPS
IMPORTANT: For best performance, keep
mower housing free of built-,up grass and
trash, See "Cleaning" in CUS'f©MER
RESPONSIBILITIES section of this manual
. The special mulching blade will recurthe
grass clippings many times and reduce
them in size so that as they fall onto the
lawn they will disperse into the grass and
not be noticed. Also, the mulched grass will
biodegrade quickly to provide nutrients for
the lawn. Always mulch with your highest
engine (blade) speed as this will provide the
best recutUng action of the blade&
. Avoid culling your lawn when it is wet. Wet
grass tends to form clumps and interferes
with the mulching action. The best time to
mow your lawn is the early afternoon. A'_
this time the grass has dried and the newly
cut area will not be exposed to the direct
,sun.
° For best results, adjust the lawn mower
cutting height so that the lawn mower cuts
off only the top one-third of the grass blades.
If the lawn is overgrown it will be necessary
to raise the height of cut to reduce pushing
effort and to keep from overloading the
engine and leaving clumps of mulched
grass For extremely heavy mulching,
reduce your width of cut by overlapping
previously cut path and mow slowly°
,, Certain types of grass and grass conditions
may require that an area be mulched a
second time to completely hide the
clippings. When doing a second c_4,mew
across or perpendicular tOthe first cut path.
* Changeyour cutting pattern from week to
week. Mow north to south one week then
change to east to west the next week, This
will help prevent matting and graining of the
lawn,
MAINTENANCE SCHEDULE .,,,_'_O_.._ _..._ _'_._--_'_'_'_
F'LL 'NDATES /___
REGULAR SERVICE ,,
Check far Loose Fasteners
Clean/Inspect Grass Catcher
(If Equipped)
M Clean Lawn Mower
O Clean Under DriveCover!Power-Propelled Mowers)
Checkddvebelt/pulleys
R_ _elied Mowere'_
Check/Sharpen/Replace Blade
Lubrication Chart
Clean Battety/Recher{_e
(Electric Start Mowers!
E Check EngineOilLevel
N Chan_e EngineOil
G Clean Air Fiiler
I inspectMuffler
U CleBn or ReplaceSpark Plug
i E ReplaceAir Filter PaperCartridge
v" V' v'
v" v"
v'4
v'
v'
v'
v'2
1- Charge more olte_ whon opora_ag undora heavy load or in high ambient Iomperatut_s
2 _Servic_ rnor_ often when operalJng]n dirtyordusty conditions
3 - Replace hi,dos rnom oll_n when mowing in snndy _oU
4 * Ch_rgo 48 h_urs Qtand of r_ _,_on
GENERAL RECOMMENDATIONS
The warranty on this lawn mower does not
cover items that have been subjected to
operator abuse or negligence. To receive
full value from the warranty, operator must
maintain mower as instructed in this
manual,
Some adjustments will neec! to be made
periodically to properly maintain your unit.
All adjustments in the Service and
Adjustments section of this manual should
be checked at least once each season_
• Once a year, replace the spark plug,
replace air filter element and check
blade for wear. A new spark plug and
clean/new air filter element assures
proper air-fuel mixture and helps your
engine run better and last longer.
= Follow the maintenance schedule in this
manual,
BEFORE EACH USE
• Check engine oil level
• Check for loose fasteners.,
LUBRICATION
Keep unit well lubricated (See "LUBRICA-
TION CHART"),
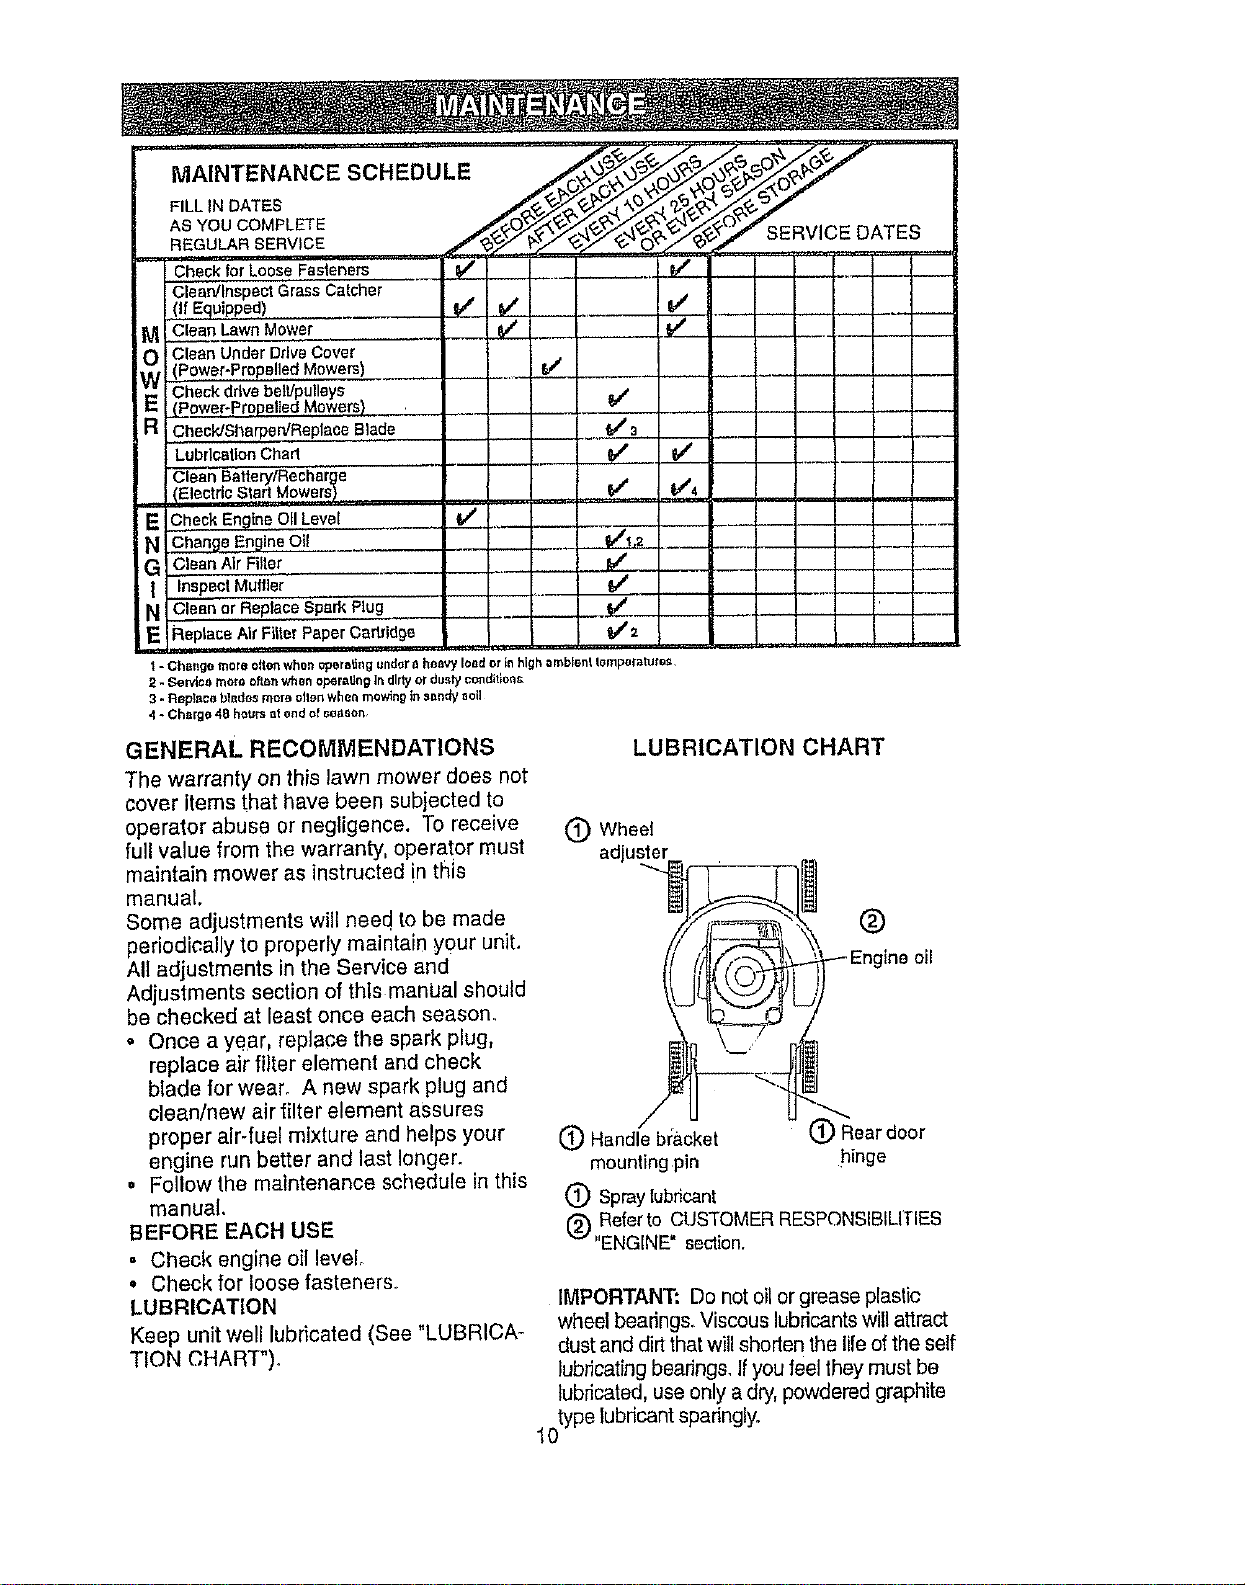
LUBRICATION CHART
(_) Wheel
adjuster
®
(_ Handie b_:acket Rear door
mounting pin hinge
(_) spray lubricant
® Reter to CUSTOMER RESPONSIBILITIES
"ENGINE" section.
IMPORTANT: Do not oil or grease plastic
wheel bearings, Viscous lubricants will attract
dust and dirt that will shorten the life of the self
lubricating bearings_ If you feel they must be
lubricated, use only a dry, powdered graphite
0type lubricant sparingly.
1
PRODUCT SPECiFiCATiONS
i
MODEL. NUMBER 9t 7,377590
'SERIAL NUMBER
DATE OF PURCHASE
HORSEPOWER; 6.75
DISPLACEMENT: 12,560 CU, IN.
GASOLINE CAPACITY/TYPE: 1.5 QUARTS
UNLEADED REGULAR
OIL TYPE (APFSF/SG/SH): SAE 30 (ABOVE 32°F)
SAE 5W-30 (BELOW 32°F)
OIL CAPACITY: 27 OZS.
SPARK PLUG(GAP: .030") CHAMPION RJ19LM OR J19LM
VALVE CLEARANCE: INTAKE: .004" - .008"
EXHAUST: ,004" -.008"
SOLID STATE IGNITION
AIR GAP: .0125 IN.
BLADE BOLT TORQUE: 35-40 FT. LBS.
• The model and serial numbers will-be found on a decal attached to the rear of the
lawn mower housing.Record both serial number and date of purchase in space
provided above.
LAWN MOWER
Always obse#e safety rules when performing
any maintenance,
TIRES
• Keep tires free of gasoline, el!, or Insect
contrbl chemicals which can harm rubber.
= Avoid stumps, stones, deep nJts, sharp
objects and other hazards that may cause
tire damage.
BLADE CARE
For best results, mower blade must be kept
sharp. Replace bent or damaged blades.
TO REMOVE BLADE
o Disconnect spark plug wire from spark plug
and place wire where it cannot come in
contact with spark plug.
•Tum lawn mower on its side, Make sure air
tilter and carburetor are up.
• Use a wood bbck between blade and
mower housing to prevent blade from
turning when removing blade bolt.
. Protect your hands with gloves and/or wrap
blade with heavy cloth.
• Remove blade bolt by turning counter-
clockwise, Use a 9/16" box or open-end
wrench,
• Remove bladeand attaching"_-
(b01t,lock washer and hardened washer),
NOTE: Remove the blade adapter and
check the key inside hub of blade adapter,
The key must be in good condition to work
properly. Replace adapter if damaged.
TO REPLACE BLADE
,, Position the blade adapter on the engine
crankshaft. Be sure key in adapter and
crankshaft keyway are aligned.
. Position blade on the blade adapter aligning
the two (2) holes in the blade with the raised
lugs on the adapter.
o Be sure the trailing edge of blade (opposite
sharp edge) is up toward the engine,
o Install the blade bolt with the lock washer
and hardaned Washer into blade adapter
and crankshaft.
° Use block of wood between blade and lawn
mower housing and tighten the blade bolt,
turning clockwise,
o The recommended tightening torque is 35-
40 ft, Ibs,
IMPORTANT: Blade bolt is grade 8 heat
treated.
11
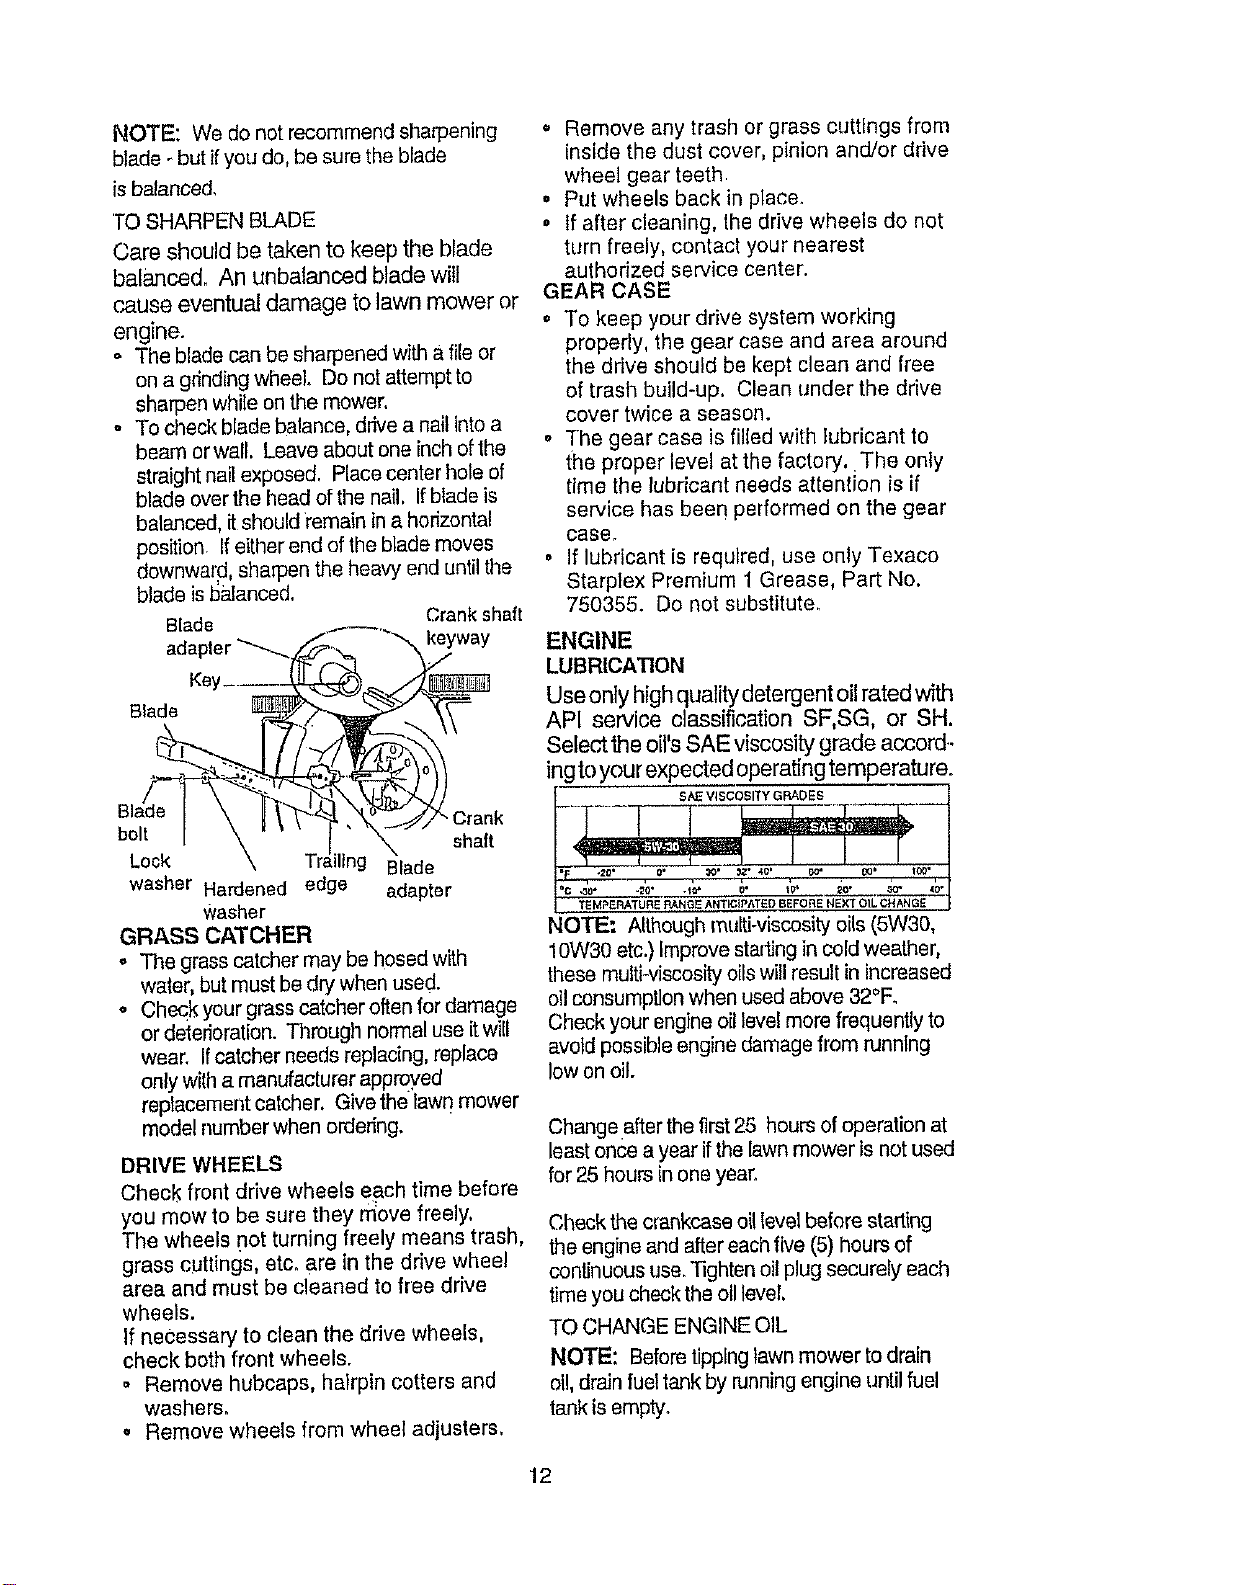
NOTE: Wedonotrecommendsharpening
blade_butifyoudo,besuretheblade
isbalanced.
TOSHARPENBLADE
Careshouldbetakento keeptheblade
balanced.Anunbalancedbladewill
cause eventual damage to lawn mower or
engine.
o The blade can be sharpened with a file or
on a grinding wheel. Do not attempt to
sharpen while on the mower.
o To check blade balance, drive a nail Into a
beam or wall. Leave about one inch of the
straight nail exposed, Place center hole of
blade over the head of the nail, Ifblade is
balanced, it should remain in a horizontal
position. If either end of the blade moves
downward, sharpen the heavy end until the
blade is balanced,
Crank shaft
Blade
keyway
Blade
Crank
bolt sh_t
Lock Blade
washer HaVened edge adapter
Washer
GRASS CATCHER
o The grass catcher may be hosed with
water, but must be dry when used.
o Check your grass catcher often for damage
or deterioration. Through normal use it will
wear. If catcher needs replacing, replace
only with a manufaclurer appmyed
replacement catcher, Givethe lawn mower
model number when ordering.
DRIVE WHEELS
Check front drive wheels each time before
you mow to be sure they rfiove freely,
The wheels rot turning freely means trash,
grass cuttings, etc, are in the drive wheel
area and must be cleaned to free drive
wheels.
If necessary to clean the drive wheels,
check both front wheels.
° Remove hubcaps, hairpin cotters and
washers,
• Remove wheels from wheel adjusters.
o Remove any trash or grass cuttings from
inside the dust cover, pinion and/or drive
wheel gear teeth
° Put wheels back in place.
o If after cleaning, the drive wheels do not
turn freely, contact your nearest
authorized service center.
GEAR CASE
o To keep your drive system working
properly, the gear case and area around
the drive should be kept clean and free
of trash build-up, Clean under the drive
cover twice a season.
o The gear case is filled with lubricant to
the proper level at the factory, The only
time the lubricant needs attention is if
service has been performed on the gear
case.
• If lubricant is required, use only Texaco
Starplex Premium 1 Grease, Part No.
750355. Do not substitute.
ENGINE
LUBRICATION
Use only high quality detergent oil rated with
API service classification SF,SG, or SH.
Select the oil's SAE viscosity grade accord..
ingtoyour expectedoperatingtemperature,
S,_ ViSCOSiTY GRADE$
qOTE: Although rnuiti-viscosity oils (5W30,
10W30 etc.) Improve starting in cold weather,
these multi-viscosity oils will result in increased
oll consumption when used above 32°Fo
Check your engine oil level more frequently to
avoid possible engine damage from running
low on oil
Change after the first 25 hours of operation at
least once a year ifthe lawn mower is not used
for 25 hours in one year.
Check the crankcase oil level before starting
the engine and after each five (5) hours of
continuous use. `tighten oil plug securely each
time you check the all level.
TO CHANGE ENGINE OIL
NOTE: Before tipping lawn mower to drain
oil, drain fuel tank by running engine until fuel
tank is empty.
12
• Disconnectsparkplugwirefromsparkp!ug
andplacewirewhereitcannotcomein
contactwithsparkplug.
o Removeengineoilcap;layasideonaclean
surface.
• Tiplawnmoweronitssideasshownand
drainoilintoasuitablecontainerRocklawn
mowerbackandforthtoremoveanyoil
trappedinsideofengine.
• Wipeoffanyspilledoilonlawnmowerand
onsideofengine°
o Fillenginewithoil Fillonlytothe"FULL"
lineonthedipstick.DONOToverfill.
. Replaceengineoilcap.
• ReconnectspaAplugwiretosparkplug.
Container
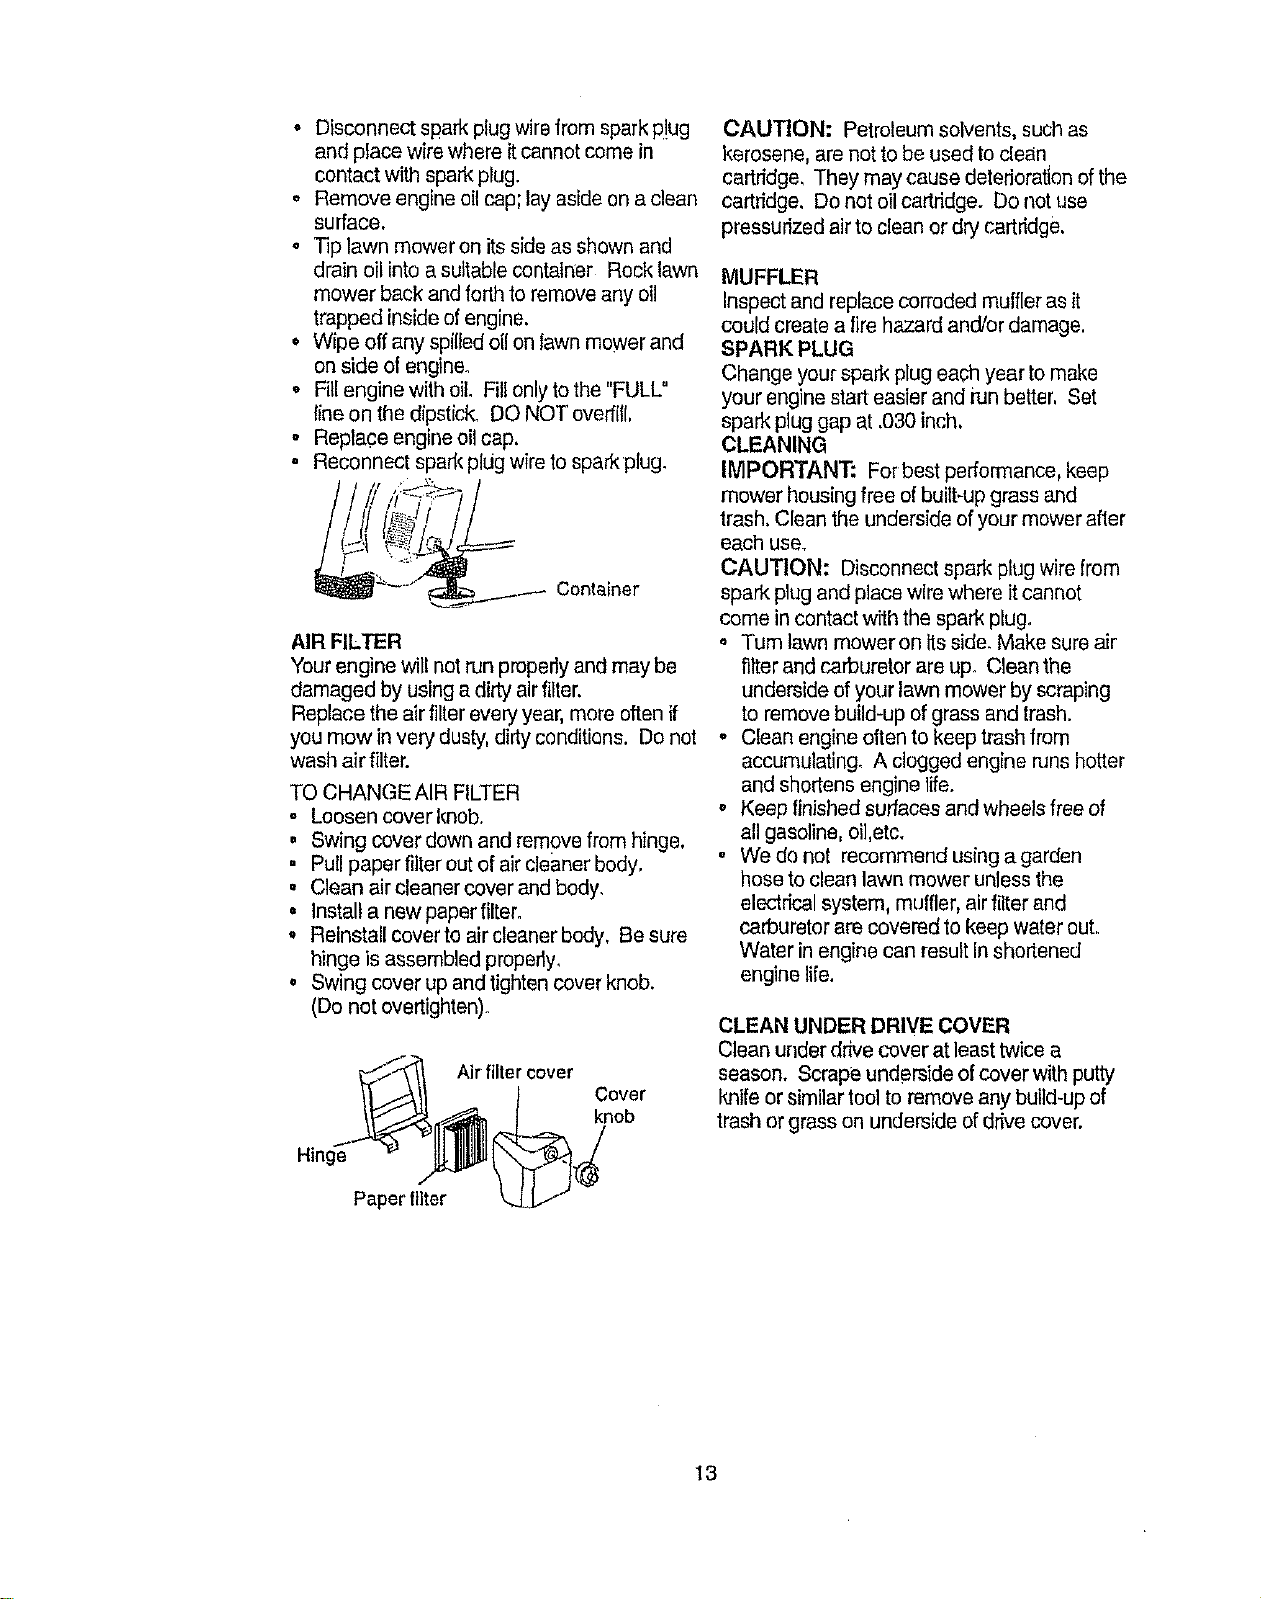
AIR FILTER
Your engine will not tun properly and may be
damaged by using a dirty air filter.
Replace the air filter every year, more often if
you mow in very dusty, dirty conditions. Do not
wash air filter.
TO CHANGE AIR FILTER
- Loosen coverknob_
, Swing cover down and remove from hinge.
• Pull paper filter out of air cleaner body.
. Clean air cleaner cover and body.
• Install a new paper filter.
, Reinstall cover to aircleanerbody. Be sure
hinge is assembled properly.
• Swing cover up and tighten cover knob.
(Do not overtighten)o
Air filter cover
Cover
knob
CAUTION; Petroleum solvents, such as
kerosene, are not to be used to dean
cartridge, They may cause deterioration of the
cartridge, Do not oil cartridge. Do not use
pressurized air to clean or dry cartridge.
MUFFLER
Inspect and replace corroded muffler as it
could create a lire hazard and/or damage,
SPARK PLUG
Change your spark plug each year to make
your engine start easier and iun better, Set
spark plug gap at .030 inch,
CLEANING
IMPORTANT: For best performance, keep
mower housing free of buiif-up grass and
trash, Clean the underside of your mower after
each use.
CAUTION: Disconnect spark plug wire from
spark plug and place wire where it cannot
come in contact with the spark plug.
o Turn lawn moweron its side. Make sure air
filter and carburetor are up_ Clean the
underside of your lawn mower by scraping
to remove buUd-up of grass and trash.
, Clean engine often to keep trash from
accumulating_ A clogged engine tuns hotter
and shortens engine life.
o Keep finished surfaces and wheels free of
all gasoline, oi],etc.
, We do not recommend using a garden
hose to clean lawn mower unless the
electrical system, muffler, air filter and
carburetor are covered to keep water out.
Water in engine can result in shortened
engine life,
CLEAN UNDER DRIVE COVER
Clean under drive cover at least twice a
season. Scrape underside of cover with putty
knife or similar tool to remove any build-up of
trash or grass on underside of drive cover.
Paper tilter
13
CAUTION: Beforeperforminganly o Remove the starter rope guide from the
service or adjustments, lower handle,
- Release control bar.
• Make sure the blade and all moving
parts have completely stopped.
,' Disconnect spark plug wire from spark
plug and place where it cannot come
in contact with plug.
LAWN MOWER
TO ADJUST CUTTING HEIGHT
See "TO ADJUST CUTTING HEIGHT" in the
Operation seclion of this manual.
REAR DEFLECTOR
The rear deflector, attached between the rear
wheels of your lawn mower, is provided to
minimize the possibility that objects will be
thrown out the rear of the lawn mower into the
eperatoCs mowing position. If the rear
deflector becomes damaged, it should be
replaced.
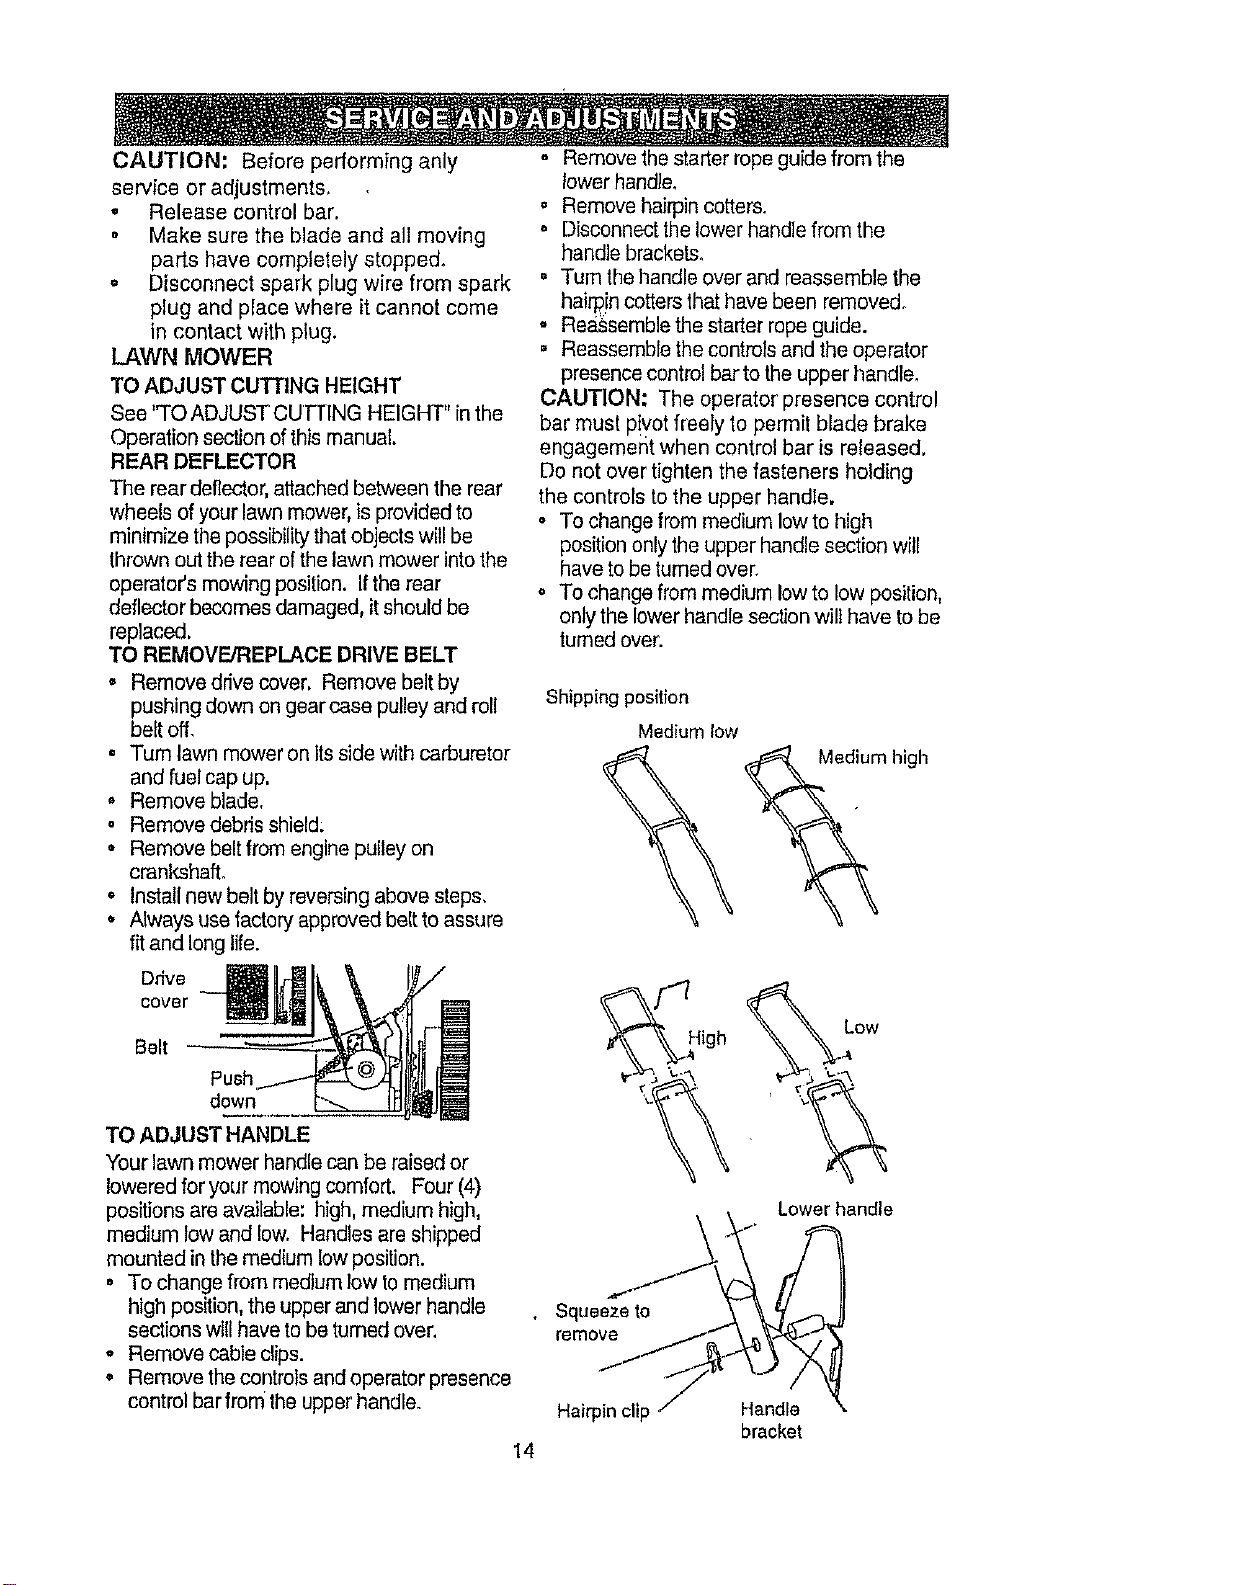
TO REMOVE/REPLACE DRIVE BELT
o Remove drive cover. Remove belt by
pushing down on gear case pulley and roll
belt off,
• Turn lawn mower on itsside with carburetor
and fuel cap up.
o Remove blade.
o Remove debris shield:
• Remove belt from engine pulley on
crankshaft,
o Install new belt by reversing above steps,
• Always use factory approved belt to assure
fit and long life.
Ddve
cover
Belt
Push
down
TO ADJUST HANDLE
Your lawn mower handle can be raised or
lowered for your mowing comfort. Four (4)
positions are available: high. medium high,
medium low and low. Handles are shipped
mounted in the medium low position.
° To change from medium low to medium
high position, the upper and lower handle
sections will have to be turned over.
° Remove cable clips.
• Remove the controls and operator presence
control bar from the upper handle.
14
° Remove hairpin cotters_
o Disconnect the lower handle from the
handle brackets,
° Turn the handle over and reassemble the
hai_!n cotters that have been removed,
° Reassemble the starter rope guide.
• Reassemble the controls and the operator
presence control bar to the upper handle,
CAUTION: The operator presence control
bar must p!vot freely to permit blade brake
engagement when control bar is released,
Do not over tighten the fasteners holding
the controls to the upper handle.
• To change from medium low to high
position only the upper handle section will
have to be turned over.
o To change from medium low to low position.
only the lower handle section wilt have to be
tumed over.
Shipping position
Medium low
urn high
Low
High
Lower handle
Squeeze to
remove
Hairpin clip Handle
bracket

Immediately prepare your lawn mower for
storage at the end of the season or ifthe unit
will not be used for 30 days or more.
LAWN MOWER
When lawn mower is to be stored for a period
of time, clean it thoroughly, remove all dirt,
grease, leaves, etc. Store in a dean, dry area.
• Clean entire lawn mower (See "CLEANING"
in the Customer Responsibilities section of
this manual),
o Lubricate as shown in the Customer
Responsibilities section of this manual,
• Be sure that all nuts, botls, screws, and pins
are securely fastened. Inspect moving
pads for damage, breakage and wear.
Replace if necessary.
• Touch up all rusted or chipped paint
surfaces; sand lightly belore painting.
HANDLE
You can fold your lawn mower handle for
storage.
• Squeeze the bottom ends of the lower
handle toward each other until the lower
handle clears the handle bracket, then
move handle for_vard,
• Loosen upper handle mounting bolts
enough to allow upper handle to be folded
back,
IMPORTANT: When folding the handle for
storage or transportation, be sure to fold the
handle as shown or you amy damage the
control cables.
. When setting up your handle from !he
storage position, the lower handle will
automatically lock into the mowing position.
Lower
handle
"-- Handle
Squeeze to lold bracket
Hairpin
cotter
Upper
Operator presence contr_ bar handle
Fo," towar- ., )/_/.,_
for storage _'_ _ ,/_
,ower owino
handle position
ENGINE
FUEL SYSTEM
IMPORTANT; It is important to prevent gum
deposits from forming in essential fuel system
parts such as carburetor, fuel system parts
such as carburetor, fuel filter, fuel hose or tank
during storage° Also, expedence indicates that
alcohol blended fuels ( called gasohol or using
ethanol or methanol) can attract moisture
which leads to separation and formation of
acids during storage_ Acidic gas can damage
the fuel system of an engine while in storage.
= Drain the fuel tank.
. Start the engine and let it run until the fuel
lines and carburetor are empty.
- Never use engine or carburetor cleaner
products in the fuel tank or permanent
damage may o_(Jr,
° Use fresh fuel next season,
NOTE: Fuel stabilizer Is an acoeptable
altema_ve In minimizing the formation of fuel
gum deposits during storage. Add stabilizer to
gasoline in fuel tank or storage container.
Always follow the mix ratio found on stabilizer
container. Runenglneatleast 10 minutes
after adding stabilizer to allow the stabilizer to
reach the carburetor. Do not draln the gas
tank and carburetor if using fuel stabilizer.
15
ENGINEOIL
Drainoil(withenginewan-n)andreplacewith
cleanengineoil.(See"ENGINE"inthe
CustomerResponsibilitiessectionofthis
manual).
CYLINDER
° Remove spark plug.
,. Pour one ounce (29 ml) of oil through spark
plug hole into cylinder.
o Pull starter handle slowly a few times to
distribute oil,
• Replace with new spark plug.
OTHER
° Do not store gasoline from one season to
another.
,, Replace your gasoline can if your can starts
to rust. Rust and!or dirt in your gasoline will
cause problems.
o If possible, store your unit indoors and cover
itto give protection from dust and dirt.
o Cover your unit with a suitable protective
cover that does not retain moisture. Do not
use plastic. Plastic cannot breathe which
allows condensation to form and wilt cause
your unit to rust.
IMPORTANT: Never cpver mower while
engine and exhaust areas are still warm.
CAUTION: Never store the lawn mower
with gasoline in the tank inside a building
where fumes may reach an open flame or
spark. Allow the engine to cool before
storing in any enclosure.
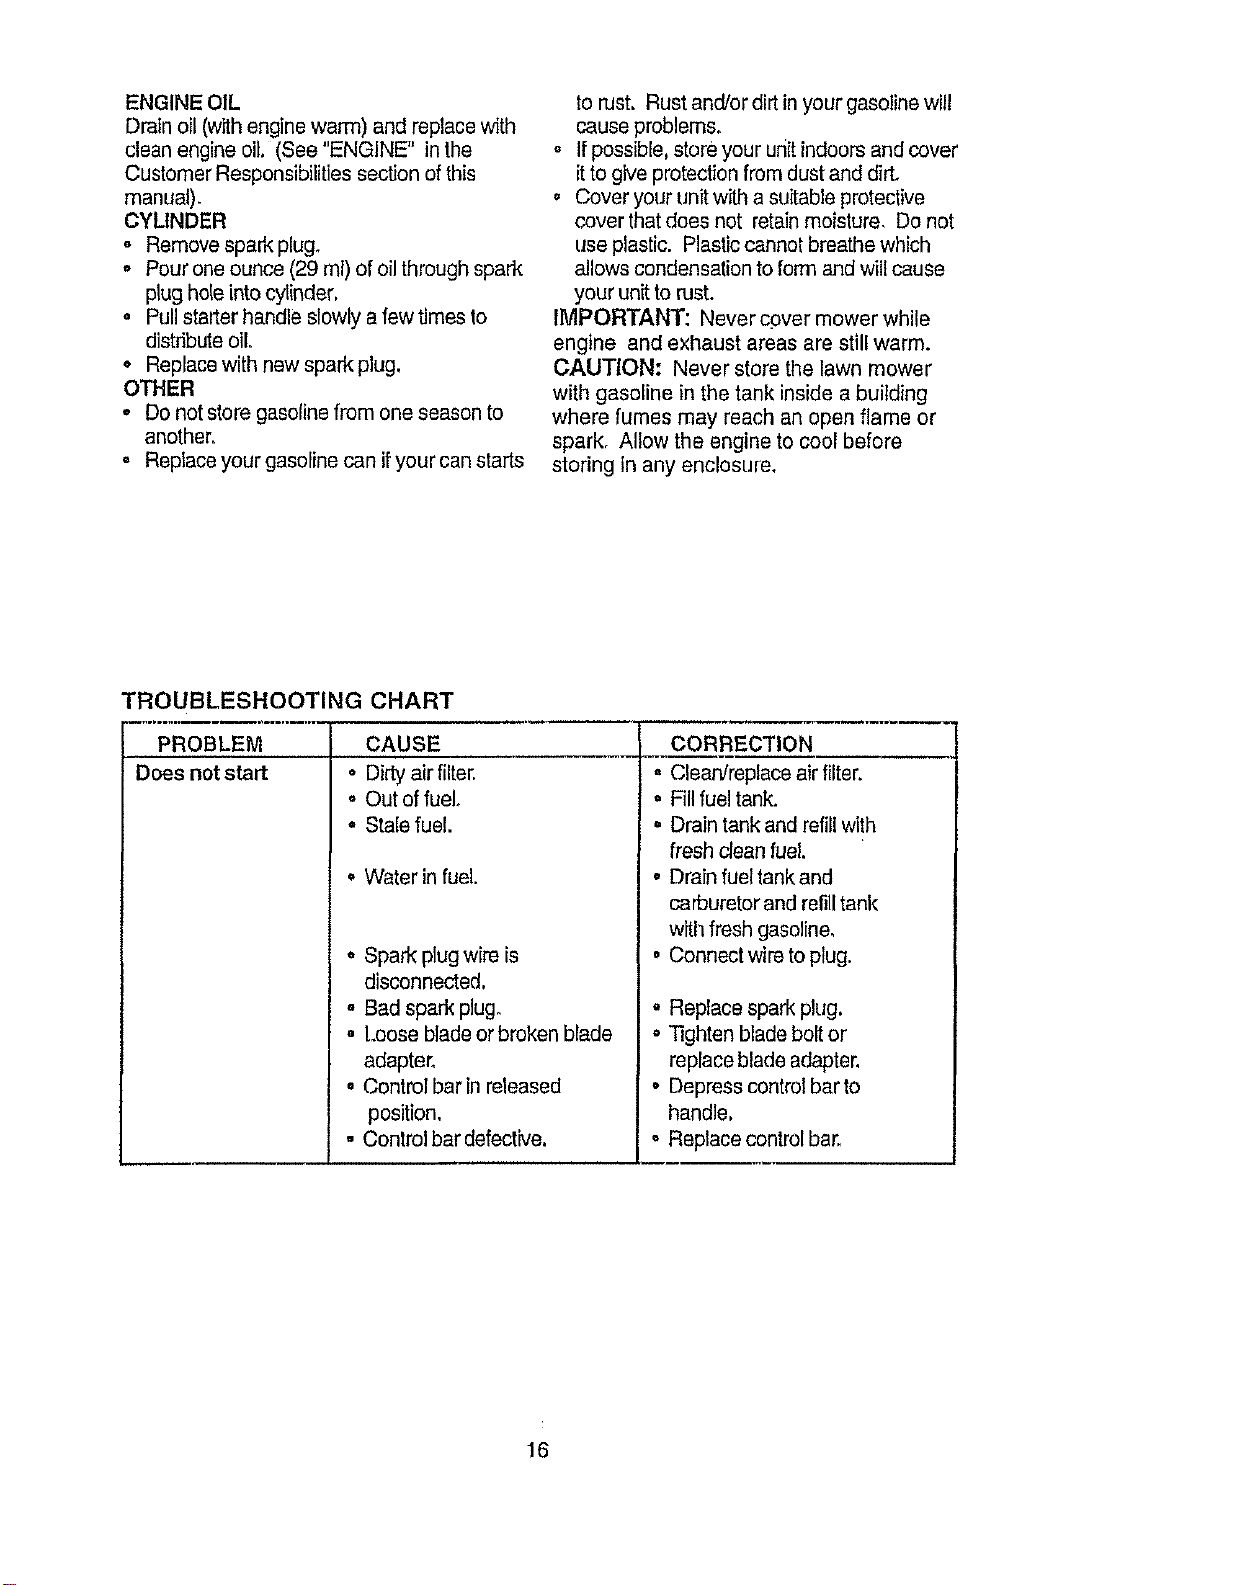
TROUBLESHOOTING CHART
PROBLEM
Does not start
o
o
e
o
o
tl
CAUSE
Dirty air filter.
Out of fuel
Stale fuel.
Water in fuel.
Sparkplug wire is
disconnected.
Bad spark plug_ ,,
Loose bladeor broken blade o
adapter.
Control barin released °
position.
Controlbar defective. ',
CORRECTION
, Clean/replace air filter.
= Fill fuel tank.
° Drain tank and refill with
fresh clean fuel.
• Drain fuel tank and
carburetor and refill tank
with fresh gasoline.
Connect wire to plug.
Replace spark plug.
"lighten blade bolt or
replace blade adapter.
Depress control bar to
handle.
Replace control bar.
16
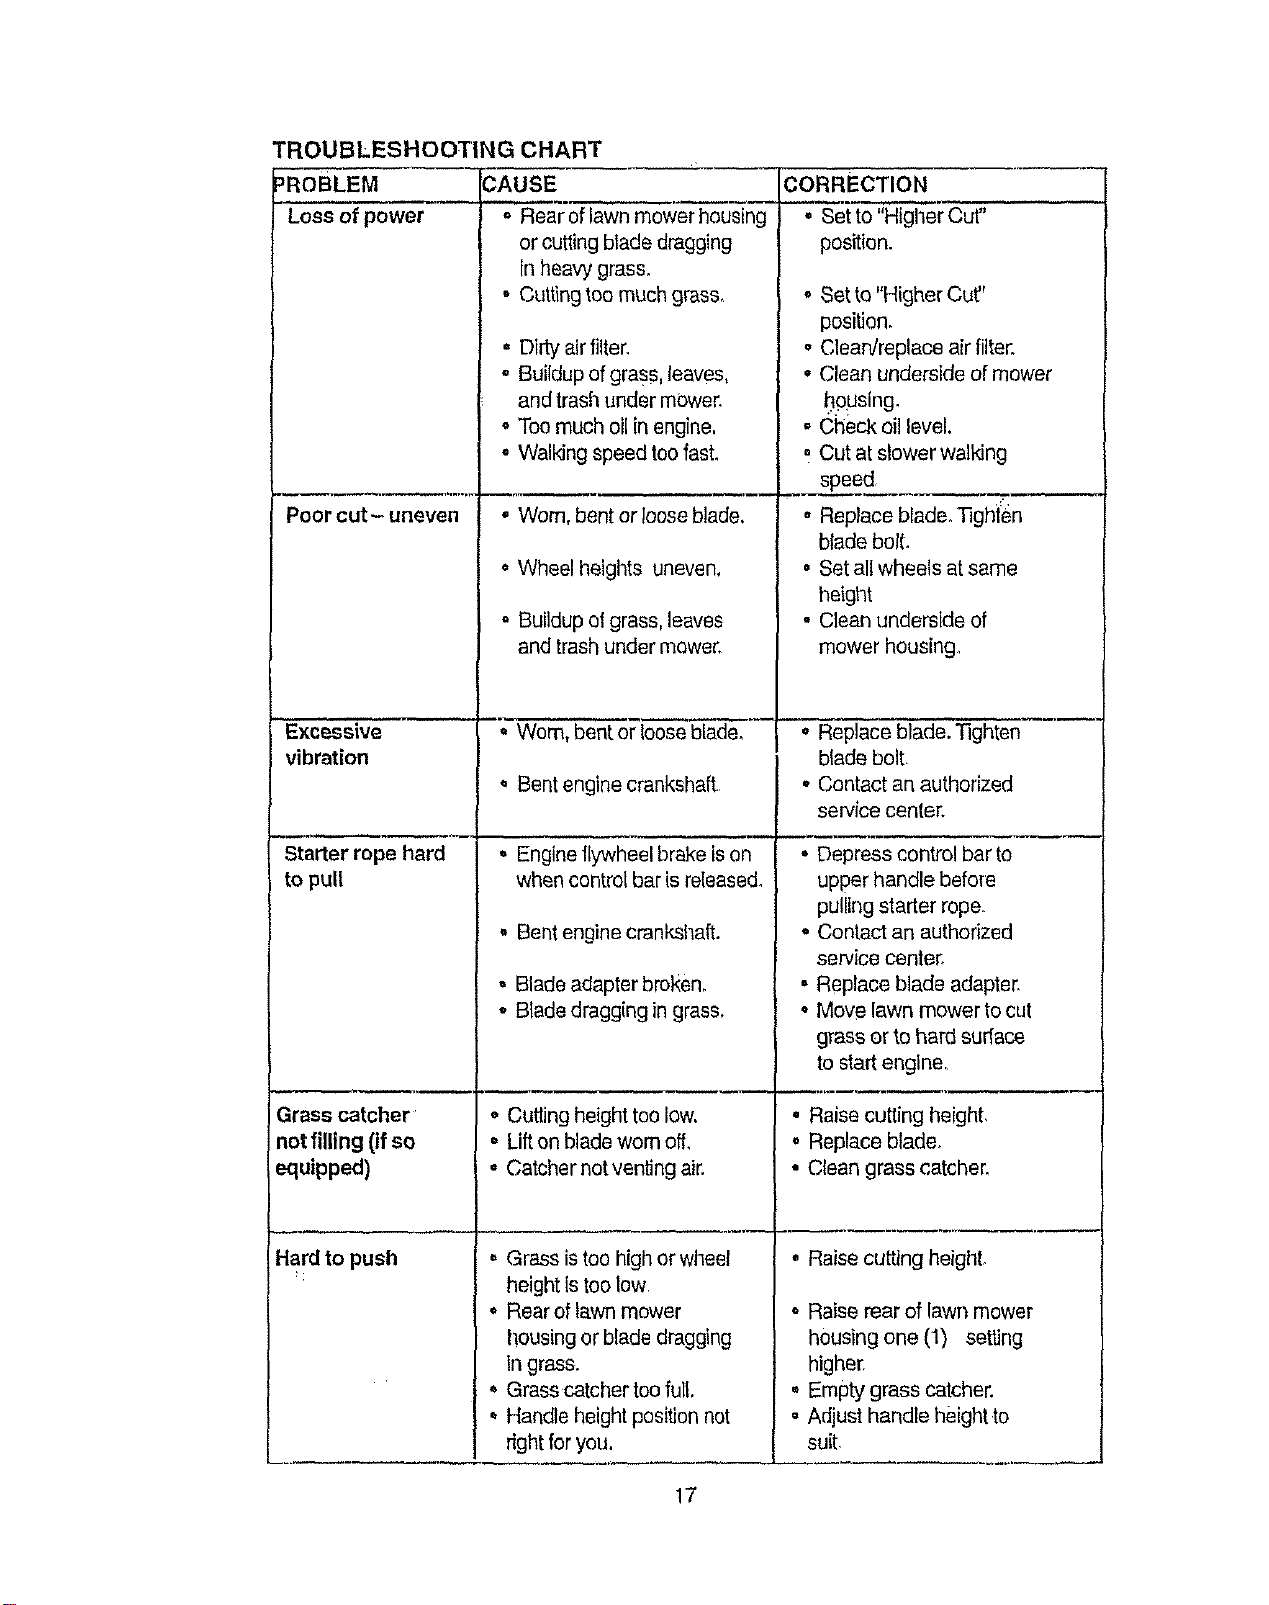
TROUBLESHOOTING CHART
_ROBLEM
.---
LOSS of power
3AUSE
or cutting blade dragging
in heavy grass.
• Cutting too much grass,
Poorcut-uneven
Excessive
vibration
Starter rope hard
to pull
Grass catcher
not filling (if so
equipped)
Hard to push
• Dirty air filter,
° Buildup of grass, leaves,
and trash under mower.
. Too much oil in engine,
• Walking speed too fast.
• Worn, bent or loose blade,
• Wheel heights uneven,
,, Buildup el grass, leaves
and trash under mower.
Bent engine crankshaft
Engine flywheel brake is on
when control bar is released.
', Bent engine crankshaft.
• Blade adapter broRen.
° Blade dragging in grass,
• Cutting height too low,
= Lilt on blade worn off,
= Catcher notventing air.
o Grass is too high or wheel
height is too low
o Rearer lawn mower
l!ousing or blade dragging
in grass.
" Grass catcher toe full,
Handle height position not
right for you.
CORRECTION
position.
" Set to "Higher Cut"
position.
o Clean/replace air filter.
• Clean underside of mower
t_pusing.
• Check oil level.
Cut at slower walking
- speed_.__ ---
, Replace blade. Tighi:en
blade boil.
- Set all wheels at same
height
o Clean underside of
mower housing,
" Replace blade. Tighten .....
blade bolt.
• Contact an authorized
service center.
• Depress control bar to
upper handle before
pulling starter rope.
• Contact an authorized
service center.
• Replace blade adaptel:
• Move lawn mower to cut
grass or to hard suflece
to start engine,
• Raise cutting height,
o Replace blade,
• Clean grass catcher.
• Raise cutting height,
. Raise rear of lawn mower
housing one (1) setting
higher.
. Emptygrass catcher.
• Adjust handle heightto
suit
17
Garanlfa 18 Especlficaciones del Producto 27
Reglas de Seguridad 18 Servicio yAdjusies 30
Montaje 20 Almacenamiento 31
Operaci6n 22 IdentificaciSn de problemas 33
Mantenlmiento 26 Parles de repuesto Vea el manual
Programs de Mantenimiento 26 tngl_s del duefio
Ordan de Parles Contratapa
. ........ . .... u • " ............... =_m: •
GARANT[A LIMITADA DE DOS AISleS PARA LA SEGADORAA MOIOR CRAFTSMAN
Per dos (2) aSos,a partirde la fecha de compra,euando e_--laSegadoraCraftsman semantenga, lubdque
y aline seg_)ntasinstruccionesparsla operaciSny el mantenlmlentoen el manualdel dueSo,Seats
repararAgratisrode defectoen el materialy la manede obra,
Si laSegadora Craftsmanse usa parafines comerdales o de ardendo,estagaranttas61ose aplica per
noventa(90) dlas a partirde la fecha decompra.
EstaGarantia no cubra:
• Artfculosque se desgaslan duranteel use normaltales come lascuchlllassegadoras rotatorias,los
adaptadores de la cuchilla,tascorreas,los filtrosde alrey lasbujfas.
,, ReparacionesnecesariasdebidoaJabuseo a )anegligenciadel eperador,inolw_ndose a los
cig[ier_les dobladosy a la falta demantenimlentodel equipo segenlasinstruccionesque se incluyen
en el manual del dueSo.
EL SERVICIO DEGARANTt'AESTADISPONIBLE al devolverla segadpraa motor Craftsmanal centre/
departmentode servicioSearsmas cercano an los EstadosUnidos.Estagarantia seaplica salamente
mlentrasel producto esteen useenlos EstadosUnidos.
EstaGarantia le otorga derechoslegatesespecifices,y puede que tambi_ntenga otms derechos que
vaffan de estado a estado.
Sears, Roebuck and Co. D/817WA, HoffmanEstates,IL 60179 USA
Losestandraresde seguddade_gen lapresencia
del operalor en loscontrolespars reduciraun
minimo el desgode lealonarse_Su unidadvlene
equipadacon dichoscontrolee.Per nfngunmolivo
tratedel ellminarla funct6ndeloscontrolesqua
exigenla presenciadel operador.
ENTRENAMIENTO:
• Lea este manualdal operador
cuidadosamente.Familiarfceseconlos
controlesy aprenda a operar su segadoraen
forma adecuada,Aprenda a pararsusegadora
mpidamente_
o No permitsque los niSosusen susegadora,
Nunca permltaque losadultos operenla
segadorasin contarcon lasfnstrucclones
adecuadas,
° Mantengael #,reade operaciOndespejada
de gents, espectalmentede nii_ospequefios
y de animatesdom_sficos.
• Use la segadorasolamentepars loslines
propuealosperel fabricantey segSn las
explicacionesdesctitassn este manual.
- Noopera la segadora sise ha cal'doo daSadoen
cualqulerafen'ha,Siemprareparelos dafios
anles de usada,
. No useaccesoriosque nohayan side
reoomendadosper elfabScante. Eluse de diches
acoesoriospt,ede serpeligroso,
. La cuchlllagim cuandoet motorest_
funcionando.
PREPARACION:
• Siemprerevisecuidadosamente el _rea que se
va a segarydesp6jalade todas las piedras,
palos,alambres,busses y otros objetos
extrafos. Estosobjetos ser_n lanzados con la
, cuchillay pueden producirleslones graves.
• Siempreuse anteojosde seguridadoprotectores
de ojoscuando ananque y durante el tiempo
que use la segadora.
18
* Vlstase en forms adecuada No opera la
segadorasinzapa_6so con sandalias
mientras qua el motor es1&luncionando.
Siegue siempre duranto el dla o con buena
luz arti|lciaL
OPERACION:
. Manlenga sus ojos y su ments on la
segadora yen el _reaqua ss eel& cortando.
No permlta qua aires intereses Io distraigano
. No carte c_sped mojado o resbaloso. Nunca
eorra mientras est6 operando su segadora,
Siempre asegtJrese de mantener el equilibrlo
-mantenga el mango agarrado firmemenle y
camine.
• No ponga las manes o los pies ceres odebajo
de las partes mtatonas. Mant_ilgase
alejade de la abertura de descarga en todo
memento.
• Siempre pare el motor ouande so veya
ocuando no est6 ueande su segadora, e
antes de atravesar las entradas pare autos,
los senderes, caminos y _.reascubiertas de
rlpio
, Nunea didja la descarga del matedal hacia
los espectadores ni permits a nadle coma de
la sagadora m{entras la est6 operando.
• Antes de Iimpiar, inspeccionar o de reparar ]
a segadora, pare el motor y est6
completamente seguro de que la cuchilla y
qua redes las partes qua ee mueven se
hayan detenido, Luego, desconecte el
alambre de la bujfa y mant6ngalo alejado de
6sis pare evitar el anranque per accidente.
, No contint_ehacienda funoionar su segadora
sile pegs aun obje|e extraRo, Siga el
procedimiento descdto antedormento, luego
repare cualquier dare antes de velvet a
arrancar y de eporar su segadora.
• No cambie los ajustes del regulador o
hagaque el motor andea una voloddad
excesiva. Se pueden pmducir da,5os en el
motor y Iesiones personales,
• No opere so segadcra el vibra fuera de Io
normal. LAvibracidn excesiva es una
indieaci6n de da_,o;pare el motor, revise en
forms segura la cause de la vibraciSn y haga
las reparaciones segQnsea neeesario.
• No hags funoionar el motor en
ree[ntoscerrados. Los gases de escape son
peligrosos.
• Nunea carte el c6sped tirando le segadora
haeia usted. Siegue a trav6s de la care de
las pendientes, nunca hacla arfiba o hacia
abaje puss puede pettier el equilibilo, No
siegue pendientes demaWado empinadas.
"l'enga cuidado cuando opere la segadera en
terraria disparejo o cuando cambie de
direcci6n - mantenga un buen equilibria.
. Nunca opera la segadora sin las
protecciones adeeuadas, las planchas, el
recogedor de c_sped y aires dispositivos de
seguddad en eu lugar,.
MANTENIMIENTO Y ALMACENAMIEN-
TO:
• Revise la cuchWay los pemos de montaje
dal motor a menudo, pare asegurerse qua
est_.napretados en la farina adecuada.
. Revise redes los pemos, tuorcas y tomillos a
intervalos Ireouentesi para vedficar si esl_n
aprelados en forms adecuada, y
asegurarseque la segadora se encuentra en
condlciones de funelonamiontosegure.
. Mantenga redes los dispositivos de segu_dacl
en su lugar y listos pare funcionar.
• Pare reducir el peligre de incendio,
mantenga e! motor sin e6sped, hojas y grasa
o aceite en exceso.
. Revise el recogedor de c6sped a menudo
pare verificar si hay deteriero y desgaete y
eatable las balsas desgastadas, Use
solamente tas balsas de repuesto
recomendadas per el fabricante de su
segadora o qua cumplen con las
especificaciones de 6ste,
• Siompre mantenga una cuehilla afilade en su
segadora,
° Siempre permits que el motor se enfrle
antes de guardarla en euatquier reeinto
cerrado.
. Nunca guards la segadora con combustible
en el est'anque dentro de un edilielo endonde
los gases pueden alcanzar una llama
expuesta o una fuenta de ignici6n, tal come el
calentador de ague, la estufa de
calefacel6n, la seceders de rope, etc.
PRECAUCION: Siempre desconecte el
alambre de la buj[a y p6ngalo donde no pueda
entrar en contacts con la buj{a, pare evitar el
arranque per accidents, durante la p[eparad6n,
el transporte, el ajuste oeuando se bacon
reparaciones.
PRECAUC|0N" Es conocido per el Estado de
California que los gases de escape del motor de
este productor contienen qu}'micos los cuales a
ciertos niveles, pueden oeasionar, c_ncer,
defectos de naclmlento, y otros da6os al sistema
reproductive.
19
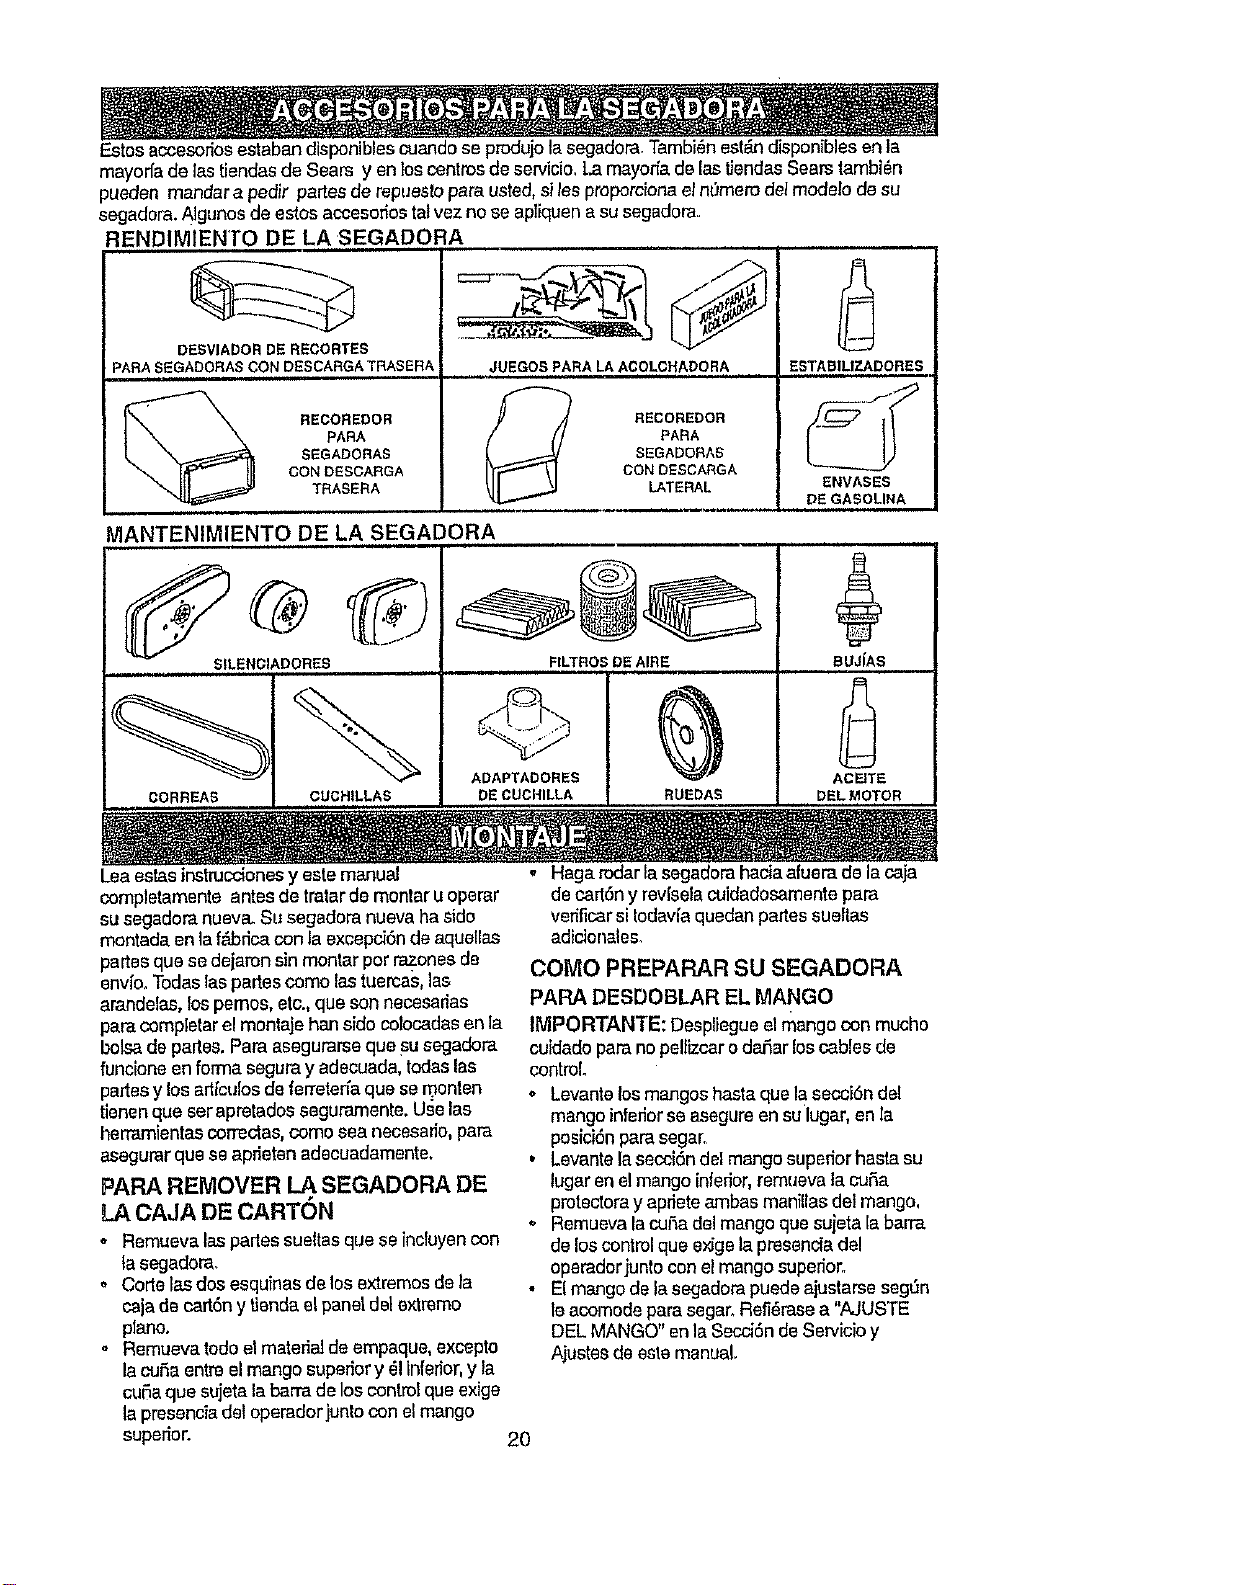
Estosaccesoriosestaban disponiblescuandose produjolasegadora. Tambi_nest_'l disponibles en ta
mayorfade lastiendasde Sears y an loscentrosde sewicio. Lamayor,sde lastJandasSea_ tambl_n
pueden mandara pedir partesde repuestopare usted,silea proporoionael n0merode/modelo de su
segadora.Algunosde estos accesodostelvezno se apliquana su segadora
RENDIMIENTO DE LA SEGADORA
DESVIADOR DE RECORTES
PARA SEGADORAS CON DI:SCARGA TRASERA
RECOREDOR
PARA
SEGADORAS
CON DESCARGA
TRASERA
JUEGOS PARA LAACOLCHADORA
...... SILENCIADORES
RECOREDOR
PARA
SEGADORAS
CON DESCARGA
LATERAL
i
FL
-,.Z
ESTABILIZADORES
ENVASES
DEGASOLINA
completamente antes de tratarde reenteru operar
susegaderanueva_Su segadoranueva haside
montada en la f_brlcacon la excepci6nde aque[las
partesqua se dejaron sin montar per razones de
envfooTodasleapartes come lastuercas,lae
arandelas,lospemos, etc., que son necesarias
parscompleterel monlaje henside colocadasan la
boisede partes. Para asegurarsequa su segadora
fandone en forma seguray adeeuada,redeslas
partesy losartfculosde ferretan'aqua sernonten
tienenqua serapretadesseguramante. Use las
herrarniantaacorrec_as,come sea necesario,pars
asegurarqua seaprietan adecuadamente.
PAPA REMOVER LA SEGADORA DE
LA CAJA DE CARTON
o Remuevalaspades sueltas qua seincluyen con
tasegadora.
o Corte lasdos esquinas de los extremes de la
cajadecart6n y',Jandael panel dol sxtromo
piano.
• Remuevatode el materi_ de empaque, excepto
la cufa entreel mange superiory _1Inferior,y la
curiaque sujeta la barrade los control que exige
la presenciadel operadorjuntocon elmango
superior.
de cart6ny rev[selacuidadosamantepara
veffficarsi tedav[aquedan partessueltas
adicienales.
come PREPAPAR SU SEGADORA
PAPA DESDOBLAR EL MANGO
IMPORTANTE: Despliegueel mango con touche
cuidade parano pellizcaro daSarloscables de
control.
o Levantelos mangos hastaque Ia secui6n del
mangoinfedorsoasegure ensu lugar, en la
posici6npara segar,
, Levantelasecci6ndelmangosupefiorhaslasu
lugar anel mango inferior,remueva la cuff,a
protectoray aprieteambas manillasdel mango,
o Remuevala cufa del mangoque sujeta la barra
de loscontrolque e_ga la pressnciadel
operadorjunte con el mangosuperior.
• El mangodela segadorapuedeajustarse segSn
le acomode parssegar.Refi_rasea ".z_,.JUSTE
DEL MANGO"en la Secci6n de Servleioy
Ajustesde este manual.
20
MANTENIMIENTO DE LA SEGADORA ............
FILTROS DE ,AIRE BUJ[AS
ADAPTADORES AC'_-T •
CORREAS CUCHILLAS DE CUCHILLA RDEDAS DEL MOTOR
Leaestasinstrucdones y este manual ,, Hags rodarla segadorahaciaafuera de la caja
Barradecontrolquaexigela
presenciadeloperado
Mangosuperior
Levantal
paresegar
Tapon
alcolchadora
Mango
inferior
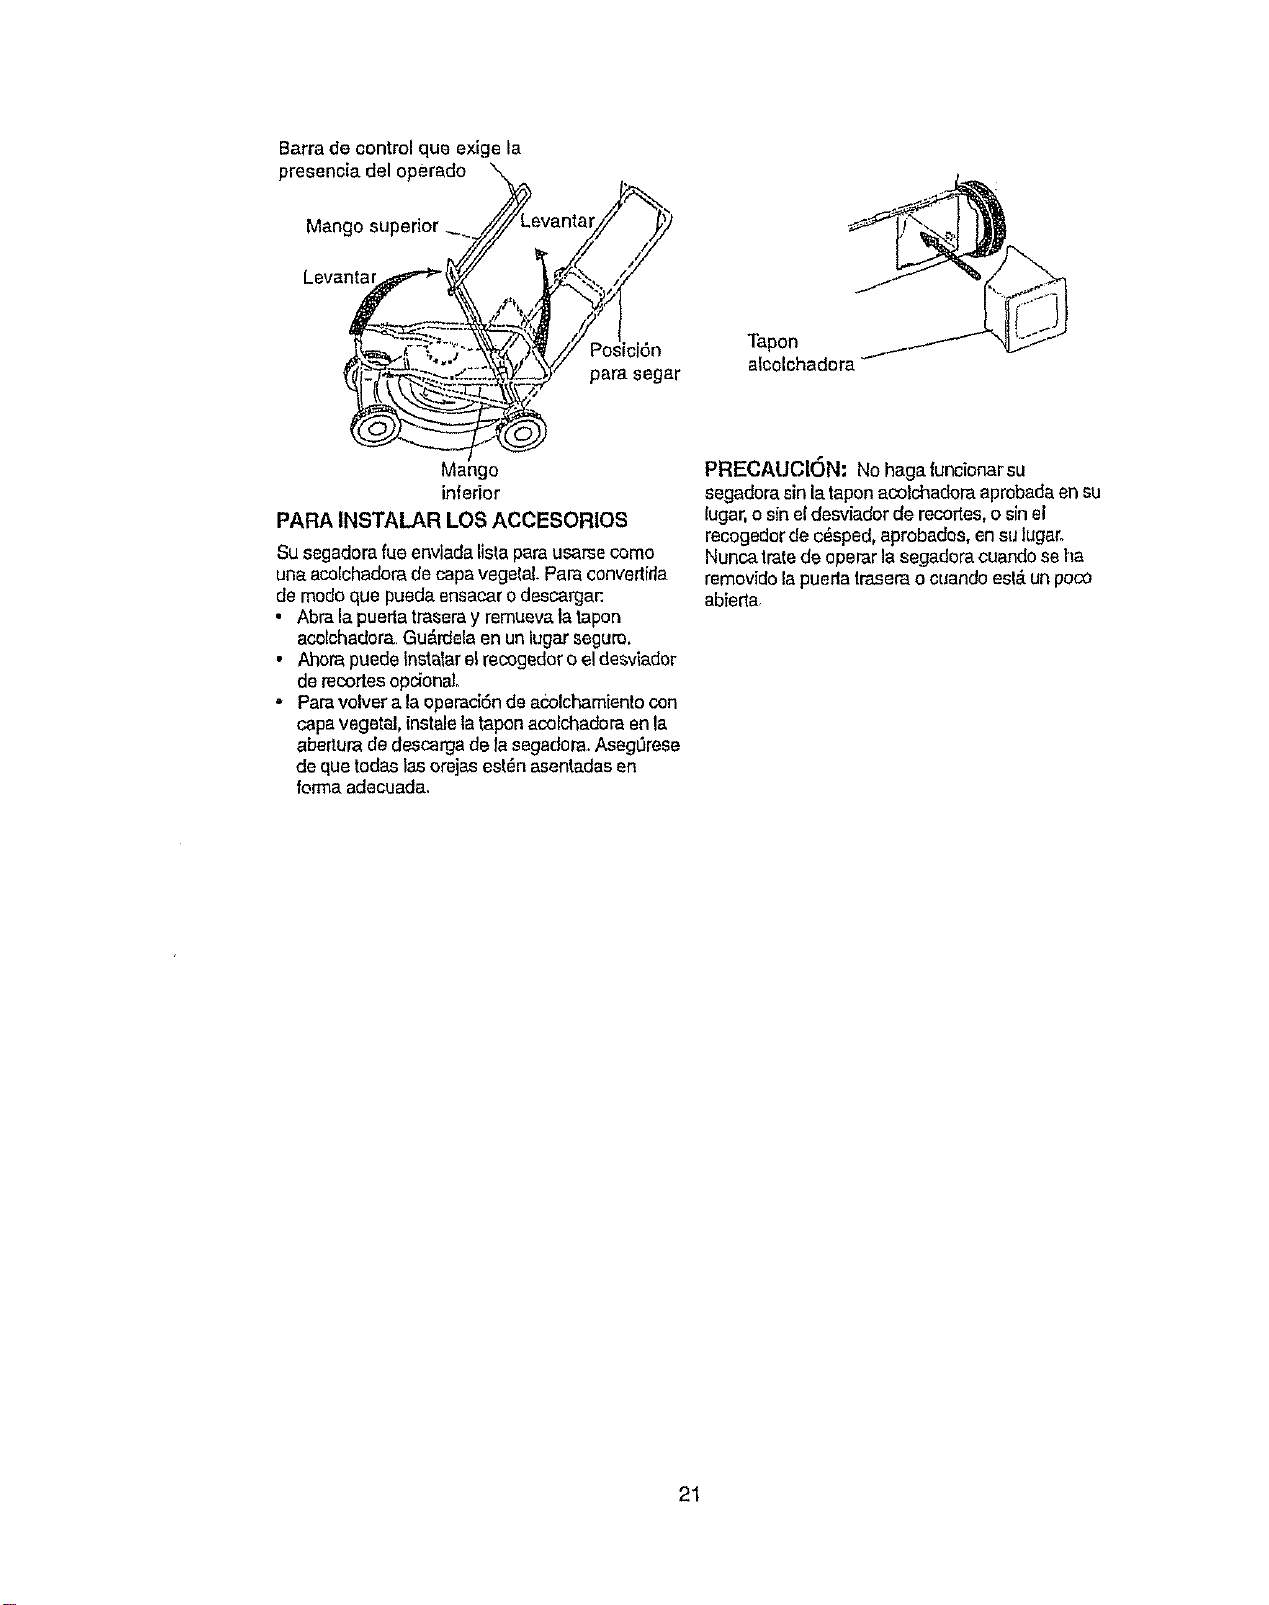
PARA INSTALAR LOS ACCESORIOS
Su segadorarue envladaUslapara usarsecome
unaacolchadorade capa vegelaLPara convertfda
de modequa pueda ensaearodescargar:
• Abra la puertatrasera y remueva latapon
acolchadora.Gu&rdelaen un lugar seguro.
• Ahorapuede Instalarel reoogedoro el desviador
de reoortesoptional
• Parevelvetala operaci6nde ecolchamientocon
capevegetal, instalelataponacolchadora en la
aberturade descarga de la segadora. Aseg_rese
de qua todas lasorejasest_n asentadasen
forma adecuada.
PRECAUCION, No hagatuncionar su
sagadorasin lataponacolchadora aprobada ensu
[ugar,o sinefdesv_adorde recortes,o sinel
recogedorde c_sped, aprobades, en sulugaro
Nunca tratede operar la segadoracuando seha
removidola puerla Irasera o cuando est,_un poco
abierta
21
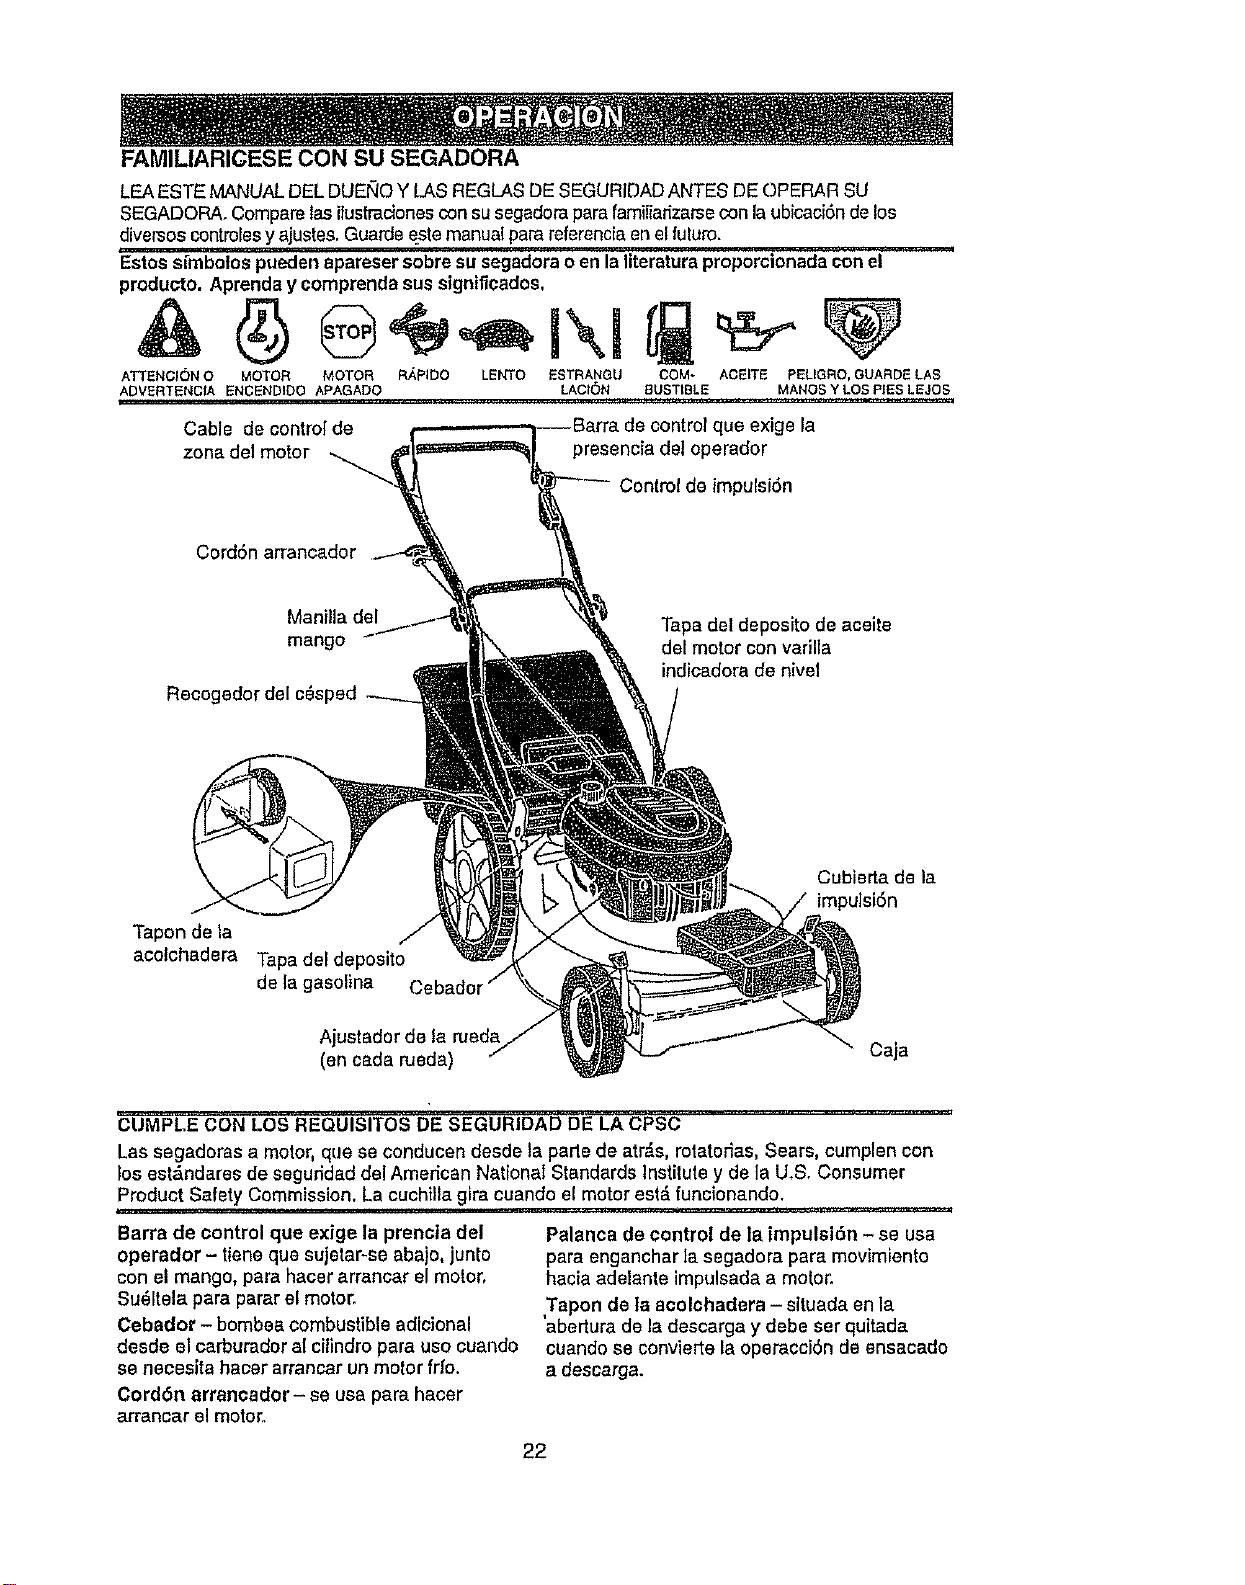
FAMILIARICESE CON SU SEGADORA
LEAESTE MANUAL DEL DUEllO Y LAS REGLASDE SEGURIDADANTES DE OPERAFISU
SEGADORA.Compare las iluslradones consu segadotapara familiarizarsecon la ubicaciOnde los
diversos controlesy ajustes. Guarde este manual pare referenciaen elfuturo.
Estoe s[mbolospueden eparesersobresu segadora oen laliteraturaproporcionadacon el
producto. Aprenday eomprenda sussignificados,
ATTENCI6N O MOTOR MOTOR R/_PIDO LENTO ESTRANGU COM- AOEITE PEUGRO, OUARDE LAS
ADVERTENCIA ENGENDIDO APAGADO LACION 8USTIBLE MANOSYLOSPIESLEJOS
Cable de eontm;de que exige la
zone del motor _ presenciadel operador
Control de impulsi6n
CordSn an'ancador
Manilla del
mango
Recogedordelc_sped
Tapa del deposito de aceite
del motor con varilla
indicadora de nlvel
Tapon de la
acolchadera Tapadeldeposito
de la gasollna
Cubierta de la
impulsi6n
Ajustador de la meda
(en cada rueda) Caja
........ ' .............. i u
CUMPLE CON LOS REQUISITOS DE SEGURIDAD DE LA CPSC
Lassegadoras a motor, q[Jese conducendesde la parle de arras, rotatodas, Sears, cumplencon
los est_,ndares de seguddad del American NationalStandards Institutey de la U.S. Consumer
ProductSafety Commission. La cuchillagira cuando el motor est_ tuncionando.
Barra de control clueexige la prencta del
operador - tiene qua sujetar-se abajo, junto
con el mango, para hacer arranear el motor,
Su_ltela para parer el motor.
Cebador - bombea combustible adicional
desde el carburador al cillndro para uso cuando
se necesita hacer arrancar un motor frfo.
Cord6n arrancador- se usa para hater
arrancar el motor.
Palanca de control de la impulsi6n - se usa
para enganehar la segadora para movimiento
hacia adelante impulsada a motor,
Tapon de la acolehadera - sltuada en la
abertura de la descarga y debeser quitada
cuando se convierte la operacci6n de ensacado
a descarga.
22
La operaci6n de cualquier segadora puede
hacer qua salten objetos exlraSos dentro de sus
ojos, lo qua puede producir da5os graves en
_stos. Siempre usa anteojos de seguridad o
protecci6n para los oios mienlms opere su
segadora o cuando haga ajustes o
reparaciones Recomendamos una mascara de
seguridad de visl6n amplia, para uso espejuelos
o anteojos de seguridad estandade.
COIVIO USAR SU SEGADORA
PRECAUCl6N: No haga funcionar su
segadora sin el desviador de recertes o sin et
recogedor de c_sped, aprobados, en su
lugar. Nunca trate de opemr la eegadora
cuando se ha removido la puerta trasera o
cuando est,. un poco abierta.
VELOCIDAD DEL MOTOR
La velocidad del motor se astableci6 en la
f&brica para un rendimiento 6primo. La
velocidad no se puede ajustar..
CONTROL DE ZONA DEL MOTOR
PRECAUCI6N: Las regulacionesfederales
exJgenqua seinstals un controlpara el motor en
esta segadora para reduclra un mfnlmoeldesgo
de lesionarse debidoal conlactocon [acuchilla.
Por ningSnmotivotrate de eliminarla |unci6ndel
control del operador.La cuchilla giracuando el
motor esi_ funcionando.
" Su segadoraviene equlpadacon una barrade
coritrol qua exigela preseneiadetoperador,Io
que requlereque el operador est_ detr'&sdel
mango de lasegadorapara hacedaarrancary
operada.
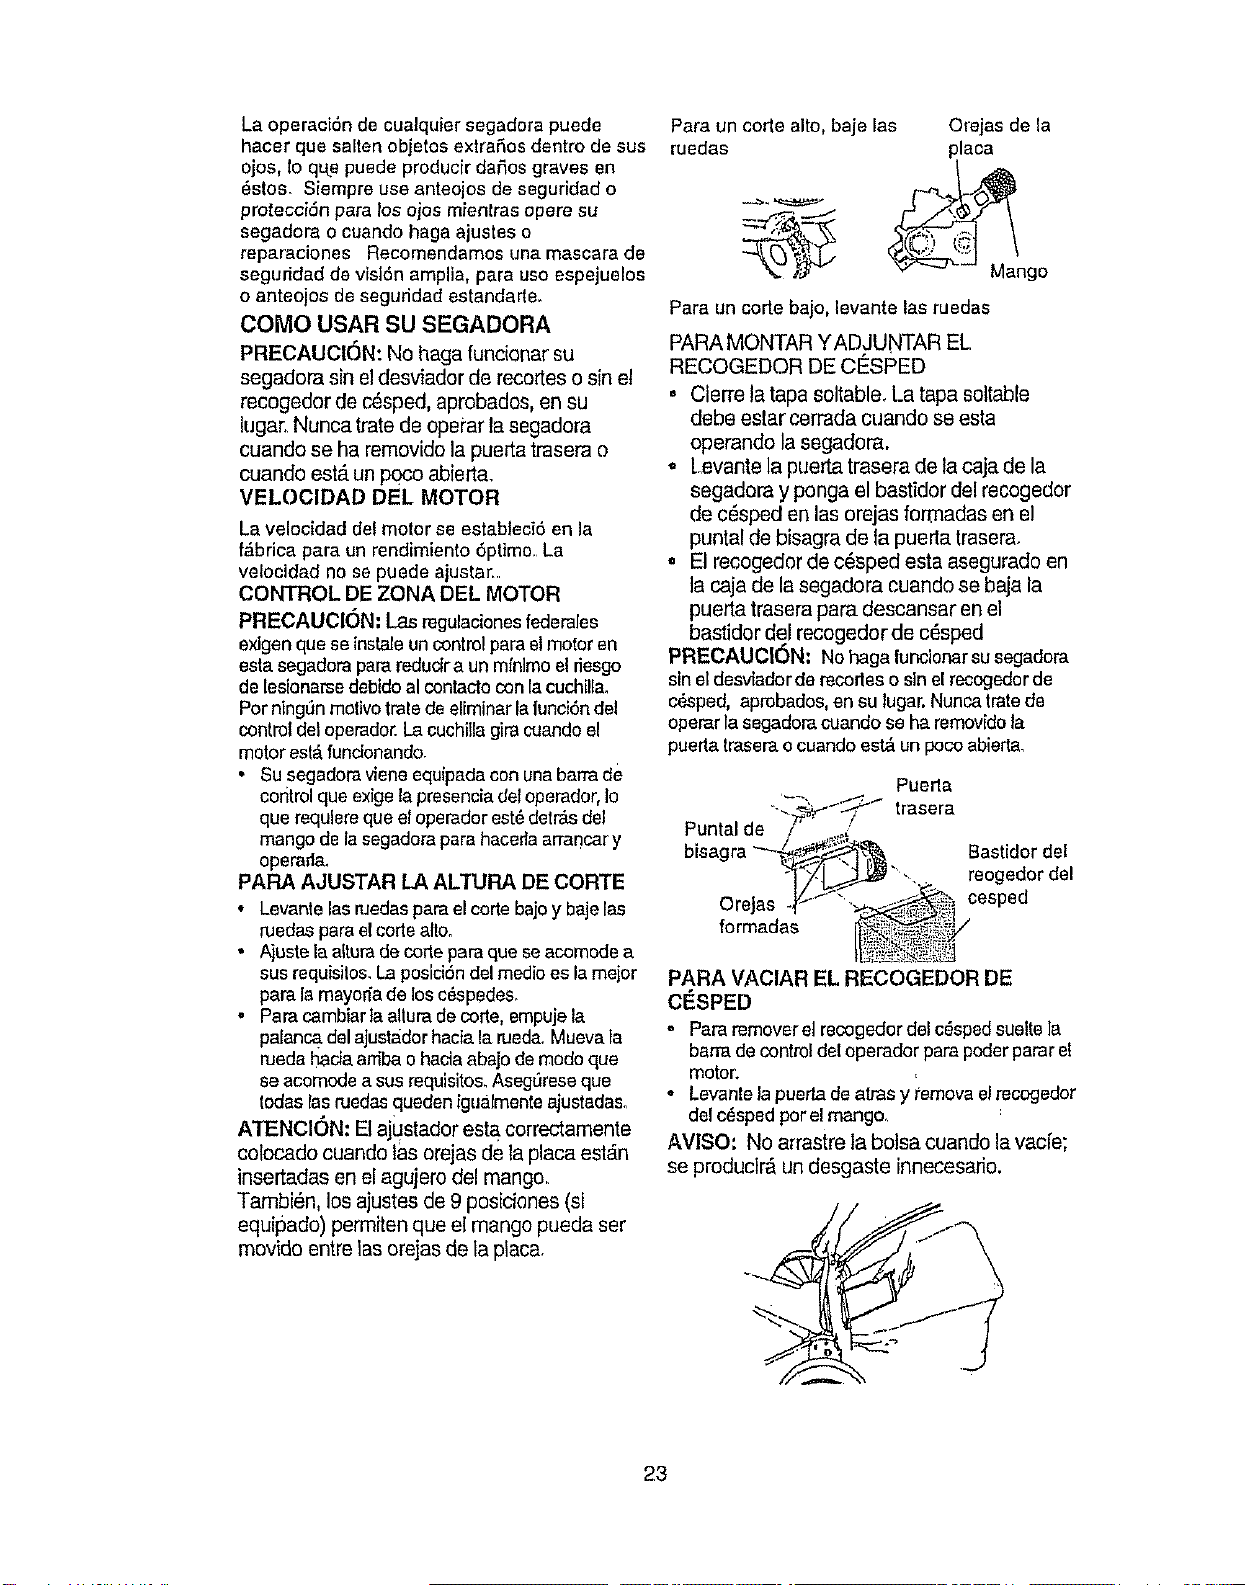
PARA AJUSTAR LA ALTURA DE CORT i=
• Levante lasruedaspara el corte bajoy baje las
ruedas para elcorte alto.
• A_ustela atturade code para qua seacomode a
sus requisites.La posld6n del roedioes la major
para la mayon'ade losc_spedes.
. Para cambiarla allura de code, empujela
palanca.del ajustadorhacia la rusda_Mueva la
rueda hada arffbaohacia abajo de modoqua
se acomode a sus requlsitos.Aseg0resequa
lodes lasruedasqueden igualmenteajustadas.
ATENClON: El ajustador esta correctamente
cotocado cuando las erejas de la placa est_.n
insertadas en el agujero del mango.
Tambi_n, los ajustes de 9 posidones (si
equipado) permiten qua el mango pueda ser
movido entre las orejas de la placa.
Para un code alto, baje las
ruedas
Orejas de la
Mango
Para un code bajo, levante las ruedas
PARA MONTAR YADJUNTAR EL,
RECOGEDOR DE CO:SPED
• Cierre la tapa soltable, La tapa soltable
debe eslar cerrada cuando se esta
operando la segadora.
o Levante la puerta trasera de la caja de la
segadora y ponga el bastidor del recogedor
de c_sped en las orejas formadas en el
puntal de bisagra de ta pueda trasera.
• El recogedor de c_sped esta asegurade en
la caja de la segadora cuando se baja la
puerta trasera para descansar en el
bastidor del recogedor de c_sped
PRECAUCl6N, No haga luncionar susegadora
sinel desviador de recodes o sin el recogedorde
c,_sped,aprobados, en su lugar.Nuncatratede
operar la segadoracuando se ha removido la
puerla traserao cuando est_ unpocoebiede,
Pueda
trasera
Puntal de
Bastidor del
reogedor del
OreJas cesped
formadas
PARA VAClAR EL RECOGEDOR DE
CESPED
o Para remover el recogedordel c_sped suelte la
berm de control del operador para poderparar el
motor.
* Levante la puerfa dealms y ternove el rocogedor
del c_sped pot el mango.
AVlSO: No arrastre labolsa cuando lavacle;
se produclr_ un desgaste innecesario.
23
CONTROL DE LA IMPULSI6N
, Laautoimpulsi6nsecontmlaalsujetarlaban-a
de control que exigela pmsenciadeloperador
hacla abaje en el mango y al empujarla palanca
do control de la impulsi6n hade adelantehssta
qua suene"clio,"tuegoso suelta Ispalanca.
= E[movlmientohacia adelanteparar&cuando la
barra decontrol qua exigela presenciadel
opemdor se suelta. Paraparer el mo',,4miento
hacia adelantesin psrar el motor,suelte labarfs
do controlqua exige lapresencia dotoperadorun
poco haste que se desenganche elcontrol do la
impulsi6n.Sujetela barfs do controlqua exigela
presenciadel operador abajo en centre del
mango para continuar segandosin
autoimpuisi6no
• Pare mantener el controlde laimpulsi6n
enganchadocuando sodovuet!aenlas
esquinas,empuje el mango haciaabajoy levante
lee ruedasdelanteras fueradel susie al girarla
segadora.
control de
\, \ la impulsi6n
\N centre,doIs
X_ impulsi6n \x_
control de Ia
pare enganchar el impulsion
control de la desenganchado
impulsi6n
ANTES DE HACER ARRANOAR EL
MOTOR
ACEITE
Su segadora fl_e enviada sin a_eite en el motor.
• Aseg0.rese qua la segadora est_ niveladay
qua el &rea alrededer del depOsito de aceite
est_ limpia,
- Remueva la tape del depOsito deaoelte del
motor con la varilla indicadora do nivel y
rellene hasta la II'neade Ileno en _sta,
. Use 27 oz. de aoeite. Para el ripe y la ealtdad
vea "MOTOR" en la secciSn de las
Responsabilidades del Cliente en este
manual.
,, Vao[e el acelte lentamente. No Io none
demasiado.
o Revise el nivel del aceite antes de cads use.
Agregue aceite st es necesario. Llene hasta
la II'rieade llano en la _iadlla Indicadora de
ntvel.
• Pare leer el nivel adeCuado,apriete la tape
del dep6sito de acelte del motor carla vez,
• Vuelva a instalar latape del dep6sito del
aceile y apri_tala.
. Despu_s de las dos (2) pdmeras horas de
siege, oambte el acetic y cads 25 horas de
ah[ en adelante Puede necesitar cambiar el
aceite m_.sa menuda cuando las
condiciones son polvorosas o sucias
GASOLINA
• Liens el estanquedo combustible. Use
gasoline regular, sin plomo, nueva y ]impia
con elminirno de 87 octanes. (El use de
gasolina con plomo aumantar_ los dep6sitos
de 6xido de plomo y carbeno y se reducir& la
duraci6n de la v&lvula). No mezcle el aceite
con la gasolina. Para asegurar que la
gasoline utiltzada sea frescacompre
estanques 10scuales puedan set utilizados
durante los primeros 30 dfas_
IMPORTANTE: CUANDO SE OPERE EN
TEMPER,_TURAS PeR DEBAJO DE 32° F
(O° C) USE GASOLINA DE CALIDAD DE
INVIERNO, LIMPIA Y NUEVA PARAAYUDAR A
ASEGURAR UN BUEN ARRANQUE EN CLIMA
FRIO
ADVERTENClA: La expedencia ha indicado
qus los combustibles mezclados con alcohol
(conocidos come gasohol, o el use de etanol o
metanol) pueden atraer la humeda6, la que
conduce ala separaciOn y formaci6n de _.cidos
durante el almacenamiento. La gasolina acfdica
puede da£1arel ststema del combustible de un
motor durante el almacenamiento, Pare evitar
los problemas con el motor, se debe racier el
sistema do combustible antes de guardado per
un periodo de 30 dlas o rag,s. Vac(e el estanque
de combustible, hags arrancar el motor y
h_galo funcionar hasta que las Ifneas del
combiJstible y el carburador queden vaoios. La
pr6xima temporada use combustible nuevo,
Vea las Instrucciones pare etAlmaeenamiento
pare m&s informaci6n. Nunca use productos de
limpleza pare el motor o pare el carburador en
el estanque del combustible pues se pueden
producir defies permanentes,
PREOAUCI(_N: Llene hasta la parte
inferior del cuello de relleno del estanque
de gasoline, No Io Itene dernastado.
Limpie el aceite 0 el combustible
derramado. No almacene, derrarne 0 use
gasollna cerca de una llama expuesta.
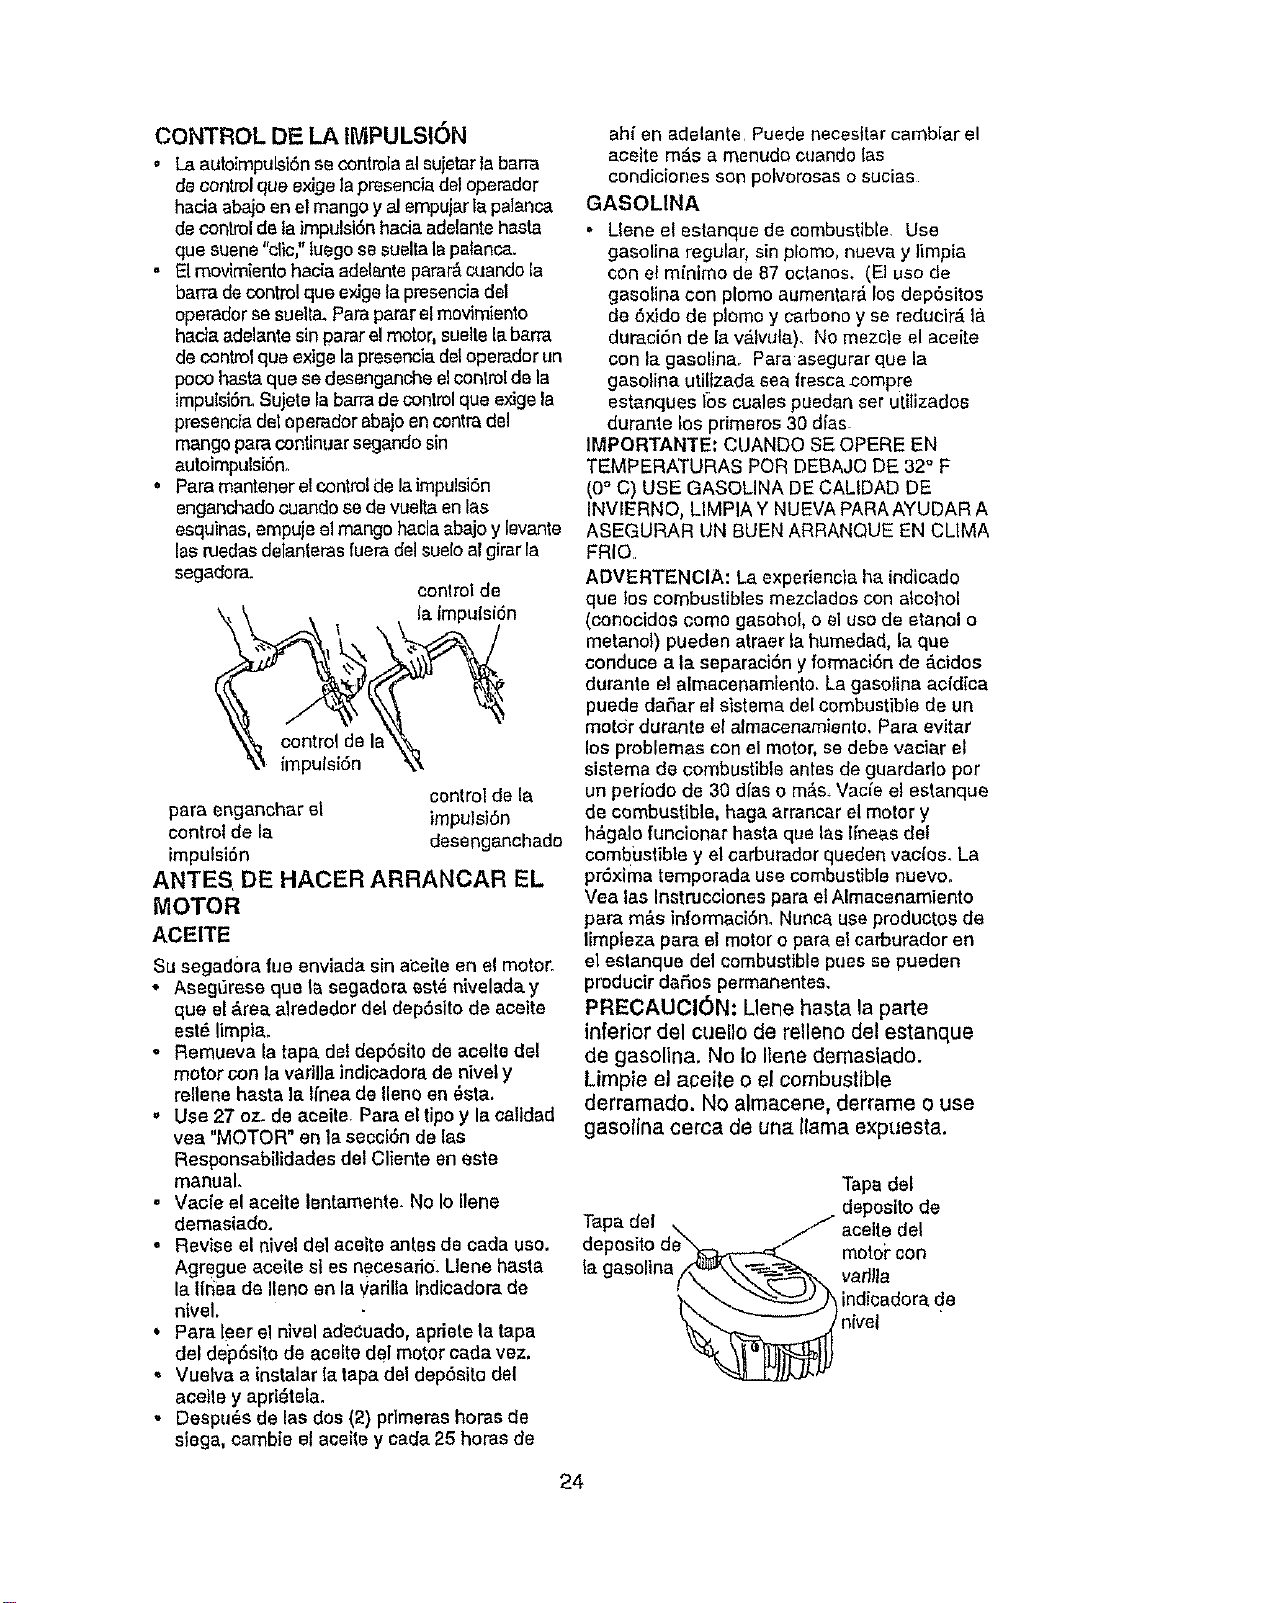
Tape del
depesito de
Tape del acelte del
merci-con
la gasoline vadlla
indicadora do
n ve
24
PARA HACER ARRANCAR EL MOTOR
o _apahater arrancarun motor fdo,empujeel
cebadorclnce (5)veces antesde tratarlo,
Empujefirmemente,Eetepaso normalmenteno
es necesadocuandose hare arpancarun motor
que ya ha astadofuncionandoper unoacuantos
minutes.
o Sujete la barrade controlque exige lapresencia
del operadorabajo en el mangoy tireel mango
del arrancadorr_pidamente.No permita que el
cotddn arrancadorse devuetvaabruptamente.
Papaparer el motor,suelte la barrade control
que exige lapresencia del operador,
AVISO" En climas m_s frfos puede que sea
necesado repetir los pesos del oebado. En
dimas m_s calurosos el cebar demasiado
puede produdr el ahogo y el motor no vaa
arrancar, Si se ahoga el motor espere unos
cuantos minutes antes de tratar de hacedo
arrancar y no repita los pesos del cebado.
CONSEJOS PAPA SEGAR
• Bajo dertas condicionee,telcome c_sped muy
alto, puede sernecesadoel elevarla alturadel
code pare reducirel esfuerzonecesar_opare
empujar la segadopay pare evltarsobrecargarel
motor, dejandomontonesde recortesdec_sped,
Puede que seanecesarioreducirlavelocidad del
recorddoy/o haga funcionarla segadorasebreel
&teaper segundavez,
• Pare uncorte mW peeado,reduzca elancho del
corte pasandoparcialmenteper enclmadel lugar
antedormentecorlado y sieguelenlamente.
o Cuando useuna segadoracondescarga trasera
en c_sped hQmedoy pesado,bs montonesdel
e_spedcortadopuede que no entrenen el
recogedorde c_sped. Reduzcala velocidad dot
recerfido (velcoidadde ernpuje)y/o haga
funcionarlasegadorasobreel _,reapersegunda
vez,
" Si queda una hueltade cortes en ellade derecho
de una segadoracondesca_a tpasepa,siegue
en la direcd6n an que giran Insmanillasdel reloj,
solapando un pocopare recaudarlos recortesen
ta prSximapasada,
,, Los poresen los recogedoresdec_sped de tela
pueden llenarsecon mugrey polvocon el use y
los recogedoresrecauda_q manes c6sped_
Papa.evitar _sto,rocfeel recogedorconla
manguepade ague regularmentey d_jelo
secarse antes de usarto_
" Mantenga la partesupedordel motor,alrededor
del an'ancador,despejaday sin recorteede
c_sped y paja.Este ayudar&el fluiodel aire de.[
motor y extender_su duraci6n.
CONSEJOS PARA SEGAR Y ACOLCHAR
IMPORTANTE; Papaobtener el meierrendimf_lnto
mantenga la caja de la segadora sinacumladonde
cesped y basupa.Vea "UMPIEZA" en seccion
de"RESPONSABILIDADESDEL CLfENTE"de este
manual..
• Lacuchlllaacolchadoraespecial vaa volver a
cortar los recortesde c_sped muchasveces, y
los reduceen lamaSo,de mode quesi secaen
en el c_sped sevan a dispesar entre_stey no
sevan a notar.Tambi_n,el c_spedacolehadose
vaa deshacer r_pidamanteentregando
substanclaanutdtk,aspaPael c_sped.Siemppa
acolche con la veloddad del motor (cuchilla)m_s
ella, pues asf se ebtendr&la meier aesi6nde
recortede Inscuchillas.
• Evitecortar el c_sped cuando est_ mojado..El
c_sped mojadotiendeaformer montonase
inteffierecon la acd6n de acolchado. Lameier
hopaparasegar el c_sped es temprano an la
larda. A eeahera ,_steseha secede y el &tea
reci_ncodada no quedara expuesla ai s01
dlrecto.
. Pare obtener losmejores resullados,ajustela
altuPadel corte de la segadora,de mode que &sla
corte solamenteel terciosupedor de lashojasde
c_sped En el case de que el c_sped haya
crecido demasiado,puede ser necesadoel
elevar la altupadel cortepare reducirel asfuerzo
necesado para empujerla eegadora y para evitar
sobreca_ar el motor,dejando montonesde
recortesde c_sped Papaun acolchamiento muy
pesado,reduzca el anchodel code pasandoper
endma del lugar antedormentecortadoy siegue
lenlamente.
,, Ciertostiposde c6spedy sus condidones
pueden exlgirque un &reatenga queser
acolchadaper segunda vez pardesconder
completamentelos reeortea.Cuando se haga el
segundocode, slegae atravesado o en forma
perpendicularala pasadadel p_mercorle.
o CambIesupatr6n decorte de semana a
semanaoSiegue de nortea sur una semana y
luego cambie de eslaa oeste la pr6xirna
semen& Esto evilar_que el c_sped seenredey
cambie de direcci6n.
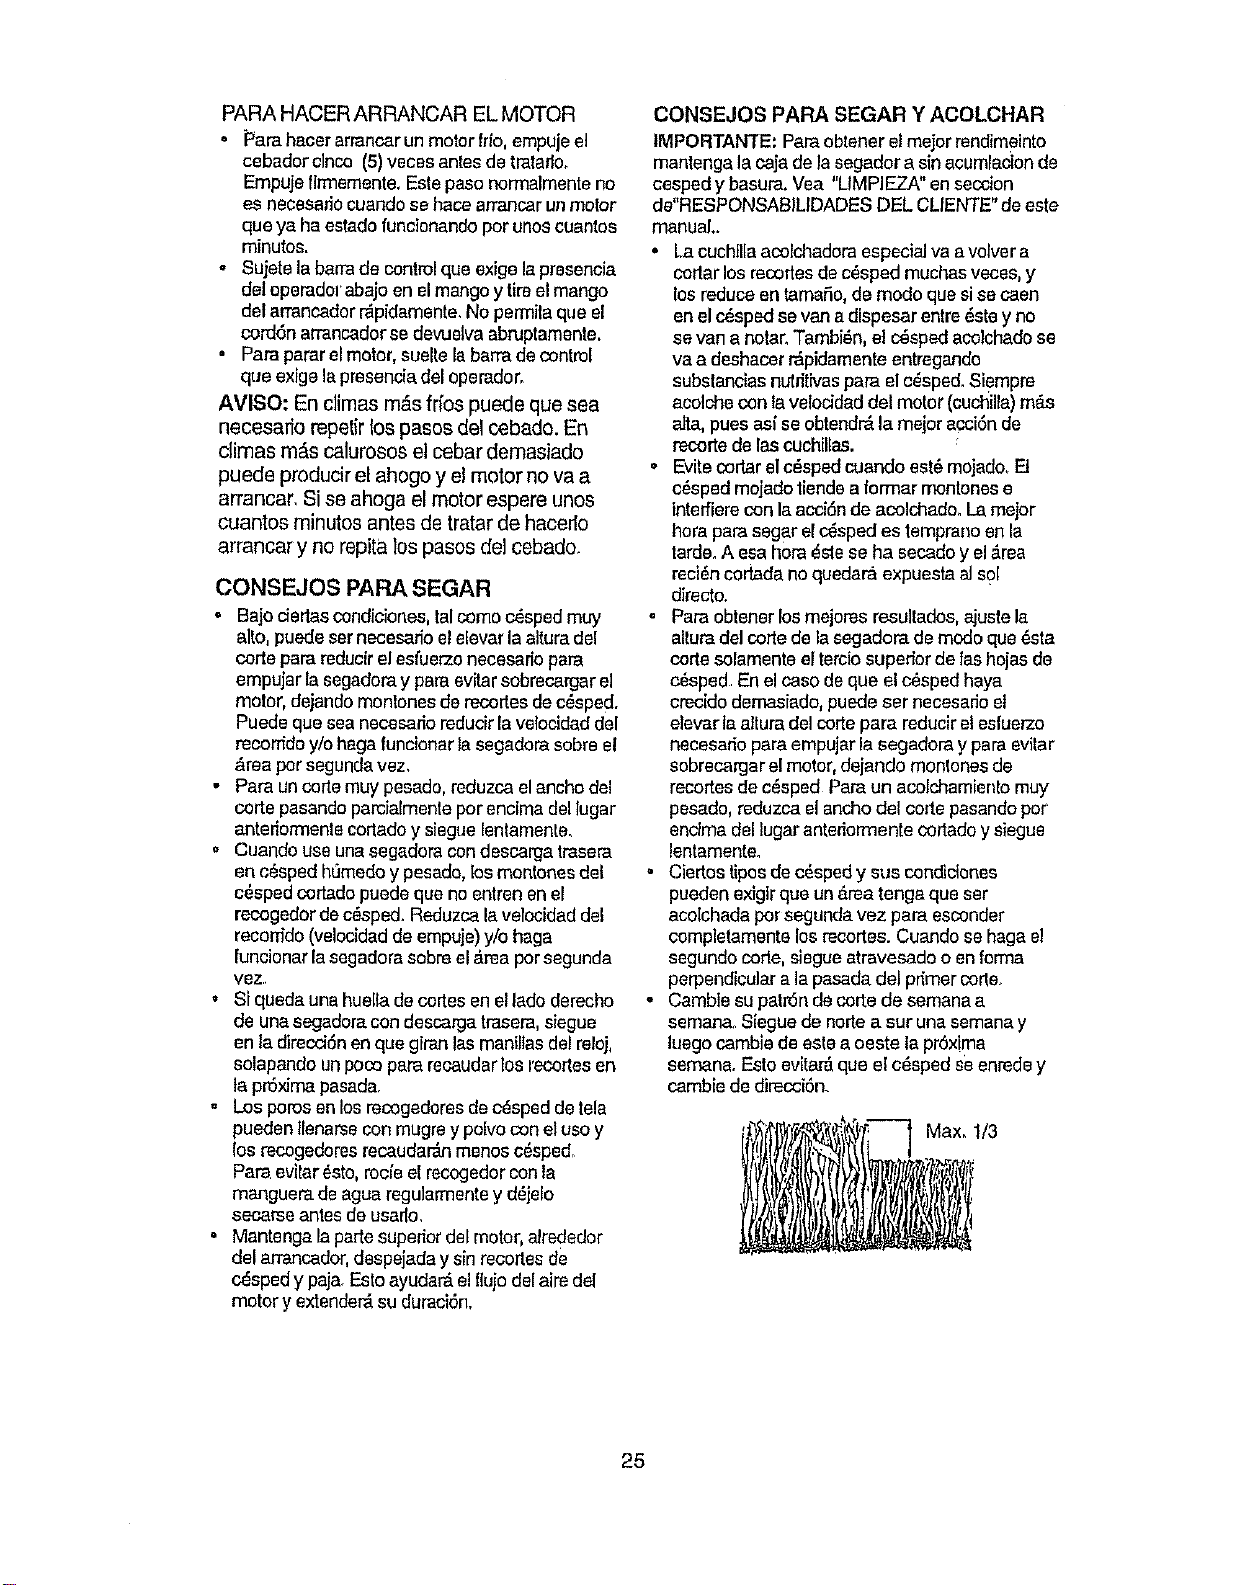
Max. 1/3
25

PROGRAMA DE MANTEN|MtENTO
LLENE LAS FECHAS A MEDIDA
QUE COMPLETE SU SERVICIO REGULAR
F_evlsars; hey,s£ieta_ores suelt6s
Ltmpladinspecclcoa{ e_recogedor do
S ¢_sped (si vfene equipado)
E U_:_Jar I_.segadora
Limplardeba o de le,cubierta de la lrans-
mfsl6n segadoras con poder propuisor
Ray{sat las correas y las po[eas impul-
sedas tsegadoras con podetpropuIsor)
Rev]sar o/afilar/'cambtar la cuchitla
Tabla de lubricaei6n
(segadoras con arranque eI_ctrico)
_0 Ray|sat el nivel de{ ace[_e
C_mb_arel aceite del motor
oT Llmptar el ltllro deair. e
InspecrJonarelsilsnclador
a Limplaro/'camb_arla bujfa
Cambief el cartucho de papet del _tm
de a#e
,,,,, , ,
v'
JLL
FECHAS DE SERV]CIO
v'
2
v"
v"
v"
v'=
1 - Cambter rodsa manude cusndo se opera ba]o carge per,ada o en amblontes coa altas larnperaturas.
2 - Oa; _ar_Lc_orn_s Qt'_enudo cut_do se opar_ en condiclon_s suclas o polvotosa_
3 _C_mble la_ cuch_l]_$m_; a menudo cul_rtdo s_oguaon lerrGno _renoso
4 _Cat!]_t p_r 48 Paras al I_nd_)I_ t_mpomda
RECOMENDACIONES GENERALES
La garantt'a de esta segadora no cubre los
articulos que han estado sujetos al abuso o a la
negligencia del operador, Para recibIr todo el
valor de la garantfa, et operador tiene que
mantenar la segadora segQn las instrueclones
desedtas an este manual
Hay algunos ajustes qua se tienen que haeer en
'_ormaperiSdica para poder mantener su unidad
adeeuadamente,
Todos los ajustes en la secei6n de Servic(o y
Ajustes de eate manualtlenen qua ser
revisados par Io menos un vez par cada
temparada.
= Una vez al aSo, cambie ta buj[a, llmpie o
cambie el e!emento cleffiltro de alre y revise
s{ la cuch(lla estd desgastadao Una buj['a
nueva y un elemento del _tro de aira limpio/
nuevo aseguran la mezcla de aire-combus-,
tib)e adecuada y ayudan a que su motor
funcione major y qua dure m_.s,
• Siga el programa de mantenimiento an este
manual,
ANTES DE CADA usa
• Revise el nivel del acelte del motor.
• Revise st hay sujatadores sueltos.
LUB RIOAClON
Mantenga la un[dad bien lubrlcada (vea la
"TABLA DE LUBRICAOI6N"),
TABLA DE LUBRIOAClON
(_) Ajustadpr de ;a rueda
/
7mo'or
de la
_'''_ puer_a
I_ Clavija de montaje trasera
del puntal del
mango
(_ ROCIE EL LUBRICANTE
(_) REFIERASE A LA SECCI()N DE
RESPONSABILIDADES DEL CLIENTE EN
"MOTOR"
IMPORTANTE: No acerit o engrase los
rodamlentos de la n,eda de plastieo, Los
lubr_cantesvlscosos atraeran polve y mugra, Io
qua acortara la duracion de los rodamlentos
auto lubdeantes. S1cree que lubricarse, use
solamente un tubricanle tide graflto, de pone
seeo, en forma moderada.
26

ESPECIFICACIONES DI=L PRODUCTO
NOMERO DE MODELO 917.377590
NOMERO DE SERIE
FECHA DE COMPRA
CABALLOS DE FUERZA: 6°75
DESPLAZAMIENTO: 12.56 CU. INo
CAPACIDAD Y TIPO 1.5 Cuartos
DE GASOLINA: REGULAR SIN PLOMO
TIPO DE ACEITE: SAE 30 (sobre 32°F)
(API-SF/SG) SAE 5W-30 (debajo 32°F)
CAPACIDAD DE ACEITE:
BUJ{A (ABERTURA: .030")
OLERANCIA DE VALVULA:
27 oz. de capacidad
CHAMPION RJ19LM O J19LM
ADMISI6N: .004" - ,008"
DESCARGA: ,004" - .008"
SENCENDIDO DE ESTADO
SOLIDO ABERTURA DE AIRE: .0125 IN.
FORSION DEL PERNO
:)E LA CUCHILLA: 35-40 FT. LBS.
El nurn_ro del nodelo y el de serie se encuentran en la calcomania adjunta a la parte
trasera de la caja de la segadora. Debe registrar tanto el nurn_ro de serie come la
fecha de compra y rnantengalos en un lugar seguro pare refencia en el future,
SEGADORA • Remueva el pemode la cuchilla girAndoloen el
Siempre observe las reglas de seguridad
cuando haga el rnantenimiento_
LLANTAS
" Mantengalas nantessingasoJina,aceiteo
substandas qufmicaspara control de insectos
que puedendafiar la goma.
,, Evite lostocones, lasptedras,lasgrielas
pmfundas,losobjetosafilados y olros peligros
que puedendaSara las Ilantas.
CUIDADO DE LA CUCHILLA
Pare obtenerlosmejoresresullados, lacuchilla de
lasegadoratieneque rnantenerse afilad&
Cambiela cuchilladoblada0 da5ada.
PAPA REMOVER LA CUCHILLA
• Desconecteel alambrede la bujfay p6ngalo en
donde no pueda entrarenconlacto con _Stao
• Haga descansartasegadoraen sulade.
Aseg6reseque el fittrode alre y que el
carburadorqueden mJrandohacia ardba,
- Use un bloque demadera entrela co.ilia y la
cajade la segadorapare evltar que la cuch[lla
glrecuande sele quiteel pemo,
• Protejasuemanescon guanlesy/o envuelva la
cuchilla conuna telagrues&
senlido eontrarioen que giran las manillasdel
reloj.
° Remueva lacuchlllay los artfculos de ferreterfa
adjuntadores (elpemo, la arandela de seguddad
y la arandela endureelda).
AVISO: Remueva etadaptador de lacuehillay
revise el cobo interiorde la ranura del adaptadorde
la cuchilla.La ranura tleneque estaren buenas
condicionespare que tuncione en fom',a,adecuada.
Cambie el adaptadorslestA daSadeo
PARA CAMBIAR LA CUCHILLA
, Ponga el adaptadorde la cuchilla en elcigueSaI
del motor.AsegSreseque la ranura del
adaptador yque elchavetero del cigue,fialest_n
allneados,,
• Pongala euehilleen el adaptador de 6sta
alineando losdos (2) agujeros en la cuchillacon
las salienteselevadasen el adaptador.
• Asegt_resede que el hordede salidade la
cuehilla(opuestoal borde afilado) est6hacia
ardba haclael moter_
,' Instaleel pemo de la cuchil[a con la arandelade
seguddady la arandela endurecida en el
adaptadorde la cuchillay el ciguefia].
,, Use un bloquede madera entre lacuchlllay la
27
caja de la segadoray apdeteel pemode la
cuchilla gir&ndoloen elsentido enque giranlas
manillas del reIoj_
o La torsi6npare apretarrecomendada esde 35-,
40 pies libras.
IMPORTANTE: El pemo la cuchllla es class 8
tratadoa color,
AVISO: No recomendamos el afilar la cuchilla -
pero si [o hace, asegt)rese de que quede
balanceadao
PARAAFILAR LA CUCHIL[A
Setlene que tenereuldadode manteneda
balanceada. Unacuch[[laque no eat&balanceada
va a produdr eventualmentedafio en la segadorao
enel motor.
• [a cuchillapuede afilarse con una limao en una
[ueda reclificadora.No trate de afilarlarT_entras
seencuentra en la segedora
,, Para reviser el balancede la cuchilla,dave un
clave en u[laviga o en la pared.Deje alrededor
de una 13ulgadade un clave rectoexpuesto.
Ponga elagujero central de lacuchilla sobrela
cabeza del dave. Sila cuchilla est_balanceada
debe permanecer on la pos_ci6nhor(zontaf.S_
cualqulerade los extremes de la cuchillase
mueve haoia abajo,afileel extremepesade
hasla que 6sta quedebalanceadao
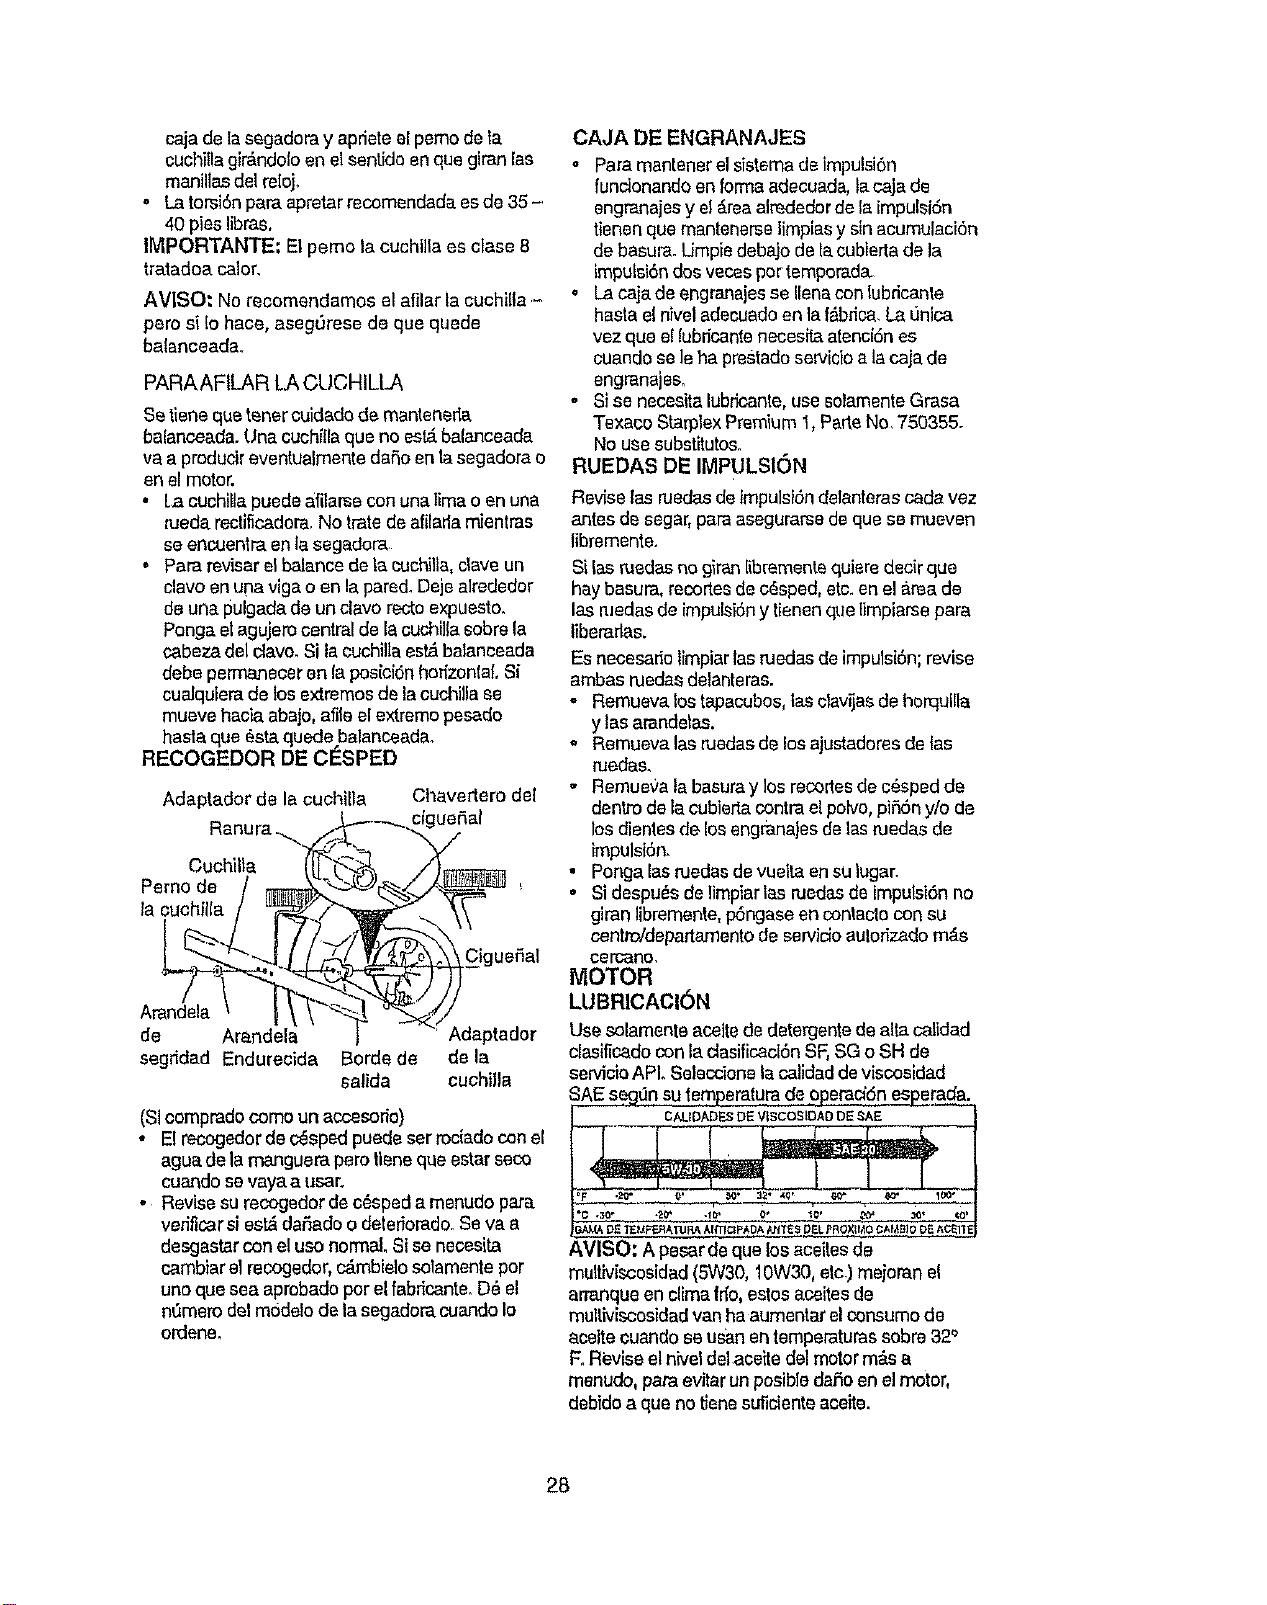
RECOGEDOR DE CESPED
Adaptador de la cuchilla
Ranura ........_
de Arandela
segridad Endurecida
Chavertero del
Adaptador
Borde de de la
salida cuchilla
(SIcomprado come un accesorlo)
• Elmcogedorde c_spedpuede ser rodado conel
ague de la manguera petetlene que ester seco
cuandoseveya auser.
,, Revisesu recogedorde c_sped a menudo pare
ved_carsi es_ da,Sadoo deteriorado.Se vaa
desgastarcon el use normal, Si se necesita
cambiar el recogedor, c_mbietosolamenteper
uno que sea aprobado per el fabrlcante. D6 el
nt_merodel modelo de la segadoracuando Io
ordene.
CAJA DE ENGRANAJES
o Pare mantener el sistemade impulsi6n
fundonando en formaadecuada, lacaja de
engranajesy el _.reaalrededorde la impulsiSn
tienenque mantenerselimplasy sinacumulaei6n
de basura.Umpie debajo de lacublertade la
impuisi6ndos vecesper tempered&
, La cajade engranajesse lianacon lubricante
hasta el niveladecuadoen laf_brisa,La 0nice
vez que ellubricantsnecesltaatenciSnes
euandose leha prestadosewicio ala caja de
engmnaje&
,, Sise necesitalubdcante,usesolamenteGrasa
Texaco StarplexPremium 1,Parts No,75035&
No usesubstitute&
RUEDAS DE IMPULSION
Reviselos ruedasde tmpuislSndelanterascada vez
antes de segar,pare asegurarsede que se mueven
libremente.
Si losruedas no 9iran[ibrementequiere dedr que
haybasura, recortesde cSsped,etc.enel &reade
losruedasde impulsiSny tienenquelimpiarse pare
liberadas.
Es necesario limpiarlas ruedasde impuisl6n;revise
ambas rdedaedelanteras.
o Remuevalos tapaeubos,lasdavijas de horqui!la
y las arandetas.
- Remueva losruedasde losajustadoresde las
ruedas.
,, Remue'Jalabasuray los recortesde c_sped de
dentro de la cubier_acentreel polvo,pifSn y/o de
los dientesde losengr_anajesde losrJedas de
_mpulsi6n.
• Ponga losruedasde vuelta en su lugar.
• Si despu_s de limpiarlos ruedasde impuisi6n no
glran libremente,p6ngaseen conlaclo consu
centr_/departamentode sewido aulorizadom_s
cel'o_no,
MOTOR
LUBRIOACISN
Use solamenteaceltede detergentede altocalidad
dasificado con la dasificad6n SF,SG o SH de
servido APL Selections la calidaddeviscosidad
8AE segLinsutemperalurade opem_dn esperada.
... c_D_ DEwscost_AeDs_,_E
' .__[__L_
AVISO: A pesar de que los aeeitesde
multlviscosidad(5W30, 10W30,etc) mejoran el
ananque en clime |rfo,estosaceitesde
multk,iscosidadvan ha aumentar elconsume de
aceltecuando seusanentemperatures sobre32'_
E Revise el niveldel aceite del motorm_.sa
msnudo, para evitar unposible daJSoen el motor,
debido a que no fienesuficianteaceite.
28
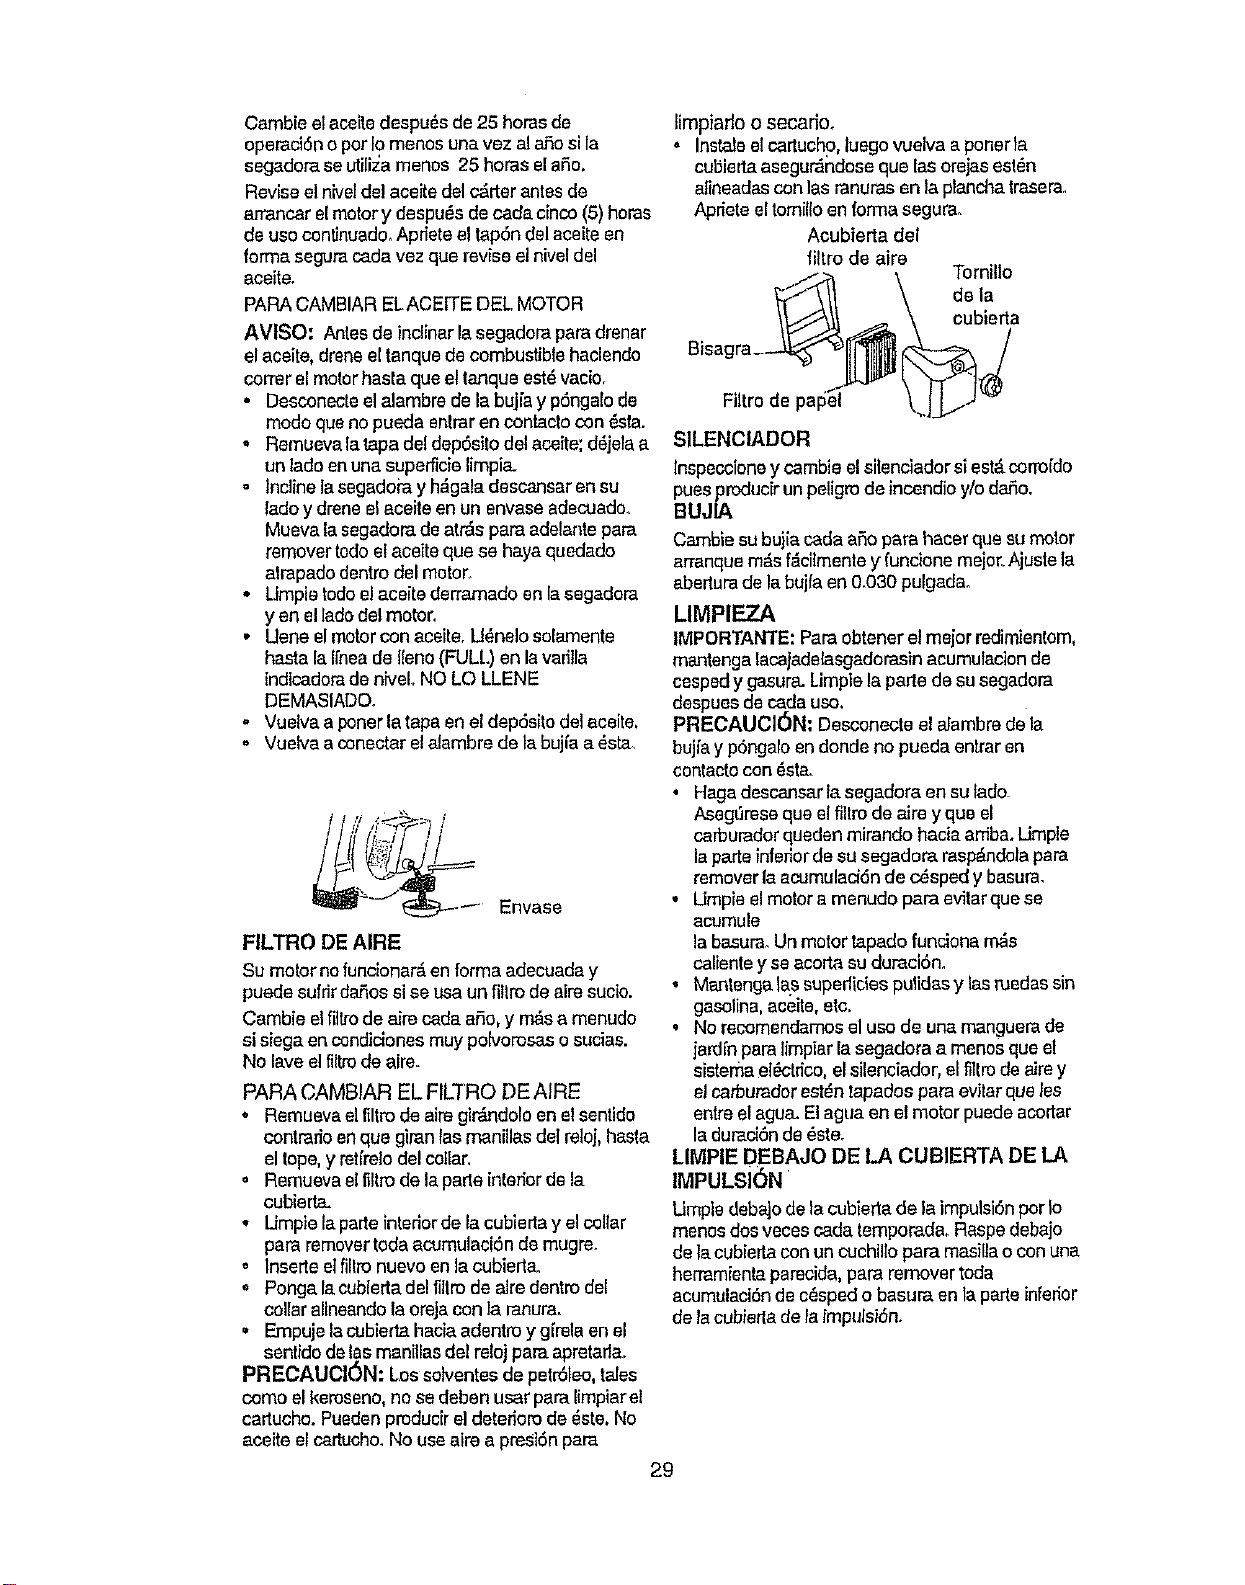
Cambie el ace_todespu_s de 25 homede
opereciSno par Iomenos una vez aJa.fiosila
segadorese utili;:amanes 25 hares el aSo,
Reviseel niveldel aceite del c_rter antes de
arrancar e[motory despu_sde cadac_nco(5) horas
de usacontJnuado,Aprieteeltaprn del aceite en
forma segurecadavez quarevise el niveldel
aceite.
PAPACAMBIAR ELACEITE DEL,MOTOR
AVISO: Antes de inclinerla segadora para drenar
el aceite,droneel tanque de combustible hacienda
correrel motorbasra qua el tanque est_ vacio.
• Desconecteel alambre de la buj[ay prngaio de
mode qua no pueda entreren contacto con _sla.
• Remuevala tapadel deprsito del aceite;drjela a
un lade en una supetflcia limpia.
• incline lasegadoia yh_gala descansaren su
lade y droneel aceito en un envaseadecuado..
Mueva la segadorade atria pare adelantepare
remover lode etaceite que se hayaquedado
atrapadodentrodel motor,
• LJmpleredoel ace[toderremado en lasegadora
yen elladedel motor,
• Uene el motorcon aceite.U_nelo salamente
haa_ la I[neade I{eno(FULL.)en lavarilla
indlcadorade nlveloNOLO LLENE
DEMASIADO.
,, Vuelvaa poner la tapa en ai dep_sito del aceite,
•, Vuefvaa conectar elalambre de la bujfaa_sta.
FILTRODEAIRE
Su motor no funcionar_,en farina adecuada y
puedesufrirdafios sise usa unfiltro de alre sucio.
Cambie elfiltrode airs cada aSo,y rn_samenudo
al siege en condidones muy polvorosas o sucias.
No lave el filtrode aire.
PARA CAMI31AR EL FILTRO DE AIRE
* Remuevael filtrode airsgir_indoloenelsentido
contrario en qua giran tasmanillas del reloj,hasta
el tope,y ret(relodel collar.
,, Remuevael filtrode la parts interiorde la
cubierta.
, Umpie la parle intedorde la cubierta y el collar
pare removertoda acumulaciSnde mugre.
,, Inserts el filtronuevoen la cubierta.
o Ponga la cubIertadel tillro de alre dentrodel
coUarallneandola oreja conla ranum.
,, Empujela cubieda haciaadentroy g[rela en el
sentido de leemaniIlasdal retojpare a,pretariao
PRECAUCION: Los solventes de petroleo,tales
coma el kerosene,no se deben user pare limpiarel
cartucho.Puedenproduc[rel deterioro de 6ste, No
aceite el cattuoho.No useairs a preSlrn pare
29
limpiarlo o secado.
,, Instateelcartuchp, luego vuetvaa ponerla
cubiertaasegur_ndose qua lee orejasest_n
alineadascon las ranurasen la pianchatrasera.
Apr_eteeltomilloen |ormasegurao
Aeubierta del
filtro de aire
Tornillo
de la
eubierta
Filtro de
SILENCIADOR
Inspecoioney cambie elsilenciador si eat&corro[do
puss joroductrun peligrode incendioy/o dario,
BUJIA
Cambie subuj[acada aria pare hater que su motor
arranquem_s f_cilmentey fundone mejo=:Ajuste la
aberturade la bujfaen0.030 pulgada,
LIMPIEZA
IMPORTANTE:Pareobtener elmajor redimientom,
mantengalacajadelasgadoresinacumutacJonde
cespedy gasura. LJmplela partsde su segadora
despuesde cadausa.
PREOAUCl0N: Desconecte el alambrede la
bujlay pSngaloendonde no pueda entraren
contactocon _sta.
• Hagadescansartasegadora en su lade.
Asegt_resequa elfiltro de airs y qua el
carburadorqueden miranda hacia arfiba.LJmpie
laparteinferiorde su segadora rasp;_.ndolapare
removerla acumulacldn de c_sped y basura.
• Umpie el motora menudo pare evitarque se
acumule
la basura_Unmotor tapado funciona rn_s
cal[entey seacorta su duracirn.
° Mantengalassuperlides pufidasy lasnJedassin
gasolina,aceite,eta,
, No recomendamosel usa de una manguerade
jardfn parelimpiarla segadora a menos quael
sistemael_,ctrico,elsilenciador, elt_ltrode aJrey
el carburadorest_n tapadospara evitarqua les
entreel aguacElague en el motor puede acortar
la durec{rnde _ste.
LIMPIE DEBAJO DE LA CUBIERTA DE LA
IMPULSION'
Ump]edebajo de la cubierta de la impulsiSnparIo
manesdosveces cada temporada, Raspedebajo
de lacubiertacon un cuchUlopare masillao con una
herramientaparecida, pare remover toda
acumulacirn de c_sped o basure enla parts inferior
de lacubiertade la impalsiSn.
PREOAUCION: ANTES DE DAR
CUALQUIER SERVICIO O DE [.IACER
AJUSTES:
, SuelteIsbana de controly pare el motor
• Aseg_rese qua la cuchillay qua todas lasparLes
moviblesse hayandetenidocompletamente.
, DesconeCteel alarnbrede la bujfay p6ngalo en
donde no pueda entraren contacto con6s'_.
SEGADORA
PAPA AJUSTAR I.,A ALTURA DE COR'TE
Vea "PARAAJUSTAR LAALTURA DE CORTE" en
la secci6n de Operad6n de este manual.
DI=SVIADOR TRASERO
Se pmporciona un desviadortrasem, adjunto entre
las ruedastraserasde su segadora, pare reducira
un mFnimola posibllidadqua objetos seen lanzados
haciaafuera de !aparts trasera de la segadora,en
la posiciOnen donde seencuentra el oparador.Si
se dafa el desviadordebe cambiarSeo
PARA REMOVER/CAMBIAR LA CORFIEA
DE IMPULSI6N
• Remueva laoubiertade la impulsi6n,Remueva
la correa empujandohaciaabajo anla polea de
la cajade engran&je_
• Haga de,censer la s_gadora en su lado conal
tiltm de airsy el carburadormirandohaciaarriba.
Remuevala cuchilla..
• Remuevaladefense an conga del desperdicio,
• Remueva lacorrea de la polea del motoran el
ciguefial.
,, Instals la correanueva siguiendolos paso_
anterlores enel orden inverso
• Siempreuse lacorreaaprobadapot la |_.brlca
pare asegurarsequa calce y dure.
° Remuevalasabrazaderasdel cable.
• Remuevaloscontrolesy la barra de controlqua
exigela presenciadel opemdor delmango
superior.
, Remuevala gu_adel cordSnarrancadordet
mangoinferior.
• Remuevalasclavijasde horquilla
° Desconecteel mango infedorde lospuniales dal
mango(.
, Devuelia el mangoy vuelva a montar lasdavijas
de horqui!laqua sehabian removido.
, Vuetvaa rnontarla gufadel cord6nerrancador.
, Vuelva a mon_r los controlesy la barra de
controlque exJgsla presencia del operador en el
mangosuperior,
PRECAUOI(_N: La barra de conlrol qua exigela
pmsenciadel operadortienequa pivotear
I_remantepara pen'nitirel enganehe de la cuchilla!
frenocuandosesuelia la bamade control.No
aprietedem&siadolossujetadores quesujetan a los
controlesal mangosuperior,
, Pare cambiarde taposici6n de medianabajaa
alia solamantesetendr&qua dar vuelia la
eecciSndel mango superior,
• Pare cambiarde la posid6n medianabaja a baja,
sotamentesetend_ qua dar vuelta laseoclSn
del mangoinferior;
Posict6n de envio
Medlana baja
Mediana alia
%
Cubierta
de la
impulsion
Correa
Empujar
hacia
abajo
PAPA AJLISTAR EL TV'LANGO
Se puede levantaro balerel mango de su segadora
segl_nle quads o6modo.Hay cuatlo (4) posiciones
disponibles: alia,medianaalia,mediana baja,baja.
Los mangoaseenvian montadosen la posiciSn
madlanabaja.
• Pare camblarde la posiciSnmedianabaja a
medianaalta, la secci6nSUlberiory la Infeffordsl
mango tendr'&nqua darsevuelta.
30 ¸
Alia
Abrazadera de
gorquilla
inferior
_Puntal
del
mango
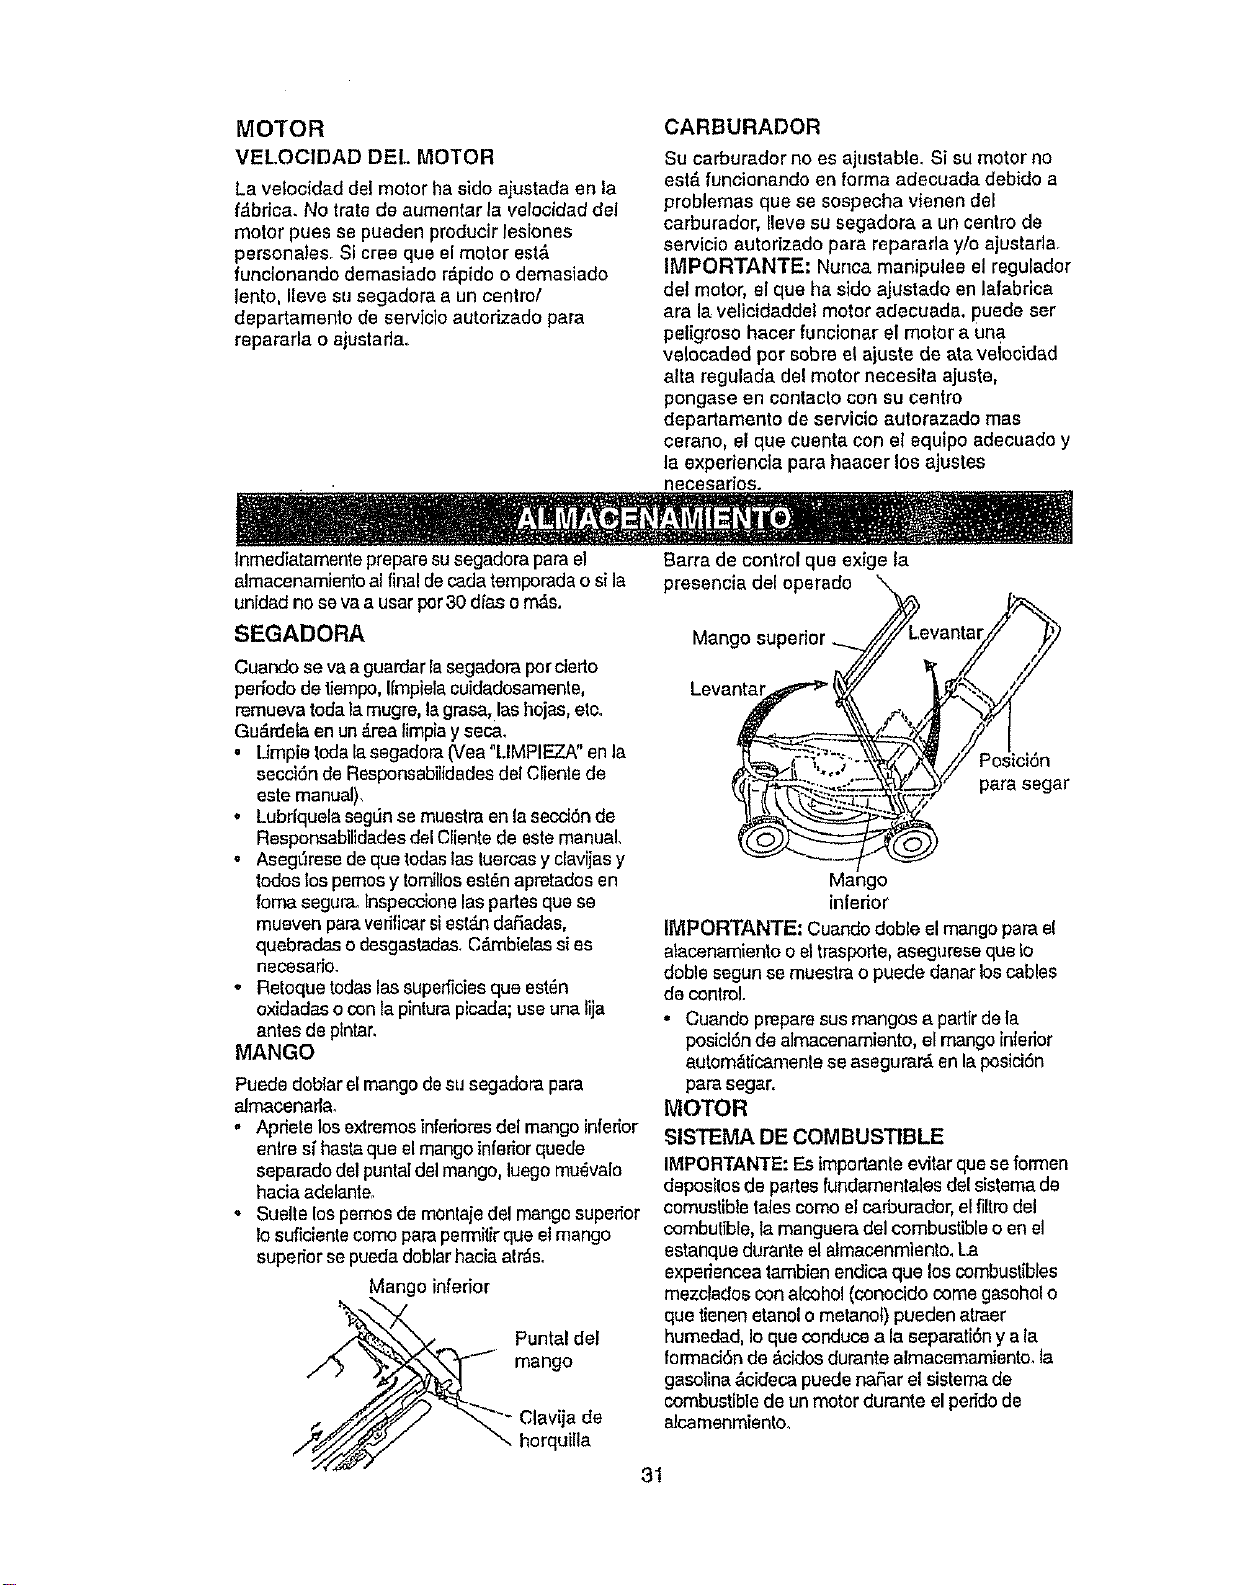
MOTOR
VE1.OClDAD DEL MOTOR
La velocidad del motor ha side ajustada en la
f_brica. No tratede aumentar la vefocidad del
motor pues se pueden preducir leslones
personales. Si cree que el motor est&
funcionandodemasiado r&pido o demasiado
lento, Ileve su segadora a un centre/
departamento de servlclo autorizado pare
repararla o ajustadao
CARBURADOR
Su carburador no es ajustable. Si su motor no
est,. funcionandoen forma adecuada debido a
problemas qua se sospecha vienen del
carburador, Ileve su segadora a un centre de
servicio autorizado para reparar]a y/o ajustada.
IMPORTANTE: Nunca manipulee el regulador
del motor, el que ha side ajustado en lafabrloa
era la velicidaddel motor adecuada, puede ser
peligroso hacer funeionar el motor a una
velocaded per sobre el ajuste de ateveiocidad
alta regulada del motor necesita ajuste,
pongase en contacto con su centre
departamanto de servic{o autorezado mas
cerano, el qua cuenta con el equipo adecuado y
la experiencla pare haaoer los ajustes
. . necesarios.
Inmediatamentepreparesusegadora pareel Barra de control que exige la
almacenamienfoal final decadatemporada osi la presencia del operado
unidad no so vaa userper30 d_'aso n'_s.
SEGADORA
Cuando se vaa guardar la segadoraper cierlo
pedodo de tiempo,Ifmpielacuidadosamente,
remueva toda la mugre,la grasa, lashojas,ere.
GuEirdetaen un_.realimpiayseca.
• Utopia toda laeegadora (Vea °LIMPIEZA"en la
secci6n de Responsabilidedesdel Clientede
este manual),
o Lubrfquelasegdnse muestraenla secd6n de
Responsabilidadesdel Cliente de estemanual,
• Aseg6rese de quatodas tas luercas y clavijasy
redeslospemos y tomillosest_n apretados en
foma eegur& Inspecclonelas partesque se
muaven par'&verfiicarsiest_tndaSadas,
quebradas o desgastadas.CAmbielassi es
necesario.
• Retoque todas lassuperficiesqua est_n
oxidadas o con la pinturaplcada; useuna lija
antes de ptntar.
MANGO
Puede doblarel mango desu segadora pare
almacenada.
,, Apdete los extremesinferioresdel mangoinfedor
entresf hasteque el mangoinferiorquede
separadodel puntaldel mango, luego mu_vale
hada adelante.
o Suelte lospemos de montajedel mangosuperior
Iosuficientecome pare permitirque el mango
superior sepueda doblarhaciaalr_&
Mango infedor
Puntal del
mango
Clavija de
horquilla
Levantar
i6n
pare segar
Mango
infedor
IMPORTANTE: Cuando doble el mangopare el
alacenamlento o el trasporle,asegurese qua Io
doble segunse muestrao puede danarloscables
de control.
• Cuando prepare sus mangos a parttrde la
posicl6n de almacenamiento, el mangointerior
autom_ticamente seasegurar_ en la posici6n
pare segar.
MOTOR
SISTEMA DE COMBUSTIBLE
IMPORTANTE: Esimportanle evitarquase formen
depcailos de partes fundamentales de[sisternade
comustible tales come el carburador, elfiltro del
combutible, tamanguera del combustible o en el
estanque duranteel almacenmlento. La
experlenceatambien endica qua los combustibles
rnezctados conalcohol (conocido come gasoholo
qua tlenenetanol o metanot)pueden atraer
humedad, Ioque conduce ala separati6n y ala
formaci6n de &citiesdurante almacemamiento, la
gasoline &cidecapuede naSar el sistema de
combustible de un motor durante el per_dode
aJcamenmiento_
31
,' Drene atestanque decombustible
,, Haga arrancarel motor y d6jelofundonarhaste
que las llneas del combusSbley el carburador
est_n vaofos.
• Nunca use losproductespare limpiezadel
carburador o detmotor en el estanque de
combustible puss se puedenproducirdaSos
permanentes.
, Use combustiblenue,'o !apnSximatemporad&
AVISO: El estetbilizadorde combustiblees una
a_temativaaceptable pare reducira un mfnimo la
formaci6n de dap6sitosdegoma enel combustible
duranceel pan'odede atmacenarniento.Agregue
estabilizadorala gasolineen el estanqua de
comb.ustibleo en el envase para el
almacenamiento, Siempresigala proporciSnde
mezclaque se encuentra en e[envase del
estabtiizador,,Hagafuncionarefmotor per Iomanes
10minutes de_pu&sde agregar el estabilizador,
pare permitir qua esle llegue al_.arburador_No
drene la gaaolinadel estanquede gasoliney el
carburador si se eat&usandoestabiIizadorde
combustible.
ACEITE DEL, MOTOR
Drene el aceite (con el motor caliante)y c_.rnbielo
con acettede motor llmpio.(Vea"MOTOR" enla
secci6n de Responsabifidadesdel Cliantede este
manual.)
CILINDRO
• Remuevalabujfa.
,, Vac[e una enza(29 ml) de aceitea trav&sdel
agujerode'la buj[aen elcilindro.
• Tirelamanillade arranqueientamanteunas
cuantasvases paradistdbuirel aceite.
• Vuelva a reenterla nuevabuj[a.
OTROS
. Noguarde la gasolinede una temporada ala
o[ra,
o Cambie elenvase de la gasolinesi se empieza a
oxidar.La oxJdaciSny/o tamugreen su gasolina
produci_n problemas,
', Si esposible,guards suunidad an un recinto
cerradoy ctibrala pare protegerlacontra el polvo
y la mugre.,
. Cubrasuu_dadconunfon'oprotectoradecuado
que no retengala humedad Nouse pl_sti¢o.El
pl_sticono poederesplrar,Ioqua permttela
formaci6nde condensad6n, Ioquap[oduclrA la
oxidac!Snde su unidad.
IMPORTANT,E: Nuncacobra la segadora
mantrasel mentory lasareasde escape todavla
estan dienles.
PREOAUCl6N: Nunca almasenela segadora
congasolineen el estanque dentrode un ediflclo en
donde los gasespuedan alcanzar una llama
expuestao una chispa.Permitaqua se enffie el
motor antes de almacenar_aen alga'inrecinto
cerrado.
32
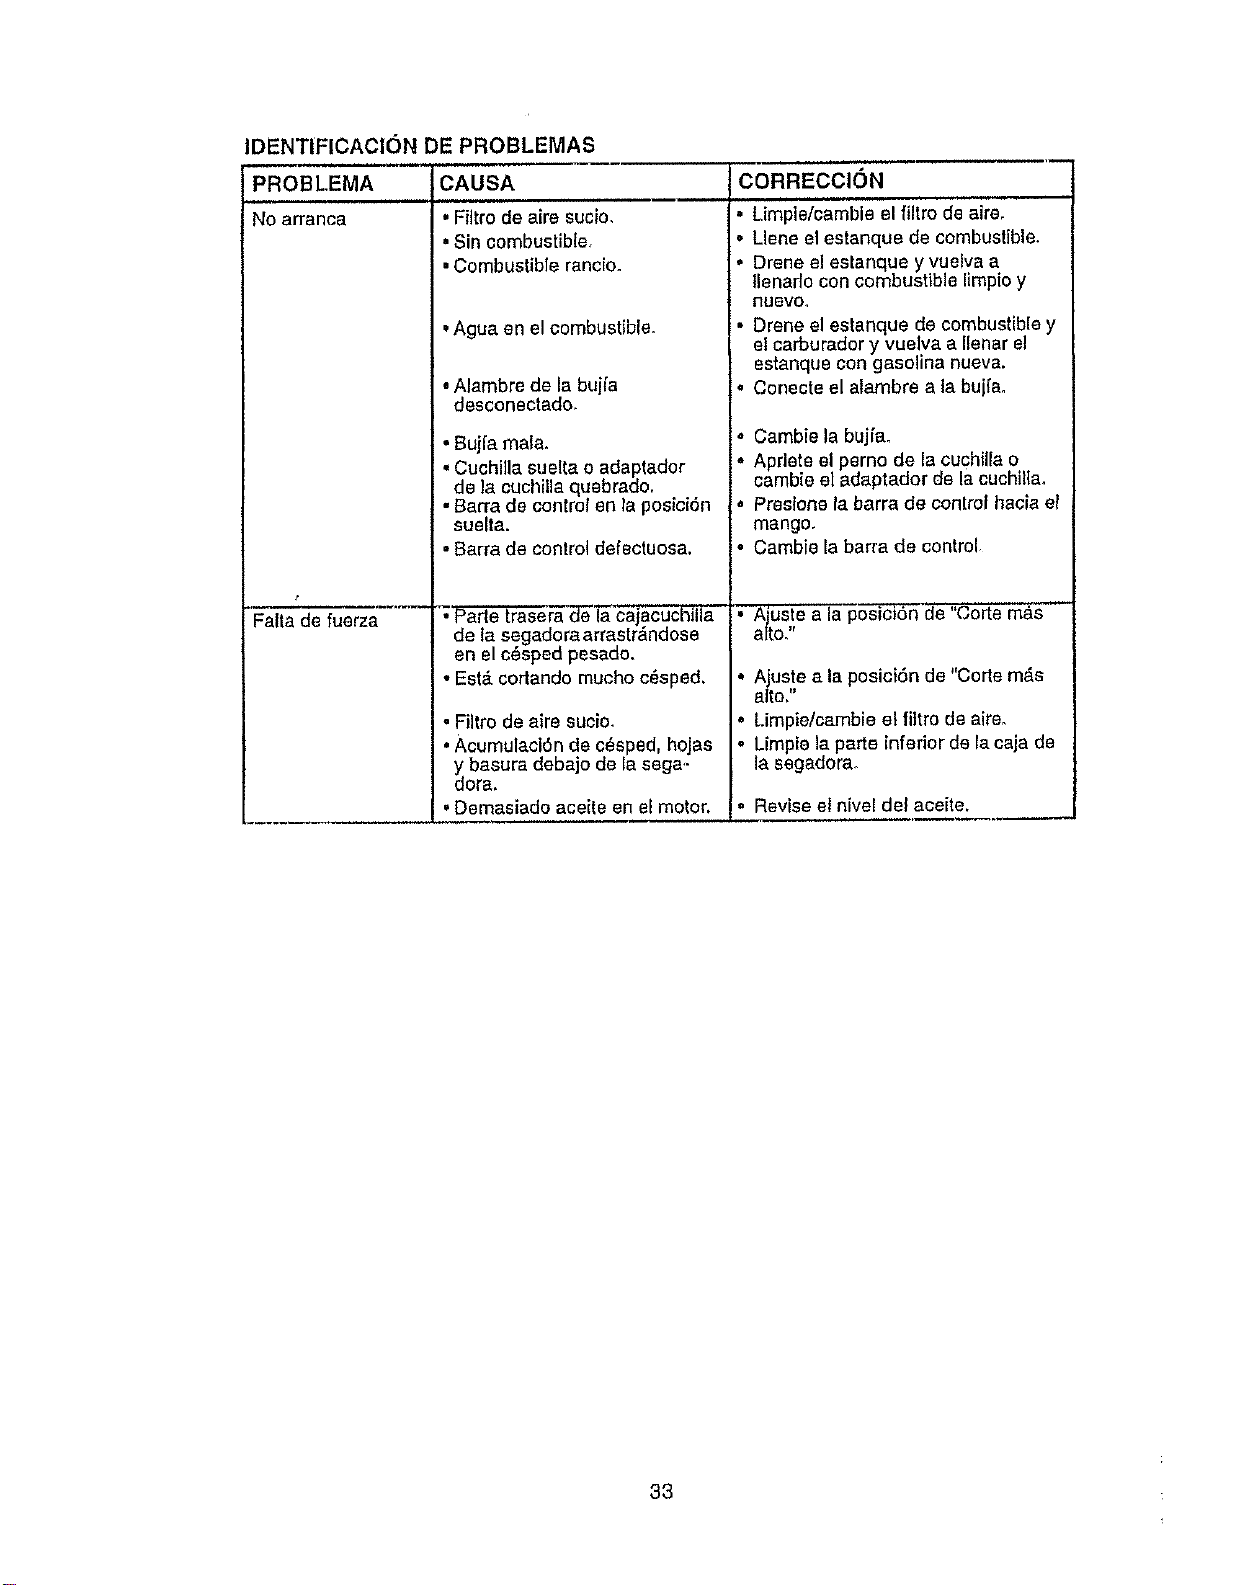
IDENTIFICACION DE PROBLEMAS
i PROBLEMA
No arranca
Felts de fuerza
OAUSA
• Filtro de sire sucio,
• Sin combustible.
•Combustible rancio.
, Agua en el combustible.
, Alambre de la bujfa
desconectado,
•Bujfa male.
•Cuchilla suelta o adaptador
de la cuchilla quebrado.
Barra de control en la posici6n
suelta.
, Barfs de contro_de_ectuosa,
"__r'_'ae" I'a'caiacuchilla
de la segadoraarrastr_ndose
en el c6sped pesado.
• Est,. cortando touche e_sped,
• Filtro de aire sucio,
. Acumulaol6n de c6sped, hojas
y basura debajo de la saga,-
dora.
, Demasiado aceite en el motor, !
CORREOCI()N
Limple/camble el filtro de air&
Llene el estanque de combustible.
Drene el estsnque y vuelva a
tlenado con combustible limpio y
_2evo_
Drene el estenque de combustible y
el carburador y vuelva a Ilenar el
estanque con gasotina nueva.
Conecte el alambre ala bujfa.
Cambie la bujfa.
Aprlete el perno de la cuchilla o
cambie el adaptador d8la cuchilla
Preslone la barra de control hacia el
mango.
Cambie la barfs de cor_trot
Aiuste ala po"_ci6n de "torte m_,s
alto."
A uste ala posici6n de "CoMem#,s
alto,
Limpie/cambieet filtre de aire.
Limpie la parte inferior de la caja de
la segadora_
Revise el nivel del aceite.
33

PROBLEMA
Malcorte -disparejo
Vibraci6n exces(va
,,, ,, , , ,,,,,,,
Cord6n arrancador
diffcil de tirar
i Recogedor de c_sped
no se Ilena (st viene
equipado)
Dif(cil de empujar
CAUSA CORRECCION
Cuohilta desgastada, doblada o
suelta.
Allure de las ruedas dispareja°
Acumuleck_n de c_sped, hojas o
basura debajo de la segadora.
• CuchiUadesgastada, doblada o
suslla,
= Cigue_al del motor doblade.
ll
O
i"
El Irene del volante del motor
esl_.aplicado cuando se suelta
la barra de control
Ciguei_al del motor doblado.
Adaptador de la cuchilla
quebrade.
La euohillase arrastraen el
c_sped.
Altura do code demasiado
bale.
Levantamiento de la cuchilla
desgastado.
Recogedor sin ventifaci6n de
sire,
El eE_spedest& demasiado alto
o ]a altura do la rueda dema-
siado baja.
Parte trasera de la caja/cuchilla
de la segadora arrastr_ndose
en el o_sped.
Reeogedor de c_sped dema-
siado llenOo
Poeici6n de la altura del mango
no adecuada pare usted_
Cambie la cuohilla Apdete el
peme de la ouchillao
Ajuste todas las ruedas ala
misma altura.
Limpie la parts inlerior de la caja
do la segadora_
Cambie la cuchilla. Apriete el
pemo do la cuchilla.
POngase en oontacto con su
centre de servieio autodzado
m_.soercano.
Presiene la barra de control
hacia el mango superior antes de
Iirar el cerd6r_ arrancador.
P6ngase en contaclo con su
centre de servicio autorizado
m_s cercano.
Camble el adaptador de la
cuchilla.
Mueva la segadora a un lugar en
donde el c_sped ha side cortado
o a una superficie firms pare
hacer arrancar el motor.
Eleve la altura de coke
Cambie la cuchillae.
Limpie el recogedor de c_sped
Eleve lealtura de corte.
Eleve la parte trasera de ta caja d_
la segaclora (1) un lugar m&s alton
Vac{e el recogeder de c_sped.
Ajuste la altura del mango de
mode que le acomode.
34
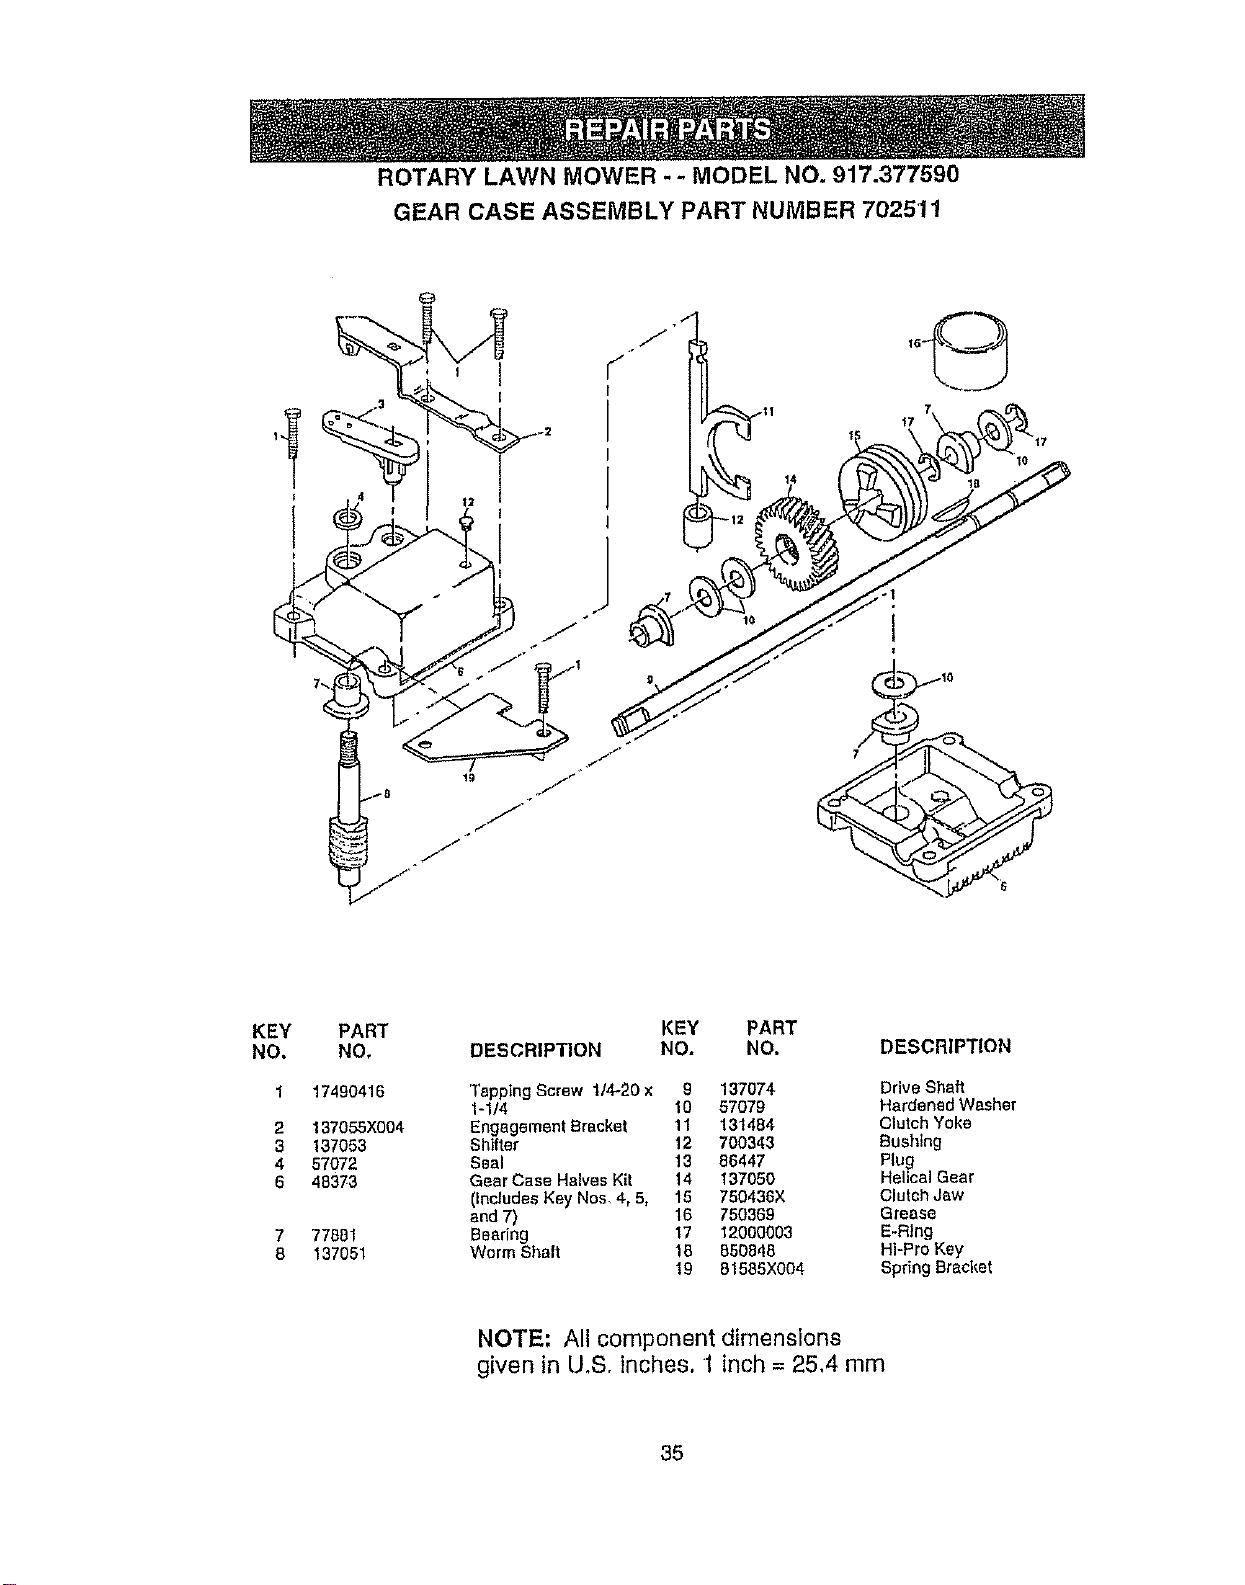
ROTARY LAWN MOWER - - MODEL NO. 917.377590
GEAR CASE ASSEMBLY PART NUMBER 702511
14
0
KEY
NO.
2
3
4
6
7
S
PART
NO,
17490416
137055X004
137053
57072
48373
77681
137051
KEY PART
DESCRIPTION NO. NO. DESCRIPTION
Tapping Screw 1/4--20x 9 137074 Drive Shaft
1-1/4 10 57079 Hardened Washer
Engagement Bracket 11 131484 Clutch Yoke
Shifter 12 700343 Bushing
Seal 13 86447 Plug
Gear Case Halves Kit 14 137050 Helical Gear
(IncludesKey Nos, 4, 5, 15 760436X Clutch Jaw
and 7) 16 750369 Grease
Beadng 17 12000003 E-Ring
Worm Shaft 15 650848 Hi-Pro Key
19 81585X004 Spring Bracket
NOTE; All component dimensions
given in lJ,Sr inches. 1 inch = 25,4 mm
35
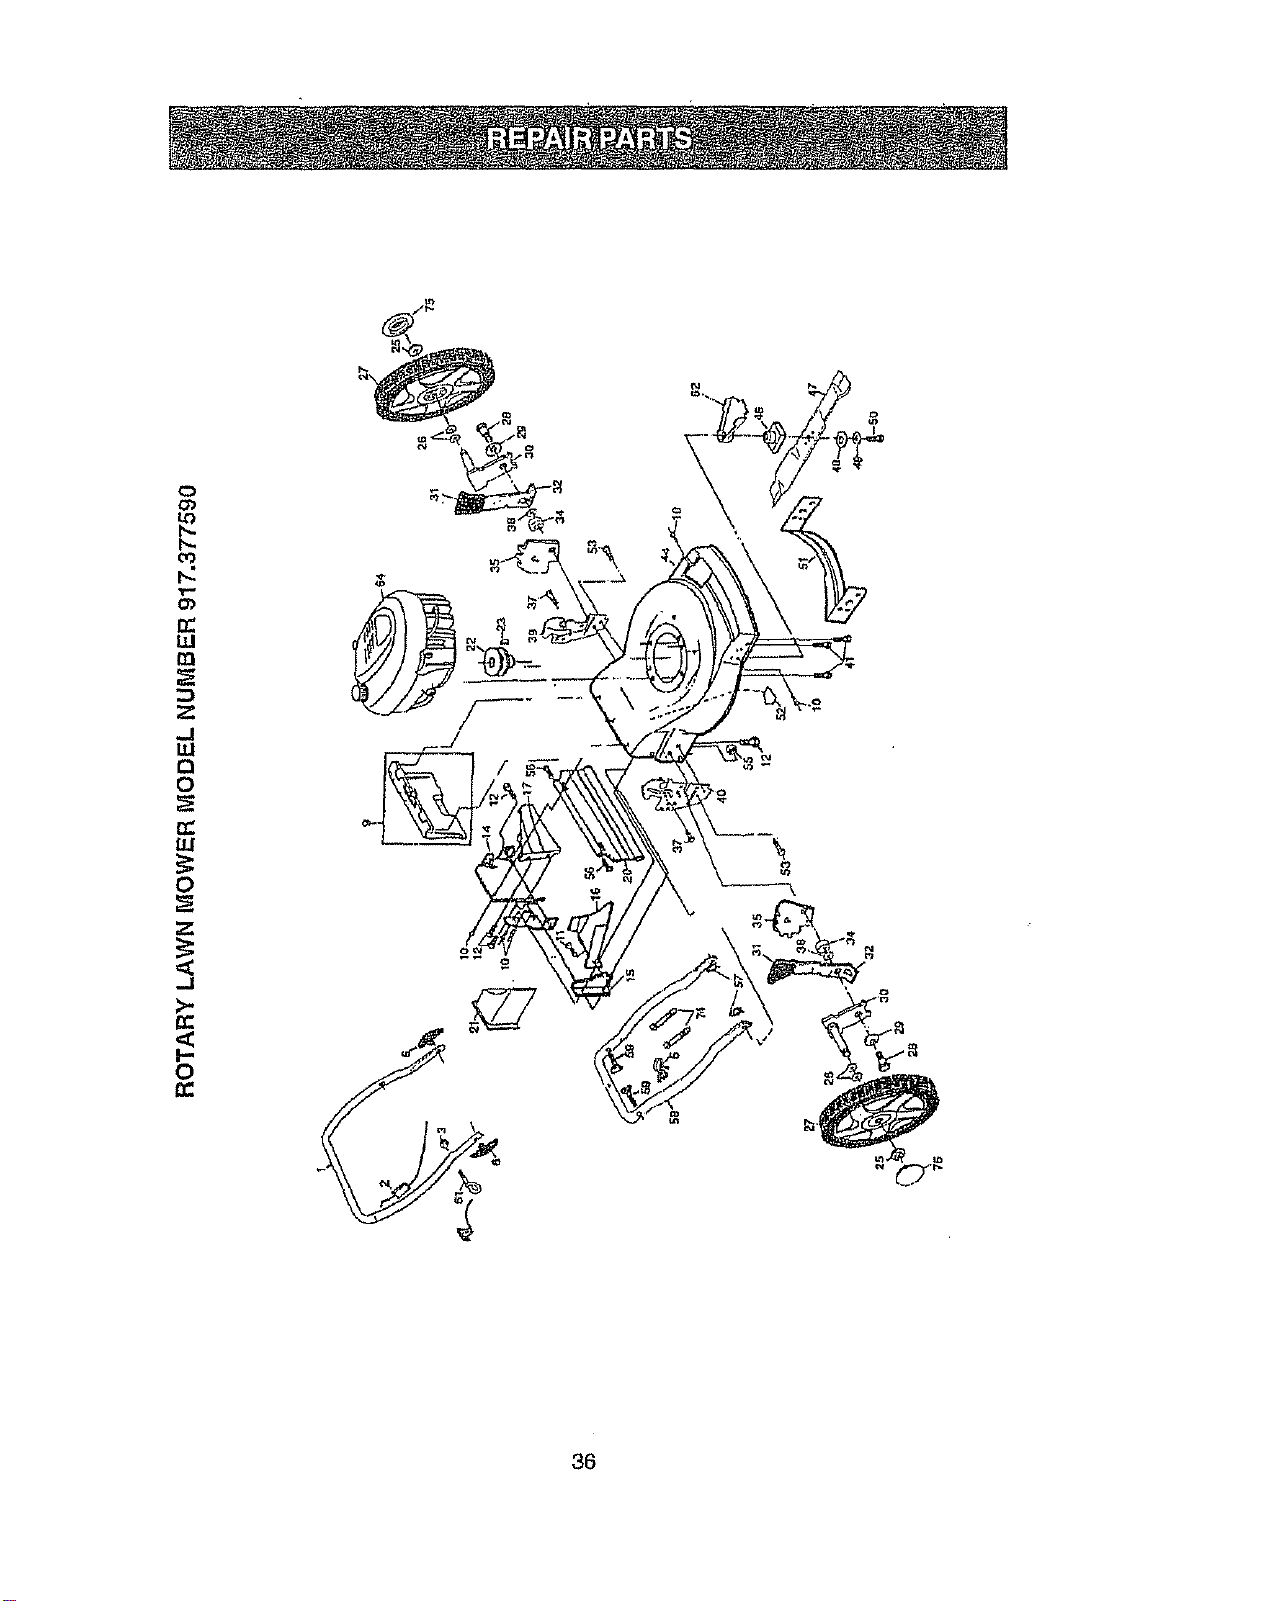
O_
o>
r_
LU
Z
.J
IU
0
0
r_
LU
0
Z
-J
I-
0
36

o
co
h.,
oo..
h-
O_
re
U.I
m
Z
.,4
lU
13
0
I,U
0
z
r_
I--
0
z
o
w
m
o
._. ,_ _ o _ o._._ '
;_:_=__.. _J= _,.__,__=
n,,
Q
_r
x
tD
37
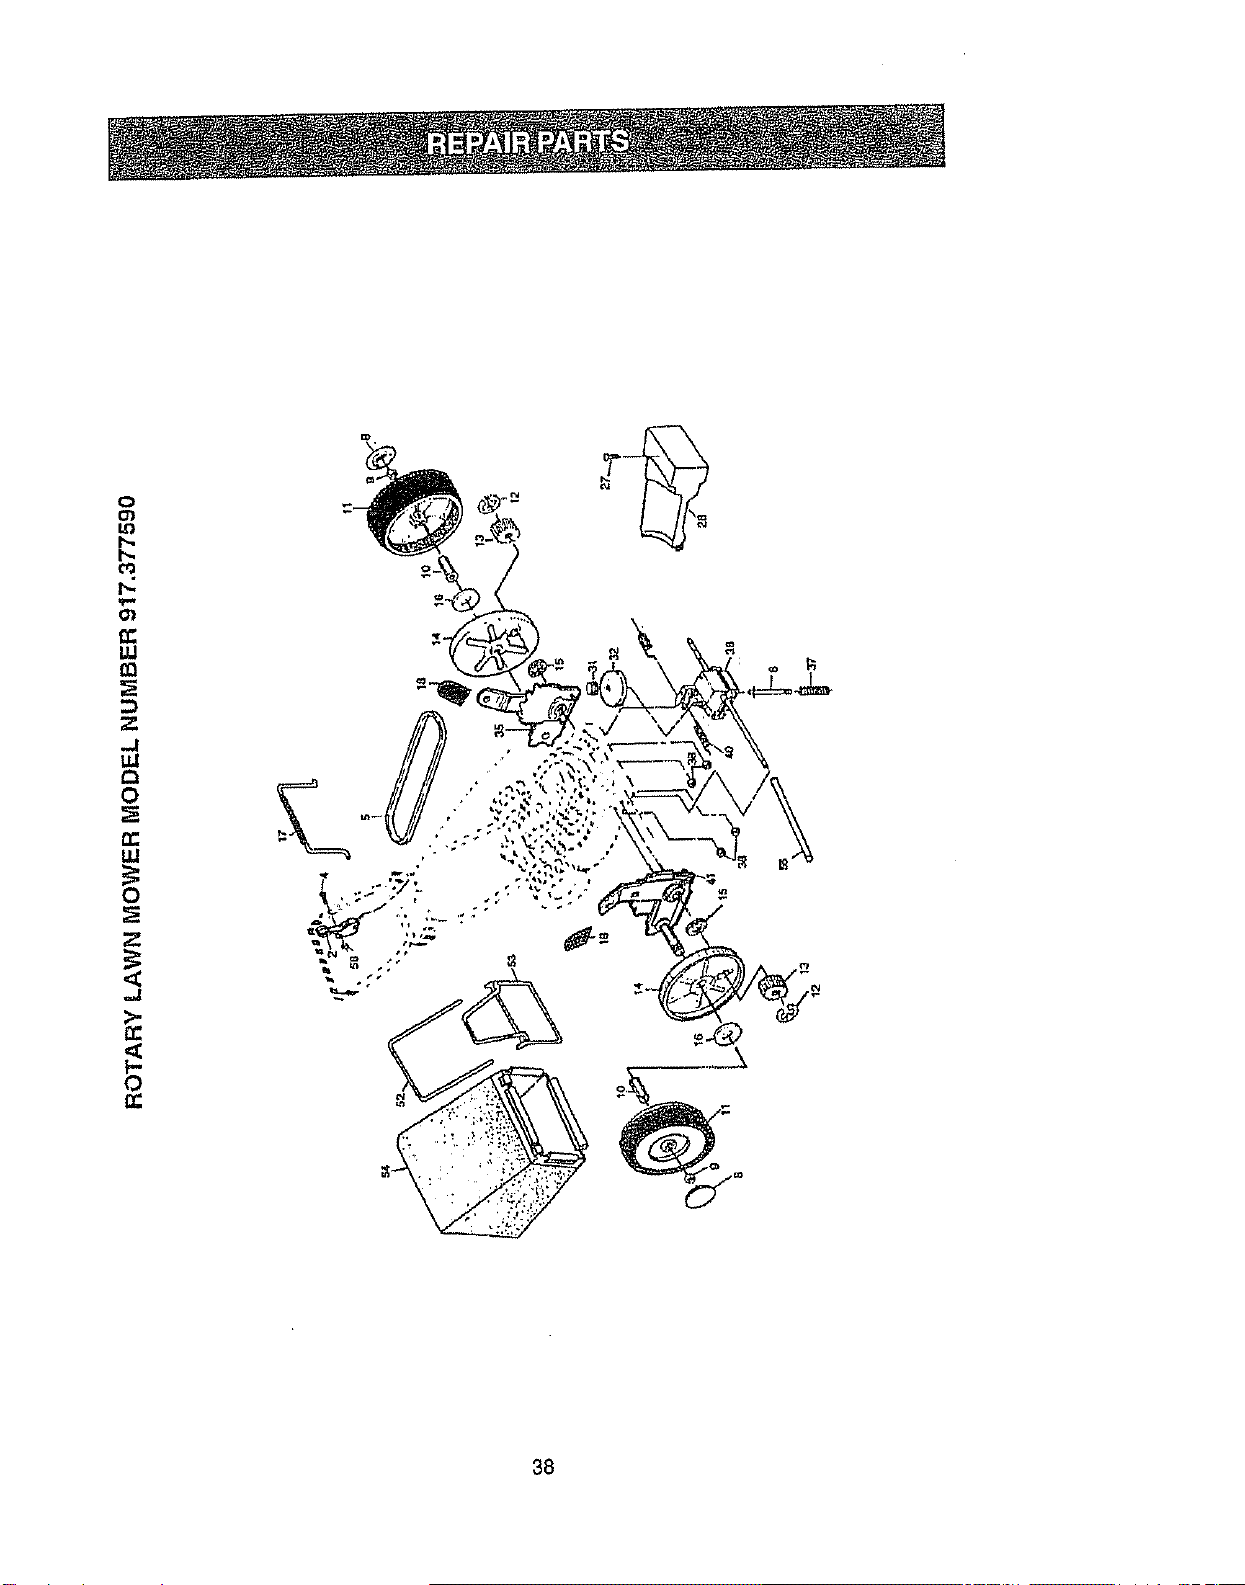
0
O_
LO
b-
n"
LU
m
..J
uJ
0
rr
UJ
0
z
>.
u:
0
38
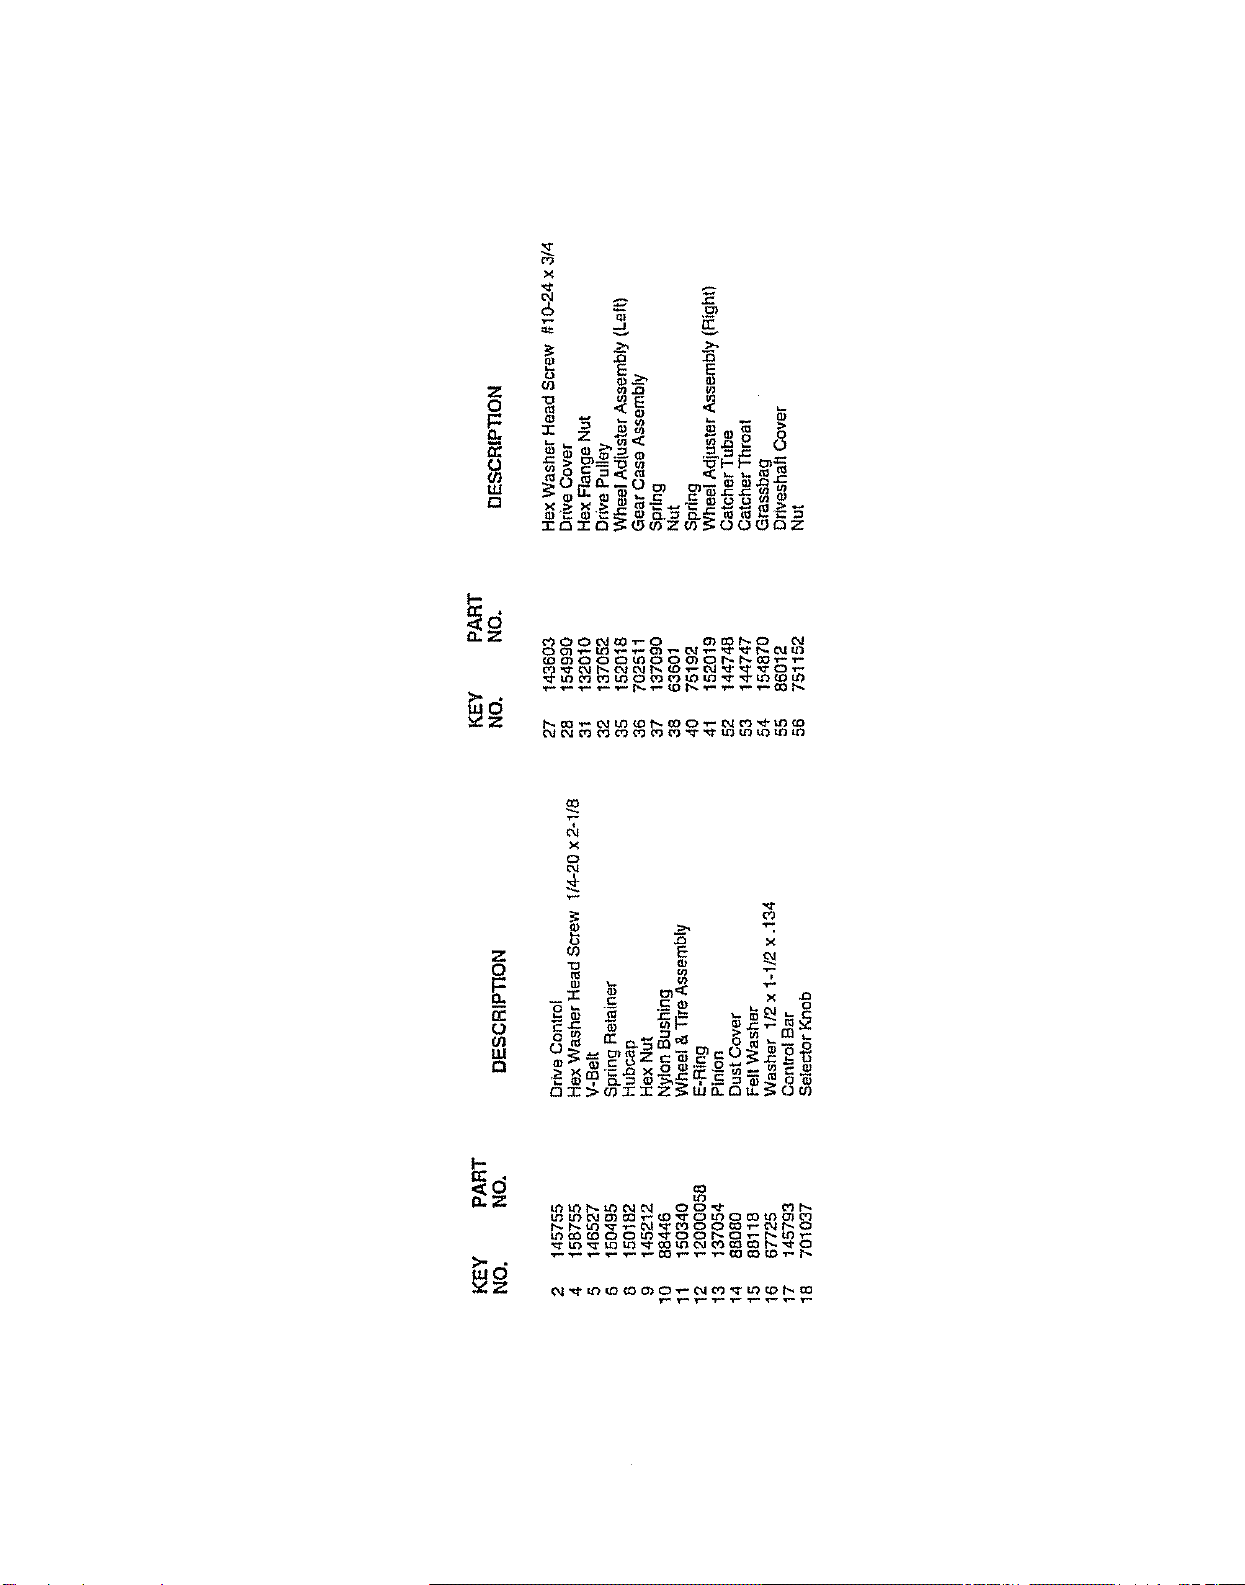
z
o
,'T-
O
W_
W
,"-1
l'o
o _ ::,.. E
z
o
G:
0
6_
111
n
X
0
t_
co 5
"_ .... _ '-e4 o
_3 2C > 03 _ I Z _; UJ D.. _3 tl.._ (J _
I-
>"d
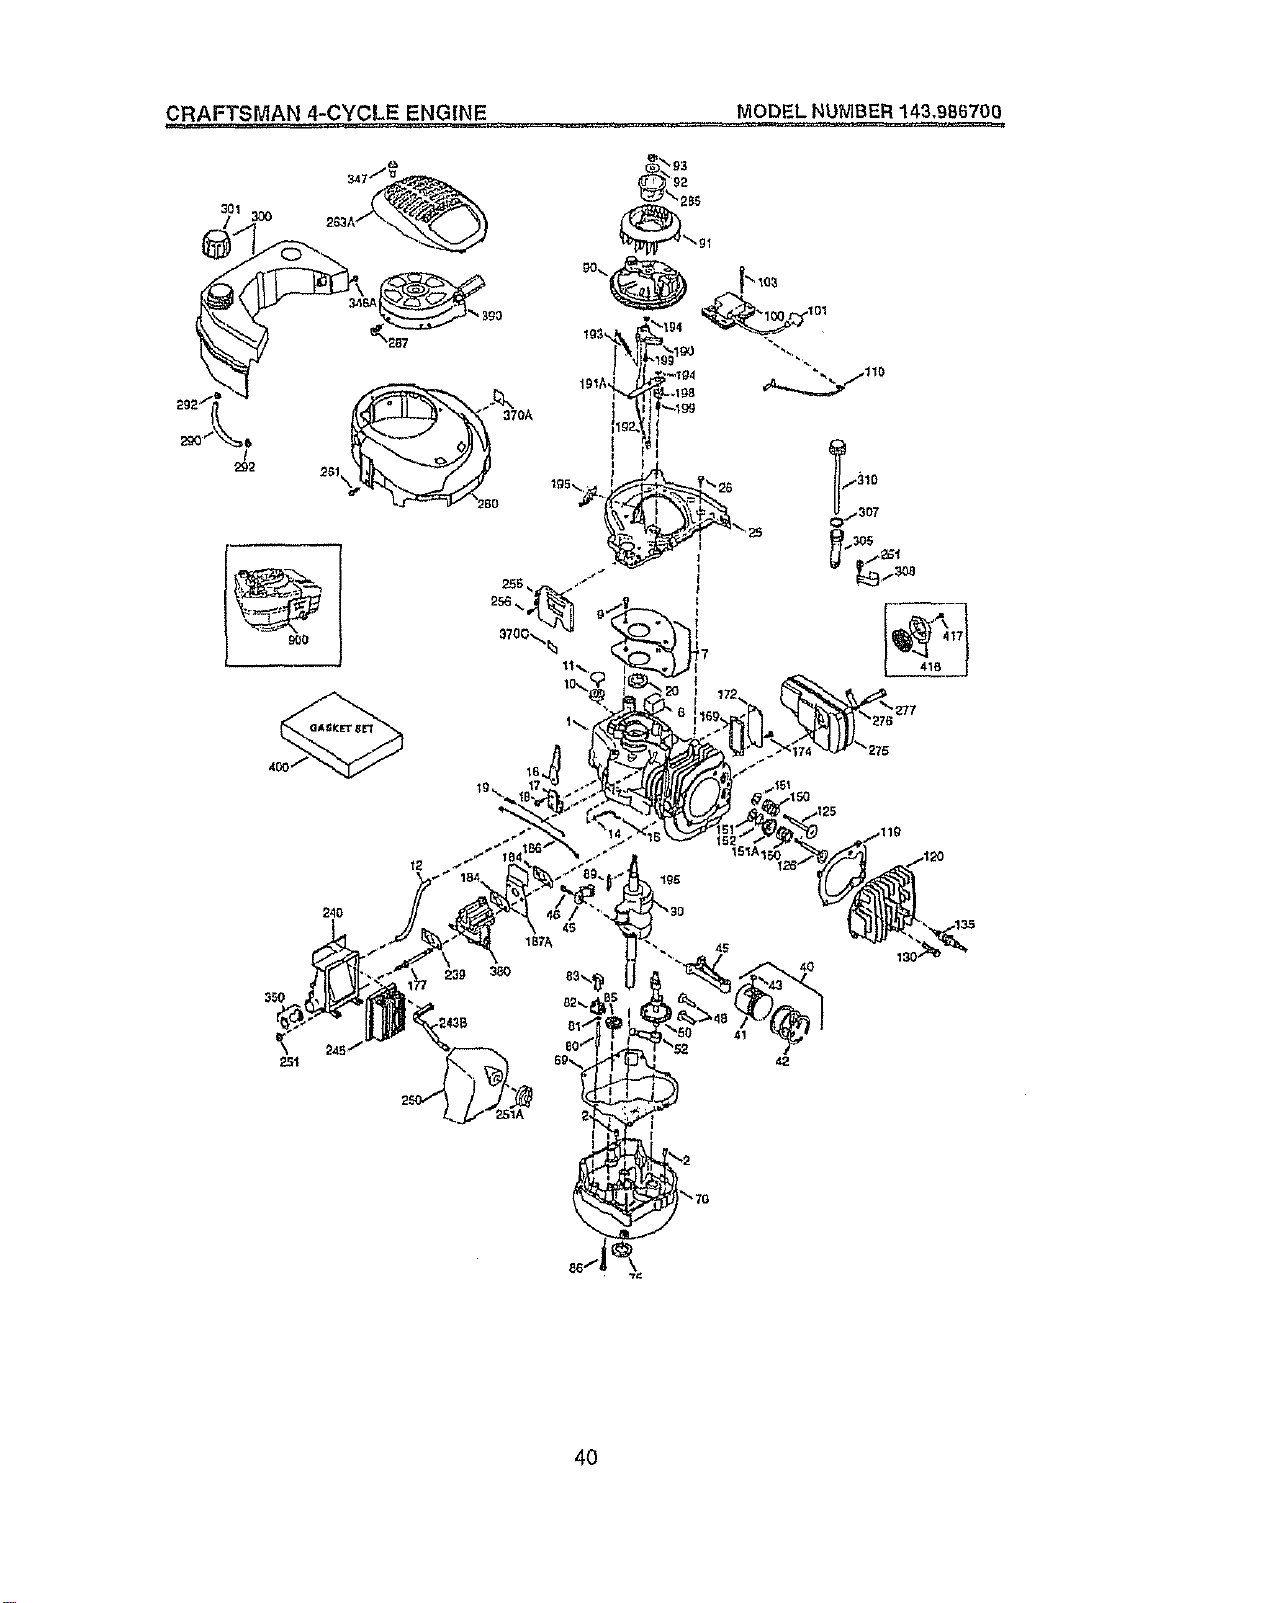
CRAFTSMAN 4-CYCLE ENGINE MODEL NUMBER 143,986700
42
I
I
4O
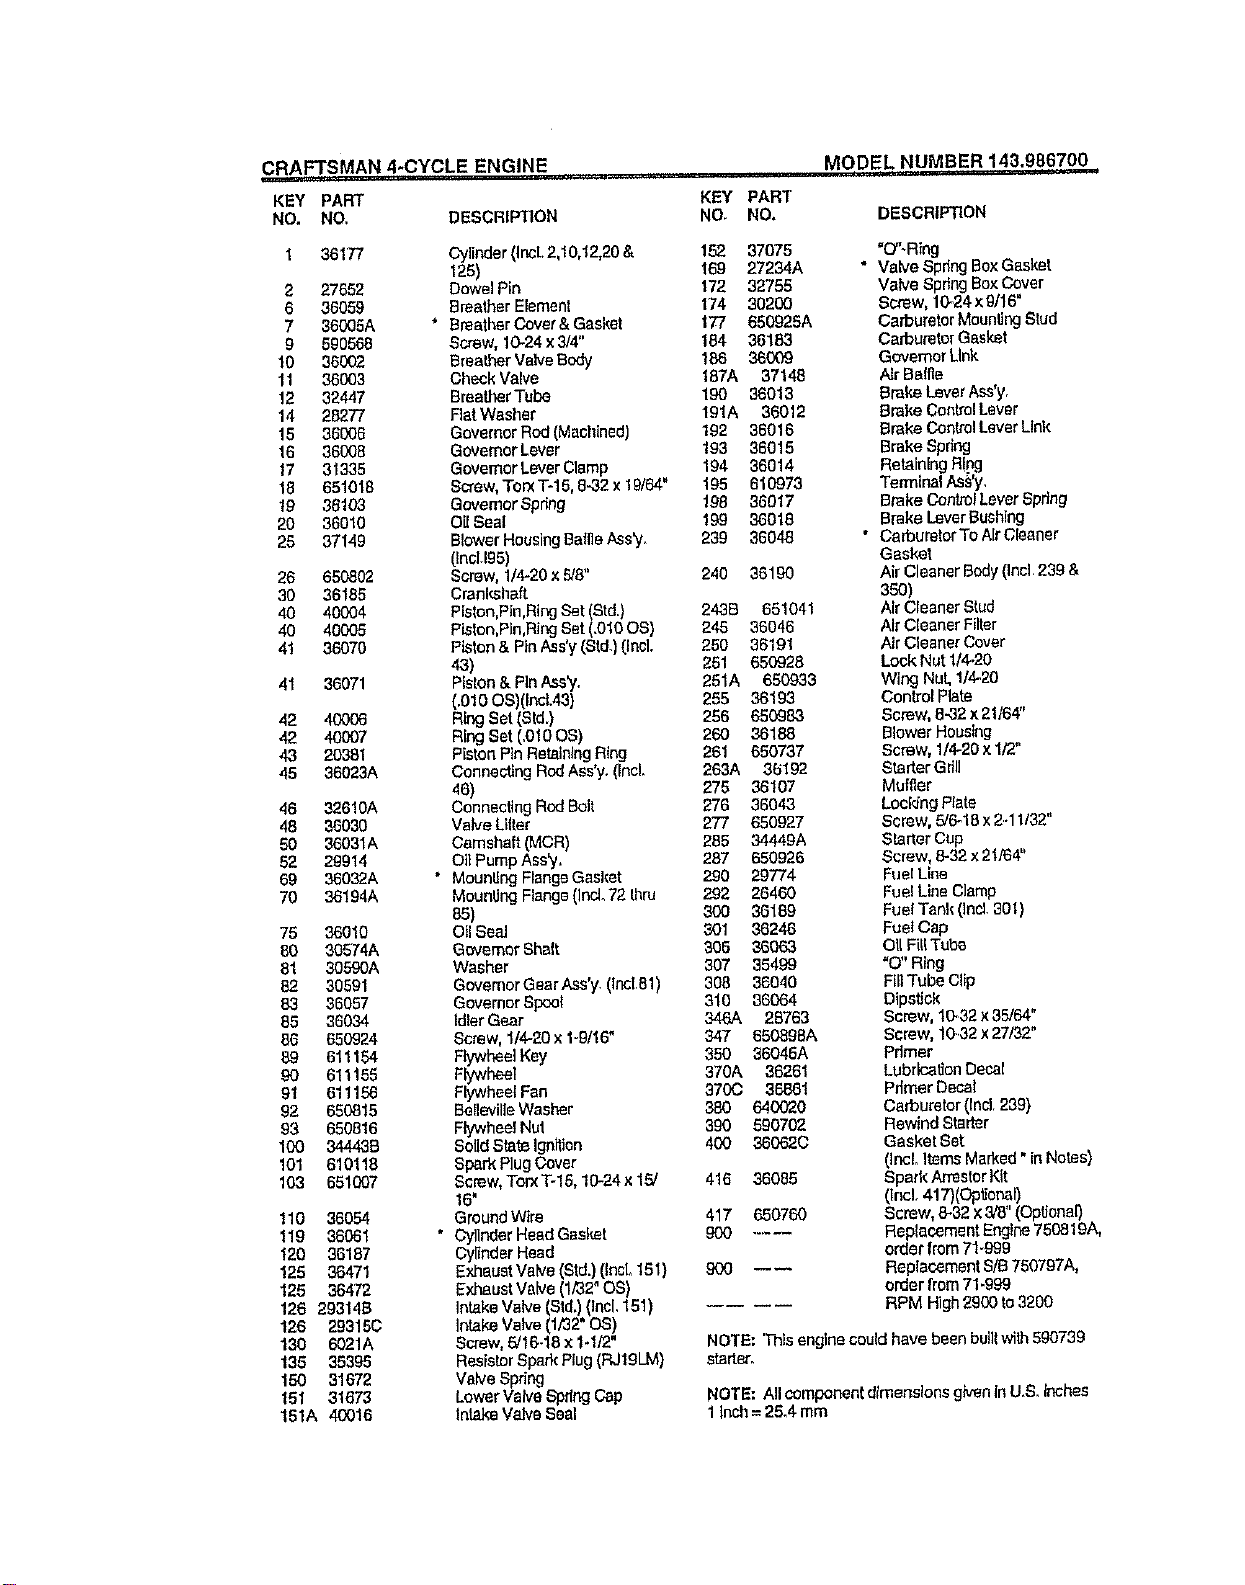
CRAFTSMAN 4-CYCLE ENGINE
i=,,, ,1=r
KEY PART
NO. NO, DESCRIP'[ION
1 36177
2 27652
6 36059
7 36_05A
g 590568
10 36002
11 36o03
12 32447
14 26277
15 66006
16 36008
17 31335
16 651018
19 36103
20 36010
25 37149
26 650802
30 36185
40 4OOO4
40 40005
41 36070
41 36071
42 40006
42 40007
43 20361
45 36023A
46 326!0A
48 36030
50 36031A
52 29914
69 36032A
70 36194A
75 36010
80 30574A
81 305O0A
82 30591
83 36067
85 36034
86 650924
89 611154
90 611155
91 611158
92 650815
93 650816
100 344438
101 610118
103 661007
110 36054
119 36061
120 36187
125 36471
125 364'72
126 29314S
126 29315C
130 6021A
135 36395
150 31672
151 31673
151A 40016
MODEL NUMBER 14:3.986700
= , =,1 =, H_,r= I =
KEY PART
NO NO, DESCRIPTION
Cylinder(IncL2,10,12,20& 152 37075
125) 169 27234A
Dowel Pin 172 32755
Breaker Element 174 30200
* SreatherCove[&Gaeket f77 650925A
Screw,10-24 x3/4" 164 36183
Breather ValveBody 186 36009
Check Valve 187A 37148
BreatherTube 190 36013
Rat Washer lglA 36012
Governer Rod(Macbinod) 192 36016
Governor Lever 193 36015
Governor LeverClamp 194 36014
Screw,Ton(T-15, 8.-32x 19/64." 195 610973
GovemorSpring 198 86017
O11Seal 199 36016
Blower Housing6atl]oAss'y. 239 36048
(thcl.195)
Screw, 1/4.-20x_,',',',',',',',','_8" 240 36190
CranKshaft
Piston,Pin,RingSet (Std.) 2436 651041
PIsten,Pin,RingSet (.010OS) 245 36046
Piston & PinAss'y(Std.)(lncL 250 36191
43.) 251 65O928
Piston & PinAss'y. 251A 650933
(.010 OS)(Ir_.43) 265 36193
RingSet (Std.) 256 650983
RingSet (.OfOOS) 260 ,36188
PistonPinRetainingRing 261 650737
ConnecBngRodAss'y,(Incl, 263A 36192
46) 275 36107
ConnectingRodBolt 276 36043
Valve Lilter 277 650927
Camshaft (MCR) 285 34449A
Oil Pump Ass'y, 287 650926
* MounUngFlangeGasket 290 29774
MouelJngFlange()erie72 Ihru 292 26460
85) 3OO 36189
OIISeal 301 36246
GovernorSha|t 305 36063
Washer 307 35499
GovemorGearAss'y. (test.81) 308 36040
GovernorSpool 310 36064
idlerGear 346A 28763
Screw,1/4-20x 1-8!16" 347 650896A
FlywheelKey 350 36045A
Flywheel 370A 36261
FlywheetFen 370(3 36881
6ellovilleWasher 380 6406'20
FlywheelNut 390 590702
SolidSta_ Ignff_on 400 360620
Spark PlugCover
Screw,TorxT-15,16`24 x 15/ 416 36085
16"
GroundWire 417 650760
* CylinderHeadGasket 9O0 .....
Cyr(nderHead
ExhaustValve (Std.)(InsL151) 900 ---
ExhaustValve (1/32"OS)
Intakevalve(st_.[(tnsl,151) ....
IntakeValve (1/32 OS)
Screw,5/16-18x 1-1/2"
ResistorSpark Plug(RJlgLM}
Valve Spring
LowerValve SpringCap
IntakeValveSeal
"O"-Ring
• ValveSpdng BoxGesket
ValveSpringBoxCover
Screw,10-'24X9/16"
Carburetor MountingStud
Carburetor Gasket
GovernorLink
A_ Balfle
BrakeLeverAss'y,
Brake ControlLever
Brake ControlLoverLink
Brake Spdng
Retaining R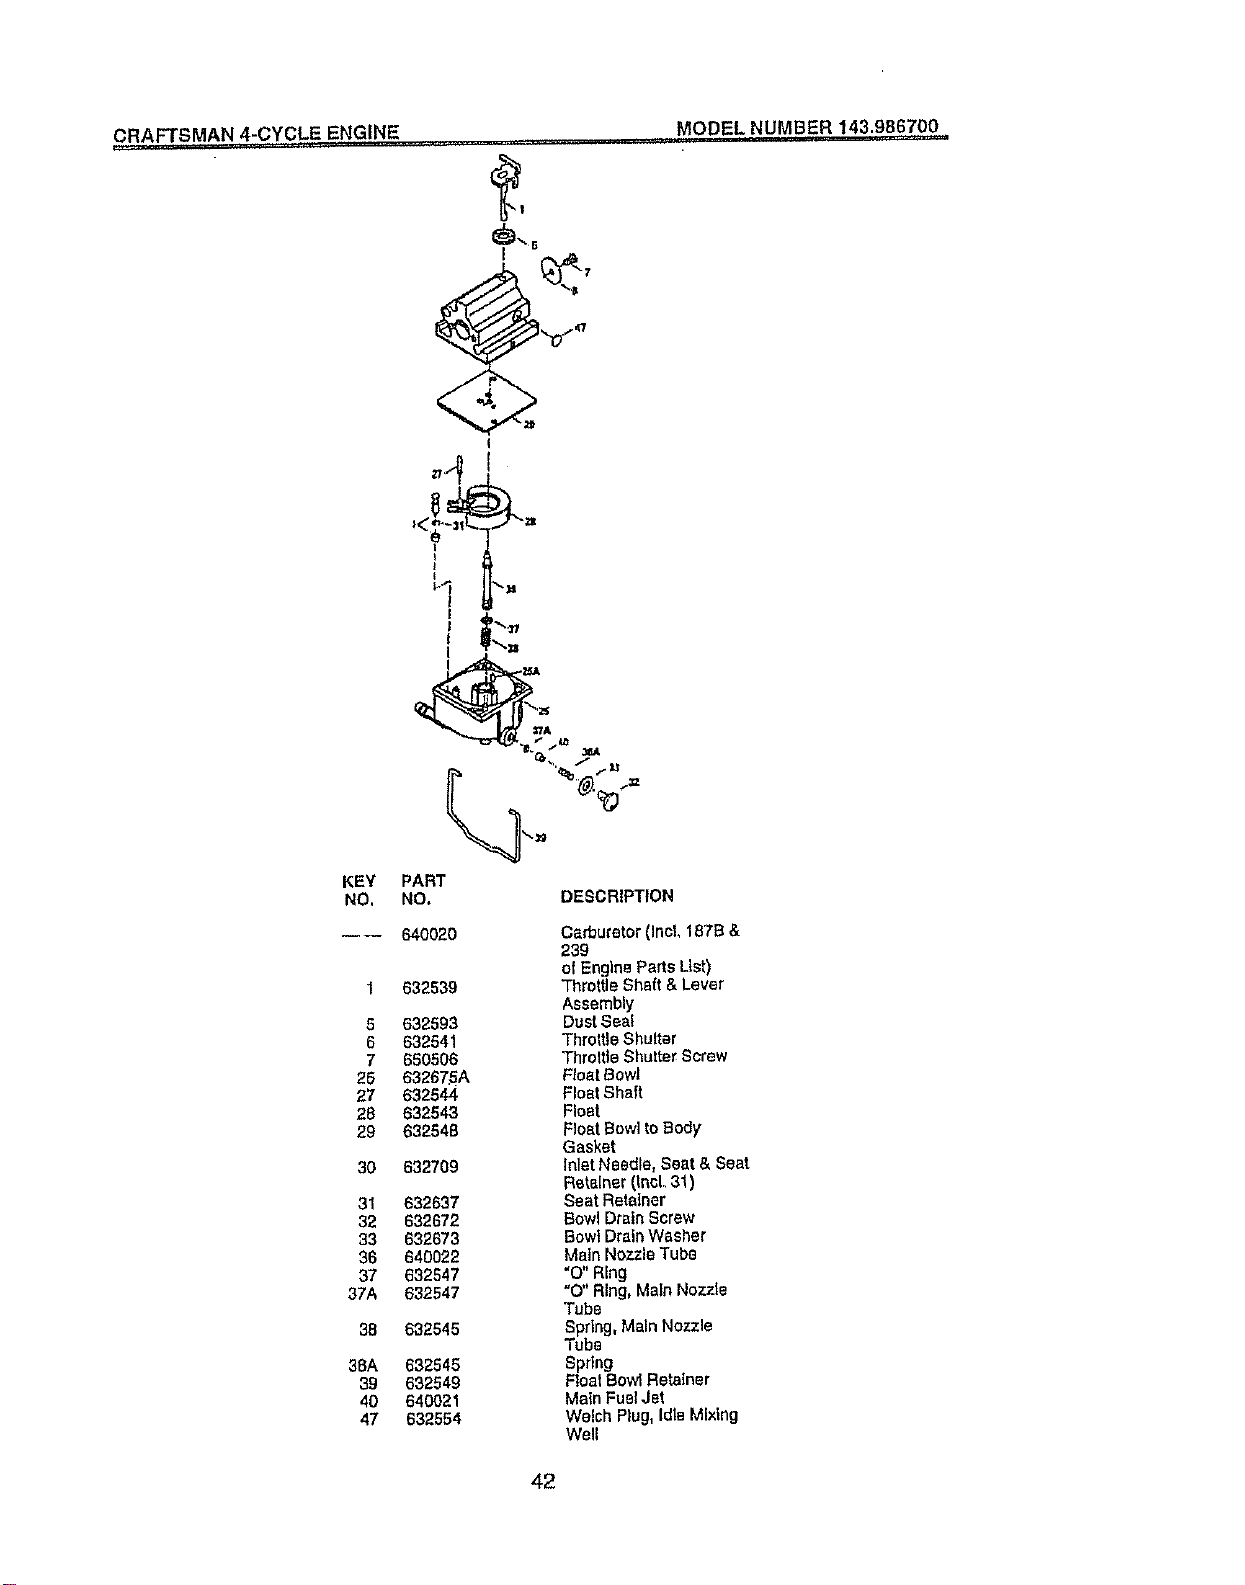
CRAFTSMAN 4-CYCLE ENGINE MODEL NUMBER 143.986700
I
KEY
NO,
5
6
7
26
27
26
29
3O
31
32
33
36
37
37A
36
36A
39
4O
47
=1
=TA
_d t_
PART
NO, DESCRIPTION
---- 640020 Carburetor(Incl, 187S &
239
ol EnglneParts List)
632539 ThrctUeShaft &Lever
Assembly
632593 Dust Seal
632541 Throttle Shulter
650506 Throltle Shutter Screw
632675A FloatBowt
632544 FloatShaft
632543 Float
632548 Float BowltoBody
Gasket
632709 inlet Needle, Seat & Seat
Retainer (Incl, 31)
632637 Seat Retainer
632672 Bowl Drain Screw
632673 Bowl DrainWasher
640022 Main Nozzle Tube
632547 "O" Ring
632547 "O" Ring, Main Nozzle
Tube
632545 Spring, Main Nozzle
Tuba
632545 Spring
632549 FloatBowl Retainer
640021 Main FuelJet
632554 Welch Plug, IdleMixing
Well
42
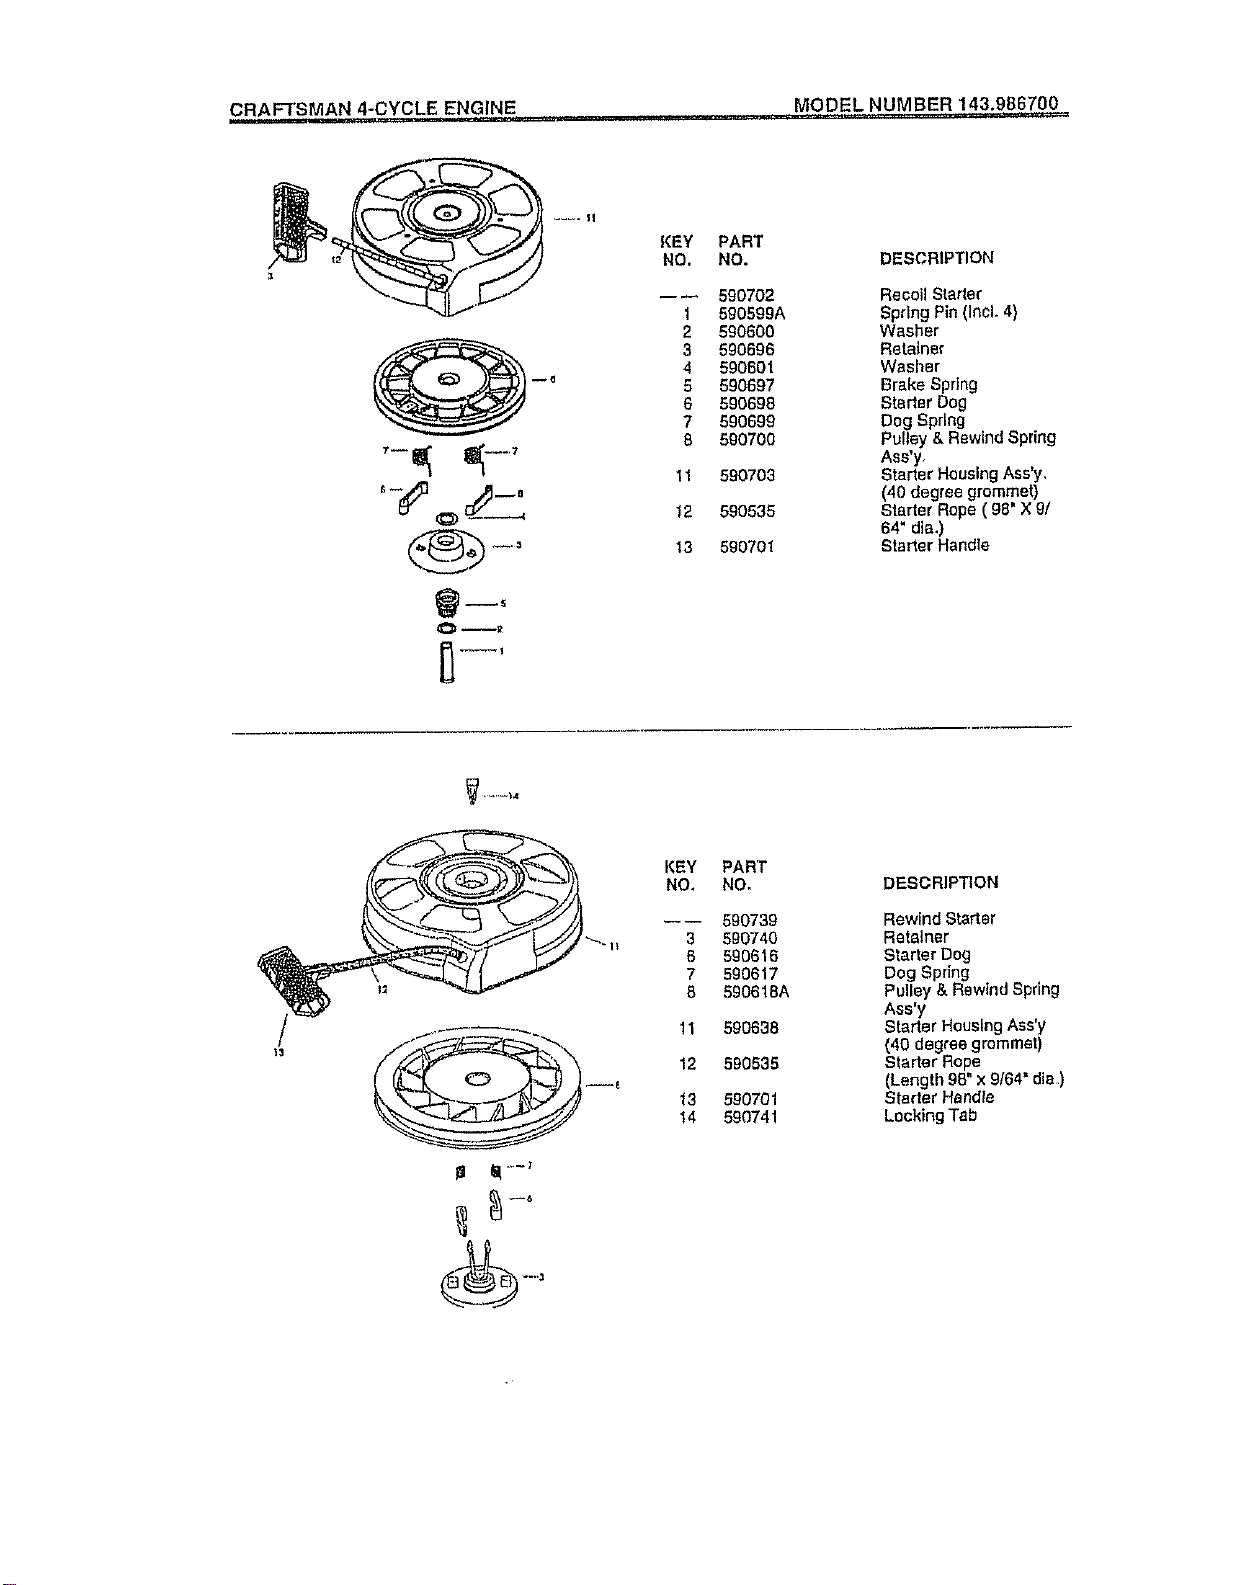
CRAFTSMAN 4-CYCLE, ENGINE MODEL NUMBE B 143.986700
..... II
Omit
KEY
NO.
1
2
3
4
5
6
7
8
11
12
13
PART
NO.
590702
590599A
590600
590696
590601
590697
590598
590699
590700
590703
590535
590701
DESCRIPTION
Recoil Starter
Spring Pin (IneL 4}
Washer
Retainer
Washer
Brake Spring
Starter Dog
Dog Spring
Pulley & Rewind Spring
Ass'y,
Starter Housing Ass'y,
(40 degree grommet)
Starter Rope ( 98" X 9/
64" dla.)
Starter Handle
KEY
NO,
3
6
7
8
11
12
13
t4
PART
NO,
590739
590740
590616
590617
590618A
590638
590535
690701
590741
DESCRIPTION
Rewind Starter
Retainer
Starter Dog
Dog Spring
Pulley &Rewind Spring
Ass'y
Starter Housing Ass'y
(40 degree grommet)
Starter Rope
(Length 95" x 9/64' die)
Starter Handle
Locking Tab
For the repair or replacement parts you need
delivered directly to your home
Call 7 am - 7 pro, 7 days a week
1-800-366 PART
(1-800_366-7278)
Para ordenar piezas con entrega a
domicilio - 1-800-.659-7084
For in-.house major brand repair service
Ca!124 hours a day, 7 days a week
1.-800=4=REPAIR
(1-800-473-7274)
Para pedir servicio de reparaci6n a
domicilio - 1-800-676-5811
For the location of a Sears Parts and
Repair Center in your area
Call 24 hours a day, 7 days a week
1-800-488-1222
For information on purchasing a Sears
Maintenance Agreement or to inquire
about an existing Agreement
Cal_ 9 am -5 pro, Monday-Saturday
1-800-827-6655
When requesting service or ordering
parts, always provide the following
information:
* Product Type • Part Number
o Model Number • Part Description
America s Repair Specialists
161851 05.04°98 REVo4 VB Printedin U,S.A,