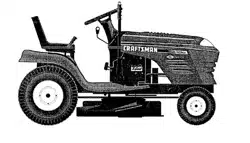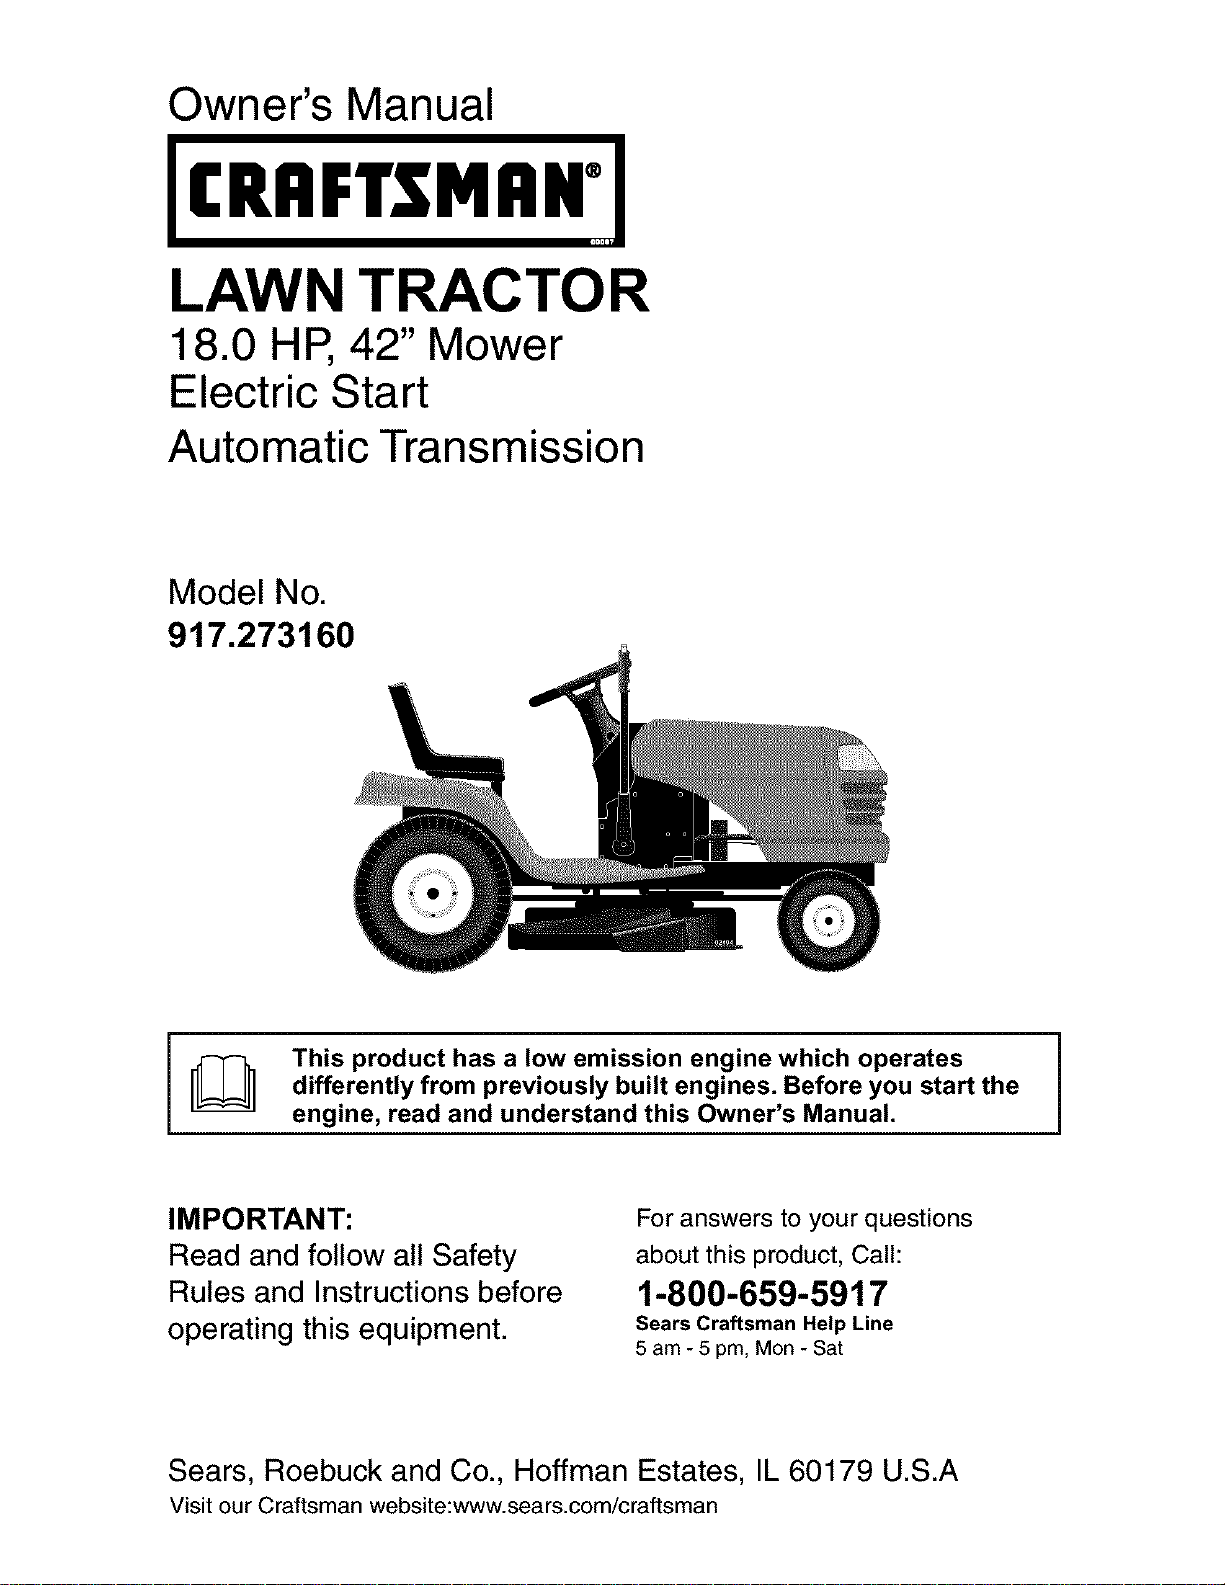
Owner's Manual
IC..FTSMeWl
LAWN TRACTOR
18.0 HP, 42" Mower
Electric Start
Automatic Transmission
Model No.
917.273160
[_ This product has a low emission engine which operates
differently from previously built engines. Before you start the
engine, read and understand this Owner's Manual.
IMPORTANT:
Read and follow all Safety
Rules and Instructions before
operating this equipment.
For answers to your questions
about this product, Call:
1-800-659-5917
Sears Craftsman Help Line
5 am - 5 pm, Mon- Sat
Sears, Roebuck and Co., Hoffman Estates, IL 60179 U.S.A
Visit our Craftsman website:www.sears.com/craftsman
Warranty ................................................ 2
Safety Rules .......................................... 3
Product Specifications ........................... 6
AssemblyP re-Operation ........................ 8
Operation ............................................. 11
Maintenance ....................................... 18
Maintenance Schedule ........................ 18
Service and Adjustments ..................... 22
Storage ................................................ 28
Troubleshooting ................................... 29
Repair Parts ......................................... 34
Sears Service ........................ Back Cover
LIMITED WARRANTY ON CRAFTSMAN RIDING EQUIPMENT
For two (2) years from the date of purchase, if this Craftsman Riding Equipment is
maintained, lubricated and tuned up according to the instructions in the owner's manual,
Sears will repair or replace free of charge any parts that are found to be defective in
material or workmanship according to the guidelines of coverage listed below. Sears
will also provide free labor for these applicable warranted parts for the two full years.
During the first 30 days of purchase, there will be no charges to service the product
at your home for issues covered by this warranty. (See exclusions below). For your
convenience, IN HOME warranty service will still be available after the first 30 days
of purchase, but a trip charge will apply. This charge will be waived if the Craftsman
product is dropped off at an authorized Sears location. For the nearest authorized Sears
location, please call 1-800-4-MY-HOME®. This warranty applies only while this product
is within the United States.
This Warranty does not cover:
• Expendable items which become worn during normal use, including but not limited to
blades, spark plugs, air cleaners, belts, and oil filters.
• Standard Maintenance Servicing, oil changes, or tune-ups
• Tire replacement or repair caused by punctures from outside objects, such as nails,
thorns, stumps, or glass.
• Repairs necessary because of operator abuse, including but not limited to, damage
caused by towing objects beyond the capability of the riding equipment, impacting
objects that bend the frame or crankshaft, or over-speeding the engine.
• Repairs necessary because of operator negligence, including but not limited to, elec-
trical and mechanical damage caused by improper storage, failure to use the proper
grade and amount of engine oil, failure to keep the deck clear of flammable debris,
or failure to maintain the equipment according to the instructions contained in the
owner's manual.
• Engine (fuel system) cleaning or repairs caused by fuel determined to be contami-
nated or oxidized (stale). In general, fuel should be used within 30 days of its pur-
chase date.
• Normal deterioration and wear of the exterior finishes, or product label replacement.
• Riding equipment used for commercial or rental purposes.
LIMITED WARRANTY ON BATTERY
For ninety (90) days from date of purchase, if any battery included with this riding
equipment proves defective in material or workmanship and our testing determines the
battery will not hold a charge, Sears will replace the battery at no charge. During the
first 30 days of purchase, there will be no charges to replace the battery at your HOME.
After the first 30 days, for your convenience, IN-HOME warranty service will still be avail-
able but a trip charge will apply. This charge will be waived if the Craftsman product is
dropped off at an authorized Sears location. For the nearest authorized Sears location,
please call 1-800-4-MY-HOME®.
This battery warranty applies only while this product is within the United States.
This warranty gives you specific legal rights, and you may also have other rights, which
vary, from state to state.
Sears, Roebuck and Co.,Dept.817WA, Hoffman Estates, IL 60179
2
IMPORTANT: This cutting machine is capable of amputating hands and feet and throw-
ing objects. Failure to observe the following safety instructions could result in serious
injury or death.
_WARNING: In order to prevent ac-
cidental starting when setting up, trans-
porting, adjusting or making repairs,
always disconnect spark plug wire and
place wire where it cannot contact spark
plug.
,_WARNING: Do not coast down a
hill in neutral, you may lose control of the
tractor.
_WARNING: Tow only the attachments
that are recommended by and comply with
specifications of the manufacturer of your
tractor. Use common sense when towing.
Operate only at the lowest possible speed
when on a slope. Too heavy of a load,
while on a slope, is dangerous. Tires can
lose traction with the ground and cause
you to lose control of your tractor.
_bWARNING: Engine exhaust, some
of its constituents, and certain vehicle
components contain or emit chemicals
known to the State of California to cause
cancer and birth defects or other reproduc-
tive harm.
_WARNING: Battery posts, terminals
and related accessories contain lead and
lead compounds, chemicals known to the
State of California to cause cancer and
birth defects or other reproductive harm.
Wash hands after handling.
I. GENERAL OPERATION
• Read, understand, and follow all instruc-
tions in the manual and on the machine
before starting.
• Only allow responsible adults, who are
familiar with the instructions, to operate
the machine.
• Clear the area of objects such as rocks,
toys, wire, etc., which could be picked
up and thrown by the blade.
• Be sure the area is clear of other people
before mowing. Stop machine if anyone
enters the area.
• Never carry passengers.
• Do not mow in reverse unless abso-
lutely necessary. Always look down and
behind before and while backing.
• Be aware of the mower discharge direc-
tion and do not point it at anyone. Do
not operate the mower without either
the entire grass catcher or the guard in
place.
• Slow down before turning.
• Never leave a running machine unat-
tended. Always turn off blades, set
parking brake, stop engine, and remove
keys before dismounting.
• Turn off blades when not mowing.
• Stop engine before removing grass
catcher or unclogging chute.
• Mow only in daylight or good artificial
light.
• Do not operate the machine while under
the influence of alcohol or drugs.
• Watch for traffic when operating near or
crossing roadways.
• Use extra care when loading or un-
loading the machine into a trailer or
truck.
• Data indicates that operators, age 60
years and above, are involved in a large
percentage of riding mower-related in-
juries. These operators should evaluate
their ability to operate the riding mower
safely enough to protect themselves
and others from serious injury.
• Keep machine free of grass, leaves or
other debris build-up which can touch
hot exhaust / engine parts and burn. Do
not allow the mower deck to plow leaves
or other debris which can cause build-
up to occur. Clean any oil or fuel
spillage before operating or storing the
machine. Allow machine to cool before
storage.
II. SLOPE OPERATION
Slopes are a major factor related to loss-
of-control and tipover accidents, which can
result in severe injury or death. All slopes
require extra caution. If you cannot back
up the slope or ifyou feel uneasy on it, do
not mow it.
3

DO:
• Mow up and down slopes, not across.
• Remove obstacles such as rocks, tree
limbs, etc.
• Watch for holes, ruts, or bumps. Un-
even terrain could overturn the machine.
Tall grass can hide obstacles.
• Use slow speed. Choose a low gear
so that you will not have to stop or shift
while on the slope.
• Follow the manufacturer's recommend-
ations for wheel weights or counter-
weights to improve stability.
• Use extra care with grass catchers or
other attachments. These can change
the stability of the machine.
• Keep all movement on the slopes slow
and gradual Do not make sudden
changes in speed or direction.
• Avoid starting or stopping on a slope.
If tires lose traction, disengage the
blades and proceed slowly straight
down the slope.
DO NOT:
• Do not turn on slopes unless neces-
sary, and then, turn slowly and gradually
downhill, if possible.
• Do notmow near drop-offs, ditches,
or embankments. The mower could
suddenly turn over if a wheel is over
the edge of a cliff or ditch, or if an edge
caves in.
• Do not mow on wet grass. Reduced
traction could cause sliding.
• Do not try to stabilize the machine by
putting your foot on the ground.
• Do notuse grass catcher on steep
slopes.
III. CHILDREN
Tragic accidents can occur if the operator
is not alert to the presence of children.
Children are often attracted to the ma-
chine and the mowing activity. Neveras-
sume that children will remain where you
last saw them.
• Keep children out of the mowing area
and under the watchful care of another
responsible adult.
• Be alert and turn machine off if children
enter the area.
• Before and when backing, look behind
and down for small children.
• Never carry children. They may fall off
and be seriously injured or interfere with
safe machine operation.
• Never allow children to operate the
machine.
• Use extra care when approaching blind
corners, shrubs, trees, or other objects
that may obscure vision.
IV. SERVICE
• Use extra care in handling gasoline and
other fuels. They are flammable and
vapors are explosive.
- Use only an approved container.
- Never remove gas cap or add fuel
with the engine running. Allow
engine to cool before refueling. Do
not smoke.
- Never refuel the machine indoors.
- Never store the machine or fuel
container inside where there is an
open flame, such as a water heater.
• Never run a machine inside a closed
area.
• Keep nuts and bolts, especially blade
attachment bolts, tight and keep equip-
ment in good condition.
• Never tamper with safety devices.
Check their proper operation regularly.
• Keep machine free of grass, leaves, or
other debris build-up. Clean oil or fuel
spillage. Allow machine to cool before
storing.
• Stop and inspect the equipment if you
strike an object. Repair, if necessary,
before restarting.
• Never make adjustments or repairs with
the engine running.
• Grass catcher components are subject
to wear, damage, and deterioration,
which could expose moving parts or
allow objects to be thrown. Frequently
check components and replace with
manufacturer's recommended parts,
when necessary.
• Mower blades are sharp and can cut.
Wrap the blade(s) or wear gloves, and
use extra caution when servicing them.
• Check brake operation frequently. Ad-
just and service as required.
4
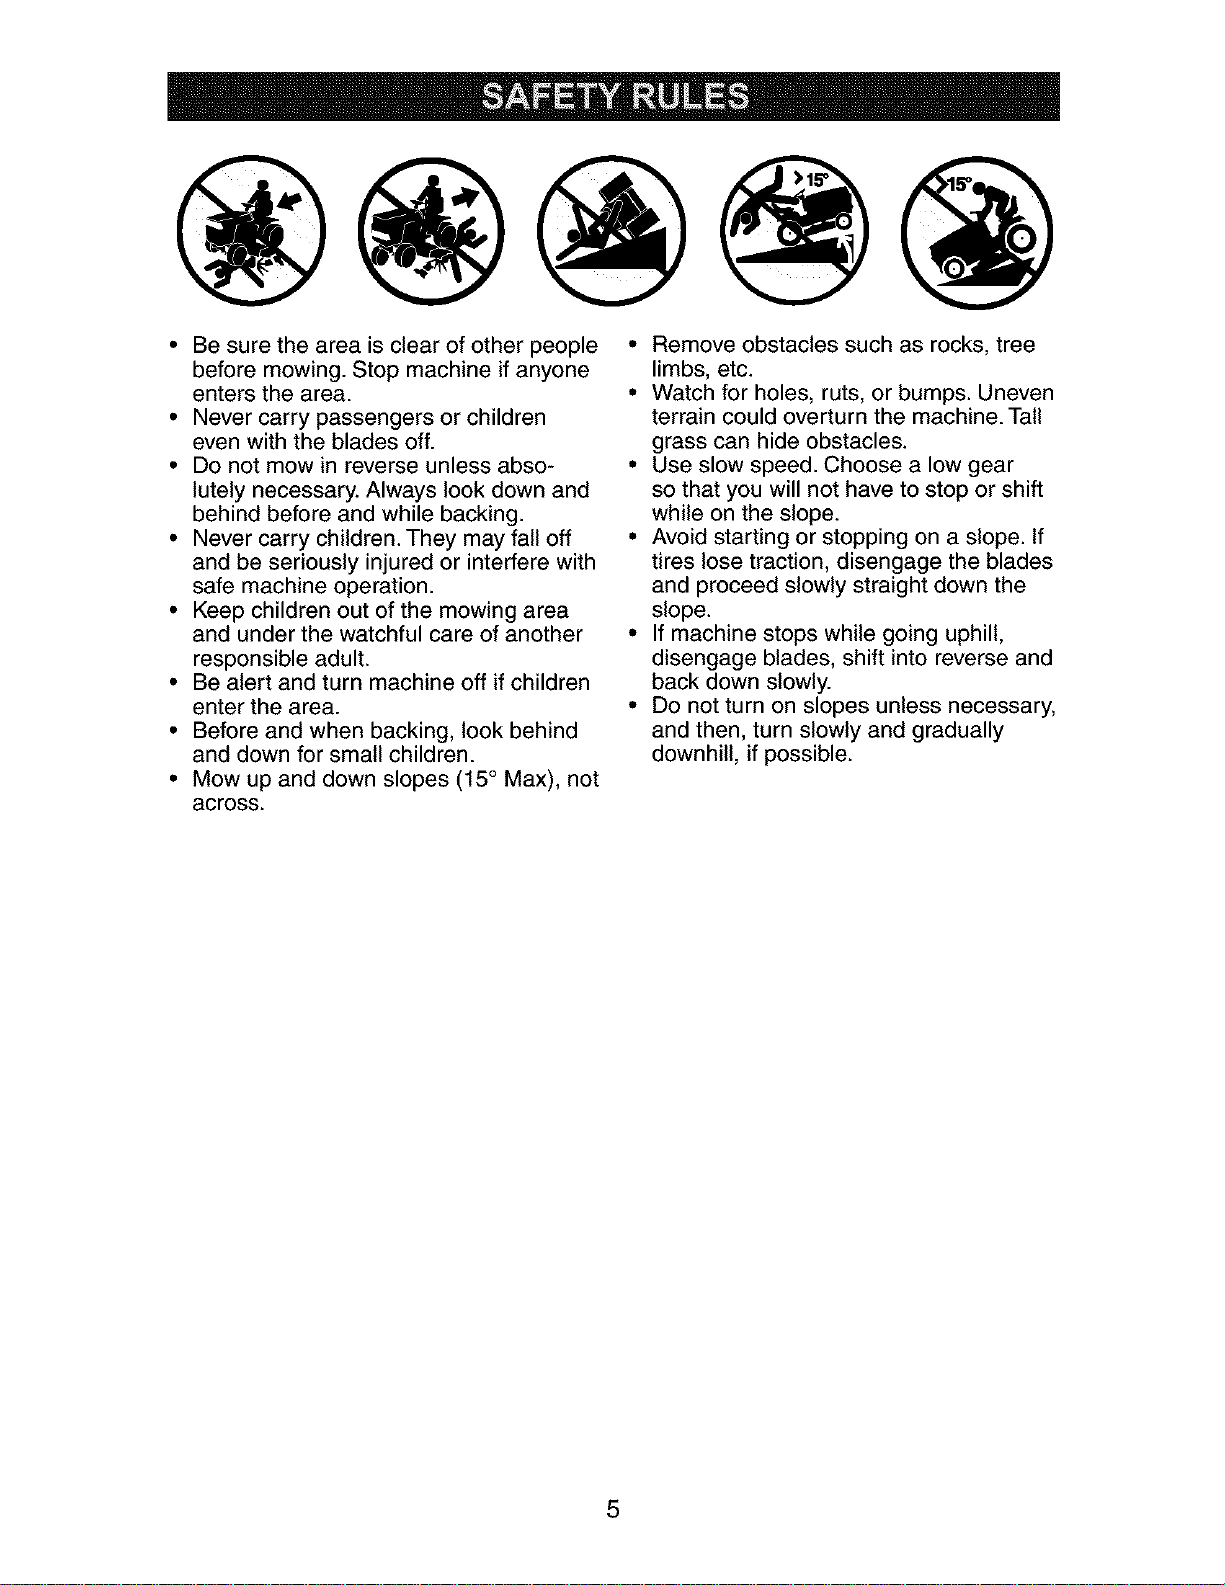
• Be sure the area is clear of other people
before mowing. Stop machine if anyone
enters the area.
• Never carry passengers or children
even with the blades off.
• Do not mow in reverse unless abso-
lutely necessary. Always look down and
behind before and while backing.
• Never carry children. They may fall off
and be seriously injured or interfere with
safe machine operation.
• Keep children out of the mowing area
and under the watchful care of another
responsible adult.
• Be alert and turn machine off if children
enter the area.
• Before and when backing, look behind
and down for small children.
• Mow up and down slopes (15 ° Max), not
across.
• Remove obstacles such as rocks, tree
limbs, etc.
• Watch for holes, ruts, or bumps. Uneven
terrain could overturn the machine. Tall
grass can hide obstacles.
• Use slow speed. Choose a low gear
so that you will not have to stop or shift
while on the slope.
• Avoid starting or stopping on a slope. If
tires lose traction, disengage the blades
and proceed slowly straight down the
slope.
• If machine stops while going uphill,
disengage blades, shift into reverse and
back down slowly.
• Do not turn on slopes unless necessary,
and then, turn slowly and gradually
downhill, if possible.
5

PRODUCT SPECIFICATIONS
i Gasoline Capacity 1.25 Gallons
and Type: Unleaded Regular
Oil Type SAE10W30(Above 32°F
API-SF-SJ): SAE 5W-30(Below 32°F
Oil Capacity: W/Filter 4.0 Pints
W/O Filter 3.5 Pints
Spark Plug: Champion RC12YC
GAP: .040")
Ground Speed Forward: 5.5
(MPH): Reverse: 2.4
Tire Pressure: Front: 14 PSI
Rear: 10 PSI
i Charging 15 Amps @ 3600RPM
i System:
i Battery: Amp/Hr: 28
Min. CCA: 230
Case Size: UIR
Blade Bolt
Torque: 27-35 Ft. Lbs.
CONGRATULATIONS on your purchase
of a new tractor. It has been designed,
engineered and manufactured to give
you the best possible dependability and
performance.
Should you experience any problem you
cannot easily remedy, please contact a
Sears or other qualified service center.
We have competent, well-trained techni-
cians and the proper tools to service or
repair this tractor.
Please read and retain this manual. The
instructions will enable you to assemble
and maintain your tractor properly. Always
observe the "SAFETY RULES".
CUSTOMER RESPONSIBILITIES
° Read and observe the safety rules.
• Follow a regular schedule in main-
taining, caring for and using your tractor.
• Follow the instructions under"Mainte-
nance" and "Storage" sections of this
owner's manual.
_WARNING: This tractor is equipped
with an internal combustion engine and
should not be used on or near any unim-
proved forest-covered, brush-covered or
grass-covered land unless the engine's
exhaust system is equipped with a spark
arrester meeting applicable local or state
laws (if any). If a spark arrester is used, it
should be maintained in effective working
order by the operator.
In the state of California the above is re-
quired by law (Section 4442 of the Califor-
nia Public Resources Code). Other states
may have similar laws. Federal laws apply
on federal lands. A spark arrester for the
muffler is available through your nearest
Sears service center (See REPAIR PARTS
section of this manual).
REPAIR PROTECTION
AGREEMENTS
Congratulations on making a smart pur-
chase. Your new Craftsman® product is
designed and manufactured for years of
dependable operation. But like all prod-
ucts, it may require repair from time to
time. That's when having a Repair Protec-
tion Agreement can save you money and
aggravation.
Purchase a Repair Protection Agreement
now and protect yourself from unexpected
hassle and expense.
Here's what's included in the Agreement:
• Expert service by our 12,000 profe-
sional repair specialists.
• Unlimited service and no charge for
parts and labor on all covered repairs.
• Product replacement if your covered
product can't be fixed.
• Discount of 10% from regular price of
service and service-related parts not
covered by the agreement; also, 10%
off regular price of preventive mainte-
nance check.
• Fast help by phone- phone support
from a Sears technician on products
requiring in-home repair, plus conve-
nient repair scheduling.
Once you purchase the Agreement, a
simple phone call is all that ittakes for you
to schedule service. You can call anytime
day or night, or schedule a service ap-
pointment online.
Sears has over 12,000 professional repair
specialists, who have access to over 4.5
million quality parts and accessories.
That's the kind of professionalism you can
count on to help prolong the life of your
new purchase for years to come. Purchase
your Repair Protection Agreement today!
Some limitations and exclusions apply.
For prices and additional information
call 1-800-827-6655.
SEARS INSTALLATION SERVICE
For Sears professiona/ installation of home
appliances, garage door openers, water
heaters, and other major home items, in
the U.S.A. call 1-800-4-MY-HOME®
6

Steering
Wheel Insert
(1) Locknut
1/2-20
Steering Wheel
(1) Locknut
1/4-28
Steer,
Boot
Steering
Wheel Adapter
(1) Large Flat Washer
(1) Hex Bolt
1/4-28 x 1-1/4
_ teering
Extension
Shaft
(_Washer
17/32 x 1-3/16 x 12
Gauge
_(1) Knob
For Future Use
Slope Sheet
Keys
Video Cassette
7
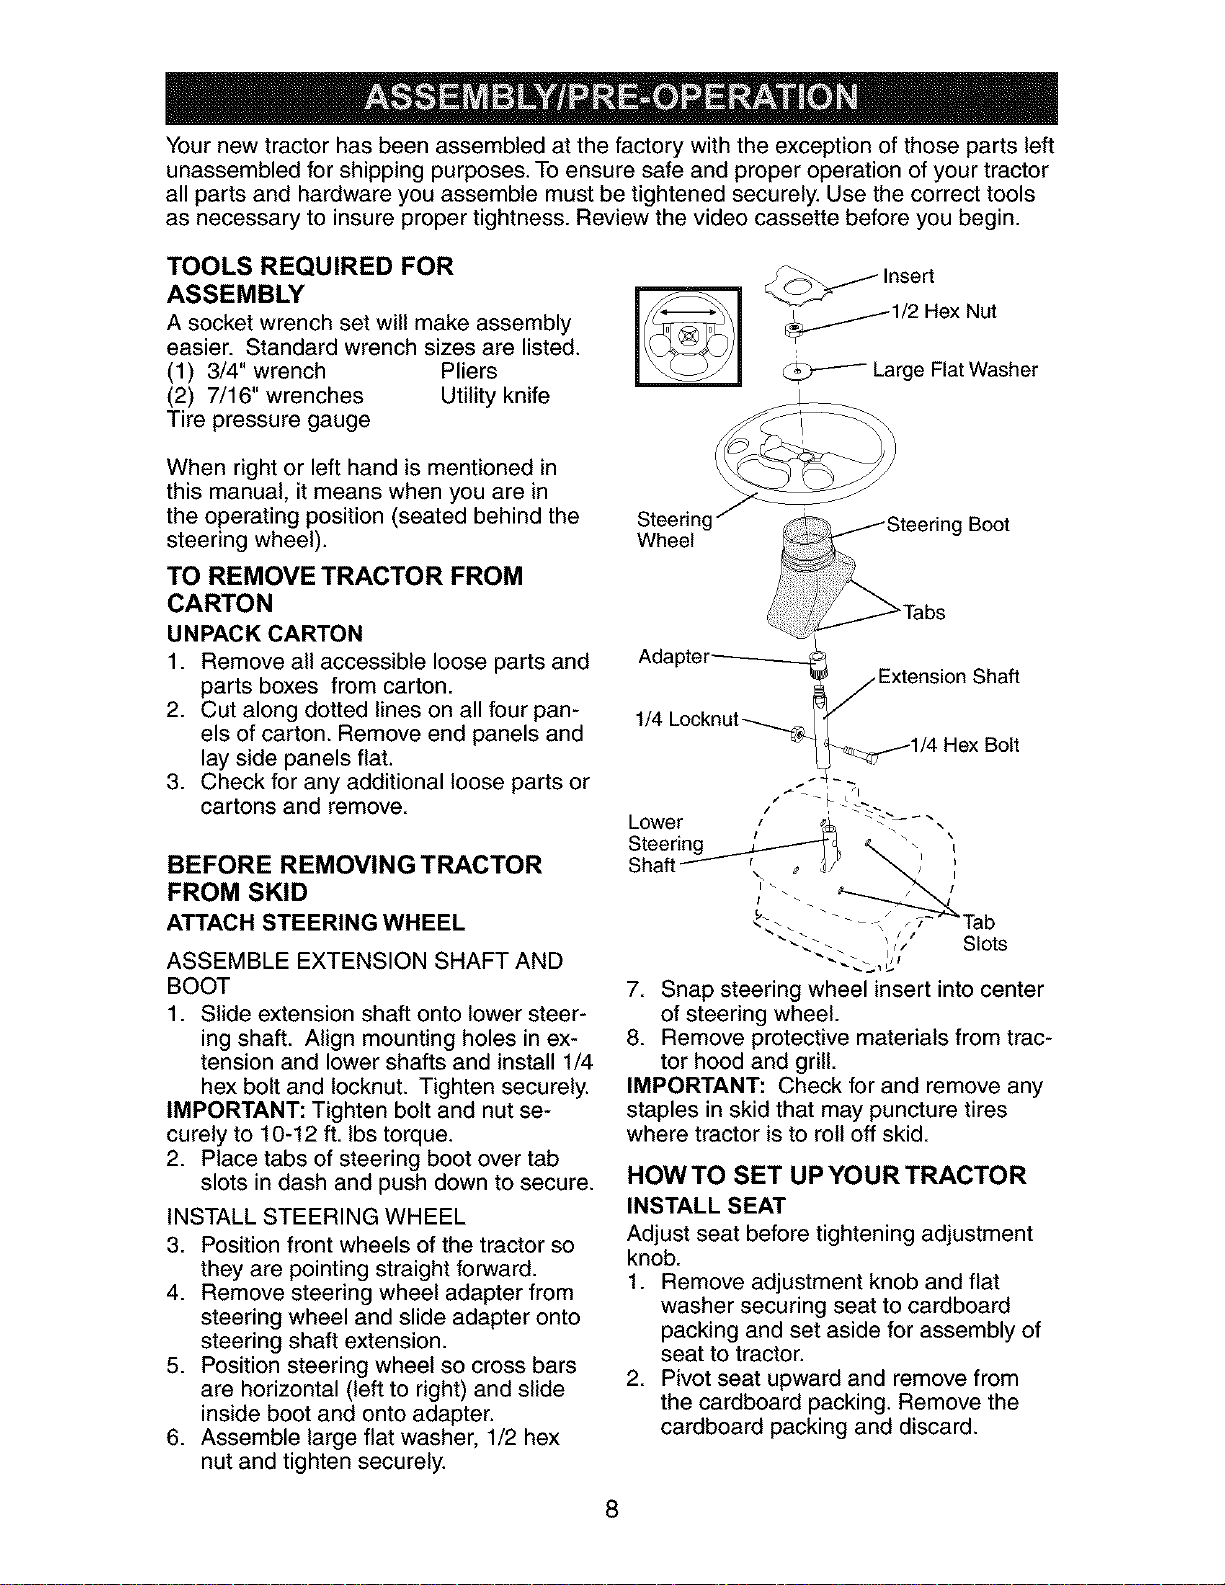
Your new tractor has been assembled at the factory with the exception of those parts left
unassembled for shipping purposes. To ensure safe and proper operation of your tractor
all parts and hardware you assemble must be tightened securely. Use the correct tools
as necessary to insure proper tightness. Review the video cassette before you begin.
TOOLS REQUIRED FOR
ASSEMBLY
A socket wrench set will make assembly
easier. Standard wrench sizes are listed.
(1) 3/4" wrench Pliers
(2) 7/16" wrenches Utility knife
Tire pressure gauge
When right or left hand is mentioned in
this manual, it means when you are in
the operating position (seated behind the
steering wheel).
TO REMOVE TRACTOR FROM
CARTON
UNPACK CARTON
1. Remove all accessible loose parts and
parts boxes from carton.
2. Cut along dotted lines on all four pan-
els of carton. Remove end panels and
lay side panels flat.
3. Check for any additional loose parts or
cartons and remove.
BEFORE REMOVING TRACTOR
FROM SKID
ATTACH STEERING WHEEL
ASSEMBLE EXTENSION SHAFT AND
BOOT
1. Slide extension shaft onto lower steer-
ing shaft. Align mounting holes in ex-
tension and lower shafts and install 1/4
hex bolt and Iocknut. Tighten securely.
IMPORTANT: Tighten bolt and nut se-
curely to 10-12 ft. Ibs torque.
2. Place tabs of steering boot over tab
slots in dash and push down to secure.
INSTALL STEERING WHEEL
3. Position front wheels of the tractor so
they are pointing straight forward.
4. Remove steering wheel adapter from
steering wheel and slide adapter onto
steering shaft extension.
5. Position steering wheel so cross bars
are horizontal (left to right) and slide
inside boot and onto adapter.
6. Assemble large flat washer, 1/2 hex
nut and tighten securely.
St_ere_g _eering
Tabs
Adapter---------__
1/4 Locknut---......_
_._-_J Insert
_._1/2 Hex Nut
Large Flat Washer
Boot
Extension Shaft
_t_._/1/4 Hex Bolt
, /
Lower _ ¢& _. .
• / \
Steering _....__-----_-_ _ L
Shaft_ _\ _ 4/
• I
""_'_ ' _' Slots
7. Snap steering wheel insert into center
of steering wheel.
8. Remove protective materials from trac-
tor hood and grill.
IMPORTANT" Check for and remove any
staples in skid that may puncture tires
where tractor is to roll off skid.
HOW TO SET UP YOUR TRACTOR
INSTALL SEAT
Adjust seat before tightening adjustment
knob.
1. Remove adjustment knob and flat
washer securing seat to cardboard
packing and set aside for assembly of
seat to tractor.
2. Pivot seat upward and remove from
the cardboard packing. Remove the
cardboard packing and discard.
8
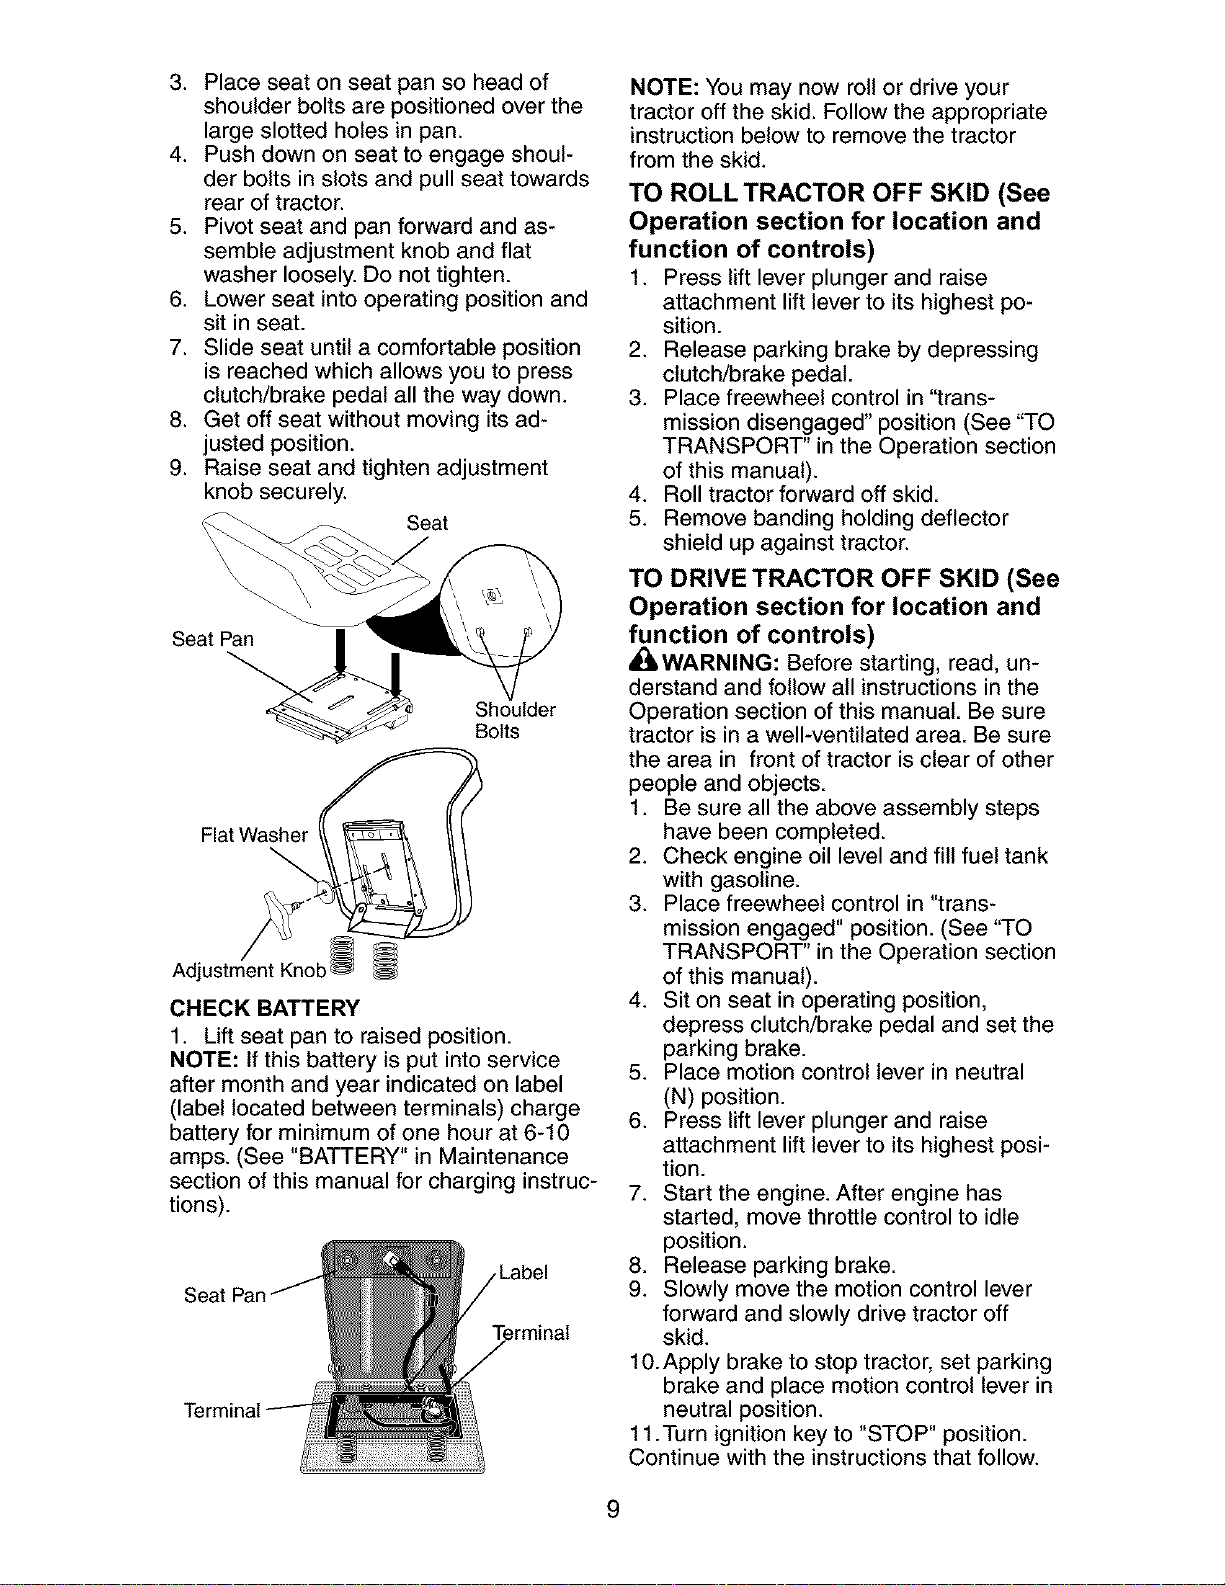
3. Place seat on seat pan so head of
shoulder bolts are positioned over the
large slotted holes in pan.
4. Push down on seat to engage shoul-
der bolts in slots and pull seat towards
rear of tractor.
5. Pivot seat and pan forward and as-
semble adjustment knob and flat
washer loosely. Do not tighten.
6. Lower seat into operating position and
sit in seat.
7. Slide seat until a comfortable position
is reached which allows you to press
clutch/brake pedal all the way down.
8. Get off seat without moving its ad-
justed position.
9. Raise seat and tighten adjustment
knob securely.
Seat
Seat Pan
Shoulder
Bolts
Flat Washer
Adj
CHECK BATTERY
1. Lift seat pan to raised position.
NOTE: If this battery is put into service
after month and year indicated on label
(label located between terminals) charge
battery for minimum of one hour at 6-10
amps. (See "BATTERY" in Maintenance
section of this manual for charging instruc-
tions).
Seat
Label
Terminal
NOTE: You may now roll or drive your
tractor off the skid. Follow the appropriate
instruction below to remove the tractor
from the skid.
TO ROLL TRACTOR OFF SKID (See
Operation section for location and
function of controls)
1. Press lift lever plunger and raise
attachment lift lever to its highest po-
sition.
2. Release parking brake by depressing
clutch/brake pedal.
3. Place freewheel control in '"trans-
mission disengaged" position (See "TO
TRANSPORT" in the Operation section
of this manual).
4. Roll tractor forward off skid.
5. Remove banding holding deflector
shield up against tractor.
TO DRIVE TRACTOR OFF SKID (See
Operation section for location and
function of controls)
,dr_WARNING: Before starting, read, un-
derstand and follow all instructions in the
Operation section of this manual. Be sure
tractor is in a well-ventilated area. Be sure
the area in front of tractor is clear of other
people and objects.
1. Be sure all the above assembly steps
have been completed.
2. Check engine oil level and fill fuel tank
with gasoline.
3. Place freewheel control in "trans-
mission engaged" position. (See "TO
TRANSPORT" in the Operation section
of this manual).
4. Sit on seat in operating position,
depress clutch/brake pedal and set the
parking brake.
5. Place motion control lever in neutral
(N) position.
6. Press lift lever plunger and raise
attachment lift lever to its highest posi-
tion.
7. Start the engine. After engine has
started, move throttle control to idle
position.
8. Release parking brake.
9. Slowly move the motion control lever
forward and slowly drive tractor off
skid.
10.Apply brake to stop tractor, set parking
brake and place motion control lever in
neutral position.
11.Turn ignition key to "STOP" position.
Continue with the instructions that follow.
9
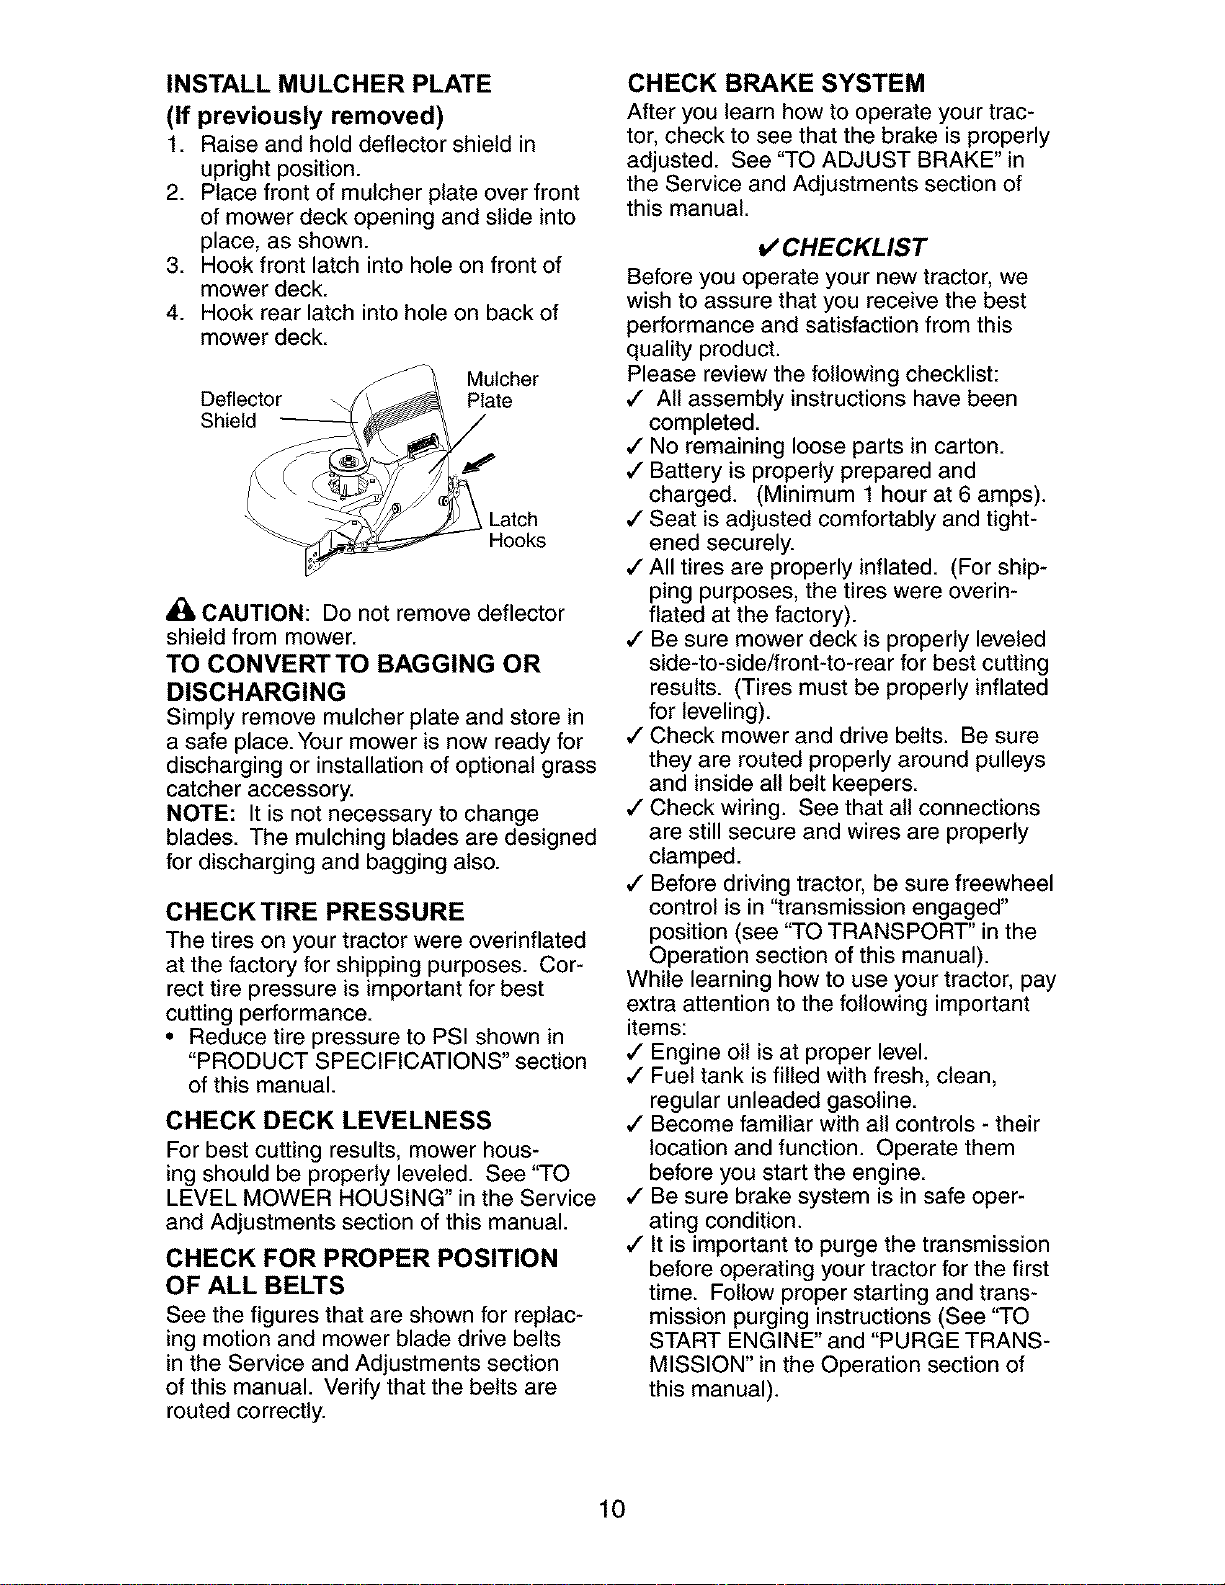
INSTALL MULCHER PLATE
(If previously removed)
1. Raise and hold deflector shield in
upright position.
2. Place front of mulcher plate over front
of mower deck opening and slide into
place, as shown.
3. Hook front latch into hole on front of
mower deck.
4. Hook rear latch into hole on back of
mower deck.
Deflector
Shield
Mulcher
Plate
Latch
Hooks
,l_ CAUTION: Do not remove deflector
shield from mower.
TO CONVERTTO BAGGING OR
DISCHARGING
Simply remove mulcher plate and store in
a safe place.Your mower is now ready for
discharging or installation of optional grass
catcher accessory.
NOTE: It is not necessary to change
blades. The mulching blades are designed
for discharging and bagging also.
CHECK TIRE PRESSURE
The tires on your tractor were overinflated
at the factory for shipping purposes. Cor-
rect tire pressure is important for best
cutting performance.
• Reduce tire pressure to PSI shown in
"PRODUCT SPECIFICATIONS" section
of this manual.
CHECK DECK LEVELNESS
For best cutting results, mower hous-
ing should be properly leveled. See "TO
LEVEL MOWER HOUSING" in the Service
and Adjustments section of this manual.
CHECK FOR PROPER POSITION
OF ALL BELTS
See the figures that are shown for replac-
ing motion and mower blade drive belts
in the Service and Adjustments section
of this manual. Verify that the belts are
routed correctly.
CHECK BRAKE SYSTEM
After you learn how to operate your trac-
tor, check to see that the brake is properly
adjusted. See "TO ADJUST BRAKE" in
the Service and Adjustments section of
this manual.
v' CHECKLIST
Before you operate your new tractor, we
wish to assure that you receive the best
performance and satisfaction from this
quality product.
Please review the following checklist:
,/ All assembly instructions have been
completed.
,/No remaining loose parts in carton.
,/Battery is properly prepared and
charged. (Minimum 1 hour at 6 amps).
,/Seat is adjusted comfortably and tight-
ened securely.
,/All tires are properly inflated. (For ship-
ping purposes, the tires were overin-
flated at the factory).
,/Be sure mower deck is properly leveled
side-to-side/front-to-rear for best cutting
results. (Tires must be properly inflated
for leveling).
,/Check mower and drive belts. Be sure
they are routed properly around pulleys
and inside all belt keepers.
,/Check wiring. See that all connections
are still secure and wires are properly
clamped.
,/Before driving tractor, be sure freewheel
control is in '"transmission engaged"
position (see "TO TRANSPORT" in the
Operation section of this manual).
While learning how to use your tractor, pay
extra attention to the following important
items:
,/Engine oil is at proper level.
,/Fuel tank is filled with fresh, clean,
regular unleaded gasoline.
,/Become familiar with all controls - their
location and function. Operate them
before you start the engine.
,/Be sure brake system is in safe oper-
ating condition.
,/It is important to purge the transmission
before operating your tractor for the first
time. Follow proper starting and trans-
mission purging instructions (See "TO
START ENGINE" and "PURGE TRANS-
MISSION" in the Operation section of
this manual).
10
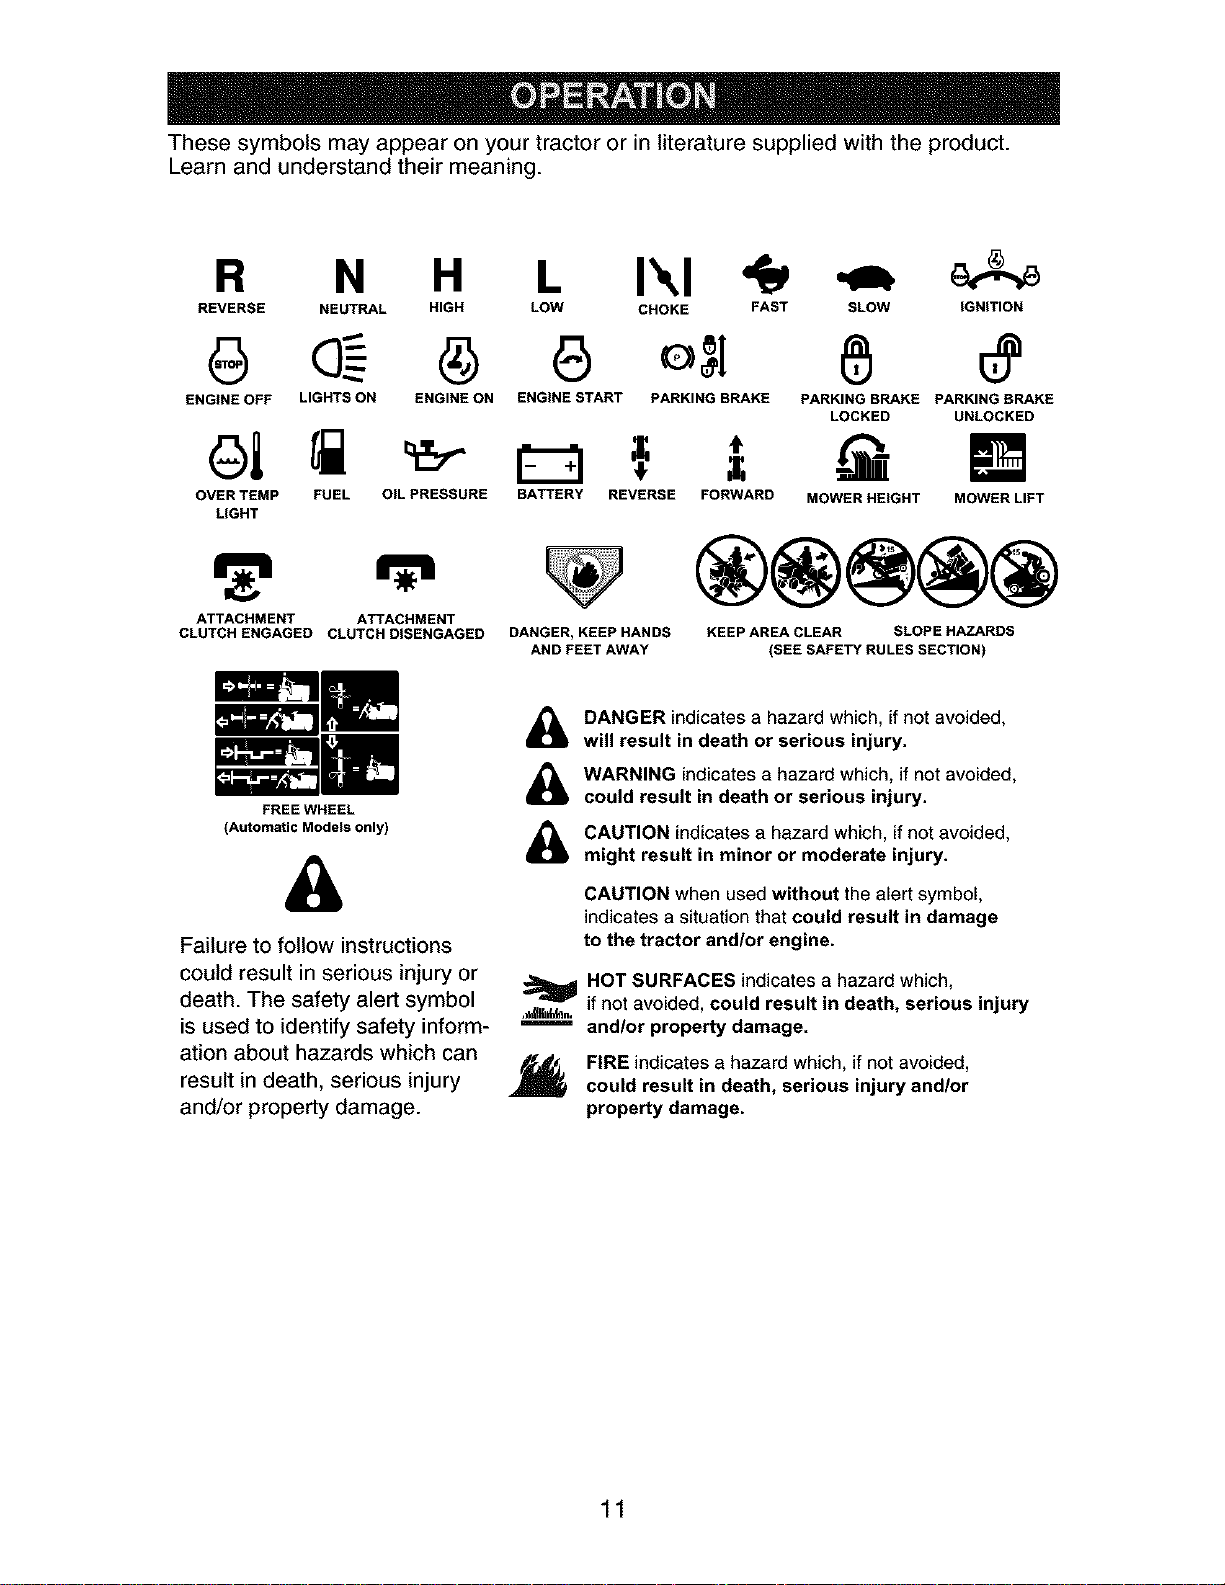
These symbols may appear on your tractor or in literature supplied with the product.
Learn and understand their meaning.
R N H L I\1
REVERSE NEUTRAL HIGH LOW CHOKE FAST SLOW IGNITION
ENGINE OFF LIGHTS ON ENGINE ON ENGINE START PARKING BRAKE PARKING BRAKE PARKING BRAKE
LOCKED UNLOCKED
OVER TEMP FUEL OIL PRESSURE BATTERY REVERSE FORWARD MOWER HEIGHT MOWER LIFT
LIGHT
ATTACHMENT ATTACHMENT
CLUTCH ENGAGED CLUTCH DISENGAGED
==E
FREE WHEEL
(Automatic Models only)
&
Failure to follow instructions
could result in serious injury or
death. The safety alert symbol
is used to identify safety inform-
ation about hazards which can
result in death, serious injury
and/or property damage.
DANGER, KEEP HANDS
AND FEET AWAY
®@@@@
KEEP AREA CLEAR SLOPE HAZARDS
(SEE SAFETY RULES SECTION)
&
&
&
DANGER indicates a hazard which, if not avoided,
will result in death or serious injury.
WARNING indicates a hazard which, if not avoided,
could result in death or serious injury.
CAUTION indicates a hazard which, if not avoided,
might result in minor or moderate injury.
CAUTION when used without the alert symbol,
indicates a situation that could result in damage
to the tractor and/or engine.
=_HOT SURFACES indicates a hazard which,
.,g_., if not avoided, could result in death, serious injury
and/or property damage.
FIRE indicates a hazard which, if not avoided,
could result in death, serious injury and/or
property damage.
11
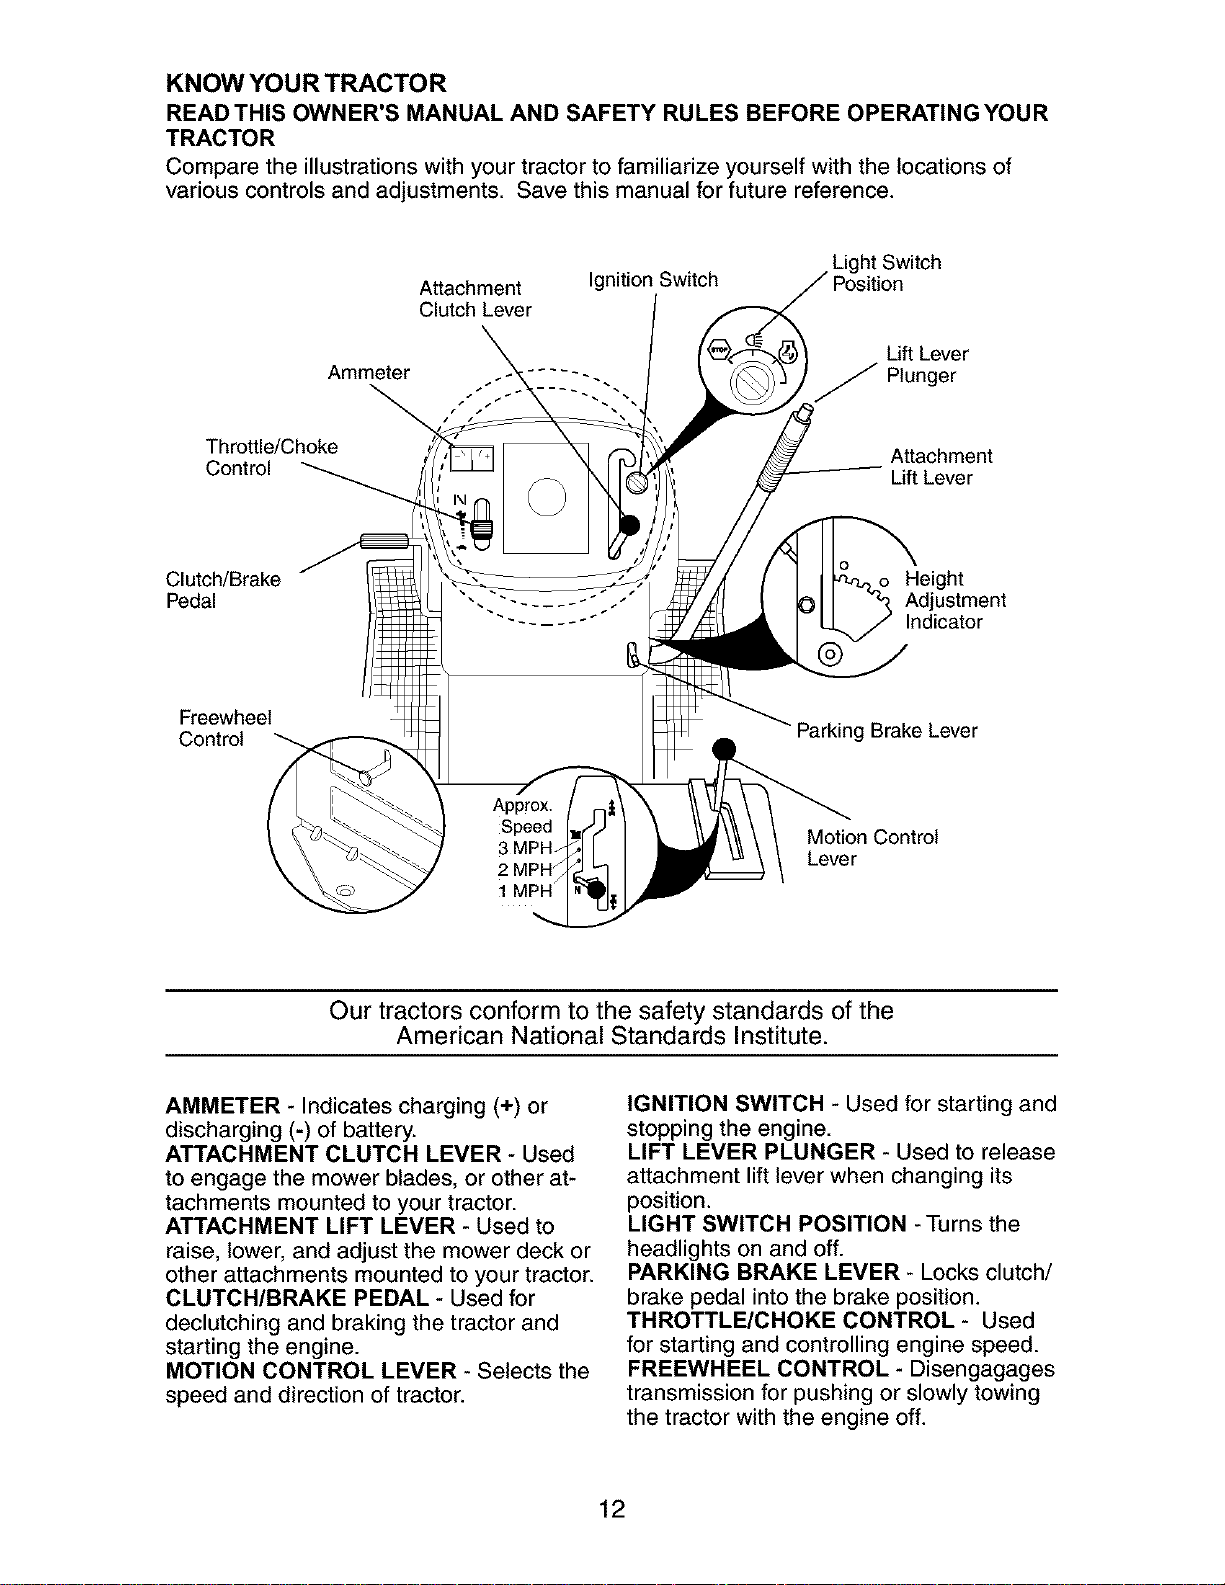
KNOW YOUR TRACTOR
READ THIS OWNER'S MANUAL AND SAFETY RULES BEFORE OPERATING YOUR
TRACTOR
Compare the illustrations with your tractor to familiarize yourself with the locations of
various controls and adjustments. Save this manual for future reference.
Attachment
Clutch Lever
Ignition Switch
Light Switch
Lift Lever
Ammeter .... ~-.. Plunger
Throttle/Choke
Control
Attachment
Lift Lever
Clutch/Brake
Pedal
Height
Adjustment
Indicator
Freewheel
Control
Parking Brake Lever
Motion Control
Lever
Our tractors conform to the safety standards of the
American National Standards Institute.
AMMETER - Indicates charging (+) or
discharging (-) of battery.
ATTACHMENT CLUTCH LEVER - Used
to engage the mower blades, or other at-
tachments mounted to your tractor.
ATTACHMENT LIFT LEVER - Used to
raise, lower, and adjust the mower deck or
other attachments mounted to your tractor.
CLUTCH/BRAKE PEDAL - Used for
declutching and braking the tractor and
starting the engine.
MOTION CONTROL LEVER - Selects the
speed and direction of tractor.
IGNITION SWITCH - Used for starting and
stopping the engine.
LIFT LEVER PLUNGER - Used to release
attachment lift lever when changing its
position.
LIGHT SWITCH POSITION -Turns the
headlights on and off.
PARKING BRAKE LEVER - Locks clutch/
brake pedal into the brake position.
THROTTLE/CHOKE CONTROL - Used
for starting and controlling engine speed.
FREEWHEEL CONTROL - Disengagages
transmission for pushing or slowly towing
the tractor with the engine off.
12
|
The operation of any tractor can result in foreign objects thrown into the
eyes, which can result in severe eye damage. Always wear safety glasses
or eye shields while operating your tractor or performing any adjustments I
or repairs. We recommend standard safety glasses or a wide vision safetyl
mask worn over spectacles. J
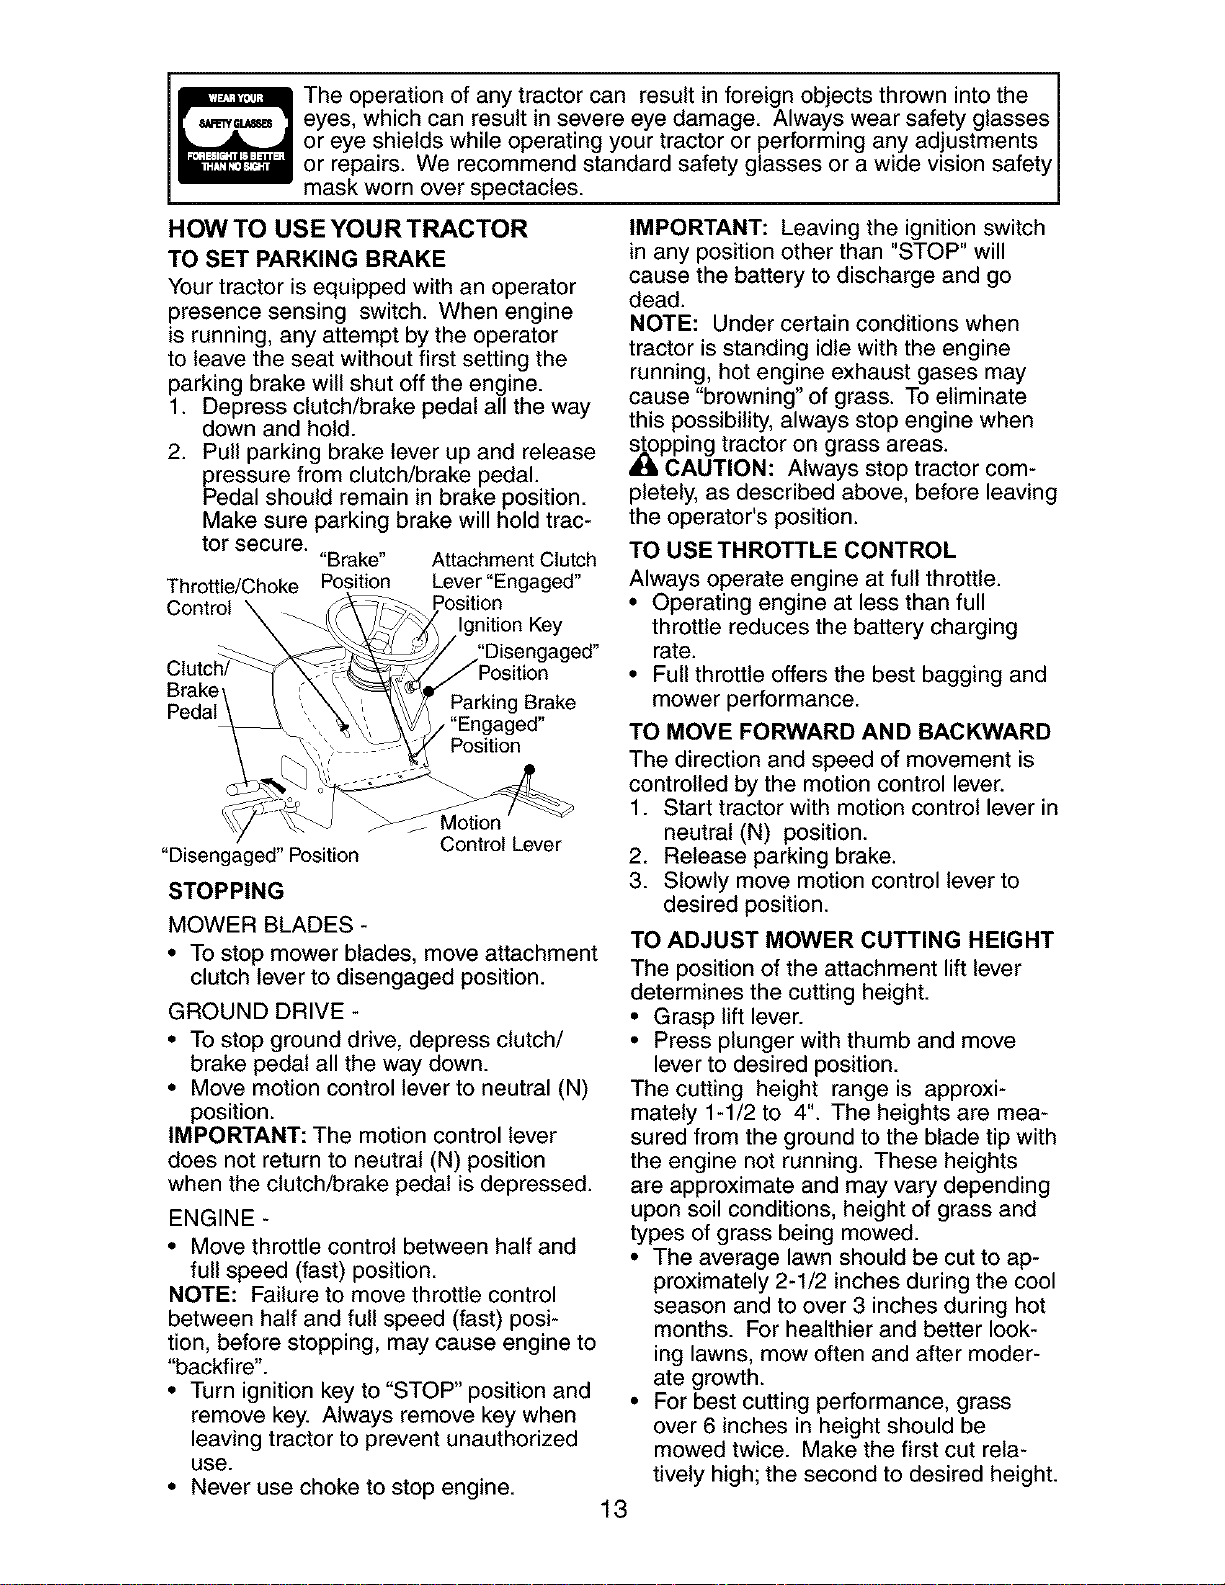
HOW TO USE YOU R TRACTOR
TO SET PARKING BRAKE
Your tractor is equipped with an operator
presence sensing switch. When engine
is running, any attempt by the operator
to leave the seat without first setting the
parking brake will shut off the engine.
1. Depress clutch/brake pedal all the way
down and hold.
2. Pull parking brake lever up and release
pressure from clutch/brake pedal.
Pedal should remain in brake position.
Make sure parking brake will hold trac-
tor secure.
"Brake" Attachment Clutch
Position Lever "Engaged"
Throttle/Choke
Control
Ignition Key
Brake
Parking Brake
Position
"Disengaged" Position
Control Lever
STOPPING
MOWER BLADES -
• To stop mower blades, move attachment
clutch lever to disengaged position.
GROUND DRIVE -
• To stop ground drive, depress clutch/
brake pedal all the way down.
• Move motion control lever to neutral (N)
position.
IMPORTANT: The motion control lever
does not return to neutral (N) position
when the clutch/brake pedal is depressed.
ENGINE -
• Move throttle control between half and
full speed (fast) position.
NOTE: Failure to move throttle control
between half and full speed (fast) posi-
tion, before stopping, may cause engine to
"backfire".
• Turn ignition key to "STOP" position and
remove key. Always remove key when
leaving tractor to prevent unauthorized
use.
• Never use choke to stop engine.
IMPORTANT: Leaving the ignition switch
in any position other than "STOP" will
cause the battery to discharge and go
dead.
NOTE: Under certain conditions when
tractor is standing idle with the engine
running, hot engine exhaust gases may
cause "browning" of grass. To eliminate
this possibility, always stop engine when
,_pping tractor on grass areas.
CAUTION: Always stop tractor com-
pletely, as described above, before leaving
the operator's position.
13
TO USETHROTTLE CONTROL
Always operate engine at full throttle.
• Operating engine at less than full
throttle reduces the battery charging
rate.
• Full throttle offers the best bagging and
mower performance.
TO MOVE FORWARD AND BACKWARD
The direction and speed of movement is
controlled by the motion control lever.
1. Start tractor with motion control lever in
neutral (N) position.
2. Release parking brake.
3. Slowly move motion control lever to
desired position.
TO ADJUST MOWER CUTTING HEIGHT
The position of the attachment lift lever
determines the cutting height.
• Grasp lift lever.
• Press plunger with thumb and move
lever to desired position.
The cutting height range is approxi-
mately 1-1/2 to 4". The heights are mea-
sured from the ground to the blade tip with
the engine not running. These heights
are approximate and may vary depending
upon soil conditions, height of grass and
types of grass being mowed.
• The average lawn should be cut to ap-
proximately 2-1/2 inches during the cool
season and to over 3 inches during hot
months. For healthier and better look-
ing lawns, mow often and after moder-
ate growth.
• For best cutting performance, grass
over 6 inches in height should be
mowed twice. Make the first cut rela-
tively high; the second to desired height.
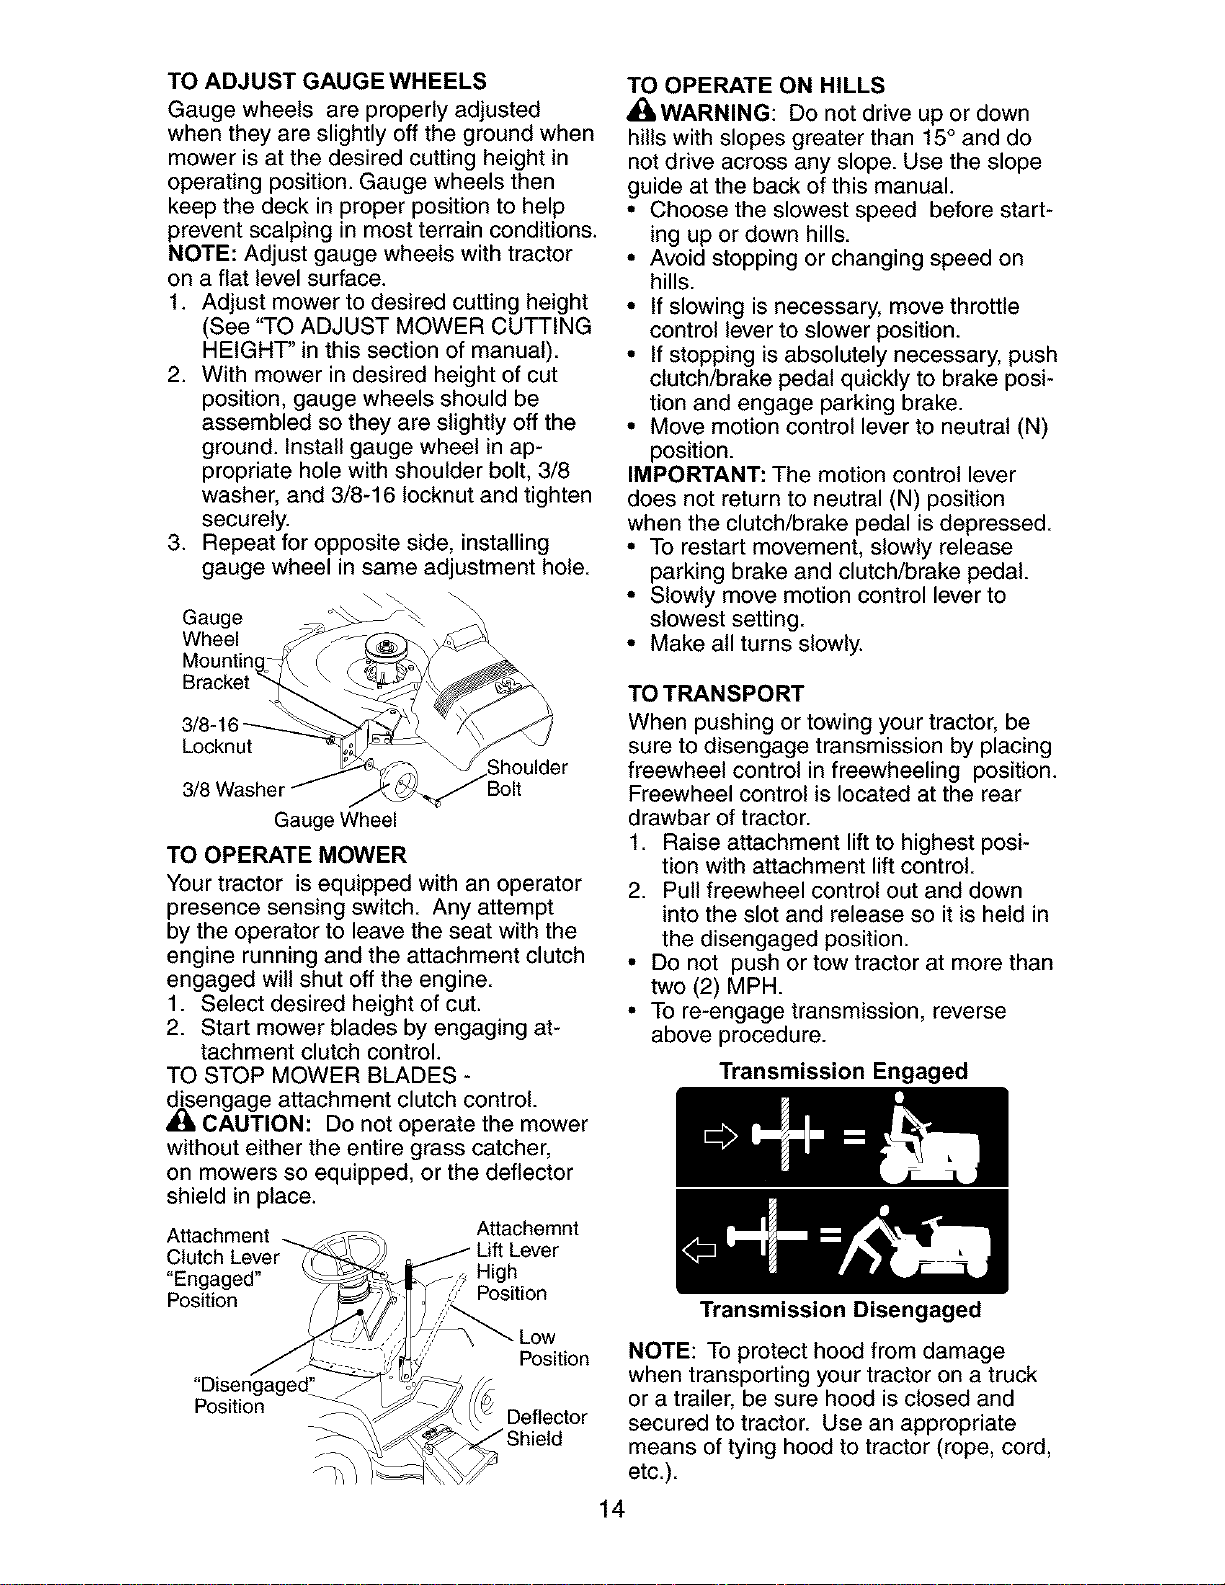
TO ADJUST GAUGE WHEELS
Gauge wheels are properly adjusted
when they are slightly off the ground when
mower is at the desired cutting height in
operating position. Gauge wheels then
keep the deck in proper position to help
prevent scalping in most terrain conditions.
NOTE: Adjust gauge wheels with tractor
on a flat level surface.
1. Adjust mower to desired cutting height
(See "TO ADJUST MOWER CUTTING
HEIGHT" in this section of manual).
2. With mower in desired height of cut
position, gauge wheels should be
assembled so they are slightly off the
ground. Install gauge wheel in ap-
propriate hole with shoulder bolt, 3/8
washer, and 3/8-16 Iocknut and tighten
securely.
3. Repeat for opposite side, installing
gauge wheel in same adjustment hole.
Gauge
Wheel
Locknut
3/8 Washe 3olt
Gauge Wheel
TO OPERATE MOWER
Your tractor is equipped with an operator
presence sensing switch. Any attempt
by the operator to leave the seat with the
engine running and the attachment clutch
engaged will shut off the engine.
1. Select desired height of cut.
2. Start mower blades by engaging at-
tachment clutch control.
TO STOP MOWER BLADES -
,_engage attachment clutch control.
CAUTION: Do not operate the mower
without either the entire grass catcher,
on mowers so equipped, or the deflector
shield in place.
Attachment Attachemnt
Clutch
"Engaged" High
Position Position
"Disengaged"
Position
Low
Position
Deflector
TO OPERATE ON HILLS
_iLWARNING: Do not drive up or down
hills with slopes greater than 15° and do
not drive across any slope. Use the slope
guide at the back of this manual.
• Choose the slowest speed before start-
ing up or down hills.
• Avoid stopping or changing speed on
hills.
• If slowing is necessary, move throttle
control lever to slower position.
• If stopping is absolutely necessary, push
clutch/brake pedal quickly to brake posi-
tion and engage parking brake.
• Move motion control lever to neutral (N)
position.
IMPORTANT: The motion control lever
does not return to neutral (N) position
when the clutch/brake pedal is depressed.
• To restart movement, slowly release
parking brake and clutch/brake pedal.
• Slowly move motion control lever to
slowest setting.
• Make all turns slowly.
TO TRANSPORT
When pushing or towing your tractor, be
sure to disengage transmission by placing
freewheel control in freewheeling position.
Freewheel control is located at the rear
drawbar of tractor.
1. Raise attachment lift to highest posi-
tion with attachment lift control.
2. Pull freewheel control out and down
into the slot and release so it is held in
the disengaged position.
• Do not push or tow tractor at more than
two (2) MPH.
• To re-engage transmission, reverse
above procedure.
Transmission Engaged
Transmission Disengaged
NOTE: To protect hood from damage
when transporting your tractor on a truck
or a trailer, be sure hood is closed and
secured to tractor. Use an appropriate
means of tying hood to tractor (rope, cord,
etc.).
14
TOWING CARTS AND OTHER ATTACH-
MENTS
Tow only the attachments that are recom-
mended by and comply with specifications
of the manufacturer of your tractor. Use
common sense when towing. Too heavy
of a load, while on a slope, is dangerous.
Tires can lose traction with the ground and
cause you to lose control of your tractor.
BEFORE STARTING THE ENGINE
CHECK ENGINE OIL LEVEL
The engine in your tractor has been
shipped, from the factory, already filled
with summer weight oil.
1. Check engine oil with tractor on level
ground.
2. Unthread and remove oil fill cap/
dipstick; wipe oil off. Reinsert the
dipstick into the tube and rest oil fill
cap on the tube. Do not thread the cap
onto the tube. Remove and read oil
level. If necessary, add oil until "FULL'
mark on dipstick is reached. Do not
overfill.
• For cold weather operation you should
change oil for easier starting (See the
oil viscosity chart in the Maintenance
section of this manual).
• To change engine oil, see the Mainte-
nance section in this manual.
ADD GASOLINE
• Fill fuel tank to bottom of tank filler neck.
Do not overfill. Use fresh, clean, regular
unleaded gasoline with a minimum of 87
octane. (Use of leaded gasoline will in-
crease carbon and lead oxide deposits
and reduce valve life). Do not mix oil
with gasoline. Purchase fuel in quanti-
ties that can be used within 30 days to
assure fuel freshness.
4_ CAUTION: Wipe off any spilled oil or
fuel. Do not store, spill or use gasoline
near an open flame.
IMPORTANT: When operating in tempera-
tures below 32 F(0 C), use fresh, clean
winter grade gasoline to help insure good
cold weather starting.
CAUTION: Alcohol blended fuels (called
gasohol or using ethanol or methanol) can
attract moisture which leads to separa-
tion and formation of acids during storage.
Acidic gas can damage the fuel system of
an engine while in storage.
To avoid engine problems, the fuel system
should be emptied before storage of 30
days or longer. Drain the gas tank, start
the engine and let it run until the fuel lines
and carburetor are empty.
15
Use fresh fuel next season. See Storage
Instructions for additional information.
Never use engine or carburetor cleaner
products in the fuel tank or permanent
damage may occur.
TO START ENGINE
When starting the engine for the first time
or if the engine has run out of fuel, it will
take extra cranking time to move fuel from
the tank to the engine.
1. Be sure freewheel control is in the
transmission engaged position.
2. Sit on seat in operating position,
depress clutch/brake pedal and set
parking brake.
3. Place motion control lever in neutral
(N) position.
4. Move attachment clutch to disengaged
position.
5. Move throttle control to choke position.
NOTE: Before starting, read the warm
and cold starting procedures below.
6. Insert key into ignition and turn key
clockwise to start position and release
key as soon as engine starts. Do
not run starter continuously for more
than fifteen seconds per minute. If the
engine does not start after several
attempts, move throttle control to fast
position, wait a few minutes and try
again. If engine still does not start,
move the throttle control back to the
choke position and retry.
WARM WEATHER STARTING (50° F and
above)
7. When engine starts, move the throttle
control to the fast position.
• The attachments and ground drive can
now be used. If the engine does not
accept the load, restart the engine and
allow it to warm up for one minute using
the choke as described above.
COLD WEATHER STARTING ( 50° F and
below)
7. When engine starts, allow engine
to run with the throttle control in the
choke position until the engine runs
roughly, then move throttle control
to fast position. This may require an
engine warm-up period from several
seconds to several minutes, depending
on the temperature.
AUTOMATICTRANSMISSIONWARMUP
Beforedrivingthe unitin coldweather,
thetransmissionshouldbe warmedup as
follows:
1. Besurethetractorisonlevelground.
2. Placethemotioncontrolleverin
neutral.Releasetheparkingbrake
andlettheclutch/brakeslowlyreturn
to operatingposition.
3. Allowoneminutefortransmissionto
warmup.Thiscanbe doneduring
theenginewarmup period.
• The attachmentscanalso be useddur-
ingtheenginewarm-upperiodafterthe
transmissionhasbeen warmedup.
NOTE: Ifat a highaltitude(above3000
feet)or incoldtemperatures(below32 F)
thecarburetorfuel mixturemayneedto
beadjustedfor bestengineperformance.
(See"TOADJUSTCARBURETOR"in the
ServiceandAdjustmentssectionof this
manual.)
PURGE TRANSMISSION
4_ CAUTION: Never engage or dis-
engage freewheel lever while the engine
is running.
To ensure proper operation and per-
formance, it is recommended that the
transmission be purged before operating
tractor for the first time. This procedure will
remove any trapped air inside the trans-
mission which may have developed during
shipping of your tractor.
IMPORTANT: Should your transmission
require removal for service or replace-
ment, it should be purged after reinstall-
ation before operating the tractor.
1. Place tractor safely on level surface
with engine off and parking brake set.
2. Disengage transmission by placing
freewheel control in '"transmission dis-
engaged" position (See "TO TRANS-
PORT" in this section of manual).
3. Sitting in the tractor seat, start engine.
After the engine is running, move
throttle control to slow position. With
motion control lever in neutral (N)
position, slowly disengage clutch/brake
pedal.
4. Move motion control lever to full
forward position and hold for five (5)
seconds. Move lever to full reverse
position and hold for five (5) seconds.
Repeat this procedure three (3) times.
NOTE: During this step there will be no
movement of drive wheels. The air is being
removed from hydraulic drive system.
5. Move motion control lever to neutral
(N) position. Shutoff engine and set
parking brake.
6. Engage transmission by placing
freewheel control in '"transmission
engaged" position (See "TO TRANS-
PORT" in this section of manual).
7. Sitting in the tractor seat, start engine.
After the engine is running, move
throttle control to half (1/2) speed.
With motion control lever in neutral (N)
position, slowly disengage clutch/brake
pedal.
8. Slowly move motion control lever for-
ward, after the tractor moves approxi-
mately five (5) feet, slowly move motion
control lever to reverse position. After
the tractor moves approximately five
(5) feet return the motion control lever
to the neutral (N) position. Repeat this
procedure with the motion control lever
three (3) times.
Your transmission is now purged and
ready for normal operation.
16
MOWING TIPS
• Mower should be properly leveled for
best mowing performance. See "TO
LEVEL MOWER HOUSING" in the
Service and Adjustments section of this
manual.
• The left hand side of mower should be
used for trimming.
• Drive so that clippings are discharged
onto the area that has already been cut.
Have the cut area to the right of the trac-
tor. This will result in a more even distri-
bution of clippings and more uniform
cutting.
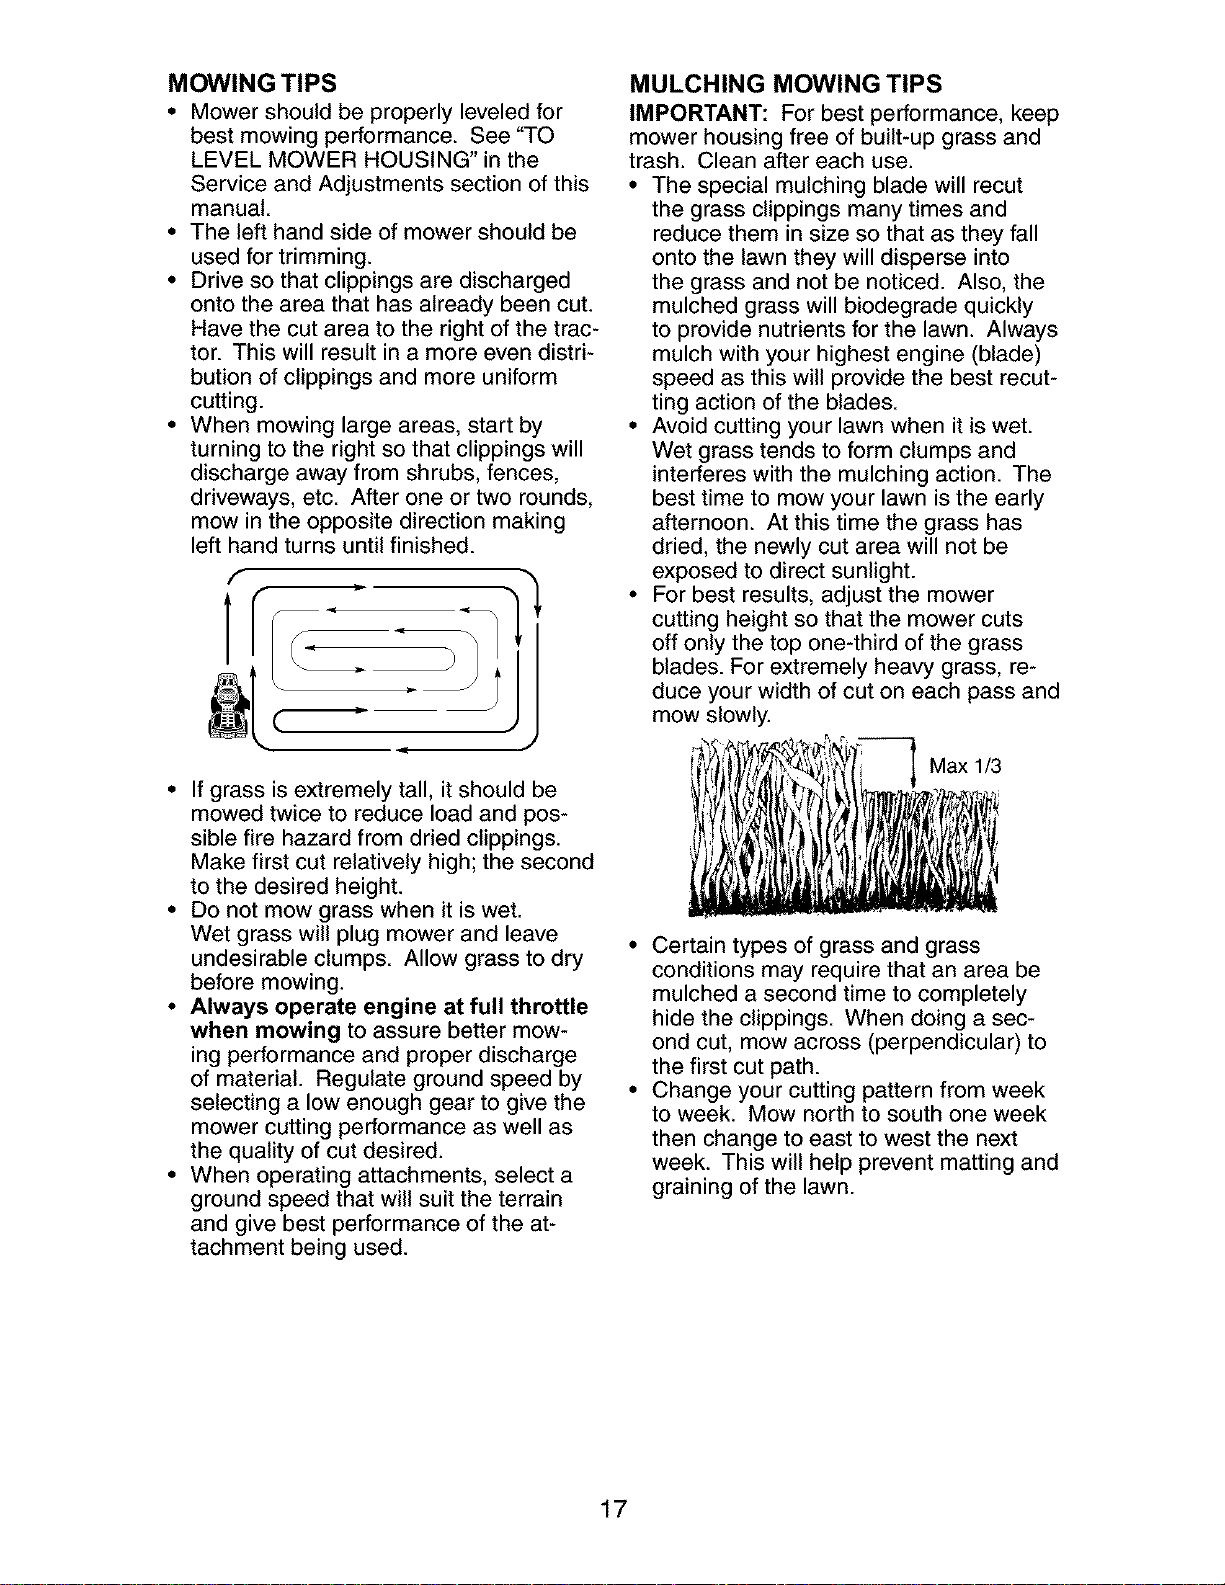
• When mowing large areas, start by
turning to the right so that clippings will
discharge away from shrubs, fences,
driveways, etc. After one or two rounds,
mow in the opposite direction making
left hand turns until finished.
I"
jj
, )
MULCHING MOWING TIPS
IMPORTANT: For best performance, keep
mower housing free of built-up grass and
trash. Clean after each use.
• The special mulching blade will recut
the grass clippings many times and
reduce them in size so that as they fall
onto the lawn they will disperse into
the grass and not be noticed. Also, the
mulched grass will biodegrade quickly
to provide nutrients for the lawn. Always
mulch with your highest engine (blade)
speed as this will provide the best recut-
ting action of the blades.
• Avoid cutting your lawn when it is wet.
Wet grass tends to form clumps and
interferes with the mulching action. The
best time to mow your lawn is the early
afternoon. At this time the grass has
dried, the newly cut area will not be
exposed to direct sunlight.
• For best results, adjust the mower
cutting height so that the mower cuts
off only the top one-third of the grass
blades. For extremely heavy grass, re-
duce your width of cut on each pass and
mow slowly.
• If grass is extremely tall, it should be
mowed twice to reduce load and pos-
sible fire hazard from dried clippings.
Make first cut relatively high; the second
to the desired height.
• Do not mow grass when it is wet.
Wet grass will plug mower and leave
undesirable clumps. Allow grass to dry
before mowing.
• Always operate engine at full throttle
when mowing to assure better mow-
ing performance and proper discharge
of material. Regulate ground speed by
selecting a low enough gear to give the
mower cutting performance as well as
the quality of cut desired.
• When operating attachments, select a
ground speed that will suit the terrain
and give best performance of the at-
tachment being used.
Max 1/3
• Certain types of grass and grass
conditions may require that an area be
mulched a second time to completely
hide the clippings. When doing a sec-
ond cut, mow across (perpendicular) to
the first cut path.
• Change your cutting pattern from week
to week. Mow north to south one week
then change to east to west the next
week. This will help prevent matting and
graining of the lawn.
17
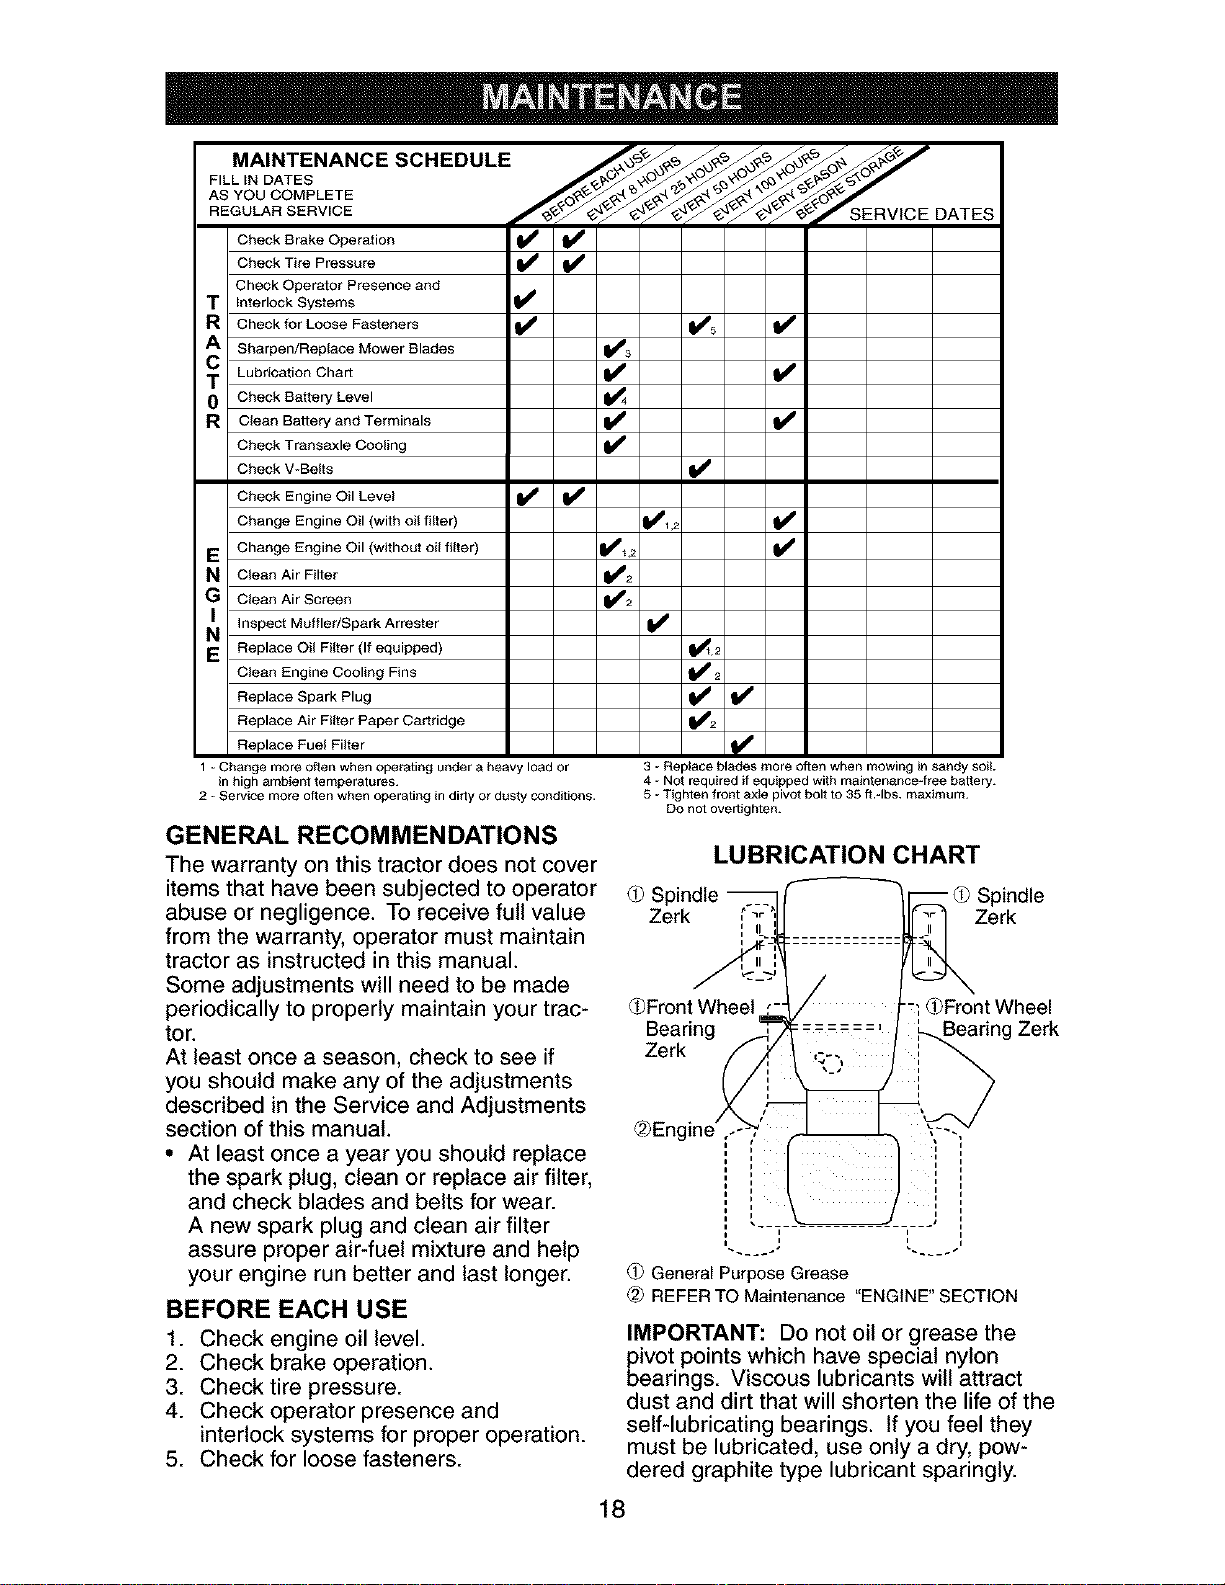
MAINTENANCE SCHEDULE _,_ ,_-_ ,_,_ _ _-_. ,_
AS YOU COMPLETE
REGULAR SERVICE _'__'_" S E R V lC e DATES
i
Check Brake Operation _
Check Tire Pressure
Check Operator Presence and
f Interlock Systems
R CheckforLooseFasteners _ 1_'5 t_'
A Sharpen/Replace Mower Blades _#3
T Lubrication Chart
0 Check Battery Level 1_4
R C_ean Battery and Terminals _#, I_
Check Transaxle Cooling
Check V-Belts
Check Engine Oil Leve_ I_ I_
Change Engine Oil (with oil filter) _1,2 ql_
v,
E ChangeEngineOil(withoutoilfilter) _i;
N Clean Air Filter
G Clean Air Screen
N_ Inspect Muffler/Spark Arrester I_
E Replace Oil Filter (If equipped) _2
Clean Engine Cooling Fins _2
Replace Spark Plug _#2 t_'
Replace Air Filter Paper Cartridge
Fuel Filter If
Replace
iF
1 - Change more often when oper4tting under a heavy load or
in high ambient temperatures.
2 - Service more often when operating in dirty or dusty conditions.
GENERAL RECOMMENDATIONS
The warranty on this tractor does not cover
items that have been subjected to operator
abuse or negligence. To receive full value
from the warranty, operator must maintain
tractor as instructed in this manual.
Some adjustments will need to be made
periodically to properly maintain your trac-
tor.
At least once a season, check to see if
you should make any of the adjustments
described in the Service and Adjustments
section of this manual.
• At least once a year you should replace
the spark plug, clean or replace air filter,
and check blades and belts for wear.
A new spark plug and clean air filter
assure proper air-fuel mixture and help
your engine run better and last longer.
3 - Replace blades more often when mowing in sandy soil
4 - Not required if equipped with maintenance=free battery.
5 - Tighten front axle pivot bolt to 35 ft.=lbs, maximum.
DO not overtighten.
LUBRICATION CHART
Spindle -- _ Spindle
Zerk t'_-;' Zerk
_Front Wheel
Bearing
Zerk
q _Front Wheel
, Zerk
BEFORE EACH USE
1. Check engine oil level.
2. Check brake operation.
3. Check tire pressure.
4. Check operator presence and
interlock systems for proper operation.
5. Check for loose fasteners.
(_ General Purpose Grease
REFER TO Maintenance "ENGINE" SECTION
IMPORTANT: Do not oil or grease the
pivot points which have special nylon
bearings. Viscous lubricants will attract
dust and dirt that will shorten the life of the
self-lubricating bearings. If you feel they
must be lubricated, use only a dry, pow-
dered graphite type lubricant sparingly.
18
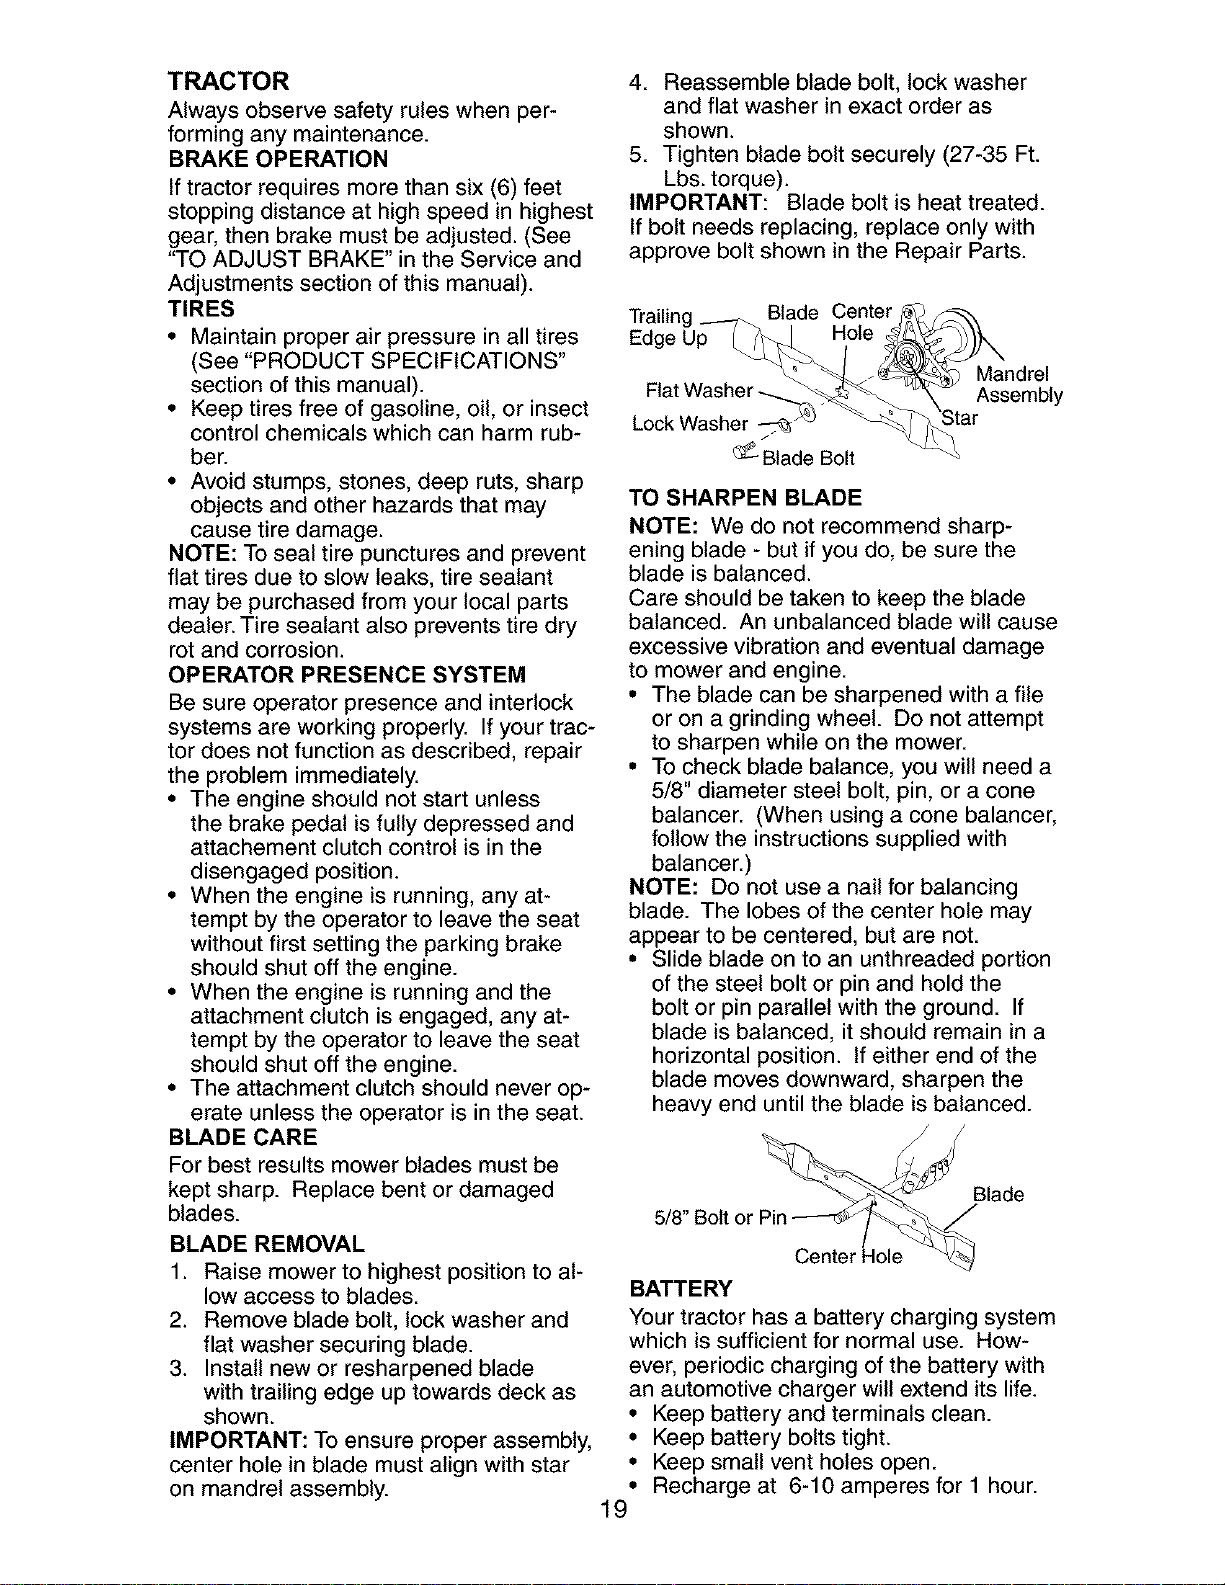
TRACTOR
Always observe safety rules when per-
forming any maintenance.
BRAKE OPERATION
If tractor requires more than six (6) feet
stopping distance at high speed in highest
gear, then brake must be adjusted. (See
"TO ADJUST BRAKE" in the Service and
Adjustments section of this manual).
TIRES
• Maintain proper air pressure in all tires
(See "PRODUCT SPECIFICATIONS"
section of this manual).
• Keep tires free of gasoline, oil, or insect
control chemicals which can harm rub-
ber.
• Avoid stumps, stones, deep ruts, sharp
objects and other hazards that may
cause tire damage.
NOTE: To seal tire punctures and prevent
flat tires due to slow leaks, tire sealant
may be purchased from your local parts
dealer. Tire sealant also prevents tire dry
rot and corrosion.
OPERATOR PRESENCE SYSTEM
Be sure operator presence and interlock
systems are working properly. If your trac-
tor does not function as described, repair
the problem immediately.
• The engine should not start unless
the brake pedal isfully depressed and
attachement clutch control is in the
disengaged position.
• When the engine is running, any at-
tempt by the operator to leave the seat
without first setting the parking brake
should shut off the engine.
• When the engine is running and the
attachment clutch is engaged, any at-
tempt by the operator to leave the seat
should shut off the engine.
• The attachment clutch should never op-
erate unless the operator is in the seat.
BLADE CARE
For best results mower blades must be
kept sharp. Replace bent or damaged
blades.
BLADE REMOVAL
1. Raise mower to highest position to al-
low access to blades.
2. Remove blade bolt, lock washer and
flat washer securing blade.
3. Install new or resharpened blade
with trailing edge up towards deck as
shown.
IMPORTANT: To ensure proper assembly,
center hole in blade must align with star
on mandrel assembly.
4. Reassemble blade bolt, lock washer
and flat washer in exact order as
shown.
5. Tighten blade bolt securely (27-35 Ft.
Lbs. torque).
IMPORTANT: Blade bolt is heat treated.
If bolt needs replacing, replace only with
approve bolt shown in the Repair Parts.
Trailing Blade Center
Edge Up Hole
Lock Washer
/
_ Blade Bolt
Mandrel
Assembly
TO SHARPEN BLADE
NOTE: We do not recommend sharp-
ening blade - but if you do, be sure the
blade is balanced.
Care should be taken to keep the blade
balanced. An unbalanced blade will cause
excessive vibration and eventual damage
to mower and engine.
• The blade can be sharpened with a file
or on a grinding wheel. Do not attempt
to sharpen while on the mower.
• To check blade balance, you will need a
5/8" diameter steel bolt, pin, or a cone
balancer. (When using a cone balancer,
follow the instructions supplied with
balancer.)
NOTE: Do not use a nail for balancing
blade. The lobes of the center hole may
appear to be centered, but are not.
• Slide blade on to an unthreaded portion
of the steel bolt or pin and hold the
bolt or pin parallel with the ground. If
blade is balanced, it should remain in a
horizontal position. If either end of the
blade moves downward, sharpen the
heavy end until the blade is balanced.
Blade
5/8" Bolt o
Center t
BATTERY
Your tractor has a battery charging system
which is sufficient for normal use. How-
ever, periodic charging of the battery with
an automotive charger will extend its life.
• Keep battery and terminals clean.
• Keep battery bolts tight.
• Keep small vent holes open.
• Recharge at 6-10 amperes for 1 hour.
19
NOTE:Theoriginalequipmentbatteryon
yourtractoris maintenancefree.Do not
attemptto openorremovecapsorcovers.
Addingorcheckinglevelof electrolyteis
notnecessary.
TOCLEANBATTERYANDTERMINALS
Corrosionanddirt onthe batteryand
terminalscan causethe batteryto "leak"
power.
1. DisconnectBLACKbatterycablefirst
then RED batterycableandremove
batteryfromtractor.
2. Rinsethebatterywith plainwaterand
dry.
3. Cleanterminalsandbatterycableends
withwirebrushuntilbright.
4. Coatterminalswith greaseor petro-
leumjelly.
5. Reinstallbattery(See"REPLACING
BATTERY"inthe ServiceandAdjust-
mentssectionofthis manual).
TRANSAXLE COOLING
The transmission fan and cooling fins
should be kept clean to assure proper
cooling.
Do not attempt to clean fan or transmis-
sion while engine is running or while the
transmission is hot. To prevent possible
damage to seals, do not use high pressure
water or steam to clean transaxle.
• Inspect cooling fan to be sure fan blades
are intact and clean.
• Inspect cooling fins for dirt, grass clip-
pings and other materials. To prevent
damage to seals, do not use com-
pressed air or high pressure sprayer to
clean cooling fins.
TRANSAXLE PUMP FLUID
The transaxle was sealed at the factory
and fluid maintenance is not required for
the life of the transaxle. Should the trans-
axle ever leak or require servicing, contact
a Sears or other qualified service center.
V-BELTS
Check V-belts for deterioration and wear
after 100 hours of operation and replace
if necessary. The belts are not adjustable.
Replace belts if they begin to slip from
wear.
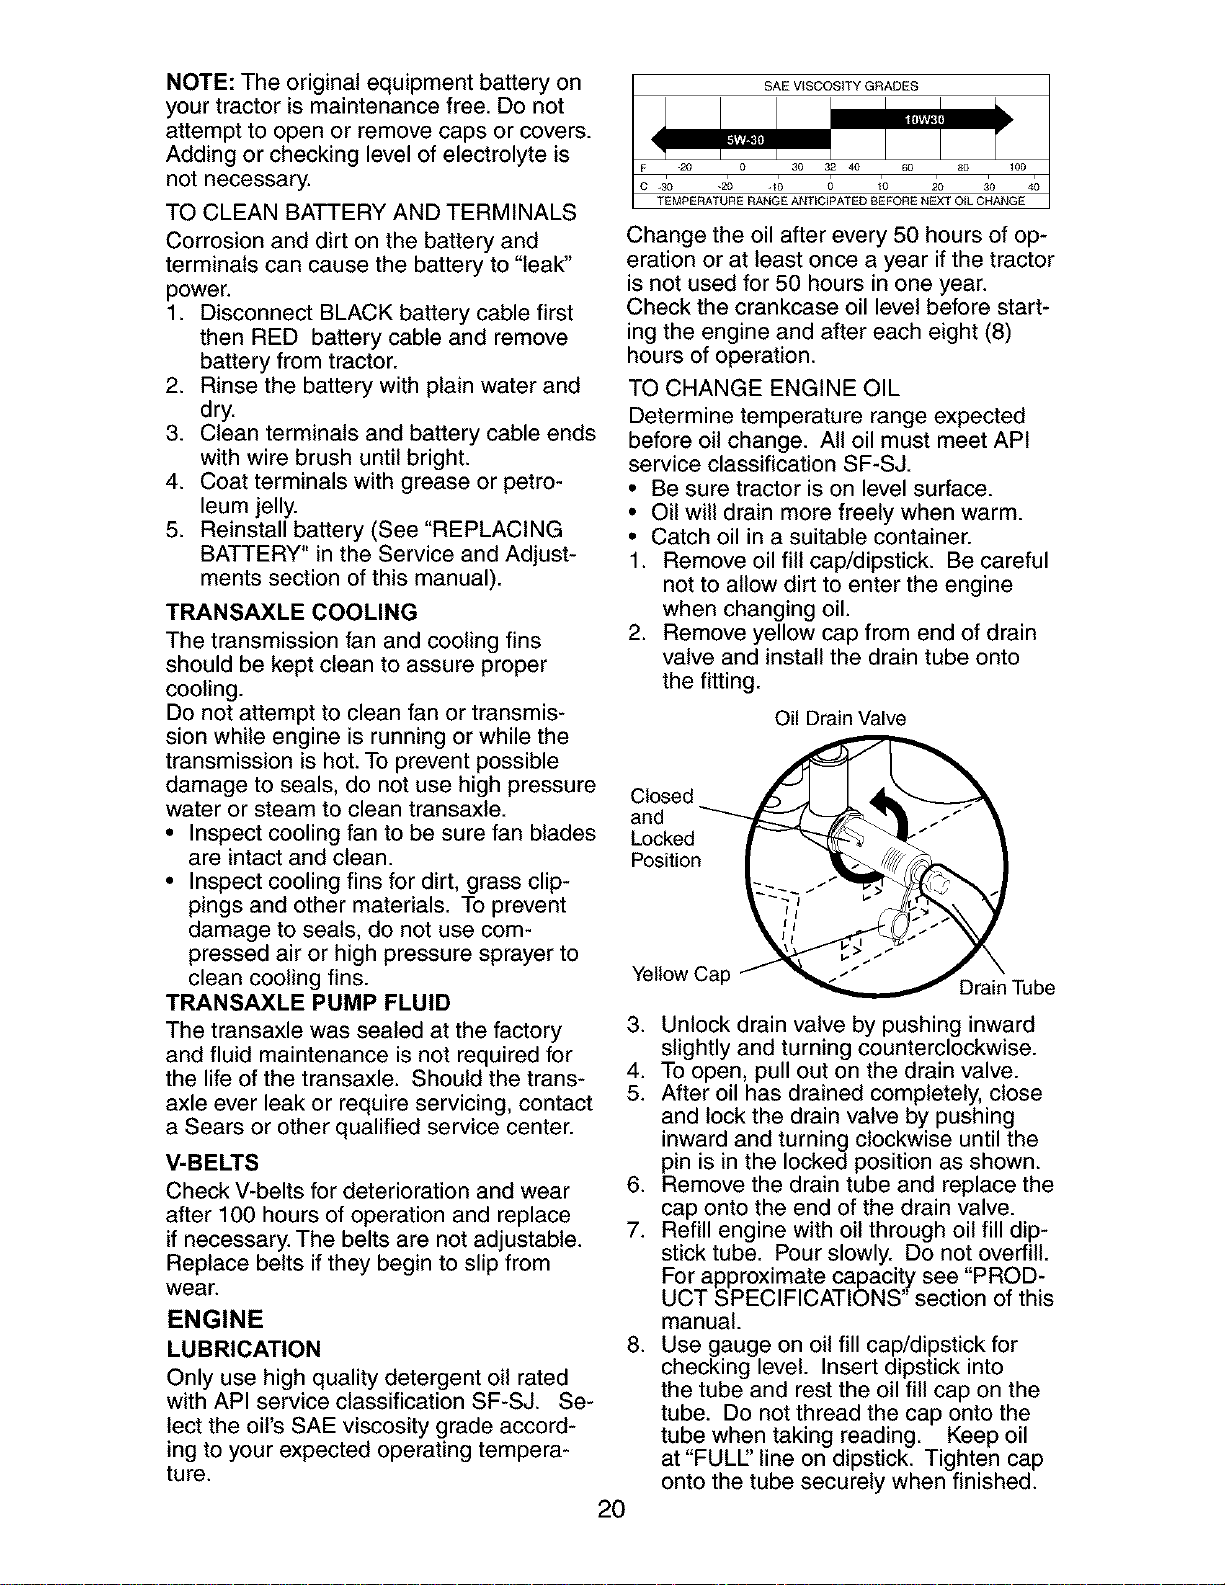
ENGINE
LUBRICATION
Only use high quality detergent oil rated
with API service classification SF-SJ. Se-
lect the oil's SAE viscosity grade accord-
ing to your expected operating tempera-
ture.
3. Unlock drain valve by pushing inward
slightly and turning counterclockwise.
4. To open, pull out on the drain valve.
5. After oil has drained completely, close
and lock the drain valve by pushing
inward and turning clockwise until the
pin is in the locked position as shown.
6. Remove the drain tube and replace the
cap onto the end of the drain valve.
7. Refill engine with oil through oil fill dip-
stick tube. Pour slowly. Do not overfill.
For approximate capacity see "PROD-
UCT SPECIFICATIONS" section of this
manual.
8. Use gauge on oil fill cap/dipstick for
checking level. Insert dipstick into
the tube and rest the oil fill cap on the
tube. Do not thread the cap onto the
tube when taking reading. Keep oil
at "FULL' line on dipstick. Tighten cap
onto the tube securely when finished.
SAE V_SCOSITY GRADES
F
TEMPERATURE RANGE ANTiCiPATED BEFORE NEXT OiL CHANGE
TO CHANGE ENGINE OIL
Determine temperature range expected
before oil change. All oil must meet API
service classification SF-SJ.
• Be sure tractor is on level surface.
• Oil will drain more freely when warm.
• Catch oil in a suitable container.
1. Remove oil fill cap/dipstick. Be careful
not to allow dirt to enter the engine
when changing oil.
2. Remove yellow cap from end of drain
valve and install the drain tube onto
Change the oil after every 50 hours of op-
eration or at least once a year if the tractor
is not used for 50 hours in one year.
Check the crankcase oil level before start-
ing the engine and after each eight (8)
hours of operation.
the fitting.
Oil Drain Valve
Closed _ _
Yellow Cap f -_-_'/"J'Drain
Tube
20
ENGINE OIL FILTER
Replace the engine oil filter every season
or every other oil change if the tractor is
used more than 100 hours in one year.
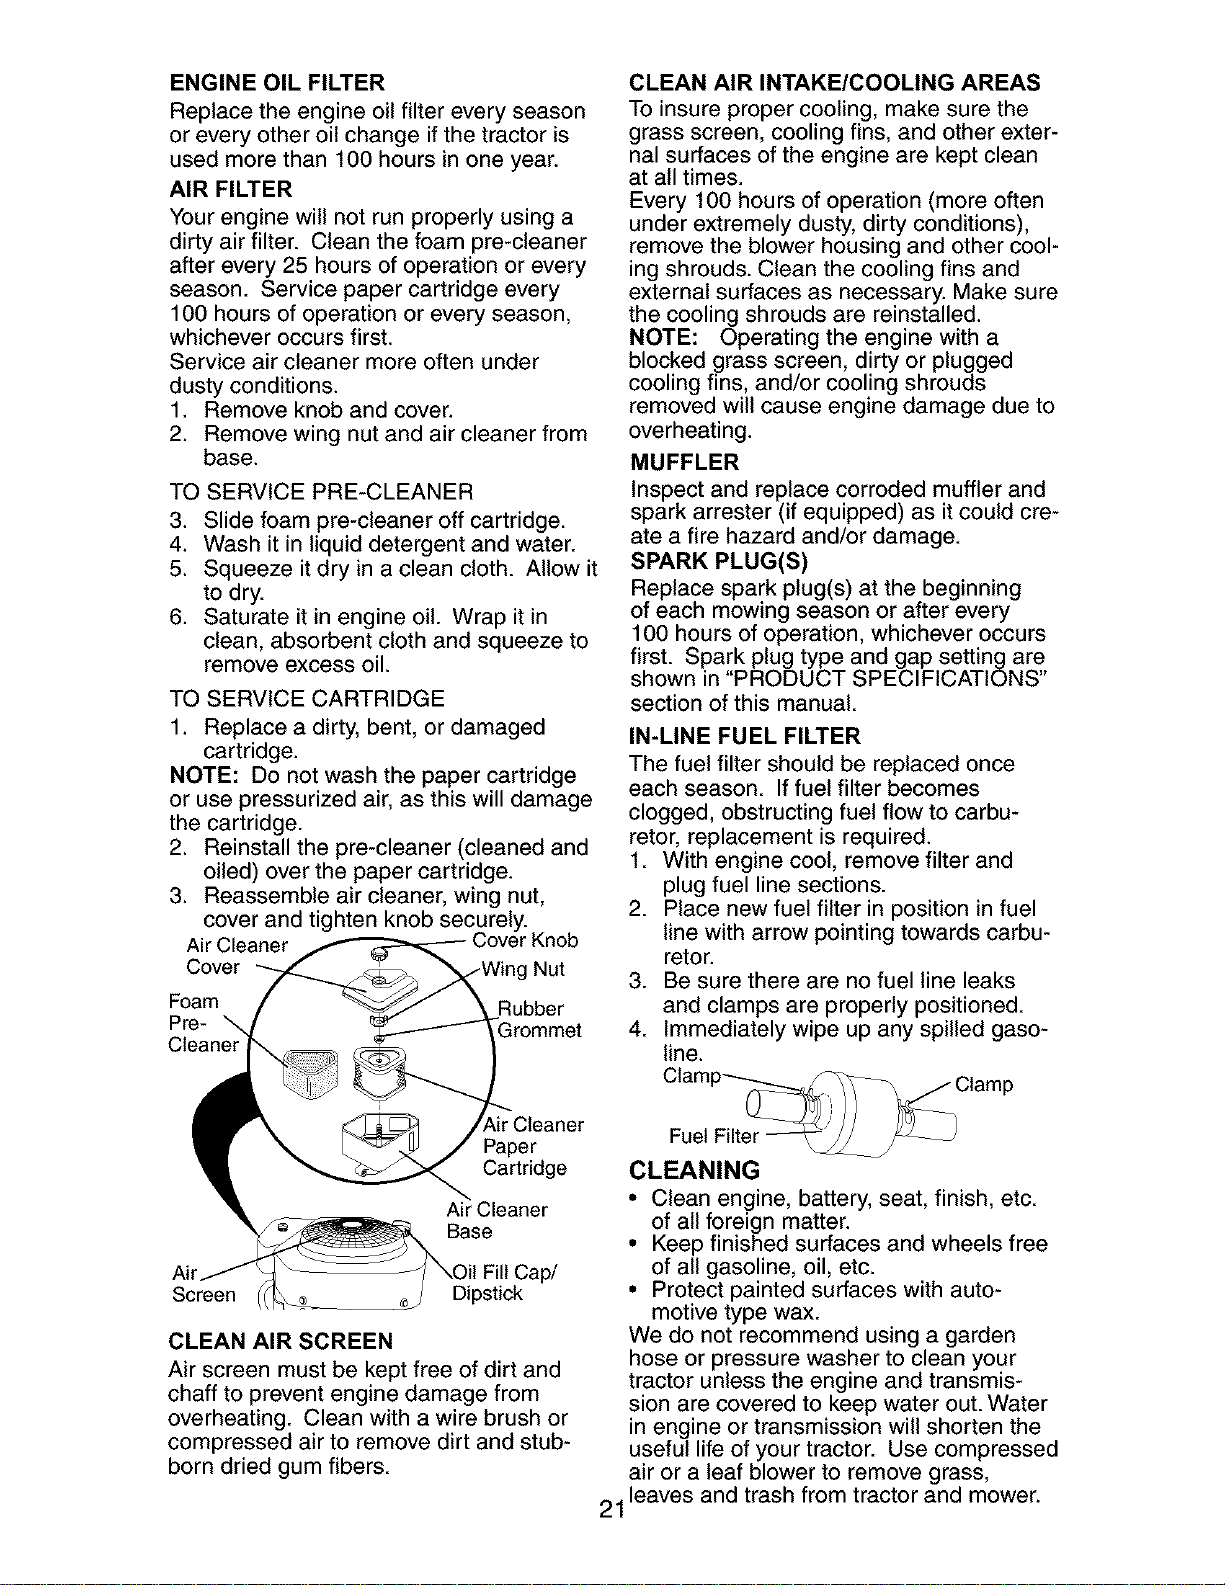
AIR FILTER
Your engine will not run properly using a
dirty air filter. Clean the foam pre-cleaner
after every 25 hours of operation or every
season. Service paper cartridge every
100 hours of operation or every season,
whichever occurs first.
Service air cleaner more often under
dusty conditions.
1. Remove knob and cover.
2. Remove wing nut and air cleaner from
base.
TO SERVICE PRE-CLEANER
3. Slide foam pre-cleaner off cartridge.
4. Wash it in liquid detergent and water.
5. Squeeze it dry in a clean cloth. Allow it
to dry.
6. Saturate it in engine oil. Wrap it in
clean, absorbent cloth and squeeze to
remove excess oil.
TO SERVICE CARTRIDGE
1. Replace a dirty, bent, or damaged
cartridge.
NOTE: Do not wash the paper cartridge
or use pressurized air, as this will damage
the cartridge.
2. Reinstall the pre-cleaner (cleaned and
oiled) over the paper cartridge.
3. Reassemble air cleaner, wing nut,
cover and tighten knob securely.
Air Cleaner Cover Knob
Cover Nut
Foam Rubber
Pre-
CLEAN AIR INTAKE/COOLING AREAS
To insure proper cooling, make sure the
grass screen, cooling fins, and other exter-
nal surfaces of the engine are kept clean
at all times.
Every 100 hours of operation (more often
under extremely dusty, dirty conditions),
remove the blower housing and other cool-
ing shrouds. Clean the cooling fins and
external surfaces as necessary. Make sure
the cooling shrouds are reinstalled.
NOTE: Operating the engine with a
blocked grass screen, dirty or plugged
cooling fins, and/or cooling shrouds
removed will cause engine damage due to
overheating.
MUFFLER
Inspect and replace corroded muffler and
spark arrester (if equipped) as it could cre-
ate a fire hazard and/or damage.
SPARK PLUG(S)
Replace spark plug(s) at the beginning
of each mowing season or after every
100 hours of operation, whichever occurs
first. Spark plug type and gap setting are
shown in "PRODUCT SPECIFICATIONS"
section of this manual.
IN-LINE FUEL FILTER
The fuel filter should be replaced once
each season. If fuel filter becomes
clogged, obstructing fuel flow to carbu-
retor, replacement is required.
1. With engine cool, remove filter and
plug fuel line sections.
2. Place new fuel filter in position in fuel
line with arrow pointing towards carbu-
retor.
3. Be sure there are no fuel line leaks
and clamps are properly positioned.
4. Immediately wipe up any spilled gaso-
line.
kir Cleaner
Paper
Cartridge
Air Cleaner
Base
cap/
Screen Dipstick
CLEAN AIR SCREEN
Air screen must be kept free of dirt and
chaff to prevent engine damage from
overheating. Clean with a wire brush or
compressed air to remove dirt and stub-
born dried gum fibers.
21
Fuel
CLEANING
• Clean engine, battery, seat, finish, etc.
of all foreign matter.
• Keep finished surfaces and wheels free
of all gasoline, oil, etc.
• Protect painted surfaces with auto-
motive type wax.
We do not recommend using a garden
hose or pressure washer to clean your
tractor unless the engine and transmis-
sion are covered to keep water out. Water
in engine or transmission will shorten the
useful life of your tractor. Use compressed
air or a leaf blower to remove grass,
leaves and trash from tractor and mower.
I,_ ARNING: TO AVOID SERIOUS INJURY, BEFORE PERFORMING ANY SER-
VICE OR ADJUSTMENTS:
1. Depress clutch/brake pedal fully and set parking brake.
2. Place motion control lever in neutral (N) position.
3. Place attachment clutch in "DISENGAGED" position.
4. Turn ignition key to "STOP" and remove key.
5. Make sure the blades and all moving parts have completely stopped.
6. Disconnect spark plug wire from spark plug and place wire where it cannot
come in contact with plug.
TRACTOR
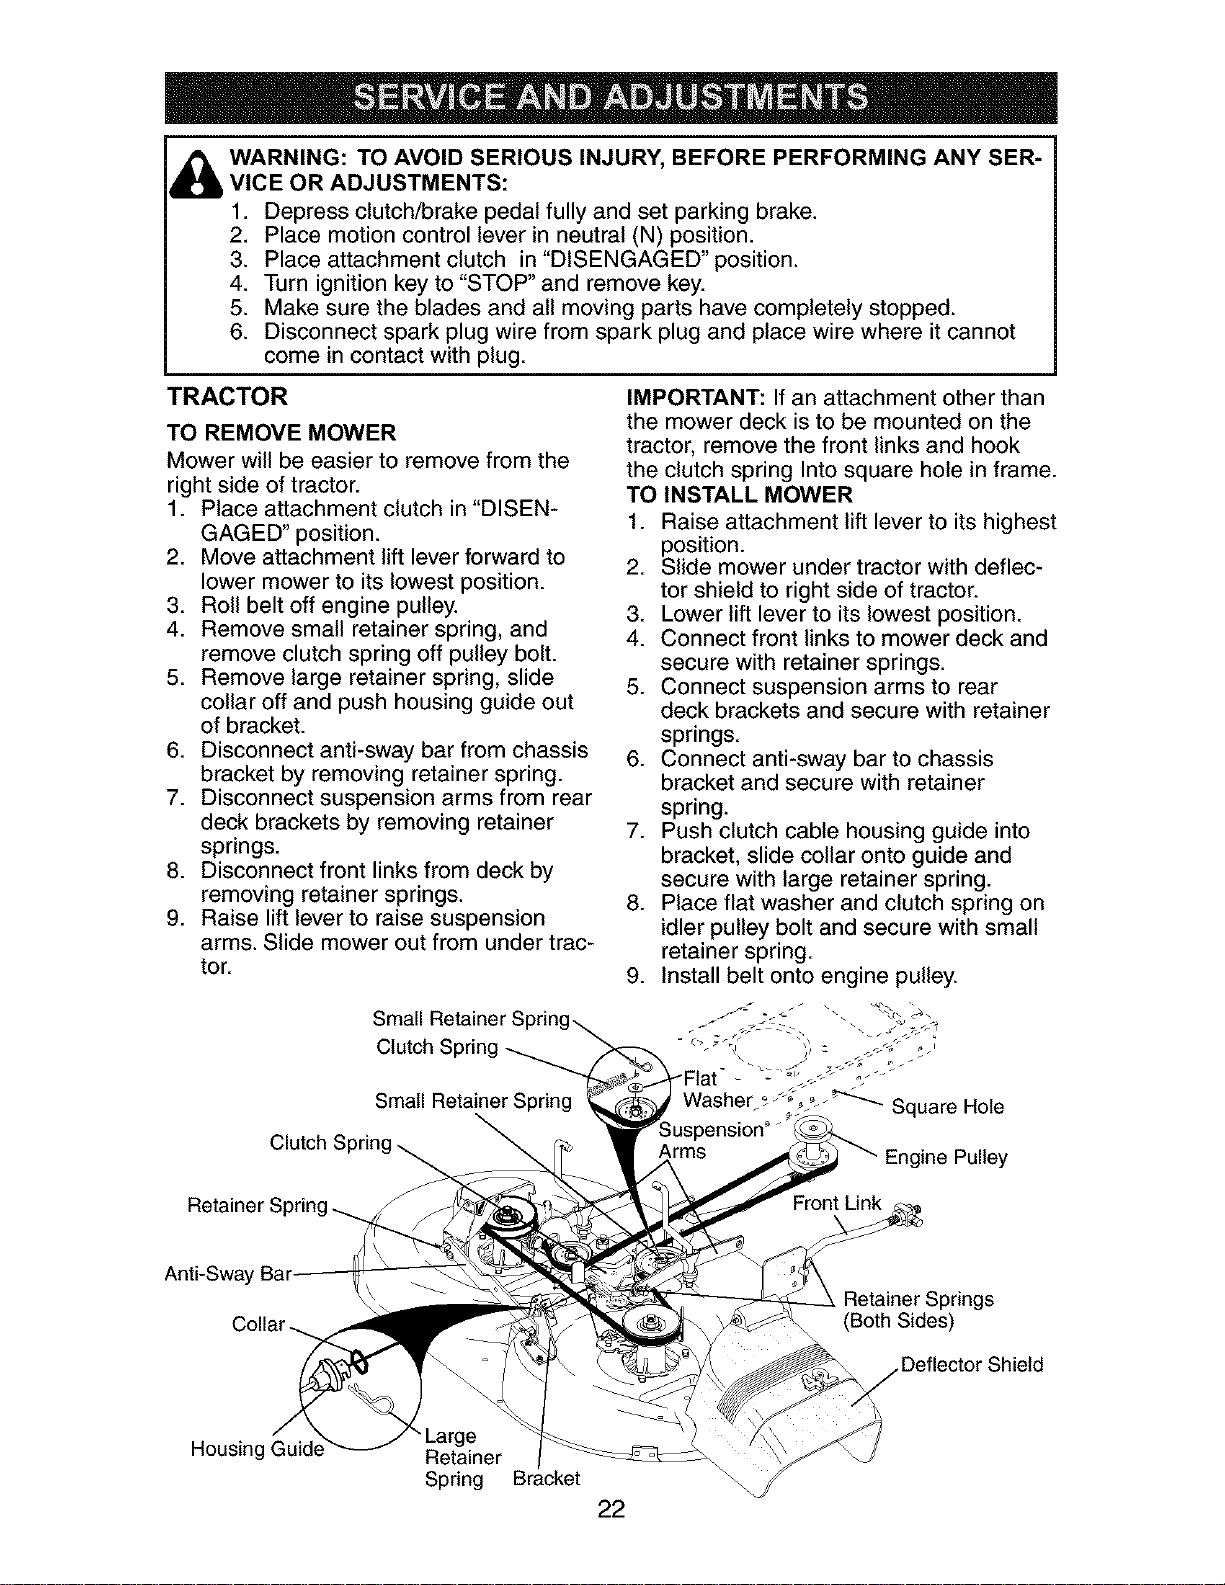
TO REMOVE MOWER
Mower will be easier to remove from the
right side of tractor.
1. Place attachment clutch in "DISEN-
GAGED" position.
2. Move attachment lift lever forward to
lower mower to its lowest position.
3. Roll belt off engine pulley.
4. Remove small retainer spring, and
remove clutch spring off pulley bolt.
5. Remove large retainer spring, slide
collar off and push housing guide out
of bracket.
6. Disconnect anti-sway bar from chassis
bracket by removing retainer spring.
7. Disconnect suspension arms from rear
deck brackets by removing retainer
springs.
8. Disconnect front links from deck by
removing retainer springs.
9. Raise lift lever to raise suspension
arms. Slide mower out from under trac-
tor.
Clutch Spring
Small Retainer Spring
IMPORTANT: If an attachment other than
the mower deck is to be mounted on the
tractor, remove the front links and hook
the clutch spring Into square hole in frame.
TO INSTALL MOWER
1. Raise attachment lift lever to its highest
position.
2. Slide mower under tractor with deflec-
tor shield to right side of tractor.
3. Lower lift lever to its lowest position.
4. Connect front links to mower deck and
secure with retainer springs.
5. Connect suspension arms to rear
deck brackets and secure with retainer
springs.
6. Connect anti-sway bar to chassis
bracket and secure with retainer
spring.
7. Push clutch cable housing guide into
bracket, slide collar onto guide and
secure with large retainer spring.
8. Place flat washer and clutch spring on
idler pulley bolt and secure with small
retainer spring.
9. Install belt onto engine pulley.
Retainer Spring
Anti-Sway
Collar ._.
Retainer Springs
(Both Sides)
Deflector Shield
Housing
Large
Retainer
Spring
Bracket
22
TO LEVEL MOWER HOUSING
Adjust the mower while tractor is parked
on level ground or driveway. Make sure
tires are properly inflated (See "PROD-
UCT SPECIFICATIONS" section of this
manual). If tires are over or underinflated,
you will not properly adjust your mower.
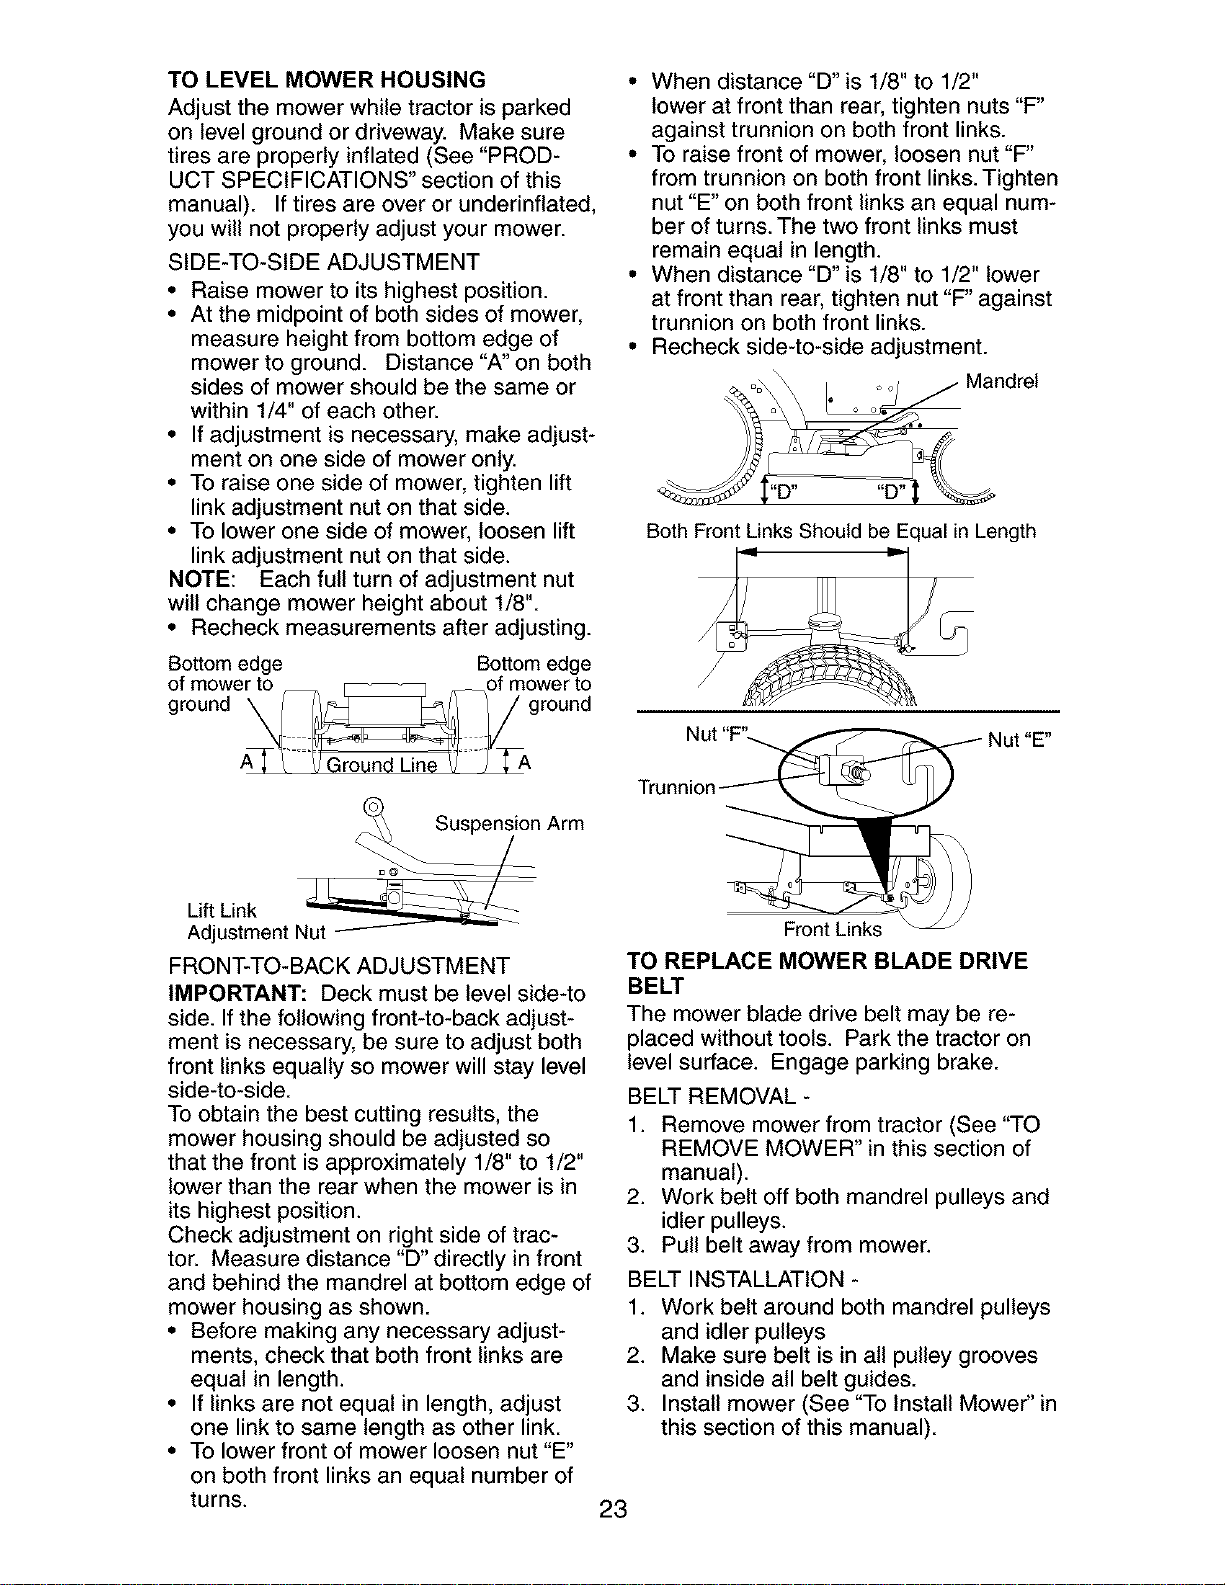
SIDE-TO-SIDE ADJUSTMENT
• Raise mower to its highest position.
• At the midpoint of both sides of mower,
measure height from bottom edge of
mower to ground. Distance "A" on both
sides of mower should be the same or
within 1/4" of each other.
• If adjustment is necessary, make adjust-
ment on one side of mower only.
• To raise one side of mower, tighten lift
link adjustment nut on that side.
• To lower one side of mower, loosen lift
link adjustment nut on that side.
NOTE: Each full turn of adjustment nut
will change mower height about 1/8".
• Recheck measurements after adjusting.
Bottom edge Bottom edge
of mower to _-_ of mower to
ground _ __//ground
A_ _ -_Ground IJ,ne_- _ _A
Suspension Arm
Lift Link Nut_
Adjustment
FRONT-TO-BACK ADJUSTMENT
IMPORTANT: Deck must be level side-to
side. If the following front-to-back adjust-
ment is necessary, be sure to adjust both
front links equally so mower will stay level
side-to-side.
To obtain the best cutting results, the
mower housing should be adjusted so
that the front is approximately 1/8" to 1/2"
lower than the rear when the mower is in
its highest position.
Check adjustment on right side of trac-
tor. Measure distance "D" directly in front
and behind the mandrel at bottom edge of
mower housing as shown.
• Before making any necessary adjust-
ments, check that both front links are
equal in length.
• If links are not equal in length, adjust
one link to same length as other link.
• To lower front of mower loosen nut "E"
on both front links an equal number of
turns.
• When distance "D" is 1/8" to 1/2"
lower at front than rear, tighten nuts "F"
against trunnion on both front links.
• To raise front of mower, loosen nut "F"
from trunnion on both front links. Tighten
nut "E" on both front links an equal num-
ber of turns. The two front links must
remain equal in length.
• When distance "D" is 1/8" to 1/2" lower
at front than rear, tighten nut "F" against
trunnion on both front links.
• Recheck side-to-side adjustment.
Both Front Links Should be Equal in Length
Trunnio
Jt"E"
Front Links
TO REPLACE MOWER BLADE DRIVE
BELT
The mower blade drive belt may be re-
placed without tools. Park the tractor on
level surface. Engage parking brake.
BELT REMOVAL -
1. Remove mower from tractor (See "TO
REMOVE MOWER" in this section of
manual).
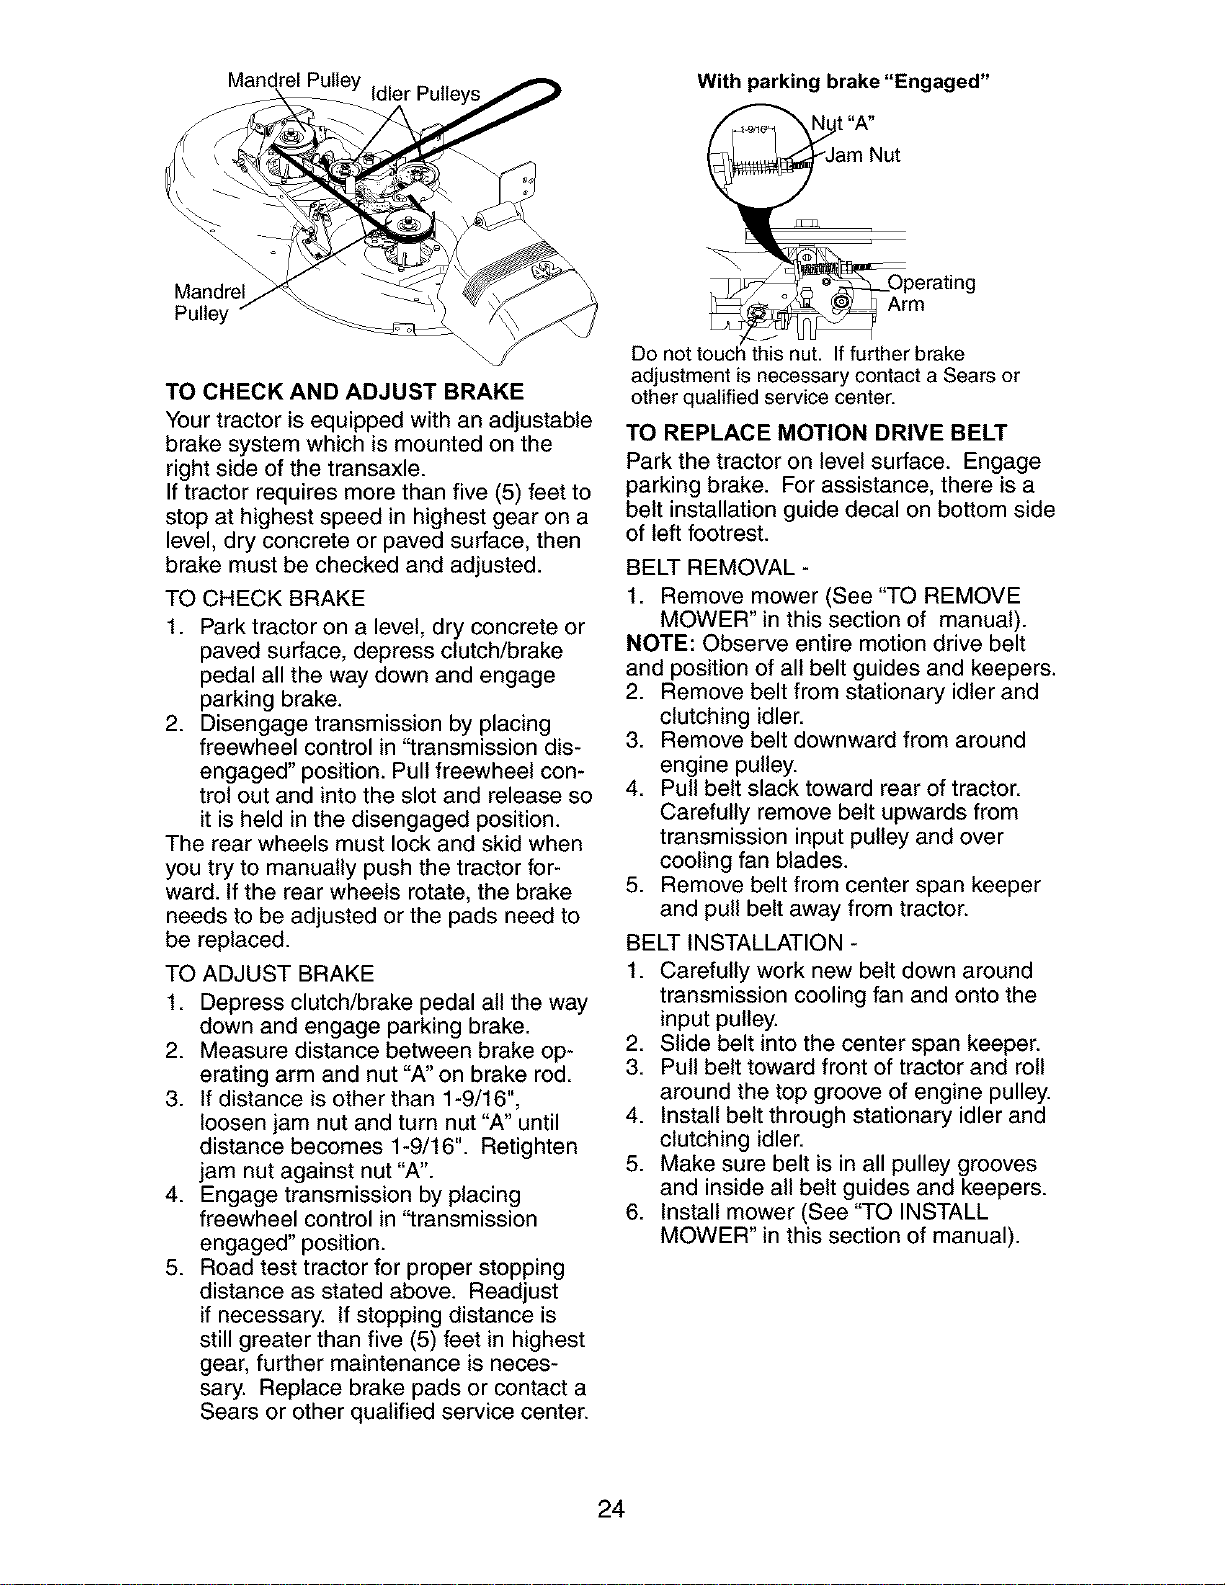
2. Work belt off both mandrel pulleys and
idler pulleys.
3. Pull belt away from mower.
BELT INSTALLATION -
1. Work belt around both mandrel pulleys
and idler pulleys
2. Make sure belt is in all pulley grooves
and inside all belt guides.
3. Install mower (See "To Install Mower" in
this section of this manual).
23
Mandrel Pulley
Mandrel
Pulley
TO CHECK AND ADJUST BRAKE
Your tractor is equipped with an adjustable
brake system which is mounted on the
right side of the transaxle.
If tractor requires more than five (5) feet to
stop at highest speed in highest gear on a
level, dry concrete or paved surface, then
brake must be checked and adjusted.
TO CHECK BRAKE
1. Park tractor on a level, dry concrete or
paved surface, depress clutch/brake
pedal all the way down and engage
parking brake.
2. Disengage transmission by placing
freewheel control in "transmission dis-
engaged" position. Pull freewheel con-
trol out and into the slot and release so
it is held in the disengaged position.
The rear wheels must lock and skid when
you try to manually push the tractor for-
ward. If the rear wheels rotate, the brake
needs to be adjusted or the pads need to
be replaced.
TO ADJUST BRAKE
1. Depress clutch/brake pedal all the way
down and engage parking brake.
2. Measure distance between brake op-
erating arm and nut "A" on brake rod.
3. If distance is other than 1-9/16",
loosen jam nut and turn nut "A" until
distance becomes 1-9/16". Retighten
jam nut against nut "A".
4. Engage transmission by placing
freewheel control in "transmission
engaged" position.
5. Road test tractor for proper stopping
distance as stated above. Readjust
if necessary. If stopping distance is
still greater than five (5) feet in highest
gear, further maintenance is neces-
sary. Replace brake pads or contact a
Sears or other qualified service center.
With parking brake "Engaged"
erat, o0
Donott rake
adjustment is necessary contact a Sears or
other qualified service center.
TO REPLACE MOTION DRIVE BELT
Park the tractor on level surface. Engage
parking brake. For assistance, there is a
belt installation guide decal on bottom side
of left footrest.
BELT REMOVAL -
1. Remove mower (See "TO REMOVE
MOWER" in this section of manual).
NOTE: Observe entire motion drive belt
and position of all belt guides and keepers.
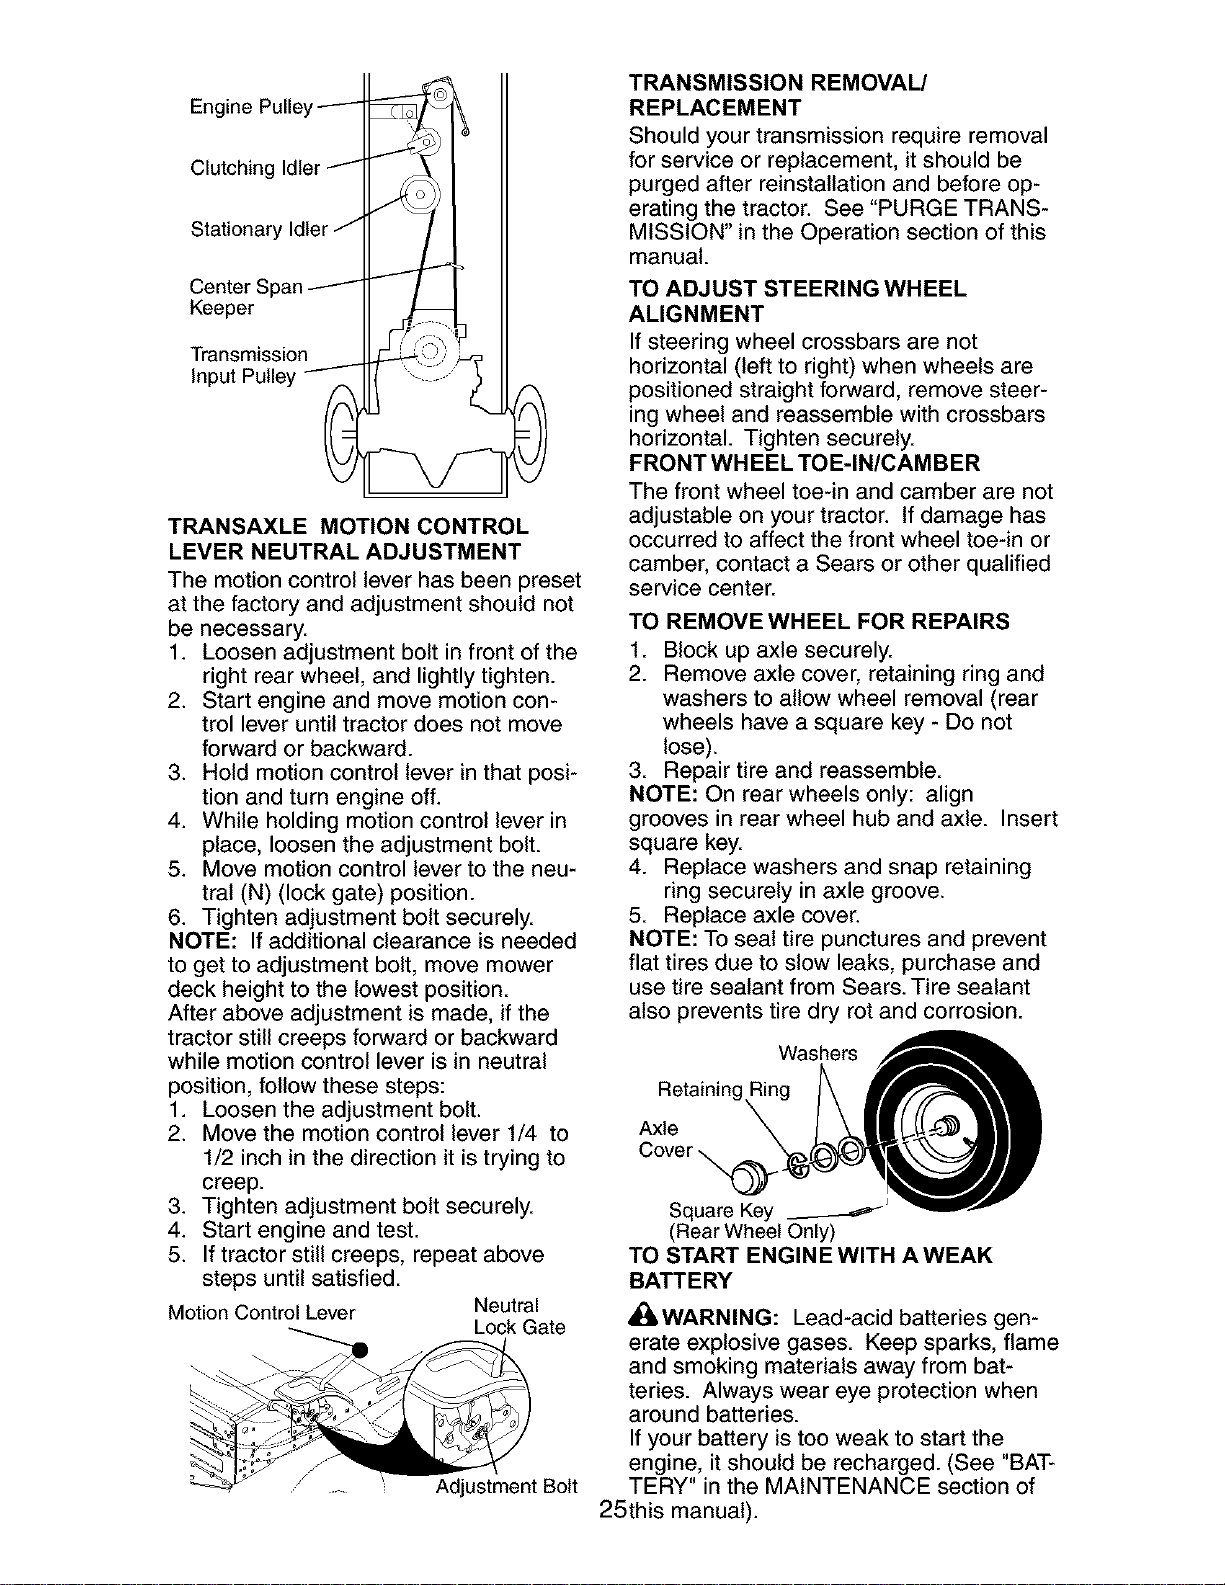
2. Remove belt from stationary idler and
clutching idler.
3. Remove belt downward from around
engine pulley.
4. Pull belt slack toward rear of tractor.
Carefully remove belt upwards from
transmission input pulley and over
cooling fan blades.
5. Remove belt from center span keeper
and pull belt away from tractor.
BELT INSTALLATION -
1. Carefully work new belt down around
transmission cooling fan and onto the
input pulley.
2. Slide belt into the center span keeper.
3. Pull belt toward front of tractor and roll
around the top groove of engine pulley.
4. Install belt through stationary idler and
clutching idler.
5. Make sure belt is in all pulley grooves
and inside all belt guides and keepers.
6. Install mower (See "TO INSTALL
MOWER" in this section of manual).
24
Engine Pulley-----
Clutching Idler -""I _ I
Keeper
TRANSAXLE MOTION CONTROL
LEVER NEUTRAL ADJUSTMENT
The motion control lever has been preset
at the factory and adjustment should not
be necessary.
1. Loosen adjustment bolt in front of the
right rear wheel, and lightly tighten.
2. Start engine and move motion con-
trol lever until tractor does not move
forward or backward.
3. Hold motion control lever in that posi-
tion and turn engine off.
4. While holding motion control lever in
place, loosen the adjustment bolt.
5. Move motion control lever to the neu-
tral (N) (lock gate) position.
6. Tighten adjustment bolt securely.
NOTE: If additional clearance is needed
to get to adjustment bolt, move mower
deck height to the lowest position.
After above adjustment is made, if the
tractor still creeps forward or backward
while motion control lever is in neutral
position, follow these steps:
1. Loosen the adjustment bolt.
2. Move the motion control lever 1/4 to
1/2 inch in the direction it is trying to
creep.
3. Tighten adjustment bolt securely.
4. Start engine and test.
5. If tractor still creeps, repeat above
steps until satisfied.
Motion Control Lever Neutral
Lock Gate
Adjustment Bolt
TRANSMISSION REMOVAL/
REPLACEMENT
Should your transmission require removal
for service or replacement, it should be
purged after reinstallation and before op-
erating the tractor. See "PURGE TRANS-
MISSION" in the Operation section of this
manual.
TO ADJUST STEERING WHEEL
ALIGNMENT
Ifsteering wheel crossbars are not
horizontal (left to right) when wheels are
positioned straight forward, remove steer-
ing wheel and reassemble with crossbars
horizontal. Tighten securely.
FRONT WHEEL TOE-IN/CAMBER
The front wheel toe-in and camber are not
adjustable on your tractor. If damage has
occurred to affect the front wheel toe-in or
camber, contact a Sears or other qualified
service center.
TO REMOVE WHEEL FOR REPAIRS
1. Block up axle securely.
2. Remove axle cover, retaining ring and
washers to allow wheel removal (rear
wheels have a square key - Do not
lose).
3. Repair tire and reassemble.
NOTE: On rear wheels only: align
grooves in rear wheel hub and axle. Insert
square key.
4. Replace washers and snap retaining
ring securely in axle groove.
5. Replace axle cover.
NOTE: To seal tire punctures and prevent
flat tires due to slow leaks, purchase and
use tire sealant from Sears. Tire sealant
also prevents tire dry rot and corrosion.
Axle
Cover _
Square Key
(Rear Wheel Only)
TO START ENGINE WITH A WEAK
BATTERY
,_IILWARNING: Lead-acid batteries gen-
erate explosive gases. Keep sparks, flame
and smoking materials away from bat-
teries. Always wear eye protection when
around batteries.
If your battery is too weak to start the
engine, it should be recharged. (See "BAT-
TERY" in the MAINTENANCE section of
25this manual).
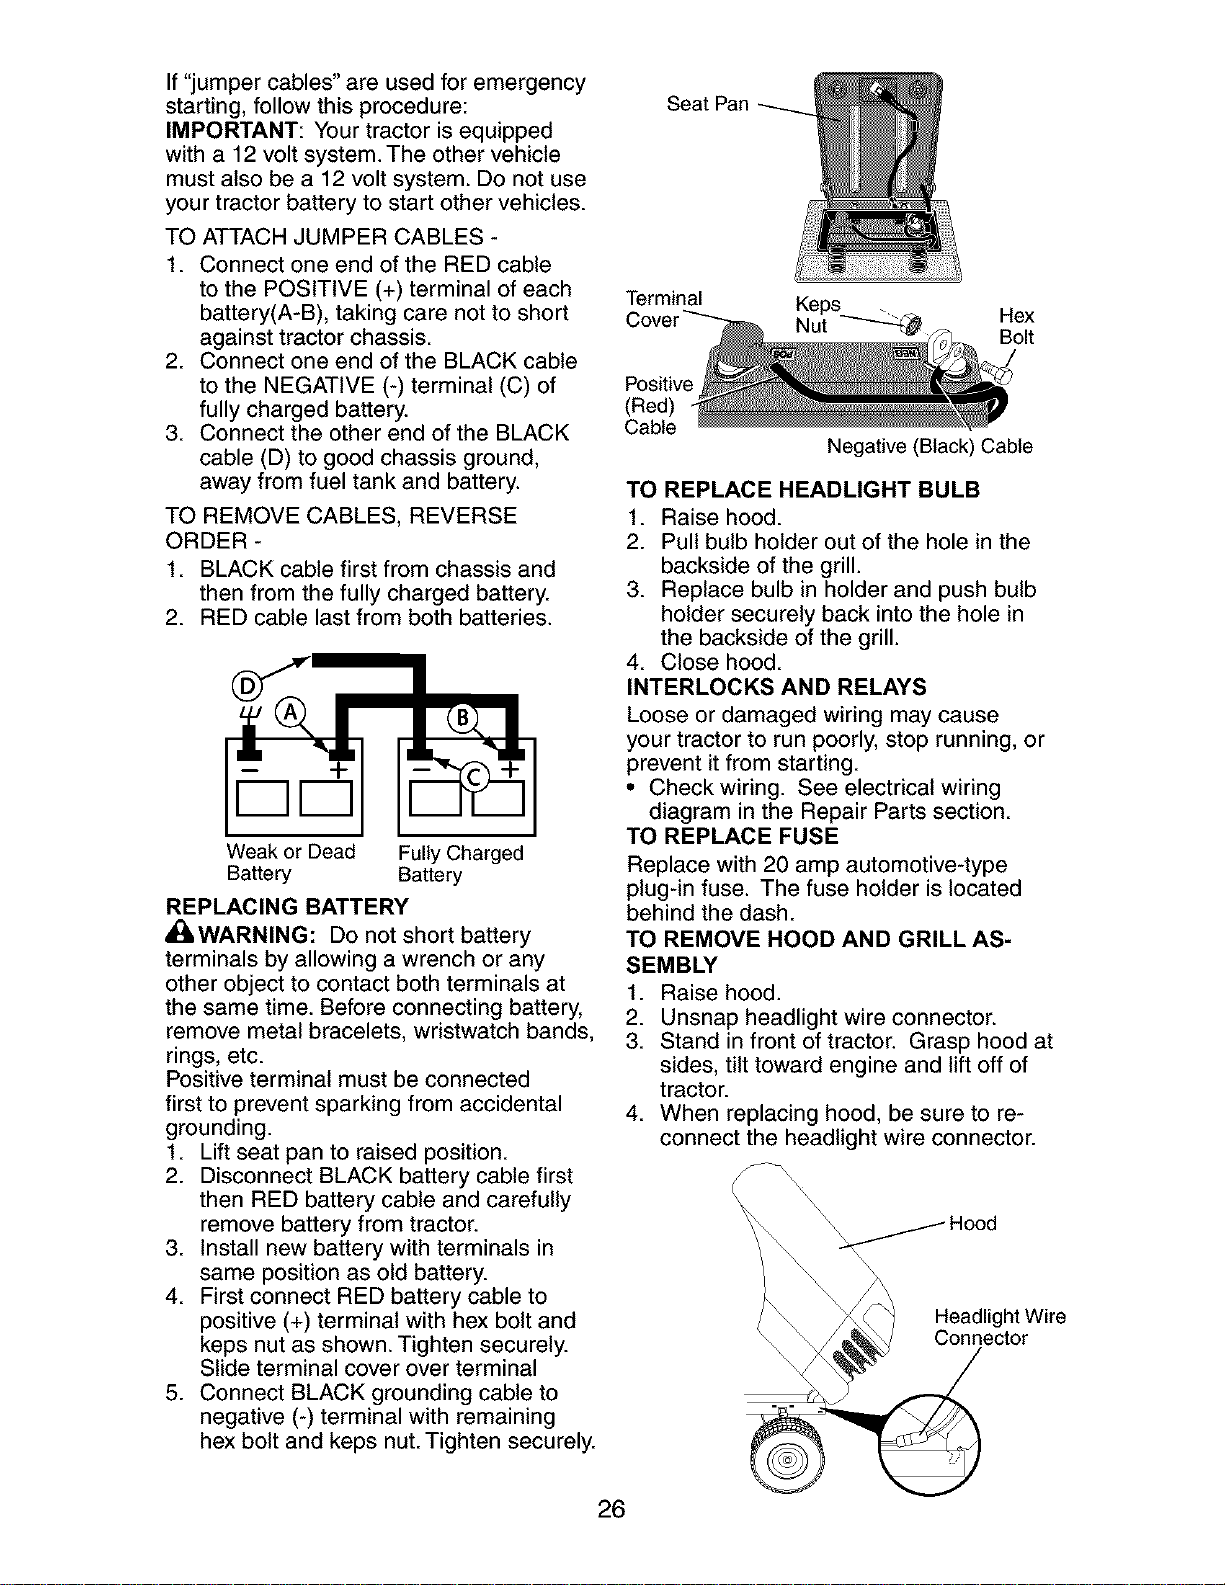
If"jumpercables"are usedforemergency
starting,followthisprocedure:
IMPORTANT:Yourtractoris equipped
with a 12voltsystem.The othervehicle
mustalsobe a 12voltsystem.Do notuse
yourtractorbatteryto startothervehicles.
TOATTACHJUMPERCABLES-
1. Connectoneendof the REDcable
to the POSITIVE(+)terminalof each
battery(A-B),takingcare notto short
againsttractorchassis.
2. Connectoneendof the BLACKcable
to the NEGATIVE(-)terminal(C)of
fully chargedbattery.
3. Connecttheotherendof the BLACK
cable(D)to goodchassisground,
awayfromfuel tankand battery.
TOREMOVECABLES,REVERSE
ORDER-
1. BLACKcablefirst fromchassisand
thenfromthefully chargedbattery.
2. REDcablelastfrom bothbatteries.
Weak or Dead Fully Charged
Battery Battery
REPLACING BATTERY
_ILWARNING: Do not short battery
terminals by allowing a wrench or any
other object to contact both terminals at
the same time. Before connecting battery,
remove metal bracelets, wristwatch bands,
rings, etc.
Positive terminal must be connected
first to prevent sparking from accidental
grounding.
1. Lift seat pan to raised position.
2. Disconnect BLACK battery cable first
then RED battery cable and carefully
remove battery from tractor.
3. Install new battery with terminals in
same position as old battery.
4. First connect RED battery cable to
positive (+) terminal with hex bolt and
keps nut as shown. Tighten securely.
Slide terminal cover over terminal
5. Connect BLACK grounding cable to
negative (-) terminal with remaining
hex bolt and keps nut. Tighten securely.
Seat Pan
Terminal
Keps . _
Nut _ Hex
Bolt
Positive
(Red)
Cable
Negative (Black) Cable
TO REPLACE HEADLIGHT BULB
1. Raise hood.
2. Pull bulb holder out of the hole in the
backside of the grill.
3. Replace bulb in holder and push bulb
holder securely back into the hole in
the backside of the grill.
4. Close hood.
INTERLOCKS AND RELAYS
Loose or damaged wiring may cause
your tractor to run poorly, stop running, or
prevent it from starting.
• Check wiring. See electrical wiring
diagram in the Repair Parts section.
TO REPLACE FUSE
Replace with 20 amp automotive-type
plug-in fuse. The fuse holder is located
behind the dash.
TO REMOVE HOOD AND GRILL AS-
SEMBLY
1. Raise hood.
2. Unsnap headlight wire connector.
3. Stand in front of tractor. Grasp hood at
sides, tilt toward engine and lift off of
tractor.
4. When replacing hood, be sure to re-
connect the headlight wire connector.
Headlight Wire
Connector
26
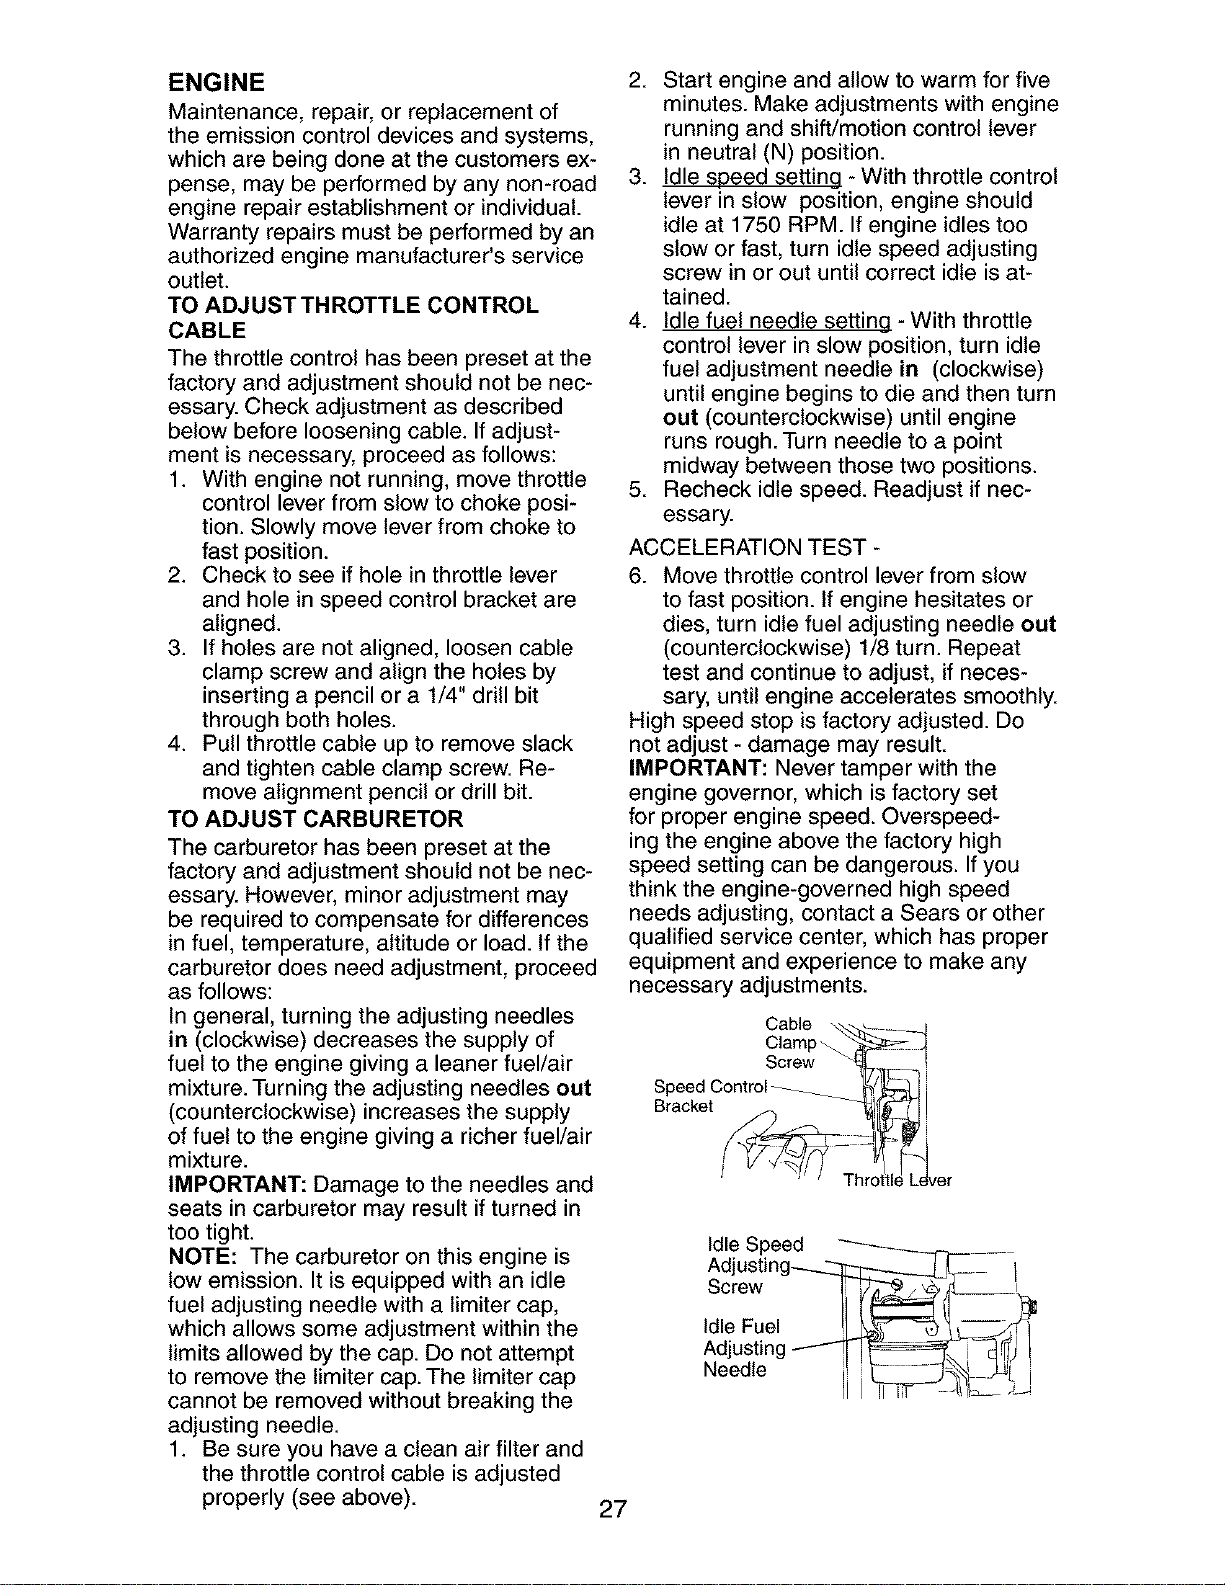
ENGINE
Maintenance, repair, or replacement of
the emission control devices and systems,
which are being done at the customers ex-
pense, may be performed by any non-road
engine repair establishment or individual.
Warranty repairs must be performed by an
authorized engine manufacturer's service
outlet.
TO ADJUSTTHROTTLE CONTROL
CABLE
The throttle control has been preset at the
factory and adjustment should not be nec-
essary. Check adjustment as described
below before loosening cable. If adjust-
ment is necessary, proceed as follows:
1. With engine not running, move throttle
control lever from slow to choke posi-
tion. Slowly move lever from choke to
fast position.
2. Check to see if hole in throttle lever
and hole in speed control bracket are
aligned.
3. If holes are not aligned, loosen cable
clamp screw and align the holes by
inserting a pencil or a 1/4" drill bit
through both holes.
4. Pull throttle cable up to remove slack
and tighten cable clamp screw. Re-
move alignment pencil or drill bit.
TO ADJUST CARBURETOR
The carburetor has been preset at the
factory and adjustment should not be nec-
essary. However, minor adjustment may
be required to compensate for differences
in fuel, temperature, altitude or load. If the
carburetor does need adjustment, proceed
as follows:
In general, turning the adjusting needles
in (clockwise) decreases the supply of
fuel to the engine giving a leaner fuel/air
mixture. Turning the adjusting needles out
(counterclockwise) increases the supply
of fuel to the engine giving a richer fuel/air
mixture.
IMPORTANT: Damage to the needles and
seats in carburetor may result if turned in
too tight.
NOTE: The carburetor on this engine is
low emission. It is equipped with an idle
fuel adjusting needle with a limiter cap,
which allows some adjustment within the
limits allowed by the cap. Do not attempt
to remove the limiter cap. The limiter cap
cannot be removed without breaking the
adjusting needle.
1. Be sure you have a clean air filter and
the throttle control cable is adjusted
properly (see above).
2. Start engine and allow to warm for five
minutes. Make adjustments with engine
running and shift/motion control lever
in neutral (N) position.
3. Idle speed setting - With throttle control
lever in slow position, engine should
idle at 1750 RPM. If engine idles too
slow or fast, turn idle speed adjusting
screw in or out until correct idle is at-
tained.
4. Idle fuel needle setting - With throttle
control lever in slow position, turn idle
fuel adjustment needle in (clockwise)
until engine begins to die and then turn
out (counterclockwise) until engine
runs rough. Turn needle to a point
midway between those two positions.
5. Recheck idle speed. Readjust if nec-
essary.
ACCELERATION TEST -
6. Move throttle control lever from slow
to fast position. If engine hesitates or
dies, turn idle fuel adjusting needle out
(counterclockwise) 1/8 turn. Repeat
test and continue to adjust, if neces-
sary, until engine accelerates smoothly.
High speed stop is factory adjusted. Do
not adjust - damage may result.
IMPORTANT: Never tamper with the
engine governor, which is factory set
for proper engine speed. Overspeed-
ing the engine above the factory high
speed setting can be dangerous. If you
think the engine-governed high speed
needs adjusting, contact a Sears or other
qualified service center, which has proper
equipment and experience to make any
necessary adjustments.
Cable \_ _ _j
Screw _][ I
Speed Contro,_ _/'_7 '
Bracket if._TI I
! _ Thr_ie_ktver
Idle Speed
Adjusting__T_ - }
screw
,d,eFue,Iq
Adjusting -----__fj I
Needle I'' _ _L_!j
27
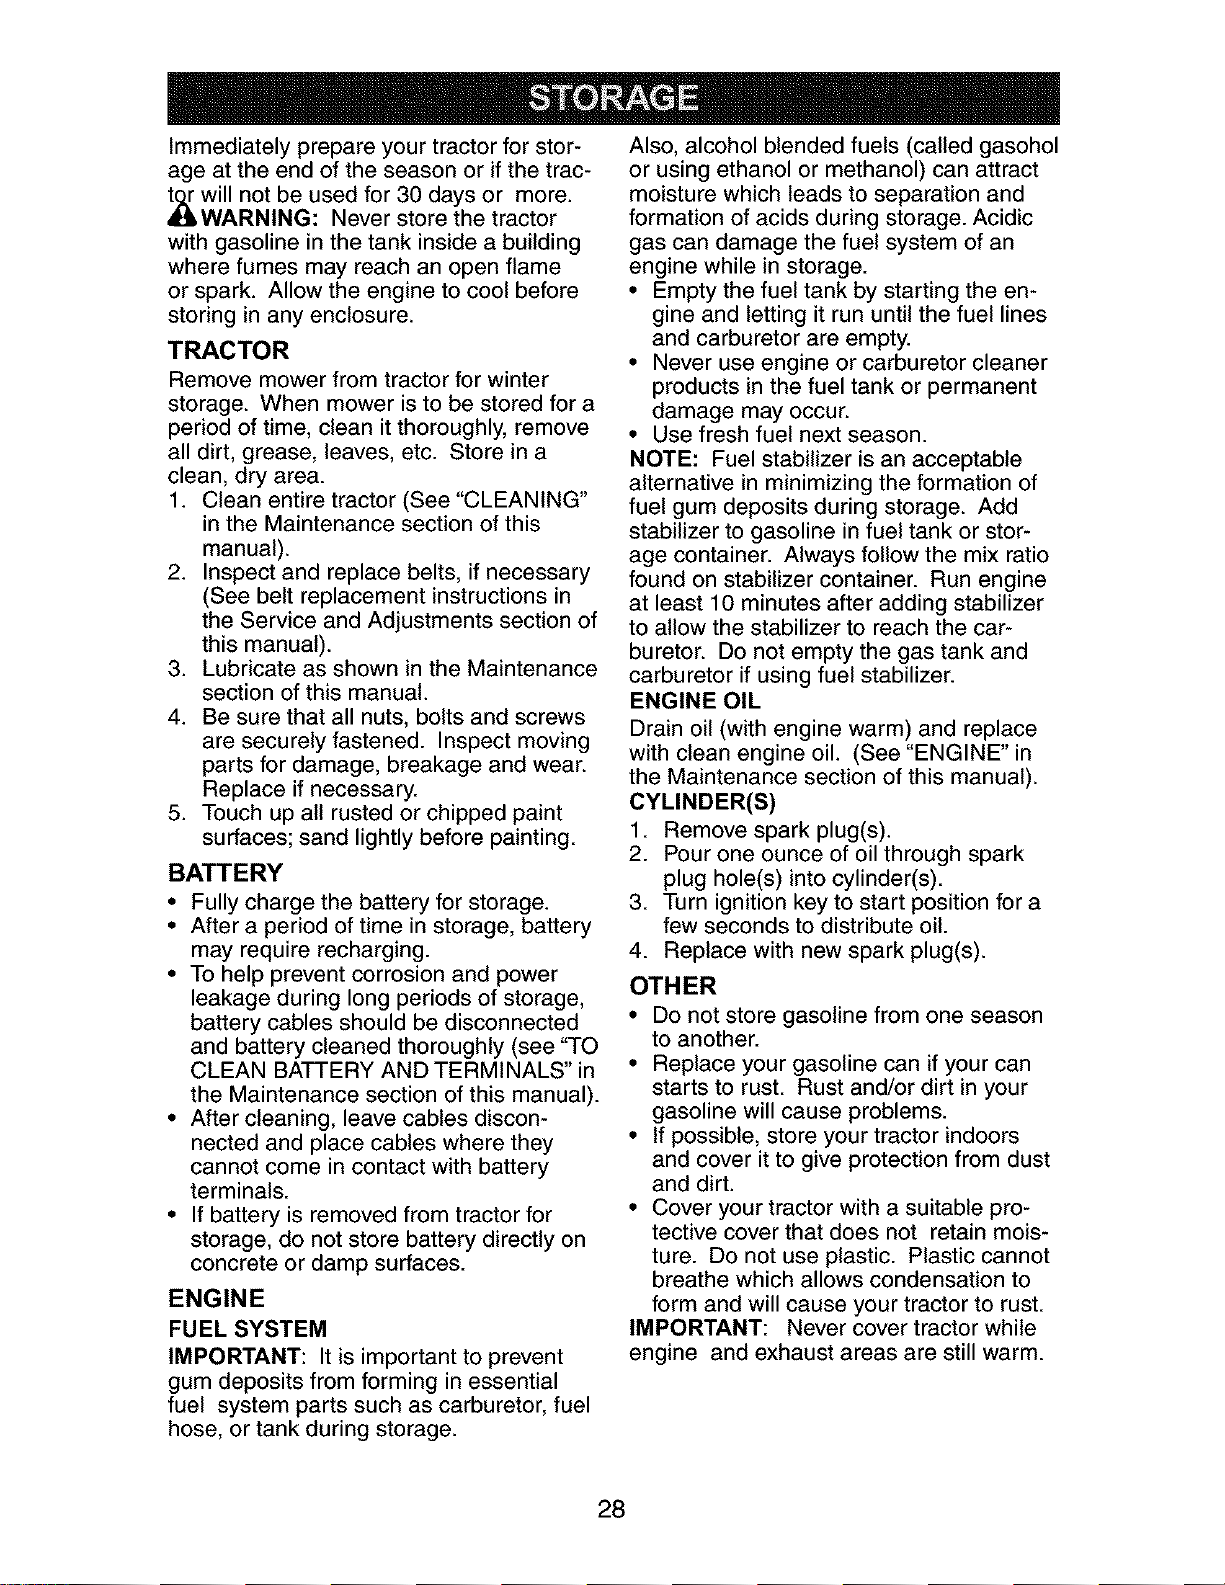
Immediately prepare your tractor for stor-
age at the end of the season or if the trac-
_ will not be used for 30 days or more.
WARNING: Never store the tractor
with gasoline in the tank inside a building
where fumes may reach an open flame
or spark. Allow the engine to cool before
storing in any enclosure.
TRACTOR
Remove mower from tractor for winter
storage. When mower is to be stored for a
period of time, clean it thoroughly, remove
all dirt, grease, leaves, etc. Store in a
clean, dry area.
1. Clean entire tractor (See "CLEANING"
in the Maintenance section of this
manual).
2. Inspect and replace belts, if necessary
(See belt replacement instructions in
the Service and Adjustments section of
this manual).
3. Lubricate as shown in the Maintenance
section of this manual.
4. Be sure that all nuts, bolts and screws
are securely fastened. Inspect moving
parts for damage, breakage and wear.
Replace if necessary.
5. Touch up all rusted or chipped paint
surfaces; sand lightly before painting.
BATTERY
• Fully charge the battery for storage.
• After a period of time in storage, battery
may require recharging.
• To help prevent corrosion and power
leakage during long periods of storage,
battery cables should be disconnected
and battery cleaned thoroughly (see "TO
CLEAN BATTERY AND TERMINALS" in
the Maintenance section of this manual).
• After cleaning, leave cables discon-
nected and place cables where they
cannot come in contact with battery
terminals.
• If battery is removed from tractor for
storage, do not store battery directly on
concrete or damp surfaces.
ENGINE
FUEL SYSTEM
IMPORTANT: It is important to prevent
gum deposits from forming in essential
fuel system parts such as carburetor, fuel
hose, or tank during storage.
Also, alcohol blended fuels (called gasohol
or using ethanol or methanol) can attract
moisture which leads to separation and
formation of acids during storage. Acidic
gas can damage the fuel system of an
engine while in storage.
• Empty the fuel tank by starting the en-
gine and letting it run until the fuel lines
and carburetor are empty.
• Never use engine or carburetor cleaner
products in the fuel tank or permanent
damage may occur.
• Use fresh fuel next season.
NOTE: Fuel stabilizer is an acceptable
alternative in minimizing the formation of
fuel gum deposits during storage. Add
stabilizer to gasoline in fuel tank or stor-
age container. Always follow the mix ratio
found on stabilizer container. Run engine
at least 10 minutes after adding stabilizer
to allow the stabilizer to reach the car-
buretor. Do not empty the gas tank and
carburetor if using fuel stabilizer.
ENGINE OIL
Drain oil (with engine warm) and replace
with clean engine oil. (See "ENGINE" in
the Maintenance section of this manual).
CYLINDER(S)
1. Remove spark plug(s).
2. Pour one ounce of oil through spark
plug hole(s) into cylinder(s).
3. Turn ignition key to start position for a
few seconds to distribute oil.
4. Replace with new spark plug(s).
OTHER
• Do not store gasoline from one season
to another.
• Replace your gasoline can ifyour can
starts to rust. Rust and/or dirt in your
gasoline will cause problems.
• If possible, store your tractor indoors
and cover it to give protection from dust
and dirt.
• Cover your tractor with a suitable pro-
tective cover that does not retain mois-
ture. Do not use plastic. Plastic cannot
breathe which allows condensation to
form and will cause your tractor to rust.
IMPORTANT: Never cover tractor while
engine and exhaust areas are still warm.
28
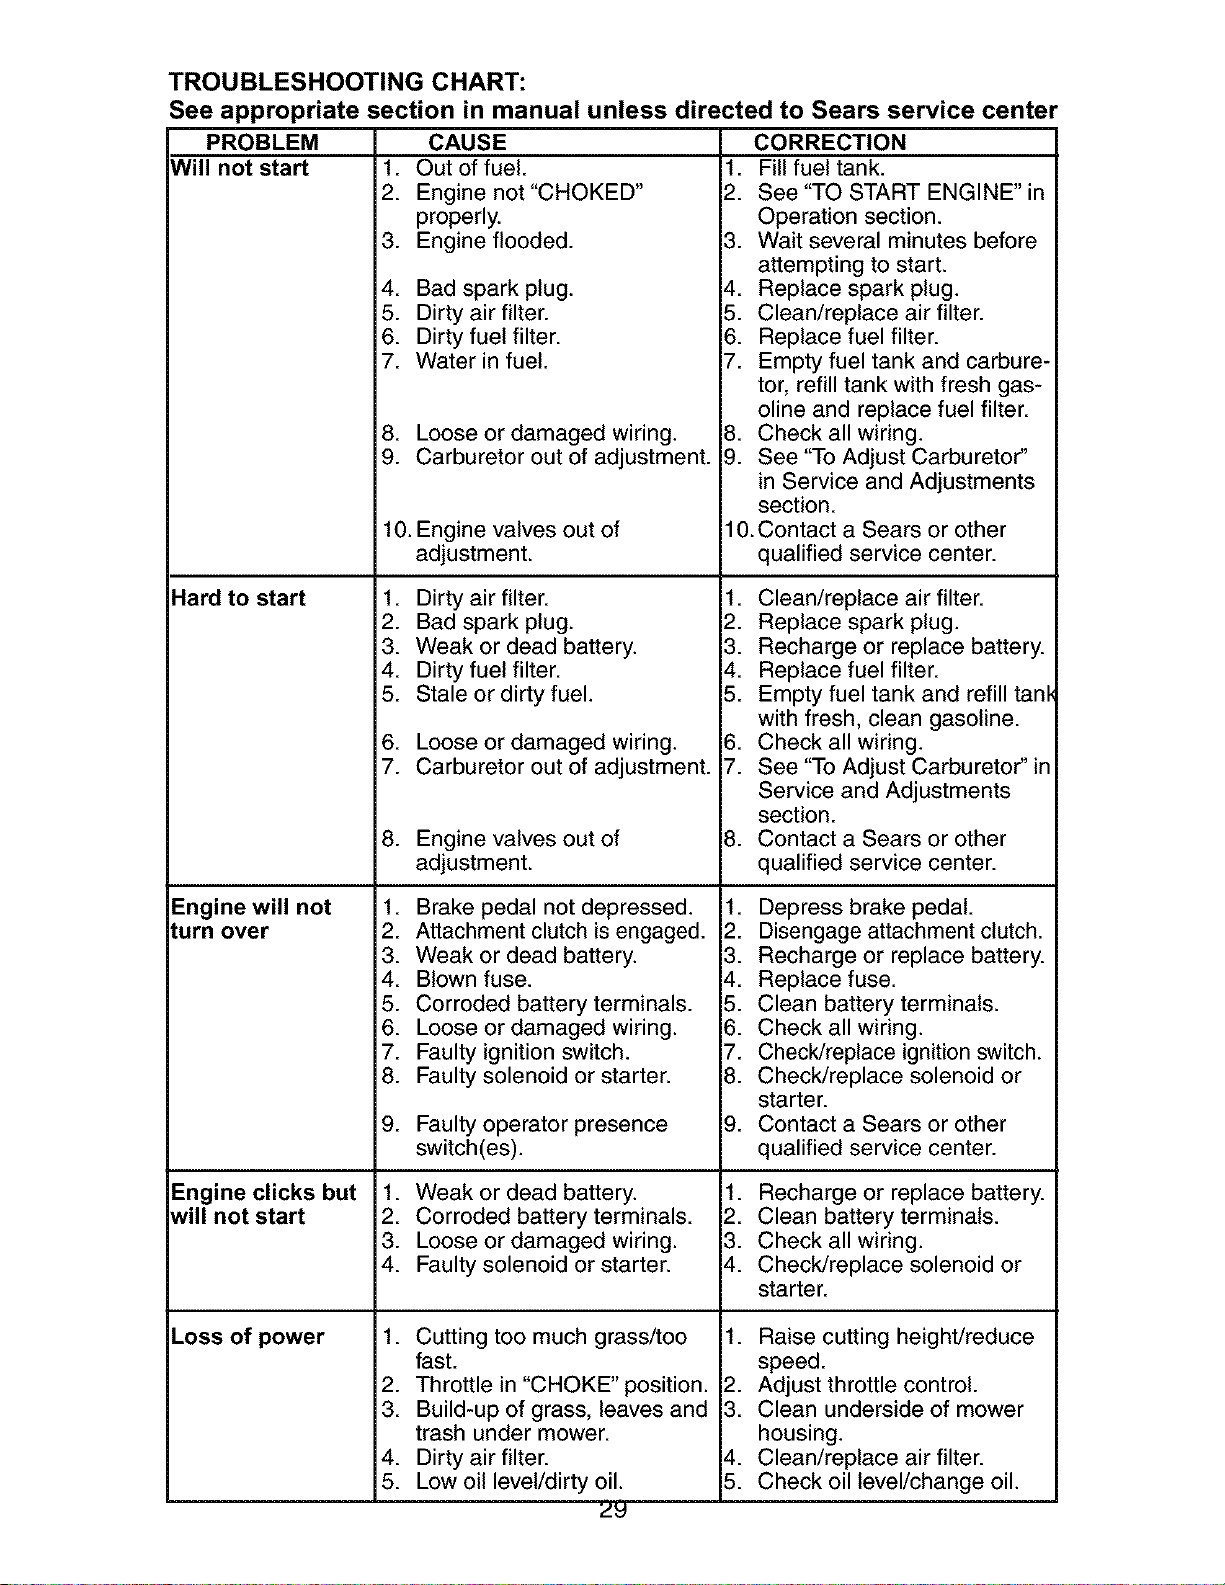
TROUBLESHOOTING CHART:
See appropriate section in manual unless directed to Sears service center
PROBLEM
Will not start 1.
2.
3.
4.
5.
6.
7.
8.
9.
Hard to start
Engine will not
turn over
Engine clicks but
will not start
CAUSE
Out of fuel.
Engine not "CHOKED"
properly.
Engine flooded.
Bad spark plug.
Dirty air filter.
Dirty fuel filter.
Water in fuel.
Loose or damaged wiring.
Carburetor out of adjustment.
10. Engine valves out of
adjustment.
1. Dirty air filter.
2. Bad spark plug.
3. Weak or dead battery.
4. Dirty fuel filter.
5. Stale or dirty fuel.
6. Loose or damaged wiring.
7. Carburetor out of adjustment.
8. Engine valves out of
adjustment.
1. Brake pedal not depressed.
2. Attachment clutch isengaged.
3. Weak or dead battery.
4. Blown fuse.
5. Corroded battery terminals.
6. Loose or damaged wiring.
7. Faulty ignition switch.
8. Faulty solenoid or starter.
g.
Faulty operator presence
switch(es).
1. Weak or dead battery.
2. Corroded battery terminals.
3. Loose or damaged wiring.
4. Faulty solenoid or starter.
CORRECTION
il. Fill fuel tank.
i2. See "TO START ENGINE" in
Operation section.
i3. Wait several minutes before
attempting to start.
i4. Replace spark plug.
i5. Clean/replace air filter.
i6. Replace fuel filter.
i7. Empty fuel tank and carbure-
tor, refill tank with fresh gas-
oline and replace fuel filter.
i8. Check all wiring.
i9. See "To Adjust Carburetor"
in Service and Adjustments
section.
10.Contact a Sears or other
qualified service center.
Cutting too much grass/too
fast.
Throttle in "CHOKE" position.
Build-up of grass, leaves and
trash under mower.
il. Clean/replace air filter.
i2. Replace spark plug.
i3. Recharge or replace battery.
i4. Replace fuel filter.
i5. Empty fuel tank and refill tank
with fresh, clean gasoline.
i6. Check all wiring.
i7. See "To Adjust Carburetor" in
Service and Adjustments
section.
i8. Contact a Sears or other
qualified service center.
Loss of power
il. Depress brake pedal.
i2. Disengage attachment clutch.
i3. Recharge or replace battery.
i4. Replace fuse.
i5. Clean battery terminals.
i6. Check all wiring.
i7. Check/replace ignitionswitch.
i8. Check/replace solenoid or
starter.
i9. Contact a Sears or other
qualified service center.
il. Recharge or replace battery.
i2. Clean battery terminals.
i3. Check all wiring.
i4. Check/replace solenoid or
starter.
1. il. Raise cutting height/reduce
speed.
2. i2. Adjust throttle control.
3. i3. Clean underside of mower
housing.
4. Dirty air filter, i4. Clean/replace air filter.
5. Low oil level/dirty oil. i5. Check oil level/change oil.
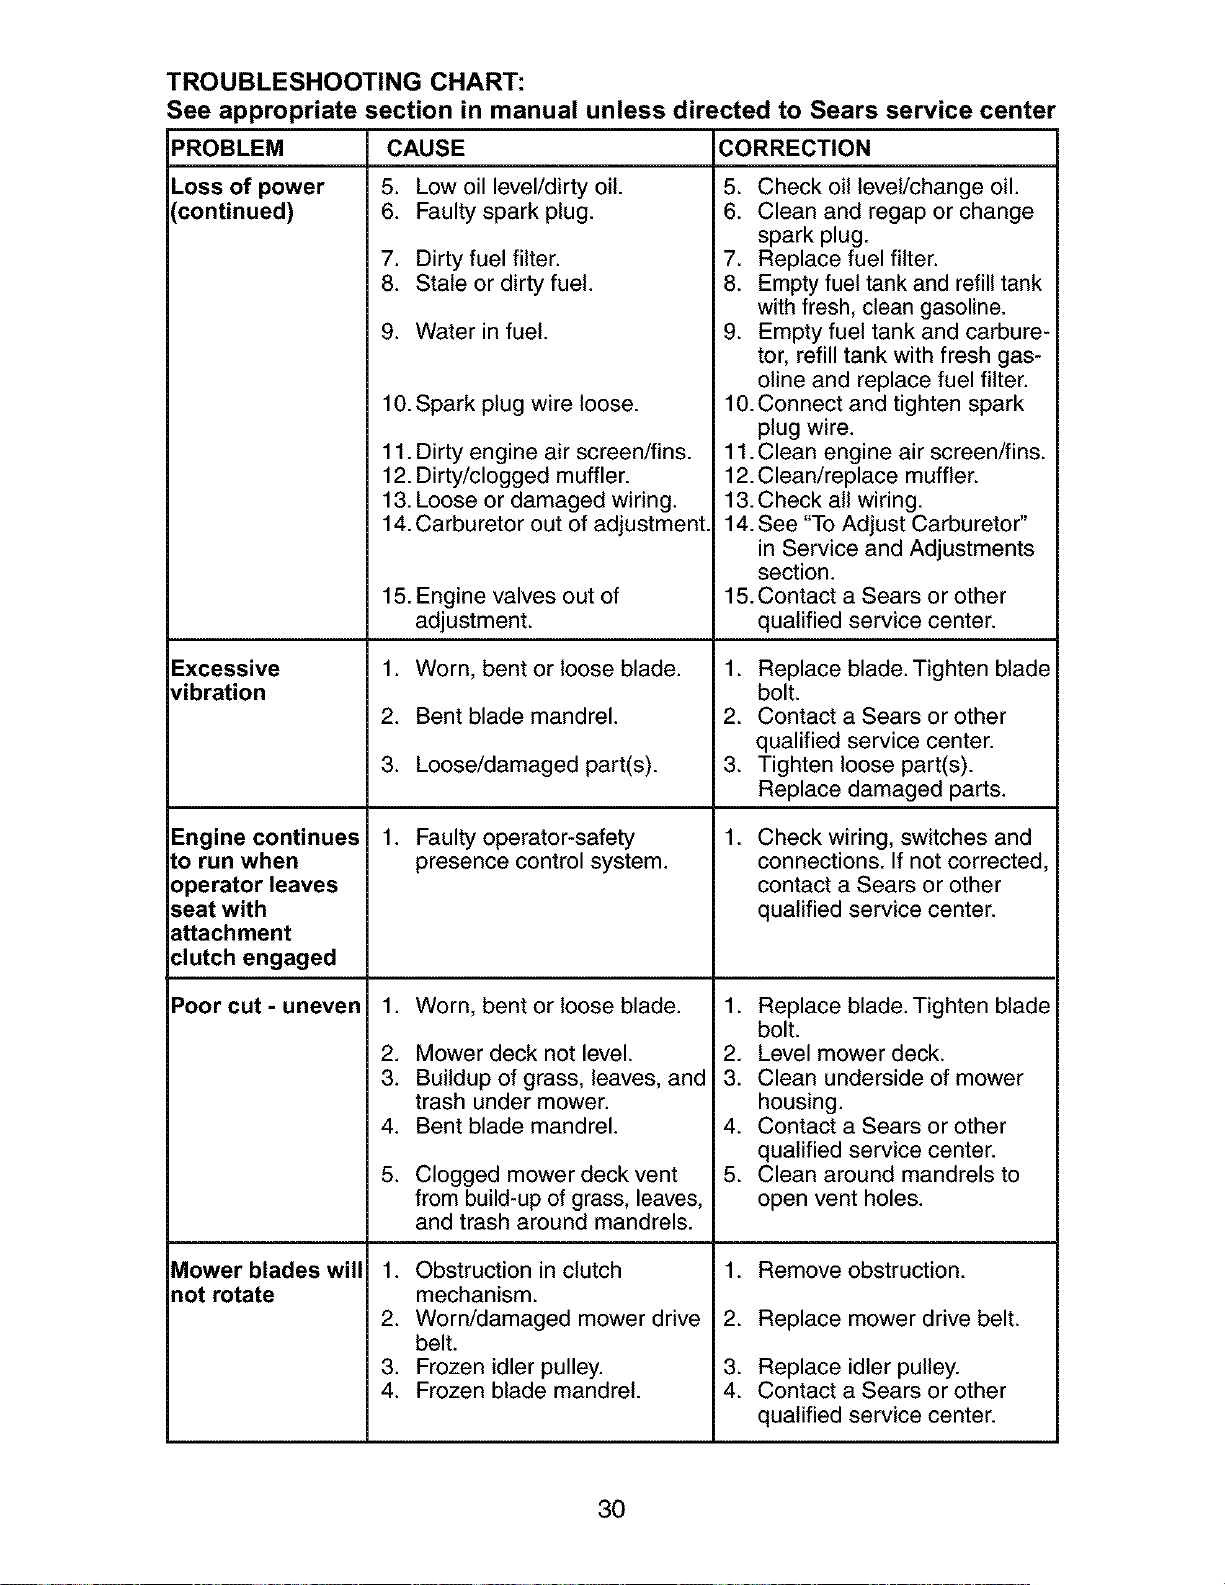
TROUBLESHOOTING CHART:
See appropriate section in manual unless directed to Sears service center
PROBLEM
Loss of power
continued)
Excessive
vibration
Engine continues
to run when
operator leaves
seat with
attachment
:lutch engaged
Poorcut-uneven
Mower blades will
notrotate
CAUSE
5. Low oil level/dirty oil.
6. Faulty spark plug.
7. Dirty fuel filter.
8. Stale or dirty fuel.
9. Water in fuel.
10.Spark plug wire loose.
11. Dirty engine air screen/fins.
12. Dirty/clogged muffler.
13. Loose or damaged wiring.
14.Carburetor out of adjustment.
15. Engine valves out of
adjustment.
1. Worn, bent or loose blade.
2. Bent blade mandrel.
3. Loose/damaged part(s).
1. Faulty operator-safety
presence control system.
2.
3.
4.
Worn, bent or loose blade.
Mower deck not level.
Buildup of grass, leaves, and
trash under mower.
Bent blade mandrel.
5. Clogged mower deck vent
from build-up of grass, leaves,
and trash around mandrels.
1. Obstruction in clutch
mechanism.
2. Worn/damaged mower drive
belt.
3. Frozen idler pulley.
4. Frozen blade mandrel.
CORRECTION
5. Check oil level/change oil.
6. Clean and regap or change
spark plug.
7. Replace fuel filter.
8. Empty fuel tank and refill tank
with fresh, clean gasoline.
9. Empty fuel tank and carbure-
tor, refill tank with fresh gas-
oline and replace fuel filter.
10.Connect and tighten spark
plug wire.
11.Clean engine air screen/fins.
12.Clean/replace muffler.
13.Check all wiring.
14.See "To Adjust Carburetor"
in Service and Adjustments
section.
15.Contact a Sears or other
qualified service center.
1. Replace blade. Tighten blade
bolt.
2. Contact a Sears or other
qualified service center.
3. Tighten loose part(s).
Replace damaged parts.
Check wiring, switches and
connections. If not corrected,
contact a Sears or other
qualified service center.
1. Replace blade. Tighten blade
bolt.
2. Level mower deck.
3. Clean underside of mower
housing.
4. Contact a Sears or other
qualified service center.
5. Clean around mandrels to
open vent holes.
1. Remove obstruction.
2. Replace mower drive belt.
3. Replace idler pulley.
4. Contact a Sears or other
qualified service center.
30
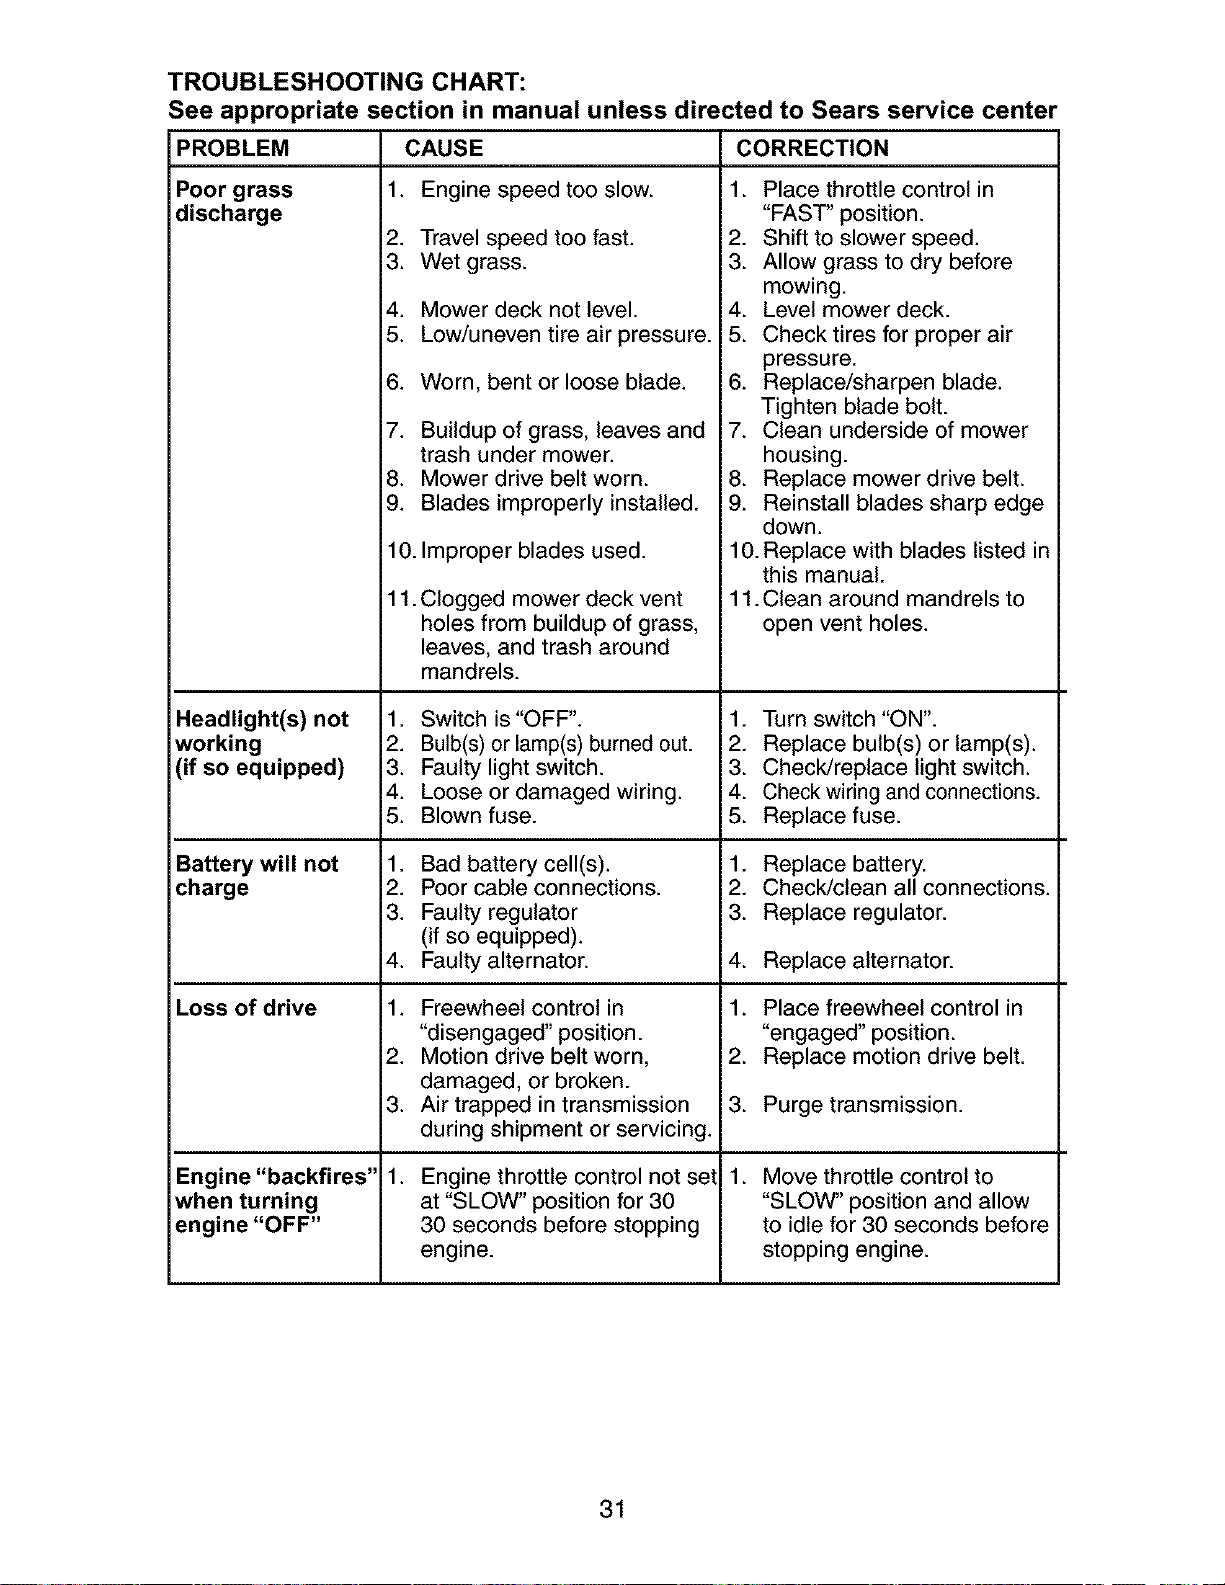
TROUBLESHOOTING CHART:
See appropriate section in manual unless directed to Sears service center
PROBLEM CAUSE CORRECTION
Poor grass f.
discharge
2.
3.
4.
5.
6.
7.
8.
9.
Headlight(s) not
working
(if so equipped)
Battery will not
charge
Loss of drive
Engine "backfires"
when turning
engine "OFF"
Engine speed too slow.
Travel speed too fast.
Wet grass.
Mower deck not level.
Low/uneven tire air pressure.
Worn, bent or loose blade.
Buildup of grass, leaves and
trash under mower.
Mower drive belt worn.
Blades improperly installed.
10. Improper blades used.
11. Clogged mower deck vent
holes from buildup of grass,
leaves, and trash around
mandrels.
1. Switch is "OFF".
2. Bulb(s) or lamp(s) burned out.
3. Faulty light switch.
4. Loose or damaged wiring.
5. Blown fuse.
1. Bad battery cell(s).
2. Poor cable connections.
3. Faulty regulator
(if so equipped).
4. Faulty alternator.
1. Freewheel control in
"disengaged" position.
2. Motion drive belt worn,
damaged, or broken.
3. Air trapped in transmission
during shipment or servicing.
Engine throttle control not set
at "SLOW" position for 30
30 seconds before stopping
engine.
i1. Place throttle control in
"FAST' position.
i2. Shift to slower speed.
i3. Allow grass to dry before
mowing.
i4. Level mower deck.
i5. Check tires for proper air
pressure.
i6. Replace/sharpen blade.
Tighten blade bolt.
i7. Clean underside of mower
housing.
i8. Replace mower drive belt.
i9. Reinstall blades sharp edge
down.
i10. Replace with blades listed in
this manual.
i11. Clean around mandrels to
open vent holes.
i1. Turn switch "ON".
i2. Replace bulb(s) or lamp(s).
i3. Check/replace light switch.
i4. Check wiring and connections.
i5. Replace fuse.
i1. Replace battery.
i2. Check/clean all connections.
i3. Replace regulator.
i4. Replace alternator.
i1. Place freewheel control in
"engaged" position.
i2. Replace motion drive belt.
i3. Purge transmission.
il.
Move throttle control to
"SLOW" position and allow
to idle for 30 seconds before
stopping engine.
31

32
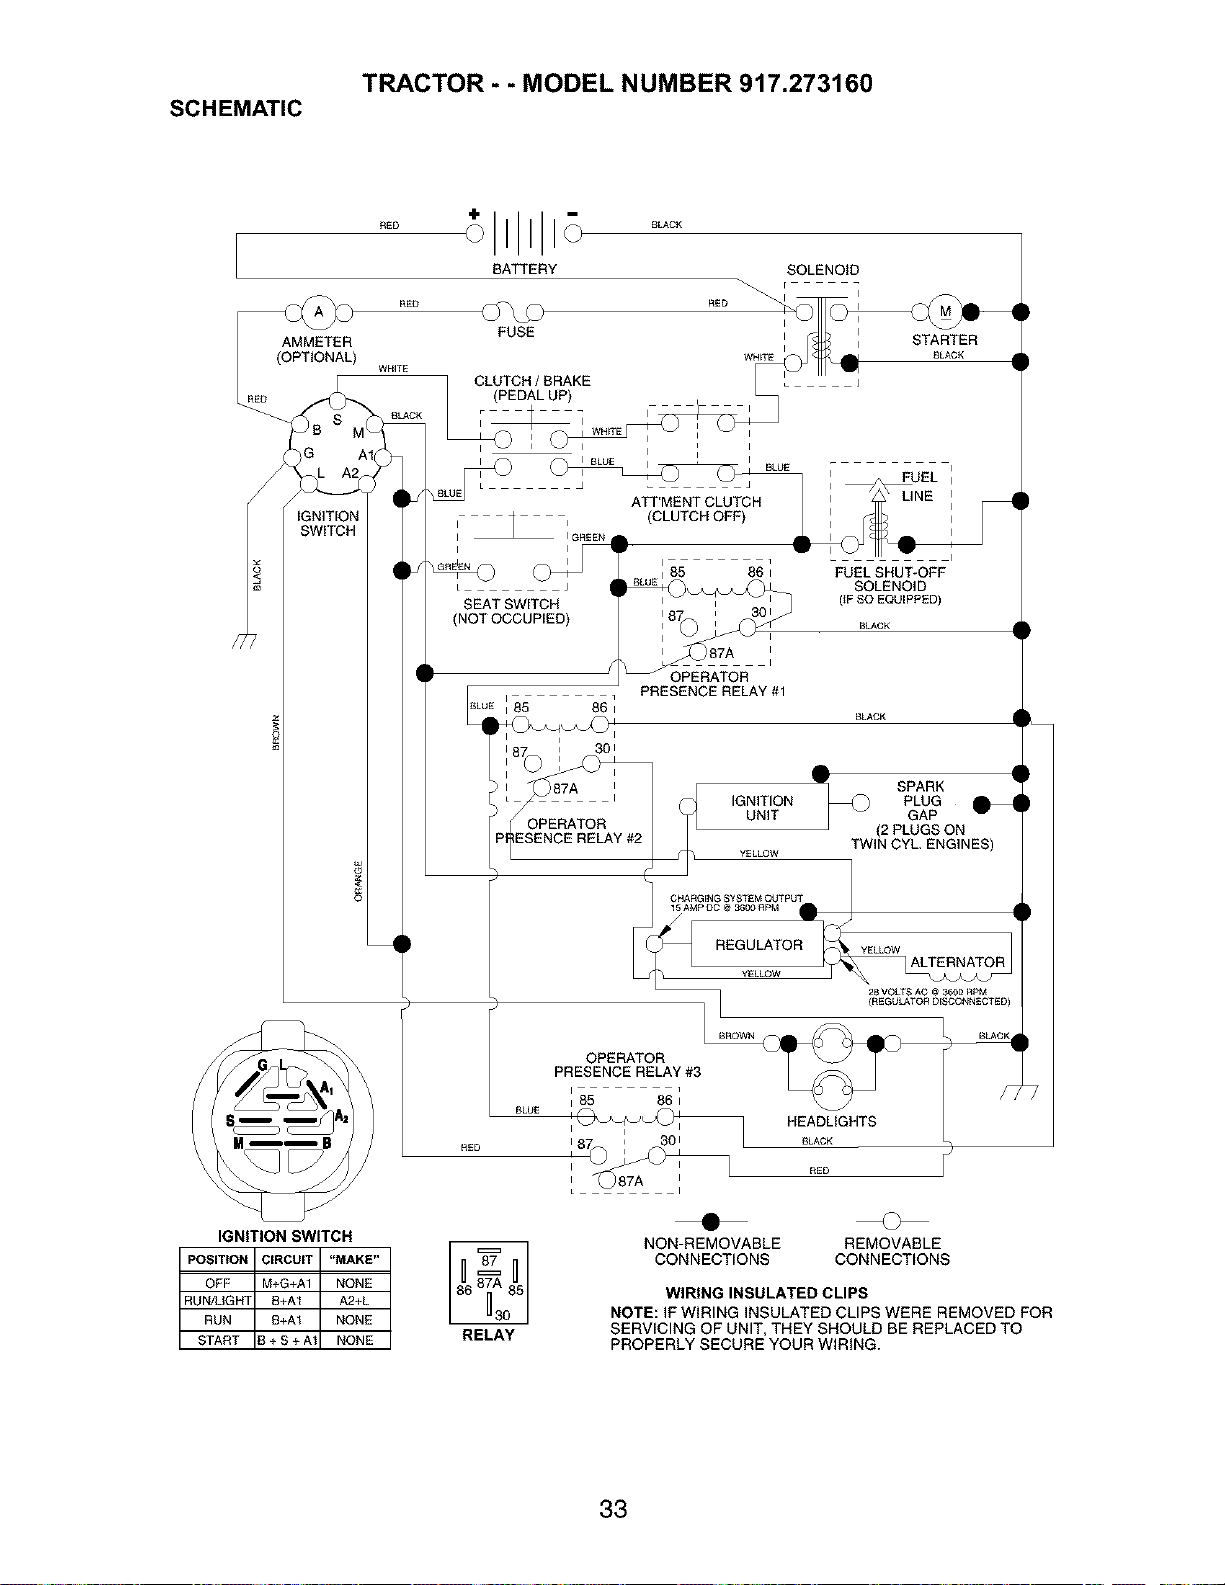
TRACTOR - - MODEL NUMBER 917.273160
SCHEMATIC
RED
°LACK
BATTERY SOLENOID
BLUE I I BLUE /
A_'ME_TCLUTCH
• •Iv
I 85 86 ] FUEL SHUT-OFF
OWE i
__q SOLENOID
SEAT SWITCH _)_ (IF SO EQUIPPED)
(NOT OCCUPIED 187 ' 301
i I BLACK
I
i 87A I
_1 PRESENCE RELAY #1
BLUE I 85 86 I BLACK
87 I 301
REGULIA_OR YELLOWALTERNATOR
L_ 28 VOLTS AC @ 3600 RpM
I 1 (RE GULATOR D'SCONNECTE D)
OPERATOR _ _ •
PRESENCE RELAY #3
BLO0_W_ HEADL,GRTS/
nED I 87 i 30 OLACK ½
, o_o_ r_
I -_)87A _ nED
IGNITION SWITCH
POSITION CIRCUIT "MAKE"
OFF M+G+A1 NONE
RUN/LIGHT B+A1 A2+L
RUN 8+A1 NONE
START 3 + S + A1 NONE
RELAY
NON-REMOVABLE REMOVABLE
CONNECTIONS CONNECTIONS
WIRING INSULATED CLIPS
NOTE: IF WIRING INSULATED CLIPS WERE REMOVED FOR
SERVICING OF UNIT, THEY SHOULD BE REPLACED TO
PROPERLY SECURE YOUR WIRING.
33
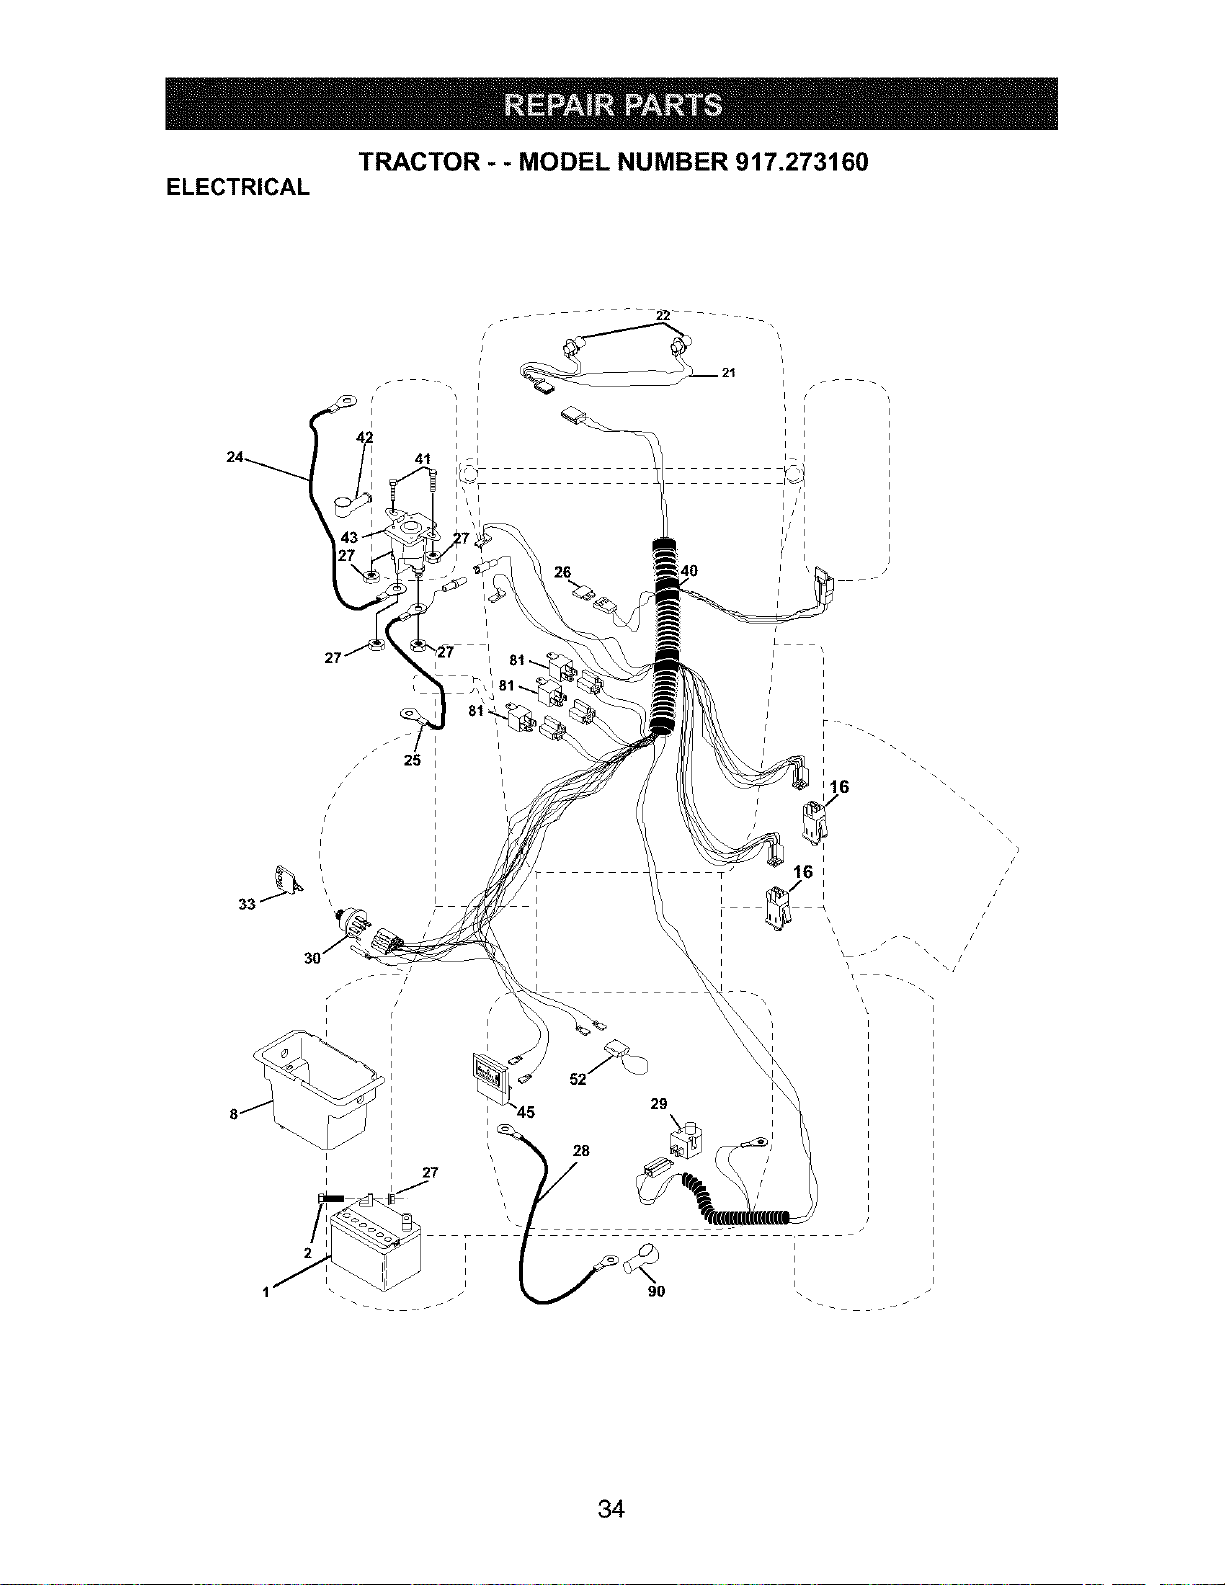
TRACTOR - - MODEL NUMBER 917.273160
ELECTRICAL
i/
I I
I / i
// i
{
25
27
I
1 / i
I
I
I
'16
I
161
I
I
I
I
I
I
\
?
/
34
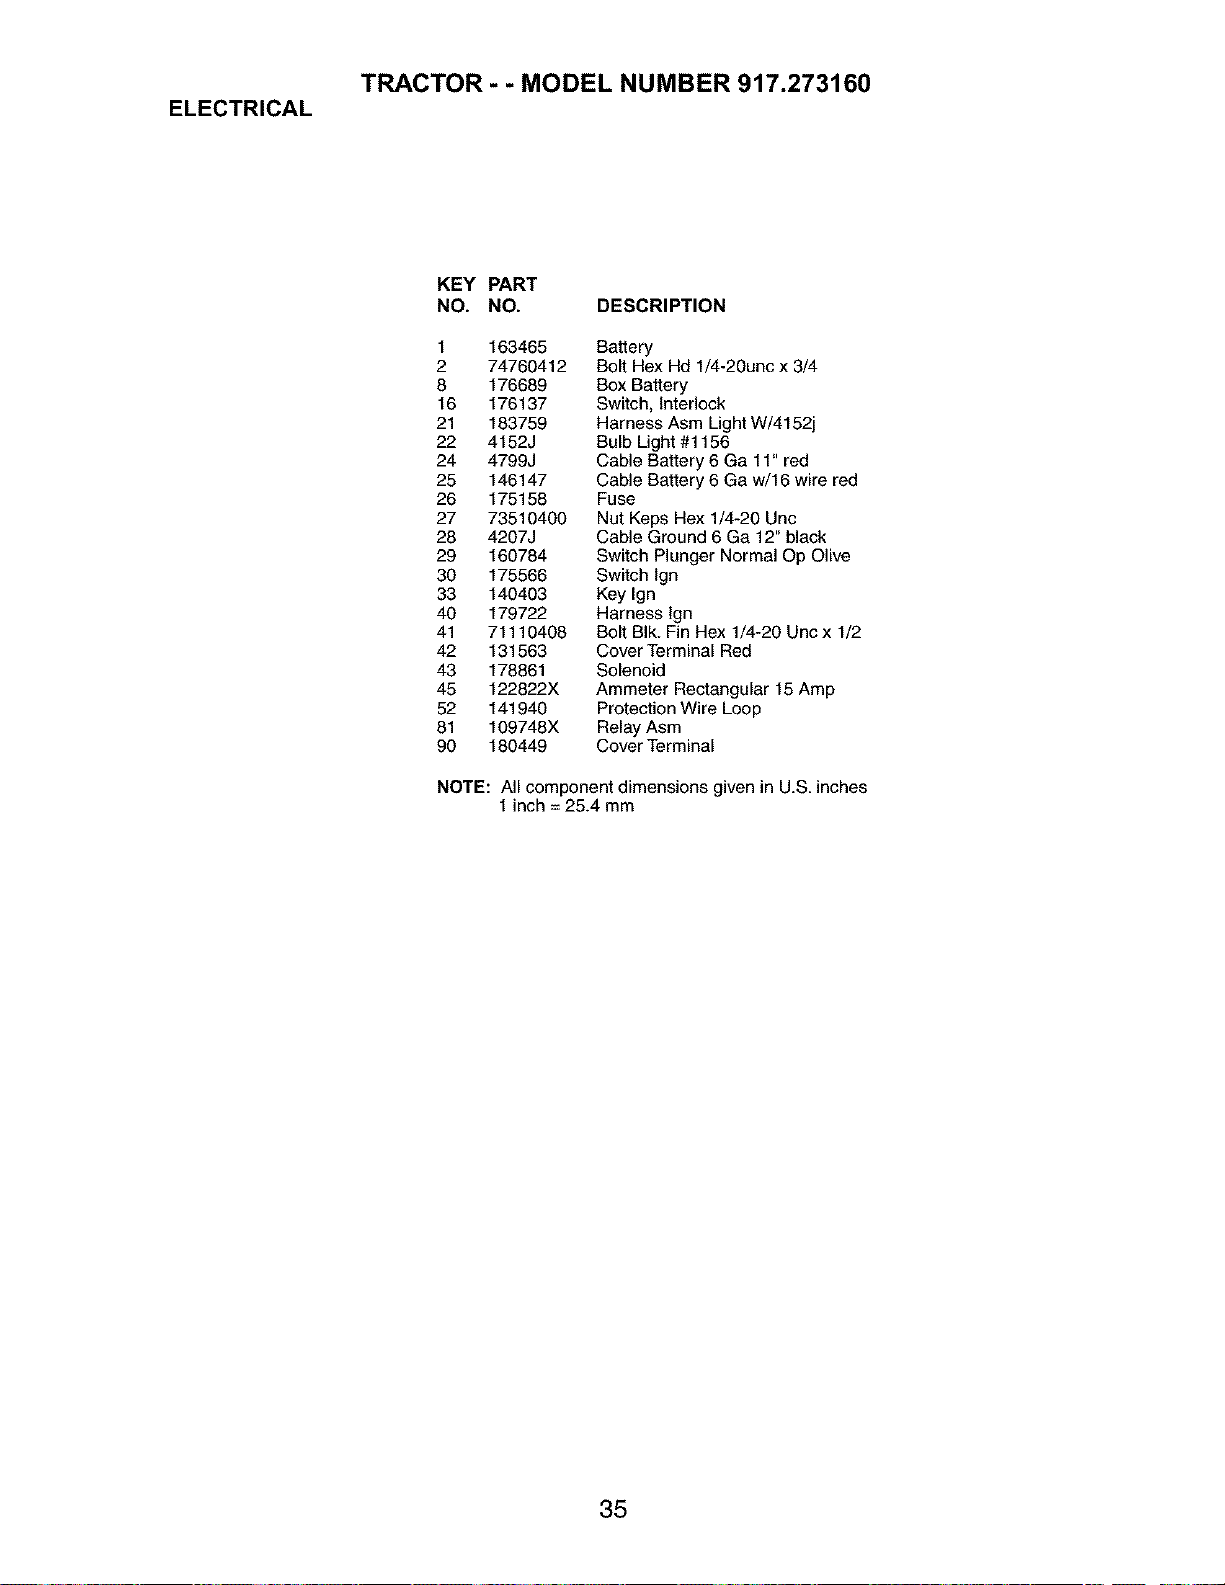
TRACTOR - - MODEL NUMBER 917.273160
ELECTRICAL
KEY PART
NO. NO. DESCRIPTION
1 163465 Battery
2 74760412 Bolt Hex Hd 1/4-20unc x 3/4
8 176689 Box Battery
16 176137 Switch, Interlock
21 183759 Harness Asm Light W/4152j
22 4152J Bulb Light #1156
24 4799J Cable Battery 6 Ga 11" red
25 146147 Cable Battery 6 Ga w/16 wire red
26 175158 Fuse
27 73510400 Nut Keps Hex 1/4-20 Unc
28 4207J Cable Ground 6 Ga 12" black
29 160784 Switch Plunger Normal Op Olive
30 175566 Switch lgn
33 140403 Key Ign
40 179722 Harness lgn
41 71110408 Bolt BIk. Fin Hex 1/4-20 Unc x 1/2
42 131563 Cover Terminal Red
43 178861 Solenoid
45 122822X Ammeter Rectangular 15 Amp
52 141940 Protection Wire Loop
81 109748X Relay Asm
90 180449 Cover Terminal
NOTE: All component dimensions given in U.S. inches
1 inch = 25.4 mm
35
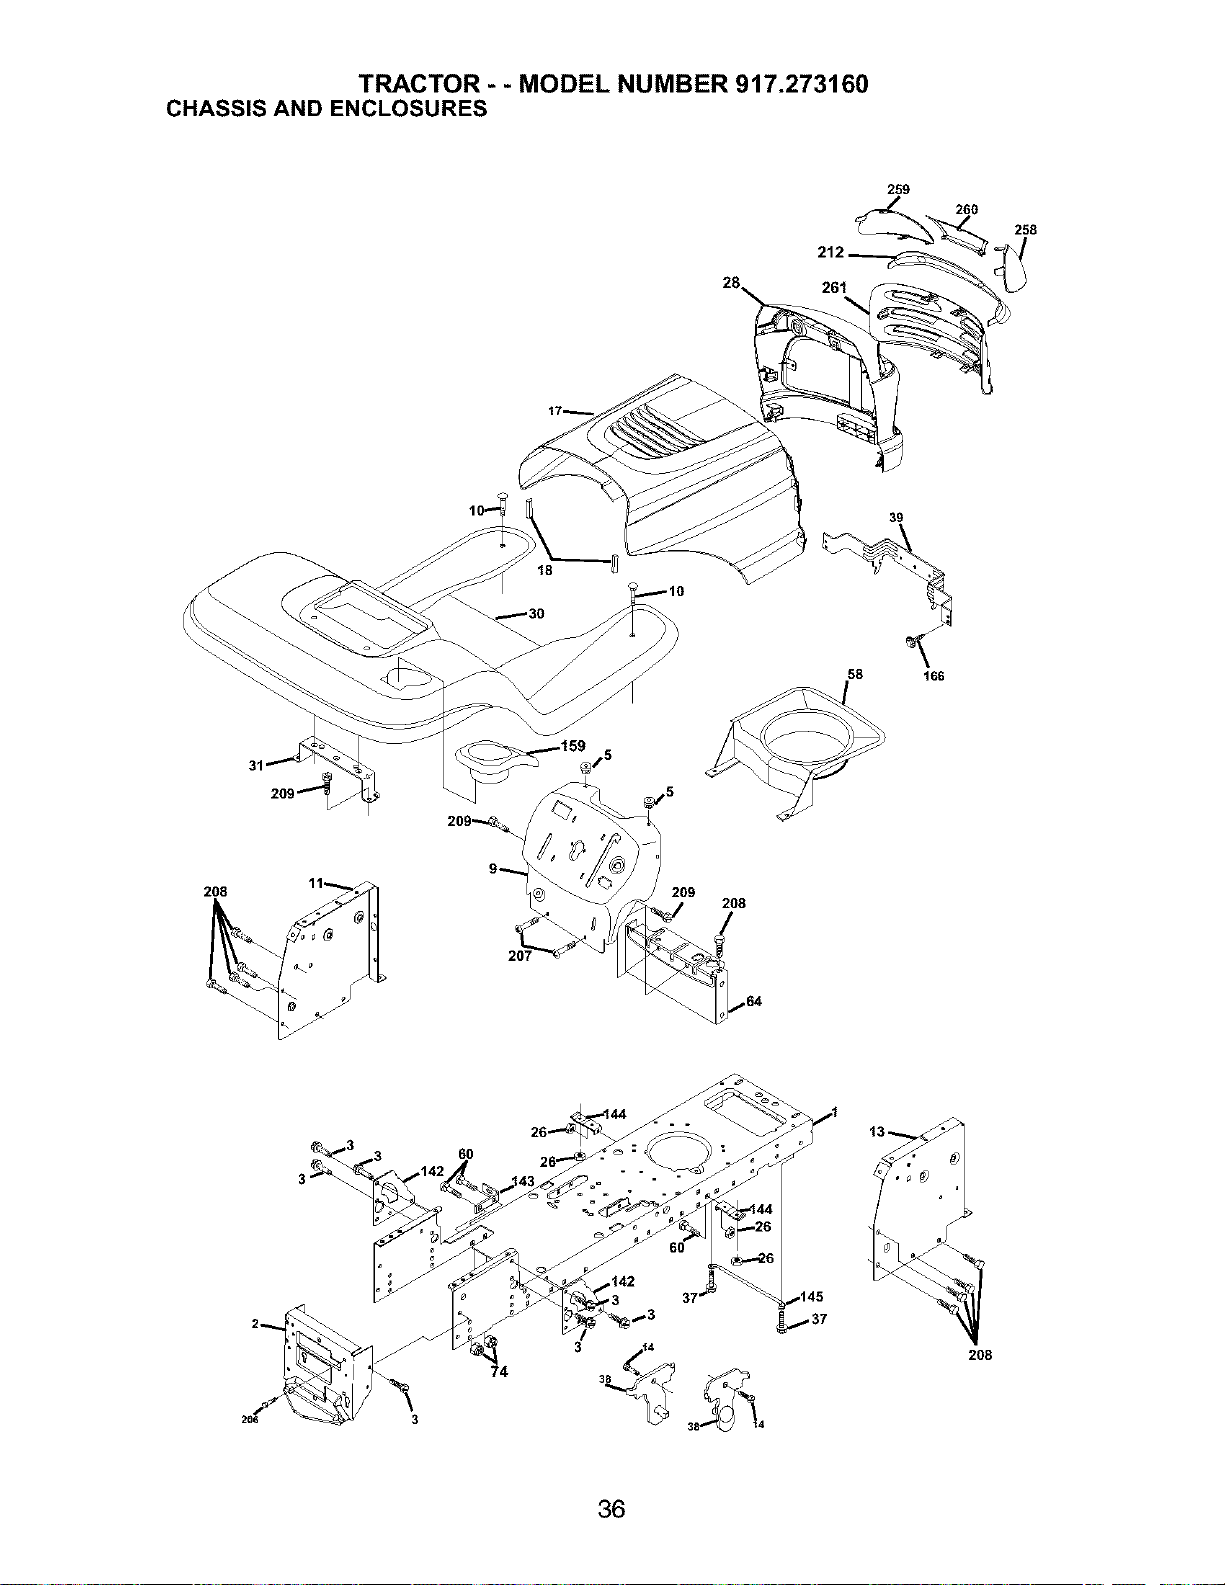
TRACTOR - - MODEL NUMBER 917.273160
CHASSIS AND ENCLOSURES
259
258
261
18
39
58 166
2O8
2O9
2O8
,.64
6O
,145
74
2O8
36
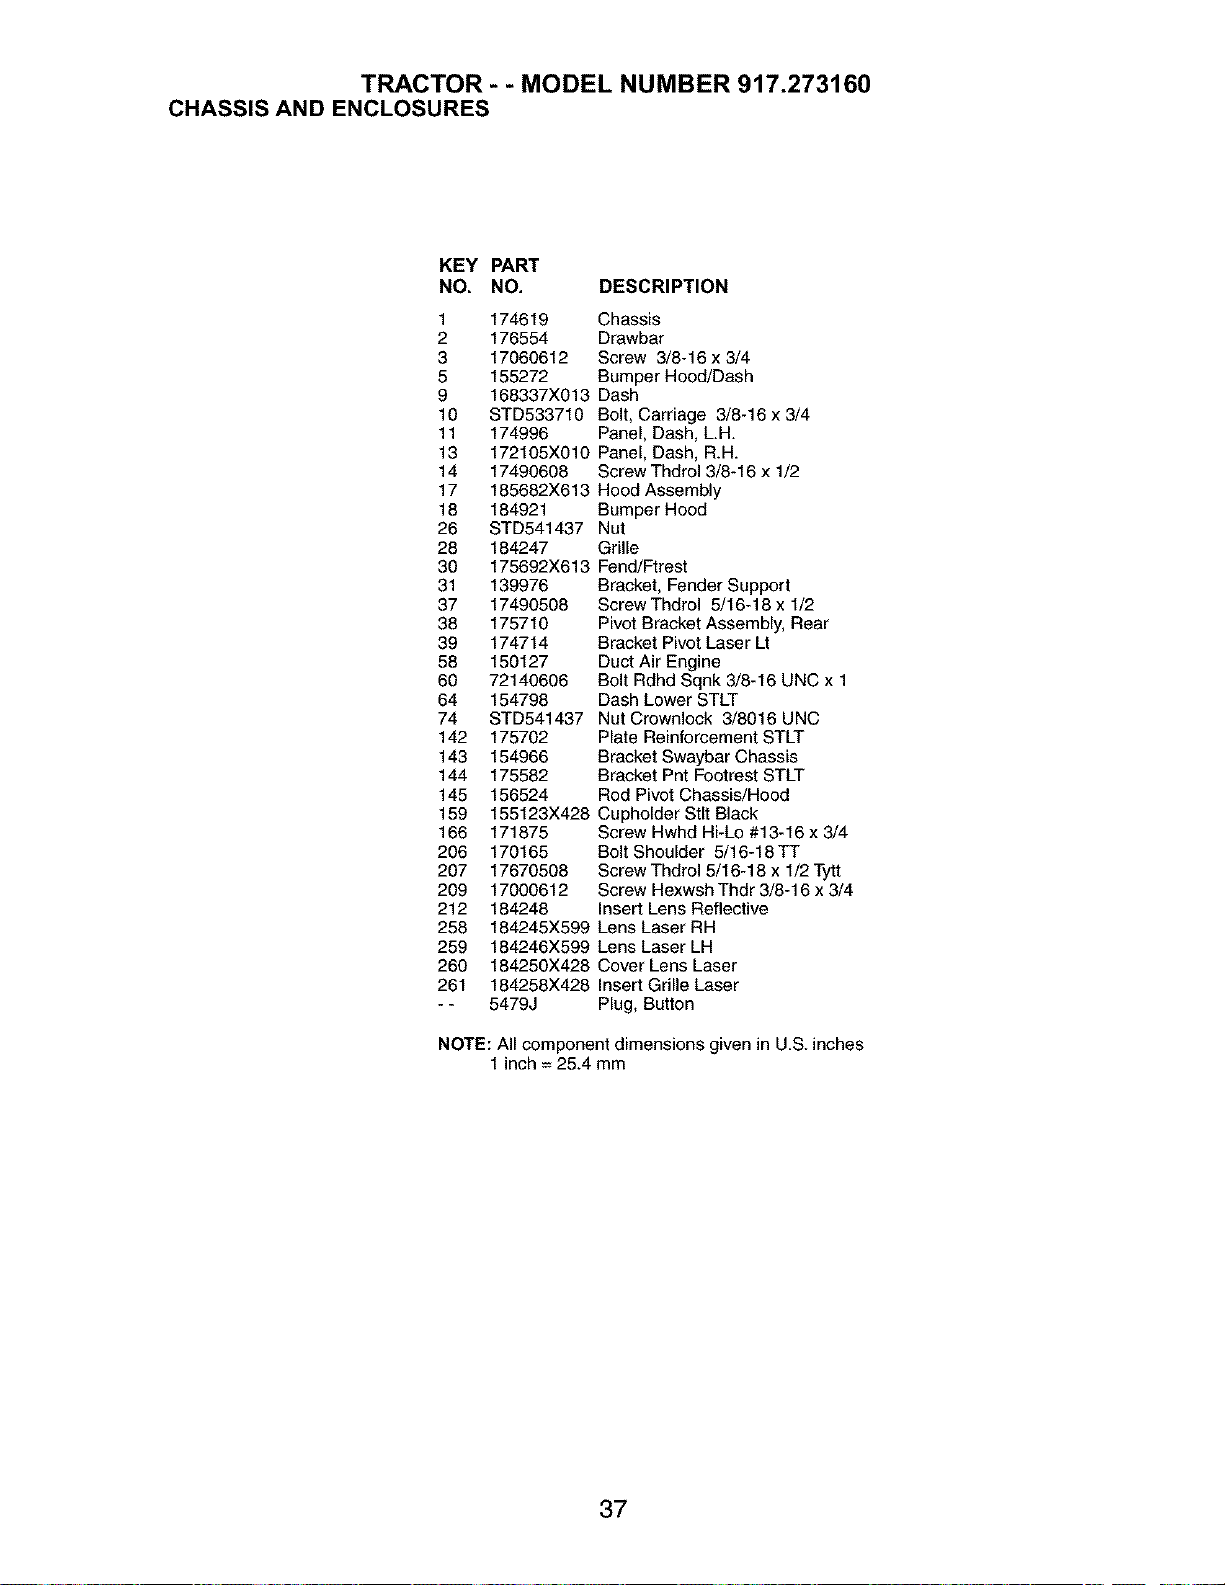
TRACTOR - - MODEL NUMBER 917.273160
CHASSIS AND ENCLOSURES
KEY PART
NO. NO, DESCRIPTION
139976
17490508
175710
174714
150127
72140606
154798
STD541437
175702
154966
175582
156524
1 174619 Chassis
2 176554 Drawbar
3 17060612 Screw 3/8-16 x 3/4
5 155272 Bumper Hood/Dash
9 168337X013 Dash
10 STD533710 Bolt, Carriage 3/8-16 x 3/4
11 174996 Panel, Dash, LH.
13 172105X010 Panel, Dash, R.H.
14 17490608 Screw Thdrol 3/8-16 x 1/2
17 185682X613 Hood Assembly
18 184921 Bumper Hood
26 STD541437 Nut
28 184247 Grille
30 175692X613 Fend/Ftrest
31 Bracket, Fender Support
37 Screw Thdrol 5/16-18 x 1/2
38 Pivot Bracket Assembly, Rear
39 Bracket Pivot Laser Lt
58 Duct Air Engine
60 Bolt Rdhd Sqnk 3/8-16 UNC x 1
64 Dash Lower STLT
74 Nut Crownlock 3/8016 UNC
142 Plate Reinforcement STLT
143 Bracket Swaybar Chassis
144 Bracket Pnt Footrest STLT
145 Rod Pivot Chassis/Hood
159 155123X428 Cupholder Stlt Black
166 171875 Screw Hwhd HFLo #18-16 x 3/4
206 170165 Bolt Shoulder 5/16-18TT
207 17670508 Screw Thdrol 5/16-18 x 1/2 Tytt
209 17000612 Screw Hexwsh Thdr 3/8-16 x 3/4
212 184248 Insert Lens Reflective
258 184245X599 Lens Laser RH
259 184246X599 Lens Laser LH
260 184250X428 Cover Lens Laser
261 184258X428 Insert Grille Laser
- - 5479J Plug, Button
NOTE: All component dimensions given in U.S. inches
1 inch = 25.4 mm
37

TRACTOR - - MODEL NUMBER 917.273160
GROUND DRIVE
t6 3_ 52
38
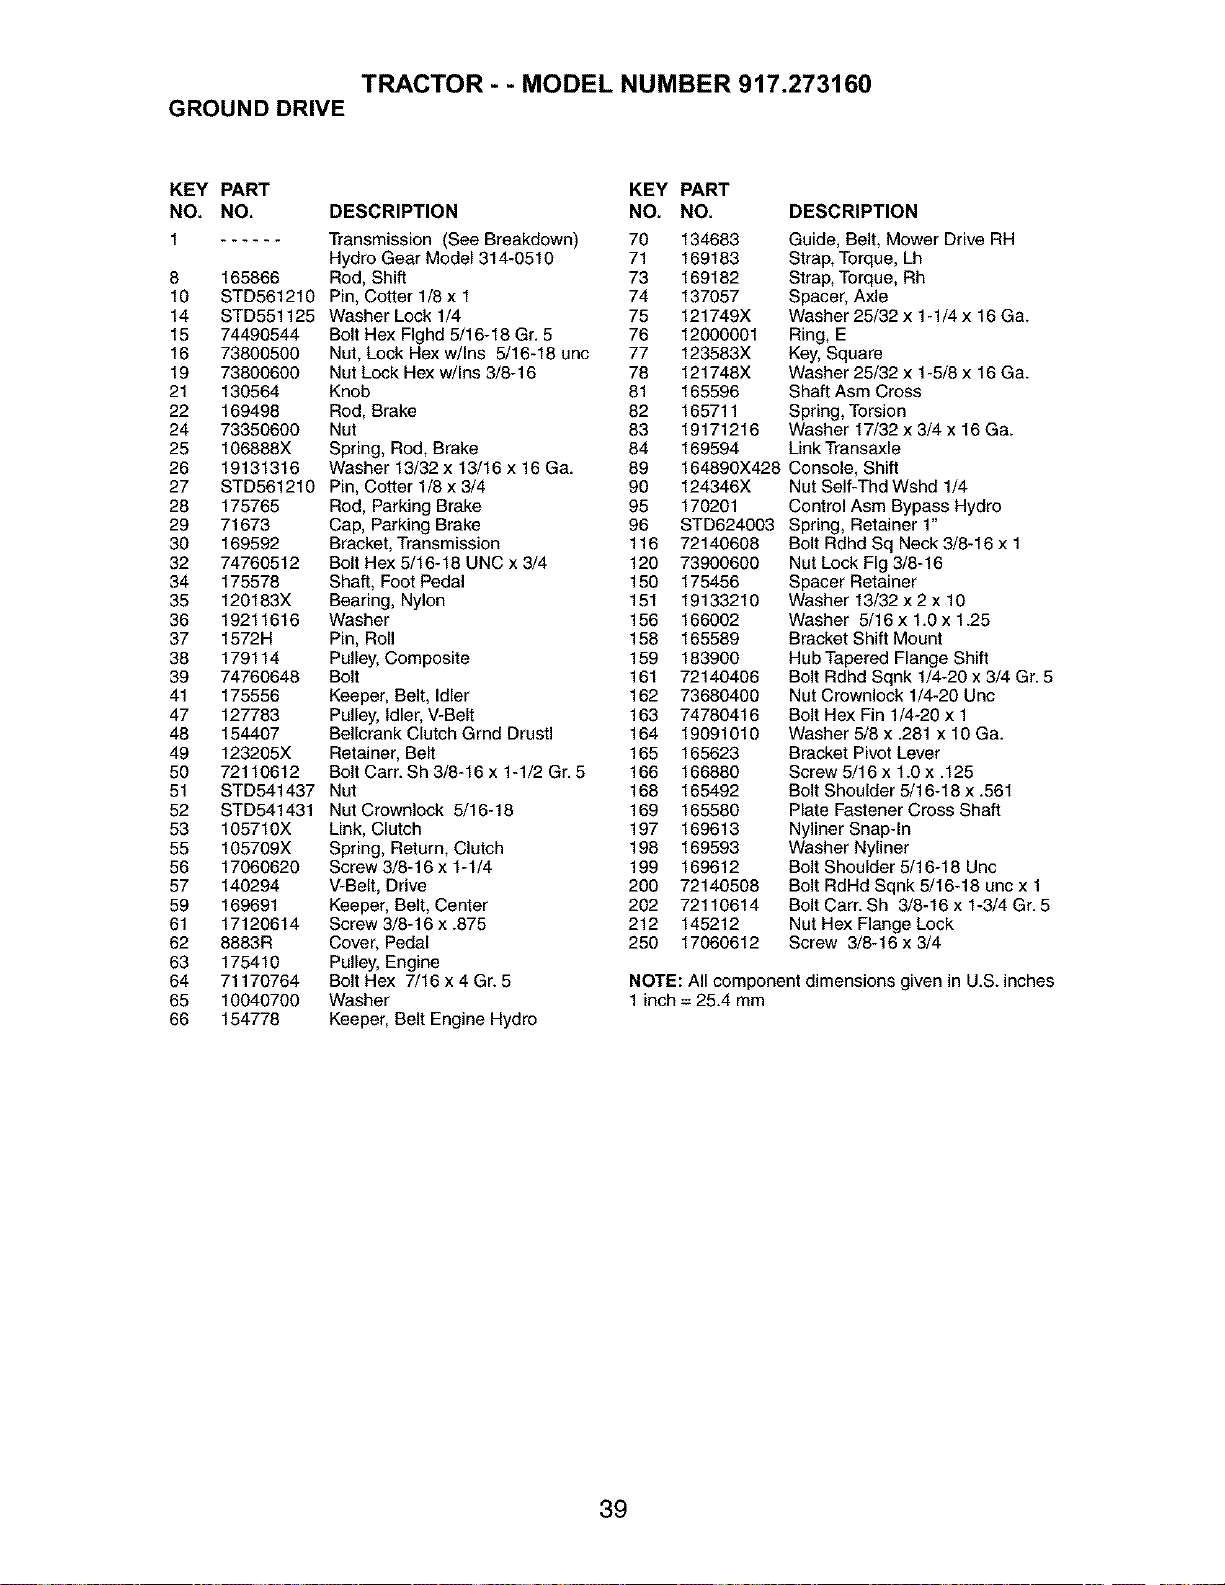
TRACTOR - - MODEL NUMBER 917.273160
GROUND DRIVE
KEY PART KEY
NO. NO. DESCRIPTION NO,
1 Transmission (See Breakdown) 70
Hydro Gear Model 314-0510 71
8 165866 Rod, Shift 73
10 STD561210 Pin, Cotter 1/8 x 1 74
14 STD551125 Washer Lock 1/4 75
15 74490544 Bolt Hex FIghd 5/16-18 Gr. 5 76
16 73800500 Nut, Lock Hex w/Ins 5/16-18 unc 77
19 73800600 Nut Lock Hex w/Ins 3/8-16 78
21 130564 Knob 81
22 169498 Rod, Brake 82
24 73350600 Nut 83
25 106888X Spring, Red, Brake 84
26 19131316 Washer 13/32 x 13/16 x 16 Ga. 89
27 STD561210 Pin, Cotter 1/8 x 3/4 90
28 175765 Rod, Parking Brake 95
29 71673 Cap, Parking Brake 96
30 169592 Bracket, Transmission 116
32 74760512 Bolt Hex 5/16-18 UNC x 3/4 120
34 175578 Shaft, Foot Pedal 150
35 120183X Bearing, Nylon 151
36 19211616 Washer 156
37 1572H Pin, Roll 158
38 179114 Pulley, Composite 159
39 74760648 Bolt 161
41 175556 Keeper, Belt, Idler 162
47 127783 Pulley, Idler, V-Belt 163
48 154407 Bellcrank Clutch Grnd Drustl 164
49 123205X Retainer, Belt 165
50 72110612 Bolt Cart. Sh 3/8-16 x 1-1/2 Gr. 5 166
51 STD541437 Nut 168
52 STD541431 NutCrownlock 5/16-18 169
53 105710X Link, Clutch 197
55 105709X Spring, Return, Clutch 198
56 17060620 Screw 3/8-16 x 1-1/4 199
57 140294 V-Belt, Drive 200
59 169691 Keeper, Belt, Center 202
61 17120614 Screw 3/8-16 x .875 212
62 8883R Cover, Pedal 250
63 175410 Pulley, Engine
64 71170764 Bolt Hex 7/16 x 4 Gr. 5
65 10040700 Washer
66 154778 Keeper, Belt Engine Hydro
PART
NO. DESCRIPTION
134683 Guide, Belt, Mower Drive RH
169183 Strap, Torque, Lh
169182 Strap, Torque, Rh
137057 Spacer, Axle
121749X Washer 25/32 x 1-1/4 x 16 Ga.
12000001 Ring, E
123583X Key, Square
121748X Washer 25/32 x 1-5/8 x 16 Ga.
165596 Shaft Asm Cross
165711 Spring, Torsion
19171216 Washer 17/32 x 3/4 x 16 Ga.
169594 Link Transaxle
164890X428 Console, Shift
124346X Nut Self-Thd Wshd 1/4
170201 Control Asm Bypass Hydro
STD624003 Spring, Retainer 1"
721406O8
739O06OO
175456
19133210
166O02
165589
183900
72140406
73680400
74780416
19091010
165623
166880
165492
165580
169613
169593
169612
72140508
72110614
145212
17060612
Bolt Rdhd Sq Neck 3/8-16 x 1
Nut Lock Fig 3/8-16
Spacer Retainer
Washer 13/32 x 2 x 10
Washer 5/16 x 1.0 x 1.25
Bracket Shift Mount
Hub Tapered Flange Shift
Bolt Rdhd Sqnk 1/4-20 x 3/4 Gr. 5
Nut Crewnlock 1/4-20 Unc
Bolt Hex Fin 1/4-20 x 1
Washer 5/8 x .281 x 10 Ga.
Bracket Pivot Lever
Screw 5/16 x 1.0 x .125
Bolt Shoulder 5/16-18 x .561
Plate Fastener Cross Shaft
Nyliner Snap-In
Washer Nyliner
Bolt Shoulder 5/16-18 Unc
Bolt RdHd Sqnk 5/16-18 unc x 1
Bolt Carr. Sh 3/8-16 x 1-3/4 Gr. 5
Nut Hex Flange Lock
Screw 3/8-16 x 3/4
NOTE: All component dimensions given in U.S. inches
1 inch = 25.4 mm
39
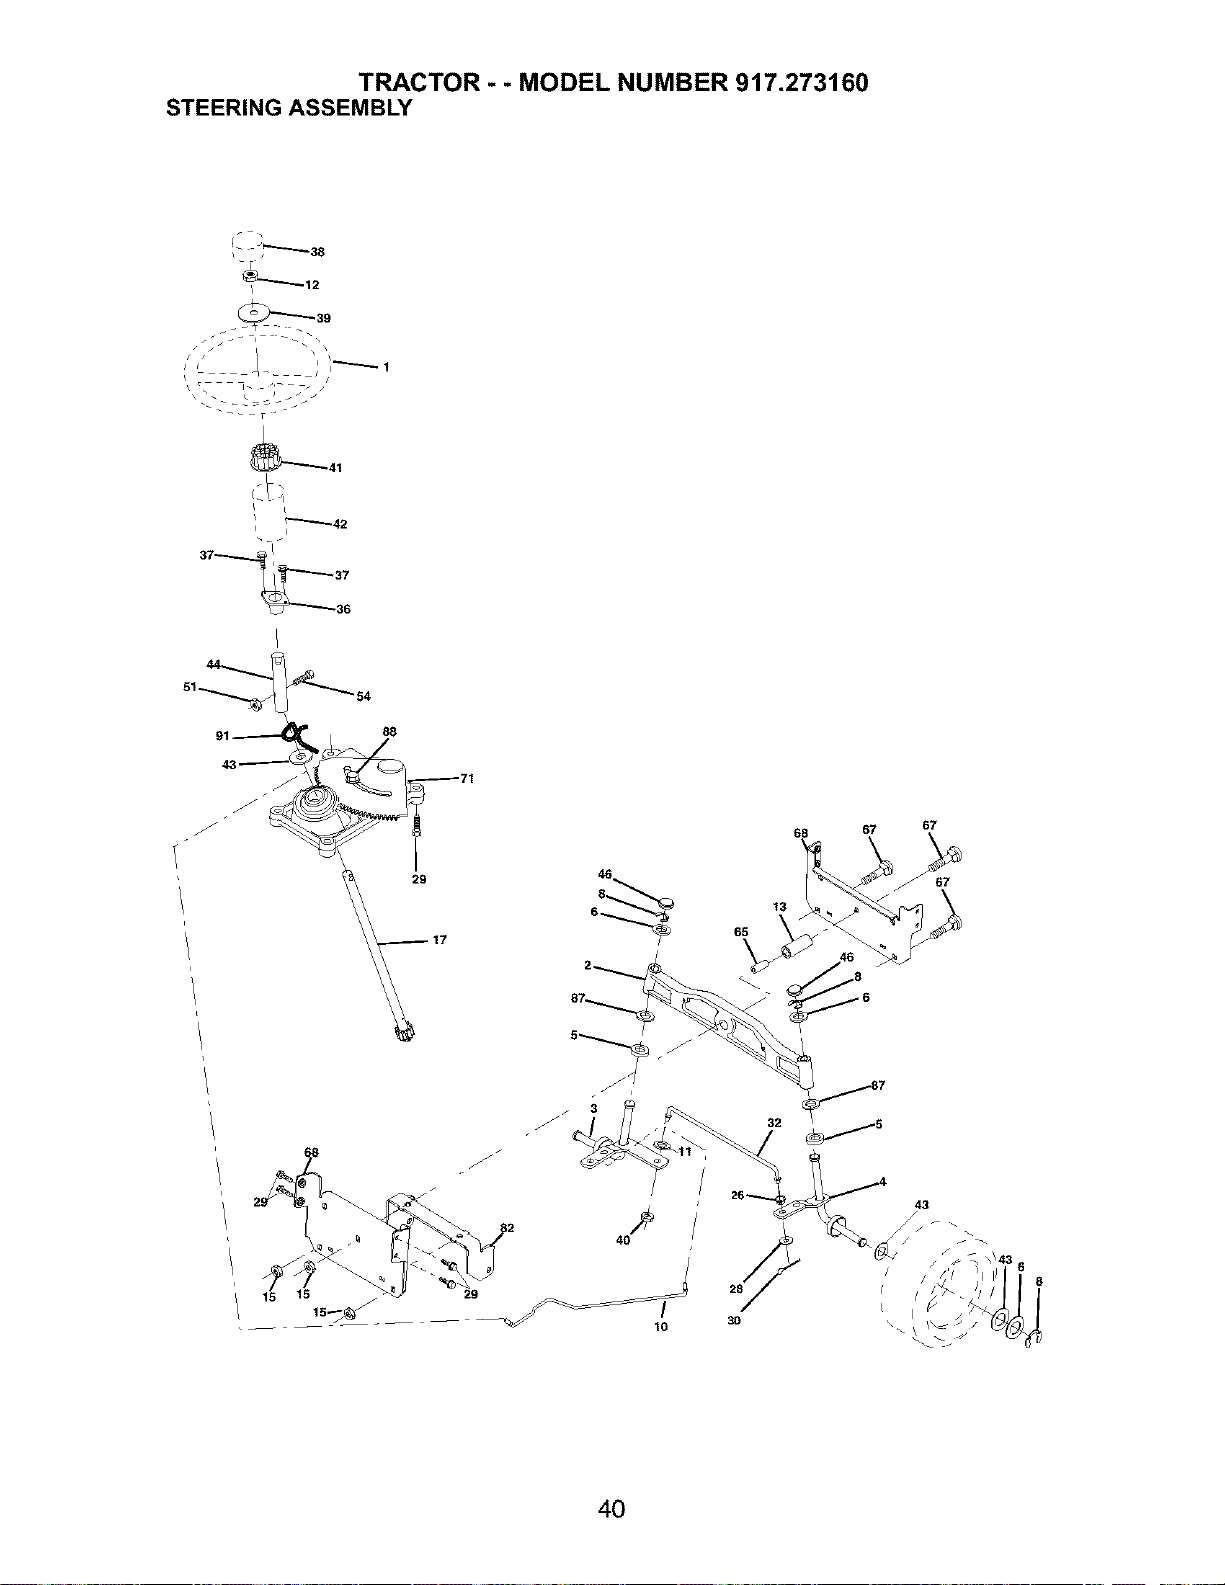
TRACTOR - - MODEL NUMBER 917.273160
STEERING ASSEMBLY
_12
._39
\ _ \ _ ./I •
41
88
t3
65
67 67
67
15 15
15_
4O
10
4O
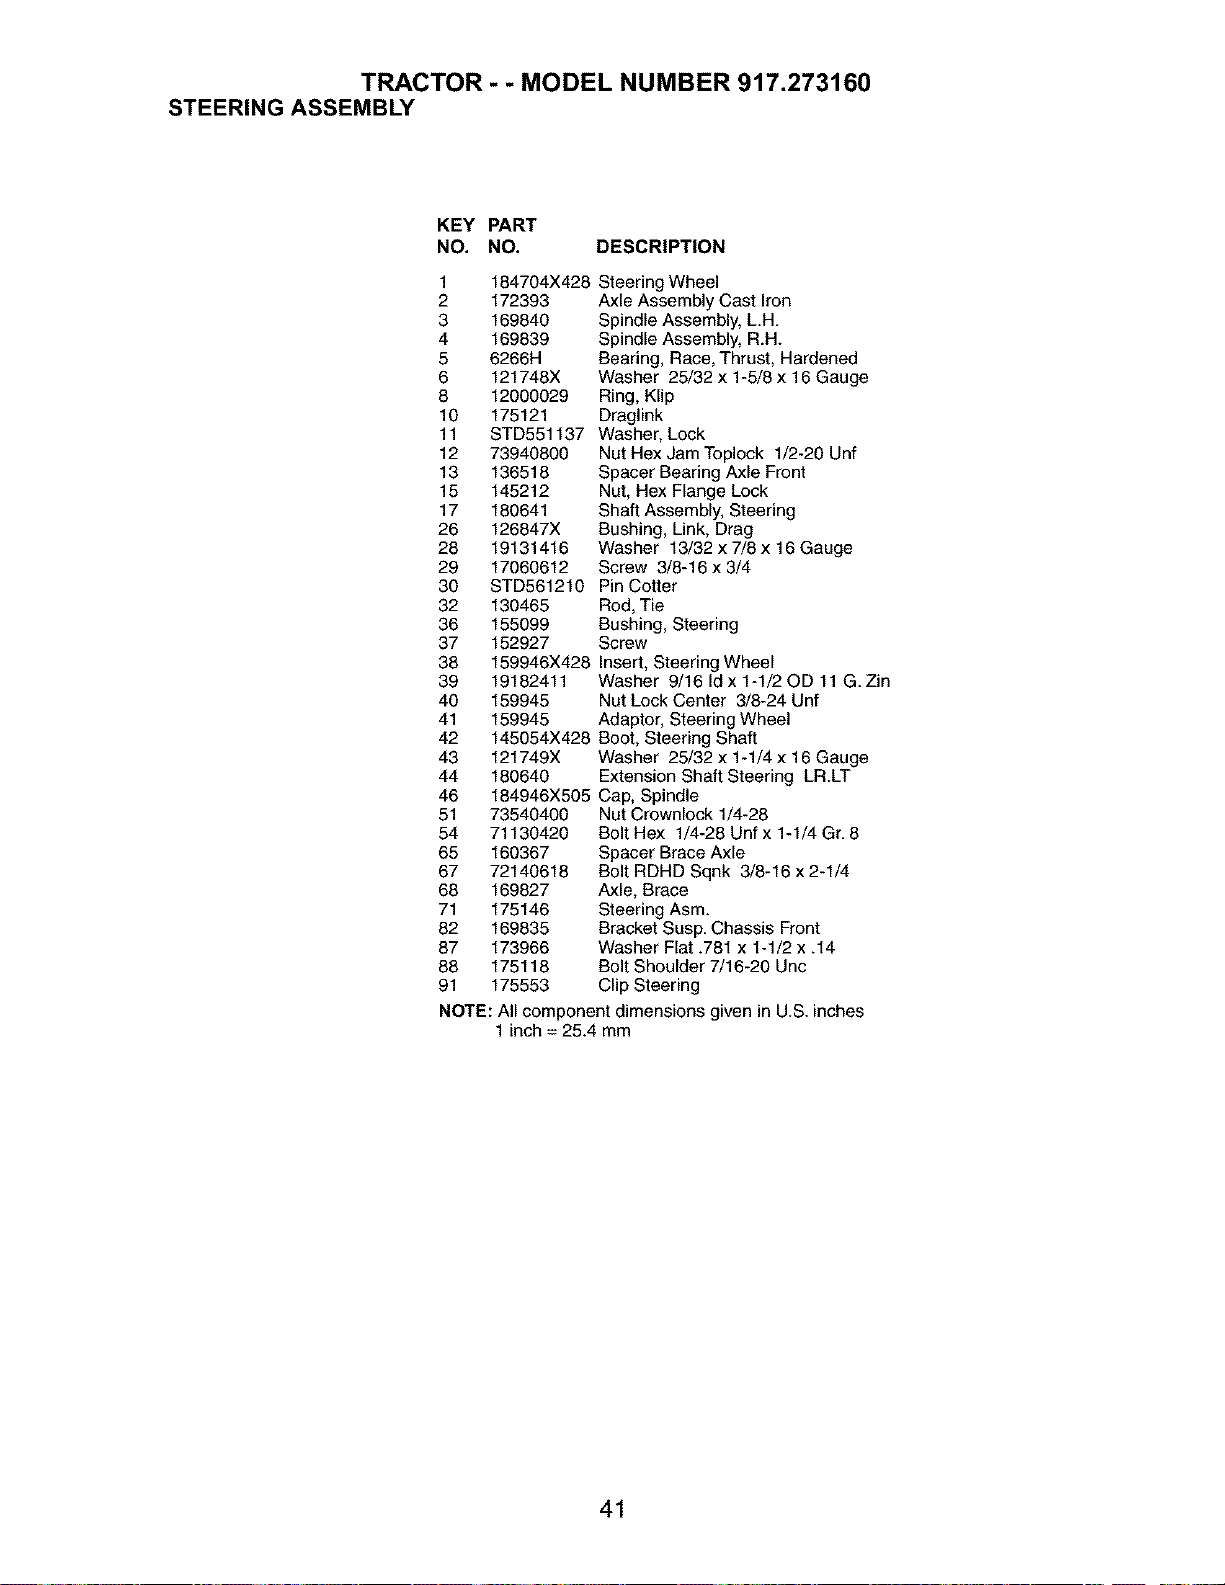
TRACTOR - - MODEL NUMBER 917.273160
STEERING ASSEMBLY
KEY PART
NO, NO, DESCRIPTION
1
2
3
4
5
6
8
10
11
12
13
15
17
26
28
29
30
32
36
37
38
39
40
41
42
43
44
46
51
54
65
67
68
71
82
87
88
91
184704X428 Steering Wheel
172393 Axle Assembly Cast Iron
169840 Spindle Assembly, L.H.
169839 Spindle Assembly, R.H.
6266H Bearing, Race, Thrust, Hardened
121748X Washer 25/32 x 1-5/8 x 16 Gauge
12000029 Ring, Klip
175121 Draglink
STD551137 Washer, Lock
73940800 Nut Hex Jam Toplock 1/2-20 Unf
136518 Spacer Bearing Axle Front
145212 Nut, Hex Flange Lock
180641 Shaft Assembly, Steering
126847X Bushing, Link, Drag
19131416 Washer 13/32 x 7/8 x 16 Gauge
17060612 Screw 3/8-16 x 3/4
STD561210 Pin Cotter
130465 Rod, Tie
155099 Bushing, Steering
152927 Screw
159946X428 Insert, Steering Wheel
19182411 Washer 9/16 Id x 1-1/20D 11 G.Zin
159945 Nut Lock Center 3/8-24 Unf
159945 Adaptor, Steering Wheel
145054X428 Boot, Steering Shaft
121749X Washer 25/32 x 1-1/4 x 16 Gauge
180640 Extension Shaft Steering LR.LT
184946X505 Cap, Spindle
73540400
71130420
160367
72140618
169827
175146
169835
173966
175118
175553
Nut Crownlock 1/4-28
Bolt Hex 1/4-28 Unf x 1-1/4 Gr. 8
Spacer Brace Axle
Bolt RDHD Sqnk 3/8-16 x 2-1/4
Axle, Brace
Steering Asm.
Bracket Susp. Chassis Front
Washer Flat .781 x 1-1/2 x .14
Bolt Shoulder 7/16-20 Unc
Clip Steering
NOTE: All component dimensions given in U.S. inches
1 inch = 25.4 mm
41

TRACTOR - - MODEL NUMBER 917.273160
ENGINE
2
32_
/
31
4O
33
29
33
/,
OPTIONAL EQUIPMENT
Spark Arrester
38
/
14
_105
i
_101 4
KEY PART
NO. NO.
1 170548X505
2 17720408
3
4 174667
13 12-001-03
14 148456
16 STD551237
23 169837
29 137180
31 184900
32 140527
33 123487X
DESCRIPTION
Control, Throttle
Screw, Hex Head, Thread
Cutting 1/4-20 x 1/2
Engine, (See Breakdown)
Kohler Model CV492-27506
Muffler
Gasket
Tube Drain Oil Easy
Washer
Shield Brn/Dbr Guard
Arrestor, Spark
Tank, Fuel
Cap Assembly, Fuel Sears, Vented
Clamp, Hose
KEY PART
NO. NO.
37 137040
38 181654
40 124028X
44 17670412
45 17000612
46 19091416
77 19101216
8O 747605O8
101 M73030800
105 17120616
DESCRIPTION
Line, Fuel
Plug Drain Oil Easy
Bushing, Snap, Fuel Line
Screw, Hex Washer Head,
Thd., Roll 1/4-20 x 3/4
Screw Hxwsh Thdr 3/8-16 x 3/4
Washer 9/32 x 7/8 x 16 Ga
Washer 5/16 x 3/4 x 16 Ga.
Bolt Hex Hd 5/16-18 Uric x 1/2
Nut Flange M8-1.25 Non-Lk Zinc
Screw 3/8-16 x 1
NOTE: All component dimensions given in U.S. inches
1 inch= 25.4 mm
42
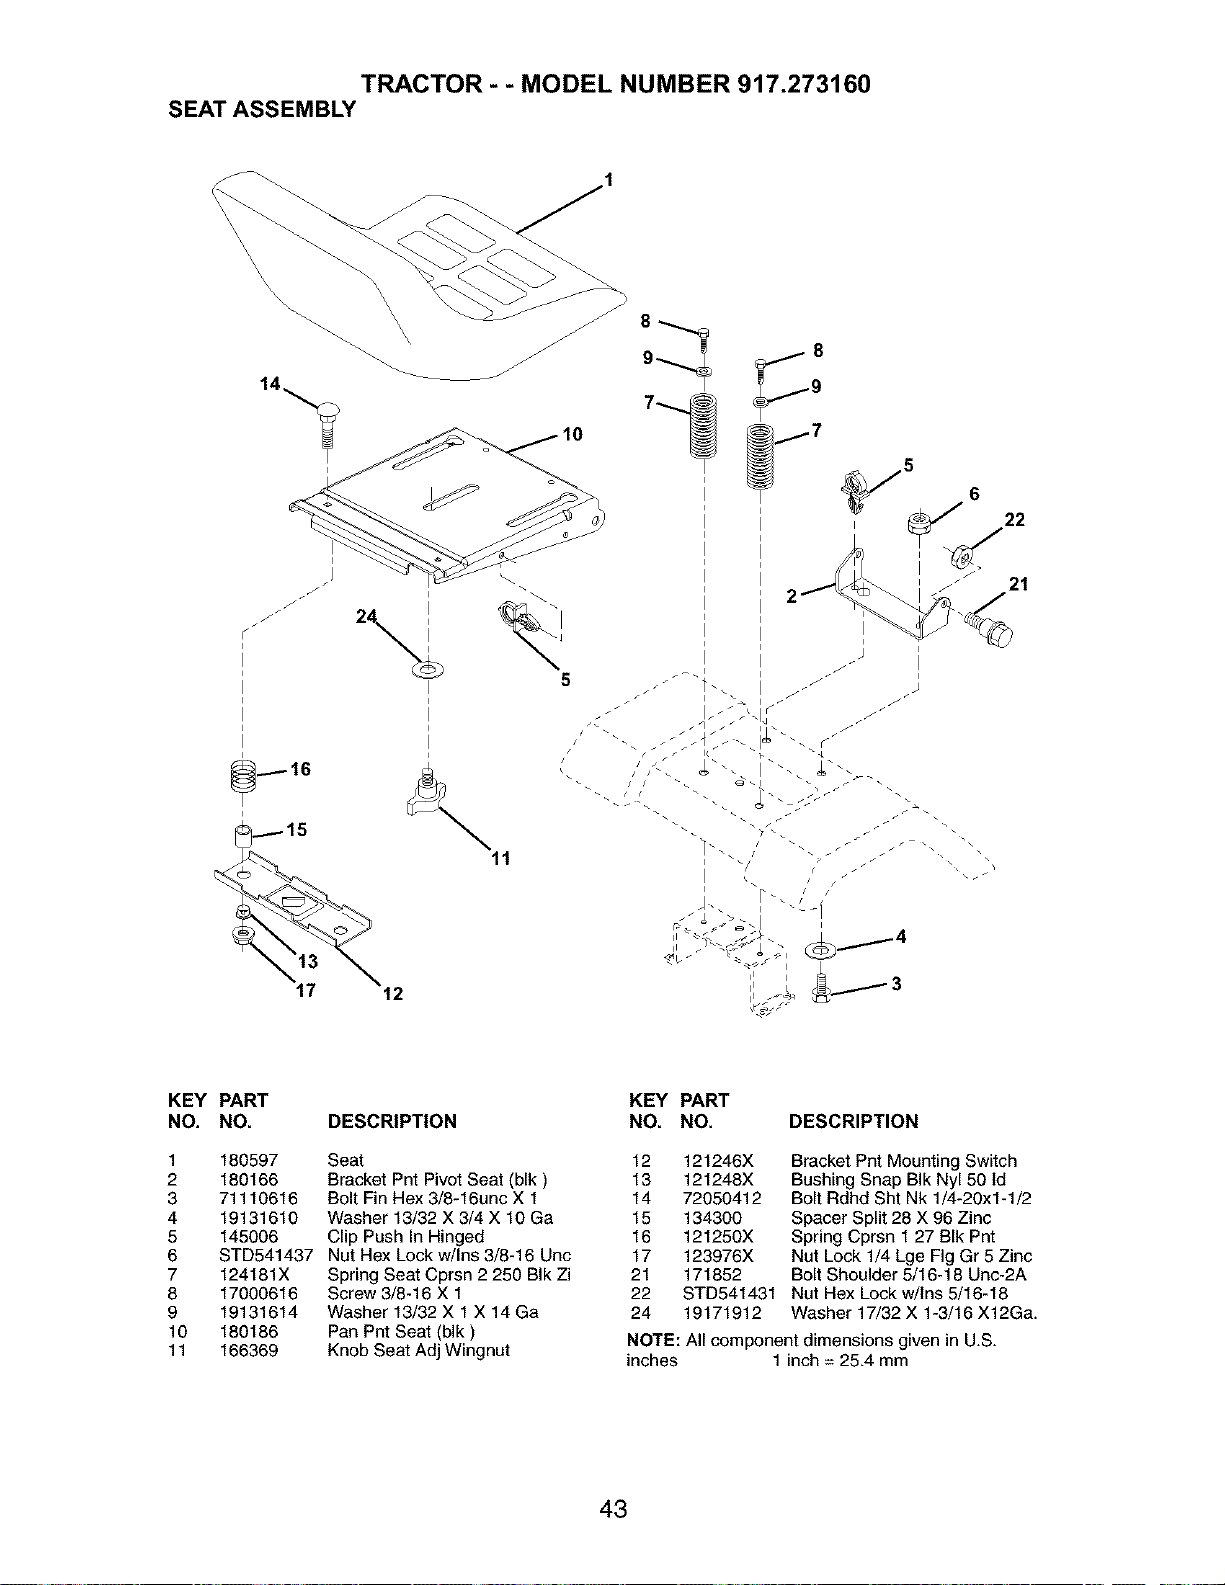
TRACTOR - - MODEL NUMBER 917.273160
SEAT ASSEMBLY
\
\
\\\\
I
I
I
I
I
I
I
I
I
I
5
/ 21
I
I.-" -_lj z "Z"
12
11
KEY PART
NO, NO.
1 180597
2 180166
3 71110616
4 19131610
5 145O06
6 STD541437
7 124181X
8 17000616
9 19131614
10 180186
11 166369
DESCRIPTION
Seat
Bracket Pnt Pivot Seat (blk)
Bolt Fin Hex 3/8-16unc X 1
Washer 13/32 X 3/4 X 10 Ga
Clip Push In Hinged
Nut Hex Lock w/Ins 3/8-16 Uric
Spring Seat Cprsn 2 250 BIk Zi
Screw 3/8-16 X 1
Washer 13/32 X 1X 14 Ga
Pan Pnt Seat (blk)
Knob Seat Adj Wingnut
KEY PART
NO. NO. DESCRIPTION
12 121246X
13 121248X
14 72050412
15 134300
16 121250X
17 123976X
21 171852
22
24
Bracket Pnt Mounting Switch
Bushing Snap BIk Ny150 ld
Bolt Rdhd Sht Nk 1/4-20x1-1/2
Spacer Split 28 X 96 Zinc
Spring Cprsn 127 BIk Pnt
Nut Lock 1/4 Lge Fig Gr 5 Zinc
Bolt Shoulder 5/16-18 Unc-2A
STD541431 Nut Hex Lock w/Ins 5/16-18
19171912 Washer 17/32 X 1-3/16 X12Ga.
NOTE: All component dimensions given in U.S.
inches 1 inch= 25.4 mm
43
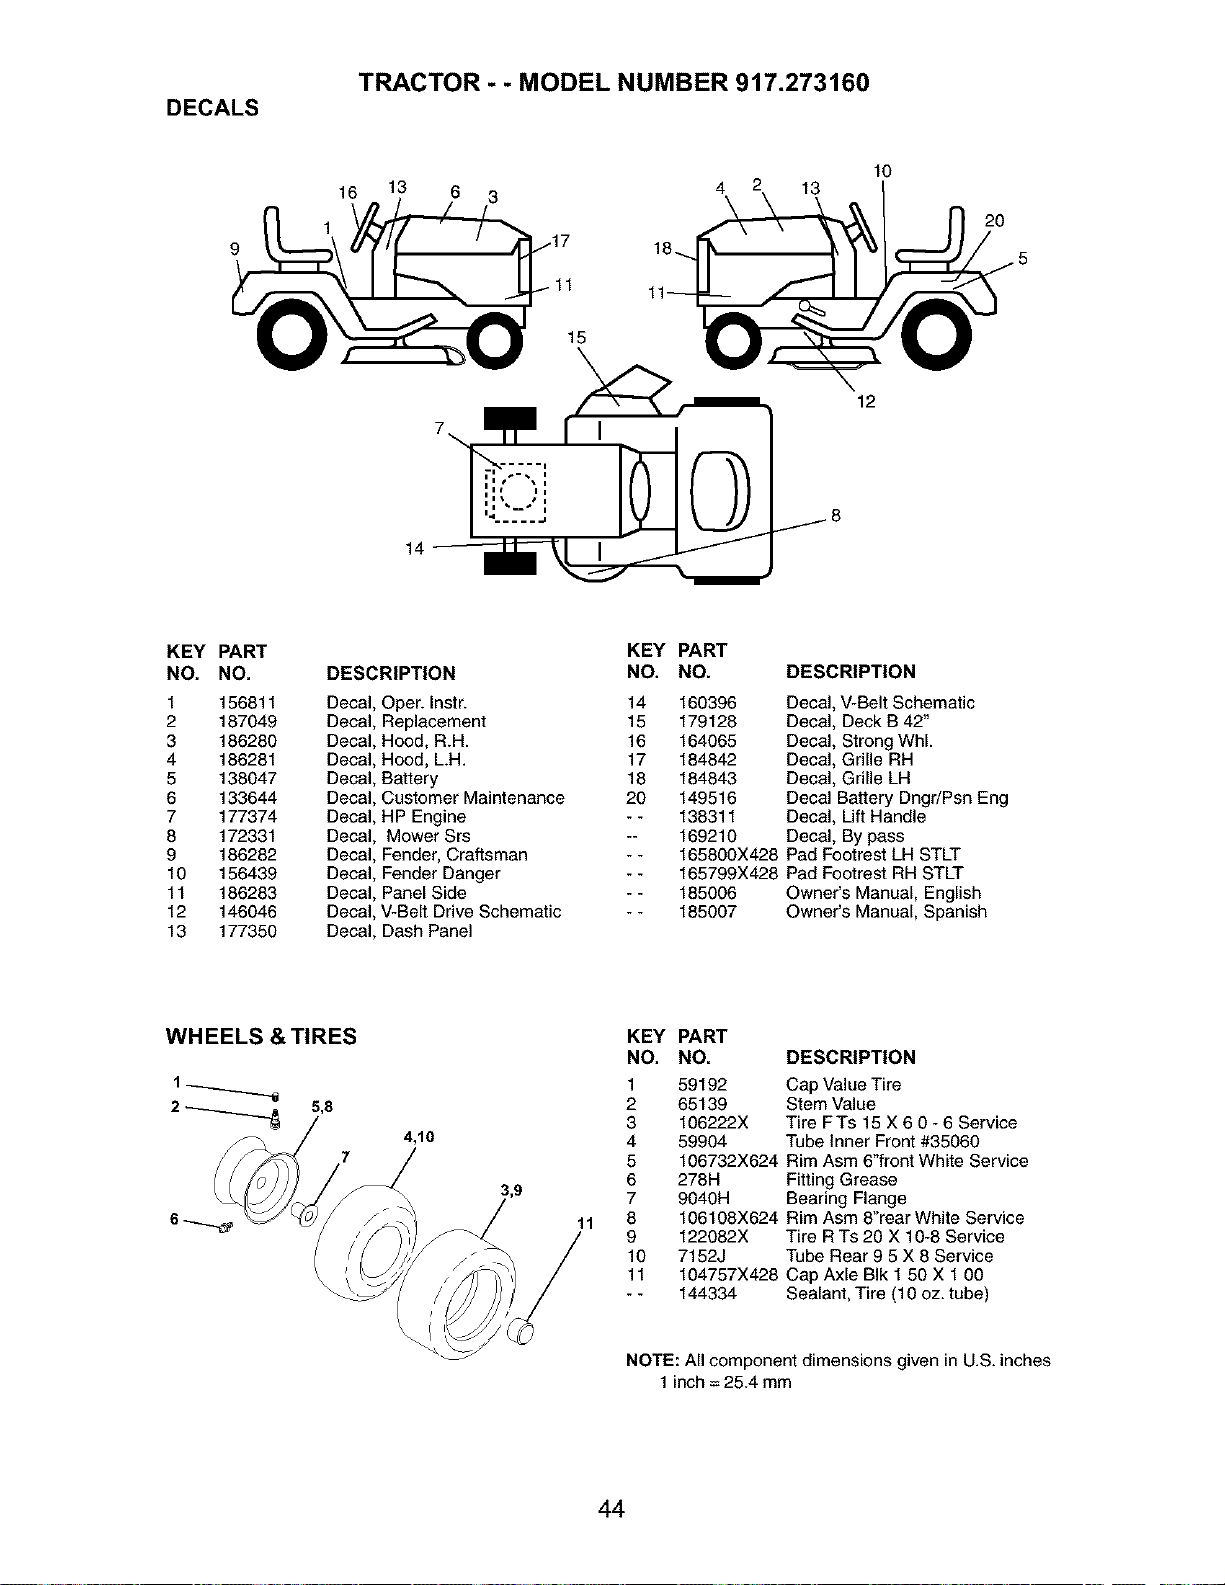
TRACTOR - - MODEL NUMBER 917.273160
DECALS
9
10
16 13 6 3 4 13
20
12
KEY PART
NO. NO.
1 156811
2 187049
3 186280
4 186281
5 138047
6 133644
7 177374
8 172331
9 186282
10 156439
11 186283
12 146046
13 177350
KEY PART
DESCRIPTION NO. NO. DESCRIPTION
Decal, Oper. Instr. 14 160396
Decal, Replacement 15 179128
Decal, Hood, R.H. 16 164065
Decal, Hood, LH. 17 184842
Decal, Battery 18 184843
Decal, Customer Maintenance 20 149516
Decal, HP Engine - - 138311
Decal, Mower Srs -- 169210
Decal, Fender, Craftsman - - 165800X428
Decal, Fender Danger - - 165799X428
Decal, Panel Side - - 185006
Decal, V-Belt Drive Schematic - - 185007
Decal, Dash Panel
Decal, V-Belt Schematic
Decal, Deck B 42"
Decal, Strong WhL
Decal, Grille RH
Decal, Grille LH
Decal Battery Dngr/Psn Eng
Decal, Lift Handle
Decal, By pass
Pad Footrest LH STLT
Pad Footrest RH STLT
Owner's Manual, English
Owner's Manual, Spanish
WHEELS &TIRES
2 _ 5,8
7
4,10
KEY PART
NO. NO.
1 59192
2 65139
3 106222X
4 59904
5 106732X624
6 278H
7 9040H
11 8 106108X624
9 122082X
10 7152J
11 104757X428
-- 144334
DESCRIPTION
Cap Value Tire
Stem Value
Tire FTs 15 X 6 0 - 6 Service
Tube Inner Front #35060
Rim Asm 6"front White Service
FittingGrease
Bearing Flange
Rim Asm 8"rear White Service
Tire R Ts 20 X 10-8 Service
Tube Rear 9 5 X 8 Service
Cap Axle BIk 1 50 X 1 O0
Sealant, Tire (10 oz. tube)
NOTE: All component dimensions given in U.S. inches
1 inch= 25.4 mm
44

TRACTOR - - MODEL NUMBER 917.273160
LIFT ASSEMBLY
7
13
4
6
3
2
6
5
19
13
32
32
19
13
20
15
20
KEY PART
NO. NO.
1 159460
2 159471
3 105767X
4 1200O002
5 19211621
6 120183X
7 125631X
8 122365X
11 139865
12 139866
DESCRIPTION
Washer Asm Inner Spring W/
Plunger
Shaft Asm. Lift
Pin Groove
E Ring #5133-62
Washer 21/32 x 1x 21 Ga.
Bearing Nylong
Grip Handle Fluted
Button Plunger Read
Link Asm Lift L.H.
Link Asm Lift R.H.
KEY PART
NO. NO. DESCRIPTION
13 STD624008 Retainer Spring
15 173288 Link Front
16 73350800 Nut Jam Hex 1/2-13 Unc
17 175689 Trunnion BIk Zinc
18 73800800 Nut Lock w/Wsh 1/2-13 Uric
19 139868 Arm Suspension Mower
20 163552 Retainer Spring
31 169865 Bearing, Pvt. Lift
32 73540600 Nut Crownlock 3/8-24
NOTE: All component dimensions given in U.S. inches
1 inch= 25.4 mm
45
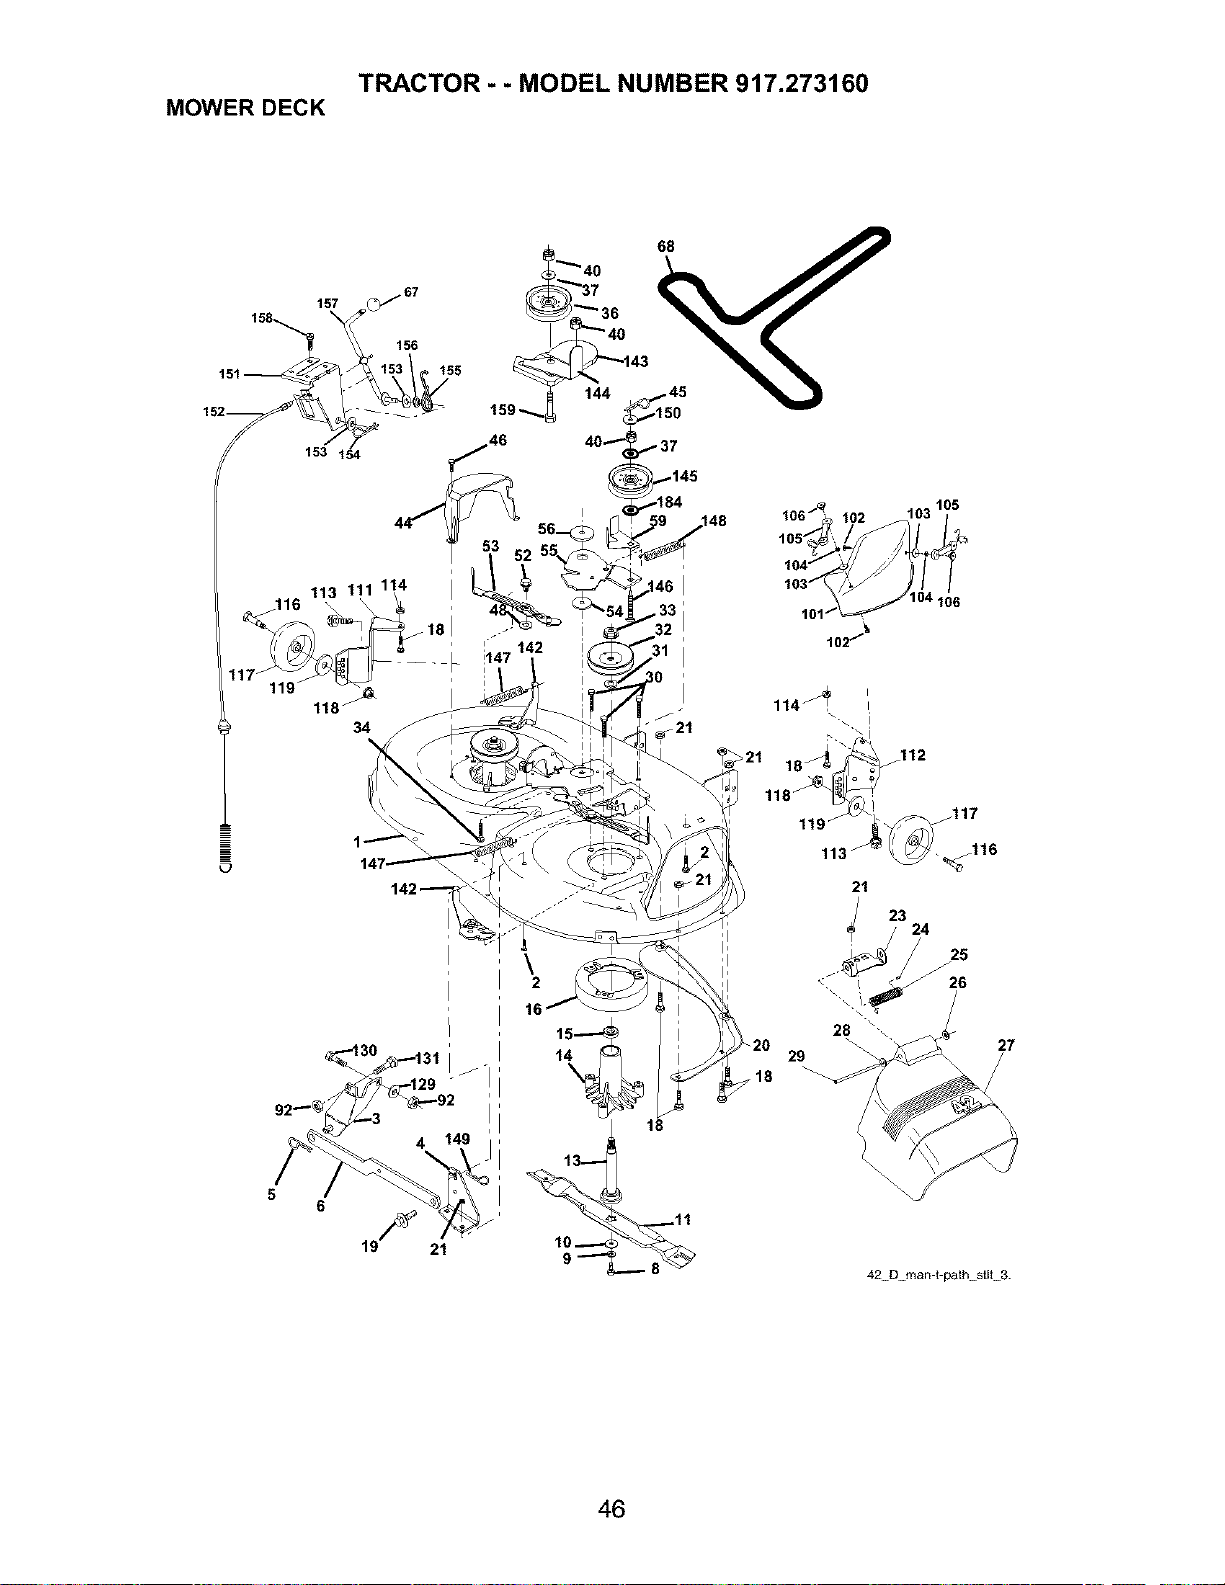
TRACTOR - - MODEL NUMBER 917.273160
MOWER DECK
158 157 0 ,'/67
156
i
113 111 1!4 I
116 \ _ _ ,
11 - i
119 118 _._ _ I
34
5
6
F
19 21
\
16
10.---
9_
18
21
-\
28
29
_112
23
24
25
27
, 11
42 D m_n-t-path stir 3.
46
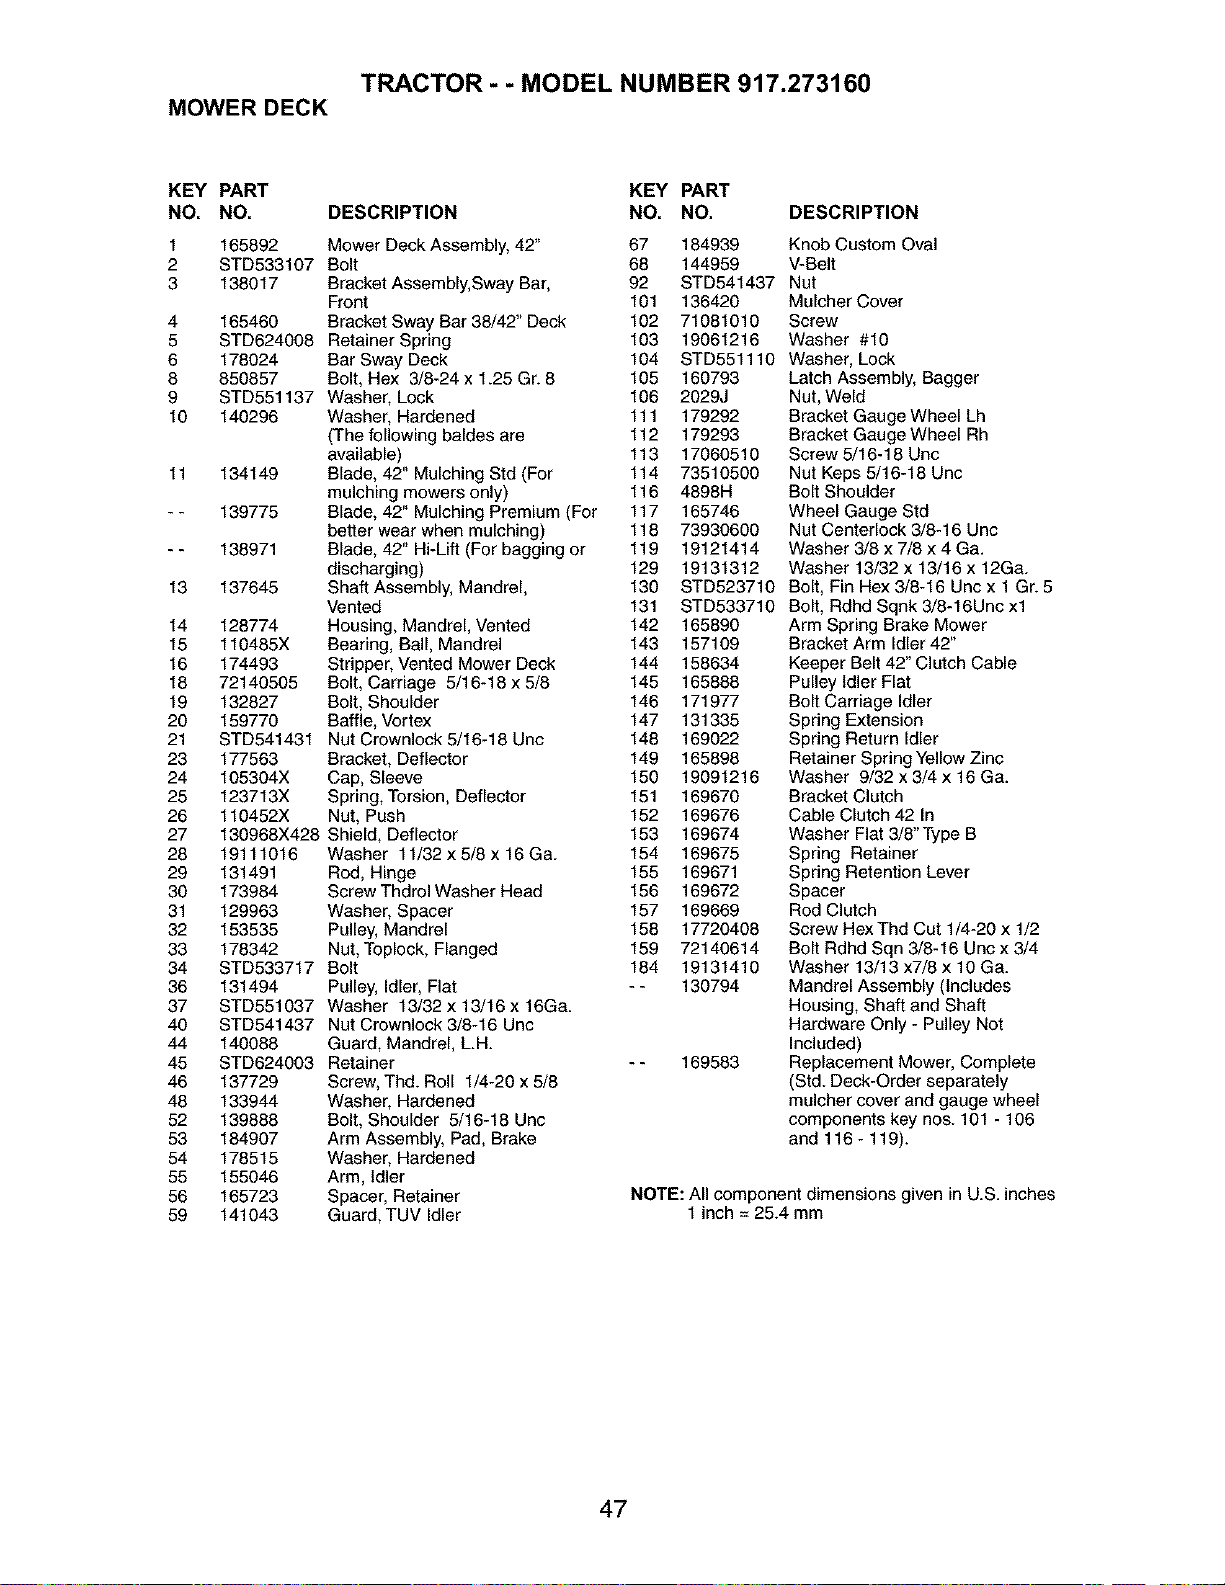
TRACTOR - - MODEL NUMBER 917.273160
MOWERDECK
KEY PART KEY PART
NO. NO. DESCRIPTION NO. NO, DESCRIPTION
1
2
3
4
5
6
8
9
10
11
13
14
15
16
18
19
20
21
23
24
25
26
27
28
29
30
31
32
33
34
36
37
40
44
45
46
48
52
53
54
55
56
59
165892 Mower Deck Assembly, 42" 67 184939
STD533107 Bolt 68 144959
138017 Bracket Assembly, Sway Bar, 92 STD541437
Front 101 136420
165460 Bracket Sway Bar 38/42" Deck 102 71081010
STD624008 Retainer Spring 103 19061216
178024 Bar Sway Deck 104 STD551110
850857 Bolt, Hex 3/8-24 x 1.25 Gr. 8 105 160793
STD551137 Washer, Lock 106 2029J
140296 Washer, Hardened 111 179292
(The following baldes are 112 179293
available) 113 17060510
134149 Blade, 42" Mulching Std (For 114 73510500
mulching mowers only) 116 4898H
139775 Blade, 42" Mulching Premium (For 117 165746
better wear when mulching) 118 73930600
138971 Blade, 42" Hi-Lift (For bagging or 119 19121414
discharging) 129 19131312
137645 Shaft Assembly, Mandrel, 130 STD523710
Vented 131 STD533710
128774 Housing, Mandrel, Vented 142 165890
110485X Bearing, Ball, Mandrel 143 157109
174493 Stripper, Vented Mower Deck 144 158634
72140505 Bolt, Carriage 5/16-18x5/8 145 165888
132827 Bolt, Shoulder 146 171977
159770 Baffle, Vortex 147 131335
STD541431 Nut Crownlock 5/16-18 Unc 148 169022
177563 Bracket, Deflector 149 165898
105304X Cap, Sleeve 150 19091216
123713X Spring, Torsion, Deflector 151 169670
110452X Nut, Push 152 169676
130968X428 Shield, Deflector 153 169674
19111016 Washer 11/32x5/8x16Ga. 154 169675
131491 Rod, Hinge 155 169671
173984 Screw Thdrol Washer Head 156 169672
129963 Washer, Spacer 157 169669
153535 Pulley, Mandrel 158 17720408
178342 Nut, Toplock, Flanged 159 72140614
STD533717 Bolt 184 19131410
131494 Pulley, Idler, Flat - - 130794
STD551037 Washer 13/32 x 13/16 x 16Ga.
STD541437 Nut Crownlock 3/8-16 Unc
140088 Guard, Mandrel, LH.
STD624003 Retainer
137729 Screw, Thd. Roll 1/4-20 x 5/8
133944 Washer, Hardened
139888 Bolt, Shoulder 5/16-18 Unc
184907 Arm Assembly, Pad, Brake
178515 Washer, Hardened
155046 Arm, Idler
165723 Spacer, Retainer
141043 Guard, TUV Idler
-- 169583
Knob Custom Oval
V-Belt
Nut
Mulcher Cover
Screw
Washer #10
Washer, Lock
Latch Assembly, Bagger
Nut, Weld
Bracket Gauge Wheel Lh
Bracket Gauge Wheel Rh
Screw 5/16-18 Unc
Nut Keps 5/16-18 Unc
Bolt Shoulder
Wheel Gauge Std
Nut Centerlock 3/8-16 Unc
Washer 3/8 x 7/8 x 4 Ga.
Washer 13/32 x 13/16 x 12Ga.
Bolt, Fin Hex 3/8-16 Unc x 1 Gr. 5
Bolt, Rdhd Sqnk 3/8-16Unc xl
Arm Spring Brake Mower
Bracket Arm Idler 42"
Keeper Belt 42" Clutch Cable
Pulley Idler Flat
Bolt Carriage Idler
Spring Extension
Spring Return Idler
Retainer Spring Yellow Zinc
Washer 9/32 x 3/4 x 16 Ga.
Bracket Clutch
Cable Clutch 42 In
Washer Flat 3/8"Type B
Spring Retainer
Spring Retention Lever
Spacer
Rod Clutch
Screw Hex Thd Cut 1/4-20 x 1/2
Bolt Rdhd Sqn 3/8-16 Unc x 3/4
Washer 13/13 x7/8 x 10 Ga.
Mandrel Assembly (Includes
Housing, Shaft and Shaft
Hardware Only - Pulley Not
Included)
Replacement Mower, Complete
(Std. Deck-Order separately
mulcher cover and gauge wheel
components key nos. 101 - 106
and 116 - 119).
NOTE: All component dimensions given in U.S. inches
1 inch = 25.4 mm
47
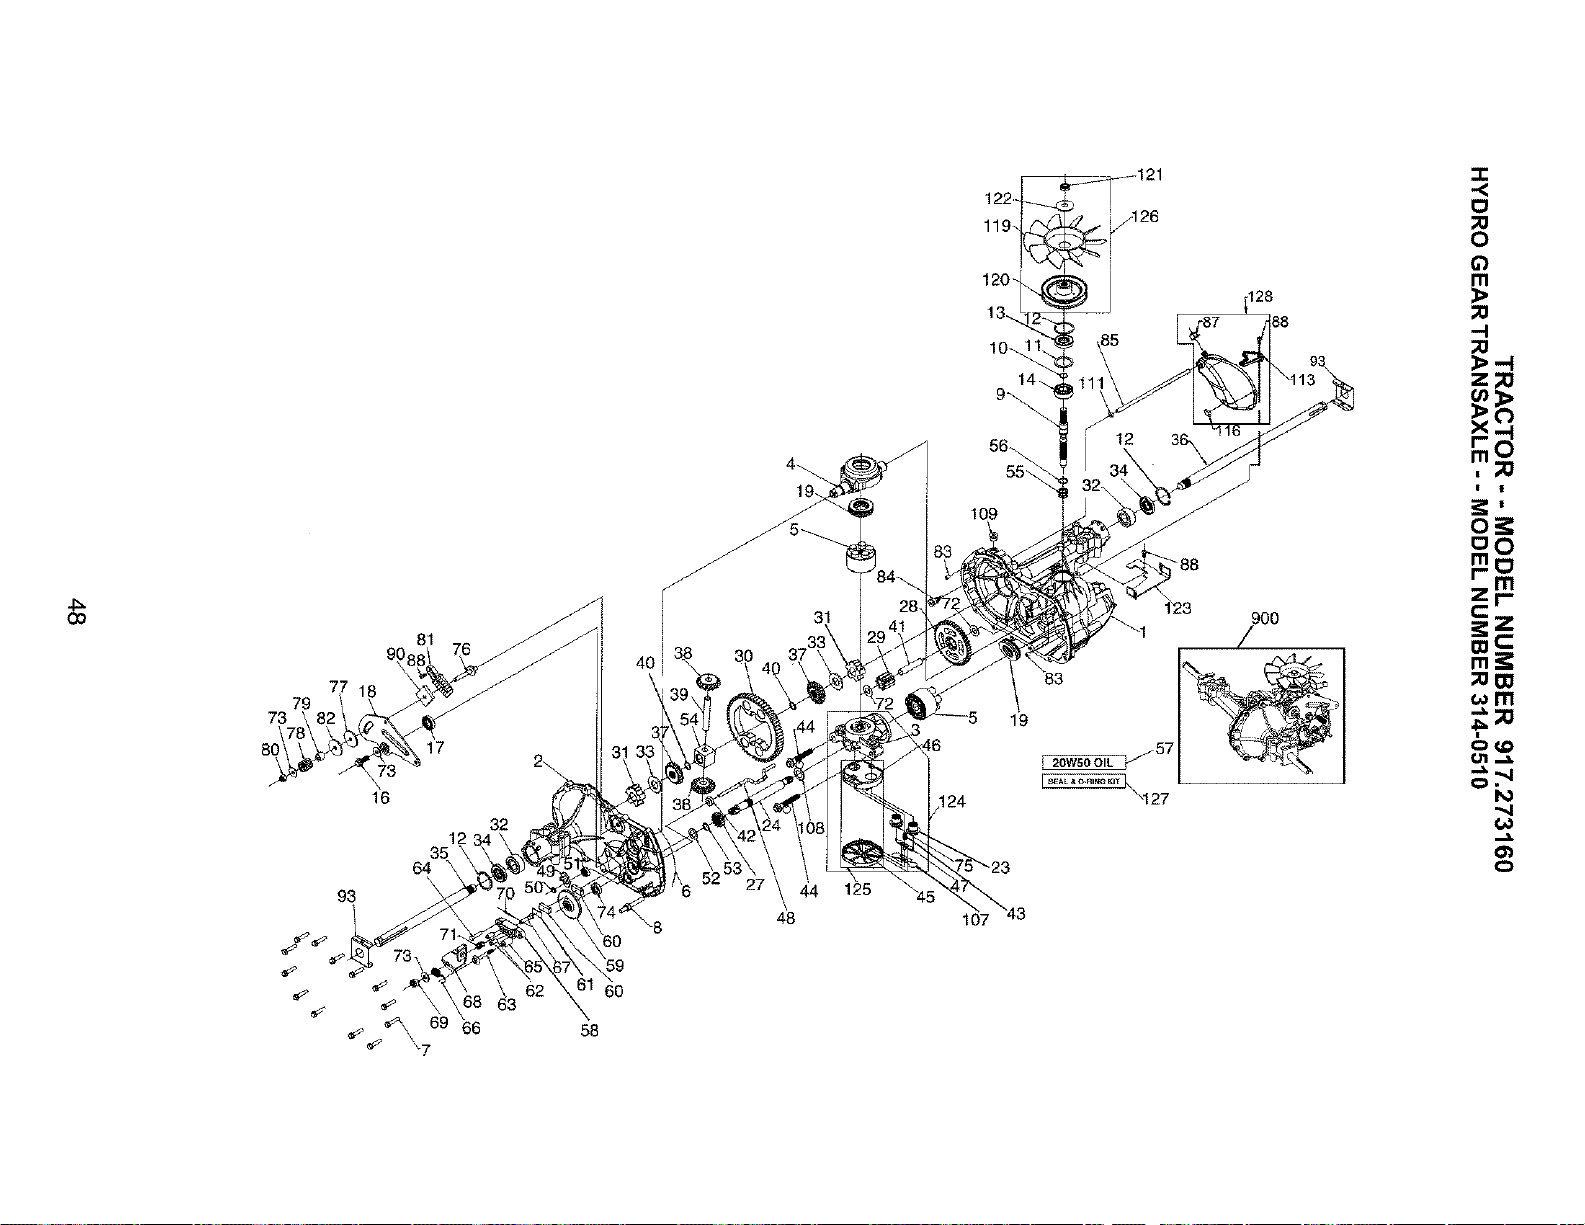
(3O
81
79
73
77
\
16
93
17
2\
12
35
64
\
32
62
_9
60
58
125
48
122-
109
124
107
_128
12
88
19
900
/
_127
=
o
! |
o_
_0
Z r-
t-'
;oW
_m
-" ",,1
O.
'M
0
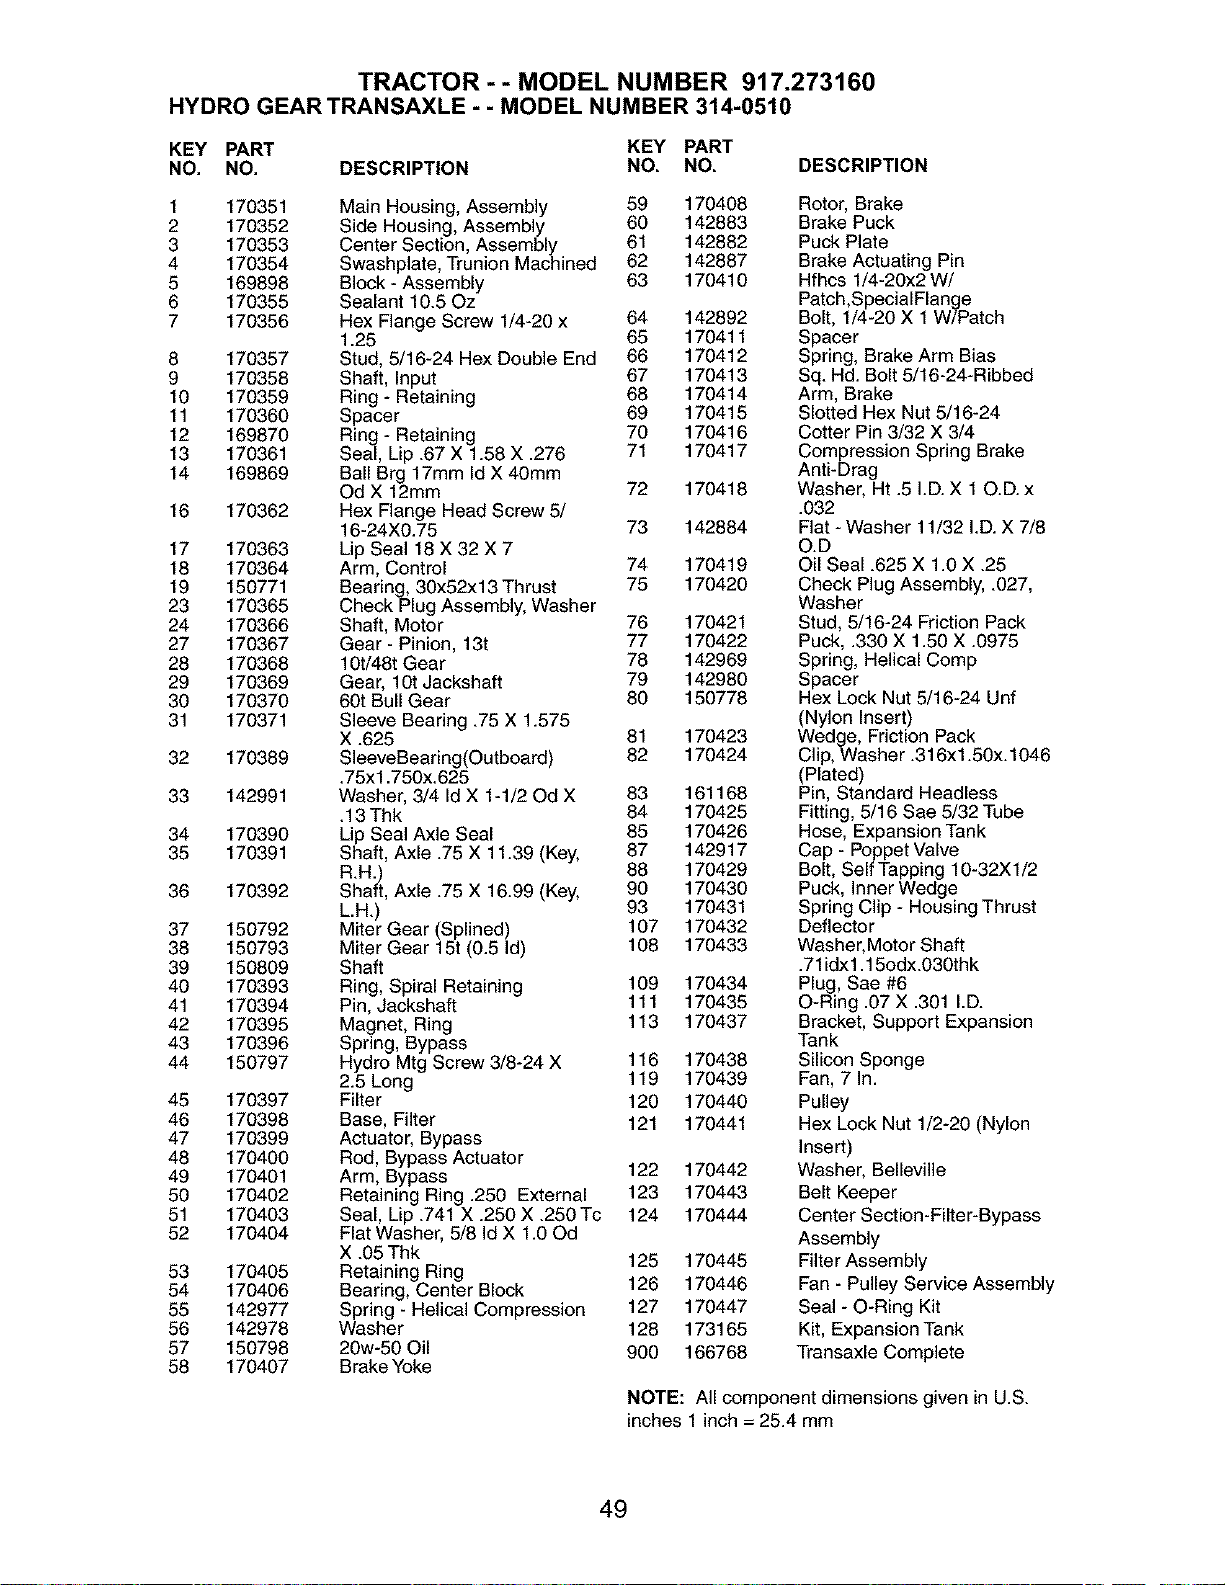
TRACTOR-- MODEL NUMBER 917.273160
HYDRO GEAR TRANSAXLE - - MODEL NUMBER 314-0510
KEY PART KEY PART
NO, NO, DESCRIPTION NO. NO. DESCRIPTION
1
2
3
4
5
6
7
8
9
10
11
12
13
14
16
17
18
19
23
24
27
28
29
30
31
32
33
34
35
36
37
38
39
4O
41
42
43
44
45
46
47
48
49
5O
51
52
53
54
55
56
57
58
170351 Main Housing, Assembly 59 170408
170352 Side Housing, Assembly 60 142883
170353 Center Section, Assembly 61 142882
170354 Swashplate, Trunion Machined 62 142887
169898 Block - Assembly 63 170410
170355 Sealant 10.50z
170356 Hex Flange Screw 1/4-20 x 64 142892
1.25 65 170411
170357 Stud, 5/16-24 Hex Double End 66 170412
170358 Shaft, Input 67 170413
170359 Ring - Retaining 68 170414
170360 Spacer 69 170415
169870 Ring - Retaining 70 170416
170361 Seal, Lip .67 X 1.58 X .276 71 170417
169869 Ball Brg 17mm Id X 40mm
Od X 12mm 72 170418
170362 Hex Flange Head Screw 5/
16-24X0.75 73 142884
170363 Lip Seal 18 X 32 X 7
170364 Arm, Control 74 170419
150771 Bearing, 30x52x13 Thrust 75 170420
170365 Check Plug Assembly, Washer
170366 Shaft, Motor 76 170421
170367 Gear - Pinion, 13t 77 170422
170368 10ti48t Gear 78 142969
170369 Gear, 10t Jackshaft 79 142980
170370 60t Bull Gear 80 150778
170371 Sleeve Bearing .75 X 1.575
X .625 81 170423
170389 SleeveBearing(Outboard) 82 170424
.75xl .750x.625
142991 Washer, 3/4 Id X 1-1/20d X 83 161168
.13 Thk 84 170425
170390 Lip Seal Axle Seal 85 170426
170391 Shaft, Axle .75 X 11.39 (Key, 87 142917
R.H3 88 170429
170392 Shaft, Axle .75 X 16.99 (Key, 90 170430
L.H.) 93 170431
150792 Miter Gear (Splined) 107 170432
150793 Miter Gear 15t (0.5 Id) 108 170433
150809 Shaft
170393 Ring, Spiral Retaining 109 170434
170394 Pin, Jackshaft 111 170435
170395 Magnet, Ring 113 170437
170396 Spring, Bypass
150797 Hydro Mtg Screw 3/8-24 X 116 170438
2.5 Long 119 170439
170397 Filter 120 170440
170398 Base, Filter 121 170441
170399 Actuator, Bypass
170400 Rod, Bypass Actuator
170401 Arm, Bypass 122 170442
170402 Retaining Ring .250 External 123 170443
170403 Seal, Lip .741 X .250 X .250 Tc 124 170444
170404 Flat Washer, 5/8 Id X 1.00d
X .05 Thk 125 170445
170405 Retaining Ring
170406 Bearing, Center Block 126 170446
142977 Spring- Helical Compression 127 170447
142978 Washer 128 173165
150798 20w-50 Oil 900 166768
170407 BrakeYoke
Rotor,Brake
Brake Puck
Puck Plate
Brake Actuating Pin
Hfhcs 1/4-20x2 W/
Patch,SpecialFlange
Bolt, 1/4-20 X 1 W/Patch
Spacer
Spring, Brake Arm Bias
Sq. Hd. Bolt 5/16-24-Ribbed
Arm, Brake
Slotted Hex Nut 5/16-24
Cotter Pin 3/32 X 3/4
Compression Spring Brake
Anti-Drag
Washer, Ht .5 I.D. X 10.D. x
.032
Flat - Washer 11/32 I.D. X 7/8
O.D
OIl Seal .625 X 1.0 X .25
Check Plug Assembly, .027,
Washer
Stud, 5/16-24 Friction Pack
Puck, .330 X 1.50 X .0975
Spring, Helical Comp
Spacer
Hex Lock Nut 5/16-24 Unf
(Nylon Insert)
Wedge, Friction Pack
Clip, Washer .316x1.50x.1046
(Plated)
Pin, Standard Headless
Fitting, 5/16 Sae 5/32 Tube
Hose, Expansion Tank
Cap - Poppet Valve
Bolt, Self Tapping 10-32X 1/2
Puck, Inner Wedge
Spring Clip - Housing Thrust
Deflector
Washer,Motor Shaft
.71idxl. 15odx.030thk
Plug, Sae #6
O-Ring .07 X .301 I.D.
Bracket, Support Expansion
Tank
Silicon Sponge
Fan, 7 In.
Pulley
Hex Lock Nut 1/2-20 (Nylon
Insert)
Washer, Belleville
Belt Keeper
Center Section-Filter-Bypass
Assembly
Filter Assembly
Fan - Pulley Service Assembly
Seal - O-Ring Kit
Kit, Expansion Tank
Transaxle Complete
NOTE: All component dimensions given in U.S.
inches 1 inch = 25.4 mm
49

TRACTOR - - MODEL NUMBER 917.273160
KOHLER ENGINE-MODEL NUMBER CV492,TYPE NUMBER 27506
CYLINDER HEAD, VALVE AND BREATHER [
YLmNDRE DIRIGE SOUPAPE ET RENIFLARD
CRANKCASEJ CARTER=MOTEUR J
23 22 "i
/ /
a%N__ _- _
_..-t4
50
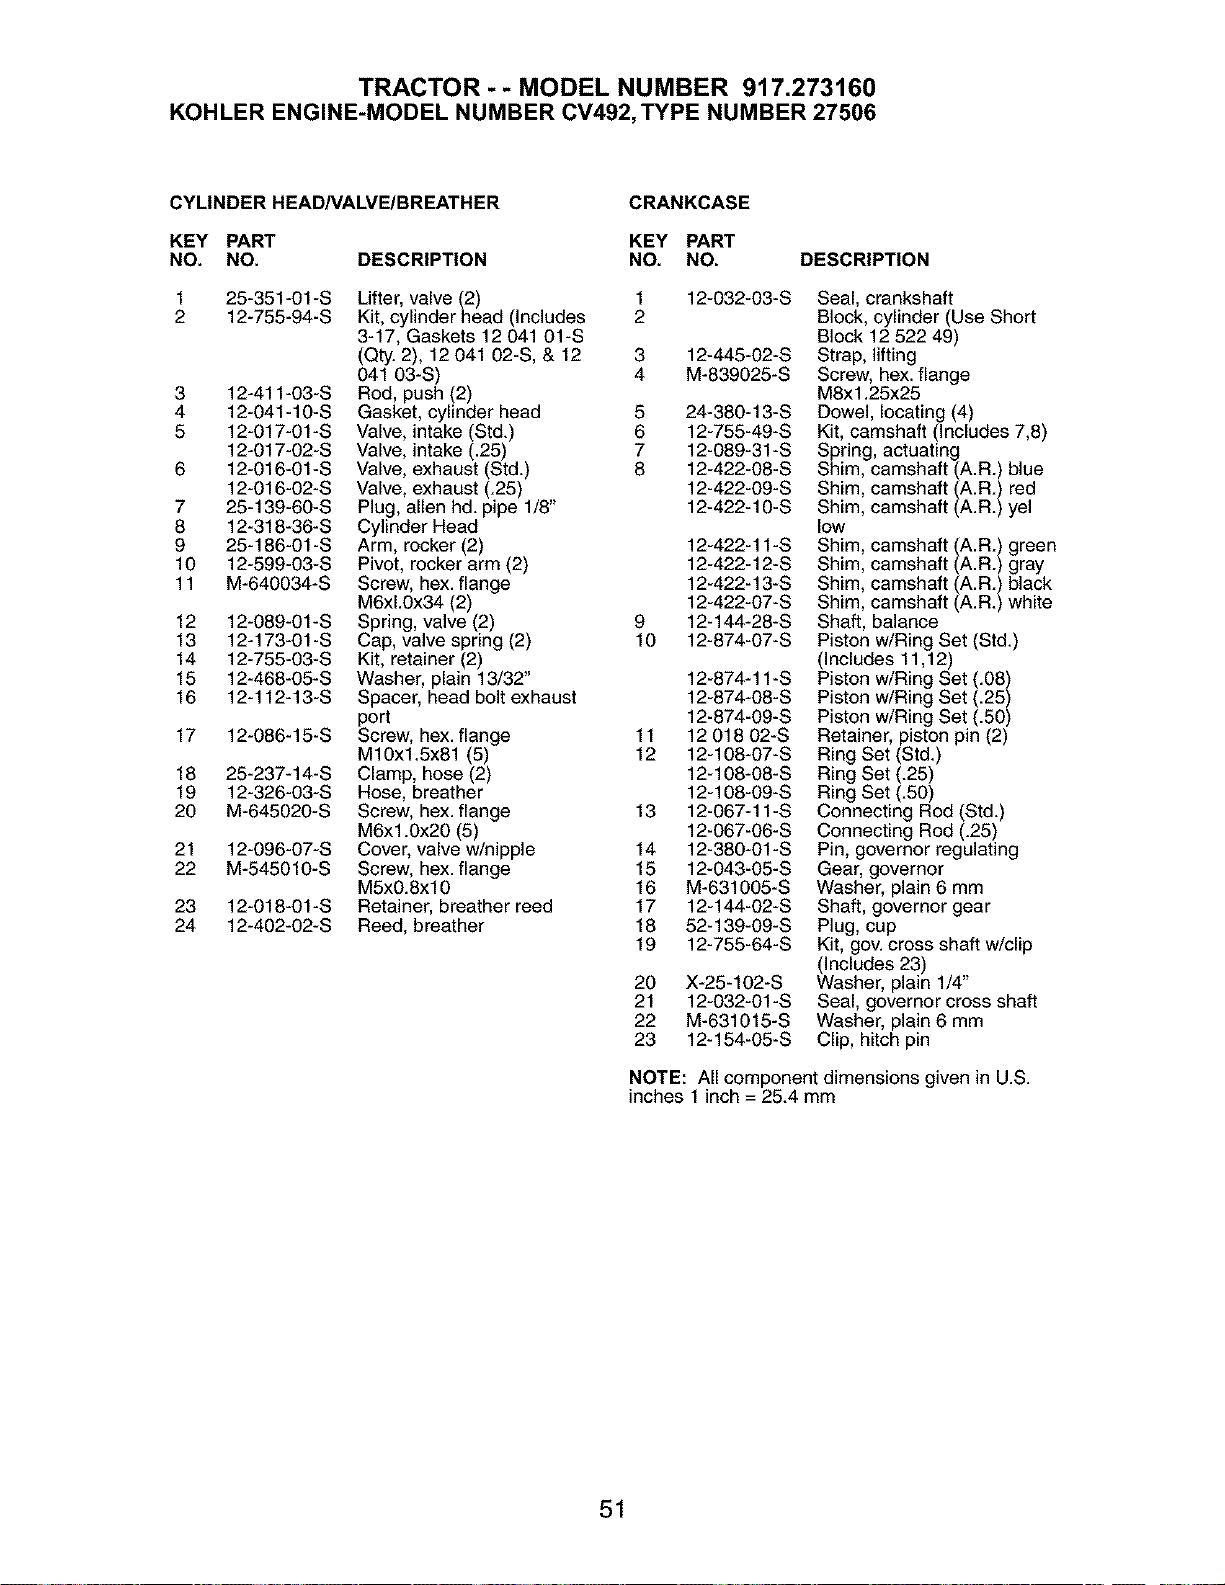
TRACTOR-- MODEL NUMBER 917.273160
KOHLER ENGINE-MODEL NUMBER CV492,TYPE NUMBER 27506
CYLINDER HEAD/VALVE/BREATHER CRANKCASE
KEY PART KEY PART
NO. NO. DESCRIPTION NO, NO. DESCRIPTION
1 25-351-01-S Lifter, valve (2) 1 12-032-03-S
2 12-755-94-S Kit, cylinder head (Includes 2
3-17, Gaskets 12 041 01-S
(Qty. 2), 12 041 02-S, & 12 3 12-445-02-S
041 03-S) 4 M-839025-S
3 12-411-03-S Rod, push (2)
4 12-041-10-S Gasket, cylinder head 5 24-380-13-S
5 12-017-01-S Valve, intake (Std.) 6 12-755-49-S
12-017-02-S Valve, intake (.25) 7 12-089-31-S
6 12-016-01-S Valve, exhaust (Std.) 8 12-422-08-S
12-016-02-S Valve, exhaust (.25) 12-422-09-S
7 25-139-60-S Plug, allen hd. pipe 1/8" 12-422-10-S
8 12-318-36-S Cylinder Head
9 25-186-01-S Arm, rocker (2) 12-422-11-S
10 12-599-03-S Pivot, rocker arm (2) 12-422-12-S
11 M-640034-S Screw, hex. flange 12-422-13-S
M6xL0x34 (2) 12-422-07-S
12 12-089-01-S Spring, valve (2) 9 12-144-28-S
13 12-173-01-S Cap, valve spring (2) 10 12-874-07-S
14 12-755-03-S Kit, retainer (2)
15 12-468-05-S Washer, plain 13/32" 12-874-11-S
16 12-112-13-S Spacer, head bolt exhaust 12-874-08-S
port 12-874-09-S
17 12-086-15-S Screw, hex. flange 11 12 018 02-S
M10x1.5x81 (5) 12 12-108-07-S
18 25-237-14-S Clamp, hose (2) 12-108-08-S
19 12-326-03-S Hose, breather 12-108-09-S
20 M-645020-S Screw, hex. flange 13 12-067-11-S
M6x1.0x20 (5) 12-067-06-S
21 12-096-07-S Cover, valve w/nipple 14 12-380-01-S
22 M-545010-S Screw, hex. flange 15 12-043-05-S
M5x0.8xl 0 16 M-631005-S
23 12-018-01-S Retainer, breather reed 17 12-144-02-S
24 12-402-02-S Reed, breather 18 52-139-09-S
19 12-755-64-S
20 X-25-102-S
21 12-032-01-S
22 M-631015-S
23 12-154-05-S
Seal, crankshaft
Block, cylinder (Use Short
Block 12 522 49)
Strap, lifting
Screw, hex. flange
M8x1.25x25
Dowel, locating (4)
Kit, camshaft (Includes 7,8)
Spring, actuating
Shim, camshaft (A.R.) blue
Shim, camshaft (A.R.) red
Shim, camshaft (A.R.) yel
low
Shim, camshaft (A.R.) green
Shim, camshaft (A.R.) gray
Shim, camshaft (A.R.) black
Shim, camshaft (A.R.) white
Shaft, balance
Piston wiRing Set (Std.)
(Includes 11,12)
Piston wiRing Set (.08)
Piston wiRing Set (.25)
Piston wiRing Set (.50)
Retainer, piston pin (2)
Ring Set (Std.)
Ring Set (.25)
Ring Set (.50)
Connecting Rod (Std.)
Connecting Rod (.25)
Pin, governor regulating
Gear, governor
Washer, plain 6 mm
Shaft, governor gear
Plug, cup
Kit, gov. cross shaft w/clip
(Includes 23)
Washer, plain 1/4"
Seal, governor cross shaft
Washer, plain 6 mm
Clip, hitch pin
NOTE: All component dimensions given in U.S.
inches 1 inch = 25.4 mm
51
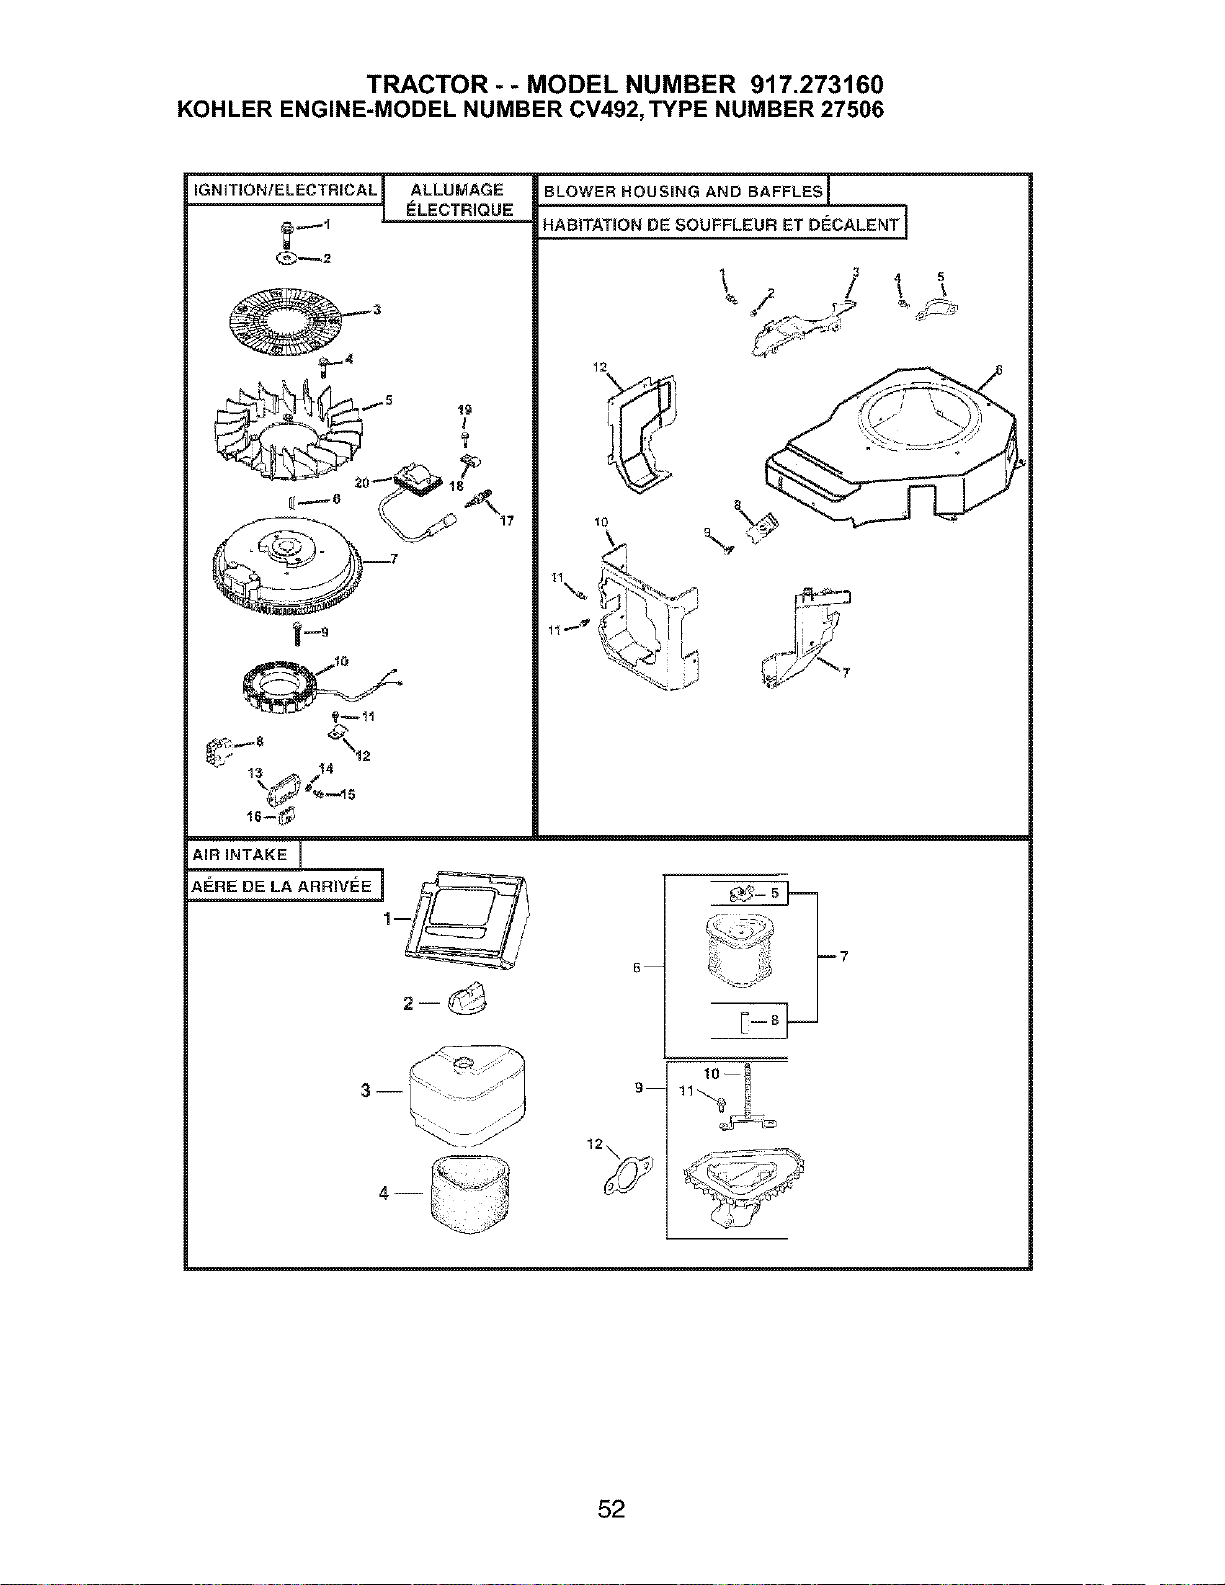
TRACTOR - - MODEL NUMBER 917.273160
KOHLER ENGINE-MODEL NUMBER CV492,TYPE NUMBER 27506
IGNITION/ELECTRICAL ! ALLUIViAGE
ELECTRIQUE
BLOWER HOUSING AND BAFFLESI_
HABiTATiON DE SOUFFLEUR ET DECALENT]
5
\
52
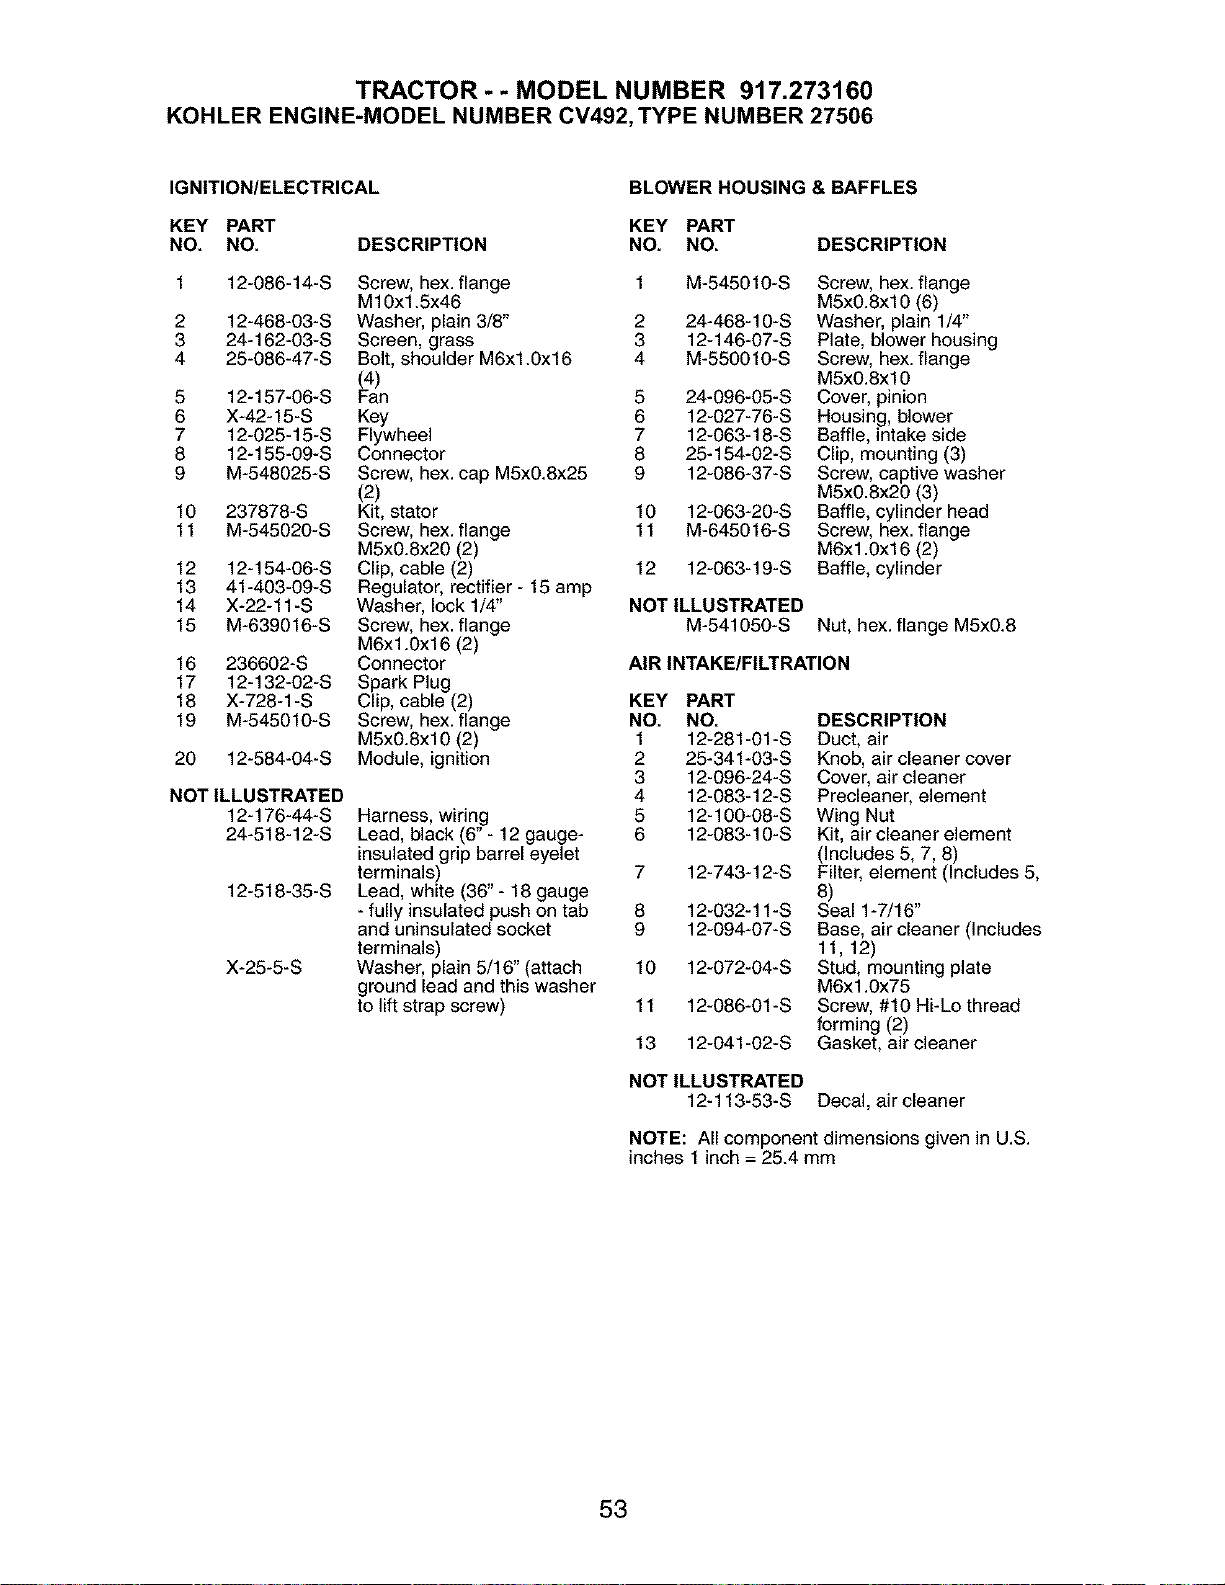
TRACTOR - - MODEL NUMBER 917.273160
KOHLER ENGINE-MODEL NUMBER CV492,TYPE NUMBER 27506
IGNITION/ELECTRICAL BLOWER HOUSING & BAFFLES
KEY PART KEY PART
NO. NO. DESCRIPTION NO, NO.
1 12-086-14-S Screw, hex. flange
M10x1.5x46
2 12-468-03-S Washer, plain 3/8"
3 24-162-03-S Screen, grass
4 25-086-47-S Bolt, shoulder M6x1.0x16
(4)
5 12-157-06-S Fan
6 X-42-15-S Key
7 12-025-15-S Flywheel
8 12-155-09-S Connector
9 M-548025-S Screw, hex. cap M5x0.8x25
(2)
10 237878-S Kit, stator
11 M-545020-S Screw, hex. flange
M5x0.8x20 (2)
12 12-154-06-S Clip, cable (2)
13 41-403-09-S Regulator, rectifier- 15 amp
14 X-22-11-S Washer, lock 1/4"
15 M-639016-S Screw, hex. flange
M6x1.0xl 6 (2)
16 236602-S Connector
17 12-132-02-S Spark Plug
18 X-728-1-S Clip, cable (2)
19 M-545010-S Screw, hex. flange
M5x0.8xl 0 (2)
20 12-584-04-S Module, ignition
NOTILLUSTRATED
12-176-44-S
24-518-12-S
12-518-35-S
Harness, wiring
Lead, black (6" - 12 gauge-
insulatedgrip barrel eyelet
terminals)
Lead, white (36"- 18 gauge
- fully insulated push on tab
and uninsulated socket
terminals)
Washer, plain 5/16" (attach
ground lead and this washer
to lift strap screw)
X-25-5-S
DESCRIPTION
2
3
4
5
6
7
8
9
10
11
12
M-545010-S
24-468-10-S
12-146-07-S
M-550010-S
24-096-05-S
12-027-76-S
12-063-18-S
25-154-02-S
12-086-37-S
12-063-20-S
M-645016-S
12-063-19-S
Screw, hex. flange
M5x0.8xl 0 (6)
Washer, plain 1/4"
Plate, blower housing
Screw, hex. flange
M5x0.8xl 0
Cover, pinion
Housing, blower
Baffle, intake side
Clip, mounting (3)
Screw, captive washer
M5x0.8x20 (3)
Baffle, cylinder head
Screw, hex. flange
M6x1.0xl 6 (2)
Baffle, cylinder
NOT ILLUSTRATED
M-541050-S Nut, hex. flange M5x0.8
AIR INTAKE/FILTRATION
KEY PART
NO. NO. DESCRIPTION
1 12-281-01-S Duct, air
2 25-341-03-S Knob, air cleaner cover
3 12-096-24-S Cover, aircleaner
4 12-083-12-S Precleaner, element
5 12-100-08-S Wing Nut
6 12-083-10-S Kit, air cleaner element
(Includes 5, 7, 8)
7 12-743-12-S Filter, element (Includes 5,
8)
8 12-032-11-S Seal 1-7/16"
9 12-094-07-S Base, aircleaner (Includes
11, 12)
10 12-072-04-S Stud, mounting plate
M6x1.0x75
11 12-086-01-S Screw, #10 HI-Lo thread
forming (2)
13 12-041-02-S Gasket, air cleaner
NOT ILLUSTRATED
12-113-53-S Decal, air cleaner
NOTE: All component dimensions given in U.S.
inches 1 inch = 25.4 mm
53
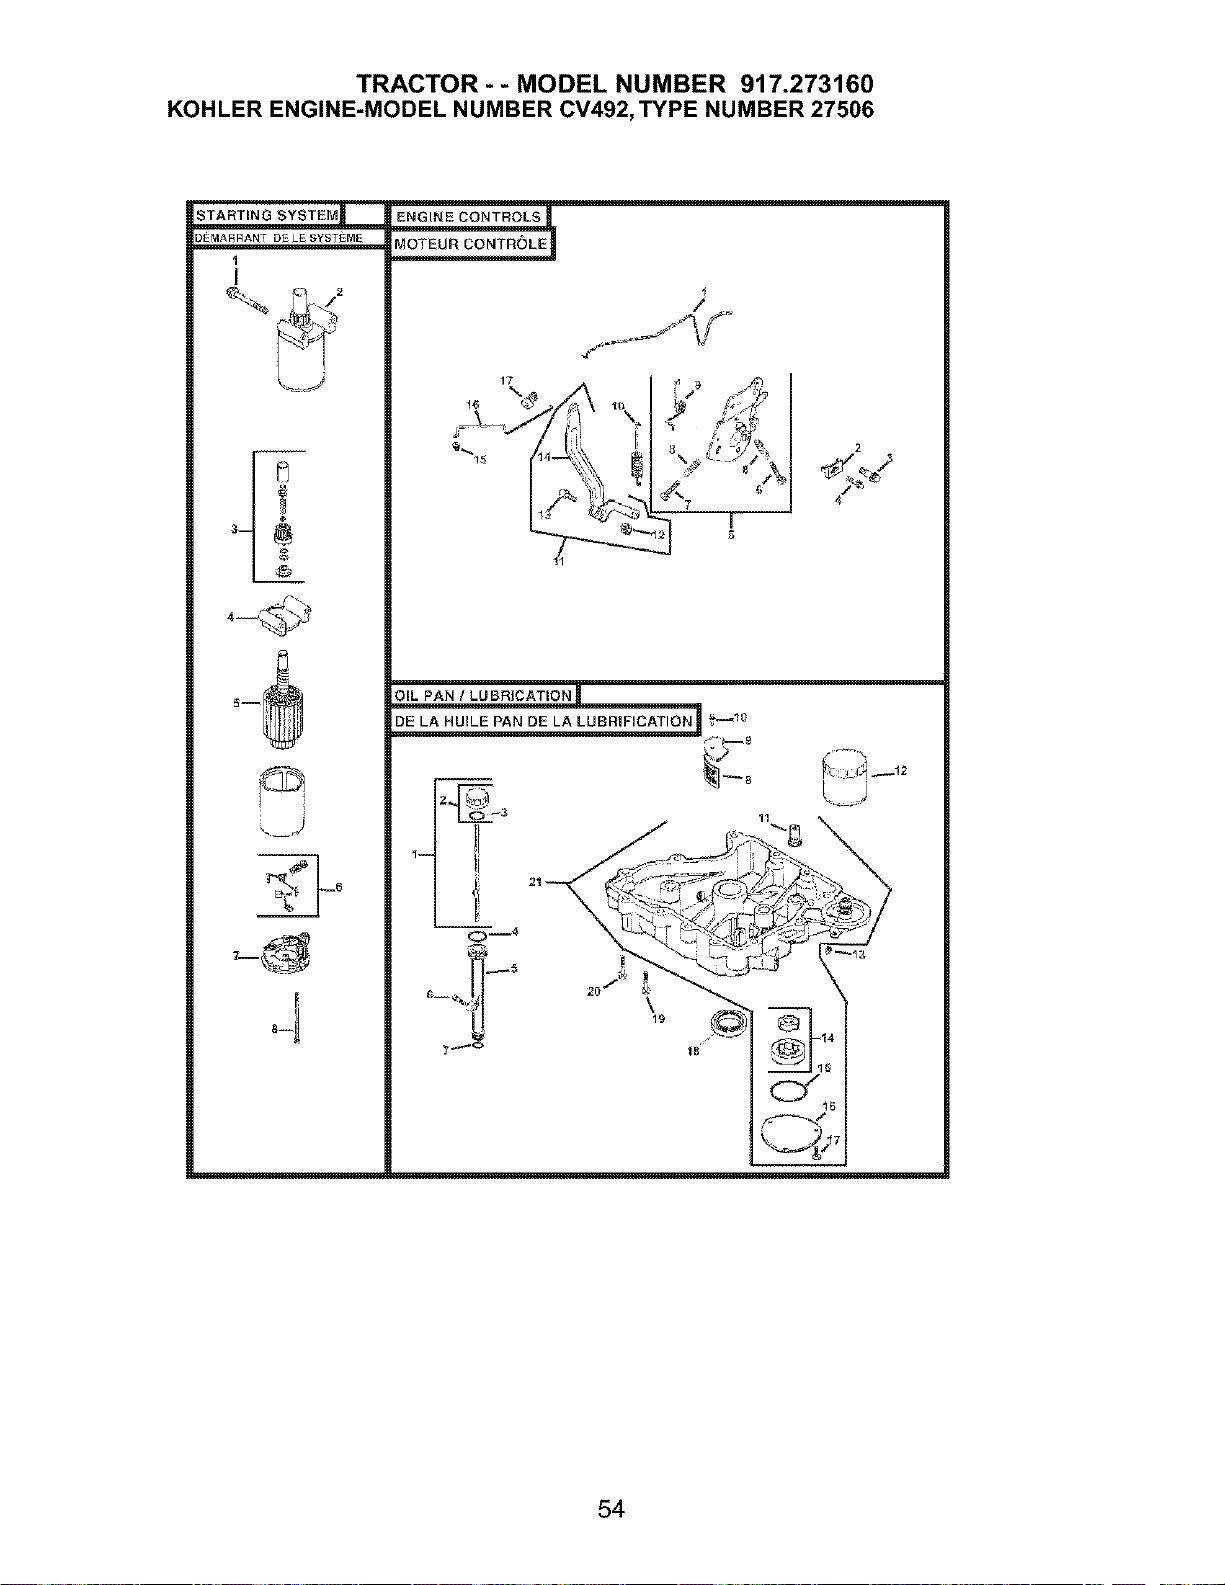
TRACTOR-- MODEL NUMBER 917.273160
KOHLER ENGINE-MODEL NUMBER CV492,TYPE NUMBER 27506
STARTING SYSTEM w ENGINE CONTROLS
DEMARRANTD£LESYST_ME MOTEUR CONTROLE
1
I
i 2
g--
/
OIL PAN / LU BR]CATION
DE LA HU!LE PAN DE LA LUBB!FICATIO N _ _io
lu
II
cJ
16
54
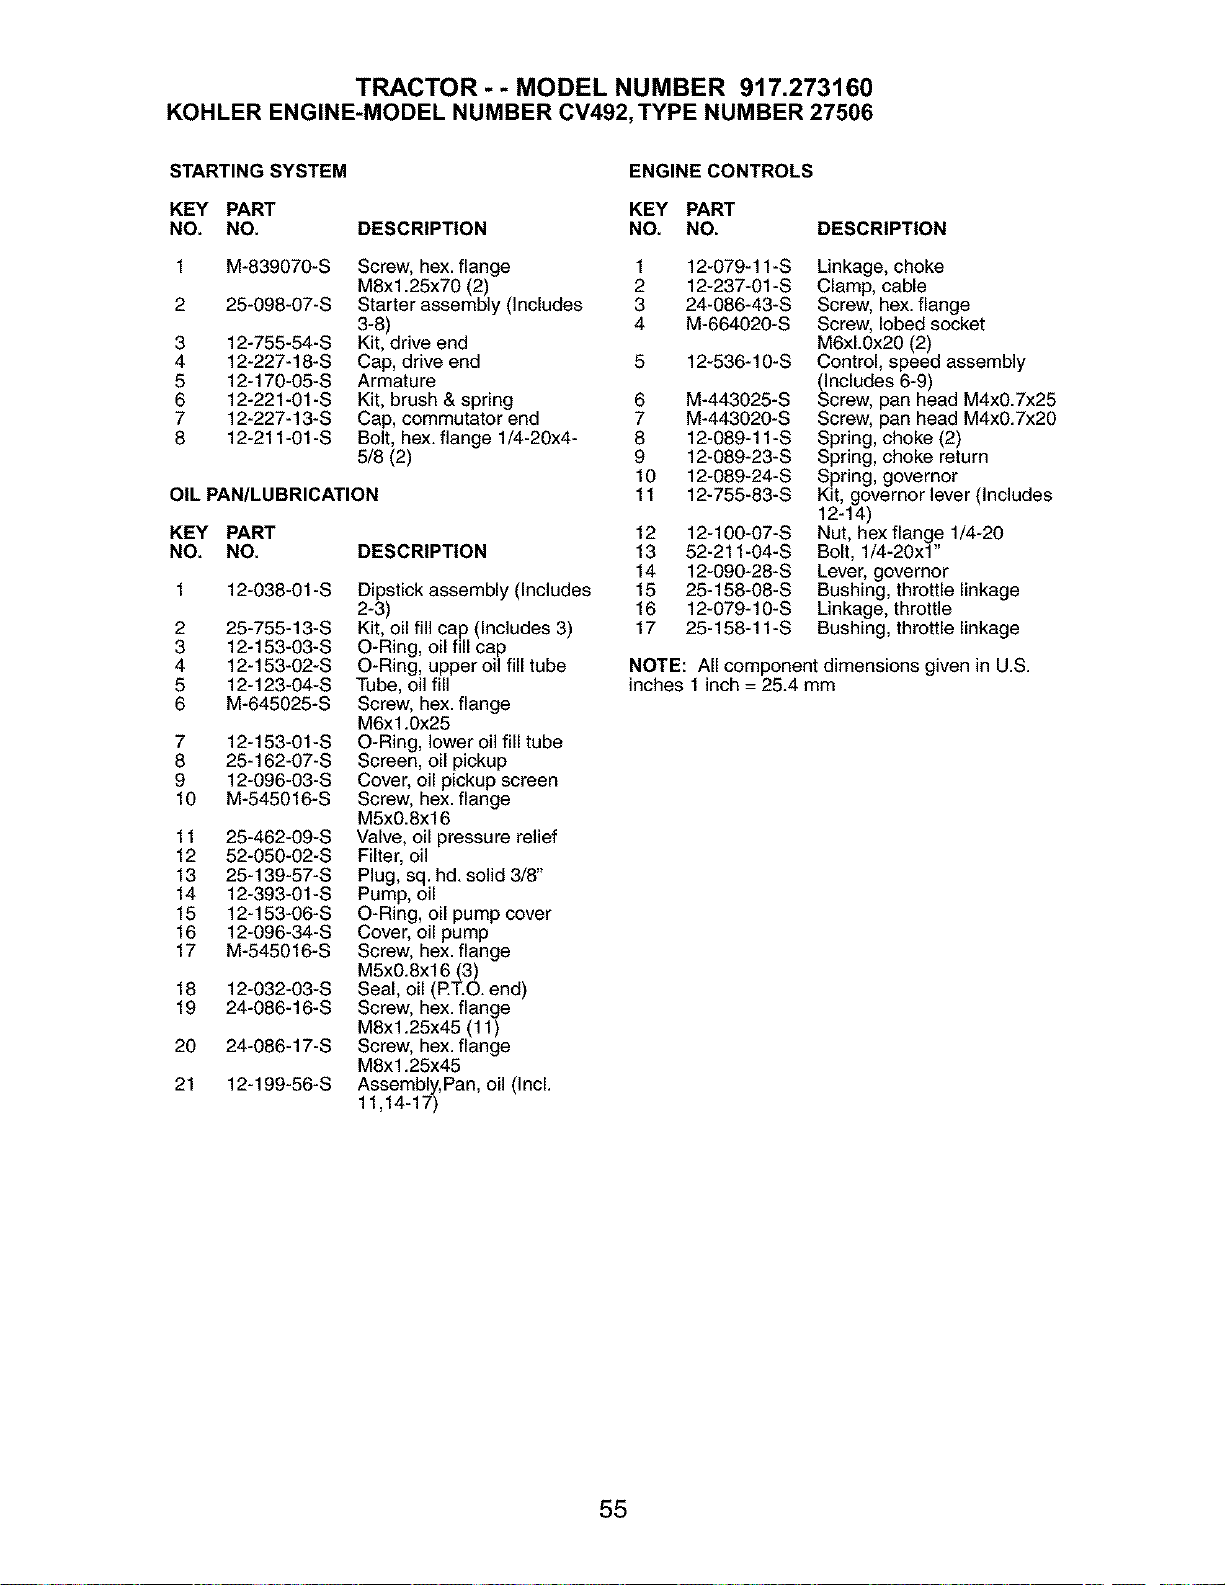
TRACTOR - - MODEL NUMBER 917.273160
KOHLER ENGINE-MODEL NUMBER CV492,TYPE NUMBER 27506
STARTING SYSTEM ENGINE CONTROLS
KEY PART KEY PART
NO. NO. DESCRIPTION NO, NO.
M-839070-S Screw, hex. flange 1
M8x1.25x70 (2) 2
25-098-07-S Starter assembly (Includes 3
3-8) 4
12-755-54-S Kit, drive end
12-227-18-S Cap, drive end 5
12-170-05-S Armature
12-221-01-S Kit, brush & spring 6
12-227-13-S Cap, commutator end 7
12-211-01-S Bolt, hex. flange 1/4-20x4- 8
5/8 (2) 9
10
OIL PAN/LUBRICATION 11
3
4
5
6
7
8
DESCRIPTION
KEY PART
NO. NO.
2
3
4
5
6
12-038-01 -S
25-755-13-S
12-153-03-S
12-153-02-S
12-123-04-S
M-645025-S
12-153-01-S
25-162-07-S
12-096-03-S
M-545016-S
25-462-09-S
52-050-02-S
25-139-57-S
12-393-01-S
12-153-06-S
12-096-34-S
M-545016-S
12-032-03-S
24-086-16-S
24-086-17-S
12-199-56-S
Dipstick assembly (Includes
2-3)
Kit, oil fill cap (Includes 3)
O-Ring, oil fill cap
O-Ring, upper oil fill tube
Tube, oil fill
Screw, hex. flange
M6x1.0x25
O-Ring, lower oil fill tube
Screen, oil pickup
Cover, oil pickup screen
Screw, hex. flange
M5x0.8xl 6
Valve, oil pressure relief
Filter, oil
Plug, sq. hd. solid 3/8"
Pump, oil
O-Ring, oil pump cover
Cover, oil pump
Screw, hex. flange
M5x0.8xl 6 (3)
Seal, oil (P.T.O.end)
Screw, hex. flange
M8x1.25x45 (11)
Screw, hex. flange
M8x1.25x45
Assembly,Pan, oil (Incl.
11,14-17)
7
8
9
10
11
12
13
14
15
16
17
18
19
20
21
DESCRIPTION
12
13
14
15
16
17
12-079-11 -S
12-237-01 -S
24-086-43-S
M-664020-S
12-536-10-S
M-443025-S
M-443020-S
12-089-11-S
12-089-23-S
12-089-24-S
12-755-83-S
12-100-07-S
52-211-04-S
12-090-28-S
25-158-08-S
12-079-10-S
25-158-11 -S
Linkage, choke
Clamp, cable
Screw, hex. flange
Screw, lobed socket
M6xL0x20 (2)
Control, speed assembly
_ncludes 6-9)
crew, pan head M4x0.7x25
Screw, pan head M4x0.7x20
Spring, choke (2)
Spring, choke return
Spring, governor
Kit, governor lever (Includes
12-14)
Nut, hex flange 1/4-20
Bolt, 1/4-20x1"
Lever, governor
Bushing, throttle linkage
Linkage, throttle
Bushing, throttle linkage
NOTE: All component dimensions given in U.S.
inches 1 inch = 25.4 mm
55
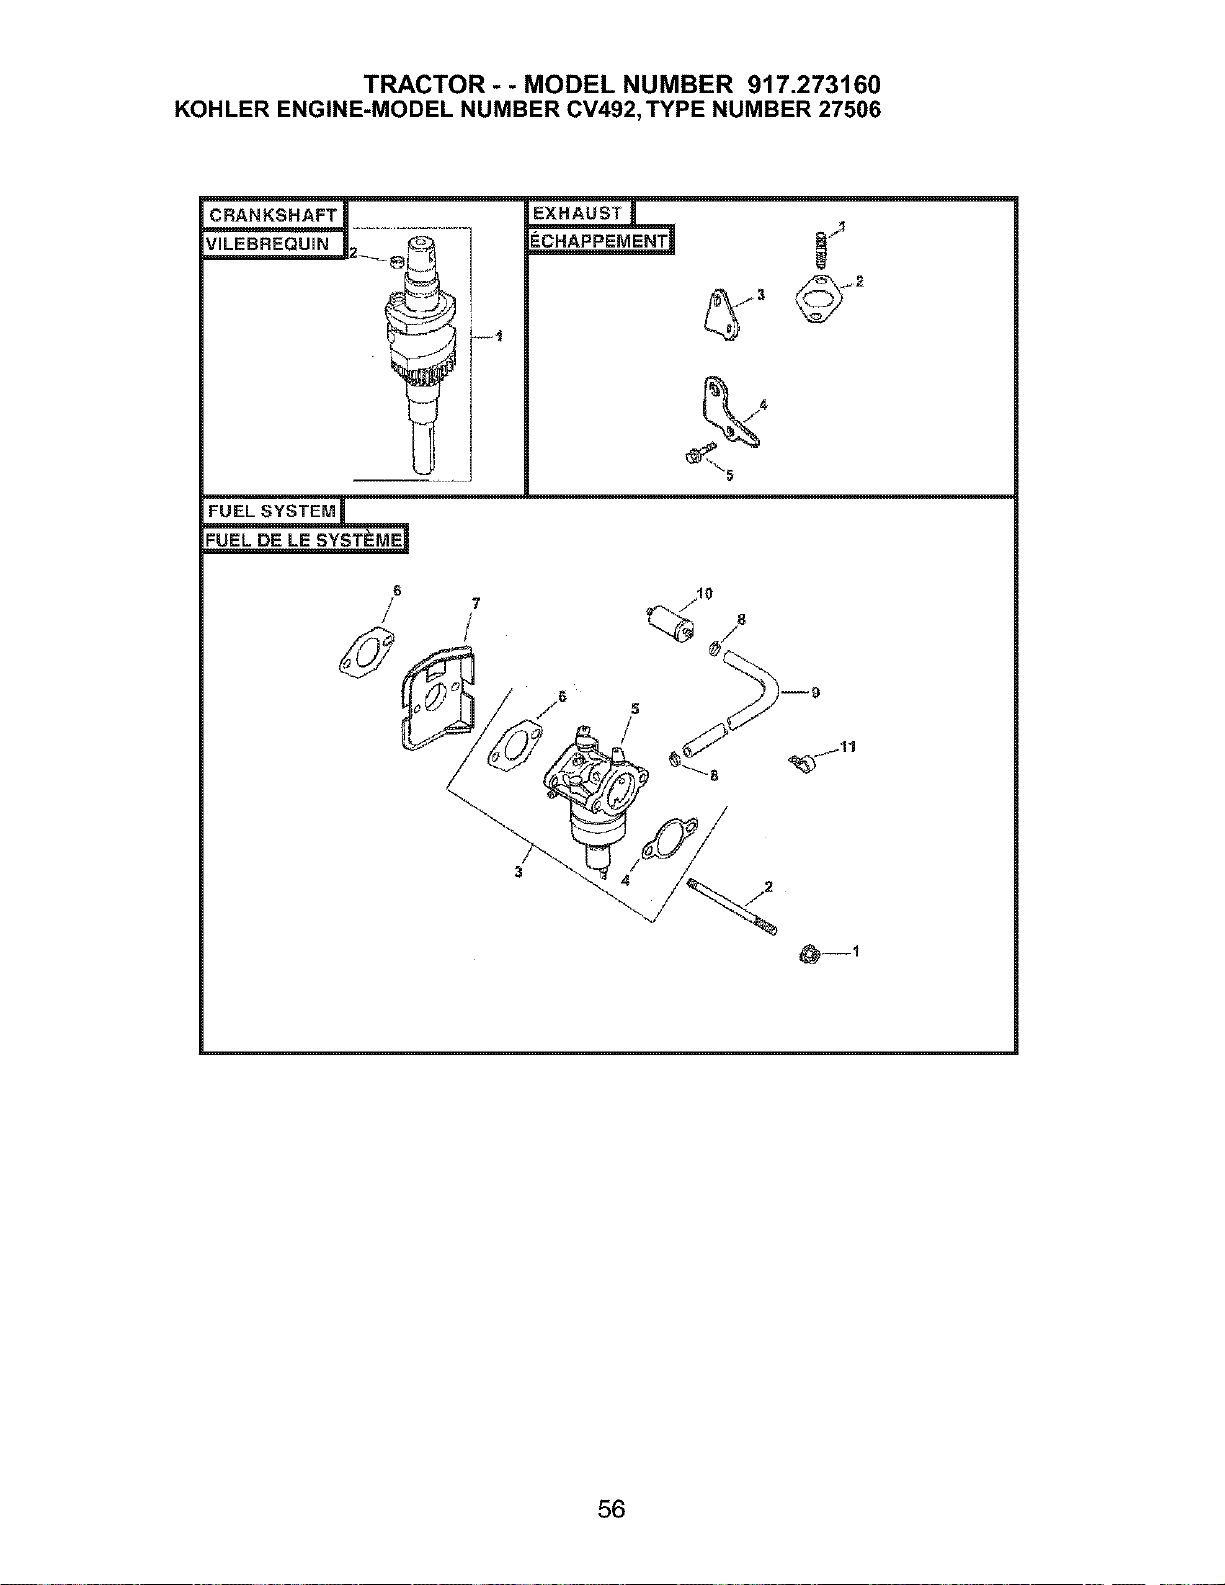
TRACTOR - - MODEL NUMBER 917.273160
KOHLER ENGINE-MODEL NUMBER CV492, TYPE NUMBER 27506
CRANKSHAFT| .......................
VlLEBREQUIN ___ _!
!)-'
EXHAUST
ECHAPPEMENT| _'_
FUELSYSTEM_
7
/
/
3
56
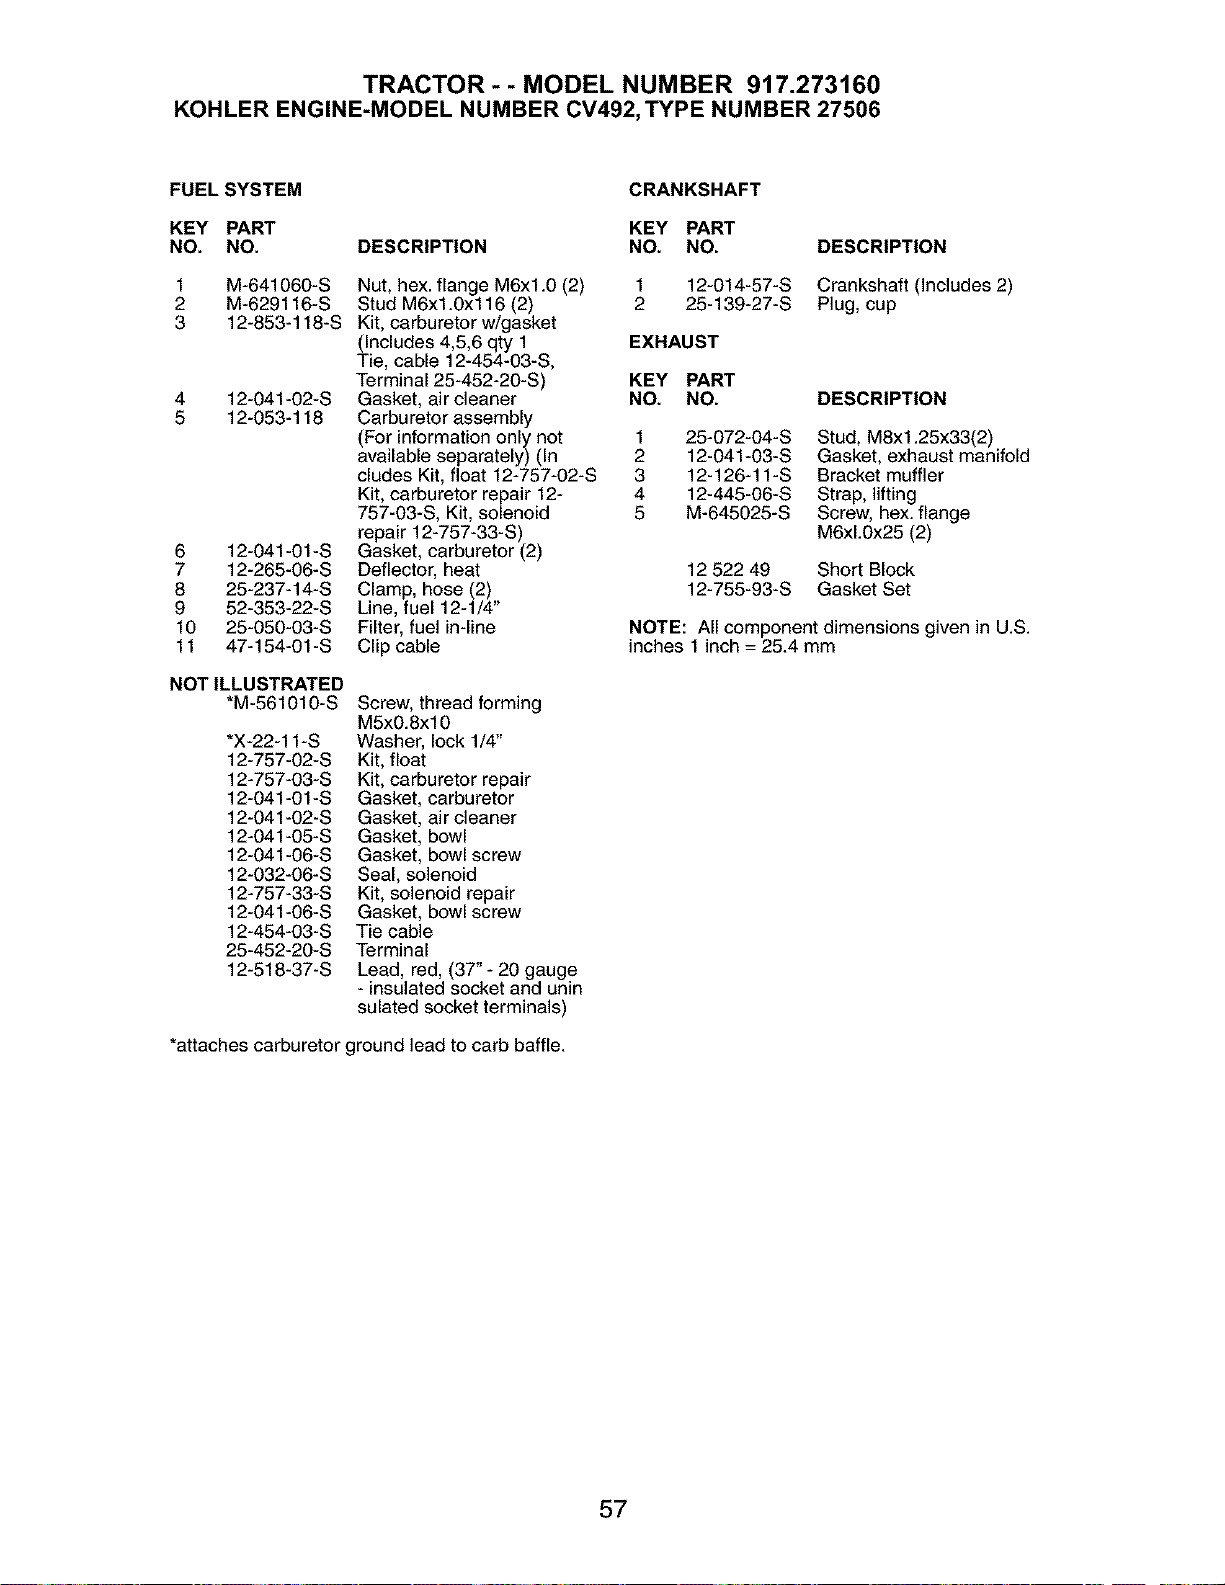
TRACTOR-- MODEL NUMBER 917.273160
KOHLER ENGINE-MODEL NUMBER CV492,TYPE NUMBER 27506
FUEL SYSTEM CRANKSHAFT
KEY PART KEY PART
NO. NO. DESCRIPTION NO, NO. DESCRIPTION
M-641060-S
M-629116-S
12-853-118-S
12-041-02-S
12-053-118
1
2
3
Nut, hex. flange M6x1.0 (2) 1
Stud M6x1.0xl 16 (2) 2
Kit, carburetor w/gasket
(Includes 4,5,6 qty 1 EXHAUST
Tie, cable 12-454-03-S,
Terminal 25-452-20-S) KEY PART
Gasket, air cleaner NO. NO.
Carburetor assembly
(For informationonly not 1
available separately) (In 2
cludes Kit, float 12-757-02-S 3
Kit, carburetor repair 12- 4
757-03-S, Kit, solenoid 5
repair 12-757-33-S)
Gasket, carburetor (2)
Deflector, heat
Clamp, hose (2)
Line, fuel 12-1/4"
Filter, fuel in-line
Clip cable
6 12-041-01-S
7 12-265-06-S
8 25-237-14-S
9 52-353-22-S
10 25-050-03-S
11 47-154-01-S
NOTILLUSTRATED
*M-561010-S
Screw, thread forming
M5x0.8xl 0
Washer, lock 1/4"
Kit, float
Kit, carburetor repair
Gasket, carburetor
Gasket, air cleaner
Gasket, bowl
Gasket, bowl screw
Seal, solenoid
Kit, solenoid repair
Gasket, bowl screw
Tie cable
Terminal
Lead, red, (37" - 20 gauge
- insulatedsocket and unin
sulated socket terminals)
*X-22-11-S
12-757-02-S
12-757-03-S
12-041-01-S
12-041-02-S
12-041-05-S
12-041-06-S
12-032-06-S
12-757-33-S
12-041-06-S
12-454-03-S
25-452-20-S
12-518-37-S
*attaches carburetor ground lead to carb baffle.
12-014-57-S Crankshaft (Includes 2)
25-139-27-S Plug, cup
DESCRIPTION
25-072-04-S
12-041-03-S
12-126-11-S
12-445-06-S
M-645025-S
Stud, M8x1.25x33(2)
Gasket, exhaust manifold
Bracket muffler
Strap, lifting
Screw, hex. flange
M6xL0x25 (2)
12 522 49 Short Block
12-755-93-S Gasket Set
NOTE: All component dimensions given in U.S.
inches 1 inch = 25.4 mm
57

58
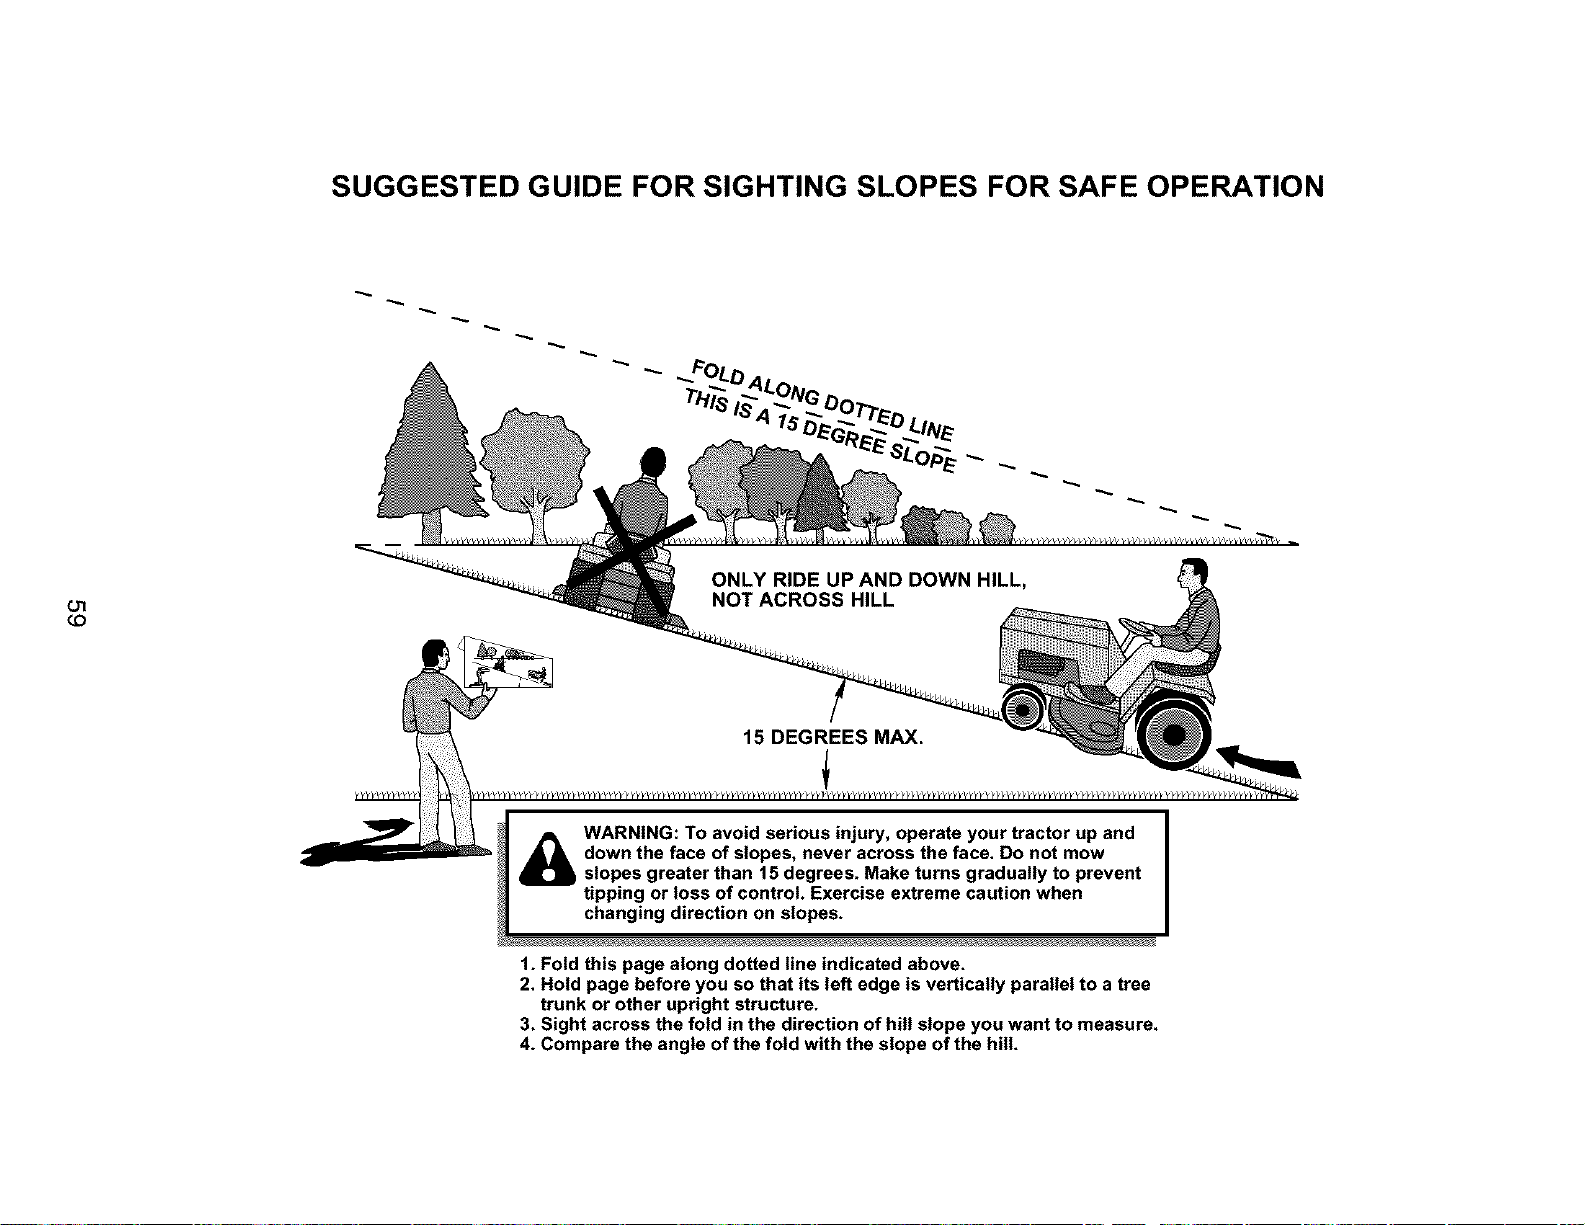
SUGGESTED GUIDE FOR SIGHTING SLOPES FOR SAFE OPERATION
¢.o
_k ARNING: To avoid serious injury, operate your tractor up and
down the face of slopes, never across the face. Do not mow
slopes greater than 15 degrees. Make turns gradually to prevent
tipping or loss of control. Exercise extreme caution when
changing direction on slopes.
1. Fold this page along dotted line indicated above.
2. Hold page before you so that its left edge is vertically parallel to a tree
trunk or other upright structure.
3. Sight across the fold in the direction of hill slope you want to measure.
4. Compare the angle of the fold with the slope of the hill.

Get it fixed, at your home or ours!
Your Home
For repair - in your home - of all major brand apphances,
lawn and garden equipment, or heating and coohng systems,
no matter who made it, no matter who sold it!
For the replacement parts, accessones and
owner's manuals that you need to do-it-yourself.
For Sears professional mstallahon of home apphances
and _tems hke garage door openers and water heaters.
1-800-4-MY-HOME ® Anytime, day or night
(1-800-469-4663) (U.S A and Canada)
www.sears.com www.sears.ca
Our Home
For repatr of carry-m products hke vacuums, lawn equipment,
and electronics, call or go on-hne for the nearest
Sears Parts and Repair Center.
1-800-488-1222 Anytime, day or night (U.S.A. only)
www.sears.com
To purchase a protection agreement (U.S.A.)
or maintenance agreement (Canada) on a product serviced by Sears:
1-800-827-6655 (u S_) 1-800-361-6665 (Canada)
Para ped_rservicio de reparaciSn
a dom_ciho,y para ordenar ptezas:
1-888-SU-HOGAR sM
(1_88-784-6427)
Au Canada pour service en fran_.ats:
1-800-LE-FOYER Mc
(1-800-533-6937)
www sears ca
6E/ARS
© Sears,Roebuckand Co
® Registered Trademark / "_uTrademark / sr,_Servtce Mark of Sears, Roebuck and Co
® Marca Regtstrada / TUMarca de FAbnca / _u Marca de Servtclo de Sears, Roebuck and Co
r,_cMarque de commerce / MDMarque depos_e de Sears, Roebuck and Co
185006 Rev. 2 7.29.03 TR/MH Pnnted in U.S.A.