Loading ...
Loading ...
Loading ...
3
8. Plug the power cord into an electrical outlet and press the On Button (C). NOTE: When the steriliz-
er is turned on, you will notice that cycle indicator lights (E) will illuminate with a cycle of
RED-BLUE-GREEN colors. After this initial cycle-through of colors, the green symbol will remain lit
indicating “READY” mode.
Ready Cycle: With the green “ready” symbol illuminated, press the cycle start button (D).
Heat Cycle:
The red symbol will indicate that the appliance is “HEATING” to create steam. It will
remain lit until all water is consumed and the sterilization cycle is complete. This is approximately
8 minutes but may vary by the amount of water you add, the number of items to be sterilized and
other environmental factors.
Cool Down Cycle: Upon the completion of the sterilization cycle, the blue symbol will illuminate
to indicate the “COOL DOWN” cycle. Note: If you forget to add water to the unit and start the
heating cycle (red light on), the unit must complete the cool down cycle (blue light on) before a new
“heat”cycle can be attempted. CAUTION: DO NOT OPEN STERILIZER DURING COOL DOWN CYCLE.
READY (unload) Cycle: When the cool down cycle is complete, the green “READY” symbol will
again light. You may unload your items or allow them to air dry.
9. Open the main cover and remove all bottles and place on a countertop or other flat surface. Open
the top cover and re-assemble the bottles with the various components.
10. You may now turn the unit off by pressing the on-off button (C) or begin another sterilization cycle
after again adding 3 oz/80 ml of water.
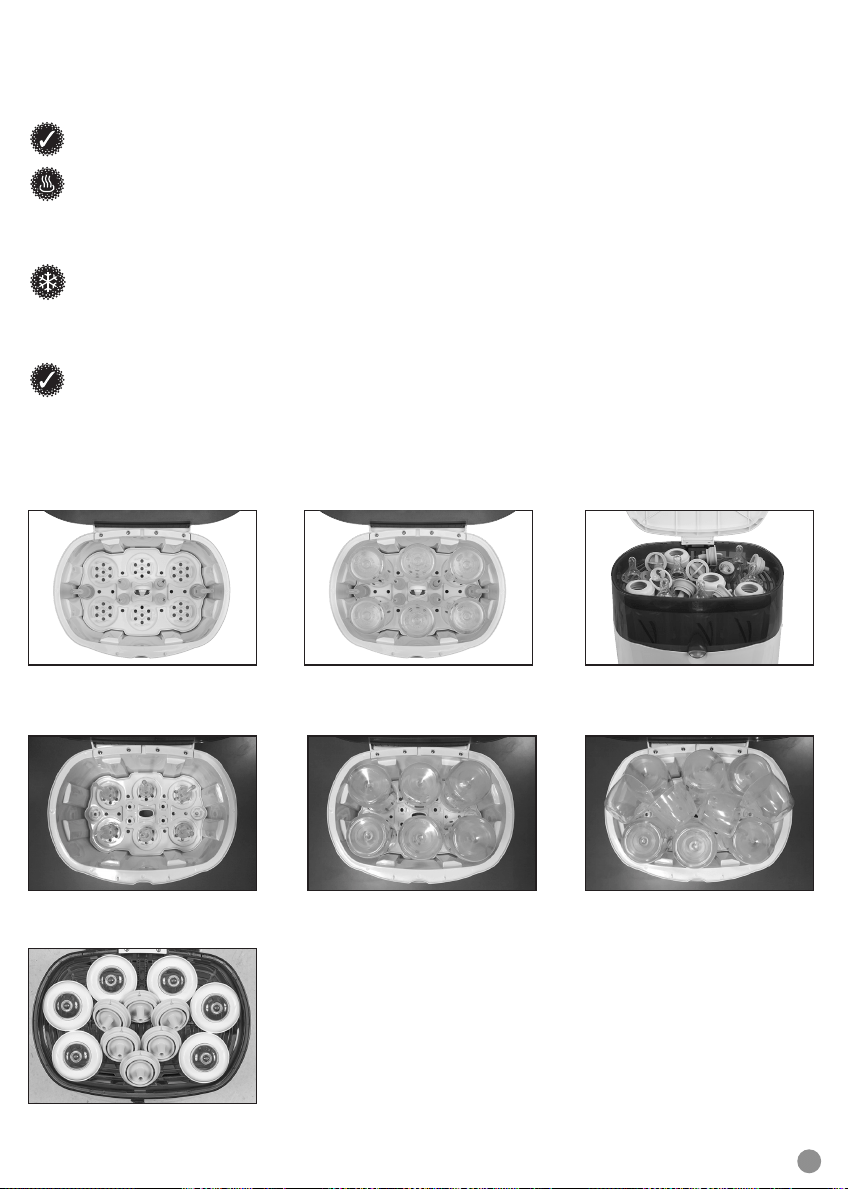
FIGURE A. Placement of
narrow reservoirs
FIGURE B. Placement of
narrow bottles
FIGURE C. Placement of narrow
parts (nipples/teats, collars,
inserts) and pacifiers/soothers
FIGURE D. Placement of
wide-neck reservoirs*
FIGURE G. Placement of wide-neck
parts
(nipples/teats, collars,
inserts) and pacifiers/soothers
FIGURE E. Placement of
wide-neck bottles
FIGURE F. Placement of
wide-neck caps (2 caps on
bottom, 4 caps on top)
* When sterilizing six (6) 9 oz/270 ml Wide-Neck Options+
TM
bottles,
remove the detachable handle from the inner tray to make room for all
six bottles, reservoirs, and caps in the main compartment. The green
reservoirs should be placed inside the bottles during sterilization.
Ensure that all parts are completely cool before removing from the unit.
Loading ...