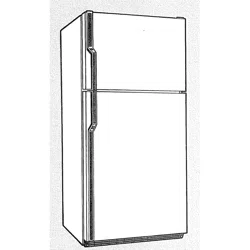
ORDER # 67003379
Side-by-Side Refrigerator
Use & Care Guide
Refrigerador D(=plex
Gufa para el Uso y Cuidado
R_frig_rateur b Compartiments Juxtaposes
Guide D'utilisation et D'entretien
Models:
596.53462301, 596.53463301, 596.53464301, 596.53469301,
596.52672201, 596.52673201, 596.52674201, 596.52679201,
596.50002100, 596.50003100, 596.50004100, 596.50009100,
596.50012100, 596.50013100, 596.50014100, 596.50019100
fft
Z
I"'
m
"!I
Z
I
I11
Z_
r-
PartNo,12591320 Sears, Roebuckand Co., Hoffman Estates,tL 60179 U,S,A wwwosears.com
FormA/04103 Sears Canada, Inc, Toronto, Ontario, Canada MSB 2B8 Au Canada, www.searsoca
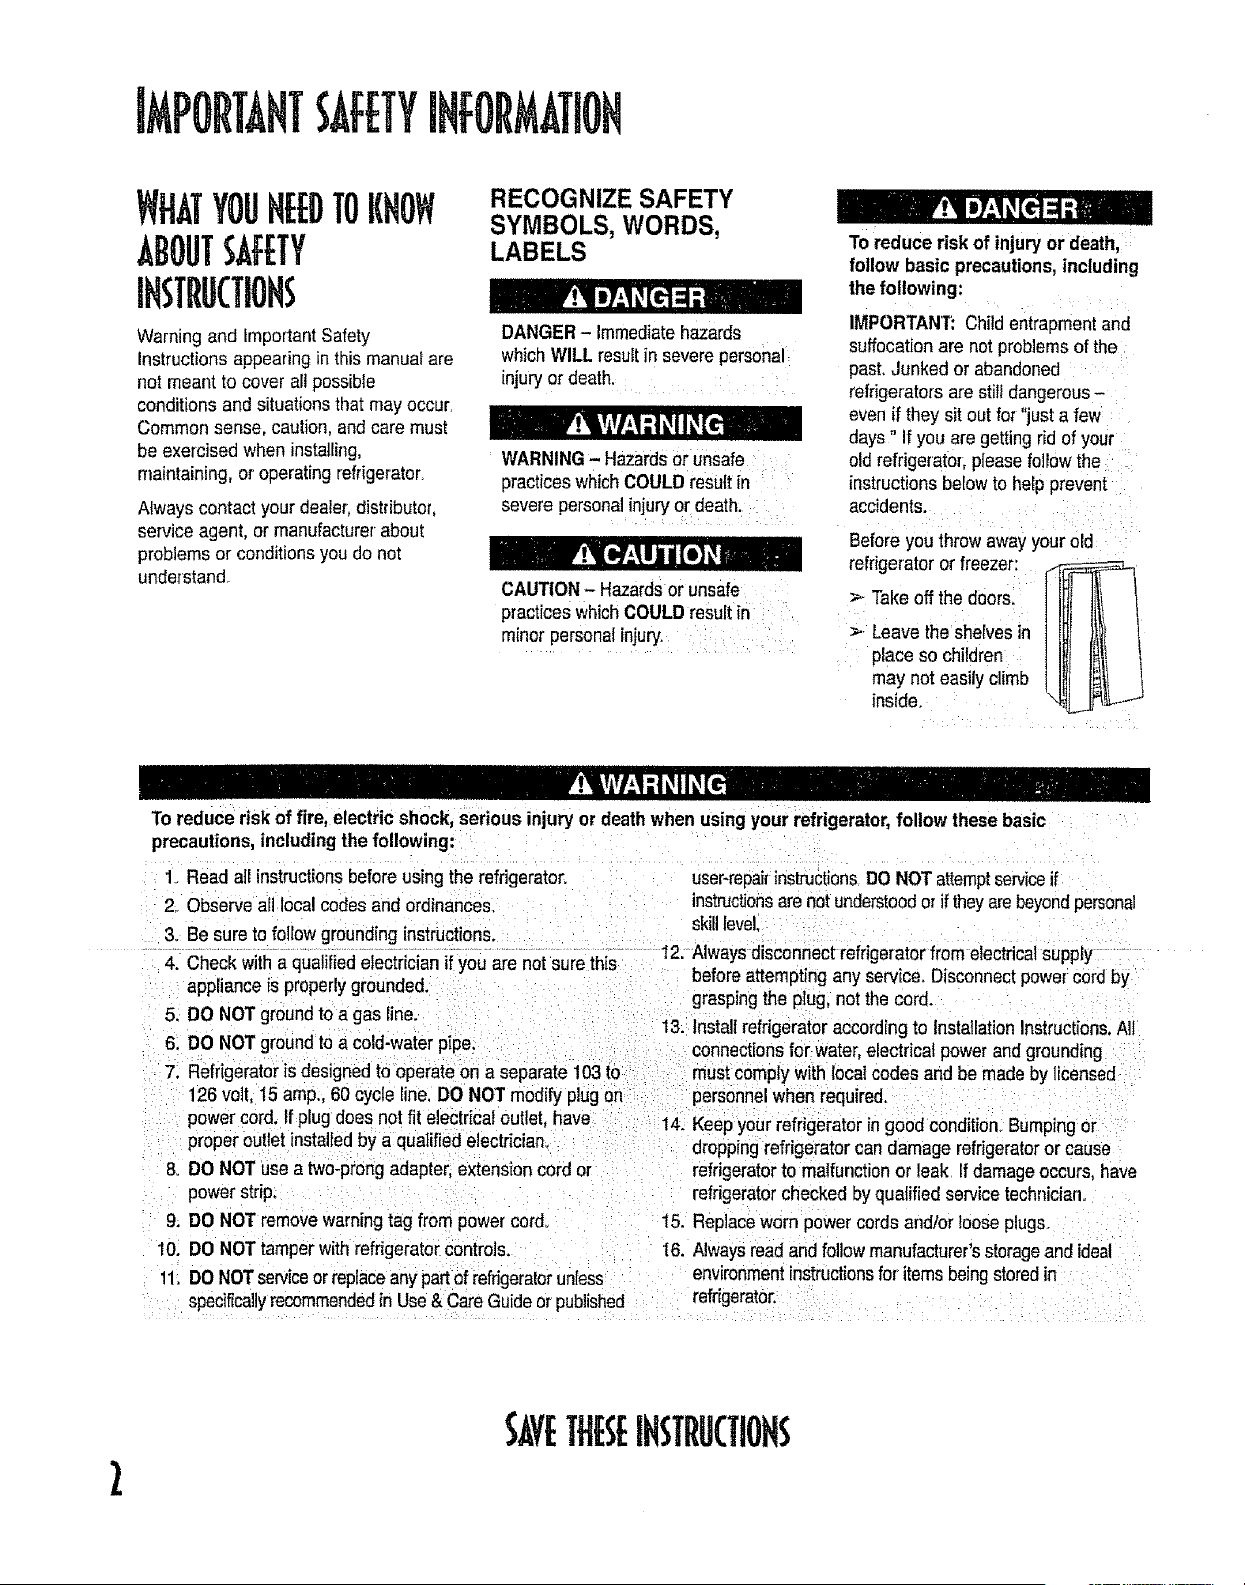
BMPORTAHTSAFETYINFORMATIOH
WHATYOUHEEDTOKHOW
ABOUTSAFETY
IHSTROCTiONS
Warning and ImportantSafety
Instructionsappearing in this manualare
not meant to cover aii possible
conditions and situationsthat may occur.
Common sense, caution, and care must
be exercised when installing,
maintaining, or operating refrigerator,
Always contact your dealer;distributor,
service agent, or manufacturerabout
problemsor conditionsyou do not
understand,.
RECOGNIZE SAFETY
SYMBOLS, WORDS,
LABELS
DANGER- Immediatehazards
whichWILLresultin severepersonal
injury or death, .... :
WARNING- Hazardsor Unsafe
practiceswhichCOULDresult in
severe personalinjuryor death: :
CAUTION- Hazardsor unsafe
practicesWhichCOULD resu tin
minor personal injurY. ; ,i
To reduce risk of injury or death,,:
follow basic precautions,including
the following:
IMPORTANT: Child entrapmentand
suffocationare not problemsof the
past. Junked or abandoned
refrigerators are stilldangerous-
even if they sit out for "just a few
days" I[you are getting rid of your
old refrigerator;piease foll0wthe
instructions belowto heipprevent
accidents...........
Before youihrow away your 0id
Takeoff the doorsl
"_. Leave thesheives in
place s° chiidren I_ !_. _
may not easily climb
inside.
To reduce risk of fire, electric shock, serious injury or deathwhen using your refrigerator,follow these basic
precautions,includingthe following:
1 Read atl instructionsbefore using the refrigerator, user-repairinstructionsDO NOTattemptserviceif
2. Observeall local codesand ordinances, instructionsare not understoodor iftheyarebeyondpersonal
skilllevel.
3_Be sure to foIIowgroundinginstructions.
.................................................................................. 12. Always disconnectrefrigeratorfrom electricalsupply
4. Check with a qualifiedelectrician if you are not sure this
appliance is properly grounded.
5. DO NOT groundto a gas line.
6. DO NOT groundto a cold-water pipe,
7. Refrigeratoris designedto operateon a separate 103to
126volt. 15 amp., 60 cycle line. DO NOT modify plugon
before attempting any service. Disconnectpowercord by
grasping the plug, not thecord.
13. Installrefrigerator accordingto InstallationInstructions.Alt
connectionsfor water, electrical powerand grounding
must complywith local codes and be made by licensed
personnelwhen required.
power cord.If plug does not fit electricaloutlet, have 14. Keepyour refrigerator in good conditi0n_Bumping or
properoutlet installedby a qualified electrician droppingrefrigerator can damage refrigeratoror cause
8. DO NOT use a two-prongadapter,extensioncord or
power strip.
9. DO NOTremovewarningtag from power cord°
10. DO NOTtamper with refrigeratorcontrols°
11. DO NOTserviceorreplaceany partof refrigeratorunless
specificallyrecommendedinUse& CareGuideorpublished
refrigeratorto malfunctionor leak if damageoccurs, have
refrigeratorchecked by qualified servicetechnician°
15. Replaceworn power cords and'or loose plugs,
I6, Alwaysreadand followmanufacturer'sstorageand ideal
environmentinstructionsfor itemsbeingstoredin
refrigerator,
2
SAVETHESEIHSTflUCTIOH5
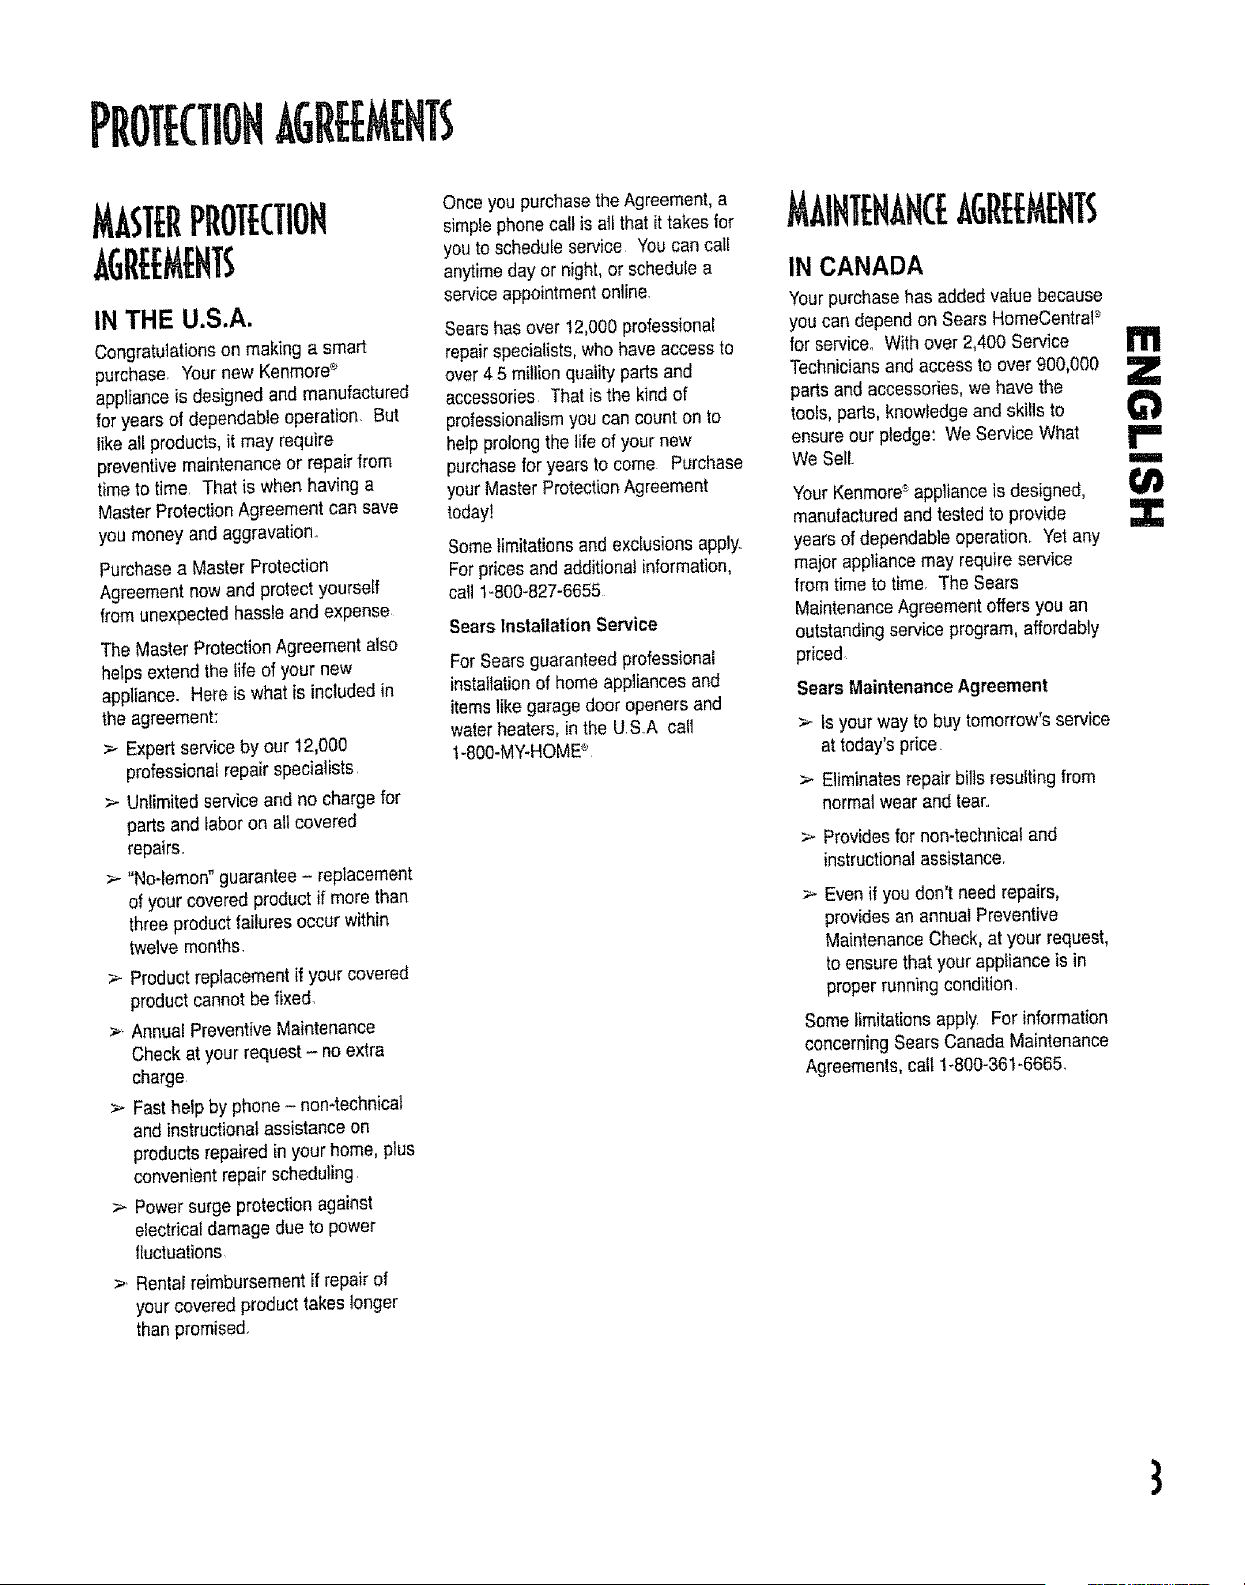
PROT[CTIONAGR[[M[HT ;
IN THE U.S.A.
Congratulationson making a smart
purchase. Yournew Kenmore_'
applianceis designed and manufactured
for years of dependable operation. But
like all products,it may require
preventivemaintenanceor repair from
timeto time That is when having a
Master ProtectionAgreementcan save
you money andaggravation..
Purchasea Master Protection
Agreementnow and protect yourseff
fromunexpected hassleand expense
The Master ProtectionAgreementalso
helps extendthe life of your new
appliance. Here is what is included in
the agreement:
> Expertserviceby our 12,000
professionalrepair specialists
> Unlimited serviceand no charge for
parts and laboron all covered
repairs_
> "No-lemon"guarantee - replacement
of your coveredproduct if more than
three productfailures occur within
twelve months.
> Productreplacementff your covered
productcannot be fixed.
>' Annua_PreventiveMaintenance
Check at your request- no extra
charge
> Fasthelp by phone- non4echnicat
and instructionatassistance on
products repairedinyour home, plus
convenientrepair scheduling
> Power surge protection against
electricaldamage due to power
fluctuations
>. Rentalreimbursementif repair of
your coveredproducttakes longer
than promised.
Onceyou purchasethe Agreement,a
simpfephone call is all thatit takes for
you to scheduleservice Youcan call
anytimeday or night,or schedulea
serviceappointmentonline.
Searshas over 12,000professional
repairspecialists,who have accessto
over 4 5 millionquality pads and
accessories Thatis the kind of
professionalismyou can count on to
help prolongthe life of your new
pumhasefor yearsto come Purchase
your Master ProtectionAgreement
today!
Somelimitationsand exclusionsapply,
Forpricesand additionalinformation,
call 1-800-827-6655
Sears InstallationService
For Sears guaranteedprofessional
installationof homeappliancesand
itemslike garagedoor openers and
waterheaters, in the U S.A call
t -800-MY-HOME_'
il l]'E IANCli, GREEMEHT$
IN CANADA
Yourpurchasehas addedvalue because
you can depend on Sears HomeCentraP
for service° With over 2,400 Service
Techniciansand accessto over 900,000
parts and accessories,we have the
tools, parts, knowledgeand skills to
ensure our pledge:We ServiceWhat
We Sell. ii
YourKenmore_applianceis designed,
manufacturedand tested to provide
yearsof dependableoperation. Yet any
major appliancemay requireservice
from time to time. The Sears
MaintenanceAgreementoffers you an
outstandingservice program,aflordably
priced
Sears MaintenanceAgreement
> Is your way to buy tomorrow'sservice
at today's price
> Eliminatesrepairbills resulting from
normalwear and tear.
> Providesfor non-technicaland
instructionalassistance.
Even if you don't need repairs,
providesan annual Preventive
MaintenanceCheck, at your request,
to ensure that your appliance is in
properrunningcondition.
Somelimitationsapply Forinformation
concerningSears Canada Maintenance
Agreements,call 1-800-361-6665.
Z
3
RRANTY
Full One Year Warranty on
Refrigerator
Forone year from the date of purchase,
when this refrigeratoris operated and
maintainedaccording to instructions
attached to or furnishedwith it,Sears
wilt repair it, free of charge,if defective
in materialor workmanship
Full Five Year Warranty on Sealed
Refrigeration System
For five years from the date of purchase,
when this refrigeratoris operatedand
maintainedaccording to instructions
attached to or furnishedwith it, Sears
will repair the sealed system (consisting
of refrigerant, connectingtubing and
compressormotor) free of charge, if
defective inmaterial or workmanship.
The above warranty coverageapplies
only to refrigeratorswhich are used for
storage of food for privatehousehold
purposes It exctudesoriginaland
replacementKenmore ice & water filter
cartridges, Original and replacement
cartridges are warrantedfor 30 days,
parts only,against defects in materialor
workmanship
Warranty service is available by
contacting 1-800-4-MY-HOME_
(1-800-469-4663)
This warranty applies only while this
productis in use in the United States..
This warranty gives you specificlegal
rights, and you may also have other
rights, whichvary from state to state
Sears,Roebuck and Co., Dept. 817WA,
HoffmanEstates, IL 60179
NOTE: Some ReverseOsmosis home
water systems cause low water
pressure Lowwater pressurecan affect
the water and icedispensing system by
causing small or hollow ice cubesand
slow water flow from the dispenser.
Serviceproblemsrelated to the home's
ReverseOsmosis watersystem are not
covered by the warranty.
PRODUCTRECORD
In the space below record the model
and serial numbersand purchasedate
of your refrigerator'You will find the
model and serial number sticker inside
the refrigeratorsection on the leftwall.
Model Number: 596.
Serial Number:
PurchaseDate:
Keepthis booklet and your Sears
sales receipt in a safe placefor future
reference.
4
Important Safety Information .............................................................................................. 2
What You Need to Know About Safety instructions............................................... 2
Protection Agreements ................................................................................ 3
Master Protection Agreements - U S A .............................................................. 3
Maintenance Agreements - Canada ............................................ 3
Warranty ..................................................................................................................... 4
Product Record ....................................................................................... 4
Installing Your Refrigerator........................................................................... 6-10
Measuringthe Opening................................................................................................ 6
TransportingYour Refrigerator..................................................................................6
Selectingthe Best Location....................................................................................... 6
How to Install and RemoveHandles.......................................................................7
Removing the Doorsand Hinges.................................................................. 8
Replacingthe Doors......................................................................................... 8
How to Install and RemovePanels......................................................................... 9
How to Connect the WaterSupply....................................................................... 10
How to Level Your Refrigerator.................................................................................1!
Setting and MaintainingProperTemperatures ......................................................12
Dial TemperatureControls.....................................................................................12
Electric TemperatureControls....................................................................................12
Fresh Food Storage................................................................................................ 12
Frozen Food Storage ...................................................................................... 12
AboutYour Water Filter.......................................................................................13-14
Water Filter Installationand Removal....................................................................13
Water FilterData................................................................................. 14
Fresh Food Features................................................................................. 15-16
interior Shelves................................................................................................ 15
Door Storage................................................................................................ 15
Climate-ControlledDrawers........................................................................................I6
Storage Drawers.......................................................................................... 16
Freezer Features......................................................................................................17
Automatic Ice Maker...............................................................................................17
InteriorShelves.................................................................................................. 17
Storage Drawers..................................................................................................17
Door Storage.................................................................................................... 17
Dispenser Features .................................................................................. 18-22
DispenserLight ................................................................................................. !8
Dispenser Pad....................................................................................................18
RemovableTray.......................................................................................................18
WaterDispenser Operation................................................................................ 18
Five-ButtonControlFeatures......................................................................................19
Electronic ControlFeatures........................................................................... 20-21
Hidden Electronic ControlFeatures........................................................................... 22
Hints and Care.....................................................................................................23-24
Howto Clean YourRefrigerator........................................................................... 23
How to RemoveOdors from Refrigerator...............................................................24
Energy Saving ideas .......................................................................................... 24
How to Removeand ReplaceLight Bulbs..................................................................24
Normal Operating Sounds .................................................................................... 25
Troubleshooting.................................................................................................26-27
Operation ......................................................................................................... 26
ice and Water................................................................................................ 27
Fran_ais .................................................................................................................29
Espafiol........................................................................................................ 57
Service ..........................................................................................................Back Cover
t11
Z
r"
m
:3:
5
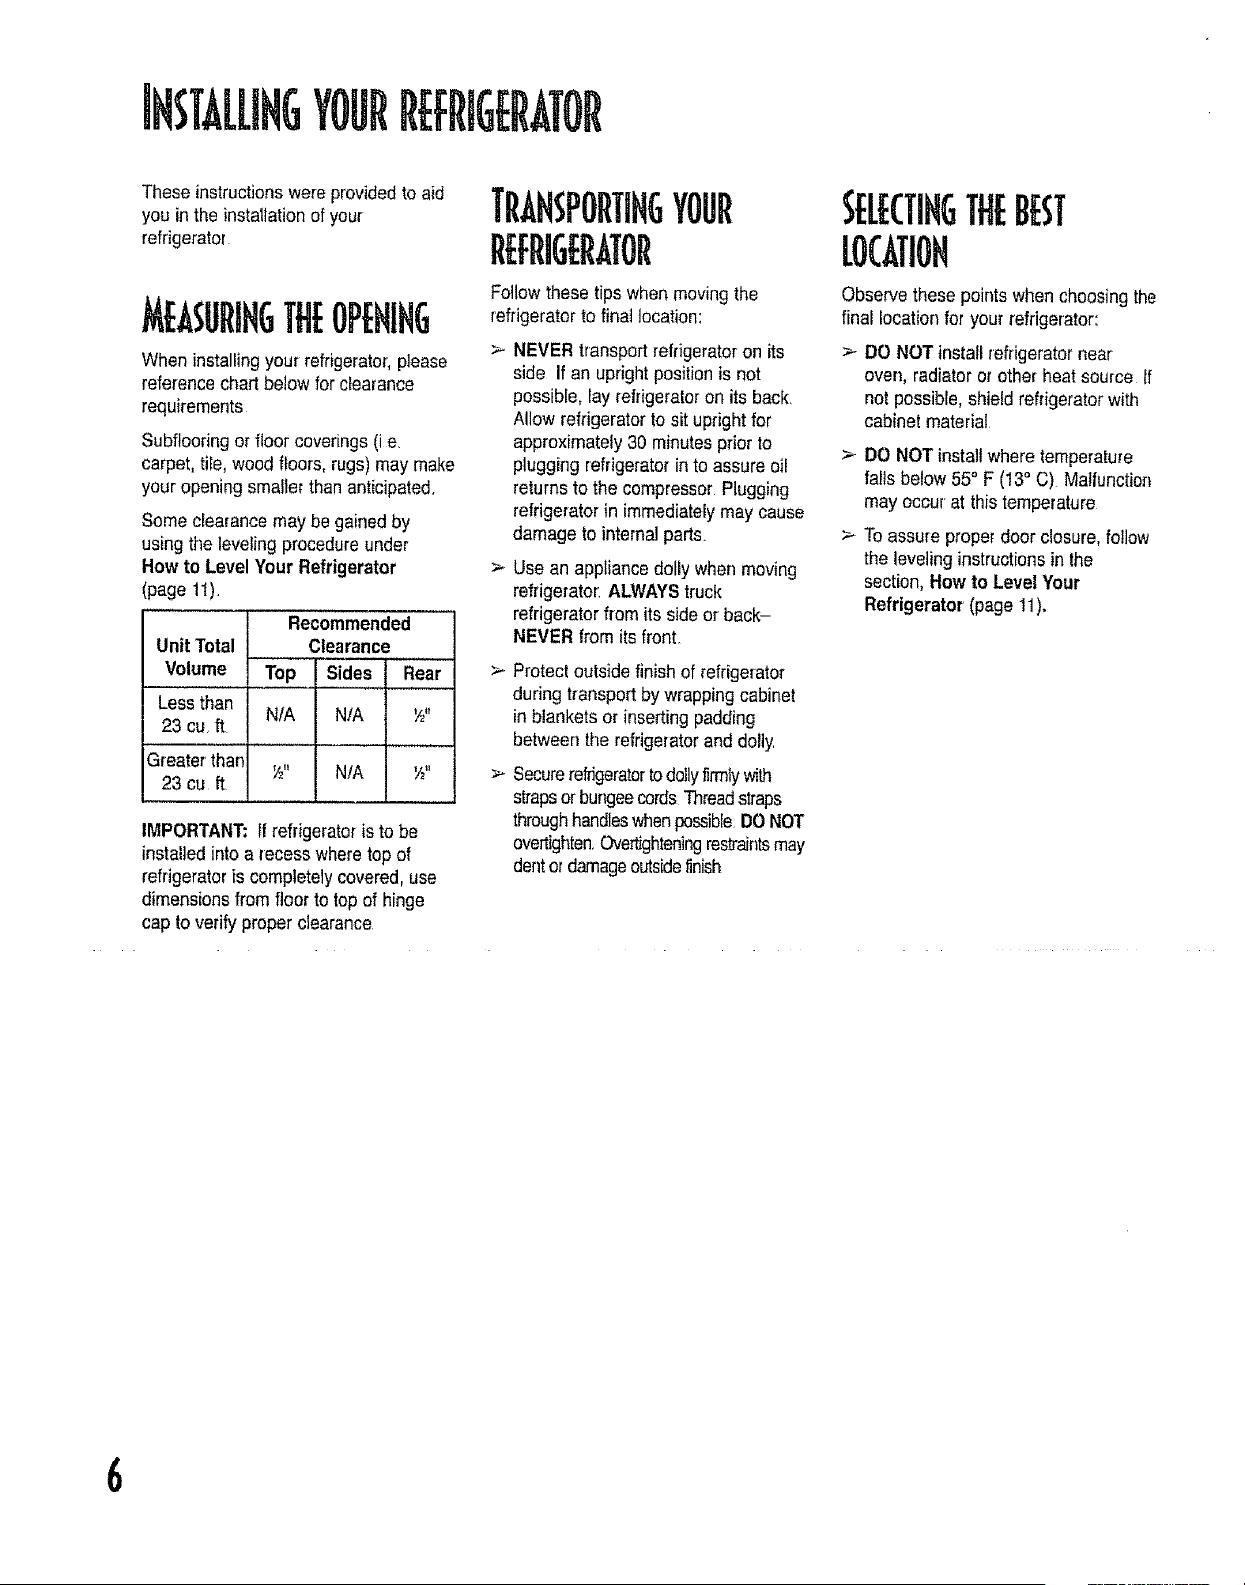
IHSTAU.IHGYOURR[I:RIG[RATOR
These instructionswere providedto aid
you inthe installation of your
refrigerator
MBSUEIHGTileOPENING
When installingyour refrigerator,please
referencechartbelow for clearance
requirements
Subftooringor floor coverings(i e
carpet, tile, wood floors, rugs) may make
your openingsmaller than anticipated.
Some clearancemay be gainedby
using theleveling procedureunder
How to Level Your Refrigerator
(page 11).
Recommended
Unit Total Clearance
Volume Top Sides Rear
Lessthan
N/A N/A Y£"
23 cu. ft
Greater'than
Y_" N/A _"
23 cu it
IMPORTANT: ffrefrigeratoris to be
installedinto a recess wheretop of
refrigeratoris completelycovered, use
dimensions from floor to top of hinge
cap to verify proper clearance
TRAHsPORTixGYOUr
REFRIGERATOR
Followthese tips whenmovingthe
refrigeratorto finai location:
Observe thesepointswhenchoosingthe
final locationfor your refrigerator:
>- NEVER transportrefrigeratoron its >-
side If an uprightposition is not
possible,lay refrigeratoron its back.
Allow refrigeratorto sit upright for
approximately30 minutesprior to
plugging refrigeratorin to assure oil
returns to the compressor Plugging
refrigeratorin immediatelymay cause
damage to internalparts. >
Use an appliancedolly when moving
refrigerator:ALWAYStruck
refrigeratorfrom its side or back-
NEVER from its front.
Protect outside finish of refrigerator
during transport by wrappingcabinet
in blankets or insertingpadding
between the refrigeratorand dolly
Securerefrigeratortodoilyfirmlywith
strapsorbungeecordsThreadstraps
throughhandleswhenpossibleDONOT
overtightenOve_ghteningresb'aintsmay
dentordamageoutsidefinish
DO NOTinstati refrigeratornear
oven, radiator or other heat source If
not possible, shield refrigeratorwith
cabinet material
DO NOTinstall where temperature
fallsbelow 55° F (13° C) Malfunction
may occur at this temperature
To assure properdoor closure,follow
the levelinginstructionsinthe
section, How to Level Your
Refrigerator (page I1).
6
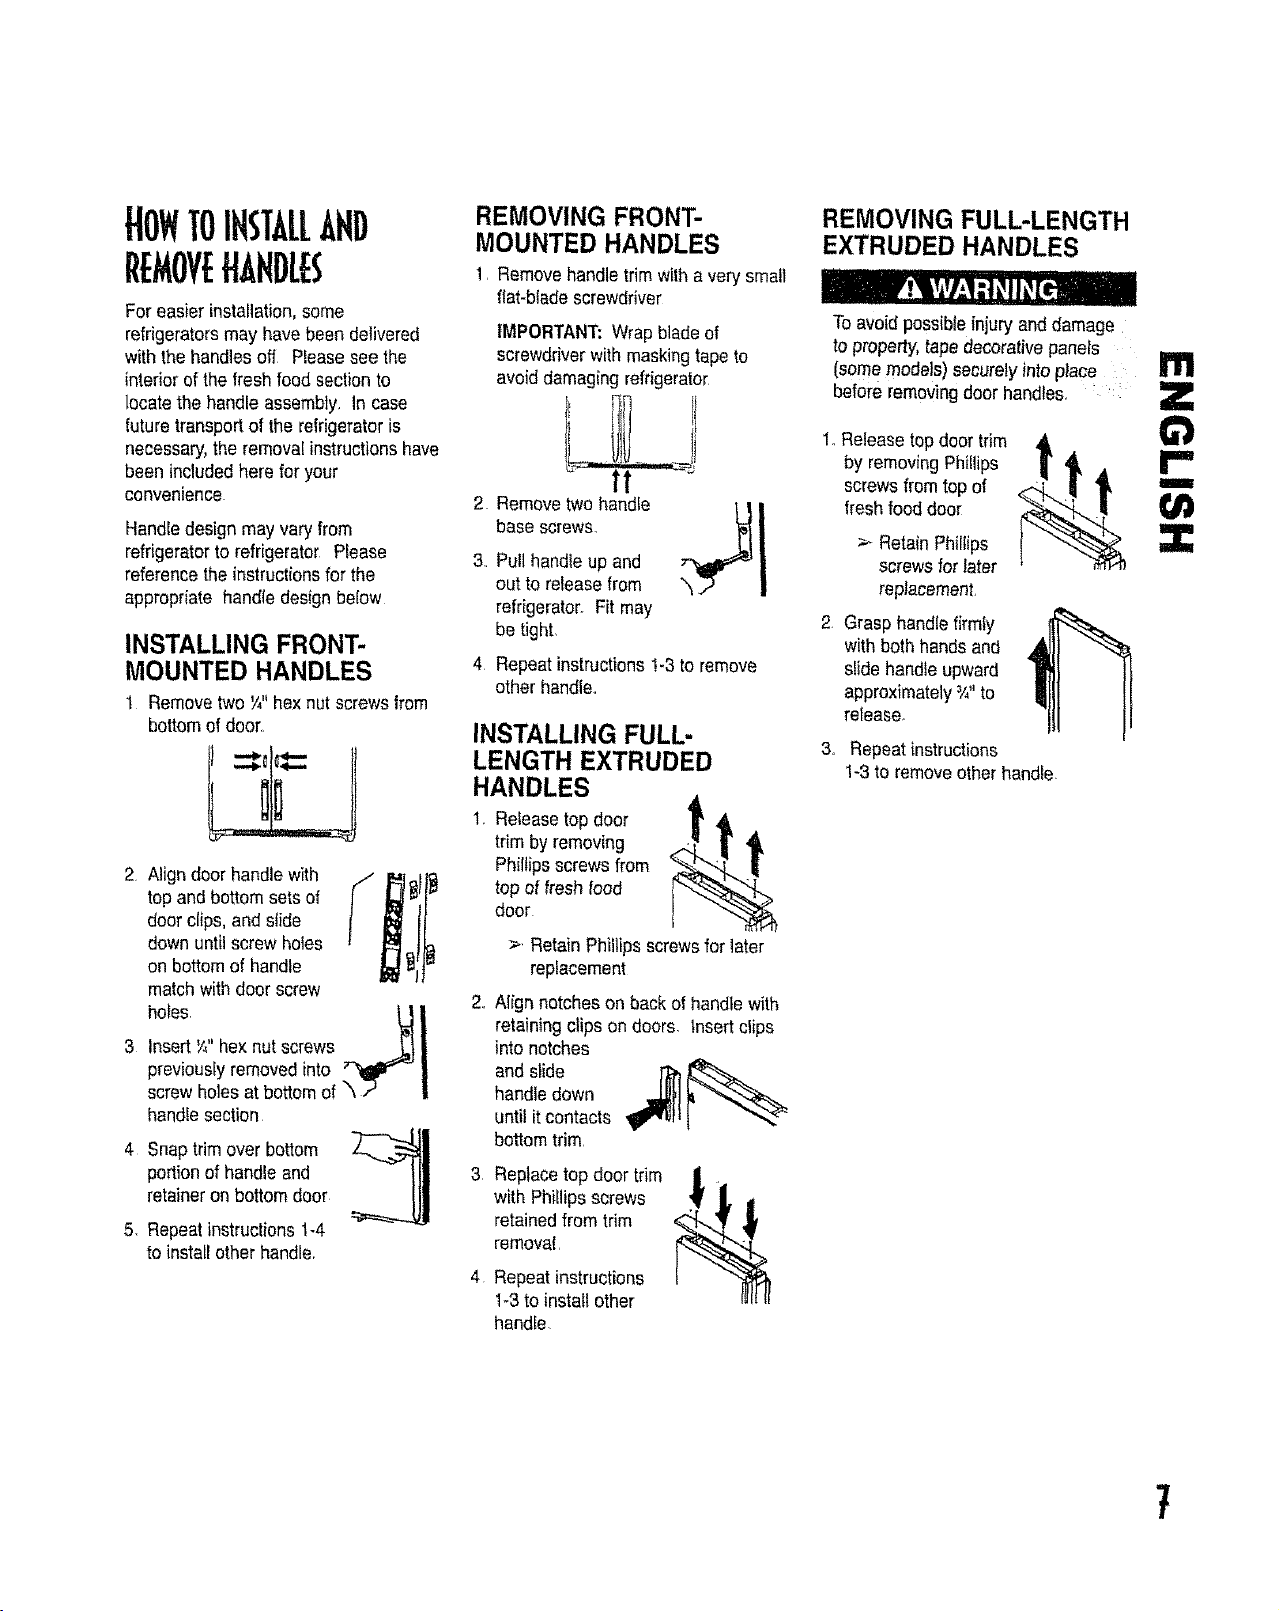
For easier installation,some
refrigeratorsmay have been delivered
with the handles ofl P_easesee the
intedor of the fresh food section to
locate the handle assembly, In case
futuretransport of the refrigeratoris
necessary,the removal instructionshave
been includedhere for your
convenience
Handle design may vary from
refrigeratorto refrigerator Please
referencethe instructionsfor the
appropriate handle design below
INSTALLING FRONT-
MOUNTED HANDLES
1 Removetwo V_"hex nut screwsfrom
bottomof door,,
2 Align doorhandle with j
top and bottom sets of
l
doer clips, and siide
down until screw ho_es
on bottomof handle
match with door screw
holes. _I
3 Insert W'hex nut screws _ _._ |
previouslyremovedinto "_ |
screw holes at bottomof _ .P |
handEesection
4 Snap trim over bottom
portion of handleand
retainer on bottom door
5 Repeatinstructions 1-4
to install other handle,
REMOVING FRONT-
MOUNTED HANDLES
1, Removehandle trim with a very small
f_at-bl_descrewdriver
2
3_
IMPORTANT: Wrap blade of
screwdriverwith maskingtape to
avoid damaging refrigerator
base screws
Pull handleup and
out to release from
refrigerator. Fit may
be tight.
Repeat instructions!-3 to remove
other handle.
INSTALLING FULL-
LENGTH EXTRUDED
HANDLES
1, Releasetop door
trim by removing
Phillipsscrews from
top of fresh food
door
>, Retain Phillips screwsfor later
replacement
Nigh notches on back of handlewith
retaining clips on doors, insert clips
into notches
and slide _
handle down
until it contacts
bottom trim,
Replacetop door trim
with Phillips screws
retainedfrom trim
removal,
Repeat instructions
1-3to install other
handle.
REMOVING FULL-LENGTH
EXTRUDED HANDLES
To avoid possibleinjury and damage
to property, tape decorativepanels
(somemodels) securelyinto place :
before removingdoor handles. :
1,,Release top door trim
by removingPhillips
! AI
screwsfrom top of "
flesh food door
!
_--RetainPhillips
screwsfor later
replacement,
2. Grasp handlefirmly
with both hands and
slide handleupward
approximately3/,.to
release.
3, Repeat instructions
1-3 to remove other handle.
m
Z
¢1
m
Z
7
IHSTALLIHGYOURR[fRIG[RATOR,(OHT
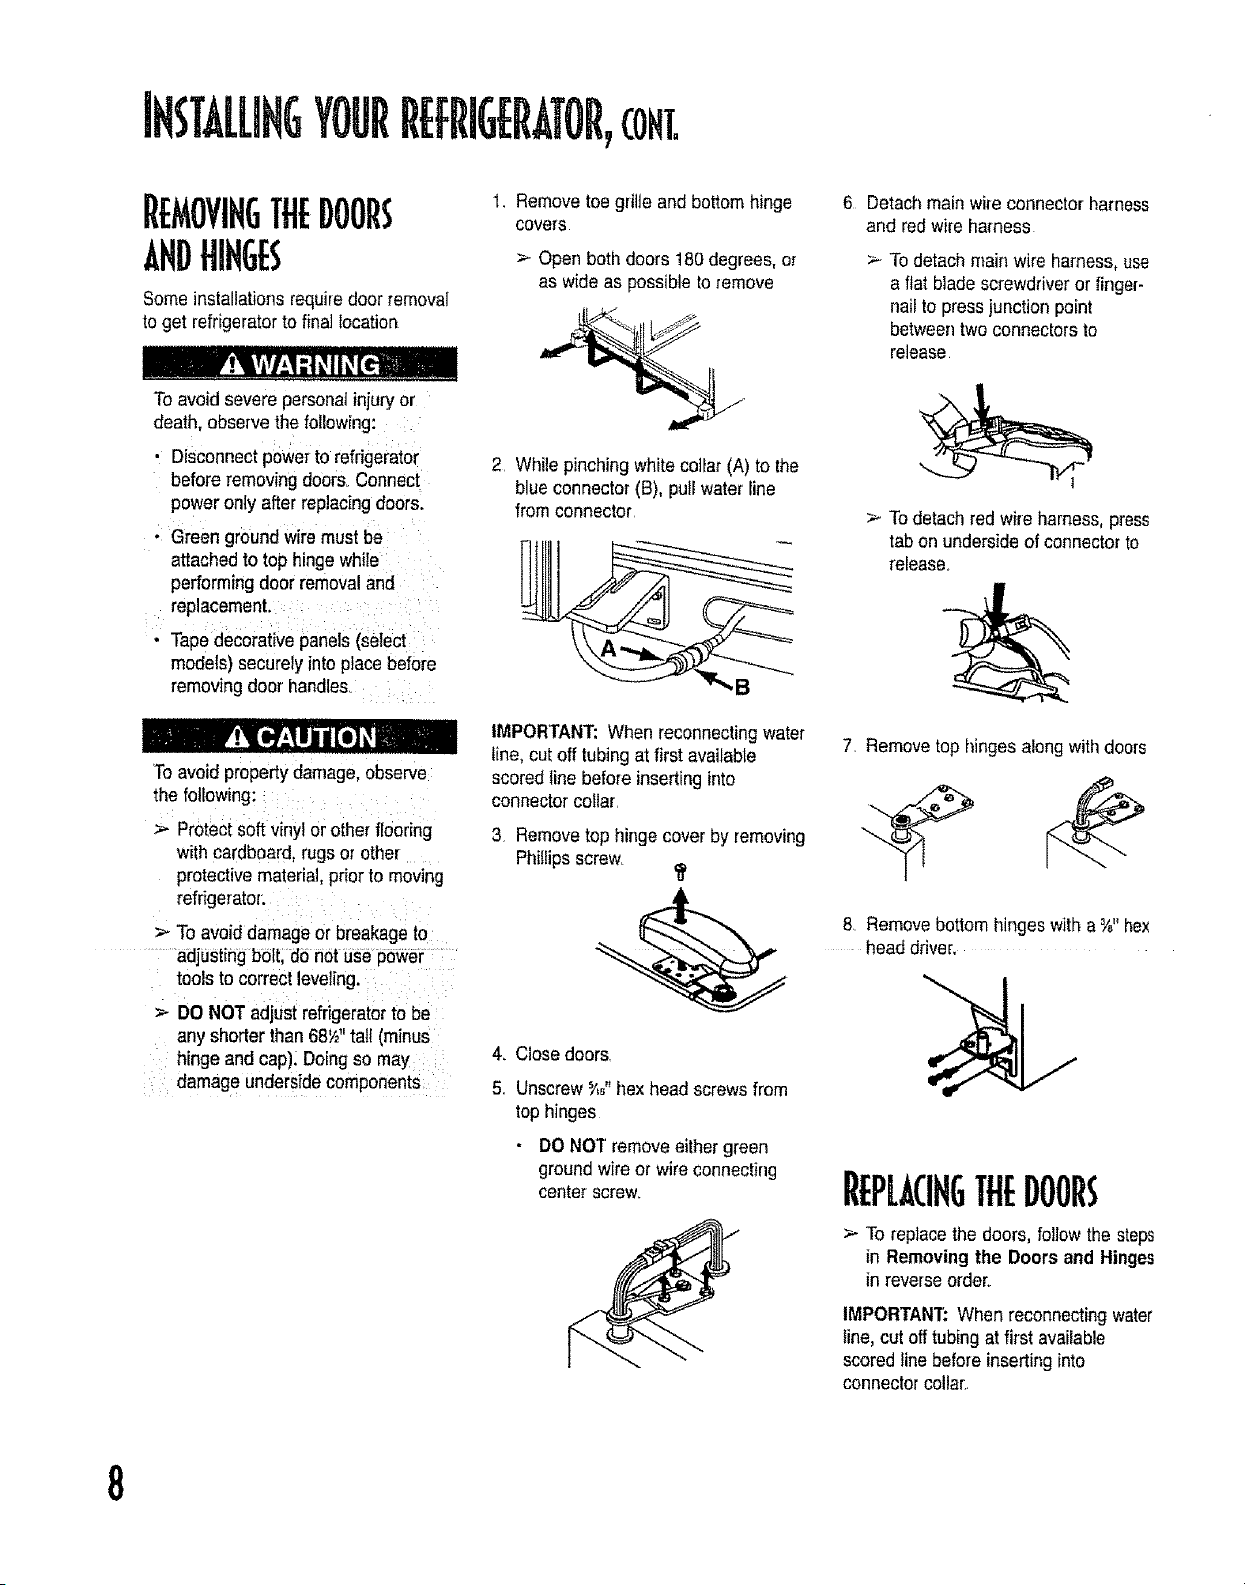
REMOVIHGTHEDOORS
AHDfllHGES
Some installations requiredoor remova]
to get refrigeratorto final Iocation
To avoid severe personatinjury or
death, observe the following:
• Disconnectpower to refrigerator
before removing doors.Connect
power only after replacingdoors.
Greengroundwire must be :
attached to top hingewhile
performingdoor removaland
replacement. _ : :
• Tapedecorative panels (select
models) securely into place before
removingdoor handles_
To avoid propertydan'iage,observe
the following: _ ....
ProteCtSoftvinylor other flooring
with cardboard,rugsor other ......
protectivematerial, prior to moving
refrigerator:.....
>- To avoid damage Orbreakage to
.........a_dj0Stingbolt;do not use powei-i
tools to correct leveling.
_- DO NOT adjust refrigeratorto be
any shorterthan 68',2"tall (minus
hinge and cap)_Doing so may
damage Undersidecomponents i
1. Removetoe grilte and bottom hinge
covers
> Open both doors 180 degrees,or
as wide as possible to remove
2 While pinching white collar (A) to the
blue connector (B), pull water line
from connector
B
IMPORTANT: When reconnectingwater
line, cut off tubing at first available
scored line before insertinginto
connector collar.
3. Removetop hinge cover by removing
Phillipsscrew. _,
%
4. Close doors.
5. Unscrew_',_"hex head screws from
tophinges
DO NO]' remove either green
groundwire or wire connecting
center screw.
6 Detach main wire connector harness
and red wire harness
_- To detach main wire harness, use
a flat bladescrewdriver or finger-
nail to pressjunction point
betweentwo connectors to
release
_- Todetach red wire harness, press
tab on undersideof connector to
release°
7. Remove top hinges alongwith doors
8 Removebottom hinges with a _/_"hex
head driver.
REPLACIHGTHEDOORS
_- To replacethe doors, followthe steps
in Removing the Doors and Hinges
in reverseorder_
IMPORTAN'I_:When reconnectingwater
line, cut offtubing at first available
scored finebefore insertinginto
connectorcollar:.
8
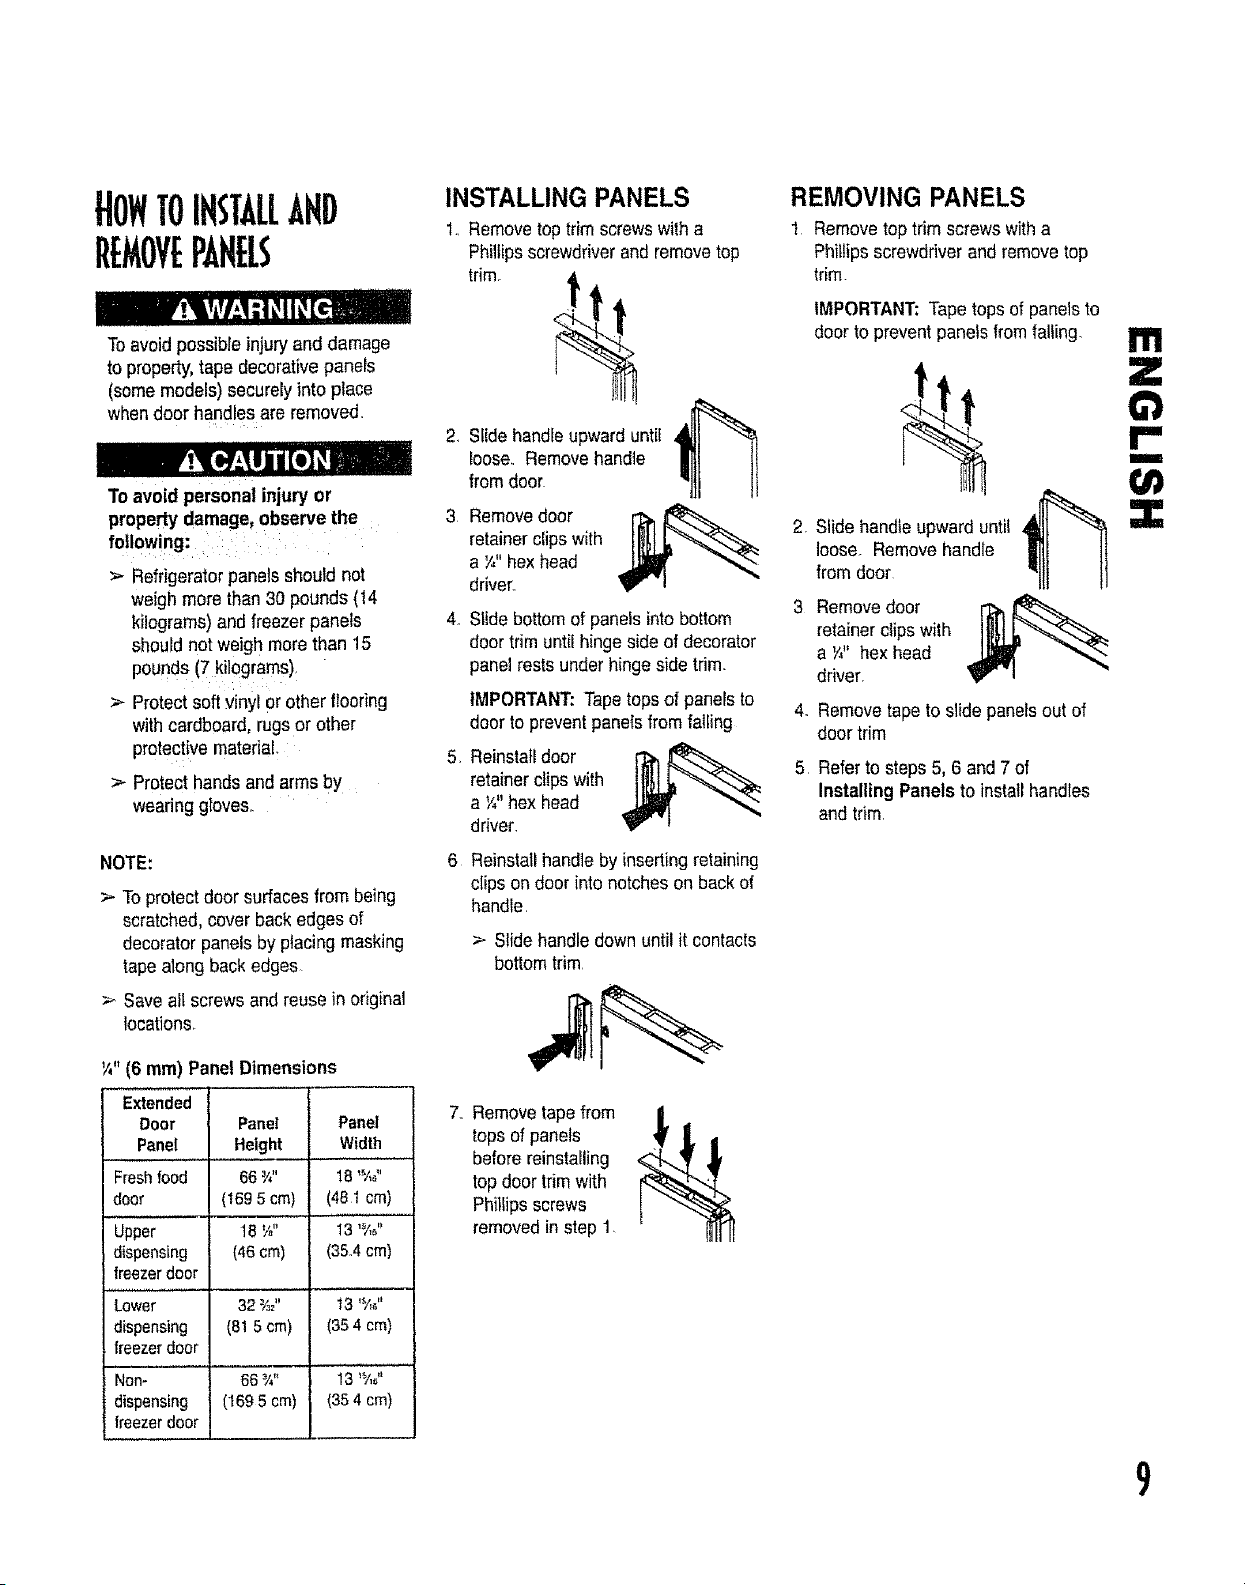
TOIHSTALLAHD
REMOVEPAFIELS
To avoid possibleinjury and damage
to property,tape decorativepanels
(somemodels)securely into place
when door handlesare removed.
To avoid personal injury or
propertydamage, observe the
following: ....
> Refrigeratorpanelsshould not
weigh more than30 pounds (14
kilograms) and freezerpanels
should not weigh more than 15
pounds (7 kil0grams),
> Protect soft vinyl or otherflooring
with cardboard,rugs or other
protectivematerial.
>- Protect hands and arms by
wearing gToves,
NOTE:
> To protectdoor surfacesfrom being
scratched,cover back edges of
decoratorpanels by placing masking
tape along back edges
>- Save all screwsand reuse in original
locations
1/2'(6 ram) PanelDimensions
Exte. ed
Door Panel Panel
Pane[ Height Width
Freshfood 66_/," 18'_/,_'
door (I69 5cm) (481 cm)
Upper t 8 V_" 13'_/,_"
dispensing (46 cm) (35.4 crn)
freezerdoor
Lower 32_/3_" t3 '_/,_"
dispensing (815 cm) (35 4 cm)
freezerdoor
Non-' 66%" 13'_/,_"
dispensing (1695cm) (35 4 cm)
lreezerdoor
INSTALLING PANELS
t .. Removetop trimscrewswitha
Phillipsscrewdriverand removetop
trim°
2_
4_
Slide handleupward until _Jl "_
loose. Removehandle
from door
Removedoor
retainer clipswith
a 7,"hex head
driver.
Slidebottom of panels into bottom
door trim until hingeside of decorator
panelrests under hingeside trim.
IMPORTANT:Tape topsof panels to 4.
doorto preventpane{sfrom fatiing
Reinstalldoor [_ _-_ 5
retainerclips with
a ¼" hex head
driver.
Reinstall handleby insertingretaining
clips on door into notches on backof
handle.
> Slidehandle down until it contacts
bottomtrim
7. Removetape from
tops of panels
before reinstalling
top door trim with
Phillips screws
removedin step 1,
REMOVING PANELS
l Removetoptrimscrews witha
Phillips screwdriverand removetop
trim.
IMPORTANT: Tape tops of panels to
door to prevent panels fromfalling.
Slide handte upward until
loose. Remove handle
from door
Removedoor
retainerclips with
a ¼" hex head
driver.
Remove tape to slide panelsout of
door trim
Referto steps 5, 6 and 7 of
Installing Panels to instatl handles
andtrim.
I'll
Z
!"'
m
Z
9
ImmtmYourrmmmmr,cont.
To reducethe risk of injury or
death, follow basic precautions,
includingthe following:
> Read all instructionsbefore
installingdevice. ........
:_. DO NOT attemptinsta}lationif
instructions are not understoodor
ifthey are beyondpersonal skill
level;
ObserveaiiiOcaic0de a"d
: ordinances.............
._- DO NOT servicedeviceUnless
specifically recommendedin
owner+smanua!or published
user-repairinstructions, ....
_--Disconnectpowerto refrigerator
prior to installingdevice.
To avoid property damageor
possible injury,follow basic
precautions,includingthe
following:
>- Consult a plumberto connect
copper tubing to household
plumbingto assure compliance
with local codes andordinances.
>- Confirm water pressureto water
valve is between20 and 1co
pounds persquare inch,If water
filter is installed,water pressure to
water vaive must be a m_nimumof
35 poundsper squareinch.
_- DO NOT use a self+piercing,or _,_"
saddle valve! Both reducewater
flow, becomeclogged with time,
and may cause leaksif repair is
attempted,
>. Tighten nutsby handto prevent
cross threading. Finishtightening
nutswith pliers and wrenches. DO
NOT overtighten°
> Wait 24 hours before plating
refrigeratorintofinal position to
check andcorrect any water leaks.
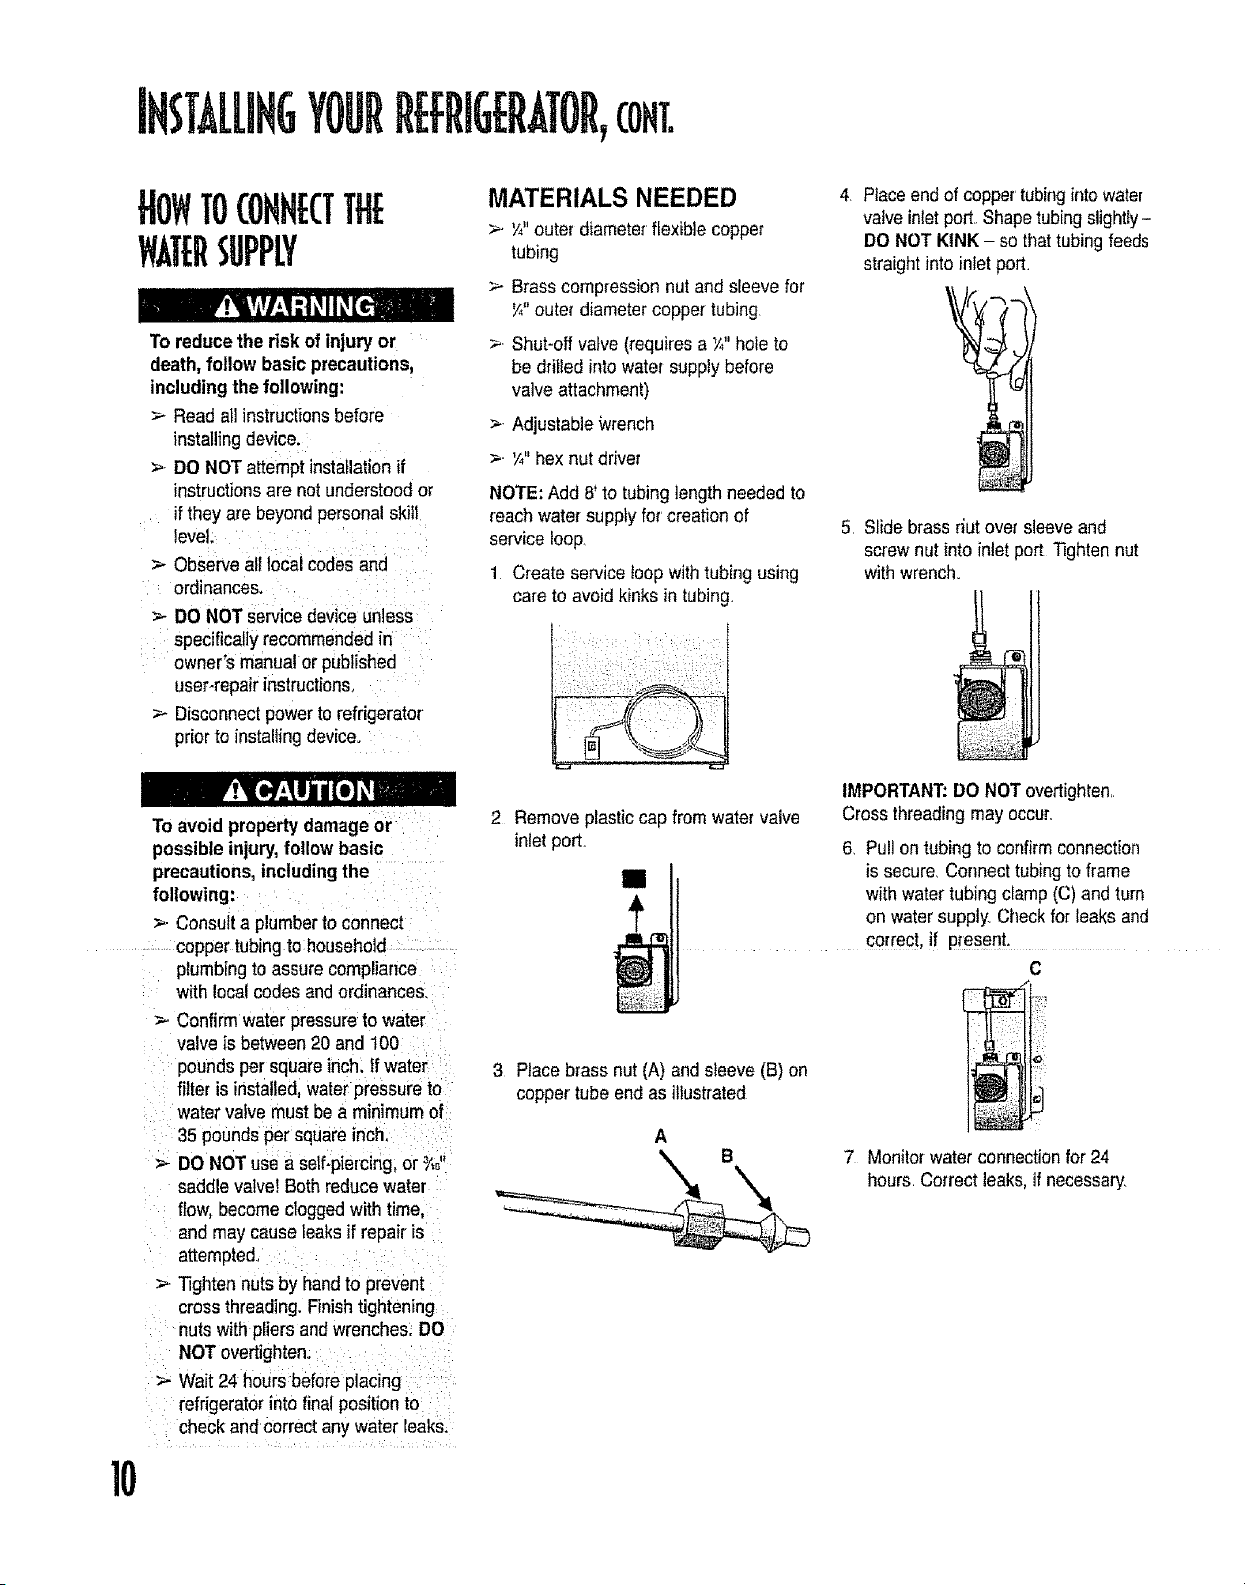
MATERIALS NEEDED
>. ¼"outer diameterftexible copper
tubing
_--Brasscompressionnut and sleeve for
¼"outer diametercopper tubing
>. Shut-off valve (requires a Y+"hole to
be drilled intowater supplybefore
valve attachment)
._.Adjustable:wrench
_- '/+"hex nut driver
NOTE: Add 8' to tubing length needed to
reach water supplyfor creationof
service loop
1 Create service loopwith tubing using
care to avoid kinks in tubing,
2 Remove plastic cap from watervalve
inlet port+
II
3 Place brass nut (A) andsleeve (B) on
copper tube end as illustrated
4, Placeendof copper'tubinginto water
valveinlet port,.Shapetubing slightly-
DO NOT KINK - so thattubing feeds
straight intoinlet port.
5, Slide brassr_utover sleeveand
screw nut intoinlet port Tightennut
with wrench,,
I
IMPORTANT:DO NOTovertighten,
Cross threadingmay OCOU_r,
6, Pull ontubing to confirm connection
is secure. Connect tubingto frame
with water tubing clamp (C) and turn
on watersupply. Checkfor leaks and
correct, if present.
C
7 Monitorwaterconnectionfor 24
hours Correct leaks,if necessary.
10

If your refrigeratorrequiresan ice maker
watersupply connection,refer to How
to Connect the Water Supply (page
I0) before leveling your refrigerator
To protect personalproperty or
refrigeratorfromdamage, observe
the following:
_,- Protect soft vinyl or other flooring
with cardboard,rugs, or other
protectivematerial.
_- DO NOT use power tools when
performingleveling procedure.
MATERIALS NEEDED
-.__/_"hex heeddriver
>- Lever
1. Removetoe grilleand bottombracket
covers (see previousinstructions).
2 Turn bothfront adjustmentscrews(A)
clockwiseto raise andcounter-
clockwiseto lower
3 Turn both rearadjustmentscrews (B)
clockwise to raise and
counterclockwiseto lower,
®
4 Usinga level,makesure front of
refrigeratoris Y,"(6 ram)or _ bubble
higherthan backof refrigerator.See
levelingstep 3 for assistance.
Ifrequired, correct rockingof
refrigeratorby turning rear
adjustmentscrew clockwiseto raise
rockingcorner If doors are
uneven ..
> Determinewhichdoor needs to be
raised
>. Turn front rolleradjustmentscrew
clockwise to raisefront corner of
door,
Ifthe refrigeratorhas reachedthe
limitof its adjustmentrange, and
doorsare still not level-lower
oppositedoor by turning roller
adjustmentscrew
counterclockwise,
>- Check withlevel to verify ¼"tilt to
the back forproperdoor closure
>- tf refrigeratoris alignedand stable,
replace toe grilleand hinge
covers
!11
Z
r-
t
3:
11
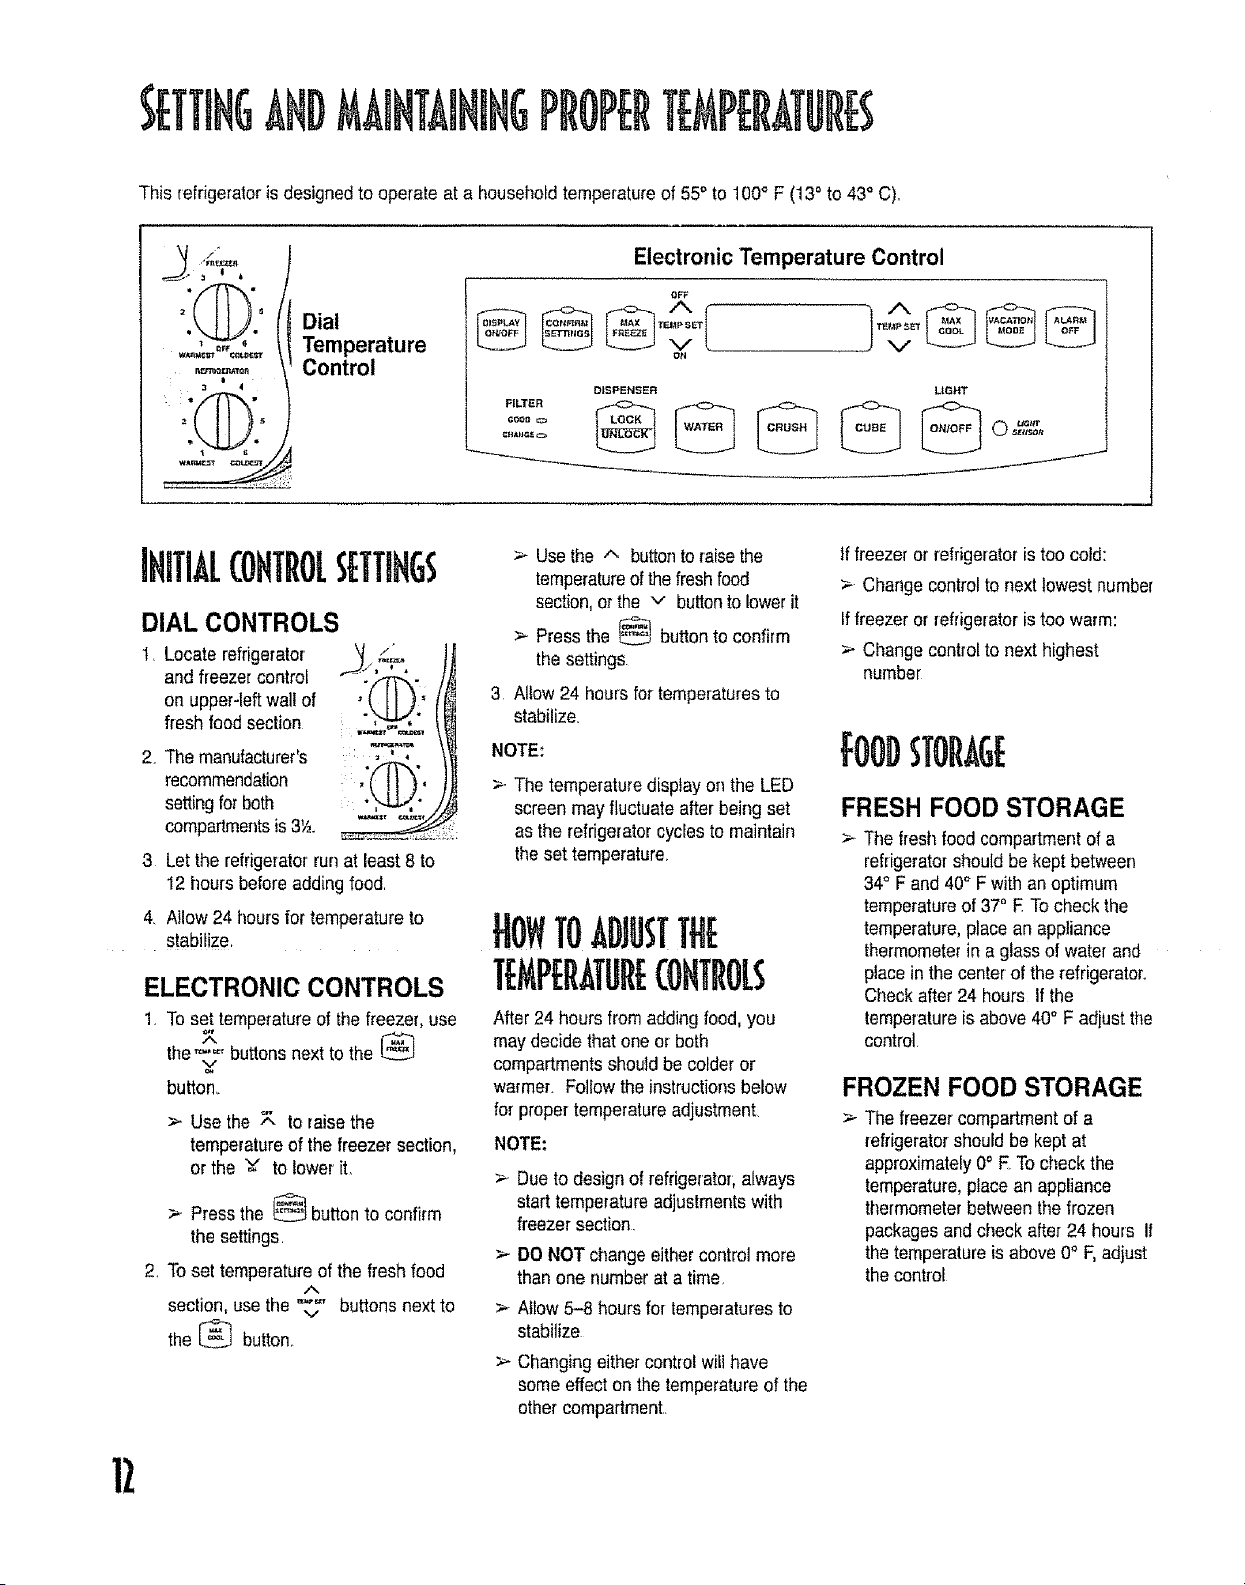
ETTtNGAND TEMPERATURES
This refrigeratoris designedto operate at a householdtemperatureof 55" to 1O0° F (13° to 43° C),,
rlr.,"T_o r,f_t i_11
i, ;1 I ,I
Dial
Temperature
Control
Electronic Temperature Control
OFF
ON
A
DISPENSER LIGHT
gHIB_ _
ITIALCOHTROLS[TTIHGS
DIAL CONTROLS
1 Locate refrigerator _, , ,
and freezercontrol _. (_
on upper-leftwall of ' ' '_
fresh food section .
2 The manufacturer's ..... , ,
recommendation ,'(_"_',)I,
settingfor both "_," /,_,/
compartmentsis 3_.
3 Let the refrigeratorrun at least 8 to
12 hours before addingfood,
4_ Nlow 24 hours for temperature to
stabilize,
ELECTRONIC CONTROLS
1, To set,temperatureof the freezer, use
the ""_ buttonsnext to the
v
button,.
>- Use the 7. to raisethe
temperatureof the freezer section,
or the =v to lower it,
_. Pressthe P.L_Jbutton to confirm
the settings
2, To set temperatureof the fresh food
section,use the v buttons nextto
the _ button,.
> Usethe -"- buttonto raisethe
temperatureof thefreshfood
section,or the v buttontolowerit
>- Pressthe _ buttonto confirm
the settings
3 Allow 24 hours for temperaturesto
stabilize,
NOTE:
> The temperaturedisplayon the LED
screenmay fluctuateafter being set
as the refrigeratorcyclesto maintain
the set temperature
HOWTOADJUSTTHE
TEMPERATURE€OHTROLS
After24 hours from addingfood, you
may decide that one or both
compartmentsshould be colder or
warmer, Followthe instructionsbelow
for propertemperatureadjustment.
NOTE;
>- Due to design of refrigeratoqalways
start temperatureadjustmentswith
freezer section
>- DO NOT change either controlmore
than one numberat a time
> Allow 5-8 hours for temperaturesto
stabilize
> Changing either controlwill have
some effecton the temperatureof the
other compartment,.
tf freezer or refrigeratoris too cold:
>- Changecontrolto next lowest number
Iffreezer or refrigeratoris too warm:
Changecontrolto next highest
number
fOODSTOrAG[
FRESH FOOD STORAGE
> The freshfood compartmentof a
refrigeratorshouldbe kept between
34° F and 40_ F with an optimum
temperatureof 37° E To check the
temperature,place an appliance
thermometerin a glass of water and
place inthe centerof the refrigerator.
Check after 24 hours If the
temperatureis above 40° F adjustthe
control.
FROZEN FOOD STORAGE
> The freezercompartmentof a
refrigeratorshould be keptat
approximately0° E To checkthe
temperature,place an appliance
thermometerbetweenthe frozen
packagesand check after 24 hours If
the temperatureis above 0° F,adjust
the control
12
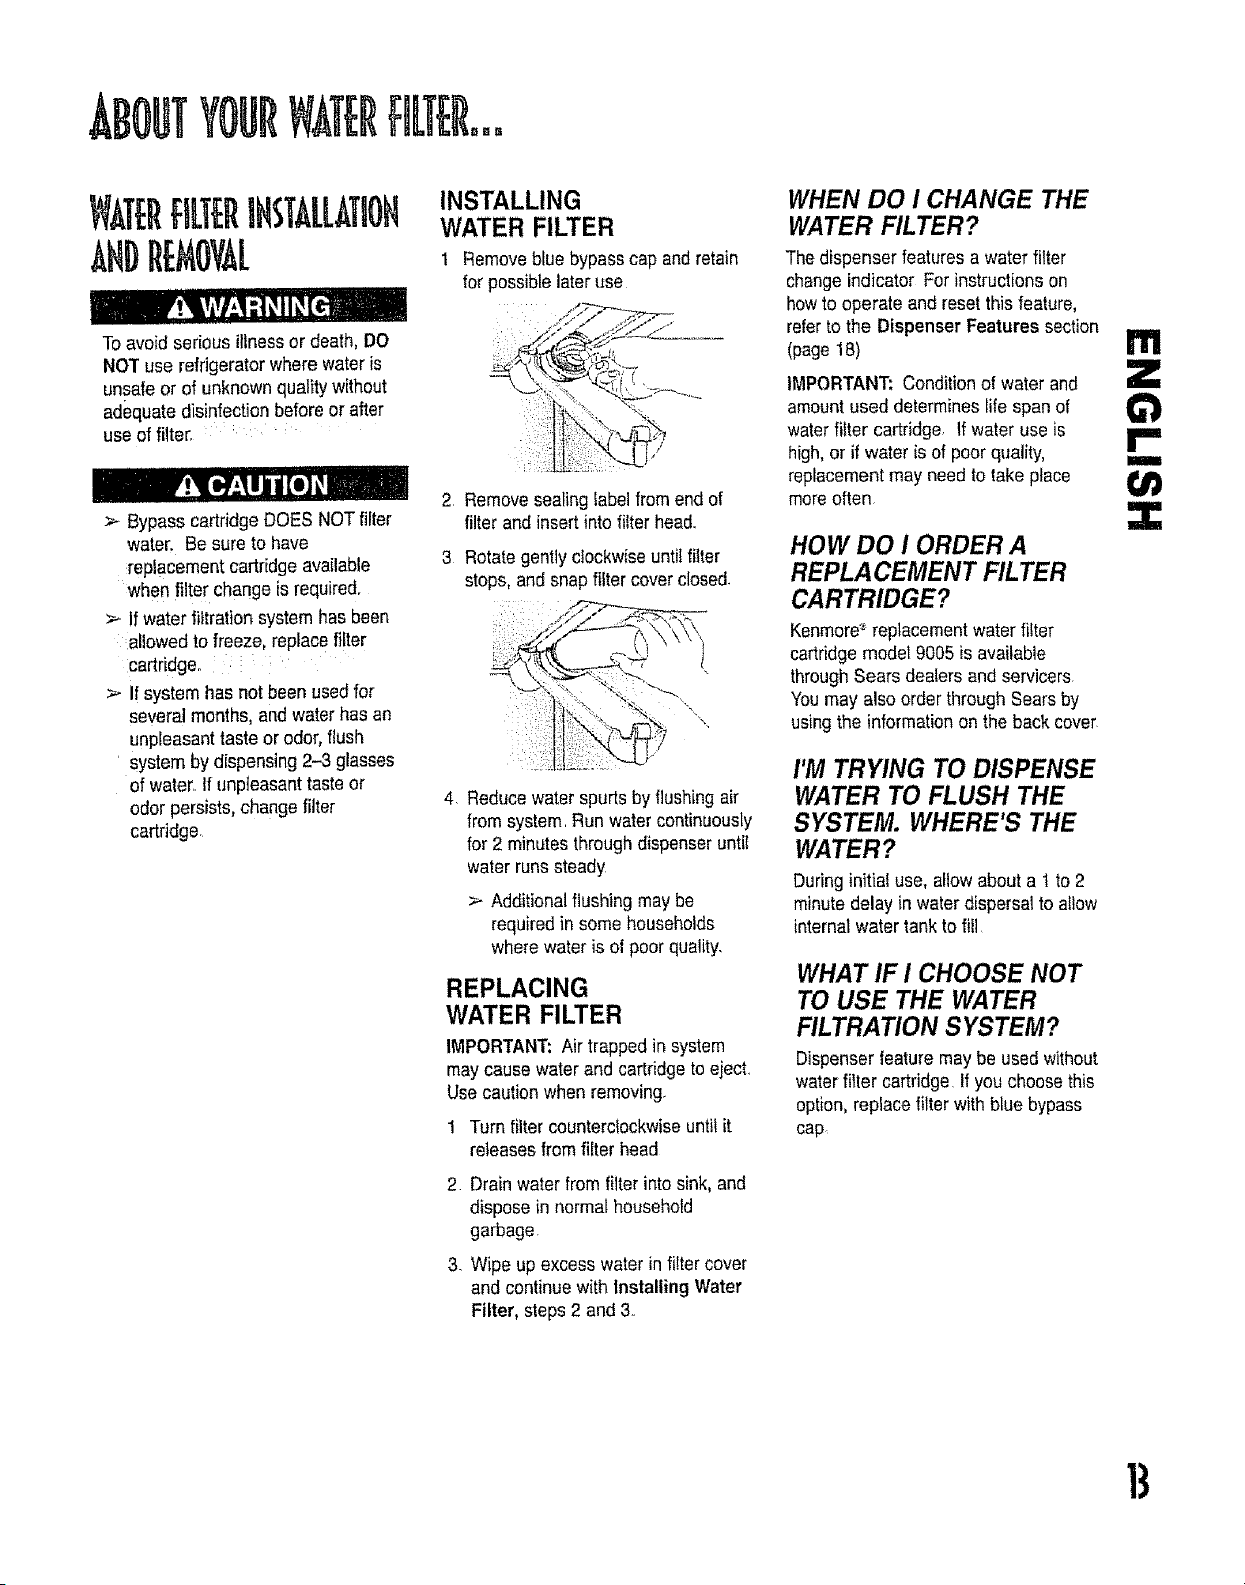
To avoid serious illnessor death, DO
NOT use refrigeratorwhere wateris
unsafe or of unknownqualitywithout
adequate disinfection before or after
use of filter. ....
>- Bypass cartridgeDOES NOTfilter
water. Be sure to have
replacement cartridge available
when filter change is required.
> If water filtration system has been
allowed to freeze, replace filter
cartridge,,
> If system has not been used for
several months, and waterhas an
unpleasanttaste or odor, flush
system by dispensing 2-3 glasses
of water, If unpleasanttaste or
odor persists, change filter
cartridge.
INSTALLING
WATER FILTER
1 Removeblue bypass cap andretain
for possible later use
2 Removesealing label from end of
filter and insertinto filter head.,
3 Rotate gentlyclockwise until filter
stops, and snap filter coverclosed.
4 Reducewater spurts by flushing air
from system.Run water continuously
for 2 minutes through dispenseruntie
water runs steady
>- Additionalflushing may be
requiredin some households
where water is of poor quality.
REPLACING
WATER FILTER
IMPORTANT:Air trappedinsystem
maycause water and cartridgeto eiect.
Use cautionwhen removing.
1 Turn filter counterclockwiseuntil it
releasesfrom filter head
2 Drain waterfrom filter into sink, and
disposein normal household
garbage.
3. Wipe up excess water in filter cover
and continue with Installing Water
Filter, steps 2 and 3.
WHEN DO I CHANGE THE
WATER FILTER?
The dispenser features a water filter
changeindicator For instructions on
howto operate and reset this feature,
referto the Dispenser Features section
(page18)
IMPORTANT: Conditionof water and
amountused determines life span of
waterfilter cartridge. If water use is
high, or if water is of poor quality,
replacement may need to lake place
moreoften.
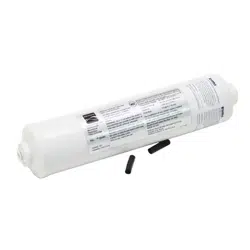
HOW DO i ORDER A
REPLACEMENT FILTER
CARTRIDGE?
Kenmore_replacement water filter
cartridge model 9005 is available
throughSears dealers and servicers.
Youmay also orderthrough Sears by
using the informationon the back cover
I'M TRYING TO DISPENSE
WATER TO FLUSH THE
SYSTEM. WHERE'S THE
WATER?
During initialuse, allow about a 1 to 2
minute delay in water dispersalto allow
internal water tank to fill
WHAT IF I CHOOSE NOT
TO USE THE WATER
FILTRATION SYSTEM?
Dispenserfeature may be used without
water filter cartridge. If you choosethis
option,replace filter with blue bypass
cap
m
Z
G"}
r-
m
Z
13
HLTER.oo,(ONT.
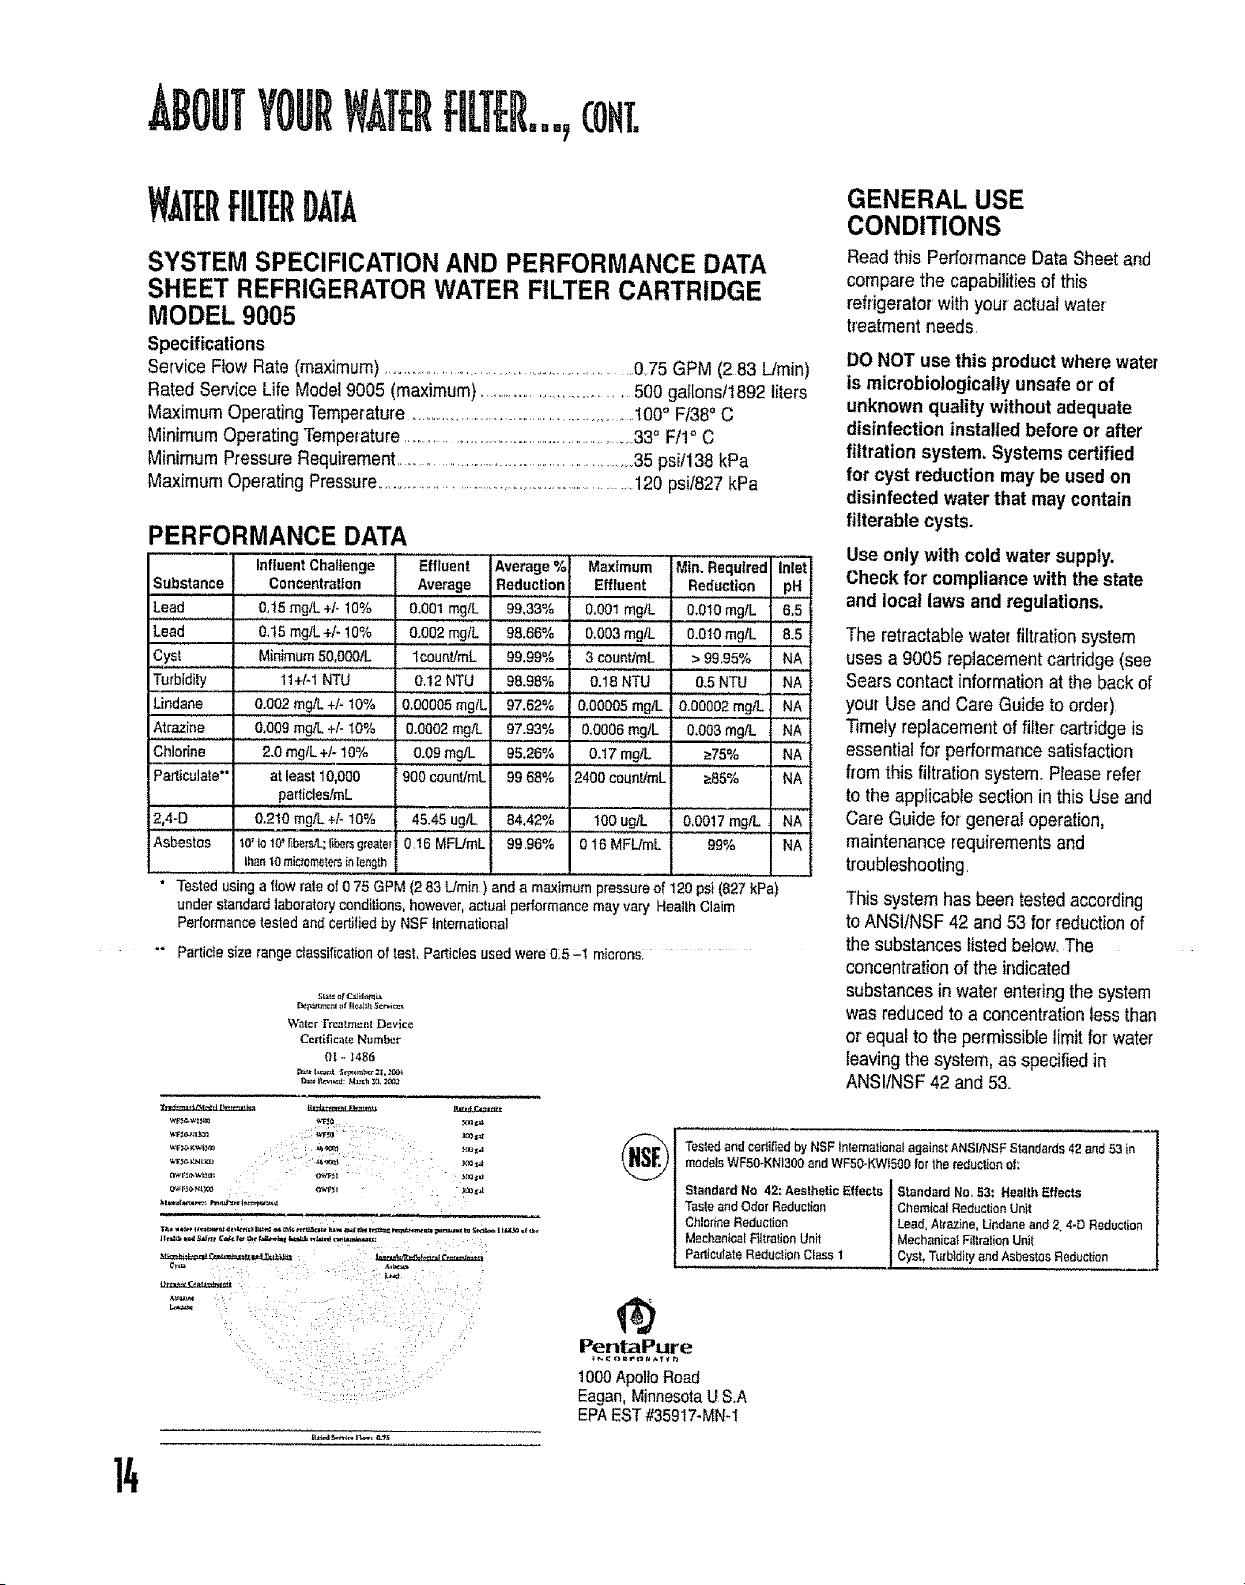
]4
fiLERDATA
GENERAL USE
CONDITIONS
SYSTEM SPECIFICATION AND PERFORMANCE DATA
SHEET REFRIGERATOR WATER FILTER CARTRIDGE
MODEL 9005
Specifications
Service Flow Rate (maximum)................................................. 0,75 GPM (2 83 L/rain)
RatedService Life Model9005 (maximum)..................................500gaHonst1892liters
MaximumOperatingTemperature...................................................100° Ft38° C
MinimumOperatingTemperature......................................................33° F/1° C
Minimum PressureRequirement.........................................................35 ps[1138kPa
MaximumOperatingPressure.................................................................120 psif827kPa
PERFORMANCE DATA
Influent Challenge
Substance Concentration
Lead & 15 mg/L +/.-19%
Lead 0.15 rag&.+k 10%
Cyst Minimum50,O001L
Turbidity 11+hl NTU
Lindane 0.002 rag& +!- t0%
Atrazine 0+009mgiL +/- 10%
Chlorine 2.0 mglL +/- 10%
Particulate" at least 10.000
paFff,c!es/mL
2,4-D' 0.210 mgiL +/- 10%
Effluent Average % Maximum Mira Required Inlet
Average Reduction Effluent Redaction pH
0.001 mg/L 99.33% 0,001 mgiL 0+0t0 mg/L 6.5
,0,002 mgiL 98.66% 0.003 mgfL 0.010 mgtL &5
lcount/mL 99.99% 3 coanUmL > 99,95% NA
&i2 NTU 98.98% O.18 NTU 0.5 NTU NA
,0,00005mg/L 97.62% 0.00005 mgiL 0.00002 mgiL NA
0.0002 mg/L 97.93% &0006 mgtL 0.003 mg/L NA
0+09rng/L 95.26% 0.17 mg/L _75% NA
900 cauntimL 99 68% 2400 ceanttmL _85% NA
45,45 ugtL 84.42% 100 ugiL 0.0017 mg/L NA
99 96% 015 MFUmL 99% NA
Asbestos 1,0'1o10'rLbersfL;t;bersgteater016 MFUmL
than10mi_motetsmlength
";" Tesied Usinga flow rate of 0 75 GPM (2 83 L!rain ) and a maximum pressureof 120 psi(827 kPa)
undo+"standard laboratoryconditions, however, actual performance may vav] HealthClaim
Performancetested and certified by NSF International
"° Particte size range ctassificationof test+Parttcles used were 0:5+t microns:
Water i'rcaltn_nl D_vic_
Certificate Number
ol+ 1486
Read this PerformanceData Sheet and
comparethe capabilities of this
refrigeratorwith your actualwater
treatmentneeds
DO NOT use this product where water
is microbiologicallyunsafeor of
unknownquality withoutadequate
disinfectioninstalled beforeor after
filtration system, Systemscertified
for cyst reduction may be used on
disinfected water that may contain
filterable cysts.
Use only with cold water supply.
Check for compliance withthe state
and local laws and regulations,
The retractable waterfiLh'ationsystem
uses a 9005 replacementcartridge(see
Sears contactinformation at the backof
yout Use and Care Guideto order)
Timely replacementof filter cartridgeis
essential for performancesatisfaction
from this filtration system+Pleaserefer
to the applicable sectionin this Useand
Care Guidefor genera! operation,
maintenance requirementsand
troubleshooting.
This system has been testedaccording
to ANSI/NSF 42 and 53for reductionof
the substanceslistedbelow,The
concentrationof the indicated
substancesin water enteringthe system
was reduced to a concentrationlessthan
or equal to the permissiblelimitfor water
leavingthe system,as specifiedin
ANSItNSF42 and 53+
@
Tesled and codifiedby NSF internationalagainst ANSI/NSF Standards 42 and 53 in
modelsWF50+KNI3Ogand WFS0-KW_500for the redaction o_:
Standard No 42: Aesthetic t_ffeata Standard No, 53: Health Effects
Taste and Odor Reduction Chemical Redaction Unit
Chledne Reduction [ Lead, A{razJne,Lindane and 2 4-D Rsdae ion
Mechanical FiltrationUnit Mechanical Filtration Unit "
Purlieu]ate Reduc ionClass 1 Cyst, Turbidity and Asbestos Redaction
@
PentaPure
1000ApolloRoad
Eagan,MinnesotaUS+A
EPAEST#35917*MN-I
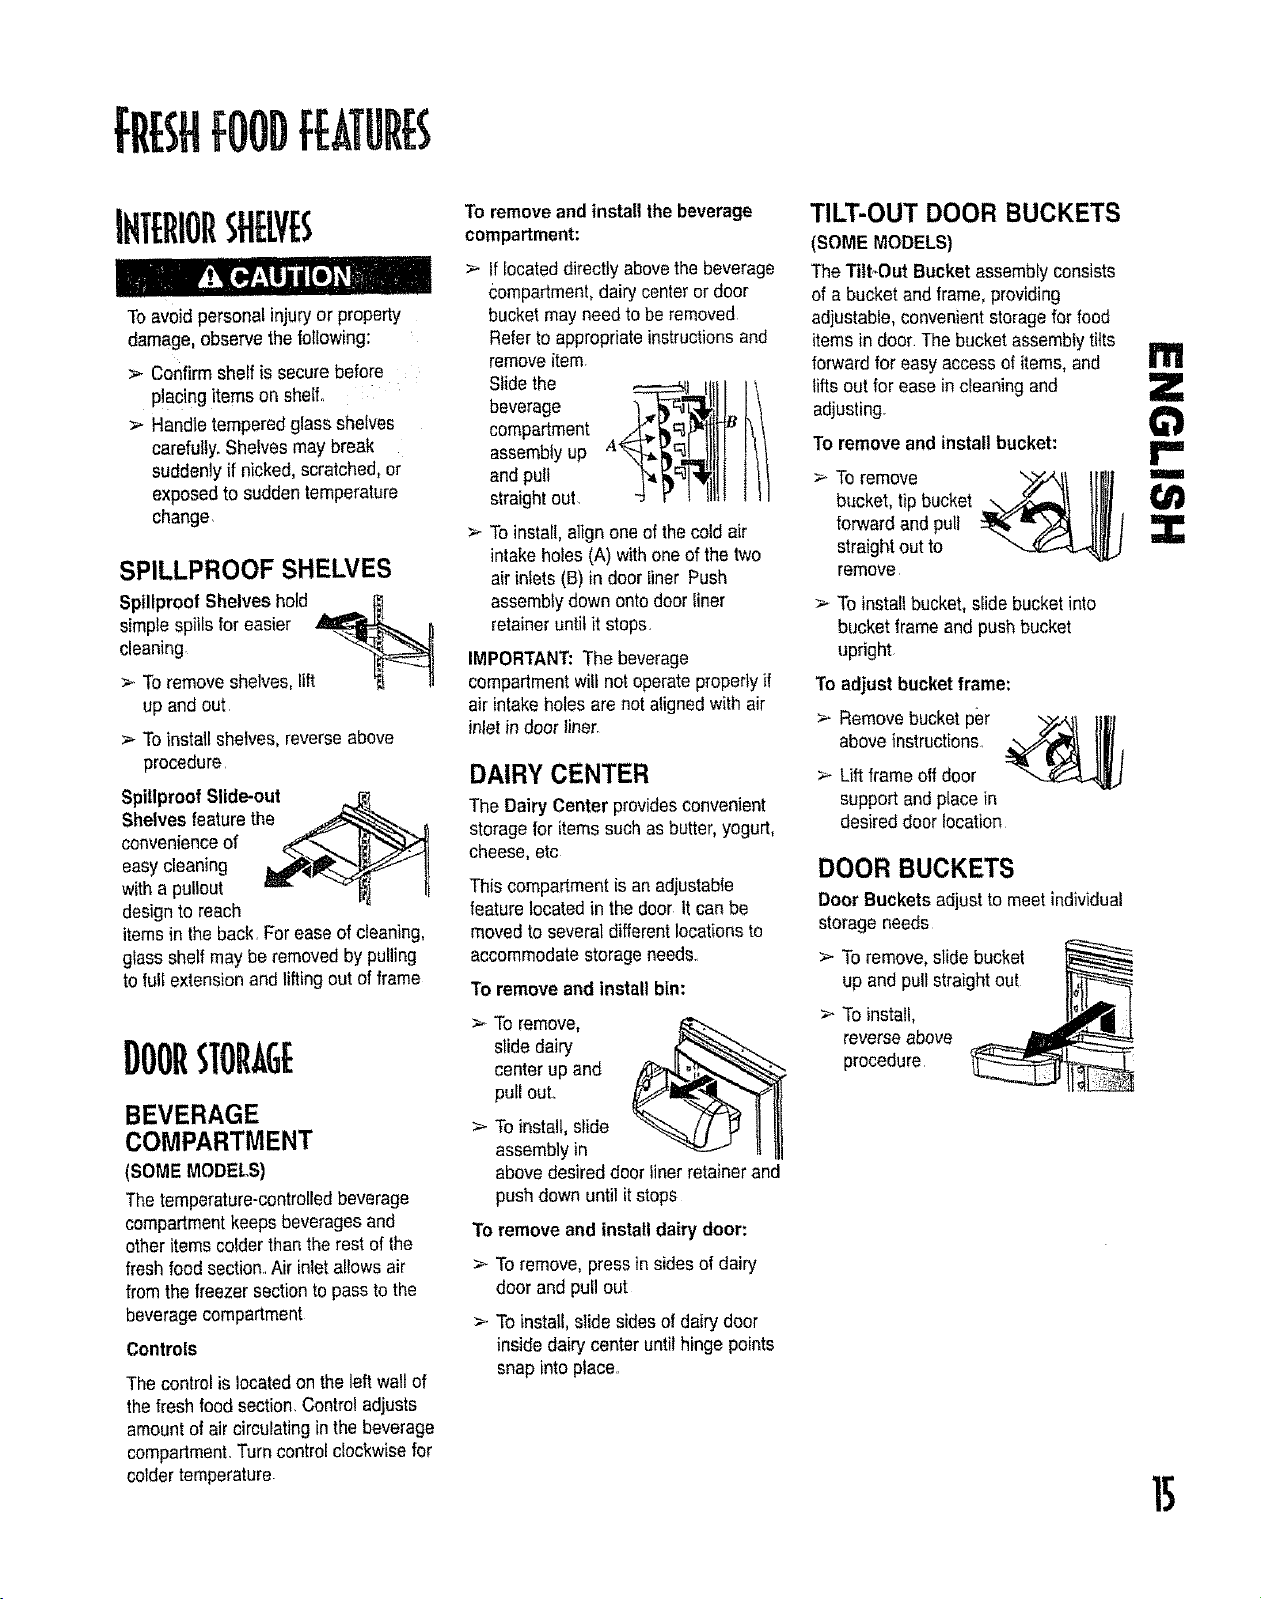
FflESHFOODFEATURES
SHELVES
To avoid personal injury or property
damage,observethe following:
>- Confirm shelf is securebefore
p!acingitems on shelf.
>- Handletempered glass shelves
carefully.Sheives may break
suddenlyif nicked, scratched, or
exposedto sudden temperature
change,
SPILLPROOF SHELVES
Spillproof Shelves hold . _ 1_
simplespills for easier _ 1)
cleaning
>. To removeshelves, lift _j 11
up and out
_- To install shelves,reverseabove
procedure
Spillproof Slide-out
Shelvesfeaturethe _:_.._"_..
convenienceof _"._..,._ }}f_>_
easycleaning II_I_ _-_ II
witha pullout m v I_ II
designto reach
items in the back, For ease of cleaning,
glass shelf maybe removedby pulling
to full extensionand lifting out of frame
I)0011STOflAGE
BEVERAGE
COMPARTMENT
(SOME MODELS)
The temperature-controlledbeverage
compartmentkeepsbeveragesand
other items colder than the rest of the
fresh food section.,Air inlet allows air
from the freezer sectionto passto the
beveragecompartment
Controls
The control is locatedon the left wall of
the fresh food section.Controladjusts
amountof air circulatingin the beverage
compartment.Turn controlclockwisefor
colder temperature
TOremove and install the beverage
compartment:
If locateddirectly abovethe beverage
c;ompartment,dairy centeror door
bucket may needto be removed
Referto appropriateinstructionsand
removeitem,
Slide the
beverage
compartment
assemblyup
andpull
straightout,
To install, align one of the cold air
intake holes (A) with oneof the two
air inlets (B) in door liner Push
assemblydown onto door liner
retainer until it stops.
IMPORTANT: The beverage
compartmentwilt not operate properlyif
air intake holes are not alignedwith air
inlet in door liner,
DAIRY CENTER
The Dairy Center providesconvenient
storagefor items such as butter, yogurt,
cheese, etc
This compartment is an adjustable
featurelocated in the door tt can be
movedto several differentlocations to
accommodatestorageneeds.,
To remove and install bin:
._ To remove,
slide dairy
center up and
pull out..
> To install, slide
assembly in
above desired door linerretainer and
push down until it stops
To remove and install dairy door:
> To remove, pressin sidesof dairy
door and pull out
>. To install, slide sidesof dairy door
inside dairy center until hinge points
snap into place..
TILT-OUT DOOR BUCKETS
(SOME MODELS)
TheTitFOut Bucketassemblyconsists
of a bucket and frame, providing
adjustable,convenient storagefor food
items in door. The bucket assemblytilts
forwardfor easy accessof items, and
lifts out for ease in cleaning and
adjusting.
To remove and install bucket:
tl'l
Z
r=
remove
> To installbucket, slide bucket into
bucket frame and push bucket
upright
To adjust bucket frame:
>. Removebucket per "bY.,,-"€IIl_l
above instructions.
>- Lift frame oif door
support andplace in
desired door location
DOOR BUCKETS
Door Bucketsadjustto meet individual
storage needs
> To remove,slide bucket
up and pullstraight out
> To instali,
reverse above
procedure
To remove V_f_ IIBIIt i
bucket,tip bucket _
forward and pull
straight out to
fRESHFOODfBTUflES,cont.
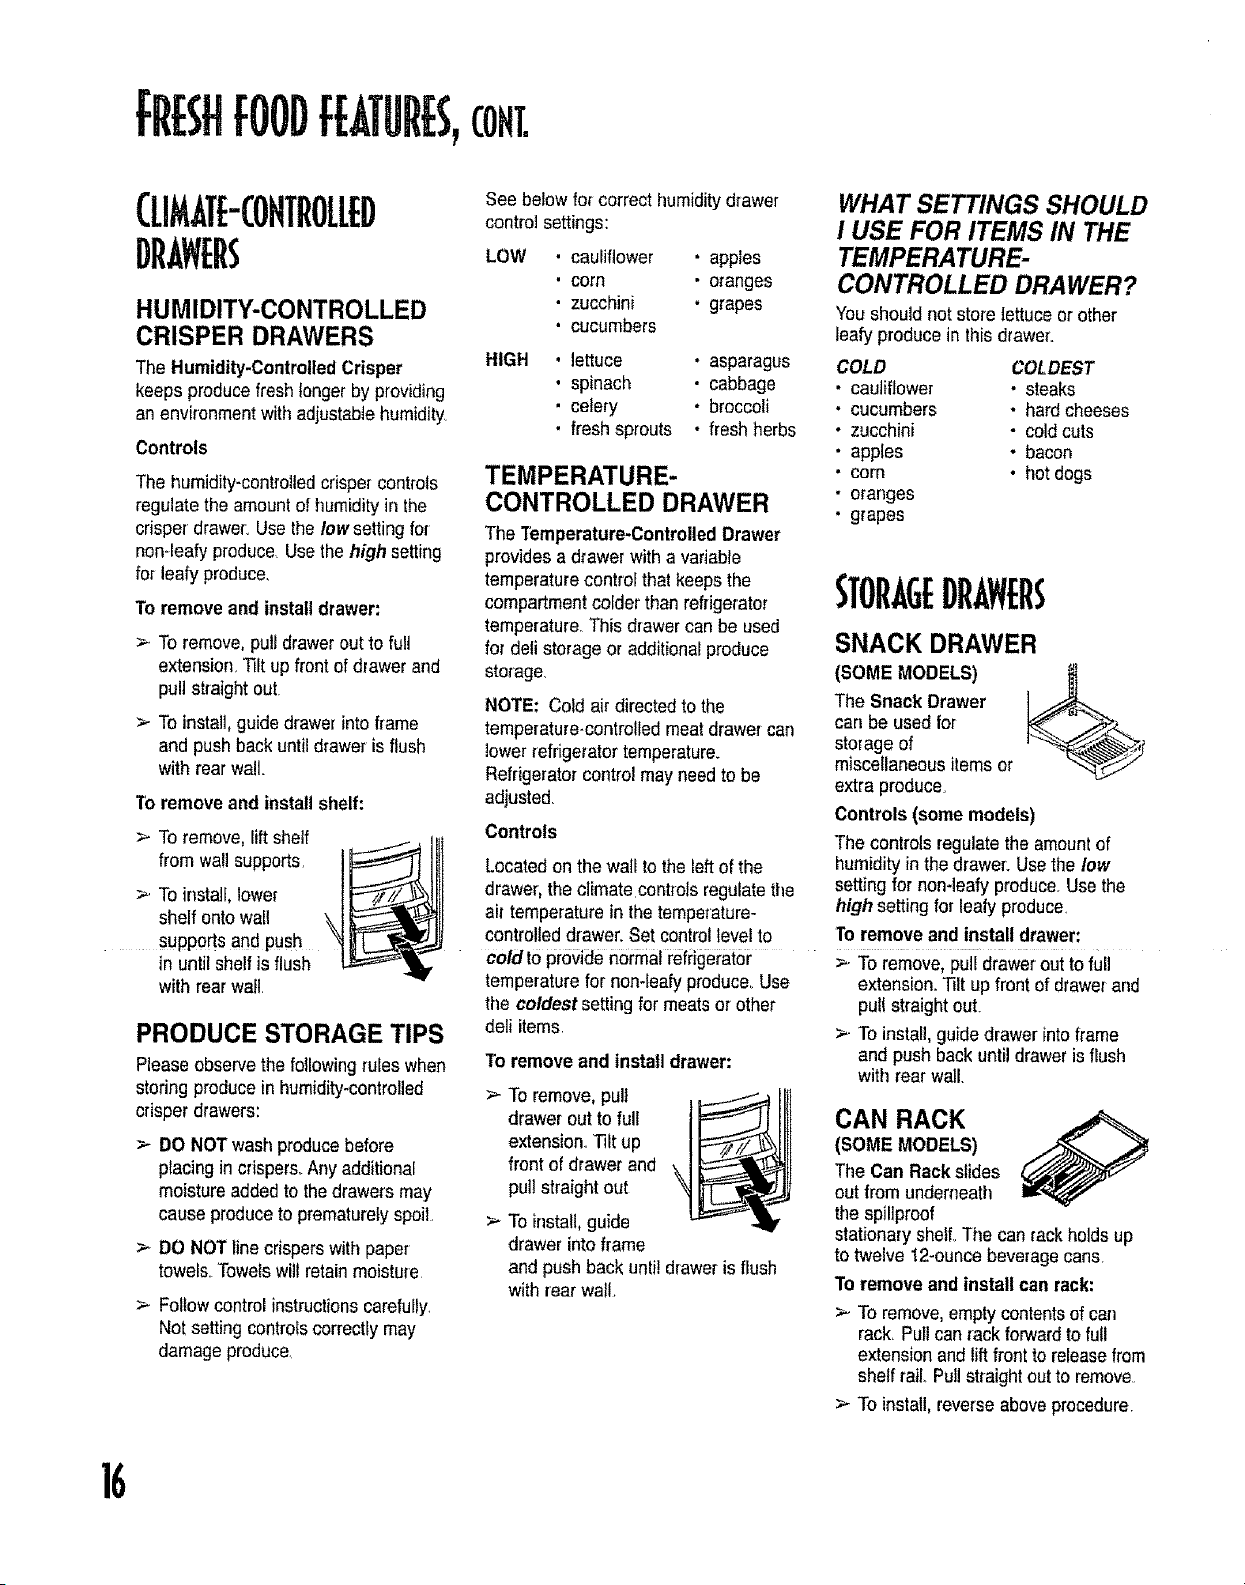
CLIMATE-COHTROLED
DR. Wt rS
HUMIDITY-CONTROLLED
CRISPER DRAWERS
The Humidity-ControlledCrisper
keeps produce fresh longerby providing
an environment with adjustablehumidity.
Controls
The humidity-controlledcrispercontrols
regulatethe amountof humidity inthe
crisper drawer: Usethe low setting for
non-leaty produce.Usethe high setting
for leafy produce,
To remove and install drawer:
>. To remove, putl drawerout to full
extension,Tilt up frontof drawer and
pull straight out.
> To install, guidedrawer into frame
and push backuntil drawer isflush
with rear wall.
"l'b remove and install shelf:
>- Toremove, lift sheif
from wall supports,
>. To install, lower
shelf ontowall
supports and push
in until shelf is flush
with rear wall,
PRODUCE STORAGE TIPS
Please observethe followingruleswhen
storing produceinhumidity-controlled
crisper drawers:
>- DO NOTwash produce before
placingin crispers.Any additional
moisture addedto the drawers may
cause produceto prematurelyspoil,
> DO NOT linecrispers with paper
towel& Towelswill retain moisture
> Follow controlinstructionscarefully.
Not setting controtscorrectlymay
damage produce
See below for correct humiditydrawer
control settings:
LOW . cauliflower • apples
• corn • oranges
• zucchini • grapes
' cucumbers
HIGH
, lettuce • asparagus
' spinach • cabbage
• celery • broccoli
• fresh sprouts • fresh herbs
TEMPERATURE-
CONTROLLED DRAWER
The Temperature-ControlledDrawer
provides a drawer with a variable
temperaturecontrofthatkeeps the
compartmentcolder than refrigerator
temperature.This drawercan be used
for deftstorageor additional produce
storage.
NOTE: Cold air directedto the
temperature-controlledmeat drawer carl
lowerrefngerator temperature_
Refrigerator control mayneed to be
adjusted.
Controls
Locatedon the wail to the left ofthe
drawer,the climate controls regulate the
air temperature in the temperature-
controlleddrawer. Set controltevei to
cold tOprovide normal refrigerator
temperaturefor non-leafyproduce..Use
the coldest setting for meats orother
deli items
To remove and installdrawer:
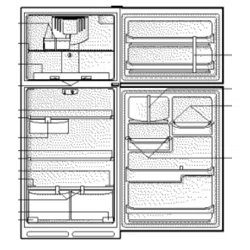
>- Toremove, pull ___._.1_j
drawer out to full
extension,,Tilt up
front of drawer and
pull straight out
> To install, guide
drawer into frame
and push back until drawer is flush
with rear wail,
WHAT SETTINGS SHOULD
I USE FOR ITEMS IN THE
TEMPERATURE-
CONTROLLED DRAWER?
You should not store fettuceor other
leafy produce in thisdrawer:
COLD COLDEST
cauliflower • steaks
cucumbers • hard cheeses
zucchini • cold cuts
apples . bacon
corn • hot dogs
oranges
grapes
STORAGEDR. wERs
SNACK DRAWER
(SOME MODELS)
The Snack Drawer
carl be usedfor
storage of
miscellaneousitems or
extra produce.
Controls (some models)
The controls regulatethe amountof
humidity inthe drawer: Usethe low
setting for non-leafy produce,Usethe
high setting for leafy produce,
Toremove and install drawer;
>, To remove, pull drawerout to full
extension.Tilt up frontof drawerand
pull straight out.
>. To install, guide drawer into frame
and push back until draweris flush
withrear wall.
CAN RACK
(SOME MODELS)
The Can Rack slides
out fromunderneath
the spiliproof
stationaryshell The can rack holds up
to twelve 12-ouncebeveragecans,
To remove and install can rack:
> To remove, empty contentsof can
rack, Pull can rackforwardto full
extension and liftfront to releasefrom
shelf rail,,Pullstraight out to remove.
> To install, reverseabove procedure
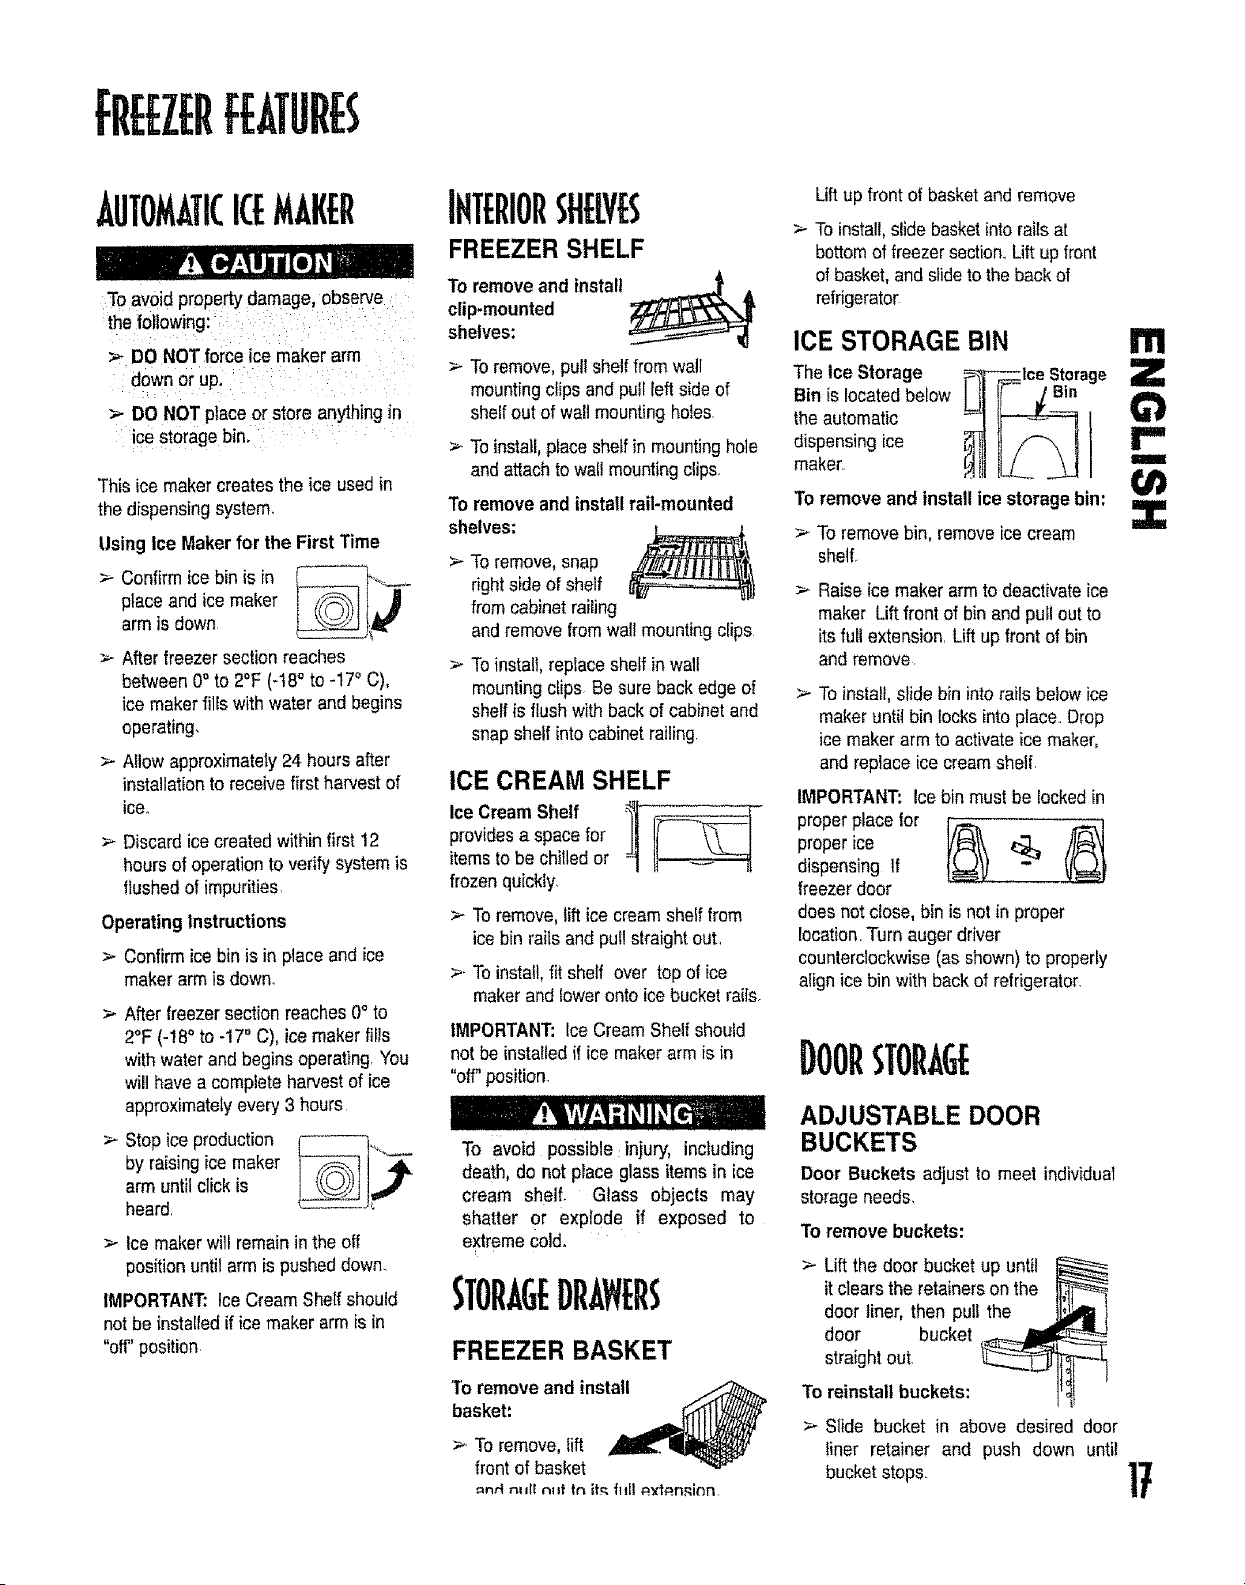
fiiEEZEllFE UflES
AUTOMATICICEMAKEfl
To avoid propertydamage, observe
the following:
:_ Be NOTforce ice maker arm
down or up....
>- 00 NOT place or store anythingin
ice storage bin,
This ice maker creates the ice used in
the dispensingsystem.
UsingIce Maker for the First Time
> Confirm ice bin is in _------------_._
place and ice maker
arm is down
> Afterfreezer section reaches
between0° to 2°F (-t8 ° to -17oC),
ice maker filfs with water and begins
operating,
> Allow approximately24 hours after
installationto receive first harvest of
ice°
>- Discard ice createdwithinfirst 12
hours ofoperation to verify system is
flushedof impurities.
Operating Instructions
>- Confirm ice bin is in place and ice
makerarm is down.
> After freezersection reaches0° to
2°F (-18° to -17° C), ice makerfills
with waterand begins operating.You
will have a complete harvest of ice
approximatelyevery 3 hours
> Stop iceproduction
by raising ice maker
arm until click is
heard.
> Ice makerwill remain inthe off
positionuntil arm ispusheddown.
IMPORTANT: IceCream Sheffshould
not be instafledif ice makerarm is in
"off" position
SHELVES
FREEZER SHELF
To remove and install _4t_ A
clip-mounted
shelves:
> Toremove, pull shelffrom wall
mountingclips and pull [eft side of
shelfout of walt mountingholes
>. Toinstall,placeshelfin mountinghole
andattach to wall mountingc?ips.
To remove and Jnsta?lrail-mounted
shelves:
> To remove,snap
right side of shelf
from cabinetrailing
and removefromwall mountingclips
To install, replaceshelf in wall
mountingclips Be sure backedge of
shelf is flushwith backof cabinetand
snap shelf into cabinetrailing
ICE CREAM SHELF
providesa space for
itemsto be chilled or -
frozen quickly
Toremove, lift ice creamshelf from
icebin rails and pull straight out.
_ Toinstall,fit shelf over top of ice
makerand lower onto ice bucket rails.
IMPORTANT: Ice CreamShelf should
not be installed if ice makerarm is in
"off"position.
To avoid possible injury, including
death, do not pIace glass items in ice
cream shelf. Glass objects may
shatter or explode if exposed to
extreme cold.
FREEZER BASKET
'Toremove and install
basket" __
=nil n=_llnnt In it_ fitll _t__n,_inn
Lift up front of basket and remove
> To install,slide basketinto railsat
bottomof freezersection..Lift up front
of basket,and slideto the backof
refrigerator
ICE STORAGE BIN
TheIce Storage
Bin is locatedbelow
the automatic
dispensingice
maker_
To remove and install ice storage bin:
;-- To removebin, removeice cream
shelf.
Raiseice maker arm to deactivateice
maker Lift front of bin and pull outto
itsfull extension. Lift upfront of bin
andremove
>- To install,slide bin intorails below ice
makeruntil bin locks intoplace. Drop
ice makerarm to activateice maker,
and replace ice creamshelf.
IMPORTANT: Ice bin must be lockedin
properplace lot r'_ _
proper ice
dispensing If
freezerdoor
does not close, bin isnot in proper
location.Turn auger driver
counterclockwise(as shown)to properly
alignice bin with back of refrigerator.
ADJUSTABLE DOOR
BUCKETS
Door Buckets adjustto meet individual
storageneeds,
To remove buckets:
>- Lift the door bucket up until
it clearsthe retainersonthe
door liner, then pull the
door bucket
straightout.
To reinstall buckets:
> Slide bucket in above desired door
liner retainer and push down until
bucket stops.
!'11
Z
r"
m
Z
17
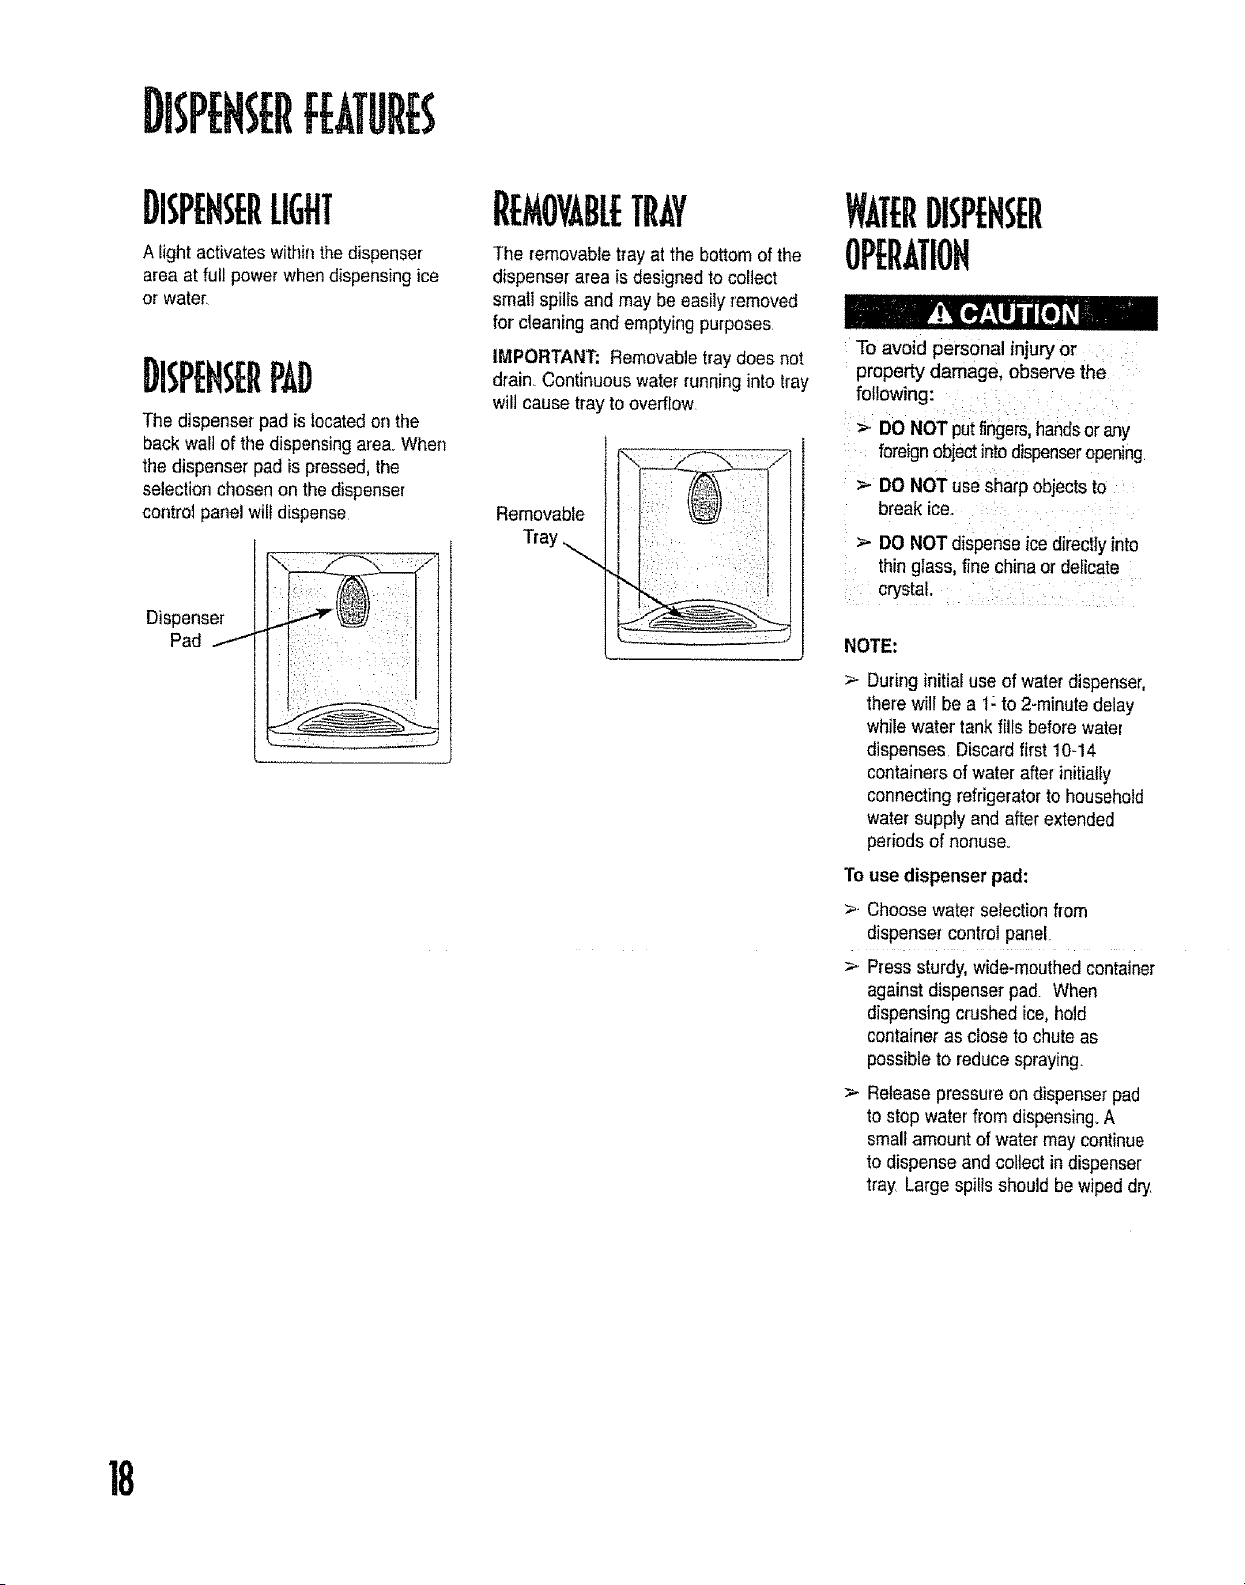
DHP[HSERF[ATURES
DISPEHSERLIGHT
A lightactivates withfflthe dispenser
area at full power when dispensingice
or water,
The dispenser pad is locatedon the
back wa!l of the dispensingarea. When
the dispenser pad is pressed,the
selection chosenon the dispenser
control panel wiltdispense
Dispenser
Pad
R MOYABLETrAY
The removabletray at the bottom of the
dispenser area is designedto col]ect
small spilIs and may be easilyremoved
for cleaning and emptying purposes
IMPORTANT: Removab]etraydoes not
drain. Continuouswater runninginto tray
will cause tray to overflow
Removable
Tray
To avoid personal injury or
property damage, observe the
following:
>. DO NOTput fingers,handsor any
foreignobjectintodispenseropening
DO NOTuse sharp objectsto
break ice.....
> DO NOTdispenseicedirectly into
thin giass, fine chinaor delicate
crystal,
NOTE:
> During initial use of waterdispenser,
there will be a t: to 2-minutedelay
while water tank fills beforewater
dispenses Discardfirst 10-14
containers of water after initially
connecting refrigeratorto household
water supply and afterextended
periods of nonuse.
To use dispenser pad:
>- Choosewater selection from
dispensercontrol panel
>. Press sturdy,wide-mouthedcontainer
againstdispenser pad. When
dispensingcrushed ice,hold
containeras dose to chuteas
possibleto reducespraying.
Releasepressure on dispenserpad
to stop waterfrom dispensing°A
smallamount of water may continue
to dispense and collect in dispenser
tray Large spillsshould bewiped dry.
18
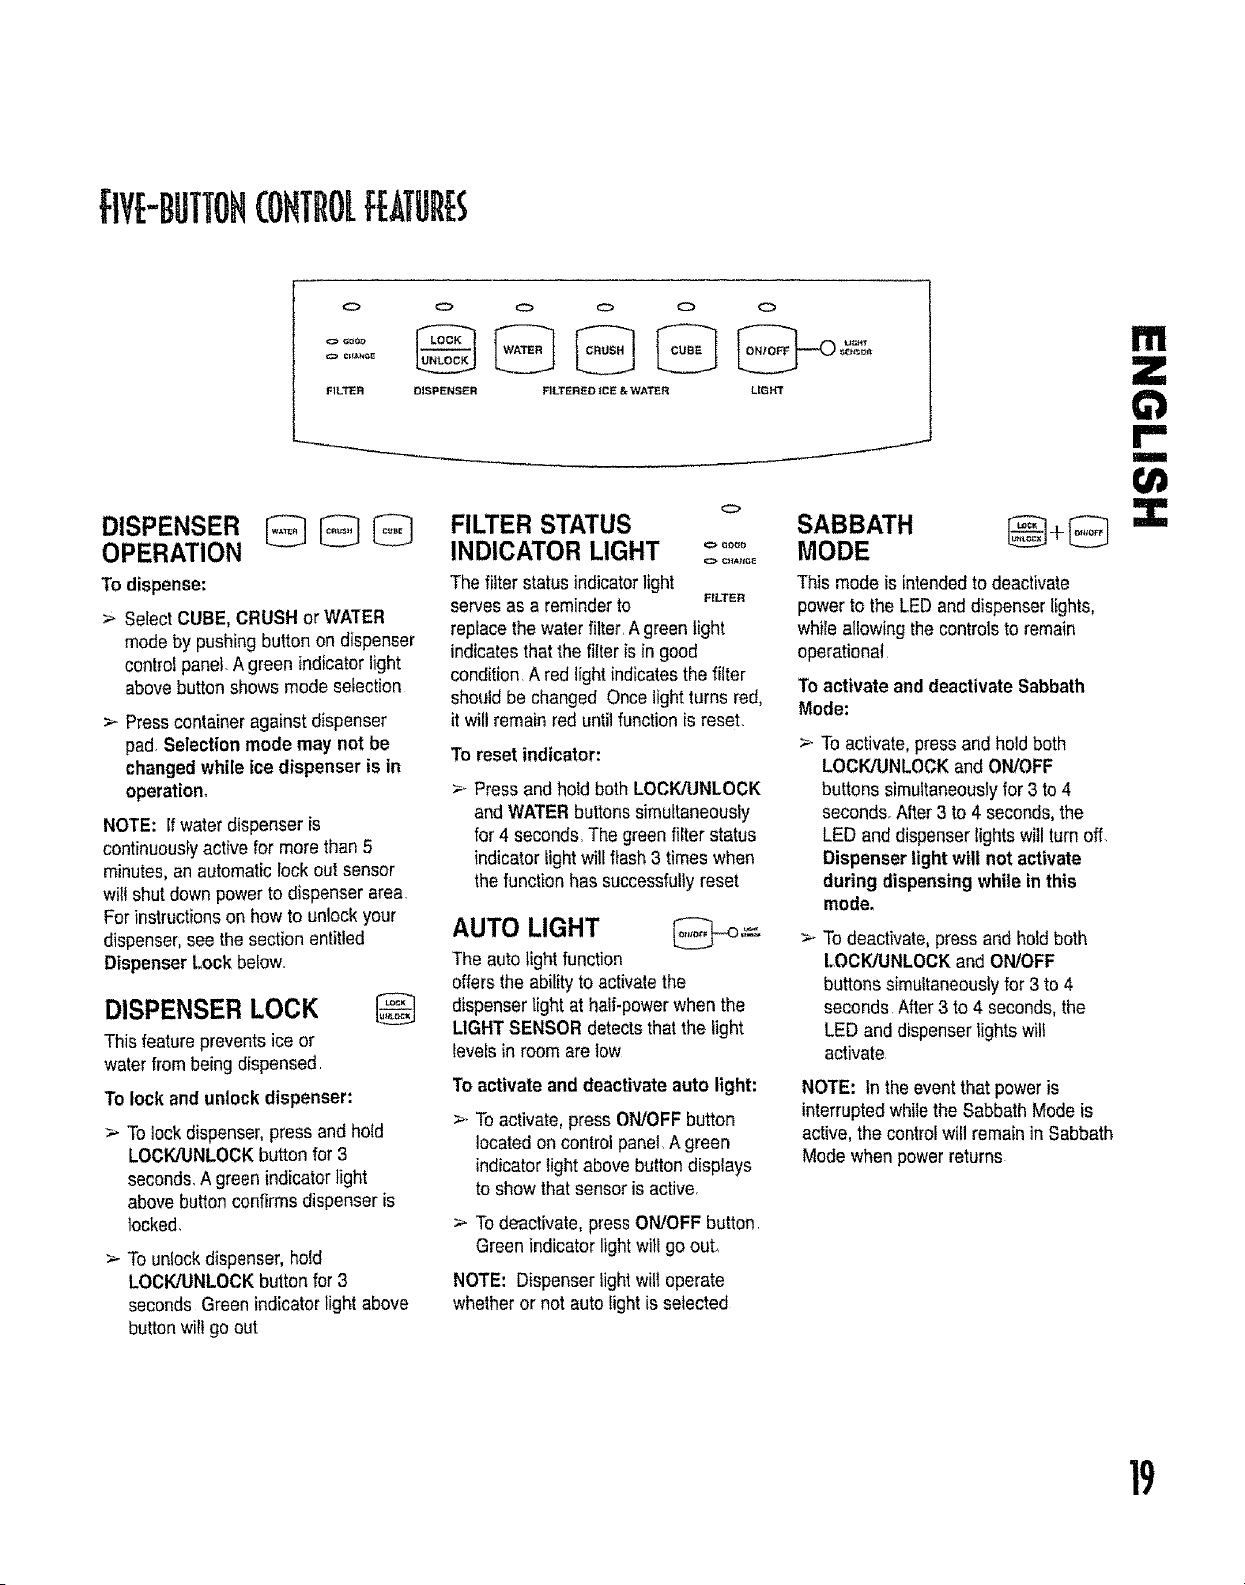
fiVE-BUTTOHCONTROLFEATUflES
O 0
F1LTER DISPENSER
DISPENSER
OPERATION
To dispense:
> SelectCUBE, CRUSHor WATER
mode by pushing buttonon dispenser
controipanel. A green indicatorlight
abovebuttonshows mode selection
Presscontaineragainst dispenser
pad Selectionmode may not be
changedwhile ice dispenser is in
operation,
NOTE: Ifwaterdispenser is
continuouslyactive for more than 5
minutes,an automaticlock out sensor
wi!l shutdown power to dispenserarea
For instructionson how to unlockyour
dispenser,see the section entitled
Dispenser Lock below..
DISPENSER LOCK
Thisfeatureprevents ice or
waterfrom beingdispensed.
To lock and unlock dispenser:
To lockdispenser,press and hotd
LOCK/UNLOCKbutton for 3
seconds.A green indicatortight
above buttonconfirms dispenseris
iocked.
> To unlockdispenser, hold
LOCK/UNLOCKbutton for 3
seconds Green indicatorlight above
buttonwill go out
O O O O
FILTERED iCE & WATER UGHT
J
O
FILTER STATUS
INDICATOR LIGHT °°°°°
The filter statusindicatorlight
servesas a reminderto _t_..TER
repfacethe waterfilter.Agreen light
indicatesthat the tilteris in good
condition.A red light indicatesthe tilter
should be changed Once light turns red,
it will remain red until function is reset.
To reset indicator:
>_Pressand hold bothLOCK/LJNLOCK
andWATER buttonssimultaneously
for 4 seconds.The greenfilter status
indicatorlight will flash 3 times when
the function has successfullyreset
AUTO LIGHT
The auto light function
offersthe abilityto activatethe
dispenserlight at halt-powerwhen the
LIGHT SENSORdetectsthat the light
levelsin room are tow
To activate and deactivateauto light:
>- To activate, pressON/OFFbutton
located on control panel.A green
indicatorlight above buttondisplays
to show that sensoris active.
> To deactivate, pressON/OFF button
Green indicator lightwill go out,
NOTE: Dispenserlightwil_operate
whetheror not auto light is selected
SABBATH
MODE
This mode is intendedto deactivate
power to the LED and dispenserlights,
while allowing the controlsto remain
operational
To activate and deactivate Sabbath
Mode:
To activate, pressand hold both
LOCK/UNLOCKand OWOFF
buttons simultaneouslyfor 3 to 4
seconds.After 3 to 4 seconds,the
LED and dispenserlightswill turnoff.
Dispenserlight wilt not activate
during dispensing while in this
mode.
To deactivate,press and hotdboth
LOCK/UNLOCK and ON/OFF
buttons simultaneouslyfor 3 to 4
seconds After3 to 4 seconds,the
LED and dispenserlightswilf
activate
NOTE: In theeventthat poweris
interruptedwhile the Sabbath Mode is
active, the controlwi{Iremain in Sabbath
Mode when powerreturns
I11
!""
I
:3::
19

DISP[N ;[R[[ATILIR[$,(ONT.
[L[CTRONICCONTROLfEATUR[ ;
OFF
A
D_SpENSER
FILTER @
L{GHT
J
D,SPENSER
OPERATION
To dispense water:
>- Selectthe WATERbutton ___
>- Presscontainer againstdispenser
pad,
To dispense ice:
>- Selectthe CUBE button for __
cubed ice
v
-_ Pressthe CRUSH buttonfor
crushedice.
>. Presscontainer againstdispenser
pad°
NOTE: if waterdispenser is
continuouslyactive for more than 2
minutes,an automatic lockout sensor
will shut down power to dispenserarea.
For instructionson how to unlock your
dispenser,see the section entitled
Dispenser Lock below.
DISPENSER LOCK
This featureprevents ice or
waterfrom being dispensed
To lock and unlock dispenser:
•_.To lock dispenser,press and hold the
LOCK/UNLOCK buttonfor 3
seconds..A green indicatorlight
above buttonconfirmsdispenser is
locked.
> To unlockdispenser, hold the
LOCK/UNLOCK buttonfor 3
seconds.Green indicatorlight above
button wiltgo out°
u_rt
LIGHT FUNCTION
Oh
The light function offers two
settings: OFF andAUTO.
The OFF setting will turnoff the
dispensercavity light
The AUTO setting allowsthe SENSOR
to measurethe surroundinglight levels
and adjustthe power of the cavity light
accordingly.When the sensor registers
lower light levels (night time, darkened
kitchen),the cavity light will respond at
50'/opower.When the sensor registers
high light levels (lightedkitchen, direct
sunlight),the cavity lightwill not activate.
NOTE: Dispenserlight wilt operate at
full power whenice or waterfunctions
are in use.
To activate auto setting:
> Pressthe ON/OFF button locatedon
controlpanel. When the green
indicatorlight abovethe button
display is on, the cavitydispenser
light will use theAUTO setting.
To deactivateauto setting.
>- Pressthe ON/OFFbutton locatedon
controlpanel Greenindicator light
above button will go out.
FILTER STATUS F,L .
GOOO
INDICATOR °.',,°°°
LIGHT
The filter status indicatorlight serves as
a reminderto replacethe waterfilter A
green light indicates that the filter is in
good condition A red light indicatesthe
filter should be changed Once light
turns red, it wilt remain
red until function is +
reset
To reset indicator:
> Press and hold beth the LOCK/
UNLOCK and the WATERbuttons
simultaneouslyfor 4 seconds The
green filter status indicatorlight will
flash 3 times when the function ...
has successfullyreset "_=
V
TEMPERATURE KEYS
These keys willlower or raisethe
freezer or fresh food compartment
temperature.
NOTE: See the section Howto Adjust
the TemperatureControls (page12)
for instructionson how to set food
compartmenttemperatures.
ELECTflOF!ICCOHTflOLFEATUflES,COHT.
OFF
A
t3H
A
D_SPENSER
LIGHT
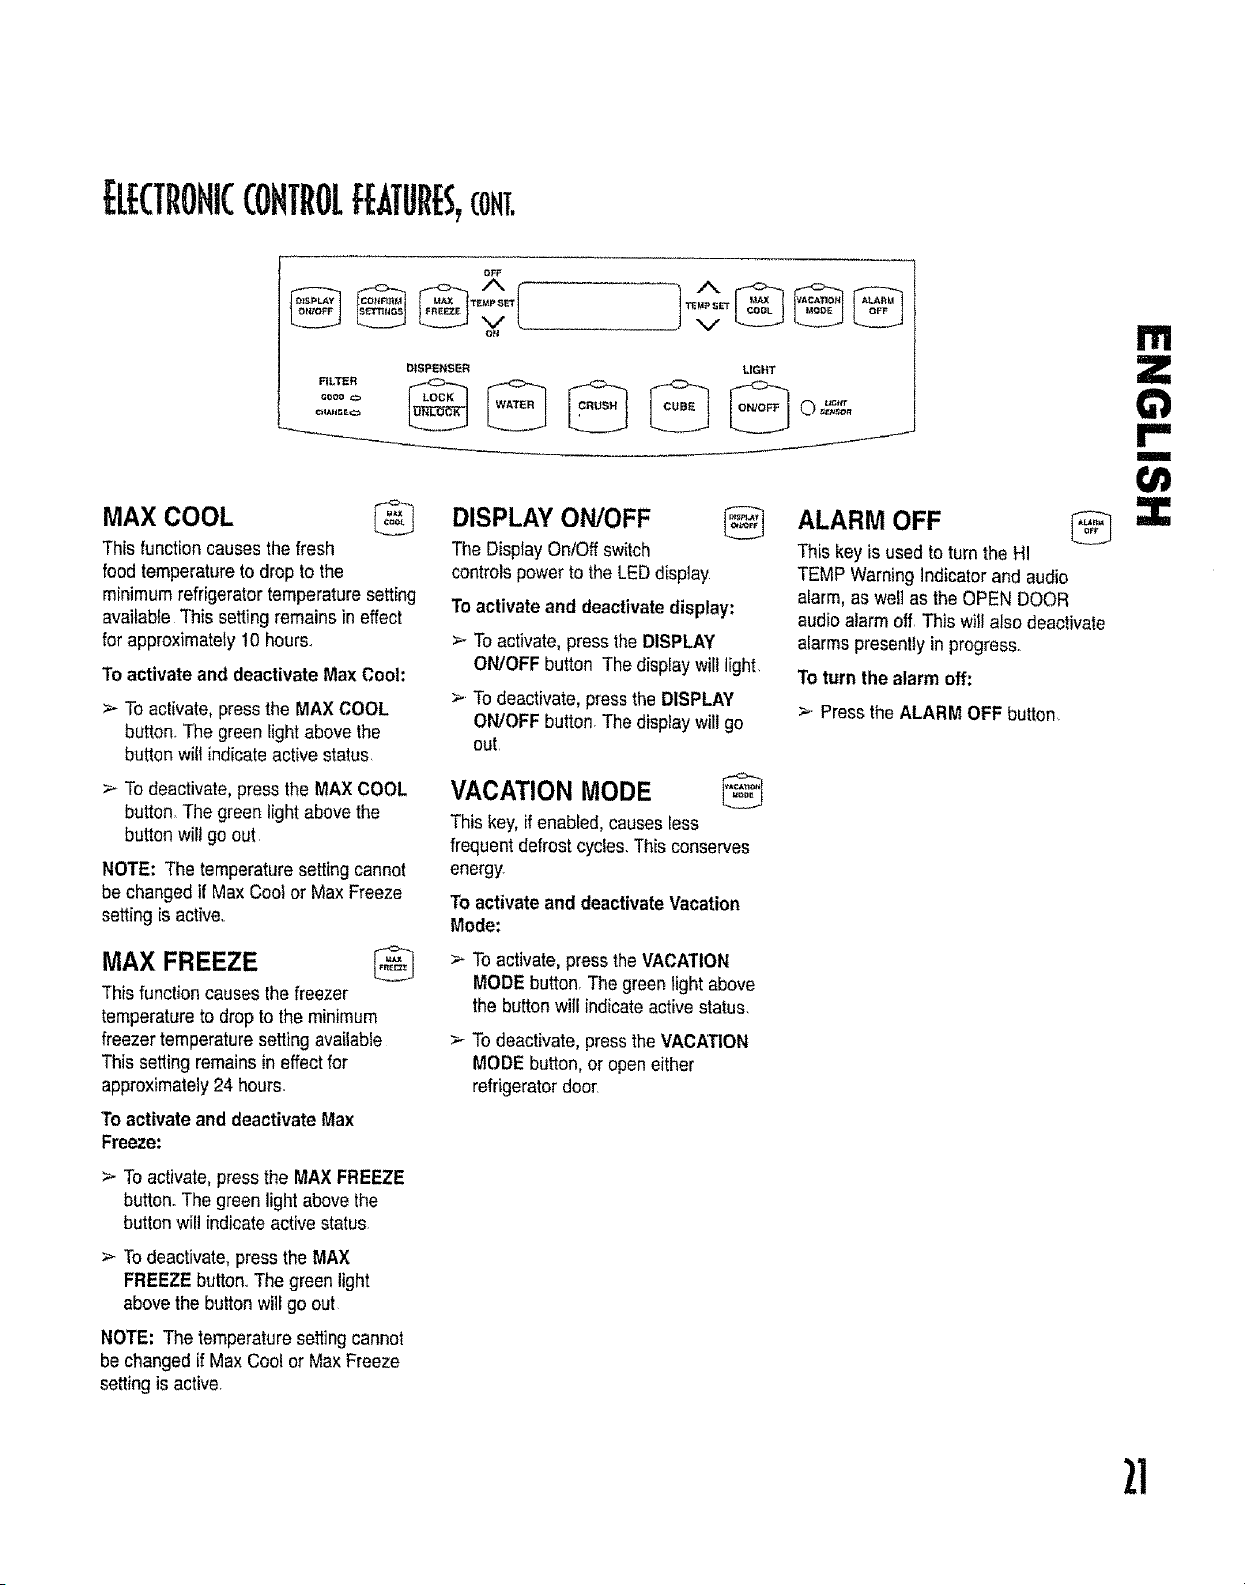
MAX COOL
Thfs functioncauses the fresh
food temperature to drop to the
minimumrefrigeratortemperaturesetting
available This setting remains in effect
for approximately10 hours_
To activate and deactivate Max Cool:
>_To activate, pressthe MAXCOOL
button. The green light above the
button will indicateactive status,
>- To deactivate,pressthe MAX COOL
button.The green light above the
buttonwillgo out
NOTE: The temperature setting cannot
be changed if Max Cooi or Max Freeze
setting is active..
MAX FREEZE @
This function causes the freezer
temperatureto drop to theminimum
freezertemperature setting available
This setting remainsin effectfor
approximately24 hou_s_
To activate and deactivateMax
Freeze:
> To activate, pressthe MAX FREEZE
button. The green light above the
button wilt indicateactive status.
>_ Todeactivate, pressthe MAX
FREEZEbutton..Thegreen light
above the buttonwill go out
NOTE: The temperaturesettingcannot
be changed if Max Cool or MaxFreeze
settingis active.
DISPLAY ON/OFF @
The DisplayOnfOff switch
controlspower to theLED display
Toactivateand deactivatedisplay:
>- To activate,press the DISPLAY
ON/OFF button The displaywilllight.
> To deactivate, pressthe DISPLAY
ON/OFF button. The displaywill go
out
VACATION MODE
This key, if enabled,causes less
frequent defrost cycles.This conserves
energy.
To activate and deactivate Vacation
Mode:
>_To activate, pressthe VACATION
MODEbutton The green light above
the buttonwill indicateactivestatus.
>_To deactivate,pressthe VACATION
MODE button,oropen either
refrigeratordoor.
ALARM OFF
Thiskey is used to turn the H_
TEMP Warning Indicatorand audio
alarm,as well as the OPEN DOOR
audioalarm off This will also deactivate
alarmspresentlyin progress.
Toturn the alarm off:
>. Pressthe ALARM OFF button
I11
Z
I""
I
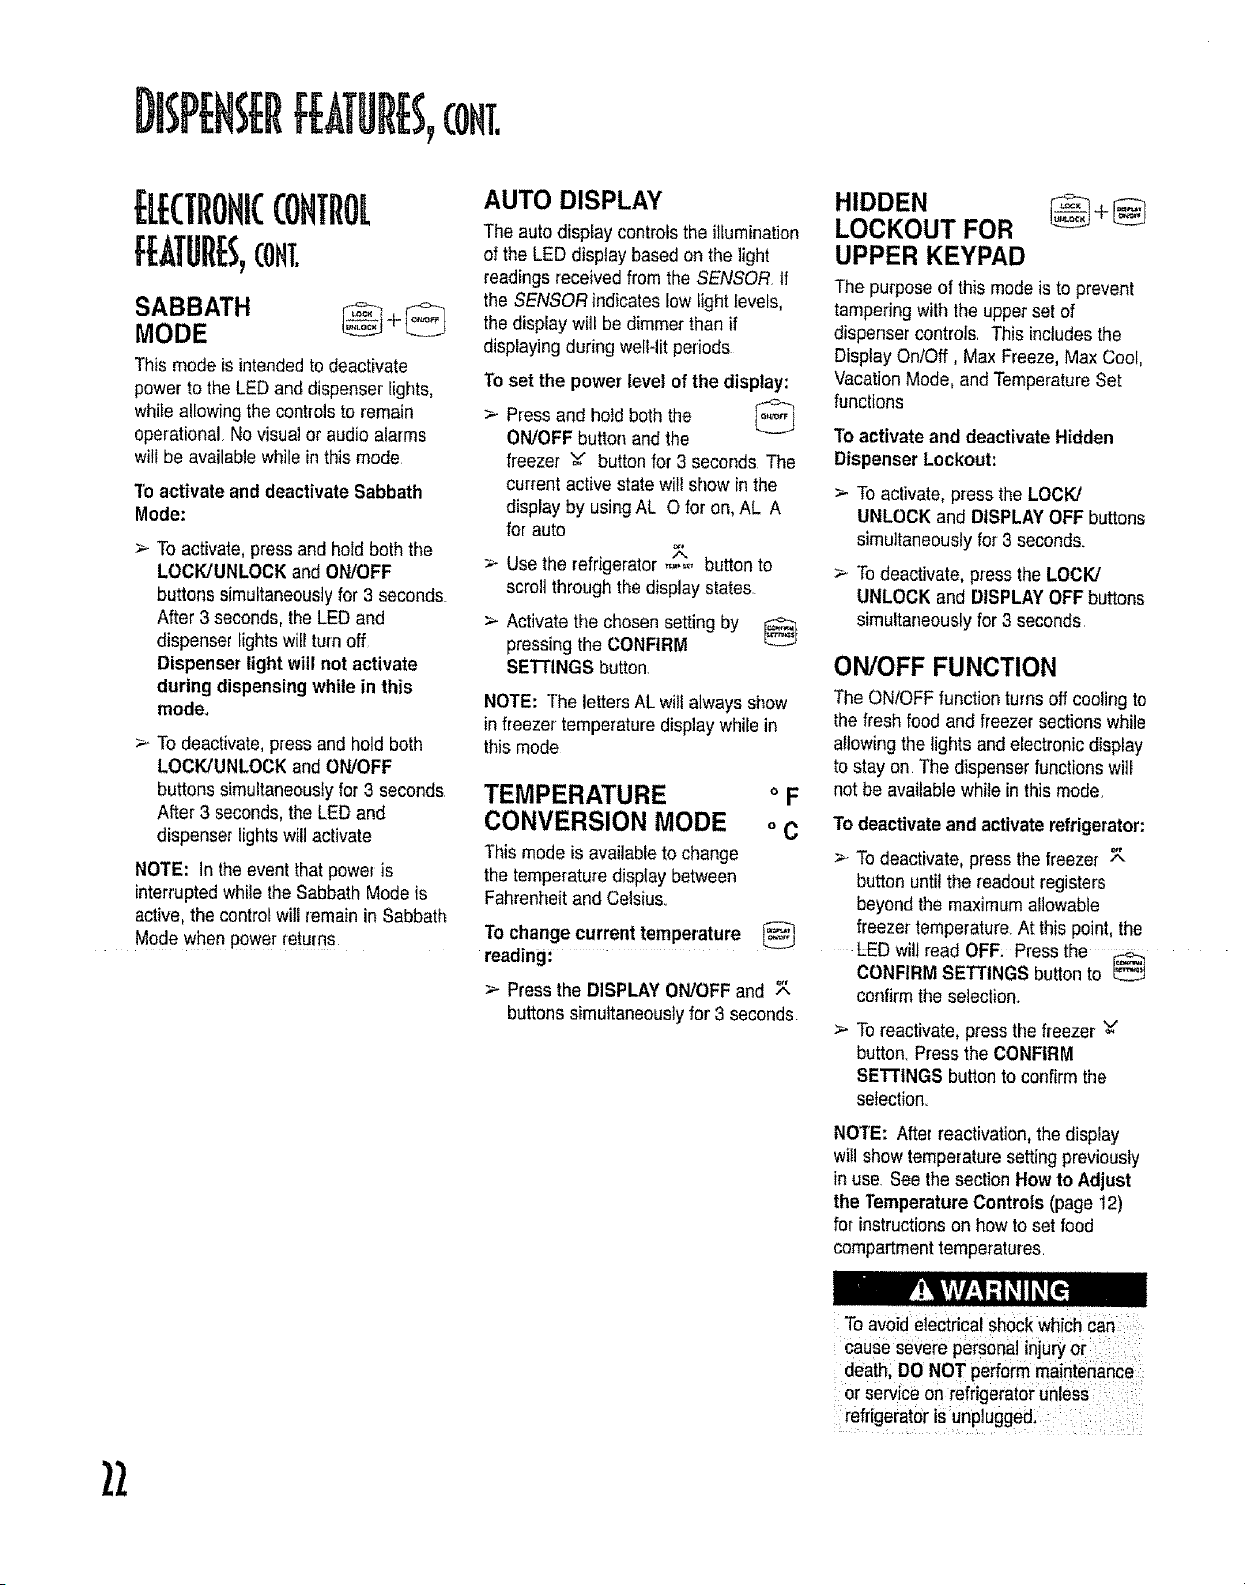
Dt PEH ERFEA[URES,[oN].
SABBATH
MODE
This mode is intendedto deactivate
power to the LED and dispenserlights,
while allowingthe controlsto remain
operational.No visual or audio alarms
wittbe available while inthis mode
3'oactivate and deactivateSabbath
Mode:
> To activate,pressand hold both the
LOCK/UNLOCKand ON/OFF
buttons simultaneouslyfor 3 seconds
Atter 3 seconds,the LED and
dispensel lights w{llturnoff
Dispenser light will not activate
during dispensingwhile in this
mode.
> To deactivate,pressand hold both
LOCK!UNLOCKand ON/OFF
buttons simultaneouslyfor 3 seconds
After 3 seconds,the LED and
dispenser lightswillactivate
NOTE: In the event thatpowemis
interruptedwhile the Sabbath Modeis
active,the controlwitl remain in Sabbath
Modewhen power returns
AUTO DISPLAY
The auto display controlsthe illumination
of the LED displaybased on the light
readings receivedfrom the SENSOR. If
the SENSORindicates _owfightrevels,
the displaywitl bedimmer than if
displayingduring weiI4itperiods
To set the power level of the display:
> Press and hold both the -_,7 i
ON/OFF button andthe
freezer v button for 3 seconds The
current active state will show in the
display by usingAL O for on, AL A
for auto
> Use the refrigerator-=,"_'_,button to
scrollthrough the displaystates.
> Activate the chosensetting by
pressingthe CONFIRM
SE'N'INGS button
NOTE: The letters ALwillalways show
in freezer temperaturedisplaywhile in
this mode
TEMPERATURE
CONVERSION MODE
Thismode is availableto change
the temperaturedisplay between
Fahrenheitand Celsiu&
oF
°C
Tochange current temperature
reading:
> Pressthe DISPLAYON/OFFand _.
buttons simultaneouslyfor 3 seconds
HIDDEN
LOCKOUT FOR
UPPER KEYPAD
The purpose of this mode is to prevent
tampering with the upperset of
dispensercontrols. Thisincludesthe
Display OnlOff, Max Freeze, MaxCool,
VacationMode, and TemperatureSet
functions
To activate and deactivateHidden
Dispenser Lockout:
> To activate, press the LOCK/
UNLOCK and DISPLAYOFF buttons
simultaneouslyfor 3 seconds.
> To deactivate, pressthe LOCK/
UNLOCK and DISPLAYOFF buttons
simultaneoustyfor 3 seconds
ON/OFF FUNCTION
The ONIOFF function turnsoffcoo_ingto
the fresh food and freezersectionswhile
allowing the lights and electronicdisplay
to stay on The dispenserfunctionswitl
not be availablewhile in this mode.
To deactivateandactivaterefrigerator:
> To deactivate, press the freezer -_-
button untitthe readoutregisters
beyond the maximumallowable
freezertemperature.At this point,the
LED will read OFF. Press the
CONFIRMSETTINGS buttonto
contirmthe seleclion._
> To reactivate,pressthe freezer
button Pressthe CONFIRM
SETTINGSbuttonto confirm the
selection.
NOTE: Atter reactivation,the display
willshow temperaturesetting previously
in use. See the section Howto Adjust
the TemperatureControls(page 12)
for instructionson how to set food
compartmenttemperatures.
TOavoid electrical shock which
: causesevere persOnaiinjuryo_ :,
death;DO NOT performmaintenance
orservice on refrigeratorUnless
refrgerator Sunplugged:: :: :
ZZ
fllN AND(ARE
TOCLEANYOURREFRIGERATOR
To avoid electdcal shockwhich can
causesevere personal injury or
death, disconnect powerto
refrigerator before cleaning.After
cleaning, connect power.
To avoid personalinjuryor propertydamage,observe the following: :
• Read and foflowmanufacturer'sdirectionsfor all cleaning products.
• DO NOT place buckets,shelvesor accessoriesin dishwasher Cracking or
warping of accessoriesmay result.
Ill
Z
r"'
PART
Textured Doors
and Exterior
Cabinet Interior
Stainless Steel Doors
and Exterior*
IMPORTANT: Damage
to stainless steel finish
due to improper use of
cleaningproducts or
non-recommended
products is not covered
under this product's
warranty.
Door Gaskets
Condenser Coil
Remove base grille to
access
Condenser Fan Outlet
Grille
See back ofrefrigerator
Accessories Shelves,
buckets, drawers,etc
DO NOT USE
> Abrasiveor harsh cleaners
> Ammonia
> Ch!orinebleach
>- Concentrateddetergents or
solvents
>- Metalor plastic4extured
scouringpads
> Abrasiveor harsh cleaners
> Ammonia
_- Chlorinebteach
>- Concentrateddetergents or
solvents
>Metat or plastic-textured
scouringpads
>_Vinegar_basedproducts
>- Citrus-basedcleaners
> Abrasiveor harsh cleaners
> Metalor plastic-textured
scouringpads
> A dishwasher
I
DO
> Use4 tablespoonsof baking soda dissofvedin 1 quart
(1 liter) warmsoapywater,.
> Rinsesudaces withclean warm water and dry immediately
to avoidwater spots
> Usewarm, soapy waterand a soft, dean cloth or sponge
Rinse surfaceswith clean warm water and dry immediately
to avoid waterspots
> Usea vacuum cleaner hose nozzle
> Use a vacuum cleaner hose nozzlewithbrush attachment.
>. Followremovaland installationinstructionsfrom appropriate
featuresection
>- Allow items to adjustto room temperature
> Dilutemild detergentand use a soft dean cloth or sponge
for cleaning.
Usea pfasticbristlebrush to get intocrevices
> Rinsesurfaceswith clean warm water..
> Dry glassand dear items immediatelyto avoid spots,
* A stainless steel cleaner has been includedinside the refrigeratorfor your use. To purchase additiona! cleaner,please contact
Sears usingthe informationon the back of your manual,
2}
TOREMOVEODORS
FROMREFRIGERATOR
,
2
3,
6
7
Removeall food,
Disconnectrefrigerator,
Cleanthe followingitems-paying
specialattention to crevices-using
the appropriateinstructions in How to
CleanYour Refrigerator:
• Walls, floor,and ceiling of cabinet
interior.
• Drawers,shelves,and gaskets.
Wash and dry all bottles,containers,
arrdjar& Discard spoiled or expired
items
Wrapor store odor-causingfoods in
tightly-sealedcontainersto prevent
reoccurringodors
Connectpower to refrigeratorand
returnfood.
After24 hours,check if odor has
beeneliminated,
If odor is still present,.,
1, Removedrawers and place on top
shelfof refrigerator,
2, Packrefrigerator andfreezer
sections-including doors-with
crumpledsheets of black andwhite
newspaper._
3 Place charcoalbriquettes randomly
on crumplednewspaperin both
freezerand refrigerator
compartments.
4_ Closedoorsand let stand24-48 hours.
5 Repeatsteps 5 through 7 above.
If odor was noteliminated, contact
Sears ServiceCenter: Referto back of
manualfor phone number:.
SAVIH5IDEAS
> Avoid overcrowdingrefrigerator
shelves This reduceseffectivityof air
circulationaround food and causes
refrigeratorto run longer.
>- Avoid addingtoo much warm food to
refrigeratorat one time. This
overloadscompartmentsand slows
rate of cooling
24
> DO NOTusealuminumfoil,waxpaper,
or papertowelingas shelfliners.This
decreasesair flowandcauses
refrigeratorto runlessefficiently. 1
>- Afreezer that is % full runs most
efficiently
>- Locaterefrigerator in coolest part of
room.Avoid areas of direct sunlight,
or near heating ducts, registers,or
other heat producing appliances.If
this is not possible,isolate exteriorby
using a section of cabinet or an
addedlayer of insulation.
> Refer to section in Use and Care
Guideon temperature controls for
recommendedcontrolsettings
> Clean door gasketsevery three
months accordingto use and care
guide instructions This will assure
that door seals properly and
refrigeratorruns efficiently
>- Taketime to organizeitems in
refrigeratorto reducetime that door
is open.
>- Be sure your doors are closing
securely by leveling refrigeratoras
instructedin your use andcare guide.. 4
>- Clean condensercoils off as
indicatedin the Useand Care Guide
every 3 months.This will increase
energy efficiency and cooling
performance.
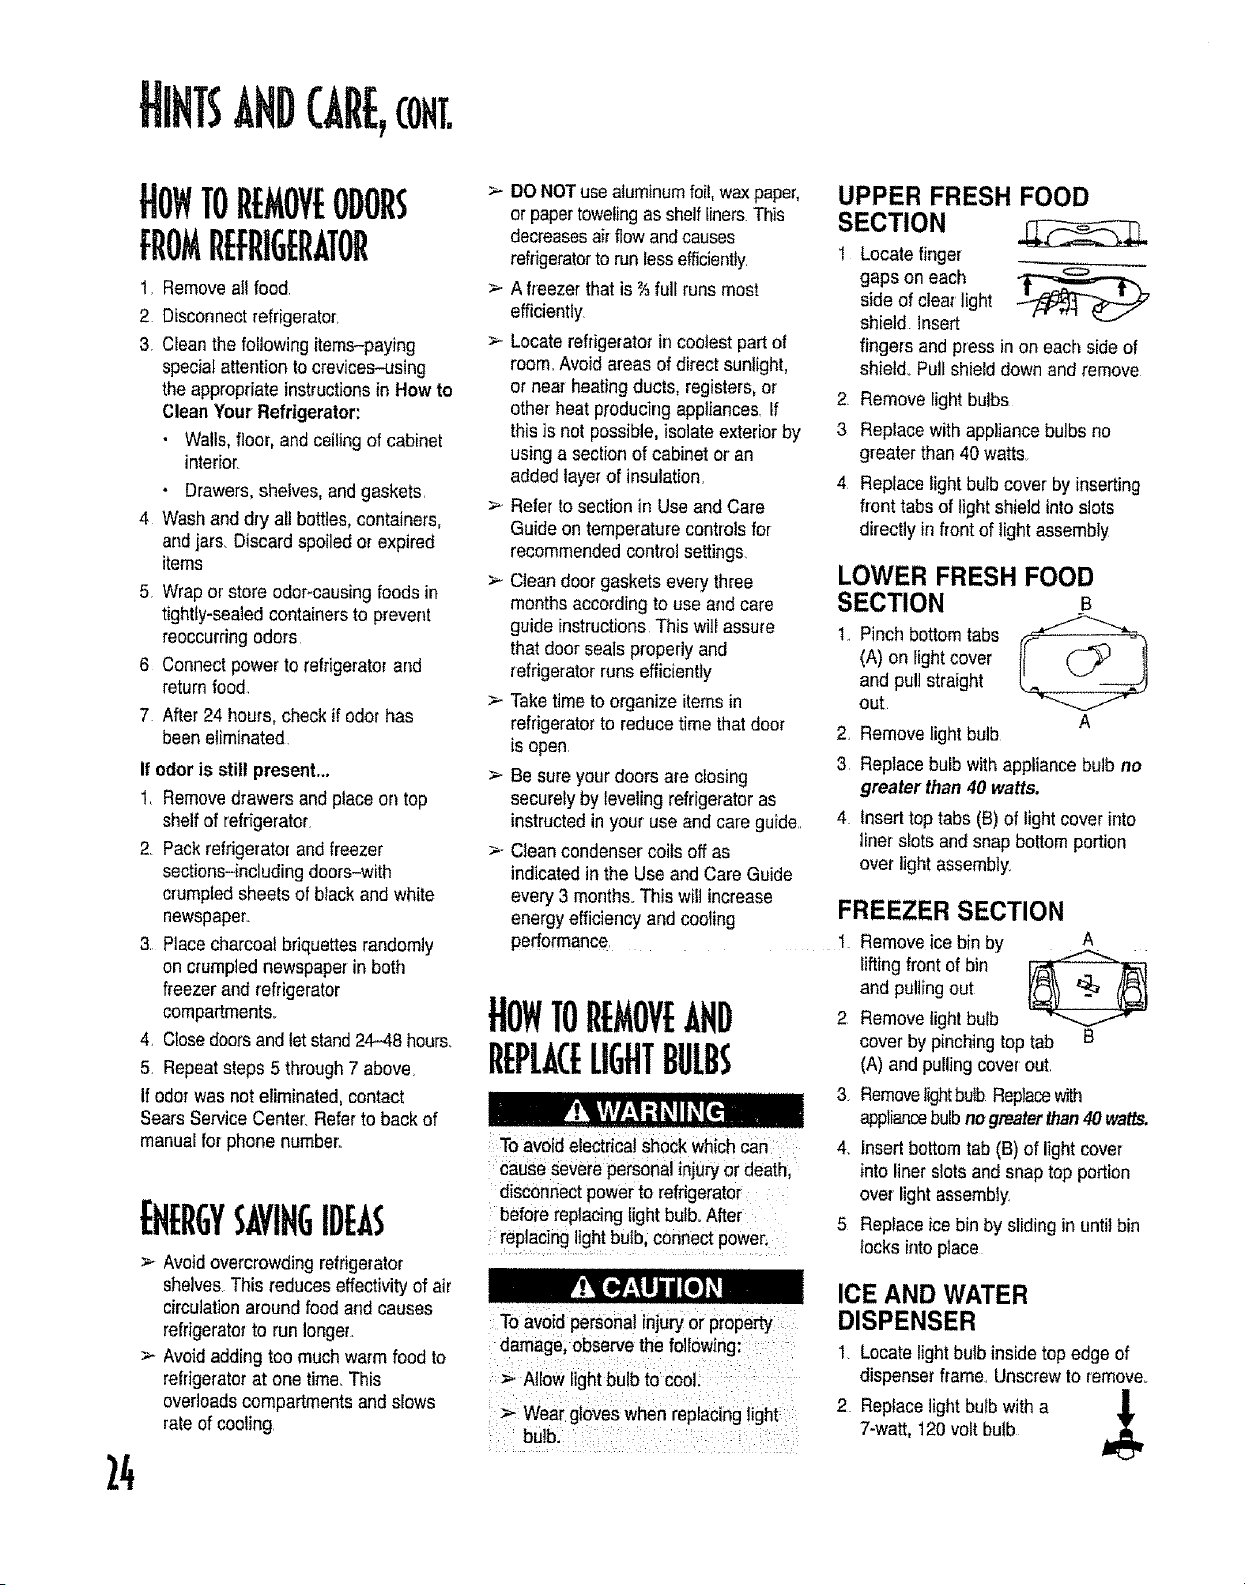
TOP,EMOVEAHD
REPLACELIGHTBULBS
Toavoid electricalShoCkwhich Can
:Cau:seseverepersonalinjury or death,
disconnectpowerto refrigerator
before replacinglight bulboAfter
replacing light bulb; connect power,
iToavoid personal injUryor property
damage;observe the following:
Wea;gio es:whenrepiaC,,g
bu]& : :
UPPER FRESH FOOD
SECTION
Locate finger
gaps on each
side of clear light
shield Insert
fingers and pressin on each side of
shiel& Pull shielddown and remove
2, Remove light bulbs
3 Replace with appliance bulbs no
greater than 40 watts,
4 Replace light bulb cover by inserting
front tabs of light shield into slots
directly in #ent of light assembly
LOWER FRESH FOOD
SECTION B
I. Pinch bottomtabs
(A) on light cover
and pull straight
out
A
2. Remove light bulb
3 Replace bulbwith appliancebulb no
greater than 40 watts.
Insert top tabs (B)of light cover into
liner slots and snap bottom portion
over light assembly.
FREEZER SECTION
1_Remove ice bin by
A
lifting front of bin _'_'1
and pulling out
2 Remove light bulb
cover by pinchingtop tab B
(A) and pullingcover out.
3. Removelightbulb Replacewith
appliancebulbnogreaterthan40 watts.
4. Insert bottomtab (B) of light cover
into liner slots and snap top portion
over light assembly
5 Replaceice bin by sliding in until bin
locks into place
ICE AND WATER
DISPENSER
1, Locate light bulb inside top edge of
dispenserframe, Unscrewto remove,
2 Replacelight bulb witha 1
7-watt, 120 volt bulb
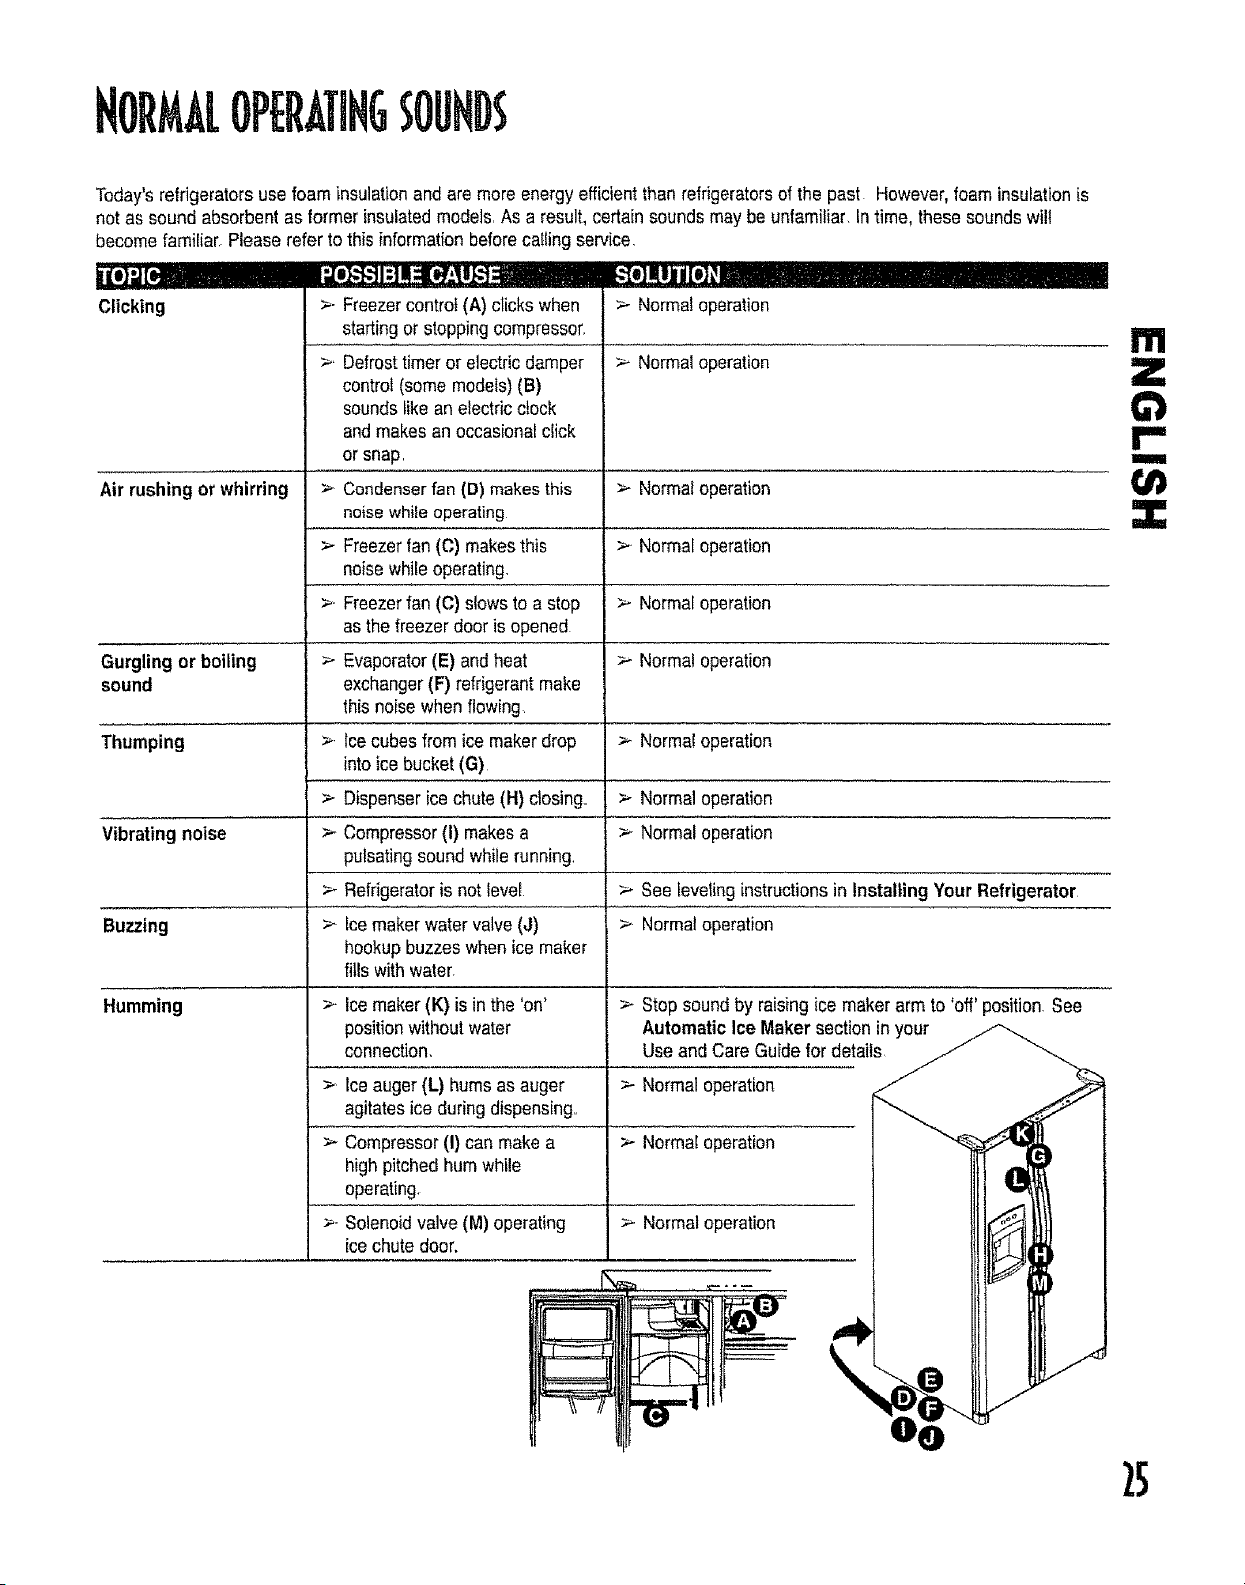
HORMA[OP[RAHHG$08HB
Today'srefrigerators use foam insulationand are more energy efficientthan refrigeratorsof the past However,foam insulationis
not as sound absorbentas formerinsulatedmodels,As a result, certainsoundsmay be unfamiliar In time, thesesoundswill
becomefamiliar, Please refer to this informationbeforecatling service,
Clicking
>- Freezercontrol(A) clicks when
startingor stoppingcompressor,
>. Defrosttimeror electricdamper
control(some models)(B)
soundstikean electric clock
and makesan occasional click
or snap
> Condenser fan (D) makes this
noise while operating
> Freezerfan (C) makesthis
noise while operating.
>. Freezerfan (C) slows to a stop
as the freezerdoor is opened
> Evaporator(E) andheat
exchanger(F) refrigerantmake
this noise when flowing
>. Icecubesfrom ice makerdrop
into ice bucket (G)
Dispenser ice chute(H) dosing.
> Compressor(i) makesa
pulsatingsound while running,
Refrigeratoris not level
> Ice makerwater valve(J)
hookup buzzeswhen ice maker
fills with water.
> Normaloperation
> Normaloperation
Air rushing or whirring > Normaloperation
> Normaloperation
> Normaloperation
Gurgling or boiling > Normal operation
sound
Thumping > Norma!operation
> Normaloperation
Vibrating noise > Normaloperation
See leveling instructionsin Installing Your Refrigerator
Buzzing > Normaloperation
Humming
>- Ice maker(K) is in the 'on'
positionwithout water
connection.
> Ice auger(L) hums as auger
agitates ice during dispensing,,
Compressor(I) can makea
high pitchedhum while
operating,
>- Solenoidvalve (M) operating
ice chutedoor.
> Stop sound by raisingice maker arm to 'off' position See
Automatic Ice Maker section inyour
Useand Care Guidefor details
> Normaloperation
> Normaloperation
> Normaloperation
I11
Z
r"
m
:3:
5
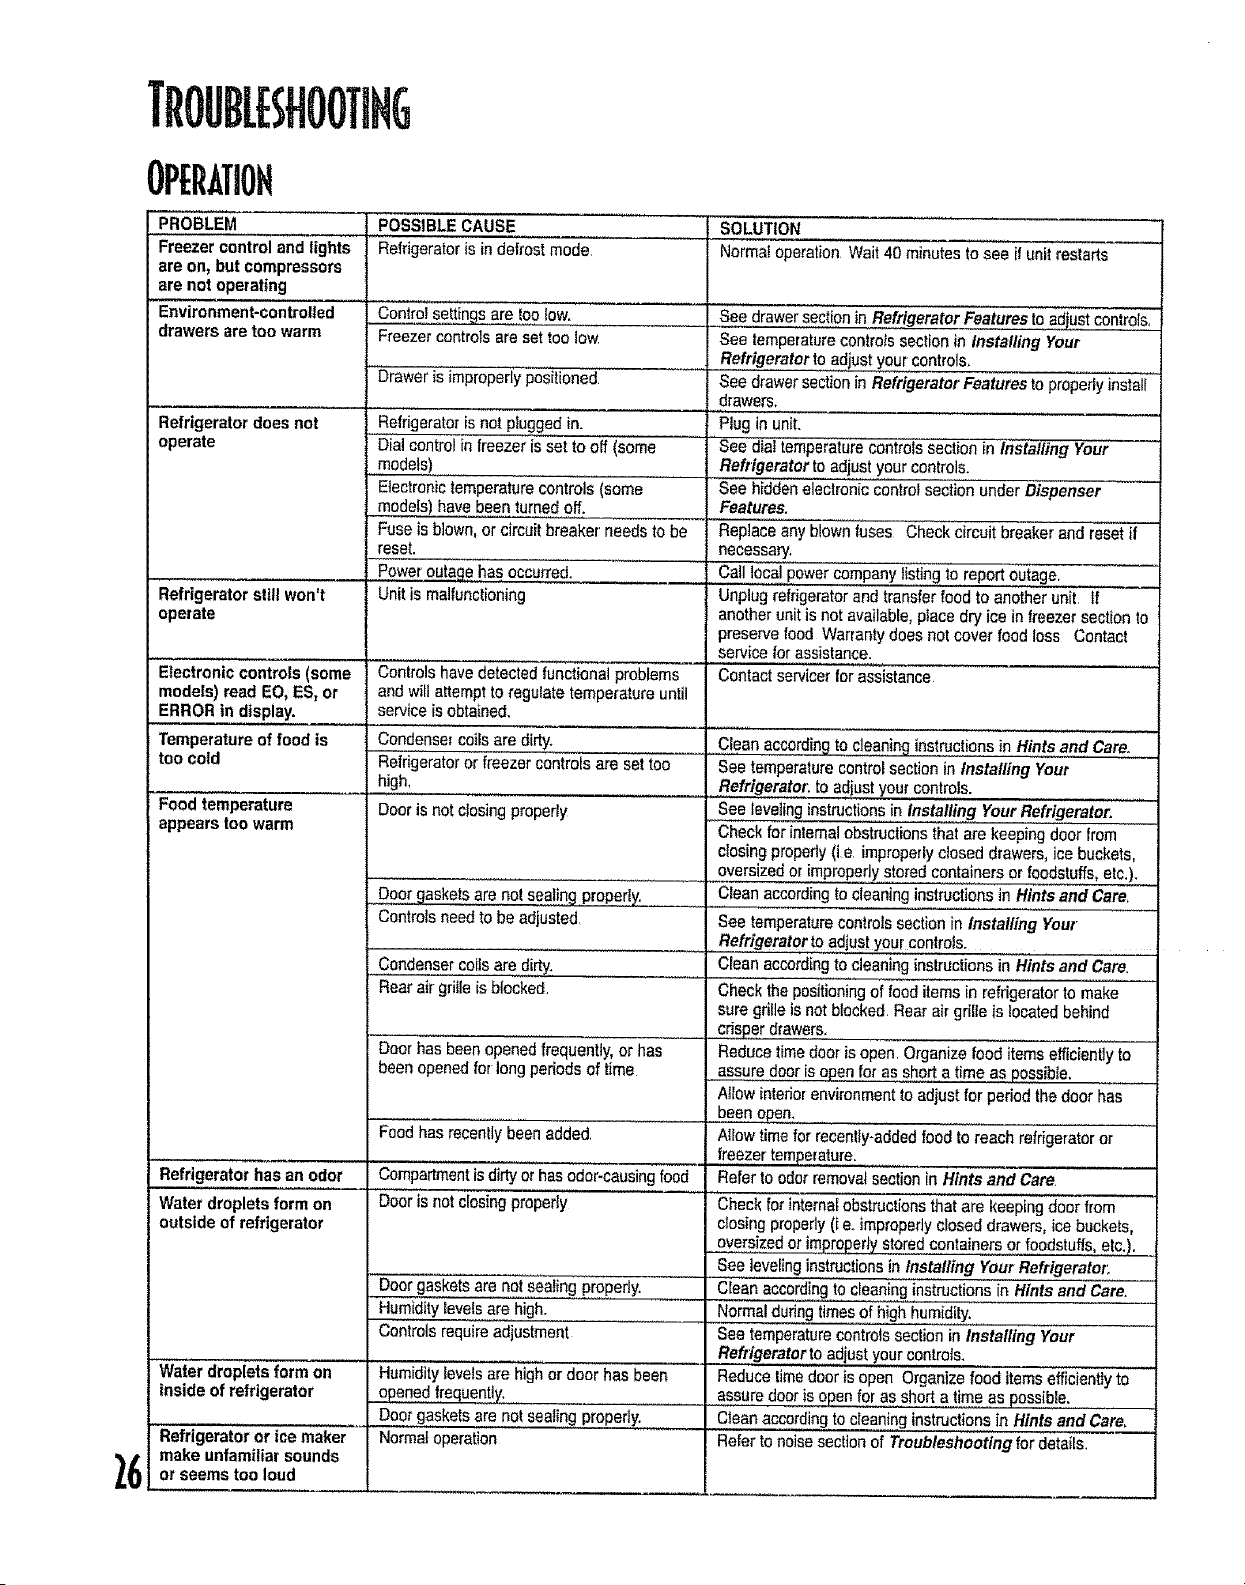
TROUBLESHOOTING
OPEflATIOH
PROBLEM
Freezer control and lights
are on, but compressors
are not operating
Environment-controlled
drawers are too warm
Refrigerator'does not
operate
Refrigerator still won't
operate
Electronic controls (some
models) read EO_ES, or
ERROR in display.
Temperatureof food is
too cold
Food temperature
appears too warm
Refrigerator has an odor
Water droplets form on
outside of refrigerator
..... ,,,,,, ,,
Water droplets form on
inside of refrigerator
Refrigerator or ice maker
make unfamiliar sounds
or seems too loud
POSSIBLECAUSE
Refrigeratoris in defrost mode
Controi se_ings are too tow. '......
Freezer controls are set too low
Drawer is improperly positioned
Refrigeratoris not piugged in.
Dial control in freezer isset to off (some
.,models)
Electronictemperaturecontrols(some
models),have been turned off.
Fuseis blown, or circuitbreaker needs to be
reset.
Power outaqe hi'Is 0 CO" _ 4 Ii ill i i ZI i
Unit is malfunctioning
SOLUTION
Normal operationWait 40 minutes to see if unitrestarts
So,_ drawer sectionin RefrigeratorFeaturesto adiu,stContro!sl
See temperaturecontrotssection in Installing Your
Refrigeratorto adjust your'controls,
See drawersectionin RefrigeratorFeaturesto properlyinstall
drawers,
........._ ,,, ,,,,,, ,,,
Plug in unit.
'_ temperaturecontrols section in Installing Your
Refrigeratorto adjust your controls.
See hidden electronic control section under Dispenser
Features.
Replace any blownfuses Check circuit breaker and resetit
necessary.
.........Call loca.!.,powercompany listing to report ou.!age.
Unplug refrigeratorand transfer food to anotherunit If
another unitis not available,placedry ice in freezersection to
preservefood Warrantydoes not cover food loss Contact
service Ior assistance.
, ,,,,_,,,
Contact servicer far assistance
Clean accordingto cleaning instructionsin Hints and Care.
See temperaturecontrol section in Installing Your
Refrigerator:to adiust yourcontrols.
See leveling instruction.s.inlnsta!ling Your Refrigerator.
Check for internalobstructionsthat are keeping door from
closingproperlyfie. improperlyclosed drawers, ice buckets,
oversizedor irnpropedY..storedcon!a.inersor foodstuffs, etc.). _
Clean accordingto cleaning instructions in Hints and Care,
See temperaturecontrolssection in installing Your"
RefrigeratortOadjust your controls.
........Clean accordingto cleaning instructions in Hints and Care.
Check the positloningof food items in refrigeratorto make
sure grille is notblocked. Rear air grille is located behind
crisper drawers:....
Reduce timedoor is open Organize food items efficiently to
assure dooris ape.nfor as shorta time as possible.
Atlow interiorenvironmentto adjust for periodthe door has
been open,
AIrowtime for recently-addedfood to reach refrigeratoror
freezer temperature.
Referto odor removalsection in Hints and Care.
Check for internalobstructionsthat are keepingdoor from
closing properly(ieoimproperlyclosed drawers, ice buckets,
oversizedor improperlystoredcontainer.s.orfoodstuffs, etc.).
See levelinginstructionsinInstalling YourRefrigerator:
Cleanaccordingto cleaninginstructionsin Hints and Care,
Normalduring timesof high humidity.
See temperaturecontrolssection in Installing Your
Refrigeratorto.adjustyour controls.
Reduce timedoor isopen Organize food itemseffficientlyto
assure dooris open for as shorta time as possible, ....
Cteanaccording to clean,!,nginstruc!!o,n.s,in Hints and Care_
Refer to noisesection of Troubleshooting for details.
Controls havedetected functional problems
and will aftempt toregulate temperature until
service is obtained,
Condensercoilsare dirty.
ReIiigerator or freezercor_troisare eel too
high,
Door is not closingproperly
Doorgaskets are not sealing properly. ....
Controls need to be adiusted.
. CondenserCOilsare dirty.
Rear oil grilleis blocked.
Door has been openedfrequently, or has
been opened for long periods of time
Food has recentlybeenadded,
,,,,, ,,,....................,_ ,
Compartmentis dirty or hasodor-causingfood
Door is not closingproperly
Doorgaskets are not sealing properly.
Humiditylevelsare high.
Controls require adjustment
Humiditylevels are highor door has been
opened frequently,
Door gaskets are not sealing prope.rl.y...........
Normal operation
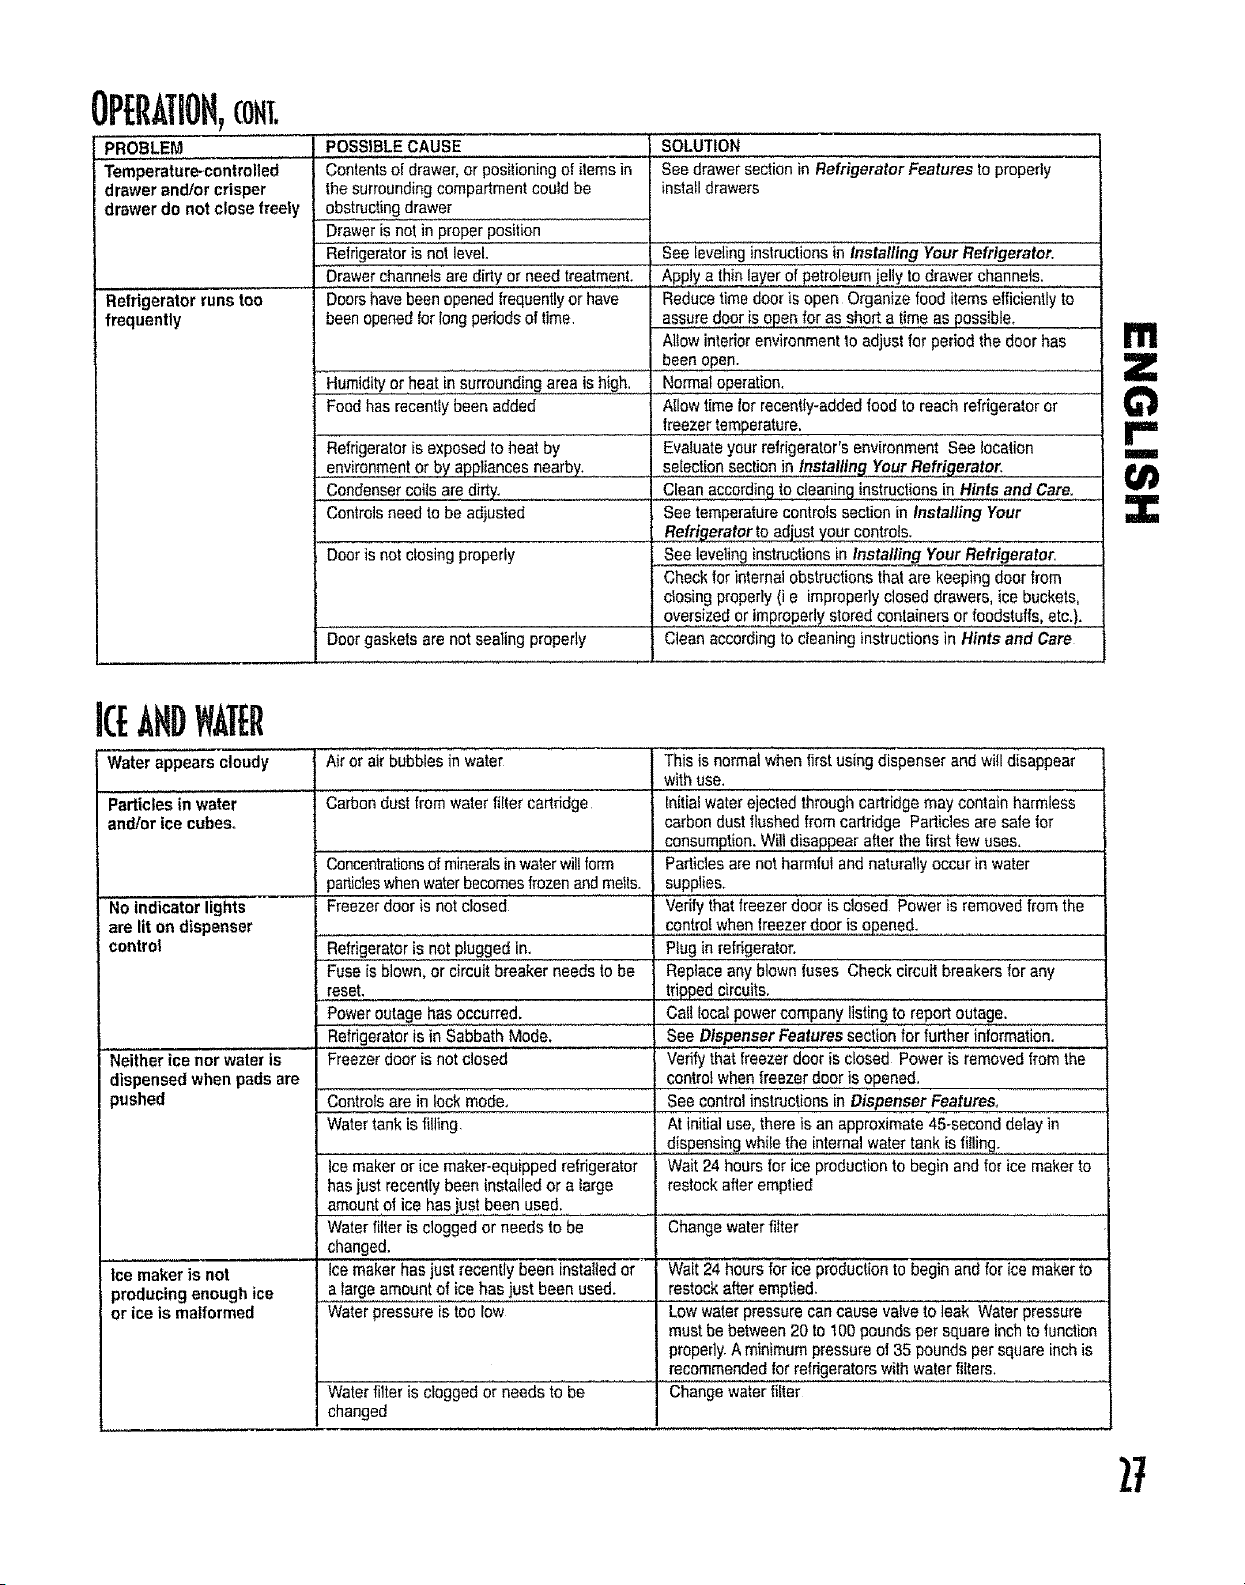
OPERATION,coNl.
PROBLEM
Temperature-controlled
drawer and/or crisper
drawer do not close freely
I
Refrigerator runs too
frequently
POSSIBLECAUSE
Contentsof drawer,or positioningst itemsin
the surroundingcompartmentcould be
obstructingdrawer
Drawer is not in proper position
Refrigeratoris not level.
Drawerchannelsare dirty or need treatment.
Doorshave beenopened frequentlyor have
beenopenedIor longperiodsoftime,
Humidityor heat in surrounding aiea is h!gh_
Foodhas recentlybeen added
Refrigeratoris exposed to heat by
environmentor by appffancesnearby.
Condensercolts are dirty.
Controlsneed to be adjusted
Door is not closingproperly
SOLUTION
See drawer sectionin RefrigeratorFeatures to properly
installdrawers
Door gaskeis arenot sealing properly
See levelinginstructions in installing Your Refrigerator.
Apply a thinlayer of petroleumjellyto drawer channels.
Reducetime dooris open Organize food itemsefficiently to
assuredooris open for as sho_ta timeas possible.
I AHowinterior environmentto adjust for periodthe door has
been open.
Normal operation.
AIIowtime for recently-addedfood to reach refrigeratoror
freezertemperature,
Evaluateyour refrigerator's environment See tocation
select!onsec!!on!n #tsta!!!ngYourRefriqerator,
Cleanaccording to cleaning instructionsin Hints and Care.
See temperaturecontrofssection in instalfing Your
• Refri_eratortoadjust your controls.
see leveling instructionsin Installing YourRefrigerator.
Check for internalobstructionsthat are keeping doorfrom
closingproperly (i e improperlyclosed drawers,ice buckets,
oversized or improperlystored containers or foodstuffs,etc.).
Cleanaccordingto cleaning instructionsin Hints and Care
m
Z
r"
mira
:3::
IcEANDWATEr
Water appears cloudy
Particiesin water
and/or ice cubes°
No indicator lights
are lit on dispenser
control
Neither ice nor water is "
dispensedwhen pads are
pushed
Air or air bubblesin water
Carbondust fromwater filtercartridge
Concentrationsof mineralsinwaterwillform
particleswhenwaterbecomesfrozenandmelts.
Freezerdoor is not closed
Refrigeratoris not plugged in.
Fuse is blown, orcircuit breaker needs to be
reset.
POwerOutagehas occurred.
Refrigeratoris in Sabbath Mode.
This is normal whenfirst using dispenser and wi!ldisappear
with use.
Initial water ejected through cartridgemay contain harmless
carbondust flushed fromcartridge Particles are safe for
consumption.Will disappearafter the first few uses.
Particles are not harmful and naturallyoccur in water
supplies. .....
Verify that freezer door is closed Power is removedfromthe
controlwhen |raezerdooris opened.
Ptug in refrigerator.
Replaceany blownfuses Check circuitbreakers for any
tripped circuits.
Call local powercompany listing to report outage.
See Dispenser Features section for further information.
Freezer door is notclosed _ Verifythat fieezei dooi is ciosed Power iSiem0ved fromthe
controlwhenfreezer door is opened,
Controls are in lock mode. See control instruclions in Dispenser Features,
Watertank isfilling, At initial use,thereis an approximate45-second delayin
dispensingwhife the internalwater tank istiffing.
Ice maker or ice maker-equipped refrigerator Wait 24 hoursfor ice productionto begin and for icemakerto
hasjustrecently been installedor a targe restock after emptied
amount of ice hasjust been used.
Water filter is cloggedor needs to be
changed.
Ice maker hasjustrecently been installed or
a large amount of ice has justbeen used.
Water pressureis too low
Change water filter
, ,, ,, , ,,, ,_ , , ,, , , ,,, ,
Ice maker is not Wait24 hoursfor iceproduction to begin and for ice maker to
producing enough ice restock after emptied.
or ice is malformed Low waterpressurecan cause valve to leak Water pressure
must be between 20 to 100poundsper squareinchto function
properly A minimumpressureof 35 pounds per square inchis
recommendedfor refrigeratorswith water filters.
Water filter is clogged or needs to be Changewater _ter
changed
27
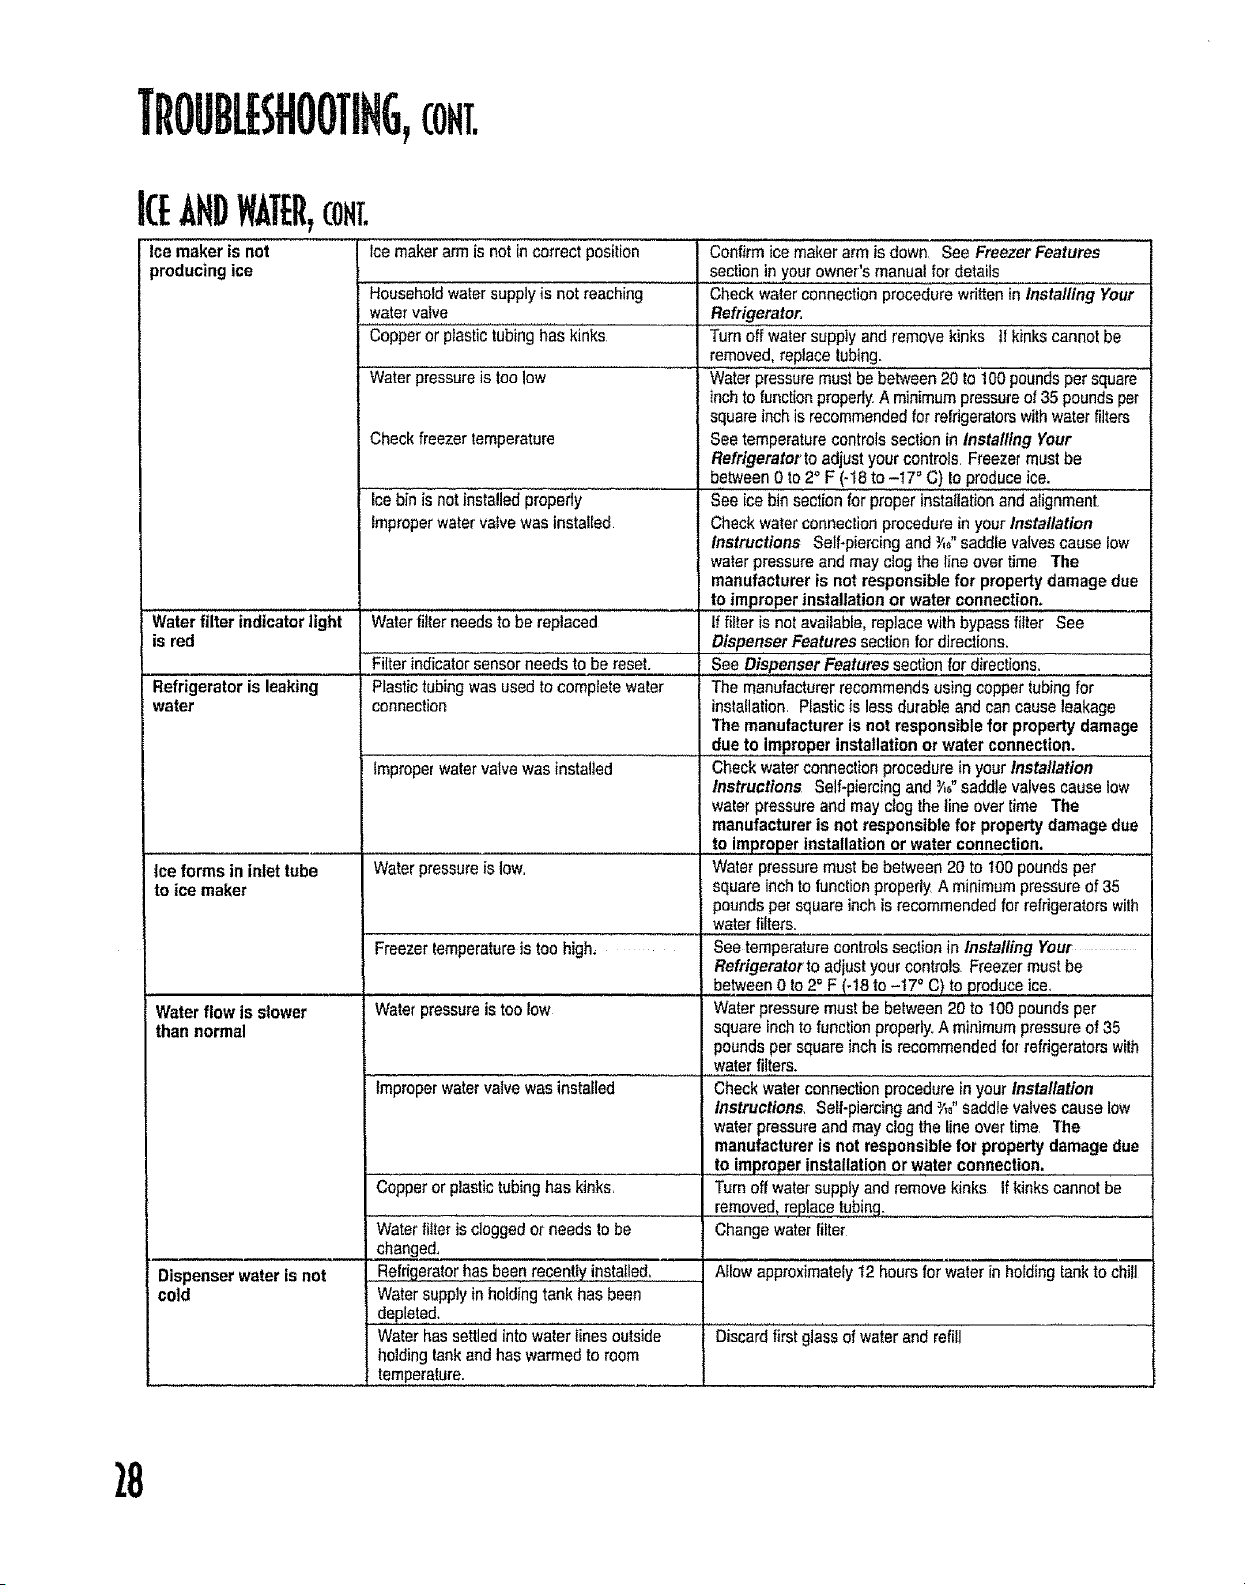
TROUBLESHOOTIHG,(ONT.
ice maker is not
producing ice
ANDWATER,com.
Ice makerarm is not incorrectposition
Householdwater supplyis not reaching
water vaIve
Copper or plastictubing has kinks
Water pressure is too low
Check freezer temperature
icebin is not installed properly
improperwatervalvewas installed
Confirm ice maker arm is down See Freezer Features .........
sect!0nin your owner's manual for details
Check water connection procedure written in Installing Your
Refrigerator.
Turnoff water suppiy and remove kinks ttkinks cannot be
rem°ved._..[ep!acetubing
Water pressuremustbe between 20 to100 poundsper square
inchto functionproperly A minimumpressureof 35 pounds per
square inch is recommendedfor refrigeratorswithwater filters
Seetemperature controls section in Installing Your
Refrigeratorto adjust your controls. Freezer must be
between0 to 2+F (-18 to -17 ° C) !o produceice.
See ice bin section for proper installation and alignment.
Check water connection procedure in your Installation
Instructions Self*piercingand _'m"saddle valves causelow
water pressureand may clog the line over time The
manufacturer is nat responsible for property damage due
Waterfiller needs to be replaced
Filterindicatorsensor needs to be reset.
Plastictubingwas usedto complete water
connection
......................... to improper installation or water connection,
Waterfilter indicator light If fiiter is not available, replace withbypass filter See
is red Dispenser Featuressection for directions.
See Dispenser Features section for directions.
Refrigerator is leaking The manufacturerrecommendsusing copper tubingfor
water installation.Plastic is less durable and can cause leakage
The manufacturer is not responsible for property damage
.....due.to .!mproper installation or water connection. .......................
improper water valve was +nstafled Check water connection procedurein yourInstallation
Instructions Self-piercing and _,_"saddle valves cause low
water pressureand may dog the line over time The
manufacturer is not responsiblefor property damage due
to improper installationor water connection.
Waterpressureis low. Water pressuremust be between 20 to 100 pounds per
Allow approximately12 hoursfor water in holding tank to chili
Discard firstglass of waier and refill
ice forms in inlet tube
to ice maker
Water flow is slower
than normal
Freezertemperatureis too high,
Water pressureis too low
improperwatervalve wasinstalled
Copperor plastictubinghaskinks.
Waterfitter is cloggedor needs to be
changed:
Befrigera!or has been recent!Yinsta!led, _
Water supplyin holding tank has been
depleted.
Water has settledinto water lines outside
holding tankand has warmed to room
temperature. .........
Dispenser water is not
cold
square inch to functionproperly A minimumpressure of 35
poundsper square inch is recommendedfor refrigeratorswith
water filters.
See temperaturecontrolssection in installing Your
Refrigeratorto adjust your controls. Freezer must be
between 0 to 2° F (-18 to -17". C) to produceice+
Water pressuremust be between20 to 100 pounds per
square inchto function properly.A minimum pressureof 35
poundsper squareinchis recommendedfor refrigeratorswith
water filters.
Check water connection procedure in your installation
Instructions. Self-piercing and _A_"saddle valves causelow
water pressureand may clog the line over time The
manufactureris not responsible for property damagedue
.....to !mproper..!nsta!!ation or water connection...
Turnoff watersupply and remove kinks if kinks cannot be
removed,re lace tubin.
Changewater filter
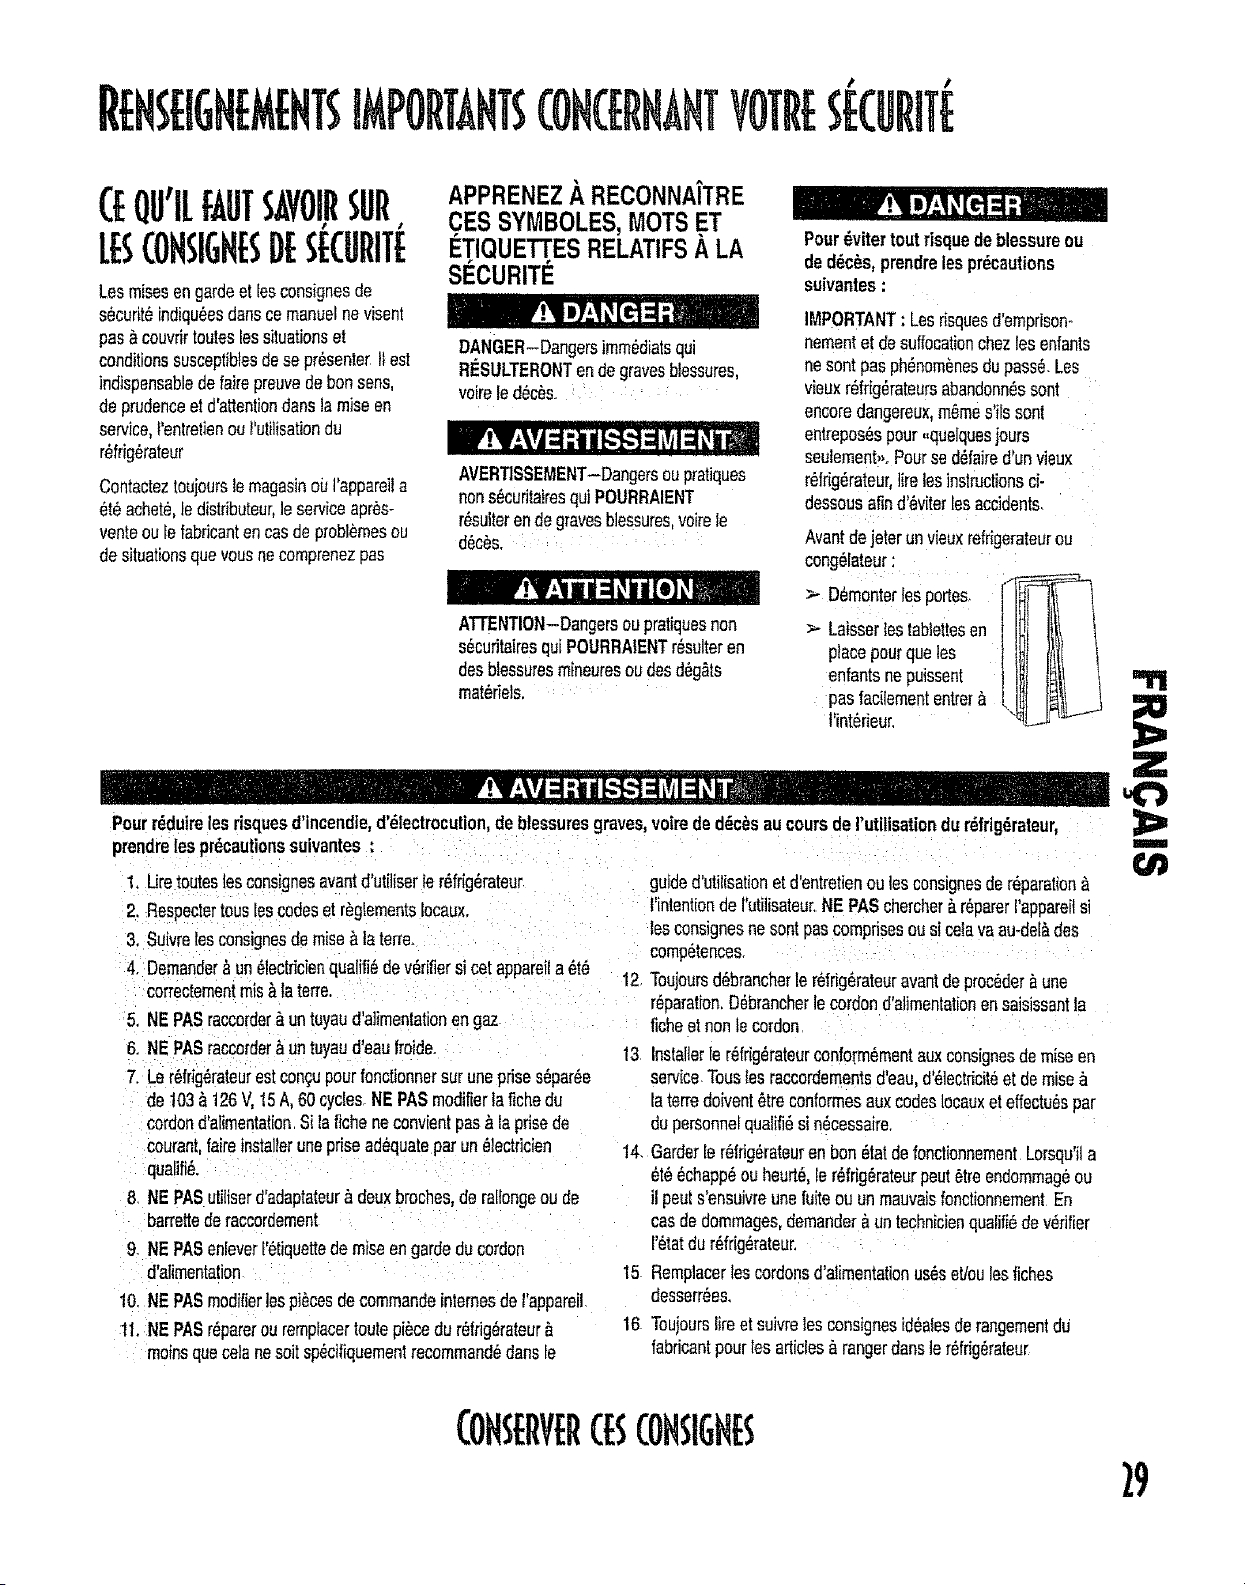
(EQU'ILfAUTSAVOIR$UR,
LEs(ONslGHESDEsKURITE
Lesmisesengardeet fesconsignesde
securit6indiqu_esdensce manuelnevisent
pas_couvrirlouteslessiluafionsel
conditionssusceptiblesdese pr6senter.Itest
indispensabledefairepreuvedebonsens,
deprudenceetd'attentiondenslam]seen
service,I'enlrelienout'utilisationdu
r6frig_rateur
Contactezloujourslemagasinout'appareila
_16achet_,ledistdbuteur,le serviceapr6s-
venteou fefabdcantencasdeproblemesou
desituationsquevousnecomprenezpas
APPRENEZA RECONNA|TRE
CES SYMBOLES,MOTS.ET
IETIQUETTESRELATIFSA LA
S¢:CURITE
DANGER-Dangersimm_diatsqui
RESULTERONTendegravesbtessures,
voireled_c_s.. :
AVERTISSEMENT-Dangersoupratiques
nons_curitairesquiPOURRAIENT
r_sulterendegravesblessures,voirele
ATTENTION-Dangersouprafiquesnon
s_cudtairesquiPOURRAtENTr_sulteren
desblessuresmineuresoudesd6g_ts
mat6dels.
Pour6rite[ toutrisquedeblessureou
ded6c_s,prendreles precautions
suivantes:
IMPORTANT: Lesrisquesd'emprisono
nementet desuffocationchezlesenfants
nesontpasph6nom_nesdupasse.Les
vieuxr6frig_rateursabandonn_ssont
encoredangereux,m_mes'ils sont
entrepos_spour,,quelquesjours
seulement,,.Poursed_faired'unvieux
r_fdg_rateur,]irelesinstructionsci-
dessousafind'_viterlesaccidents.
Avantdejeterunvieuxrefrigerateurou
cong_lateur:
D_mQnterlesportes_
Laissertestabtettesen
placepourqueles
enfantsnepuissent
pas tacilemententre[
t'int6rieur.
Pourr_duireleerisquesd'incendie,d'dlectrocution,deblessuresgraves,voirededdc_saucoursderutilisation dur_frig6raleur,
prendreles precautionssuivantes:
guided'utilisationeld'entrefienou tesconsignesder6paration
I'intentiondeI'utilisateur.NEPASchercher_ r_parerl'appareilsi
lesconsignesnesontpascomprisesousi celavaau-del&des
competences.
12 Toujoursd_brancherlerefrig6rateuravanldeproc_der&une
reparation.D_brancherlecordond'alimentafionensaisissantla
1. Urerouteslesconsigneseventd'utiliserler_frig_rateur
2. Respectertouslescodeset r_glementsIocaux.
3. SuivreIesconsignesderaise_,lare[re.
4. Demander_un_lectdcienqualifi_dev_rifiersicet appareila_t_
correctementmis_.laterre.
fiche et non le cordon,
13 Installerler_frig_rateurconform_mentauxconsignesdemiseen
serviceToustesraccordementsd'eau,d'_lectficit6et deraise
laterredoivent_treconformesauxcodeslocauxeteffeotuespar
dupersonnelqualifi_si n_cessaire
14. Garderle r_trig_rateuren bon6tatdefonctionnementLorsqu'ila
_t__chapp_ouheurt_,ler_frig_rateurpeut_treendommageou
ilpeuts'ensuivreunefuiteouunmauvatsfonctionnementEn
casdedommages,demander&untechnicienqualifi_dev_rifier
rSlatdur_fdgerateur.
15 Remplacerlescordonsd'atimenlationuseseb'oulesfiches
desserr_es.
16 Toujoursfireet suivrelesconsignesidOafesderangementdu
fabdcantpour/esarticles&rangerdenster_fdg6rateur
5. NEPASraccorder&untuyaud'a]imentafionengaz
6. NEPASraccorder&untuyaud'eaulroideo
7. Ler_frig_rateurestcon_;upourfoncfionnersurunepdses_par_e
de 103&126V,15A,60cyclesNEPASmodifierla fichedu
cordond'alimentalionSila ficheneconvientpas_,laprisede
courant,faireinstalleronepriseadequateparun_lectricien
qualifi_.
8. NEPASuliliserd'adaptateur&deuxbroches,derallongeou de
barrettederaccordement
9oNEPASenfeverf'_tiquettedemiseengardeducordon
d'alimentation
10. NEPASmodifier]espi_cesdecommandeinternesdei'appareil.
11.NEPASreparerouremplacertoulepiecedu r_frig_rateur&
mo_nsquecetanesoitsp_cifiquementrecommand_dartsle
Z
m
CoNst rvErcEsCONSIGHES
(ONTRATSDEPROTECTION
COHTIL TSBEPROTECTIOH
PRINCIPAUX
AUX I TATS-UNIS
Nousvousf61icitonspourvotreachatDepar
sa conceptionetsa fabdealion,votrenouvel
appareilKenmore_vousfoumirade
nombteusesann6esdeserviceliableMais,
commetoutautreproduit,itpourrait
necessiterdesr6parationsoutravaux
d'entretiendetemps&autreC'estdansces
drconstancesqu'uncontratdeprotection
principalvousperme_ad'6vitersouciset
d6penses
Souscrivezmaintenantuncontratde
protectionprincipalpourvousprot6gercentre
lesprobl6mesetd6pensesinattendues
Lecontratdeprotectionprincipalvous
permettra_galementdemaximiserIa
!ong6vit6devotrenouvelappareiI,Voiciee
qu'ilinclut:
>- Serviceapres-ventedispens_par12,000
professionnels,sp6cialistesdes
r_parationsdesappareilsm_nagers
> Serviceapr_s-venteitlimit_,etgratuit_
(pi_ceset mair_d'ceuvre)deroutes]es
r@arationscouvertes
>- Garantiedeperformance- remplacement
dupreduitcouverts'iisubitplusdetrois
> Accesinstantan_&unserviced'aidepar
t616phone- foumitured'instructionet
d_informationnontechniquesurlos
produitsr_par_s&domicile,et fixationde
rendez-vouspourrouteintervention
> Protectioncentrelessurtensionsettes
dommagesimputablesauxfluctuationsde
t'alimentation_lectrique
> Rembeursementdesfraisde locationd'un
apparei!dartsteeasor)leproduitr6par_
n'estpasdisponible&ladatepromise
Lorsquevous_tesprot_g_pariecontratde
protection,ilsuffitd'unappelt_l_phonique
pou[demanderuneinterventionVous
pouvezt_l_phoner&toutmomentdujourou
dela nuit,oufixerunrendez-vousenligne
Searsdisposed'uneequipede12,000
professionnelssp_cialistesdesr_parations
quiontaccOs&plusde4,5 millions
d'accessoireset depiOcesdequatit&C'estle
genredeprofessionnalismesurlequelvous
peuvezcompter,et quivousaidera
maximiserfaIongL,vit_devotrenouvel
appareitpendantdesannOesSouscrivez
sansattendrevotrecontratde protection
Certaineslimitationset exclusionssent
applicabtesPourlos prixetdet'information
additionnelle,composezle 1-800-827-6655
Serviced'installationSears
Pourl'installationgarantieparlos
COHTRgt'SD't HTRETIEH
AU CANADA
Votreachata unevaleursupplementaire
parcequevouspouvezcomptersurle
HomeCentraPdeSearspourunservice
apr_s-venteAvecplusde2,400sp_cialistes
form,s&]'entretienet unacc_s&ptusde
900,000pieceset d'accessoires,nousavons
Eesoutils,lospi_ces,lesavo[retletalent
pourr_pondre&votredemande:nous
r@aronsceque nousvendons
VotreappareilKenmore*estcon;u,fabriqu_
etessay_pourvousassurerdesann_esd'un
fonetionnementliable Cependant,comme
toutappareilm_nager,il peutn_cessiterun
entretiendetemps&autre Lecontrat
d'entretienSearsvousoffreunremarquable
programmedeservice&unprixabordabte
Contratd'entretienSears
> Estvotremani_red'acheterunservice
pourdemainauprixd'aujourd'hui
>- _liminefacturesdereparationresultant
d'usurenormale
>, Fournituneassistancenontechniqueet
informative.
> Memesi vousn'avezpasbeso[nde
r_paration,vousfournituncontr61e
d'entretienpr_ventifannuel&votre
d_faillancespendantuneperiodede professionnelsSearsdetoutappareil demande,pourVousassurerquevotre
douzemois
> Rempiacementdu produitcouverts'i]ne
pout6trer_par6
> ContrSleannue]d'entretienpr_ventifsur
demandedeI'utilisateur-sansfrais
additionneI
m_nageroudeproduitcommesyst6me
d'ouverturedeportedegarageou
ehaufle-eau,auxE-U composezle
1-800-4-MY_HOME*
appareiIestenben_tatdemarche
Certaineslimitess'appiiquenlPourdeplus
amplesinformationssurlescontrats
d'EntretienSearsCanada,composezle
1-800-361-6665,
30

GARAHTIE
Garantiecompleted'uneannie surle
r_frig_rateur
Durantunep6rioded'unan&compterdela
datedel'achatinitial,Searsreparera
gratuitementcerefrig_rateurencasdevice
demati_reou defabrication,quandcet
appareilestutilisOet entretenuselonles
directivesappos_essurcetappareilou
fourniesavec
Garantiecompletedecinqanssur le
syst_mede r_frig_rationscell6
Durantunep_riodedecinqans&compterde
ladatede t'achatinitial,Searsreparera
gratuitementte syst_mescelle(quicomprend
ie r#fdg6rant,latuyauterieet temoteurdu
cempresseur)encasdevicedemati_reou
defabrication,quandcetappareitestutilis6
et entretenuselonLesdirectivesappos#es
surcetappareiioufourniesavec
Lagarantieci-dessuscouvreseulementles
r6ffig6rateursquisentutilis6spour
t'entreposaged'aliments&desfins
domestiquesseufementLescartouchesde
filtration(poureauetgla_;ons)Kenmore,de
rechangeet d'origine,nesentpascouvertes
parcettegarantieLescartouchesd'origineet
derechangesentgarantiespendant30jours,
pi_cesseutement,centretesvicesdemati_re
oudefabrication
Leserviceapr_s-venteenvertudeta
garantieestdisponibleencomposantle
1-800-4-MY-HOME_(1-800-469-4663)
Cettegarantiene s'appliqueque sice produit
esl ulilis6 aux i._tats-Unis
Cettegarantievouscon|6redesdroits
jufidiquessp_cifiqueset vouspouvez
6galementjouird'autresdroitsvariablesd'un
_tat&unautre
Sears,RoebuckandCo, Dept 817WA,
HoflrnanEstates,IL 60179
REMARQLtE:Certainssyst_mesd'eau
domestiques&osmeseinverseprovoquent
unebaissedetapressiond'eauUne
pressiond'eaubassepeutaflecterlesyst_me
dedistributiond'eauet degla;onsen
produisantdesgla_onspetitsoucreuxet
ralentitted_bitd'eauaudistributeurLes
probI_mesdelonctionnementii6sausyst_rne
d'eau&osmoseinversenesentpascouverts
partagarantie
EF!flEGISTflEMEFITDU
PflODUIT
Veuitlezinscdredanet'espaceci-dessous}e
num_rodemodeleet Ienum_rodes_rie
ainsiqueladated'achatdur_ffig_rateur,
Veustrouverez!'#tiquettecomportantIe
num_rodemod61eet lenum_rodes_rie&
I'interieurdur_ldg_rateursurla paroigauche
Num6rode mod_,le: 596
Num_rodes_rie"
Dated'achat
Conservezce guideetle re_uSearsdens
unendroitsGrpourvousy reporter
ult6rieurement,
=1'!
Z
m
31
32
Renseignementsimportantsconcernantvotres_curit_.....................................................29
Cequ'il fautsavoirsurlesconsignesdeaecurit6................................................. 29
Contratsde protection............................................................................... 30
Contratsdeprotectionprincipaux- aux_tas-UNIS............................................... 30
Contratsd'entretien- auCanada............................................................ 30
Garantie.......................................................................... 3!
Enregistrementdu produit................................................................... 31
Installationdur_frig_rateur......................................................... 33-38
Mesuredel'ouveflure................................................................................ 33
Transportdur_frig_rateur................................................................. 33
Choixdumeitteuremplacement............................................................................. 33
D_poseel posedespoign_es........................................................................... 34
Retraitdesporteset deschami_res............................................................... 34
Remontagedesportes.................................................................................. 35
Posedepanneauxdeported_coratits................................................................. 36
RaccordementdeI'alimentationen eau.................................................................. 37
Mised'aplombdur_fdg6rateur........................................................................... 38
R6glageetmaintiendesbonnestemperatures....................................................... 39
R6glageinitial............................................................................................. 39
R6glagedescommandes.............................................................................................39
Conservationdesaliments............................................................................ 39
Filtre_ eau................................................................................................ 40-41
D_poseet installationdufiltre&eau............................................................................40
Caract_ristiquesdes filtres&eau..................................................................................41
Caract_ristiques- compartimentr_frig_rateur..........................................................42-43
Etag_resint6rieures.................................................................................... 42
Rangementdansla centre-porte...................................................................... 42
T_roirset bacs®lagehygrom6tdque................................................................... 43
Bacsde rangement...................................................................................................43
Caract_ristiqaes- compartimentcong_lateur...................................................................44
Machinebgta_onsautomatique................................................................................44
Bacderangement.............................................................................................. 44
Baiconnetrangement..............................................................................................44
Caraet_ristiquesdudistributeur....................................................................... 45-49
Lumi_redudistributeur..............................................................................................45
Touchedudistributeur.......................................................................................................45
Plateauamovible..........................................................................................................45
Fonctionnementdudistributeutd'eau........................................................................................45
Contr61eztesdispositifsdescinqboutons..........................................................................46
Dispositifselec[roniquedecommande.....................................................................47-49
Conseilsetentretien......................................................................................................................50-5I
Nettoyagedurbfrigerateur..........................................................................................50
D_sedorisaliondu r_frig_rateur.......................................................................................51
ConseifspourI'_conomied'_nergie................................................................................5t
Remplacerleaampoutes_lectriques...........................................................................51
Bruitsnormaux...............................................................................................................52
Diagnostic........................................................................................................................53-54
Fonctionnement .......................................................................................................53-54
Gia_ns et eau .................................................................................................................54-55
Espafiol..................................................................................................................................57
Service................................................................................. Derni_redecouverture
t
IHsTALLATIONDUrefrIG Ur
Cesinstructionssentdestinies&vousaider
&insta]lercorrectementvotrerefdg_rateur
MESUREDEL'OLIYERTUR[
Eninstallantvotrerefrig6rateur,employezsi'l
vouspta[trediagrammeci-dessouspourdes
conditionsd'espacement
Lesrev_temenlsdesot(tapis,carreaux,bois)
peuventdiminuer!asdimensionsde
f'ouverture
Und6gagementsupp16mentairepout6tre
obtenuen ayantrecours_}amethode
present6edenslasectionVise #aplomb du
refrigerateur(page38)
Volume
totalde
I'appareil
Mainsde
6,5m_
Plusde
6,5m=
D_gagement
recommand_
Haut'"!"Cot_s i Arri_re
I
s.o I so 13mm
i
t
13mini so 13ram
IMPORTANT: Sile r_frig_rateurdoit_tre
installS,dansuneenceinteo2 sapattie
sup6rieuresetrouveraitcompl6tement
recouvert,mesureztadistanceentrele
plancheret lehautducache-charni6repour
v_rifierleband6gagement
Suivezcosconseilspourd_placerle
refrig_rateur&sonemplacementd_finitif
> NEtransportezJAMAISler_lrigerateur
surtecote £'iln'estpaspossibledele
metlre&leverticate,posez-lesurl'arri_re
Laissezter_fdg_raleurala verticale
pendantenviron30minutesavantdele
brancharpour_trest3tquat'huilerevienne
aucompresseu_Lebranchement
imm_diatdurefrig6rateurpeurrait
endommagerlespi_cesinternes
> Servezwousd'unchariotoudiabtepour
d6placerle r6Ng6rateurFaites
TOUJOURSfairereposertec6teou
sondes,JAMA|Sdesonavant
> Prot6geztefiniext_rieurdur_frig_rateur
tarsdutransportenenvetoppantlacaisse
decouverturesouenajoutantdu
rembourrageentre{er_frigerateuret le
diable
Assujet_ssezfermementler_ffig_rateurau
diable&l'aidedesang_esoudecordons
#lastJques.Fa_tespasserIassanglasparlos
poign_es,sipossibleNEserfezPAS_op.Un
serrageexcessifpourraJtendommager
t'ext6deurdufini
Respectezcesconsignes1orsdelaselection
det'emptacementd_finitifdu r_frigerateur:
> N'installezPASler_frig#rateurpr&,sd'un
four,radiateuroud'uneautresourcede
chaleurSicetan'estpaspossible,
prot_gez4eavecdumaledaude f'armoire
NEf'insta!lezPASdensunendroitoufa
temperaturedescendendessousde
13°C(55°F) ,gcettetemperature,i1
poutraitrealfonctlonner
Suivez1asinstructionssurtarnise
d'aplombfoumiesdensla sectionVise
#aplomb du refrig_rateurpourqualos
portesseIarmantcorrectement(page38)
"11"1
Z
m
33
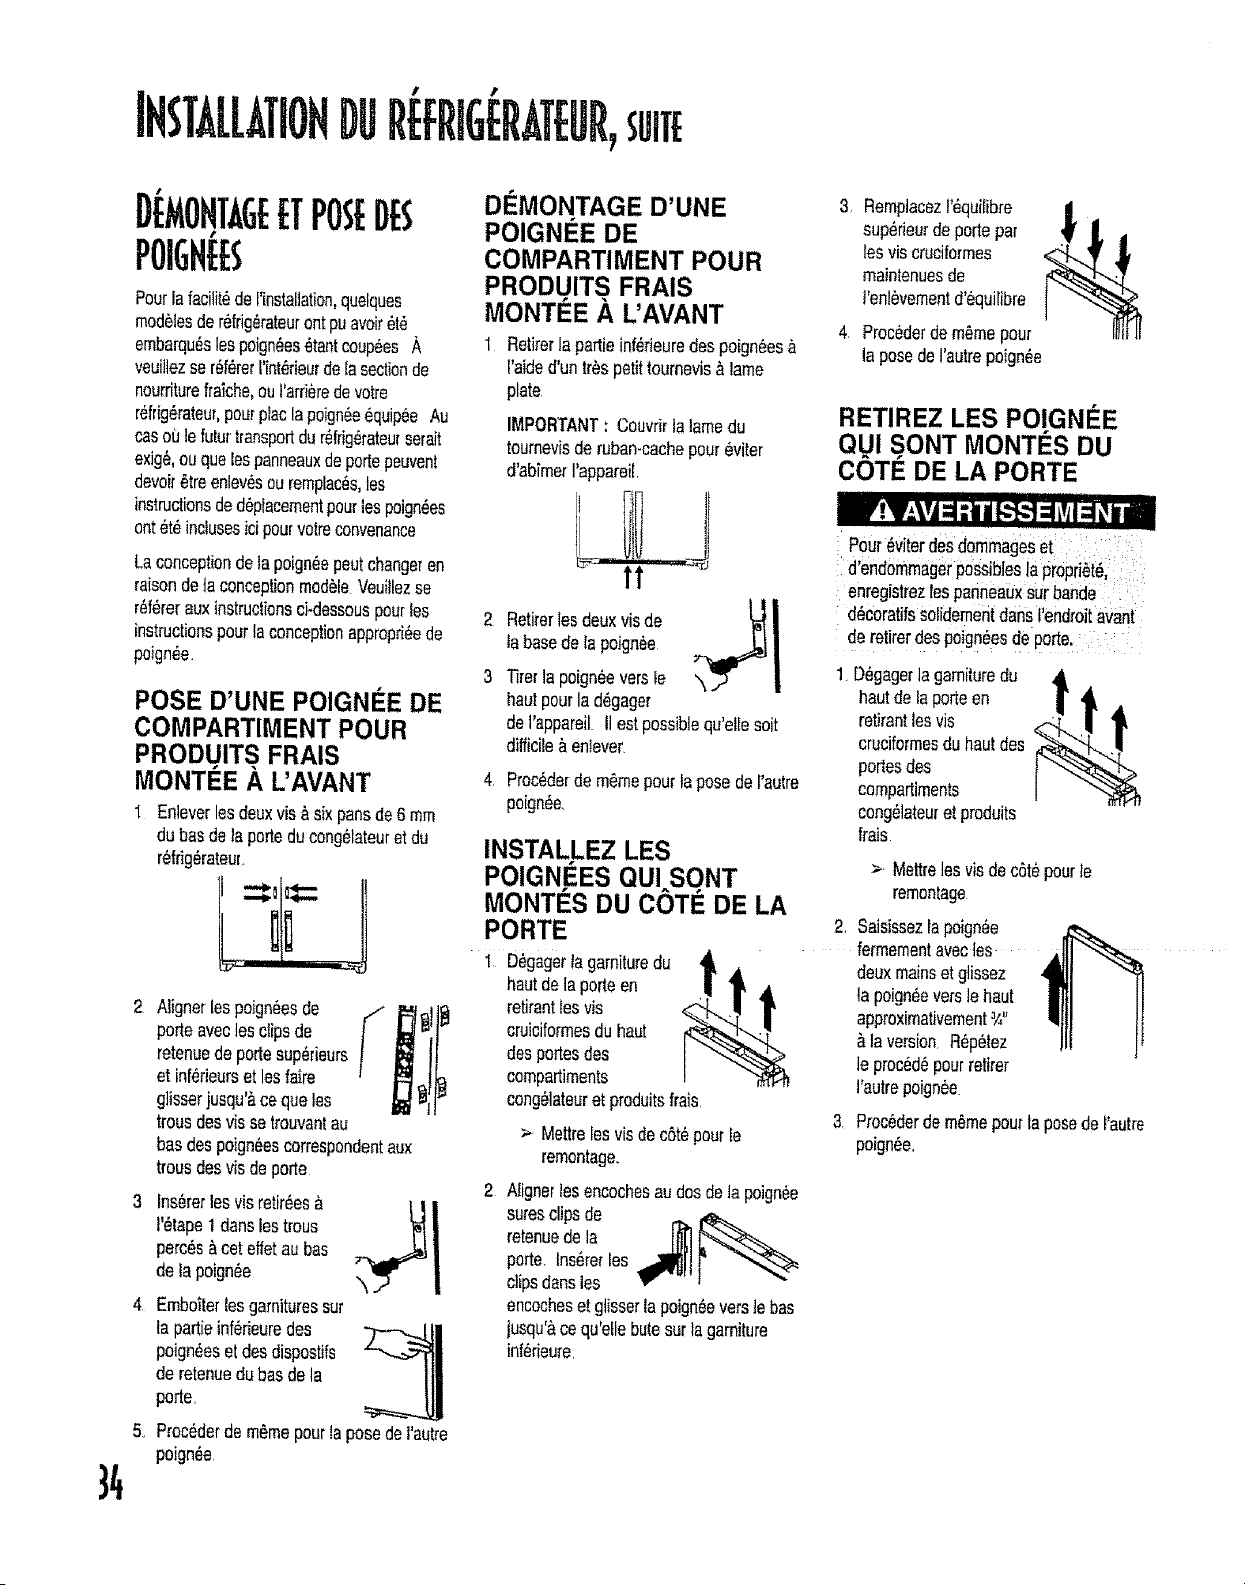
IHSTALLATIOHDUR FRIG :RAT[UR,sunE
D MOHTAGE£TPOSEDES
POIGH[E ;
Pour[afacifitdde['installation,quelques
rr_dblesder,_i£drateurontpuevoir_td
embarqu_slospoigndesdtantcoupdesA
veui]lezser_fdrer['int_deurdeIasectionde
nourfiturefraiche,ouI'arri_redevotre
refr[gdrataur,pourp[aclapoignde6quip6eAu
casoL_]e futurtransportdur_Ngdrateurserait
exig&ouqua[espanneauxdeportepeuvent
devoir_treeniev_sourempiac_s,tes
instructionsdeddp[acementpourlospoign_es
ontdtdinclusesicipourvotreconvenance
Laconceptiondelapoign_epoutchangeren
raisonde]a conceptionrned_le.Veuillezse
rSfdrerauxinstructionsci.dessouspourlos
instructionspourlaconceptionappropd_ede
poign_e
POSE D'UNE POIGNC:EDE
COMPARTIMENT POUR
PRODUITS FRAIS
MONT#E ,& L'AVANT
I Enieverlosdeuxvis_sixpensde6 mrn
dubasdelaporteducong_lateuretdu
re_rig6rateuL
'i-- tr
34
4
Aligner[espoign_esde ,../
porteavec]esclipsde
l
retenuedeportesup_rieurs
et inf_rieurset leetaire
glisserjusqu'_cequales
trousdesvissetrouvantau
basdespoign6escorrespondentaux
trousdesviedeporte
InsUrerles visretir6es_.
l'_tape1daneleetrous
perc_s&coteffetaubas
dela poign_e
Ernbo]terlosgarnituressur
la partieinf_rieuredes
poign_eseLdesdispostifs
de retenuedubasdela
po_e,
Proc6derdern6mepourlaposedei'autre
poign6e
DF.MON,TAGE D'UNE
POIGNEE DE
COMPARTIMENT POUR
PRODUITS FRAIS
MONTi_E .& L'AVANT
l Retirerlapartieinf_rieuredespoign_es
I'aided'untr_spetittournevisAlame
plate
IMPORTANT: Couvrirlalamedu
toumevisde ruben-cachepour_viter
d'abirner]'appareii
H
2 Retirerlesdeuxvisde _-} !
labasedeIapoignee
!
3 l_rerlapoigneeversie
hautpourlad6gager
del'appareiLIIestpossiblequ'etlesuit
difficile_.entever.
4. Proc6derdern6rnepourlaposedeI'autre
po[gn6e.
INSTALLEZ LES
POIGNEES QUI SONT
MONTES DU COT_. DE LA
PORTE
i D_gagerla garnituredu ,l_
hautdelaporteen !
retirentleevis
cruiciformesduhaut
desportesdes
compartiments
cong_lateuretproduitsfrais.
> Mettrelosvisdec6t6pourie
remontage.
2 Alignerlesencochesaudosdelapoign_e
suresclipsde r_
retenuedela l|itl
porte_Ins6rerlos
clipsdensles
encocheset gtisserlapoign_everste bas
jusqu'&cequ'e[lebutesurlagarniture
inf_rieure
3. Rernplacez1'6quilibre
sup6rieurdeportepar
losviscruciformes
maintenuesde
t'enl#vernentd'6quilibre
4 Procederdem_mepou_
laposedeI'autrepoign#e
RETIREZ LES POIGNI_E
QUi SONT MONTF.S DU
COTIe DE LA PORTE
Pour#Viterdesdommageset :: :
d'endornrnagerpOSsiblesla propri6t6,:
enregistrezleepanneauxsurbande.: i
d6coretifssolidernentdaneI'endroitevent
deretirerdespoign_esdePOrt&''
1.D_gagerlagarnituredu _ .
hautdeleporteen
retirantlosvis
cruciforrnesduhautdes
portesdes
cornpartirnents
cong_lateuret produits
frais
2,
> Mettrelesvisdec6t6pearte
rernontage
Saisissezlapoign6e
fermernentavectes
deuxmainset glissez
la poign6evers]ehaut
approxirnativement_/,"
&laversion.R_p_tez
le proc_d_pourrotifer
I'autrepoign6e.
Proc6derdern6rnepourta posedeI'autre
poign_e.

Certainesinstallationsexigentleretraitdes
portesavantded6placerler6frig_rateur&son
emp}acementfinal
Pour6viterdosbfessuresgraves,voirele
d_c6s,observerfespointssuivants:
• D6brancherter6[rig6rateuravantde
d6montertespertesLerebrancher
uneloislosportesremontees
uniquement.
• Lefilderaise_latorteveildolt_tre
:fix6_lacharni_resup6rieurependant
led_montageetleremontagedes
portes,
. Fixerteapanneauxd6corafifs(certains
mod_Ies)enplace&I'aidederuban
adh6sifavantded6rnonterlos
poign_ea.
Pour6viterd'endommagerleproduit,
voireled6c_s,observerleapoints
suivants: : ,
> Pr0t6gerlesplanchersenvinyle
soupleouautrerev6tementdesol
avecducarton,untapisouautre
mat_rietdeprotectionavantde
d6placerler6fdgerateur,
>. Nepasutiliserd'outils6lectriquesIors
delamisedeniveauafindenepas
risquerd'endommagernibriserle
boulonder6glage.
NE PASr6gterl'appareil_unehauteur
in|6rieure_ 1,74rn(charni_reel
couvre-charni6renoncompds)car los
composantsdudessousdel'appareil
risqueraientdese trouver
endommag6s.
Retirerla grilleet lescouvre-chami_res
inf6rieurs
>- Ouwirlos deuxportes&180°,ouaussi
grandquepossible,pourlead6monter
Toutenserrantlecoltierblanc(A)au
connecteurbIeu(B),tirezlalignepour
I'eauduconnecteur
IMPORTANT: Avantd'ins6rerlalignepour
I'eauclansle connecteur,d_coupezla
tuyauterie_la prerni_relignedisponiblesur
tatuyauterie.
3 Retirerle couvre-charni_resup_rieur
apr_savoiren_ev6laviscruci!orrne
%
4, Formertesportes
5 D6visserlosvis&sixpans_/_podes
charni6ressup6rieures
, NE PASenleverlefi!demisea ta
terrevertoulaviacentratede
raccordementdufil
6 Detacherleharnaisderaccordernentdu
fil principal D6tacherleharnaisde
c&blagerouge
> Utiliseruntoumevis&lameplateouun
onglepourappuyersurtepointde
jonctionentrelesdeuxconnecteurs
afindelesd6gager
> Appuyer sur Ia patte se trouvant sur le
dessous duconnecteur pourd_gager
celui-ci
"11'1
7 Enlever?escharni_ressup_rieuresen
m_metempsque_esportes Z
8 Enleverteachami6resinf_deuresavecun
tourne-_creuhexagonalde_/,po
fl[: OHTAGEDESPOflTES
> Pourremonterlesportes,suivredans
I'ordreinverselos6tapesindiqu6essous
tasectionRetraitdes Porleset des
Charnieres.
IMPORTANT: Avantd'insOrerlalignepour
l'eaudansle conneeteur,d_coupezla
tuyautefle_ lapremi6relignedisponiblesur
latuyauterie
35

!NSTALLATt{JNDUR[:I:RIG[RATEUR,sum
PO$[i)[PANHEAIJXDE
#
PORTEDti(ORATIFS
Afind'_vil6rtousrisquesdeblessuresou
ded_g_ts,fixerlespanneauxdOcoratifs
(certainsmodules)enplace&t'aidede
rubanadhOsifavantded_monterles
poign_esi
...... ;<: : :
Afind'+vitertoutesblessuresou
d_g,_ts,observerles pointssuivants:
>+Lespanneauxducompartiment
r+fr[g+rateurnedoiventpaspeserplus
de 14kgetles panneauxdu
compartimenteong_1ateur7 kg
>- Prot_gerlesplanchersenvinyte
soupleouautremat_riau&I'aidede
cartons,demorceauxdemoquetteou
d'autrematOriauprotectaur.
> Porterdesgantsafindeseprot_ger
lesmainsetles bras.
REMARQUE:
> PourOviterquelasurfacedetaportene
r _ • . T .
se t ouveerafca,recouvnrI ameredes
rebordsdespanneauxd6coratilsderuban
cache
>Mettre routeslesvisdec+t6etles
r+uttser&eur emplacementd'origine
Dimensionsde panneauxde 6 mm
d'_paisseur
ModUlesa porte
surdimensionn_e
Portedu
compartimentpour
produitsfrais
Portede
cong_lateur
!superieur
distdbuteurd'eau
iet de g!a_:gns
Podede
congetateur
inf_rieur
distributeurd'eau
st de g!a?ons
Portede
cong_lateursans
d]stributeur
HauteurduLargeurdu
panneau panneau
169,5cm 48,tcm
46,0cm 35,4cm
81,5cm 35,4cm
169,5cm 35,4cm
POSE DES PANNEAUX
t Retirerlesvisdelagarnituresup_rieure
de]a porte&l'aided'un toumevis
cruiciformeet fa retirer "_ t--_t
2 FaireglisserLapoign_evers
le hautjusqu'&cequ'eIlese
d_gage Tirerpourlaretirer
de]a porte,
3 Retirerlesattaches _ _._
de]a porte&l'aide
d'untoume-ecrou
hexagonalde7_po
4 Faireglisserlebasdespanneauxdansta
garnituredubasdeIaportejusqu'&ce
quelec6t_chami_resdupanneau
d_coratifreposesouslagarnitureduc5t6
charni_res
IMPOR]'ANT: Fixerlehautdes
panneaux&la porte&t'aidede ruban-
cachepouremp6cher]espanneuxde
tomber+
5 Remontertes _ ,_
attachesdela porte
&]'aidedu toume-
ecrouhexagonalde
y,po
6 Remonterlapoign_een[ns'_rantles
attachesdela portedartslesencochesau
dosdelapoign_e
> Fairecoulisserlapoign6everslebas
jusqu'&cequ'ellefassecontactavecla
garnitureinf_rieure
7 Enleverleruban-cache
duhautdespanneanx
avantderemonterla
garnituredeporte
sup_rieure&l'aidedes
viscruciformesrefir_es
&I'_tape1
DI MONTAGE DES
PANNEAUX
1 Retirer]asvisdelagarnituresup_rieure
dela porte&l'aided'untoumevis
cruciformeet laretirer.
IMPORTANT: Fixerlehautdes
panneaux&Isporte&I'aidederuban-
cachepouremp_cherlespanneuxde
tomber
t
FairegIissertapoign_evers
lehautjusqu'ace qu'e!tese
d_gage+"5rerpourla retirer
delaporte
Retirerlesattaches r_ [_--..
delaporte.4I'aide
d'untoume-ecrou
po,
Enleverlembancacheafindepouvoir
sortirlespanneauxdelagarnitureenles
faisantcoulisser
5. Continuerensuivantles_tapes5, 6 et7
pourremettrela poign_eet +agarnitureen
place.
}6
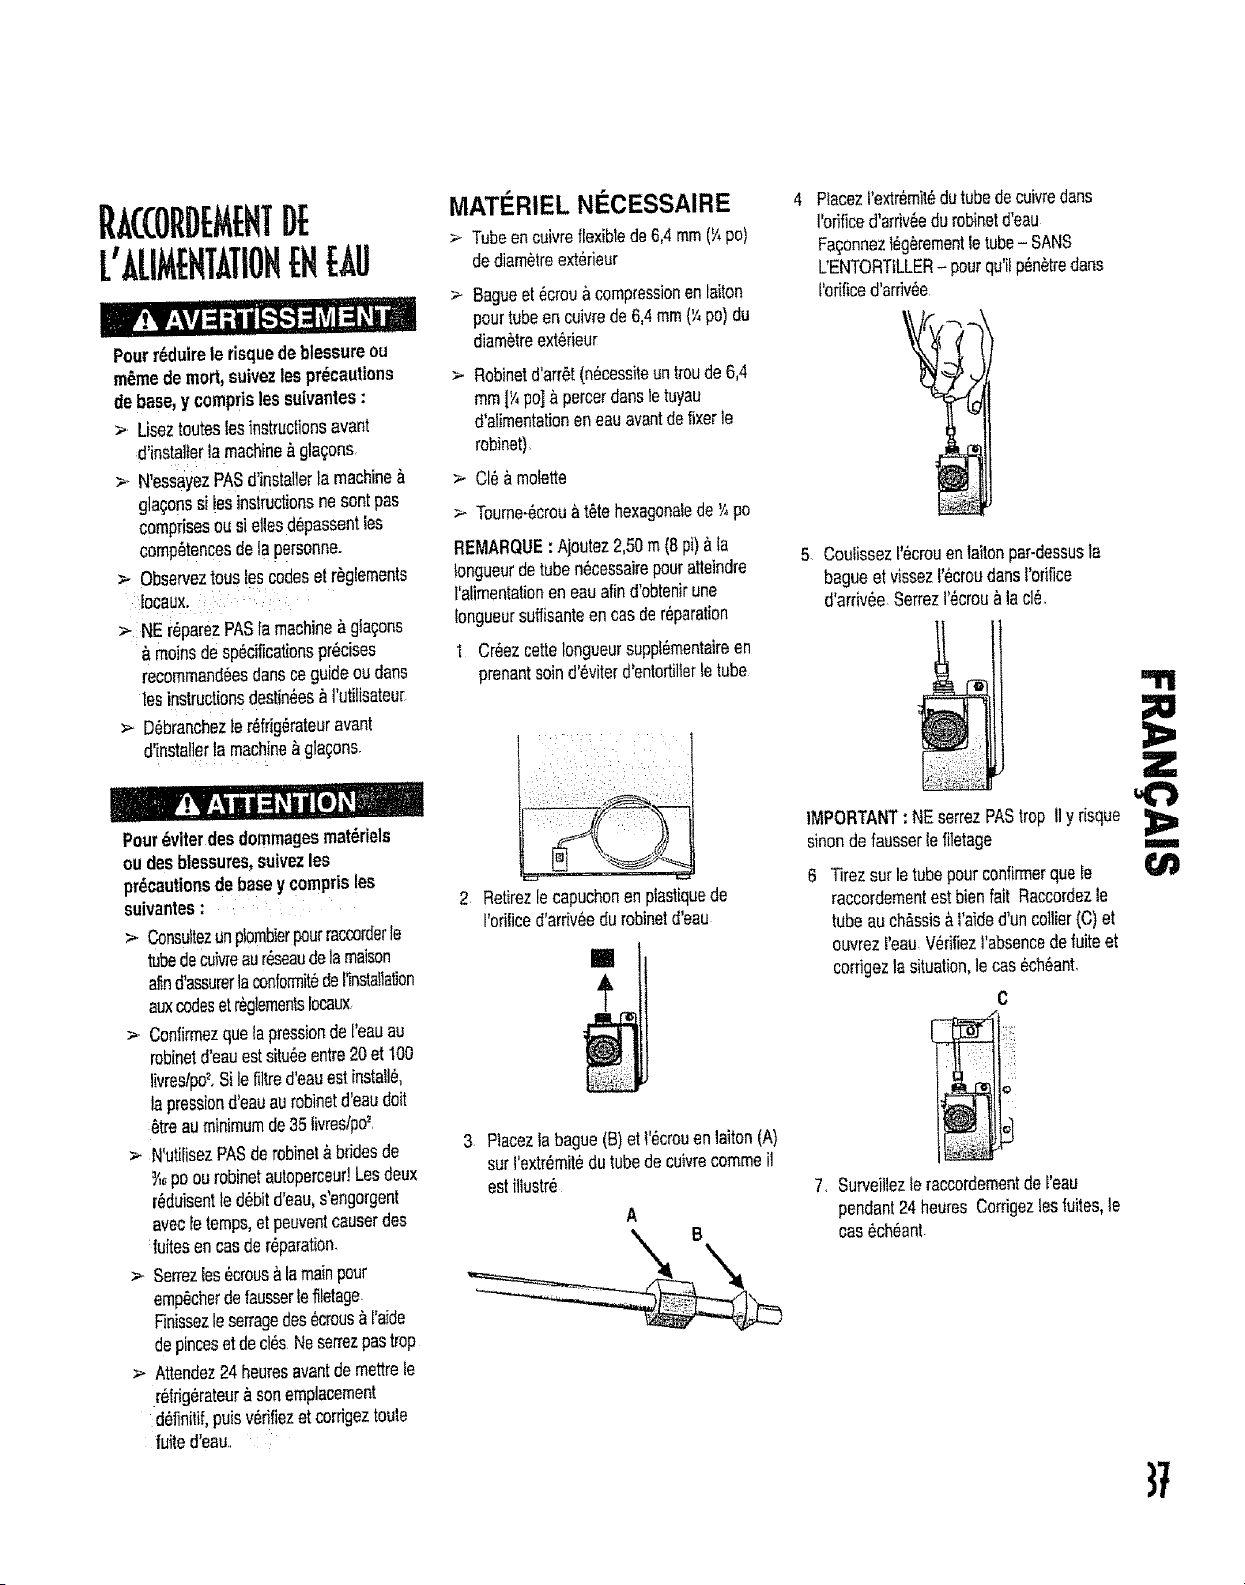
P,ACCOiIDr MEBTDE
L'ALIMENTATIOBEl!EAU
Pourrdduirele risquedeblessureou
m_mede mort,suivezlesprecautions
debase,y comprislessuivantes:
> Useztouteslesinstructionsavant
d'insta]lerlamachine_gla_ons
>. N'essayezPASd'installerla machine
gla_;onssi lesinstructionsnesentpus
comprisesousi stiesd@assentles
comp_tencesdetapersonne.
> Observeztoustescodeset r_gfements
Iocaux.:
>-NE r_parezPASlamachine&gia{)ons
#,moinsdespecificationspr_cises
recommand_esdartscaguideouduns
tesinstructionsdestinies&I'utilisateur
> D_branchezle r_frig_rateuravant
d'instalierla machine&platens.
Pourdviterdesdommagesmateriels
oudesblessures,suivezles
precautionsde baseycomprisles
suivantes:
> Consultezunplombier_ur raccorderte
tubedecuMeaur_seaudetamaison
aEqd'assurerfaconfomTit_def_nslaflalbn
auxcodesetrL=glementsIocaux
> Confirmezquelapressionde{'eauao
robinetd'eauestsitu_eentre20et 100
livmstpo_,Sile tiltred'eauestinstall&
lapressiond'eauaurobinetd'eaudoit
_tre auminimumde35 livres/po=,
._.N'utilisezPASderobinet&bridesde
._;_poourobinetau_epemeur!Lesdeux
r_duisentted_bitd'eau,s'engorgent
avecIetemps,et peuventcauserdes
luitesencasder_paration.
> Sermzles_crous_ lamainpour
emp_cherdefausserlefi!etage
Finissezlesen'agedes_crous_1'aide
depincesetdecl_s.Neserrezpustrop
> Attendez24heuresavantdemettrele
r_.fdg6rateur_sonemplacement
d_finitif,puisv_rifiezet cordgeztouts
fuited'eau..
MATI RIEL NECESSAIRE
> TubeencuivreflexibledeG,4mm(_ po)
dediam_treext_rieur
> 8agueet _crou#,compressionenlaiton
pourtubeen cuivrede6,4mm(y,po)du
diam_tree×t_rieur
>. Robinetd'arr_t(n_cessiteuntroudeG,4
mm[_',po]#,percerdartstetuyau
d'atimentationeneauavantdefixerle
robinet).
CI__.mofette
>- Toume-_cmuat_tehexagonaledeY,po
RE;MARQUE: Ajoutez2,50m(8pi)_ta
Iongueurdetuben_cessairepouratteindm
l'alimentationeneauafind'obtenirune
fongueursuflisanteencasder_paration
1 Cr_ezcetteIongueursuppl_mentairean
prenantsoind'6viterd'enturtilferletube
2 Retirezlecapuchonenplastiquede
I'odficed'arriveedurobinetd'eau
[]
3 Ptacezfa bague(B)et l'ecrouenlaiton(A)
surI'extremit_dutubedecuivrecommeil
esti?lustr_
4 P_acezl'extr_mit_dutubedecuivredans
lbfificed'arriv_edurobinetd'eau
Fa;onnezl_g_rementletube- SANS
L'ENTORTILLER- pourqu'ilp_n_treduns
('orificed'arrivee
5. Coulissez1'6cmuenlaitonpar-dessusla
bagueet vissezt'#croudunsl'orii]ce
d'arrivee.SermzI'_crou,_iacl_
IMPORTANT:NEserrezPAStrop 11y risque
sinondefausserlefiletage _==m=
6 Tirezsurletubepourconfirmerquate
raccordementestbienfait Raccordezle
tubeauchassis#,l'aided'uncollier(C)et
oovrezI'eau.V_rifiezl'absencedefuiteat
corfigezIssituation,lecas_ch_ant.
C
7, Surveiliezleraccordementdereso
pendant24heumsCordgez!as{uites,le
cas_ch_ant
37
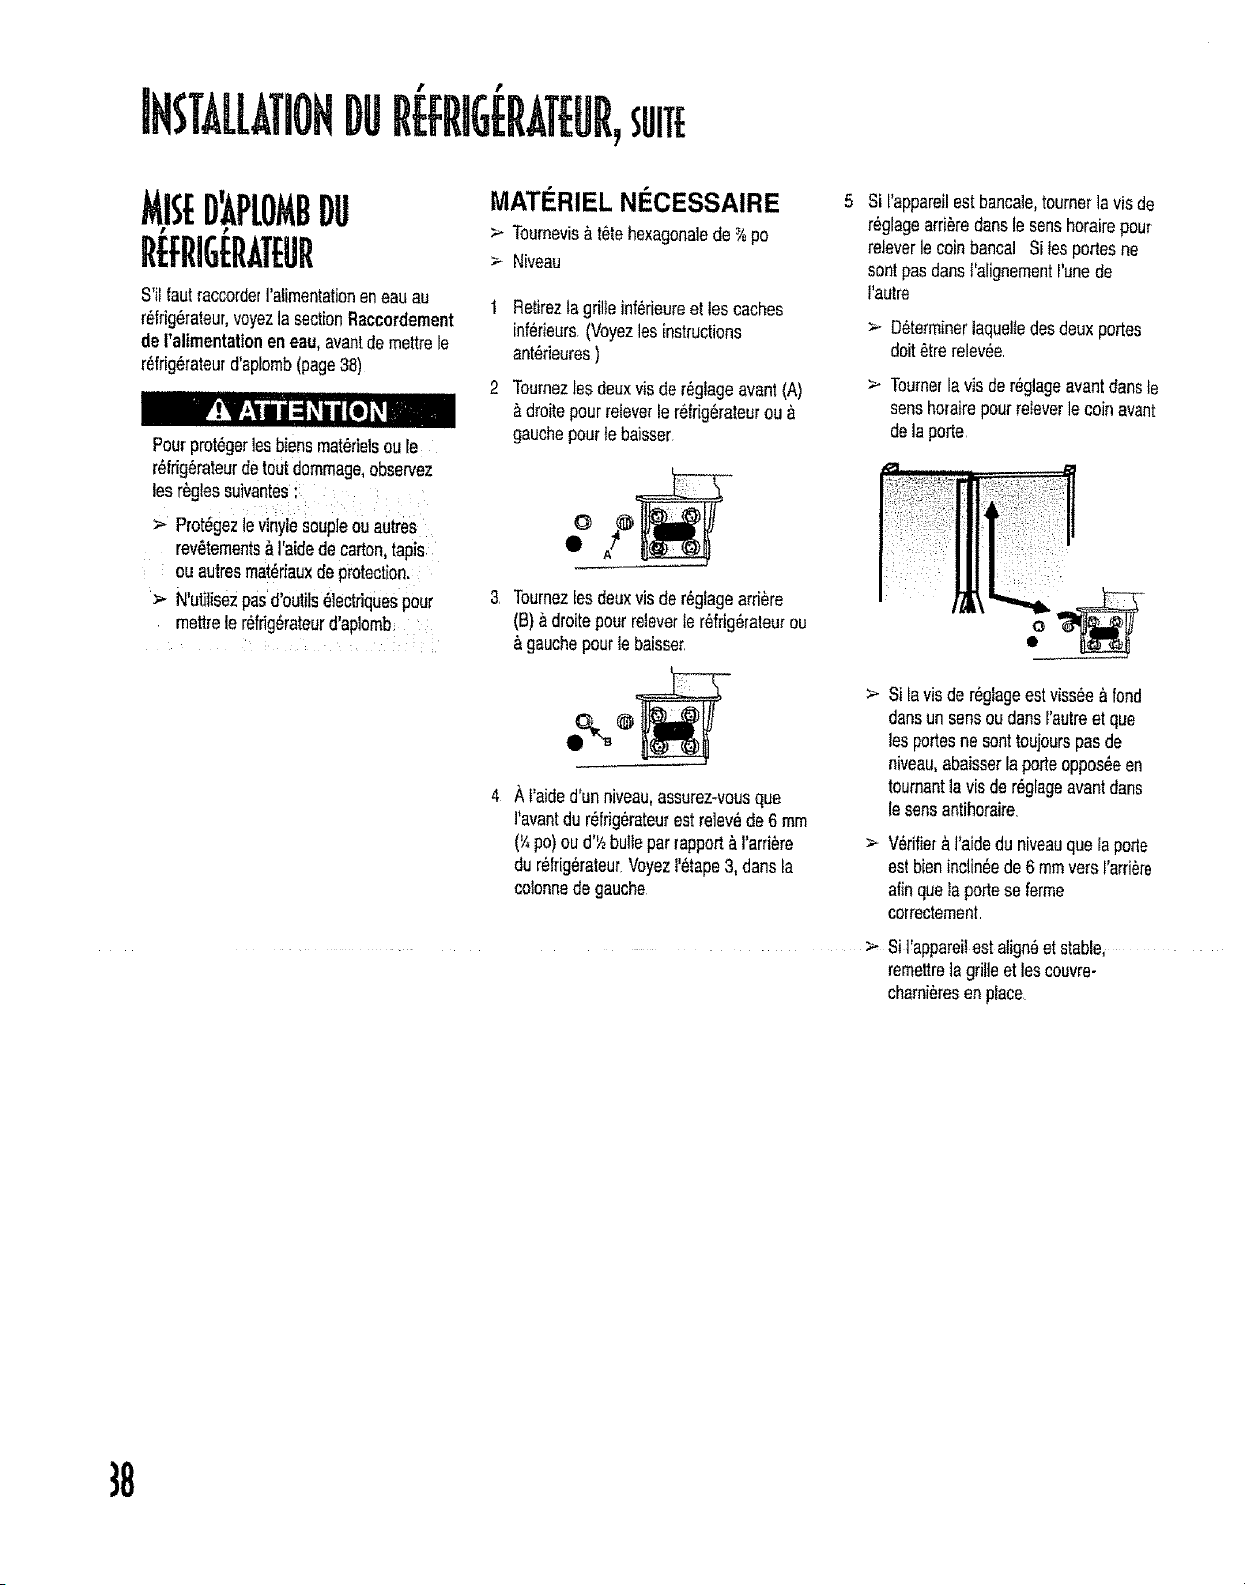
INSTALLATIOHDUfi[:FRaG[:RAT[UR, unE
S'ilfautraccorderI'afimentationeneauau
r_|rig_rateur,voyezla sectionRaccordement
de I'aUmentationeneau,avantdemettrele
rNrig6rateurd'aplomb(page38)
Pourprotegerlesbiensmaterielsou Ee
r_frig6rateurdetoutdomrnage,observez
leer#glessuivantes:
> Prot_gezlevinylesoupieouautres
rev_ternents&l'aidedecarton,tapis
ou autresmat_riauxdeprotection.
:_ N'utilisezpasd'outils_]ectriquespour
mettreler6frig#rateurd'ap]omb
MATERIEL NI CESSAIRE
> Toumevis_ t_'tehexagonalede%po
> Niveau
Retirezlagrilleinf6fieureettes caches
infedeurs(Voyezlos instructions
ant_rieures)
Tournezlosdeuxvisder_glageavant(A)
&droitepourreleverler_fr[g_ateurou &
gauchepourte baisser
Si l'appareilestbancale,tournerlavisde
r_glageartistedanslesenshorairepour
releverlecoinbancal Siles ponesne
sontpasclanst'alignementrunede
I'autre
>- D_terminerlaque]ledesdeuxportes
doltetrerelev_e,
> Toumerlavisder_glageavantdartste
senshorairepourreleverlecoinavant
delaporte
o
O
3 Tournezlesdeuxvisder6glagearri_re
(B)&droitepourreteverter_frigOrateurou
&gauchepourle baisser.
4 /_t'aided'unniveau,assurez-vousqua
]'avantdur_frig6rateu_estre]ev6de6 mm
(¼po)oud'_ bulleparrapport&]'arri#re
du r6frigOrateur.Voyezl'0tape3,dansla
coionnedegauche
Silavisder6glageestviss_e&fond
danaun sensoudansrautreet que
]esportesne sonttoujourspasde
niveau,abaisserlaporteoppos_een
toumant]avisder#glageavantdans
lesonsantihoraire,
V_rifier&t'aideduniveauqueIaporle
estbieninclin_ede6 rnmversI'arri#re
afinqualaportese ferme
correctement
>" Sit'appareilastalign_etstable,
remettretagrilleet leacouvre-
charni_resenplace
38
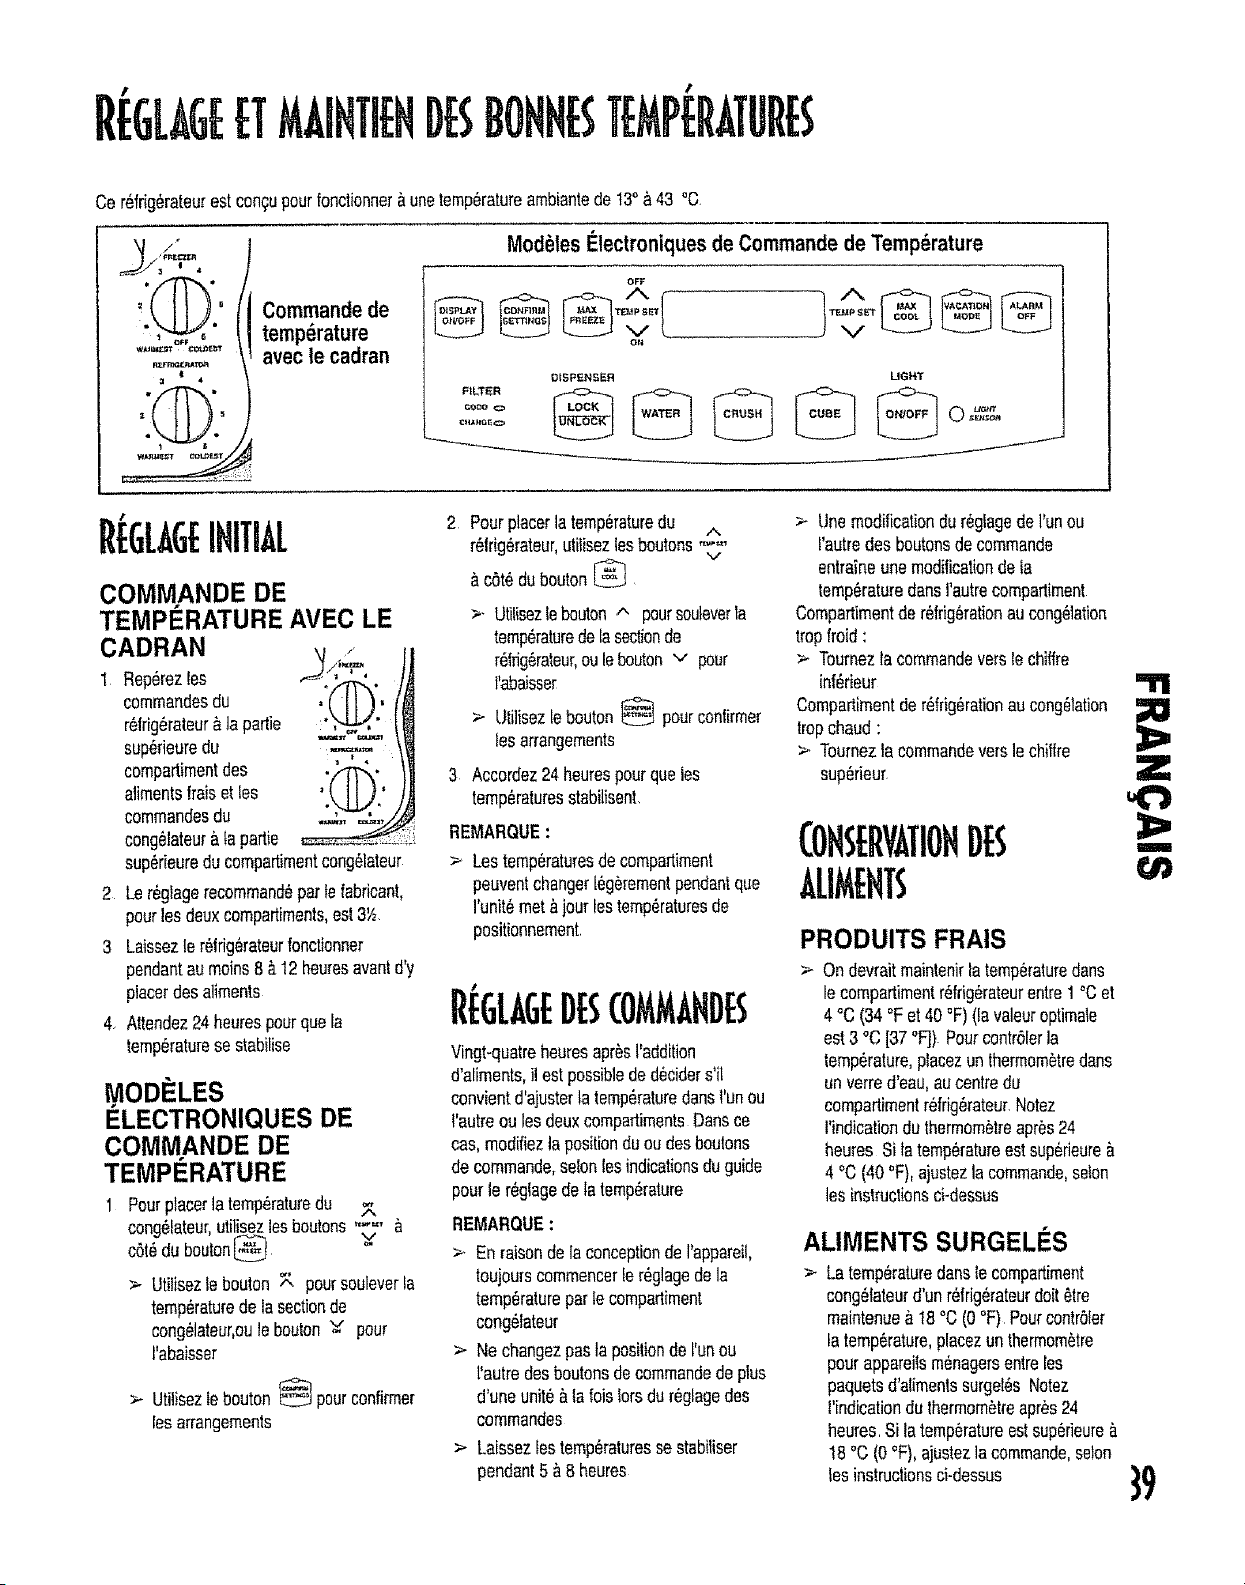
Ce r6frig6rateurestcon_upourfonctionner_.unetemp6ratureambiantede t3° &43 _C.
Commandede
temp6rature
avecle cadran
ModUles_:lectroniquesde Commandede Temp6rature
OFF
RLTER
GOOO
OISPENBER UGHT
R GLAGEINITIAL
COMMANDE DE
TEMPI_RATURE AVEC LE
CADRAN ,4
1 Rep6rezles .-_J."_"
commandesdu
r6frig6rateur&la partie
sup6fieuredu =.,_=
compartimentdes "'/'q'T_"*
alimentsfraisettes ' [llJ'
commandesdu
cong61ateur&tapattie
sup6rieureducompartimentcong61ateur
2 Ler6glagerecommand6partelubricant,
pourlesdeuxcompartiments,est3Yz.
3 Laissezler6trig6rateurfonctionner
pendantaumoins8&12heuresavan|d'y
placerdesaliments
4. Attendez24heurespourquela
temp6raturesestabilise
MODELES
I_LECTRONIQUES DE
COMMANDE DE
TEMPERATURE
1 Pourplacerta temp6raturedu ,_,
cong6fateur,utiliseziesboutons.... &
c616du bouton_ v
>- Utifisezte bouton_ poursouleverta
temp6raturedelasectionde
cong61ateur,oule bouton=v pour
l'abaisser
> Utilisezfebouton_ pourconfirmer
lesarrangements
2 Pourplacerlatemp6raturedu ....
r61rig6rateur,ufifisezlesboutons"-'-'
&cotedubouton
>. Utilisezlebouton^ poursouleveria
temp6raturedelasectionde
r6_fig6rateur,ouleboutonv pour
l_abaisser
>- Utifisez[ebouton_ pourconfirmer
tesarrangements
3 Accordez24heurespourqueles
temp6raturesstabilisent.
REMARQUE:
> Lestemp6raturesdecompartiment
peuventchanger16gOrementpendantque
I'unit6met&jourlestemp6raturesde
positionnement.
R GL GEDt S(O M, HDES
Vingt-quatreheuresapr6s1'addition
d'aliments,ilestpossibleded6ciders'il
convientd'ajusterlatemp6raturedunsl'unou
t'autreoulesdeuxcompartimentsDunsce
cas,modifiezla positionduoudesboutons
decommande,selonlesindicationsduguide
pourle r6glagedelatemp6rature
REMARQUE:
> EnraisondelaconceptiondeI'apparei!,
toujourscommencer[er6glagedeia
temp6raturepartecompartiment
cong61ateur
> Nechangezpustapositiondet'unou
t'autredesboutonsdecommandedeplus
d'uneunit6&la loislotsdur6glagedes
commandes
> Laissezfestemp6raturesse stabiliser
pendant5 &8 heures
> lJnemodificationdur6gfagedel'un ou
l'autredesboutonsdecommande
entraineunemodificationdela
temp6raturedunsI'autrecomparliment
Compartimentder6fdg6rationaucong61ation
tropfroid:
> Tournezla commandeverslechiffre
inf6rieur
Compartimentder6frig6rationaucong6tation
tropchaud:
>. Toumeztacommandeversle chiflre
sup6rieur
PRODUITS FRAIS
Ondevraitmaintenklatemp6ratureduns
lecompartimentr6frig6rateurentre1°Cet
4 °C(34°Fet 40°F)(tavaleuroptimate
est3 °C[37°FJ).PourcontrOlerla
temp6rature,placezunthermom_tredans
unverred'eau,aucentredu
compartimentrefrig6rateur.Notez
rindicationduthermometreapr_s24
heuresSi latemp6ratureestsup6rieure_.
4 °C(40°F),ajustezlacommande,seton
les instructionsci-dessus
ALIMENTS SURGELI_S
Latemp6raturedunslecompartiment
cong6lateurd'unr6frig6rateurdoit6ire
maintenue&18°C (0°F) PourcontrOler
latemp6rature,placezunthermom_tre
pourappareiism6nagersentreles
paquetsd'alimentssurgel6sNotez
l'indicationduthermom_treapres24
heures.Sitatemperatureestsup6fieure&
!8 °C(0°F),ajustezlacommande,selon
tesinstructionsci-dessus
"T'I
Z
,,1,,)
!
39
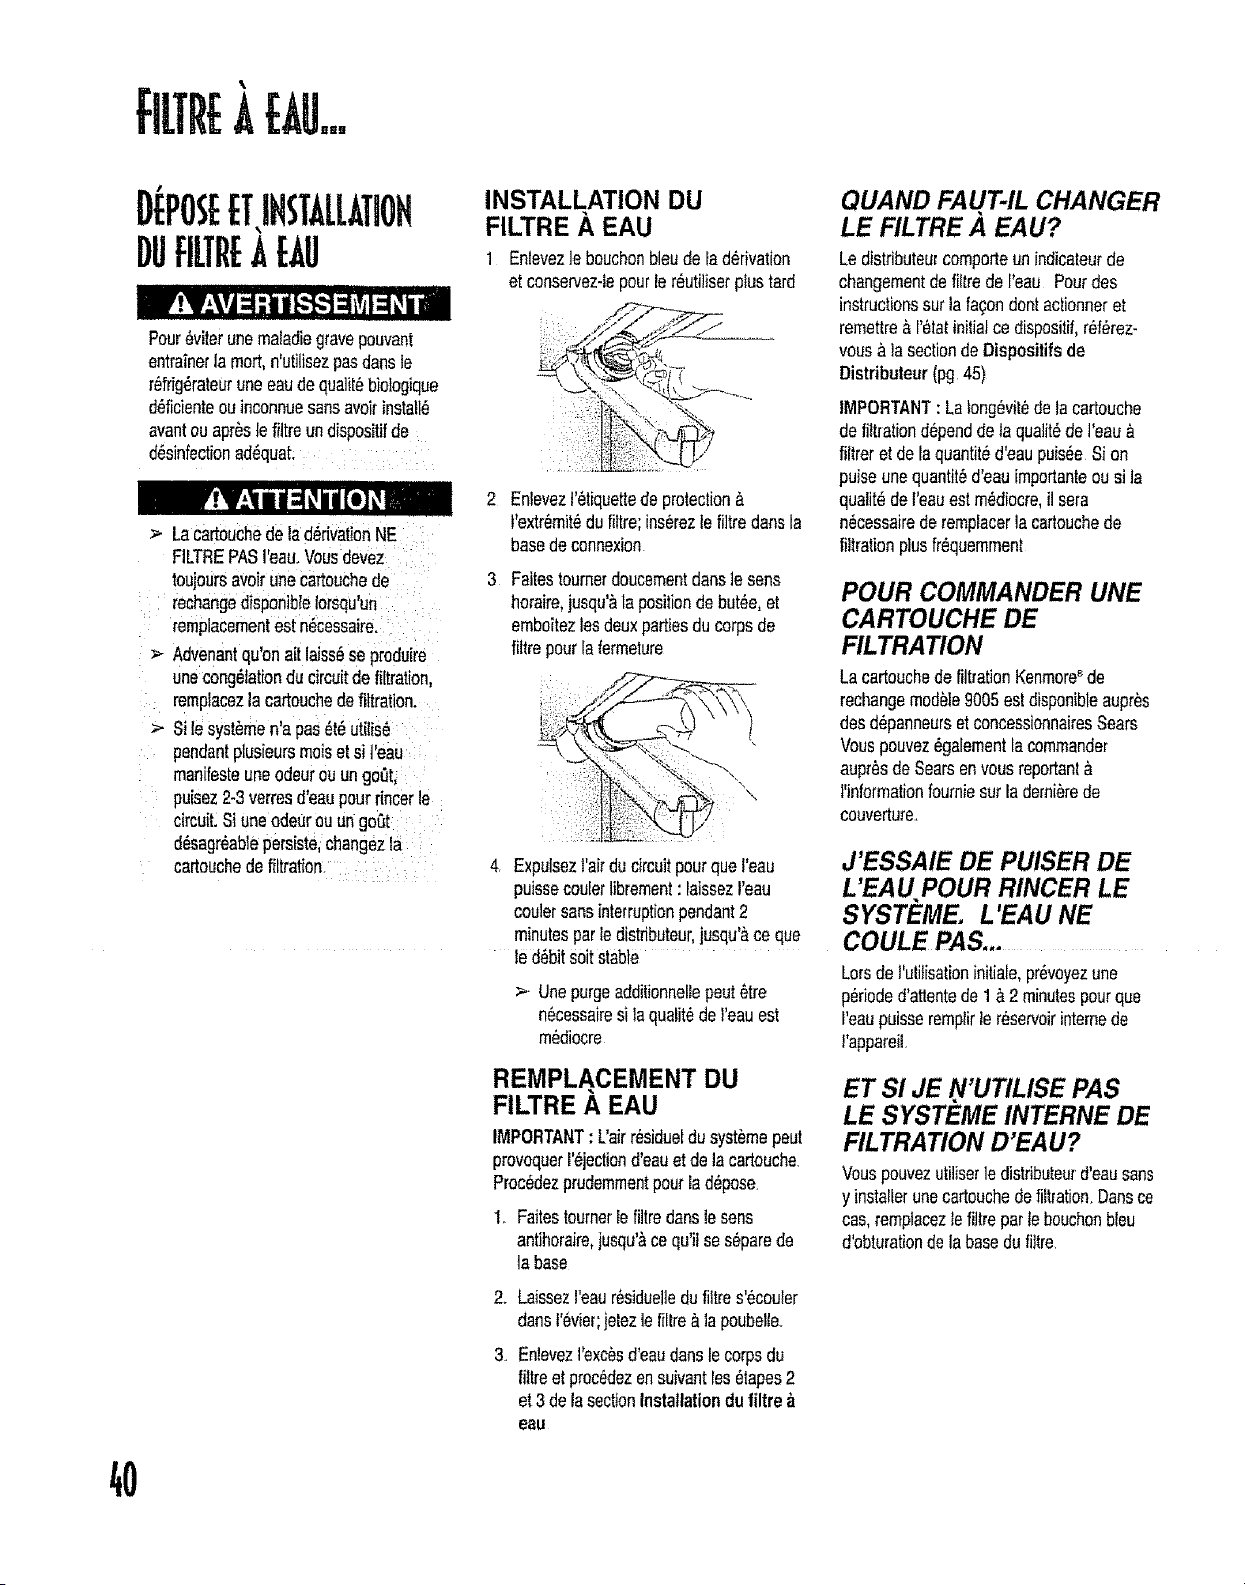
DF:POSEETIHSTALLATIOH
DUflLTflE,AEAU
Pour_viterunemaladiegravepouvant
entrainerla mort,n'utilisezpeadartsle
refrig_rateUroneeaudequa]it_biologique
d_ficienteouinconnuesansavoirinstall_
eventouapr_sfeflttreundispositifde
d_sinfectionad_quaL .....
]
_- Lacartouchede lad_rivationNE
FILTREPAS]'eau.Vousdevez
toujoursavoirunecartouchede
rechangedisponibtetorsqu'un
remplacementestn_cessaire.
> Advenantqu'onairlaiss_seprodoire
unecong_tationdu circuitde fi[tration,
remplacezlacartouchedefiltration,
Sile syst_men'a pas_t8utilis_
pendantplusieursmoiset si ]'eau
man[fasteuneodeurouungoat;
puisez2-3verresd'eaupourrincerle
circuit.Siuneodeurouungo_3t
d_sagr_abtepersiste,changezla
cartouchedefiltration
INSTALLATION DU
FILTRE A EAU
1 Enlevezlebouchonbleude}aderivation
etconservez-lepourler_utiliserplustard
< i:'
2 EnlevezI'_tiquettede protection&
I'extr_mit6dufiltre;ins6rezte filtredansla
basedeconnexion
3 Faitestournerdoucementdansle sens
bemire,jusqu'&la positiondebutte, et
emboitezlosdeuxpartiesdu corpsde
fittrepour[afermelure
j "--,- .
4r ExpuIsezt'airducircuitpourquel'eau
puissecoulerlibrement: laissezl'eau
coulersansinterruptionpendant2
minutesparledistdbuteur,jusqu'ace qua
led_bitsoitstable
> Unepurgeadditionneltepeut_tre
n_cessairesi laqualit_de]'eauest
m_diocre
REMPLACEMENT DU
FILTRE A EAU
IMPORTANT:L'airr_siduetdusyst_mepeut
provoquerr_jectiond'eauetdela cartouche.
Proc_dezprudemmentpourlad_pose.
1.. Faitestournerlefiltredartsle sons
antihoraire,jusqu'&cequ'ilse s_parede
labase
2_
3.
LaissezIeaur_sidueHedufittres _couler
densI'_vier;jelezlefillre_.la poubelteo
Enlevezl'exc_sd'eaudartsle corpsdu
filtreetproc_dezensuivantlos_tapes2
et3 delasectionInstallationdufiltre
eau
QUAND FAU,T-IL CHANGER
LE FILTRE A EAU?
Ledistributeu_comporteunindicateurde
changementdefiltredel'eau Pourdes
instructionssurlafa;ondentactionneret
remettre&l'_tatiniliaice dispositif,r_f#rez-
vous&lasectiondeDispositifsde
Distdbuteur(pg 45)
IMPORTANT: Lalong,ritedelacartouche
defiltrationd_penddelaqua]it_de]'eau&
filtreret delaquantit_d'eaupuis_eSion
pulseunequantit#d'eauimportanteousi la
qualit6deI'eauestm_diocre,i] sara
nScessairederemplacerlacartouchede
filtrationplusfrequemment
POUR COMMANDER UNE
CARTOUCHE DE
FILTRATION
Lacartouchede filtrationKenmore_de
rechangemod_le9005estdisponibleaupr_s
desd_panneursetconcessionnairesSears
Vouspouvez_galementlacommander
aupr_sde Searsenvousreportant
l'informationfoumiesurla derni_rede
couverture.
J'ESSAIE DE PULSER DE
L'EAU POUR RINCER LE
SYSTE-ME. L 'EAU AlE
COULE PAS....................................
Lotsdel'utitisationinitiale,prdvoyezune
p_rioded'attentede1&2 minutespourqua
reaupuisseremptirler_servoirinternede
I'appareii,
ET SI JE ,N'UTILISEPAS
LE SYSTEME INTERNE DE
FILTRATION D'EAU?
Vouspouvezutiliserledistributeurd'eausans
y installerunecartouchedefiltration.Dartsce
cas,remplaceztefiltrepartebouchonbieu
d'obturationdelabasedufiltra.
40
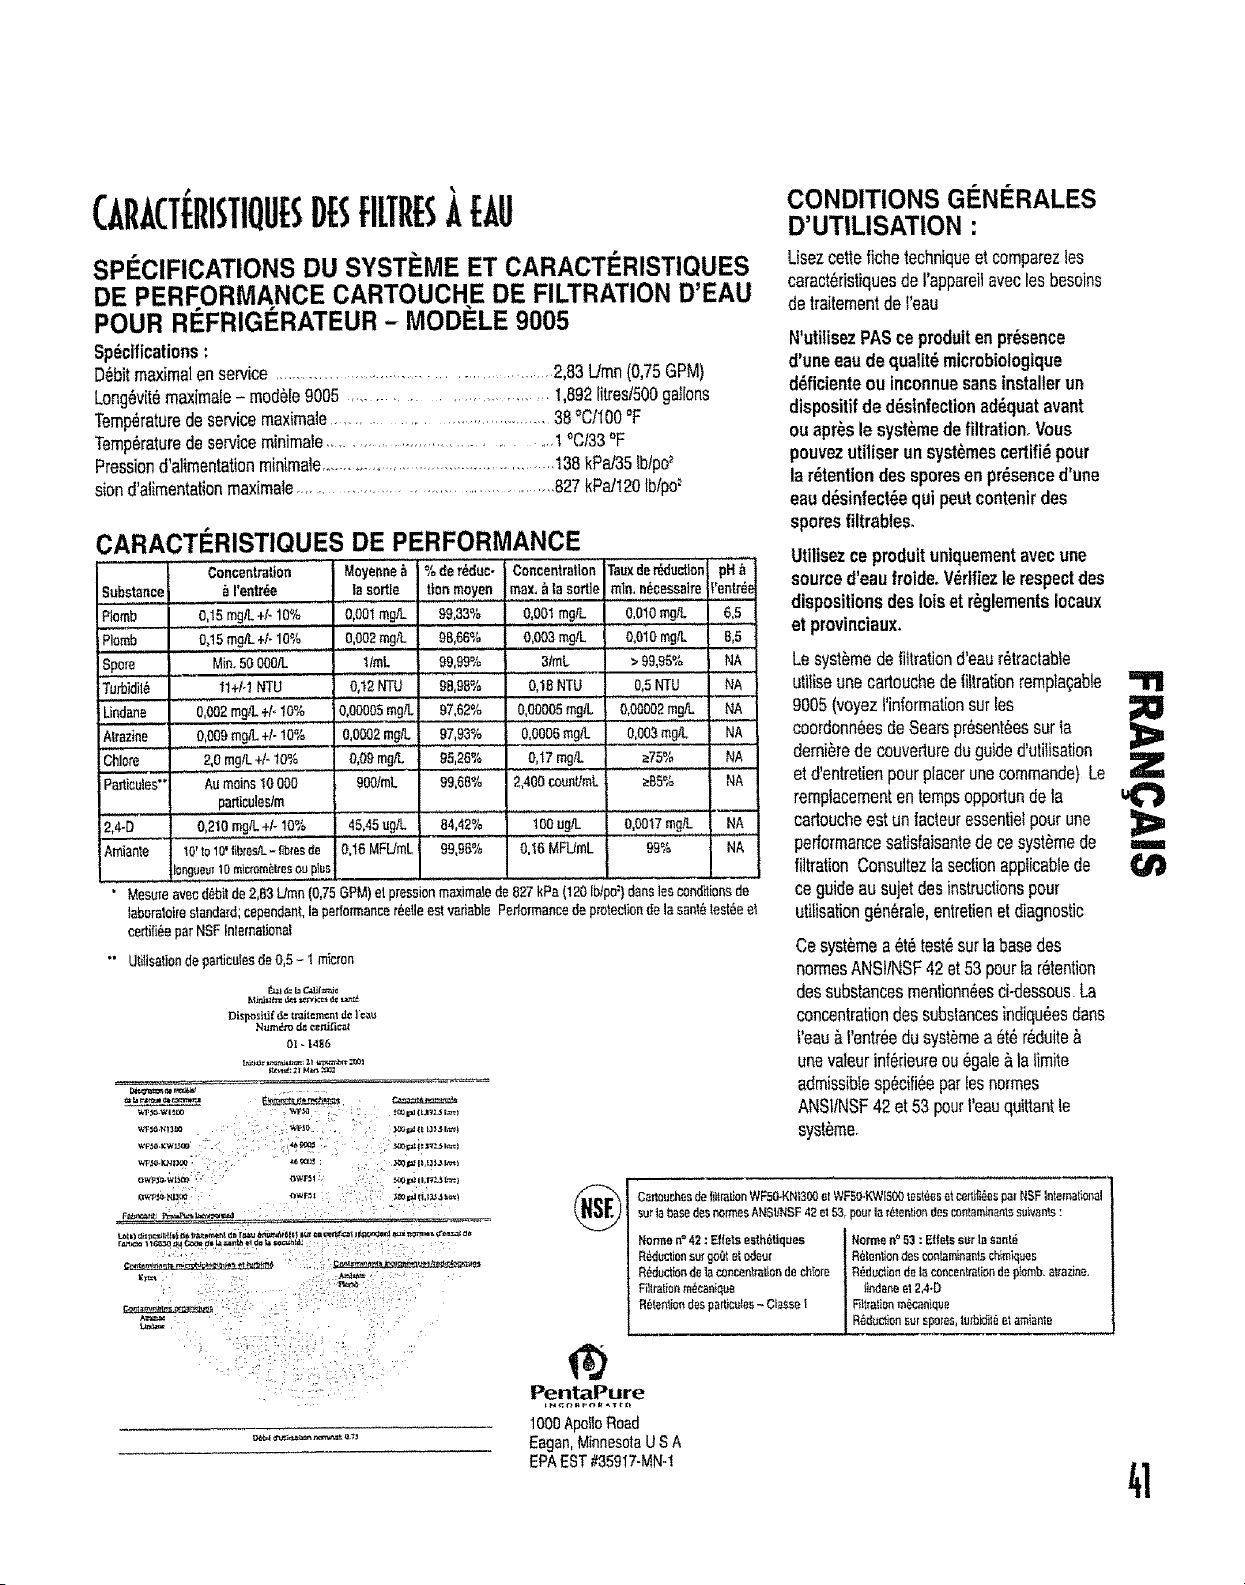
CARACTERISTIQUESDESflLTRES.&EAU
CONDITIONS Gt=NIERALES
D'UTILISATION ."
SPI_CIFICATIONS DU SYSTI_ME ET CARACTI_RISTIQUES
DE PERFORMANCE CARTOUCHE DE FILTRATION D'EAU
POUR RI_FRIGi_RATEUR - MODELE 9005
Spdcifications:
D_bitmaximWenservice.... ................................................. 283 Umn(0,75GPM)
Long_vit_maxima{e- modWe9005 ........................... 1892 litreslS00gWlons
TemperaturedeservicemaximWe...................................... 38_'C/100°F
Temp6raturedeserviceminimate.................................. 1°C133_'F
Pressionda]imentationminimWe..................................................138kPa/35lbtpo_
siondWimentationmaximale............................................ 827kPa/120Ib/po`_
CARACTI_RISTIQUES
co"'_;ntr.tto.
Substance _ I'entr_
Piomb 0!5 mg/L+A 10%
Piomb 0,15mgiL,+l-10% ....
Spare Min 50 000/L
Turbidit_ I1+t-1 NTU
Undene........o,0o2mg_.,:...!.OO:o
Atrazine 0,009mg/L+: 10%
Chlore 2o mgfL+/- t0%
Perticuies" Aumains10 000
particules/m
2,40 0,210mg/L+/10%
Amiante 10' to 10' _b;es/L - fibres cte
oeguaa110 microm_tzes OU plus
Moyenne
ls sortie
0,001mgJL
0,002mg/L
l/mL
0,t2 NTU
OOOOO5mgfL
0,0o02m_,_
o,o9m_
900lmL
DE PERFORMANCE
%der_due- ConcentrationTsuxder&iu_on pH_
ttonraoy,e,n,,,,,max._ ta sortie rain.n_cesseireI'entr_
99,_ ....q,oo,!,_:-......O,OlOm:__,s
45,45sg/L
016 MFUmL
9866%
9999%
sg,_eo:o
97,62%
....97 93%
9526%
99,68%
84,42%
99,96%
0,003mgiL
3/mL
0,18NTU
0 00005mg/L
0!00OBmgiL,
0,17mgiL
2,400CountrmL
1O0ugiL
036 MFUrnL
0,010mgfL 05
>99,95% NA
o,swu _
0,00002mgIL NA
0003 mg!L NA
s75% NA
_85% NA
00017 mg/L NA
' Mesureavecd_bitde 2 83 Umn (075 GPM)etprussianmaXimetede 827kPa (120Ibtpe:)densleecondWensde
tsboraloires!andard;cependantlaperionnancer_eUeestvarisbWPedozmencede pmiediondeIs san_6lest6eei
certifi6epar NSFInlemaBona_
"" lJ_isationdeparticulesde O5 - 1 m_on
Nurn_ro d_ c_qcal
Ol - |4_6
Usezcettefichetechniqueetcomparezies
caract6ristiquesdeI'appareilaveclesbesoins
detraitementde?'eau
N'utilisezPASceproduitenpresence
dune eaude qualit_microbiologique
d_ficienteou inconnuesansinstallerun
dispositifde d_stnfectionad6quatevent
ou apr_sle systbmedefiltration Vous
pouvezutiliser un syst_meacertifi_pour
la r_tentiondes sporesen presenced'une
eaud_sinfect_equi peutcontenirdes
sporesfiltraWes
Utilisezceproduit uniquementavecune
sourced eaufroideoVdrtfiezle respectdes
dispositionsdes lois et r_glementsIocaux
et provinciaux
Lesystbmedefiltrationdeaur_tractabte
utiliseunecartouchedefiltrationremplagabie
9005(voyezf informationsurles
coordonn_esdeSearspr_sentbessurla
dernibrede couvertureduguidedutHisation
et dentretienpourplacerunecommande)Le
remp?acemententempsopportundeta
cadoucheestuniacteuressentialpourune
performancesatisfaisantedecesystbmede
filtrationConsWteziasectionapplicablede
ceguideausujetdesinstructionspour
utilisationg6n_raleentretienetdiagnostic
Cesyst_mea_t6test6suriabasedes
normesANSttNSF42et53pourlar_tention
dessubstancesmentionn_esci dessousLa
concentrationdessubstancesindiqu6esdens
teau_,ientrbedusyst_mea etbr6duite_,
unevaleurinf_rieureou_gaie_ lalimite
admissiblesp_cifi6eparieshermes
ANSttNSF42et 53pourl eauquitrentte
syst_me
Carlouchesdetillrat_onWFS0.KNt300el WFS0.KVVIG00tes_eset es_fi_es parNSFtntema_k)r,a_
surta basedesnonr esANSI/NSF42el 53 pourla r_len_n descon_aminantssuivanLs:
Norraen° 42: Effeteesth_ttquea I Ratine n° 53 : Effeteaur In sant_
Redu_onsui"goOtetodear _R_lon_ondeseonb_minantach_mk:lues
R_ucliondelacOncen_'at_oede chTom |R_duClionde _aconcentrationde p!omb,aeazine,
Fittratioam_eanique ] _ndaneel 2,4D
R_[entiondespsrllcWes_ CtasseI I F_Valionm_ean]que
J R_duct]onsurspolas,_uIb'_t{_atamisnte
@
PentaPure
1000 Apoilo Road
EaganMinnesotaUSA
EPAEST#35917MN!
"1'1
Z
m
or&
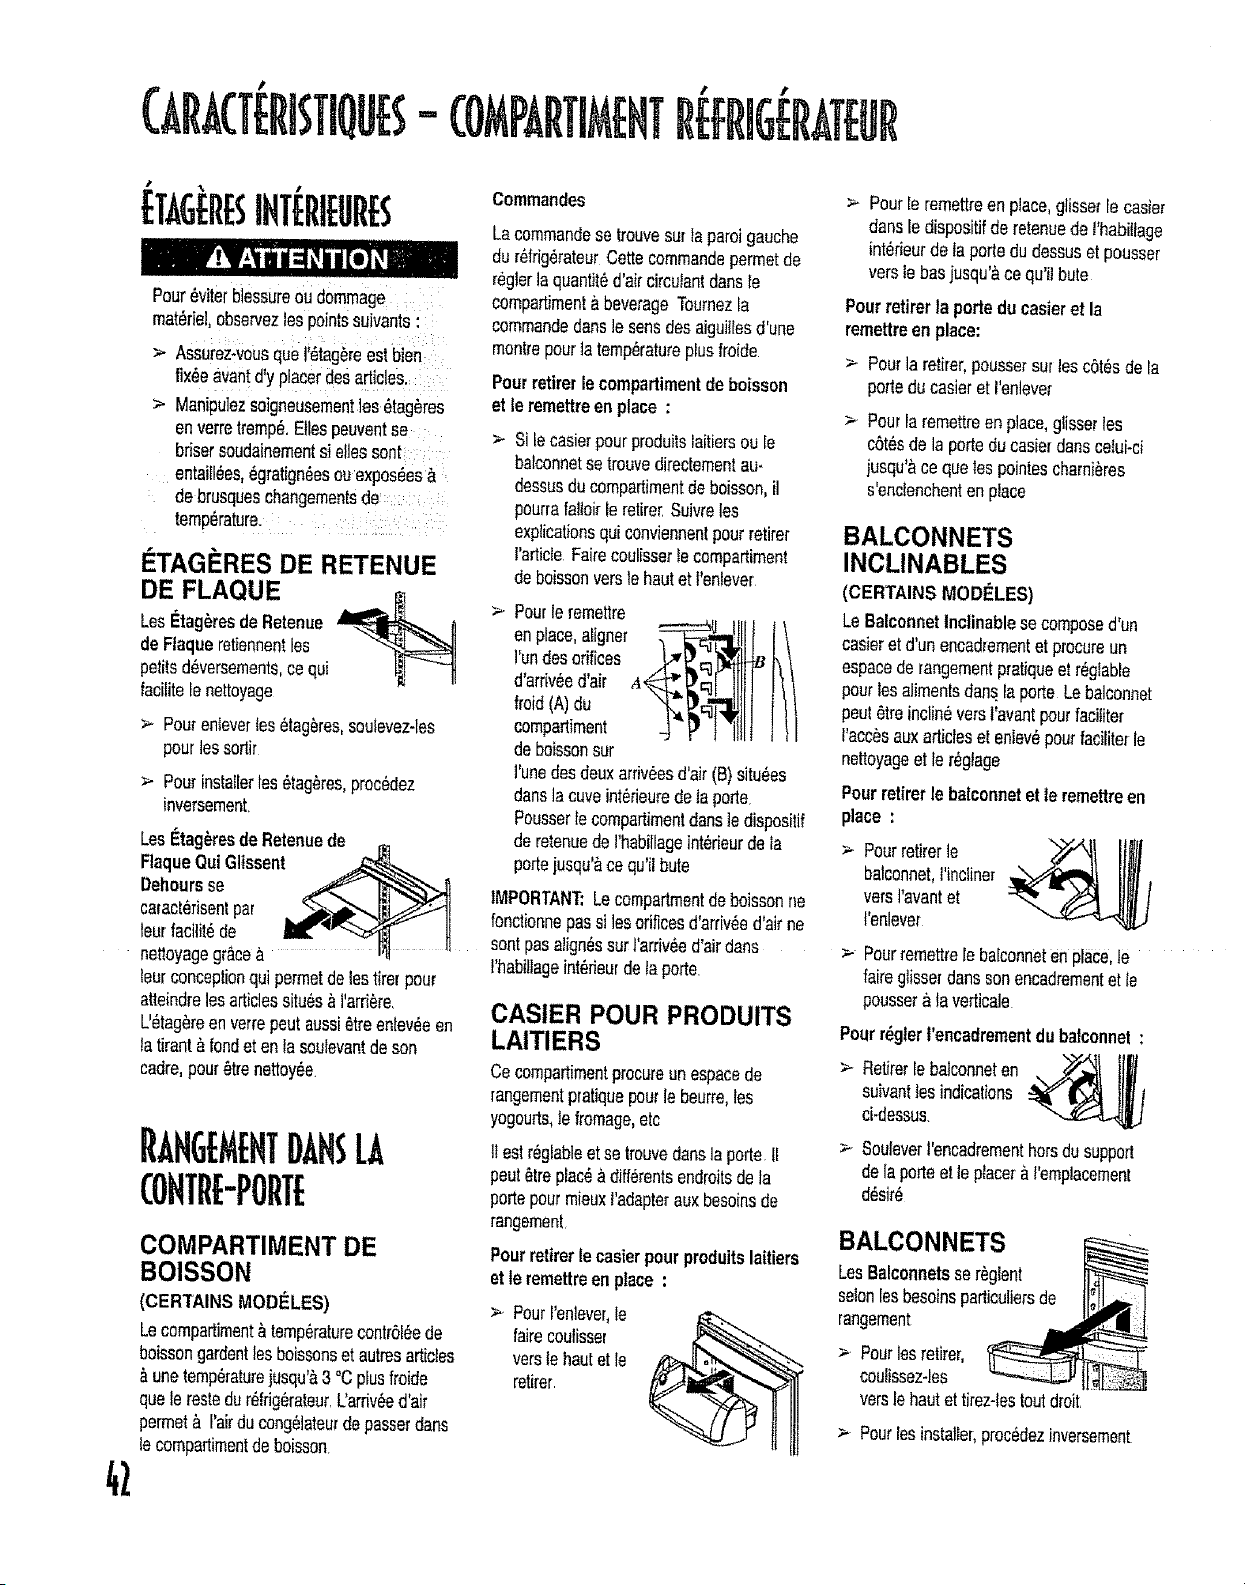
ETAG rEsINT rlEOREs
Pour6_iterblessureoudommage
materiel,observezlespointssuivants:
_,- Assurez-wusqual'_tag_reestbien
Iix_eavantd'y placerdesarticles.
> Mani0ulezsoigneusementlea_tag_res
enverretremp_.Eliaspeuventse
bdsersoudainementsi ellessont
entaifl_es,_gratign_esouexpos_es&
debrusqueschangementsde
temperature.
I:!:TAGERES DE RETENUE
DE FLAQUE
LeaI_tag_resdeRetenue
deFlaqueretiennentles
petitsd_versements,ce qui
facilitefenettoyage
:_ Pourentevertes6tag_res,souievez-les
pourtessortir
:=-Pourinstallerles_tag_res,proc_dez
inversement
LesI_tag_resde Retenuede
FlaqueOuiGlissent
Oehoursse
caract_risentpar
teurfacifit6de
nettoyagegrace__
leurconceptionquipermetdetestirerpour
atte{ndreleaarticlessitu_.s,_t'arri_re.
L'_tag_reenverrepeutaussi_treenlargean
tatirant_fondet enlasoutevantdeson
cadre,pour_trenettoy_.
COMPARTIMENT DE
BOISSON
(CERTAINS MODULES)
Lecompartiment&temperaturecontr016ede
boissongardenLleaboissonset autresarticles
,_unetemperaturejusqu'&3 oCpfusIroide
quelerestedur_trig_rateur.L'ardv_ed'air
permet_.I'air0ucong_iateurdepasserdans
lecompartimentdeboisson
Commandes
Lacommandesetrouvesur Iaparoigauche
dur_frig_rateurCartecommandepermetde
regterlaquantit_d'aircircutantdansIe
compartimentabeverageTournezla
commandedansle sensdesaiguiIlesd'une
montrepour]atemperaturepiusfroide
Pourretirer lecompartimentdeboisson
et te remettreen place :
> Silecasierpourproduitslaitiersouie
balconnetse trouvedirectementau-
dessusducompartimentdeboisson,il
pourrafalloirle retire_Suivreles
explicationsquiconviennentpourretirer
l'articleFairecoul[sserlecompartiment
deboissonverstehautet l'enlever
Pourleremettre
enplace,aligner !tl
d'ardv6ed'air
froid(A)du
compartiment _=' _g_P!_jlj
deboissonsur
l'unedesdeuxarri%esd'air(B)situ6es
danslacure int6rieuredetaporte.
Pousserlecompartimentdansledispositif
deretenuedeI'habfilageint_rieurdela
portejusqu'Ace qu'ilbute
IMPORTANT:Lecompartmentdeboissonne
fonctionnepassilesorificesd'arriv_ed'airne
sontpasalightssurl'arriv_ed'airdana
I'habiliageint6deurdetaporte
CASIER POUR PRODUITS
LAITIERS
Cecompartimentprocureunespacede
rangementpratiquepourle beurre,les
yogourts,le fromage,etc
tIestr_glableet selrouvedanslaporte If
peut_lreplac__ cliff,rentsendroitsdela
portepourmieuxl'adapterauxbesoinsde
rangement
Pourretirerlecaaierpourproduitslaitiers
etleremettreenplace :
> Pourl'enlever,le
fairecoulisser
verslehautet le
retirer
> Pourleremettreenplace,glisserle easier
dartsle dispositifderetenuedet'habitlage
int6rieurde laportedudessuset pousser
verslebasjusqu'&ce qu'ilbute
Pour retirerta porteducasieretla
remettreen place:
> Pourlaretirer,poussersurtesc(_t_sdeta
porteducasieret I'enlever
> Pourlaremettre_nplace,glisserlea
cSt_sdelaporteducasierdanscetui-ci
jusqu'Ace queteapointescharni_res
s'enclenchentenplace
BALCONNETS
INCLINABLES
(CERTAINSMODI_LES)
LeBalconnetInclinablesecomposed'un
casieret d'unencad_ementetprocureun
espacederangementpratiqueet r6glable
pourleaalimentsdanslaporte Lebalconnet
peut(_treinclin_versl'avantpour{aoiliter
I'acc_sauxarticlese{enlev_pourfaciliterle
nettoyageat ler_glage
Pourretirerle balconnetel te remettreen
place:
._ Pourretirerle /glll ll
balconnet,l'incliner
verst'avantet
t'enlever
> PourremettreIebatconneten ptace,ie
fairegfisserdanasonencadrementet te
pousserata verticale
Pourr_glert'encadrementdu balconnet:
RefUter{eba{conneten ,._I I(|I
suivant{asindications
ci-dessus.
> Souleverl'encadrementhorsdusuppod
delaporteet te placeral'empiacement
d_sir_
BALCONNETS
LesBalconnetsse r_gient
selonlesbesoinsparticuliersde U;I_1_ !
rangement .__.__
> Pourlearetirer,
coulissez-les
versle hautettirez-lestoutdroit.
> Pourlesinstaller;proc_dezinversement
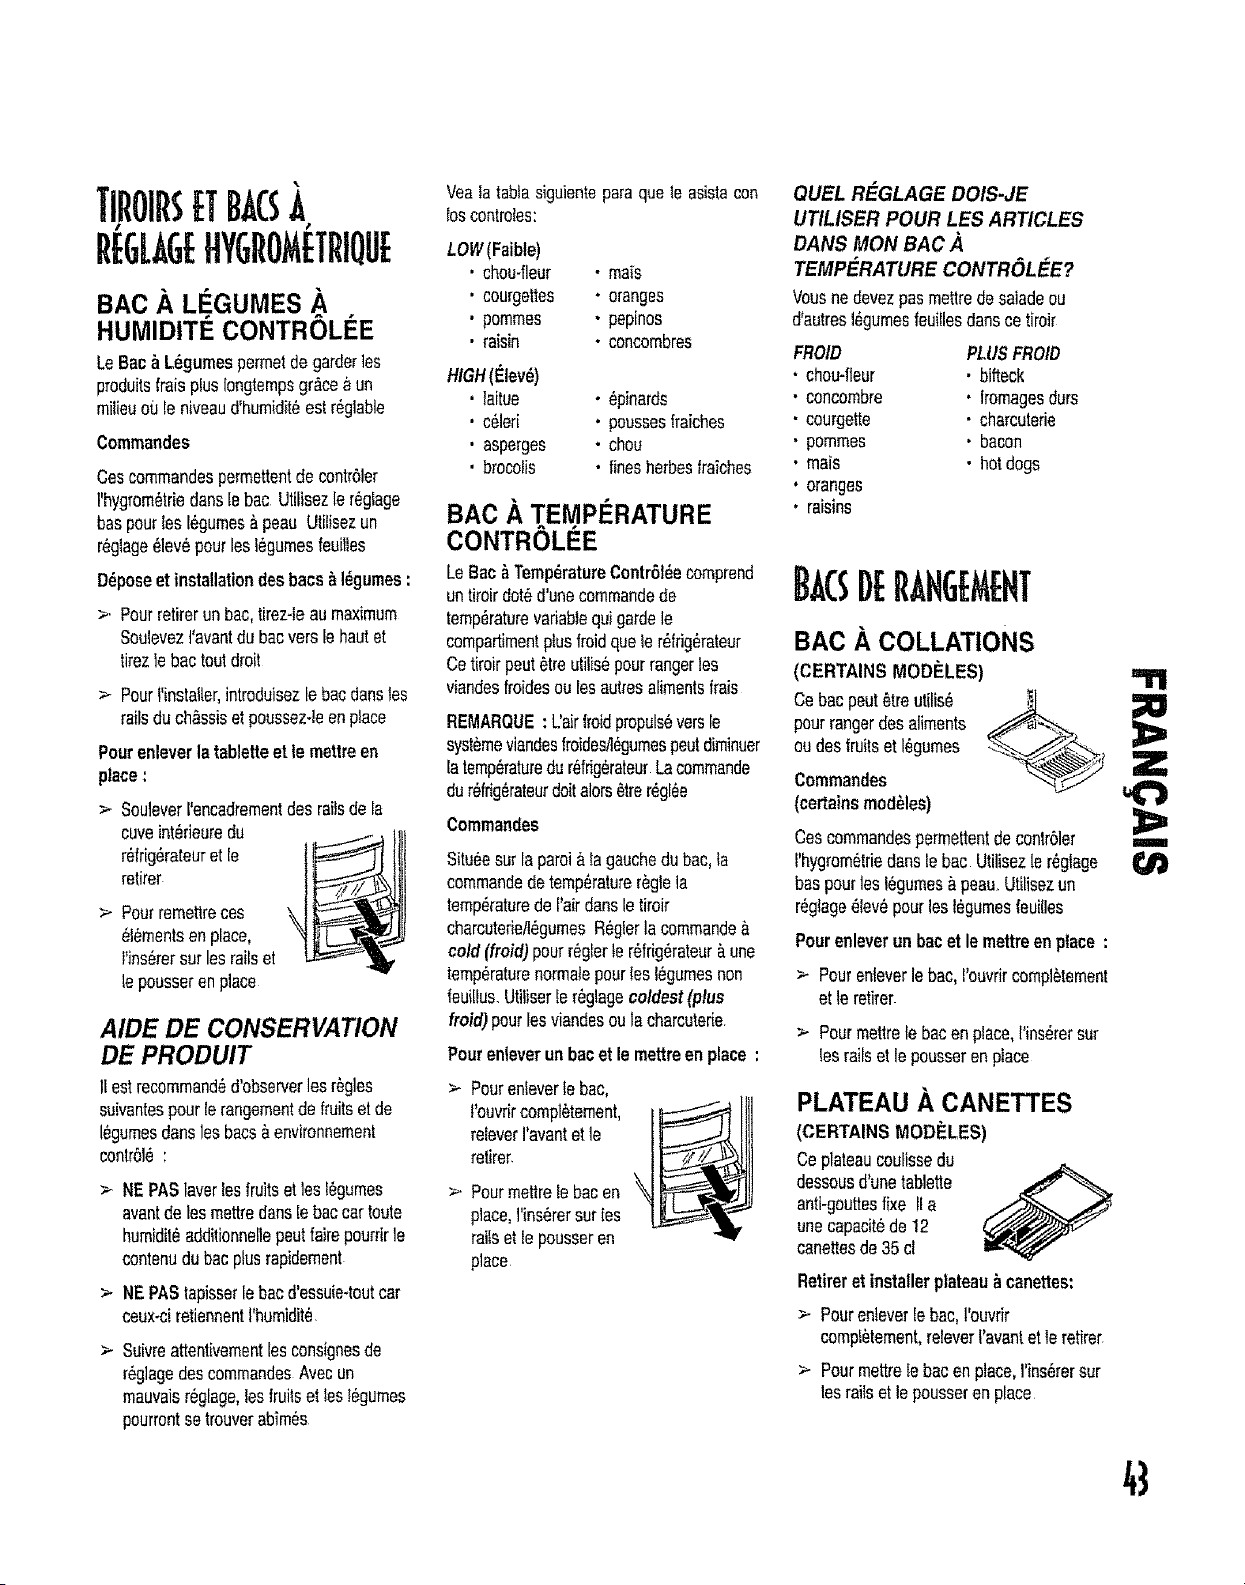
TlrolrsETBACS
/ !
REGLAGEHvGrOMETriQuE
BAC LC:GUMESA
HUMIDITI CONTR6Li E
LeBac_ L_gumespermetdegarderlea
produitsfraisplus[ongtempsgraceaun
milieuo_Jle niveaud'humidit6estr6giable
Commandes
Cescommandespermettentdecontr61er
l'hygrom0triedanslebac Utitisezler_glage
baspourles 16gumes_,peauUtitisezun
r_gtage_lev6pourlestegumesfeuilfes
D_poseetinstallationdesbats _I_gumes:
>, Pourretimrunbac,tirez-leaumaximum
Soulevezt'avantdubacverslehaulet
tirezle bactoutdroit
>- Pourl'installer,introduisezlebacdanslea
railsduch&ssiset poussez4eenplace
Pourenleverlatabletteet te mettreen
place:
>- Souleverl'encadrementdesraftsdela
cure int_rieuredu
r_frig6rateuret [e
retirer
> Pourremettreces
6?_mentsenplace,
Pins_rersur lesrailset
lepousserenplace
AIDE DE CONSERVATION
DE PRODUIT
11estrecommand6d'observerlesr6gles
suivantespourlerangementde fruitset de
l_gumesdansles bacs&envlronnement
contr61_:
>- NEPASlaverlesfruitsetles !egumes
avantdeleamettredartslebaccar route
humidit_additionnellepeutfairepourrirle
contenudubacplusrapidement
> NEPAStapisserle bacd'essuie-toutcar
ceux-ciretiennentI'humidite
> Suivreattentivementlesconsignesde
r_glagedescommandesAvecun
mauvaisr6glage,lesfruitset +ast_gumes
pourrontsetrouverabim6s
Vea ia labia siguiente para qua le asietacon
lOScontroles:
LOW(Faible)
. chou-fleur • mais
, courgettes • oranges
• pommes • pepinos
, raisin • concombres
HIGH(Elev_)
. taitue • _pinards
, c61eri . poussesfraiches
. asperges • chou
. brocolis . finesherbesfraiches
BAC A TEMPI:tRATURE
CONTR()LI E
LeBac_Temp6ratureContrGl_ecomprend
untiroirdot_d'unecommandede
temperaturevariablequigardele
compartimentplusfroidqueter_fdg_rateur
Cetiroirpeut_treutilis6pourrangerles
viandesfroidesoulesautresaliments{rais
REMARQUE:Uairfroidpropuls6versle
systemeviandesfroidesfl_gumespeutdiminuer
latemperaturedur6frig_rateurLacommande
dur_frig_rateurdoltalors_trer_gl6e
Commandes
$itu6esurlaparei&tagauchedubac,la
commandedetemperaturer_gtela
temperaturede Pairdansletiroir
charcutede/l_gumesR_gierla commande_,
cold(froid)pourr6gterte r_frig_rateur_.une
temperaturenormatepouries I_gumesnon
feui[lus.Utiliserler_glagecoldest(plus
froid)pourlesviandesoulaeharcuterie
Pourenteverunbacet le mettreenplace:
> Pourenfevertebac,
!'ouvrircompl_tement,
reteverI'avantet le
retirer.
>, Pourmettrelebacen
place,1'insUrersurIes
railset le pousseren
place
QUEL REGLAGE DOIS-JE
UTILISER POUR LIES ARTICLES
DANS MON BAC A
TEMPERATURE CONTROL_'E?
Vousnedevezpasmettredesaladeou
d'autresl_gumesfeuitlesdansce tiroir
FROID PLUSFROID
chou-fleur • bifteck
concombre • lromagesdurs
courgette • charcuterie
potatoes • bacon
mais . hotdogs
oranges
raisins
BACsR .NGEMr HT
BAC .&,COLLATIONS
(CERTAINS MOD_:LES)
Cebacpeut_treutilis_ i__
pourrangerdesaliments
oudesfruitset IOgumes
Commandes Z
(certainsmodules)
3>
Cescommandespermettentdecontr61er i
f'hygrom_triedanalebac Utilisezte r_glage
baspourles I_gumesa peau,Utilisezun
r_gtage_lev_pourleal_gumesfeuilles
Pourenleverunbacet le mettreenplace:
> Pourenleverlebac,t'ouvrircompl6tement
et teretirer
> Pourmettrelebacenplace,l'ins6rersur
tesrailsetle pousserenplace
PLATEAU CANETTES
(CERTAINSMODELES)
Ceplateaucoulissedu
dessousd'unetablette
anti-gouttesfixe II a
unecapacit_de12
canetlesde35ci
Retireret installerplateaubcanettes:
> Pourenleverlebac,l'ouvrir
compf_tement,releverf'avantet ?eretirer
>- Pourmettrefebacenptace,I'ins_rersur
learailset le pousseren place
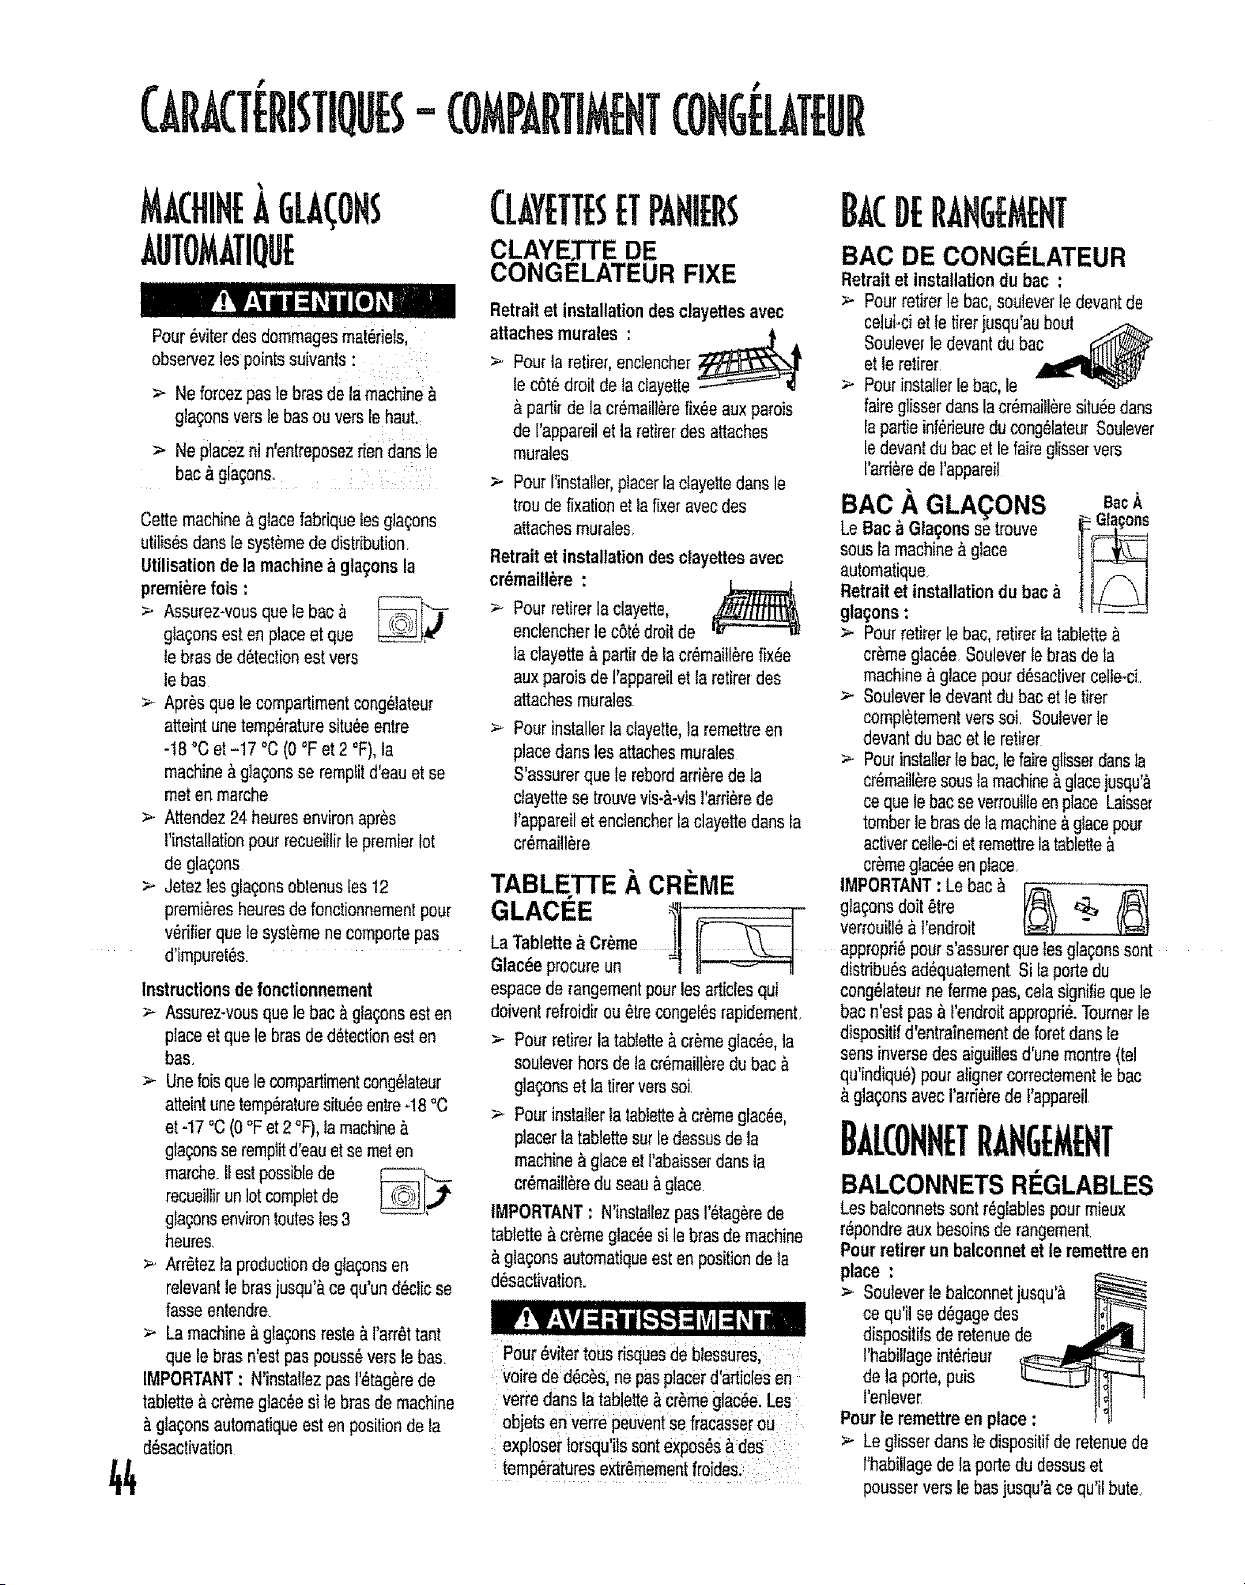
Pour_viterdesdommagesmateriels,
observezlospointssuivants: i :
> Neforoezpaslebrasdelamachine&
gta_onsverslebasouverslehaut
> Nep]aceznin'entreposezriendanste
bac_gla_ons. :'
Cettemachine&glacefabriquelesgla_ons
utilis6sdans[esyst_mededistribution
Uttlisationdela machinea gla_;onsla
premierelois :
> Assurez-vousquelebac& I_ t"T
glac;onsestenplaceet que
lebrasded6tectionestvers
lebas
>- Apresquelecompartimentcong61ateur
atteintunetemperaturesitu_eentre
-18°Cet -17 °C(0_Fet 2 °F),la
machine&gla{onsse remp_itd'eauet se
metenmarche
>. Attendez24heuresenvironapr_s
l'instaUationpourrecueiIlirte premierlot
degla_ons
>- Jetezlesgla£onsobtenustes12
premieresheuresdefonctionnemenlpour
v_rifierquete syst_menecomportepas
d'impuret6s.
Instructionsdefonctionnement
> Assurez-vousquelebae#,gla{;onsesten
placeet quelebraeded6tectionesten
bas.
> Uneloisquelecompartimentcong61ateur
atteintunetemp6raturesitu_eentreq8 °C
et -17°C(0"F et2°F),lamachine&
gla_onsserempl_d'eauetsemeten
marche.IIestpossiblede
recueiltirunlotcompletde
gtagonsenvirontoutestes3
heures.
>. Arr_tezlaproductionde gla£onsen
relevanllebrasjusqu'&cequ'und_clicse
fasseentendre.
> Lamachine>a(;onsrests#,l'arrSttant
quelebrasn'estpaspouss_verslebas.
IMPORTANT: N'installezpasI'_tag_rede
tablette&cr_meglacis sile brasdemachine
&gla(;onsautomatiqueestenpositiondeta
d_sactivation
44
(LAYETTESETPANIEI S
CLAYE.TTE DE
CONGELATEUR FIXE
Retraitet installationdesclayettesavec
attachesmurales: },
>. Pouriarotifer,enclencher
lecStedroitdelactayette
&partirdelacr_maill_refixesauxpatois
deFappareiletla rotiferdesattaches
mutates
> PourFinstatler,placerlaclayettedansle
troudefixationet iafixeravecdes
attachesmurales,
Retraitet installationdesctayettesavec
cr_maill_re :
retirerlaclayette,
Pour
enclencherle cSt_droitde
r_
laclayette&part#delacr_maill_refix_e
auxpatoisdel'appareilet laretirerdes
attachesmurales
Pourinstallerlaclayette,taremettreen
placeclanslos attachesmurales
S'assurerquelerebordartistedela
ctayettese trouvevis-a-visI'arri_rede
I'appareiletenctencherlaclayettedansla
cr_maill6re
TABLETTE A CREME
GLACEE
LaTablette, Cr6me _[_
Glac_eprocureun -1 .........
espacederangementpourlesarticlesqui
doiventrefroidirou_trecongel_srapidsment.
>- Pourrotiferlatablette&cr_meglacis, ta
souleverhorsdetacr6mailleredubac&
gla_;onset latireryoresol
> Pourinstallerlatablette&cremeglacis,
placerlatabMtesurledessusdela
machine>aceet !'abaisserdansla
cr_mail[_reduseau&glace
IMPORTANT; N'instaIIezpasl'_tagerede
tablette&or#meglac_esile brasdemachine
&gla£onsautomatiqueesten positiondeta
d6sactivation.
Pour_vitertOusrisquesdeblessures,::
V0irede d_c6s;nepasplacerd'articlesen :
Verredanslatablette&Cr_megiac_e.Les
objetsen verrepeuventSefracasserou
exp!osertorsqu'itSsentexposes&des
temperaturesextr_rnementfroide&::
DEIL&HGEMEHT
BAG DE CONGI LATEUR
Retraitet installationdu bac :
> Pourretirerlebac,souleverledevantde
celui-ciet letirerjusqu'aubout
Souieverledevantdubac _ _l]]/v_
et leretirer _,_"
> Pourinstallerlebac,le
faireglisserdartslacr_maitleresitu_edarts
Iapattieinf_deureducong_lateurSoulever
ledevan_dubacet lefakeglisservers
I'arri_redel'appareil
BAC ,a,GLA( ONS A
LeBac&Gla_onssetrouve ,,_:Gla_ons
sousIamachine&glace __._
automatique
Retraitet installationdu bac&
gla(;ons:
> Pourretirerle bac,retirerlatablette
cr6meglacis Souleverte brasdela
machine&glacepourd#sactivercelte-ci.
>. Souleverledevantdubacetle tirer
eompl_tementverssol Souleverle
devantdubacet leretirer
> Pourinstallerlebac,lefairsglisserdansla
cr_maill_resoustamachine&glacejusqu'&
cequelebacseverrouilleenplaceLaisser
tomberlebrasdelamachine&glacepour
activercelle-ciet remettrelatablette&
cr_megIac_eenpIace.
IMPORTANT: Lebac& _,.._,_ .,...,_
gla;onsdoit_tre
verrouill_&I'en_roit
appropri6pours'assurerquelosgla£onssent
distdbu6sad_quatementSi taportedu
cong_lateurneformspas,colasignifiequele
bacn'estpas&l'endroitappropri&Tournerle
dispositifd'entra;nementdeforetdansle
sensinversedesaiguillesd'unemontre(tel
qu'indiqu_)pouralignercorrectementlebac
&gla(;onsavecI'arri_rede I'appareil
B, L(OHHETR HSEMEHT
BALCONNETS RI=GLABLES
Lesbalconnetssontr_glablespourmieux
r_pondreauxbesoinsderangement
Pourretirerunbalconnetet leremettreen
place :
> Souieverlebalconnetjusqu'&
ce qu'ilsed_gagedes
dispositifsderetenuede
l'habiilageint_rieur
delaporte,puis
l'enleve_
Pourte remettreen place,
Leglisserdansledisposilifderetenuede
l'habillagedela portedudessuset
pousserverslehasjusqu'&ce qu'ilbute.
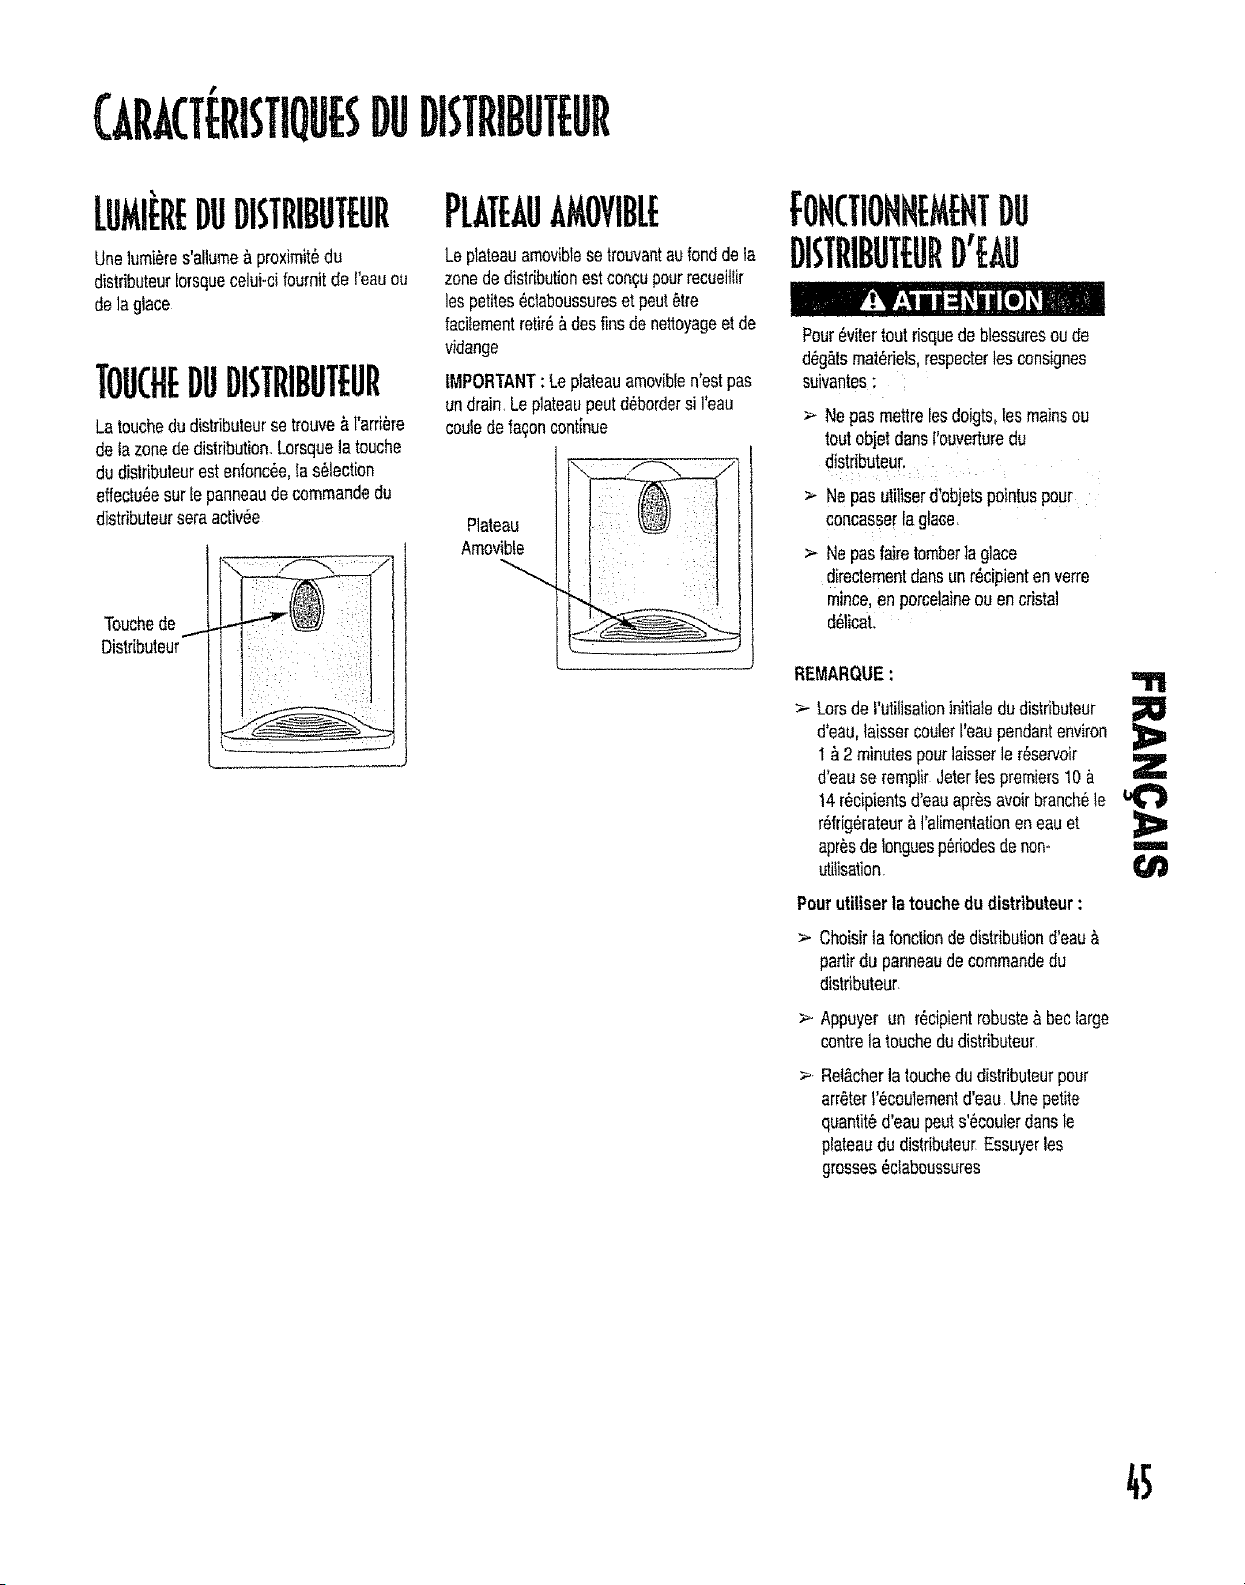
#
(ARACTERISTIQUESDUDISTRIBUTEUR
EREDUDISTRIBUTEUR
Unelumi_res'allume&proximit6du
distributeurIorsquecelui-cifoumitde l'eauou
delagtace
TOUCHEDUDIS'IRIBUTEUR
Latouchedudistributeursetrouve9,l'arri_re
de lazonededistribution,Lorsquelatouche
dudistributeurestenfonc_e,la s_lection
effectu_esurlepanneaudecommandedu
distributeurseraactiv#e
Touchede
Distributeur
PLATEAUAMOVIBLE
Leplateauamoviblese trouvantaufonddela
zonededistributionestcon{_upourrecueitiir
lospetites6daboussureset peut6tre
facitementretir6&desfinsdenettoyageet de
vidange
IMPORTANT: Leplateauamoviblen'estpas
undrain,Leplateaupoutd6bordersi I'eau
couledefa?oncontlnue
Plateau
Amovibte
FOHCTIOHHEMEHTDU
DISTRIBUTf:URD'L U
Pour_vitertoutrisquedeblessuresoude
d_+g&tsmateriels,respecterlosconsignes
suivantes:
> Nepasmettrelesdoigts,tesmainsou
toutobjetdensl'ouverturedu
distributeur,
> Ne pasutiliserd'objetspointuspour
concasse[laglace<
Nepasfairetomberlaglace
directementdansunr+cipientenverre
mince,anporcelaineouencristal
d_licaL
REMARQUE:
"111
Loisdei'utilisationinitiatedudistributeur
d'eau,taisserCOUlerI'eaupendantenviron
I _2 minutespourlaisserler_servoir
d'eause remplirJeterlespremiers10& Z
14r_cipientsd'eauapr_savoirbranch6le
r_frig6rateur_,t'alimentationeneauet
apr_sdeIonguesp_riodesdenon-
utitisation
Pourutiliser la touchedu distributeur:
> Choisirla fonctiondedistributiondeau&
partirdupanneaudecommandedu
distributeur.
>- Appuyerun r6cipientrobustea beclarge
centrela touchedudistributeur
Rel&cherla touchedudistributeurpour
arrOter1'6coulementd'eau Unepetite
quantit6d'eaupouts'_couierdansle
plateaududistributeurEssuyerlos
grosses6claboussures
45
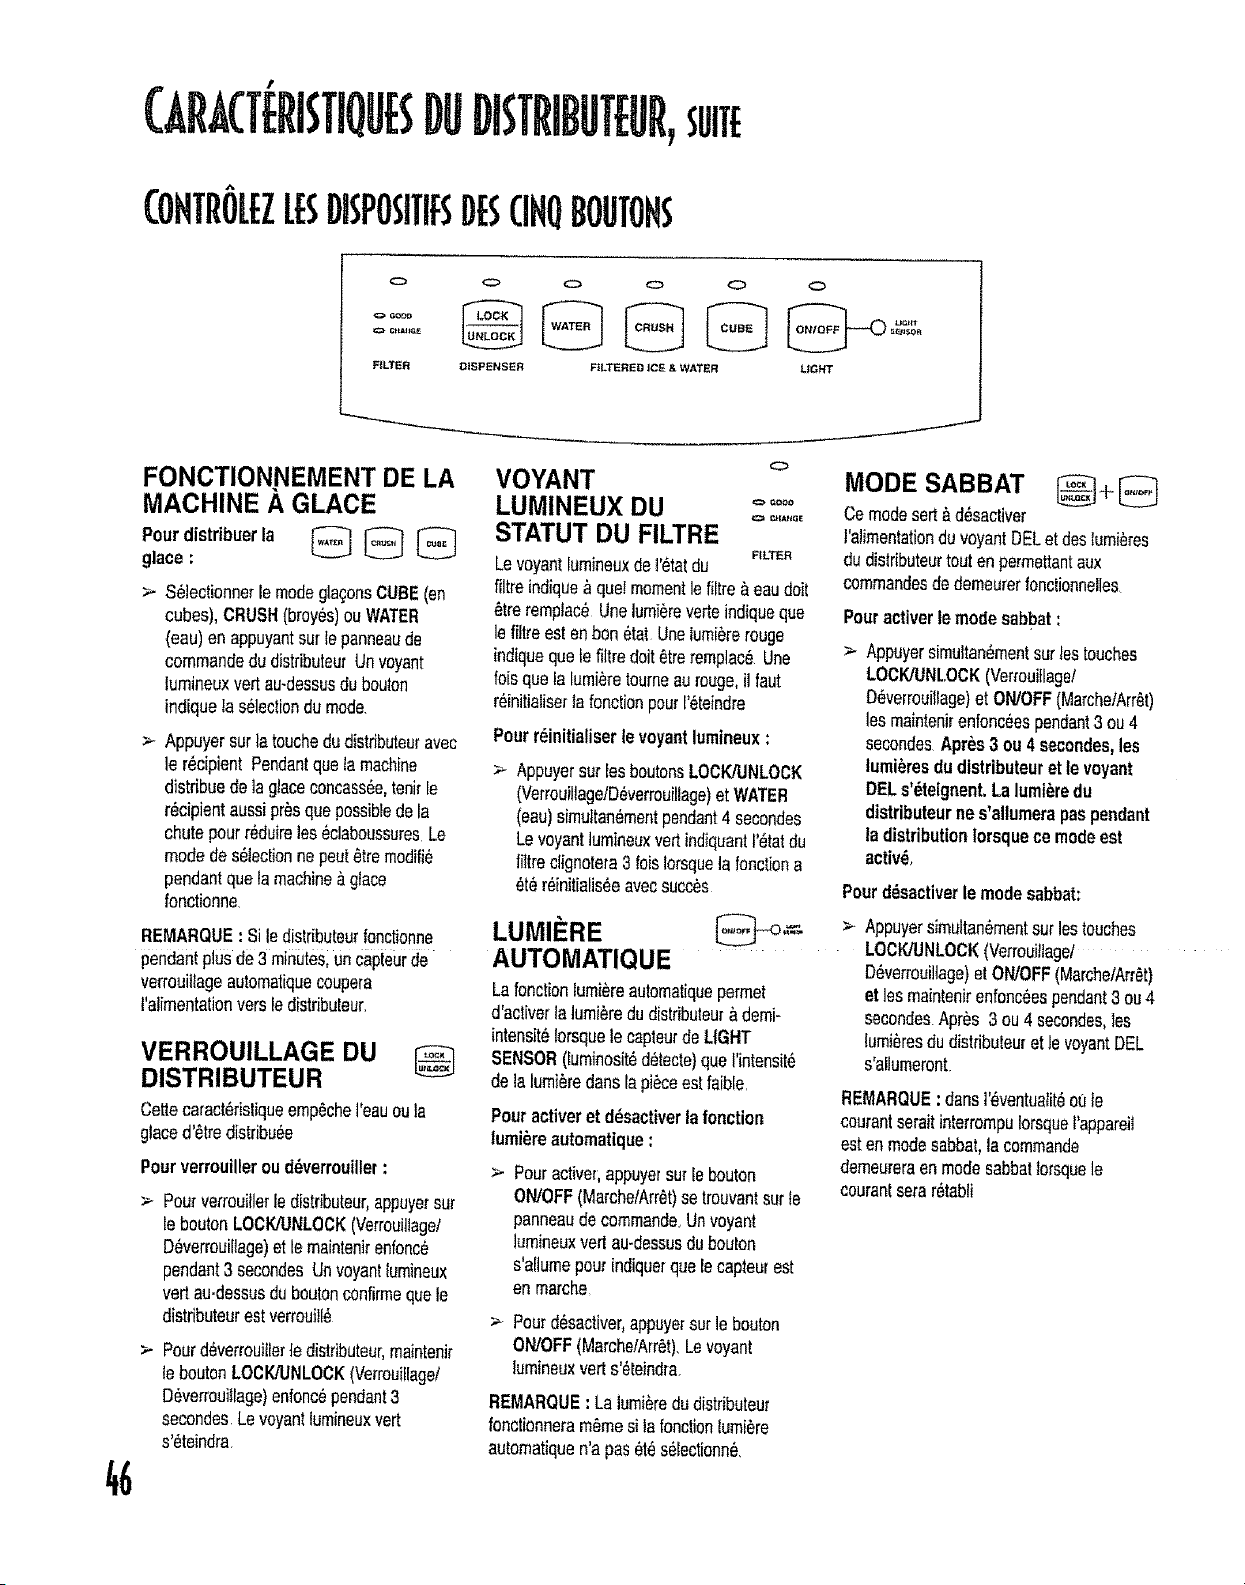
(:ARA(TERI ;T!0!JB
DISTRIBUT[UR,suilE
Tr()LEZL[$DlSPO$ffll:$DES(IHQBOUTOH$
0 G
F_LTER DISPENSER
o o o
FtLTI,'_R E D _CE & WATER L;GHT
FONCTION.NEMENT DE LA
MACHINE A GLACE
Pourdistribuerla _ _
glace:
> Selectionnerlernodegla(;onsCUBE(on
cubes),CRUSH(broyes)ouWATER
(eau)enappuyantsurlepanneaude
commandodu distfibuteutUnvoyant
lurnineuxvertau-dessusdubouton
indiqueta selectiondumode.
Appuyersurlatouchedudistdbuteuravec
[e recipientPendantquatamachine
distribuedeiaglaceeoncassee,tonirle
r_cipientaussipresquapossibledela
chutepourreduirelos eciaboussuresLe
modedeselectionnepoutetremodifie
pendantquatamachine_glace
fonctionne.
REMAR(;IUE:Site distributeurfonctionne
pendantptusde3 rnir_uteS;uncapteurde
verrouillageautornatiquecoupera
I'alirnentationversledistfibuteur.
VERROUILLAGE DU
DISTRIBUTEUR
Cetlecatact_ristiqueemp_.chet'eauouta
giaced'etredistribu_
Pourverrouilleroud_verrouiller:
Pourverrouillerledistfibuteur,appuyersur
teboutonLOCK/UNLOCK(Verrouiltage/
Deverrouiltage)etle rnaintenirenfonc6
pendant3 secondesUnvoyantlurnineux
vertau-dessusduboutonconfirmequale
distributeurestverrouille
Pourdeverrouitlerfedistfibuteur,maintenir
teboutonLOCK/UNLOCK(Verrouiflagel
Deverrouiflage)enfoncependant3
secondes.Levoyant_urn{neuxvert
s'eteindra
VOYANT
LUMINEUX DU °°°°°
STATUT DU FILTRE
FILTER
Levoyantlumineuxde]'_tatdu
filtreindique_ quelmomentiefiltre_eaudoit
_trerernpiac_Unelumiereverteindiquequa
]efiltreestenbon_tat Unelurni_rerouge
indiquequatefiltredoit_trerernplac6Une
foisque[a lumieretoumeaurouge,iltaut
r_initialiserta fonctionpourretefndre
Pourr_initialiserle voyantlurnineux:
> kppuyersurfeeboutonsLOCK/UNLOCK
(VerrouillagelDeverrouillage)et WATER
(eau)simuttan_mentpendant4 secondes
Levoyantlumineuxvertindiquant1'6tatdu
flltreclignoteta3 loisIorsquela fonctiona
_t_reinitialis_eavecsucces
LUmlpRE
AUTOMATIQUE
LafonctionIumiL,reautomatiquepermet
d'ac_iverlalurnieredudistributouT&demi-
intensit_IorsquelecapteurdeLIGHT
SENSOR(Iuminosited_tecte)quaI'intensit_
delalurnieredanslapieceestfoible.
Pouractiveret desactiverlafonction
lumi_reautomatique:
>- Pouractivet;appuyersurle boutoo
ON/OFF(Marche/Arret)se trouvantsurte
panneaudecommando.Unvoyant
lumineuxvertau-dessusdubouton
s'allurnepourindiquerqualecapteurest
en marche
> Pourdesactiver,appuyersurlebouton
ON/OFF(Marche/Arret).Levoyant
lurnineuxverts'e_eindra.
REMARQUE: Lalumieredudistributeur
fonetionnerarn_mesila fonctionlurnibre
autornatiquen'apas_t_s_lectionn6
MODE SABBAT
Cemodesert_ d_sactiver
t'aiirnentationduvoyantBELetdesIt_m{_res
dudistfibuteurtoutenpermettantaux
commandosdederneurerfonctionnelles.
Pouractiverle modesabbat:
Appuyersimultan_rnentsur_estouches
LOCKIUNL.OCK(Verrouitlaget
D_verrouitlage)et ON/OFF(MarchetArret)
los maintenirenfonceespendant3 ou4
secondesApr_s3 ou4 secondes,les
lurni_resdu dietributeuret le voyant
DELs'_telgnent,La lurni_redu
distributeurne s'allumerapaspendant
tadistributionlorsquecemodeest
activdo
Pourdesactiverle modesabbat:
Appuyersirnultan_mentsurlostouches
LOCtO'UHLOCK(Verrouittage/
D_verrouiltage)etON/OFF(Marche/Arret)
et ]asmaintenirenfonc_espendant3ou4
secondesApres 3ou4 secondes,los
lumieresdudistributou_etIs voyantDEL
s'aUurneront
REMARQUE: donsl'_ventua_iteo(_fe
courantseraitinterrompuIorsquerappareit
estenmodesabbat,lacommando
derneureraenmodesabbatlorsquele
courantsararetabli
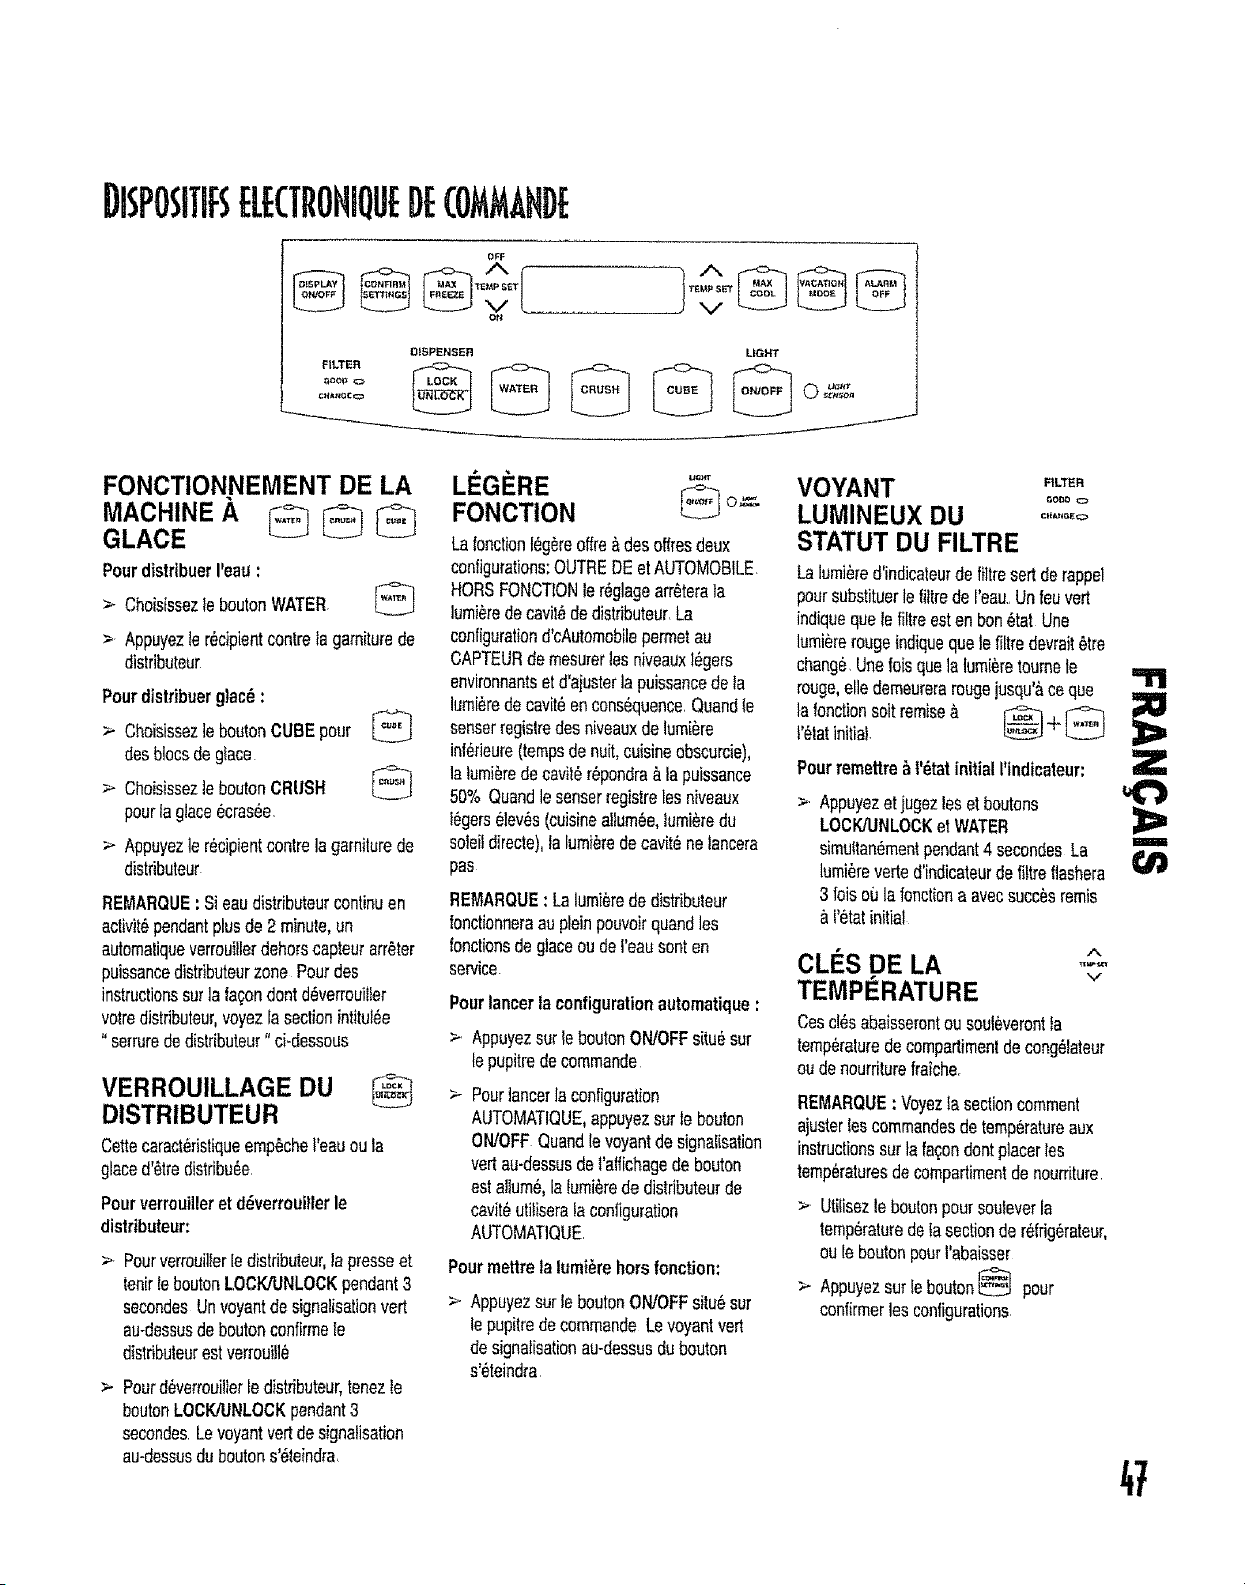
DIsPOsITIFsELECTRONIQUEDECOMMANDE
oFF
A
DISPENSER
FILTER _ _
¢HAn_CI_
LIGHT
FONCTION.NEMENT DE LA LI_GI_RE ..r_.__
MACHINE A FONCTION
Lafonotionf g reo,re deso,resdeux
GLACE
PourdistribuerI'eau:
> ChoisissezleboutonWATER. *'_1
> Appuyezler6cipientconlrela garniturede
distributeur
Pourdistribuerglac_:
> ChoisissezleboutonCUBEpour
desb!ocsdegiace
A
> ChoisisseztebeulahCRUSH
pourlaglaco_cras_e.
>- Appuyezte r_cipientcentretagarniturede
distributeur
configurations:OUTREDEetAUTOMOBILE.
HeRSFONCTIONler_glagearr_terala
lumi_redecavil_dedistdbuteur.La
configurationd'cAutomebilepermetau
CAPTEURdemesurerlesniveauxl_gers
environnantsetd'ajuster]apuissancedeta
lumi_redecavit_enconsequence.QuandSe
sensorregistredesniveauxdelumi_re
inf_rieure(tempsdenuit,cuisineobscurcie),
la tumi_radecavit_r_pondra_tapuissance
50% Quandlesensorregistreles niveaux
l_gerselev_s(cuisineallum_e,tumi6redu
soleitdirecte),talumiOredecavit6nelancera
pas
REMARQUE: Sieaudistributeurcontinuen
activit_pendantplusde2 minute,un
automaliqueverrouitlerdebarsoapteurarr_ter
puissancedistributeurzone Pourdes
instructionssurla la(_ondentd6verrouilter
votredistributeur,voyezlasectioninfitu!_e
"serrurededistributeur"ci-dessous
VERROUILLAGE DU _
DISTRIBUTEUR
Cettecaract_ristiqueempOchet'eauoula
glaced'6tredistribu6e.
Pourvarrouillerat d6verrouitlarla
distdbuteur:
> Pourverrouilferladistributeur,laprasseet
lenirleboutonLOCK/UNLOCKpendant3
secondesUnvoyantde signalisationvert
au-dessusdeboutonconfirmele
distributeurestverroui!i_
>- Pourd_verrouillertedistributeur,tenezle
boutonLOCK/UNLOCKpendant3
secondesLevoyantvertdesignalisation
au-dessusduboutons'eteindra,
REMARQUE: Latumi_rededistributeur
fonctionneraauplainpouvoirquandlos
fonctionsdeglaceou del'eausenten
service.
Pourlancertaconfigurationautomatique:
>. AppuyezsurleboutonON/OFFsitu_sur
tepupitrede commande
Pourlancerlaconfiguration
AUTOMATIQUE,appuyezsurte bouton
ON/OFFQuandlevoyantdesignalisation
vertau-dessusdel'atfichagede bouton
esIallure6,lalumi6rededistributeurde
cavil6utitiserafaconfiguration
AUTOMATIQUE.
Pourmettrela lumi_rehersfonction:
> AppuyezsurlaboutonON/OFFsitu6sur
lepupitredecommandoLevoyantvert
designatisationau-dessusdubouton
s'_teindra
VOYANT _,L_E.
LUMINEUX DU ......,o
STATUT DU FILTRE
Lalumi_red'indicaleurdefiltresortderappel
poursubstituerlefiltrede I'eau..Unfeuvert
indiquaqualefiltreestenben_tat Une
lumiererougeindiquequelefiltredevrait_tre
chang6.Unefatsquala lumi_retournete
rouge,elledemeurerarougejusqu'&cequa =TJ_
lafonetionsoilremise& _ + _
l'_tatinifial.
Pourremettra_l'dtatinitialI'indicateur:
> Appuyezatjugezloset boutons
LOCK/UNLOCKetWATER
simuftan_mentpendant4 secondesLa
lumi_reverted'indicateurdefittreflashera
3 loisoulafoncfiona aveesucc6sremis
l'_tatinitial
Z
m
CLIPS DE LA -_,_
TEMPI_RATURE v
Cosc!_sabaisserontousouieverontta
temp_ralu_'edecompartimenldecong_lateur
oudenourriturefraiche.
REMARQUE: Voyeztasectioncomment
ajusterlescommandosdetemperatureaux
instructionssurlafa;ondentplacerlos
temperaturesdecompartimentdenoun'iture
> Utitisezle beulahpoursouleverla
temp6raturedelasectionder_frig6rateur,
oule beulahpouri'abaisser
> Appuyezsurlebeulah_ pour
confirmerlesconfigurations.
47
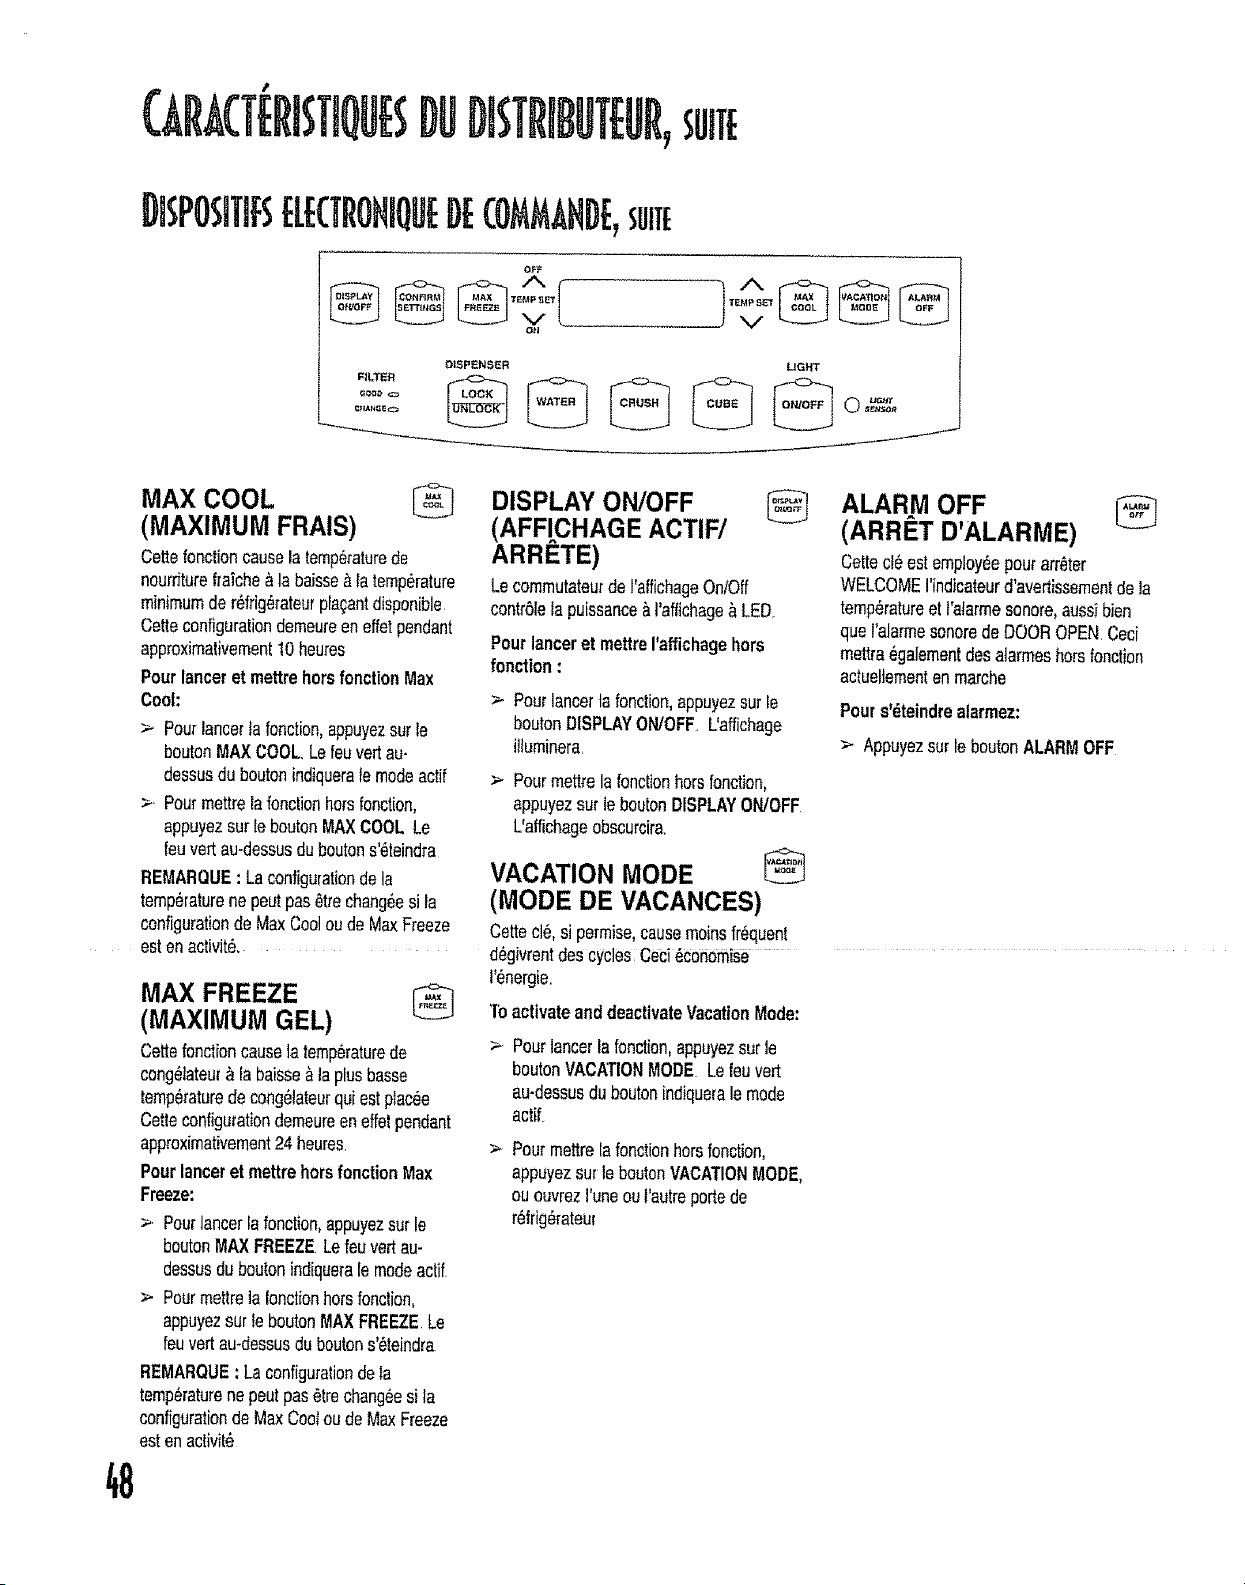
(ARA(T Ri ;I'iQUES
DISTRI@T[Ul,sunE
DISPO$1TIF$eLE(TrOHIOU De(:OMMAHDE,suite
OFF
Y
A
DISPENSER LIGHT
48
MAX COOL
(MAXIMUM FRAIS)
Cettefonctioncauselatemperaturede
nourfiturefrai'chea labaisse_la temperature
minimumder6frig6rateurpla_antdisponible
Cetteconfigurationdemeureeneffetpendant
approximativement10heures
Pourlanceret mettrehorsfonction Max
Coot:
> Pourlancertafonction,appuyezsurle
boutonMAXCOOL.Lefeuvertau-
dessusdu boutonindiqueralemodeactif
>. Pourmettrelafonctionhorsfonction,
appuyezsur leboutonMAXCOOLLe
feuvertau-dessusduboutons'_teindra
REMARQUE: Laconfigurationdela
temp6raturenepeutpas_trechang_esi la
configurationde MaxCooloudeMaxFreeze
estenactivit6...........................
MAX FREEZE @
(MAXIMUM GEL)
Cettefonctioncause]atemp6raturede >
cong6tateur_ la baisse&la plusbasse
temperaturedecong61ateurquiestplacee
CetteconfigurationdemeureeneffeIpendant
approximativement24heures. >
Pourlanceret mettrehersfonction Max
Freeze:
>- Poutlancerlafonction,appuyezsur le
boutonMAXFREEZELefeuvertau-
dessusdu boutonindiqoerale modeacUf
> Pourmettre]alonctionhorsfonction,
appuyezsurleboutonMAXFREEZELe
feuvertau-dessusduboutons'_teindra
REMARQUE: Laconfigurationdela
temperaturenepeutpas_trechang_esi la
configurationde MaxCootoudeMaxFreeze
estenactivif_
DISPLAY ON/OFF ___
(AFFI,CHAGE ACTIF/
ARRETE)
Lecommutateurde I'affichageOn/Off
contr61elapuissance&I'affichage&LED.
Pourlanceret mettreI'affichagehors
fonction :
> Pourlancerta fonction,appuyezsur le
boutonDISPLAYON/OFF.Uaffichage
illuminera.
ALARM OFF
(ARRET D'ALARME)
Cettecl_ estemployeepout arr_ter
WELCOMEI'indicateurd'avertissernentde la
temperatureet l'alarmesonore,aussibien
queI'alarmesonoredeDOOROPENCeci
mettraegaiementdesalarmeshorsfoncfion
actuellementenmarche
Pours'dteindrealarmez:
> Appuyezsurle boutonALARMOFF
> Pourmettrelafonclionhorsfonction,
appuyezsurleboutonDISPLAYON/OFF.
L'affichageobscurcira.
VACATION MODE @
(MODE DE VACANCES)
Cettecl6,si permise,causemoinsfr_quenl
d_givrentdes cyclesCeci_conomise
I'_nergie.
ToactivateanddeactivateVacationMode:
Pourlancerla fonction,appuyezsurle
boutonVACATIONMODE.Lefeuvert
au-dessusduboutonindiquerale mode
actif.
Pourmettrelafonctionhorsfonction,
appuyezsurle boutonVACATIONMODE,
ououvrezl'uneoul'autreportede
r_frig_rateur
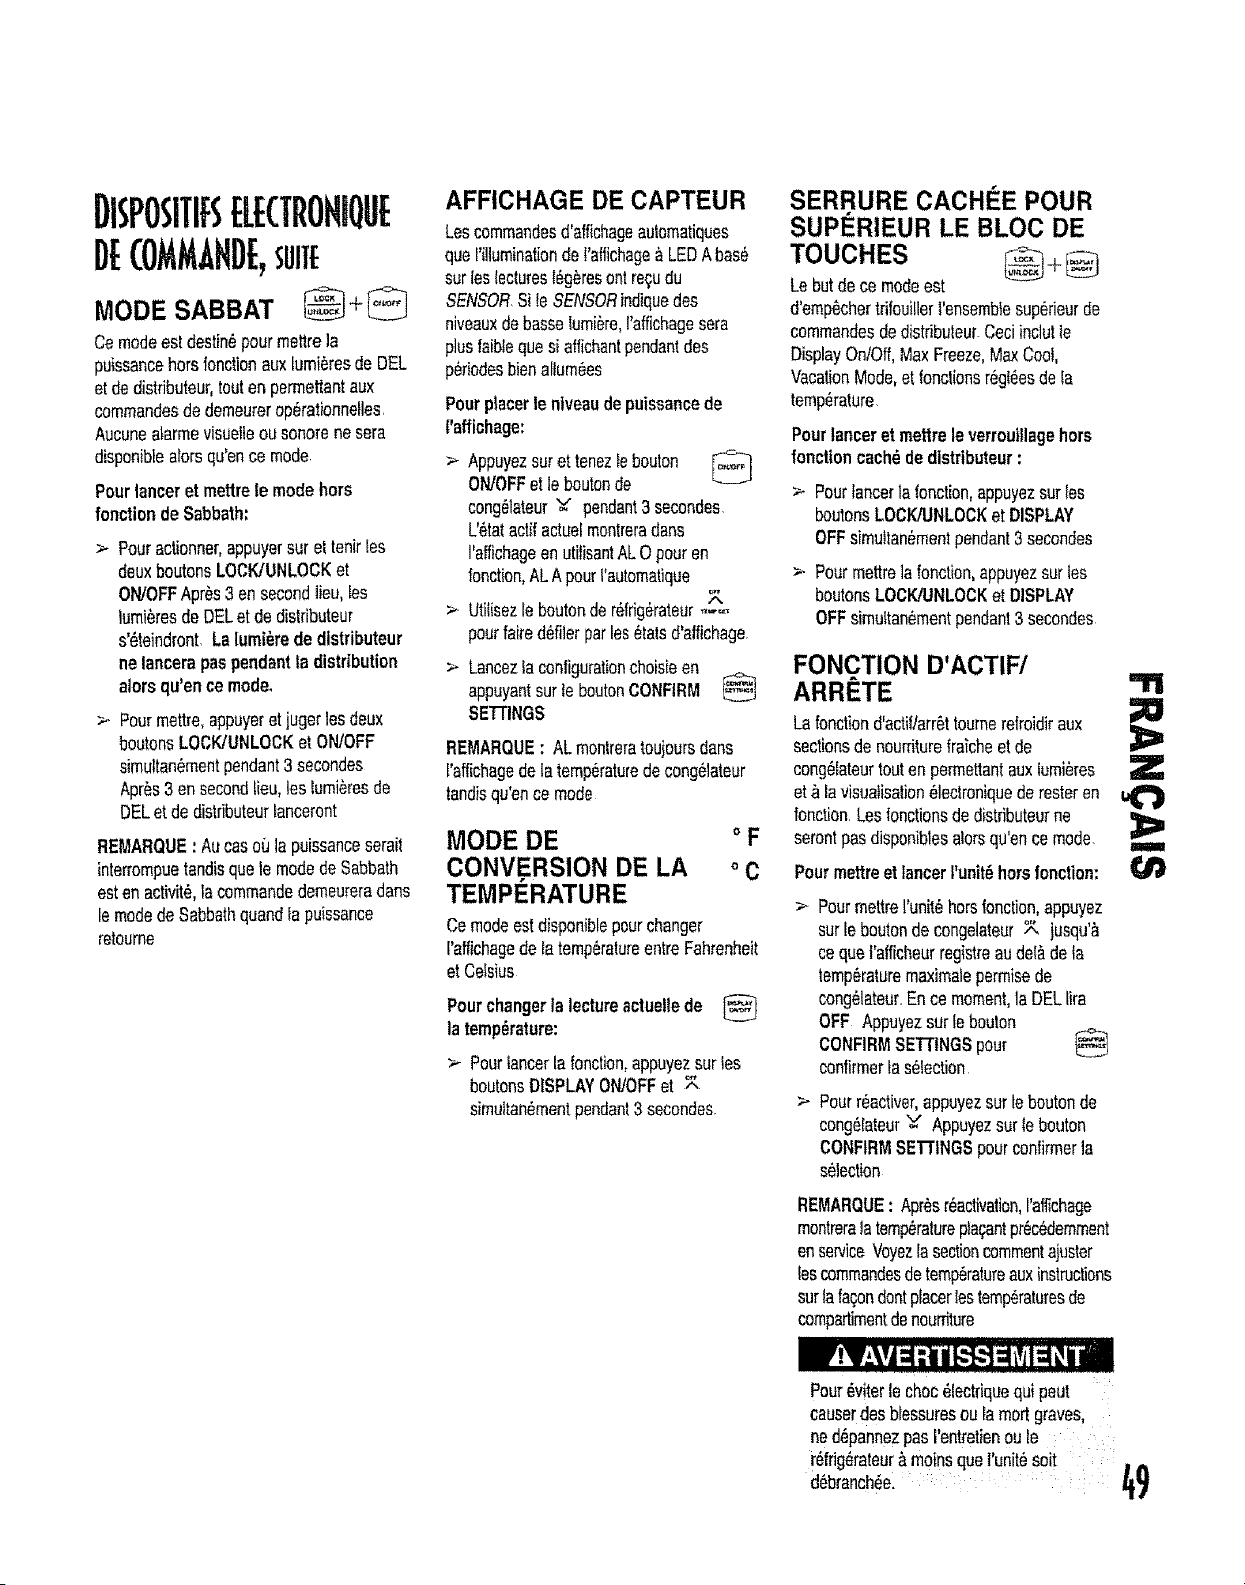
DISPOSITIFSELE(TROHIQUE
I)E(OMMAHDE, UiTE
MODE SABBAT
Cemodeestdestin_pourmetlrela
puissanceherslonctionauxlumieresdeDEL
etdedistributeur,toutenpermettantaux
commandesdedemeureroperationnetles.
Aucuneatarmevisuelleousonorenesera
disponibleaforsqu'ence mode
Pourlanceret mettrele modehers
fonction deSabbath=
> Pouractionner,appuyersuret tenirfes
deuxboutonsLOCK/UNLOCKet
ON/OFFApr6s3 ensecondlieu,tes
lumieresdeDELet dedistributeur
s'6teindront.La lumi6rede distributeur
nelancerapaspendantla distribution
alors qu'ence mode.
>. Pourmettre,appuyeretjugerlesdeux
boutonsLOOK/UNLOCKet ON/OFF
simuttan6mentpendant3 secondes
Apr6s3ensecondlieu,lesbmi_resde
DELet dedistributeurlanceront
REMARQUE:AucasoL_lapuissanceserait
interrompuetandisquele modedeSabbath
estenactivit6,lacommandedemeureradarts
lemodedeSabbathquandlapuissance
retoume
AFFICHAGE DE CAPTEUR
Lescommandesd'afficbageaulomatiques
que!'i!luminationdel'affichage&LEDAbas6
surleslecturest6g6resontregudu
SENSORSiie SENSORindiquedes
niveauxdebasselumi6re,raffichagesera
plusfaiblequesi affichantpendantdes
p6riodesbienaltumees
Pourplacerle nlveaudepuissancede
l'afftchage:
> Appuyezsuret tenezIebouton _q
ON/OFFet leboutonde
cong61ateurv pendant3 secondes.
L'_tatactifactuelmontreradans
I'affichageenutilisantALOpouren
bnction,ALApourl'automa|ique
> Utilisezleboutonder_ffig_rateur_,-_
pourfairedefilerparles_tatsd'alfichage.
> Lancezta configurationchoisieen
appuyantsurle boutonCONFIRM
SETFINGS
REMARQUE: ALmontreratoujoursdans
l'affichagedelatemp6raturedecong61ateur
tandisqu'ence mode
MODE DE ° F
CONVERSION DE LA oc
TEMPI RATURE
Cemodeestdisponiblepourchanger
l'affichagedelatemperatureentreFahrenheit
etCelsius
Pourchangerla lectureactuellede
la temperature:
> Pourlancerla fonction,appuyezsurles
boutonsDISPLAYON/OFFet
simuttan_mentpendant3 secondes_
SERRURE CACH! E POUR
SUPI RIEUR LE BLOC DE
TOUCHES
Lebutdece modeest
d'emp_chertrifouillerl'ensemb_esup6rieurde
commandesdedistributeur.Ceciinclutle
DisplayOn/Off,MaxFreeze,MaxCool,
VacationMode,et fonctionsr_gI_esdefa
temperature
Pourlanceretmettreleverroulllagehers
fonctioncach_dedlstributeur:
> Pourlancerla fonction,appuyezsurles
boutonsLOCK]UNLOCKet DISPLAY
OFFsimultan#mentpendant3 secondes
> Pourmettrela fonction,appuyezsurles
boutonsLOCK/UNLOCKet DISPLAY
OFFsimuttan#mentpendant3secondes
FONCTION D'ACTIF/
ARRETE 'TI
Lafonctiond'actiI/arr_ttournerelroidiraux
sectionsde nourrituretraicheet de
cong_fateurtouten permettantauxlumi_res Z
et ,_lavisualisation_leclroniquederesteren _=_
fonction.Lesfonctionsdedistributeurne _lm
serontpasdisponiblesalorsqu'ence mode ,,,.=,,,
PourmettreetlancerI'unit_herslonction:
> Pourmettrel'unit6hersfonclion,appuyez
surteboutondecongelateur._ jusqu'&
ce quet'afficheurregistreaudeI&deia
lemp6raturemaximalepermisede
cong_lateur.Ence moment,laDELlira
OFF Appuyezsur tebouton
CONFIRMSETrtNGSpour
confirmerlas_lection
> Pourr_activer,appuyezsurleboutonde
cong_Iateur=v Appuyezsurlebouton
CONFIRMSE'N'tNGSpourconfirmerla
s_lection
REMARQUE: Apr_sr_activation,I'affichage
mentreralatemperaturepla_.:antpr_c_emment
enserviceVoyezlasectioncommentajuster
fescommandesdetemperature_uxinstructions
surlafa_ondentplacerlestemperaturesde
compartimentdenourriture
Pour_viterlechoc_lectriquequipeut
causerdesbfessuresou famortgraves,
ned_pannezpasI'entretienoute
r_frig_rateur_ moinsquet'unit_soit
J_
d branch e: ,,q
ql#
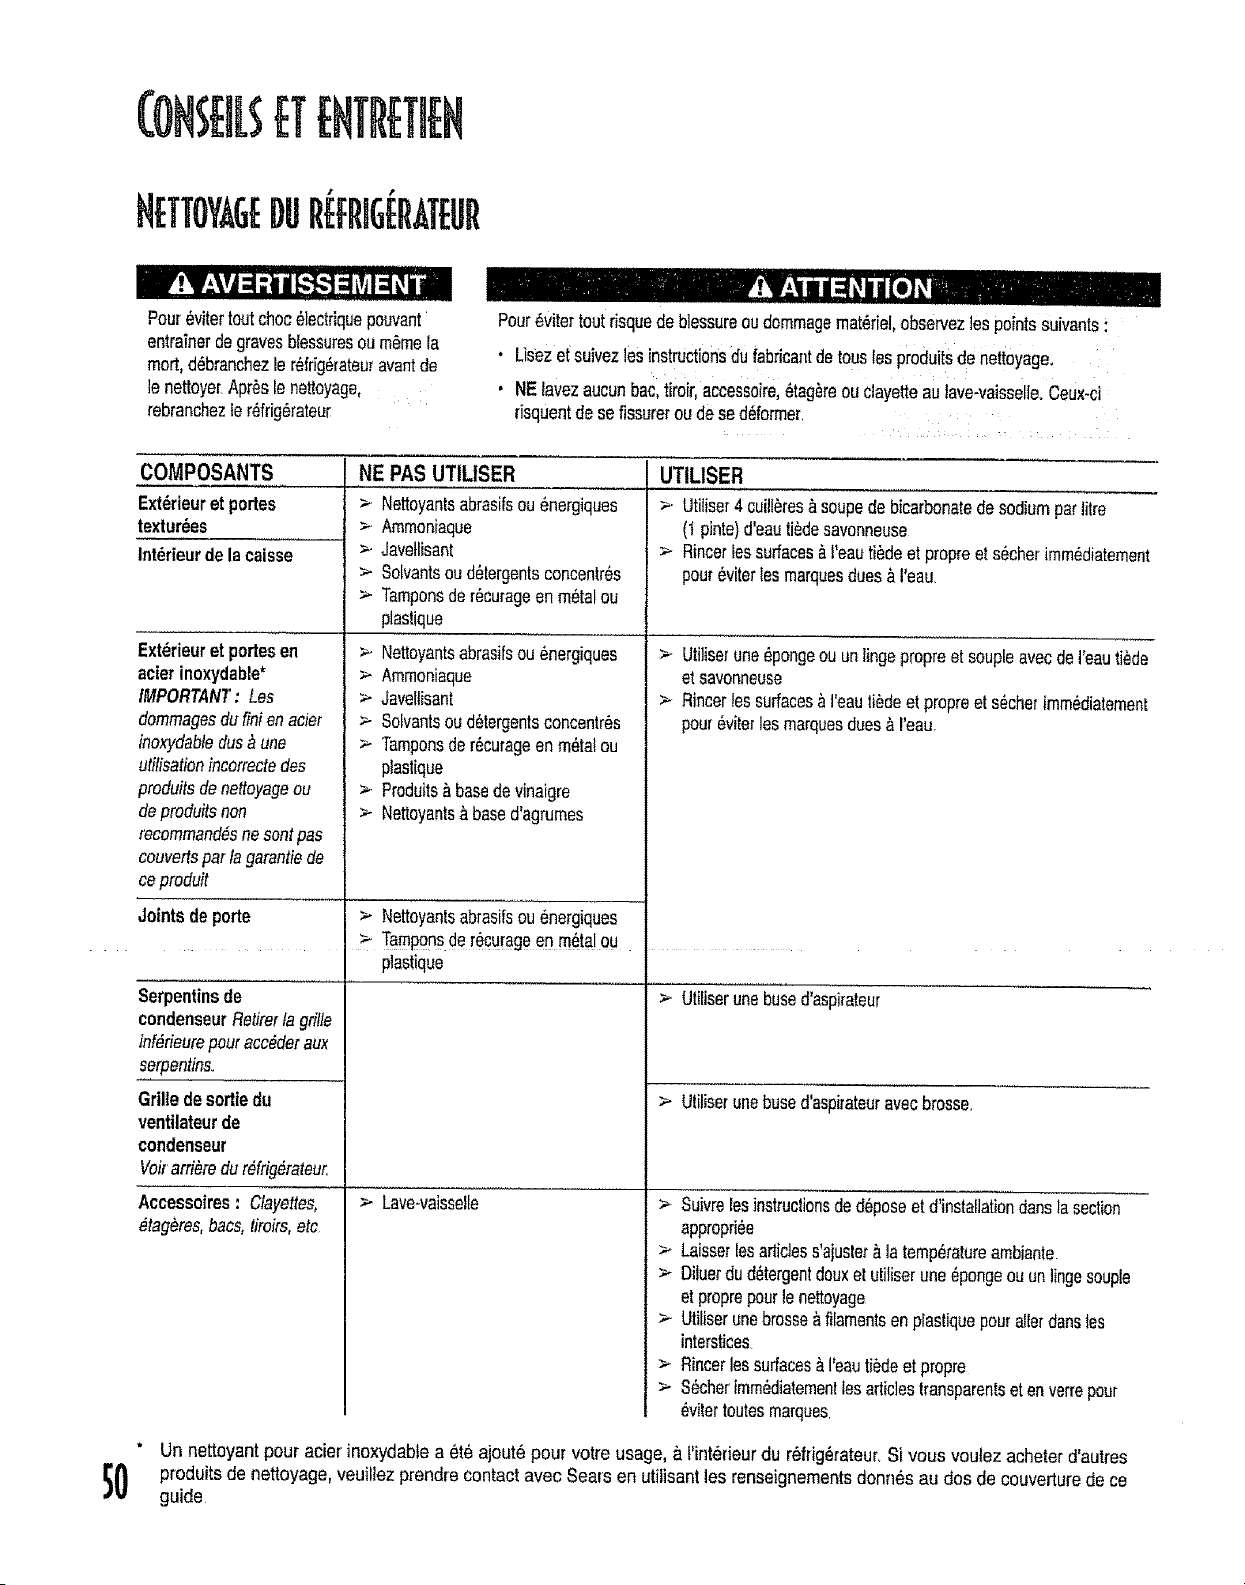
(O SEII.SETF.HTRETIEN
ETTOYAGEDUr mG rATeur
Pour6vilertoutchoc_.lectfiquepo',Jvant
entrainerdegravesblessuresoum_mela
mort,d_branchezle r_frig_rateuravantde
le nettoye[Apr_slenettoyage......
rebranchezler_frig_rateur
Pour6vitertoutrisquede blessureoudemmagemat6riel,observezlespointssuivants
. Lisezet suivezlesinstructionsdufabricantdetousles produitsdenettoyaga
, NElavezaucunbac,limit, accessoire,_tag_reouclayetteaulave-vaisselleoCeux-cs
risquentdese fissureroudese d_fermer.
COMPOSANTS
Ext_rieuretportes
textur_es
Int_rieurdela caisse
Ext_rieuret portesen
acierinoxydable*
IMPORTANT:Les
dommagesdufinien acier
inoxydabledus_ une
utilisationincorrectedes
produitsdenettoyageou
deproduitsnon
recommand6snesentpas
couvertspar fagarantiede
ceproduit
Joints deporte
Serpentinsde
condenseurRetirerfa grille
inf_rieurepouracc#deraux
serpentins.
Grilledesortiedu
ventilateurde
condenseur
Veilartistedu r_frig_rateur.
Accessoires: C/ayettes,
_tag_res,bacs,tiroirs,etc
NE PAS UTIUSER
> Nettoyantsabrasffsouenergiques
>- Ammoniaque
> Javetlisant
> Solvantsoud_tergentsconcentr6s
> Tamponsder6cumgeenm_talou
plastique
>- Nettoyantsabrasifsou_nergiques
> Ammoniaque
> Javellisant
> SolvantsoudOtergentsconcentres
> Tamponsder_curageen m_talou
plastique
>. Produits#,basedevinai§re
>- Nettoyants_ based'agrumes
> Nettoyanlsabrasitsouenergiques
> Tamponsder0curageenrn6ta!ou
plastique
>- Lave-vaisselle
UTIUSER
>. Utilisef4 cuill_res6soupedebicarbonatedesodiumparlitre
(t pinte)d'eautilde savonneuse
> Rincerlessurfaces&I'eautilde et propreelsecherimmOdiatement
pour6viterles marquesdues&I'eau.
>- Utiliserune_pongeou unlingepropreet soupleavecdeI'eautilde
et savonneuse
> Rincerlessurfaces&I'eauti#deet propreet s_cherimm6diatement
pour_viterlesmarquesdues&I'eau,
> Utitiserunebused'aspirateur
> Utitiserunebused'aspirateuravecbrosse.
> Suivrelesinstruclionsded#poseetd'installationdanslasection
appropr{_e
> Laisse_lesarticless'ajusler&la temperatureambiante
> Diluerdud_tergentdouxet utiliserune_pongeouunlingeseuple
et proprepourlenettoyage
>- Utiliserunebrosse#,filamentsenplastiquepourallerdansles
interstices
> Rincerlessurfaces&l'eautilde et propre
> S_cherimm_diatemenllesarticlestransparentset enverrepour
_vilertoutesmarques.
" Un nettoyantpour acier inoxydablea _tOajoute pour votre usage,& l'int_rieurdu r_frig6rateur,Si vous voufezacheterd'autres
SO produits de nettoyage,veuillezprendrecontactaveo Sears en utilisantles renseignementsdennis au dos de couverturede ce
guide,
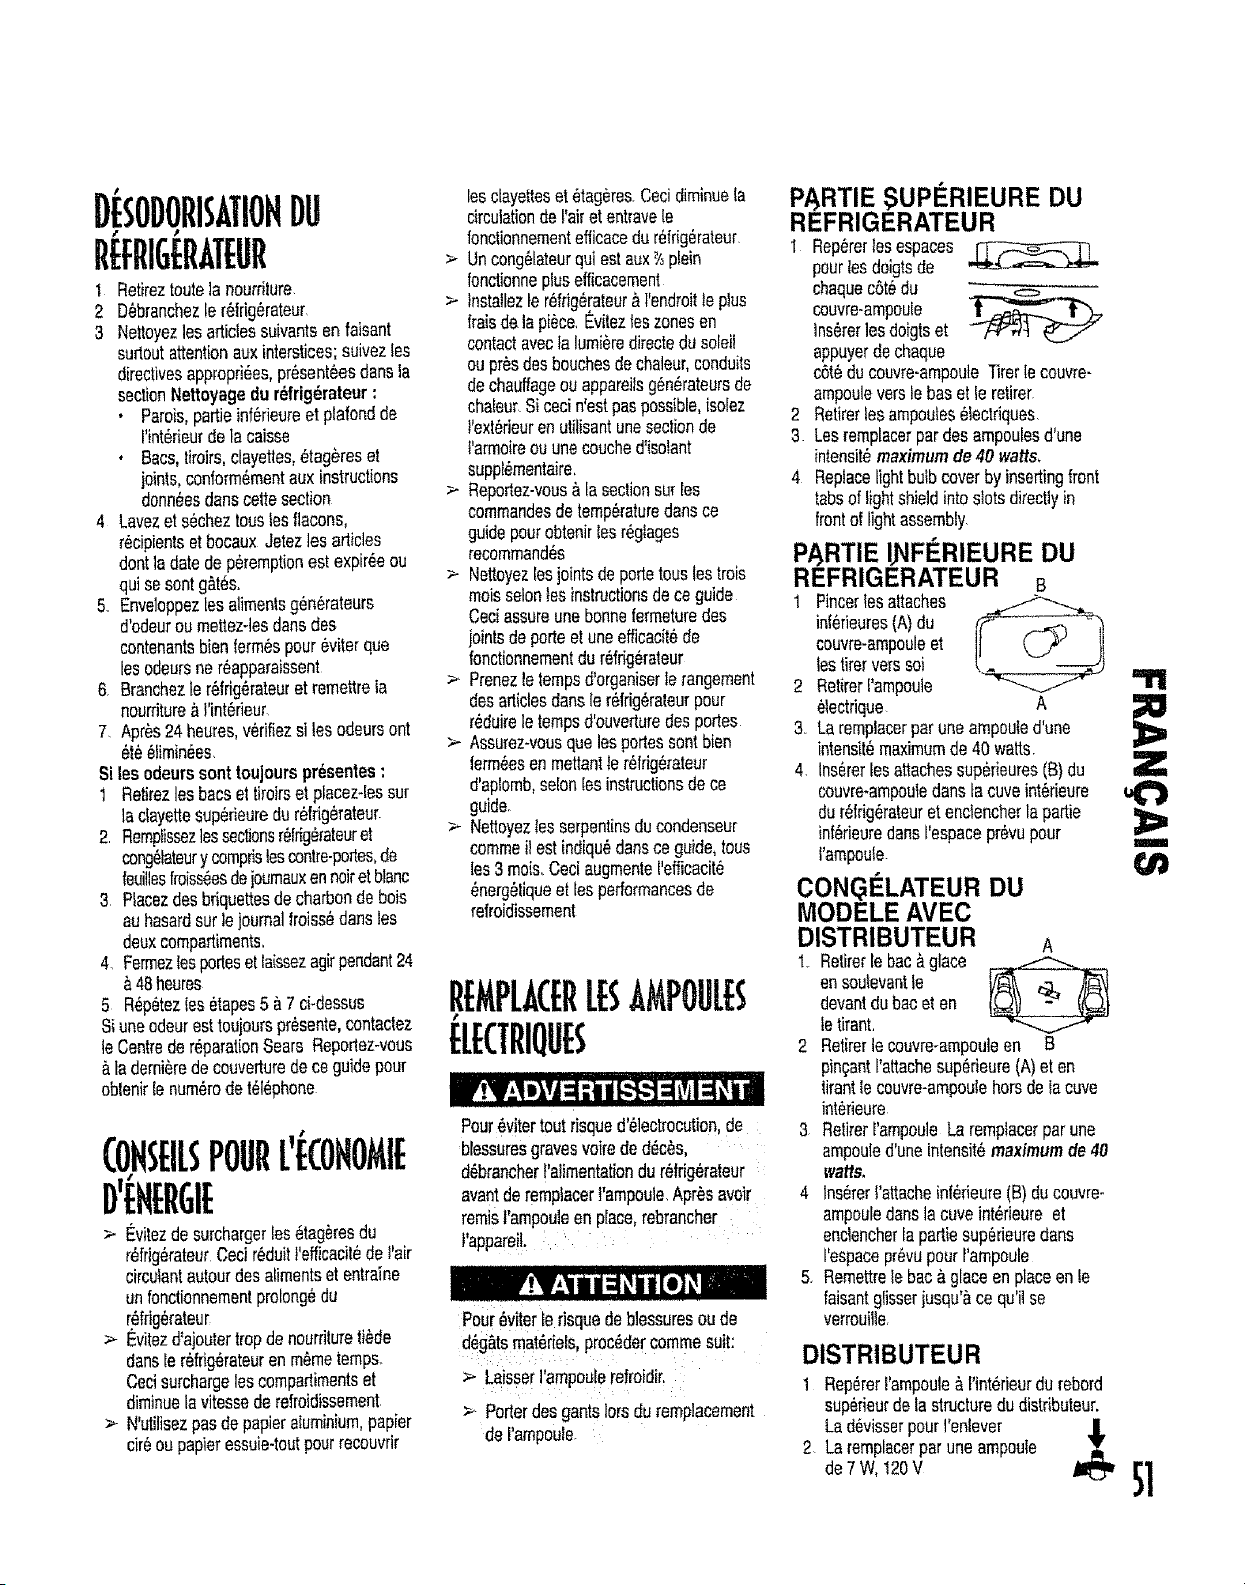
D SODORISATIOHDU
REFRIGERATEUR
I Retirezroute]anourrilure
2 D_branchezler6ldg_rateur
3 Nettoyezlesarticlessuivantsenfaisant
surtoutattentionauxinterstices;suivezles
directivesappropfi_es,pr_senleesdansla
seclionNettoyagedur_frig_rateur:
• Patois,pattieinf_rieureet plafondde
I'int6rieurdela caisse
• Bacs,tiroirs,clayettes,_tag_resel
joints,conform_mentauxinstructions
donneesdanscettesection
4 Lavezete_eheztouslesflacons,
recipientset bocauxJetez]esarticles
dentladatedeperemptiones!expir_eou
quisesentg&tes.
5. Enveloppezles alimentsg_nerateurs
d'odeuroumettez-lesdansdes
contenantsbienfermespoureviterque
lesodeursner6apparaissent
6. Branchezle r6frig_rateuret remettreia
nourriture&I'int_.rieur
7. Apr_s24heures,v_rifiezsi tesodeursont
6t6_liminees
Si les odeurssenttoujeurs pr_sentes:
1 Retirezlesbacsettiroirset placez4essur
la clayettesuperieuredur#lfigerateur
2. Remplissezlessectbnsr_lrig#rateuret
congetateury comp_stescontre-pottes,de
feuillesfr_sseesdejoumauxenheirel blanc
3 Placezdesbriquettesdecharbonde bois
auhasardsurlejournalfroissedartsles
deuxcompartiments,
4. Fermezlesportesellaissezagirpendant24
&48heures
5 R_p_tezles_tapes5 &7ci-dessus
Siuneodeuresttoujourspr_sente,contactez
le CentredereparationSears Reperlezwous
&ladernieredecouverturedece guidepour
oblenirlenum_rodetelephone
COHSEILSPOURL'[:CONOMIE
D'J HERSIE
>- Evitezdesurchargerles_tag_resdu
r_frig_rateurCecir_duitt'efficacitedet'air
circulantautourdesalimentsetenlraine
unfonctionnementprolong_du
r._frigerateu_
> Evitezd'ajoutertropdenourrituretilde
danslerefrigOrateurenm6metemps.
Cecisurchargelescompartimentset
diminuelavitessederefroidissement.
>- N'utilisezpasdepapieraluminium,papier
citeoupapieressuie-toutpourrecouvrir
lesclayettesetetag_res.Cecidiminuela
circulationde!'airetentravele
fonctionnementefficacedur_frig_rateur
> Uncongelateurquiestaux'%plein
fonctionneplusefficacement
>- tnstallezte r_frigerateur&l'endroitle plus
fraisdela piece,Evilezteszonesen
contactavecta lumi_redirecteduso[eli
oupresdesbouchesdechaleur,conduits
dechauffageouappareilsg#n#rateursde
chaleurSicecin'estpaspossible,isolez
l'ext_deurenutflisantunesectionde
t'armoireouunecouched'isotant
suppl_mentaire,
> Reportez-vous&lasectionsurles
commandesdetemperaturedartsce
guidepourobtenirlesr_gtages
recommand_s
>- Nettoyezlesjointsdeportetouslestrois
moissciontesinstructionsdece guide
Ceciassureunebonnefermeturedes
jointsdeporteetuneefficacil_de
fonctionnementdur_frigerateur
> Prenezletempsd'organiserlerangement
desarticlesdartsler6lrig_raleurpour
r_duireletempsd'ouverturedesportes
> Assurezwousquelesportessentbien
lettucesenmettantler_frig_rateur
d'aplomb,scion[esinstructionsdece
guide.
>- Nettoyezlesserpentinsducondenseur
commeilest{ndiquedansceguide,tous
[es3mois.Ceciaugmente{'ef_eacit6
_nerg_tiqueet fesperformancesde
refroidissement
REMPLACERLESAMPOULES
ELECTRIQUES
Pour_vitertoutrisqued'_lectrocution,de
blessuresgravesvoirededecks,
d_brancherf'alimentationdur_trig_rateur
avantderemplacerl'ampoule.Apr_savoir
remist'ampouleen place,rebrancher
I'appare!!_
Pour6viterIe risquedeblessuresoude
d6g&tsmat6riels,precedercommesuit:
>- LaisserI'ampoulerefroidir,
>- Porterdesgantslotsduremplacement
derampoule.
P, RTIE SUPI RIEURE DU
REFRIGERATEUR
1 Rep_rerlesespaces
pourtesdoigtsde
chaquecSt#du
couvre-ampoule
InsUrerlesdoigtset
appuyerdechaque
cGteducouvre-ampouleTirerlecouvre-
ampouleverslebaset leretire_
2 Retirerfesampoutes#lectfiques.
3 Lesremplacerpardesampoulesd'une
intensit_maximumde40 watt&
4 Replacelightbulbcoverby insertingfront
tabsof lightshieldintoslotsdirectlyin
frontof lightassembly.
P/ RTIE I.NF! RIEURE DU
REFRIGERATEUR
1 Pincerlesattaches j_-.__
inf_rieures(A)du
couvre-ampouleet
tesliterverssoi
2 Retirerf'ampoute
_teetrique A
3,,
4.
"11'1
Laremplacerparuneampouled'une
intensitOmaximumde40watts
InsUrertesattachessuperieures(B)du
couvre*ampoutedanstacure intOrieure
durOtfigOrateuret enctencherlapartie
inlerieuredansl'espacepr_vupour ,i,,.,.
l'ampoute.
CONGI LATEUR DU
MODELE AVEC
DISTRIBUTEUR A
l, Retirerlebae&glace _.._._=...___
ensoutevantle
devantdubacet en
Letirant.
2 RetirerleCouvre-ampou]een B
pin,antl'attachesup_rieure(A)et en
tirantle couvre-ampoulehersde Iacure
inlerieure
3 Retirer['ampouleLaremplacerparune
ampouled'uneinteneit_maximumde40
watt&
4 InsUrert'attacheinferieure(B)ducouvreo
ampouledarts]acure int_rieureet
enclencherlapattiesup_deuredane
I'espacepr_vupourrampoule
5. Remettrelebac&glaceenplaceente
faisantglisserjusqu'&ce qu'i]se
verrouille.
DISTRIBUTEUR
1 Rep_rerl'ampoule&I'interieurdurebord
sup_rieurdelastructuredudistributeur.
Lad_visserpourl'enlever
2 Laremplacerparuneampoule
de7W, ov S1
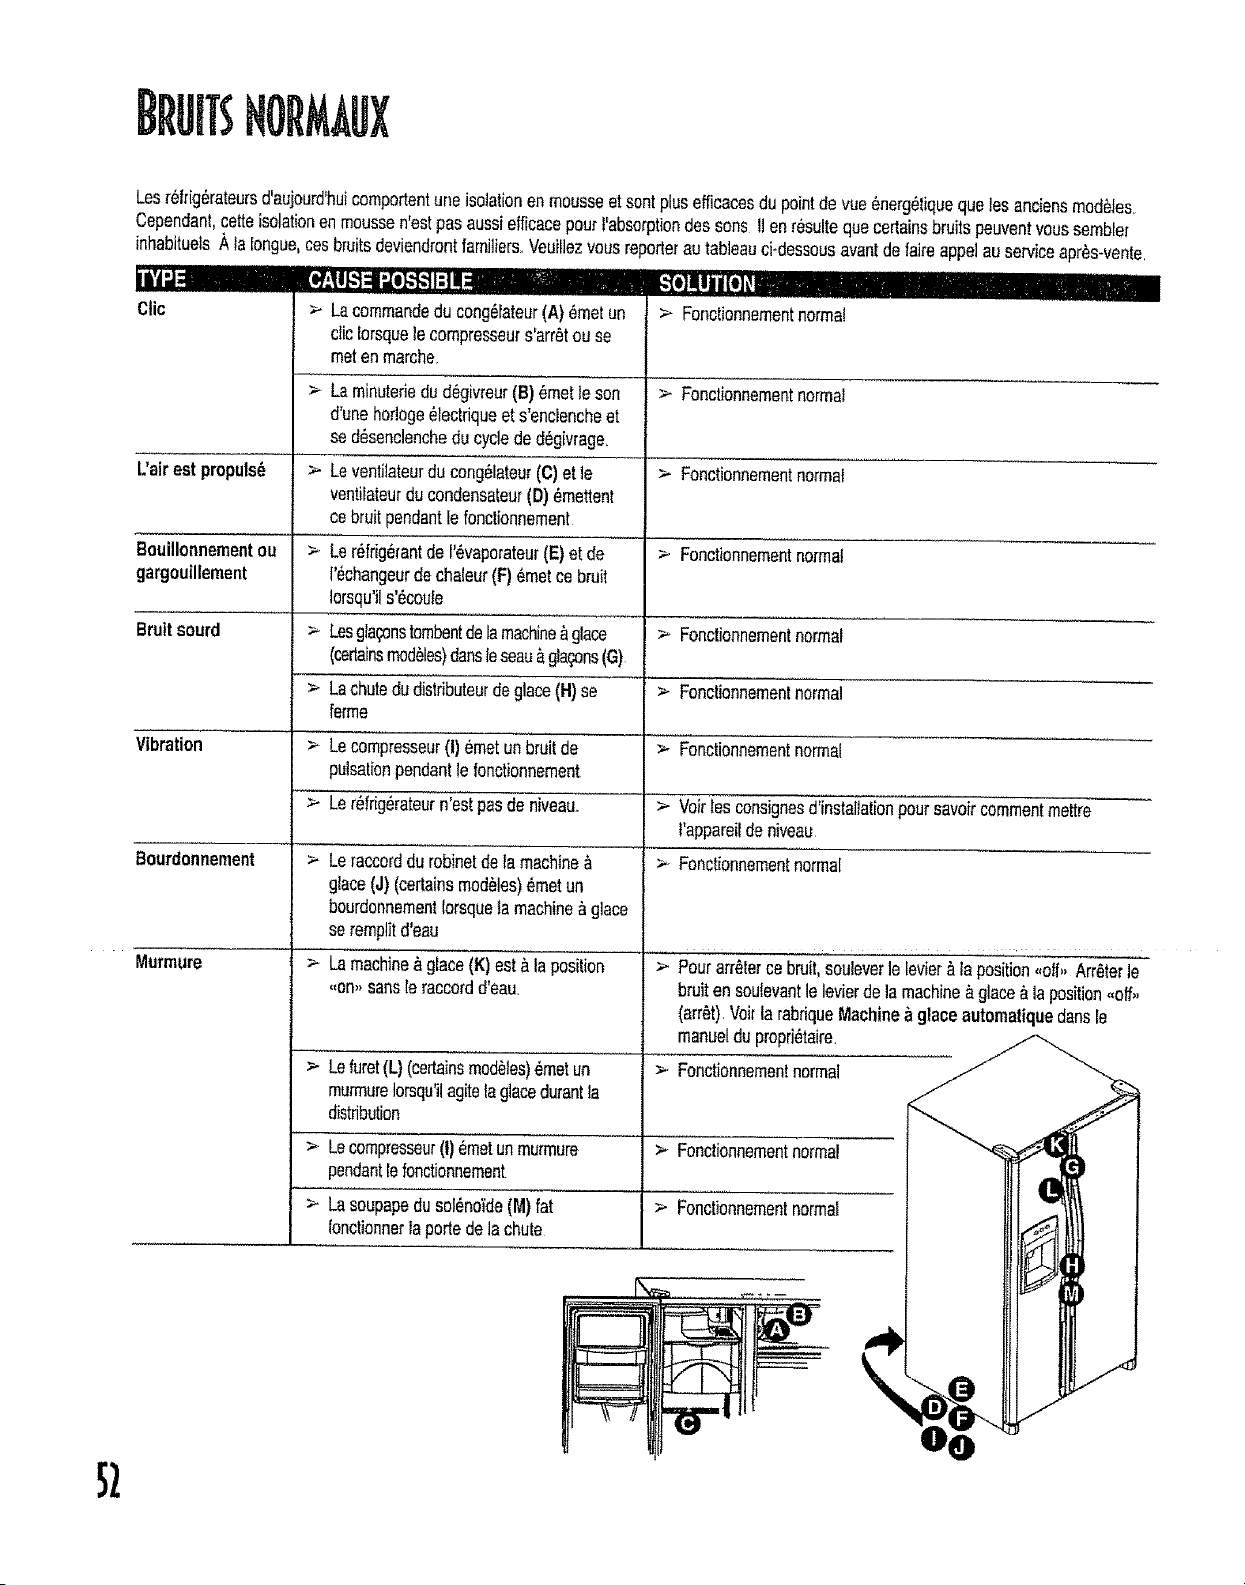
BRUITSNORMAUX
Lesr_frig6rateursd'aujourd'huicomportentuneisolationenmousseetsentplusefficacesdupointdevue_nerg_tiquequelesanciensmod_,,les
Cependant,cetteisolationenmoussen'estpasaussiefficacepourt'abserptiondes sons Uenresultequecedainsbruitspeuventvoussembfer
+nhabituelsA iatongue,cesbruitsdeviendrontfamiliers.Veuillezvousreporterautableauci-dessousavantdeloireappelauserviceapr_s-vente.
........................... .................... II1'1111 '1 1II
ill'4 "J
Ctic
Uair estpropuls_
Beuillonnementou
gargouillement
>- Lacommandedu congblateur(A) 6metun
cliclorsquelecompresseurs'arr_tou se
metenmarche.
> Laminuteriedud_givreur(B)bmetleson
d'unehoriogeblectriqueet s'enclencheet
se d_senclencheducyclededbgivrage.
>- Leventitateurdu cong_lateur(C)et le
ventilateurducondensateur(D)_mettent
oebruitpendantte fonctionnement
>. Ler6frig_rantde I'bvaporateur(E)et de
t'_changeurdechaleur(F) _metce bruit
lorsqu'ils'6couie
> Losgla_nstombentdelamachine_,glace
(cedainsmod_les)dons{esoau&gIagons(G)
> Lachutedudistributeurdegiace(H)se
ferme
> Lecompresseur(t) emetunbruitde
pulsationpendantlefonetionnement
> Ler_frig_rateurn'estpasdeniveau..
> Leraccerddurobinetdela machine&
glace(J) (cedainsmod_les)_metun
bourdonnementIorsquelamachine_ glace
seremplitd'eau
> Lamachine&glace(K}estala position
,,on,,sansleraccordd'eau+
_--Lefuror(L}(cedainsmode,los)_metun
murrnureIorsqu'ilagitelaglacedurantla
distribution
_-Lecompresseur(I)_metunmurmure
pendant[efonctionnement
>- LasoupapedusoI_noide(M)fat
tonctionnerlaportedela chute
._l]ltlji[I] _
> Fonctionnementnormal
> Fonctionnementnormal
> Fonctionnementnormal
> Fonctionnementnormal
Bruitsourd _ Fonctionnementnormal
._ Fonctionnementnormal
Vibration > Fonctionnementnormal
> Voirlos consignesd'installationpoursavoircommentmettre
l'appareildeniveau
Bourdonnement > Fonctionnementnormal
Murmure
;- Pourarr_terce bruit,souleverle tevie{Ala position,,eli,,Arr_terle
bruitensoulevantle levierdelamachineAglace_ laposition,,off,,
(arr6t).Voirla rabriqueMachinef_glaceautomattquedonsle
manueldu propd6taire.
>. Fonctionnementnormal
_. Fonctionnementnormal
>- Fonctionnementnormal
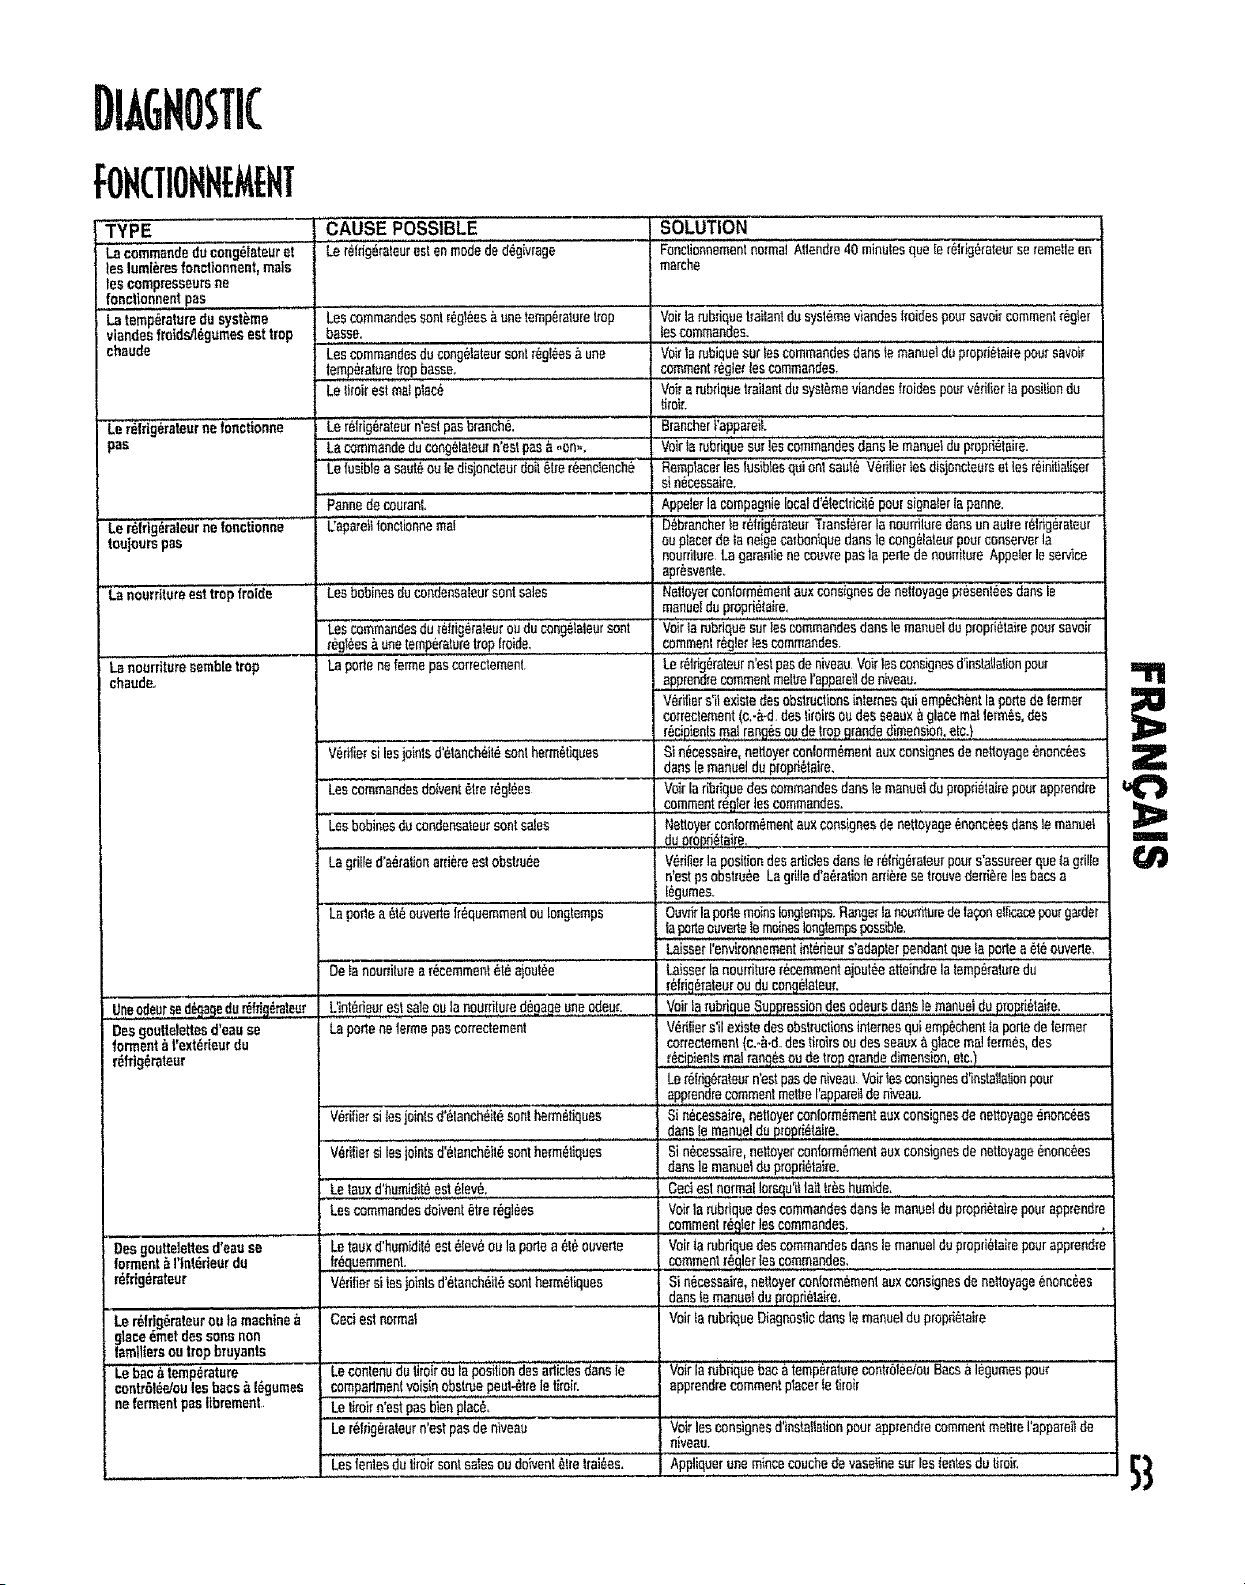
DIAGNOSTIC
FOFtCTIONNEMENT
"TYPE
La'commendedu cong_Iateuret
aslum[_resfonctionnent,male
lea compreaseursne
fonct_.onnen_,pas
Latemperaturedu systbme
viandeafretdM_gumesest trop
chaude
Le_'_ir'ig_rateurne fonctionne
_as
Ler_ldg_rateurne fonctisnn'e....
toujourspoe
'L_ nourrttureanttropfrolde
La nourriture sombretrop
chaudeo
, , ,,,,,,,,,, ,
Uneodeur_
Desgauttelettead'eause
ferment_ t'ext_rteurdu
reffig_rateur
Desgoutte]ettesd'eau se
ferment_ t'interteurdu
refdgerateur
Ler_lrig_rateurou la machine
glaceemetdessonsnon
lamllieraoutropbruyants
.....Lebac a"temp_rature
contrGl_/oulosbans& I_Jumas
nefermentpasflbrement
CAUSE POSSIBLE
_eretrig_;i';_eatenmo_& _iv';_ga
Leseommandessent r_g_esa unetemperaturetrap
hesse.
Leacommandosdu congelateursootr_glees&une
temperaturetropbasso,
Letiroirestmatp_aee
, _ , ,,,,_,,,,_, ,,,,,,,,,,,, ,,,,,,,.......
Le relfig_rateurn'estposbranch&
Lacommandedu congela_eurn'ee_poe_ ,,on,,,
Lefusiblea sauteoute disjoncteu}doi'{'_irer&enctenche
Pannede couranL
'L'apmeitfonctionnemaf
Leabobinesdocondone'aleutsentsales
SOLUTION
FonctiannementnormalAtlendra40 minu_esqueIer_tricj_rateurseremetteen
marche
r Vairlarubriquetraitantdusystemeviandosfroidespoo_savoircommentreglar
teacommandos.
Voirtan_biquesur _escommandosdana_emanueldupropd_tairepoursavair
commentreglerloscommandos.
Voiratubriquei_'ailantdosyst_meviandssfrsidespourverifierta posilionde
tiroir.
grancharrappamii.
' Voirta rubiiquesurlos commandosdanaia manueldu propdetaire.
Ramp}auntles tueiblesquieel aaoteVerifierteadisioncteursetlear_initialiser
sin_cesaaire.
Appe_arla compagnielocald'eteclrioilepoursignalerlaparma.
D_brancherlaretrig0rateurTransferorla nourfituredonsonnotre r_tdgerateur
ou placerde _aneigecorbaniquedanale cong_lateurpourconserverla
nour_itureLagarantieneoeuvrepasla perlede nourri_ureAppointle sauce
apr_sven_e.
Nettoyercor_formemeotauxconsigneedeneiloyagepresenteesdanale
manuelduproprielalre,
Leacommandosdu [e!rig_ra/auroudu congetaleersent Voir]arubriquesurtescommandosdanalemanueldo propri_lairepoorsavoir
regions,_unetemperature_op froide. , .... c.om,m_n.!,r_.glerleecommandos. ,.,,
La portenefermepascorrectement Ler_trkj0rateurn'estpasde niveauVoir_s consignee'd'insla_laganpour '
apprendrecommentmeleel'apporeilde niveau.
Verifiersll existedesobstructionsinternesqui crop,sheetlaportede (armor
co,testament(e.-a_ddestiroiraoudesseauxa glacema_]erm{_s,des
reciPientSraa!ranges0u de !topgrandedimens!on,e!c,)
Vedliersi losjointsd'etanch_it_senthermetiques Sin_cessaire,nettoyerconform_montauxconsigneede netteyageenanc_es
danalemanueldupropr;etaire, ,
Leecommandosdoivenl_treregimes Voirlaribriquedescommandosdanate manueidupropfi_tairepourapprentice
commentre£1arleacommandos. , ,.
Leabobinesducondensateursootsales Nettoyercon[ormementauxconsigneede nettoyageenonceesdanale manuel
dupropd_raise, , ....
Lagrilled'a_ra_ionarrieraeatobstruee V_fifierla positiondesarticlesdonsle r_tfig_rateurpours'assuraerquaiagdfln
n'estpsabstruse Lagdlleda_rationanierosetreuvederriereInsboosa
Iegumes.
La perlea hieauverteIrequemmentoo longtemps Oov_rla podemo_nsIongtempsRangerlanour4turedeIaqone[ticacepourga_der
,ta,,po_e,9_e_e,?,e,,mo!aes]ongtempopossible,
LaisserI'environnemeetint_deurs'adapterpendantquelaporte,a6t_ouverte,
De lanourriturear_cemmenteta aiout_e Laisserlanoeni_urerecemmentajouteeatteindrelatemperaturedo
r_fri,q_rateurou ducenge_ateur,
L' ntedeure tsa eou=ano r,tured ageoneodeur. Veer aru r=,uas,ppra s!o,od u, pio ii i iie,
La porteneiermepascorrectement V_dliers'il existedesobst_utionsinternesquiemp_ohentta portede farmer
correctement(c.-_-d.destiroirsoudesseaux_,glacoma?lermes,dee
r_cipientsmatrang_sou detrop ,qrandedimension,etc.)
Lereldg_'ratanrn'estpasdeniveauVoirleac_nak_nesd'instaltationpour
apprandrecommentmaitreI'apporeitdenk,aao.
V_.rifiersi_s joints'd"$'la'n'ch_'iieSentherm_fiques _ Sin_cessaire,netloyerconform_mentauxconsigneede nettoyageenonc_es
danale manueldupropd_taire.
V_tifieisiins jointsd'_ianch_it_sentharm_iiques Sin_cessaire,nettoyerconform_menteuxconsignesde nettoyage_nonc_es
............... dans,.!,e.manueldu propri_taire.
Letauxd'humidiLeesi _leV& cad eslnormallerequ'i_lair|r_shumide.
LeecommandosdoiventOtrar_gl_es
m
Letauxd'humidit_estelev_ou la podea et_ouve_e
V_dtiersi insjointsd'_tanch_it8senthermetiques
Ceci esi normat
Lecontenudu tiroi_"ou ia'p'esltlo'ndss"'a_'ici'esdanele
comparimen(voisinebstn_epeut-_lreIs firoir. ....
Le tiroirn'estpasbienplace,
Ler_lfig_rateurn'estpasdeniveat_
Los]antesdu tireirsentsalesou do,ventetre troikas.
Voirla_briquedescommandosdonslemanue_dupropdetairepoura£prendre
commentr_!er !asC°mmandes'
Voirta rubriquedescommandosdonslemanuelduproprietairepourapprendre
commentr_gler!ascommandos,
Sinecessaire,net_oyerooolorm_menlauxconsignasde ne_toyageenonc_as
danate manue_du _rielaire.
VoirfatubdqueDiagnosticdonste manueldu prOp_-taire
voir iarubfiqueb_ca temp_rai_iecontreI_elouBats _ i_gumespeu_
apprendrecommentpincerfe tiroir
Voirleaconsignesd'instaflationpourapprendrecommentmerlrerappereitde
' niveau.
AppliquerunemincecoUchedevaseiineSui iesientesdutiiOir.
"ll'l
Z
III

DIkGNOSTI(,SUITE
TYPE
Let_fHg_rateursemeten
merche trop frdquemment,
ICTIONHEMEHT,suite
.............cAUSE POssIBLE
Lea partes ant _te ouvertes eouvent eu pendant
loflgtempe
L humd_ta ou la chaleur eel elevee dens la p_ece.
De la nourrilure a r_cemment(_i_ ajout_e
L'appareiIeatexpes__,la chaieurde ................
I'environnemantoudesappareils:_proximitY,
Leabobinesducondesateursentsales,
Loscommandosdo'iv_nt_lre_'gi_
La portene {ermepasnerreclemenl
-'V-_ti er si lea joinis d*etencheite s6nt hennetiqu'e'_,
SOLUTION ...........
Ouwir la 'po'rtemains Jongtamps, Ranger la nourd_urede f'aqon sift'cane'Pour garder i_
porte ouverie le rnoines longtemps posaibIe.
Laieset i"envirennement int_deur s'adapter pe,ndani'que Is pods a"._t_0averts.
Ceei eat normal
1
.........
La{sserla nourriture r=acer_'mentajout_e a{teindre la temperature du r_frig_rateur oU du
cong_.lateur.
Evaluer I'eevironnement de I'appareil' D_aplacer' i"appaieii pour qu'H fonclienne de laden
plus,,,e,f,!icace.
NettoT.ereonfo_'_ment aux consignes nettoyage _nonc_es dan's'Is manuel"du
prepn_taire.
Veir la mbdque des commandos dens le manuel du propri_lake pour epprandre
commentr_gler los commandos.
Le r_frig_rateur n'est pas de niveau Veir les'"eonsignesd'ies't'_iiaiion p0Urapprsndie -
commentmettre I'appareil de niveau,
V_ri_er s'il existe des obs_c_o'nsinternes qaiemp_chent _ portede Iermer '
eotrectemen_(e.-&-d.des tkoira ou des seaux _ glans real lermes, des r_c p an s rnal
rangesou de trap grands dimension, etc.)
.S}n_cessaire, ne_oyer contermeman!au'xeonsign_s"d'e'ne'itoyageenes_es_'_'_
manual prepn_taire.
54
5L [EETBU
!.,'eaasemblebrumeuse_ IIya dol'eitoudesholiesd'ob"daneI'e_u.,,
It 1/odee pertlculeadana l'eau et/ou De le p_essibtede catbcnased_gegado la c_docche
lo gface, do _tlre_eau
Leo concen_raliensdemin0taaxdaneI*eaos'e"ierment
IorsqueI'eeop_ieel fond.
AUC_ voyantiumineuxn'eat allum_ L_ portedocoeg_loicurn'est pasferm_a
ear Ie peeneeude cemmandedu
dtatribatear (terrains med61es) Le t_g_releur n*estpasbranch&
Le IueibIeaaool_oa tedisjoncteurBoil81rerbinilialis_:
Unepeensde coursera'estprodecite,
Ni i'eaunl Iegioce ne scot distribute La ported_c_ng_loleutn+esipea_orm_e.
lersquo lea toucheesen enfonc_eu .....
L_ machine_ gtaceno prodeitpas
essexde 9Ia_oneeu lee glanceson!
one formebizarre(caffeine mod_les)
La machine_ glansno predeBpeade
glans(carbine m_l_lee)
La machine_glice_ l'opp_eiidel_d'unemachioe
glace_enIlool _sted'etreinslait_ou_ne grandqoentffb
de gbce vientd }tre u_il_s_e,
Le filire beau eatob_,!ru,_,,Q,u,doit_(rechen_. _ _
La ptessiend'seuas1tropbible
'"La machine_''_ie'cevieutd'_l_ei_tal}_eou unet_ep
,,grandeqaentitodegb_ns out _6 uti[is_u.
La p{essiond'eaueelttop feeble
...._ ,!i,l,lre_eaueatobolm_ou doil _t_ech_n_,
Le levis{de lamachine_ g_acen'estpasenhenna
L'a!!men_Ioo_e eneau r_ rejoinlp_s_ee_se_.
Le tuyauee oeuvreneen plas_ee eel Iordo,
La pte_iaud'eoaeelItopfoible
,,,_,,,,,,, ,
V_rifierla !om_mlure do cong_lelaul:
Lebacbglacen'esIpasins_l_ c0e_c_emenL
Urt robins1d'eauioed_uat a _1_insleB_
ceciee_no,mo_le_,oo_odi,_o,eo_e_n_i,_poor=a_,emi._,eoeo_dG_rei_a_enra_o,_i
,i ....... r
La premiereguanlit_d'eaeserentdelacarleochepoutcor_eeirde lapoussi,_redeee_r=e
,_vecu_ede la canou_e. Leapediculeaee sootpoedangereuses& consomme,"Elles dispotailroeI
e_r_e...._,gueiueoulilisalioua
Leapon_cuIesnesenl poedar,_reosesat.soretrouvoolnalure[iementdanaI'eau
vdd,e_.ilapo,edo=n_la_o.;'e_i"te.._eL&'_m_.de_setonc_ion_,p_Io._oe_o_.e
de congelateurset oaver[e.
Broacherf_apporeiL
Remplacerleefusiblos_]uion sou_ V_ tierteadsonc e_ se es en teiser ain_eeasare
........ ,,, . ........................ ,,, •
Apdelervol_eCOmpegnled'_lece_citepoorsf_faaferlenenno,
VerifierquaIapoliodu cong_laro_restle_m_e,Lacommandonelone%lensepasbrsqueepone"du
oonp_!a!Rursolouy,e{!eT,
Lqtsdelap{emE_euni_afi0nilyeued_o_d'env_en45sec_ndeavan adsdb_npendan qU_
e r,_Servoriatemed'eeuse rempliL
Ntondte 24 heureepoorqoeIome_hioe_glseeseremplisseaprbsavoir _16vid_e
'"c,ee_e_le_i_;;_eeu. '............................
,,,,,,,,,,, ,
V_,cfier_ p_e de_mem d'seu_ le_o_ns_nssdlnsta_ia!_m,Leaseupaposau_n_r_s
_o_ 3t16popewsetd_vnuerTapresslond'eauel obstn_erlel_u epr_sun_ em_ Le
r[cantsn'es_posr_spoesab__ d_ts morsels caesdepat usen_ _ serviceou un
rsecoordemsetd'eautecermcL
A_iendre24 heuresquataprodect_ude glo_nsdebuleeIqoelemchineeeremplisseden0UVeU
p{_aaveir et_vid_a.
Unepresiond'eauIrop{e_bfepoutcauseruse{uiled'eat_i"_"p_e_iond'eou_bii's'e'siiue_"enVa20et
tO01blp_l_,.!rass=sefle_n{sec_onnementUrepressionmieimumde351b/po_eeesernm_nd_o
....._ur Iseoppa(eil,sawe el_'ead'e_. ,,
Chan_er,le,!!!!reZ_eau.
Vdriflerquole levierde le morJ_inea placeeatIir_ verslebee Voirla rubdquamacule _ gi_
aotomatiquedenoIomanueldo preputiaL,e,, .......................
V_r;fier,!,a,_roc_urede _ccotdcmentd'eaudanelea cons_oeed'nse a on ,,
Formerl'eeue!eliminerteaplis.S!,,tos,_o!Lsne pe_yse,t_lre _limin_s,remp_ecerle luyau.
_ pressiond'eaudeilsesiluerenlte20 elt_ Ibipo"pou:r_surerleL_nfenc_ioanemonUoe
p_seoionminimumdo 35Ib/po'e_{recommsed_epoutlea a_pareilaavset_llresd'eeu.
Voirla mbdquedescommandodar_ _emonuefdupropri_leirepourapprendtecommentr_}g_e{lea
commends.La temperatureducong_bteurdoll sesituereetreOet 2_ F (--18et -17_C}pout
Vo[rb _e doba_& gkl_epoursa_rO0mmenti_er el_gnerle_ _gFam.
V_d6erlaproc_u,,"ade_merA d_audens_ cse_gnesd_ns_a_. Leaseupapeseutopor_antes
c_@ 3]16popeuvenI_r lapmssx:_d'eaoe_ot_er _elLStauepr_ unsenainL_mps,Le
tabs€antsn'e_tpas responsebled= d_J_Sn'mt_e!scausespatone missen serviceou un
mac_o_emenld'eauIncottsel
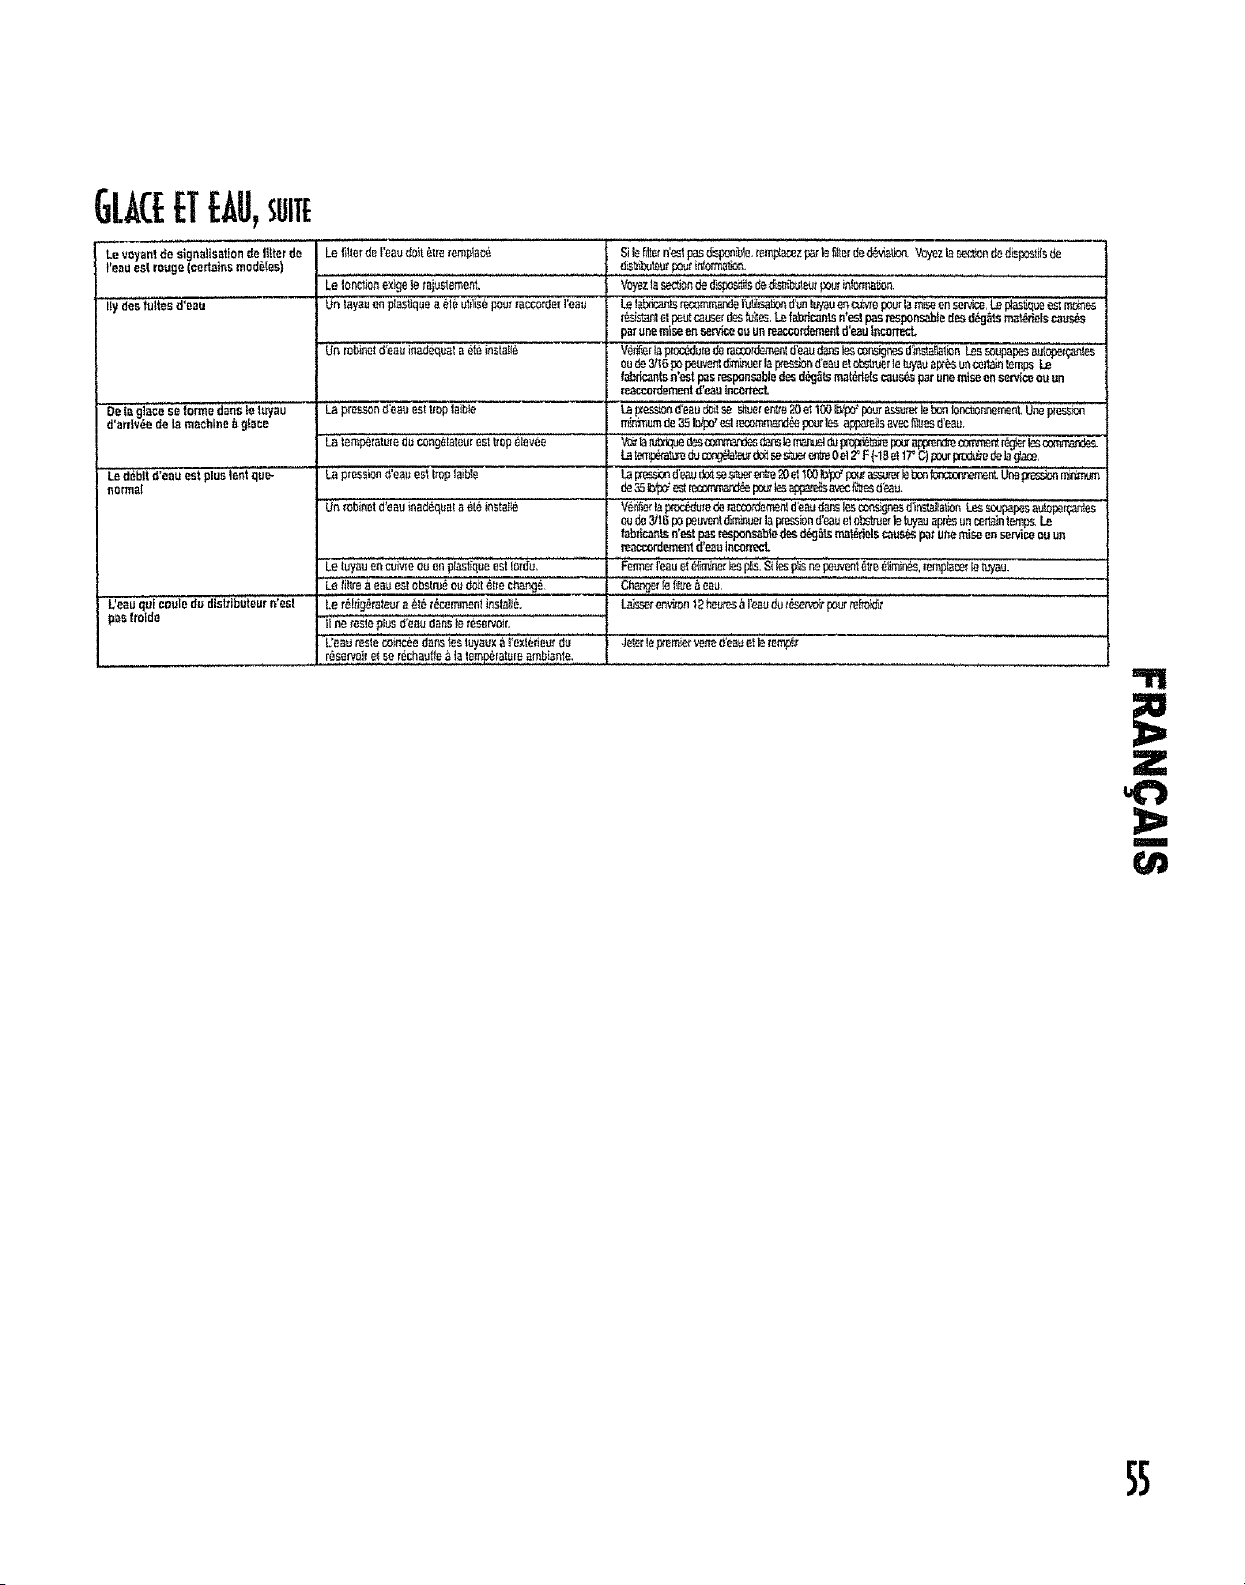
GLACEETEAU,SUITE
Le voyantde slgna!isationde fi?terde
I'eeuas{ reuge(cattails mod6Ies)
flydesfultes d'eau
Deta g]ecese fotmedenste Iuyau
d'antv6ede |a machineb glace
estplusle_t que-
nOlTna_
L'_'_u qul cou|e du dishi'b'uieur r_'es!
pea ftoido
Le fillerde l'e_ud_it6_rerem_lac6 Sile_11e_n'eslpasclSponible._ecez parle51tarde66_c_ Vc_/ezta,_'_._nded_l'x_stilsde
d_z_ur _ur informat:,or,, ..............................................
Le ioncfionexigeletajuslemenL Voyezla s_'tJafi_ dis_x_s_,_sdec_'bule__ inf_._t_,
Un _ayauenplaa_quaa 616utilizep_)u__cco_de[rea_ Le!_b_;a_tsrr=._,mm,:_IaI'u_Iisabond_n _m.uen_Me tx_urlam_ en serC.,ce._ _ _I m_
_,_I eI peutcauserd_ _, b_f_rkanls nes_pasresp_nsabfedesd_Ats rr_t66els causes
I_ uneml,,_ensar_:e o_ unre_r..c.o_eme_td'_u fncon'_
Ur_robin_d'e_uinad_,quaIa61eins_aff6 Ve.r#,_rEtpt_L'd_e 6e raoco_demen!d'eau_ ie_o_nsrgr,_sd_li_n Lea_upape_aufopel_as
oude3/_6po peuv_nlc_z_erlaIX._sbr_d'eauelobs_,'uer_e_ia_eptL_unc_la_n_empsLe
fab,dcaBtsn'estp_stespontabtedesd_s rnat_eIs cau_ p_runeraiseonsauce ouun
reaCCOTd_m_ntd'_u tn_rte_
"Lapres._n_'eaueatItoplaible La_xes.,:_d'eau_._I._ _uerenlte20el100_ pou_L'assb_lebantanc_ar,."_rr,e_t'U_i_e_ '
mirmlumde35Ib,_po_eat_L_'_mrn_ pourle_ app_e_ avec_es d'eaD.
Lalempetatu_edu cor_g_lataureattz_p_levee Vo_b tub_iuedes_ {_ns_e_ _ prOF'_eFo_a.pp_r,(_(:_r_'r_rt'r_g',__
La p[essianO'eauest {r_)pIaibIa _ _ d'e._udo_se_ _ 20_ 100b_(i _ _ _ bo_f_'_{_r, em_J_tUre_ m_m'_'r,
de35_,_po__ re_r_e pout_ _ _c f_'_sd_aa.
Un tObinOtd'eauinad_qua_a e{6instBfl6 Ve_ta _ _ _ao_ord_f¢_.'lid;e_u_ i_ _gr_ dlr,st_I_at{onLeas_._s au',oper_es
oude3/IGpopeb'venl_mi_azlap_ion d'e.auelob_ue__ _Wauapr_un_n _'mps.Le
fabtic_Lsn'_t pasr_por_sab_de_d_g51sm_V_elscaus_ paturgeraiseen service_uun
-L_(.ya.en'_;_'o.'_',p_._"_'_;_o. ' .......... Fo_o,_"_a.e_._,_ _. S_,_,. _,_r_,,_,,_i_,_,_,i,,,,,,--'_
LBtilde t_eaL{eatobs_'_._eo_doit6tie chat_ge. Char_:3e_'teflIueaeau.
Le r6ffig6raleu_a6t6r_cemmen_install6. L,_s_zen_,_onI_ heutes_re_ doz_sen_o_pourm_ki_
t{netes!o p_usd'e_ dartsla reserv(_i{.
reservoiretBe[6chauffe_la!e_{at_{_ara!!ante.
Z
m
SS
I_EMARQUES
56
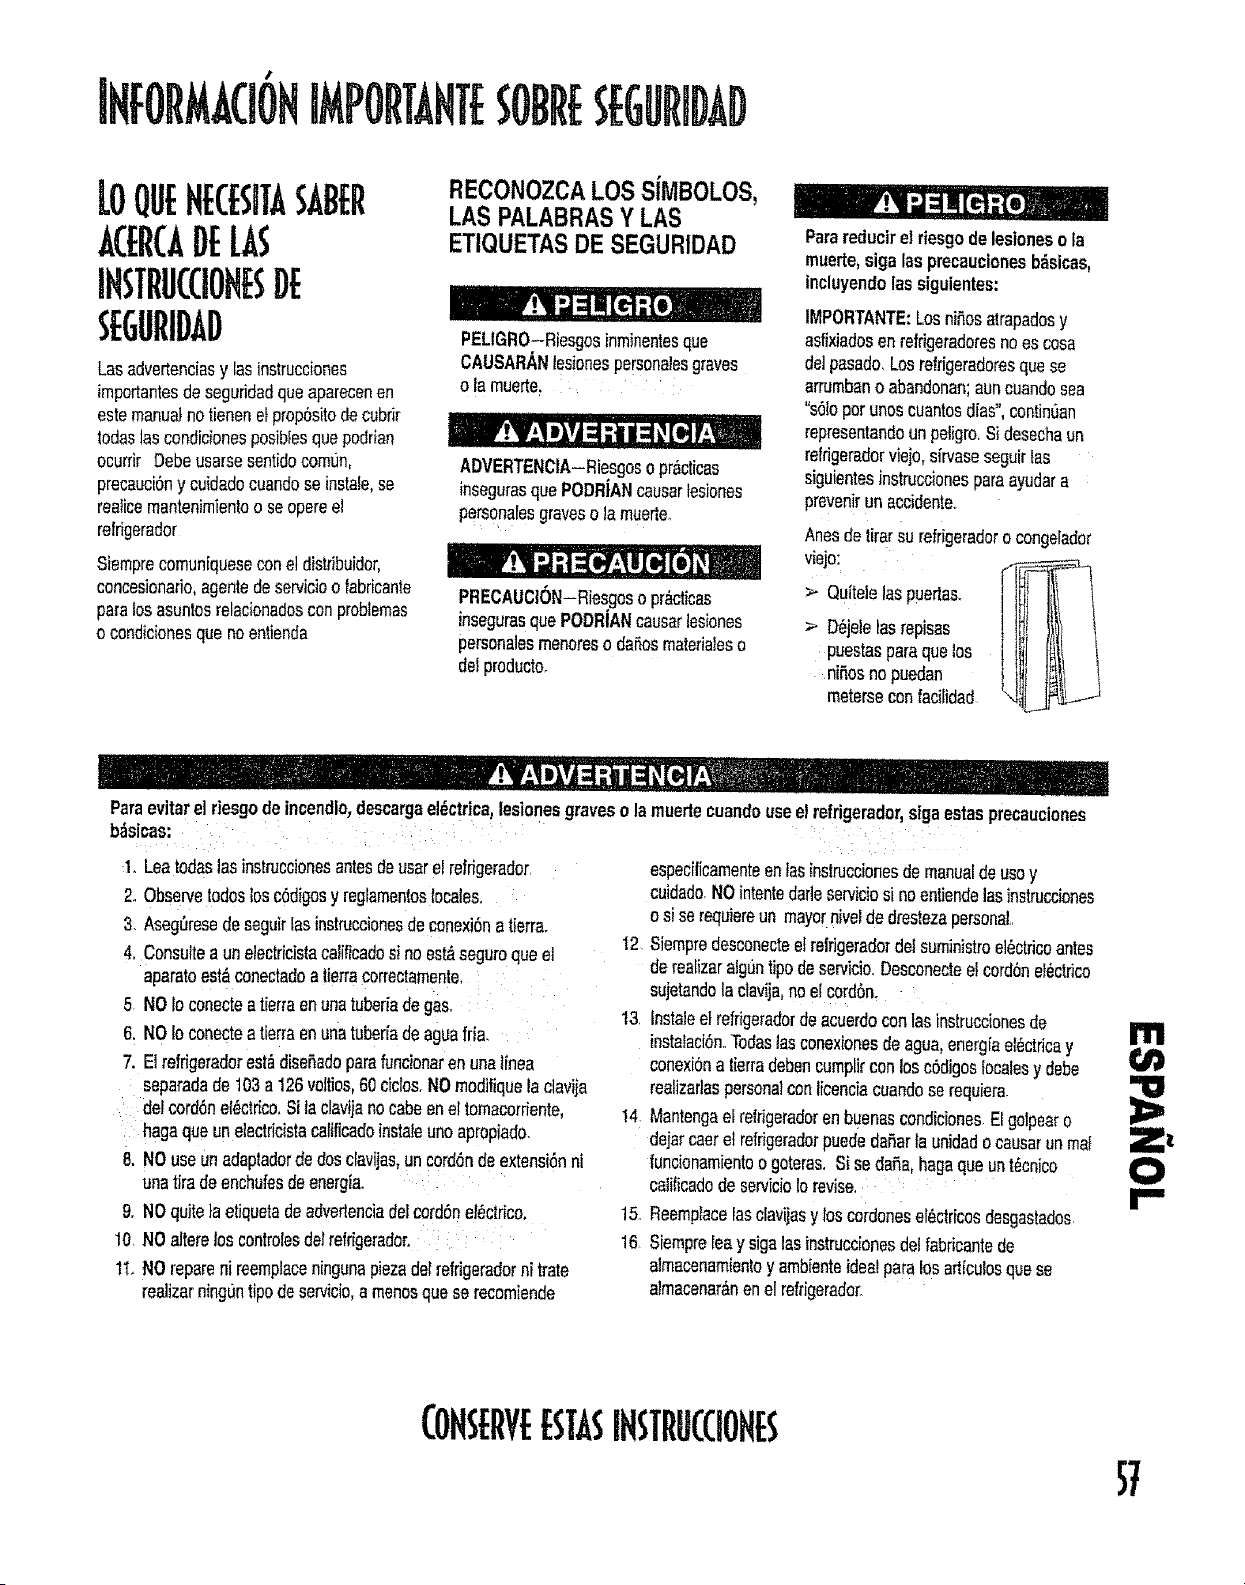
/.
IHfORMA(IONIMPORTAMESOBESEG,RIDAD
Lasadvertenciasy Insinstrucciones
irnportantesdeseguridadqueapsrecenen
estemanualnetienene_prop_sitodecubfir
lodeslss condi¢}onesposibfesquepodrien
ecurrir Debeusarsesentidecorn_Jn,
precauci6ny cuidadocusndese instale,se
reaticernantenirnientoo seoperael
refrigersdor
Siemprecornun[queseconetdistribuidor,
concesienario,agentsdeservicioo tabdcsnte
paralosasuntosrelacionadesconprob}emas
ocondieionesqueneentienda
RECONOZCALOS SiMBOLOS,
LAS PALABRASY LAS
ETIQUETASDE SEGURIDAD
PELIGRO-Riesgosinminentesque
CAUSARANlesionespersonalesgraves
o larnuerte. ,
ADVERTENCIA-Riesgoso practices
insegurasquePODRtANcauserlesiones
personaiesgravesola muerte,.
PRECAUC|ON-Riesgoso pr&cticas
inseguras quePODRiANcausertesiones
personatesrnenereso daf,os rnaterialeso
delproductor
Parsreducirel riesgodelesioneso la
muerte,sigs Iss precaucionesb_sicas,
incluyendolassiguientes:
IMPORTANTE:LosniSesatrapadosy
asfixisdosenrefrigeradoresnoescase
delpasado,Losre_rigeredoresquese
srrumbano abandonan;auncuandosea
"s6toperunoscuantosdins",eontinOan
representandeunpeligro,Sidesechaun
relrigeradorviejo,sfrvaseseguirtas
siguientesinstruccionespareayudara
prevenirunaccidente,,
Anesdetirarsu refrige_aderocon,elader
viejo:
> QuiteleInspuertas_
> D_jelelas repisss
puestasparequelos
niSesnopuedan
rneterseconfacilided
Paraevitarel riesgode incendlo,descargael_ctrica,lesionesgraveso la muertecuandouseel refrigerador,signestasprecauciones
b_sicas:
I LearedesInsinstruccionesantesdeussrel refrigerader,
2, Observelodeslosc6digosy regtarnentoslocales.
3 Aseg_resedeseguirInsinstruceionesdeconexi6natierr&
4. Consultsaun electrieistacalificadosinoeat&seguroquae]
aparatoeat&cenectadoatierracorreetarnente,
5 He to conecteatie[reonunatuberiadegas.
6. NO_oconecteatierraenunatuberiadeaguafria.
7. E_ref_igeraderest&diseSadoparefuncionarenunalinen
separadede 103a126voltios,60ciclos,NOrnedifiquelaclavija
delcord6nel_tdco, Silacla_janocabseneltornscorriente,
hagaqueunelectdcistacalificadoinstafeunoapropiado.
8. NOuseunadeptadordedosclavljas,uncerdSndeextensiSnni
unatira deenchufesdeenergia
9, NOquite]aetiquetadesdvertenciadeicordSneJ_ctr_COo
10 NOalterslos centre{asdelrefrigerador,
1£ NO repareni reernplaceningunapiezadetrefrigeradornitrate
reaiizarninguntipodeservicio,a manesqueserecorniende
especilicamenteeninsinstruccionesdemanualdeusey
cuidado,NOintentedafleserviciosi noentiendeInsins!.rucciones
osi serequiereun mayornivelde drestezapersonal.
12 Siempredescenecteelrelrigeradordelsurninistroel_ctriceantes
derealizaraigt]ntipodeservicio,Desconecteel cord6net_ctrico
sujetandola clavija,noelcord6n.
13, instalselrefrigeradordeacuerdoconlasinstruccionesde
instalaciSn.Todasinsconexionesde ague,energ[aeI_ctricay
conex[bna t(erradebencutup[itconloscGdigos!ocatesy debe
restizartaspersonalconlicenciacuandose requiera.
14 MantengaelrefrigeradorenbuenascondidonesElgotpear0
dejarcaerel refrigeradorpuededsSarla unidadocauserunrna}
funeionamientoogoteras.Sisedsfis,hagsquaunt_cnico
cali_icsdedeserviciolerevise,
15 Reernplacelasclavijasy los cordonesel_ctricosdesgastados
16 SiempreIeay signInsinstruecionesdelfabrieantede
alrnscenamientoy arnbienteidealparelosartlculosquase
alrnacenar_nenelrefrigerador.
m
Z _
COHSERVEEST, SIHSTRUC(10HES
57

/,
COHTRATOsD[PROTEcCIOH
58
parafijarlafechadelservicio.Puedellamara
cualquierhera,dufanteeldieo en lanocheo
puedefijartafechaparaelservicioa traves
detacomputadora.
EN LOS EE.UU.
Lofelicitamospersusabiadecisi6nde
compra.Sunuevoelectrodom_stico
Kenmore_hasidediseSadey fabricadopare
ofrecerletouchesa_osde rendimiento
seguro.Pore,aligua]queredeslos
productos,devezencuendopuedenecesitar
mantenimientopreventiveoreparaci6nEn
ia[momenloescuandounContratode
Protecci6nle puedeahorrarpreocupaciones
y gastes.
AdquieraunContratode Protecci6nPrincipaI
ahorayprot_,jasecentreincertidumbresy
gastosinesperados.
ElContratodeProteccionPrincipaladem_.s
le ayudaa prolongarlavidet]ti[desu nuevo
electrodom6sticoElContratoinciuyelo
siguiente:
> Servicioposventapernuestros12000
profesionalesespeeializadosen
reparaciones
Servicioposventailimitadoy gratisde
piezasy manedeobraparatodastas
reparacionescub[ertasperelcontrato.
> Garanliaderendimiento- reemplazodot
productobajocontratosi ocurrenm&sde
Searstienem_sde12000profesionales
especiatizadosenreparaciones,quetienen
accesoamrs de4,5railleriesde repuestosy
accesoriosdeealidad.Estees elripede
profesionalismoatqueustedpuederecurfir
paraprolongerla videuti!desu nuevo
electrodom_sticodurantetouchesaSos
iCompreheymismosuContratode
ProtecciSnPrincipa!!
ExistenciertasIimitacionesy exclusiones
Parapreciosy mayorinfermaci6n,Ilamea!l
1-800=827-6655
Serviciodeinstalaei6nSears
Parainstalac[6nprofesionalgarantizadade
eIectrodom_sticosSearsy articulostales
comesistemadeaperturadepuertasde
cocherasy calefactoresdeague,enlos
EEUU Ilameal 1-800-4-MY-HOME_
(1-800-469=4663)
EN CANADA
Sucompratienemayorvalorpuesusted
puededependerde SearsHomeCentraP
pareservicioConm:_sde2400t#cnicosde
servie[oy accesoa mrs de900.000
repuestosy accesorios,tenemoslas
herramienlas,losrepuestos,los
conocimientosy las destrezasparecumplir
nuestrapromesa:ReparamosIo que
Vendemos
Suelectrodom_sticoKenmore_haside
dise_ado,fabricadoy probadopareofrecerle
touchesaSesdefuncionamientoseguro Sin
embargo,cualquiereleclrodom6sticopuede
requerirserviciodevezencuandoEt
ContratodeMantenimientoSearsteofrece
unprogramadeserviciosobresalientey
econSmico.
ElcontratodemantenimientoSears
> Significaqueustedest_comprandoel
serviciodeheyalospreciosdemanana
Eliminalosgastosenreparaciones
resu]tantesdeusey desgastenormal
>. Leofreceayudaeducacionale
informaci6nnot_cnica
tresfa!lasdelproductodentrodedoce
meses
Reemplazodesuproduetosi el producto
bajecontratonopuedesetreparado
Revisi6nAnuatde Mantenimiento
PreventivecuandoIosolicite- sincosto
adicionat.
> Ayudar@idapertel_fono- ayudae
informaci6nnot#cnicaparelos productos
reparadosensuhogar,edemasde
fijaci6ndefechasconvenientesparatas
reparaciones
> Protecci6ncentrearremetidase!_etricas
debidoaftuctuacionesdeta corriente
el_ctfica.
>- A(tnsi ustednonecesitareparaciones,le
ofreceunarevisi6nanualde
mantenimientopreventive,cuandoIo
solicit&a findeasegurardequesu
electrodom#sticoest6siempreenbuenas
condieionesde use.
ExistenciertaslimitacionesParainformaci6n
sobrelosContratosdeMantenimientode
SearsCanada,]tameal 1-800-36t-6665.
> Reembolsodecoslosdearriendosi las
reparacionesdesu productobajocontrato
demoranm&stiempoquetoprometid&
Unavezqueustedhacompradoel Contrato,
solamentenecesilaunaflamadapertel_fono
raARANTjA
Garantiacompletade unafio parael
refrigerador
Duranteunafiodesdeta fechadecompra,
cuandoestereffigeradores usadoy
mantenidodeacuerdocon lasinstrucciones
adjuntaso entregadasconel producto,Sears
1oreparar&gratuitamente,si lienedefectos
dematerialodefabricaci6n
Garantiacompletadecincoafiosparael
sistemade refrigeracibnsellado
Durantecincoafiosdesdelafechade
compra,cuandoesterelrigeradores usadoy
mantenidodeacuerdocon lasinstrucciones
adjuntaso entregadasconelproducto,Sears
reparar_,gratuitamenteelsistemasellado
(compuestopotel refrigerante,tuberiade
conexiOny motordelcompresor),si tiene
defectosdematerialo defabricaci6n
Lasgarantiasdescrilasanteriormente
sotamentesonv_.fidasparalosreffigeradores
queseanusadosparaconservaciSnde
alimentosdesfinadosalconsumodelhogar
Noincluyeloscartuchosfiitrantesofiginalesy
derepuestodefsistemaautomaticodeagua
y hieloKenmoreLoscaftuchosoriginalesy
derepuestosongarantizadosdurante30
dias,encuantoalas piezasmismas
solamente,contradefectosdematerialode
fabricaci6n
E1serviciobajo]agarantiaestadisponible
Ilamandoal 1-800-4-MY-HOME_
(1-800-469-4663).
EstagarantiaesvalidasoJamentecuandoel
productoest&siendousadoenlosEstados
Unidos
Eslagarantialeotorgaderechoslegales
especificosy ustedadem&spuedetener
olrosderechosquevafiandeunestadoa
otto
Sears,RoebuckandCo, Dept817WA,
HoffmanEstates,IL60179
NOTA:Algunossistemasdetratamientode
aguapotosmosisinversacausanunabaja
delapresi6ndelaguaLapresiOnbajadel
aguapuedeafectarelsistemade!distribuidor
deaguay hieloproduciendocubosdehielo
pequefioso huecosy flujodeagualentodel
distfibuidorLosprobfemasdeservicio
relacionadosconetsistemadetratamiento
deaguaporosmosisinversadelhogarno
est_ncubiertospotlagarantia
REGISTROD[LPRODUCTO
Enelespacioprovistoacontinuacion,anote
elnumerode modeloy elnumerodeseriey
IsfechadecompradesureirigeradorEl
numerodemodeloy desefiese encuentran
dentrodelrefrigeradorenla paredizquierda
NflmerodeModelo:596
NumerodeSerie:
FechadeCompra:
Conserveestefoltetoy su recibode
compradeSearsenun tugarseguropara
relerenciafutura,
I11
59
TABLADEMATERIAS
Informaci6nimportantesabreseguridad.........................................................................57
Loquanecesitasaberacercadelasinstruccionesdesegufidad...................................... 57
Contratosde Proteccibn............................................................................. 58
ContratosdeProleco6nPrincipales- entosEEUU......................................... 58
ContratosdeMantenimiento- enCanad_................................................................. 58
Garantia................................................................................................................. 59
Registrodelproducto.......................................................................................... 59
tnstalactbndelrefrigerador.......................................................................... 6166
Medici6ndelacavidad................................................................................ Gt
Transportedel refrigerador....................................................................... G1
SelecciOndeta majorubicaci6n........................................................................... 61
COmoinstalary quitarlasasas........................................................................ 62
Quitartaspuertasy lasbisagras........................................................................ 63
C6movolveracolocarlaspuertas.................................................................... 63
Comainstalare quitarlospanelesdelaspuertas...........................................................64
ConexiOndelsuministrodeagua........................................................................ 65
Nivelacibndel_eifigemdo_................................................................................... 66
Ajustey mantenimientode lastemperaturasapropiadas............................................. 67
Ajustesinicialesdeloscontrotes............................................................................ 67
Ajustedeloscontroles.............................................................................. 67
ConservaciSndealimentos................................................................................. 67
Informacibnsabreelfiltrodeagua ................................................................ 68-69
InstataciOny desmontajedelfillrodeagua ................................................................. 68
Datosdelflltrodeagua ............................................................................ 69
Oaracleristicasdelcompartimientodel refrigerador........................................... 70-71
Bandejasinteriores........................................................................................... 70
Almacenamientoenlapuerta............................................................................... 70
Caj6ncontroladodelclima............................................................................................71
CajOnesdealmacenamienlo............................................................................................... 7t
Caracteristicasdel congelador............................................................................. 72
M&quinaautom_ticadehacarhie!o...........................................................................;; ;; 72
Repisas...................................................................................................................72
Cajones...........................................................................................................................72
Almacenamien!oentapuerta.........................................................................................72
CaracterisUcasdefsurtidor........................................................................................ 73T/
Focodelsurtidor.............................................................................................................73
Almohadilladesurtido..................................................................................................73
Funcionamientodalsurlidordeagua..................................................................................73
Caracleristbasdelcontrolconcincobotches...............................................................74
Caracleristicaselectr6nicodelcontrol.........................................................................75-77
Consejosyouidado...................................................................................... 7879
Umpiezadesurefrigerador.............................................................................................78
Eliminaci6ndebs oloresde_refr[gerador................................................................. 79
Sugerenciasparaahorrodeenergia............................................................................... 79
Quitary reemplazarlosfocos............................................................................... 79
Sonidosnormalesdefuncionamlento............................................................................... 80
Localizacl6ny SolutiOndeAverias................................................................................8183
Funcionamiento...........................................................................................................8t 82
Hieloy agua.................................................................................................................82-83
Serviclo......................................................................................................Contraportada
60
t
BNSTABCIOHDE[REFRUGER DOR
Estasinstruccionessonproporcionadaspara
ayudaflea instalarsurefrigerador
DE[ACAYIDAD
AIinstalarsu refrigerador,utilbe perfavorla
cartaabajoparabs requisitesde
espaciamiento.
Losrevestimientosdelsubsuebo delpiso
(esdecir,alfombras,baldosas,pisosde
madera,tapetes)puedendisminuireltamaSo
delacavidad
Sepuedeobtenerm&sespaeiolibreusando
elprocedimientode nNetaciSnincbWeenla
secciSnNivelaoiSndel refdgerador(pagina
66).
Volumen Espacio libra
total de la recommendado
unidad En la A los Per
parle lades detr,%
. .superior .
Manesde NIA N/A W'
23 pies
c_bicos
(7 ms)
M#,sde
y/' NIA 'I2"
23 pies
cubices
(7 m=)
IMPORTANTE:Sielrefrigeradorva aset
instaladoenunacavidadenquelaparte
superiordetrefrigeradorquedar_
eompletamentecubierta,uselasdimensiones
desdeelpisobasralaparlesuperiordela
lapade]abisagraparaverificaret espacio
libreapropiado
Sigaestosconsejoscuandomuevaei
refrigeradora sulugardefinitive
> NUNCAtransporteelrefrigeradorde
costadoSinoesposibletransporiarloen
posici6nvertical,transp6rtelohaci6ndolo
descansarenlapartetraseraDejeel
refrigeradorenposici6nverticaldurante
aproximadamente30minutesantesde
enehufarloa findeasegurardequeel
aceitevuetvaalcompresorSiel
refrigeradorseenehufainmediatarnente,
se puedecausardaSaalas piezas
intemas
Useunacarretillaparaeleetrodom_sticos
cuandomuevala unidad StEMPRE
transportelaunidadsabreunladeniIa
parteposterior,NUNOAperelfrente
Protejael acabadoexteriordel
refrigeradordurantee!transporte
envobiendoelgabineteenfrazadaso
insertandoacolchadoenlreelrefrigerador
y lacarretitta
Asegureelref_gerador_rmementeenla
carretiIiademane,conflejesocuerdas
el_sticas.Paselosflejosabav_sdelas
manijascuandeseaposibieNOapriete
demasiadolosmatedalesdesujeci6npues
puedenhendirodaSarelacabadoexterior.
SELECCll)F!DE[AMUOr
UBICACION
Tomeencuentalospuntosindicadosa
conlinuaci6ncuandoseleeeioneel lugar
definitiveparasu refrigerador:
NOinstaleel refrigeradorcercadelhomo,
radiadoruotratuentedecalor.Siestono
es posible,protejael reWgeradorcon
materialdelosarmarios
NOinstaieel refrigeradorenunbgar
dondelatemperaturadescender&a
menosde t3" C (55° F) Aesta
temperaturapuedeocurrirmat
fundonamiento
Paraasegurarunbuencierredeta
puerta,sigalasinstruccionesde
nivelaci6ndescritasenlasecci6n
Nivelaci6ndel refrigerador(pagina6G)
I'll
O
61
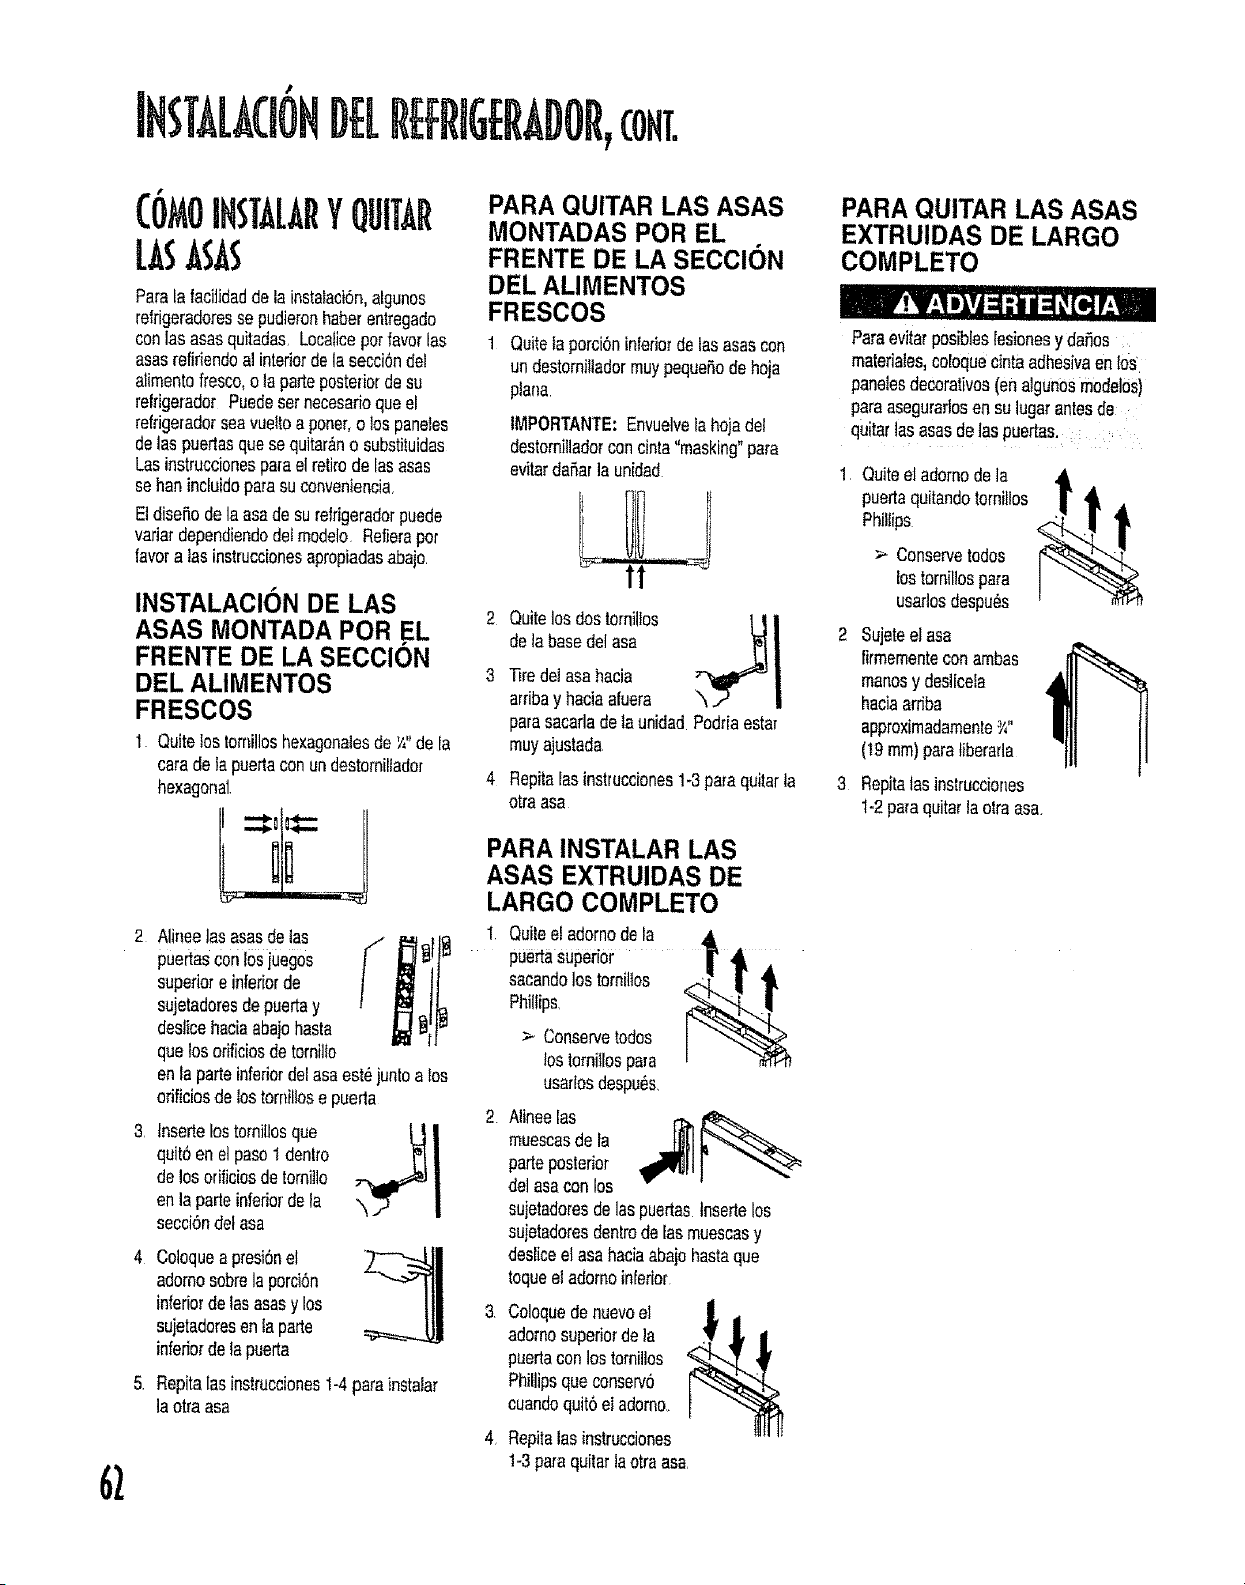
INSTALA(IOH
REFRIGERADOR,CONT
62
Parala facilidaddeta instataciSn,algunos
retrigeradoresse pudieronhaberentregado
conIasasasquitadas.Localicepotfavorlas
asasrefiriendea]interiordelasecciOndel
alimentofresco,o taparleposteriordesu
rekigerador Puedeset necesarioquael
refrigeradorseavueltoaporter,o tospaneIes
detaspuerlasquesequitar_no substituidas
Lasinstruccionespa[ael retirode lasasas
se hartincluidoparasu conveniencia
EldiseSodelaasade surefrigeradorpuede
vafiardependiendodetrnode]o Refierapot
favoralas instruccionesapropiadasabajo
INSTALACION DE LAS
ASAS MONTADA POR EL 2
FRENTE DE LA SECCION
DEL ALIMENTOS 3
FRESCOS
1 Quitelostomiiloshexagonaiesde _',"de fa
caradelapuerlaconundestorniliador
hexagonal, 4
j
Alinee]asasasde]as
puertasconlosjuegos
superioreinferiorde
sujetadoresdepuertay
desticehaoiaaba]ohasta
qualosodficiosdetorniiIo
enla parleinferiorde!asaest_juntoalos
ofificiosdelostorniliose puerla
Insertelostomillosque
quit6en elpasot dentro
delosorificiosdetomitlo
enlaparleinferiordela
secci6ndetasa
Coloqueapresignel
adornosobre]aporci6n
inferiordelas asasy los
sujetadoresenlaparle
inferiordelapuerta
Flepita[asinstrucciones1-4parainstalar
laotraasa
PARA QUITAR LAS ASAS
MONTADAS POR EL
FRENTE DE LA SECCIC)N
DEL ALIMENTOS
FRESCOS
1 QuiteIa porci6ninferiordelasasascon
undestomiltadormuypequeSodehoja
ptana
IMPORTANTE:Envueivelahojadel
destomiUadorconcinta"masking"para
evitardafiarla unidad
deiabasede]asa
Tiredelasahacia
arribay haciaafuera
parasacarladelaundad Podriaestar
muyajustada
Repitalasinstrucciones1-3paraquitarla
otraasa
PARA INSTALAR LAS
ASAS EXTRUIDAS DE
LARGO COMPLETO
1 Quitee!adornode la
4
puertasuperior
sacandolos tomilios
Phillips,
> Conservetodos
lostorniilospara
usaflosdespu_s.
t
Alineelas _
muescasdela
parleposterior
delasaconlos
sujetadoresdelaspuertastnserlelos
sujetadoresdentrodefasmuescasy
desliceetasahaeiaabajobasraqua
toqueeladomoin[erior
3 Coloquedenuevoel
adomosuperiordela
puertacon lostomilIos
Phillipsquaconserv6
cuandoquit6el adomo.
4, Repitalasinstrucciones
1-3paraquitarlaotraasa
PARA QUITAR LAS ASAS
EXTRUIDAS DE LARGO
COMPLETO
Paraevitarposibleslesionesy dafios
materiales,coloquecintaadhesivaenlos
panelesdecorativoa(analgunoSmodelos)
paraasegurarlosen sulugarantesde
quitariasasasdetaspuertas
1 Quiteeladomodela
puerlaquitandotornittos
Phillips
Conservetodos
lostornillospara
usarIosdespugs
2 Sujeteelasa
firmementeconambas
manosy deslicela
haciaarriba
approximadamente_"
(19ram)paratiberarla
3 Repitatasinstrucciones
I-2 paraquitarla olraasa.
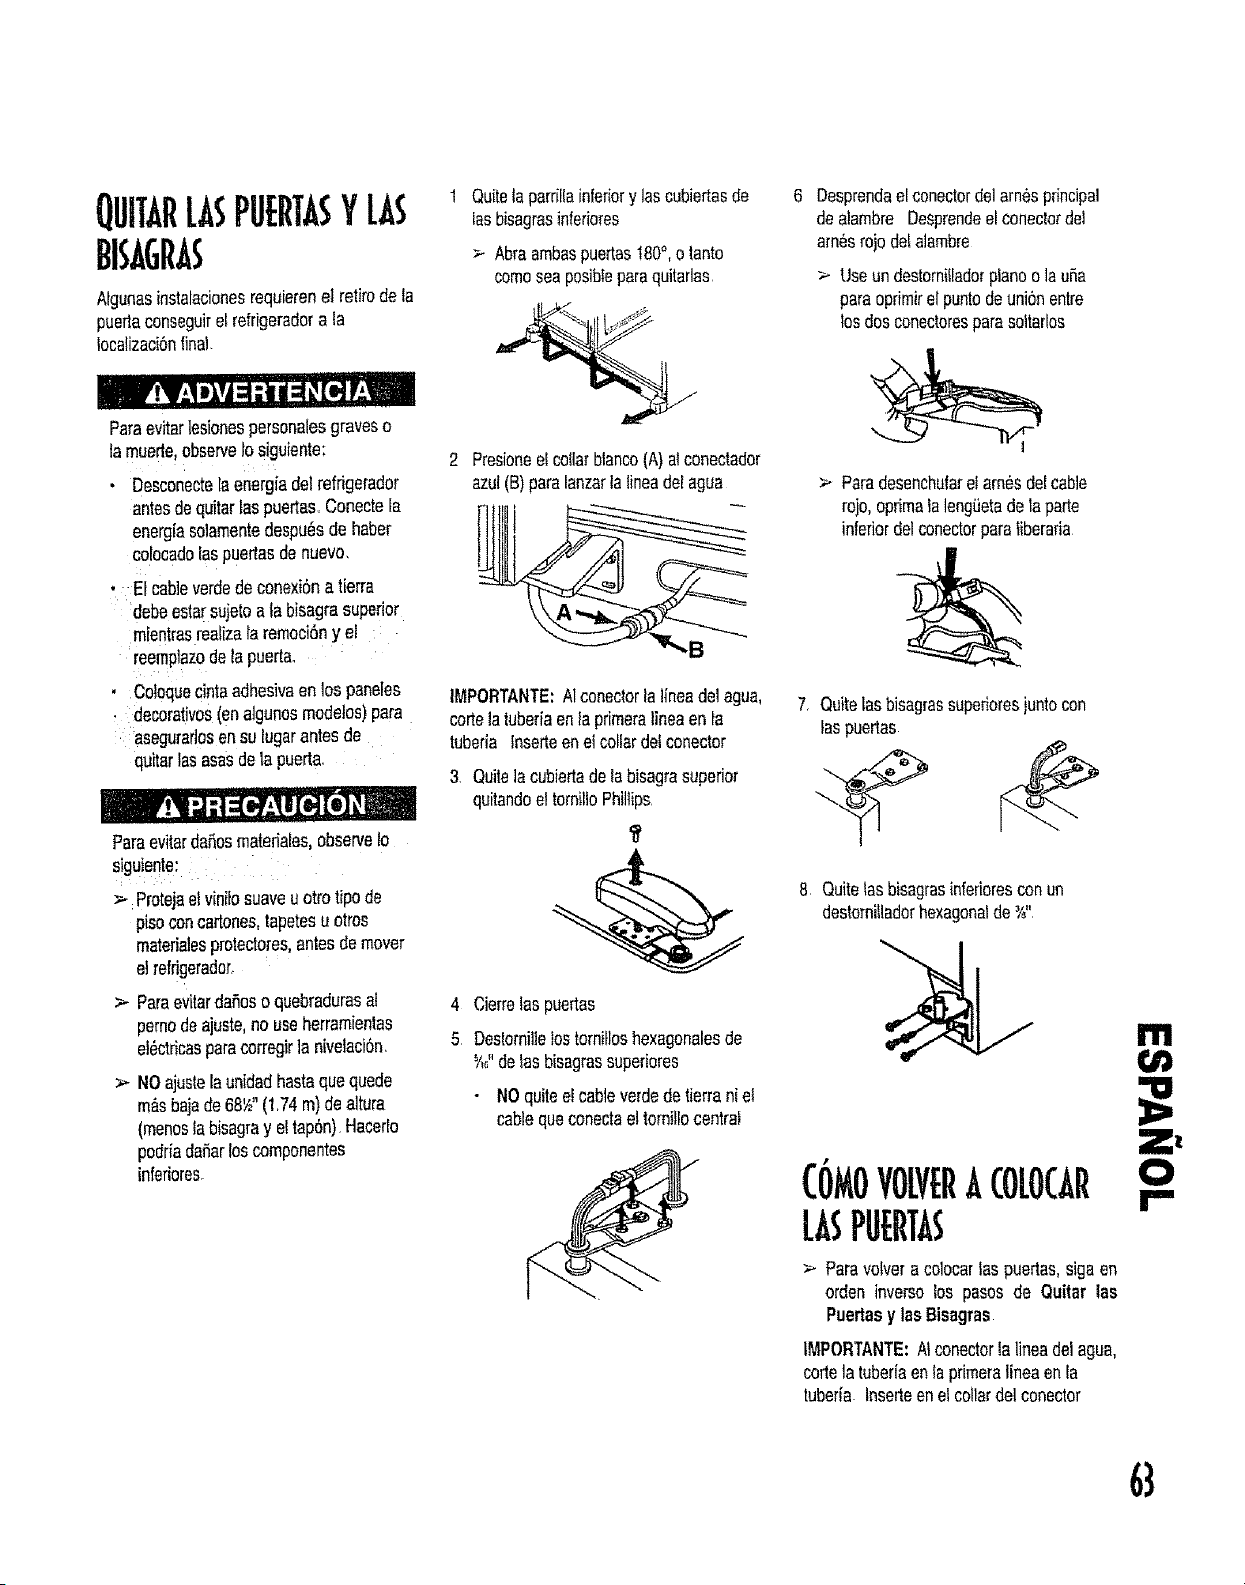
IITARLASPUERTASYLAS
BISAGRA
Algunasinstalacionesrequierenel retirodeta
puertaconseguirel refrigeradora la
focalizaci6nfinal.
Paraevitarlesionespersonalesgraveso
fa muede,observe1osiguiente;
, Desconectelaenerg{adelrefrigerador
antesdequitartaspuertas,Conectefa
energiasolamentedespu_sdehaber
colocadotaspuertasdenuevo
El cableverdedeconexihna tierra
debeestareujetoala bisagrasuperior
mlentrasrealizetaremoci6ny el
reem]31azodela ouerta,
Co!oquecintaadhesivaenlos paneles
decorativos(ena]gunosmode]os)para
aseguraflosensu iugarantesde
quitarlasasasdela puerta,
Paraevitardahosmatefiales,observeIo
siguiente:
Protejae!vinilosuaveuottotipode
pisoconcartones,tapetesu otros
materialesprotectores,antesdemover
elrefrigeradoro
> Paraevitardafioso quebradurasat
pernodeajuste,nouseherramientas
el#ctficasparacorregirla nivelaci6n.
>- NOajuslelaunidadhastaquequede
m&sbajade68_"(1,74m)dealtura
(menoslabisagray e!tap6n)Hacerlo
podriadafiarloscomponentes
inferiores.
Quiteta parr[ffainferiory lascubiertasde
lasbisagmsinferiores
Abraambaspuertast80°,o tanto
comeseaposibleparaquitarlas.
J
Presioneelcollarbtanco(A)alconectador
azul(B)paralanzarta fineadelagua
[ ltIli
IMPORTANTE: AI conectorla lineadel agua,
corte la luberia en fa primeralinea en fa
tuberia lnserteen el collar delconector
3 Quite]acubiertadelabisagrasuperior
quitandoel tornilloPhillips.
4 Cierretaspuertas
5 Destornillelostornitloshexagonalesde
_/_"delas bisagrassuperiores
• NOquitee!cableverdedetierraniel
cablequeconectaeltomillocentral
Desprendaelconectordelamesprincipal
dealambre Desprendeelconeclorde]
arn6srojodetalambre
> Useundestorni!ladorpianoo lauRa
paraoprimirelpuntodeuni6nentre
losdosconectoresparasoltarlos
> Paradesenchufarel arn#sdelcable
rojo,optimalalengLietadelaparte
inferiordelconectorparaliberafia
7. Quitelasbisagrassuperioresjuntocon
taspuertas
8 Quite _asbisagrasinteriorescon un
destornitladorhexagonalde %"
C!)MOVOLVERACOLOCAR
LASPUERTAS
>- Paravotveracolocarfaspuertas,sigaen
orden inversotoe pasosde Quitarlas
Puerlasy lasBisagras
IMPORTANTE:Atconectorta lineade1agua,
cortela tubefiaenla primeralineaenla
tuberia Inserteenetcollardelconector
m
O
I""
63
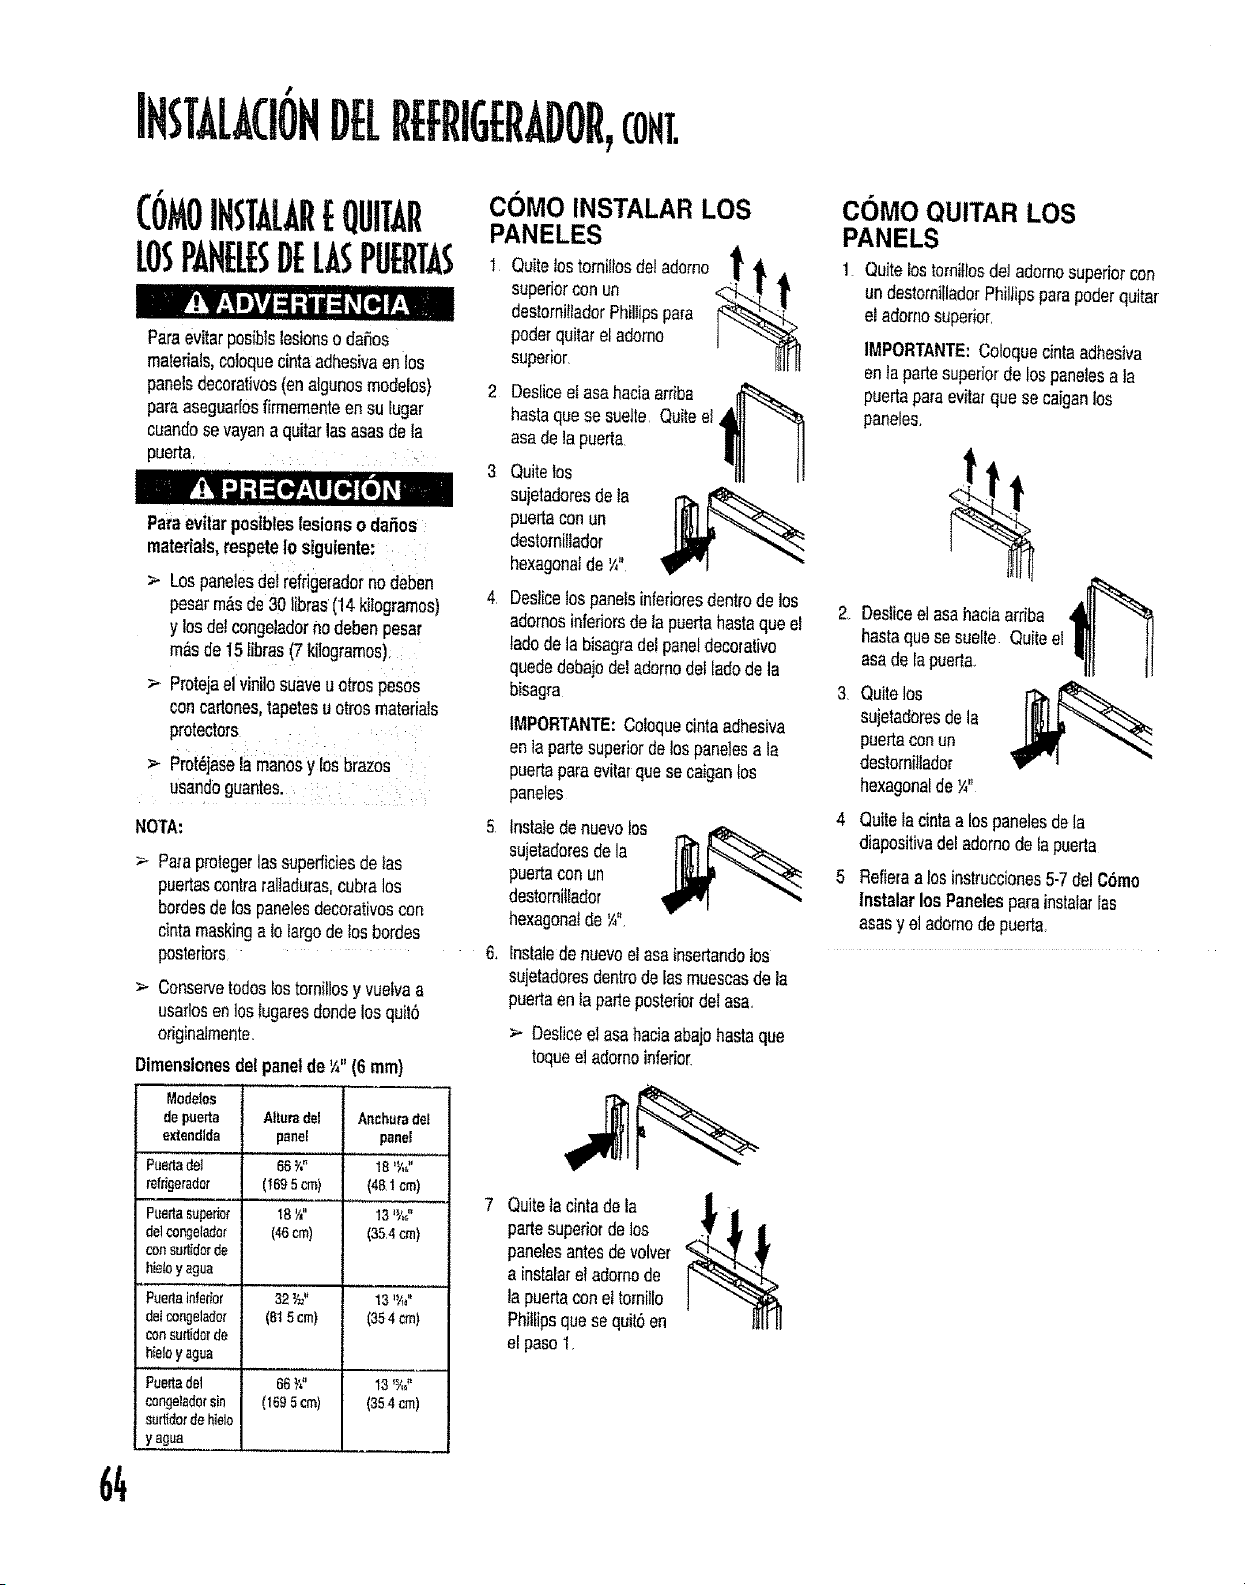
/.
IHSTALACIOHDE[R£fRIGERADOR,corn,
Pareevitarposib+slesionso daSos
materials,coloquecintaadhesiveenlos
panelsdecorativos(enalgunosmodelos)
paraaseguadosffrmementeensu Eugar
cuandosevayana quitarlasasasdela
puerta, : .....
64
Paraevilerposibleslesionso daSos
materials,respeteIo siguiente:
> Lospanelesdelrefdgeradornodeben
pesarm_sde30libras(14kilogramos)
y losde+congeladornodebenpesar
masde15tibras(7kilogramos),
>+ Protejael vinitosuaveu otrespesos
concartones,tapetesuotrosmaterials
protectors
>- Prot+jasetamaaosy tosbrazes
usandoguantes.
NOI'A-
> Pea protegerlassuperficiesde+as
puerlascentre[altaduras,cubralos
bordesdelospanelesdecorativoscon
cintamaskinge 1olargodelosbordes
posteriors
> Conserveredeslostornillosy vuetvaa
usaflosenloslugaresdondelosquit6
originalmente.
Dimensionesdelpane+deY+"16am)
Modelos
depuerta Alturade1 Artchumdei
extendlda panel panel
Puettadet 66'/," 18 %"
mfrigerader (1695 cm) {451 ca)
Puertasuperior 18 '/_" 13 %"
de1congelader (46era) (354 ca)
consurlidi_rde
hieloy egua
Ptle_a {a_efio_ 32 _" 13,%"
de+congeledor (81Sore) (3,54ca)
consuttidorde
hieloy ague
eee_tadel 66 _'_" 13%"
cengelad0rysurt_dOraguadehie_osin t695 cm) (35 4 ca)
COMe INSTALAR LOS
PANELES
1 Quitetostorniitosde!adomo
superiorconun
destornitladorPt_il+ipspara
poderquitareladomo
superior,
2 Desliceet asahaciaarriba
hastequese suelte Quiteel 4
asadelapuerla
3 Quitelos
sujetadoresde!e l"J_ _
puerlaconun
destomillador
hexagonalde¼"
4 Desiicelospanelsinferioresdenimde los
adomosinferiorsdela puertahastaqueel
ladodela bisagmdelpaneldecorativo
quededebajodeladornodelladodela
bisagra
IMPORT_,NTE:Coloquecintaadhesive
enlaparlesuperiordelospanetesa la
puertaparaevitatqueseca',,ganlos
paneles
5 instatede nuevo los ,..,,. _...
sujetadoresdela
puertaconun
destornillador
hexagonalde¼".
6+ instaledenuevoelasalnserlandolos
sujetadoresdentrode fasmuescasdeia
puertaenlaperleposteriordelasa,
-=-Desiiceelasahaciaabajobasraque
toqueel adomoinferior.
7 Quitelacintadela
parlesuperiordelos
panelesantesdevolver
a instalareladomode
la puertaconel tomillo
Phillipsquese quitsen
el paso1,
CO)Me QUITAR LOS
PANELS
1 QuitelostornillosdeJadomosuperiorcon
undestornilladorPhillipsparapoderquitar
el adornosuperior,
IMPORTANTE:Coloquecintaadhesiva
enta parlesuperiordelospanelesala
puerlaparaevitarquese caiganlos
paneles+
4
5
Desliceelasahaciaarriba
hastaquese suelte Quiteel
asadetapuerla,.
Quitelos
suietadoresde_a
puerlaconun
destornillador
hexagonalde_"
Quitelacintaalospanelesdela
diapositivadeladornodelapuerta
Refieraa losinstrucciones5-7delCSmo
InstalarlosPanelesparainstalarlas
asasy eladornode puerla
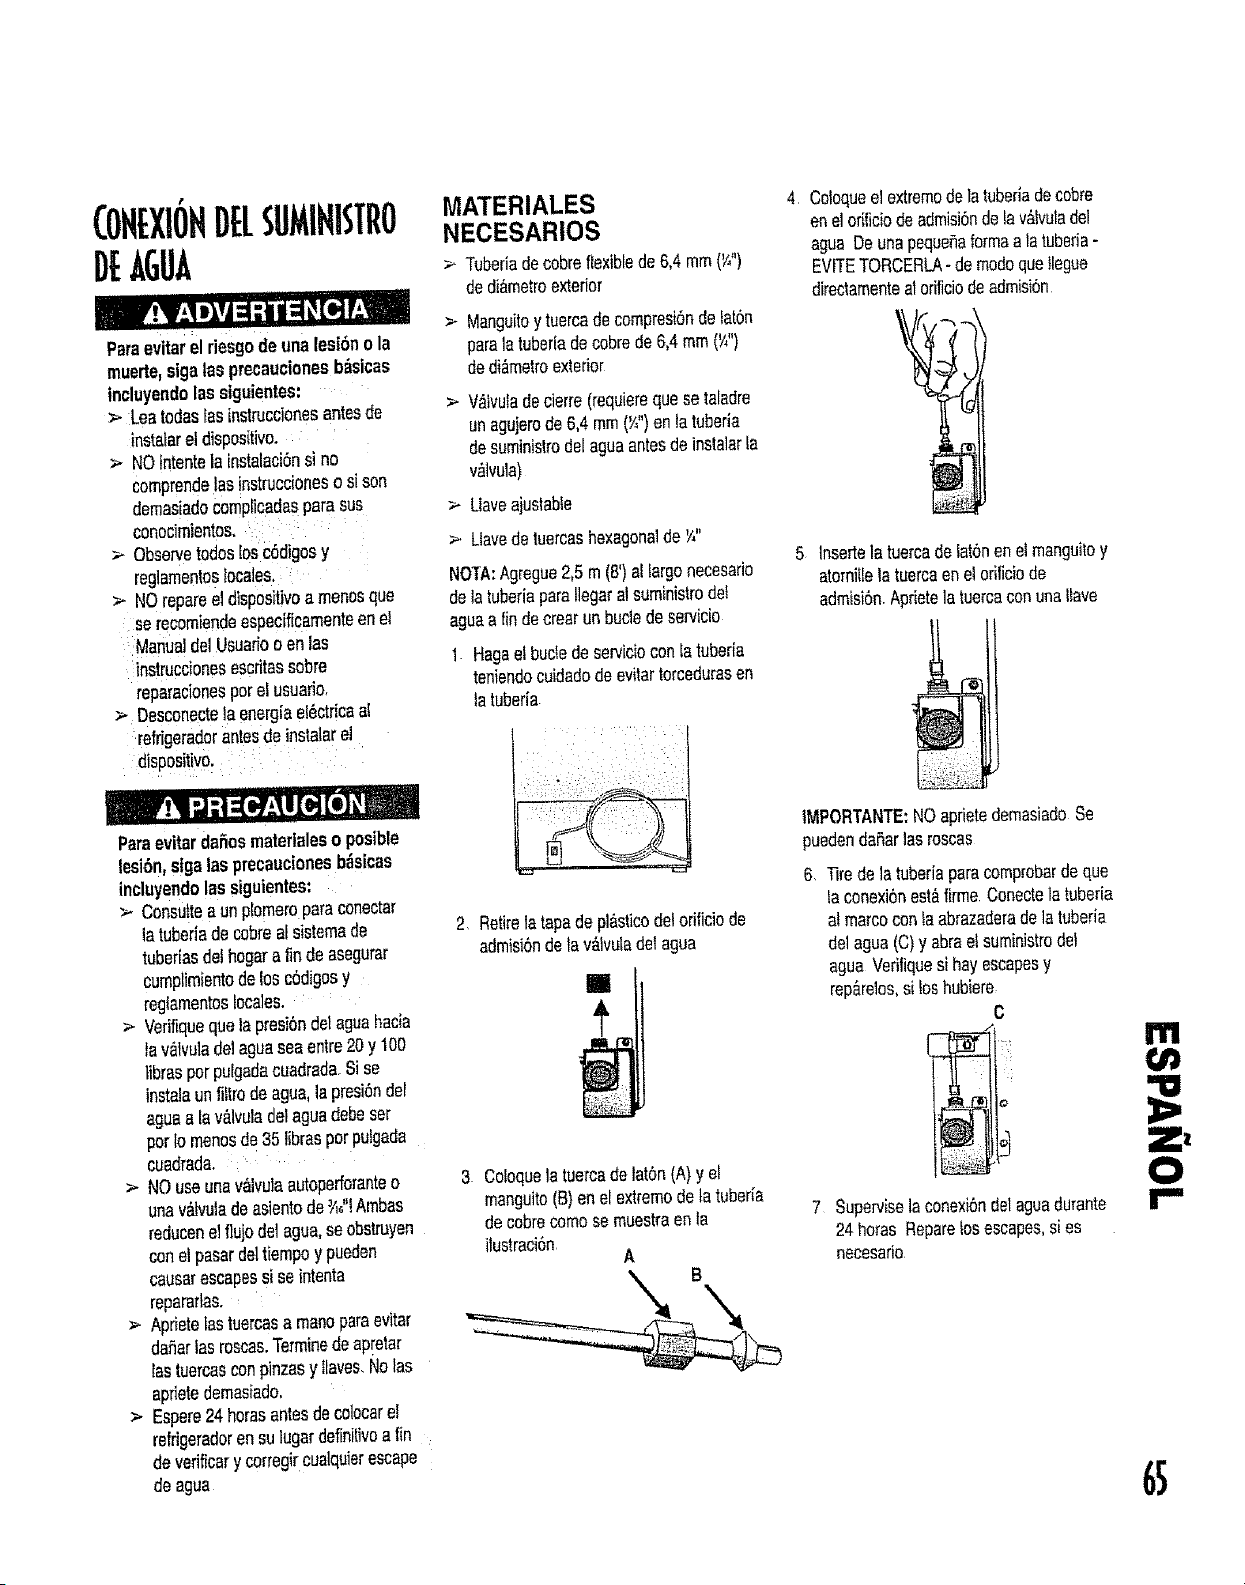
f
CONEXIOHDELSUMIHISTflO
DEAGUA
ParaeVitarel desgode unalest6no la
muerte,sigaInsprecaucionesb_sieas
incluyendolassiguientes:
> Leatodasasinstruccionesantesde
instatareldispositivo.
> NOintentela instalaci6nsi no
comprendelas !nstruccioneso si son
demasiadocompticadasparssus
conocimientos,
> Observeredeslosc6digosy
reglamentoslocales,
>- NOrepareeldispositivoa manesqua
se recomiendeespecificamenteenel
_ManualdelUsuafiooenins
inslruccionesescdtassobre
reparacionesperelusuario.
> Desconectelaenergiael_ctr!caal
refrigeradorantesdeinstalarel
dispositre. •
Paraevitardefiesmaterialeso posible
lesi6n,stgalas precaucionesbdsicas
incluyendolassiguientes:
> Consu!teaun plomeroparsconectar
latuberiadecobreatsistemade
tuberiasdelhogara finde asegurar
cumplimientodelosc6digosy
regiamentoslocates. :
_- Verifiquequala presi6ndelaguehacia
Isv_lvulade1agueseaentre20y 100
}ibrasperpulgadacuadradaSise
instalsunfiflrodeague,lapresi6ndel
aguea lav&lvuladelaguadebeset
perIomanesde35Ifbrasperputgada
cuadrada.
>- NOusaunaV&ivulaaL_operforanteo
unav_vuladeasientede_o"!Ambas
reducenelflujodelague,se obstruyen
conel pasardeltiempoy pueden
causarescapessi se intenta
repararlas.
> Aprietelastuercasa maneparaevitar
deferInsroscas.Terminedeapretar
Instuercasconpinzasy tiaras.Nolas
apfietedemasiado,
> Espere24hornsantesdecolocarel
relrigeradorensu lugardefinilivoa fin
deverificary corregircualquierescape
deague
MATERIALES
NECESARIOS
> Tubefiadecobraflexiblede6,4mm(Y_")
dedi&metroexterior
> ManguitoytuercadecompresiSndetat6n
paralatuber/adecobrade6,4mm(_")
dedi_metroexterior
> V_lvutadecierre(requierequesetaladre
unagujerode6,4 mm(_")enlatuberia
desuministrodelaguaantesdeinslalarla
v,_lvula)
> Uaveajuslabte
>. UavedeluercashexagonaldeY,"
NOTA:Agregue2,5m (8')alfargonecesario
delatuberiaparstiegaralsuministrodef
aguaa fir}decrestunbucledeser_,icio
1. Hagsetbudedeservicioconlatuberia
tenisndocuidadodeevitartorcedurasen
la tubefia
2. RetirelatapsdeplAsticodelofificiode
admisi6ndelav_lvuladelagua
m
3. Cotoquelatuercade lat6n(A)yet
manguito(B)enel extremedetatuberia
decebrecomese muestraenta
itustraci6n
A
4 Cotoqueelextremedelatubefiadecobra
enel orificiodeadmisi6ndelav_Ivuladel
agueDeunapequeSaformsalalubsfia-
EVITETORCERLA- demodequeItegue
directamenteatorificiodeadmisi6n
5 Insertela tuercadelat6nenelmanguitoy
atomilleiatuercaenelofificiode
admisi6n.Apfietela tuercaconunaitave
IMPORTANTE:NOaprietedemssiadoSe
puedendaSar]asroscas
6. Tiredela tuberiaparscomprobardeque
la conexi6nest&firme.Conectelatuberia
a!marcoconla abrazaderadelatubefia
delagua(C)y abrae! suministrodet
aguaVerifiquesihayescapesy
rep_relos,si Ioshubiere
C
7 Superviselaconexi6ndelaguadurante
24horns Reparelosescapes,si es
nacesario
I'111
t,#'!
6S
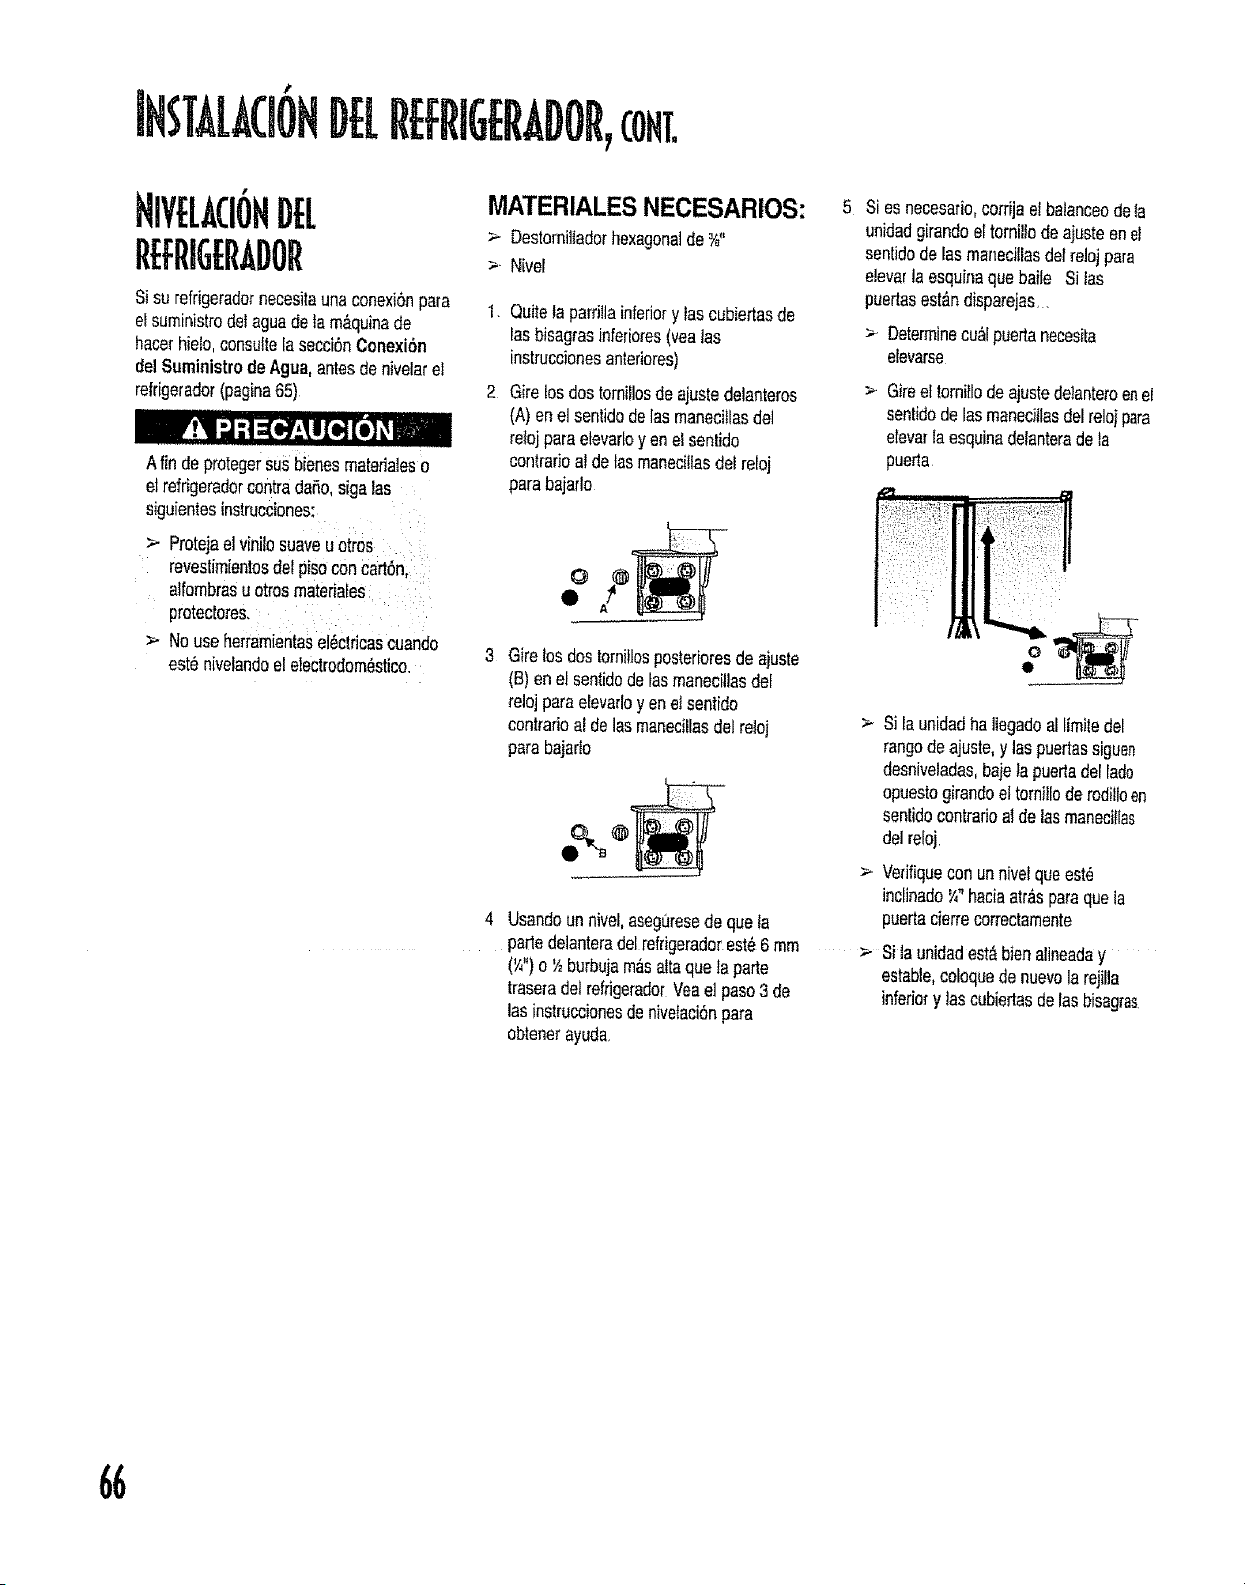
J
IHSTALA(IONDELREFrIGERADOR,cont.
!
HIVELACIOHDEL
REFtlIGErADOr
MATERIALES NECESARIOS:
> DestomiUadorhexagonalde _"
>-Nivel
Sisu refrigeradornecesitaunaconexi6npara 1.
elsuministrode_aguadeta rn_quinade
hacerhielo,consu!lela secci6nConexi6n
del SuministrodeAgua,antesdenivelarel
retrigerador(pagina65) 2
Afin deprotegersusbienesrnatedaieso
elrefrigeradorcontradaSosigalas
siguientesinstrucciones:
> Protejaelvinilosuaveu otros
raveslimientosdelpisoconcarton,
alfornbraeuotresrnateriates
proteclores.
> Nouseherrarnientasel_clricascuando
est6nivelandoel electrodorn_stico.
Quitela pardllainteriory lascubiertasde
las bisagrasinferiores(yealas
instruccienesanterieres)
Girelosdostomillosdeajustedelanteros
(A)enel sentidodelasrnanecillasde1
re{ojparaetevar_oyen etsentido
contrarioaldetasrnanec{ltasdelreloj
parabajado
Q
O
3 Girelosdostorniflosposterieresde ajuste
(B)enelsentidodetasrnanecitlasdet
relojparaelevarloyen etsentido
contradoaIde1asrnanecillasdelreloj
parabajarto
O
4 Usandounnivel,aseguresedequela
parledelanteradelmfdgeradorest66rnm
(_")o ½burbujam_sattaquelaparte
trasetade_refrigeraderVeael paso3 de
lasinstruccienesdenivetaci6npara
obtenerayuda.
5 $i es necesar{o,corrijaeIbaianceode{a
unidadgirandoeltomiliodeajusteenel
sentidodeias rnaneciliasdelrelojpara
eievarla esquinaquebaite Silas
puertasest_ndisparejas..
> Determinecu_lpuertanecesita
e/evarse
> Gireel tornRIodeajustedelanteroenel
sent{dodelasmanecJtlasdelrelojpara
etevarlaesquinadelanteradela
puerta
> Sila unidadhaliegadoatlirnitedet
rangedeajuste,y laspuertassiguen
desniveladas,bajeta puertadellade
opuestogirandoettornilloderodilloen
sentidocontrarioa{delasrnaneci_ias
delrelej
> Vedfiqueconunnivelqueest6
inclinado¼"haciaarrasparaquela
puertacierrecorrectarnente
_- Silaunidadest_bienalineadey
estable,coloquedenuevolarejilla
interiory }ascubiertasdelasbisagras.
66
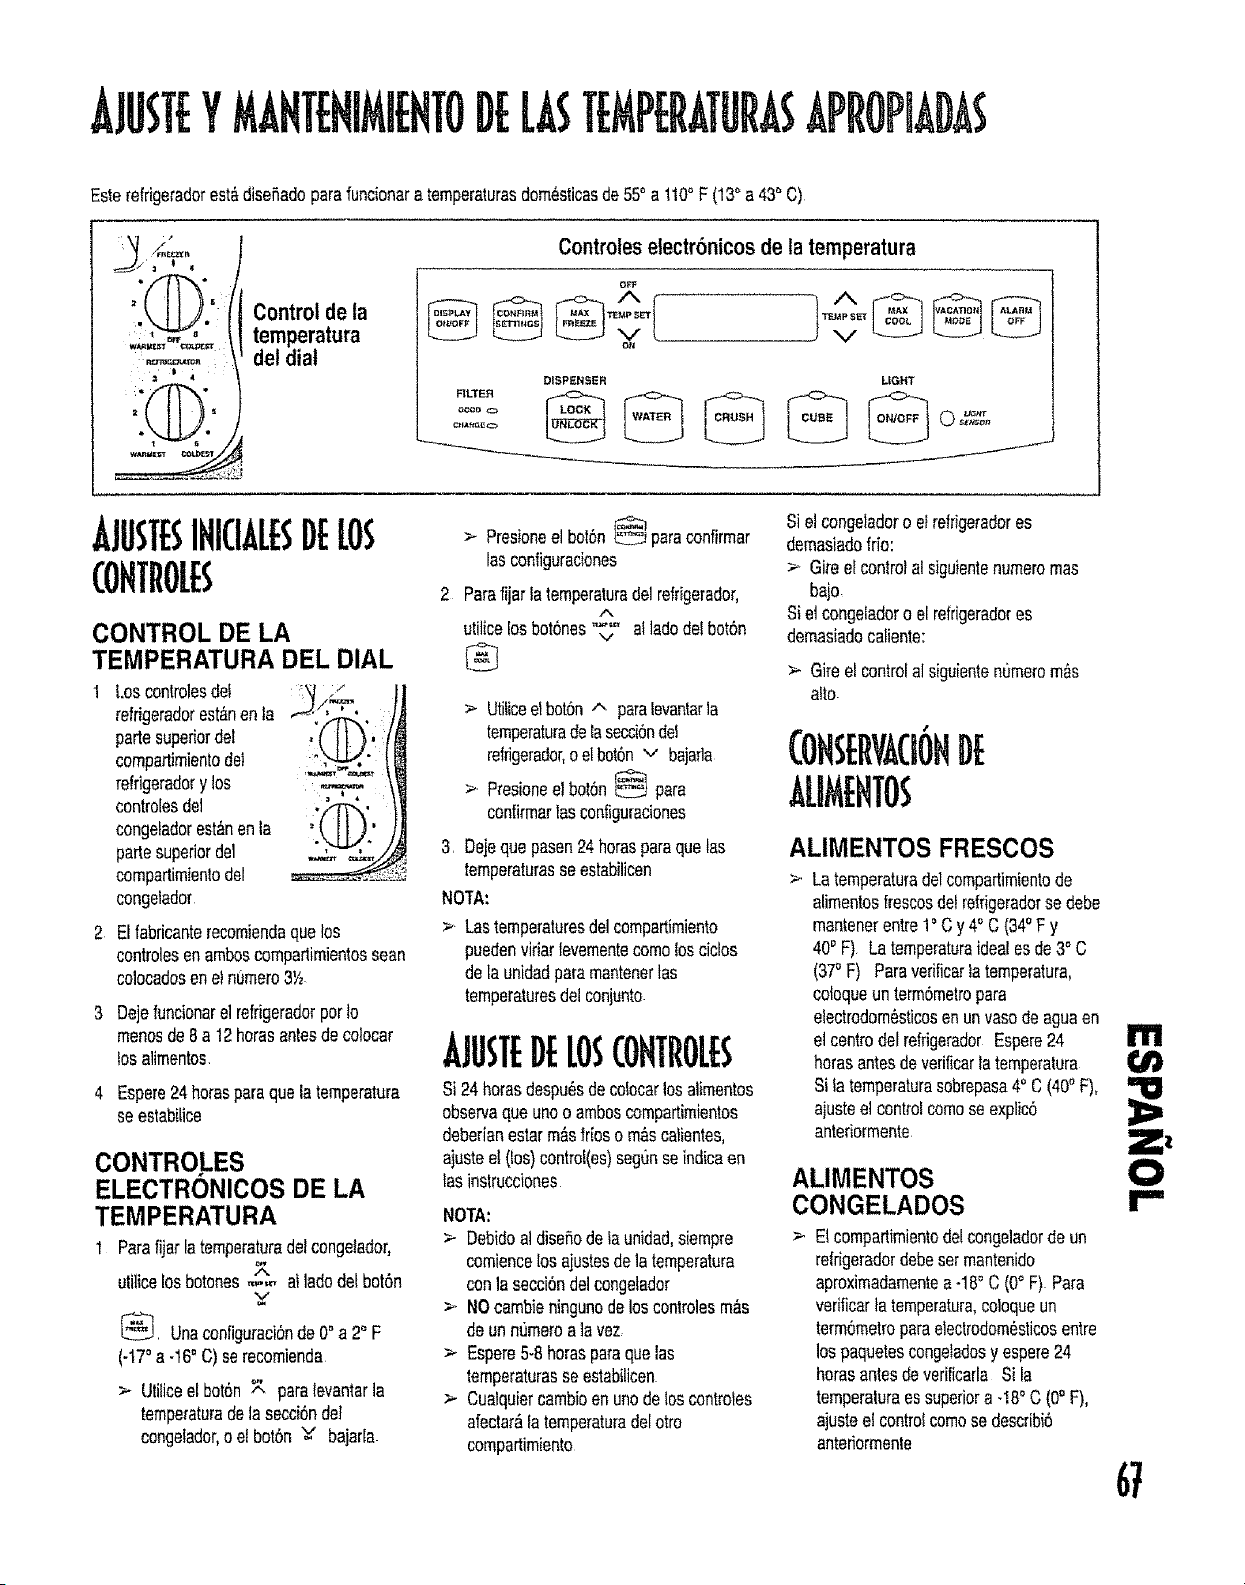
Esterefrigeradorest&disefiadoparafuncionaratemperaturasdom_sticasde55° a !10° F (13° a 435C)
Controlde ta
temperatura
del dial
Controlesetectrbnicosde ta temperatura
OFF
v
DISPENSER LIGHT
J
AJUSTE$IHICIALE$DELOS
COHTROff$
CONTROL DE LA
TEMPERATURA DEL DIAL
1 Loscontrolesdei "_/_.=,,
refrigeradorest_nenla _ , ' •
partesuperiordel
compartimientodei
refrigeradory tos _ ,
controlesdel .@,
eongetadorest_nenla ;. '
partesuperiorde1
compartimientodel
congefador
2 Elfabricanterecomiendaquelos
controlesenamboscompartimientossean
colocadosenet numero3Y_.
3 DejefuncionarelrefrigeradorperIo
menosde8 a12horasantesdecolocar
iosalimentos.
4 Espere24horasparaquelatemperatura
se estabitice
CONTROLES
ELECTRONICOS DE LA
TEMPERATURA
1 Parafljartatemperaturadelcongeiador,
7.
utilicelosbotones,,,,.-_aitadodelbot6n
v
Unaconfiguraci6nde0° a2_F
(-t70a-16° C) serecomienda
> Utilicee[bot6n ,_ paratevantarla
temperaturadelasecci6ndel
congelador,oetbot6n =v bajada
> Presioneel bot6n _ paraconfirmar
las configuraciones
2 Parafijarlatemperaturadelrefrigerador,
/%
utilicelosbot6nes_" atladedelbot6n
v
> Utiticeelbot6n-", paraIevantarla
temperaturadelasecci6nde1
reffigerador,oelbot6nv bajarla
>- Presioneel bot6n_ para
confirmar]asconfiguraciones
3, Dejequepasen24horasparaquetas
temperaturasse estabilicen
NOTA:
>. Lastemperaturesdelcompartimiento
puedenviriarlevementecomelosciclos
detaunidadparamantenertas
temperaturesdetconjunto
AJUSTEDELOSCOHTROLES
Si24herasdespu_sdecolocarlosalimentos
observaqueunoo amboscompartimientos
deberianestarm&sfiresom&scaiientes,
ajustee!(los)controI(es)seg6nseindicaen
tasinstrucciones
NOTA:
> Debidoal diseSodefaunidad,siempre
comiencelosaiustesdeiatemperatura
conla secci6ndelcongetador
NOcambieningunodeloscontrolesm&s
deunnt]meroa lavez_
> Espere5-8betasparaquelas
temperaturasseestabilicen
> Cualquiercambioenunodeloscontroles
afectar&fatemperaturadelotro
compartimiento
Sielcongeladoroei refrigeradores
demasiadofrio:
> Giree[controlalsiguientenumeromas
baio
Sie]congeladoro elrefrigeradores
demasiadocaliente:
> Gireelcontrolal siguientenumerom_s
alto
ALIMENTOS FRESCOS
>, Latemperaturadelcompartimientode
alimentosfrescosdetrefdgeradorsedebe
mantenerentre1°C y 4° C (34° F y
40_F) Latemperaturaidealesde3° C
(3? F) Paravedficartatemperatura,
celoqueunterm6metropara
electrodom_sticosenunvasedeaguaen
el centredelreffigeradorEspere24
herasantesdeverificar}aternperatura
Si latemperaturasobrepasa4° C (40"F),
ajusteel centre!comeseexplic6
anteriormente
ALIMENTOS
CONGELADOS
> E{comparlimientodelcongeladordeun
reNgeradordebesetmantenido
aproximadamentea-18° C(0° F) Para
verificar}atemperatura,coloqueun
term6metroparaelectrodom_sticosentre
lospaquetescongetadasy espere24
herasantesdevedficarlaSi la
temperaturaessuperiora -18° C (0° F),
ajusteel controlcomesedescribi6
antefiormente
m
Z_t
O
r =
67
t
[NFORMACIONE[
Afindeevitarunaenfermedadgraveo
mortar,nousee]refrigeradorderideet
aguenoseasegurao sedesconozcasu
calidad,sindesinfecciSnadecuadaantes
o despu_sdepasarperel fiffro_ .......
> E!cartuchedederivaci6nNOfiltmel
agua.Asegeresedetenetcartuchos
filtrantesderepuestocuandoelfiltro
necesitesercambiado
> Sielsisternadefiltraci6ndeagua
estuvocongelado,reemplaeeel
cartuchefiltrante
>- Siel sistemanohasideusadedurante
variesmesasy el aguetieneunsaber
y olordesagradabte,laveelsistema
haciendosatir2 o 3vasesdeague.Si
el oloro saberdesagradablepersiste,
cambieelcartuchofiltrante.
INSTALACION DEL FILTRO
DE AGUA
1 Retirelatapadoderivaci6nazuly
cons_rvetaparauseposterior
2. Retire]aetiquetadesefladodelextreme
delfittroe inserteloenla cabezadelfillro
3 Giresuavementeala derechahastaqua
elfittrosedetengay cierrelacubiertadeI
filtro
4 Reduzcaloschorrosrepentinesdeague
purgandoelairedelsistemaDejecorrer
el aguecontinuamenteduranle2 minutes
atrav0sdeldispensadorhastequeel
aguesalgauniformementa
.> Sepuederequefirpurgeadicionalen
loshogaresenquaelagueesdemala
calidad
REEMPLAZO DEL FILTRO
DE AGUA
1MPORTANI'E:Etairequepermanece
atrapadoenetsistemapuedecausar
eyecci0ndeaguey delcartuchoTenga
cuidadocuandoretireelcartucho
2
Gireelfiltroala izquierdahastequese
desenganchedela cabeza
Desagdeel aguadelfll/roenel fregadero
ydesc#,rteloenla basurano;realdel
begat
Utopiaelexcesode aguaacumuladaen
lacubiertadelfiltroy continueconla
Instalaci6ndeltiltro deague,paso2y
3,
CUANDO DEBO
CAMBIAR EL FILTRO DEL
AGUA?
Ciertosmodelosdesurtidorescuentancon
unindicadorpatacambiodefiltro Pare
obtenerfasinstruccionesaeercadecome
operary reajustarestacaracteristica,
consullelasecciOndelascaracteristicasdel
surlidorenel manual
Elfiltrodelaguadebecambiarse
aproximadamentecada6mesas
IMPORTANTE:Laca_idaddelaguay la
cantidadusadadeterminanta duraciOnde la
vide,3ti{de!cartuchofilt.rante.Siconsume
toucheagueo si elaguaes demalacalidad,
puadequaseanacesarioreemplaza[elfiltre
m_samenudo
&COMO HACER PEDIDOS
DE CARTUCHOS DE
REPUESTO?
El cartuchofiltrantederepuestoKenmore'_
modelo9005est&disponiblea tray,sdelos
d{stfibuidoresy cantrosderepafad6nSears
Ustedtambi0npuedehacerpedidosatray,s
deSearsusandolainformaci6nquaaparece
entacubiedatrasera
&DONDE SE ENCUENTRA
EL AGUA QUE SE USA
PARA PURGAR EL
SISTEMA ?
Duranteel useinicial,es necesarioespe_ar
deI a2 minuteshastequaelaguecomience
a salirpueseldep6sitodeiagueinternedebe
tartertiempodellenarse
i.ES NECESARIO USAR EL
SISTEMA DE FILTRACION
DEL AGUA ?
E!dispensadorpuedeserusadosinel
cartuchofiltrantedelague Siusteddecide
estaopci0n,reemplaceel fiffroconIatapade
derivaciOnazul
68
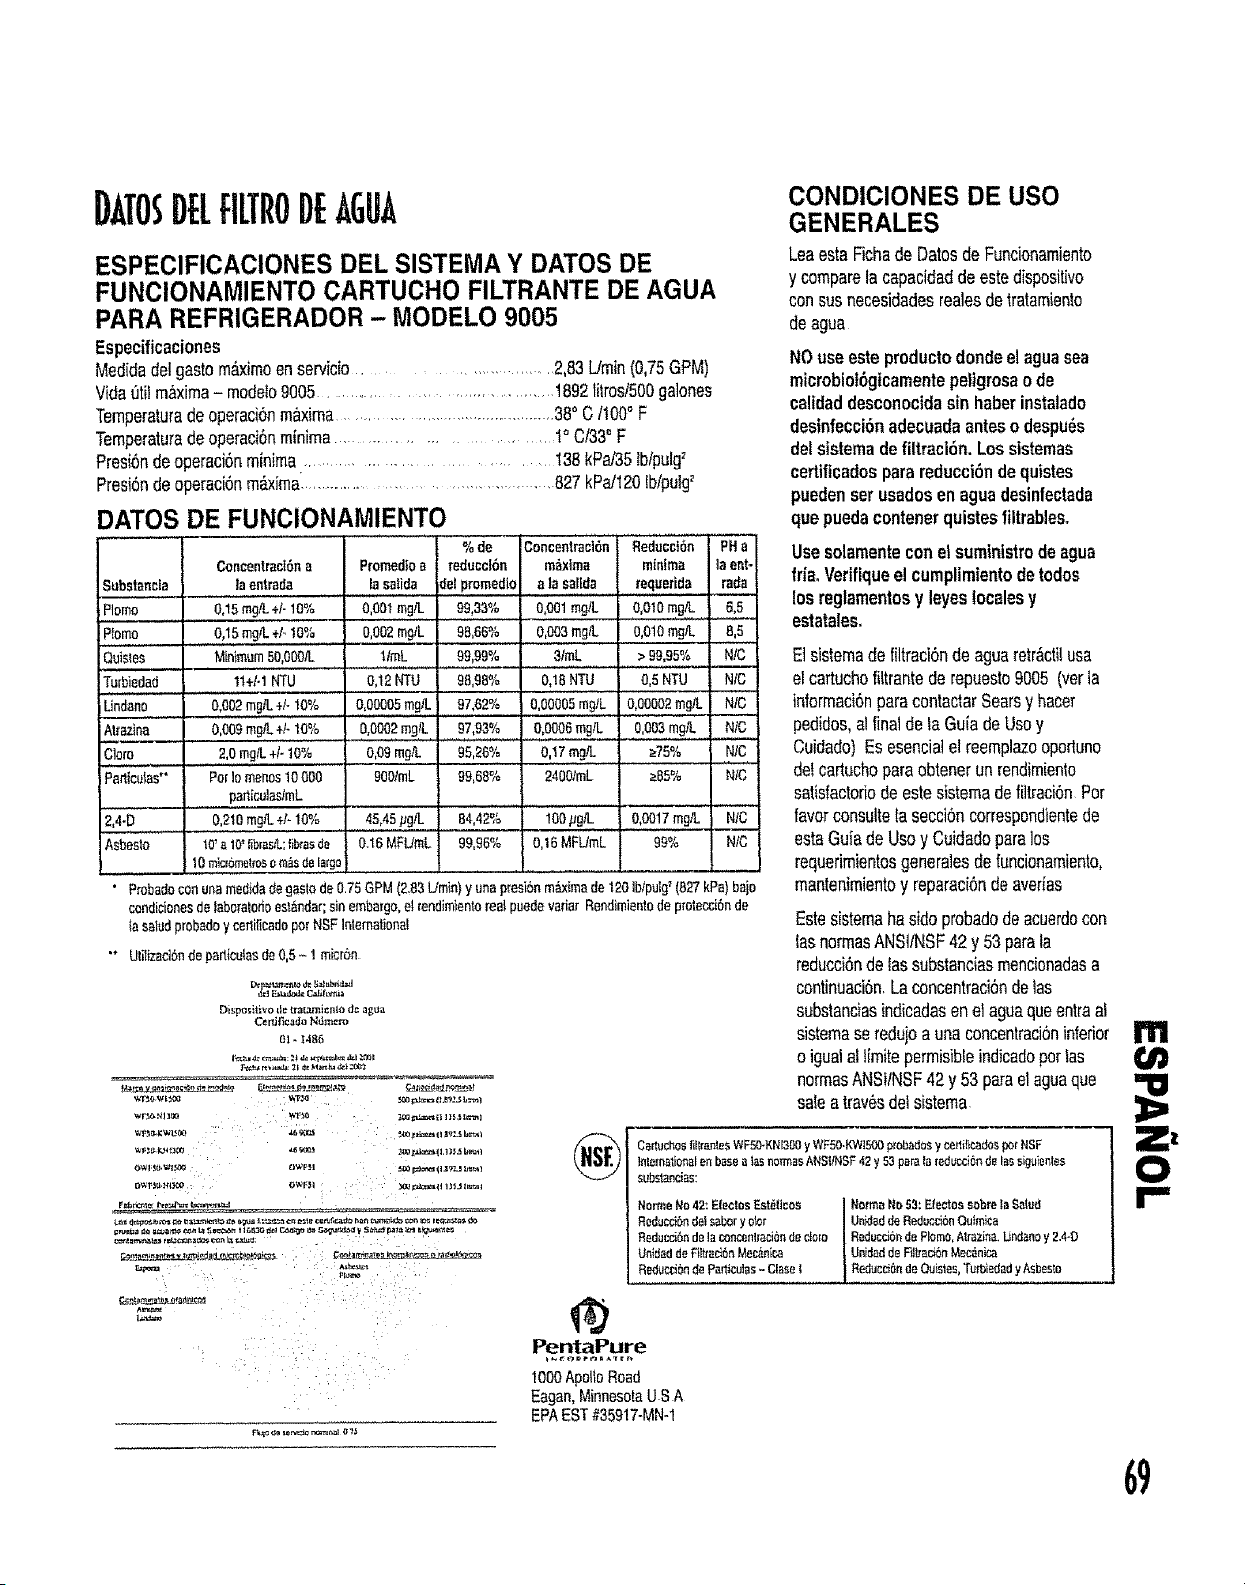
DATOSDELFILTRODEAGUA
CONDICIONES DE usa
GENERALES
ESPECIFICACIONES DEL SISTEMA Y DATES DE
FUNCIONAMIENTO CARTUCHO FILTRANTE DE AGUA
PARA REFRIGERADOR - MODELO 9005
Especificaciones
Medidadelgastom_imoenservicio....................... 2,83Umin(0,75GPM)
Vidat_ti!m_,xima- modelo9005........................................ 1892titrosi500galenas
Temperaturadeoperaci_maxima...............................................38° C/100° F
Temperaturadeoperaci6nminima............................... 1° C/33° F
Presi6ndeoperaci6nminima,................................. 138kPai35tb/pulg_
Presi6ndeoperaci6nm&xima......................................... 827kPa/120{b/pulg"_
DATES DE FUNCIONAMIENTO
Concentraci6ri a
Substancta la entracla
Plomo 0,15mg/L+I- 10%
Piomo
Ouistes
Tu[biadad
Lindano
Atrazina
Clara
Particu_as*'
Promedtoa
la saiida
0,0OfmgiL
0,002mg/L
l/mL
0,12NTU
0,00005malL
0,0002mail
0,09mg."L
9001mL
........o_.!.5mg_÷/,.to_,_,......
Minimum5O,000/L
tt+1-1NTU
0,002mail +1-10%"'
0,009mg!L+t- 10%
2,0malL+k t0%
Par]omar=ast0 000
pariicu]asimL
..o,.2.!o..r,9__÷/-lo_
_0' a 10' _brasiL; tibiae de
10micfamel;o_,o m_Sdelargo
% de
reducct6n
del promedlo
99,33%
9B,66%
99,99%
97,62%
97,93%
95,26%
99,68=/o
Concentraci6n Reducct6n PHa
m_xima minima la ento
ala saIlda requerida rada
.0,001malL 0,010mg,'L 6,5
0,003mgfL _ 0,010mgiLB,5
3/mL > 99,95% N/C
0,1BNTU 0,5 NTU NfC
0,00005maiL . 0,00002mg/L N/..C.C
0,003mg_'L N/C
;_75% N/C
_B5% N/C
0,0006mg/L
0,17mg,q.
2400ImL
,, ,,, ,,,,,j,,,,,, ,........
B4,42% 100,ug/L
99,96% 0,16MFUmL
45,45.ugiL ........0,0017mgtL N/C
2,4-D .......
Asbesto 0.16MFUmL 99% N;C
' Probadoconunamedidadagaslede 0.75GPM(2.83Umin)y unapresianmaximade 120IblpuI9'(B27kPa)bajo
candicionesde_aboratodaas'lander;sin embargo,el rendimientorealpuedevafia_Rendimientodep_olecciande
_asa_d probadoy celli[icadopar NSF]nlemational
"* Utilizadande pariiculasde 0,5- ! micr6n
Dispositlvo tle l_a[_ili_ n_o d¢ ague
Cerli£_c_do Nam_ro
01 - 148a
LeaestaFichade DatesdeFuncionamiento
y comparelacapacidaddeestedispositivo
consusnecesidadesrealesdelratamiento
deague
NOuseesteproductodondeelaguasea
microbiot6gicamentepeligrosaode
calidaddesconocidasin haberinstalado
desinfecci6nadecuadaanteso despu_s
delsistemadefiltraci6n. Lossistemas
certiflcadosparereducci6ndequistes
puedenserusadosenaguedesinfectada
quepuedacontenerquistesfiltrableso
Usesolamenteconetsumtnlstrodeague
fria,Verifiquee! cumplimientodetodos
los reglamentosy leyeslocalesy
estatales.
Elsislemadefiltraci6nde aguarelrActi!usa
elcartuchofiltrantede repuesto9005(verla
informaciOnparacontac|arSearsy hacer
pedidos,al finaldela GuiadeUsay
Cuidado)Esesencia]elreemplazooportuno
dotcartuchoparaobtenerunrendimiento
satisfactoriodeestesistemadefiltraci6nPar
favorconsultelasecci6ncorrespondientede
estaGuiadeUsay Cuidadoparalos
requerimientosgeneralesdefuncionamiento,
mantenimientoy reparaci6ndeaverias
Estesistemahasideprobadodeacuerdocon
lashermesANSltNSF42y 53pareta
reducci6ndelassubstanciasmencionadasa
continuaci6n,Laconcentraci6ndelas
substanciasindicadasenet aguequaentreaf
sistemaseredujoa unaconcentraci6ninferior
oigualalt{mitepermisibleindicadoparlas
hermesANSI/NSF42y 53paraelaguaqua
saleatravasdelsistema
Cartuci_esfiRranleSWF50.KNL3_y WFa0-KWtao0probadosy cer_ificado_po_NSF
lnlemationalan baeea_asno,hasANSIJNSF42y 53pareta reducd6nd_las a_g_Jientes
subs_ancias:
Norme No42: Eiea|aeEst_licoe
ReducciSndel sabery otor
Fleducd6r_de {aconceelfaci6r,de clolo
UnidaddeFilttad.6nMe_eir,a
Redacci_)nde par_iculas- ClaaeI
NotmaNo 53: Electossabrela Selt_IJ
I Ueidadde Fleduc_iOnOutmi_:a
] ReducciOr_deFlame,Alrazina.Undanoy 2.4,D
| Unidadde F_i_ac_nMec_nica
] Reduec_andeOaislas,Tu_biedady Asbesto
@
PentaPure
1000 ApolloRoad
Eagan,MinnesotaUSA
EPAEST#35917-MN-1
m
Z 1,
I==
69
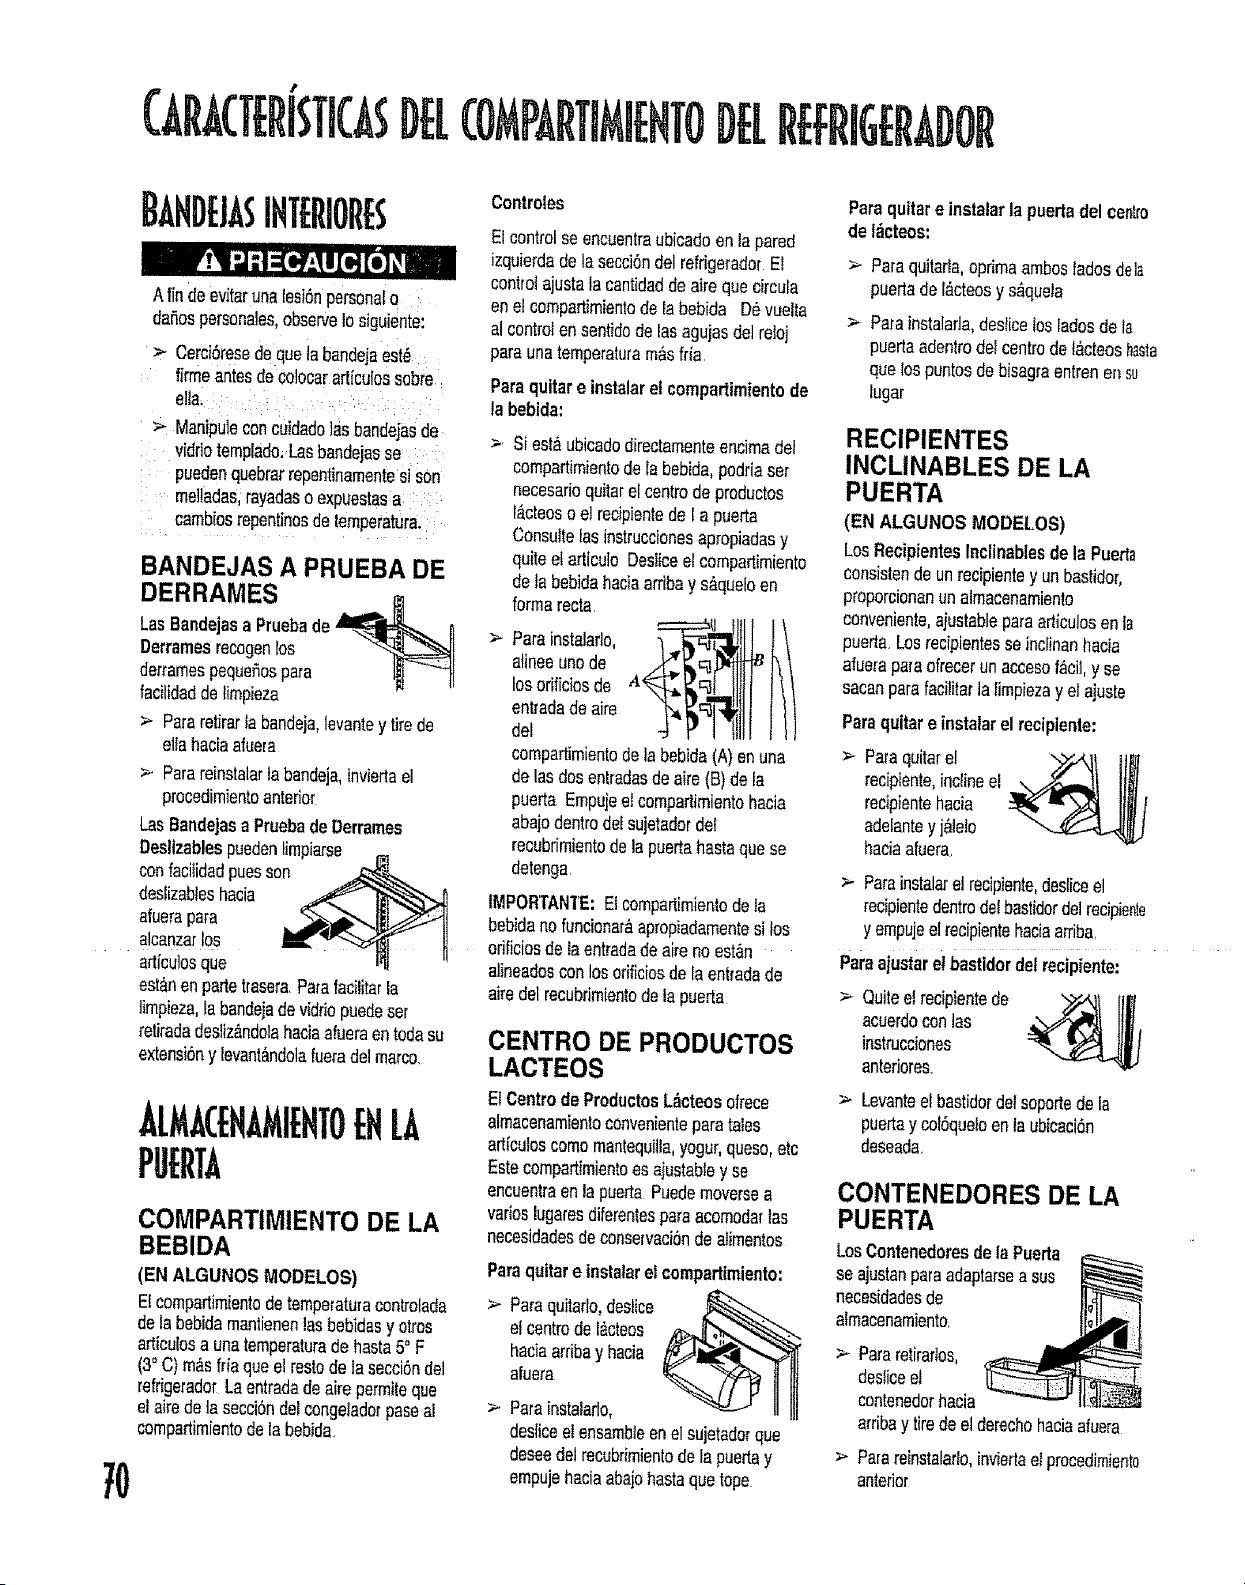
BAHDEJASIHTERIORE$
A findeevitarunalesi6npersonalo
dutiespersonales,observe1osiguiente:
Cerci6reeedequelabandejaeet_
firmeantesdecolocararticulossabre
ella.
:_ Manipuleconcuidado]asbandejasde
viddotemplado.Lasbandejasse
puedenquebrarrepentinamentesi son
me]ladas,rayadasoexpuestasa
cambiosrepent]hasdetempetatura.
BANDEJAS A PRUEBA DE
DERRAMES
LasBandejasa Pruebade __
DerramesrecogenIos _1
derramespequefiospars _ _-_
tacilidaddelimpieza
;,,- Parsretirariabandeja,levantey tirede
ellahaciaatueta
._ Parareinstatarlabandeja,inviertael
procedimientoanterior
LasBandejasa Pruebade Derrames
DeslizablespuedenIimpiarse
confacilidadpuesson
deslizabfeshacia
afuerapara
alcanzarlos
articulosqua
esl_nenpartet_asera.Paratacilitarla
limpieza,labandejadevidriopuedeset
retiradadesliz_ndo_ahaciaafueraentodasu
extens_ny levant&ndolafueradelmarco.
ALM .(EHAMIEHTOEHLA
PUErTA
COMPARTIMIENTO DE LA
BEBIDA
(EN ALGUNOSMODELOS)
Etcompartimientodetempe_atutacontrotada
dela bebidamantienenlasbebidasy aires
articolosa unatemperaturadehasta5° F
(3"C)mgsfriaqueeltestadeta secciSndel
refrigerado[Laentradadesire permitequa
elsiredetasecci6ndetcongeladorpaseal
compartimientodelabebida.
Contreles
Elcontrolse encuentraubicadoenla pared
izquierdade lasecci6ndelreldgeradorEl
contToiajustalacantidaddesire quadrcula
enel compadimientodelabebida D6vuelta
alcontrolensentidodelasagujasdelreloj
pars unatemperaturam&sfda.
Psraquitar e instalarel comparlimientode
la bebida:
$i est,,ubicadodirectamenteenc]made]
compadimientodelabebida,poddaset
necesarioquitarel centredeproductos
l&cteosoel recipientedeI a puerta
Consultelasinstrucclonesap_opiadasy
quiteel art{culoDesltcee_compartimiento
dela bebidahaciaarribay s_queloen
farinarecta
Parsinstsla lo, I!]1
losorificiosde .4.
entradadeai,edel _T_I!t
compartimientodelabebida(A)enuna
delas dosentradasdeaire(B)de la
puerta Empujeel compa_rnientohacia
abajodentrodefsujetadordel
recubrimientodelapuertabastsquese
detenga
IMPORTANTE:Elcempartimientodeta
bebidanofuncionar&apropiadamentesi los
afificiosdetaentradadesirenoest&n
alineadosconlosodficiosdeIa entradade
sirede]recubrimientodeta puerta
CENTRe DE PRODUCTOS
LACTEOS
EICentrede ProductosL_cteosofrece
almacenamientoconvenienteparatales
art(cutoscomemantequilla,yogur,queso,etc
Estecompartirnientoes ajustsbJey se
encuentraenlapuertaPuedemoverses
varieslugaresdiferentesparsacomodartas
necesidadesdeconsewaci6ndealimentos
Paraquitare |nstalarel compartimiento:
Parsquitaflo,destice_
el centrede l_cteos
haciaarribay hacia
afuera
Parsinstalarlo,
desliceel ensambleenelsujetadorque
deseedelrecobrimientodelapuertay
empujehaciaabajobasraquatope
Parsquitar einstslar lapuertadelce_fe
de izicteos:
> Parsquitafla,oprimaambosladesdela
puertadet_cteosy s_quela
> Parsinsta(ada,desticelosladesde la
puedaadentrodelcentredel&cteoshasta
qualos puntosdebisag[aentrenens_
lugar
RECIPIENTES
INCLINABLES DE LA
PUERTA
(EN ALGUNOSMODELOS)
LosRecipientesInclinablesde la Puerta
consistendeunrecipientey unbaslidor,
proporcionanunalmacenamiento
conveniente,ajustableparsarticulosenta
puerta.Losrecipientesse inclinanhacia
afueraparsofrecerunaccesof_cil,y se
sacanparafacititarla limpiezay el ajuste
Paraquitareinstalarel reciplente:
Papaguitarel y,,,.x_l 1}_]j
recipiente,inclineel
recipientehacia
adelantey j_lelo
haciaafuera.
_- Parsinstalare] rec]piente,desliceel
recipientedentrodelbastidordelrecipiente
y empujeelrecipientehaciaarriba.
Psraajustare!bastidordel recipiente:
> Quiteeirecipientede
scuerdoconJas
instrucciones
antefiores.
> Levanteetbastidordelsoportede la
puertay col6queloenla ubicaci_n
deseada.
CONTENEDORES DE LA
PUERTA
LosContenedoresde IsPuerta
se ajustanparsadaptarsea sue
necesidadesde I1_
almacenamiento, --_t
>Para retiraflos, _,_
deslicee, _h_
contenedorhaoia
ardbay tiredeel derechehaciaafuera
:_ Parsreinstalado,inviertaelprocedimiento
anterio_
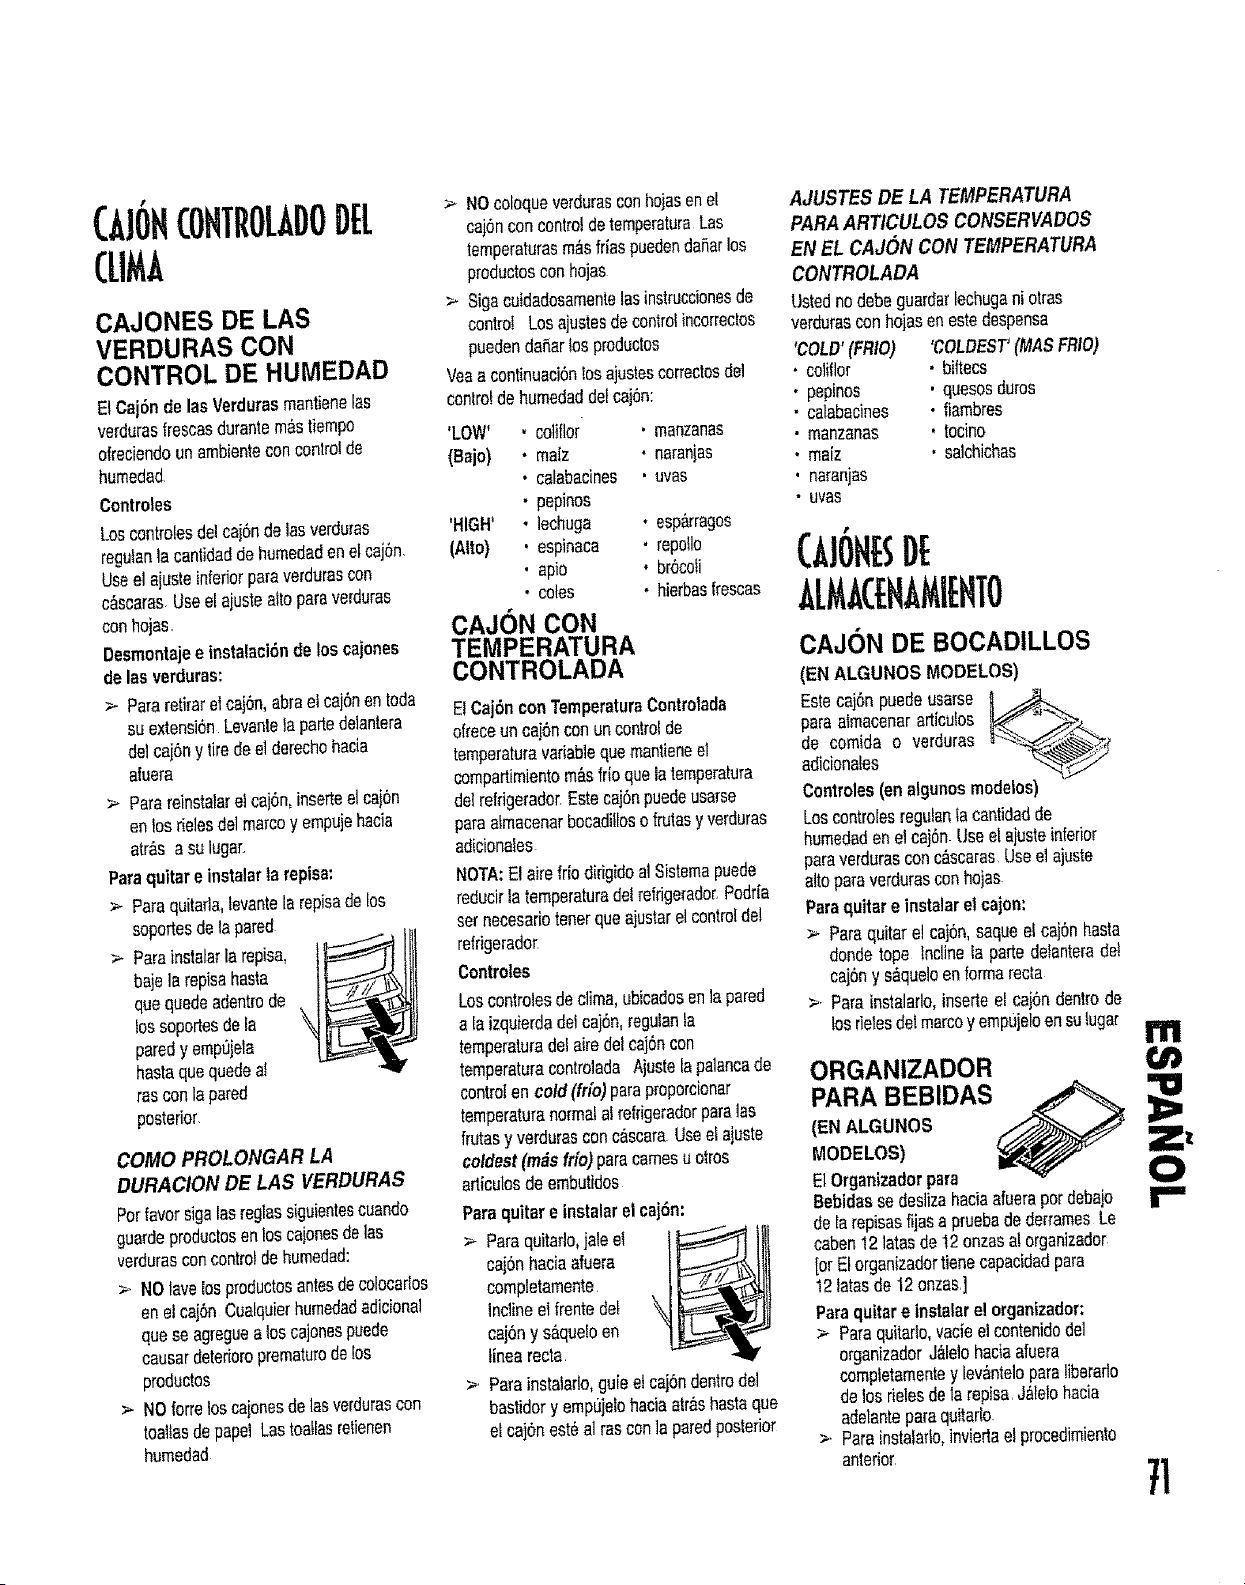
(Aj6BCONTflOLADODEL
(LIMA
CAJONES DE LAS
VERDURAS CON
CONTROL DE HUMEDAD
ElCaj6nde lasVerduresmantienefas
verdurasfrescasdurantem;_stiempo
offeciendounambienteconcontrolde
humedad
Controles
LoscontrolesdelcajSndelasverdures
regutanfacantidaddehumedaden elcaiSn,
Use el ajuste inferior pareverdurascon
cascarasUseel ajustesitepareverduras
conholes.
Desmontajee instalsei6nde los calories
delas verdures:
._ Pararotifereicajun,abrael caj6nentoda
suextensi6nLevantela partedelantera
de1cajSny tiredeelderechohac(a
efuera
._ Parereinstalarel cajSn,insertselcaibn
enlosdelesdelmarcoy ampulehacia
atr_s asu lager.,
Parequitar e instalarta repisa"
•_ Parequitada,tevantela repisadelos
soportesdelapared
> Pareinsta/erlarepise,
balela repisehasta
quaquedeadentrede
lossoportesdefa
paredy emp0jela
hestaquaquadsal
rasconle pared
posterior,
COMO PROLONGAR LA
DURACION DE LAS VERDURAS
Perfavorsigalosreglassiguientescuando
guardsproductosenloscaloriesdeJas
verdurasconcentre!dehumedad:
>. NOlavelosproductosantesdecolocados
enefcaj6n Cualquierhumedadadicional
quese agreguealoscajonespuede
causerdeterioroprematurede!os
productos
_- NOforreloscajonesdelasverdurescon
teethesdepapeiLostoatlasretienen
humedad
> NOcoloqueverduresconhojasenel
caj6nconcontroldetemperatureLas
temperaturasm_sfriaspuedendafterlos
productosconholes
> Sigacuidadosamentelasinstruccionesde
control Losajustesdecontrolincorrectos
puedendeftertosproductos
Veae continuaci6n!osajustescorrectosdel
controldehumedaddetcajSn:
'LOW' coltflor . manzanas
(Bale) maiz • neranjas
calabacines ,uvas
pepinos
'HIGH' lechuga • esp_rragos
(Alto) espinaca • repo]b
epic • br6coti
colas • hierbasfrescas
CAJON CON
TEMPERATURA
CONTROLADA
E_Caj6nconTemperatureControlada
ofreceuncaj6ncon uncontrolde
temperaturevadablequemantieneel
compartimientom_sfrioqualatemperature
dotrefrigerado_EstecajSnpuedeusarse
paraatmacenarbocadillosofrutasy verdures
adicionales
NOTA:El airsffiodirigidoal Sistemapuede
reducirlatemperaturedelrefrigerador.Podfia
setnecesarbtenorquaajustarelcontrolde!
refdgeradot_
Controles
Loscontrolesdeclime,ubicadosenlapared
ala izquierdadelcaj6n,regulanta
temperaturedelairsdotcajSncon
temperaturecontroladaAjustelapalancede
controlencold(file) pareproporcionar
temperaturenormalai refdgeradorparelas
frutasy verduresconcascara.Useetajuste
coldest(m_s frio)parecamesuotros
aflbulosdeembutidos
Paraquitar e instalarel caj6n:
> Parequitedo,jaleel
caj6nhac{aafuere
completamente
Inclineetfrentede!
cai6ny sfiquetoen
_fnearecta
>, Pare]nstalarlo,guiee!cajSnden_rode]
bastidory empujelohaciaatr&shasteque
et caj6nest_alrasconlaparedposterior
AJUSTES DE LA TEMPERATURA
PARAARTICULOS CONSERVADOS
EN EL CAJON CON TEMPERATURA
CONTROLADA
Ustednodebeguarderleohugani otras
verduresconhojasenestedespsnsa
'COLD'(FRIO) 'COLDEST'(MASFRIO)
coliflor • biffecs
pepinos , quesosdares
calabacines • fiambres
manzanas . tocino
maiz , salchiohas
neranjas
uvas
CAJON DE BOCADILLOS
(EN ALGUNOSMODELOS)
Estecej6npuedeuserse _ _.._
pareatmacenararticufos
de comide o verdures _,
adiciona,es '_'
Controles(onalgunosmodelos)
Loscontrolesregutsnla centidadde
humedadenelcaj6n Useelajusteinferior
paraverduresconc_scaras,Useelajuste
altopareverduresconhojas
Parequitar e instalarelcajon:
Paraquitare! caj6n,saqueel cajOnhasta
dondetope Inclinela partsdetanteredel
cajuny s_queloenformsrecta
_.-Pareinstalarlo,insertsel caj0ndentrode
los rietesdotmarcoy empujeloensulugar
I'll
7]
ORGANiZADOR
PARA BEBIDAS _
(ENALGUNOS
MODELOS)
E10rganizadorpara
Bebidasse deslizahec{aafueraperdebajo
dela repisasfijasa pruebadederramesLe
caben12laresde I2 onzasa!organizedor
[orElorganizadortienecapacidadpare
12laresde 12onzas,]
Paraquitare instalare! organizador:
> Parequitarlo,vacieel contenidodel
organizadorJ_lelohaciaafuera
comptetamentey levAnteloparetiberarlo
delos delesdele repisa,Jalelohecie
adelanteparequitarb
_, Parainstataflooinviertaelprocedimiento
anterior
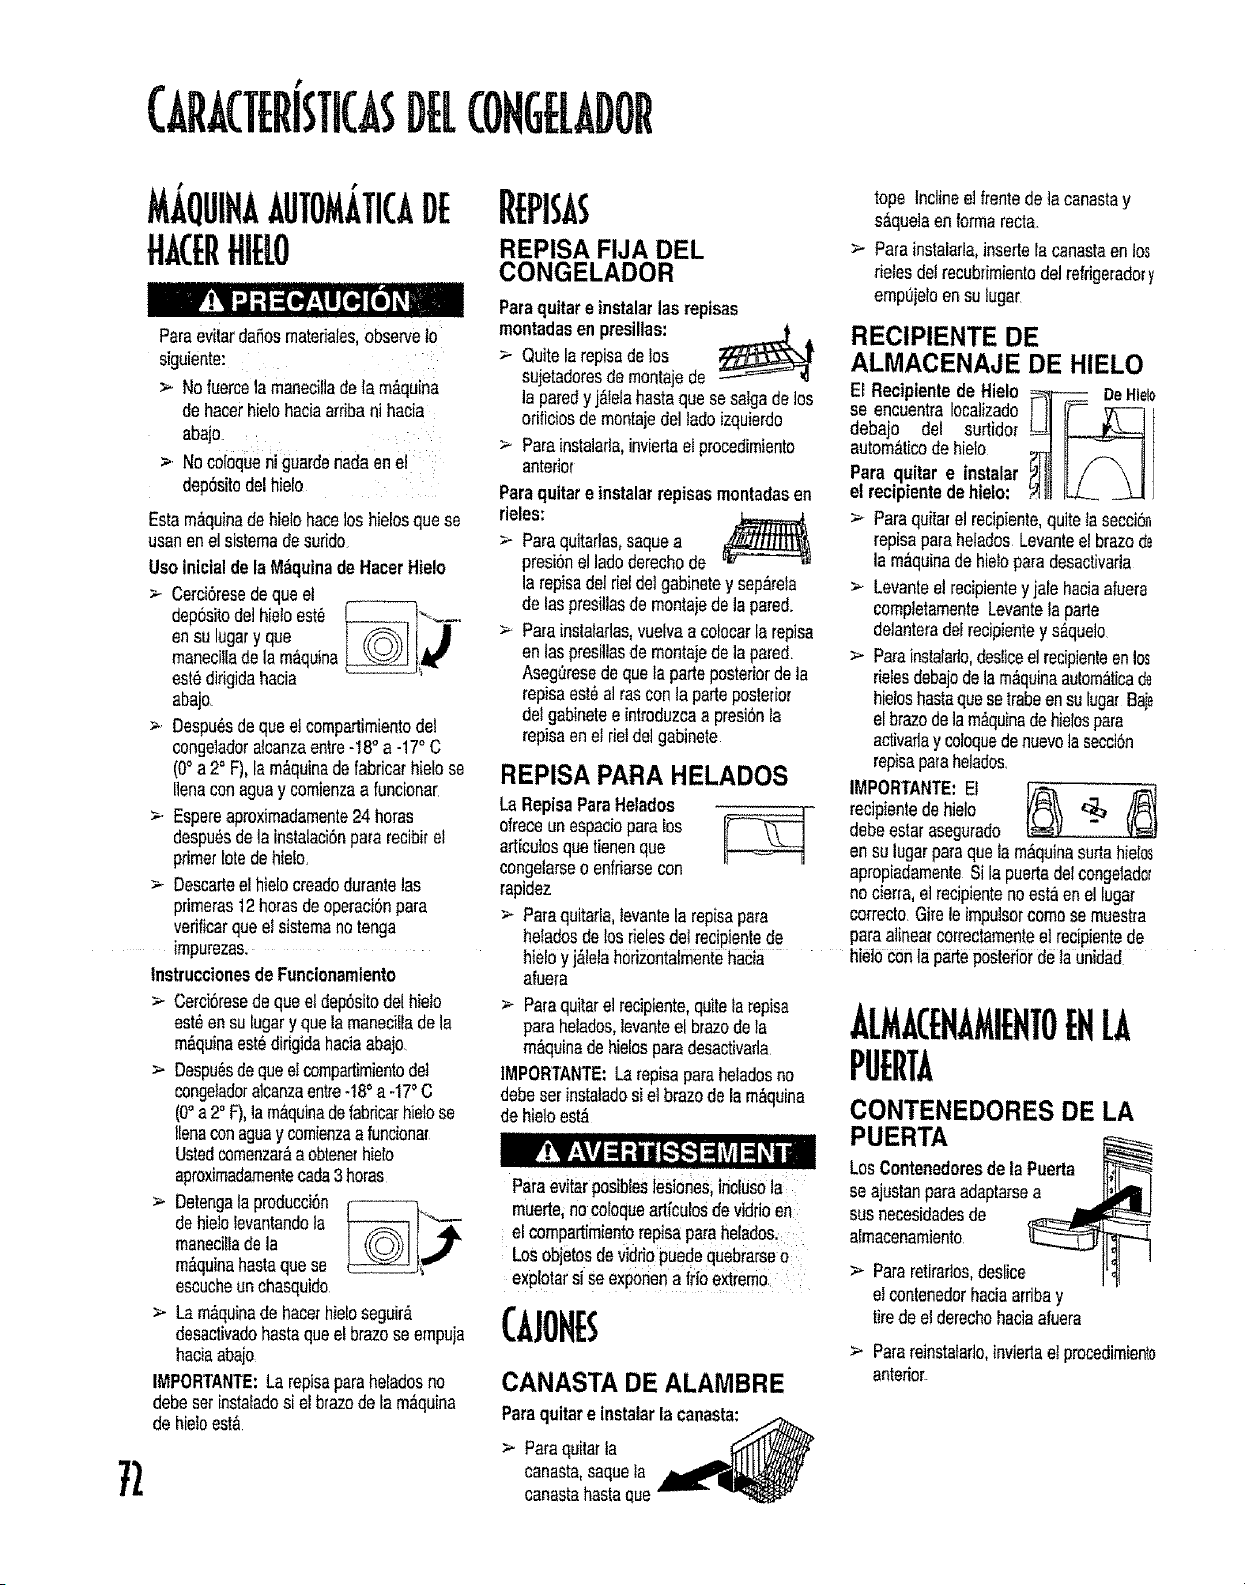
t
GRACTERISTKASBEL€OHGELADOR
M,AQUINAAUTOM, TICADE
tIACEfltU[LO
Paraevilerda_osmateriales,observeto
siguiente: _
> NofuercetamanecilladeIa m_.quina
dehacerhielohaciaarribanihaoia
abajo.
> Nocoloq_enigUardenadaenel:
depSsitodelhieb............
Estam_.quinadehielohaceloshielosquese
usanenelsistemadesurido
Useinicial dela M_quinade HacerHielo
>. Cerd6resedequeel
dep6sitode]hieloest_ _----_--_...._-.
ensu lugary que I _-_--_'_[ ! .
maneci_iadelamaquina_t_"
est_difigidahacia
abajo.
>. Despu_,sdequee_compartimientodel
congetadora{canzaentre-18° a -17° C
(0° a 2° F),lam6quinadefabricarhielose
Ilenaconagt_ay comienzaaIuncionar
.,_Espereeproximadamente24bores
despu6sdeIa instataci6nparerecibirel
primerloredehielo.
>- Descarteelhielocreadedurantetas
primeras12betasdeoperaci6npare
verificarqueel sistemanotenga
impurezas.
InstruecionesdeFuncienamiento
>. Cerci6resede queeldep6sitodelhieto
est_ensulugary quelamaneciUadela
m_quinaest,,dirigidahaciaabaio.
> Despu_sdequeelcompadimientodel
congeladoralcanzaentre-18° a -17°C
(0° a2oF),la m&quinadefabricarhielose
llenaconaguay comienzaafuneionar
Ustedcomenzar&aobtenerhielo
aproximadamentecada3bores
> Detengalaproducci6n _-------___
dehieIoIevantandola ....
maneciUadela
m&quinahastaquese
escucheunehasquide
> Lam&quinadehacerhieloseguir_,
desactivadohastaqueelbrazese empuja
haciaabajo
IMPORTANTE:Larepisapareheladosno
debesetinsta_adosi elbrazedelam_quina
dehieloest&
t)
REPll
CON(
;A FIJA DEL
IELADOR
Paraquitar einstalarlas repisas
montadasenpresillas:
" Quitelarepisadelos
sujetadoresdemontajede
laparedy j#,leiahastequese saigadelos
orificiosdemontajedelladeizquierdo
> Pareinstalarla,inviertaelprocedimiento
anterior
Paraquitar einstalarrepisasmontadasen
rieles:
> Parequitarlas,saquea
presi6nel ladederechode
larepisadelrieldeIgabinetey sep_rela
delaspresillasde montajedeIa pared.
> Pareinstatarlas,vuelvaa coloearla repisa
enlaspresiltasde montaiedela pared.
Asegt_resedequela parteposteriordela
repisaest_alrasconlaparteposterior
delgabinetee introduzcaa presi6nla
repisaenel deldelgabinete
REPISA PARA HELADOS
La RepisaPareHelados
ofreceunespaciopareios
articutosquetienenque
congelarseo enfriarsecon
rapidez
>Para quitada,levantela repisapare
heladosdelosrielesdelrecipientede
hieloy j_letahorizontalrnentehacia
afuera
>Para quitarelrecipiente,quitelarepisa
parehelados,levanteelbrazedela
m_quinadehielosparadesactivarla
IMPOR'TANTE:Larepisaparaheladosno
debeset instaladosiel brazede lam&quina
dehieloest&
PareevitarposiblesiesioneS;inciUS0ia
muerte;noco[oqueart{culosdevidrioen:
el compartimientorepisaparehelado&
LosobjetosdeVidriopuedequebiarseo
exp0tars seexp0nena fd0 extrem0:
CAJOHES
CANASTA DE ALAMBRE
Parequitareinstalarla canasta: /,._
> Parequitarta _1'_1_
canasta,saqueta .m_!=I_
canastahasteque_
tope Inclineel frentedeta canastay
s_quelaenformarecta.
>- Parainstalafla,insertela canastaenlos
fietesdelrecubfimientodelrekigeradory
empujeloensu tugar.
RECIPIENTE DE
ALMACENAJE DE HIELO
El Recipientede Hielo DeHide
se encuentraIocalizado
debajo del surtidor
automat[code hielo
Pare quitar e instalar
el recipientedehielo:
>Para quitarel recipiente,quitetasecoi6n
repisaparaheladosLevanteelbrazede
la m_quinadehieloparadesactivarla
>- Levanteel recipientey jalehaciaafuera
completamenteLevantefa parle
delanteradelrecipientey s&quelo
>Para instalarto,desliceelrecipienleenlos
rielesdebajodelam_quinaaulom_ticade
hieloshastequesetrabeensulugarBaie
el brazedetam&quinadehielospare
activaflay coloquedenuevo]aseeci6n
repisaparehelados.
IMPORTANTE:El
recipientedehielo
debeestarasegurado
ensu lugarparequela m#=quinasudahieIos
apropiadamenteSila puertadelcongeladol
nociena,elrecipientenoestaenellugar
correcto.Gireleimpulsorcomesemuestra
parealinearcorrectamenteelrecipientede
hielo_n laparteposteriorde taunidad
ALMACEHA IEFITOEHLA
PUERTA
CONTENEDORES DE LA
PUERTA
LosContenedoresde laPuerta
se ajustanpareadaptarsea
susneeesidadesde
almacenamiento
>Para retirartos,deslice
eicontenedorhaciaarribay
tiredee_derechohaciaafuera
> Parereinstalarlo,inviedaetprocedimiento
anterior.
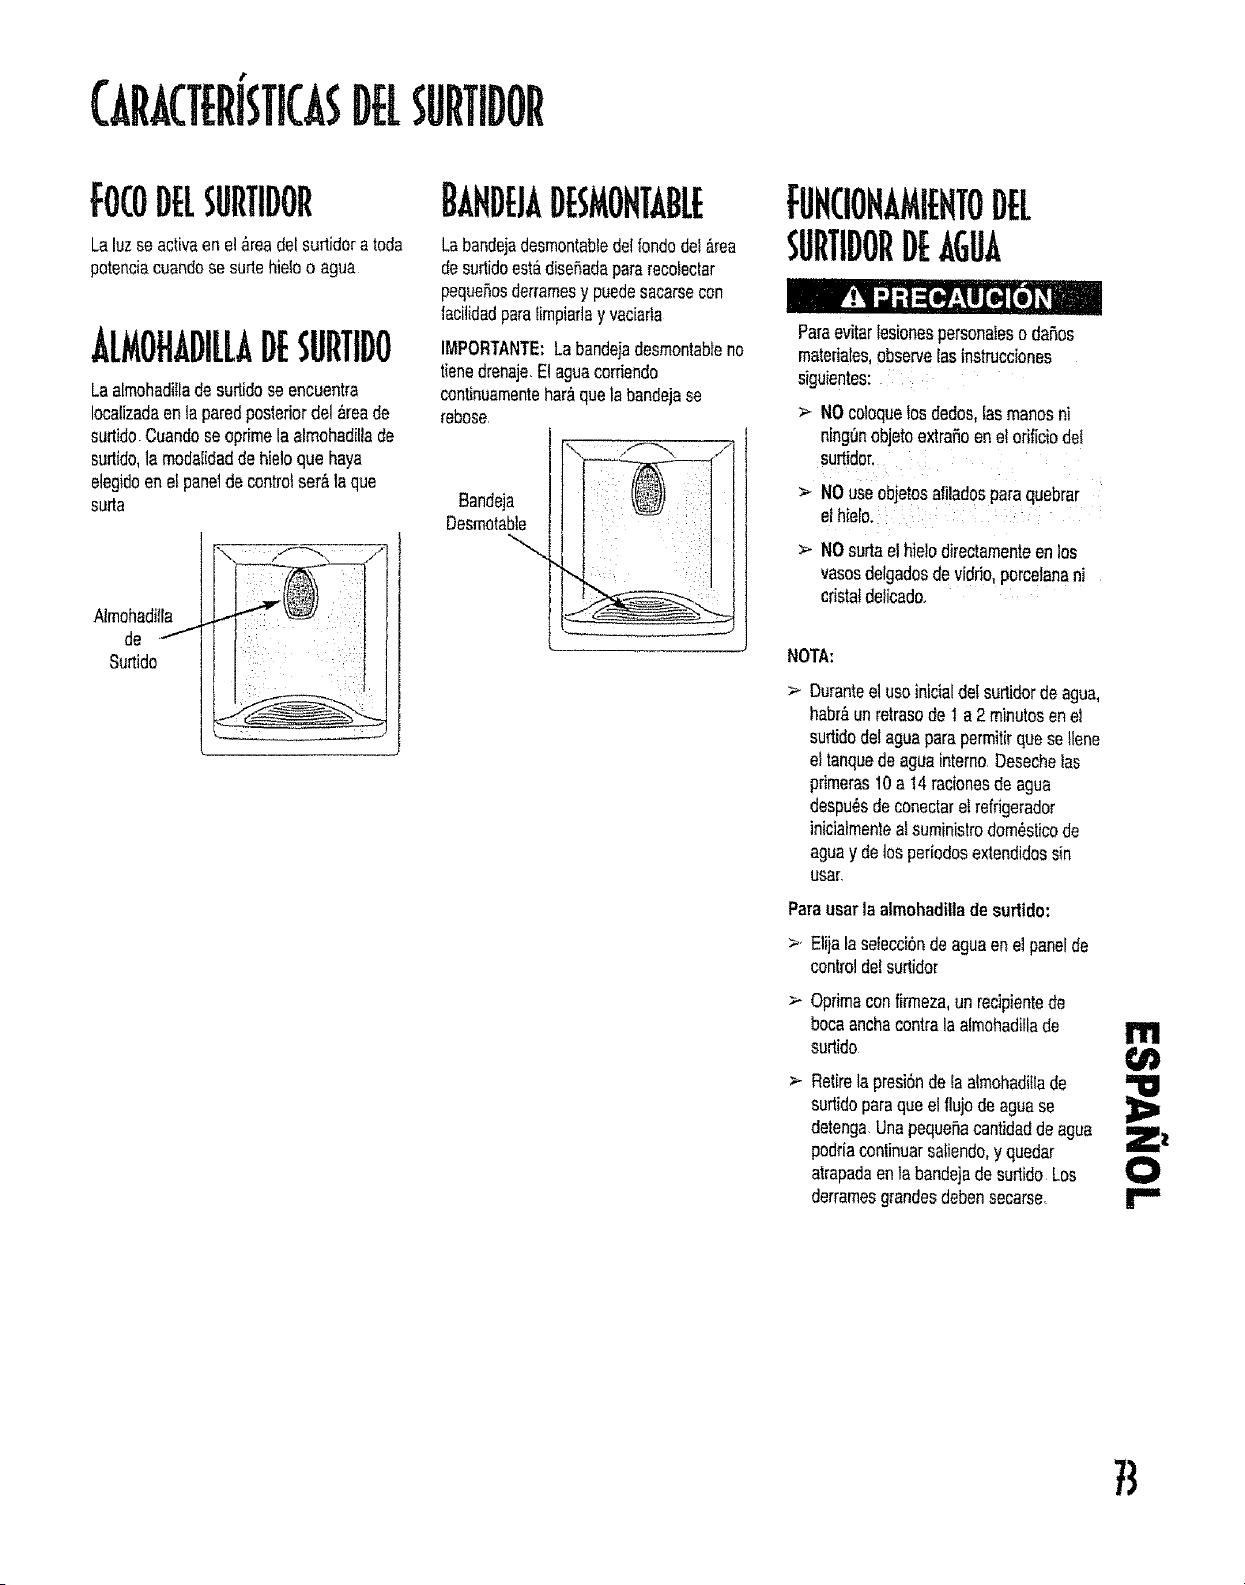
CARACTERi TKASDE[SURTIDOR
FOCODELSURTIDOR
Laluzseactivaenel_readelsurtidoratoda
p{)tenciacuandosesurtehieI{)o agua
. LMOHADI[LADESURTIDO
LaalmohadiIladesurtidose encuentra
Iocalizadaenta paredposteriordel&teade
surtidoCuandose{)primelaalmohadillade
surlido,la modalidaddehie]oquehaya
elegidoenelpaneldec{)ntroiset&laque
surta
Afmohaditla
de ..,...I
Surtido
,,,
BAHD[JADESMOHTABL[
Labandejadesmontab?edelrondode!#,tea
desurtidoest,.disefiadapararec{)fectar
pequeSesderramesy puedesacarsecen
facilidadpara[impiarlay vac[arla
IMPORTANTE:Labande}adesm{)ntabteno
tienedrenaje.Elaguacorfiendo
continuamentehat&quela bandejase
reb{)se
Bandeja
DesrnotaNe
FUHCIOHAMI[HfOD[[
SURTIDORD[,&GUA
Paraevitarlesi{)nespers{)naleso daSos
matefiates,observe[asinstruec[{)nes
sfguientes: :
> NOcoloquelosdedos,lasmanesni
ning0nobjetoextrafi{)enet orificiode!
surtidor.
>- NOuseobjet{)safiladosparaquebrar
e[hie[&
> NOsurtaelhiel{)directamenteenlos
vasesdelgadosdevidrio,percelanani
cristatdelicado,
NOTA:
> Duranteelus{)}n[cialdetsurtidordeagua,
habrAunretrasode t a 2minutosenel
surtidode!aguaparapermitirquesetlene
eltanquedeaguaintern{)Desechelas
primeras10a 14racionesde agua
despu_sdeconectareI reffigerador
inicialmentea_suministrodomestic{)de
aguay detosperiodosexlendidossin
usar,
Parausarlaaimohadilladesurtido:
>, Elijataselecci(_ndeaguaenelpanelde
controldefsurlidor
>- Optimaconfirmeza,unreeipientede
bocaanchacontralaafmohadillade
surtido
I'111
1/}
Retirelapresi6nde laatm{)hadiilade
surtidoparaqueelflujodeaguese
detenga.Unapequef}acantidaddeagua Zl I
podriacontinuarsaliendo,y quedar
atrapadaenla bandejadesurtidoLos
derramesgrandesdebensecarse,
t3
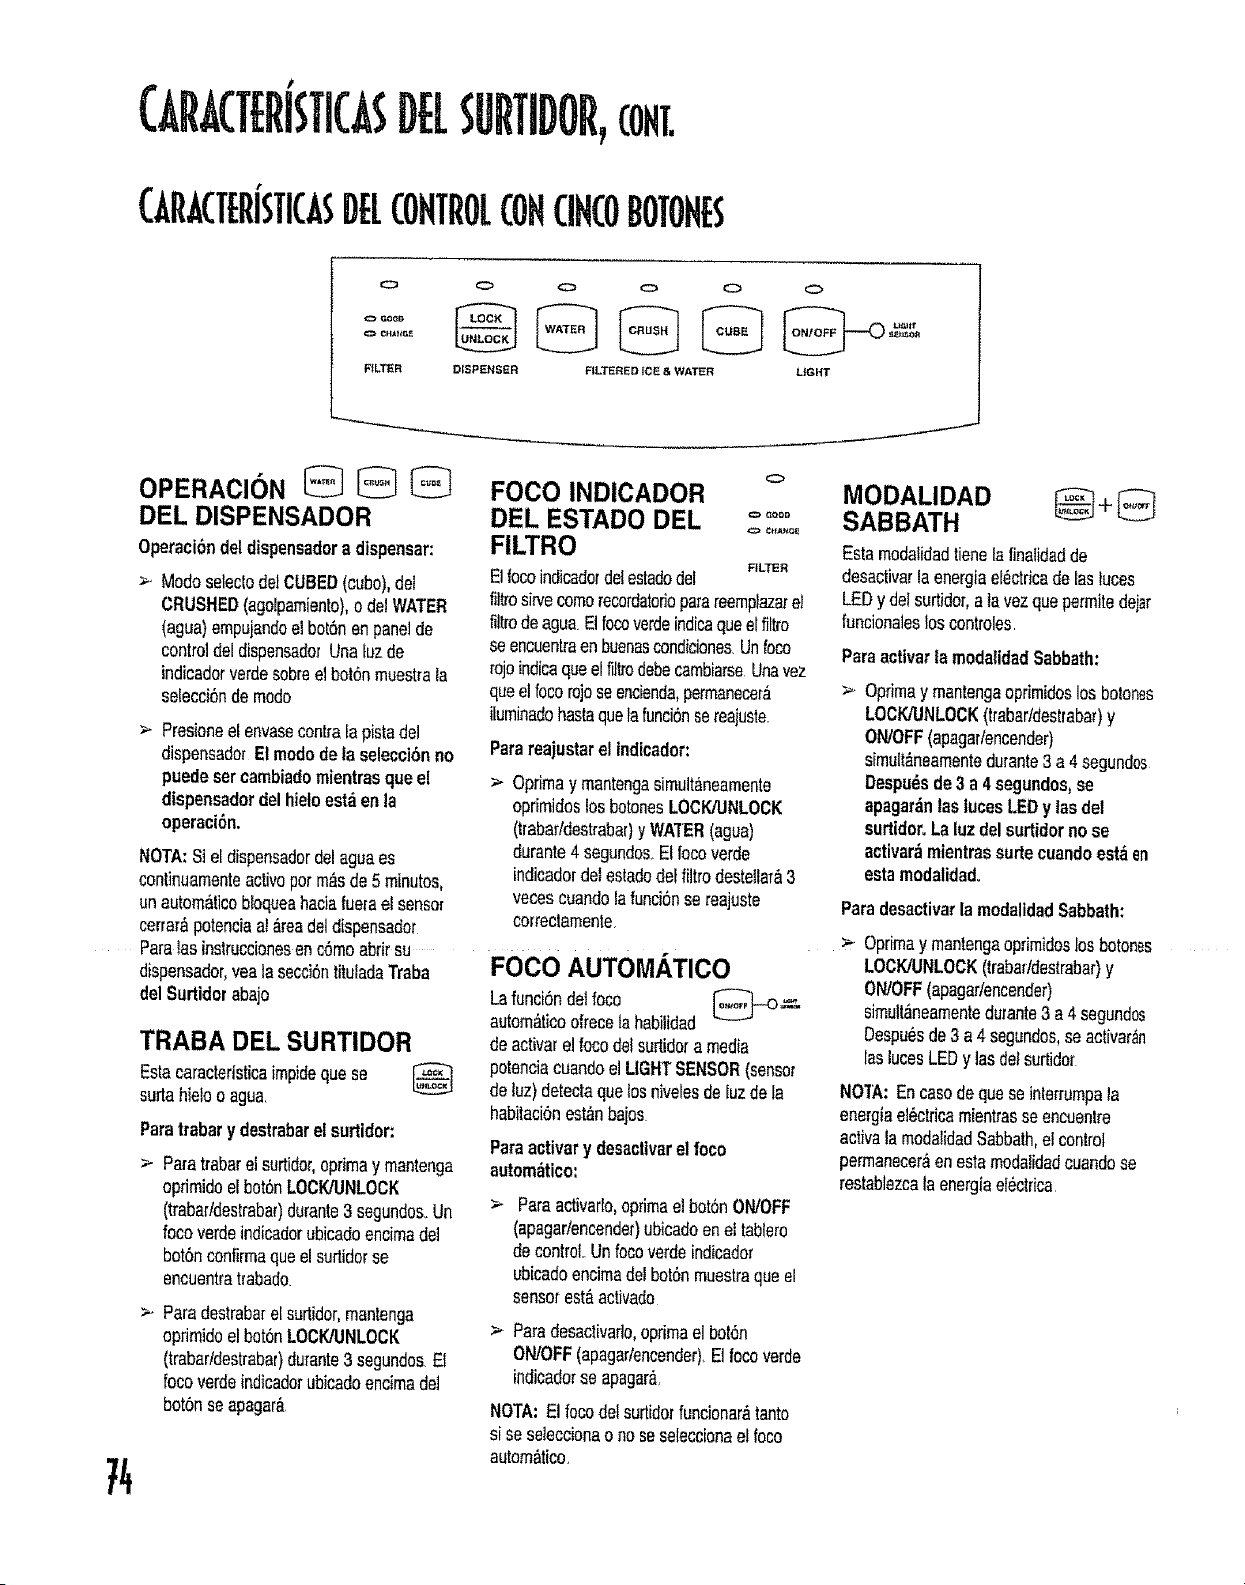
GRACTERiSTJCASDE[SURTIDOR,CONT.
GRACTERJSTICA5DELCONTROLCONCINCOBOTONE5
o GoOD @
o CIfAt_o£
FILTER DISPENSER FILTERED iCE & WATER L_GHT
J
OPERACION
DEL DISPENSADOR
Opetaci6ndeldispensadora dispensar:
ModeselectodelCUBED(cube),del
CRUSHED(agolpamiento),o delWATER
(agua)empujandoelbot6nenpanelde
controtdeldispensado_Una_uzde
indicadorverdesobreelbot6nmuestrala
selecci6ndemode
Presioneelenvasecontralapistadel
dispensadorEl modede la selecciSnno
puedesercambiadomientrasqueel
dispensadordel hieloest_en la
operaci6n,
NOTA:St eldispensadordelaguaes
continuamenteactiveperm_sde5 minutes,
unautornatieobloqueahaciafuerael sensor
cerrar_ipotenciaat_readeldispensador
Pars1asins_ruccionesenc6moabrirsu
dispensador,veatasecci6ntiMadaTraba
delSurtidorabajo
TRABA DEL SURTIDOR
Estacaracteristicaimpidequese
surtahieloo agua,
Paratrabary destrabarel surtidor:
Paratrabarel surtidor,optimaymantenga
oprimidoelbot6nLOCK!UNLOCK
(trabar/deslraba0durante3 segundos_Un
focoverdeindicadorubicadoencimadel
bot6nconfirmsqueelsurttdorse
encuentratrabado
Paradestrabarelsurtidor,mantenga
opdmidoel bet6nLOCK/UNLOCK
(trabar/destrabaT)durante3 segundos,E_
focoverdeindieadorubicadoencimadel
bot(_nseapagarA
O
FOCO INDICADOR
DEL ESTADO DEL .....
FILTRO
FILTER
E1(ocoindicadordelestadodet
li]tros]rvecomerecordatorioparsreempfazare)
fiitrodeaguaElfocoverdeindicaqueelflltro
seencuentraenbuenascondieione&Unfoco
rojoindiesqueelfiltrodebecambiarseUnavez
queetfocorojoseencienda,permaneeer,i
ilurninadohastaquelaIunci(_nserealus_e
Parareajustarel indicador:
>, Opdmay rnantengasimultaneamente
oprirnidoslosbotonesLOCKJUNLOCK
(t_abarldestraba_)YWATER(agua)
durante4 segundosElfocoverde
indicadordelestadodelfiltrodesteIlar&3
vecescuandolafunci6nse reajuste
co:_reclamente
FOOD AUTOMATICO
Lafunci6ndelfoco _
autom_ticoofrecetahabilidad
deactivarel focedelsurtidoramedia
potenciacuandoelLIGHTSENSOR(sensor
deluz)detectsquetosnivelesdeIuzdela
habitaeiOnestAnbajos
Paraactivary desactivarelfoco
autom_tico:
Parsactivarto,opdmaeIbot6nON/OFF
(apagarlencender)ubicadoeneltablero
decontrolUnfocoverdeindicador
ubicadoencimadelbot6nmuestraqueel
sensorest&activado
Parsdesactivarlo,optimael bot(_n
ON/OFF(apagar/encender)Elfocoverde
indicadorse apagar&
NOTA:Elfocodelsurtidorfuncionaratanto
si seseleccionao noseseleccionael foco
automAtico,
MODALIDAD
SABBATH
Estamedalidadtienelatinalidadde
desactivarla energfaef6ctricadefasluces
LEDy delsurtido[,alavezquepermitedeist
funcionalesloscontroles
ParsactNar|amoda_idadSabbath:
>, Optimay mantangaoprirnidoslos botones
LOCK/UNLOCK(trabarldes_,_abar)y
ON/OFF(apagarleneender)
simult&neamentedurante3a 4segundos
Despu_sdo3a 4segundos,se
apagar_nlas tucesI.EDy lasdel
surtidor,La luzdel surtidornose
activar_mientrassurtecuandoest_en
estamodalidad.
Paradesactivarla modalidadSabbath:
>, Oprimay mantengaoprimidoslosbotones
LOCI_JNLOCK(trabafldestrabar)y
ON/OFF(apagar/encender)
simult_neamentedu_ante3 a 4segundos
Despu_sde3 a4 segundos,se activar_n
IaslucesLEDy las detsurtidor
NOI'A: Encasedequese interrumpala
energiae!_ctricamientrasseeneuentre
activalarnodalidadSabbath,el control
permanecer&enestamodalidadeuandose
restablezca(aenergiaeI_ctrica
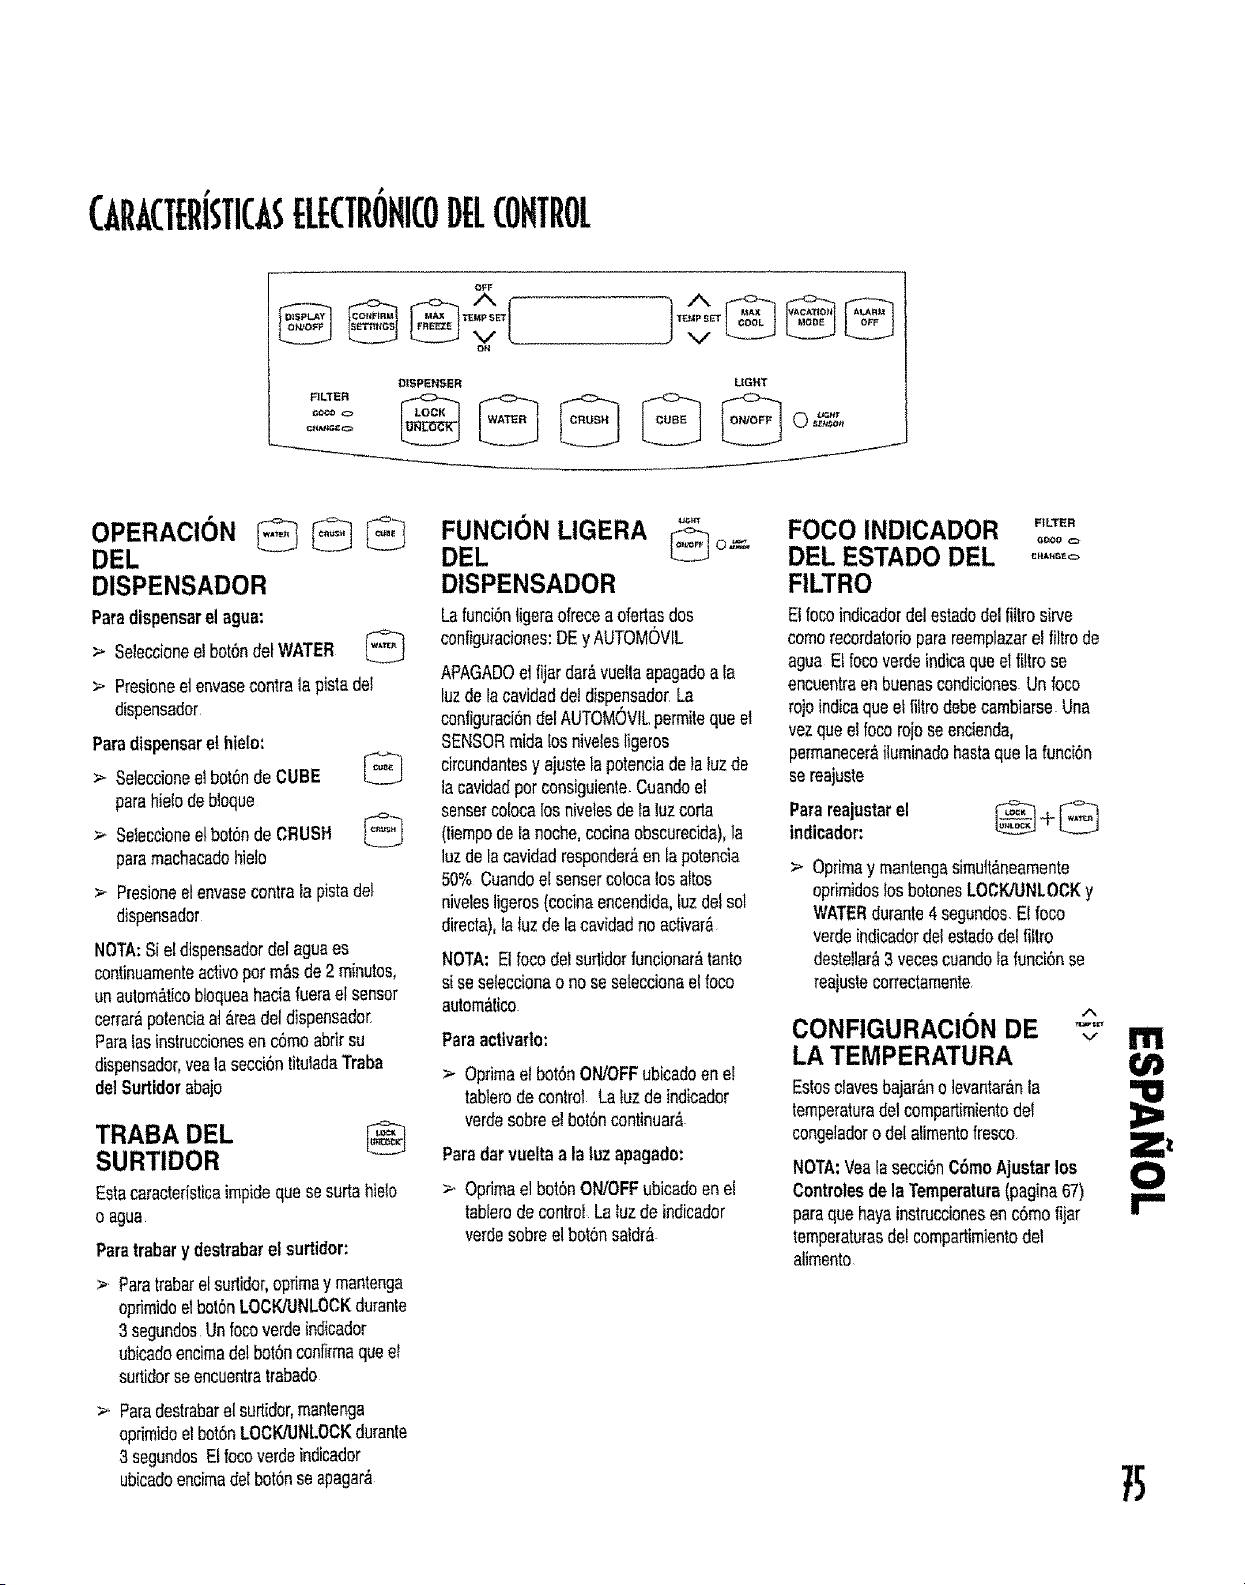
€ArACTErlsTI(AsELECTRONI(ODEI.(OHTROI
oFF
oN
DISPENSER LIGHT
OPERACION _ _
DEL
DISPENSADOR
Paradispenserel ague:
> Seleccioneel bot6ndetWATER
> Presioneelenvasecentrela pistade!
dispensador
Paredispenseret hie!o:
> Seleccioneelbot6ndeCUBE
parehie!odebleque
> Sefeccionee/botSndeCRUSH
paremachacadohieto
> Presioneelenvasecontrala pistadel
dispensador
NOTA:Sieldispensadordelaguees
continuamenteactiveperm_sde 2minutes,
unautom_,ticebloqueahadafueraetsensor
cerrar_polenc{aatareadeldispensado_
PareInsinstruccionesencOmoabrirsu
dispensador,yealasecci6ntituladaTraba
delSurtidorabajo
TRABA DEL
SURTIDOR
Estacaracteristicaimpidequese surtahielo
o ague
Paretrabary destrabarel surtidor:
> Paretrabarelsurtidor,optimay mantenga
oprimidoelbot6nLOCK/UNLOCKdurante
3segundosUnfocoverdeindicador
ubicadoencimadelbot6nconfirmaqueel
surtidorse encuentratrabado
> Paredestrabarelsurtidor,mantenga
oprimidoelbot6nLOCK/UNLOCKdurante
3 segundosElloseverdeindicador
ubicadoencimadelbot0nseapagar_
FUNCION LIGERA °°"
DEL _ o=
DISPENSADOR
Lafunci6nligeraofreceaofertasdos
configuraciones:DEy AUTOMOVfL
APAGADOeltijardar_vueilaapagadoata
luzdelacavidaddetdispensado_La
configuraci6ndelAUTOMOVILperrnitequeet
SENSORmida!osnivelesligeros
circundantesy ajustelapotenciadelaluzde
lacavidadperconsiguiente,Cuandoet
sensercolocalosnive_esdetaluzcorta
(tiempode lanoche,cocinaobscurecida),la
luzdelacavidadresponder_enlapotencia
50% Cuandoelsensercoloca?osaltos
nivelesligeros(cocinaencendida,fuzdelsol
directa),latuzdelacavidadno activar_
NOTA: Elfocodetsurlidorfuncionar_tanto
si se seleccionao noseseLeccionaelfoco
autom_tico
Paraacttvarto:
> Optimael bot6nON/OFFubicadoene!
tabterodecontrol Laluzde indicader
verdesobreelbot6ncontinuar_
Paredarvueltaa la luz apagado:
>, Oprimael bot6nON/OFFubicadoenel
tablerodecontroiLaluzde indicador
verdesobreelbot6nsaldr_.
FOCO INDICADOR .,L_.
DEL ESTADO DEL .........
FILTRO
Elfocoindicadordelestadodelfittrosirve
comerecordatorioparareemplazarel tiltrode
ague Etfocoverdeindicaqueelfittrose
encuentraenbuenascondicionesUn foco
rojoindicaqueellittrodebecambiarseUna
vezqueelfocorojoseencienda,
perrnanecer&iluminadohastequelafunci6n
sereajuste
Parereajustarel _ +
indicador:
> Optimay mantengasimult&neamente
oprimidoslosbotonesLOCK/UNLOCKy
WATERdurante4 segundosElfoco
verdeindicadordelestadodelfiltro
destetlar&3vecescuandoIafunci6nse
reajustecorrectamente,
CONFIGURACION DE ^
v I'll
LA TEMPERATURA
Estosclavesbajar_no ievantar&nla
temperaturedelcompartimientodel
congeladoro delalimentofresco Z_
NOTA:Yeatasecci6nC6moAjustarlos
Controlesdela Temperature(pagina67)
parequehayainstruccionesenc6motijar
temperaturesdeÁcompartimientodel
alirnento
75
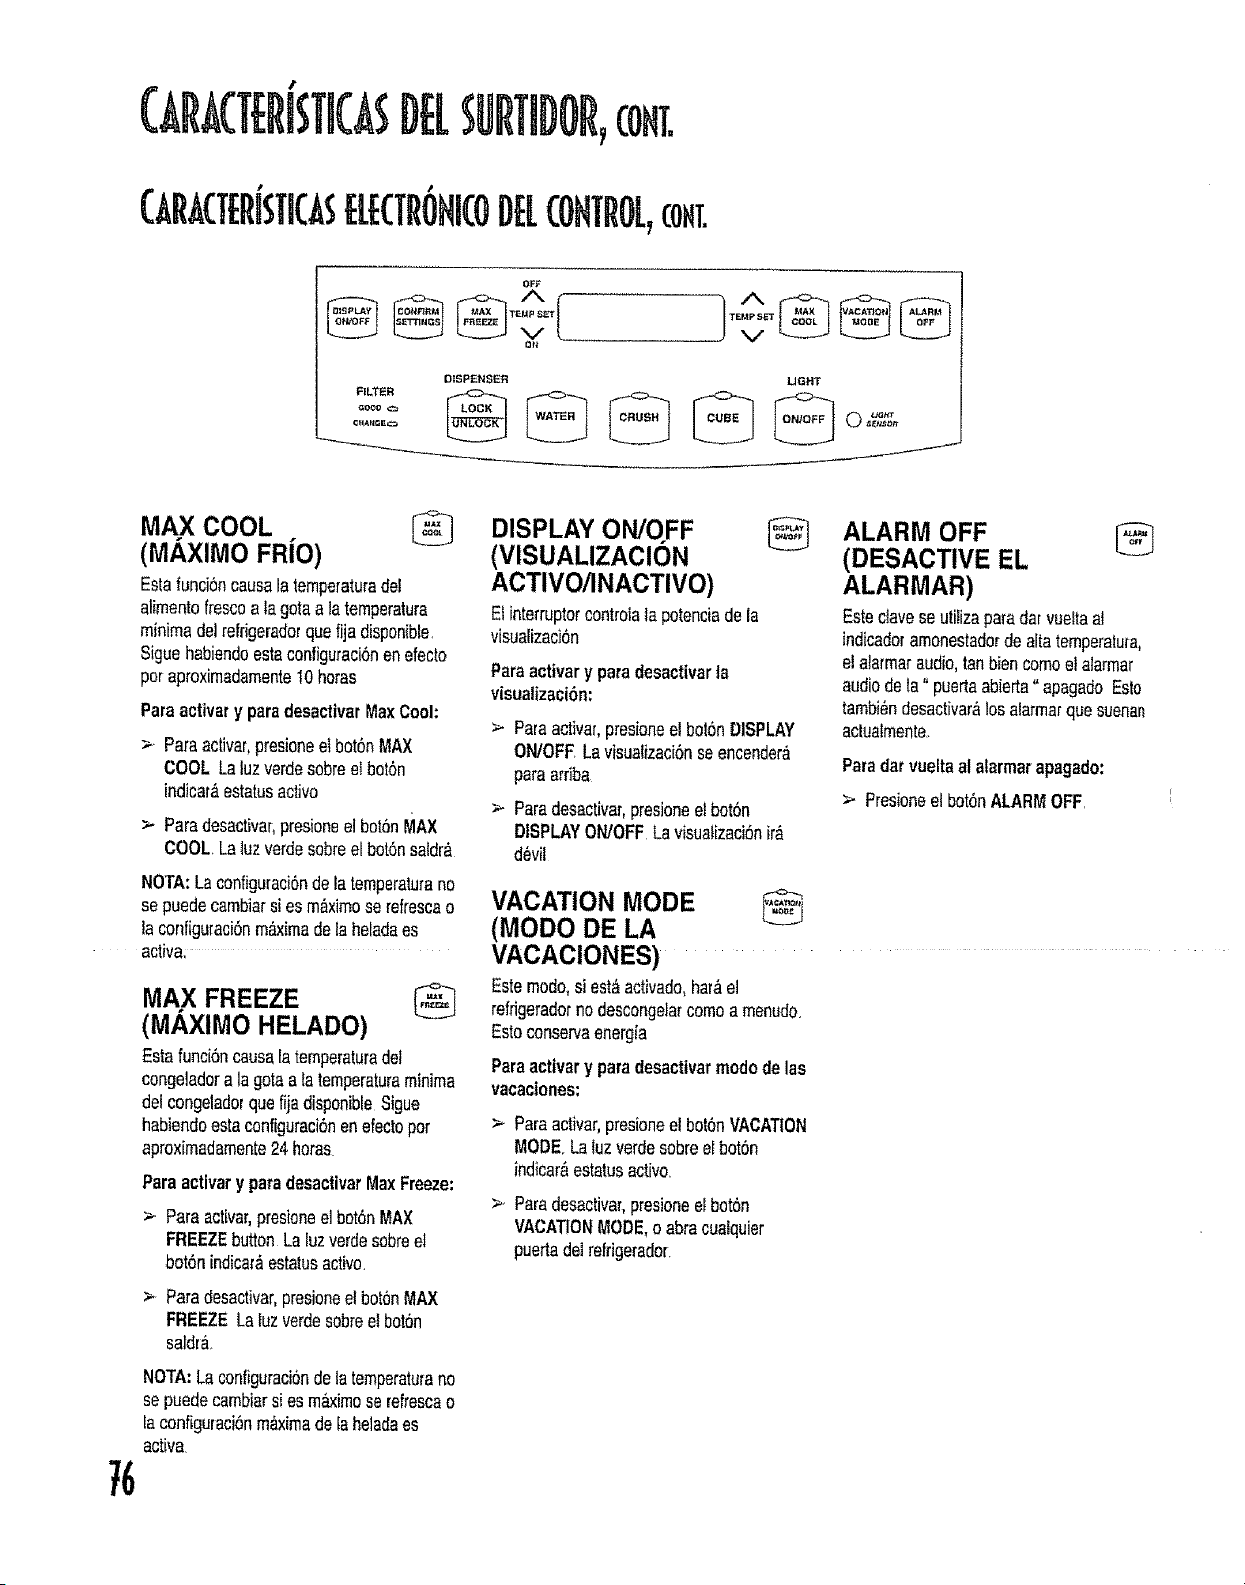
!
(ARA(T[RtSTI(A$D[[SURHDOR,(ONT.
• I
(ARA(TERISTI(A$ELE(TROHi(ODEL(ONTROL,(oNt.
OFF
Ott
DISPENSER
,,%
MGHT
MAX COOL
(M.&.XIIVlOFR[O)
Estafunci6ncausalatemperaturedel
alirnentofrescoala gotaala temperatura
minimade]refrigeradorquefija disponibfe.
Siguehabiendoestecenfigu_aci6nenefecto
pot aproximadamente10horas
Paraactivar y paredesactivarMaxCool:
>_ Paraactivar,presioneel bot6nMAX
COOL Latuzverdesobreel bot6n
indicar&estatusactivo
>- Paredesactivar,presioneel bot6nMAX
COOL.Laluzverdesabree[bot6nsatdr_
NOTA:Laconfiguraei6ndelatemperatureno
se puedecambiarsi esmaximose refrescao
]aconfiguraciSnm&×imadelaheladaes
activa_
MAX FREEZE @
(MAXIMO HELADO)
Estafunci6ncausaIatemperaturedel
conge]adorala gotaala temperatureminima
delcongeladorquefijadisponibleSigue
habiendoestaconfiguraci6nenefecloper
aproximademente24horns.
Paraactivary papadesactivarMaxFreeze"
>- Pareactivar,presioneel bot6nMAX
FREEZEbuttonLaluzverdesobreet
bot6n[ndicar&estatusactivo.
> Paradesactivar,presioneelbot6nMAX
FREEZELaluzverdesobreelboron
saldr_.
NOTA:Lacor',_guraci6ndelatemperatu{ano
sepuedecambiarsies m_imo serefrescao
faconfiguraciSnm_×irnade taheladaes
active.
/6
DISPLAY ON/OFF
(VISUALIZACION
ACTIVO/INACTIVO)
Elinterruptorcontroiatapotenciadela
visualizaci6n
Pareactivary paradesaclivarIs
visualizaci6n:
> Pareactivar,wesioneelbol6nDISPLAY
ON/OFFLavisualizaci6nseencendera
parearriba
>- Paredesactivar,presioneet bot6n
DISPLAYON/OFFLavisuatizaci6nir_,
d6vil
VACATION MODE
(MODO DE LA
VACACIONES)
Estemodo,si est&acfivado,har_el
refrigeradornodescongelarcornoamenudo.
Estoconserveenergia
Paraacttvary paradesactivarmodode las
vacaciones:
> Pareactivar,presioneel bot6nVACATION
MODE.Laluzverdesobreelbot6n
inditer&estatusactivo
>..Paredesaclivar,presioneelbotOn
VACATIONMODE,o abracualquier
puertade_refrigerador,
ALARM OFF
(DESACTIVE EL
ALARMAR)
Estedave seutiiizapapadarvueltael
indicadoramonestadorde altatemperature,
elataTmaraudio,tanbiencomoelalarmar
audiodela" puertoabierta"apagadoEsto
tambi_ndesactivaralosalarmarquesuenan
actualmente..
Paredarvueltaal alarmarapagado:
>- Presioneelbot6nALARMOFF.
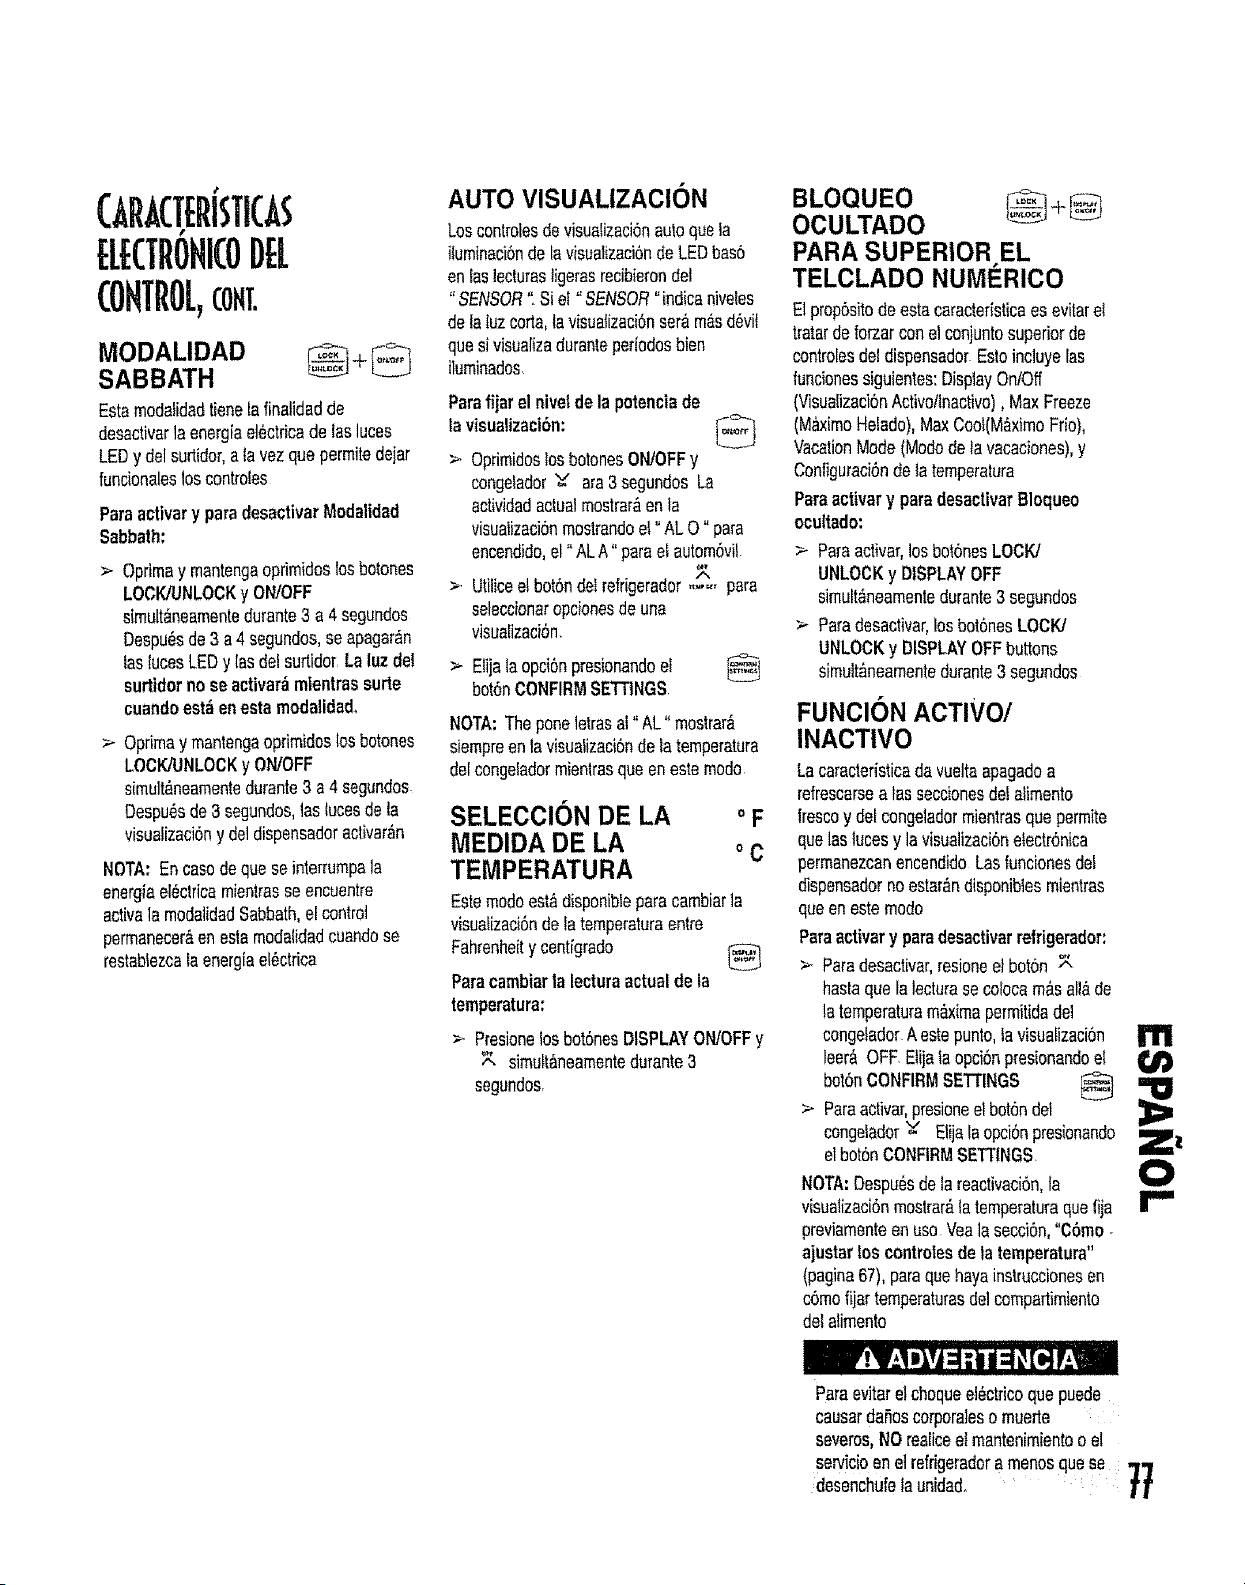
#
CARACTERISTICAS
ELECTflONICODEL
[ONTROL,CONT.
MODALIDAD
SABBATH
Estamodatidadtienelafinatidadde
desactivar]aenergiael_ctricadeIasluces
LEDy delsurtidor,alavezquepermitedejar
funcionalesloscontroles
Paraactivary paradesactivarModatidad
Sabbath:
>- Optimay mantengaoprirnideslosbOtCheS
LOCK/UNLOCK7ON/OFF
simult_.neamentedurante3 a 4segundos
Despu_sde3 a4segundos,seapagar_,n
ias lucesLEDy lasdelsurtidorLaluz de!
surttdorno seactivarbmientrassurte
cuandoest_enestamoda]idad,
>- Opdmay rnantengaopfimidos!osbotones
LOCK/UNLOCKy ON/OFF
simu]t_.nearnentedurante3 a4 segundes
Despu_sde3 segundos,taslucesdeta
visualizaci6ny deldispensadoractivar_n
NOTA:Encasedequase interrumpala
energiael_ctrieamienlrasseencuentre
activala modalidadSabbath,elcontrot
permanecerAenestamodalidadcuandose
restabtezcalaenergiael_ctrica
AUTO VISUALtZACII )N
Loscontrolesdevisuafizaci6nautoquata
iluminaci6nde lavisualizaci6ndoLEDbas6
entasleclurasligerasrecibierondel
"SENSOR".Siel "SENSOR°indicaniveles
delatuzcorta,tavisuatizaci6nsaram_sd6vit
quesi visualizaduranteperiodosbien
iluminados
Parafijarel niveldela potenciade
lavisualizaci6n: _,_
> Oprimidos!osbotonesON/OFFy
congefador=v ara3segundosLa
actividadactualmostrar&enla
visualizaci6nmostrandoet"AL O" para
encendido,el° ALA" paraelautom6viL
>. Utiiiceelbot6ndefrefrigerador..... para
se]eccionaropcienesdeuna
visualizaci6n.
> Elijataopci6npresienandoel
bot6nCONFIRMSETTINGS
NOTA:Theponetetrasal"AL" mostrar_
siempreenla visuafizaci6ndelatemperatura
de[congeladormientrasquaenestemode
SELECClON DE LA ° F
MEDIDA DE LA ° C
TEMPERATURA
Estemodeeat&disponibleparacambiarla
visua[izaci6ndefa temperaturaentre
Fahrenheity centigrade
Paracambiarta lecturaactualdo la
temperatura:
> Presionelosbot6nesDISPLAYON/OFFy
_, simu[t&nearnentedurante3
segundOSr
BLOQUEO
OCULTADO
PARA SUPERIOR EL
TELCLADO NUMI RICO
Elprop6sitodeestacaracteristicaes evitarel
tratardeforzarconel conjuntosupeflorde
controlesdeldispensadorEstoineluyelas
luncionessiguientea:DisplayOntOff
(Visualizaci6nActivo/lnactivo),MaxFreeze
(MaximoHelado),MaxCoot(M_ximoFrio),
VacalionMode(Mododela vacaciones),y
Conliguraci6ndetatemperatura
Paraactivary paradesactivarBloqueo
ocultado:
>- Paraactivar,losbotchesLOCK/
UNLOCKy DISPLAYOFF
simult_neamentedurante3 segundos
>- Paradesactivar,losbot6nesLOCK/
UNLOCKy DISPLAYOFFbuttons
simutt_neamentedurante3segundos
FUNCION ACTIVe/
INACTIVe
Lacaracteristicadavueltaapagadoa
refrescarsealas seccionesdetalimento
irescoy delcongeladormientrasquepermite
qualaslucesy lavisualizaci6nelectr6nica
permanezcanencendidoLasfuncionesdel
diepensadornoestar_ndisponiblesmientras
queenestemode
Paraactivary paradesactivarrefrigerador:
>- Paradesactivar,resioneet bOtCh_"
hastaquelalecturase colocam_sal!_de
latemperaturam_ximaperrnitidado]
congeladorAestepunto,tavisuatizaci6n _H
leer_OFF.Elijafa opci6npresionandoel
bot6nCONFIRMSETTINGS _
_- Paraac|ivar,presioneelbot6ndel
congeladorv Etijalaopci6npresionando Zl
elbot6nCONFIRMSETTINGS.
NOTA:Despu_sdelareactivaci6n,fa
visualizaci6nmostrar_la temperaturaquefija r m
previamenteenuse Vealasecci6n,"C6mo°
ajustarlos controlesdela temperatura"
(paginaG7),paraquahayainstruccionesen
c6mofijartemperaturasdelcornpartimiento
delalimento
Paraevitaretchequeel_ctdcoquapuede
causardaSoscorperaleso muerte
severos,NOrealiceelrnantenimientoo el
sewicioenet refrigeradoramenosquese :
:desenchufelaunidad, tt

COHSEjOSY
LIMPIEZADESUrEfrIGErADOr
Paraevitarchoqueel6ctricoquepuede
causarunalesi6npersenafgraveo :
mortal,desconecte(aenergfae!_ctrica
haciaelrefrigeradorantesdelaUrnpieza.
Despu6sde lalimpieza,enchufe ....
nuevamenteelrefrigeradoro, _....
A(indeevitaruna)esiSnpersonalo da_osrnateriales,observe(osiguiente:
• Leay sigalasinstruccionesdelfabrfcanteparatodoslosproductosde Ump_eza.
, NOeoloquelos compartimlentos,bandejaso accesoriosenel(avavajUlasLosaecesorios
se puedenagrietarodeformar,
PIEZA
PuertasTexturadas
y Exterior
Interiorde!Gabinete
PuertasdeAcero
Inoxidabley Exterior*
IMPORTANTE:La
garantfadeesteproducto
nocubreda_oafacabado
deaceroinoxidable
causadopot usoincorrecto
deproductosde limpiezao
deproductosno
recomendades
JuntasdelasPuertas
Bobinadel Condensador
Retirefa re/i/lainferiorpara
tenetacceso
Rejilladela Salidadel
Ventiladordei
Condensador
Vea/apartetraserade/
refrigerador
AccesoriosBandejas,
compartimientos,cajones,
etc
NO USE
> Limpiadoresabrasiveso &speros
> Amoniaco
>. Btanqueadorde cloro
>- Detergenteso solventes
concentrados
> Esponjasde restregarde metal
o plbsticotexturado
>_ Limpiadoresabrasivos o
asperos
Arnoniaco
>. Blanqueadorde cloro
Sofventeso detergentes
concent(ados
> Esponjasde restrega(de metal
o pl_sticotexturado
> Productos a base de vinagre
> Limpiadoresa base de iimSn
> Limpiadoresabrasivoso
_spezos
>- Esponjasde restregarde metal
o pi&sticotexturado
:_ Un lavavajillas
USE
Use 4 cucharadas de bicarbonatodisueltoen 1 cuarto de
gal6n (1 litro) de agua tibia con jabSn,,
:_ Enjuague lassuperficiescon agua tibialimpia y seque
inmediatamentepara evitar las manchas,.
Use agua tibia con jabSn y un paso suave limpio o una
esponjar.
._ Enjuague )assuperficiesconagua tibia limpiay seque
inmediatamentepara evitar las manchas.
>- Use la boquiUade unamanguera de aspiradora
Usela boquiUade una manguerade aspiradora con
escobilla.
Siga las instruccionesde desmontaje e instalaciSnindicadas
en la secciSncorrespondientea cada accesozio
Espere hasta que losarticulos se ajustena la temperatura
ambiente.
DUuyadetergentesuavey use unpa_o limp)o y suaveo una
esponja para limpiarlos.
Use una escobillacon cerdasde pl_sticopara limpiar las
hendiduras.
Enjuague tassuperficiescon aguatibia limpia,r
:_ Seque inmediatamentelos articulos de vidrio y los
transparentespara evitarlas manchas.
[8 * En e{ interior del refrigerador se ha incluidoun Umpiadozde acero inoxidabie para su uso Paracomprar limpiadoradicional,
por favor p6ngase en contactocon Sears usando la informaciSnindicadaen la contraportadade su manual.
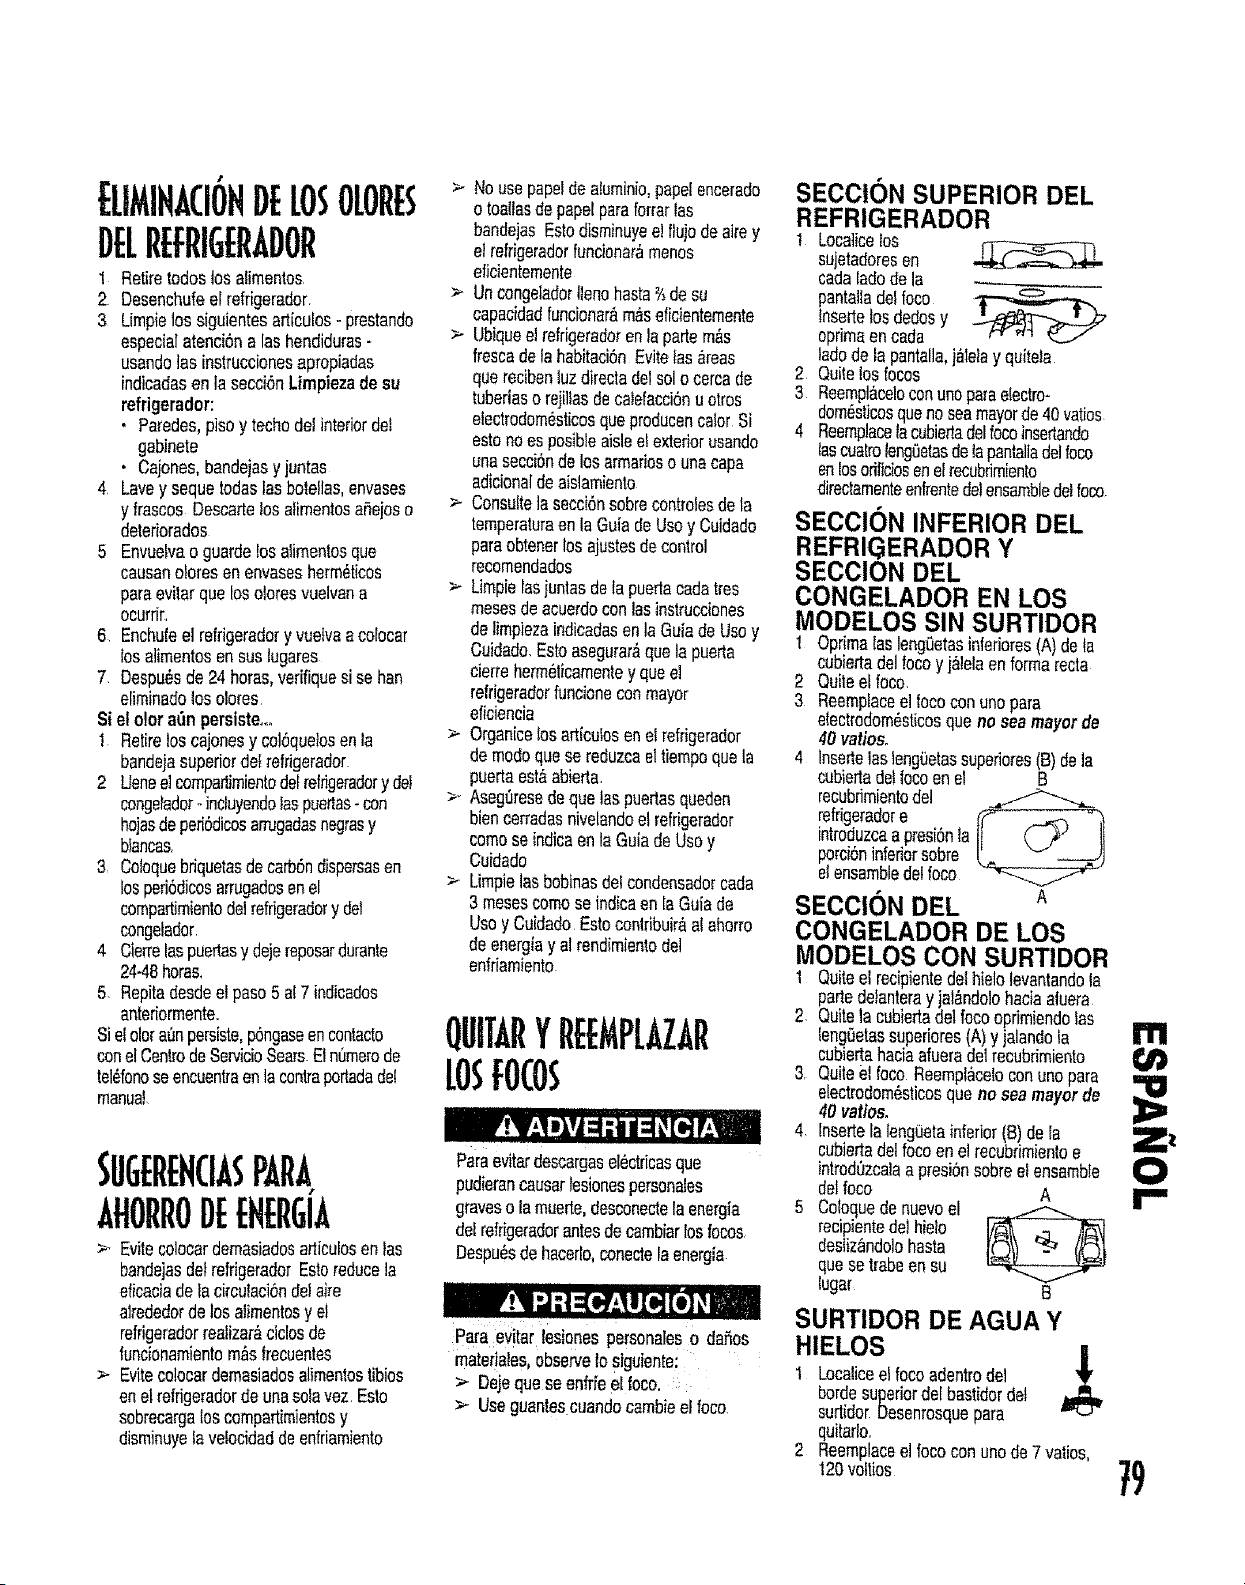
ELIMIHACiOHDELOSOLORE$
DELREFRIGERADOR
1 Retireredeslosalimonies
2 Desenchufeei reffigerador
3 Utopia_ossiguientesart(cu[os- prestando
especialatendSnalas hendiduras-
usando]asinstruccionesapropiadas
indicadasen iasecci6nLimpiezade su
refrigerador:
• Paredes,pisoy techodelinteriordot
gabinete
• Cajones,bandejasyjuntas
4 Lavey sequetodaslas bote}las,envases
y frescosDessertslosafimentosaSejoso
deteriorados
5 Envuelvao guardslosalimentosqua
causano!oresanenvasesherm_ticos
paraevilerqualosoloresvueNana
ocurri[.
6 Enchufeel refrigeradory vueNaacolocar
losalimentosen sustugares
7. Despu_sde 24horus,verifiquesise han
eliminadoloso_o[es
Sielolor rain persisteooo
1 Retireloscajonesy colSquelosanla
bandejasuperiorde[refrigerador
2 Uonee!compadimientodefrefrigeradory de[
congelador° incluyendolaspuertas-con
hojasdeperiSdicosarrugadasnegrasy
bfancas.
3 ColoquebriquetasdecarbSndispersesen
losperi6dicosarrugadosenel
compa_timientodWrefrigeradory dd
congetador
4 Cierrelaspuertasy dejereposardurante
24-48horus.
5. Repitadosdeelpaso5af7 indicados
anteriormente.
Sielolora_npersisto,pOngaseencontacto
conelCentredeServicioSears.Eln0memde
tel_fonoseencuentTaenlacontraporladadel
manual
SIJG[R[HCIAsP. RA
1
. ,orroDeEHERGI.
> Evilscolocardemasiadosarticulosonlas
bandejasdotrefrigeradorEstoreduce]a
oficadadela drcu}aciSnde_airs
alrededordelosalimentosy et
refrigaradorreatizar_ciclosde
funcionamientom,%frecuentes
> Evitecolocardemasiadosalimentostibios
one',re_figeradordeunasofavez.Esto
sobrecargaloscemparlimientosy
disminuyefavelocidaddeenfriamiento
> Nousepapaldealuminio,paperencerado
o toaltasdepapalparaforrarIas
bandejasEstodisminuyee!flujodeairsy
etrefrigeradorfuncionar&menus
eticientemente
Uncongeladorllanohasta%deso
capacidadfuncionar&m&seficientemente
•_ Ubiqueel refrigeradoren tapartsm&s
frescadetahabffaciOnEviteWsareas
quareciben_uzdirectadotsoto cercade
tubedasorejilJasdecalefacciSnu otros
efectrodom_sticosquaproducencalor S[
estonoesposibleaislee!exteriorusando
unasecci6ndelosarmarioso unacapa
adic[ona[deaistamiente
> ConsWtelasecci6nsobrecontroiesdela
temperaturaenta GuiadeUsey Cuidado
paraobtenerlosajustesdecontrol
recomendados
Utopia[asiuntasdelapuertacadatres
mesasdeacuerdoconlasinstruccienes
delimpiezaindicadasenlaGuiadeUsey
Cuidade.Estoasegura_&qualapuerta
cierrehermeticamentey quae]
relrigeradorfuncioneconmayor
eficiencia
> Organicelosarficufosenei refrigerador
demodequase reduzcael_iempoquela
puertaest6abierta.
> Asegeresedequelaspuedasqueden
biencerradasnive[andoetrefrigerador
comese indicaenlaGuiadeUsey
Cwdado
> Limpielasbobinasdelcondensadorcada
3 mosescomeseindicaen laGuiade
Usey CwdadoEstocontribuiraal ehorro
deenergiay alrendimientode]
enWamiento
OUITArYREEJ PLAZAR
LOSM(OS
Paraovitardescargasel_ctricasqua
pud{erancauserlesienespersonalos
graveso lamuerte,desconectelaenergia
delrefrigeradorantesdecambiarlosfeces.
Despu_sdehacerlo,conectelaenergia.
Paree_itarlesionespersonWes0 darius
matedaies,observelo siguiente:
> Dejequese enfrieel foco,
> Useguantescuanriocambieel foco.
SECCION SUPERIOR DEL
REFRIGERADOR
1 Localicelos
sujetadoresen
cadatadodela
pantallade!foco
Insertslosdodosy
optimaen cada
ladedela pantalla,jWelay quitWa
2 Quitelosfocus
3 Reemplaceloconunopareelectro-
dom6sticosquanoseamayorde40ratios
4 Reemplacetacubiertadel_ocoinsertando
tascualroleng0elasdelapantalladelfoco
en los orilicios en elrecubrimiento
directamenteentrantsdetensembledel_oco.
SECCION INFERIOR DEL
REFRIGERADOR Y
SECCION DEL
CONGELADOR EN LOS
MODELOS SIN SURTIDOR
I Optimalasleng0etasinteriores(A)dela
cubier!adel!ocoyj_lelaenformarecta
2 Quiteel foc0,
3 ReemptaceelIococonunopare
etectrodom_sticosquano seamayorde
40vatioso
4 lnse_e_as_eng0stassu_rieres(B)dela
cubiertaddfocoenel B
recubfimientodei
refrige_adore
introduzcaapresi6nta
porci6ninferiorsobre
etensambledeltoco
SECClt N DEL A
CONGELADOR DE LOS
MODELOS CON SURTIDOR
1 Quiteel recipientsdelhidetevantandola
partede}anteray jal&ndolohaciaaluera.
2. Quitela cubiertadelfocoopfimiendofas
feng0etassuperiores(A)y jalandola
cubiertahaciaafuerade1recubrimiento
3. Quiteel(oco ReempI&celoconunopare
electrodom6sticosquano seamayorde
40varies.
4. tnserLe[a leng0etair_erior(8) de[a
cubiertadotfocoen elrecobrimientoe
introd0zca]aa presibnsabreelensambte
delfoco A
5 CoIoquedenuevoel _,_:_:_.._
recipientsdelhieio
des_izandolobasra
quasetrabeen su
lugar B
SURTIDOR DE AGUA Y
HIELOS
1 Loealiceelfocoadentrodel
bordesuperiordelbastidordel
sudidorDesenrosquepare
quitarlo.
2 Reemplaceelfococonunode7varies,
120voftios
I'il
79
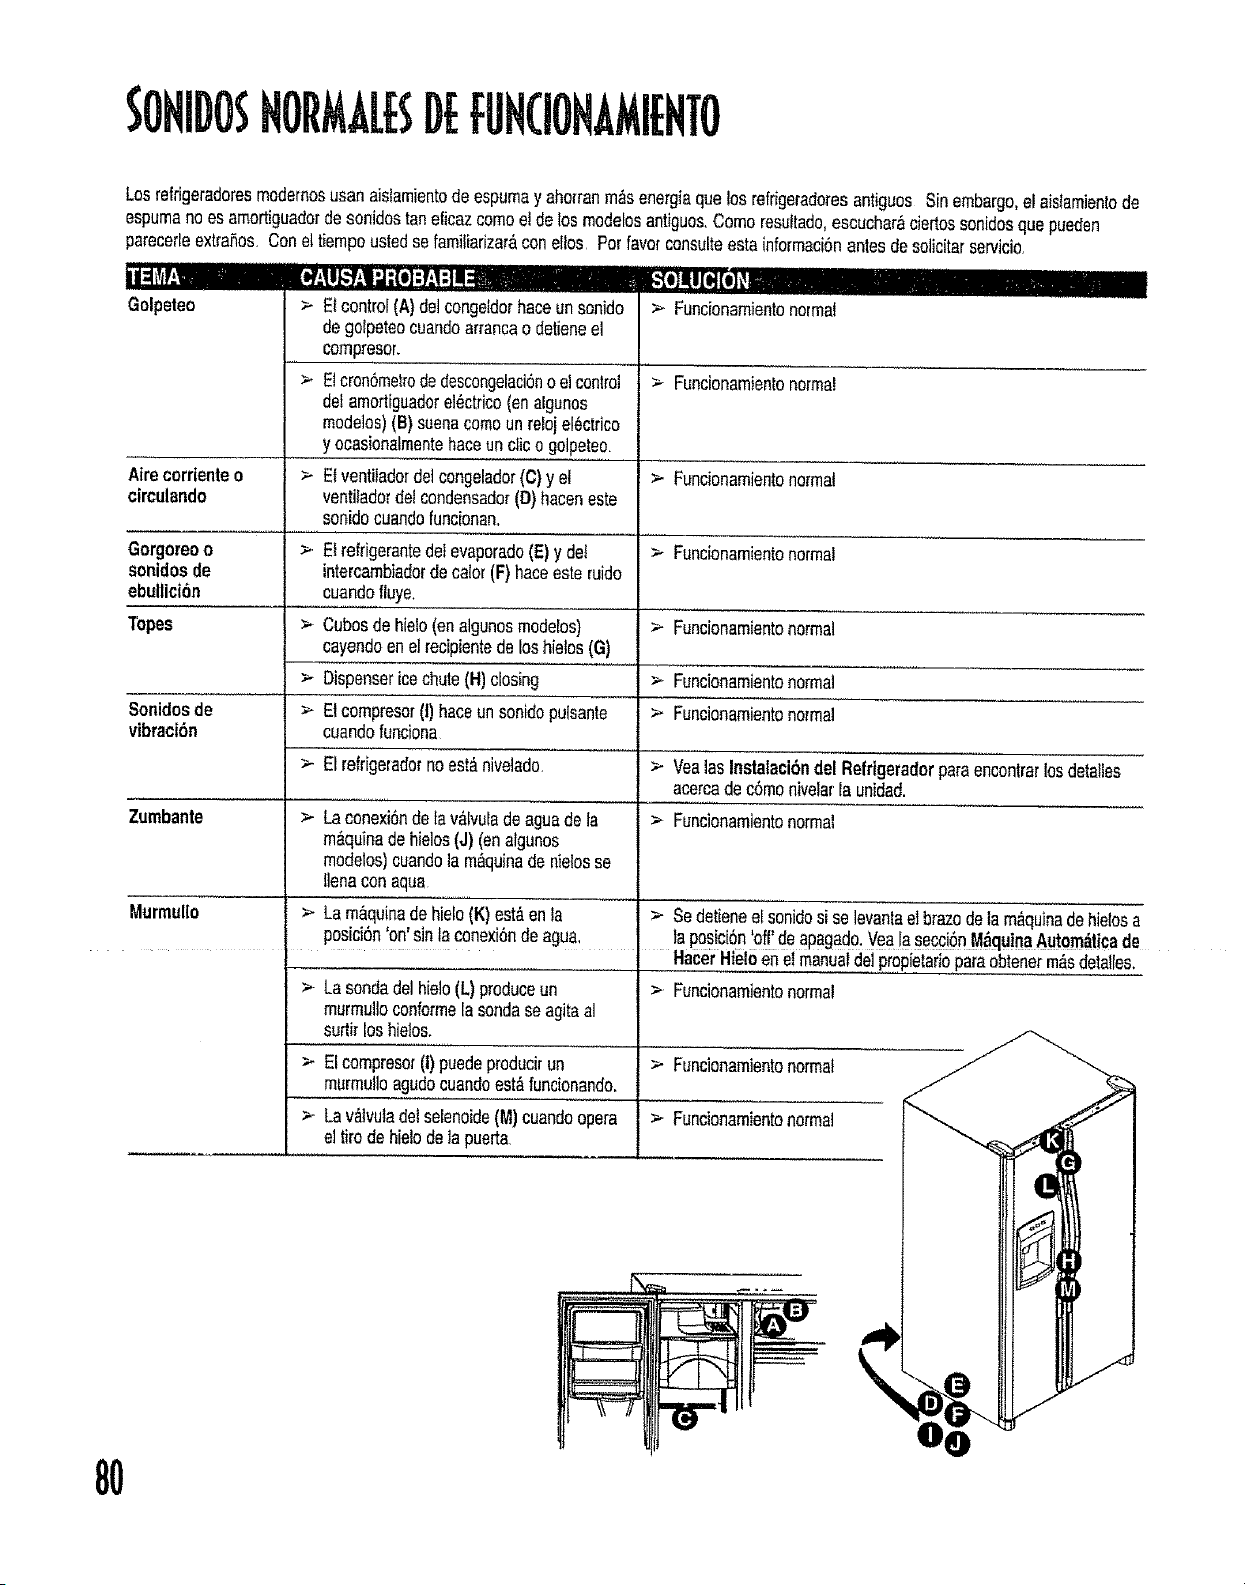
SONIDOSNORMAL[SI)[fUH(IOHAMIEHTO
Losfefrigeradoresmodemosusanaislamientodeespumay aho_ranrn_senergiaqualosrefrigeradoresantiguos Sinembargo,elais{amientode
espumanoes amortiguadordesonidostaneficazcomee! delosmodelosantigues.Comeresultado,escuchar&eiertossonidosquapueden
parecerteextrahos.Conel tiempoustedsefamiliar[zaraconolios Perfavorconsulteestainformaci6nantesdesolicitorservicio.
Ii:l_vlF: ..........................._:t1_'_.'11".1:[e]:f-,l:l! .................................._ej_!_o][ell III
Golpeteo > Elcontrol(A)de]congeldorhaceunsonido > Funcionarnientonormal
dego{peteocuandoarrancao detie_ el
compresor.
> Elcron6metrodedescongelaci6noelcontrol > Funcionamientonormal
delamortiguadore16ctrico(enalgunos
mode]as)(B)suenacomeunrelojel6ctrico
y ocasionalmentehaceunclico golpeteo.
Airecorrlenteo > Elventiladordetcongelador(C)y el >- Funeionarnientonormal
circulando ventiladordelcondensador(D)baconeste
sonidocuandofuncionan_
Gorgoreoo >. E!refrigerantedetevaporado(E) y det > Funcionamientonormal
sonidos de intereambiadordecolor(F) haceesteruido
ebuliici6n cuandolluye.
l'bpes > Cubesdehielo(enalgunosmodelos)
cayendoenelrecipientedeloshie{os(G)
> Dispensericechute(H)closing
Sonidosde > Etcompresor(1)haceunsonidopulsante
vibracibn cuandofunciona
>- Elrefrigeradornoest,.nivelado.
Zurnbante > Laconexi6ndelav_lvuladeaguade ta
m_quinadehielos(J) (analgunos
modelos)cuandota m&quinade n_elosse
I]enaconaqua
Murmullo > Lam&quinadehielo(K)est,.enla > Sedetienee[sonidosi selevantaelbrazedelam_quinadehietosa
posici6n'on'sinlaconexi6ndeagua, ta posici6n'off'deapagado_Vealasecc!SnM_qu!naAutom_ticade
• HacerHiel6ene{manualdelpropietarioparaobtenerm_sdetalles.
> Lasondade1hielo(L) produceun > Funcionarnientonormal
murmuttoconformelasondase agitaal
surtirloshielos.
>- Elcompresor(I)puedeproducirun
murrnulloagudocuandoest_funcionando.
_.- Lav_tvulade_selenoide(M)cuandoopera
eltiredehielodelapuerto
>- Funcionamientonormal
Funcionamientonormal
>- Funcionamientonormal
VealosInstalaci6ndel Refrigeradorparaencontrarlosdetailes
acercadec6menivela_la unidad.
> Funcionamientonormal
> Funcionamientonormal
._ Funoionamientonormal
8O
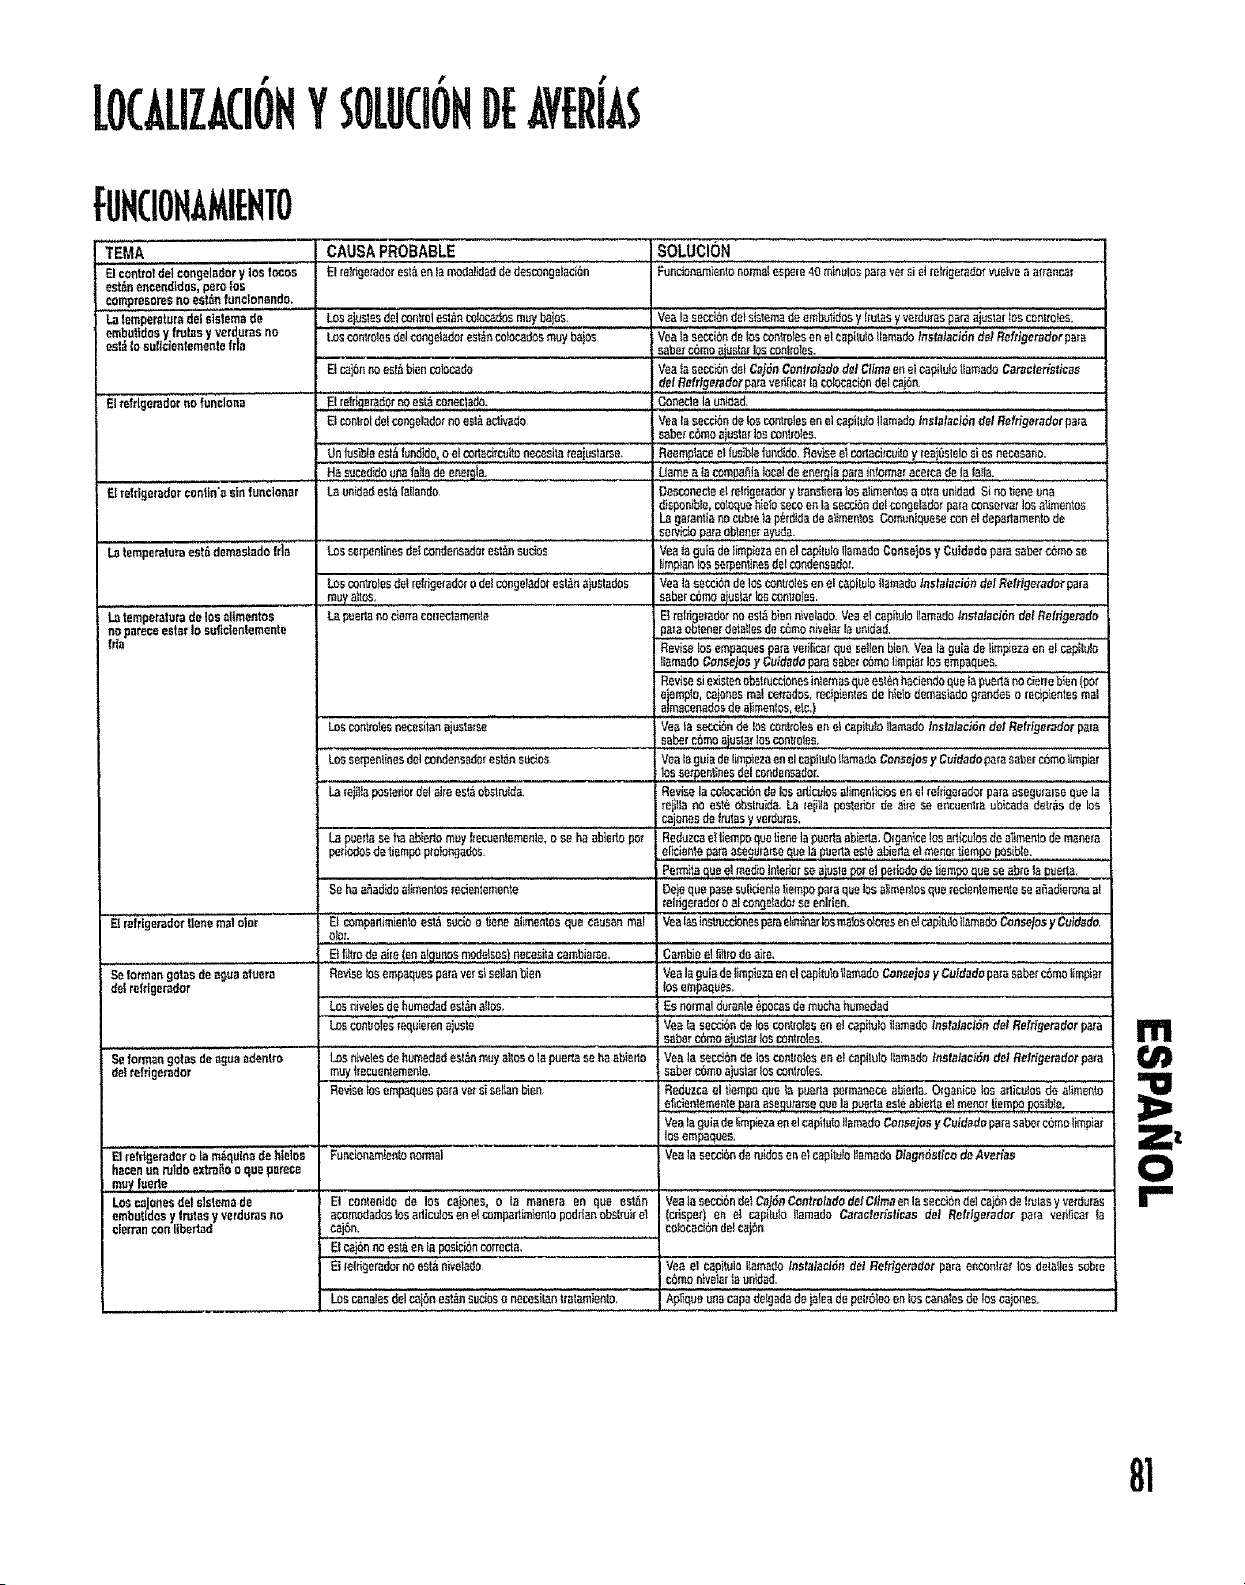
,t r r
LO(A[IZAOOHYSOWOOHDEAVERIAS
fUNCIOHAMIEHTO
TEMA CAUSAPROBABLE SOLUCION
Et contzolde] cengeladory Insfeces Elrafngezado_estaenSamodalidaiJdede_oong_i_(:iGn...... Fundanamien_ono'_a!'e'spem40 min_io_pareve[si el _etdgerado_vuelvea a_ranca_
est_nencendtdes, parelos
compresoresnoes_n funclonendo,
La iemperatura delsi'_temade LOsa}uslesdel conlraiest_no_]acadosmuyba]os_ Veala sessiondotsislemade embutidasy[rulasy velduraaparsa]uslarIoncentre!as,
embattdos y fmtasy vordprasno Losson,roles_el ¢ongeladorest_ncotocadosmW bajos VeaIa section delos conVntesonel capftuiallamadolnstatacidnde/Reffigeraderpare
es]_i1oeu'_tclentemenlefrla sabe;,cbmoaiustarlosconlrelas.
E!caibnnoeetObiencobcada Van_asessionde! CajSnContmladodei C_lmaenei capilulotfamadoCat_ctedsticae
delRefflgeradorparave_flcarla co_ocasibndefcajbn.
EItefrlgerad'_'tno'ignelona ...... E!refrigeradornOestOconac_ado. Canada la uniciad,
Elcontrolde!con_ela,:{orno esl_sC,lvado Veala cocci.ande insconlrolesan elcapilaIoIlarnadainstates/bede! Reftigeradarpare
sabercomaai,Jslarlos_n_les,
UntuaibleeSt_landido,o el cartsoi_rc_Hnnecasitareaiustarse_ Reamptacaet IL_sibie|undido.;Reviseel conaci_ceiley reaiOsls]osi esnecass_i_
. Hasucedidounafa!iade energ!a, uame aia _mpaSia !ape!deer_rg!aPa{a!nfon_u acet_ d_ !a!a!!a,
Elre_rlgatadorconlln'asin funclonar La un_da_lest_lallando Oasconeelee] rel_£lsmdazy tzanslieralosalimantosaol,a aniOadSino liens una
disponibte,coloqueh_Iosecoen la secci_ndel corOslsdorparsconservarlosalimontos
Lagarantianocubre_ap_rdidadealimentosComaniqueseconeldeparlamentode
Servisi9F'aranb!e_e_a_a-
Lotemperatureest_ demnslado'fria......... Losserpenl[nesdefconOensadarasiansatins Van_aguiade Iimpiezaenel capilL_fOIlama_oConsolesy Cuidadopare nabe:rcomese
Hmp_nlos serpanlinesdal condensador.
Losoon_zalesdel refrignradoro de!cOngslado_eaton a_uslados Vea]a eeccibndainsconliolesenel capilu[ellamadnlnstatacibn del Refggeredorpara
aires, sabercoma siu_!a,"bpcontralss.
L._temperaturede los oHrnentas L_ p_sriano c_erraenlrec_amen_e Elrelzi_eradornoest_biennivetado.Veaelcap[_u_ollamadn/nstatecibn de_Reftigetad_
no parsee ester la suflcienlemente =areeL{tonerdatstlesde _mo nivalatla unidad.
frta
Reviselosempaquaspareverilicerquasallnnbien.Vea_a9uiada limpiezaanelcapilulo
IlamsdoConsolesy Cuidadopa;rasabercOmaIJmpia_losempaques,
Revisesi e_stenobstrasdonesin_amasquaes_bnhaciendaqua fapue_Ianosienablan(par
: e emlga,_jones me{r:en'adns,redpien_esde hielodemasisdegrandeeo rec_pinntesreal
amanep_dosde aimer_tes,eta.}
Loscantra_e_neaesita,aias=rse................ v&'i__'n' _'=';_'co_io_ose_etcapi_a_otlama__ne,._e_.ae_Re,_e_o_pare
i sabercbmeajaslar_esconlmles.
LOSse_panlinesdelcondenssdorasiansodas 'Vealagu=adehmplezaenelcap,ruletfamaclnConsejosy Cmdadoparasabercoma{_mp_ar
ca_enlinesdel non(Jsnsador. ,..........
Lareiii_ap_ster_orde{aireestaobslruida. ReviselacolocaciOnde losaniculasi_imanliciosen elrnI_igaradarpareasagaralseq_eIs
reiHiano est_ obslruida.L_ teiiHa_sle_iarde airs se encuenlraubisada delr_s delea
_cajaneade{tu_asy verdures.
puer_asa ha abierlomay l_ecuentemante,ose haab]s_per Reduzcae_tiempoqua_sne{ap_e_aabierla.O_genicelosediculasdee_Jmentedemane_'a
penodosdetiempoprolo_dos elieientepareesega_ar_equala peoriaestOabie_aelmanortinmpoposibln.
................ P.ern_it_,c{u,_..e,l,marlin!n.l.efi.n,_s_siesta_r. al _lindo. da tiem_ _casa sbrela Dt_ar_a.
Beha a_adidoa_imenlosrecientemonte De_ qua passsalidenle_ismpoparsqua losalimoniesRUerecisn_ementasea_edieronaal
rehigerade_o alco_gadotee enlfien,
Elreltige:radotllano realoiot FJcampsnimisnloosta susieo tianea{imentosquacanaanreal Vealasinstn._donespame_minsrlasma]osoloresenelcaplt_oi{_"n_OoCense?esyCuldndo.
olaf.
Et f_imale aie ,an a_anosmodalsea)necesitacambiarse. Carnbiae_{illro doairs.
Sa fotmangalende agueeluero ReviselosempaqaesparevetsiseHanbien Men{aguiade_impiazaenelcapitutoHamadoCaneejosy CuldadepapasabercOmelimpisr
de{rnfdgerador los empaques,
Los€Ontlole_requierenaiuste Vea In seccidnde lea can{re?asan el capi{ulotlamadetnstalaaldn dot Reirigetadnrpars
_abercbrnoajusta!!ascantra!ps,
fo_an gotasde egaa aden,to
defreffigerador
Elrefdgeradoro la m_quins de b{elaa
hacenan ruidoextremeo qua parsee
rnuy!_erle
LOScaJonesdel slsternade
embulidosy Irutes y verduresno
eierranconlibefl_d
LosnNelesdehumedadesl&nmuysilos o{a puer_aseha sbie_o
maytrecaan_emanle.
Reviselos empaqcaspareve_siso,tanbian
F_ndocarnEentenonna}
E} cantenido do los caones, o la mane.re en qua asian
ncofnodsdaslosad cu]osan e compalt_e_D pod_anoba[rur e
cain,
Elcajbnnoest_en tapasiclbncarrecta.
EIreldgeradornoasianivelaOo
Loscana}asdalca{Oneatensur3aso necasilantralamienlo.
Vea]a sectionde lee eenltoiesen elcapilutoIIama_ _nstalac;Sndot Re#igeradetpare
sabe_"comeajuslarloscon_ro_e.s.
Reduzcael t_mpnqua ?apearlspermanecaabieda.O_gsnicalosarlia_losdo alimen_o
ef_cienlementepars aesqurat'se_ue{ap_sttaee_eablettael manortiempoposible.
Vealagainde?impiezaene]capiMa!ismadaCease,as y Ceidsdoparesabercome!_mpiar
losempaqcas.
Vea_assr.x:iOnde n._dosen e_capilulollsmadoOlagndsl_code Avetias
Veala secobnde$C_jbnCantreladodelClimeenla sessionde_ca Onde_r_Iany ve_'duras
(erisbez)en et capi{u{aitamadoCaractedstieasdot Reltigerador pare ve,_fica_{a
calocaciOnde{cai_
Vaa el capilaiaIlamadolnstatacJ5ndot Re[dgeradorpara enaonlraf los de{aites"snbm
cbmonive{arIsun_Jsd.
111
Om
Z i
81

t • t
[OCALIZACIONYSO[UOONDEAVEfllAS,CONT.
FUNCiONAMIENTO,(ONT.
TEMA
E!refdgerader(use]onecon
demantsdafranueneia
CAUSAPROBABLE
La_"_e,_anse_. _s muy(_ee"e._ma.fae_rpedodesde
tiempoprolongados
"_, ,umededoo!osiere,ei'_;';_"dea_odeder"_'_uy'altca.
SOhun aSadlderonianI_te alimeutos
LB unidad es_ expuesta al calor medianlo el ambiente o par
e_ecI_edem_stioosqua asian estuaries,
.............. ,,,, ,,,.
Los serpentines de{ condensador satan soeios
Loscanbo(estienonqua a(uslame
LBpeorianoelartabien.
SOLU 'i6N...........
Raduzca e)tlempo qua ia'"poertaperraaneceabieda.Organee os 'aimanos'"'m_
efinienlsmantopare9aranlizarquatopaeaaeel6abio_eelmanortiembeposiblo,
Pormi(aqua pass!iempaparaqualosalimanfosreci_nahadidesaicaneenIntemperaura
delrsfri_srad_ro de(congelador_
Funcionare_enlonormal
Potmit'a"quepasotiemp( :_araqua(as a(imantesrenibna_adideaaloe'neon'fe ampereera
delrekigeradofo daico= e(odes
Evare eI ambien/odela unldad LBunidedpaddae"cesitar _mbiarse delager pora qua
funcionem_ef,
'.Yeala gu{ade iimpiazaen""e'i"'n'a'p'it,loUamadoCensejosy Cuidede parssaber c_ma
limpisr(asserpanUnesde)condanaador,
Yea la cacai6ndelos _Ofrofesen elcop(taleHamadeInstafa(d_ndei Refrigomdot paia
saber_ma ai_ustarlos centre)as.
E1reffigeradorno est_ biennivelade,Veael capffu{o/nsta]ecl6edel Be(dgetador pa;a
saberteadelaI_es sabreohmsn)velarbienlaunid_d.,,,
Revisesi hayobslrucaionesinfemasqua_I_n eausandequa a puedanoeerrsb an {pot
eiempto,caonesmal can'adea redpien(osde hietodemasiadog andesoee pen esde
a_imenfesmatguardades,ale,).
Reviselos empaqoespats eomproberquaaeI(anDish. Van a gua de mpeza en e_
_pi{u?oIlamadoConsojosy Cuidadsparssaberc6malimpiarlee empaques.
Y
.El e_ea pare_etsrb)a = Airs o bmbuas doaim ene a.qua
Hay pattteulosen el agua oen los PaIvode oarb_ndel cartuchodotfibredo ague
hieios
Concanirad6nde mineraTesan e) ague fotmar_npar_'calas
No hay feces Indie_o_reeoneandidoo La poedadelcongeladotno es(_terraria,
en el oontro_del surflder(an a)gunee
Est,_(endidoen fusible,oef codacircailonecosilafee(us)area.
Ha ecunido,u,na,,laliadeene_gia.
No saleni oguani hlelo delsuttidor
cuondese optimettfas afmohadfllas
(on atgunos medelos)
La puer_adelcoogstaderno estAcarrada
F.sloesnormalcaandeoo u_spotp_im'era"vaze'lsonider,ydesaparecarkconeluse.
El agaa qua Iiuye inicialmanlea ttav6sdel oartuehopaddaconteneret pairs nocuode
_r_n qualiberaelcapture._s pa_cu]assonangumaporanonsumoydesaparene_n
clesRU_Sde onescuanlosusco.
Laspetunias no sonda_inasy ocurrannalutalmanteen leaaualinislmsde agaa
............... ,,,,,,,,
Vedfiqooqualapuerladelco_e_doresi_cerFadaLa onerg(aso in'_ermmpedei'co'nirei
sounds(a peo_a,del _noelador,,ssabte. ,........
ConeeIela unidad.
Reomplace(as(usibles(andido_,Revisesle]cor_acifeuitoest_bolado,
,,,Us,meala compa_!a,localde en_r_iapats informaraeercade la(aJIo.
VafilklUOquo_ puerladelnongsladeros_6corrodeLa onergia"seinlemJm_enel_nt,el
_ando (a_a del,c,o,n_lela_?se abe
I
m_qelnade hlelonoeol_
prodttctendesuficlenteshleloso
_stos est_ndeformea(on algunes
medoleo)
La m;_q_}Inade hleleaonesI_
prodanieodohIolo(en algunos
made)eel
m&quinade hieloso launidedconequipaparebaserhielosse
ha inatafaderenlonleman_oseha esadorec_aniemanto_o gran
nantidadde hialos,
El[ifftodeaquaasiaobstmideo necesitaoambiame.
Se instal6 roeienteman_oia m_quina de hioloso se us6
,reoien_omaniaonegranconfidedde hie{os,
L_ prosi6ndelaguees_ maybeja,
Seestalienandoel tanqaedeagua
Enelusoin_af, ha_tunrelrasoaproximadodo45segundoapaaan osmenraose ena
,,, e( |a¢.3uode aooa)t_lerno,
, ,,,, ,,,,_,,, ,............. ,,,,,,_
-'_ _ittodei aguaoolaobslmidoe necesi{acambiamo.
Elbrazede_am6quinano est_enla posidSncotrac_
Eleuminist,ode a_uadon_siieano os(6_iogandoala v_Nuladel
squa,
Lz tuberiade anbteo plasticsesI_.lercido
LapresiSndolaguaoa maybaja
-Revisefalempora,o,e=_=_k_do_ ............
E(recipientsdeIhleiono asiainslaladnco{rectamenle
Seicalal6lav_fvuladeaguetncorreefa
_pere 24hemsparequocomiot_elapt_ecai_ndeh_eloopataqua am_quna dehielos
vueIvaa oudi_sodeepensde uaadcolodes.
C_bie elI_I_odeequa,
.....,_........ ,,,,
Espere24 betasparaquacomience(apmdu_On de hieloy parequala m_quinavuolva
a surlii'sedospa_sde vaciarla.
Lapreei6nbajadelaguepoedecausarqualav_lvuIagales, LaptosiSndeiaguadebees_r
anita20 aI00 libranperpomadecaadradaPO_aqua(anYonecorreclamane Unoptesk_n
minimade 35 (ibrasper poigadacoadradese_tacomisndaparalas unidadesconfilliesde
_a.
Cambieol fitVodelague.
Confirmaquo elbrazede Iam_quinade hielosest_hada _aJo,Yea (asocai6n
Cerac_,edstlcasdotCenge/aderensumanuatdel propietadeparsobler_r {asdea sa
Reviseel pronedim_enfode la conexiondeagua anlas Instalact6ndel Rolrigerador
Cierreelssministtodeagueydeshagalabtomed_rasSinopuedehanoio anmpBeela
tubsfla,
La pmsiandel egua dsbe estarshire 20"'a'"'i0'0lib;as per' pu(gadacued ads pats qua
(anctor,e _traclamenlo, Be recomiendaana presidn minimade 35 l_btasper poigada
oJadradap_a 18SonidadesconfilIrcadeequa,
- , , ....,,,,,_.,,,,.,,,,,
Voala se¢66nde leasouL,ales ena! manualdalpmpioladopats oblenetayudaacemade
c6moa_usfatleoc_n_olesElcongeladordebeeaterenko O=a 2_F(-18 a -t7°O} sara
produsi_"hieIo.
Vea(a secaiOndel redpionlede hlelo pars encon(ra_"(a inslalac)6ny ia aiir_6aci_n-
adecuadca.
_Iv,JlosauIopade_nteoo do siliinde 3/16"_caan una ptesi0nbajado aguey pod an
abattoirlalineaanneltiempo,Fabticantosno es zosponsablepot losdahosma eriees
debidesala in,_!_!_,g it.canadade a cortexdn dea_aa,
81
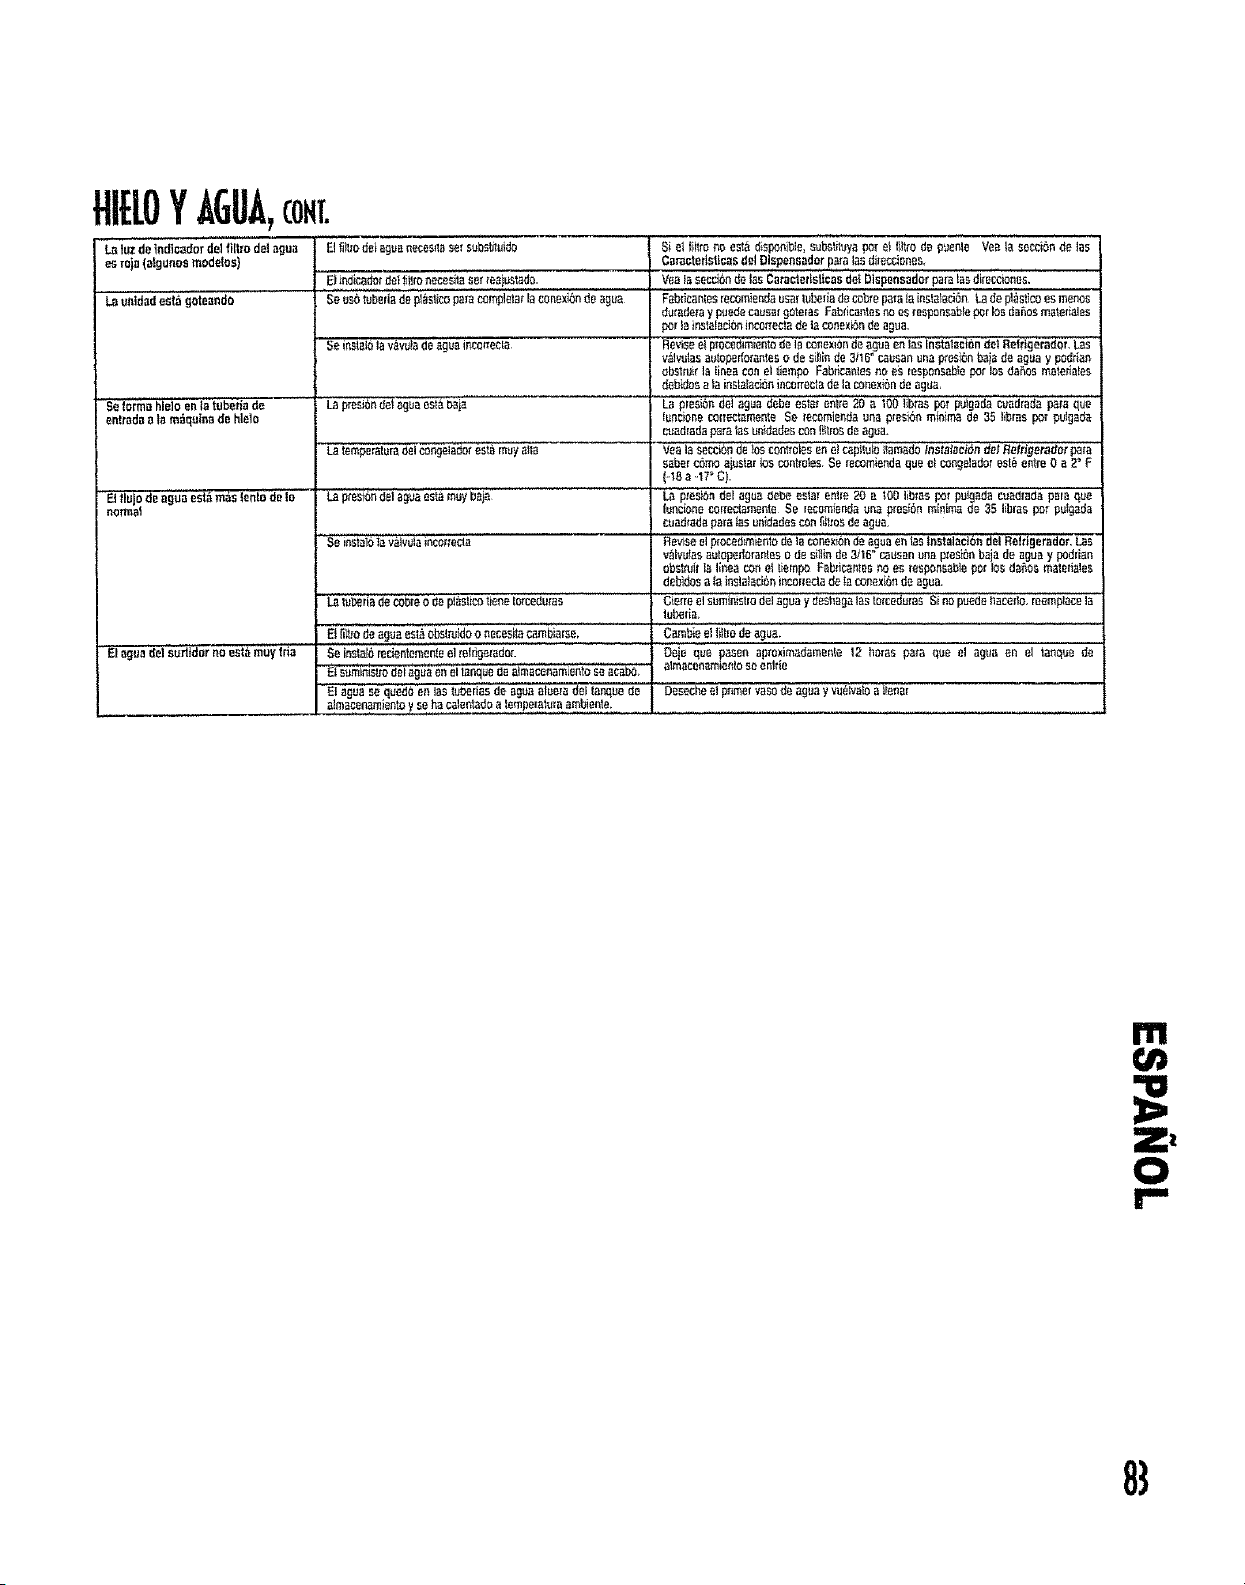
Y AGUA,me.
La luz detndteadorde1fittrodel ague
esroje (algunosmodetos)
L.Bunidadesi_ 9oteando
5et_rmahieIo en+_tubedade
enttada e +amdqu{nade hielo
!' Etfluo de ague esbi mas tentode In
norma
I ague {tel suflidet no est_ mW Inn
E]fiI_ode_egua necesIIaseesubst_tu+do
E| indicado+ del _i11+onecesila seTF_a!us_ado.
ISeus6 tubefia de pI_stico parecorr'_pleIarEaeonexi6nde egua
Se +nstalOla vavu+a de ague in_et{eeta
Lap_esi6ndetaguees_abaja
Latemp_ratmadeI_ngel_o+"_'si_,'muyalia
Se iestet6 iavalvela+ncor+eclB
La Iub_ria de cobte o de plastico tiene torcedu+es
8i el likiro_ esta {hsponible,s_JbsliIuyaper el I_I1_ode p_enIe Vea la sectionde _as
Caraetedst_eas del Dispensador papa las di+eeciones
Vea la secd6n de Ins Caractetlsticas deI bispensador pare lab dimcc_enes,
Fab_icaetesrecomiemlaesa_tubedade cob+eparelainstalaci6nLB de pl_sfiCOes menee
durade_a y p_ede caesa_ gete_a5 F_bficaeles no es re,_ponsab_ep_ _OEd_os maleda!_s
par }ainstalac]0r,ince_Teetade laeenexi6nde ague,
Revise el proced_mientede la _neX_En de ag_a en Ins Instalaci{_n det Beldgerador. Las
v_1_las e_topeffomeleso de SM_r_de 3116"caus_n ena p_esi(_nbaiade ague y ped_ia_
obstnJi+Ia tineacon eltiempo Fabdcaetes+'toes mspensable per losdeans rnatedates
debi_iosala instalaci_nincorrec_ade laconexi6nde eg_a,
La plesiondeiague debe esle_enlre21Ja 100 fibrespot pulgada cuadrada pate que
{eIlcioeer_oll_nt_r_enleSe tecomiendauna p[esi6nminima de 35 tibiaeper pulgeda
ct_diada pare lee er_adEB con {iItrosd8 ag_a+
ve8 la secciGn de Ins controtes en ei capiiuie Iiamede (nstataeidn det Reirigerader pain
sEber c6mo ajeslar tos controles Se recomienda queet coegetado_ est_ entre 0 a 2_ F
{,18 a +.17"C).
La presibnde[ Egua debe esla{entre20 a 10{)Iibtasper pu_gadacua_mcla pate que
tunei_ne noFIeetamente Se tecomieedE UnE presi6n m{n[mE de 35 librae per pUt§Bite
coEdreda pare_Esuni_Jadescon _troede ague.
RevFSeel proco_u'eiento de la'con_x_e de Eg_a en Ins tn stal'-",cl6n del Retdgerador, Lee
valv_lae EE_OperIOrEeteE0 de siIiin _e 3_t6" causan una preside bEia de EgUE y p_iri_n
ebslmi{le,l_nea con eltiemp_ Fab_icames _ ee tesponsablepet foe da_es matefiales
debidosa IainstEiad6n inconeciEde IEconexibnde EBua.
Cierreel seministm del EgUE y desha_E Ins tercedurasS[no puede I_ace{1o,reemp_aceIE
tu_dE+
+h+t+<+d+++,m++++b+i_+<_oon+cos+m=m++.r+e, : c",+t++++++++i;++ee+++t.
Se insta[,6redentemeeteelmlhgeradnr. Oejeque pasenap_rexima#amente12 hmas papaqve el agueen elianquede
EI_min_Iiod_i_cj_aen"eltanquedealmacenam[enioS_Ecabo. almEconamientosoenlr{e
EI aguesequedoee I_ teberiasde EgUEatEeradel{anqeede Deseeheelpnme_vase(_eag_JEy veelvEloa_eear
BlmBconamienloy _ehacElentadEa temperatulaambiente+
1911
Z I
0
8}

84

rrl
r.n
85

86

I11
Z_
in
Get it fixed, at your home or ours!
Your Home
For repair- in your home- of all major brand appliances,
lawn and garden equipment, or heating and cooling systems,
no matter who made it, no matter who sold it!
i,
i-
For the replacement parts, accessories and
owner's manuals that you need to do-it-yourself.
For Sears professional installation of home appliances
and items like garage door openers and water heaters.
1-800-4-MY-HOME ® (1-800-469-4663)
Call anytime, day or night (U_S.A. and Canada)
!
: www.sears.com www.sears.ca
Our Home
For repair of carry-in items like vacuums, lawn equipment,
and electronics, call or go on-line for the location of your nearest
.... Sears Parts & Repair Center.
1-800-488-1222
Call anytime, day or night (U.S.A. only)
i i: www.sears.com
To purchase a protection agreement (U.S.A.) or
maintenance agreement (Canada) on a product serviced by Sears:
1-800-827-6655 (U.S.A.) 1-800-361-6665 (Canada)
Para pedir servicio de reparaciSn
a domicilio, y para ordenar piezas:
1-888-SU-HOGAR sM
(1-888-784-6427)
Au Canada pour service en fran£ais:
1-800-LE-FOYER Mc
(1_800-533-6937)
www=searsoca
S A/R8
Registered Trademark ! Trademark / Service Mark of Sears, Roebuck and Co
T&_ SM
_M,_rcaReglstrada I Marca de F_brica/ Marca de Setvicio de Sears, Roebuckand Co
MS MD
Marque de commerce / Marque d_pos6e de Sears, Roebuck and Co
Part No. 12591320
FormN04/03
© Soars, Roebuck and Co