Loading ...
Loading ...
Loading ...
Section 4 - ADJUSTMENTS & REPAIR
WARNING
DO NOT attempt any adjustments, maintenance,
service or repairs with the engine running. Stop
engine. Stop blade.Engage parking brake. Remove
key. Remove spark plug wire from spark plug and
secure away from plug.Engine and components are
HOT. Avoid serious burns, allow all parts to cool
before working on machine. Fuel Filler Cap and Vent
must be closed securely to prevent fuel spillage.
4.3.4. BELT REPLACEMENT
(Continued From Previous)
2. Route belt around stationary idler.
3. Remove spring that is connected to idler pulley.
Loosen nut and bolt that secures idler pulley to idler
arm. Route belt between belt guide and idler pulley.
4. Route belt onto spindle pulley. Make sure belt is
inside spindle pulley belt guide.
5. Reinstall idler pulley spring. See Figure 4.4.
NOTE: The idler belt guide should be positioned so
the Iocator tab fits into the corresponding hole
found on the idler arm. See Figure 4.4. Tighten bolt
securely.
6. Reinstall footrest/floor pan assembly.
BELT REPLACEMENTS
Engine to Hydro Pumps (All Models) Part No. 4-2773
Engine to Electric Clutch (All Models) Part No. 2-9117
Electric Clutch to Mower (33" Decks) Part No. 3-5389
Electric Clutch to Mower (38" Decks) Part No. 2-9308
IDLER ARM AND BELT
GUIDE DETAIL
MOWER
BELT
_TAB MUST GO
T OC TO
STATIONARY BELT
PULLEY GUIDE
IDLER
ARM
FIGURE 4.4
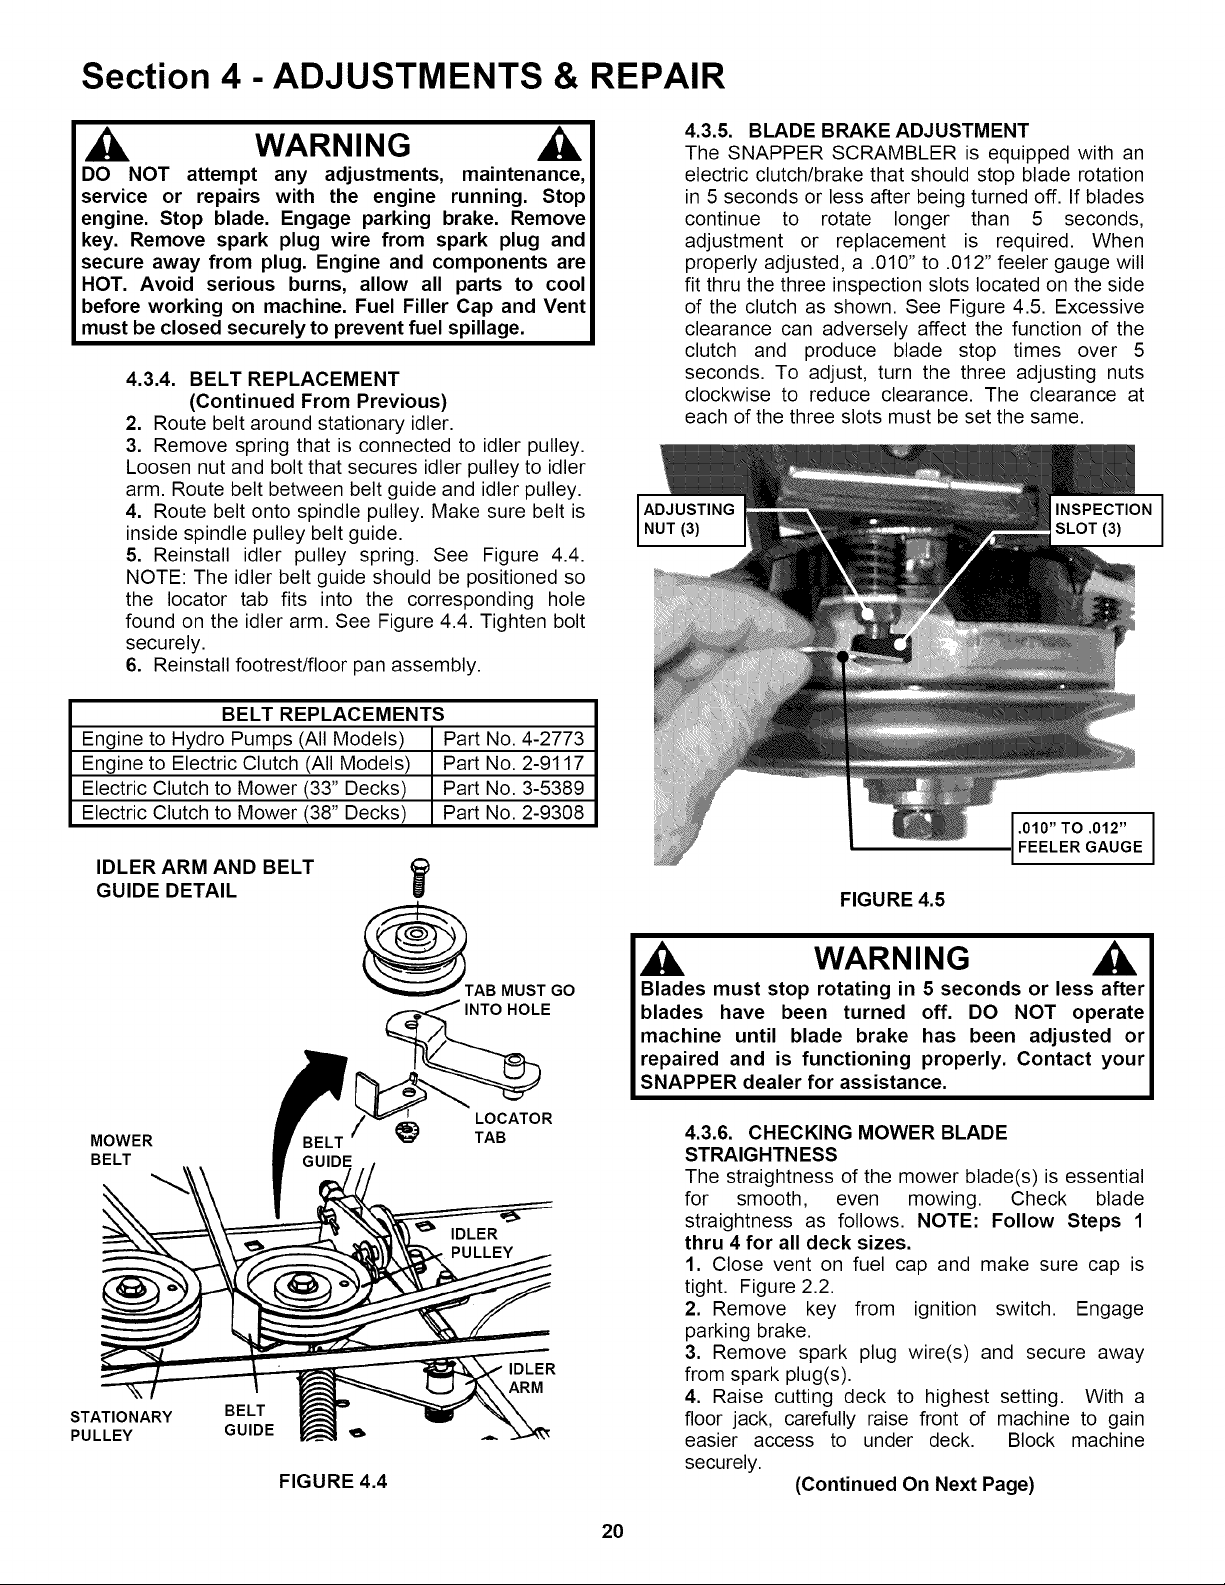
4.3.5. BLADE BRAKE ADJUSTMENT
The SNAPPER SCRAMBLER is equipped with an
electric clutch/brake that should stop blade rotation
in 5 seconds or less after being turned off. If blades
continue to rotate longer than 5 seconds,
adjustment or replacement is required. When
properly adjusted, a .010" to .012" feeler gauge will
fit thru the three inspection slots located on the side
of the clutch as shown. See Figure 4.5. Excessive
clearance can adversely affect the function of the
clutch and produce blade stop times over 5
seconds. To adjust, turn the three adjusting nuts
clockwise to reduce clearance. The clearance at
each of the three slots must be set the same.
FIGURE 4.5
.010" TO .012" J
FEELER GAUGE
WARNING
Blades must stop rotatingin 5 seconds or less after
blades have been turned off. DO NOT operate
machine until blade brake has been adjusted or
repairedand is functioningproperly.Contact your
SNAPPER dealerforassistance.
4.3.6. CHECKING MOWER BLADE
STRAIGHTNESS
The straightness of the mower blade(s) is essential
for smooth, even mowing. Check blade
straightness as follows. NOTE: Follow Steps 1
thru 4 for all deck sizes.
1. Close vent on fuel cap and make sure cap is
tight. Figure 2.2.
2. Remove key from ignition switch. Engage
parking brake.
3. Remove spark plug wire(s) and secure away
from spark plug(s).
4. Raise cutting deck to highest setting. With a
floor jack, carefully raise front of machine to gain
easier access to under deck. Block machine
securely.
(Continued On Next Page)
20
Loading ...
Loading ...
Loading ...