Loading ...
Loading ...
Loading ...
06/2020
- 5 -
Copyright © 2020, Fast ČR, a.s.
EN
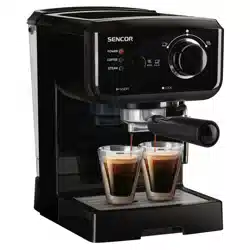
Espresso Machine
User'smanual
■
Prior to using this appliance, please read the user’smanual thoroughly, even
in cases, when one has already familiarised themselves with previous use of
similar types of appliances. Only use the appliance in the manner described in
this user’smanual. Keep this user’smanual in asafe place where it can be easily
retrieved for future reference.
■
We recommend saving the original cardboard box, packaging material, purchase
receipt and responsibility statement of the vendor or warranty card for at least
the duration of the legal liability for unsatisfactory performance or quality. In
the event of transportation, we recommend that you pack the appliance in the
original box from the manufacturer.
DESCRIPTION OF THE APPLIANCE
A1 Cup warming plate
A2 Power indicator light
A3 Coffee brewing water temperature
indicator
A4 Steam release water temperature
indicator
A5 Coffee brewing and steam release
mode toggle button
A6 Brew head
A7 Portafilter with coffee spout
A8 Removable grate
A9 Removable drip tray
A10 Tilt-down lid with handle
A11 1.5-litre removable water tank
A12 Selection knob, 3 options
– brew coffee , stand-by mode
and steam release
A13 Boiler (not shown)
A14 Swivel steam nozzle
A15 Removable milk frothing
attachment
A16 ON/OFF switch
A17 Stainless steel filter for 1 cup
of coffee
A18 Stainless steel filter for 2 cups
of coffee
A19 Coffee measuring cup with tamper
BEFORE FIRST USE OF THE APPLIANCE
1. Remove all packaging materials, protective film, promotional tags or labels
from the appliance.
2. Install the appliance on an even, dry and clean surface. Take the water tank
A11 out of the appliance and rinse it out with clean water with the addition of
asmall amount of neutral dishwashing detergent. Then rinse it out thoroughly
using clean water, dry it and put it back in its place.
3. Take out the removable drip tray A9 with grate A8, wipe with adampened
textile, wipe dry and insert it back into the bottom part of the appliance.
4. Wash the portafilter A7, coffee measuring cup A19 and the stainless steel filters
A17 and A18 under clean running water with an addition of kitchen detergent.
Then rinse with clean water and wipe dry.
5. Wipe the outer surface of the appliance with alightly dampened cloth and then
wipe it thoroughly dry.
6. Prior to brewing the first cup of coffee, run the appliance empty for
approximately 60 seconds, i.e. with the water tank A11 filled with water but
without coffee tamped in the filter. This will clean out the inner components
and the brew head A6. A sufficiently large container must be placed
underneath the portafilter A7 for the hot water to flow into. Instructions for
starting the appliance are provided in chapter Operating the appliance.
OPERATING THE APPLIANCE
1. FILLING THE WATER TANK
1.1 Grasp the water tank A11 by the handle A10. Lift it up and remove it from the
rear part of the appliance.
1.2 Fill it up with cold water up to the maximum water mark, insert it back into the
appliance and tilt down the lid with handle A10. The water tank A11 must be
securely seated in place in order for water to be pumped out of it into the boiler
A13.
Note:
The water that you pour into the water tank A11 should ideally
be at room temperature (approximately 25 °C). Water that is too
cold, could negatively affect the final taste of the coffee beverage.
Attention:
The water tank A11 has amaximum capacity of 1.5 litres of
water. Do not overfill it.
Never fill the water tank A11 with warm water, hot water or
sparkling water, or other liquids such as, for example, milk.
Do not fill the water tank A11 when it is inserted in the
appliance. There is adanger of splashing the appliance or
overfilling the water tank A11.
1.3
Do not leave any remaining water in the water tank A11 for longer than one day.
For brewing quality fresh coffee, it is necessary to use fresh water. Otherwise, the
resulting flavour of the coffee beverage may be negatively affected.
2. TURNING ON THE APPLIANCE
2.1 Connect the power cord plug to apower socket. Make sure that the water tank
A11 is filled with fresh water, that the drip tray A9 and grate A8 are installed in
their place and that the knob A12 is set to the stand-by mode position.
2.2 To turn on the appliance, set the switch A16 to the ON position. Indicator A2
will be lit.
2.3 Underneath the brew head A6 place acup into which hot water will flow. Make
sure the button A5 is in the pressed out position that is intended for the coffee
brewing mode. Set the knob A12 to the coffee brewing position. As soon as
water starts flowing out of the brew head A6, set the knob A12 back to the
stand-by mode position. This step is performed after the appliance is turned on
to pump water from the water tank A11 into the boiler A13. In the boiler A13,
water is heated to the optimal coffee brewing temperature.
3. PRE-HEATING THE APPLIANCE AND CUPS
3.1 Preparing aquality cup of espresso requires that the appliance, portafilter A7,
filter A17 or A18, and cups are preheated. This is done in the following way.
3.2 Place empty coffee cups upside down on to surface A1 and allow them to
warm up.
3.3 Select filter A17 or A18 and insert it into the portafilter A7 so that it securely
slides in along the entire perimeter. Insert the portafilter A7 underneath the
brew head A6 so that the handle is pointing to the left. This position is marked
with “INSERT” on the front panel of the appliance. To fasten the portafilter A7 to
the brew head A6, turn the handle to the right to the “LOCK” position.
3.4 Wait until indicator A3 is lit, and set knob A12 again to the coffee brewing
mode position. Hot water will start flowing out of the spout on the portafilter
A7 into the cup located under the spout. When the indicator A3 turns off, set
the knob A12 back to the stand-by mode position. Remove the cup containing
the hot water. Now the pre-heating process is finished.
4. BREWING COFFEE
4.1 Take the portafilter A7 out of the appliance and dry the filter with apaper towel.
4.2 Place the portafilter A7 on to an even surface and pour the corresponding
amount of ground coffee into the filter. The one-cup coffee filter A17 is filled
with asingle level measuring cup A19 of coffee. The two-cup coffee filter A18
is filled with double the amount of coffee. One level measuring cup A19 is
equivalent to 7 g of ground coffee. Spread the coffee out evenly inside the filter
and gently tamp it down with the flat end of the measuring cup A19.
4.3 Thoroughly clean ground coffee remains from the edges of the filter A17 or
A18. Insert the portafilter A7 underneath the brew head A6 so that the handle
is pointing to the left. This position is marked with “INSERT” on the front panel of
the appliance. To fasten the portafilter A7 to the brew head A6, turn the handle
to the right to the “LOCK” position.
4.4 Place one or two preheated cups underneath the portafilter A7. Make sure that
the cups are located underneath the spout.
4.5 When the indicator A3 is lit, set knob A12 to the coffee brewing mode position.
Within afew moments, coffee will start flowing into the cups.
Note:
The indicator A3 may turn off while the coffee is being extracted.
This signals adecline in the water temperature in the boiler A13.
The indicator A3 will light up again as soon as the boiler A13
heats the water up to the ideal coffee brewing temperature.
Once the required amount of coffee is in the cup, set the knob A12 to the stand-
by mode position. This completes the coffee extraction process. The extraction
time for a cup of espresso should be between 20 and 30 seconds and the
volume should be approximately 20 to 30 ml.
Note:
Make sure that button A5 is in the brew coffee position. If button
A5 is set to the steam release position, the espresso machine will
not dispense coffee.
4.6 If you do not fill the filter with ground coffee, you may simply pour just hot
water, for example for tea, hot chocolate, etc.
4.7 Before you start brewing another cup of coffee, first remove used coffee
grounds, clean out the filter according to the instructions contained in chapter
Maintenance and cleaning and pour out the water from the drip tray A9. When
returning the drip tray A9 to its place, push it all the way against the back wall
of the appliance.
Attention:
The water contained in the drip tray A9 is hot. When
handling the drip tray A9, pay extra attention.
During operation, regularly check the water level in the
water tank A11 and make sure that it does not fall below
the minimum water level mark.
5. USING THE NOZZLE TO FROTH MILK AND HEAT WATER
5.1 Prepare some cooled semi-skimmed or full-fat milk and the container in which
you will froth the milk. During the milk frothing process, its volume expands,
therefore fill the container to no more than ⅓ of its capacity.
Loading ...
Loading ...