Register
your product
www.kaercher.com/welcome
86400940-B 12/06/19
Commodore 20 - 115V
English 02
From Serial Number (Ref No1*)
*See Serial Number Page in Spare
Parts List or call manufacturer

2
Warranty Registration
Thank you for purchasing a Kärcher North America product. Warranty registration is quick
and easy. Your registration will allow us to serve you better over the lifetime of the product.
To register your product go to :
http://warranty.karcherna.com
For customer assistance:
1-800-444-7654
86400940 Operators Manual - CMD20
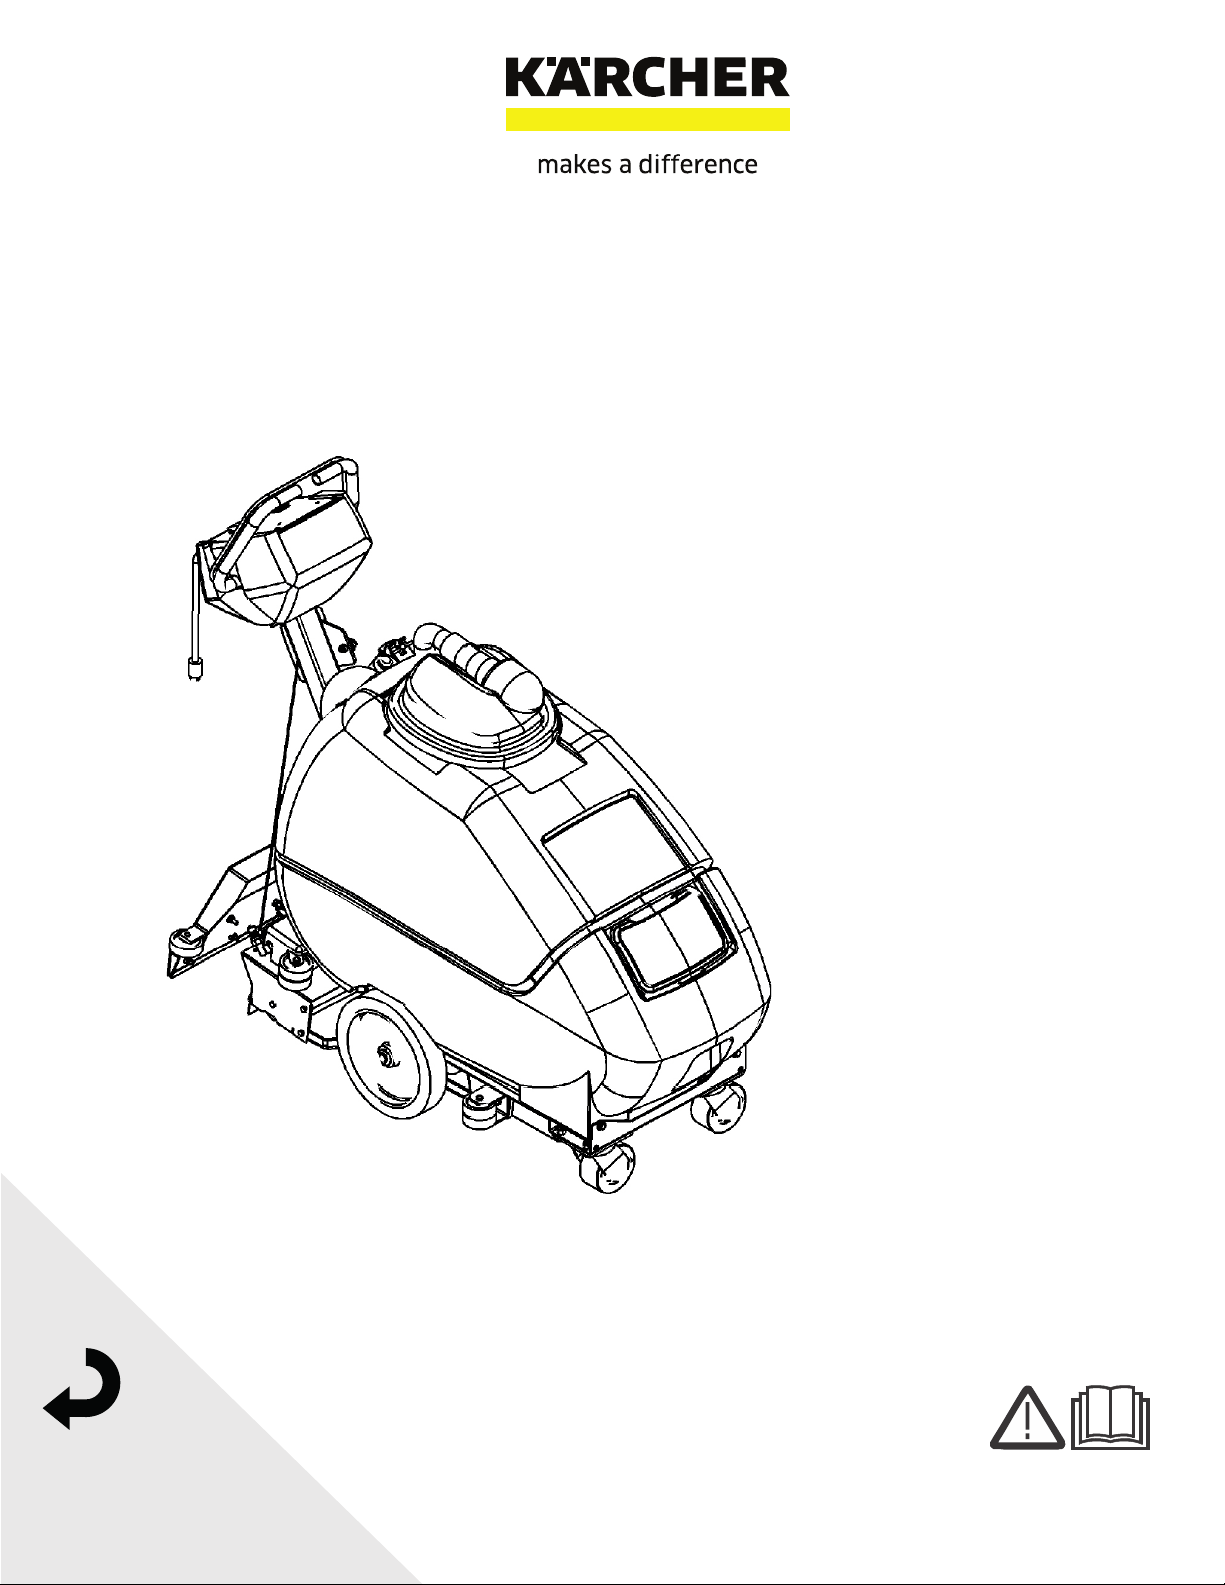
Machine Data Label
Overview
This carpet extractor is an electrical powered carpet extractor intended for commercial use. The appliance sprays
a cleaning solution onto the carpet agitates the wet carpet, and then extracts the soiled solution back into the unit's
recovery tank. The appliance is fitted with and a hand tool for cleaning upholstery and stairs.
MODELS:
CMD20
1.008-605.0

3
Table of Contents
Machine Data Label . . . . . . . . . . . . . . . . . . . . . . . . . .2
Overview . . . . . . . . . . . . . . . . . . . . . . . . . . . . . . . . . .2
Table of Contents . . . . . . . . . . . . . . . . . . . . . . . . . . .3
How To Use This Manual . . . . . . . . . . . . . . . . . . . . .4
Safety
IMPORTANT SAFETY INSTRUCTIONS . . . . . . . . .5
HAZARD INTENSITY LEVEL . . . . . . . . . . . . . . . . . .6
Grounding Instructions . . . . . . . . . . . . . . . . . . . . . . .7
Safety Labels . . . . . . . . . . . . . . . . . . . . . . . . . . . . . . 8
Operations
Technical Specifications . . . . . . . . . . . . . . . . . . . . .10
Controls. . . . . . . . . . . . . . . . . . . . . . . . . . . . . . . . . . 12
Drive Controls . . . . . . . . . . . . . . . . . . . . . . . . . . . . . 12
Filling the Solution Tank . . . . . . . . . . . . . . . . . . . . . 13
Machine Operation . . . . . . . . . . . . . . . . . . . . . . . . . 15
Brush Adjustment . . . . . . . . . . . . . . . . . . . . . . . . . .17
Cleaning . . . . . . . . . . . . . . . . . . . . . . . . . . . . . . . . .18
Accessory Tool Usage . . . . . . . . . . . . . . . . . . . . . . 20
Maintenance
Periodic Maintenance . . . . . . . . . . . . . . . . . . . . . . .21
Daily / Regular Maintenance. . . . . . . . . . . . . . . . . . 21
Service Schedule . . . . . . . . . . . . . . . . . . . . . . . . . . 22
Troubleshooting . . . . . . . . . . . . . . . . . . . . . . . . . . .23
86400940 Operators Manual - CMD20
4
How To Use This Manual
This manual contains the following sections:
• How to Use This Manual
•Safety
• Operations
• Maintenance
The HOW TO USE THIS MANUAL section will tell you
how to find important information for ordering correct
repair parts.
Parts may be ordered from authorized dealers. When
placing an order for parts, the machine model and
machine serial number are important. Refer to the
MACHINE DATA box which is filled out during the
installation of your machine. The MACHINE DATA box
is located on the inside of the front cover of this manual.
The model and serial number of your machine is on the
control panel support arm, located on the back of the
machine.
The SAFETY section contains important information
regarding hazardous or unsafe practices of the
machine. Levels of hazards are identified that could
result in product damage, personal injury, or severe
injury resulting in death.
The OPERATIONS section is to familiarize the operator
with the operation and function of the machine.
The MAINTENANCE section contains preventive main-
tenance to keep the machine and its components in
good working condition. They are listed in this general
order:
• Storage
• Maintenance
• Troubleshooting
NOTE: If a service or option kit is installed on your
machine, be sure to keep the KIT INSTRUCTIONS
which came with the kit. It contains replacement parts
numbers needed for ordering future parts.
NOTE: The manual part number is located on the
lower right corner of the front cover.
Model:
Date of Purchase:
Serial Number:
Dealer:
Address:
Phone Number:
Sales Representative:
86400940 Operators Manual - CMD20

5
Safety
IMPORTANT SAFETY INSTRUCTIONS
When using this machine, basic precaution
must always be followed, including the following:
READ ALL INSTRUCTIONS BEFORE USING THIS MACHINE.
To reduce the risk of fire, electric shock, or injury:
Connect to properly grounded outlet. See Grounding Instructions.
Do not leave the machine unattended. Unplug machine from outlet when not in use and before maintenance or
service.
Use only indoors. Do not use outdoors or expose to rain.
Do not allow machine to be used as a toy. Close attention is necessary when used by or near children.
Use only as described in this manual. Use only manufacturer's recommended components and attachments.
Do not use damaged electrical cord or plug. Follow all instructions in this manual concerning grounding the
machine. If the machine is not working properly, has been dropped, damaged, left outdoors, or dropped into water,
return it to an authorized service center.
Do not pull or carry machine by electrical cord, use as a handle, close a door on cord, or pull cord around edges or
corners.
Do not run machine over cord. Keep cord away from heated surfaces.
Do not unplug machine by pulling on cord. To unplug, grasp the electrical plug, not the electrical cord.
Do not handle the electrical plug or machine with wet hands.
Do not operate the machine with any openings blocked. Keep openings free of debris that may reduce airflow.
This machine is intended for cleaning carpet only.
Do not vacuum anything that is burning or smoking, such as cigarettes, matches, or hot ashes.
This machine is not suitable for picking up health endangering dust.
Turn off all control before unplugging.
Do not operate this machine near flammable fluids, dust or vapors.
Maintenance and repairs must be done by qualified personnel.
If foam or liquid comes out of machine, switch off immediately.
READ AND SAVE THESE INSTRUCTIONS
86400940 Operators Manual - CMD20

6
Safety
The following symbols are used throughout this guide as indicated in their descriptions:
HAZARD INTENSITY LEVEL
There are three levels of hazard intensity identified by signal words -WARNING and CAUTION and FOR SAFETY.
The level of hazard intensity is determined by the following definitions:
WARNING - Hazards or unsafe practices which COULD result in severe personal injury or death.
CAUTION - Hazards or unsafe practices which could result in minor personal injury or product or property damage.
FOR SAFETY: To Identify actions which must be followed for safe operation of equipment.
Report machine damage or faulty operation immediately. Do not use the machine if it is not in proper operating
condition. Following is information that signals some potentially dangerous conditions to the operator or the equip-
ment. Read this information carefully. Know when these conditions can exist. Locate all safety devices on the
machine. Please take the necessary steps to train the machine operating personnel.
FOR SAFETY:
DO NOT OPERATE MACHINE:
Unless Trained and Authorized.
Unless Operation Guide is Read and understood.
In Flammable or Explosive areas.
In areas with possible falling objects
WHEN SERVICING MACHINE:
Avoid moving parts. Do not wear loose clothing; jackets, shirts, or sleeves when working on the machine. Use
manufacturer approved replacement parts.
86400940 Operators Manual - CMD20
7
Safety
Electrical
In the USA this machine operates on a standard 15
amp 115 volt A.C. power circuit. The amp, hertz, and
voltage are listed on the data label found on each
machine. Using voltages above or below those
indicated on the data label will cause serious damage
to the motors
Extension Cords
If an extension cord is used, the wire size must be at
least one size larger than the power cord on the
machine, and must be limited to 50 feet (15.5m) in
length.
Grounding Instructions
This appliance must be grounded. If it should malfunc-
tion or breakdown, grounding provides a path of least
resistance for electric current to reduce the risk of
electric shock. This appliance is equipped with a cord
having an equipment-grounding conductor and
grounding plug. The plug must be inserted into an
appropriate outlet that is properly installed and
grounded in accordance with all local codes and ordi-
nances.
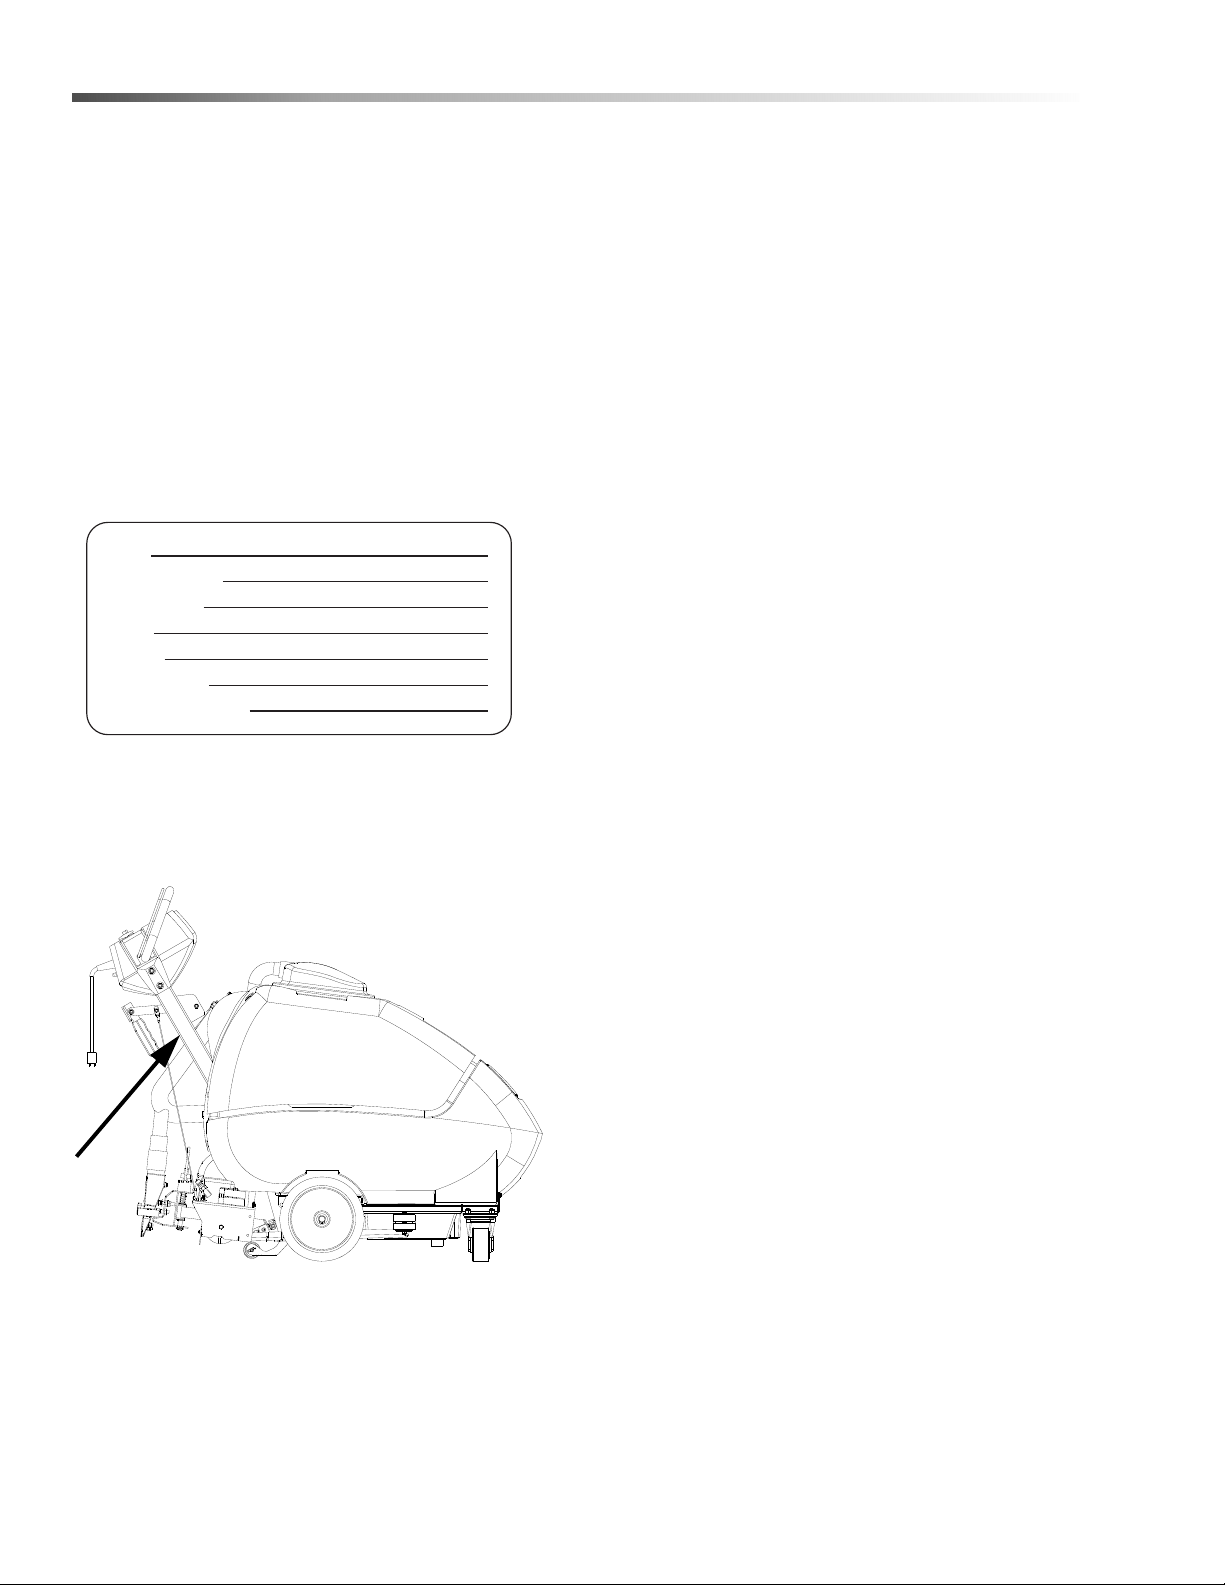
This appliance is for use on a nominal 120-volt circuit,
and has a grounded plug that looks like the plug illus-
trated in sketch A. A temporary adapter looks like
adapter illustrated in sketches B and C, may be used to
connect this plug to a 2-pole receptacle as shown in
sketch B if a properly grounded outlet is not available.
The temporary adapter should be used only until a
properly grounded outlet (sketch A) can be installed by
a qualified electrician. The green colored rigid ear, lug
or the like extending from the adapter must be
connected to a permanent ground such as a properly
grounded outlet box cover. Whenever the adapter is
used, it must be held in place by a metal screw
Improper connection of the equipment-grounding
conductor can result in a risk of electric shock.
Check with a qualified electrician or service person
if you are in doubt as to whether the outlet is
properly grounded. Do not modify the plug
provided with the appliance - if it will not fit the
outlet, have a proper outlet installed by a qualified
electrician.
.
NOTE: In Canada, the use of a temporary adapter is
not permitted by the Canadian Electrical Code.
USING AN ADAPTOR
GROUNDING CONNECTION
Note: Adaptors are not allowed in Canada.
Outlet
Tab for Grounding
Outlet Box
FIGURE C
Grounded
FIGURE A
Adaptor
Screw
FIGURE B
Adaptor
Metal Screw
Grounded
Grounding Pin
86400940 Operators Manual - CMD20
8
Safety
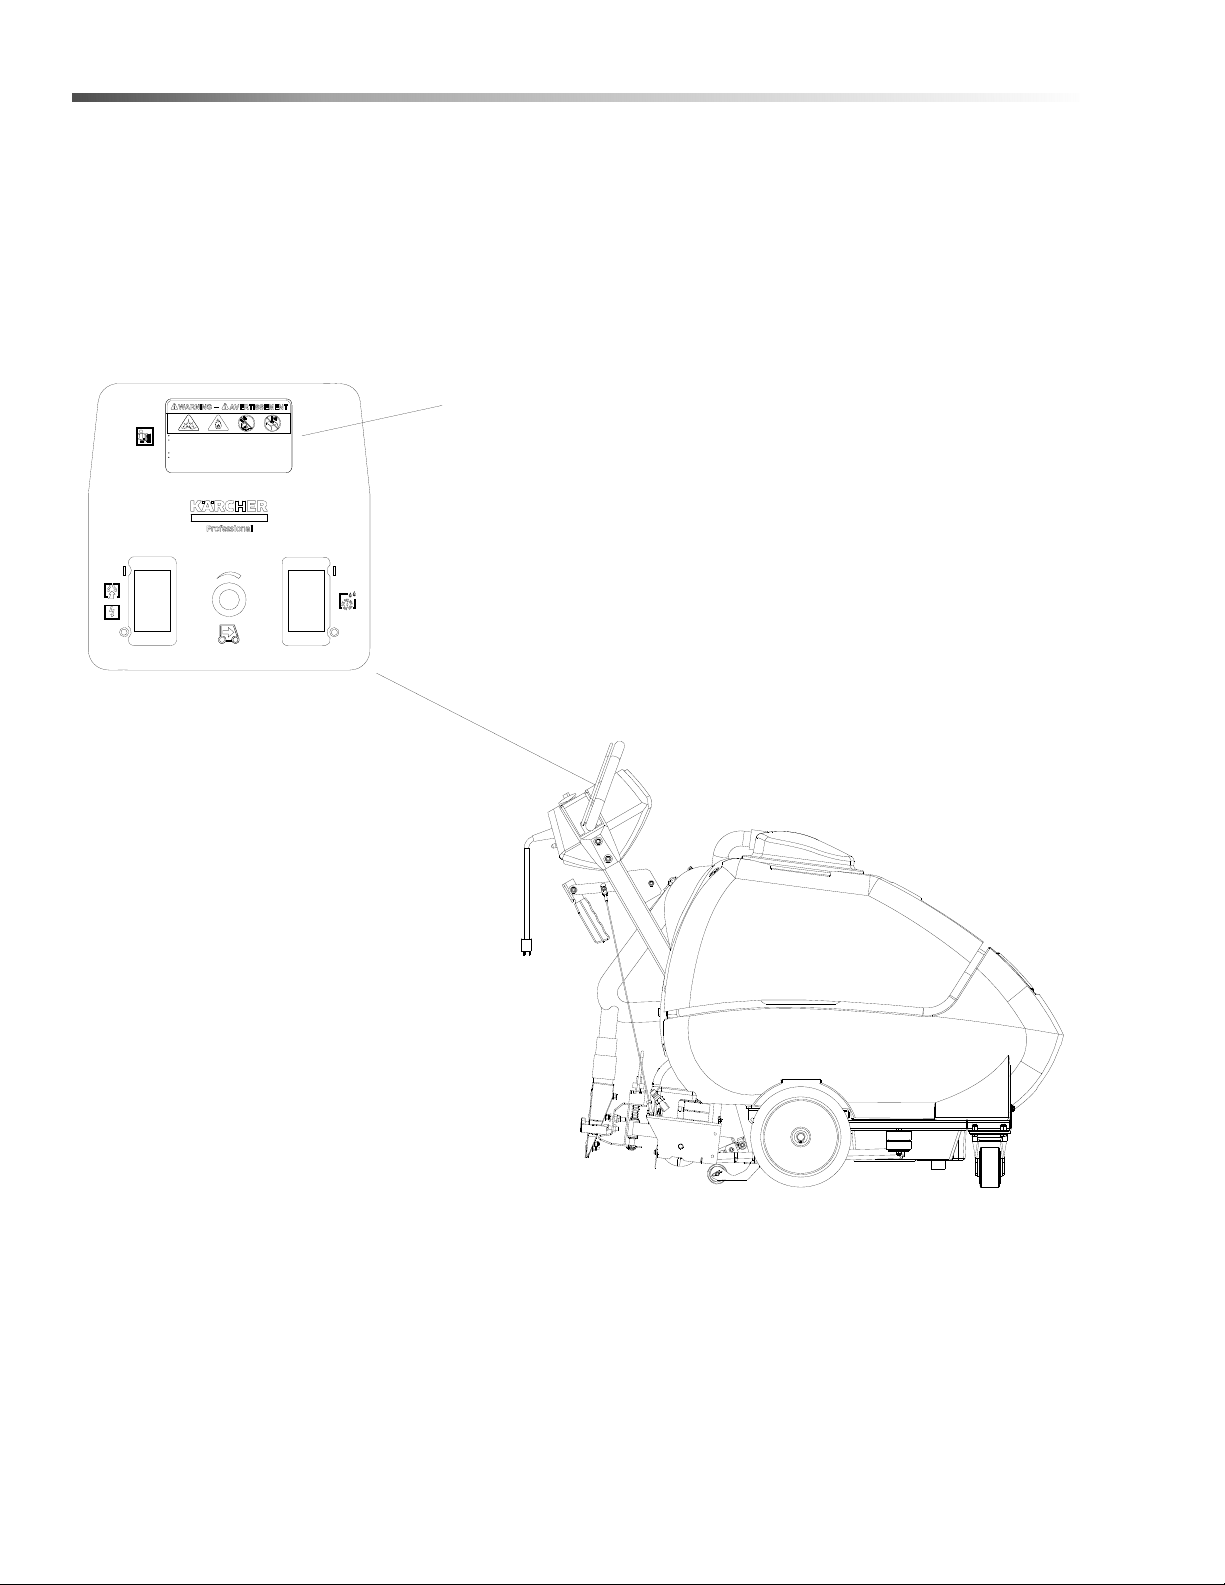
Safety Labels
NOTE: These drawings indicate the location of safety labels on the machine. If at any time the labels become
illegible, promptly replace them.
RISK OF EXPLOSION. DO NOT USE OR PICK UP FLAMMABLE MATERIAL.
TO REDUCE THE RISK OF ELECTRIC SHOCK, USE INDOORS ONLY AND ALWAYS INSTALL
FLOAT BEFORE ANY WET PICK-UP OPERATION. USE ONLY DETERGENT INTENDED
FOR CLEANING CARPETS.
RISQUE D'EXPLOSION. NE PAS UTILISER OU RAMASSER DES MATIÈRES INFLAMMABLES.
POUR RÉDUIRE LE RISQUE D'ÉLECTROCUTION, UTILISER À L' INTÉRIEUR SEULEMENT ET
TOUJOURS INSTALLER LE FLOTTEUR AVANT TOUTE OPÉRATION DE RAMASSAGE DANS
DES CONDITIONS HUMIDES. UTILISER SEULEMENT DU DÉT ERGENT CONÇU POUR LE
NETTOYAGE DES TAPIS.
WARNING LABEL INCLUDED ON
86396920 CONTROL PANEL LABEL
86400940 Operators Manual - CMD20

9
Notes
86400940 Operators Manual - CMD20

10
Operations
Technical Specifications
ITEM DIMENSION/CAPACITY
Electrical 115 V, 15 A, 60 HZ
Electric Propelling Motor (1) –1/4 hp DC (186 watts) with variable speed forward.
Drive system Transaxle unit variable speed Operating Speed: 0-100 ft/min
Electric Vacuum Motor (1) – 3 stage, 1 hp 99 cfm (2.80m?/min.)
Brush (1) 18” (45.8 cm)
Solution Pump 100 psi (6.9 bars), diaphragm style, demand pump
Solution Capacity 20 gallons (75 ltr)
Recovery Capacity 20 gallons (75 ltr)
Brush Speed 1000 RPM
Vacuum Shoe 22” (56 cm) wide, cast urethane floating and pivoting.
Wheels:
Front: (2) 4” dia. (10 cm) wheels by 2.5”
Rear: (2) 10” dia. (25 cm) wheels by 2”
Solution Spray 2 quick change jets
Power Cable 75’ (23m) (12 gauge)
86400940 Operators Manual - CMD20
11
Operations
This appliance is not intended for use by persons (including children) with reduced physical, sensory or mental
capabilities, or lack of experience and knowledge, unless they have been given supervision or instruction
concerning use of the appliance by a person responsible for their safety. Children should be supervised to ensure
that they do not play with the appliance.
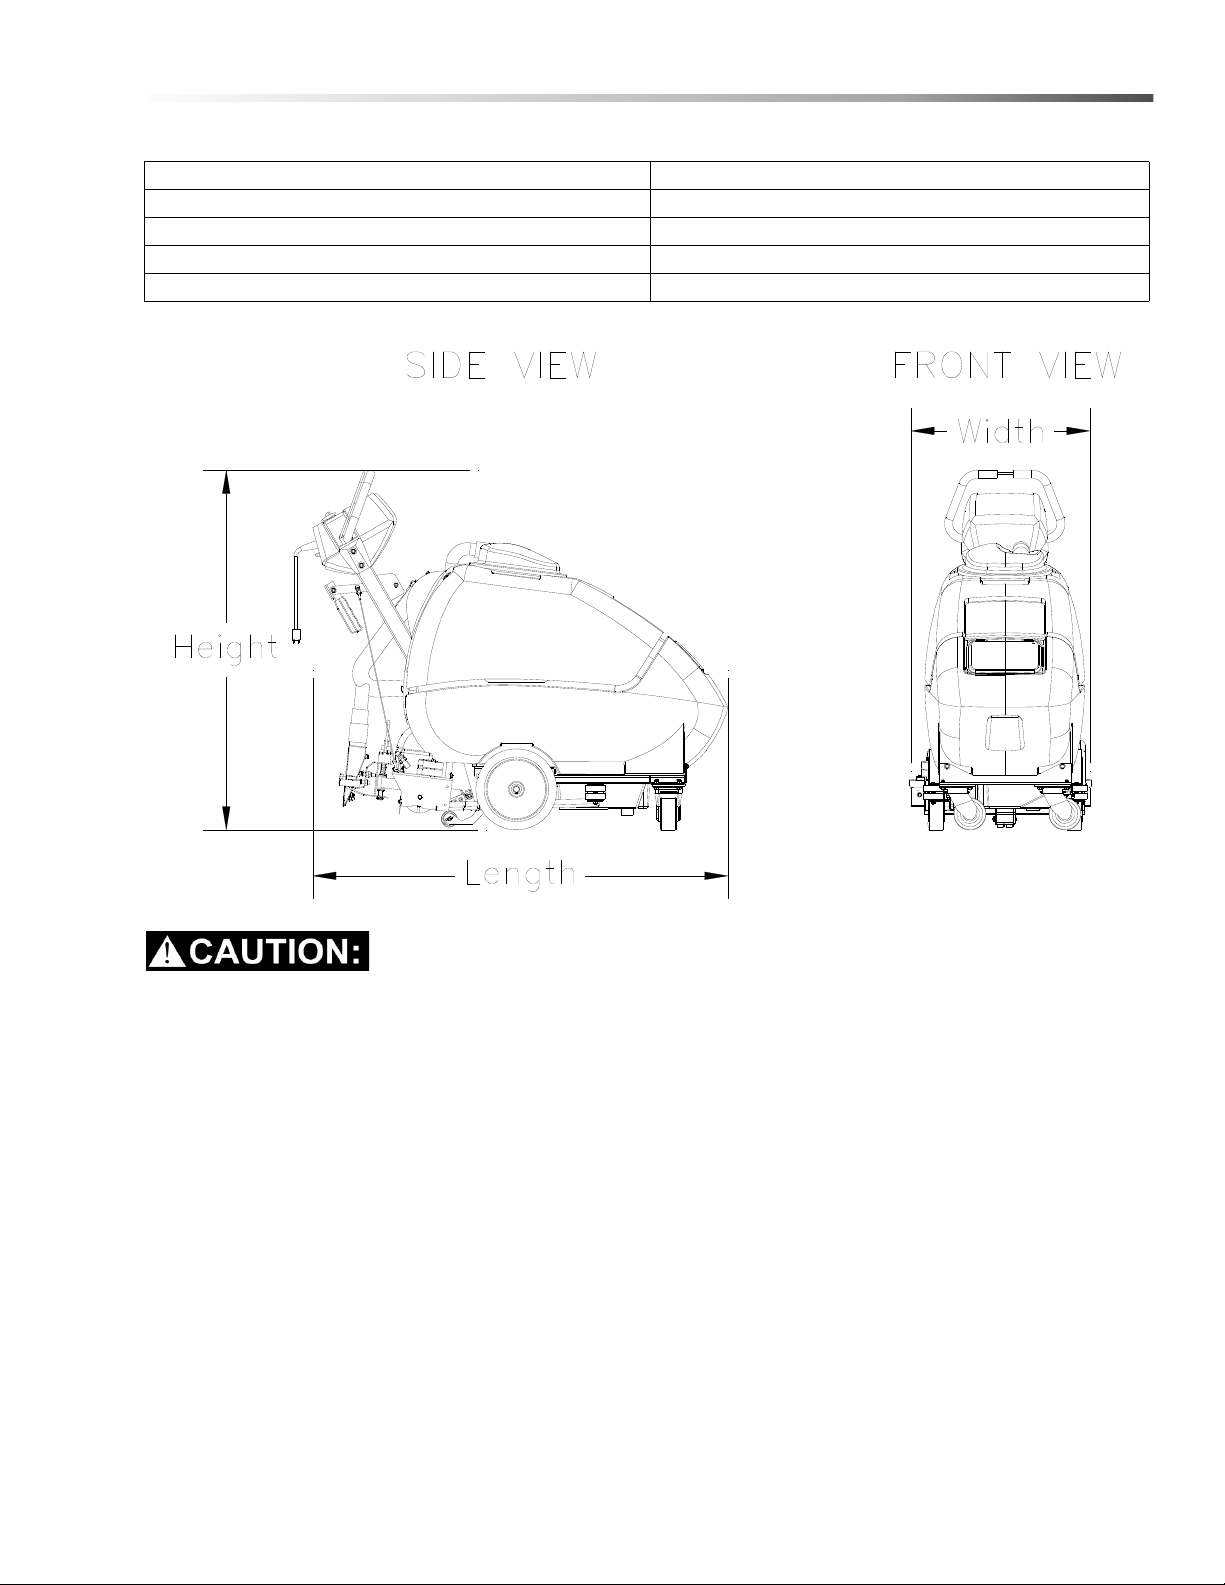
ITEM MEASURE
Weight 215 lbs (98kg)
Length 51” (130 cm)
Height 44” (111 cm)
Width 22” (56 cm)
86400940 Operators Manual - CMD20
12
Operations
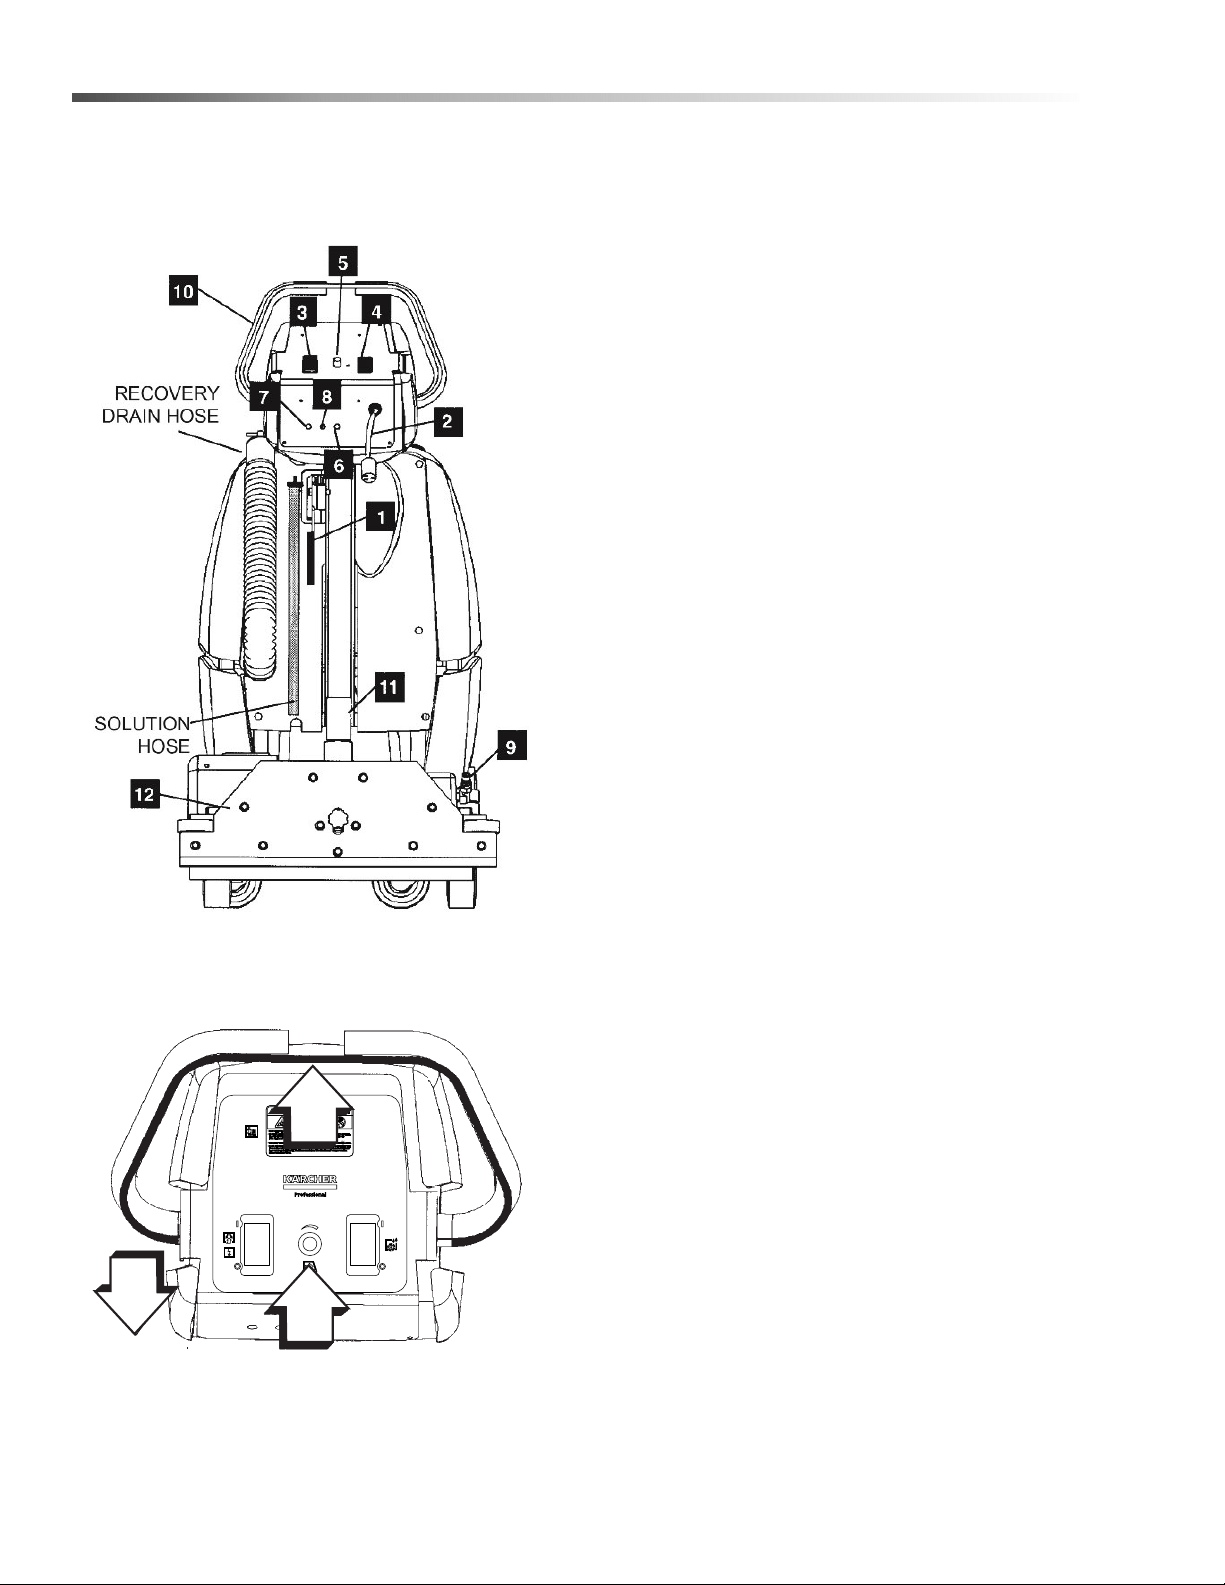
Controls
1. Brush/Vac Shoe Lift Lever - Raises and lowers
both brush and vac shoe.
2. Electrical Cord
3. Main Power Switch - Turns On and Off the vac
motor/pump and machine.
4. Brush/Solenoid Knob - Enables the brush motor
and solution spray (only when propelling).
5. Speed Control Knob - Adjusts the forward drive
speed of the machine. (See Below)
6. Drive Motor Circuit Breaker - 6 amp, protects the
drive motor mechanism.
7. Vac Motor Circuit Breaker - 11 amp, protect
vacuum motor.
8. Brush Motor Circuit Breaker - 8 amp, protect
brush motor.
9. Solution Accessory Tool Hook-Up - Used for
various auxiliary cleaning tools.
10. Main Handle
11. Vacuum Accessory Tool Hook-Up - To use
accessory tool, remove hose from vac shoe and
attach to accessory tool adaptor. 8.608-908.0
12. Vac Shoe Assembly
Drive Controls
A. The speed the machine will travel is regulated by
the knob located on the center of control panel.
Turn the knob to the right to increase the speed
of the machine and to the left to decrease the
speed of the machine.
B. Squeezing the control lever will propel the
machine forward at the selected speed. Machine
will also engage the brush and spray if #4 is acti-
vated.
C. To move the machine backwards release the
control lever and then pull back on main handle
NOTE: The machine drive assembly is disengaged.
Do not pull back on the control lever
A
B
C
86400940 Operators Manual - CMD20
13
Operations
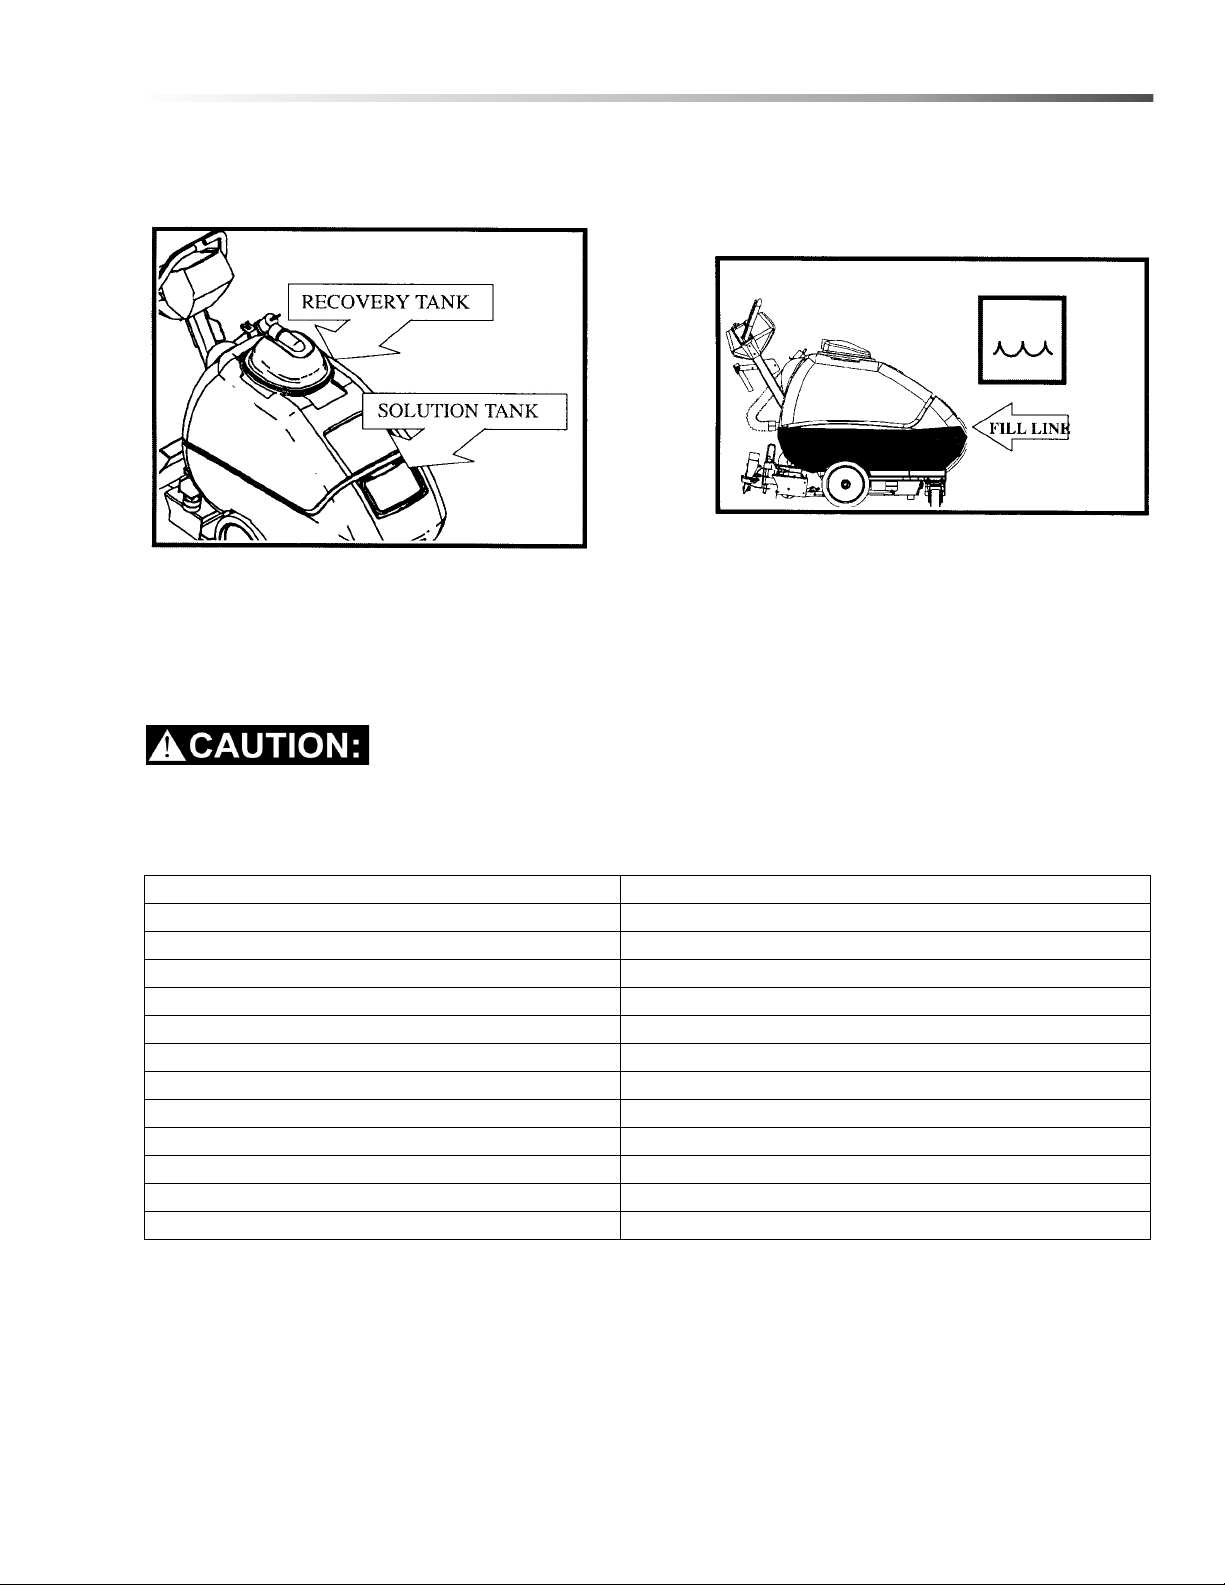
Filling the Solution Tank
NOTE: Use clean bucket of water to fill solution tank.
Do not put defoamer, solvents, spotter or pre-spray chemicals in the solution tank.
* Product Trademark Names
Suitable Chemicals Non-Compatible Chemicals
Alkalis Aldehydes
Detergents Aromatic Hydrocarbons
Hydroxides SP Butyls
Soaps Carbon Tetrachloride
Vinegar Clorox*
Chlorinated Bleaches
Chlorinated Hydrocarbons
Lysol*
Methyl Ethel Ketone (MEK)
Perchorethylene (perc)
Phenolics
Trichlorethylene
86400940 Operators Manual - CMD20
14
Operations
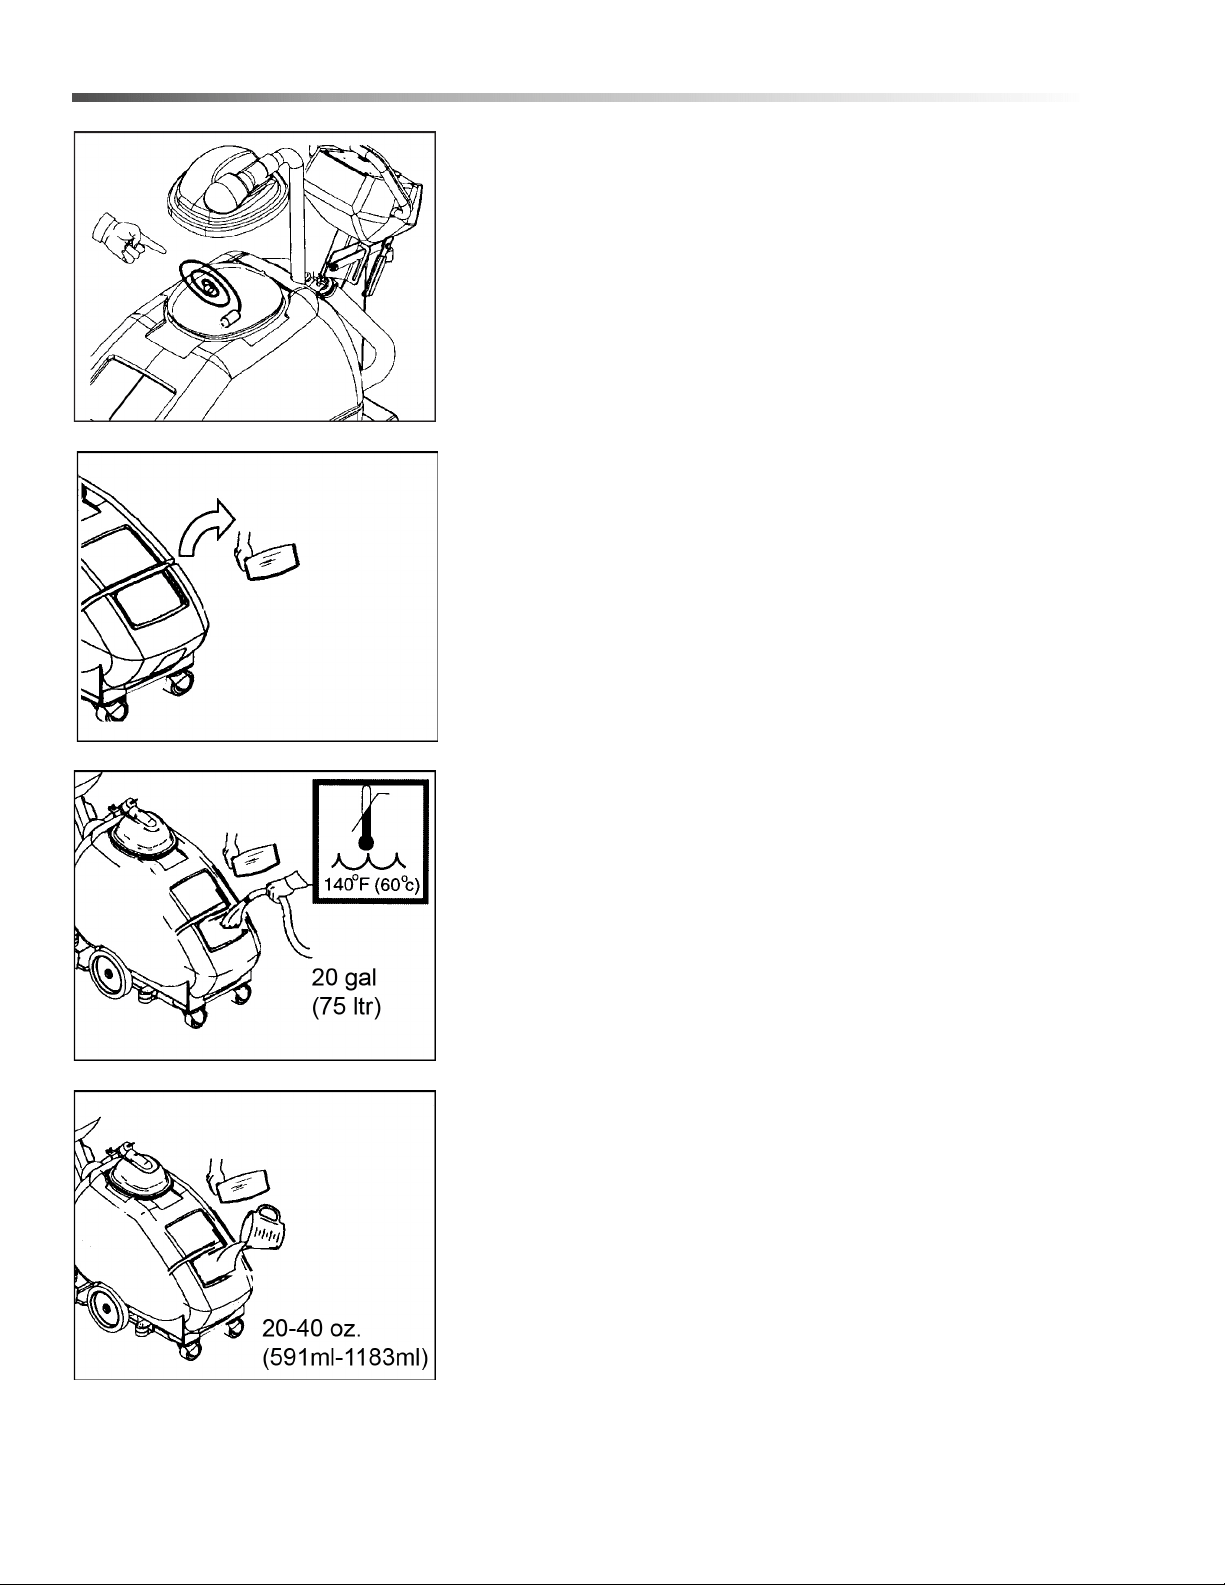
Filling the Solution Tank - continued
1. Remove electrical cord from recovery tank.
2. Remove dome from solution tank.
3. Fill the solution tank with 20 gallons (75 ltr) of
water, that is no more than 140°F/60°C.
4. Add 20-40oz. (591ml-1183ml) of cleaning
chemical.
86400940 Operators Manual - CMD20
15
Operations
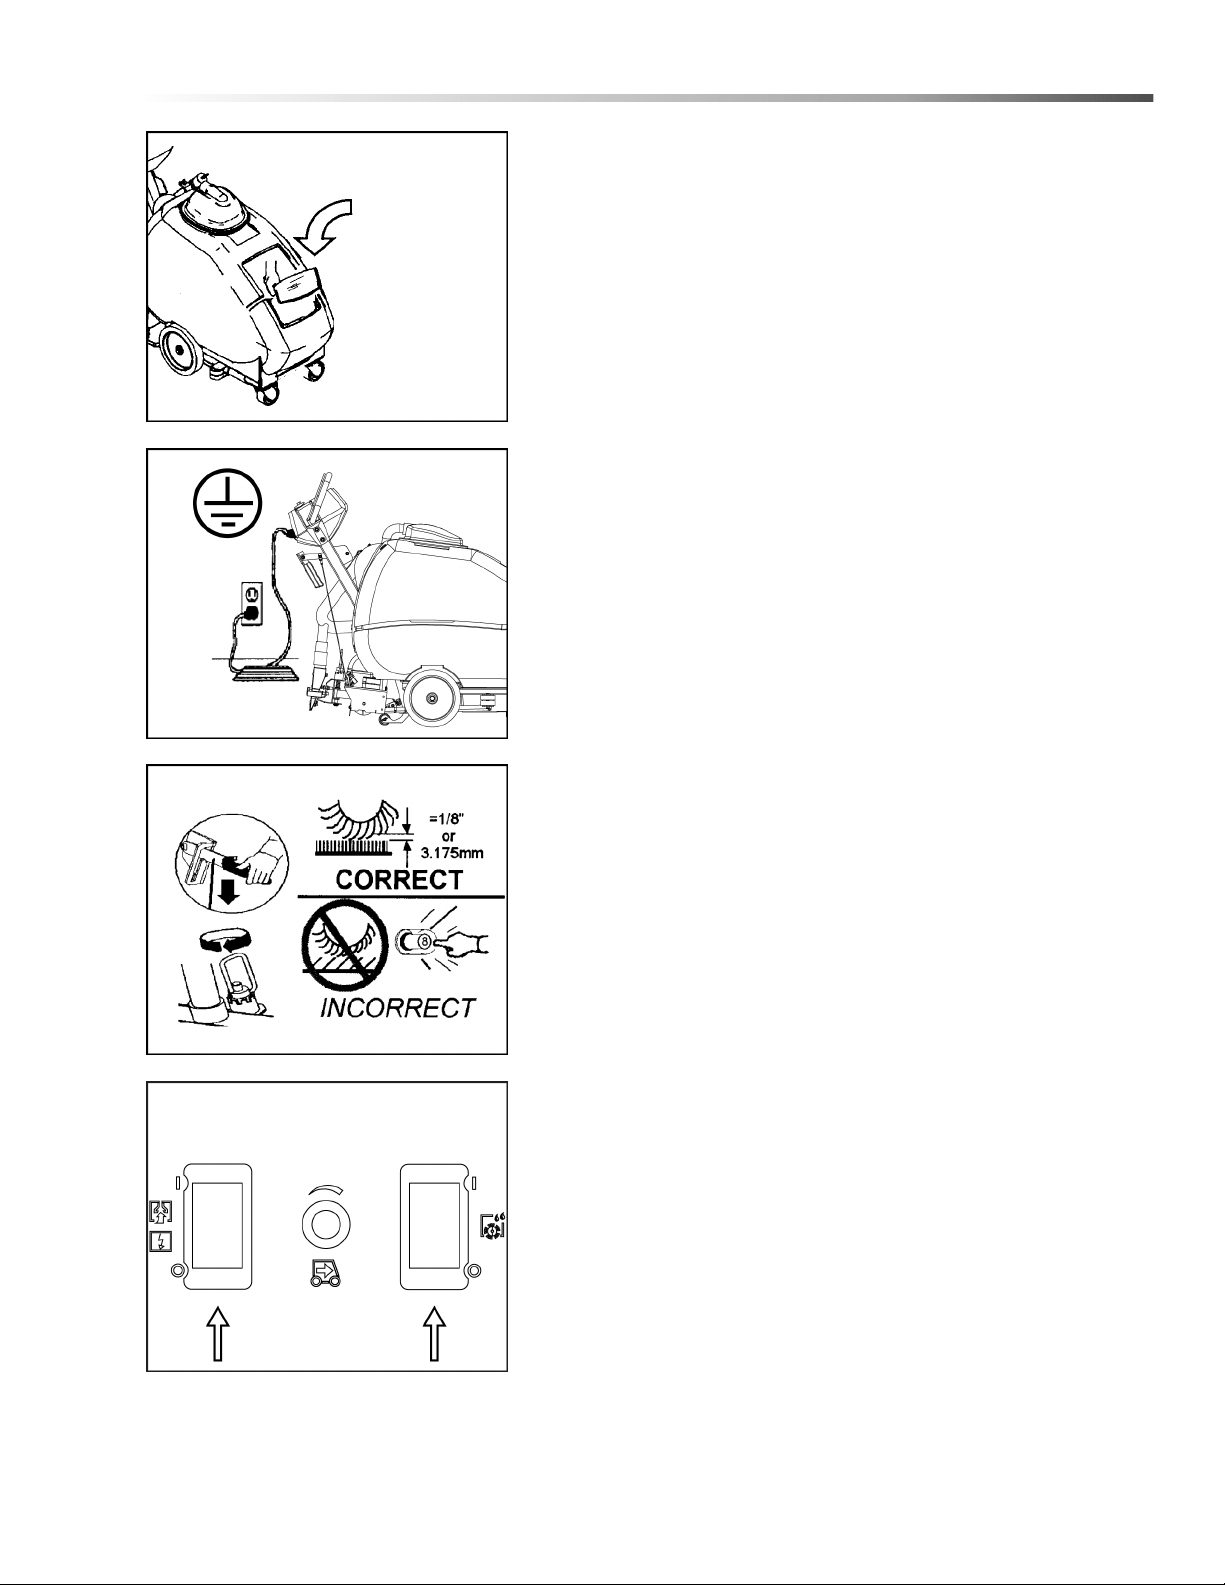
5. Replace dome on solution tank.
Machine Operation
1. Plug cord into grounded outlet.
2. Adjust brush to proper setting (see Brush Adjust-
ment). Lower the brush.
3. Turn both the power and brush switches “ON”.
86400940 Operators Manual - CMD20
16
Operations
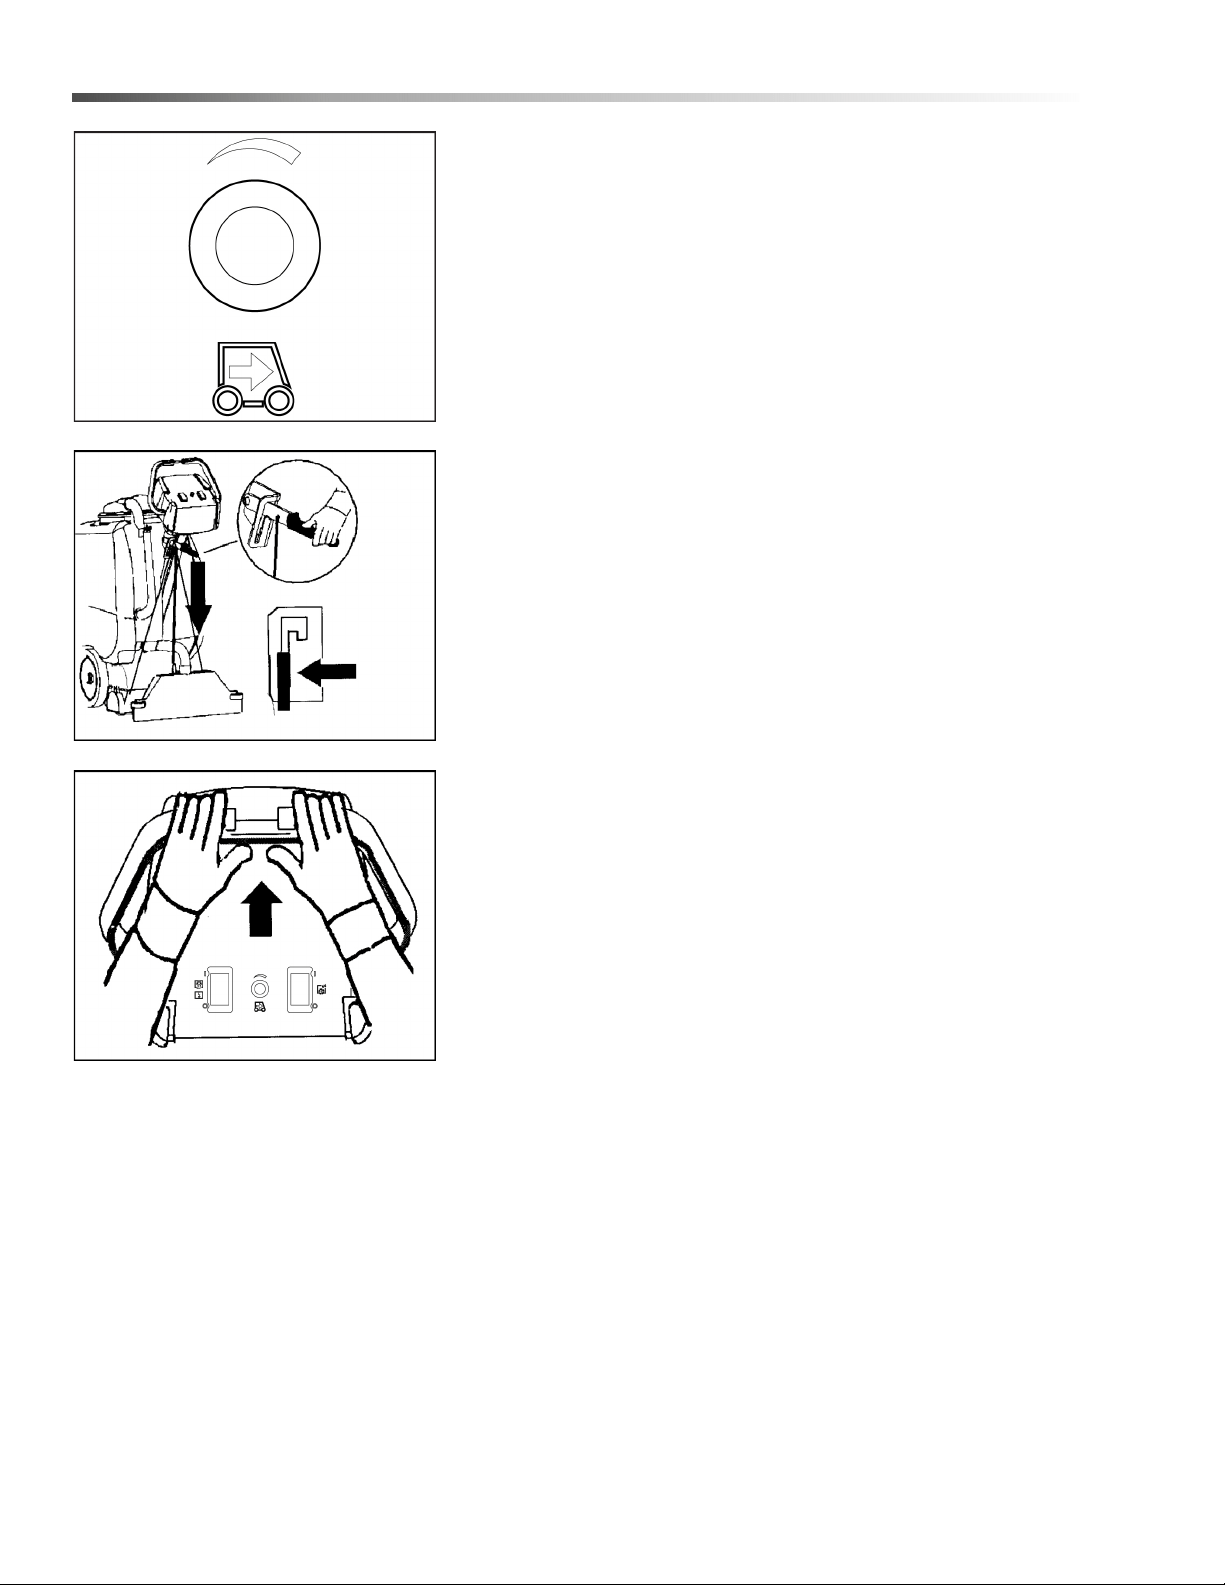
Machine Operation - continued
4. Adjust speed control knob to desired speed.
5. Lower brush assembly to floor.
6. Depress lever to propel machine forward and to
activate the brush and spray.
86400940 Operators Manual - CMD20
17
Operations
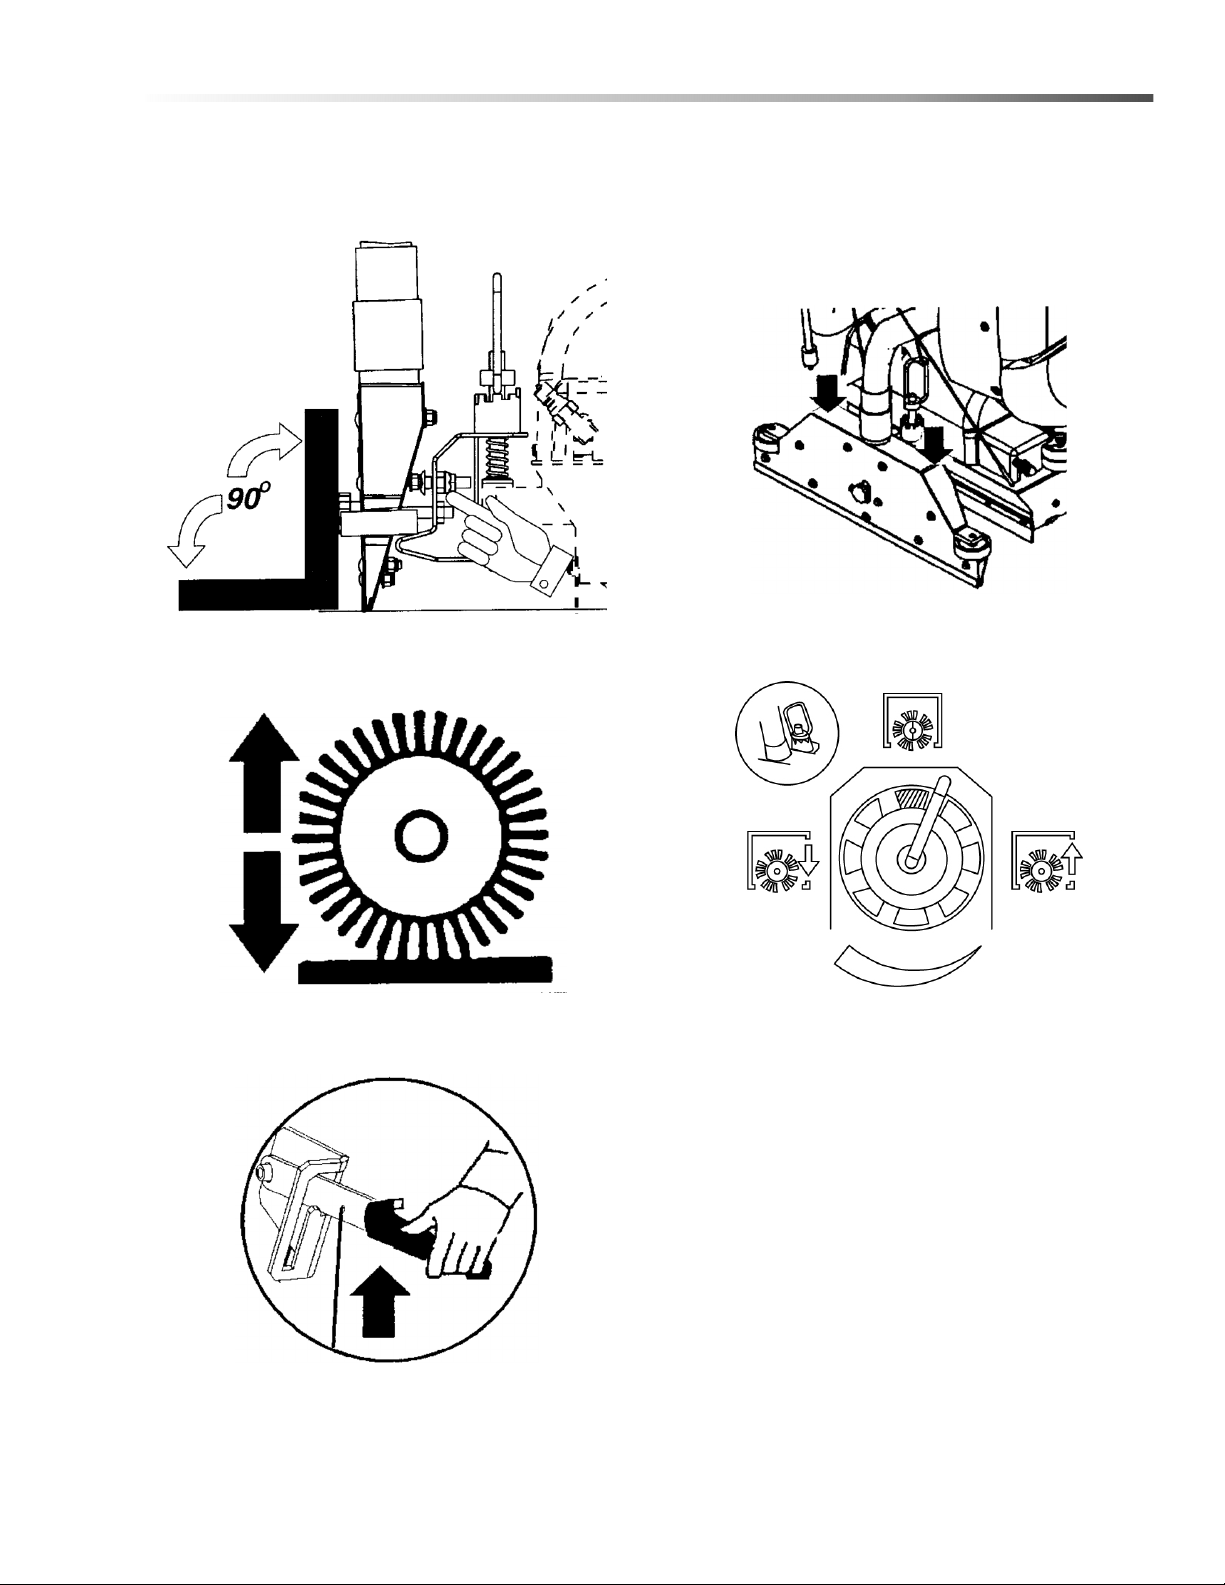
Brush Adjustment
For good operation the brush must skim the carpet.
1. Adjust the vacuum shoe assembly to 90°.
2. Adjust brush so that it is touching the carpet.
3. Raise handle to “Storage Position”.
4. Push down on squeegee assembly.
5. Adjust brush to correct height for carpet.
86400940 Operators Manual - CMD20
18
Operations
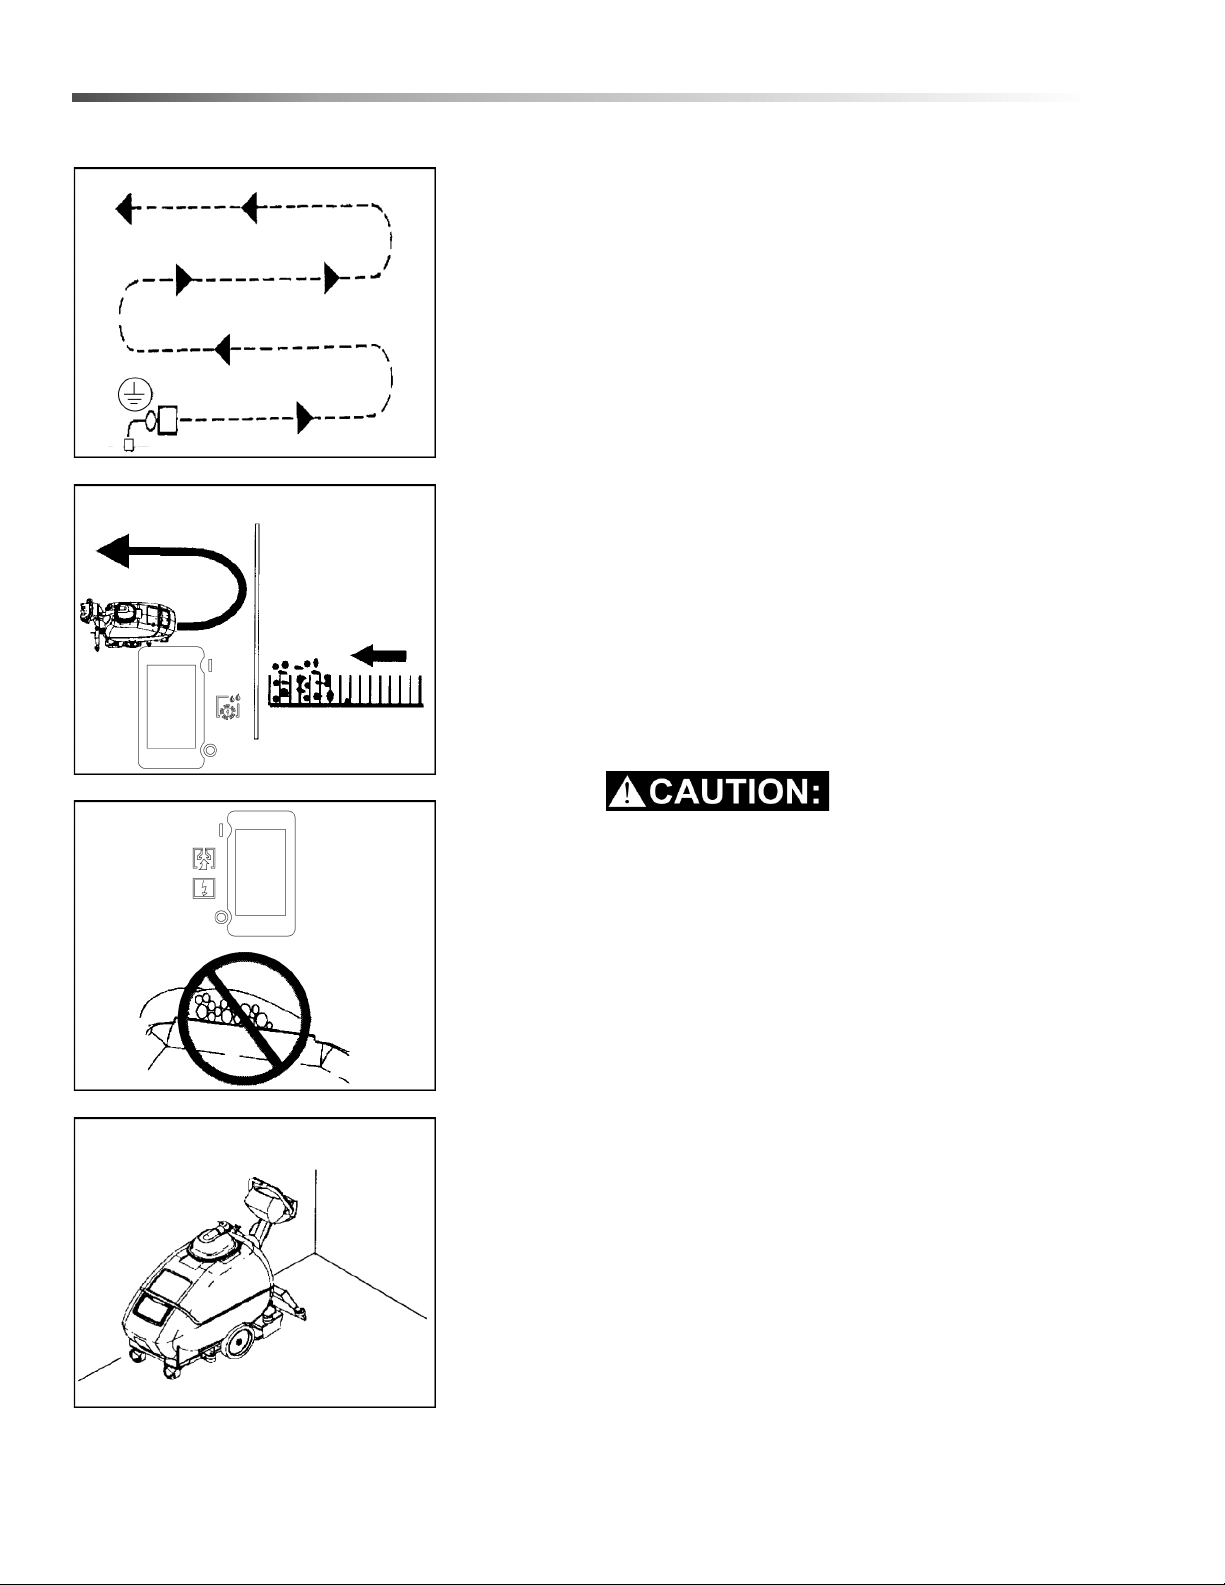
Cleaning
1. Operate machine in parallel passes. Clean
perimeter last.
2. When turning the machine, turn “OFF” brush/
solution switch. Go slow over heavily soiled
carpet.
3. Foam! Turn off machine and add defoamer to
recovery tank only.
4. Use right side of machine for cleaning against
walls.
Go slow over
heavily soiled
carpet
86400940 Operators Manual - CMD20
19
Operations
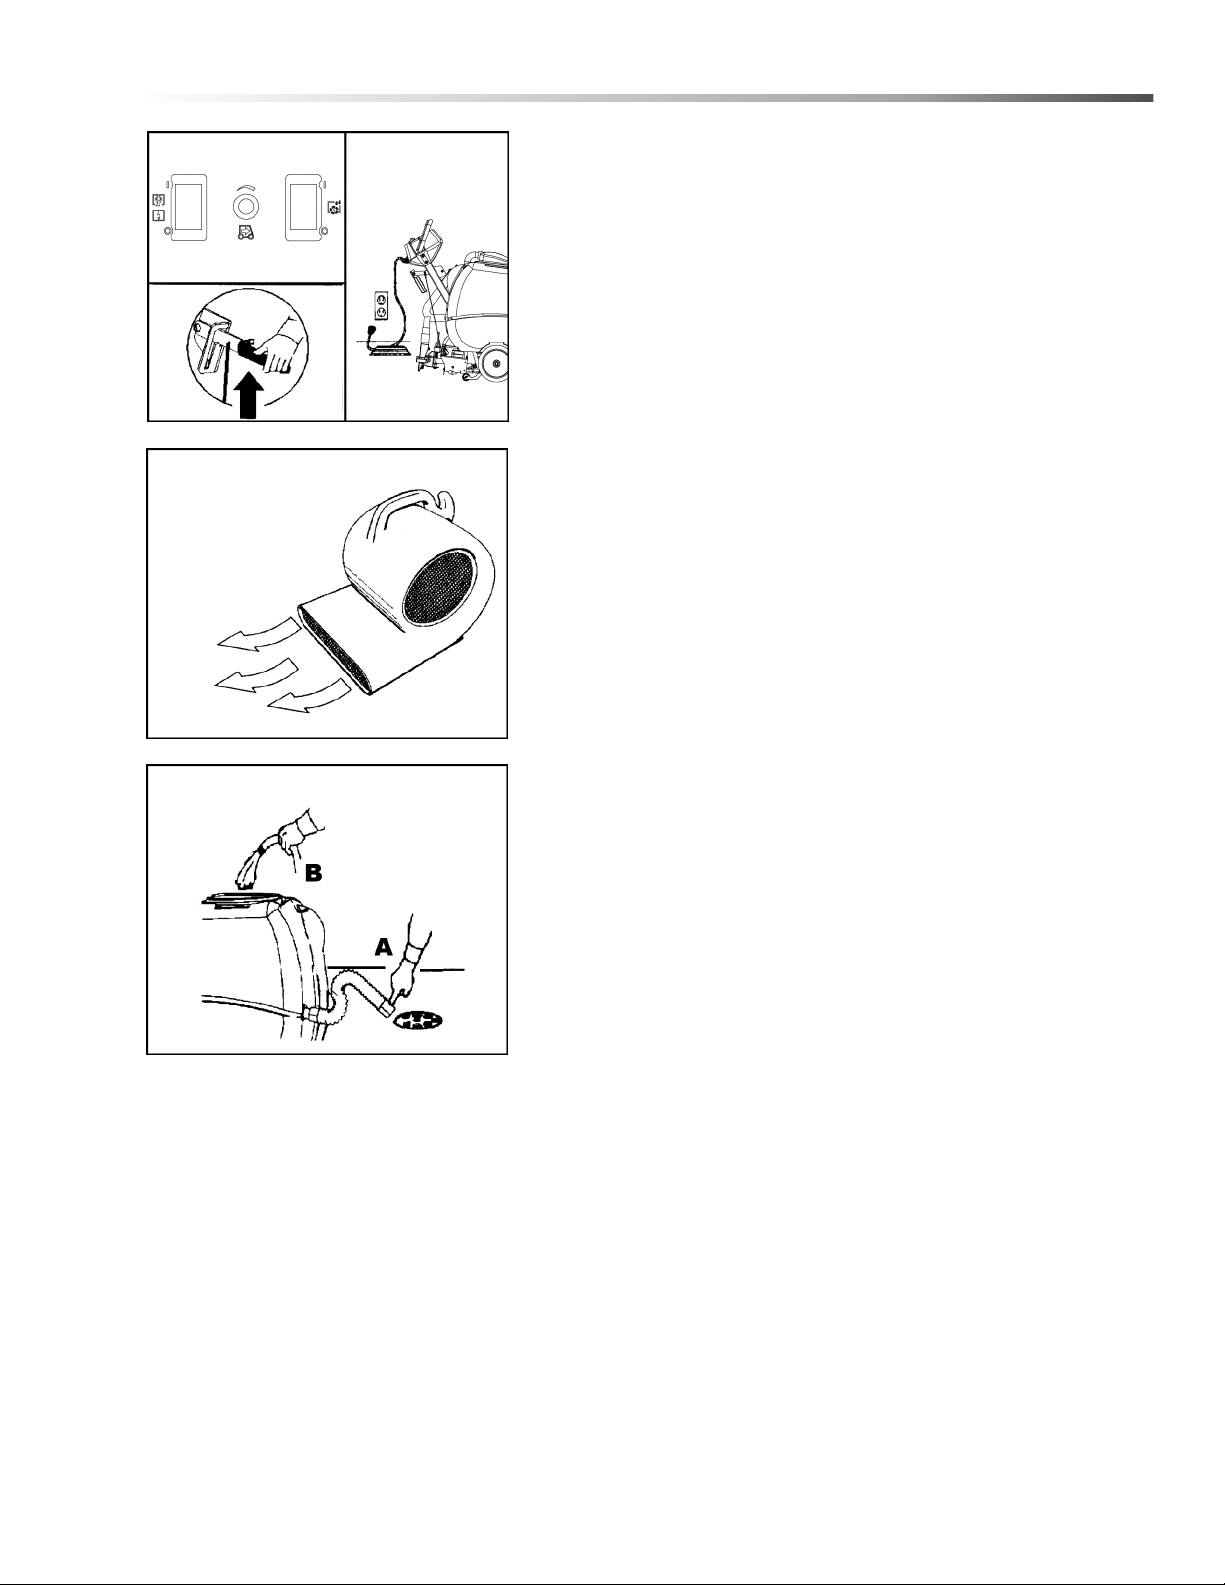
5. After cleaning, turn off all controls, raise brush
assembly to storage position and carefully unplug
machine.
6. To speed drying, use an air mover fan.
7. Empty recovery tank by releasing dump hose (A).
Use a hose with cold water to clean out the
recovery tank (B). Drain solution tank after each
use.
86400940 Operators Manual - CMD20
20
Operations
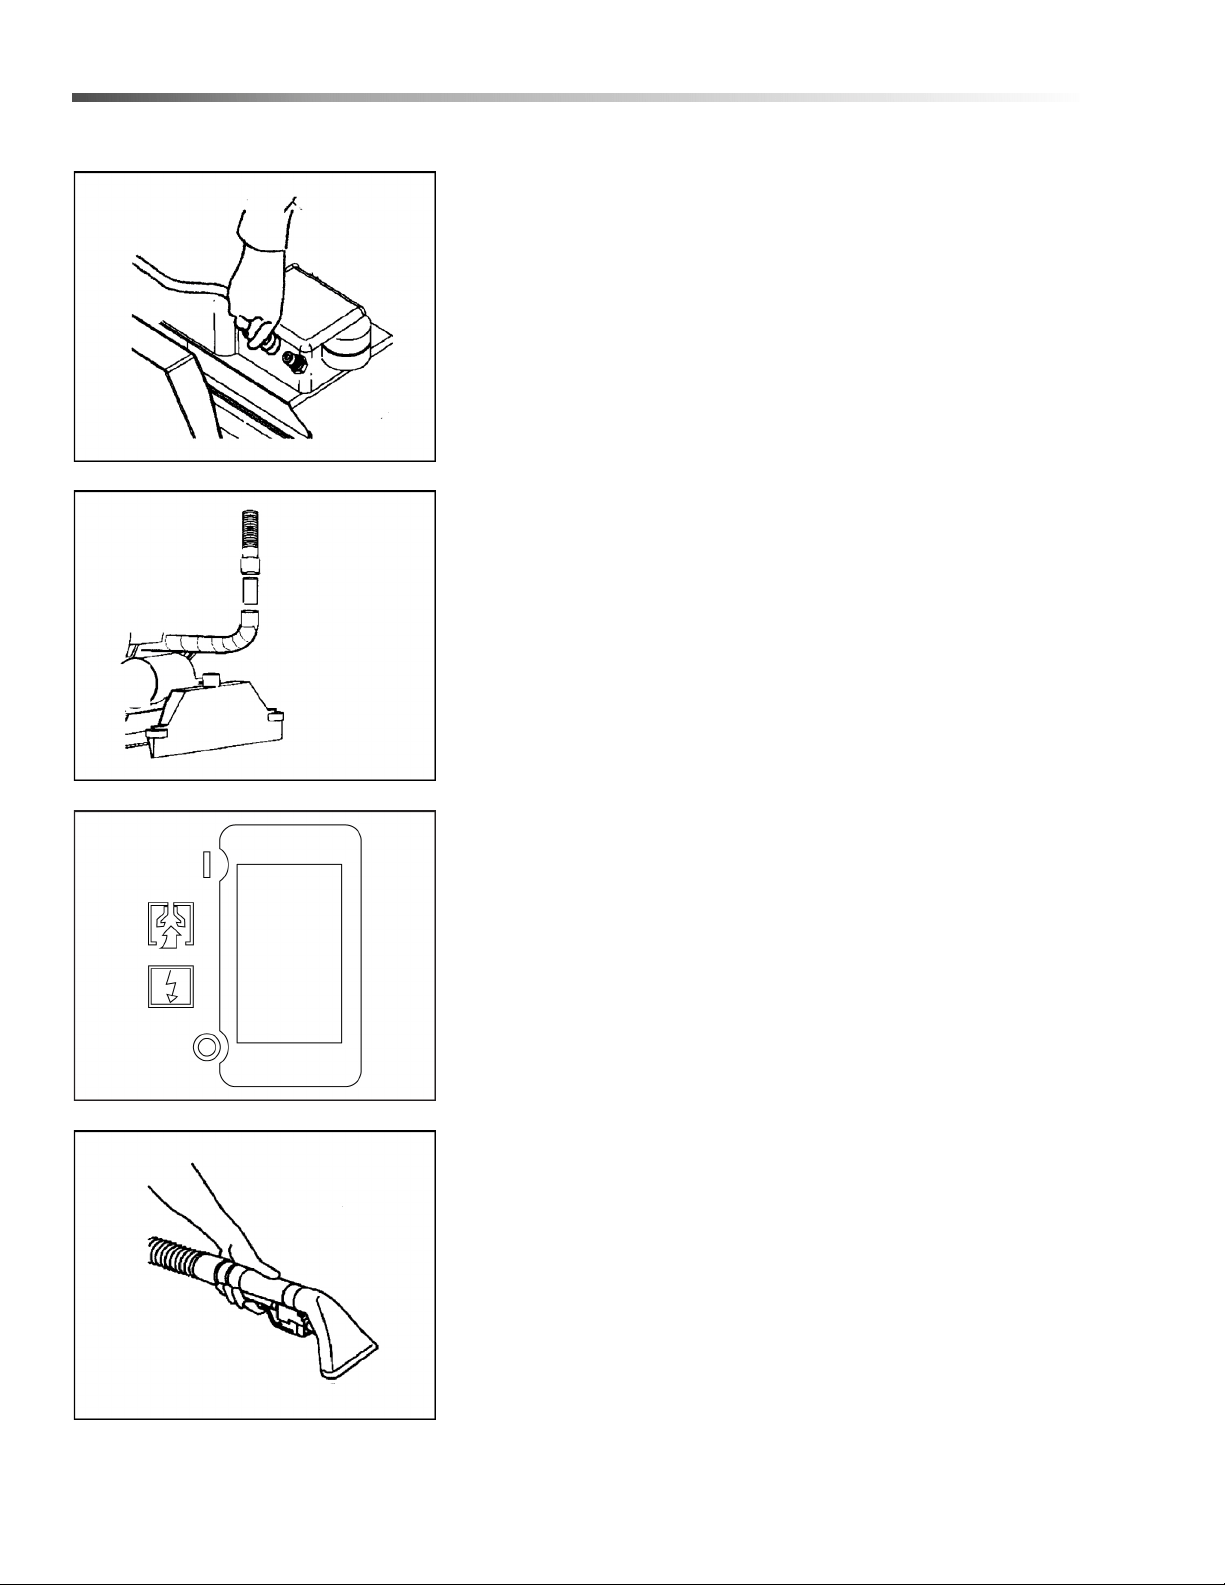
Accessory Tool Usage
1. Insert collar over fitting.
2. Insert adapter (86089080) into vac shoe hose, then
insert accessory tool cuff onto adapter.
3. Turn main power switch “ON”
4. Squeeze handle on accessory tool to begin
cleaning.
86400940 Operators Manual - CMD20

21
Maintenance
Periodic Maintenance
Twice a month, flush a white vinegar solution (One
quart vinegar to two gallons of water) or anti-browning
solution (mixed as directed) through the extractor. This
will prevent build-up of alkaline residue in the system. If
spray jets become clogged, remove the spray tips,
wash them thoroughly, and blow dry.
NOTE: Do not use pins, wire, etc. to clean nozzles as
this could destroy spray pattern.
Periodically inspect all hoses, electrical cables and
connections on your machine. Frayed or cracked hoses
should be repaired or replaced to eliminate vacuum or
solution pressure loss. Because the electrical cable
must be well insulated and cable connector screw kept
tight. If the cable insulation is broken or frayed, repair or
replace it immediately. Don't take chances with elec-
trical fire or shock.
Daily / Regular Maintenance
Before making any adjustments or repairs to the
machine, disconnect the power cord from the electrical
source.
1. Empty unused cleaning solution from the solution
tank.
2. Inspect and clean filter screen in solution tank.
3. Flush pumping system with 4 or 7 liters of clean,
hot water.
4. After each use, rinse tank with fresh water. Periodi-
cally inspect the recovery tank and decontaminate
if necessary, using a Hospital Grade Virucide or a
1-10 bleach to water solution. Waste water should
be disposed of properly.
5. Check for and remove any lint or debris around vac
shoe.
6. Check spray jets for full spray pattern.
7. Remove lint and dirt build-up from brush and
housing.
NOTE: Always store machine with brush in "Store"
position.
86400940 Operators Manual - CMD20

22
Maintenance
Service Schedule
Maintenance Daily Weekly Quarterly
Check machine for cord damage *
Check recovery dome and gasket for damage and cleanliness *
Check brush – should be clean with no lint or strings attached *
Inspect vac shoe for blockage; remove fibers with coat hanger, etc. *
Check hoses for wear, blockages, or damage *
Check handles, switches, and knobs for damage *
Check vac motor intake filter and clean *
Run one gallon of water through system *
Clean out recovery tank and check float valve to make sure it moves freely *
Clean out solution tank and remove and clean vacuum intake screen *
Clean outside of all tanks and check for damage *
Run vac motor for at least one minute to allow motor to dry *
Store with dome off tank to allow the tank to dry *
Check all bearings for noise *
Check all gaskets for wear and leakage *
Check vacuum intake screen for damage; replace if necessary *
Check pump pressure; observe spray pattern and check with gauge if
necessary
*
Check and clean solution screen *
Check belts for wear and replace as necessary *
Check brush for wear; ensure bristles are not damaged *
Check cables for fraying *
Check the spray bar (manifold) for damage; replace if broken or bent *
Check condition of vac shoe and frame for damage *
Check overall performance of machine *
Check vac motor carbon brushes *
86400940 Operators Manual - CMD20

23
Maintenance
Troubleshooting
Problem Cause Solution
No Power, Nothing Runs
Is the cord plugged in. Plug in cord.
Circuit breaker tripped in building. Reset breaker.
Faulty switch. Call for service.
Faulty power cord or pigtail. Call for service.
Vacuum Motor Will Not Run
Vacuum circuit breaker tripped. Reset breaker.
Faulty main vacuum switch. Call for service.
Loose wiring. Call for service.
Faulty vac motor. Call for service.
Vacuum Motor Runs but
Suction is Poor
Debris lodged in vac shoe. Remove debris from vac shoe.
Dome gasket defective or missing. Replace as necessary.
Vacuum hose cracked or hose cuff
loose.
Replace or repair as necessary.
Incorrect vac shoe angle. Adjust as necessary.
Recovery tank full/float ball stuck in the
up position.
Drain and rinse recovery tank, free
float ball.
Clamp loose on vac motor. Call for service.
Recovery tank inlet loose or gasket
defective.
Call for service.
Vac shut-off engaged. Drain recovery tank.
Poor or No Water Flow
(Carpet is Streaky)
Solution filter clogged.
Drain solution tank and clean
solution filter.
Jets clogged or missing.
Clean using a vinegar/water
solution or replace.
Faulty solenoid. Call for service.
Propel lever not engaged.
Brush switch must be on and
propel lever squeezed to activate
spray.
Brush Does Not Spin
Brush switch on. Turn on brush switch.
Brush circuit breaker tripped. Reset circuit breaker.
Propel lever not engaged.
Propel lever must be squeezed to
activate brush.
Brush belt not broken. Replace as necessary.
Faulty brush motor. Call for service.
Machine will not Propel When
Handles are Squeezed
Circuit breaker tripped. Reset circuit breaker.
Speed control knob set at zero.
Turn speed control knob clockwise
to higher speed.
Faulty speed control board. Call for service.
Faulty propel motor. Call for service.
Solution/Brush Turn on When
Brush Switch Engaged
Faulty micro switch. Call for service.
86400940 Operators Manual - CMD20

24
Suggested Spare Parts
PART NO. QTY DESCRIPTION
SEE PAGE IN SPARE PARTS
LIST
86026360 1 PUMP ASM, CMD20 115V Pump
86136800 1 SCREEN, 80 MESH STRAINER DEEP Pump
86313170 1 CAP, STRAINER TALL Pump
86025320 1 IDLER ASM, BRUSH CMD20 Brush
86026130 1 MOTOR ASM, BRUSH CMD20 Brush
86026220 1 PULLEY ASM, BRUSH CMD20 Brush
86026480 1 SOLENOID ASM, CMD20 Manifold and Solenoid
86026040 1 MANIFOLD ASM, CMD20 Manifold and Solenoid
86026870 1 VAC MOTOR ASM, CMD20 Solution Tank
86135320 1 BRUSH SET, 120V VAC, WINDSOR Solution Tank
86025180 1 DOME ASM, CMD20 Recovery Tank
86400940 Operators Manual - CMD20

25
Notes
86400940 Operators Manual - CMD20

Rate your product and tell us your opinion.
Évaluer votre produit et dites-nous votre opinion.
www.kaercher.com/welcome
www.kaercher.com/dealersearch
Alfred Kärcher SE & Co. KG
Alfred-Kärcher-Str. 28-40
71364 Winnenden (Germany)
Tel.: +49 7195 14-0
Fax: +49 7195 14-2212
DANKE!
THANK YOU!
MERCI!
GRACIAS!
!
Registrieren Sie Ihr Produkt und protieren Sie von vielen Vorteilen.
Register your product and benet from many advantages.
Enregistrez votre produit et bénécier de nombreux avantages.
Registre su producto y aproveche de muchas ventajas.
Bewerten Sie Ihr Produkt und sagen Sie uns ihre Meinung.
Reseñe su producto y díganos su opini
ó
n