


64
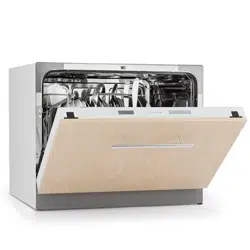
3 Montage de l‘habillage de porte
(si nécessaire)
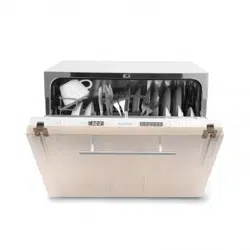
4 Montage de l‘habillage de porte (si nécessaire)
supporting foot
Pieds réglable


65
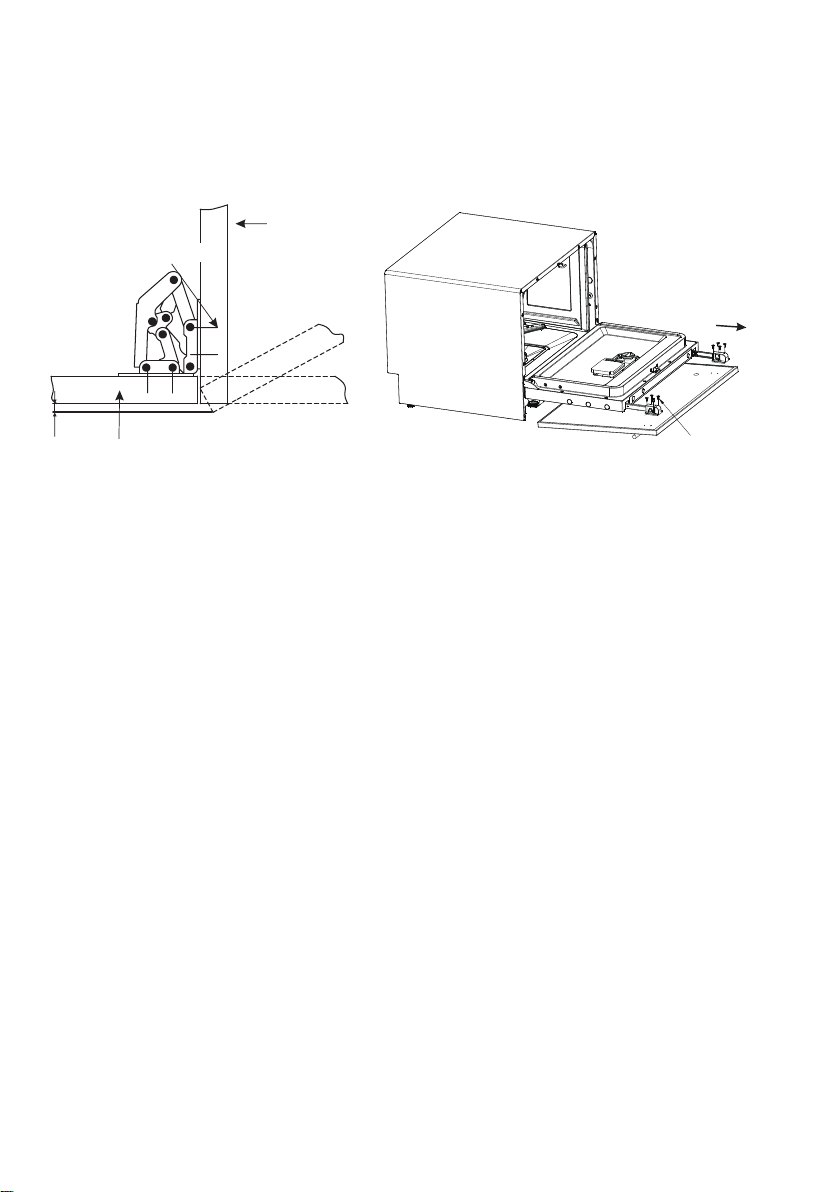
5 Placez le lave-vaisselle dans l‘ouverture, mais ne l‘insérez pas complètement. Alignez d‘abord les pieds
avec la surface d‘appui puis placez l‘appareil complètement en place.
Decorative panel
Panneau décoratif

66
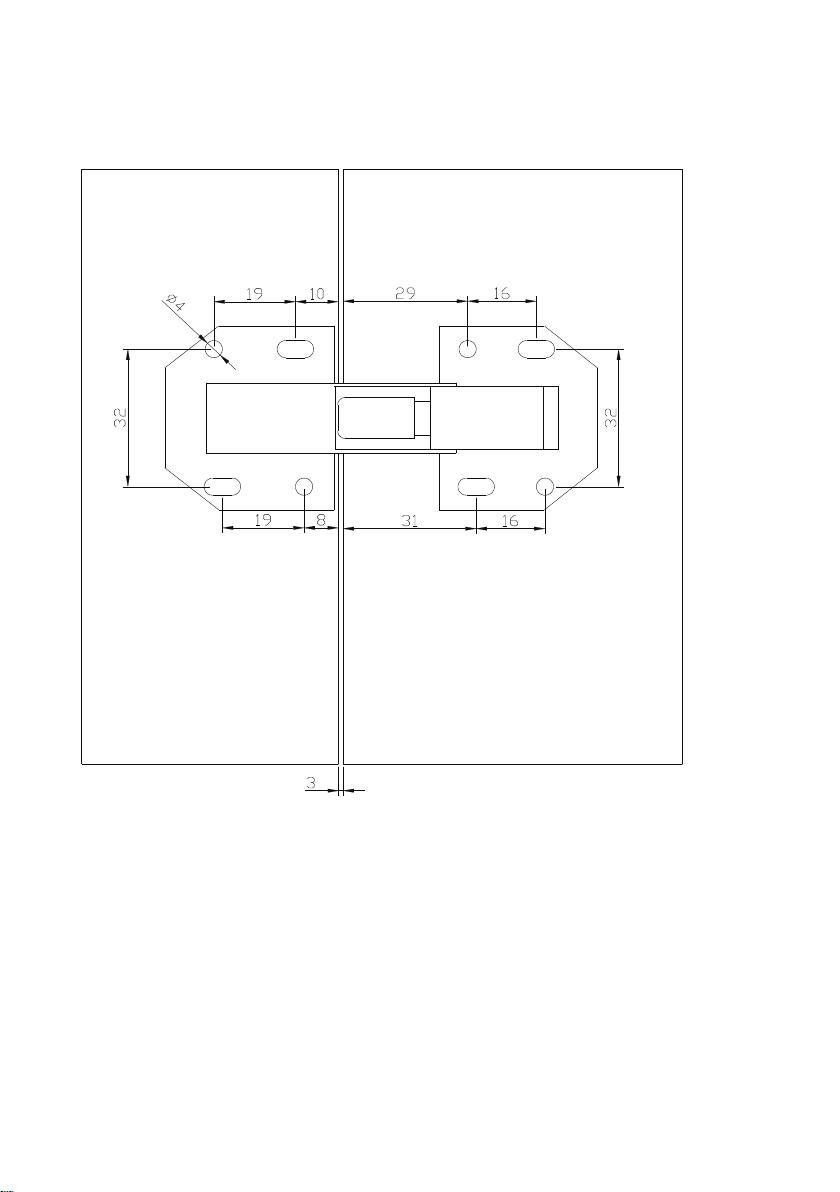
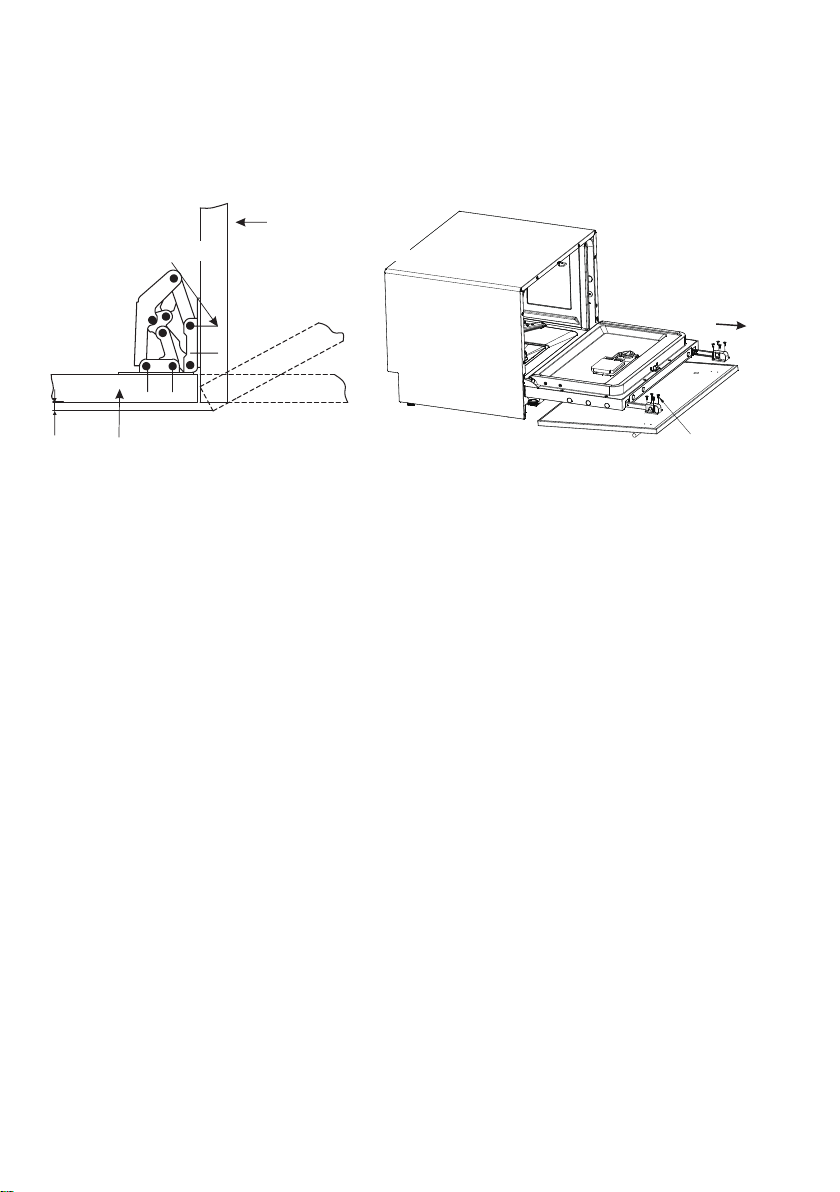
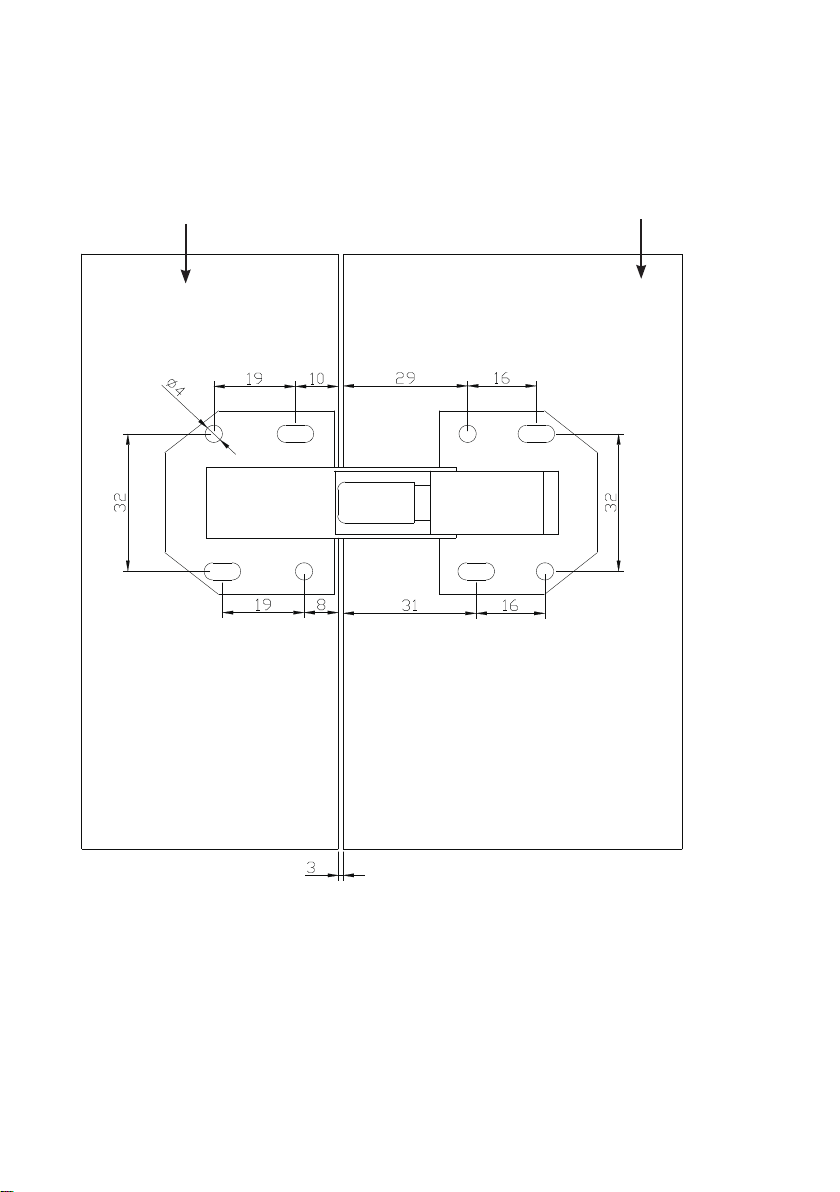
6 Montage de l‘habillage de porte
Procédez comme sur l'illustration ci-dessous. Montez d'abord les charnières entre le support de la niche et le
panneau de porte avec 16 vis au total.
Screw, in al
l 8
Cabinet base board
Screw,in all 16
6
Decorative panel
Habillage de porte
16 vis
8 vis
Surface de pose

67
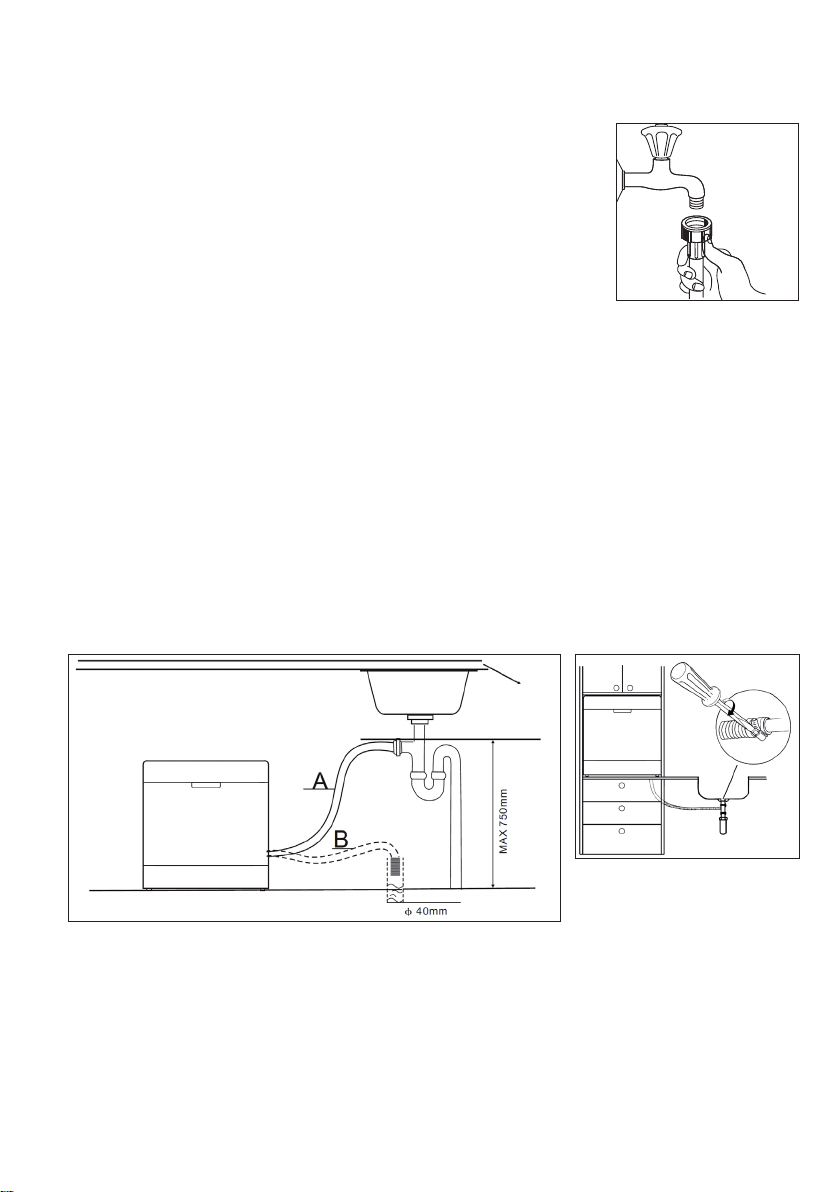
Installation et démontage de l‘admission d‘eau
Pour le branchement, utilisez des tuyaux neufs. N'utilisez pas de tuyaux usagés.
La pression de l'eau doit être comprise entre 0.04-1 MPa. Si la pression est
inférieure, demandez conseil à un professionnel.
Installation de l'admission d'eau : Déroulez complètement le tuyau d'entrée
de sécurité de son support à l'arrière de l'appareil. Fixez la vis à un robinet
d'eau de ¾ pouce. Ouvrez l'arrivée d'eau à fond avant d'utiliser l'appareil.
Débranchement de l'admission d'eau : fermez l'arrivée d'eau. dévissez le
tuyau d'admission d'eau du robinet.
IMPORTANT : Assurez-vous que la vis est bien serrée sur le robinet. Si vous n'avez jamais utilisé le branchement
auparavant, ou si vous ne l'avez pas utilisé depuis longtemps, laissez couler un peu d'eau jusqu'à ce qu'elle sorte
du robinet. Cette précaution garantit que la vanne d'entrée ne soit pas bouchée ou endommagée par des
particules contenues dans l'eau.
Installation de l'évacuation d'eau
Insérez le tuyau de vidange dans un tuyau d'évacuation d'eau de 4 cm de diamètre minimum ou laissez-le
s'égoutter dans l'évacuation. Veillez à ne pas pincer ou plier le tuyau. Utilisez le collier de serrage fourni pour
la fixation. Le tuyau d'évacuation de l'eau (A) ne doit pas dépasser 75 cm et le tuyau de vidange (B) ne doit pas
être immergé dans l'eau pour éviter le refoulement.
IMPORTANT : Fixez fermement le tuyau de vidange à l'évacuation avec le collier de serrage fourni afin qu'il ne
bouge pas et que les eaux usées ne débordent pas.
.

68
Récupération des eaux usées
Si votre évacuation se trouve plus d'un mètre au-dessous de l'appareil, vous ne pouvez pas diriger les eaux usées
directement dans l'évacuation. Dans ce cas, vous devez récupérer les eaux usées dans un bac récupérateur à
cet effet qui doit être situé plus bas que la sortie d'eau.
Tuyau rallonge
Si vous avez besoin de rallonger votre tuyau, utilisez un tuyau aux mêmes caractéristiques et veillez à ne pas
dépasser 4 mètres. Les tuyaux trop longs peuvent avoir un effet négatif sur l'efficacité du nettoyage du lave-
vaisselle.
Démarrage du lave-vaisselle
Avant la première utilisation du lave-vaisselle veuillez vérifier les points suivants :
• L'installation du lave-vaisselle doit être terminée et il doit reposer sur une surface plane
• La vanne d'admission d'eau doit être ouverte
• Les branchements du tuyau d'admission doivent être bien serrés et étanches
• Le câble secteur doit être branché
• L'alimentation doit être allumée
• Les tuyaux d'admission et d'évacuation sont branchés et bien serrés
• Tous les matériaux et films d'emballage ont bien été retirés
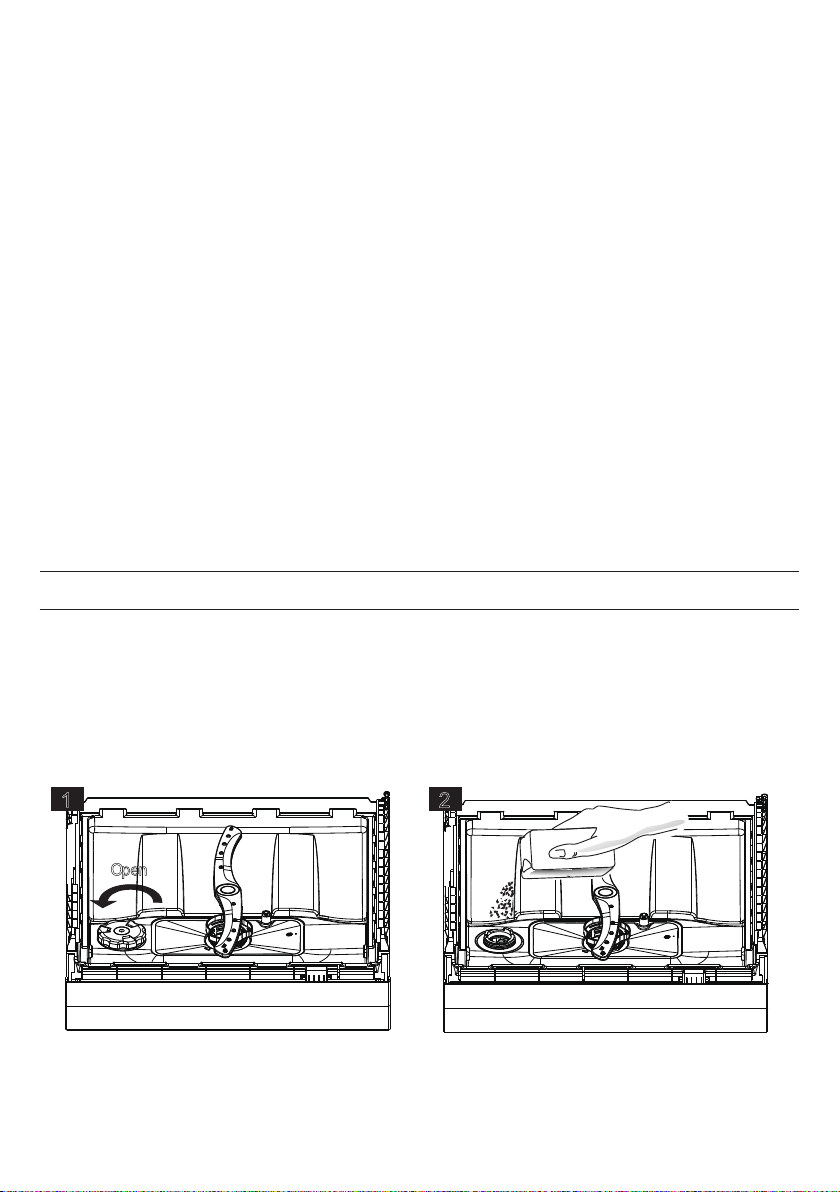
Versez du sel régénérant dans l'appareil
• Utilisez seulement du sel régénérant prévu pour les lave-vaisselle. Tous les autres sels, comme le sel de table
par exemple, peuvent endommager l'appareil. le fabricant ne peut être tenu pour responsable des dégâts
causés par l'utilisation d'un sel inadapté.
• Versez le sel juste avant de démarrer un programme complet de lavage. Vous éviterez ainsi que des grains
de sel ou de l'eau salée ne reste au fond de l'appareil, provocant l'apparition de corrosion
Open
1 2
51
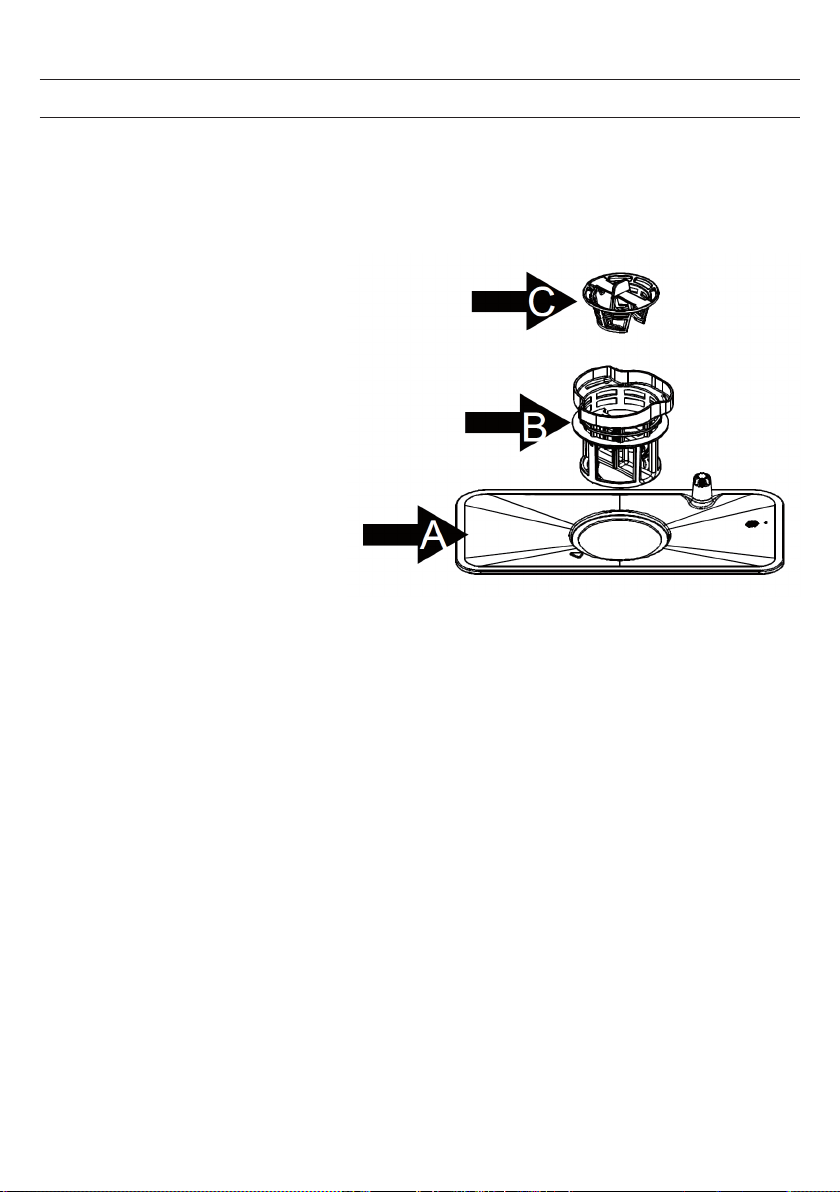
Filtering System
The filter prevent larger remnants of food or other objects from getting inside the pump. The filter system
consists of a coarse filter, a flat (Main filter) and a micro filter (fine filter).
Coarse filter (C)
Larger items, such as pieces of bone
or glass, that could block the drain are
trapped in the coarse filter. To remove
the items caught by the filter, gently
squeeze the tap on the top of this fil-
ter and lift out.
Fine filter (B):
This filter holds soil and food residue
in the sump area and prevents it from
being deposited on the dishes during
wash cycle.
Main filter (A):
Food and soil particles trapped by this
filter are pulverized by a special jet on
the spray arm and washed down to
drain.
Filter assembly
The filter efficiently removes food particles from the wash water, allowing it to be re-cyclated during the cycle.
For best performance and results, the filter assembly must be regularly cleaned. For this reason, it is a good idea
to remove the larger food particles trapping in the filter after each wash cycle by rinsing the filter and cup under
running water. To remove the filter assembly, pull on the cup handle in the upward direction.
WARNING: The dishwasher must never be used without the filters. Improper replacement of the filter may
reduce the performance level of the appliance and damage dishes and utensils.
Turn the coarse filter (C) counterclockwise and remove it.
Disassemble the filter system.
After cleaning put the filters back in the shown order.
Important Hints on Cleaning the Filter System
To clean the coarse filter and the fine filter, use a cleaning brush.
When cleaning the filters, don‘t knock on them. Otherwise, the filters could be contorted and the perfor-
mance of dishwasher could be debased.
52
Caring for the Dishwasher
The control panel can be cleaned by using a lightly dampened cloth and dry thoroughly.
The exterior use a good appliance polish wax.
Never use sharp objects, scouring pads or harsh cleaners on any part of the dishwasher.
To clean the edge around the door, you should use only a soft warm,
damp cloth. To avoid penetration of water into the door lock and electrical components, do not use a spray
cleaner of any kind.
Protect against Freezing
please take frost protection measures on dishwasher in winter. Each time after washing cycles, please operate
as follows:
Cut off electrical power to the dishwasher.
Turn off the water supply and disconnect the water inlet pipe from the water valve.
Drain water from the inlet pipe and water valve. (Use a pan to catch the water)
Reconnect the water inlet pipe to the water valve.
Remove the filter at the bottom of the tub and use a sponge to use up water in sump.
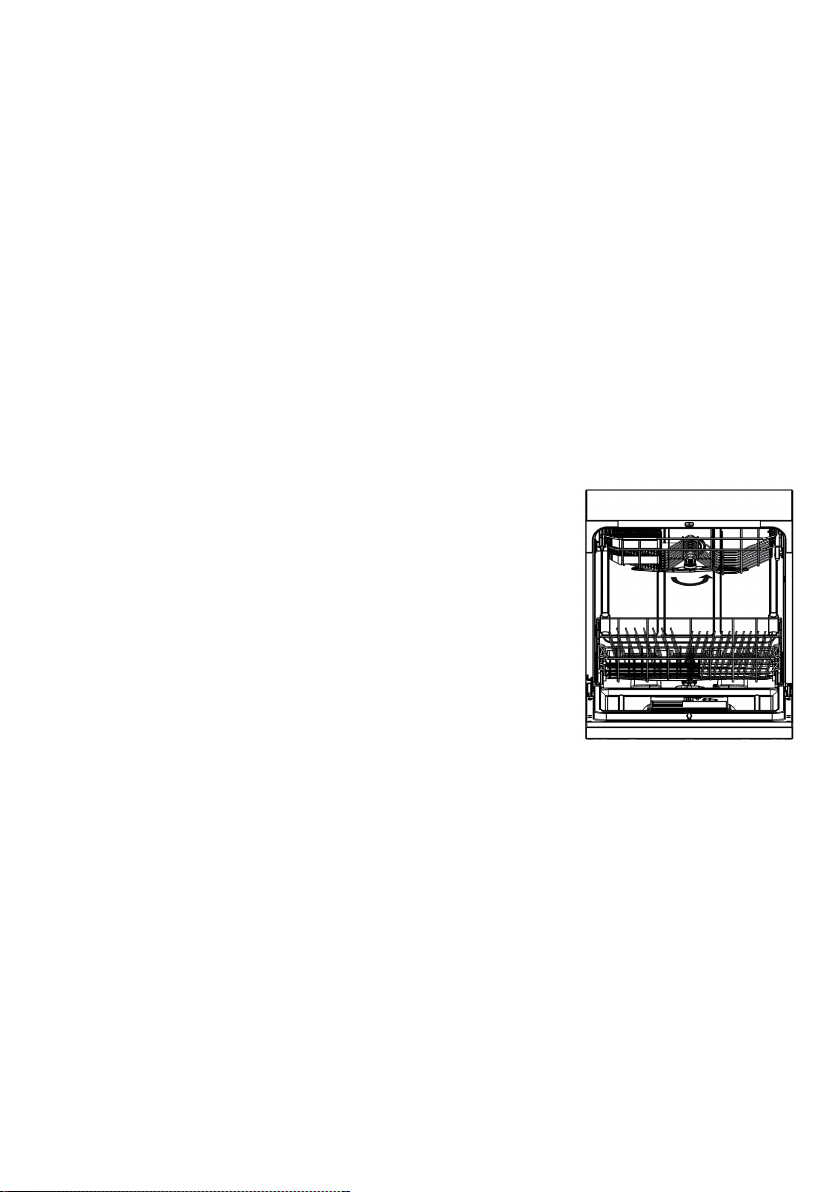
Cleaning the Spray Arms
It is necessary to clean the spray arms regularly for hard water chemicals
will clog the spray arm jets and bearings.
To remove the upper spray arm, hold the nut, rotate the arm clockwise to
remove it. To remove the lower spray arm, pull out the spray arm upward.
Wash the arms in soapy and warm water and use a soft brush to clean the
jets. Replace them after rinsing them thoroughly.
How to keep your Dishwasher in Shape
After every wash, turn off the water supply to the appliance and leave the door slightly open so that mois-
ture and odors are not trapped inside.
Before cleaning or performing maintenance, always remove the plug from the socket.
To clean the exterior and rubber parts of the dishwasher, do not use solvents or abrasive cleaning products.
Only use a cloth with warm soapy water. To remove spots or stains from the surface of the interior, use a
cloth dampened with water with a little vinegar, or a cleaning product made specifically for dishwashers.
It is recommend that you run a wash cycle with the dishwasher empty and then remove the plug from the
socket, turn off the water supply and leave the door of the appliance slightly open. This will help the door
seals to ast longer and prevent odours from forming within the appliance.
If the appliance must be moved, try to keep it in the vertical position. If absolutely necessary, it can be
positioned on its back.
One of the factors that cause odors to form in the dishwasher is food that remains trapped in the seals.
Periodic cleaning with a damp sponge will prevent this from occurring.
53
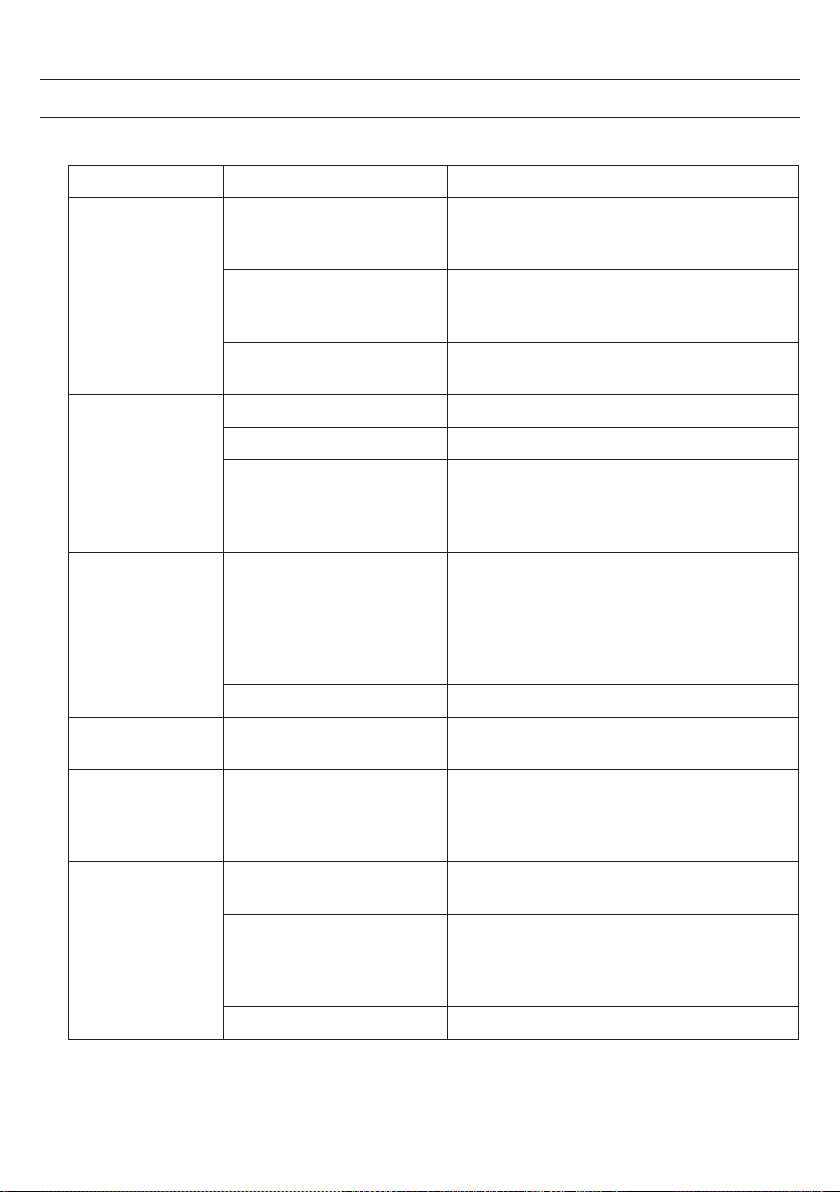
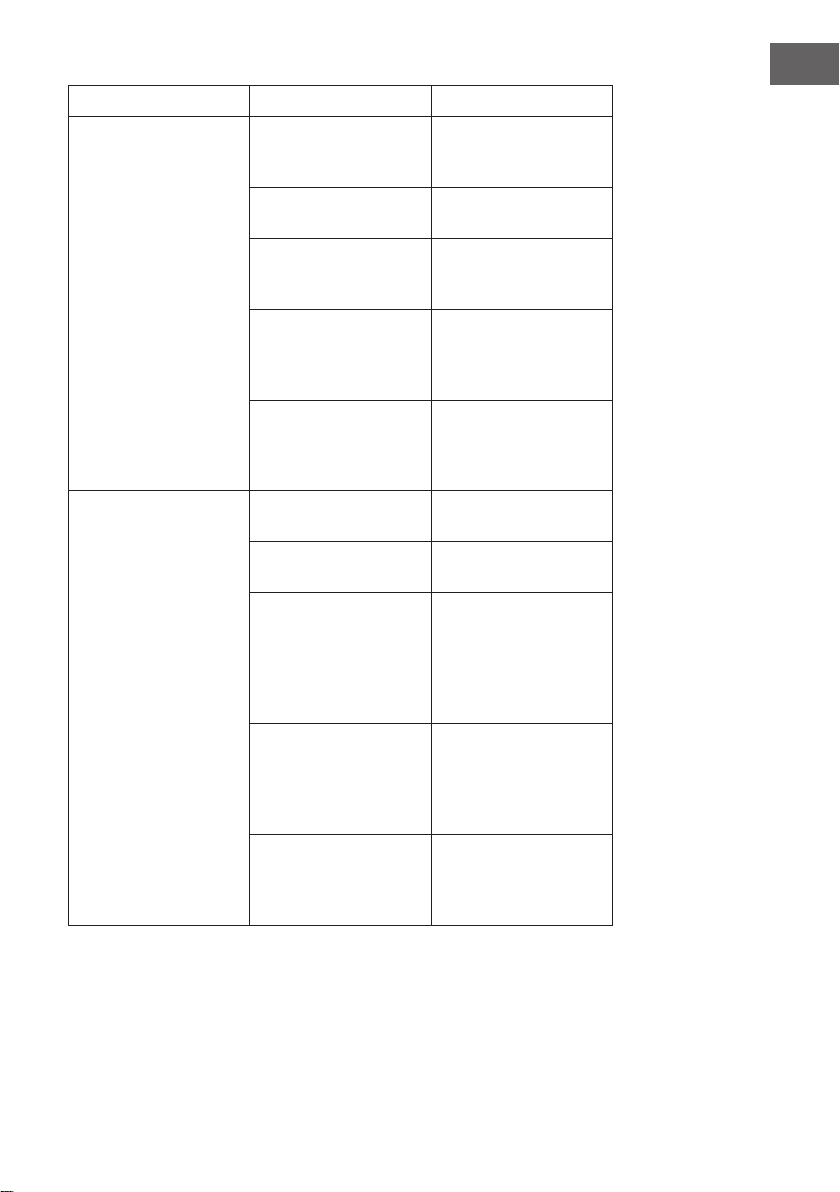
TROUBLESHOOTING
Problem Possible Causes What to do
Dishwasher doesn‘t
start.
Fuse blown, or the circuit
breaker tripped.
Replace fuse or reset circuit breaker. Remove any
other appliances sharing the same circuit with the
dishwasher.
Power supply is not turned on. Make sure the dishwasher is turned on and the
door is closed securely. Make sure the power cord is
properly plugged into the wall socket.
Door of dishwasher not
properly closed.
Closed dishwasher making sure that door latches.
Water not pumped
from dishwasher.
Kink in drain hose. Check drain hose.
Filter clogged. Check coarse filter.
Kitchen sink clogged. Check kitchen sink to make sure it is draining well.
If problem is kitchen sink not draining ,you may
need a plumber rather than a serviceman for dish-
washer.
Suds in the tub. Improper detergent Use only the special dishwasher detergent to avoid
suds. If this occurs, open the dishwasher and let
suds evaporate. Add 1 gallon of cold water to the
tub. Close and latch the dishwasher, then Start any
wash cycle to drain out the water . Repeat if neces-
sary.
Spilled rinse-aid Always wipe up rinse-aid spills immediately.
Stained tub interior. Detergent with colourant was
used.
Make sure that the detergent is the one without
colourant.
White film on inside
surface.
Hard water minerals. To clean the interior, use a damp sponge with dish-
washer detergent and wear rubber gloves. Never
use any other cleaner than dishwasher detergent
for the risk of foaming or suds.
There are rust stains
on cutlery.
The affected items are not cor-
rosion resistant.
Don‘t wash corrosive items in the dishwasher.
A programme was not run after
dishwasher salt was added.
Traces of salt have got into the
wash cycle.
Always run the Quick wash programme, without
any crockery in the dishwasher and without se-
lecting the Turbo function (if present), after adding
dishwasher salt.
The lid of softer is loose. Check the lip .Ensure the fix is fine.
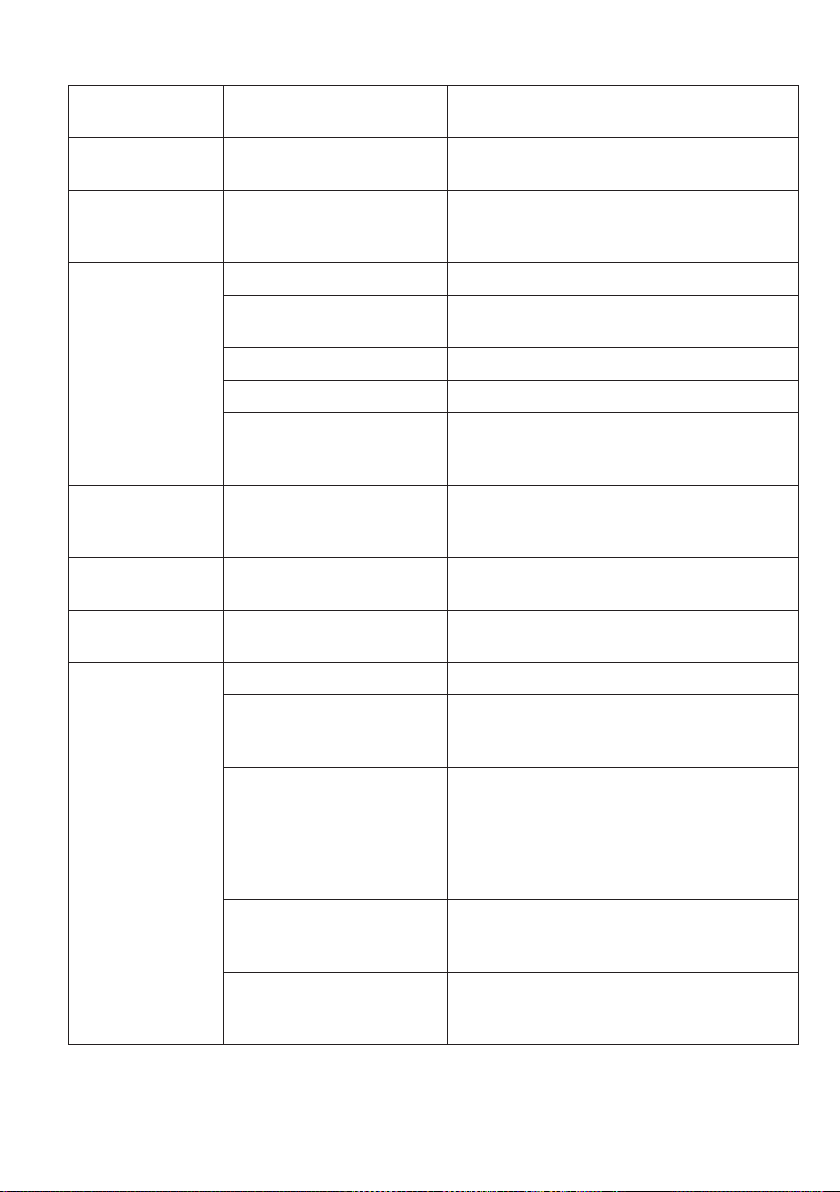
54
knocking noise in the
wash cabinet.
The sp ay arm is knocking
against an item in a basket.
Interrupt the programme, and rearrange the items
which are obstructing the spray arm.
Rattling noise in the
wash cabinet.
Item of crockery are insecure
in the wash cabinet.
Interrupt the programme, and rearrange the items
of crockery.
knocking noise in the
water pipe.
This may be caused by on-site
installation or the cross-section
of the piping.
This has no influence on dishwasher function. If in
doubt, contact a suitably qualified plumber.
The dishes are not
clean.
Dishes were‘nt loaded correctly. See notes in „Loading the Dishwasher Baskets“.
The programme was not pow-
erful enough.
Select a more intensive programme. See “Wash
Cycle Table“.
Not enough detergent dispensed. Use more detergent, or change your detergent.
Item are blocking spray arms. Rearrange items so that the spray can rotate freely.
The filter combination is not
clean or is not correctly fitted
or spay arm jets are blocked.
Clean and/or fit the filter combination correctly.
Clean the sp ay arm jets. See „Cleaning the Spray
Arms“.
Cloudiness on glass-
ware.
Combination of soft water and
too much detergent.
Use less detergent if you have soft water and select
a shortest cycle to wash the glassware and to get
them clean.
Black or gray marks
on dishes.
Aluminum utensils have rubbed
against dishes.
Use a mild abrasive cleaner to eliminate those
marks.
Detergent left in
dispenser cups.
Dishes block detergent cups. Re-loading the dishes properly.
The dishes are not
drying.
Improper loading Load the dishwasher as suggested in the directions.
Too little rinse-aid Increase the amount of rinse-aid/Refill the rinse-
aid Increase the amount of rinse-aid/Refill the
rinse-aid dispenser.
Dishes are removed too soon. Do not empty your dishwasher immediately after
washing. Open the door slightly so that the steam
can escape. Begin unloading the dishwasher only
once the dishes are barely warm to the touch.
Empty the low basket first. This prevents water
form dropping off dishes in the upper basket.
Wrong programme selection In short programmes the washing temperature
is lower. This also lowers cleaning performance.
Choose a programme with a long washing time.
Using cutlery with a low-
quality coating
Water drainage is more difficult with these items.
Cutlery or dishes of this type are not suitable for
washing in the dishwasher.
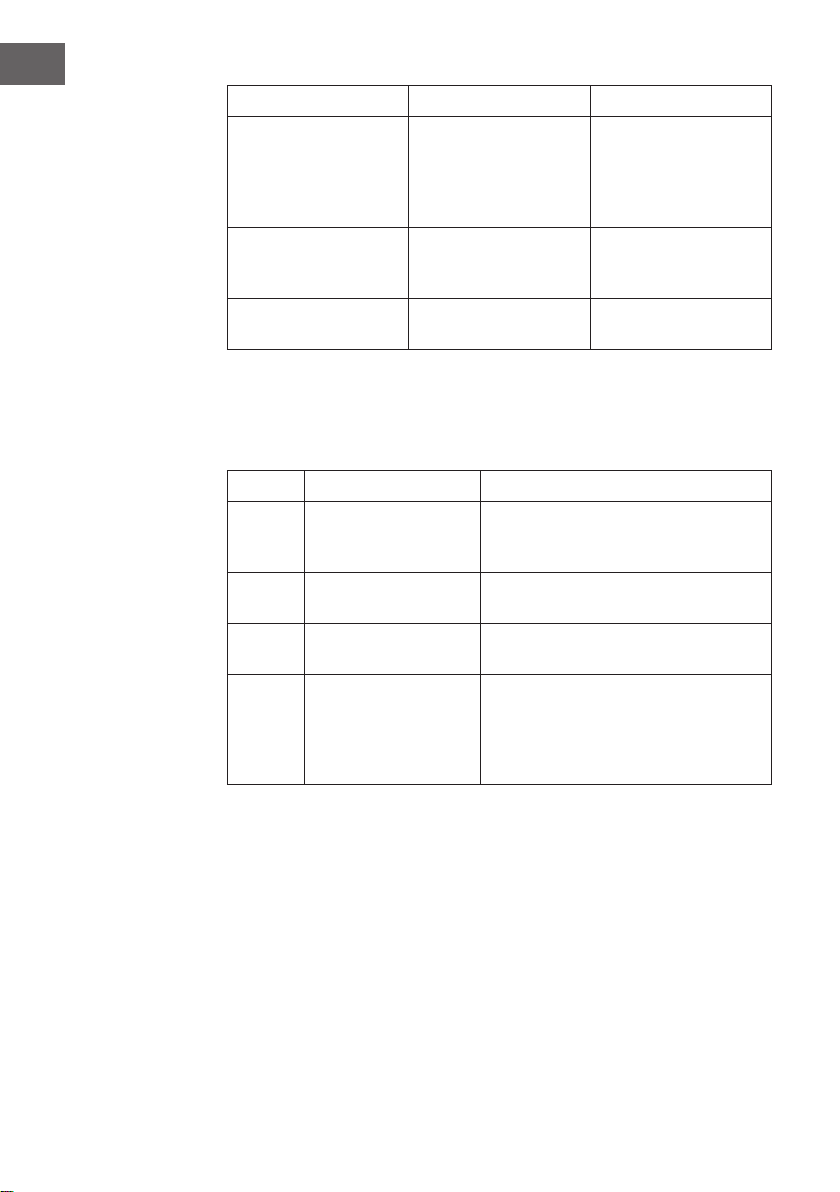
55
Error Codes
When some malfunctions come on, the appliance will display error codes to warn you:
Code Meanings Possible Cause
E1 Longer inlet time. Faucets is not opened, or water intake is restricted,or water pres-
sure is too low.
E4 Overflow. Some element of dishwasher leaks. If overflow occurs, turn off
the main water supply before calling a service. If there is water in
the base pan because of an overfill or small leak, the water should
be removed before restarting the dishwasher.
DISPOSAL CONSIDERATIONS
According to the European waste regulation 2012/19/EU this symbol on the product or
on its packaging indicates that this product may not be treated as household waste. In-
stead it should be taken to the appropriate collection point for the recycling of electrical
and electronic equipment. By ensuring this product is disposed of correctly, you will help
prevent potential negative consequences for the environment and human health, which
could otherwise be caused by inappropriate waste handling of this product. For more de-
tailed information about recycling of this product, please contact your local council or your
household waste disposal service.
DECLARATION OF CONFORMITY
Producer: Chal-Tec GmbH, Wallstraße 16, 10179 Berlin, Germany.
This product is conform to the following European Directives:
2014/30/EU (EMC)
2014/35/EU (LVD)
2011/65/EU (RoHS)
2009/125/EC (ErP)


56
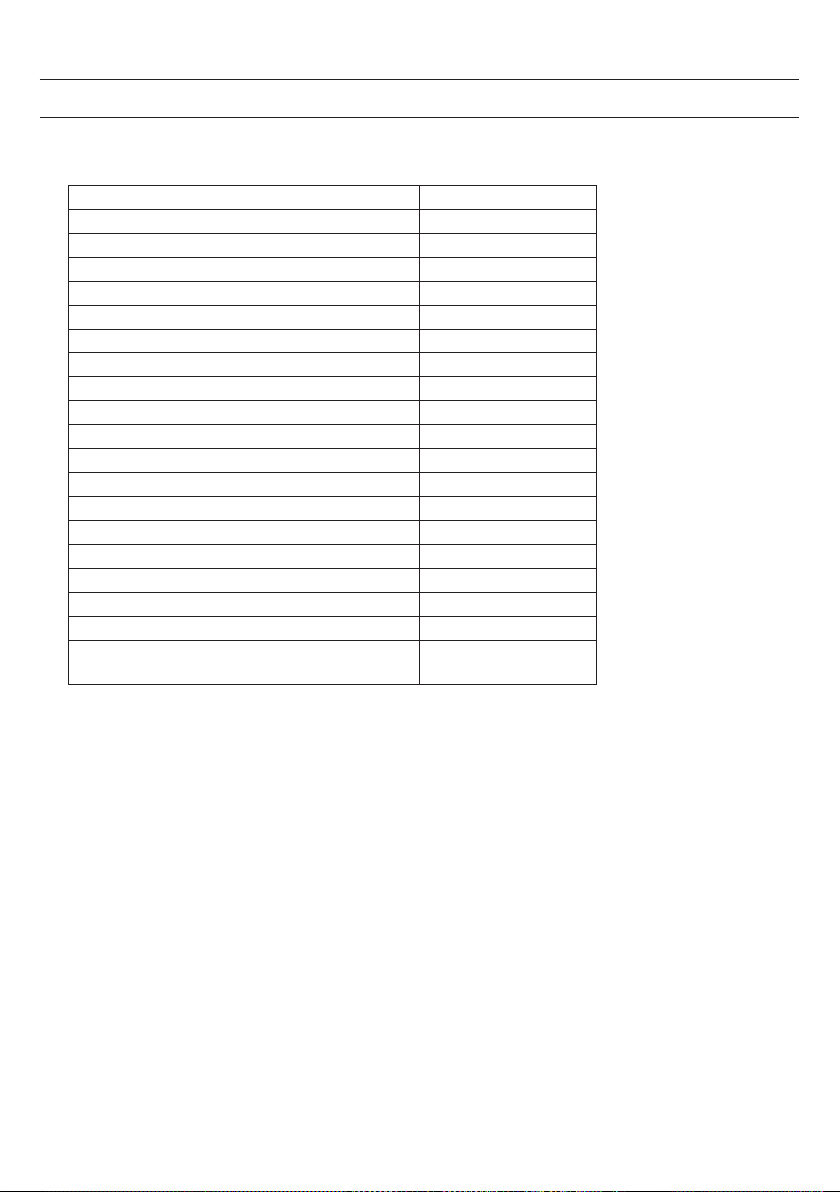
Fiche de données produit 57
Consignes de sécurité 58
Guide de démarrage rapide 59
Aperçu de l‘appareil et panneau de commande 60
Installation 62
Avant la première utilisation 68
Comment charger correctement le lave-vaisselle 73
Programmes de lavage 75
Mise en marche et utilisation 76
Nettoyage et entretien 77
Identification et résolution des problèmes 79
Chère cliente, cher client,
Toutes nos félicitations pour l’acquisition de ce nouvel appareil.
Veuillez lire attentivement et respecter les instructions de ce mode
d’emploi afin d’éviter d’éventuels dommages. Nous ne saurions
être tenus pour responsables des dommages dus au non-respect
des consignes et à la mauvaise utilisation de l’appareil. Scannez le
QR-Code pour obtenir la dernière version du mode d'emploi et à
d'autres informations concernant le produit.
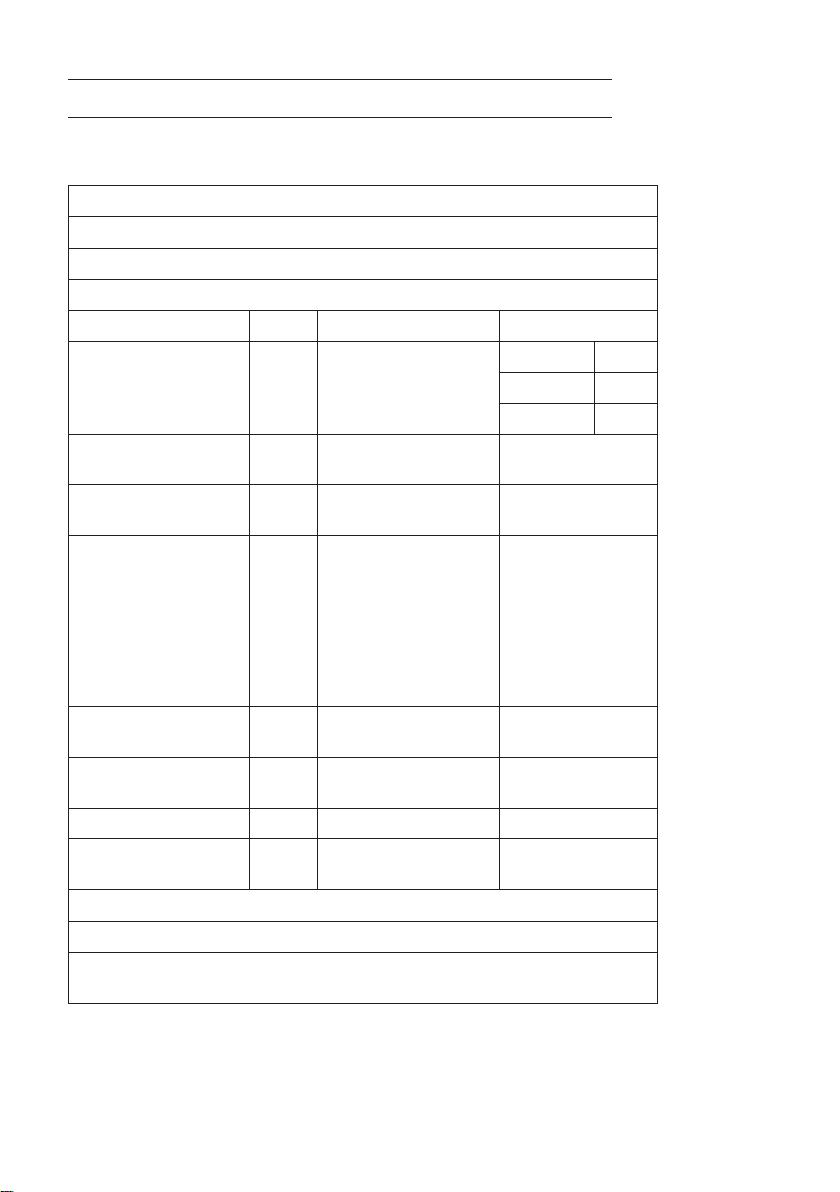
57
Informations selon la réglementation déléguée (UE) 1059/2010 du 28 septembre 2010
Fabricant Chal-Tec GmbH
Référence du modèle 10032915
Capacité nominale de couverts standard 6
Classe d'efficacité énergétique
1
A+
Consommation annuelle d'énergie (AE
C
)
2
174 kW
Consommation éteint 0,45 W
Consommation en veille 0,49 W
Consommation d'eau annuelle pondérée (AW
C
)
3
1820 litres
Classe d'efficacité du séchage
4
A
Cycle de lavage standard
5
ECO 50 °C
Durée du programme standard de lavage 180 minutes
Niveau sonore 49 dB(A)re 1 p W
Appareil encastrable oui
Dimensions
Hauteur 43,8 cm
Largeur 55 cm
Profondeur (branchements inclus) 50 cm
Consommation 1280 W
Alimentation 230 V~ / 50 Hz
Pression de l'eau (pression d'écoulement) 0,4-10 bar=0,04-
1MPa
Remarques
1 A+++ est la plus haute classe d'efficacité énergétique. D est la plus basse classe d'efficacité
énergétique.
2 Consommation d'énergie "174 kWh par an " : sur la base de 280 cycles de lavage standard à
l'eau froide et utilisation des programmes courts. La consommation réelle d'énergie dépend
de l'utilisation de l'appareil.
3 Consommation d'eau 1820 litres par an : basée sur 280 cycles de lavage standard.
La consommation d'eau réelle dépend de l'utilisation de l'appareil.
4 De A (plus haute classe d'efficacité énergétique) à G (plus basse classe d'efficacité)
5 Ce programme convient pour le lavage de la vaisselle normalement sale. C'est le programme
le plus efficace pour ce type de lavage en termes de consommation d'eau et d'électricité.
Les valeurs ci-dessus ont été mesurées selon les normes dans des conditions de fonctionnement
spécifiques. Les résultats peuvent varier selon la quantité et la saleté de la vaisselle, la dureté de
l'eau, la quantité de détergent et d'autres facteurs.

58
Lisez toutes les instructions et gardez-les pour vous y référer ultérieurement.
Consignes générales de sécurité
• L'appareil n'est pas destiné à un usage commercial, mais uniquement pour un usage domestique et similaire.
• Les enfants de plus de 8 ans, les personnes physiquement ou psychiquement handicapées ne doivent
utiliser l'appareil que s'ils ont été soigneusement formés par une personne responsable de leur sécurité des
fonctions et mesures de sécurité. Assurez-vous que les enfants ne jouent pas avec l'appareil. Le nettoyage et
l'entretien ne doivent être effectués par des enfants que sous surveillance et s'ils ont plus de 8 ans.
• Cet appareil est conçu pour un usage intérieur et domestique uniquement. Ne pas immerger l'appareil, le
câble d'alimentation ou la fiche dans l'eau ou d'autres liquides.
• Débranchez la fiche avant de nettoyer ou d'entretenir l'appareil. Utilisez un chiffon humide et un détergent
doux pour le nettoyage, puis essuyez avec un chiffon sec.
• Pour réduire le risque d'électrocution en cas de dysfonctionnement ou de panne, l'appareil doit être branché
à une prise électrique reliée à la terre. Si vous n'êtes pas sûr que votre prise réponde aux exigences, consultez
un électricien. Ne connectez l'appareil qu'à des prises correspondant à la tension spécifiée de l'appareil.
• N'apportez aucune modification à la fiche. La modification et le remplacement de la fiche ne doivent être
effectués que par du personnel qualifié.
• Ne vous asseyez pas ou ne vous tenez pas sur la porte du lave-vaisselle.
• N'allumez pas l'appareil tant que toutes les pièces n'ont pas été correctement installées.
• Pendant le fonctionnement, ouvrez la porte très soigneusement car de l'eau pourrait jaillir.
• Ne placez pas d'objets lourds sur la porte lorsqu'elle est ouverte, sinon l'appareil pourrait basculer vers
l'avant.
59
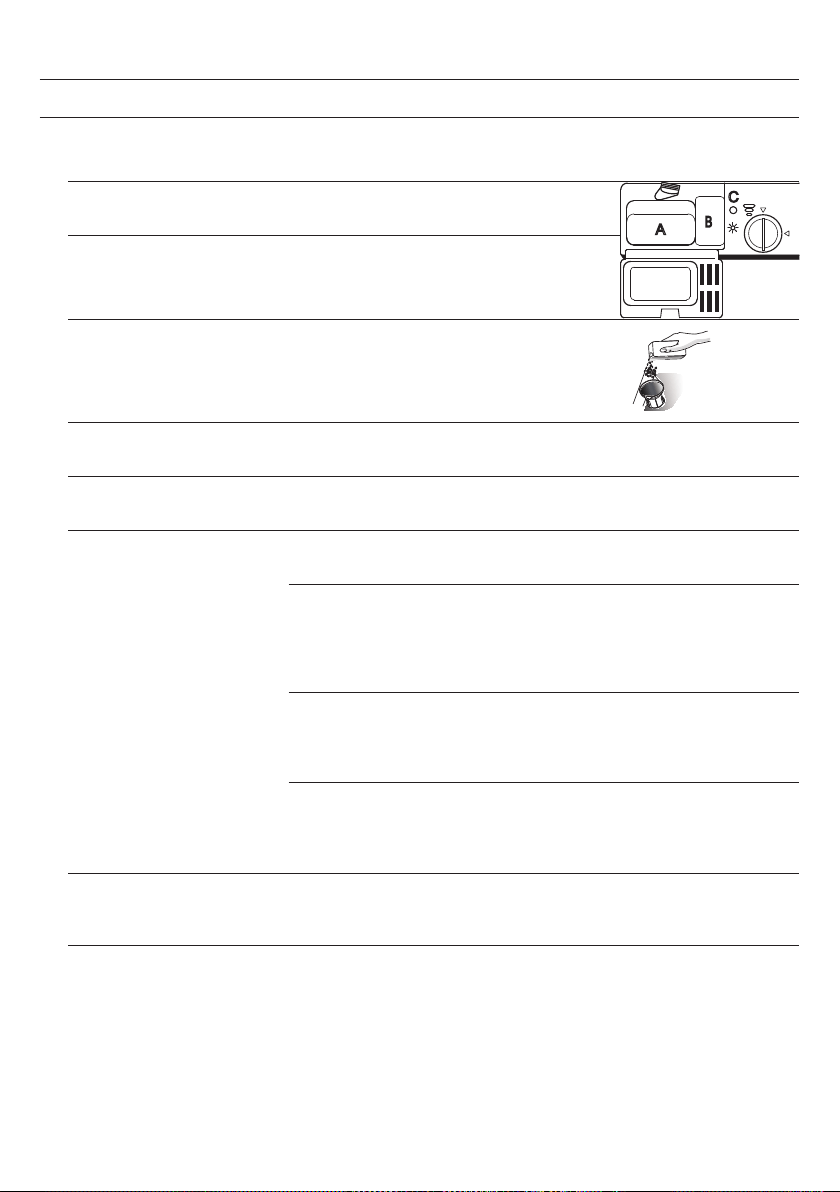
1 Démarrage de l'appareil Appuyez sur la touche Power et ouvrez la porte
2 Remplir de produit de
lavage
Remplissez le grand compartiment (A) avant chaque
programme de lavage
A
B
C
3 Vérification du liquide de
rinçage
Le témoin C vous permet de détecter s'il se trouve
encore assez de liquide de rinçage dans la chambre.
4 Vérification du sel régé-
nérant
Faites l‘appoint en sel régénérant dès
que le témoin s‘allume
5 Charger le lave-vaisselle Retirez les restes d'aliments de la vaisselle et trempez au préalable les poêles con-
tenant des restes brûlés. Respectez les conseils pour charger votre lave-vaisselle.
6 Choisir un programme Refermez la porte et appuyez sur la touche programme aussi longtemps que néces-
saire pour affiche le programme désiré.
7 Démarrer le lave-vaisselle Ouvrez l'arrivée d'eau et appuyez sur la touche marche/pause. Le programme débute
au bout de dix secondes.
Changer de programme :
Vous pouvez changer de programme tant que le produit de lavage n‘est pas fondu.
Si c‘est le cas, vous devrez en rajouter. Appuyez pendant 3 secondes sur la touche
marche/pause pour interrompre le programme en cours. Choisissez un nouveau
programme et démarrez-le.
Ajouter de la vaisselle :
Ouvrez doucement la porte et attendez que les bras de lavage se soient arrêtés.
Ajoutez alors la vaisselle puis refermez la porte et le lave-vaisselle reprend son
programme automatiquement au bout de 10 secondes..
Si l‘appareil a été éteint pendant un programme :
Si le programme a été interrompu au milieu, choisissez à nouveau le programme
après redémarrage de l‘appareil, pur que le lave-vaisselle puisse poursuivre à partir de
l‘endroit où il s‘est arrêté.
8 éteindre l'appareil Dès que le programme est terminé, le buzzer retentit pendant 8 secondes. Appuyez
sur la touche Power pour éteindre l'appareil. si vous ne l'éteignez pas, il passe en
mode veille puis s'éteint automatiquement au bout de 30 minutes.
9 couper l'eau et vider le
panier
Patientez 15 minutes avant de retirer la vaisselle car celle-ci est très chaude et fragile
juste après le séchage et risquerait de se casser facilement. De plus, elle sèchera ainsi
plus rapidement. Au bout de 15 minutes, vous pouvez retirer la vaisselle.


35
The installation position of dishwasher should be near the existing inlet and drain hoses and power cord.
One side of the cabinet sink should be chosen to facilitate the connection of drain hoses of the dishwasher.
Positioning the appliance
Position the appliance in the desired location. The back should rest against the wall behind it, and the sides,
along the adjacent cabinets or wall. The dishwasher is equipped with water supply and drain hoses that can be
positioned to the right or the left to facilitate proper installation.
Power connection
Ensure the voltage and frequency of the power being corresponds to those on the rating plate. Only insert the
plug into an electrical socket which is earthed properly. If the electrical socket to which the appliance must be
connected is not appropriate for the plug , replace the socket, rather than using a adaptors or the like as they
could cause overheating and burns.
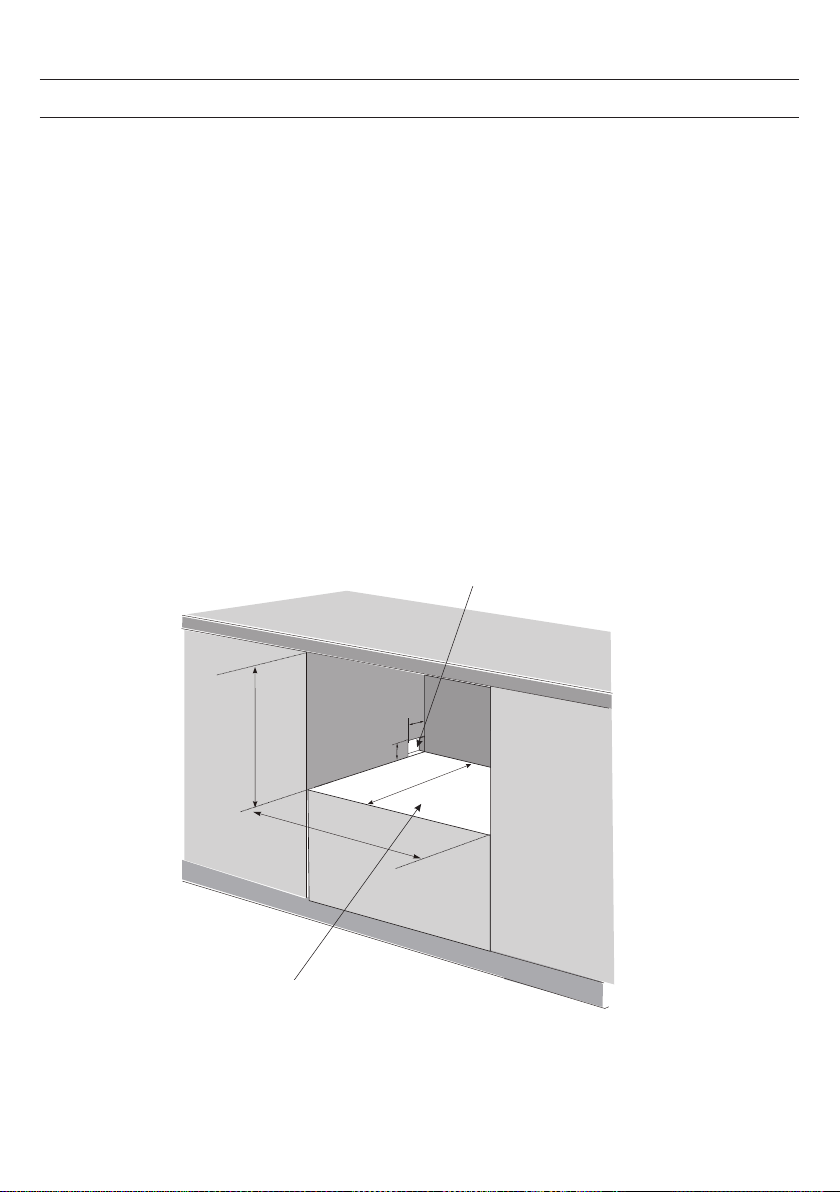
555 min
100
550 min
458 min
Space of cabinet
80
Electrical, drain
and water supply
line entrances,
both sides
Electrical, drain and
water supply line
entrances, both
sides
Space of cabinet

36
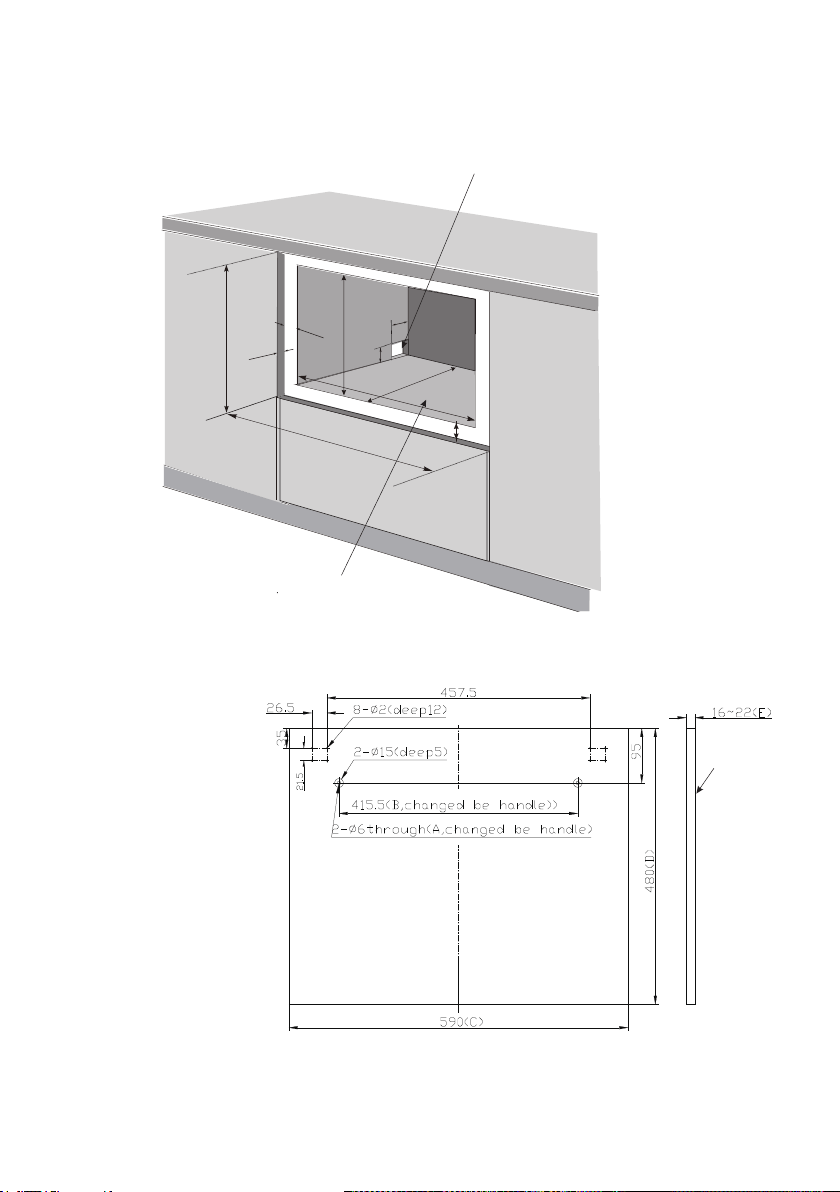
555 min
B=C(590)+6
100
7)
550 min
F(1
80
458 min
A=D(480)+9.5
(C-555) / 2 +3
Space of cabinet
Electrical, drain
and water supply
line entrances,
both sides.
25
Electrical, drain
and water supply
line entrances,
both sides
Space of cabinet
decorative panel
The weight of the decorative
panel should be min 3 kg - max
4 kg.
Dim.A and B could be alterable
by handle,
Dim.C,D and E could be alterable
by fact,
Dim.E should be in range
16~22 mm, besides the appli-
ance assembling decorative
panel.


37
supporting foot


38
5 Install the dishwasher in aperture,but not full, as figure, supporting feet, let its bottom align aperture’s
base, then push dishwasher full..
Decorative panel
Cabinet base board Fix the hinge with screws, in all 16

39
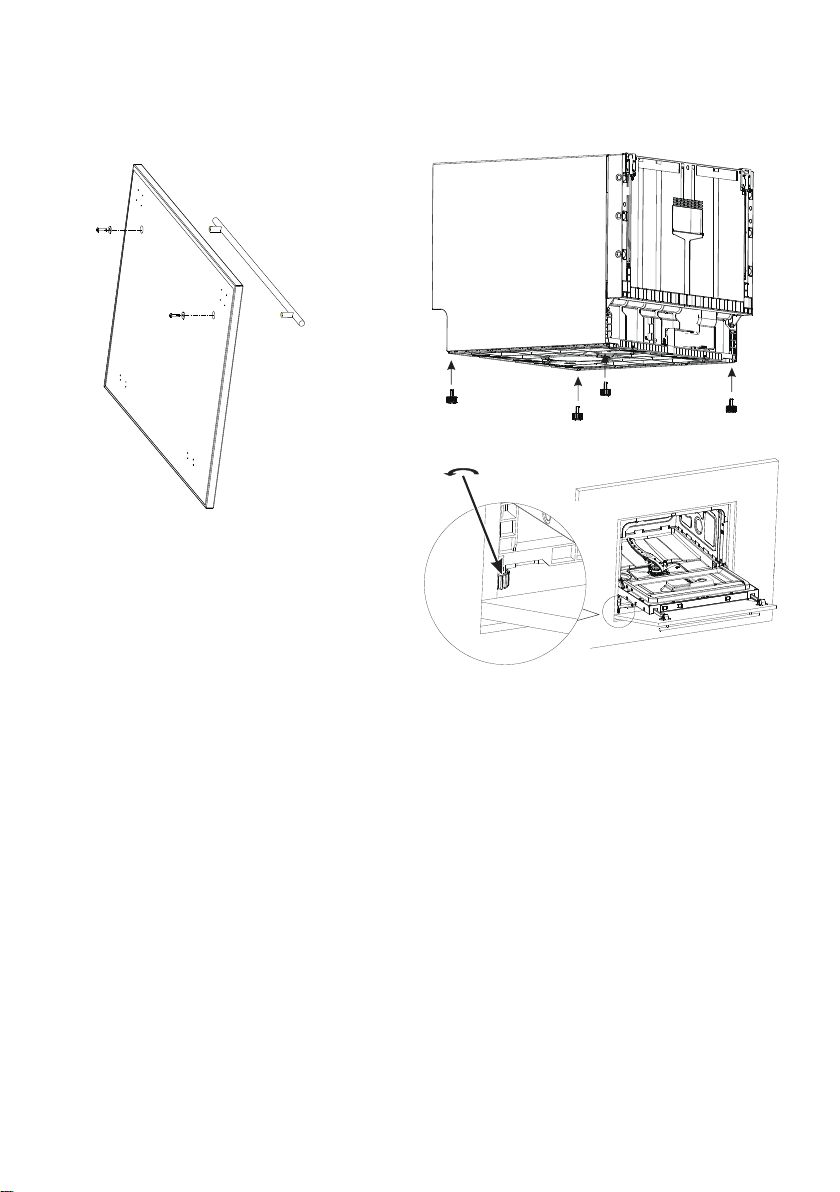
6 Türverkleidung montieren
Assemble the decorative door on the dishwasher, as figure. First install screw between the cabinet base
board and decorative panel,in all 16;then pull glide from out door groove ,case 8-screw between decorative
panels and glide.
Screw, in al
l 8
Cabinet base board
Screw,in all 16
6
Decorative panel


141
IT
CARICARE CORRETTAMENTE LA LAVASTOVIGLIE
• Si consiglia di lavare in lavastoviglie solo stoviglie idonee.
• Utilizzare solo detersivi delicati per lavastoviglie.
• Si consiglia di lavare le stoviglie delicate selezionando programmi con le più basse
temperature possibili.
• Per evitare danni non estrarre bicchiere e posate immediatamente dopo la ne del
programma di lavaggio.
Stoviglie non adatte al lavaggio in lavastoviglie
Stoviglie e posate non adatte Stoviglie poco adatte
• Posate o stoviglie con manici in
legno, osso o madreperla.
• Posate e stoviglie in plastica non
resistenti al calore.
• Vecchie posate con parti incollate
con resine non resistenti al calore.
• Stoviglie e posate rivestite.
• Oggetti in rame o in peltro.
• Bicchieri in vetro di cristallo.
• Oggetti non in acciaio inossidabile.
• Stoviglie in legno.
• Stoviglie e posate in plastica
• Alcuni tipi di bicchiere che possono
diventare opachi dopo numerosi
lavaggi.
• Oggetti in alluminio e argento
che tendono a scolorire durante il
lavaggio.
• Stoviglie smaltate che tendono a
scolorire se lavati di frequente.
Prima di caricare la lavastoviglie
Prima di caricare i cestelli, eliminare dalle stoviglie i residui di cibo e vuotare bicchieri e
i contenitori dei liquidi rimasti. Non è necessario un risciacquo preventivo sotto acqua
corrente. Sistemare le stoviglie come segue:
• Sistemare le tazze, i bicchieri, le pentole e le padelle con l’apertura rivolta verso il
basso in modo che l’acqua non si raccolga al loro interno.
• Posizionare le pentole profonde in posizione inclinata per favorire il deusso
dell’acqua.
• Sistemare le stoviglie in modo che siano ben ferme e non si ribaltino.
• Assicurarsi che gli irroratori ruotino liberamente.
• Non lavare utensili troppo piccoli che possono facilmente cadere dal cestello.
• Le stoviglie non devono essere sistemate una dentro l’altra o coprirsi a vicenda.
• Posizionare le stoviglie di maggiori dimensioni nel cestello.
• Gli utensili lunghi e aflati devono essere sistemati nel cestello in posizione
orizzontale.
• Per ottenere migliori risultati, non sovraccaricare la lavastoviglie.
142
IT
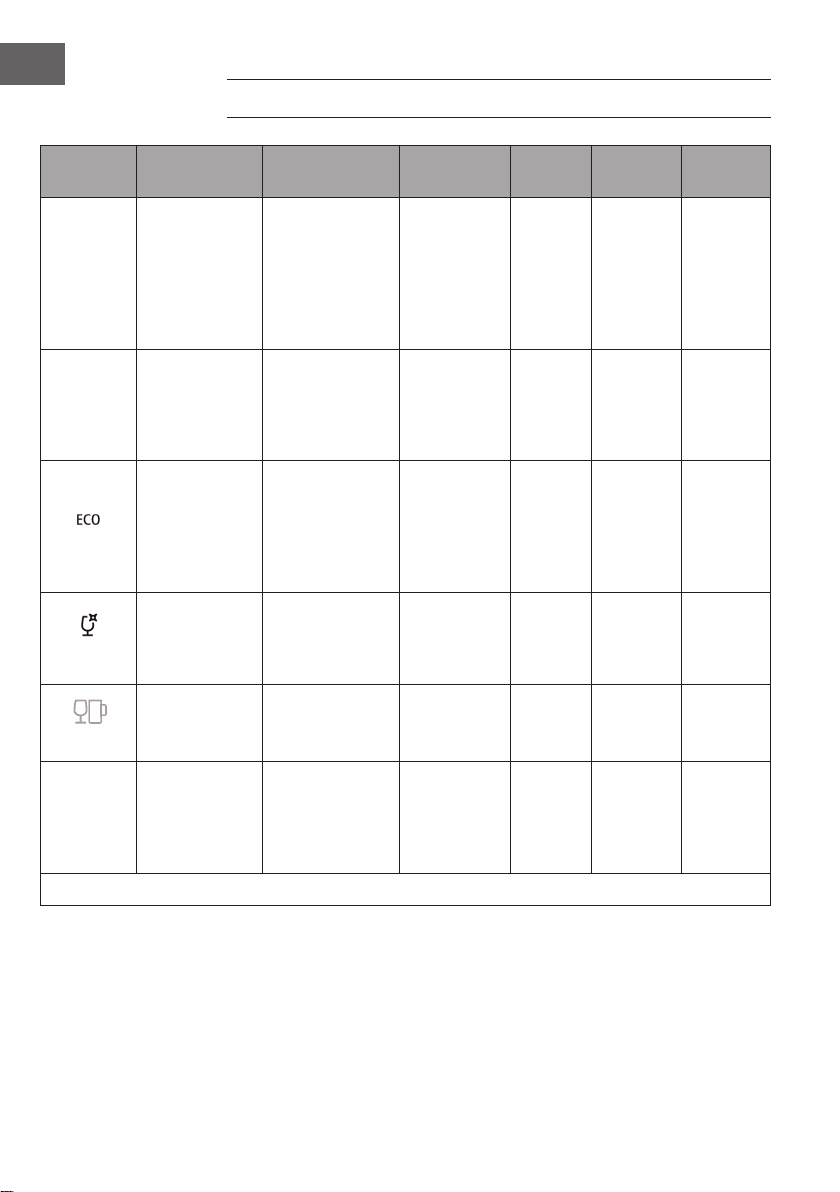
PROGRAMMI DI LAVAGGIO (EN 60436)
Programma Descrizione Ciclo di lavaggio
Detersivo Pre/
Principale
Durata
(minuti)
Energia
(kWh)
Acqua
(litri)
Intenso
Per stoviglie mol-
to sporche, come
pentole, padelle
e piatti con resti
di cibo secchi.
Prelavaggio (50
°C)
Lavaggio (70 °C)
Risciacquo
Risciacquo
Risciacquo (70 °C)
Asciugatura
4/10 g 140 1.200 9.6
Universale
Per stoviglie non
delicate con un
normale grado di
sporco.
Prelavaggio
Lavaggio (60 °C)
Risciacquo
Risciacquo (70 °C)
Asciugatura
4/10 g 12 0 1.050 7.7
(*EN 60436)
Per stoviglie
con un normale
grado di sporco,
come pentole,
piatti, bicchieri e
padelle.
Prelavaggio
Lavaggio (45 °C)
Risciacquo (65 °C)
Asciugatura
14 g 230 0.613 6.5
Glas
Per carichi poco
sporchi, come
bicchieri e cera-
mica.
Lavaggio (45 °C)
Risciacquo
Risciacquo (60°C)
Asciugatura
14 g 75 0.650 5.8
Bicchieri
Per stoviglie e
bicchieri poco
sporchi.
Lavaggio (45 °C)
Risciacquo
Risciacquo
12 g 20 0.390 7.0
90 minuti
Per stoviglie e
bicchieri legger-
mente sporchi.
Lavaggio (65 °C)
Risciacquo
Risciacquo
Risciacquo (70 °C)
Asciugatura
14 g 90 1.100 6.6
*EN 60436: per il controllo è stato utilizzato il programma ECO, conformemente a EN 60436.

14 3
IT
MESSA IN FUNZIONE E UTILZZO
Avviare il lavaggio
1. Tirare fuori i cestelli superiore e inferiore, riempirli con le stoviglie e spingerli di
nuovo nel dispositivo. Si consiglia di riempire prima il cestello inferiore.
2. Mettere il detersivo.
3. Inserire la spina nella presa elettrica. Assicurarsi che il rubinetto dell’acqua sia
completamente aperto.
4. Chiudere lo sportello e premere il tasto ON/OFF per accendere il dispositivo.
5. Se è stato selezionato un programma, si illumina la spia corrispondente. Premere
Start/Pausa per avviare la lavastoviglie.
Cambiare programma
Un programma può essere cambiato solo se il dispositivo è stato in funzione per poco
tempo, altrimenti è già stato rilasciato il detersivo e la lavastoviglie è piena d’acqua. Se
è così, è necessario resettare il dispositivo e il vano deve essere riempito nuovamente
con il detersivo. Procedere in questo modo per resettare la lavastoviglie:
1. Premere Start/Pausa per mettere in pausa il lavaggio.
2. Premere PROGRAM per oltre 3 secondi per interrompere il programma.
3. Selezionare il nuovo programma con PROGRAM.
4. Premere Start/Pause per avviare il dispositivo e dopo 10 secondi inizia il nuovo
programma.


146
IT
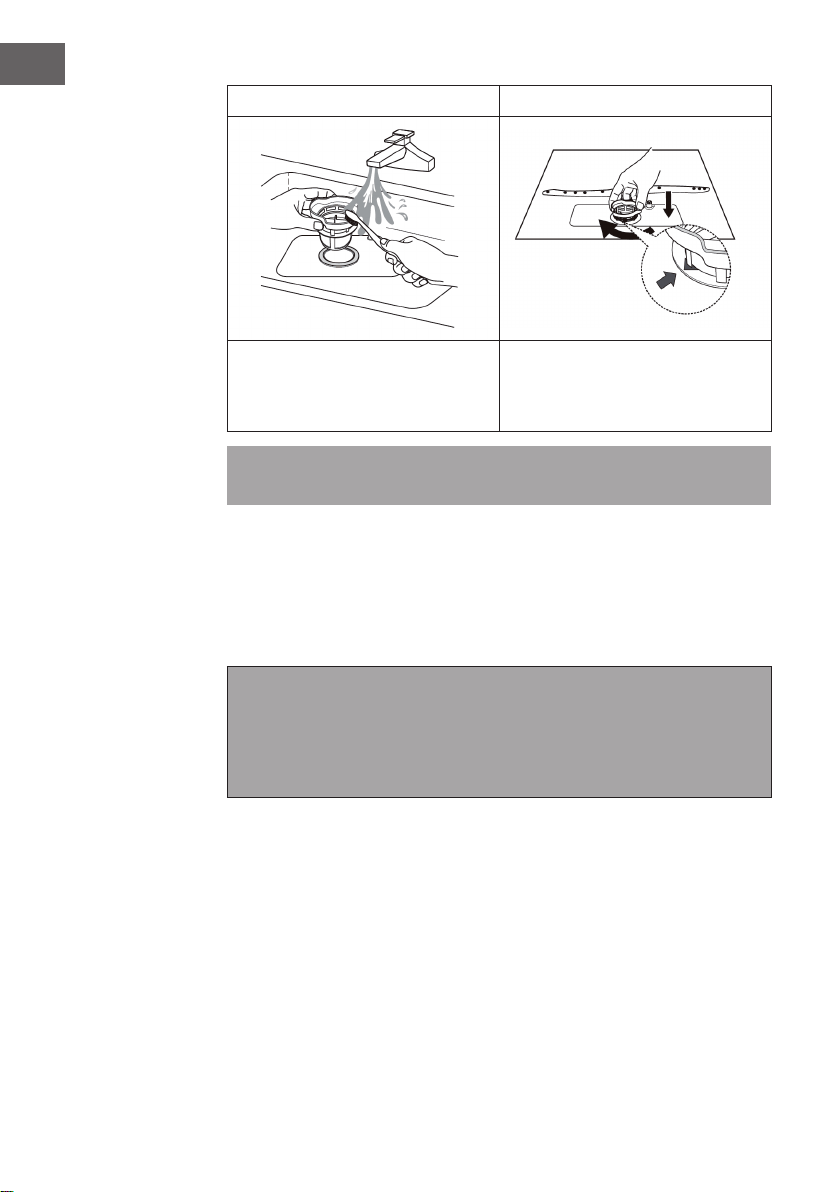
3 4
I grossi residui possono essere rimossi
con acqua corrente. Per una pulizia più
profonda si consiglia l’utilizzo di uno
spazzolino morbido.
Riposizionare il ltro seguendo i
passaggi precedenti al contrario. Ruotare
il ltro in senso orario per bloccarlo.
Avvertenza: le immagini sono a mero scopo esemplicativo e potrebbero essere
diverse dal vostro modello.
• Non ruotare il ltro con troppa forza per bloccarlo. Riposizionare il ltro seguendo
il procedimento, altrimenti i resti dal ltro grossolano niscono negli altri due ltri e
potrebbero causare un blocco.
• Non utilizzare mai la lavastoviglie senza ltro. Un riposizionamento sbagliato del
ltro può inuire negativamente sulle prestazioni del dispositivo e danneggiare
stoviglie e accessori.
Avvertenza su solventi o detergenti aggressivi
Non utilizzare solventi o detergenti aggressivi per pulire il lato esterno e i componenti
in gomma del dispositivo. Utilizzare solo un panno morbido con acqua calda e
sapone. Utilizzare un panno inumidito con un po’ di aceto o un detergente per
lavastoviglie per rimuovere macchie ostinate o sporco all’interno.
Se il dispositivo non viene utilizzato per lunghi periodi
Si consiglia di far funzionare a vuoto la lavastoviglie una volta, staccare la spina,
chiudere il rubinetto dell’acqua e lasciare leggermente aperto lo sportello. In questo
modo si conservano meglio le guarnizioni e non si formano odori all’interno.

147
IT
RISOLUZIONE DI PROBLEMI
Problema Possibili cause Soluzione
La lavatrice non parte. Il fusibile è bruciato o
guasto.
Sostituire il fusibile o
resettare l'interruttore.
Scollegare tutti gli
apparecchi serviti dallo
stesso circuito della
lavastoviglie.
L’alimentazione elettrica
non è stata attivata.
Assicurarsi che la
lavastoviglie sia accesa
e lo sportello ben chiuso.
Assicurarsi che il cavo
di alimentazione sia
correttamente inserito
nella relativa presa.
Lo sportello non è ben
chiuso.
Assicurarsi di chiudere
bene e ssare lo sportello.
L'acqua non viene
scaricata dalla
lavastoviglie.
Il tubo di scarico è
piegato.
Controllare il tubo di
scarico.
Il ltro è intasato. Controllare il ltro a
maglia larga.
Lo scarico è intasato. Controllare che lo scarico
avvenga senza intoppi.
Se il problema persiste,
rivolgersi a un idraulico.
Macchie di ruggine sulle
posate.
Le posate non sono in
acciaio inossidabile.
Lavare solo posate in
acciaio inossidabile.
Dopo aver caricato il sale,
non è stato avviato un
programma di lavaggio.
Eseguire sempre il
lavaggio rapido senza
stoviglie, dopo aver
aggiunto il sale.
Coperchio del serbatoio
del sale è allentato.
Assicurarsi che il
coperchio sia ben chiuso.
Macchie sulle superci
interne.
È stato utilizzato un
detersivo con coloranti.
Utilizzare detergenti privi
di coloranti.

148
IT
Problema Possibili cause Soluzione
Patina bianca sulla
supercie interna.
Resti di minerali nell’acqua
dura.
Pulire l'interno con una
spugna umida con
del detergente per
lavastoviglie. Indossare
guanti di gomma. Non
usare altri detergenti.
Colpi all’interno della
vasca.
L’irroratore urta contro un
oggetto nel cestello.
Interrompere il programma
e risistemare le stoviglie
cosi che l’irroratore si
muova senza intralci.
Tintinnio all’interno della
vasca.
Le stoviglie non sono ben
ferme nella vasca.
Interrompere il programma
e risistemare le stoviglie.
Battiti all’interno dei tubi
dell’acqua.
La causa potrebbe essere
l'installazione o la sezione
delle tubazioni.
Questo non inuisce sulla
funzionalità della lava-
stoviglie. In caso di dubbio
contattare un idraulico
qualicato.
Schiuma nella vasca. Detersivo non adatto. Usare solo detergenti
appositi per lavastoviglie.
In presenza di schiuma,
aprire la lavastoviglie
e lascia- re evaporare
la schiuma. Aggiungere
dell’acqua fredda nella
vasca. Chiudere la
lavastoviglie, quindi
selezionare qualsiasi
ciclo in modo che la
lavastoviglie scarichi
l'acqua con la schiuma.
Fuoriuscita del brillantante. Asciugare sempre
eventuali fuoriuscite
immediatamente.
149
IT
Problema Possibili cause Soluzione
Le stoviglie non sono
pulite.
Le stoviglie non sono state
caricate correttamente.
Consultare le indicazioni
del paragrafo “Caricare
la lavastoviglie”.
Il programma scelto non
era sufciente.
Selezionare un
programma più intensivo.
Il detersivo erogato non
era sufciente.
Utilizzare una maggiore
quantità di detersivo o
cambiarlo.
Alcuni oggetti bloccano
gli irroratori.
Risistemare le stoviglie in
modo che gli irroratori
possano ruotare
liberamente.
Il sistema ltrante non
pulito o non correttamente
installato.
Pulire e/o sistemare
correttamente il sistema
ltrante. Pulire gli
irroratori.
Le stoviglie non sono
asciutte.
Caricamento non corretto. Caricare le stoviglie come
suggerito nelle istruzioni.
Poco brillantante. Aumentare la dose di
brillantante.
Le stoviglie sono state
estratte troppo presto.
Dopo il lavaggio, lasciare
le stoviglie per 15 minuti
nella lavastoviglie. Aprire
leggermente lo sportello
in modo tale da far uscire
il vapore.
È stato selezionato il
programma sbagliato.
Nei cicli brevi la
temperatura per il
lavaggio e l’asciugatura
è più bassa. Scegliere un
programma più lungo.
Posate con rivestimento di
bassa qualità.
Posate e stoviglie di
questo tipo non sona
adatte ad essere lavate in
lavastoviglie.
150
IT
Problema Possibili cause Soluzione
Bicchieri/vetro appannati. Combinazione di acqua
morbi- da ed eccesso di
detersivo.
Impiegare meno detersivo
se l'acqua è dolce e
selezionare un ciclo più
breve per i bicchieri e il
vetro.
Segni neri o grigi sulle
stoviglie.
Sfregamento di utensili
di alluminio contro le
stoviglie.
Utilizzare un detergente
mediamente abrasivo per
eliminare questi segni.
Resti di detersivo lasciato
nelle vaschette.
Le stoviglie bloccano la
distribuzione del detersivo.
Ricaricare le stoviglie in
modo corretto.
Codici di errore
In caso di malfunzionamenti, il display dell‘apparecchio visualizza dei codici per
avvertire l‘utente:
Code
Signicato Possibili cause
E1
L’afusso d’acqua dura
a lungo.
Il rubinetto non è aperto, il punto di afusso
dell’acqua è limitato o la pressione è troppo
bassa.
E3
Non viene raggiunta la
temperatura necessaria.
Malfunzionamento dell’elemento
riscaldante.
E4
La lavastoviglie perde. Un elemento della lavastoviglie non tiene
e perde.
Ed
La comunicazione
tra circuito stampato
principale e circuito
stampato dello schermo è
interrotta.
Cortocircuito o cavo di comunicazione
guasto.
SCHEDA DATI DEL PRODOTTO
Indicazioni conformi alla direttiva (UE) N° 2019/2017
Nome o marchio commerciale del produttore: Klarstein
Indirizzo del produttore: Wallstraße 16, 10179 Berlino, Germania.
Numero articolo: 10032915A
Parametri generici del prodotto:
Parametro Valore Parametro Valore
Coperti standard 6 Dimensioni in mm
Altezza 438
Larghezza 550
Profondità 518
Indice di efcienza
energetica
61.9
Classe di efcienza
energetica
F
Indice di capacità pulente 1. 13
Indice di capacità
asciugante
1,07
Consumo energetico in
kWh (per ciclo) basato
sul programma Eco e
riempimento con acqua
fredda. Il consumo
energetico effettivo
dipende da come si usa il
dispositivo.
0.613
Consumo energetico in
litri (per ciclo) basato
sul programma Eco e
riempimento con acqua
fredda. Il consumo idrico
effettivo dipende da come
si usa il dispositivo.
6,5
Durata del
programma (h:min)
3:50 Tipo di struttura Posizionamento libero
Rumorosità
(dB(A) re 1 pW)
49
Classe di emissioni
rumorose
C
Dispositivo spento (W) 0.49 Modalità standby (W) 0
Avvio ritardato (W) (se
pertinente)
1
Servizio standby (W) in
rete (se pertinente)
0
Durata minima della garanzia offerta dal fabbricante : 24 mesi
Informazioni supplementari:
Link verso il sito web del fornitore sul quale sono reperibili le informazioni di cui all’allegato II,
punto 6, del regolamento 2019/2022 della Commissione: www.klarstein.it

152
IT
AVVISO DI SMALTIMENTO
Se nel proprio paese si applicano le regolamentazioni
inerenti lo smaltimento di dispositivi elettrici ed elettronici,
questo simbolo sul prodotto o sulla confezione segnala che
questi prodotti non possono essere smaltiti con i riuti normali
e devono essere portati a un punto di raccolta di dispositivi
elettrici ed elettronici. Grazie al corretto smaltimento dei
vecchi dispositivi si tutela il pianeta e la salute delle persone
da possibili conseguenze negative. Informazioni riguardanti il
riciclo e lo smaltimento di questi prodotti si ottengono presso
l’amministrazione locale oppure il servizio di gestione dei
riuti domestici.
PRODUTTORE E IMPORTATORE (UK)
Produttore:
Chal-Tec GmbH, Wallstraße 16, 10179 Berlino, Germania.
Importatore per la Gran Bretagna:
Chal-Tec UK limited
Unit 6 Riverside Business Centre
Brighton Road
Shoreham-by-Sea
BN43 6RE
United Kingdom