Use & Care Guide
Manual de Usoy Cuidado
Kenmore_
Vacuum Cleaner
Aspiradora
Moctel/Mode_o:
116.2_514
Vacuum Cleaner Help Line:
1-877-531-7321
8:00am-5:00pm EST,M-F
(U.S.A. and Canada)
Sears Brands Management Corporation
H0ffman Estates, IL 60179 USA
www.kenmore.com
vcww.sears.com
vrww.kmart.¢om
Before Using Your New
Vacuum Cleaner .................... 2
Packing List ..................... 2
Vacuum Cleaner Help Line ........... 3
Kenmore Vacuum Cleaner Warranty ... 3
Important Safety Instructions .......... 4
Parts and Features ................ 5-7
Assembly Instructions .............. 8-9
Operating Instructions .............. 10
How to Start .................. 10-11
Vacuuming Tips ............... 12-13
Suggested Pile Height Settings ...... 13
Attachments .................. 14-16
Attachment Use Table ............ 16
Attachment Storage .............. 17
Performance Features ............. 18
Canister Care ..................... I9
Removing Clogs ................. 19
Cleaning Exterior and Attachments .. 19
Bag Changing .................. 20
Motor Safety Filter Cleaning ....... 21
Exhaust Filter Changing ........... 22
PowerMate ®Care .................. 23
Belt Changing and Agitator
Cleaning .................... 23-24
Bulb Changing .................. 25
Agitator Servicing ............... 25
Troubleshooting ................ 26-27
Requesting Assistance
Or Service ................ Back Cover
Please read this guide. It will help you assemble and operate your new Kenmore vacuum
cleaner in the safest and most effective way.
For more information about vacuum cleaner care and operation, call your nearest Sears
store. You will need the complete model and serial numbers vchen requesting information.
Your vacuum cleaner's model and serial numbers are located on the Model and Serial
Number Plate.
Use the space below to record the model number and serial number of your new Kenmore
vacuum cleaner.
Model No.
Serial No.
Date of Purchase
Keep this book and your sales check (receipt) in a safe place for future reference.
PACKING LIST j
Your KENMORE VACUUM CLEANER is packaged with the following parts and
components assembled separately in the carton=
1 Canister Vacuum Cleaner t Pet Tool*
1 PowerMate® 1 Pet PowerMate®
1 Hose &Handle Assembly 1 Upper Wand
1 Floor Brush* t Lower Wand
1 Crevice Tool** t Use & Care Guide
t Combination Brush 1 Repair Parts List
Each of the above assemblies are shown in detail inside the Repair Parts List.
*These items are found under the Tool Cover.
**These items are found on the hose & handle assembly.
I(ENMORELIMITEDWARRANTY
FORONEYEARfrom the date of sale this appliance is warranted against defects in
material or workmanship when it is correctly installed, operated and maintained
according to all supplied instructions.
WITH PROOF OF SALE,returna defective appliance to the retailer from which itwas
purchasedfor free repair or replacement at option of seller.
This warranty applies for only 90 DAYS from the sale date if this appliance is ever used
for other than private household purposes.
This warranty covers ONLY defects in material and workmanship, and will NOT pay
for:
1. Expendable items that can wear out from normal use, including but not ]trotted to
filters, belts, bags or screw-in base light bulbs.
2. A service technician to clean or maintain this appliance, or to instruct the user in
correct appliance installation, operation and maintenance.
3. Service calls to correct appliance installation not performed by Sears authorized
service agents, or to repair problems with house fuses, circuit breakers, house wiring,
and plumbing or gas supply systems resulting from such installation.
4. Damage to or failure of this appliance resulting from installation not performed by
Sears authorized service agents, including installation that was not in accord with
electrical, gas or plumbing codes.
5. Damage to or failure of this appliance, incIuding discoloration or surface rust, if it is
not correctly operated and maintained according to all supplied instructions.
6. Damage to or failure of this appliance, including discoloration or surface rust,
resulting from accident, alteration, abuse, misuse or use for other than its intended
purpose.
7. Damage to or failure of this appliance, including discoloration or surface rust,
caused by the use of detergents, cleaners, chemicals or utensils other than those
recommended in all instructions supplied with the product.
8. Damage to or failure of parts or systems resulting from unauthorized modifications
made to this appliance.
9. Service to an appliance if the model and serial plate is missing, attered, or cannot
easily be determined to have the appropriate certification logo.
Disclaimer of implied warranties; limitation of remedies
Customer's sole and exclusive remedy under this limited warranty shall be product
repair or replacement as provided herein. Implied warranties, including warranties of
merchantability or fitness for a particular purpose, are fimited to one year or the
shortest period allowed by law. Seller shal] not be liable for incidental or consequential
damages. Some states and provinces do not allow the exclusion or limitation of
incidental or consequential damages, or limitation on the duration of implied warranties
of merchantability or fitness, so these exclusions or limitations may not appIy to you.
This warranty applies only while this appliance is used in the United States.
This warranty gives you specific legal rights, and you may also have other rights which
vary from state
to state.
5ears Brands Management Corporation, Hoffman Estates, IL 60179
ii
Read all instructions in this guide before assembling or using your vacuum cleaner.
LWARNING:
Your safety is important to us. To reduce the risk of fire, electrical shock, injury to
persons or damage when using your vacuum cleaner, follow basic safety
precautions including the following:
Use "tour vacuum cleaner only as described
in this guide. Use only with Sears
recommended attachments.
Disconnect electrical supply before
servicing or cleaning out the brush area.
Failure to do so could result in the electrical
shock or brush suddenly starting.
Do not leave vacuum cleaner when plugged
in. Unplug from outlet when not in use and
before performing servicing.
To reduce the risk of electrical shock - Do
not use outdoors or on wet surfaces.
Do not allow to be used as a toy. CFose
attention is necessary when used by or near
children.
Do not use with a damaged cord or plug.
if vacuum cleaner isnot working as it
shou)d, has been dropped, damaged, left
outdoors, or dropped in water, return it to a
Sears Service Center.
Do not pull or carry by cord, use cord as a
handle, close a door on cord, or pull cord
around sharp edges or corners. Do not run
vacuum cleaner over cord. Keep cord
away from heated surfaces.
Do not unplug by pulling on cord. To
unplug, grasp the plug, not the cord.
Do not handle plug or vacuum cleaner with
wet hands.
Do not put any objects into openings.
Do not use with any opening blocked; keep
free of dust, lint, hair, and anything that
may reduce air flow.
Keep hair, loose clothing, fingers, and all
parts of body away from openings and
moving parts.
Turn off all controls before unplugging.
Use ex,ra care when cleaning on stairs.
Do not put on chairs, tables, etc. Keep on
floor.
Do not usevacuum cleaner to pick up
flammable or combustible liquids (gasoline,
cleaning fluid, perfumes, etc.), or use in
areas where they may be present. The
fumes from these substances can create a
fire hazard or explosion.
Do not pick up anything that isburning or
smoking, such as cigarettes, matches, or hot
ashes.
Do not usevacuum cieaner without dust
bag and/or filters in ptace.
Always change the dust bag after
vacuuming carpet cleaners or freshener,
powders, and fine dust. These products
clog the filters, reduce airflow and can
cause damage to the vacuum cleaner.
Failure to chage the bag could cause
permanent damage to the vacuum cleaner.
Do not usethe vacuum cleaner to pick up
sharp hard objects, small toys, pins, paper
clips, etc. They may damage the vacuum
c_eaner.
Do not operature the vacuum cleaner
without the exhaust filter or filter door in
place.
The hose contains electrical wires. Do not
usewhen damaged, cut, or punctured.
Replace if cut or worn. Do not pick up
sharp objects.
Always turn off and unplug before
connecting or disconnecting either hose,
wand, Pet PowerMate ®,or nozzle.
Hold plug when rewinding onto cord reel.
Do not allow plug to whip when rewinding.
You are responsible for making surethat
your vacuum cleaner is not used by anyone
unable to operate it properly.
SAVE THESEINSTRUCTIONS
Proper assembly and safe useof your vacuum cleaner are your responsibilities. Your vacuum
cleaner is intended for Household use. Read this Use & Care Guide carefully for important
useand safety information. Thisguide contains safety statements under warning and
caution symbols.
lllllH HI IHH HI IHI II I
4
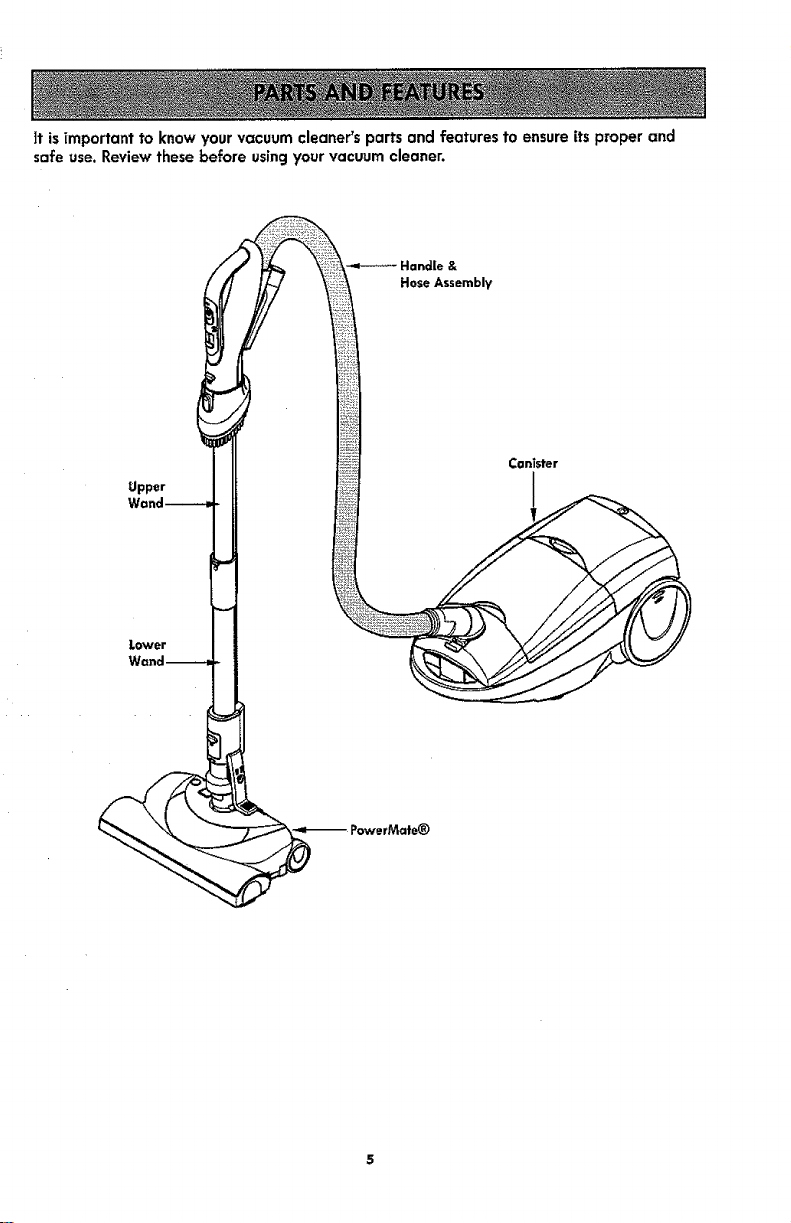
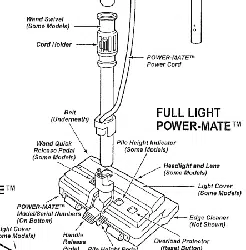
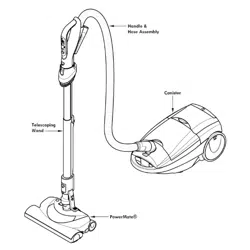
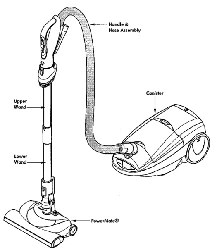
|t is _mportant to know your vacuum cleaner's parts and features to ensure its proper and
safe use. Review these before usingyour vacuum cleaner.
Handle &
Hose Assembly
ConTster
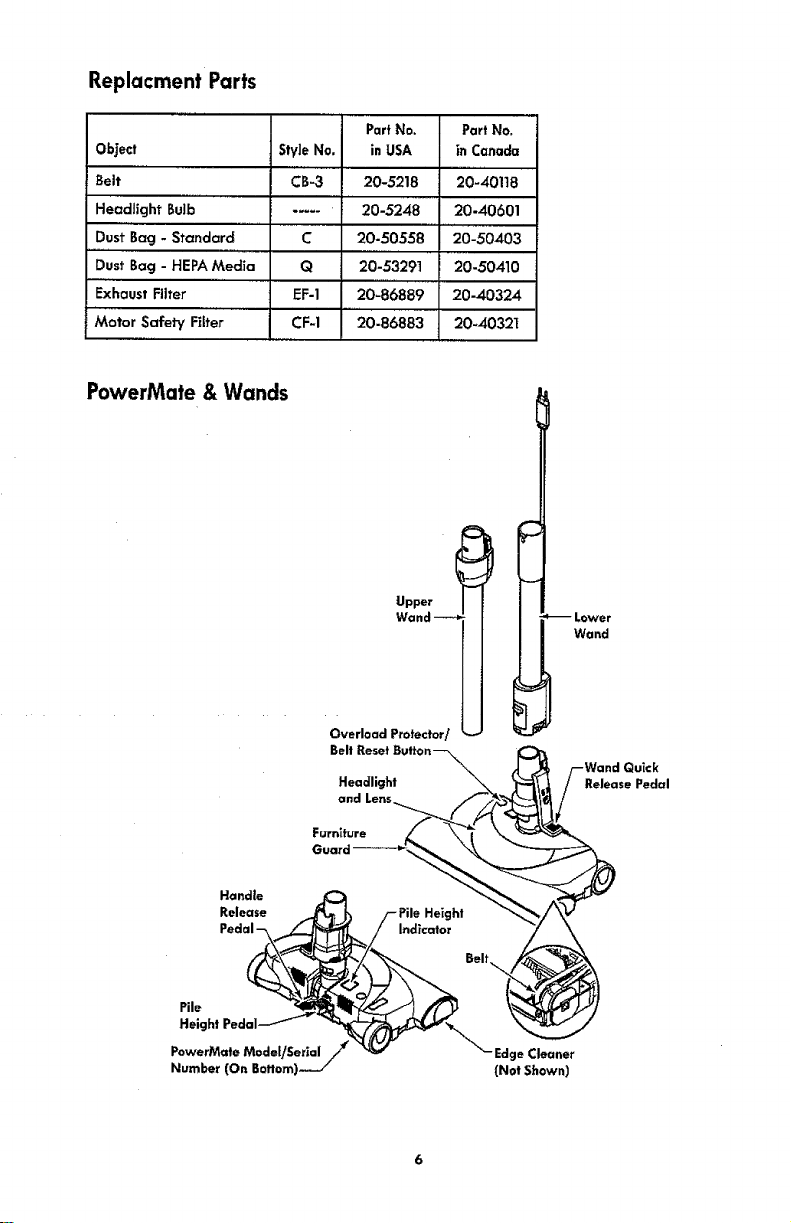
Replacment Parts
Object StyleNo.
Belt CB-3
Headlight BuJb..... -....
Dust Bag - Standard C
Dust Bag - HEPAMedia Q
Exhaust Filter EF-1
Motor Safety Filter CF-1
PartNo.
inUSA
20-5218
20-5248
20-50558
20-53291
20-86889
.....20-86883
PartNo,
in Canada
20-40118
20-40601
20-50403
20-50410
20-40324
20-40321
PowerMate & Wands
Upper
Belt
Headlight
and Lens
Furniture
--Lower
Wand
Wand Quick
Release Pedal
Handle
Release
Pile
Height Pedal
PowerMate Model!Serial /
Number (On Boffom)-.,- /
Edge Cleaner
(Not Shown)
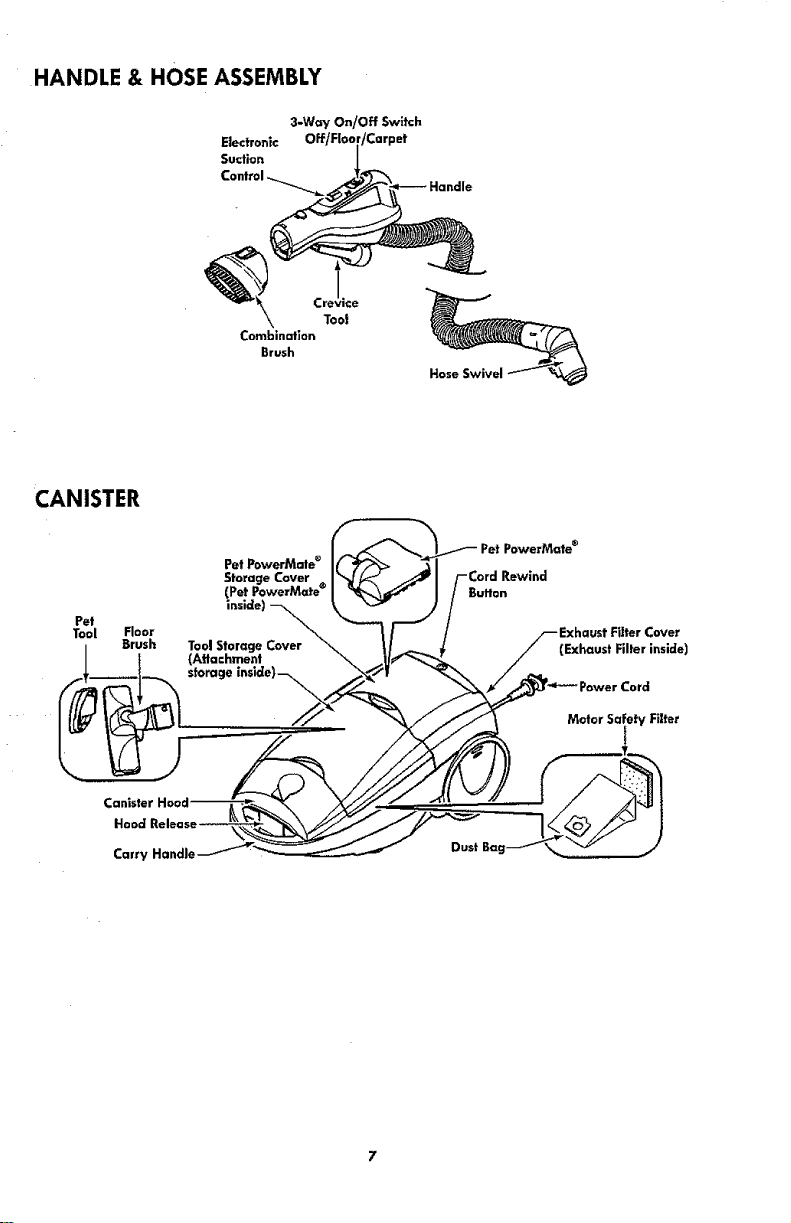
HANDLE & HOSE ASSEMBLY
3*W_y" On/Off Switch
Electronic 3et
Suction
Combination
Brush
.rev_ce
Toot
Hose Swivel
CANISTER
Pet
Tool Floor
Brush
Pet PowerMate ®
Storage Cover
(Pet PowerMate ®
(Attachment
storage inslde)--_.\._
PowerMate ®
Cord Rewind
Button
Filter Covex_
(Exhaust Filter inside)
'ower Cord
Motor Safety Filter
Canister
Hood
Carry Handle
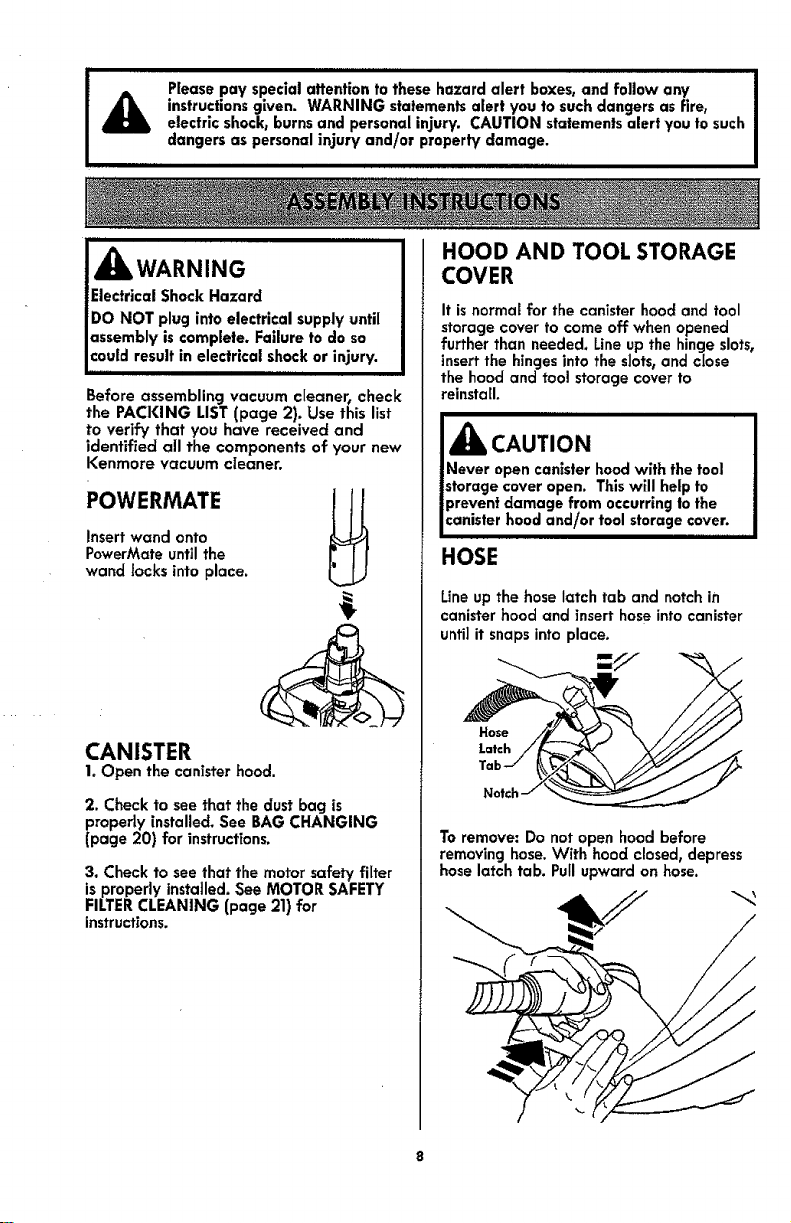
Please pay special attention to these hazard alert boxes, and follow any
instructions given. WARNING statements alert you to such dangers as fire,
electric shock, burns and personal inJury. CAUTION statements alert you to such
dangers as personal injury and/or property damage.
iiii1,1i
j wA..I.G
IElectrical Shock Hazard
JDO NOT plug into electrical supply until
Jassembly is complete. Failure to do so
Jcouid result in electrical shock or injury.
Before assembling vacuum cleaner, check
the PACKING LIST (page 2). Use this list
to verify that you have received and
identified all the components of your new
Kenmore vacuum cleaner.
POWERMATE
Insert wand onto
PowerMate until the
wand locks into place.
CANISTER
1. Open the canister hood.
2. Check to see that the dust bag is
properly installed. See BAG CHANGING
(page 20) for instructions.
3. Check to see that the motor safety filter
is properly installed. See MOTOR SAFETY
FILTER CLEANING (page 21) for
instructions.
HOOD AND TOOL STORAGE
COVER
It isnormal for the canister hood and tool
storage cover to come off when opened
further than needed. Line up the hinge slots,
insert the hinges into the slots, and close
the hood and tool storage cover to
reinstall.
IAcAuT,o. J
Never open canister hood with the tool
storage cover open. This will help to
prevent damage from occurring to the
canister hood and/or tool storage cover.
HOSE
Line up the hose latch tab and notch in
canister hood and insert hose into canister
until it snaps into place.
=///
To remove: Do not open hood before
removing hose. With hood closed, depress
hose latch tab. Pull upward on hose.
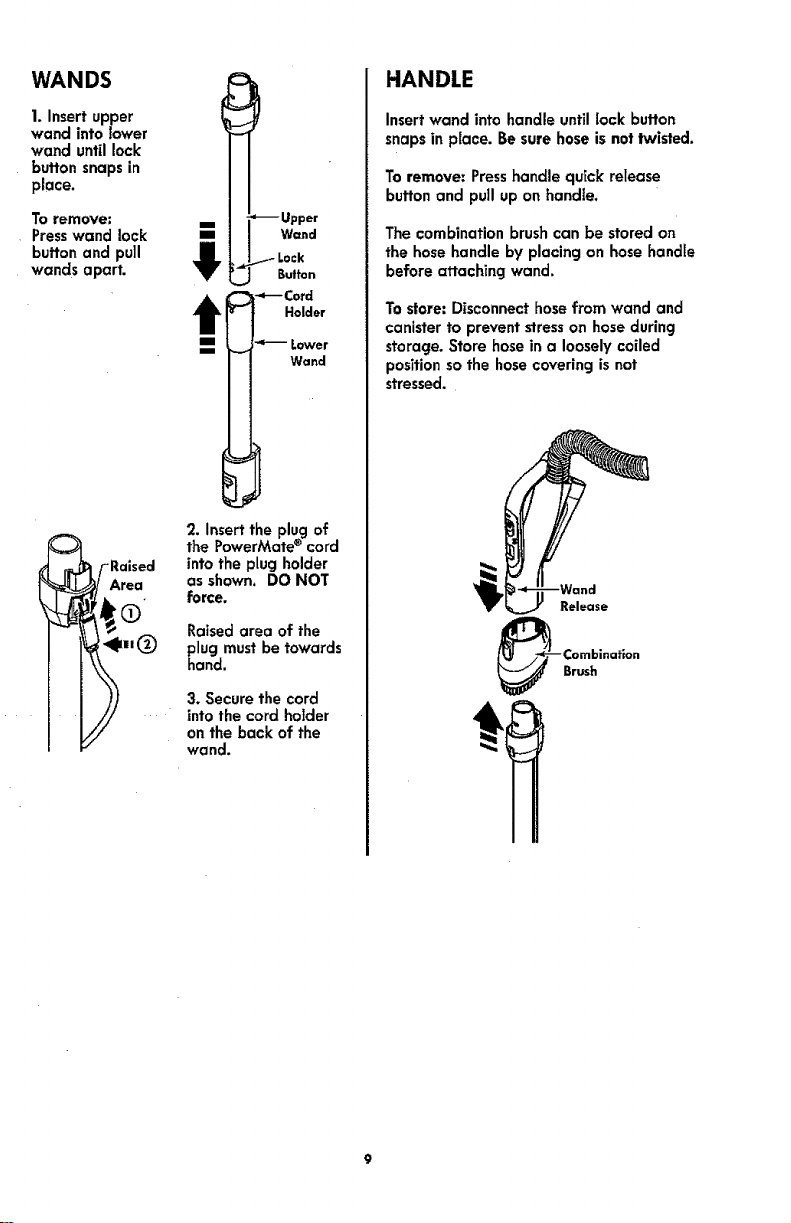
WANDS
1. Insert upper
wand into lower
wand until lock
button snaps in
place.
To remove:
Presswand lock
button and pull
wands apart.
i
1
-- Upper
Wand
t Lock
Button
Holder
Wand
2. insert the plug of
_F the PowerMate ® cordRaised into the plug holder
t_/ Area as shown. DO NOT
Raised area of the
[ _ll(_) plug must be towards
hand.
3. Secure the cord
into the cord holder
on the back of the
wand.
HANDLE
Insert wand intohandleuntillock button
snapsin place. Besurehoseisnotlwisted.
Toremove:Presshandle quickrelease
button and pull uponhandle.
The combination brush can be stored on
the hose handle by placing on hose handle
before attaching wand.
To store: Disconnect hose from wand and
canister to prevent stresson hose during
storage. Store hose in a loosely coiled
position so the hose covering is not
stressed.
,Hill II
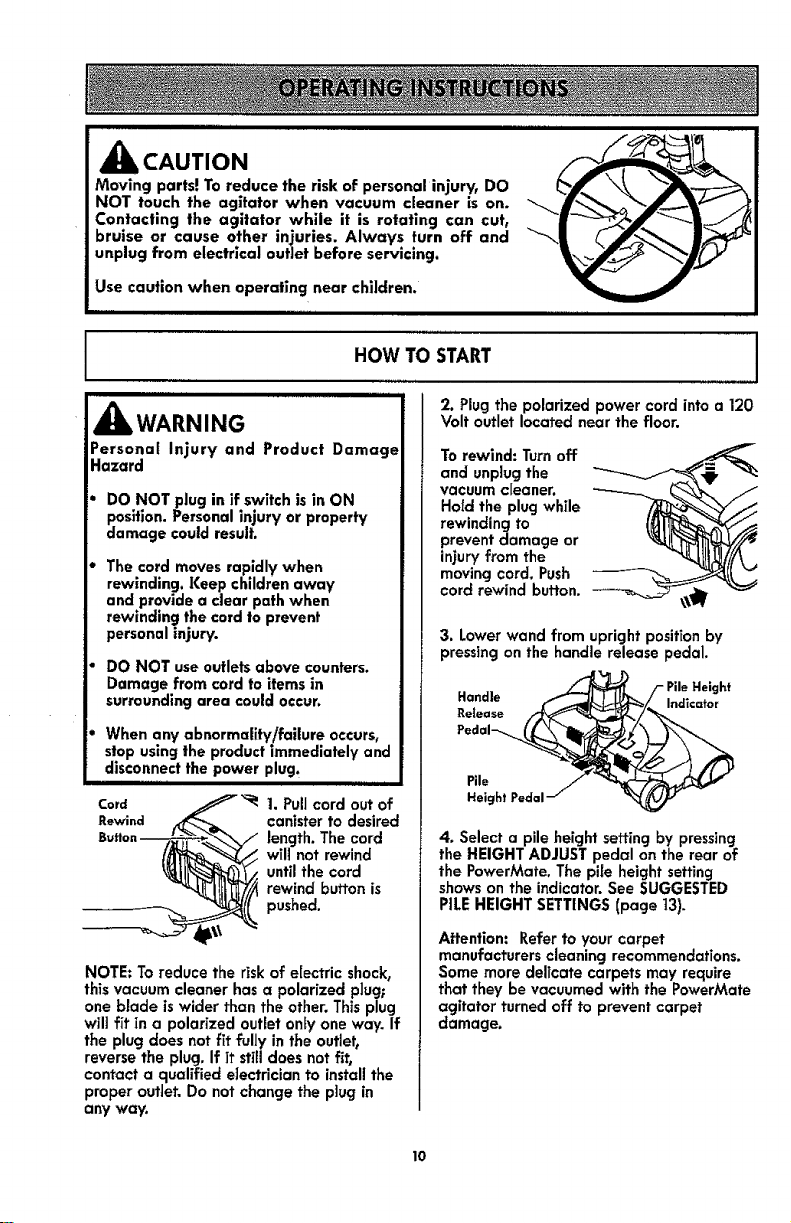
CAUTION
Moving parts! To reduce the risk of personal injury, DO
NOT touch the agitator when vacuum cleaner is on.
Contacting the agitator while it is rotating can cut,
bruise or cause other injuries. Always turn off and
unplug from electrical outlet before servicing.
Use caution when operating near children.
IIIIIII I
HOW TO
,,1111ii i
,_ WARNING
Personal Injury and Product Damage
Hazard
DO NOT plug in if switch is in ON
position. Personal injury or property
damage could result.
The cord moves rapidly when
rewinding. Keep children away
and provide a clear path when
rewinding the cord to prevent
personal injury.
DO NOT use outlets above counters.
Damage from cord to items in
surrounding area could occur.
When any abnormality/failure occurs,
stop using the product immediately and
disconnect the power plug.
Card /_ 1. Pull cord out of
Rewind i_"e_ canister to desired
will not rewind
until the cord
rewind button is
pushed.
NOTE: To reduce the risk of electric shock,
this vacuum cleaner has a polarized plug;
one blade is wider than the other. This plug
will fit in a polarized outlet only one way. If
the plug does not fit fully in the outlet,
reverse the plug. If it still does not f_t,
contact a qualified electrician to install the
proper outlet. Do not change the plug in
any way.
J
2. Plug the polarized power cord into a 120
Volt outlet located near the floor.
To rewind: Turn off
and unplug the
vacuum cleaner.
Hold the plug while
rewinding to
prevent damage or
injury from the
moving cord. Push
cord rewind button.
3. Lower wand from upright position by
pressing on the handle release pedal.
Handle
Release
Pile
Height Pedal
Height
Indicator
4. Select a pile height setting by pressing
the HEIGHT ADJUST pedal on the rear of
the PowerMate. The pffe height setting
shows on the indicator. See SUGGESTED
PILE HEIGHT SETTINGS (page 13).
Attention: Refer to your carpet
manufacturers cleaning recommendations.
Some more delicate carpets may require
that they be vacuumed with the PowerMate
agitator turned off to prevent carpet
damage.
10
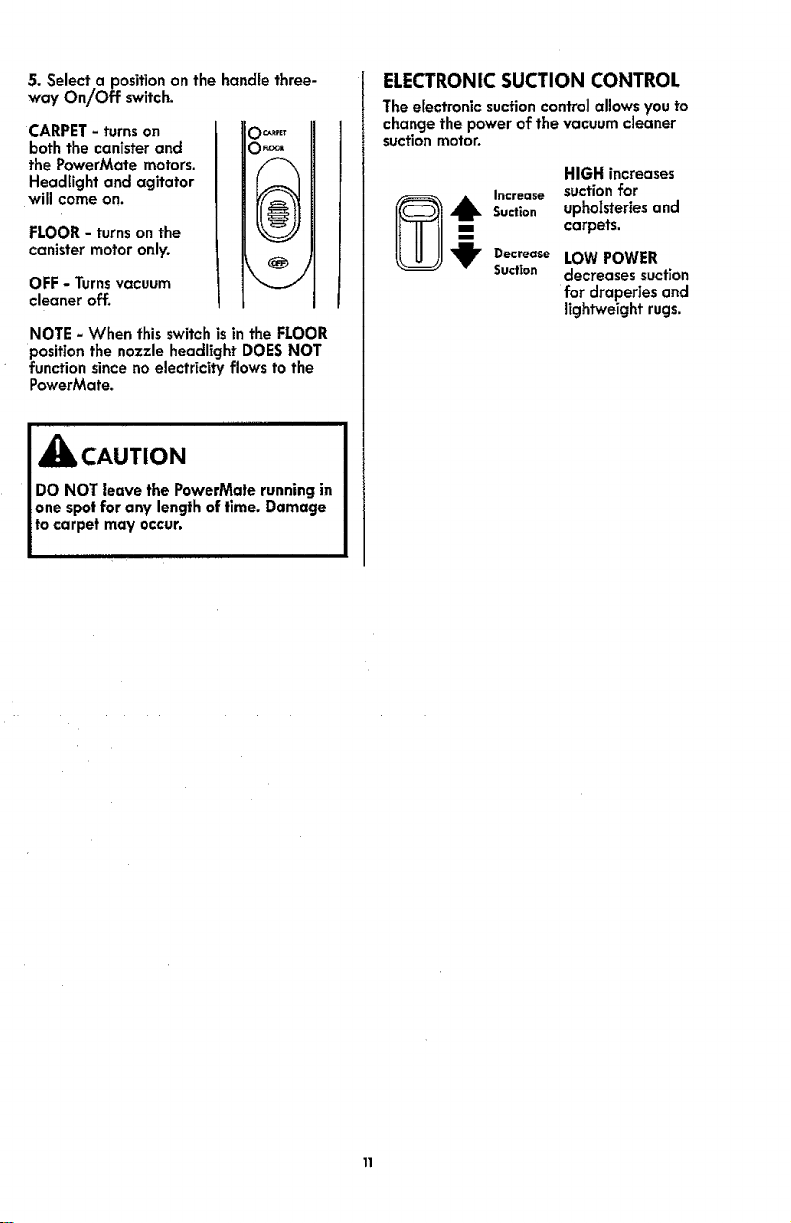
5. Select.a position on the handle three-
way On/Off switch.
CARPET - turns on
both the canister and
the PowerMate motors.
Headlight and agitator
will come on.
FLOOR - turns on the
canister motor only.
OFF - Turnsvacuum
cleaner off.
O0,RtET
NOTE - When this switch isin the FLOOR
position the nozzle headlight DOES NOT
function since no electricity flows to the
PowerMate.
_Ib CAUTION
DO NOT leave the PowerMate running in
one spotfor any length of time. Damage
to carpet may occur.
ELECTRONICSUCTION CONTROL
The electronic suction control allows you to
change the power of the vacuum cleaner
suction motor.
HIGH increases
Increase suction for
,_1_ Suction upholsteries and
-- carpets.
_jr Decrease LOW POWER
Suction decreases suction
for draperies and
lightweight rugs.
I
VACUUMING TIPS
I
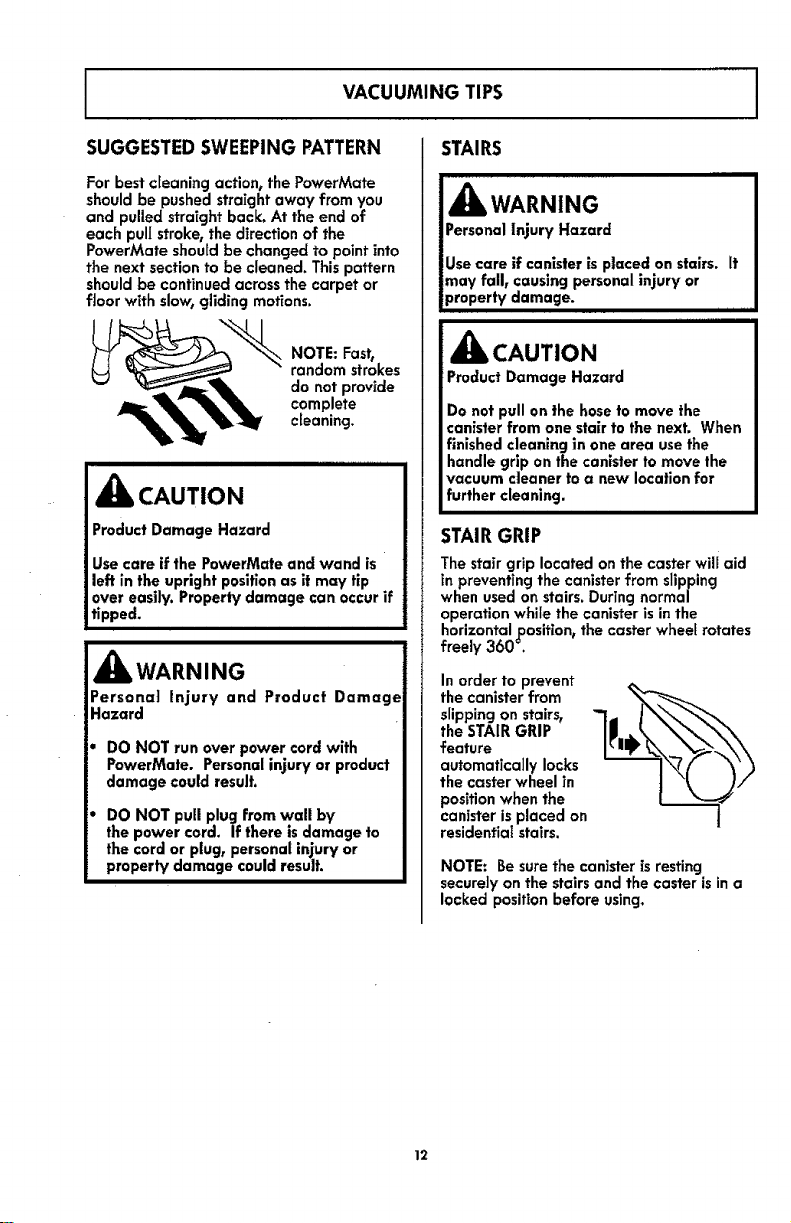
SUGGESTEDSWEEPING PATTERN
For best cleaning action, the PowerMate
should be pushed straight away from you
and pulled straight back. At the end of
each pulJstroke, the direction of the
PowerMate should be changed to point into
the next section to be cleaned. This pattern
should be continued across the carpet or
floor with slow, gliding motions.
NOTE: Fast,
random strokes
do not provide
complete
cleaning.
_k CAUTION
Product Damage Hazard
Use care if the PowerMate and wand is
left in the upright position as it may tip
over easily. Property damage can occur if
tipped.
_Jl, WARNING
Personal Injury and Product Damage
Hazard
DO NOT run overpowercordwith
PowerMate. Personalinjuryor product
damage couldresult.
DO NOT pull plug from wall by
the power cord. If there is damage to
the cord or plug, personal injury or
property damage could result.
STAIRS
IH IIIIIIIIIIIIIIIIIIIIIIIIIIIIIII
Personal Injury Hazard
lUse care if canister is placed on stairs, it
lmay fall, causing personal injury or
Iproperty damage. .....
CAUTION
Product Damage Hazard
Do not pull on the hose to move the
canister from one stair to the next. When
finished cleaning in one area use the
handle grip on the canister to move the
vacuum cleaner to a new location for
further cleaning.
STAIRGRIP
The stair grip located onthe caster will aid
in preventing the canister from slipping
when used on stairs. During normal
operation whlIe the canister is in the
horizontal position, the caster whee[ rotates
freely 360 _.
In order to prevent
the canister from
slipping on stairs,
the STAIR GRIP
feature
automatically locks
the caster wheel in
position when the
canister is placed on
residential stairs,
NOTE: Be sure the canister is resting
securely on the stairs and the caster is in a
locked position before using.
12
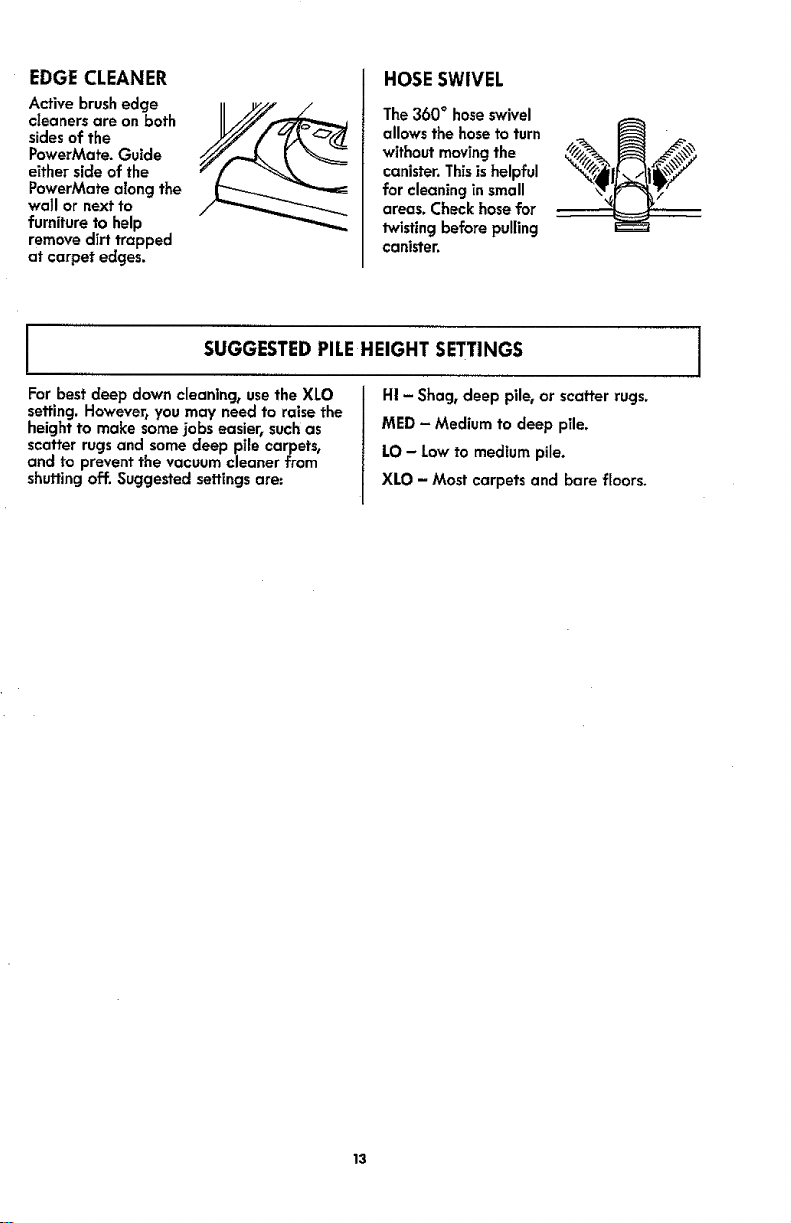
EDGECLEANER
Active brush edge
cleaners are on both
sides of the
PowerMate. Guide
either side of the
PowerMate along the
wall or next to
furniture to help
remove dirt trapped
at carpet edges.
HOSESWIVEL
The 360 ° hose swivel
allows the hose to turn
without moving the
canister. Thisis helpful
for cleaning in small
areas. Check hose for
twisting before pulling
canister.
J SUGGESTEDPILEHEIGHT SETTINGS I
For best deep down cleaning, use the XLO
setting. However, you may need to raise the
height to make some jobs easier, such as
scatter rugs and some deep pile carpets,
and to prevent the vacuum cleaner from
shutting off. Suggested settings are:
H! - Shag, deep pile, or scatter rugs.
MED - Medium to deep pile.
LO - Low to medium pile.
XLO - Most carpets and bare floors.
13
ATTACHMENTS J
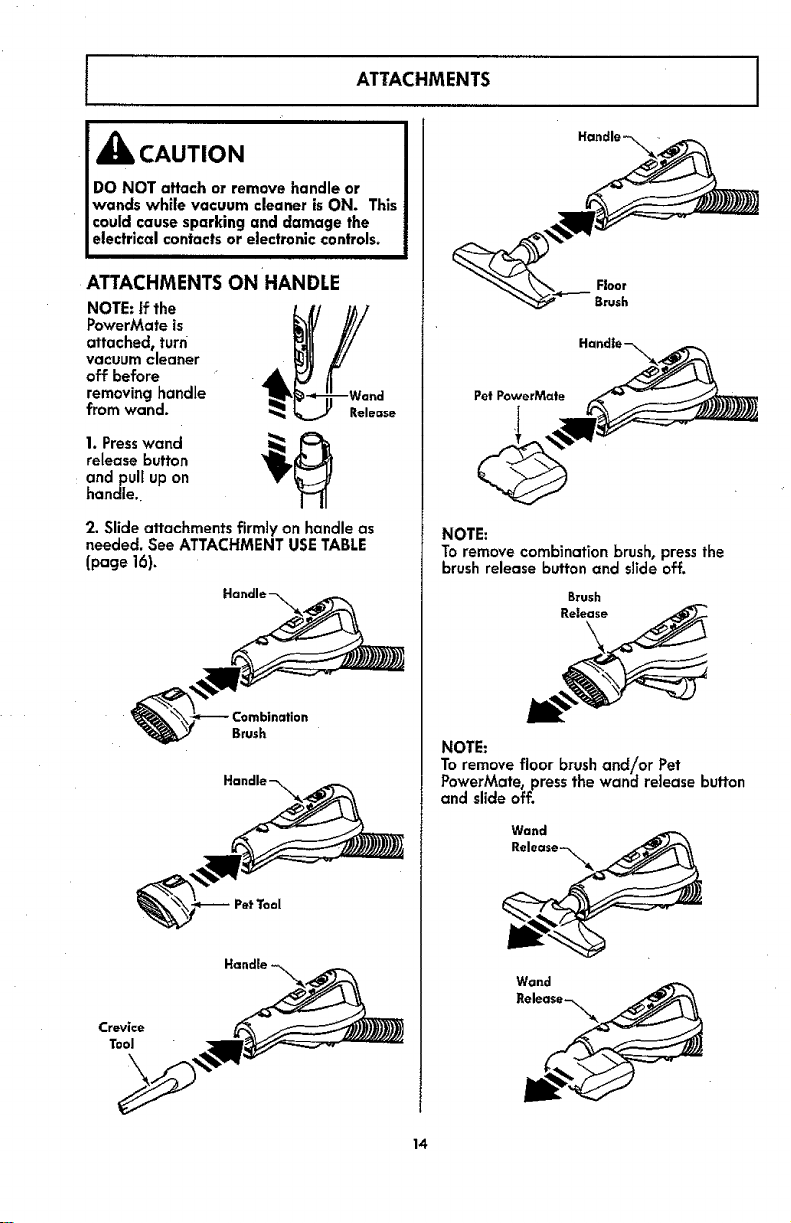
_k CAUTION
i
DO NOT affach or remove handle or
wands while vacuum cleaner is ON. This
could cause sparking and damage the
electrical contacts or electronic controls.
,,,,1111,Ill I II II II
ATTACHMENTS ON HANDLE
NOTE: if the
PowerMate is
attaehedt turn
vacuum cleaner
off before
removing handle
from wand.
Release
1. Presswand _, _i_
release button
andpui[ up on
handle
2. Slide attachments firmly on handle as
needed. See ATTACHMENT USE TABLE
(page 16)_
Pet Tool
Floor
Brush
Pet PowerMate
NOTE:
To remove combination brush, pressthe
brush release button and slide off.
Brush
Release
NOTE:
To remove floor brush and!or Pet
PowerMate0 press the wand release button
and slide off.
Wand
Release --_\_
Wand
14
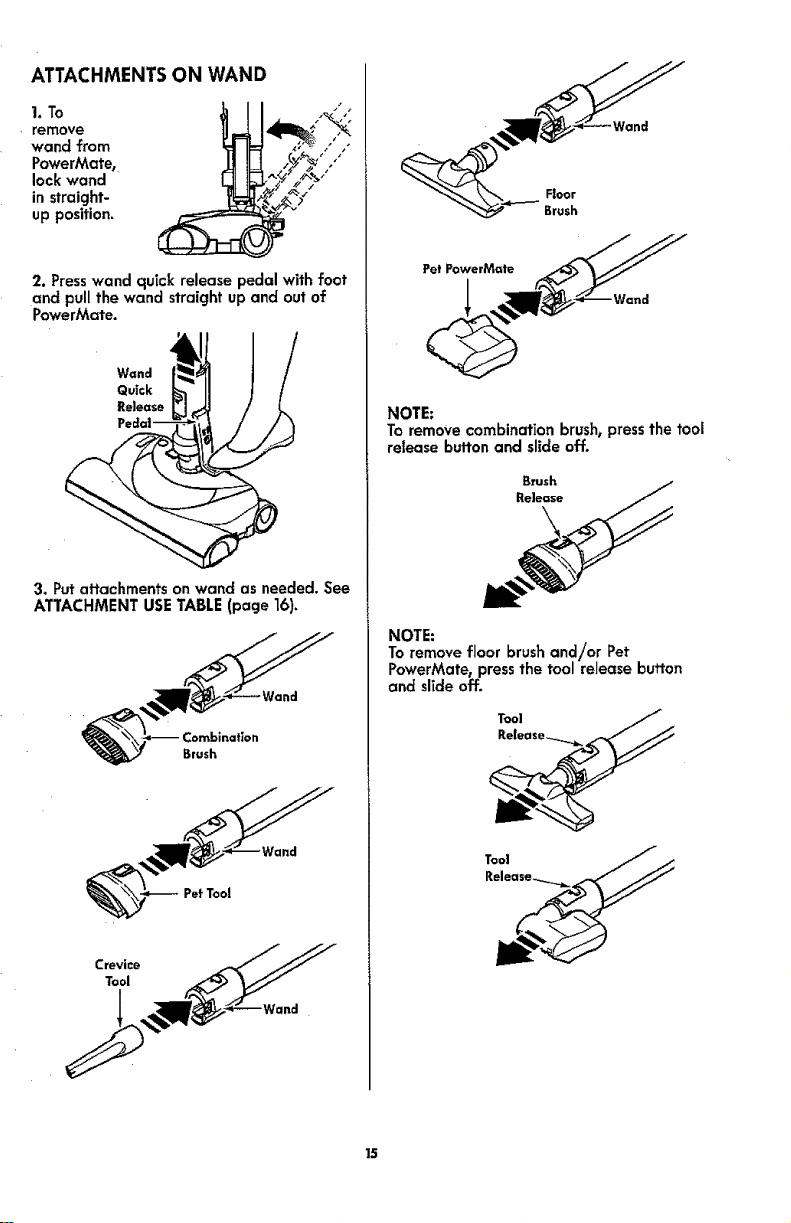
ATTACHMENTSON WAND
1. To
remove
wand from
PowerMate,
lock wand
in straight-
up position.
2. Presswand quick release pedal with foot
and pull the wand straight up and out of
PowerMate.
Wand
Quick
Release
<
3. Put attachments on wand as needed. See
ATTACHMENT USE TABLE (page ]6),
Brush
NOTE:
To remove combination brush, press the tooJ
release button and slide off,
NOTE:
To remove floor brush and!or Pet
PowerMate, pressthe tool release button
and slide off,
15

COMBINATION BRUSH
The combination brush usestwo tools, the
dusting brush and the pet tool. Each is for
use on various surfaces. See ATTACHMENT
USE TABLE (page 16).
To remove dusting
brush or pet tool,
release by
pressing tab and
lifting off the
holder,
T=h-_
Toattach, insert
tab on holder
intosloton
dustingbrushor
pet tool and
pressuntiltab
snapsintoplace.
CREVICE TOOL
Attach the crevice tool to the handle
storage locations as shown.
I ATTACHMENT USETABLE I
CLEANING AREA
BetWeen Bare CarpeJed
ATTACHMENT eu_ait_,e1 CushionsI Drapes! Stairs FJoo,s Floors/Rugs Walls
ComblnaffonBrush _ Ve It t,_
PetToo[2 (_ V' V'
CreviceTool V_ _V'
FloorBrush _ iv, _,
PowerMate _ V' 3
PetPowerMaee4 _ V' V'
1. Always cleon attachments before using on fabrics.
2. Use the pet tool to remove pet hair from deffcate surfaces, such as upholstery and
drapes. DO NOT use on a pet.
3. 3-way On/Off switch should be in FLOOR position.
,4. Some Models: Pet PowerMate attachment instructionsare included with the products.
16

ATTACHMENT STORAGE
Pet PowerMate
This canister is equipped with an on-board
storage area for a Pet PowerMate
attachment.
To Store:
1. Open the Pet PowerMate storage cover.
2. Insert the Pet PowerMate and press down
until it clicks into place.
3. Close the lid securely.
Pet PowerMate
Cover
To Remove:
1. Open the storage cover.
2. Remove Pet PowerMate from the storage
area.
3. Use as needed. See ATTACHMENTS
(page 14-t5) and ATTACHMENT USE TABLE
(page 16).
Floor Brush& Pet Tool
This canister isequipped with an on-board
storage area for attachments.
To Store:
1. Open the tool storage cover.
2. insert the tool and press down until it
clicks into place.
3. Close the lid securely.
_ CoverSt°ra!
To Remove:
1.Open the storage cover.
2. Remove attachment from the storage
area.
3. Use as needed. See ATTACHMENTS
(page 14-15) and ATTACHMENT USE TABLE
(page 16).
_7
PERFORMANCEFEATURES J
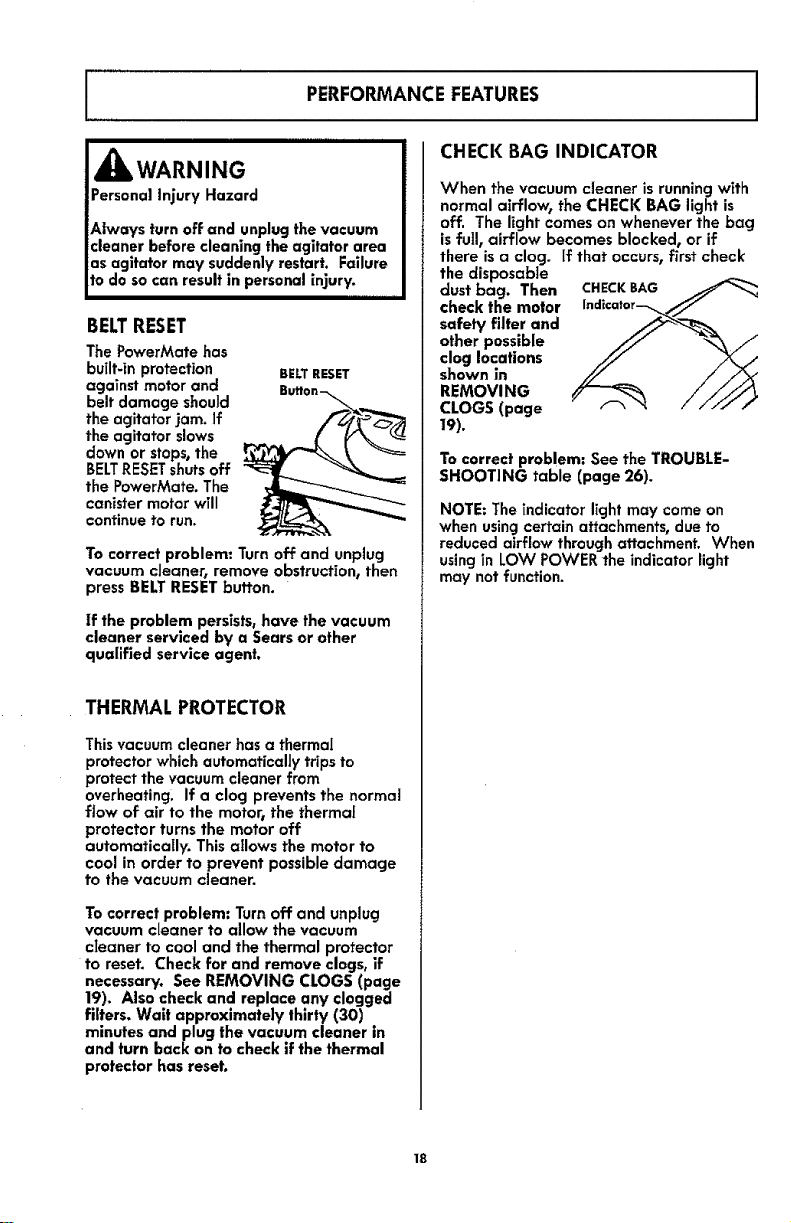
,_k WARNING
Personal lnjury Hazard
Always turn off and unplug the vacuum
cleaner before cleaning the agitator area
usagitator may suddenly restart. Failure
to do so can result in personal injury.
BELTRESET
The PowerMate has
built-in protection
against motor and
belt damage should
the agitator jam. If
the agitator slows
down or stops,the
BELTRESETshuts off
the PowerMate. The
canister motor wTll
continue to run.
BElT RESET
Buflon-_
To correct problem: Turn off and unplug
vacuum cleaner, remove obstruction, then
press BELT RESET button.
if the problem persists, have the vacuum
cleaner serviced by a Sears or other
qualified service agent.
THERMAL PROTECTOR
This vacuum cleaner has a thermal
protector which automatically trips to
protect the vacuum cleaner from
overheating. If a clog prevents the normal
flow of air to the motor_ the thermal
protector turns the motor off
automatically. This allows the motor to
cool in order to prevent possible damage
to the vacuum cleaner.
To correct problem: Turn off and unplug
vacuum cleaner to allow the vacuum
cIeaner to cool and the thermal protector
to reset. Check for and remove clogs, if
necessary. See REMOVING CLOGS (page
19). Also check and replace any clogged
filters. Wait approximately thirty (30)
minutes and plug the vacuum cleaner in
and turn back on to check if the thermal
protector has reset.
CHECK BAG INDICATOR
When the vacuum cleaner is running with
normal airflow, the CHECK BAG light is
off. The light comes on whenever the bag
isfull, airflow becomes blocked, or if
there is a clog. if that occurs, first check
the disposable
dust bag. Then CHECKBAG
check the motor Indicator__//
other possible
clog locations
shown in
REMOVING
CLOGS (page
19).
To correct problem: See the TROUBLE-
SHOOTING table (page 26).
NOTE: The indicator light may come on
when using certain attachments, due to
reduced airflow through attachment. When
using in LOW POWER the indicator light
may not function.
18
j REMOVING CLOGS j
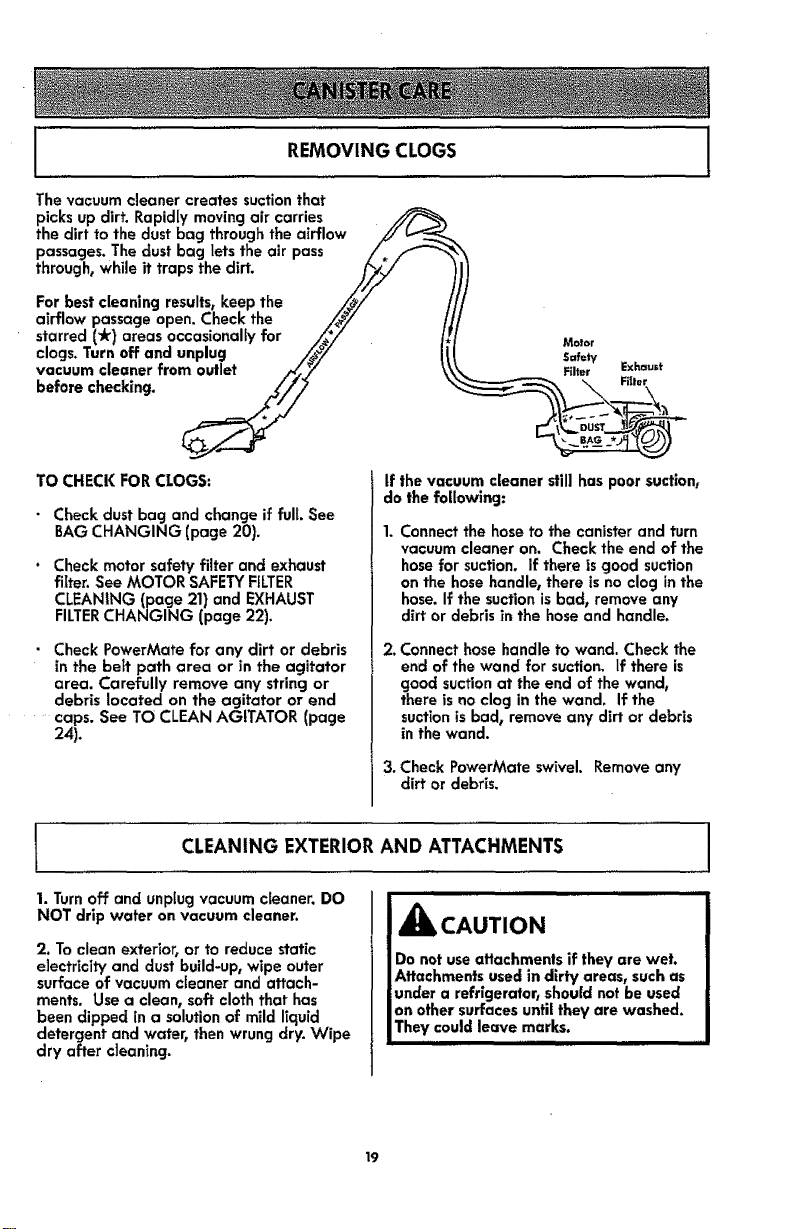
The vacuum cleaner creates suction that
picks up dirt. Rapidly moving air carries
the dirt to the dust bag through the airflow .//b__-__
passages. The dust bag lets the air pass /.
through, whi,e it traps the dirt. ///,_
For best cleaning results, keep the /_,/ t
airflow passage open. Check the /_/ /
starred (_) areas occasionally for /_*/_ //
clogs.Turnoea.dunplug
vacuum cleaner from outlet ._y
before checking. //_
TO CHECKFORCLOGS:
• Checkdustbag and changeif full. See
BAGCHANGING (page 20).
• Check motor safety filter and exhaust
filter. See MOTOR SAFETY FILTER
CLEANING (page 21) and EXHAUST
FILTERCHANGING (page 22).
• Check PowerMate for any dirt or debris
in the belt path area or in the agitator
area. Carefully remove any string or
debris located on the agitator or end
.... caps. See TO CLEAN AGITATOR (page
24).
Molar
Safety
Filter Exhaust
If the vacuum cleaner still has poor suction,
do the following:
Connect the hose to the canister and turn
vacuum cleaner on. Check the end of the
hose for suction. If there is good suction
on the hose handle, there is no clog in the
hose. If the suction is bad, remove any
dirt or debris in the hose and handle.
2, Connect hose handle to wand. Check the
end of the wand for suction, if there is
good suction at the end of the wand,
there isno clog in the wand. If the
suction is bad, remove any dirt or debris
in the wand.
3. Check PowerMate swivel. Remove any
dirt or debris.
l CLEANING EXTERIORAND ATTACHMENTS
i ii
1. Turn off and unplug vacuum cleaner. DO
NOT drip water on vacuum cleaner.
2. To clean exterior, or to reduce static
electricity and dust build-up, wipe outer
surface of vacuum cleaner and attach-
ments. Use a clean, soft cloth that has
been dipped in a solution of mild liquid
detergent and water, then wrung dry. Wipe
dry after cleaning.
iiiii
CAUTION
Do not use attachments if they are wet.
Attachments used in dirty areas, such as
under a refrigerator, should not be used
on other surfaces until they are washed.
They could leave marks.
III III
19
BAGCHANGING
For best cleaning results,the dust bag shouJdbe changed often. The CHECK BAG indicator
will come on when the bag needs to be changed or the airflow is blocked.
NOTE: Use replacement dust bag STYLE C, see part number detail in REPLACEMENT PARTS
(page 6).
I
REMOVING DUSTBAG
1. Turnoff and unplug vacuum cleaner.
2. Remove hose from canister. (See
ASSEMBLY INSTRUCTIONS, page 8).
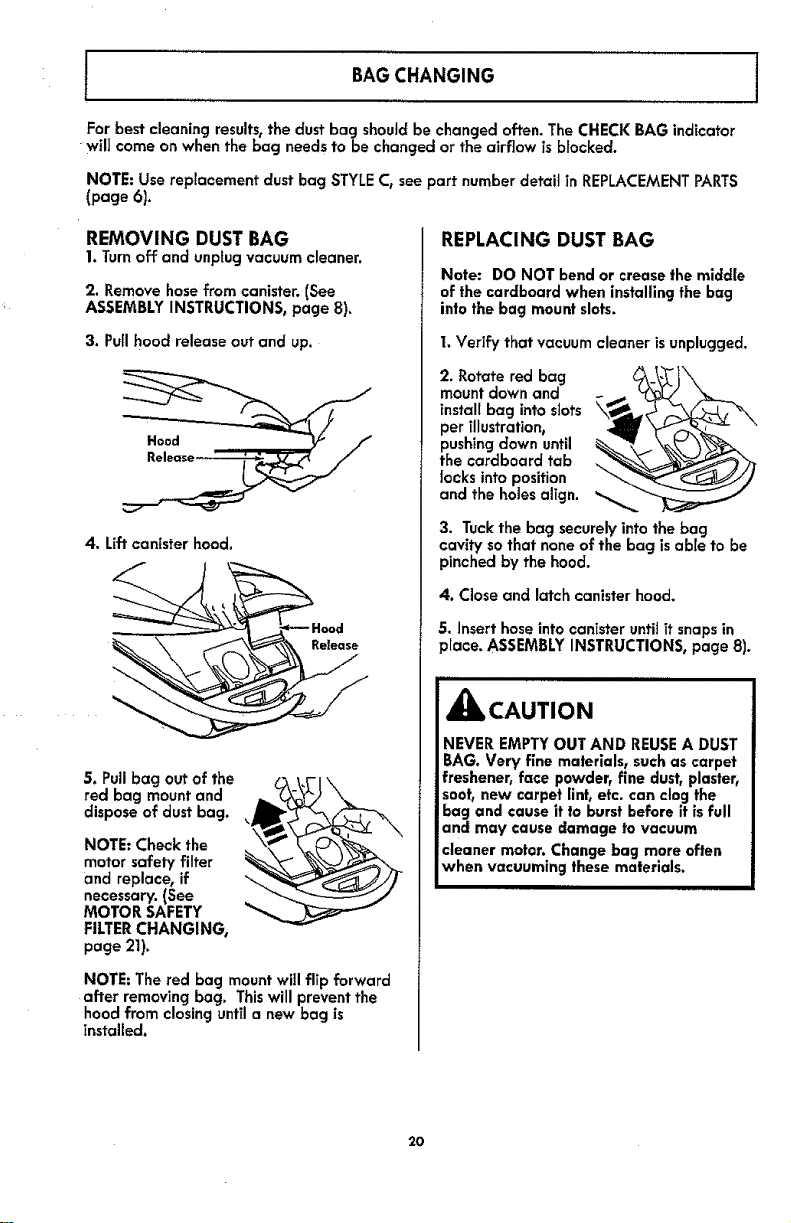
3. Puffhood release out and up.
4. Lift canister hood.
S. Pullbag out of the
red bag mount and
dispose of dust bag.
NOTE: Check the
motor safety filter
and replace, if
necessary. (See
MOTOR SAFETY
FILTERCHANGING,
page 21).
NOTE: The red bag mount will flip forward
after removing bag. Thiswill prevent the
hood from closing until a new bag is
installed.
REPLACING DUST BAG
Note: DO NOT bend or crease the middle
of the cardboard when installing the bag
into the bag mount slots.
1.Verify that vacuum cleaner isunplugged.
2. Rotate red bag
mount down and
instal[ bag into stats \_
per illustration,
pushing down until _
the cardboard tab
locks into position
and the holes align.
3. Tuck the bag securely into the bag
cavity so that none of the bag is able to be
pinched by the hood.
4. Close and latch canister hood.
5. Insert hose into canister until ff snaps in
place. ASSEMBLY INSTRUCTIONS, page 8).
_lb CAUTION
NEVER EMPTY OUT AND REUSEA DUST
BAG. Very fine materials, such as carpet
freshener, face powder, fine dust, plaster,
soot, new carpet lint, etc. can clog the
bag and cause it to burst before it is full
and may cause damage to vacuum
cleaner motor. Change bag more often
when vacuuming these materials.
2O

I MOTOR SAFETYFILTERCLEANING 1
Check motor safety filter occasionally and clean when dirty.
i
_IbWARNING
Electrical Shock Hazard
Turn off and unplug vacuum cleaner from
electrical outlet. Do not operate the
vacuum cleaner without the motor safety
filter, Be sure the filter is dry and properly
installed to prevent motor failure and/or
electrical shock.
I. Remove the bag
as outfined in the
BAG CHANGING
section.
2. Uff the rubber
retainer and pull
out motor safety fil-
ter as shown.
3. V/ash filter in warm soapywater, rinse,
then dry. Donotclean in dishwasher or
install while damp.
4. Replace the filter
by sliding it back into
place under the ribs
in the bag cavity.
Tuck filter in so that it
fits completely under
the rubber retainer.
5. Replace the bag as outlinedin the BAG
CHANGING section.
21

EXHAUST FILTERCHANGING
The exhaust filter cartridge must be replaced regularly. Replace the filter when the entire
surface area is covered evenIy. The filter CANNOT be washed as it will lose its dust trap-
ping ability.
NOTE: Use replacement exhaust filter STYLEEF-1,see part number detail in REPLACEMENT
PARTS(page 6).
iiiiiiiiill illlllll ill i i ii i iiillll i
,_ WARNING
Fire and/or Electrical Shock Hazard
Do not operate with a clogged exhaust
filter or without the exhaust filter installed.
Do not operate without filter cover
installed.
1. Pullout and down on
the exhaust filter cover
to remove from the
canister and lay aside.
Filter
2. Pullthe exhaust
filter up and out
from the rear of
the canister.
3. Replace the
exhaust filter
cartridge. Place
the new filter into
the canister with
the foam seal
facing towards
the canister.
Slots
Tabs
Filter
4. Replace the
exhaust filter cover
by placing the two
tabs on the filter
cover into the slots
on the canister and
rotate into place
until it snaps closed.
22
Always follow all safety precautions when performing maintenance to the PowerMate.
WARNING
Electrical Shock Or Personal injury Hazard
Always turn off and unplug vacuum
cleaner before performing maintenance
to the vacuum cleaner. Failure to do so
could result in electrical shock or personal
injury from vacuum cleaner suddenly
starting.
BELTCHANGING AND AGITATOR CLEANING
TO REMOVE BELT
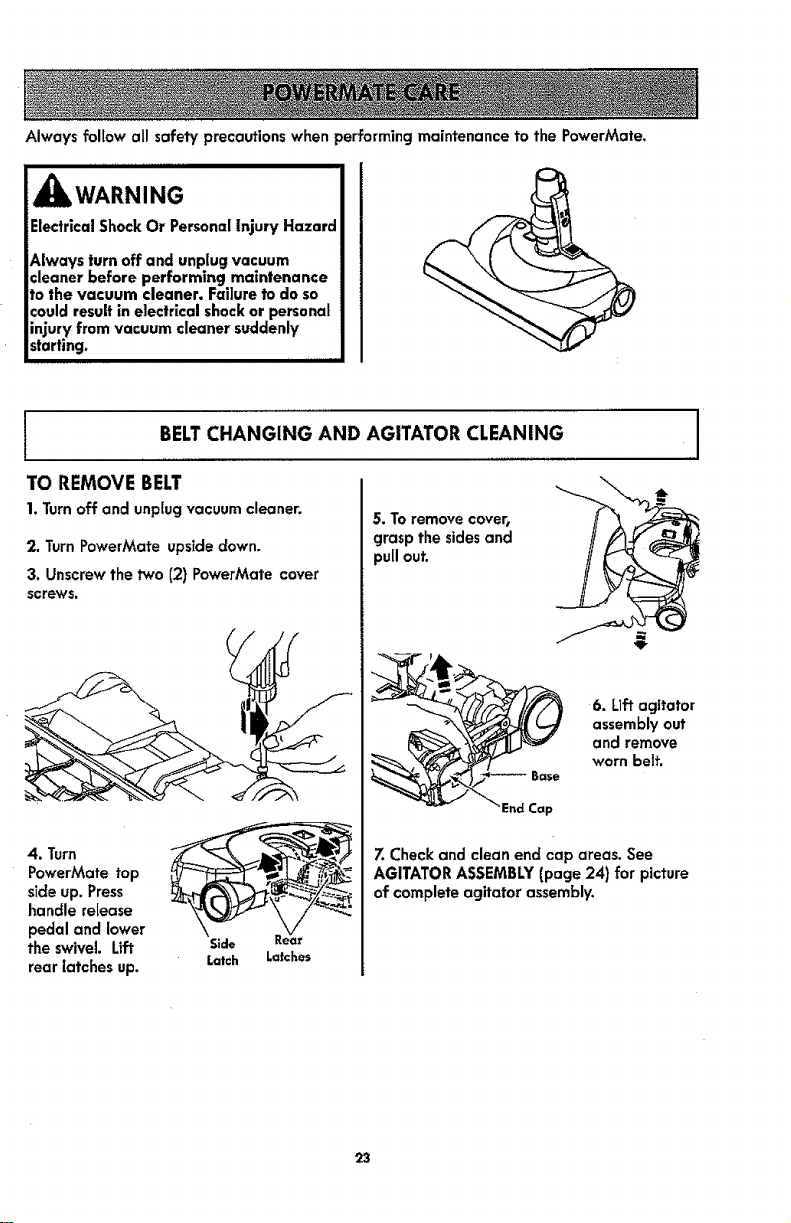
1. Turn off and unplug vacuum cleaner.
2. Turn PowerMate upside down.
3. Unscrew the two (2) PowerMate cover
screws.
4. Turn
PowerMate top
side up. Press
handle release
pedal and lower
the swivel Lift
rear latches up.
Latch
Latches
5. To remove cover,
grasp the sides and
pull out.
6. Liftagitator
assembly out
and remove
worn belt.
End Cap
7. Check and clean end cap areas. See
AGITATOR ASSEMBLY (page 24) for picture
of complete agitator assembly.
23
TO CLEAN AGITATOR:
NOTE: In order to keep cleaning efficiency
high and to prevent damage to your vacu-
um cJeanertthe agitator must be cleaned
every time the belt is changed.
The agitator must also be cleaned accord-
ing to the following schedule=
Vacuum Cleaner Use Clean A_ilator
HEAVY - every week
(used daily)
MODERATE - every month
(used 2-3 times/week)
LIGHT - every 2 months
(used 1time/week)
IMPORTANT
Disconnect vacuum cleaner from electrical
outlet. Check and remove hair, string and
lint build-up frequently in the PowerMate
agitator and end cap areas.
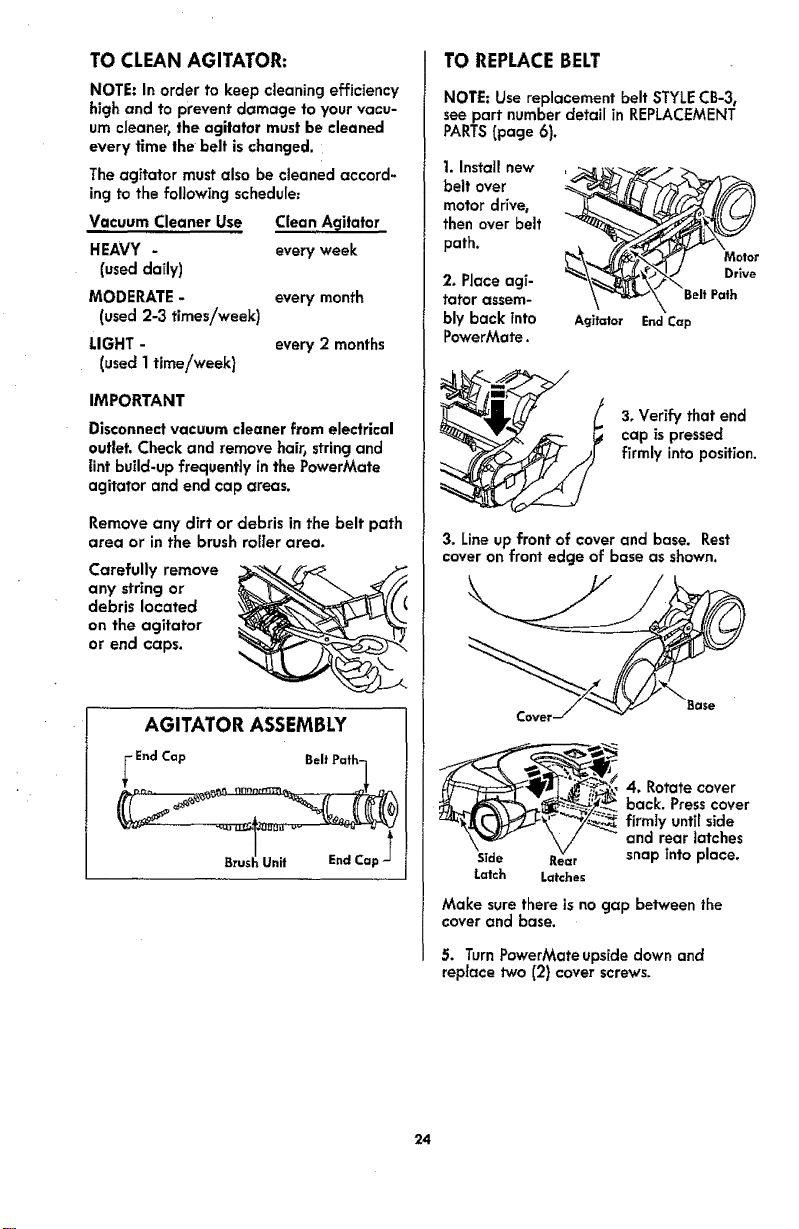
Remove any dirt or debris in the belt path
area or in the brush roller area,
Carefully remove
any string or
debris located
on the agitator
or end caps.
AGITATOR ASSEMBLY
End Cap
Unit End Cap
TO REPLACEBELT
NOTE: Use replacement belt STYLECB-3,
see part number detail in REPLACEMENT
PARTS(page 6).
1. Install new __r
belt over
motor drive,
then over belt
path.
2. Place agi- _\_'_'_. Drive
tatar assem- \ _'-_-_\.\ BeltPath
bly back tnto Agitator EndCap
PowerMate.
3, Verify that end
cap aspressed
firmly into position.
3. Line up front of cover and base. Rest
cover on front edge of base as shown.
Cover
___k_ 4. Rotate cover
__ back. Press cover
U_!'__-_ farmty unti[ side
and rear latches
Side Rear snap into place.
Latch Latches
Make sure there isno gap between the
cover and base.
5. TurnPowerMateupsidedownand
replacetwo (2)cover screws.
24
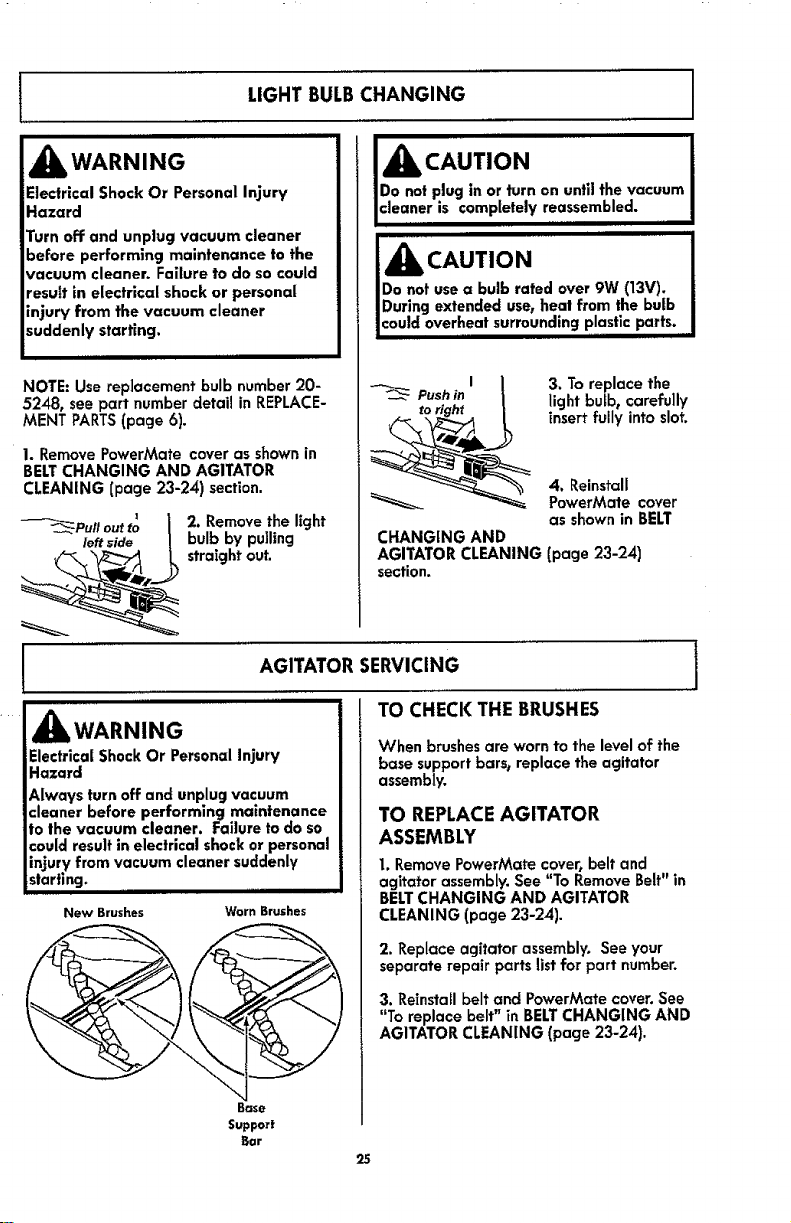
LIGHT BULBCHANGING
_IbWARNING
Electrical Shock Or Personal Injury
Hazard
Turn off and unplug vacuum cleaner
before performing maintenance to the
vacuum cleaner. Failure to do so could
result in electrical shock or personal
injury from the vacuum cleaner
suddenly starting.
NOTE: Use replacement bulb number 20-
5248, see part number detail in REPLACE-
MENT PARTS(page 6).
1. RemovePowerMate coveras shownin
BELTCHANGING AND AGITATOR
CLEANING(page 23-24) section.
2. Remove the light
bulb by pulling
straight out.
_k CAUTION
Do not plug in or turn on until the vacuum
cleaner is completely reassembled._
Do not use a bulb rated over 9W (13V), !
During extended use, heat from the bulb J
Jcould overheat surrounding plastic...... parts, I
3. To replace the
light bufb0 carefully
insert fully into slot,
4. Reinstall
PowerMate cover
as shown in BELT
CHANGING AND
AGITATOR CLEANING (page 23-24)
section.
AGITATOR SERVICING j
TO CHECK THE BRUSHES
iiiiiii
,_ WARNING
Electrlcai Shock Or Personal Injury
Hazard
Always turn off and unplug vacuum
cleaner before performing maintenance
to the vacuum cleaner. Failure to do so
could result in electrical shock or personal
injury from vacuum cleaner suddenly
starting, .....
New Brushes
Worn Brushes
Base
Support
Bar
25
When brushes are worn to the level of the
base support bars, replace the agitator
assembly.
TO REPLACEAGITATOR
ASSEMBLY
1. Remove PowerMate cover, belt and
agitator assembly. See "To Remove Belt" in
BELTCHANGING AND AGITATOR
CLEANING (page 23-24).
2. Replace agitator assembly, See your
separate repair parts list for part number.
3. Reinstall belt and PowerMate cover. See
"To replace belt" in BELTCHANGING AND
AGITATOR CLEANING (page 23-24).
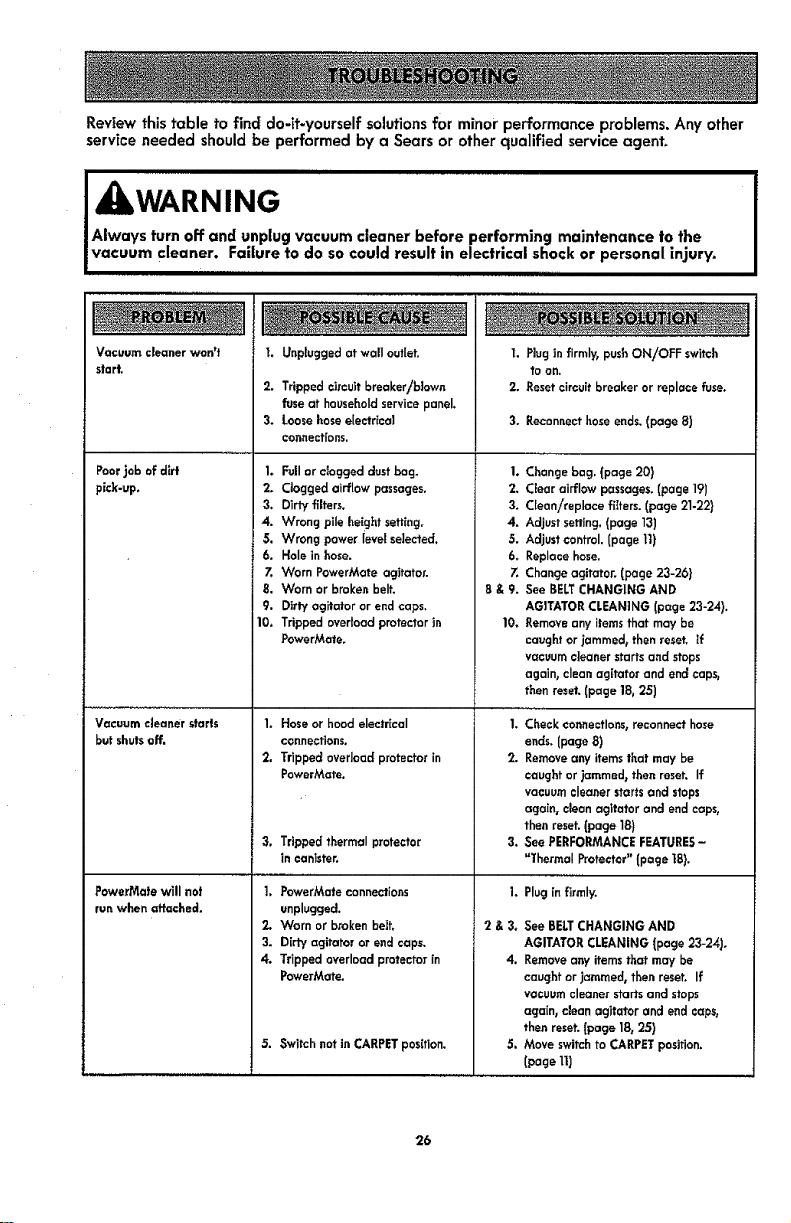
Reviewthistabletofinddo-it-yourselfsolutions for minor performance problems. Any other
service needed should be performed by a Sears or other qualified service agent.
4 kWARNING
Always turn off and unplug vacuum cleaner before performing maintenance to the
vacuum cleaner. Failure to do so could result in electrical shock or personal injury,
IIIIII II II
Vacuum cleaner won't
start.
Poorjob of dkt
pick-up,
Vacuum cleaner starts
but shutsoff,
PowerMate will nat
run when attached.
2. Trippedcircuitbreaker/blown
fuseat householdservicepanel.
3. Loosehoseelectrteal
connections,
Unplugged at wall outlet, 1. Plug in firmly, pusF,ON/OFF switch
to on.
2. Reset circuit breaker or replace fuse.
1. Full or clogged dust bog.
2, Clogged airflow passages,
3. Dirty filters.
4. Wrong pile height settir.g,
5. Wrong power ievel se]ected_
6, Hole in hose.
Z Worn PowerMate agitator.
8. Worn or broken belt.
9. Dirty agitator or end caps,
10, Tripped overload protector in
PowerMate,
1. Hose or hood electrical
connections,
2. Tripped overload protector in
PowerMate.
3, Trippedthermal protector
in canister.
1. PowerMateconnections
unplugged,
2. Worn or brokenbell
3. Dirty agitator or end caps.
4. Trippedoverload protectorin
PowerMate.
5. Switchr.ot in CARPETposition.
3. Reconnect hose ends, (page 8)
2.
3.
4.
5.
6.
7.
8&9.
Changebag. (page 20}
Clear airflow passages.(page 19)
Clean/replace filters. (page 21-22)
Adjust setting. (page 13)
Adjustcontrol.(page tt)
Replacehose.
Changeagitator. [page 23-26)
See BELTCHANGING AND
AGITATORCLEANING(page 23-24).
10. _emove any itemsthat may be
caughtor jammed_thenreset. If
vacuumcleanerstarts and stops
again, clean agffatorand endcapsj
then reset.(page 18, 25)
1. Checkconnections,reconnecthose
ends.(page 8)
2. Removeany itemsthat may be
caughtor jammed_then reset. If
vacuumcleanerstartsar.d stops
again, cleanagltator and endcaps,
then reset.(page 18)
3. See PERFORMANCEFEATURES-
=l'hermaI Protector"(page t8).
Plugin firmly.
I.
2&3.
4.
See BELTCHANGING AND
AGITATORCLEANING [page23-24).
Removeanyitemsthat may be
caughtor jammed, then reset. If
vacuumcleaner startsand stops
again,clear, agitator and endcaps,
then reset.[page 18,25)
Moveswitchto CARPETposition.
[page11)
26
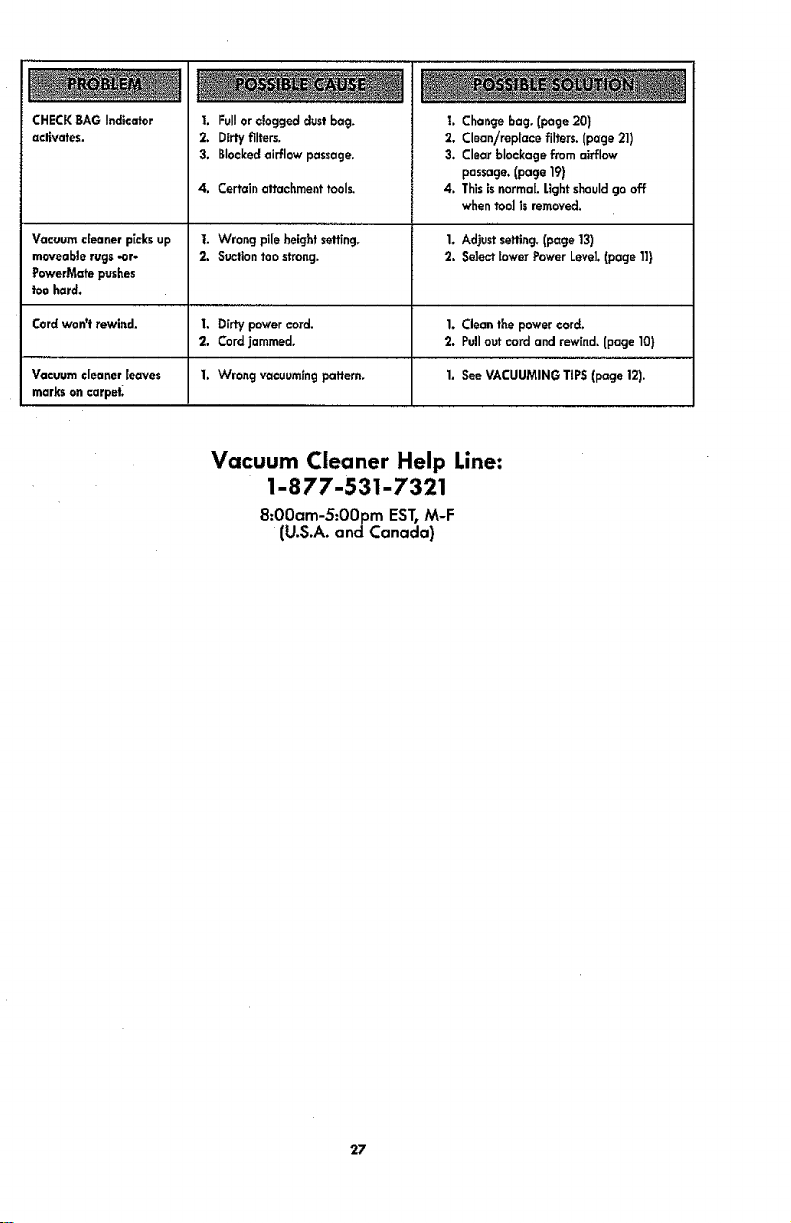
CHECKBAGIndicatorI. Fullorcloggeddust bag.
activates. 2. Dirty filters.
3, Blockedairflow passage.
4. Certain attachmenttools.
Vacuum cleanerpicksup t. Wrong pile height setting.
moveablerugs -or- 2. Suctiontoo strong.
FowerMatepushes
toe hard.
Cordwon't rewind. I. Dirty powercord.
2, Cordjammed.
Vacuum cleanerleaves 1. Wrong vacuumingpattern.
markson carpet_
t. Changebag. [page 20)
2. Clean/replace fJlters.(page 21)
3, Clearblockage fromairflow
passage.(page 19)
4. Thisis normal.Lightshouldgo off
when tool Jsremoved.
1. Adjustsetting,(page13)
2. Selectlower Power LeveJ.(page 11}
1. Clean tee powercord.
2. Pullout cord and rewind.[page 10)
1. See VACUUMING TIPS(page 12).
Vacuum Cleaner Help Line:
1-877-531-7321
8:00am-5:00pm EST, M-F
(U.S.A. and Canada)
27

28
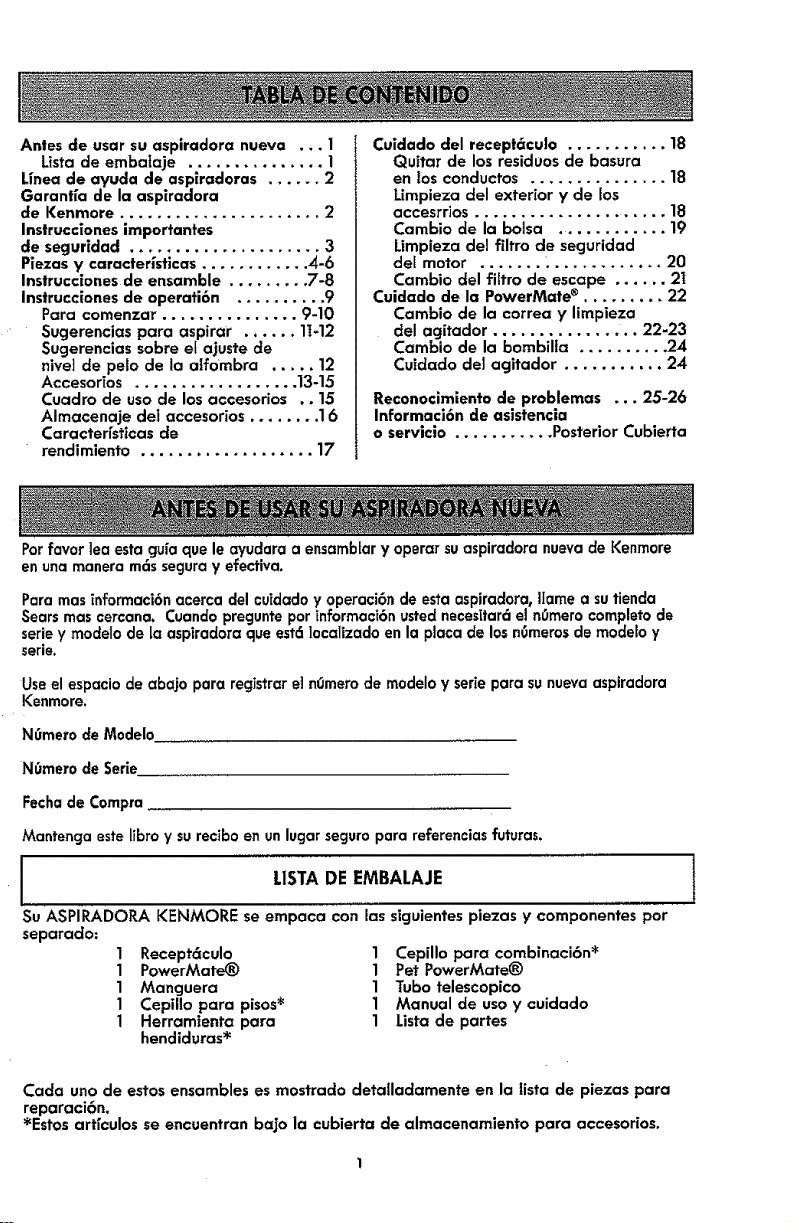
Antes de usar su aspiradora nueva ... 1
Lista de embalaje ............... 1
Unea de ayuda de aspiradoras ...... 2
Garanffa de la aspiradora
de Kenmore ...................... 2
Instrucclones importantes
de segurldad ..................... 3
Piezas y caracteristicas ............ 4-6
Instrucciones de ensamble ......... 7-8
Instrucciones de operati6n .......... 9
Para comenzar ............... 9-10
Sugerencias para aspirar ...... 11-12
Sugerencias sobre el ajuste de
niveI de pelo de la alf0mbra ..... 12
Accesorios .................. 13-15
Cuadro de uso de los accesorios .. 15
Almacenaje del accesorios ........ 16
Caractedst|cas de
rendimiento ................... 17
Cuidado del receptc_cu|o ...... 18
Quitar de los residuos de "basura
en los conductos ............... 18
Limpieza del exterior y de los
accesrrios ...................... 18
Cambio de la bolsa ............. 19
Umpieza del filtro de secjuridad
del motor ....... . ............ 20
Cambio del filtro de escape ...... 2I
Cuidado de la PowerMate ®......... 22
Cambio de la correa y limpieza
del agitador ................ 22-23
Cambio de la bombilla .......... 24
Cuidado de1 agitador ........... 24
Reconocimiento de problemas ... 25-26
Informaci6n de asistencia
o servicio ........... Posterior Cubierta
Potfavortea estagufaque leayudaraa ensarnbtary operorsuaspiradoranuevade Kenmore
en unamaneram6sseguray efectiva.
Para mas informaci6n acerca del cuidado y operaci6n de esta aspiradora_ Ilame a su tienda
Sears mas cercana. Cuando pregunte por informaci6n usted necesitar6 eJn0rnero completo de
serie y modelo de la aspiradora que estd localizado en la plata de los nOmerosde modelo y
serie.
Useel espaciode abajo para registrare] nOmemde modeloy serieparasunuevaaspiradora
Kenmore.
N0mero de M0delo
N0mero de Serie
Fecha de Compra
Mantenga este ltbro y su recibo en unlugar seguro para referencias futuras.
m
I LISTADEEMBALAJE
I
Su ASPIRADOR.A KENMORE se empaca con los siguientes piezas y componentes por
separado:
1 Recept6culo 1 Cepillo para combinaci6n _
1 PowerMate_) 1 Pet PowerMate_)
1 Manguera 1 Tubo telescopico
1 Cepillo para pisos* 1 Manual de uso y cuidado
1 Herramienta para 1 Lista de partes
hendiduras *
Cada uno de estos ensambles es mostrado deta|ladamente en la |ista de piezas para
reparaci6n.
*Estos arffculos se encuentran bajo la cubierta de almacenamiento para accesodos.
GarantfalimitadadeKenmore
DURANTE un afio a partir de la fecha de compra este aparato est6 garantizado contra
defectos de material o mano de obra cuando sees instalado correctamente, operado y
mantenido seg0n las instrucciones suministradas.
CON LA PRUEBADE COMPP.A,devuelva el aparato defectuosoa la tienda donde Io
compr6 para la reparaci6n o reemplazo sin costo a discreci6n del vendedor.
Estagarantia esvcilidasolamentedurante 90 dfasdesde la fecha de ¢ompra,
sita aspiradora seutiliza para otros fines que nosean el uso familiar privado.
Esta garanffa cubre EXCLUSIVAMENTE los defectos de matedales y fabricaci6n y NO
pagar6:
1. Los elementos desechables que puedan desgastarse con un uso normal, incluyendo
sin car6cter excluyente, filtros, correas, bolsas., y bornbiltas con rosca en la base.
2. Un t_cnico del servicio t6cnico para limpiar o mantener este aparato, o para que
ensefie al usuario a instalar, manejar o mantener correctamente el producto.
3. Llamadas de servicIo para corregir instalaciones de un aparato no realizadas pot
agentes de servicios autorizados por Sears o para reparar problemas con fusibles
de casas, Interruptores de circuitos, cableado de casa, y plomer_a o sistemas de
alirnentaci6n de gas que resulten de la instalaci6n.
4. Dafios o fallas en este aparato que resulten de una instalaci6n no realizada pot
agentes de servicio autorizados por Sears, incluyendo insta|aci6n que no fue de
acuerdo a los c6digos de electr]ciclad, gas o plomeri'a.
5. Dafios o fallas de este aparato, incluyendo descoloraci6n u oxido en la superficie, si
no se ha manejado correctamente o mantenido siguiendo todas tas instrucciones
Tncluidas con el proclucto.
6. Dafios o fallas de este aparato, incluyendo descoloraci6n u oxido en la superficie,
originados pot accidente, alteraci6n, abuso, uso incorrecto o uso del producto para
otros fines distintos de los indicados.distintos de los indicados.
7. Dafios o fallas de este aparato, incluyendo descoloraci6n u oxido en la superficie,
causados por el uso de detergentes, lirnpiadores, productos quimicos o utensilios
diferentes a los recomendados en todas las instrucciones que se incluyen con el
producto.
8. Dafios o averfas de las piezas o sistemas causados por modificaciones no
autorizadas que se hayan hecho a este producto.
9. Servicio a un aparato sTel modelo y etiqueta de serie faitan, son alteradas o sTno
se puede deterrninar f6cilmente sTtienen el logo de certificaci6n apropiado
L|mitaci6n de responsabilidad de las garanffas impl[citas_ limitaci6n de remedios
El 0nico y exclusivo remedio del cliente bajo esta garanffa lirnitada ser6 el reemplazo
del aparato segOn io indicado en este documento. Las garanffas impffcitas0 incluyendo
las garanffas de comerciabilidad o idoneidad para un prop6sito especffico, se limitan a
un afio o el per[odo m6s corto permitido por la Jey. El comerciante no set6 responsable
pot dafios incidentales ni consecuenciales. Algunos estados no permiten la exclusi6n o
limitaci6n de dafios tncidentales o consecuenciales, ni limitaciones en ta duraci6n de las
garanffas impffcitas de comerciabiJidad o idoneidad, por Io que estas exclusiones o
limttaciones podr[an no apIicar en su caso.
Esta garantfa aplica solamente cuando esta aparato se utiliza en Estados Unidos.
Esta garant[a le otorga derechos legales especfficos, y usted podr[a tenet otros
derechos que varfan en funci6n de cada estado.
Sears Brands Management Corporation, Hoffman Estates, tL 60179
2

Lealasinstruccionesenestemanualantes de armar o usar su aspiradora.
ADVERTENCIA:
Su sec_uridad es muy |mportante para nosotros. Pare reduclr el riesgo de incendio, cheque
el6ctnco, lesi6n corporal o defies al u|ilizar su aspiradora, act0e de acuercto con precauciones
b6slcas de seguridad, entre elias:
Usesuaspiradora 6nlcamente en la farina
descrltaen este manual. Use6nicamente con
accesoriosrecomendados par Sears.
Desconecteel cord6n el6ctricoantes de
componero limp[atel6tea de1cepilIo.De Io
contraHo,el cepillopodrfaarrancar de farina
imprevistao podr_aproducirseun cheque
ei6ctrlco.
No abandone la asplradora cuando est6
conectada. Descon6ctela cuando no la est6
usando y antes de dade servicio.
Para reducir el r[esgo de cheque eI6ctrico, no
use suaspiradora al aire Iibre ni sabre
superficies mojadas.
No permita que sea utiffzada coma juguete. Se
requiere tenet mayor cuiclado cuando sea
utillzada en la proximidad de nifios o par nifios.
No use la aspiradora sieLcord6n o el enchufe
est6n da_ados. Si la aspiradora no estd
funcionando adecuadamente o s! se ha dejado
caer0 est6 da_ada, se ha dejado expuesta a Ia
intemperte o se ba dejado caer en agua,
devu61va]a a un Centre de servicio de Sears.
No jale ni transporte la aspiradera par el
;ord6n; no use el cord6n coma mango; no cierre
puertas sabre el corct6n; no jale el cord6n sabre
rebordes agudos ni esquinos. No pase la
asptradora sabre el cord6n. Mantenga el cord6n
r_lejcndo de superficles calientes.
No desconecte [a aspiradora tirando deI cord6n
el4ctrico. Para desconectadat jale el enchufe_ no
el cord6n.
No toque la aspiradora ni ef enchufe con las
manes mojadas.
No co]oque objetos en [as aberturas.
No ufitTce la aspiradora si alcjuna abertura est6
bloqueada; mant4ngala libre de polvo, pelusa,
cabel]os y cualquiera cosa que podria dismlnuir
el flujo de alre.
Montenga el cabello, rope suelta, dedos y todas
las partes del cuerpo alejados de tas aberturas
y piezas mec6nicas.
Apague todos los controles antes de
desenchufar.
Teng,, culdado especial al utilizer la aspiradora
en escalones. No la coloque sabre sillas, mesas,
etc. Mant4ngala en el piso.
No use la asp|fedora pare aspirer ffquidos
tnflamables o combustibtes (gasolina, ffquidos
pare limpieza, perfumes, etc.) ni la use en
lugares donde 4stos podrlan estar presentes. Los
vapores de estas sustancias pueden crear un
peffgro de incendio o explosi6n.
No ]evante ninguna cosa que se est_ quemanclo
o emitiendo heine, coma cigarrlffost cerillos o
cenizas calientes.
No use la asp|radora sin tenet insta[ada la balsa
para polvo Yio los fiitros.
Cambte slempre la balsa pare polvo despu6s de
aspirer limpiadores de a]fombras o
desodorantes, talcos y pelves fines. Estos
procluctos atascan la babe, reducen el flujo de
aire y pueden causer que 6sta se tampa. $I no
cambia la balsa podria ocasionar dafio
permanente ala aspiradora.
No use la aspiradora para levantar objetos
agudos, juguetes pequefios, alfileres,
suJetapapeles, etc. Podrian dafter la aspiraclora
o [a balsa pare polvo.
No opere sin el filtro de escape nila cubierta
del fiffro de escape insta[ados.
La manguera contiene cables et6ctricos. No la
use cuando est6 dafiada, cortada, o perforada.
Reemplace si estcf cortada o desgastada. No
levante abjetos afilados.
Siempre apagu6 y desconecte la asplradora
antes de conectar o desconectar la mancjuera,
Pet HandiMate_ ola boquiffa.
Sujete el enchufe con la mane al enrollar el
cord6n el_ctrico. Para desconectarla, jale el
enchufe_ no el cord6n.
Usted es responsable de asecjurar que su
aspiradara no sea utilizada par ninguna persona
que no pueda manejarla correctamente.
GUARDEESTASINSTRUCCIONES
E armada y usasegurode suaspiradorason suresponsabilidad.Estaasplradora ha sidedisefiada
e×clusivamentepara usadam6stico.La aspiradoradeber6 almacenarse en unlugar secoyen el
interior.LeaesteManual de Usay Cuidadodetenidamente_puescontieneinformaci6nimportante
sabre secjurldady Use.Estaguia contleneinformaci6nsabre seguricladdebajo de s[mbolosde
advertencia cuiclado.
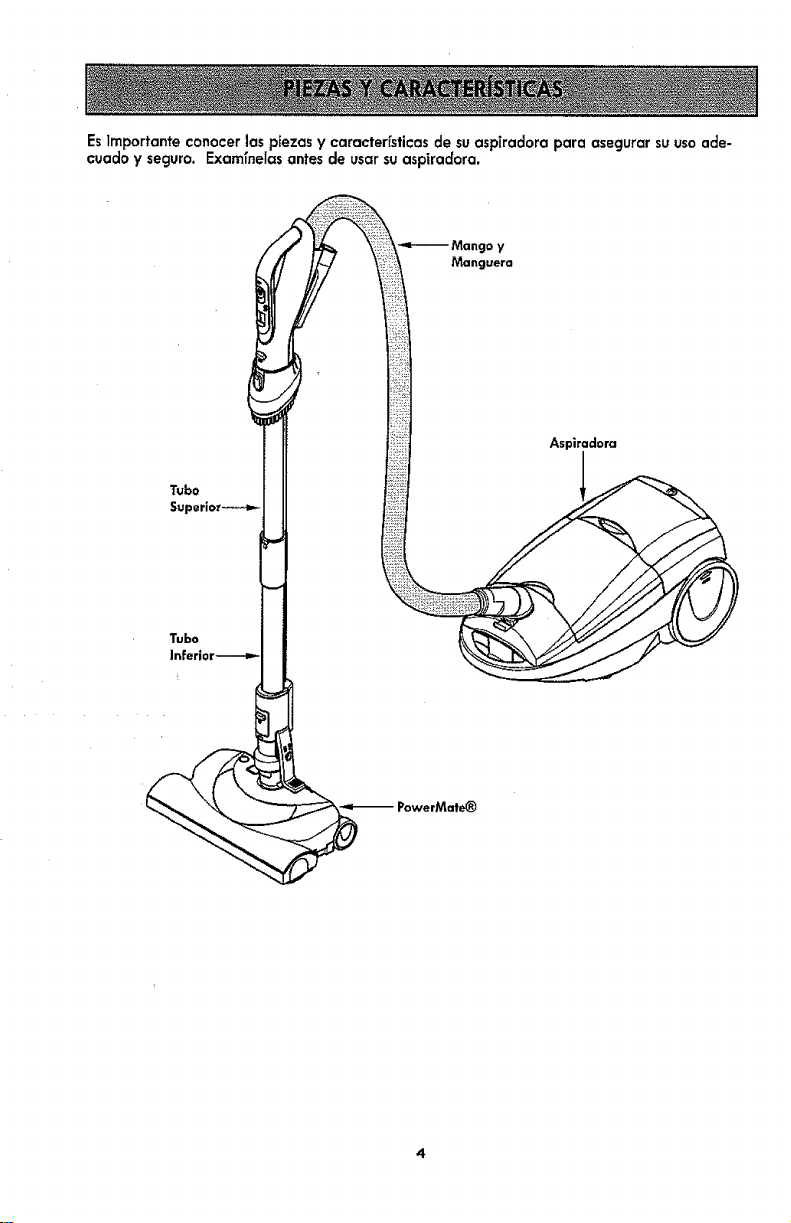
EsirnportanteconocerlaspiezasycaracterfsticasdesuaspTradoraparaasegurarsuusoade-
cuadoyseguro.Examfnelasantesdeusar su aspiradora.
Tubo.
< !
Mango y
Manguera
Aspiradora
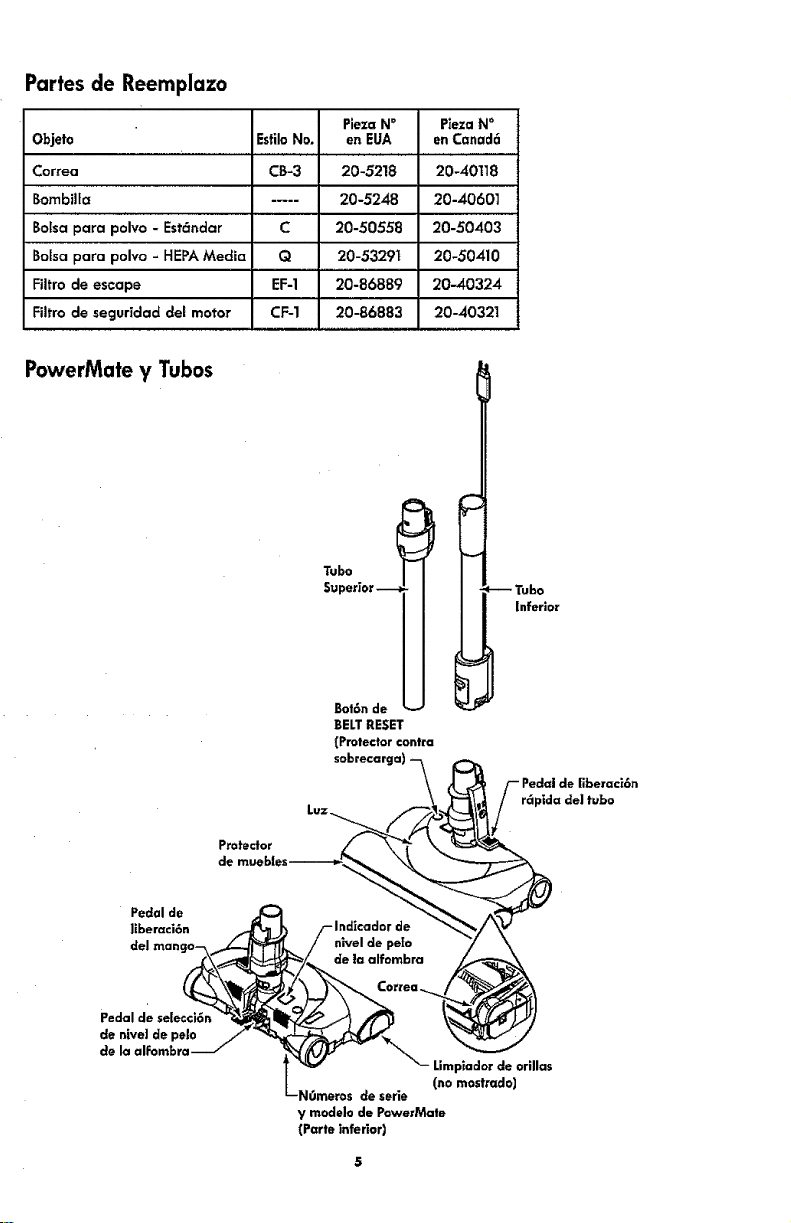
Partes de Reemplazo
Objeto
Correa
Bombilla
Botsa para polvo - HEPA Media
Filtro de escape
Filtro de seguridad del motor
Esfilo No.
CB-3
C
Q
EF-1
CF-1
PJeza N°
en EUA
20-5218
20-5248
20-50558
20 -53291
20-86889
2o-8688-_
PiezaN°
en Canad6
20-40118
20-4060]
20-50403
20-50410
20--40324
20-40321
PowerMate y Tubos
Pro_eclor
Superior -_,__
Bot6n de
BELTRESET
(Protector contra
sobrecart
--Tubo
inferior
r6pida del tubo
Pedal de
llberaci6n
Pedal de selecci6n
de nlve| de pelo
de la alFombra
Limplador de orillas
(no mostrado)
de serie
y modelo de PowerMale
(Parte inferior)
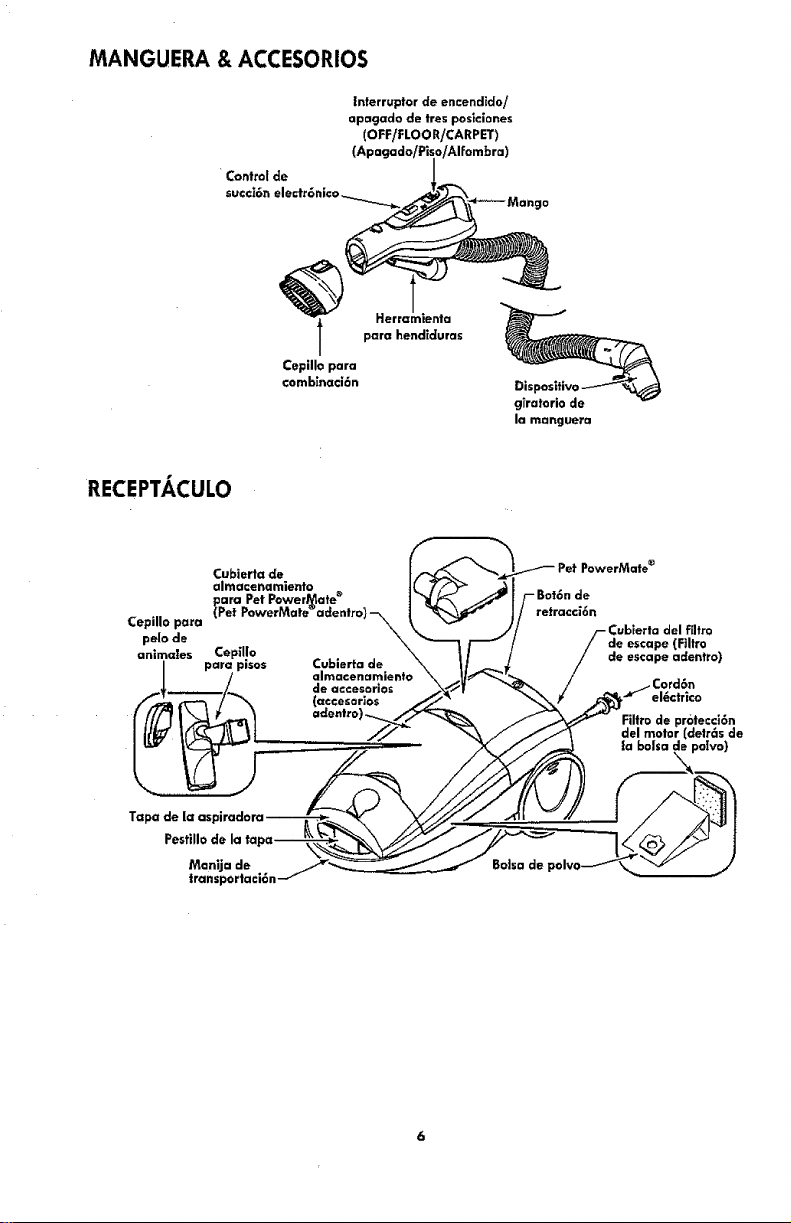
MANGUERA & ACCESORIOS
L
Control de
Interrupter de encendldo/
apagado de tres pos_clones
(OFF/FLOOR/CARPET)
(Apagado/Pi_
Herral
para hendlduras
Cepille para
comblnaci6n
cjTratorlode
la manguera
RECEPTACULO
Cubierta de
almacenamiento
CepUlo para
pelo de
animates Cepillo
para pisos
/.
Cublerta de
almacenamienta
de accesorlos
PowerMate e
retracci6n
_ublerta del ffltro
de escape (Filtro
de escape adentre)
Cord6n
el_ctrico
Filtrode protecci6n
clelmotor (€letr6s de
la balsa de polvo)
Pest|lie de la ta
Mon|ja de
transportaci6n
IBo]sa de
I
Porfavor ponga especial alenci6n a 6stos recuadros con alerta de riesgo, t
ADVERTENCIA: Esta informaci6n Realertar6 del pefigro de fuego, choque el_ctrico,
!
quemaduras y leslones. CU|DADO: Estainformaci6n le a|ertara de peligros como
leslonesy dafiosa la propiedad.
I IIIII III i /llllllllllllllllllllUII _11111111111
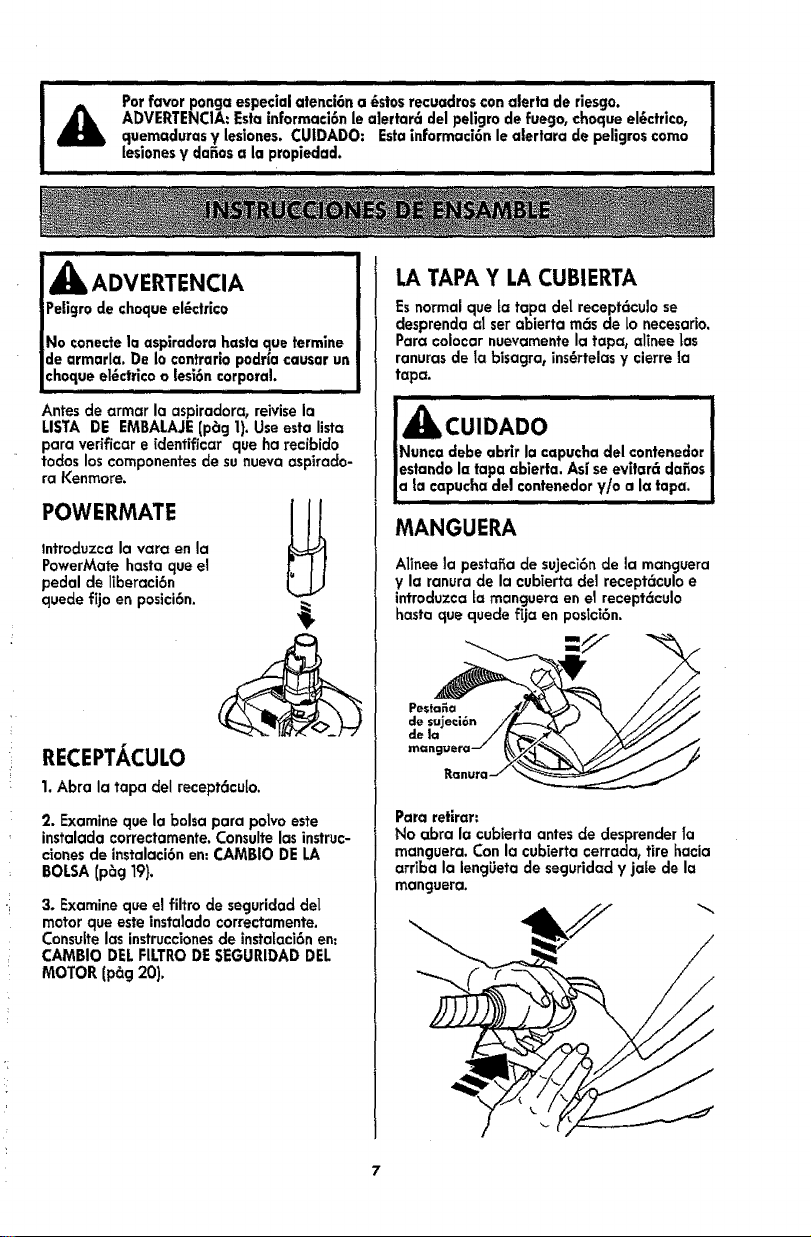
ADVERTENCIA
Peligro de cheque el_ctr[co !
No conecte la asplradora hasta que termine
de armarla. De Io €ontrario podrla causar un
choque el_ctricoo lesi6n corporah
Antes de armar la aspiradora, reivisela
LISTA DE EMBALAJE (p_g 1).Use esta lista
para verificar e [dentificar que ha reclbido
todos loscomponentes de su nueva aspiraclo-
ra Kenmore.
POWERMATE
lntrocluzca la vara en la
PowerMate hasta que el
pedal de liberaci6n
quede fijo en posici6n.
RECEPTACULO
1, Abra la tapa del recept6cu[o.
2. Examine que la bolsa para polvo este
instalada correctamente. Consulte las instruc-
cionesde instalaci6n en: CAMBIO DE LA
BOLSA (p_g 19).
3. Examine que el filtro de seguridad del
motor que este instalado correctamente,
Consuitelas instruccionesde instalaci6n en;
CAMBIO DEL FILTRODE SEGURIDAD DEL
MOTOR (p_g 20).
LATAPA Y LA CUBIERTA
Es normal que [a tapa dei recept6culo se
desprenda al set abierta m_s de Lonecesario.
Para coiocar nuevamente la tapa, alinee Las
ranuras de la bisagra, ins6rtelas y cierre la
tapa.
! u,oAoo !
Nunca €lebe abrir la capucha del contenedor J
estando la tapa ablerta. As[ seevltar_ dafios |
a la capucha del €ontenedor V/o a Ia tapa. J
MANGUERA
Alinee la pestafia de su)eci6n de la manguera
y la ranura de la cubTertade] recept6culo e
lntroduzca [a manguera en el recept6culo
hasta que quede fija en poslci6n.
-/./
Para retirar;
No abra la cubierta antes de desprender Ta
manguera, Con la cubierta cerrada_ tire hacia
arriba la lengUeta de seguridad y jale de la
manguera.
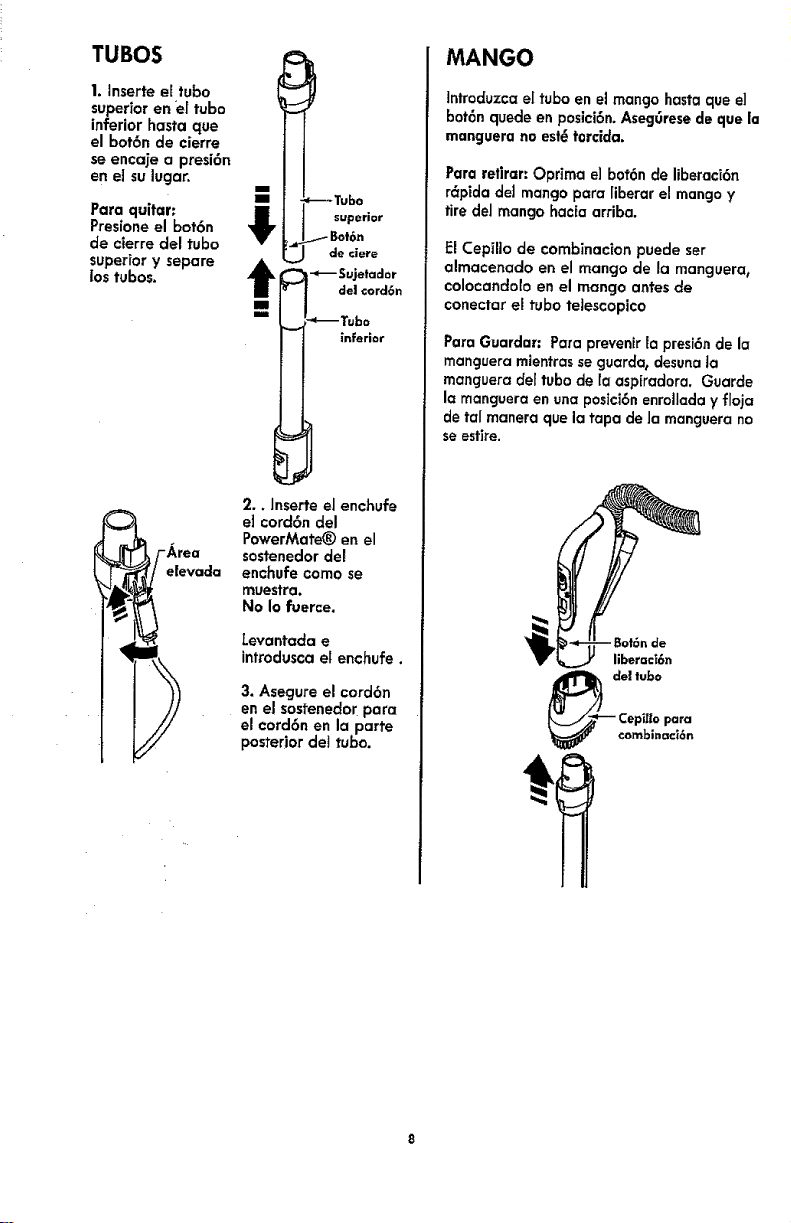
TUBOS
1. Inserte el tube
superior en _e(tube
inferior hasta que
el bot6n de cierre
se encaje a presi6n
en el su lugar,
Para quitar:
Presione el bot6n
de cterre del tube
superior y separe
los tubes.
elevada
Tubo
JLt I superior
L_ de ciere
t _ -*--Sujetaaor
de| cord6n
iin
'_Tubo
inferior
b
2.. Inserte el enchufe
el cord6n del
PowerMate® en el
sostenedor del
enchufe come se
muestra.
No Io fuerce.
Levantada e
introdusca el enchufe.
3. Asegure el cord6n
en el sostenedor para
el cord6n en la parte
posterior dei tube.
MANGO
lntroduzca el tube en e] mango hasta que e3
bot6n quede en posici6n. Aseg0rese de que |a
manguera no est_torcida.
Para retlrar: Oprima e) bot6n de liberaci6n
r_pida del mango para liberar el mango y
fire del mango hacia arriba.
FJCepillo de combinacion puede set
almacenado en el mango de la manguera,
colocandolo en el mango antes de
conectar el tube teJescopico
Para Guardar: Para prevenir la presi6nde la
manguera mientrasse guarda, desuna ta
manguera de[ tube de fa aspiradora. Guarde
la manguera en una posici6nenrollada y floja
de taI manera que la tapa de Jamanguera no
se estire.
"""I i/l_llwlull,,,,i i
|Partes en movimiento! Para reclucir el riesgo de dafios
€orporales, no toque el agitador cuando la asplradora
est6 encendida. El tatar el agitador mientras que est6
irando puede cortar, €ontusionar o causar otras
esiones. Siempre apague ¥ desconecte del
tomacorrlente antes de dar mantenimiento. Tenga
(:uldado a| aspirar cerca de ni_os.
,,,,i i , ii iilllllllllll
PARA COMENZAR
ii i i
_ ADVERTENCIA
Peligro de lesi6n personal y da_o a|
_roducto
SIEMPREapague ante de desconectar.
El cord6n el6ctrico semueve
r6pldamente durante el enrollamiento.
Mantenga atejados a los nifios ¥
asegure espoclo libre suficiente para
evitar lesionespersonaies at enroUar
el cord6n.
NO use los enchufes _ocalizados sabre
losmuebles, Los objetoscercanos
podrfan resultarda_ados.
Cucmdo alguna anormalidad/desperfec.
to ocurra, pare de usar el producto
inmed|atamente ¥ descon_ctelo de|
toma corrlente.
Bot6nde
1.Tire del cord6n
para sacar[o del
recept6culo hasta
tener Io Iongitud
deseada, Elcord6n
no seenrollar6 hasta
que optima el bot6n
para enrollar[o.
NOTA: Para reducir
el riesgo de choque e_ctrico, esta aspiradora
cuenta con una claviia polarizada0 uno de los
contactos es mc_ ancho queet otro. La otav[ja
s6Eopuede introducirsede una monera en el
enchufe. Si la clavi ia no cabe b|en en el
enchufe, invi_rtala. Si aOn no cabe, tlame a un
efectricista para que instale un enchufe
correcto. No altere la clavija de n_nguna
manera,
2. Conecte el cord6n e!_ctrico polarizado en
un enchufe de 120 volfios que se encuentre
cerca del piso.
Para enrollar: Apagu6 y
desconect_ la aspiradora.
Sujete el enchufe rnientras
enrolla el cord6n para
impedir c/ariao les|6ncor-
poral par el movimiento
del cord6n. Optima el
bot6n del cord6n el_ctrico
co_ la mano o con el pie.
t
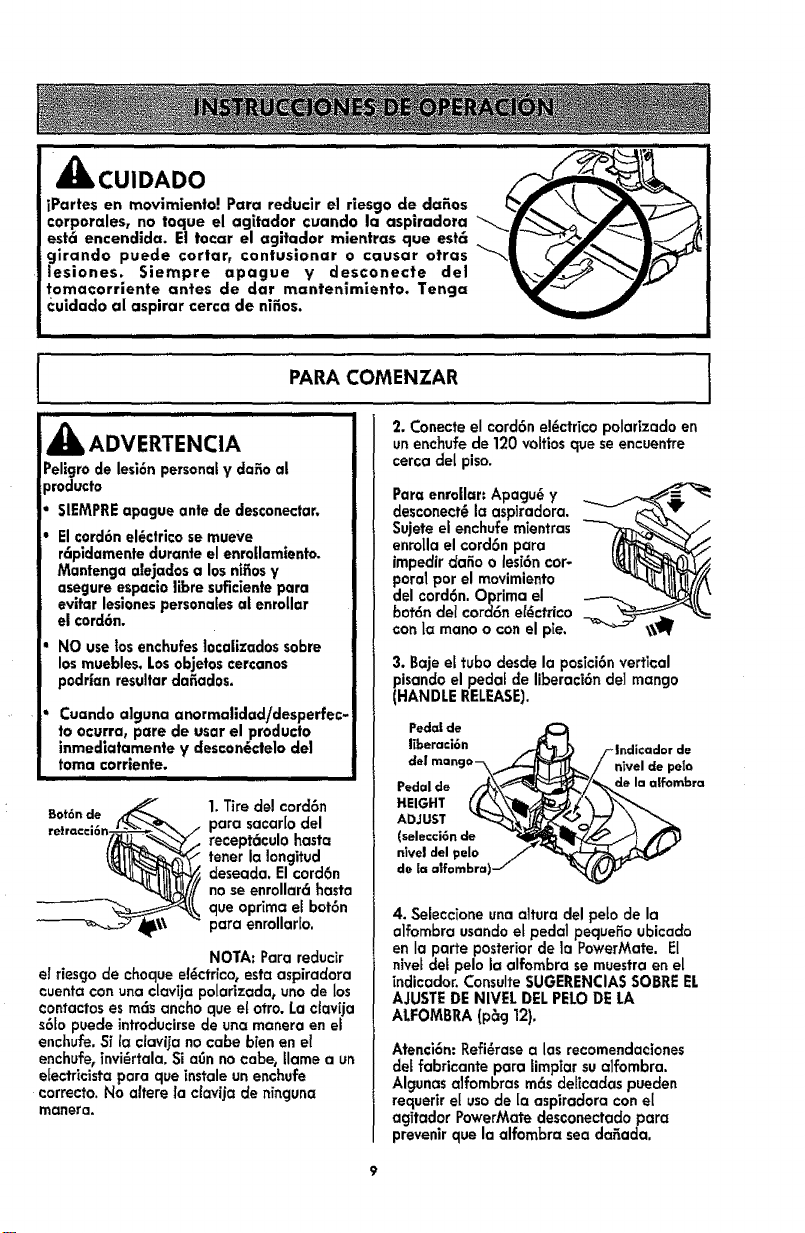
3. Baje el tuba desde la posici6nvertical
pisando el pedal de liberaci6n del mango
(HANDLE RELEASE).
Ped_s|de
Iiberaci6n
Pedal de
HEIGHT
ADJUST
(selecci6n de
nlvel del pelo
de la affombra)
nivel de pelo
de la alfombra
4. Selecc|one una altura del peto de la
alfornbra usandoet pedal pequefio ubicado
en la porte posterior de la PowerMate. El
nivet det pelo la alfornbra semuestra en el
[ndicador. ConsulteSUGERENCIAS saBRE EL
AJUSTEDE NIVEL DEL PELODE LA
ALFOMBRA (p_g 12).
Atenci6n: Refi_rase a las recomendac|ones
del fabricante para lirnpiar sualfornbra.
Algunasalfornbras m6s deffoadas puecien
requer|r e| usa de [a aspiradora con el
agitador PowerMate desconectado para
prevenirque la alfornbra sea da_ada.
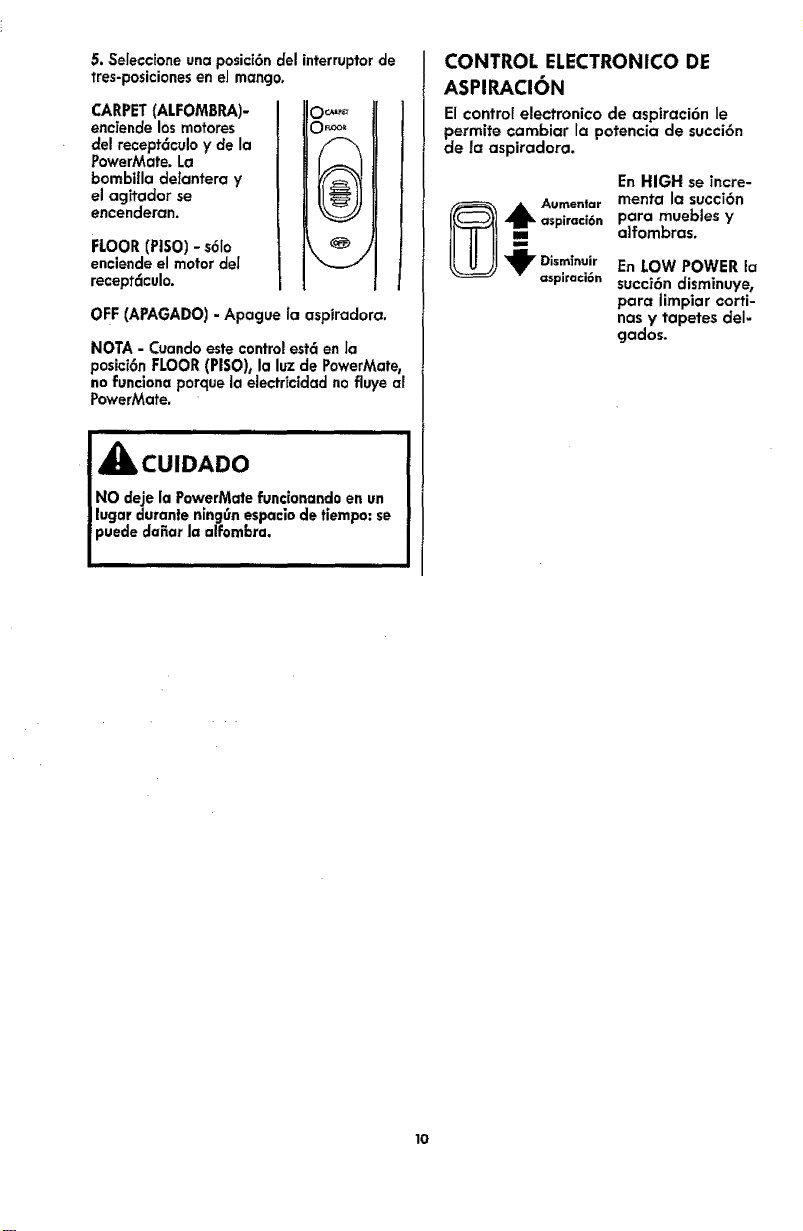
5. Seieccione una posici6n del interruptor de
tres-posiciones en el mango.
CARPET (ALFOMBRA)-
enciende los motores
del recept_culo y de la
PowerMate. La
bombiIla delantera y
el agitador se
encenderan.
FLOOR (PISO) - s6Io
enciende el motor del
recept6culo.
o_
OFF (APAGADO) - Apague la aspiradora.
NOTA- Cuandoestecontrolestcien Ja
posici6nFLOOR(PISO),la luzde PowerMate,
nofuncionaporquela electricidadnofluyeal
PowerMate.
NO deje la PowerMate funcionando en un
lugar duranle nincjOnespaciode tiempo: se
puede dafiar la alfombra.
CONTROL ELECTRONICO DE
ASPIRACION
El control electronico de aspiraci6n le
permite cambiar la potencia de succi6n
de la aspiradora.
En HIGH se incre-
_ ,_k Aumenlar menta la succi6n
aspiraci6n para muebles y
alfombras.
"_ Dism_nuir En LOW POWER la
asplraci6n succ|6n disminuye,
para iimpiar corti-
nas y tapetes del=
gados.
lO
I
SUGERENCIASPARAASPIRAR
!
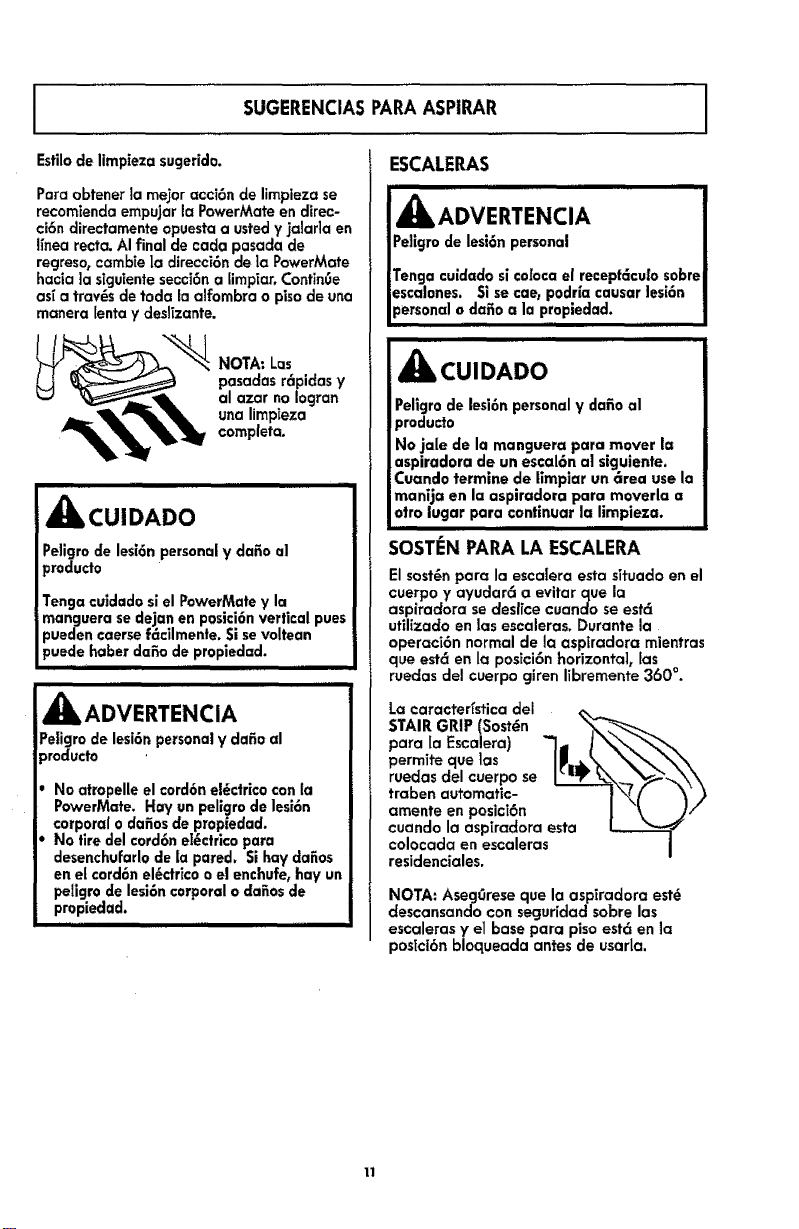
Esfilode limp[eza sugerido.
Paraobtenerla me,or acci6nde limplezase
recomiendaempujarla PowerMateendirec-
ci6ndirectamenteopuestaausted¥ jalarla en
finearecta.AIfinal de cadapasaclade
regreso,cambie|a direcci6ndela PowerMote
hacia ]asiguientesecci6na limpiar,ContinOe
as_a tray,s de toda laalfombrao pisodeuna
manerabntay deslizante.
NOTA" Los
pasadas r6pidas y
al azar no Iogran
una limpieza
completa.
I,H,,
_kCUIDADO
Peligro de lesi6npersonal y dafio al
_roducto
Tenga cuidado sl el PowerMate y la
manguera sedejan en posici6n vertical pues
_ueden caerse f6cilmente. Si se voltean
_uede habet dafio de propledad.
,_ ADVERTENCIA
Pe|igro de lesi6n persona|y dafio al
)roducto
No atropelle el cord6n el_ctrlco con |a
PowerMate. Hay un pellgro de |esi6n
corporal o dafios de propiedad.
No tire del cord6n eI_ctrico para
desenchul:arlode la pared. Si hay dafios
en el cord6n el_ctrico o el enchufe, hay un
peligro de lesi6n corporal o dafios de
propiedad.
I II I
ESCALERAS
A OVE.E.C, I
Peligro de lesi6n personal !
!
Tenga cuidado sico[oca el receptc_cu[osobre|
esca|ones. Si se cae, podr[a causar lesi6n !
personal o dafio a la propledad. !n i m,,m,,,,, iiii
i ii
_CUIDADO
Peligro de lesi6n personal y dafio a|
producto
No ja|e de la manguera para mover la
aspiradora de un esca|6n a] siguiente.
Cuando termine de limp|or un 6rea use la
manija en la aspiradora para mover|a a
otto lugar para continuar la limpieza.
, i ii
SOSTEN PARALA ESCALERA
El sost_n pora la escalera esta situado en el
cuerpo y ayudar6 a evitar que la
aspiradora se desffce cuando se est6
utilizado en |as escaleras. Durante la
operaci6n normal de la aspiradora mientras
que est6 en la posici6n horizontal, las
ruedas del cuerpo giren iibremente 360 °.
La caracterfstica del
STAIR GRIP (Sost_n <_,_-_'_
para la Escalera) "I- J_'_,.
permite que ]as |_,._k _'_'_'_\x
ruedasdel cuerpo se I_'_w _x _\\
,_aben automatic- '--'-----i\_F _ --? )
amente en posici6n I "\ 7 /
cuando la aspiradora esta
colocada en escaleras i
residenciales.
NOTA:Aseg0resequela asp_radoraest_
descansandocon seguridadsabrelas
escalerasy el basepara pisoest6 en]a
postci6nbloqueadaantesde usaria.
11
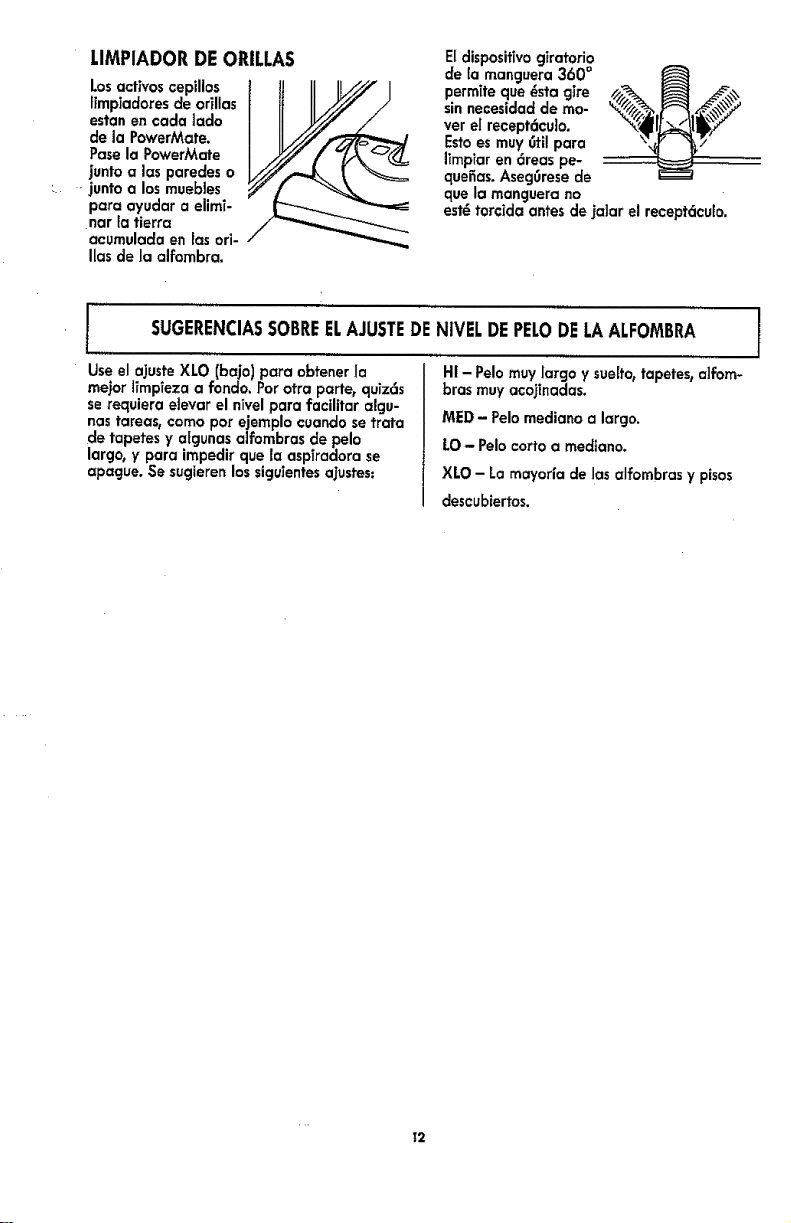
LIMPIADORDEORILLAS
Losattires cepillos 1 tJ II II.//// I
ffmpiadores de orillas
estan en cada lada
de la PowerMate.
Pase la PowerMate
junto alas paredes o
}unto a los muebJes
para ayudar a elimT-
nar }atierra
acumulada en las ori-
Ilas de la alfombra.
EIdisposit(vogiratorio
de [a manguera 360 °
permTteque _sta giro
sinnecesidad de mo-
ver el recept6cuJo.
Estoes muy 0til para
limpiar en 6reas pe-
quefias. Aseg0rese de
que la manguera no
estHtar€ida antes de ]alar el recept6cu[o.
r
Use el ajuste XLO (bajo) para obtener Ia
me}or iimpleza a rondo. Par otra porte, quiz6s
se requiera eJevar el nTvelpara facilitar algu-
nas tareas, coma par ejemplo cuando se trata
de tapetes y aigunas alfombras de pelo
largo, y para impedir que la aspiradora se
apague. Se sucjierenlos sicjuientesa]ustes:
I
SUGERENCIASSABREELAJUSTEDENIVELDEPELODELAALFOMBRA 1
/
H! - Polomuy largo y sueffo0tapetes, alfom-
bras muy aco}inadas.
MED - Pelomediano a largo.
LO- Pelo carte a medtano.
XLO - La rnayorfa de las alfombras y pisos
descubiertos.
T2
ACCESORIOS 'i
iiIIIHIIIIIIIIII IIIIIIIIIIIII
! _CUIDADO
INO instale ni retire el mango ni los tubas
|cuando la aspiradora esg_encendida. Esto
| podr|a causar oh|spas y dafiar los contac-
tos et6ctricos o control electronico.
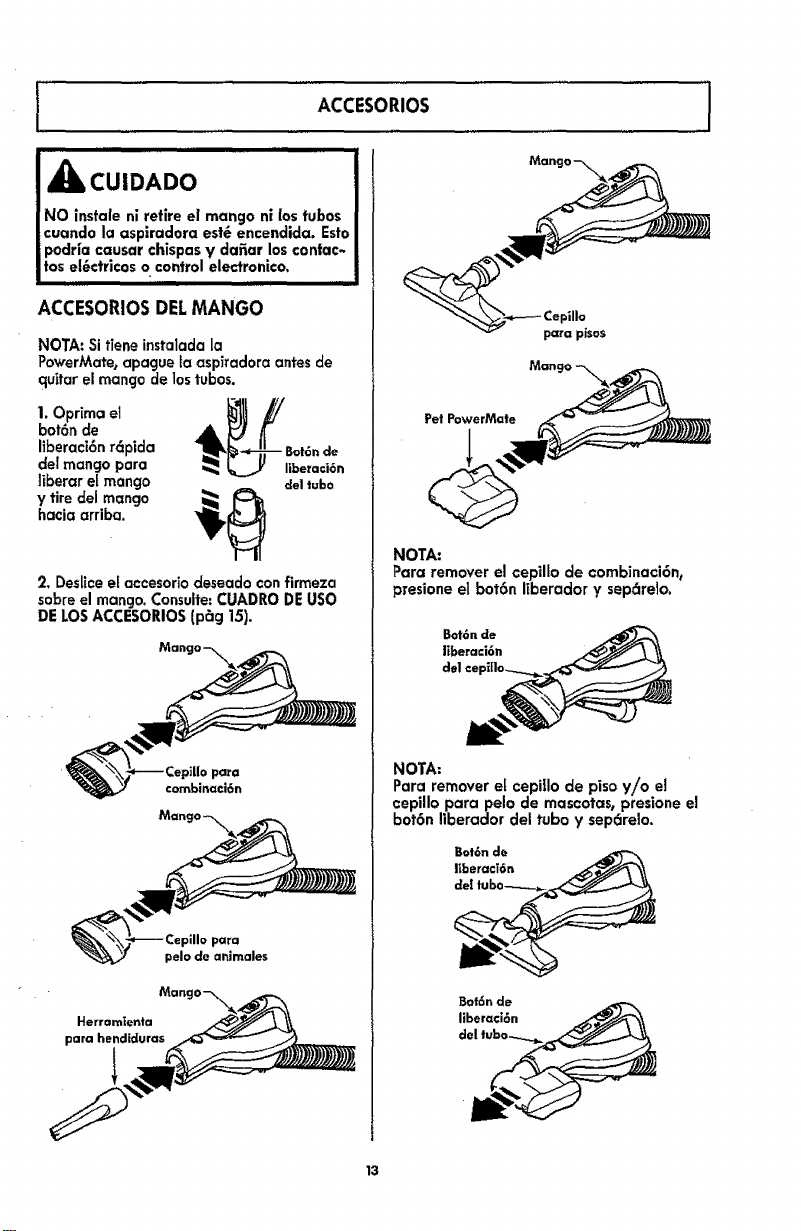
ACCESORIOSDELMANGO
NOTA: Si tiene instalada la
PowerMate, apague ta aspiradora antes de
quitar el mango de lostubas.
1. Opr[ma e, 4_k_!B_:den
bot6n de
liberaci6n r6pida
del mango para
tiberar et mango €leltuba
y tire del mango _l(_
hacia arriba.
2. Deslice et accesoriodeseado con firmeza
sabre el mango. Consulte:CUADRO DEusa
DELOS ACCESORIOS (p_g 15).
para
combinaci6n
para pisos
Pet PowerMate
NOTA:
Para remover el cepillo de combinaci6n_
presione el bot6n ffberador y sepc_relo.
NOTA:
Para remover e[ cepiIIo de piso y/o el
oepillo parapelo de mascotas, presione el
bot6n liberador del tuba y sep6relo.
Bot6n de
liberaci6n
13
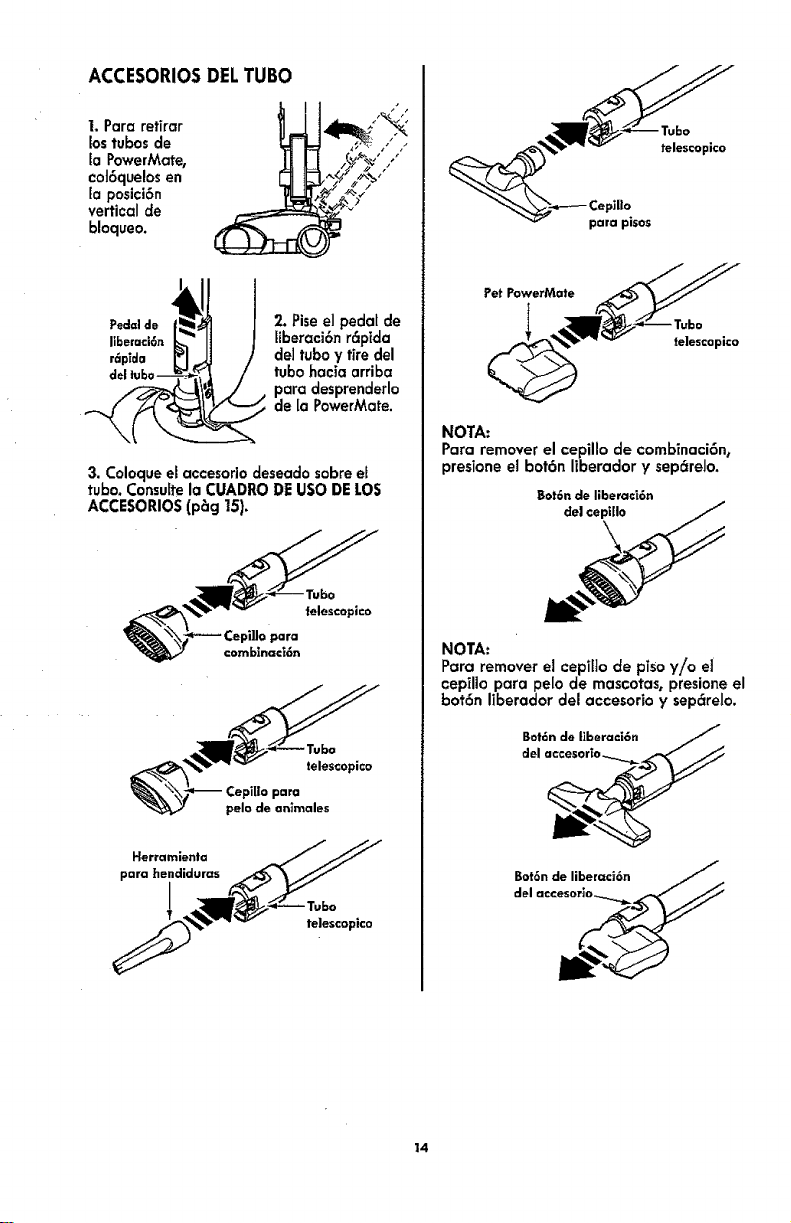
ACCESORIOSDELTUBO
I. Para retirar
lostubos de
EaPowerMate,
coJ6quelosen
la posici6n
vertical de
bloqueo.
_d_n __ l 2. Pise el pedat de
liberaci6n r6plda
de] tubo y tire del
tubo hacia arriba
para desprenderlo
de [a PowerMate.
3. Coloque el accesorio deseado sobre el
tubo. Consulte a CUADRO DE USO DE LOS
ACCESORIOS (p_g !5).
_"_ Cepi]Jo para
€omblnaci6n
telescopic°
NOTA:
Para remover el cepillo de comb_naci6n,
presione el bot6n liberador y sep_reJo.
Bot6ndeliberac_6n
de| cep|llo
NOTA:
Para remover el cepilto de piso y!o el
cepillo para pelo de mascotas, presione el
bot6n Iiberador del accesorio y sep_relo.
14
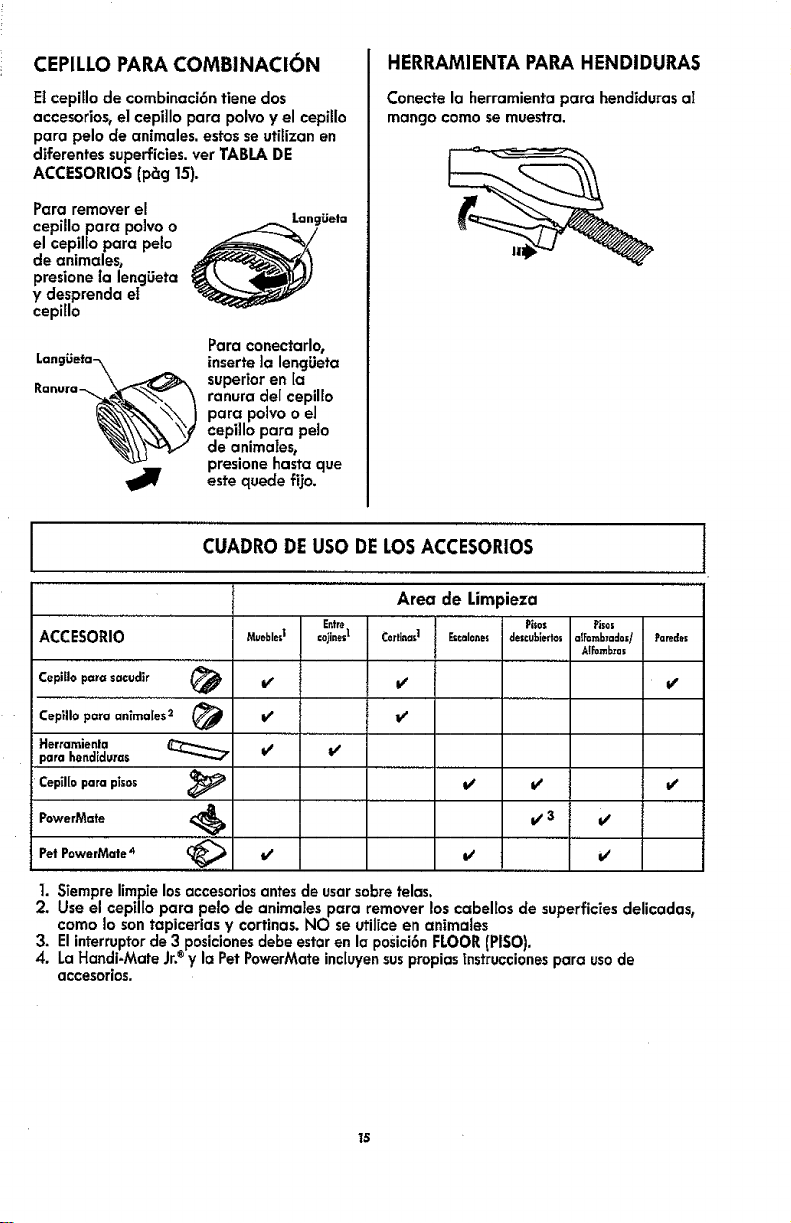
CEPILLO PAPA COMBINACI(_N
E1cepiflo de combinaci6n tiene dos
accesorios, el cepiflo para polvo y el cepillo
para pelo de animales, estos se utilizan en
diferentes superficies, vet TABLA DE
ACCESORIOS (p_g 15).
Para remover el
cepillo para po]vo o _/Languet=
eJcepilfo para pelo ,_,_/
de animales,
presione ta lengLieta
y desprenda el
cepillo
Para conectarlo,
LangLieta-_ inserte ]a lencjLieta
ranura de[ cepil[o
o.,
cepillo para peio
de animalest
presione basra que
_1_ este quede fijo.
HERRAMIENTA PAPA HENDIDURAS
Conecte la herramienta para hendfduras al
mango como se muestra,
CUADRODEUSODELOSACCESORIOS
Area de Limpieza
Entre Pi$os Pisn=
ACCESORIO Munblnd ©o_inesI C0rliea_1 Et_=10_es descublerto= =IF=mbT=do=/ FareSe=
Al_mb:ras
Cepillo para sacudir _ _ If e/
Cepillopc=raanimales2 _ it l/
Herramienla I/ t/
parahend[dums
Ceptl[o
para plsos _ _" _
t/3 t/
PowerM=te
Pet PowerMate 4 _(_, t/
v' v'
1. Siempre limpie losaccesoriosantes de usarsobre telas.
2. Use el cepilIo para peto de anima]es para remover los cabellos de superficfes delicadas,
como Io son tapicerias y cortinas. NO se utiJice en anfmales
3. El interruptorde 3 posicionesdebe estar en la posici6n FLOOR (PISO).
4. La Handi-Mate Jr.®y la Pet PowerMate inc[uyensuspropias fnstruccionespara usode
accesorios.
15
I
ALMACENAJE DEL PET POWERMATE Y ACCESORIOS l
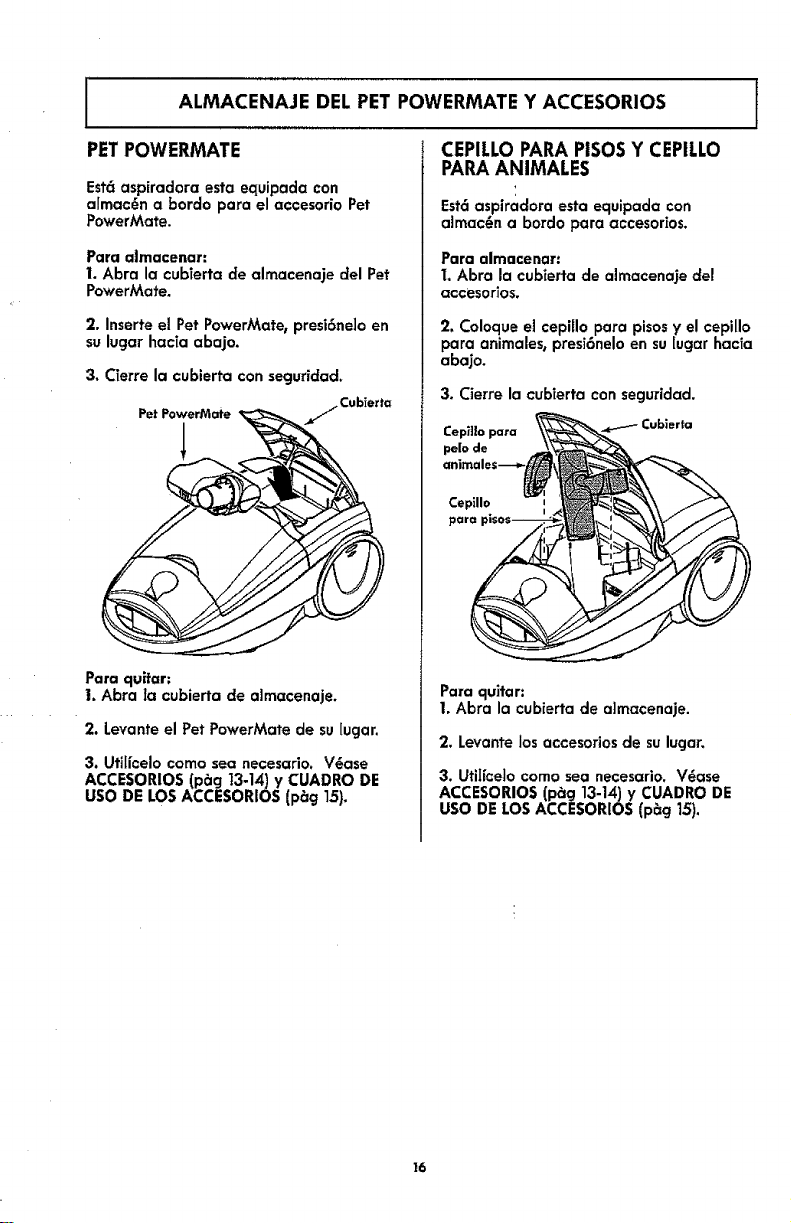
PETPOWERMATE CEPILLOPARAPISOSY CEPILLO
Estc_aspiradora esta equipada con
aImac_n a 10ordopara el accesorio Pet
PowerMate.
Para almacenar:
I, Abra la cubTerta de almacenaje del Pet
PowerMate.
2. Inserteel Pet PowerMate,presi6ne]oen
sulugarhacia abajo.
3. C(erre la cubierta con seguridad.
Pe_PowerMate / Cub_erta
Para quffar:
1. Abra la cubierta de affnacenaje.
2. Levante el Pet PowerMate de su lugar.
3. Ufiffcelo como sea necesario. V@ase
ACCESORIOS (pbcj 13-14) y CUADRO DE
USO DE LOS ACCESORIOS (p_g 15).
PARAANIMALES
Est6 aspiradora esta equipada con
aimac_n a bordo para accesorios.
Para almacenar:
I, Abra la cubierta de almacenaje del
acce$or]os,
2. Coloque el cepillo para pisos y el cepillo
para animales, presi6nelo en su [ugar hac[a
abajo.
3. Cierre la cubierta con seguridad.
Cep_]lo para Cubierta
pe|o de
Cepillo
para
Para qultar:
1, Abra la cub[erta de a]macenaje.
2, Levante Josaccesorios de sulugar,
3. UtiIfcelo corno sea necesario, V_ase
ACCESORIOS (pbg 13-14) y CUADRO DE
USO DE LOS ACCESORIOS (p_g 15).
16
J CARACTER|STICASDERENDIMIENTO ,I
AADVERTENCIA
Peligrode lesiones personales
Apagu_ y desconectesiempre la aspiradora
antes de limpiar las 6reas de la agitador
pues_stos podrian arrancar de manera
imprevlslo. Etno hacerlo, podria resultar en
lesionespersonales.
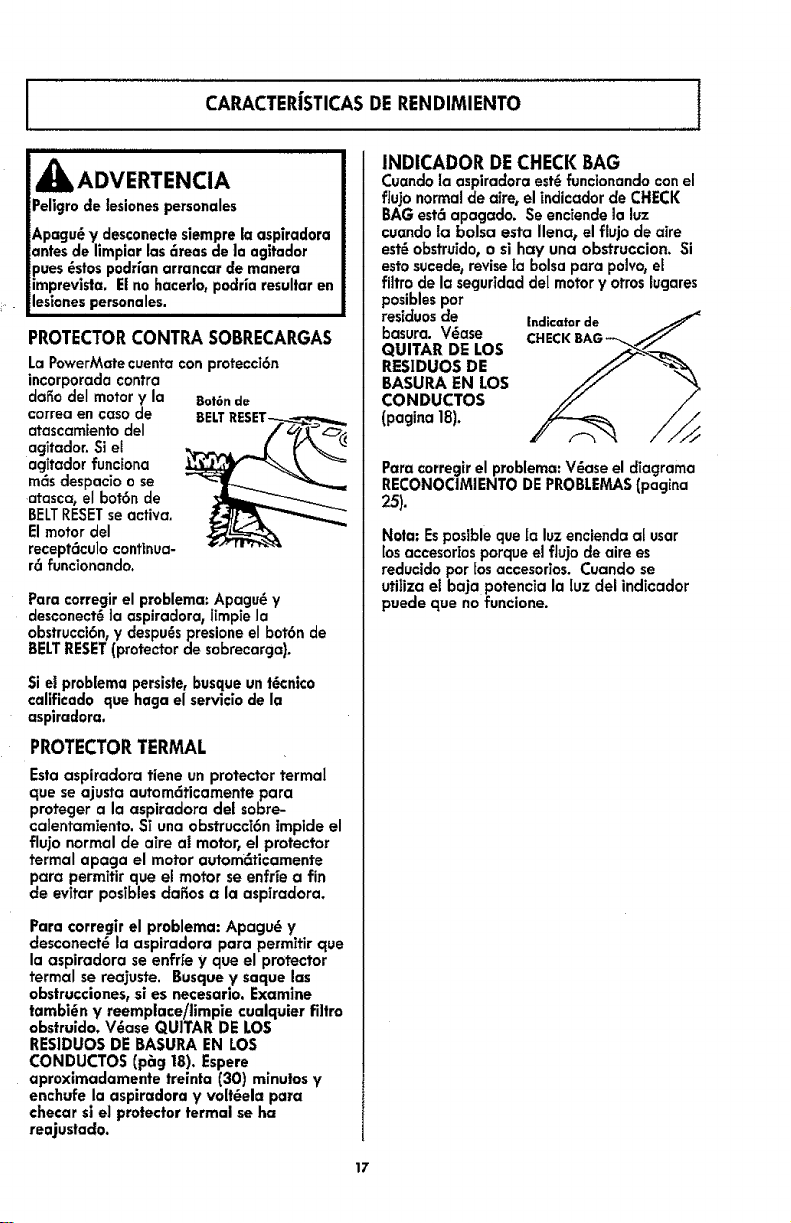
PROTECTORCONTRASOBRECARGAS
La PowerMate cuenta con protecc]6n
incorporada contra
da_o del motor y la Bot6ndo
correa en caso de
atascamiento del
agitador. Si el
agitador funciona
mcis despacio o se
atasca, el bot6n de
BELTRESETseactiva.
Elmotor del
recept_culo continua-
r6 funcionando.
Para corregir el problema: Apagu_ y
desconect_ la aspiradora, Iimpie la
obstrucci6n,y despu_s presione el bot6n de
BELTRESET(protector de sobrecarga).
Si el problema persisle, busque unt6cnico
calificado que haga el serviclo de la
aspiradora.
PROTECTORTERMAL
Estaaspiradora tiene un protector termal
que se ajusta autom6ticarnente para
protecjer a la aspiradora del sobre-
calentamiento. Si una obstrucoi6n impide el
flujo normal de aire at motor, el protector
formal apaga el motor autom6ticamente
para permffir que el motor se enffi'e a fin
de evitar posibles dafios a la aspiradora.
Para corregir el problema: Apagu_ y
desconect_ la aspiradora para permifir que
la aspiradora se enfrie y que el protector
termal se rea.iuste. Busque y saque los
obstrucciones, si es necesario. Examine
tambi_n y reemp|ace/|imple cualquler filtro
obstruido. V_ase QUITAR DE LOS
RES1DUOS DE BASURA EN LOS
CONDUCTOS (p_g 18). Espere
aproxlmadarnente trelnta (30) minulos y
enchufe la aspiradora y volt_ela para
checar si el protector terrnal se ha
reajustado.
INDICADOR DECHECKBAG
Cuando la aspiradora est6funcionando con el
flujo normal de oire, el indicador de CHECK
BAG est6 apacjado. Se enciende la luz
cuando la bolsa esta Ilena, el flujo de aire
est_ obstruido, o si hay una obstruccion. Si
esto sucede, reviseta bolsa para polvo, el
fi]tro de la seguridad del motory otros lugares
posibles por
t_es|duos de Indicator de
basura. V_ase CHECKBAG--..
QUITAR DE LOS
RESIDUOS DE
BASURA EN LOS
CONDUCTOS
(pagina 18),
Paro corregir el problerna: V_ase el diagrama
RECONOCIMIENTO DEPROBLEMAS(pagina
25).
Nota: Esposible que [a luz encienda al usar
los accesortosporqueel flujo de aire es
reducido por los accesorios, Cuando se
utiliza el baja potencia la luz del indicador
puede que no funcione.
17
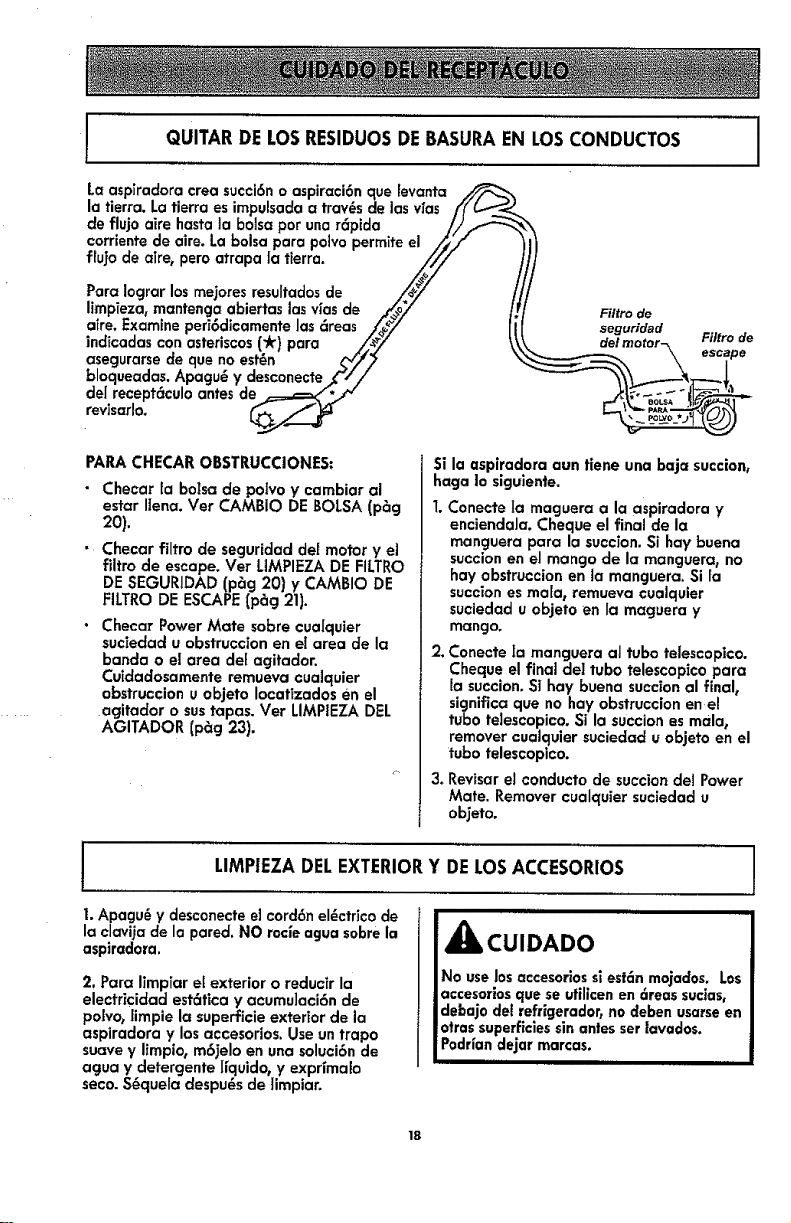
QUITARDELOSRESIDUOSDE BASURAEN LOSCONDUCTOS
La aspiradora ¢rea succi6n o aspiraci6n que [evanta _,
la tierra. La tierra es impulsada a tray,s de lasvias f!" L-_'J._
de flujo aire hasta la bolsa por una r_pida //f_'_
corriente de aire. La bolsa para polvo permite el /_/"
fluio de aire, pero atrapo |a tierra. ,//,/
Para Iogror los mejores resuffadosde _/_#/_/8/ /,
Iimpieza, mantenga abiertas lasvias de ._._oy /!
aire. Examine peri6dicamente las _reas ;/_/ l[
indicadas con asteriscos('k) para /._/" \\
asegurarse de que no est_n __//_
bloqueadas. Apagu_ y desconecte f//
del recept_culo antes de _=._=_./4
revisarlo. _/...__
Filtro de
seguridad
PARA CHECAR OBSTRUCCIONES:
• Checar la bolsa de polvo y cambiar al
estar Ilena. Vet CAMBIO DE BOLSA (p_g
2o).
• Checar filtro de segurJdad de[ motor y e]
filtro de escape. Vet LIMPIEZA DE FILTRO
DE SEGURIDAD (p_g 20) y CAMBIO DE
FILTRO DE ESCAPE {p_g 21).
• Checar Power Mate sobre cualquier
suciedad u obstruccion en el area de la
banda o el area de[ agitador.
Cuidadosamente remueva cualquier
obstruccion u objeto Iocafizados en el
agitador o sustapas. Ver LIMPIEZA DEL
AGITADOR (p_g 23),
Si la aspiradora aun tiene una baja succion,
haga |o siguiente.
1.Conecte Ia maguera a la aspiradora y
enciendaJa. Cheque el final de la
manguera para la succion. Si hay buena
succion en el mango de la manguera, no
hay obstruccion en la manguera. Si ra
succion es ma[a, remueva cualquier
suciedad u objeto en Ia maguera y
mango.
2. Conecte Ia manguera al tubo telescopico.
Cheque el final de! tubo telescopico para
la succion. SI hay buena succion al finale
significa que no hay obstruccion en el
tubo telescopico. Si la succion es mala_
remover cualquier suciedad u objeto en el
tubo telescopico.
3. Revisar el conducto de succion det Power
Mate. Remover cualquier suciedad u
ob_eto.
LIMPIEZADELEXTERIORY DELOSACCESORIOS !
i. Apagu_ y desconecte eJcord6n el_ctrico de
la clavija de la pared. NO rocie agua sobre la
aspiradora.
2. Para limpiar el exterior o reducir la
electricidad estcitica y acumu]aci6n de
po|vo, limpie la superficie exterior de la
aspiradora y losaccesorios. Use untrapo
suave y limpio, m6jelo en una soluci6n de
agua y detergente I{quido, y exprlmalo
seco. S_quela despu_s de 1impiar.
iiii
_i, CUIDADO
No uselos accesorios si est6n mojados. Los
accesorlosque se utilicen en 6teas sucias,
debajo del refrlgerador_no deben usarse en
otras superficiessin antes ser lavados.
Podr{andejar marcas.
18

I
CAMBIO DELA BOLSA
Lo boJsadebe cambiarse seguido para Iograr los mejoresresultadosde limpieza. El indicador
CHECK BAG (indicador electr6nico de la bolsa) prencJeracuando esta necesiteset cambiada o
cuando el fluido de aTreeste bloqueado.
1
NOTA: Use el reempiazo de la BOLSA DE POLVO Estilo C, vet en detatle el nOmero de parte
en CA,MBIO DEPARTES(P_g6),
REMOVIENDO LA BOLSA DE
POLVO
1.Apagu_y desconect_=la aspiradora.
2. Quitela rnanguerade laaspiradora.(Vet
ENSAMBLE,p_g 7).
3. Tiredeepestillode la tapa haciafueray
hacia arriba,
Pestillo
de la
4. Levante ta tapa del recept6culo.
_Pestil|o
5. Saque la bolsa del rnontaje rojo.
NOTA: Revisey
carnbie e] fiitro de
segurTdaddel motor,
cuando sea necesario.
(Ver CAMBIO DEL
FILTRO DE
SEGURIDAD DEL -_
MOTOR, p_g 20).
NOTA: Elmontajerojodela bolsaseinclinar6
hacia adelantedespu_sde queretirela bolsa,
Estoimpedir6quelatapasecierreantesde
instalarunabolsanueva.
REEMPLAZANDO LA BOLSA DE
POLVO
NOTA: NO doble ni pliegue el centro del
cart6n al instalar la bolsa en las ranuras del
montaje de la bolsa.
1.Verifique que la aspiradora este
desc0nectada.
2.Girehaciaabajo
elsoportepara la
boisarojay para
insertarla bolsaen
lasranurasempuje
haciaabajo basra
quelaslengGetasde
cart6nencierren
secjuramenteenlasposicionesapropiadas
comoseveeneldTacjrama.
3. Empujela bo]saasegur6ndola dentro de la
cavidad para evitar que sea trabada por ]a
tapa de la aspiradora.
4. Baje]a cubierta del recept6culo y cierre el
pestillo.
5. Introduzca la manguera en el recept6cu[o
hasta que quede fija en posici6n (Ver
ENSAMBLE, p_g 7).
i ii i iii iiiiiiiii
_k CUIDADO
NUNCA VACIE Y REUTILICE UNA
BOLSA PARA POLVO. Los materlales
muy flnos, tales €omo desodorantes
para alfombras, falco faciaJ, polvo fino,
yeso, hoi|[n, pelusa de alfombras
nuevas, etc., pueden atascar la bo[sa y
causar que se rompa antes de que est6
Ilena y puede dafiar e[ motor de la
aspiradora. Camble la bolsa m6s
seguldo cuando aspire esfe tlpo de
materiales.
19
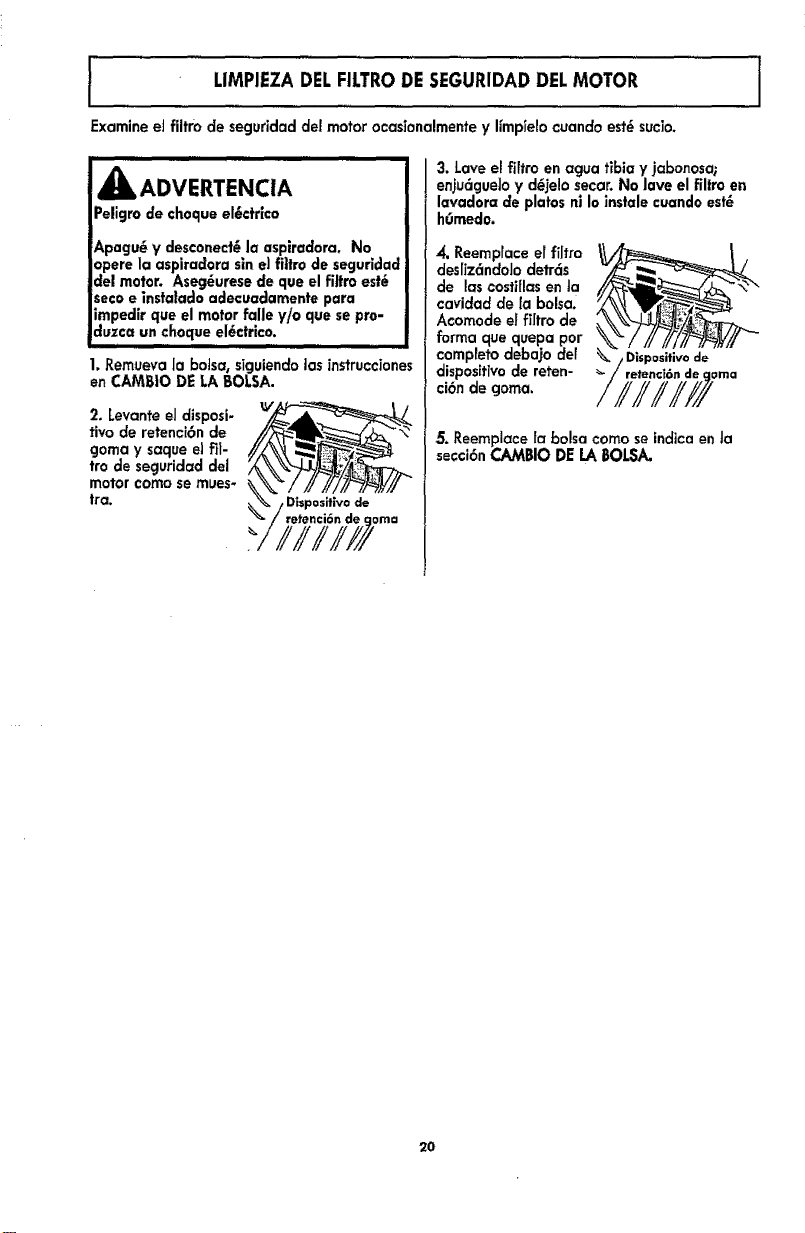
i LIMPIEZADELFILTRODE SEGURIDADDELMOTOR J
I
I
Examine el fiitm de seguridad de! motor ocasianalmente y llmptelo cuando est_sucio.
_jk, ADVERTENCIA
Peligro de cheque el6ctr|ca
Apagu_ y desconect6 la aspiradora. No
opere la aspiradora sin e] fittro de seguridad
del motor. Aseg_urese de que el filtro est_
secoe insta|ado adecuadamente para
impedlr que el motor falle y/o que se pro-
duzca un cheque el_ctrico.
1. Remueva la botsa, siguiendo las instrucciones
en CAMBIO DE LA BALSA.
2. Levante eJdisposi-
rive de retenci6n de
goma y saque ei fit-
tro de secjuridad del
motor come se mues-
tra.
0osltivo de
retenci6n de
3. Lave el filtro en agua tibia y jabonosa;
enju6guelo y d_3elosecar. No lave el filtro en
lavador= de plates n| Io instale cuando est_
hr_medo.
4. Reemprace ef filtro
desffz_ndolo detrds
de loscosfiffasen la
cavidad de la balsa.
Acomode el filtro de
farina cluequepa per
complete debajo de1
disposifivode reten-
ci6n de goma,
5. Reemplace la balsa come se indica en ta
secci6n CAMBIO DE LA BALSA.
2O
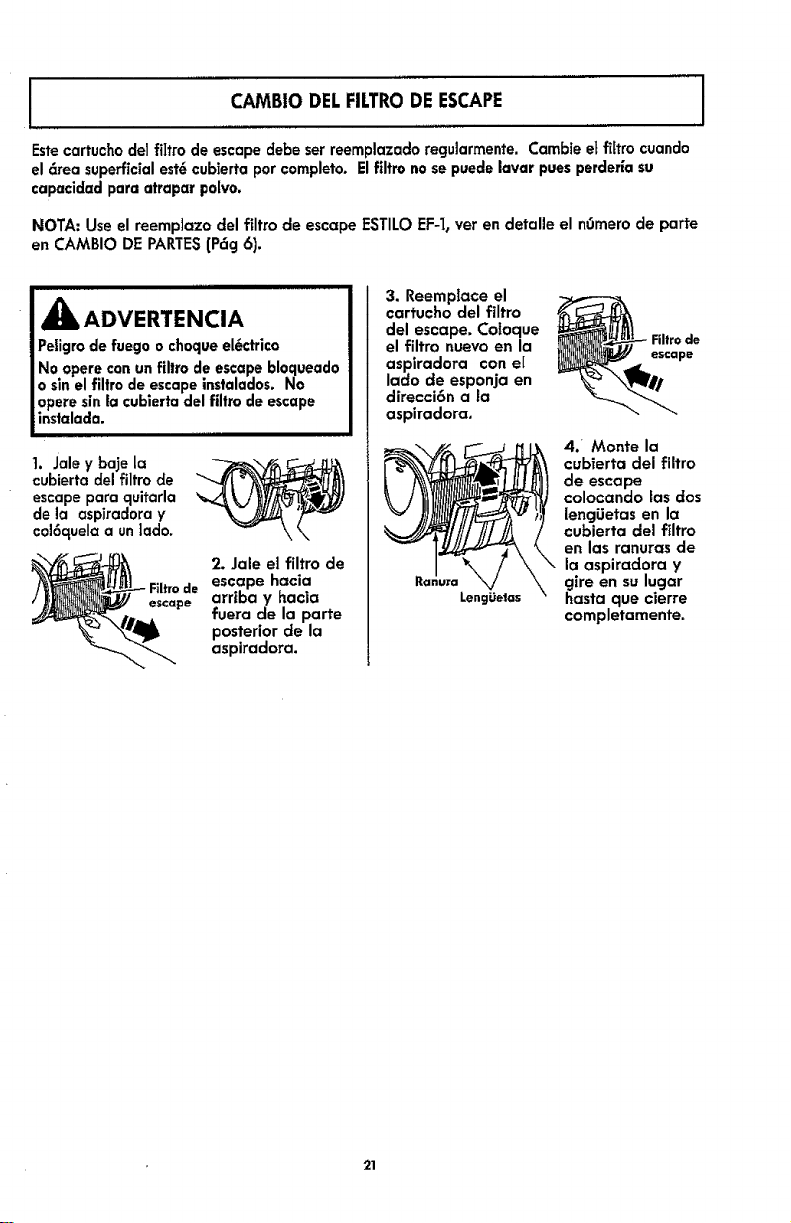
CAMBIO DELFILTRODEESCAPE
Estecartucbo del filtro de escape debe ser reemplazado regularmente. Cambie et filtro cuando
el _rea superficial est_ cubierta por €ompleto. El filtro no se puede lavar pues perderia su
capacldad para atrapar polvo.
I
NOTA: Use el reemplazo del filtro de escape ESTILO EF-I, ver en detalle el nOmero de parte
en CAMBIO DE PARTES(P6g 6).
ADVERTENCIA
Peligro de fuego o choque el_ctrico
No opere con un filtro de escape bloqueado
o sln el filtro de escape instalados. No
opere sin la cubierta del filtro de escape
instalada.
1. Jale y baje la
cubierta del filtro de
escape para quitarla
de la aspiradora y
cal6quela a unlado.
Filtro de
escape
2. Jale el filtro de
escape hacia
arriba y hacia
fuera de la parte
posterior de la
aspiradora.
3. Reemplace el
cartucho del filtro
del escape. Coloque
el filtro nuevo en la
aspiradora con el
lado de esponja en
direcci6n a la
aspiradora,
LengOefas
escape
4/ Monte la
cubierta del filtro
de escape
colocando las dos
lencjUetas en la
cubierta clel filtro
en las ranuras de
la aspiradora y
gire en su lugar
basra que cierre
completamente.
21
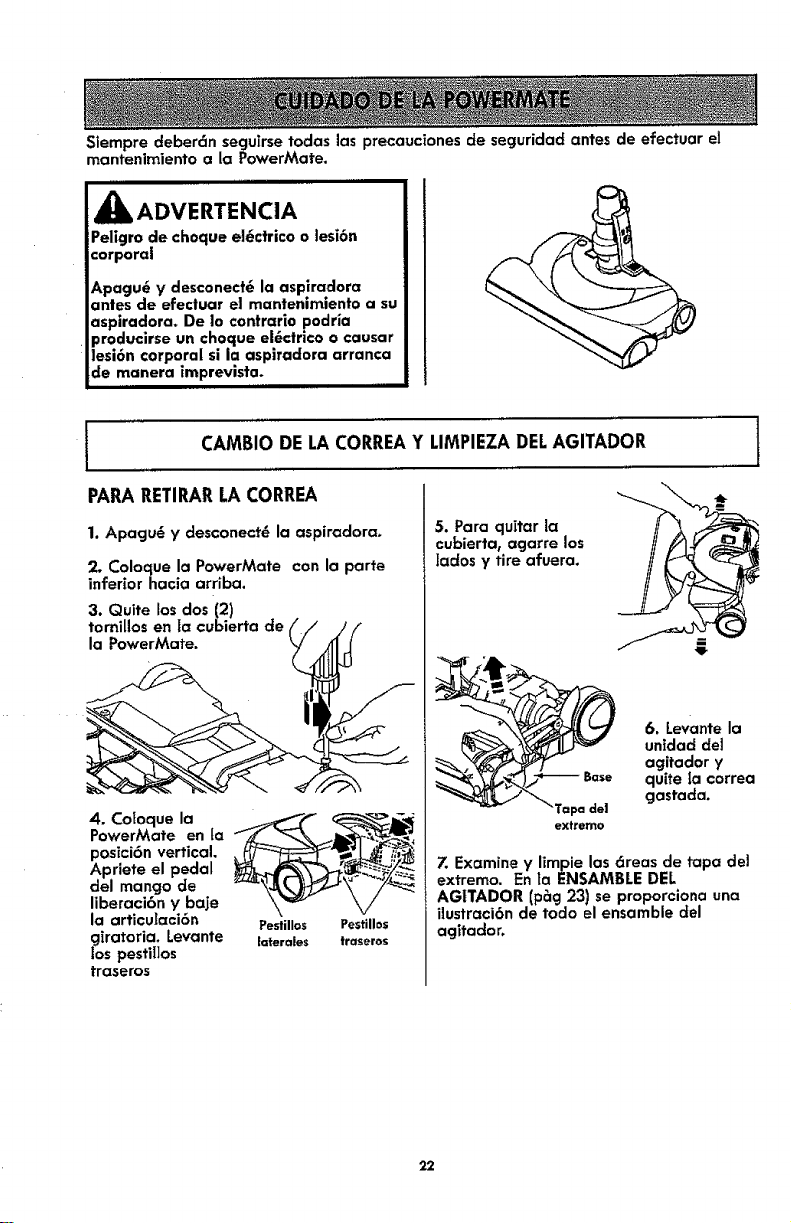
Slempre deber6n seguirse todas las precauciones de seguridad antes de efectuar el
mantenimiento a la PowerMate,
ADVERTENCIA
Peligro de choque el6ctrico o lesi6n
corporal
Apagu6 y desconect6 la aspiradora
antes de efectuar el mantenimiento a su
aspiradora, De Io contrario podr_a
producirse un choque ei6ctrico o causar
lesi6n corporal si la aspiradora arranca
de manera imprevista.
PARARETIRARLA CORREA
1. Apacju_ y desconect_ la aspiradora,
2. Coloque la PowerMate con la parte
inferior hacia arriba.
3. Quite los dos (2)
tornlllos en la cubierta de
la PowerMate.
CAMBIO DE LACORREAY LIMPIEZADELAGITADOR 1
. o,o.uo,oPowerMate en ta
posici6n vertical. _
Apriete el pedal
del mango de
liberaci6n y bale
la articulaci6n Pestillos PestUlos
giratoria, Levante laterales traseros
los pestiIlos
traseros
5. Para quitar la
cubierta, agarre los
[ados y tire afuera,
extremo
6. Levante la
unidad del
agitador y
quite la €orrea
gastada,
Z Examine y limpie las 6teas de tapa del
extremo. En la ENSAMBLE DEL
AG|TADOR (prig 23) se proporciona una
ilustraci6n de todo el ensamble del
agitador,
22
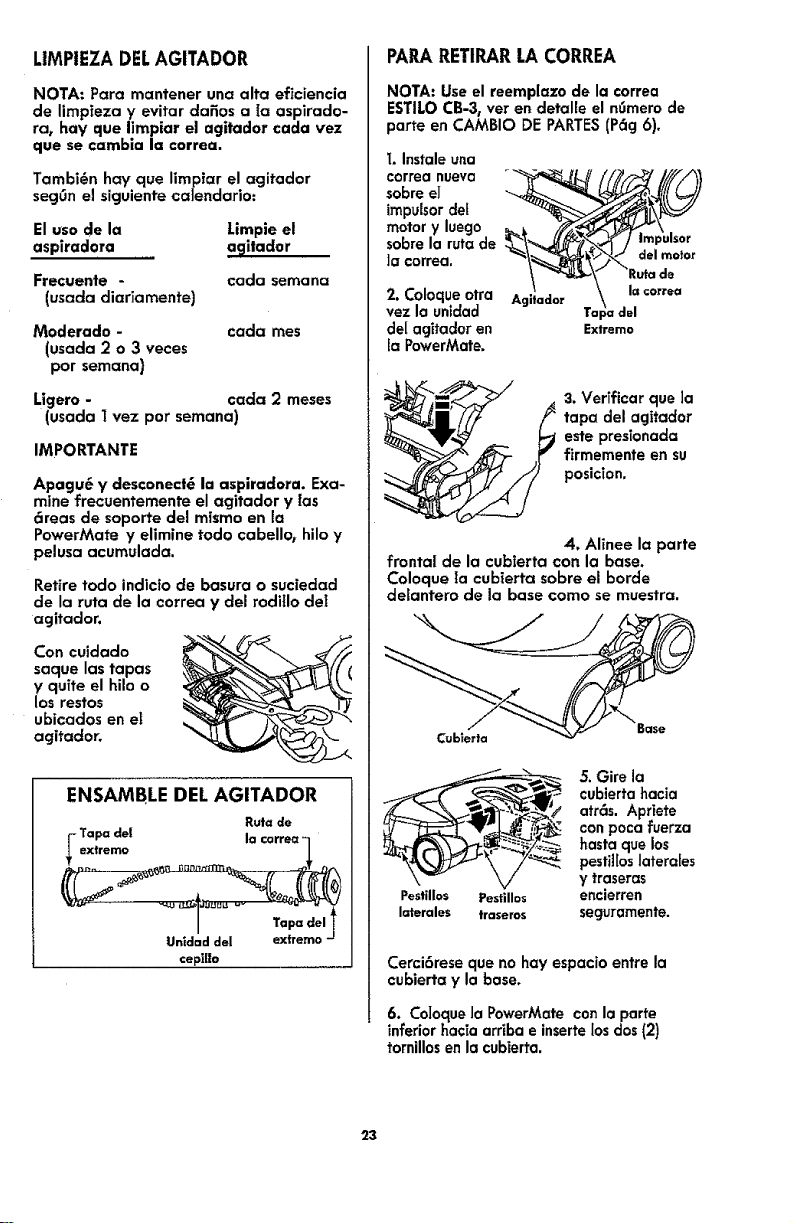
LIMPIEZADELAGITADOR
NOTA: Pora mantener una alto eficiencia
de limpieza y evitar dafios a Ia aspirado-
ra, bay que limpiar el agitador coda vez
que se cambla la correa,
Tambi@n hay que limpiar el agitador
seg6n el siguiente calendario:
El usa de la Limpie el
aspiradota a_lilador
Frecuente - coda semona
(usada diariamente)
Moderado -
(usada 2 o 3 veces
par semana)
coda rues
Ligero - coda 2 meses
(usada I vez par semana)
IMPORTANTE
Apagu6 y desconect_ la aspiradora. Exa-
mine frecuentemente el agitador y [as
_reas de soporte del mismo en la
PowerMate y elimine todo cabello_ hilo y
pelusa acumulada.
Retire todo indicia de basura o suciedad
de la ruta de la correa y del rodillo del
agitador.
Con cuidado
saque los topos
y quite el hilo o
los restos
ubicados en el
agitador.
ENSAMBLE DELAGITADOR
Ruta de
-Tapa de|
extremo
Tap(=del
Unldad del extremo -
cepi|lo
PAPARETIRARLA CORREA
NOTA: Use el reemplazo de la €orrea
ESTILO CB-3, ver en detaffe el n_mero de
porte en CAMBIO DE PARTES(P6g 6).
I. Instale una
correa nueva "_
sabre el
impulsor del
motor y luego
sabre la ruta de
]a €orrea.
2. Coloque otra
vez la unidad
de[ agitador en Extremo
la PowerMate.
3. Verificar que ]a
tapa del agitador
este presionada
firmemente en su
posiclon.
4, Alinee la porte
frontal de la cubierta con la base.
Coloque [a cubierta sabre el borde
delantero de Io base coma se muestra.
Cublerla
cubierta hacia
_/ atrc_s. Apriete
con poca fuerza
"-'_.-'-_ hasta que los
- ".... : pesti][osJaterales
Pestil|os Pestillos encierren
laterales traseros seguramente.
Cerci6rese que no hay espacio entre la
cubierta y la base,
6. Co]oque la PowerMate con la porte
inferior hacia arriba e inserte los dos (2)
tornillos en la cubierta.
23
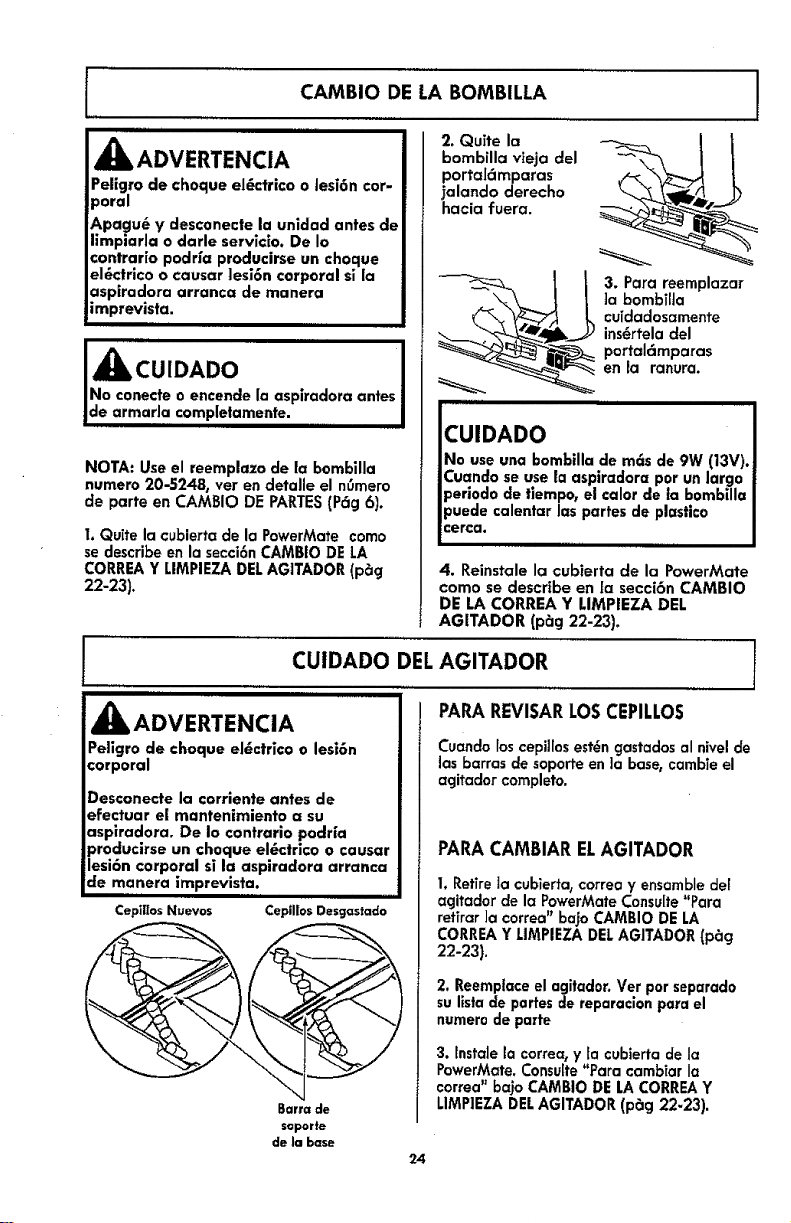
CAMBIO DE LA BOMBILLA
iiii i
,_ ADVERTENCIA
Peiigro de choque el6ctrico o tesi6n cor-
poral
_,pagu_ y desconecte la unidad antes de
limpiarla o darle servicio. De Io
contraHo podr_a producirse un choque
el6ctrlco o causar lesi6n corporal si la
asplradora arranca de manera
imprevista.
III I I
i i
JNo conecte o encende la aspiradora antes
Jde armarla completamente.
NOTA: Use el reemplazo de la bombilla
numero 20-5248, ver en detalle el n0mero
de parte en CAMBIO DE PARTES(P_g 6).
I, Quffe la cubierta de la PowerMate como
se describe en la secci6n CAMBtO DE LA
CORREA Y LIMPIEZA DELAG1TADOR (p6g
22-23).
2, Quite la
bombilla vieja del
portaldmparas
jalando derecho
hacia fuera.
3. Para reemplazar
]a bombiHa
cuidadosamente
ins_rtela clel
portal6mparas
en Ja ranura.
CUIDADO
No use una bombilla de m6s de 9W (13V).
Cuando se use la aspiradora por un largo
periodo de fiempo, el calor de la bombilla
0uede calentar las partes de plastico
:erca.
llllll ii
4. Reinstale la cubierta de la PowerMate
como se describe en [a secci6n CAMBIO
DE LA CORREA Y LIMPtEZA DEL
AGITADOR (p_g 22-23).
CUIDADO DEL l
iiiii i
_k ADVERTENCIA
Peligro de choque el_ctrico o lesi6n
corporal
Desconecte la €orriente antes de
efectuar el mantenimiento a su
aspiradora. De io contrario podrfa
producirse un choque el6ctrlco o causar
lesi6n corporal si la aspiradora arranca
de manera imprevista.
ii ii
Cep]ffos Nuevos
(
Barrade
soporte
de |a base
24
AGITADOR
,,, ,,
PARAREVISARLOSCEPILLOS
Cuando los cepillosest_n gastados al nivel de
las barras de soporfe en )a base, cambie el
agitador completo.
PARACAMBIARELAGITADOR
I. Retire la cubierta, correa y ensamble del
agitador de la PowerMate Consulte_Para
refirar ]a correa" bajo CAMBIO DE LA
CORREA Y L1MPIEZA DELAGITADOR (p_cj
22-23),
2, Reemplace el agitador. Vet por separado
su llsta de partes de reparacion para el
numero de parte
3. tnstale la correa, y ta cubierta de la
PowerMate. Consulte"Para cambiar la
correa" ba]o CAMBIO DE LA CORREAY
LIMPIEZA DELAGITADOR (pSg 22-23).
I
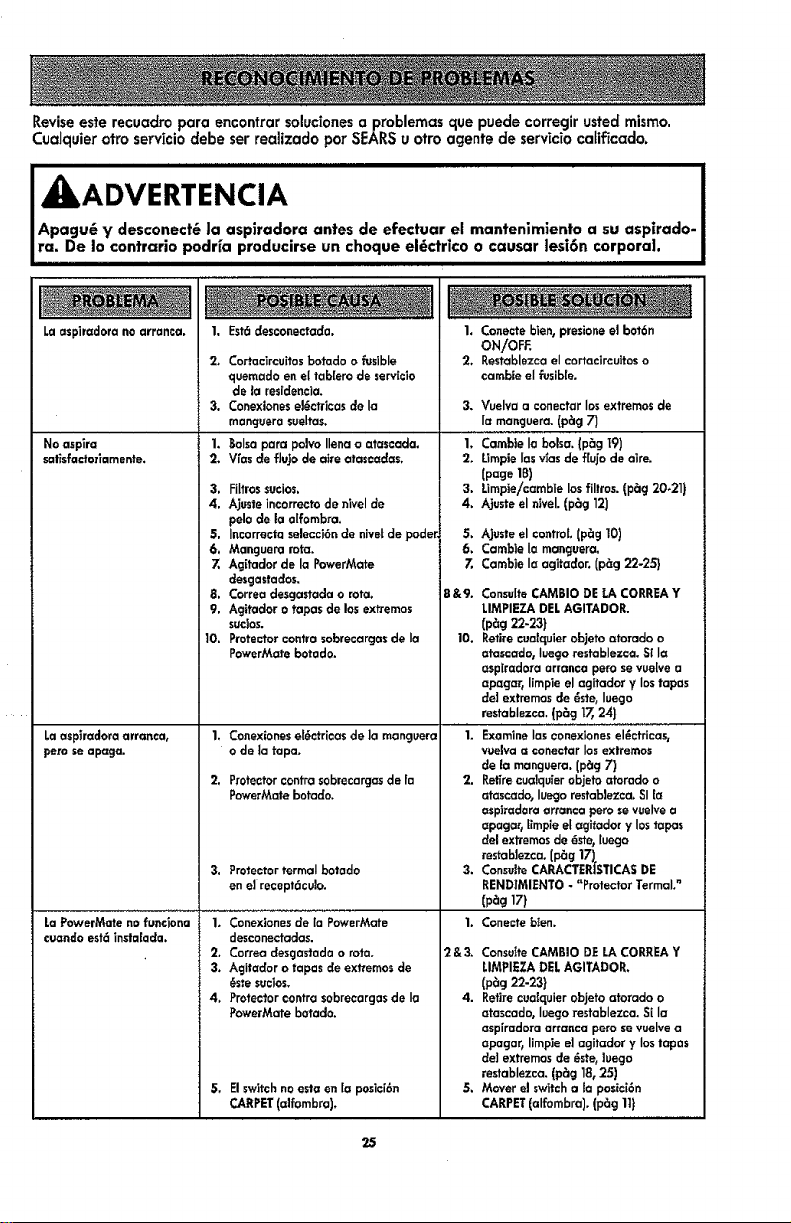
Reviseeste recuadro para encontrar solucionesa problemas que puede corregir usted mismo.
Cualquier otto servicio clebe ser reaiizado par SEARSu otro agente de servic_ocaffficado.
j kADVERTENCIA
Apagu6 y desconect6 |a aspiradora antes de efectuar el mantenimiento a su aspirado-
ra. De lo contrario podria producirse un choque el6ctrico o causar ]esi6n corpora|.
Laaspiradora noarranca, I. Est6desconectada,
No asplra
salisfadorlamente.
Laaspiradora arranca,
pert seapaga.
LaPowerMate nofunciona
cuandoest6instatada.
2_ Cortacircuitosbotado o _slble
quemadoen eltab[era de servicie
de la residencia,
3. Conexionesel_c_icasde la
manguerasuelJas.
1. Boba para polvo Ilena o atascada,
2. Vfas deflujo de aim atascacias,
3, FiItrossucios,
4, Aiusteincorrectodenivel de
pelo de la aifombra.
5, Incorrectaselecci6nde nivetde poder,
6. Manguera rata,
7. Ag[tadorde la PowerMate
desgastados,
8, Correadesgastadao rata.
9, Agitador o tapas do losextremes
sucios.
10, Protectorcontrasobrecargasde ia
PowerMate botado.
1, Conexioneset6ctricasde la manguera
o de la tapa,
2, Protectorcontrasobrecargasde fa
PowerMatebotado,
3. ProtectortermaI botado
on e]recept6culo,
1, Conexionesde [a PowerMate
desconectadas.
2, Correa desgastadao rata,
3. Agitador o tapas de extremesde
_ste sucios+
4, Protectorcontrasobrecargasde Ia
PowerMate betado.
5, Elswitchnoesta en [a posici6n
CARPET(alfombra).
1. Conecteblen, presionee] bot6n
ON/OFF,
2, Restablezca eI cortacircuitoso
cambie eI fusible.
3. Vuelva a eonectar Ias extremes de
ia manguera, (p_g 7)
1, Cambte la balsa. (pSg 19)
2, Umpie Ias v_as de f[uje de aim.
{page 18)
3. Umpie/camb|e los fillros. (p_g 20_21)
4. Ajuste el ntveJ. (p_g 12)
5. Ajuste elcontrol (p_g 10)
6. Camble [a manguera,
7, Cambie Ia agitador. (p_g 22-25}
8 &9. ConsdteCAMBIO DELA CORREAY
LIMPIEZADELAGITADOR.
(p_g 22-23)
10. Retirecuaiquier objetoatorado o
atascado, luegorestablezca,Sl la
asp[radora arranca pero sevue[ve a
apagar, limpieelagitador y Ios tapas
de] extremes de _ste, luego
restablezca,(p_g 17,24}
" i. Examinelas'con'exiones el_ci;i:'a's.
vue]vaa €onectar Iosextremes
de la manguera.(p_g 7)
2. Retirecua]quierobjetoatomdo o
atascado, Iuego restablezca.SI [a
asptradora arranca pete se vuelvea
apagar_[impiee[agitador y lostapas
del extremes de 6ste,luego
restab]ezca. {p_g17),
3, ConsulteCARACTERISTICASDE
REND]MIENTO- "Protector Termal?
(pag17)
1. Cenecte bIen.
2&& ConsutteCAMBIO DE LACORREAY
LIMPIEZADELAGITADOR.
(p_g 22-23)
4. Retirecuaiquier objeto atorado o
atascado, Iuego restablezca,Si la
aspiradora arranea pete sevuelvea
apagar_limp]ee]agitador y Ios topos
de] extremos de _ste,]uego
restablezca. (p_g 18,25)
5, Mover e] switcha la pesic[6n
CARPET(alfombra). (p_g 11)
25
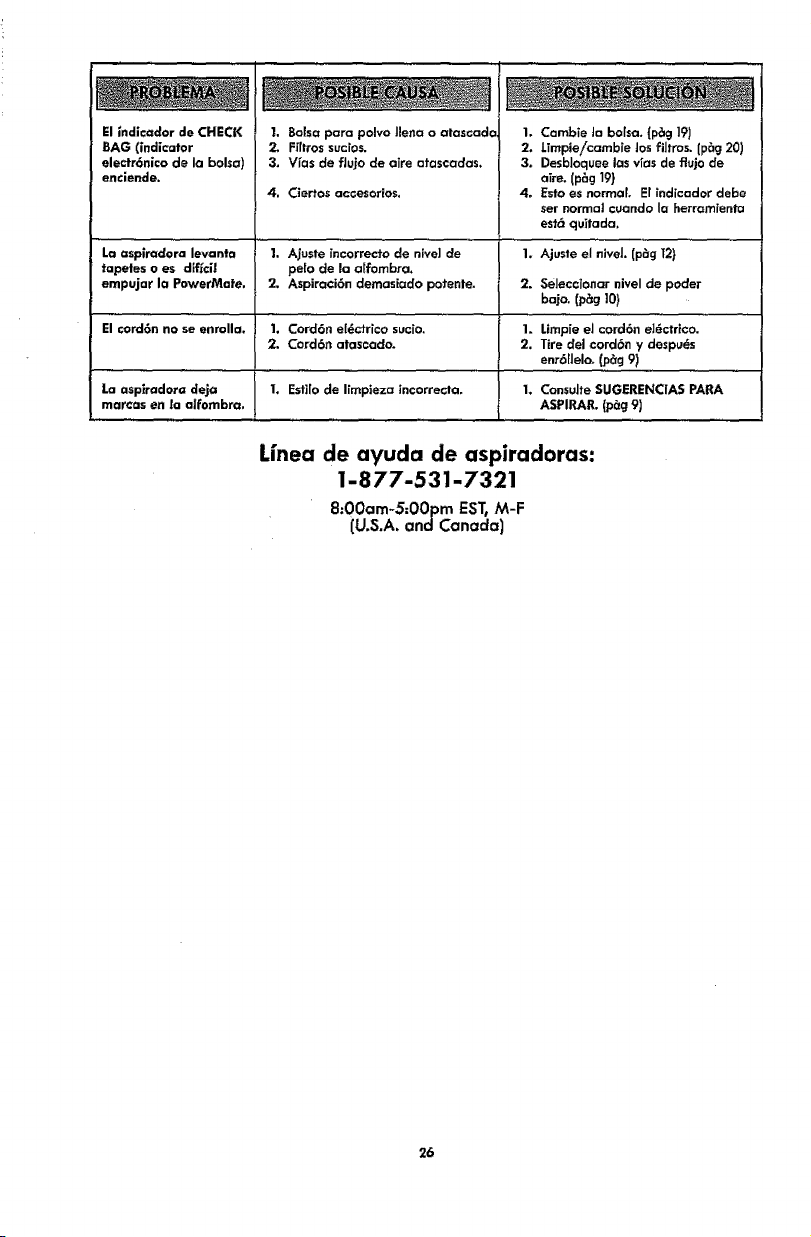
ElindicadordeCHECK
BAG(indicator
electr6nlco de la bolsa)
enciende.
I, Bolsa pare polvo llena o atascado
2, Ffffros sucios.
3. V_as de flu]o de aire atascadas.
4, Ciertos accesorlos,
I. Cambie la bolsa. (p_g 19)
2. Limpie/cambie Josfiltros. (p_g 20)
3. Desbloquee los vras de flujo de
aTre.(p_g 19)
4. Esto es normal. El indicador debe
ser normal cuando la herramienta
esf6 qu_tada,
1. Ajusle el niveL Ip_g _2}La aspiradora levanta 1. Ajuste incorrecto de nive] cle
taL0etes o es diffci| pe[o de la a[fombra.
empujar Io PowerMefe, 2. Aspiraci6n demasiado potente. 2. Selecctonar niveI de pocler
bajo. (p_g 10}
El cord6n no se enmllo. 1. Cord6n ete_ctrico sucio. 1. Lfmpie el cord6n el_ctHco.
2. Cord6n atascado. 2, Tire del cord6n y despu_s
enr611elo. (p_g 9)
La asplredora deja 1. Esfi[o de Iimpleza incorrecta, 1, Consulte SUGERENCIAS PARA
mar€as en la alfombra, ASPIRAP_ (p_g 9)
Linea de ayuda de aspiradoras:
1-877-531-7321
8:00am-S;OOpmEST,M-F
(U.S.A. andCanada)
26

27
Your Home
For troubleshooting, product manuals and expert advice:
managemylife
www.managemylife.com
For repair - in your home - of all major brand appliances,
lawn and garden equipment, or heating and cooling systems,
no matter who made it, no matter who sold it!
For the replacement parts, accessories and
owner's manuals that you need to do-it-yourself.
For Sears professional installation of home appliances
and items like garage door openers and water heaters.
1-800-4-MY-HOME ® Ca_Ianytime,day ornight
(1-800-4694663) (U.S.A.andCanada)
www.sears,com www,sears,ca
Our Home
For repair of "carry-ins" like handheld lawn equipment or
home electronics items, call anytime for the location of the nearest
Sears Parts & Repair Service Center
1-800-488-1222 (U.S.A.) 1-800-4694663 (Canada)
www.sears.com v_ww.sears.ca
To purchase a protection agreement on a product serviced by Sears:
1-800-827-6655 (U.S_,.) 1-800-361-6665 (Canada)
Para pedir servicio de reparaci6n ...........Au Canada pourser'_ce en francis:
a domicilio, y para ordenar piezas: 1-800-LE-FOYER Mc
t-888-SU-HOGAR® (1-800-,533-6937)
(1-888-784-6427) www.sears.ca
WWW.Sears,com
® Registered Trademark 1,rMTrademark of KCD IP, LLC in the United States, or Sears Brands, LLC in other countdes
r
® Ma ca Registrada I Marca de F_btica de KCD IP, LLC en Estados Unidos, o Sears Brands, LLC in otros pa_ses
_c Marque de commerce ! _ Marque d_pos_e de Sears Brands, LLC
P/'N C01ZEBHIOUO0 - KC01ZEBHZOU0