Loading ...
Loading ...
Loading ...
page 8
10. Light Kit Assembly (Optional). (cont.)
It is recommended that you test fan before finalizing
installation. Restore power from circuit box and light switch (if
applicable). Test fan speeds with the pull chain on the switch
housing. Start at the OFF position (no blade movement). First
pull will set the fan to HI. Second pull will set the fan to
MEDIUM. Third pull will set the fan to LOW. Fourth pull will
again set the fan to the OFF setting. Test light with the pull
chain in the middle. (diagram 1) If fan and/or light do (does)
not function, please refer to "Troubleshooting" section to
solve any issues before contacting Customer Service.
Turn fan completely off before moving the reverse switch. Set
reverse switch to recirculate air depending on the season:
- DOWN position in summer (diagram 2)
- UP position in winter (diagram 3)
A ceiling fan will allow you to raise your thermostat setting in
summer and lower your thermostat setting in winter without
feeling a difference in your comfort.
Important: Reverse switch must be set either completely UP or
completely DOWN for fan to function. If the reverse switch is
set in the middle position (diagram 4), fan will not operate.
Attach pull chain extensions supplied or custom pull chain
extensions (sold separately) to ends of the pull chains
11. Testing Your Fan.
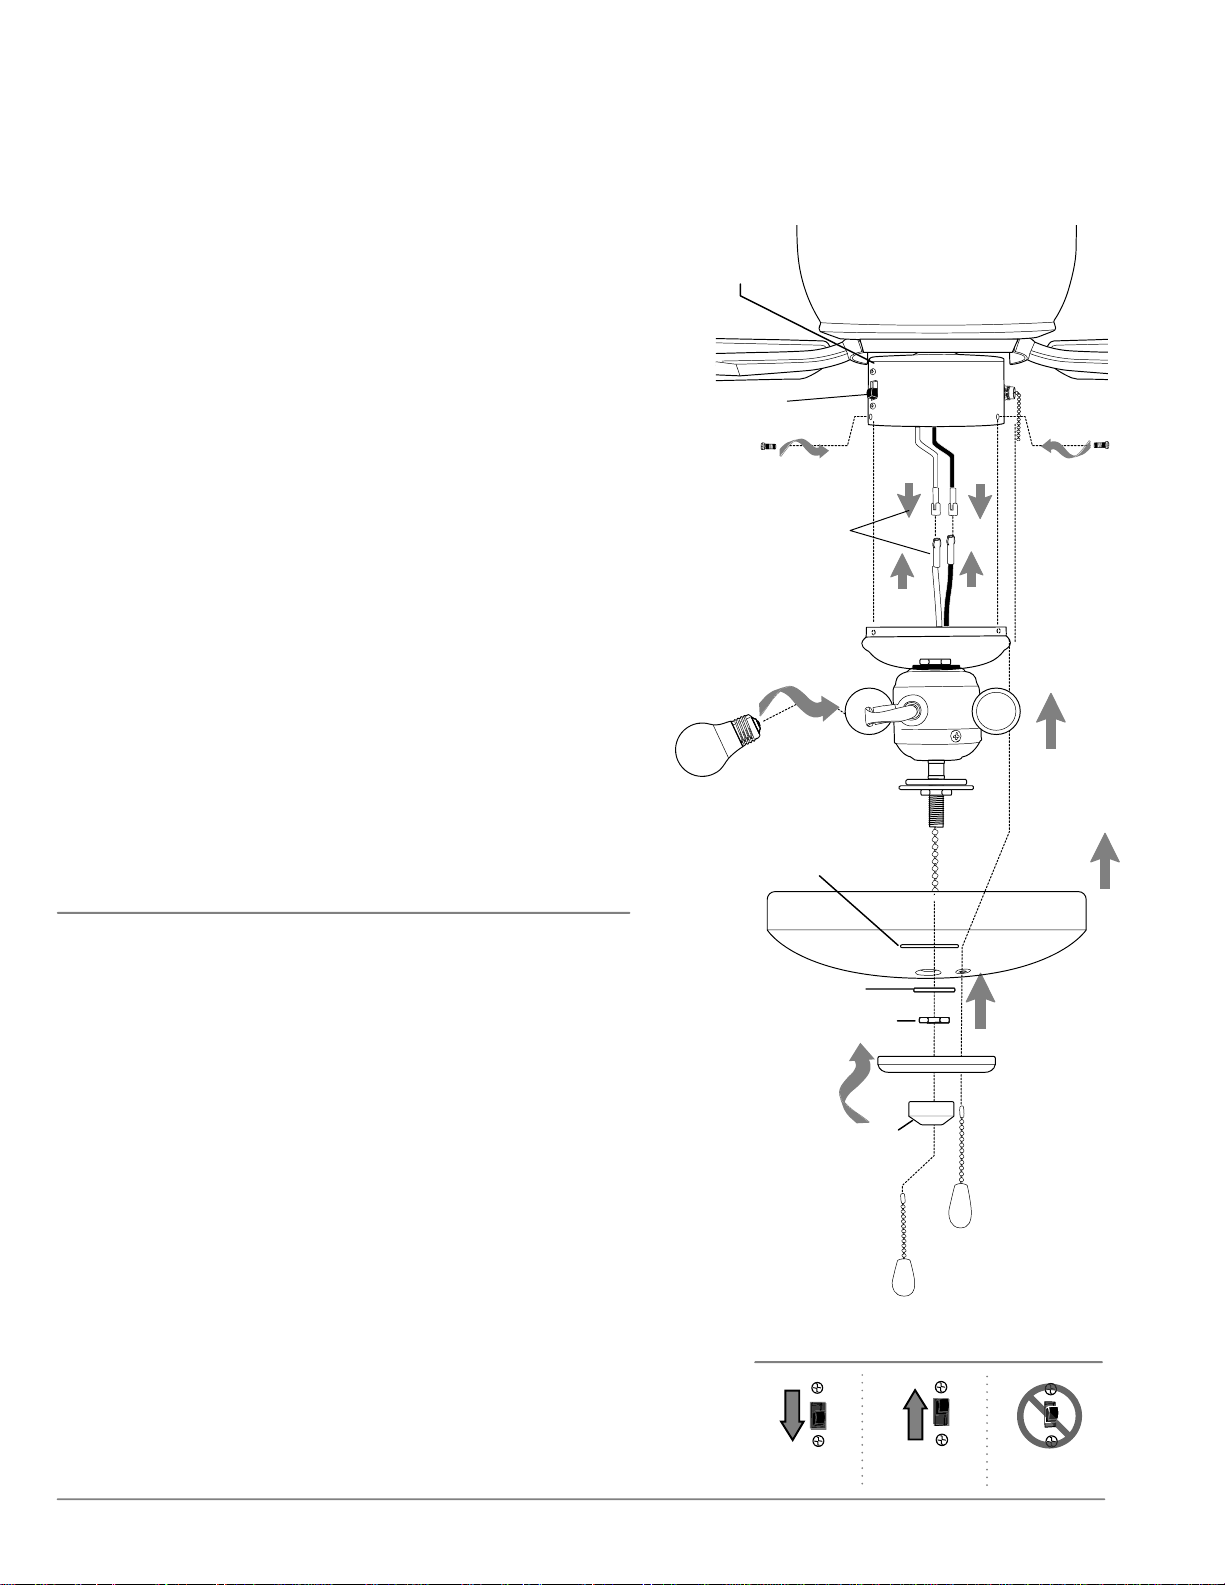
Connect WHITE wire from switch housing to WHITE wire
from light kit fitter. Connect BLUE (or BLACK) wire from
switch housing to BLACK wire from light kit fitter. Be sure
molex connections snap together completely.
Align holes in light kit fitter with holes in switch housing.
(Note: The gap on the top edge of the switch housing cap
must align with the reverse switch on the switch housing
for the proper fit.) Attach light kit fitter with screws that
were removed on previous page. Securely tighten all
3 screws with a Phillips screwdriver.
Install 3 medium base 6.5 watt LED bulbs (included).
IMPORTANT: When you need to replace bulbs, please allow
bulbs and glass shade to cool down before touching.
Remove finial, finial plate, hex nut, flat washer and rubber
washer from threaded rod at bottom of light kit fitter.
Place rubber washer inside glass shade over center hole.
Raise glass shade in order to guide pull chains through
corresponding holes in glass shade. Align threaded rod on
light kit fitter with hole in middle of glass shade and push
up gently, allowing threaded rod to come through hole.
(Be sure pull chain for fan operation does not rub against
bulb during operation.)
Replace flat washer and hex nut on threaded rod. Tighten
hex nut to secure glass shade, but DO NOT OVERTIGHTEN
hex nut as glass may crack or break. Align hole in center of
finial plate with threaded rod, allowing pull chains to come
through corresponding holes in finial plate, and push up.
Thread center pull chain through hole in finial and secure
glass shade to light kit fitter by tightening finial. DO NOT
OVERTIGHTEN finial as glass may crack or break.
glass
shade
finial
bulb
light kit fitter
switch
housing
reverse
switch
finial plate
black wire
blue
(or black)
wire
white
wire
molex
connections
white wire
flat washer
hex nut
rubber washer
diagram 2 diagram 3
diagram 4
diagram 1
light
pull chain
extension
fan
pull chain
extension
motor housing
Loading ...