Loading ...
Loading ...
UK/2
1 TECHNICAL DATA
1.1 DESCRIPTION OF THE OVEN
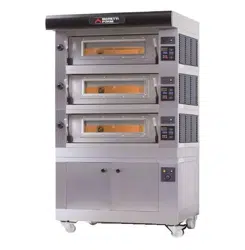
The oven comprises several units positioned one on top of the other:
- hood
- baking chamber/s
- base
- lower frame (stand) or proofer
Each baking chamber is totally independent and is equipped with
electronic temperature regulator, safety thermostat and with a single
door hinged at the bottom.
According to the model, the internal structure of the chamber can be
made entirely of metal plate, with a refractory brick or an embossed
metal baking surface.
The support element comprises a steel structure fitted with tray holder
guides.
The proofer comprises a steel structure which is panelled, has tray
holder guides and is fitted with a thermostat for heating.
1.2 REGULATIONS APPLIED
UL STD 197
NSF STD 4
CAN/CSA C22.2 STD No.109
1.3 WORKPLACES
The appliances are programmed by the operator using the control
switchboards on the front of the appliances themselves, and they must
be attended to while in operation.
The doors giving access to the appliances are located at the front
1.4 MODELS
The following models are available:
AMALFI C (indicated in the certification as AMAC)
P120E C (indicated in the certification as P12C)
AMALFI L (indicated in the certification as AMAL)
P120E L (indicated in the certification as P12L)
1.5 WORKING DIMENSIONS AND WEIGHTS (See tab.)
1.6 TECHNICAL DATA (See tab.)
1.7 IDENTIFICATION
When communicating with the manufacturer or service centre, always
give the appliance SERIAL NUMBER, which can be found on the
rating plate, fixed in the position indicated in figure 1.
1.8 LABELLING
The appliance is provided with safety warning labels at the points
indicated in figure 1 end 2:
A - Large sign "HOT SURFACE"
B - Sign "PROOFER SANITATION"
C - Sign "FITTING FUSES"
D - Sign "CONNECTION 9 AWG" or "CONNECTION 7 AWG"
or "CONNECTION 5 AWG"
E - Sign "PREVENTION OF FIRE AND ELECTRIC SHOCKS"
F - Label "ELECTRIC U.S. AND CANADA AND SANITATION"
G - Sign "ELECTRIC SHOCK"
H - Sign "PHASE IDENTIFICATION"
I - Small sign "HOT SURFACE"
L - Sign "DISTANCE FROM WALL"
M - Sign "LAMP"
2 INSTALLATION
2.1 TRANSPORT
The appliance is normally delivered dismantled on wooden pallets
using overland transport (fig. 3).
The single parts are protected by plastic film or in cardboard boxes.
2.2 UNLOADING
NOTE: On receiving the appliance it is advisable to check its
conditions and quality.
Raise the equipment using only and exclusively the points indicated at
the pict. 4.
2.3 ENVIRONMENTAL SPECIFICATIONS
To ensure that the oven operates properly, it is advisable to comply
with the following limits:
Working temperature: +5°C÷+40°C
Relative humidity: 15%÷95%
2.4 POSITIONING, ASSEMBLING AND MAINTENANCE
AREAS
WARNING! When positioning, assembling and installing the oven,
the following specifications have to be complied with:
- Laws and standards in force regarding the installation of
electrical appliances.
- Directives and indications issued by the electricity supply
network.
- Local building and fire-prevention laws
- Accident prevention regulations.
- Regulations in force of the electromechanical rules.
- The appliances must be installed in conformity with current
national regulations.
Remove the protective film from the outside of the oven, pulling it
gently to remove all the adhesive.
Should any adhesive remain on the oven, remove using kerosene or
benzene.
The single elements that have been selected to make up the oven must
be placed one on top of the other as shown in figure 5, slotting the
reference feet of each unit into the housing on the one underneath it
(item A - fig.5).
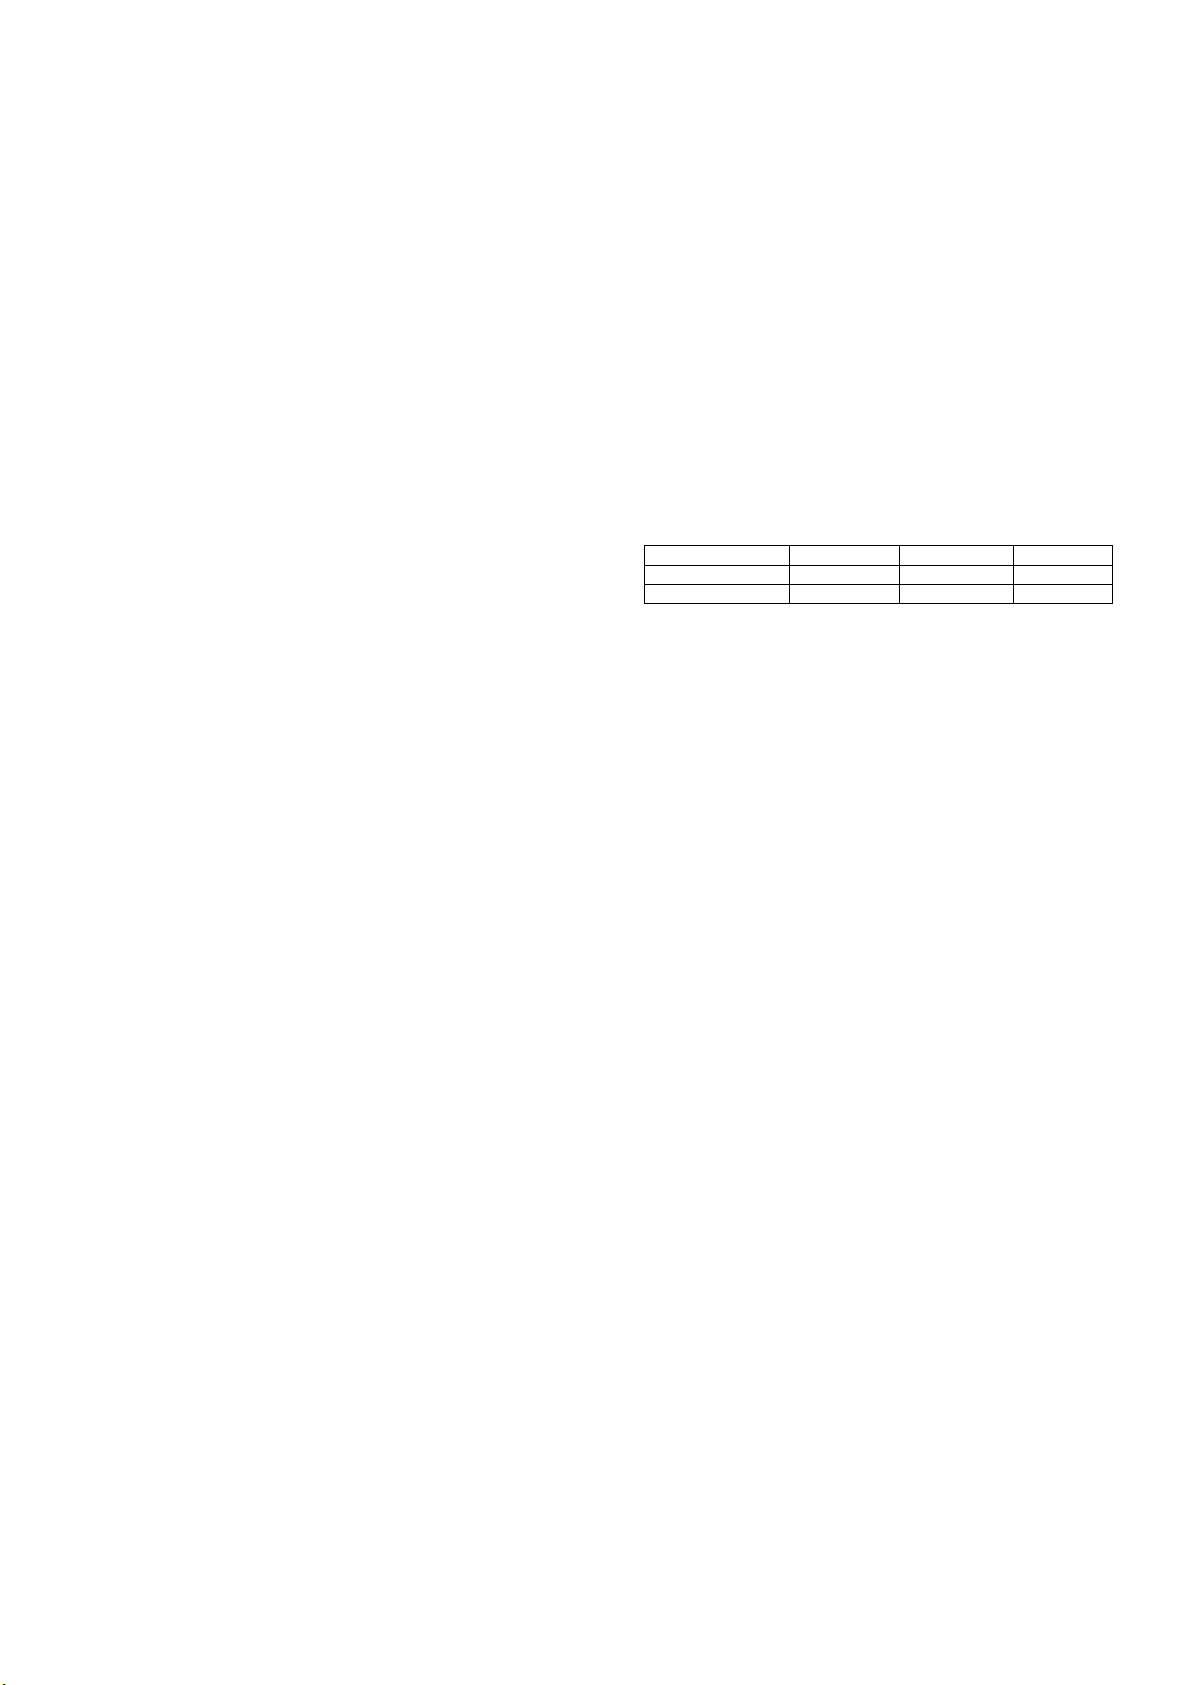
The equipment needs to be placed in a well ventilated area.
The following minimum gaps must be left between the oven and any
combustible or non-combustible construction (see fig. 6):
N. Chambers
A
B
C
1-2-3
4” (10cm)
4” (10cm)
1” (2,5cm)
Servicing
20” (50cm)
20” (50cm)
20” (50cm)
Take into account that for certain cleaning/maintenance operations, the
distance needs to be greater than stated here and therefore, consider the
possibility to be able to move the oven for the purpose of carrying out
these operations.
WARNING! After final assembly of the oven, a bead of NSF
approved silicone must be run around all the joints to avoid liquids
or dirt entering.
2.5 CONNECTIONS
2.5.1 VAPOUR EXHAUST CONNECTION
WARNING! Connection of the vapour exhaust must only be
carried out by specialised personnel.
The vapour exhaust pipe is located at the rear of the oven (fig. 7 item
C). Insert the perforated ring (fig. 7 item B) in the vapour exhaust
outlet and connect.
NOTE: It is recommended that you connect the vapour exhaust to
a flue or to the outside using a pipe with a minimum diameter of
110 mm.
This pipe (fig. 7 item A) must be inserted into the oven exhaust outlet
by means of the ring. Any extensions must also be connected so that
the upper pipes fit into the lower ones, as illustrated for the connection
described above.
If the external vapour exhaust pipe is very long, it is advisable to fit a
small plastic tube at the base of the pipe itself to drain off any
condensation (fig.7 item D). This operation must be carried out before
coupling the pipe to the outlet.
WARNING! Openings in food zones shall be protected to prevent
the entry of seepage, condensation, and spills. Covers protecting a
food shall overlap the opening and shall be sloped to provide
drainage from the cover surface.
2.5.2 ELECTRICAL CONNECTION
WARNING! Electrical connection must only be carried out by
specialised personnel, in compliance with current local state
Electric Quality Assurance Corporation requirements. In the
absence of local codes, Electrical connection must conform with the
National Electrical Code (NEC) ANSI/NFPA70 and Canadian
Electrical Code CSA C22.2.
- Before starting the connection procedure, check that the
earthing system is provided in accordance with local codes.
- Before starting the connection procedure, check that the main
power switch has been turned to the “off” position.
- The rating plate contains all the information necessary for
proper connection.
2.5.2.1 ELECTRICAL CONNECTION OF THE BAKING
CHAMBER
WARNING! Each of the baking chambers must be fitted with a
omnipolar main switch with fuses or an automatic switch suitable
for the values shown on the plate, to allow the single appliances to
be disconnected from the mains.
Loading ...
Loading ...
Loading ...