Loading ...
Loading ...
Loading ...

5
Use the arrows in the center of the screen to move the
colored distance guidance lines up or down.
The red guidance line should be aligned with the rearmost
part of your vehicle. This could be the rear bumper, a trailer
hitch, or another object protruding from the rear of the
vehicle.
6
Reposition the vehicle with the passenger side closely
aligned to a curb, driveway, or parking stall lines, and use the
arrows to align the white, passenger-side guidance line.
The guidance lines should be symmetrical.
Changing the Camera Order
You can change the order in which cameras appear when you
switch cameras.
1
Select Settings > Wireless Camera.
2
Select a camera.
3
Select Set Default Camera.
A list of paired cameras appears.
4
Drag each camera to the desired location in the list.
When you switch cameras from the camera view, the
cameras appear in the listed order, from top to bottom. The
camera at the top of the list is the default camera and
appears first each time the camera view appears.
Renaming a Camera
You can change the name that appears above a camera in the
camera view. You should use a descriptive name that clearly
identifies the location of the camera.
1
Select Settings > Wireless Camera.
2
Select a camera.
3
Select Rename.
Removing a Paired Camera
You can pair up to 4 wireless cameras with a compatible Garmin
navigation device. If you have already paired the maximum
number of cameras, you must unpair one before you can pair
another one.
1
From a paired Garmin navigation device, select >
Wireless Camera.
2
Select a camera.
3
Select Unpair.
Device Information
Software Updates
Software updates for your camera are received automatically
from the paired Garmin navigation device. You should update
your Garmin navigation device software regularly to keep both it
and the camera up to date. For more information about updating
software, see the owner's manual for your Garmin navigator.
Updating the Camera Software
Before you can update the camera software, you must pair the
camera with a compatible Garmin navigation device (Pairing the
Camera with a Garmin Navigation Device, page 5).
On the paired Garmin navigation device, select an option:
• Connect to a Wi‑Fi
®
network, and select > Updates >
Install All.
• Install all available updates using the Garmin Express
™
application.
See the owner's manual for your Garmin navigation device
for more information.
The navigation device downloads updates for itself and updates
for your BC 40 camera, if available. The next time the device
connects to your camera, it sends the update to the camera
automatically. A message and progress indicator appear on the
navigation device screen while the camera is updating. It takes
about one minute to install the camera update.
Checking the Camera Software Version
Before you can check the camera software version, you must
pair the camera with a compatible Garmin navigation device
(Pairing the Camera with a Garmin Navigation Device, page 5).
1
On the paired Garmin navigation device, select > Device >
About.
The device displays version information for all software on
the device.
2
Locate the camera name in the list.
The software version number appears next to the camera
name.
Specifications
Battery Type 2 removable 1.5 V AA. Lithium recom-
mended.
Camera and transmitter water
rating
IEC 60529 IPX7
Operating temperature range From -20° to 70°C (from -4° to 158°F)
Wireless frequencies/protocols 2.4 GHz @ +13dBm nominal
Troubleshooting
The camera takes a long time to connect or
does not connect
Your camera may have a weak wireless connection to your
navigation device if it takes a long time to display video on the
navigation device, if the video frequently pauses or buffers, or if
the camera does not display video at all on your navigation
device. Interference with the connection can be caused by other
wireless signals, vehicle wiring, or structural elements of your
vehicle.
You can try these options to help improve the stability of the
wireless connection between your camera and your navigation
device.
• Move the navigation device to a different location on your
dash or windshield.
• Remove the camera from the mount, flip it upside down, and
place it back into the mount.
When mounted with the Garmin logo upside-down, the
camera automatically flips the video the next time it connects
to your navigation device to provide a correctly oriented
image. Flipping the camera upside down changes the
position of the wireless antenna and can improve the
connection quality in some cases.
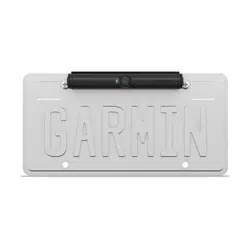
• Mount the camera at a different location on your license
plate.
Device Information 7
Loading ...
Loading ...
Loading ...