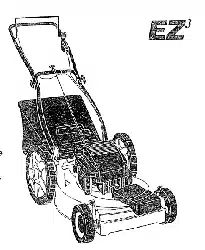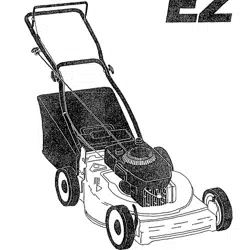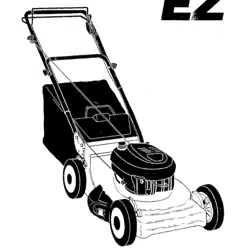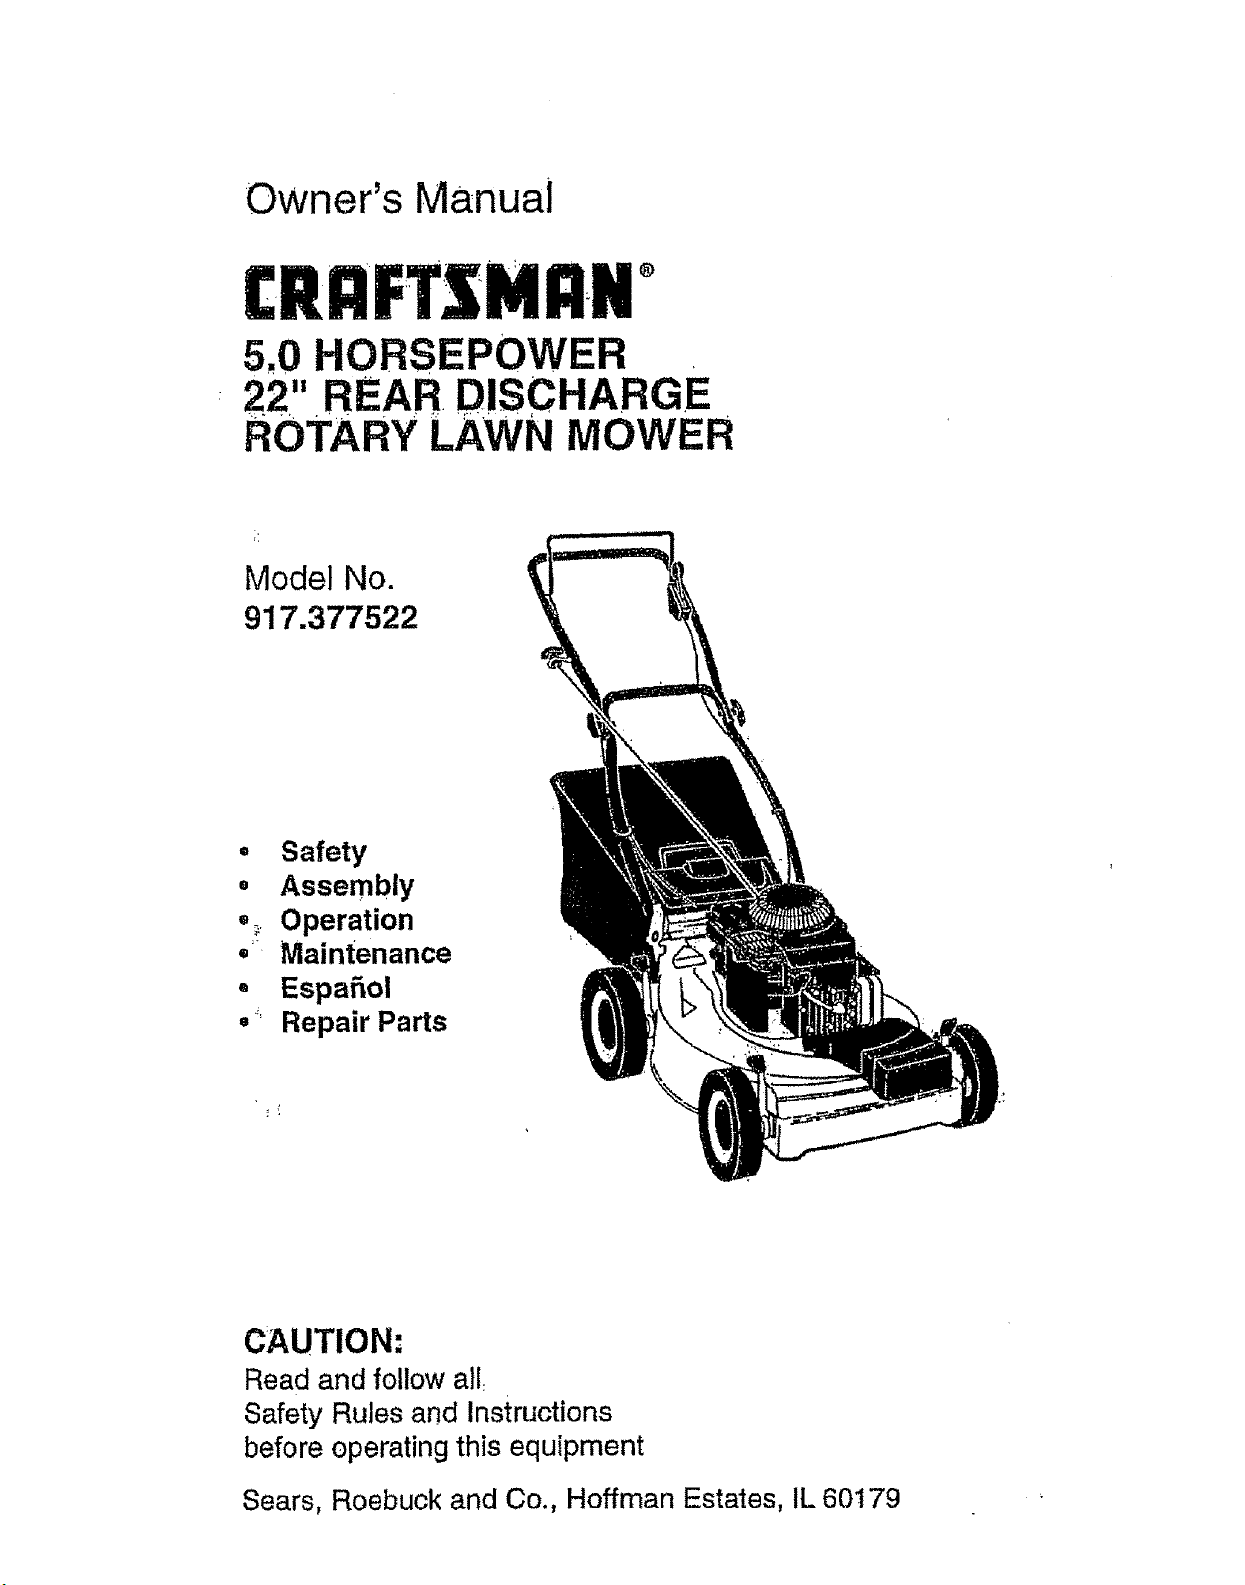
Owner's Manual
[RRFTSMRN°
5.0 HORSEPOWER
22" REAR, DISCHARGE
ROTARY LAWN MOWER
Model No.
917.377522
• Safety
• Assembly
•_ Operation
° Maintenance
• Espafiol
, Repair Parts
CAUTION:
Read and follow all:
Safety Rules and Instructions
before operating this equipment
Sears, Roebuck and Co., Hoffman Estates, IL 60179
Warranty 2 Product Specifications 11
Safety Rules _.. 2 Service and Adjustments t4
Assembiy .... 4 Storage 16
Operation 6 Troubleshooting 17
Maintenance Schedule 10 Repair Paris 37
Maintenance 10 Parts Ordering Back Cover
LIMITED TWO YEAR WARRANTY ON CRAFTSMAN POWER MOWER
For two years from date of purchase, when this Craftsman Lawn Mower is maintained,
lubricated, and tuned up according to the operating and maintenance instructions In the
owner's manual, Sears wiil repair free of charge any defect in material or workmanship.
If this Craftsman Lawn Mower ts used for commercial or rental purposes, this warranty
applies for only g0 days from the date of purchase,
This Warranty does not cover:
• Expendable Items which become worn during normal use, such as rotary' mower
blades, blade adapters, belts, air cleaners and spark plug.
- Repairs necessary because of operator abuse or negligence, including bent crank-
shafts and the failure to maintain the equipment according to the instructions con-
tained in the owner's manual.
Warranty service is avai}able by returning the Craftsman power mower to the nearest
Sears Service Center/Department in the United States. This warranty applies only while
this product is in use in the Un!ted States.
This Warranty gives you specific legal rights, and you may also have other rights whtch
vary from state to state.
SEARS, ROEBUCKAND CO., D/817 WA_ HOFF'MAN ESTATES, ILLINOIS 60179
Safety standard's "requite operator
presence controls to mimimize the risk of
injury. Your unit is equipped with such
controls. DO not attempt to defeat the
function of the operator presence controls
under any circumstances.
TRAINING:
• Read this operator's manual carefully.
Become familiar with the controls and
know how to operate your mower
properly. Learn how to quickly stop
mower.
- Do not allow children to use your mower.
Never allow adults to use mower without
proper instructions,
° Keep the area of operation clear of all
persons, especially small children and
pets.
• Use mower only as the manufacturer
intended and as described in this manual.
° Do not operate mower if fthas been
dropped or damaged in any manner.
Always have damage repaired before
using your mower.
° Do not use accessc_ry attachments that
are not recomrn_€led by the manufac-
turer. Use of such attachments may be
hazardous.
• The blade turns when the engine is
running,
PREPARATION;
• Alway_ thoroughly check the area to be
mowed and clear it of all stones, sticks,
wires, bones, and other foreign objects.
These objects will be thrown by the blade
and can cause severe injury.
° Always wear safety glasses or eye
shields when starting and while using
your mower.
o Dressproperly.Donotoperatemower
whenbarefootorWearingopensandals.
Wearonlysolidshoeswithgoodtraction
whenmowing.
• Checkfueltankbeforestartingengine.
Donotfillgastankindoors,whenthe
engineisrunningorwhentheengineis
hot.AllowtheenginetOcoolforseveral
minutesbeforefillingthegastank,Clean
offanyspiltedgasolinebeforestartingthe
engine.
° Alwaysmakewheelheightadjustments
beforestartingyourmower,Never
attempttodothiswhiletheengineis
running.
• Mowonlyindaylightorgoodartificial
light.
OPERATION:
• Keepyoureyesandmindonyourmower
andtheareabeingcut.Donottetother
interestsdistractyou,
• Donotmowwetorslipperygrass.Never
runwhileoperatingyourmower.Always
besureofyourfooting-keepa firmhold
onthehandlesandWalk.
° Donotputhandsorfeetnearorunder
rotatingparts.Keepclearofthedischarge
openingatalltimes,
, Alwaysstoptheenginewheneveryou
leaveorarenotusingyourmower,or
beforecrossingdriveways,Walks, roads,
and any graver-covered areas,
• Never direct discharge of material toward
bystanders nor allow anyone near the
mower while you are operating it.
• Before cleaning, Inspecting, or repairing
your mower, stop the engine and make
absolutely sure the blade and all moving
parts have stopped. Then disconnect the
spark plug Wire and .k_.!!; away from the
spark plug to prevent accidental starting.
• Do not continue to run your mower if you
hit a foreign object. Follow the procedure
outlined above, then repair any damage
before restarting and 0pera!ing your
mower.
° Do not change the governor settings or
overspeed the er_gine. Engine damage or
personal injury may resu{t,
• Do not operate y0ui mower if it vibrates
abnormally. Excessive v]bration is an
indication of damage; stop the engine,
safely check for the cause of vibration
and repair as required.
= DO not run the engine indoors. Exhaust
fumes are dangerous,
- Never cut grass by pulling the mower
towards you. Mow across the face of
slopes, never up and down or you might
lose your footing. Do not mow exces-
sively steep slopes. Use caution when
operating the mower on uneven terrain
or when changing directions - maintain
good footing.
• Never operate your mower without
proper guards, plates, grass catcher or
other safety devices tn place.
MAINTENANCE AND STORAGE:
• Check the blade and the engine mount-
ing bolts often to be sure they are
tightened properly.
• Check all bolts, nuts and screws at
frequent intervals for proper tightness to
be sure mower is in safe working
condition.
• Keep all saiety devices in place and
working.
• To reduce fire hazard, keep the engine
free of grass, leaves or excessive grease
and oil.
° Check grass catcher often for deteriora-
tion and wear and replace worn bags.
Use only replacement bags that are
recommended by and comply with
specifications of the manufacturer of your
mower;
• Always keep a sharp blade on your
mower.
• Allow engine to coot before storing in any
enclosure.
° Never store mower with fuel in the tank
inside a building where fumes may reach
an open flame or an Ignition source such
as a hot water heater, space heater,
clothes dryer, etc.
•.CAUTION: Always disconnect spark
plug wire and place wire where it cannot
contact spark plug in order to prevent
accidental starting when setting up,
transporting, adjusting or making repairs,
WARNING
The engine exhaust from this product
contains chemicals known to the State of
California to cause cancer, birth defects, or
other reproductive harm.
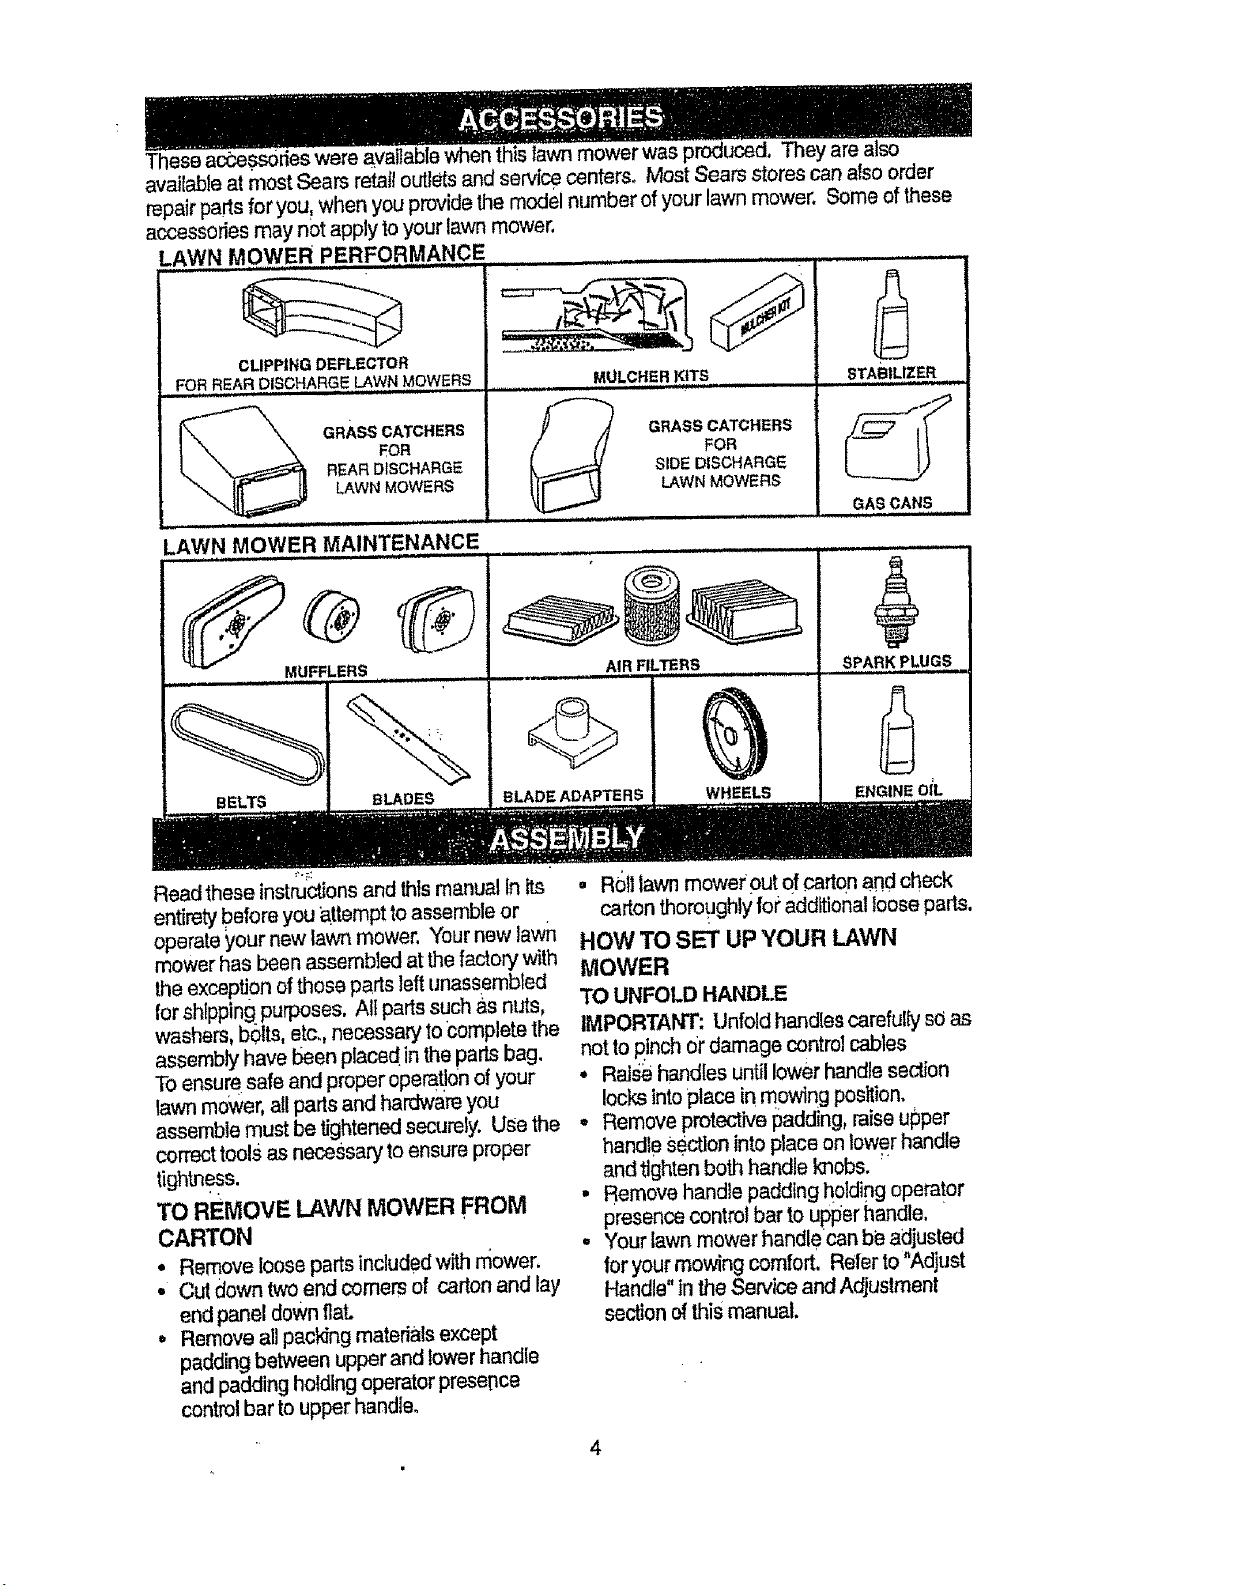
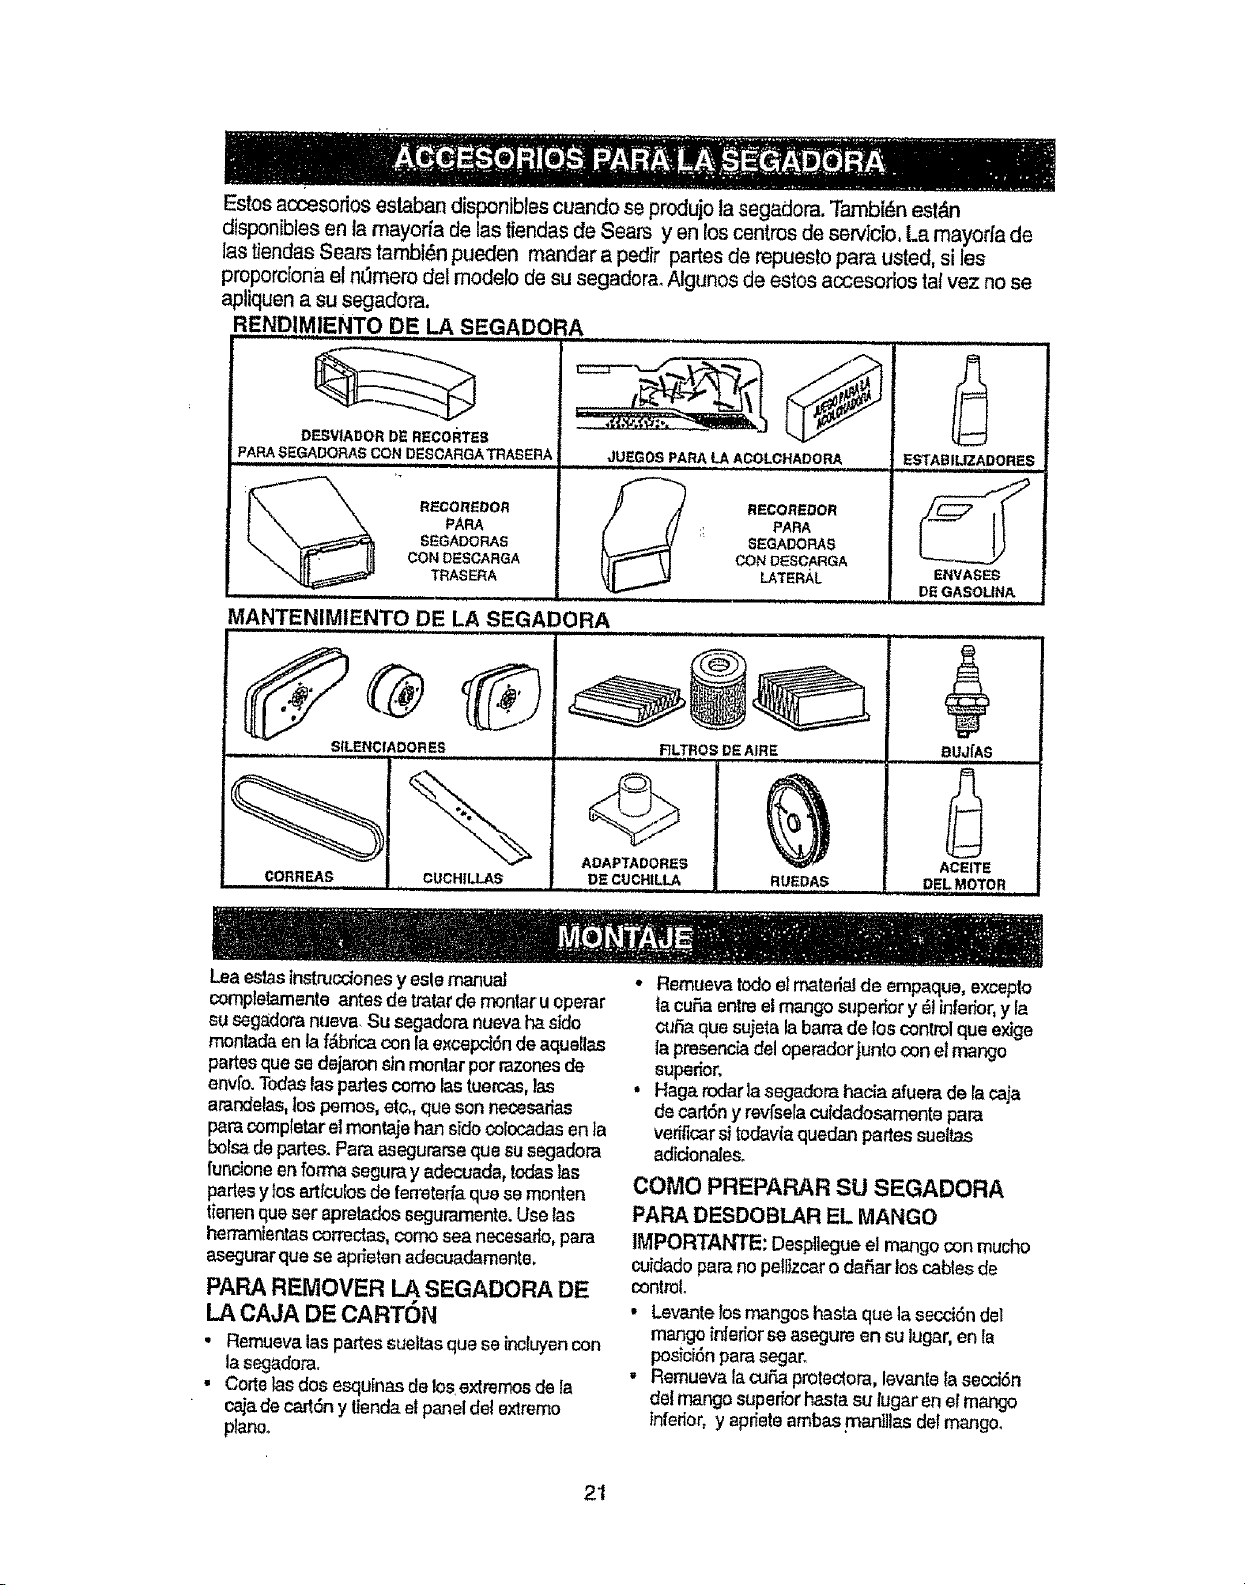
whenthislawn mower was produced, They are also
available at nlost Sears retail outlets and service centers, Most Sears stores can also order
repair parts for your when you provide the model number of your lawn mower. Some of these
accessories may not apply to your lawn mower.
LAWN MOWER PERFORMANCE
'-'- \
cuPPz.QDEFLECTOR
FOR,,REARDISC,ARGELAwNMOWERS
GRASSCATCHERS
FOR
REARDISCHARGE
LAWNMOWERS
L_i,,
LAWN MOWER MAINTENANCE
MULCHER KiTS
GRASS CATCHERS
FOR
SIDE DISCHARGE
LAWN MOWERS
MUFFLERS
BELTS BLADES
AIR FILTERS
BLADE ADAPTERS WHEELS
STAeIL,fZr'R
GAS CANS
SPARK PLUG8
ENGINE OiL
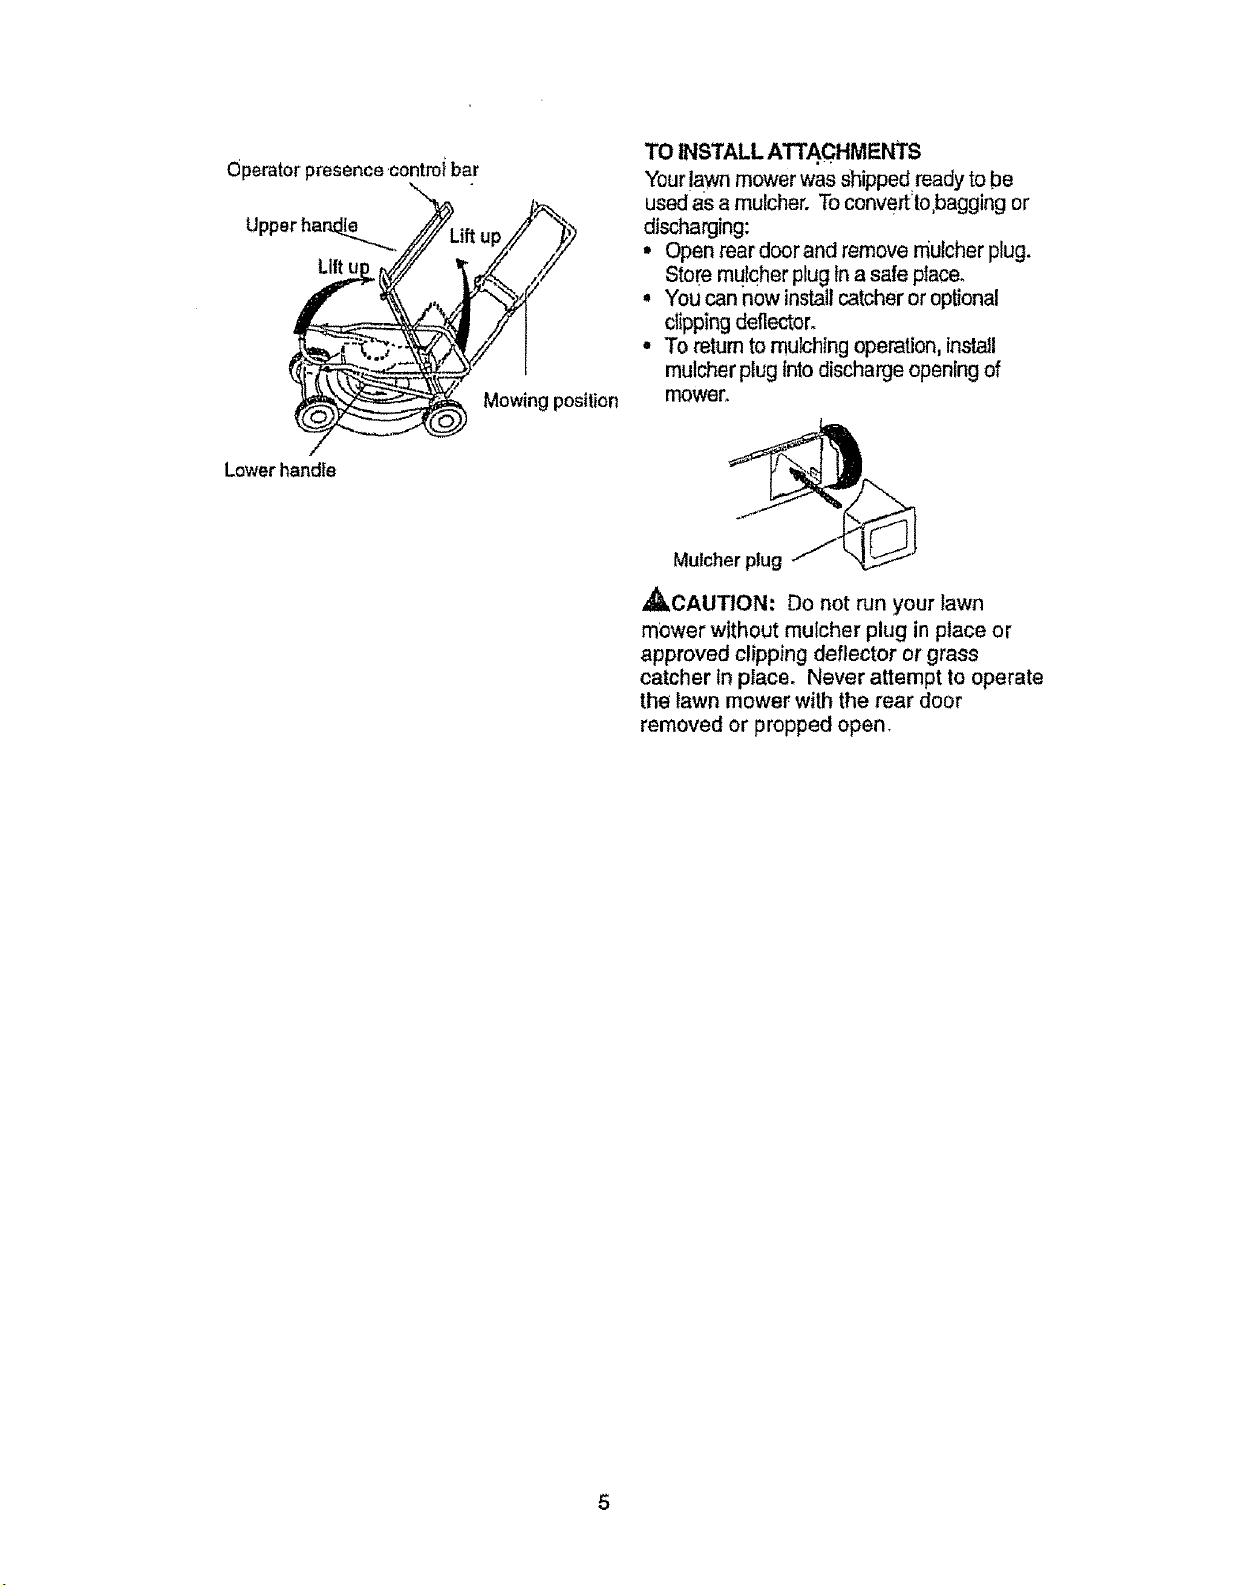
Read these instructionsand this manual in its
entirety before you _,ttempt to assemble or
operate your new lawn mower. Your new lawn
mower has been assembled at the factory with
the exception of those parts left unassembled
for shipping purposes. Aft parts such as nuts,
washers, bolts, etc,, necessary to complete the
assembly have _en placed inthe partsbeg,
To ensure safe and proper operat!0nof your
lawn mower, a_lparts and hardware you
assemble must be tightened securely. Use the
correct tools as necessary to ensure proper
tightness.
TO REMOVE LAWN MOWER FROM
CARTON
• Remove loose parts includedwP,h mower,
• Cut down two end comers of carton and lay
end panel down flaL
• Remove all packing materials except
padding between upper and lower handle
and padding holding operatorpresence
control bar to upper handie°
• Rt_tllawn mowerout ofcarton and check
carton thoroughlyfopadditionallooseparts.
HOW TO SET UP YOUR LAWN
MOWER
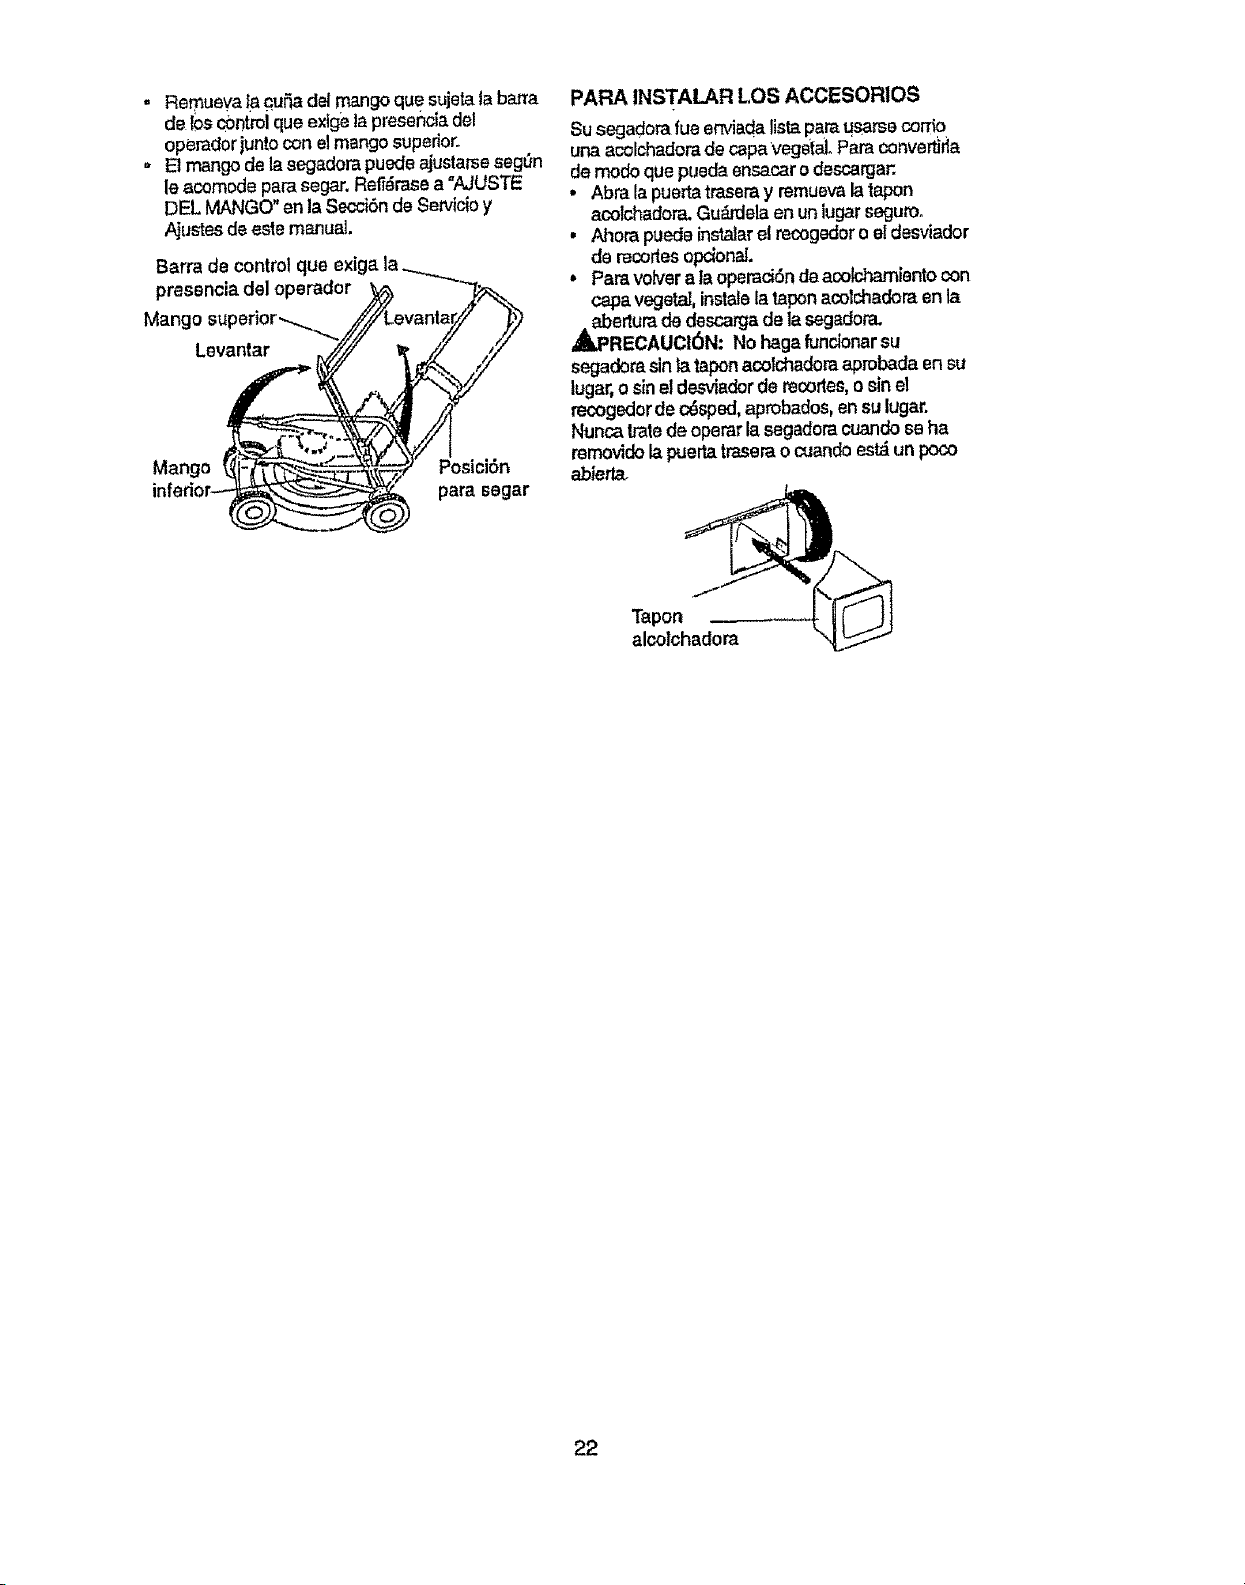
TO UNFOLD HANDLE
IMPORTANT: Unfold handlescarefullysOas
notto pinchOrdamage controlcables
• Raisehandles untillowerhandlesection
locks intoplace inmowing position,
• Remove protectivepadding,raiseut_per
handlesection intoplaceonlowerhandle
and tightenbothhandle knobs. '
• Remove handlepadding holdingoperator
presencecontrol bar to upperhandle,
• Yourlawnmower handle canbeadjusted
foryourmowingcomfort. Referto "Adjust
Handle"inthe Serviceand Adjustment
sec_onofthismanual,
4
Operator presence controi bar
Lilt u
Mowing position
TO INSTALL ATTACHMENTS
Your !awn mower was Shippedready to be
used as a mulcher. To convertto,bagging or
discharging:
• Open rear door and remove rnulcher plug.
Store mulcher plug ina safe place_
• You can now install catcher or optional
dipping deflector.
• To return to mulching operation, install
mulcher plug into discharge opening of
mower.
Lowerhandle
Mutcher plug
A_.CAUTION: Do not run your lawn
mower without mutcher plug in place or
approved clipping deflector or grass
catcher tn place. Never attempt to operate
the lawn mower with the rear door
removed or propped open.
5
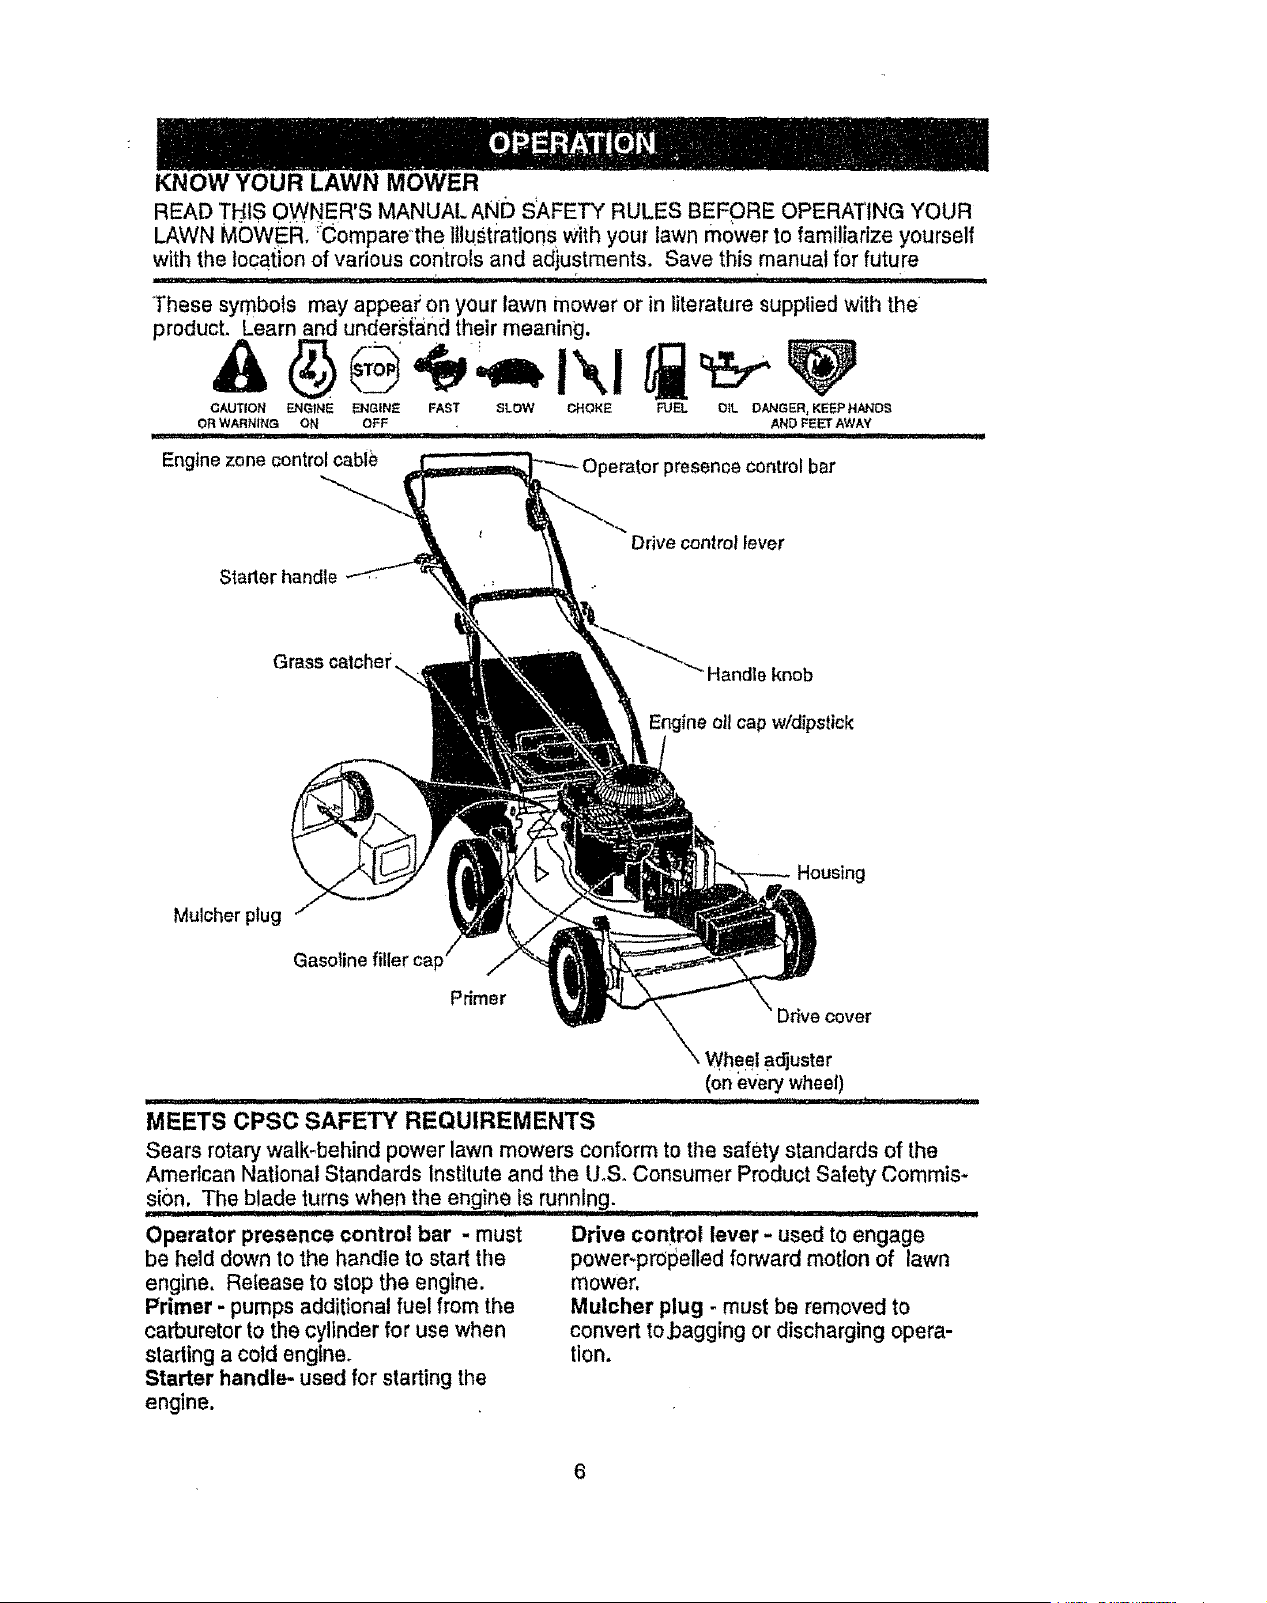
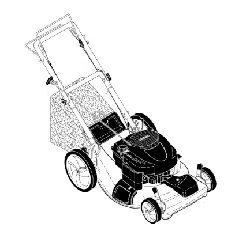
KNOW YOUR LAWN MOWER
READ THIS OVVNER'S MANUAL AND S_.FETY RULES BEFORE OPERATING YOUR
LAWN MOWER. :Compareth e |llust_'ations with your lawn mower to familiarize yourself
with the tocation of various controls and adjustments. Save this manual for future
._ ..... * ........ z .... I
These symbols may appear on your lawn mower or in literature supplied with the
product. Learn and under,stand their meaning.
CAUTION F-.NGtNE EJqGtNE FAST SLOW CHOKE FUEL O_L DANGER= KEEPHANOS
OR WARNING ON OFF , AND FEET AWAY
Enginezone controlcabie presencecontrolbar
• ii, ,i, ,11_11
Starter handle
Drive control lever
Handle knob
Engine oil cap w/dipstick
Mulcher plug
Housing
Primer
, Whe#l adjuster
(on every wheel)
_LI,L................ ............. i f"l ......... ! Jl ....
MEETS CPSC SAFETY REQUIREMENTS
Sears rotary walk-behind power lawn mowers conform to the safety standards of the
American National Standards Institute and the UoSoConsumer Product Salety Commis-
sion. The blade...........turns when the engine is running. .
Operator presence control bar - must
be held down to the handle to start the
engine, Release to stop the engine.
Primer - pumps additional fuel from the
carburetor to the cylinder for use when
starting a cofd engine,
Starter handle- used for starting the
engine.
Drive control lever - used to engage
power-prOpelled forward motion of lawn
mower.
Mulcher plug - must be removed to
convert tobagging or discharging opera-
tion,
Theopei'atonofar_ylawnm,0wer.can
resultinforeignobjectsthrowniniothe
eyes,whichcanresultinsevereeye
damage.A wayswearsafetyglassesor
eye shields while .operating your awn
mower or performing any adjustments or
repairs, We recommend a wide vision
safety mask over spectacles or standard
salety glasses.
HOW TO USE YOUR LAWN MOWER
ENGINE SPEED
The engine speed Was set at the factory
for optimum performance. Speed is not
adjustable.
ENGINE ZONE CONTROL
_,CAUTiON: Federal regulations require
an engine control to be installed on this
lawn mower in order to minimize the risk of
blade contact injury. Do not under any
circumstances attempt to defeat the
function of the operator control. The blade
turns when the engine ts running.
• Your lawn mower is equipped with an
operator presence control bar which
requires the operator to be positioned
behind the lawn mower handle to start
and operate the lawn mower,
TO ADJUST CUTTING HEIGHT
• Raise wheels for low cut and lower
wheels for high Cut.=
° Adjust cutting height to suit your
requirements, Medium position iSbest
for most lawns.
• To change cutting height, squeeze
adjuster lever toward wheel. Move
wheel up or down to suit your require-
ments, Be sure a I wheels are in the
same setting°
NOTE; Adjuster IS pi'_ii_Q_lt!oned
when plate tab inserts ir_6' hSie in lever,
Also, 9-position adjusters (if so equipped)
allow lever to be positioned between the
plate tabs.
Lower Wheels for High Cut Plate Tab
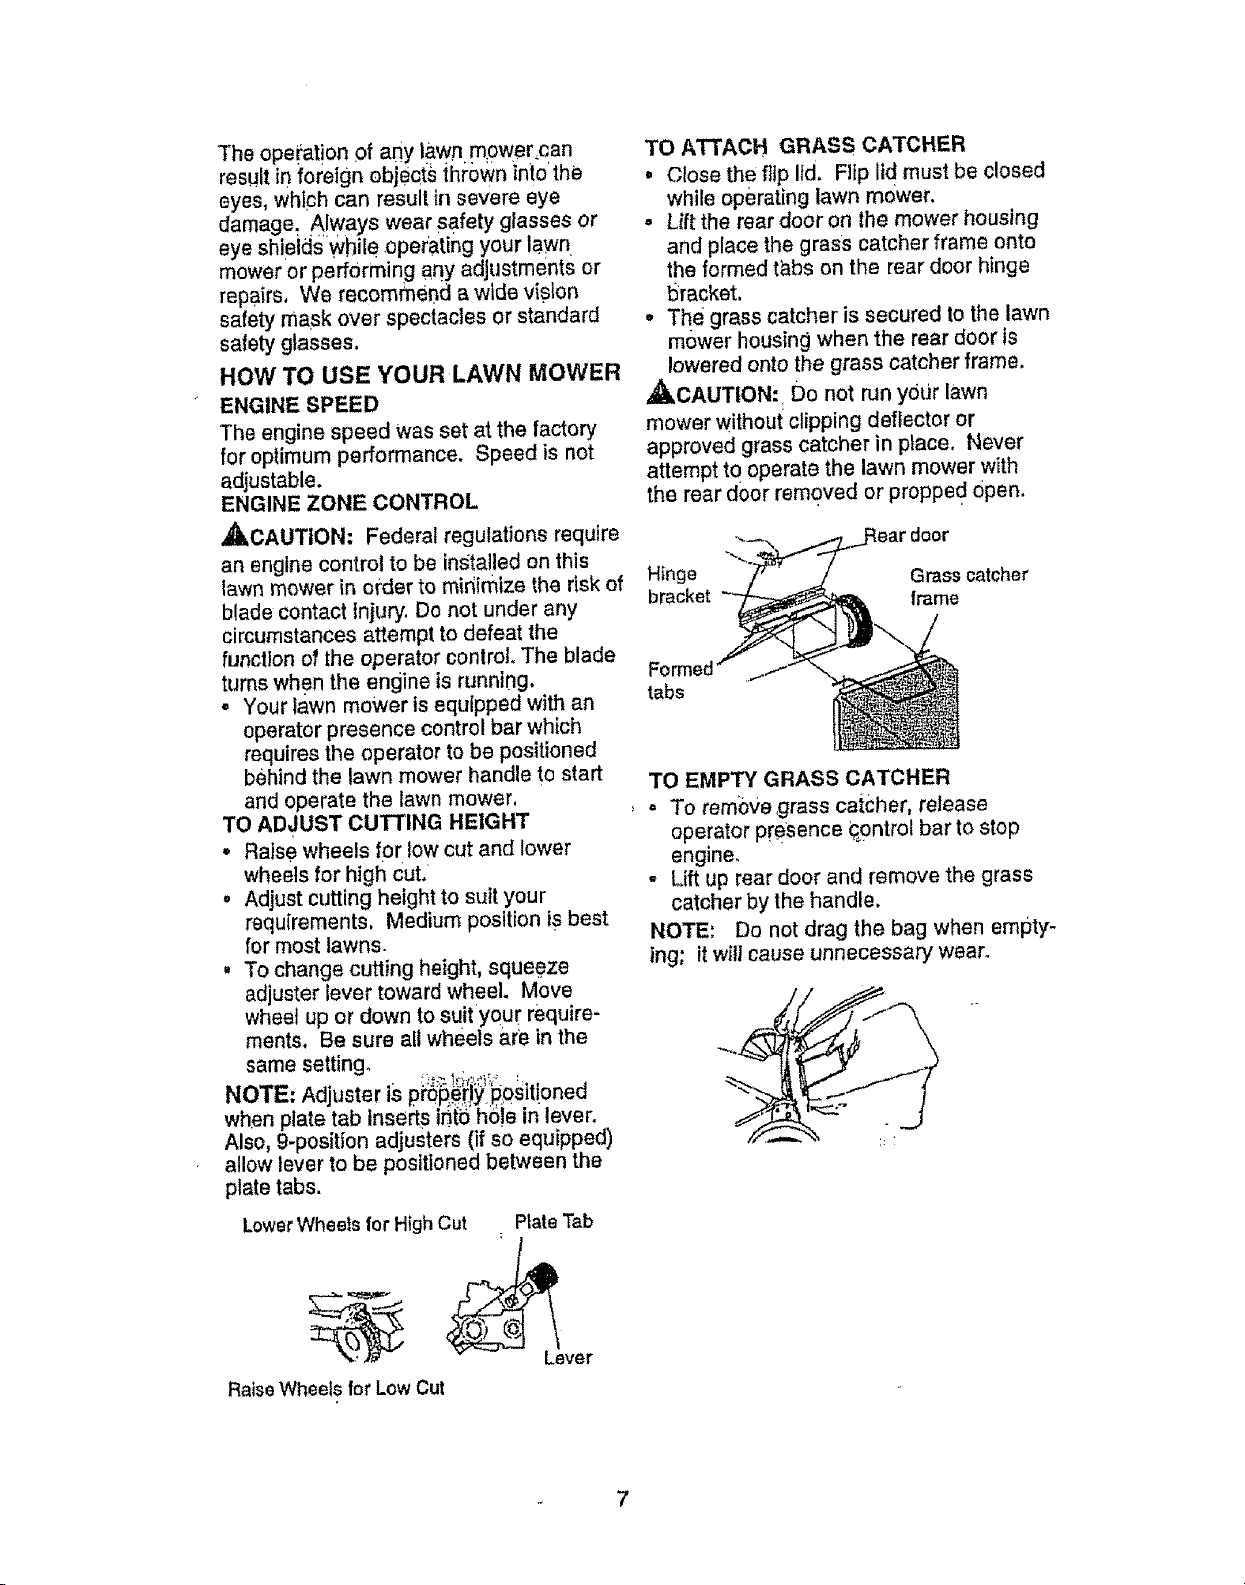
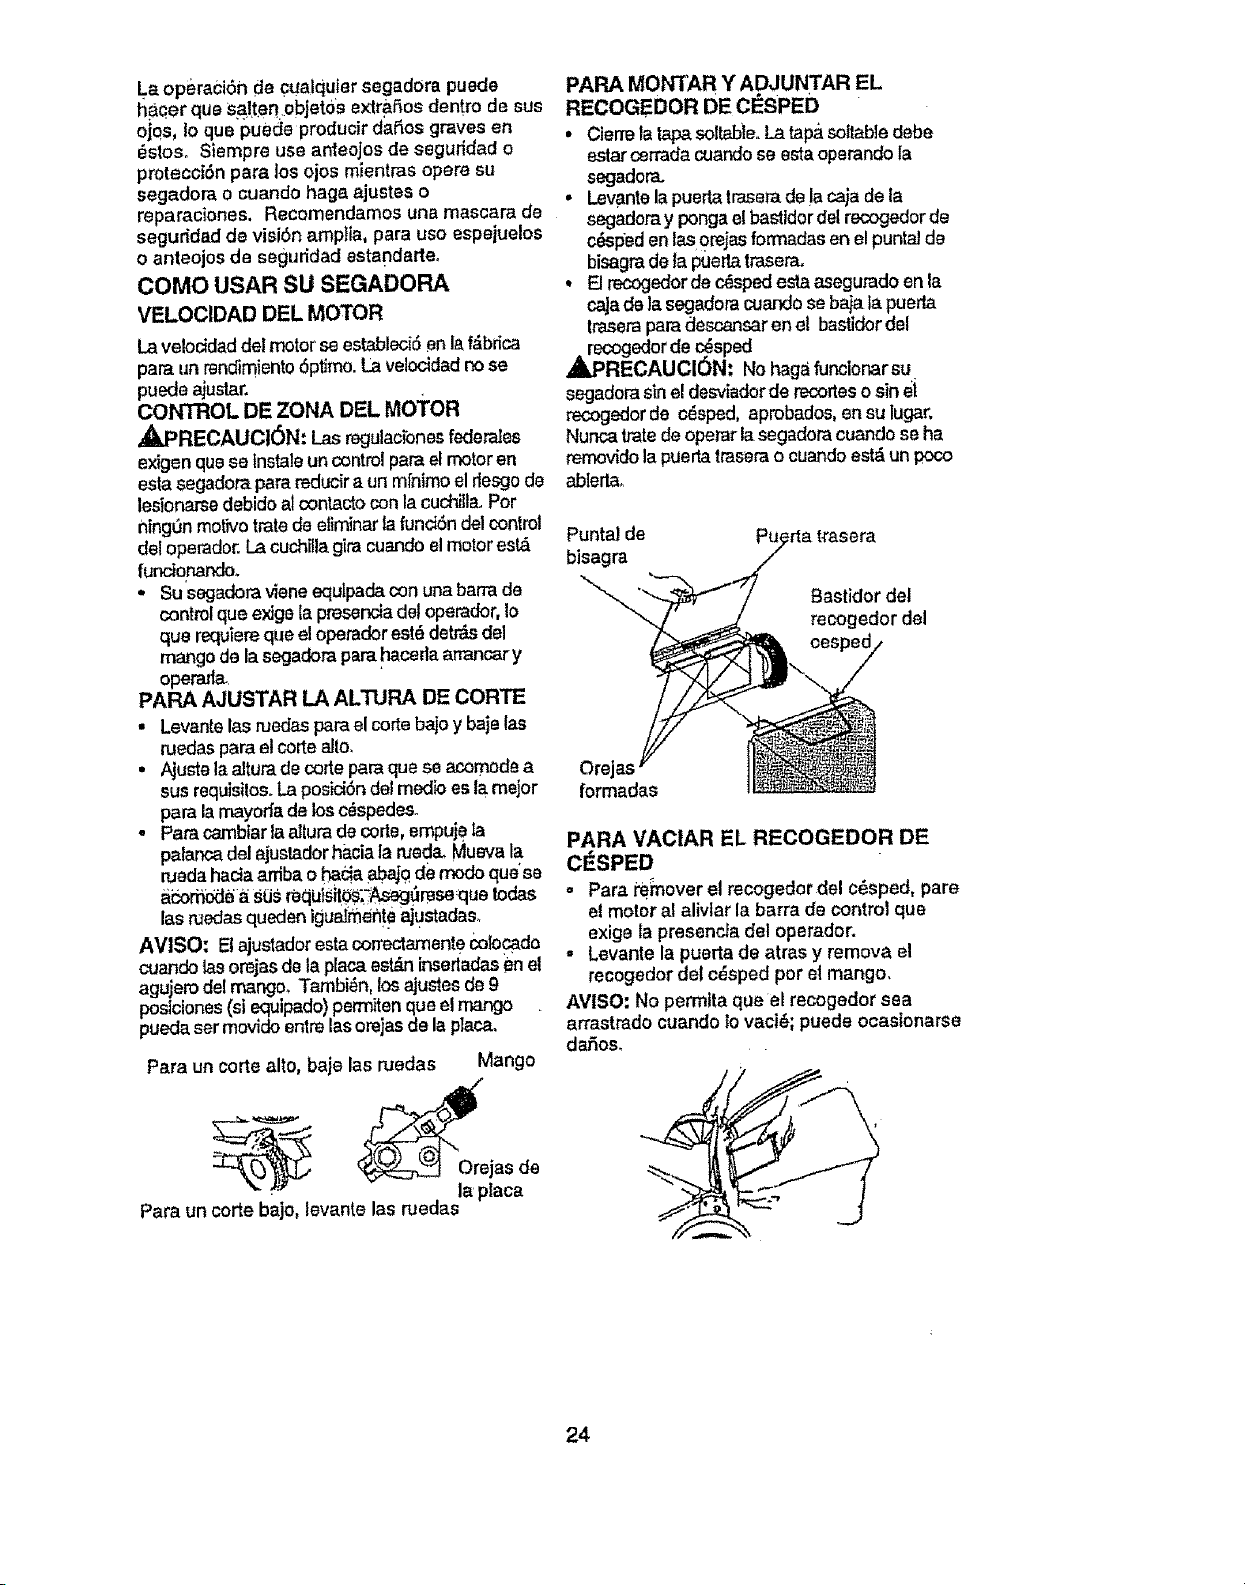
TO ATTACH GRASS CATCHER
, Close the flip lid. Flip lid must be closed
while operating lawn mower.
• Lift the rear door on the mower housing
and place the grass catcher frame onto
the formed t_bs on the rear door hinge
bracket.
- The grass catcher is secured to the lawn
mower housing when the rear door is
lowered onto the gross catcher frame.
,_CAUTION: Do not run your lawn
mower without clipping deflector or
approved grass catcher in place. Never
attempt to operate the lawn mower with
the rear door removed or proppe d Open.
Hinge Grasscatcher
bracket frame
tabs
TO EMPTY GRASS CATCHER
, = To remove grass catcher, release
operator Presence ¢_0ntrol bar to stop
engine.
- Lift up rear door and remove the grass
catcher by the handle,
NOTE: Do not drag the bag when empty-
ing; it wi!l cause unnecessary wear.
Raise Wheets for Low Cut
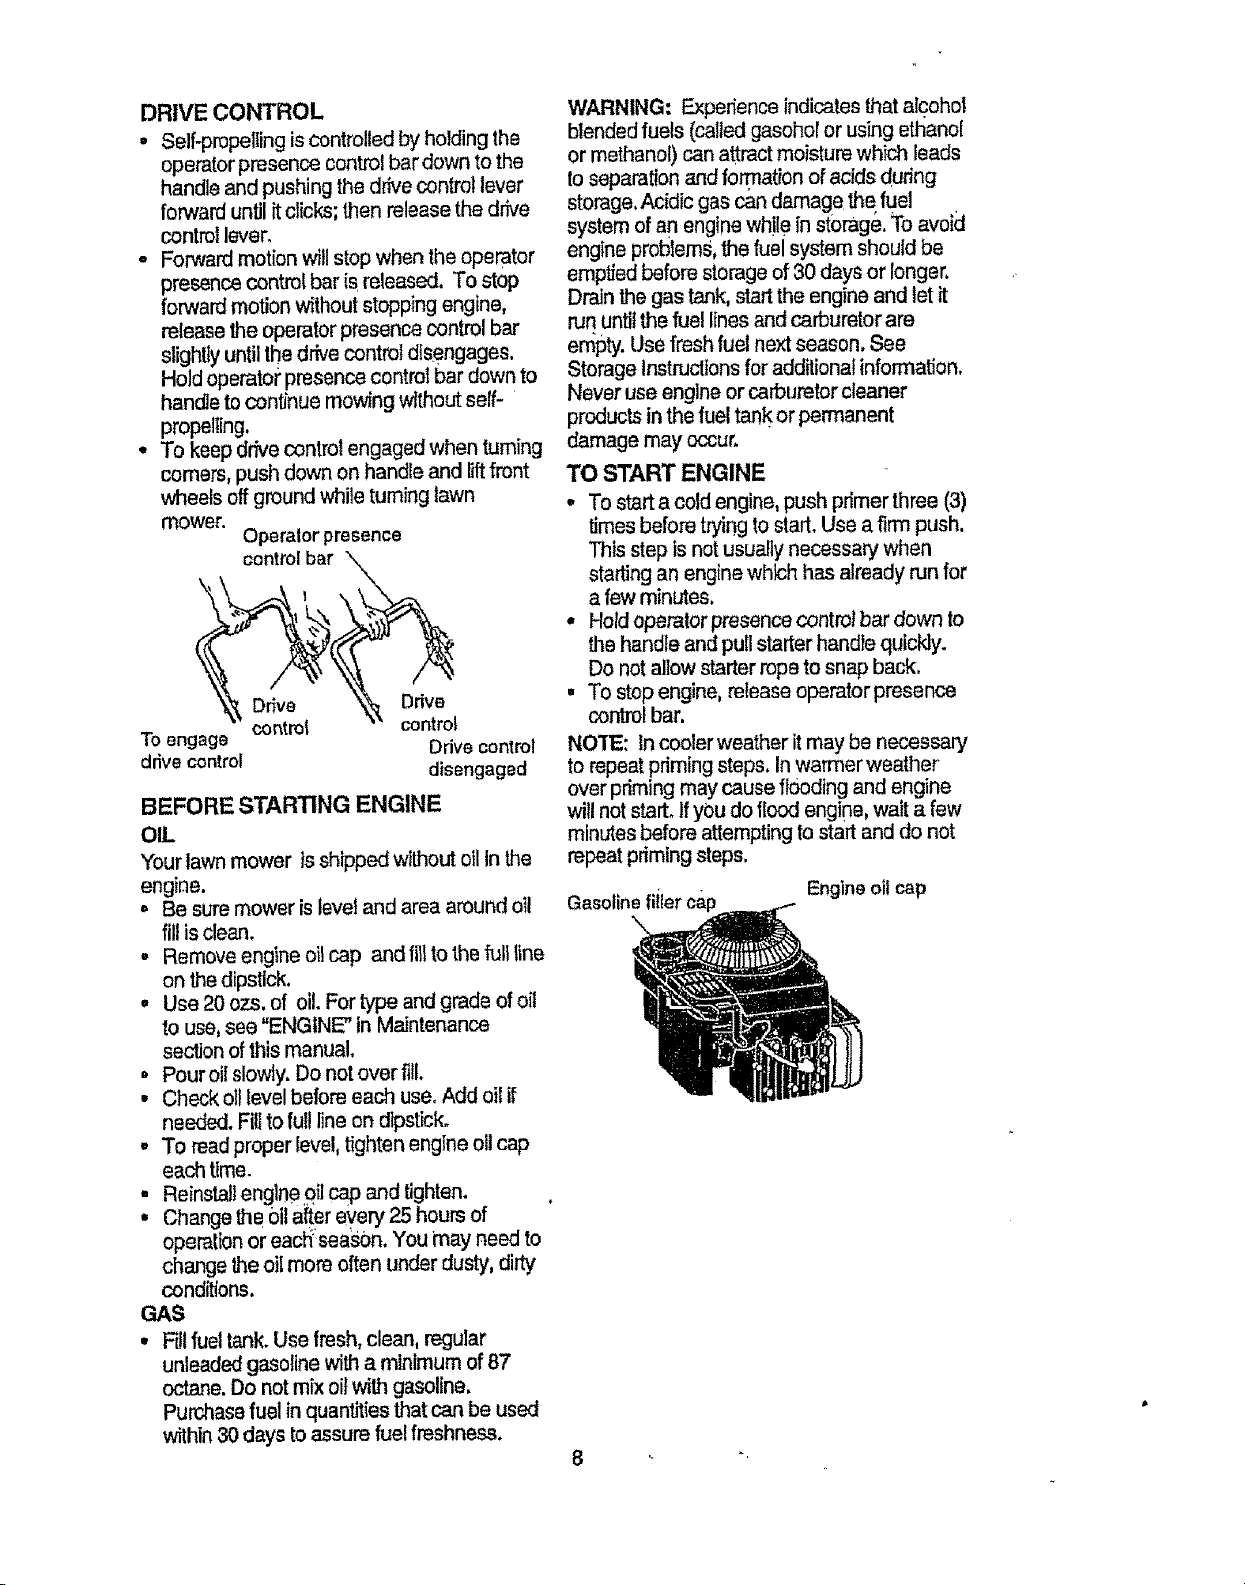
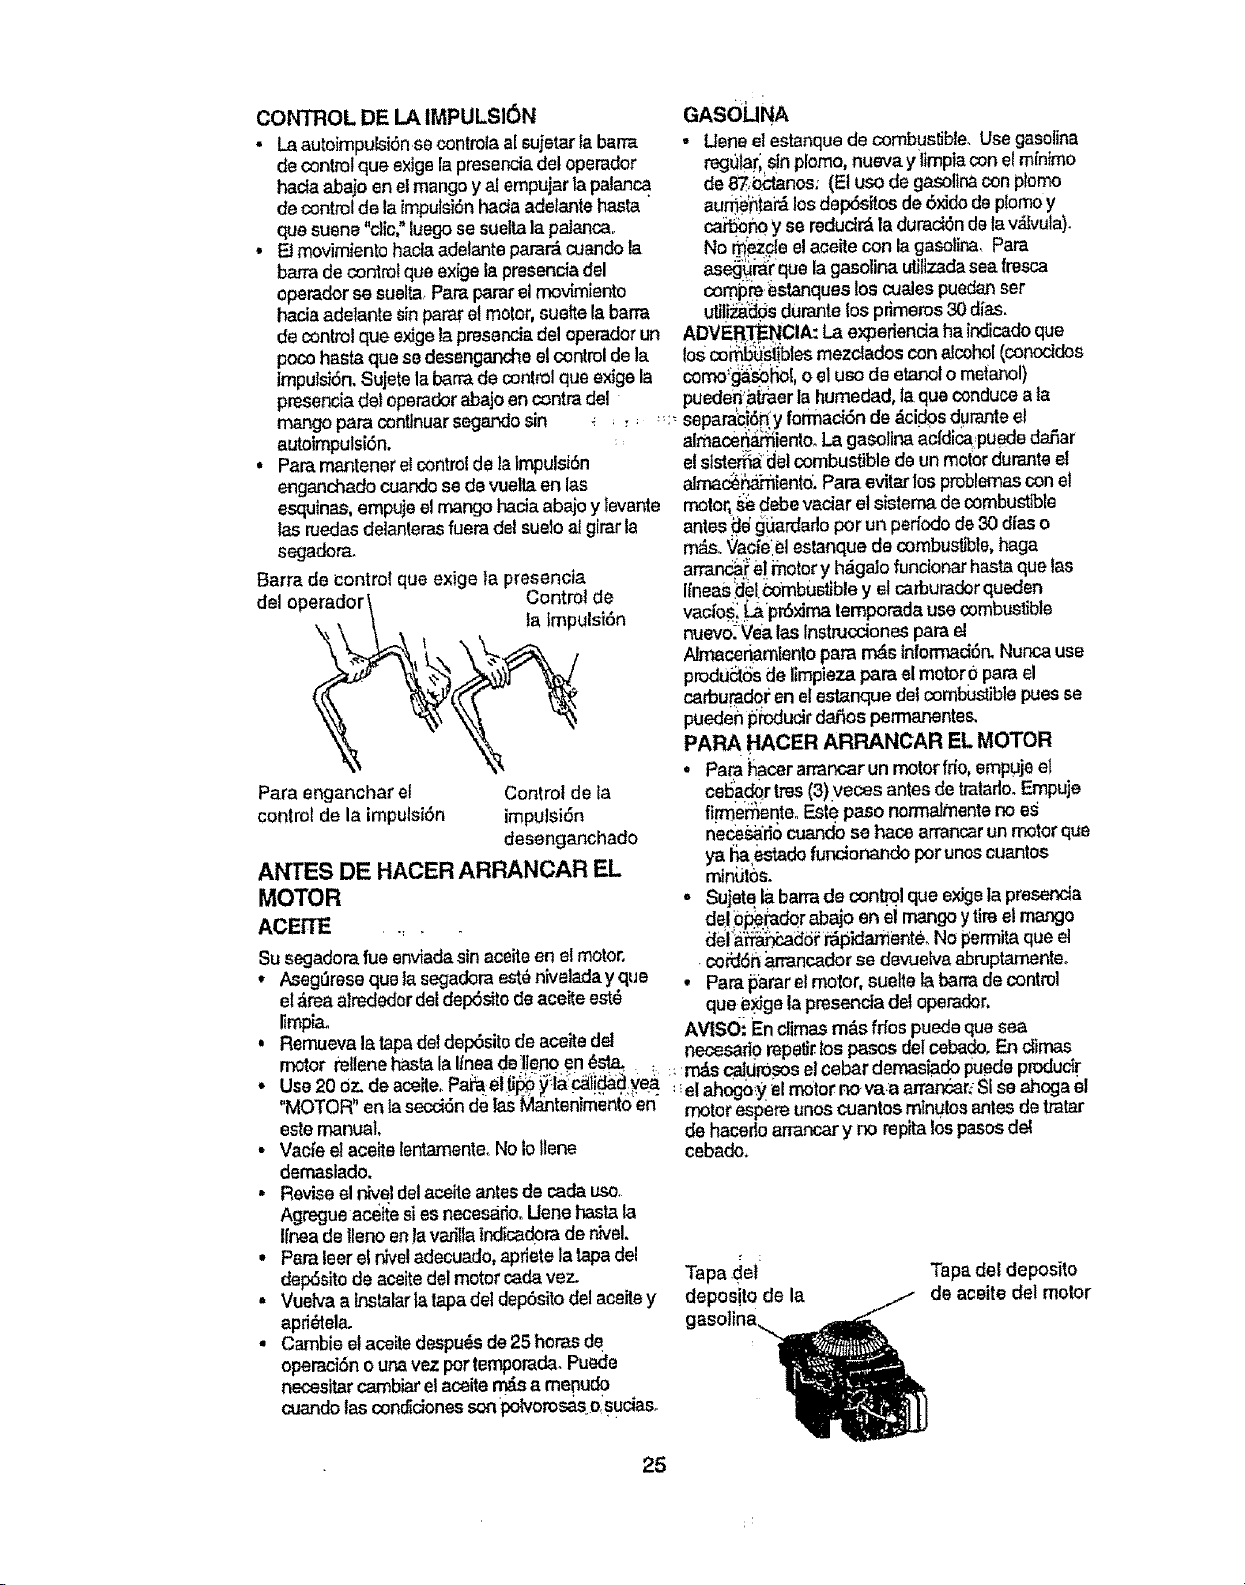
DRIVE CONTROL
• Self-propelling is controlled by holding the
operator presence control bar down to the
handle and pushing the drive control lever
forward until it clicks; then release the drive
control lever,
- Forward motion will stop when the operator
presence control bar is released. To stop
forward motion without stopping engine,
release the operator presence control bar
slighlty until the drive control disengages.
Hold operator presence control bar down to
handJe to con_nue mowing _thout self-
propelling.
• To keep drive control engaged when turning
comers, push down on handle and lift front
wheels off ground while turning lawn
mower.
Operalor presence
control bar ",,,
.'=- t m
To engage Drive control
drive control disengaged
BEFORE STARTING ENGINE
OIL
Your lawn mower is shipped without oll In the
engine.
° Be sure mower is level and area around oil
fill is dean.
• Remove engine oil cap and lilt to the full _lne
on the dipstick.
, Use 20 ozs. of oil. For type and grade of oil
to use, see "ENGINE" in Maintenance
section of this manual.
o Pour oit slovAy, Do not over fill.
• Check oi1level before each use, Add oil if
needed. Filt to ful! line on dipstick,
• To read proper level, tighten engine oti cap
each time,
• ReinstaIl englne 0jl cap and tighten,
° Change the 0it after every 25 hours of
operation or eacF_:seas0n.You may need to
change the oil more often under dusty, dirty
cond_'ons.
GAS
• Fill fuel tank. Use fresh, clean, regular
unleaded gasoline with a minimum of 87
octane. Do not mix oil with gasoline,
Purchase fuel in quantities that can be used
within 30 days to assure fuel freshness.
WARNING: Experience indicates that alcohol
blended fuels (called gasohoror using ethanol
or methanol) can attract moisture which leads
to separation and forTnation of acids during
storage, Acidic gas can damage the fuel
system of an engine wh!le in st0rage, To avoid
engine problems, the fuel system should be
emptied before storage of 30 days or longer,
Drain the gas tank, start the engine and let it
run until the fue! lines and carburetor are
empty. Use fresh fuel next season, See
Storage instructions for additional information,
Never use engine or carburetor cleaner
products in the fuel tank or permanent
damage may occur,
TO START ENGINE
• To start a cold engine, push primer three (3)
times before trying to start. Use a firm push.
This step is not usually necessary when
starting an engine whk;h has already run for
a few minutes.
• Hold operator presence control bar down to
the handle and pull starter handle quickly.
Do not allow starter rope to snap back,
• To stop engine, release operator presence
control bar,
NO'fE: In cooler weather it may be necessary
to repeat pdming steps, In warmer weather
over priming may cause flooding and engine
will not start, If you do flood engine, wait a few
minutes before attempting to start and do not
repeat priming steps.
Gasolinefiiler cap Engine oilcap
MOWING TIPS
o Under certain conditions, such as very
t_tll grass, it may be necessaryto raise
the height of cut to reduce pushing effort
and tc keep from overloading the engine
and leaving clumps of grass clippings. It
may also be necessa_ to reduce
ground speed and!or run the lawn
mower over the area a second time.
- For extremely heavy cutting, reduce the
width of cut by overlapping previously
cut path and mow slowly.
• For better grass bagging and most
cutting conditions, the engine speed
should be set in the fast position.
° When using a rear discharge lawn
mower in moist, heavy grass, clumps of
cut grass may not enter the grass
catcher, Reduce ground speed (push-
ing speed)and/or run the lawn mower
over the area a second time.
= If a trail-of clippings is left on the right
side of a rear discharge mower, mow in
a clockwise direction with a small
overlap to collect the clippings on the
next pass.
° Pores in cloth grass catchers can
become filled with dirt and dust with use
and catchers will collect less grass,_ To
prevent this, regularly hos_'catcher off
with water and le! dry bef0re using.
o Keep top cf engine around starter clear
and clean of grass clippings and chaff.
This will help engine air flow and extend
engine life.
MULCHING MOWING TIPS
IMPORTANT: Forbest performance, keep
mower housing free of built-up grass and
trash. See "Cleaning" in MAINTENANCE
section of this manual.
= The special rnulching blade will recur the
grass clippings many times and reduce
them in size so thatas they fall onto the
lawn they will disperse intothe grass and
not be noticed. Also, the mulched grass will
blodegrade quickly to provide nutrients for
the lawn. Always mulch with your highest
engine (blade) speed as this wl!l provide the
best recuttlng action of the blades.
o Avoid cutting your lawn when it iswet. Wet
grass tends toform clumps and interferes
with the mulching action. The best t_meto
mow your lawn Isthe early afternoon. At this
time the grass has dried and the newly cut
area will not be exposed to the direct sun.
o For best results, adjust the lawn mower
cutting height so that the lawn mower Cuts
off only the top one-thirdof the grass blades.
If the lawn is overgrown it will be necessary
to raise the height 0f cut to reduqe pushing
effort and to keep from overloading the
engtne and leaving clumps of mu_ched
grass. For extremely heavy mulching,
reduce your width cf cut by cverfapping
previously cut path and mow slowly.
o Certain types of grass and grass conditions
may require thatan area be mulched a
second time to completely hide the
clippings. When doing a second cut, mow
across or perpend{cular to the first cut path.
• Changeyour cutting pattern from week to
week. Mow north to south one week then
change to east to west the next week. This
wilt help prevent matting and graining of the
lawn.
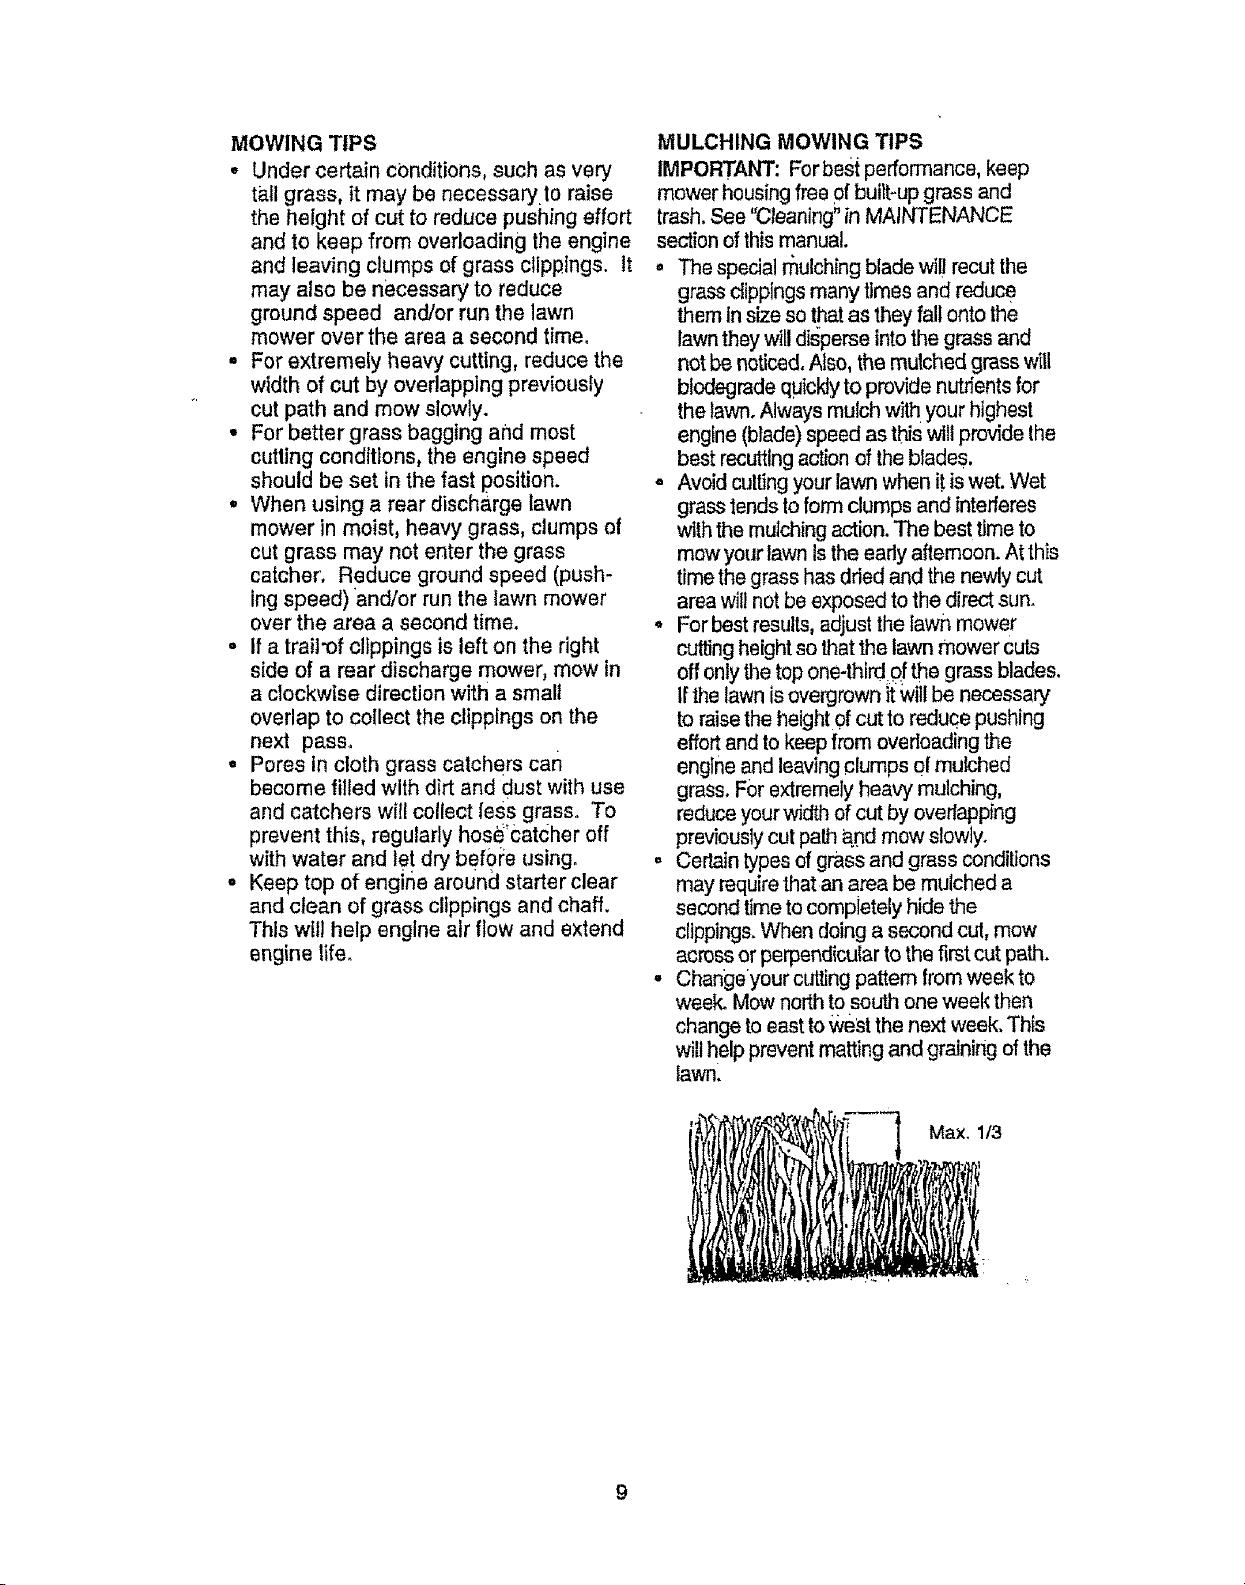
Max, 1/3
MAINTENANCE SCHEDULE
FILL IN DATES
AS YOU COMPLETE
REGULAR SERVICE
ChepkforLoose Fas!eneFs _ i
C|ean/tnspect Grass Catcher
,(ifEq,uipped) ...... I,/ IV#
M CleanLawn Mower _ iJ_-.
iO Clean Under DriveCover
IM (P°wer"Pr°pelied Mowers) ....
:_ CheckdrivebeiVpulIeys.
iR _d Mowers3
Chec_,$harpeNRepleceBlade .....
u"
v'
SERVICE DATES
t/' I-
LubricationChad " IV/ V' ................
_ry/Recharge
(Electric,,slsrtMow_,_) ,, .,,, V' v'4
°E Check Engine, Olt Level J
. , , , ,
N Change EngineOil ............
G Clean Air Fiiler _ 2
| inspecIMuffler J ' J i i
N 'Cieanor ReplaceSpark Plug "' ___
E Repiac Pap,B ,C dd ge .........V'=
I - Cha."_gomore often whenopem'Jngund_,_'t=he_,y toad orlnhigh ambient ternpotat'Jrr_s,
2 - S8_/TIOT_, organ when i:)por a_r'_g _ ditt_ or dusty c=3rtdffJo;18
3 - Replace blades more citronwhen moving in_ndy _1],
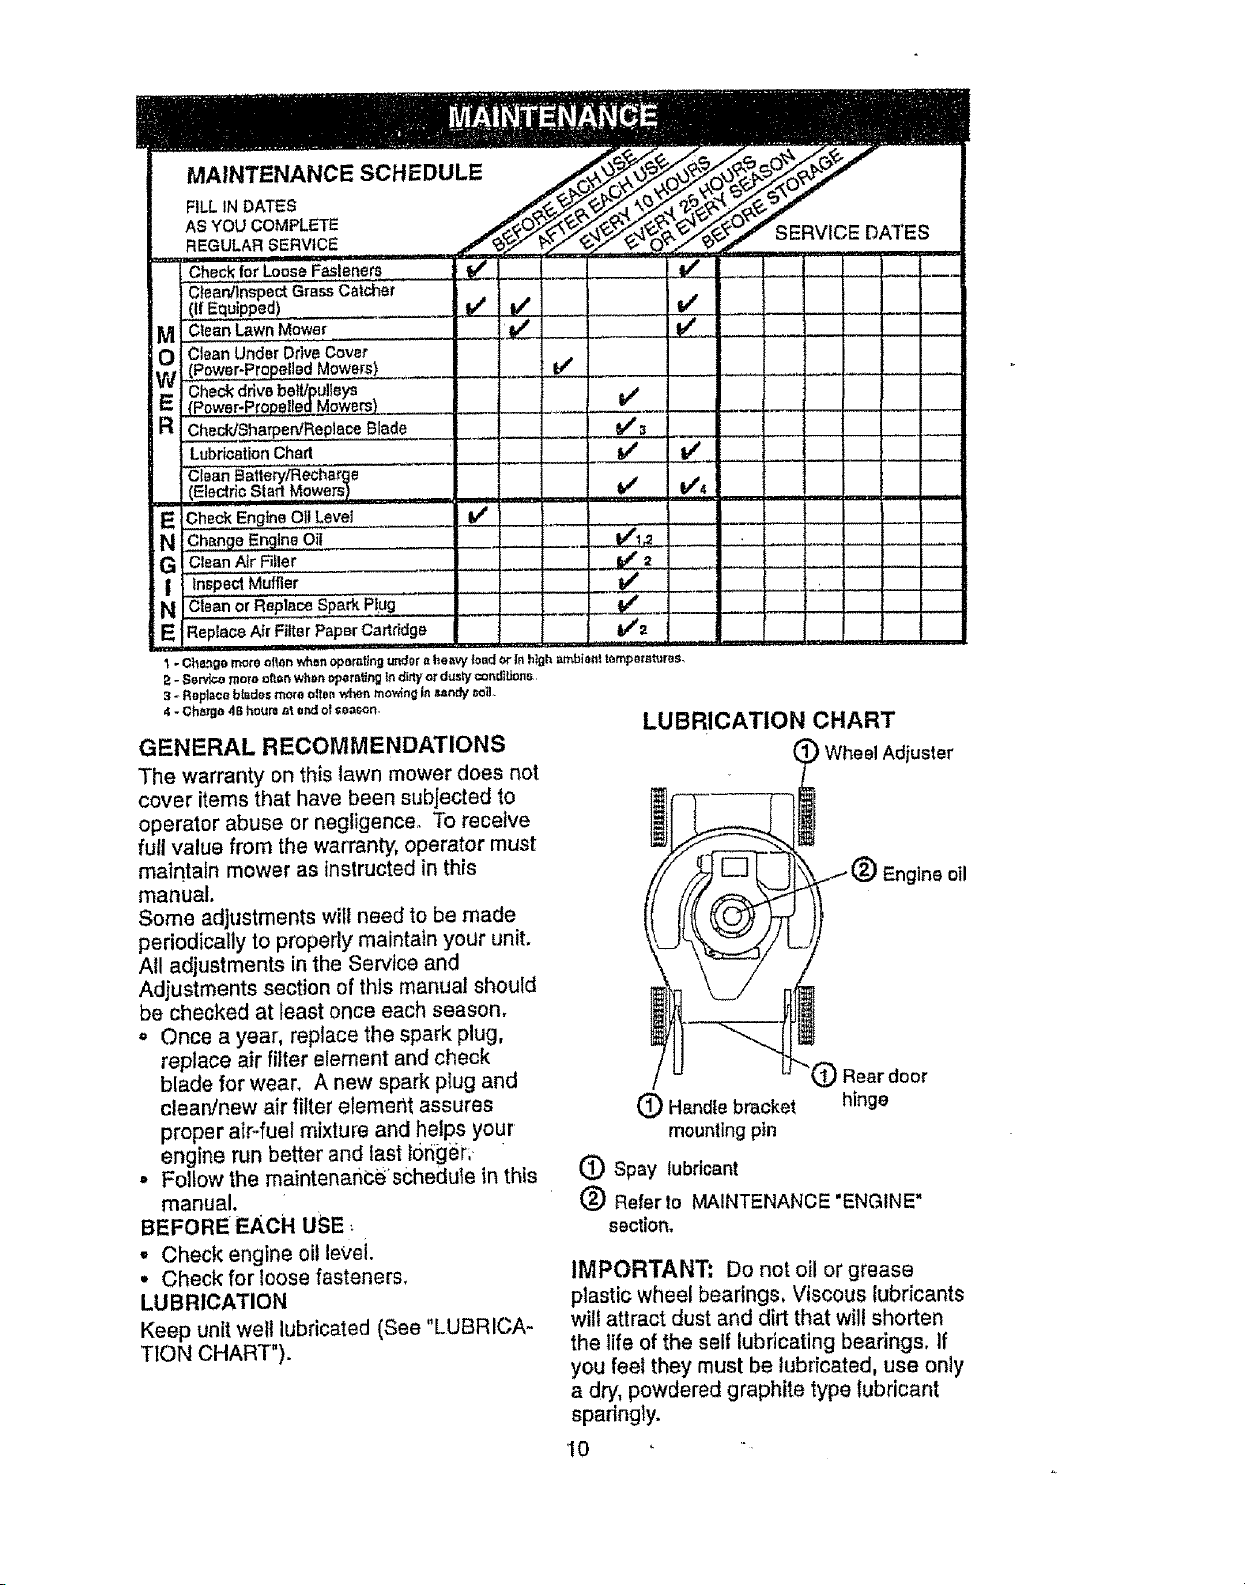
4- ch_,,o4,,o_.._ o._o_-ooo.- LU BRICATION CHART
GENERAL RECOMMENDATIONS )Wheel Adjuster
The warranty on this lawn mower does not
cover items that have been subjected to
operator abuse or negligence° To receive
full value from the warranty, operator must
maintain mower as instructed in this
manual.
Some adjustments will need to be made
periodically to properly maintain your unit.
All adjustments in the Service and
Adjustments section of this manual should
be checked at least once each season.
o Once a year, replace the spark plug,
replace air filter element and check
blade for wear, A new spark pIug and '_ Rear door
clean/new air fitter element assures (_ Handle bracket hinge
proper aiPfuel mixture and helps your mounting pin
engine run better and last 10r_ger;.
,, Follow the maintenanceschedule tn this (_) Spay tubdoant
manual. (_) Referto MAINTENANCE'ENGINE"
BEFORE EACH USE, section.
- Check engine oil level.
• Check for loose fasteners, IMPORTANT; Do not oil or grease
LUBRICATION plastic wheel bearings, Viscous lubricants
Keep unit well lubricated (See "LUBRICA- will attract dust and dirt that will shorten
T!ON CHART"). the life of the self lubricating bearings. If
you feel they must be lubricated, use only
a dry, powdered graphite type lubricant
sparingly.
10 "
PRODUCT SPECIFICATIONS
MODEL NUMBER 917.377522
SERIAL NUMBER
DATE OF PURCHASE
HORSEPOWER: 5,0
DISPLACEMENT: 11.6 CU. IN.
GASOLINE CAPACITY/TYPE: I.6QUARTS
UNLEADED REGULAR
OIL TYPE (API-SFiSG/SH): SAE 30 (ABOVE 32°F)
SAE 5W-30 (BELOW 32"F)
OIL CAPACITY: 20 OZS,
SPARK PLUG(GAP: .030") CHAMPIONR JI9LM OR J19LM
VALVE CLEARANCE: INTAKE: .005" _ .007"
EXHAUST: .007" - .009"
SOLID S½ATE IGNITION
AIR GAP: .010 IN.
BLADE BOLT TORQUE: 35-40 FT, LBS.
The model and serial numbers will be found on a decal attached to the rear of the
lawn mower housing,Record both serial number and date of purchase in space
provided above,
LAWN MOWER
Always observe safety rules when
performing any maintenance.
TIRES
• Keep ttres free of gasoline, oil, or Insect
control chemicals which can harm
rubber,
• Avoid stumps, stones, deep ruts, sharp
objects and other hazards that may
cause tire damage.
BLADE CARE
For best results, mower btade must be
kept sharp, Replace bent or damaged
blades.
TO REMOVE BLADE
• Disconnect spark plug wire from spark
plug and place wlre where it cannot
come in contact with spark plug,
• Turn lawn mower on its side. Make sure
air filter and carburetor are up.
° Use a wood block between blade and
mower housing to prevent blade from
turning when removing blade bolt.
• Protect your hands wlth gloves and/or
wrap blade with heavy cloth,
11
. Remove blade bolt by turnfng counter-
clockwise.
• Remove blade and attaching hardware
(bolt, lock washer and hardened
washer).
NOTE: Remove the blade adapter and
check the key inside hub of blade adapter.
The key must be in good condition to work
properIy. Replace adapter if damaged.
TO REPLACE BLADE
• Position the blade adapter on the engine
crankshaft. Be sure key in adapter and
crankshaft keyway are aligned. '
• Position blade on the b!ade adapter
aligning the two (2) ho!es in the blade
with the raised lugs on the adapter."
° Be sure the trailing edge of blade
(opposite sharp edge) is up toward the
engine.
• Install the blade bolt with the lock
washer and hardened washer into blade
adapter and crankshaft.
° Use block of wood between blade and
lawn mower housing and tighten the
blade bolt, turning clockwise,
• The recommended tightening torque is
35-40 ft. Ibs.
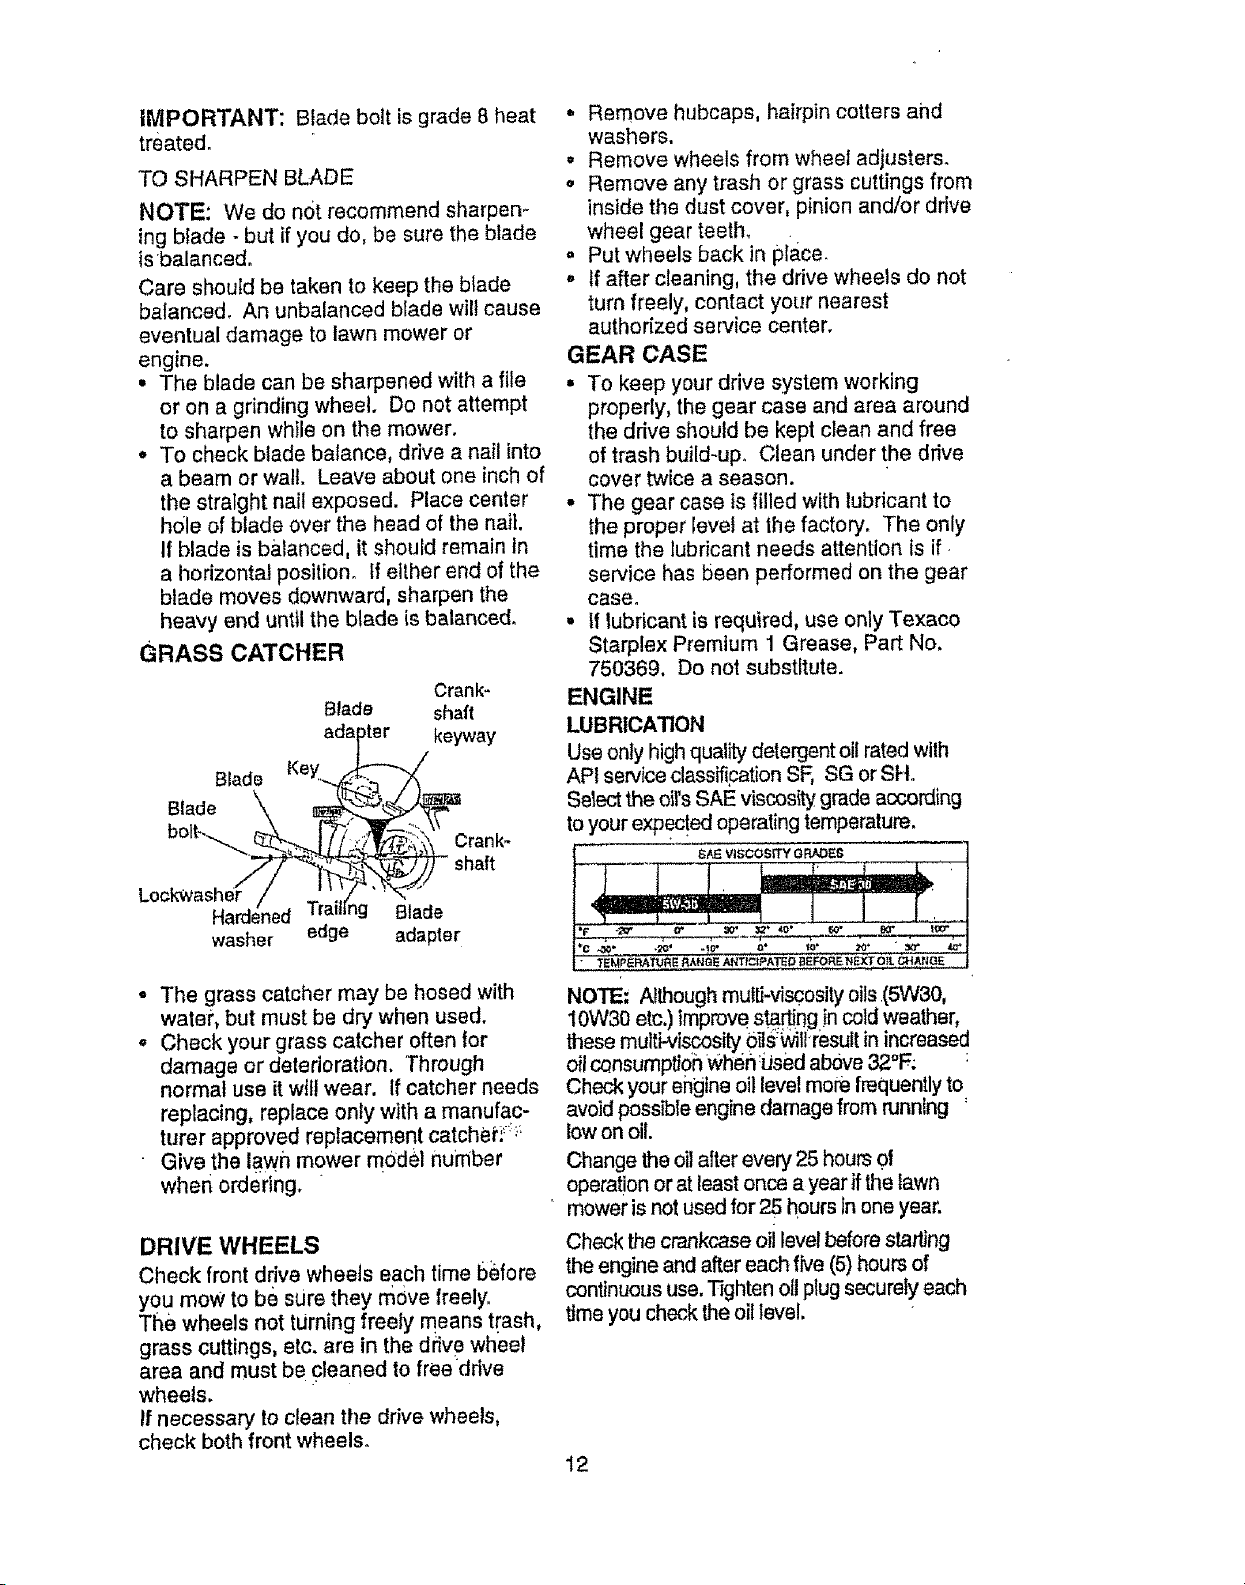
IMPORTANT: Bladeboltisgrade8heat
treated.
TOSHARPENBLADE
NOTE: Wedonotrecommendsharpen-
ingblade- but if you do, be sure the blade
is balanced.
Care should be taken to keep the blade
balanced. An unbalanced blade wilt cause
eventual damage to lawn mower or
engine.
• The blade can be sharpened with a file
or on a grinding wheel. Do not attempt
to sharpen while on the mower.
• To check blade balance, ddve a nail into
a beam or walt. Leave about one inch of
the straight nail exposed. Place center
h01e of blade over the head of the nail.
If blade is balanced, it should remain In
a horizontal position, tf elther end of the
blade moves downward, sharpen the
heavy end until the blade is balanced.
GRASS CATCHER
Crank-
Blade shaft
ada >ter keyway
Blade Ke_....,_ _
washer edge adapter
• Remove hubcaps, hairpin cotters ahd
washers.
• Remove wheels from wheel adjusters.
o Remove any trash or grass cuttings from
inside the dust cover, pinion and/or drive
wheel gear teeth_
, Put wheels back in place.
° If after cleaning, the drive wheels do not
turn freely, contact your nearest
authorized service center.
GEAR CASE
• To keep your drive system working
properly, the gear case and area around
the drive should be kept clean and free
of trash build-up. Clean under the drive
cover twice a season.
° The gear case ts filled with lubricant to
the proper level at the factory. The only
time the lubricant needs attention is if
service has been performed on the gear
case_
• If lubricant is required, use only Texaco
Starplex Premium 1 Grease, Part No.
750369. Do not substitute.
ENGINE
LUBRICATION
Use only high quality detergent oil rated with
API service classification SF, SG or SH°
Select the oil's SAE viscos_ grade according
to your expec!ed operating temperature.
• The grass catcher may be hosed with
water, but must be dry when used.
° Check your grass catcher often for
damage or deterioration. Through
normal use it wil! wear. If catcher needs
replacing, replace only with a manufac-
turer approved replacement catchei': '_:`
Give the lawn mower model number
when ordering.
DRIVE WHEELS
Check front drive wheels each time before
you mow to be sure they move freely°
The wheels not turning freely means t[ash,
grass cuttings, etc. are in the df_ve wheel
area and must be cleaned to free drive
wheels.
If necessary to clean the drive wheels,
check both front wheels.
NOTE: Although multi-viscosity oils (5W30,
10W30 etc,) improve sta_ng in cold weather,
these multi-viscosity 0its_ll resultin increased
oil c,_nsumpti0n when :used above &?.oF; :
Check your engine oil level more frequently to
avoid possible engine damage from running '
low on oil.
Change the oil after every 25 hours .of
operation or at least once a year if the lawn
mower is not used for 25 hours in one year.
Check the crankcase oil level before starting
the engine and after each five (5) hours of
continuous use. Tighten olt plug securely each
_Jmeyou check the oil level.
I2
TOCHANGEENGINEOIL
NOTE:Beforetippinglawnmowertodrain
oi!,drainfueltankbyrunningengineuntilfuel
tankisempty,
° Disconnectsparkplugwirefromsparkplug
andplacewirewhereitcannotcomein
contactwithSparkplug.
° Removeengineoilcap;layasideonaclean
surface.
• Tiplawnmoweronitssideassfiownand
drain0ilintoasuitablecontainer.Rocklawn
mowerbackandforthtoremoveanyoil
trappedinsideofengfne.
• Wipeoffany spilled oil on lawn mower and
on side of engine,
• Fill engine with oil. Fill only to the "FULL"line
on the dipstick. DO NOT overfill..
° Replace engine oli cap.
• Reconnect spark plug wire to spark plug.
Container
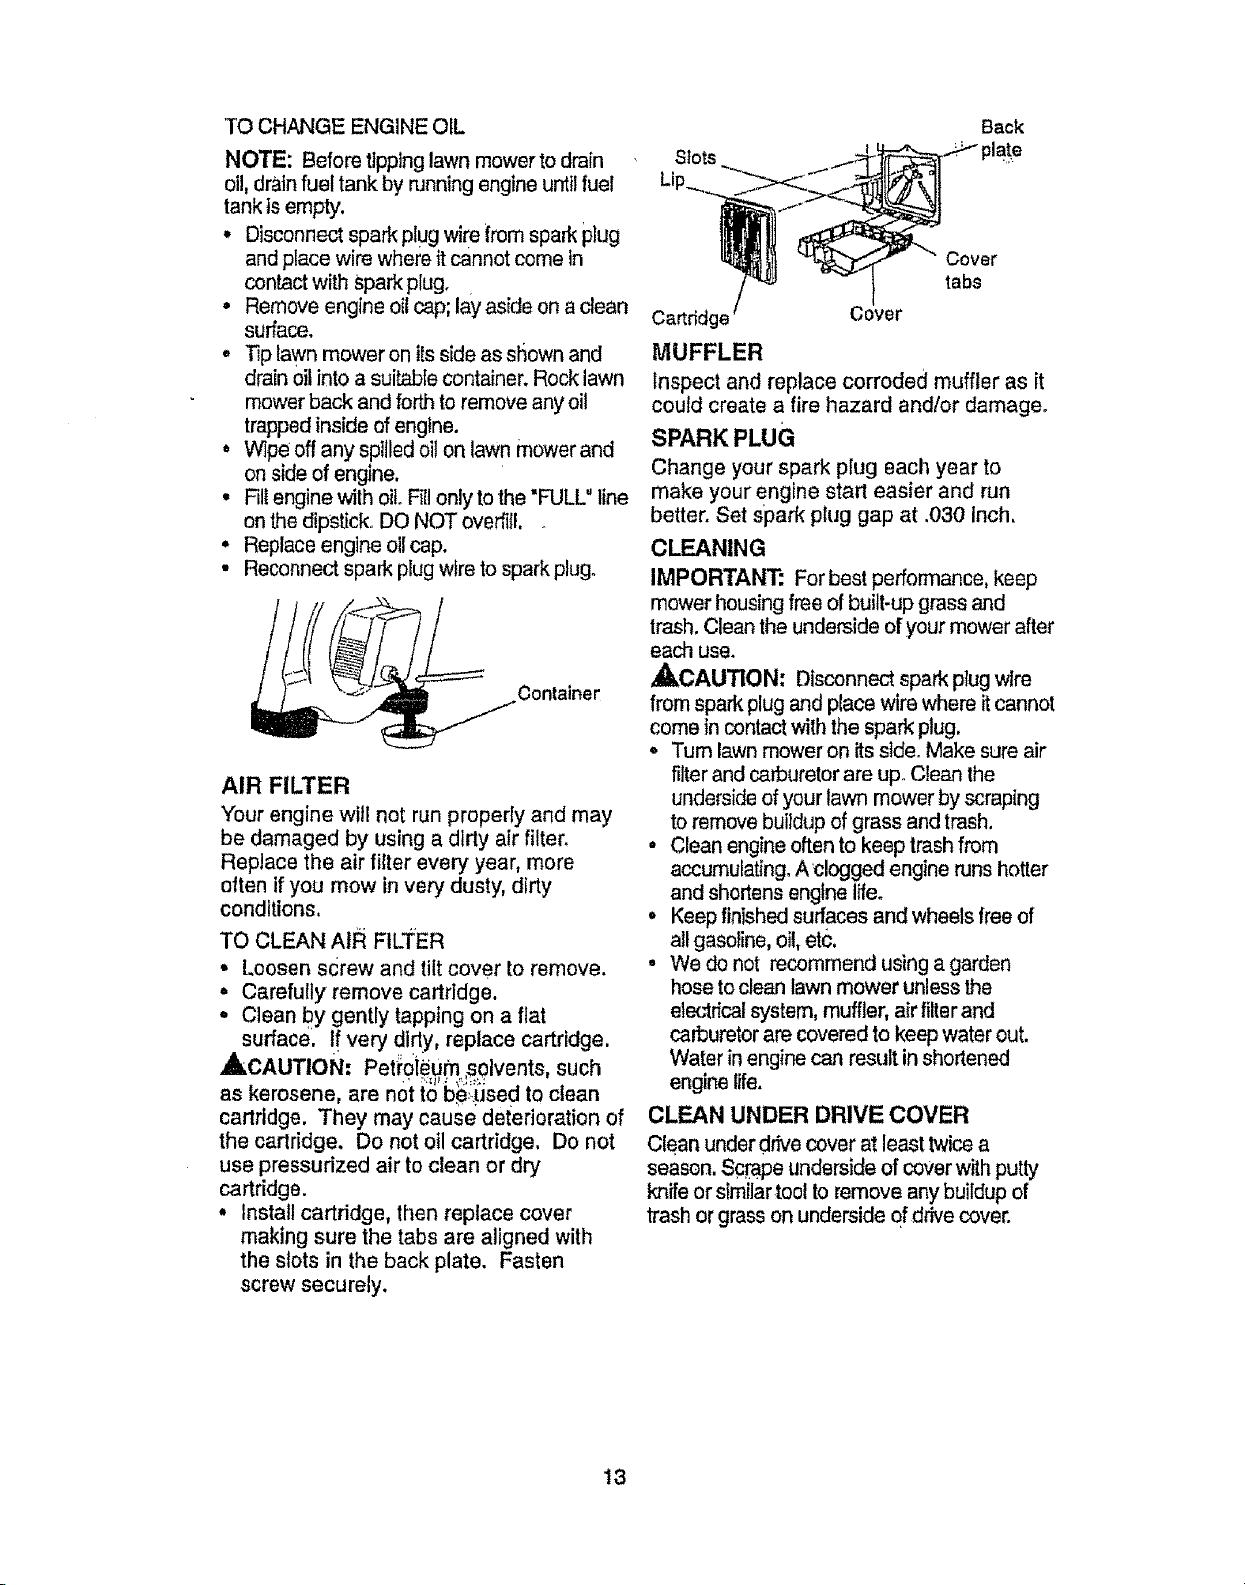
AIR FILTER
Your engine will not run properly and may
be damaged by using a dirty air filter.
Replace the air filter every year, more
often if you mow in very dusty, dirty
conditions,
TO CLEAN AIR FIL]"ER
• Loosen screw and tilt cover to remove.
• Carefully remove cartridge,
• Clean by gently tapping on a flat
surface, If very dirty replace cartridge,
,'_CAUTION" Pet_:oieum ,solvents, such
as kerosene are not to becaused to clean
cartridge. They may cause deterioration of
the cartridge. Do not oil cartridge, Do not
use pressurized air to clean or dry
cartridge.
° Install cartridge, then replace cover
making sure the tabs are aligned with
the slots in the back plate. Fasten
screw securely.
Back
Slots _la!e
Cover
tabs
Cartridge Cover
MUFFLER
Inspect and replace corroded muffler as it
could create a fire hazard and/or damage.
SPARK PLUG
Change your spark plug each year to
make your engine start easier and run
better. Set spark plug gap at ,030 Inch,
CLEANING
IMPORTANT: Forbest performance, keep
mower housing free of built-up grass and
trash. Clean the underside of your mower after
each use.
,_,CAUTION: Disconnect spark plug wire
from spark plug and place wire where it cannot
come in contact with the spark plug,
° "rum lawn mower on its side. Make sure air
filter and carburetor are up. Clean the
underside of your lawn mower by scraping
to remove buildup of grass and trash,
• Clean engine often to keep trash from
accumulating. A_clogged engine runs hotter
and shortens engtne life.
° Keep finished surfaces and wheels free of
all gasoline, oil, etc,
• We do not recommend using a garden
hose to clean lawn mower unless the
electrical system, muffler, air filter and
carburetor are covered to keep water out.
Water in engine can result in shortened
engine life.
CLEAN UNDER DRIVE COVER
Clean under drive cover at least twice a
season, Scrape underside of cover with putty
knife or similar tool to remove any buildup of
trash or grass on underside of drive cover.
13

,_I, CAUTION: BEFORE PERFORMING
ANY SERVICE OR ADJUSTMENTS:
• Release control bar and stop engine.
° Make sure the blade and all moving
parts have completely stopped.
° Disconnect spark plug wire from
spark plug and place where it cannot
come in contact with plug,
LAWN MOWER
TO ADJUST CUTTING HEIGHT
See "TO ADJUST CUTTING HEIGHT" In
the Operation section of this manual.
REAR DEFLECTOR
The rear deflector, attach_ed between the
rear wheels of your lawn mower, is
provided to minimize the possibility that
objects will be thrown out the rear ol the
lawn mower into the operator's mowing
position: Ifothe rear deflector becomes
damaged, it should be replaced,
TO REMOVE/REPLACE DRIVE BELT
o Remove drive cover. Remove belt by
pushlng down on gear case pulley and
roiling belt off it,
° Turn lawn mower on its side with
carburetor and fuel cap up,
• Remove blade,
• Remove debris shield,
° Remove belt from engine puiley on
crankshaft.
° Install new belt by reversing above
steps.
, Always use factory approved belt to
assure fit and long life,
Drivo
Cover
Push
down
TO ADJUST HANDLE
Your lawn mower handle can be raised or
lowered for your mowing comfort. Four
(4) positions are available: high, medium
high, medium low and low. Handles are
shipped mounted in the medium low
position.
° To change from medium low to medium
high position, the upper and lower handle
sections willhave to be turned over,
° Remove the cable clips.
• Remove the controls and operator presence
control bar from the upper handle.
• Remove the starter rope guide from the
upper handle.
° Remove hairpin cotters,
° Disconnect the lower handle from the
handle brackets.
° Turn the handle over and reassemble the
hairpin cotters that have been removed,
• Reassemble the starter rope guide.
° Reassemble lhe controls and theoperator
_resence control bar to the upper handle.
CAUTION; The operator presence
control bar must pivot freely to permit
blade brake engagement when control bar
is released° Do not over tighten the
fasteners holding the controls to the upper
handle.
° To change from medium low to high
posltton only the upper handle section
will have to be turned over.
o To change from medium low to !ow
position, only the lower handle section
will have to be turned over,
Shipping position
Medium low Medium high
Low
14
Lowerhandle Lower Frame
Squeeze to
remove
Handle
bracket
Hairpin cotter
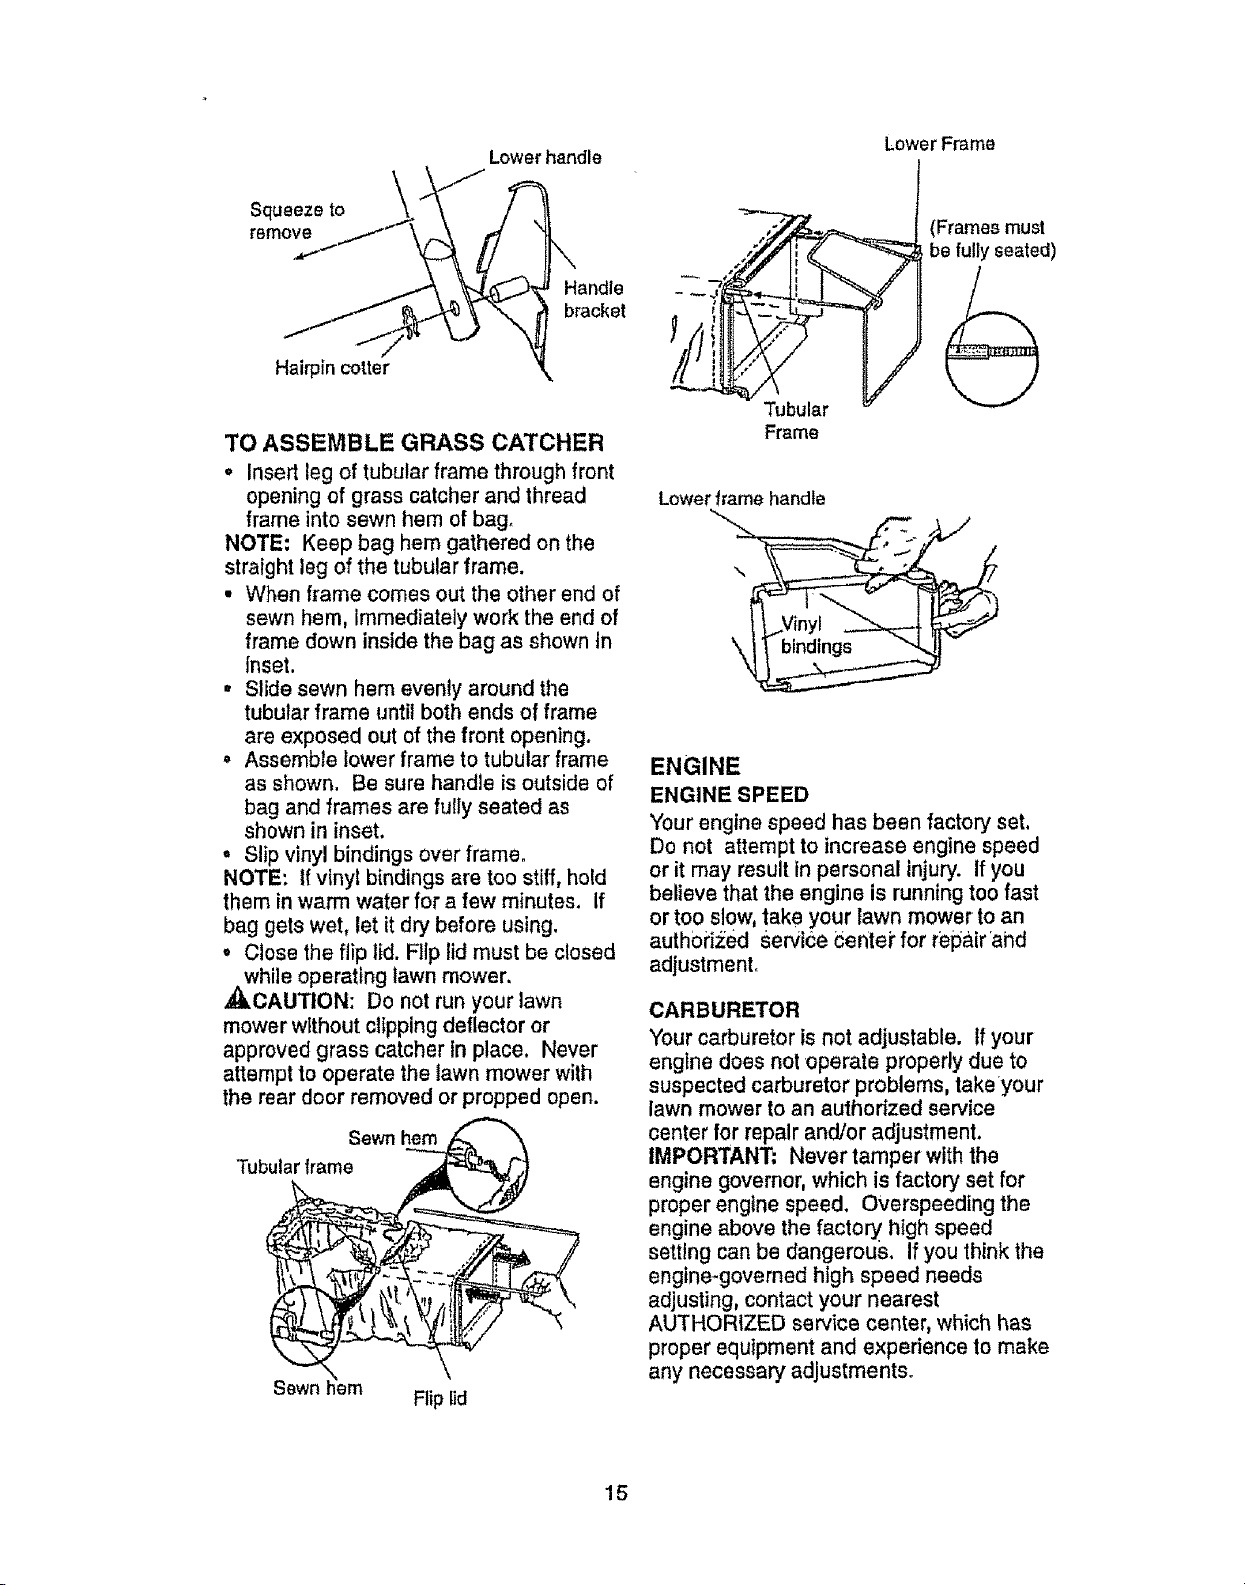
TO ASSEMBLE GRASS CATCHER
o Insert leg of tubular frame through front
opening of grass catcher and thread
frame into sewn hem of bag.
NOTE: Keep bag hem gathered on the
straight leg of the tubular frame.
• When frame comes out the other end of
sewn hem, Immediately work the end of
frame down inside the bag as shown tn
Inset.
, Slide sewn hem evenly around the
tubular frame until both ends of frame
are exposed out of the front opening,
° Assemble lower frame to tubular frame
as shown, Be sure handle is outside of
bag and frames are fully seated as
shown in inset.
• Slip vinyl bindings over frame.
NOTE: If vinyl bindings are too stiff, hold
them in warm water for a few minutes. If
bag gets wet, let it dry before using.
• Close the flip lld. Fllp lid must be closed
while operating lawn mower,
CAUTION: Do not run your lawn
mower without clipping deflector or
approved grass catcher in place. Never
attempt to operate the lawn mower with
the rear door removed or propped open.
Sewn
Tubular frame _ [_
Flip lid
Tubular
Frame
(Frames must
be fully seated)
Lowerframe handle
ENGINE
ENGINE SPEED
Your engine speed has been factory set.
Do not attempt to increase engine speed
or it may result in personal injury. If you
believe that the engine is running too fast
or too slow, take your lawn mower to an
auth0rized Service centei" for repair and
adjustment.
CARBURETOR
Your carburetor isnot adjustable. If your
engine does not operate properlydue to
suspectedcarburetor problems, takeyour
lawn mowerto an authorized service
center for repair and/or adjustment.
IMPORTANT; Never tamper with the
engine governor,which is factory set for
properengine speed. Overspeedtng the
engineabove the factory high speed
setting canbe dangerous, If you thinkthe
engine-governedhigh speed needs
adjusting, contactyour nearest
AUTHORIZED service center, which has
proper equipment and experience to make
any necessary adjustments.
15
Immediatelyprepareyourlawnmowerfor
storageattheendoftheseasonorifthe
unitwillnotbeusedfor3Qdays or more,
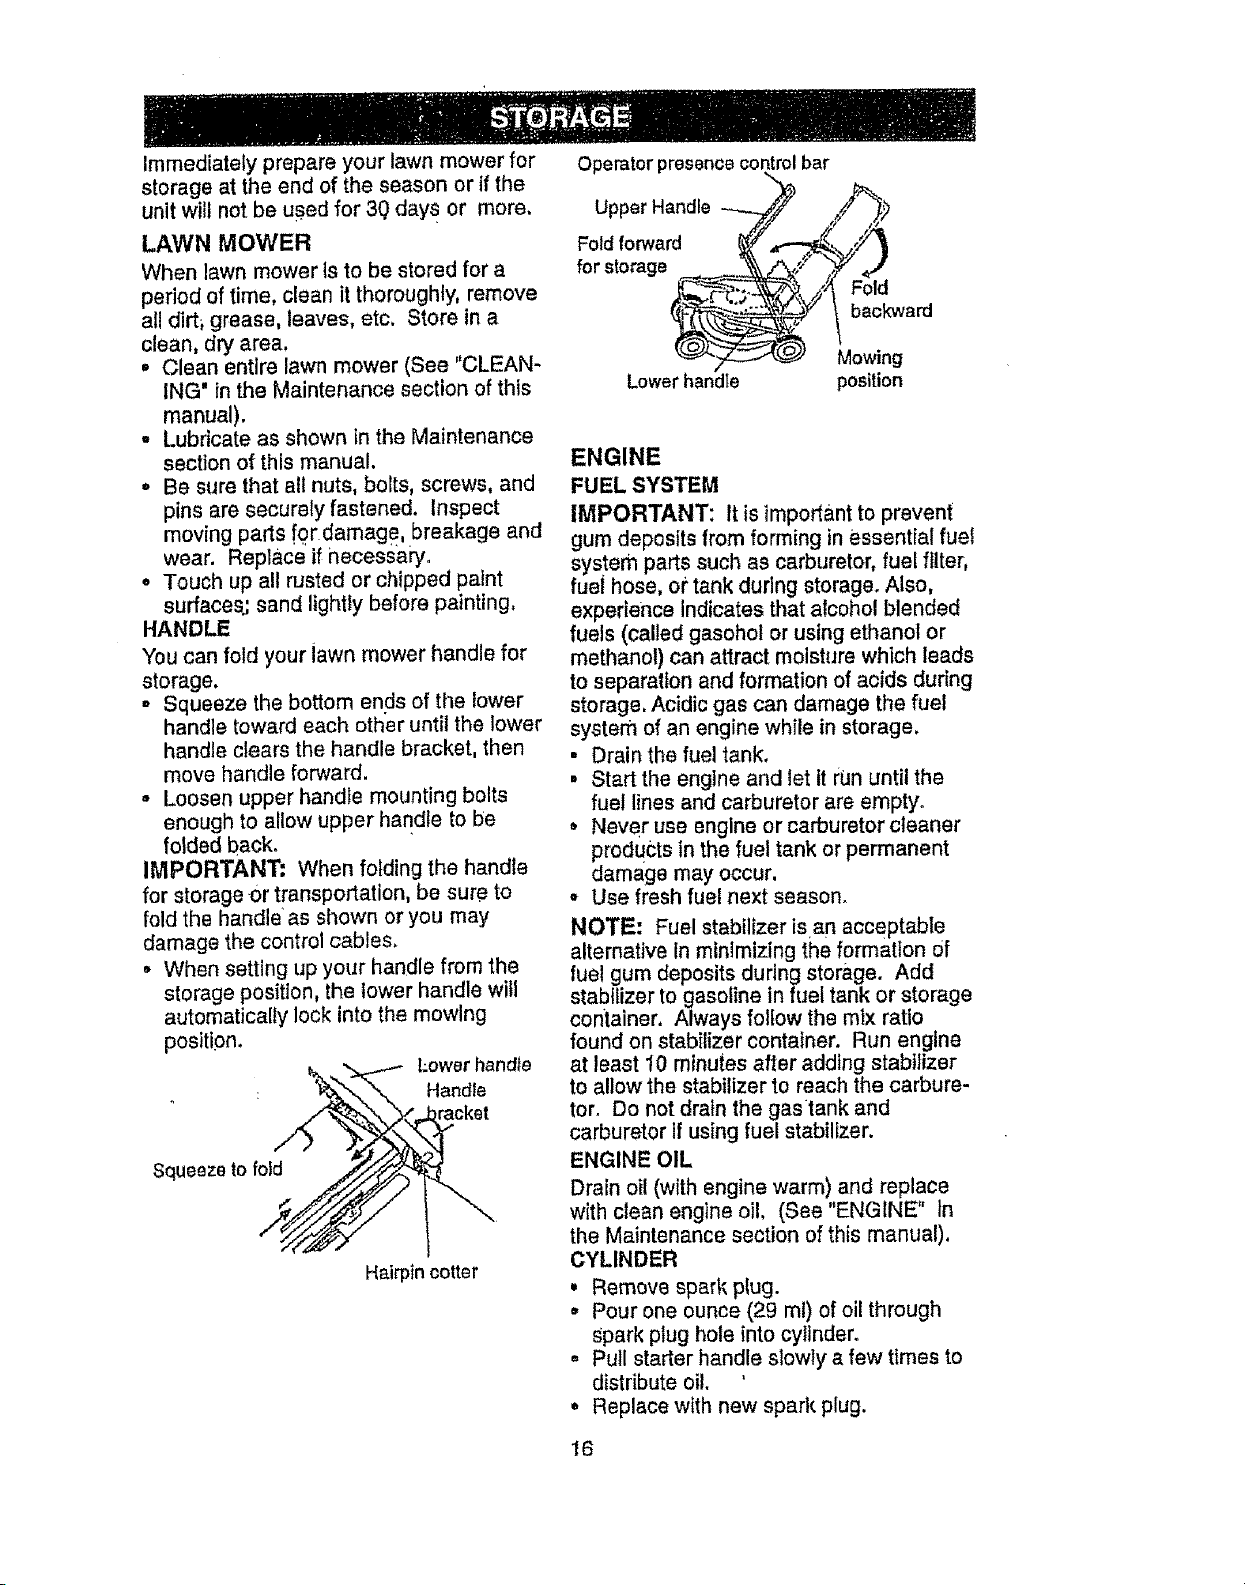
LAWN MOWER
When lawn mower Is to be stored for a
period of time, clean it thoroughly, remove
all dirt_ grease, leaves, etc, Store in a
clean, dry area,
• Clean entire lawn mower (See "CLEAN-
ING' in the Maintenance section of this
manual).
- Lubricate as shown in the Maintenance
section of this manual.
• Be sure that all nuts, bolts, screws, and
pins are securely fastened. Inspect
moving parts for damage, breakage and
wear. Replace if necessary.
• Touch up all rusted or chipped paint
surfaces.; sand lightly before painting,
HANDLE
You can fold your lawn mower handle for
storage,
- Squeeze the bottom ends of the lower
handle toward each other until the lower
handle clears the handle bracket, then
move handle forward.
- Loosen upper handle mounting bolts
enough to allow upper handle to be
folded back.
IMPORTANT: When folding the handle
for storage or transportation, be sure to
fold the handle as shown or you may
damage the control cables.
• When setting up your handle from the
storage position, the lower handle will
automatically lock into the mowing
position.
Lower handle
: Handle
racket
Squeeze to fold
Hairpin cotter
Operator presence control bar
Upper Handle -._ ,f_,_
Fold forward ,__,_
forstorage .... __;7 _'_ ,_'
/ backward
_"_---__ Mowing
Lowerhandle position
ENGINE
FUEL SYSTEM
iMPORTANT: It is important to prevent
gum deposits from forming in essential fuel
system parts such as carburetor, fuel filter;
fuel hose, of"tank during storage. Also,
experience indicates that alcohol blended
fuels (called gasohol or using ethanol or
methanol) can attract moisture which leads
to separation and formation of acids during
storage, Acidic gas can damage the fuel
system of an engine while in storage.
• Drain the fuel tank,
• Start the engine and let it run until the
fuel lines and carburetor are empty.
• Never use engine or carburetor cleaner
products in the fuel tank or permanent
damage may occur,
° Use fresh fuel next season.
NOTE: Fuel stabilizer is an acceptable
alternative In minimizing the formation Of
fuel gum deposits during storage. Add
stabilizer to gasoline in fuel tank or storage
container. Always follow the mtx ratio
found on stabilizer container. Run engine
at least 10 minutes after adding stabilizer
to allow the stabilizer to reach the carbure-
tor. Do not drain the gastank and
carburetor if using fuel stabilizer.
ENGINE OIL
Drain oil (with engine warm) and replace
with clean engine oil. (See "ENGINE" tn
the Maintenance section of this manual),
CYLINDER
• Remove spark plug.
° Pour one ounce (29 ml) of oil through
Spark plug hole into cylinder_
• Pull starter handle slowly a few times to
distribute oil. '
= Replace with new spark plug.
16
OTHER
= Donot store gasoline from one season
to another.
* Replace your gasoline can if your can
starts to rust. Rust and/or dirt in your
gasoline will cause problems.
, If possible, store your unit indoors and
cover it to gtve protection from dust and
dirt.
, Cover your unit with a suitable protective
cover that does not retain moisture. Do
not use plastic. Plastic cannot breathe
which allows condensation to form and
wilt cause your unit to rust.
IMPORTANT: Never cover mower while
engine and exhaust a_eaS are still warm.
_Ib.CAUTION: Never store the lawn
mower with gasoline in the tank instde a
building where fumes may reach an open
flame or spark. Allow the engine to cool
before storing in any enclosure.
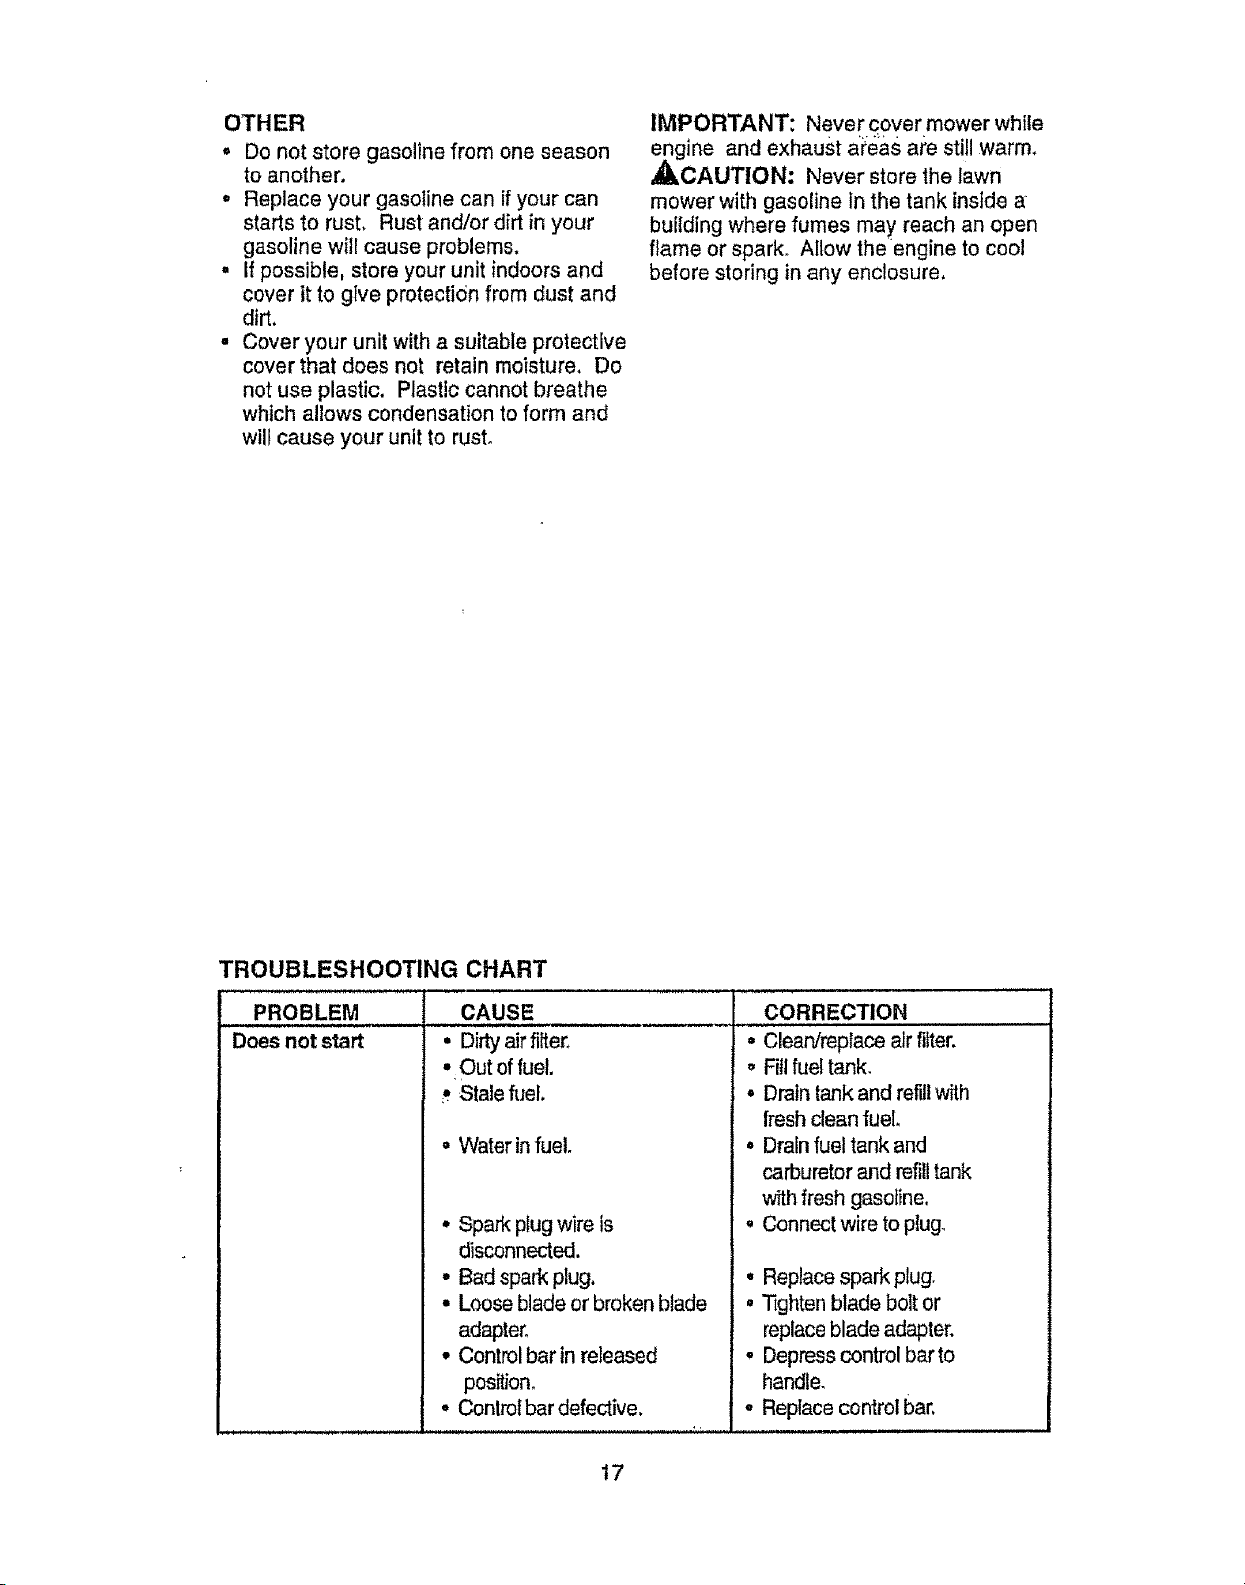
TROUBLESHOOTING CHART
PROBLEM
, , , i , H,,
Does not start
CAUSE
• Dirty airfilter,
• Out of fuel.
., Stale tuel.
• Water infuel.
• Spark plug wire is •
disconnected.
• Bad spark plug.
• Loose blade or broken blade •
adapter°
• Control bar in released
position.
• Conlrot bar defective. °
CORRECTION
• Clean/replace air filter.
Fill fuel tank.
• Drain tank and refill with
fresh clean fuel.
° Drain fuel tank and
carburetor and refill tank
with fresh gasoline.
Connect wire to ptug_
Replacespark plug.
T_ghtenblade boltor
replaceblade adapter,
Depresscontrol barto
handle,
Replacecontrolbar.
t7
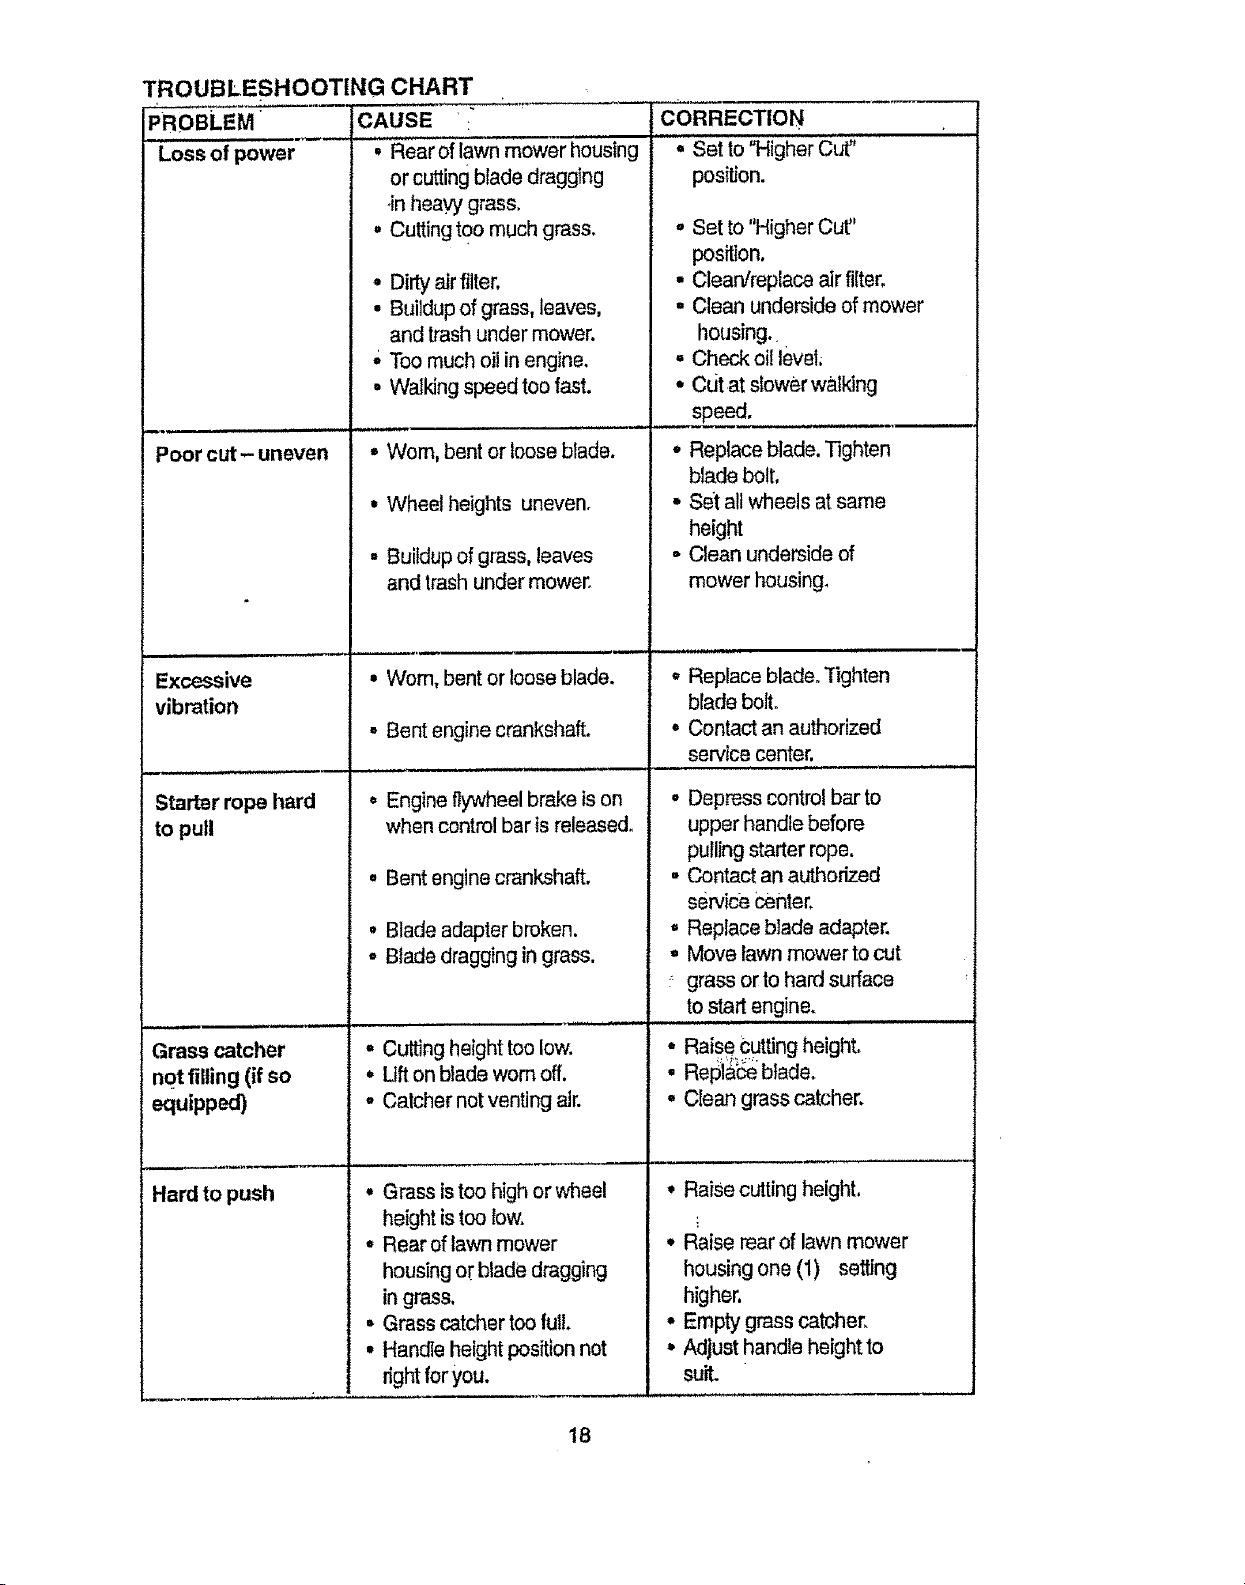
TROUBLESHOOTING CHART
PROBLEM CAUSE :
Loss of power
Poor cut- uneven
Excessive
vibration
to pull
Grass catcher
not tilting (if so
equipped)
Hard to push
• Rear of lawn mower housing
or cutting blade dragging
4n heavy grass.
• Cutting tOOmuch grass.
• Dirty airfilter.
• Buildup of grass, leaves,
and trash under mower.
; Too much oil in engine.
• Walking speed too fast.
• Worn, bent or loose blade.
• Wheel heights uneven.
• Buildup of grass, leaves
and trash under mower,
• Worn, bent or loose blade.
- Bent engine crankshaft.
• Engine flywheel brake is on
when control bar is released.
° Bent engine crankshaft.
° Blade adapter broken.
• Blade dragging in grass.
• Cutting height too low.
° Uft on blade wornoff.
• Catcher not venting air.
° Grass istoo high or wheel
height istoo low.
• Rear of lawn mower
housing or blade dragging
in grass,
- Grass catcher too full.
° Handle height position not
right for you.
CORRECTION
• Set to "Higher Cut"
posil_on.
• Set to "Higher Cut''
position.
• Clean/replace air filter,
• Clean underside of mower
housing.
• Check oil level;
•Cutat slower walking
speed.
• Replace blade. Tighten
blade bolt,
• Set all wheels at same
height
- Clean underside of
mower housing,
• Replace blade, Tighten
blade boil
• Contact an authorized
service center.
• Depress control bar to
upper handle before
pulling starter rope.
• Contact an authorized
service Center,
° Replace blade adapter.
• Move lawn mower to cut
: grass or to hard surface
to start engine,
_ Raise culting height.
ReOi&_ blade.
° Clean grass catcher,
° Raise cutting height,
• Raise rear of lawn mower
housing one (1) setting
higher.
• Empty grass catcher.
,, Adjust handle height to
suit.
18
Garantfa t9 Especificaoiones del Producto 28
Reglas de Segurldad 19 Serv|cio y Adjustes 31
Montaje 21 Almacenamiento 33
Operaci6n 23 Identificaci6n de p_;oblemas 34
Mantenimiento 27 Partes de repu6sto Vea el manuat
Programa de Mantenlmienlo 27 ingl6s del duefio
O_len de Partes Oontratapa
GARANT_ LIMITADA DE DOS A_OS PARA LA SEGADORAA MOTOR CRAFTSMAN
Perdos (2) aSos,a parlirde la fecha de compra,cuandoestaSegadoraCraftsmanse mantenga,lubrique
y alineseg6nlasinstrucotonespara taoperaciSny el mantenimientoenel manualdel dueFlo,Sears
reparardgratistodo defectoenel materialyla mane de obra.
Si la SegadoraCraftsmanseusa para fines comerctaleso de arriendo,estagarantfas61ose aplicaper
noventa(90) dfas a partJrdelafecha decompra.
EstaGarantfano cubre:
• Arff_los qua sedesgastandurante el usenormal talescomeloscuchillassegadoras rotators, los
adaptadoresde _acuchiIla,las correas,teafiltrosde aJrey tasbujfas.
• Reparactonesnecesar_asdebid0 al abuseoa tanegligenctadeloperador,tncfuy_ndosea los
dgSeSatesdobladosy a lafa!tade mantenimtentodel equiposegOnlasinstruccionesquase incluyen
en el manual de!duefio.
ELSERVICIO DE GARAN_t'AESTADISPONIBLEal devolverlasegadpraa motorCraftsman al esntro/
depadmento deserv_o Searsmas cercano en losF-_tadosUnidos.Estagaranlfa se aplicasolamente
mientraselpmductoesteen useen los EstadosUnidos.
Esta Garantfaleotorgadetaches leg..alasespecfficos,y puedequa tambi_ntonga otmsderechosque
vadan de estado a estado.
Seam, Roebuckand Co.,D/817WA,HoffmanEstates,IL 60179 USA
Los estandraresde seguridadexigen lapresenda
deloperatorenlos osntrolespare reducira un
mir_moelriesgo de lesionarse.Su untdadv{ene
equipadacon dJchoscontroles.Per ningunmotive
tmle dele!iminarla funci6n.de.IQscontrolesque
exigen!apresencla dotope_i'_
ENTRENAMIENTO:
• Lea esternar_aJdeloperador
cuidadosamente.Familiarfcesecon los
controlesy aprendaa ePerarsu segadora en
forma adecuada.Aprenda a.parar eusegadora
rdpidamenleo
• No pem_itaqua losnifios usen su esgadora.
Nunca permita que losadultos operenla
segadorasin contarconlas instnJcoiones
adecuadas.
= Mantengael dreade operacidndespejada
de gents,especialmentede nifios pequer'-,os
y de anImalesdom_ticos.
• Use lasegadorasotamentepare losfines
propuestosper elfabricanley seg,3nlas
ax_icaciones desc_asen eslemanual.
• Nooper_la esgadorasise haca_doodafiadoen
cua_quieraforrna.SiemprerepamlosdaSos
antesdeusarfao
, Nouseaccesoriosclueno hayanside
recomendadosperelfabric,ante. Elusededichos
accesoriospuedeser peligroso.
• Lacuchillagirdcuandoelmotorest_
func_onando°
PREPARACl6N:
• Siempre revise cuidadosamente el _rea qua
se va a segar y desp6jela detodas las
Pledras, palos_alambres, huesos y otros
objetQSextrafios. Estos objelos seffm
tanzadoscon la cuchillay pueden pmducir
leslones graves,
• Siempre use anteojosde seguddad o
protectoresdeojoe cuando arranque y
durantee! tiempoqua use ta segadora.
19
• V(stasa en !_rma ade cuada. No opera la
segadora s!n zapatos o con sandalias
abtertas. Use solamente zapatos sSlidos con
buena tracciSn cuando siegue.
. Revise e! eslanque de combustible antes de
hacer arrancar el motor. No liene el estanque
de gaso]ina en reeintos cerrados, ni cuando
el motor est', funcionando o cuando est_i
caliente. Permits qua elmotor se enfrfe per
varies minutes antes de Ilenar el estanque de
gasolina. Limple toda la gasolina derramsda
antes de baser arrancar et motor.
• Siempre haga los ajustes de altura de los
ru.edasantes de haeer arrancar'su segadora.
Nui_catrale de haCer_sto mientras qua el
motor est', funcionando.
, Siegue siempre durante el di_.o con buena
luz a_tiftcfai.
OPERACI6N:
• Manlenga sus ojos y su menle en la
segadora y en el &tea que se est_ cortando,
No permita que otros intereses 1odistraigano
• No code c@spedmojado o resbaloso..Nunca
corra mientras est6 operando su segadora.
Siempre asegerese de mantener el equilibrio
- mantenga el mango agarrado firmamentsy
camine.
• No ponga tas manes o los pies cema odebajo
de los partes rolatorias. Mant_ngase
alejado de la abedura de descarga en lode
memento.
• Siempre pare el motor cuando se vaya
ocuando no esl_ usando su segadora, o
antes de atravesar ]as entradas pars autos,
los senderos, caminos y &reaseubiertas de
dpio,
• Nunca dirija la descarga del material hacia
• Nunca torte el c6sped lirando lasegadora
hacia usted. Siegue a trav_s de !a cam de
los pendientes, nunca hacIa arriba o hacia
abajo pues puede perder el equiltbrio. No
siegue pendienles demasiado empinadas.
Tenga cutdado cuando opera la segadora en
terrenodisparejo o cuando cambie de
dfrecci6n- mantenga un buen equilibtio,
• Nunca opera la segadora sin los
protecciones adecuadas, }as planchas, el
recogedor de c_.spedy sires disposltivos de
seguridad en su lugaro
MANTENIMIENTO Y ALMACENAMIEN-
TO:
- Revise la cuchllla y los pemos de montaje
del motora menudo, paraasegurarse que
est_n apretados en la forms adecuada_
• Revise lodeslos pemos, tuercas y tomillos a
intervalosfrecuentes, pars verificar si est_n
aprelados en |orma adecuada, y
asegurarsequa la segadora se encuentra en
condiciones de funcionamiento seguroo
, Mantehga lodes los disposltivos de seguridad
en su lugar y listos pars funcionar.
• Pars reduclr el peligro de incendio,
mantenga el meier sin c@sped,hojas y grass
o aceite en excess.
• Revise el recogedor de c_sped a menudo
pars vedficar si hay deterioro y desgasley
eatable las bolsas desgastadas. Use
so{amente los bolsas de repuesto
recomendadas per el fabric.antede su
segadora o qua eumplen con los
especificabiones de _ste_
. Siempre mantenga una cuchilla afilada en su
segadora.
• Siempre permila que el meier se enfrfe
los _specLad.o[esn!pem]_,_),taa.nacl!eceres de antes de guardarla en cuaJquiertacit, to
" la segadora mientras !a est_ opei'ai_ds. "............. _i:i:acl6_ ...........................................
, Antes de limpiar, inspeccionar o de reparar ! . Nunca guards la segadora con combustible
a segadora, pare etmotor y esl_
compietamente seguro de qus la cuchiIlay
qua todas las partes que se mueven se
hayan detenido° Luego, desconecte el
alarnbre de la buj_ay mant_ngalo alejade de
_sta pars evitar el arranque per accidents.
• No contimie haclendo funcionar su segadora
si le pegs aun objeto extraSo. Siga el
procedimienlo desorito anteriormente, luego
repare cuatquler dose antes de volver a
arrancar y de operar su segadom.
• Nocambie losajusles del regulador o
hagaque elmeier ands a una velocidad
exees=va.Se puedan producir daF,os en el
motor y. Iesiones personates.
• No spare su segadora si vibra fuera de Io
normal. La vibraciOnexcostva es una
indicaci6n de doris; pare el motor, revise en
forms segura la causa de la vibraci6n y hags
las reparaciones seg'_nSea neoesado.
• No haga funcionar etmotor en
recint0scerradoe, L0s gases _e escape son
peligrosos.
on elestanque dentro de un edificio endonde
los gases pueden alcanzar unallama
expuesta o una fuente de igniciSn, tal come el
calenlador de agua, la estula de
calefacci6n, la seeadora de mpa, etc.
,4_iI_PRECAUCi6N: Siempre desconecte el
alambre de ta bujia y p6ngalodonde no pueda
entrar en contacts conla bujfa,para evitarel
arranque per acsiden!e, durantelapreparact6n,
et transporte,el ajust_ o cuando se hacen
reparaciones,
,_PRECAUCI6N: Esconocidoper el Estado
de California qua los gases de escape del meier
de esteproductor contienen qulmicos los ouales
a ciertosntveles, pueden ocaslonar, c_.ncer,
defectos de nacimienlo, y otros doses al sistema
reproductive.
2O
Estosaccesoriosestabandisponiblescuandoseproclujotasegadora.Tambi_nest&n
disponiblesenlamayoriadelastiendasdeSearsyenloscentrosdeservtcio.Lamayortade
lastiencJasSears tambi_n pueden mandar a pedir partes de repuesto pare usted, si lee
proporc[ona el nQmero del modefo de su segadora. Algunos de estos accesorios tar vez no se
apliquen a su segadora.
RENDIMIENTO DE LA SEGADORA
DESV1ADOR DERECORTES
PARA SEGADORAS CON DESOARGA TRASERA
J i
:_ RECOREDORpARA
SEGADORAS
CON DESCARGA
TRASERA
........ JUEGOS PARA_ACOLCHADO_
_! RECOREDOR
:_ PARA
SEGADO_S
_N DESC_GA
! _TERAL
MANTENIMIENTO DE LA SEGADORA
............. SiLENCfA, D,,ORES
RLTROI_, DE AIRE
CORREAS CUCHTLLAS
ADAPTADORES
DE CUCHILLA
£STABILIZADORES
Ell'VASES
DE GASOLINA
... BuJf^.s.
ACEITE
[}EL MOTOR
Lea estaslnstrucdonesy eslemanu_J
cornpletamenteantes de tratar de montaruoperar
su seg_doranueva. Su segadem nuevaha side
monladaenla f_bdca con la e;ccepcldnde aquetlas
partesque se dejaron sinmonlar per razonesde
env[o.Todaslaspartescomelastueroas,las
arandelas,los pemos,etc. que sonnecesarias
pareoompletarelmontaje hen sidecolocadasenta
bolsade partes.Paraasegurarseque eu segadora
[undone er_formasegura y adecuada,tares las
parleey losartlculoede ferreterfaque sa monten
tienenqueser apretadossegumrnente.Uselas
herramientascorreclas,comesea necesarto,para
asegurarque se aprietenadecuadamente.
PAPA REMOVER LA SEGADORA DE
LA CAJA DE CARTON
• Remuevalas partessueltasque seincluyencon
la segadora.
• Corte)asdos esquinasde los.extrernosde la
cajade cart6n y lienda elpaneldel extreme
plane,
• Remuevarodeel materialde empaque,excepfo
ta cufa entreel mangosuperior y _1inferior,y la
_J_)aque sujeta labarra de los conlrol que exige
lapresenciadel operador junto conelmango
superior,
• Haga_rodarla segadorahaciaafuerade la caja
de carl6ny revfselacuidadosamente pare
verificarsi todavia quedan partes suel!,_s
adidonaJes.
COMe PREPARAR SU SEGADORA
PAPA DESDOBLAR EL MANGO
IMPORTANTE: Despltegueel mangocon touche
cuidadopare no pellizcaro dafar los cablesde
aonlrol.
• Levantelosrn_ngoshaste que la secci6nde!
mangoiHeriorse asegure en sulugar,en la
posici6nparesegaro
. Remuevala curiaproteclora,levante tasecci6n
del mango supederhast_,su lugar en el mango
inferior, y aprieteambas manillas detmango.
21
• Remueya._acuSadeJmango quesujetatabarra
de loscontrolque extgela prese_ia del
operadorjunto conetmangosuperior.
- El mango de la segaderapuede ajustarsesegdn
le acomode para segar.Refi_rasea"AJUSTE
DEL MANGO"en la SecctSnde Servicioy
Ajustes de eslemanual.
Mango PosiciSn
para segar
PARA INSTALAR LOS ACCESORIOS
Susegadora rueenviadalista pareusarsecorfio
una acolchadomde capaVegelaLPare convertida
de modeque puedaensacar o descargar:
• Abra la puertatrasaray remuevala lapon
acotchadora.Gu_dela en un iugarseguro_
• Ahora puede ins_r el recogedoro el desviador
de recortesopcionaL
. Paravo_vera taoperaci6ndeacolchamiento con
capa vegetal,instatela taponacotchaderaen la
,_abertum de dehs_.cargade laseg_ora.
RECAUCK_N. No haga fundonarsu
segadorasintataponacolchaderaapmbada ensu
lugar,o sineldesviadorde recortes,o sinel
recog_lor de c_sped,aprobados, ensulugar.
Nunca Irate deoperar la segadom¢uande se ha
removidela puertatraserao cuandoesl_un poco
abJerla,
Tapon _
22

FAMILIARICESE CON SU SEGADORA
LEA ESTE MANUAL DEL DUE_O Y LAS REGLAS DE SEGURIDAD ANTES DE OPERAR SU
SEGADORA, Compare las llustraciones6-onsu segadora pare familiar_zarse con la ubtcaci6n de
los diversos controles y ajustes. Guards este manual pare referencia en el futuro,
ii.flll I i i1,11 i ii i _ _ ,i,m i
Estosst"rnbolospuedenaparesersobre susegadora o en laliteraturaproporcionadacon el
ATTENG_N O W,OTOR MOTOR RAROO LENTO ESTRANGU COM- ACE|TE PEL_GRO,GUARDEI.AS
ADVERTENCfA ENOEND_DO APAGADO LACI_N BUSTIBLE MANOS Y LOS P_ES LEJOS
Cable de controlde
zona del motor
-\\
Cord6n arrancadcor
Barra de control que exlge }a
presenciadel operador
Control deimpuls{6n
Manilla del
mango
Recogedordelc_sped _
Tape del deposito de aceite
det motor con varilla
indicadorade nivef
Caja
Tapon de la
acolchadera
Tape de[ deposito de la
gasolina
AJustadorde la rueda
(en cada rueda)
Cubierla de la
impulst=Sn
CUMPLE COI_ LOS REQUISITOS'"D'E'SEGLIRiDAD DE LA CPSC ...............
Lassegadoras a m6ter, que Se €onducendesde la parle de etrg,s, rotatorias,Sears, curnplencon
tos est,_ndaresde seguridaddelAmedcan NationalSlandards lnstitule y de la U.S. Consumer
Product Safety Commission. La cuchilla,,,g!,racuandoel motorest&funcionando.
i!111111 i IH! , [
e _Barra de control qu exlge la presencta del Patanca de control de la Impulst6nA - se usa
operatic - liens que sujetar-seabajo, junto con pare enganchar la segadora pare movimiento
elmango, pare hacer arrat_car el motor. Su*_ltela hacia adelante impuisada a motor.
para parer el motor. Tapon de la acolchadera - situada en la
aberturade ladescarga y debeser quitada
cuandose convierlela operacciSnde ensacado
a descarga.
CebadoF- bombea combustibleadic{onaJdesde
el carburadoral cilindropare uso cuando se
necestta hacer armnoar un motor fr[o,
Cord6n arrancador- se usa pare hacer
arrancar el motor°
23
Laoperaci6n de qualquier segadora puede
hacer qua Salteq objet0s extrafios dentro de sus
ojQs, Io qua puede producir dafios graves en
_stos. Siempre use anteojos de seguridad o
protecoi6n pare los ojos m]entras opera su
segadora o cuando haga ajustes o
reparaciones, Recomendamos una mascara de
seguddad de visi6namplia, pare use espejuelos
o anteojos de seguridad estandarte,
COMO USAR SU SEGADORA
VELOCIDAD DEL MOTOR
La veloddaddel motor se estableci6en la f&brica
pare un mndimiento6primo.La velocidadno se
puede ajustar.
CONTROL DE ZONA DEL MOTOR
,_PRECAUCI6N: I.as regulac_onesfederales
exigenquase instalsun controlpare el motoren
estasegadoraparereducira un mfnimoeldesgode
lesTonarsedebideal contacto conlacuchilla.Per
nfng0n motiveIratede efiminarfafunc_6nde]control
del operador.Lacuchilia gira cuandoelmotores!_
funcionando°
* Su segadora vieneequlpadacon una barra de
control que exigela presenctadetoperedor,!o
qua requierequa eloperador est6detr&sdel
mango de la segadorapare hacedaarrancary
operada.
PARA AJUSTAR LA ALTURA DE CORTE
• Levantelasruedaspareel corte bajo y bajelas
ruedaspareelcorte aJto,
• Ajustela alturadecodeparequa se acomodea
suerequisites.La posici6ndel medb esla major
pare la mayoffa de losc_spedeso
- ParecambtarlaaJturade code, empujeIa
palancadel ajustadorhaciala rueda_Muevala
ruedaI'_cia aniba o ha_a abajg de mode que'ee
&i_o_0_lbtl S0_,requisit_:__mse:que redes
las ruedasqueden igualmeh!eajustades_
AM|SO: E(ajustador estacotrectamente _Ioc_do
cuandetaberejasde la place est_qinsedadas en et
agujero de[mango. Tarnbi6n, losajustesde 9
posiciones(siequipado)perrnitenqua el mango
pueda sermovido entre lasorejas de la place.
Para un corte alto, baje [as ruadas Mango
Para un torte bajo, levante las ruedasla placa
PARA MONTAR Y ADJUNTAR EL
RECOGEDOR DE C_SPED
° Ciermla_ solt_Jole°Latapasoltabledebe
estercerradacuando se estaoperandola
segadora.
. Levantela puertatraserade !acaja de la
segadom y ponga el bastidordel recogedorde
c_sped en lasorejasformadas an el puntalde
bisagrade tapuertatrasem.
° [] recogedordec_spedestaasegurado en la
cajade lasegadoracuandosebaja la.puerla
tre_erapare descansaren et bastldor del
RECAUCION, Nohaga funcionareu
segadorasinel de_,tiaderde recortesosin el
recogedorde c_sped, aprobados,en sulugar.
Nuncatratede operar la segadomcuando seha
removidola pUedatmserao cuandoest&un poco
abterla_
Puntal de
bisagra
-..
Bastidor del
recogedor del
Orejas
formadas
PARA VACIAR EL RECOGEDOR DE
ClaSPED
= Para i'e_noverel recogedor del c_sped, pare
e!motoral alivtar la barra de controlqua
exige la presenc_adetoperador.
° Levante la puertade atras y remora el
recogedordel c_sped per et mango.
AVISO: No permffaqua el recogedor sea
arrastrado cuandolo vacLa;puede ooastonarse
dafios.
24
CONTROL DE LA IMPULSI6N
• La autoimpulsi6nse contmlaal sujstar taban'a
de controlque exigela presenciadetoperador
hactaabajo anel mangoyalempujarla paJan_
de controlde la impulsiOnhacis adelantehaste
cluesuene"dic,"luego sosuetlala palanca.
• Elmovimiento hactaadelanteparar&cuandola
barra de controlqua exigela presencia del
operador so suelta Pare parerel movimiento
haciaadelante sinparerel motor,eueftela barra
de control qua exlgela presenciadel operadorun
pacehaste qua sedesenganchee!control de la
impulsi6n,Sujetela barrade control qua exigela
pmsenciadel operadorabajoan centre del
mangopare continuersegandosin _ , ,, _':_
autoimpulsi6n.
. Paremantener elcontrolde IsImpulsiOn
enganchado cusndoso de vuellaen les
esquinas,empujael mango haciaabajoy tevante
las ruedasdelanlerasfuera detsueloal girar la
segadora.
Barra de control qua exige la presencia
del Control de
operador_,
\_ \ _, fa impulsion
\ /
Para enganohar et Control de la
control de la impulsi6n impulsi6n
desonganchado
ANTES DE HACER ARRANCAR EL
MOTOR
ACEi3"E ....
Su segadorarue enviadasinsceiteen el motor,
• Aseg=1resequa la segadoraest,_niveladayqua
el _ireaalrededordel dep6sitode aceite est_
limpia.
• Remuevala lapadet dep6sitode aceite del
GASOLINA
- Lions elestanquede combustible_Use gasoline
rogutarlsinplomo,nueva y limpiaconel mfntmo
de 87,i_ctanos;(Et use de gasoltnaconplomo
au_thtai_ losdep6sitos de 6xidode plomoy
cai'bonoy se reduct_la duradOndo lav_lvula).
No mi:ez_eelaceite con lagasolina, Pare
aseg,ararqua la gasoline ulilizadaseafresca
corni_mestanquesloscuales puedansot
uti!i_d_s durantelos pnmeros30 dies.
ADVEt_T_CIA: La experienciahaindicadoqua
loscoi'hb_stiblesmezclsdos conalcohol(conoddos
corno_g_hol, o el use de etanolo meianol)
pueded'alraer lahumedad, taqua conduces la
sepam_;i6_tlyformaci6nde &cid0sduranteel
_mece_ientoo Lagasoline acldi_puede da6ar
el siste_ _Jelcombustiblede un motorduranteel
aJmac_i-hient6, Pare evitarlos problemasconel
motor,s_ debevaciar etsisterna decombustible
antes_leg_tardadoper un periodo de30 dies o
m_soVacte_elestanque de combustible,haga
arrandai;el i'nolory h_gatofunclonarhaste qua ins
linens_el €ombustibley etcarburadorqueden
vaclo_i j_ pr6xima temporadausecombustible
nuevo;Vea Ins Instrucciones pare et
Almacenamtentopare maletnformadOn.Nuncause
produ_t6sde limpieza loamelmotor0 pareel
cerburadoren elestanque del coml_stible pussse
puedeh ¢i'oducirdales perrnanentes,
PAPA HACER ARRANCAR EL MOTOR
• Pare hacer arrancarun motor frio,empujeel
celD]a_rIres (3) races antes detratarlooEmpuje
tim_ementeoEstepaso normalmentenoes
nece_,a_riocuandosohacearrancarun motor qua
ya I_ estadofuncionando perunoscuantos
mtn0toe.
= Sujete la barrade control que ex}gela presenda
d_lpl_dqr abajo enel mangoytireelmango
del _,_eiSi' l_pidarnente. No permitaque el
,oo_Sr__rancador se devuetvaabmptamenteo
° Pareparerelmotor, suettela bane decontrol
que e_ge la presenoiadel operador,
AVIS0i EnrJimasm&sfries puedequa sea
necesario repeti_los pesos del cebado,En dimes
motor mltenehastalal/neadeil]enoen!_ _ :_rr_catdrososelcebardemasiadopuedeproduct r
• Use20 Oz..de aceite,Pa_ ettJ_ _l_tc_iicladyea :_elahogo,y _1motor no van arrancar:SIse ahoga el
"MOTOR" en la secci6nde Ins_ntenim;_ni(_'en motor espereunos cuantosmtnulosantesde tinter
este manual, de hacerloarrancary no repitalospesosdel
• Vacie el aceite lentamente.Noio liens cebado.
demaslado.
• Reviseelniveldelacelteantesde cada uso,
Agregue aceticsies neces_irio,Uene haste la
Ifneadellano en]avadllaind_cadorade niveL
• Psra leerel n;'vetadecuado,apriete la lapa del
dep6sitode aceitedelmotor cadavez.
• Vuelvaa Inslalarla tapa deldep6sito de!aceitey
apri_ela.
• Cambie el aceitedespu_s de25 hornsde
operact6no una vez per temporada.Puade
necesitarcarnbiafetaceite _ a menudo
cuandolas condidonessonpoNorosaso,sudas,
Tape ,del:
depoeito de la
Tapa del deposito
do aeeitedel motor
25
CONSEJOS PARASEGAR
° Bajo ciertas oondiciones, tal como c_sped
muy alto, puede ser necesario e! elevar la
altura del corte para reducir el esfuerzo
necesario para empuiar Jasegadora y para
evitar sobrecargar el motor, dejando
montones de recortes de c6sped. Puede que
sea necesado reducir ta velocidad del
reoorffdo ylo haga flmclonar la segadora
sobre el _rea per segunda vez.
, Para un corte muy pesado, reduzca el anoho
del corto pasando parctalmente per encima
del lugar anteriormenle cortado y siegue
lentamenle,
• Para un meier ensaoado del c6sped y para la
mayoffa de las condiciones de corte, la
velecidad del motor debe ajustarse a la
posici6n de r_.pidoo
° Cuando use una segadora con descarga
trasera en c_sped hOmedoy pesado, los
montones del c_sped cortado puede que no
entren en el recogedor de c_sped. Reduzca
}a veIocidad del recorrldo (velocidad de
empuje) y/o haga funcionar la segadora
sobre el _.reaper segunda vez.
o Si queda una huella de cortes an el lade
derecho de una segadora con descarga
trasera, siegue en la direcciSn en que girar_
las manillas del reloj0solapando un poco para
recaudar los recortes en la prSxima pasada.,
° Los pores en los recogedores de c_sped de
tela pueden llenarse con mugre y polvo con
el use y los recogedores recaudar_n menos
c_sped, Para evitar _sto, reefs el recogedor
con la manguera de agua regularmente y
d_jelo secarse antes de usado.
• M&ntenga la parts superior del motor,
alrededor del arrancader, despejada y s!n
ftujo del aJredel motor y e×tender_ su
duraciSn.
CONSEJOS PARA SEGAR Y
ACOLCHAR
IMPORTANTE"Paraobteneretmeior rendlmeinto
mantenga lacajade la segadom sinacumulacion
de cespedy basura=Vea"Ump{ozaen la seccionde
"Manter_mento"deesle manual.
° Lacuchillaacolchadoraespecialva a velveta
cortarlosrecortesde c_sped muchasveces,y
losreduceen tamar3o,de modoque slse caen
en etc_sped sevan a dispesar entre6stey no
se van a notar.Tambi_n,el c_speclacolchadose
va a deshacerMpidamenteentregande
subslar_as nutritivasparael c_sped.Siempre
acolcheconla veloddad del motor (cuchitta)m_s
alta,puesasf se obtendr&la meieracdSnde
recorteda lascuchillas,,
• Evitecortarel c_sped cuando est_mojado, E[
c_sped mojadotiendea formar monlones e
interfierecon la aco_6nde amlchado, La mejor
horapara segar elcOspodestempranoen la
tardeoA esa hera_ste se ha secado yel_.rea
reci_ncortada no quedar&expuestaalsol
directo.
• Pare obtenerlos mejores resultados,ajustela
alturadel torte de la segadorade mode que _sta
code solamenle elterciosuperiorde lashojasde
c_sped.oEn el case de que el c_sped ha,ya
orecidodemasiado,puede sernecesarioel
elevarla alturadel code para reducirelesfuerzo
necesariopara empujartasegaderay para evltar
sobrecargarelmotor, dejandomonlones de
mcorlesde c_sped. Para un acolchamientomuy
pesado,reduzcael ancho del torte pasandoper
encimade[lugaranteriormantecor_do y siegue
lentamente.
. Ctertosl_posde c_sped y sus condiolones
puedenexigirque un ,_reatenga queset
acolchadapersegunda vezpara esconder
completamentelos recortes.Cuandosehaga el
segundocode, siegueatravesadoo enferrna
perpendiculara la pasadadel primercode.
• Cambiesupatr6n de corlede semana a
semana_Siegue de notrea sur una semanay
luego cembtede estea oeste la pr6xima
semana.Esloevitar&que el c._spedseenrede y
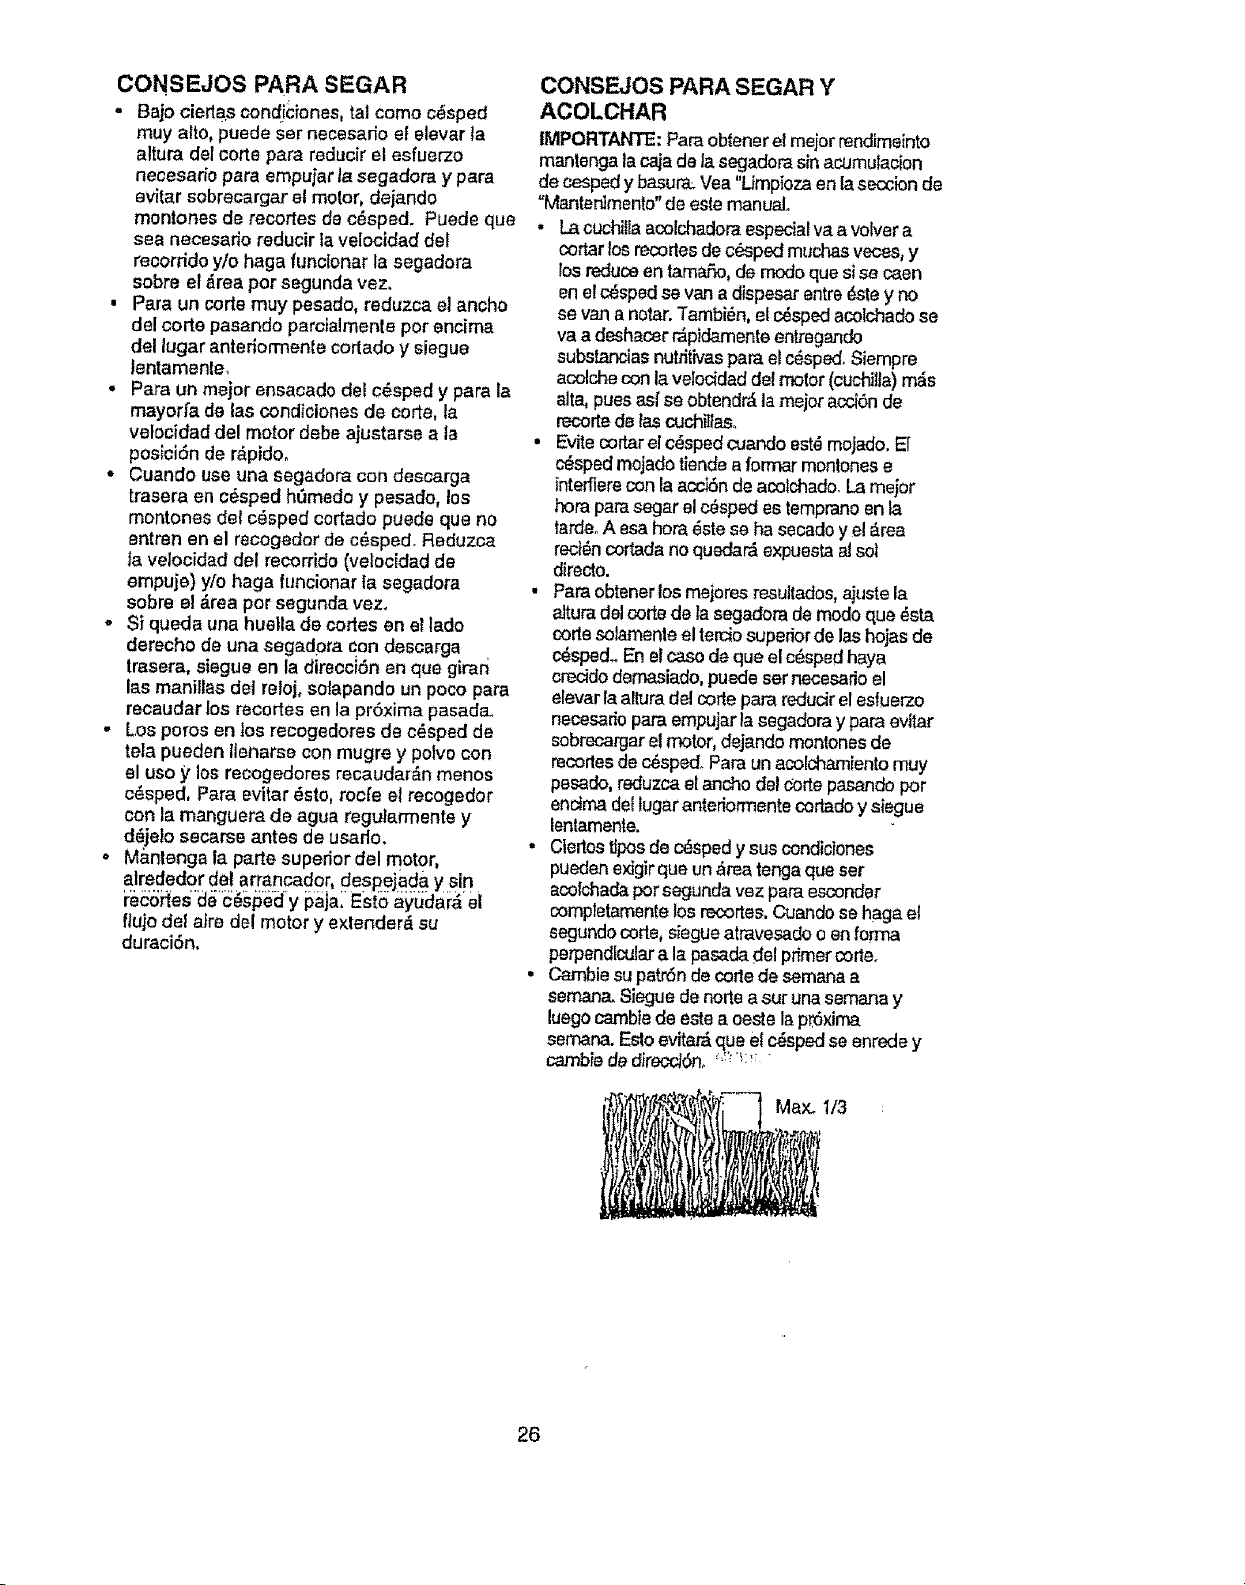
cambiede direcc_6n,_''_'_:_;"
26
DESERVICIO
! ReviserSth_,ysuJetadoressusltos _ _
,i i ,1111 i
l_=j ........... " • •
1 - C_mb|ar m_t_n menudo cu_,r,do se oper= b_ ea_a pn_da roen _mb_nta= ¢ot_alta_ f_mperzdur_s.
2 - D_I_'s_lyi¢io rods a m_llud¢_cu_i_do _eoparo en _dP..tol_$ su_ o po]voros_s.
3 - Camb_e|as _illo.s. mAsa menudo cuando a|_gue en I._tr_no aranoso.
4 - C=rgar per48 hor_ d fin d_ la temporada.
RECOMENDACIONES GENERALES
Lagaranli'ade es_aeegadomno cubrelos ad_cu_os
quehan estadosujetosal abuso oala negllgenoia
deloperador,Para re_)ir lodo el valorde la
garantia, eloperadortienequo mantenerla
_dom segi.inlasinstmcdones descrltasen este
manure
Hayatgunosajustesquase IJenenque haoeren
lon'r_peri_:llcaparepodermantenersuunidad
adecuaclamente.
Todoslos ajustesenI_seod6nde Se_cio y
Ajustes de estemanualtlenenClUeserrevi_dos
perIomenos unvez_r cadatemporada.
• Unavez atado,camblela bujia, limpleocan_e
elalemento del filtmde airey revisesila cuchilla
est_desgasl_da. UnabuJfanuovay un elemenlo
del/iltm de ait_}impto/nuavoasegurr_ lamezda
de eke-combustibleadec'-uadayayudan a que
sumotor_uncionemejory que dum rn_s.
• Siga elprogramade msntenimlentoeneste
manual.
ANTES DE CADA USO
• Reviseetniveldelsceite de{motor.
= Revisesihaysujetadoressueltos.
LUBRICACION
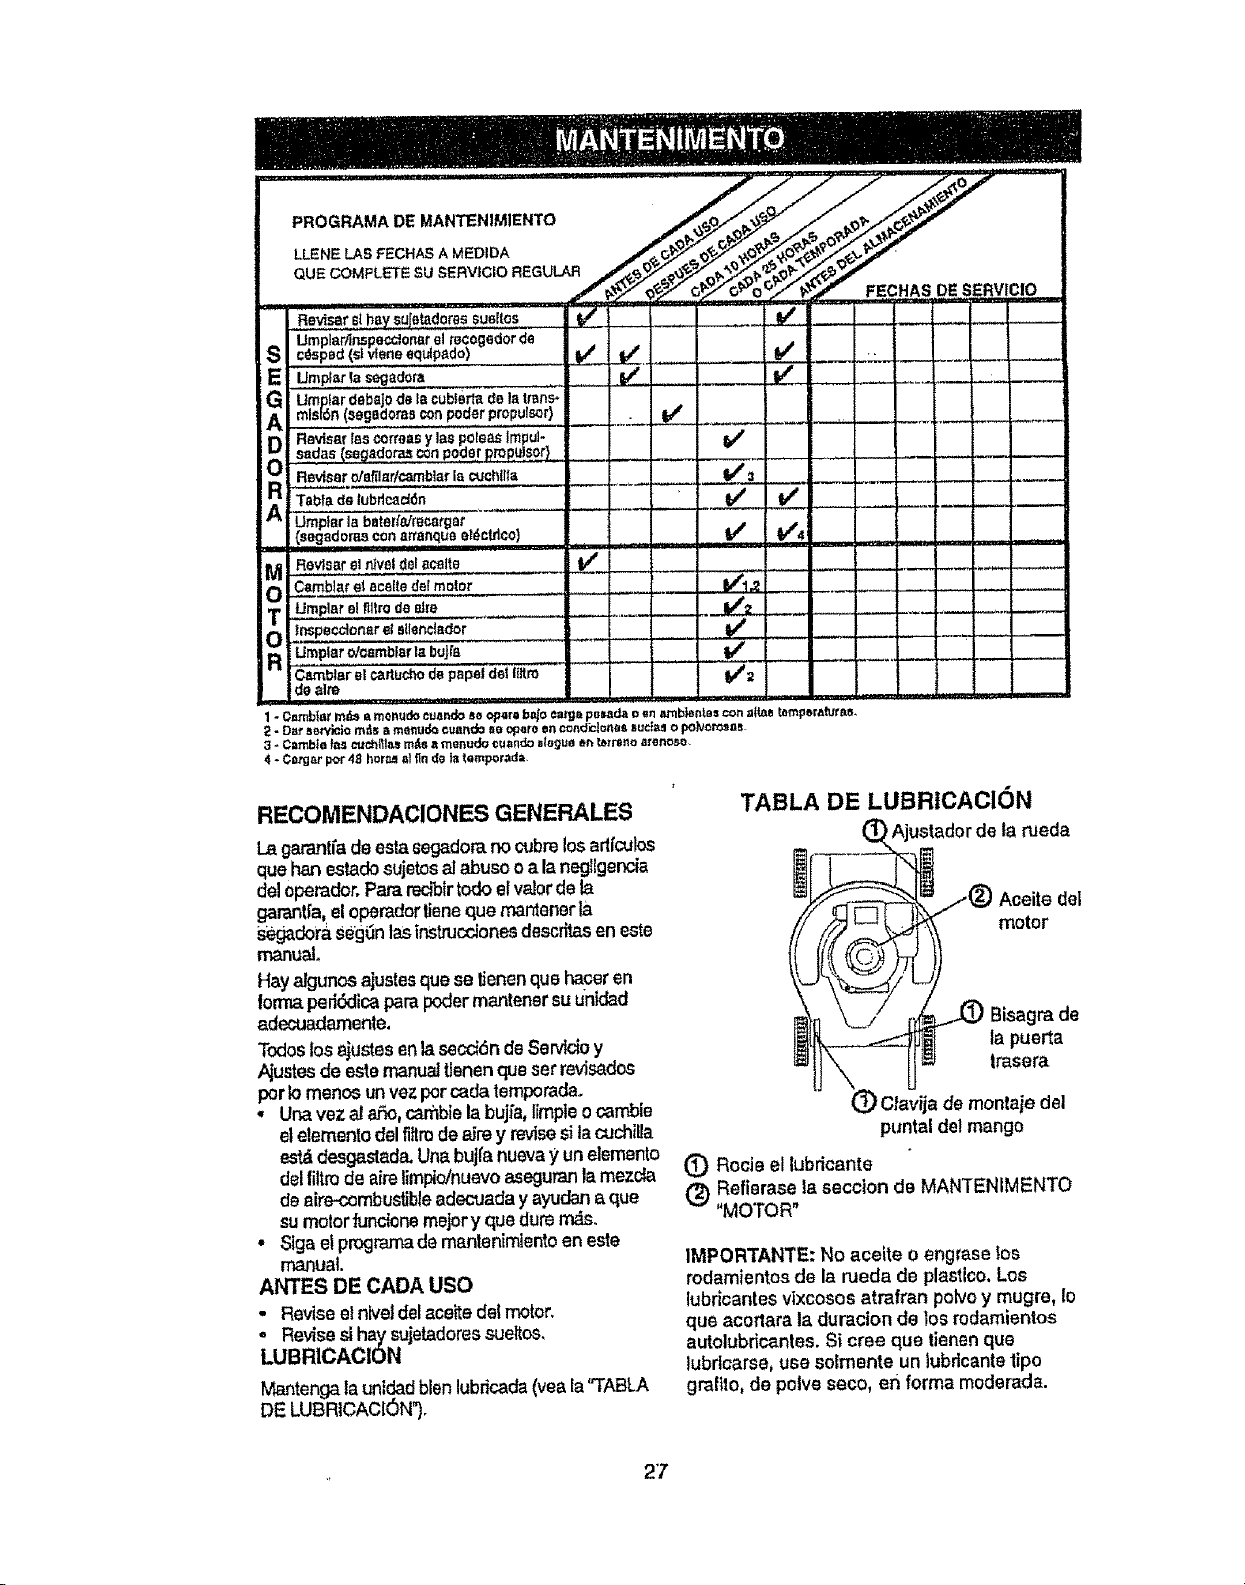
Mantenga tauntdadblen lubricada(yea la"TABLA
DE LUBRtCACION").
TABLA DE LUBRtCACION
Ajusladorde la rueda
Aceite del
motor
Bisagra de
la puerta
tmsera
Clavija de montaje del
puntalde! mango
t_ Rocie ellubdcante
1_ Refierase Is seccion de MANTENIMENTO
"MOTOR"
IMPORTANTE: No aceite o engraselos
mdamientos de la rueds de plastico, Los
lubricantes vixcososatrafran polvo y mugre, Io
que acertara la duracion de los mdamientos
autolubric_ntes.Sicree que tienenque
lubrlearse, use solmente un lubdcante ripe
graftlo, de polveseco, en forms modersda.
27
IESPECIFICACIONES DEL PRODUCTO
!NOMERO DE MODELO 917.377522
NOMERO DE SERiE
FEOHA DE COMPRA
CABALLOS DE FUERZA:
DESPLAZAMIENTO:
CAPACIDAD Y T1PO
DE GASOL1NA:
i
TtPO DE ACEITE:
(API-SF/SH/SG)
CAPAC/DAD DE ACEITE:
RJURA: .030")....
TOLERANCIA DE VALVULA:
5_0
11.6 CU. IN.
1.6 Cuartos
REGULAR SIN PLOMO
SAE 30 (sobre 32°F)
SAE 5W-30 (debajo 32°F)
20 oz. de capacidad
....... CHAMPION RJ19LM O J19LM
ADMISI6N: 005" - .007"
DESCARGA: °007" - .009"
SENCENDIDO DE ESTADO
SOLIDO ABERTURA DE AIRE: .010 IN.
TORSI6N DEL PERNO
DE LA CUCHILLA: 35-40 FT. LBS.
° El num_ro del nodelo y el de serie se encuentran en la catcomania adjunta ala parte
trasera de la caja de la segadora. Debe registrar tanto el num6ro de serie come la
fecha de compra y mantengalos en un/ugar seguro pars refencla en e! futurol
SEGADORA
Slempre observe Issreglas de seguridad
cuando haga el mantenimiento.
LLANTA$
o Mantenga tas Ilantas sin gasoline, aceite o
substancias quimicas pars control de
insectosque pueden daSsr fa gems.
• Evitelos tocones, Iss piedras, Is9 grtetas
pmfundas, losobjetos afitados y otros
pe|Igr0sque pueden dafiaralas Ilantas.
CU|DADO DE LA CUCHILLA
Pars obtener los mejores resultados,la cuchlila
de la segadora tiene que manteneme aft/ada.
Cambie la cuchills doblada o dafadao
PARA REMOVER LA i3,UCHILLA
• Desconecte et alambre de la bujfs y p6ngalo
en deride no pueda en'_raren contactocon
6sta.
• Hags descansar la segadora en su lade.
Asegtlrese que el _lro de aire y que el
carburador queden mirando hacia arribm
o Use un bioque de madera entre la cuchilla y
la caja de la segadora psra evitsr que la
cuchtlla gire cusndo se lequite el pemoo
, Proteja sus manes con guantes y/o envuelva
ra cuchi{la con una teta gnaess.
• Remueva et pemo de Is cuchillsgir_ndoto en
el s_ntido conlmrloen que gtrantas manfltas
de! reloj.
• .RemueyaIs cuchilia¥ los arffculosde
de seguridad y la arandela endurectda).
AVISO: Remueva el adaptad6i_do Is cuchilla y
revise el cube interior de la ranura del
adaptador de la cuchilta. La ranura Ilene que
estar an buenas condtclonespars que funcione
en forms adecuads. Cambie el adaptsdor si
est_ dafiado_
PARA CAMBIAR LA CUCHILLA
• Ponga e! adaplador de ta ouchilla en et
ciguefa] del motor. Aseg0rese que la ranura
del adaptador y que el chavetero del ciguefial
est_n alineados.
• Ponga la cuohi!la en el adaptador de 6sta
alineandolos dos (2) agujeros en la cuchitls
con las salienles elevadas en el adaplador.
• Aseg0rese de que el bordede salida de la
cuchilla (opuesto al borde afilado) est_ haole
arrtba haole el motor,
, Instate el pemo de la ouchilla con la arandela
de seguridad y la smndela encturecida en el
edapt_dor do la cuchilla y el ciguefalo
28
. Use un bloque de madera entre 1acuchilla y
ta caja de la segadora y apriete el pemo de la
cuchllla gk_ndolo en el sentido en q'_egiran
las manillas del reloj.
• La torsiSn pare apretar recomendada es de
35 -40 pies ltbras.
IMPORTANTE" El perno de la cuchilla es ctase
8 tmtado a calor.
PARA AFtLAR LA CUCHILLA
AVISO: No recomendamos el afilar la cuchitla -
pero silo hace, asegdrese de ql._equede
balanceada.
Se liene que tenet cuidado de mantenerla
balanceadao Una cuchifla que no est&
balanceada vaa producir eventualmente da.5o
en la segadora o en el motor.
. La cuchilla puede altlarse con una lima o en
una rueda recliflcadora. No trate de afilarla
mientras se encuentra en Jasegadora.
• Pare revisar el balance de la cuchilla, clave
un clave en una viga o en la pared. Deje
alrededor de una pulgada de un clave recto
expuesto. Ponga el agujero central de la
cuchitla sabre la cabeza det clave. SI la
cuchilJa est& balanceada debe perrnanecer
en laposici6n horizontal. St cualqutera de los
extremes de la cuchitla se mueve hacia
abajo, afile et extreme pesado haste que 8sta
quede balanceada,
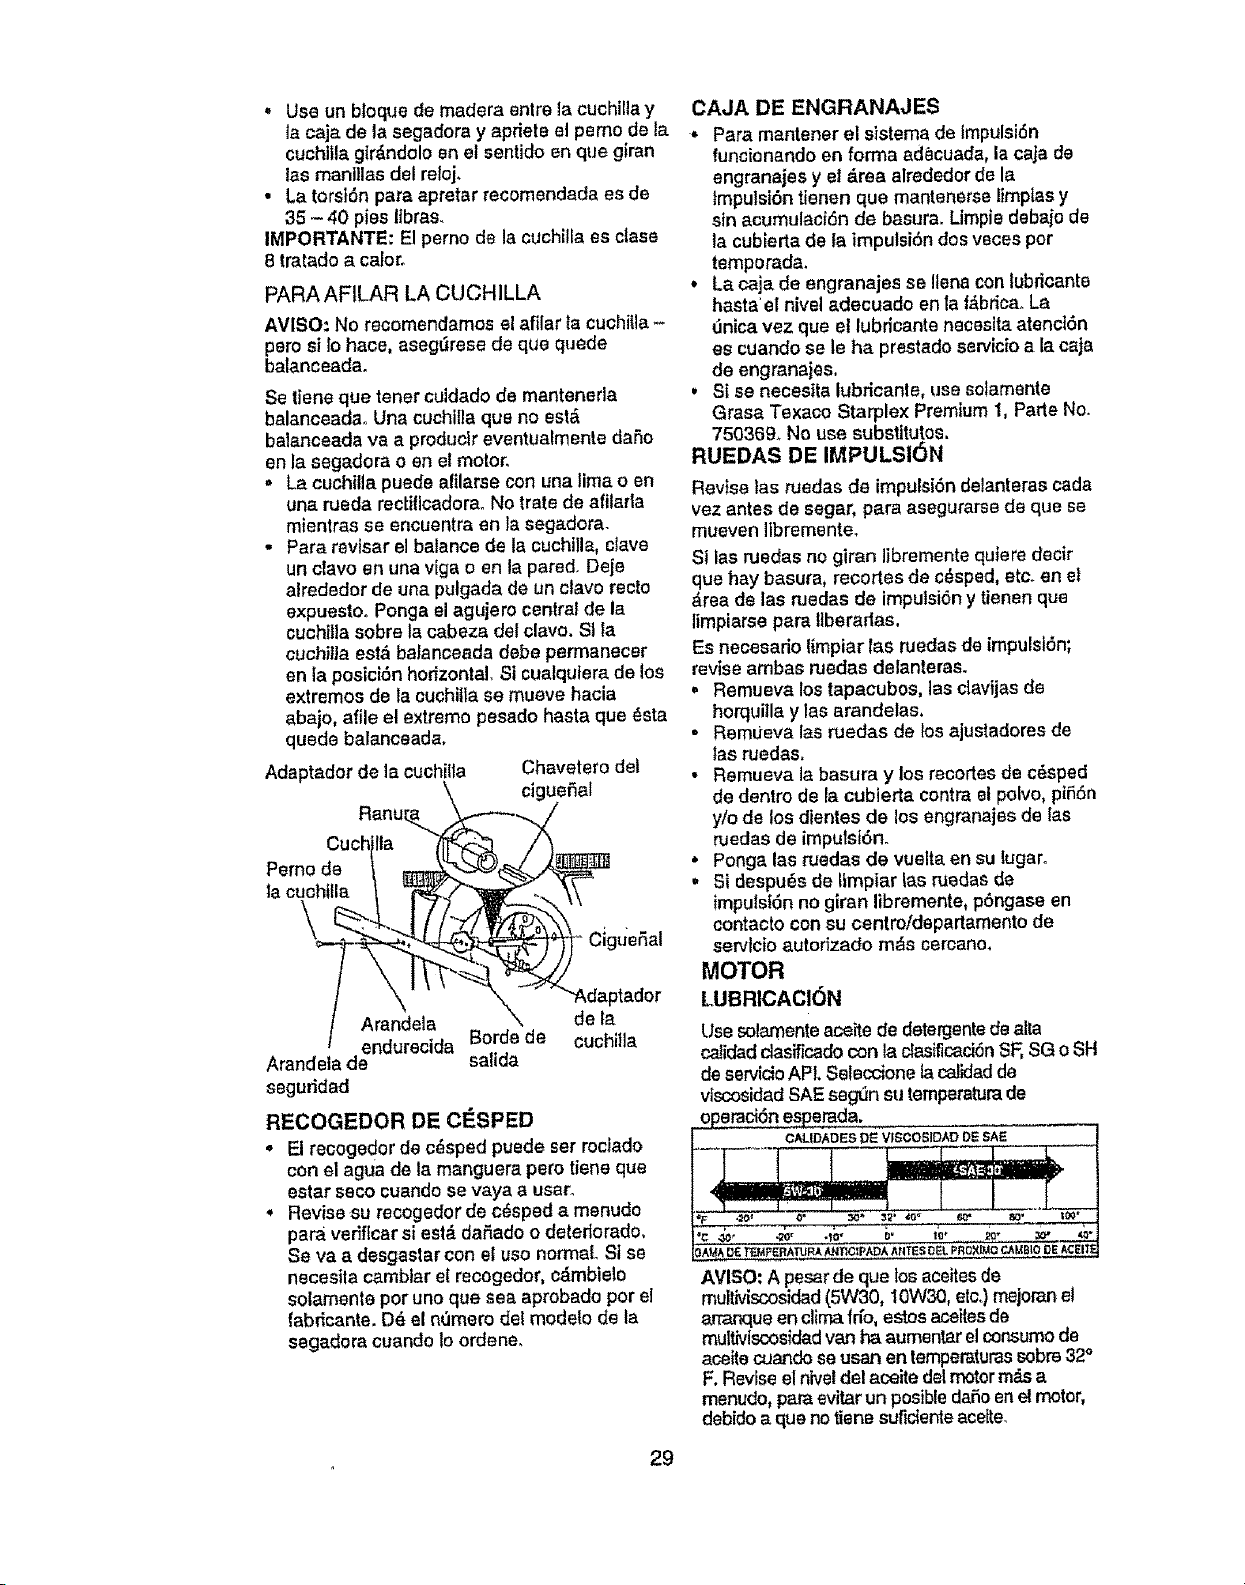
Adaptador de la cuchilla Chavetero det
\ ciguefial
Cuchjlla 'I1_ /'_
t Arandela \ de la
/ endurecida Borde de cuchilla
Arandela de salida
seguddad
RECOGEDOR DE ClaSPED
• El recogedor de c_sped puede ser rociado
con el agua de la manguera pore tiene que
estar seco cuando se vaya a usa_.
• Revise su recogedor de c_sped a menudo
para vedfloarsi estddaSado o deterlorado.
Se va a desgastar con el use normal. Si se
necesila cambiar el recogedor, cdmbielo
solamente per uno que sea aprobado per el
fabdcante.Dd el n0mero del modelo de la
segadora cuando to ordene.
29
CAJA DE ENGRANAJES
•Para mantenerel sistema de impulsi6n
funcionandoen farina adecuada, la caja de
engranajesy el &rea alrededor de la
tmpulsi6n tienen que mantenerse limptasy
sin acumulaci6n de basura. Limpie debaje de
la cubierta de ta impulsiSn dos veces per
temporada.
• La caja de engranajes se !lena conlubricante
haste' el nivel adecuado en la |&brica.La
_nlca vez que et lubricante necesita atenctSn
es cuando se le ha prestado servlclo ala caja
de engranajes,
, Si se necesita lubricanle, use solamente
Grasa Texaco Starplex Premium 1, Pade No.
750369. No use substitutes.
RUEDAS DE IMPULSI6N
Revise las ruedas de impulsi6n delanteras cada
vez antes de segar, pare asegurarse de que se
mueven libremente.
Si las ruedas no giran librementequiere decir
que hay basura, recortes de o_sped,etcoen el
drea de las ruedas de impulsi6n y Uenenque
limpiarse pare !tberadas,
Es necesario limpiar las ruedas de impulsi6n;
revise ambas ruedas delantems.
, Remueva los tapacubos, las clavijas de
horquilla y las arandelas,
• Remueva las ruedas de los ajustaderes de
las ruedas,
• Remueva la basura y los reeortes de c_sped
de dentro de lacubterta centre et polvo, pi56n
y/o de los dientos de los engmnajes de lee
ruedas de imputsi6n.
• Penga las ruedas de vuelta en su lugaro
• Si despuf_sde ttmpiar las ruedasde
impulst6nno giran libremente, p6ngase en
contaoto con su centroldepartamento de
servicioautorizade m_s cercano.
MOTOR
LUBRICACI(SN
Use solamenteaceitede dotergentede atla
calidaddasificado con la clasfficacklnSF,SG o SH
de servicloAP!. Seleccione la calidadde
vtscosidadSAE seg,3nsu temperaturede
operaci6nesperada.
AVISO: Apesarde quelos aceitesde
mulliviscosidad(5W30, 10W30, etc,)mejorane!
arranque enclirnafrfo, estosaceitesde
multiviso0sidadvanha aumentar elconsumede
aceite cuandoseusan en temperaturessabre32°
F. Reviseel hive!de!aceite delmotorm_s a
menudo, pareevitar un posibledaSoenel motor,
debido a que no tiene sufic_enteacette_
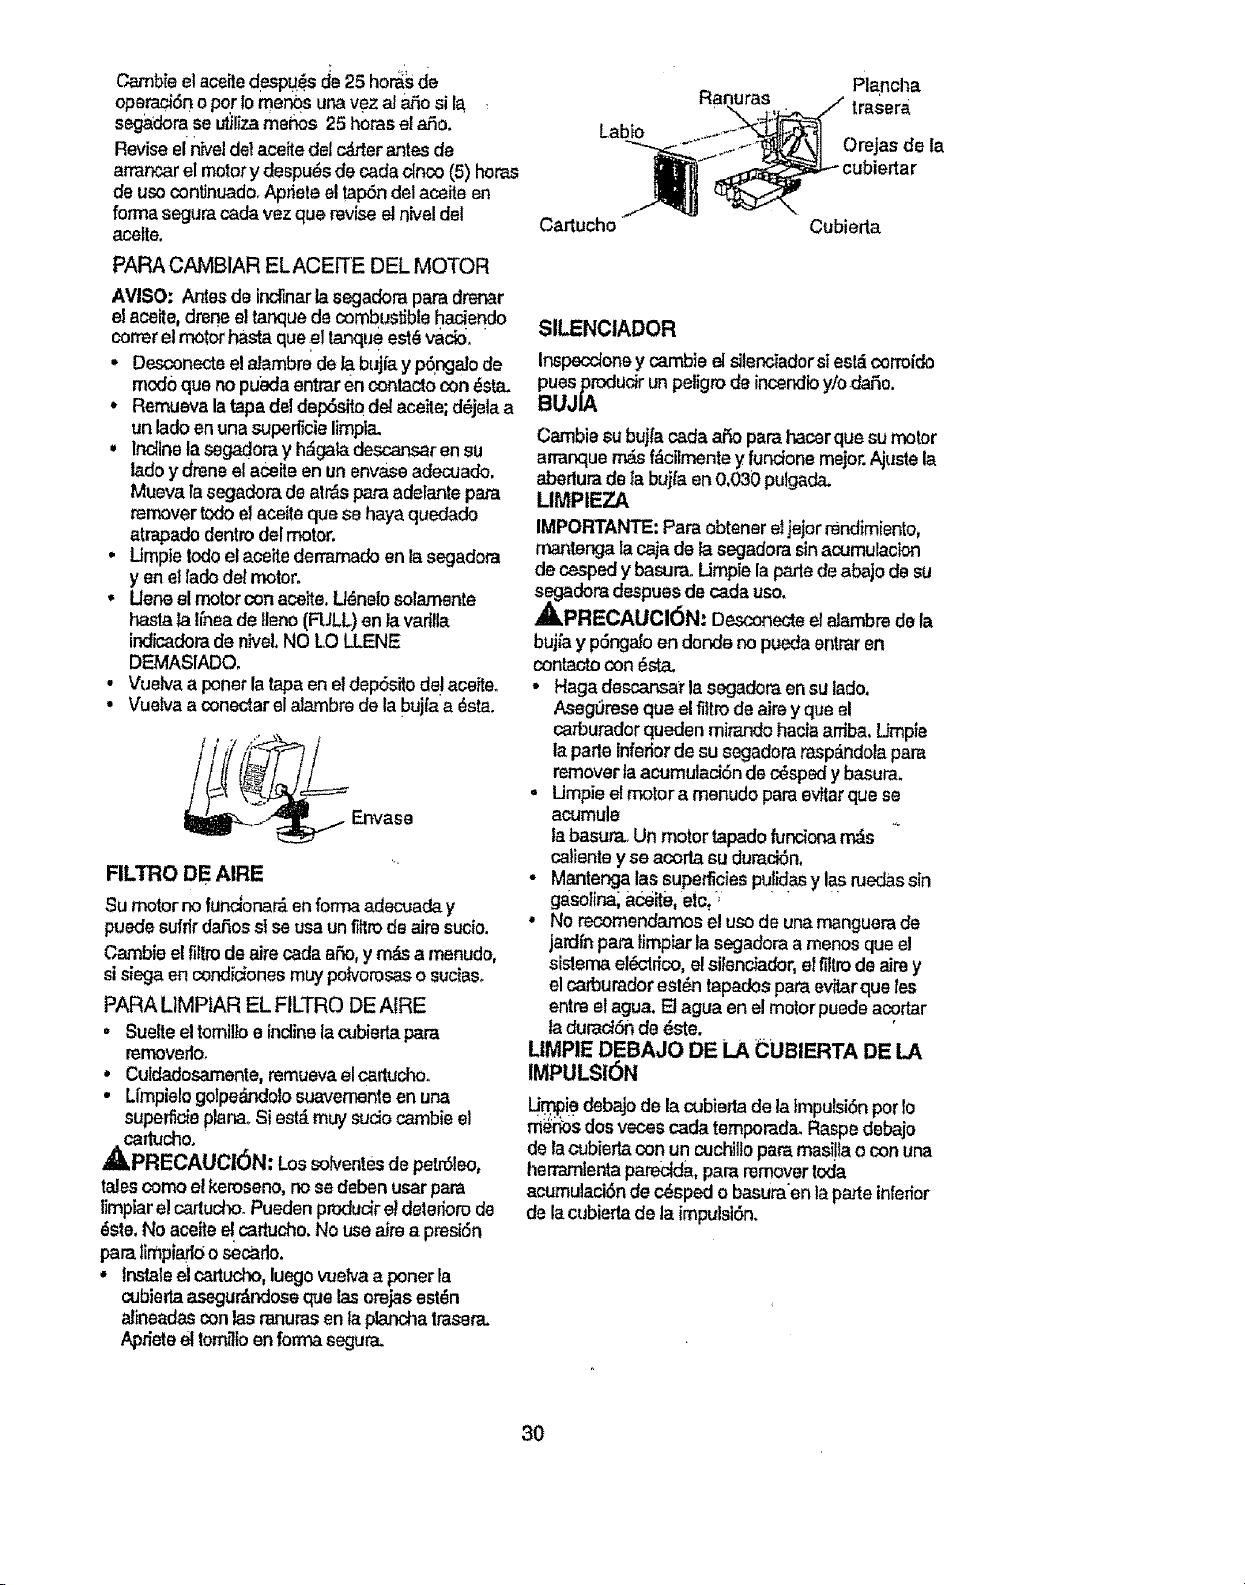
Oamb_eel a_ile despu_s c_e25 hor_sde
eperaci6no por Iomenos unavez a! ado si la
seg_dorase_liza meilos 25 horesetaSo.
Reviseelnivelde!aceitedel cd.rterantes de
arrancarelmotory despu_s de cadsclnco (5) horas
de usocontinuado.Apriete el tapSndelaceite en
formasegura cadavez que revise el niveldel
acette,
PARA CAMBIAR ELACEtTE DEL MOTOR
AVI$O, Antesde inc_narlasegadora para drsnar
elaceite,drene e!tanque de combustible haciendo
correrelmotor haste queel lanclue est_vaci0.
. Desconecteelalambrede la bujia y pSngalode
modoque no pueda entraren contactocon6eta.
* Remuevalatapa del dep6sito del aceile; d_jelaa
un ladoen unasuperfbie limpia.
. Incline lasegadom y h_galadescansarensu
tadoy dreneel aceite en un envaseadecuado.
Mueva la segadorade atr'_spare adelantepara
removertodo e!aceitequese hayaquedado
atrapadodentrodel motor,
. Umptelodo el acettederremado en la segadora
yen ellado del motor.
. Uene el motor conacelte,L18netosolarnente
hasla la linea de lleno (FULL)en la var_lla
indicadorade niveLNO LO LLENE
DEMASIADO.
• Vuelvaa poner la tapaen eldep6sitodel aceite.
• Vuetvaa conectarel alarnbrede la bujfaa _sta.
. Envase
RLTRO DE AIRE
Su motornofundonard enforma adecuaday
puedesufrir daSosslse usaunfittrode airs susie.
Oambieeltiltrode airecadaa£',o,y rn_ a menudo,
st siega encondicionesmuy polvorosaso suelas.
PARA LIMPIAR EL FILTRO DE AIRE
• Sue[reel tomilfoe inclinelactJbiedapare
rernovedo.
• Cutdadosamente,remuevaelcartucho.
• L{mplelogolpe_J'ldolosuavernenteen una
superfic_eplanaoSiest,_muy suciocambieel
,_kcartucho.
PRECAUCI_N: Los solventesde petrSleo,
taJescomoelkemsano, nosedebenuser pare
limpiarelcartucho.PuedenprodudrMdetedorode
6ste.Noaceite elcartucho.No useaJrea presi6n
parelirnpiadOo secede.
• tn._aleelca_tucho,luegovuelvaa ponerla
cubiertaasegurdndeseque lasorejasest_n
aJineadasconlas ranuresentapbnchatrasera.
Aprieteet tom_ioenformasegura.
Labio
Ra_,?ras
Plancha
trasera
Orejas de la
r
Cartucho Cubierta
SlLENCIADOR
Inspecc_oney cambie el silencJadorsiestd corro{do
puesproducirunpeligrode incendby!o.da,5o.
BUJIA
Cambie subuj_'acads ar3oparehacerque sumotor
ananquerodsf_cilrnenteyfundonemejor.Ajuste la
abedurade la buj_aen0.030pulgads.
LIMPIEZA
IMPORTANTE:Pareobtener eljejorrendimisnto,
rnantengala cajade lasegadora sinacumulasion
de seepedy basura. Limptelaparledeabajo de su
segadomdespuesde cadauso.
_.PRECAUCI6N.' Desconecteelabrnbre de !a
buj_ay p6ngaSoen donde no puedaentmr en
conlactocon _sta.
• Hagadescansar lasegadom ensu lado,
AsegLireseque elfiltrode airsy que el
carburadorqueden mitando haciaarriba. Urnpie
la parleinferiorde susegadorarasp_,ndolaperu
remover taacumulaci6n de c_sped ybasura.
° Umpie el motor a menudo paraevttarque se
acumule
labasUr_LUn motor tapado funcionan_s
calientey soacorta su dumd6n,
• Mantenga las superficiespu!idasy las ruedassin
gesolina;acelte,etc..'
• Norecomendamos el uso do una manguemde
jardfnpara timpiar la segadoraa menosque e!
sislema et_'trico, e!siienciador,el filtrodeaimy
el carburadorest_ntapadospareevitarqueles
entree!agua.EJague enelmotorpuedeaprtar
iadumd6n de _.ste.
UMPIE DEBAJO DE LA _UBIERTA DE LA
IMPULS!ON
UrDpiedebajo de lacubierta de la impulsi6npor 1o
mi_s dosveces cada temporada_Rasps debajo
de lacub_ertacon un cuc.hillopare masi!iao con una
herremlentaparectda,pare removertoda
acumulaci6nde r__spedo basuraen taparte inferior
de lacubieda de la impulslSn.
3O
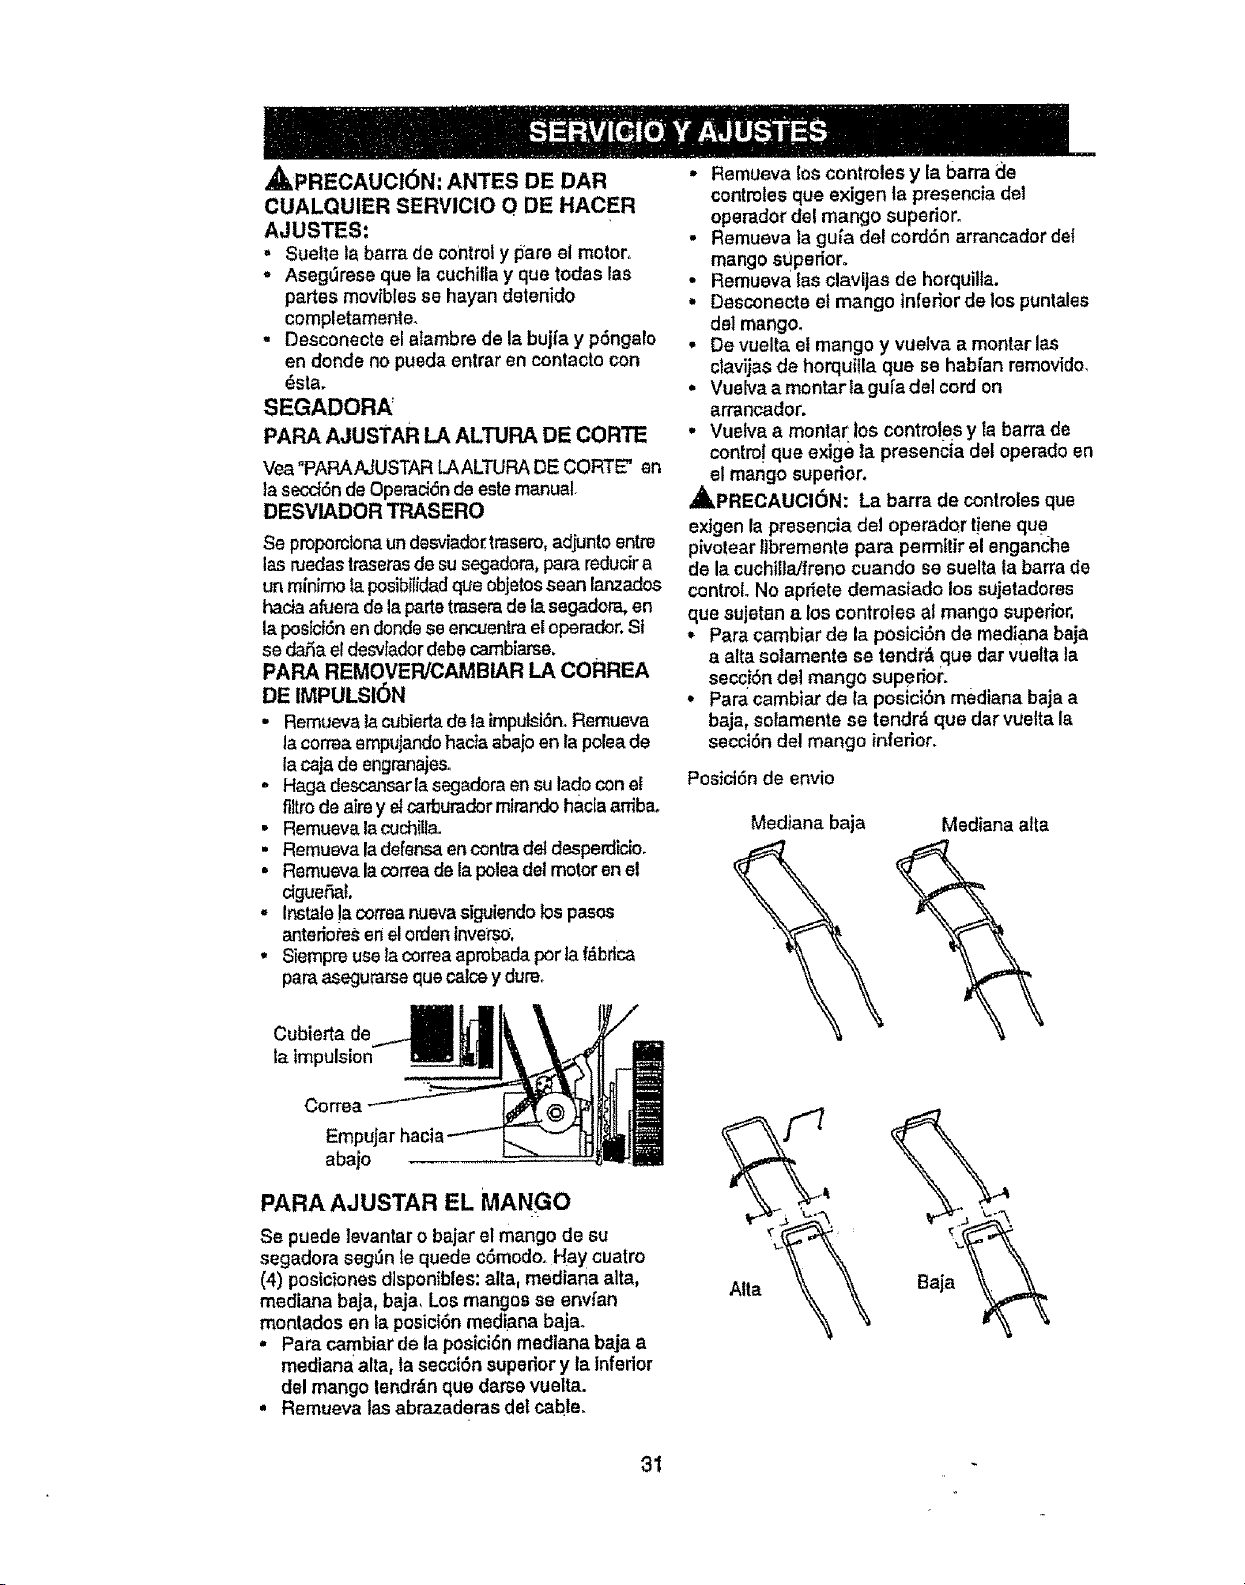
,_PRECAUCI6N: ANTES DE DAR
CUALQUIER SERVICIO O DE HACER
AJUSTES:
, Suelte la barra de control y pare el motor,
• Aseg0rese que la cuchila y que todaa las
partes movibles se hayan detenido
completamsnte.
. Desconecte el atambrede la bujfa y p6ngalo
en donde no pueda entrar an contactocon
data.
SEGADOR_
PARA AJUSTAR LA ALTURA DE CORTE
Vea"PARAAJUSTAR LAALTURADE CORTE" en
}asecddn de Operad6n de satemanual.
DESV1ADOR TRASERO
Se proporclonaun dosviador,trasero,adjunto entre
las ruedastraserasde susegadora,pare reducira
un mfnlrno_aposibilidadqua objetosscan lanzados
haciaafuerade la padetraserade lasegadora, en
laposfct6nen dondese encuentraeloperador.St
sedada el desv[adordabs cambiarse,
PAPA REMOVEWOAMBIAR LA CORREA
DE IMPULSION
- Remuevalacubiedadela impulsi6n. Remueva
la correaempujandohaciaabajo enla polea de
la cajade engranajeso
" Haga descansarlasegadoraensu tadoconet
flltrode aimy etcarburadormirandohac[aarfiba.
. Remuevala cuchilla.
• Remuevala defenseen contradotdesperdiclo.
• Remuevala correade la poleadel motor an el
ciguefiat,
- Instale!acorreanuevasiguiendobe pesos
antedoteSenel ordenirvverso,
• Siempreusetacorreaaprobadaper la f_brtca
paraasegurarsequecatcey dureo
Cubierta de
ta impulsion
CoFfee
abajo
PARA AJUSTAR EL MANGO
Se puede levantaro bajarel mango de su
segadora segtln le quede c6modo. Hay cuatro
(4) postoonesdtsponibles: alia, mediana alta,
mediana baja, baja, Los mangos se envi'an
montados en la posicI6n mediana baja.
,, Para cambiar de la posici6n medlana baja a
mediana alia, tasecei6n supedory ta Infedor
del mango lendr_n que daresvuelta.
• Remueva las abrazaderasdel cable.
• Remueva lee contmles y la barra _le
contmlesque exigen la presencia del
operadordel mango superior,
. Remueva la gu[a del cord6n arrancador de{
mangosUpedoro
• Remueva las clavtJasde horquilla.
, Desconecte el mango inferiorde los puntales
del mango,
. De vuelta et mango y vuetva a reenter las
clavijas de horquilla qua se hab{an removido,
. Vuelvaamontarlagui'adelcord on
arrancador.
• Vuelva a montar los control es y la barra de
centre! que exige la presencia del opemdo en
el mango superior.
_I_PRECAUOI6N: La barra de controtes qua
extgenla presencia del operador t!enequa.
pivotear |ibremente pare permitir el enganche
de lacuchillaJfrenocuando se suelta la barra de
control.No apriete demasiado los sujetadoree
qua sujetana los controleeal mango superior,
• Pare cambiarde la posici6n de mediana baja
a alia sotamente se tendrd qua dar vuetta la
secc!6n del mango superioL
° Para cambiarde la posici6nmediana baja a
baja, so[amente se tendr& que dar vuetta la
seccidn del mango inferior.
Posici6n de envio
Med}ana baja
Mediana alia
Alia
31
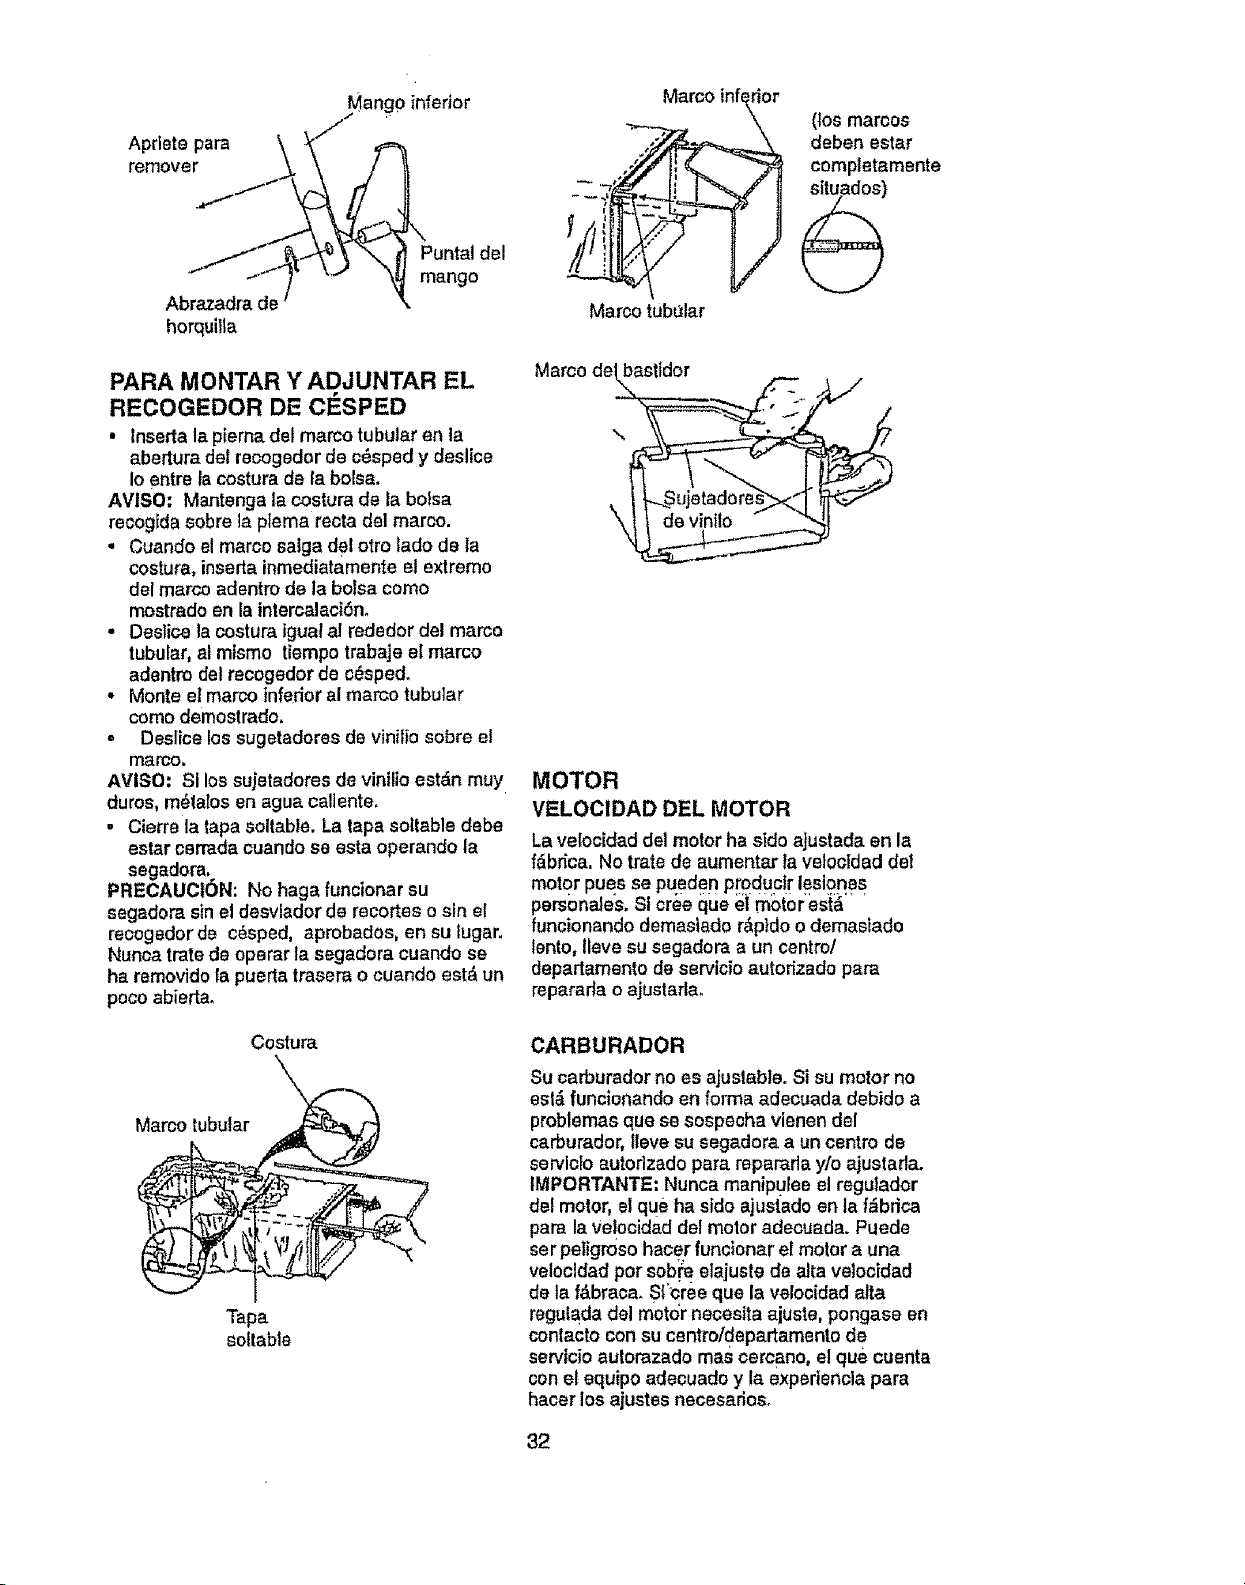
Apdete para
remover
Abr_adra de
horqui!ta
Mango inferior
del
mango
areo inf tier
t_ r
,_Tt"
Marco tub_tlar
(tO5 marcos
deben estar
completamente
situados)
PARA MONTAR Y ADJUNTAR EL
RECOGEDOR DE ClaSPED
• lnsertala piernadel marco tubularen la
abertura dat recogeder de c6sped y deslice
Ioentre la costura de ta bolsa.
AVISO: Mantenga |a costura de la botsa
recogfda sobre la plema recta del marco.
• Cuando el marco ealga del otro lade de la
costura, inserta inmediatamente el extreme
del marco adentro de |a bolsa come
mostrado en la tntercalaci6n.
. Destice lacostura lguat at rededor del marco
tubular, al mfsmo tiempo trabaje el marco
adentm del recogedor de c_sped.
• Monte et marco inferior al marco tubular
comedemostrado.
° Deslice los sugetadores de vinil|o sobre el
marco.
AVISO: SI lossujetadores de vinilio estdn muy
duros, m_tatos en agua caliente.
• Cierre la tapa soltable.La tapa soltable debe
estar eerradacuando se esta operando la
segadora,
PRECAUCtON: No haga funcionar su
segadora sinel desvlador de recortes osin el
recogedor de c_sped, aprobados, en su lugar.
Nunca Irate de operar la segadora cuando se
ha removidola puertatrasera o cuando est_ un
pocoabierta.
Marco del bastidor
oI_ 2.
MOTOR
VELOCIDAD Dt=LMOTOR
La vetocidaddel motor ha side ajustada en la
fdbr_ca,No trate de aumentar tavetocidaddet
motor pues se pueden produc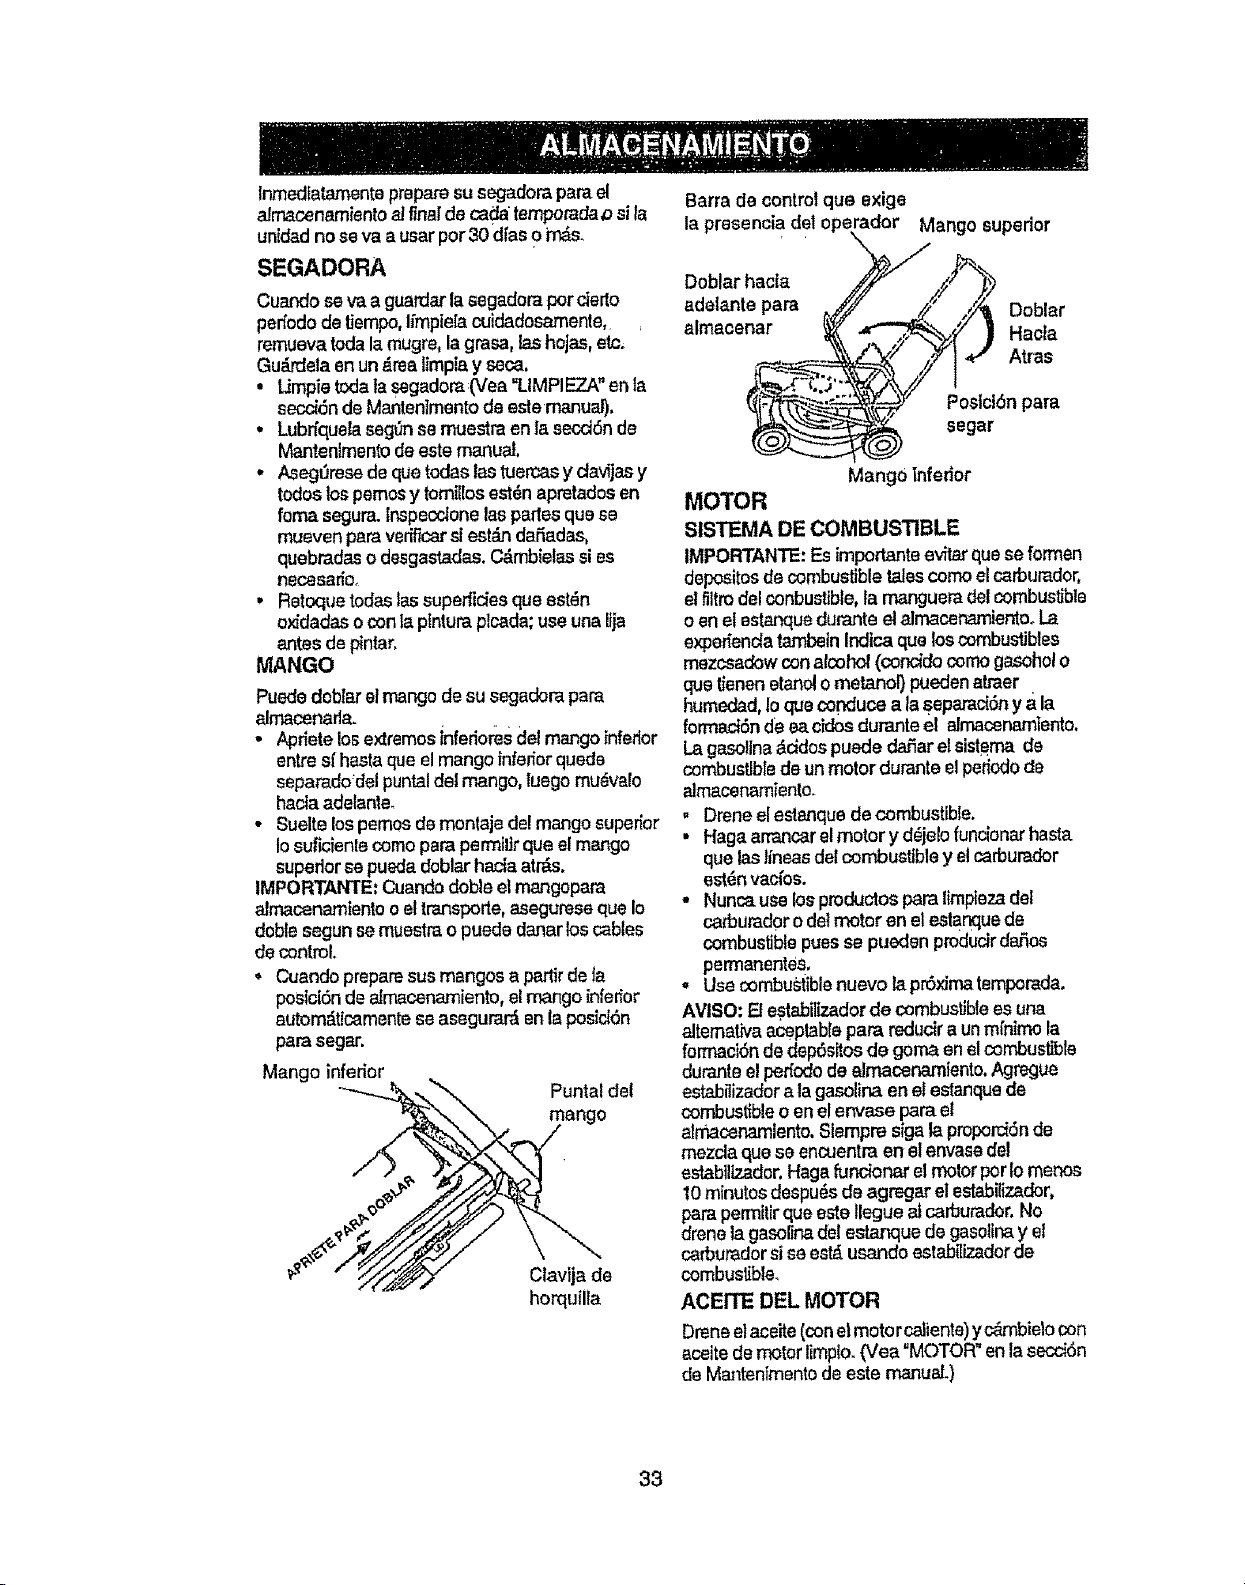
_nmedlatamentepreparesu segadoraparael
almacenamientod f_nai'de cadatemporada_si la
unidadno seva a usarper30 dras0 m_
SEGADORA
Cuando seva a guardar lasegsdora perdertc
per_ododetiempo,I£mpielacuidadosamenle,
remuevatodalamugre,lagrasa,lashojas,etc.
Gu_dela en un_.realimptay seca,
• Utopia t_la tasegadora_(Vea=LIMPIEZA"enIs
seccidnde Mantenimentodeestemanual),
• Lubrfquelasegtln se rnuestreenIs secd6n de
Mantenlmentodeeste manual,
• Asegt_resede quetodas Iss tuercasy davfjas y
tcdos lo_pemosy tomillosest_n apretadosen
foma segura.InspecrJonelaspartesqua ae
muevenpsravefffk_arslest_ da_adas,
quebradasodesgastadas.C&mbielassi es
necasario.
• Retoquetcdas lassuperiides que sst_n
oxidadasoconia ptnturaptcada;useunaIlia
antesdepintar.
MANGO
Puededobrsrelmango desu segadorapare
almacenarla.
• Aprletelosextremesinferiorestie!mango inferior
entresf hastaqua el mango infe._orquede
sepamdo'delpuntaldel mango, luego mu_velo
hscia adelsnte.
• Sueltelospemes de montaje de!mango superior
Iosuficienle comeparaparmil]rque elmango
supedor_e puedadoblarhacis atr@s,
IMPORTANTE:Cuandodoble el mangopam
almacenamiantco el transpode,asegurese qua Io
dobtesegunsemuestrao puede danar loscables
de control.
• Cuandopreparesus mangos a pa_r de Ja
posicidnde almacenamientc, elmango _n|erior
autom_.ticamentese asegurar&enla posicldn
parasegar.
Mango inferior
Puntal del
mango
Clavljsde
horqullla
Barra de controlqua exige
la prasenciadel operador
Doblarhacta
adelante para ,,._
almaoenar
Mango supedor
_ ,,_ Doblar
| I-tacta
.j/ l *" Arras
PostclOnpara
segar
Mango inferior
MOTOR
StSTEMA DE COMBUSTIBLE
IMPORTANTE:Esimportanteevitarquase formen
depositosdecombustible talescome elcarbumdor,
el filtrodel conbuslible,larnangueradel combustible
o en el estanquedurante etalrnacenarnientooL_
exper_endatambelnIndtcaqua loscombustibles
mezcsadowcon alcohol(conddocomegasoholo
quetienanetanolo metanol) puedenstraer
humedad,1oclueconducea laseparac{6ny a la
formad6n deeacldosdurante elalrnacenamlento,
Lagasotlna_ddos puededa,fiarelsistemade
combustibledeunmotor duranteelper_odode
almacanamier_o.
• Dreneel eslanque de combustible.
• Haga armncarel motor y d_jelofuncionarhasta
que lasJfneasdel combustible y elcarburedor
est6nvac{os.
• Nunca uselos pmductos paralimpiezadel
carburadorode_motor en el estanquede
combustible puesse pt,edenproducirda,fos
permanentes,
= Use combustiblenuevo lapr6×imatemporada,
AMISO:Elestabilizadorde combustibleesuna
altemativa aceptabrepara reducira unmfnimo la
formacidnde dep6sitosde gorn_ enel combust_le
duranteelperfedode almacer_..miento,Agregue
estabUizsdora tagasolinaan etestanquede
combus_fbleo en el envase parael
atrnacenamlento,Siempre sigala proporct6nde
mezclaqua seencuentraen elenvasedel
estab!ltzador,Hagafuncionar el motorperIomanes
10m{nutosdespu_sde agregar el estabil{zador,
para permitirqua este llegue al carburador. No
drene la gasolir_ del estanque degasolinay el
carburadorsi seest_ usando estab_izadorde
combustible.
ACEITE DEL MOTOR
Drenaelaceite(conel motor celienta)yc_nbielo con
aceitede motor limp_o.(Vea "MOTOR"en lasecd6n
de Man[entmentcde este manual.}
33
C!LINDRO
. Remuev_ _abujl'a,
• Vacieuna onza (29 ml)de aceite a travdsdel
aguiero de la bujfaon elcitindroo
• Tire la manlllade amanquetentamenteunas
cuantasraces para distribuirel aceite.
• Vuetva a montarlanuevabujla,
OTROS
• No guards la gasolinedo una temperers a Is
otta.
, Cambie elenvasedelagasolineslseempiezaa
oxidar.Laoxldaci6nylolamugreonsugasoline
producirdnpmblemas,
• Si esposlbte,guards su unidad en un recinto
corrode ycSbralaparsprotegerlacentre el polvo
y la mugre.
• Cubrasuunidadcon un form protectoradecuado
qua no retenga_ humeded.No use pl_st_co,[]
pld_co no pusderespirar,Ioqua pennltela
formaciSnde condensaciSn,Ioqua producir&la
o_ddaci6nde suunidad.
IMPORTANTE: NLmCacubralasegsdoraMientras
motor y las areasdoescapetodavia estancalientel,
_LPRECAUCI6N: Nunca almacenela segadora
con gasoiinaen el est_que dentrodeuned_ficioen
donde losgases puedenalcanzar unallama
expuesla o una cNspa.Perrnitaqua se enfrieel
motor antes de a_rnacenartaen elgin mcinto
cerrado.
DENTIFiCACI6N DE PROBLEMAS
-'-PROBLEMA'' cAUSA ....................................
i ,ll i i i ii i
No arranca • Fiitro de airs sucio_
• Sin combustible,
•Combustiblerancio.
•Ague en el combustible.
• Alambre de ta bujia
desconectado.
•Buj|a male,
• Cuchiltasuelta o edaptador
de la cuchillaquebrado.
, Berm de contmt on la postol6n
suelta.
•Barra de conlroldefectuosa.
HHHHI , , I ,I ,.,J,
Felts de fuerza •Parte trasera de la cajacuchilla_
de la segadoraarrastr_ndose
en el cesped pesado.
• Est,. oortandotouche c_sped
CORRECCK_N
• Ur pieloambioel'fili,o"de' ;i i
• Liensel estanque de combustible°
• Drone el estanquey vuetva a
]lenarlocon combustiblelimpio y
RUeVO,
• Drone el estanquede combustibley
el carburadory vuelva a Uenare!
estanque con gasolinanueva.
"Coneote el alambre ala buji'a,
,, Cambie la bujfa.
• Apriete el pemo de la cuchitla o
csmbie el adaptador de Ia cuchilla.
• Presione la barra de controlhacia el
mango.
• Cambte la barra de control
, ,,J L i,i i, ,,,, ,iJ ,I,,,,L L i
• AIuste ata poslcl6nde "Corte m_,s
alto.
• Ajuste ata posict6n de "Corte m&s
alto."
• Filtrode atre sucio,
• Acumulac_6n de cesped, hojas_
y basuradebajo de la saga-
dora.
,Demasiado aceite en elmotor,
Llmple/cambieel filtrode airs,
Limple la parte inferior de tacaja de
la segadora.
Revise et nivel del aceite_
34
PROBLEMA
Mal corte- disparejo
Vibraei6n exces_va
Cord6n arrancador
diffcif de tirar
Recogedor de c_sped
no se Itena (st viene
equtpado)
Diffcil de empujar
CAUSA
• Cuchtlla desgastadal doblada o
suelta
• AItura de las fuedas dispareja
• Acumulaci6n de c_sped, hojas o
basura debajo de la segadora
,, Cuchilla desgastada, doblada o
suelta_
* CiguefiaI del motordobladoo
,, Et freno del volantedel motor
est_ apiicado cuando se suelta
la barra de control
• Ciguedal del motor doblado.
Adaptador de la cuchilla
quebrado
La cuchillase arrastra en el
c_sped
Attura de corte demasiado
baja
Levantamtento de lacuchilla
desgastado
Recogedor sin ventJtaciSnde
aire
Elc_sped est& demasiado alto
o la alturade ta rueda dema_
siado baja
Parte trasera de fa caja!cuchilta
de ta segadora arrastr_ndose
en elc6sped
Recogedor de c_sped dema-
siado liens
Posici6n de la alturadel mango
no adecuada para usted
C0RRECCI6N ..........
Cambie la cuchilla Apriete el
pemo de la cuchltla
Ajuste todas las ruedas a la
misma altura
Limpie la parts infedor de la caja
de la segadorao
Cambie la cuchilla Apdete et
pemo de ta cuchilla
P6ngase en contacts con su
centro de servicio autor_zado
m#s oereano
Preslone la barra de control
hacia el mango superior antes de
tirar e! cordcln arrancador
P6ngase en contacts con su
centro de servicio autorizado
m&s cercano.
Cambie el adaptador de ta
cuchilla
Mueva ta segadora a un lugar en
donde el c_sped ha sido cortado
o a una superficte fitme para
hacer arrancar e!motor;
Eieve la altura de corte°
Cambte la cuchil_as.
Ltmpie et recogedor de c#spedo
Eleve la altura de code
Eleve la parte trasera de la caja dE
la segadora (1) un lugar m&s atto
Vacie el reeogedor de c_sped
Ajuste ta altura del mango de
mode que le acomode
35

36
ROTARY LAWN MOWER - - MODEL NO. 917,377522
GEAR CASE ASSEMBLY PART NUMBER 702511
I
l
17
7
6
KEY PART
NO. NO.
1 17490416
2 137085X004
3 137053
4 57072
8 48373
7 77881
8 13705 t
8 137074
DESCRIPTION
TappingScrew 1/4_20
1-1t4
EngagementBracket
Shifter "
Seal
Gear Case Halves Kit
(includesKeyNos. 4, 5,
and 7)
Bearing
Worm Shaft
DriveShaft
KEY PART
NO. NO.
DESCRIPTION
10 57079 Hardened Washer
11 131484 ClutchYoke
12 700343 Bushing
I3 86447 Plug
14 137050 HelicalGear
15 750436X ClutchJaw
16 750369 Grease
17 12000003 E-Ring
18 850848 Hi-Pro Kay
19 81585X004 Spring Bracket
NOTE: All component dimensions given
in UoS. inches, 1 inch = 25,4 mm
37
N
W
Z
--I
111
0
U_
0
Z
0
n-
38
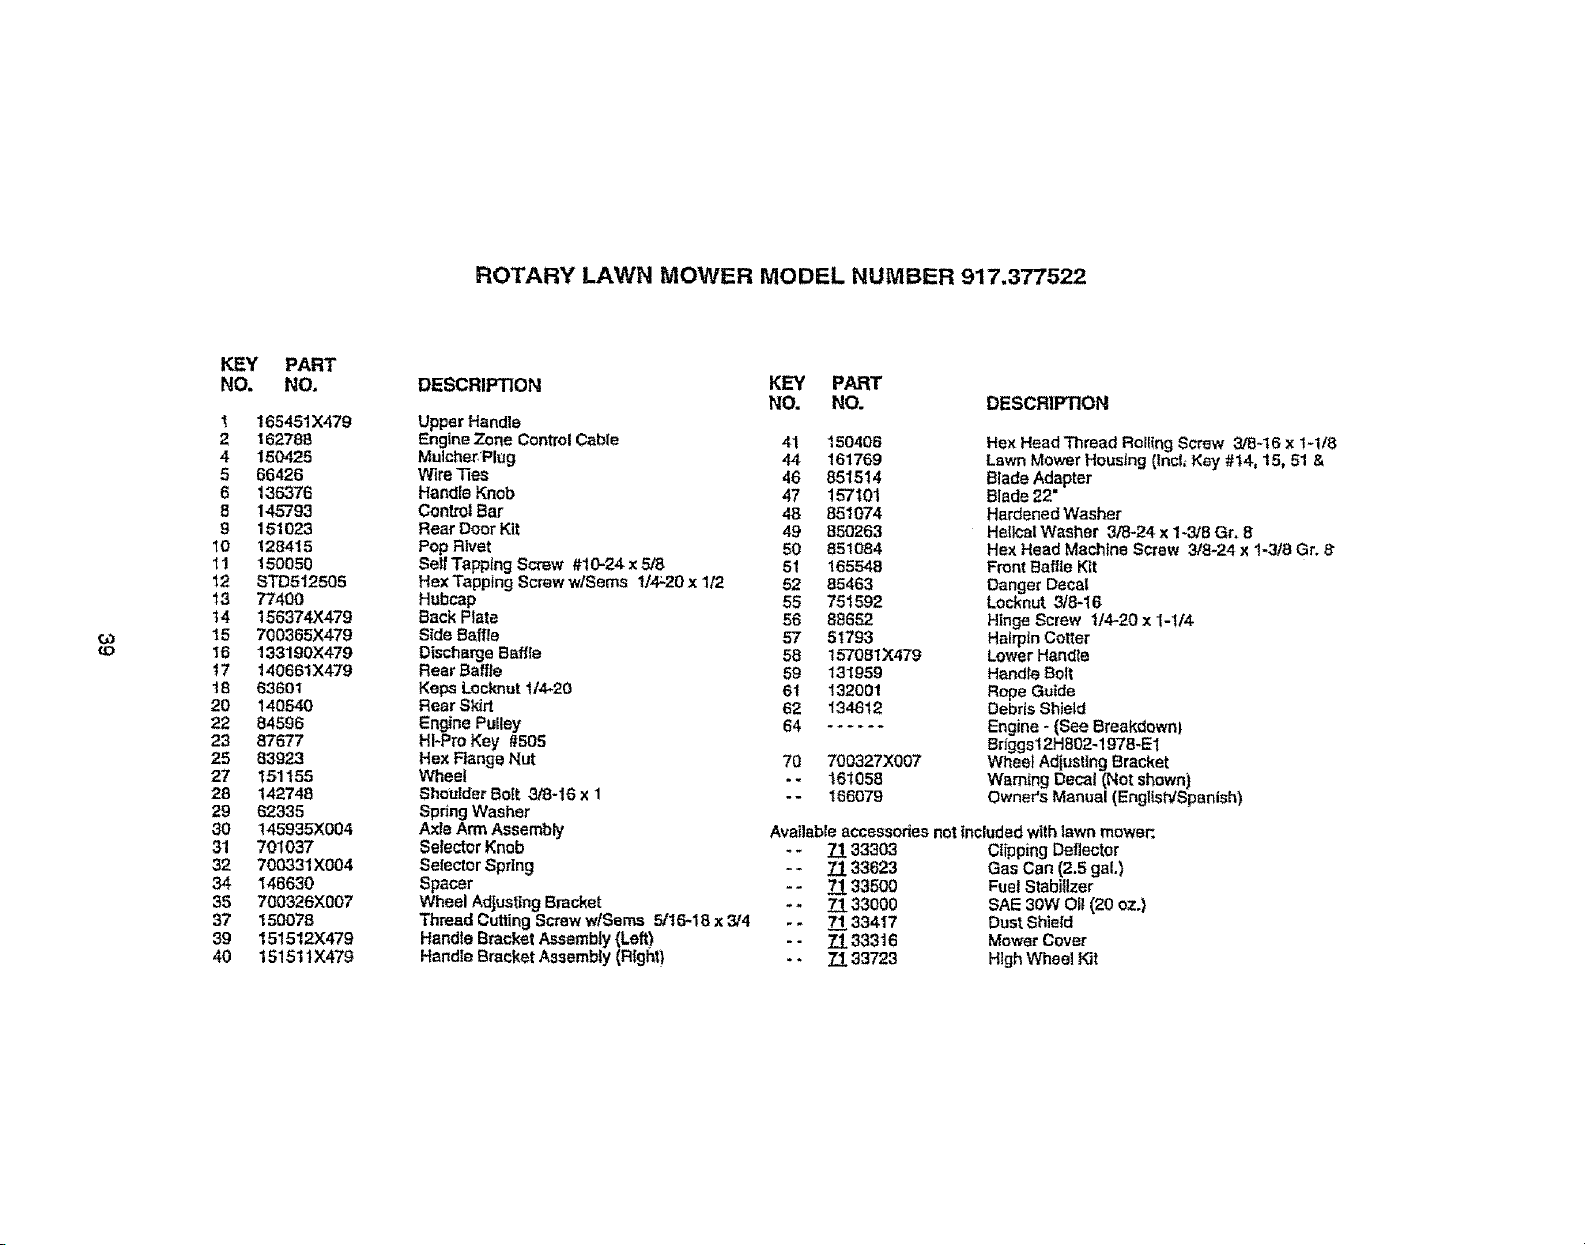
ROTARY LAWN MOWER MODEL NUMBER 917.377522
LO
KEY PART
NO. NO.
t 165451X479
2 162786
4 150425
5 66426
6 136376
6 145793
9 151023
10 128415
1! 150050
12 STD512505
13 77400
t 4 156374)(479
15 700365X479
16 133190X479
t 7 140661 X479
16 83801
20 140540
22 84596
23 67677
25 83923
27 t51155
28 142748
29 62335
30 145935X004
31 701037
32 700331 )(004
34 146630
35 700326X007
37 150078
39 151512X479
40 1515tlX479
DESCRIPTION KEY PART
NO. NO. DESCRIPTION
Upper Handle
EngineZone ControlCabie 41 t 50406
Mulcher:Plug 44 161769
Wlre -lies 46 851514
HandleKnob 47 157101
Control Bar 48 851074
Roar DoorKit 49 850263
Pop Rivet 50 851084
Self Tapping Screw #10-24 x 5/8 51 165548
HexTapping Screw w/Sems 1/4;-20x 1/2 52 85463
Hubcap 55 751592
Sack Plata 56 88652
Side Baffle 57 81793
DischargeBaffIe 58 t57081X479
Rear Baffle 59 131g5g
Keps Locknutt/4-20 61 132001
Roar Skirt 62 134612
Engine Pulley 64 ......
HFPro Key #505
Hex Flange Nut 70 700327X007
Wheel - - 161058
ShoulderBoit 3/8-t6 x 1 - - 166079
SpringWasher
Axte Arm Assembly
$etector Kneb
SelectorSpring
Spacer
Wheel Adjus_ng Bracket
Thread CuttingScrew wlSems 5/16-18 x 3,'4
Handle Bracket Assembty (Left)
Handle Bracket Assembly(Right)
Hex HeadThread RoliingScrew 3/8-16 x t-118
Lawn Mower Housing(lnc{_Key #14, 15, 51 &
Blade Adapter
Blade 22"
HardenedWasher
Helical Washer 3/8-24 x 1-3/6 Gr. 8
Hex Head Machine Screw 3/8-24 x 1-3/8 Gr. 8"
Front Baffle Kit
Danger Decal
Locknut 318-16
Hinge Screw t14-20 x 1-t14
HairpinCotter
LowerHandle
Handle Bolt
Rope Guide
Debris Shield
Engine- (See Breakdownl
Bdggs12H802-!978-E1
Wheel Adiusting Bracket
Warning Decal (Not shown)
Owner'sManual (Englis_Spanish)
Available accessories not included with _wn mower:.
.. 71 33303 CiippingDeflector
- - 71 33623 Gas Can (2.5 gal.)
- - 71 33500 Fuel Stabilizer
- * 71 33000 SAE 30W Oil (20 oz.)
- - 71 33417 DustShield
- - 71 333t 6 MowerCover
- * 71 33723 HighWheel Kit

N
N
LO
r-,
uJ
_n
.J
uJ
Q
0
o
Z
>.
• 40
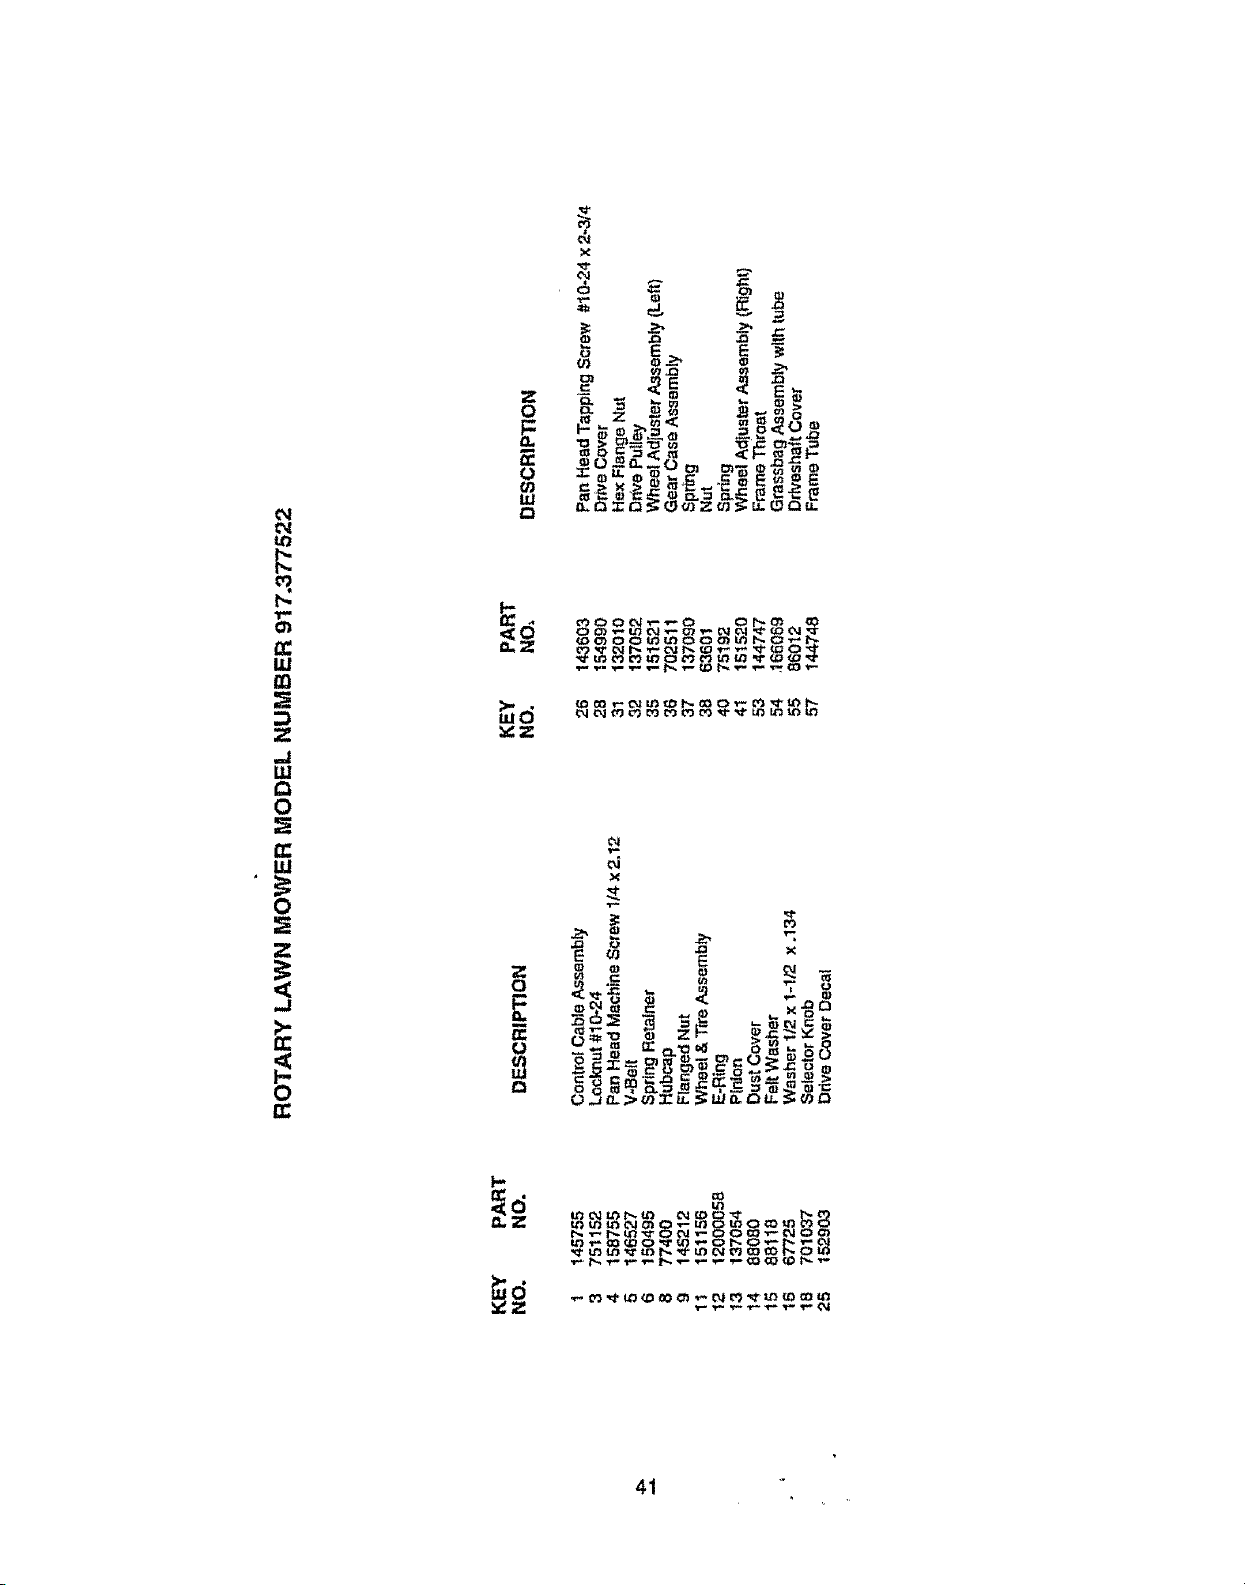
h-
Ill
a]
Z
_J
W
0
W
0
Z
<
..J
0
r_
Z
0
0
tU
L3
<0
o-2:
_z
z
Q
_oo_oo__
14
<o
_Z
_z
41
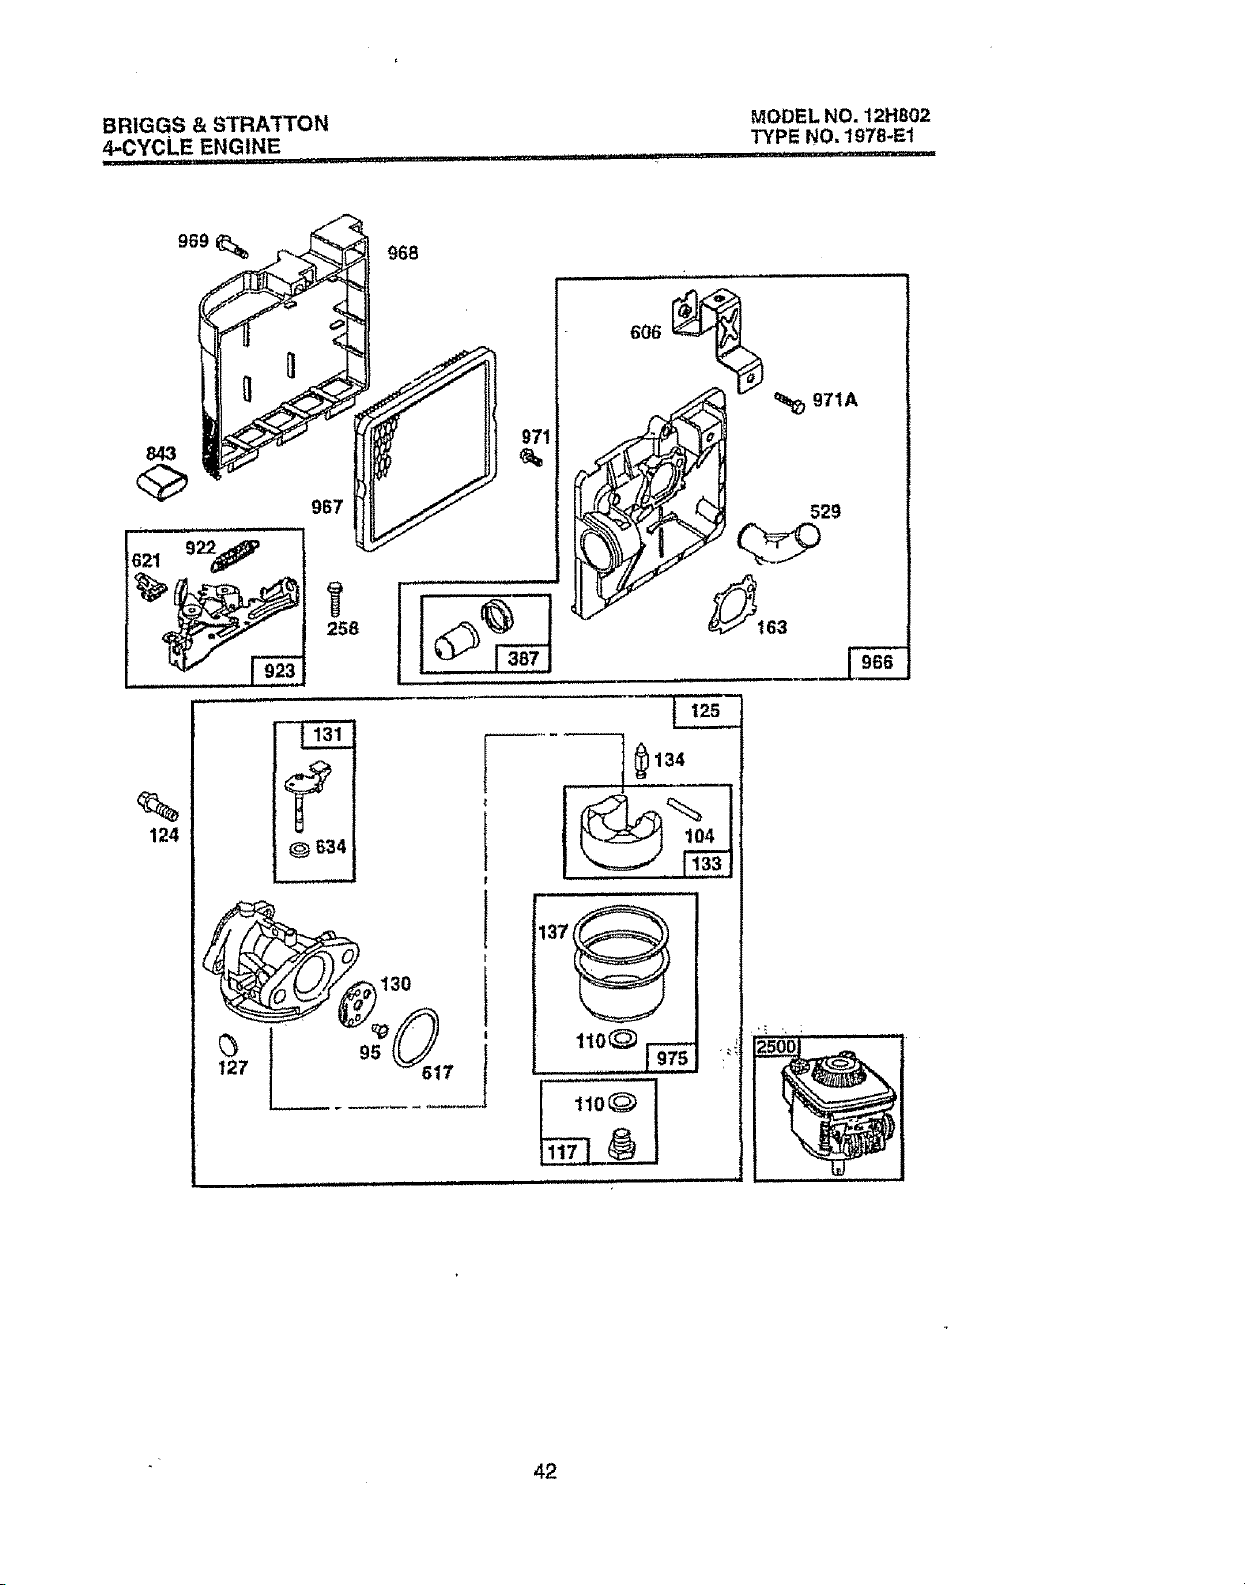
BRIGGS & STRA'TTON
4,-CYCLE ENGINE
................. ii, i i ..=_,,i i,i ............ i ....................
MODEL NO. 12H802
TYPE NO, 1978-E1
_1 9_f
%
124
967
_t_1
E
_;_ 634
_130
127 7
971A
529
_163
1100
i i iqllqqqNqUpllllpqql iiii
_ 42
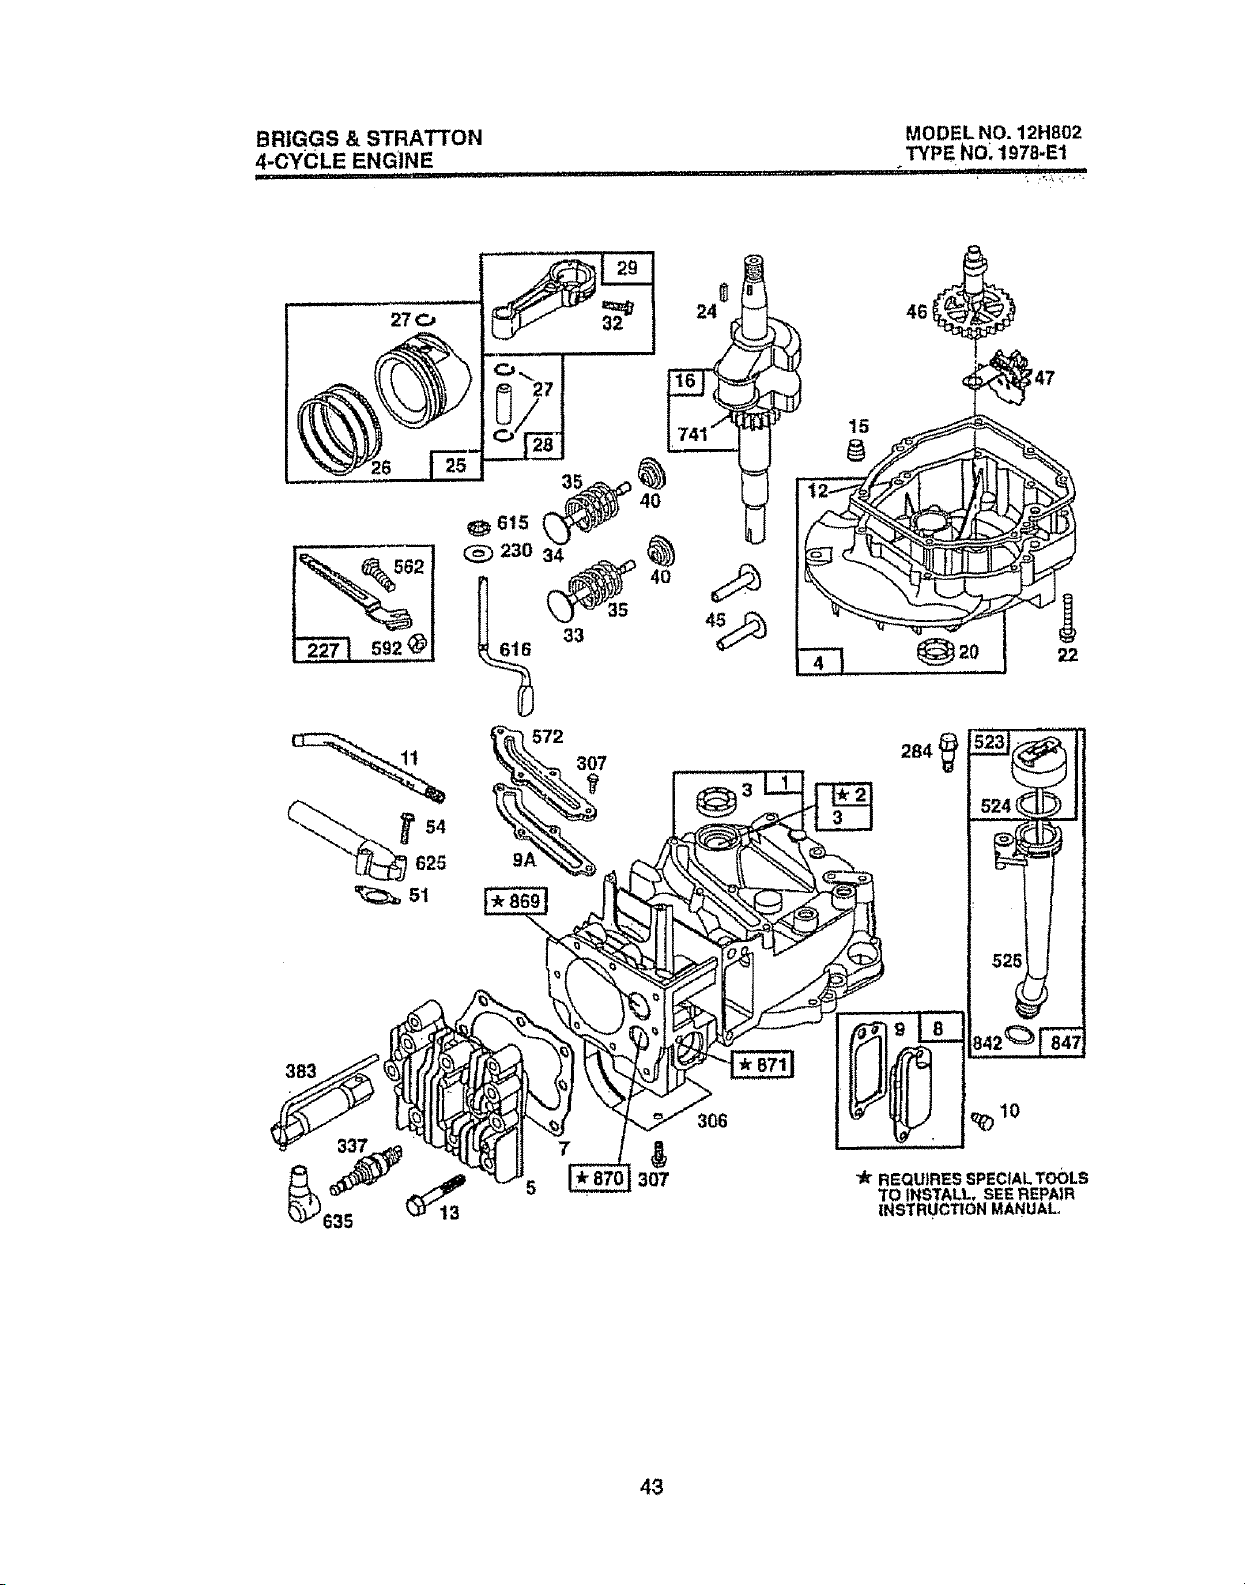
BRIGGS & STRATTON
4-CYCLE ENGINE
MODEL NO. 12H802
TYPE NO: 1978-E1
.................. 29
27°
615 I_
33
625
24 46
383
3O7
REQUIRES SPECIAL TOOLS
TO INSTALL, SEE REPAIR
INSTRUCTION MANUAL
43
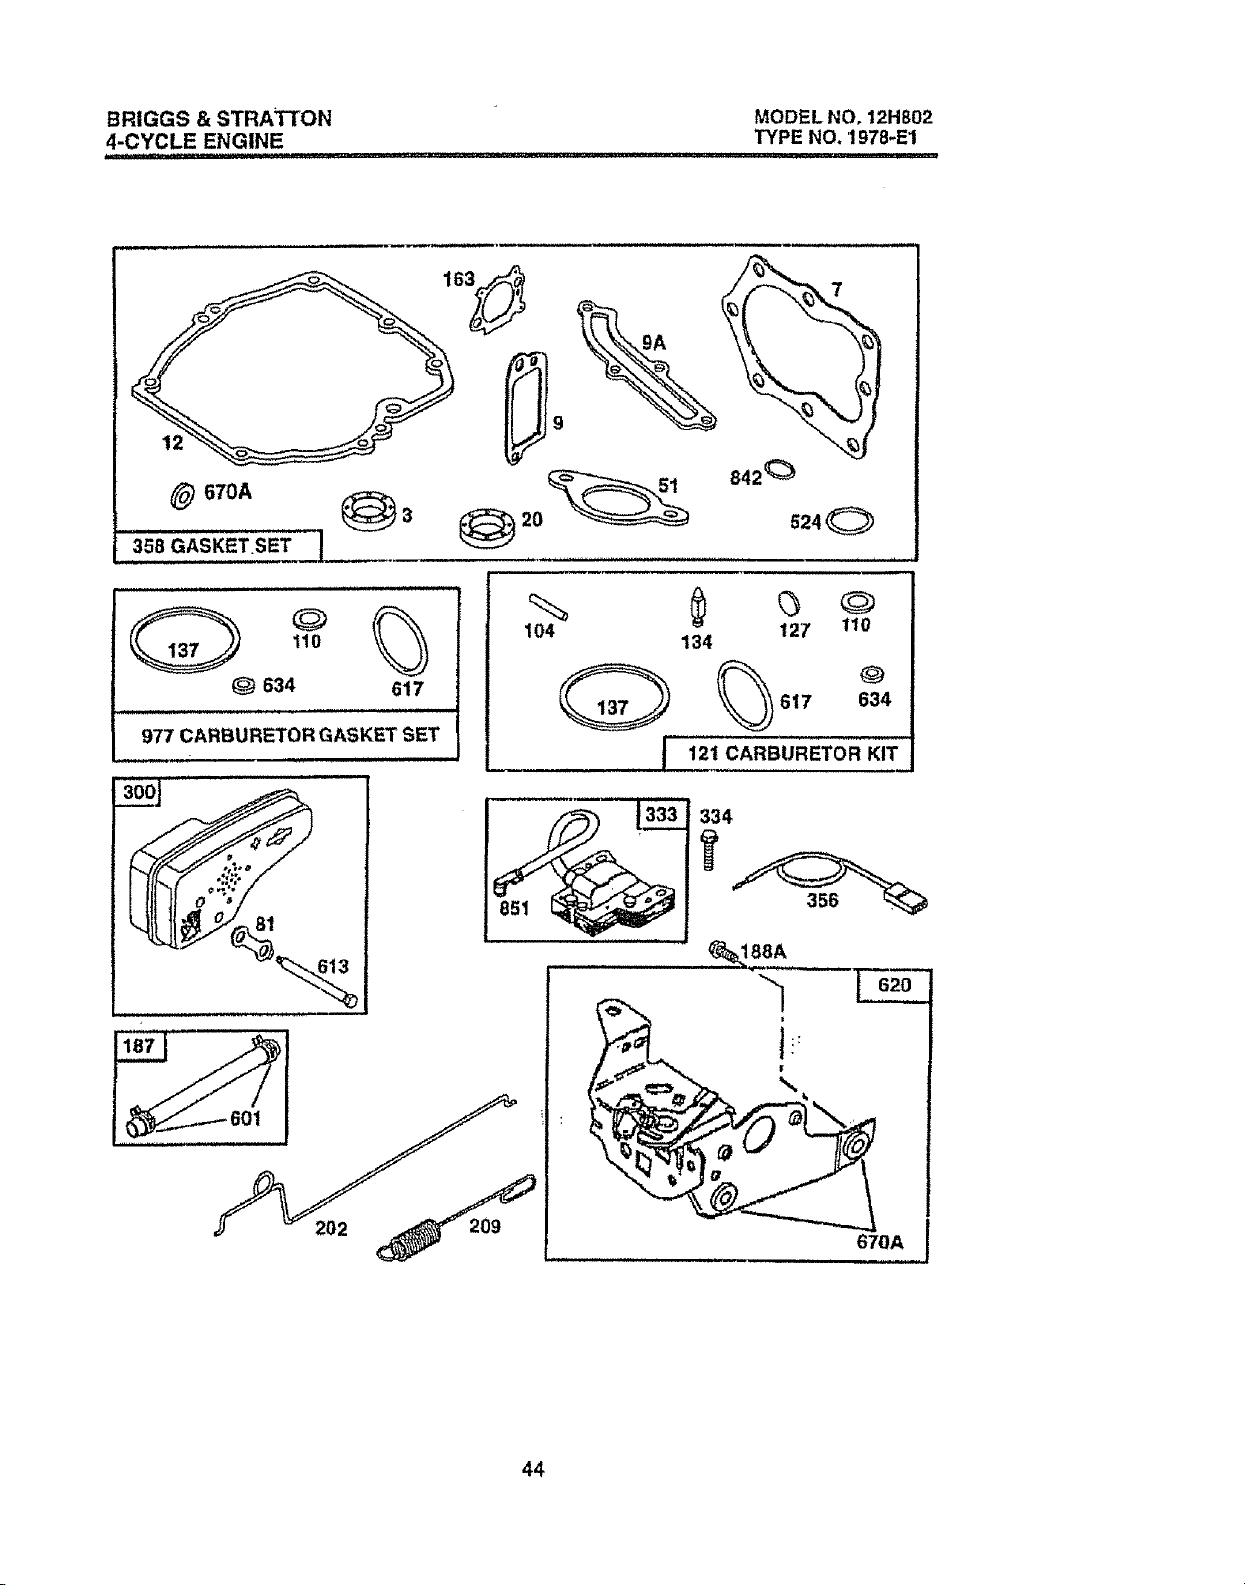
BRIGGS & STRATTON
4-CYCLE ENGINE
........ i, i
MODEL NO, 12H802
TYPE NO. 1978-E1
670A _ 3
358 GASKET,SET J
e420
524 0
, i ii i
110
(_ 634 617
977 CARBURETOR GASKET SET
104
I
12'/' 110
134
°
617 634
121 CARBURETOR KIT
!
334
356
44
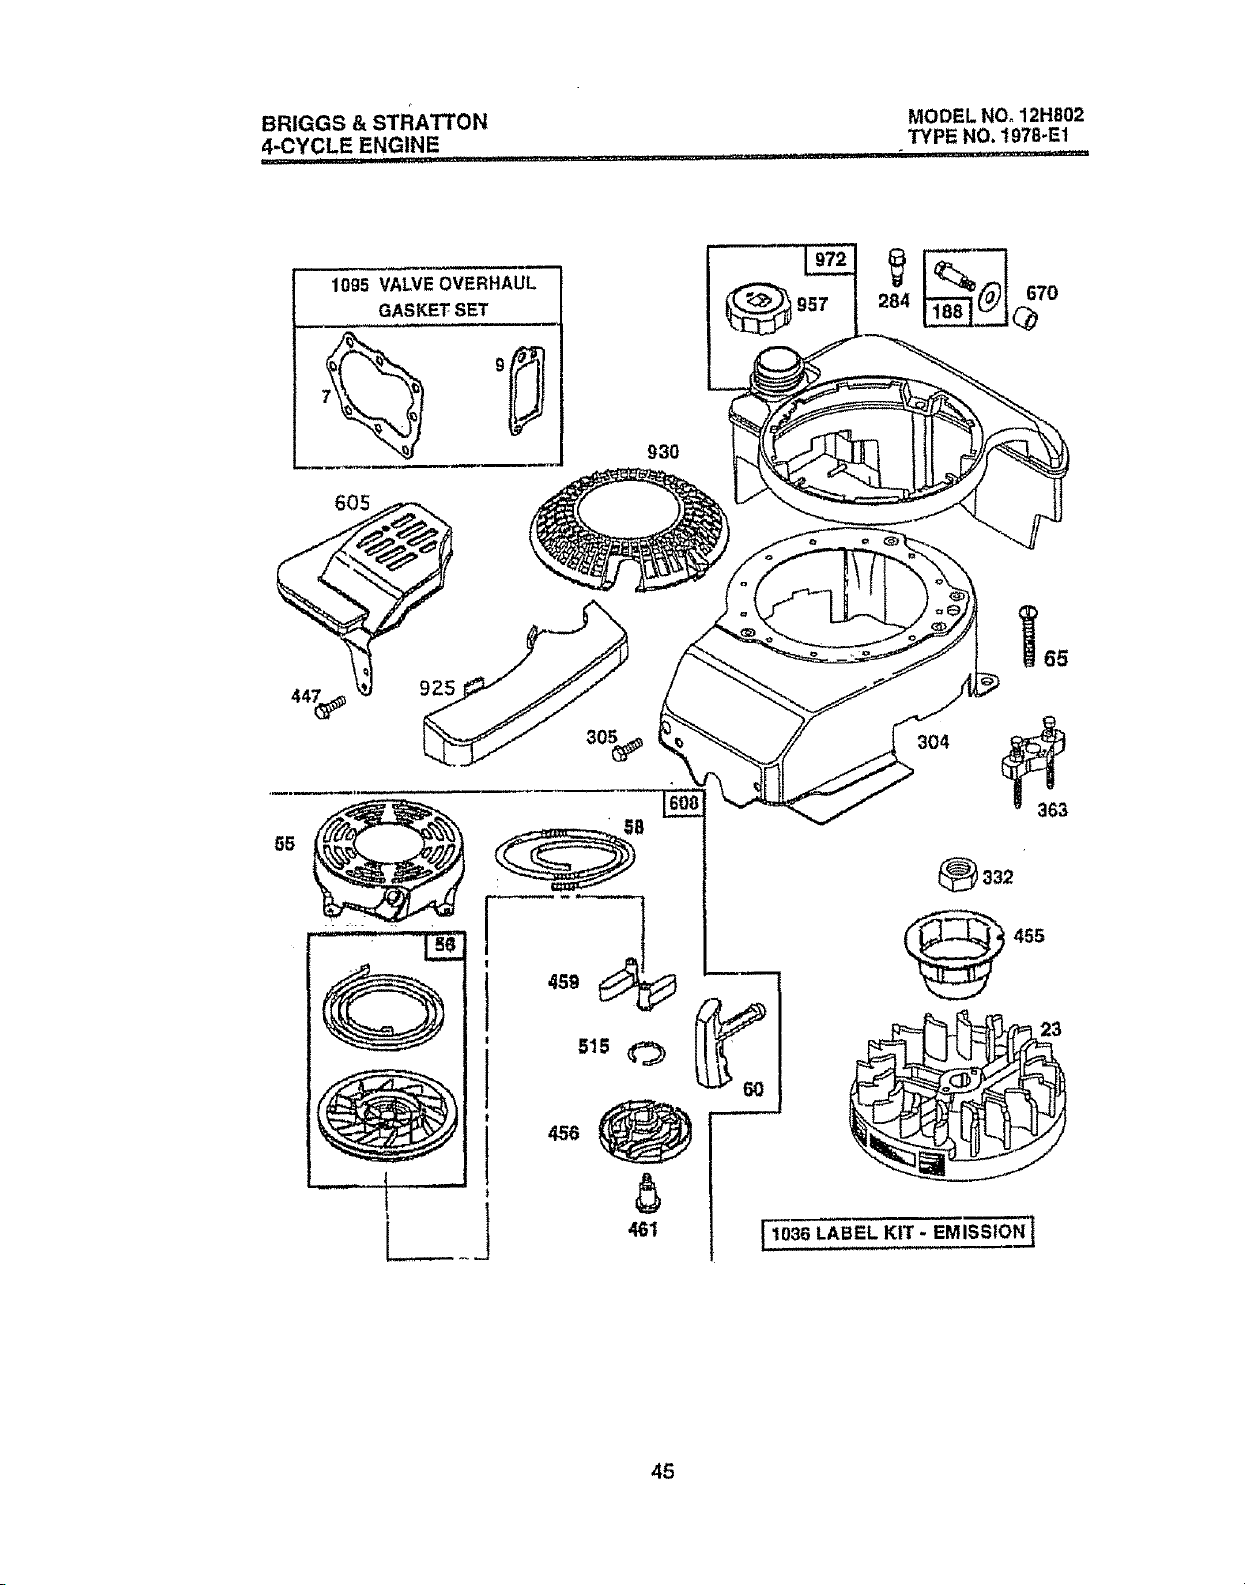
BRIGGS & sTRATTON MODEL NO. 12H802
4-CYCLE ENGIN E TYPE NO. 1978-E1
1095 VALVE OVERHAUL
GASKET SET
55
65
Q
1
5150 _
_ 332
455
rio36 LABEL KIT - EMISSION 1
45
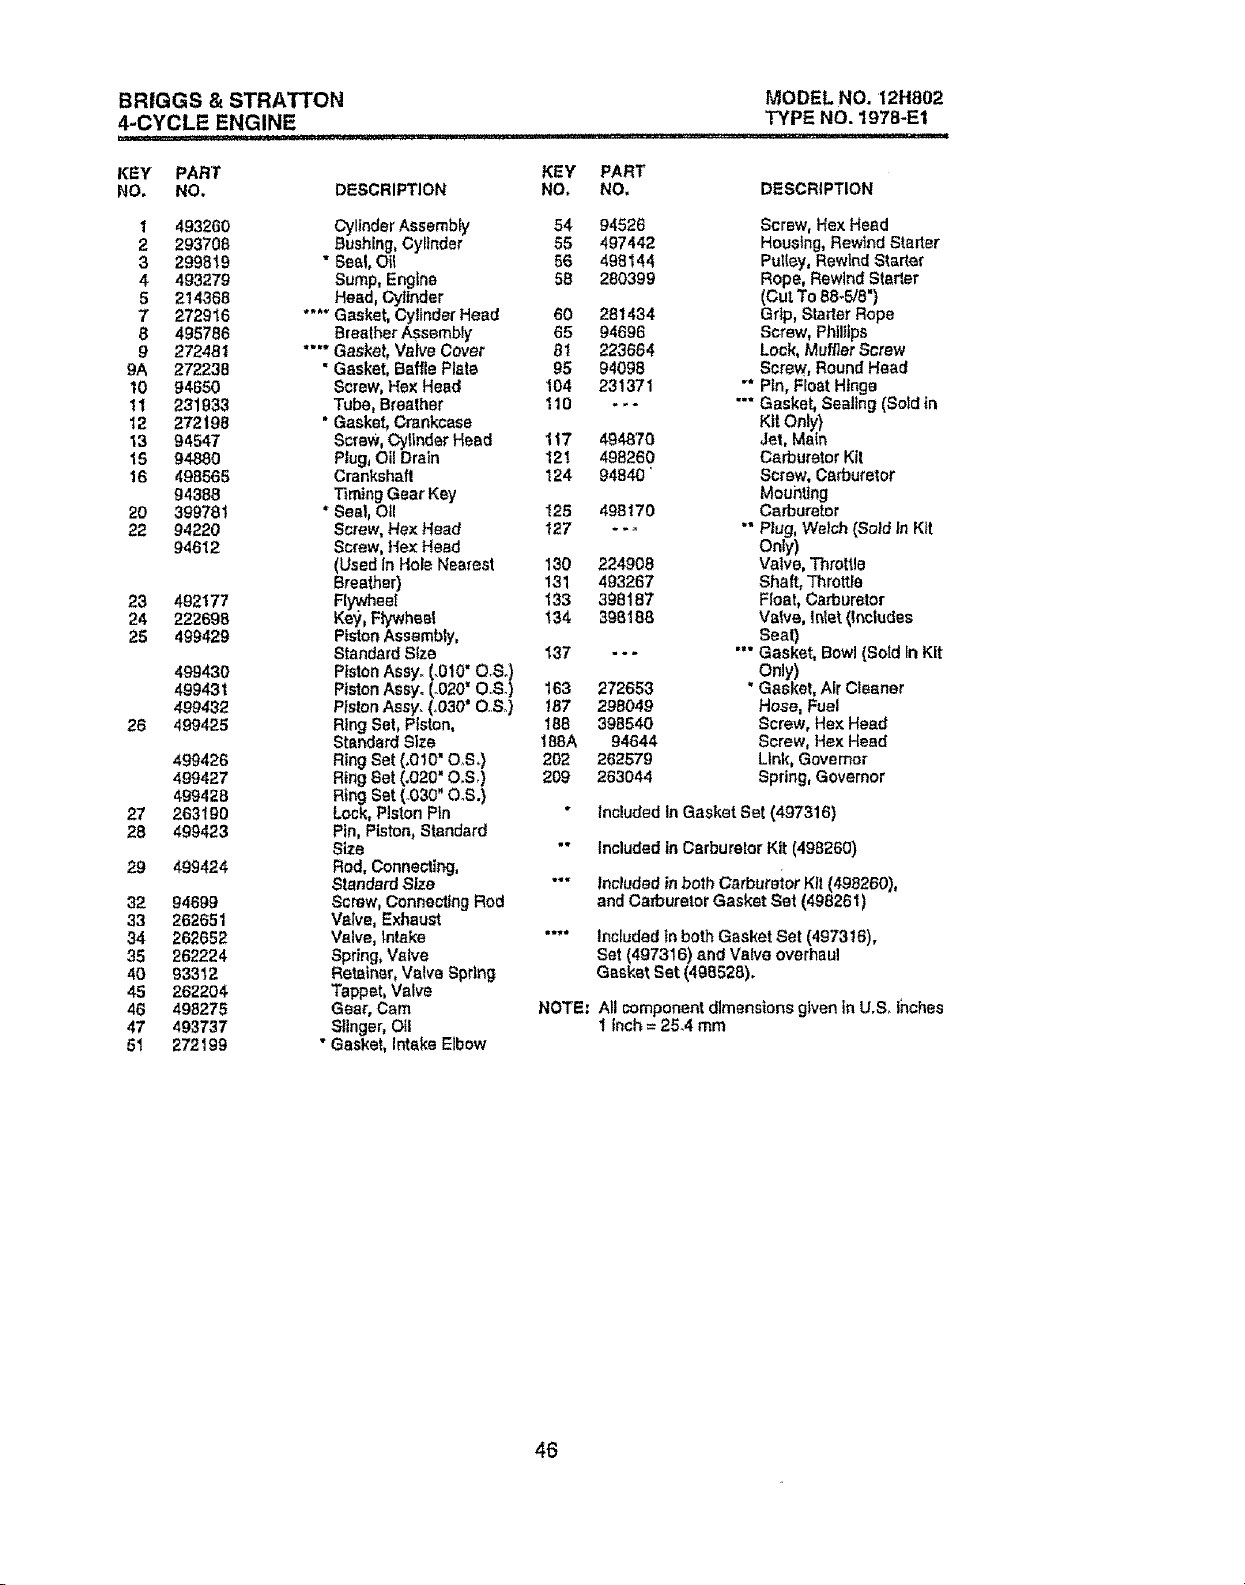
BR|GGS & STRATTON MODEL NO. 12H802
4-CYCLE ENGINE TYPE NO. 197B-E1
KEY PAR]" KEY PART
NO. NO. DESCRIPTION NO. NO. DESCRIPTION
1 493260 Cylinder Assembly 54 94528 Screw, Hex Head
2 293708 Bushing, Cylinder 55 497442 Housing, RewindStarter
3 299819 " Seal, OI_ 56 498144 Pul{ey, Rewind Starter
4 493279 Sump, Engine 58 280399 Rope, Rewind Starter
5 2t 4368 Head,Cylinder (Cut To 88+5/8")
7" 272916 .... Gasket, CylinderHead 60 281434 Grip,StarterRope
8 495786 BreatherAssembly 65 94696 Screw, Philitps
9 272481 .... Gasket,Valve Cover 8t 223664 Lock, Muffler Screw
9A 272238 "Gasket, BafflePlate 95 94098 Screw, Round Head
10 94650 Screw,He× Head 104 23!371 "*Pin, Float Hinge
11 231933 Tube, Breather 110 . +- "" Gasket, Sealing(Sold in
12 272t 98 " Gasket,Crankcase Kit Only)
13 94547 ScreW,CylinderHead 117 494870 Jet, Main
15 94880 Plug+Oif Drain 121 498260 Carburetor Kit
16 498565 Crankshaft 124 94840' Screw, Carburetor
94388 T_mingGear Key Mouilttng
20 399781 "Seat+ O11 125 498170 Carburetor
22 94220 Screw,He× Head 127 - -° "" Plug,Welch (Sold In Kit
94612 Screw,Hex Head Only)
(UsedIn Hole Nearest 130 224908 Valve, Throttle
Breather) 131 493267 Shaft, Throttre
23 492177 Flywheel 133 398187 Float, Carburetor
24 222695 Key, Flywheat !34 398188 Verve,tnlet(Includes
25 499429 Piston Assembly, Seat)
Standard Size 137 - - - "'" Gasket, Bowl (Sold In Kit
499430 Piston Assy. (_01O"US.) Only)
49943t PistonAssy.(_020'O..S+) 163 272653 "Gasket, AErCleaner
499432 PistonAssy. (.030' 03.) t67 298049 Hose, Fuel
26 499425 Ring Set, Piston, I88 398540 Screw, Hex Head
StandardSize 188A 94644 Screw, Hex Head
499426 RingSet (+010' O_S+) 202 262679 Link,Governor
499427 RingSet (.020=O.S+) 209 263044 Spring,Governor
49942-8 Ring Set(+030"O.S.)
27 263190 Lock,Piston Pin includedIn Gasket Set (497316)
28 499423 Pin, Piston, Standard
Size "" Included in Carburetor Kit (498260)
29 499424 Rod,Connecting,
Standard S_e "* Included inboth CarburaiorKII (498260),
32 94699 Screw,ConnectingRod and Carburetor Gasket Set (49828I)
33 262651 Valve, Exhaust
34 262652 Valve, Intake .... IncludedIn both Gasket Set (497316),
95 262224 Spring, Valve Set (497316) and Valve overhaul
40 93312 Retainer, Valve Spring Ga_kBtSet (498528).
45 262204 Tappet, Valve
46 498276 Gear, Cam NOTE: All component dimensions gtvenin U.S+inches
47 493737 Slinger, O{I t inch= 25.4 mm
51 272199 "Gasket, IntakeElbow
46
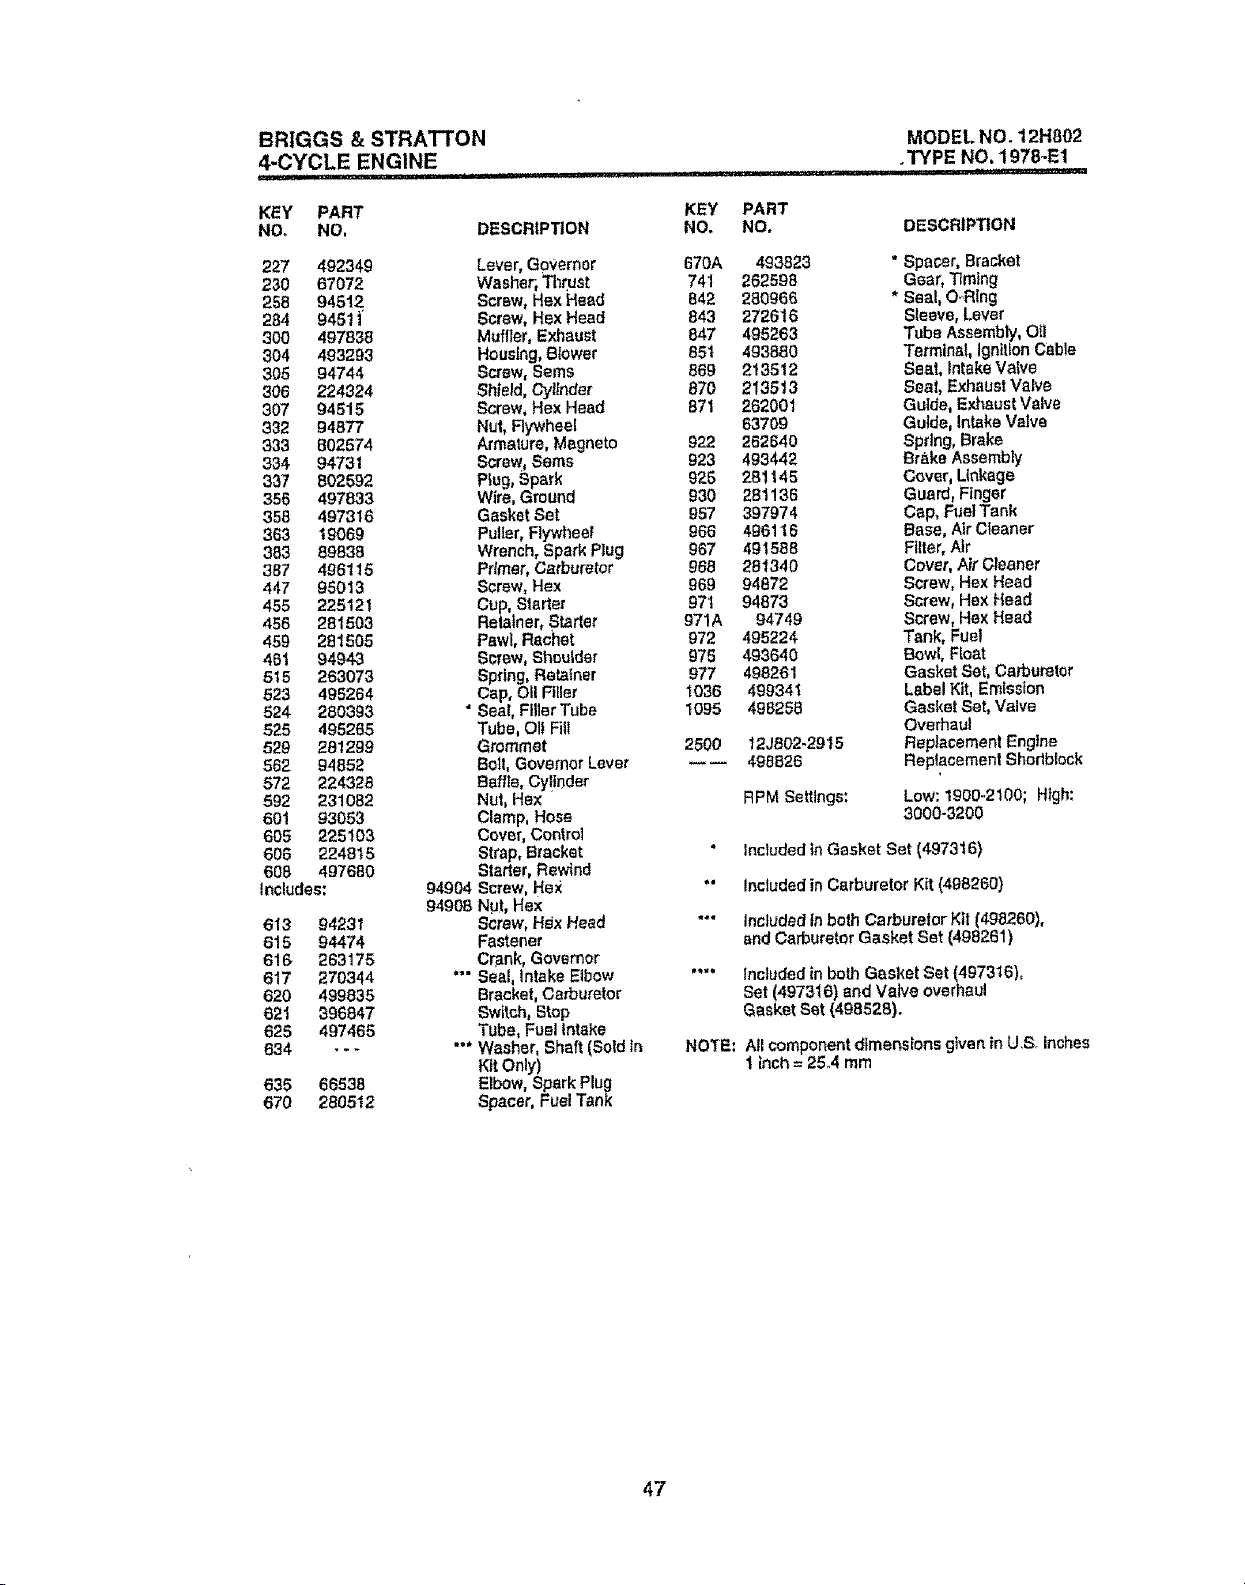
BRIGGS & STRATTON
4-CYCLE ENGINE
MODEL NO. 12H802
. TYPE NO, 1 978-E1
i!pll , .,=;3
KEY PART
NO, NO,
227 492349
230 67072
258 94512
264 9451[
300 497838
304 493293
365 94744
306 224324
307 94515
332 94877
333 802574
334 94731
337 802592
356 497833
358 497316
363 19069
383 89838
387 406115
447 95013
455 225121
456 281503
459 281505
461 94943
5t5 263073
523 495264
624 280393
525 495265
529 281299
562 94652
572 224328
592 231082
60t g3063
605 225103
606 224815
608 497680
includes:
613 94231
615 94474
6!6 263175
617 270344
620 499835
621 386847
625 497465
634 ---
635 66538
670 280512
KEY PART
DESCRIPTION NO. NO,
Lever,Governor 670A 493823
Washer; Thrust 741 262598
Screw, Hex Head 842 280966
Screw, HexHead 843 2726t6
Muffler, Exhaust 847 495263
Housing, Blower 85t 483880
Screw, Sems 869 213512
Sh|eld, Cylinder 870 213513
Screw. Hex }-lead 871 262001
Nut.Flywheel 63709
Armature, Magneto 922 262640
Scre,,?,Seres 923 493442
Plug,Spark 925 281145
Wire,Gmund 830 281136
GasketSet 957 397974
Puller,Flywheet 966 496116
Wrench,Spark Plug 967 491588
Primer.Carburetor 968 281340
Screw.Hex 869 94872
Cup, Starter 97t 94873
Retainer, Starter 971A 94749
Pawl,Rachet 972 495224
Screw, Shoulder 975 493640
Spdng,Rata{nor 977 498261
Cap, Oil Filler 1036 499341
• Seal, FillerTube 1095 498258
Tube, OIt FlU
Grommet 2560 12J802-2915
Boll, Governor Lever ---- 498826
Baffle. Cylinder
Nut, Hex RPM Settings:
Clamp, Hose
Cover,Control
Strap,Bracket
Starter,Rewind
94904 Screw,Hex
94908 N_Jt,Hex
Screw, Hsx Head
Fastener
Cr'4nk,Governor
*'" Seal,intake Elbow ....
Bracket, Carburetor
Switch,Step
Tube, FuelIntake
"* Washer, Shaft [Sold In NOTE:
KitOnly)
Elbow,Spark Plug
Spacer, Fuel Tank
DESCRIPTION
* Spacer, Bracket
Gear, T_ming
* Seal, O..Rlng
Sleeve,Lever
Tube Assembly, Oil
Terminal, Ignition Cable
Seat, intakeValve
Seal, Exhaust Valve
Gulda, Exhaust Valve
Guide, Intake Valve
Spring,Brake
Brake Assembly
Cover, Linkage
Guard, Finger
Cap, FuelTank
Base, Air Cleaner
Filter, Air
Cover, Air Cleaner
Screw, Hex Heed
Screw, Hex triead
Screw, Hex Head
Tank. Fuel
Bowl, Float
Gasket Set, Carburetor
LabelKit, Emission
Gasket Set, Valve
Overhaul
ReplacementEngine
ReplacementShodbleck
Low:1900-2100; High:
3000-3200
" Included in Gasket Set (497316)
"" Included in Carburetor Kit (498260)
"" Included In both Carburetor Kit (498260),
end Carburetor Gasket Set (498261)
Included in bothGasket Set (497316),
Set (497316) and Valve overhaul
GasketSet (498528).
Allcomponentdimensionsgivenin U.S. inches
1 inch= 25.4 ram
47
Fortherepairorreplacementpartsyouneed
delivereddirectlytoyourhome
Call7am- 7pro,7daysaweek
1-800-366-PART
(1-800-366-7278)
Pare ordenar piezas con entrega a
domicilio - 1-800-659-7084
For in-house major brand repair service
Call 24 hours a day, 7 days a week
1-800-4-REPAIR
(1-800..473-7274)
Pare pedlr servicio de reparaci6n a
domicilio - 1-800-676-5811
For tile location of a Sears Parts and
Repair center in your area
Call 24 hours a day, 7 days a week
1-800-488-1222
For information on purchasing a Sears
Maintenanc e Agreement or to inquire
about an existing Agreement
Call 9 am - 5 pro, Monday-Saturday
1-800.,827-6655
When requesting service or Ordering
parts, always provide the following
information:
=Product Type • Part Number
° Model Number ° Part Description
6EZ4RS
Americas RepalrSpecia/rsts
166079 12.03.98 VB Printed in U.S.A.