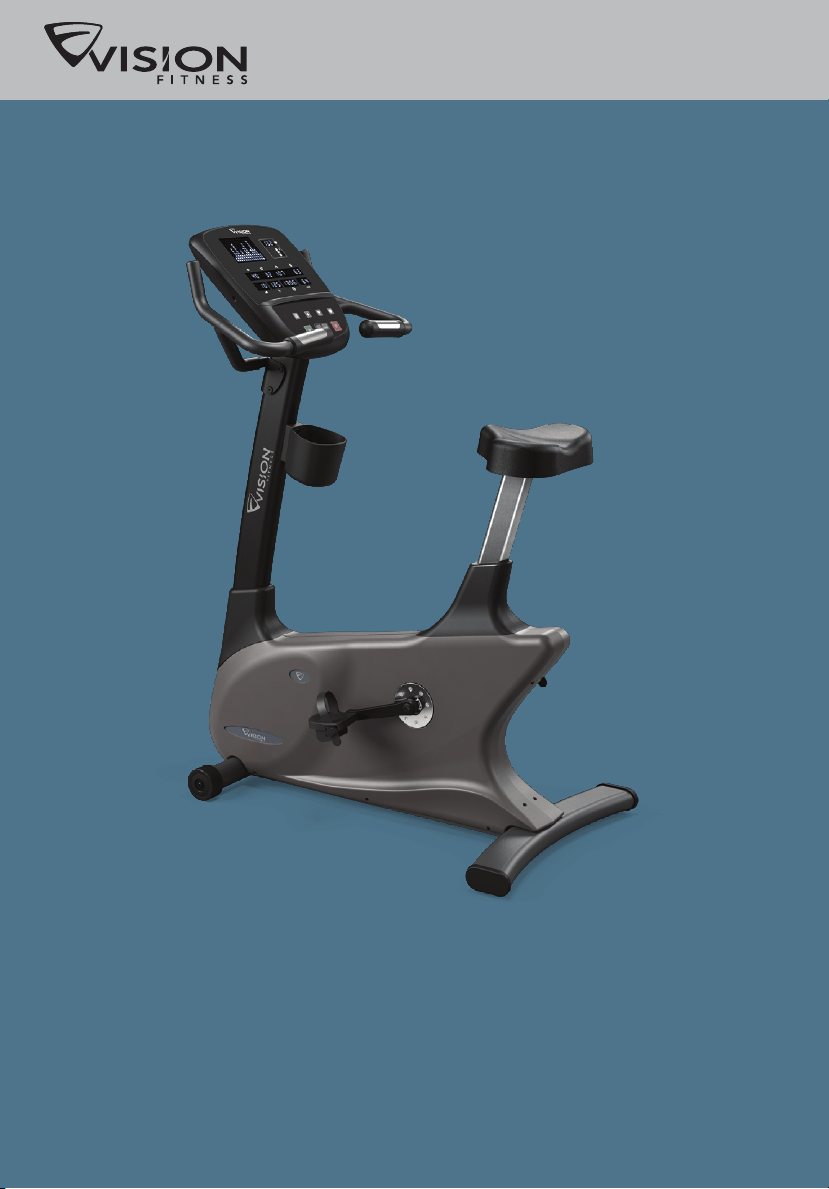
OWNER’S GUIDE
U60
Commercial Fitness Bike


ongratulations on choosing a VISION FITNESS Bike. You’ve taken an
important step in developing and sustaining an exercise program! Your
Bike is a tremendously effective tool for achieving your facility’s fitness
goals. Regular use of your Bike can improve the quality of your members’
lives in so many ways.
Here are just a few of the health benefits of aerobic exercise:
• Weight Loss
• A Healthier Heart
• Improved Muscle Tone
• Increased Daily Energy Levels
• Reduced Stress
• Help in Countering Anxiety and Depression
• An Improved Self Image
The key to reaping these benefits is to develop the exercise habit. Your
new Bike will be an important tool in helping your members achieve this
exercise habit. This Owner’s Guide provides you with basic information
on using this VISION FITNESS Bike. A more complete knowledge of your
new Bike will assist you in helping your members achieve their goals.
Some kinds of service to your Bike should only be performed by your
VISION FITNESS retailer. Please contact your authorized VISION FITNESS
retailer should service be required. If a question or problem arises which
cannot be handled by your VISION FITNESS retailer, please contact us:
VISION FITNESS
1600 Landmark Drive
Cottage Grove, WI 53527
Ph: 1.800.335.4348
Fax: 1.608.839.8731
www.visionfitness.com
C

1
INTRO
CONSOLE
GENERAL
SAFETY INSTRUCTIONS ..................... 4
ASSEMBLY & MOVING THE BIKE ..... 6
STABILIZING THE BIKE, PEDAL STRAP
ADJUSTMENT ................................... 7
SEAT ADJUSTMENT ........................... 8
SELF-POWERED FEATURE & CONTACT
HEART RATE ..................................... 9
INTRO
PREVENTATIVE MAINTENANCE .......... 20
TROUBLESHOOTING ........................ 21
TROUBLESHOOTING HEART RATE
MONITOR CHEST STRAP .................. 23
DEVELOPING A FITNESS PROGRAM ... 24
EXERCISE GUIDELINES .................... 25
BALANCED FITNESS ........................ 26
GENERAL
Table of Contents
DISPLAY CONSOLE ......................... 10
DISPLAY CONSOLE DESCRIPTIONS .... 11
BATTERY ....................................... 13
PROGRAM OVERVIEWS ................... 14
USING THE PROGRAMS ................... 16
USING HEART RATE TRAINING .......... 18
TELEMETRIC HEART RATE
CHEST STRAP, PLACEMENT .............. 19
CONSOLE

2

3
FRONT FOOT &
TRANSPORT WHEELS
SEAT
ADJUSTMENT
CONSOLE
COMMERCIAL FITNESS BIKE
U60
HANDLEBARS
CONSOLE MAST
REAR FOOT
ACCESSORY
TRAY
INTRO

4
INTRO
IMPORTANT SAFETY INSTRUCTIONS
SAVE THESE INSTRUCTIONS
When using an electrical product, basic precautions should always be
followed, including the following: Read all instructions before using this
exercise product.
Your VISION FITNESS Bike is self-generating (requiring no external power
source) and must be pedaled to power-up the console.
To reduce the risk of burns, fire, electrical shock or
injury to persons:
• Use this exercise product for its intended use as described in this
Owner’s Guide. Only use attachments recommended by the manufacturer.
• Never drop or insert any object into any opening.
• Do not remove the Bike sidecovers. Service should be performed only
by an authorized VISION FITNESS retailer.
• Never operate this Bike if it is not working properly or if it has been
damaged or immersed in water. Return the Bike to a retailer for
examination and repair.
• Do not use outdoors.
• The maximum user weight capacity is up to 400 lbs. (182 kg.)
CHILDREN
• Keep children off of your Bike at all times.
• When the Bike is in use, young children and pets should be kept at least
10 feet away.
WARNING!

5
INTRO
OTHER SAFETY TIPS FOR YOUR VISION FITNESS BIKE
CAUTION! If you experience chest pains, nausea, dizziness or shortness of
breath, stop exercising immediately and consult your physician before continuing.
• Do not wear loose clothing that might catch on any part of the Bike.
• Read this Owner’s Guide before operating this Bike.
• Drink plenty of fluids during your workout.
WARNING!
• Heart rate monitoring system may be inaccurate. Over exercise may result
in serious injury of death. If you feel faint stop exercising immediately.
CLEANING
• Clean only with soap and a slightly damp cloth; never use solvents.

6
INTRO
ASSEMBLY
It is recommended, when possible, that an authorized VISION FITNESS
retailer assemble your Bike. If you have elected to assemble this product
yourself, for your safety please read and follow each of the steps in the
enclosed assembly instructions. If you have any questions regarding any
part or function of your Bike, contact your retailer.
MOVING
Your VISION FITNESS Bike has transport wheels included for ease of
mobility. To move your UPRIGHT Bike, firmly grasp the rear of the frame
assembly, or the rear of the seat rail. Carefully lift and roll on the transport
wheels. To move your Upright Bike, firmly grasp the handlebars, carefully
tip toward you, and roll on the transport wheels.
CAUTION: Our Bikes are well-built and heavy, weighing up to 160 pounds!
Use care and additional help if necessary.

7
INTRO
STABILIZING THE BIKE
After positioning the Bike in
its intended location, check its
stability by attempting to rock it
side to side. Rocking or wobbling
indicates that your Bike needs
to be leveled. Determine which
leveler is not resting completely on
the floor. Loosen the wing nut at
the base of the leveler to allow the
leveler to rotate. Now rotate the
leveler to the left or right until the
Bike is stable. Lock the adjustment
by tightening the wing nut against
the rear foot support.
PEDAL STRAP ADJUSTMENT
The straps are designed to fit your
individual foot size and should be
adjusted tight enough to keep your
feet from slipping.
8
INTRO
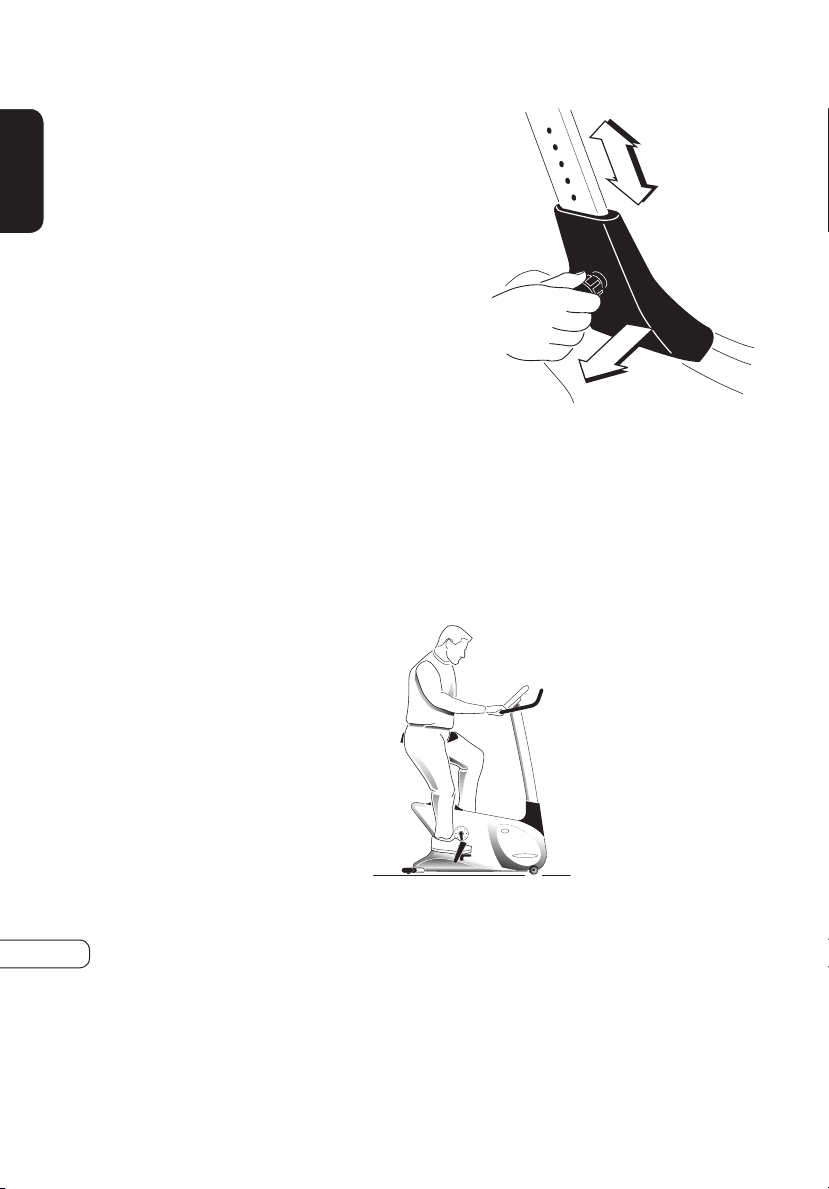
SEAT POSITIONING
To determine proper seat position, sit on the seat and position the ball of
your foot on the center of the pedal. Your knee should bend slightly at the
furthest pedal position. You should be able to pedal without locking your
knees or shifting your weight from side to side.
SEAT POST ADJUSTMENT
The U60 uses a simple pull-pin
adjustment knob to adjust seat
height. To adjust, grab hold of the
seat and pull the seat post knob
out. Raise or lower the seat to its
desired position and release the
seat post knob. Push down on the
seat to make sure the pin is secure
in the rail. Seat height adjust level
from 1 to 15, if you see the mark
on 15, please DO NOT pull out
the seat post anymore.

9
SELF-POWERED FEATURE
The U60 is a self-powered unit, requiring no external power source.
When a user pedals at a speed above 25 revolutions per minute (RPM),
the power is generated to allow the Bike to function properly. Because
of this self-generating feature, the console feedback will fade away when
you cease pedaling. The console does, however, use a 9-volt battery as
backup to save your feedback information for 30 seconds from the time
you stopped pedaling. If you resume pedaling within the 30 seconds, the
information will reappear. If the information does not appear within the
30 seconds, your battery may need to be plugged in or replaced.
CONTACT HEART RATE
HAND PULSE HEART RATE SENSORS
The Contact Hand Pulse Sensors are included on each product to monitor
your heart rate. To use, grasp both of the sensors with a comfortable grip
during your workout. The console will display your heart rate. Although
your signal will be displayed immediately, it may take the system a few
seconds to zero in on your actual heart rate.
INTRO
10
CONSOLE
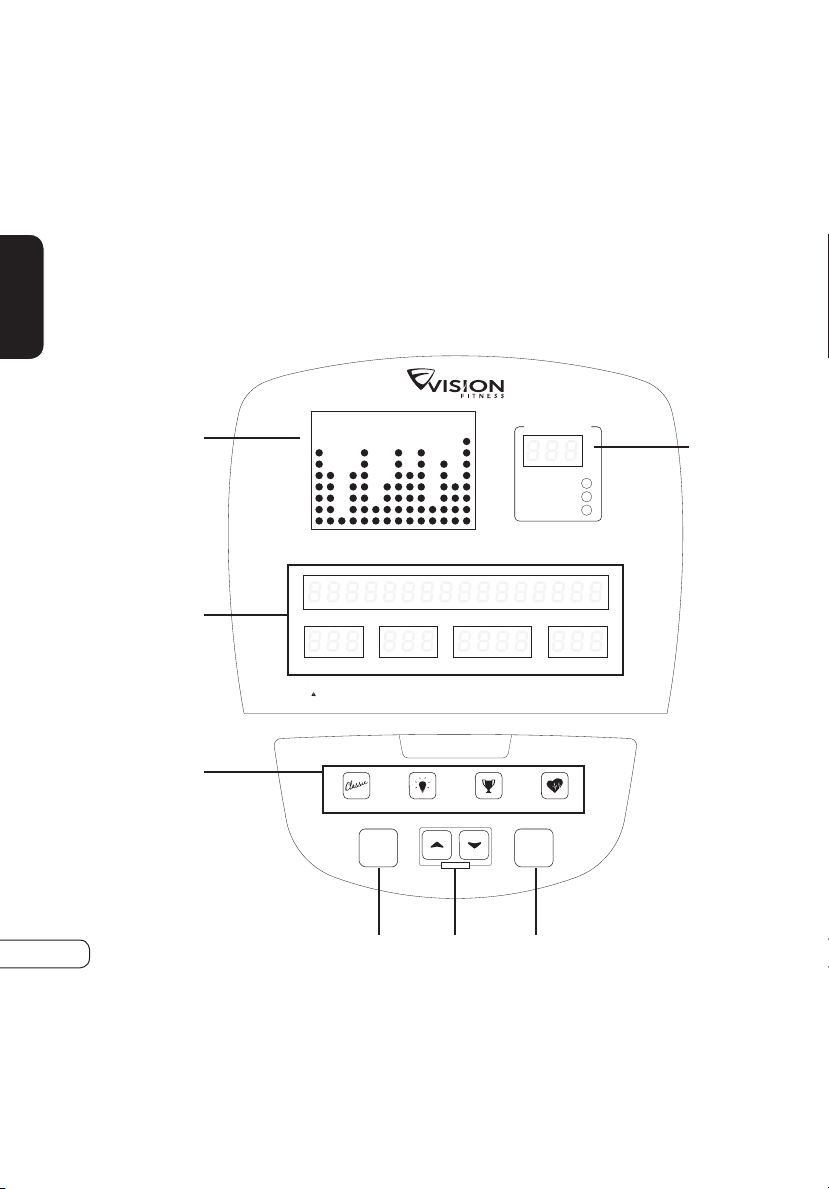
DISPLAY CONSOLE
DISPLAY CONSOLE OVERVIEW
The computerized display allows the user to select a workout that meets
their desired fitness goals. It also allows the user to monitor the progress
and feedback of each workout so they can track improvements in overall
fitness over time.
Heart Rate Zone
Heart Rate
Max H.R.%
Target H.R.
SPEED DISTANCE CALORIES RPM
RESISTANCE WATTS TIME METS
The heart rate displayed may be inaccurate
and should be used for reference only.
Heart rate monitoring systems may be inaccurate. Over exercising may result in serious injury or death. If you feel faint stop exercising immediately.
WARNING
Go
Enter • Hold to Scan
Stop
Hold to Reset
Start pedaling to begin
CLASSIC PROGRAMS WATTS PROGRAMS
GOAL PROGRAMS HRT PROGRAMS
Resistance
B
E
F
D
G
A C

11
CONSOLE
DISPLAY CONSOLE DESCRIPTIONS
A. GO/ENTER/HOLD TO SCAN
Press the GO key to begin a MANUAL workout immediately without
having to set individual information. When the program begins, you
have the ability to adjust resistance levels with the ARROW keys.
Feedback information will be calculated using default settings.
ENTER: This key is used after entering each piece of information in
setup such as age, weight, or level.
HOLD TO SCAN: If you need to change the display of heart rate, you
can do so by holding down the GO button for three seconds, the
HEART RATE ZONE window will display HEART RATE, % MAX.
HEART H.R., TARGET H.R. in sequence in HRT PROGRAMS.
B. STOP/HOLD TO RESET
STOP: If you need to STOP your program during the workout, press
the STOP key will STOP the program.
RESET: If you need to RESET the console during your workout, you
can do so by holding down the GO button for three seconds or until
the display resets.
C. ARROW BUTTONS
These keys are used to change values in setup mode prior to your workout.
During your workout, they are used to change workout levels. In HRT
®
programs, they are used to change your target heart rate.
D. PROGRAM BUTTONS
These keys provide quick access to your favorite workouts. Press the
arrow keys to select one of multiple workouts.

12
CONSOLE
DISPLAY CONSOLE DESCRIPTIONS (continued)
E. PROFILE DISPLAY
This window provides a dot matrix profile of the workout segments
you are about to complete, as well as those you have already
completed, and the level of resistance for each segment.
F. MESSAGE/FEEDBACK WINDOWS
These windows provide step-by-step instructions in the setup mode,
instructions, feedback and motivational messages during your
workout.
FEEDBACK:
During your workout, these windows display exercise feedback
about your workout, including:
SPEED: the pedaling speed in miles or kilometers per hour.
DISTANCE: the total distance traveled in miles or kilometers since
the start of your workout.
CALORIES: an estimate of calories burned since the beginning of
the workout.
RPM: the pedal rate or Revolutions Per Minute (RPM).
RESISTANCE: the current resistance level of your workout.
WATTS: a measurement of workload; one watt is equal to six
kilogram-meters per minute.
TIME: the time elapsed or the time remaining in your workout.
METS: a measurement of oxygen consumption; one MET equals
the approximate amount of oxygen consumed per minute by a
person at rest.
NOTE: At the end of your workout, the totals will be displayed as
averages of your total workout time. The only exceptions are
distance and calories, which are program totals.
G. HEART RATE/HRT FEEDBACK WINDOW
This window provides feedback on your current heart rate and the
percent of your predicted maximum heart rate (% Heart Rate). It also
includes your target heart rate when using one of the HRT
®
programs.
13
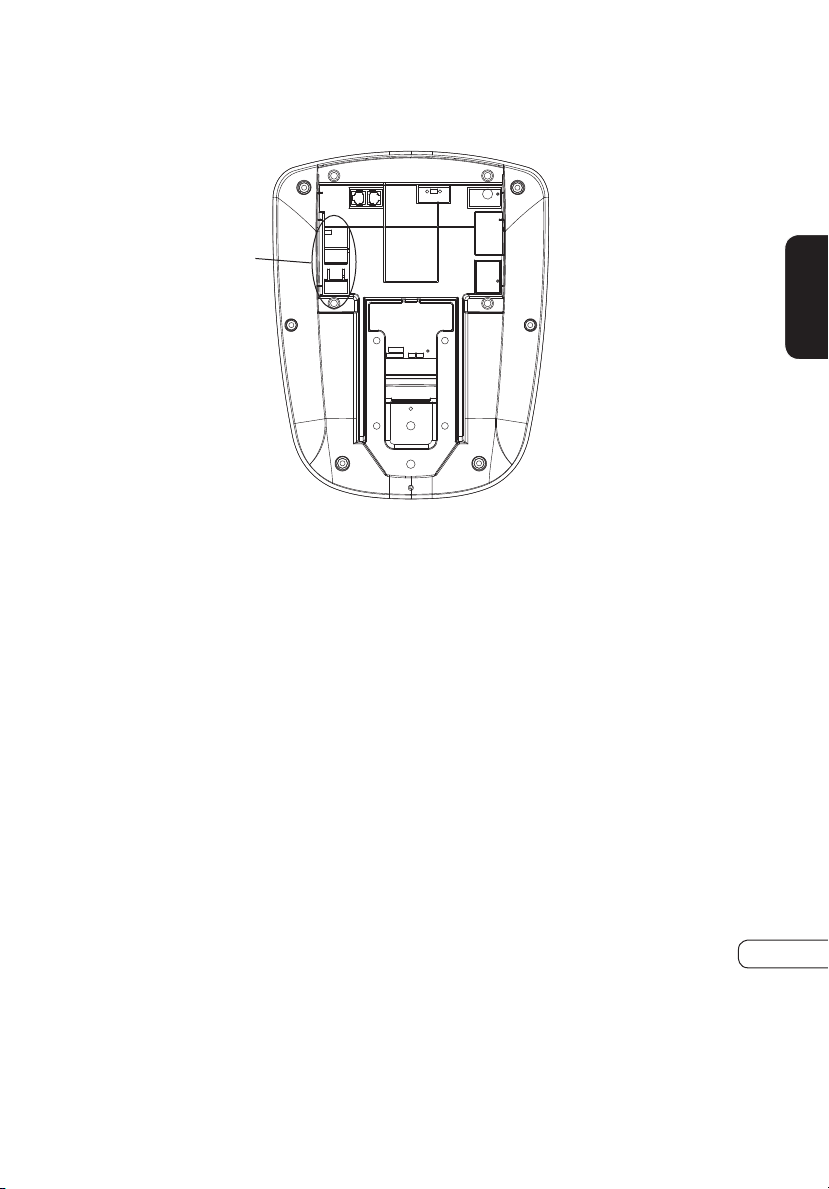
CONSOLE
9V Battery
BATTERY: Your console is equipped with a 9V battery to maintain
workout information.
14
CONSOLE
PROGRAM OVERVIEWS
FAT BURN is a program designed to target your
stored body fat. This program is generally
used at a slightly lower resistance level but
runs for longer durations than other programs.
INTERVAL is an efficient workout that strengthens
your cardiovascular system by alternating
work intervals and recovery intervals. Be
sure to challenge yourself with intense work
intervals.
INTERVAL WATTS allows you to choose a high
WATTs value and a low WATTs value. The
interval program will switch between High
and Low WATTs values, making for a very
intense and effective workout.
HILL WATTS lets you choose four WATTs
levels. Each WATTs level will change at 1
minute intervals and repeat until your preset
workout time is over. Perfect for a challenging
workout.
CLASSICS
WATTS PROGRAMS
MANUAL is a user-controlled program in which
the resistance remains at a set level unless you
decide to change it.
CONSTANT WATTS allows you to set your target
WATT output (energy output). The resistance
will change automatically to keep you at your
target WATTs.
RANDOM is a program that will give you a
different workout every time you workout.
The resistance levels will change randomly,
providing a challenging workout.

15
CONSOLE
HRT WEIGHT LOSS is a lower intensity workout
that will help your body burn a higher
percentage of calories from your body’s fat
reserves. The user must grasp the hand pulse
sensors or wear a telemetric heart rate chest
strap during use.
HRT
®
PROGRAMS
GOAL PROGRAMS
HRT INTERVAL this program is designed to
increase your cardiovascular fitness capacity.
The user must grasp the hand pulse sensors
or wear a telemetric heart rate chest strap
during use.
TIME GOAL allows you to set your target
workout time. This program can help users to
manage the time when they workout.
DISTANCE GOAL allows you to choose the
workout distance. This program can help
users to do self-challenge.
CALORIES GOAL allows you to set the calories
you want to consume during workout. This
program can help the users to control the
calories.
16
CONSOLE
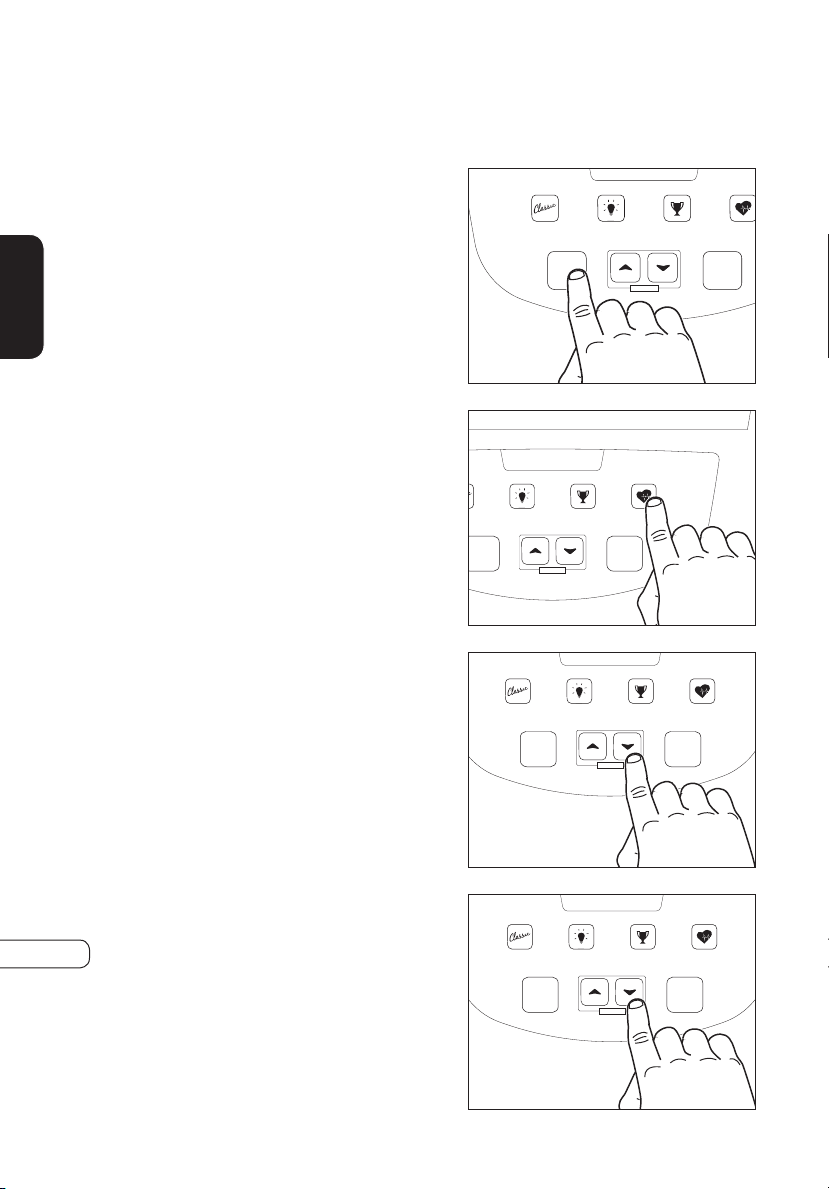
USING THE PROGRAMS
SELECTING EASY START
The easiest way to begin exercising
is to simply press the GO key. You
will begin exercising in a MANUAL
resistance program in which you
can change the resistance levels
to meet your goals. Current default
settings will be used to determine
exercise feedback.
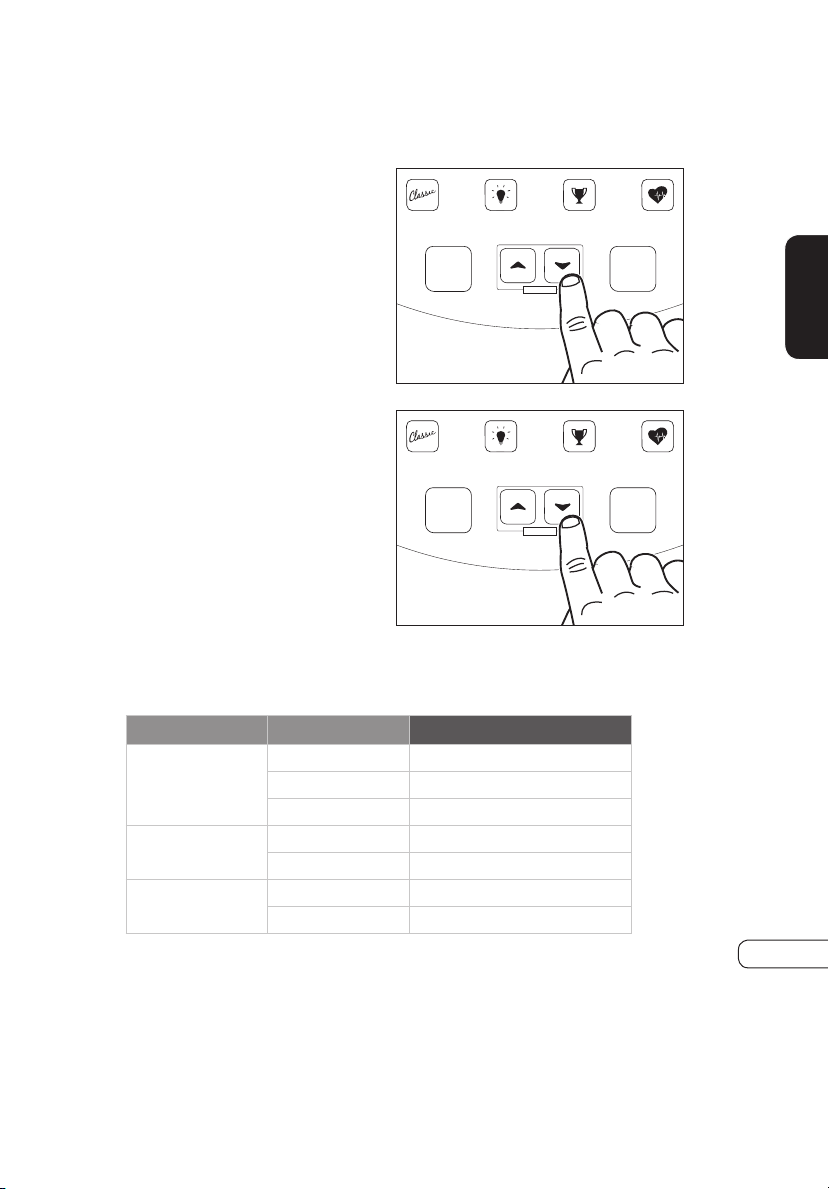
SELECTING A PROGRAM
Each program has its own program
button. Some program buttons
have multiple programs. Press the
key of the program you would like
to use.
ENTERING AGE
When prompted by the message
center to enter your age, use the
UP
s
arrow or DOWN
t
arrow
to adjust displayed age to the
correct value. This information is
necessary for the HRT
®
programs
and will affect your “% Heart Rate”
feedback.
ENTERING TIME
When prompted by the message
center to enter a time, use the UP
s
arrow and DOWN
t
arrow to
adjust the displayed exercise time
to a desired value.
Heart Rate Zone
Heart Rate
Max H.R.%
Target H.R.
SPEED DISTANCE CALORIES RPM
RESISTANCE WATTS TIME METS
The heart rate displayed may be inaccurate
and should be used for reference only.
Heart rate monitoring systems may be inaccurate. Over exercising may result in serious injury or death. If you feel faint stop exercising immediately.
WARNING
Go
Enter • Hold to Scan
Stop
Hold to Reset
Start pedaling to begin
CLASSIC PROGRAMS WATTS PROGRAMS
GOAL PROGRAMS HRT PROGRAMS
Resistance
Heart Rate Zone
Heart Rate
Max H.R.%
Target H.R.
SPEED DISTANCE CALORIES RPM
RESISTANCE WATTS TIME METS
The heart rate displayed may be inaccurate
and should be used for reference only.
Heart rate monitoring systems may be inaccurate. Over exercising may result in serious injury or death. If you feel faint stop exercising immediately.
WARNING
Go
Enter • Hold to Scan
Stop
Hold to Reset
Start pedaling to begin
CLASSIC PROGRAMS WATTS PROGRAMS
GOAL PROGRAMS
HRT PROGRAMS
Resistance
Heart Rate Zone
Heart Rate
Max H.R.%
Target H.R.
SPEED DISTANCE CALORIES RPM
RESISTANCE WATTS TIME METS
The heart rate displayed may be inaccurate
and should be used for reference only.
Heart rate monitoring systems may be inaccurate. Over exercising may result in serious injury or death. If you feel faint stop exercising immediately.
WARNING
Go
Enter • Hold to Scan
Stop
Hold to Reset
Start pedaling to begin
CLASSIC PROGRAMS
WATTS PROGRAMS
GOAL PROGRAMS HRT PROGRAMS
Resistance
Heart Rate Zone
Heart Rate
Max H.R.%
Target H.R.
SPEED DISTANCE CALORIES RPM
RESISTANCE WATTS TIME METS
The heart rate displayed may be inaccurate
and should be used for reference only.
Heart rate monitoring systems may be inaccurate. Over exercising may result in serious injury or death. If you feel faint stop exercising immediately.
WARNING
Go
Enter • Hold to Scan
Stop
Hold to Reset
Start pedaling to begin
CLASSIC PROGRAMS WATTS PROGRAMS
GOAL PROGRAMS HRT PROGRAMS
Resistance
17
CONSOLE
ENTERING RESISTANCE
When prompted by the message
center to enter level, use the UP
s
arrow and DOWN
t
arrow
to adjust the displayed resistance
level. There are 25 levels of
resistance to choose from in each
program. The maximum resistance
level varies by program.
ENTERING WEIGHT
When prompted by the message
center to enter weight, use the UP
s
arrow and DOWN
t
arrow
to adjust the displayed weight to
equal your current body weight.
This information is necessary to
give accurate exercise feedback
for calorie and MET calculations.
This is a bike that the braking system is adjustable. The training speed and
resistance setting below that are used in the test for reference.
The WATTS programs will ask you to set the desired WATT level instead
of resistance levels. The WATT level will range from 40 to 250 in
increments of five.
The HRT programs will set your target heart rate in the place of resistance
level. The console will display your target heart rate and give you the
opportunity to adjust this value if you wish.
RPM LEVEL DISPLAY (WATT)
50
4 46
5 53
9 88
60
12 136
16 176
70
17 211
20 240
Heart Rate Zone
Heart Rate
Max H.R.%
Target H.R.
SPEED DISTANCE CALORIES RPM
RESISTANCE WATTS TIME METS
The heart rate displayed may be inaccurate
and should be used for reference only.
Heart rate monitoring systems may be inaccurate. Over exercising may result in serious injury or death. If you feel faint stop exercising immediately.
WARNING
Go
Enter • Hold to Scan
Stop
Hold to Reset
Start pedaling to begin
CLASSIC PROGRAMS
WATTS PROGRAMS
GOAL PROGRAMS
HRT PROGRAMS
Resistance
Heart Rate Zone
Heart Rate
Max H.R.%
Target H.R.
SPEED DISTANCE CALORIES RPM
RESISTANCE WATTS TIME METS
The heart rate displayed may be inaccurate
and should be used for reference only.
Heart rate monitoring systems may be inaccurate. Over exercising may result in serious injury or death. If you feel faint stop exercising immediately.
WARNING
Go
Enter • Hold to Scan
Stop
Hold to Reset
Start pedaling to begin
CLASSIC PROGRAMS
WATTS PROGRAMS
GOAL PROGRAMS
HRT PROGRAMS
Resistance

18
CONSOLE
USING HEART RATE TRAINING
WHAT IS HEART RATE TRAINING?
Heart Rate Training means exercising at an intensity that keeps you in your
ideal heart rate zone. Your personal heart rate training zone depends
on your fitness goal, such as weight loss, cardiovascular endurance, or
strength building. VISION FITNESS HRT
®
programs are set up to keep
you at an ideal heart rate based on your fitness goal. These programs
automatically adjust resistance based on your heart rate readings.
The console features two programs (HRT Weight Loss, HRT Interval) that
offer the benefits of Heart Rate Training. Refer to Page 19 for more details
on these programs.
HAND PULSE HEART RATE SENSORS
The Contact Hand Pulse Sensors are included on each product to monitor
your heart rate. To use, grasp both of the sensors with a comfortable grip
during your workout. The console will display your heart rate. Although
your signal will be displayed immediately, it may take the system a few
seconds to zero in on your actual heart rate.
NOTE: The Contact Hand Pulse Sensors will work for the HRT
®
programs,
but it is recommended to use the telemetric chest strap for an uninterrupted
signal and ease of use.
WARNING:Heart rate monitoring systems may be inaccurate. Over
exercising may result in serious injury or death. If you feel faint stop
exercising immediately
19
CONSOLE
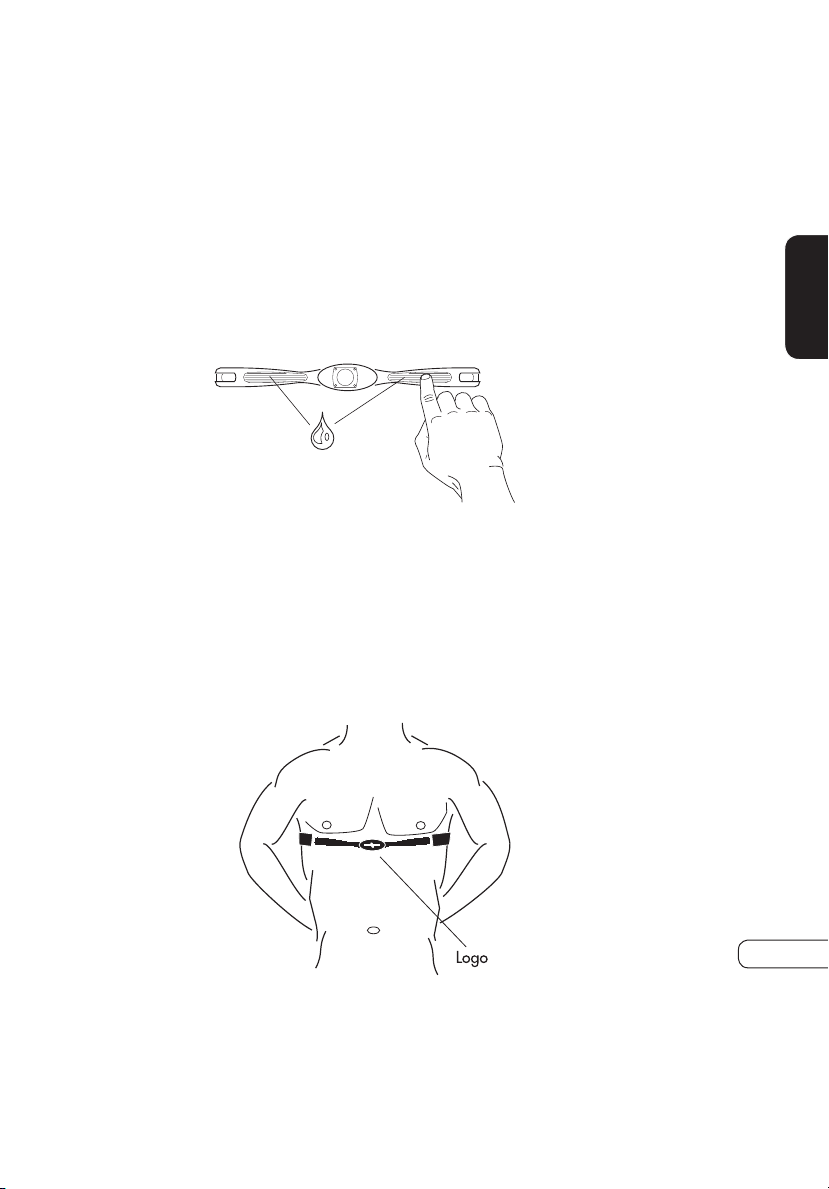
TELEMETRIC HEART RATE CHEST STRAP
The wireless Telemetric Chest Strap uses a pair of electrodes on the
underside of the strap to send your heart rate signal to the console. Prior
to wearing the chest strap, moisten the two rubber electrode pads with
several drops of water. These electrodes must remain wet to provide an
accurate signal. We advise using the chest strap against your skin, but it
also functions through a thin layer of wet clothing.
NOTE: Heart Rate Chest Strap is optional, not include in the box
STRAP PLACEMENT
Center the transmitter strap just below the breast or pectoral muscles,
directly over your sternum with the logo facing out. Adjust the elastic strap
so it is snug but comfortable enough for proper breathing.

20
GENERAL
SERVICE AND TROUBLESHOOTING
PREVENTATIVE MAINTENANCE TIPS
• Locate Bike in a cool, dry place.
• Clean the top surface of the pedals regularly.
• Make sure pedals are kept tight to crank arms.
• Keep the display console free from fingerprints and salt buildup
caused by sweat.
• Use a cotton cloth with water and a mild cleaning product to clean
the Bike. Other fabrics, including paper towels, may scratch the
surface. Do not use ammonia or acid-based cleaners.
• Clean the housing thoroughly on a regular basis.
PREVENTATIVE MAINTENANCE SCHEDULE
Follow the schedule below to ensure proper operation of the product.
WEEKLY MONTHLY BI-ANNUALLY ANNUALLY
DISPLAY CONSOLE
CONSOLE MOUNTING BOLTS
FRAME
SEAT FRAME
HANDLEBARS
PLASTIC COVERS
PEDALS AND STRAPS
SEAT
ITEM
CLEAN
CLEAN
CLEAN
CLEAN
CLEAN
CLEAN
CLEAN
INSPECT
INSPECT
INSPECT
INSPECT
INSPECT
INSPECT
INSPECT
INSPECT

21
GENERAL
TROUBLESHOOTING
Our Bikes are designed to be reliable and easy to use. If, however, you
have a problem, these troubleshooting steps may reveal the cause.
PROBLEM: The console does not light up.
SOLUTION: Make sure you are pedaling the Bike.
SOLUTION: Make sure the wire harness is plugged into the back of the
console.
PROBLEM: The Bike is making a
clicking noise.
SOLUTION: Using the pedal
wrench supplied with your Bike,
remove both the left and right
pedals, apply grease to the
threaded portion and reassemble
the pedals onto the Bike. Make
sure the pedals are tight.
SOLUTION: Make sure the pedal straps or your shoe laces are not hitting
the side cover.
SOLUTION: Assure seat adjustment is tight.
PROBLEM: The Bike makes a squeaking or creaking noise.
SOLUTION: Check and tighten all hardware.

22
GENERAL
NOTE: If the above steps fail to remedy the problem, discontinue use, turn
the power off and contact your retailer.
OBTAINING SERVICE
Do not attempt to service this Bike yourself except for the maintenance
tasks described in this manual. For information on service to your
VISION FITNESS Bike, contact the local retailer from whom you purchased
the Bike. To expedite service, please make sure to have your serial number
available. The serial number is found on a label located on the front
support tube of your Bike.
SERIAL NUMBER:______________________

23
GENERAL
TROUBLESHOOTING YOUR HEART RATE MONITOR CHEST STRAP
PROBLEM: No pulse reading appears.
SOLUTION: There may be a poor connection between the contact pads
and skin; remoisten the electrode pads.
SOLUTION: Transmitter is not properly positioned; reposition the chest
strap.
SOLUTION: Verify that the distance between the transmitter and receiver
is not beyond the recommended range of 36 inches.
PROBLEM: There is an erratic pulse rate.
SOLUTION: Chest strap is too loose; readjust according to directions.
NOTE: It is possible that heart rate monitors will not function properly
on some people for a variety of reasons. It may be necessary to
experiment with the fit and position of the chest strap. Outside interference
sources such as computers, motors, electric dog fences, home security
systems, remote controls, CD players, fluorescent lights, etc., may cause
problems for heart rate monitors.

24
GENERAL
DEVELOPING A FITNESS PROGRAM
By purchasing this piece of VISION FITNESS exercise equipment, you
have made a commitment to exercise and now have the convenience of
exercising in your own home. Your new equipment offers the flexibility to
exercise at whatever time suits you best. It will be easier to maintain a
consistent exercise program that will help you achieve your fitness goals.
ACHIEVING YOUR FITNESS GOALS
An important step in developing a long-term fitness program is to determine
your goals. Is your primary goal to lose weight? Improve muscle tone?
Relieve stress? Prepare for the spring racing schedule? Knowing what your
goals are will help you develop a more successful exercise program. If
possible, try to define your personal goals in precise, measurable terms
over specific periods of time. Examples of these goals might include:
• Decrease your waistline by two inches over the next two months.
• Run the local 5K race this summer.
• Get 30 minutes of cardiovascular exercise at least five days per week.
• Improve your race time by two minutes over the next year.
• Move from walking a mile to jogging a mile within the next
three months.
The more specific the goal, the easier it will be to track your progress. If
your goals are long-term, divide them into monthly and weekly segments.
Long-term goals can lose some of the motivational benefits. Short-term
goals are easier to achieve and will allow you to see the progress you are
making. Every time you reach a goal, it is important to set a new goal.
This will lead to a healthier lifestyle and will provide the motivation that
you will need to move forward.
TRACK YOUR PROGRESS
Now that you have set your exercise goals, it is time to write them down
and make an exercise schedule that will help you achieve them. By
keeping a fitness diary, you will stay motivated and know where you are
in terms of reaching your goals. As time goes on, you will be able to
look back with pride to see how far you’ve come. For your convenience,
we have included exercise log sheets in the wellness tools section of our
website at www.visionfitness.com.

25
GENERAL
EXERCISE GUIDELINES
EXERCISE DURATION
A common question asked is, “how much exercise do I need?” We
recommend following the guidelines set up by the American College of
Sports Medicine (ACSM) for healthy aerobic activity.
• Exercise three to five days per week.
• Warm up for five to 10 minutes before aerobic activity.
• Maintain your exercise activity for 30 to 45 minutes.
• Gradually decrease the intensity of your workout, then stretch to
cool down during the last five to 10 minutes.
If weight loss is a major goal, participate in your aerobic activity at least
30 minutes for five days each week.
EXERCISE INTENSITY
The next question asked is, “how hard do I need to work out?” To reap the
most cardiovascular benefits from your workout, it is necessary to exercise
within a recommended intensity range. We recommend monitoring your
exercise heart rate to measure exercise intensity.

26
GENERAL
BALANCED FITNESS
While cardiovascular exercise has been the primary method of fitness for
many programs over the years, it should not be the only method. Strength
Training and Flexibility Training have become more popular as exercise
has developed. Incorporating Strength and Flexibility Training into your
current exercise program will give you the balance you need to improve
your athletic performance, reduce susceptibility to injury, increase metabolic
rate, increase bone density, and reach your goals faster.
STRENGTH TRAINING
Strength Training was once known as an activity performed by young
males only. That has changed with the advances in scientific research on
Strength Training over the last 20 years or so. Research has proven that,
after age 30, we begin to lose muscle mass if we do not incorporate
Strength Training into our exercise program. With this decrease in muscle
mass, our ability to burn calories decreases, our physical ability to do
work decreases and our susceptibility to injuries increases. The good news
is that, with a proper Strength Training program, we can maintain or even
build muscle as we age. A proper Strength Training program will work
the muscle groups of the upper and lower body. There are now many
options available for Strength Training including: yoga, Pilates, selectorized
machines, free weights, stability balls or medicine balls, exercise tubing
and body weight exercises, just to name a few.
Recommendations for a minimum Strength Training program include:
FREQUENCY: Two to three days per week
VOLUME: One to three sets consisting of eight to 12 repetitions.

27
GENERAL

1600 Landmark Drive • Cottage Grove, WI 53527
toll free 800.335.4348 • fax 608.839.8731
www.visionfitness.com
2019 Vision Fitness. All Rights Reserved. ECB-Plus, HRT, PerfectStride, Quick-Set,
Quiet-Glide, SPRINT 8, and Suspension Elliptical are Trademarks of Vision Fitness.
07.19 REV 2
U60
MOVE WITH CONFIDENCE