Note: All the pictures in this manual are schematic diagram just for reference, product appearance and color may vary from pictures.
Plug, WIFI function, Negative-ion function, and Vertical and horizontal swing function both are optional,the actual unit shall prevail.
Clean and Care
Warning!
Before the cleaning of the air conditioner, it must be shut down and the electricity must be cut off for more than 5 minutes, otherwise there might be the risk of electric shocks.
Do not wet the air conditioner, which can cause an electric shock. Make sure not to rinse the air conditioner with water under any circumstances.
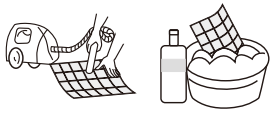
Volatile liquids such as thinner or gasoline will damage the air conditioner housing, therefore please clean the housing of air conditioner only with soft dry cloth and damp cloth moistened with neutral detergent.
In the course of the using, filter is required to clean regularly to prevent dust or dirt affect the filter function. If the service environment of the air conditioner is dusty, correspondingly increase the number of times of cleaning. After removing the filter, do not touch the fin part of the indoor unit with the finger, so as to avoid scratching it.
Clean the panel
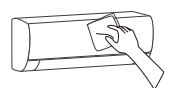
When the panel of the indoor unit is contaminated, clean it gently with a wrung towel using tepid water below 113°F and do not remove the panel while cleaning.
Clean the air filter
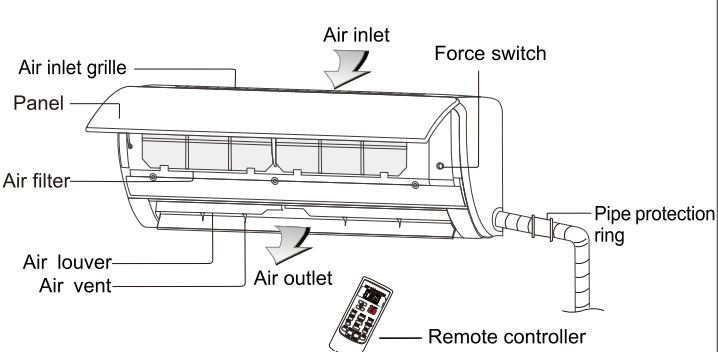
Remove the air filter
Use both hands to open the panel for an angle from both ends of the panel in accordance with the direction of the arrow.
Release the air filter from the slot and remove it.
Clean the Air Filter
Use a vacuum cleaner or water to rinse filter, and if the filter is very dirty (for example, with greasy dirt), clean it with warm water (below 113°F with milddetergent dissolved in, and then put the filter in the shade to dry in the air.
Mount the Filter
Reinstall the dried filter in reverse order of removal, then cover and lock the panel.
Check before use
Check whether all the air inlets and outlets of the units are unblocked.
Check whether there is blocking in the water outlet of the drain pipe, and immediately clean it up if any.
Check the ground wire is reliably grounded.
Check whether the remote control batteries are installed, and whether the power is sufficient.
Check whether there is damage in the mounting bracket of the outdoor unit, and if any, please contact our local service center.
Maintain after use
Cut off the power source of the air conditioner, turn off the circuit breaker and remove the batteries from the remote control.
Clean the filter and the unit body.
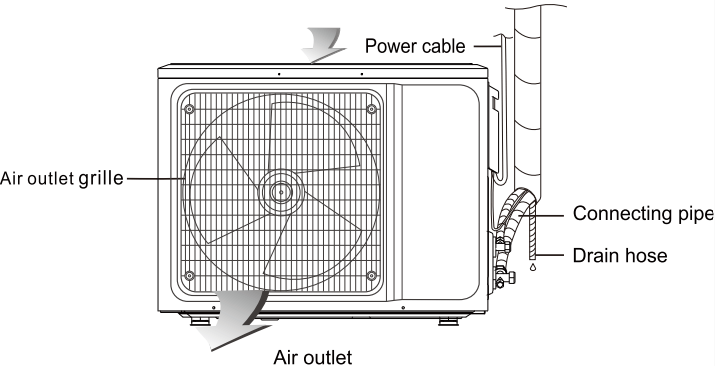
Remove the dust and debris from the outdoor unit.
Check whether there is damage in the mounting bracket of the outdoor unit, and if any, please contact our local service center.
Troubleshooting
Caution: Do not repair the air conditioner by yourself as wrong maintenance may cause electric shock or fire, please contact the authorized service center and let the professionals conduct the maintenance, and checking the following items prior to contacting for maintenance can save your time and money.
Problem
Troubleshooting
Air conditioner can not operate at all.
Has the power been shut down?
Is the wiring loose?
Is voltage too high or too low ?(measured by professionals)
Does it reach the set time for start up?
Does the circuit protection device trip? ,
Remote controller is not available.
Is the remote controller out of effective distance to the indoor unit?
Are there any obstructions between the controller and the signal receptor?
Is the battery exhausted?
Cooling (Heating) efficiency is not good.
Is the setting temperature suitable?
Are air filter dirty?
Is the air inlet or outlet obstructed?
Is indoor fan speed set at low speed?
Is there any heat source in your room?
Indoor unit does not operate immediately when the air conditioner is restarted.
If the air conditioner is turned on immediately after it is turned off, the protective delay switch will delay the operation for 3 to 5 minutes.
There is unusual smell blowing from the outlet after operation is started.
The air conditioner itself does not have undesirable odor. If there is odor, it may be due to accumulation of the odor in the environment. Please clean the air filter or activate the cleaning function.
There is sound of running water during the running of air conditioner.
Sometimes the "hissing" sound of running water can be heard. This is the sound of the flow of the refrigerant, not a malfunction.
A slight “click” sound is heard at the of start-up or shut-down.
Due to temperature changes, panel and other parts will swell, causing the sound of friction. This is normal, not a fault.
During the cooling operation, the indoor unit outlet sometimes will blow out mist.
This is because the indoor air is cooled rapidly. After it runs for some time, the indoor temperature and humidity will be reduced and the mist will disappear.
Immediately stop all operations and cut off the power supply, contact our Service center locally in following situations.
Shrill sound is heard or Unpleasant odor is emitted during the operation.
There is an abnormal heat in power supply cord and power plug.
Accidentally pour impurities or water into the machine or the remote control.
Air switch or protection switch often breaks.
Description
Analysis of cause
Air conditioner can't be configured successfully
Check the mobile connected Wi-Fi address and password is correct;
Check the air conditioner under configuration status;
There are any firewall or other restrictions have been set or not;
Check the router work normally;
Make sure air conditioner, router and mobile work within signal scope;
Check router shielding App or not;
Mobile can't control air conditioner
Software display: Identification failed,
It means the air conditioner has been reset, and the mobile phone lost control permission.
You need to connect Wi-Fi to get permission again.
Please connect the local network and refresh it.
After all still can't work, please delete air conditioner and wait its refresh.
Mobile can't find air conditioner
Software display: Air conditioner out of line.
Please check network working;
The air conditioner has been reconfiguration;
Air conditioner out of power;
Router out of power;
Air conditioner can't connect to router;
Air conditioner can't connect to network through the router (under remote control mode);
Mobile can't connect to router(Under local control mode);
The mobile phone can't connect to network (under remote control mode)
Install indoor unit
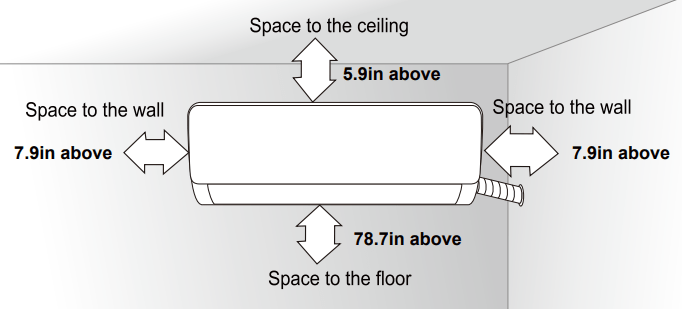
Dimension drawing of indoor unit installation
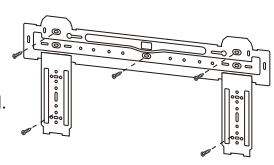
Mounting plate
1. The wall for Installation of the indoor unit shall be hard and firm, so as to prevent vibration.
2. Use the"+" type screw to fasten the peg board, horizontally mount the peg board on the wall, and ensure the lateral horizontal and longitudinal vertical.
3. Pull the peg board by hand after the installation, to confirm whether it is solid.
Wall-through Hole
1. Make a hole with an electric hammer or a water drill at the predetermined position on the wall for piping, which shall slant outwardly by 41°F - 50°F.
2. To protect the piping and the cables from being damaged running through the wall, and from the rodents that may inhabit in the hollow wall, a pipe protecting ring shall be installed and sealed with putty.
Note: Usually, the wall hole is 60mm~80mm. Avoid pre-buried power wire and hard wall when making the hole.
Route of Pipeline
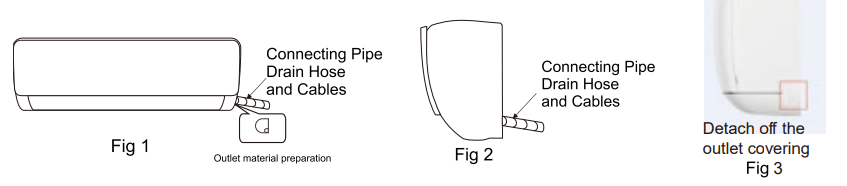
1. Depending on the position of the unit, the piping may be routed sideway from the left or the right ( Fig 1 ), or vertically from the back( Fig 2 )(depending on the pipe length of the indoor unit). In the case of sideway routing, detached off the outlet covering plate and let the piping get through the hole (Fig 3).
Drain pipe connection
1. Remove the mountings and pull the indoor unit pipe out of the housing.
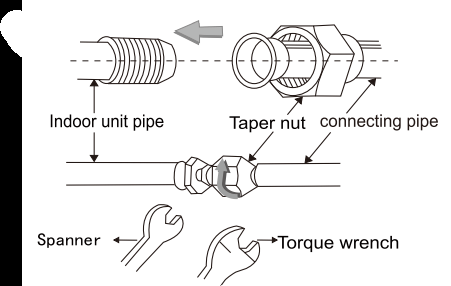
2. Connect the connecting pipe to the indoor unit:
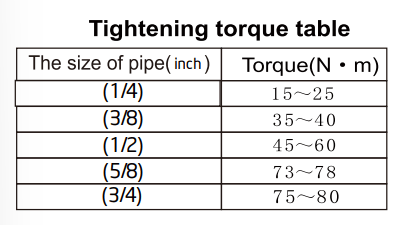
Aim at the pipe center, tighten the Taper nut with fingers, and then tighten the Taper nut with a torque wrench, and the direction is shown in diagram on the right. The torque used is shown in the following table.
Wrap the Piping
1. Use the insulation sleeve to wrap the joint part of indoor unit and the connection pipe, and then use insulating material to pack and seal insulation pipe, to prevent generation of condensate water on the joint part.
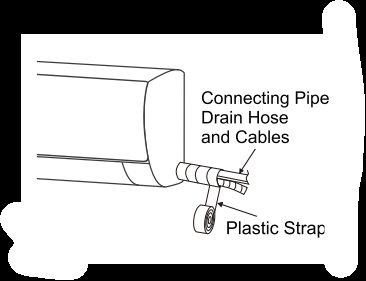
2. Connect the water outlet with drain pipes, and make the connection pipe, cables, and the drain hose straight.
3. Use plastic cable ties to wrap the connecting pipes, cables and drain hose. Run the pipe sloping downward.
Fixing the Indoor Unit
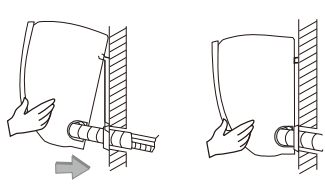
1. Hang the indoor unit on the peg board, and move the unit from left to right to ensure that the hook is properly positioned in the peg board.
2. Push toward the lower left side and the upper right side of the unit toward the peg board, until the hook is embedded in the slot and makes a "click" sound.
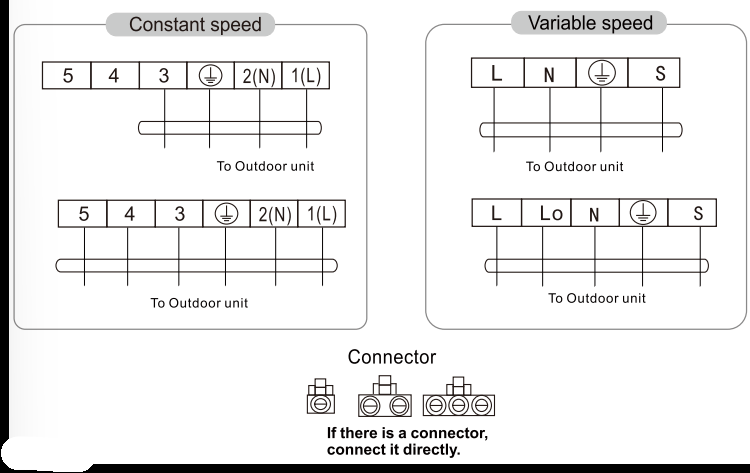
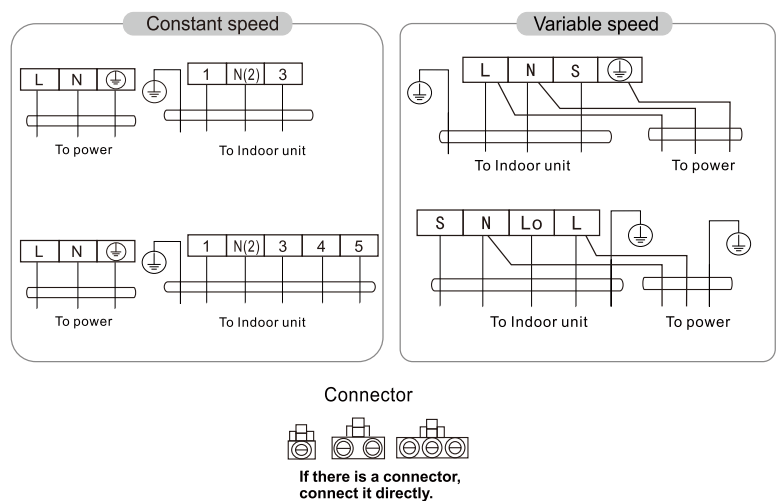
Wiring diagram
• If your air conditioner is provided with interconnection cord, the wiring of the indoor unit is connected in the factory, there is no need of connection.
• If the interconnection cord is not provided, connection is needed in accordance with the wiring diagram.
NOTE:
This manual usually includes the wiring mode for the different kind of A/C. We cannot exclude the possibility that some special type of wiring diagrams are not included.
The diagram are for reference only. If the entity is difference with this wiring diagram, please refer to the detailed wiring diagram adhered on the unit which you purchased.
Install outdoor unit
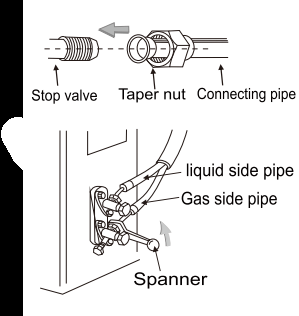
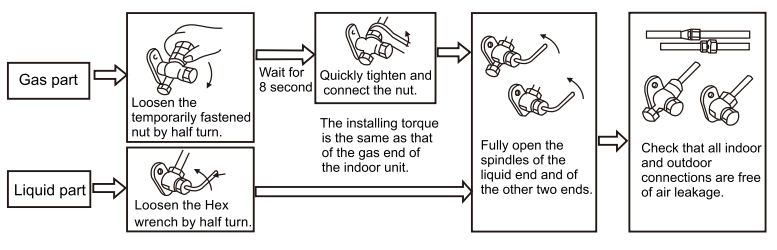
Install the connection pipe
Connect the Outdoor Unit with Connecting Pipe: Aim the counter-bore of the connecting pipe at the stop valve, and tighten the Taper nut with fingers.
Then tighten the Taper nut with a torque wrench.
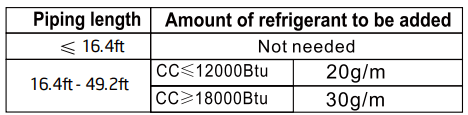
★ When prolonging the piping, extra amount of refrigerant must be added so that the operation and performance of the air conditioner will not be compromised.
Note: This table is for reference only.
Wiring Connection
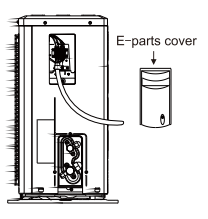
1 .Loosen the screws and remove E-parts cover from the unit.
2. Connect the cables respectively to the corresponding terminals of the terminal board of the outdoor unit (see the wiring diagram), and if there are signals connected to the plug, just conduct butt joint.
3. Ground wire: Remove the grounding screw out of the electric bracket, cover the grounding wire end onto the grounding screw and screw it into the grounding hole.
4. Fix the cable reliably with fasteners (Pressing board).
5. Put the E-parts cover back in its original place and fasten it with screws.
Wiring Diagram
NOTE:
This manual usually includes the wiring mode for the different kind of A/C. We cannot exclude the possibility that some special type of wiring diagrams are not included.
The diagram are for reference only. If the entity is difference with this wiring diagram, please refer to the detailed wiring diagram adhered on the unit which you purchased.
Expelling the air
★ Outdoor unit refrigerant discharging method
After the pipe side connection is complete, proceed as follows.
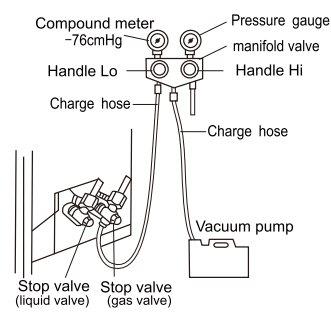
★ Vacuum Pumping Method (R410A refrigerant evacuation must use the vacuum pumping method)
Before working on the air conditioner, remove the cover of the stop valve(gas and
liquid valves)and be sure to retighten it afterward.(to prevent the potential air leakage)
1. To prevent air leakage and spilling tighten all connecting nut of all flare tubes.
2. Connect the stop valve, charge hose, manifold valve, and vacuum pump.
3. Fully open the handle Lo of the manifold valve and apply vacuum for at least 15 minutes and check that the compound vacuum gauge reads -0.1MPa(-76cmHg).
4. After applying vacuum, fully open the stop valve with a hex wrench.
5. Check that both indoor and outdoor connections are free of air leakage.
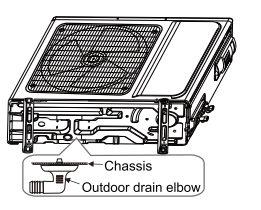
Outdoor condensation drainage(Heat pump type only)
When the unit is heating, the condensing water and defrosting water can be out reliably through the drain house.
Installation:
Install the outdoor drain elbow in $25 hole on the base plate, and joint the drain hose to the elbow, so that the waste water formed in the outdoor unit can be drained out to a proper plate.
Check after installation and test operation
Check after installation
★ Electrical Safety Check
1. If the supply voltage Is as required.
2. If there is any faulty or miss connection in each of the power, signal and grounding wires.
3. If the grounding wire of the air conditioner is securely grounded.
★ Installation Safety Check
1. If the installation is secure.
2. If the water drain is smooth.
3. If the wiring and piping are correctly installed.
4. Check that no foreign matter or tools are left inside the unit.
★ Leak test of the refrigerant
Depending on the installation method, the following methods may be used to check for suspect leak, on areas such as the four connections of the outdoor unit and the cores of the cut-off valves and t-valves:
1 .Bubble method: Apply of spray a uniform layer of soap water over the suspected leak spot and observe carefully for bubble.
2.lnstrument method: Checking for leak by pointing the probe of the leak detector according to the instruction to the suspect points of leak.
Test Operation
Test Operation preparation:
Verify that all piping and connection cables are well connected.
Confirm that the valve at the gas side and the liquid side are fully open.
Connect the power cord to an independent power socket.
Install batteries in remote control.
Test Operation method:
1. Turn on the power and push the ON/OFF switch button of the remote controller to start the air conditioner.
2. Select COOL, HEAT (not available on cool-only models), SWING and other operation modes with the remote controller and see if the operation is ok.
Specific caution
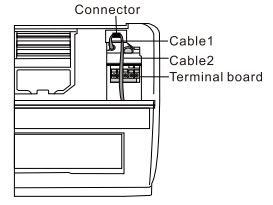
1 .Open front panel of the indoor.
2.The connector(as Fig) can not touch the terminal board, and is positioned as shown in Fig.