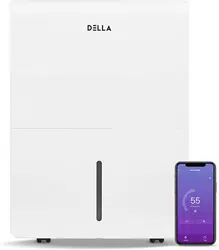
User Manual for Dehumidifier
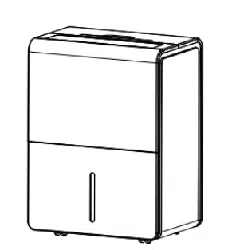
Parts and Features
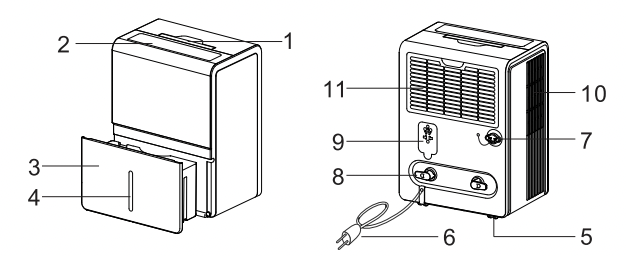
1 .Handle
2. Control panel
3. Bucket
4. Water level view window
5. Castors
6. Power cord
7. Drainage holes
8. Hooks
9. Plug fixer
10. Airoutlet
11. Air intake grille
Note: All the Illustrations in this manual are for explanatory purposes only. Your appliance may be slightly different. Be sure all accessories are removed from the packing and bucket before use.
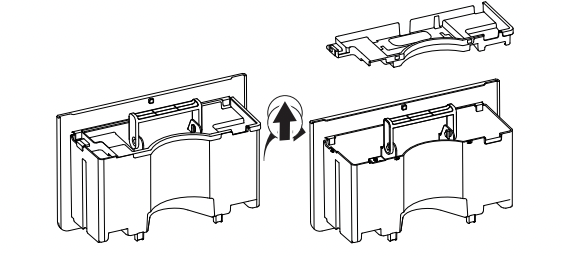
Installation Guide
Before use, please check the bucket whether some accessories in it.
- Remove the bucket, rotate the handle to the position like fig below.
- Open the cover, take out of accessories in bucket.
- Re-install the cover and handle, correctly put back the bucket into the unit.
User Instruction
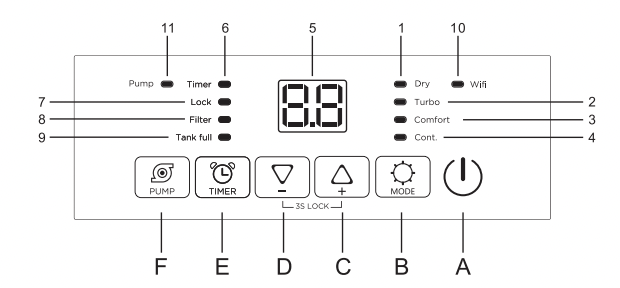
|
A. On/Off button
B. Mode button Clncrease button
D. Decrease button
E. Timer button
F. Pump button
|
1. Dry symbol
2. Turbo symbol
3. Comfort symbol
4. Continuous symbol
5. LED screen
|
6. Timer symbol
7. Child lock symbol
8. Clean filter symbol
9. Bucket Full Alarm
10. Wi-Fi symbol*
|
Note: *The WIFI is an optional function.
When the unit is connected with phone, the WIFI symbol is light on, and howto connected with phone, please see the Wi-Fi manual.
Insert the plug in the socket, the unit goes to stand-by, and the screen display as the fig shown:

- "
 " button
- On / off power supply, used to control the start-up or shut down the appliance.
Pre-set mode allow the user to easily move the appliance room-to-room and select the corresponding mode for the location in which the appliance operating for optimum performance. Press the "MODE" button to choose from Dry, Turbo, Comfort or Continuous.
* Dry mode
- Press the"
 " button until the "Dry" symbol is lights.
- Press the "
 " or"
" or"  " to choose the humidity desired, adjustable range is 35%RH-80%RH.
The fan speed is low and cannot be adjusted.
The screen will display the setting humidity, and after 2 seconds, turn to display the ambient humidity.
*Turbo mode
Press the " " button until the "Turbo" indicator lights, the setting humidity is 35%RH, press the " "or " " to choose the humidity desired.
The fan speed is high and can not be adjusted.
The screen will display the setting humidity, and after 2 seconds, turn to display the ambient humidity.
* Comfort mode
Press the "” button until the' Comfort" indicator is lights, the appliance will setting humidity according the ambient temperature. So the humidity can not be adjusted.
The fan speed is low and can not be adjusted.
The screen will display the ambient humidity, and after 1 minute the screen light will go to dim, another 1 minute later the screen will turn off.
Press the "" button to quit the Comfort mode, and press other button to check the status, the screen will light again.
* Continuous mode
Press the " " button until the" Cont." indicator is lights, the setting humidity is 15%RH and can not be adjusted, the unit will continuously run.
The fan speed is low and can not be adjusted.
- Decrease /Increase button
- Press" "/ " "to select the indoor humidity level you expect to achieve, or set the time.
- Humidity adjustable range is 35%RH-80%RH. The screen will display the setting humidity, and after few seconds, turn to display the ambient humidity.
- When the ambient humidity lower than setting humidity, the compressor stop running, and after few minutes the fan stop running.
This timer can be used to delay the appliance start-up or shutdown, this avoids wasting electricity by optimizing operating periods.
Programming start-up
- Turn on the appliance, choose the mode you want, for example Dehumidify mode, 65%RH.Turn off the appliance.
- Press the"  " button, the screen starts to flash, press the" "or " "to adjust the set time from 0.5-24 hours.
- In 5 seconds without the operation, the timer start function, then the "Timer" symbol lights.
- Press the "  " button again to cancel the Timer, and the "Timer" symbol disappear.
Programming shut down
- When the appliance is running, press the" "button, the screen starts to flash, press the “" or" "to adjust the set time from 0.5-24 hours.
- In 5 seconds without the operation, the timer start function, then the" Timer" symbol lights.
- Press the " " button again to cancel the timer, and the "Timer" symbol disappear.
* Clean filter
- When the filter needs to be cleaned, the "Filter" symbol will light up after 250 hours of use). Remove the filter from the back of unit follow the "CLEAN THE FILTER" chapters.
- Once the filter is completely dry, place filter back in the unit and hold the " " button 3 second to reset the time and the " Filter" symbol is turn off.
Caution: Do not operate the appliance without the included filter.
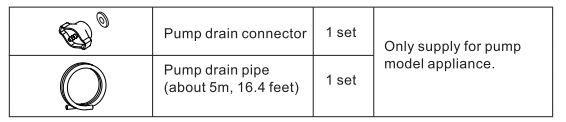
* Pump drain (For 048-TL-D50WP only)
Connect the pump drain pipe(5m or 16.4ft) on the backof unit, then the unit can continuous run without clean the bucket.
1) Put the unit on level floor, unscrew the cap on the back of unit;
2) Install the pump adaptor and gasket;
3) Install the drain pipe on connector;
4) Press "PUMP" button to run the unit, press the'PUMP" button start the pump drain function, and the"PUMP" symbol is light up.
5) The max. height of pump drainage is about 5 meters(16.4 ft).
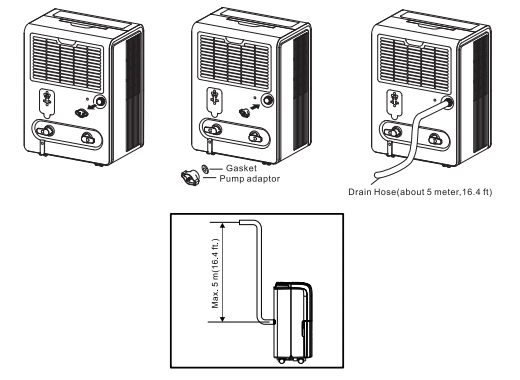
Note:After pump button has been activated, pump will not begin removing water, the pump will remain on stand-by. When bucket is almost full, pump will automatically begin removing water and stop when pump work4 min. This cycle will continue until pump button is deactivated. Make sure there are no kinks or knots in the hose.
* Alarm of bucket full
-When the bucket is full, the compressor will shut off, the fan will stop for a few minutes, and make a beeping noise, "Tank Full" symbol is flashing.
-The unit will not run again until the bucket is emptied and properly placed back inside the unit.
-The bucket should be cleaned every week to prevent the growth of mold, mildew and bacteria. Use a mild detergent to clean. Once clean, completely dry the bucket and place it back inside unit.
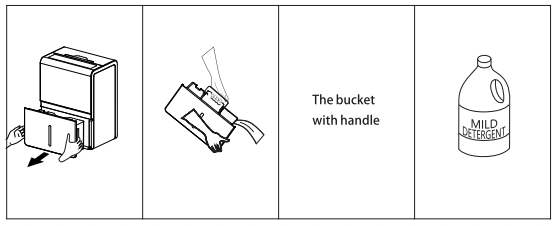
Note: Hold the bucket with both hands when emptying.
Note: When the bucket is full or removed from the unit, the compressor will turn off but the fan will continue to run for a few minutes. This is completely normal. The unitwill not be removing moisture from the air at this time.
Note: During operation, it is normal for the unit to exhaust warm air from the top of the unit.
Caution: Do not place the bucket on the floor when it is full as it is uneven on the bottom and water may spill.
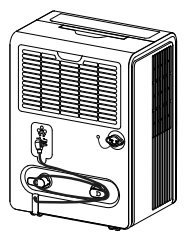
*Continuous drain (For North America area)
Connect the drain pipe on the back of unit, then the unit can continuous run without clean the bucket.
1) Put the unit on level floor, unscrew the cap on the back of unit;
2) Install the garden hose(which has an outer diameter of 1 1/16 inches, or 1.0625 inches or 27.0mm, and a pitch of 11.5 TPI) on unit;
3) Press "ON/OFF" button to run the unit.
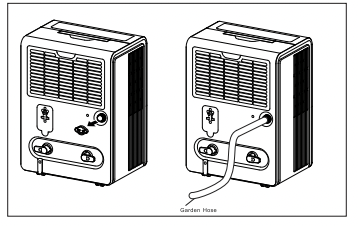
Note: Please install the drain pipe follow below picture.
Please install the drain pipe correctly, or the water cannot drain from the pipe.
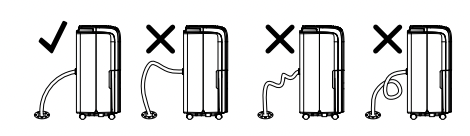
Notice: If the unit put on the un-level ground or not correctly install the drain pipe, the water will full the bucket and stop run. If that happened, please check the ground is whether horizon, and the drain pipe is correctly installed.
At the same time, the bucket need to be install correctly.
*AUTOMATIC DEFROST
When frost builds upon the evaporator coils, the compressor will cycle off and the fan will continue to run until the frost disappears. When the coils are completely defrosted, the compressor or fan (depending on the model) will automatically restart and dehumidify will resume.
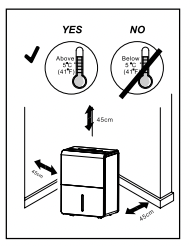
Location requirements:
The unit operating in a basement will have little no effect in drying out an adjacent enclosed storage area, such as a closet, unless there is adequate circulation of air in and out of the area.
1. Do not use outdoors.
2. This appliance is intended for indoor use only. Place the appliance on a smooth, level floor surface that is strong enough to support the unit with a full bucket of water.
3. Allow at least 18"(45cm) of around and above space away from the wall for efficient working.
4. Place the appliance in an area where the temperature will not fall 5°C(41°F).
5. Use the dehumidifier in cooking, laundry, bathing and dish-washing areas that have excessive moisture.
6. Place the dehumidifier away from a clothes dryer.
7. Use the dehumidifier in a basement to help prevent moisture damage.
8. The dehumidifier must be operated in an enclosed area to be most effective,close all doors, windows and other outside openings to the room.
9. Do not block the air inlet or outlet of the appliance. Reduced airflow will result in poor performance and could damage the unit.
CLEAN AND MAINTENANCE
Before cleaning or maintenance, turn the appliance off by pressing the "POWER" button on the control panel, wait for a few minutes then unplug from the mains socket.
CLEANING THE CABINET
You should clean the appliance with a slightly damp cloth then dry with a dry cloth.
• Never wash the appliance with water, it could be dangerous.
• Never use petrol, alcohol or solvents to clean the appliance.
• Never spray insecticide liquids or similar.
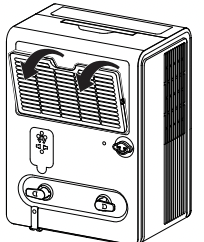
CLEANING THE FILTER
• To keep your appliance working efficiently, you should clean the filter every week of operation.
• The filter can take out like fig.
• To avoid possible cuts, avoid contacting the metal parts of the appliance when removing or re-installing the filter.
It can result in the risk of personal injury.
• Use a vacuum cleaner to remove dust accumulations from the filter. If it is very dirty, immerse in warm water and rinse a number of times. The water should never be hotter than 40°C (104°F). After washing, leave the filter to dry then attach the intake grille to the appliance.
END OF SEASON OPERATIONS
- To unplug from the mains socket, empty the bucket, remove the cap.
- Run off all water left inside the appliance. When all the water has been drained, put the cap back in place.
- Clean the filter and dry thoroughly before putting back.
- Cover the appliance prevent from dust.
- Store the appliance upright in a dry location.
- The power cord can winding in the wire hook, and then put the plug into the storage hole.
START OF SEASON CHECKS
Make sure the power cable and plug are undamaged and the earth system is efficient.
Follow the installation instructions precisely.
Troubleshooting
Occasionally, you may encounter some problems that are of a minor nature and a service call may not be necessary. Use this troubleshooting guide to identify possible problems you may be experiencing.
|
Problem
|
Possible Causes
|
Solutions
|
|
Dehumidifierdoes not start
|
The dehumidifier is unplugged.
|
Make sure the dehumidifier's plug is pushed completely into the outlet.
|
|
The fuse is blown/circuit breaker is tripped.
|
Check the house fuse/circuit breaker box and replace fuse or reset breaker.
|
|
Dehumidifier has reached its present level or the bucket is full.
|
The dehumidifier automatically turns off when either condition occurs. Change to a lower setting or empty the water bucket and replace properly.
|
|
Bucket is not in the proper position.
|
The bucket must be in place and securely seated for the dehumidifier to operate.
|
|
Power Failure
|
There is a protective time delay (up to 3 min.) to prevent trip-ping of the compressor overload.Forthis reason, the unit may not start normal dehumidify for 3 min after it is powered back on.
|
| Dehumidifier does not dry the air as it should
|
Not enough time allowed for unit to remove moisture |
When first installed. allow at least 24 hours to maintain the desireddryness. |
| Airflow is restricted |
Make sure there are no curtains. blinds. or furniture blocking the front or back of the dehumidifier. See the
CHOOSING A LOCATION section. |
| Dirty filter |
See the CLEAN FILTER section. |
|
Airflow is restricted
|
Make sure there are no curtains, blinds, orfurniture blocking the front or back of the dehumidifier. See the CHOOSING A LOCATION section.
|
| Dirty filter |
See the CLEAN FILTER section.
|
|
The Humidity Control may not be set low enough
|
For drier air, press the  button to lower the percent humidity desired in the room, or set the dehumidifier to "Cont." mode for maximum dehumidify. button to lower the percent humidity desired in the room, or set the dehumidifier to "Cont." mode for maximum dehumidify.
|
|
Clothes dryer may be blowing moist air into the room
|
Install the dehumidifier away from the dryer.
The dryer should be vented outside.
|
|
Doors and windows may not be closed tightly
|
Check that all doors, windows, and other openings are securely closed.
|
|
Room temperature is too low
|
Moisture removal is best at higher room temperatures. Lower room temperatures will reduce the moisture removal rate. This model is designed to operate at temperatures above 5°C(41°F).
|
|
Appliance runs too long
|
The area is too large
|
The capacity of the appliance can not meet the area of the room.
|
|
Doors and windows are open
|
Close the door and window.
|
|
Frost apears on heat-exchanger
|
Appliance run recently or the room temperature is too low
|
It is normal, frost usually disappear in 60 min.
|
|
Fan noise
|
The air is passing through the appliance
|
This is normal.
|
|
Water on the floor
|
The drain connection may be aging or loose
|
Check the drain connection and the appliance is placed level.
|
|
The drain pipe is connected, but the water is not drained
|
If use the bucket, remove the drain pipe and put back the drain cover; or install the drain pipe correctly.
|
Error Code Chat
If the following error code appears, please check the causes and solution.
|
CODE
|
DESCRIPTION
|
POSSIBLE CAUSES
|
SOLUTIONS
|
|
EH
|
Humidity sensor failure
|
Humidity sensor is damaged.
|
Connect customer service center.
|
|
E1
|
Temperature sensor failure
|
Temperature sensor is damaged.
|
Connect customer service center.
|
|
E2
|
|
E3
|
Gas leakage
|
Ambient temperature is too high.
|
Move the appliance to cooler place.
|
|
E3 appears many times.
|
Connect customer service center.
|
|
P1
|
Bucket pull out
|
The bucket isn't in proper position.
|
Please Re-install the bucket and make it in proper position.
|
|
E5
|
Pump failure
|
Didn't install the pump drainage kit before start pump function.
|
Install the pump drainage kit, before start pump function.
|
|
Users use non-standard drainage pipes. (Manufacturer's original pipe)
|
Use the original pipe.
|
|
The drain cover is not tightened.
|
Tighten the cover.
|
|
The rubber washer is missing.
|
Re-install the washer in cover.
|
|
Poor connection between drain pipe and drain cover.
|
Check the connection of pipe and drain cover.
|
Note:
1 .The code "PI" and "E5" is only for pump model, others model appliance have not these two codes.
2. lf E3 appears, please the check the ambient temperature range whether below 32 °C.
If the ambient temperature over 32 X. place the unit into the place below 32 °C (suggest 30°C) for two hours before running the air conditioner again.
Star-up the unit, if the E3 appears again in 2 hours, please contact the service center.
Strictest operation environment: 5°C~32‘,C (41°F~90°F) ,30%RH~90%RH.