Loading ...
Loading ...
Loading ...
Water Supply Requirements
Water supply faucets must fit standard 3/4 inch [19 mm] female
garden hose couplings. DO NOT USE SLIP-ON OR CLAMP-
ON CONNECTIONS.
NOTE: Water supply faucets should be readily accessi-
ble to permit turning them off when washer is not being
used.
Recommended cold water temperature is 50° to 75° Fahrenheit
[10° to 24° Celsius]. Recommended maximum hot water temper-
ature is 125° Fahrenheit [51° Celsius]. Warm water is a mixture
of hot and cold water. Warm water temperature is dependent upon
the water temperature and the pressure of both the hot and cold
water supply lines.
WARNING
To prevent personal injury, avoid contact with inlet
water temperatures higher than 125° Fahrenheit [51°
Celsius] and hot surfaces.
W748
Water pressure must be a minimum of 20 to a maximum of 120
pounds per square inch [minimum of 138 to a maximum of 827
kPa] static pressure measured at the faucet.
NOTE: Water pressure under 20 pounds per square
inch [138 kPa] will cause an extended fill time in the
washer and decreased rinse performance.
Turn on the water supply faucets and flush the lines for approxi-
mately two minutes to remove any foreign materials that could
clog the screens in the water mixing valve. This is especially im-
portant when installing your washer in a newly constructed or
renovated building. Build-up may have occurred during construc-
tion.
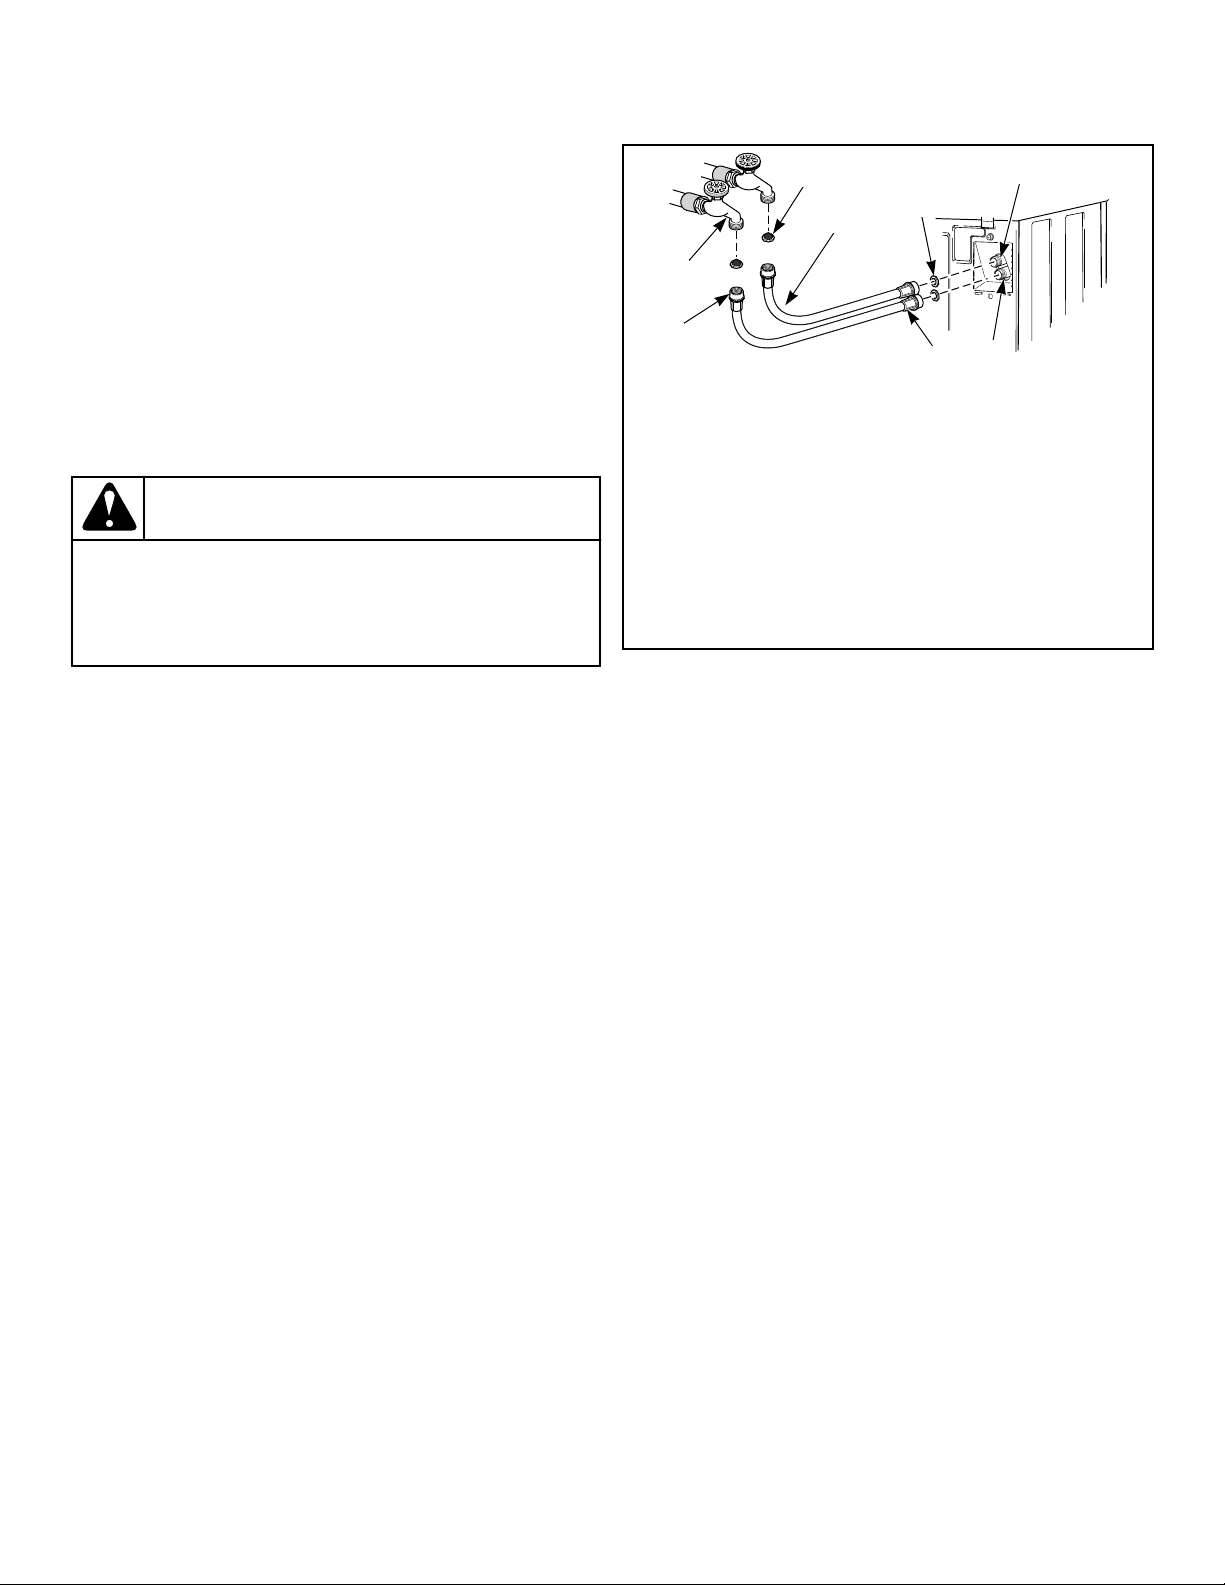
Connecting Hoses
1. Insert rubber washers and filter screens (from accessories
bag) in water fill hose couplings (two hoses supplied with
washer). The filter screen must be facing outward.
2. Connect fill hose couplings with filter screens to water supply
faucets.
3. Connect the other hose couplings to the hot and cold valve
connections at the rear of the washer.
4. Make sure the hose from the hot water faucet goes to the wa-
ter mixing valve marked “H” and the hose from the cold fau-
cet goes to the valve marked “C”.
5. Thread hose couplings onto valve connections finger tight.
Then turn 1/4 turn with pliers.
IMPORTANT: DO NOT cross thread or overtighten
couplings. This will cause them to leak.
6. Turn water on and check for leaks.
7. If leaks are found, retighten the hose couplings.
8. Continue tightening and rechecking until no leaks are found.
COLD
HOT
TLW2273N_SVG
C
H
8
7
6
5
4
3
2
1
1. Filter Screen (Screen must be facing outward)
2. Fill Hose
3. Plain Rubber Washer
4. Cold Water Connection
5. Hot Water Connection
6. Install this end of hose to valve connections at rear of
washer
7. Install this end of hose to water supply faucet
8. Faucet
Figure 4
IMPORTANT:
Hoses and other rubber parts deteriorate after exten-
ded use. Hoses may develop cracks, blisters or materi-
al wear from the temperature and constant high pres-
sure they are subjected to.
All hoses should be checked on a monthly basis for
any visible signs of deterioration. Any hose showing
the signs of deterioration listed above should be re-
placed immediately. All hoses should be replaced ev-
ery five years.
IMPORTANT: Turn off water supply faucets after check-
out and demonstration. Owner should turn off water
supply whenever there will be an extended period of
non-use.
Risers
Risers (or air cushions) may have to be installed if the pipes
knock or pound when flow of water stops. The risers are more ef-
ficient when installed as close as possible to the water supply fau-
cets. Refer to Figure 5 .
Installation
©
Copyright, Alliance Laundry Systems LLC -
DO NOT COPY or TRANSMIT
11 Part No. 204371EN
Loading ...
Loading ...
Loading ...