www.GEAppliances.com
Safe_In_rue6ons ...... 2-8
Operating Instructions
Canning ................ ] 2
Clock, Timer and
Control I,ockout .......... 17
Controls ............. 14-16
Convection ........... 29-32
Cookware ............ 11, 12
Defrost .............. 24, 25
Introduction ............. 13
Oven ................... 18
Oven Thermostat ......... 39
Proofing ................ 34
Rack Placement .......... 23
Recipes ................. 33
Sabbath Feaulre ....... 40, 41
Self-Cleaning Oven ..... 35, 36
Settings .............. 37, 38
Speedcook ............ 19-22
Speed Baking/
Speed Roasting ........ 20-22
Speed Broiling ........ 22, 23
Surface Units .......... 9, 10
Timed Baking
and Roasting ............. 27
Traditional
Baking/Roasting .......... 26
Traditional Broiling Guide . .28
_'a rming ................ 34
Write the model and serial
numbers here:
Model #
Serial #
You can lind them on a label
behind the open oven door
on the lower left corner of the
range fl'ame.
Care and Cleaning
Broiler Pan & Grid ....... 45
Cleaning Oven Door . ..... 43
Control Knobs ........... 42
Control Panel ........... 42
Glass Cooktop ........ 46, 47
Oven Light .............. 44
Oven Vent .............. 42
Packaging Tape .......... 42
Racks .................. 44
Stainless Smel Surfaces ..... 45
Storage Drawer . ......... 45
Troubleshooting
Tips ................ 48-52
Consumer Support
Consumer
Support ......... Back Coxer
Product Registration . . . 53, 54
Warranty ............... 55
164D4290P336-2 49-80180-2
_S'998
!0-03 JR
IMPORTANTSAFETYINFORMATION.
READALLINSTRUCTIONSBEFOREUSING.
WARNING!
For your safe_, the information in this manual must be followed to minimize the risk of fire or
explosion, electric shock, or to prevent property damage, personal injury, or loss of life.
PRECAUTIONSTOAVOIDPOSSIBLEEXPOSURETOEXCESSIVE
MICROWAVEENERGY
Do not attempt to operate this oxen with
tile door open since ope,l-door operation
can result in hal3nfll] exposure to
microwaxe energ?'. It is importantnot to
defeat or tamper with the safety interlocks.
Do not place any ol)ject between the oxen
front lace and the door or allow soil or
cleaner residue to accumulate on sealing
snrf;.tces.
The oxen should not be adjusted or
repaired by anyone except properly
qualified service personnel.
Do not operam file oven if it is damaged.
It is particularly important that tile oxen
door close properly and that there is no
damag_ to tile:
[] door (bent),
[] hinges and latches (broken or
loosened),
[] door seals and sealing suri_tces.
IMPORTANTSAFETYNOTICE
The California Safe Drinking Water and ToxicEnforcement Act requires the Governor of California
to publish a list of substances known to the state to cause cancer, birth defects or other reproductive
harm, and requires businesses to warn customers ofpotential exposure to such substances.
The fiberglass insulation in self-clean ovens gives off a very small amount of carbon monoxide during
the cleaning cycle. Exposure can be minimized by venting with an open window or using a ventilation
fan or hood.
2

w_w.GEAppliances,com
WARNING!
For your safe_ the information in this manual must be followed to minimize the risk of fire, electric
shock, or to prevent propert V damage, personal injury, or loss of life.
• ,WARNINGANTI-TIPDEVICE
All ranges can tip and injury could result.
Toprevent accidental tipping of the range, attach it to the wall and floor by installing the Anti--tip
device supplied.
Tocheck if the device is installed and engaged properly, remove the storage drawer and inspect the
rear leveling leg. Make sure # fits securely into the slot.
[['yOU pull tile range Otlt fronl file wall for any reason, make stlre tile device is properly
engaged when you push the range back agvdnst tile wall. If it is not, there is a possible risk of
tile rang_ tipping ox_r and causing il_ju W if you or a child stand, sit or lean on all open door
Please Iefer to file Anti-Tip device information ill this manual. Failule m take this piecaufion
cou]d resuh ill tipping of tile rang> and injm T.
SAFETYPRECAUtiONS
When using electrical appliances, basic safe_/precautions should be followed, including the following:
Use this appliance only %r its intended
(
pu_l)ose as described in this )wner s
Manual.
Be sure your appliance is properly
installed and grounded by a qualified
installer ill accordance with tile provided
installation instructions.
Hme tile installer show you tile location of
tile circuit breaker or fllse. Mark it tbr easy
reference.
Do not attempt to repair or replace ally
part of your range unless it is specifically
recon/mended in this manual. All other
set\icing should be referred to a qualified
technician.
Do not coxer or block any openings
on tile appliance.
Before performing any service, disconnect
tile range power supply at file household
distribution panel by removing the fllse or
switching off tile ciIvuit breakei:
Do not leax> children alone---children
should not be left alone or unattended in
an area where all appliance is ill rise. They
should nex>r be allowed to sit or stand on
any part of tile appliance.
Do not allow anyone to climb, stand
or hang on tile dooi; storag_ drawer or
cooktop. They could damag_ tile rang_
and exen tip it ox_i; causing sex.re
personal injui T,
3
READALLfiVSTRUCTiON$BEFOREU$1N&
•iiiiiii............
a, WARNING'!
SAFETYPRECAUTIONS
Do not operate the oven or cooktop controls if the glass is broken. Foodsplatter or cleaning solution
may penetrate a broken control panel or cooktop and create a risk of electrical shock. Contact a
qualified technician immediately should your glass control panel or cooktop become broken.
Do not store flammable materials in an
oxen or near the cooktop.
iiiiiiiiiiii_iii
CAUTION: temsofinterestto
children should ,lot be stored in cabinets
aboxe a range or on the back of a range--
children climbing on the range to reach
items could be seriously injured.
Never wear loose-fitting or hanging
garments while using file appliance.
Be carefld when reaching %r items stored
oxer tile rang_. Flammable material could
be ignited if brought in contact with hot
surface units or heating elements and may
canse se\_re bnins.
iiiiiiiiiiii_iii
Use only dly pot holders--moist or damp
pot holders on hot snr/_aces may result in
burns fiom smam. Do not let pot holders
touch hot sur/_ace units or heating
elements. Do not use a towel or other
bulky cloth in place of pot holders.
Do not use water on grease fires. Never
pick up a flaming pan. Turn the controls
off. Smother a flaming pan on a surface
unit 1)ycoxering tile pan completely with
a well-fitting lid, cookie sheet or fiat u W.
Use a mulfi-puq)ose dU chemical or
foam-type fire extinguisher
Flaming grease outside a pan can be put
out 1)y co\>fing it with baking soda o_,
if available, by using a mulfi-pulpose dU
chemical or foam-type fire extinguisher
I_]ame in die ox>n can be smothered
complemly by closing die oxen door
and turning the oven off or by using
a mulfi-puq)ose &Y chemical or
foam-type fi_e extinguisher:
For your safety, nexer use your appliance
for warming or heating the room.
Do not let cooking grease or other
flammable materials accumulate in or
near the range.
Do not touch the surface units, rite
heating elements or tile inmfior sur/_ace
of tile oven. These sur/_aces m W be hot
enough to 1)urn even though they ate
dark in color Dining and after use, do not
much, or let clothing or other flammable
materials contact rite surface units, areas
nearl)y the surface units or any interior
area of the oxen; allow sufficient time tbr
cooling fi rst.
Potentially hot surPaces include the
cooktop, areas Pacing tile cooktop, oxen
xent opening, sniJ_aces near the opening,
crevices around the oven doon
iiiiiiiiiiii_iii
iiiiiiiiiiii_iii
REMEMBER:Tile inside surface of die oxen
may be hot when the door is opened.
Do not store or use combustible materials,
gasoline or other flammable vapors and
liquids in the vicinity of this or any other
appliance.
Kee I) tile hood and grease filters clean
to maintain g_od xenting and to axoid
grease fires.
Teach children not to play with tile
controls or any other part of the range.
Always kee I) dish towels, dish cloths, pot
holders and other linens a safe distance
fiom your range.
Always kee I) wooden and plastic utensils
and canned food a safe distance fiom
your range.
Always kee I) combustible wall coxefings,
curtains or drapes a safe distance from
yonr range.
4
COOKMEATANDPOULTRYTHOROUGHLY...
Cookmeat andpoultry thoreughly--meat toat least an INTERNALtemperatureof 160°Fandpoultry
toat least an INTERNALtemperatureof 180°ECookingto thesetemperaturesusuallyprotects against
foodbomeillness.
www.GEAppliances.com
SURFACEUNITS
Use proper pan size--select cookware having flat bottoms large enough to cover the surface unit
heating element. The use of undersized cookware will expose a portion of the surface unit to direct
contact and may result in ignition of clothing. Proper relationship of cookware to surface unit will
also improve efficiency.
Nex.er leax.e file surfi_ce units unatmnded
at high heat seuings. Boilox.ers cause
smoking and greasy spillo_.ers that m W
catch on fire.
Only certain wpes of glass, gtassAeramic,
earthenware or other glazed containers are
suitable for cooktop service; others m W
break because of the sudden chang.e in
temperature.
To minimize the possibili U of burns,
ig)lifion of flamnlable materials and
spillag.e, tile handle of a container
should be turned toward the center of
the rang.e wifltottt exmnding ox.er nearby
sur/_ace units.
Always uml fire surfi_ce units off before
removing cookware.
_4]len preparing flaming %ods under
the hood, uml the fan on.
Use care when touching the cooktop. Tile
glass sur_ace of rite cooktop will retain heat
after the controls hax.e been mined off;
Kee I) an eye on %ods being flied at high
or medium high heat settinKs.
Foods for flying should be as dry as
possible. Frost on fiozen foods or moisutre
on flesh foods carl cause hot lht to bubble
up and ox.er the sides of the pan.
Use little _t for efl_cfi_.e shallow or deep
tilt flTing. Filling the pan too fltll of/_at carl
cause spillox.ers when food is added.
If a combination of oils or/_ats will be
used in flTing, stir tog.ether before heating,
or as/_ats meh slowly.
Always heat fi_tslowly, and watch as it heats.
Use a deep t:at tltem/ometer whenever
possible to piex.ent overheating/_at beyond
rite smoking point.
Avoid scratching tile glass cooktop. The
cooktop can be scratched Mill items such
as shaq) insmm_ents, ring_ or other
jeweh> and rix.ets on clothing.
Larg.e scratches or impacts to glass
doors or cooktops carl lead to broken
or shattered glass.
Do not operate tile radiant surface units if
the glass is broken. Spillo_.ers or cleaning
solution m W penetrate a broken cooktop
and cream a risk of electrical shock.
Contact a qualified mchnician immediamly
should your glass cooktop become broken.
Nex.er use tile glass cooktop sur/_ace as a
cutting board.
Do not place or store imms that can melt
or catch fire on file glass cooktop, ex.en
when it is not being used.
Be careflrl when placing spoons or other
sfin_ing utensils on glass cooktop sur_ace
when it is in use. They m W become hot
and could cause bums.
Clean file cooktop Mill caution. If a wet
sponge or cloth is used to wipe spills on a
hot snr_ace unit, be carefitl to avoid steam
burns. Some cleaners carl produce
noxious flmtes if applied to a hot surfi_ce.
NOTE."h:e recommend dlatyou moid
wiping any surface unit areas until they
hax.e cooled and the indicator light has
g_ne off: Sugar .spills are the exception
m this. Please see the gleaning the glass
cooktop section.
When the cooktop is cool, use only tile
CERAMA BRYTE ¢_Ceramic Cooktop
Cleaner and the CERAMA BRYTE
Ceramic Cooktop Cleaning Pad to clean
rite cooktop.
To ax_id possible damag.e to file cooking
sur/_ace, do not apply cleaning cream to
the glass sur/_ace when it is hot.
Mter cleaning, use a dry cloth or paper
towel to remox.e all cleaning cream residue.
Read and follow all instructions and
warnings on the cleaning cream labels.
5
IMPORTANTSAFETYINFORMATION.
READALLINSTRUCTIONSBEFOREUSING.
TRIVECTIO MOVEN
Read and follow thespecific "Precautions toAvoid Possible Exposure to Excessive Microwave Energy"
section in this manual
Toreduce therisk of fire in the ovencavity:
Do not overtook food. Carefully attend
appliance if pat)el, plastic or other
combustible mamfials are placed irrside
die ox>n to facilitam cooMng.
In deflost mode, Iemox> wire twist-ties
flom paper or plastic containers before
placing bags in tile oxen.
()\'err Cooking Bags--Do not use file wire
twist-fie to close tile bag.
Do not use paper rowels.
Do not use your o\_n m dU newspapers.
Do not oxeivook potatoes. They could
dehydram arrd catch file, causing damag_
m your ox>n.
Do not operam file oven while empff m
ax_id damag_ to tile ox>n arrd tile danger
of file.
Do not use die oven for storag_ purposes.
Do not ]eax_ paper products, cooking
umnsils or food in die oven when not
in use.
If mamfials irrside the oven should ignim,
kee I) the oxen door closed, tm-n tile oxen
off and shut off power at Ore flrse or circuit
breaker panel. If tile door is opened, tile
fire may spread.
This oxen is not approxed or msmd for
nlarine use.
Some products such as whole eggs arrd
sealed corrtainers for example, closed
jars will explode arrd should not be
heated in fills oxen. Such use of tile oven
could Iesult in irljm-y.
Do not boil eg_:s ira this oxen. Pressure will
build up irrside file egg yolk and will cause
it m burst, possibly iesulting ira injm-y.
Do not pop popcorn ira your o_en.
Foods widl unbroken outer "skin" such as
potatoes, sausag>s, tomatoes, apples, egg
yolks, chicken li_el_ and odler giblets
should be pierced to allow steam to escape
dining cooking.
Don't deflost flozen bex>rages ira nan_ow -
necked bottles (especially carbonated
beverages). Even if the container is
opened, plessme can build up. This can
cause fire container m burst, possibly
resulting in irljnI T.
Hot foods and steam can cause bums.
Be careflfl when opening any corrtainers
of hot tbod, cooking pouches and boxes.
To prevent possible injury, direct steam
away flom hands arrd face.
:ks with arty appliance, close supeiMsion is
necessa U when used by children.
vvww.GEAppliances.com
ALLTHESETHINGSARENORMALWITHYOURTRIVECTIO__OVEN
Steam or xapor escaping from around
tile dooI:
Dimming of tile oven light and chang.e
in tile blower sound may occur.
Tile microwm.e fan m W operam with both
ox.ens oft: It is cooling tile control and will
mrn itself oft:
Some TV-radio inte.rference might be
noticed while using your o\.en. It is
similar to tile inmrference caused by other
small appliances and does ,lot indicam a
problem with your o_.en.
ARCING
If you see arcing, open the door and correct the problem.
Arcing is themicrowave term for sparks in the
oven.Arcing is causedby:
Metal or foil touching tile side of tile o_.en.
Foil *lot molded to tbod (uptui_rled edg.es
act like antennas).
Metal, such as twist-ties, poulu T pins or
gold-iimmed dishes in tile oven.
ReQ'cled paper towels containing small
metal pieces being used in tile ox.en.
SUPERHEATEDWATERANDSPONTANEOUSBOILING
Liquids such as wam_; coffee or tea are able
to be ox.erheated beyond tile boiling point
without appeming to be boiling. Visible
bubbling or boiling when tile container is
remo\.ed flom tile microwm.e o\,en is ,lot
always present. THISCOULD RESULTIN VERY
HOTLIQUIDSSUDDENLYBOltING OVERWHEN
THECONTAINERIS DISTURBEDORA UTENSIL
IS INSERTEDINTO THELIQUID.
IMPORTANTSAFETYINFORMATION.
READALLINSTRUCTIONSBEFOREUSING.
WARNING'!
OVEN
Stand away from the range when opening the oven door. Hot air or steam which escapes can cause
bums to hands, face and/or eyes.
Do riot heat unopened food containers.
Pressure could build up and tile container
could burst, causing an inju W.
Kee I) file oxen x_nt unobstructed.
Kee I) file oven flee flom grease buildup.
Place rim ox>n shelf in file desiied position
while tile oxen is cool. If sheh>s must be
handled when hot, do not let pot holder
contact tile heating elements.
When using cooMng or roasting bags
in tile oven, follow tile manufltcturer's
directions.
Do not use the oxen to dlT newspapers.
If oxerheated, they can catch on fire.
Do riot use the oxen for a storage area.
Items stored in an oxen can ignite.
Do riot leme paper products, cooking
utensils or food in tile oxen when riot
in use.
Do riot use ahuninum foil to line oxen
bottoms, except as suggested in this
mannal. Improper installation of
aluminum foil may result in a risk
of electric shock or fire.
Pulling out tile shelf to the stoI>lock is a
comenience in lifting heax T foods. It is also
a precaution against burns from touching
hot sm_hces of tile door or oven walls.
SELF-CLEANINGOVEN
Do not use oven cleaners. No commercial oven cleaner or oven liner protective coating of any kind
should be used in or around any part of the oven. Residue from oven cleaners will damage the inside
of the oven when the self-clean cycle is used.
Do not clean the door gasket. Tile door
gasket is essential %r a good seal. Care
should be token riot to rub, damag_ or
mow file gasket.
Before self-cleaning the oven, remo_e
tile racks, broiler pan, gild arid other
cookware.
Be sure to Mpe up excess spillage be%re
starting tile self-cleaning operation.
If die self-cleaning mode malfimcdons,
mrn the oven off arid disconnect tile
power supply. Haxe it secviced by a
qualified mchnician.
Clean only parts lismd in fills Owner's
Manual.
Listen %r fim--A tan noise should be
heard sometin/e duiing the cleaning Q'cle.
If not, call a secx@eman before self-
cleaning again.
READANDFOLLOWTHISSAFETYINFORMATIONCAREFULLY.
SAVETHESEINSTRUCTIONS
8
Usingthesurfaceunits, www.GEAppliances.com
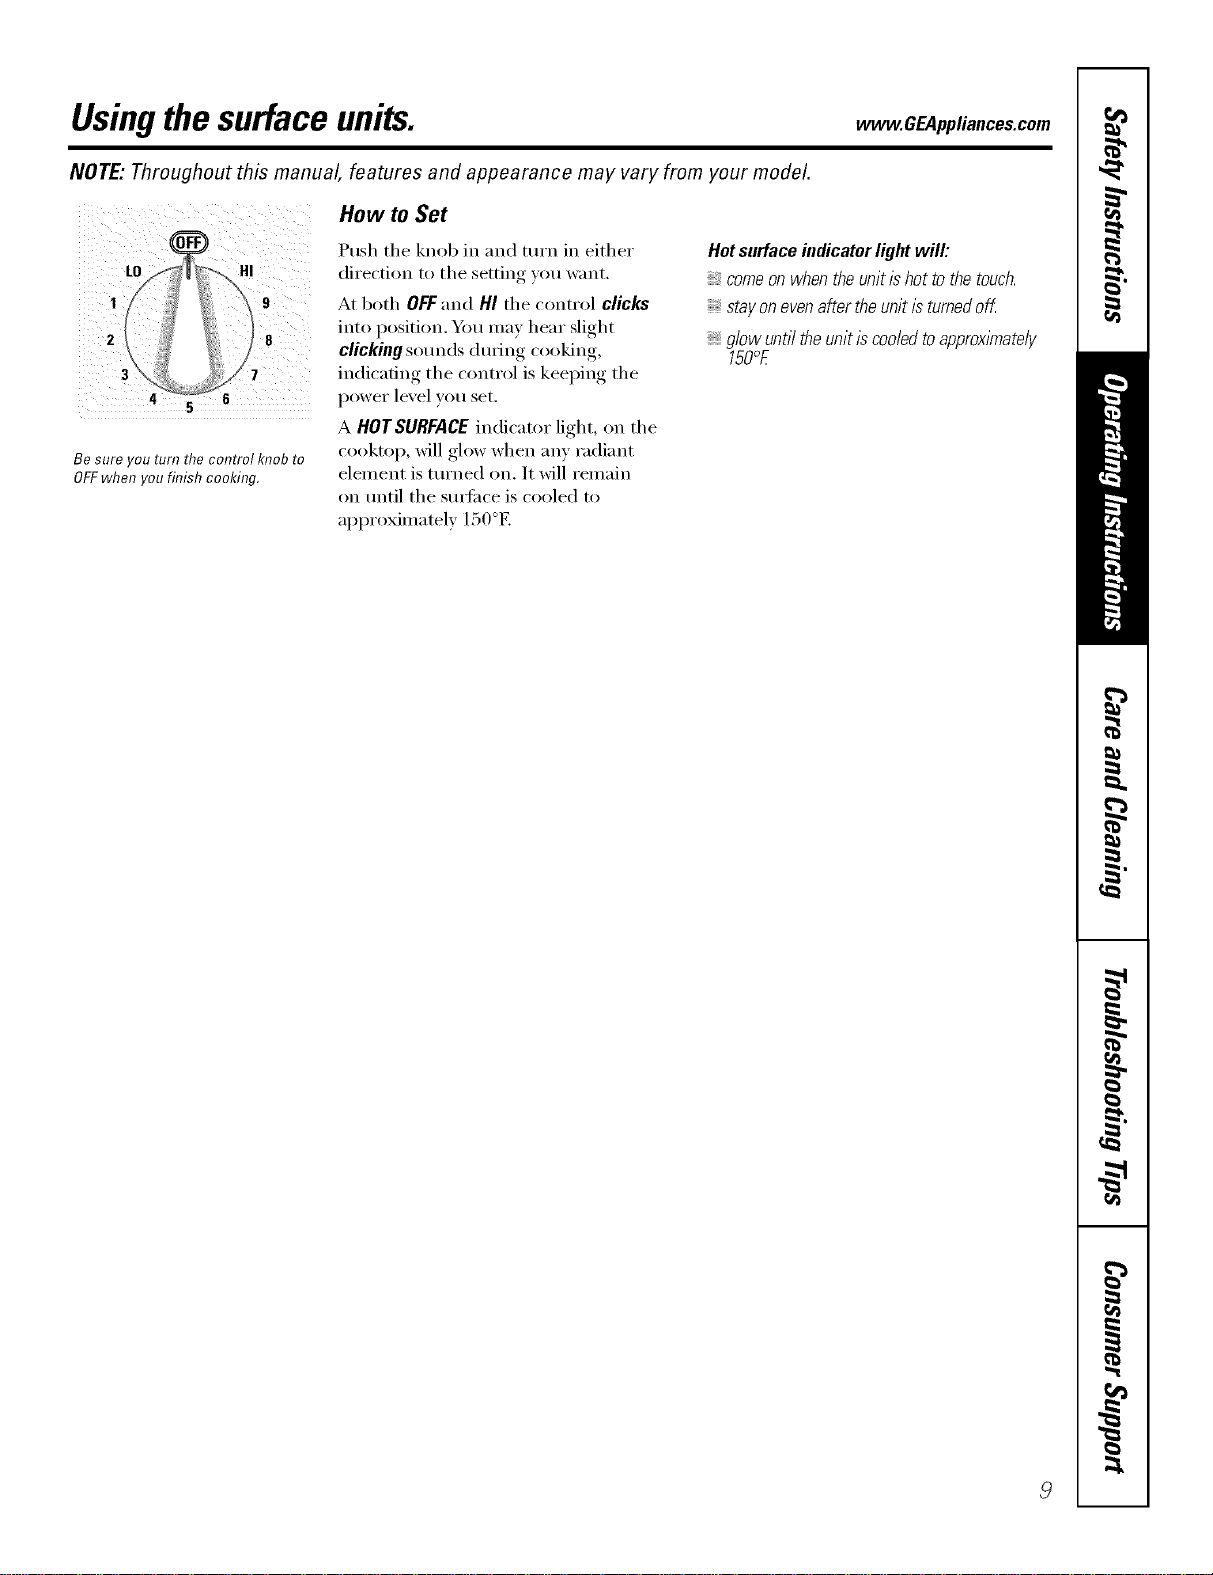
NOTE: Throughout this manual, features and appearance may vary from your model.
1
2
9
8
Be sure you turn the control knob to
OFFwhen you finish cooking.
How to Set
Push the knob in and turn in either
direction to the setting you want.
At both OFFand HI the control clicks
into position. Ym may hear slight
clicking som_ds during cooking,
indicating the control is keeping the
power level you set.
A HOTSURFACE indicator light, on the
cooktop, will glow when any radiant
element is turned on. It will remain
on until the smti_ce is cooled to
approximately 150°E
Hotsurfaceindicator lightwill:
,_comeonwhentheunitishottothetouch.
stayonevenaftertheunitisturnedoff.
glowunti/theunitiscooledtoapproxlmate/y
150c_E
Usingthesurface units.
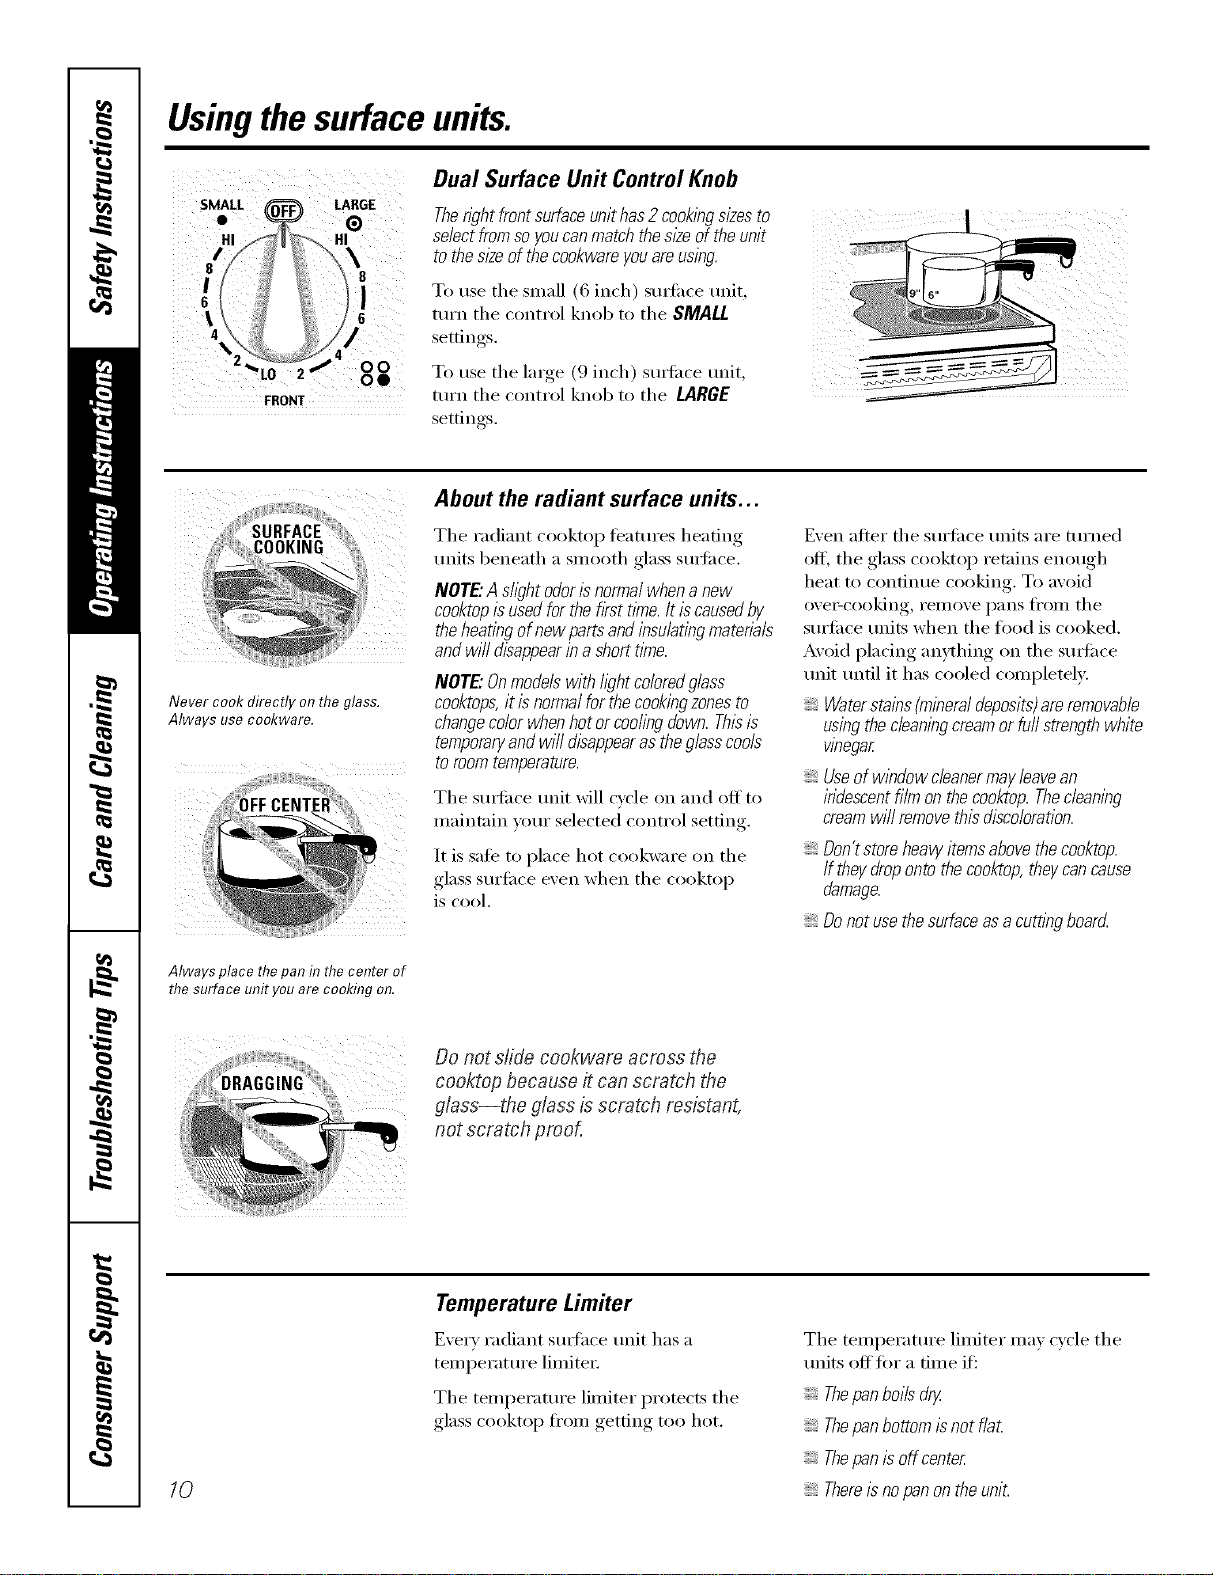
FRONT
Dual Surface Unit Control Knob
Theright front surfaceunit has 2cookingsizes to
select fromso youcanmatch the sl_eof the unit
to the sl2eof thecookware youareusing.
To use the small (6 inch) stntilce unit,
turn the control knob to the SMALL
settin rS
To use the large (9 inch) surfi_ce trait,
ttlrn the control knob to the LARGE
settin ,s
Never cook directly on the glass.
Always use cookware.
Always place thepan in thecenter of
the surface unit you are cooking on.
About the radiant surface units...
The radiant cooktop features heating
units beneath a smooth glass smti_ce.
NOTE."Asfl)ht odorIsnormal when a new
cooktopis usedfor the first tithe.It is causedby
the heating of new partsand insulatingmateriab
andwill disappearin a short time.
NOTE"Onmodelswithfightcoloredglass
cooktops,it is normalfor the cookingzonesto
changecolorwhen hot or cooling down. Thl2is
temporaryandwill disappearas theglasscools
to room temperature.
The sudi_ce unit Mll c)cle on and off to
maintain _otu" selected control settin ,
It is sale to place hot cookware on the
glass surtilce exert when the cooktop
is cool.
Even alter the surti_ce traits are ttH'ned
off, the glass cooktop retains enough
heat to continue cooking. To avoid
eve>cooking, remove pans fl'om the
surli_ce units when the food is cooked.
Avoid placing anything on the Stli_ilce
unit until it has cooled complemly.
Waterstains (mineraldeposits)areremovable
using thecleaningcreamor furl strength white
wbegar
Useof window cleanermay leavean
iridescent film on thecooktop.Thecleaning
cream will removethisdiscoloration.
Dontstoreheavyitemsabovethecooktop.
Iftheydropontothecooktop,theycancause
damage.
_Donotusethesurfaceasa cu_ingboard
Do not slide cookwara across the
cooktop because it can scratch the
glass--the glass is scratch resistant,
not scratch proof,
10
Temperature Limiter
Every radiant sudhce unit has a
temperature limited:
The temperature limiter protects the
glass cooktop from getting too hot.
The temperature limiter ma) cycle the
units off tot a time if:
Thepanboiis dry.
Thepanbottom Is not flat.
Thepan is off center
Thereisno panon the unit.
Selectingtypesofcookware.
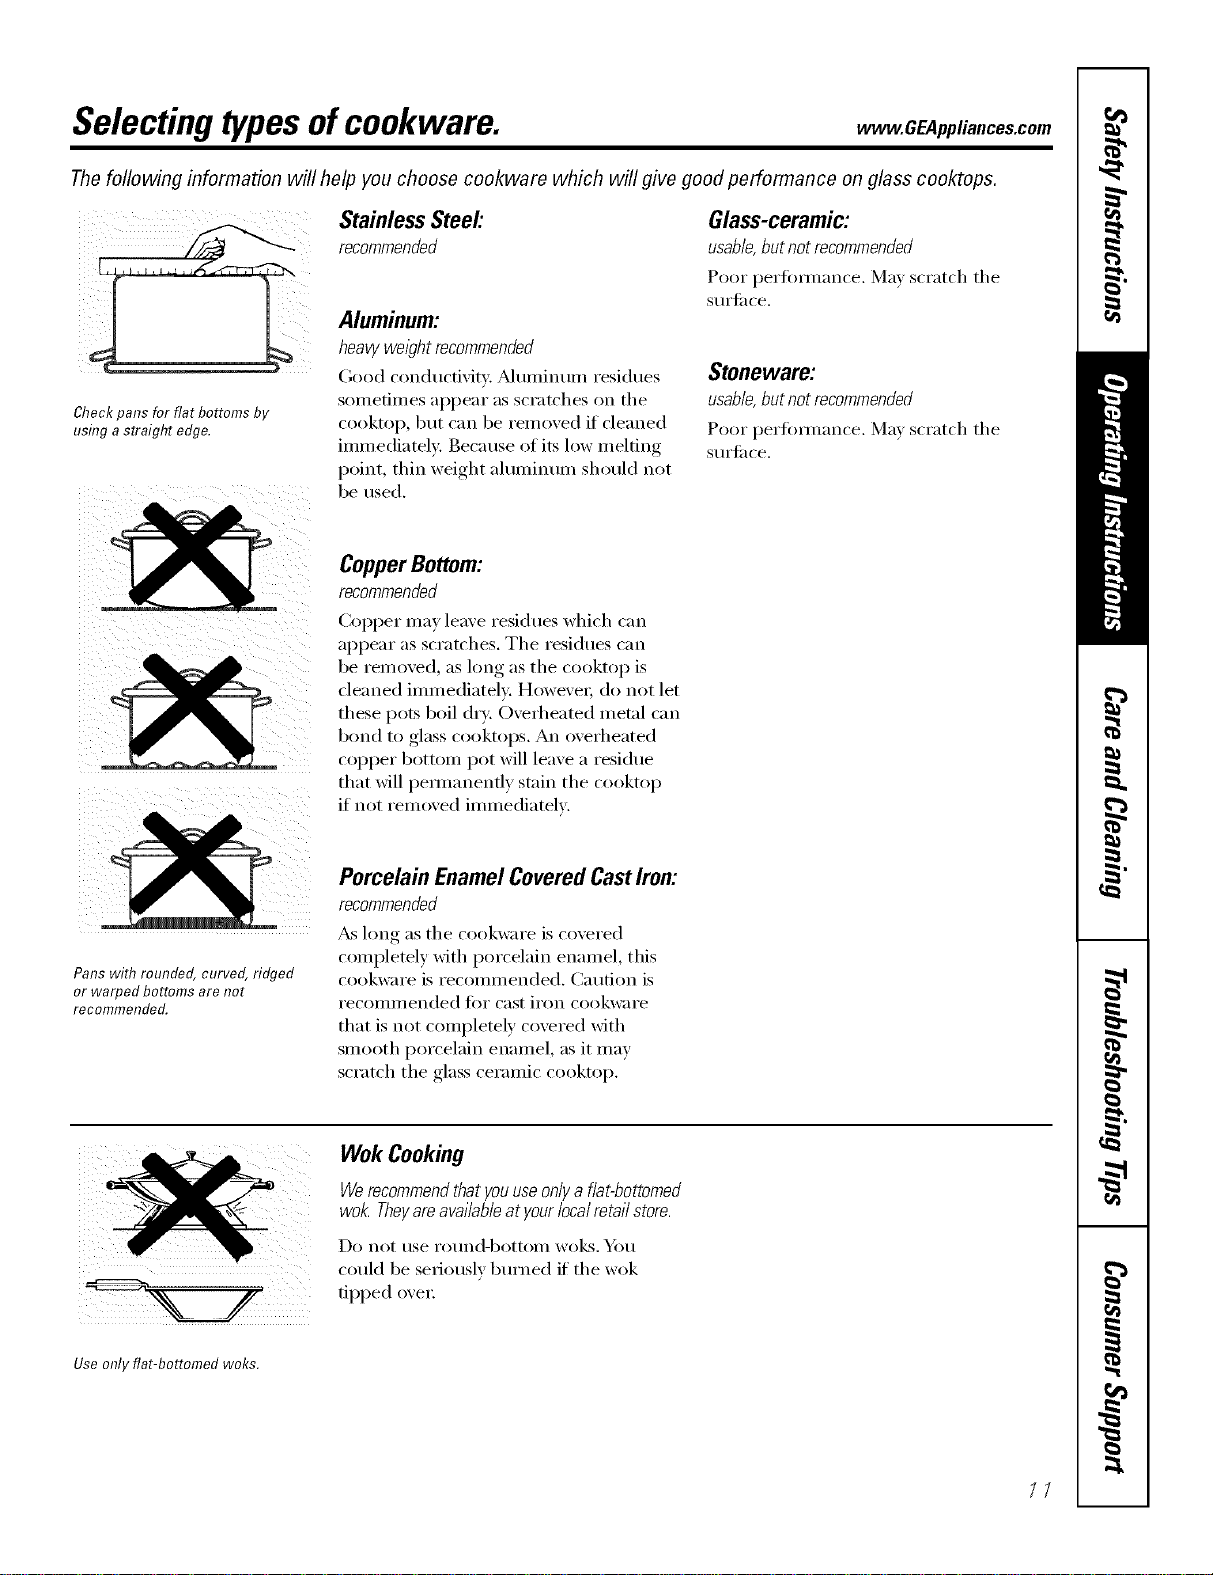
Thefollowing information will help you choose cookware which will give good performance onglass cooktops.
Check pans for flat bottoms by
using a straight edge.
Stainless Steel:
recommended
Aluminum:
heavy weight recommended
(;ood conductivity. _Muminun/residues
somefin/es appear as scratches on the
cooktoI% but can be removed if cleaned
immediately. Because of its low melting
point, thin weight ahmfinum should not
be used.
Glass-ceramic:
usable,butnotrecommended
Poor l)erfimnance. May scratch the
stli'til ce.
Stoneware:
usable,butnotrecommended
Poor perfimnance. May scratch the
StlI'til ce.
CopperBottom:
recommended
(bpper may leave residues which can
appear as scratches. The residues can
be relnoved, as long as the cooktop is
cleaned immediately. Howe\'ei; do not let
these pots boil dry. Overheated metal can
bond to glass cooktops. An overheated
COl)per bottom pot will leave a residue
that will pem_anenfly stain the cooktop
if not removed immediately.
Pans with rounded, curved, ridged
or warped bottoms are not
recommended.
Porcelain EnamelCoveredCastIron:
recommended
_&s long as the cookware is covered
completely with porcelain enamel, this
cookware is recomn/ended. Caution is
i'ecoilli/lended t()i" cast ii'on cookware
that is not completely covered with
smooth porcelain enamel, as it may
scratch the glass ceramic cooktop.
Wok Cooking
Werecommendthatyouuseonlya flat-bottomed
wok.Theyareavailableatyourlocalretailstore.
Do not rise i'otlnd-bottoi/l wo]<s. _I/})tl
could be seriously burned if"the wok
tipped oveI:
Use only flat-bottomed woks.
/7
Selecting typesofcookware.
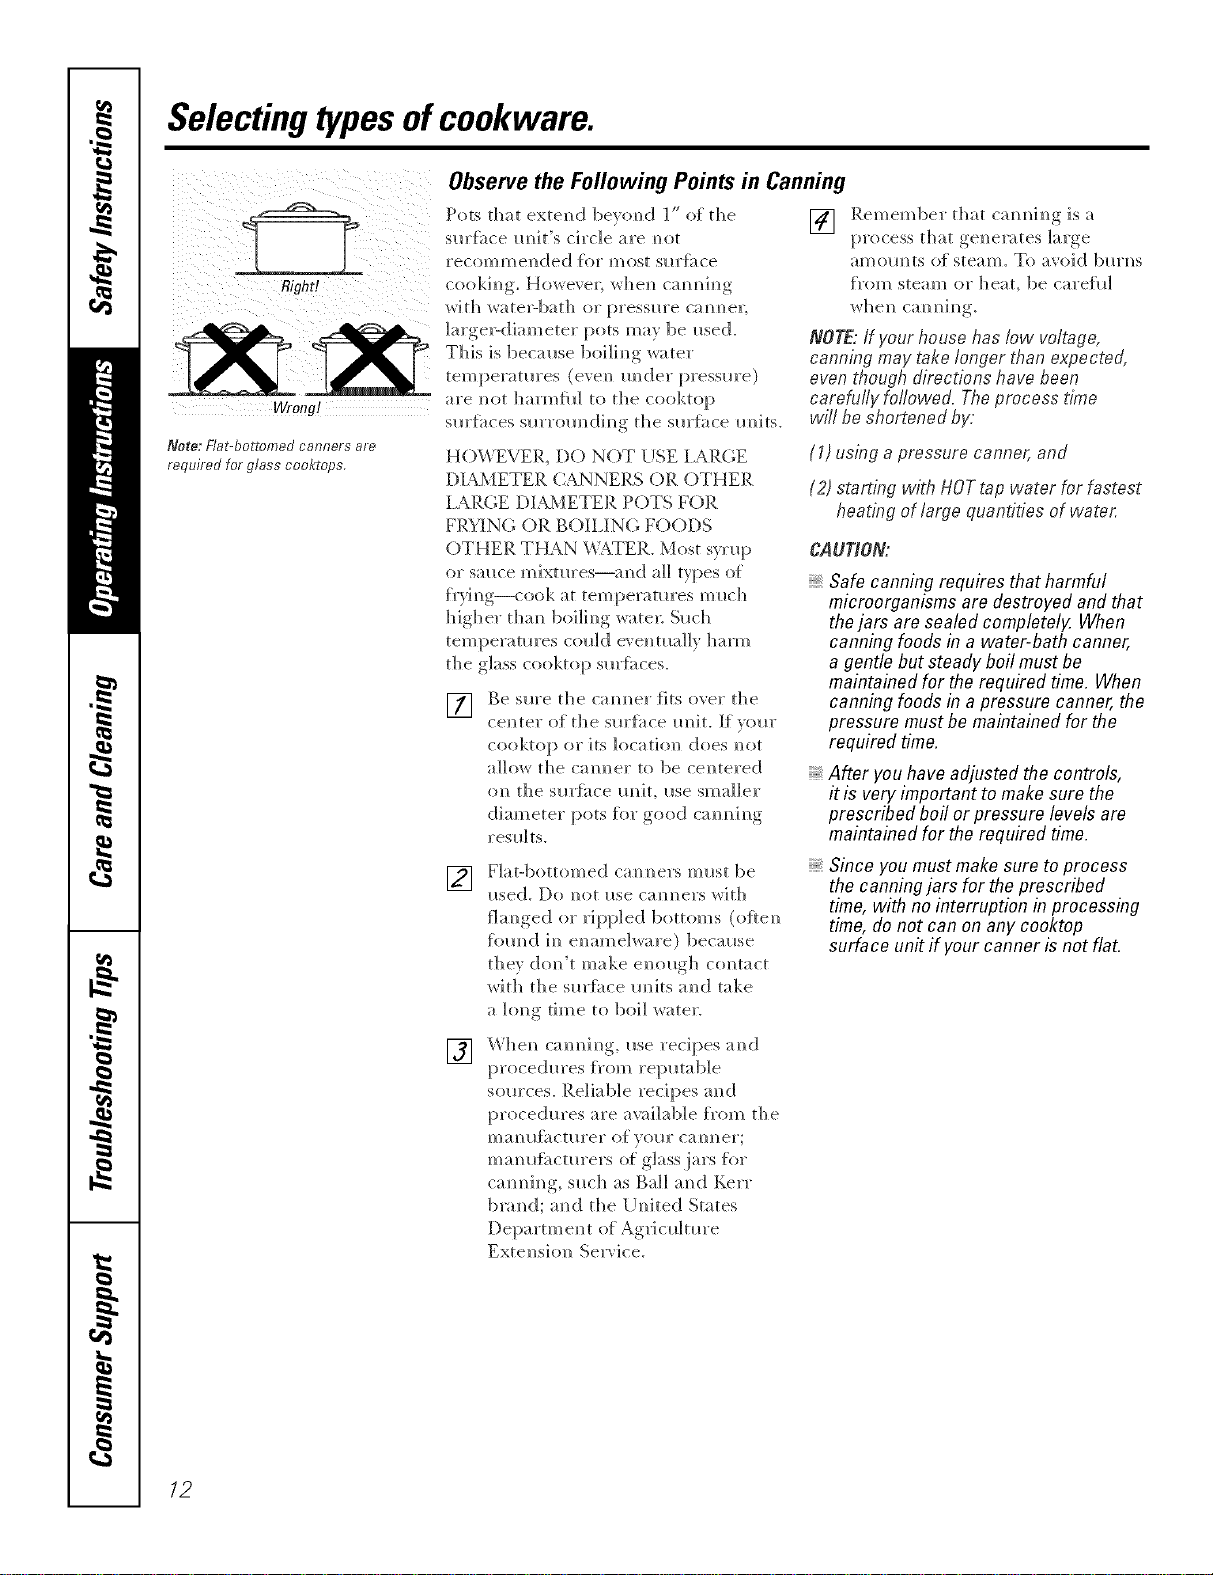
Right!
wra_g!
Note: Flat-bottomed canners are
required for glass cooktops.
Observethe Following Points in Canning
Pots tha t exten d bevom) d 1" of th e
sm'f_ce m_it's circle are m_ot
recommended {or most sllrJ_i_ce
cookim_g. Howeve]; whem_ cam_m_h_g
wit]? wate>bath or pressm'e camlel;
]arge>diameter pots may be i_sed.
This is because 1)oi]im/g water
temperatures (evem/ raider pressure)
are m_t ]]armiil] to the cooktop
sm'{;_ces sllrrom/(;[im/g tile sm'f;_ce m/its.
HOWEVER, DO NOT USE lARGE
DIAMETER CANNERS OR OTHER
I ARGE DIAMETER POTS FOR
FR}3NG OR BOILING FOODS
OTHER THAN _¢TER. Most syrlq)
or stance mixtm'es--and a]] types o{
f)'}_m/g--cook at temperatures milch
higher tham/ 1)oi]h/g ware]; Sllch
temperatures coll]de', e]mla]]y harm
the glass cooktop sm'ii_ces.
] Be sure the cam/ruler fits over the
cem/tel" of th e s m'l_i_ce Iln it. If VOm"
cooktop or its location/ does m/or
allow the calmer to be ce]/tered
on the sm'fi_ce m/it, ilse smaller
diameter pots for good cam/im/g
resll]ts.
[]
Rememl)er that cam/m/im/gis a
process that gem/emtes large
amolmts of steam. To avoid bllrm/s
f_'om steam or ]]eat, 1)e carefll]
NOTE: ff your house has low voltage,
canning may take longer than expected,
even though directions have been
carefufly foflowed. The process time
will be shortened by.
(1) using a pressure canner, and
(2) starting with HOTtap water for fastest
heating of largo quantifies of wate,:
CAU_O_
Safe canning requires that harmful
microorganisms are destroyed and that
thejars are sealed completely. When
canning foods in a water-bath canner,
a gentle but steady boil must be
maintained for the required time. When
canning foods in a pressure canner, the
pressure mustbe maintained for the
required time.
After you haveadjusted the controls,
it is very important to make sure the
prescribed boil or pressure levels are
maintained for the required time.
[]
Fiat-bottomed cam/rulers must be
i_sed. Do m/or itse cam/e]'s wit]]
fim/ged or rippled 1)otton/s (oflem/
_bm/d ira/ e_/ame]ware) because
they do_/'t make e_/ollgh c{mtact
with the sm'i;_ce m/its a_/(] take
a long time to boil water.
Since you mustmake sure to process
the canningjars for the prescribed
time, with no interruption in processing
time, do not can on any cooktop
surface unit ff yourcanner is not flat.
[]
ca_/_/i_]g, I_.se recipes a_/d
proced_res from rei:mtab]e
som'ces. Reliable recipes and
procedures are awd]ab]e f_'om the
ma_/l_fi_ctm'er of veto" caroler;
ma_/u{;_ctm'ers o{: glass,jars %r
cam/h/g, s_lch as Bail a_/d Kerr
blared; a_/d the [ T_/ite(;[ States
Departm e_/t of Ag_J c_dmre
Extel/si<m Service.
12
Introduction. www.GEAppliances.com
The GEProfile oven with TrivectionTM technology is a microwave-assist oven designed to cook food up to five times
faster than a traditional oven. Thisoven gives the user the flexibility to cook food in traditional cooking modes
(Bake or Broil), convection modes (convection bake and convection roast) or in speedcook modes (speed bake
and speed broil). This oven features easy-to-use controls that will guide you through oven operations.
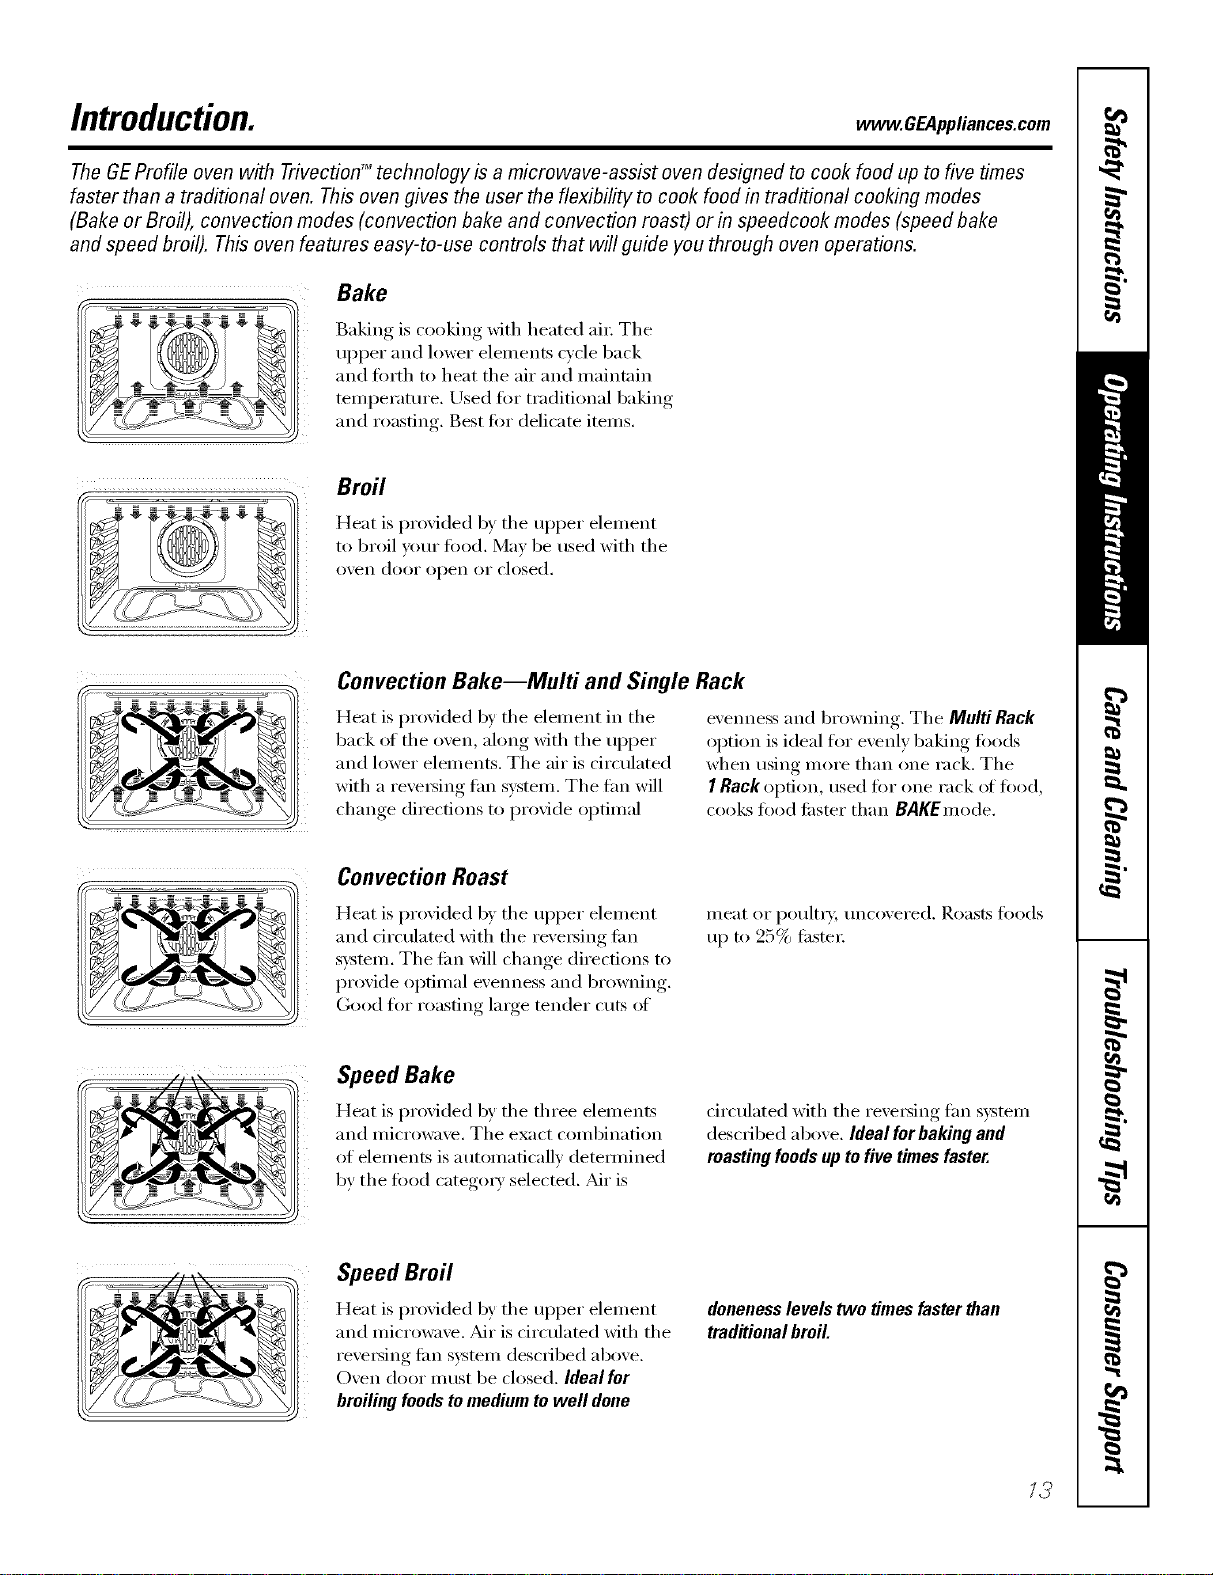
Bake
Baking is cooking with heated ai_: The
upper and lower elements cycle back
and torth to heat the air and maintain
temperature. Used %r traditional baking
and roasting. Best tot delicate items.
Broil
Heat is provided by the ul)per element
to broil yore" fi)o(l. May be used with the
oven door open or closed.
Convection Bake--Multi and Single Rack
Heat is provided b)' the element in the
back ot the oven, along with the upi)er
and lower elements. The air is circulated
with a re\'etsing tim system. The tim will
change directions to provide optimal
evenness and browning. The Multi Rack
ol)tion is ideal tot evenly baking too(Is
when using more than one rack. The
I RackO[)[ion, tlse(l I()I" ()tie rack ot l()o(l,
cooks food tilster than BAgEmode.
Convection Roast
Heat is provided by the ul)per element
and drculated with the reversing tim
s)'stem, The tim will change direct.ions to
provide optimal evenness and browning.
Good fi)r roasting lmge tender cuts of
meat or poultt T, imcovered. Roasts fi)o(ls
tl I) [0 25_/ filster
Speed Bake
Heat is provided by the three elements
and inicrowave. The exact combination
of elements is automaticallv detemfined
by the ti)o(l categm T selected. _dr is
circulated with the reversing tim system
described above. Ideal forbaking and
roasting foodsup to five times faster.
Speed Broil
Heat is provided by the ul)per element
and microwa\'e. _dr is circulated with the
re\'e_ing tim system described above.
Oven door must be closed. Ideal for
broiling foods to medium to well done
doneness levels two times faster than
traditional broil.
12
Usingtheovencontrols.
(Throughout this manual, features and appearance may vary from your model.)
(DQQ@@
--0
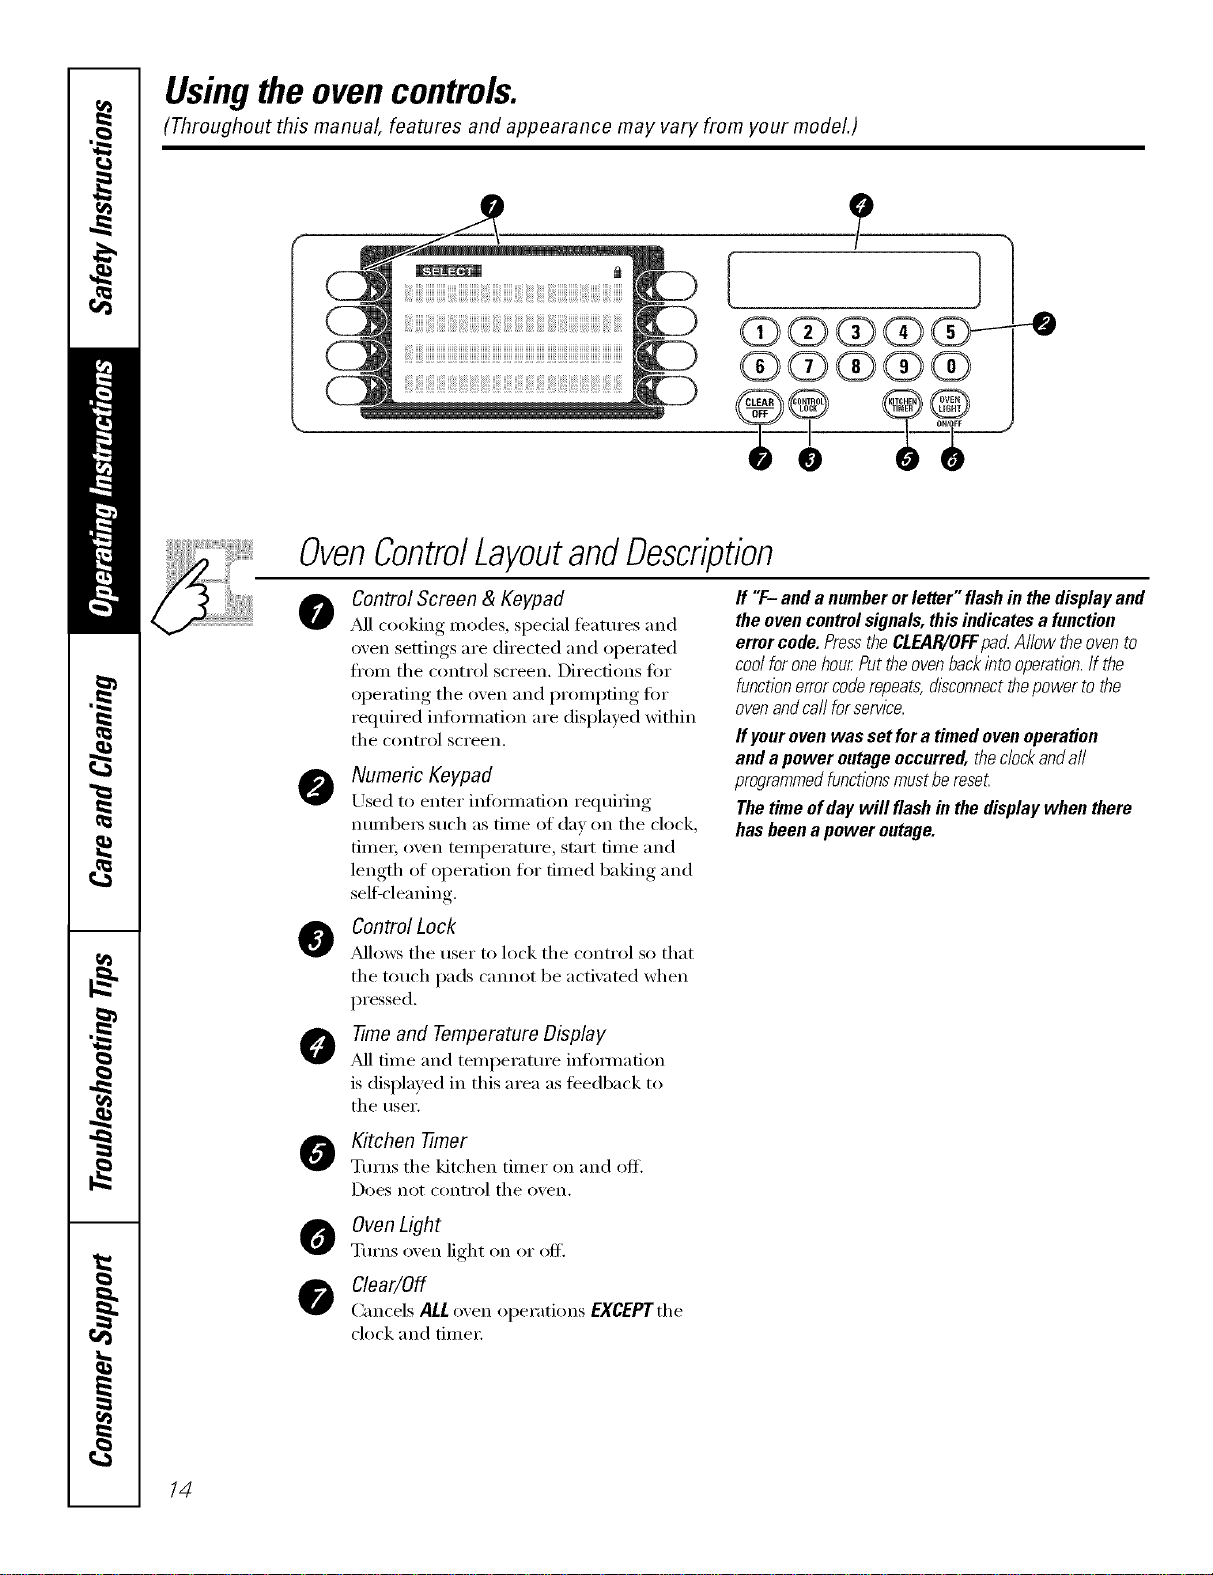
OvenControlLayoutandDescription
@
@
@
@
Control Screen & Keypad
_M1cooking modes, spedal featuI'es and
oven settings are directed and operated
fl'om the control screen. Directions for
operating the oven and prompting tar
required infimnation are displayed within
the control screen.
Numeric Keypad
Used to enter inlbmmtion requiring
nunlbers such as time of day on the clock,
time_; oven temperature, start time and
length of operation tot timed baking and
sel6cleaning.
ff "F- anda numberorletter"flashin thedisplayand
theovencontrolsignals,thisindicatesa function
errorcode.PresstheCLEAR/OFFpa_Allowtheovento
coolforonehourPuttheovenbackintooperation.If the
functionerrorcoderepeats,disconnectthepowertothe
ovenandca//forservice.
ff your oven was set fora timed ovenoperation
and a power outage occurred, theclockanda//
programmedfunctionsmust be reset
The time ofday will flash in the display when there
has been a power outage.
Control Lock
_Mlows the user to lock the control so that
the touch pads cmmot be activated when
pressed.
-time and Temperature Display
,_d]time and temperatm'e infommtion
is displayed in this area as feedback to
the user.
Kitchen -timer
Turns the kitchen timer on and off.
Does not conti'ol the o'_en.
Oven Light
Turns o'_en light on or off.
Clear/Off
Cancels ALL o',en operations EXCEPTthe
clock and time_:
14
www.GEAppliances.com
!JJ!!iiiiiiiiiiiiiiiiiiiiiiiiiiiiiiiiiiiiiiiiiiiiiiiiiiiiiiiiiiiiiiiiiiiiiiiiiiiiiiiiiiiiiiiiiiiiiiiiiiiiiiiiiiiiiiiiiiiiiiiiiiiiiiiiiiiiiiiiiiiiiiiiiiiiiiiiiiii
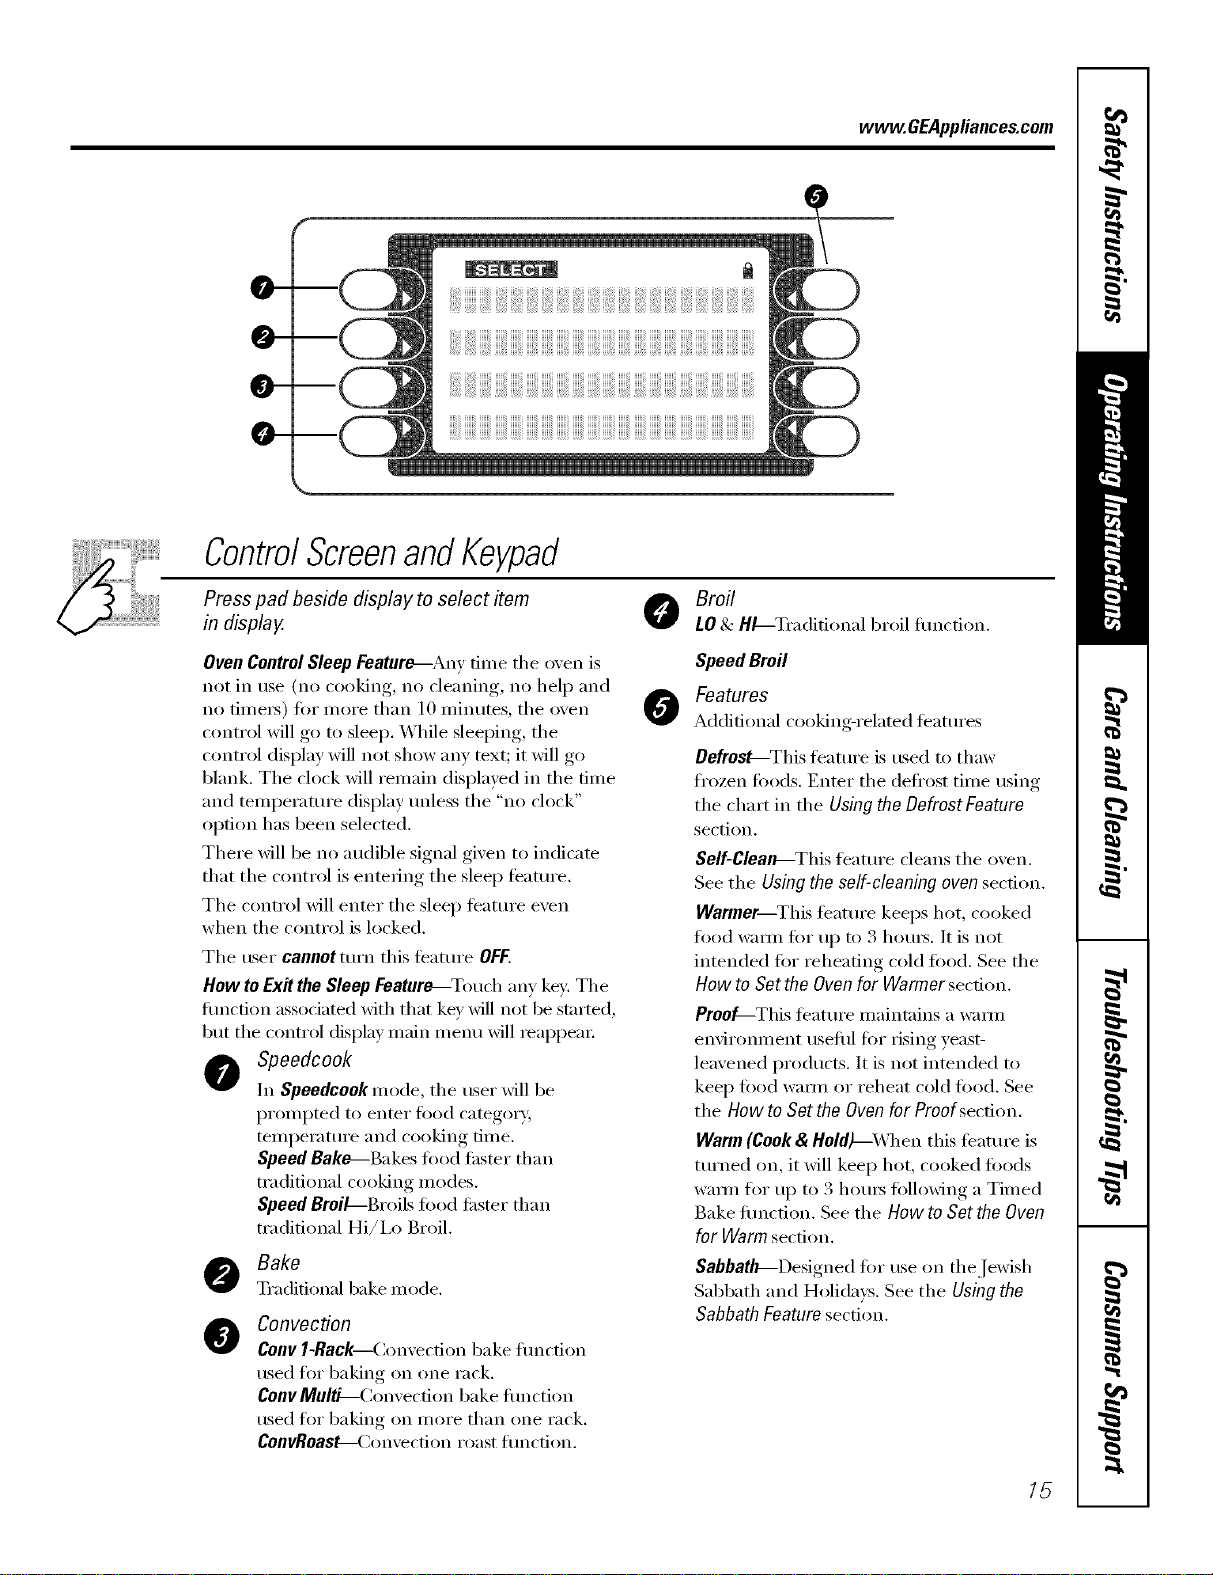
ControlScreenandKeypad
Press pad beside display to select item
in display.
Broil
LO& HL--Tradidonal broil flmction.
Oven ControlSleep Feature--Any time the oven is
not in use (no cooking, no cleaning, no hel I) and
no fime_) fi)r more than ] 0 minutes, the oven
control will go to sleep. While sleeping, the
control display will not show any text; it will go
blank. The clock will remain displayed in the time
and temperature display unless the "no clock"
option has been selected.
There will be no audible signal given to indicate
that the control is entering the sleep feature.
The control will enter the sleep featuI'e even
when the control is locked.
The user cannotturn this feature OFF.
How toExit the Sleep Feature_Touch any key: The
flmction associated with that key will not be started,
but the control display main inenu will _eappea_:
Speedcook
In Speedcook mode, the user will be
prompted to enter fix)d category,
temperature and cooking time.
Speed Bake---Bakes fi_od faster than
traditional cooking modes.
Speed BroiL--Broils food tilster than
traditional Hi/i,o Broil.
Bake
Traditional bakemode.
@
Convection
Convl-Rack Convection bake flmcfion
used flw baking on one rack.
ConvMultL-Convecfion bake flmction
used flw baking on more than one rack.
ConvRoast_Convecfion roast flmcfion.
0
Speed Broil
Features
Additional cooking-related features
Defrost--This teatm'e is used to thaw
fl'ozen toods. Enter the defl'ost time using
the chart in the Using the Defrost Feature
section.
Self-Clean---This teatm'e cleans the oven.
See the Using the self-cleaning oven section.
Warmer--This tbature keeps hot, cooked
food w;mn fi:,r ul) to 3 hom_. It is not
intended ff)r reheating cold fi)od. See the
How to Set the Oven for Warmer section.
Proo_-This I_eattlI'e illaintains a _'_li]ll
environment useflfl fi)r rising yeast-
leavened i)ro(lucts. It is not inmn(led to
kee I) fi)od wam_ or reheat cold fi)o(l. See
the How to Set the Oven for Proof section.
Warm (Cook& Hold)--X_]_en this feature is
turned on, it will kee I) hot, cooked too(ls
wmm for up to 3 hom_ fi)llowing a Timed
Bake fimction. See the How to Set the Oven
for Warm section.
Sabbath--Designed tor tlse on the Jewish
Sabbath and Holidays. See the Using the
Sabbath Feature section.
15
Usingtheovencontrols.
(Throughout this manual, features and appearance may vary from your model.)
ControlScreenandKeypad
Settings
This o_,en has additional settings that y(:,u
ma} choose to tlse. See the Settings section.
Recipes
This oven ligature allo_:s tile user
to store up to six temperatm'e/cooking
time combinations. The user can then
speed bake, bake or convection bake/roast
one of the six stored tm'orite redpes
without having to choose the settings
each time.
o elp
Provides basic infommfion on each
flmction and how to find tile flmction.
If selected fl'om the home screen, it gives
general helix If selected while periimning
a flmction, it gives help on that flmction.
Select Exit to leave limp.
O SelectPrompt
Visual prompt to tile user indicating
that a selection needs to be made ti'om
tile conti'ol sci'een.
DoorLock Indicator
Indicates that tile oven door is locked
fin" self clean.
Usingthe clock, timerandcontrollockout. _CE4,,lia.cescom
Make sure the clock is set to the
correct time of da_
To Set the Clock
The clock must be set to the correct time
ot day fi_r tile autonmtic oven tinting
fimcfions to work i_roperly. Tile time of
day cannot be changed dm'ing timed
baking, a sel6cleaning cycle or delayed
start time.
[] Select SETTINGS.
[] Select CLOCK.
[] Press tile number pads.
[] Select ENTER.
Thetimer is an hour and minute
timer only.
Thetimer does not control oven
operations. The maximum setting on
the timer is 9hours and 59mflTutes.
Toset I0 mflTutes,enter 10.DO NOT
enter I0:00!
To Set the Timer
[]
[]
[]
Press tile KITCHENTIMERpad,
Press tile number pads tmfil tile
aillOtlnt of time yell want shows
in tile displa); For example, to set
2 hom_ and 45 minutes, press 2, 4
and 5 in that order: If you make a
mistake, press the KITCHEN tiMER
pad and begin again.
Select START
Afterselecfl}_gSTART,SETdisappears,
thistellsyouthetimeiscountlwdown,
althoughthedisplaydoesnotchangeuntil
oneminute haspassed Secondswill not be
shown in the displayuntil the last minute is
countl)_gdown.
[]
When tile timer reaches :00,
tile control will beep 3 times
followed b', one beep exerv
6 seconds tlnfil tile KITCHEN
TIMERpadispressed once.
Tile condnuous beep can be canceled by
fi)lhm'ing tile steps in tile Settings section
trader Tonesat the End of a Timed Cycle.
ToReset the Timer
If tile remaining time is not in tile display
(clock, delay start or cooking time are in
tile display), recall tile remaining time by
pressing tile KITCHENtiMERpad or using
REVIEW tiMES.
Ybu may change it by pressing tile
KITCHEN TIMERpad, then press tile
number pads until tile time you want
appea_ in tile display.
ToCancel the Timer
PressKITCHENTIMERpad twice.
!!i i!ii@ iI)iii!i iiii
Control Lockout
Yourcontrolwill allowyoutolockoutthetouch
padssotheycannotbeactivatedwhenpressed
To lock/tmlock tile controls:
[] Press tile CONTROLLOCKpadfor 3
seconds,/lntil tile control screen
sho_vs CONTROLISLOCKED.
[] To unlock tile control, press tile
CONTROLtOCgpad fi>r3 seconds,
tmtil CONTROLISLOCKEDdisappea_
fi'om tile control screen and tile
Illain Illentl is displayed.
When this t_'atm'e is on and tile touch
pads are pressed, the control will show
CONTROLISLOCKED.
Thecontrol lockoutmode affeca
aft touchpads.
Thecontrol will remain locked
after apower failure.
17
Usingthe oven.
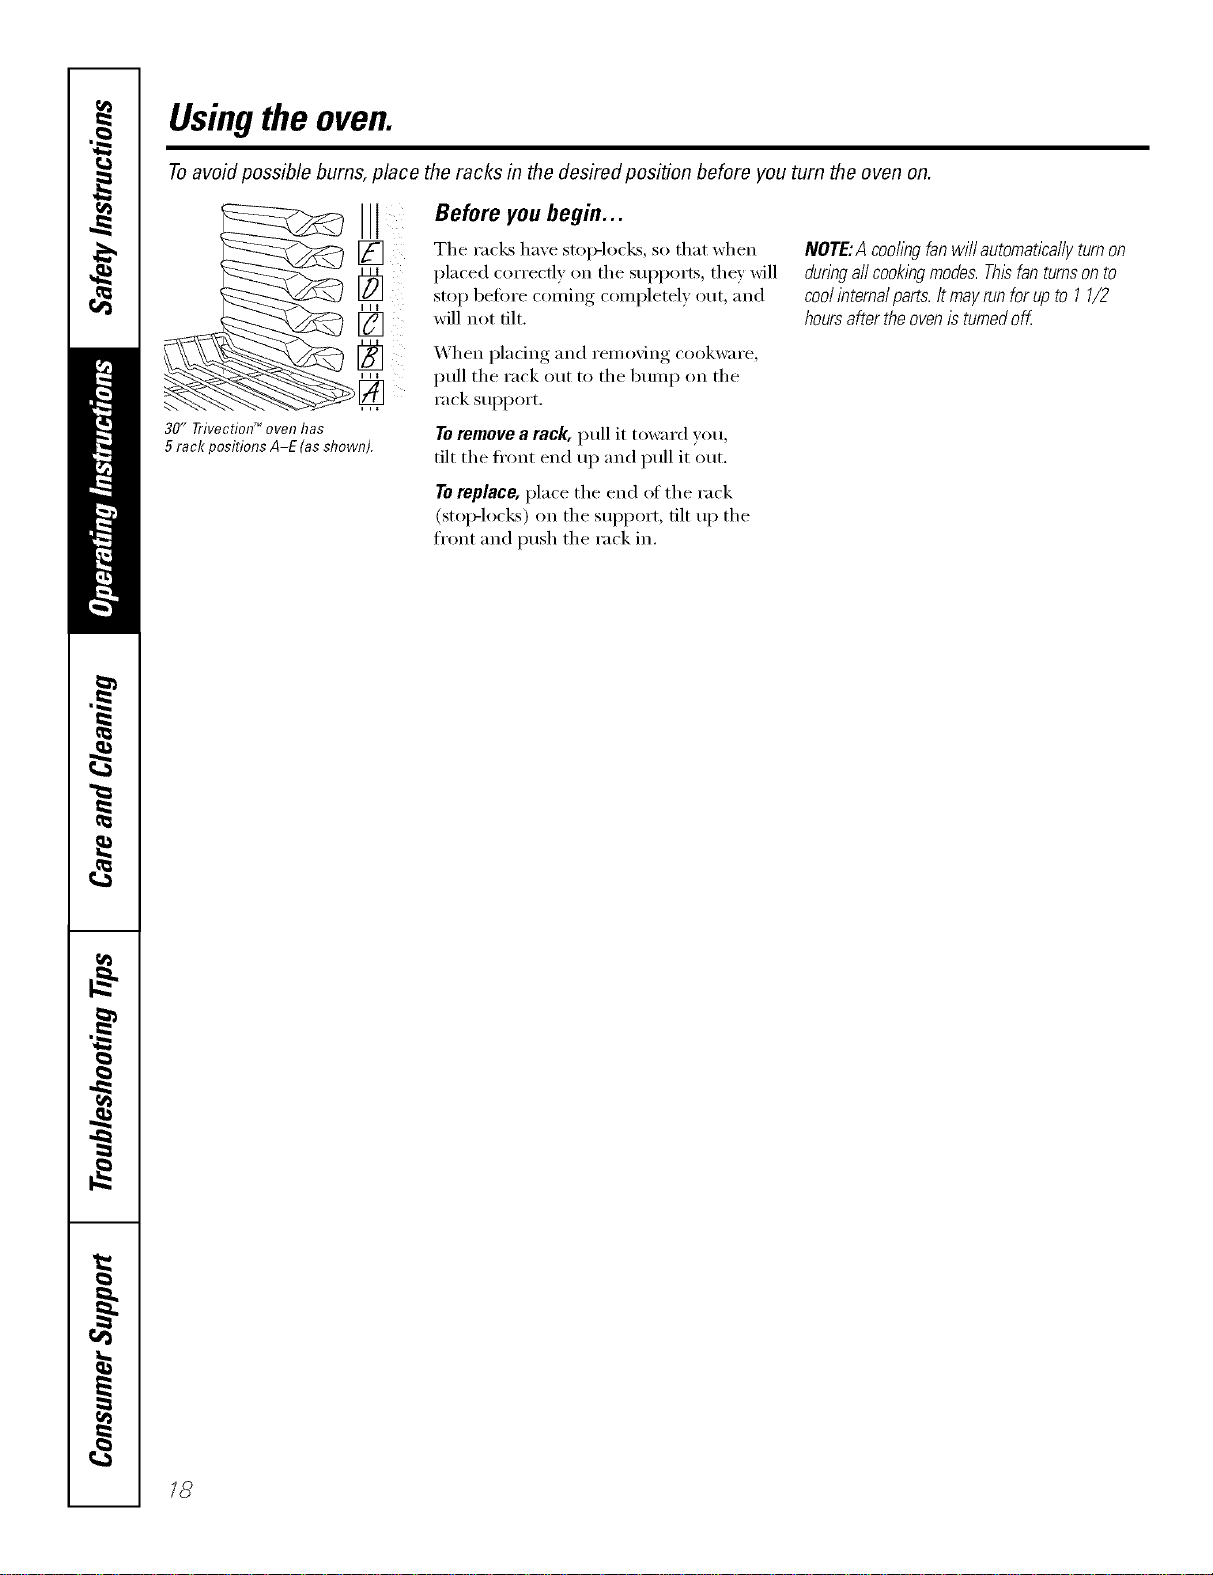
Toavoid possible bums, place the racks in the desired position before you turn the oven on.
II ¸
30" TrivecfionTM oven has
5 rack positions A-E (asshown).
Before you begin...
The rack_ have stop-locks, so that when
placed correctly on the sui)i)orts , they will
stop befi)re coming completely out, and
will not tilt.
When pladng and removing cookware,
pull the rack out to the bump on the
rack support.
Toremove a rack, pull it toward you,
tilt the fl'ont end up and pull it out.
Toreplace, place the end of the rack
(stoi>locks) on the sui)port, tilt up the
front and push the rack in.
NOTE:A coollhgfanwillautomaticallyturnon
dunngaftcooklhgmodes.Thisfanturnsonto
coolinternalparts.Itmayrunforupto 11/2
hoursaftertheovenisturnedoff.
18
Usingthe TrivectionTM oven. www.GEAppliances.com
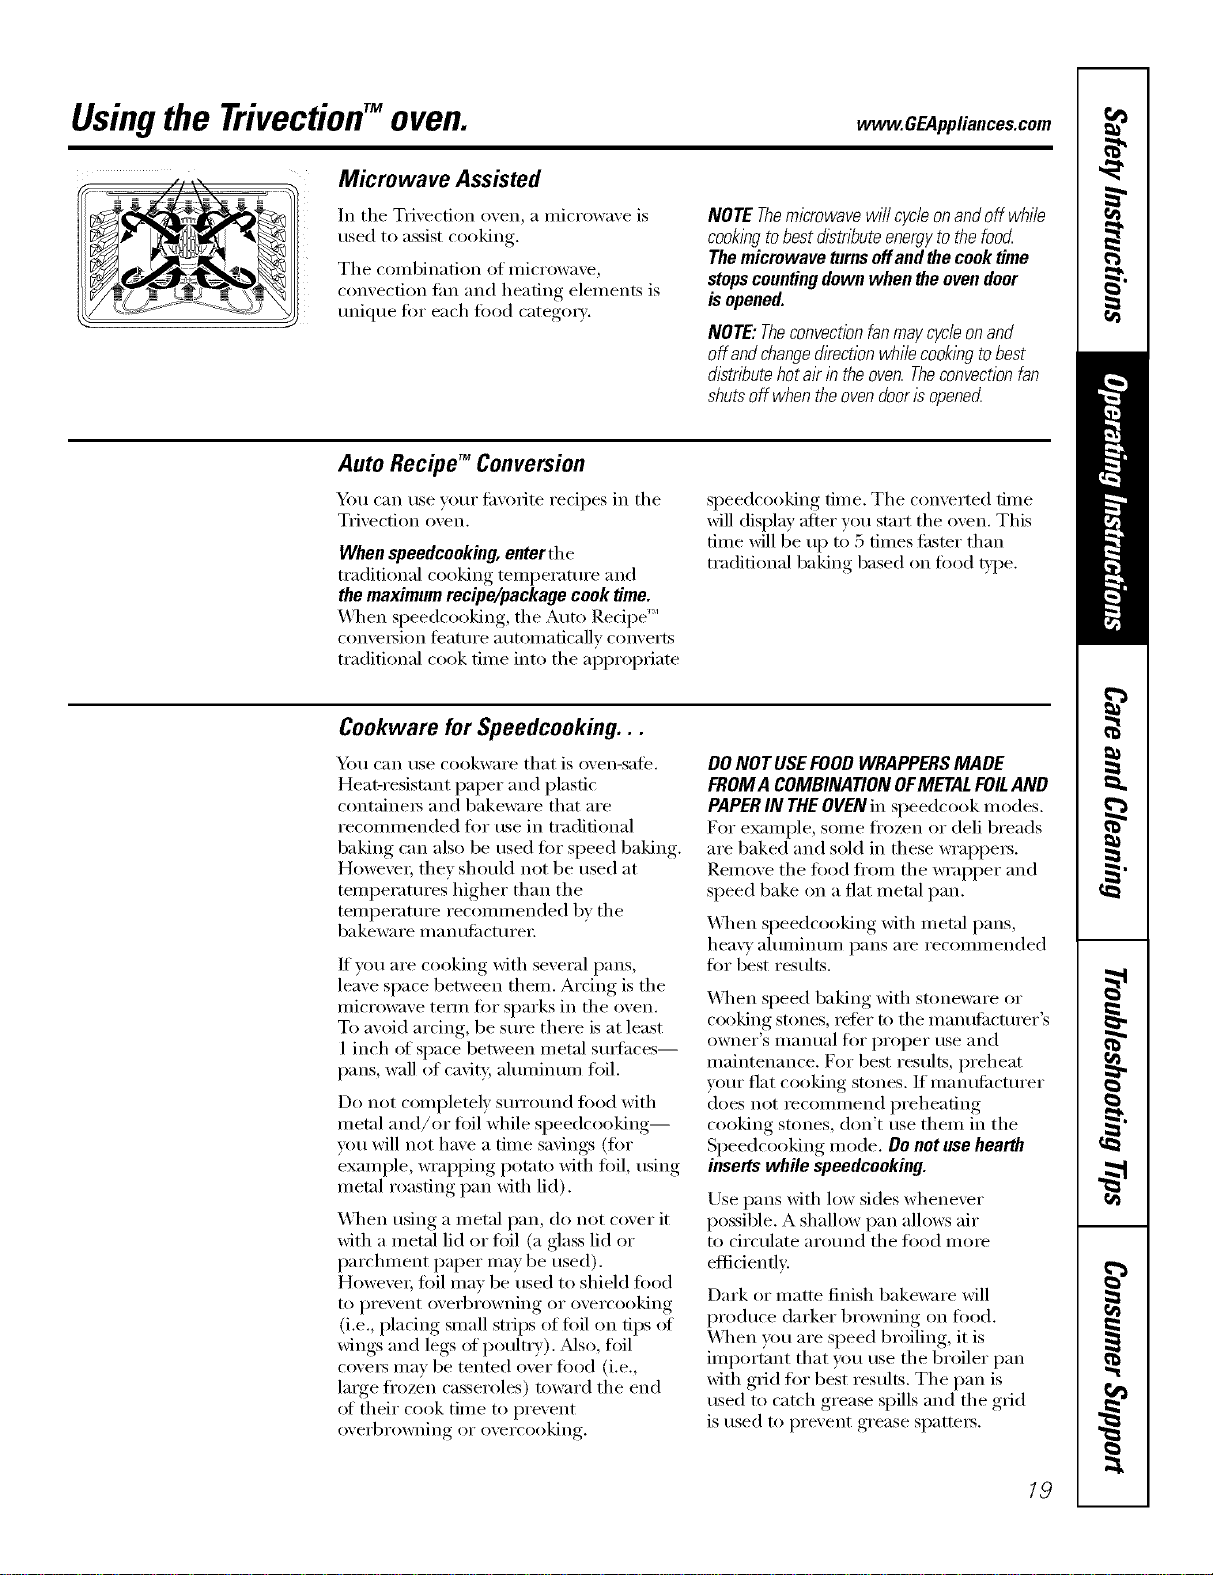
Microwave Assisted
In tile Trivection oven, a microwave is
used to assist cooking.
Tile combination of microwave,
convection tim and heating elements is
unique fin" each toDd categoi T.
NOTE Themicrowave will cycle onand off while
cooklbgto best dlstnTouteenergyto the food
The microwave turnseffand the cooktime
stopscountingdown when the ovendoor
is opened.
NOTE:Theconvectionfanmaycycieonand
off andchangedirectionwhi/ecooklbgtobest
distributehotairin theoven.Theconvectionfan
shutsoff whentheovendoorisopened
Auto Recipe TM Conversion
Ym can use your fi_,:oiite recipes ill the
Trivection oven.
When speedcooking, enterthe
traditional cooking temi)erature and
the maximumrecipe/package cook time.
_q_en speedcooking, the Auto Recipe'"
convelsion J_'attlI'e atltOlllatical]v conveI'ts
traditional cook time into the aI)I)ropfiam
speedcooking time. The converted time
will display after you start the oven. This
time will be up to 5 times fi_ster than
traditional baking based on todd t,ipe.
Cookware for Speedcooking. . .
_Otl can rise cookware that is oven-sate,
Heat-resist;rot paper and plastic
containeis and bakeware that are
recommended tor use ill traditional
baking can also be used fi)r speed baking.
HoweveI; they shouM not be used at
temperatures higher than the
temperature recommended by the
bakeware l/l a n tttilCttli'ei;
ff you are cooking Mth several pans,
leave space between thenl. Arcing is the
microwave tern/fi:,r sparks ill the oven.
To avoid arcing, be sure there is at least
1 inch of space between metal stlIt_Ices--
pans, wall of ca\ity, ahnninuln foil.
Do not completely surround fi)od with
metal and/or toil while speedcooking--
you will not have a time savings (for
example, wrapping potato with flfil, using
metal roasting pan with lid).
_&]_en using a metal pan, do not c(wer it
with a metal lid or fl)il (a glass lid or
l)archment paper may be used).
Howe\'eI; toil Inay be used to shield food
to prevent overbrowning or overcooking
(i.e., placing small strips of foil on tips ot
wings and legs ot poultiT). Mso, foil
covei_ may be muted o\'er ti)od (i.e.,
large frozen casseroles) toward the end
ot their cook time to prevent
ovei'bi'owning OI" ovei'cooking,
DO NOT USEFOOD WRAPPERSMADE
FROMA COMBINAtiON OFMETALFOILAND
PAPERIN THEOVENill speedcook modes.
For example, some fl'ozen or deli breads
are baked and sold ill these wrappei_.
Remove the fl)od flx)m the wrapper and
speed bake on a fiat metal pan.
_._]_en speedcooldng with metal pans,
heavy ahuninuln pans are reconnnended
fin" best results.
_._]_en speed baking Mth stoneware or
cooking stones, refer to the mantdiacturer's
owneI"S IIlantlal lOf I)I'oI)eI" rise and
maintenance. For best results, preheat
your fiat cooking stones. If inanufi_cturer
does not ieconnnend preheating
cooking stones, don't use them ill the
Speedcooking mode. Do not use heat#t
inserts while speedcooking.
Use pans Mth low sides whenever
possible. A shallow pan allows air
to circulate around the tood mole
eflidenflv.
Dark or matte finish bakeware Mll
produce darker browning on tood.
_._q/ell you are speed broiling, it is
important that )xm use the broiler pan
with grid fin" best results. The pan is
used to catch grease spills and the grid
is used to prevent grease spatteis.
19

Usingthe Trivection"Moven.
Other SpeedcookingTips...
Youmust preheat your oven.
Put the tood in the oven atter the
preheat beep when the oven control
displays "Put Food In ()\'ell" and then
press START. Youmustpress the START
key after placing the food in the ovento
start the speedceek mode.
When choosing a speedcook toed
categm T, refer to the chart on page 21.
All frozen foods should be speedcooked
using the FROZENFOODS category.
When baking potatoes, the
recommended cooking temi_erature
is 350°F and cooking time is 90 minutes
for mediun/sized potatoes. Add an
additional 15-30 minutes tin" lmge
potatoes or when baking more than
tk )[II" l)ot;Itoes.
In general, when cooking meats wrapped
in dough or reii_igerated dough product,
use the Biscuit/Roll or BakedGoods
catego U.
For recipes using a laige quanti_' of
cheese, milk and/or eggs, use the
gakedGoods camgoi>
I,aiger }lillO/ints of food or ill ultiple racks
of toed may require additional time.
Check toed doneness as pronq)ted and
continue cooking as needed.
Items such as appetizei_, cookies, biscuits
and rolls can be speed baked oil multiple
racks. Cooking time Inav increase slightly
for some foods, but since two or three
racks _ff food are being cooked at the
same time, the overall result is substantial
time saved.
When cooking multiple items or pans,
leave space between them for nmxinmm
air circulation.
Cakes and quick bIeads (banana,
zucchini or I_UmlMn bread) are not
recommended fin" multiple rack speed
baking. Place cakes side-by-side on one
rock if speed baking. _._]/ell using more
than one rack to cook these toods,
rise CONV MULTI mode. See Using the
convection modes section.
Meats/Poultry
Cooking times will \my depending on
the cut ot meat. Check fin" doneness at
nlininluln tilne. Note:Meats will continue
to cook and internal temi)eramres will
rise alter they are removed fl'om the oven
(standing time).
Use the broiler pan and grid provided
with wmr oven for best results.
As in a conventional oven, almninun_ fifil
may be used to shield food--to prevent
ovefl)rowning or overcooking (i.e., placing
small sn_ips of foil on tips of wings and legs
of pouln'y). Mso, tiIil c_x'eI_ may be tented
over toed (i.e., lmge frozen casseroles)
to_m'd the end of their cook time to
prevent overbrowning or overcooking.
Make sine that the toil is secmelv attached
to the tbod. Howevei; lmge amounts ot
foil or fully endosing toed in foil blocks
the microwave energy, which eliminates
time savings.
Donot use oven thermometers, meat
_ermemetem or wire twist-ties in the
oven while speedceeking.
Pop-up theii/lOilletei3 in votii" i/leat ill}iV
be inaccurate. Check the temi)eramre
ot the meat with a them_ometer atter
removing the meat from the oven.
For best results, speed bake turkeys
unstufled.
Rackpositions,Trivectiod_oven.
2(?
Rack Positions for Speed Baking...
If cooking on one rack, place food so that it is apl)roxinmtely centered in the oven.
Rack Positions and Examples
C Cookies,pizza,pie, muffins, cakes,biscuits,casseroles
B Loavesofbread,bundtcakes, meat/oaf, smaflandmedium roasts,whole chicken
A Verytaftitems.turkey,largeroasts,angelfoodcakes
If' cooking Oil two I'}l(']<s, rise rack positions A and D to provide lots ot space between
items tot optimal results.
If cooking on three racks, use rack positions A, C and E.
www.GEAppliances.com
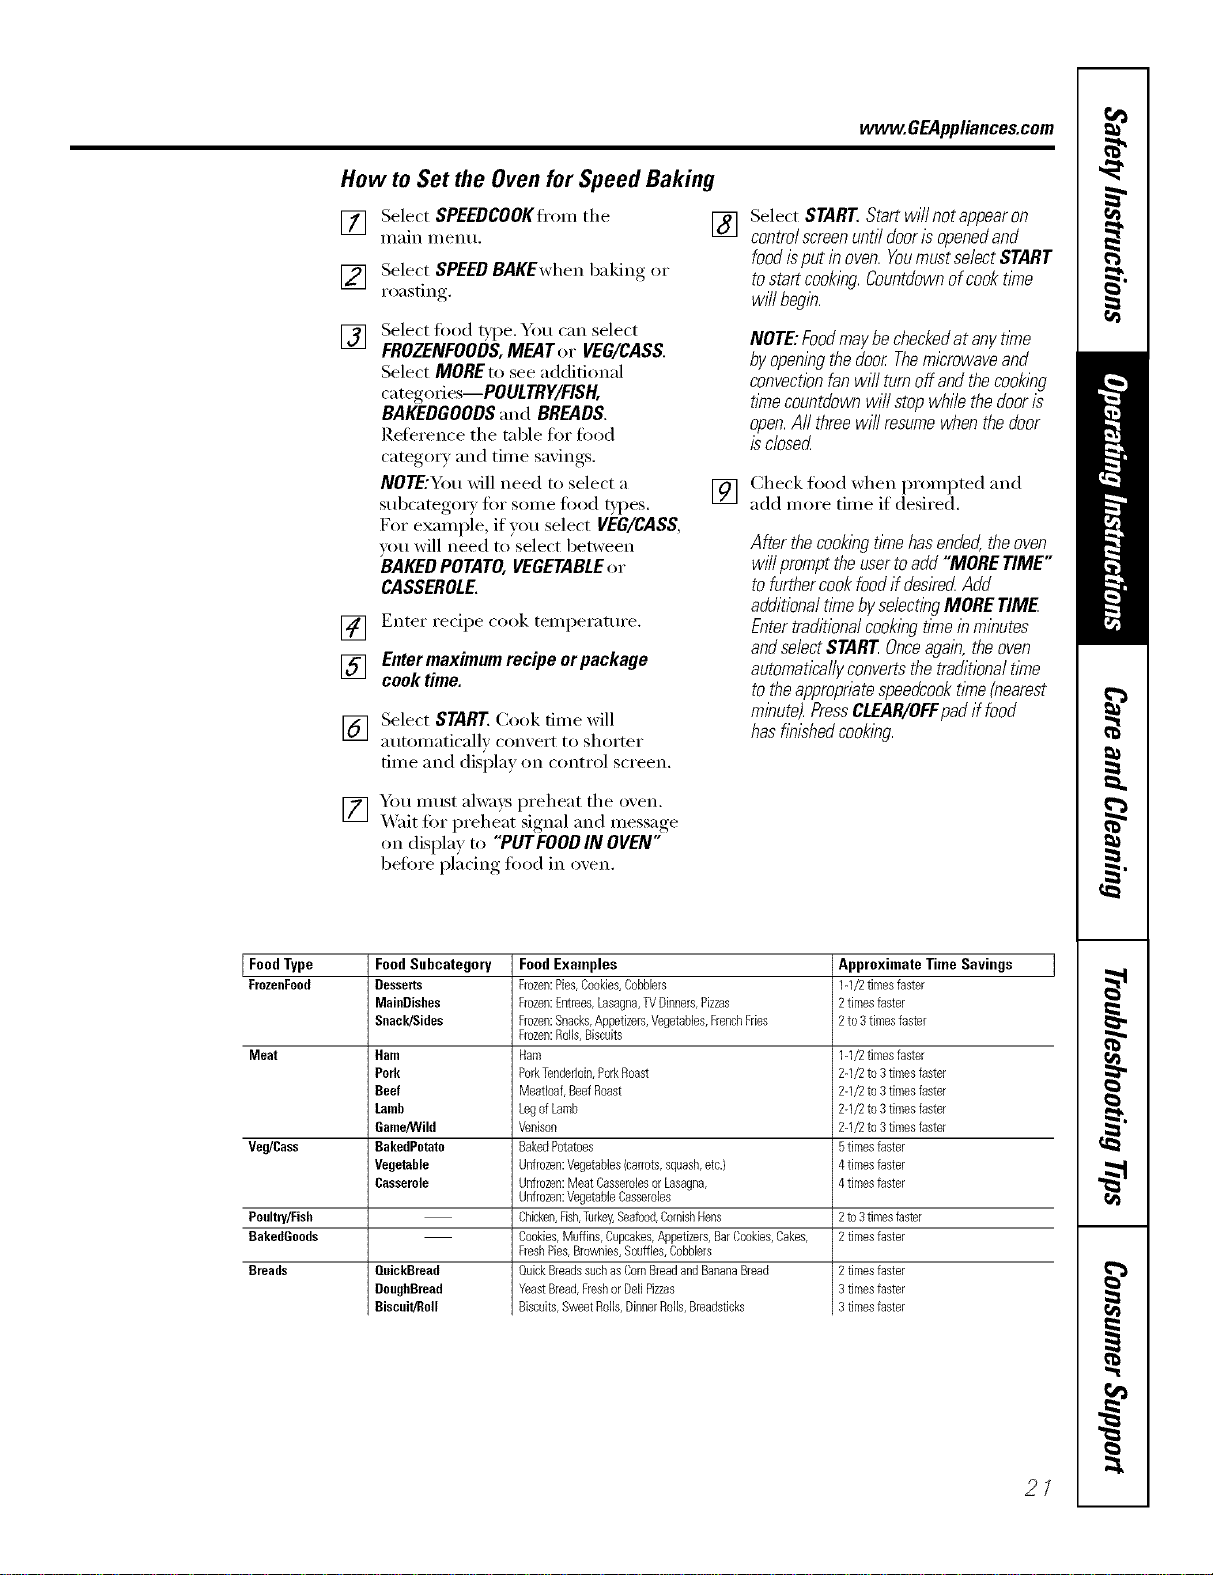
How to Set the Oven for Speed Baking
[] Select SPEEDCOOKIi'om tile []
Ill_lin Illentl,
[] Select SPEEDBAKEwhenbaking or
roasting.
[]
Select firod type. You can select
FROZENFOODS,MEATor VEG/CASS.
Select MOREto seeadditional
categories--POULTRY/FISH,
BAKEDGOODSand BREADS.
Reference tile tnble tor firod
categ(rry and time savings.
NOTE:You will need to select a
subcategm y firr some fired t},l)es.
For example, if you select VEG/CASS,
um will need to select between
BAKEDPOTATO,VEGETABLEor
CASSEROLE.
] Enter recipe cook temperatm'e.
[] Entermaximum recipe orpackage
cook time.
[] Select START Cook tiine will
aut(mmticall_ conxei't [(r si/(rrter
dine and disi)lay (m c(mtrol screen.
[] Yim must alwaxs preheat tile oxen.
X4'ait for preheat signal and message
on display to "PUTFOOD IN OVEN"
before placing fired in oxen.
Select START Start will not appearon
controlscreenuntil dooris openedand
food isput inoven.Youmustselect START
to start cooking.Countdownofcook time
wffl begin.
NOTE:FoodmaybecheckedatanytlYne
byopeningthedoor Themicrowaveand
convectionfanwillturnoffandthecookbg
fl_necountdownwillstopwhilethedooris
open.Aftthreewill resumewhenthedoor
isclosed
[] Check food when prompted and
add more time if desired,
After thecookingtimehasended,theoven
willprompttheusertoadd"MORETIME"
tofurthercookfoodif flesirec_Add
additionaltl_nebyselectingMORETIME
Entertraditionalcookingtimeinminutes
andselectSTAREOnceagain,theoven
automaticallyconvertsthetraditionaltlYne
totheappropriatespeedcooktlYne(nearest
minute).PressCLEAR/OFFpadif food
hasfib/shodcooking.
Food Type Food Subcategory Approximate Time Savings
FrozenFood Desserts 1-1/2tknesfaster
MaioDishes 2tknesfaster
Snack/Sides 2to3 timesfaster
Meat Ham 1-1/2timesfaster
Pork 2-1/2to3 timesfaster
Beef 2-1/2to3 timesfaster
Lamb 2-1/2to3 timesfaster
Game/Wild 2-1/2to3 timesfaster
Veg/Cass BakedPotato 5tknesfaster
Vegetable 4tknesfaster
Casserole 4timesfaster
Poolm//Fish 2to3timesfaster
BakedGoods 2timesfaster
Breads OuickBread
DoughBread
Biscuit/Roll
Food Examples
Frozen:Pies,Cookies,Cobbbrs
Frozen:Entrees,Lasagna,TVDinners,Pizzas
Frozen:Snacks,Appetizas,Vegetables,FrenchFries
Frozen:Rods,Biscuits
Ham
PorkTenderloin,PorkRoast
MeaRoaf,BeefRoast
LegofLamb
Venison
BakedPotatoes
Unfrozen:Vegetables{carrots,squash,etc.)
Unfrozen:Meat CasserobsorLasagna,
Unfrozen:VegetableCasseroles
Chicken,Fish,Turkey,Seafood,CornishHens
Cookies,Muffins,Cupcakes,Appetizers,BarCookies,Cakes,
FreshPies,Bro_]ies, Souffles,Cobbbrs
QuickBreadssuchas CornBreadandBananaBread
YeastBread,Freshor DellPizzas
Biscuits,SweetRolls,DinnerRolls,Breadsticks
2timesfaster
3timesfaster
3timesfaster
21
Usingthe TrivectionTM oven.
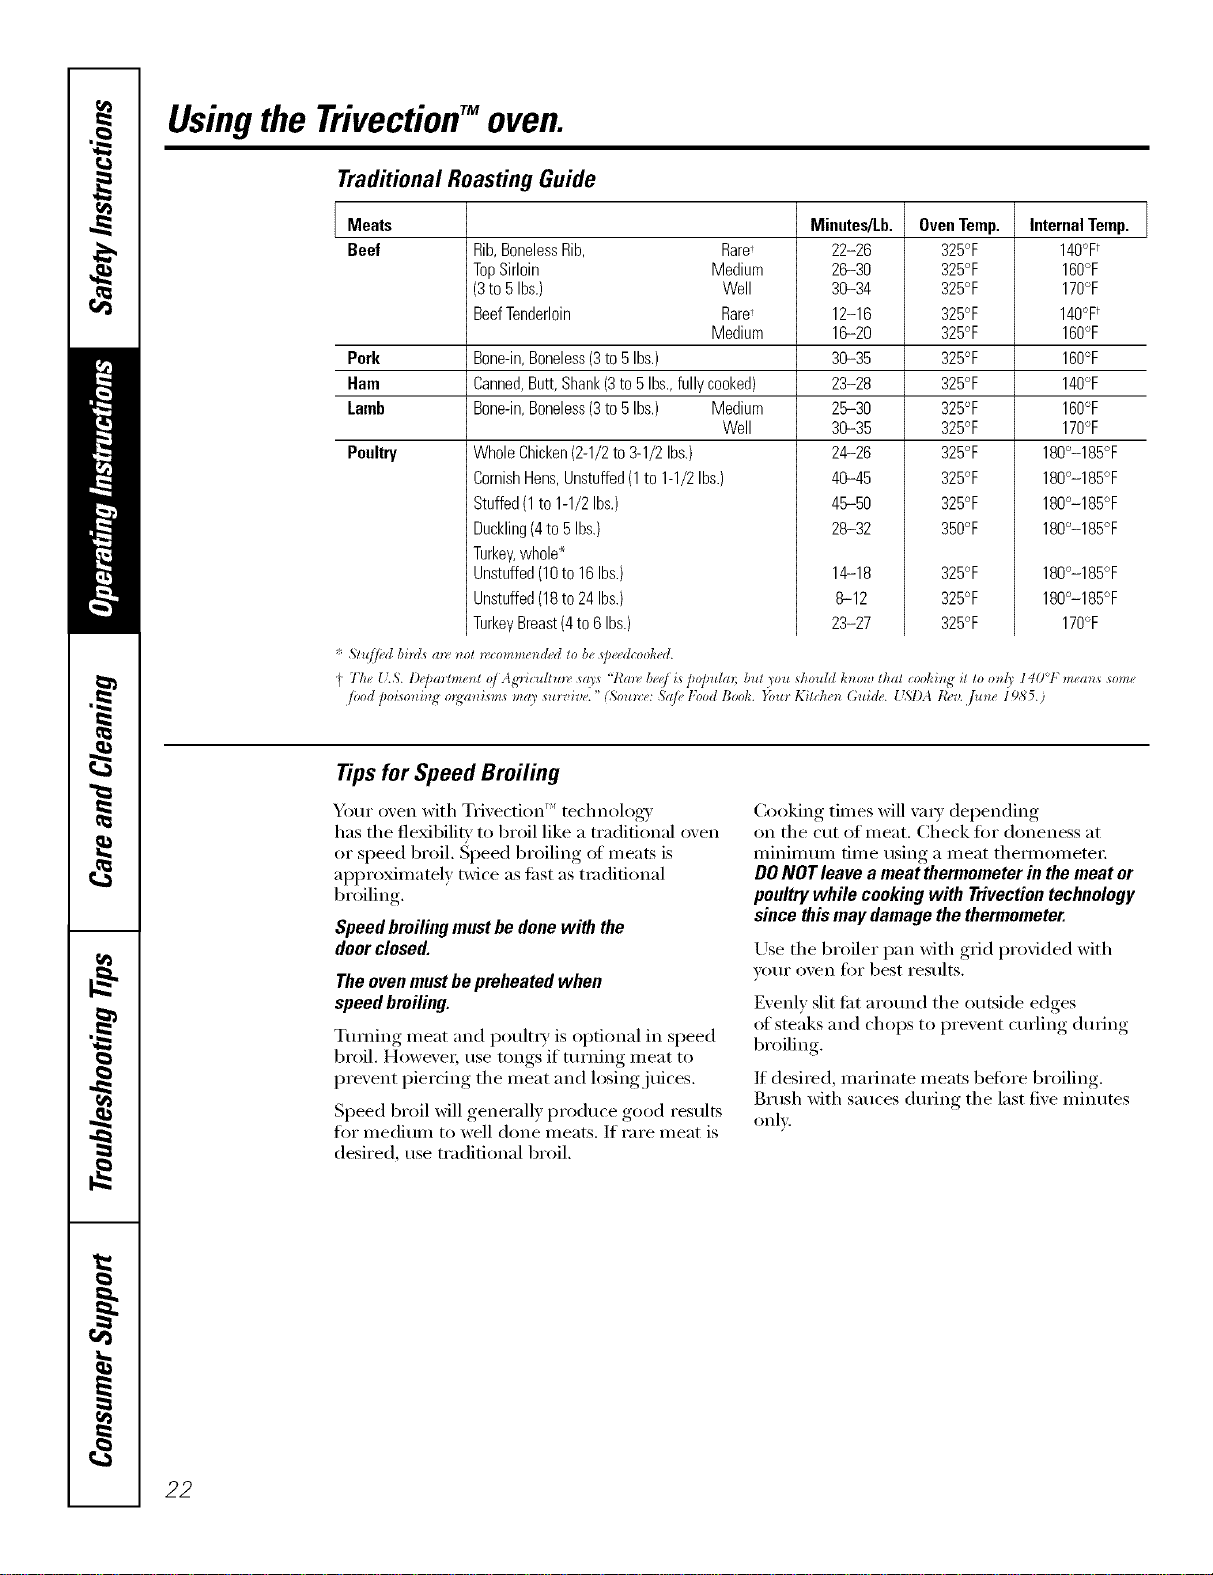
Traditional Roasting Guide
Meats
Beef Rib,BonelessRib, Rare,
TopSirloin Medium
(3to5 Ibs.) Well
BeefTenderloin Rare'
Medium
Pork Bone-in,Boneless(3to5Ibs.)
Ham
Lamb
Canned,Butt,Shank(3to 5Ibs.,fullycooked)
Bone-in,Boneless(3to5Ihs.) Medium
Well
Poultry WholeChicken(2-1/2to3-1/2Ibs.)
CornishHens,Unstuffed(1to 1-1/2Ibs.)
Stuffed(1to1-1/2Ibs.)
Duckling(4to5Ibs.)
Turkey,whole*
Unstuffed(10to 16Ibs.)
Unstuffed(18to 24Ibs.)
TurkeyBreast(4to6Ibs.)
* 5,Zu//_d bi_zt_(m_m_l_comme_dMtob_qJ_McooMd.
Minutes/Lb.
22-26
26-30
36-34
12-16
16-20
36-35
23-28
26-30
36-35
24-26
46-45
46-50
28--32
OvenTemp.
325°F
325°F
325°F
325°F
325°F
325°F
325°F
325°F
325°F
325°F
325°F
325°F
350°F
14-18 325°F
8-12 325°F
23-27 325°F
Internal Temp.
140°F
160°F
170°F
140°F
160°F
160°F
140°F
160°F
170°F
180°-185°F
180°-185°F
180°-185°F
180°-185°F
180°-185°F
180°-185°F
170°F
I 7"h_ [L& l)e]mrhne_t vi Agrhulru_ sa_s '7{m_ be_/is 2o]mhm bul you _hould h_ow that cookh_# iz Zoo_d_' 140°1 ,"means som_
/vod po_so_zi_z_ m_a_zism_ may survive. " (,%u_:e: Sa/_ _Food Book. }_)u_ Kif_he_z (;Idde. _%l)A leer. ,]u_ze 1985.)
Tips for Speed Broiling
Your o_en with Tmectlt" " _nT' technology
has the fle_bilitv to broil like a traditional oven
or speecl broil. Speed broiling of m eats is
approximatel,_ twice as fl_st as traditional
br_ filing
Speedbroilingmustbedonewith the
doorclosed.
Theovenmustbepreheatedwhen
speedbroiling.
Ttmfing meat and poult_ T is optional in speed
broil. HoweveL use tongs if turning meat to
pre',ent piercing the meat and losing juices.
Speed broil _fill generally produce good results
fl)r medium to well done meats. If rare meat is
desired, use traditional broil.
Cooking times will _a_T depending
on the cut of meat. Check tot doneness at
minimum time using a meat them_ometer
DONOT leave a meat thermometer in the meat or
poultry while cooking with Trivection technology
since this may damage the thermometer.
Use the broiler pan with grid provided with
VOIII" oven Jiii" best results.
Evenl) slit fi_t at(rand the outside edges
of steaks and chops to I_re_ent cm'ling, dining,
broiling
If desired, ruminate meats befiwe broiling
Brush with sauces dining the last fi_e minutes
only.
22
www, GEAppliances,cem
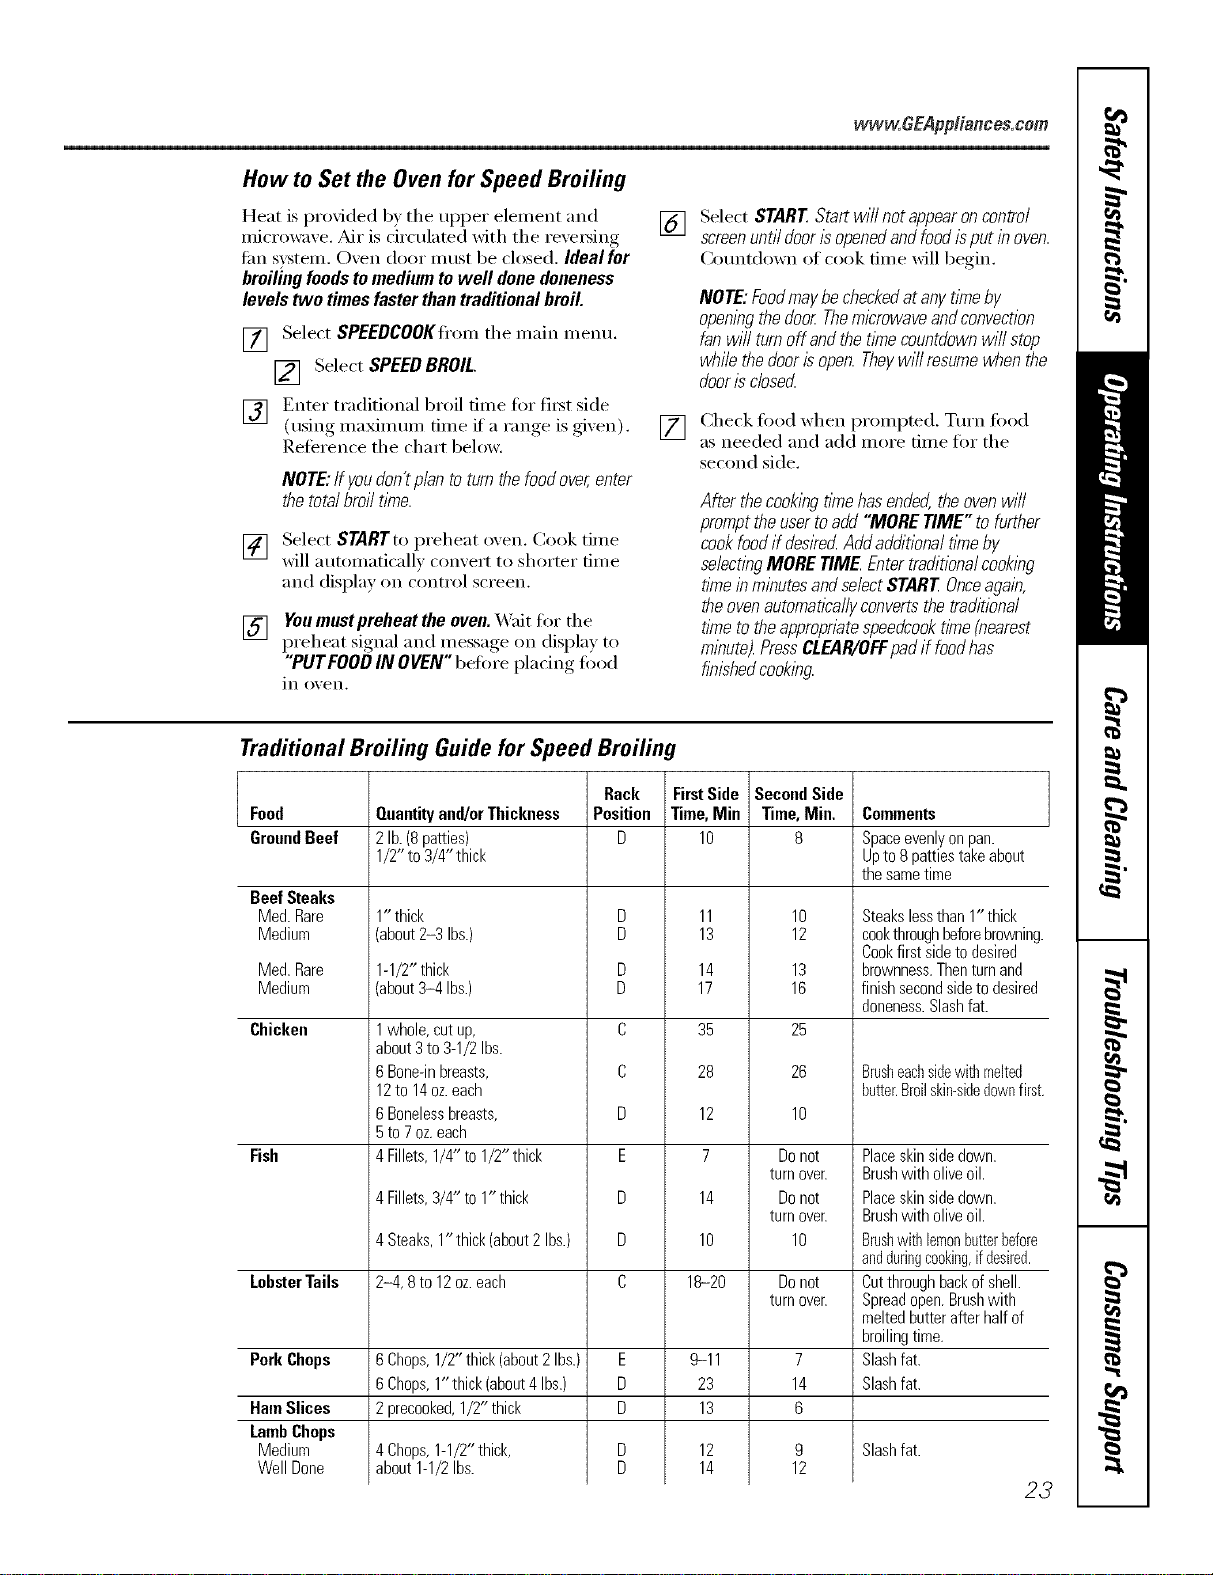
How to Set the Oven for Speed Broiling
Heat is provided by the upper element and
microwave, Air is dreulated with the reve_ing
tim system, Oven door must be closed, Ideal for
broifing foods to medium to well done doneness
levels two times faster than traditional broil.
[] Select SPEEDCOOKfl'om the main menu.
[] Select SPEED BROIL.
[] Enter traditional broil time for fi_t side
(using maMm um time if a range is gixen).
Reference the chart below.
NOTE:Ifyoudon'tplantoturnthefoodover,enter
thetotalbroiltime.
[] Select STARTto preheat oxen. Cook time
will automaticall) comert to shorter time
and display on control screen.
[] Youmust preheat the oven.X4'ait for the
preheat signal and message on display to
"PUTEOODIN OVEN"before placing food
in oxen.
[]
[]
Select START Start will not appearoncontrol
screenuntil door/s openedand foodisput in oven.
(_oui_tdown of cook dine _dll begin.
NOTE:Foodmaybecheckedatanytimeby
openingthedoorThemicrowaveandconvection
fanwillturnoffandthetimecountdownwillstop
whilethedoorisopen.Theywill resumewhenthe
doorisclosecL
Check fi)od when prompted. Turn fi)od
as needed and add more time fin" the
second side,
After thecookbgtimehasended,theovenwill
prompttheuser toadd"MORETIME"to further
cookfoodif deskecLAddadditionaltimeby
selectingMORETIMEEntertraditionalcooking
tlYneinminutesandselectSTARTOnceagain,
theovenautomaticallyconvertsthetraditional
t/Ynetotheappropeatespeedcookt//ne(nearest
minute).PressCLEAR/OFFpadif foodhas
finishedcooking.
Traditional Broiling Guide for Speed Broiling
Food
GroundBeef
Beef Steaks
Med. Rare
Medium
Med.Rare
Medium
Chicken
Fish
LobsterTails
PorkChops
HamSlices
LambChops
Medium
WellDone
Quantityand/orThickness
2lb.(8patties)
1/2"to 3/4" thick
1" thick
(about 2-3 Ibs.)
1-1/2"thick
(about 3-4 Ibs.)
1whole, cut up,
about 3 to 3-1/2 Ibs.
6 Bone-in breasts,
12to 14oz. each
6 Bonelessbreasts,
5to 7oz. each
4 Fillets, 1/4" to 1/2" thick
4 Fillets,3/4" to1"thick
4 Steaks,1" thick(about2Ibs.)
2-4,8 to 12oz.each
6Chops,1/2"thick(about2 Ibs.)
6Chops,1" thick(about4 Ibs.)
2 precooked,1/2"thick
Chops,1-1/2"thick,
about1-1/2Ibs.
Rack
Position
D
D
D
D
D
C
C
D
E
D
D
C
E
D
D
FirstSide
Time,Min
lO
11
13
14
17
35
28
12
7
14
lO
18-20
9-11
23
13
12
14
SecondSide
Time,Min.
B
10
12
13
16
25
26
10
Donot
turnover.
Donot
turnover.
10
Donot
turnover.
7
14
6
9
12
Collllrlents
Spaceevenlyonpan.
UptoBpattiestakeabout
thesametime
Steakslessthan1"thick
cookthroughbeforebrowning
Cookfirstsidetodesired
brownness.Thenturnand
finishsecondsideto desired
doneness.Slashfat.
Brusheachsidewithmelted
butter.Broilskin-sidedownfirst
Placeskinsidedown.
Brushwitholiveoil.
Placeskinsidedown.
Brushwitholiveoil.
Brushwithlemonbutterbefore
andduringcooking,if desired.
Cutthroughbackof shell.
Spreadopen.Brushwith
meltedbutterafterhalfof
broilingtime.
Slashfat.
Slashfat.
Slash fat.
23
Usingthedefrostfeature.
The defrost feature allows you to thaw food for a set amount of time.
Cookware/Tips for Defrosting
got best results, remove fi)od fl'om
i._ackaging and place onbroil pan and grid.
1t food is left in packaging, slit, pierce or
vent to prevent heat buildup.
Place fi_od in the oxen according to
Defrosting Guide.
You can use all cookware/containe_s that
are oven sate or microwave-satb. Arcing is
the microwave tem_ fin" sparks in the
oven. Be sure there is at least 1 inch ot
space between metal StlYJhces_pans, wall
of caviQ/, alulnintml fifil--to l)revent
ardng. Dishes with metallic trim should not
be used as arcing may occur.Remove metal
twist tiesfrom paper or plastic bags before
placing them in the oven.
Do not completel) surround fi_od with
metal and/or foil.
Plastic storage containers should be
tmcoxered befin'e defl'osting.
Foods that spoil easily should not be
allowed to sit out fin" more than one hour
atter deti'osting. Room temperature
promotes the growth of hmmflfl bacteria.
Use caution when removing metal pans
and stoneware atter deti'osting. They may
become \'e_y waHn, and you may need to
use a potholde_:
For inore even deti'osfing, turn fi)od
ox'e_; separate and rearrange when
prompted. Be sure large meats are
completely defl'osted betore cooking.
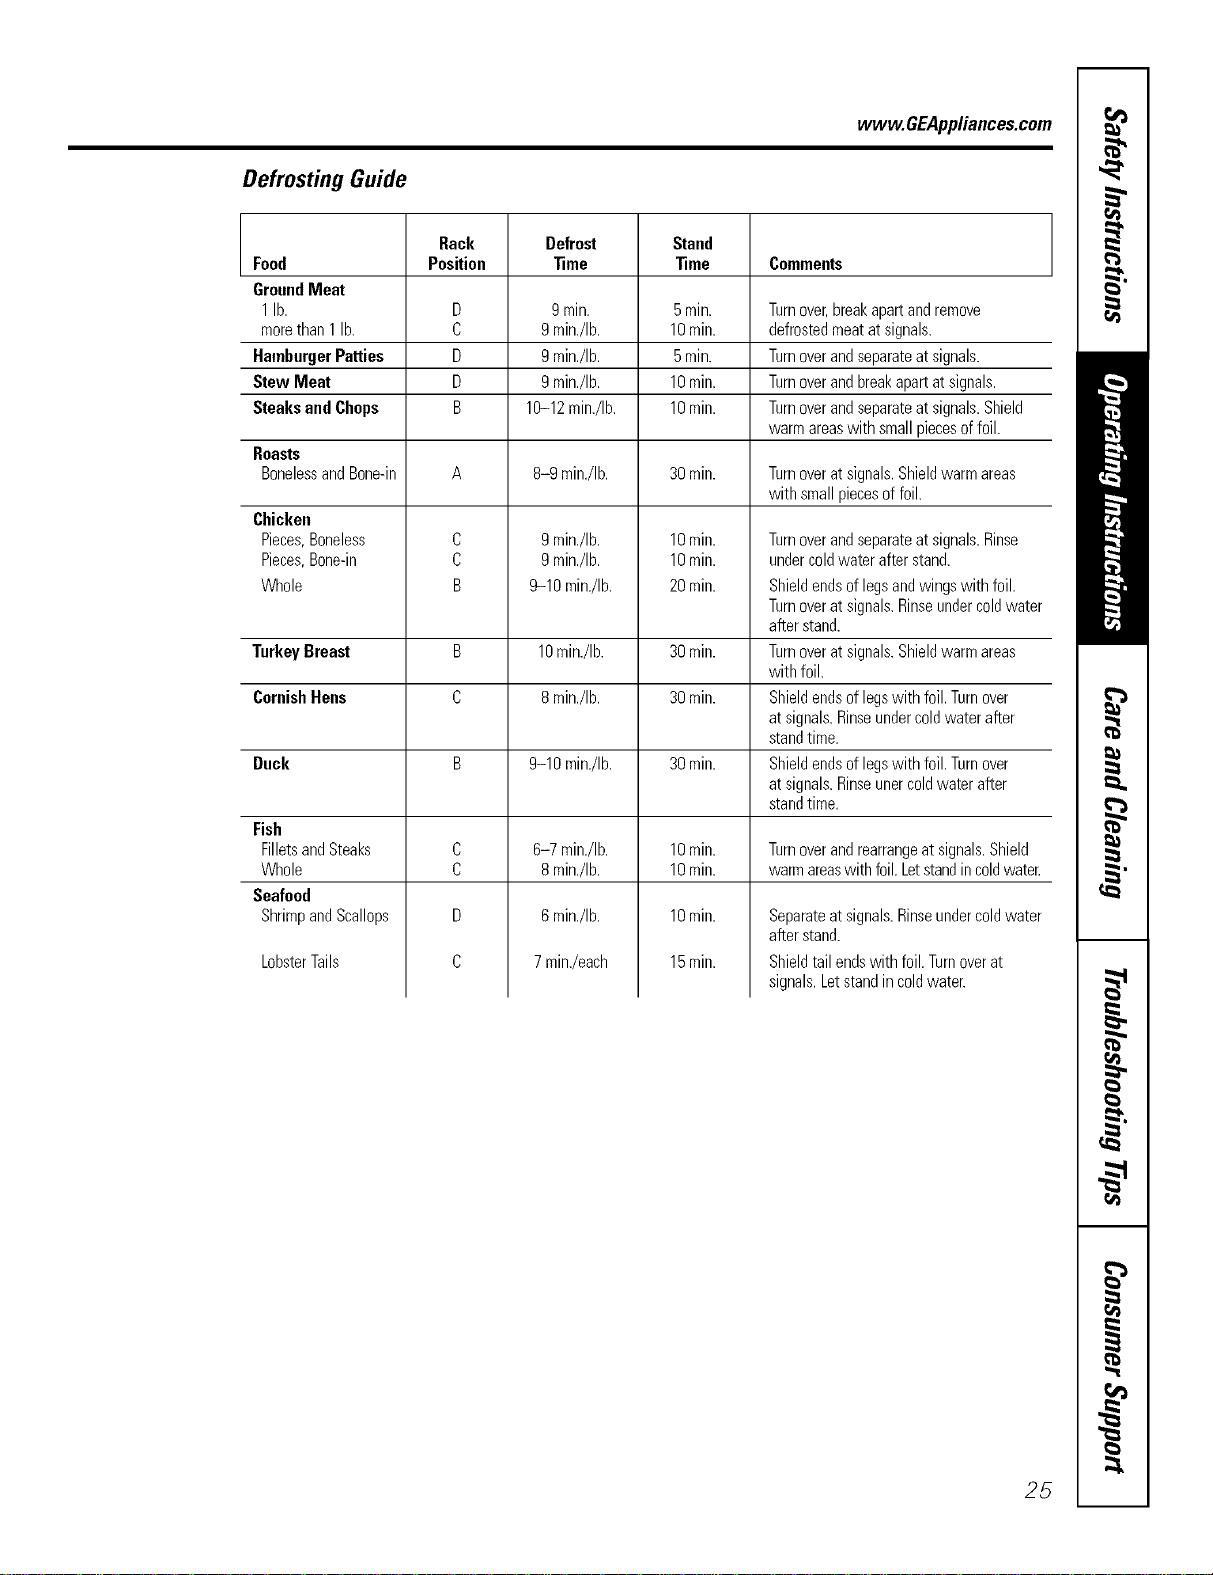
See the Defrosting Guide fin- additional
COIlllI] ents.
\,_]_en deti'osted, todd should be cool but
softened in all areas. If still slightly icy,
return to the oven vet)' briefly, or let it
stand a tew minutes.
How to Set the Oven for Defrost
[]
[]
[]
[]
[]
Place food in o_,eil.
Select FEATUREfl'ommain inenu.
Select DEFROST
Enter the defl'ost time in hours
and/or minutes. Reterence the
chart on the next I)age,.
Select START
NOTE"FoodmaybecheckedatanytlYne
byopeningthedoorThemicrowaveand
convectionfanwi//turnoffaodthedefrost
tlYnecountdownwi//stopwhilethedoor
isopen.Theywi//resumewhenthedoor
/sdosed
[_] Check fix)d and turn oxer when
prompted. Add more time if
desired.
After thedefrosttimehasended,theoven
wi//prompttheusertoadd"MORE
TIME" AddadditionalttYnebyselecting
MORETIME Entertimeinminutes.
PressCLEAR/OFFpadif foodhasfinished
defrostIw.
24
vvww.GEAppliances.com
Defrosting Guide
Rack Defrost Stand
Food Position _me _me Comments
GroundMeat
1lb. D 9min. 5min. Turnover,breakapartandremove
morethan1 lb. C gmin./Ib. 10rain. defrostedmeatatsignals.
HamburgerPatties D 9min./Ib. 5min. Turnoverandseparateat signals.
Stew Meat D 9min./Ib. 10min. Turnoverandbreakapartatsignals.
SteaksandChops B 10-12min./Ib. 10rain. Turnoverandseparateat signals.Shield
warmareaswith smallpiecesoffoil.
Roasts
BonelessandBone-in A 8-9 min./Ib. 30rain. Turnoveratsignals.Shieldwarmareas
with smallpiecesoffoil.
Chicken
Pieces,Boneless
Pieces,Bone-in
Whole
Turnover and separate at signals. Rinse
under coldwater after stand.
Shield ends of legs and wings with foil.
Turnover at signals. Rinseunder coldwater
after stand.
Turnover at signals. Shield warm areas
with foil.
Shield ends of legswith foil. Turn over
at signals. Rinseunder cold water after
stand time.
Shield ends of legswith foil. Turn over
at signals. Rinseuner cold water after
stand time.
C
C
B
9min./Ib.
9min./Ib.
9-10 min./Ib.
10rain.
10rain.
20 rain.
TurkeyBreast B 10min./Ib. 30rain.
CornishHens C 8min./Ib. 30rain.
Duck B 9-10 min./Ib. 30min.
C
C
D
C
Fish
FilletsandSteaks
Whole
Seafood
ShrimpandScallops
6-7 min./Ib.
8min./Ib.
6min./Ib.
7 min./each
LobsterTails
10rain.
10rain.
10rain.
15rain.
Turnover and rearrange at signals.Shield
warm areaswith foil. Letstand incoldwater.
Separate at signals.Rinseunder cold water
after stand.
Shield tail ends with foil. Turnover at
signals. Letstand in cold water.
25

Usingtraditionalbake and mast.
Toavoid possible bums, place the racks in the desired posifion before you turn the oven on.
Cut slits in flTefoiljust like flTegrid.
Aluminum Foil
You can use almninun_ fl)il to line the
broiler pan and broiler grid. However;
w)u must mold the foil tightly to the grid
and cut slits in it just like the grid.
Never entirely cover a rack with aluminum
foil. This will distufl) the heat circulation
and result in poor baking.
A smaller sheet of foil may be used to
catch a spilh)ver by placing it on a lower
rock several inches below the toed.
Preheating and Pan Placement for Baking
Preheat the oven if the recipe calls fin" it.
To preheat, set the oven at the correct
teml)eratm'e. Preheating is necessa_ y for
good results when baking cakes, cookies,
past_ T and breads.
Baking results will be better if baking pans
are centered in the oven as much as
possible. Pans should not touch each
other or the walls of the oven. If you need
to tlse tWO I'aC_% rise CONVMULTImode
described in Using the convection modes
section for best results, placing food on
racks A and D.
TypeofFood
Frozenpies BorC
(oncookiesheet)
Angelfoodcake A
Bundtorpoundcakes B
Biscuits,muffins, BorC
brownies,cookies,
cupcakes,layer
cakes,pies
Casseroles BorC
Rack Position
Trivectioff"
3if' Oven
III
[]
III
III
How to Set the Oven for Baking or Roasting
[] Select BAKE.
] Press the mmfl)er pads to set the
desired temperatm'e.
NOTE:A coohngfanmayautomaticallyturnon
andofftocoolinternalparts.Thisisnormal,and
thefanmaycontinuetorunevenaftertheovenis
turnedof_
[]
Select START The display will
show the changin,*,_ temperature
(starting at 100°F). The display
starts changim* (race the
temperatm'e reaches 100°E
[] Check fi)od fin" doneness at
minimmn time on recipe. Cook
hmger if necessa_):
[] Press the CLEAR/OFFpad when
cooking is complete.
26
Usingthe trad#ienMtimedbaking
and roasting features. .CEA lia.ces.corn
NOTE:Foods that spoil easily--such as milk, eggs, fish, stuffings, poultry and pork--should not be allowed to sit for
more than I hour before or after cooking. Room temperature promotes the growth of harmful bacteria. Be sure that
the oven light is off because heat from the bulb will speed harmful bacteria growth.
How to Set an Immediate Start and Automatic Stop
Theovenwi#turnonirnmediatelyandcookfora
selectedlengd_oftime.At theendofthecooking
thee,be ovenwillturnoffautomafi2a//]z
[] Select ENTER.This tells the o',e]l that
;ol_ have fim_ished settim_g it.
Make sm'e the clock shows the correct [] Select START.
time of day.
[] Select RAKE.
[] [Jsim_gthe mmfl)er pads, em_ter the
desired temperature.
[] Select OPTIONS.
[] Select TIMER RAKE.
NOTE" Thetinrncountdown will not start until
aMr the ovenis"preheated.
] [ ]sim_, the mmfl)er pads, em_ter the
desired bakh_g dine. Tile ovem_
tempe_:_ture amid the cookim_g time
that w_l_entered will be displayed.
The display will sho_ the changim_g
tempe_;m_re (startim_g at ]00°F) m_d the
cooldN_g time_ The display starts changim_g
oN_cethe temperatm'e reaches ]i(IO°K
The ove_ will con ti m_i_e to cook fin" the
[)ro_]_m m ed am olh_ t o[ tim e, the]_ sh IK
(_ffm _tom aticall5 Im1ess tb e WARM
ieatm'e was set. See the Using the Proof,
Warmer and Warm Features section.
AMr thecook_q timehas ended, #_eovenwill
prompt the usertoadd "MORE TIME" to further
cookfood if desired Add additional time by
sebctTngMORE T_ME Entertraditionalcooking
time b mbutes and sebct STARE Press
CLEAR/OFFmadif foodhas finMTedcooking.
How to Set a Delayed Start and Automatic Stop
Youcanset the ovencontrol todeNy-start the [] Select ENTER.
oven,cookfor aspecihc lengthof timeand then
turn off automatica/lg [] Select START.
Make sure the clock shows the correct
time of day.
[] Select RAKE.
[] Using the number pads, enter the
desired temperatm'e.
[] Select OPTIONS.
[] Select TIMED BAKE.
[] Using the number pads, enter the
desired baking time.
NOTE" The t/Ynecountdown will not start until
after the oven is preheatec_
[] Select ENTER.
[] Select OPTIONS.
[] Select DELAYBAKE.
[] Using the number pads, enter the
time of day you want the o_en to
tt/I'n on and St;lI't cooking.
If you would like to check the times _ou
have set, select REVlEWTIMES. You have
the option to see delta time, clock, bake
time or time_:
X,_]]en the oven turns on at the time
ot day you have set, the display will
show the changing temperatm'e
(starting at 100°F) and the cooking
time. The display starts changing once
the temperatm'e reaches 100°E
The oven will contintte to cook tor the
programmed _llllO/lnt 0][ time. After the
cookingt_mehasended,the oven will prompt the
userto add "MORE TIME" to furthercook food
if desked Add additional t_nebyselecting
MORE TIME Entertraditionalcookingfl_nein
minutesandselect START PressCLEAR/OFF
padif foodhas finishedcooking.The oven will
mrn off automatically, tmless the WARM
teatm'e was set. See the Using the Preef,
Warmer and Warm Features section.
27
Usingtraditionalbroil.
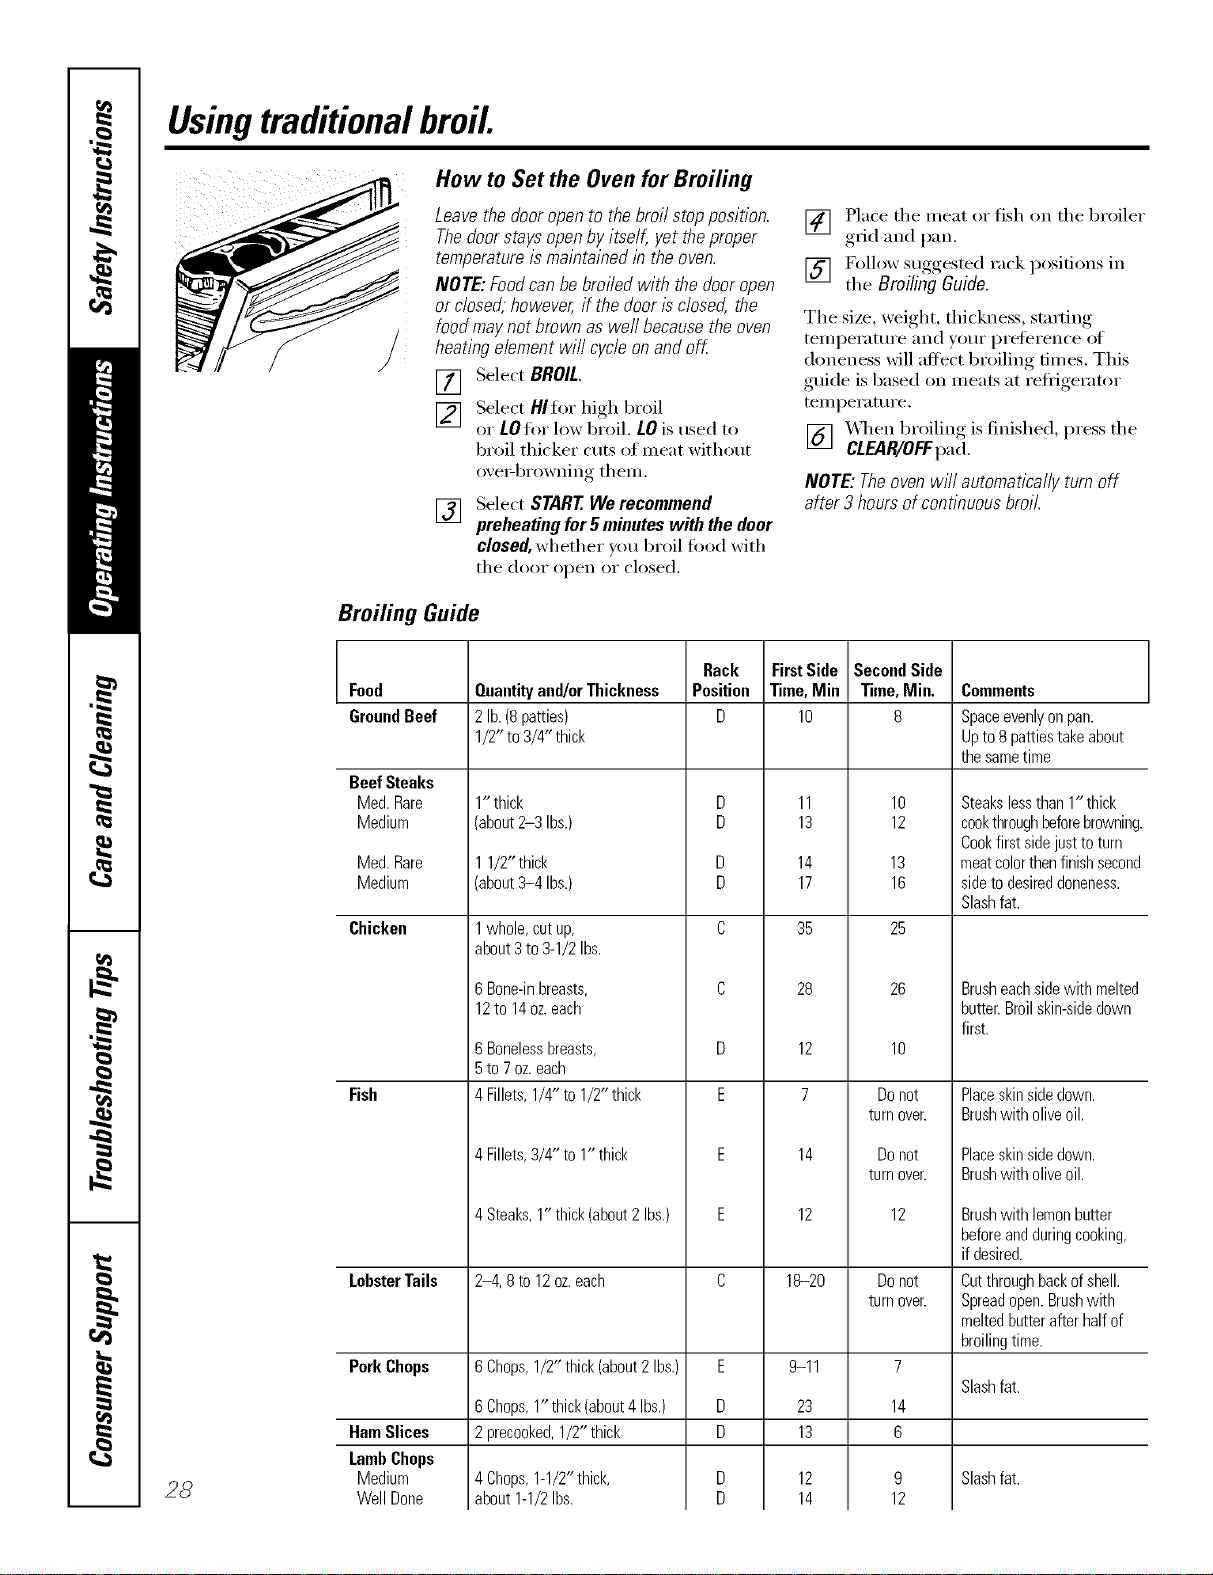
How to Set the Ovenfor Broiling
Leave the door open to the broil stop position.
Thedoor stays open by itself, yet the proper
temperature is maintained lb the oven.
NOTE: Foodcan be broiled with the door open
or closed, however, if the door is closed, the
food may not brown as well because the oven
heating element will cycle on and off
[] Select BROIL.
[] Select HIfor high broil
or LOfor low broil. LOis used to
broil thicker cuts of meat without
oxe>browning them.
[] Select START We recommend
preheating for 5 minutes with the door
closed,whether _ou broil food with
the dooi" open oi" closed.
[_] Place the meat or fish on the broiler
it i
,grid and l)an .
[] Follow suggested rack posit.ions in
the BroilingGuide.
The size, weight, thickness, st;uting
temperatm'e and )ore" preference of
doneness will affect broiling times. This
guide is based on meats at refl_igerator
temperature.
[] _q_en broiling is finished, press the
CLEAR/OFFpad.
NOTE: Theoven wiii automatically turn off
after 3 hours of continuous broil.
Broiling Guide
28
Food
GroundBeef
Beef Steaks
Med. Rare
Medium
Med. Rare
Medium
Chicken
Fish
LobsterTails
PorkChops
HamSlices
LambChops
Medium
WellDone
Quantityand/orThickness
2lb.(8patties)
1/2" to3/4" thick
1" thick
(about 2-3 Ibs.)
11/2" thick
(about3-4 Ibs.)
1whole,cutup,
about3to 3-1/2Ibs.
6Bone-inbreasts,
12to 14oz.each
6 Bonelessbreasts,
5 to 7 oz. each
4 Fillets, 1/4" to 1/2" thick
4Fillets,3/4" to 1" thick
4Steaks,1" thick(about2 Ibs.)
2-4, 8 to 12 oz.each
6Chops,1/2" thick(about2 Ibs.)
6Chops,1" thick(about4 Ibs.)
2precooked,1/2" thick
4Chops,1-1/2"thick,
about1-1/2Ibs.
Rack
Position
D
D
D
D
D
C
C
D
E
E
E
C
E
D
D
FirstSide
Time,Min
lO
11
13
14
17
35
28
12
7
14
12
18-20
9-11
23
13
12
14
SecondSide
Time,Min.
8
lO
12
13
16
25
26
lO
Donot
turnover.
Donot
turnover.
12
Do not
turn over.
7
14
6
9
12
Comments
Spaceevenly on pan.
Up to 8 patties take about
the same time
Steakslessthan1"thick
cookthroughbeforebrowning.
Cookfirst sidejusttoturn
meatcolorthenfinishsecond
sidetodesireddoneness.
Slashfat.
Brush each sidewith melted
butter. Broil skin-side down
first.
Placeskinsidedown.
Brushwith oliveoil.
Placeskinsidedown.
Brushwith oliveoil.
Brushwith lemonbutter
beforeandduringcooking,
if desired.
Cutthroughbackofshell.
Spreadopen.Brushwith
meltedbutterafterhalfof
broilingtime.
Slash fat.
Slash fat.
Usingtheconvectionmodes, www.GEAppliances.com
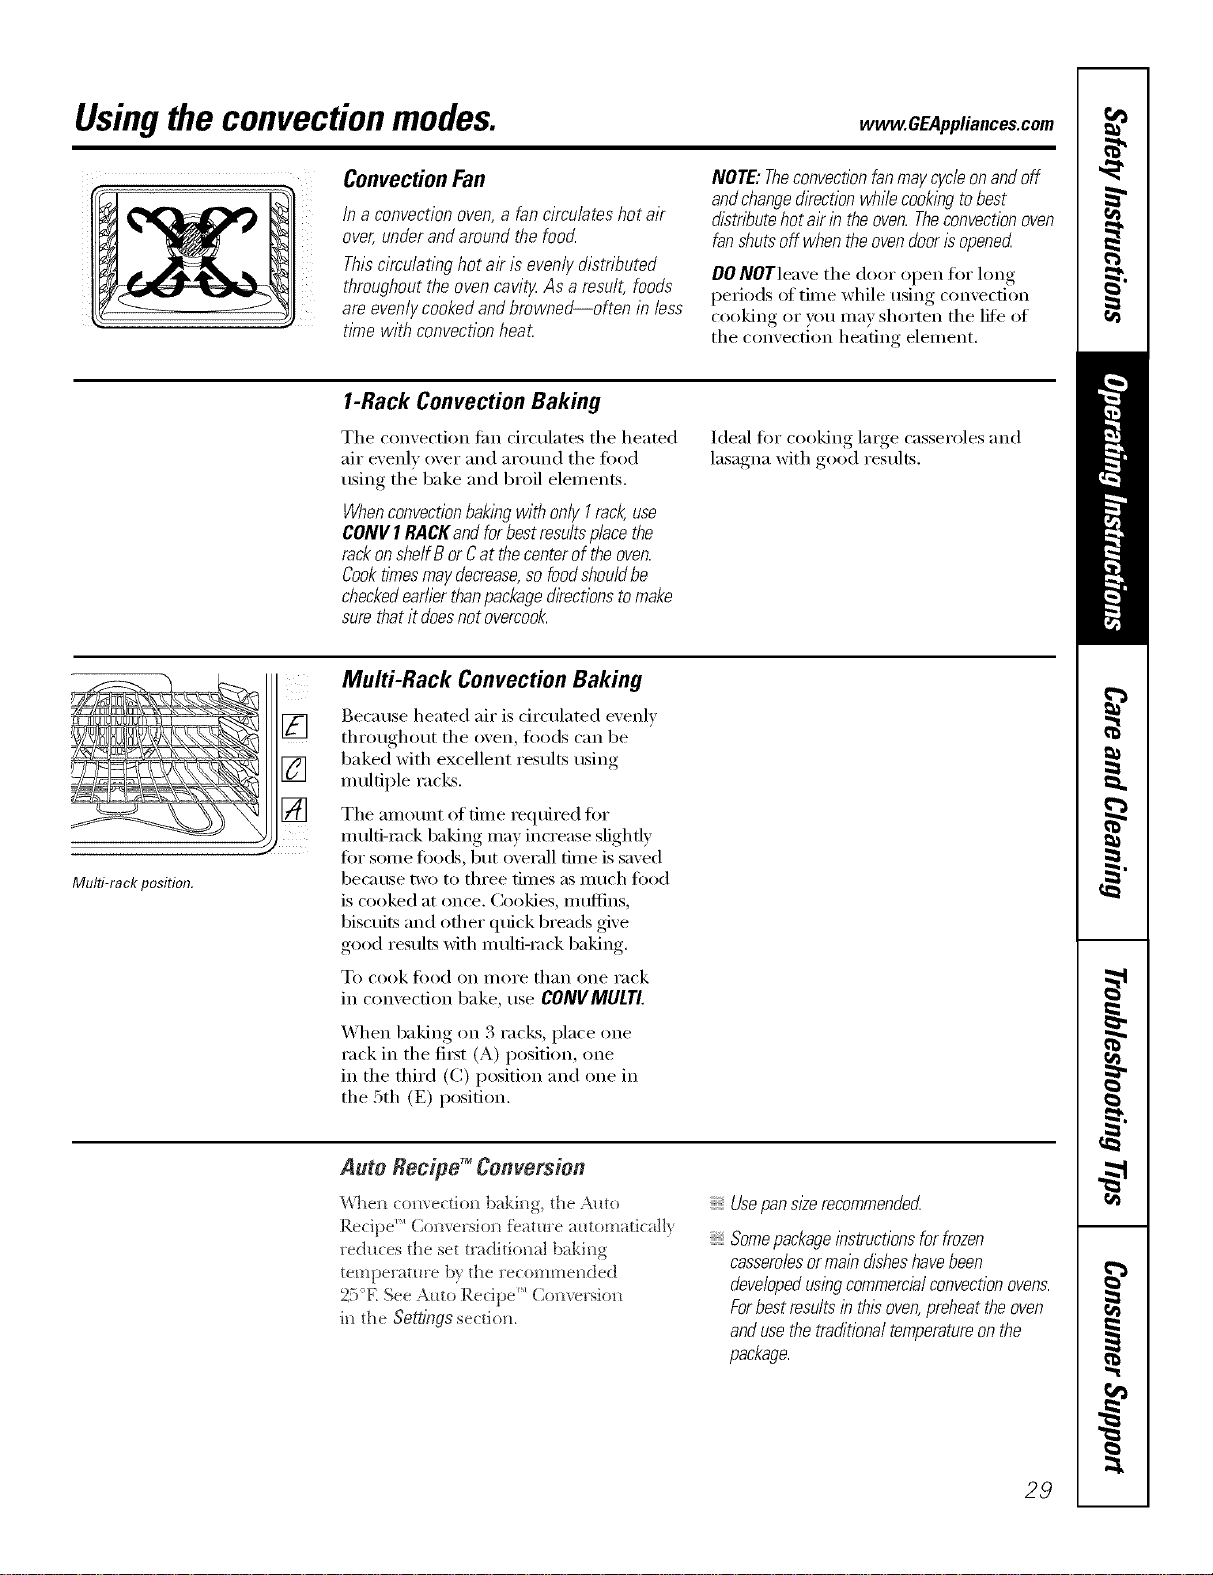
Convection Fan
/na convectionoven,afancimu/ateshotair
over,underandaroundthefood
Thiscireu/atinghotak is evenlydistributed
throughouttheovencavit_Asa result,foods
areevenlycookedandbrowned--often in less
t/mewith convectionheat.
NOTE:Theconvectionfanmaycycleonandoff
andchange&ection whilecookingtobest
distributehotairin theoven.Theconvectionoven
fanOuts off whentheovendoorisopened
DO NOTleave the door open fl)r hmg
periods of tilne while using convection
cooking or you may shorten the life of
the convection heating element.
1-Rack Convection Baking
The comection tim circulates the heated
air exenlv over and arotmd the fi)od
using the bake and broil elements.
WhenconvectionbakingwithonlyI rack use
CONVI RACKandforbestresultsplacethe
rackonshelfB orCat thecenterof theoven.
Cooktimesmaydecrease,sofoodshou/dbe
checkedearlierthanpackage&ectionstomake
surethatit doesnotovercook.
Ideal fi:,r cooking large casseroles and
lasagna with good results.
Multi-rackposition.
[]
[]
[]
Multi-Rack Convection Baking
Because heated air is d_vulated evenly
throughout the oven, toods can be
baked with excellent results using
multiple racks.
The amotmt of time required fin.
multi-rock baking may increase slightly
fin" sore e fi)o(Ls, but overall time is saved
bec;_ttse two to three tiilles as Illtlch food
is cooked at once. (;()()]des, Illttflins,
biscuits and other qtfick breads give
good results with multi-rock baking.
To cook/i)od on I//oI'e than one rack
in con'_ecti(m bake, use CONVMULTI.
When baking on 3 racks, place one
rack in the fi_st (A) position, one
in the third (C) position and one in
the 5th (E) position.
Auto Reefpg _Conversion
_&%e_lconvectio_ baki_g, the Amo
Recipe ''_Co_versio_ fea/uce automatically
reduces the set traditio_ml baki_g
temperature b} the cecomme[/ded
25°E See Auto Recipe'" Co_versio_
i_ the Se_ings section.
Usepansl#erecommended
Somepackageinstructionsfor frozen
casserolesormaindisheshave been
developedusingcommercialconvectionovens.
Forbest resultsin thisoven,preheat the oven
and usethe treditiona/ temperatureon the
package.
29
Usingthe convectionmodes.
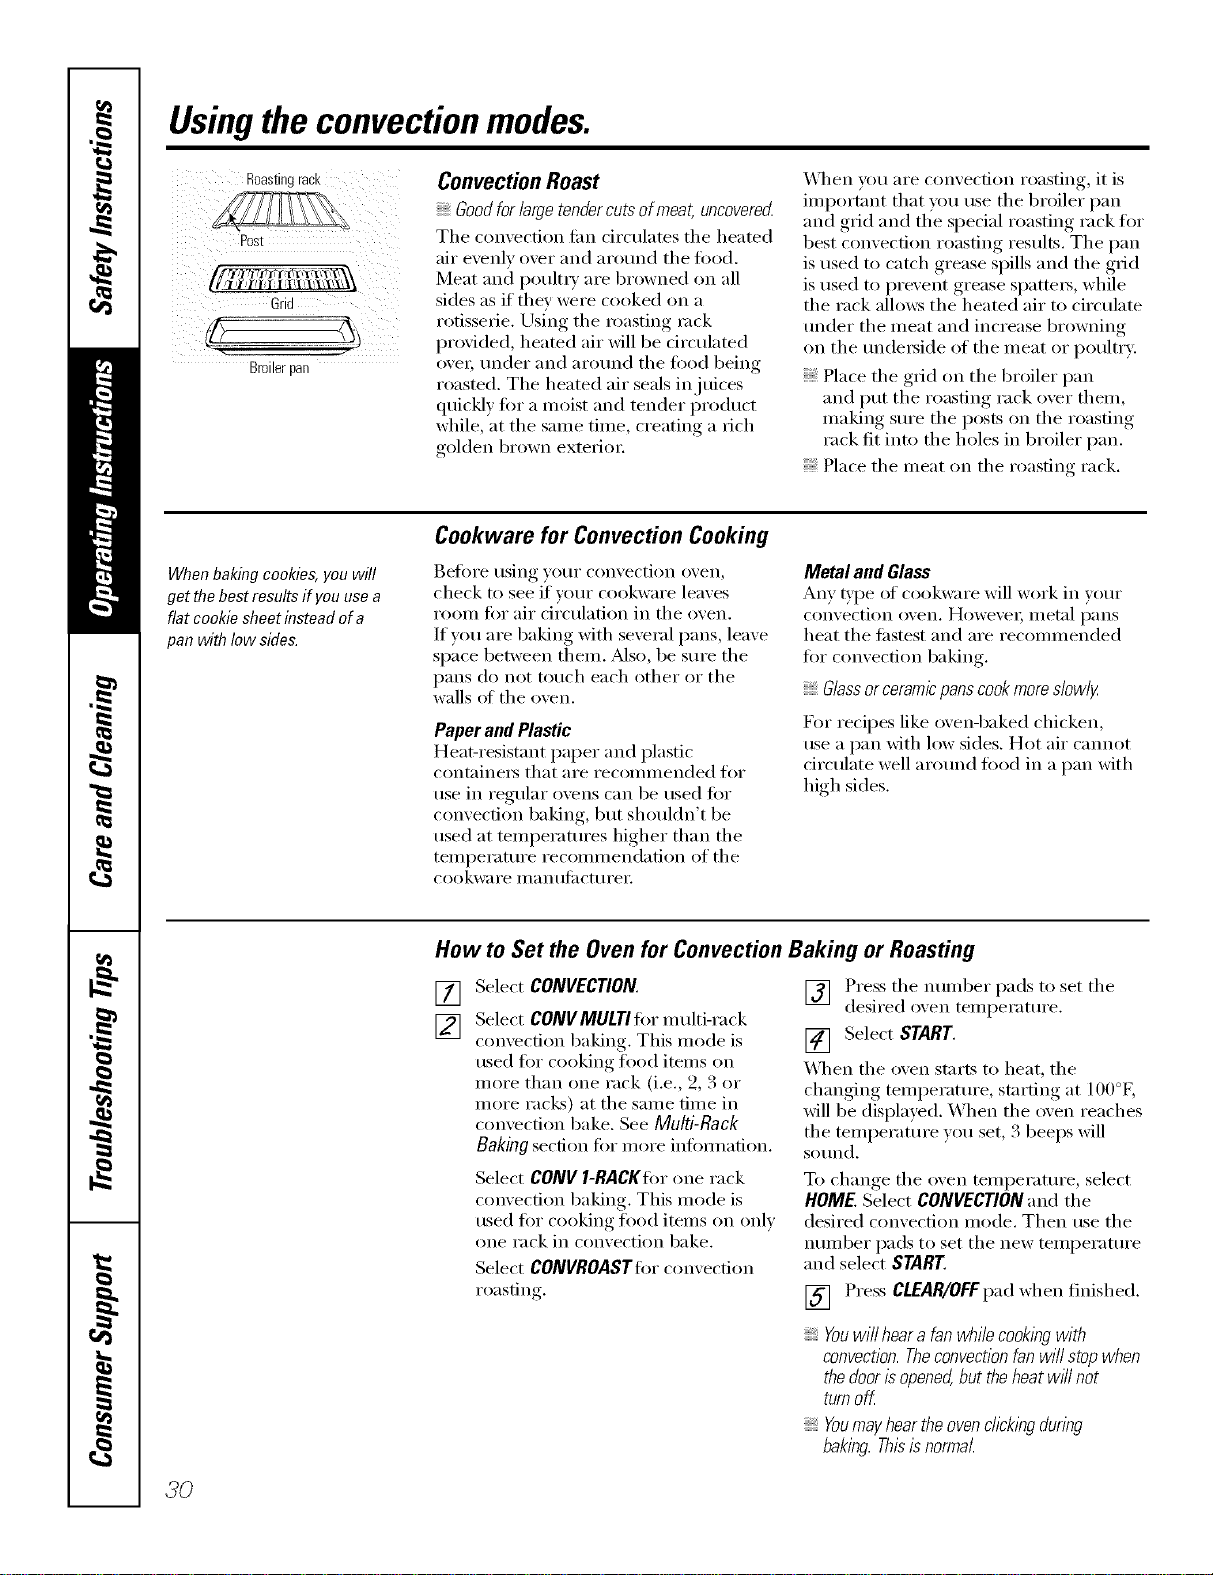
Roastingrack
Post
\ /
Broilerpan
Convection Roast
Goodforlarge tendercuts of meat, uncovered
The convection tim circulates the heated
air evenly over and around the food.
Meat an(l poult_ y are browned on all
sides as if they were cooked on a
rotisserie. Using the roastin,, rock
proxided, heated air will be circulated
ove_; trader and arotmd the fi)od being
roasted. The heated air seals in juices
quickly fin" a moist and tender product
while, at the same time, creating a rich
golden brown exterioi:
_]_en you are convection roasting, it is
important that you use the broiler pan
and grid and the special roasting rack ti)r
best convection roasting results. The pan
is used to catch grease spills and the grid
is used to prevent grease spatters, while
the rack allcms the heated air to circulate
trader the meat and increase browning
on the tm(le_ide of the meat or poultr}:
Place the grid on the broiler pan
and put the roasting rack over them,
making sm'e the posts on the roasting
rack fit into the holes in broiler pan.
Place the meat on the roasting rack.
When baking cookies, you will
get the best results if you use a
flat cookie sheet instead of a
pan with Iow side&
Cookware for Convection Cooking
get()i'e rising }'()Ill" convection oven_
check to see if vain" cookware leaves
room fi)r air d_'culation in the oven.
If w)u are baking with several pans, leave
space between them. Mso, be sure the
pans do not touch each other or the
walls at the oven.
Paper and Plastic
Heat-resistant paper and plastic
containei3 that ai'e i'eCOll/illended [()I"
use in regular ovens can be used for
convection baking, but shouldn't be
used at temperatures higher than the
temperature recommendation of the
cookware ill _1n tllilCttli'ei:
Metal and Glass
Any type of cookware will work in w,ur
convection oven, Howevex; Illetnl l)_lIlS
heat the fi_stest and are recommended
for convection baking.
Glassorceramicpanscookmoreslowly
For recipes like ovenq)aked chicken,
use a pan Mth low sides. Hot air cmmot
circulate well arotmd food in a pan with
high sides.
How to Set the Oven for Convection Baking or Roasting
[]
[]
Select CONVECTION.
Select CONVMULTI fiw m ulti-rack
convection baking. This mode is
used for cooking load items on
more than one rack (i.e., 2, 3 or
more racks) at the same time in
convection bake. See Multi-Rack
Baking section fi)r more inflmnation.
Select CONV I-RACKIor one rack
convection baking. This mode is
used for cooking food items on only
one rack in convection bake.
Select COIVVROASTtor convection
roasting.
] Press tile number pads to set the
desired oxen temperatm'e.
[] Select START.
\_]_en the oven starts to heat, the
changing temperatm'e, starting at 100°E
will be displayed. When the oven reaches
the temperature you set, 3 beeps will
SOtlnd,
To change tile oven temperatm'e, select
HOME. Select CONVECTION and the
desired convection mode. Then use the
nun/ber pads to set the new temperatm'e
and select S/ART
[] Press CLEAR/OFFpad when finished.
Youwill hear a fan wh& cookingwith
convection.Theconvection fan will stop when
the door isopened,but theheat will not
turn off.
Youmay hearthe ovenchcklngduring
baking. Thisis normal
3O

Usingthe timedfeaturesforconvectioncooking. CEA,,,ia.cescom.
Youwill hear a fan while cooking with these features. The convection fan will stop when the door is opened, but the
heat will not turn off.
NOTE:Foods that sped easily--such as milk, eggs, fish, stuffings, poultry and pork--should not be allowed to s# for
more than 1hour before or after cooking. Room temperature promotes the growth of harmful bacteria. Be sure
that the oven light is off because heat from the bulb will speed harmful bacteria growth.
How to Set an Immediate Start and Automatic Stop
Theovenwill turnonimmediatelyandcookfora
selectedlengthof time.At theendof thecooking
time,theovenwilf turnoff automatica//}_
Make stlI'e the clock sho_,:s the correct time
of day.
[] Select CONVECTION,
[] Select CONVMULTItor multi-rack
comection baking. This mode is
used fi)I" cooking food itelns on
more than one rack (i.e., 2, 3 or
more racks) at the same time in
convection bake. See Multi-Rack
Baking section fiw more infimnafion.
Select CONV I-RACKIor one rack
convection baking. This mode is
used for cooking food items on only
one rack in convection bake.
Select CONVROASTIor convection
roasting.
Press the number pads to set the
desired oxen temperature.
SelectOPTIONS.
[]
[]
[]
[]
Select TIMEDBAKE,
Using the number pads. enter the
desired comection cooking dine.
The oven temperature and the
cooking time that you entered will
be displayed.
NOTE: Thetime countdown will not start until
after the ovenispreheated
[] Select ENTER.This tells the oxen
that _ou haxe finished setting it.
[] Select START.
X._]_en the oven starts to heat, the
changing temperature, starting at 100°K
will be displayed. X._]_en the oven reaches
the temperature you set, 3 beeps will
SOtlnd.
The oven will continue to cook for the
programmed alllOtlnt of tillle, then sh tit
off automaticall 5 unless the WARM
feature was set. See the Settings section.
After thecoohng timehas ended,theovenwill
prompt the userto add "MORE TIME" to further
cook foodif desirecLAdd additional time by
selectlbgMORE TIME Entertraditionalcooking
time inminutesandse/ect START Press
CLEAR/OFFpad if foodhas finishedcooking.
37
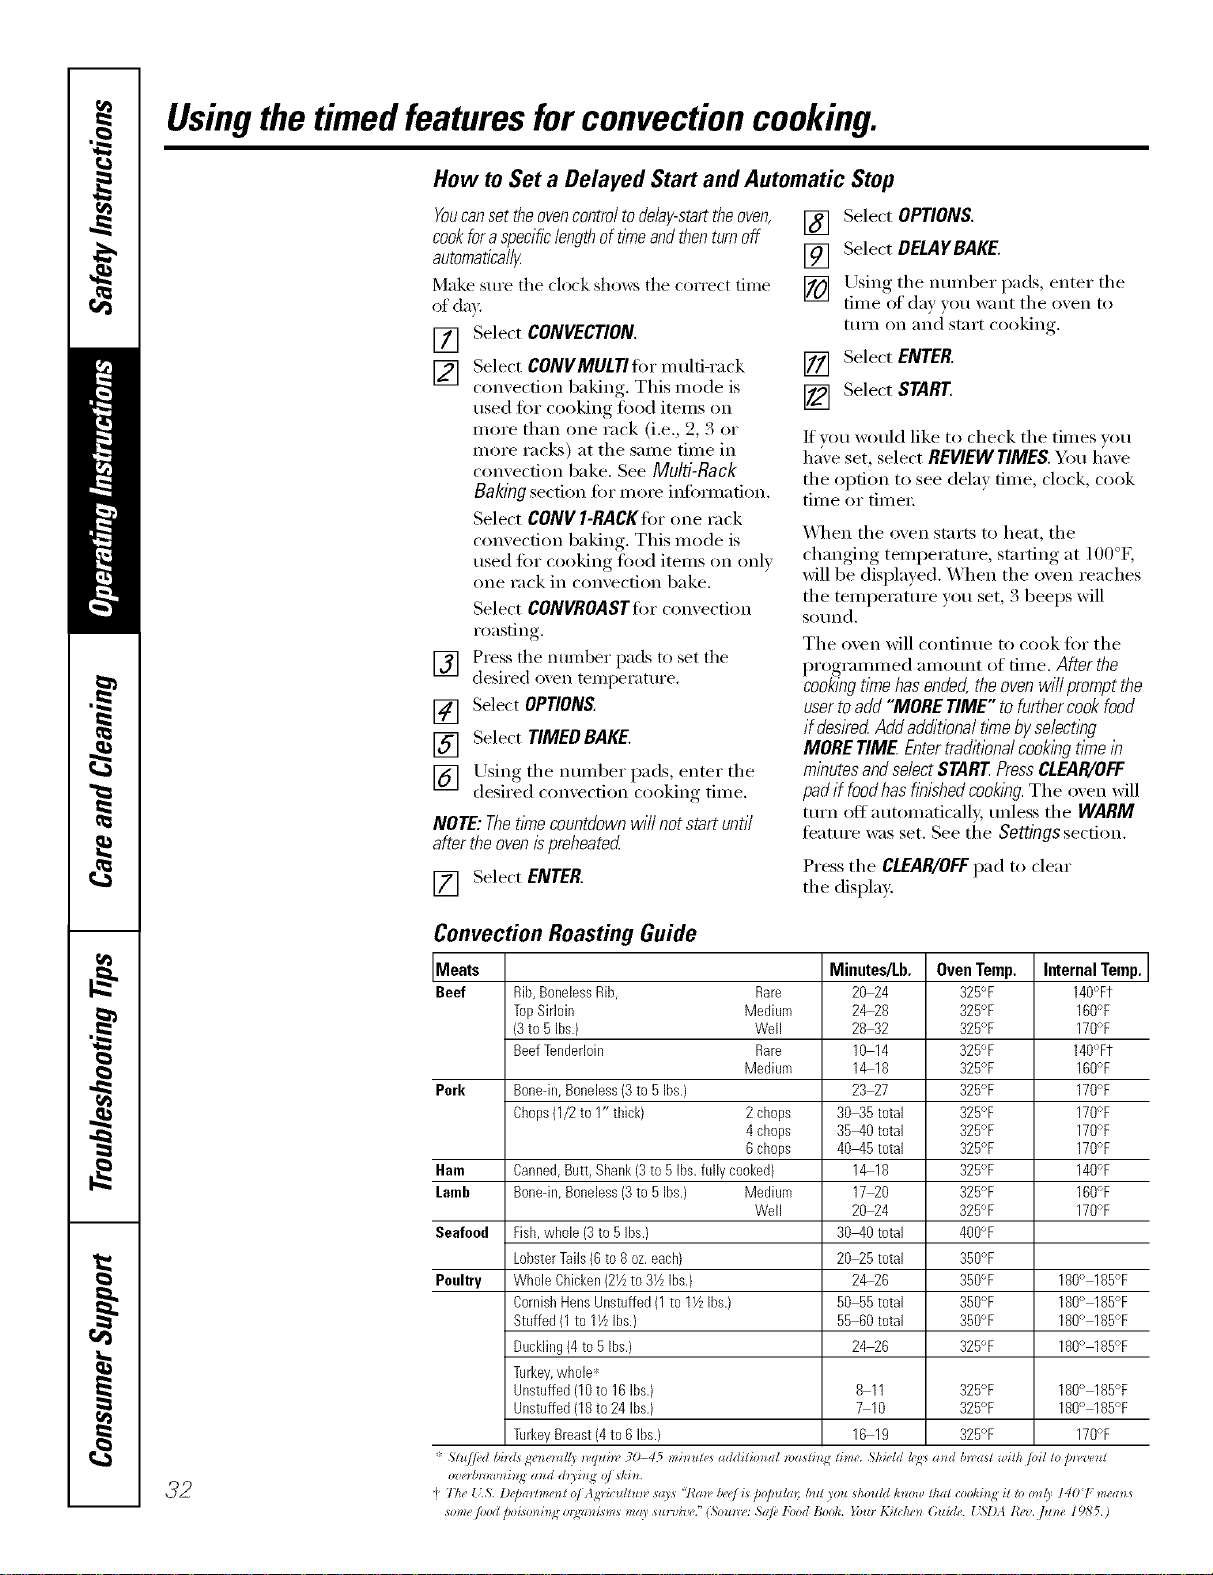
Usingthetimed featuresforconvectioncooking.
How to Set a Delayed Start and Automatic Stop
[]
[]
[]
YOUcanset theovencontrol todelay-starttheoven,
cookfor aspecificlengthof timeandthenturnoff
automatica/l_
Make sm'e the clock sho_:s the correct time
of da)'.
[] Select CONVECTION.
[] Select CONVMULTItor multi-rack
convection baking. This mode is
used for cooking food items on
more than one rack (i.e., 2, 3 or
more racks) at tile same time in
convection bake. See Multi-Rack
Baking section for more infimnation.
Select CONV I-RACKIor one rack
convection baking. This mode is
used tOT cooking fi)od items on only
one rack in convection bake.
Select CONVROASTIor convection
roasting.
Press tile number pads to set tile
desired oven tempemtm'e.
SelectOPTIONS
Select TIMED BAKE.
[] Using tile number pads, enter tile
desired comecfion cooking time.
NOTE: Thetithe countdown will not start until
after theovenispreheated
[] Select ENTER.
[] Select OPTIONS.
[] Select DELAYBAKE.
[] Using tile nmnber pads, enter tile
time of day }ou want tile oxen to
tuI'n on and S[_lI'[ cooking.
[] Select ENTER.
[] Select START.
If you would like to check tile times you,
haxe set, select REVIEWTIMES.You have
the option to see delta time, clock, cook
time or timex:
\_]/en tile oven starts to heat, tile
changing temperatm'e, starting at 100°g
will be displayed. When tile oven reaches
tile temperatm'e you set, 3 beeps will
S{}/ln(1.
Tile oven will continue to cook for tile
programmed amo/mt of time. After the
cookbgtl_nehasended,theovenwillpromptthe
usertoadd"MORETIME"tofurthercookfood
if desiredAddadditionaltimebyse/ectbg
MORETIME Entertraditionalcookingtknein
minutesandselect$TAR[ PressCLEAR/OFF
padif foodhasfl?}lshedcookl?_g.The oven will
ttlI'I1 oil autoinaticall,v, tlllless tile WARM
teatm'e was set. See tile Settingssection.
Press tile CLEAR/OFFpad to clear
tile display:
32
Convection Roasting Guide
Meats Minutes/Lb. Oven Temp. Internal Temp.
Beef Rib,BonelessRib, Rare 20 24 325°F 140°Ft
TopSirloin Medium 2&28 325°F 160°F
(3to 5 Ibs.) Well 28 32 325°F 170%
BeefTenderloin Rare 10 14 325°F 140°Ft
Medium 1&18 325°F 160%
Perk Bonedn,Boneless(3to 5Ibs.) 23 27 325°F 170%
Chops(1/2to 1" thick) 2 chops 30_5 total 325°F 170°F
4 chops 35-40 total 325°F 170°F
6 chops 40-45 total 325°F 170%
Ham Canned,Butt, Shank(3to 5 Ibs.fullycooked} 1_18 325°F 140%
Lamb Bonedn,Boneless(3to 5Ibs.) Medium 17 20 325°F 160°F
Well 20 24 325°F 170°F
Seafood Fish,whole (3to 5 Ibs.) 30-40 total 400°F
LobsterTails(6 to 8oz.each) 20_5 total 350°F
Poultry WholeChicken(2_ to31/zIhs.} 2_26 350°F 180° 185°F
CornishHensUnstuffed(1to IY_Ibs.) 50 55total 350°F 180° 185°F
Stuffed(1 to 11/LIhs.) 55 60total 350°F 180° 185°F
Duckling(4to 5 Ibs.) 2_26 325°F 180° 185°F
Turkey,whole*
Unstuffed(10to 16Ihs.) 8 11 325°F 180° 185°F
Unstuffed(18to 24 Ibs.) 7 10 325°F 180° 185%
TurkeyBreast(4to 6 Ibs.) 16 19 325°F 170%
'_ Slu//ed bi)zls gr')_e_*ll/)_,q*li_v 3t)-45 misrules addilim*al n)asli) lime. ,Shi4"ldh;<:sa_ d b*_'asl a_ilh toil 1opn,'l,e_ l
o'ze_¢n)wnhl,_ a_ d d_i_i_N o/ *kin.
_}The {5. D@a_¢me_l o/ Ag_'ic_lllun" *a)s "!'a_v/)_'e/L* D@_lla,; but you should h_ml! 1hal cooki_N i1 rl)o_(y I401 mea_s
some /oM t_oisoni_lg o*gzz_*gsm*may *u_wiv('." (So_m*': ,S(@lbod Book. }bu_ Kitchen* Guide. { SI)A l?ez. flz_*e 19,b'5.)

Recipes. www.GEAppliances.com
Youcan preset up to six temperature/cooking time combinations with this function. Youcan then bake, convection
bake/roast or speed bake any of these six favorite recipes without choosing settings each time.
NOTES:
Youcannot program Broil, Defrost, Dehydrate, Warmer, Proof, Speed Broil, Delay Bake or Self-Clean in RECIPES.
Youroven will remember FAVORITESthat have been programmed even after a power outage.
Thecooking time you enter does not include preheat time. The oven will begin to countdown the cooking time
after the oven hascompleted preheating. At thepreheat tone,put yourfoodin the oven.
ToProgram a New FAVORITE
[] Select RECIPES. [] Use tile nunlber pads to enter tile
cooking temperature.
[] Select an axailable FAVORITE. An
ax filable FAVORITEwill not haxe [] Use tile number pads to enter tile
a block heft)re and after it. A cookh N thne. Select fNTfRwhen
FAVORITEthat has ah'eady been finished.
progranm/ed will ha_e a block
heft)re and after it. For example:
IF_¥ORITE 1I.
[]
Select tile desired cooking mode,
Tile a_ailable options are BAKE,
CONVECTION(both convecti()n bake
modes and convection roast) and
SPEEDBAKE(all speed bake
categories and sul>categories).
[]
[]
Tile conu'ol displa} Mll show file
progTmnmed cooking mode,
temperatm'e and time fi)r tile
FAVORITE.Select SAVEif tile
infi)rmation displa)'ed is correct.
Select STARTto begin cooking with
tile recipe that was just saved. If _ou
do not want to start tile recipe now,
touch tile CLEAR/OFFpad.
ToUse a FAVORITE
[] Select RECIPES.
F_q Select an axailable FAVORITE. An
a\_filable FAVORITEwiII not ha_e
a block befi)re and after it. A
FAVORITEthat has ah'eadx been
progranmled will ha_e a ])lock
befbre and after it. For example:
mFaVOPJTEIm.
[]
Tile control display will show
the programmed cooking mode,
temperatm'e and time fi)r the
FAVORITEselected. Select START
to begin cooking with the selected
recipe.
ToChange or Replace a FAVORITE
[]
[]
Select RECIPES.
Select the desired FAVOR/TErecipe.
_, FAVORITEthat has a]read _, l/ee_l
_rog_mm_ed wi]] ]lave a b];>ck
[ ,
be{ore and a:tter it. For examl:>]e:
mFAVORN% II
[] The contr(4 dispLQ wi]] show
the l)r°g_mm_ed, cooki_g, mode,
tempel:m_re ;rod time {or the
FAVORITE. Select REPLACE.
[] Select the desired cookim_g mode.
The available options are BAKE,
CONVECTION(bodl com'ection bake
v_odes ;H_d colP,'ectiom_ ]'o_st) amid
] Use the )mmber pads to emec the
coo]<i_) g temperatm'e,
] Use the mmfl)er pads to entec the
cookiilg time, Se]ect ENTERwhel_
f_nished emering the cooki[)g time.
[]
[]
The comm'o] display will stlo_ the
progl_mm_ed cookiN_g mode,
temperatm'e m_d tic,]e {k)r the
FAVORITE.Select SAVEif the
h#ilrmati(m displayed is correcL
Select STARTto hegira) cookim)g with
the recipe that was il_st saved, I{_ou
do m)ot wm)t to stair the recipe _)(>_r,
touch the CLEAR/OFFpa(L
categories :rod suM>catego[%s).
33
Usingtheproof,warmerand warm features.
Theproofing feature maintains a warm environment useful for rising yeast-leavened products.
How to Set the Oven For Proof
NOTE:Forbest results,coverthe doughwith a
cloth or with graasedplastlc wrap(theplastic
mayneed to beanchoredunderneath the
containerso the ovenfan will not blow it off).
[] Place the covered dough in the oven
on rack g or C.
[_] Select FEATURES,then MORE, then
PROOFand then START.
Tile interior oven lights mm on and
remain on dining proofing.
Tile pro_Nng feature aummaticallv
provides tile optimum mmperature fin"
the proofing process, and theretore does
not have a mml)eratm'e a(!jusnn ent.
[] Set !he KITCHEN TIMER fi,r tile
IIllnllIl[llIl I)I'OOJ[ tilIle.
[] "_._q/ellproofing is finished, press
tile CLEAR/OFFpad.
Toavoid lowering theoventemperature
andlengtheningproofing tlYne,donot
open the ovendoor unnecessarily
Checkbreadproductsearly toavoid
over-proofing.
NOTE"
Donotusetheproofingmodeforwarming
foodorkeepingfoodhoLTheproofingoven
temperatureisnothotenoughtoholdfoods
atsafetemperatures.UsetheWARMER
featuretokeephotfoodwarm.
Proofingwillnotoperatewhenovenisabove
125°E"OVENTOOHOT"willshowin the
display
How to Set the Oven For Warmer
Tile w;mner teatm'e can be acti\:Ked
independently to kee I) hot, cooked
fi)o(ls w;mn. This feature is not designed
to reheat cold food.
To use this teature, select FEATURES,then
WARMER,then START.
To Crisp Stale Items
Place fl_od in lo_sided dishes or pans.
For best results, place tile food items in
a single lave_: Do not stack.
I,eave them uncovered.
Check c_ispness after 20-30 minutes.
Add time as needed.
IMPORTANTNOTES:
Foodshouldbekepthotin itscooking
containeror transferredtoaheat-safe
servingdish.
Formoistfoods,coverthemwithanoven-safe
lid oraluminumfoil.
Friedorcnsp foodsdonot need tobe covered,
but can becometoo dryif warmedfor too long.
Repeatedopeningof the doora//ows thehot
ak toescapeand the food tocool
Allow extrat/Yneforthe temperatureinside the
ovento stabih2eafter adding items.
With large loadsitmaybe necessarytocover
someof the cookedfooditems.
Removeservingspoons,etc.,beforeplacing
containersin theoven.
Do not useplastic containers,lids orp/astic
wrap.
CAUTION: Plasticcontainers,lids or p/astlc wrap
will melt if placed in theoven.Melted p/astlc may
not be removabfeandb not coveredunderyour
warrant_
How to Set the Oven For Warm
Tile wmm feature (cook and hold)
automatically keeps hot cooked foods
wam_ for up to 3 horns after a TIMED
BAKEis finished.
If tile bloc!<s befi)re and after WARM are
lit, tile feature is ON. If'there are no
blocks lit before and after WARM, the
flmture is OFF.
To turn this teature ONor OFF,select
.?4 FEATURES,then MORE,then WARM.
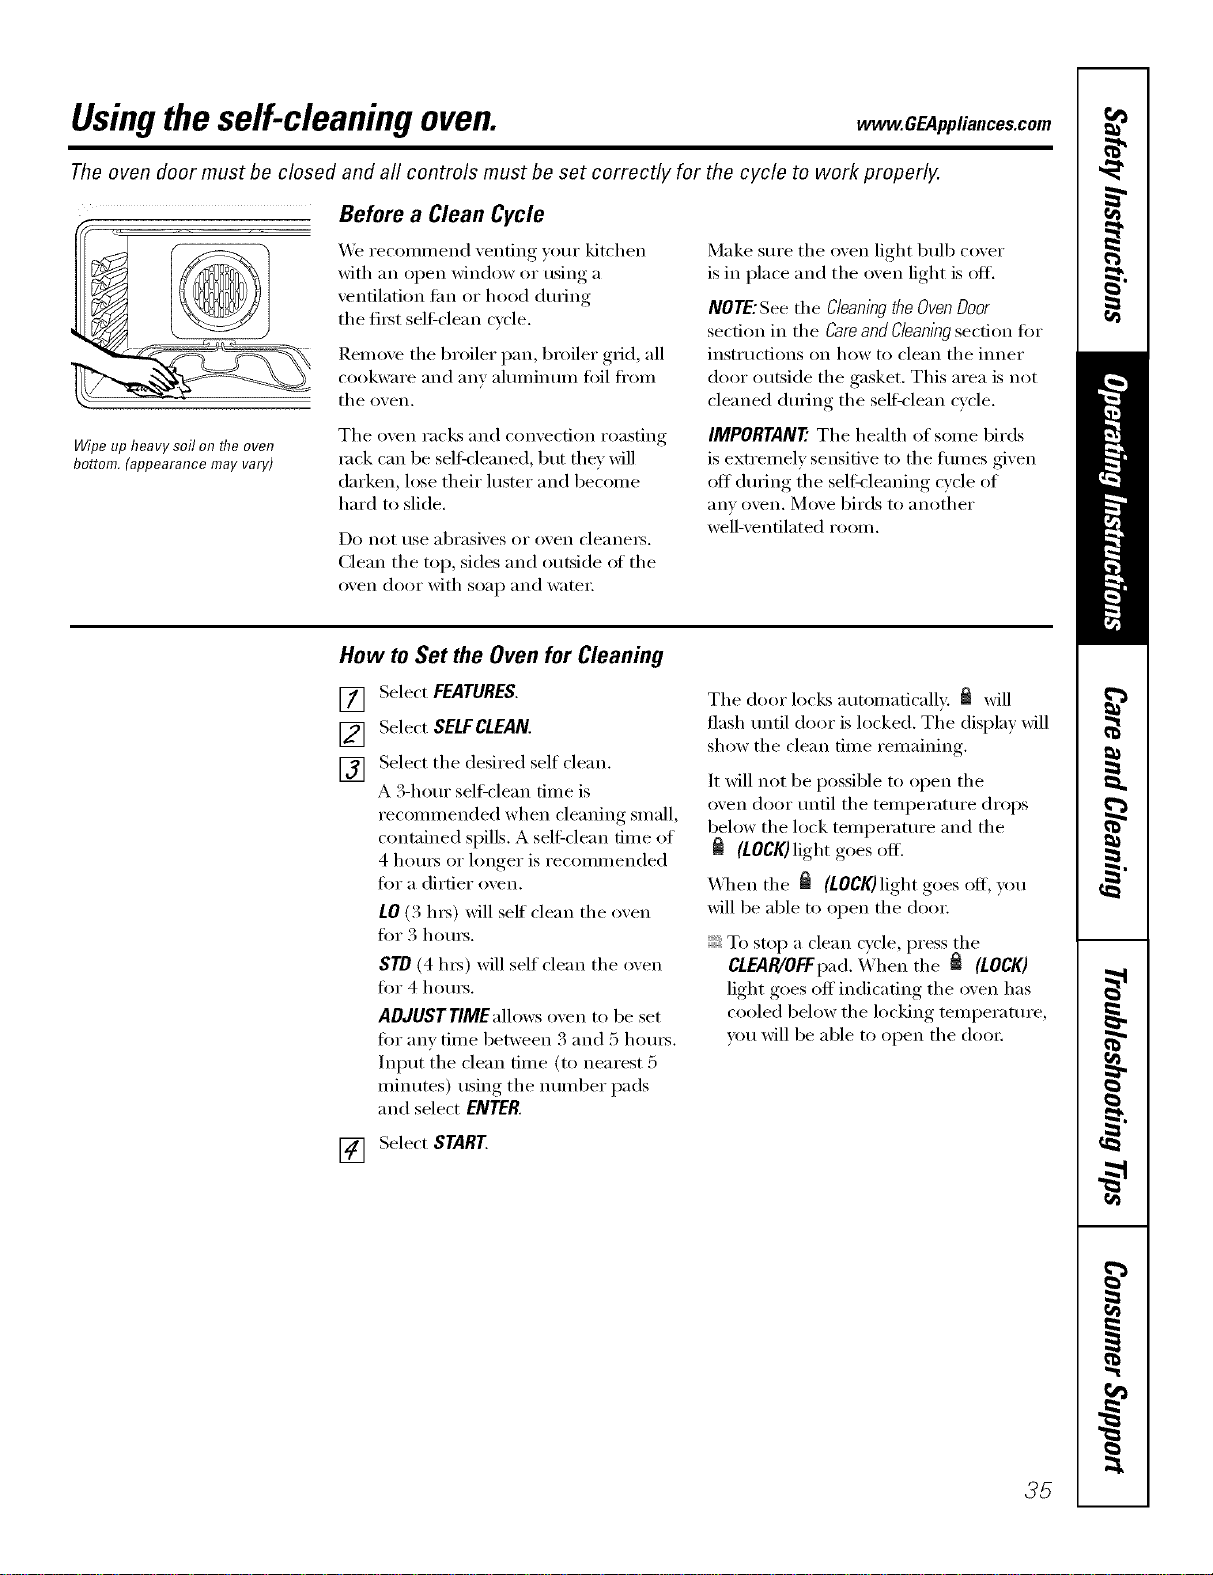
Usingtheself-cleaning oven. OEa,,,ia.oesoom
The oven door must be closed and all controls must be set correctly for the cycle to work properly.
Before a Clean Cycle
We reconm/end venting your kitchen
with an open window or using a
ventilation tim or hood dm-ing
the fi_t sel6clean cycle.
Remoxe tile broiler pan, broiler grid, all
cookware and am' almninmn fi)il fl'om
tile oxen,
Wipe up heavy soil on flTeoven
bottom. (appearance may vary)
Tile oven racks and convection roasting
rock can be selt_leaned, but tile}' will
darken, lose their luster and become
hard u) slide.
Do not use abrasixes or oxen cleaners.
Clean the top, sides and outside of the
oxen door with soap and water;
Make sm'e tile oven light bulb cover
is in place and the oven light is oil
NOTE:See the Cleaningthe OvenDoor
section in tile Careand Cleaningsection fi>r
instructions on how to clean tile ironer
door outside tile gasket. This area is not
cleaned (hwing the selfk'lean cycle.
IMPORTANT'. Tile health of some birds
is extremely sensitive to the tirades given
off dining tile seltkleaning cycle of
anv oven, Move birds to anothei"
well-ventilated room.
How to Set the Oven for Cleaning
Select FEATURES,
[]
[]
[]
Select SELFCLEAN.
Select tile desired self clean.
A S-horn" sell=clean time is
recommended when cleaning small,
contained spills. A sell:clean time of
4 hom_ or longer is recommended
fin" a dirtier oven.
tO (3 l/_) will self clean the oven
fin" 3 hom_.
STO (4 ll_) will self' clean tile oven
fin" 4 hom_.
ADJUST TIMEalh>ws oven to be set
fin" any time between S and 5 hom_.
Input the clean time (to nearest 5
minutes) using tile number pads
and select ENTER.
[] Select START
Tile door locks automatically. _ will
flash tmtil door is locked. The display will
show the clean time remaining.
It will not be possible to open the
oven door until the temperatm'e drops
below the lock temperature and the
(LOCK) light goes off.
\_]_en tile _ (LOCK)light goes off, you
will be able to open tile do()):
To stop a clean cycle, press the
CLEAR/OFFpad. When tile _ (LOCK)
light goes off indicating tile oven has
cooled below tile locking temperature,
you will be able to open tile do()):
35
Usingtheself-cleaning oven.
The oven door must be closed and all controls must be set correctly for the cycle to work properly.
How to Delay the Start of Cleaning
Select FEATURES.
[]
[]
[]
Select SELFCLEAN.
Select the desired self clean.
A 3-hour sel6clean time is
recommended when cleaning small,
contained spills. A self,lean time of
4 hotu_ or longer is recommended
for a dirtier oven.
LO (3 hx_) will self clean the oven
for 3 hom_.
STD (4 hx_) will self clean the oven
for 4 houI_.
ADJUST TIME allows oven to be set
for any time between 3 and 5 hom_.
Input the clean time (to nearest 5
minutes) using the number pads
and select ENTER.
The door locks automatically when you
select START The oven will remain
locked. The display will show the start
time. Once the self=clean cycle starts, it
will not be possible to open the oven
door tmtil the temperature drops below
the lock tempemtm'e and fl_e _ goes off.
_A]/en _ goes off', you will be able to
open the (lore:
[_ Select DELAYCLEAN.
[] Using the number pads, enter the
time of (la_ you want the clean cycle
to start.
[] Select ENTER.
[] Select START.
After a Clean Cycle
Y_m may notice some white ash in the
oven. Wipe it up with a damp cloth after
the oven cools.
If white spots remain, remove them with a
soap-filledsteel-woolpadand nnse thoroughly
with a vinegarand water mixture.
These deposits are tlStlallv a salt residue
that cmmot be removed by the clean
cycle.
If the oven is not clean after one clean
cycle, repeat the cycle.
You cannot set the oxen for cooking
tmtil the oxen is cool enough fi)r the
door to tln]ock.
If the racks become hard to slide, wipe
the rack sui)po_ts with cooking oil.
3_
Settings. _ GEAppliances.com
Your new touch pad control has additional settings that you may choose to use. They remain in the control's
memory, even after a power failure.
NOTE: If a setting is selected, it wifl have blocks before and after. For example: FJsettingsll
If the setting is not selected, it will not have a block before and after. For example: (settings).
Clock
The clock must be set to the correct time
of day fi)r the autonmtic oven tinting
flmcfions to work properly: Note that the
time of day cannot be changed (lining a
dined baking or sel6cleaning cycle,
[] Select SETTINGS and then select
CLOCK.
] Press the nmnber ke_s to enter the
correct time of day,
[] Select ENTER,
Clock Options
Yore" control uses a 12-hour clock. If you
prefer U) have no clock displayed or a
24-hour military time clock, fi)llow these
steps:
V_] Select SETTINGSand then select
it i
CLOCKOPTIONS.
_] .elect 12 hem"', "24 hem"' or
"no clock."
] ,Mter setting this option, select
HOME.
NOTE:If _ou select the "no clock" option,
you will not be able to rise the OelayBake
or OelayClean timctions.
12 Hour Shut Off
With thisoption,shouldyou forgetand leave the
ovenon, thecontrol will automatically turn the
ovenoff after 12hours.
Toturnthisoption ONor OFF:
VT] Select SETTINGS and then select
it i
MORE.
[] Select 12HOUROFFto turn the option
ON or OFF.
] _Mter setting this option, select
HOME.
Check FoodDoneness
Tohelpyouadapttocooklbgwith Trivection_
technology,thisoptionpromptsyou3/4of the
waythroughaspeedbakemodesothatyoucan
checkyourfoodaloneness.
Toturnthisoption ONor OFF."
FT] Select SETTINGSand then select
it i
MORE.
V2] Select CHECKFOODto turn the
option ONor OFF.
] _Mtersetting this option, select
HOME.
37

Settings.
Auto Recipe TM Conversion
Whenusingconvectionbake,the Auto Recipe_
Conversionfeatureautomatically changes
entered traditionalbaklbgtemperaturesto
convectionbaklbgtemperatures.Forexample,if
youenter a regularrecipetemperatureof 350°F
andselectSTART,the display will show Con
andthenthe converted temperatureof325°£
NOTE"Thisfeaturedoesnotchangetraditional
baklbgtimes,onlytraditionalbaklbgtemperatures.
Toturn this option ON or OFF:
[_7 Select SETTINGS and then select
it i
MORE
[] Select CONVTEMPto mrn the option
ON or OFF.
[] _dter setting this option, select
HOME.
Tonesat the End of a Timed Cycle
At theendofa tl_nedcycle,3shortbeepswill
soundfollowedbyonebeepevery6secondsuntil
theCLEAR/OFFpadispresserLThiscontlbuous
&secondbeepmaybecanceled
Toturnthecontinuous6-secondbeep
ONor OFF."
V_] Select SETTINGS and then select
it i
MORE twice.
[]
Select BEEPONCEto mrn the
continuous (;-second beep OFF.
Select FULLBEEPto mrn the
continuous 6-second beep ON.
[] _Mier .setfim,_ this option, select
HOME.
Fahrenheit or Celsius Temperature
Youroven control displaysthe temperaturein
Fahrenheit(°F),but youmay changethis to
display the temperaturein Celsius(°C).
Tochange the temperature display between
Fahrenheit or Celsius:
[] Select SETTINGSand then select
MORE.
[]
Select TEMP°Fto display the
temperature in Fahrenheit (°F).
Select TEMP°C to display the
temperature in Celsius (°C).
] _Mter settim* this option, select
HOME.
Tone Volume
Thisfeatureallows youto adjust the tone
volumesto amoreacceptablelevel Thereare
threepossible volumelevels.
Tochange the volume level:
[_q Select SETTINGSand then select
MORE twice.
F2] Select BEEPVOLUME Each time the
_olume level is chart ,ed the tone
you hear is an audible indication of
the volume level. Select 2 BEEP tbr
the middle volume level. Select
3 BEEP tier the loudest volume level.
Select I BEEPtor the quietest
volume level.
[] _dter choosing the desired sound
le'_el ( 1BEER 2 BEEPor 3 BEEP),
select HOME.
38
Adjustthe oventemperature--Do it yourself! .CEApp,ia.ces.com
Youmay find that your new oven cooks differently than the one it replaced. Use your new oven for a few weeks
to become more familiar with it. If you still think your new oven is too hot or too cold, you can adjust the
temperature yourself.
Donot use thermometers, such as those found in grocery stores, to check the temperature setting of your oven.
These thermometers may vary20-40 degrees.
NOTE: This adjustment will only affect baking and roasting temperatures; it does not affect broiling, convection,
speedcooking or self-cleaning temperatures. The adjustment will be retained in memory after apower failure.
To Adjust the Temperature
[] Select SETTINGS,then MORE,then
MORE,then -+temp.
The current temperature
ac!iustment will appear in tile time
and teml)eramre display.
[] Select INCREASE (cook hotter) or
DECREASE (cook cooler) to change
cooking tell/perattlre ac!itlS[lllent
in 1° increments. Continue tmfil
desired number is displayed.
[]
Tile o,,en temperatm'e can be
a(!justed up to (+) 35°F hotter or
(-) 35°F coole_:
X._hen you haxe made tile
a(!iustment, select HOMEtogo back
to tile main displa); Use your oxen
aS VOII would nora]ally:
Thetype ofmargarine will affectbakingperformance!
Most recipes for baking have been developed using high-fat products such as butter or margarine (80% fat). If you
decrease the fat, the recipe may not give the same results as with a higher-fat product.
Recipe failure can result if cakes, pies, pastries, cookies or candies are made with Iow-fat spreads. Thelower the fat
content of a spread product, the more noticeable these differences become.
Federal st;mdards require products labeled "margarine" to contain at least 80% tilt by weight, i,ow-fllt spreads, on tile
other hand, contain less tilt and mine water: Tile high-moistm'e content ot these spreads affect tile textm'e and flavor
of baked goods. For best results with umr old tm'orite recipes, use mmgmine, butter or stick spreads containing at least
70% vegetable oil.
39
Usingthe SabbathFeature.(Desig,edforuseon theJewish SabbathandHolidays.)
TheSabbathfeaturecan be usedfor baking/roastingonly.It cannotbe usedfor Convection,Broil,Speedcook,Defrost,Proof,
Dehydrate,Warm,Warmer,Self-Cleanor DelayBakecooking.
NOTE"
Theovenlightis automaticallylockedout bythecontrol whileusingtheSabbathfeature.Thelight cannotbe turnedon or off
bytheovenlightkeypador byopeningor closingthedoor ff theovenlightis on,it will remainonand iftheovenlightisoff,it
willremainoffwhile theSabbathfeatureis beingused.
If thereis aloss ofpower while usingtheSabbathfeature,theovenwill return totheSabbathfeature whenpower returns,
buttheBakesettingswill need tobe reentered.
TheCLEAR/OFFpad still works duringtheSabbathfeature and will clearanyactive BAKEsettings.
TheGlassTouchnumberpadssurfaceissolidand will notdepress whenpushed.Tomakesurethat any commandentered
while usingSabbathregistersforthe GlassTouch,ensurethat the entirepad ofyour fingerissquarelyoverthe keypadfortwo
seconds.Make surenot tooverlapanotherpad while touching thedesiredpad--be especiallycareful aroundthe CLEAR/OFF
pad sothat theprogrammedcookingmodeis notexited accidentally.
How to Set for Sabbath Feature in Baking/Roasting
Makesurethatthedockshowsthecorrecttimeofday Controlscreen
[]
[]
[]
Select BAKE.Enter the desired
temperature usino,_ the number pads and
STARTthe o'_en.
Select HOME, then FEATURESthen MORE.
Select SABBATH. No audible signal
will be gixen and the temperatm'e
will disappear fl'om the time and
temperature display. The element and
oven icons will remain displayed u_
indicate that the oven is on.
*Sabbath*
Back
Start
NOTE: Selecting BAKE,entering a
temperature and pressing STARTwill
clear any prc,grammed Timed Bake
and start the new settings.
4O
How to Set for Sabbath Feature in TimedBaking/Roasting--Immediate Start
and Automatic Stop
Make surethat the clockshows the correct t/meof day
[] Select BAKE.
[] Using the nmnber pads, enter the desired
temperatm'e between ] 70°F and 550°F. No
audible signals will be given and no
temperature will be displayed.
Select OPTIONS.
[]
[]
Select TIMEDBAKE. Enter the desired
cooking time using the nmnber pads. Note
that the cooking time will not start to cotmt
down tmtil after preheat is complete.
[]
[]
[]
[]
Select ENTER. This tells the oven that you
haxe finished setting it.
Select START.
Select HOME, then FEATURESthen MORE.
Select SABBATH. No audible signal Mll be
given and the temperature will disappear
ti'om the time and temperatm'e display.
The element and oven icons will remain
displayed to indicate that the oven is on
and the cooking time will remain displayed.
Controlscreen
)ath*
Back
Start
NOTEJThe temperature can not
be changed during a Timed Bake.
Selecting BAKE, entering a
temperatm'e, and pressing
STARTwiII clear any programmed
Timed Bake and start the new
settings.
\._]_en cooking is finished, 0_R:00will
appear in the time and temperatm'e
display: Then the _:00along with
the element and oven icons will ttlrn
off, indicating that the oven has
turned OFF.The control remains
in the Sabbath teatm'e.
wvvw.GEAppliances.com
Once in Sabbath Feature... How to Set for Baking/Roasting or
Adjust Baking Temperature
[] Select BAKE. No audible signal will
be gi', en.
[] Using tile ntlIl/beI" pads, enter tll(e .
desired temperature between 1/ ) F
and 550°E No audible signals will be
given and no temperature will be
displayed.
[] Select START. No audible signal will
be gixen.
NOTE:
Whensettingtheovenforbaking/roasting,
theelementandovenicons will light after
a randomdelayperiod ofapproximately30
secondsto 1minuteto indicatethat the
ovenis baking/reasting.If the elementand
ovenicons do notappearin the timeand
temperaturedisplay,start againat step 1.
Thecontrol did notrecognizethe
temperatureenteredasa valid
temperature.
Whenadjustingthetemperaturesetting
ofthe oven,the elementandovenicons
remainlit to indicatethat the ovenis still
on.If theelementand ovenicons turn off,
startagainat step 1.Thecentre/did not
recognizethe temperatureenteredas a
validtemperature.
TheGlassTouchnumberpadssurfaceis
solidand willnot depress whenpushed.
Tomakesure thatany commandentered
while usingSabbathregistersfor the
GlassTouch,ensurethatthe entirepad of
yourfingerissquarely overthe keypadfor
two seconds.Make surenotto overlap
anotherpad while touchingthedesired
pad--be especiallycareful aroundthe
CLEAB/OFFpad sothat theprogrammed
cookingmodeisnot exitedaccidentally.
How to Exit the Sabbath Feature
[] Touch tile CLEAR/OFFpadto make
sure that tile oxen is turned OFF. No
mMible signal will be given.
[] HoM tile BACKke)for 3 seconds. No
audible signal will be gixen. This will
take tile oven control out _ff tile
Sabbath teature. The control will
return m tile Features menu where
SABBATHwas originally selected.
Select HOME to return to tile inain
menu on tile control display.
41
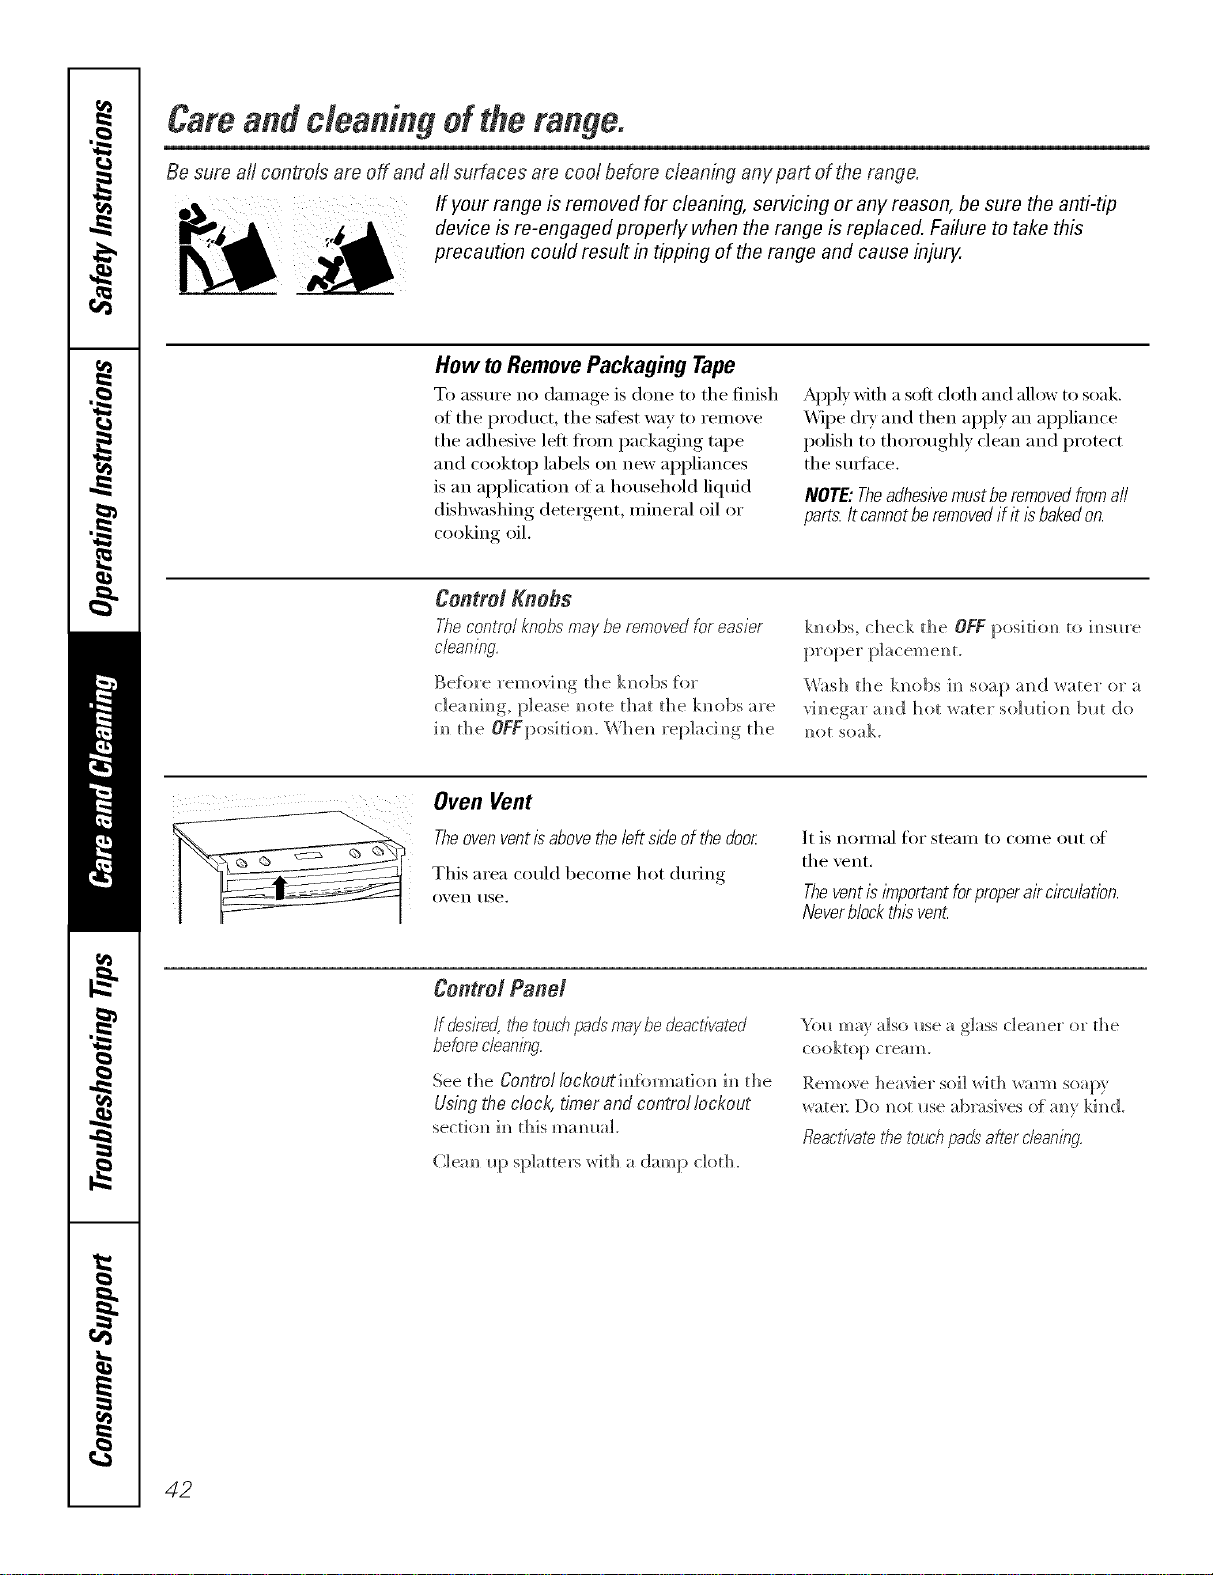
Careandcleaningoftherange,
Be sure aft controls are off and aft surfaces are cool before cleaning any part of the range.
If your range b removed for cleaning, servicbg or any reason, be sure the anti-tip
device b re-engaged properly when the range b replaced. Failure to take this
precaution could result b tippbg of the range and cause injury.
How toRemovePackaging Tape
To assure no clmnage is done to tile finish
of the product, the safest way to rein eve
tile adhesive left fi'om packaging tape
and cooktop labels on new appliances
is an application (ff a household liquid
dishwashing detergent, mineral oil or
cooking oil.
Apply wifl/a soft doth and allow to soak.
Wipe (hT and then apply an appliance
polish to thoroughly clean and protect
tile smthce.
NOTE: Theadhesivemust be removedfromall
parts. Itcannot be removedif it is bakedon.
Control Knobs
Thecontrol knobs may be removed for easier
cleaning.
Be[ore removim_g the k]_obs [or
c]eam_im_g, please m>te that the km_bs are
im_the OFypositiom _'Vhe_ rel)]acim_g_ the
km>bs, check d_e OFF posidom_ to im_sm'e
Wash d_e km>bs im_soap a]_d water or a
vim?egar a[id hot water s(>]10ti(m blot do
re?o[ soak.
Oven Vent
Theoven ventis abovethe left sideof the door
This area could become hot dining
o_, eIl rise.
It is IlOII//al for stealll to COllie ()/It of
tile vent.
Theventis important for properair circulation.
Neverblock this vent
Control Pand
/f desire_ the touchpads maybe deactivated
before cbanl)_g.
See the Control Iockout infbrmado_ i_l die
Using the clock, timer and control lockout
sec[]oH im_ Ibis m_H_ll;tL
}%11 may also ilse a glass cleanser o1" t]_e
cookto[) cream.
Remo_e heavier soil _ith _arm soapy
water: Do _ot _*se ab_wsives of a_v Idled.
fleacfivate the touch pads"after clean/bg.
42
www.GEAppliances.com
Do not rub or clean the door gasket--
it has an extremely low resistance to
abrasion.
If you notice the gasket becoming worn,
frayed or damaged in any way or if it
has become displaced on the door,
you should have it replaced.
Cleaning the Oven Door
Toclean the inside ofthe door:
Because tile area inside tile gasket is
cleaned during tile sel6clean cycle,
you do not need to clean this bv hand.
Tile area outside tile gasket and
tile door liner can be cleaned Mth a
soap-filled steel _mol or plastic pad,
hot water and detergent. Rinse well
with a vinegar and water solution.
Toclean the outsideof the door:
Use soap and water to thoroughly
clean the top, sides and front of the
oven dora: Pdnse well. You may also
use a glass cleaner to clean the glass
on tile outside of tile dora: Do not let
water drip into tile vent openings.
If any stain on tile door vent trim is
i)e_istent, use a soft abrasive cleaner
and a sponge-scrubber tot best results.
Spillage of marinades, fl'uitj uices,
tomato sauces and basting materials
containing acids may cause
discoloration and should be wiped
up immediately: When surtiace is
cool_ cle}lIl }lIl(l Finse,
Do not use oven cleane_, cleaning
i)owde_ or hm_h abrasives on the
outside of tile (lore:
X,_q/en cleaning surfi_ces ot door and
oven that come together on closing
tile (lore; use only mild, non-abrasive
soaps or (lete_gents applied with a
sponge or soft cloth.
43
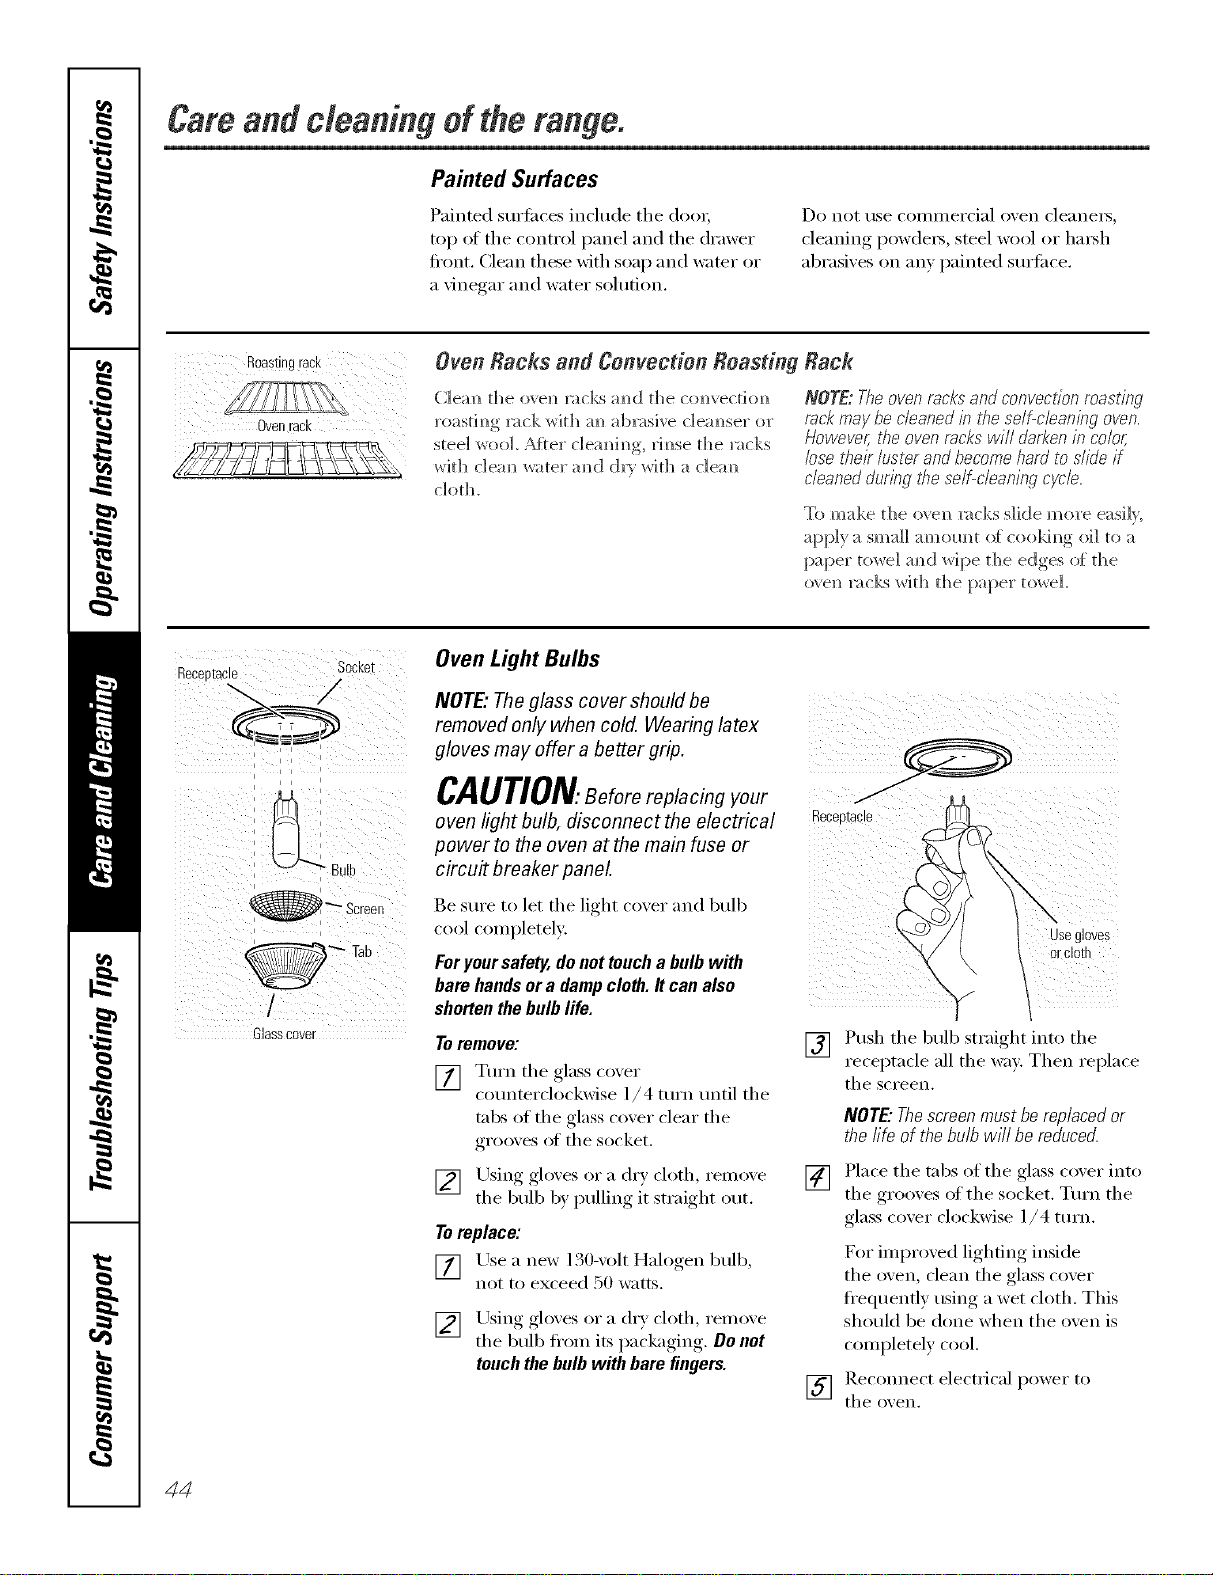
Careandcleaningoftherange.
Painted Surfaces
Painted surfi_ces include tile doo_;
top at tile control panel and tile drawer
fi'ont. Clean thee with soap and water or
a \'inegar and water solution.
Do not use COil/illeFcial o_en cleanei_,
cleaning powde_, steel wool or l/m_h
abrasixes on an) painted sm'ti_ce.
Ovenrack
Oven Racks and Convection Boasting
roastim_g rack with m_ abx:_sive c]em_ser or
steel wool After c]eaMm_g, rim_se the ntcks
with c]em_ _ater amid (]_'}r _%rHt]_:_ c]em_
cloth.
Rack
NOTE:Theovenrocksandconvectionmasting
m& maybe cleanedb these/f-cbanbg oven.
However,theovenrackswill darkenb colo_
losethek lusterandbecomehardtoslideif
cleanedduringbe self-cleaningcycM
To make the o',e]_ rocks slide more easi]},
apply a small amomlt o{ cookim_g oil to a
[)aper roD, re] am)d _]pe t]_e edges of d_e
o_ el_ x:_cks Wi[h the paper towel
Receptade
: ,-, :
i i i
i
i i i
__l
_ Screen
i i
/
Glasscover
Oven Light Bulbs
NOTE,"Theglass cover should be
removed only when cold. Wearing latex
gloves may offer a better grip.
CAUTION.Beforereplacing your
oven light bulb, disconnect the electrical
power to the oven at the main fuse or
circuit breaker panel
Recel_tacle
Be sm'e to let tile light coxer and bulb
cool completely:
Foryour safety, do not toucha bulb with
bare handsera damp cloth. It can also
shorten the bulb life.
Toremove'.
[] Turn tile glass co',er
counterclockwise ]/4 turn tmtil tile
tabs of the glass cover clear the
grooves at the socket.
[] Using gloves or a dr) cloth, relnoxe
tile bulb by pulling it straight out.
Toreplace:
[] Use a new 130-volt Halogen bulb,
not to exceed 50 watts.
[] Using., _*loxes,or a dry cloth relnoxe
tile bulb fl'om its packaging. De net
touch the bulb with bare fingers.
Jse gloves
orclog
[]
"1 1
Push the bulb straight into the
receptacle all the wa_: Then replace
tile screen.
NOTE"Thescreenmustbereplacedor
thefife ofthebulbwi// bereduced.
[] Place tile tabs of tile glass coxer into
tile grooxes of tile socket. Turn tile
glass cover clockwise 1/4 turn.
For improved lighting inside
the oven, clean the glass cover
fl'equenfly using a wet cloth. This
should be done when tile oven is
completely cool.
[] Rec(mnect electrical power to
tile oxen.
44
www.GEAppliances.com
Stainless Steel Surfaces
Do not use a steel-wool pad; it will
scratch the surface.
[]
[]
E) ( ) •Shake CEIL_dMA BRYTE b tile well.
Place a small an]omit of CEIL_MA
BRYTE _"St;finless Steel _ ) )liance
........ II
Cleaner on a dampcloth or damp
paper t{}wel.
[] Clean a small area (ai)proximately
8" x 8"), robbing _ath the g_am of
the stainless steel if applicable.
[] D_T and buffwith a clean, {h T paper
towel or soft cloth.
] ReI)e_lt _{s ne{'ess_li'vk
NOTE."It a mineral oil-based stainless steel
ai)plian{e cleaner has been used betore
to dean the appliance, wash the suda{'e
with dishwashing liquid and water prior
to using the CEI,L_/IA BRYTE <')Stainless
Steel Appliance (_leanei 2>dtei" washing
the sire'ace with dishwashing liquid
and watei; tlse a generotls ali/Otlnt of
CER>dMA BRYTE <')Stainless Steel
Appliance Cleaner to clean the
appliance.
To Order'.
To order CERAMA BRYTE <':Stainless
Steel Api)lian{e Cleaner, please call
our toll-fi'ee nmnber:
National Parts Center 800.626.2002
www.GEAppliances.com
CERAMABRYTE®
StainlessSteelAppliance
Cleaner .................... #PM70)(377
Donot store a soiled broiler pan
andgrid anywhere in the range.
Broiler Pan & Grid
Do not dean the broiler panorgrid in a
self-cleaningoven.
Atter broiling, remove the broiler pan
fl'om the oven. Remove the grid fl'om the
pan. Carefully i)om" out the grease fl'om
the pan into a i)roper containe_;
Washandrlnse the bro//erpanandgrld /nhot
water with asoap-tiffed orplastic scounw pad
If fl}od has burned on, sprinkle the grid
with detergent while hot and cover with
wet paper towels or a dishcloth, Soaking
the pan will remove burned-on fi)ods,
Boththe broilerpan andgrid may becleaned with
acommercialovencleaner
Both the broiler pan and grid can also be
{'leaned in a dishwasher.
I Step guide
Storage Drawer Removal
To remove the drawer:
[] Pull the drawer out tmfil it stops.
[] I,ifl the fl'ont of the drawer tmfil the
stops clear the guides.
[] Remoxe the {h'awe_;
Toreplace the drawer:
[] Place the drawer rails on the guides.
[] Push the drawer back tmfil it stops.
[] i,ift the fl'ont of the drawer and
push back ]mill the stops clear the
guides.
[] I,ower the fl'ont of the drawer and
push back tmfil it ch)ses.
Oven Heating Elements
Do not {lean the broil element. Am' soil
will bm'n off when the element is heated.
To clean the area below the bake
element, gently lilt the element and clean
with wam_, soapy water:
45
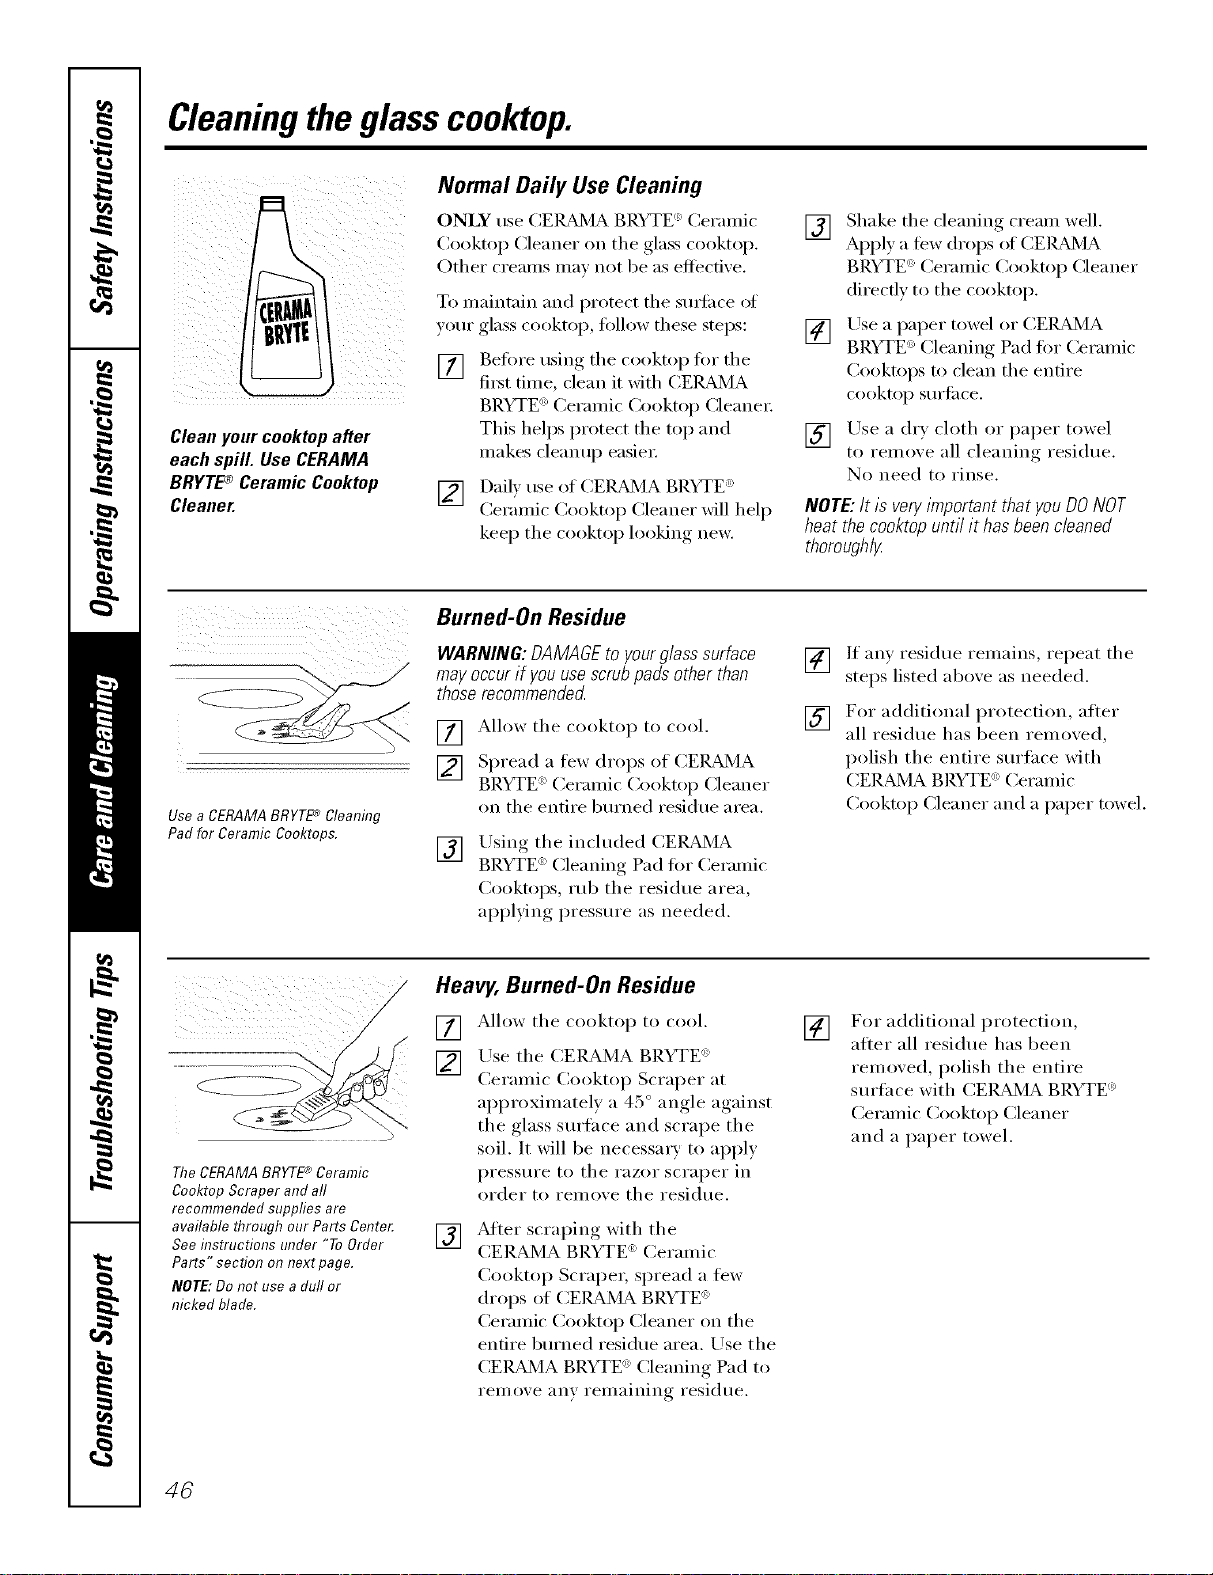
Cleaningtheglasscooktop.
Cleanyourcooktopafter
each spill. UseCERAMA
BRYTE®CeramicCooktep
Cleaner.
Normal Daily Use Cleaning
ONLY use CEIL&MA BRYTE _'Ceranfic
Cooktop Cleaner on the glass cooktop.
Other creams ma_ not be as eflecfixe.
To maintain and protect the smti_ce ot
yore" glass cooktop, fl)llow these steps:
[] Before using the cooktop fi)r the
fi_t time, clean it with CEI,L_dVIA
BRYTE ('_Ceramic Cookto I) Cleane_:
This helps protect the top and
makes cleanup easier.
[] Dail) use of CEILBd_4ABRYTE '>
Ceramic Cookto I) Cleaner will hel I)
kee I) the cooktop looking new.
[] Shake the cleaning cream well.
Apply a tew drops of CEIL_dMA
BRYTE (':Ceramic Cooktop Cleaner
directly to the cooktop.
[] Use a paper towel or CEIL_4A
BP.YTE _)Cleaning Pad fi)r Ceramic
Cooktoi)s to clean the entire
cooktop SllI'J[ilce.
[] Use a dry cloth or paper towel
to remove all cleaning residue.
No need to rinse.
NOTE: It is very important that you DO NOT
heat the cooktop until it has been cleaned
thorough/_
ii( 2( (
UseaCERAMABRYT£_Cleaning
PadforCeramicCooktops.
Burned-On Residue
WARNING:DAMAGEto yourglasssurface
mayoccurif youusescrubpadsotherthan
thoserecommende_
[] Allow the c{}{}kto I) to cool.
[] Spread a few {h'oi)s of CEIL_MA
BRYTE '>Ceramic (;ookto I) Cleaner
on the entire bm'ned residue area.
[]
Using the included CEK_d'4A
BRYTE _>Cleaning Pad fi}r Ceramic
Co{}ktops, rub the residue area,
applying pressm'e as needed.
[]
[]
If any residue remains, repeat the
steps listed above as needed.
For additional protection, alter
all residue has been remoxed,
polish the entire sm'lace with
CER?dMA BRYTE ': Ceramic
Cooktop Cleaner and a paper towel.
TheCERAMA BRYTE*_Ceramic
Cooktop Scraper and all
recommended supplies are
available through our Parts Cente_
See flTstructions under "ToOrder
Parts" section on next page.
NOTE:Do not use a dull or
nicked blade.
Heavy, Burned-On Residue
[] Allow the {'ooktop to cool.
[] Use the CERAMA BP.YTE (_>
Ceramic (_ooktop Scraper at
approximately a 45 ° angle against
the glass sm'lace and scrape the
soil. It will be necessary to apply
pI'eSStlI'e to the I'_lZOI" scraper in
order t{}remove the residue.
[]
After scrai)ing, with the
CERAMA BRYTE <_>Ceramic
Cookto I) Scraper, spread a few
drops of CEIL&_MABP.YTE :
Ceramic Cooktop Cleaner on the
entire burned residue area. Use the
CEI{Bd_<]ABRYTE (':Cleaning Pad to
remove any remaining residue.
[]
For additional protection,
after all residue has been
removed, polish the entire
surfi_ce with CEleStA BRYTE '_
Ceramic Cooktop Cleaner
and a paper towel.
46
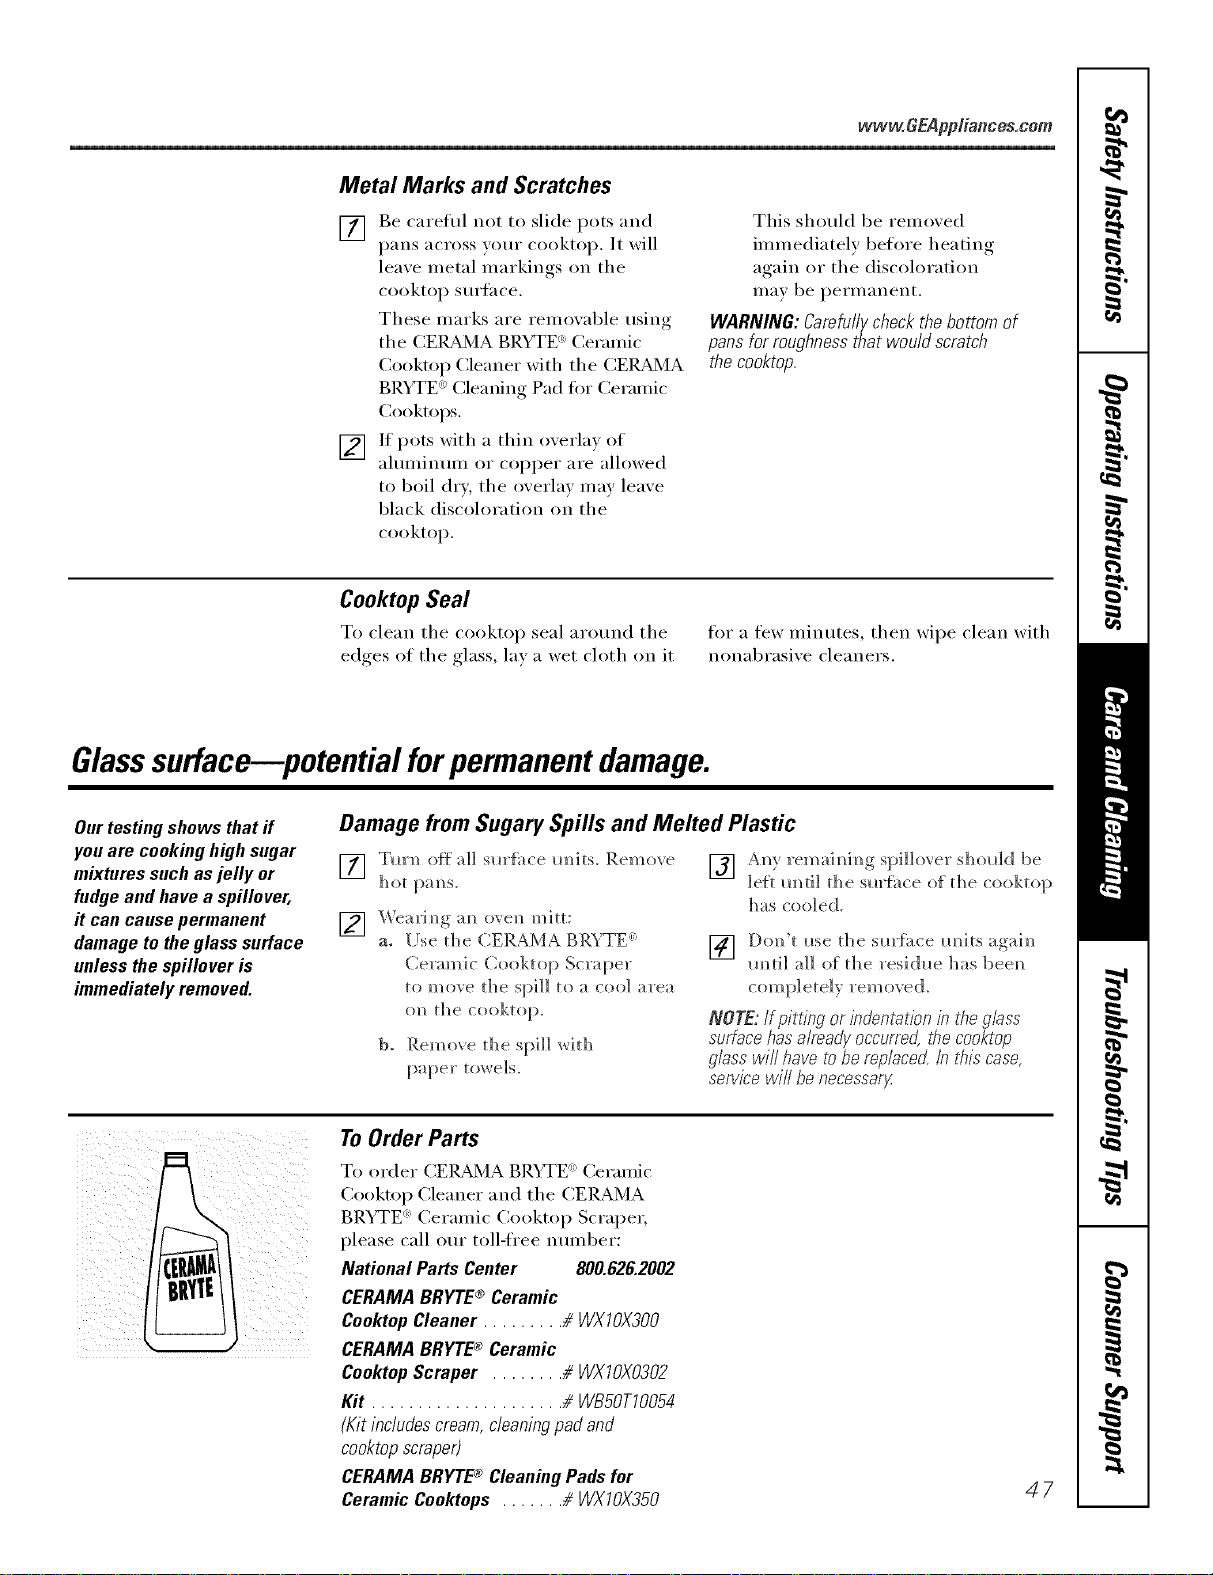
www, OEAppliances,com
Metal Marks and Scratches
[] Be careflll not to slide pots and
pans across your cooktop. It will
leave metal markings on the
cooktop surtace.
These marks are remowd)le using
the CEI_dVIA BRYTE ':Ceramic
Cooktop Cleaner with the CEI_dVIA
BRYTE '_Cleaning Pad fin" Ceramic
Cooktops.
[] If pots with a thin merla) of
aluminum or COl)per are allowed
to boil dry, tile overlay may leave
black discoloration on the
cooktop.
This shouhl be removed
immediately before heating
again or the discoloration
may be l)ei'i//ailei]t.
WARNING: Carefully check the bottom of
pans for roughness that would scratch
the cooktop.
Cooktop Seal
To clean tile ('ooktop seal around tile fin" a few minutes, then wipe clean with
edges of tile glass, lay a wet cloth on it nonabrasixe cleaners.
Glasssurface--potential forpermanent damage.
Our testing shows that ff
you are cooking high sugar
mixtures such as jelly or
fudge and have a spillover,
it can cause permanent
damage to the glass surface
unless the spillover is
immediately removed.
Damage from Sugary Spills and Melted Plastic
[] Tm'l_ off a]] sm'fhce m/its. Remove
h at pa _/s.
] _'earim/g am/ eve]/ mitt:
a. Use the CERAMA BR\TE-
Ceramic Cooktop Scraper
to move the spill to a coo] area
(m tile cooktop.
b. Remove the spill _dth
• , • _ } ....
[] _,m' remaim/im/g s _i]]over should be
]eit m/ti] the sm'fhce of the _ooku_p
has cooled.
] D(m't me the sin'[ace m/its agaim/
m/ti] a]] of the residue has beem/
completely removed.
NOTE: if pitting or indentation in t¢_eglass
surface has already'occurred, tf_ecooktop
glass will have to he rep/ace_ b his case,
service win he necess'ary
To Order Parts
To order (;El_d'dA BRYTE': Ceramic
Cooktop Cleaner and tile (_ERAMA
BRYTE ': Ceramic Cooktop Scrape_;
please call ore" toll-free I]UI]]ber:
National Parts Center 800.626.2002
CERAMA BRYTE® Ceramic
Cooktop Cleaner ......... # H/XTOX300
CERAMA BRYTE® Ceramic
Cooktop Scraper ........ # WXTOX0302
Kit ..................... # WB50TTO054
(Kit includes cream, cleaning pad and
cooktop scraper)
CERAMA BRYTE® Cleaning Pads for
Ceramic Cooktops ....... # WXTOX350
47

Beforeyoucarl forservice..°
Troubleshooting -tips
Save time and money/. Review the charts on the following
pages first and you may not need to call for service.
Possible Causes What ToDo
Surface unitswill not
maintaina rollingboil
orcookingis not
fast enough
hnproper cookware
being used.
• Use pans which are fiat and match the diameter of
the surihce unit selected.
Surface units do A fuse b_ your home may be • Rei)lace the fllse or reset the circuit breaker.
not workproperly blown or the circuit breaker
tripped.
Cooktop controls • Check to see the correct control is set for the surthce
improperly set. trait you are usin,
Scratches(mayappear
as cracks)oncooktop
glasssurface
Incorrect demlhag
methods being used.
Cookware with rough bottoms
being used or coarse partides
(salt or sand) were between
the cookwaace mid the surface
of the cooktop.
Cookware has been slid
• Scratches are not remowd)le. Tiny scratches will become
less visible in time as a result ot cleaning.
• To avoid scratches, use the recommellded cleaning
procedures. Make sure bottoms ot cookware are clean
befi)re tlse, and tlse cookware with smooth bottoms.
across the cooktop surface.
Areas of discoloration Food spillovers not cleaned • See the Cleaning the glass cooktop section.
ou the cookto p before next use.
Hot surface on a model • This is normal. The stu't,_ce may, appear discolored
with a fight-colored cooktop, when it is hot. This is temporar) and will disappear
as the glass cools.
Plastic meltedto Hot cooktop came into • See the Glasssurface--potential for permanent damage
contact with plastic placed section in the Cleaning the glass cooktop section.
on the hot cooktop.
Pitting (or indentation) Hot sugar mixture spilled • Call a qualified technician for replacement.
of the €ooktop on the cooktop.
Frequent cycling hnproper cookware • Use onlx flat cookware to minimize cxclin,
offandonof behag used.
surface units
Oven light does Light bulb is loose or defective. • Tighten or replace the bulb.
network Switch operating • Call for serxice.
light is broken.
Oven willnot work Plug on rm_ge is not completely • Make sure electrical l)lug, is l)lugged,, into a live, properly
hlserted h_ the electricaJ outlet, grounded outlet.
A fuse in your home • ]_epla(e the fuse or reset the circuit breakeL
may be blown or the circuit
breaker tripped.
Oven controls improperly set. • See the Using the oven section.
48
www.GEAppl_nce_com
i Possible Causes What ToDo
Fooddoesnot Oven controls * See Usingthe TrivectionTM Ovense('ti()n.
speed hake properly hnproperly set.
Rack position is incorrect * See Usingthe TrivectionTM Oven section.
or the rack is not level.
Incorrect use of cookware * See Usingthe Trivection '_ Oven section.
mad/or almnhamn foil.
Cookware of hnproper size
being used.
Door not closed. * Close d()()r c()mpletelv.
Very delicate item. * Use tradifi,mal bake.
Food not to desired * Cook times will \'arv due to recipe and pan variati,ms.
doneness. Check food when l)rompted and add additional time
with More Time if needed.
Sauce on food gets too brmm. • Apply sauce later in c,>,>!dng cycle.
Meat cooked too long. * Reillove tl'Olll oven s,)oner and allow to stand. Meat
telHlaerattu_e will c, mfinue t,) lJSe.
Put food in too early. • Place food in the ,wen once the oven is l)rcheated :rod
the display shows. "PUT FOOD IN OVEN."
Temperature Don't use a meat * Take the temperature of the meat after removing it
reading on meat thermometer ha oven while fi'om the oven.
thermometer seems speedcooking.
inaccurate
Food does not Oven controls • See Usingthe Trivection _ Oven secti,m.
speed broilproperly improperly set.
hnproper rack position • See the BroilingGuide.
being used.
Cookware not suited to broiling. • Use. the broiling, laan :rod .grid that came with v,)tu" ,wen.
Door not closed. • (71()se do()r c()mpletely.
Food overcooked. * ](eIU()ve froiu OVell s()oller alld allow t,) stand. Food
temperaturcs will c(mfinue t() rise.
Food madercooked. • Sl)eed broil for additional time using MoreTime.
Meat is too done ha center. • Use traditional broil fi)r very thin steals ,)r fi)r foods
where n l'_ll'e [,) lnediulH l';ll'e dollelleSS is desired.
Put food ha too early. • Place fi),)d in the ,wen ()nee the oven is l)rcheated :rod
the display shows. "PUT FOOD IN OVEN."
Cook time doesn't Oven controls hnproperly set. • See Usingthe Trivectiod_Oven secfi,m.
countdownwhile
speedcooking Door is not •Ch)se door (()mi_letelv.
closed completely.
STARTnot selected. • Prcss STARTonce fi)od is placed in the ,wen.
49

Beforeyoucall forservice...
Troubleshooting -tips
Possible Causes
Arcing between metal Improper spacing between
surfaces in oven while metaJ surfaces mid/or
speedcooking or aluminum foil.
defrosting
What ToDo
• See Usingthe TrivectionTM Ovensection.
Display shows Wiring from house to oven • Contact installer or qualified electrician to check
"Miswireddetected" is incorrect, house wilJu(r to mu re
Option not seen on the Option may be listed • Select MOREto see additional items.
display screen on the next screen.
Hot air from oven When using the cooking • This is normal.
features, hot air will exit
the oven through the vent
located above the door.
Fooddoes not bake or Oven controls improperly set. • See the Using traditionalbake and roast section.
roastproperlyin the Shelf position is incorrect • See the Using traditionalbake and roast section.
oven
or the shelf is not level.
Incorrect cookware or • See the Usingtraditionalbakeandroast section.
cookware of hnproper
size being used.
Oven temperature needs • See the Adjust the oventemperature Do it yourself[
adjustment, se(-tiou.
Fooddoesnotbroil Oven controls improperly set. • Make sure you select BROIL.
properly
Improper shelf position • See the Broiling Guide.
being used.
Cookware not suited • Use the broiling, l)nn mJd ,grid thnt crone with your oven.
for broiling.
Alumhlum foil used on the • See the Ush)g traditionalbakeandroast section.
broiling pan and grid has
not been fitted properly and
slit as recommended.
In some areas the power • Preheat the broil element fi)r 10 minutes.
(voltage) may be low. • Broil for the low_est_, period of time reconuneuded in
the Broiling Guide.
Clockandtimer The clock is in the • See the Settingsse('tiou ti)r the oveu clock.
donotworkor no clock mode.
displaygoesblank
Conlrols improperly set. • See the Using the clock and lower oven timer section.
A fuse ill your home may be • Replace the fl/se or reset the circuit brenker.
blown or the circuit breaker
tripped.
50
www.GEAppliances.com
i! ¢ iiiiiiii!! I
Oven
temperature too
hot or too cold
Possible Causes
Oven telnperature
needs adjustment.
What ToDo
• See tile Adjustthe oventemperature--Do it yourself!
se€tion,
Oven willnot work Oven controls improperly set. • See tile Using the oven sec'fiOll.
A fuse in your home may • Replace tile titse or l'eSet tile circuit bl'e;ikeF.
be blown or the circuit
breaker tripped.
Oven willnotself-clean The oven temperature is too • Allow the oveu 1o cool ;lud l'eset the coutYois,
high to set a self-cleml operation.
Oven controls improperly set. • See tile Usingthe self-cleaning oven section.
"Crackling" or This is the seined of the • This is norlual.
"popping" sound metal heating and cooling
in the oven during both the cooking and
clemfing functions.
Excessivesmoking Excessive soil. • Press tile CLEAR/OFFpad. Open tile windows to
in the oven during rid tile room of sm eke. X4'ait tmtil the _ (LOCK) light
a clean cycle goes off. \_'ipe up the excess soil and reset tile
cleau cycle.
Oven door will Oven too hot. • Allow the oveu to cool below locking telnperature.
not open after a
clean cycle
Oven not clean Oven controls improperly set. • See tile Using the self-cleaning oven section.
after a clean cycle
Oven was heavily soiled. • Clean up heavy spillo\ers beh)re starting the clean
cycle. Heavily soiled ovens may need to sell:clean
again or for a hmger period of time.
(LOCK)light is 0n The oven door is locked • Press the CLEAR/OFFpad. Allow the oven to cool.
when you want to cook because the temperature
in theoven inside the oven has not
dropped below the
locking temperature.
Displayshows"ERR" A temperature was • Set the temperature between 170°F-550°F.
set outside the allowable
range of 170°F-550°E
57
Beforeyoucall forservice...
Troubleshooting -tips
PossibleCa.se,
Ovenlight does Light bulb is loose or de fective.
not work
Pad operating light is broken.
What ToDe
• Tighten or replace the bulb.
• Call for ser',ice.
"F-- and a number or You have a function • Press the CLEAR/OFFpad. ,_dlow the oxen to cool fin" one
letter"flashin the error code. houi: Put the oxen back into operation.
oven display If the function code repeats. • Disconnect all power to the cookilw_ center for at
least 30 sec(mds and then reconnect power. If the
flmction error code repeats, call tot serxice.
Power outage, Power outage or surge. • Reset the clock. If the oxen was in rise xotl Illtlst reset
it by, I)ressing, the CLEAR/OFFpad,setting the clock
and resetting any cooking flmction.
Steam from the vent When using the convection • This is norn/al.
or speedcook feature, it is
normaltoseestea ncoming
out of the oven vent. As the
number of shelves or amount
of food being cooked increases,
the aanom_t of visible steam
will increase.
"Burning" or "oily" This is normal in a new oven • To speed the process, set a sell:clean cycle for a
odor emitting from and will disappear in time. miniumui of 3 hours. See the Using the self-cleaning
oven vent oven section.
Strong odor An odor from the insulation • This is temporary.
in the oven around the inside of the
oven is normal for the first
few times the oven is used.
Fan noise when using A cooling fan or a convection • This is normal. The cooling fan will turn on
the oven fan (depending on the function to cool internal parts. /t may rtm for up to 1-1/2
you are using) may automatically hours alter the oven is ttu'ned off. The convection
turn on. tan will cycle on and ot1 until the tunction is over
or the door is opened.
Storagedrawer Rear drawer support is • Reposition the drawel: See the Storage Drawer
is crooked on top of the guide rail. Removal instructions in the Care and cleaning of your
range section.
Storage drawer Power cord may be • Reposition the drawer and power cord. See the
won't close obstructing drawer Storage Drawer Removal instructions in the Care and
in the lower back cleaning of your range section.
of the range.
Rear drawer support is • Reposition the drawel: See the Storage Drawer
on top of the guide rail. Removalinstructions in the Care and cleaning of
your range section.
52
GE Service Protection Plus '_'
GE, a imme ie(ogi_ized v,ovklwkle for qtmlky ai_d depei_dabi]liry, offers )(m
) ,i *
Service PFotectkm t h_s --compl ehe_sl_e pvotecdoi_ (m a_]l)ore appliai_ces--
No Matter What Brand!
Benefits include:
* Backed by GE
* All bra_ds covered
* Unlimited service calls
* All pa3"ts and labor costs included
* No out=of=pocket expenses
* No hidden deductibles
. One 800 number to call
We ?l Cover Any Appliance.
Anywhere, Anytime,
Yol_ wi]] be complete]) satisfied wit]] ore" sex'vice p_'otectiol_ o_" )(m ma) x'equest )ore" moire)back
om_ the l'emaim_im_g vah0e of )ore" colinact. No ql_estioi_s asked. It's that simple.
P_'otect yore" _'ef_'ige_ato_; dishwasher; washe_" a_ld <h'ye_; _'am_ge, TV, VCR amid milch moo'e--any brand!
P] us tb e_'e's m_o ext_'a ch a _'ge fl)_" em e _'ge_ cy s e_'vi ce a _ d ] o_ m ol_ th ]y fi _ a l_ci _ g is aw_i]ab] e. Ev el_ icem a ke_"
cove_'age a_d _bod spoilage p_'otecthm is o{te_'ed. _}m ca_ _'est eas}, km)_i_g that a]] yore" vab_ab]e
ho_seho]d p_'od_cts a_'e p_'otected agai_st expel_sive _'epai_'s.
k!l bvmds cov_)_d, up _o 20 _ a)'s old, in _h_ (ond_lemal _.S.
_Ctlt h_)_
Please place in envelope and mail to:
General Electric Company
Warranty Registration Department
P.O. Box 32150
Louisville, KY 40232-2150
53
Consumer Product Ownership Registration
Dear Customer:
Thank you for purchasing our product and thank you for placing your confidence in us.
We are proud to haxe you as a C/lStonler!
Follow these three steps to protect your new appliance investment:
Complete and mail
yoHr ConsiiHler
Product Ownership
Registration today.
ttavc the pe_lcc of
mind of knowing we
call contact you ill
tile unlikely _x<nt of a
safi'ly modification.
Atter lnailing the
registration below,
store this document
in a satk place. It
contains inlormation
you will need should
you require service.
Our service mmfl)er is
800.GE.CARES
(800.4!2,2.2737).
Read VOllF()wller's
Manual carefullv.
It will help vou
operate VOllr Ilew
appliance properlv.
Model Number Serial Number
I I I I I I
Important: If you did not get a registration card with your
product, detach and return the form below to
ensure that your product is registered, or register
online at www.GEAppliances.com.
,_m_ (_//I here
Consumer Product Ownership Reg
Model Number
Ms. M*>,. Mi_s
Fir'lI I L_Sll
Name I I I I I I I I I Name I I I I I I I I I I I I
_[r( (!1 I
A&hx ss I I I I I I I I I I I I I I I I I I I I I I I
, I
I
I
54
(;i,v I I I I I I I I I I I I I I I
ZipI
l )ue Pla_ ed
Nulnl)er I , i i i i i
.,,o.,,l II II
0
GEAppliances
GE Co_tsunler Products
General Electric Company
Louisville, Kent#cky
ww_GEAppli_Ge&conl
_'Please provide your e-mail address to receive, via e-mail, discounts, special o{tbrs and other important
conmmnications fi-om GE Appliances ((;EA).
Check here if vou do not want to receive communications t]-om (;EA's carefully selected partners.
FAILI RE TO (_OMt)LETE AN[) RETI RN "FillS CARD DOES NOT DIMINISII _,X)[7R
"_V.kR1L\NTY RIGI fFS.
For information about GEA's privacv and data usage policy, go to w_av.(;EAppliances.coln and click on
'Priva_ 3 Policy" or call 80(t.626.2924.
I
I

GESelf-CleaningOvenwith TrivectionTM Warranty.
Aft warranty service provided by our Factory Service Centers, or
an authorized Customer Care®technician. Toschedule service,
on-line, 24 hours a day, visit us at www.GEAppfiances.com, or
carl 800.GE.CARES (800.432.2737).
Staple your receipt here.
Proof of the original purchase
date is needed to obtain service
under the warranty.
GEWill Provide:
Fromthedateof the
originalpurchase
Any part ot the speedcook electric convection range which tifils due to a defect in materials
or workmanship, During this full one-year warranty, (;E will also provide, free of charge, all
labor and in-home service to replace the defective part,
Five Fears
Fromthedateof the
originalpurchase
A replacement glass cooktop if it should c_ack due to them/al shock, (liscohn; crack at the
rubber seal between the glass cooktop and the porcelain edge, or if the pattern weat5 off.
A replacement radiant surface unit if it should burn out.
During this limited additional four-year warranty, you will be responsible fin" any labor or
in-home service.
LimitedAdditional
Four-Year
Forthesecond through
the fifth yearfromdate
of theoriginalpurchase
A replacement magnetron tube if the magnetron tube fails because of a manuli_cturing del_'ct.
During this limited additional four-year warranty, you will be responsible for anv labor or
or in-home service.
Service trips to your home to teach you how to use
the product.
hnproper h_staJlation, delivery or maintenance.
Failure of the product if it is abused, misused,
or used for other thm_ the intended purpose or
used commerciaJly.
Dmnage to the glass cooktop caused hy use of clemmrs
other than the recommended clem_hlg cretans.
Dmnage to the glass cooktop caused by hardened
spills of sugaxy materials or melted plastic that
axe not clemmd according to the directions in
the Owner's MmmaJ.
Replacement of house fuses or resetting of circuit
breakers.
Damage to the product caused by accident, fire, floods
or acts of God.
h_ddentaJ or consequential damage caused by possible
defects with this appliance.
Damage caused after delivery.
This warranty is extended to the original purchaser and any succeeding owner for products purchased for
home use within the USA. In Alaska, the warranty excludes the cost of shipping or service calls to your home.
Some states do not aflow the exclusion or limitation of incidental or consequential damages. This warranty
gives you specific legal rights, and you may also have other rights which vary from state to state. Toknow
what your legal rights are, consult your local or state consumer affairs office or your state's Attorney General
Warrantor: General Electric Company.Louisville, lot"40225
55
ConsumerSupport.
GEAppliancesWebsite www.GEAppliances.com
Have a question or need assistance with your appliance? Try the GE Appliances X.Vebsite 24 hom_ a day,
any day of the year! For greater convenience and fi_ster service, you can now download Owner's Manuals,
order parts, catalogs, or even schedule se_Mce on-line. You can also "Ask Our Team of Experts ......
VO/IY questions, }lll(l SO I//rich II/ore...
ScheduleService www.GEAppliances.com
Expert (;E repair service is onl,_ one step away h'om )our (loox: Get on-line and schedule )our service at
your con',enience 24 hom_ any day of the xear! Or call 800.GE.(:ARES 800.432.2737) dining n(mnal
business hom_.
RealLifeDesignStudio www.GEAppliances.com
GE SUl)ports the Universal Design concept--products, services and environments that can be used by
people of all ages, sizes and capabilities. We recognize the need to design for a wide range of physical and
mental abilities and impaim_ents. For derails at GE's Universal Design applications, including kitchen
design ideas tot people with disabilities, check out our Website to(lax: For the hearing impaired, please call
800.TDD.GEAC (800.833.4322).
ExtendedWarranties www.GEAppliances.com
Purchase a GE extended warranty and learn about special discounts that are axailable while your warrant_
is still in effect. Y))u can purchase it on-line anytime, or call 800.626.2224 (huing natural business hou_.
(;E Consumer Home Se_Mces will still be there after your warrant}, expires.
PartsandAccessories www.GEAppliances.com
Individuals qualified to service their own al)plian('es can have parts or accessories sent directly to their
homes (VISA, MasterCard and Discover cards are accepted). Mso a\_filable is a VHS video tape on using
your oven with Tfivection TM technolog T. Order on-line tocla 5 24 hou_ ever)' day or by phone at 800.626.2002
during normal business hom_.
Instructions contained in thismanual cover procedures tobe performed by any user. Other servicing generally
should be referred to qualified service personnel. Cautionmust be exercised, since improper servicing may cause
unsafe operation.
Contact Us www.GEAppliances.com
If you are not satisfied with the se_Mce you receive ti'om (;E, contact us on our _4'ebsite with all the details
including your phone numbe_; or Wlite to: General Manage_; Customer ]),elations
GE Appliances, Appliance Park
I,ouisville, KY 40225
RegisterYourAppliance www.GEAppliances.com
Register your new applim_ce on-Ibm--at your convmfience! Timel) product registration will allow fin.
enhanced carom unication and prompt set\ice under the terms of your warrant}', should the need arise.
Y))u may also mail in the pre-pfinted registration, card included in the I)acking, material.
Printed in the United States

