Owner's Manual Television
Installation
Lifting and moving the TV
When moving or lifting the TV, read the following to prevent the TV from being scratched or damaged and for safe transportation regardless of its type and size.
- It is recommended to move the TV to the box or packing material that the TV originally came in.
- Before moving or lifting the TV, disconnect the power cord and all cables.
- When holding the TV, the screen should face away from you to avoid damage.
- Hold the top and bottom of the TV frame firmly. Make sure not to hold the transparent part, speaker, or speaker grille area.
- Use at least two people to move a large TV.
- When transporting the TV, do not expose the TV to jolts or excessive vibration.
- When transporting the TV, keep the TV upright; never turn the TV on its side or tilt it towards the left or right.
- When handling the TV, be careful not to damage the protruding buttons.
- Avoid touching the screen at all times, as this may result in damage to the screen.
- Do not place the product on the floor with its front facing down without padding. Failure to do so may result in damage to the screen.
- When attaching the stand to the TV set, place the screen facing down on a cushioned table or flat surface to protect the screen from scratches.
Mounting on the Table
1 Liftandtilt theTV intoitsuprightposition on atable.
- Leave a minimum of 10 cm (4 inches) of space from the wall for proper ventilation.
2 Connect the power cord to a wall outlet
- Do not apply foreign substances (oils, lubricants, etc.) to the screw parts when assembling the product. (Doing so may damage the product.)
- If you install the TV on a stand, you need to take action to prevent the product from overturning. Otherwise, the product may fall over, which may cause injury.
- Do not use any unapproved items to ensure the safety and lifespan of the product.
- Any damages or injuries by using unapproved items are not covered by the warranty.
- Make sure that the screws are fastened tightly. (If they are not fastened securely enough, the TV may tilt forward after being installed.)
- Do not fasten the screws with excessive force otherwise, they may strip and become loose.
Securing TV to the Wall
- Insert and tighten the eye bolts or TV brackets and bolts on the back of the TV.
- If there are bolts inserted at the eye-bolts position, remove the bolts first.
- Mount the wall brackets with the bolts to the wall. Match the location of the wall bracket and the eye bolts on the rear of the TV.
- Connect the eye bolts and wall brackets tightly with a sturdy rope or cable. Make sure to keep the rope parallel to the flat surface.
- Use a platform or cabinet that is strong and large enough to support the TV securely.
- Brackets, bolts, and ropes are optional. You can obtain additional accessories from your local dealer.
Mounting to the Wall
An optional wall mount can be used with your LG Television. Consult with your local dealer for a wall mount that supports the VESA standard used by your TV model. Carefully attach the wall mount bracket at the rear of the TV. Install the wall mount bracket on a solid wall perpendicular to the floor. If you are attaching the TV to other building materials, please contact qualified personnel to install the wall mount. Detailed instructions will be included with the wall mount. We recommend that you use an LG brand wall mount. The LG wall mount is easy to adjust or to connect the cables. When you do not use LG’s wall mount bracket, use a wall mount bracket where the device is adequately secured to the wall with enough space to allow connectivity to external devices. If you are using a non-adjustable mount, attach the mount to the wall. Attach the cables to the TV first, then attach the TV to the mount.
- Remove the stand before installing the TV on a wall mount by performing the stand attachment in reverse.
- For more information on screws and wall mount brackets, refer to the Separate Purchase.
- If you intend to mount the product to a wall, attach VESA standard mounting interface (optional parts) to the back of the product. When you install the set use the wall mounting bracket (optional parts) and fix it carefully so as not to drop.
- When mounting a TV on the wall, make sure not to install the TV by hanging the power and signal cables on the back of the TV.
- Do not install this product on a wall if it could be exposed to oil or oil mist. This may damage the product and cause it to fall.
- Please use the accessory cable holder when hanging on the wall. (Only OLED48/83C2*)
Antenna/Cable
Connect an antenna, cable, or cable box to watch TV while referring to the following. The illustrations may differ from the actual items and an RF cable is optional.
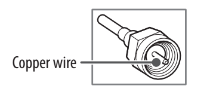
- Make sure not to bend the copper wire of the RF cable.
- Complete all connections between devices, and then connect the power cord to the power outlet to prevent damage to your TV.
- Use a signal splitter to use 2 TVs or more.
- DTV Audio Supported Codec: MPEG, Dolby Digital
- This TV cannot receive Ultra HD (3840 x 2160 pixels) broadcasts directly because the related standards have not been confirmed (Depending upon the country).
- Use the AV cover for aesthetic purposes. Connecting too many cables may cause lifting problems. In such a case, remove the AV cover before use.
Starting TV
Turning on the TV
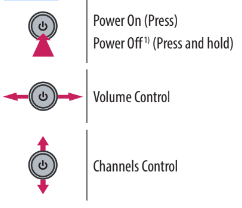
You can simply operate the TV functions, using the button.

- All running apps will close.
- You can access and adjust the menu by pressing the button when TV is on.
- You can use the function when you access the menu control.
- All running apps will close.
Note
- When the TV is turned on for the first time after being shipped from the factory, initialization of the TV may take approximately one minute...
Connections
You can connect various external devices to the TV. For more information on external device connection, refer to the manual provided with each device.
HDMI
- When connecting the HDMI cable, the product and external devices should be turned off and unplugged.
- Supported HDMI Audio format (Depending upon model): True HD (48 kHz), Dolby Digital / Dolby Digital Plus (32 kHz / 44.1 kHz / 48 kHz), PCM (32 kHz / 44.1 kHz / 48 kHz / 96 kHz / 192 kHz
Note
- If the device connected to Input Port also supports HDMI Deep Color, your picture may be clearer. However, if the device doesn’t support it, it may not work properly. In that case, change the TV’s [HDMI Deep Color] setting to off.
 →
→  → [General] → [Devices] → [HDMI Settings] → [HDMI Deep Color]
- Use a certified cable with the HDMI logo attached. If you do not use a certified HDMI cable, the screen may not display or a connection error may occur.
- Recommended HDMI cable types (3 m (9.84 feet) or less) - Ultra High-Speed HDMI®/TM cable
USB
Some USB Hubs may not work. If a USB device connected through a USB Hub is not detected, connect it directly to the USB port on the TV.
Note
- For an optimal connection, HDMI cables and USB devices should have bezels less than 10 mm (0.39 inches) thick and 18 mm (0.7 inches) wide.
- Use an extension cable that supports USB 2.0 if the USB cable or USB flash drive does not fit into your TV’s USB port.
IR Blaster
Control the set-top box (cable/satellite/IP/OTT), Blu-ray/DVD player, soundbar, game consoles, etc., using the IR Blaster. (Depending upon country) (Depending upon models)
- Connect the IR Blaster cable to the TV’s IR Blaster port.
- Use universal control settings to control the device.
- Secure the IR Blaster with the 3M tape provided
External Devices
Supported external devices are Blu-ray players, HD receivers, DVD players, VCRs, audio systems, USB storage devices, PC, gaming devices, and other external devices.
Note
- The external device connections shown may differ slightly from illustrations in a manual.
- In PC mode, there may be noise associated with the resolution, vertical pattern, contrast, or brightness. If noise is present, change the PC output to another resolution, change the refresh rate to another rate or adjust the brightness and contrast on the [Picture] menu until the picture is clear. Depending on the graphics card, some resolution settings may not allow the image to be positioned on the screen properly.
- When connecting to a wired LAN, use a CAT7 cable with high-speed Internet transmission.
- The TV may be capable of operating without a set-top box from a multichannel video programming distributor (MVPD).
Remote RS-232C setup
To obtain the RS-232C external control setup information, please visit www. lg.com. Download and read the manual, (Depending on the model).
- Do not drop the product or let it fall over when connecting external devices. Otherwise, this may result in injury or damage to the product.
- When connecting external devices such as video game consoles, make sure the connecting cables are long enough. Otherwise, the product may fall over, which may cause injury or damage to the product.
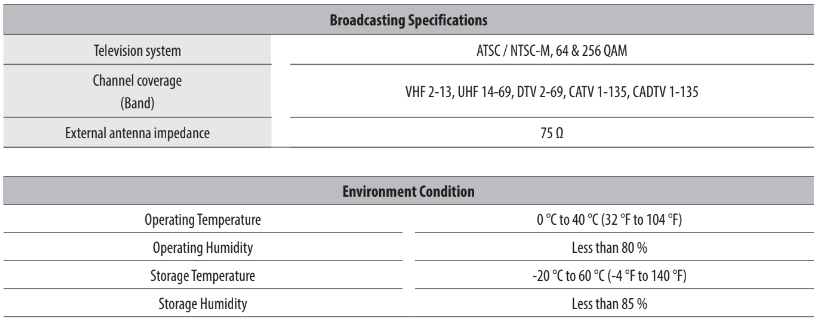
Specifications
Product specifications may be changed without prior notice due to upgrades of product functions. The estimated yearly energy consumption indicated on the FTC label is measured in accordance with the Test Procedures for Television Sets (USA only). The actual energy consumption depends on the usage environment (The content watched, TV settings, etc.).
- For information on the power supply and power consumption, refer to the label attached to the product.
- The typical power consumption is measured in accordance with IEC 62087 or each country’s energy regulations.
- On some models, the label is inside the external device connection terminal cover.
- Depending upon the model or country, the typical power consumption may not be on the label.
(Depending upon country)
Troubleshooting
Cannot control the TV with the remote control.
- Check if anything such as tape has been placed over the receiver.
- Check if there is any obstacle between the product and the remote control.
- Replace the batteries with new fresh ones.
No image display and no sound is produced.
- Check if the product is turned on.
- Check if the power cord is connected to a wall outlet.
- Check if there is a problem with the wall outlet by connecting other products.
The TV turns off suddenly.
- Check the power control settings. The power supply may be interrupted.
- Check if the auto-off function is activated in the settings menu.
- If there is no signal while the TV is on, the TV will turn off automatically after 15 minutes of inactivity.
Abnormal Display
- If the TV feels cold to the touch, there may be a small flicker when it is turned on. This is normal; there is nothing wrong with TV. Some minute dot defects may be visible on the screen, appearing as tiny red, green, or blue spots. However, they have no adverse effect on the TV’s performance. Avoid touching the screen or holding your finger(s) against it for long periods of time. Doing so may produce some temporary distortion effects on the screen.
- This panel is an advanced product that contains millions of pixels. In very few cases, you could see fine dots on the screen while you’re viewing the TV. Those dots are deactivated pixels and do not affect the performance and reliability of the TV.
Generated Sound
- Cracking noise A cracking noise that occurs when watching or turning off the TV is generated by plastic thermal contraction due to temperature and humidity. This noise is common for products where thermal deformation is required.
- Electrical circuit humming/panel buzzing A low-level noise is generated from a high-speed switching circuit, which supplies a large amount of current to operate a product. It varies depending on the product. This generated sound does not affect the performance and reliability of the product.
CAUTION:
- Make sure to wring any excess water or cleaner from the cloth.
- Do not spray water or cleaner directly onto the TV screen.
- Make sure to spray just enough water or cleaner onto a dry cloth to wipe the screen.
KEY CODES
Code 00
Code 01
Code 02
Code 03
Code 06
- > (Arrow Key / Right Key)
Code 07
Code 08
Code 09
Code 0B
Code 0E
Code 0F
Code 10 - 19
Code 1A
Code 1E
Code 20
Code 21
Code 28
Code 30
Code 39
Code 40
- Λ (Arrow Key / Cursor Up)
Code 41
- V (Arrow Key / Cursor Down)
Code 42
Code 43
Code 44
Code 45
Code 4C
Code 4D
Code 52
Code 53
Code 5B
Code 60
Code 61
Code 63
Code 71
Code 72
Code 79
Code 91
Code 9E
Code 7A
Code 7C
Code 7E
Code 8E
Code 8F
Code AA
Code AB
Code B0
Code B1
 (Stop / File List)
Code B5
Code BA
 (Freeze / Slow Play /Pause)
Code BB
Code BD
 (REC)
(REC)
Code DC
Code 99
Code 9F
Code 9B
* Keycode 4C (0x4C) is available on ATSC/ISDB models which use major/minor channels. (For South Korea, Japan, North America, and Latin America except Colombia models)