
AWD845W
OPERATION MANUAL
APPLIANCES
FOR LIVING

Congratulations, you are now the proud owner of an ARTUSI cooking appliance. Thank you for purchasing ARTUSI
and welcome to the ARTUSI Family.
This instruction manual has been specially created to inform you of the full range of features your ARTUSI appliance
has to offer and serves as an introduction to getting the very best out of your ARTUSI appliance.
We present detailed information on each of the features your ARTUSI appliance consists of. Once you have read
this section you will be able to choose the most appropriate settings for your appliance when cooking different
types of food.
We ask you to read the instructions in this booklet very carefully as this will allow you to get the best results from
using your appliance. KEEP THE DOCUMENTATION OF THIS PRODUCT FOR FUTURE REFERENCE.
TO REGISTER YOUR PRODUCT WITH ARTUSI, PLEASE FILL OUT THE WARRANTY CARD AT THE END OF
THIS BOOKLET AND POST IT TO: REPLY PAID 83617
LEICHHARDT NSW 2040
Dear Artusi Customer, please read this user manual carefully before using the product and, keep it permanently at
your disposal.
Note: This user manual is prepared for more than one model. Some of the features specified in this Manual may not
be available on your appliance.
All our appliances are only for domestic use, not for commercial use. Products marked with (*) are optional.
“THIS APPLIANCE SHALL BE INSTALLED IN ACCORDANCE WITH THE REGULA TIONS FORCE AND ONLY USED
IN A WELL VENTILATED SPACE. READ THE INSTRUCTIONS BEFORE INSTALLING OR USING THIS APPLIANCE”
“Conforms with the WEEE Regulations.”

EN
CONTENTS
• Correct use
• General warnings
• Safety warnings
- Burn risk
- Electrocution risk
- Flooding risk
- Explosion risk
- Fire risk
- Fall and injury risk
- Child safety
• Disposing of packaging and your old machine responsibly
• General Appearance
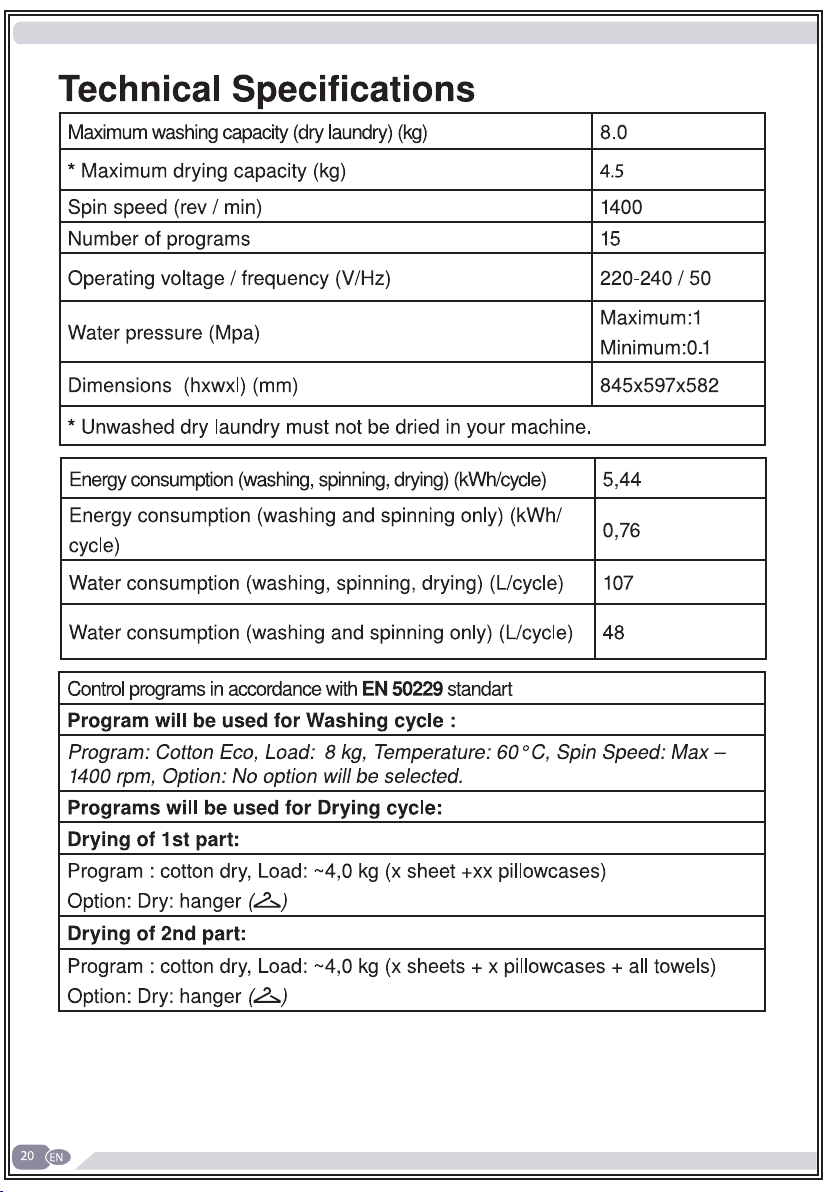
• Technical specifications
• Removing the transportation safety screws
• Placing the machine and adjusting the adjustable foot
• Electrical connection
• Water inlet connection
• Water draining connection
• Detergent drawer general view
BEFORE USING YOUR MACHINE
THE ENVIRONMENT
SAVINGS & EFFICIENCY INFORMATION
OVERVIEW OF YOUR DEVICE
SETTING UP THE MACHINE
CONTROL PANEL
5
5
6
9
9
10
10
12
12
14
15
16
17
18
20
21
23
25
26
27
29
28
21
18
16

EN
• Detergent drawer compartments 30
• Programme button 31
32
• Language selection setting 32
• Eco time settings 36
• Current time setting 38
•
Sound adjustment 40
• Screen brightness setting 41
• Screen contrast setting 41
• Revert to factory settings 42
43
• Sorting laundry 43
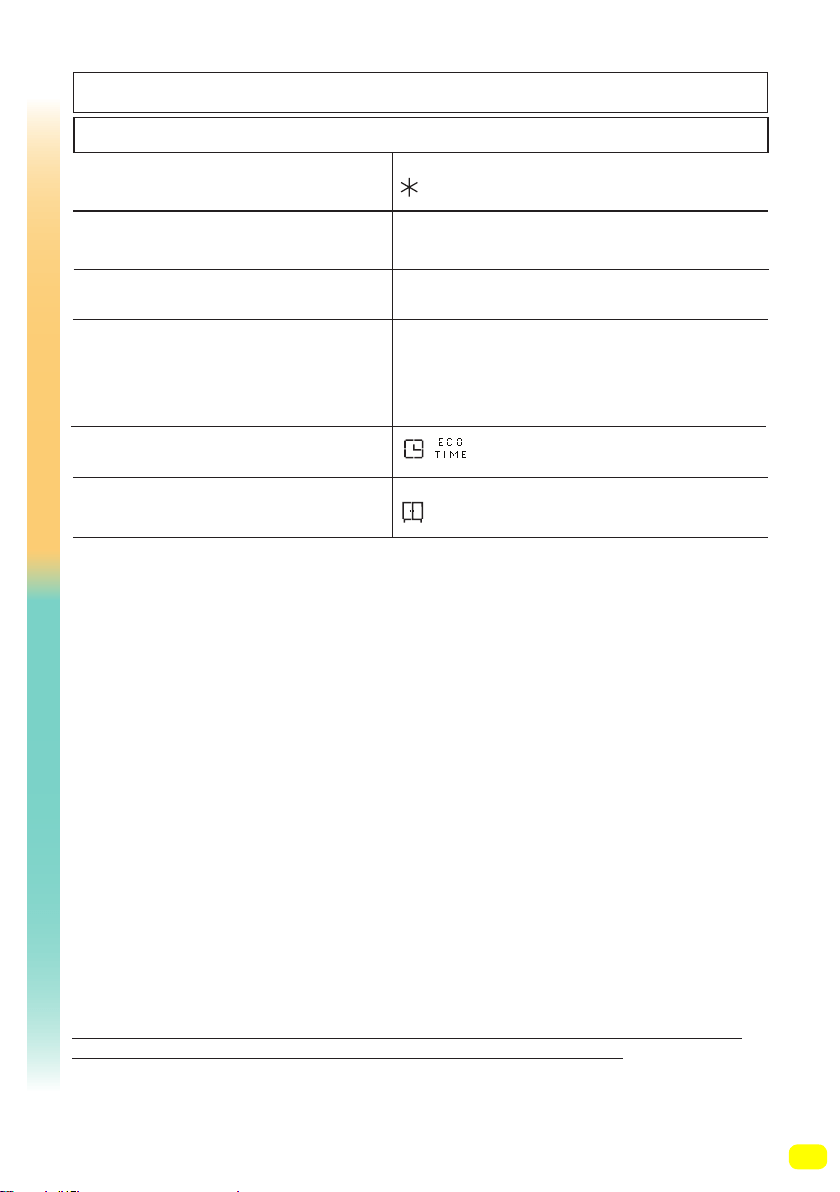
• Explanation of washing machine symbols 44
• Placing laundry into the machine 45
• Adding detergent and other chemicals 48
• Program selection 50
• If you want your laundry dried at the end of washing 51
• Cupboard dry 51
•
Hanger dry 52
• Iron dry 53
• Drying with duration 54
• Additional functions 55
• Pre-wash additional function 56
• Extra rinse function 57
• Anti-allergic additional function 58
• Easy ironing additional function 59
• Economic time interval additional function 60
• Delay Time / Finish time adjustment additional function 63
• Memory record function button (memory) 65
ADJUSTING MACHINE SETTINGS
WASHING OPERATION

EN
• Start/Pause button 71
- Starting the a programme 71
- Pausing a programme / adding laundry 74
- Cancelling a programme 74
- Finishing programme 75
-
Child lock 76
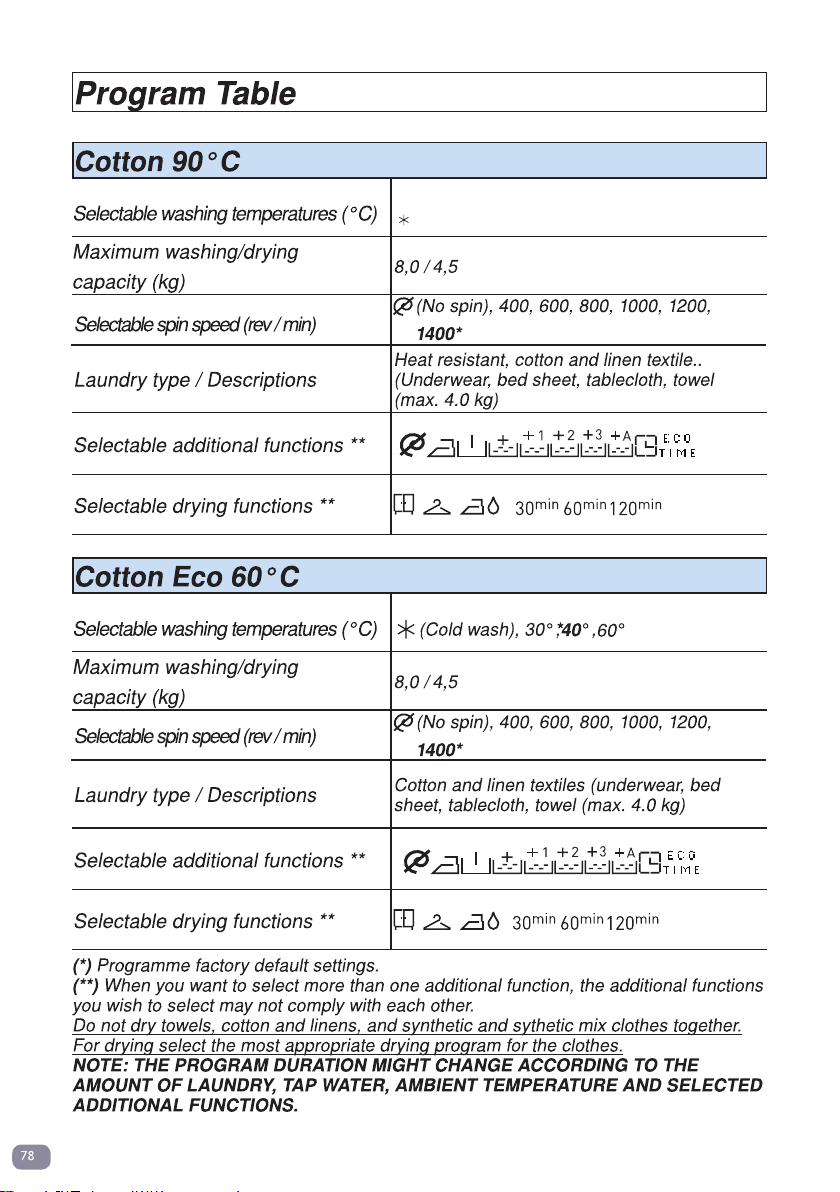
• Programme table 78
-
Cotton 78
- Cotton Eco 78
- Eco 20° 79
- Synthetics 80
- Delicates 81
- Wools / Silk 81
- Duvet 82
- Extras 83
- Refresh 83
- Rinse / Spin 84
- Drain / Drum clean 85
- Super rapid 12 min 86
- Daily Fast 60° 60 min 86
- Gentle dry 87
- Cotton dry 87
- Wash & Dry 29 min 88
- Synthetics Wash & Dry 88
- Cotton 60° Wash & Dry 89
• Selecting sub-programmes (Synthetics) 90
• Selecting sub-programmes (Delicates) 92
• Selecting sub-programmes (Extras) 94
97
MAINTENANCE AND CLEANING OF YOUR MACHINE

EN
• Water inlet filters 98
• Detergent drawer maintenance and cleaning 99
• Liquid detergent apparatus 99
• Siphon cover 100
• Drum cleaning 100
• Body cleaning 100
• Pump filter maintenance and cleaning 101
103
108
113
TROUBLESHOOTING
INDEX
AUTOMATIC FAULT WARNINGS AND WHAT NEEDS TO BE
DONE

5
• Read this user’s manual.
• Your machine is designed to be used in domes-
tic environments. Using it for commercial purpo-
ses shall cause your warranty to be void.
• Do not let your pets near the machine.
• Please check the packaging of your machine befo-
re installation, and the outer surface of the machine
after the packaging has been removed. Do not ope-
rate damaged machines or machines with opened
packaging.
• Have your machine installed only by an authorised
service company. Any interference to your machine
by anyone other than authorized services shall cau-
se your warranty to be void.
• This appliance is not intended for use by people
(including children) with reduced physical, sensory
or mental capabilities, or lack of experience or know-
ledge, unless they have been given supervision or
instruction concerning use of the appliance by a
person responsible for their safety.
• Please use your machine for laundry that is speci-
fied as washable and dryable after washing by their
manufacturer on their label.
BEFORE USING YOUR MACHINE
Correct Use

6
• You must remove the transportation safety
screws before your machine’s first use. The mac-
hine will malfunction if it is operated with the
transport safety screws still in place and this will
void your warranty.
• Your machine warranty does not cover damage
caused by external factors (floods, fire, rodents etc.)
• Please do not throw away this user manual. Store
it in a safe place. It might be needed by you or the
next user.
• The necessary ambient temperature for your
machine’s ideal operation is 15-25°.
• Frozen hoses can tear and explode. In regions
where the temperature is below zero, the electronic
card may not operate safely.
• Please ensure that the clothes you will load into
your machine do not have foreign substances (nails,
needles, coins, lighters, matches, clips etc.) in their
pockets. These foreign substances can damage your
machine.
• Before starting to use your machine, you may call
the nearest authorized service company and request
help for installation, operation and use of your mac-
hine.
General warnings

7
• It is advised that the first washing operation is
conducted by putting 1/2 scale detergent in com-
partment number 2 of the detergent drawer and
run the machine without any clothes in on the
“DRUM CLEANING” program. (Please see prog-
ram table page 85)
• As detergent or softener exposed to air for a long
time may cause residues, only put your detergent or
softener in the detergent drawer at the beginning of
each wash.
• It is advised that you unplug your machine and
close the water inlet tap if you will not use your mac-
hine for a long time. You should also leave the door
of your machine open to prevent bad odours forming
due to humidity.
• Some water might be left in your machine due to
trials and tests conducted for Quality Control pro-
cedures during production. This causes no harm to
your machine.
• Keep the document bag that came inside your
machine that contains the user manual out of the
reach of children and babies to prevent the risk of
suffocation.
• Keep small parts found in the document part away
from the reach of children and babies.
• Use pre-wash programs only for very dirty laundry.

8
• You should not load your machine with the amo-
unt of laundry that will exceed the maximum laundry
amount specified in the washing or drying program
you have chosen.
• In case of any malfunction, unplug the machine
and close the tap first. Do not attempt to repair by
yourself and consult the nearest authorized service
company.
• Never open the detergent compartment when the
appliance is running.
• Never force the door open when the machine is
running.
• Please adhere to the manufacturers’ advice regar-
ding the use of fabric conditioner or similar products
you will use in your machine.
• While your machine is in the drying process, ple-
ase do not stop your machine before the program
ends.
If you have to do this, remove all your laundry fast
and spread them on an appropriate place immedia-
tely to allow them to cool down.
• Set up your machine in a place where its door can
be completely opened. (Do not set up your machine
in places where its door cannot be fully opened.)
• Set up your machine in locations that can be venti-
lated and might have constant air circulation.

9
You must read these warnings. Ignoring these
warnings may put you or your loved ones at risk
of fatal injuries.
• Do not touch the discharge hose or the water disc-
harged during the discharging process as the appli-
ance may reach high temperatures when running.
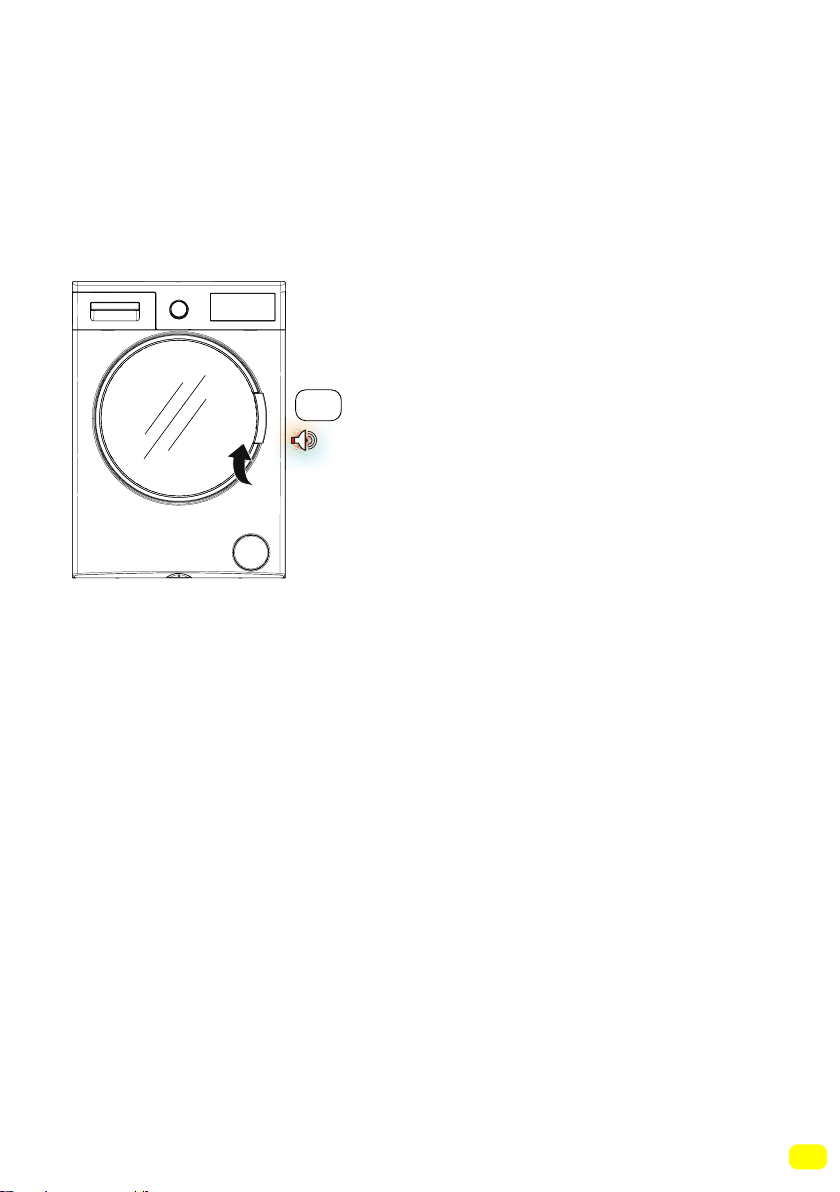
• Open the door of the machine all the way after the
drying process. Do not touch the door glass. Burn
hazard may occur due to high temperature.
Safety warnings
Burn risk!

10
Electrocution risk!
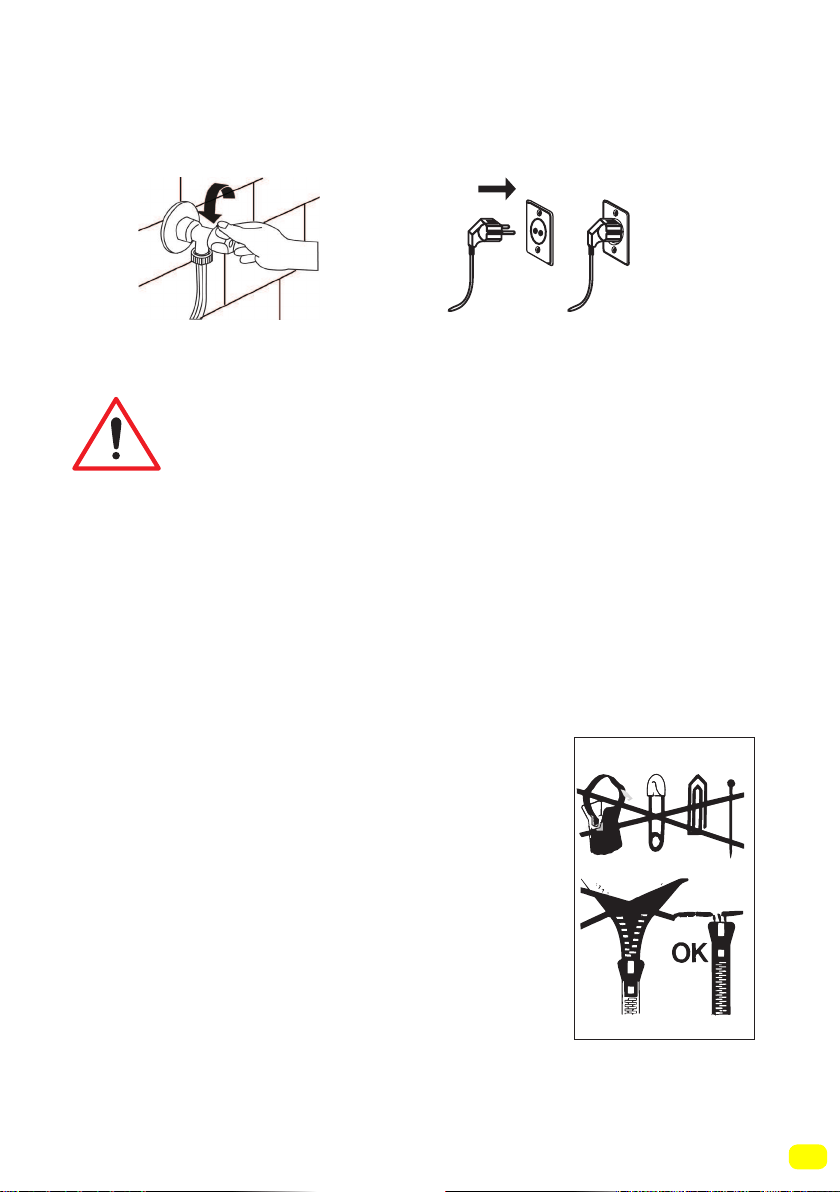
• Do not use multiple plugs or
extension cords.
• Do not plug in damaged plugs or plugs with torn
cables.
• Never pull from the cable when unplugging.
• Grab the plug when unplugging.
• Do not plug-in or out the plug from the receptacle
with wet hands to prevent electric shock.
• Never touch the machine with a wet or damp hand
or foot.
• Call the nearest authorized service company for
assistance if the power cord malfunctions.

11
• Check whether the water flows fast or not before
hanging the discharge hose on the sink.
• Take necessary measures to prevent the hose you
hung from slipping.
• The backfiring force of a hose that is not places
appropriately can move the hose from the place it is
hung on the sink. Take measures to prevent the plug
in your sink from plugging the sink hole.
Flooding risk!

12
Explosion risk!
• As there is a drying function on your machine,
make sure that materials like stain removing chemi-
cals or washing gas that you might have applied on
your laundry earlier are properly rinsed and purged.
There might be a risk of explosion when you run your
machine with the drying function otherwise.
Fire risk!
• Unwashed dry laundry must not be dried in your
machine.
• Do not keep flammable or explosive liquids near
your machine.
• Materials stained with food oil, acetone, alcohol,
petrol, kerosene, stain remover, turpentine, beeswax
and beeswax remover must first be washed with
an extra amount of detergent and hot water before
being put through the drying process. There might
be a risk of fire when you run your machine with the
drying function otherwise.
• If you’re going to choose a washing and drying
program, do not place a detergent dose adjustment
device/ball into your machine. They might pose a fire
risk.

13
• Laundry must not be dried in the machine under
the conditions specified below due to the risk of fire:
- If laundry is not washed.
- If oil stains and other stains on the laundry (food
oils, balms and cosmetic remains, kitchen swab etc.)
are not cleaned enough.
- Laundry cleaned with industrial chemicals.
- Laundry that has high amount of foam-sponge-rub-
ber or rubber-like parts and accessories on.
-Rubber, sponge(latex), shower bonnet, watertight
textile products, rubber based objects and clothes or
pillows filled with rubber sponge must not be dried in
the washing machine with the drying function.
- Stuffed and damaged parts (pillows or jackets).
The sponge parts dangling outside these stuffings
might catch fire during the drying process.
- The sulphur in paint-removing materials might cau-
se corrosion. Thus, never use paint-removing materi-
als in your machine.
- Please ensure that detergent cups are not left insi-
de the laundry. These plastic cups might melt during
drying and damage your machine and laundry.
- Laundry that has had a stain removal process app-
lied must be rinsed thoroughly before washing.
14
- Never use products that contain solvent material
(like washing gas) in your machine.
- Remove all the objects in the pockets of your la-
undry (needles, paperclips, lighters, matches etc.)
when loading your machine. Fire and Explosion
risk may occur.
Fall and injury risk!
• Do not climb on your machine. The upper table of
your machine may break and you might get injured.
• Tidy the hose, cable and packaging of your machi-
ne during installation. You might trip over and fall.
• Do not turn your machine upside down, or on its
side.
• Do not lift your machine by holding it from extruding
parts (detergent drawer, door). These parts might
break and cause you injury.
• There’s a risk of tripping and injury if the materials
like hoses and cables are not property stored after
your machine is installed.
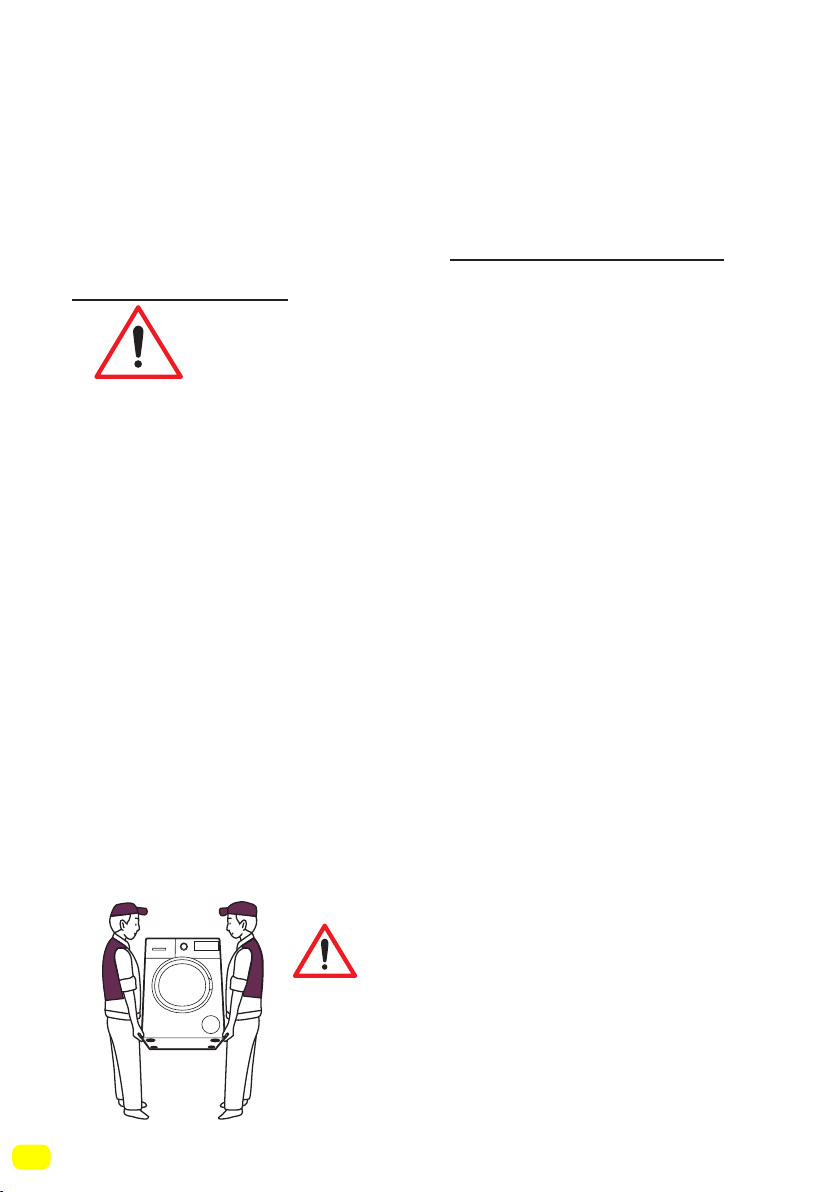
Machine must be carried by 2
people or more.
15
Child safety!
• Do not allow your children to play with the machine.
It is an electrically driven appliance.
• Do not leave children unattended near the machi-
ne. Children might lock themselves into the machine.
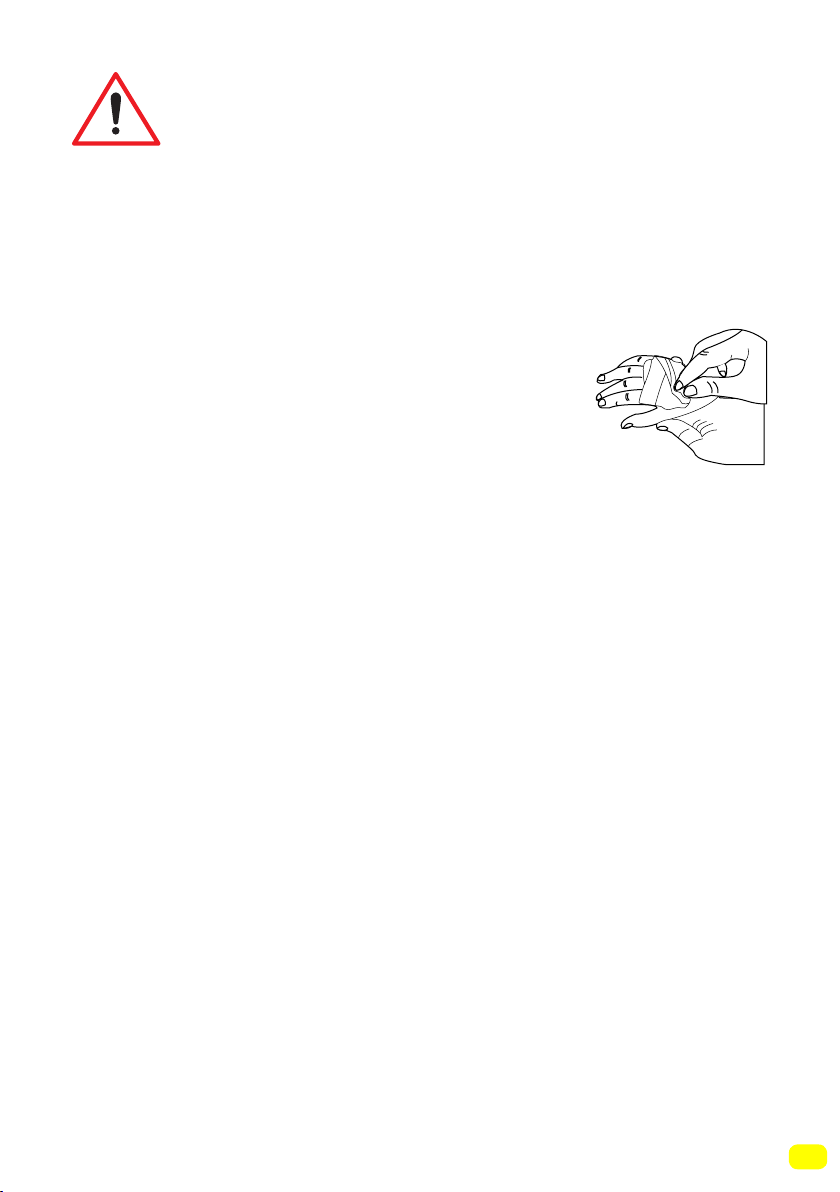
• The door glass and machine surfa-
ce might be extremely hot during your
machine’s operation.
• It is therefore especially important that
children do not touch the machine as it
may damage their skin.
• Keep packaging material away from children.
• Poisoning might occur if the detergent and other
washing aids are consumed, and eye or skin irrita-
tion might occur if they come into contact with the
skin. Keep the cleaning materials where children
cannot reach them.

16
Removal of packaging materials
Packaging materials protect your machine from the damage that
might occur during transportation. Please recycle you packaging
materials.
Recycled material provides both raw material savings and decre-
ases waste production
Removal of old machine
Old electrical devices might still contain salvageable parts.
So, never throw your old devices that you do not use into the
waste.
Ensure the parts of your old electronic or electrical devices are
reused by giving them to your local recycling centre.
Please ensure your old appliances are kept in an appropriate
place for the safety of children until they are taken outside
the house.
DISPOSING OF PACKAGING AND YOUR OLD
MACHINE RESPONSIBLY
PACKAGING AND THE ENVIRONMENT

17
SAVINGS & EFFICIENCY INFORMATION
Some important information to get more efficiency out of your
machine:
• The amount of laundry you put in your washing machine should
not exceed the maximum amount indicated. By avoiding overloa-
ding, your machine shall run more efficiently.
• Not using pre-wash feature for normal and lightly soiled laundry
shall save electricity and water.
18
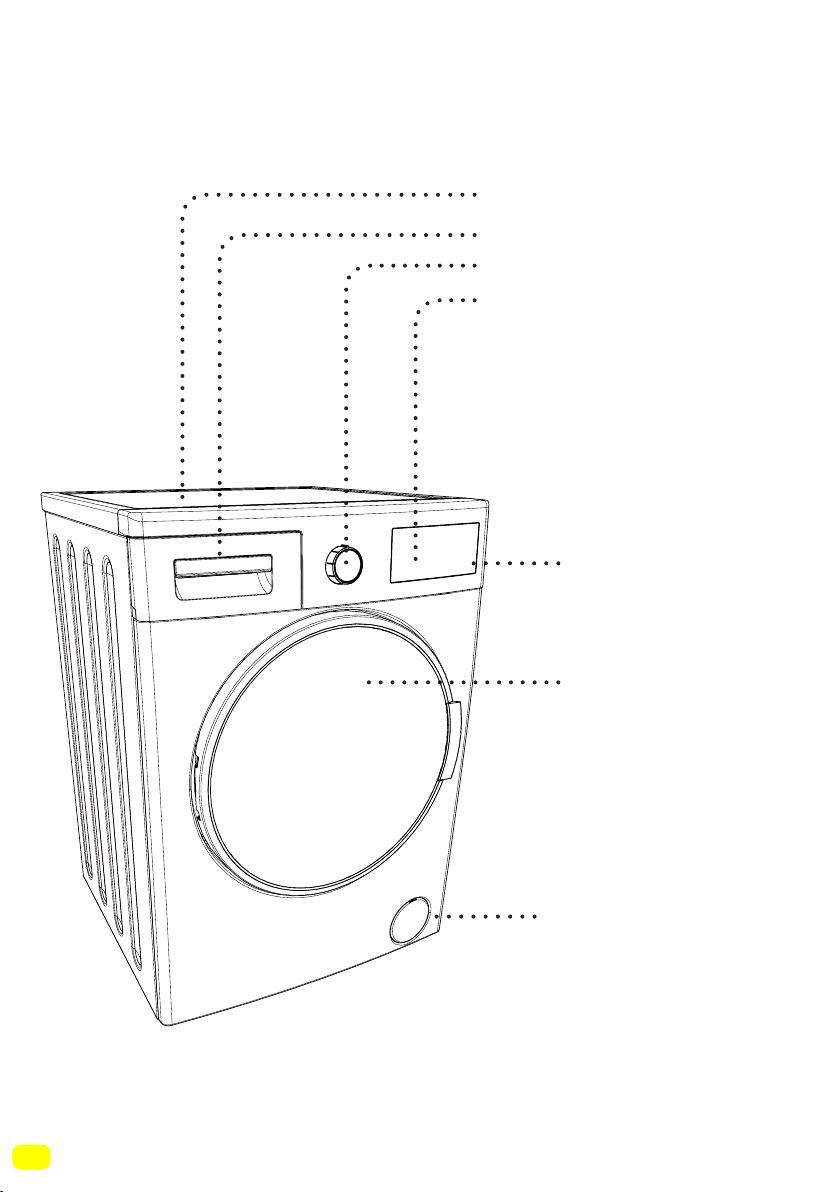
OVERVIEW OF YOUR DEVICE
2-Detergent drawer
3-Programme button
4-High-resolution
LCD display
1-Upper tray
General Appearance
7-Pump filter
cover
6-Door
5-Touch buttons
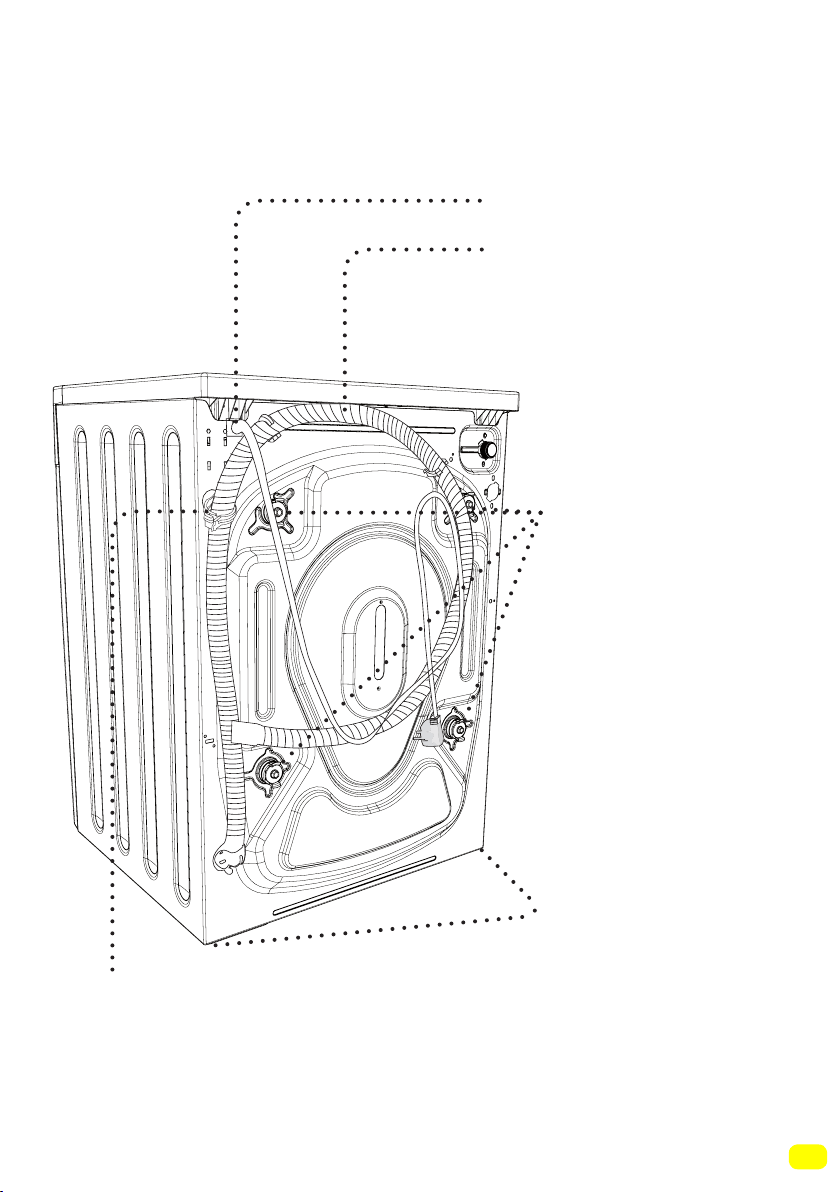
19
General Appearance
8-Power cord
9-Drain hose
10-Transportation
safety screws
11-Adjustable foot
12-Drain hose holding plastic:
(The operation of the machine will be affected if this plas-
tic part is removed. So please don’t remove this plastic
part under any condition.)
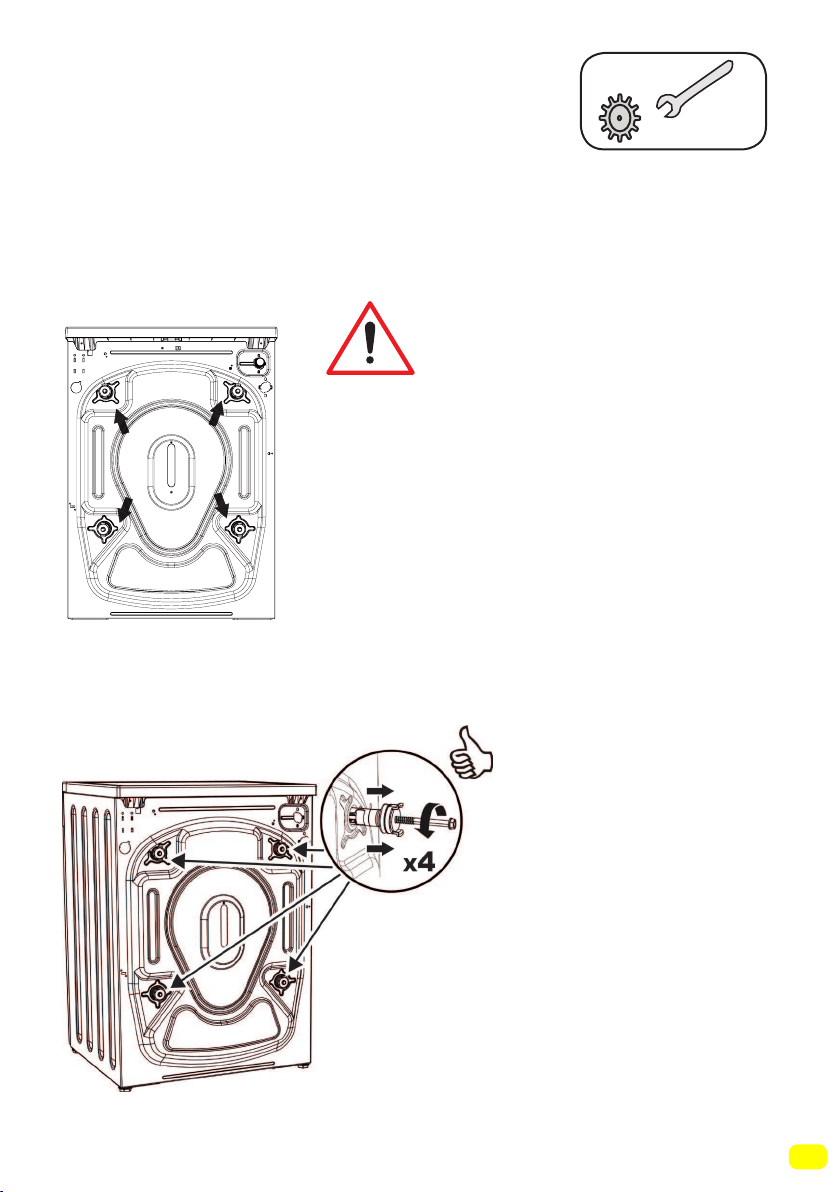
21
Removing transportation safety screws
Before operating your machine, you
must remove the transport safety
screws on the backside of the machi-
ne.
Have your machine installed only
by an authorized service company.
SETTING UP THE MACHINE
The transport safety screws should
be loosened by rotating them counter
clockwise with an appropriate wrench.
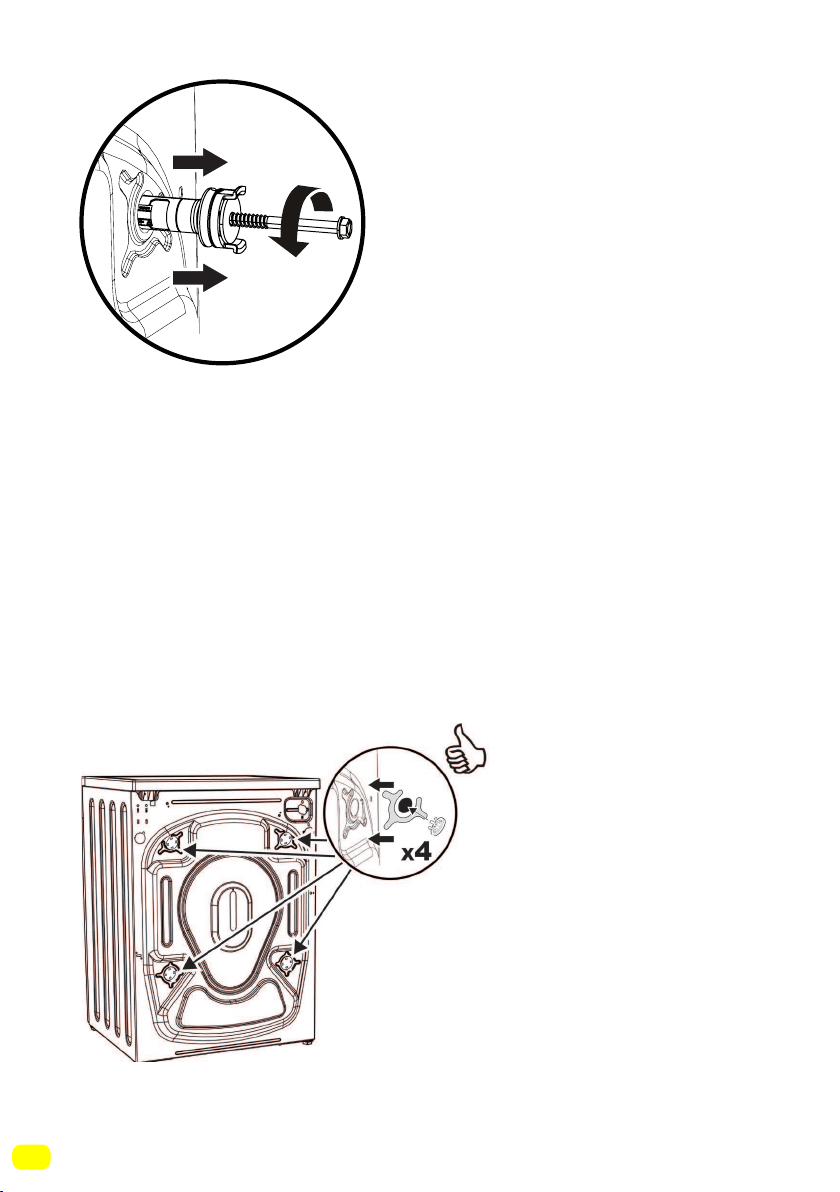
22
Transport screws should then be
removed by pulling them out. The
removed transport safety screws
should be stored to be used again in
case the machine needs to be trans-
ported again, e.g. if moving house.
NOTE:You must remove the trans-
portation screws from your machine
before first use. Faults occurring in
machines operated with transport
screws still fitted shall be out of the
scope of the warranty.
X4
Place the plastic transportation
screw caps found in the accessory
bag in the gaps left by the transpor-
tation screws.
23
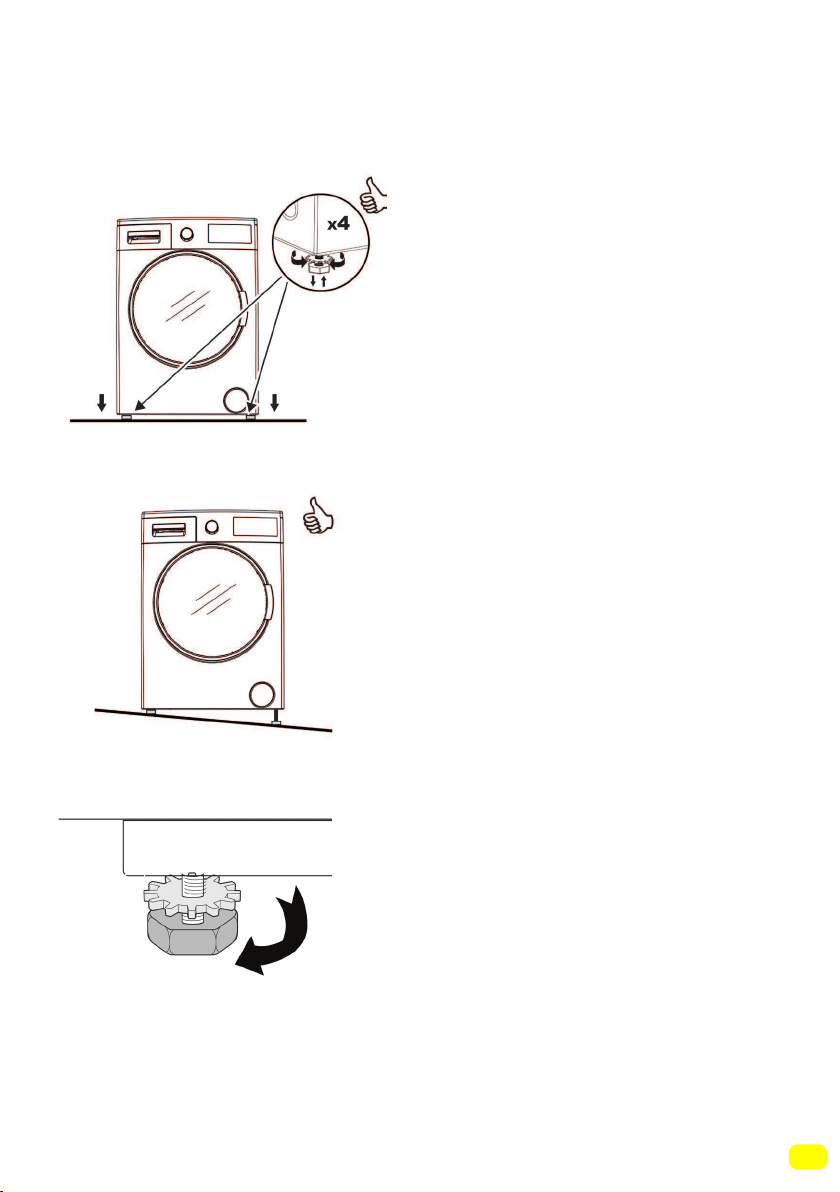
Placing the machine and adjusting the
adjustable foot
Do not install your machine on
a carpet or such ground that will
block ventilation from the base.
To ensure silent and vibration-
free operation of your machine,
it should be deployed on a non-
sliding and firm ground.
You can adjust the balance of
your machine by a gauge from
the top.
You can adjust the balance of
your machine by the adjustable
foot.
• Loosen the plastic adjustment
nut.
• Adjust the feet upward and
downward by rotating them.

24
• Tighten the plastic
adjustment nut after balance is
achieved.
• Never put cardboard, wood or
suchlike materials under your
machine if you are intending to
stabilize the distortions on the
ground.
• When cleaning the ground,
on which your machine rests,
be careful not to disrupt the
machine’s stability.

25
Electrical connection
• Your washer-dryer is adjusted for 220-240V and 50Hz.
• The mains cord of your machine is equipped
with a specific grounded plug.
• The mains plug should always be inserted to
a grounded receptacle of 10 amperes. The fuse
current value of the power line connected to this plug should also
be 10 amperes.
• If you don’t have such a receptacle and fuse conforming with
this, please have it done by a qualified electrician.
• We do not take responsibility for damages that occur due to
ungrounded usage.
Note: Operating your machine under low voltage will cause the
life cycle of your machine to be reduced and its performance to
be restricted.

26
• Operate your machine with cold water
only.
• Use only the new water inlet hoses
given with your machine or purchased
through authorized dealers.
• 1 gasket is included in the hose packaging to prevent water
leaks in connections. Fit this gasket to the end of new water inlet
hose on the side of faucet.
• Connect the white end of the water
inlet hose to the water entrance valve on
the back of the machine. Tighten plastic
parts on the hose using your hand.
• Connect the other end of the water inlet
hose to a 3/4” water tap with threads.
Tighten plastic parts on the hose using
your hand.
• In uncertain conditions, have the con-
nection works done by a qualified plum-
ber.
• Ensure that points of contact do not leak after you have made
the connections.
• Flow of water with pressure of 0.1-1 Mpa will allow your machi-
ne to operate more efficiently (0.1 Mpa pressure means that more
than 8 litres of water will flow through a fully-opened faucet per
minute).
• Ensure that the new water inlet hoses are not bent, broken,
crushed or resized.
Water inlet connection
27
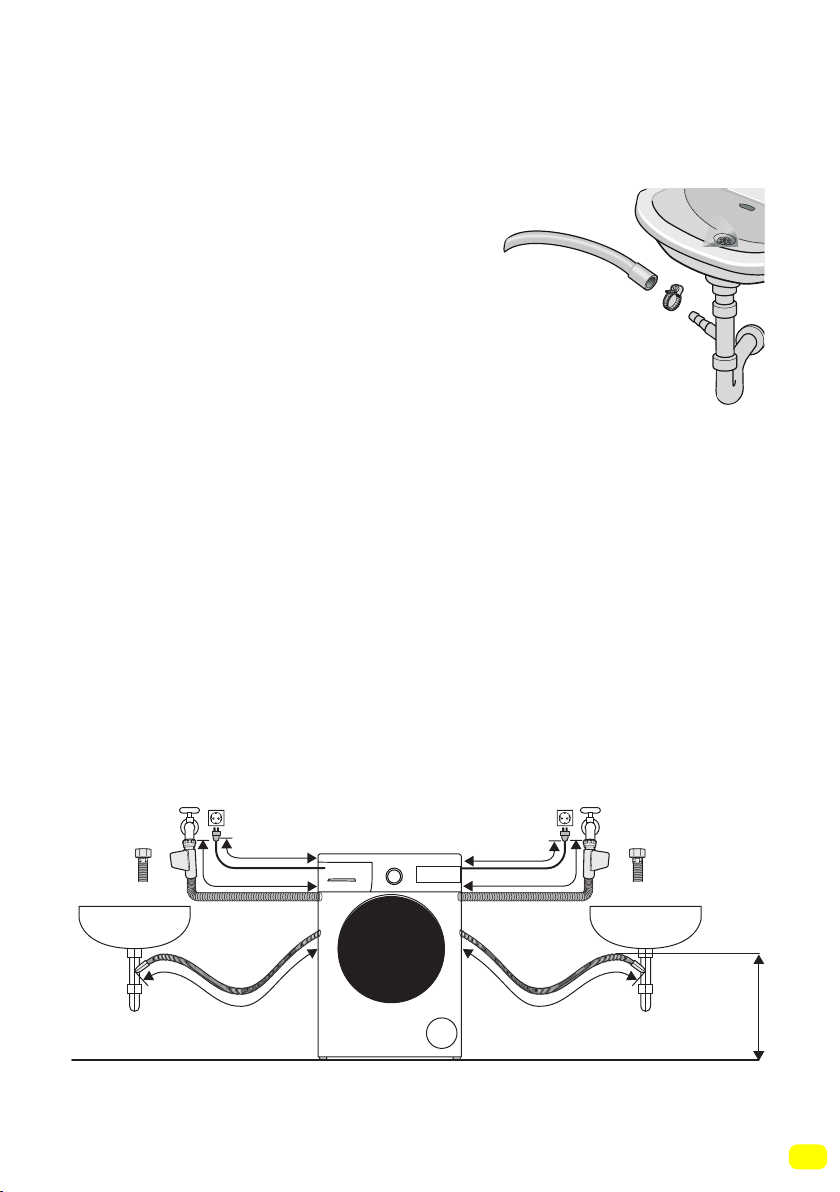
Water draining connection
• Connect the water drain hose to a
waste water drain hole or a special
apparatus connected to the outlet el-
bow of the sink placed at a maximum
height of 80 cm.
• Never attempt to extend the water discharge hose by jointing.
• Do not put your machine’s water discharge hose into any contai-
ner, bucket or bathtub.
• Make sure that the water discharge hose does not bend, buckle,
get crushed or extended.
Note: Use only the new water inlet hose coming with your machi-
ne when making the water inlet connections. Never use old, used
or damaged water inlet hoses.
~ 95 cm ~ 140 cm
~ 145 cm ~ 95 cm
0 – max. 80 cm
~ 95 cm ~ 150 cm
28
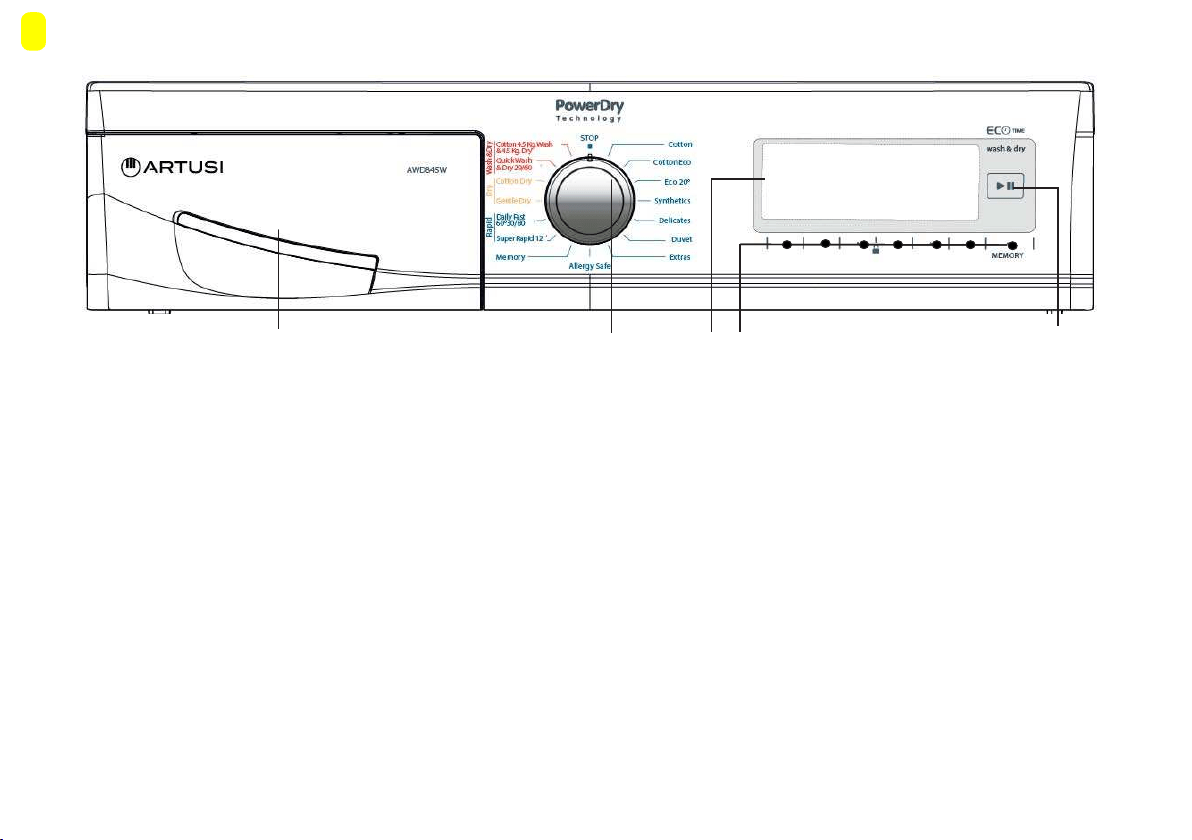
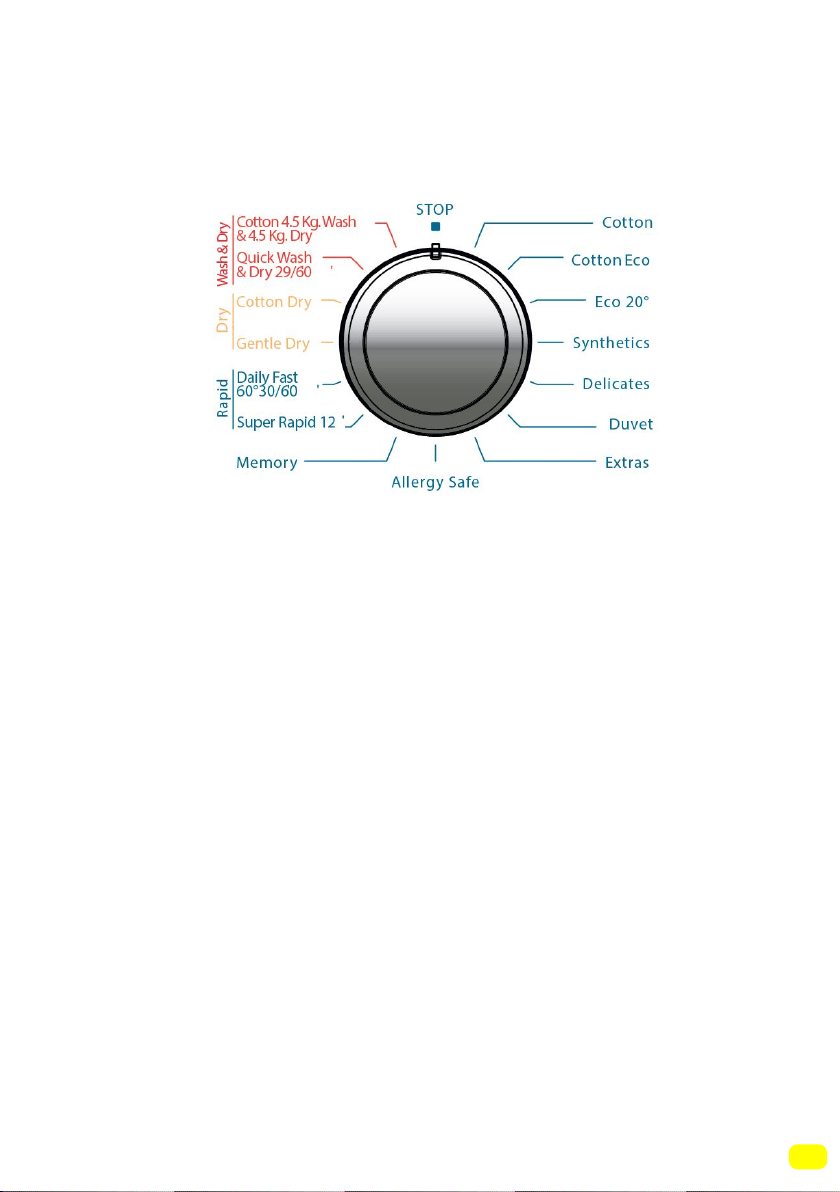
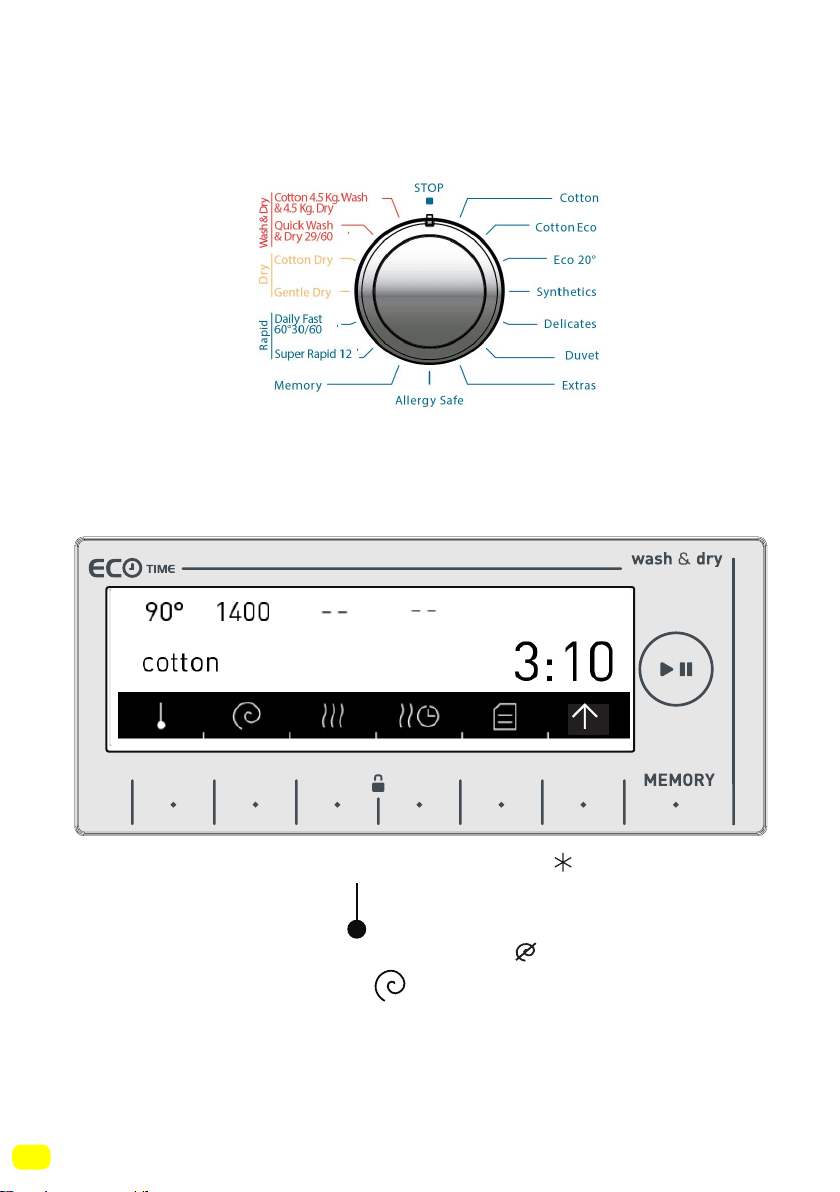
2- Program knob: You may select the programme you wish to
use via the program knob. You may set the program selection op-
eration by rotating the programme knob in both directions. Ensure
that the programme knob is exactly on the programme you want to
select.
3- Info Screen: In this screen, you can see the features of the
washing or drying program you selected and also get information
about the machine’s status.
4-Adjustment and additional function buttons: The buttons
on your machine are touch buttons. You only have to touch them
lightly to make a selection.
CONTROL PANEL
5-Start/Pause button: You can start your machine
and make it pause with this button.
2
1
4 5
1- Detergent drawer
3
29
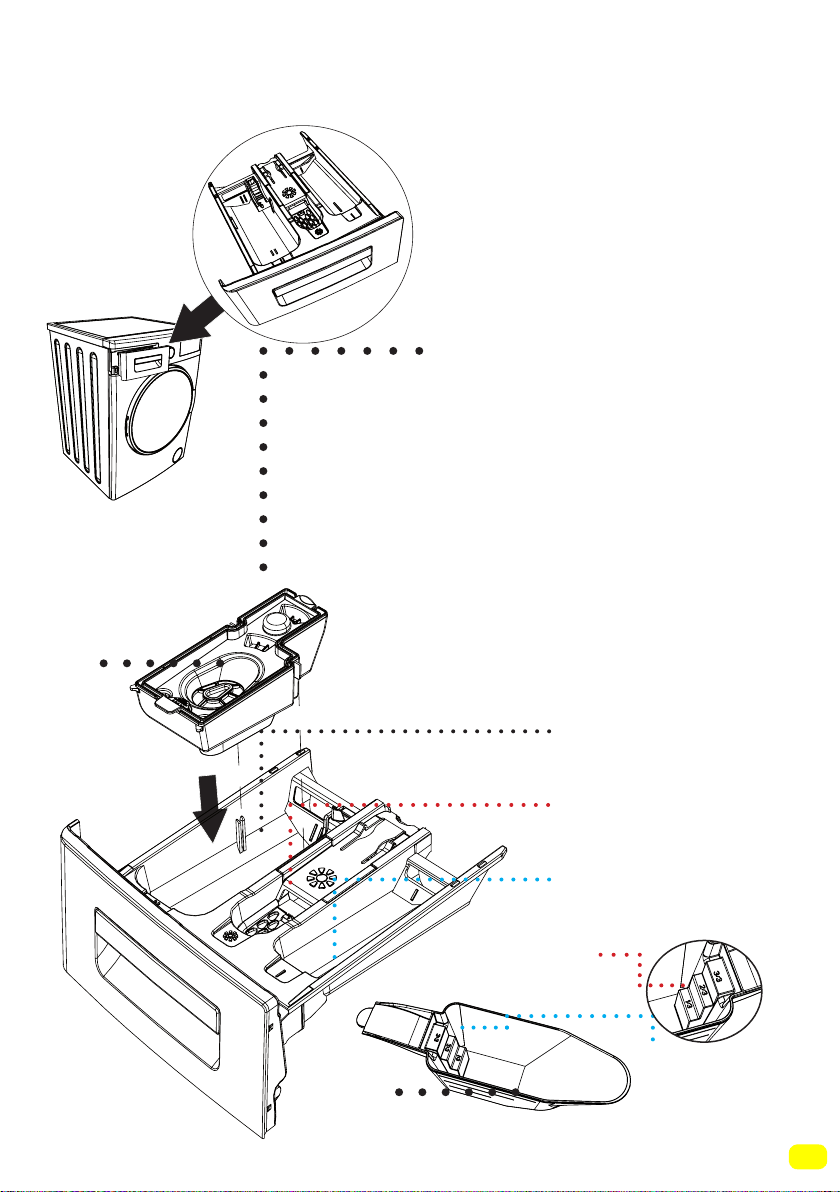
Detergent drawer general view
When you want to wash your
laundry with liquid detergent,
you can use the liquid detergent
apparatus. You can use your
liquid detergent in all programs
without pre-wash. For this, plug
the liquid detergent apparatus
to second compartment of the
detergent drawer (present in
your machine) and adjust the
liquid detergent amount (use
liquid detergent in the amounts
the detergent manufacturers
foresee). Do not exceed the part
that is labeled Max., use only for
liquid detergent, remove this
from its place during powder
detergent use.)
Main Wash
Detergent Compartment
Softener
Compartment
Pre-Wash
Detergent Compartment
Powder detergent
level steps
Powder detergent
scoop
(1)
(2)
(1
-
2)
Model dependant
30
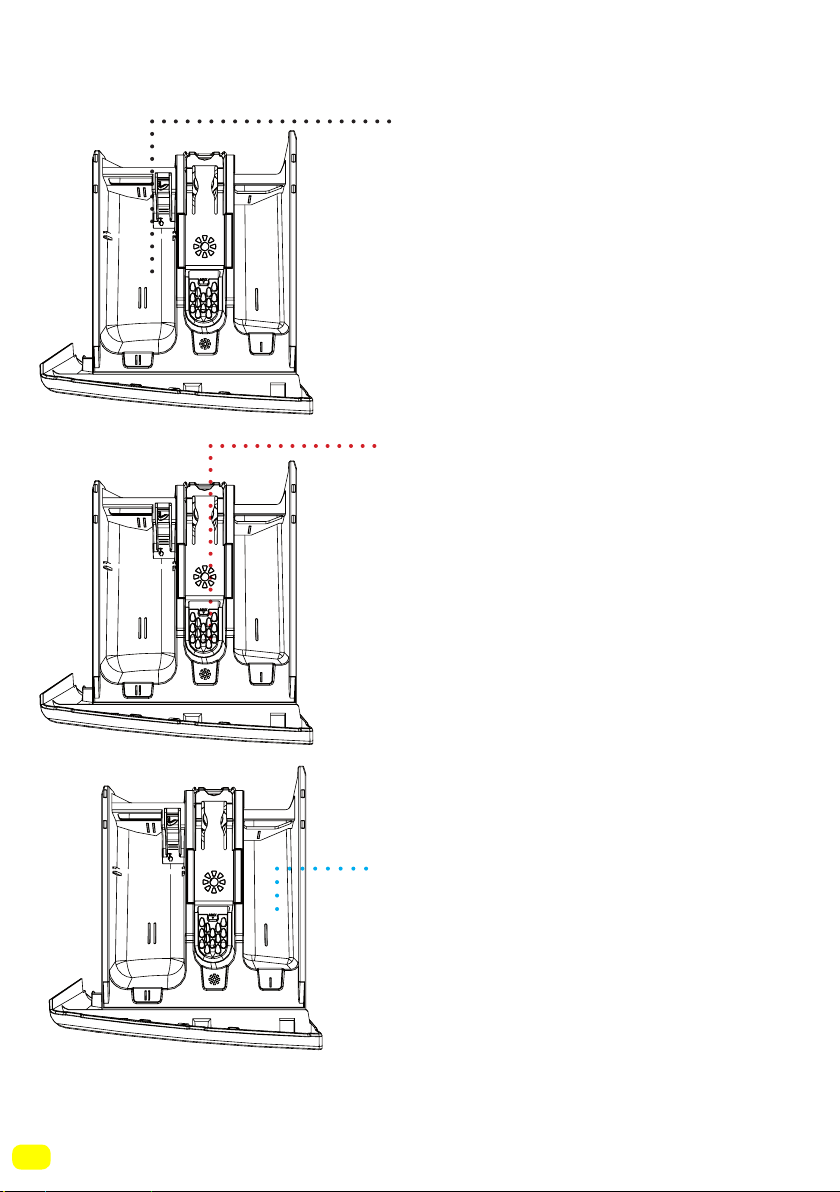
Detergent drawer compartments
Main wash detergent compartment:
In this compartment, only materials
like detergent (liquid or
powder) or anti-lime. You can find
the liquid detergent apparatus for
your liquid detergent inside your
machine during the first set up.(*)
Softener, starching, detergent
compartment:
In this compartment, materials like
softener for your laundry can be
used (it is advised that you use the
amount and type the manufacturer
recommends). The softeners
you use for your may sometimes
remain in this compartment. The
reason for this is that softener is
not fluidal. To prevent this, it is
recommended to use liquid
softeners that are more fluidal or
use the softener by diluting.
Pre-Wash detergent compartment:
This compartment should be used
only when pre-wash feature is
selected. It is recommended that
pre-wash feature used only for
very dirty laundry. Please refer to
page 99 for the maintenance of
detergent drawer.
(*)
Model dependant
31
You can select the programme you want to wash your laundry in
with the programme knob. You may set the programme selecti-
on operation by rotating the programme knob in both directions.
Ensure that the programme button is exactly on the programme
you want to select.
• You can see page (78) programme table for programme features.
Programme Knob

32
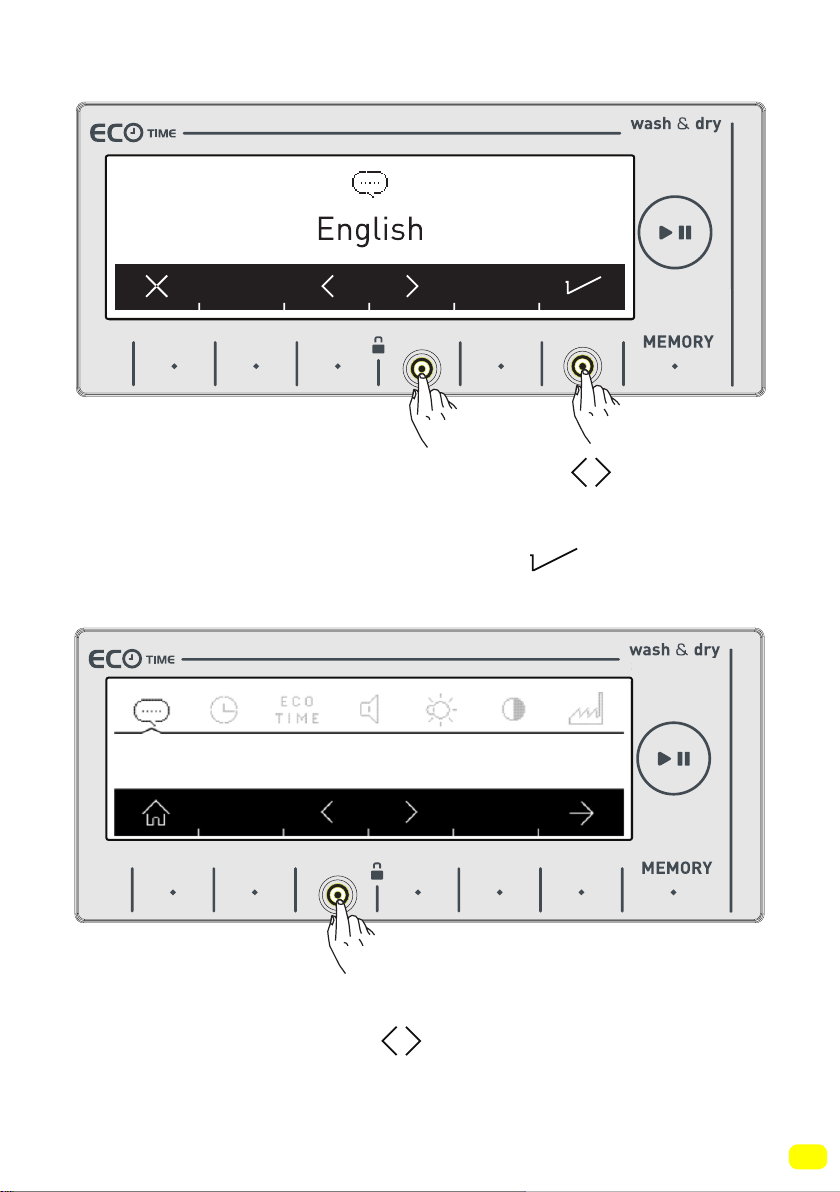
To make the first settings of your washer-dryer:
• Plug in your machine.
• Open the water tap.
• Turn the programme knob.
Language selection setting
• The first thing that will be displayed on the main screen is the
language selection setting.
• Go to the language you wish the use with the symbol
button.
• You can exit the language selection screen without making a
selection with the symbol button.
Adjusting machine settings
9 kg. 6kg.
33
• Go to the language you wish the use with the symbol but-
tons.
• Approve your language selection with the symbol button.
• When you want to change your language selection again, you
can make the language selection by going into the language
selection page and using the symbol buttons.
Deutsch
9 kg. 6kg.
9 kg. 6kg.
34
• Touch the button to save the language you selected.
• You will be asked to confirm the language selection on screen.
• Touch the button to approve the selection.
Change to”Deutsch”?
Deutsch
9 kg. 6kg.
9 kg. 6kg.
35
• If you believe you have selected the wrong language, touch the
button and re-make the language selection.
• When you approve the language change, the language you
have selected will be active.
Deutsch
9 kg. 6kg.
36
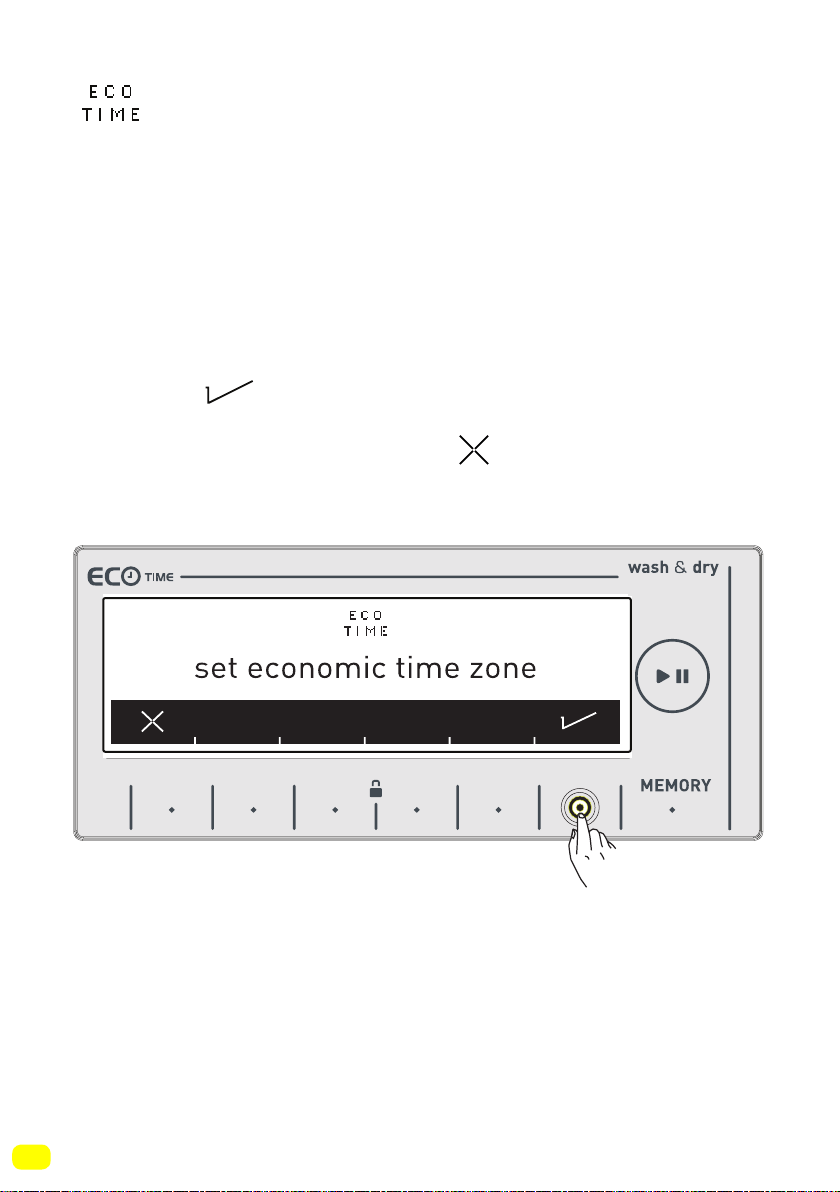
Eco Time Setting
(Economic time interval)
• The electrical energy consumption cost changes during the day
according to the time intervals set by electricity providers. You
can learn these intervals from electricity providers and set your
eco time running hours, and have your machine run between
these hours you determined.
Note: Your mains electricity must be connected to a counter with
a smart-counter feature to be able to provide this energy saving.
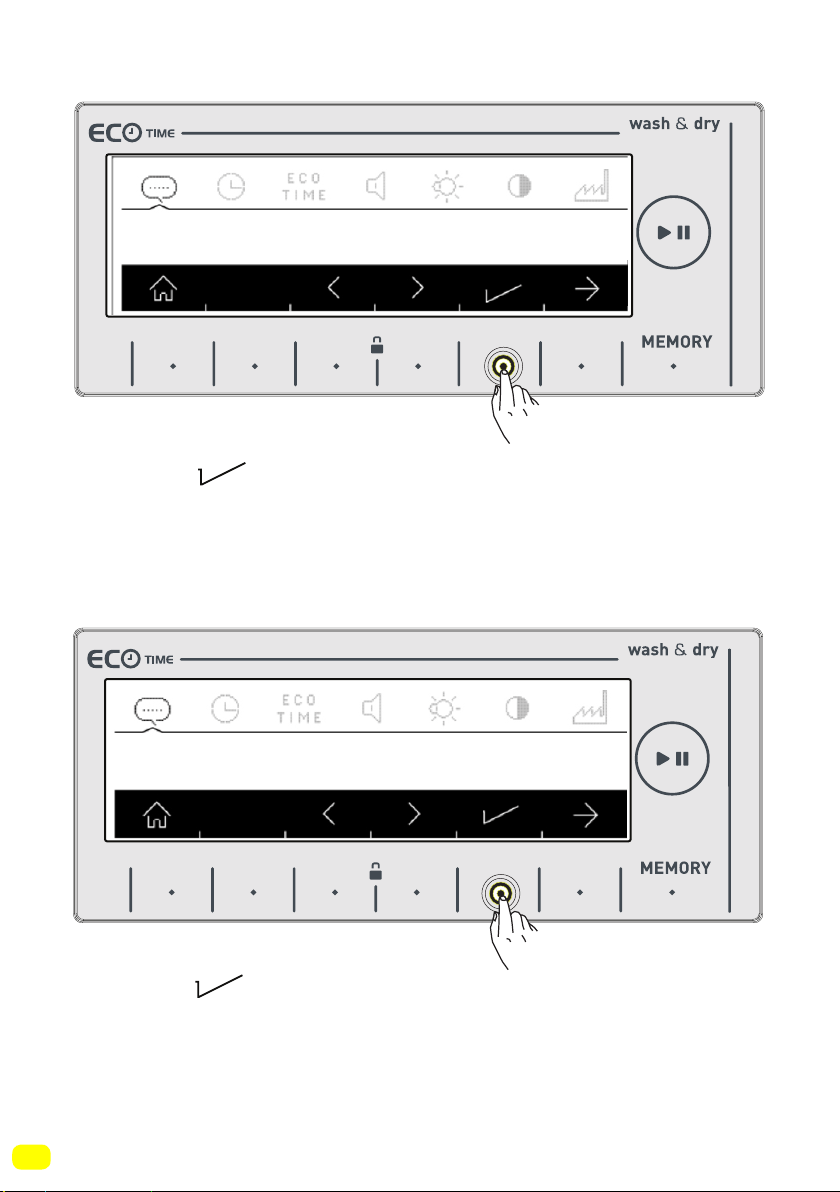
• Touch the symbol button to make this adjustment.
• If you want to do it later, touch the symbol button.
9 kg. 6kg.
37
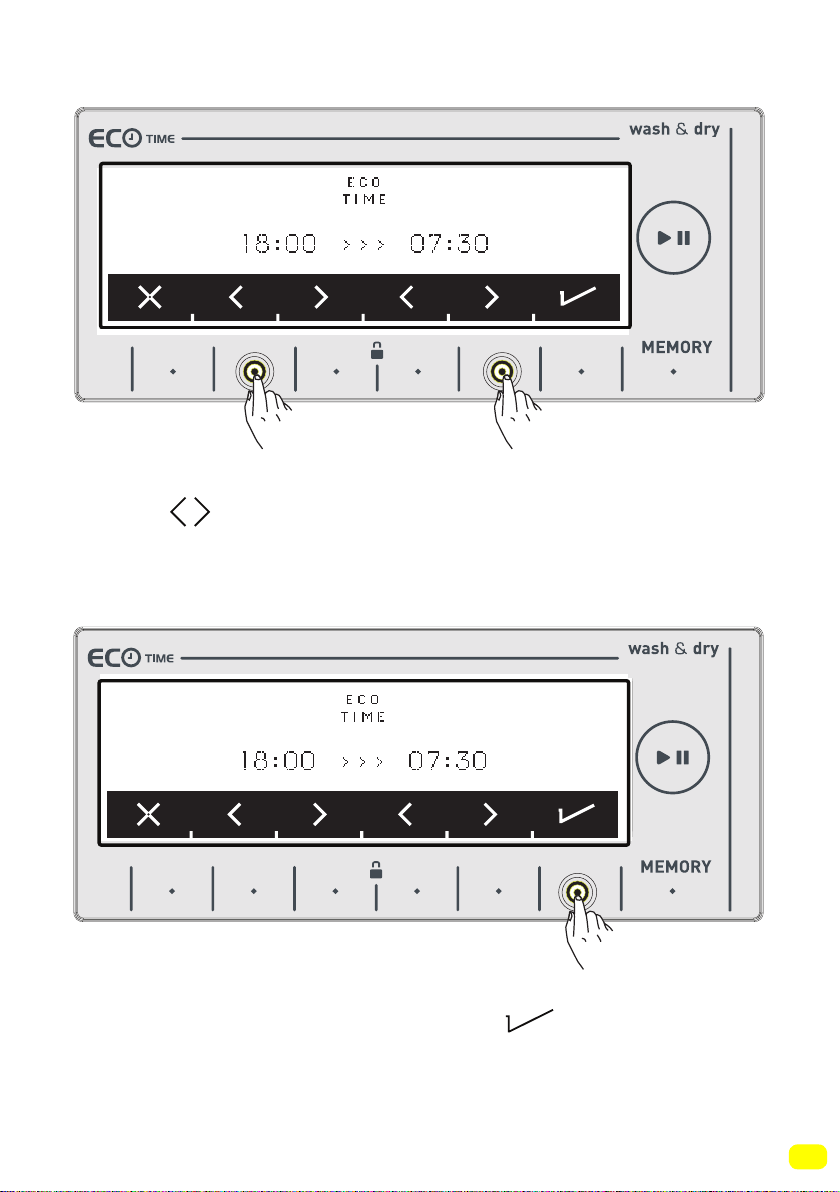
• You can adjust the Eco Time interval by touching the buttons of
symbols See page 60 to activate the Eco Time interval additi-
onal function.
• Approve your selection by touching the symbol button.
9 kg. 6kg.
9 kg. 6kg.
38
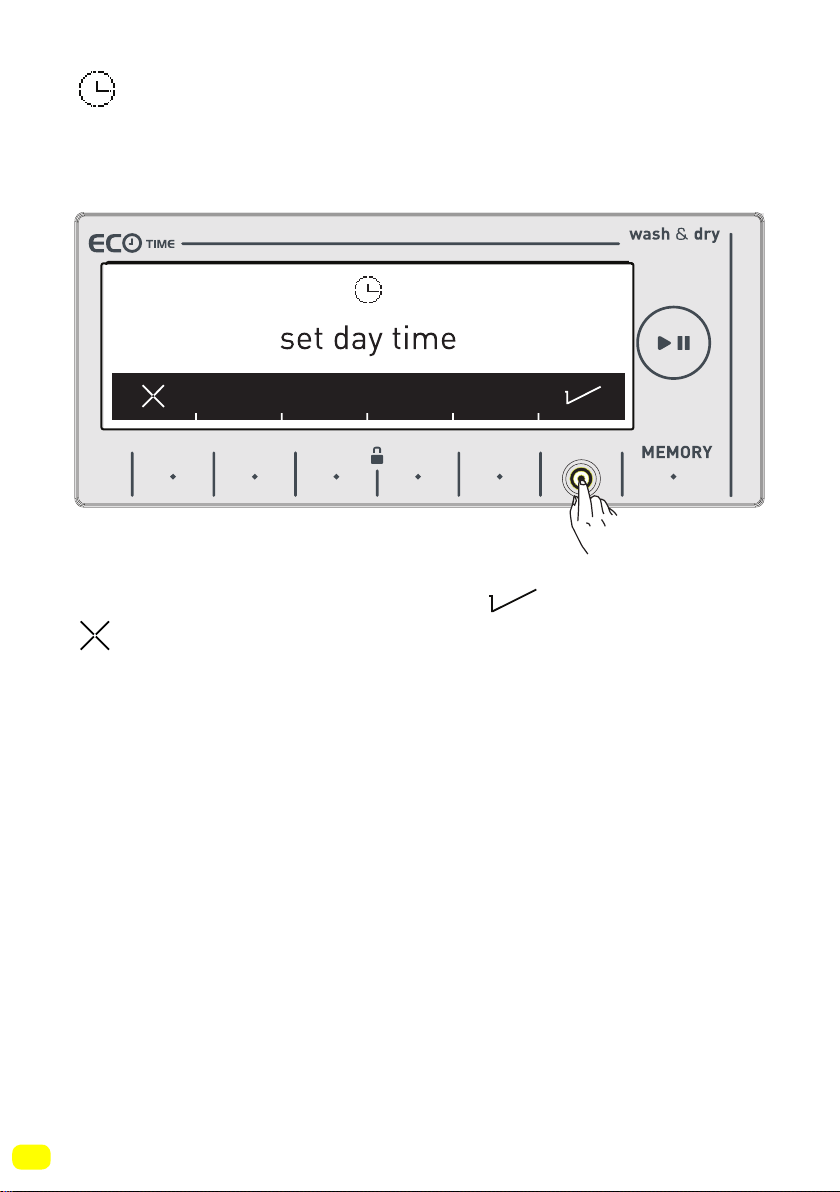
Current time setting
• We advise that you set the correct time at the point of installati-
on.
• Your machine will ask your approval for setting the current time.
Go to the setting menu by touching the symbol button.
symbol button allows you to exit without setting.
Note: You must set the current time correctly. Otherwise, operati-
on of other related functions will be affected.
Note: Recorded time information will be reset if you keep your
machine unplugged for longer than 15 days. In such a case your
machine will ask you again for the time setting when you next
turn it on.
9 kg. 6kg.
39
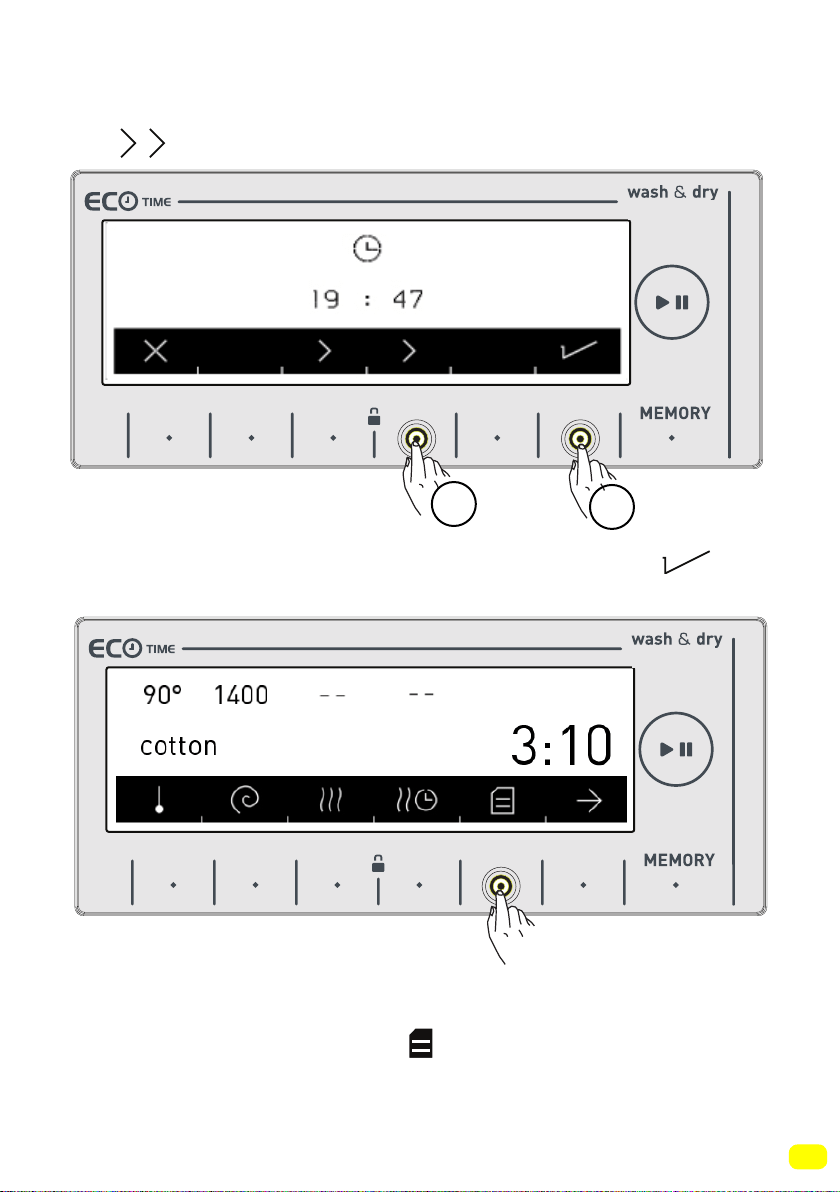
• Please make the current hour and minute settings by touching
the symbol buttons.
• After setting the current time, approve by pressing the
symbol button.
• Your machine will automatically go to the main screen of the
programme you have selected. Go to the appliance settings
menu by touching the button of symbol on this screen.
1
2
9 kg. 6kg.
9 kg. 6kg.
40
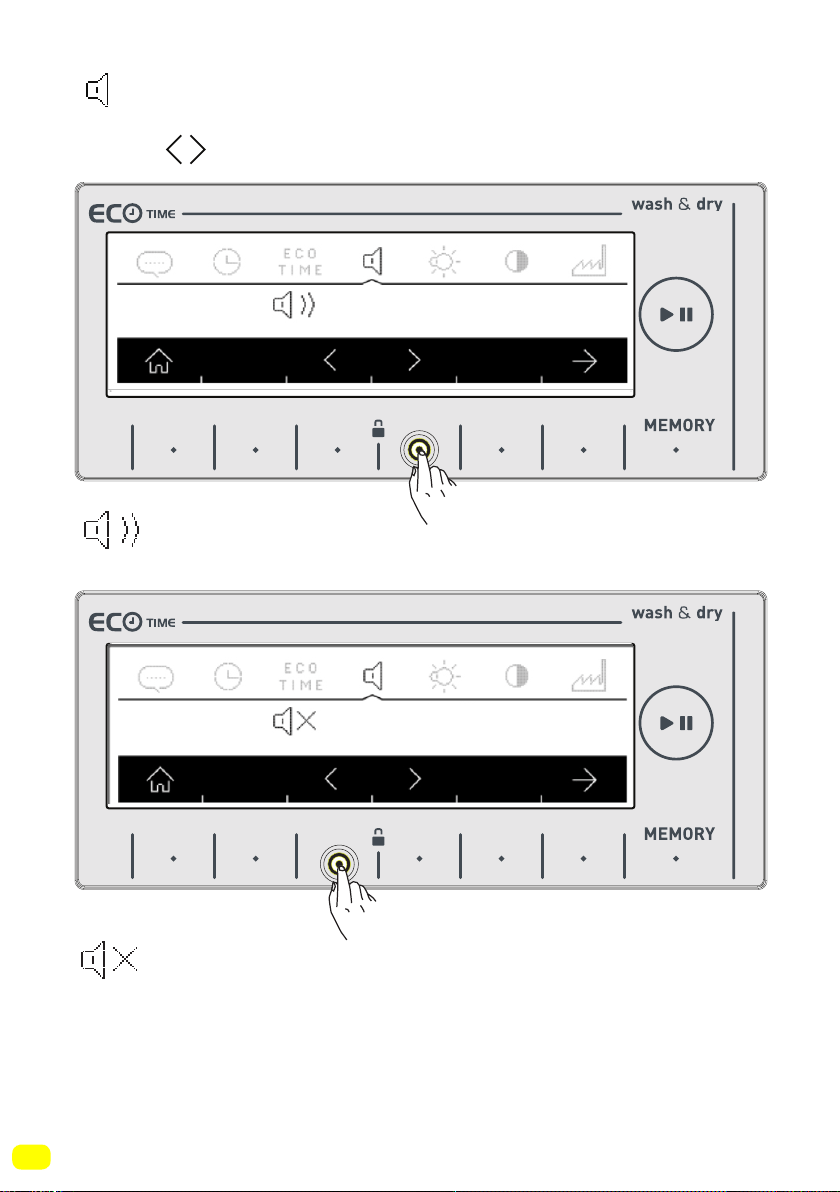
Sound Adjustment
• You can make the sound adjustment of your appliance by pres-
sing the symbol buttons.
symbol denotes that the warning sounds of your appliance
is on.
symbol denotes that the warning sounds of your applian-
ce are off.
9 kg. 6kg.
9 kg. 6kg.
41
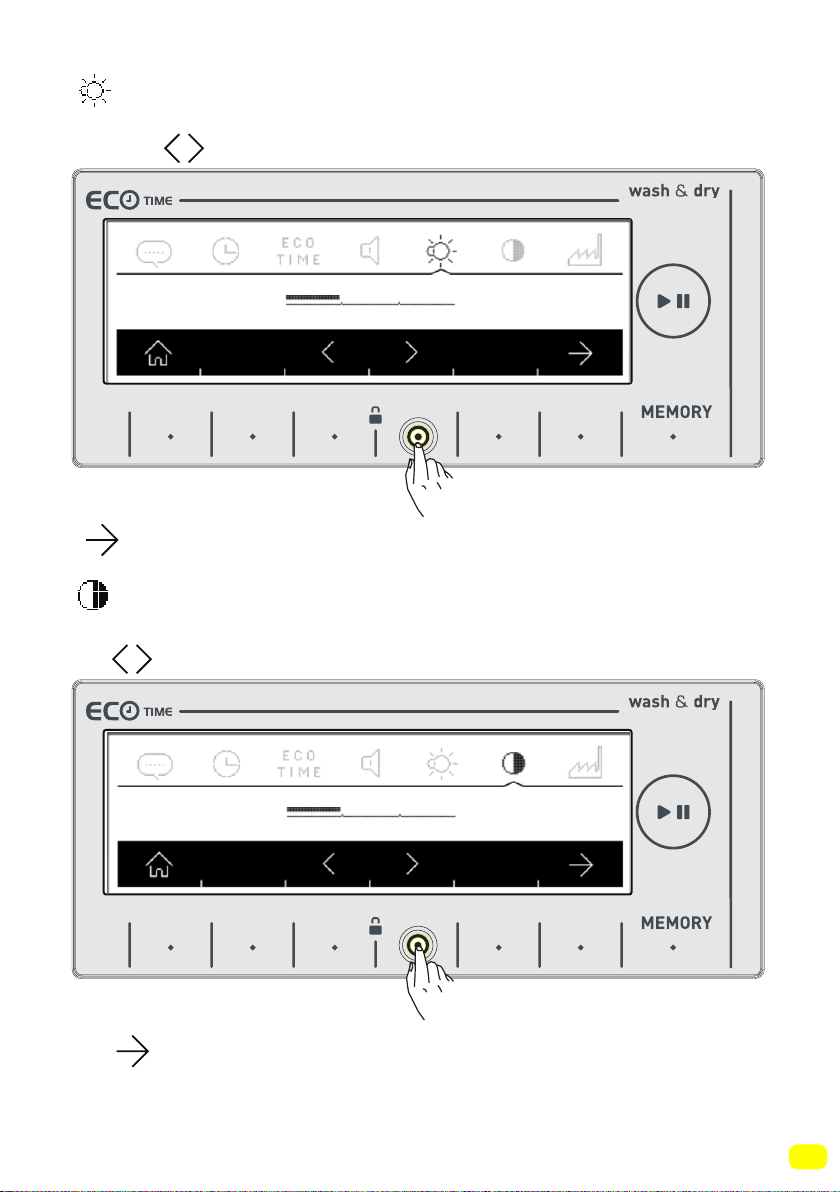
Screen brightness setting
• You can adjust the screen brightness of your appliance by touc-
hing the symbols.
• Adjust the screen contract of your appliance by touching the
symbol button.
Screen contrast setting
• You can adjust the screen contrast your appliance by touching
the symbol buttons.
• You can go to the ‘revert to factory settings’ screen by touching
the symbol.
9 kg. 6kg.
9 kg. 6kg.

42
Revert to factory settings
If you want to revert your appliance to the factory default settings:
• Touch the symbol.
• You will be asked on screen if you want to reset to Factory
Settings.
• Touch the symbol to approve the selection.
• If you want to cancel the selection touch the symbol.
• You can return to the main screen by touching the
button.
9 kg. 6kg.
9 kg. 6kg.
43
WASHING OPERATION
• Open the tap. • Plug in your machine.
Sorting laundry
Your laundry has product labels on them that specify
their appropriate washing conditions. Wash or dry your
laundry according to the specifications on the product
label.
• Sort your laundry according to their type (cotton, synthetic,
delicates, wool, etc.), washing temperature (cold, 30°C, 40°C,
60°C, 90°C), their level of dirtiness (less dirty, dirty, very dirty).
• Never wash your coloured and white laundry together.
• Wash your coloured laundries separately in the first washing as
they may bleed.
• Ensure that there are no metallic materials on your laundries or
in the pockets; if so, take them out.
WARNING: Any malfunctions occurring due to
foreign materials getting in your machine are
not covered by warranty.
• Zip up and button up your laundries.
• Remove the metallic or plastic hooks of
curtains or place them in a washing net or bag
and then muzzle them.
• Reverse textiles such as pants, knitwear,
t-shirts and sweat suits.
• Wash socks, handkerchiefs and suchlike
small laundries in a washing net.
44
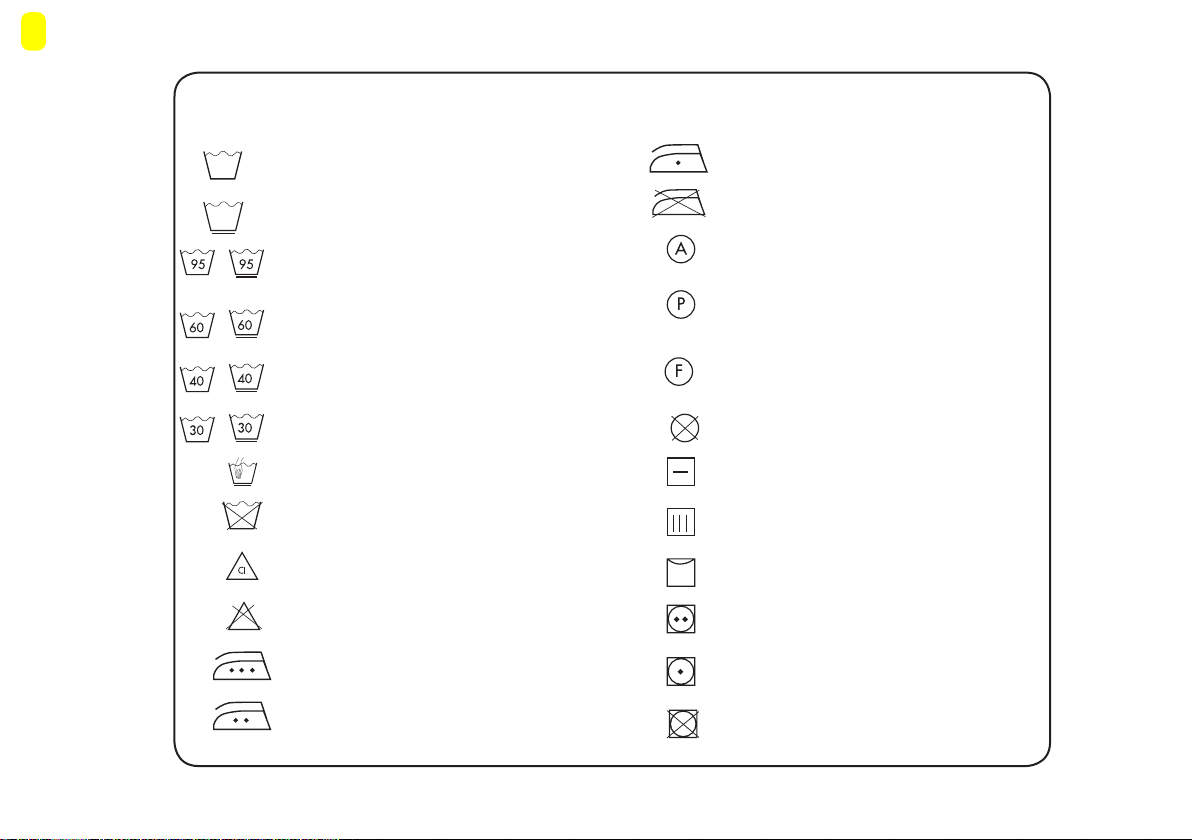
Sturdy Material
Delicates fabric
Maximum washing temperature is 95°C
Maximum washing water temperature 60°C
Maximum washing water temperature 40°C
Maximum washing water temperature 30°C
Hand washing
Dry cleaning only
Can be bleached in cold water
Do not use bleacher.
Ironing temperature maximum 200°C
Ironing temperature maximum 150°C
Ironing temperature maximum 110°C
No ironing
Can be dry cleaned with all kinds of
solvents
Can be cleaned only with
perchloride, lighter gas, alcohol or
R113.
Can be cleaned only with
perchloride, lighter gas, alcohol or
R113.
Explanation of washing symbols
No dry cleaning
Leave on flat surface
Hang when wet
Dry by hanging
Drying in normal temperature dryer
Low temperature
Do not dry in drying
45
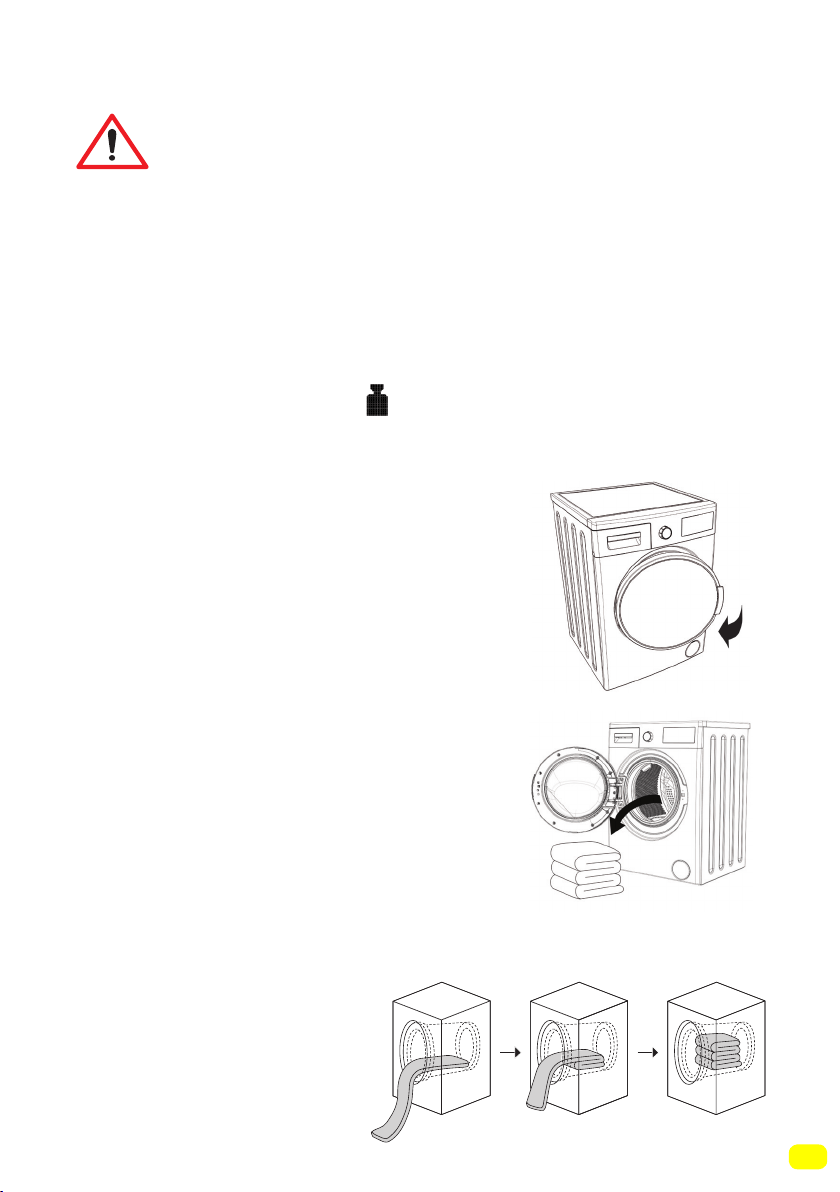
Placing laundry into the machine
• Open the loading door of
your machine.
• Place your laundry into the machine by
spreading them well. Fold objects like quilts and blankets that
you will load into the machine as shown below.
• Check inside the drum of
your machine. There might be laundry
left inside from previous washes. If
there is, empty your machine before
selecting your programme.
You must select a programme before loading
your laundry into the machine. If you load laundry
into the machine without selecting a programme,
the load sensor will not be activated.
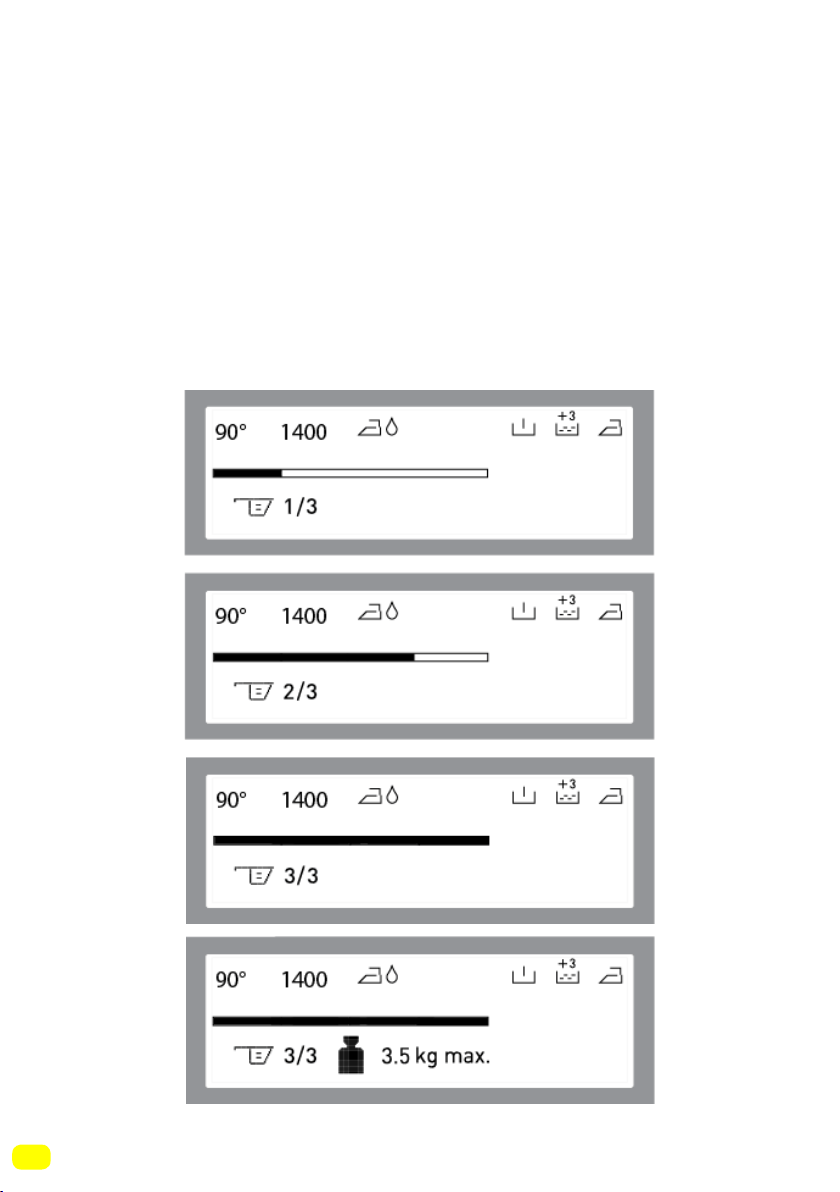
Note: The maximum load capacity of your machine may chan-
ge according to the programme you select. Do not exceed the
maximum dry loading capacity indicated in the programme table
for washing programmes. If you exceed the load capacity of the
programme you selected, symbol will be displayed on the
screen of your machine and your machine will warn you with so-
und. It is advised that you remove laundry from your machine
until this symbol disappears.
46
• There is a load detection system in your machine. The load
detection system measures the weight of the laundry inside your
machine and informs you by the moving sticks on the electronic
screen and automatically adjusts the programme features
(programme duration, energy consumption, water consumption
etc.) according to the load amount.
• If you continue to operate your washing machine whilst
overloaded, washing and drying performances will be affected.
Additionally, your washing machine can be damaged and you
may see your clothes get yellow after drying programs.
47
• Put each item of laundry separately.
• Ensure that no laundry is stuck between the
cover and bellow seal when closing the door of your machine.
• Ensure that the machine door is completely closed.
• Tightly shut the door of your machine or the machine won’t start
the washing operation.
click

48
The amount of detergent you will put in your machine will depend
on the following criteria:
• Your detergent utilization will be based on the degree of contami-
nation of your laundries.
• Do not prewash your less stained laundries and put the correct
amount of detergent in the 2nd compartment of the detergent dra-
wer.
• The Pre-wash feature might be used for your very dirty laundry.
If you are going to do a pre-wash, place 1/4 of the detergent you
would normally put in the detergent compartment into the compart-
ment numbered 1, and put the remaining 3/4 to the compartment
numbered 2.
• Use detergents produced for automatic washing machine in your
machine. Adhere to the advice of detergent manufacturers while
determining the amount of detergent you should use with your la-
undry.
• The higher the degree of hardness of the water the more deter-
gent you will use.
• The amount of the detergent you will use will increase as the
amount of your laundry increases.
• Put the softener in the softener compartment in the detergent
drawer. Do not exceed the MAX level. Otherwise, softener will flow
into washing water through flushing.
• Softeners with high density are required to be thinned to a degree
before being put in the drawer. Because high-density softener will
clog the flush and block the flow of the softener.
• You can use your liquid detergent in all programs without pre-
wash. For this, plug the liquid detergent apparatus to second com-
partment of the detergent drawer (present in your machine) and
adjust the liquid detergent amount (use liquid detergent in the
amounts the detergent manufacturers foresee). Do not exceed the
part that is labeled Max, use only for liquid detergent, remove this
from its place during powder detergent use.)
For positioning detergent apparatus in the detergent box, see the
page 29.(*)
Choice of detergent and placing into the machine
(*)Model dependant
49
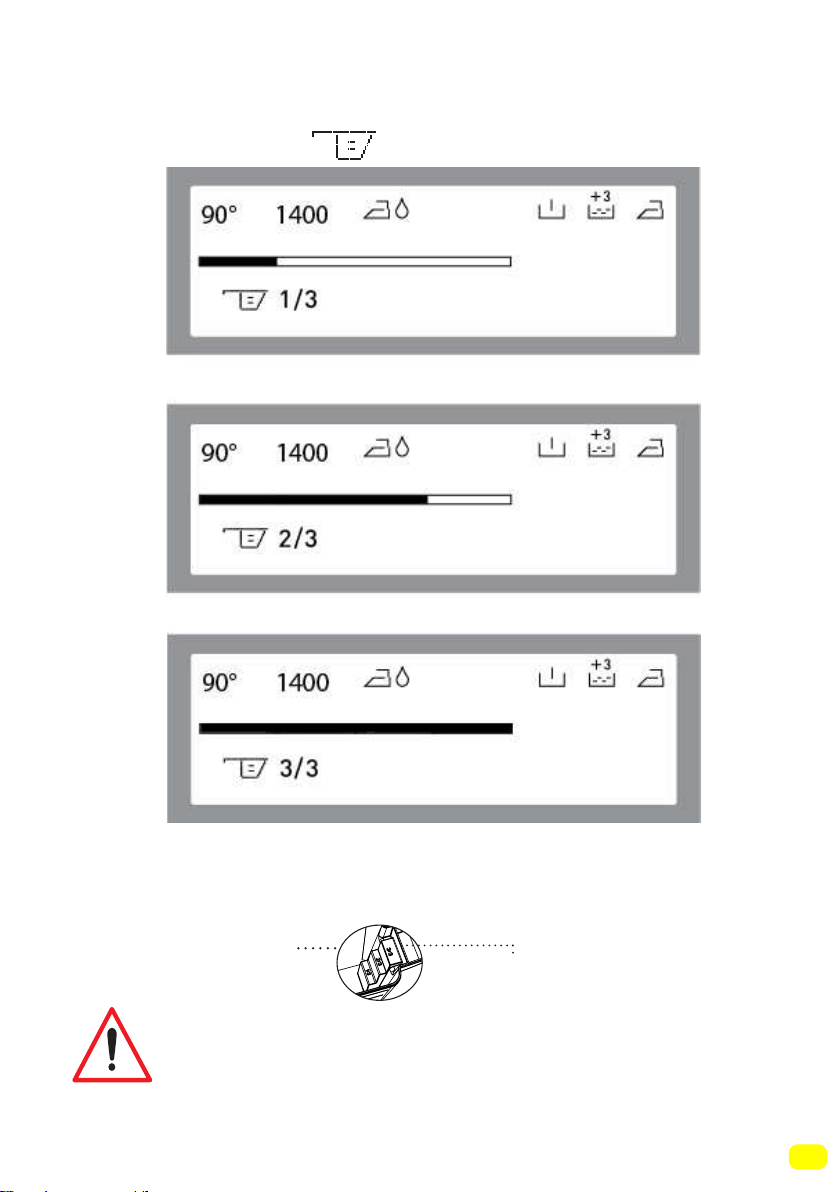
• Your machine has a system that advises the detergent amount
(dose) according to the laundry amount you will load. This
system is show by the symbol found on the electronic
screen.
Note: 3/3 means a completely full detergent drawer. The amount
of the detergent on the screen should be appropriate with
the same amount that you put into your washing machine by
detergent shovel.
If you are going to select a washing or drying
programme, do not place a detergent dosage
adjustment device/ball in your machine. They might
pose a fire risk.
Powder detergent
level steps
(*)
(*)Model dependant
50
Program selection
• Select the washing programme you desire by the programme
knob.
• The programme name and features will be shown on the scre-
en.
• You can make the temperature adjustment ( , 20°, 30°, 40°,
60°, 90°) by touching the symbol button.
• You can make the spinning adjustment ( , 400,600,800,1000,
1200, 1400) by touching the
symbol buttons.
Note: After setting the spin speed, if you select a drying prog-
ramme, your machine shall set the spin speed automatically to
enhance drying performance.
• You can see page (78) of the programme table for programme features.
9 kg. 6kg.
51
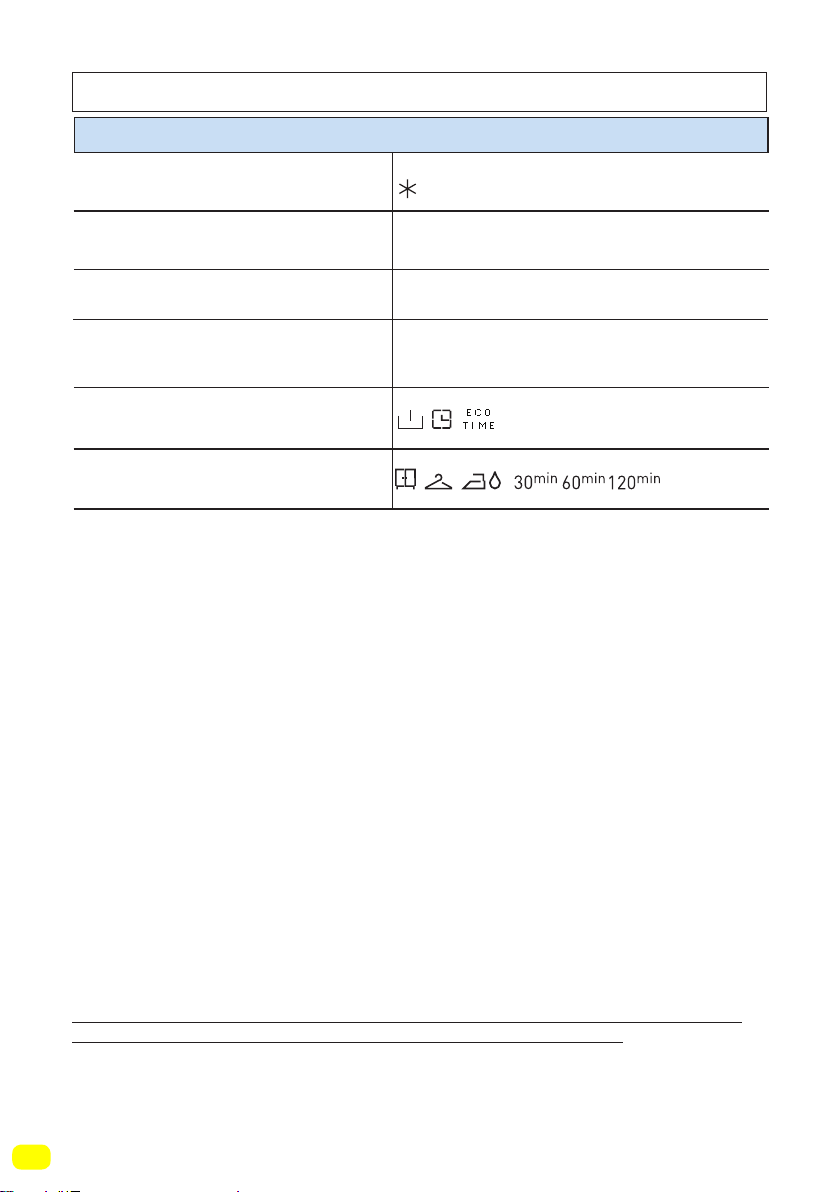
If you want your laundry dried at the end of was-
hing
• You can select the drying setting you wish to use by touching
the symbol button.
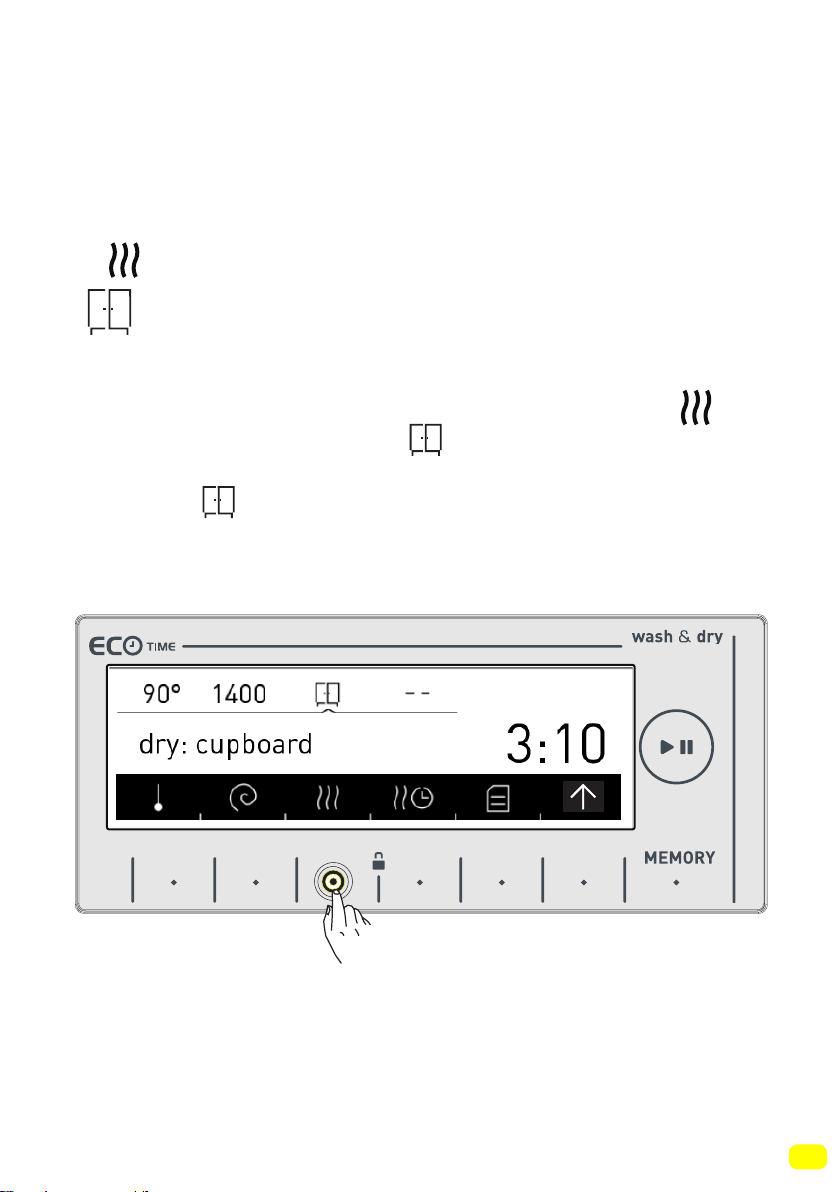
Cupboard dry
• Recommended for laundry that you will put in the cupboard
directly.
• If you want to select the cupboard dry feature, touch the
symbol button until you see the symbol on the screen.
Note: If the symbol does not appear on the screen when
you want to select the cupboard dry function, it means this drying
feature is not used in the washing programme you selected.
9 kg. 6kg.
52
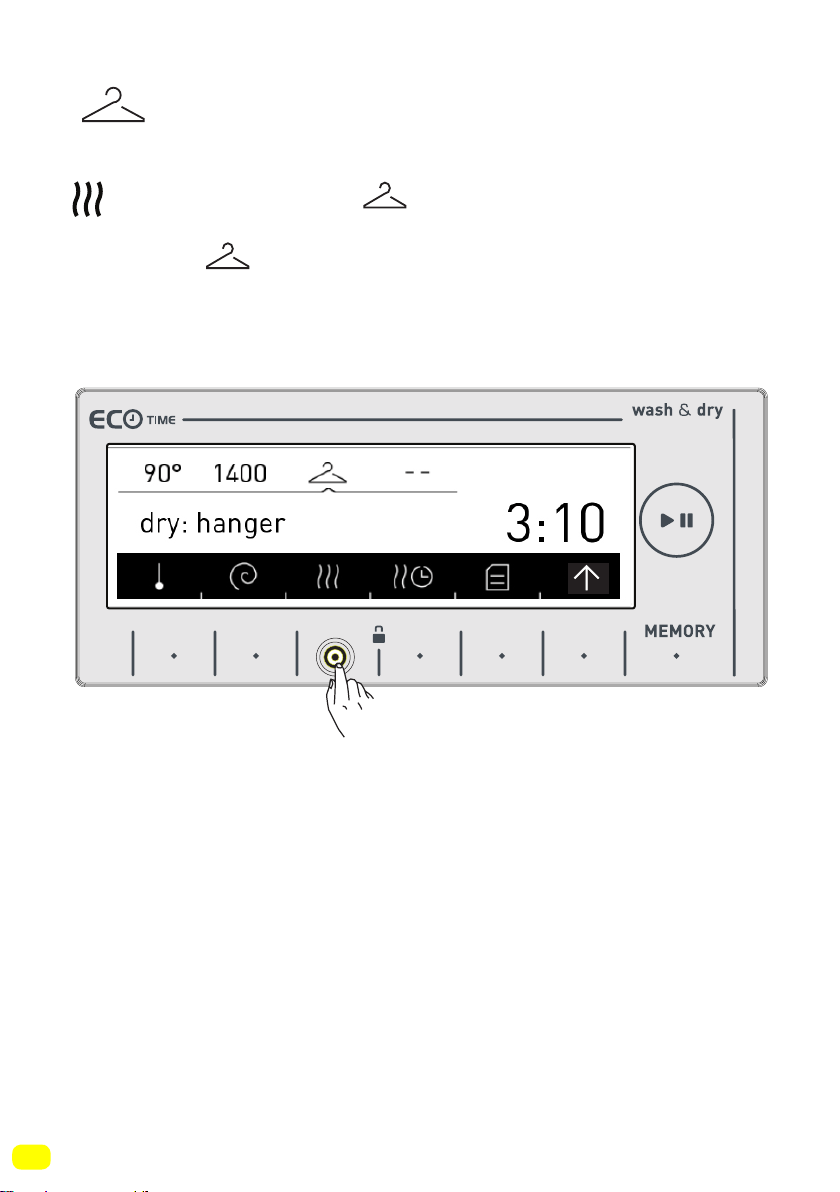
Hanger dry
• Recommended for laundry that requires hanger drying.
• If you want to select the hanger dry feature, touch the symbol
button until you see the symbol on the screen.
Note: If the symbol does not appear on the screen when
you want to select the hanger dry feature, it means that the was-
hing programme you selected does not use this drying feature.
.
9 kg. 6kg.
53
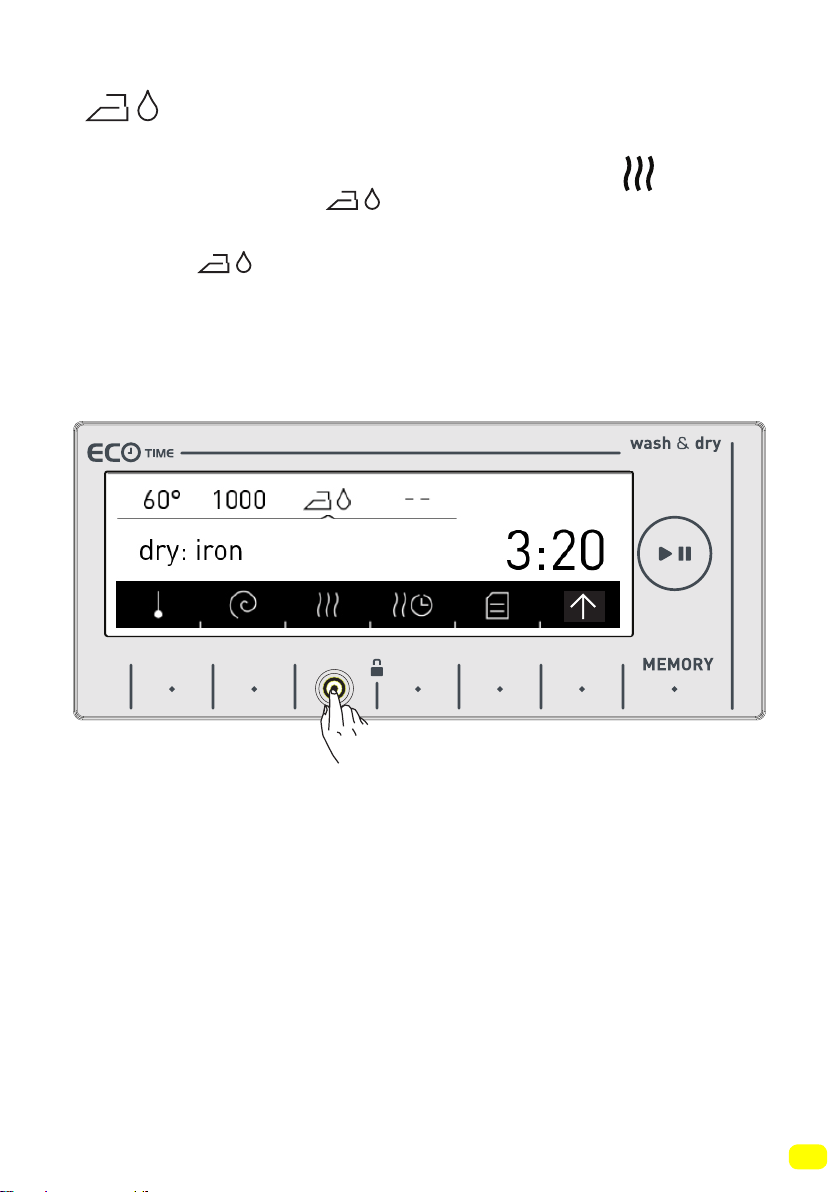
Iron dry
• Recommended for laundry that you will iron before use.
• If you want to select the iron dry feature, touch the symbol
button until you see the symbol on the screen.
Note: If the symbol does not appear on the screen when
you want to select the iron dry feature, it means that the washing
programme you selected does not use this drying feature.
9 kg. 6kg.
54
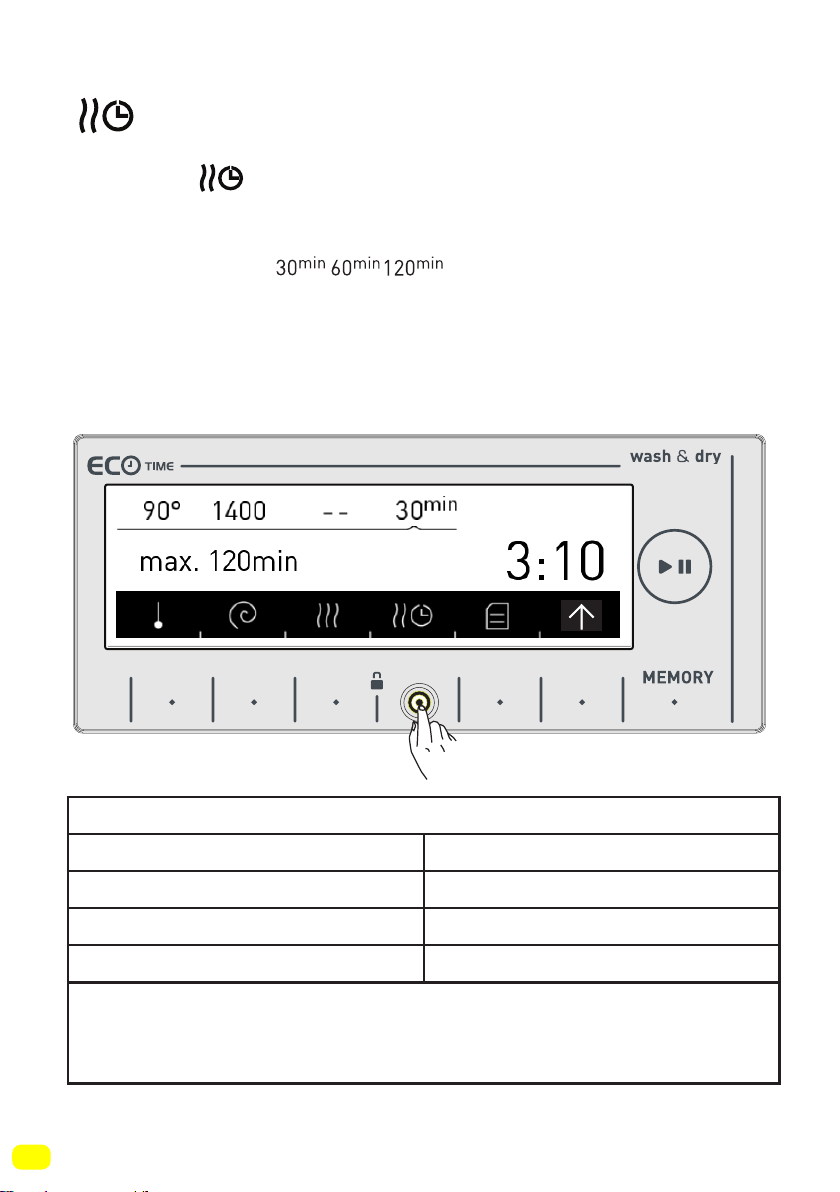
Drying with duration
If you want to use a time-set drying programme;
• Touch the symbol on the screen.
• Drying selections will be displayed on your machine screen as
30, 60 and 120 minutes.
Note: If one of the symbols are not displayed on
the screen when you wish to select the duration drying feature,
it means this drying feature cannot be used in the programme
you selected or the load amount in the machine is not appropriate
for that duration of drying.
9 kg. 6kg.
Duration Drying Programs
Amount of laundry to dry Recommended drying time
1 kg 30 minutes
2 kg 60 minutes
3,5 kg 120 minutes
If the amount of laundry to be dried is above 3,5kg, it is
advised that one of the options of Cupboard, Hanger or iron
drying is selected.
55
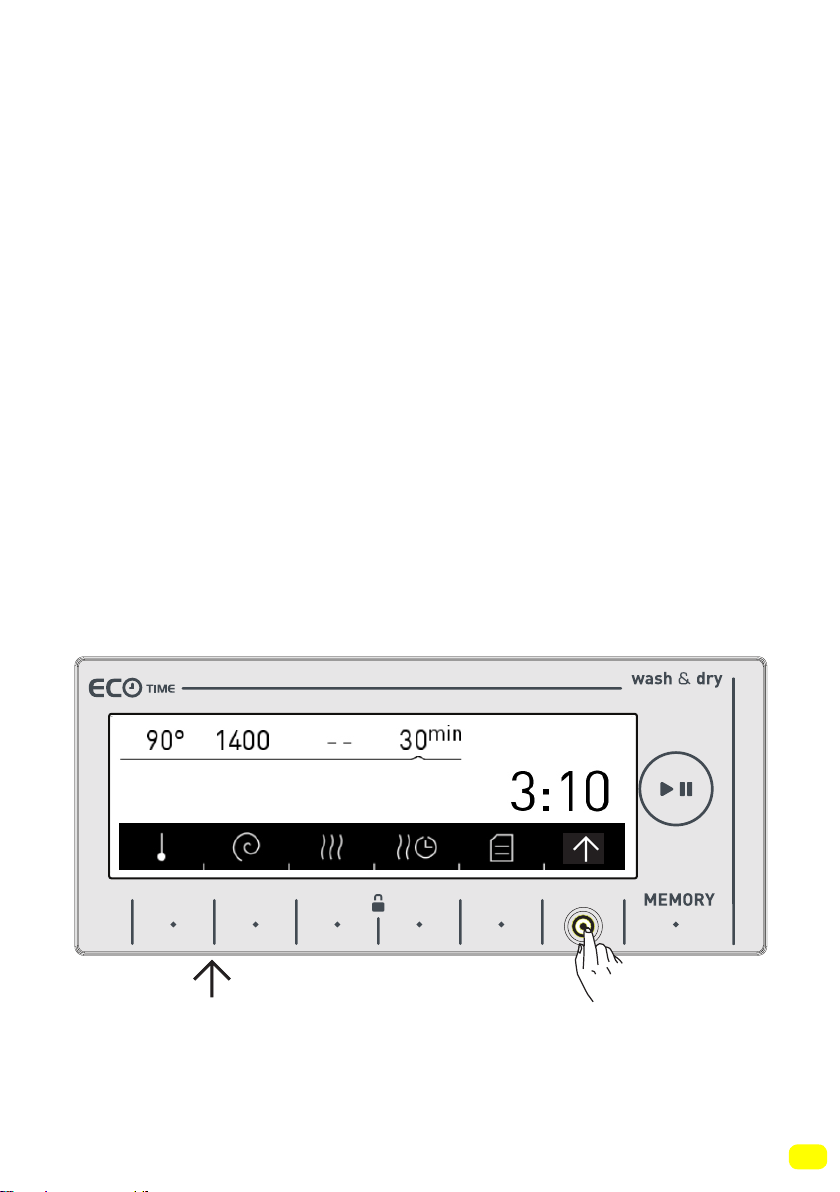
Additional Functions
Before starting the programme, you can optionally select an addi-
tional function.
• Press the button of an additional function you would like to se-
lect.
Additional functions may not be available due to the programme
you selected or the amount of laundry you put in your machine.
Why an additional function may not be available:
-It is not compatible with a function you have selected previously.
- There may not be enough time left on the current programme to
carry out the additional function you wish to select
• You can see the programme table in pages between 78-89 for
the additional functions used in programmes.
• Touch the symbol button to arrive on the additional function
view.
9 kg. 6kg.
56
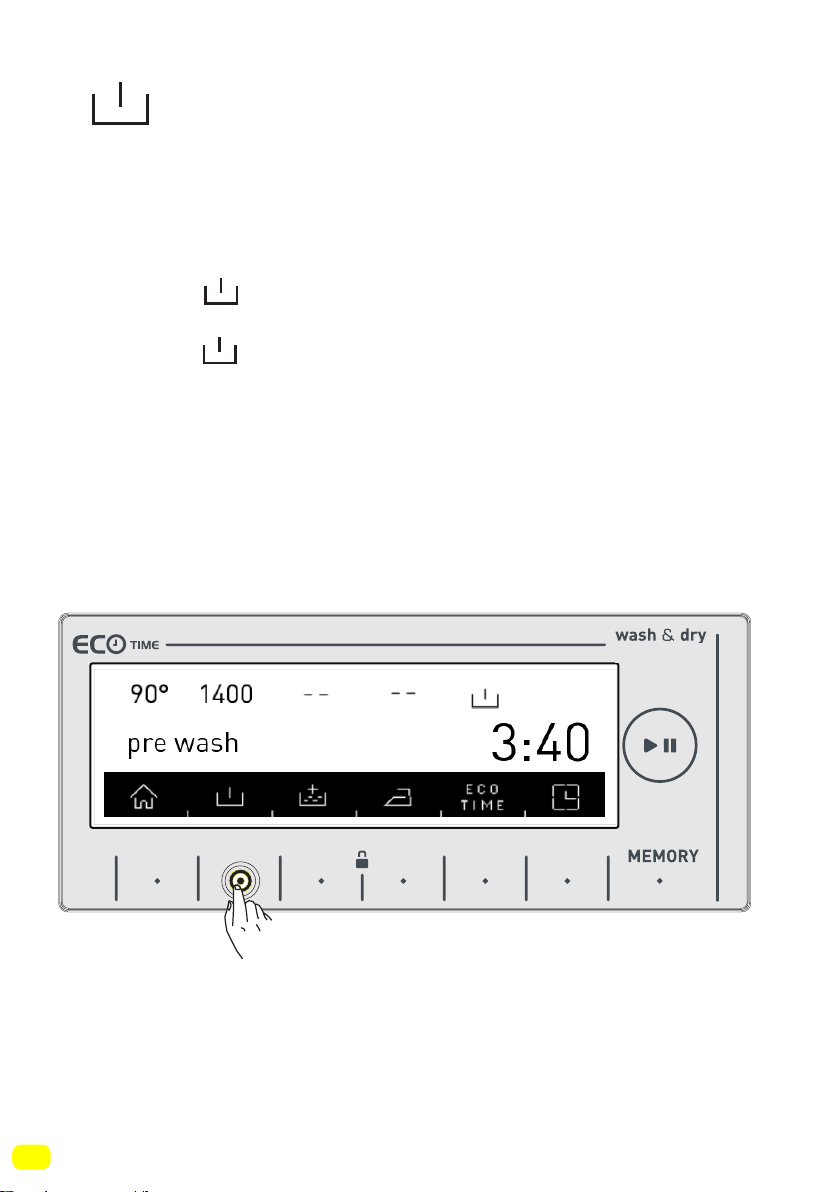
Pre-wash additional function
You can give your heavily soiled laundry a pre-wash before the
main wash using this function. When using this function, you sho-
uld put detergent in the front washing compartment of the deter-
gent drawer.
• Touch the symbol button to activate the pre-wash additio-
nal function.
Note: If the symbol is not displayed on the screen when you
want to choose the pre-wash additional function, it means that
this feature can not be used in the washing programme you se-
lected.
9 kg. 6kg.
57
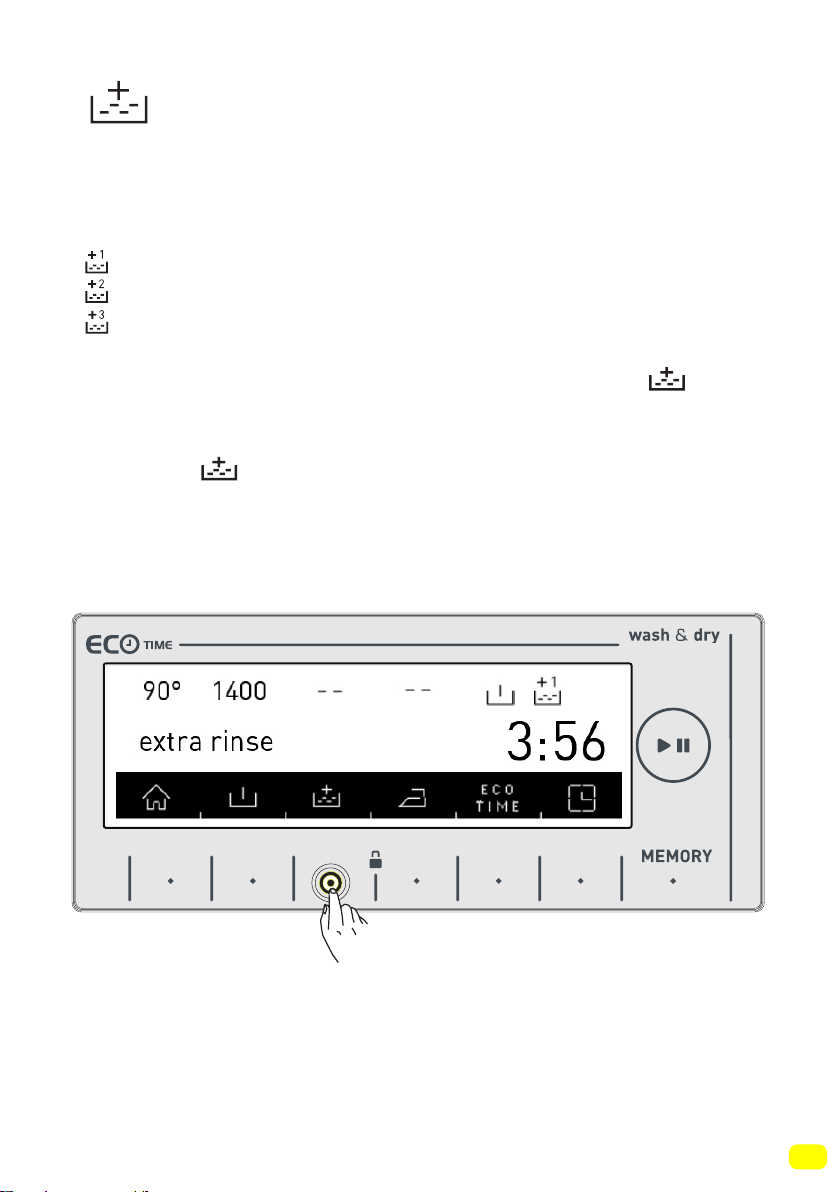
Extra rinse function
You can add an additional rinse or rinses to your laundry by using
this function. Your machine offers you 3 rinsing options for this
additional feature.
: One additional rinse is made at the end of washing.
: Two additional rinses are made at the end of washing.
: Three additional rinses are made at the end of washing.
• If you want to make more than one rinsing, touch the
symbol button until you see the number of rinses you wish.
Note: If the symbol is not displayed on the screen when you
want to choose the additional rinsing function, it means that this
feature is not used in the washing programme you selected.
9 kg. 6kg.
58
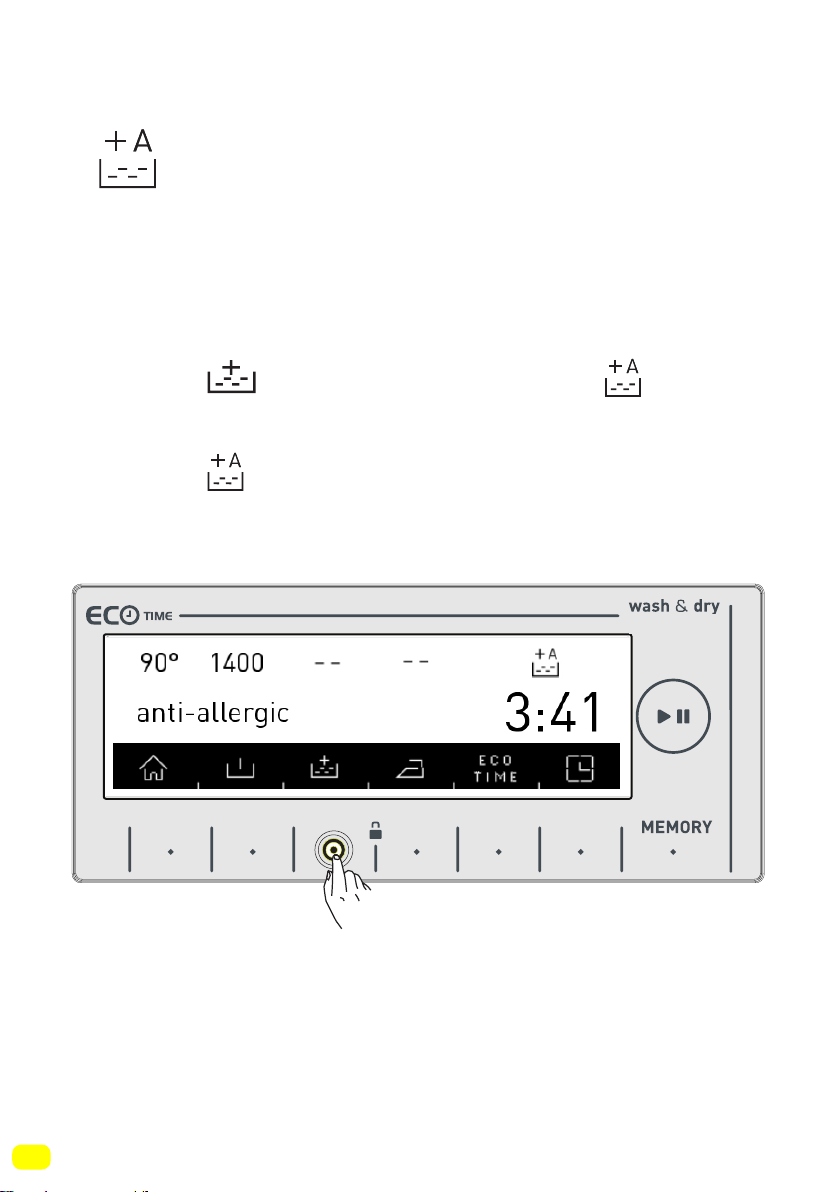
Anti-allergic additional function
You can add this additional rinse operation to your laundry by
using this function. Your machine will carry out all rinsing steps
with hot water (it is recommended for laundry worn on delicates
skin, baby clothes, underwear)
• Touch the symbol button until you see the symbol to
activate the anti-allergic additional function.
Note: If the symbol is not displayed on the screen when you
want to select the anti-allergic additional function, it means that
the washing programme you selected does not use this feature.
9 kg. 6kg.

59
Easy ironing additional function
• You can make your laundry be less wrinkled at the end of the
wash by using this additional function.
• Touch the symbol button to activate the easy ironing addi-
tional function.
Note: If the symbol is not displayed on the screen when you
want to select the easy ironing additional function, it means that
the washing programme you selected does not use this feature.
9 kg. 6kg.
60
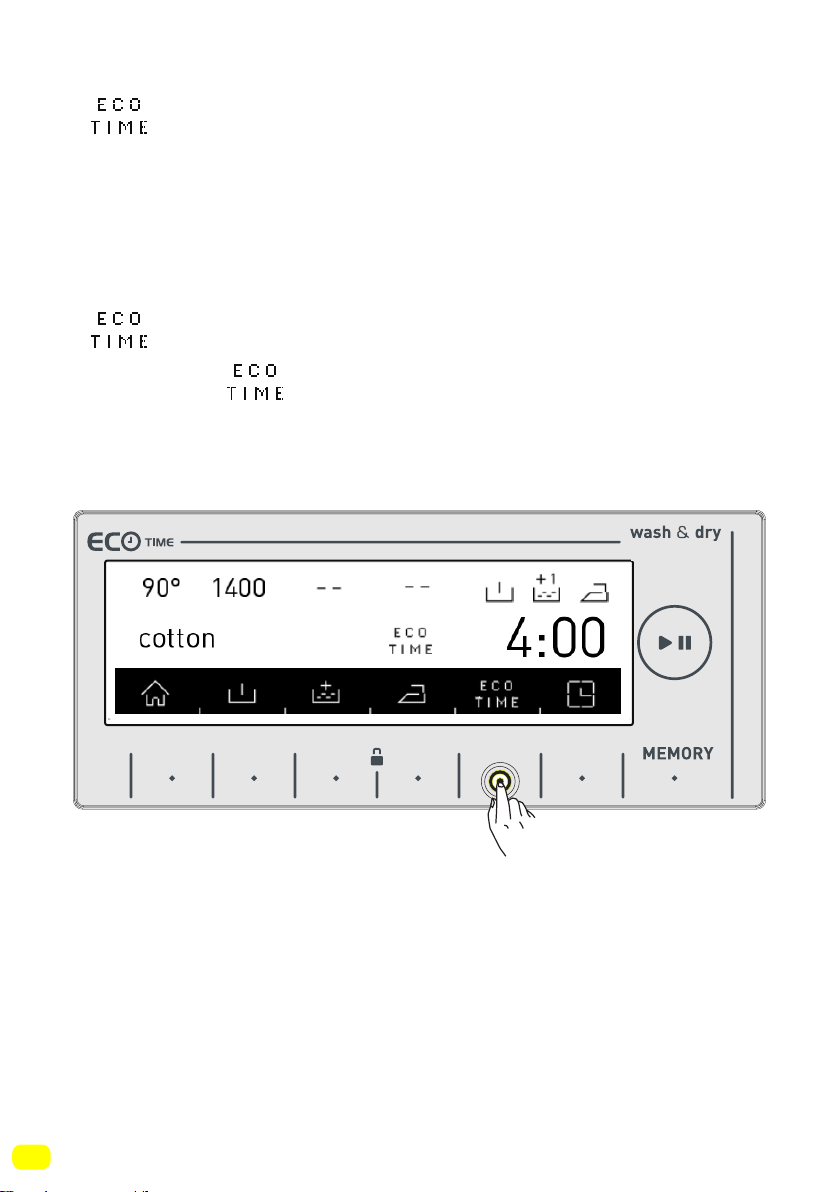
Economic time interval additional
function
• You must make the Eco Time setting from the settings section
for this function to work efficiently (see page 36).
• If you want to activate the Eco Time function touch the button of
symbol.
• You will see symbol is activated on the screen.
9 kg. 6kg.
61
9 kg. 6kg.
9 kg. 6kg.
• The Eco Time feature will be constantly displayed on the scre-
en until it is shut off. To shut off, the eco time additional function
button must be pressed.
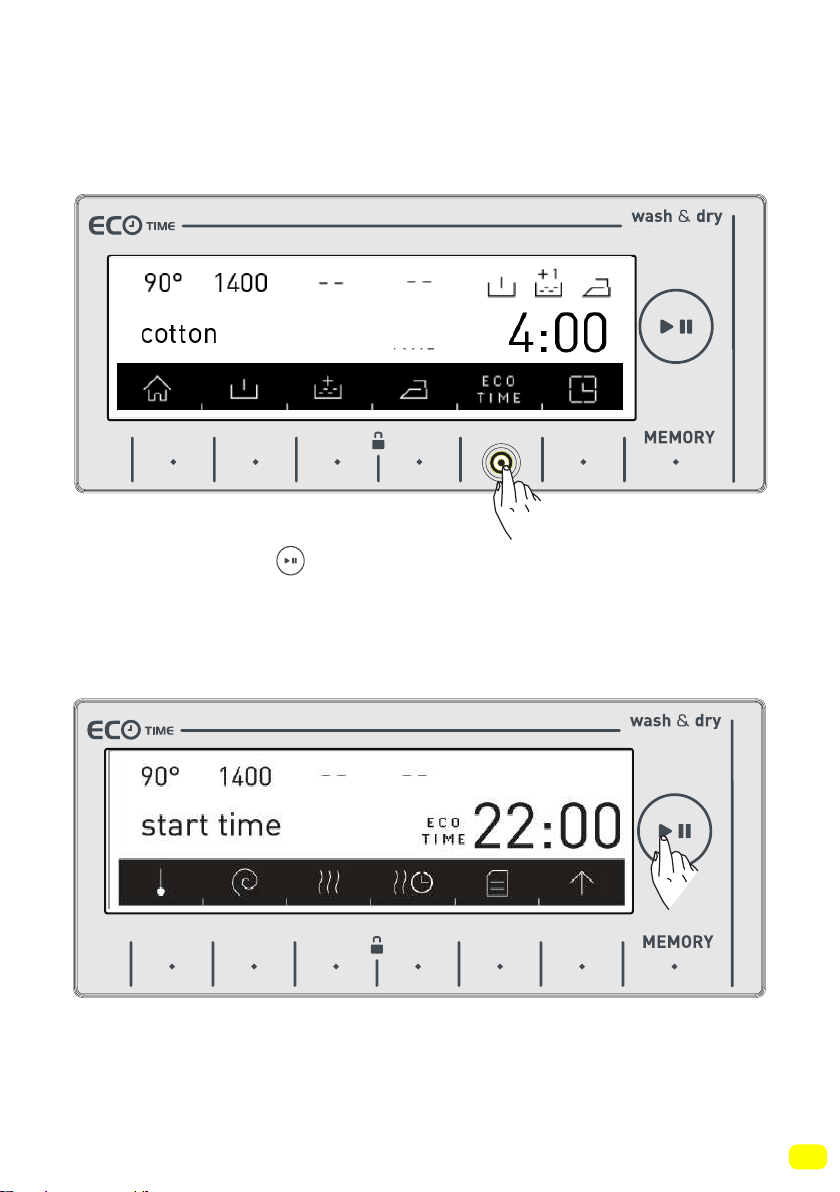
• If you want to run a program while the eco time feature is active,
touch the button of symbol. The starting time of the program-
me will automatically be delayed until the economic time interval.
The programme “starting time” and the programme duration will
be shown on the display with certain intervals.
62
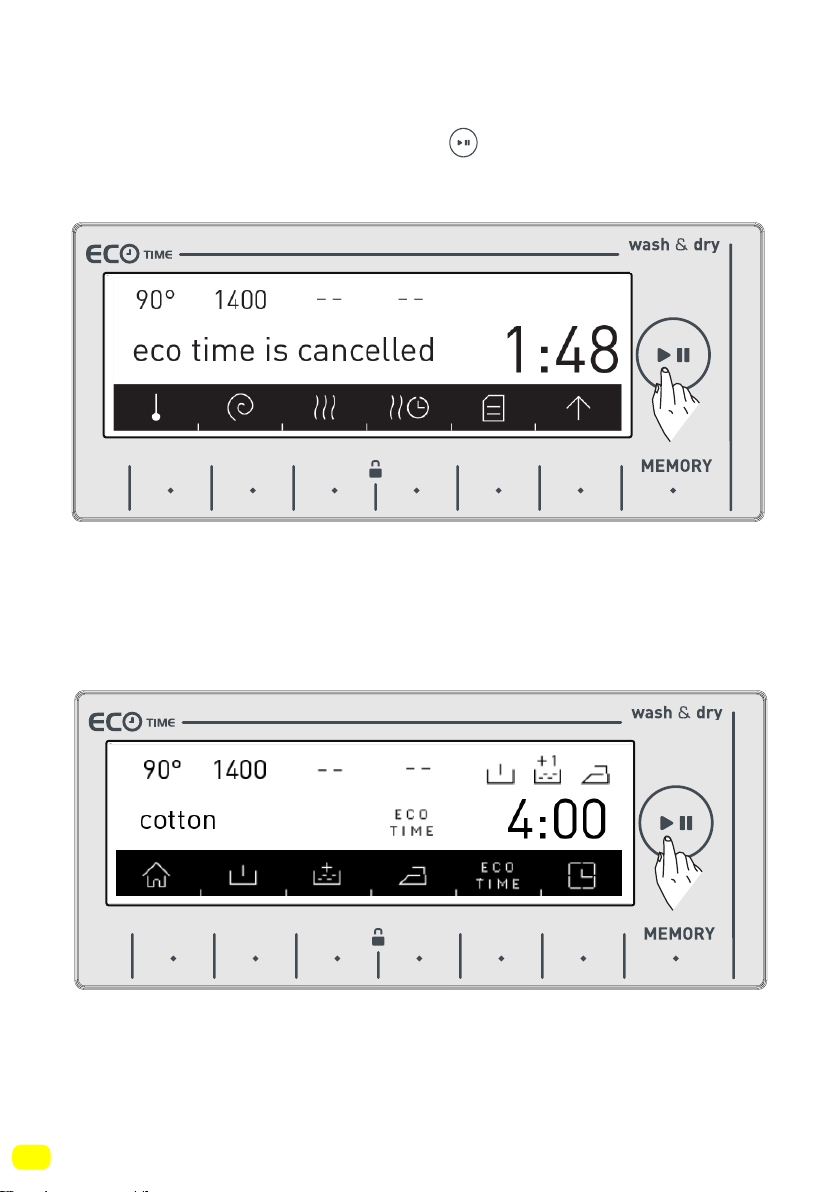
• If you don’t want to run the programme you have selected bet-
ween the eco time hours, touch the button again. “eco time
cancelled” text will be displayed on the screen.
• Your machine will return to the main screen of the programme
you have selected in 3 seconds. To start the programme, run the
programme you selected by touching the start/pause button.
9 kg. 6kg.
9 kg. 6kg.
63
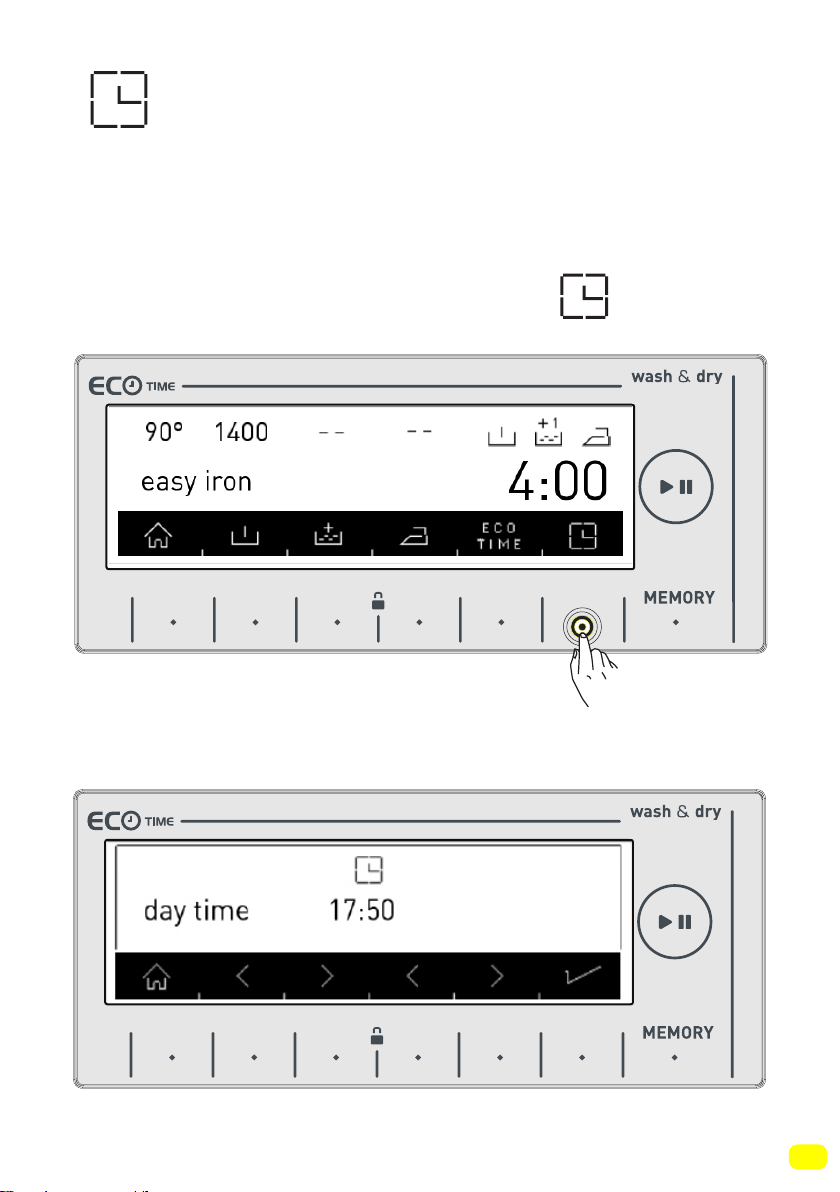
Delay Time / Finish time
adjustment additional function
• By using this function, you can delay your machine starting the
washing operation by 10 minutes up to 23 hours 50 minutes or
you can set the wash to finish at a certain time.
• To activate this additional function, touch the symbol.
• The current time shall be displayed on the screen for a short
duration.
9 kg. 6kg.
9 kg. 6kg.
64
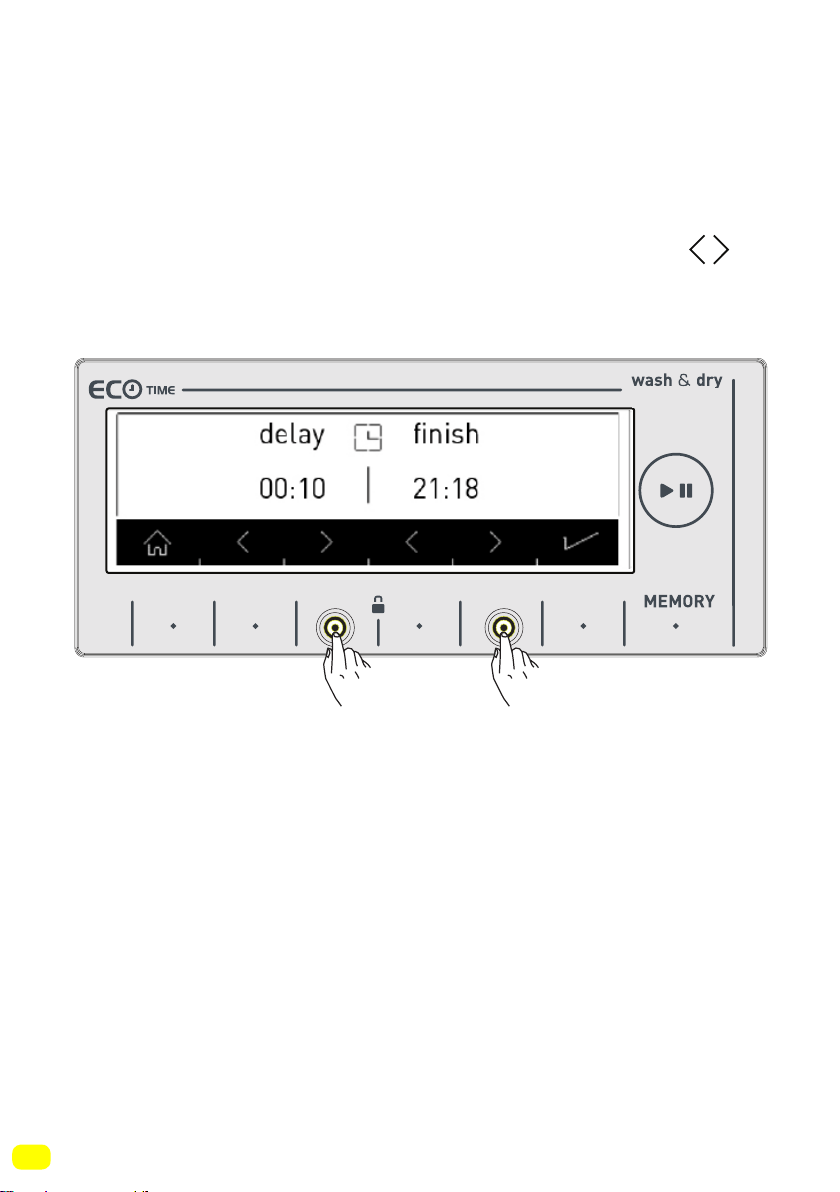
• The screen displaying the current time will automatically return
to the screen that displays the delay time / finish time.
• On this screen, you can delay the washing time, or make the
washing operation end at a time you wish by touching the
symbol buttons.
Note: The current time setting must be accurate to be able to use
this function correctly. See page 38 to change the current time
setting.
9 kg. 6kg.
65
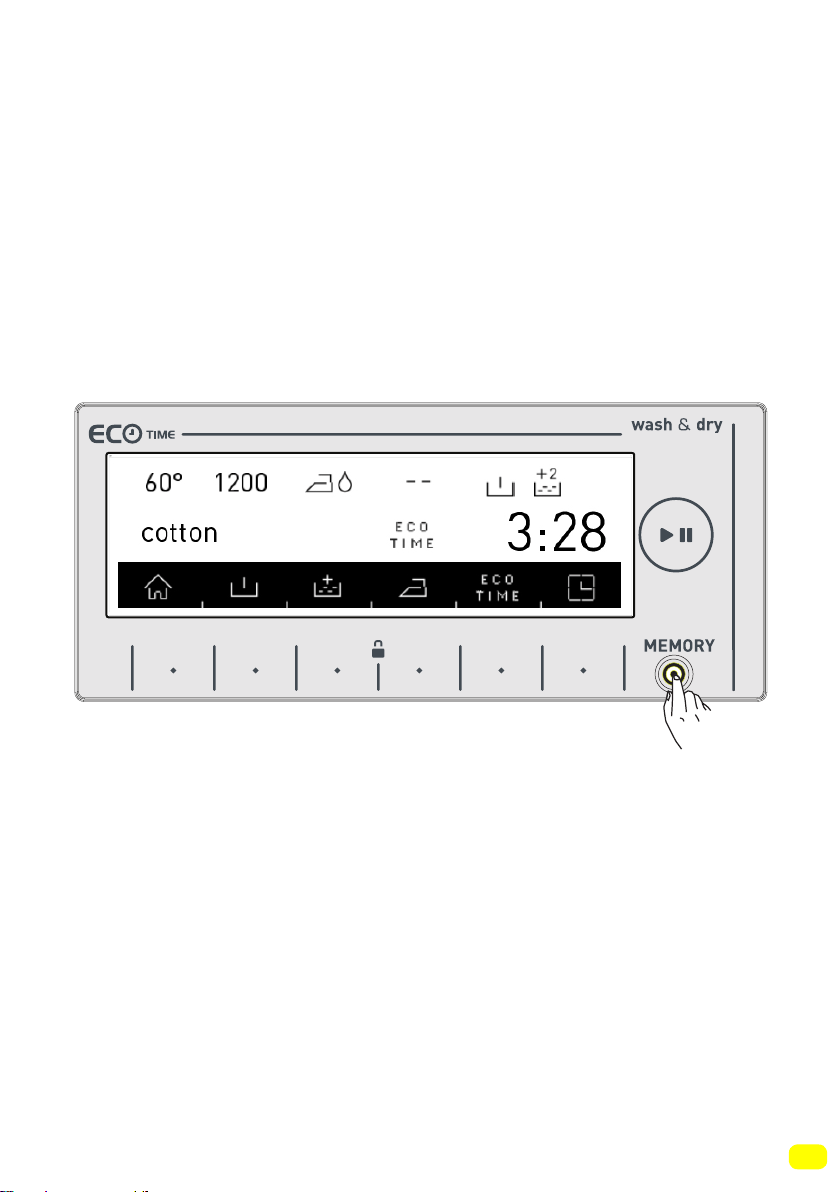
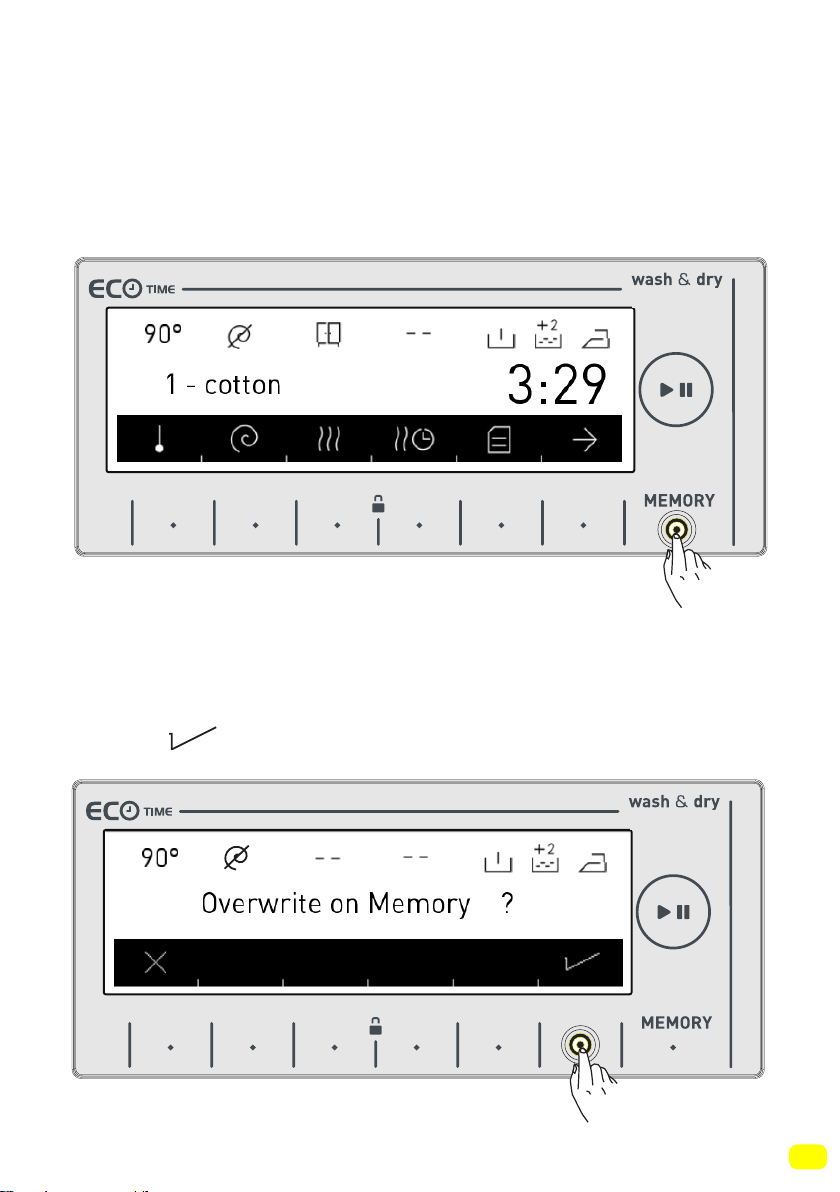
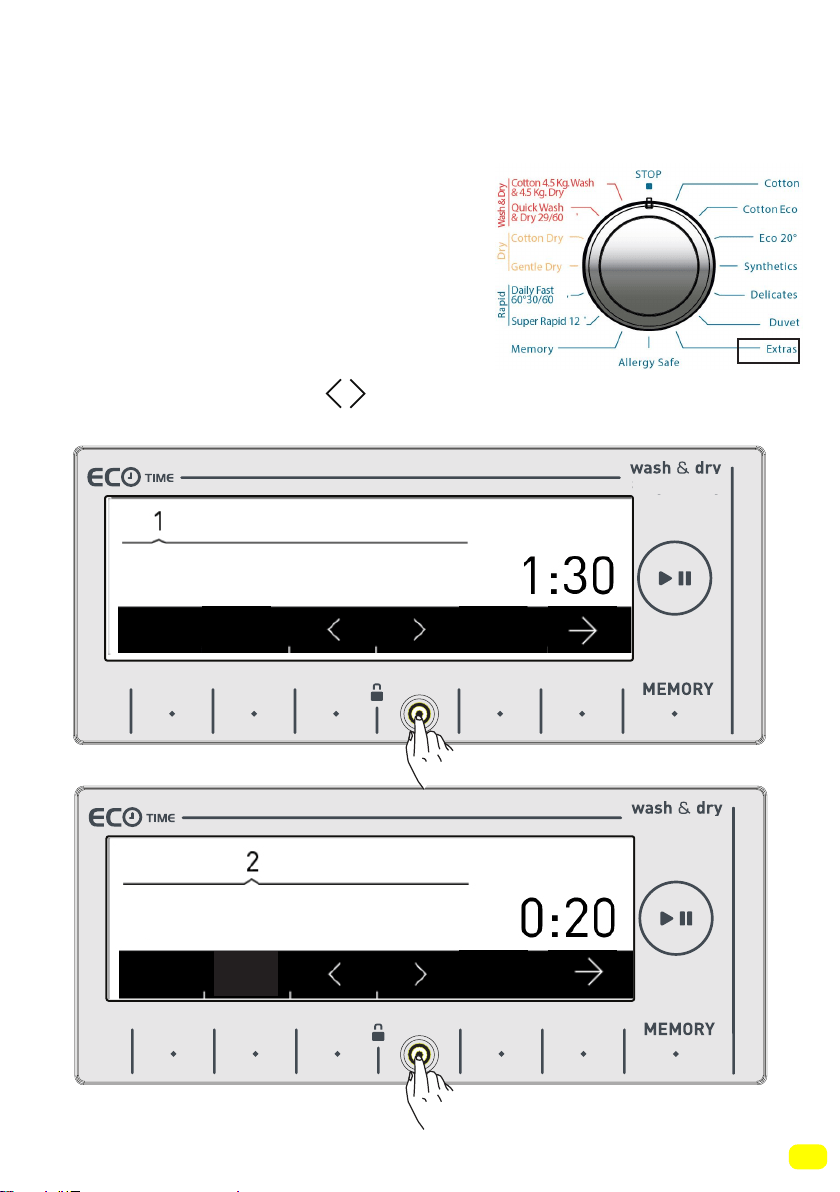
Memory record function button (MEMORY)
With this feature of your machine, you can store the washing and
drying programme you have used before or programme settings
you have performed before by simply touching a button without
taking your time with this memory option. Thus, you can wash
and dry your laundry without performing these settings again.
Select the settings you would like to store in the memory on the
display and touch the favorite record button.
9 kg. 6kg.
66
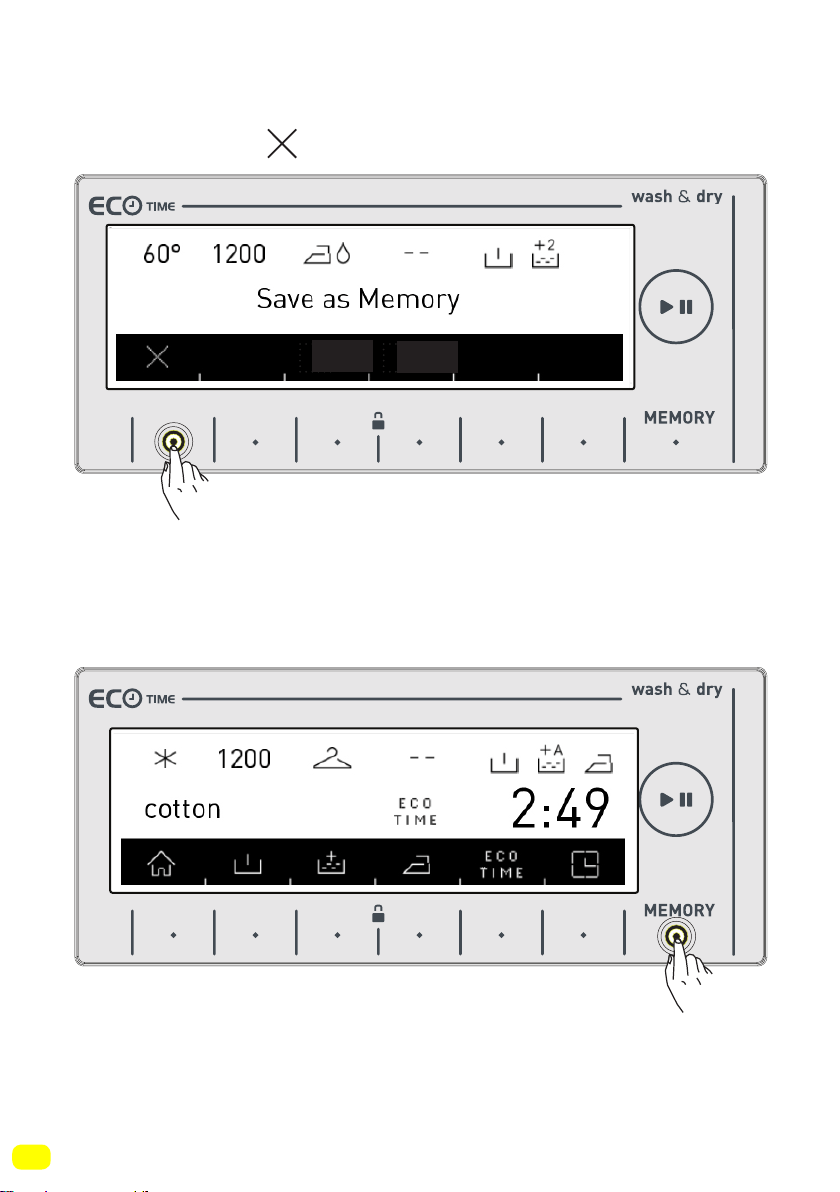
• If you would like to make changes on the washing and drying
programme before storing, you can return to the programme
menu by pressing button.
You can touch the favorite button again when you have performed
the change you desire.
9 kg. 6kg.
9 kg. 6kg.
67
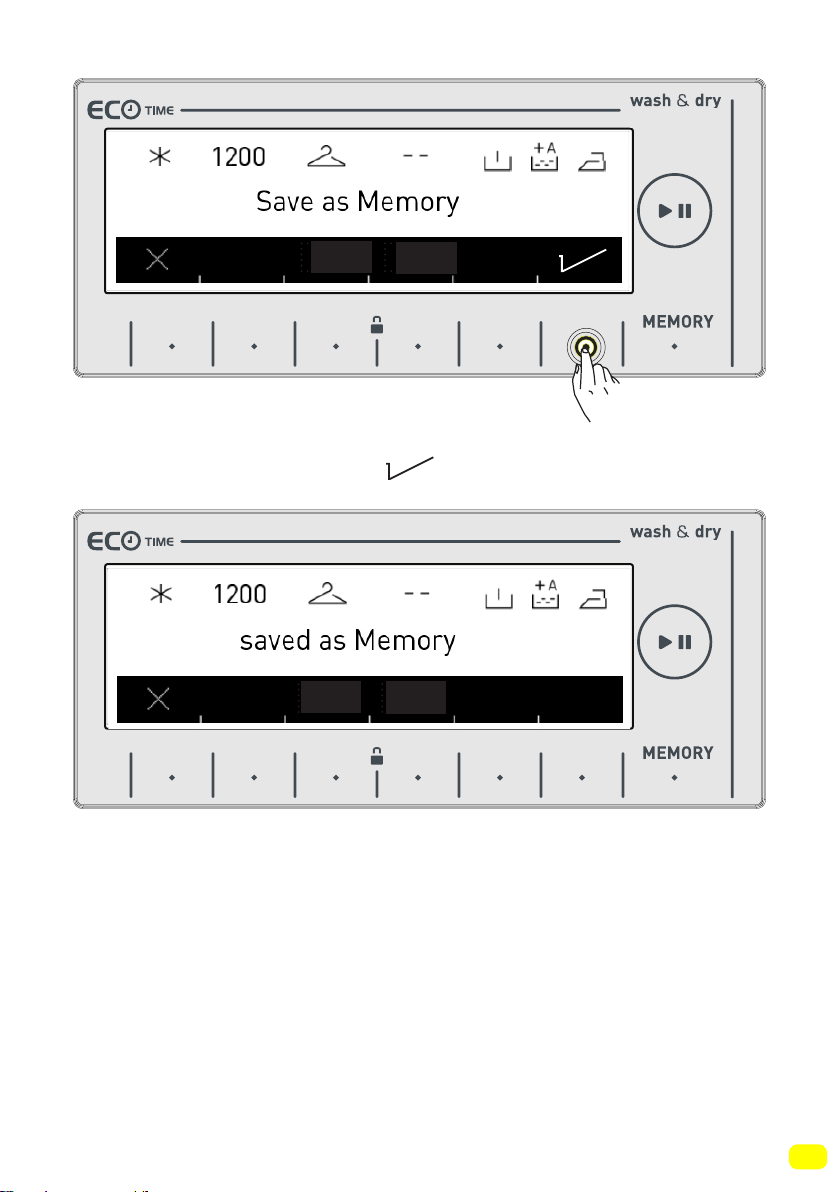
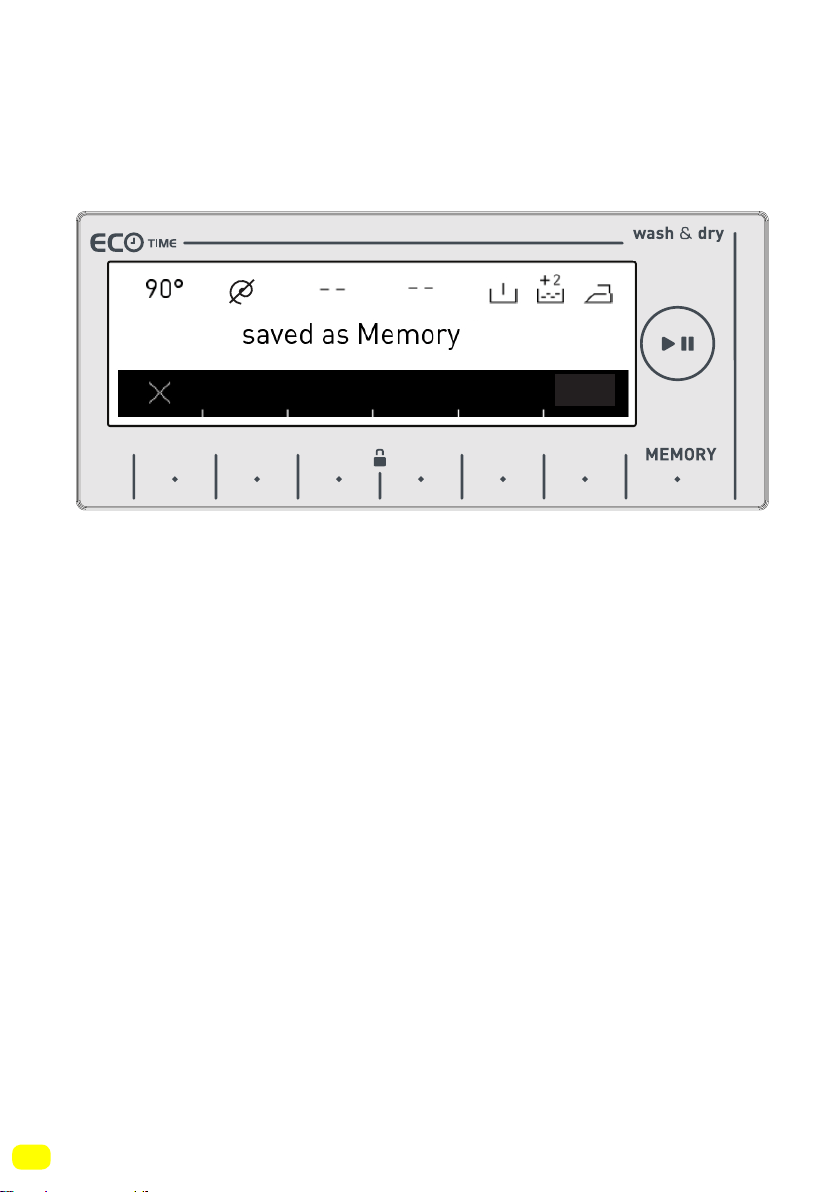
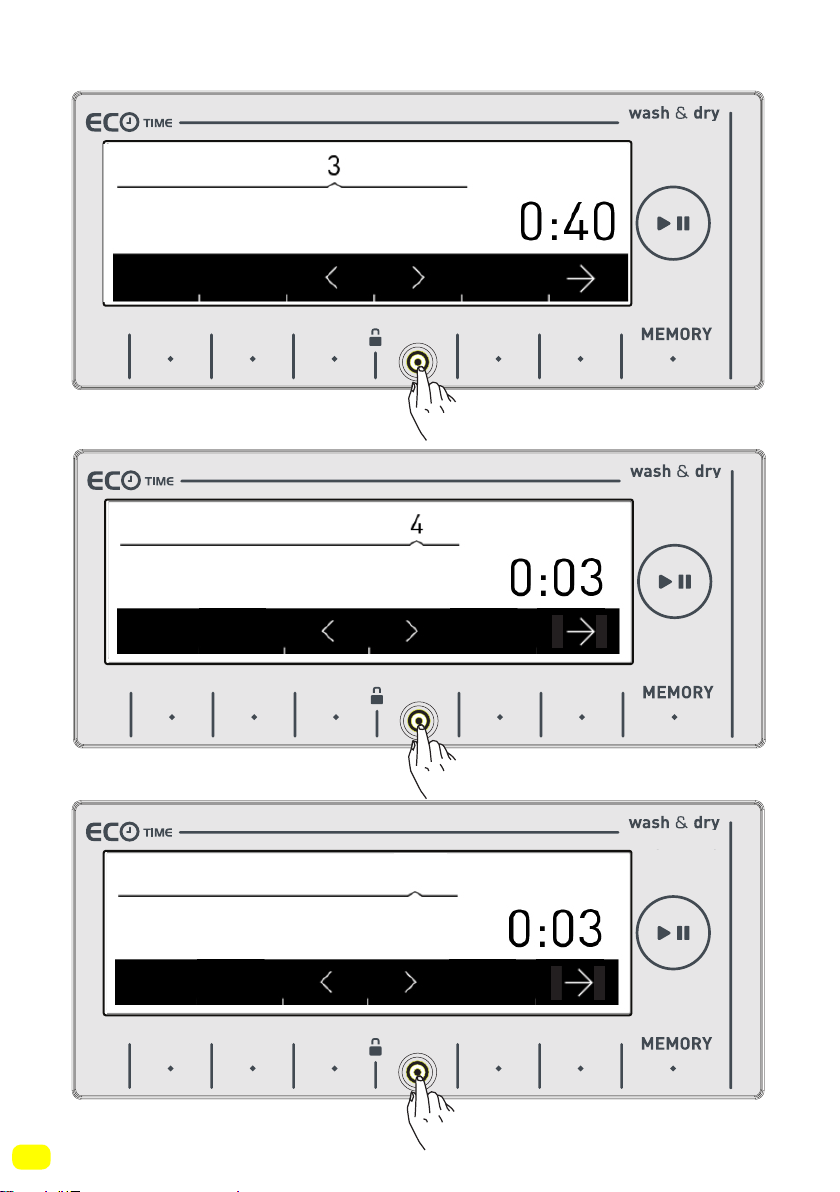
• You can store it by pressing symbol button.
• A screen as shown above shall be displayed when the storing is
complete and your machine shall automatically return to the main
screen of the washing or drying programme where you performed
the setting operation.
9 kg. 6kg.
9 kg. 6kg.
68
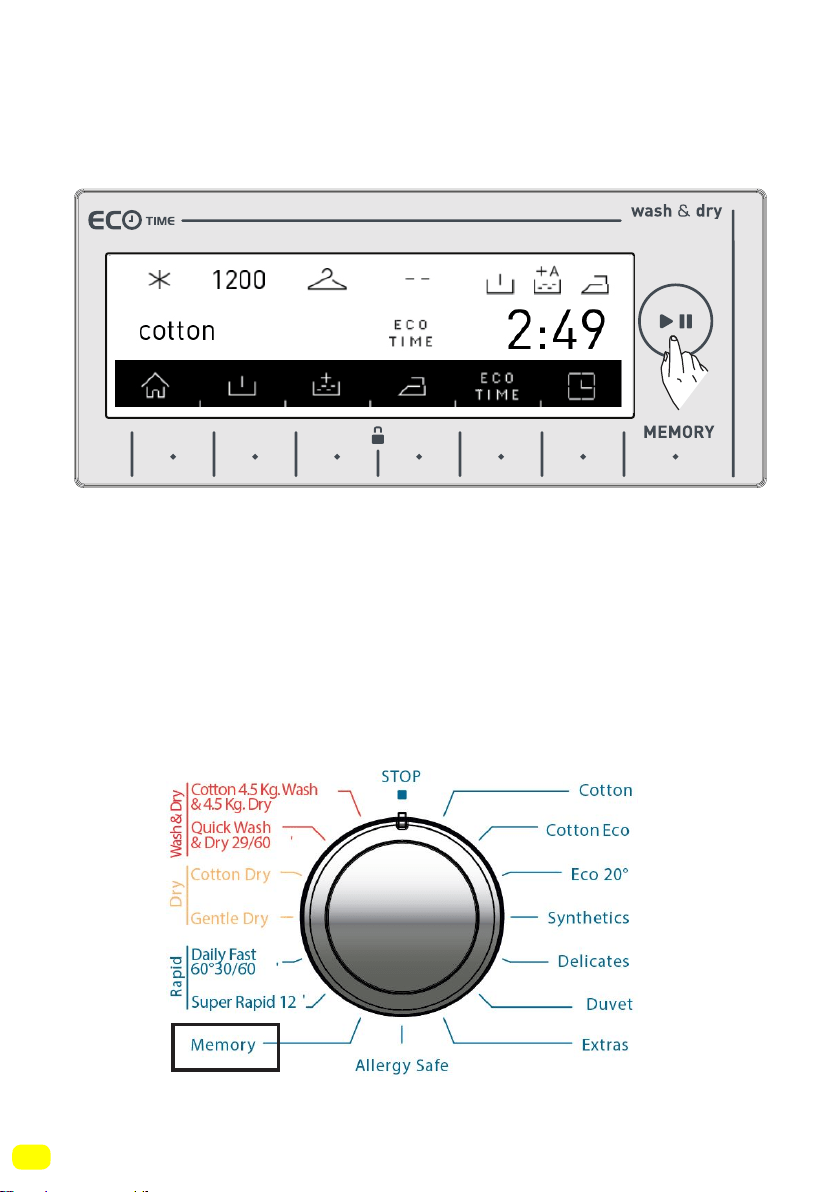
• You can wash your laundry or select other programme by pres-
sing start/hold button to perform washing.
• If you would like to use the programme you have stored in the
memory,
you can rotate the programme selection button to memory step
and perform your selection as shown in the figure below.
9 kg. 6kg.
69
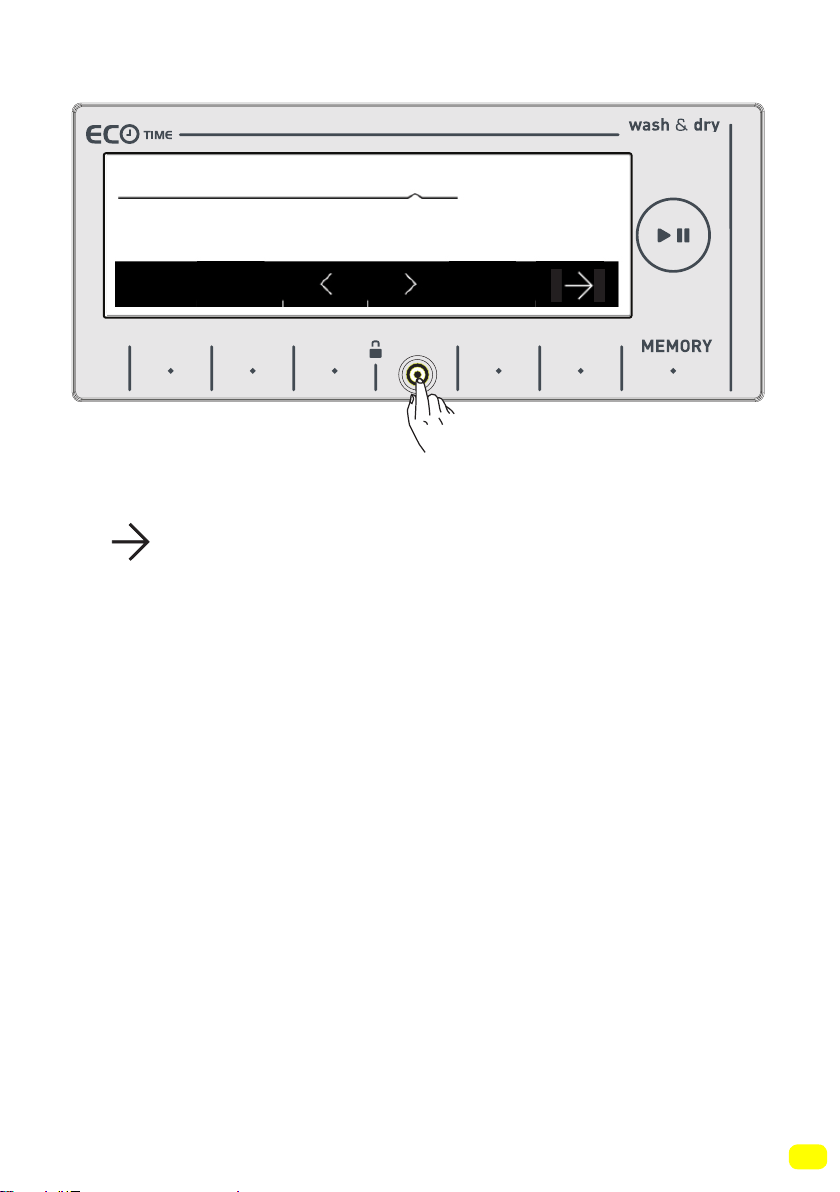
• If you would like to change the settings you have stored in the
memory, select the memory option or perform the programme
combination setting on any programme and touch the (MEMORY)
button.
• If you would store a new programme on a previously stored
programme, a confirmation dialog to confirm your selection shall
be displayed on the screen, you can confirm your selection by
pressing symbol button.
9 kg. 6kg.
9 kg. 6kg.
70
• This would allow you to store a new memory programme.
9 kg. 6kg.
71
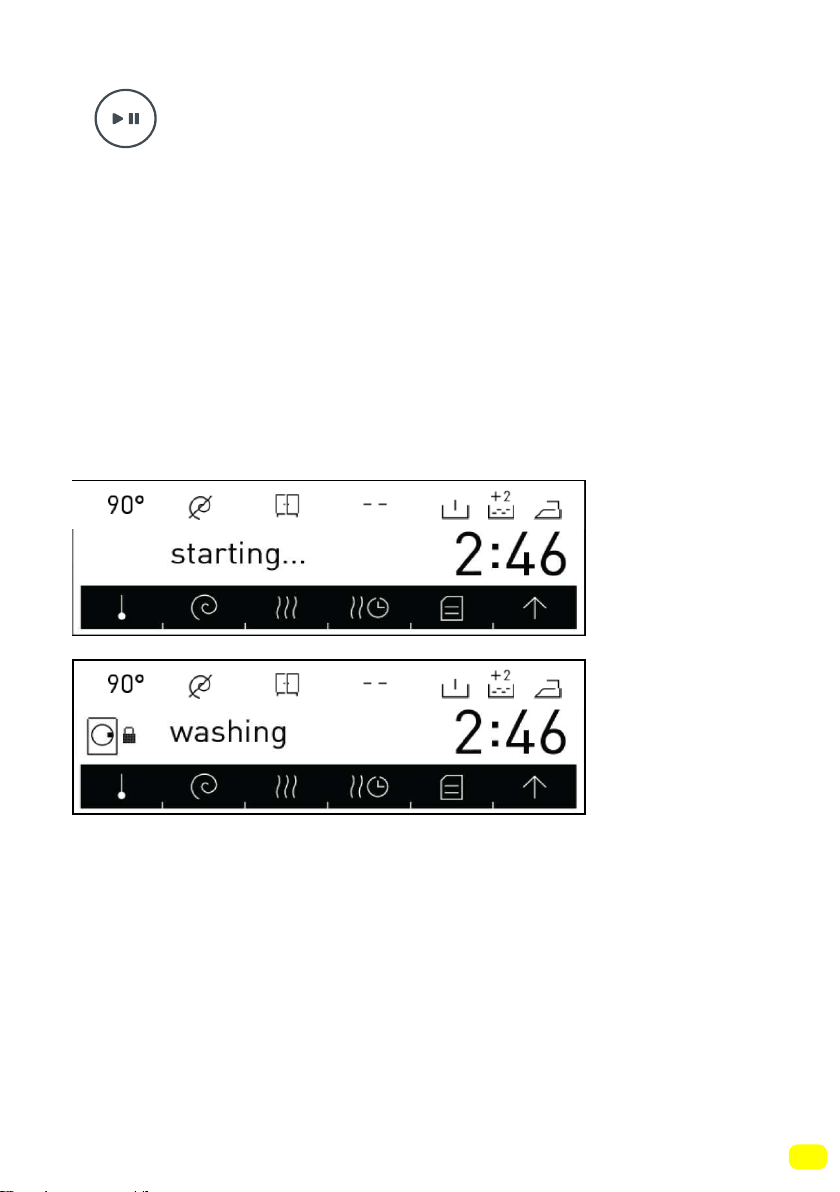
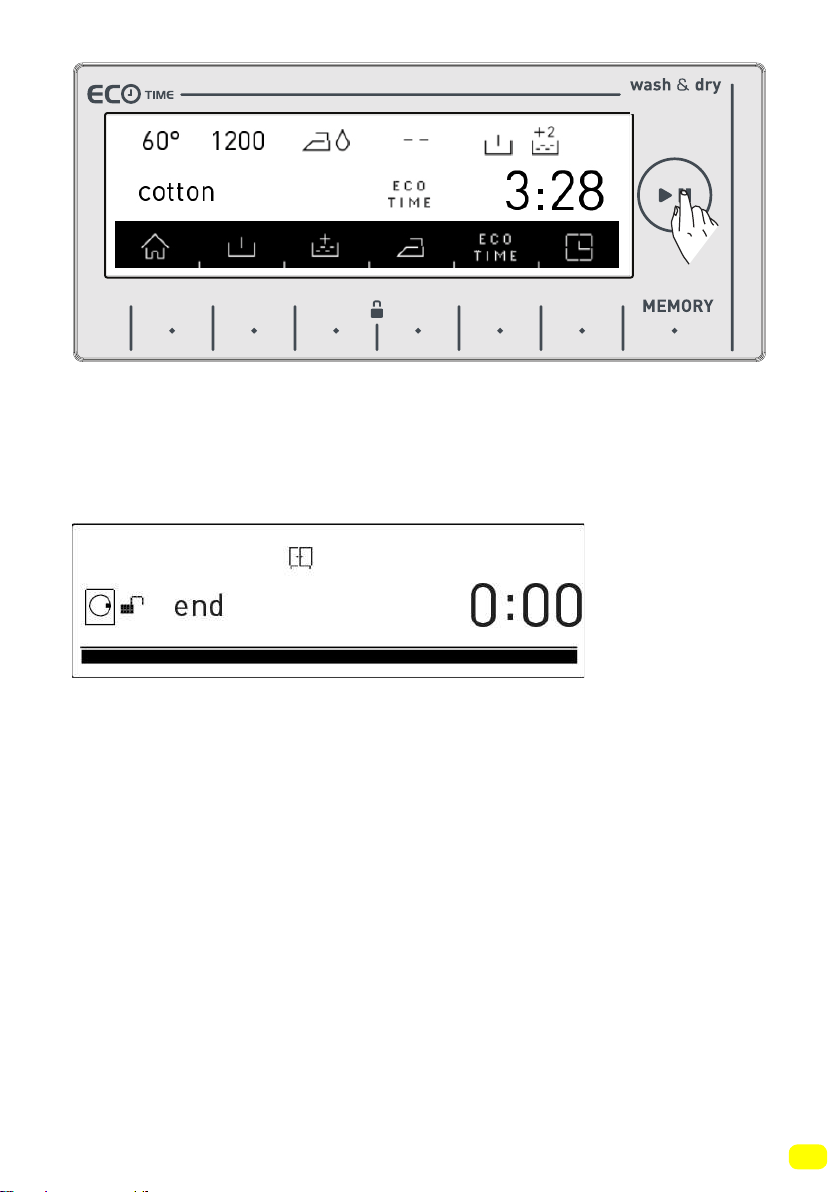
Start/Pause button
Starting the programme
• You can start the programme you have selected by touching the
Start/Pause button
• When you turn your machine on, the programme you have
selected will be active on the screen. The screens below are an
example of what is displayed on screen during washing operati-
ons.
• Washing
programme is
ready.
• Washing
programme
is active.
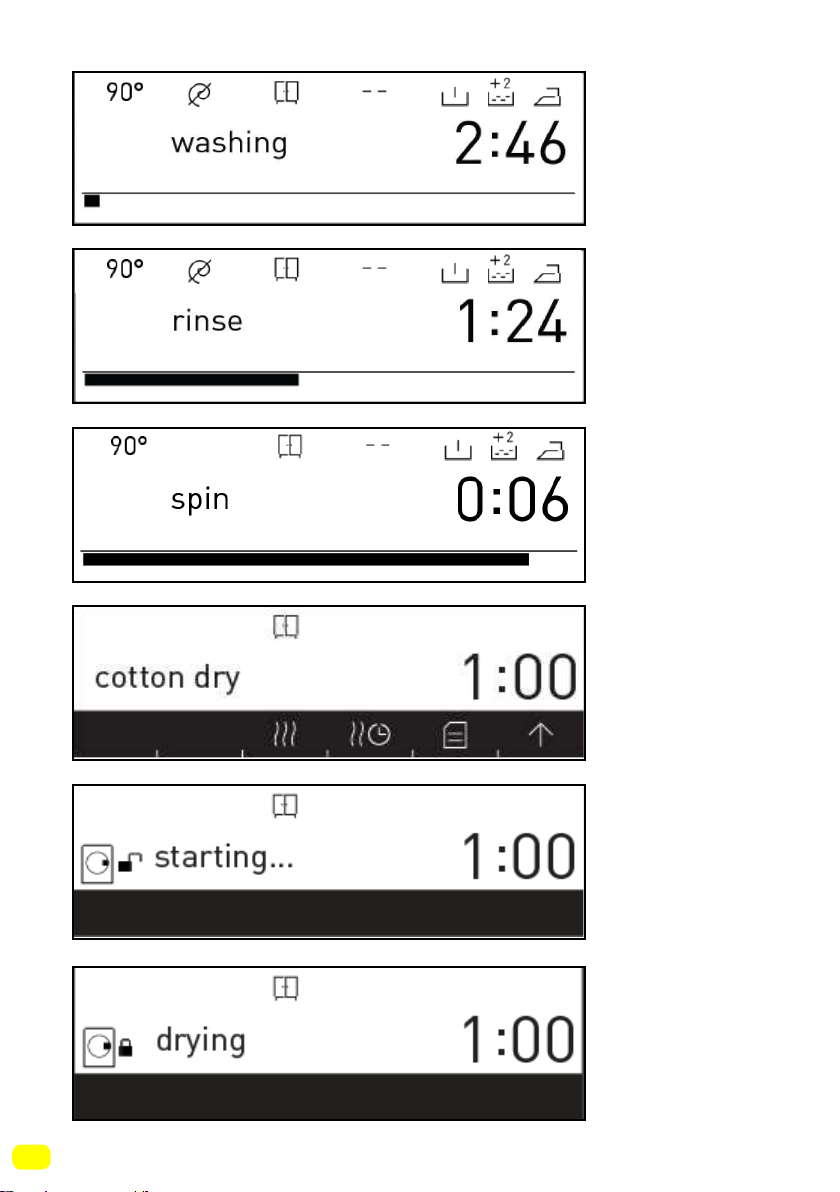
72
• Washing
step.
• Rinsing
step.
• Spinning
step.
• Drying
programme
ready.
• Drying
programme
selected.
• Drying
programme
active.
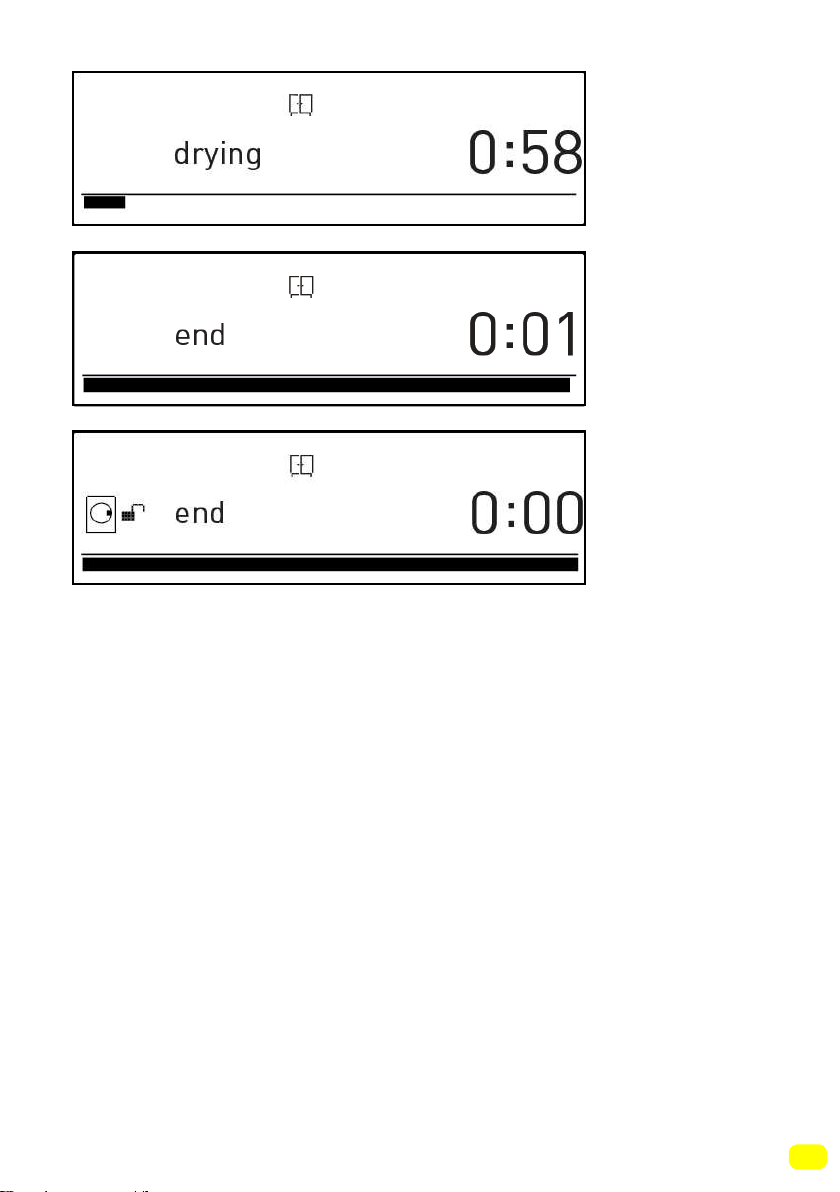
73
• Drying step.
• Programme
end.
• Programme
end door
unlocked.
74
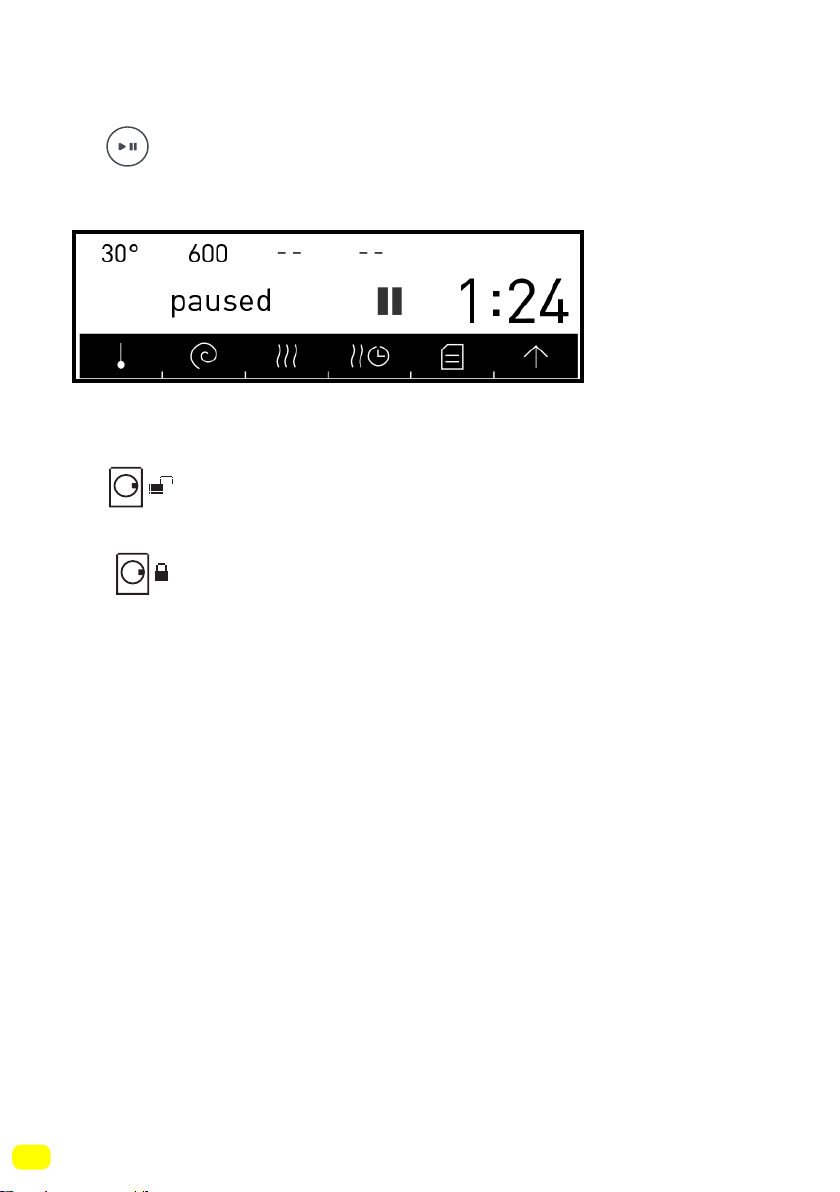
Pausing a programme / Adding laundry
• You can pause or restart the programme you have selected with
the button. You can use this function when you want to add
laundry to your machine.
• If symbol is displayed on the screen, you can
open the door of your machine and add laundry.
• If symbol is displayed on the screen you machine has
passed the laundry adding step.
Cancelling a programme
If you want to cancel a programme that is running:
- Switch the programme button to the the CANCEL position.
- Your machine will stop the washing operation and the program-
me will be cancelled.
- To get rid of the water accumulated in the machine switch the
programme button to any programme.
- Your machine will perform the necessary discharge operation
and cancel the programme.
- You can run your machine by selecting a new programme.
• Washing
stopped.
75
• See Page 78 for the Program Table
Finishing a programme
Your machine will stop by itself as soon as the programme you
have selected finishes.
- You can open the machine’s door and remove the laundry.
- Leave the door of your machine open after removing the laundry
so that the machine can dry out.
- Switch the programme button to the CANCEL position.
- Unplug your machine.
- Turn the water faucet off.
If you are not satisfied with the drying level of your laundry,
select the best drying programme for your laundry and dry
your laundry again.
Note: Your machine has a cooling stage that cools down your
laundry at the end of the drying operation. This cooling stage is
designed to prevent users from being harmed as they remove the
- ”end” is disp-
layed on the
screen.
9 kg. 6kg.
76
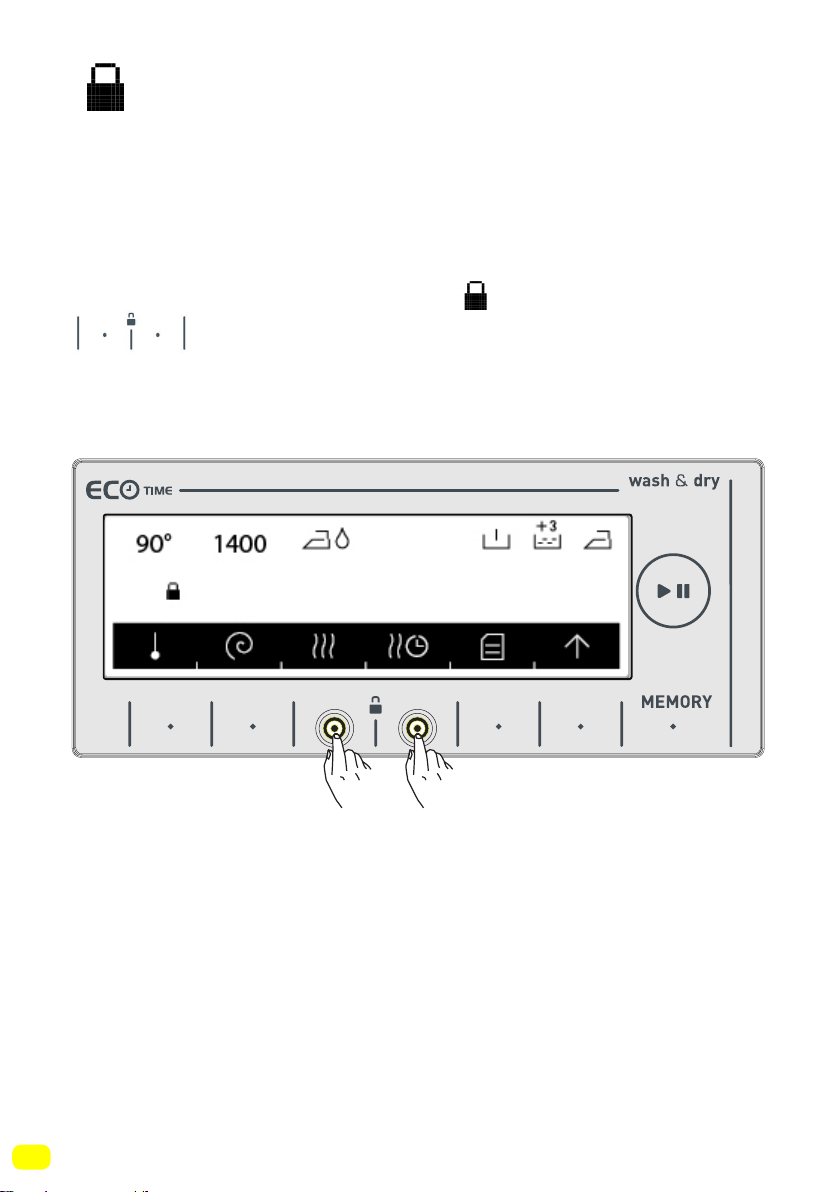
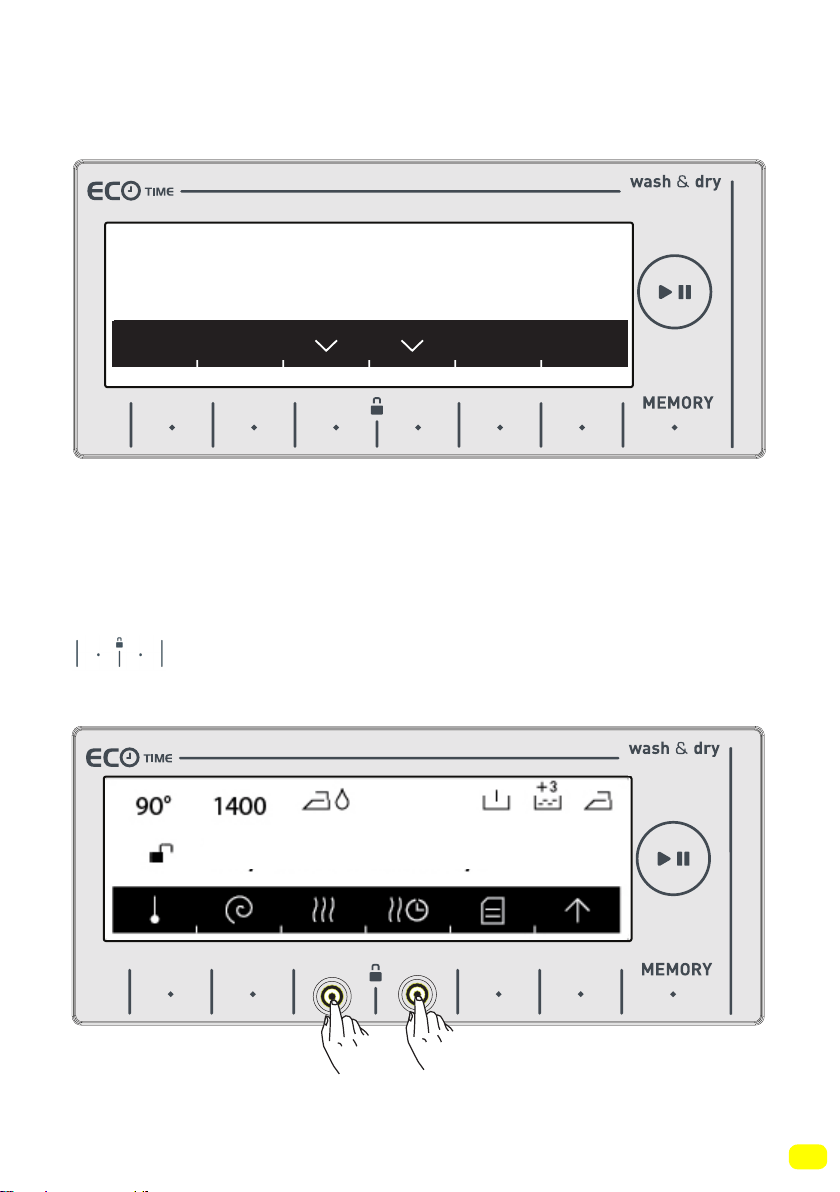
Child Lock
Your machine has a child lock so that the programme flow is not
affected if the function buttons are pressed or the programme
knob is turned while the machine is washing or drying.
Child lock engages after both of the buttons next to the
symbol are pressed for more than 3 seconds.
The following warning text will be displayed after the child lock
engages.
Keylock activated
9 kg. 6kg.
77
The following text will be displayed if any buttons are pressed
while the child lock is engaged.
If the child lock is engaged while any programme is running and
the programme knob is switched to the CANCEL position and
another programme is selected, the programme previously selec-
ted continues from where it left. No change will occur.
To disengage the child lock, you need to press the
buttons for more than 3 seconds. The following warning
text will be displayed after the child lock disengages.
Note: Child lock cannot lock the pump cover or the detergent
drawer of your machine.
To unlock press for 3s
Keylock deactivated
9 kg. 6kg.
9 kg. 6kg.
(Cold wash), 30°, 40°, 50°, 60°, 70°, 80°, 90°*
79
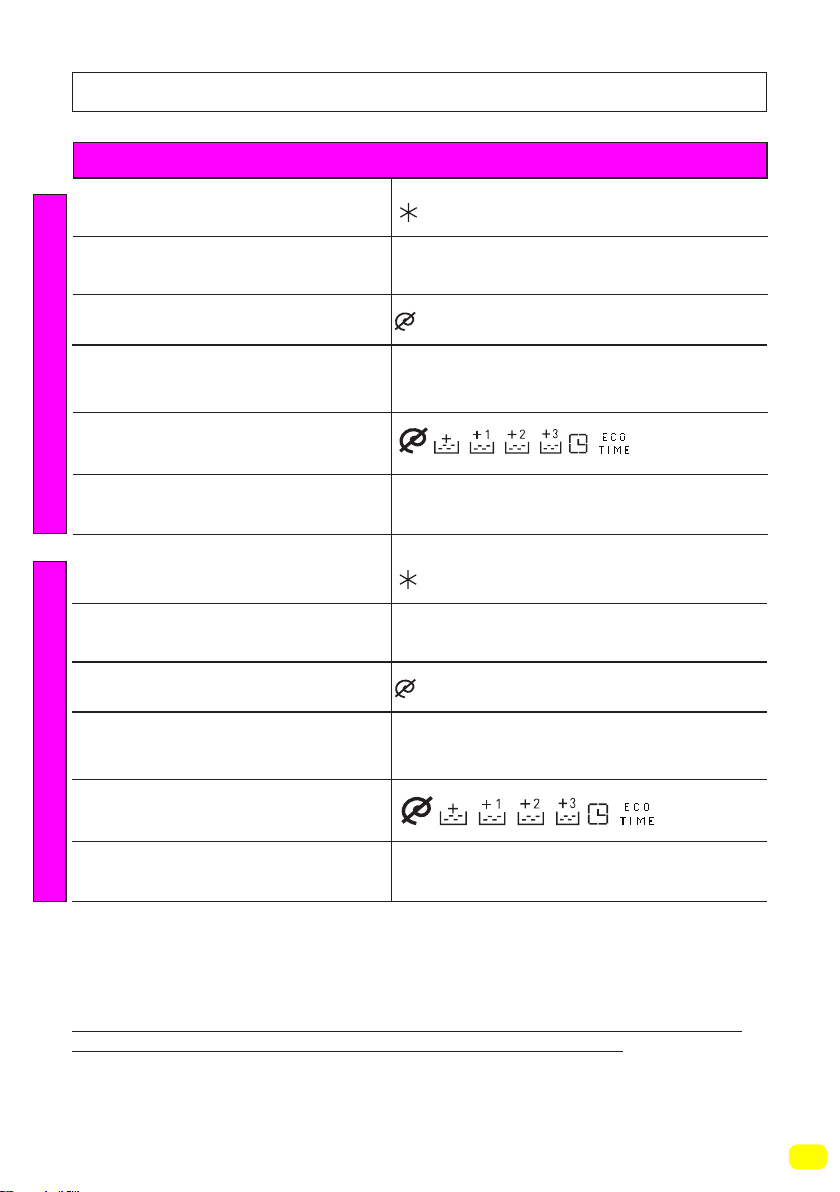
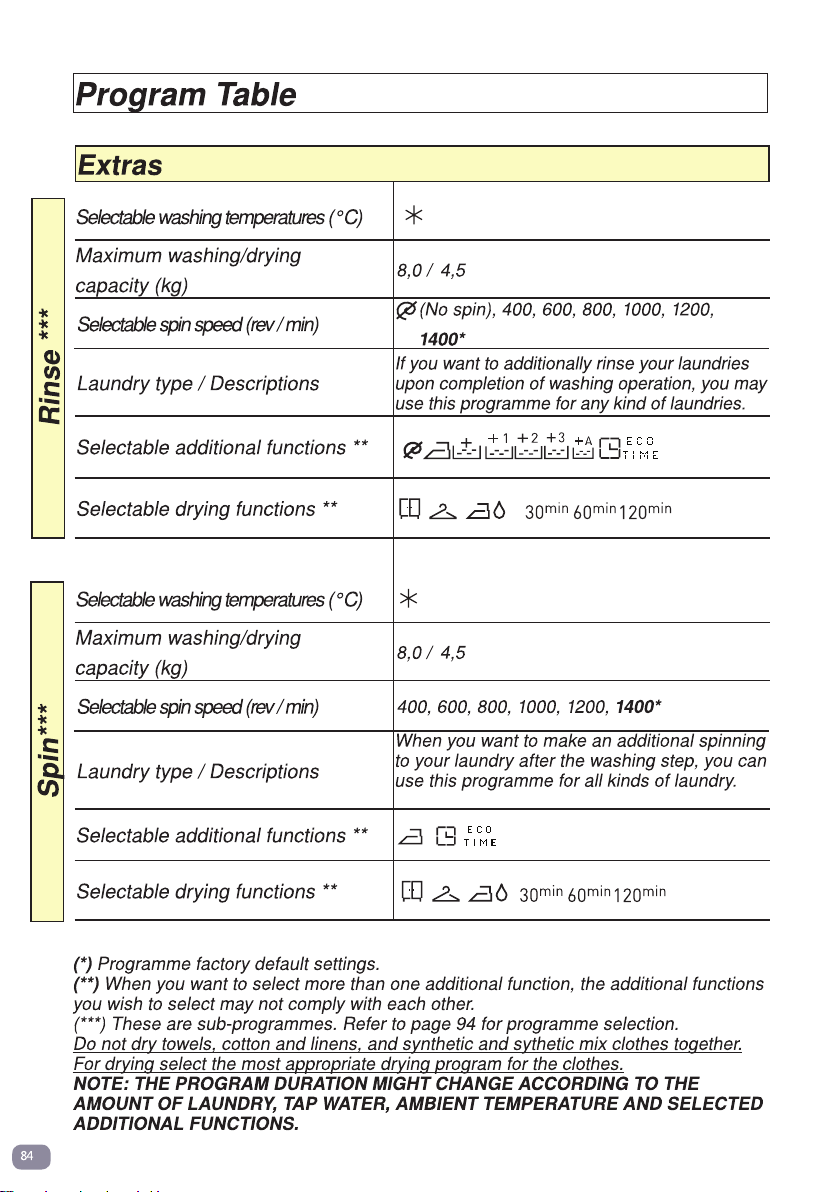
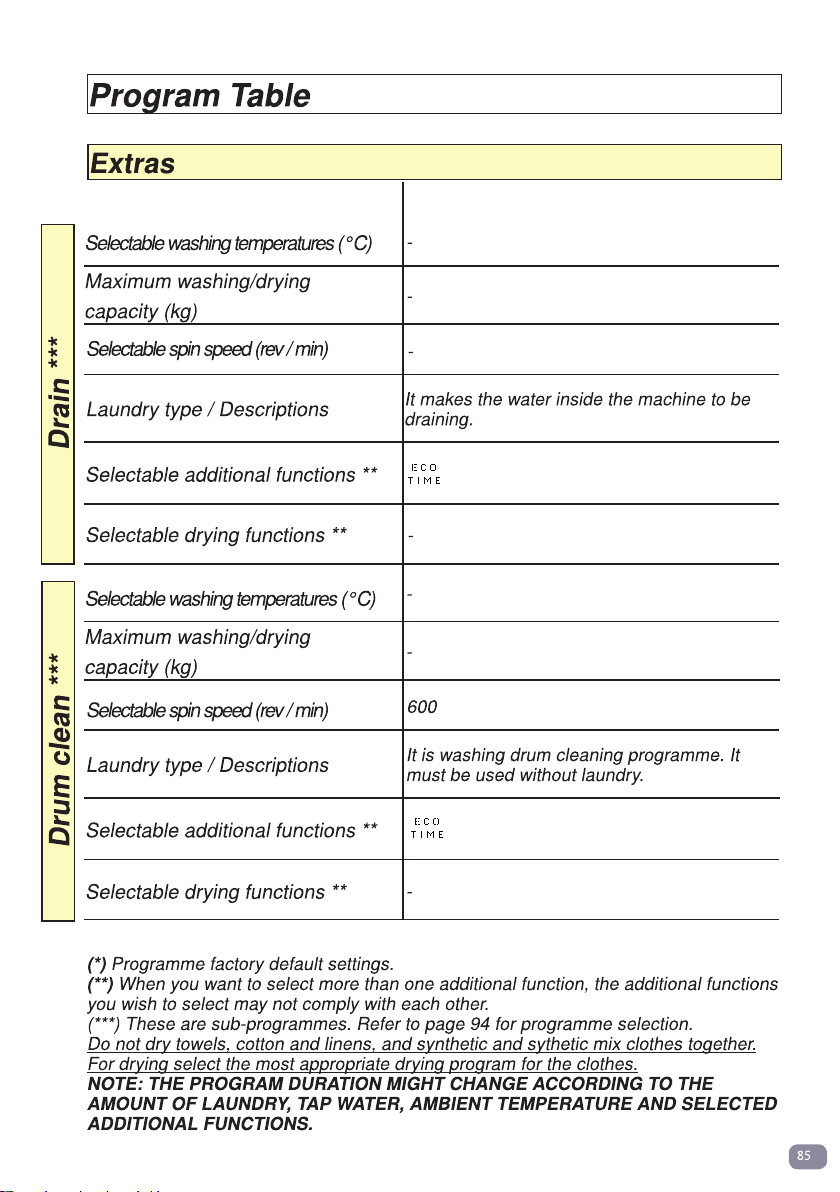
(*) Programme factory default settings.
(**) When you want to select more than one additional function, the additional functions
you wish to select may not comply with each other.
Do not dry towels, cotton and linens, and synthetic and sythetic mix clothes together.
For drying select the most appropriate drying program for the clothes.
NOTE: THE PROGRAM DURATION MIGHT CHANGE ACCORDING TO THE
AMOUNT OF LAUNDRY, TAP WATER, AMBIENT TEMPERATURE AND SELECTED
ADDITIONAL FUNCTIONS.
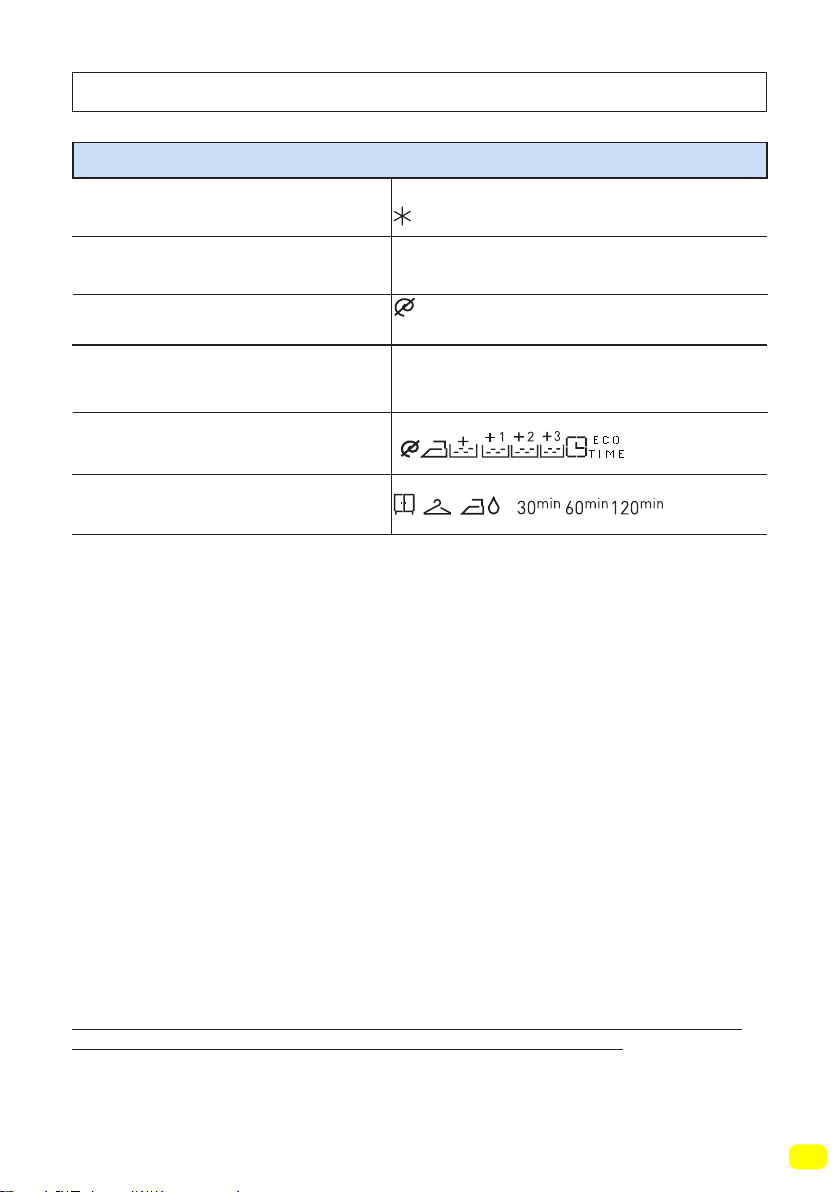
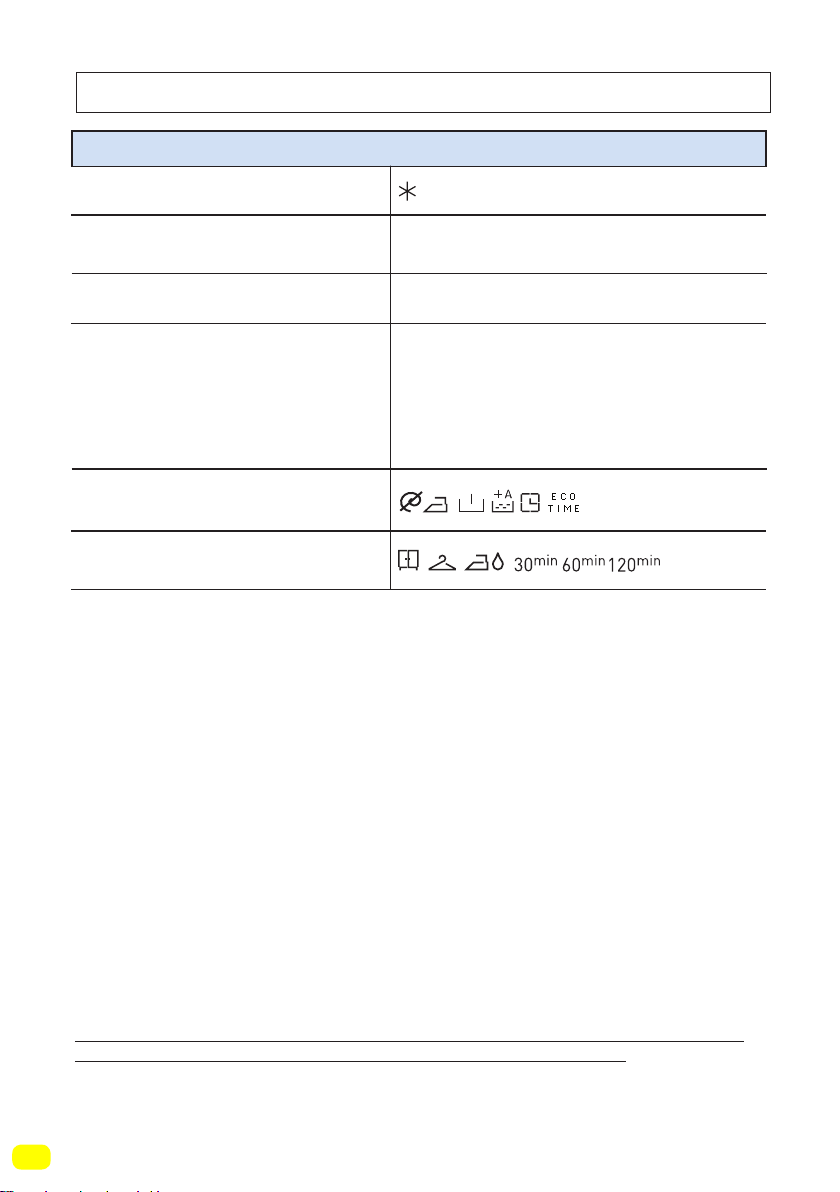
Eco 20°C
Selectable washing temperatures (°C)
Maximum washing/drying
capacity (kg)
4,0 / 4,0
Selectable spin speed (rev / min)
Laundry type / Descriptions
Selectable additional functions **
Selectable drying functions **
Less dirty, cotton and linen textiles. (bed
sheet, tablecloth, towel (max. 2.0 kg)
(Cold water)20°*
Program Table
(No spin), 400, 600, 800, 1000, 1200,
1400*
80
(*) Programme factory default settings.
(**) When you want to select more than one additional function, the additional functions
you wish to select may not comply with each other.
(***) These are sub-programmes. Refer to page 90 for programme selection.
Do not dry towels, cotton and linens, and synthetic and sythetic mix clothes together.
For drying select the most appropriate drying program for the clothes.
NOTE: THE PROGRAM DURATION MIGHT CHANGE ACCORDING TO THE
AMOUNT OF LAUNDRY, TAP WATER, AMBIENT TEMPERATURE AND SELECTED
ADDITIONAL FUNCTIONS.
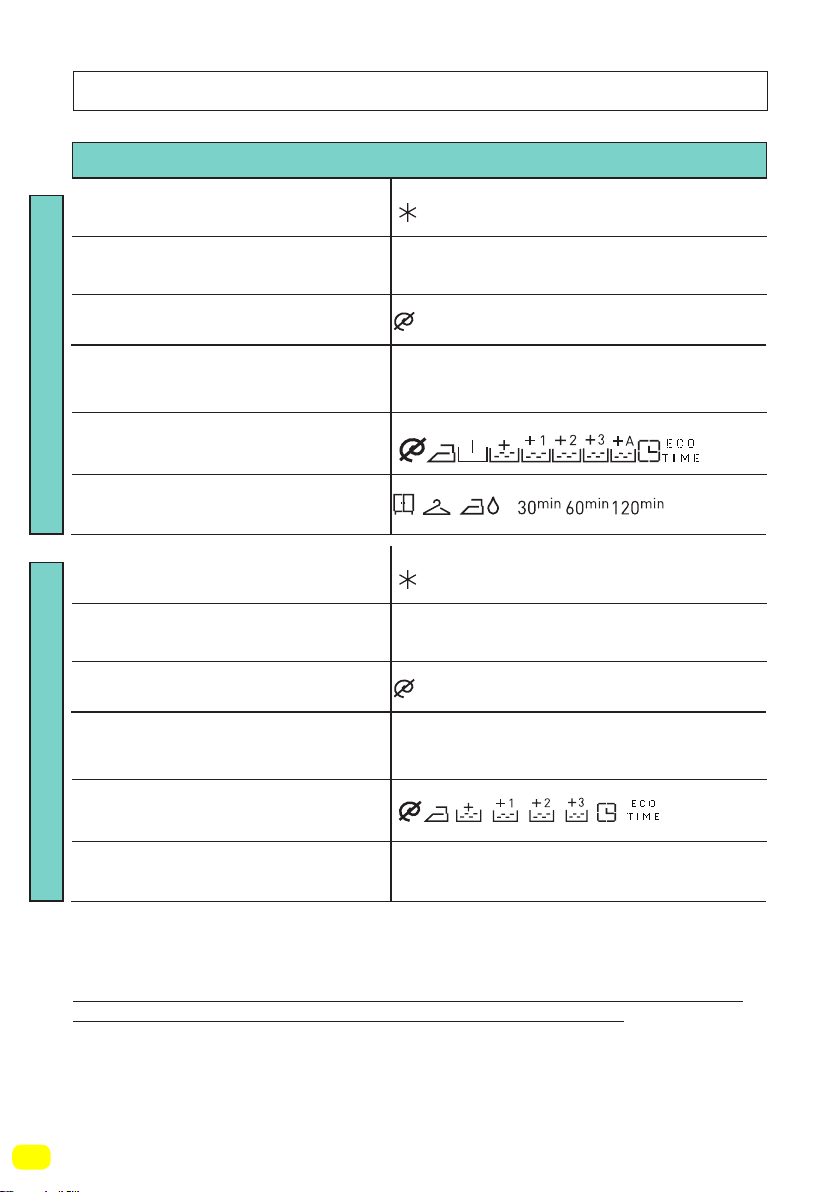
Program Table
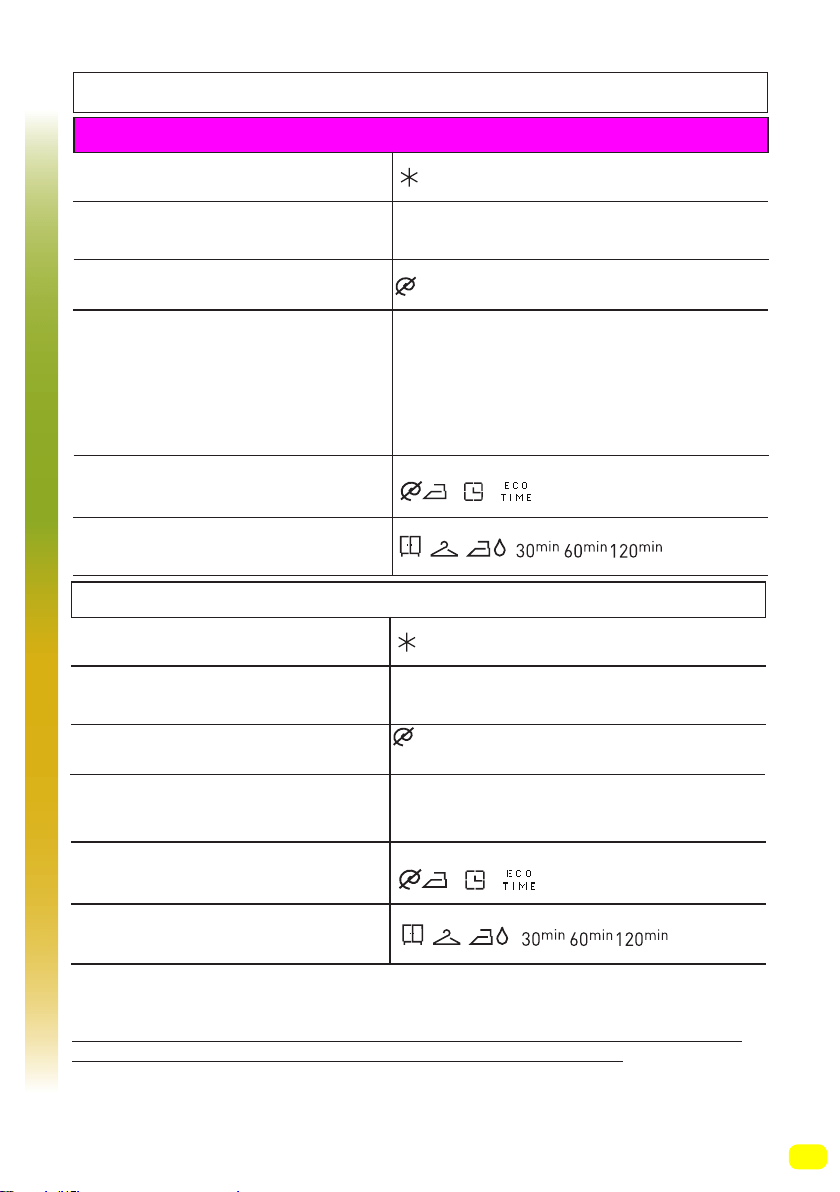
-
Easy Care
Synthetic***Curtain***
Selectable washing temperatures (°C)
Selectable washing temperatures (°C)
Maximum washing/drying
capacity (kg)
Maximum washing/drying
capacity (kg)
3,5 / 3,5
2,5
Selectable spin speed (rev / min)
Selectable spin speed (rev / min)
Laundry type / Descriptions
Laundry type / Descriptions
Selectable additional functions **
Selectable additional functions **
Selectable drying functions **
Selectable drying functions **
Synthetic and synthetic mix textiles.
(synthetic content shirt, blouse, socks etc.)
Wash your curtains only with this programme.
(Cold wash), 30°, 40°, 60°*
(Cold wash), 30°, 40°*
(No spin), 400, 600, 800, 1000, 1200*
(No spin), 400, 600*
81
(*) Programme factory default settings.
(**) When you want to select more than one additional function, the additional functions
you wish to select may not comply with each other.
(***) These are sub-programmes. Refer to page 92 for programme selection.
Do not dry towels, cotton and linens, and synthetic and sythetic mix clothes together.
For drying select the most appropriate drying program for the clothes.
NOTE: THE PROGRAM DURATION MIGHT CHANGE ACCORDING TO THE
AMOUNT OF LAUNDRY, TAP WATER, AMBIENT TEMPERATURE AND SELECTED
ADDITIONAL FUNCTIONS.
Program Table
Delicate
Selectable washing temperatures (°C)
Maximum washing capacity (kg)
2,5
-
Selectable spin speed (rev / min)
Laundry type / Descriptions
Selectable additional functions **
Selectable drying functions **
Woollen and wool mix laundry with machine
wash labels.
(Cold wash), 30°, 40°*
Wool ***
Selectable washing temperatures (°C)
Maximum washing capacity (kg)
2,5
-
Selectable spin speed (rev / min)
Laundry type / Descriptions
Selectable additional functions **
Selectable drying functions **
Silk mixture laundry with machine wash labels.
(Cold wash), 30°*
Silk ***
(No spin), 400, 600*
(No spin), 400, 600*
82
(*) Programme factory default settings.
(**) When you want to select more than one additional function, the additional functions
you wish to select may not comply with each other.
Do not dry towels, cotton and linens, and synthetic and sythetic mix clothes together.
For drying select the most appropriate drying program for the clothes.
NOTE: THE PROGRAM DURATION MIGHT CHANGE ACCORDING TO THE
AMOUNT OF LAUNDRY, TAP WATER, AMBIENT TEMPERATURE AND SELECTED
ADDITIONAL FUNCTIONS.
Program Table
Duvet
Selectable washing temperatures (°C)
Maximum washing capacity (kg)
2,5
-
Selectable spin speed (rev / min)
Laundry type / Descriptions
Selectable additional functions **
Selectable drying functions **
You can wash your fibre duvet that have
machine washable label with this programme.
(max. 2.5 kg)
(Cold wash), 30°, 40°*
(No spin), 400, 600, 800*
83
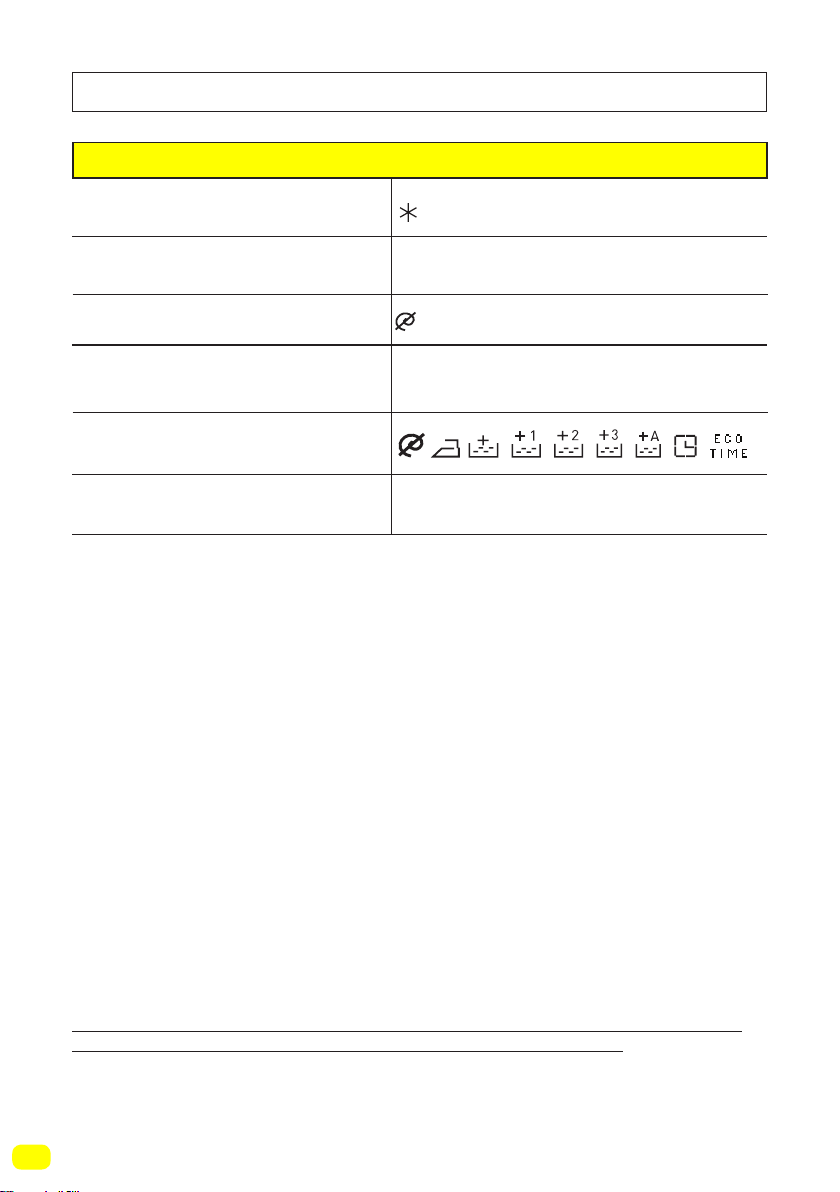
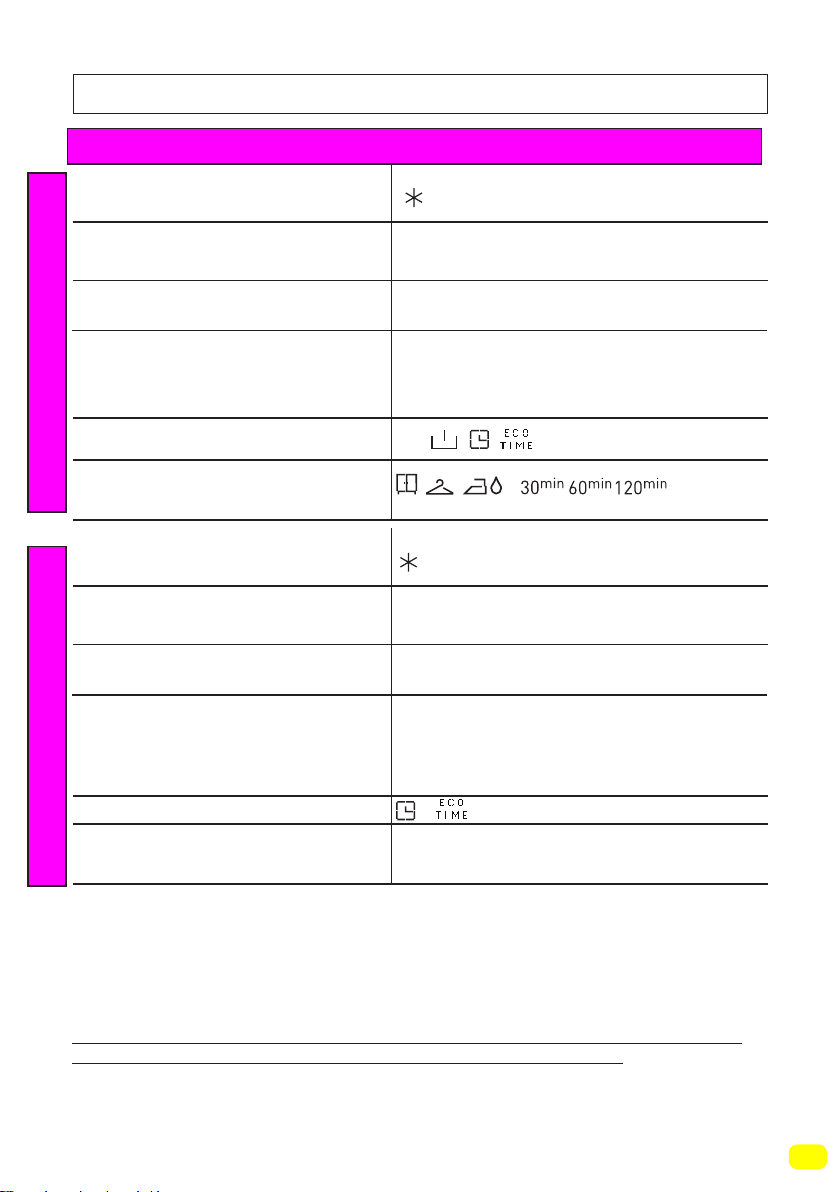
(*) Programme factory default settings.
(**) When you want to select more than one additional function, the additional functions
you wish to select may not comply with each other.
Do not dry towels, cotton and linens, and synthetic and sythetic mix clothes together.
For drying select the most appropriate drying program for the clothes.
NOTE: THE PROGRAM DURATION MIGHT CHANGE ACCORDING TO THE
AMOUNT OF LAUNDRY, TAP WATER, AMBIENT TEMPERATURE AND SELECTED
ADDITIONAL FUNCTIONS.
Program Table
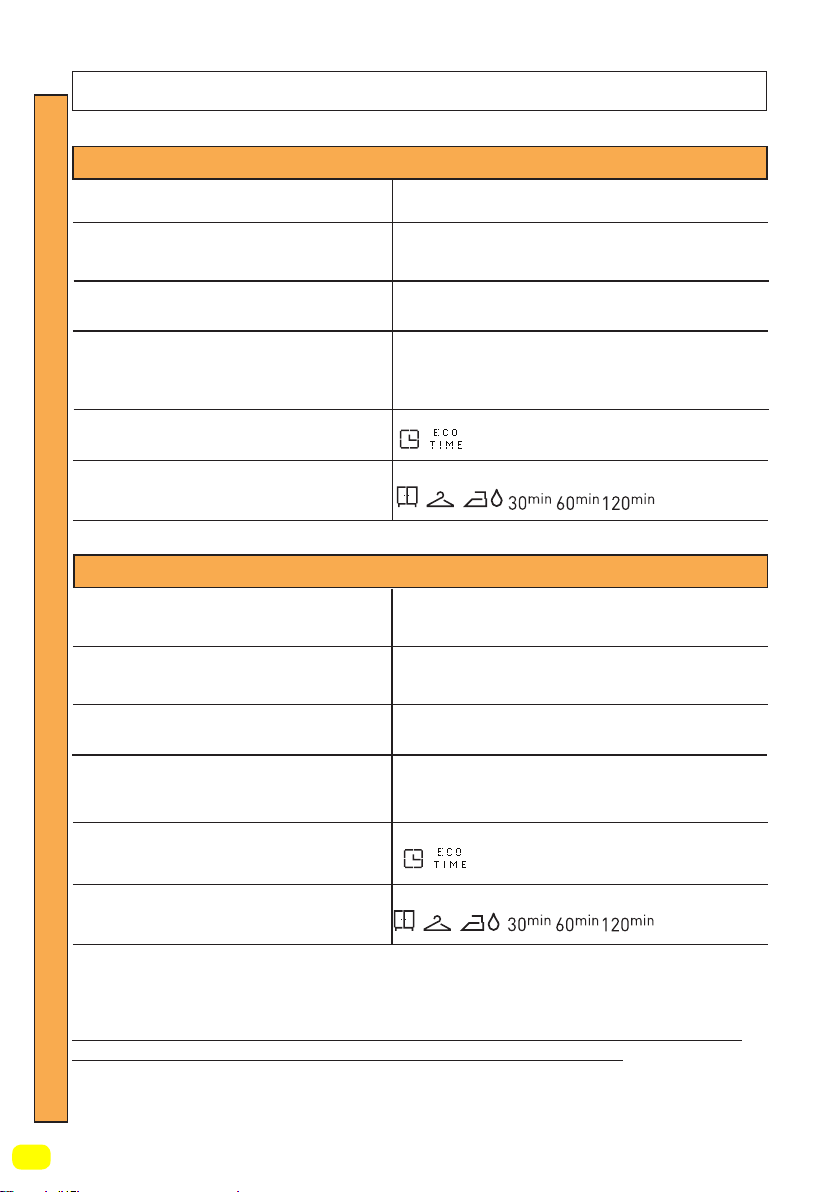
Refresh***
Synthetics Wash & Dry***
Selectable washing temperatures (°C)
Selectable washing temperatures (°C)
Maximum laundry capacity (kg)
Maximum laundry capacity (kg)
1,0
-
-
Selectable spin speed (rev / min)
Selectable spin speed (rev / min)
Laundry type / Descriptions
Laundry type / Descriptions
Selectable additional functions **
Selectable additional functions **
Selectable drying functions **
Selectable drying functions **
Laundry that is not dirty and has odours
on. Note: This programme is not a washing
programme. It only breathes hot air onto your
laundry and refreshes them.
Extras
3,5
Synthetic and synthetic mix textiles.
(synthetic content shirt, blouse, socks etc.)
(Cold wash), 30°, 40°*, 60°
600*
(Cold wash),
*
(Cold wash),
(Cold wash),
*
86
(*) Programme factory default settings.
(**) When you want to select more than one additional function, the additional functions
you wish to select may not comply with each other.
Do not dry towels, cotton and linens, and synthetic and sythetic mix clothes together.
For drying select the most appropriate drying program for the clothes.
NOTE: THE PROGRAM DURATION MIGHT CHANGE ACCORDING TO THE
AMOUNT OF LAUNDRY, TAP WATER, AMBIENT TEMPERATURE AND SELECTED
ADDITIONAL FUNCTIONS.
Program Table
Allergy Safe
Selectable washing temperatures (°C)
Maximum washing/drying
capacity (kg)
4,5 / 4,5
Selectable spin speed (rev / min)
Laundry type / Descriptions
Selectable additional functions **
Selectable drying functions **
Baby dresses
(Cold wash), 30°, 40°,50°,60*
400, 600, 800*
*
87
(*) Programme factory default settings.
(**) When you want to select more than one additional function, the additional functions
you wish to select may not comply with each other.
Do not dry towels, cotton and linens, and synthetic and sythetic mix clothes together.
For drying select the most appropriate drying program for the clothes.
NOTE: THE PROGRAM DURATION MIGHT CHANGE ACCORDING TO THE
AMOUNT OF LAUNDRY, TAP WATER, AMBIENT TEMPERATURE AND SELECTED
ADDITIONAL FUNCTIONS.
Program Table
Super rapid 12 min
Selectable washing temperatures (°C)
Maximum washing/drying
capacity (kg)
2,0 / 2,0
Selectable spin speed (rev / min)
Laundry type / Descriptions
Selectable additional functions **
Selectable drying functions **
You can wash your less dirty, cotton, coloured and
linen textiles in a short time as 12 minutes.
Note: As the washing period is short, less amount
of detergent is required to be used compared to
other programmes. The programme period will
increase if your machine detects instable loading.
(Cold wash), 30°*
Daily 60 min.
Selectable washing temperatures (°C)
Maximum washing/drying
capacity (kg)
4,0 / 4,0
Selectable spin speed (rev / min)
Laundry type / Descriptions
Selectable additional functions **
Selectable drying functions **
Dirty, cotton, coloured and linen textiles.
(The washing duration for loads of 2kg and
under is 30 minutes)
(Cold wash), 30° , 40° , 50° , 60° *
(No spin), 400, 600, 800*
(No spin), 400, 600, 800, 1000, 1200
1400*
Rapid
*
88
(*) Programme factory default settings.
(**) When you want to select more than one additional function, the additional functions
you wish to select may not comply with each other.
(***) These are sub-programmes. Refer to page 94 for programme selection.
Do not dry towels, cotton and linens, and synthetic and sythetic mix clothes together.
For drying select the most appropriate drying program for the clothes.
NOTE: THE PROGRAM DURATION MIGHT CHANGE ACCORDING TO THE
AMOUNT OF LAUNDRY, TAP WATER, AMBIENT TEMPERATURE AND SELECTED
ADDITIONAL FUNCTIONS.
Program Table
Selectable washing temperatures (°C)
Maximum drying capacity (kg)
-
Selectable spin speed (rev / min)
Laundry type / Descriptions
Selectable additional functions **
Selectable drying functions **
Cotton laundry with machine dryable label.
Cotton laundry with machine dryable label.
Cotton Dry
Selectable washing temperatures (°C)
Maximum drying capacity (kg)
3,5
Selectable spin speed (rev / min)
Laundry type / Descriptions
Selectable additional functions **
Selectable drying functions **
-
Gentle Dry
6,0 kg
*
*
Dry
-
-
89
(*) Programme factory default settings.
(**) When you want to select more than one additional function, the additional functions
you wish to select may not comply with each other.
Do not dry towels, cotton and linens, and synthetic and sythetic mix clothes together.
For drying select the most appropriate drying program for the clothes.
NOTE: THE PROGRAM DURATION MIGHT CHANGE ACCORDING TO THE
AMOUNT OF LAUNDRY, TAP WATER, AMBIENT TEMPERATURE AND SELECTED
ADDITIONAL FUNCTIONS.
Program Table
Quick Wash & Dry
Selectable washing temperatures (°C)
Maximum washing/drying
capacity (kg)
0,5 kg (3 shirts) (29 minutes)
1.5 kg (9 shirts) (60 minutes)
Selectable spin speed (rev / min)
Laundry type / Descriptions
Selectable additional functions **
Selectable drying functions **
Cotton, coloured and linen laundry with
machine dryable label.
Note: It determines the duration of the
programme itself according to the amount of
laundry you will load into the machine.
(Cold wash), 30°*
800*
*
Wash & Dry
90
(*) Programme factory default settings.
(**) When you want to select more than one additional function, the additional functions
you wish to select may not comply with each other.
Do not dry towels, cotton and linens, and synthetic and sythetic mix clothes together.
For drying select the most appropriate drying program for the clothes.
NOTE: THE PROGRAM DURATION MIGHT CHANGE ACCORDING TO THE
AMOUNT OF LAUNDRY, TAP WATER, AMBIENT TEMPERATURE AND SELECTED
ADDITIONAL FUNCTIONS.
Program Table
Cotton Wash & Dry
Selectable washing temperatures (°C)
Maximum washing/drying
capacity (kg)
6,0
Selectable spin speed (rev / min)
Laundry type / Descriptions
Selectable additional functions **
Selectable drying functions **
Cotton and linen textiles (underwear, bed
sheet, tablecloth, towel (max. 4.0 kg)
(Cold wash), 30° , 40° , 50° , 60° *, 70° , 80° , 90°
1400*
*
91
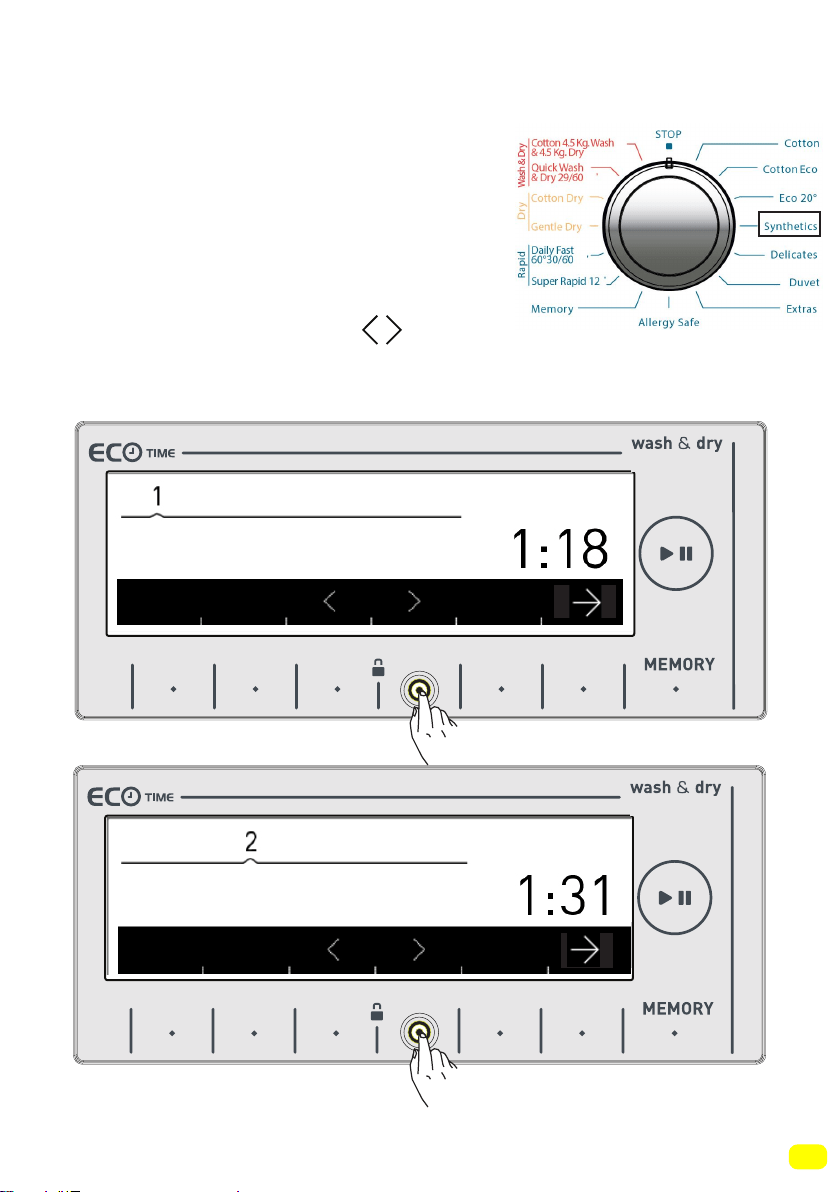
Selecting sub-programmes (Synthetics)
When you select the Synthetics prog-
ramme from the programme knob, you
will see two sub-program options.
1-Synthetics
2-Curtain
• You can make sub-programme selecti-
ons by touching the symbol buttons.
Keylock deactivated
9 kg. 6kg.
9 kg. 6kg.
Synthetics
Curtain

92
• You can activate the programme you want to select by touching
the symbol button.
• After the the selection has been activated, the electronic disp-
lay will return to the main screen of the programme you have
selected automatically. You can select other features you want to
select on this screen and run the machine by pressing the Start/
Pause button.
Keylock deactivated
9 kg. 6kg.
9 kg. 6kg.
Synthetics
Synthetics
93
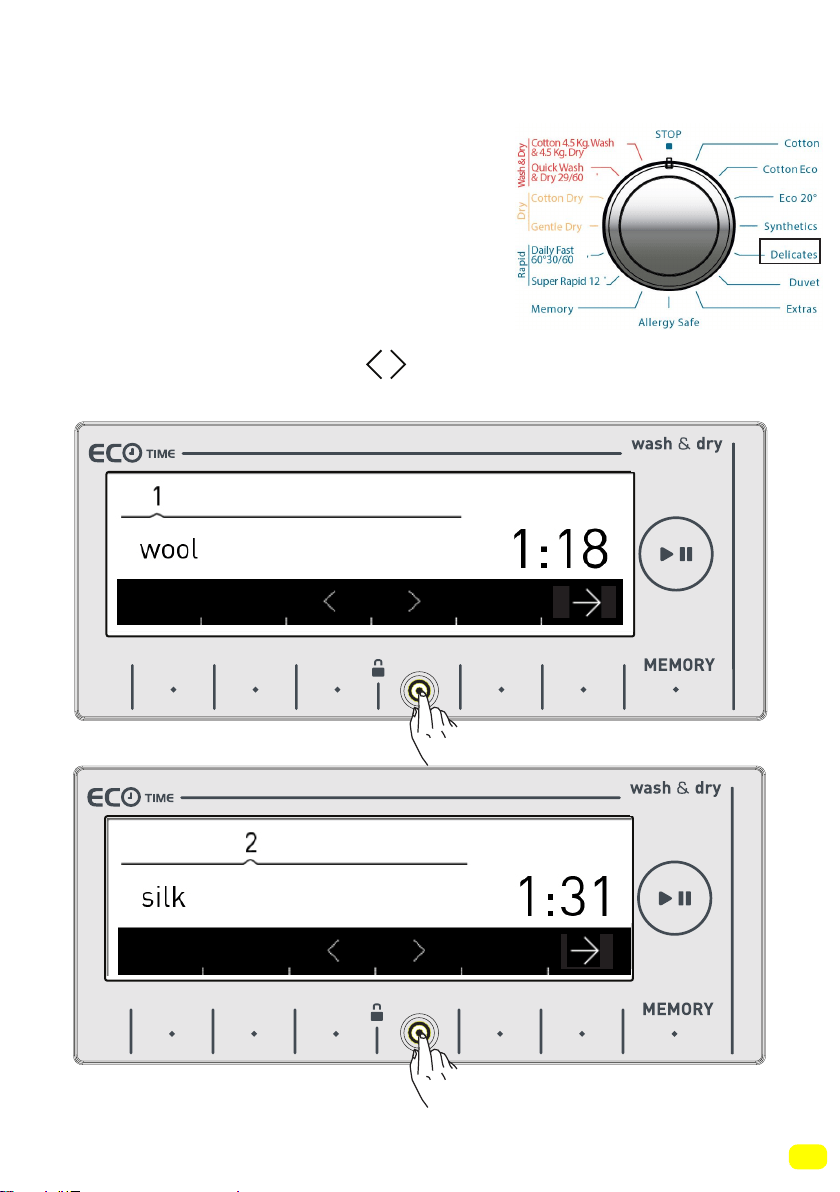
Selecting sub-programmes (Delicates)
When you select the delicates program-
me from the programme knob, you will
see two sub-program options.
1- Wool
2-Silk
• You can make sub-programme selecti-
ons by touching the symbol buttons.
Keylock deactivated
9 kg. 6kg.
9 kg. 6kg.

94
• You can activate the programme you want to select by touching
the symbol button.
• After the the selection has been activated, the electronic disp-
lay will return to the main screen of the programme you have
selected automatically. You can select other features you want to
select on this screen and run the machine by pressing the Start/
Pause button.
Keylock deactivated
9 kg. 6kg.
9 kg. 6kg.
95
Selecting sub-programmes (Extras)
When you select the extras programme from the programme knob, you
will see 6 sub-program options.
1- Refresh
2- Rinse
3- Spin
4- Drain
5- Drum clean
6- Synthetics Wash & Dry
• You can make the sub-programme
selections by touching the symbol
buttons.
9 kg. 6kg.
9 kg. 6kg.
Refresh
Rinse
96
9 kg. 6kg.
9 kg. 6kg.
9 kg. 6kg.
Spin
Drain
5
Drum Clean
97
9 kg. 6kg.
6
Synthetics Wash & Dry
• You can activate the programme you want to select by touching
the
symbol button.
• After the the selection has been activated, the electronic disp-
lay will return to the main screen of the programme you have
selected automatically. You can select other features you want to
select on this screen and run the machine by pressing the Start/
Pause button.
2:40
98
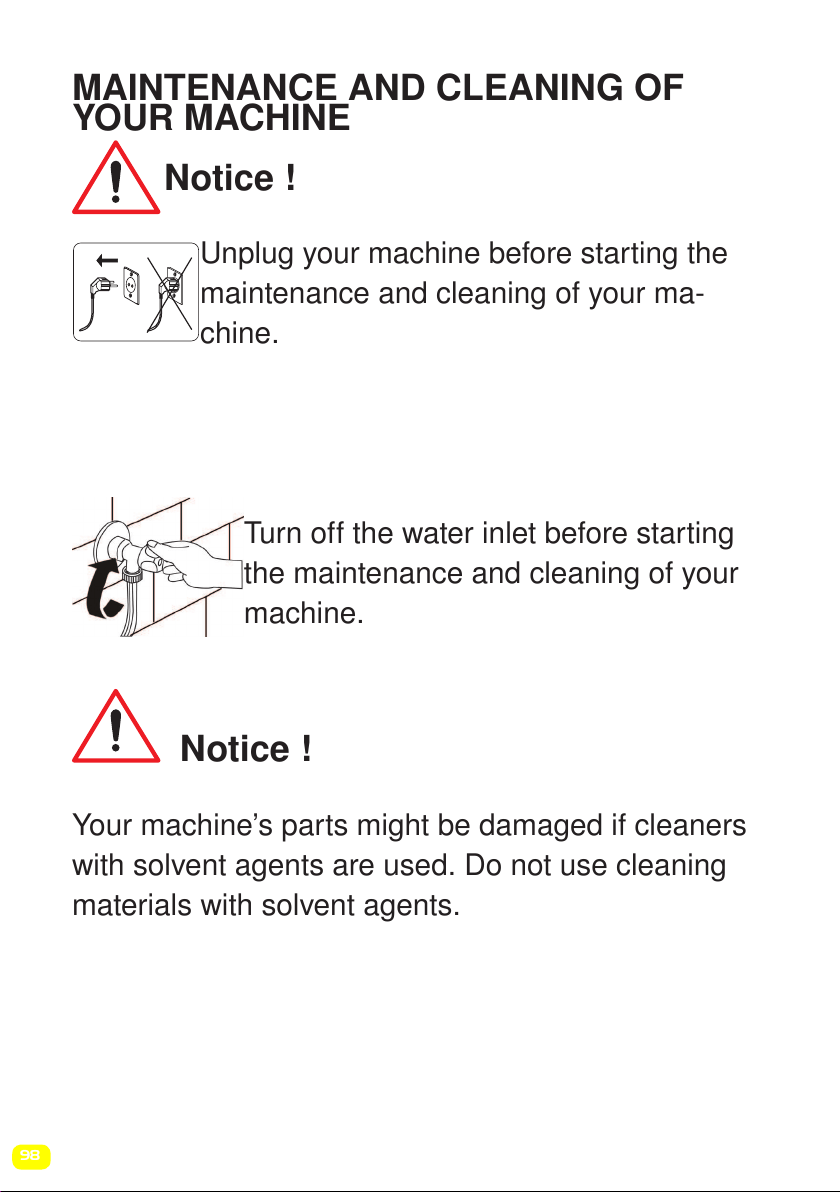
MAINTENANCE AND CLEANING OF
YOUR MACHINE
Notice !
Unplug your machine before starting the
maintenance and cleaning of your ma-
chine.
Turn off the water inlet before starting
the maintenance and cleaning of your
machine.
Notice !
Your machine’s parts might be damaged if cleaners
with solvent agents are used. Do not use cleaning
materials with solvent agents.
99
Water inlet filters
Filters are in place to prevent foreign substances entering the
machine and can be found both on the faucet side of the inlet
hose and on the ends of water valves along the water inlet hose
of your machine. If your machine cannot intake a sufficient amo-
unt of water despite the water faucet being open, these filters
should be cleaned.
• Disconnect the ends of the water inlet hose from the tap and the
machine.
• Remove the filter of the
water inlet valve on your
machine with a pair of
pliers. Clean thoroughly
using water and a brush.
• Disassemble the filter
on the faucet side of the
water inlet hose manually
and clean it.
• Once the filters are cle-
aned, put them correctly
back in place.
100
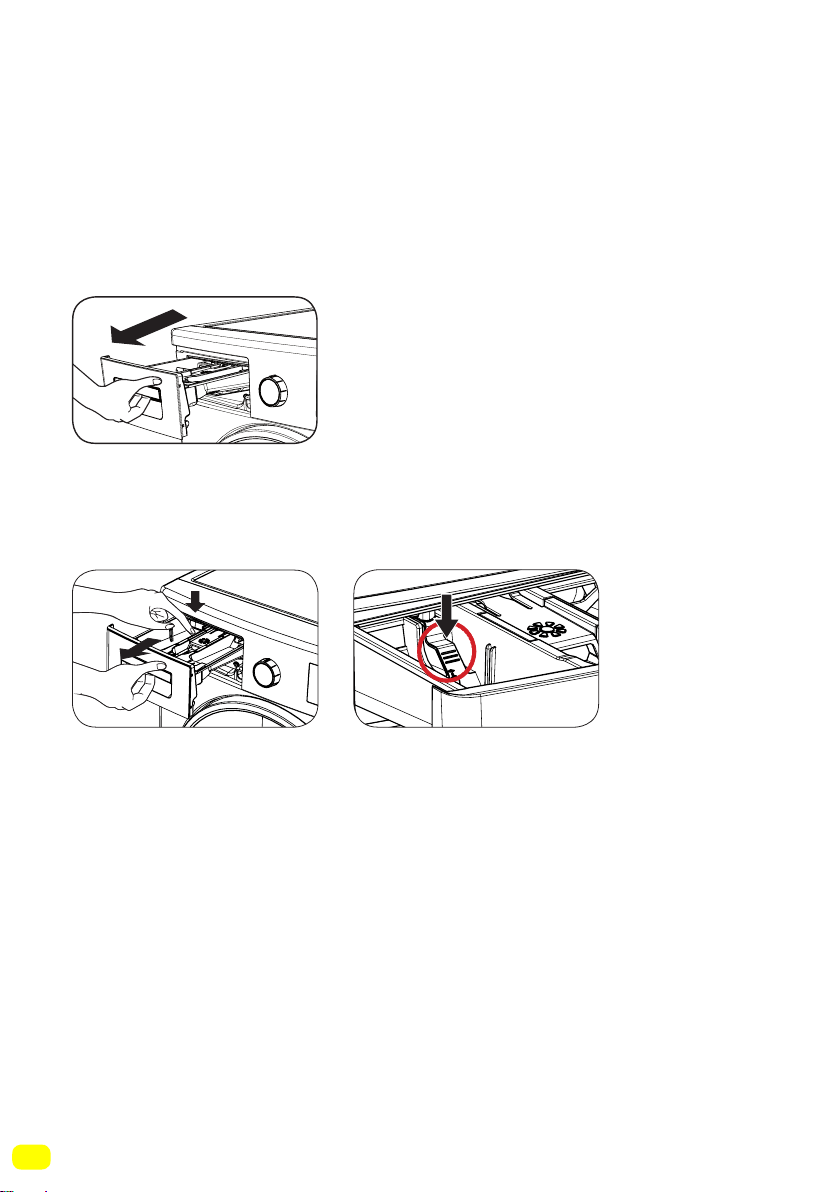
Detergent drawer maintenance and cleaning
• Your detergents may form residue in the detergent drawer and
detergent drawer slot. Remove the detergent drawer in regular
intervals to clean the formed residue. In order to remove the
detergent drawer from its place:
* Pull the detergent drawing all the way back.
• Press the region shown below inside the detergent drawer you
have pulled all the way back, and continue pulling and remove
the detergent drawer from its place.
• Rinse with a brush and lots of water.
• Collect the residues inside the detergent drawer slot so that
they don’t fall inside your machine.
• Dry the detergent drawer with a towel or dry cloth and place it
back.
• Do not wash your detergent drawer in a dishwasher.
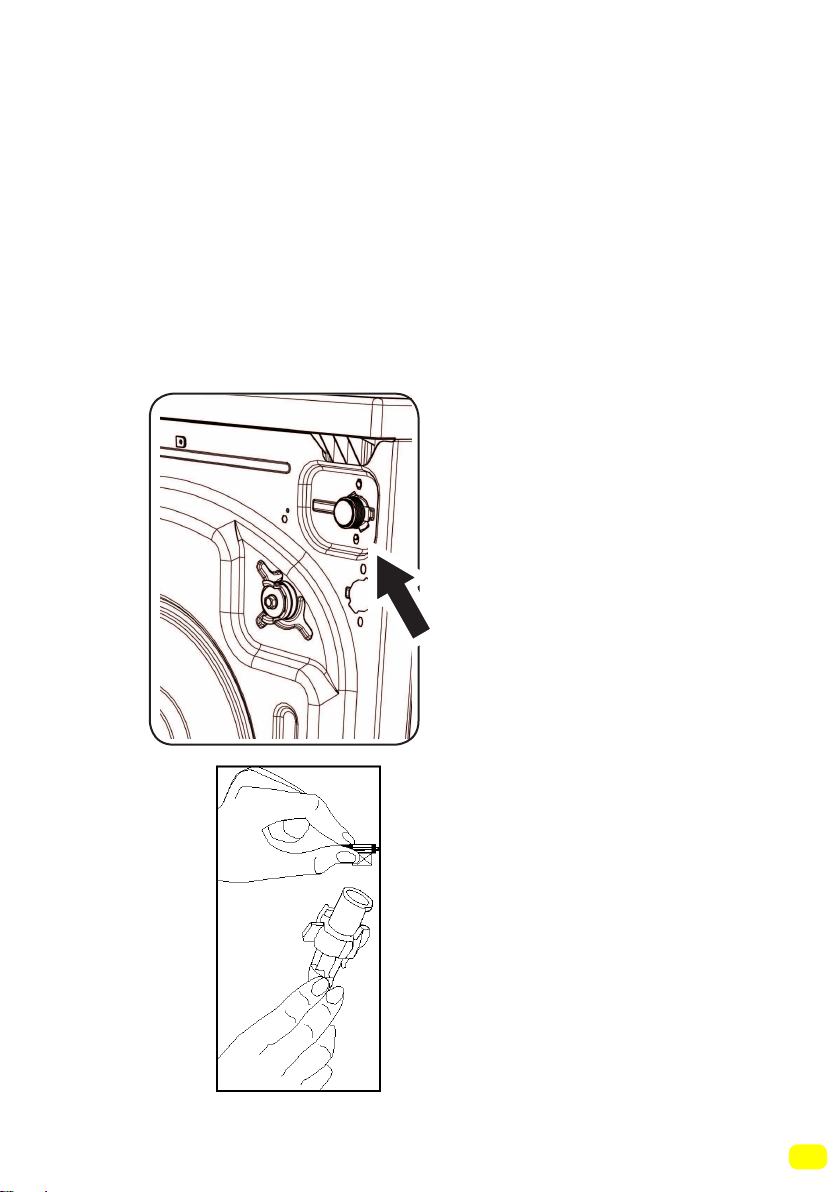
Liquid detergent apparatus(*)
For the cleaning and maintenance of the liquid level detergent
apparatus, remove the apparatus from its location as shown in
the picture below, and thoroughly clean the remaining detergent
residues. Replace the apparatus. Make sure that no residual
material remains inside the siphon.
(*) Model dependant
101
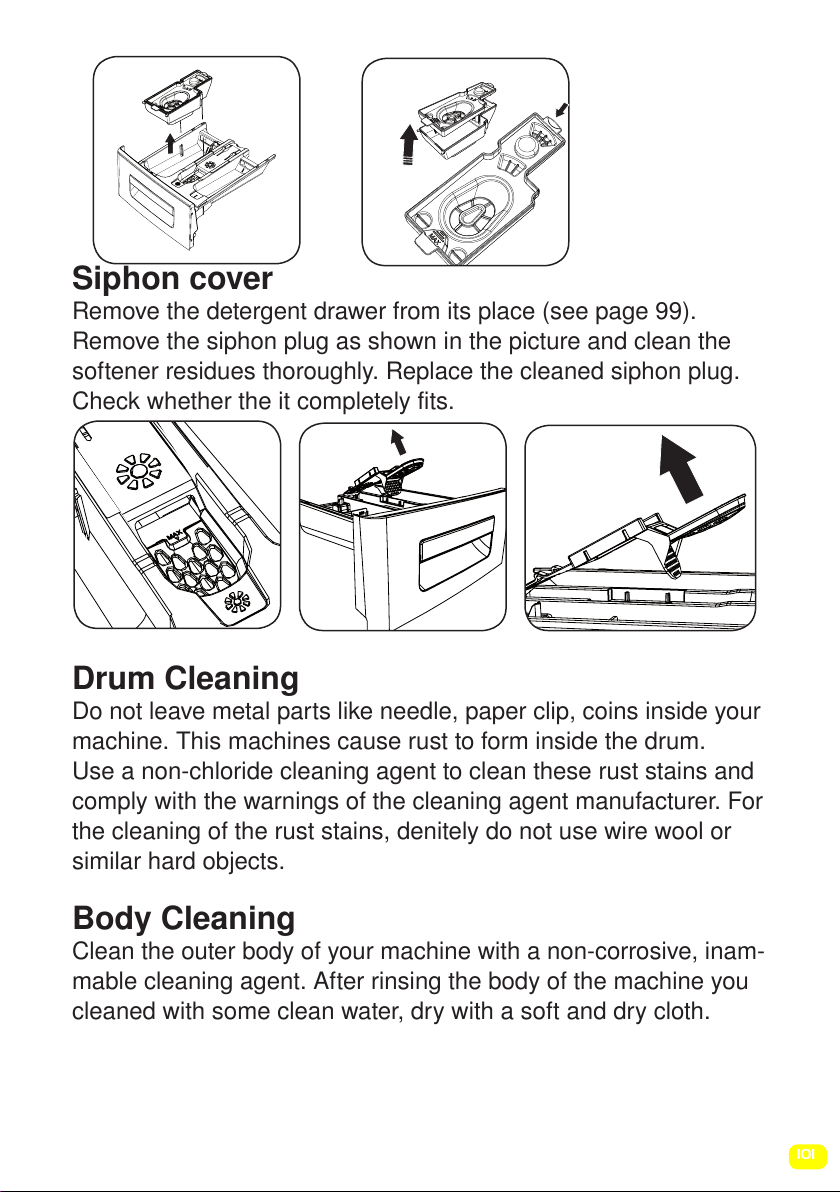
Siphon cover
Remove the detergent drawer from its place (see page 99).
Remove the siphon plug as shown in the picture and clean the
softener residues thoroughly. Replace the cleaned siphon plug.
Check whether the it completely fits.
Drum Cleaning
Do not leave metal parts like needle, paper clip, coins inside your
machine. This machines cause rust to form inside the drum.
Use a non-chloride cleaning agent to clean these rust stains and
comply with the warnings of the cleaning agent manufacturer. For
the cleaning of the rust stains, denitely do not use wire wool or
similar hard objects.
Body Cleaning
Clean the outer body of your machine with a non-corrosive, inam-
mable cleaning agent. After rinsing the body of the machine you
cleaned with some clean water, dry with a soft and dry cloth.
102
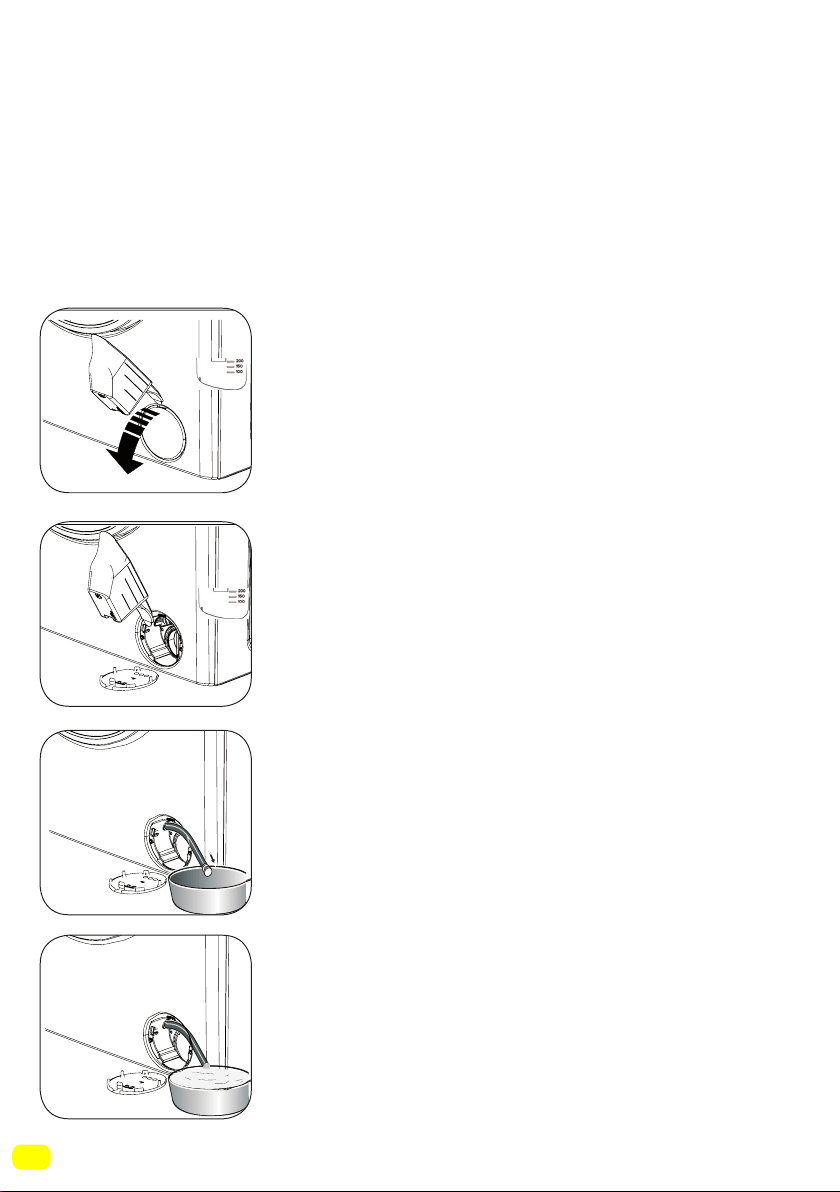
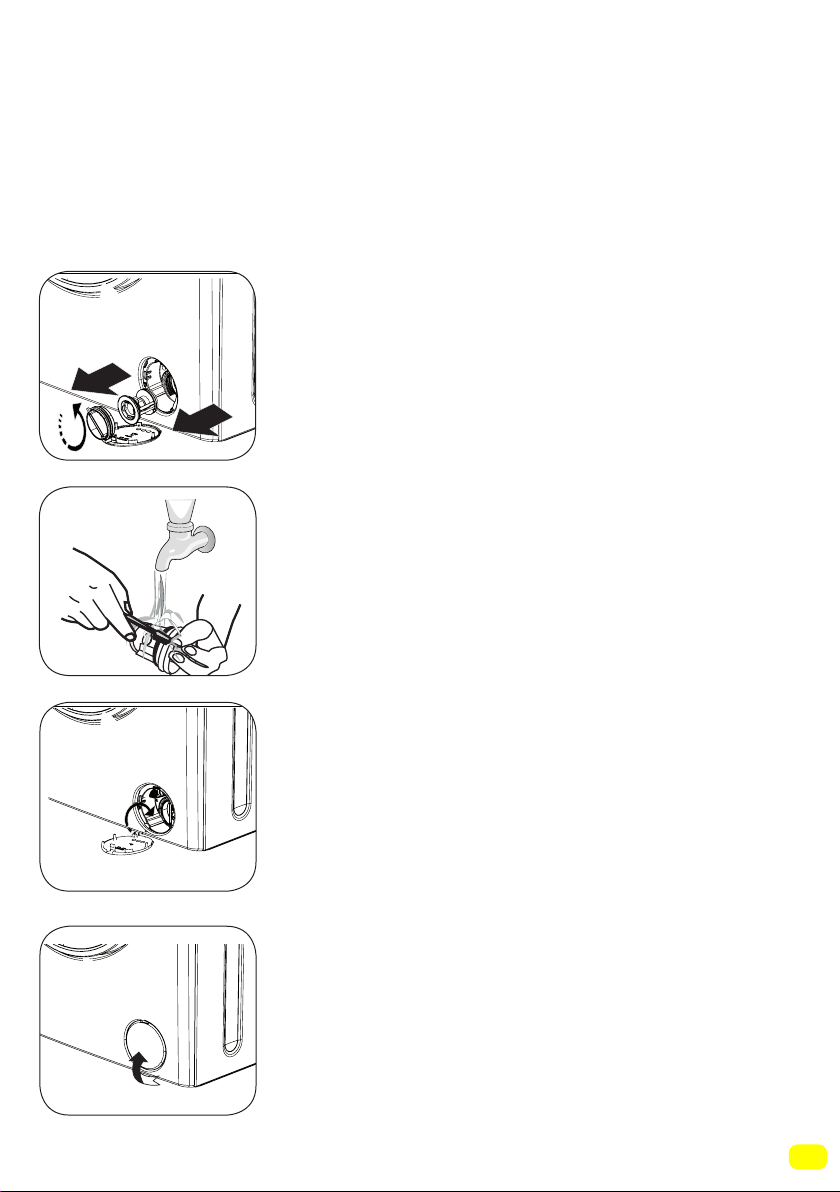
Pump filter maintenance and cleaning
This machine contains a filter system that prevents threads left
over from your laundry and other small materials from entering
the pump during the discharge operation after a completed
wash cycle. This is to protect and prolong the life of the pump.
It is recommended that you clean your pump filter once every 2
months.
To clean the pump filter:
• You may use the washing powder spade
supplied with your machine or liquid detergent
level plate to open the pump cover.
• Lodge the end part of the plastic part to the
opening of the cover and press backwards.
The cover will be opened.
• Pull the black rubber hose and detach
it from its clamp, place a container under
it and remove its plug.
• Collect the discharged water in the container.
&
&
103
Note: According to the amount of water inside the machine, you
may have you empty the water collection container a few times.
• Put back the plug of the black rubber hose after discharging the
water.
• Mount the black rubber hose back to its clamp.
• Loosen the filter cover by turning it
counter-clockwise, and remove by pulling.
• Clean the foreign materials inside the lter
with the help of a brush.
•After cleaning the filter replace the filter
cover and tighten by turning clockwise.
•Please note that filter cover will leak water
unless properly placed back.
• You can close the pump cover reverse of
how you opened it.
• While closing the pump cover, ensure that
the parts inside the cover meet the holes on
the front panel side.
104
Troubleshooting
All repairing operations required for your machine should be
carried out by an authorised service company. If your machine
requires a repair or if you cannot solve an issue with the
information provided below, then you should:
• Unplug the machine.
• Close the water tap.
• Contact the nearest authorised service company.
(*) See page 98
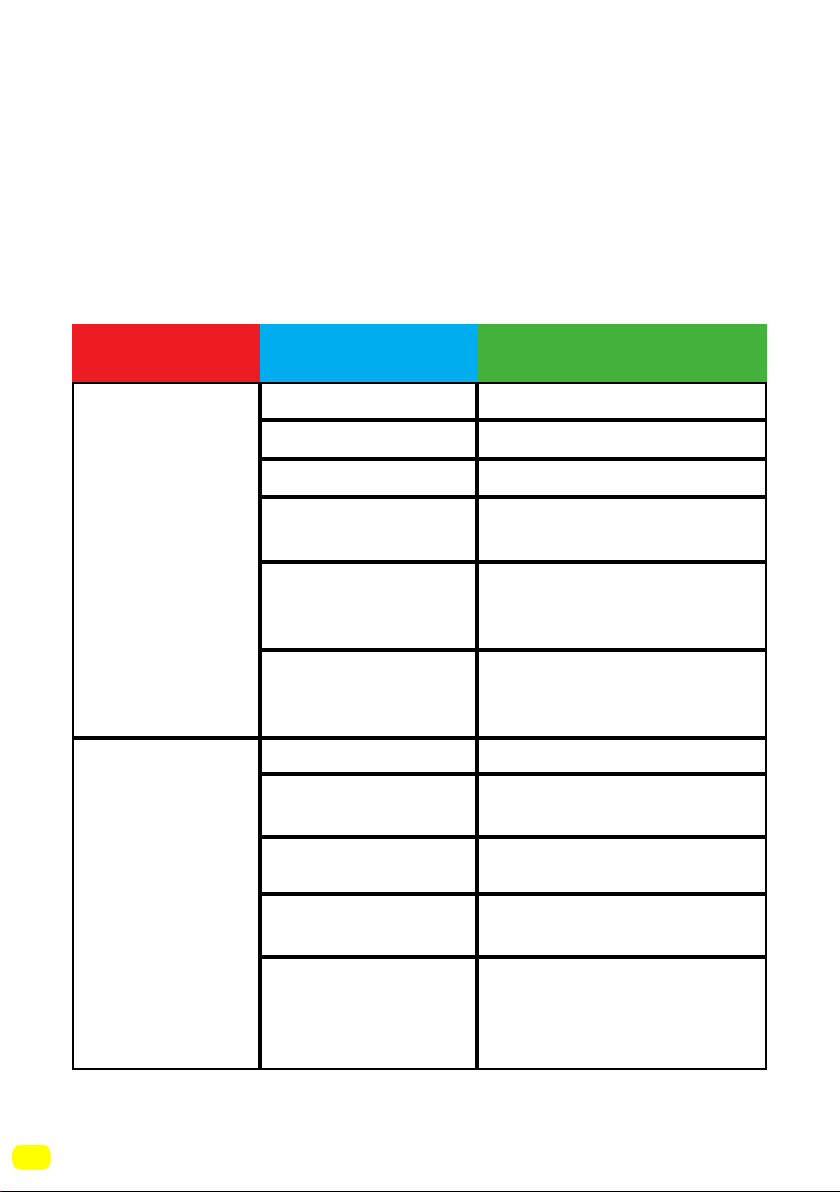
Your machine
will not start.
No water is
entering the
machine.
Start/Pause button
is not pressed.
Press the start/pause
button.
The program knob
is in stop (off)
position.
Bring the program knob on
the desired position.
The door off your
machine is not
closed properly.
Close the door of your
machine.
Your fuse is defective.
Check the water
inlet hose.
Water inlet hose
may be blocked.
Valve inlet filter is
blocked.
The door of your
machine is not
closed properly.
Close the door of your
machine.
Clean the water inlet hose
filters.(*)
Clean the valve inlet filters.
(*)
Change your fuse.
Water inlet hose may be
twisted.
It is not plugged in.
Your tap is closed.
Insert the plug into the socket.
Open the tap.
Mains supply is cut off. Check the mains supply.
FAULT POSSIBLE CAUSE REMOVING METHODS
105
(**) See page 101
(***) See page 23
(****) See page 21
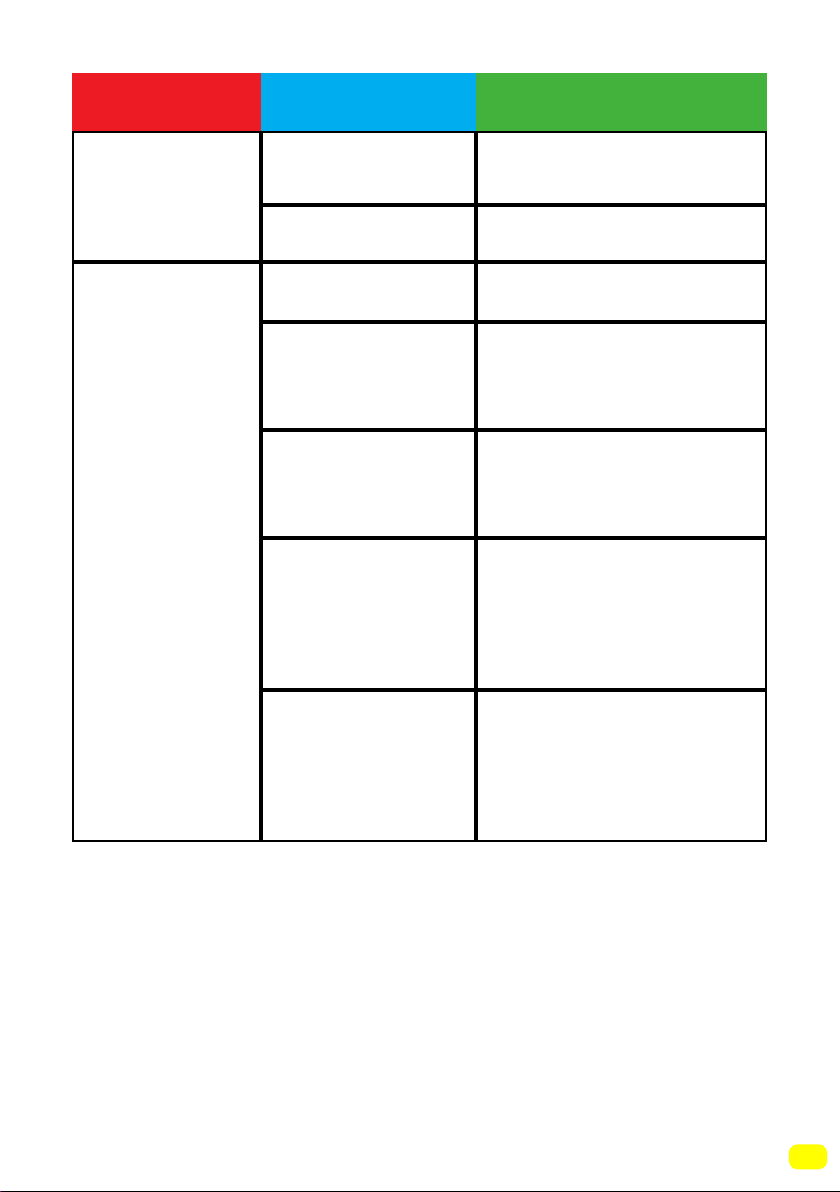
Your machine
does not
discharge
Your machine
vibrates.
Discharging hose
clogged or twisted.
Pump filter clogged.
You machine’s feet
are not adjusted.
Transportation
Safety screws are
not removed.
Your machine
only has a small
amount of laundry
inside.
Your machine is
overloaded with
laundry or the
laundry is not
distributed evenly.
Your machine rests
on a hard surface.
Adjust the feet of your
machine. (***)
Remove the transportation
safety screws from your
machine (****)
This will not prevent the
operation of your machine.
Do not put more laundry
in than the amount
recommended and make
sure it is loaded evenly.
Avoid installing your
machine on hard surfaces.
When settling your
machine, leave 2 cm
space between it and walls
or hard surfaces.
Clean the pump filter.(**)
Check the discharging
hose.
FAULT POSSIBLE CAUSE REMOVING METHODS
106
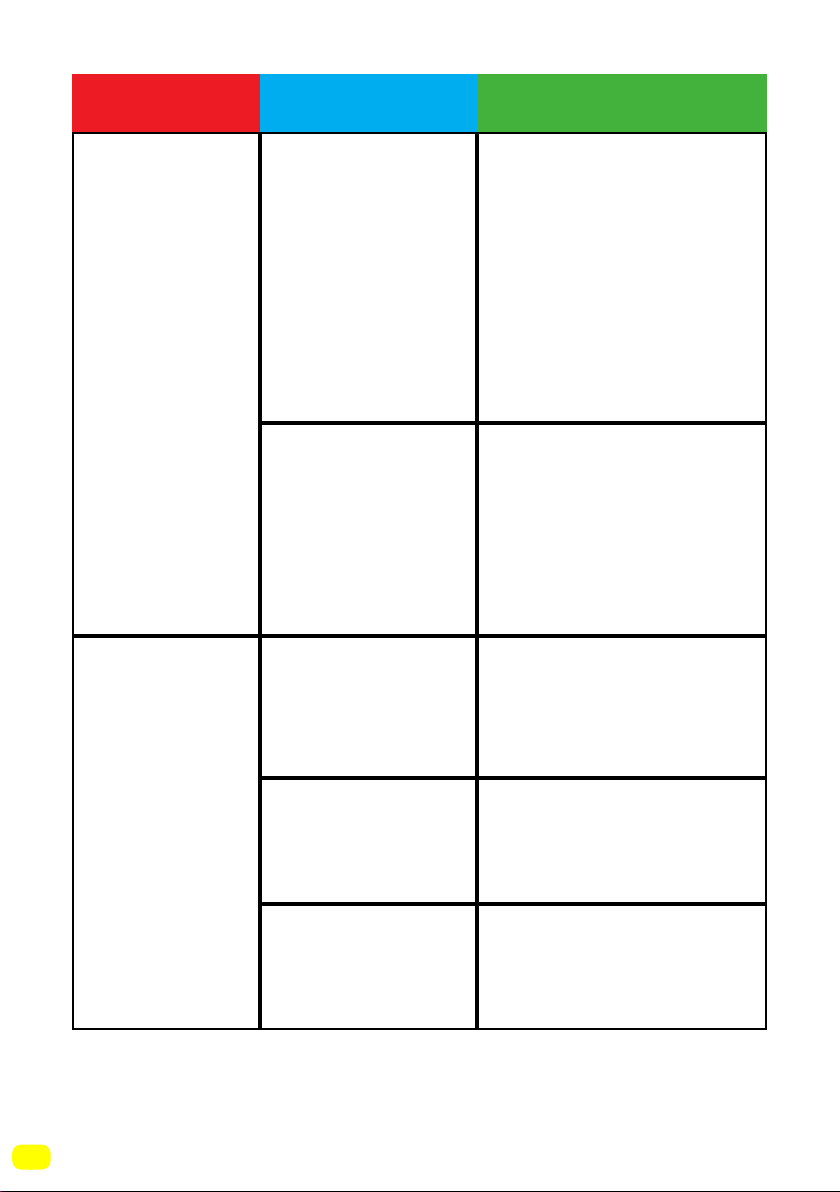
Excessive foam
is formed in
the detergent
drawer.
Unsatisfactory
washing result.
Excessive amount
of detergent used.
Wrong detergent
used.
The contamination
degree of your
laundry does not
match the programme
you have chosen.
Amount of
detergent used
insufficient.
Your machine
has more than the
maximum capacity
laundry inside the
machine.
Adjust the level of
detergent according to the
amount and level of
dirtiness of your laundry.
Load your machine with
an amount of laundry
that does not exceed
the maximum laundry
capacity.
Use detergents produced
only for automatic washing
machines in your machine.
Select programmes
appropriate for your
laundry’s level of dirtiness.
(See page 78 programme
table)
Press the Start/Pause
button. To eliminate foam
formation, mix a spoon of
softener with half a litre
of water, and pour the
mixture in the detergent
drawer. After 5-10 minutes,
press the Start/Pause
button again. In your next
washing operation,
adjust the detergent dose
accordingly.
FAULT POSSIBLE CAUSE REMOVING METHODS
107
(*****) See page 27.
As soon as the
machine is loaded
with water, water
discharges.
No water
appears in the
drum during
washing.
Laundry has
detergent
residues on
them.
Laundry have
detergent
residues on
them.
Spinning
operation is not
performed or
runs late.
The end of the
water drain hose
is too low for the
machine.
No fault.
Water is in the
unseen part of the
drum.
Non-dissolving
particles of some
detergents may
adhere to your
laundries as white
spots.
The reason for
these spots may
be oil, cream or
ointment.
No fault.
Unbalanced load
control system has
been activated.
-
Perform an extra rinsing
by setting your machine
to “Rinsing” programme,
or clean the spots using a
brush after your laundry
dries.
Apply the maximum
amount of detergent
instructed by the detergent
manufacturer in the next
washing operation.
The unbalanced load
control system will try
to spread your laundry
evenly. The spinning
operation will begin after
your laundry is spread.
Place the laundry in the
machine in a balanced
fashion next time.
Set the water drain hose
to an appropriate height.
(*****)
FAULT POSSIBLE CAUSE REMOVING METHODS
108
The load
detection system
on the screen
does not work
while loading the
machine.
symbol is
displayed
On screen and
machine does
not run.
Laundry remains
damp after the
drying operation.
Appropriate drying
programme is
not selected.
The maximum
load capacity
for the selected
programme might
be exceeded.
Select a drying
programme appropriate for
your laundry (see page 78
for the programme table)
Laundry is placed
into the machine
without choosing a
washing or drying
programme.
There is more
laundry in the
machine than the
maximum laundry
amount for the
washing or drying
programme you
selected.
Remove laundry from
your machine until the
symbol disappears
Remove the laundry in
your machine. Switch
the programme knob to
CANCEL position, reselect
the programme you
want to select. Load the
laundry in the machine
and run.
FAULT POSSIBLE CAUSE REMOVING METHODS
109
Automatic fault warnings and what
needs to be done
Your machine is equipped with systems which are capable of
both taking necessary precautions and warning you in case of
any breakdown by means of continuous self-checking during
washing operations.
ERROR CODE
POSSIBLE
FAULT
WHAT TO DO
The door of your machine is left open.
Close the machine door.
If your machine persists to indicate fault,
turn off your machine, unplug it and contact
the nearest authorised service company
immediately.
Check the door
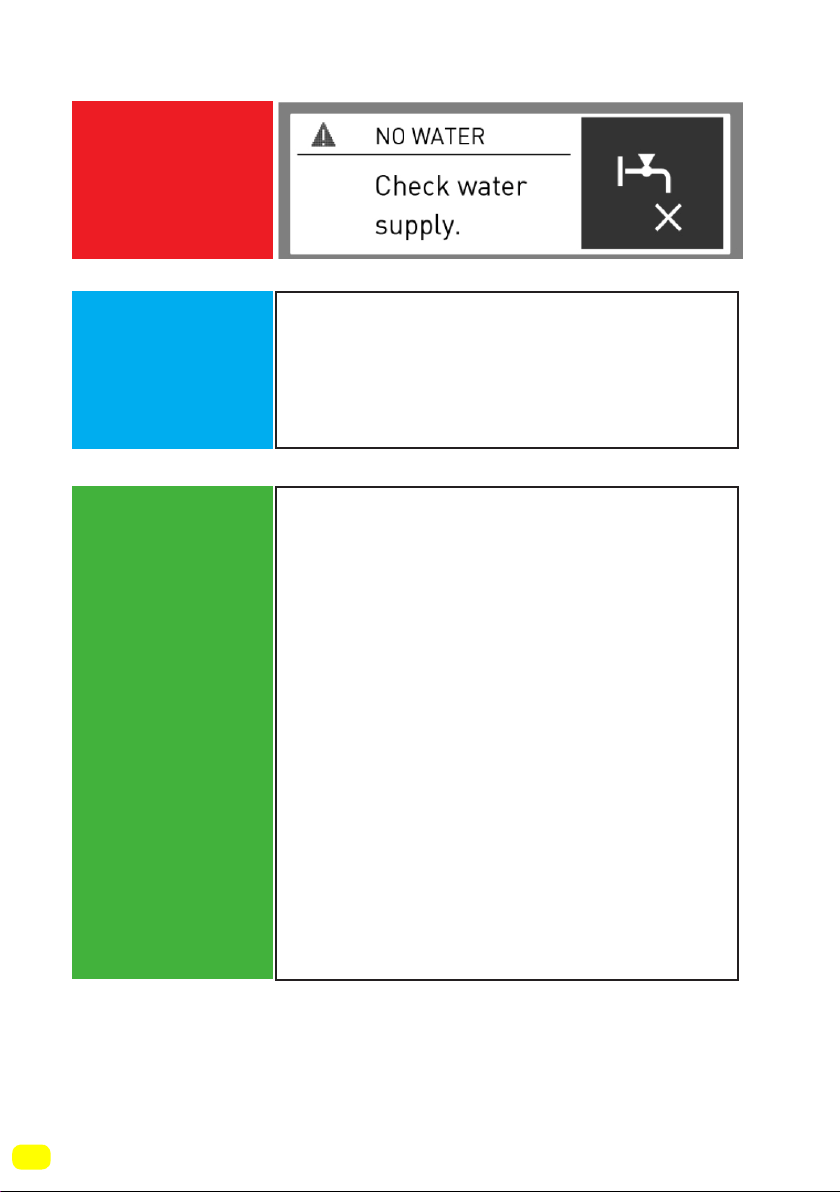
110
(*) See page 98.
ERROR CODE
POSSIBLE
FAULT
WHAT TO DO
Water cut-off or low mains water pressure.
- Water tap may be closed. Check.
- Mains water may be cut-off. Check.
- If so, switch the programme knob to
CANCEL position. You can select a
programme and run your machine after the
mains water is supplied.
- Mains water pressure may be low.
Check.
- Water inlet hose may be twisted.
Check.
- Water inlet hose may be clogged.
- Clean water inlet hose and valve inlet
filters.(*)
If the problem persists, unplug your
machine, turn off your tap and contact the
nearest authorised service company.
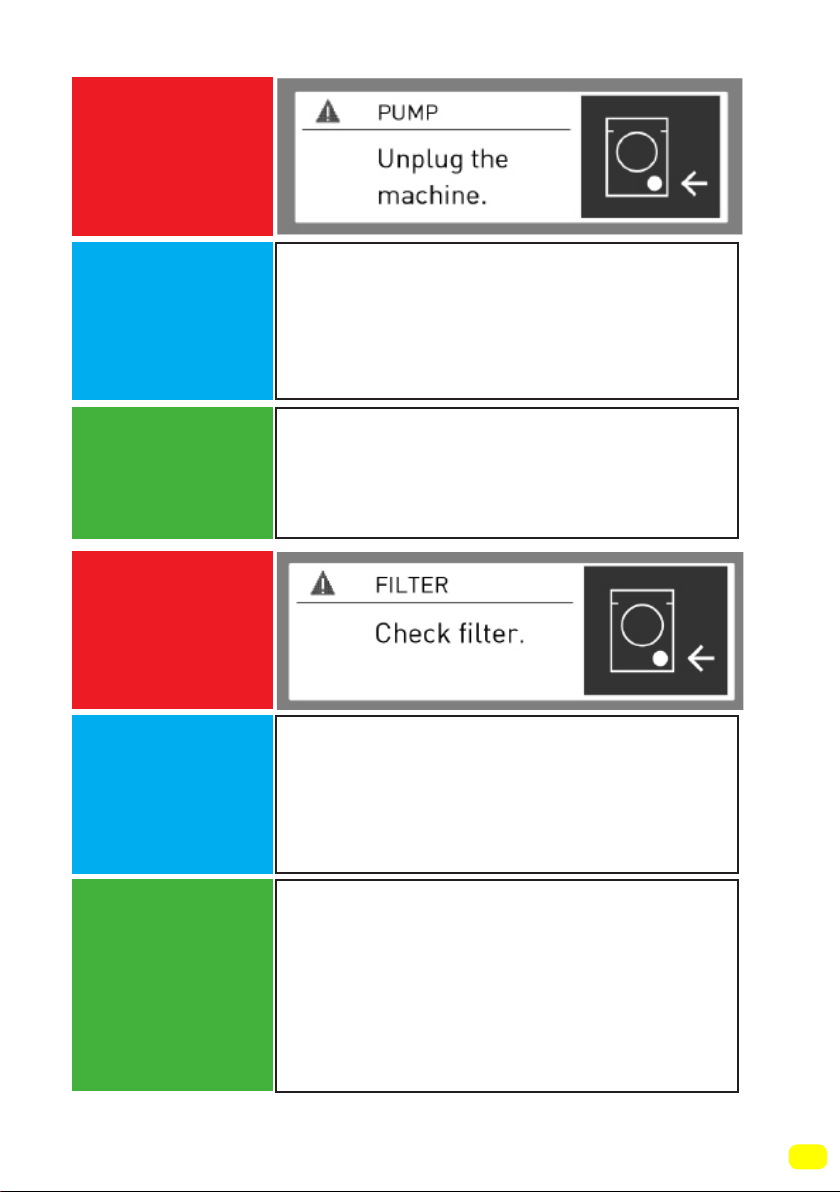
111
(**) See page 101.
ERROR CODE
ERROR CODE
POSSIBLE
FAULT
POSSIBLE
FAULT
WHAT TO DO
WHAT TO DO
Pump is damaged, pump
filter is clogged or pump electrical
connection is malfunctioning.
Pump is damaged or pump
filter is clogged or pump electrical
connection is malfunctioning.
Clean the pump(**)filter.
If the problem persists, contact the nearest
authorised service company.
- Pump filter may be clogged.
- Clean the pump filter. (**)
- Drain hose may be clogged or twisted.
- Check the Drain hose.
- If the problem persists, contact the
nearest authorised service company.

112
ERROR CODE
POSSIBLE
FAULT
WHAT TO DO
Your machine has excessive amount of
water.
Your machine will drain water by itself.
Pursuant to draining operation, turn off
your machine and unplug it. Turn off your
faucet and contact the nearest authorised
service company.
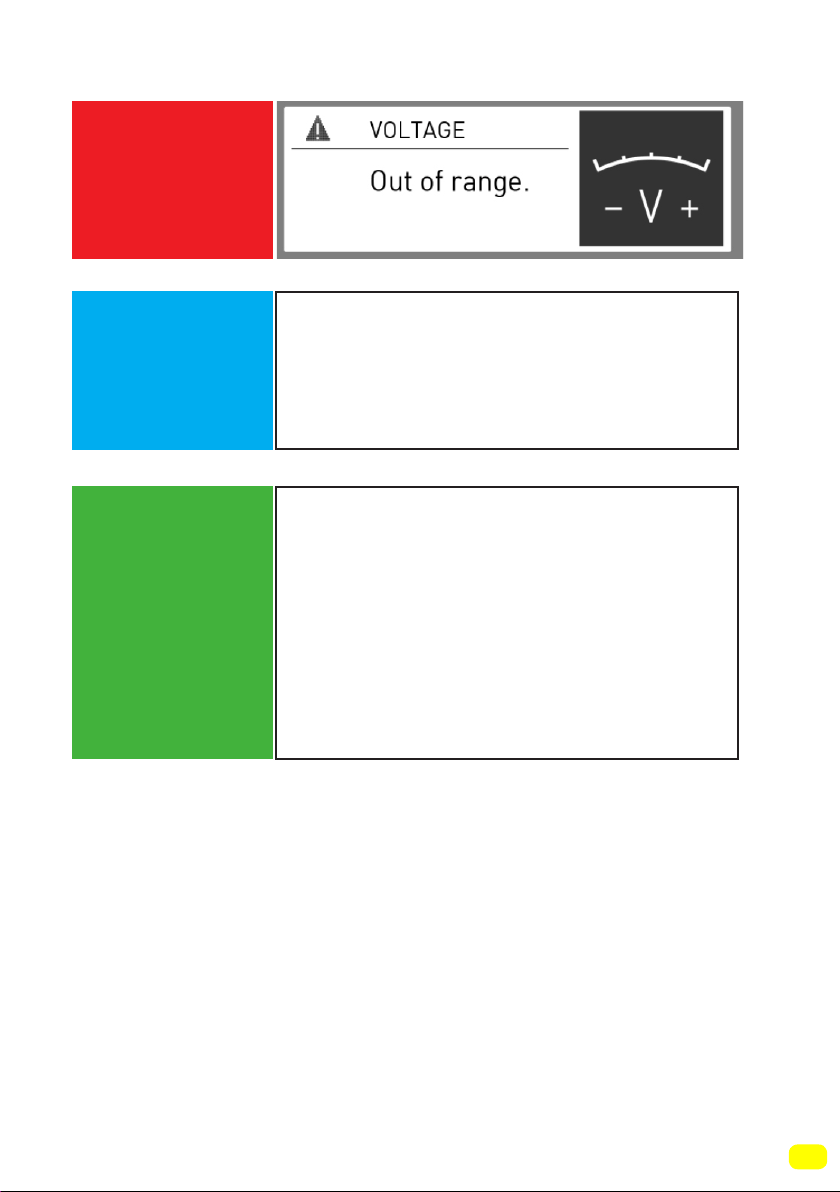
113
ERROR CODE
POSSIBLE
FAULT
WHAT TO DO
Mains voltage is high or low.
There might be a fluctuation on the energy
fed to your machine,
check if the socket you have your
machine plugged into is grounded. Have
an electrician measure the amount of
voltage coming to your house. If there is
no problem in the electricity, unplug your
machine and inform the nearest service
company.

Warranty Card
Worldwide Appliances Pty Limited
A.B.N. 45868077422
Oce:
48-50 Moore Street, Leichhardt N.S.W 2040
Post:
Locked Bag 3000, Annandale, N.S.W 2038
P: 1300 694 583
WARRANTY REGISTRATION
Your ongoing satisfaction with your artusi
product is important to us. We ask that you
complete the enclosed Warranty Registration
Card and return it to us so that we have a record
of the artusi product purchased by you.
PRIVACY
Worldwide Appliances respects your
privacy and is committed to handling your
personal information in accordance with the
National Privacy Principles and the Privacy
Act 1988 (Cth). A copy of the Worldwide
Appliances Privacy Policy is available at
www.artusi.com.au. Worldwide Appliances will
not disclose any personal information set out
in the Warranty Registration Card (“Personal
Information”) without your consent unless
required by:
1. law;
2. any Worldwide Appliances related company;
3. any service provider which provide services
to artusi or assist artusi in providing services
(including repair and warranty services) to
customers. Our purpose in collecting the
Personal Information is
to keep a record of the artusi product purchased
by you, in order to provide a better warranty
service to you in the unlikely event that there is
a problem with your artusi product. Worldwide
Appliances may contact you at any one or more
of the address, email address or telephone
numbers set out in the Warranty Registration
Card. Please contact artusi on 1300 694
583 should you not wish to be contacted by
Worldwide Appliances.
WARRANTY
1. Warranty
Worldwide Appliances warrants that each artusi
product will remain, for a period of either 12
months or 24 months of warranty. All Warranties
are valid from the original date of purchase, And
warranty claims must be accompanied by the
proof of purchase.
24 months warranty products:
All Built-in Appliances – Limited to Ovens,
Gas, Induction and Electric Cooktops, and All
Rangehoods
Freestanding Cookers - Gas and Electric Models
(900mm Width)
artusi.com.au
Dishwashers - Freestanding, Fully Integrated,
Semi Integrated and built-in
12 months warranty products:
Freestanding Cookers - Gas and Electric Models
in 50cm, 54cm and 60cm Widths
Portable Appliances* – Benchtop Models and
Portable Gas Models
2. What is not Covered by the Warranty.
The Warranty does not apply if an artusi product
is defective by a factor other than a defect arising
in the manufacture of the artusi product, including
but not limited to:
(a) damage through misuse (including failure
to maintain, service or use with proper care),
neglect, accident or ordinary wear and tear
(including deterioration of parts and accessories
and glass breakage);
(b) use for purpose for which the artusi product
was not sold or designed;
(c) use or installation which is not in accordance
with any specied instructions for use or
installation;
(d) use or operation after a defect has occurred or
been discovered;
(e) damage through freight, transportation or
handling in transit (other than when Worldwide
Appliances is responsible);
(f) damage through exposure to chemicals, dusts,
residues, excessive voltage, heat, atmospheric
conditions or other forces or environmental
factors outside the control or Worldwide
Appliances;
(g) repair, modication or tampering by the
purchaser or any person other than Worldwide
Appliances, an employee of Worldwide
Appliances or an authorised artusi service
contractor*;
(h) use of parts, components or accessories
which have not been supplied or specically
approved by artusi.
(i) damage to surface coatings caused by cleaning
or maintenance using products not recommended
in the artusi product handbook provided to the
purchaser upon purchase of the artusi product;
(j) damage to the base of an electric oven due to
items having been placed on the base of the oven
cavity or covering the base, such as aluminium
foil (this impedes the transfer of heat from the
element to the oven cavity and can result in
irreparable damage); or
(k) damages, dents or other cosmetic
imperfections not aecting the performance of the
artusi in respect of an artusi product purchased
as a “factory second” or from display
The Warranty does not extend to light globes
used in artusi products.
3. Domestic Use
Each artusi product is made for domestic use.
This Warranty may not extend to artusi products
used for commercial purposes.
Continued over...
4
Please complete and send to ARTUSI at: REPLY PAID 83617
LEICHHARDT NSW 2040
Last Name: First Name:
Address:
State: Postcode: Email:
Home Phone: Mobile:
Purchase Date: / / (Please attach proof of purchase to validate warranty)
MODEL NUMBER
SERIAL NUMBER
(if you cannot locate the serial number please call ARTUSI on 1300 694 583)
1
2
3
4
WARRANTY REGISTRATION CARD
01052013
01032014
4. Time for Claim under the Warranty
You must make any claim under this Warranty
within twenty eight (28) days after the occurrence
of an event which gives rise to a claim pursuant
to the Warranty, by booking a service call on the
telephone number below.
5. Proof of Purchase
Customers must retain proof of purchase in order
to be eligible to make a warranty claim in respect
of an artusi product.
6. Claiming under the Warranty
Customers will bear the cost of claiming under
this Warranty unless Worldwide Appliances
determines the expenses are reasonable, in which
case the customer must claim those expenses
by providing written evidence of each expense
to Worldwide Appliances at the address on the
Warranty Registration Card.
7. Statutory Rights
(a) These terms and conditions do not aect your
statutory rights.
(b) The limitations on the Warranty set out in this
document do not exclude or limit the application
of the consumer guarantees set out in the Act or
any other equivalent or corresponding legislation
in the relevant jurisdiction where to do so would:
(i) contravene the law of the relevant jurisdiction;
or
(ii) cause any part of the Warranty to be void.
(c) Worldwide Appliances excludes indirect or
consequential loss of any kind (including, without
limitation, loss of use of the artusi product) and
(other than expressly provided for in these terms
and conditions) subject to all terms,
conditions and warranties implied by custom, the
general law, the Act or other statute.
(d) The liability of Worldwide Appliances to you
for a breach of any express or non-excludable
implied term, condition or warranty is limited at
the option of Worldwide Appliances to:
(i) replacing or repairing the defective part of the
artusi product;
(ii) paying the cost of replacing or repairing the
defective part of the artusi product;
(iii) replacing the artusi product; or
(iv) paying the cost of replacing the artusi
product.
(e) Our goods come with guarantees that cannot
be excluded under the Australian Consumer
Law. You are entitled to a replacement or refund
for a major failure and for compensation for any
other reasonably foreseeable loss or damage.
You are also entitled to have the goods repaired
or replaced if the goods fail to be of acceptable
quality and the failure does not amount to a
major failure.
8. Defects
Any part of an artusi product deemed to be
defective and replaced by Worldwide Appliances
is the property of Worldwide Appliances.
Worldwide Appliances reserves the right to
inspect and test artusi products in order to
determine the extent of any defect and the
validity of a claim under the Warranty.
*To locate your closest artusi authorised service
agent please contact us on 1300 652 100 or visit
www.artusi.com.au
ALL SERVICE CALLS MUST BE BOOKED
THROUGH AN AUTHORISED DEALER OR
WARRANTY DEPARTMENT ON 1300 652 100
OR stokesaps.com.au/artusi-service
01032014
Warranty Card continued
artusi.com.au
Warranty Card tear off


ARTUSI.COM.AUP: 1300 649 583
NSW & ACT (HEAD OFFICE)
48-50 MOORE STREET
LEICHHARDT
F 02 8569 4699
QLD
1/42 CAVENDISH ROAD
COORPAROO
F 07 3397 0850
VIC, TAS & SA
1211 TOORAK ROAD
CAMBERWELL
F 03 9809 2155
WA & NT
UNIT 10/55 HOWE STREET
OSBORNE PARK
F 08 9201 9188
NZ
PO BOX 11.160
SOCKBURN CHRISTCHURCH
F 03 344 5906
ARTUSI OFFICES ARE OPEN DAILY FROM 9AM–5PM AND SATURDAYS 10AM–4PM
DISCLAIMER
Worldwide Appliances PTY LTD, trading as ARTUSI, is continually seeking ways to improve the design specifications, aesthetics and production
techniques of its products. As a result alterations to our products and designs take place continually. Whilst every effort is made to produce
information and literature that is up to date, this brochure should not be regarded as an infallible guide to the current specifications, nor does it
constitute an offer for the sale of any particular product. Product dimensions indicated in our literature is indicative only. Actual product only
should be used to define dimension cutouts. Distributors, and retailers are not agents of ARTUSI and are not authorised to bind ARTUSI by any
express or implied undertaking or representation.