WASHING MACHINE
DRUM TYPE
WASHING MACHINE (DRUM) CONTENTS
SERVICE
Manual
REPAIR GUIDE
The model code is on the next page.
1. Safety Instructions
2. FeaturesandSpecications
3. Disassembly and Reassembly
4. Troubleshooting
5. Wiring Diagram
6. Reference
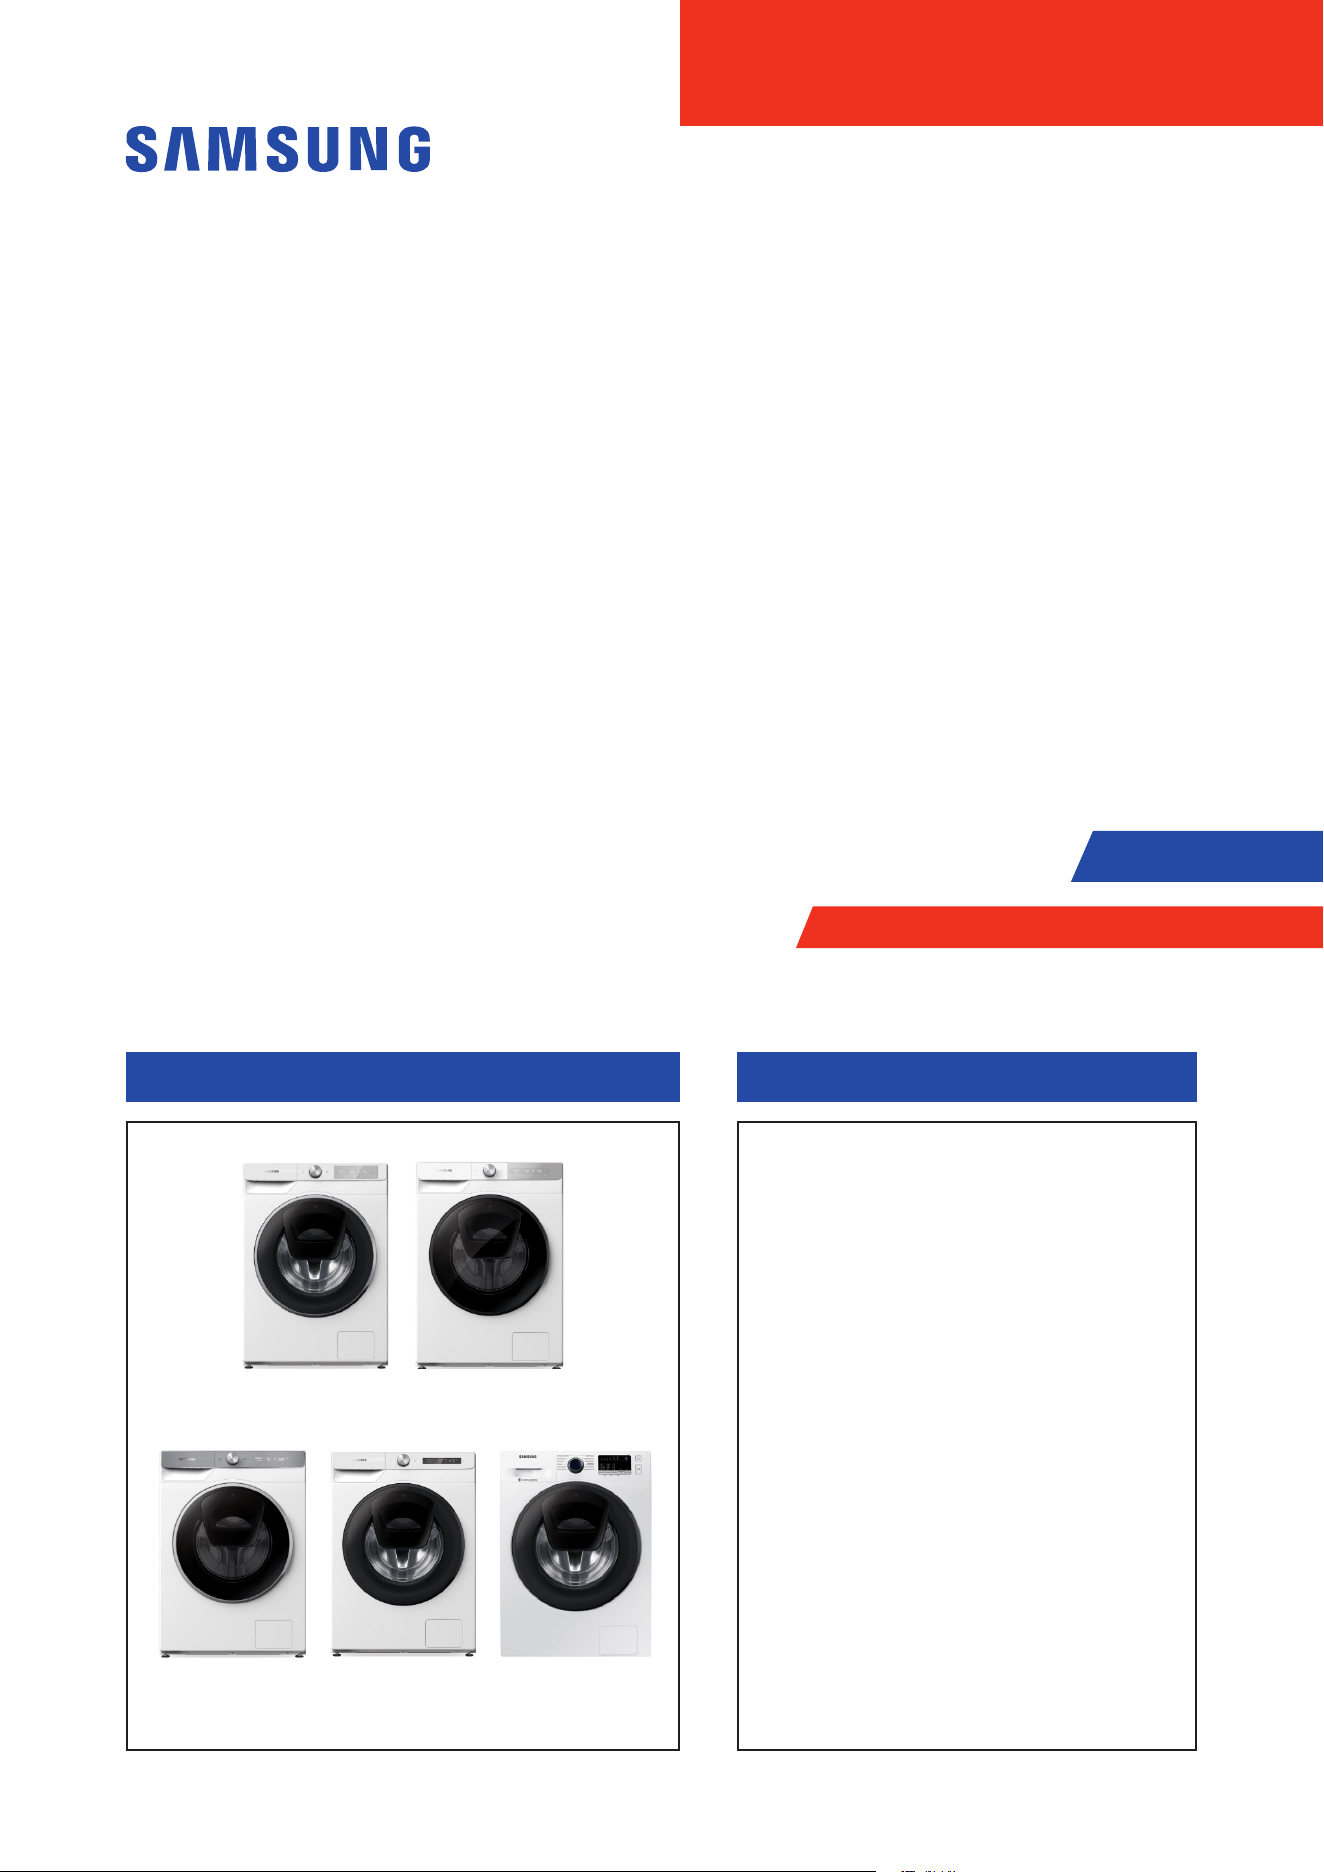
WD10T734DBH
WD80T534DBN
WD90T654DBH
WD90T984DSH WD70T4046EW
MODEL CODE
WD1*T****** WD7*T****** WD8*T****** WD9*T******
WD10T534ABW
WD70T4046CH WD80T4046CE WD85T4046CH WD90T4046EH
WD10T534DBN
WD70T4046EE WD80T4046CW WD85T534DBE WD90T534ABE
WD10T534DBT WD70T4046EW WD80T4046CX WD85T554DBW WD90T534ABW
WD10T534DBW WD70T4047CE WD80T4046EE WD85T654DBH WD90T534DBN
WD10T554DBN WD70T4049CE WD80T4046EW WD85T984DSH WD90T534DBW
WD10T634DBH WD70T554DBE WD80T4047CH WD8ET4049CE WD90T534DBX
WD10T634DBN WD70T654DBN WD80T4047EE WD8ET554ABW WD90T554DBN
WD10T654ABH
WD70TA046BE WD80T4049CE WD8ETA049BX WD90T554DBT
WD10T654CBH
WD70TA046BH WD80T534ABE WD8FT4049EE WD90T554DBW
WD10T654CBX WD70TA046BN WD80T534DBN WD8TT534ABE WD90T634ABH
WD10T654DBE WD70TA049BE WD80T534DBT WD8XT554ABE WD90T634CBN
WD10T654DBH WD71TA049BE WD80T534DBW WD8XT754AWH WD90T634DBE
WD10T654DBN WD75T4046CE WD80T554ABE WD90T634DBH
WD10T704DBX WD75T534DBE WD80T554ABT WD90T634DBN
WD10T734DBH
WD75T554DBE WD80T554CBT WD90T654ABE
WD10T734DBX WD7ETA049BE WD80T554CBX WD90T654ABH
WD10T754ABT WD80T554DBE WD90T654DBE
WD10T754CBH WD80T554DBT WD90T654DBH
WD10T754CBX WD80T554DBW WD90T654DBN
WD10T754DBH WD80T554DBX WD90T654DBX
WD10T754DBN WD80T604DBX WD90T734ABH
WD10T754DBX WD80T634ABH WD90T734DBH
WD10TA046BE WD80T634DBE WD90T734DBX
WD10TA046BX WD80T634DBH WD90T754ABH
WD10TP34DSH
WD80T634DBN WD90T754ABT
WD10TP34DSX WD80T654ABH WD90T754DBH
WD10TP54DSX WD80T654AWH WD90T754DBN
WD11T4046CH WD80T654CBE WD90T754DBX
WD11T554AWW WD80T654DBE WD90T954ASH
WD11T554DWW WD80T654DBH WD90T954ASX
WD11T604DBE WD80T654DBN WD90T954DSH
WD11T604DBN WD80T754ABH WD90T984ASE
WD11T704DBX WD80T754ABN WD90T984ASH
WD11T734DBN WD80T754DWH WD90T984DSH
WD11T734DWT WD80T954DSH WD90T984DSX
WD11T754AWH WD80TA046BE WD90TA046BE
WD11T754DBX WD80TA046BH WD90TA046BX
WD11TA046BE WD80TA046BN WD91T984ASH
WD11TA046BN WD80TA046BX WD91TA049BE
WD11TA046BX WD80TA047BT WD92T654CBE
WD12T654DBH WD80TA049BE WD92T734CBT
WD12T654DBN
WD81T4049CE WD94T754CBT
WD12T754DBN
WD81T534ABW WD95T4046CE
WD13T604DBN WD81T554ABW WD95T534CBE
WD13T704DBH WD81T754ABH WD95T634CBH
WD13T704DBX WD81TA049BE WD95T634DBH
WD13T734DBN WD82T4047CE WD95T754DBH
WD13T754DBN WD83T734CBH WD95T754DBN
WD13T784DBX WD83TA047BH WD95T954ASE
WD13T784DSX
WD84T634CBE WD95T984DSX
WD15T634CBH
WD85T4046CE WD95TA047BE

CONTENTS
1. Safety instructions .........................................................................1
1-1. Safety instructions ...........................................................................1
2. FeaturesandSpecications ................................................................4
2-1. Specications .......................................... ............................... .......4
2-2. Comparingspecicationswithexistingmodels ................................................5
2-3. Optionsspecications ........................................................................6
3. Disassembly and Reassembly ...............................................................7
3-1. Toolsfordisassemblyandreassembly ......................................................... 7
3-2. Standarddisassemblydrawings ............................. ...... ....... ...... ...... ...... ...8
4. Troubleshooting ..........................................................................30
4-1. InformationCode ...........................................................................30
4-2. Problemcheckpoint ........................................................................34
5. Wiring diagram ...........................................................................35
5-1. WiringDiagram(Simple) ....................................................................35
5-2. WiringDiagram(LED) .......................................................................36
5-3. WiringDiagram(Q-Drive) .......................................... ..........................37
6. Reference .................................................................................38
6-1. WD6000T Project name .....................................................................38
6-2. Terminology ................................................................................39
Safety Instructions _ 1
1. SAFETY INSTRUCTIONS
1-1. SAFETY INSTRUCTIONS
► Makesuretoobservethefollowinginstructionstooperatetheproductcorrectlyandsafelyandpreventpossibleaccidentsand
hazardswhileservicing.
► Twotypesofsafetysymbols,WarningandCaution,areusedinthesafetyinstructions.
WARNING
Hazardsorunsafepracticesthatmayresultinseverepersonalinjuryordeath.
CAUTION
Hazardsorunsafepracticesthatmayresultinminorpersonalinjuryorpropertydamage.
► Followingtherepairbyanon-authorisedserviceprovider,self-repairornon-professionalrepairoftheproduct,Samsungisnot
liableforanydamagetotheproduct,anyinjuryoranyotherproductsafetyissuecausedbyanyattempttorepairtheproduct
whichdoesnotcarefullyfollowtheserepairandmaintenanceinstructions.Anydamagetotheproductcausedbyanattemptto
repairtheproductbyanypersonotherthanaSamsungcertiedserviceproviderwillnotbecoveredbythewarranty.
WARNING
BEFORE SERVICING
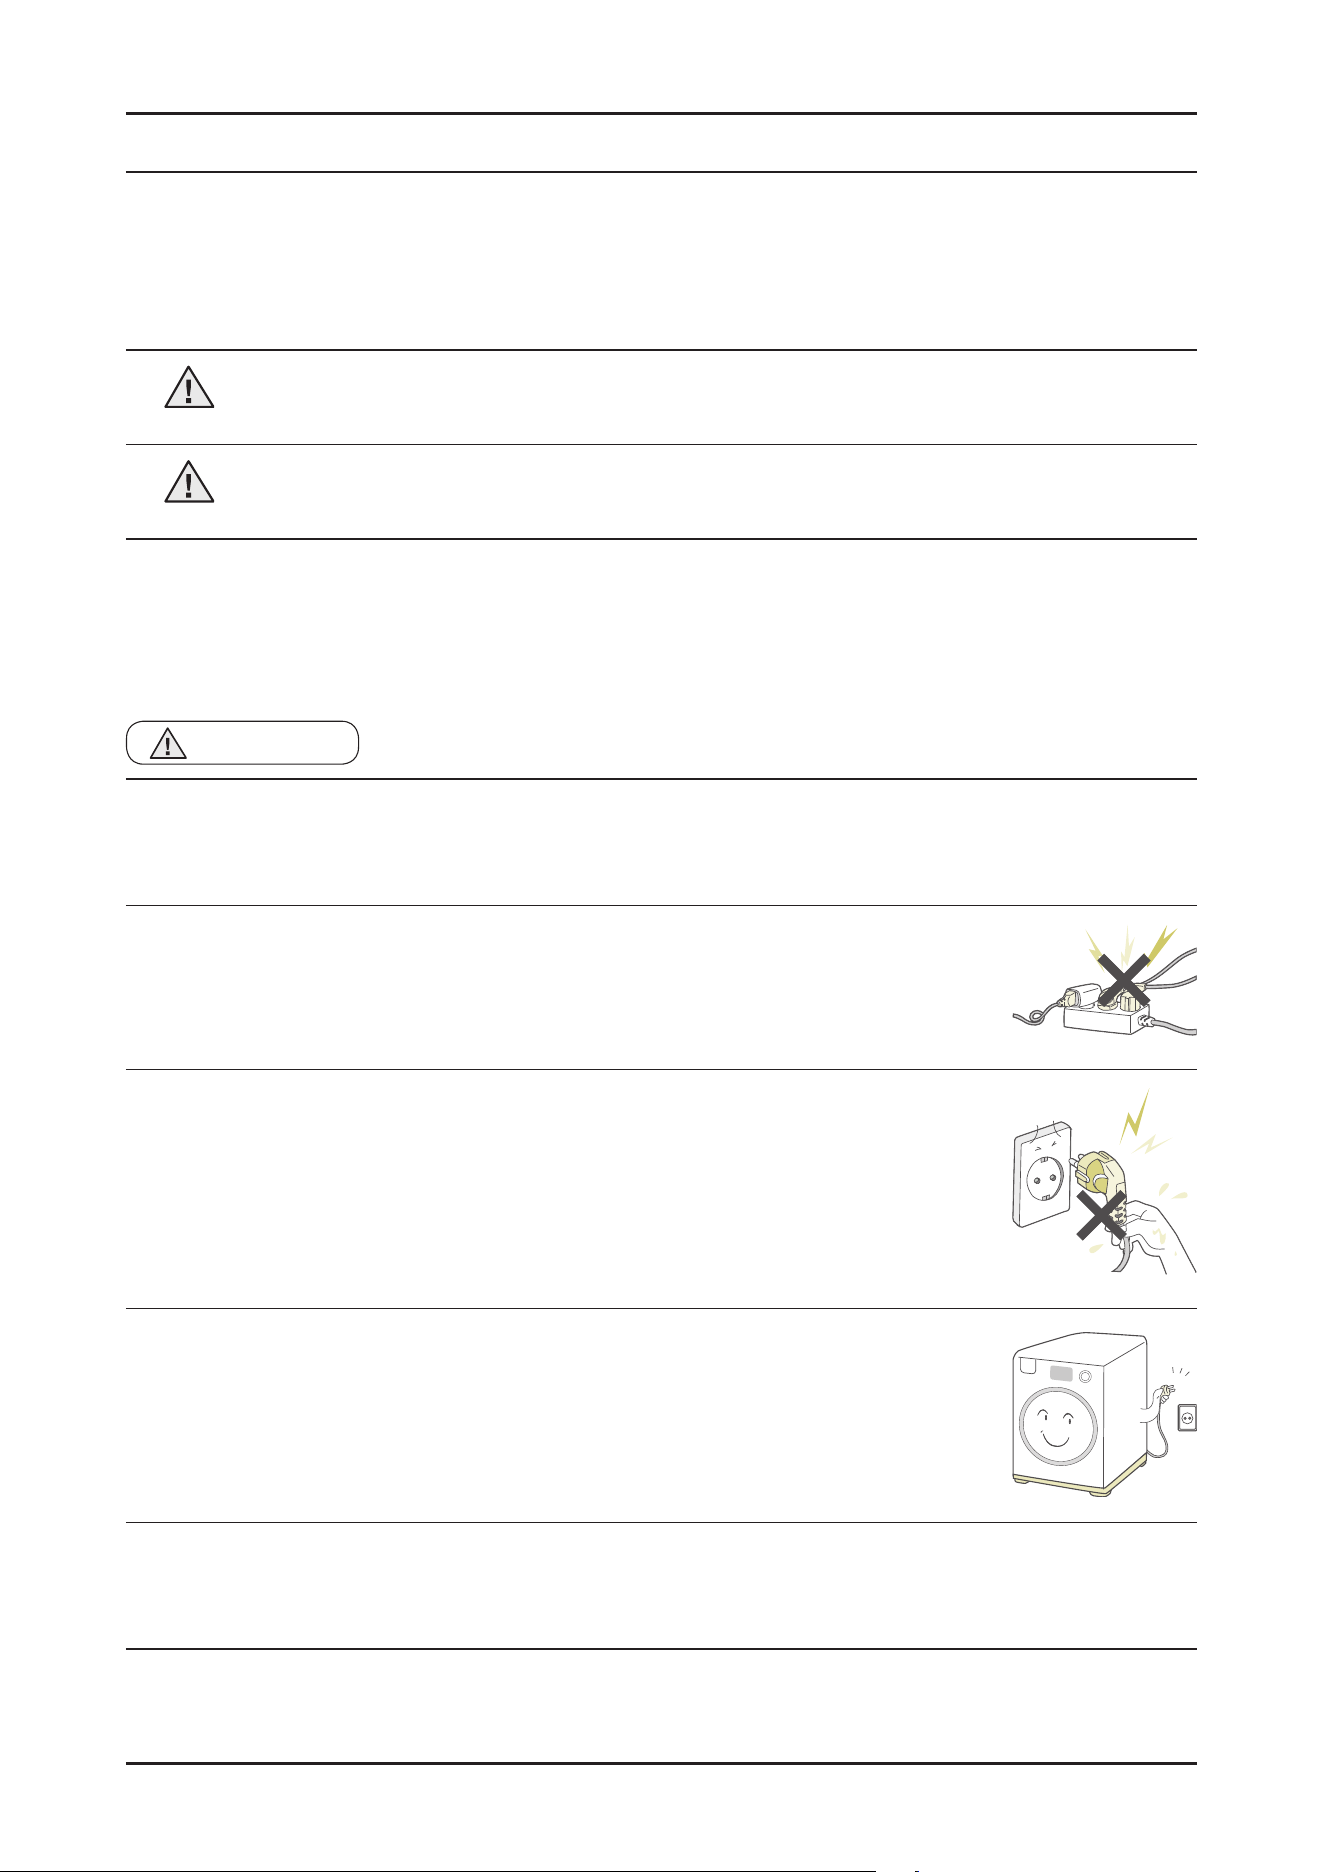
• (Whenservicingelectricalpartsorharnesses)Makesuretodisconnectthepowerplugbeforeservicing.
4 Failingtodosomayresultinariskofelectricshock.
• Adviseconsumersnottoconnectseveralappliancestoasinglepoweroutletatthesametime.
4 Thereisariskofreduetooverheating.
• Whenremovingthepowercord,makesuretoholdthepowerplugwhenpullingtheplugfrom
theoutlet.
4 Failingtodosomaydamagetheplugorpoweroutletandresultinreorelectricshock.
• Whenthewashingmachineisnotbeingused,makesuretodisconnectthepowerplugfromthe
poweroutlet.
4 Failingtodosomayresultinresultinaccidentaloperationofthewashingmachine.
• Donotplaceorusegasoline,thinners,alcohol,orotherammableorexplosivesubstancesnearthewashingmachine.
4 Thereisariskofexplosionandrecausedfromelectricsparks.
2 _ Safety Instructions
WARNING
WHILE SERVICING
• Checkifthepowerplugandoutletaredamaged,attened,cutorotherwisedegraded.
4 Iffaulty,replaceitimmediately.
Failingtodosomayresultinelectricshockorre.
• Completelyremoveanydustorforeignmaterialfromthehousing,wiringandconnectionparts.
4 Thiswillpreventariskofreduetotrackingandshortsinadvance.
• Whenconnectingwires,makesuretoconnectthemusingtherelevantconnectorsandcheckthattheyareproperlyconnected.
4 Donotusetapeinsteadoftheconnectors,itmaycausereduetotracking.
• MakesuretodischargethePBApowerterminalsbeforestartingtheservice.
4 Failingtodosomayresultinahighvoltageelectricshock.
• Whenreplacingtheheater,makesuretofastenthenutafterensuringthatitisinsertedintothebracket-heater.
4 Ifnotinsertedintothebracket-heater,ittouchesthedrumandcausesnoiseandelectricleakage.
• Donotrepairthewashingmachinewithoutsafetygloves.
4 It can cause injury.
WARNING
AFTER SERVICING
• Checkthewiring.
4 Ensurethatthewiringcannotbedamagedbyanysharpedgesormovingparts.
• Checkforanywaterleakage.
4 Performatestrunforthewashingmachineusingthestandardcourseandcheckwhetherthereisanywaterleakage
throughtheoorsectionorthepipes.
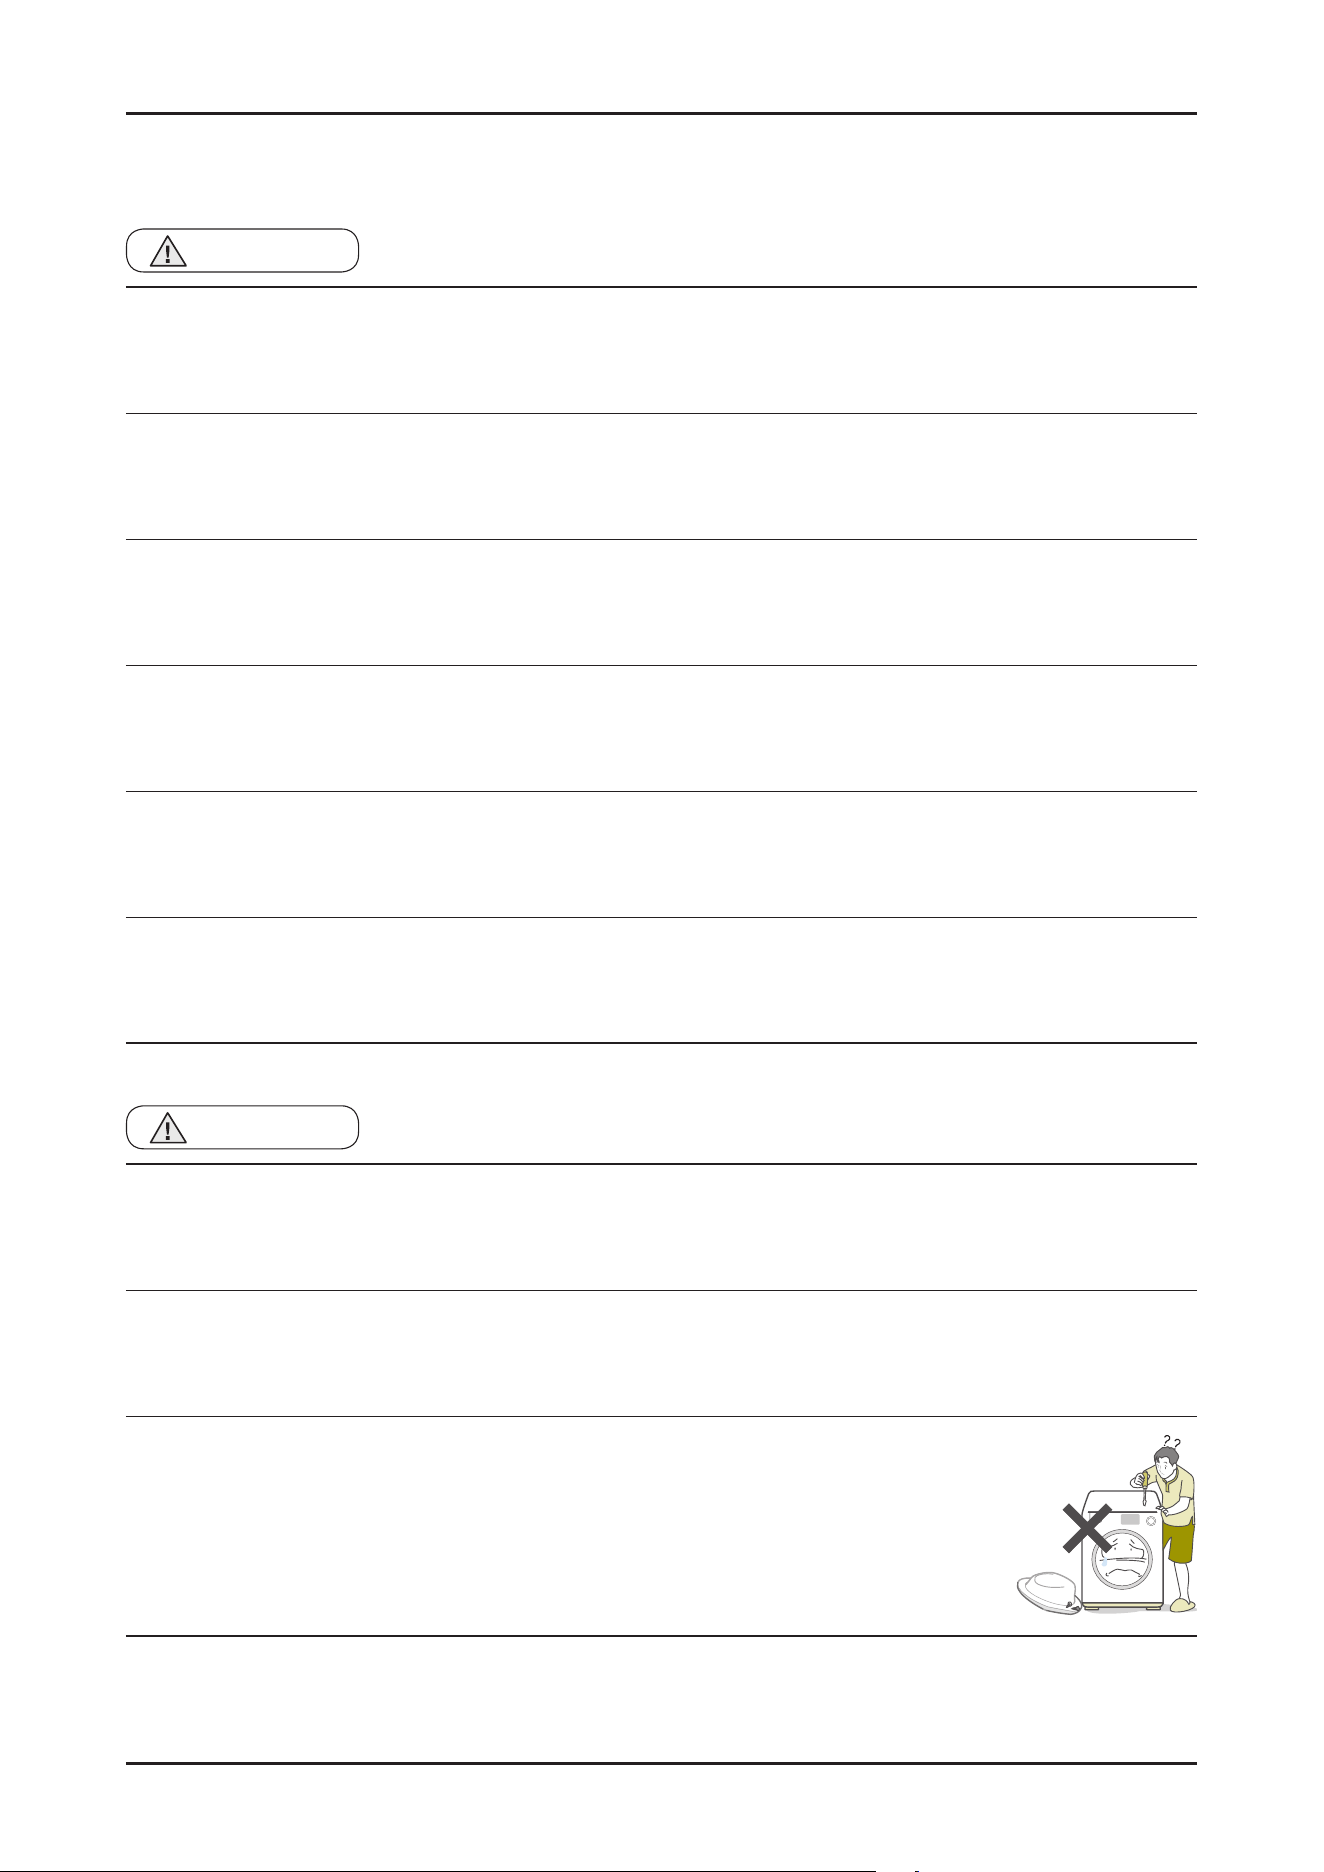
• Adviseconsumersnottorepairorserviceanypartofthewashingmachinethemselves.
4 Thismayresultinpersonalinjuryandshortentheproductlifetime.
Safety Instructions _ 3
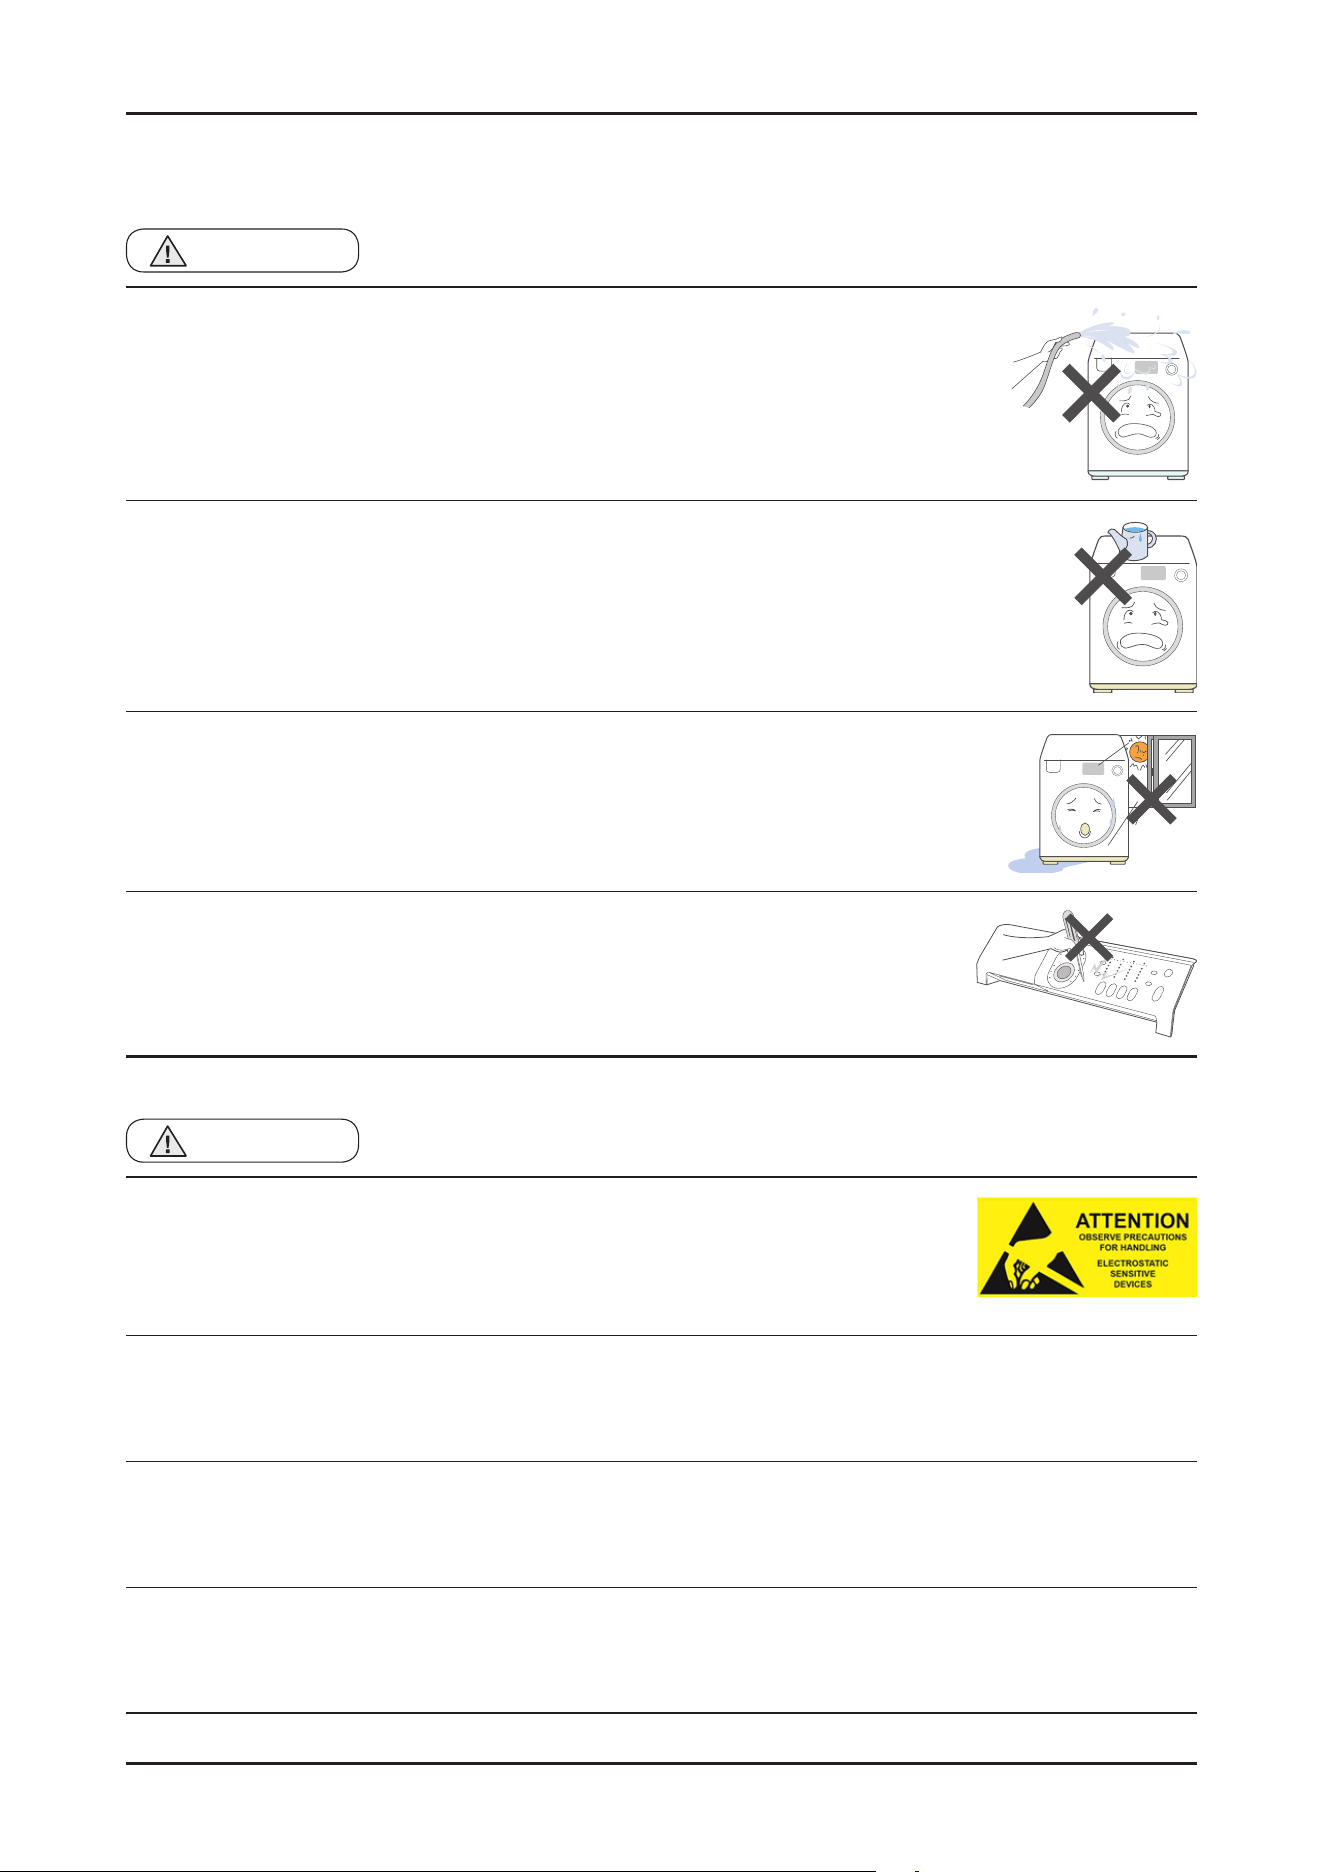
CAUTION
BEFORE SERVICING
• Donotsprinklewaterontothewashingmachinedirectlywhencleaningit.
4 Thismayresultinelectricshockorre,andmayshortentheproductlifetime.
• Donotplaceanycontainerswithwateroranyotherliquidonthewashingmachine
4 Ifthewaterisspilled,itmayresultinelectricshockorre.Thiswillalsoshortentheproduct
lifetime.
• Donotinstallthewashingmachineinalocationexposedtosnoworrain.
4 Thismayresultinelectricshockorre,andshortentheproductlifetime.
• Donotpressacontrolbuttonusingasharptoolorobject.
4 Thismayresultinelectricshockordamagetotheproduct.
CAUTION
WHILE SERVICING
• Whenwiringaharness,makesuretosealitcompletelysonoliquidcanenter.
4 Takecarewhendisconnectingconnectors,donotuseexcessiveforceasthismaydamage
theconnector.
• Checkifthereisanyresiduethatshowsthatliquidenteredtheelectricpartsorharnesses.
4 Ifanyliquidhasenteredintoapart,replaceitorcompletelyremoveanyremainingmoisturefromit.
• Ifyouneedtoplacethewashingmachineonitsbackforservicingpurposes,placeasupport(s)ontheoorandlayitdown
carefullysoitssideisontheoor.
4 Donotlayitdownonitsfront.Thismayresultintheinsidetubdamagingparts.
• Atleasttwopeopleshouldworkwhenworkingwithheavyproducts.
FeaturesandSpecications_4
2. FEATURES AND SPECIFICATIONS
2-1. SPECIFICATIONS
MODEL
WD90T654DBH WD10T734DBH WD90T984DSH WD80T534DBN WD70T4046EW
ModelName
Frontloadingwashingmachine
Water Pressure
50kPa-800kPa
NETweight(kg)
68 80 86 68 63
Wash&SpinCapacity
9 10.5 9 8 7
Dry Capacity
6 6 6 5 4
Power
Consumption
Washing
220V
150W
240V
150W
Washingandheating
220V
2000W
240V
2400W
Drying
220V
1600W
240V
1600W
Spin
220~240V
550W 600W 600W 550W 550W
Pumping
30W
Spinrevolutions
1400 1400 1400 1400 1400
-
PleasevisitSamsungofcialwebsitetoreceivemostup-to-dateinformationaboutsoftwareandproductmaintenance.
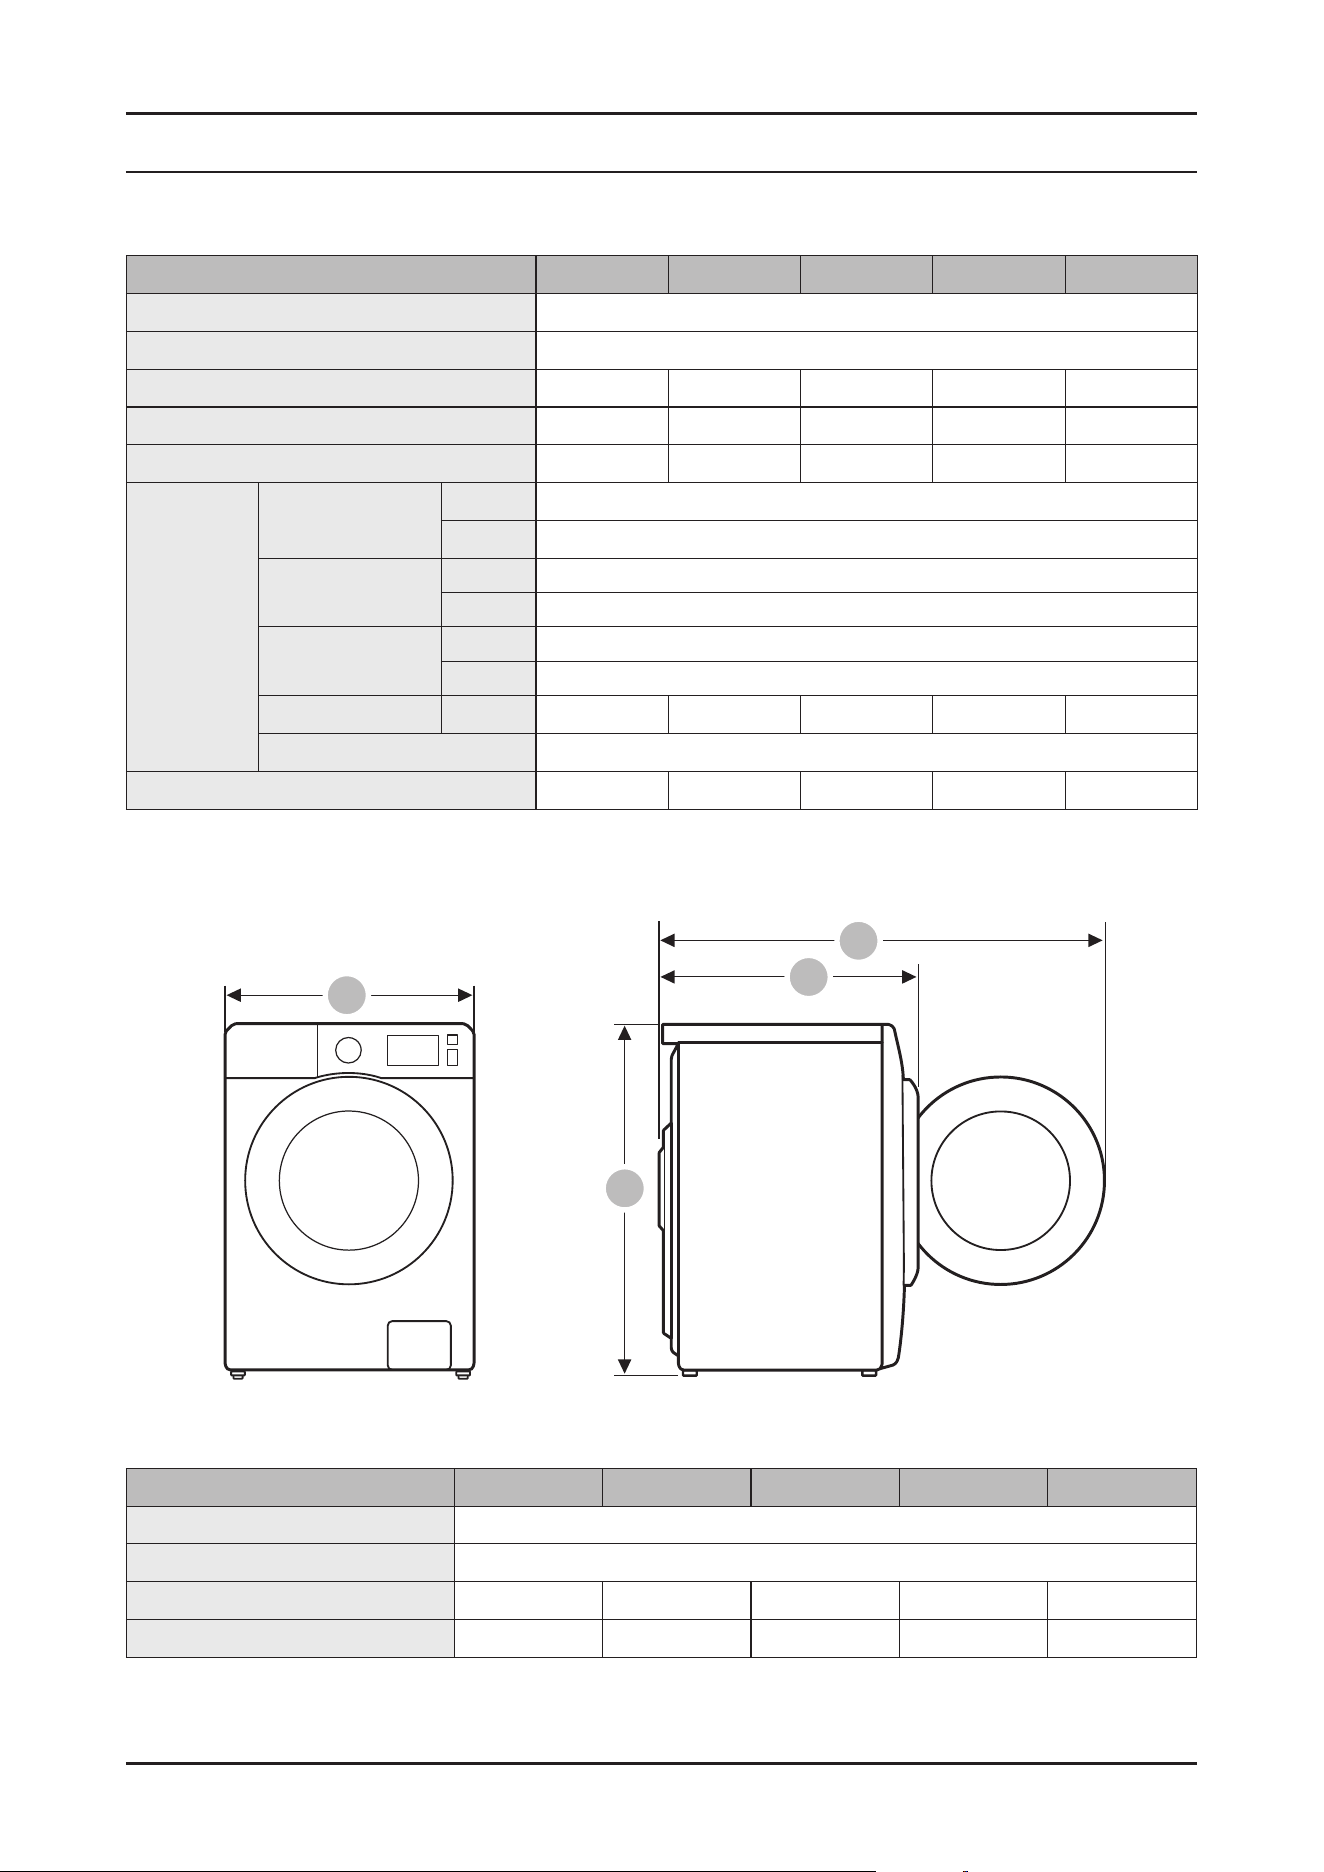
Model
WD90T654DBH WD10T734DBH WD90T984DSH WD80T534DBN WD70T4046EW
Width(A)
600mm
Height-Overall(B)
850mm
Depth(C)
650mm 600mm 600mm 600mm 550mm
Depthwithdooropen90°(D)
1160mm 1110mm 1110mm 1110mm 1060mm
A
B
C
D
5_FeaturesandSpecications
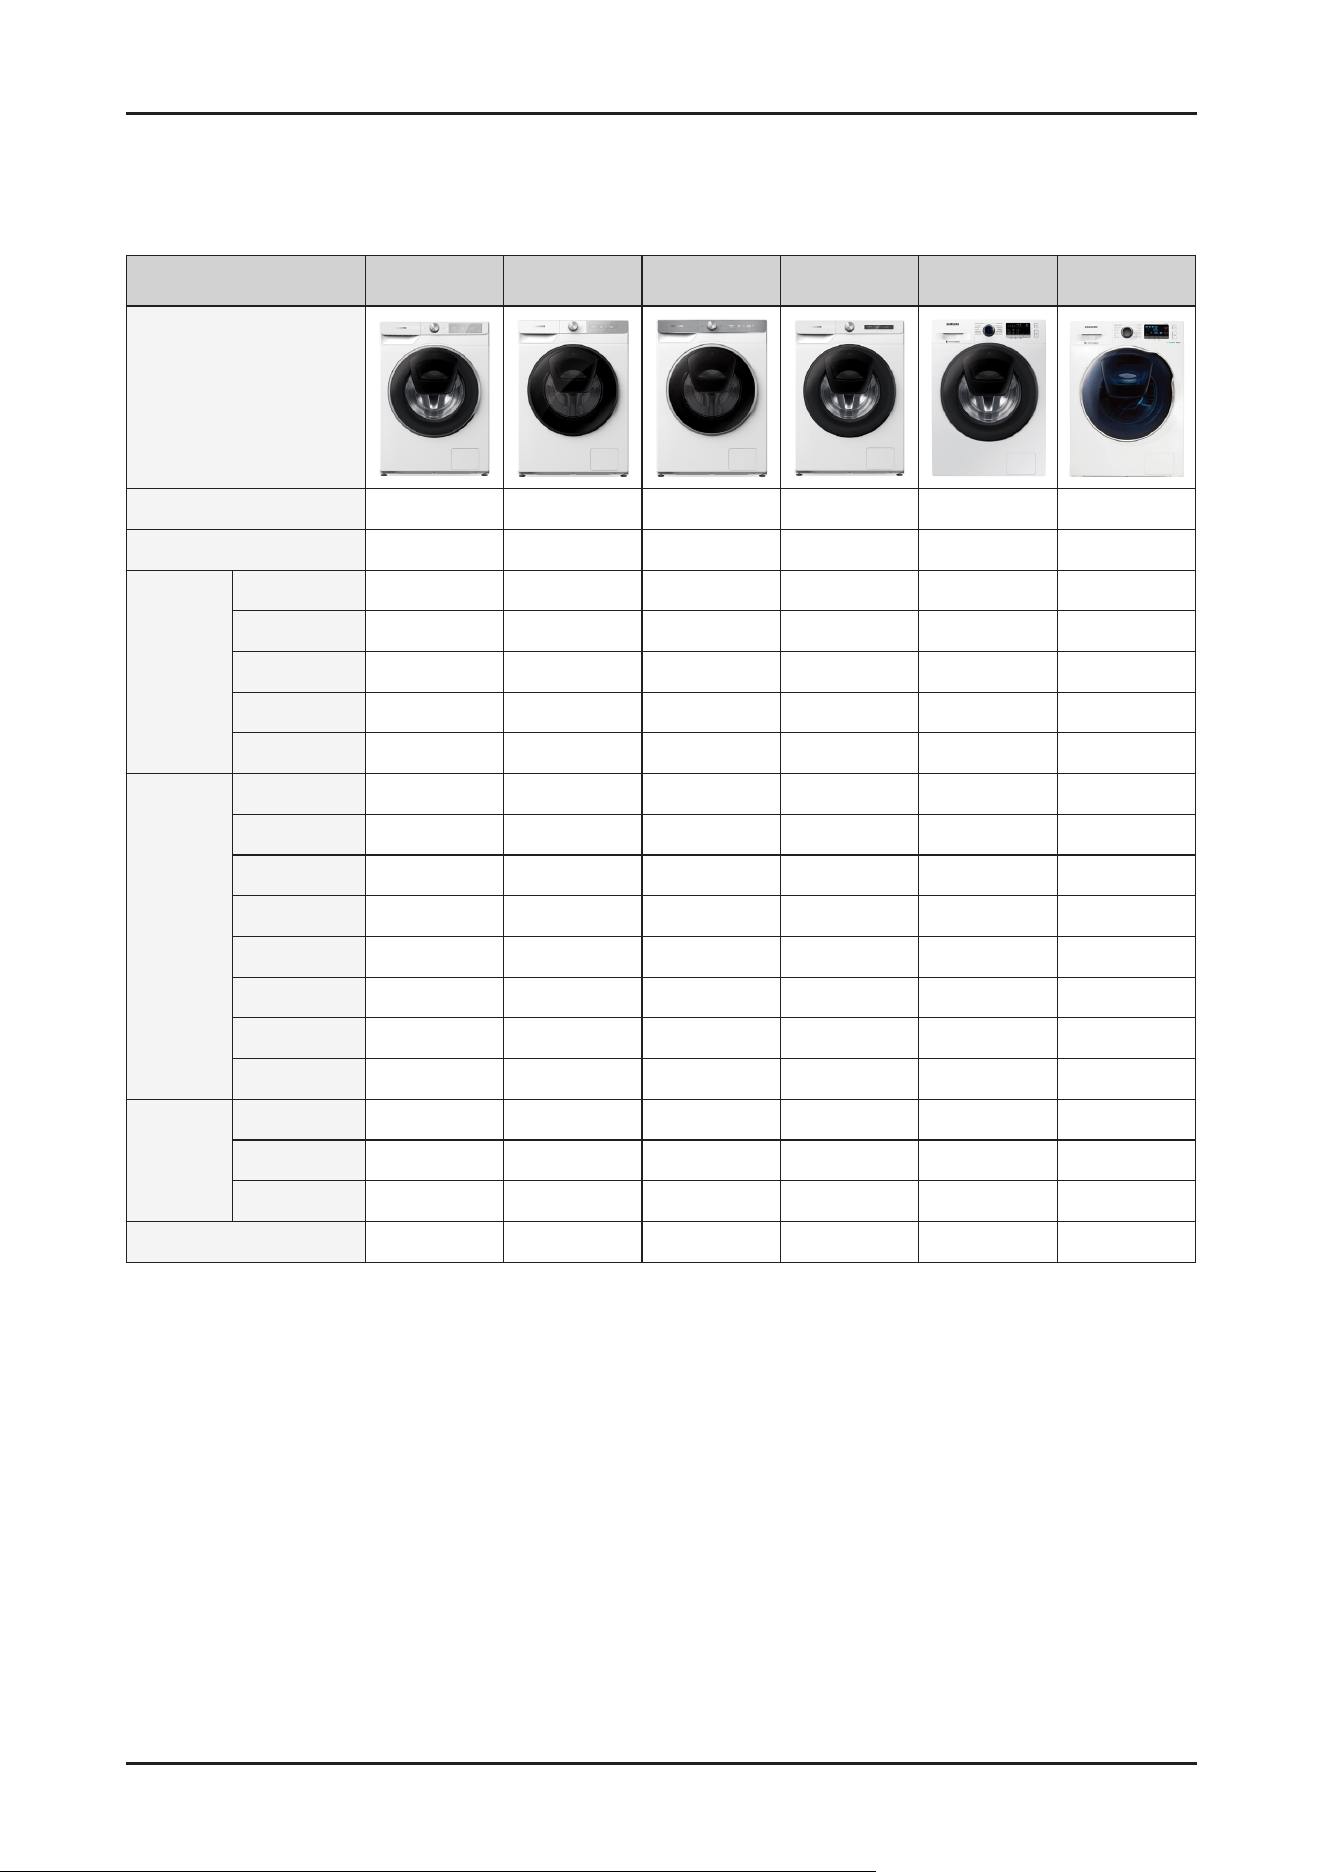
2-2. COMPARING SPECIFICATIONS WITH EXISTING MODELS
Model name
WD90T654DBH
WD10T734DBH WD90T984DSH WD80T534DBN WD70T4046EW WD10K64****
Image
Capacity
9 10.5 9 8 7 10.2
Dry Capacity
6 6 6 5 4 6
Main Spec
DrumVolume
63 70.5 65.9 58 60.1 63
MaxRPM 1400 1400 1400 1400 1400 1400
Motor DD DIT DIT DD DD DD
WaterSupply Coldonly Coldonly Coldonly Coldonly Coldonly Coldonly
Drainage Pump Pump Pump Pump Pump Pump
USP
ECO BUBBLE
● ● ● ● ● ●
AddWash
● ● ● ● X ●
Steam
● ● ● ● ● X
AOW/AD
X/X X/● ●/● X/● X/X X
BubbleSoak
● ● ● ● ● ●
SuperSpeed
● ● ● X X ●
Wi
● ● ● ● X ●
Q-Drive
● ● X X X X
Design
DOOR Good
TintDoor(Better)
TintDoor(Best)
Basic Basic CrystalGloss
Drum 2ndDiamond Swirl+ Swirl+ 2ndDiamond 2ndDiamond Diamond
DISPLAY Simple Simple Simple Simple LED LED
Dimension
600x850x650 600x850x600 600x850x600 600x850x600 600x850x550 600x850x650
FeaturesandSpecications_6
2-3. OPTIONS SPECIFICATIONS
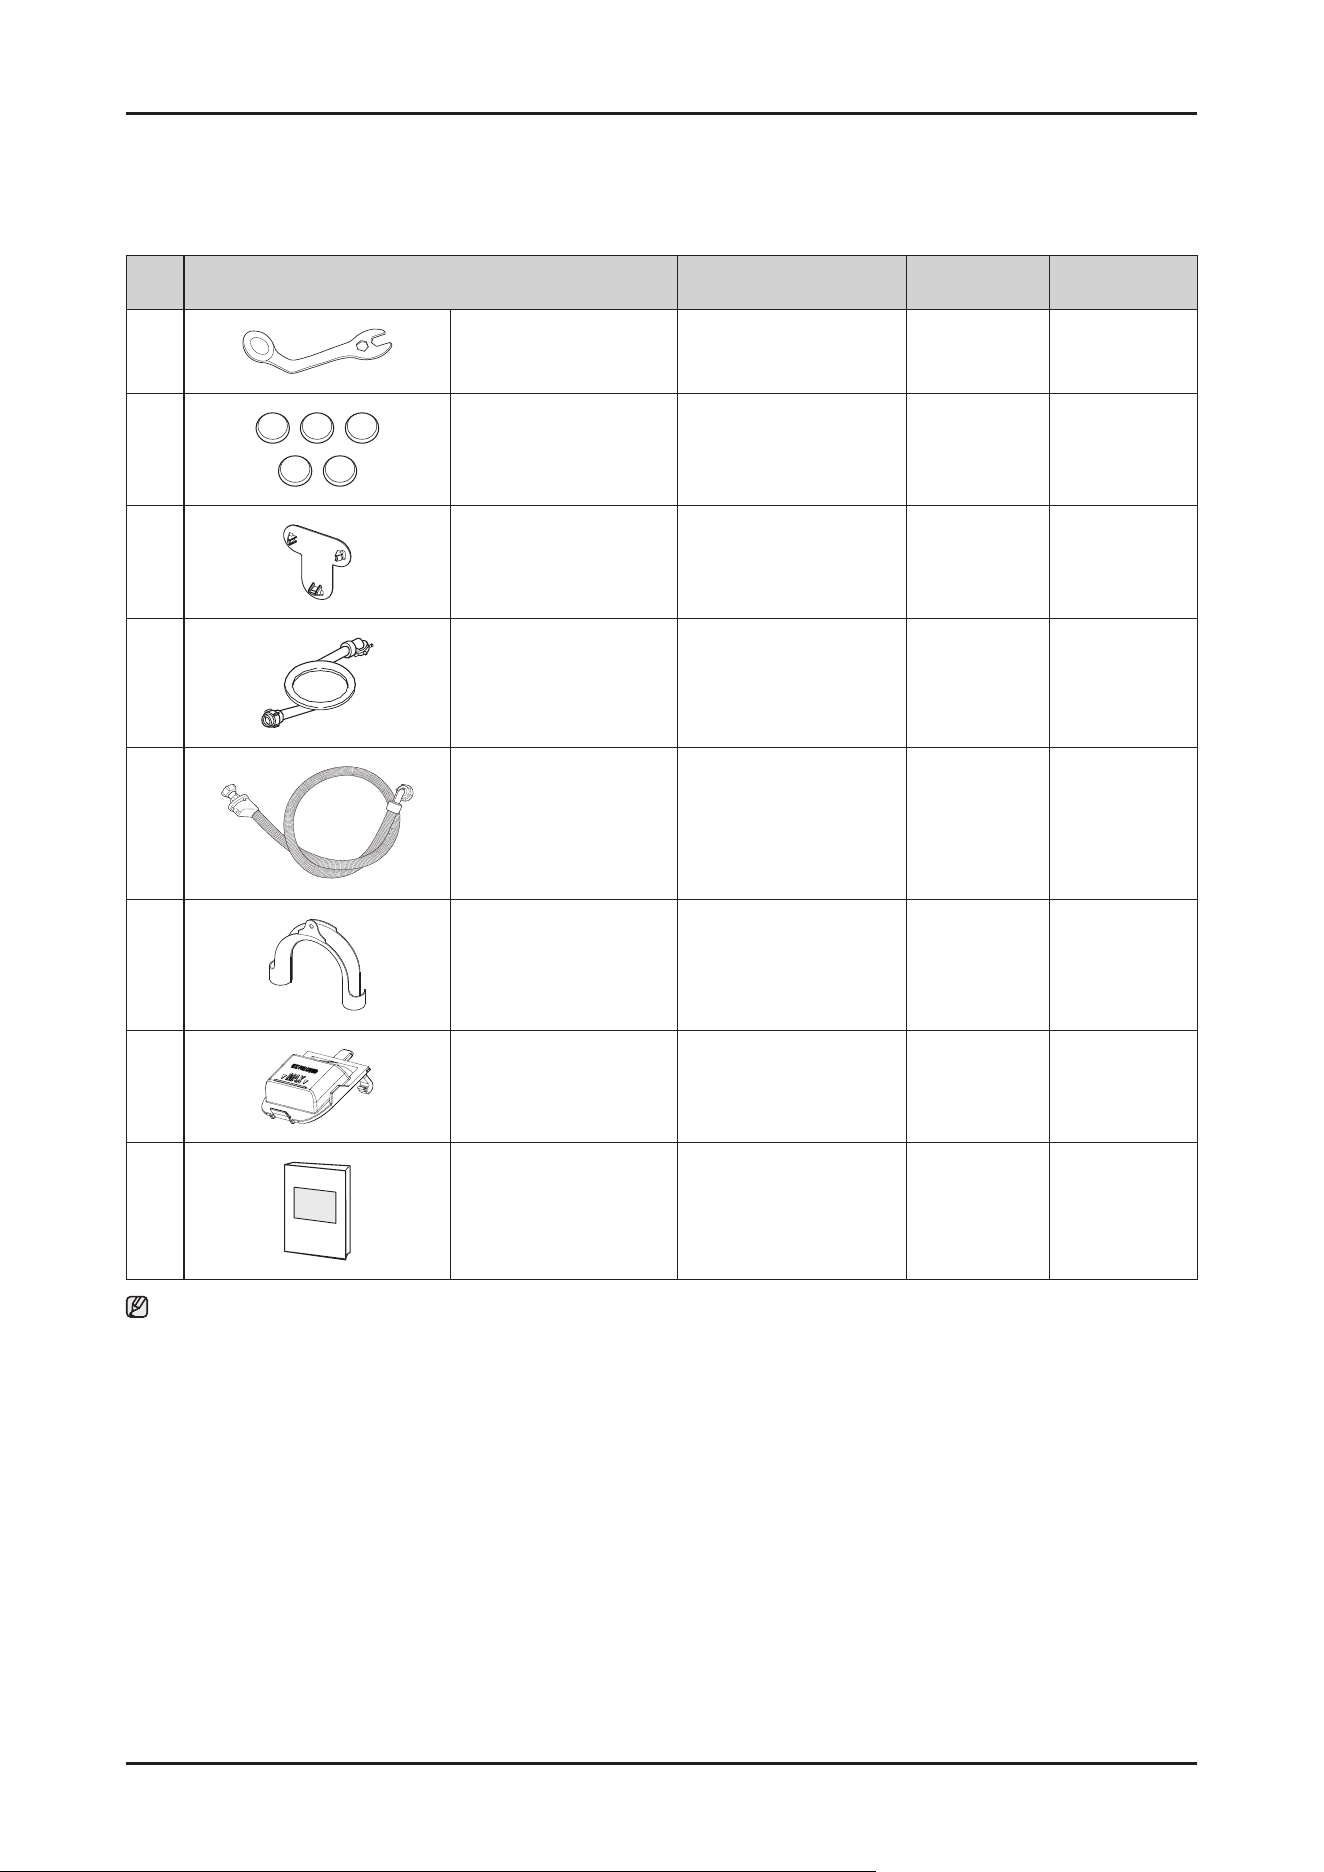
NO Item Code QTY Remarks
1 FASTENER-BOLT DC60-00104A 1 Default
2 CAP-FIXER DC67-00307A
4(8kgmodel)
5(9kgmodel)
Forspecic
modelsonly
3 CAP-FIXER DC67-00208B 1
Forspecic
modelsonly
4
ASSY HOSE WATER
DC97-16921A
★
Forspecic
modelsonly
5
HOSE-WATER
(AQUA-STOP)
DC62-00079A
★
Forspecic
modelsonly
6 HOSE-HANGER DC62-10278A 1 Default
7 GUIDE LIQUID DC61-03510A 1 Default
8 MANUAL USERS DC68-03745* series 1 Default
Note
• (H)issuppliedforspecicmodelsonlyamongthosewithoutwatersupplyhoses.
• Customercanpurchaseadditionalwatersupplyanddrainhosesfromaservicecenter.
• Forbuilt-inmodels,thespanner,watersupplyanddrainhosesarenotsupplied.Boththewatersupplyanddrainhosesare
suppliedduringtheinstallation.
Disassembly and Reassembly _ 7
3. DISASSEMBLY AND REASSEMBLY
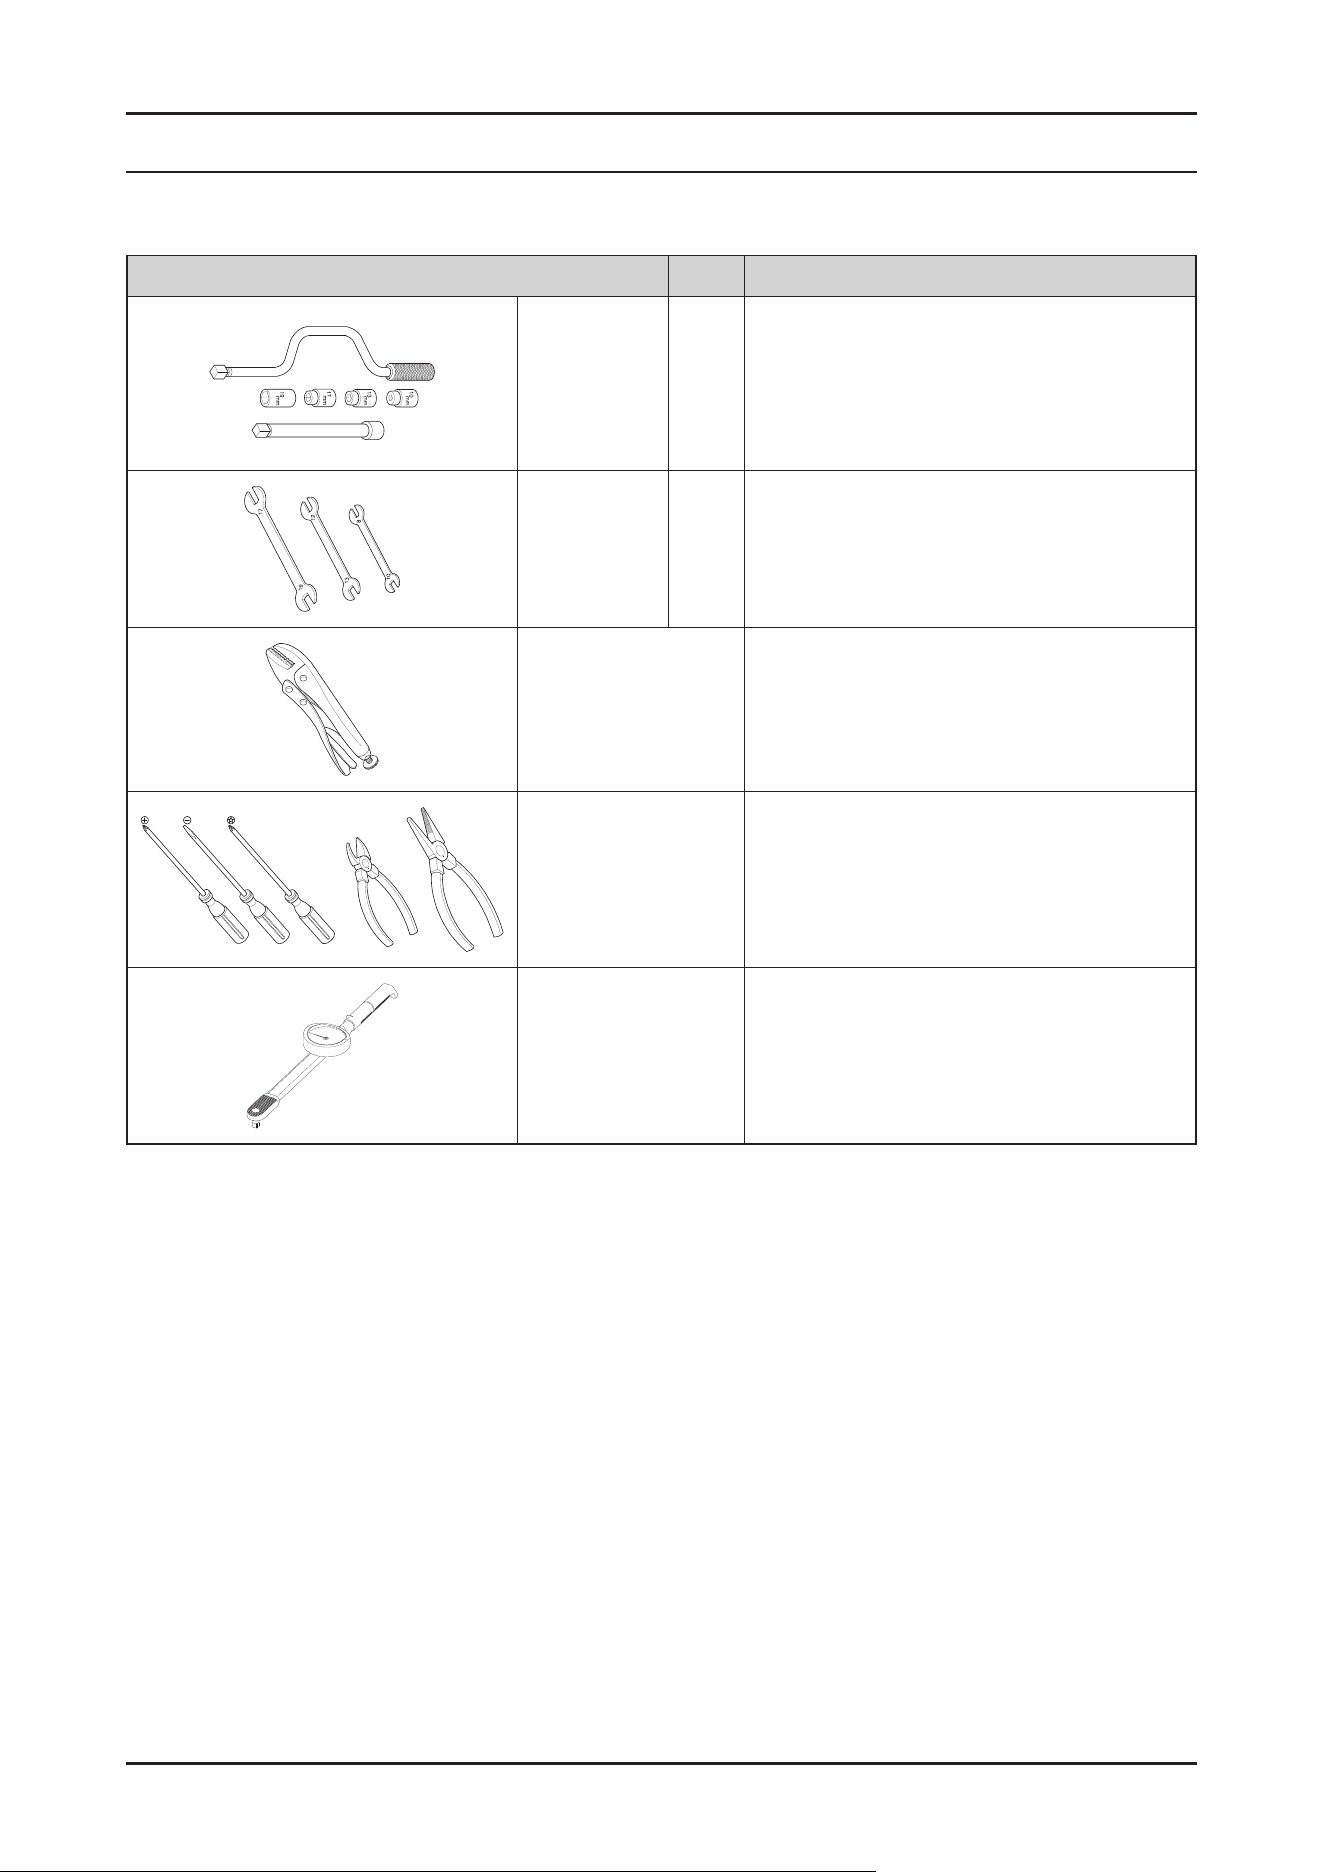
3-1. TOOLS FOR DISASSEMBLY AND REASSEMBLY
Tool Type Remarks
Boxdriver
10mm
Heater(1),Tub(12),Fixerscrew(5),Motor(2),
Balance(9)
13mm
ShockAbsorber(2holeseachinleft/right),
Damper(2),Damper(friction2)
19mm Pulley(1)
Double-ended
spanner
10mm
13mm
19mm
Replacedbyboxdriver
Leg
Vicepliers
AToolforprotectingemptyturningofboltor
abrasionfromusingboxdriver
FordisassemblyofSpindrum
Others
(screwdriver,nipper,long
nosepliers)
Commontoolsforservicing
Torquewrench TheToolforassemblyofheaterandTub
-Forinformationaboutpurchasingpartsandtool,pleasevisit
http://www.samsung.com/support
-Forthepartcodeinformation,pleaserefertheattachedle'ExplodedView'.
8 _ Disassembly and Reassembly
3-2. STANDARD DISASSEMBLY DRAWINGS
► Thisisastandarddisassemblydiagramandmaydifferfromtheactualproduct.
Usethismaterialasareferencewhendisassemblingandreassemblingtheproduct.
Disassembly
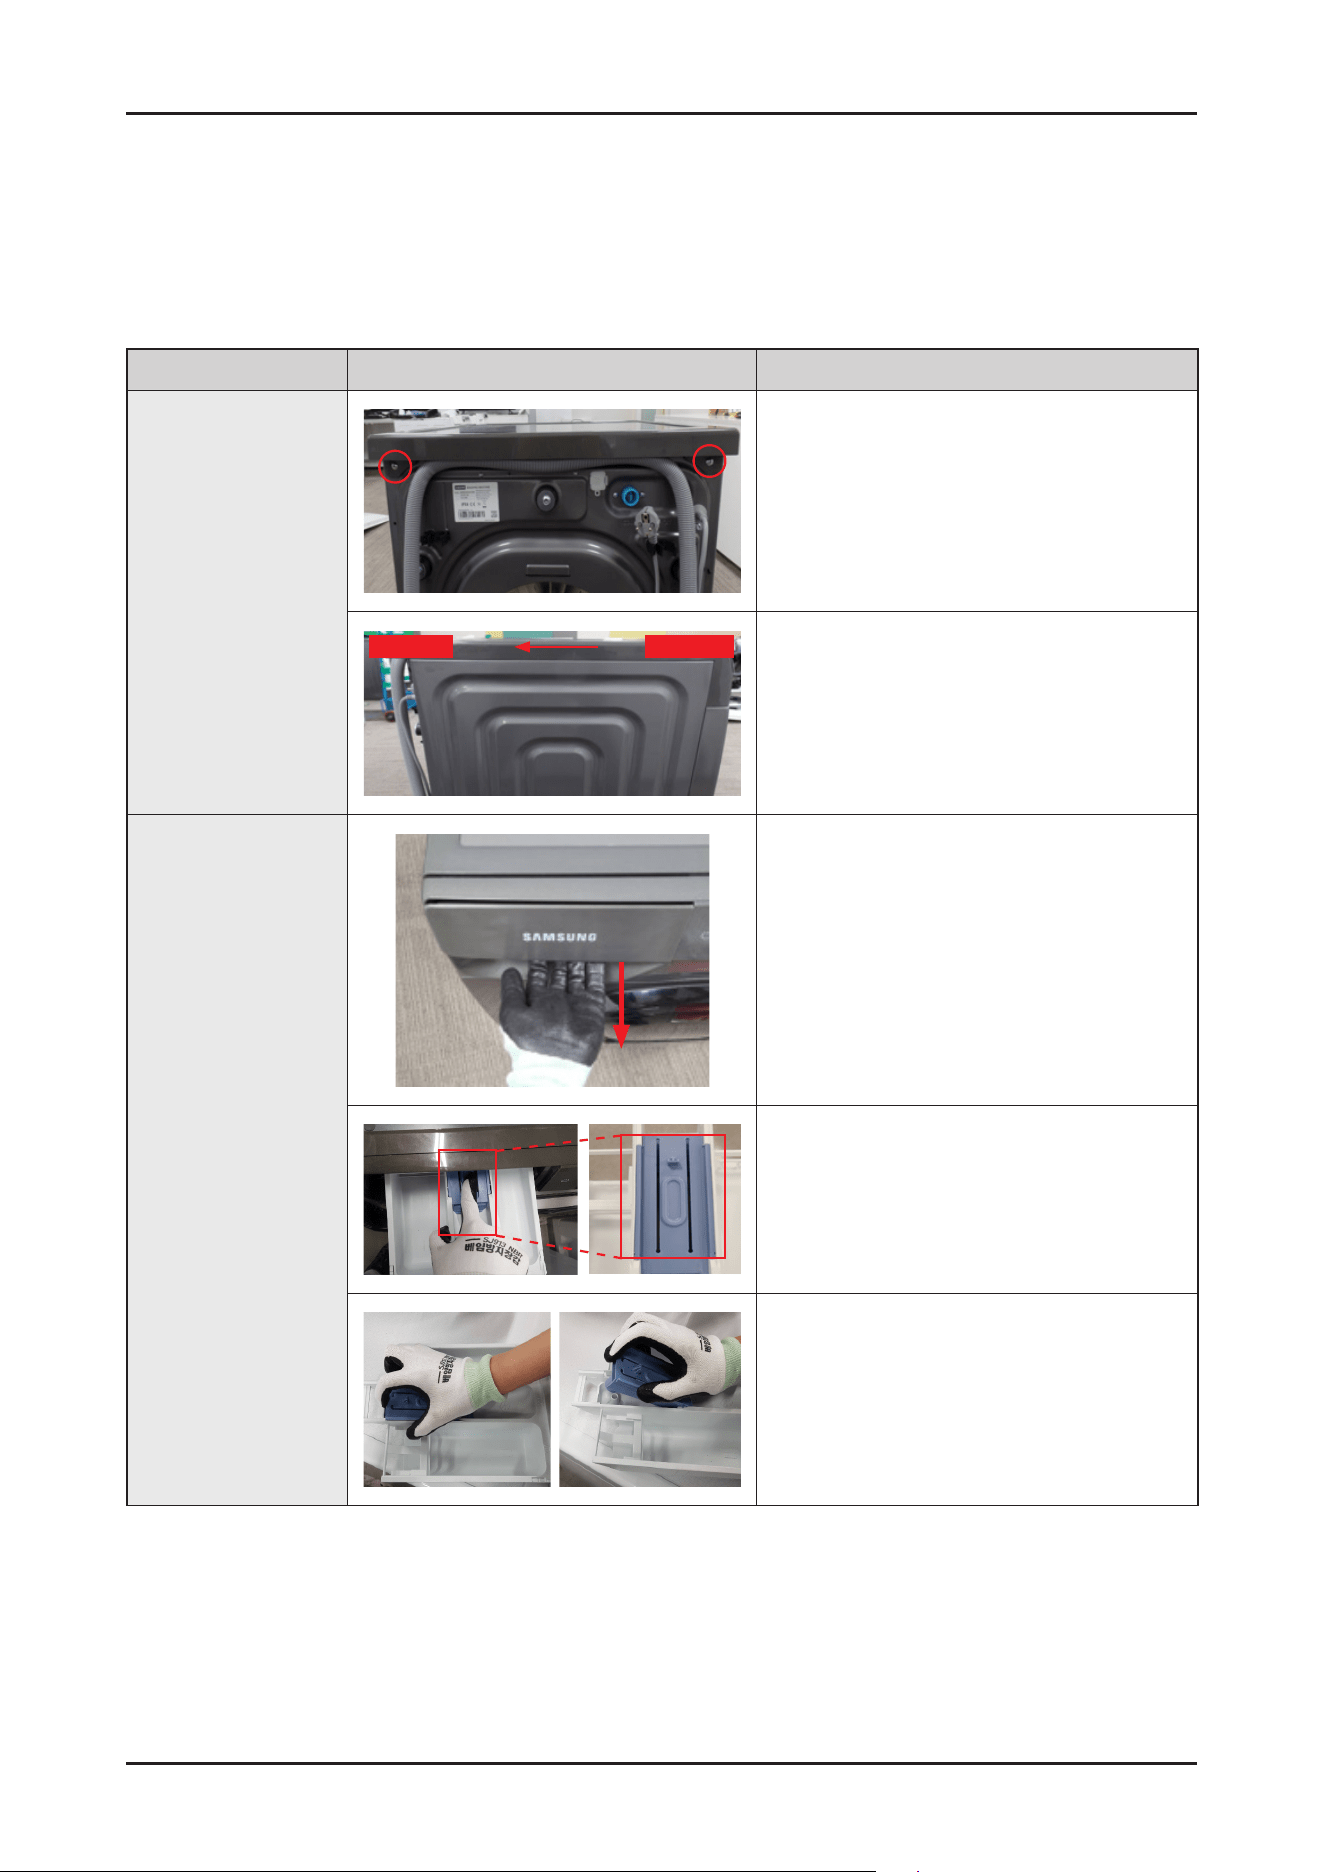
Part Figure Description
Assy Cover Top
1. Remove2screwsholdingtheCoverTopatthe
backoftheunitusing(+)screwdriver.
BACK
FRONT
2. RemovetheCoverTopbyliftingitupafter
pullingitbackabout15mm.
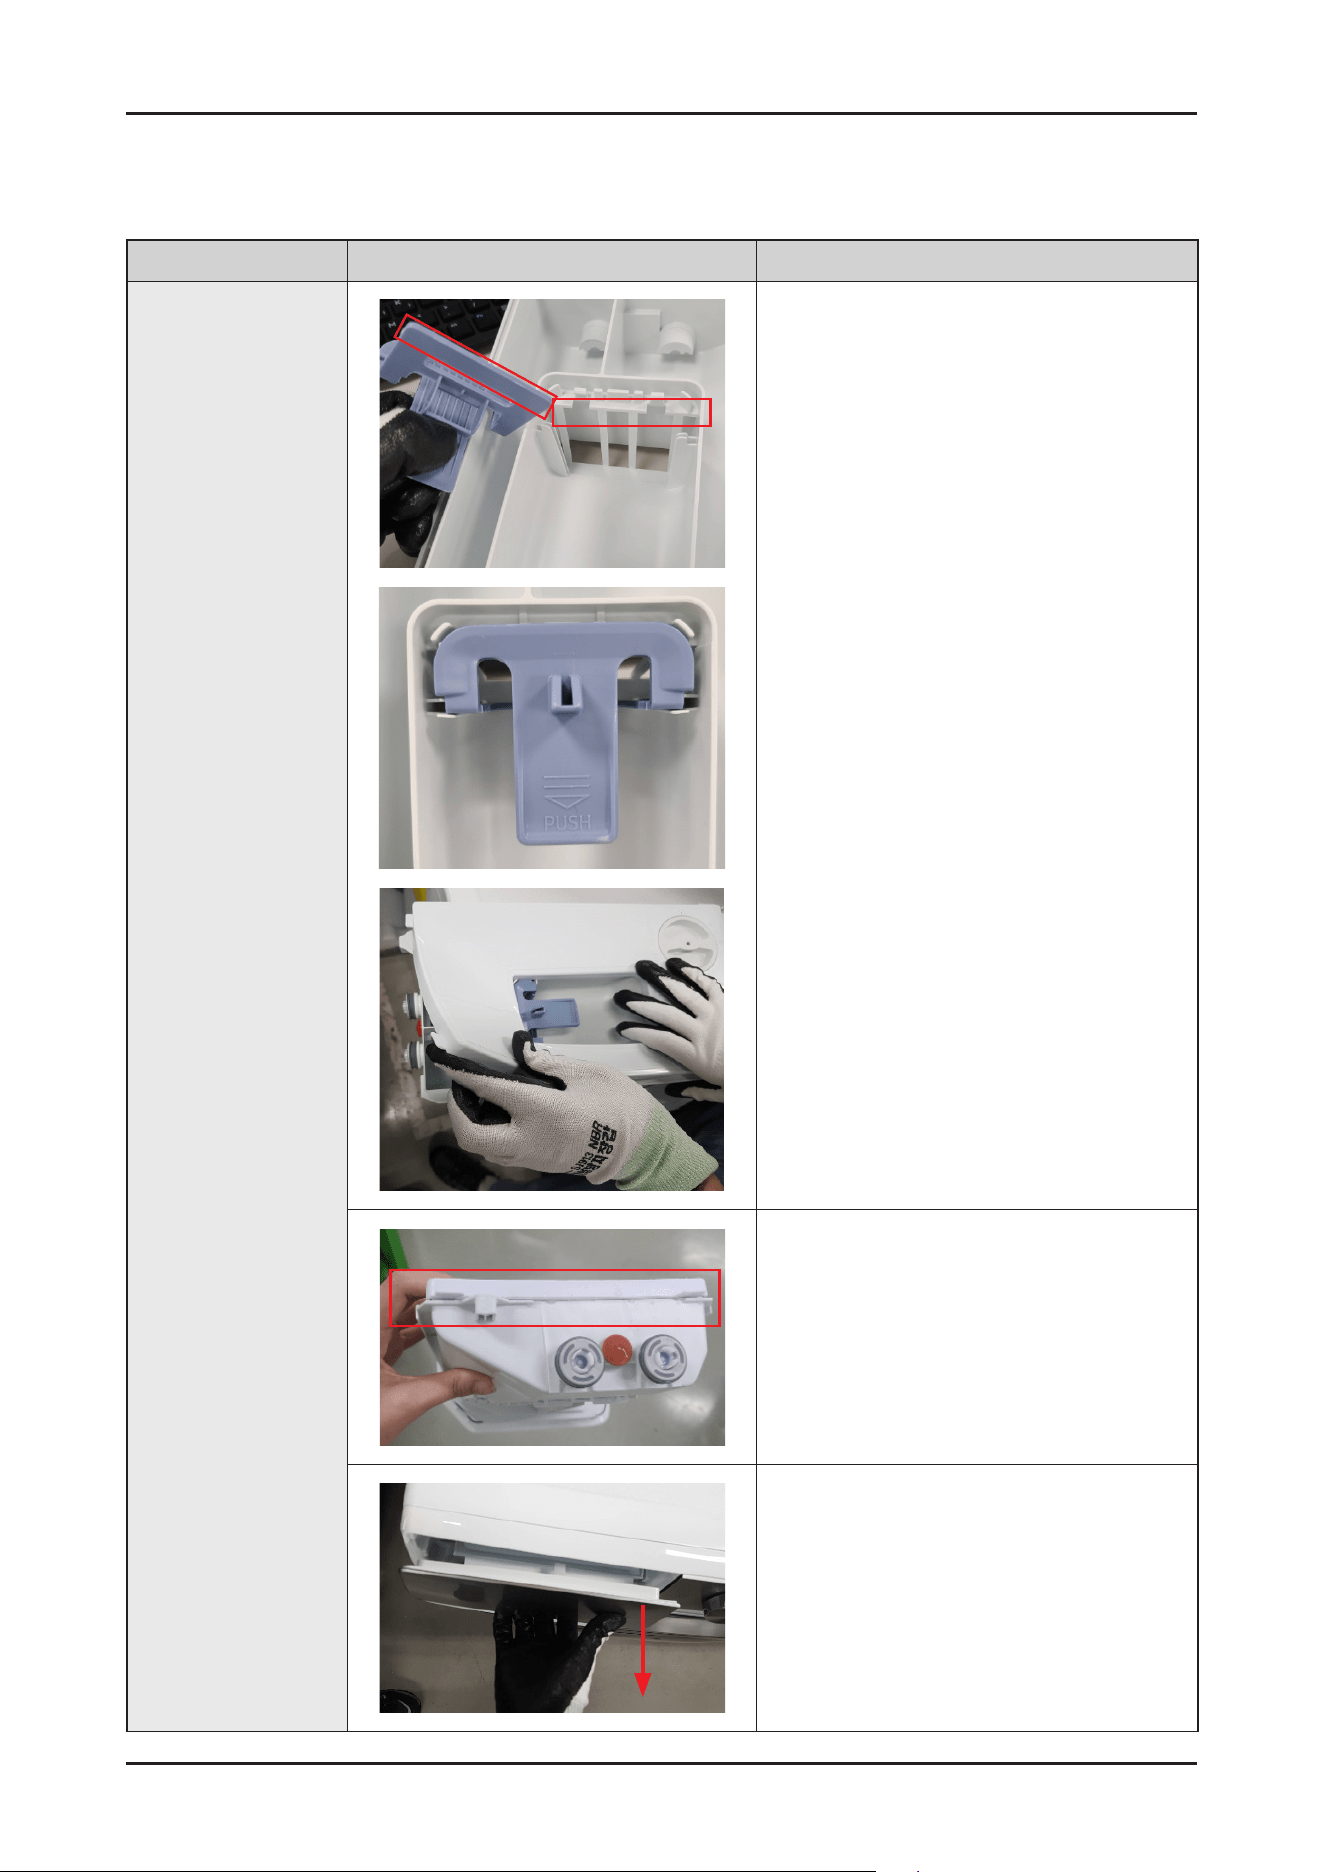
Assy Drawer
1. OpentheDrawerbyhand
2. Whileholdingdownthereleaseleverinsidethe
drawer(redbox),slideopenthedrawer.
3. PulluptheCapRinsetoremoveit.
Disassembly and Reassembly _ 9
Reassembly
Part Figure Description
Assy Drawer
1. FittheholeandpresstheCapRinsesothatit
canbeassembled.
2. Makesuretottherailwhenreassemblingthe
Assydrawer.
3. Putthedrawerintherightdirection.
10 _ Disassembly and Reassembly
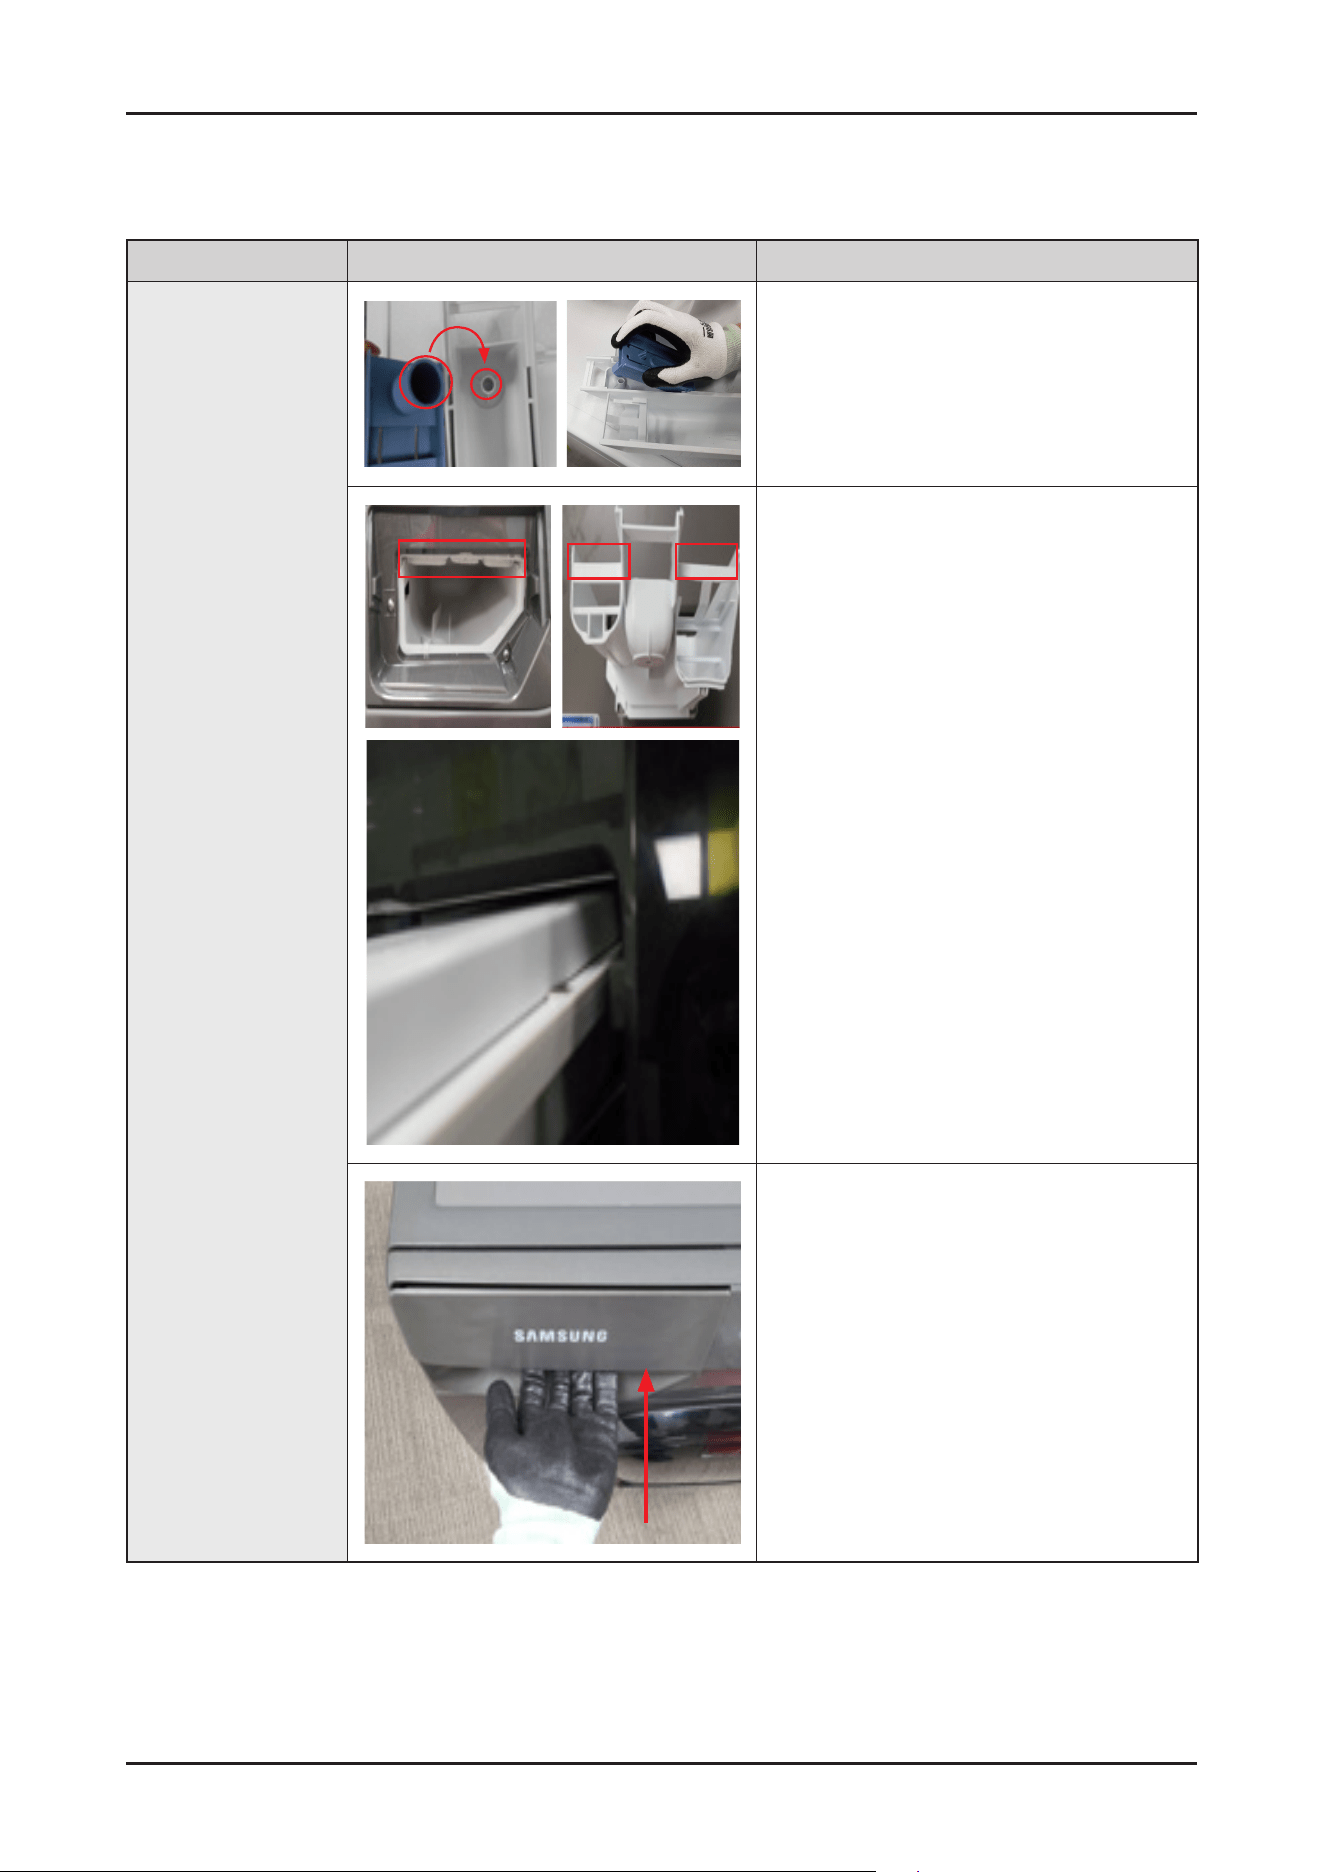
Disassembly
Part Figure Description
Assy Drawer
(Auto Dispense)
1. PulltoopentheDrawerbyhand.
2. Whileholdingdownthereleaseleverinsidethe
drawer(redbox),slideopenthedrawer.
3. DisassembletheCoverDrawerbyhand.
4. PulluptheCapRinsetoremoveit.
Disassembly and Reassembly _ 11
Reassembly
Part Figure Description
Assy Drawer
(Auto Dispense)
1. FittheholeandpresstheCapRinsesothatit
canbeassembled.
2. AssembletheCoverDrawerbyhand.
3. Makesuretottherailwhenreassemblingthe
Assydrawer.
4. Placethedrawerintherightdirection.

12 _ Disassembly and Reassembly
Disassembly
Part Figure Description
Assy Panel Control
(Simple)
-Beforeyoustart,disassembleAssyCoverTop,Assy
Drawer.
1. Remove2screwsholdingthedrawerandpanel
using(+)screwdriver.
2. RemovethescrewsatthetopoftheASSY-
PANELCONTROLusing(+)screwdriver.(3ea)
3. Grabthepanelandslightlypushthehousing
drawertoremovethehookandpullthepanel
upwardstodisassemblewithbody
Becarefulnottobreakthehook.
4. HoldtheASSY-PANELCONTROLwhilepulling
itupwardsanddisassembletheterminalto
removeit.Pressthehookwhileremovingthe
terminal.
Disassembly and Reassembly _ 13
Reassembly
Part Figure Description
Assy Panel Control
(Simple)
1. Connecttheterminalbyhand.Takealookat
thehookandputitintherightplace.
Becarefulnottobreakthehook.
MakesuretheWireharnessarenotgetting
stuckinotherparts.
2. Assemblethehookofhousingdrawerand
aseemblescrewsatthetopoftheASSY-PANEL
CONTROLwith(+)screwdriver.
3. Assemble2screwsholdingthedrawerand
panelwith(+)screwdriver.
14 _ Disassembly and Reassembly
Disassembly
Part Figure Description
Assy Panel Control
(LED)
-Beforeyoustart,disassembleAssyCoverTop,Assy
Drawer.
1. Remove2screwsholdingthedrawerandpanel
using(+)screwdriver.
2. RemovethescrewsatthetopoftheASSY-
PANELCONTROLusing(+)screwdriver.(3ea)
3. Grabthepanelandslightlypushthehousing
drawertoremovethehookandpullthepanel
upwardstodisassemblewithbody.
Becarefulnottobreakthehook.
4. HoldtheASSY-PANELCONTROLwhilepulling
itupwardsanddisassembletheterminalto
removeit.Pressthehookwhileremovingthe
terminal.
Disassembly and Reassembly _ 15
Reassembly
Part Figure Description
Assy Panel Control
(LED)
1. Connecttheterminalbyhand.Takealookat
thehookandputitintherightplace.
MakesuretheWireharnessarenotgetting
stuckinotherparts.
2. Assemblethehookofhousingdrawerand
aseemblescrewsatthetopoftheASSY-PANEL
CONTROLwith(+)screwdriver.
Becarefulnottobreakthehook.
3. Assemble2screwsholdingthedrawerand
panelwith(+)screwdriver.
16 _ Disassembly and Reassembly
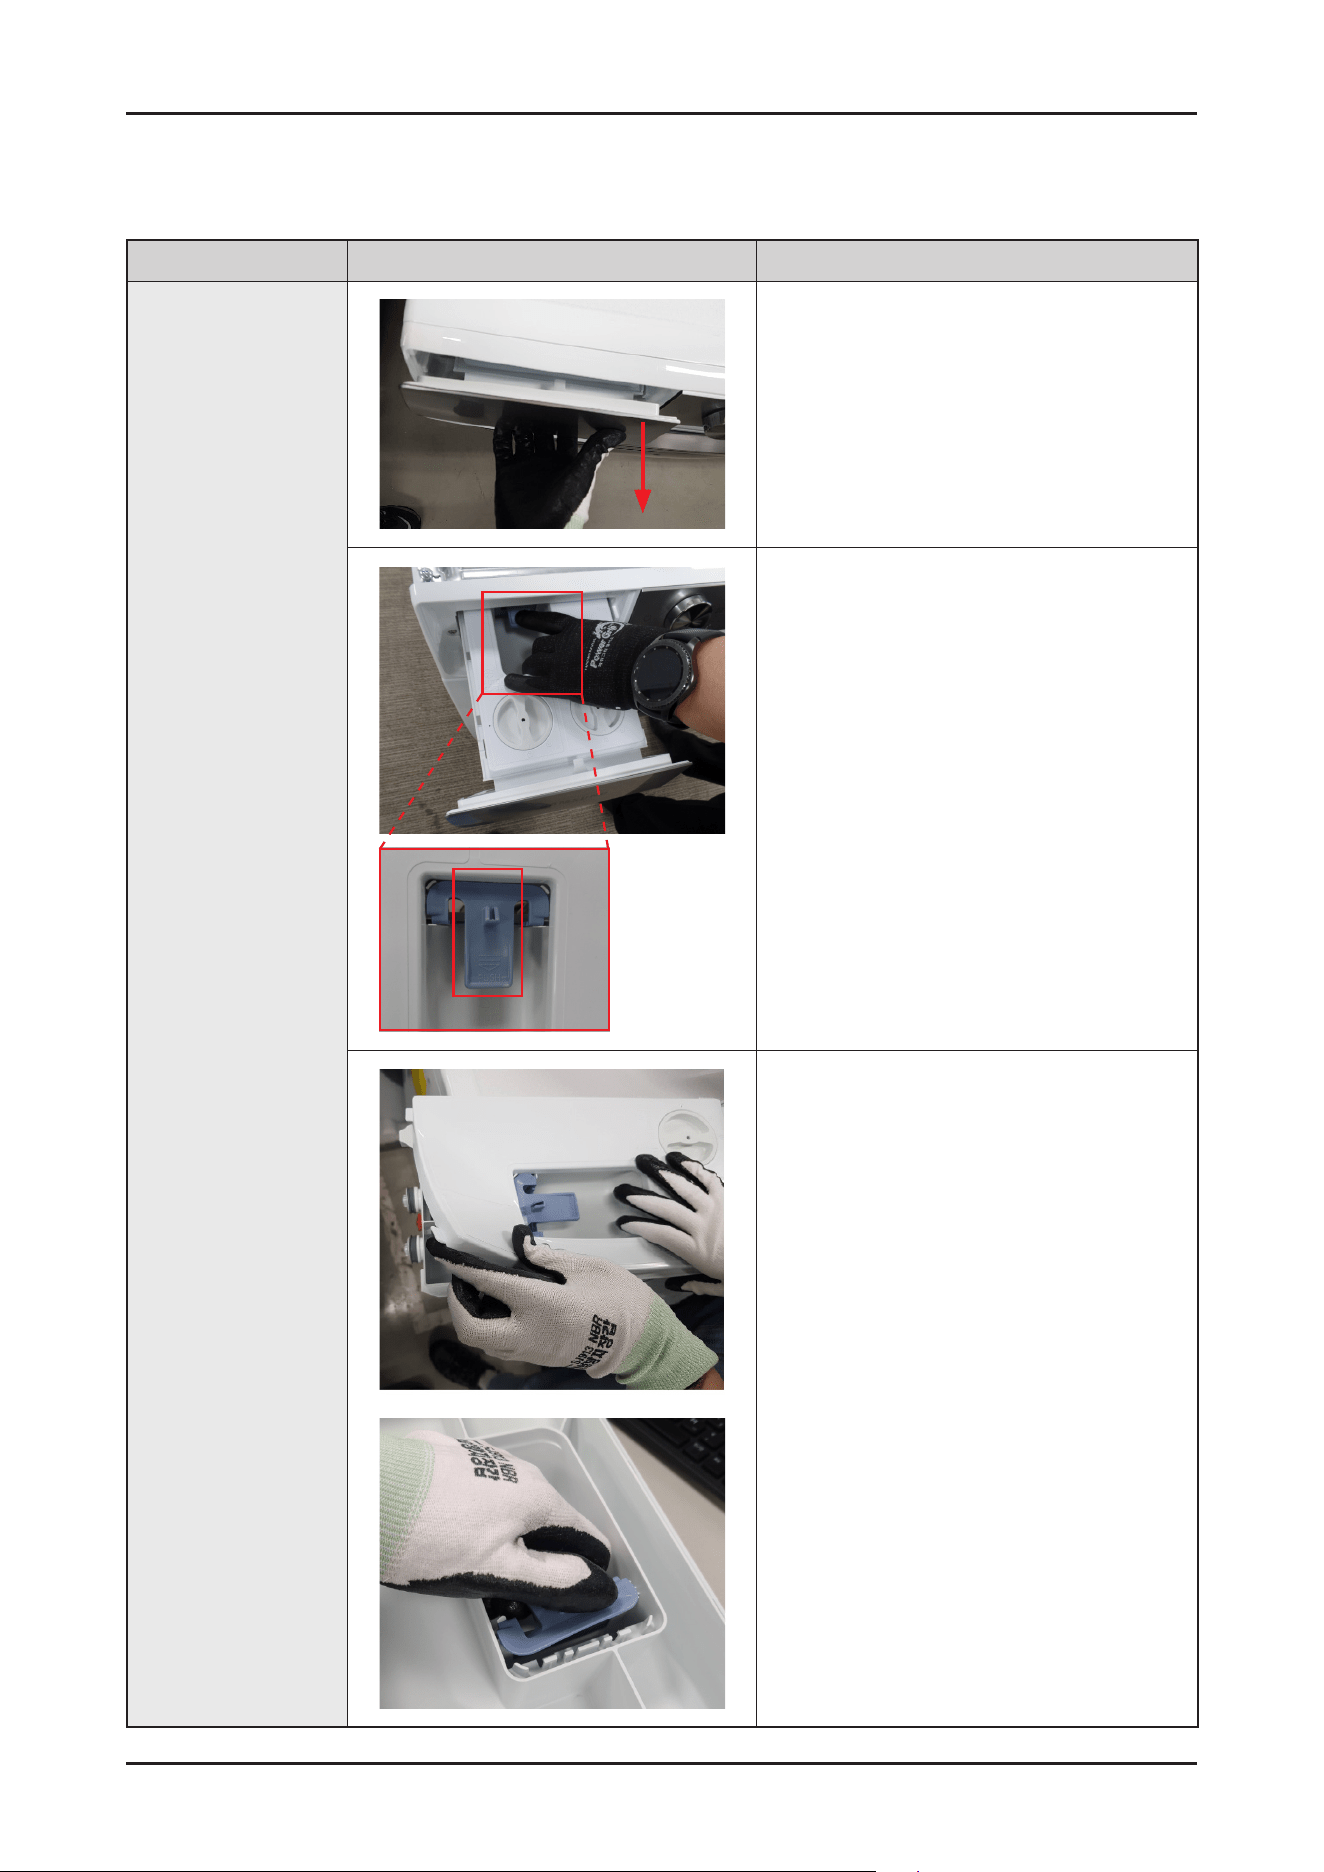
Disassembly
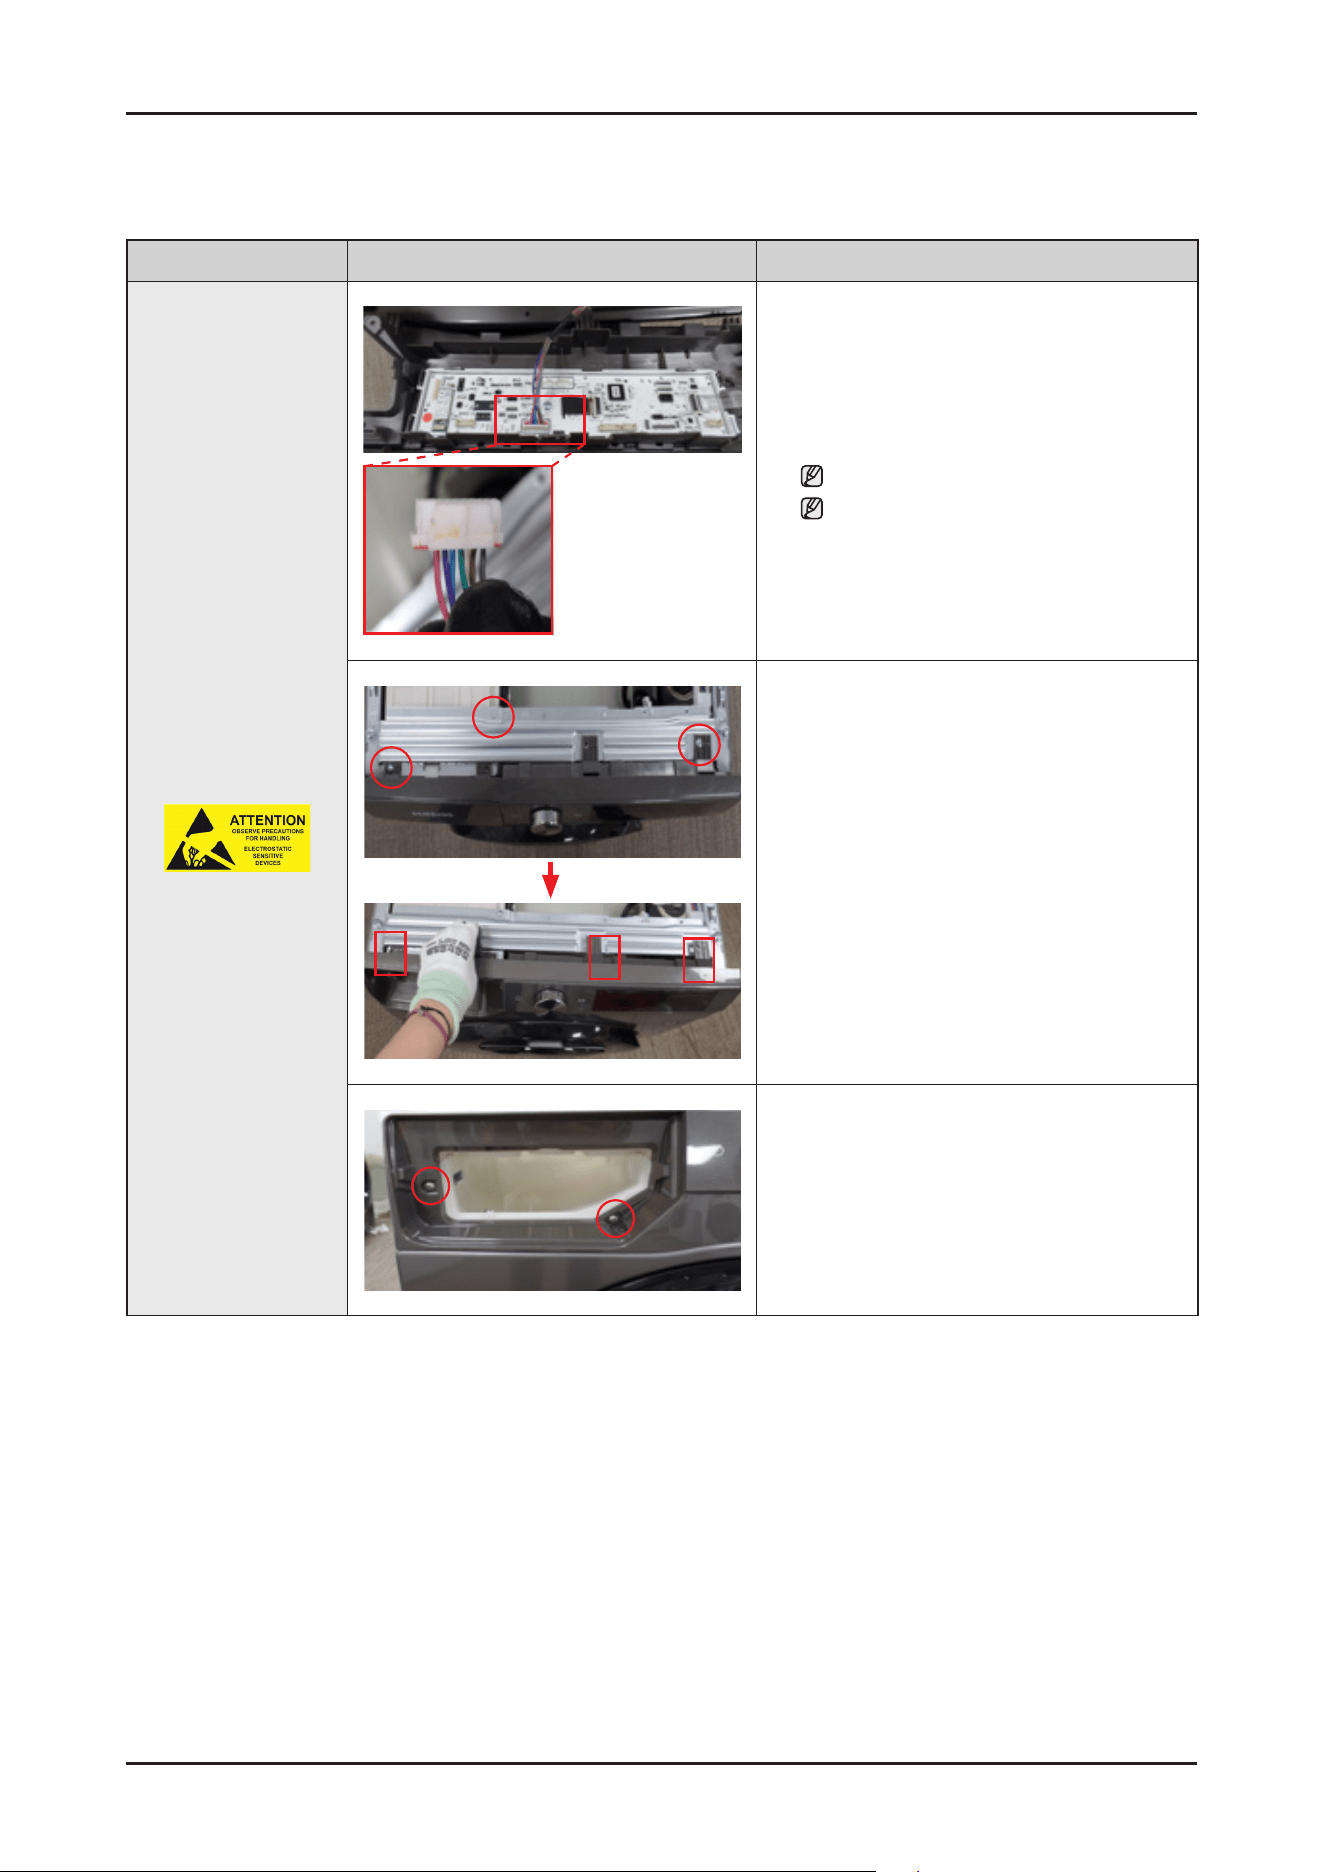
Part Figure Description
Assy Housing-Drawer
Beforeyoustart,disassembleAssyCoverTop,Assy
PanelControl.
1. Remove4screwstodisassembleframeplate-
upusing(+)screwdriver.
2. RemovetheBand-ring.(2ea)
Becarefulnottobreakthehose.
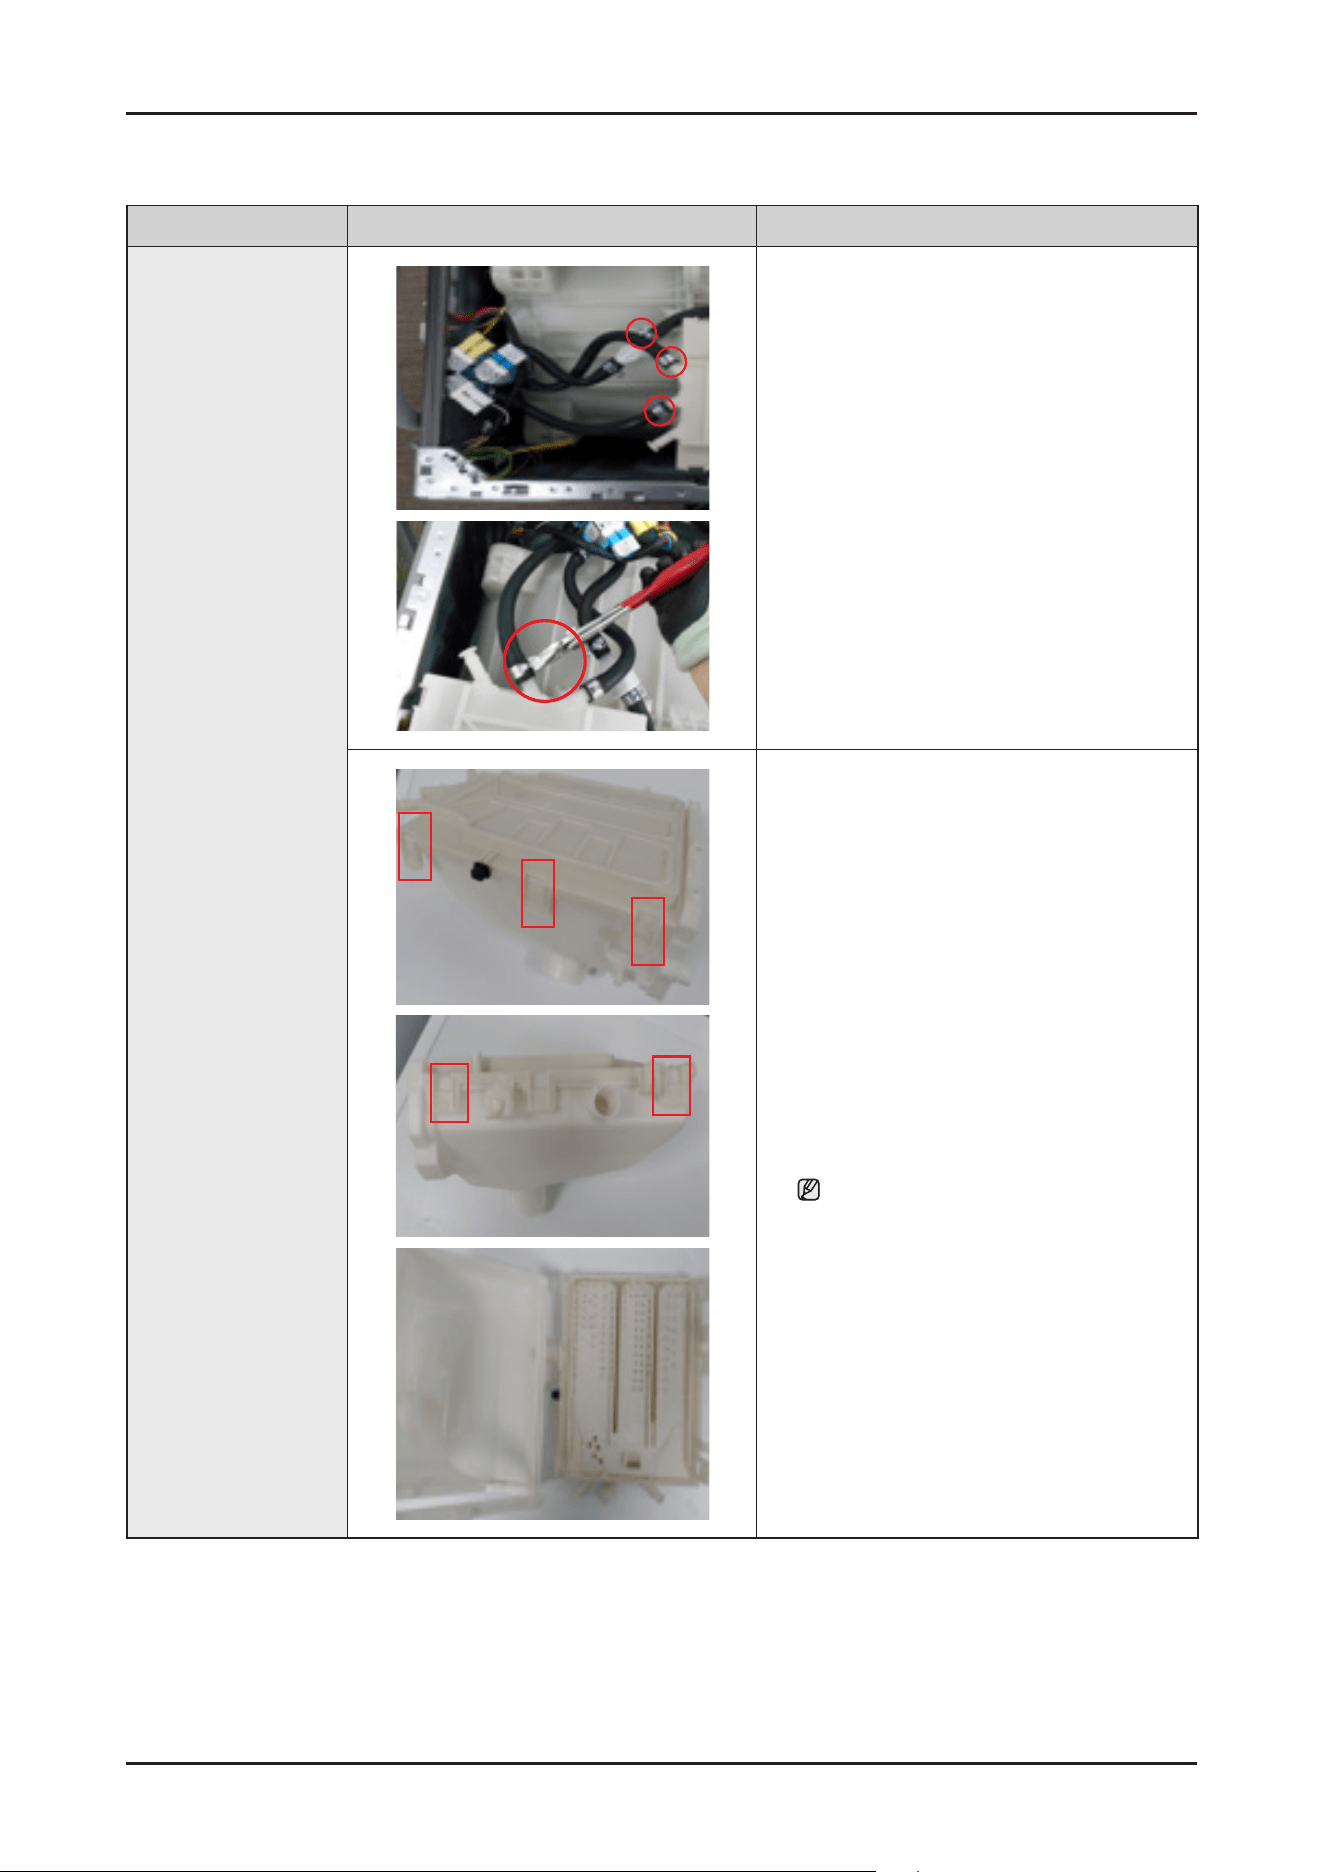
Disassembly and Reassembly _ 17
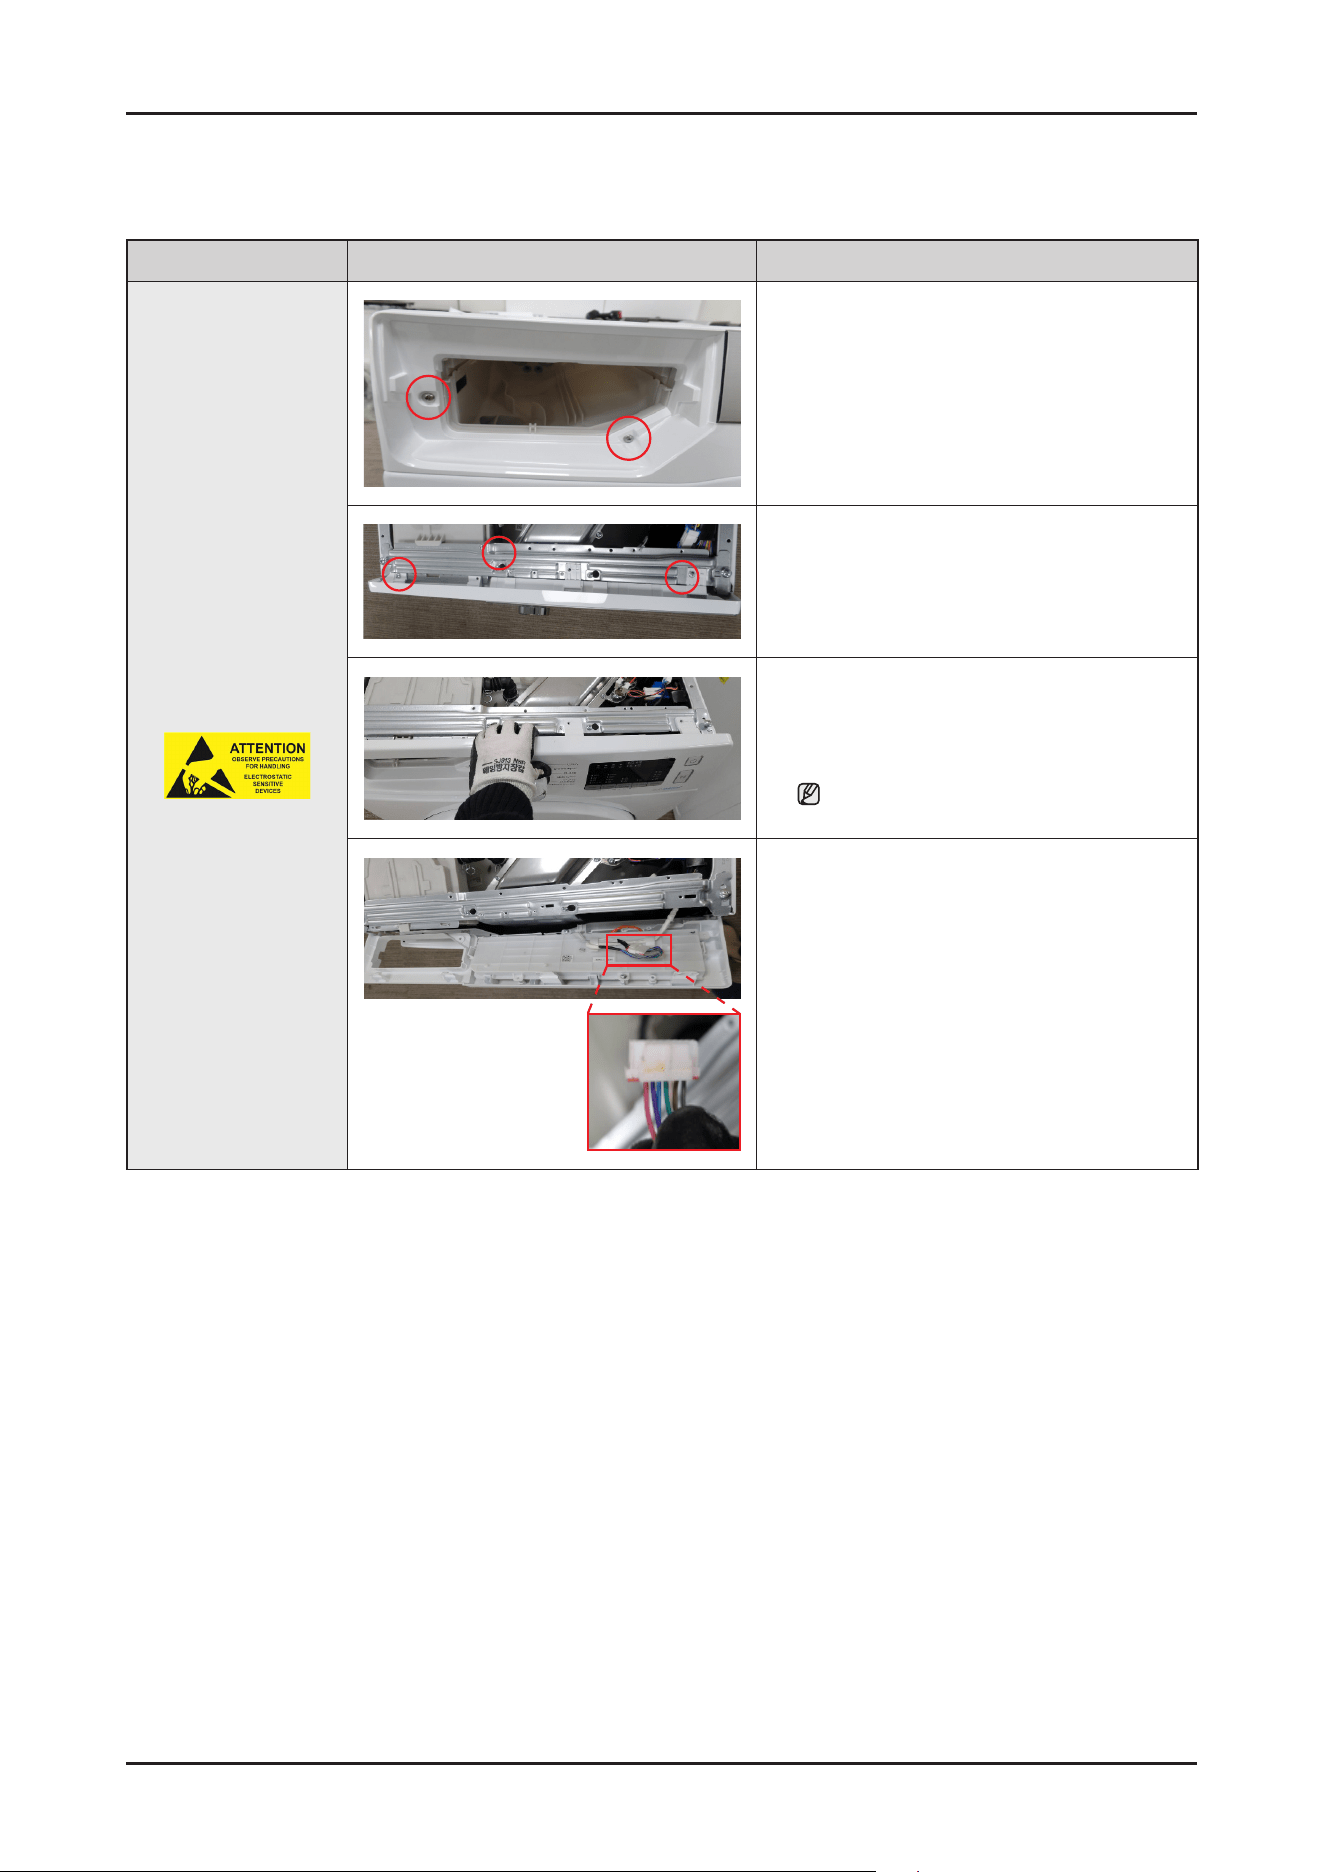
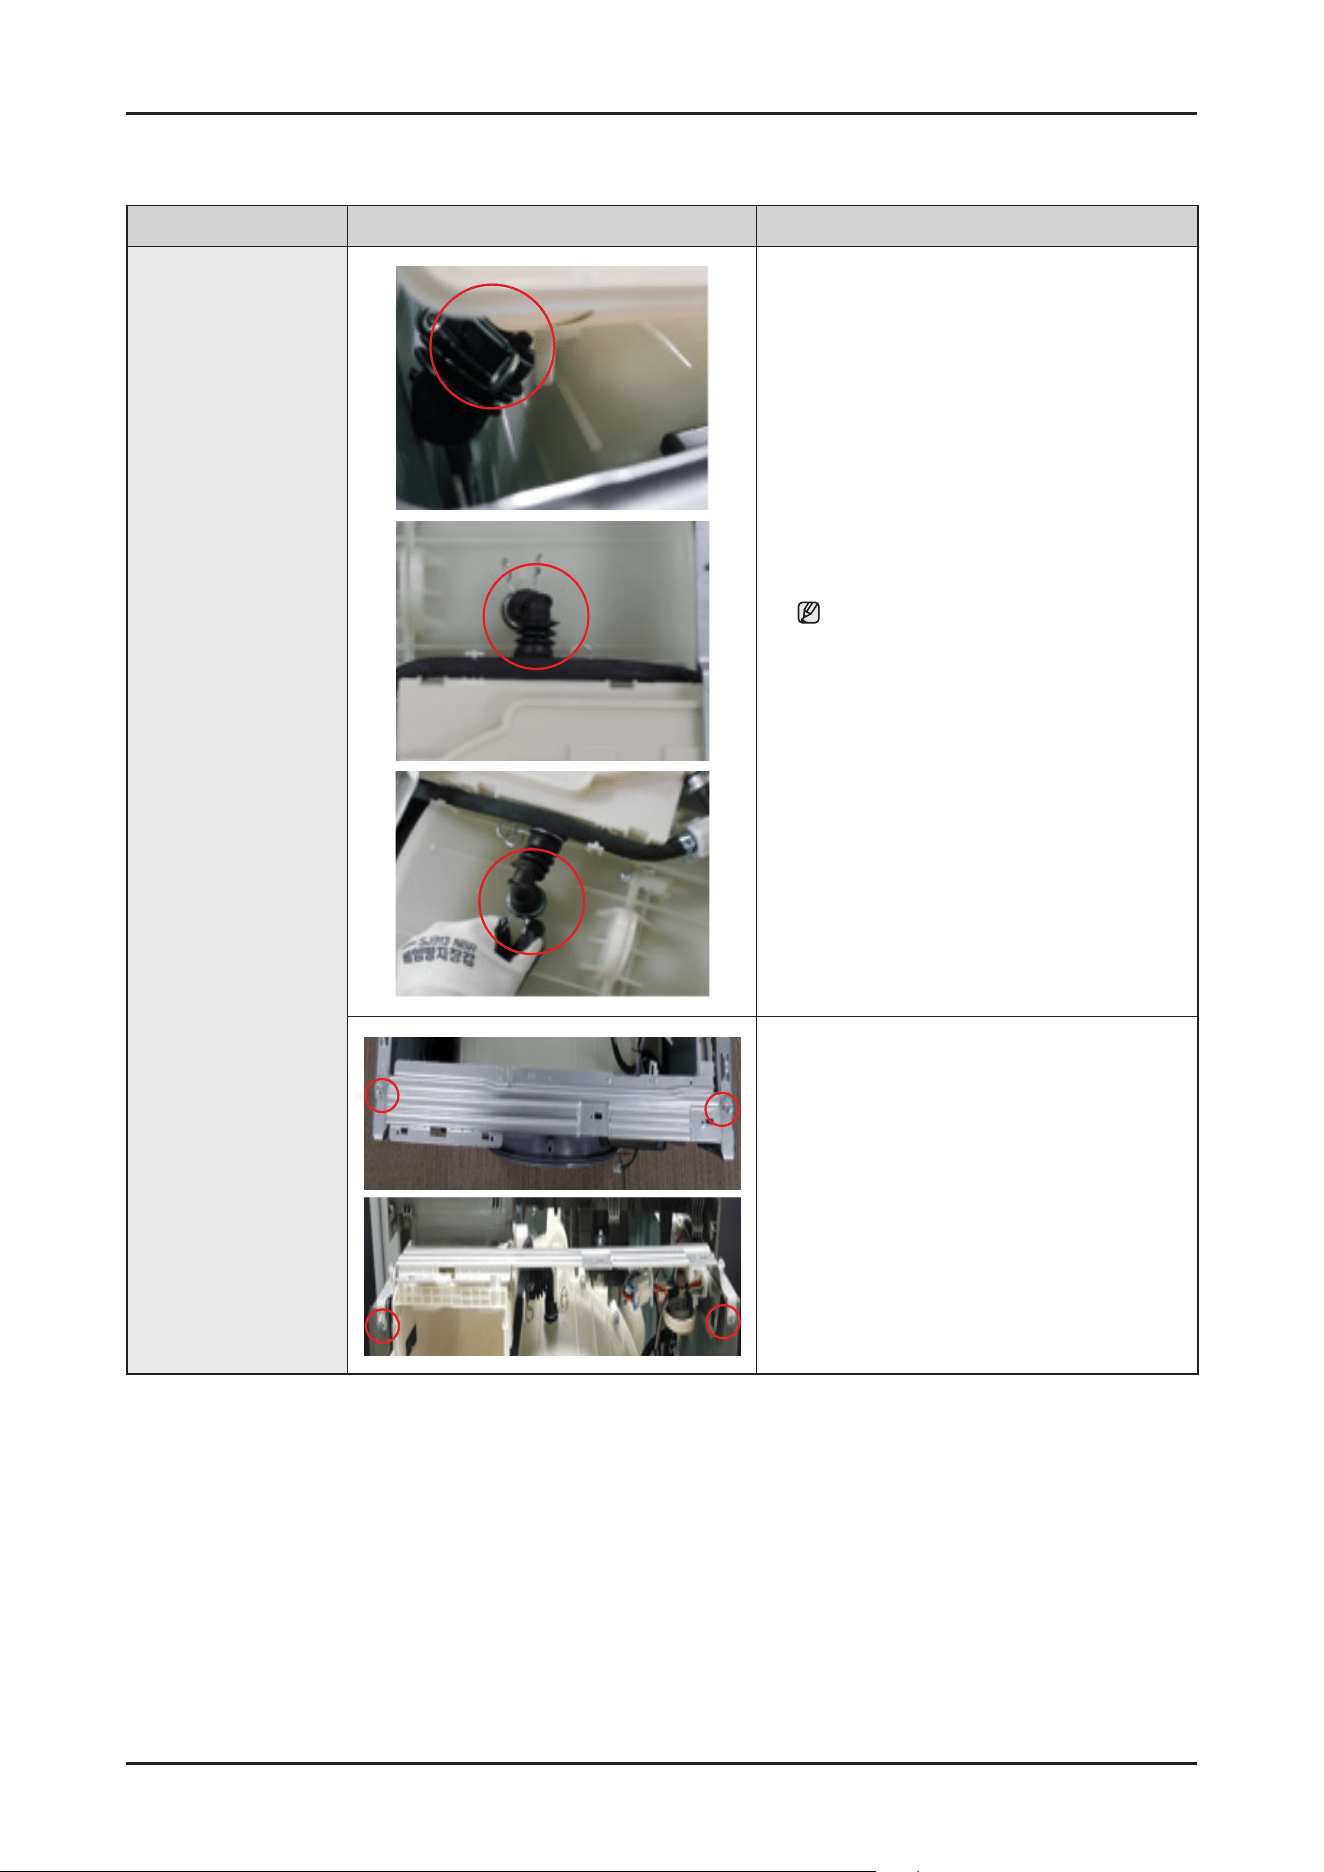
Part Figure Description
Assy Housing-Drawer
3. Separatethewatervalvehosewithlongnose
plier.
4. SeparateHousingDrawerlowbypressingthe
hooksonbothsidesbyhand.Tofullyseparate,
disassembleWaterValve.
Becarefulnottobreakthehook.

18 _ Disassembly and Reassembly
Part Figure Description
Assy Housing Drawer
(Auto Dispense)
1. Disassemblethe6screwsholdingthepump
with(+)screwdriver.
Tofullyseparate,disassembleWaterValve.
2. SeparateHousingDrawerlowbypressingthe
hooksonbothsidesbyhand.
Tofullyseparate,disassembleWaterValve.
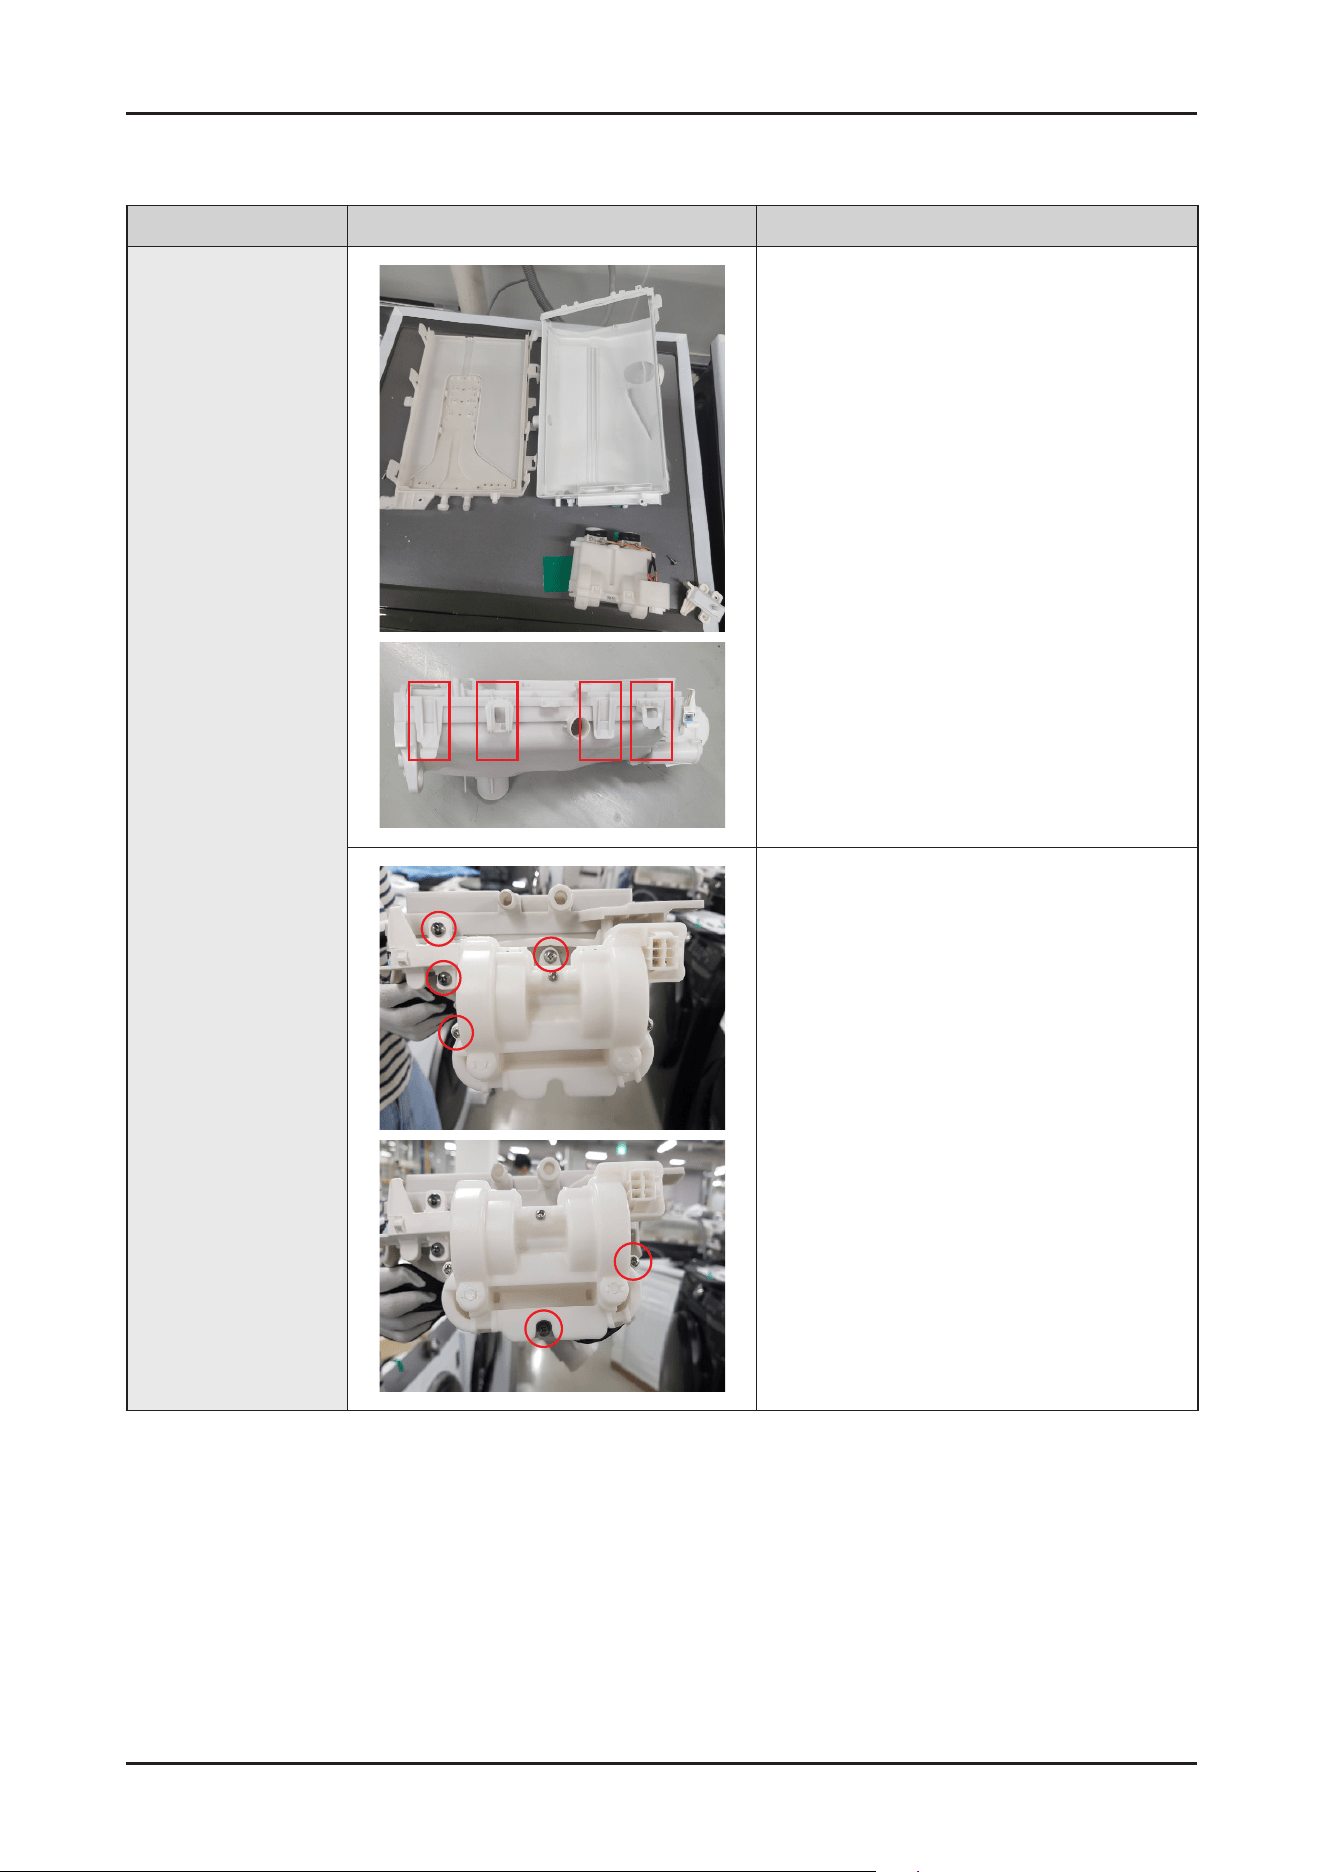
Disassembly and Reassembly _ 19
Part Figure Description
Assy Housing Drawer
(Auto Dispense)
1. AssembletheHousingDrawerlowbypressing
thehooksonbothsidesbyhand.
2. Assemblethe6screwsholdingthepumpwith
(+)screwdriver.
20 _ Disassembly and Reassembly
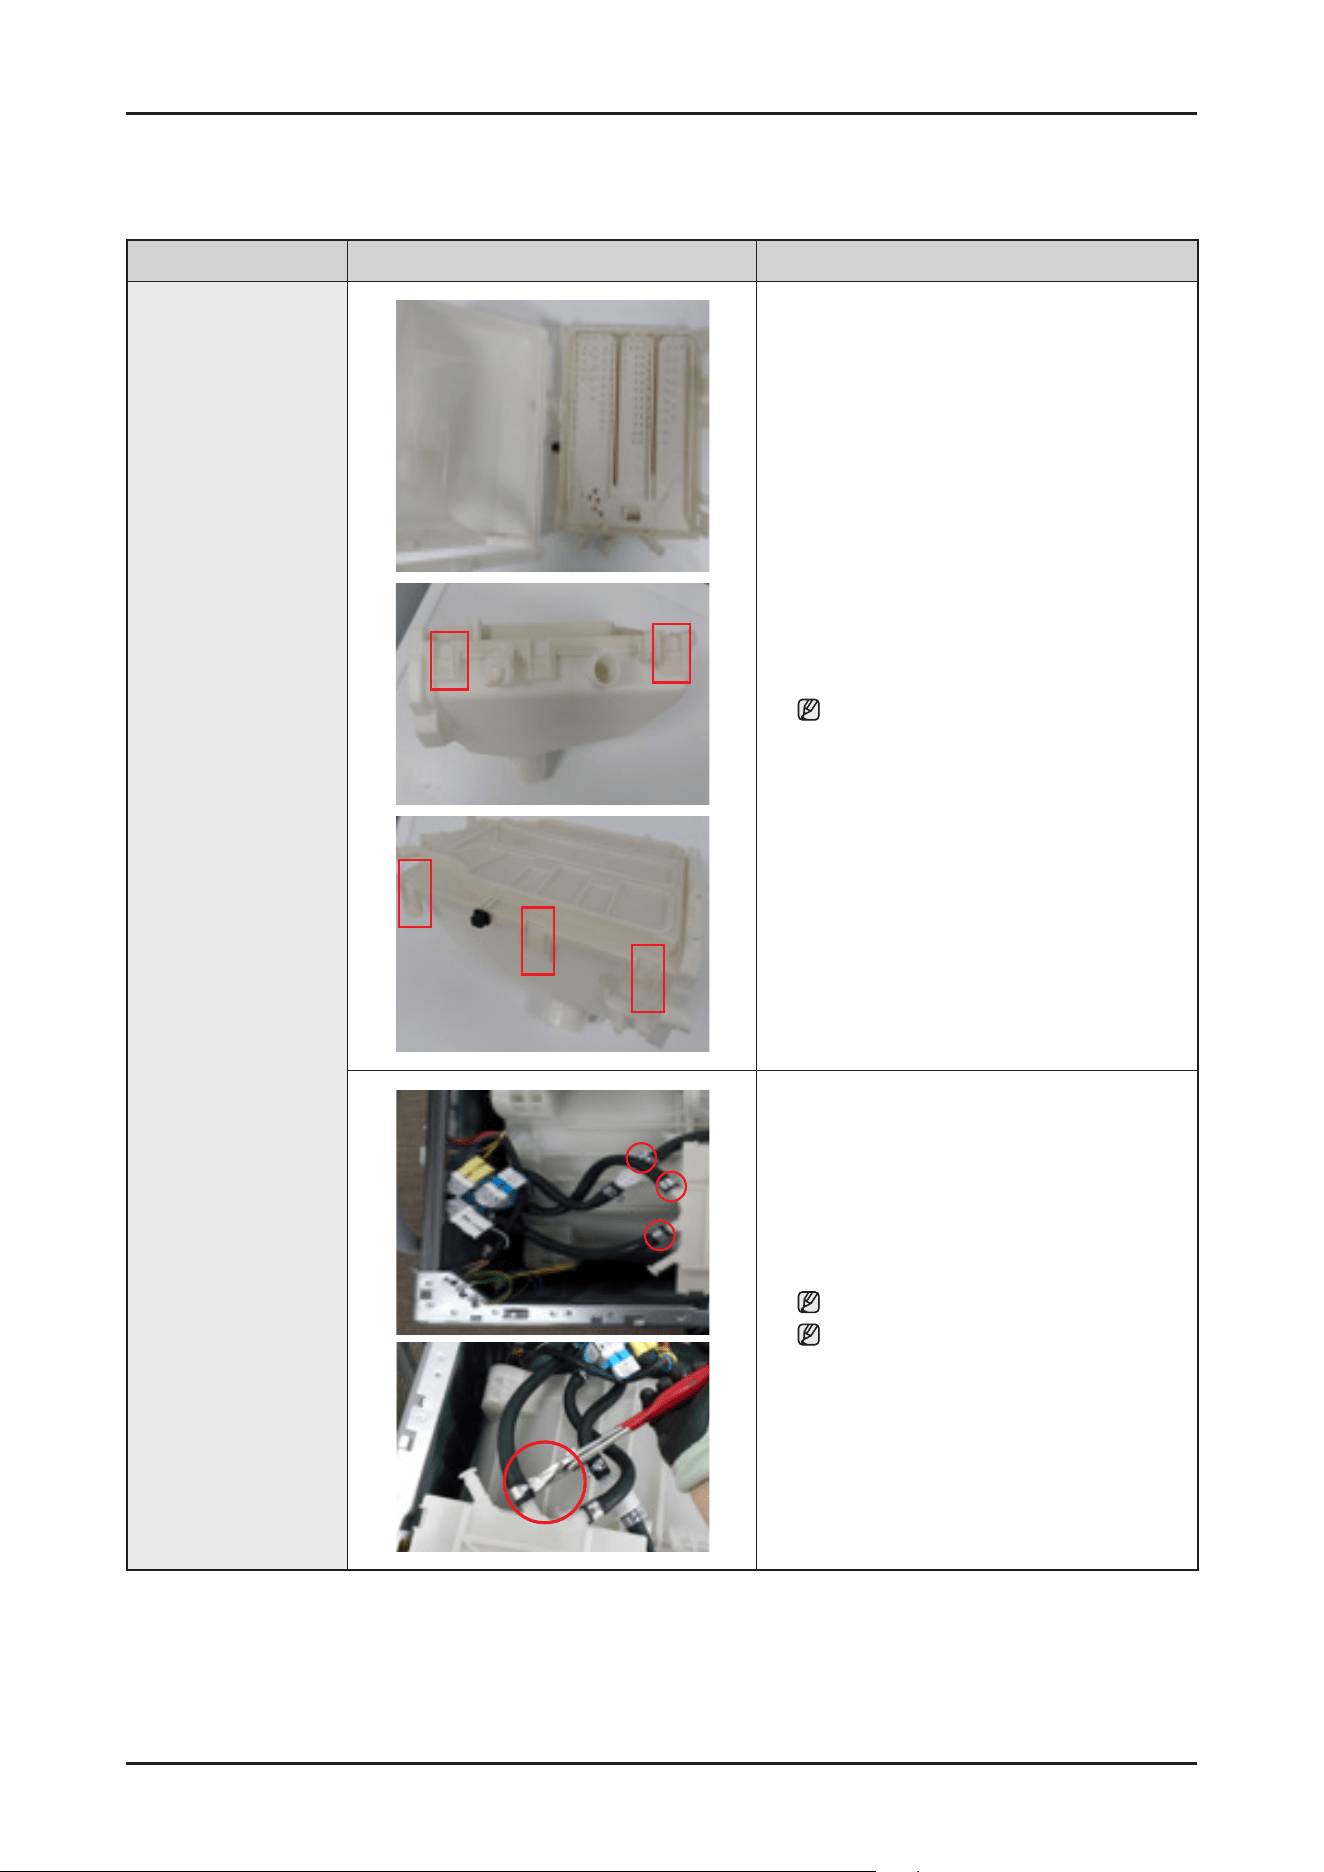
Reassembly
Part Figure Description
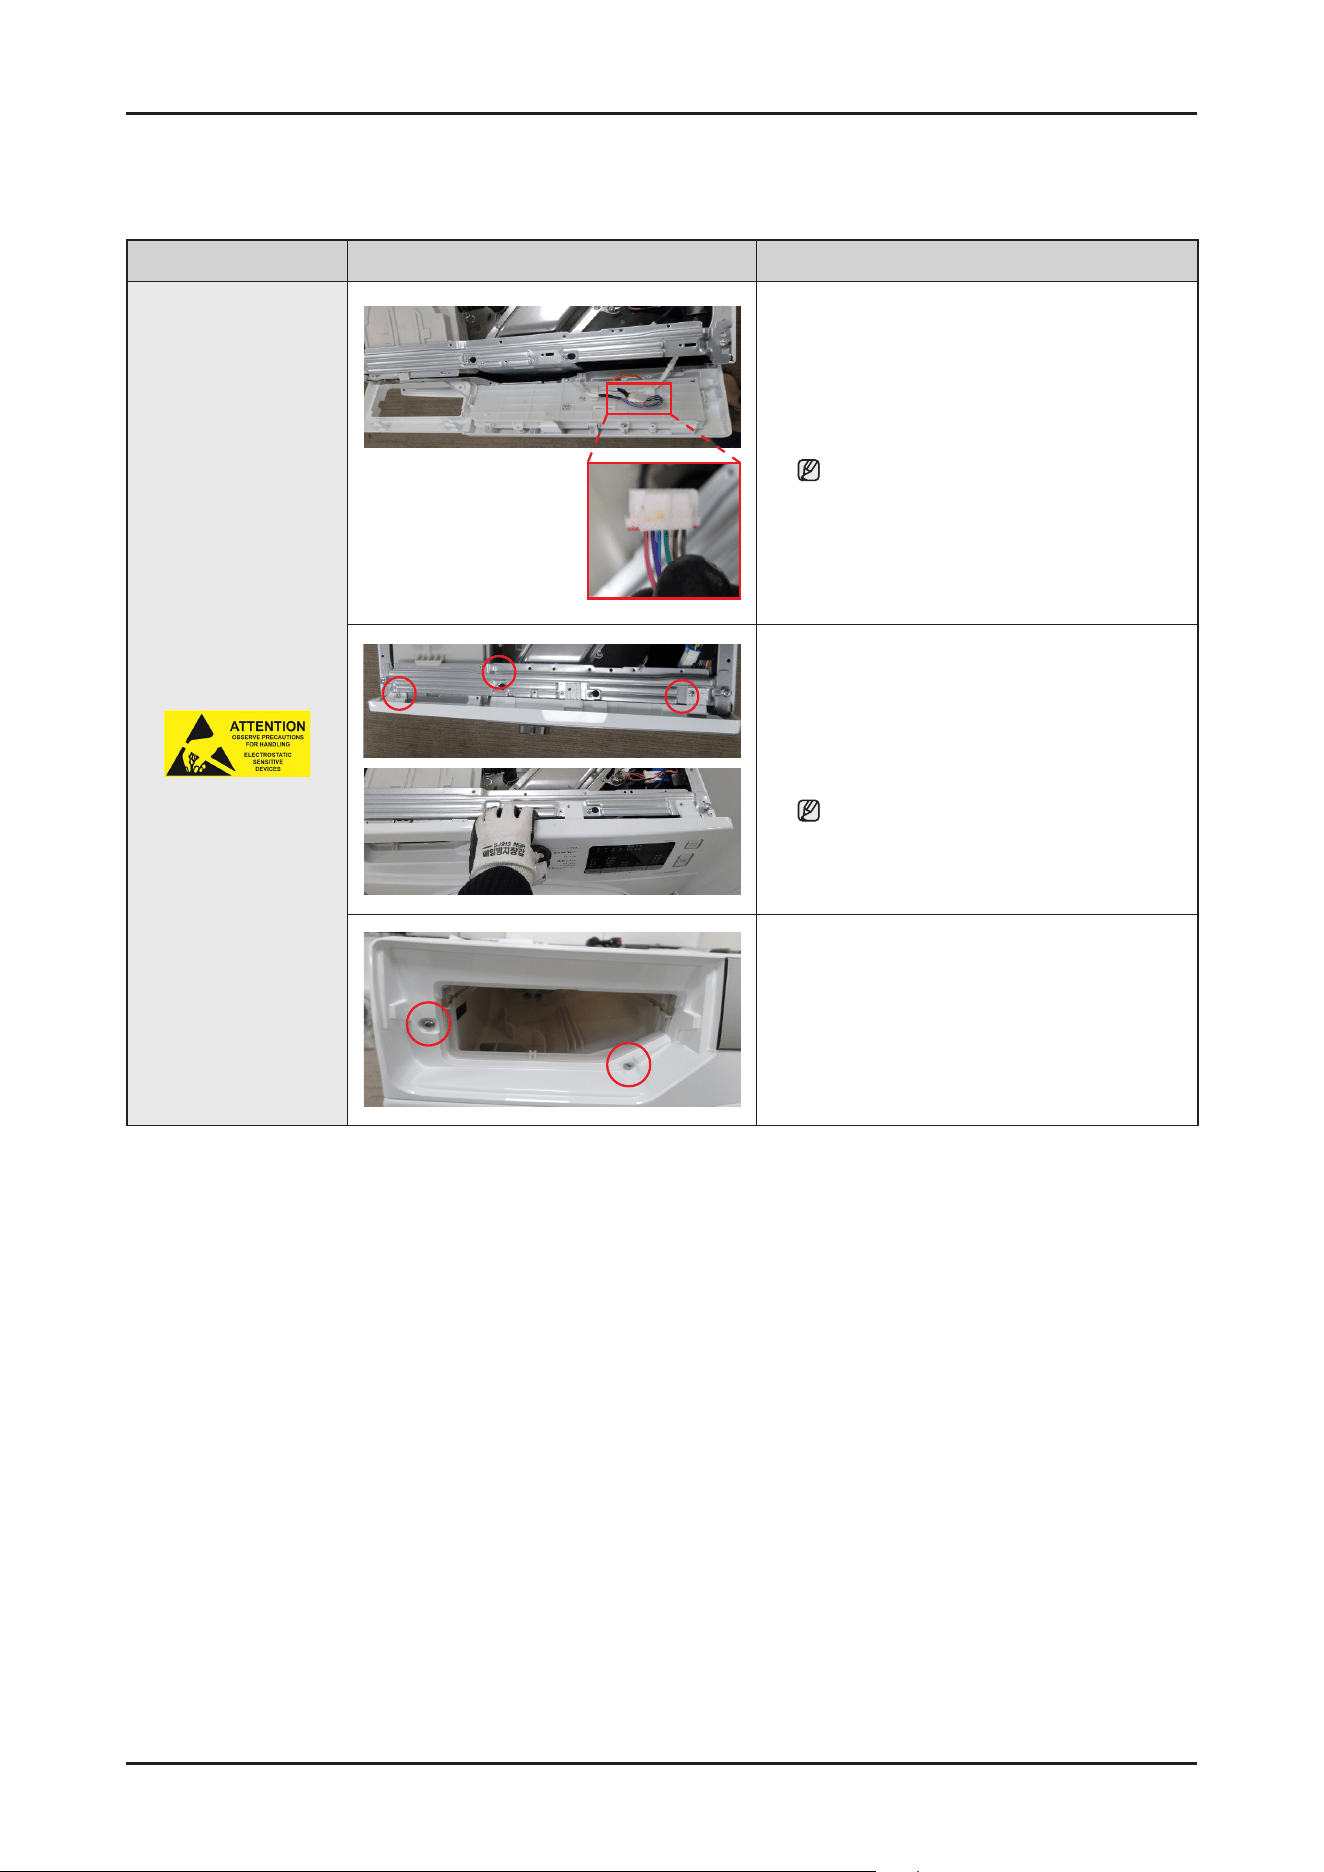
Assy Housing-Drawer
1. AssembletheHousingDrawerlowbypressing
thehooksonbothsidesbyhand.
Becarefulnottobreakthehose.
2. Assemblethewatervalvehosewithlongnose
plier.
Becarefulnottobreakthehook.
Makesuretoinsertthehosesandassemble
theclamp,bandringscorrectly.There’re
risksofleakageorpoorperformancewhen
it’smisassembled.
Disassembly and Reassembly _ 21
Part Figure Description
Assy Housing-Drawer
3. AssembletheBandrings.(2ea)
Makesuretoinsertthehosesandassemble
theclamp,bandringscorrectly.There’re
risksofleakageorpoorperformancewhen
it’smisassembled.
4. Remove4screwstodisassembleframeplate-
upusing(+)screwdriver.
22 _ Disassembly and Reassembly
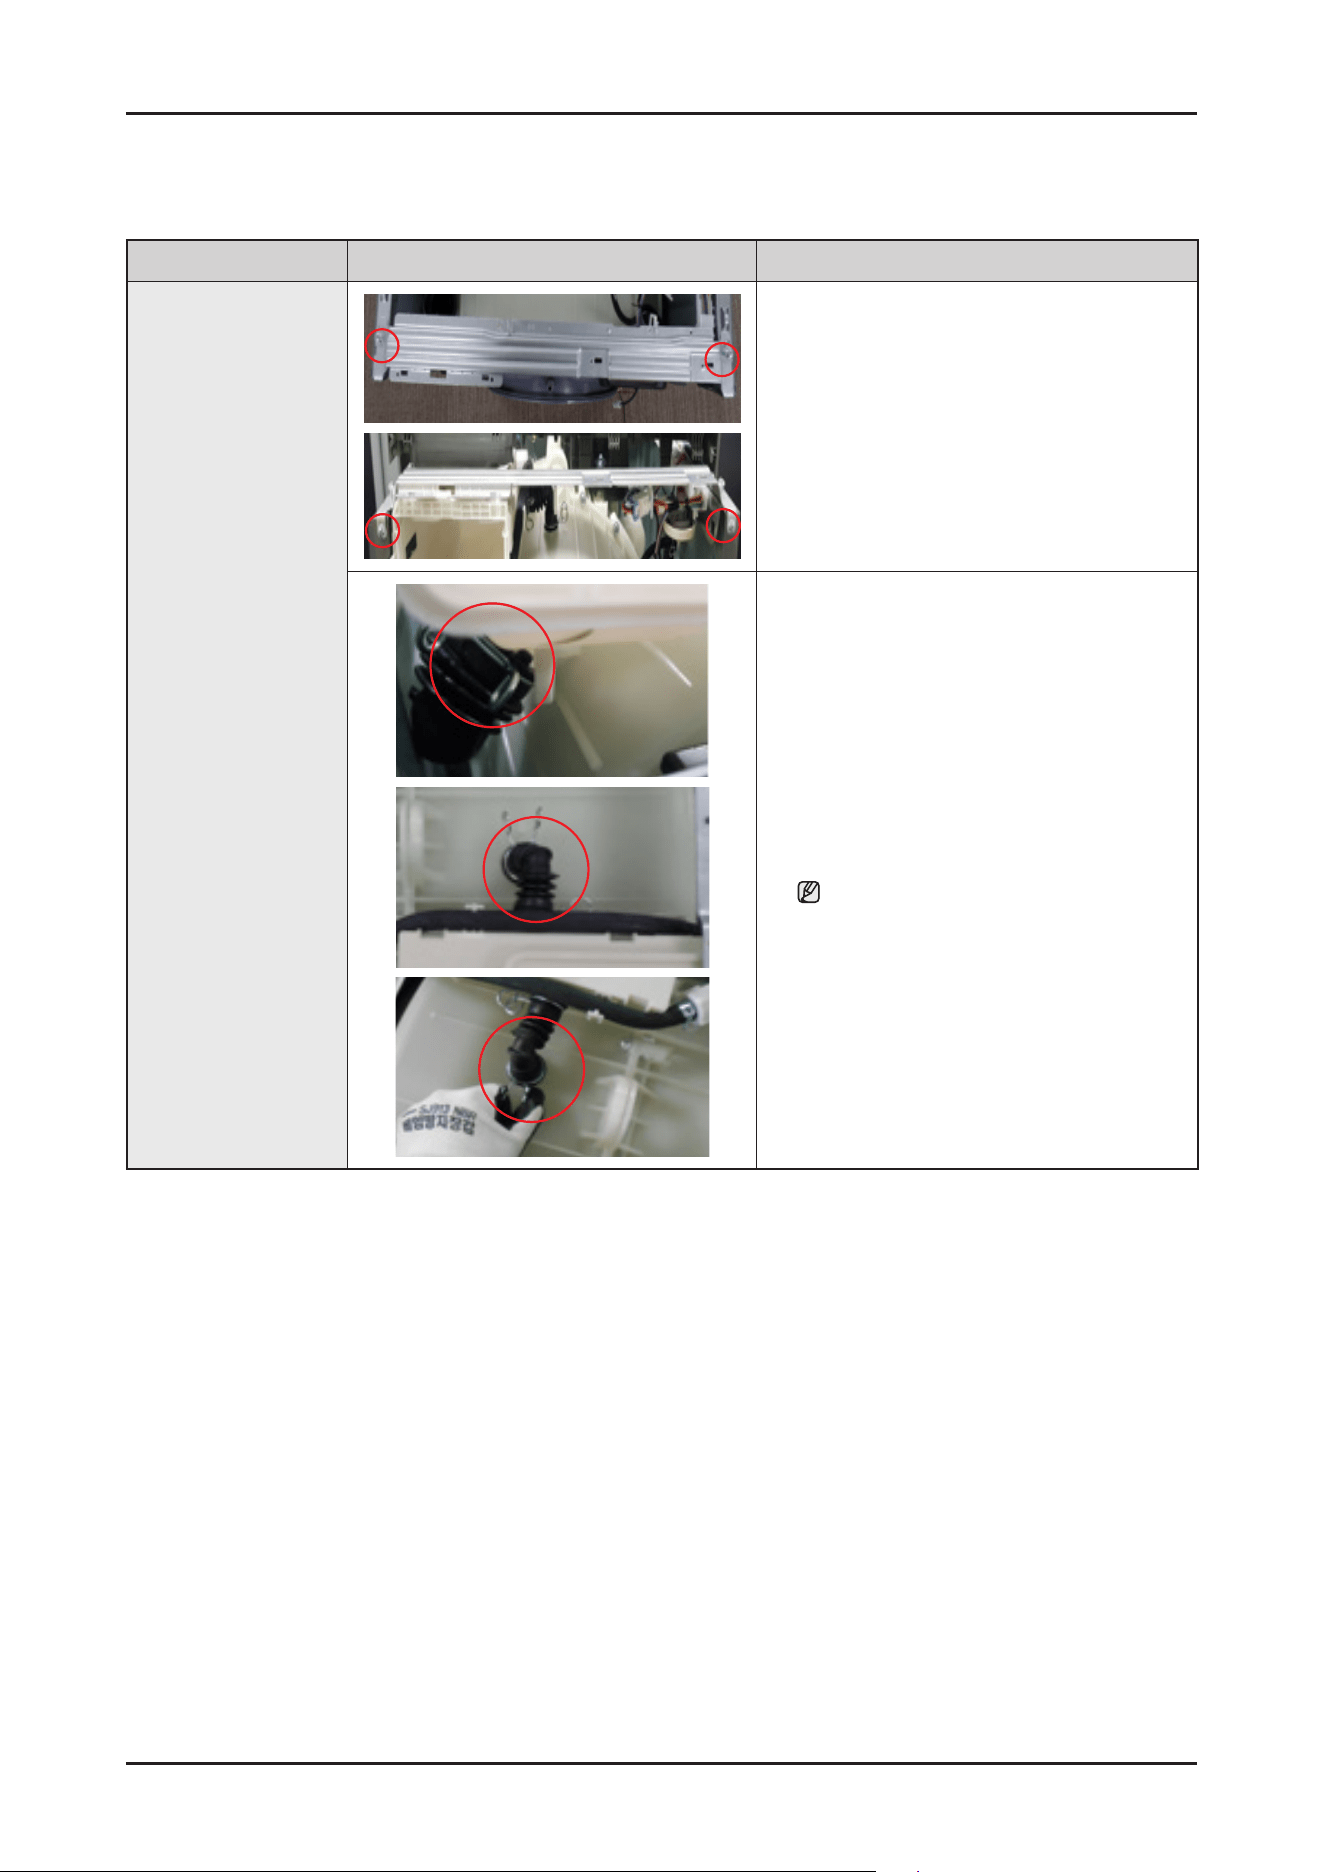
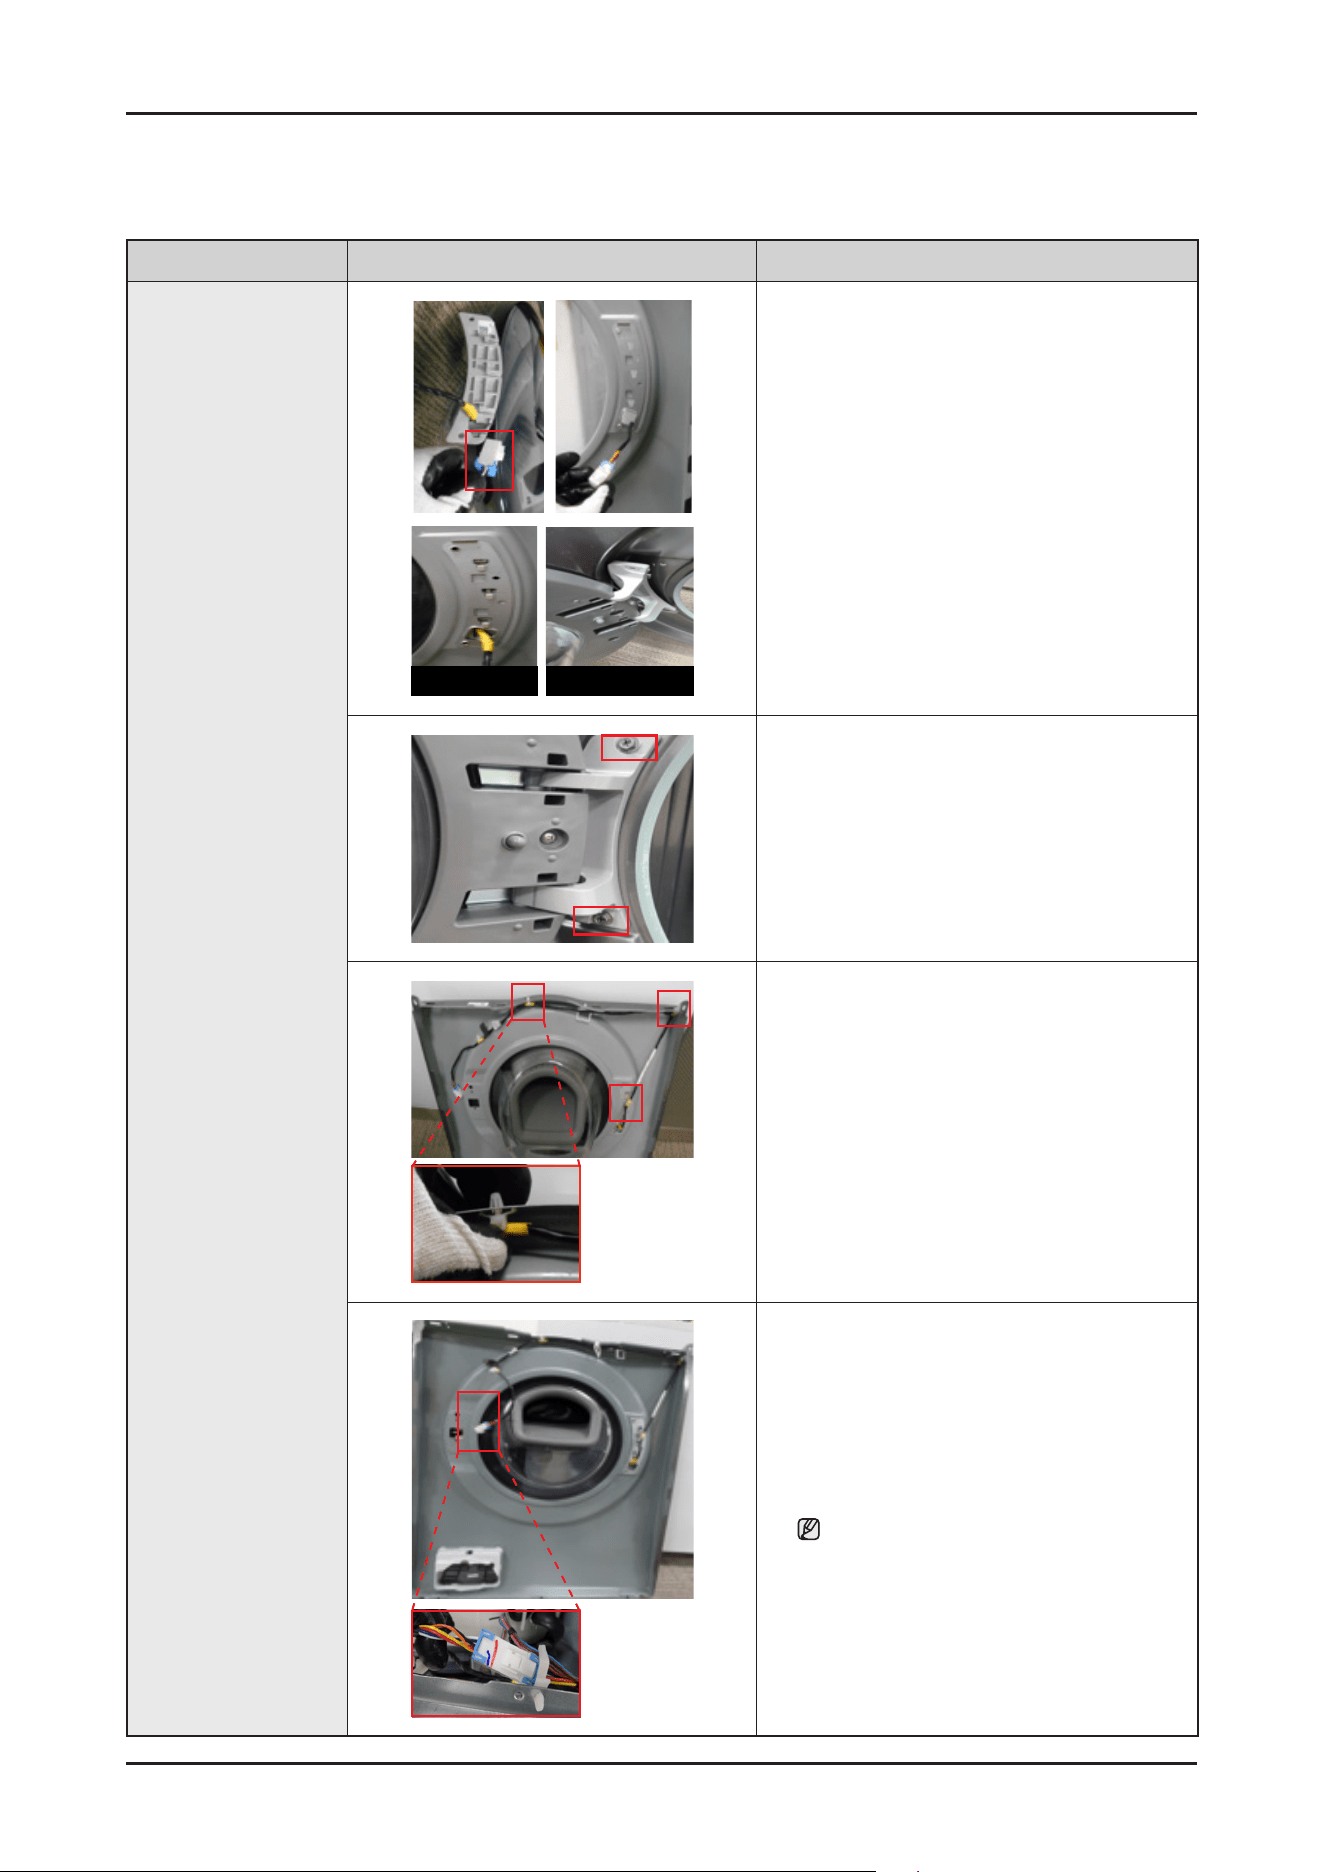
Disassembly
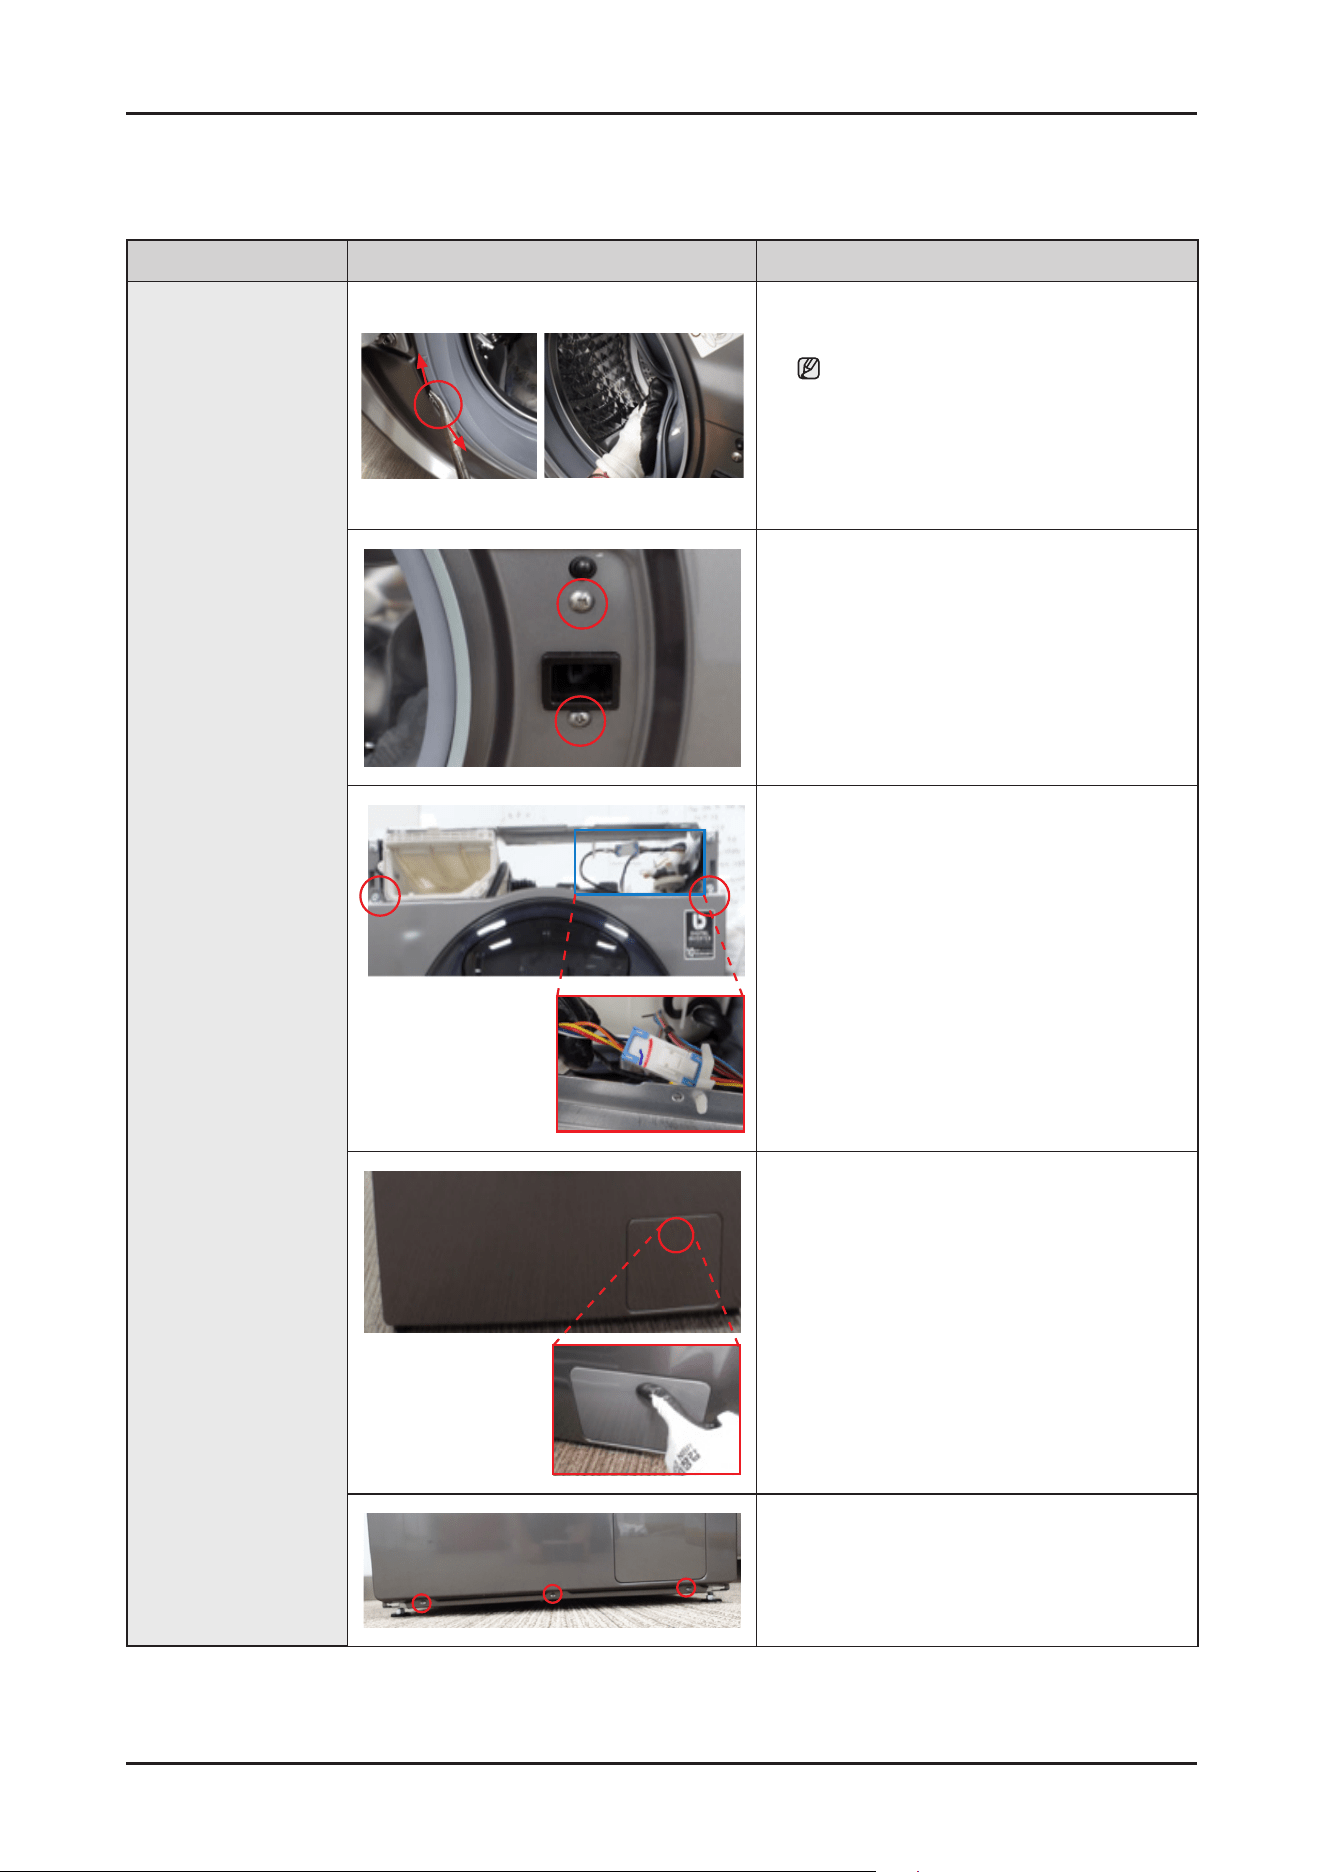
Part Figure Description
Frame Front
Beforeyoustart,disassembleAssyCoverTop,Assy
PanelControl.
Becarefulnottotearupthediaphragm.
1. Usinglongnosepliers,pickuponeofthe
ringsonWire-Diaphragmwhichconnectthe
springandthewireends.Then,separatethe
Wire-DiaphragmfromtheFRAME-FRONTand
DisconnecttheDiaphragm.
2. Remove2screwsholdingtheDOOR-LOCK
switchwith(+)screwdriver.
3. Disassembletheterminal(theblueboxis
terminallocation)bypressingthebluecircle
partandremove2screwsholdingtheFrame
Frontwith(+)screwdriver.
4. Pressthecircledplacetoopenupthecover
lter.
5. Remove3screwsholdingthebottomofthe
FRAME-FRONTwith(+)screwdriver.
Disassembly and Reassembly _ 23
Part Figure Description
Frame Front
6. Removecoverlterbyhand.
7. PressthehooktoremoveGuidecoverlter
using(-)screwdriver.
Becarefulnottobreakthehook.
8. PulltheGuideltertowardsyou.
9. LiftFramefrontuptodisassemble.
Cover-Back
Unfasten6(Dependingonthemodel,therecanbe
4screws)screwsthatholdthecoverbackinplace
with(+)screwdriver.
Removethebackcoverbyslidingitup.
(Whenassembling,slidethebackcoverdown.)
24 _ Disassembly and Reassembly
Disassembly
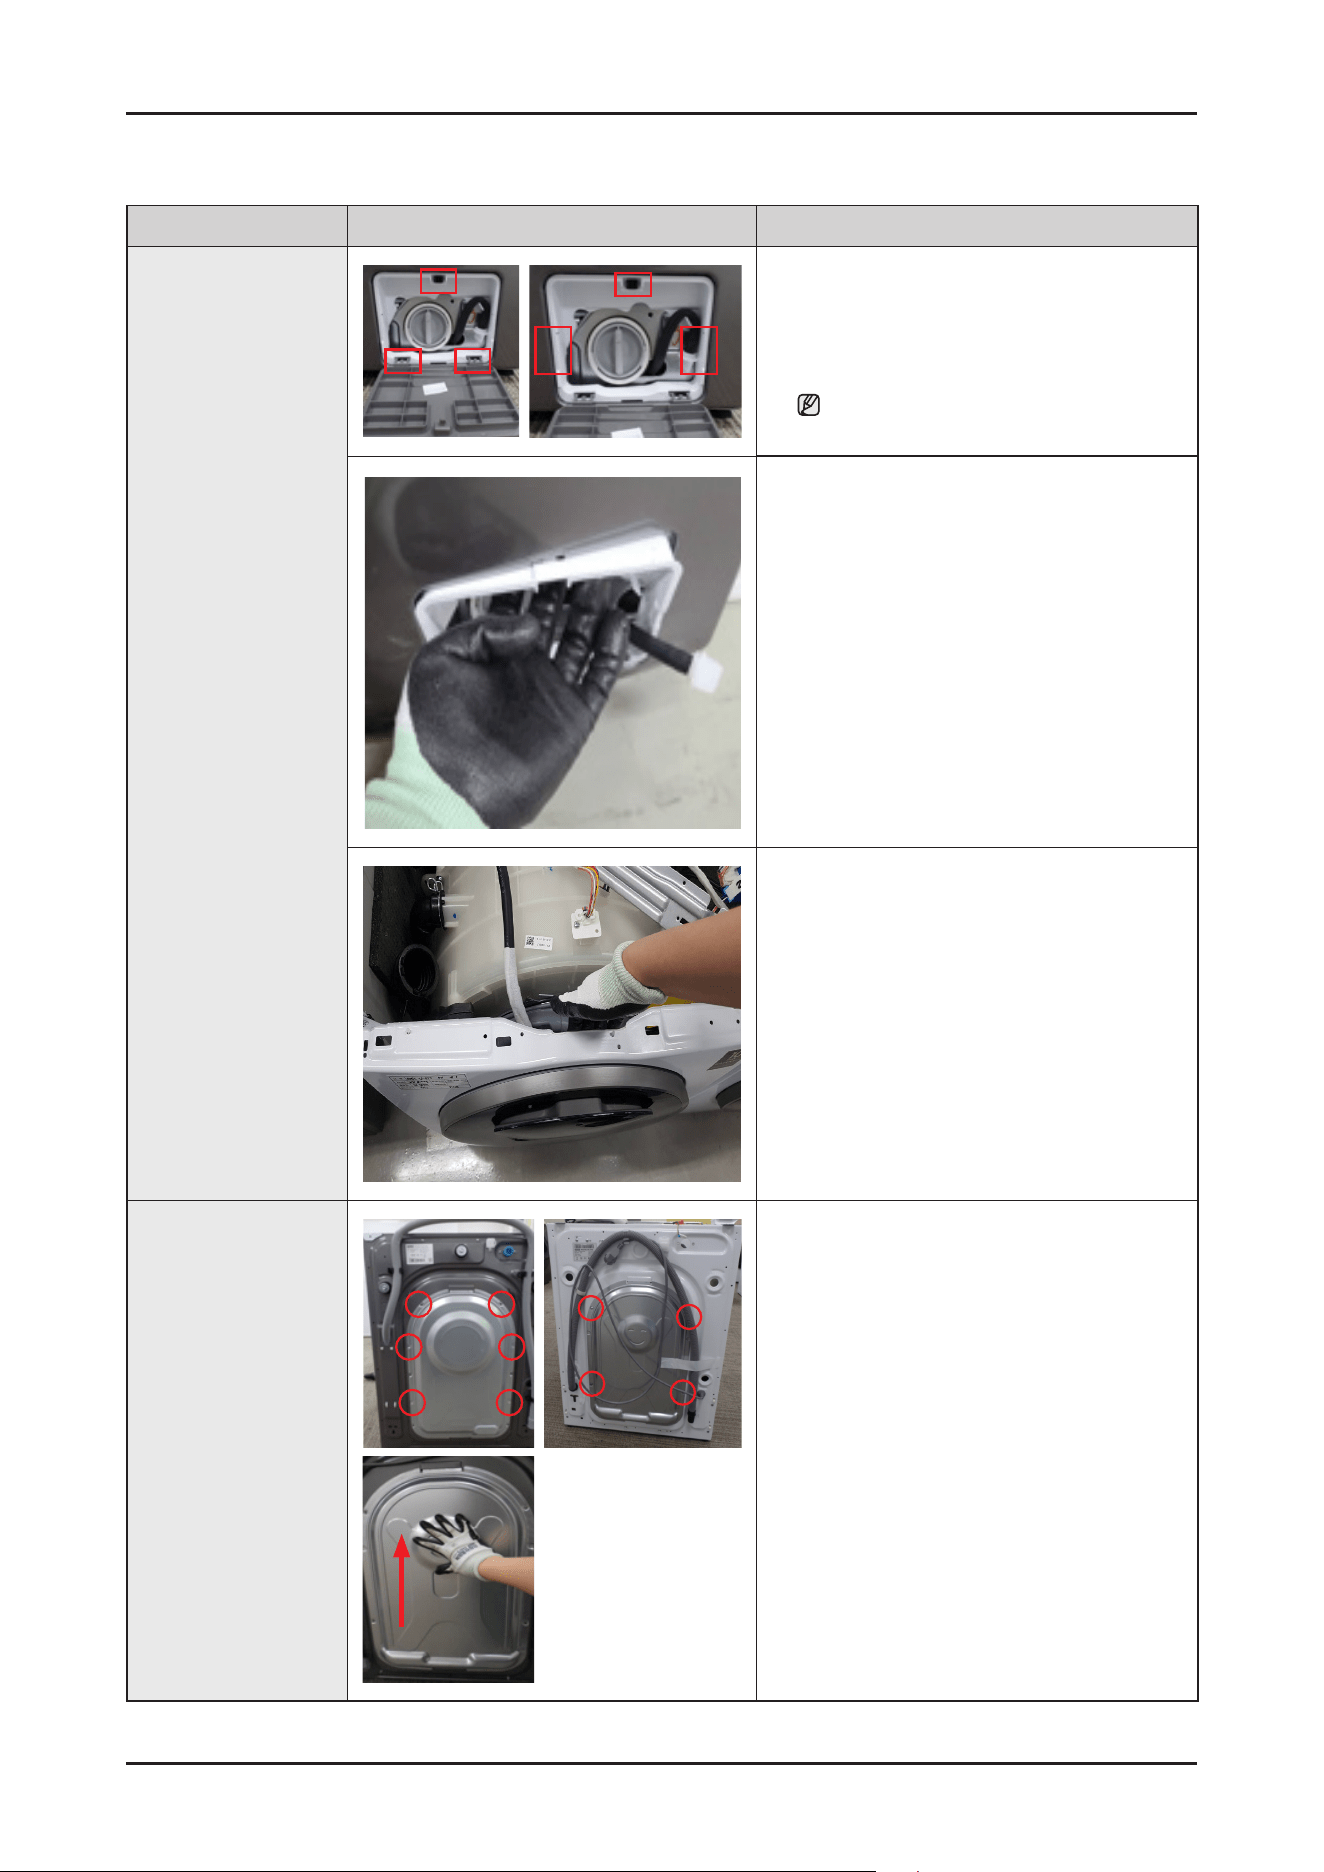
Part Figure Description
Assy Door
Beforeyoustart,disassembleAssyCoverTop,Assy
PanelControlandFrameFront.
1. Removethewirebydisassemblingthe3hooks
usinglongnoseplier.
2. Disassembletheterminalandremovethe
holdersusinglongnosepliers.
3. Remove2screwsholdingtheAssydoor.
Removethedoorbyslightlyliftingthedoor.
Disassembly and Reassembly _ 25
Reassembly
Part Figure Description
Assy Door
BACK SIDE
FRONT SIDE
1. Puttheterminalthroughthebiggestholeand
assemble3hooksasshowninthepictures.
2. AssemblethedoorwithFrameFrontbytting
thetwohooksandassemble2screwsholding
theAssydoorwith(+)screwdriver.
3. Assemble3hooksusinghand.
4. Assembletheterminalandtheholders.
MakesuretheWireharnessarenotgetting
stuckinotherparts.
26 _ Disassembly and Reassembly
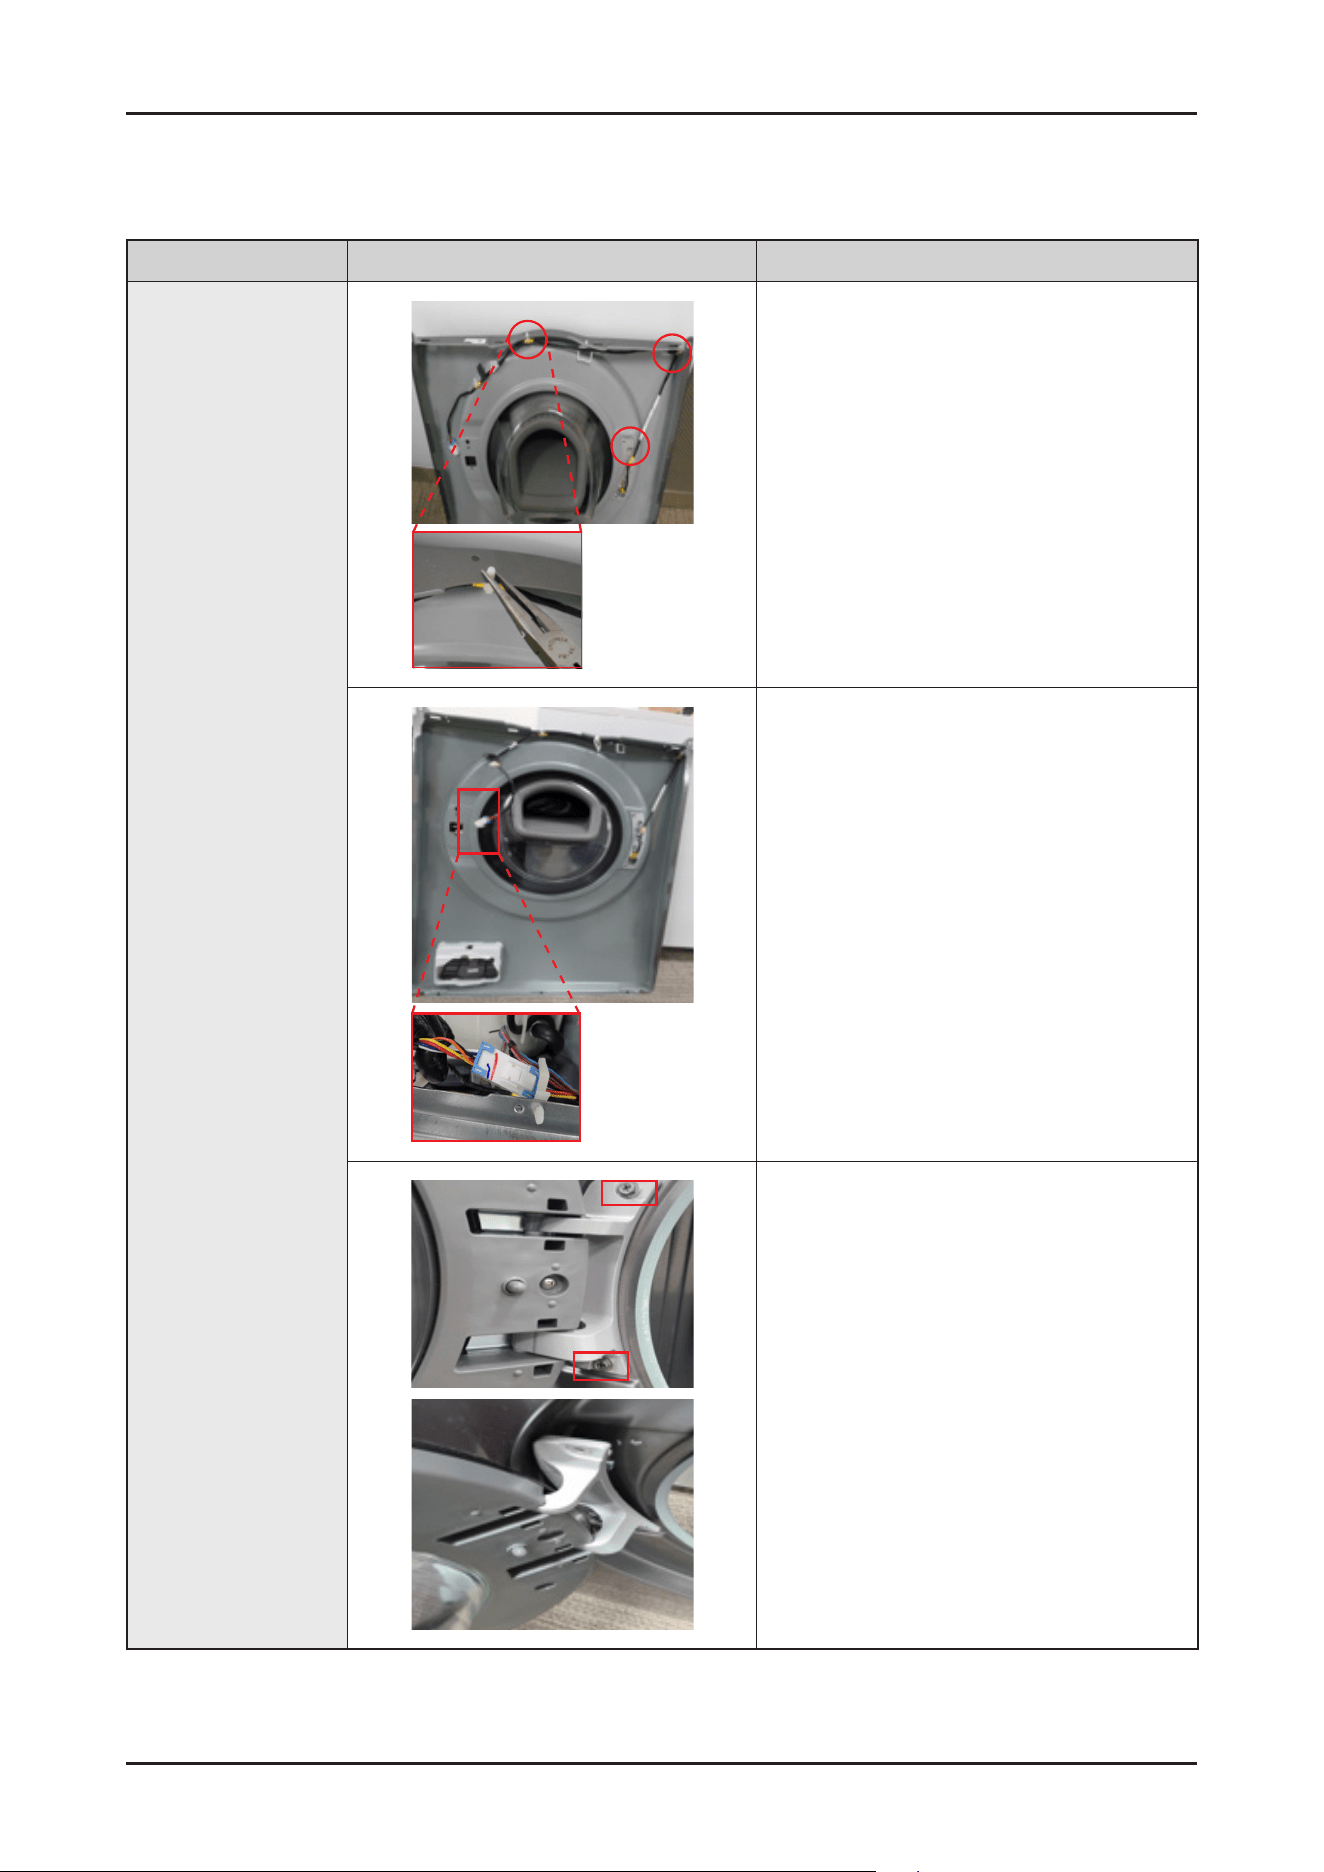
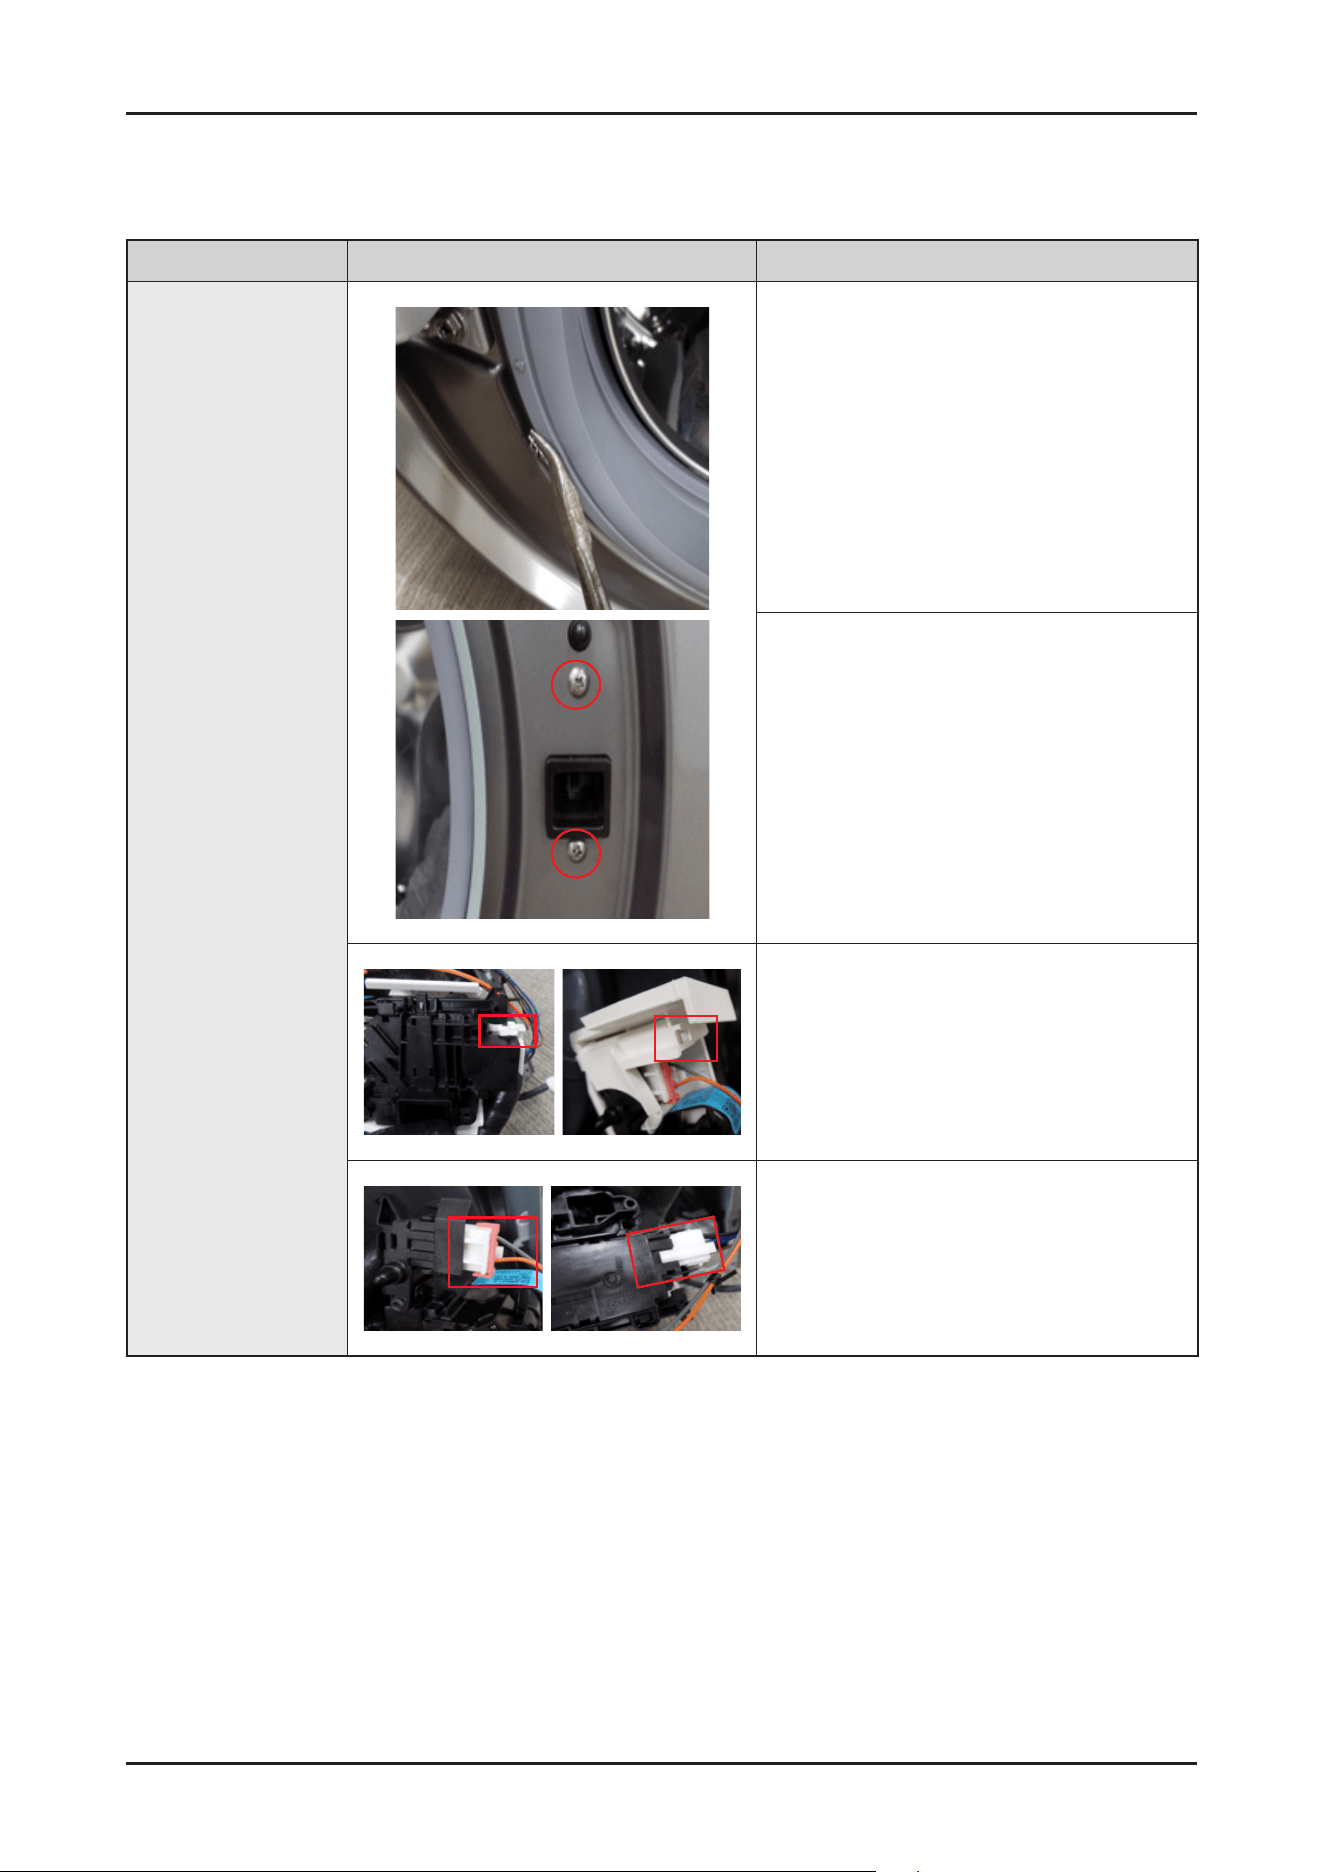
Disassembly
Part Figure Description
Door-Lock S/W
Beforeyoustart,disassembleAssyCoverTopand
AssyPanelControl.
1. OpentheDoor.RemovetheWireDiaphragm
andremovetheFrameFront.
2. Remove2screwswith(+)screwdriver.
3. RemoveCoverDoorSwitchbygentlypushing
theredboxpartwith(-)screwdriver.
4. Disassembletheterminals.(2ea)
Disassembly and Reassembly _ 27
Reassembly
Part Figure Description
Door-Lock S/W
1. Assembletheterminals.(2ea)
MakesuretheWireharnessarenotgetting
stuckinotherparts.
2. AssembletheCoverDoorSwitchbygently
pushingtheredboxpartwithhand.
MakesuretheWireharnessarenotgetting
stuckinotherparts.
3. Assemblethescrewswith(+)screwdriver.(2ea)
4. AssemblethewirediaphragmandFrameFront.
Ifthewirediaphragmislooseafterassembly
orisnotcorrectlyassembledatthecorrect
position(5o'clockor7o'clock),waterleakage
may occur.
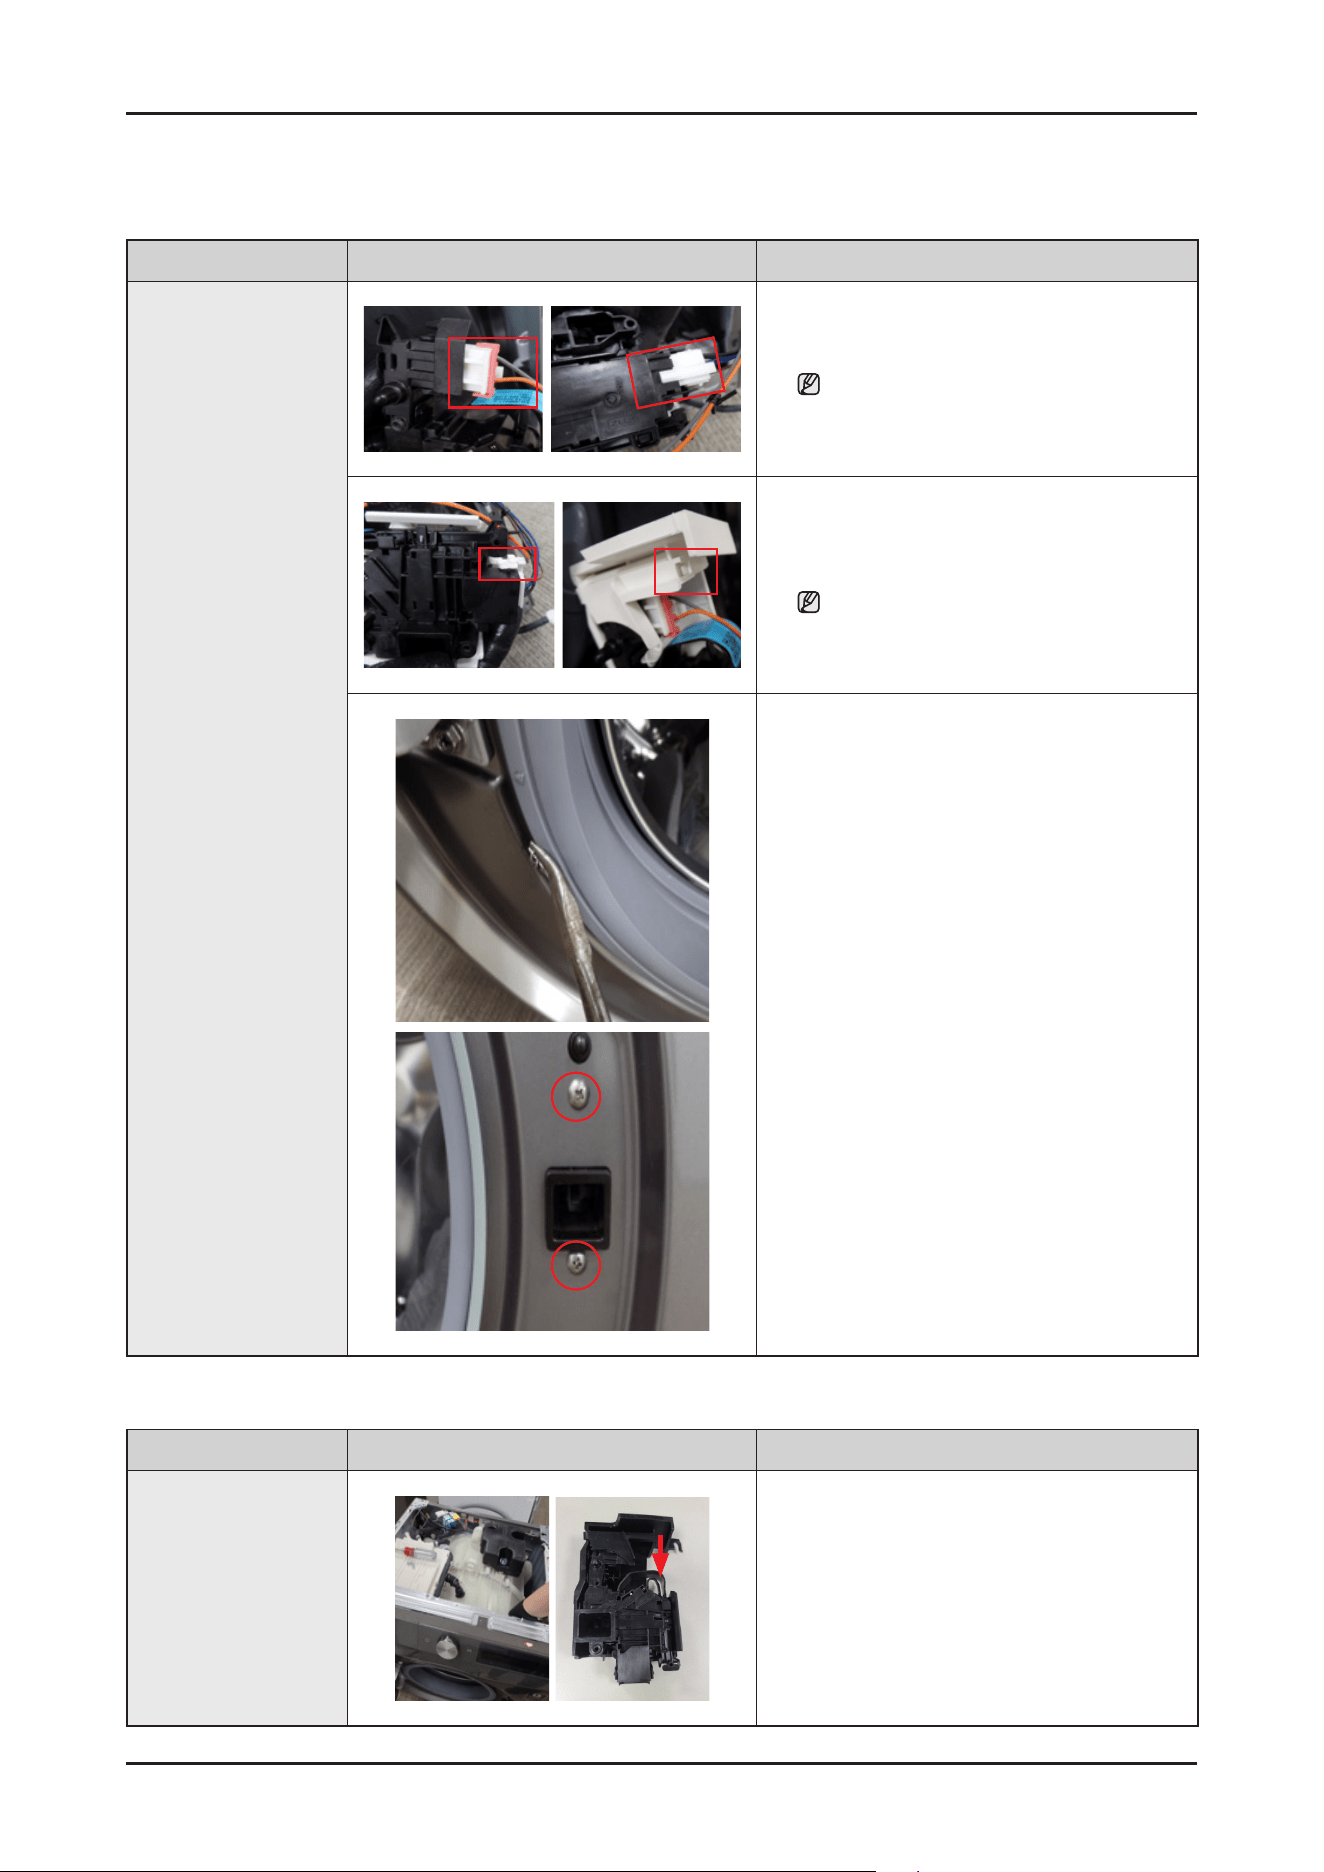
How to force open the locked Door
Part Figure Description
Door-Lock S/W
Beforeyoustart,disassembleCoverToprst
1. PutyourhandtopresstheDoor-LockSwitch.
(Thelocationyouneedtopressisshowninthe
picturewitharrow)
28 _ Disassembly and Reassembly
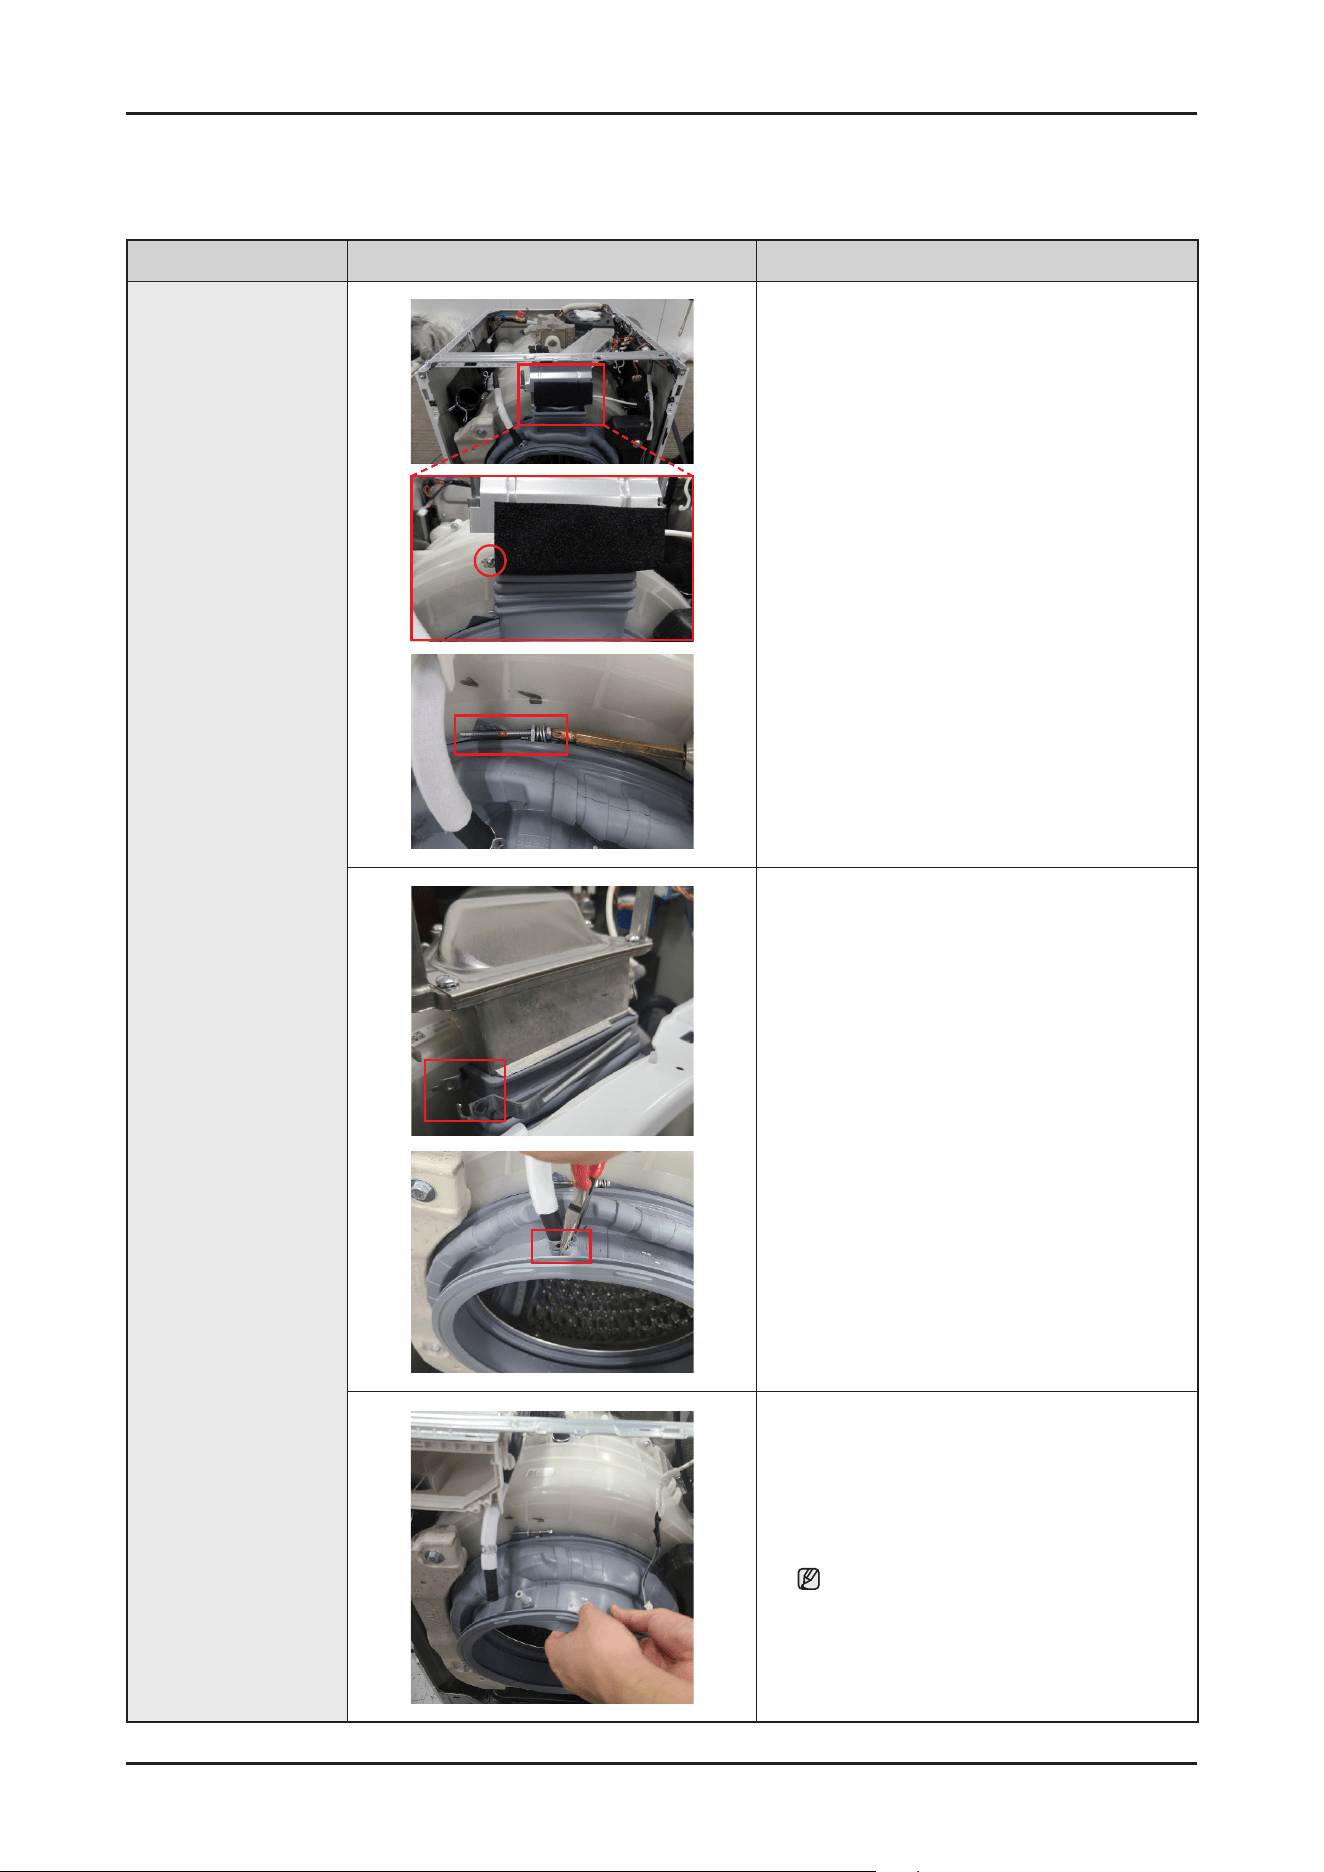
Disassembly
Part Figure Description
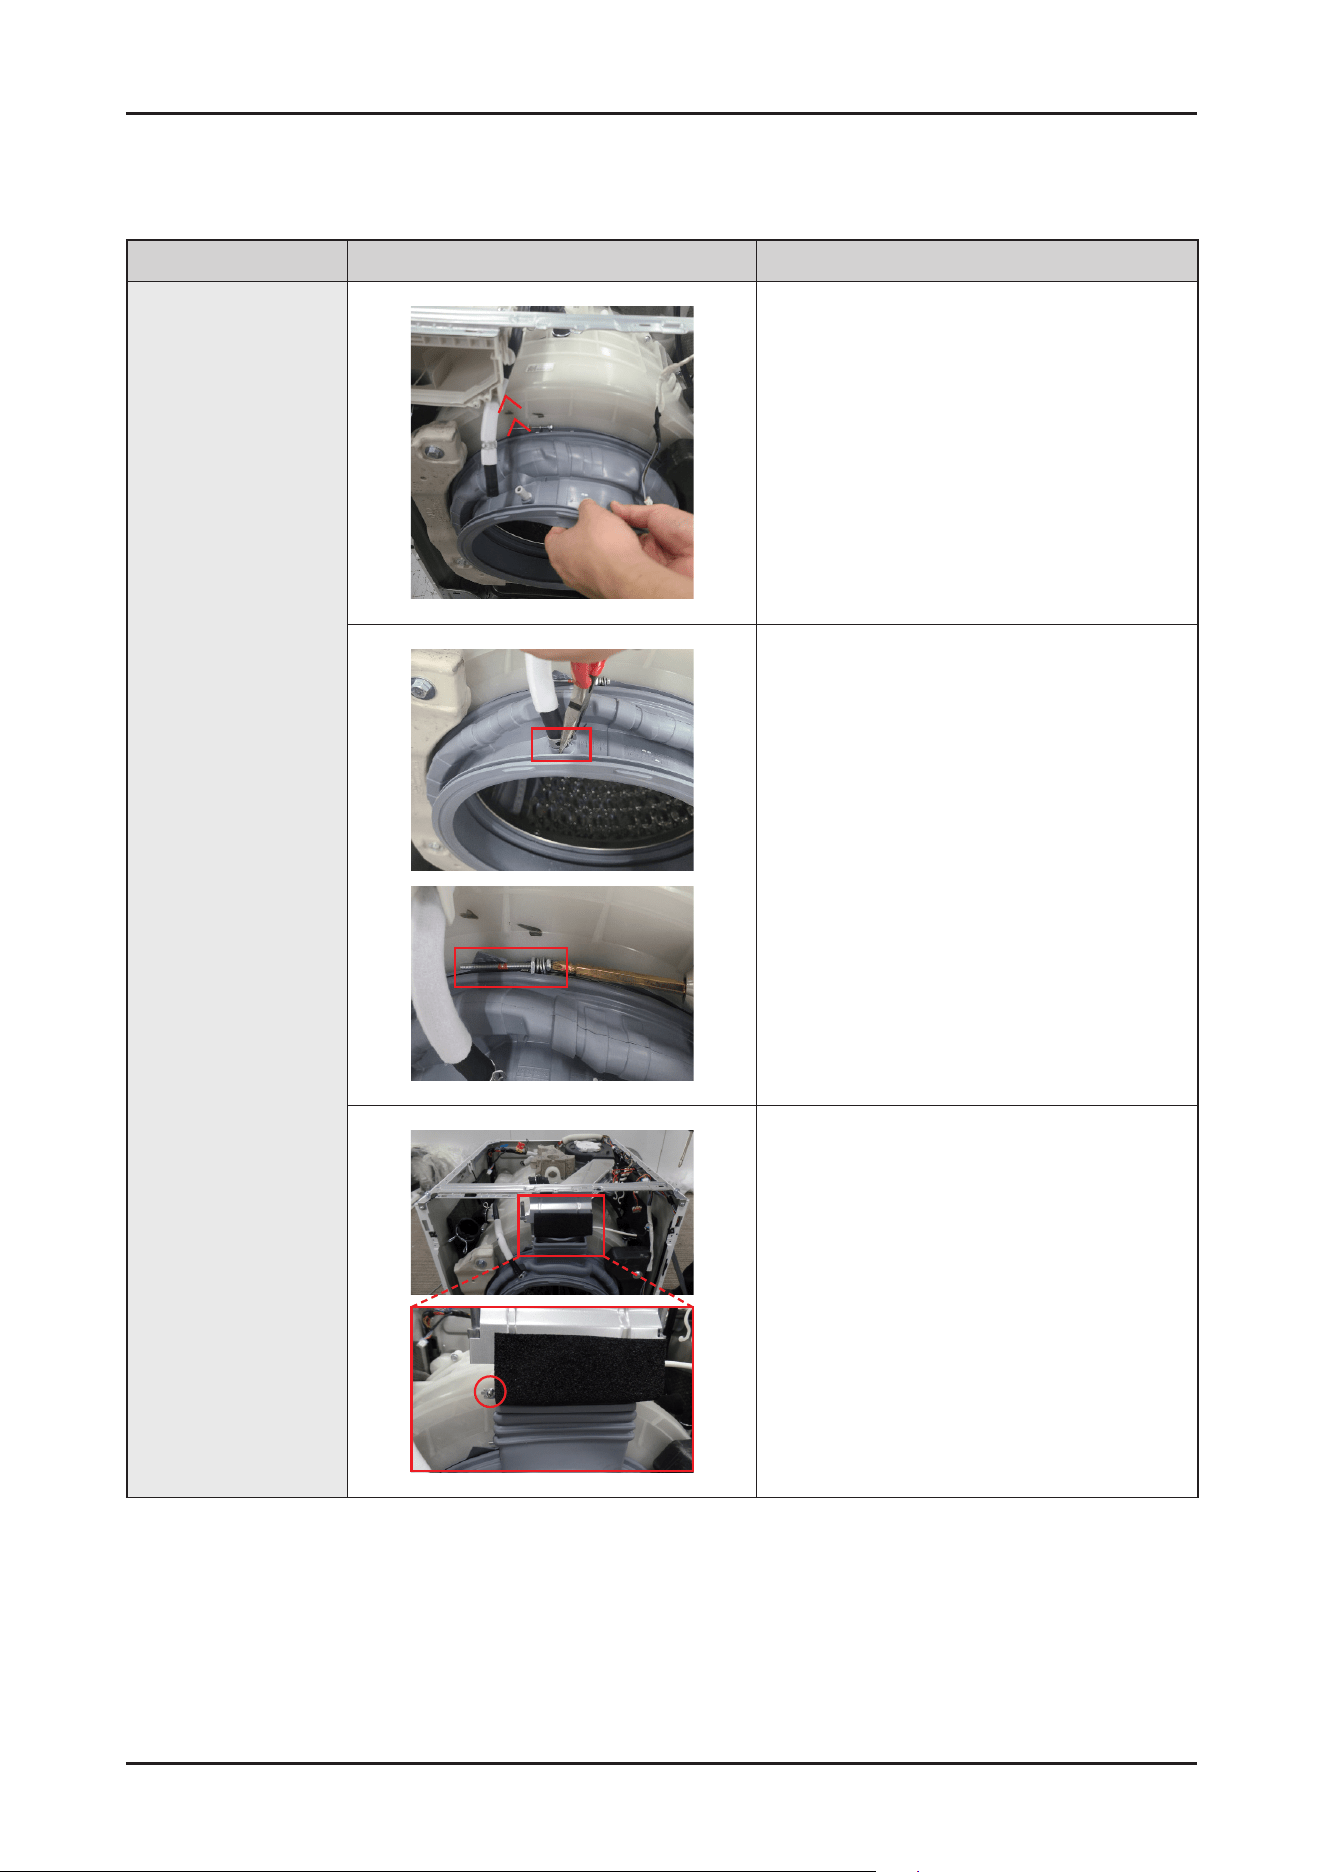
Diaphragm
Beforeyoustart,removecovertop,AssyDrawer,
AssyPanelControlandFrameFront.
1. Unfastenthescrewwith(+)screwdriveron
JointDiaphragmandwirediaphragm.
2. RemoveJointDiaphragmbyhand.
3. Removehoseandclampwithlongnoseplier.
4. Pulldiaphragmtowardsyou.
Becarefulnottoripdiaphragm.
Disassembly and Reassembly _ 29
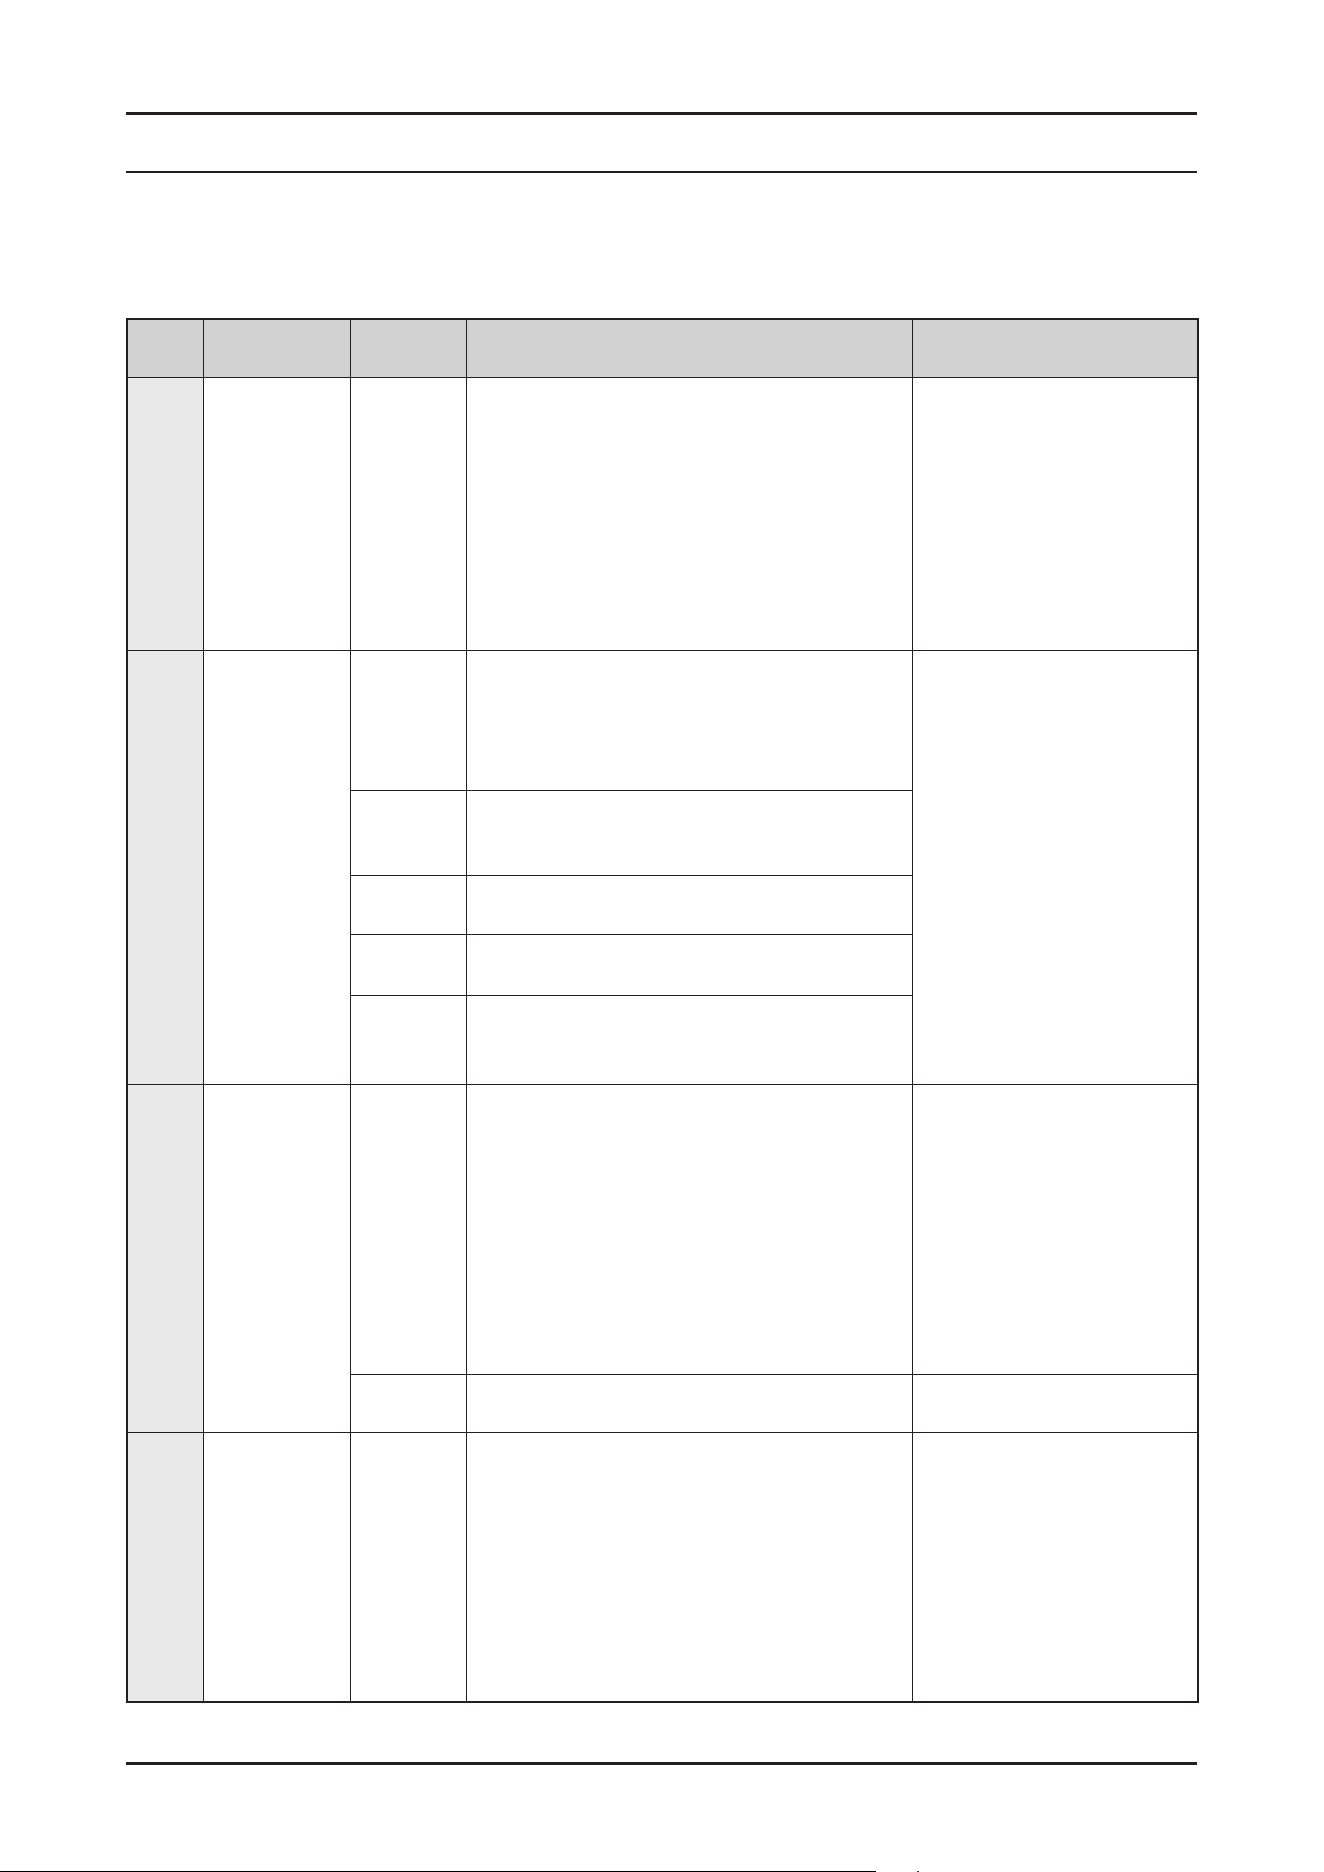
Reassembly
Part Figure Description
Diaphragm
1. AssembletheDiaphragmwithtubbyhand.
Diaphragmandtubhastrianglepartmakesure
totthemcorrectly.
2. Assemblehoseandclampwithlongnoseplier,
andfastenthescrewwith(+)screwdriver.
3. AssembleJointdiaphragmandfastenthescrew
with(+)screwdriver.
30 _ Troubleshooting
4. TROUBLESHOOTING
4-1. INFORMATION CODE
► When an abnormal condition occurs, melody sounds and displays Info. code indications as shown in the following Info. codes
are shown until the status has cleared.
No. Information Type
Information
Code
Causes Corrective Actions
1 WaterLevel 1C
- Thepartofthehosewherethewaterlevelsensoris
locatedisdamaged(punctured).
- Thehoseiscloggedwithforeignmaterial.
- Thehoseisfolded.
- Toomuchlubricanthasbeenappliedtotheinsertion
partoftheairhose.
- Hoseengagementerror(disengaged)
- Partfault(Faultyinternalsoldering)
- Thewaterlevelsensorterminalisdisengaged.
- MainPBAfault
•Waterlevelsensorfault.
•Thewaterlevelsensorterminalis
disengaged.
•Thepartofthehosewherethe
waterlevelsensorfolded.
•MainPCBfault.
2 Motor
3C
- ThePBAconnectorterminalisnotconnected.
- Themotorspinnetisnotengaged.
- Themotor’sinternalcoilisdamaged(short-circuited
orcut)
- Foreignmaterial(ascrew)hasenteredthemotor.
•Washingmotorfault.
•CheckWashingmotorconnector.
•Washingmotorrotor/statorfault.
•MainPCBfault.
3C1
- Motoroverloadedduetotoomuchlaundry(Non
sensing)
- PBAfault
3C2
- ThemotordrivingerrorfromthePBAisweak:
Unstablerelayoperation,etc.
3C3
- TheIPMterminalofthemainPBAisnotconnected.
- TheDDmotorcoverisoutofplace.
3C4
- ThePCBhousingterminalisnotconnected.
- PBAfault
- DDmotorfault
3 WaterSupply
4C
- Foreignmaterialisenteringthewatersupplyvalve.
- Thewatersupplyvalveterminalisnotconnected.
(Wiredisconnected)
- Thewarmwaterandrinseconnectorsarewrongly
connectedtoeachother.
- ThisoccursifthePCBterminalfromthedrainhoseto
thedetergentdrawerisnotconnected.Checkwhether
thetransparenthoseisfoldedortorn.
- ThisoccursWaterpressureisweak,acertaintime
delay.
- ThisoccursWaterValvebyfreezinginwinterseason.
•Watersupplyvalvefault.
•MainPCBfault.
•Freezingbywinterseason.
4C2
- Thewatertemperatureissensedashigherthan50˚C
intheWoolorLingeriecourses
-
4 Drain 5C
- Thepumpmotorimpellerisdamagedinternally.
- Thewrongvoltage(220V→110V)issuppliedtothe
parts.
- Partfault
- Thisoccursduetofreezinginthewinterseason.
- Thedrainhoseisclogged.(Injectionerror,foreign
material)
- Cloggedwithforeignmaterial.
- Thewaterpumpterminalisnotconnected:rubber
band,bills,cotton,hairpins,coins.
•Drainpumpfault.
•Freezingbywinterseason.
•Checkinsideforeignmaterialof
drainpump.
•MainPCBfault.
Troubleshooting _ 31
No. Information Type
Information
Code
Causes Corrective Actions
5 Communication AC
- ThesignalsbetweenthesubandmainPBAsarenot
sensedbecauseofacommunicationserror.
- Checktheconnectorconnectionsbetweenthesub
andmainPBAscarefully.→Checkforincorrector
looseconnections,etc.
- RemovethesubPBAC/Panelandcheckforanyfaulty
soldering.
•MainPCBandSubPCBSignal
Detectionfault.
•MainPCBandSubPCBwire
connectionfault.
6
SWITCH
(Mainrelay)
BC2
- AbuttonotherthanthePowerbuttoniscontinually
pressed(formorethan30seconds).
- Deformationofaninternalplasticinjectionpart.
- AscrewforassemblingthesubPBAistightenedtoo
much.
•WhenpressedPowerbutton.
•Whenpressedbuttonexceptfor
powerbutton.
•MainPCBrelayfault.
7 COOLING CC
- Whenthetemperatureofthewaterisgreaterthanor
equalto55℃,thiscodeappearswhenthemachine
doesnotdrain.(reason:Itisunsafeforhotwaterto
drainasmayburniftouched).
- Temperaturesensorfault,orincorrectuse.
•Washingtemperaturesensor
check.
•DescriptionPLAccident
prevention.
8 DOOR
dC
- Aswitchcontacterrorbecauseofadeformationofthe
doorhook.
- Whenthedoorispulledbyforce.
- Thisoccursinthehotwashesbecausethedooris
pushedduetoapressuredifferencefrominternal
temperaturechanges.
- S/WcontactfaultbecauseofLIDTC“L”transformation.
•Doorlockswitchfault.
•Drainpumpfault.
•Dryductfanmotorfault.
•MainPCBfault.
dC1
- Thedoorlockswitchterminalisconnectedincorrectly.
- Thedoorlockswitchterminalisbroken.
- ThisoccursduetoLowinsualtionofthewiringassy
- MainPCBfault
dC2
- ThisoccursifthePowerswitchisturnedon/off
continuallyandtoomuchheatisgenerated(Thiserror
isdifculttobereproduced.)
9 HEATER
HC - Thewashingheaterisshort-circuitedorhasawire
disconnected.
- Thewashingheaterinthetubhasanerror.(Contact
error,temperaturesensorfault)
- Ifthewaterlevelsensoroperateswithoutwater
becausewaterisfrozenorforanyotherreasonand
thetemperaturesensorengagedatthebottomto
preventoverheatingforthewashingheaterdetects
atemperatureof100to150˚C,thewashingmachine
turnstheinputpoweroff.
•Heaterfault.
•Redtemperaturesensoratthe
centerofthedryheater.
•Steamfunctionfault.
•Freezingbywinterseason.
HC1
HC2
- Thiserroroccurswhentheredtemperaturesensorat
thecenterofthedryheateroperates(atatemperature
higherthan145˚C)
:Correctiveaction–Pressthebuttonatthecenter
lightly.
Thewashingmachinewilloperatenormally.
Alternatively,replacethetemperaturesensorifthe
temperaturesensingisunstablebecauseoffunctional
degradation.

32 _ Troubleshooting
No. Information Type
Information
Code
Causes Corrective Actions
10 WaterLeakage
LC
LC1
- Heaterengagementfault.(outofplace)
- Theairhoseisoutofplaceandwaterleakageoccurs
duringthespincycle.
- Thetubbackatthesafetyboltsxingpartisbroken.
- Waterleakageoccursatthefrontwithfoaming
becauseoftoomuchdetergent.
- Waterleakageoccursbecausetheconnectinghoseto
thedetergentdrawerisconnectedincorrectly.
- Thedrainpumpltercoverisengagedincorrectly.
- Waterleakageoccursatthedrainhose.
- Theductcondensingholdingscrewsareworn.
- Thenozzle-diaphragmisengagedintheopposite
directionortherubberpackagingisomitted.
- Waterleakageoccursbecausethescrewsthat
holdthetubbackandfrontinplacearefastened
incorrectly.
- Theleakagesensorisfaulty.
•CheckWaterLeakage.
•DVCASEforeignmaterialoccurs.
•Leakageoftheproductinsidethe
hoseandpartsmoldedproblem.
11 OVER FLOW
OC
OF
- Waterissuppliedcontinuallybecausethewaterlevel
detectiondoesnotwork.
- Becausethedrainhoseiscloggedandthereisan
injectionerror(atanarrowsection),thewaterlevel
detectiondoesnotworkandwaterissupplied
continually.
- Waterissuppliedcontinuallybecauseoffreezingor
becausethereisforeignmaterialinthewatersupply
valve.
- Thismayoccurwhenthesensorisfaultyorthe
pressuretubeisblockedordamaged.
•Waterlevelsensorfault.
•Freezingbywinterseason.
12
Temperature
Sensor
TC1
- Thewashingheaterinthetubhasanerror.
(Contacterror,temperaturesensorfault)
- Theconnectorisconnectedincorrectlyoris
disconnected.
- Ifthewaterlevelsensoroperateswithoutwater
becausethewaterisfrozenorforanyotherreason
andthetemperaturesensorengagedatthebottom
topreventoverheatingforthewashingheaterdetects
atemperatureof100to150˚C,thewashingmachine
turnstheinputpoweroff.
•Washingtemperaturesensor
check.
•Drytemperaturesensorcheck
•Drycondensingtemperature
sensorcheck.
•ProblemscausedbythemainPCB
fault.
•Problemscausedbythefreezing
inwinter.
TC2
- Thetemperaturesensorfortheductassyfanhousing
isfaulty.(Asensorfaultsuchasaninternalshort-
circuitorwiredisconnection)
- Theconnectorisoutofplaceorhasacontacterror.
TC3
- Thisoccurswhentheductcondensingtemperature
sensor is open.
- Thisoccurswhentheductcondensingtemperature
sensorhasawiredisconnectedorisshort-circuited.
13 UNBALANCE UB
- Aslaundrycausesthiserror,checkthelaundry.
- Findthereasonfortheunbalanceandsolveitas
directedintheusermanual.
•Thisoccursbylaundry.
Troubleshooting _ 33
No. Information Type
Information
Code
Causes Corrective Actions
14 Power
UC
(9C)
- Powerconditionfault.
- Thisoccurswhenunderorovervoltageissupplied.
- Extensionleadorplugadapterisbeingused.
- MainPBAfault(sometimes)
•Checkthepowersupply,
polarityandvoltage.
•Selectahotwashordrycycle
(wdonly),measurethevoltage
suppliedduringheating.(Aerror
occurswhenundervoltageis
detected.)
*Safetyensuresafeworking
practicesobservedwhentesting
liveappliance.
•Checkifasocketoutletadaptoris
beingused.
•MainPCBfault(sometimes)
15 Mems PBA 8C
- ErrordetectedintheMemsPBAordataerror
detected.
•Checkthewireconnections.
Replaceifnecessary.
1.Checkthewireconnections.
2.ReplacetheMemsPBA.
3.MainPBAwireconnection
errororPBA’ssilvernanopart
malfunction.
Replaceifnecessary.
16 AddDoor
DDC
- AswitchcontacterrorbecauseofdamagetotheAdd
Doorswitch.
- Whentheadddoorispulledbyforce.
- Thisoccursinthehotwashbecausetheadddooris
pushedduetoapressuredifferencefrominternal
temperaturechanges.
- S/WcontactfaultbecauseofLIDTC“L”
transformation.
•Adddooropen/closeswitchfault.
•MainPCBfault.
DC3
- TheAddDoorlockswitchterminalisconnected
incorrectly.
- TheAddDoorlockswitchterminalisbroken.
- ThisoccursduetoLowinsualtionofthewiringassy.
- MainPCBfault.
•Adddoorlockswitchfault.
•MainPCBfault.
17
Detergent
DrawerMotor
6C
- Autodetergentdispensemotorconstrain
- Autodetergentdispensemotorwiring
- Autodetergentdispensemotornotoperate
•Checkmotoroperationby
pressingthelaundrywhenyou
enterautodetergentdispenser.
•IfnotoperationchangeASSY
PUMP DRAIN.
18 Auto Dispense
6C1 - Theinputarrestofthedetergentmotorissensed.
Checkthewireandifnecessary
replaceit.
1.CheckWireconnection
2.ReplaceAssyPump
6C2 - Thenon-operationofthedetergentmotorissensed.
6C3 - Theinputarrestofthefabricsoftenermotorissensed.
6C4
- Thenon-operationofthefabricsoftenermotoris
sensed.
6C5 - Themotormotionperceptionsensorfault
6C6 - Thedetergentlevelperceptionsensorfault
6C7 - Thefabricsoftenerlevelperceptionsensorfault
34 _ Troubleshooting
PROBLEM SOLUTION
Thewashingmachinewon’tstart.
•Makesurethewashingmachineispluggedin.
•Makesurethedoorisproperlyclosed.
•Makesurethewatertapisopen.
•TapStartorPressStart/Pausebuttonagain.
Watersupplyisinsufcient,ornowater
issupplied.
•Openthewatertapfully.
•Makesurethewatersupplyhoseisnotfrozen.
•Makesurethewatersupplyhoseisnotkinkedorclogged.
•Cleanthelteronthewatersupplyhose.
Thewashingmachinevibratesbadly,or
makesnoise.
•Makesurethewashingmachineisinstalledonaleveloor.Iftheoorisnot
level,usethelevelingfeettoadjustthelevel.
•Makesurethattheshippingboltsareremoved.
•Makesurethewashingmachineisnottouchinganyotherobject.
•Makesurethelaundryloadisbalanced.
Thewashingmachinedoesnotdrain
and/orspin.
•Makesurethedrainhoseisstraightenedallthewaytothedrainsystem.
•Makesurethedebrislterisnotclogged.
Thedoorwon’topen.
•PresstheStart/Pausebuttontostopthewashingmachine.
•Thedoorstayslockedaslongasthewashingmachineisstillhotinside
afteraheatingoperation.
•Itmaytakeseveralsecondstodisengagethedoorlockmechanism.
ButtonCheck •bCoccurs.ReferthebCtroubleshooting.
CanIopentheAddDoor
at any time?
•TheAddDoorcanbeopenedonlywhentheindicatorappears.
However,itdoesnotopeninthefollowingcases:
-Whenthewatertemperatureisabove55degorthedryingprocessisrunning,
whenthedrumisrotating,atanypointontheECOdrumcleancycle.
-IfyousettheChildLockforsafetyreasons.
-Whenthedrumwashordrumdryingcycleisrunningthatdoesnotinvolve
additionallaundry.
4-2. PROBLEM CHECK POINT
Wiring Diagram _ 35
5. WIRING DIAGRAM
5-1. WIRING DIAGRAM (SIMPLE)
► ThisDocumentcannotbeusedwithoutSamsung’sauthorization.
n REFERENCE INFORMATION
BLK BLACK
BLU BLUE
GRN GREEN
GRY GRAY
NTR NATURAL
ORG ORANGE
PNK PINK
RED RED
SKYBLU SKYBLUE
VIO VIOLET
WHT WHITE
YEL YELLOW
36 _ Wiring Diagram
5-2. WIRING DIAGRAM (LED)
► ThisDocumentcannotbeusedwithoutSamsung’sauthorization.
n REFERENCE INFORMATION
BLK BLACK
BLU BLUE
GRN GREEN
GRY GRAY
NTR NATURAL
ORG ORANGE
PNK PINK
RED RED
SKYBLU SKYBLUE
VIO VIOLET
WHT WHITE
YEL YELLOW
Wiring Diagram _ 37
5-3. WIRING DIAGRAM (Q-DRIVE)
► ThisDocumentcannotbeusedwithoutSamsung’sauthorization.
n REFERENCE INFORMATION
BLK BLACK
BLU BLUE
GRN GREEN
GRY GRAY
NTR NATURAL
ORG ORANGE
PNK PINK
RED RED
SKYBLU SKYBLUE
VIO VIOLET
WHT WHITE
YEL YELLOW
38 _ Reference
6. REFERENCE
6-1. WD6000T PROJECT NAME
► Door
10-Digit
DOOR
DESIGN
DOOR
COLOR
DECO
COLOR
S
Best Black D.silver
B Better Black Black
W Better Black White
L Good Black D.silver
H Good White D.silver
A Basic Black Black
T Basic White White
C OldBasic Black -
E OldBasic White -
► Region
12,13-Digit Country 12,13-Digit Country
S1
UNITEDKINGDOM,
IRELAND
EC SPAIN
S2
GERMANY
EE
DENMARK
AUSTRIA FINLAND
NETHERLANDS,
BELGIUM,
LUXEMBOURG
NORWAY
S3
FRANCE,MONACO SWEDEN
ITALIA.\,MALTA,
SAN MARINO
EF FRANCE
SPAIN EG GERMANY
PORTUGAL
EN
NETHERLAN
DS
S4
SWEDEN,FINLAND,
DENMARK,
NORWAY,ICELAND
BELGIUM
S5 SWITZERLAND EO POLAND
S6
POLAND EP PORTUGAL
GREECE,CYPRUS ET ITALIA
HUNGARY
LE AD
(SEAD)향
ALBANIA
S7
BULGARIA BULGARIA
ROMANIA CROATIA
CZECH CZECH
SLOVAKIA HUNGARIA
LITHUANIA MACEDONIA
LATNIA ROMANIA
ESTONIA SERBIA
SLOVENIA SLOVAKIA
SERBIA LITHUANIA
MACEDONIA LATNIA
CROATIA ESTONIA
ALBANIA SLOVENIA
GREECE
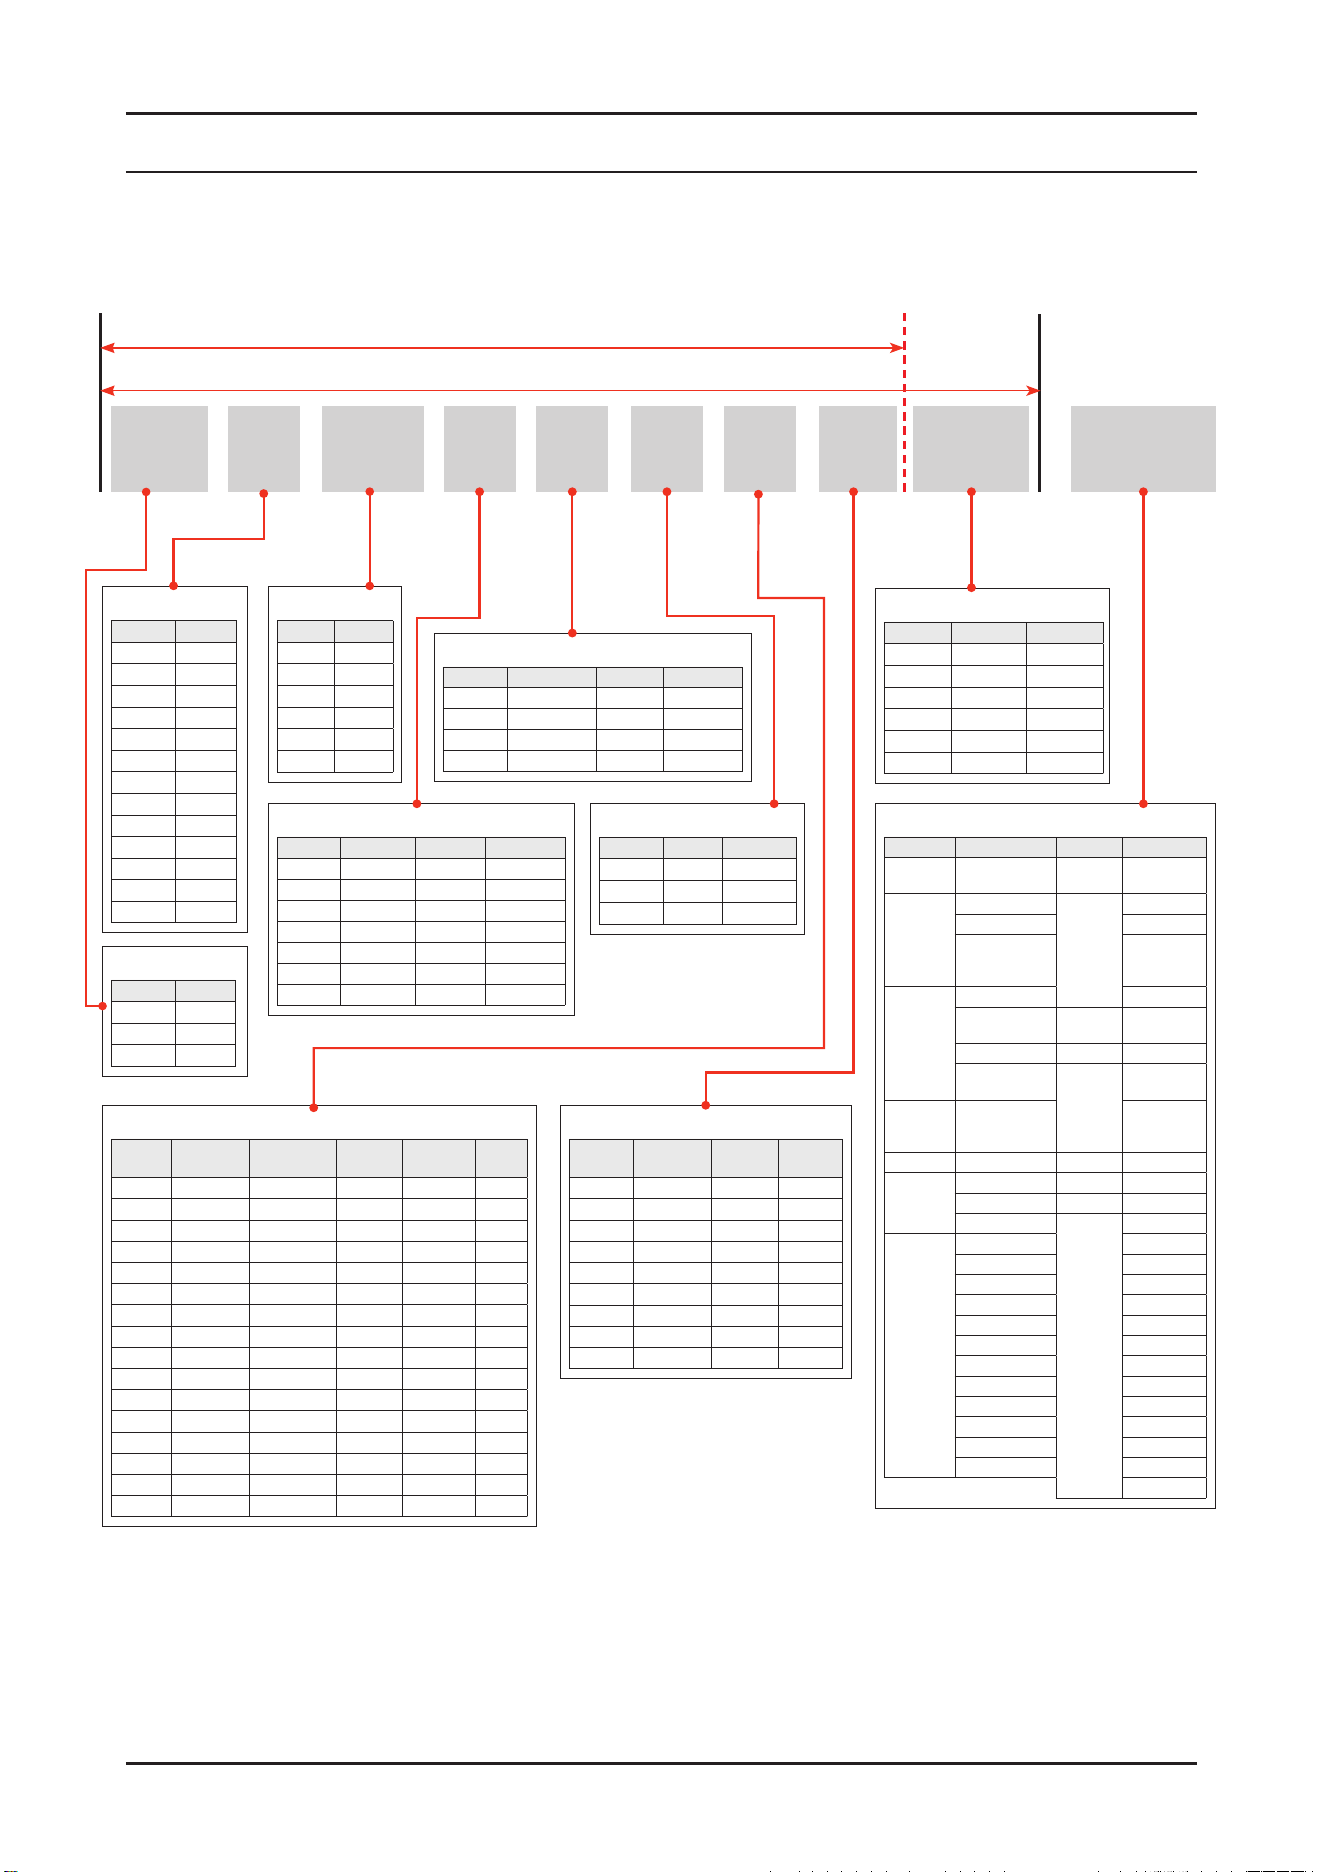
MODEL NAME
► Product Type
1,2-
Digit
Type
WW Washer
WD Combo
DV Dryer
MODEL CODE
90 BWD
► Capacity
3,4-Digit Capacity
13 13
12 12.5
12 12
11 11.5
11 11
10 10.5
10 10
95 9.5
90 9
85 8.5
80 8
75 7. 5
70 7
6 5
► Feature4
9-Digit
SUPER
SPEED
L.SENSOR A.HOSE BUBBLE WIFI
A
● ● ● ● ●
B
●
X
● ● ●
C
● ●
X
● ●
D
●
X X
● ●
A
X
● ● ● ●
B
X X
● ● ●
C
X
●
X
● ●
D
X X X
● ●
9
X
● ● ●
X
8
X X
● ●
X
7
X
●
X
●
X
6
X X X
●
X
3
X
● ●
X X
2
X X
●
X X
1
X
●
X X X
0
X X X X X
► Feature2
7-Digit ADD WASH STEAM AOW/AD
8
● ● ●
5
● ●
X
3 X
● ●
0 X
●
X
► Feature1
6-Digit Q-DRIVE UX GRADE
9
●
Simple Best
8
●
Simple Better
7 2nd
Simple Better
6 X
Simple Good
5 X
Simple Basic
A X
LED _5000_UI
4 X
LED _4000_UI
4 D
► Body
11-Digit BODY
D.PANEL
H White
Silver
E White
Black
T White
D.silver
W
White
Silver
X Inox Black
N Inox D.silver
► Feature3
8-Digit RPM
MOTOR
6 1600
DIT
4 1400
DIT
2 1200
DIT
H
► Project
5-Digit Year
J 2015
K 2016
M 2017
N 2018
R 2019
T 2020
T EU

Reference _ 39
6-2. TERMINOLOGY
1. Drain Pump
Thepumpthatdrainsthewaterfromthewashingmachinegeneratedwhilethewashing
machineisrunning
2. Heater
Theheaterislocatedonthetubinsidethewashingmachine.Itheatsthewatertoincrease
washefciency.
3.DoorLockSwitch
Detectswhetherthedoorofthewashingmachineisopenorclosedifthedoorisopenwhile
thewashingmachineisrunningthecycleistemporarystopped.

ThisServiceManualisapropertyofSamsungElectronicsCo.,Ltd.
AnyunauthorizeduseofManualcanbepunishedunderapplicable
Internationaland/ordomesticlaw.
© 2020 Samsung Electronics Co.,Ltd. All rights
reserved.
Printed in Korea
GSPN (GLOBAL SERVICE PARTNER NETWORK)
Area Web Site
Europe,CIS,Mideast&Africa gspn1.samsungcsportal.com
Asia gspn2.samsungcsportal.com
North&LatinAmerica gspn3.samsungcsportal.com
China china.samsungportal.com

