Specifications
Indexed Terms: Side-by-Side Refrigerator, Side By Side Refrigerator
Kenmore 10656242400 Questions and Answers

User Manual Kenmore 10654599400 refrigerator
ONE-YEAR FULL WARRANTY ON REFRIGERATOR
For one year from the date of purchase. when this refrigerator is operated and maintained according to instructions attached to or furnished with the product.
Sears will repair this refrigerator. free of charge. if defective in material or workmanship.
FIVE-YEAR FULL WARRANTY ON SEALED REFRIGERATION SYSTEM
For five years from the date of purchase. when this refrigerator is operated and maintained according to owner's instructions attached to or furnished with the product.
Sears will repair the sealed system (consisting of refrigeration. connecting tubing. and compressor). free of charge. if defective in materials or workmanship.
The above warranty coverage applies only to refrigerators which are used for storage of food for private household purposes and excludes original and replacement Kenmore Filtered Ice & Water filter cartridges (if equipped with the filter system).
Original and replacement cartridges are warranted for 30 days. parts only. against defects in material or workmanship.
WARRANTY SERVICE IS AVAILABLE BY CONTACTING THE NEAREST SEARS SERVICE CENTER IN THE UNITED STATES OR CANADA.
This warranty applies only while this product is in use in the United States or Canada.
This warranty gives you specific legal rights. and you may also have other rights which vary from state to state or province to province.
Warranty terms may vary in Canada. Contact your local Sears Service Center for complete details.
Sears. Roebuck and Co.
Dept. 817WA. Hoffman Estates. IL 60179
Sears Canada Inc.
Toronto. Ontario. Canada M5B 2B8
Unpack the refrigerator
WARNING
Excessive Weight Hazard
Use two or more people to move and install refrigerator.
Failure to do so can result in back or other injury.
Remove the Packaging
When Moving Your Refrigerator:
Your refrigerator is heavy. When moving the refrigerator for cleaning or service. be sure to protect the floor. Always pull the refrigerator straight out when moving it. Do not wigg{e or "walk" the refrigerator when trying to move it. as floor damage could occur.
Clean Before Using
After you remove all of the packaging materials. clean the inside of your refrigerator before using it. See the cleaning instructions in "Refrigerator Care."
Important information to know about glass shelves and covers:
Do not clean glass shelves or covers with warm water when they are cold. Shelves and covers may break if exposed to sudden temperature changes or impact. such as bumping.
For your protection. tempered glass is designed to shatter into many small. pebble-size pieces. This is normal Glass shelves and covers are heavy. Use specia{ care when removing them to avoid impact from dropping.
Location Requirements
WARNING:
Explosion Hazard
Keep flammabie materials and vapors. such as gasoline. away from refrigerator.
Failure to do so can resu}t in death, explosion, or fire.
To ensure proper ventilation for your refrigerator. allow for "1/2" (1.25 cm) space on each side and at the top. When installing your refrigerator next to a fixed wall. leave 2" (5.08 cm) minimum on each side (depending on your model) to allow for the door to swing open. If your refrigerator has an ice maker. allow extra space at the back for the water line connections.
NOTE: Do not install the refrigerator near an oven. radiator. or other heat source. nor in a location where the temperature will fall below 55°F (13°C).
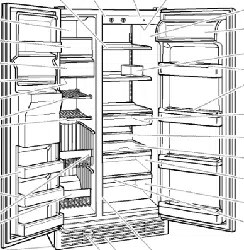
Ensuring proper air circulation
In order to ensure proper temperatures. you need to permit air to flow between the two sections. Cold air enters the bottom of the freezer section and moves up. It then enters the refrigerator section through the top vent. Air then returns to the freezer as shown.
Do not block any of these vents with food such as soda. cereal. bread. etc. If the vents are blocked. airflow will be prevented and the temperature controls will not function properly.
IMPORTANT: Because air circulates between both sections. any odors formed in one section will transfer to the other. You must thoroughly clean both sections to eliminate odors. To prevent odor transfer from food. wrap or cover foods tightly. Your model may have Digital Controls or Electronic Controls.
IMPORTANT:
NOTE: Adjusting the Refrigerator and Freezer Controls to a colder setting will not cool the compartments any faster.
Digital Controls
For your convenience. your controls are preset at the factory.
When installing your refrigerator. make sure that the controls are still preset to the mid-settings as shown. The digital control panel is located at the top of the refrigerator compartment and enables you to view the temperature control set points.
NOTE: The factory recommended set points are 0°F (-18°C) for the freezer and 37°F (3°C) for the refrigerator.
Your refrigerator will not operate
Plug into a grounded 3 prong outlet.
Replace the fuse or reset the circuit breaker.
See "Using the Controls."
Recheck to see whether the refrigerator is operating in 30 minutes. Your refrigerator will regularly run an automatic defrost cycle.
For models with digital controls, turn the unit OFF then ON again to reset. See "Using the Controls." If this does not correct the problem, call for service.
The lights do not work
Plug into a grounded 3 prong outlet.
See "Changing the Light Bulbs."
There is water in the defrost drain pan
The water will evaporate. It is normal for water to drip into the defrost pan.
When it is humid, expect that the water in the defrost pan will take longer to evaporate.
The motor seems to run too much
The motor will run longer under warm conditions. At normal room temperatures, expect your motor to run about 40% to 80% of the time. Under warmer conditions, it will run even more
Adding a large amount of food warms the refrigerator. The motor normally will run longer to cool the refrigerator back down.
The motor will run longer when this occurs. Conserve energy by getting all items out at one time, keeping food organized, and closing the door as soon as possible.
See "Using the Controls."
This prevents air transfer and makes the motor work harder. Clean the condenser coils. See "Cleaning."
Contact a technician or other qualified person.
The refrigerator seems to make too much noise
The sounds may be normal for your refrigerator. See "Normal Sounds."
The ice maker is not producing ice or not enough ice
Wait 72 hours for full ice production to begin. Once your refrigerator is cooled, the ice maker should produce 70 to 120 cubes every 24 hours.
Wait 24 hours after ice maker hookup for ice production. See "Using the Controls."
Lower the wire shutoff arm to the ON (arm down) position. See "Ice Maker and Storage Bin."
Move ice maker switch to the ON (left) position. See "Ice Maker and Storage Bin."
Turn on the water valve. See "Connect the Water Supply."
Make sure your refrigerator has been connected to a water supply and the supply shutoff valve is turned on. See "Connect the Water Supply."
For models with a standard ice storage bin, remove the ice from the ejector arm with a plastic utensil. For models with an ice storage bin on the freezer door, access the ice maker by depressing the ice sensor door on the upper left side of the freezer interior. While depressing the sensor door, lift the ice maker service door and remove the ice from the ejector with a plastic utensil. See "Ice Maker and Storage Bin."
Allow 24 hours for ice maker to produce more ice.
The filter may be clogged or installed incorrectly. Check the filter installation instructions to ensure that the filter was installed correctly and is not clogged. If installation or clogging is not a problem, call a technician or other qualified person.
See "Water Supply Requirements."
NOTE: If not due to any of the above, there may be a problem with the water line. Call for service.
Off-taste, odor or gray color in the ice
Discard the first few batches of ice.
Throw old ice away and make a new supply.
See "Cleaning" or "Ice Maker and Storage Bin."
Use airtight, moisture-proof packaging to help prevent odor transfer to stored food.
A filter may need to be installed to remove the minerals.
Gray or dark discoloration in ice indicates that the water filtration system needs additional flushing. Run additional water through the water dispenser to flush the water filtration system more thoroughly (at least 2 to 3 gal. [8 to 12 L] or 6 to 7 minutes initially). Discard discolored ice.
The ice dispenser will not operate properly
Push the door firmly closed. If it will not close all the way, see "The doors will not close completely" later in this section.
For models with a standard ice storage bin, push the ice storage bin in all the • way. For models with an ice storage bin on the freezer door, the bin should sit level. Remove and replace the bin in the door making sure it is properly aligned and snapped securely • into place. See "Ice Maker and Storage Bin."
Use only cubes produced by the current ice maker. If other cubes have been added, remove all cubes and check to see that none have become stuck in the delivery chute.
Shake the ice storage bin to separate cubes. If cubes do not separate, empty bin and wait 24 hours for ice to restock.
Dump the ice cubes and clean the ice storage bin completely. Allow 24 hours for the ice maker to restock. Do not try to remove the melted ice with a sharp object. You could damage the ice storage bin
Clear the ice from the delivery chute with a plastic utensil. Do not use anything sharp to remove the ice. You could cause damage.
Stop dispensing ice. Change the ice button from "crushed" to "cubed." Depress the ice dispenser lever using a sturdy glass. If cubed ice dispenses correctly, depress the button for "crushed" ice and begin dispensing again. See "Water and Ice Dispensers."
See "The ice maker is not producing ice or enough ice" earlier in this section.
Release dispenser lever. Ice will stop dispensing when the lever is held in too long. Wait 3 minutes for dispenser motor to reset before using again. It is best to take large amounts of ice directly from the ice storage bin, not through the dispenser.