
Dryer Installation Instructions
Instrucciones de instalación de la secadora
Instructions d’Installation de la sécheuse
English / Español / Français
Table of Contents...2 / Índice...25 / Table des Matières...49
Kenmore®
Gas & Electric Dryer
Secadora a gas y eléctrica
Sécheuse à gaz et électrique
P/N W11101350A
Sears Brands Management Corporation
Hoffman Estates, IL 60179 U.S.A.
www.kenmore.com
Sears Canada Inc.
Toronto, Ontario, Canada M5B 2C3
www.sears.ca
2
DRYER SAFETY
In the State of Massachusetts, the following installation instructions apply:
■ Installations and repairs must be performed by a qualified or licensed contractor, plumber, or gas fitter qualified or licensed by
the State of Massachusetts.
■ Acceptable Shut-off Devices: Gas Cocks and Ball Valves installed for use shall be listed.
■ A flexible gas connector, when used, must not exceed 4 feet (121.9 cm).
INSTALLATION NOTES
Date of purchase: _________________________________
Date of installation: _______________________________
Installer: ________________________________________
Model number: ___________________________________
Serial number: ___________________________________
DRYER SAFETY .................................................................. 2
INSTALLATION REQUIREMENTS .......................................4
Tools and Parts ............................................................4
LOCATION REQUIREMENTS ..............................................5
ELECTRICAL REQUIREMENTS – U.S.A. ONLY ....................7
ELECTRIC DRYER POWER HOOKUP – CANADA ONLY .....8
GAS DRYER POWER HOOKUP – U.S.A. AND CANADA ....8
INSTALL LEVELING LEGS...................................................9
MAKE ELECTRICAL CONNECTION – U.S.A. ONLY .......... 10
Power Supply Cord Connection .................................. 11
Direct Wire Connection ...............................................13
MAKE GAS CONNECTION – U.S.A. AND CANADA ........ 16
VENTING ........................................................................ 17
Venting Requirements ............................................... 17
Plan Vent System .......................................................18
Install Vent System .................................................... 19
CONNECT INLET HOSES ................................................. 19
CONNECT VENT .............................................................20
LEVEL DRYER ...................................................................21
COMPLETE INSTALLATION CHECKLIST ............................21
REVERSE DOOR SWING (OPTIONAL) .............................22
TROUBLESHOOTING .......................................................24
ASSISTANCE OR SERVICE ................................. Back Cover
TABLE OF CONTENTS
3
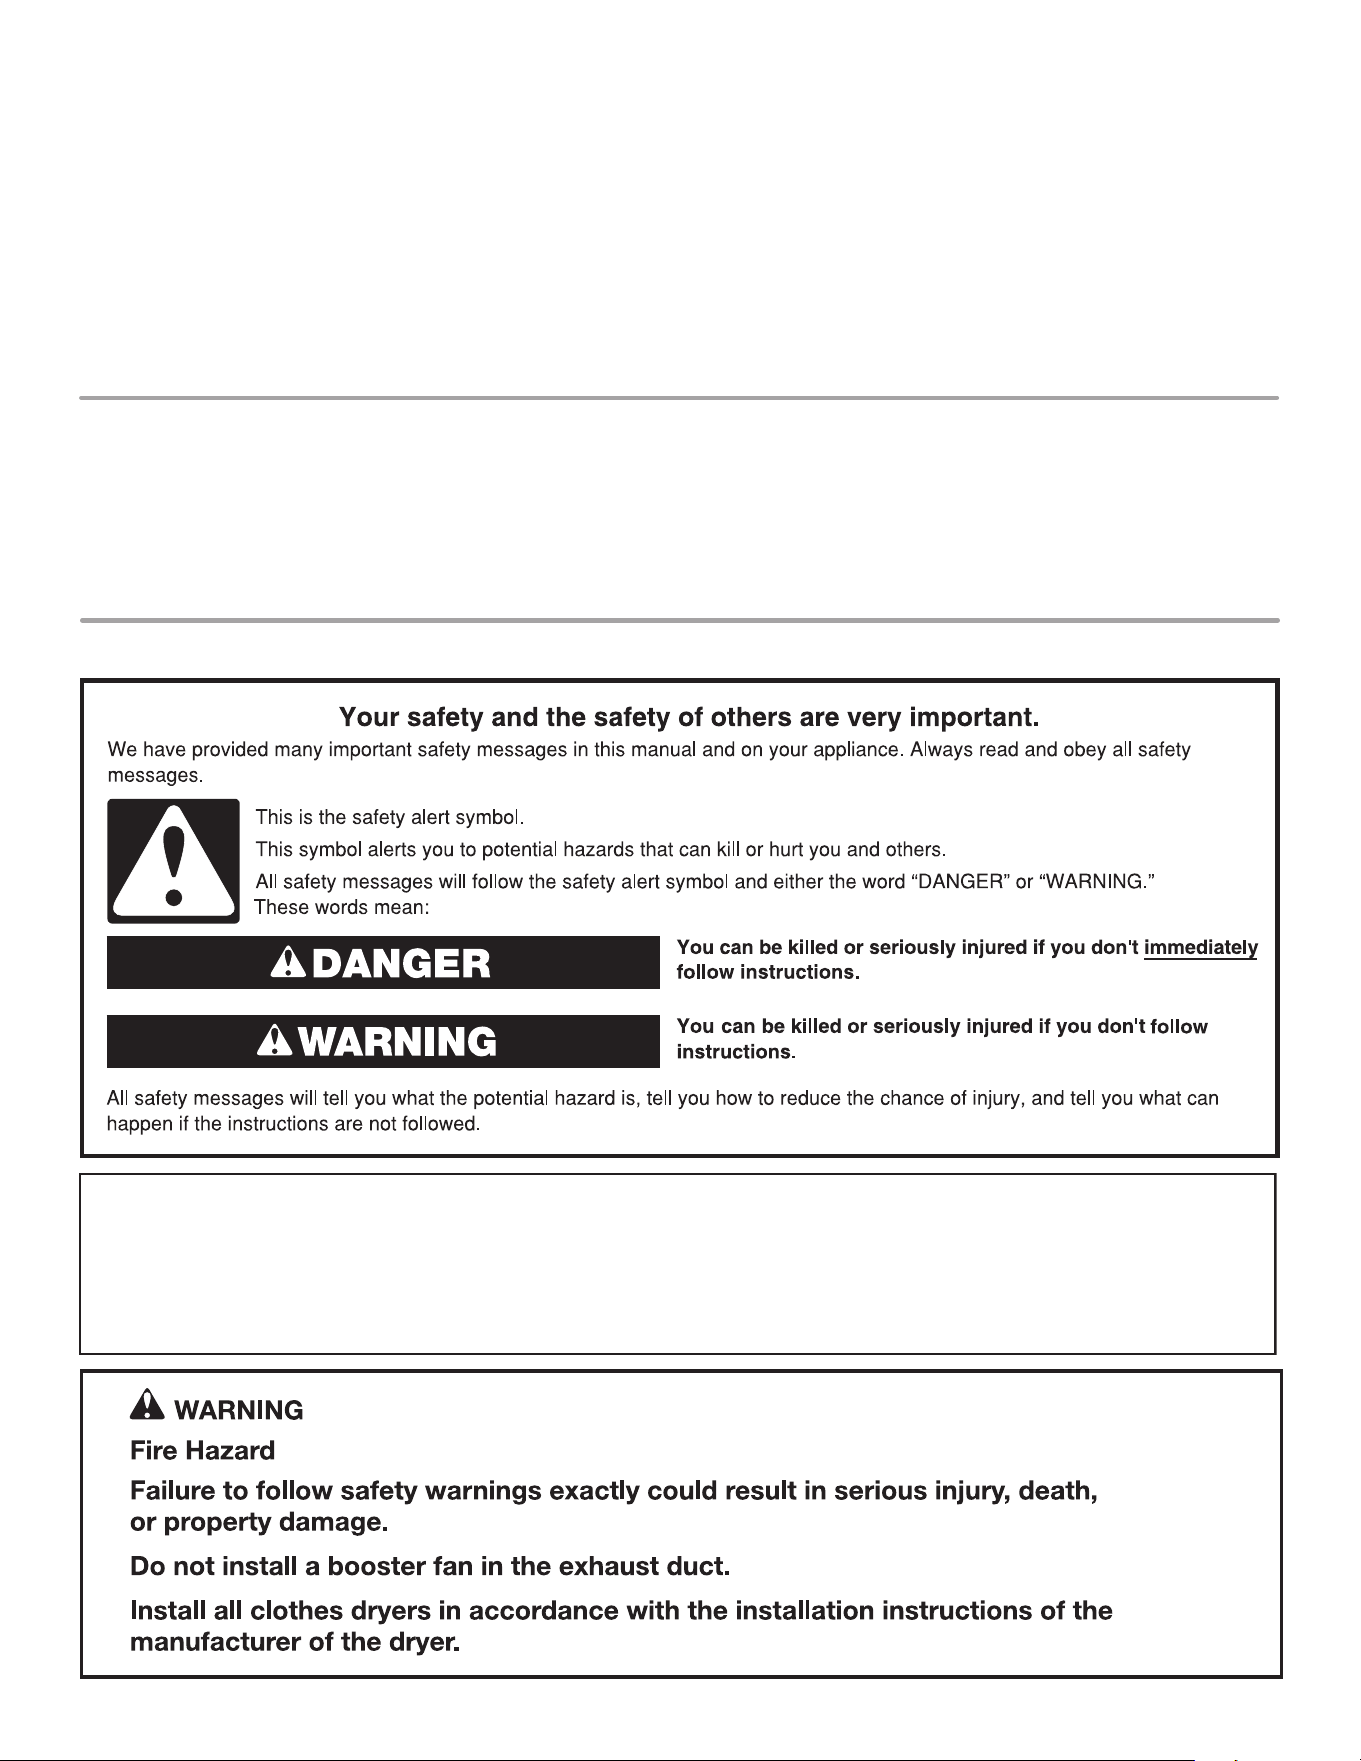
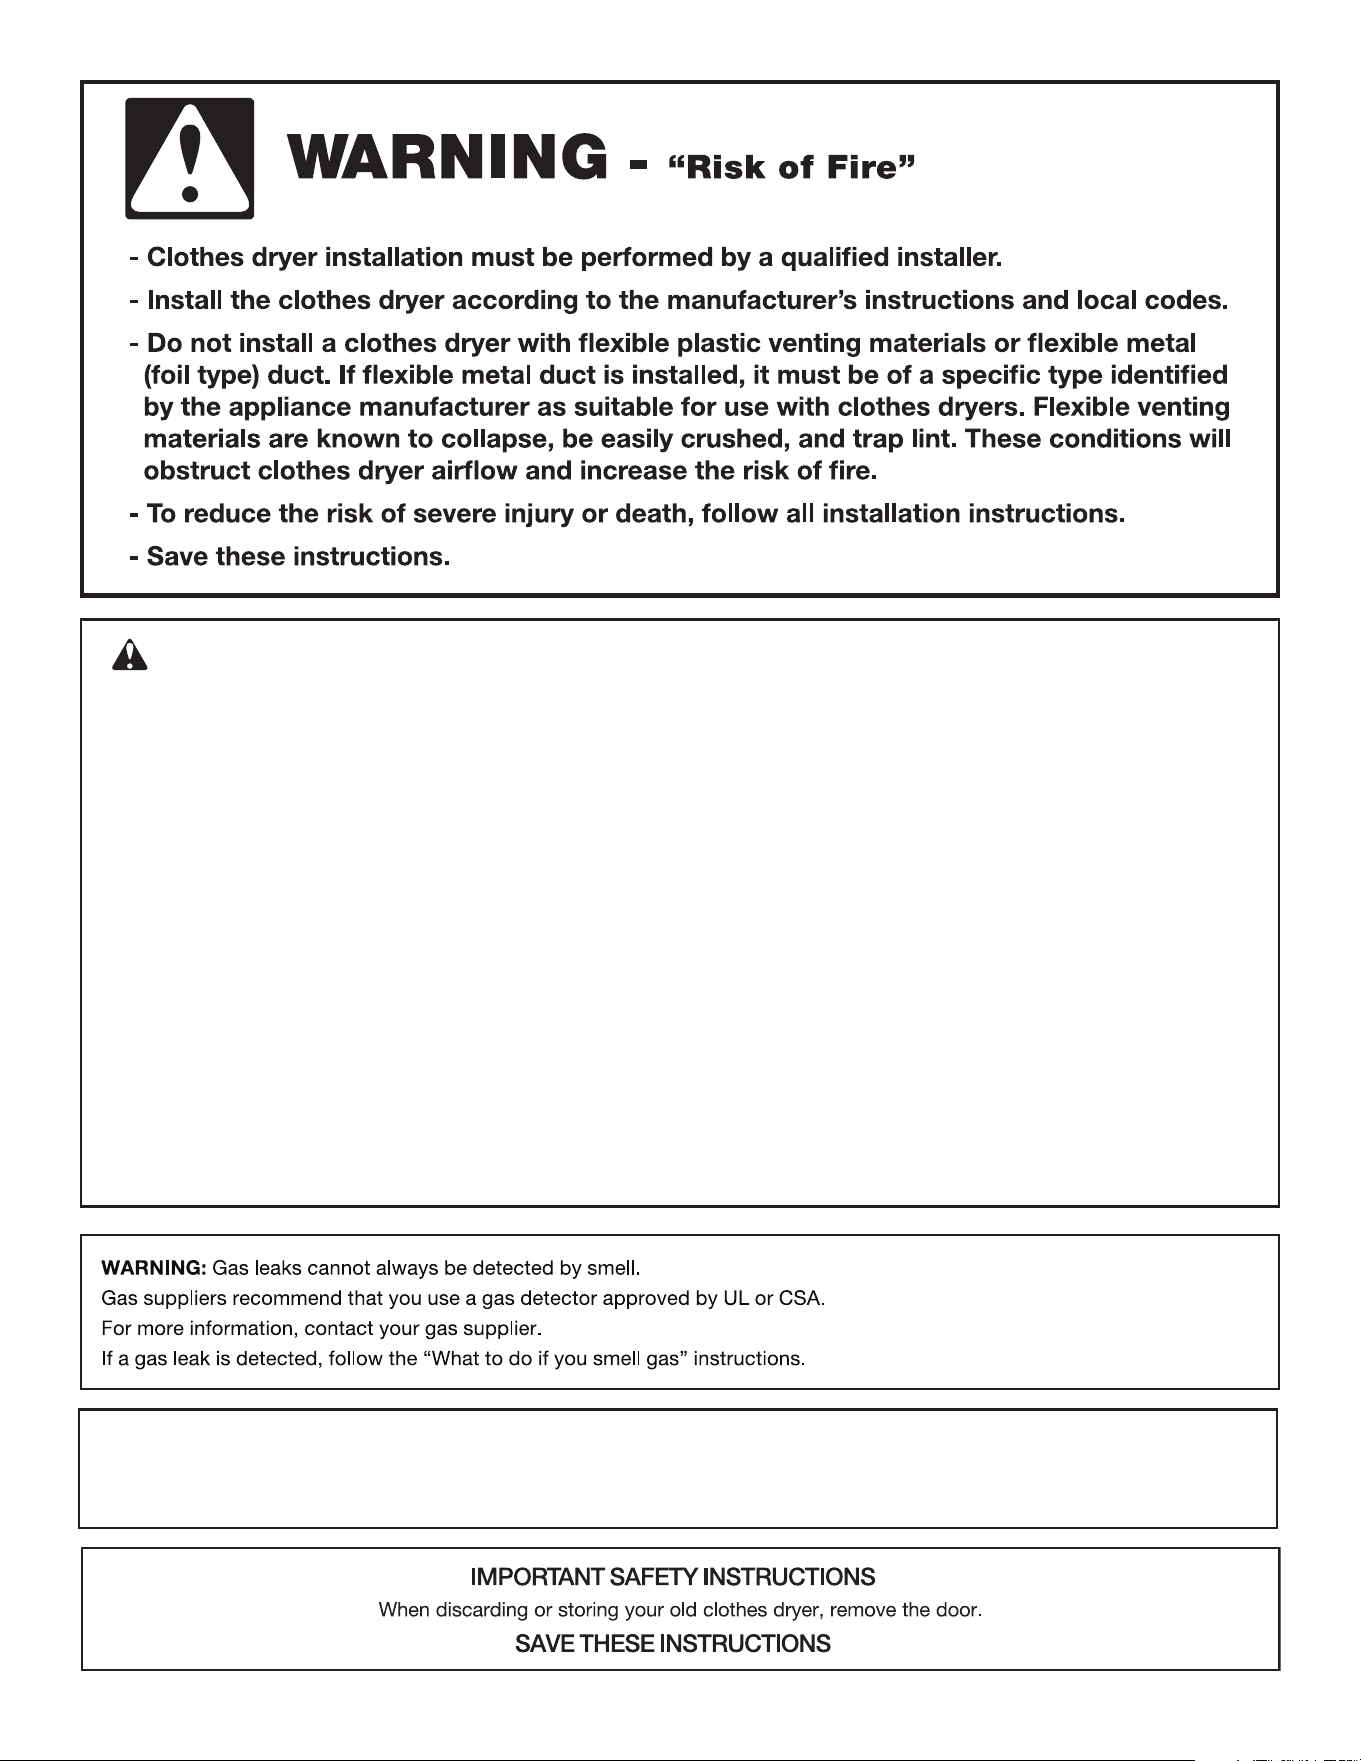
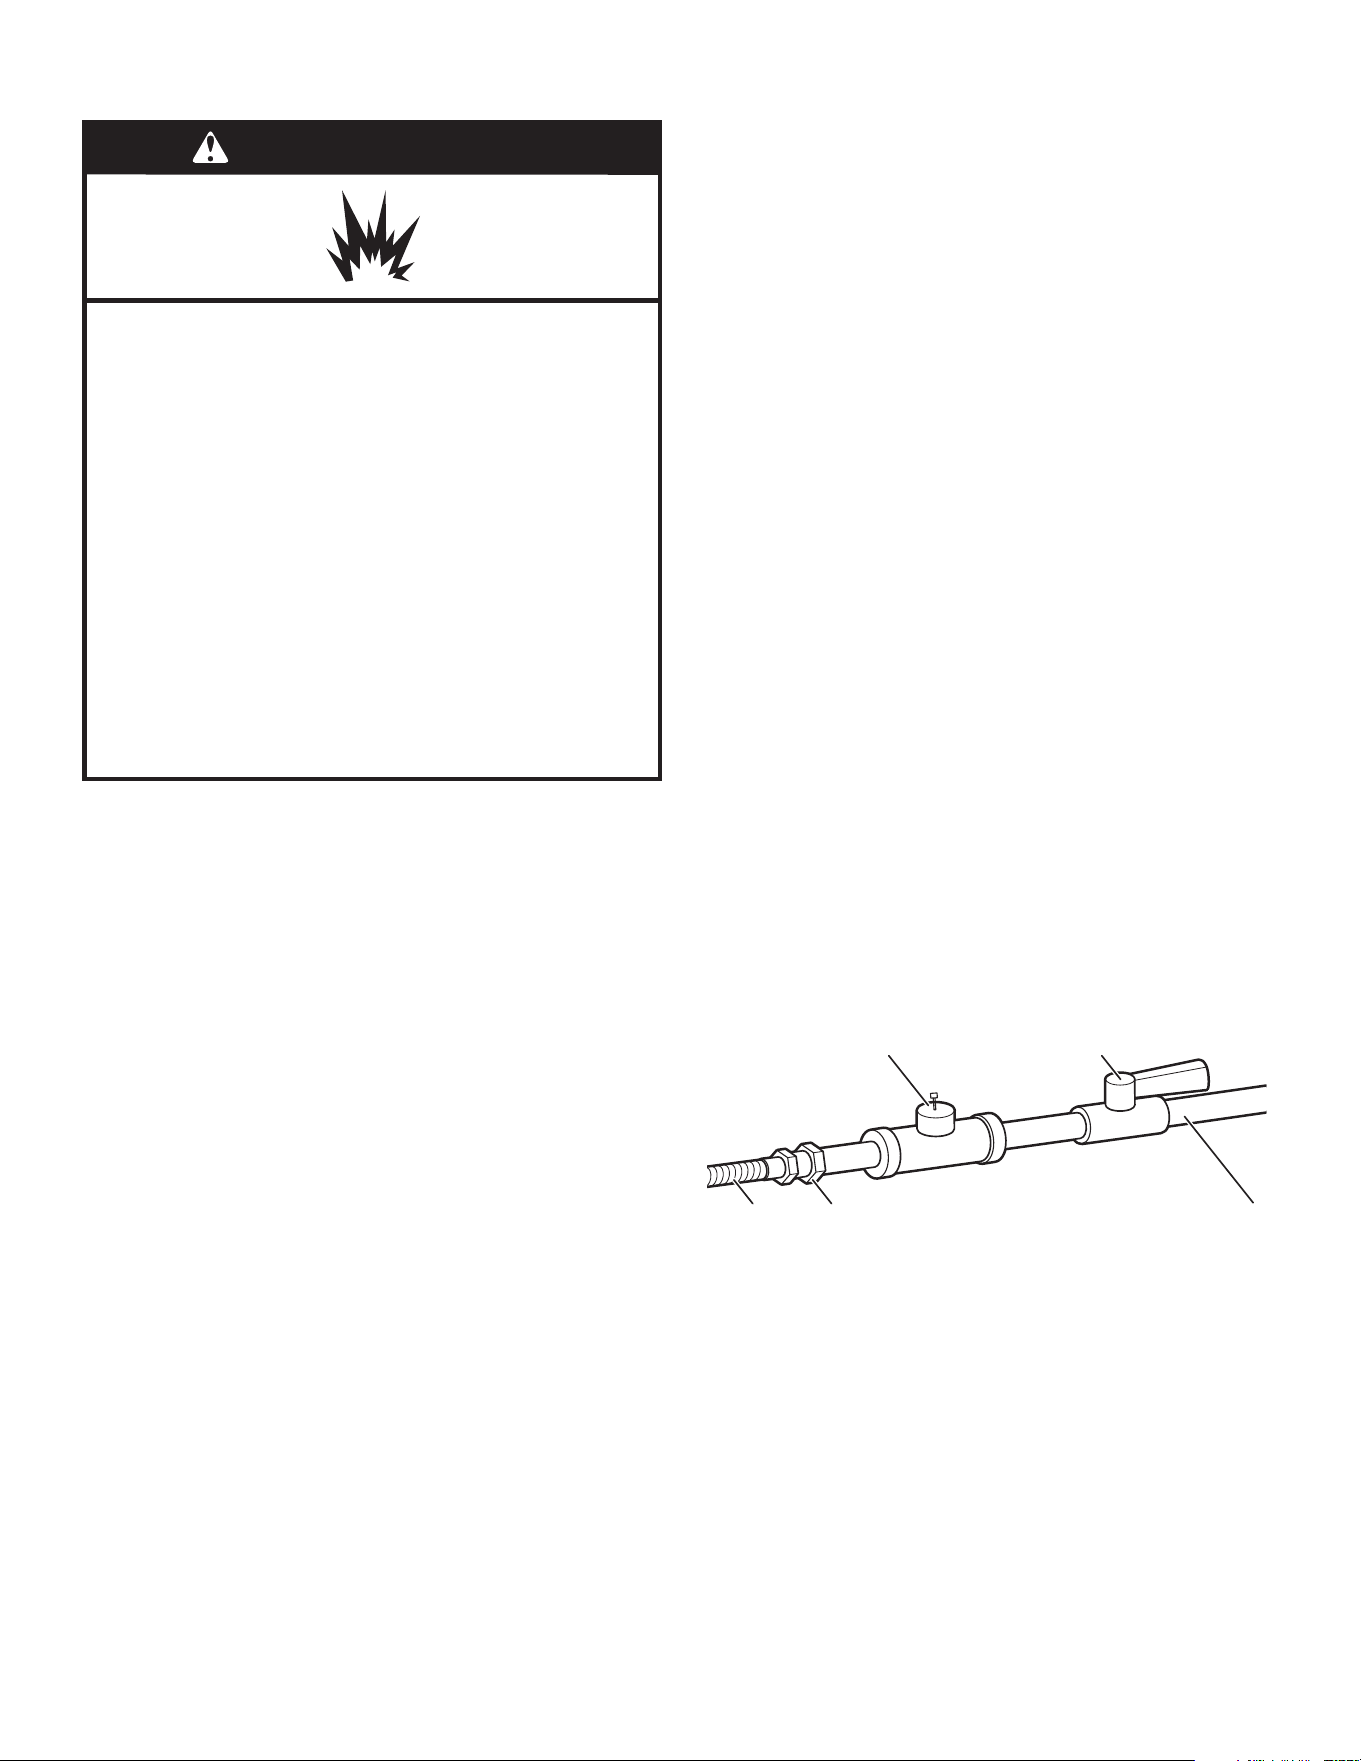
WARNING:
FIRE OR EXPLOSION HAZARD
Failure to follow safety warnings exactly could result in serious injury, death, or property
damage.
Do not store or use gasoline or other ammable vapors and liquids in the vicinity of this
or any other appliance.
–
–
WHAT TO DO IF YOU SMELL GAS:
•
Do not try to light any appliance.
•
Do not touch any electrical switch; do not use any phone in your building.
•
Immediately call your gas supplier from a neighbor’s phone. Follow the gas supplier’s
instructions.
•
If you cannot reach your gas supplier, call the re department.
–
Installation and service must be performed by a qualied installer, service agency, or
the gas supplier.
•
Clear the room, building, or area of all occupants.
IMPORTANT: The gas installation must conform with local codes, or in the absence of local codes, with the National Fuel Gas
Code, ANSI Z223.1/NFPA 54, or the Natural Gas and Propane Installation Code, CSA B149.1.
The dryer must be electrically grounded in accordance with local codes, or in the absence of local codes, with the National
Electrical Code, ANSI/NFPA 70, or the Canadian Electrical Code, Part 1, CSA C22.1.
4
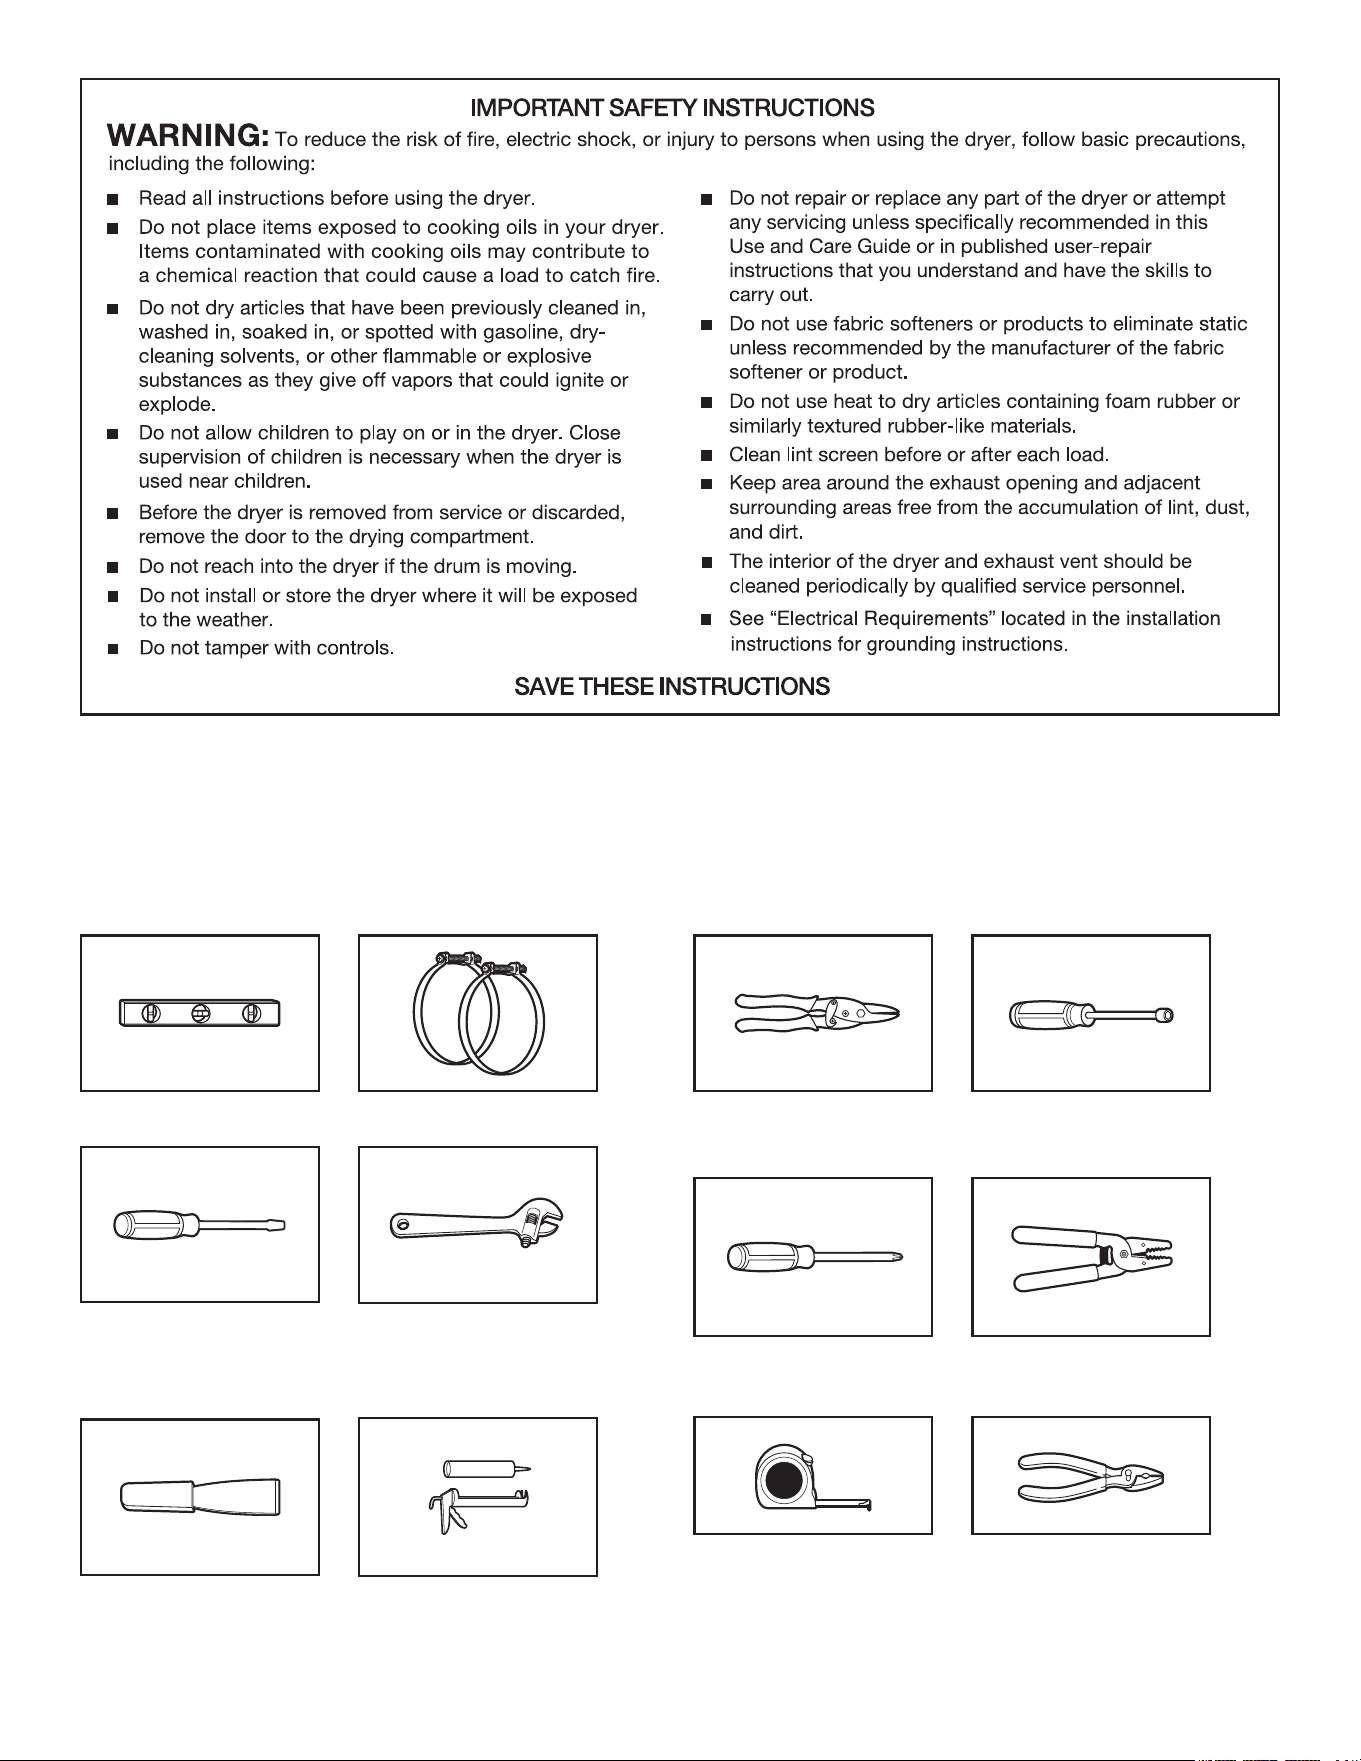
TOOLS AND PARTS
Gather the required tools and parts before starting installation. Read and follow the instructions provided with any tools listed here.
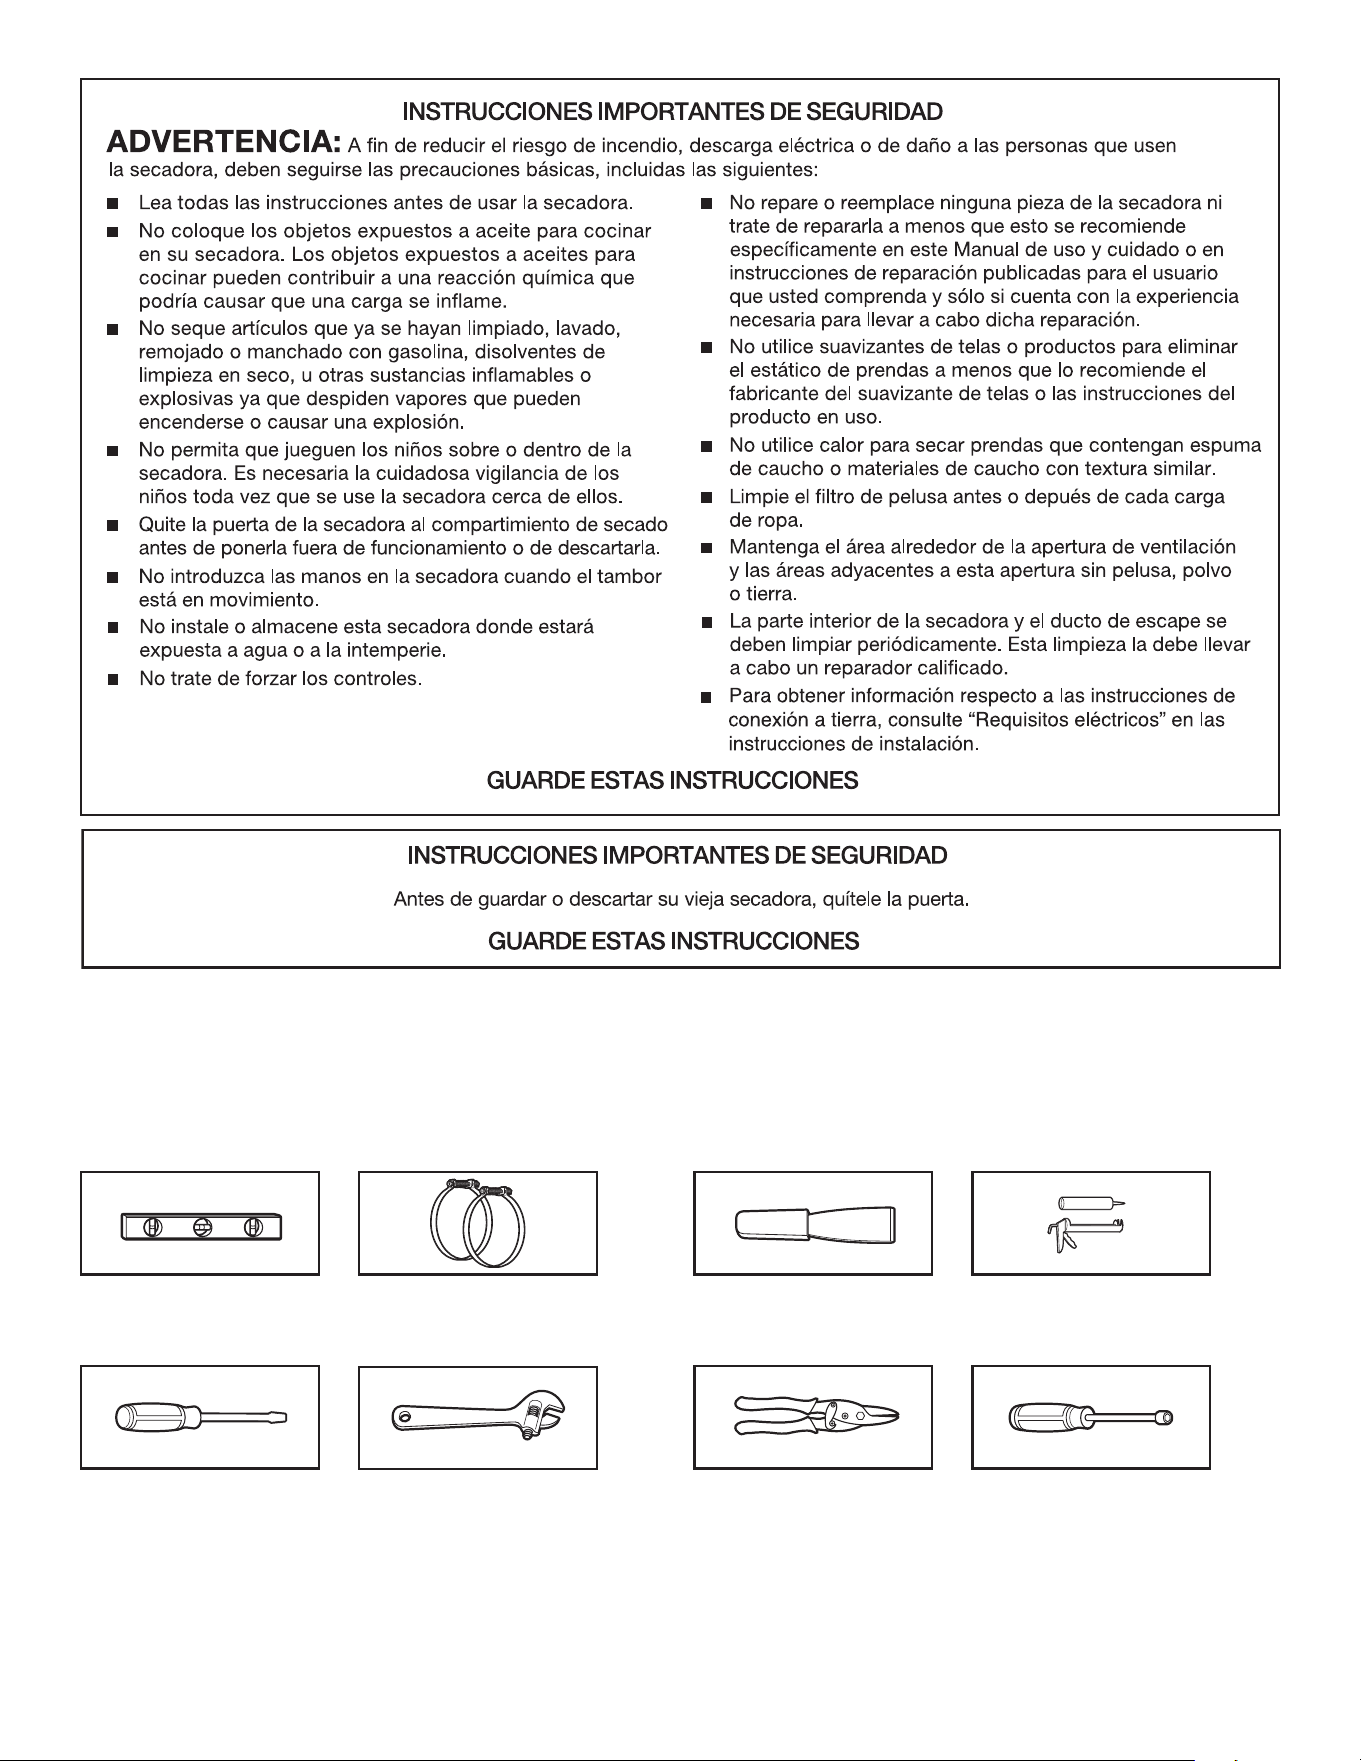
Tools needed for all installations:
Level
#2 Phillips screwdriver
Wire stripper
(direct wire installations)
Tin snips (new vent
installations)
Vent clamps
1/4" (6 mm) nut driver
(recommended)
INSTALLATION REQUIREMENTS
Tape measure
Pliers
Flat-head screwdriver
Adjustable wrench that
opens to 1" (25 mm) or
hex-head socket wrench
Caulking gun and compound
(for installing new exhaust vent)
Plastic putty knife
5
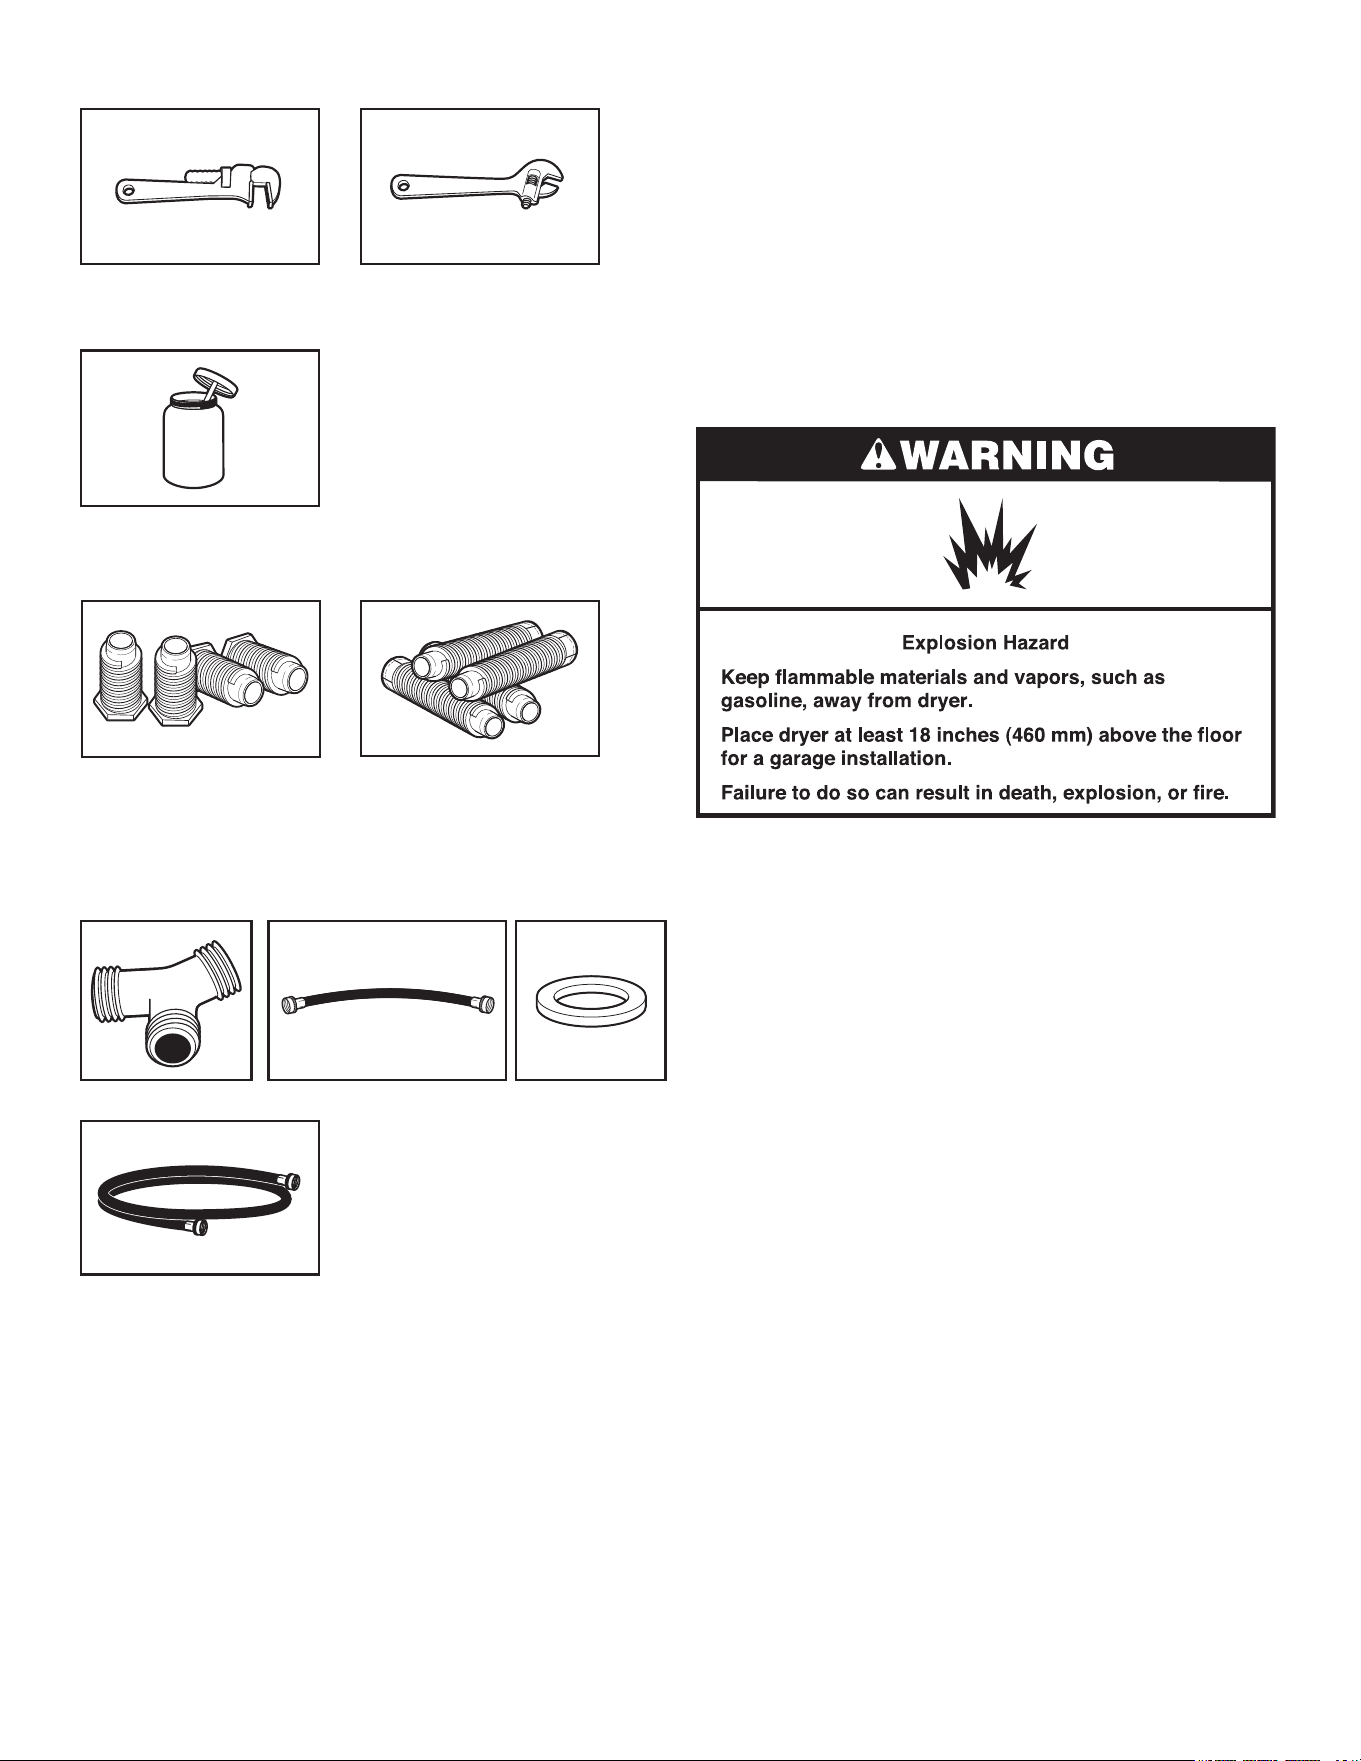
Parts supplied (all models):
Tools needed for gas installations:
8" (203 mm) or 10"
(254 mm) pipe wrench
8" (203 mm) or 10"
(254 mm) adjustable wrench
(for gas connections)
Pipe-joint compound
resistant to propane gas
Leveling legs (4)
(Length and appearance of legs may vary according to model.)
“Y” connector
Short inlet hose
Inlet hose
Rubber washer
Parts needed (steam models):
Parts package is located in dryer drum. Check that all parts
are included.
If using a power supply cord:
Use a UL Listed power supply cord kit marked for use with clothes
dryers. The kit should contain:
■ A UL Listed 30-amp power supply cord, rated 120/240 volt
minimum, and have a temperature rating of 140ºF (60ºC)
minimum. The cord should be type SRD or SRDT and be at least
4 ft. (1.22 m) long. The wires that connect to the dryer must end
in ring terminals or spade terminals with upturned ends.
■ A UL Listed strain relief.
Parts needed: (Not supplied with dryer)
Check local codes. Check existing electrical supply and venting.
See “Electrical Requirements” and “Venting Requirements” before
purchasing parts.
Mobile home installations require metal exhaust system hardware
available for purchase from the dealer from whom you purchased
your dryer. For further information, call 1-844-553-6667 (U.S.) or
1-800-469-4663 (Canada).
Optional Equipment: (Not supplied with dryer)
Refer to your Use and Care Guide for information about accessories
available for your dryer.
LOCATION REQUIREMENTS
You will need:
■ A location allowing for proper exhaust installation. See
“Venting Requirements.”
■ A separate 15- or 20-amp circuit needed for gas dryers and
30-amp circuit needed for electric dryers.
■ If using power supply cord, a grounded electrical outlet located
within 2 ft. (610 mm) of either side of dryer. See “Electrical
Requirements.”
■ Floor must support dryer weight of 200 lbs. (90.7 kg). Also
consider weight of companion appliance.
■ Level oor with maximum slope of 1" (25 mm) under entire
dryer. If slope is greater than 1" (25 mm), clothes may not
tumble properly and automatic sensor cycles may not operate
correctly.
■ For garage installation, place dryer at least 18" (460 mm)
above oor.
■ Steam models only: Cold water faucet located within
4 ft. (1.2 m) of the water ll valves, and water pressure of
20-100 psi (137.9-689.6 kPa). You may use your washer’s
water supply by purchasing the necessary parts noted in
“Parts needed.”
■ If you live in a hard water area, use of a water softener is
recommended to control the buildup of scale through the
water system in the dryer. Over time, the buildup of lime
scale may clog dierent parts of the water system, which
will reduce product performance. Excessive scale buildup
may lead to the need for certain part replacement or repair.
IMPORTANT: Do not operate, install, or store dryer where it will
be exposed to water, weather, or at temperatures below 45°F
(7°C). Lower temperatures may cause dryer not to shut o at
end of automatic sensor cycles, resulting in longer drying times.
NOTE: No other fuel-burning appliance can be installed in the
same closet as a dryer.
or
6
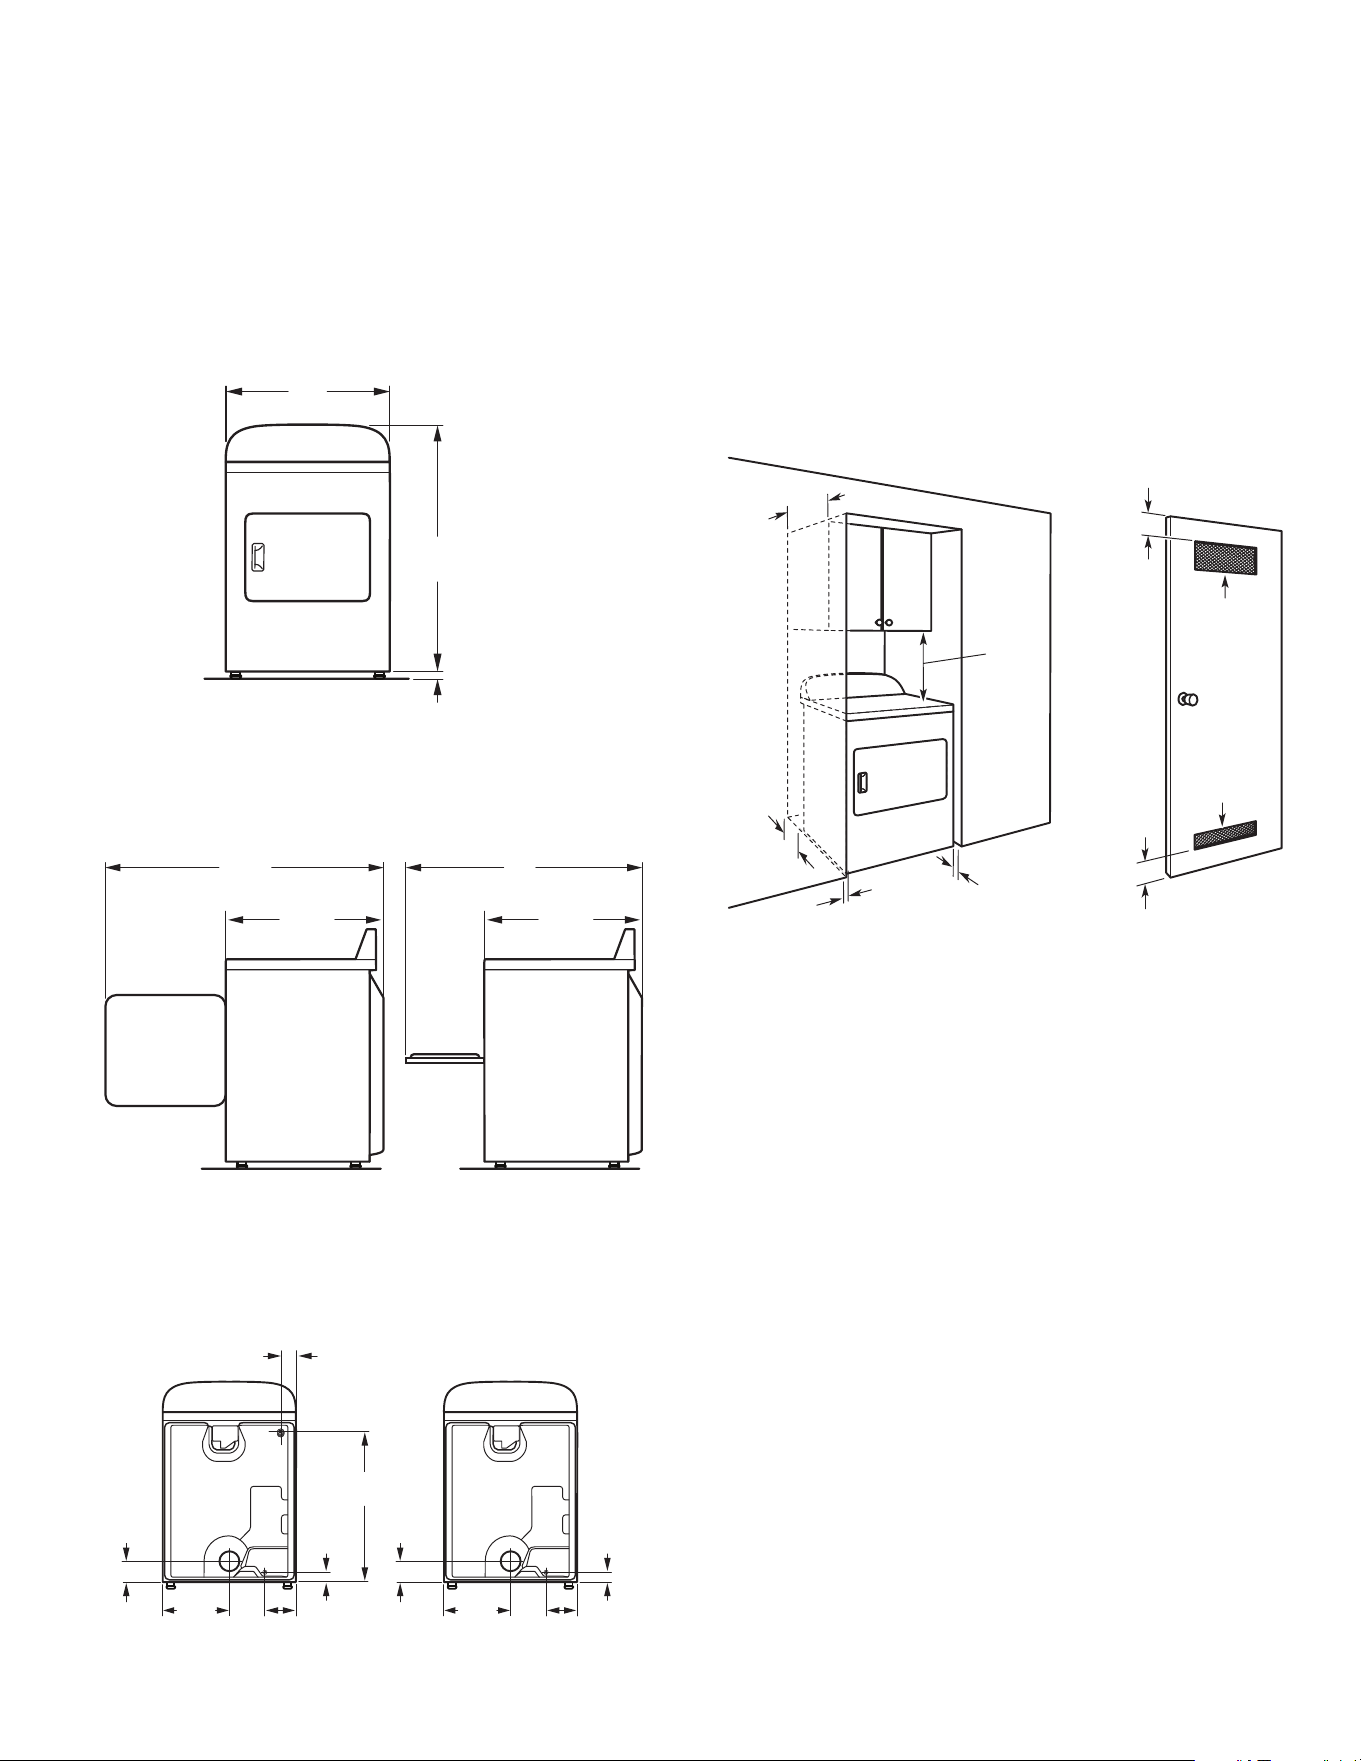
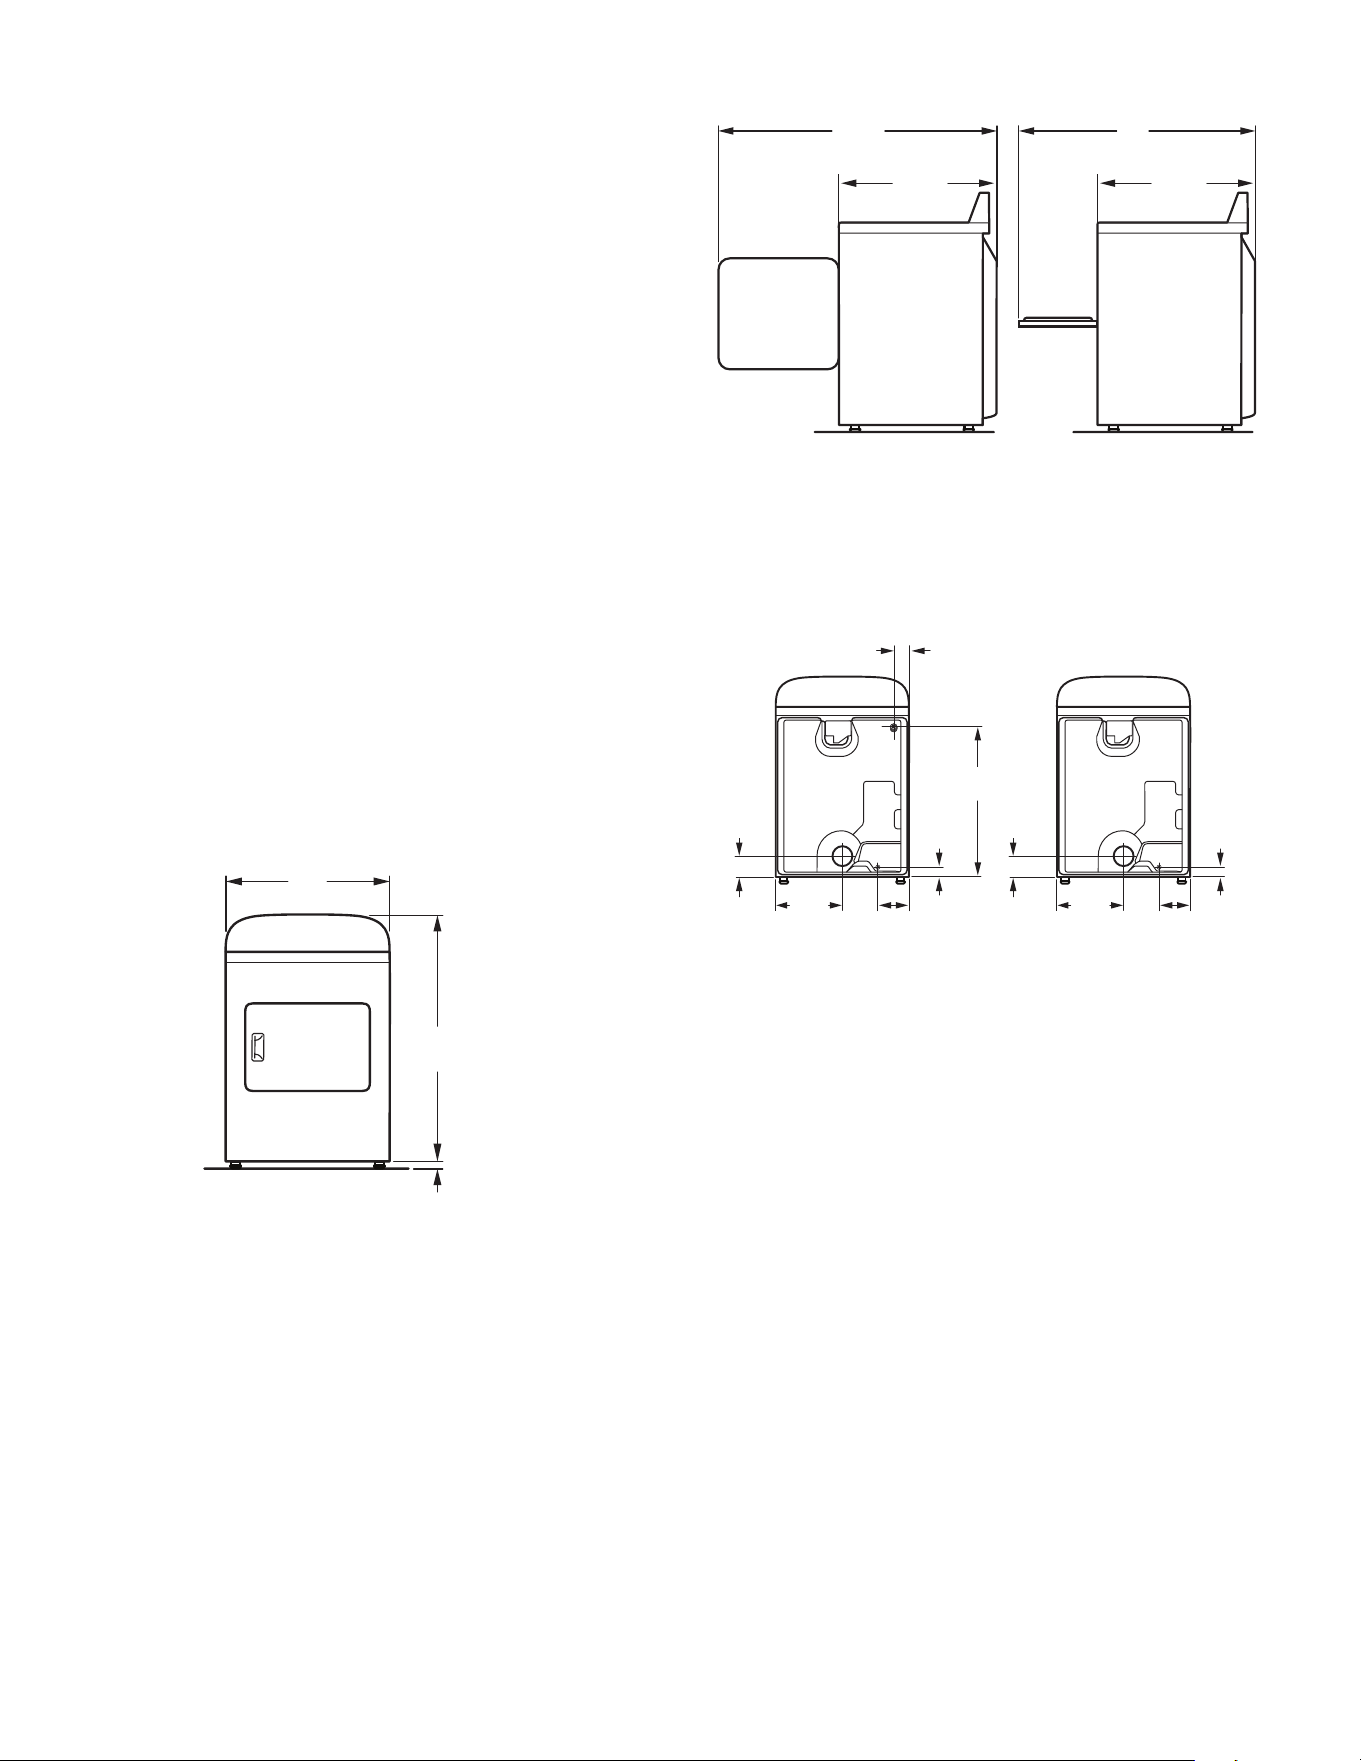
DRYER DIMENSIONS
Front View
50
3
/4"
(1289 mm)
42"
(1067 mm)
28
1
/4"
(717 mm)
28
1
/4"
(717 mm)
NOTE: Minimum height of leveling legs should be 1/2" (13 mm),
or to match the height of the accompanying washer.
Side View
29"
(737 mm)
40
7
/8"
(1038 mm)
1
/2"
(13 mm)
A B
Back View
14
1
/
2
"
(368 mm)
4
3
/4"
(121 mm)
9
1
/4"
(235 mm)
1
1
/4"
(32 mm)
14
1
/
2
"
(368 mm)
4
3
/4"
(121 mm)
9
1
/4"
(235 mm)
1
1
/4"
(32 mm)
30
1
/4"
(768 mm)
4"
(101 mm)
Steam Non-Steam
Mobile home - Additional installation requirements:
This dryer is suitable for mobile home installations. The installation
must conform to the Manufactured Home Construction and Safety
Standard, Title 24 CFR, Part 3280 (formerly the Federal Standard
for Mobile Home Construction and Safety, Title 24, HUD Part 280)
or Standard CAN/CSA-Z240 MH.
Mobile home installations require:
All dryers:
■ Metal exhaust system hardware, available for purchase from
your dealer. For further information, call 1-844-553-6667 (U.S.)
or 1-800-469-4663 (Canada).
■ Special provisions must be made in mobile homes to introduce
outside air into dryer. Openings (such as a nearby window)
should be at least twice as large as dryer exhaust opening.
For gas dryers mobile home installations:
■ Mobile Home Installation Hold-down Kit Part Number
W10432680 is available to order. For further information,
call 1-844-553-6667 (U.S.) or 1-800-469-4663 (Canada).
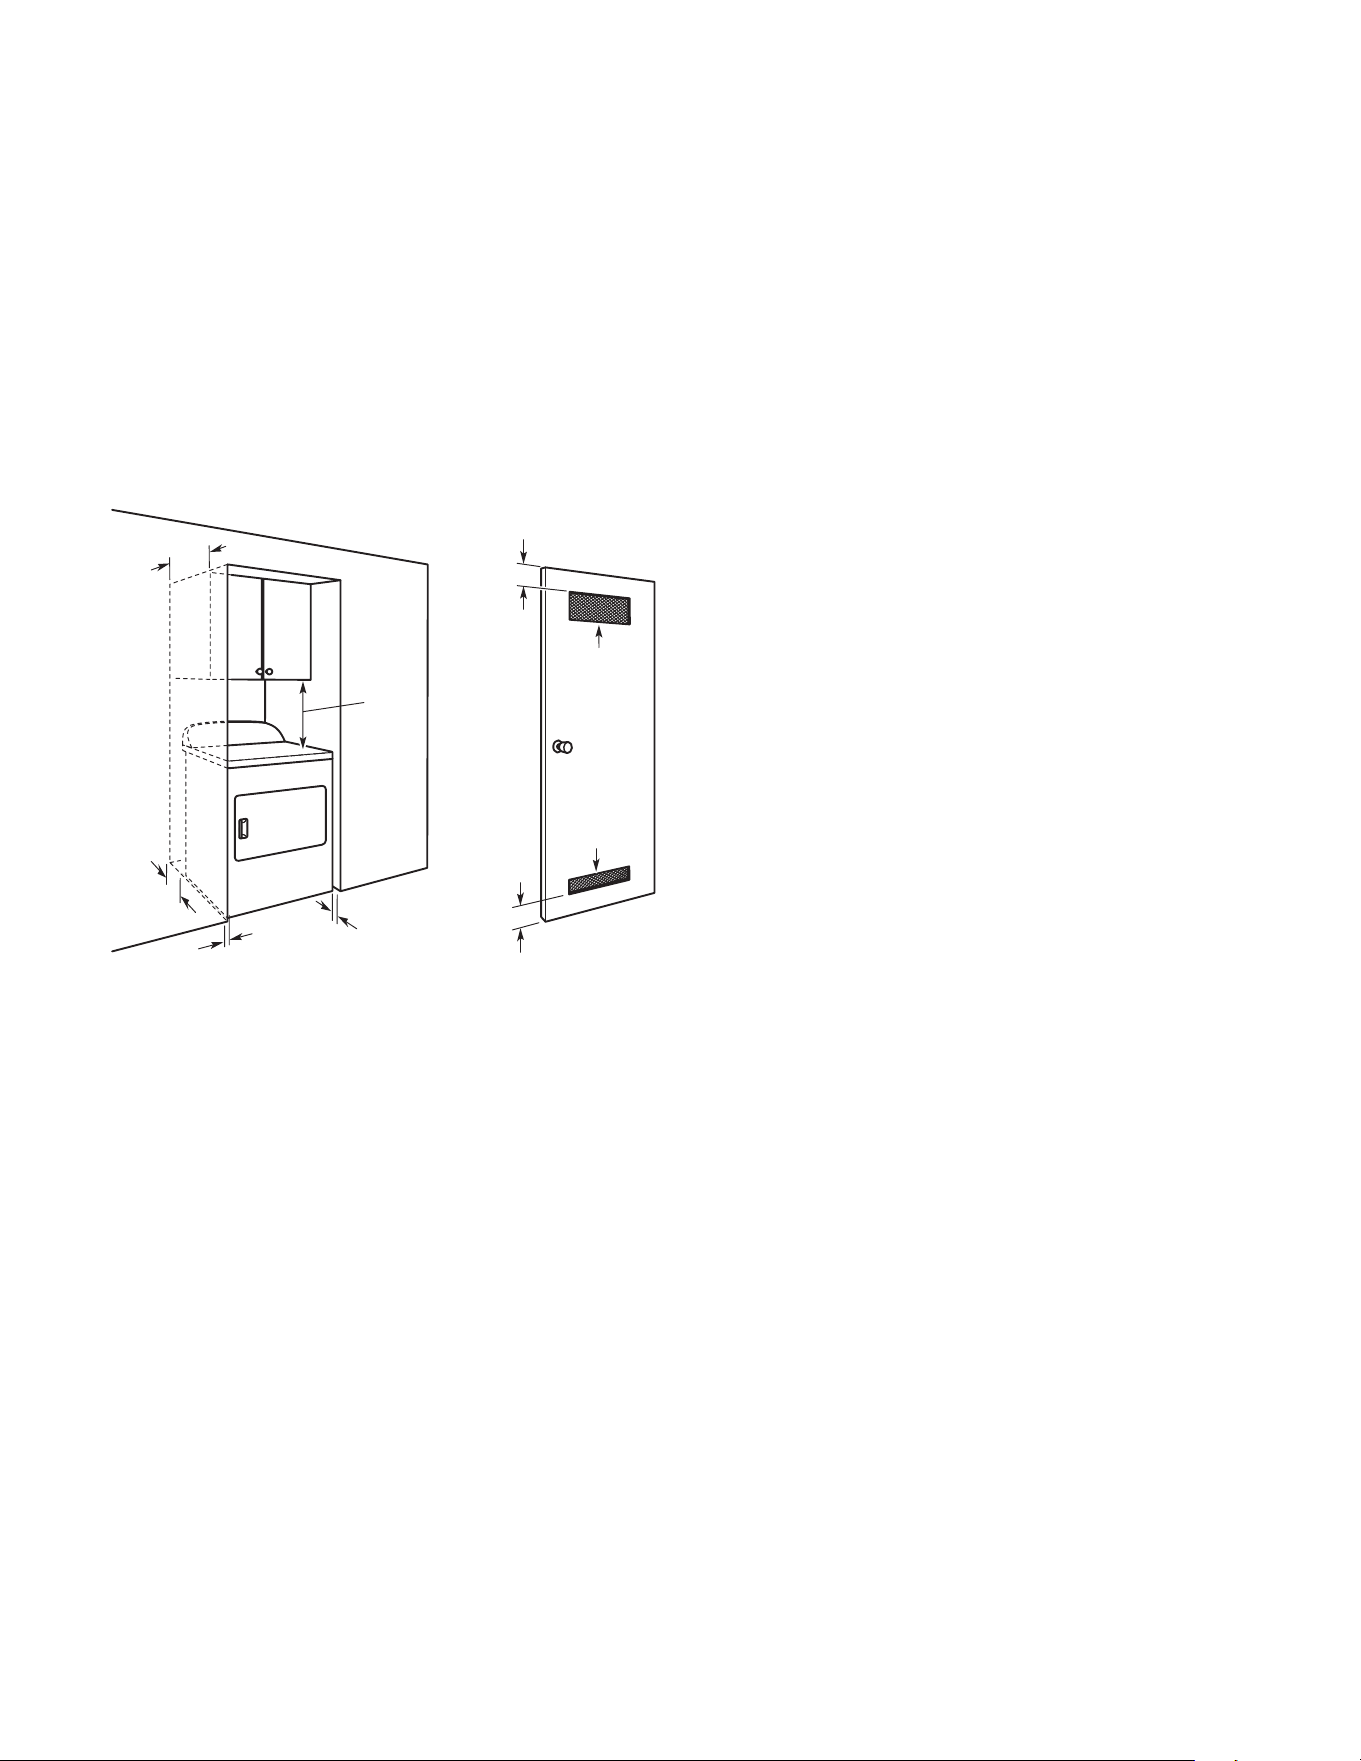
Recommended/Minimum spacing
6"/0"
(152 mm/
0 mm)
14" max
(356 mm)
1"/0"
(25 mm/0 mm)
1"/1"
(25 mm/25 mm)
18"/18"
(457 mm/
457 mm)
3"/3"
(76 mm/
76mm)
3"/3"
(76 mm/
76mm)
48"
2
/48"
2
(310 cm
2/
310 cm
2
)
24"
2/
24"
2
(155 cm
2/
155 cm
2
)
Spacing for recessed area or closet installation
The dimensions shown are for the minimum spacing allowed.
■ Additional spacing should be considered for ease of installation
and servicing.
■ Additional clearances might be required for wall, door, and
oor moldings.
■ Additional spacing of 1" (25 mm) on all sides of the dryer
is recommended to reduce noise transfer.
■ For closet installation, with a door, minimum ventilation
openings in the top and bottom of the door are required.
Louvered doors with equivalent ventilitation openings are
acceptable.
■ Companion appliance spacing should also be considered.
INSTALLATION CLEARANCES
For each arrangement, consider allowing more space for ease of
installation and servicing; spacing for companion appliances and
clearances for walls, doors, and floor moldings. Space must be
large enough to allow door to fully open. Add spacing on all sides
of dryer to reduce noise transfer. If a closet door or louvered door
is installed, top and bottom air openings in door are required.
Check code requirements. Some codes limit, or do not permit,
installation of the dryer in garages, closets, mobile homes, or
sleeping quarters. Contact your local building inspector.
Installation Spacing
A. Wide opening side-swing door
B. Wide opening hamper door

7
ELECTRICAL REQUIREMENTS –
U.S.A. ONLY (SPÉCIFICATIONS
ÉLECTRIQUES – ÉTATS-UNIS
SEULEMENT)
ELECTRICAL REQUIREMENTS
It is your responsibility:
■ To contact a qualied electrical installer.
■ To be sure that the electrical connection is adequate and in
conformance with the National Electrical Code, ANSI/NFPA
70 - latest edition and all local codes and ordinances.
The National Electrical Code requires a 4-wire power supply
connection for homes built after 1996, dryer circuits involved
in remodeling after 1996, and all mobile home installations.
A copy of the above code standards can be obtained from:
National Fire Protection Association, One Batterymarch Park,
Quincy, MA 02269.
■ To supply the required 3 or 4 wire, single phase, 120/240
volt, 60 Hz, AC only electrical supply (or 3 or 4 wire, 120/208
volt electrical supply, if specied on the serial/rating plate)
on a separate 30-amp circuit, fused on both sides of the line.
Connect to an individual branch circuit. Do not have a fuse in
the neutral or grounding circuit.
■ Do not use an extension cord.
■ If codes permit and a separate ground wire is used, it is
recommended that a qualied electrician determine that
the ground path is adequate.
Electrical Connection
To properly install your dryer, you must determine the type of
electrical connection you will be using and follow the instructions
provided for it here.
■ This dryer is manufactured ready to install with a 3-wire
electrical supply connection. The neutral ground conductor
is permanently connected to the neutral conductor (white
wire) within the dryer. If the dryer is installed with a 4-wire
electrical supply connection, the neutral ground conductor
must be removed from the external ground connector (green
screw), and secured under the neutral terminal (center or
white wire) of the terminal block. When the neutral ground
conductor is secured under the neutral terminal (center or
white wire) of the terminal block, the dryer cabinet is isolated
from the neutral conductor.
■ If local codes do not permit the connection of a neutral
ground wire to the neutral wire, see “Optional 3-wire
connection” section.
■ A 4-wire power supply connection must be used when the
appliance is installed in a location where grounding through
the neutral conductor is prohibited. Grounding through the
neutral is prohibited for (1) new branch-circuit installations,
(2) mobile homes, (3) recreational vehicles, and (4) areas
where local codes prohibit grounding through the neutral
conductors.
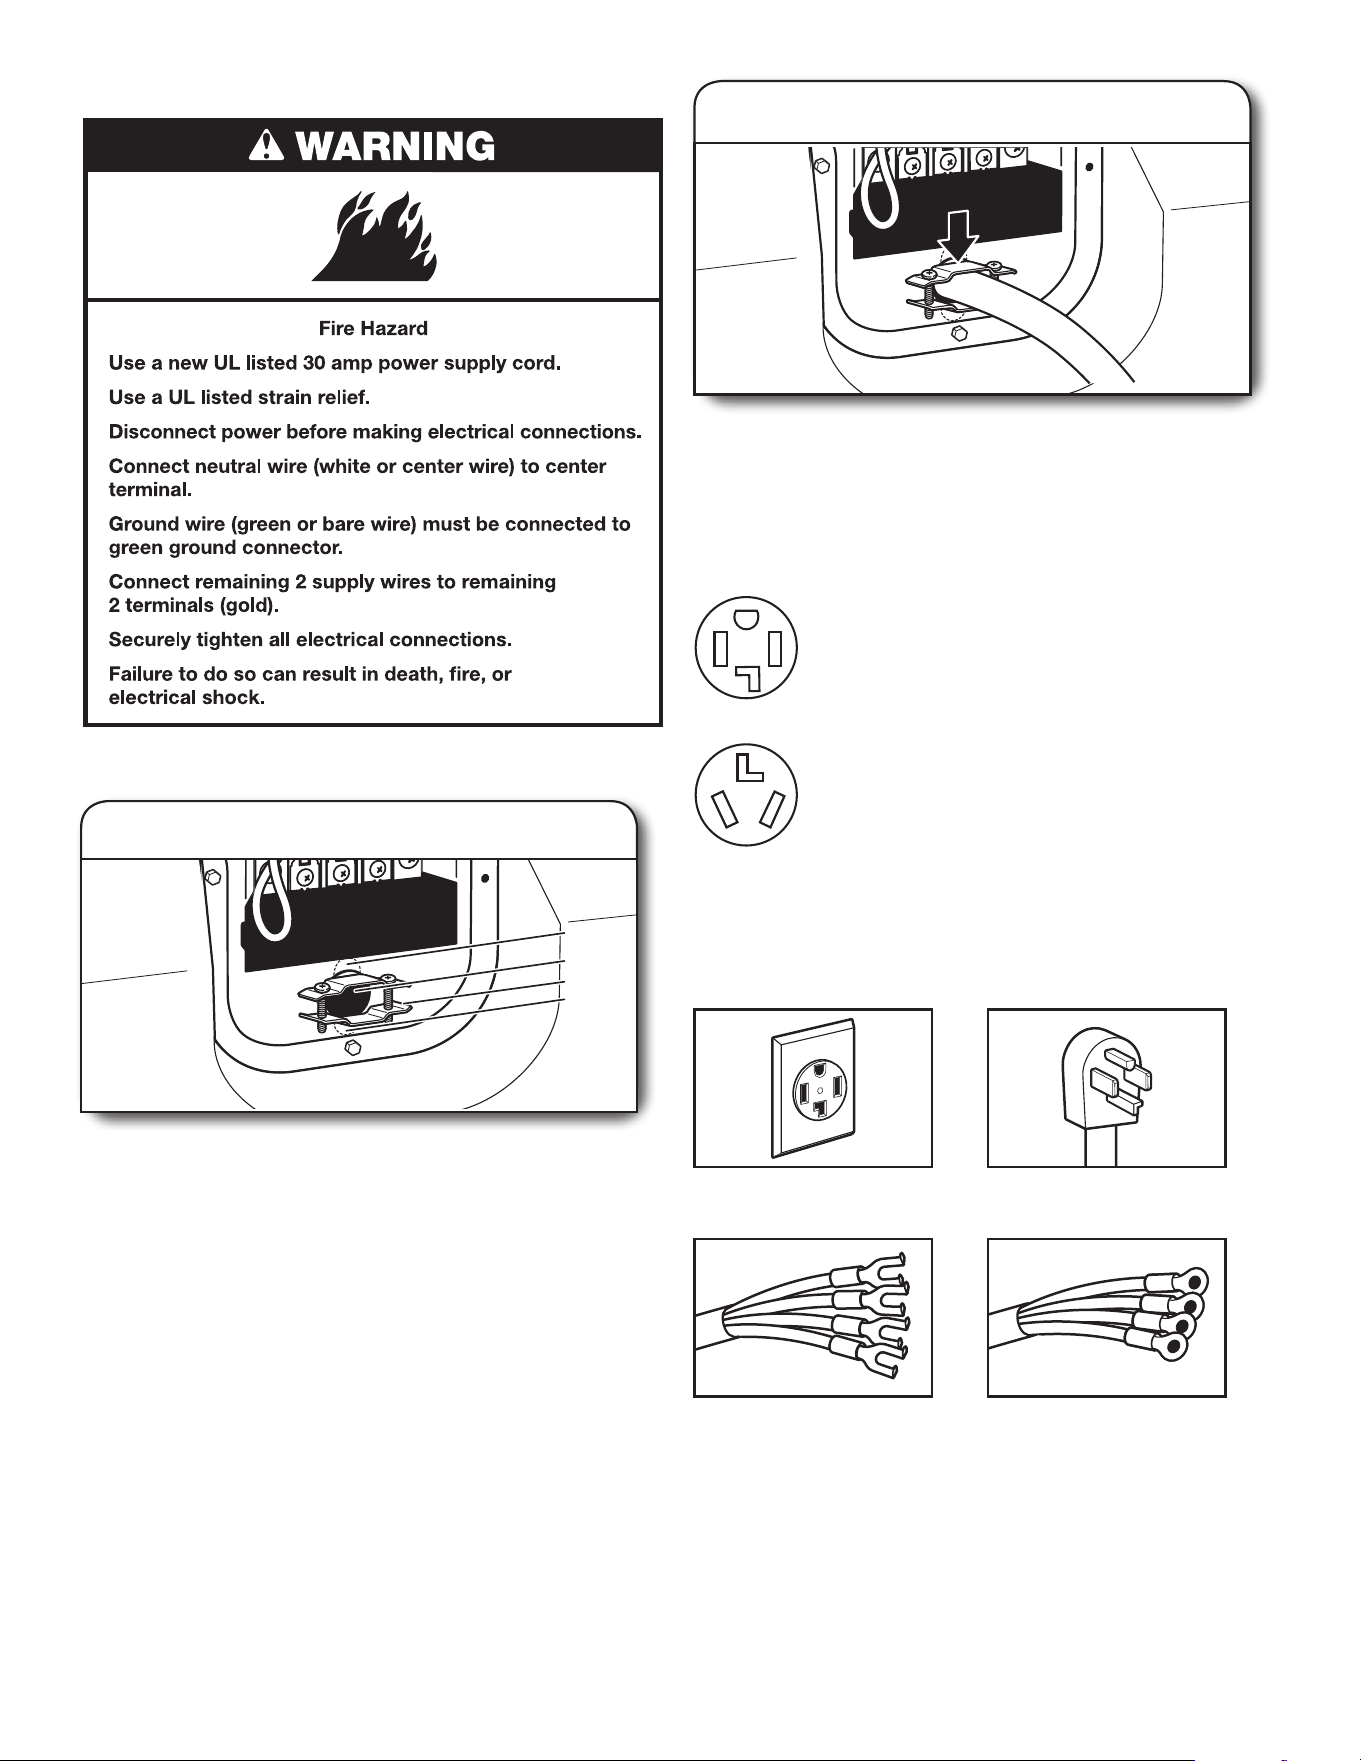
If using a power supply cord:
Use a UL Listed power supply cord kit marked for use with
clothes dryers. The kit should contain:
■ A UL Listed 30-amp power supply cord, rated 120/240 volt
minimum, and have a temperature rating of 140ºF (60ºC)
minimum. The cord should be type SRD or SRDT and be at least
4 ft. (1.22 m) long. The wires that connect to the dryer must end
in ring terminals or spade terminals with upturned ends.
■ A UL Listed strain relief.
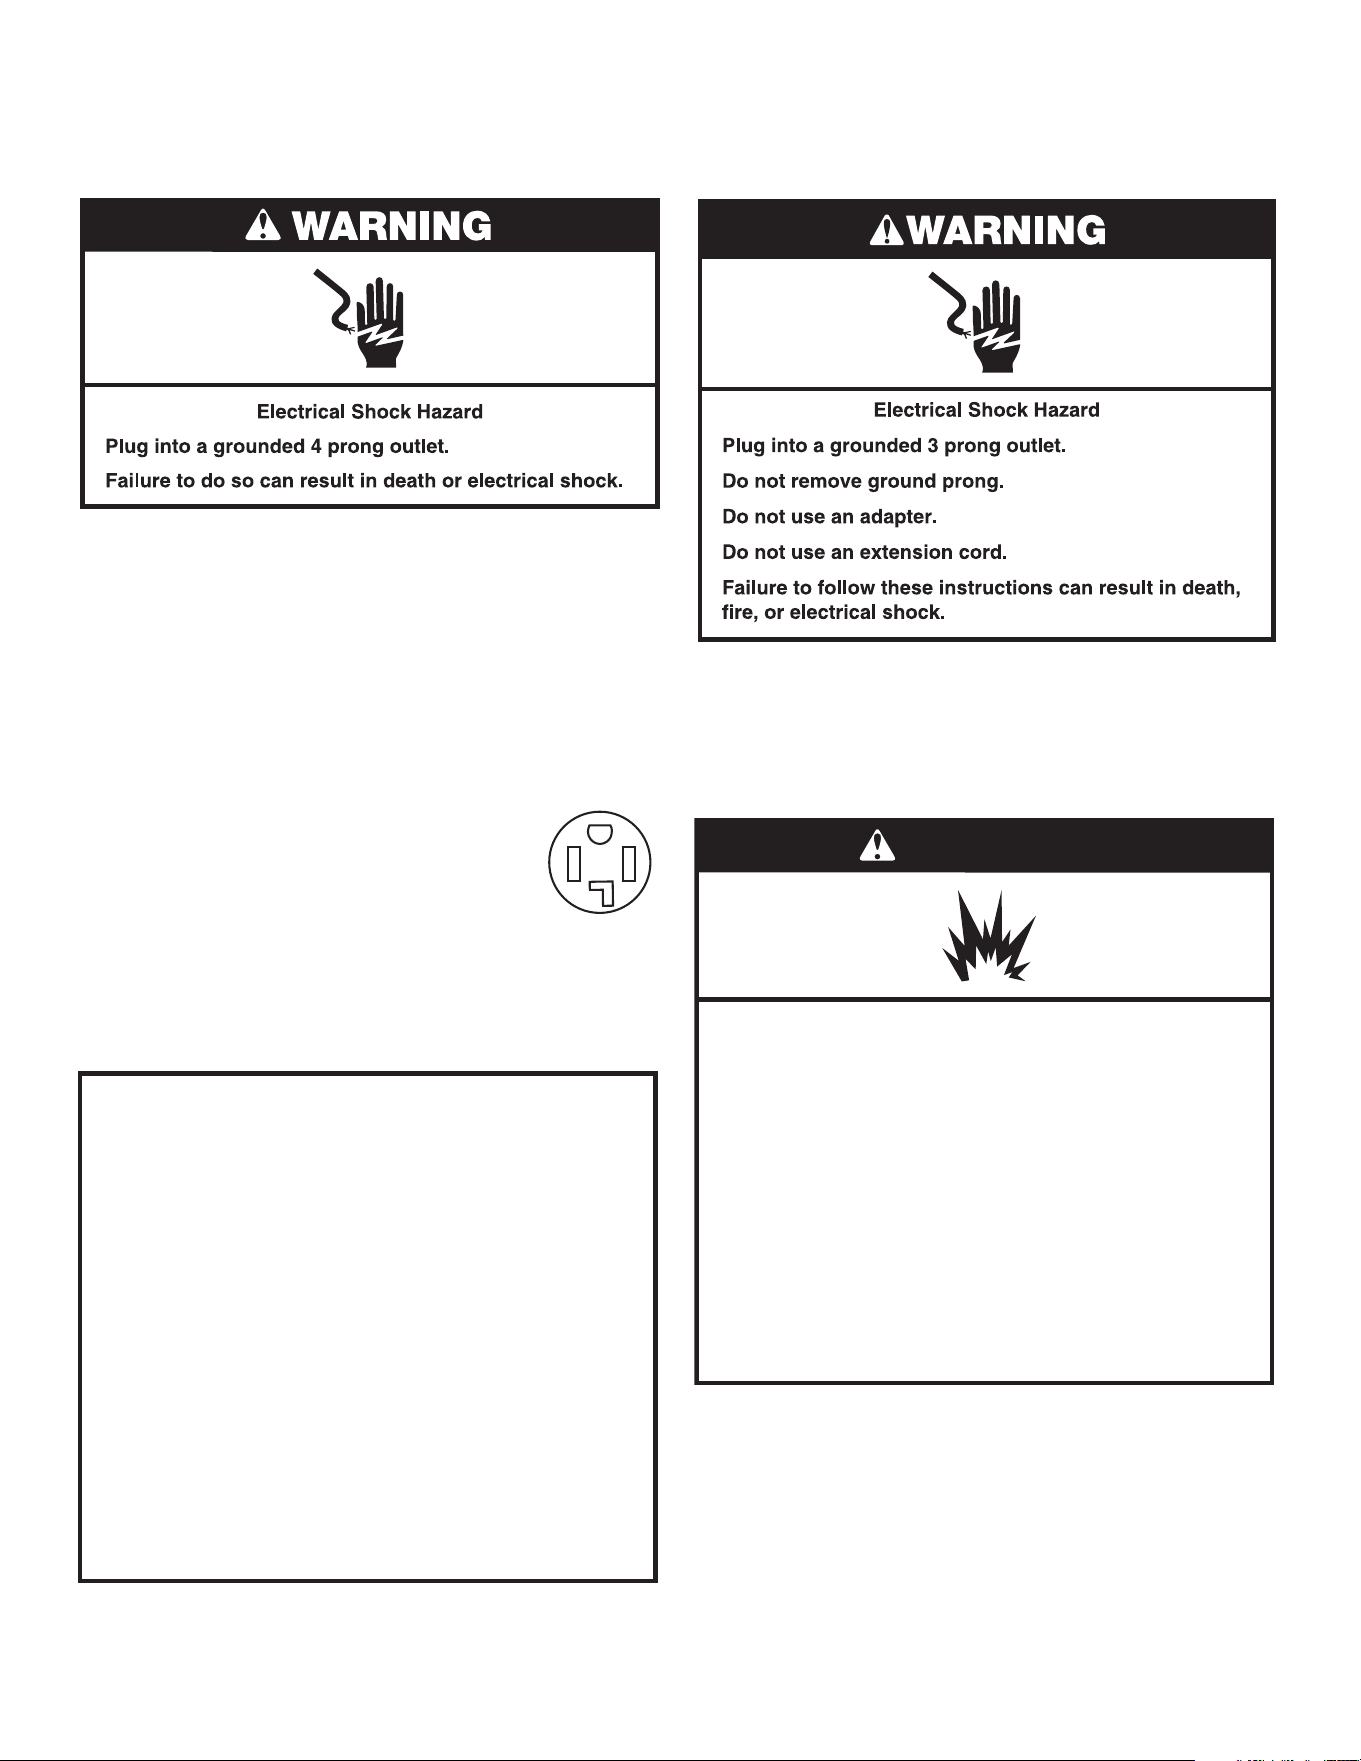
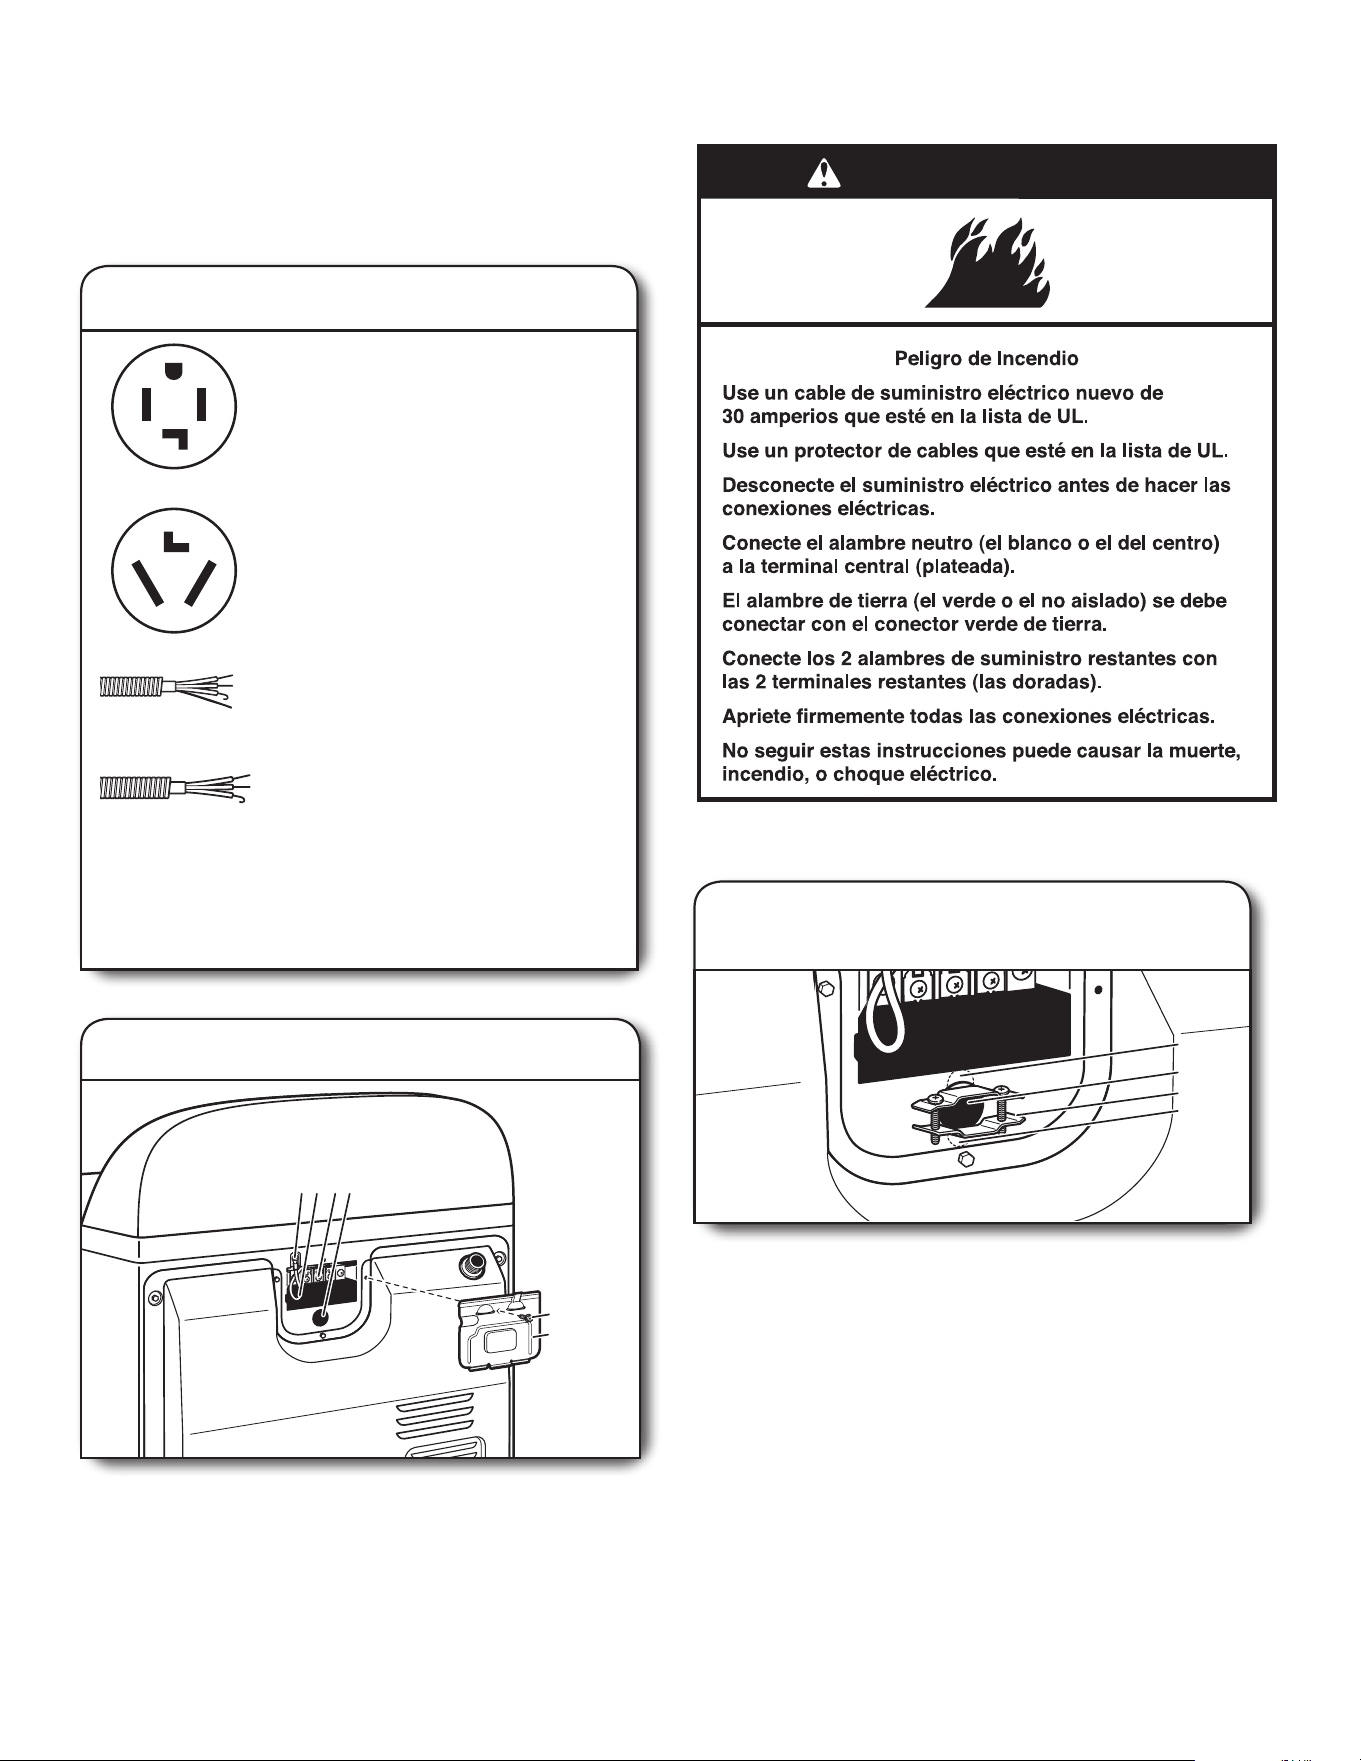
4-wire
receptacle
(14-30R)
If your outlet looks like this:
Then choose a 4-wire power supply cord with
ring or spade terminals and UL Listed strain
relief. The 4-wire power supply cord, at least
4 ft. (1.22 m) long, must have 4 10-gauge solid
copper wires and match a 4-wire receptacle
of NEMA Type 14-30 R. The ground wire
(ground conductor) may be either green or
bare. The neutral conductor must be identied
by a white cover.
3-wire
receptacle
(10-30R)
If your outlet looks like this:
Then choose a 3-wire power supply cord with
ring or spade terminals and UL Listed strain
relief. The 3-wire power supply cord, at least
4 ft. (1.22 m) long, must have 3 10-gauge solid
copper wires and match a 3-wire receptacle of
NEMA Type 10-30R.
If connecting by direct wire:
Power supply cable must match power supply (4-wire or 3-wire)
and be:
■ Flexible armored cable or nonmetallic sheathed copper cable
(with ground wire), covered with exible metallic conduit. All
current-carrying wires must be insulated.
■ 10-gauge solid copper wire (do not use aluminum) at least
5 ft. (1.52 m) long.
8
4-wire receptacle
(14-30R)
ELECTRIC DRYER POWER
HOOKUP – CANADA ONLY
ELECTRICAL REQUIREMENTS
It is your responsibility:
■ To contact a qualied electrical installer.
■ To be sure that the electrical connection is adequate and in
conformance with Canadian Electrical Code, C22.1-latest
edition and all local codes. A copy of above codes standard
may be obtained from: Canadian Standards Association,
178 Rexdale Blvd., Toronto, ON M9W 1R3 CANADA.
■ To supply the required 4 wire, single phase, 120/240 volt,
60 Hz, AC only electrical supply on a separate 30-amp circuit,
fused on both sides of the line. A time-delay fuse or circuit
breaker is recommended. Connect to an individual branch
circuit.
■ This dryer is equipped with a UL listed and/or
CSA International Certied Power Cord intended
to be plugged into a standard 14-30R wall
receptacle. The cord is 5 ft. (1.52 m) long. Be
sure wall receptacle is within reach of dryer’s
nal location.
If using a replacement power supply cord, it is recommended that
you use Power Supply Cord Replacement Part Number 9831317.
For further information, call 1-800-469-4663.
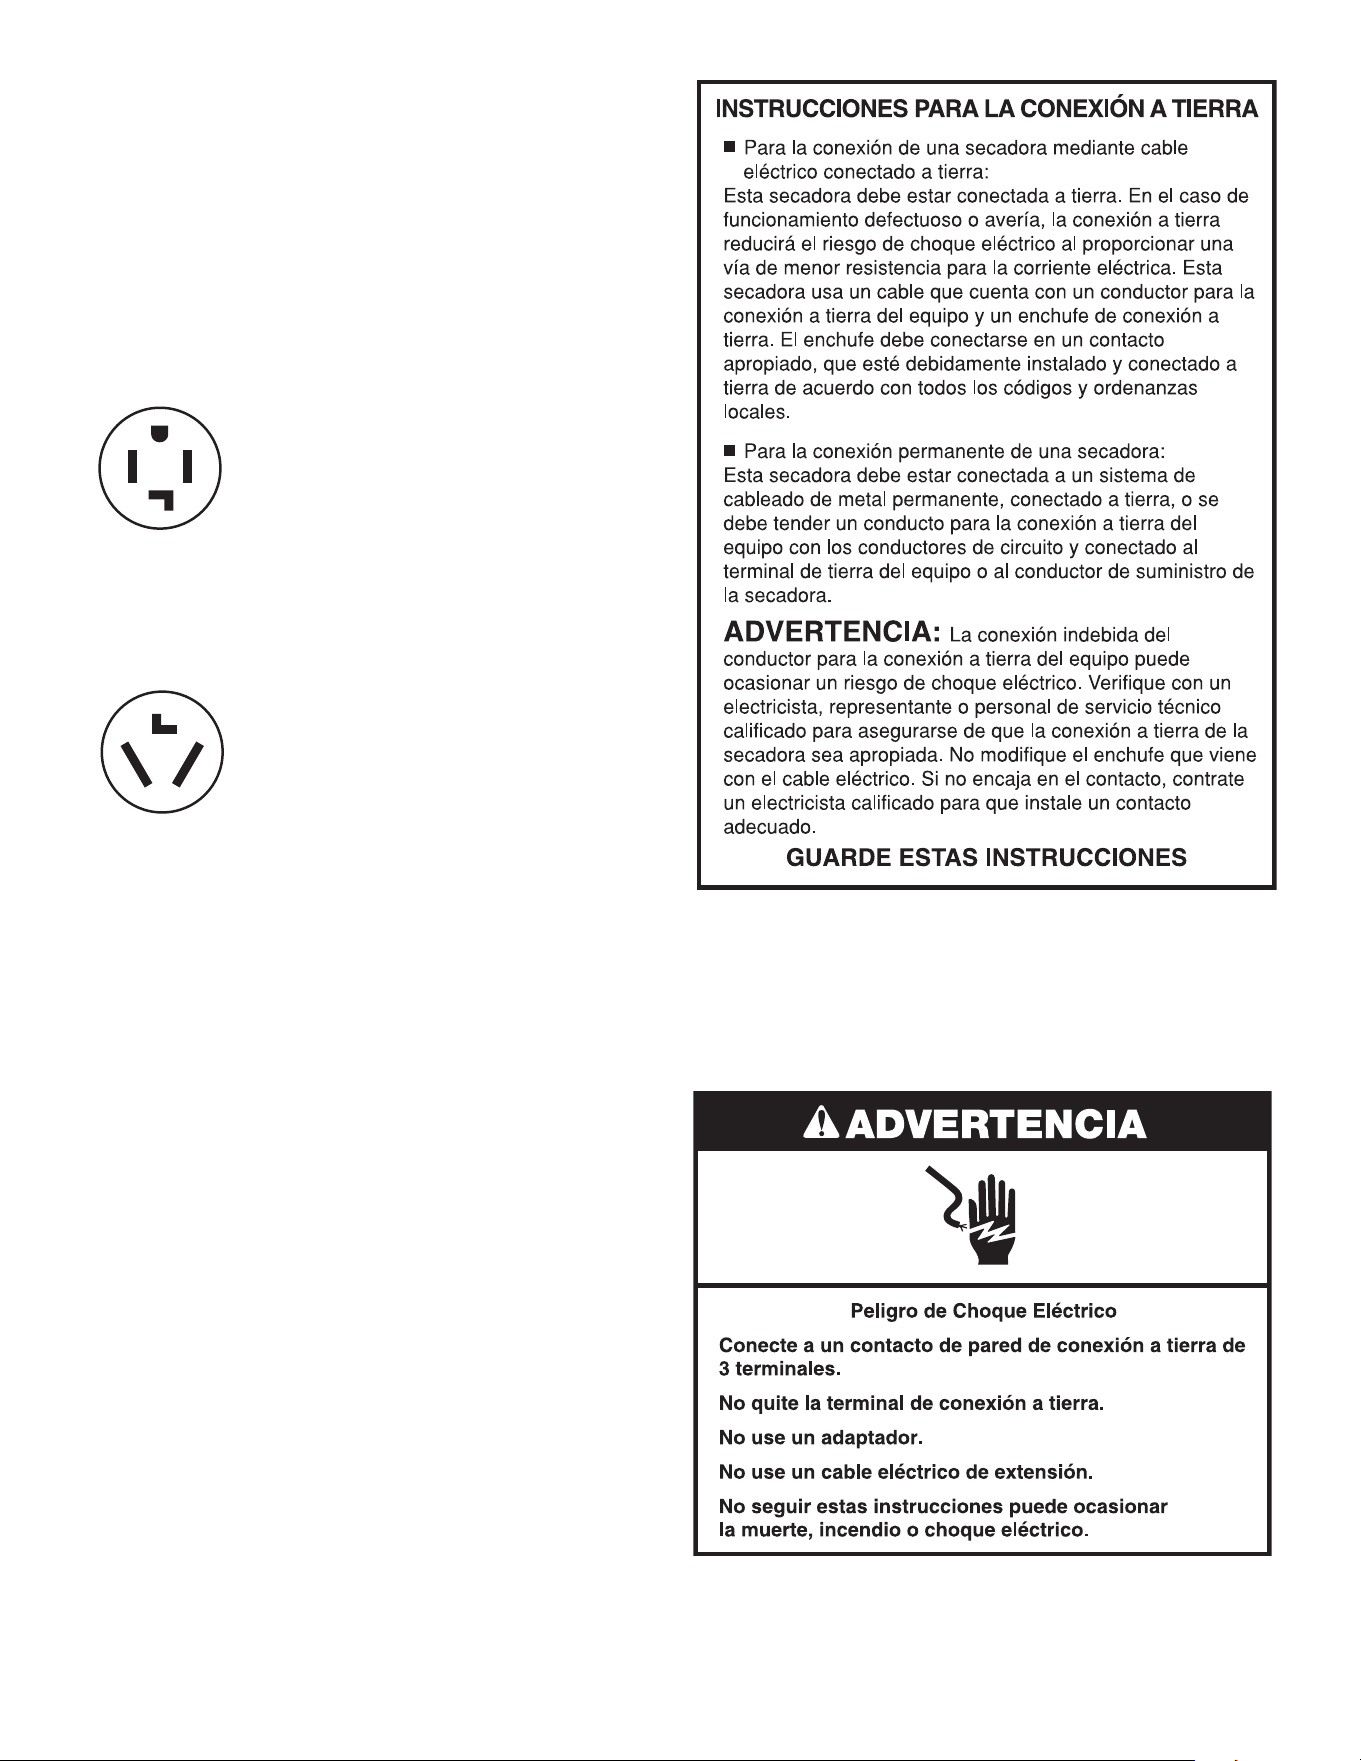
GROUNDING INSTRUCTIONS
SAVE THESE INSTRUCTIONS
■
For a grounded, cord-connected dryer:
This dryer must be grounded. In the event of malfunction or
breakdown, grounding will reduce the risk of electric shock
by providing a path of least resistance for electric current.
This dryer is equipped with a cord having an equipment-
grounding conductor and a grounding plug. The plug must
be plugged into an appropriate outlet that is properly
installed and grounded in accordance with all local codes
and ordinances.
WARNING: Improper connection of the equipment-
grounding conductor can result in a risk of electric shock.
Check with a qualied electrician or service representative
or personnel if you are in doubt as to whether the dryer is
properly grounded. Do not modify the plug provided with
the dryer: if it will not t the outlet, have a proper outlet
installed by a qualied electrician.
GAS DRYER POWER HOOKUP –
U.S.A. AND CANADA
ELECTRICAL REQUIREMENTS
■ 120 Volt, 60 Hz, AC only, 15- or 20- amp fused electrical
supply is required. A time-delay fuse or circuit breaker is
recommended. It is also recommended that a separate circuit
serving only this dryer be provided.
GAS TYPE
Natural Gas:
This dryer is equipped for use with Natural gas. It is certied
by UL for use with propane gas with appropriate conversion.
■ Your dryer must have the correct burner for the type of gas in
your home. Burner information is located on the rating plate in
the door well of your dryer. If this information does not agree
with the type of gas available, contact your dealer or call
1-844-553-6667 (U.S.) or 1-800-469-4663 (Canada).
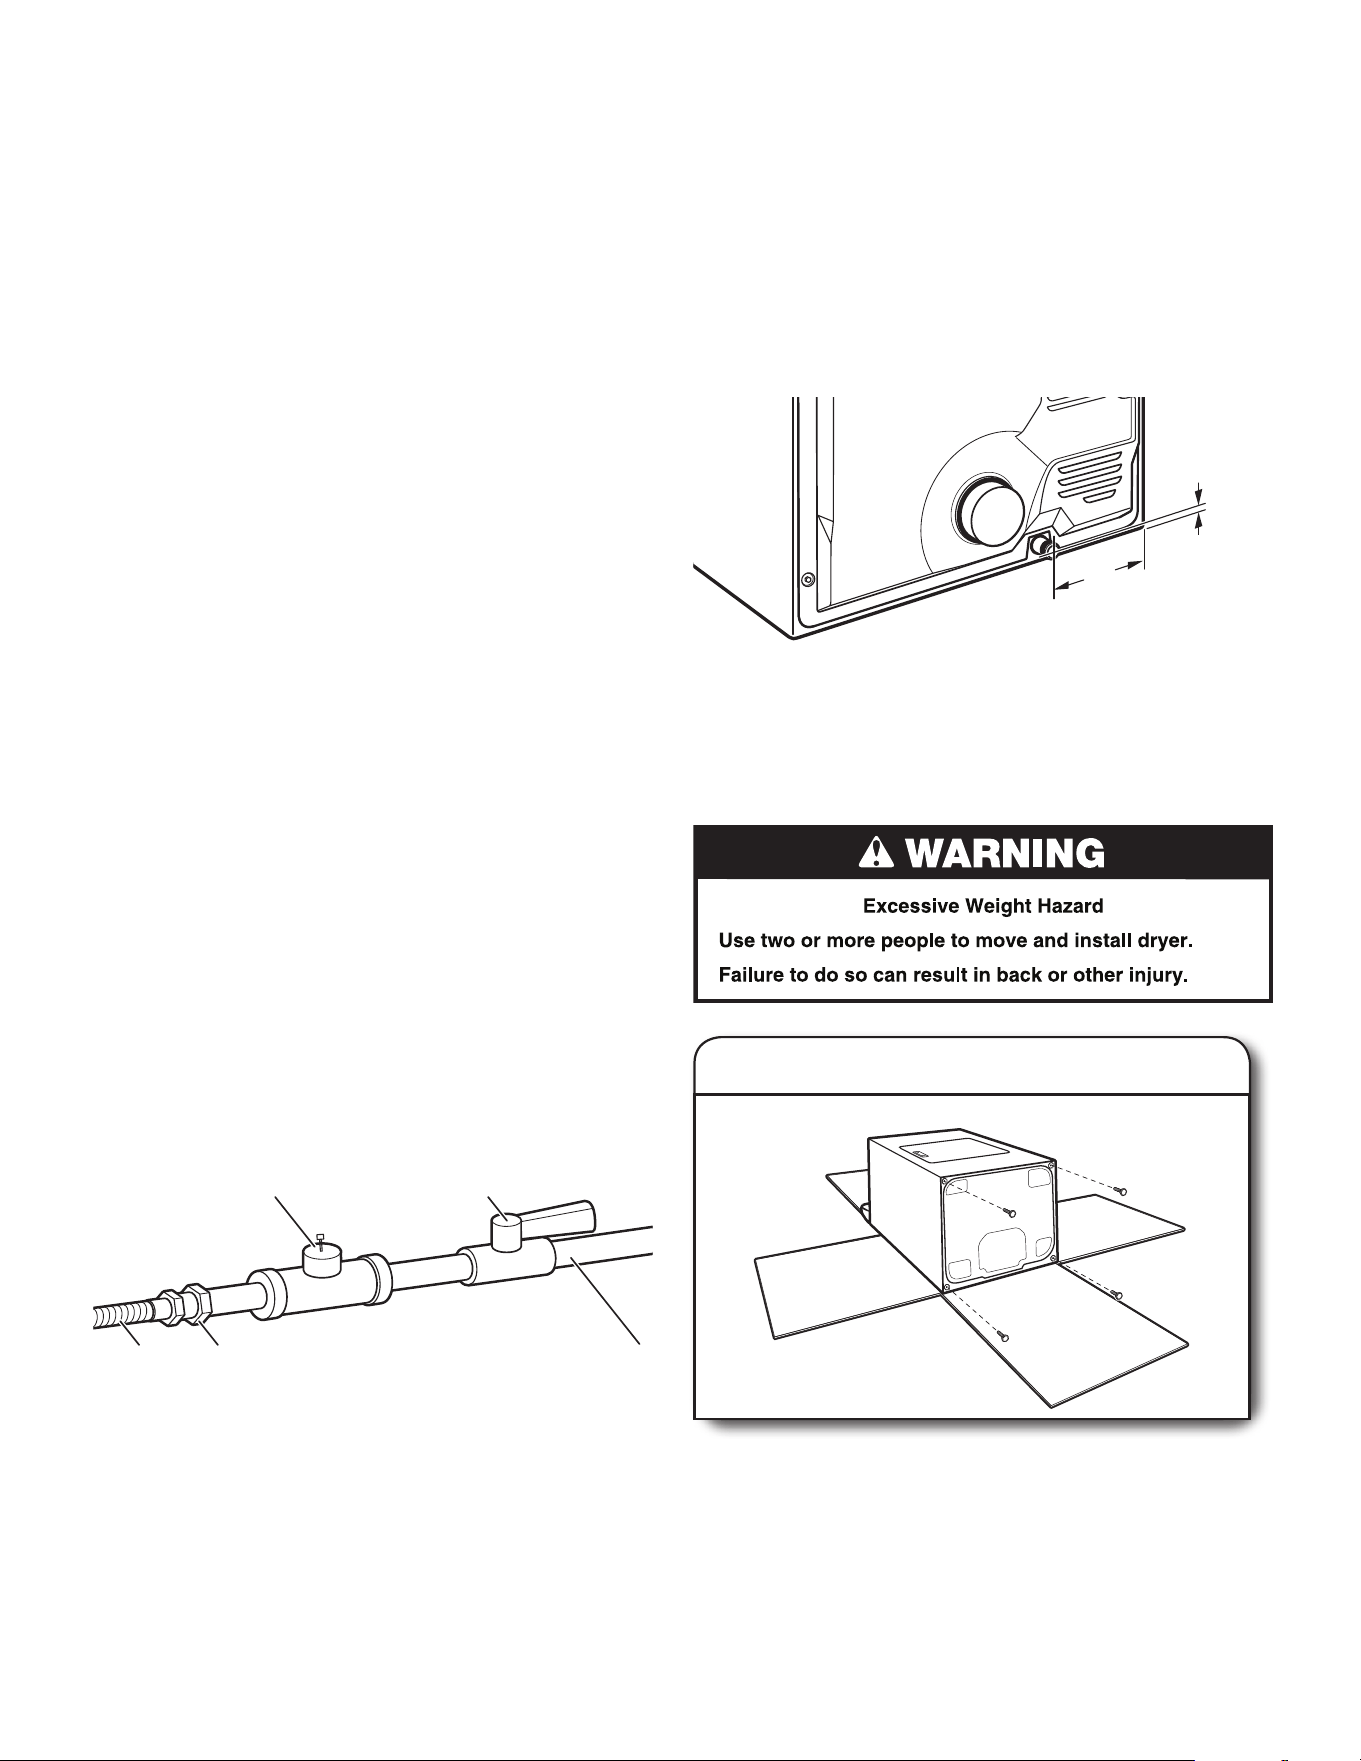
WARNING
Explosion Hazard
Use a new CSA International approved gas supply line.
Install a shut-off valve.
Securely tighten all gas connections.
If connected to propane, have a qualified person make
sure gas pressure does not exceed 13" (330 mm) water
column.
Examples of a qualified person include:
licensed heating personnel,
authorized gas company personnel, and
authorized service personnel.
Failure to do so can result in death, explosion, or fire.
GAS SUPPLY REQUIREMENTS
9
3/8" NPT dryer pipe
NOTE: For a garage installation, the gas pipe height must be an
additional 18" (460 mm) from the oor.
GAS SUPPLY CONNECTION REQUIREMENTS
■ Use an elbow and a 3/8" are x 3/8" NPT adapter tting
between the exible gas connector and the dryer gas pipe,
as needed to avoid kinking.
■ Use only pipe-joint compound. Do not use TEFLON
®
tape.
■ This dryer must be connected to the gas supply line with a
listed exible gas connector that complies with the standard
for connectors for gas appliances, ANSI Z21.24 or CSA 6.10.
9
1
/4"
(235 mm)
1
1
/4"
(32 mm)
Propane Gas Conversion:
IMPORTANT: Conversion must be made by a qualied technician.
No attempt shall be made to convert the dryer from the gas
specied on the model/serial rating plate for use with a dierent
gas without consulting your gas company.
GAS SUPPLY LINE
Option 1 (Recommended Method)
Flexible stainless steel gas connector:
■ If local codes permit, use a new exible stainless steel gas
connector (Design Certied by the American Gas Association
or CSA International) to connect your dryer to the rigid gas
supply line. Use an elbow and a 3/8" are x 3/8" NPT adapter
tting between the stainless steel gas connector and the dryer
gas pipe, as needed to prevent kinking.
Option 2 (Alternate Method)
Approved aluminum or copper tubing
■ Must include 1/8" NPT minimum plugged tapping accessible
for test gauge connection, immediately upstream of the gas
connection to the dryer.
■ 1/2" IPS pipe is recommended.
■ 3/8" approved aluminum or copper tubing is acceptable for
lengths under 20 ft. (6.1 m) if local codes and gas supplier
permit.
■ If you are using Natural gas, do not use copper tubing.
■ Lengths over 20 ft. (6.1 m) should use larger tubing and
a dierent size adapter tting.
■ If your dryer has been converted to use propane gas, 3/8"
propane compatible copper tubing can be used. If the total
length of the supply line is more than 20 ft. (6.1 m), use larger
pipe.
NOTE: Pipe-joint compounds that resist the action of propane
gas must be used. Do not use TEFLON
®†
tape.
■ Must include shut-o valve.
In the U.S.A.:
An individual manual shut-o valve must be installed within six
(6) ft. (1.8 m) of the dryer in accordance with the National Fuel
Gas Code, ANSI Z223.1. The location should be easy to reach
for opening and closing.
In Canada:
An individual manual shut-o valve must be installed in
accordance with the B149.1, Natural Gas and Propane
Installation Code. It is recommended that an individual manual
shuto valve be installed within six (6) ft. (1.8 m) of the dryer.
The location should be easy to reach for opening and closing.
E
BA
D
C
BURNER INPUT REQUIREMENTS
Elevations above 2,000 ft. (610 m):
■ When installed above 2,000 ft. (610 m), a 4% reduction of the
burner Btu rating shown on the model/serial number plate is
required for each 1,000 ft. (305 m) increase in elevation.
Gas supply pressure testing
■ The dryer must be disconnected from the gas supply piping
system during pressure testing at pressures greater than 1/2 psi.
DRYER GAS PIPE
■ The gas pipe that comes out through the rear of your dryer has
a 3/8" male pipe thread.
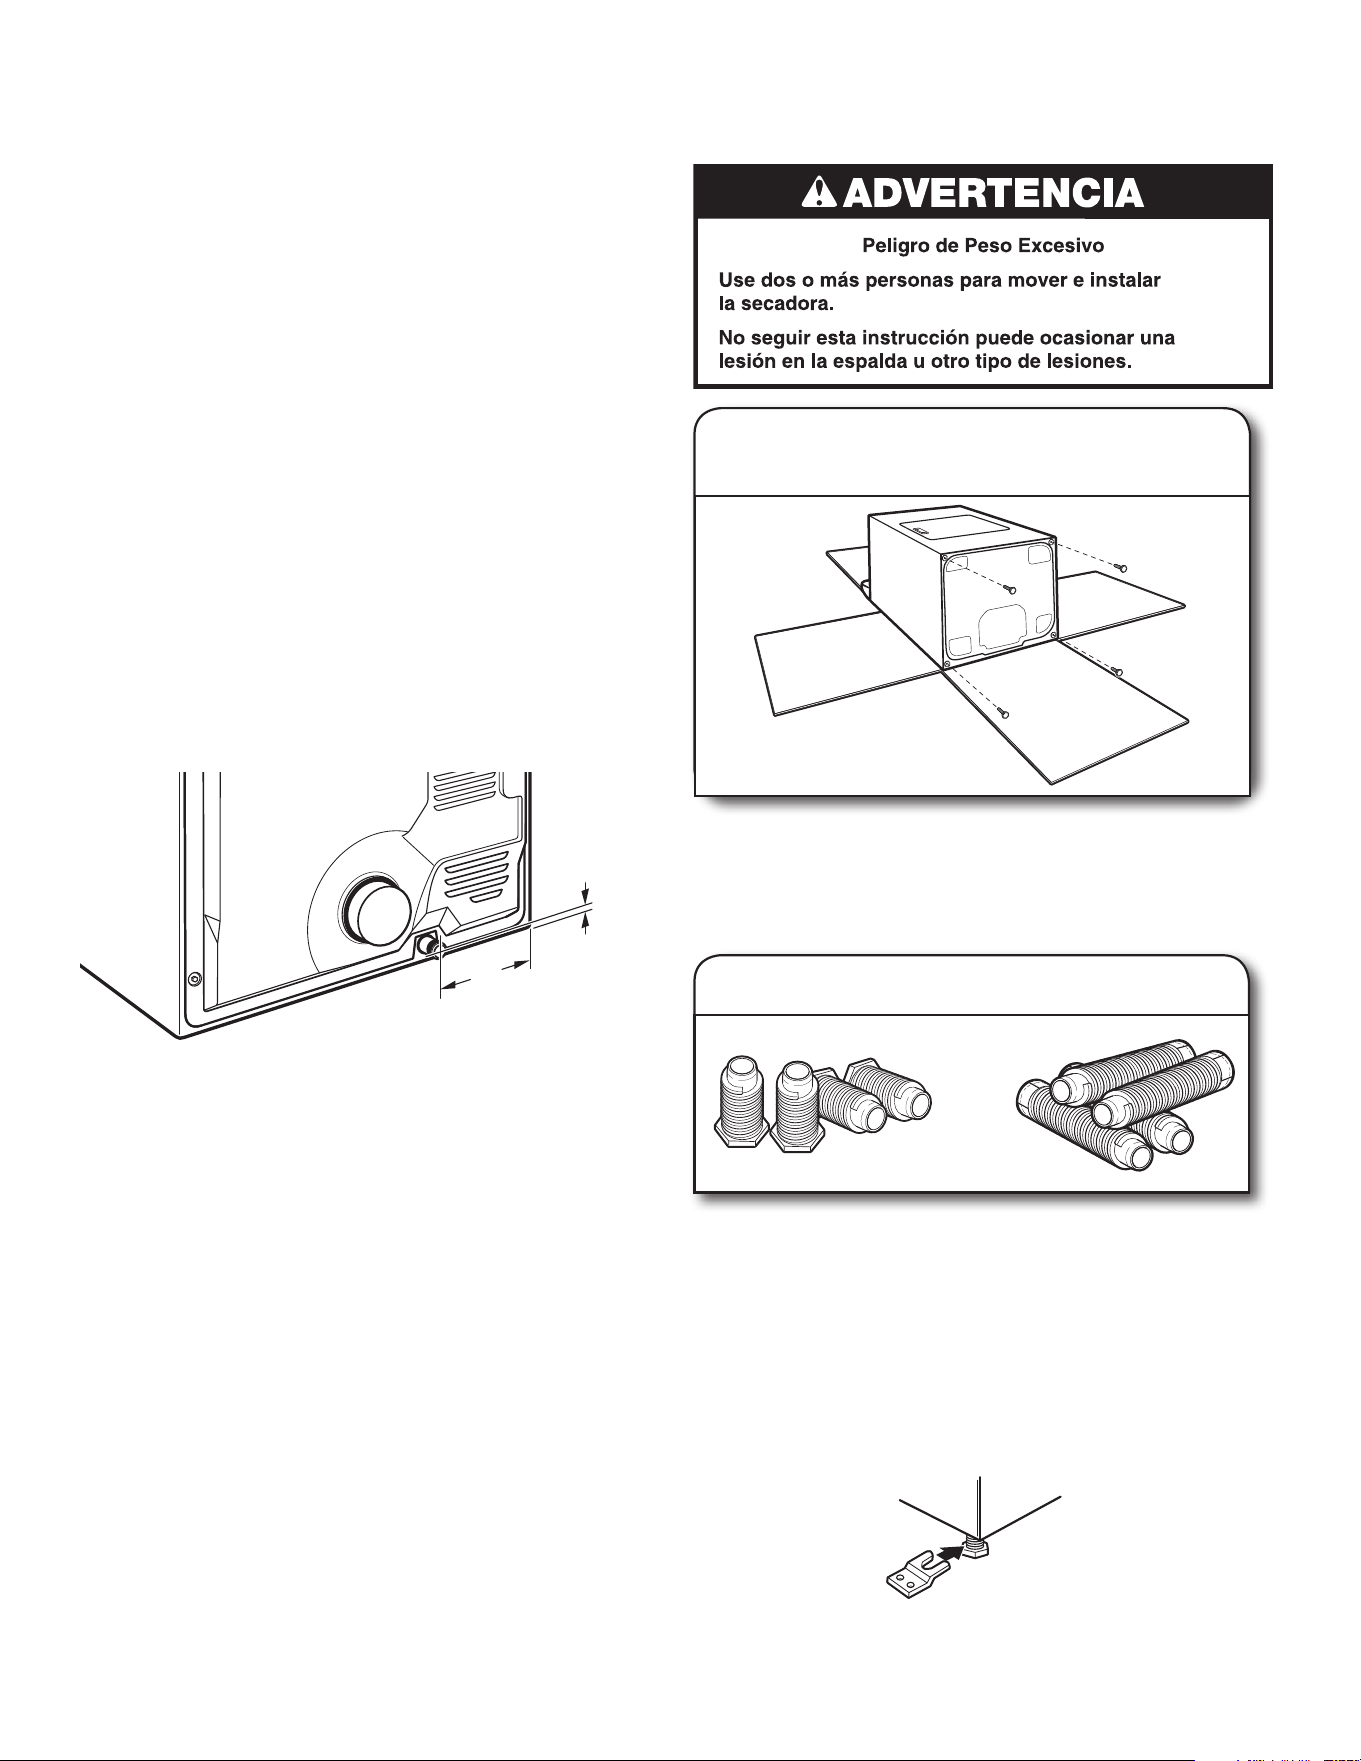
INSTALL LEVELING LEGS
1. Prepare dryer for leveling legs
To avoid damaging oor, use a large at piece of cardboard
from dryer carton; place under entire back edge of dryer.
Firmly grasp dryer body (not console panel) and gently lay
dryer down on cardboard.
†®TEFLON is a registered trademark of Chemours.
A. 3/8" exible gas connector
B. 3/8" pipe to are adapter tting
C. 1/8" NPT minimum plugged tapping
D. 1/2" NPT gas supply line
E. Gas shuto valve

10
2. Screw in leveling legs
Using a wrench and tape measure, screw leveling legs into leg
holes until bottom of foot is approximately 1/2" (13 mm) from
bottom of dryer (so that the dryer height matches that of the
accompanying washer).
Now stand the dryer on its feet. Slide the dryer until it is
close to its nal location. Leave enough room to connect
the exhaust vent.
MAKE ELECTRICAL CONNECTION – U.S.A. ONLY (EFFECTUER
LE RACCORDEMENT ÉLECTRIQUE – ÉTATS-UNIS SEULEMENT)
Electrical Connection Options
1. Choose electrical connection type
Power supply cord 4-wire receptacle
(NEMA Type 14-30R):
Go to 4-wire Power Supply Cord
Connection.
3-wire direct connection:
Go to Direct Wire Connection.
4-wire direct connection:
Go to Direct Wire Connection.
Power supply cord 3-wire receptacle
(NEMA Type 10-30R):
Go to 3-wire Power Supply Cord
Connection.
NOTE: If local codes do not permit connection of a
cabinet-ground conductor to neutral wire, go to “Optional
3-wire connection.” This connection may be used with
either a power supply cord or a direct wire connection.
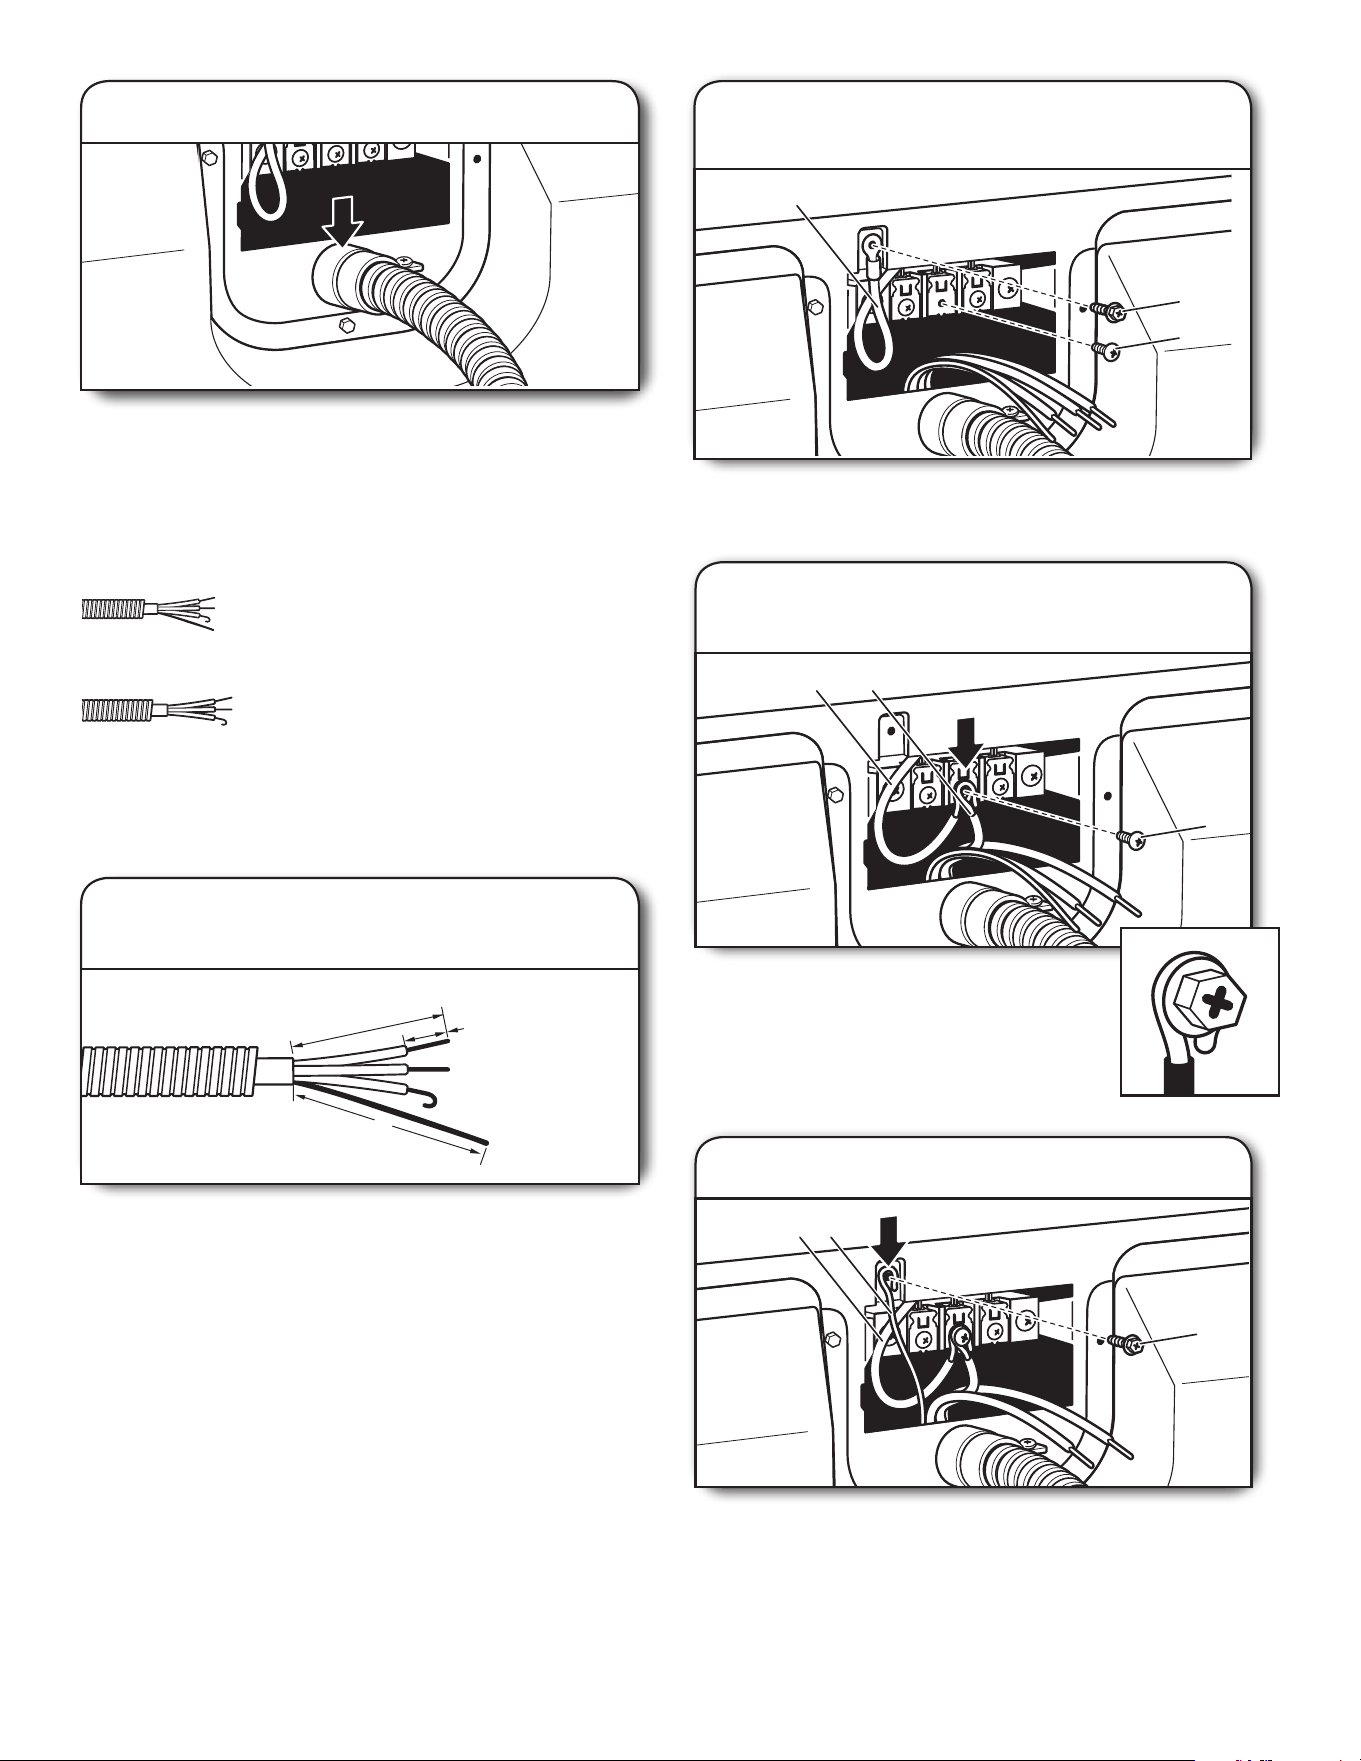
2. Remove terminal block cover
A
B
CCE F
D
Before you start, disconnect power. Remove hold-down screw
(D) and terminal block cover (A).
For mobile home use
Gas dryers must be securely fastened to the oor.
Mobile home installations require a Mobile Home Installation
Hold-down Kit. For ordering information, call 1-844-553-6667
(U.S.) or 1-800-469-4663 (Canada).
or
A. Terminal block cover
B. External ground conductor screw
C. Center terminal block screw
D. Hold-down screw
E. Neutral ground wire
F. Hole below terminal block cover
11
D
C
B
A
1. Attach power supply cord strain relief
Remove the screws from a 3/4" (19 mm) UL Listed strain relief.
Put the tabs of the two clamp sections (C) into the hole below
the terminal block opening (B) so that one tab is pointing up
(A) and the other is pointing down (D), and hold in place.
Tighten strain relief screws just enough to hold the two clamp
sections (C) together.
Power Supply Cord Strain Relief
POWER SUPPLY CORD CONNECTION
Put power supply cord through the strain relief. Be sure that
the wire insulation on the power supply cord is inside the strain
relief. The strain relief should have a tight t with the dryer
cabinet and be in a horizontal position. Do not further tighten
strain relief screws at this point.
2. Attach power supply cord to strain relief
4-wire Power Supply Cord Connection
IMPORTANT: A 4-wire connection is required for mobile homes
and where local codes do not permit the use of 3-wire connections.
Power supply cord 4-wire receptacle
(NEMA Type 14-30R):
Go to “4-wire Power Supply Cord
Connection”.
Power supply cord 3-wire receptacle
(NEMA Type 10-30R):
Go to “3-wire Power Supply Cord
Connection”.
If your outlet looks like this:
4-wire receptacle (NEMA
type 14-30R)
4-prong plug
Spade terminals with
upturned ends
Ring terminals
12
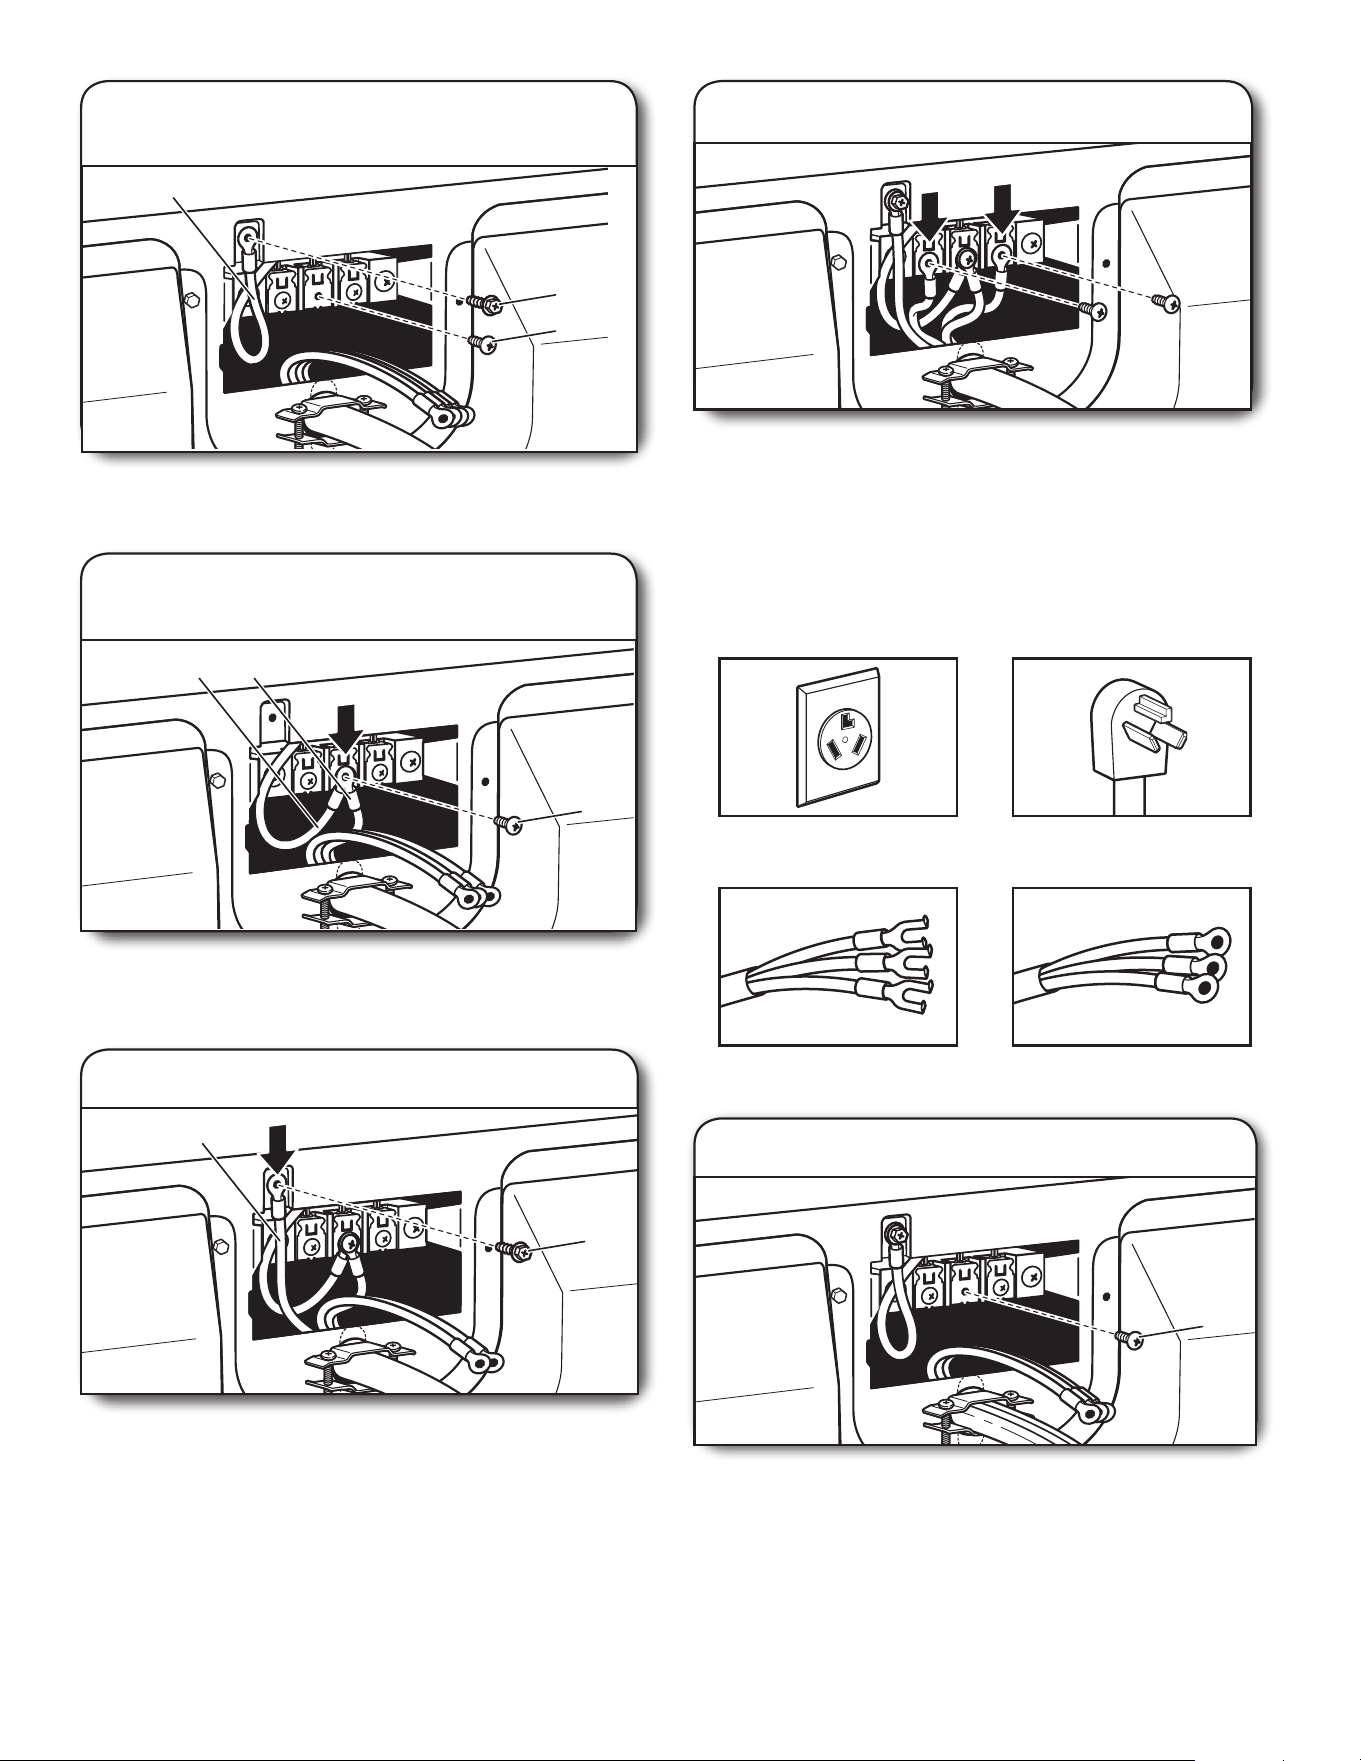
Remove center terminal block screw (B). Remove neutral ground
wire (E) from external ground conductor screw (A).
B
A
E
1. Prepare to connect neutral ground wire
and neutral wire
B
CE
2. Connect neutral ground wire
and neutral wire
Connect neutral ground wire (E) and neutral wire (white) (C)
of power supply cord under center terminal block screw (B).
Tighten screw.
A
F
Connect ground wire (F) (green or bare) of power supply cord
to external ground conductor screw (A). Tighten screw.
3. Connect ground wire
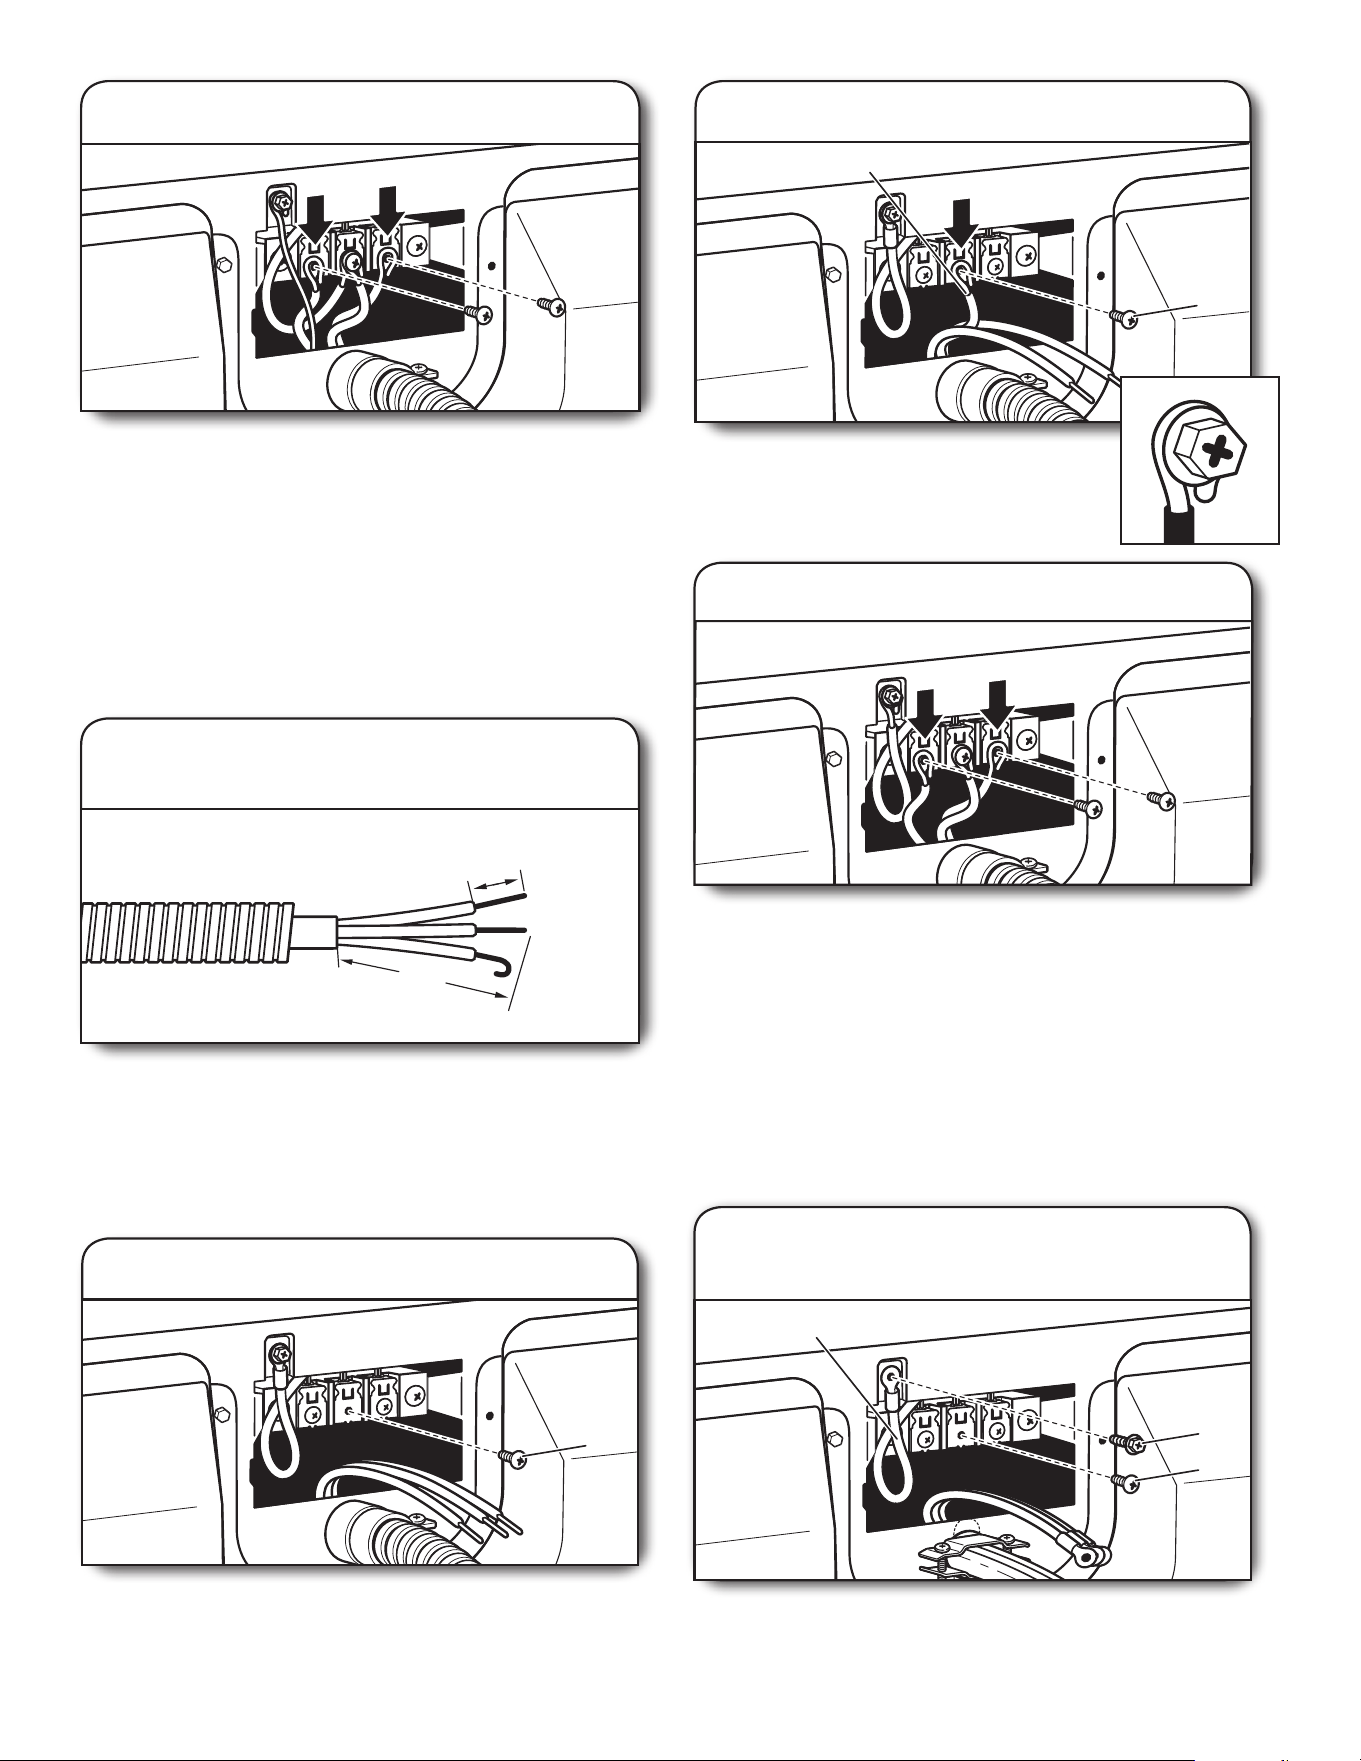
3-wire receptacle (NEMA
type 10-30R)
3-prong plug
Spade terminals with
upturned ends
Ring terminals
Use where local codes permit connecting cabinet-ground
conductor to neutral wire.
3-wire Power Supply Cord Connection
Remove center terminal block screw (B).
B
1. Remove center screw
4. Connect remaining wires
Connect remaining wires to outer terminal block screws.
Tighten screws. Finally, reinstall terminal block cover.
Secure cover with hold down screw. Now, go to “Venting
Requirements.”
13
3. Connect remaining wires
Connect remaining wires to outer terminal block screws. Tighten
screws. Finally, reinstall terminal block cover. Secure cover with
hold down screw. Now, go to “Venting Requirements.”
2. Connect neutral wire
Connect neutral wire (white or center) (C) of power supply cord
to center terminal block screw (B). Tighten screw.
B
C
B
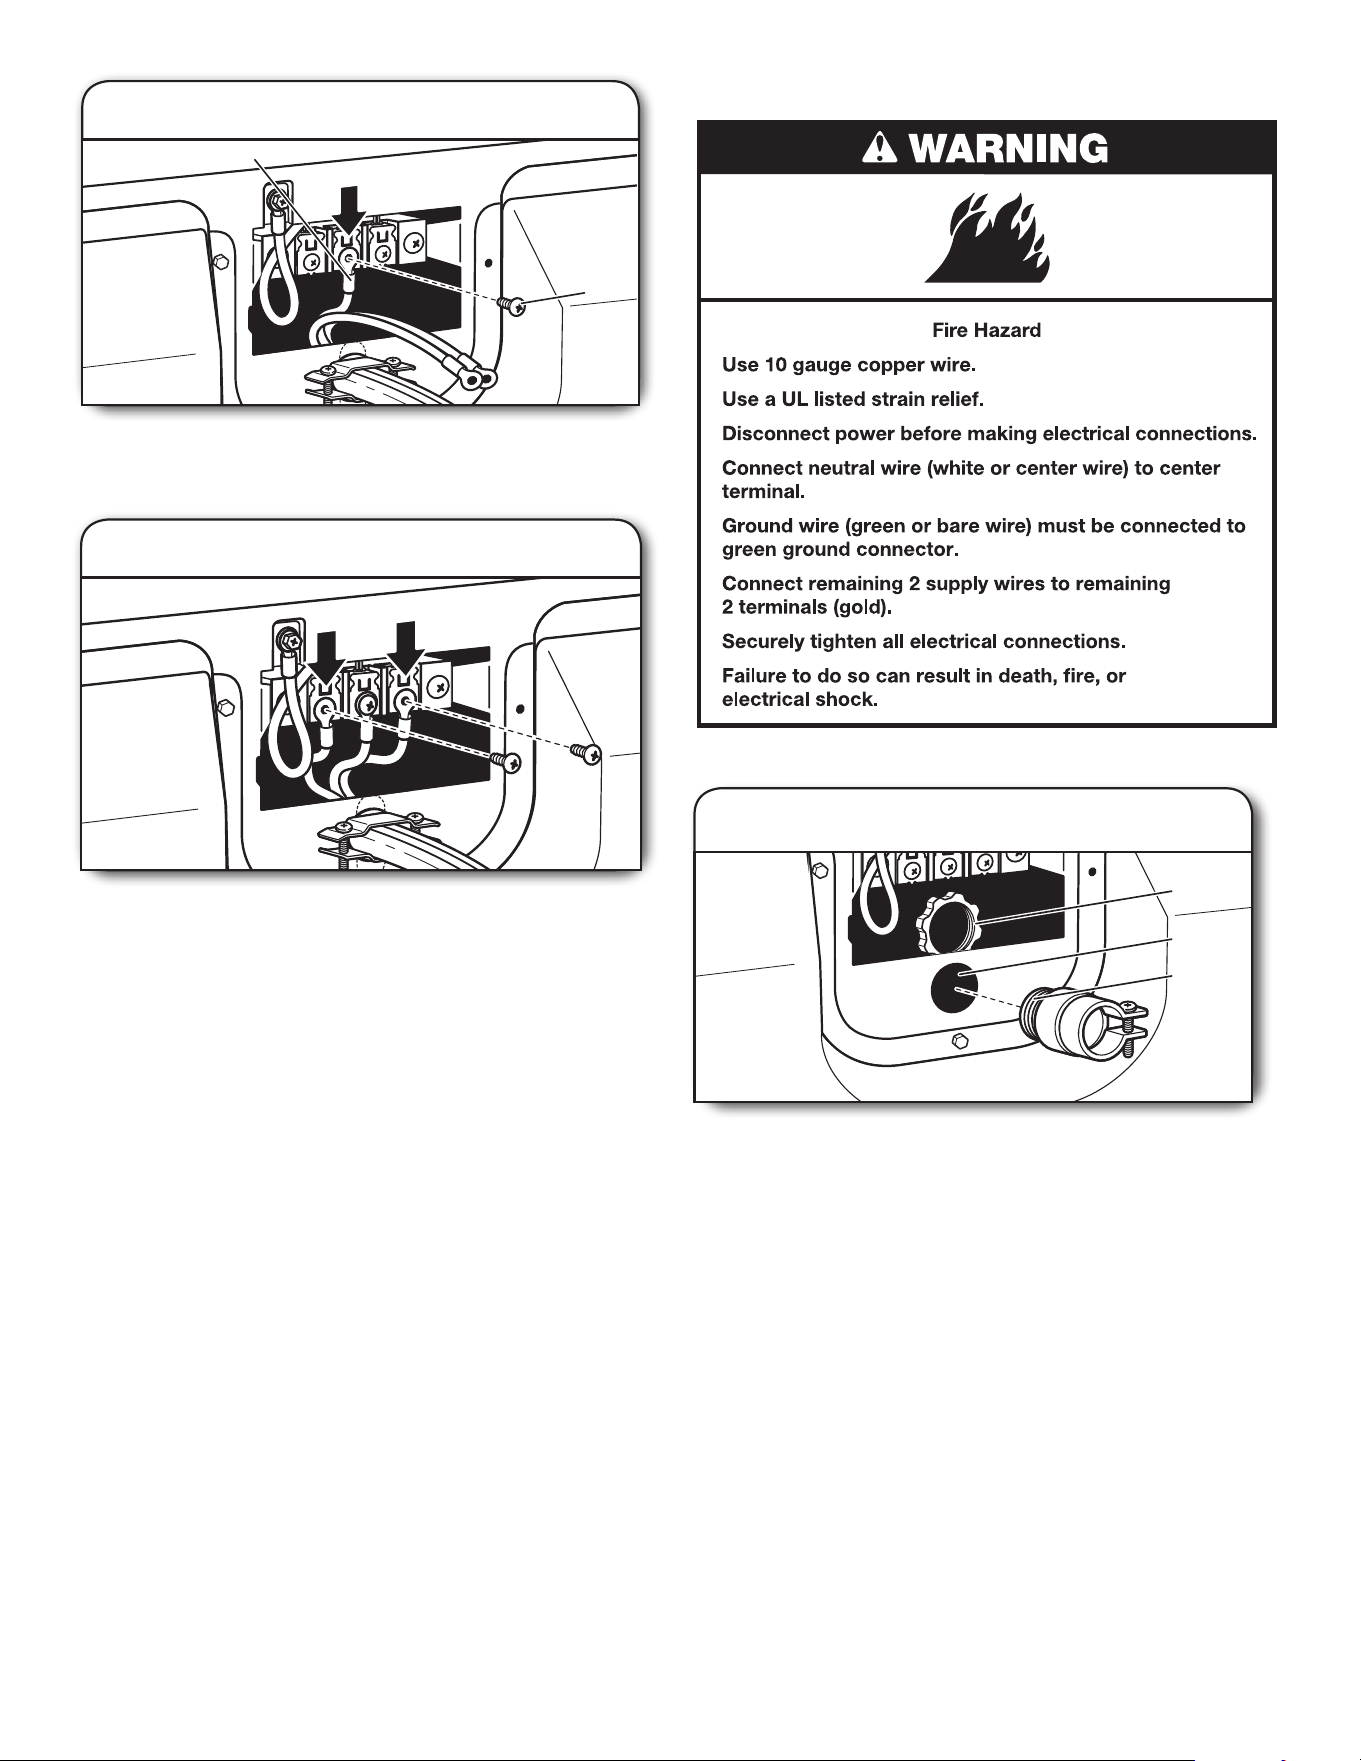
DIRECT WIRE CONNECTION
Unscrew the removable conduit connector (A) and any screws
from a 3/4" (19 mm) UL Listed strain relief. Put the threaded
section of the strain relief (C) through the hole below the
terminal block opening (B). Reaching inside the terminal block
opening, screw the removable conduit connector (A) onto the
strain relief threads.
C
B
A
1. Attach direct wire strain relief
Direct Wire Strain Relief
14
Put direct wire cable through the strain relief. The strain
relief should have a tight t with the dryer cabinet and be
in a horizontal position. Tighten strain relief screw against
the direct wire cable.
2. Attach direct wire cable to strain relief
3-wire direct connection:
Go to “3-wire Direct Connection”.
4-wire direct connection:
Go to “4-wire Direct Connection”
on this page.
If your wiring looks like this:
4-wire Direct Wire Connection
IMPORTANT: A 4-wire connection is required for mobile homes
and where local codes do not permit 3-wire connections.
Direct wire cable must have 5 ft. (1.52 m) of extra length
so dryer may be moved if needed.
Strip 5" (127 mm) of outer covering from end of cable,
leaving bare ground wire at 5" (127 mm). Cut 1
1
/
2
" (38 mm)
from remaining 3 wires. Strip insulation back 1" (25 mm).
Shape ends of wires into hooks.
1. Prepare your 4-wire cable
for direct connection
4. Connect ground wire
FE
A
Connect ground wire (green or bare) (F) of direct wire cable
to external ground conductor screw (A). Tighten screw.
B
E C
3. Connect neutral ground wire
and neutral wire
Connect neutral ground wire (E) and place
hooked end (hook facing right) of neutral
wire (white or center wire) (C) of direct wire
cable under center screw of terminal block
(B). Squeeze hooked ends together and
tighten screw.
2. Prepare to connect neutral
ground wire and neutral wire
B
A
E
Remove center terminal block screw (B). Remove neutral
ground wire (E) from external ground conductor screw (A).
1"
(25 mm)
3
1
⁄
2
"
(89 mm)
5"
(127 mm)
15
Place hooked ends of remaining direct wire cable wires
under outer terminal block screws (hooks facing right).
Squeeze hooked ends together and tighten screws. Finally,
reinstall terminal block cover. Secure cover with hold-down
screw. Now, go to “Venting Requirements.”
5. Connect remaining wires
3-wire Direct Wire Connection
Use where local codes permit connecting cabinet-ground
conductor to neutral wire.
B
2. Remove center screw
Remove center terminal block screw (B).
Direct wire cable must have 5 ft. (1.52 m) of extra length so
dryer may be moved if needed.
Strip 3
1
/
2
" (89 mm) of outer covering from end of cable. Strip
insulation back 1" (25 mm). If using 3-wire cable with ground
wire, cut bare wire even with outer covering. Shape wire ends
into hooks.
1"
(25 mm)
3½"
(89 mm)
1. Prepare your 3-wire cable
for direct connection
4. Connect remaining wires
Place hooked ends of remaining direct wire cable wires under
outer terminal block screws (hooks facing right). Squeeze
hooked ends together and tighten screws. Finally, reinstall
terminal block cover. Secure cover with hold-down screw.
Now, go to “Venting Requirements.”
B
C
Place hooked end of neutral wire (white
or center) (C) of direct wire cable under
center terminal block screw (B). Squeeze
hooked end together. Tighten screw.
3. Connect neutral wire
1. Prepare to connect neutral
ground wire and neutral wire
B
A
E
Remove center terminal block screw (B). Remove neutral ground
wire (E) from external ground conductor screw (A).
Optional 3-wire Connection with External
Grounding
You must verify with a qualified electrician that this
grounding method is acceptable before connecting.
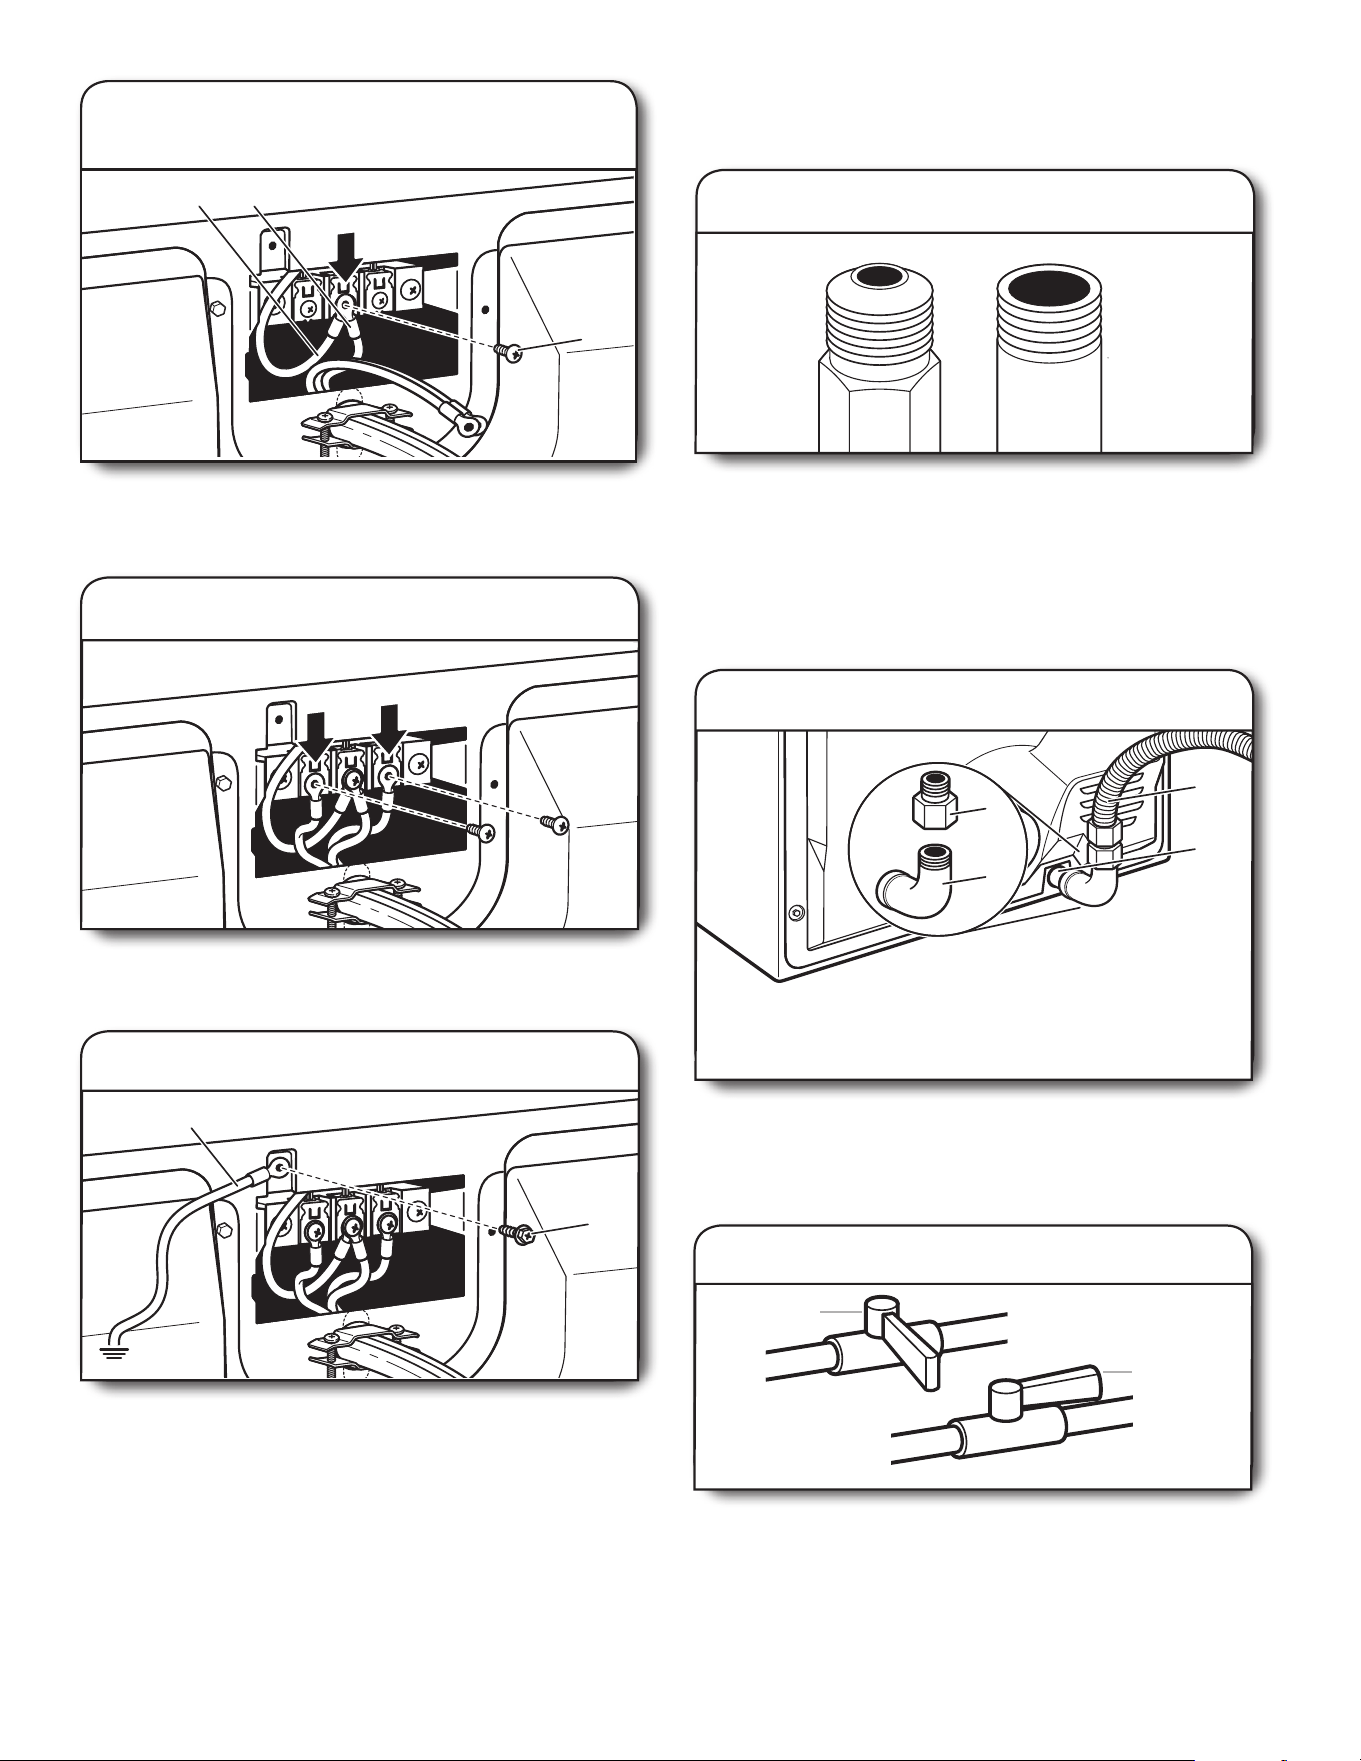
16
B
CE
2. Connect neutral ground wire
and neutral wire
Connect neutral ground wire (E) and neutral wire (white or
center wire) (C) of power supply cord or cable under center
terminal block screw (B). Tighten screw.
3. Connect remaining wires
Place hooked ends of remaining wires under outer terminal
block screws (hooks facing right). Tighten screws.
A
E
4. Connect external ground wire
Connect a separate copper ground wire (E) from the external
ground conductor screw (A) to an adequate ground. Finally,
reinstall terminal block cover. Secure cover with hold-down
screw. Now, go to “Venting Requirements.”
1. Connect gas supply to dryer
Remove red cap from gas pipe. Using a wrench to tighten,
connect gas supply to dryer. Use pipe-joint compound
on threads of all non-ared male ttings. If exible metal
tubing is used, be sure there are no kinks.
NOTE: For propane gas connections, you must use pipe-joint
compound resistant to action of propane gas. Do not use
TEFLON
®
tape.
A
B
Non-ared
male tting
Flared
male tting
3. Open shut-o valve
Open shut-o valve in supply line; valve is open when handle
is parallel to gas pipe. Then, test all connections by brushing
on an approved noncorrosive leak-detection solution. Bubbles
will show a leak. Correct any leaks found.
A
B
Open valve
Closed valve
A
B
D
C
2. Plan pipe tting connection
A combination of pipe ttings must be used to connect dryer
to existing gas line. A recommended connection is shown. Your
connection may be dierent, according to supply line type,
size, and location.
A. 3/8" exible gas connector
B. 3/8" dryer pipe
C. 3/8" to 3/8" pipe elbow
D. 3/8" pipe-to-are adapter tting
MAKE GAS CONNECTION –
U.S.A. AND CANADA
17
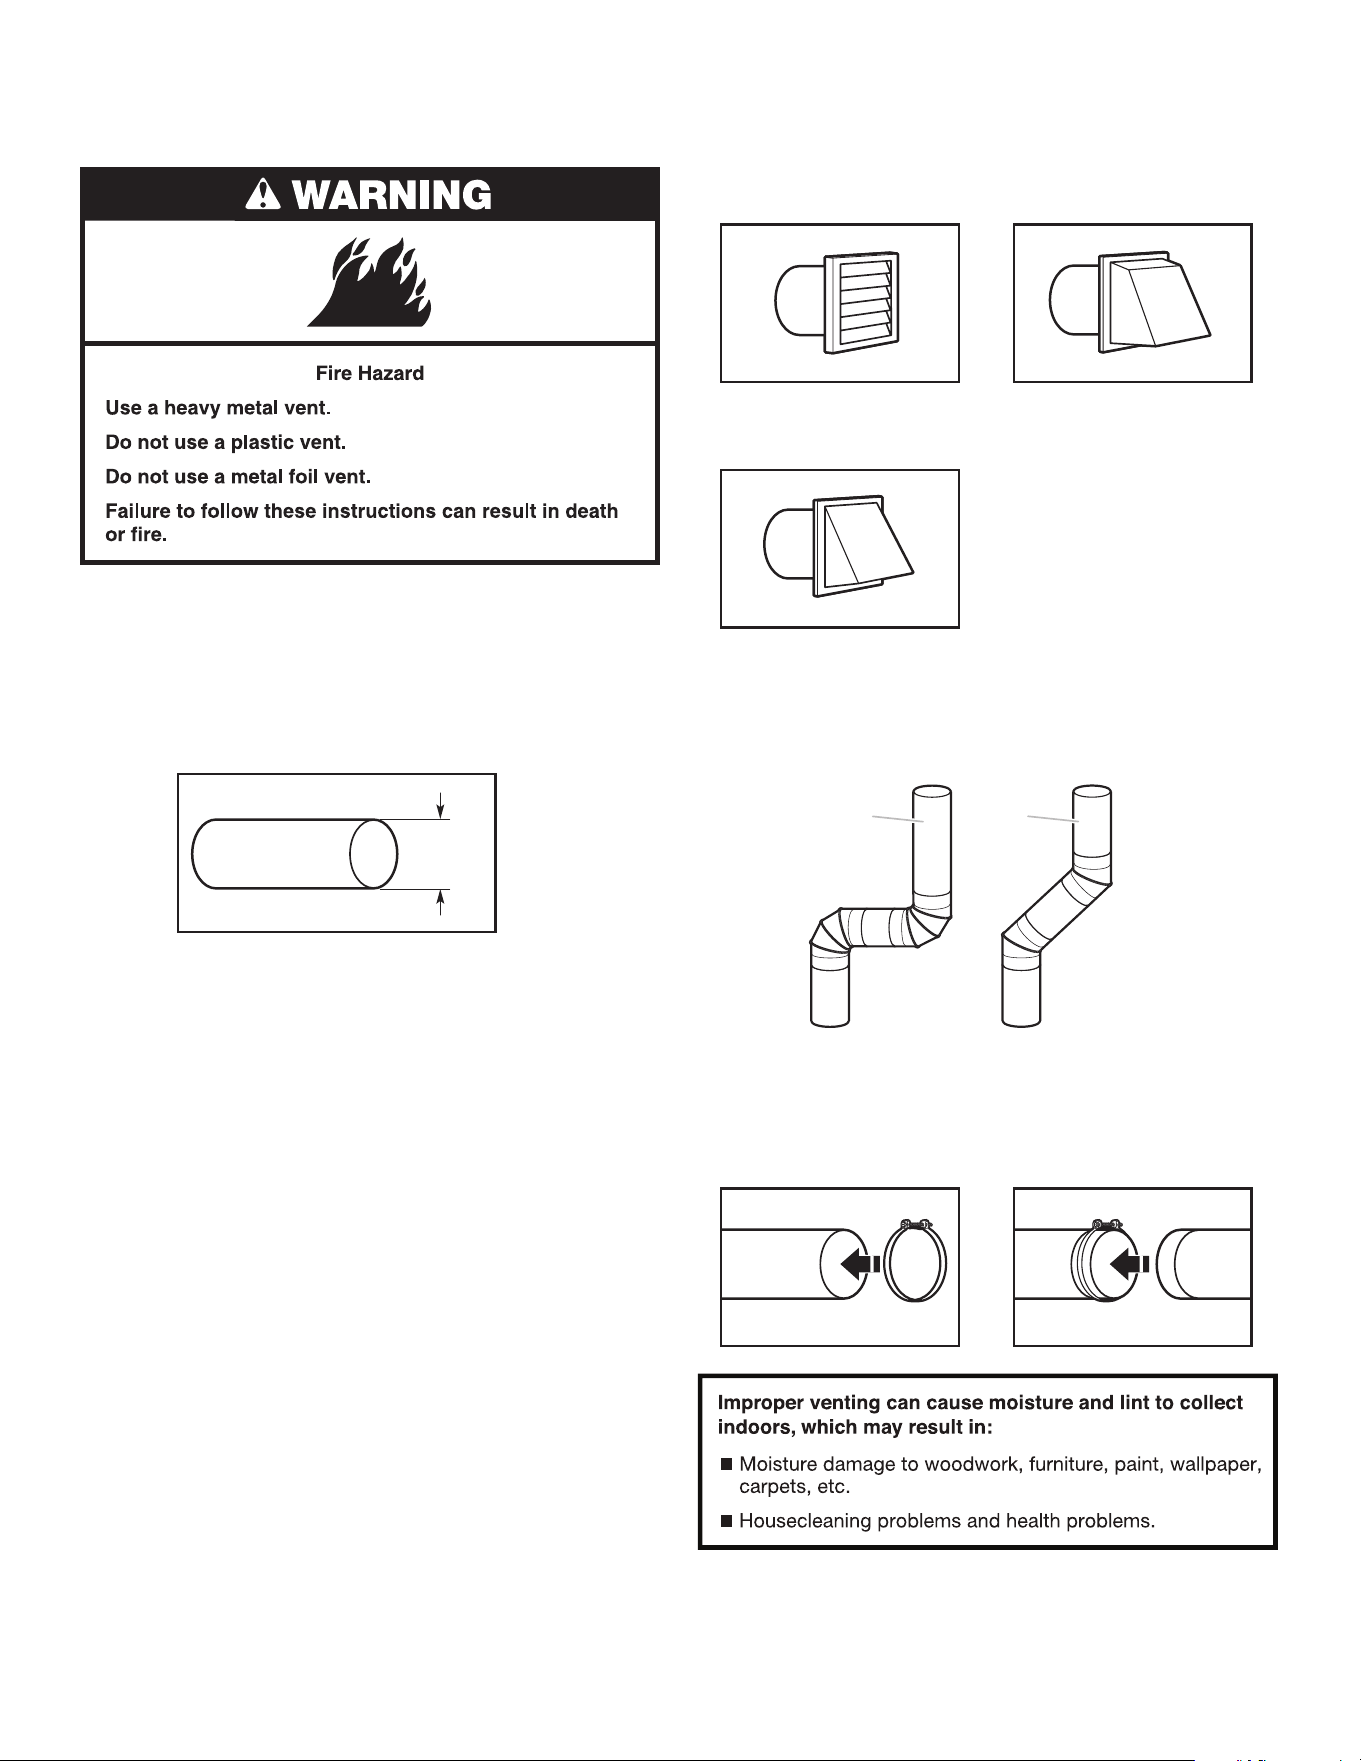
Venting Requirements
WARNING: To reduce the risk of re, this dryer MUST BE
EXHAUSTED OUTDOORS.
IMPORTANT: Observe all governing codes and ordinances.
Dryer exhaust must not be connected into any gas vent, chimney,
wall, ceiling, attic, crawlspace, or a concealed space of a
building. Only rigid or exible metal vent shall be used for
exhausting.
4"
(102 mm)
4" (102 mm) heavy metal exhaust vent
■ Only a 4" (102 mm) heavy metal exhaust vent and clamps
may be used.
■ Do not use plastic or metal foil vent.
Rigid metal vent:
■ Recommended for best drying performance and to avoid
crushing and kinking.
Flexible metal vent: (Acceptable only if accessible to clean)
■ Must be fully extended and supported in nal dryer location.
■ Remove excess to avoid sagging and kinking that may
result in reduced airow and poor performance.
■ Do not install in enclosed walls, ceilings, or oors.
■ The total length should not exceed 7
3
/
4
ft. (2.4 m).
■ The length of exible metal vent used must be included in the
overall vent system design as shown in the “Vent System Chart.”
NOTE: If using an existing vent system, clean lint from entire length
of the system and make sure exhaust hood is not plugged with
lint. Replace plastic or metal foil vents with rigid metal or exible
metal vents. Review Vent System Chart and, if necessary, modify
existing vent system to achieve best drying performance.
VENTING
Clamps:
■ Use clamps to seal all joints.
■ Exhaust vent must not be connected or secured with screws
or other fastening devices that extend into interior of duct
and catch lint. Do not use duct tape.
Vent products can be purchased from your dealer or by calling
1-844-553-6667 (U.S.) or 1-800-469-4663 (Canada).
Louvered Hood
Good
Angled Hood
Box Hood
Better
Exhaust hoods:
Elbows:
Recommended Styles:
Recommended Styles:
■ 45° elbows provide better airow than 90° elbows.
■ Must be at least 12" (305 mm) from ground or any object
that may obstruct exhaust (such as owers, rocks, bushes,
or snow).
Acceptable Style:
18
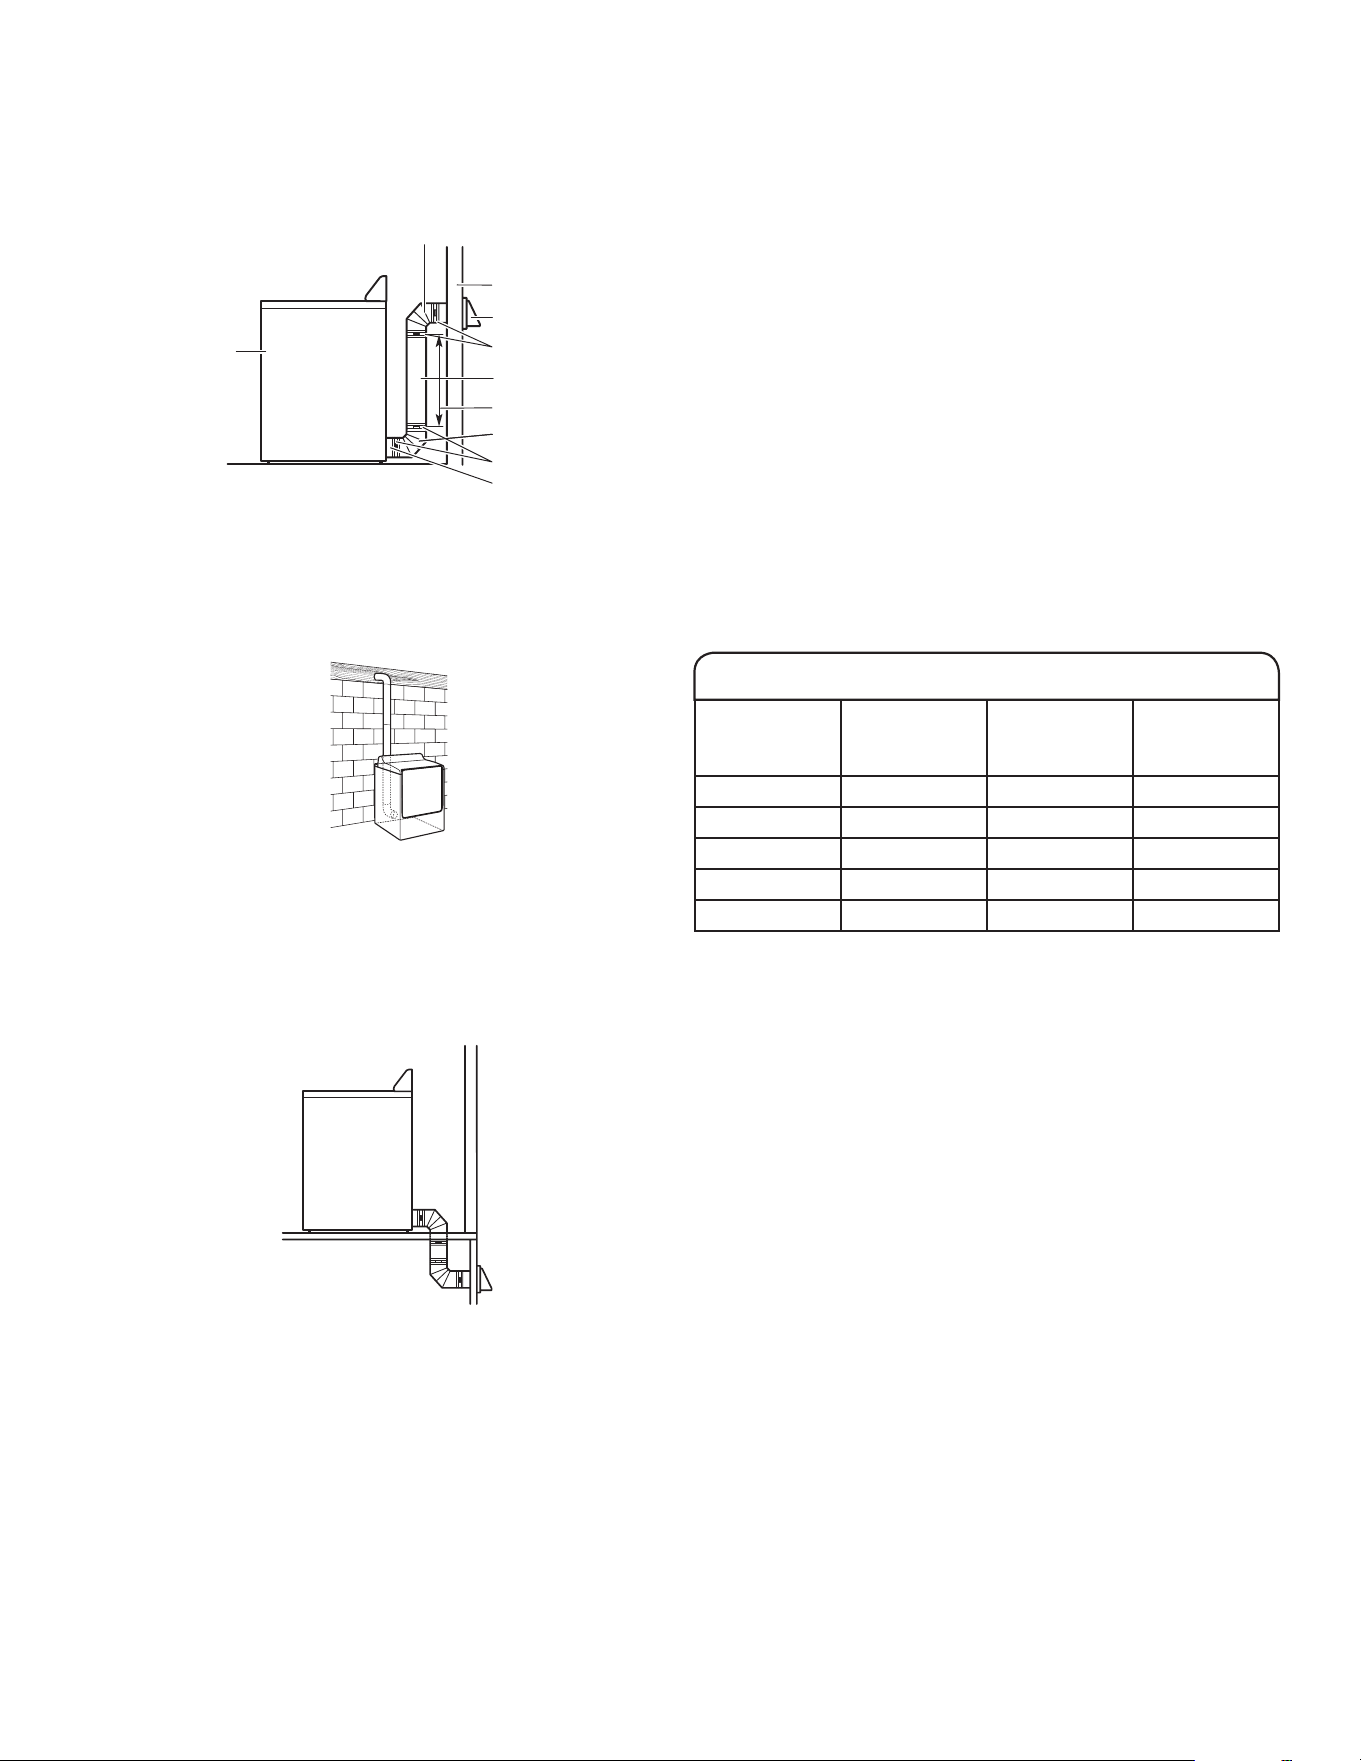
Plan Vent System
Recommended exhaust installations
Typical installations vent the dryer from the rear of the dryer.
Other installations are possible.
B
B
C
D
E
E
F
G
H
A
A. Dryer
B. Elbow
C. Wall
D. Exhaust hood
E. Clamps
F. Rigid metal or exible metal vent
G. Vent length necessary to connect elbows
H. Exhaust outlet
Standard rear oset exhaust installation
Special provisions for mobile homes:
Exhaust vent must be securely fastened to a noncombustible
portion of mobile home and must not terminate beneath the
mobile home. Terminate exhaust vent outside.
Mobile home exhaust installation
Determine vent length and elbows needed for best drying
performance:
■ Use following Vent System Chart to determine type of vent
material and hood combinations acceptable to use.
NOTE: Do not use vent runs longer than those specied
in Vent System Chart. Exhaust systems longer than those
specied will:
■ Shorten life of dryer.
■ Reduce performance, resulting in longer drying times
and increased energy usage.
Determine vent path:
■ Select route that will provide straightest and most direct
path outdoors.
■ Plan installation to use fewest number of elbows and turns.
■ When using elbows or making turns, allow as much room
as possible.
■ Bend vent gradually to avoid kinking.
■ Use as few 90° turns as possible.
Number of
90° turns
or elbows
Type
of vent
Box/louvered
hoods
Angled
hoods
0 Rigid metal 64 ft. (20 m) 58 ft. (17.7 m)
1 Rigid metal 54 ft. (16.5 m) 48 ft. (14.6 m)
2 Rigid metal 44 ft. (13.4 m) 38 ft. (11.6 m)
3 Rigid metal 35 ft. (10.7 m) 29 ft. (8.8 m)
4 Rigid metal 27 ft. (8.2 m) 21 ft. (6.4 m)
Vent System Chart
19
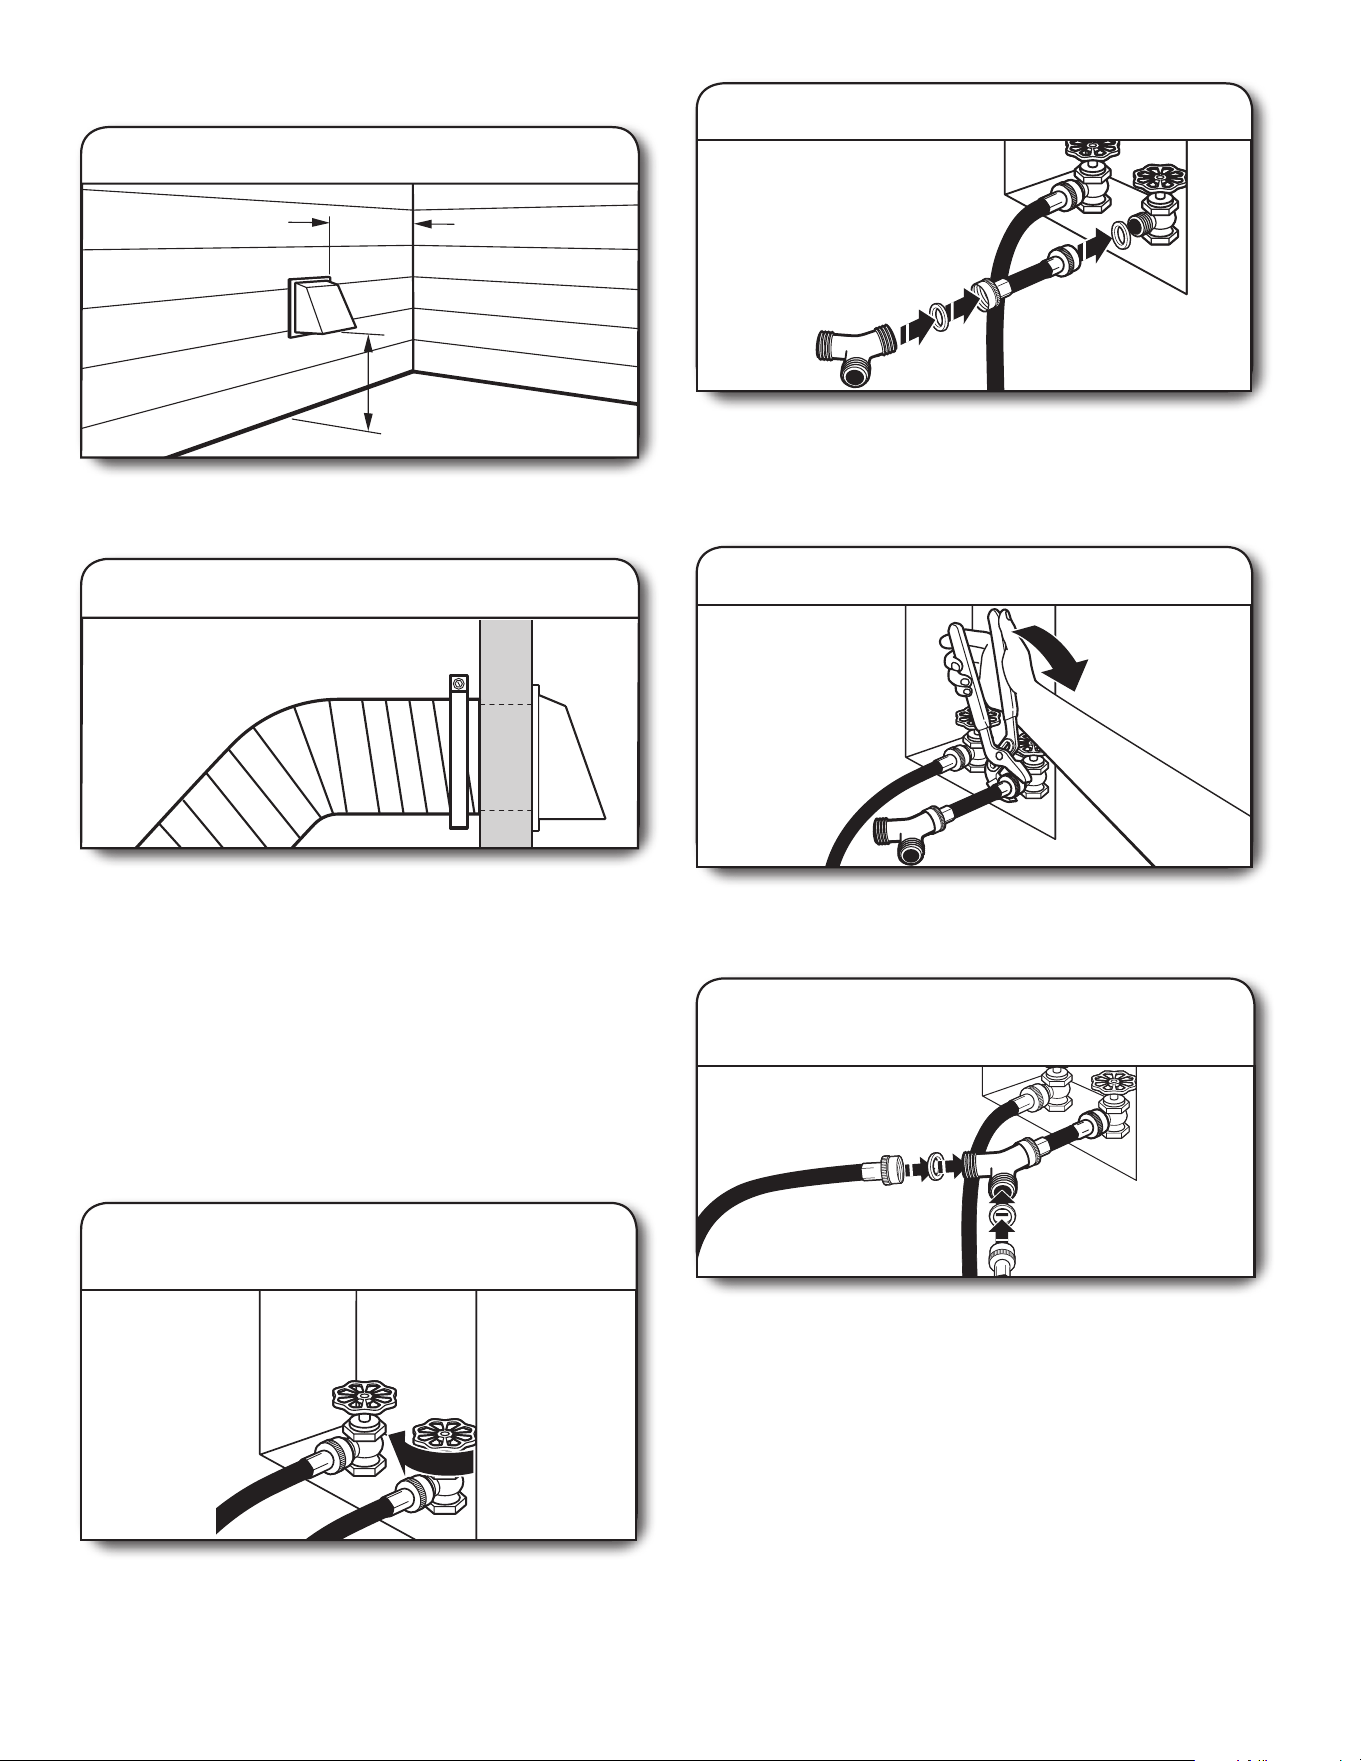
2. Connect vent to exhaust hood
Vent must t over the exhaust hood. Secure vent to exhaust
hood with 4" (102 mm) clamp. Run vent to dryer location using
straightest path possible. Avoid 90° turns. Use clamps to seal
all joints. Do not use duct tape, screws, or other fastening
devices that extend into interior of vent to secure vent,
because they can catch lint.
INSTALL VENT SYSTEM
12" min.
(305 mm)
12" min.
(305 mm)
1. Install exhaust hood
Install exhaust hood and use caulking compound to seal
exterior wall opening around exhaust hood.
CONNECT INLET HOSES
For non-steam models, skip to “Connect Vent.”
The dryer must be connected to the cold water faucet using
the new inlet hoses. Do not use old hoses.
Turn cold water faucet o and remove washer inlet hose.
Remove old rubber washer from inlet hose and replace
with new rubber washer.
1. Turn cold water o; remove and replace
rubber washer
3. Tighten couplings
Using pliers, tighten the couplings with additional two-thirds turn.
NOTE: Do not overtighten. Damage to the coupling can result.
2. Attach short hose and “Y” connector
Attach 2 ft (0.6 m) inlet hose to cold water faucet. Screw on
coupling by hand until it is seated on faucet. Then attach “Y”
connector to one end of the 2 ft (0.6 m) inlet hose. Screw on
coupling by hand until it is seated on connector.
4. Attach long hose to “Y” connector
and tighten couplings
Attach one end of dryer 5 ft (1.5 m) inlet hose to the “Y”
connector. Attach washer cold inlet hose to other side of “Y”
connector. Screw on coupling by hand until it is seated on
connector. Using pliers, tighten the couplings an additional
two-thirds turn.
NOTE: Do not overtighten. Damage to the coupling can result.
20
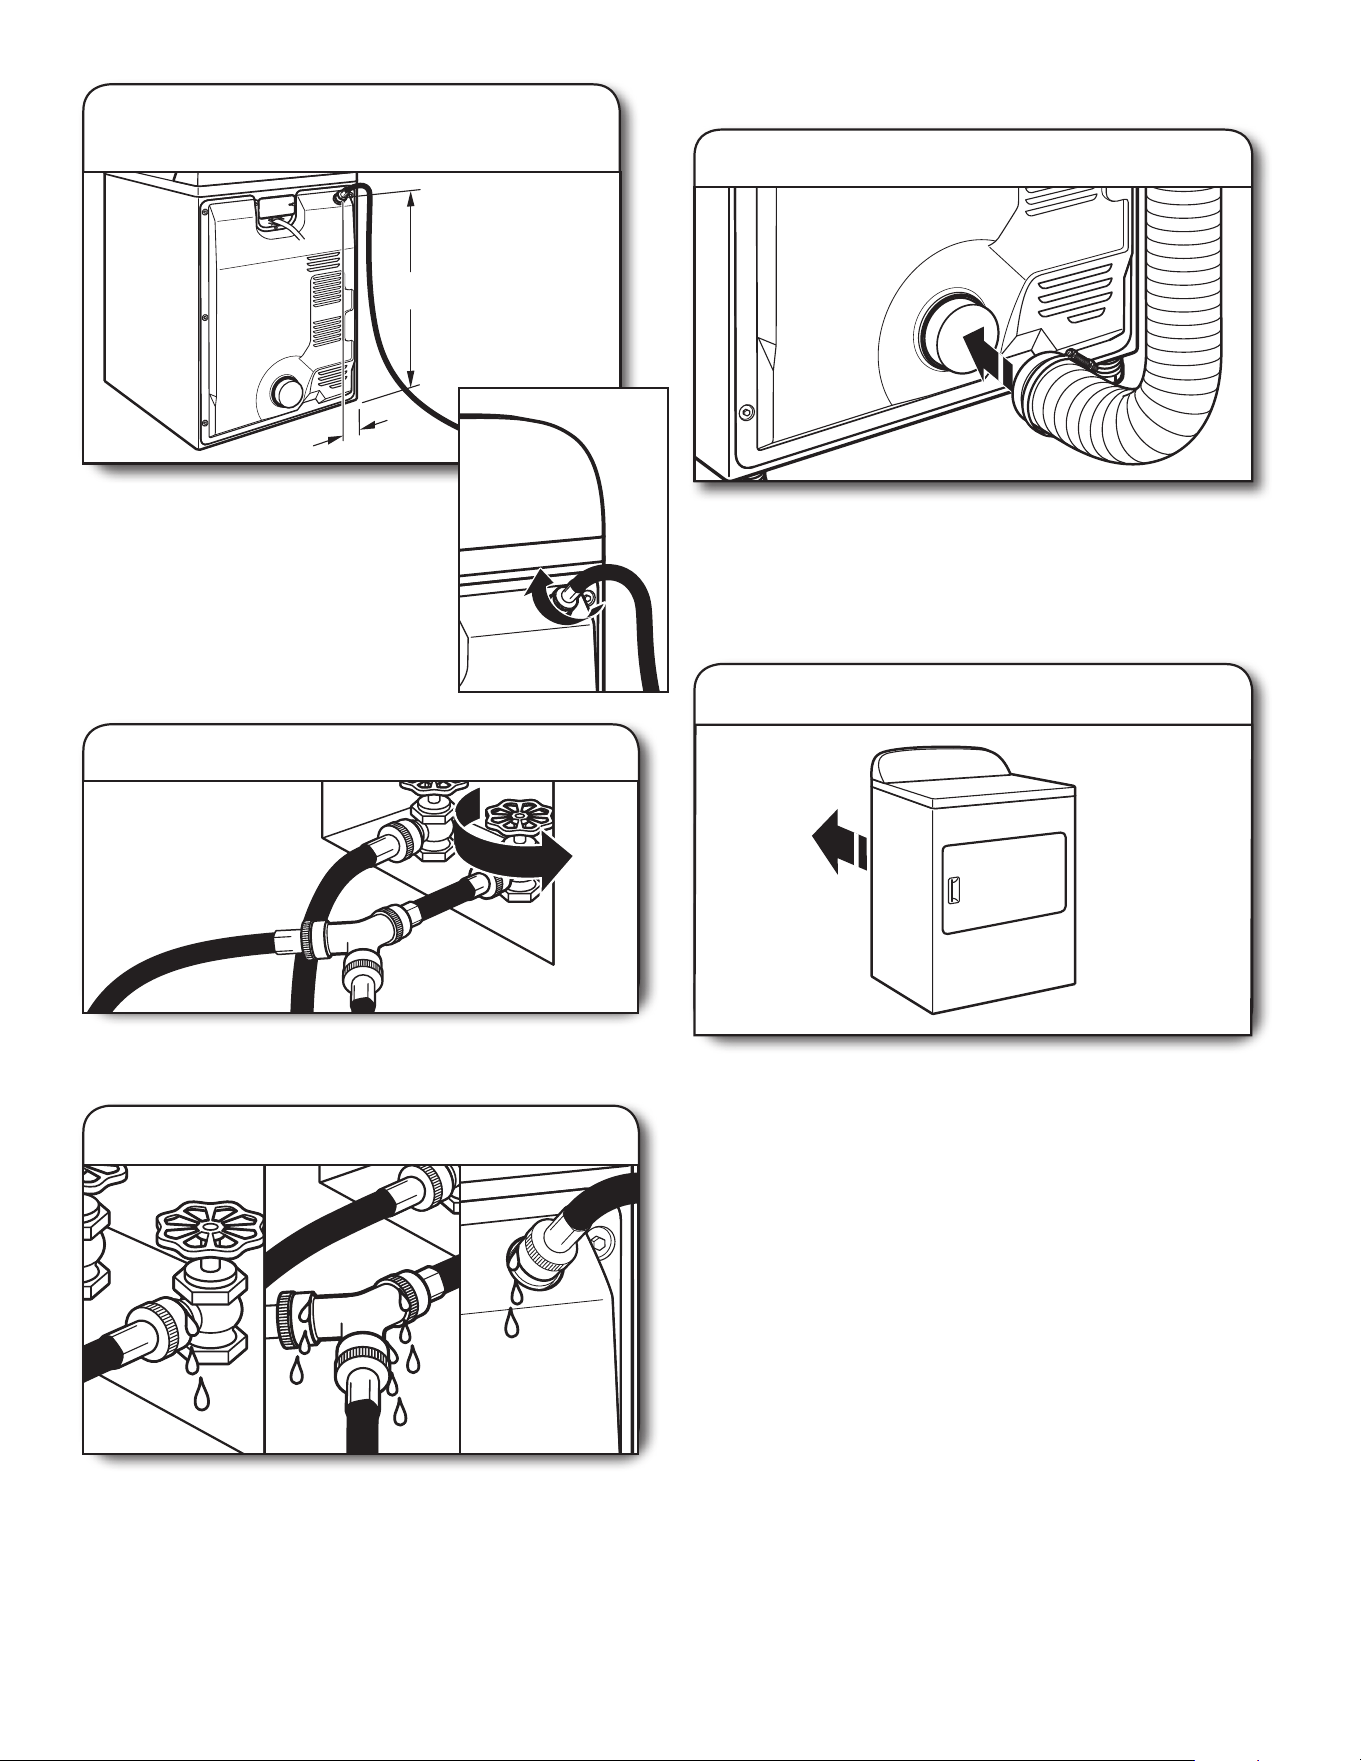
CONNECT VENT
1. Connect vent to exhaust outlet
Using a 4" (102 mm) clamp, connect vent to exhaust outlet
in dryer. If connecting to existing vent, make sure vent is clean.
Vent must t over dryer exhaust outlet and inside exhaust
hood. Check that vent is secured to exhaust hood with a
4" (102 mm) clamp.
2. Move dryer to nal location
Move dryer to nal location. Avoid crushing or kinking vent.
5. Attach long hose to dryer ll valve
and tighten coupling
7. Check for leaks
Check for leaks around “Y” connector, faucets, and hoses.
6. Turn on cold water faucet
Check that the water faucet is turned on.
4"
(101 mm)
30
1
/4"
(768 mm)
Attach other end of long hose to ll
valve at top of dryer back panel.
Screw on coupling by hand until
it is seated on ll valve connector.
Using pliers, tighten the coupling an
additional two-thirds turn.
NOTE: Do not overtighten. Damage
to the coupling can result.
21
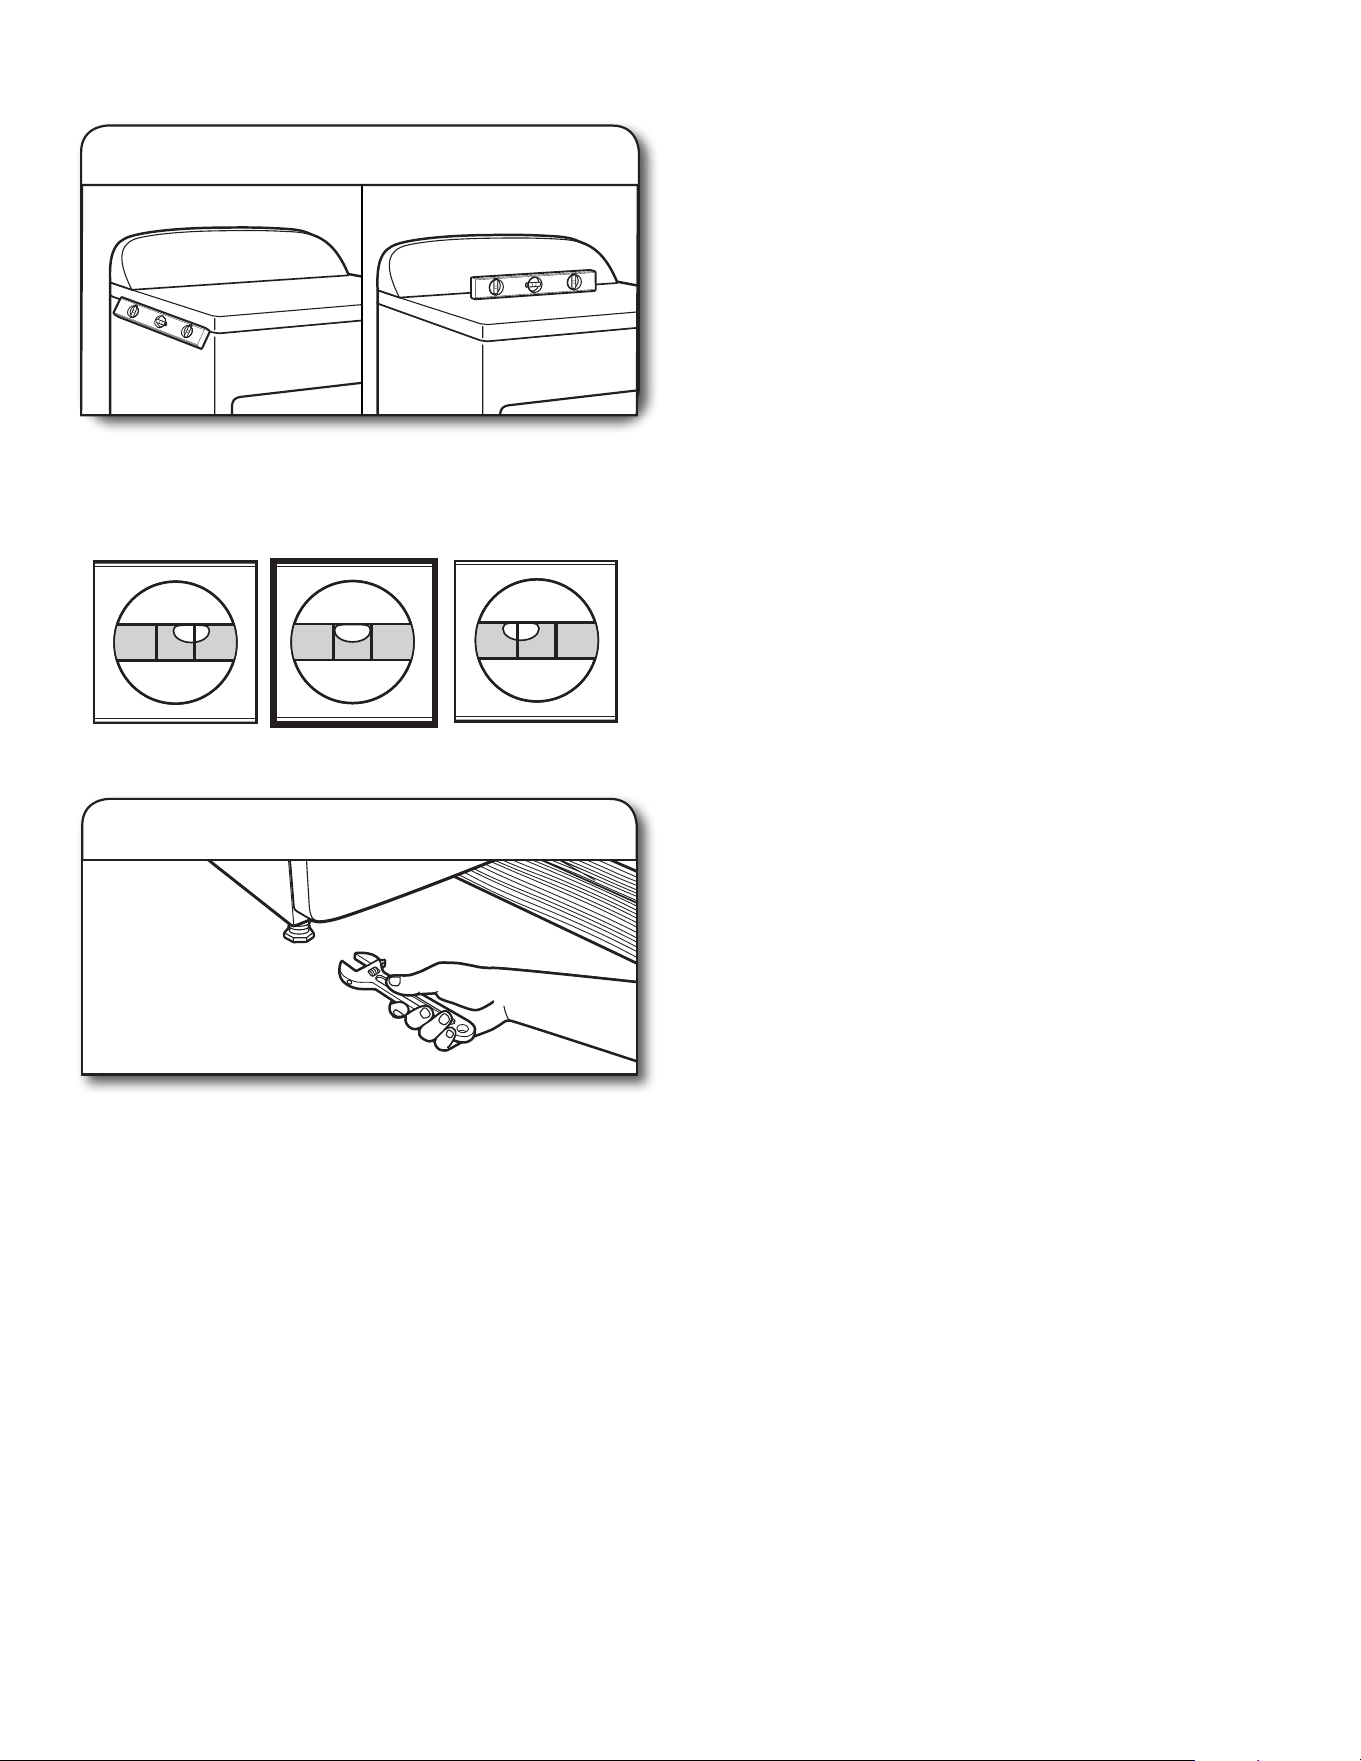
LEVEL DRYER
Not Level LEVEL Not Level
Check levelness of dryer from side to side. Repeat from
front to back.
NOTE: The dryer must be level for the moisture sensing
system to operate correctly.
1. Level dryer
2. Adjust leveling legs
If dryer is not level, prop up using a wood block. Use wrench
to adjust legs up or down, and check again for levelness.
COMPLETE INSTALLATION
CHECKLIST
■ Check that all parts are now installed. If there is an extra
part, go back through steps to see what was skipped.
■ Check that you have all of your tools.
■ Dispose of/recycle all packaging materials.
■ Check dryer’s nal location. Be sure vent is not crushed
or kinked.
■ Check that dryer is level. See “Level Dryer.”
■ Remove lm on console and any tape remaining on dryer.
■ Wipe dryer drum interior thoroughly with a damp cloth to
remove any dust.
■ Read “Dryer Use” in your “Use and Care Guide.”
Electric Models:
■ For power supply cord installation, plug into a grounded
outlet. For direct wire installation, turn on power.
Gas Models:
■ Check that gas supply is on.
■ Check for leaks.
Steam models only:
■ Be sure the water faucets are on.
■ Check for leaks around “Y” connector, faucet, and hoses.
All Models:
■ Select a Timed Dry heated cycle, and start dryer.
Do not select Air Only Temperature setting.
If dryer will not start, check the following:
• Controls are set in a running or “On” position.
• Start button has been touched and held for 3 seconds.
• Dryer is plugged into an outlet and/or electrical supply
is connected.
• Household fuse is intact and tight, or circuit breaker has
not tripped.
• Dryer door is closed.
This dryer automatically runs an installation diagnostic routine
at the start of its rst cycle.
If you receive an L2 code, there may be a problem with your
home power supply keeping the dryer’s heater from turning on.
See “Troubleshooting.”
NOTE: You may notice an odor when dryer is rst heated. This
odor is common when heating element is rst used. The odor will
go away.
22
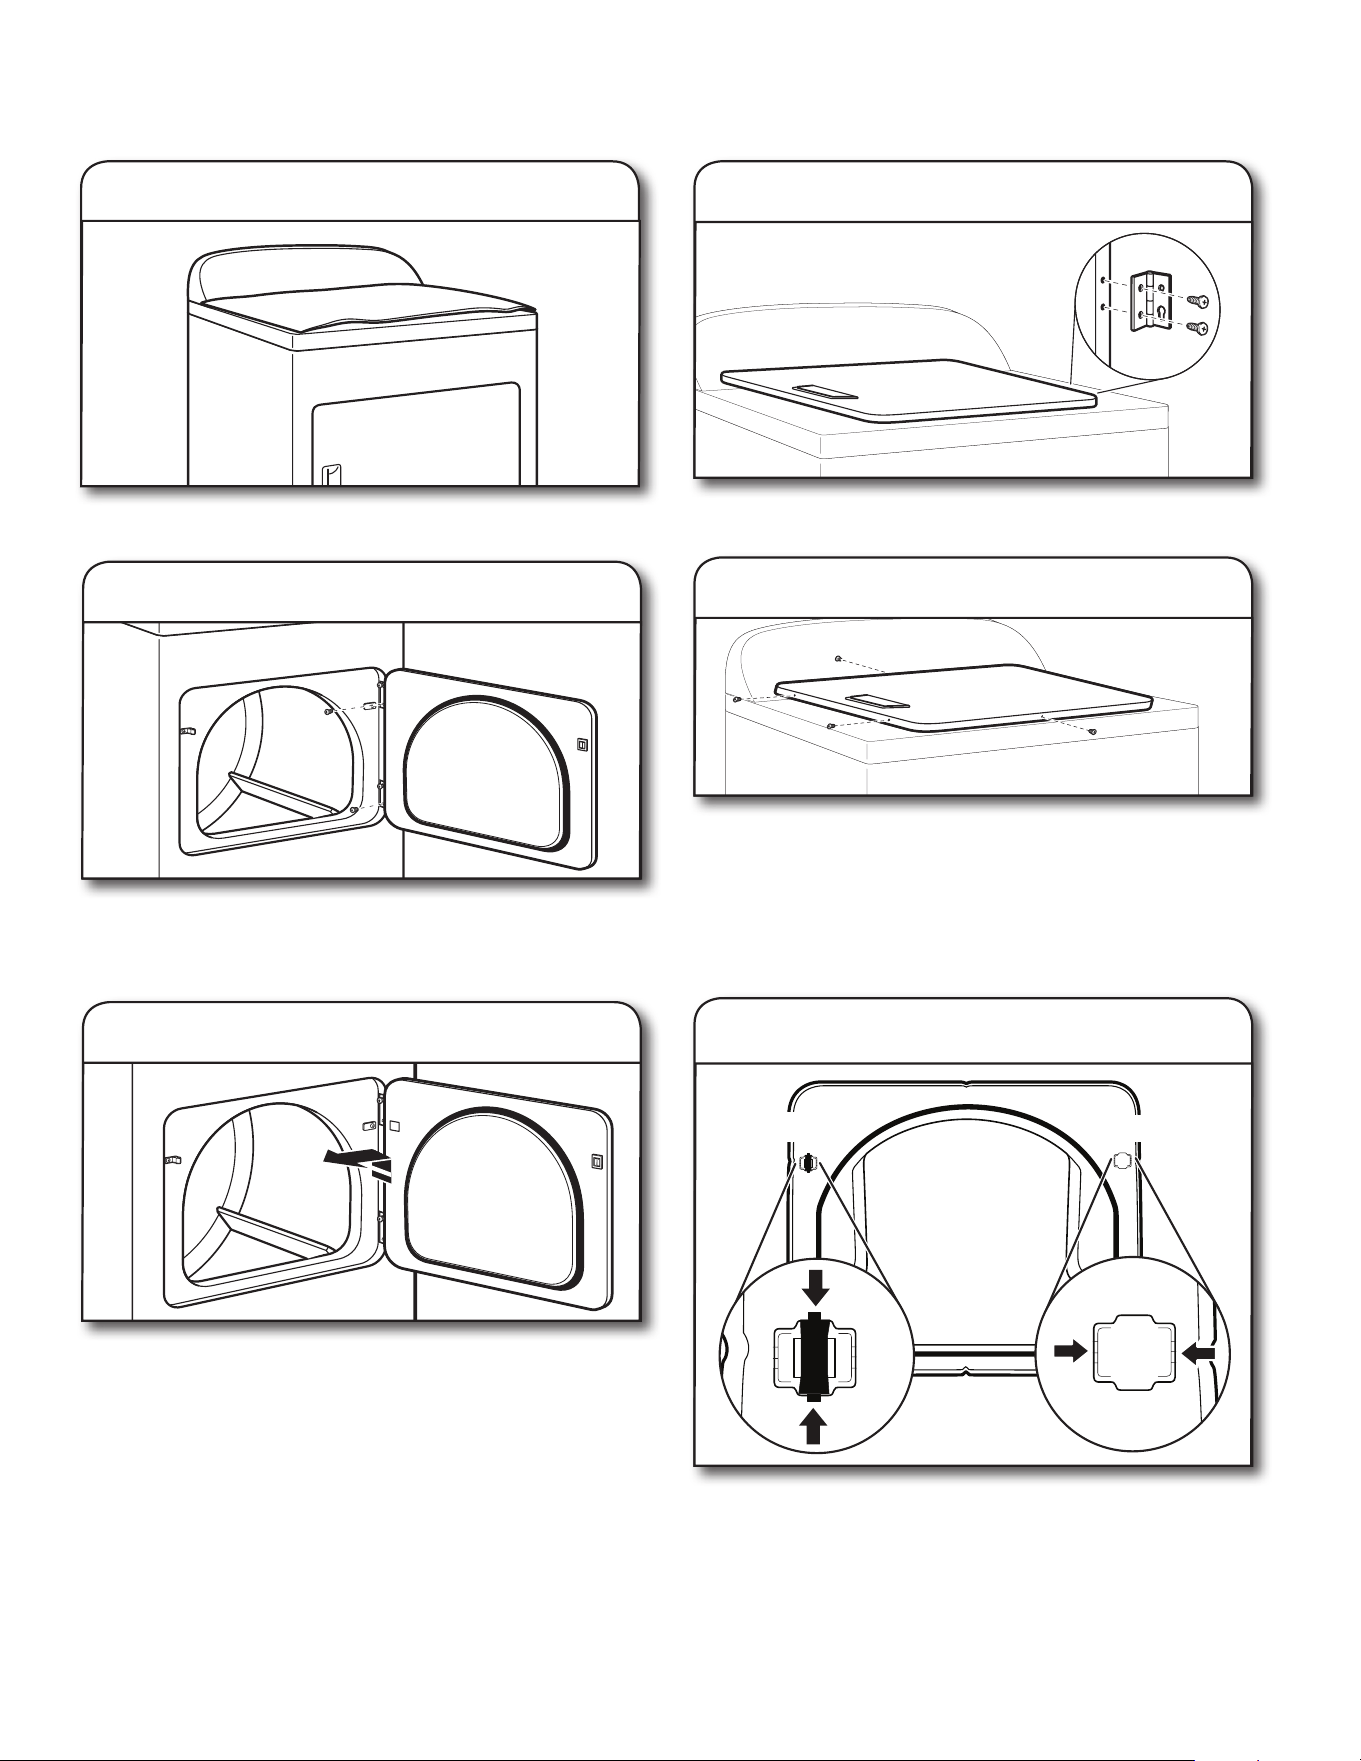
REVERSE DOOR SWING (OPTIONAL)
NOTE: Magnetized screwdriver is helpful.
Place towel on top of dryer to avoid damaging the surface.
1. Place towel on dryer
2. Remove bottom screws
Open dryer door. Remove bottom screws from dryer cabinet side
of hinges. Loosen (do not remove) top screws from dryer cabinet
side of hinges.
Lift door until top screws in dryer cabinet are in large part of
hinge slot. Pull door forward o screws. Set door (handle side
up) on top of dryer. Remove top screws from dryer cabinet.
3. Lift door o top screws
Remove screws at top, bottom, and side of door (4 screws) that
hold the inner and outer door together. Holding door over towel
on dryer, grasp sides of outer door and lift to separate it from
inner door. Set outer door aside.
NOTE: Do not pry apart with putty knife or screwdriver.
Do not pull on door seal or plastic door catches.
5. Remove screws from door
Remove the door catch, bezel, and plug from the inside of the
inner door by squeezing and pulling/pushing them. Place the
door catch, bezel, and plug on the sides opposite from where
they were.
Plug
Catch and bezel
6. Switch door catch, bezel, & plug
4. Remove screws from hinges
Remove screws attaching hinges to door.
23
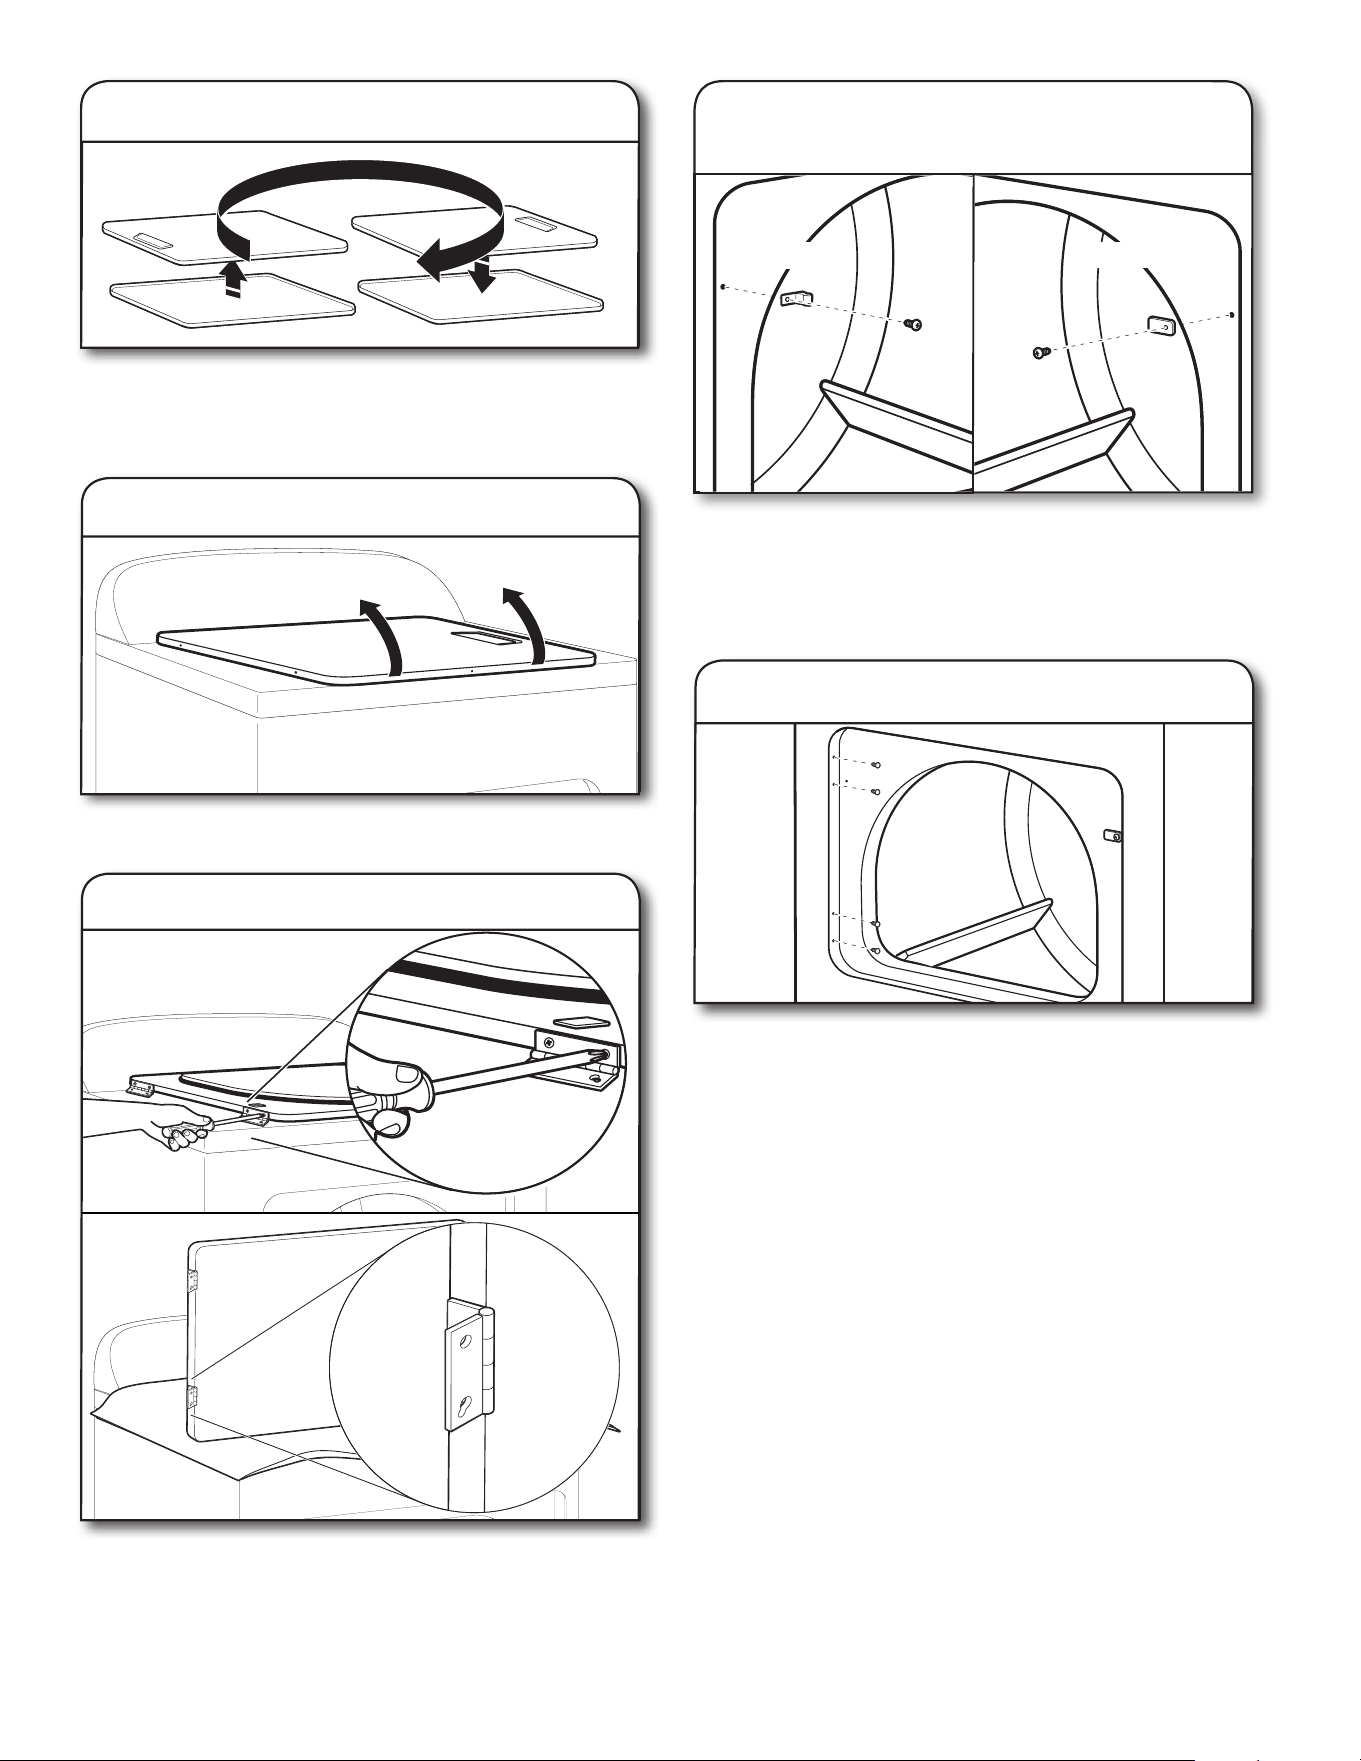
7. Rotate outer door
Rotate outer door 180º and set it back down on inner door.
Reattach outer door panel to inner door panel so handle is on
the side where hinges were just removed. Insert 4 door screws.
8. Flip door over
Flip door over so handle side is down.
9. Attach door hinges
Reattach door hinges to dryer door so that the larger hole is at
the bottom of the hinge.
Use a small, at-blade screwdriver to gently remove 4 hinge
hole plugs on left side of dryer cabinet. Transfer plugs into
hinge holes on opposite side of dryer cabinet.
11. Remove and transfer hinge hole plugs
Remove door strike and door strike plug from dryer cabinet.
Insert the door strike into door strike plug hole and secure with
screw. Insert door strike plug into original door strike hole and
secure with screw.
10. Remove door strike and
door strike plug
Door strike plug
Door strike
24
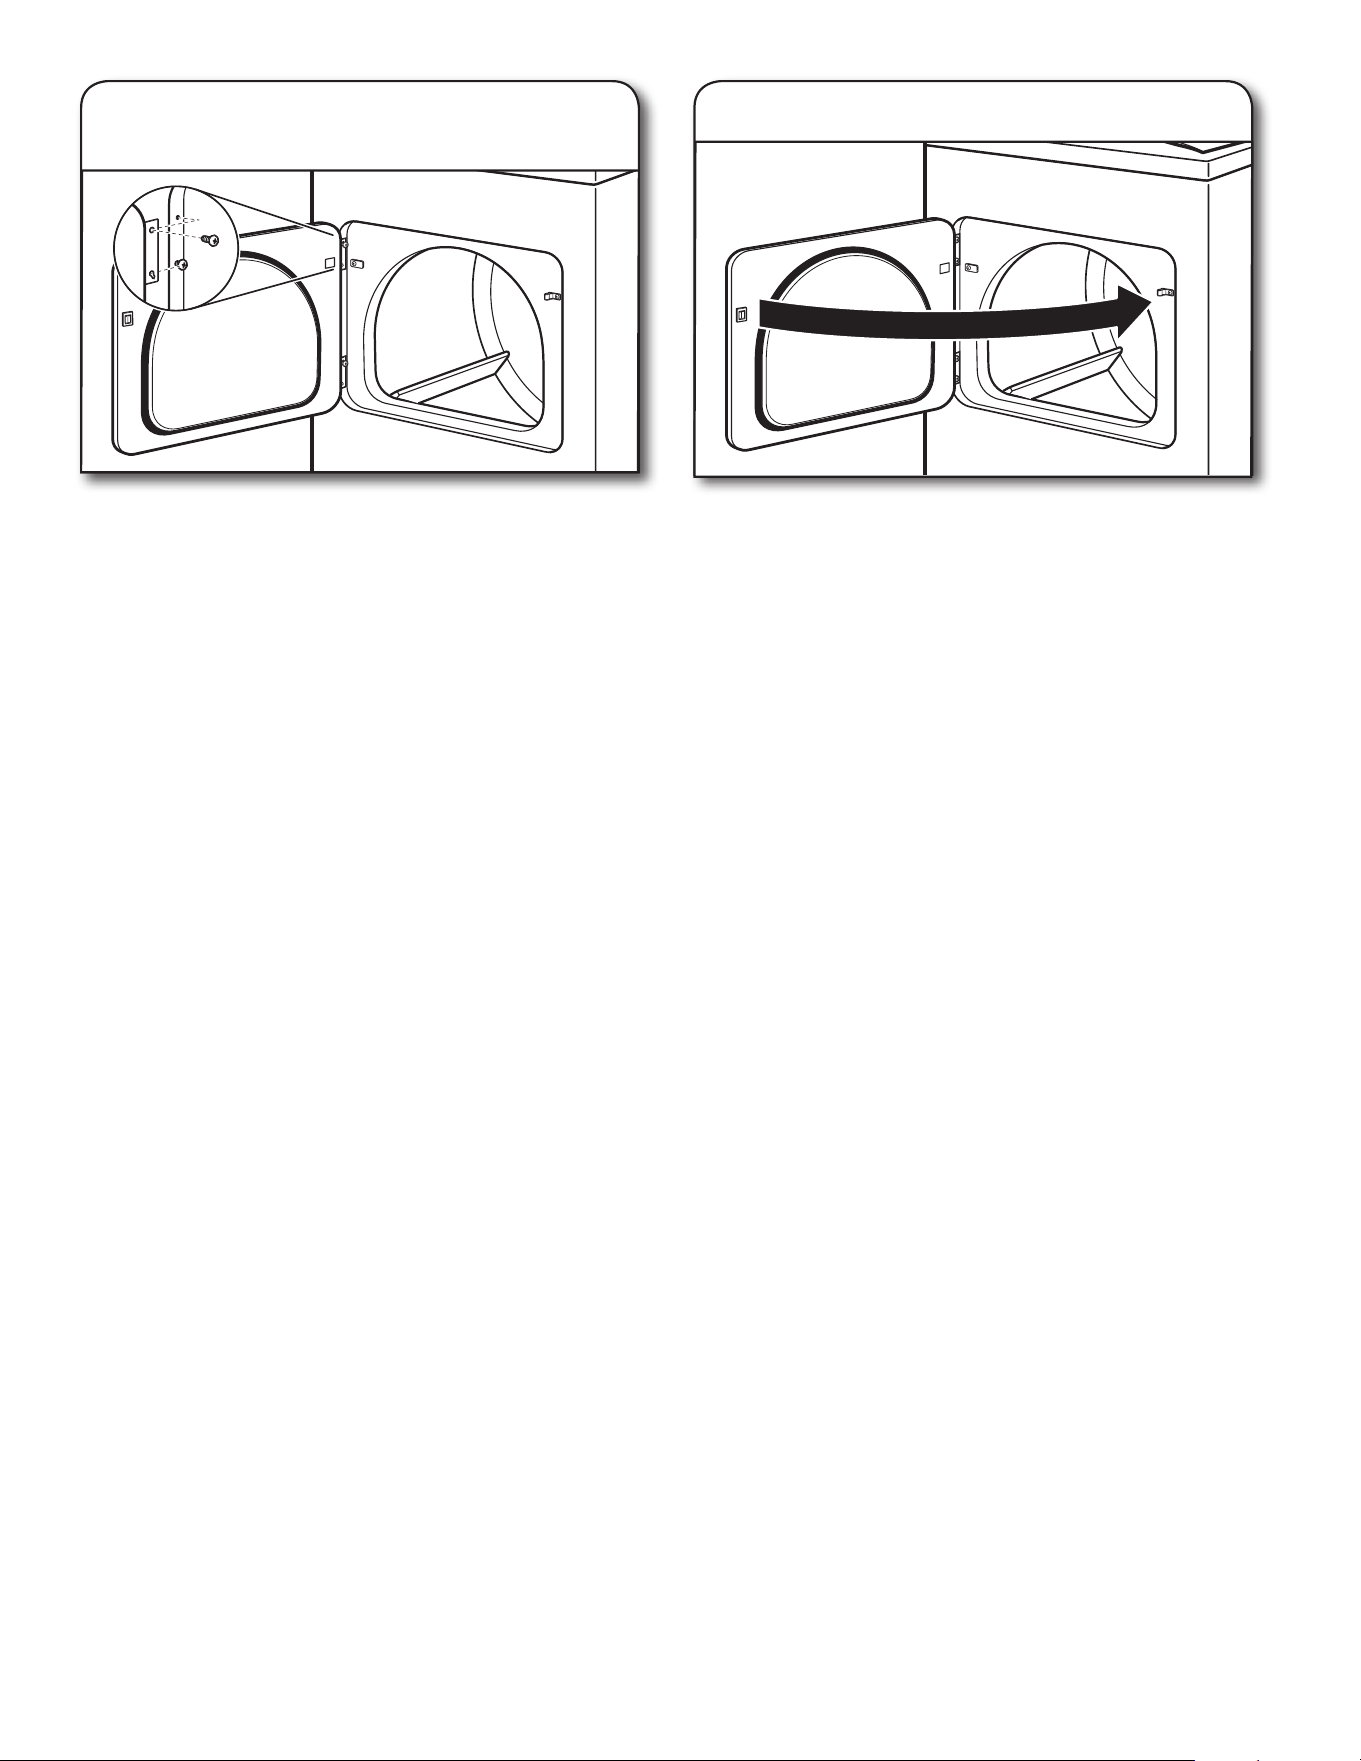
12. Insert screws in hinge holes
on dryer cabinet
NOTE: Two people may be needed to reinstall door.
Insert screws into the bottom holes on left side of dryer cabinet.
Tighten screws halfway. Position door so large end of door
hinge slot is over screws. Slide door up so screws are in bottom
of slots. Tighten screws. Insert and tighten top screws in hinges.
Close door and check that door strike aligns with door
catch. If it is needed, slide door catch left or right within
slot to adjust alignment.
13. Check door strike alignment
TROUBLESHOOTING
See “Troubleshooting” in the Use and Care Guide to possibly
avoid the cost of a service call.
25
NOTAS SOBRE LA INSTALACIÓN
Fecha de compra: _________________________________
Fecha de instalación: ______________________________
Instalador: _______________________________________
SEGURIDAD DE LA SECADORA
Si no sigue las instrucciones de inmediato, usted puede
morir o sufrir una lesión grave.
Si no sigue las instrucciones, usted puede morir o sufrir
una lesión grave.
Todos los mensajes de seguridad le dirán el peligro potencial, le dirán cómo reducir las posibilidades de sufrir una lesión y lo que
puede suceder si no se siguen las instrucciones.
Su seguridad y la seguridad de los demás es muy importante.
Hemos incluido muchos mensajes importantes de seguridad en este manual y en su electrodoméstico. Lea y obedezca siempre
todos los mensajes de seguridad.
ADVERTENCIA
PELIGRO
Este es el símbolo de alerta de seguridad.
Este símbolo le llama la atención sobre peligros potenciales que pueden ocasionar la muerte o una lesión a
usted y a los demás.
Todos los mensajes de seguridad irán a continuación del símbolo de advertencia de seguridad y de la palabra
“PELIGRO” o “ADVERTENCIA”. Estas palabras significan:
En el estado de Massachusetts se aplican las siguientes instrucciones de instalación:
■ Las instalaciones y reparaciones se deben efectuar por un contratista, plomero o gasista calificado o licenciado por el estado
de Massachusetts.
■ Reemplace con dispositivos de cierre aceptables: las llaves de gas y las válvulas de bola instaladas para el uso deben estar
en la lista.
■ Si se usa un conector de gas flexible no debe exceder de 4 pies (121,9 cm).
Número de modelo: _______________________________
Número de serie: _________________________________
SEGURIDAD DE LA SECADORA .......................................25
REQUISITOS DE INSTALACIÓN .......................................27
Herramientas y piezas ...............................................27
REQUISITOS DE UBICACIÓN ..........................................28
REQUISITOS ELÉCTRICOS – EE.UU. SOLAMENTE ............30
CONEXIÓN ELÉCTRICA DE LA SECADORA A GAS –
EE.UU. Y CANADÁ .......................................................... 31
INSTALACIÓN DE LAS PATAS NIVELADORAS .................33
PARA HACER LA CONEXIÓN ELÉCTRICA –
EE.UU. SOLAMENTE ....................................................... 34
Conexión por cable de suministro de energía ............34
Conexión por cable directo ........................................ 37
CONEXIÓN DEL SUMINISTRO DE GAS –
EE.UU. Y CANADÁ ......................................................... 40
Índice
VENTILACIÓN ...............................................................40
Requisitos de ventilación ......................................... 40
Planicación del sistema de ventilación ...................41
Instalación del sistema de ventilación ..................... 42
CONEXIÓN DE LAS MANGUERAS DE ENTRADA .......... 42
CONEXIÓN DEL DUCTO DE ESCAPE ............................. 44
NIVELACIÓN DE LA SECADORA ...................................44
LISTA DE CONTROL DE LA INSTALACIÓN
TERMINADA ...................................................................45
CAMBIO DEL SENTIDO DE ABERTURA
DE LA PUERTA (OPCIONAL) .......................................... 46
SOLUCIÓN DE PROBLEMAS .......................................... 48
AYUDA O SERVICIO TÉCNICO .................... Contraportada
26
– No almacene o use gasolina u otros líquidos y vapores inamables cerca de éste u otro
aparato electrodoméstico.
– PASOS QUE USTED DEBE SEGUIR SI HUELE A GAS:
•
No trate de encender ningún aparato electrodoméstico.
•
No toque ningún interruptor eléctrico; no use ningún teléfono en su edicio.
•
Desaloje a todos los ocupantes del cuarto, edicio o área.
•
Llame inmediatamente a su proveedor de gas desde el teléfono de un vecino.
Siga las instrucciones de su proveedor de gas.
•
Si usted no puede comunicarse con su proveedor de gas, llame al departamento
de bomberos.
– La instalación y el servicio deben ser efectuados por un instalador calicado, una
agencia de servicio o por el proveedor de gas.
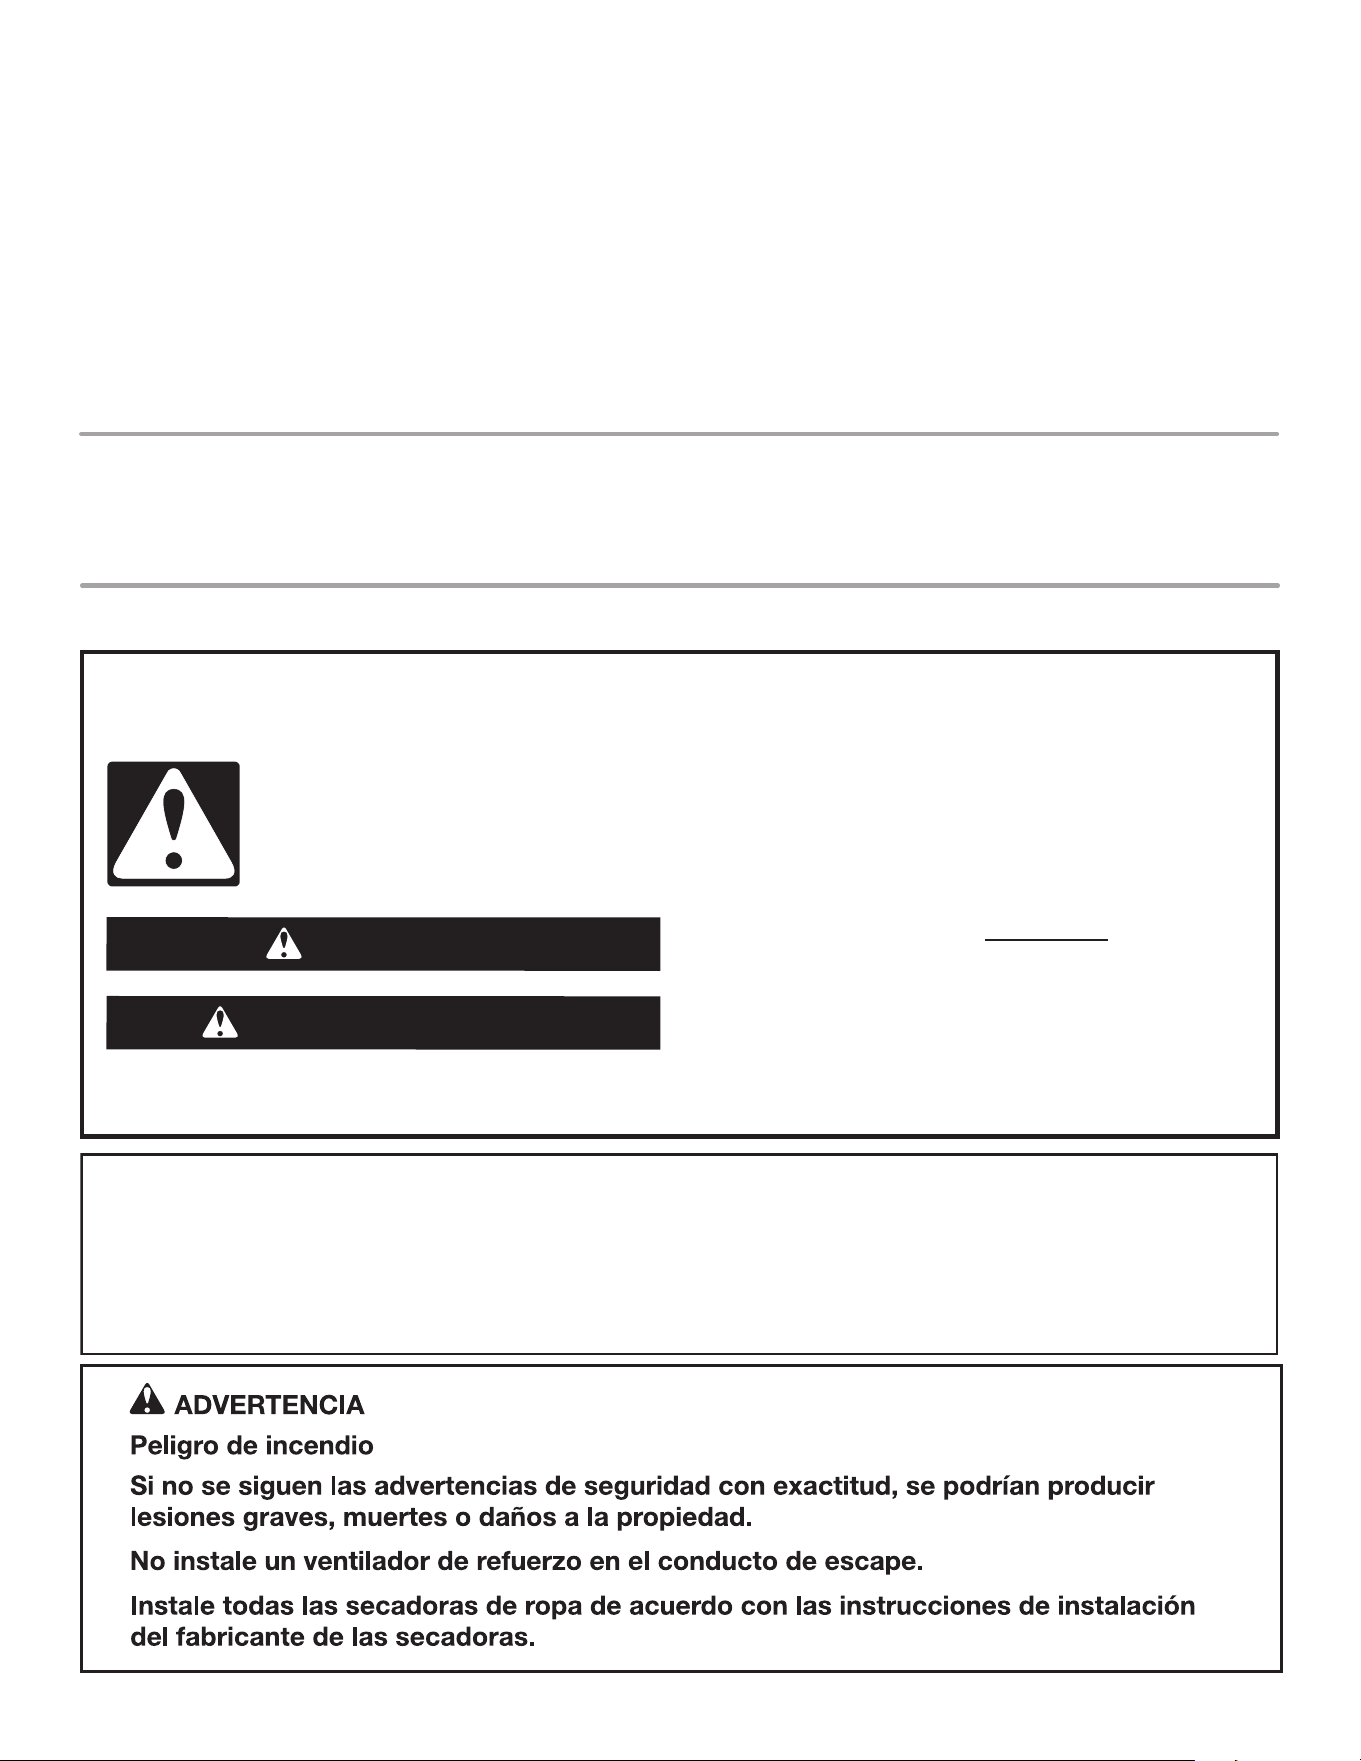
ADVERTENCIA:
PELIGRO DE INCENDIO O EXPLOSIÓN
Si no se siguen las advertencias de seguridad con exactitud, se podrían producir lesiones
graves, muertes o daños a la propiedad.
27
HERRAMIENTAS Y PIEZAS
Reúna todas las herramientas y piezas necesarias antes de comenzar la instalación. Lea y siga las instrucciones provistas
con cualquiera de las herramientas enlistadas aquí.
Nivel
Destornillador de hoja
plana
Llave ajustable que se abra
a 1" (25 mm) o llave de cubo
de cabeza hexagonal
Pistola y masilla para
calafateo (para instalar
el nuevo ducto de escape)
Abrazaderas para ducto
Cuchillo de plástico para
masilla
REQUISITOS DE INSTALACIÓN
Tijeras de lata (instalaciones
del nuevo ducto de escape)
Aprietatuercas de 1/4"
(6 mm) (se recomienda)
Herramientas necesarias para todas las instalaciones:

28
Destornillador Phillips
N.° 2
Pelacables (instalaciones
de cableado directo)
Cinta de medir Pinzas
Piezas suministradas (todos los modelos):
Herramientas necesarias para las instalaciones a gas:
Llave para tubos de 8"
(203 mm) ó 10" (254 mm)
Llave de tuercas ajustable de
8" (203 mm) ó 10" (254 mm)
(para las conexiones de gas)
Compuesto para unión de
tuberías resistente a gas propano
Patas niveladoras (4)
(La longitud y la apariencia de las patas pueden variar
según el modelo.)
Conector en “Y”
Manguera de entrada
corta
Manguera de entrada
Arandela
de goma
Piezas necesarias (modelos con vapor):
El paquete con piezas está ubicado en el tambor de la secadora.
Verique que estén todas las piezas.
Si emplea un cable de suministro eléctrico:
Use un juego aprobado de UL para cable de suministro eléctrico
que esté marcado para ser usado en secadoras de ropa. El juego
deberá contener:
■ Un cable de suministro eléctrico de 30 amperios aprobado
de UL, con 120/240 voltios mínimo, y que tenga un rango de
temperatura de 140ºF (60ºC) como mínimo. El cable deberá
ser del tipo SRD o SRDT y deberá tener un largo de por lo
menos 4 pies (1,22 m). Los hilos que conectan con la secadora
deberán terminar en terminales de anillo o de horquilla con los
extremos hacia arriba.
■ Un protector de cables aprobado de UL.
Piezas necesarias: (No se provee con la secadora)
Verique los códigos locales. Verique el suministro eléctrico y la
ventilación existentes. Vea “Requisitos eléctricos” y “Requisitos de
ventilación” antes de comprar las piezas.
Las instalaciones en casas rodantes requieren piezas para ducto
de escape de metal que están disponibles en la tienda al por
menor donde usted compró su secadora. Para obtener más
información, llame al 1-844-553-6667.
Equipo optativo: (No se provee con la secadora)
Consulte su “Manual de uso y cuidado” para obtener información
acerca de los accesorios disponibles para su secadora.
REQUISITOS DE UBICACIÓN
Usted necesitará:
■ Una ubicación que permita una instalación adecuada del
ducto de escape. Vea “Requisitos de ventilación”.
■ Se necesita un circuito separado de 15 ó 20 amperios para
las secadoras a gas, y uno de 30 amperios para las secadoras
eléctricas.
■ Si está usando un cable de suministro de energía, un contacto
con conexión a tierra ubicado a no más de 2 pies (610 mm)
de cualquiera de los lados de la secadora. Vea “Requisitos
eléctricos”.
■ Un piso que soporte el peso de la secadora de 200 lb. (90,7 kg).
Tenga en cuenta también el peso de otro electrodoméstico que
le acompañe.
■ Un piso nivelado con un declive máximo de 1" (25 mm) debajo
de la secadora completa. Si el declive es mayor que 1" (25 mm),
la ropa quizás no gire adecuadamente y los ciclos con sensor
automático posiblemente no funcionen como es debido.
■ Para realizar una instalación en el garaje, coloque la secadora
por lo menos a 18" (460 mm) por encima del piso.
■ Modelos con vapor únicamente: Grifo de agua fría ubicado
a una distancia de no más de 4 pies (1,2 m) de las válvulas
de llenado de agua y una presión de agua de 20-100 lb/pulg²
(137,9-689,6 kPa). Puede usar el suministro de agua de la
lavadora al comprar las partes necesarias indicadas en
“Partes necesarias”.
o
29
■ Si usted vive en una zona donde hay agua dura, se recomienda
usar ablandador de agua para controlar la acumulación de
sarro en el sistema de agua en la secadora. Conforme pasa el
tiempo, la acumulación de depósitos calcáreos puede obstruir
diferentes partes del sistema de agua, lo cual reducirá el
rendimiento del producto. La acumulación excesiva de sarro
puede ocasionar la necesidad de reemplazar o reparar
ciertas piezas.
IMPORTANTE: No utilice, instale ni guarde la secadora en donde
esté expuesta al agua, a la intemperie o a temperaturas por
debajo de 45 °F (7 °C). Las temperaturas más bajas pueden hacer
que la secadora no se apague al nal de los ciclos automáticos
con sensor, lo que resultará en tiempos de secado más largos.
NOTA: No se puede instalar otro electrodoméstico que usa
combustible en el mismo clóset en que se encuentra la secadora.
DIMENSIONES DE LA SECADORA
ESPACIOS LIBRES PARA LA INSTALACIÓN
Para cada disposición, considere dejar más espacio para facilitar
la instalación y el servicio técnico, así como espacio para
electrodomésticos que le acompañen y espacios libres para las
molduras de la pared, de la puerta y del piso. El espacio debe
ser lo suficientemente grande para permitir que la puerta se abra
por completo. Agregue espacio en todos los lados de la secadora
para reducir la transferencia de ruido. Si se instala una puerta de
clóset o tipo persiana, es necesario que tenga aberturas para el
aire en la parte superior e inferior de la puerta.
Verifique los requisitos de los códigos. Algunos códigos limitan
o no permiten la instalación de la secadora en garajes, clósets,
casas rodantes o dormitorios. Póngase en contacto con el
inspector de construcciones de su localidad.
Vista frontal
NOTA: La altura mínima de las patas niveladoras debe ser
1/2" (13 mm), o para hacer coincidir la altura de la lavadora
que la acompañe.
29"
(737 mm)
40
7
/8"
(1038 mm)
1
/2"
(13 mm)
50
3
/4"
(1289 mm)
42"
(1067 mm)
28
1
/4"
(717 mm)
28
1
/4"
(717 mm)
Vista lateral
A B
Vista posterior
14
1
/
2
"
(368 mm)
4
3
/4"
(121 mm)
9
1
/4"
(235 mm)
1
1
/4"
(32 mm)
14
1
/
2
"
(368 mm)
4
3
/4"
(121 mm)
9
1
/4"
(235 mm)
1
1
/4"
(32 mm)
30
1
/
4
"
(768 mm)
4"
(101 mm)
Con vapor Sin vapor
A. Apertura amplia de la puerta que abre hacia el costado
B. Apertura amplia de la puerta de la canasta
30
Espacio para la instalación en un lugar empotrado
o en un clóset
Todas las dimensiones muestran el espacio recomendado.
■ Debe considerarse un espacio adicional para facilitar
la instalación y el servicio técnico.
■ Se podrían necesitar espacios libres adicionales para
las molduras de la pared, de la puerta y del piso.
■ Se debe considerar agregar espacio adicional de 1" (25 mm)
en todos los lados de la secadora para reducir la transferencia
de ruido.
■ Para la instalación en un clóset, con una puerta, se requieren
aberturas de ventilación mínimas en la parte superior e inferior
de la puerta. Se aceptan puertas tipo persianas con aberturas
de ventilación equivalentes.
■ También se debe considerar espacio adicional para otro
electrodoméstico que le acompañe.
Requisitos de instalación adicionales para las casas rodantes:
Esta secadora es apropiada para instalaciones en casas rodantes.
La instalación debe realizarse de acuerdo al Estándar de
seguridad y construcción de casas fabricadas (Manufactured
Home Construction and Safety Standard), Título 24 CFR, Parte
3280 (anteriormente conocido como Estándar federal para la
seguridad y construcción de casas rodantes - Federal Standard for
Mobile home Construction and Safety, Título 24, HUD Parte 280) o
al Estándar CAN/CSA-Z240 MH.
Espacio mínimo/recomendado
6"/0"
(152 mm/
0 mm)
14" max
(356 mm)
1"/0"
(25 mm/0 mm)
1"/1"
(25 mm/25 mm)
18"/18"
(457 mm/
457 mm)
3"/3"
(76 mm/
76mm)
3"/3"
(76 mm/
76mm)
48"
2
/48"
2
(310 cm
2/
310 cm
2
)
24"
2/
24"
2
(155 cm
2/
155 cm
2
)
REQUISITOS ELÉCTRICOS –
EE.UU. SOLAMENTE
REQUISITOS ELÉCTRICOS
Usted es responsable de:
■ Ponerse en contacto con un instalador eléctrico calicado.
■ Asegurarse de que la conexión eléctrica sea adecuada
y de conformidad con el Código Nacional Eléctrico,
ANSI/NFPA 70 – última edición y con todos los códigos
y ordenanzas locales.
El Código Nacional Eléctrico requiere una conexión
de suministro eléctrico de 4 hilos para aquellos hogares
construidos después de 1996, para los circuitos de secadora
que se hayan reformado después de 1996 y todas las
instalaciones de casas rodantes.
Usted puede obtener una copia de todas las normas
arriba indicadas en: National Fire Protection Association,
One Batterymarch Park, Quincy, MA 02269.
■ Proveer el suministro eléctrico requerido de 3 ó 4 alambres,
monofásico, de 120/240 voltios, 60 Hz, CA solamente (o un
suministro eléctrico de 3 ó 4 alambres, de 120/208 voltios, si
se especica en la placa indicadora de corriente/de la serie)
en un circuito separado de 30 amperios, protegido con fusibles
en ambos lados de la línea. Conéctela a un circuito derivado
individual. No tenga un fusible en el circuito neutro o de
conexión a tierra.
■ No use un cable eléctrico de extensión.
■ Si los códigos lo permiten y se emplea un alambre de conexión
a tierra separado, es recomendable que un electricista
calicado determine si la trayectoria de conexión a tierra
es adecuada.
Conexión eléctrica
Para instalar su secadora adecuadamente, usted debe
determinar el tipo de conexión eléctrica que va a usar y seguir
las instrucciones que aquí se proveen para el caso.
■ Esta secadora ha sido manufacturada lista para ser instalada
en una conexión de suministro de energía eléctrica de 3
hilos. El conductor neutro de puesta a tierra de la carcasa
está permanentemente conectado al conductor neutro
(cable blanco) dentro de la secadora. Si la secadora está
instalada con una conexión de suministro eléctrico de 4 hilos,
el conductor neutro de puesta a tierra de la carcasa se debe
quitar del conductor de puesta a tierra exterior (tornillo verde)
y ajustar debajo del terminal neutro (cable central o blanco)
del bloque de terminal. Cuando el conductor neutro de puesta
a tierra de la carcasa esté ajustado debajo del terminal neutro
(cable central o blanco) del bloque de terminal, la carcasa de
la secadora queda aislada del conductor neutro.
■ Si los códigos locales no permiten la conexión de un conductor
para conexión a tierra del equipo al alambre neutro, vea la
sección “Conexión opcional de 3 hilos”.
■ Deberá usarse una conexión con suministro de energía de 4
hilos cuando la secadora esté instalada en una ubicación en la
cual esté prohibida la conexión a tierra a través del conductor
neutro. Está prohibido hacer la puesta a tierra a través del
conductor neutro para (1) las nuevas instalaciones de circuito
derivado, (2) casas rodantes, (3) vehículos de recreación y (4)
áreas donde los códigos locales prohíben la conexión a tierra
a través de conductores neutros.
Las instalaciones en casas rodantes necesitan:
Todas las secadoras:
■ Piezas para el sistema de escape de metal, que están
disponibles con su distribuidor. Para obtener más información,
llame al 1-844-553-6667.
■ Se deben tomar medidas especiales en el caso de casas
rodantes para introducir el aire del exterior a la secadora. Las
aberturas (como la de una ventana adyacente) deberán ser por
lo menos del doble de tamaño que la abertura de ventilación
de la secadora.
Para las instalaciones de secadoras a gas en casas
rodantes:
■ Está disponible para encargar el Juego de sujeción para
instalaciones en casas rodantes, pieza N.° W10432680.
Para obtener más información, llame al 1-844-553-6667.
Espacio para la instalación
31
Si emplea un cable de suministro eléctrico:
Use un juego aprobado de UL para cable de suministro eléctrico
que esté marcado para ser usado en secadoras de ropa. El juego
deberá contener:
■ Un cable de suministro eléctrico de 30 amperios aprobado de
UL, con 120/240 voltios y que tenga un rango de temperatura
de 140ºF (60ºC) como mínimo. El cable deberá ser del tipo
SRD o SRDT y deberá tener un largo de por lo menos 4 pies
(1,22 m). Los hilos que conectan con la secadora deberán
terminar en terminales de anillo o de horquilla con los extremos
hacia arriba.
■ Un protector de cables aprobado de UL.
Contacto de
4 alambres
(14-30R)
Si el contacto de pared luce como éste:
Entonces elija un cable de suministro eléctrico
de 4 alambres con terminales de anillo o de
horquilla y con protector de cables aprobado
de UL. El cable de suministro eléctrico de 4
hilos, de por lo menos 4 pies (1,22 m) de largo,
deberá tener 4 hilos de cobre de calibre 10
y coincidir con un receptáculo de 4 hilos tipo
NEMA 14-30R. El hilo de conexión a tierra
(conductor a tierra) puede ser verde o desnudo.
El conductor neutro debe ser identicado con
una cubierta blanca.
Contacto de
3 alambres
(10-30R)
Si el contacto de pared luce como éste:
Entonces elija un cable de suministro eléctrico
de 3 alambres con terminales de anillo o de
horquilla y con protector de cables aprobado
de UL. El cable de suministro eléctrico de 3
hilos, de por lo menos 4 pies (1,22 m) de largo,
deberá tener 3 hilos de cobre de calibre 10
y coincidir con un receptáculo de 3 hilos tipo
NEMA 10-30R.
Si hace la conexión con cableado directo:
El cable de suministro eléctrico debe ser igual al del suministro
eléctrico (de 4 alambres o de 3 alambres) y debe ser:
■ Cable blindado exible o cable de cobre forrado no metálico
(con alambre puesto a tierra), protegido con un conducto
metálico exible. Todos los alambres conductores de corriente
deben estar aislados.
■ Alambre de cobre sólido de calibre 10 (no utilice aluminio),
de al menos 5 pies (1,52 m) de largo.
CONEXIÓN ELÉCTRICA
DE LA SECADORA A GAS –
EE.UU. Y CANADÁ
REQUISITOS ELÉCTRICOS
■ Se necesita un suministro eléctrico de 120 voltios, 60 hertzios,
CA solamente, de 15 ó 20 amperios y protegido con fusibles.
Se recomienda un fusible retardador o un cortacircuitos.
Asimismo se recomienda el uso de un circuito independiente
que preste servicio únicamente a esta secadora.
32
ADVERTENCIA
Peligro de Explosión
Use una línea de suministro de gas nueva con
aprobación CSA Internacionál.
Instale una válvula de cierre.
Apriete firmemente todas las conexiones de gas.
Si se conecta a un suministro de gas propano, la
presión no debe exceder una columna de agua de
330 mm (13 pulg) y debe ser verificada por una persona
calificada.
Ejemplos de una persona calificada incluyen:
personal de servicio del sistema de calefacción con
licencia,
personal autorizado de la compañía de gas, y
personal autorizado para dar servicio.
No seguir estas instrucciones puede ocasionar
la muerte, explosión o incendio.
REQUISITOS DEL SUMINISTRO DE GAS
TIPO DE GAS
Gas natural:
Esta secadora está equipada para uso con gas natural. Está
certicada por UL para uso con gas propano con la conversión
apropiada.
■ Su secadora debe tener el quemador adecuado para el
tipo de gas que tiene en su casa. La información respecto al
quemador está ubicada en la placa de clasicación que está
en la cavidad de la puerta de su secadora. Si esta información
no está de acuerdo con el tipo de gas disponible, póngase en
contacto con el distribuidor o llame al 1-844-553-6667.
Conversión de gas propano:
IMPORTANTE: La conversión deberá llevarla a cabo un técnico
calicado.
No se deberá hacer intento alguno para convertir la secadora del
gas especicado en la placa indicadora del modelo/de la serie
para utilizar un gas distinto sin consultar con la compañía de gas.
LÍNEA DE SUMINISTRO DE GAS
Opción 1 (Método recomendado)
Conector flexible de gas de acero inoxidable:
■ Si los códigos locales lo permiten, use un nuevo conector
exible de gas de acero inoxidable (diseño certicado por
la Asociación estadounidense de gas o CSA International),
para conectar su secadora a la línea rígida de suministro de
gas. Use un codo y un accesorio adaptador abocinado NPT
de 3/8" x 3/8" entre el conector de gas de acero inoxidable
y el tubo de gas de la secadora, para evitar que se doblen.
Opción 2 (Método alternativo)
Tubería aprobada de aluminio o de cobre
■ Debe incluir una derivación tapada NPT de por lo menos
1/8", accesible para la conexión del manómetro de prueba,
inmediatamente arriba de la conexión de suministro de gas
a la secadora.
■ Se recomienda un tubo IPS de 1/2".
■ Es aceptable una tubería aprobada de aluminio o cobre
de 3/8" para las longitudes menores a 20 pies (6,1 m), si lo
permiten los códigos locales y el proveedor de gas.
■ Si usted está usando gas natural, no use tubería de cobre.
■ Para las longitudes mayores a los 20 pies (6,1 m) se deberán
usar tuberías más largas y un accesorio adaptador de tamaño
distinto.
■ Si su secadora ha sido convertida para usar gas propano,
se puede usar tubería de cobre de 3/8" compatible con gas
propano. Si la longitud total de la línea de suministro es mayor
que 20 pies (6,1 m), use un tubo más largo.
NOTA: Deben usarse compuestos para uniones de tubería que
sean resistentes a la acción del gas propano. No utilice cinta
TEFLON
®†
.
■ Debe tener una válvula de cierre.
En los EE.UU.:
Debe instalarse una válvula de cierre individual manual a una
distancia de no más de seis (6) pies (1,8 m) de la secadora, de
acuerdo con el Código Nacional de Gas combustible (National
Fuel Gas Code), ANSI Z223.1. La válvula deberá ubicarse en
un lugar donde se pueda alcanzar con facilidad para cerrarla
y abrirla.
En Canadá:
Se deberá instalar una válvula de cierre individual manual
conforme al Código de instalación de gas natural y propano
(Natural Gas and Propane Installation Code) B149.1. Se
recomienda instalar una válvula de cierre individual manual a
una distancia de no más de seis (6) pies (1,8 m) de la secadora.
La válvula deberá ubicarse en un lugar donde se pueda
alcanzar con facilidad para abrirla y cerrarla.
E
BA
D
C
†®TEFLON es una marca registrada de Chemours.
A. Conector flexible de gas de 3/8"
B. Accesorio adaptador abocinado para tubo de 3/8"
C. Derivación tapada NTP por lo menos de 1/8"
D. Línea de suministro de gas NPT de 1/2"
E. Válvula de cierre de gas
33
Tubo de la secadora NPT de 3/8"
NOTA: Para realizar una instalación en el garage, la tubería
de gas deberá tener una altura adicional de 18" (460 mm)
desde el piso.
REQUISITOS PARA LA CONEXIÓN
DEL SUMINISTRO DE GAS
■ Use un codo y un accesorio adaptador abocinado NPT de 3/8"
x 3/8" entre el conector de gas exible y el tubo de gas de la
secadora, para evitar que se doblen.
■ Use solamente compuesto para unión de tuberías. No utilice
cinta TEFLON
®
.
■ Esta secadora debe conectarse a la línea de suministro de gas
con un conector de gas exible que cumpla con las normas
para conectores de electrodomésticos a gas, ANSI Z21.24 o
CSA 6.10.
9
1
/4"
(235 mm)
1
1
/4"
(32 mm)
REQUISITOS DE ENTRADA DEL QUEMADOR
Elevaciones por encima de 2.000 pies (610 m):
■ Si se instala la secadora a un nivel superior a los 2.000 pies
(610 m) de altitud, se requiere una reducción de categoría de
B.T.U. del 4 % del quemador, que se muestra en la placa del
número de modelo/serie, por cada incremento de 1.000 pies
(305 m) de altitud.
Prueba de presión del suministro de gas
■ Durante pruebas de presión a presiones mayores de 1/2 lb/
pulg², la secadora debe ser desconectada de la tubería del
suministro de gas.
TUBO DE GAS DE LA SECADORA
■ El tubo de gas que sale por la parte posterior de su secadora
tiene una rosca macho de 3/8".
INSTALACIÓN DE LAS PATAS
NIVELADORAS
1. Prepare la secadora para las patas
niveladoras
2. Atornille las patas niveladoras
2.
Con una llave de tuercas y cinta métrica, atornille las patas en
sus oricios hasta que la parte inferior esté a aproximadamente
1/2" (13 mm) de la parte inferior de la secadora, para que la
altura de la secadora coincide con la altura de la lavadora que
la acompañe.
Ahora coloque la secadora en posición vertical. Deslice la
secadora cerca de su ubicación nal. Deje suciente espacio
para la conexión eléctrica y para conectar el ducto de escape.
Para uso en casas rodantes
Las secadoras a gas deberán sujetarse rmemente al piso.
Las instalaciones en casas rodantes requieren un Juego de
sujeción para instalaciones en casas rodantes. Para solicitar
información, llame al 1-844-553-6667.
Para evitar daños en el piso, use un pedazo de cartón grande
y plano de la caja de la secadora; colóquelo debajo de todo
el borde posterior de la secadora. Agarre con rmeza el
cuerpo de la secadora (no el panel de la consola) y coloque
la secadora suavemente sobre el cartón.
o
34
PARA HACER LA CONEXIÓN
ELÉCTRICA – EE.UU. SOLAMENTE
Opciones para la conexión eléctrica
1. Seleccione el tipo de conexión eléctrica
Contacto de 4 hilos (Tipo NEMA 14-30R)
para cable de suministro de energía:
Vaya a “Conexión con cable de
suministro de energía”.
Conexión directa de 3 hilos:
Vaya a “Conexión por cable directo”.
Conexión directa de 4 hilos:
Vaya a “Conexión por cable
directo”.
Contacto de 3 hilos (Tipo NEMA 10-30R)
para cable de suministro de energía:
Vaya a “Conexión con cable de
suministro de energía”.
NOTA: Si los códigos locales no permiten la conexión
de un conductor para conexión a tierra de la carcasa al
alambre neutro, prosiga a “Conexión opcional de 3 hilos”.
Esta conexión se puede utilizar con una conexión por
cable de suministro de energía o por cable directo.
2. Quite la tapa del bloque de terminal
Desconecte el suministro de energía antes de comenzar.
A
B
CCE F
D
Desconecte el suministro de energía antes de comenzar. Quite el
tornillo de sujeción (D) y la cubierta del bloque de terminal (A).
ADVERTENCIA
CONEXIÓN POR CABLE DE SUMINISTRO
DE ENERGÍA
D
C
B
A
1. Sujete el protector de cables del cable
de suministro de energía
Quite los tornillos de un protector de cables de 3/4" (19 mm)
que esté en la lista de UL. Coloque las lengüetas de las dos
secciones de la abrazadera (C) en el oricio que está debajo
de la abertura del bloque de terminal (B) de manera que
una lengüeta esté apuntando hacia arriba (A) y la otra esté
apuntando hacia abajo (D), y sujételas en su lugar. Apriete
los tornillos del protector de cables sólo lo suciente para
mantener las dos secciones de la abrazadera juntas (C).
Protector de cables del cable de suministro de energía
A. Cubierta del bloque de terminal
B. Tornillo conductor a tierra externo
C. Tornillo central del bloque de terminal
D. Tornillo de sujeción
E. Alambre de conexión a tierra neutro
F. Oricio debajo de la abertura del bloque de terminal
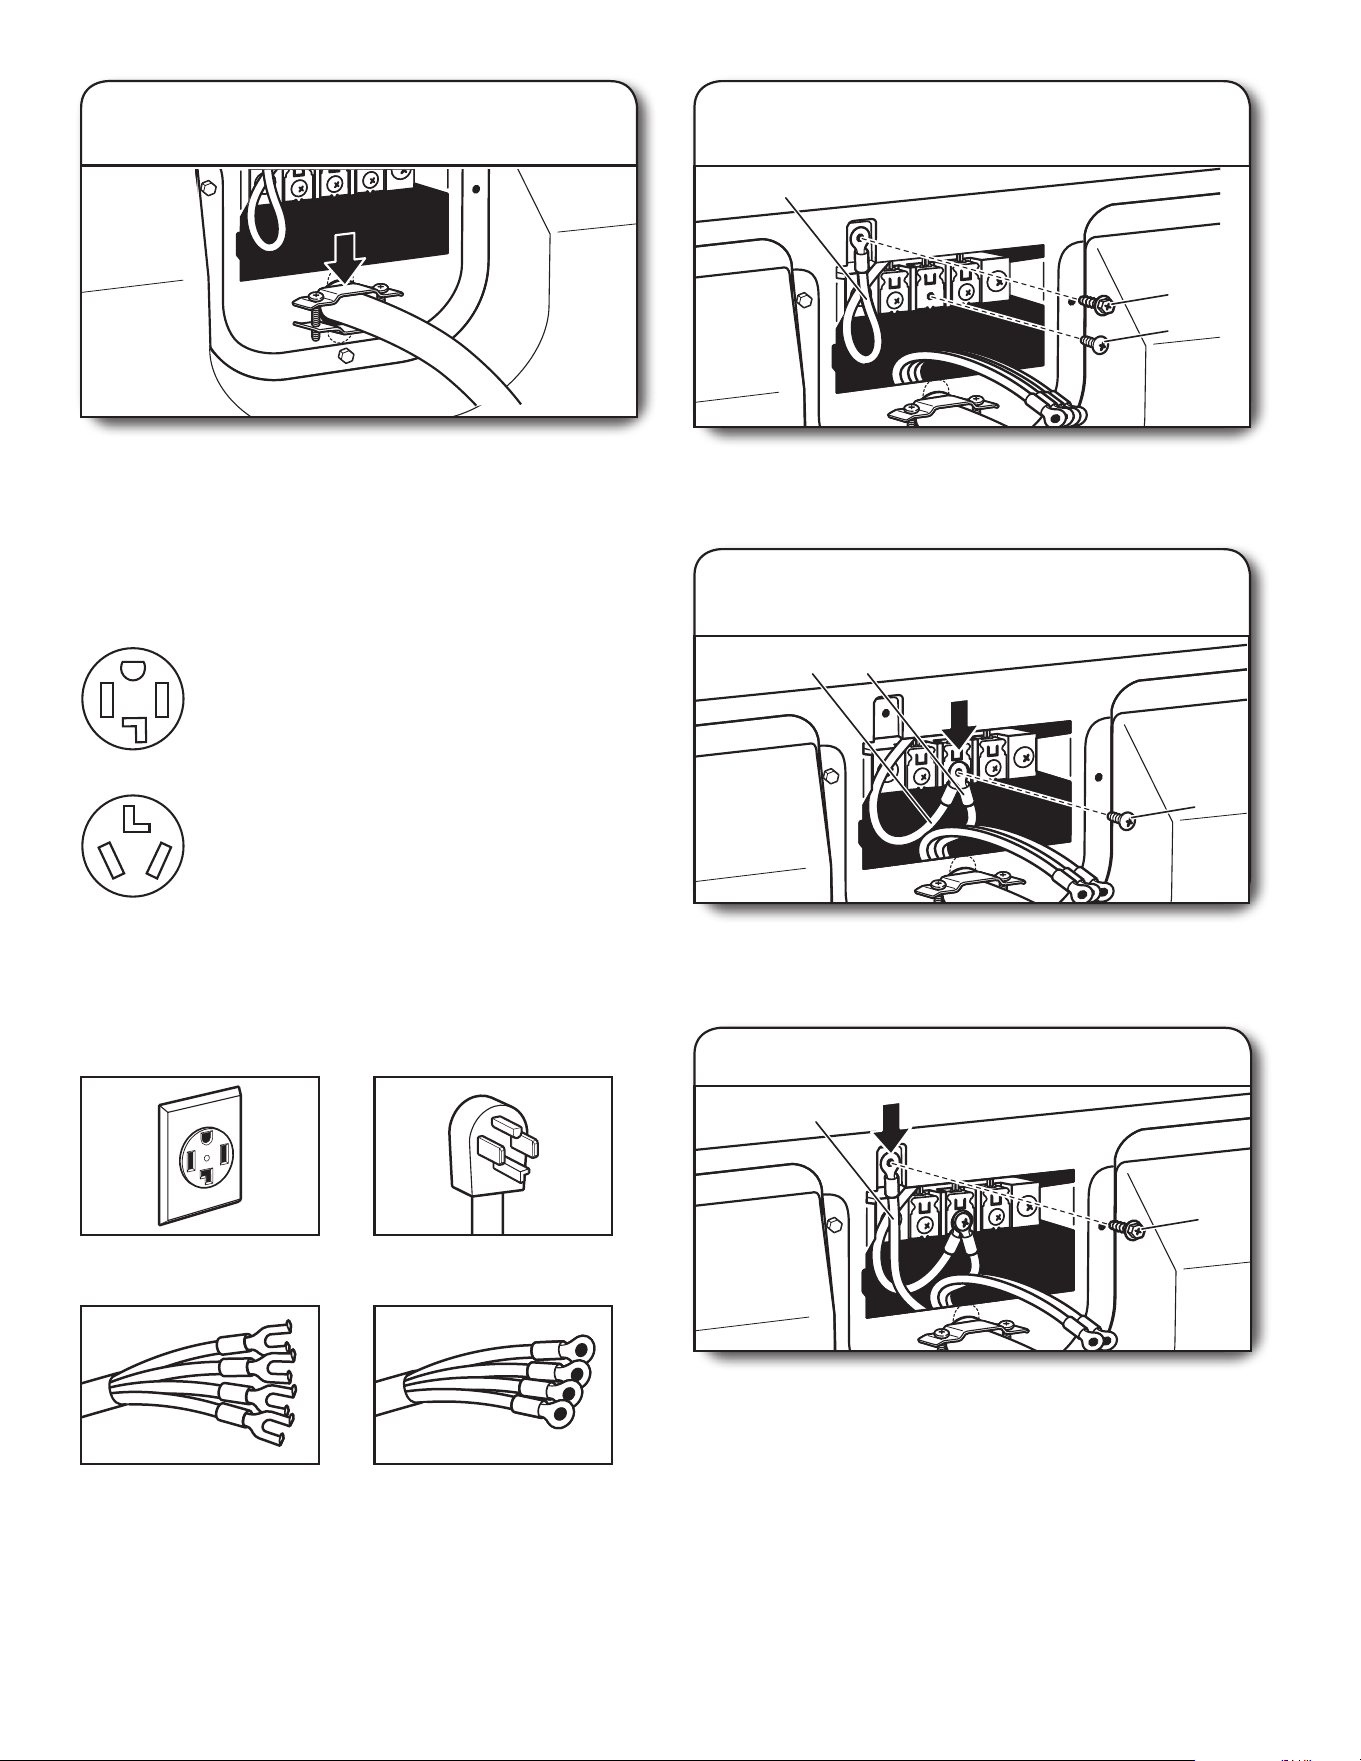
35
Haga pasar el cable de suministro de energía a través
del protector de cables. Asegúrese de que el aislamiento
de cables del cable de suministro de energía esté dentro
del protector de cables. El protector de cables deberá
encajar bien con la carcasa de la secadora y estar en
posición horizontal. No ajuste más los tornillos del protector
de cables en este momento.
2. Sujete el cable de suministro de energía
al protector de cables
Conexión con cable de suministro de energía
de 4 hilos
IMPORTANTE: Se necesita una conexión de alambre de 4 hilos
para las casas rodantes y para los casos en que los códigos locales
no permitan el uso de conexiones de 3 hilos.
Contacto de 4 hilos (Tipo NEMA 14-30R)
para cable de suministro de energía:
Vaya a “Conexión con cable de suministro
de energía de 4 hilos”.
Contacto de 3 hilos (Tipo NEMA 10-30R)
para cable de suministro de energía:
Vaya a “Conexión con cable de suministro
de energía de 3 hilos”.
Si el contacto de pared luce como éste:
Contacto de 4 hilos
(tipo NEMA 14-30R)
Enchufe de 4 terminales
Terminales de horquilla con
los extremos hacia arriba
Terminales de anillo
Saque el tornillo central del bloque de terminal (B). Saque el
hilo neutro de puesta a tierra (E) del tornillo conductor a tierra
externo (A).
B
A
E
1. Prepárese para conectar el cable
neutro a tierra y el alambre neutro
B
CE
2. Conecte el hilo neutro a tierra
y el hilo neutro
Conecte el hilo neutro de puesta a tierra (E) y el hilo neutro
(hilo blanco) (C) del cable de suministro de energía debajo
del tornillo central del bloque de terminal (B). Apriete el tornillo.
A
F
Conecte el hilo a tierra (F) (verde o desnudo) del cable de
suministro eléctrico al tornillo conductor de tierra externo (A).
Apriete el tornillo.
3. Conecte el hilo a tierra
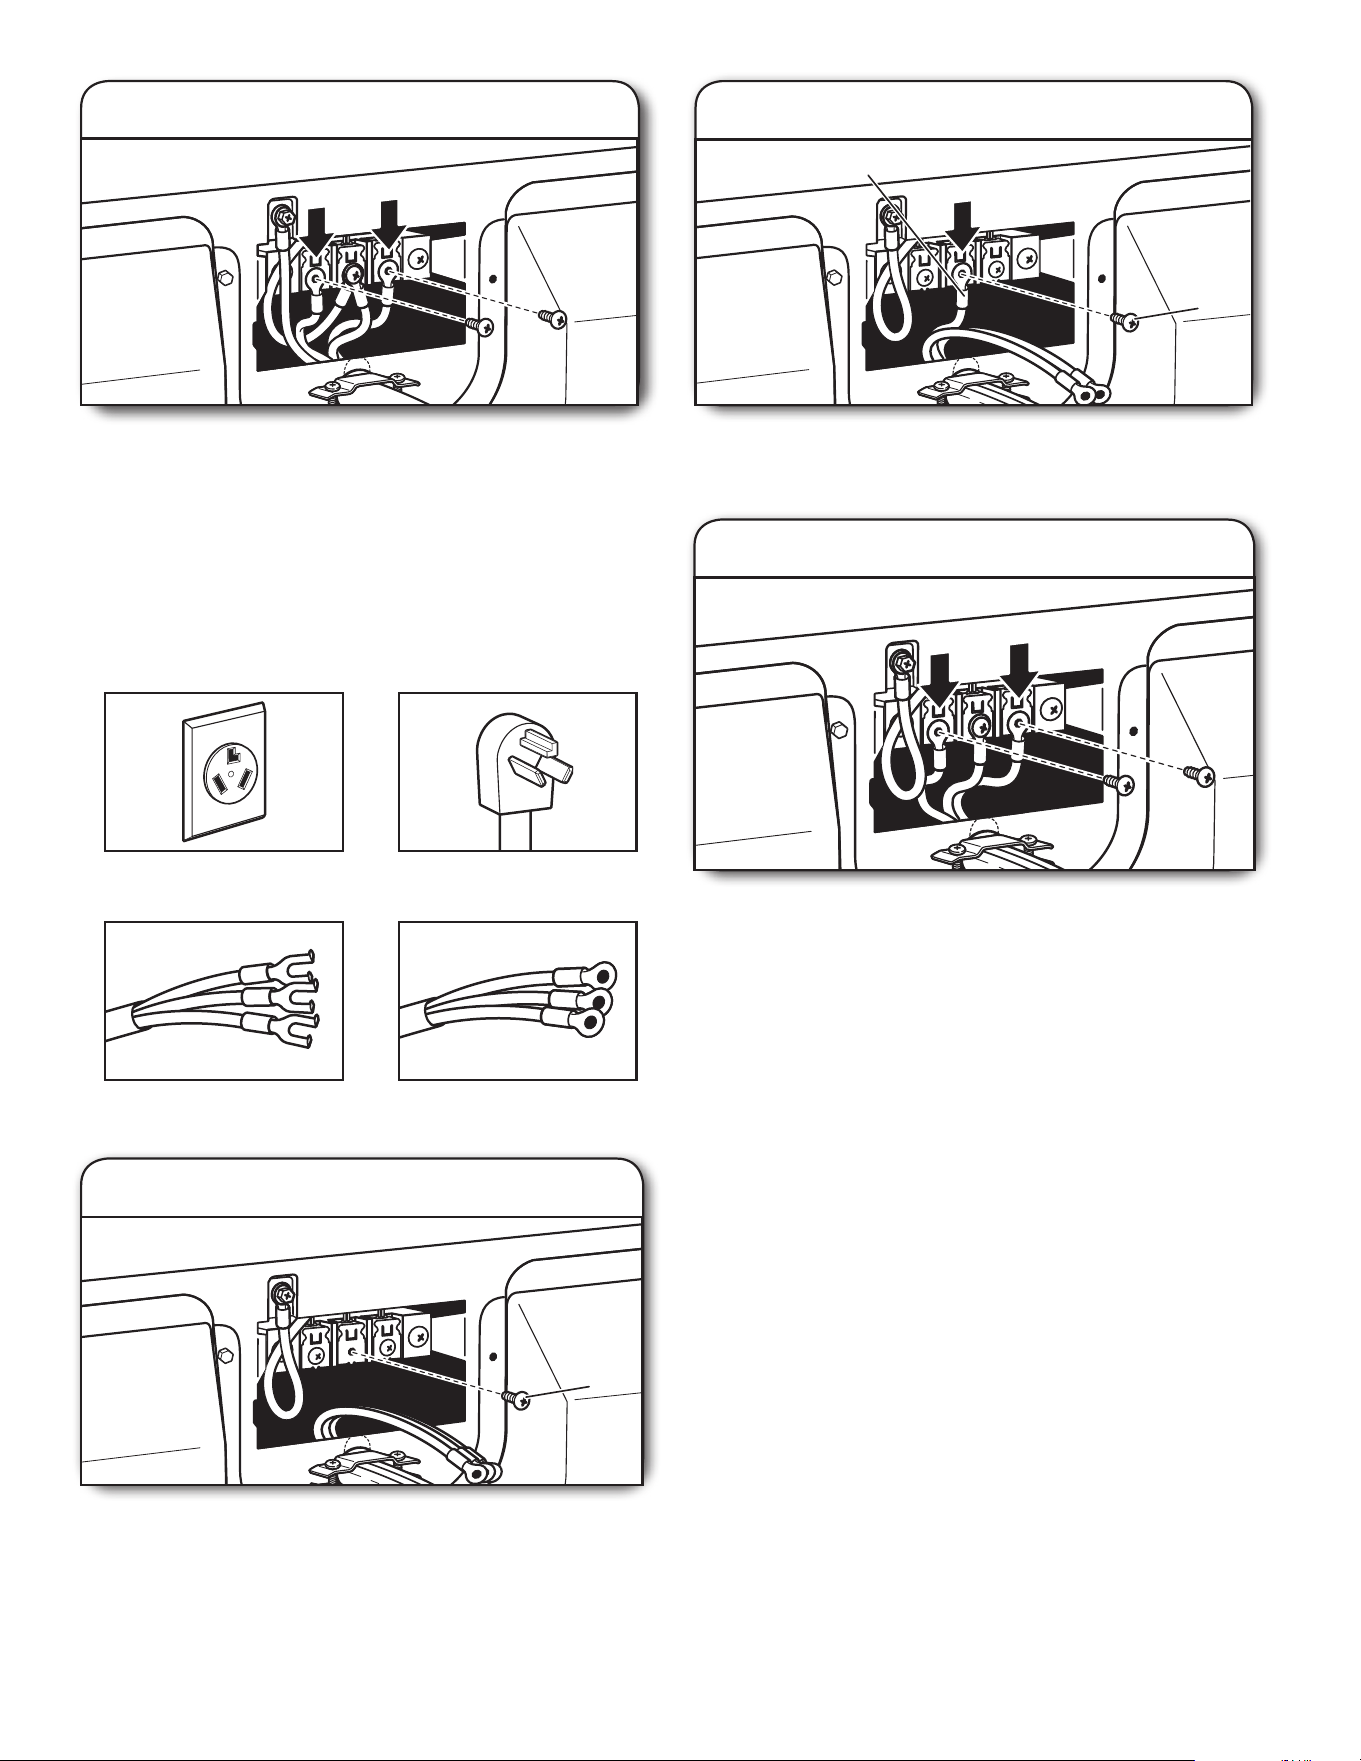
36
Contacto de 3 hilos
(tipo NEMA 10-30R)
Enchufe de 3 terminales
Terminales de horquilla con
los extremos hacia arriba
Terminales de anillo
Use cuando los códigos locales permitan la conexión
del conductor de tierra de la carcasa al hilo neutro.
Conexión con cable de suministro de energía
de 3 hilos
Saque el tornillo central del bloque de terminal (B).
B
1. Quite el tornillo central
4. Conecte los hilos restantes
Conecte los hilos restantes a los tornillos externos del bloque
de terminal. Apriete los tornillos. Por último, vuelva a instalar
la tapa del bloque de terminal. Asegure la tapa con un tornillo
de sujeción. Ahora vaya a “Requisitos de ventilación”.
3. Conecte los hilos restantes
Conecte los hilos restantes a los tornillos externos del bloque
de terminal. Apriete los tornillos. Por último, vuelva a instalar
la tapa del bloque de terminal. Asegure la tapa con un tornillo
de sujeción. Ahora vaya a “Requisitos de ventilación”.
2. Conecte el hilo neutro
Conecte el hilo neutro (C) (hilo blanco o central) del cable de
suministro eléctrico al tornillo central (B) del bloque de terminal.
Apriete el tornillo.
B
C
B

37
CONEXIÓN POR CABLE DIRECTO
Desatornille el conector de conducto removible (A) y cualquier
tornillo del protector de cables de 3/4" (19 mm) que esté en
la lista de UL. Haga pasar la sección roscada del protector de
cables (C) a través del oricio que está debajo de la abertura
del bloque de terminal (B). Busque dentro de la abertura
del bloque de terminal y atornille el conector de conducto
removible (A) sobre las roscas del protector de cables.
C
B
A
1. Sujete el protector de cables
para cable directo
Protector de cables para cable directo
Haga pasar el cable directo a través del protector de cables.
El protector de cables deberá encajar bien con la carcasa de
la secadora y estar en posición horizontal. Apriete el tornillo
del protector de cables contra el cable directo.
2. Sujete el cable directo al protector
de cables
Conexión directa de 3 hilos:
Vaya a “Conexión por cable directo
de 3 hilos”.
Conexión directa de 4 hilos:
Vaya a “Conexión por cable directo
de 4 hilos” en esta página.
Si el cableado luce como éste:
Conexión por cable directo de 4 hilos
IMPORTANTE: Se necesita una conexión de alambre de cuatro
hilos para las casas rodantes y para los casos en que los códigos
locales no permitan el uso de conexiones de 3 hilos.
El cable de conexión directa debe tener 5 pies (1,52 m) extra
de largo para poder mover la secadora si fuese necesario.
Pele 5" (127 mm) de la cubierta exterior desde el extremo
del cable, dejando el hilo de tierra desnudo a 5" (127 mm).
Corte 1½" (38 mm) de los 3 hilos restantes. Pele el aislamiento
1" (25 mm) hacia atrás. Doble los extremos de los hilos para
formar un gancho.
1. Prepare el cable de 4 hilos
para la conexión directa
1"
(25 mm)
3
1
⁄
2
"
(89 mm)
5"
(127 mm)
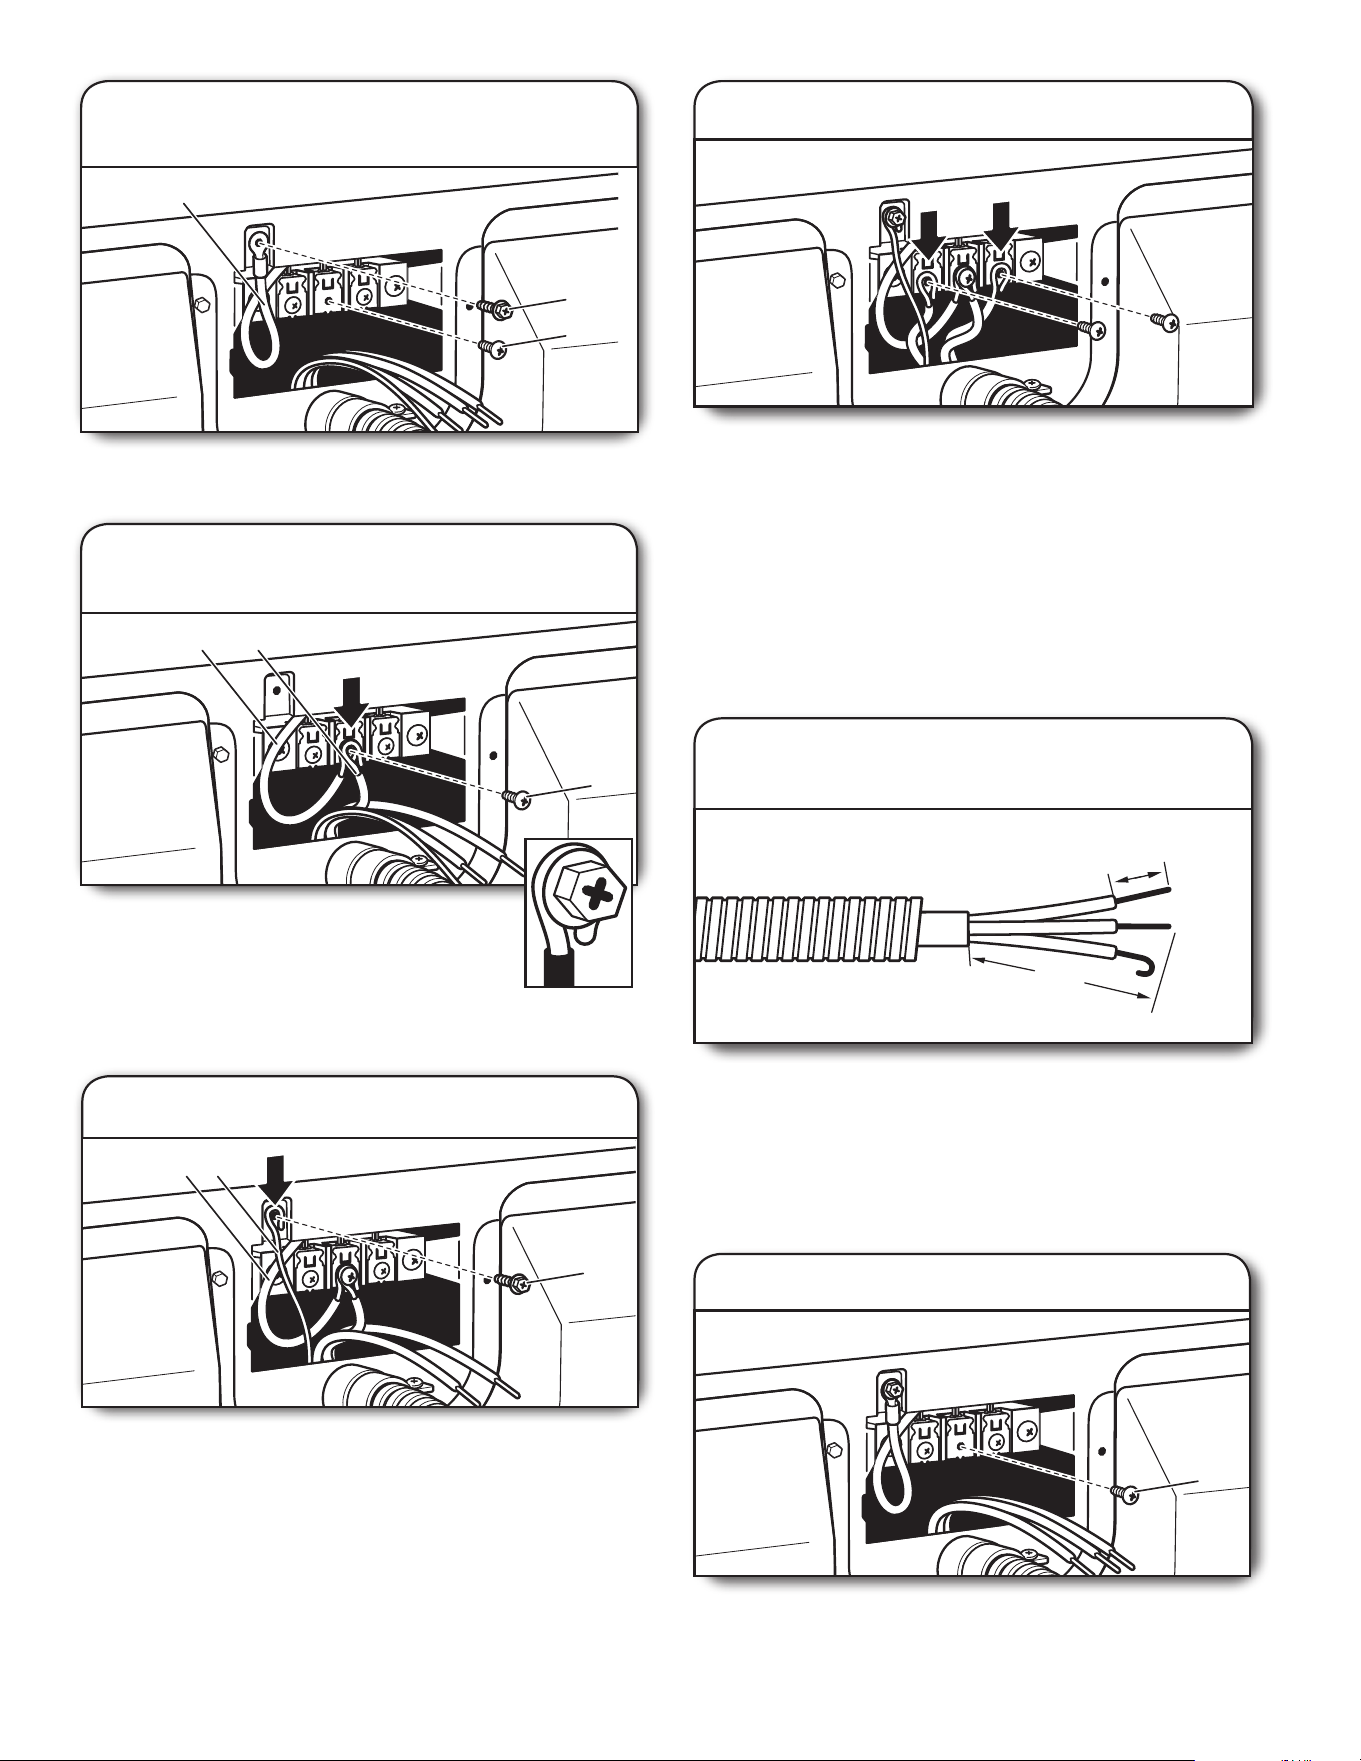
38
4. Conecte el hilo a tierra
FE
A
Conecte el hilo a tierra (F) (verde o desnudo) del cable directo
de suministro eléctrico al tornillo del conductor de tierra externo
(A). Apriete el tornillo.
B
E C
3. Conecte el hilo neutro a tierra
y el hilo neutro
Conecte el hilo neutro de puesta a tierra (E) y
coloque el extremo en forma de gancho (gancho
mirando hacia la derecha) del hilo neutro (C)
(blanco o central), del cable de conexión directa,
debajo del tornillo central del bloque de terminal (B). Apriete
y junte los extremos en forma de gancho. Apriete el tornillo.
2. Prepárese para conectar el cable neutro
a tierra y el alambre neutro
B
A
E
Saque el tornillo central del bloque de terminal (B). Saque el hilo
de tierra neutro (E) del tornillo conductor de tierra externo (A).
Coloque los extremos en forma de gancho de los hilos
restantes del cable de conexión directa debajo de los tornillos
exteriores del bloque de terminal (con los ganchos mirando
hacia la derecha). Apriete los extremos en forma de gancho
y apriete los tornillos. Por último, vuelva a instalar la tapa
del bloque de terminal. Asegure la tapa con un tornillo de
sujeción. Ahora vaya a “Requisitos de ventilación”.
5. Conecte los hilos restantes
Conexión por cable directo de 3 hilos
Use cuando los códigos locales permitan la conexión
del conductor de tierra de la carcasa al hilo neutro.
B
2. Quite el tornillo central
Saque el tornillo central del bloque de terminal (B).
El cable de conexión directa debe tener 5 pies (1,52 m) extra
de largo para poder mover la secadora si fuese necesario.
Pele 3½" (89 mm) de la cubierta exterior desde el extremo
del cable. Pele el aislamiento 1" (25 mm) hacia atrás. Si usa
un cable trilar con hilo de tierra, corte el hilo desnudo para
que quede nivelado con la cubierta exterior. Doble los extremos
de los hilos para formar un gancho.
1. Prepare el cable de 3 hilos
para la conexión directa
1"
(25 mm)
3½"
(89 mm)
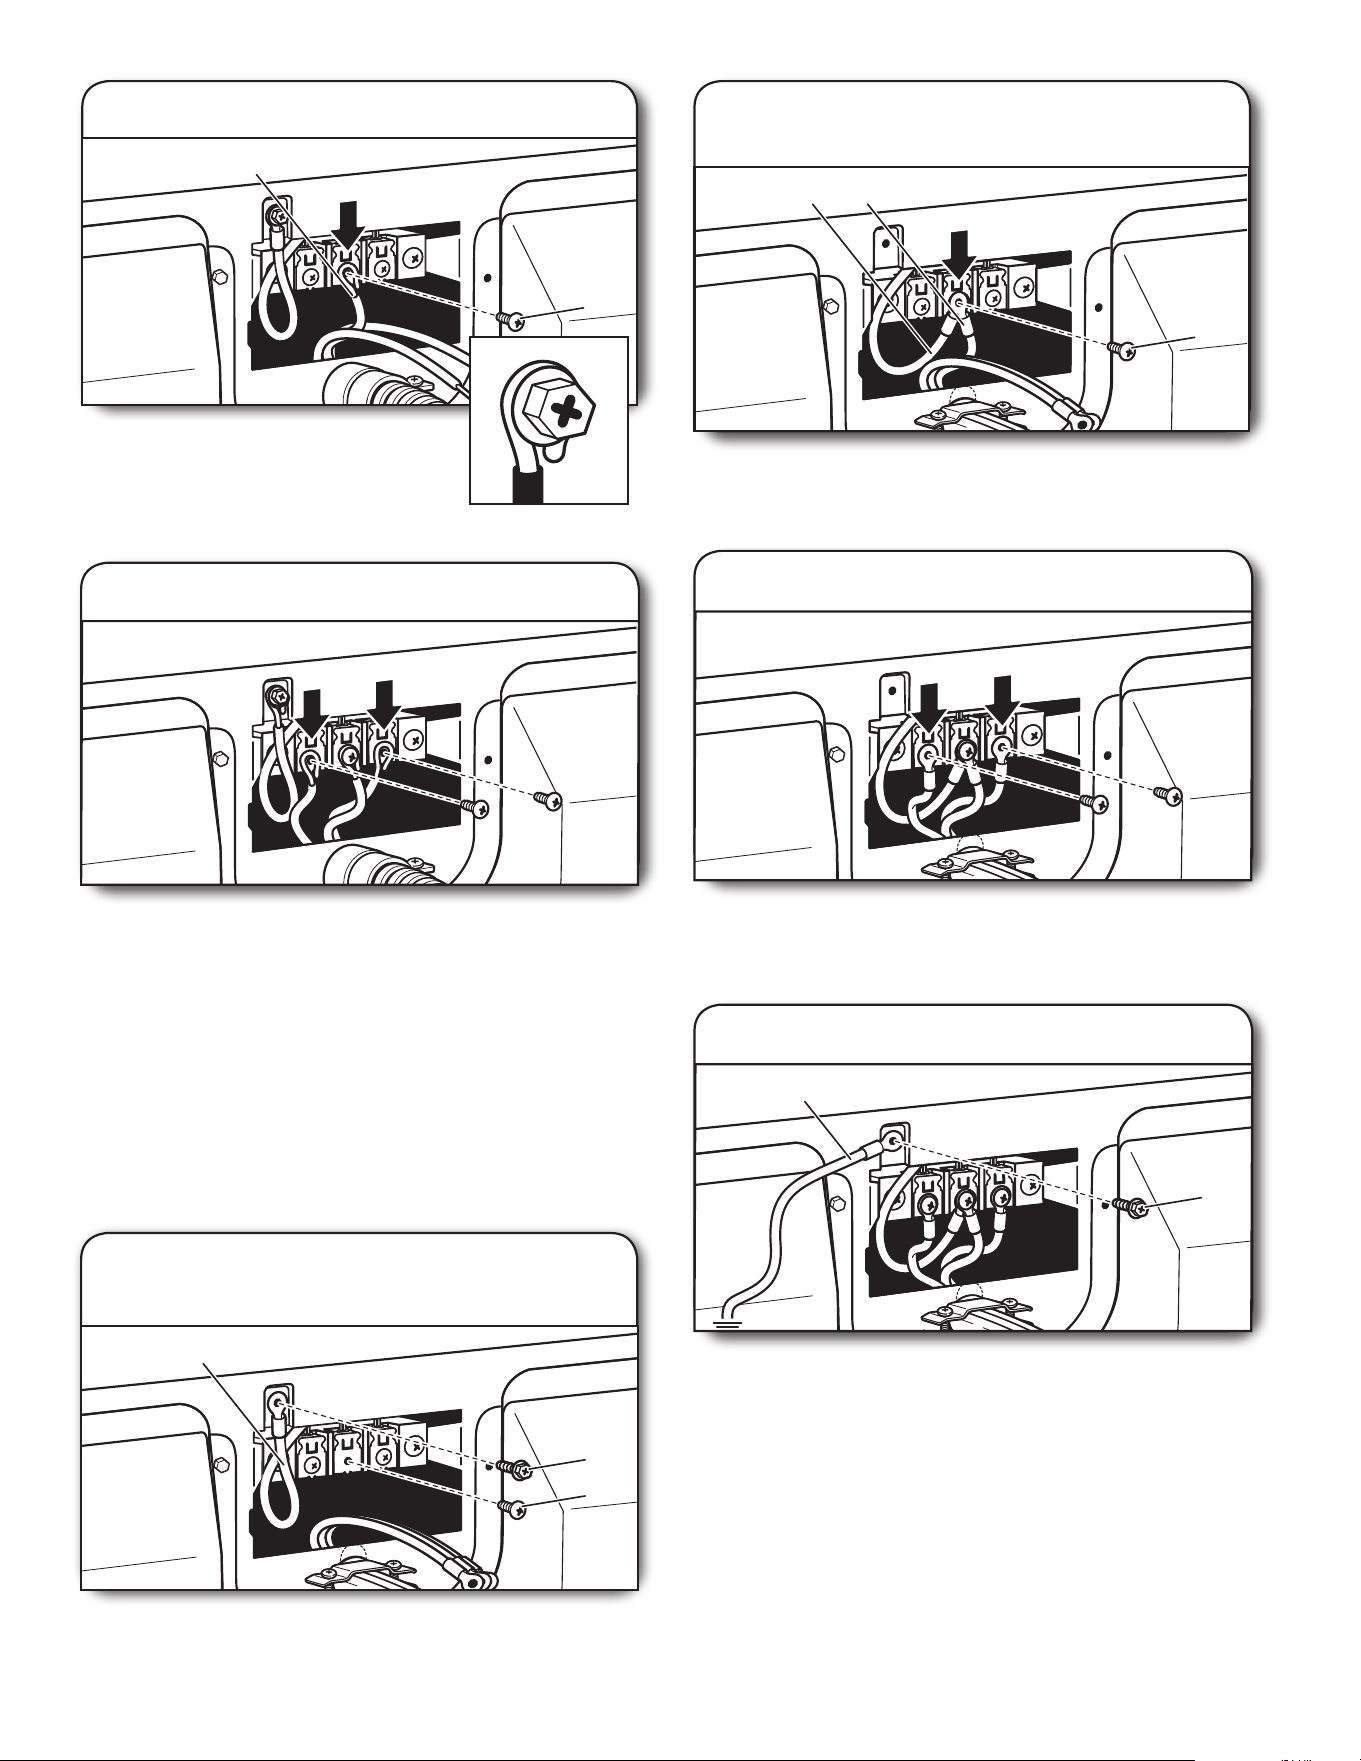
39
4. Conecte los hilos restantes
Coloque los extremos en forma de gancho de los hilos
restantes del cable de conexión directa debajo de los tornillos
exteriores del bloque de terminal (con los ganchos mirando
hacia la derecha). Apriete los extremos en forma de gancho
y apriete los tornillos. Por último, vuelva a instalar la tapa
del bloque de terminal. Asegure la tapa con un tornillo de
sujeción. Ahora vaya a “Requisitos de ventilación”.
B
C
Coloque el extremo en forma de gancho
del hilo neutro (hilo blanco o central) (C)
del cable directo debajo del tornillo
central (B) del bloque de terminal. Apriete
y junte el extremo en forma de gancho. Apriete el tornillo.
3. Conecte el hilo neutro
1. Prepárese para conectar el hilo
neutro a tierra y el hilo neutro
B
A
E
Saque el tornillo central del bloque de terminal (B). Saque
el hilo neutro de tierra (E) del tornillo conductor de tierra
externo (A).
Conexión opcional de 3 hilos con conexión
a tierra externo
Antes de hacer la conexión, usted deberá verificar
con un electricista competente que este método
de conexión a tierra sea aceptable.
B
CE
2. Conecte el hilo neutro a tierra
y el hilo neutro
Conecte el hilo neutro a tierra (E) y el hilo neutro (C) (hilo
blanco o central) del cable de suministro eléctrico, debajo
del tornillo central del bloque de terminal (B). Apriete el tornillo.
3. Conecte los hilos restantes
Coloque los extremos en forma de gancho de los hilos restantes
debajo de los tornillos exteriores del bloque de terminal (con
los ganchos mirando hacia la derecha). Apriete los tornillos.
A
E
4. Conecte el hilo externo a tierra
Conecte un hilo a tierra de cobre separado (E) desde el
tornillo conductor a tierra externo (A) a una conexión a tierra
adecuada. Por último, vuelva a instalar la tapa del bloque
de terminal. Asegure la tapa con un tornillo de sujeción.
Ahora vaya a “Requisitos de ventilación”.
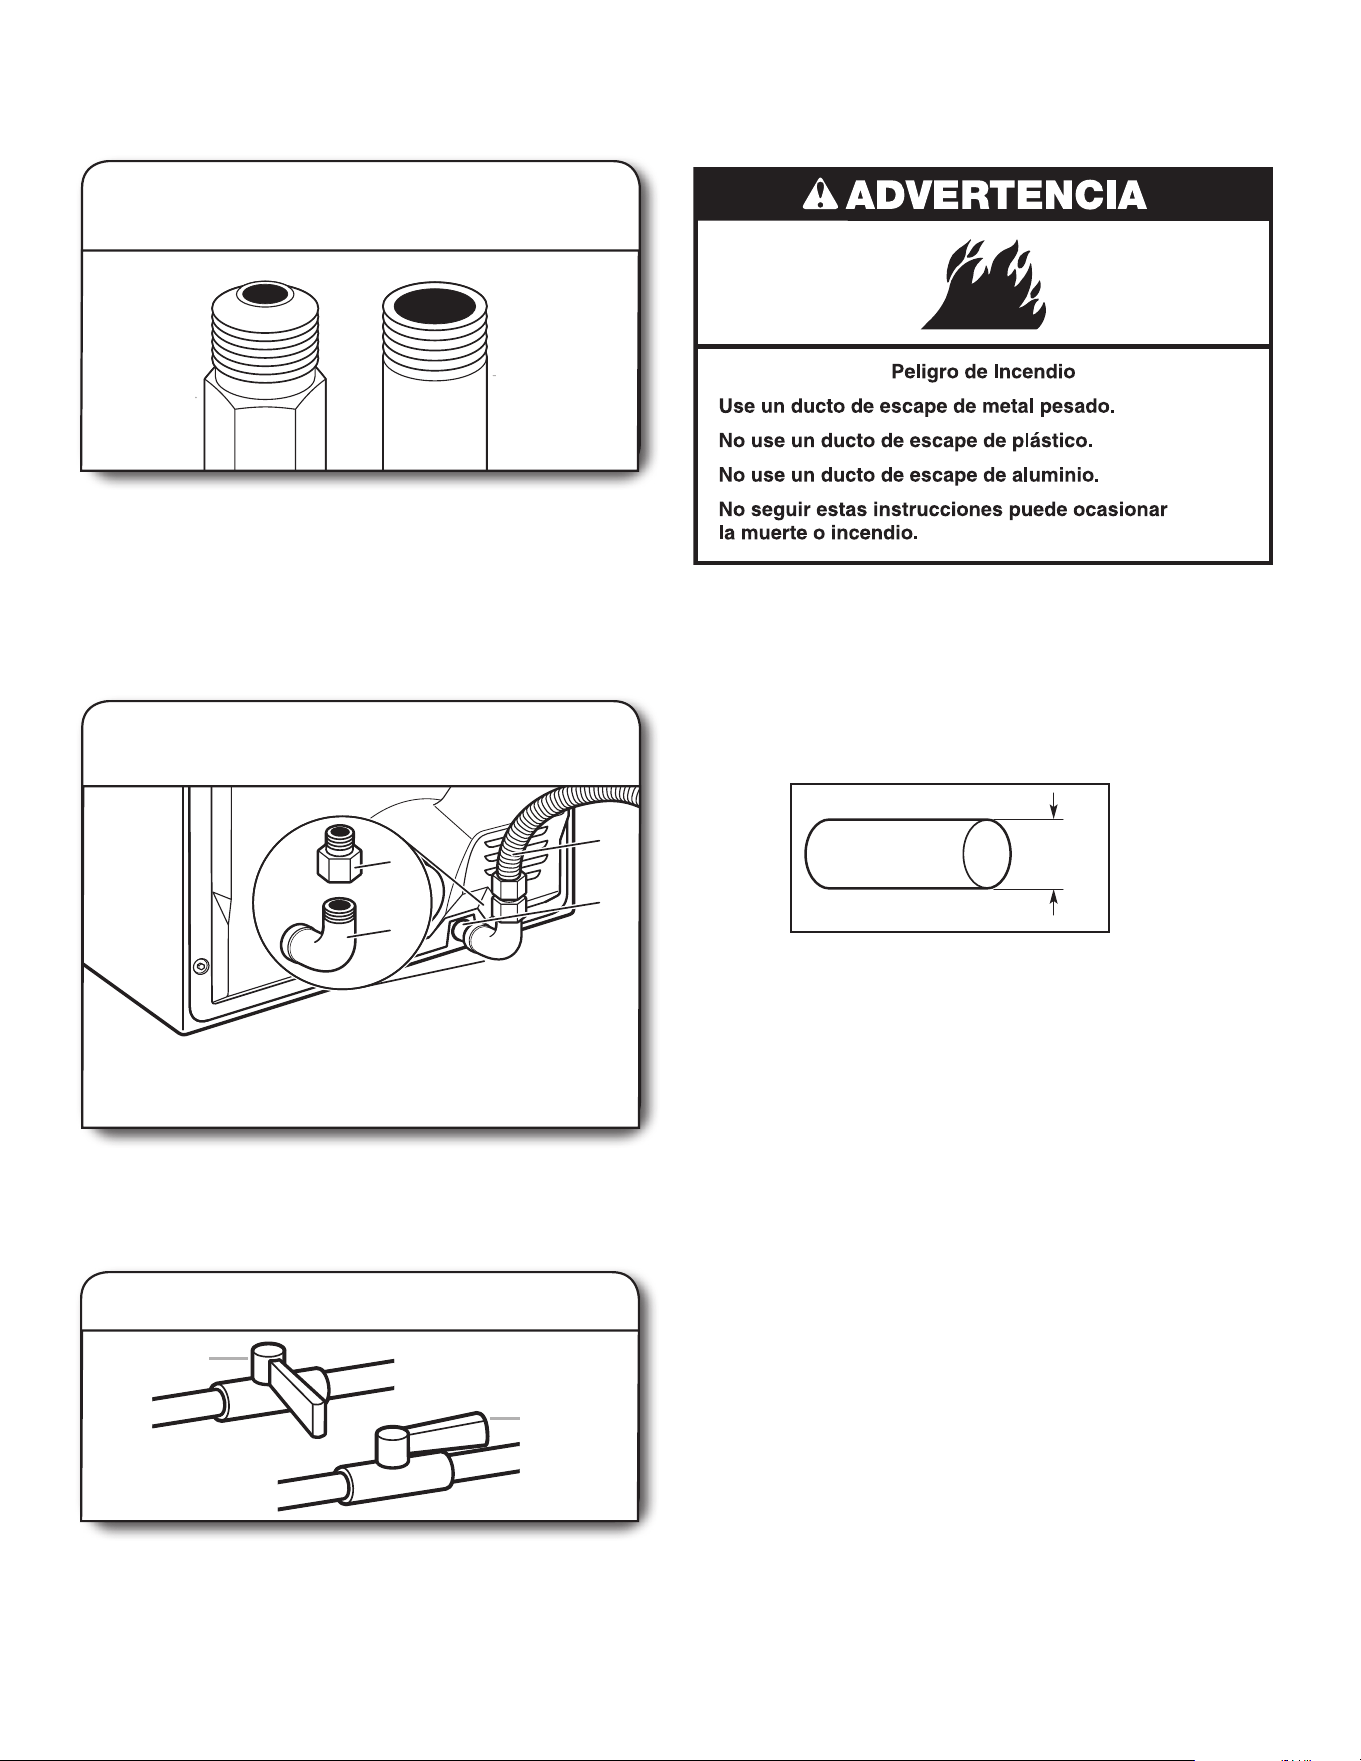
40
Quite la tapa roja del tubo de gas. Utilizando una llave de
tuercas para ajustar, conecte el suministro de gas a la secadora.
Use compuesto para unión de tubos en las roscas de todos los
accesorios macho no abocinados. Si se usa tubería exible de
metal, asegúrese de que no hayan partes retorcidas.
NOTA: Para las conexiones de gas propano, debe usar un
compuesto para unión de tuberías resistente a la acción del gas
propano. No utilice cinta TEFLON
®
.
A
B
Accesorio
macho no
abocinado
Accesorio
macho
abocinado
3. Abra la válvula de cierre
Abra la válvula de cierre en la línea de suministro; la válvula
está abierta cuando la manija está paralela al tubo de gas.
Luego pruebe todas las conexiones aplicando con un cepillo
una solución aprobada para detección de fugas que no
sea corrosiva. Se observarán burbujas si hay fugas. Tape
cualquier fuga que encuentre.
A
B
Válvula
abierta
Válvula
cerrada
A
B
D
C
2. Planique la conexión del accesorio
par la tubería
Se debe usar una combinación de accesorios para tubería
para conectar la secadora a la línea de suministro de gas
existente. Se muestra una conexión recomendada. Su conexión
puede ser distinta, de acuerdo con el tipo de línea de
suministro, tamaño y ubicación.
A. Conector exible de gas
de 3/8"
B. Tubo de la secadora de 3/8"
C. Codo para tubo de 3/8" a 3/8"
D. Accesorio adaptador abocinado
para tubo de 3/8"
CONEXIÓN DEL SUMINISTRO
DE GAS – EE.UU. Y CANADÁ
1. Conecte la línea de suministro
de gas a la secadora
Requisitos de ventilación
ADVERTENCIA: Para reducir el riesgo de incendio, esta secadora
DEBE VENTILARSE HACIA EL EXTERIOR.
IMPORTANTE: Observe todos los códigos y ordenanzas
aplicables. El ducto de escape de la secadora no debe
conectarse en ningún ducto de gas, chimenea, pared, techo,
desván, espacio angosto o el espacio oculto de un edicio.
Deberá usarse solamente un ducto de metal rígido o exible
para la ventilación.
4"
(102 mm)
Ducto de escape de metal pesado de 4" (102 mm)
■ Sólo puede usarse un ducto de escape de metal pesado
de 4" (102 mm) y abrazaderas.
■ No utilice un ducto de escape de plástico ni de aluminio.
Ducto de escape de metal rígido:
■ Se recomienda para un mejor desempeño en el secado
y para evitar que se aplaste o se tuerza.
Ducto de escape de metal exible: (Es aceptable sólo si es
accesible para la limpieza)
■ Deberá extenderse por completo y tener soporte en la
ubicación nal de la secadora.
■ Quite el exceso del mismo para evitar que se doble y se tuerza,
lo cual podría dar lugar a una reducción del ujo de aire y a
un rendimiento insuciente.
■ No instale un ducto de escape de metal exible en paredes,
techos o pisos encerrados.
■ La longitud total no deberá exceder los 7¾ pies (2,4 m).
■ El largo del ducto de escape de metal exible que se va
a utilizar debe incluirse en el diseño completo del sistema
de ventilación, como se muestra en “Cuadro del sistema
de ventilación”.
NOTA: Si se usa un sistema de ventilación existente, limpie
la pelusa que está en toda la longitud del sistema y asegúrese
de que la capota de ventilación no esté obstruida con pelusa.
Reemplace los ductos de escape de plástico o de hoja de metal
por ductos de metal rígido o de metal exible. Revise el cuadro
del sistema de ventilación y si es necesario modique el sistema de
ventilación existente para lograr el mejor desempeño de secado.
VENTILACIÓN

41
Abrazaderas:
■ Utilice abrazaderas para sellar todas las juntas.
■ No debe conectarse ni asegurarse el ducto de escape con
tornillos ni con ningún otro dispositivo de sujeción que se
extienda hacia el interior de dicho ducto y atrape pelusa.
No utilice cinta para ductos.
La ventilación inadecuada puede ocasionar la
acumulación de humedad y pelusa en la casa, lo cual
puede dar como resultado:
Daños de humedad en la carpintería, muebles, pintura,
empapelado, alfombras, etc.
Problemas en la limpieza de la casa y de salud.
Los productos de ventilación se pueden comprar con su distribuidor
o llamando al 1-844-553-6667.
Capota tipo persiana
Bien
Capota angular
Capota tipo caja
Mejor
Capotas de ventilación:
Codos:
Estilos recomendados:
Estilos recomendados:
■ Los codos de 45° proveen un mejor ujo de aire que los codos
de 90°.
■ Deberán estar a por lo menos 12" (305 mm) desde el piso
o cualquier objeto que pueda obstruir la salida (tales como
ores, rocas, arbustos o nieve).
Estilo aceptable:
Planicación del sistema de ventilación
Instalaciones recomendadas de ventilación
Las instalaciones típicas tienen la ventilación de la secadora en
la parte posterior de la misma. Otras instalaciones son posibles.
B
B
C
D
E
E
F
G
H
A
A. Secadora
B. Codo
C. Pared
D. Capota de ventilación
E. Abrazaderas
F. Ducto de escape de metal rígido
o exible
G. Longitud necesaria del ducto de escape
para conectar los codos
H. Salida de escape
Instalación estándar con ventilación por
la parte posterior y conexión indirecta
Previsiones especiales para casas rodantes:
El ducto de escape deberá sujetarse rmemente en un lugar no
inamable de la casa rodante y no debe terminar debajo de la
casa rodante. El ducto de escape debe terminar en el exterior.
Instalación del ducto de escape en casas rodantes
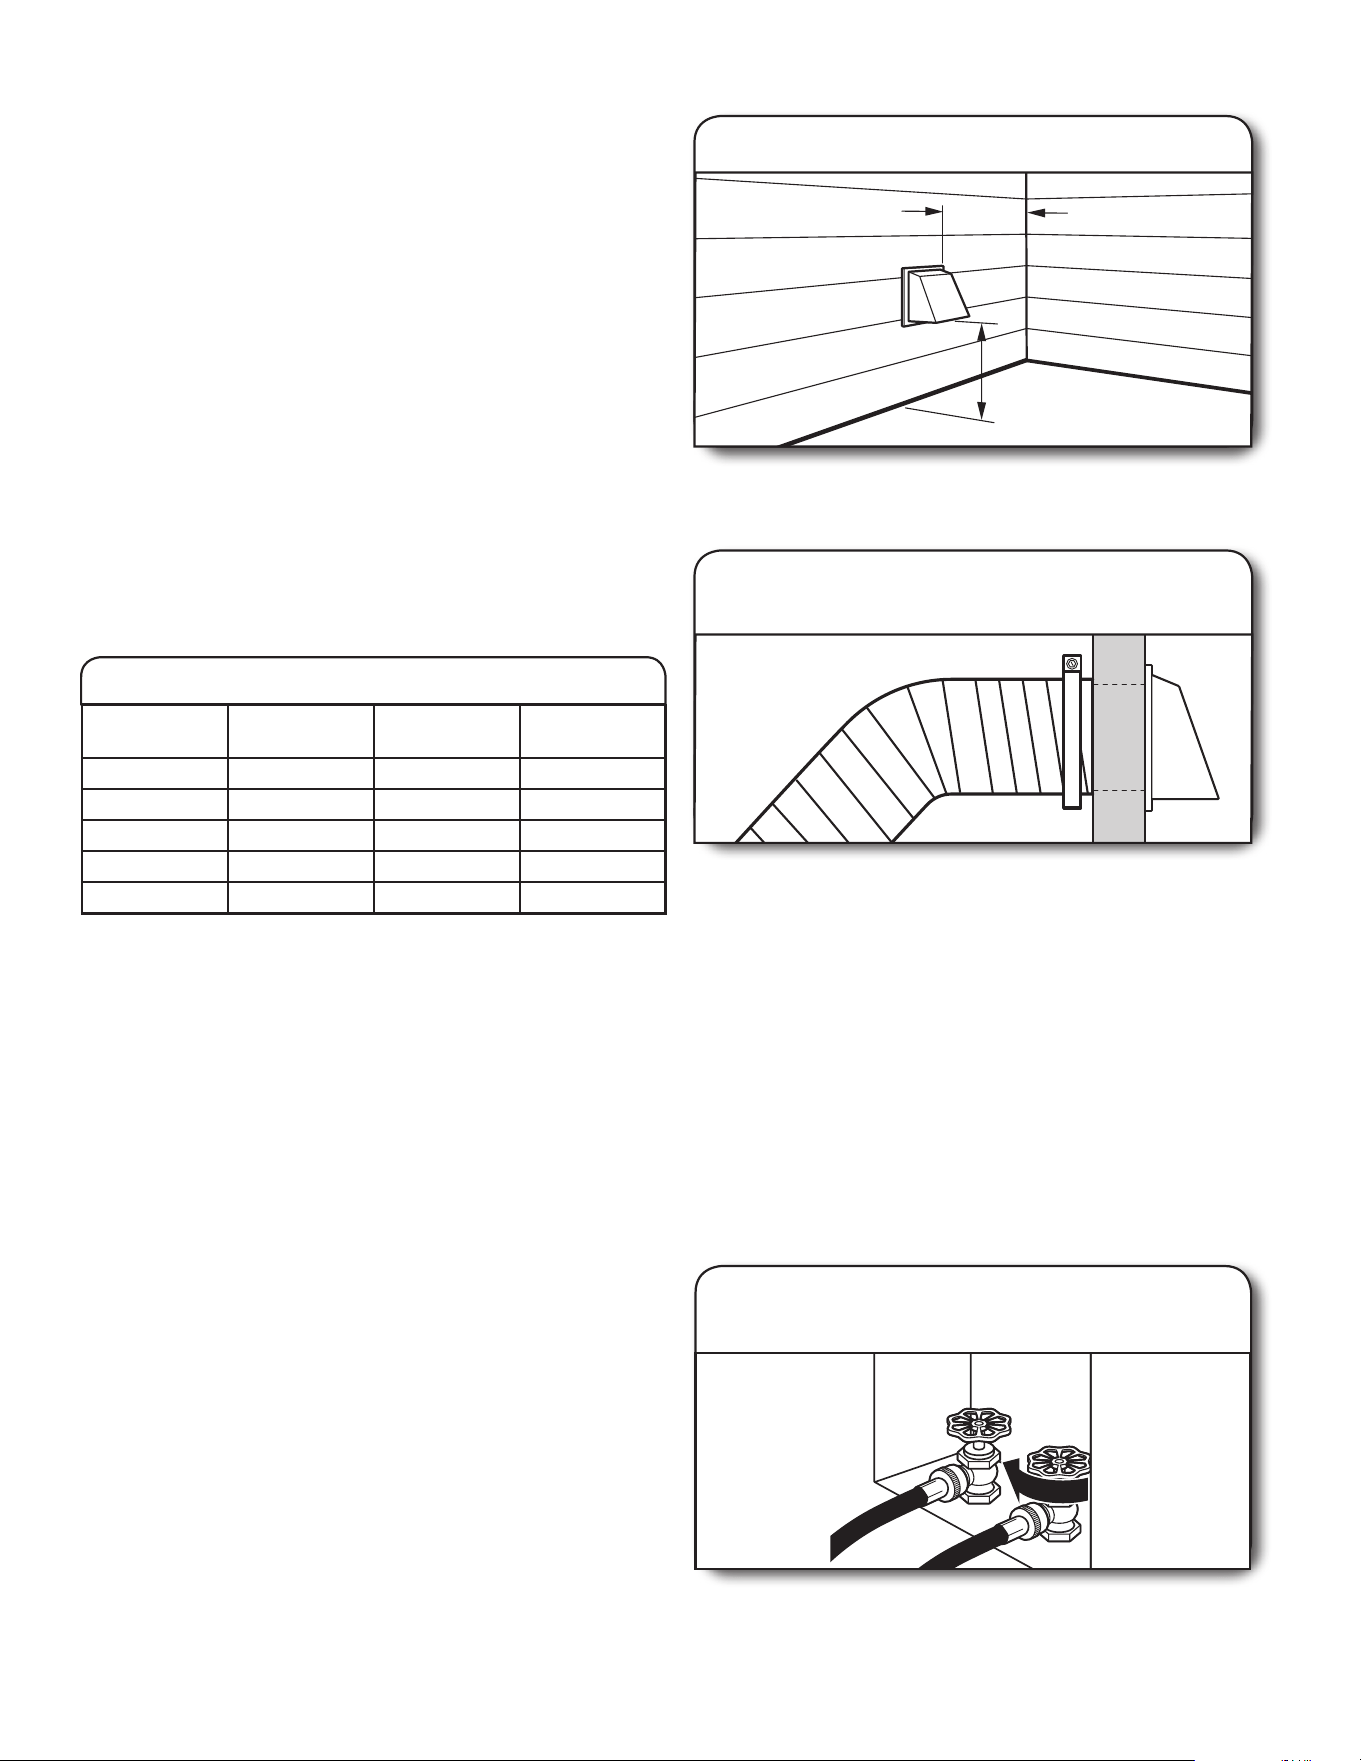
42
Determinación de la longitud del ducto de escape y el número de
codos necesarios para obtener un óptimo rendimiento de secado:
■ Use el “Cuadro del sistema de ventilación” a continuación para
determinar las combinaciones aceptables de tipo de material
para ducto y capota a usar.
NOTA: No use tendidos de ducto de escape más largos que
los especicados en el “Cuadro del sistema de ventilación”.
Los sistemas de ventilación más largos que los especicados:
■ Acortarán la vida útil de la secadora.
■ Reducirán el rendimiento, dando lugar a tiempos de secado
más largos y un aumento en el consumo de energía.
Determinación de la vía del ducto de escape:
■ Seleccione la vía que proporcione el trayecto más recto
y directo al exterior.
■ Planique la instalación a n de usar el menor número posible
de codos y vueltas.
■ Cuando use los codos o haga vueltas, deje todo el espacio
que sea posible.
■ Doble el ducto gradualmente para evitar torceduras.
■ Use la menor cantidad posible de vueltas de 90°.
2. Conecte el ducto de escape a la capota
de ventilación
El ducto de escape debe encajar sobre la capota de ventilación.
Asegure el ducto de escape a la capota de ventilación con
una abrazadera de 4" (102 mm). Extienda el ducto de escape
a la ubicación de la secadora usando la trayectoria más recta
que sea posible. Evite giros de 90°. Utilice abrazaderas para
sellar todas las juntas. Para asegurar el ducto de escape, no use
cinta para ductos, tornillos ni otros dispositivos de jación que
se extiendan hacia el interior de dicho ducto, ya que pueden
atrapar pelusa.
INSTALACIÓN DEL SISTEMA DE VENTILACIÓN
12" min.
(305 mm)
12" min.
(305 mm)
1. Instale la capota de ventilación
Instale la capota de ventilación y use compuesto para
calafateo para sellar la abertura exterior de la pared
alrededor de la capota de ventilación.
Número de
codos de 90°
Tipo de ducto
de escape
Capotas tipo
caja/persiana
Capotas
angulares
0 Metal rígido 64 pies (20 m) 58 pies (17,7 m)
1 Metal rígido 54 pies (16,5 m) 48 pies (14,6 m)
2 Metal rígido 44 pies (13,4 m) 38 pies (11,6 m)
3 Metal rígido 35 pies (10,7 m) 29 pies (8,8 m)
4 Metal rígido 27 pies (8,2 m) 21 pies (6,4 m)
Cuadro del sistema de ventilación
CONEXIÓN DE LAS MANGUERAS
DE ENTRADA
Para los modelos sin vapor, vaya a “Conexión del ducto
de escape”.
La secadora debe conectarse al grifo de agua fría usando las
mangueras de entrada nuevas. No use mangueras viejas.
Cierre el grifo de agua fría y quite la manguera de entrada
de la lavadora.
Quite la arandela vieja de goma de la manguera de entrada
y reemplácela con la arandela nueva de goma.
1. Cierre el grifo de agua fría, quite
y reemplace la arandela de goma
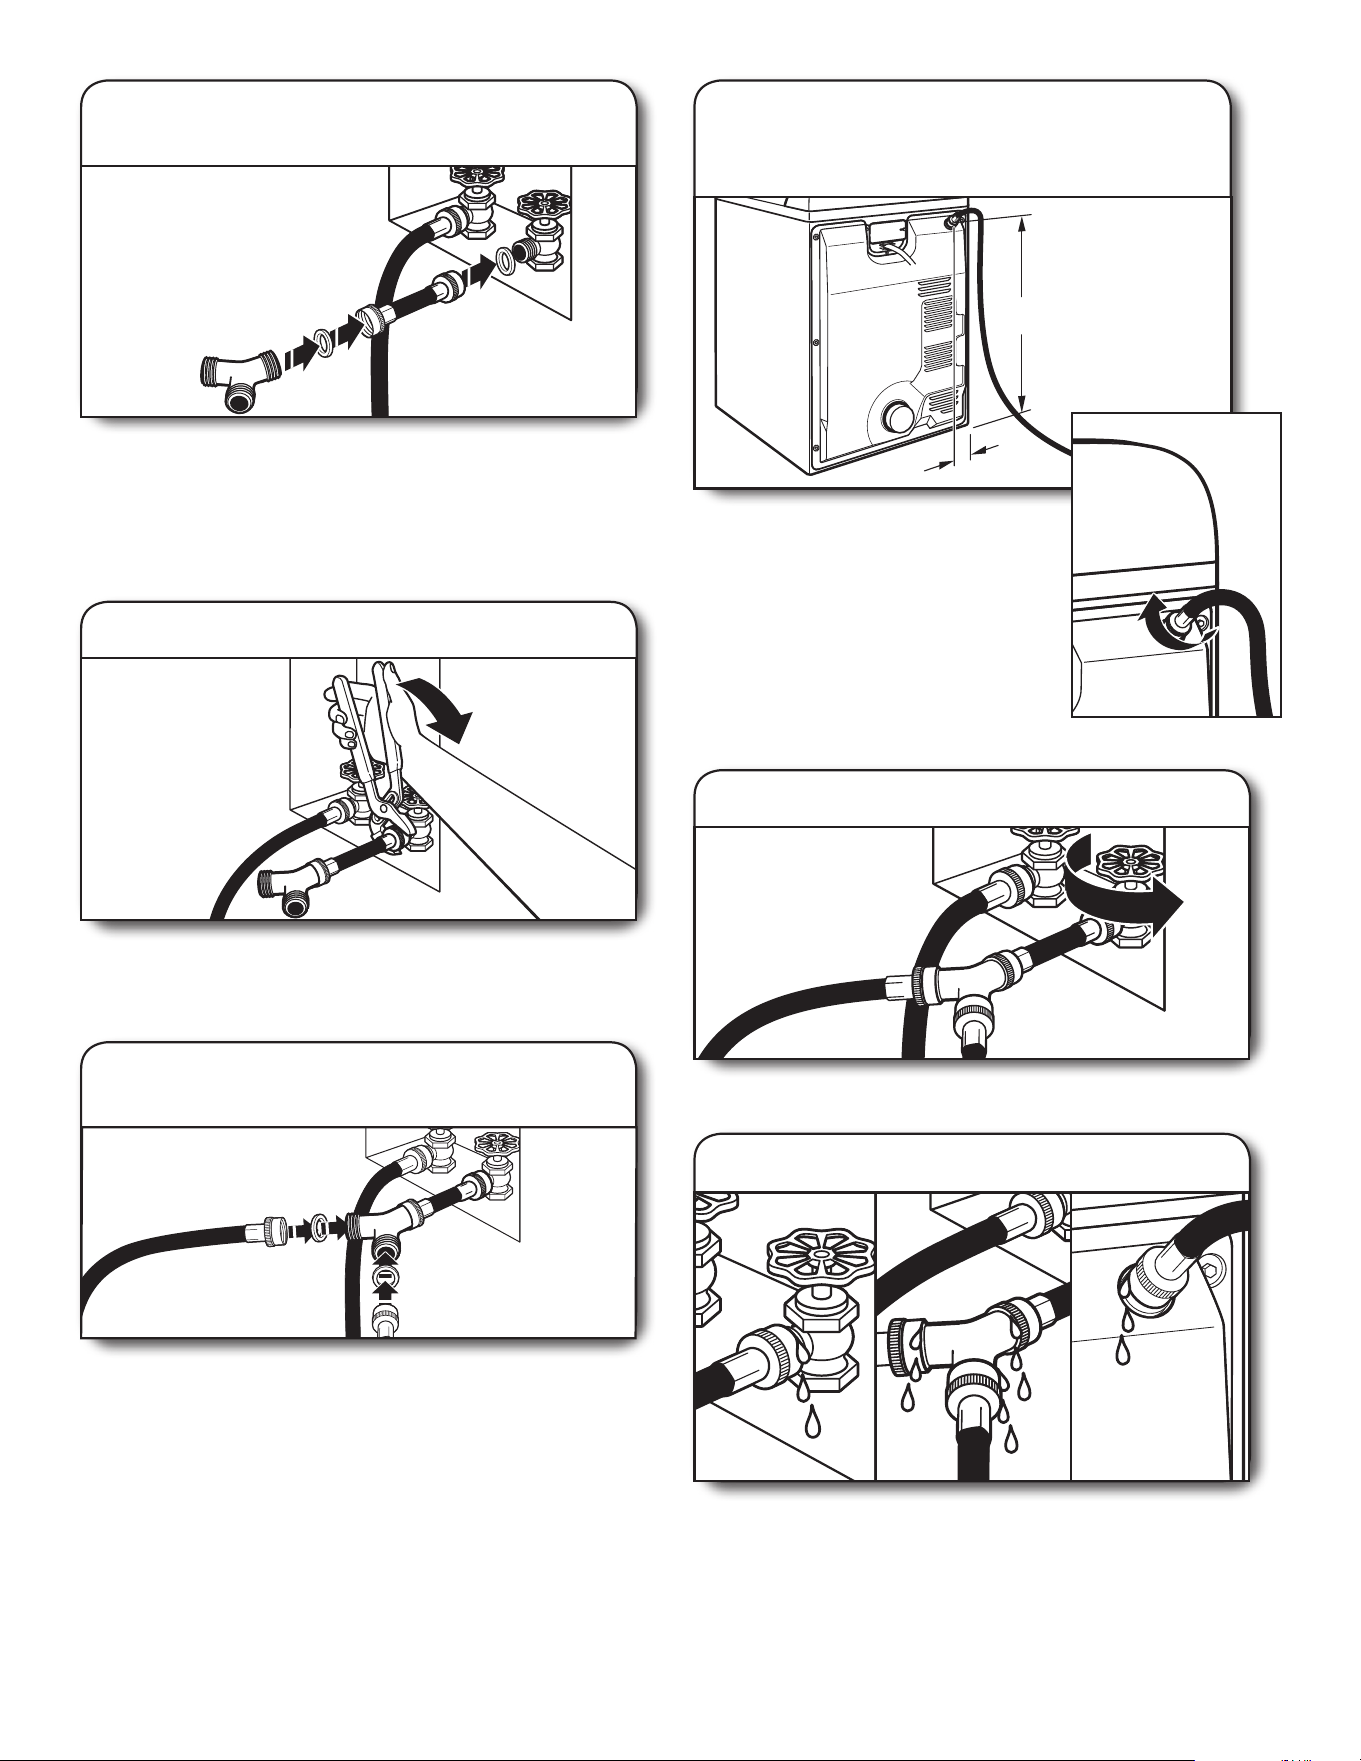
43
3. Apriete los acoplamientos
Usando las pinzas, apriete los acoplamientos dos tercios
de vuelta adicional.
NOTA: No apriete demasiado. Se puede dañar el acoplamiento.
2. Sujete la manguera corta y el conector
en “Y”
Fije la manguera de entrada de 2 pies (0,6 m) al grifo de agua
fría. Atornille el acoplamiento con la mano hasta que quede
asentado en el grifo. Luego je el conector en “Y” al extremo
de la manguera de entrada de 2 pies (0,6 m). Atornille el
acoplamiento con la mano hasta que quede asentado en
el conector.
4. Sujete la manguera larga al conector
en “Y” y apriete los acoplamientos
Fije un extremo de la manguera de entrada de 5 pies
(1,5 m) de la secadora al conector en “Y” . Fije la manguera
de entrada de agua fría al otro lado del conector en
“Y”. Atornille el acoplamiento con la mano hasta que
quede asentado en el conector. Con las pinzas, apriete
los acoplamientos dos tercios de vuelta adicional.
NOTA: No apriete demasiado. Se puede dañar
el acoplamiento.
7. Revise si hay fugas
Revise si hay fugas alrededor del conector en “Y”, de los grifos
y de las mangueras.
6. Abra el grifo del agua fría
Verique que los grifos de agua estén abiertos.
5. Sujete la manguera larga a la
válvula de llenado de la secadora
y apriete el acoplamiento
4"
(101 mm)
30
1
/4"
(768 mm)
Sujete el otro extremo de la manguera
larga a la válvula de llenado en la
parte superior del panel posterior de la
secadora. Atornille el acoplamiento a
mano hasta que quede asentado en el
conector de la válvula de llenado. Con
unas pinzas, atornille el acoplamiento
dos tercios de vuelta adicional.
NOTA: No apriete demasiado. Se puede
dañar el acoplamiento.
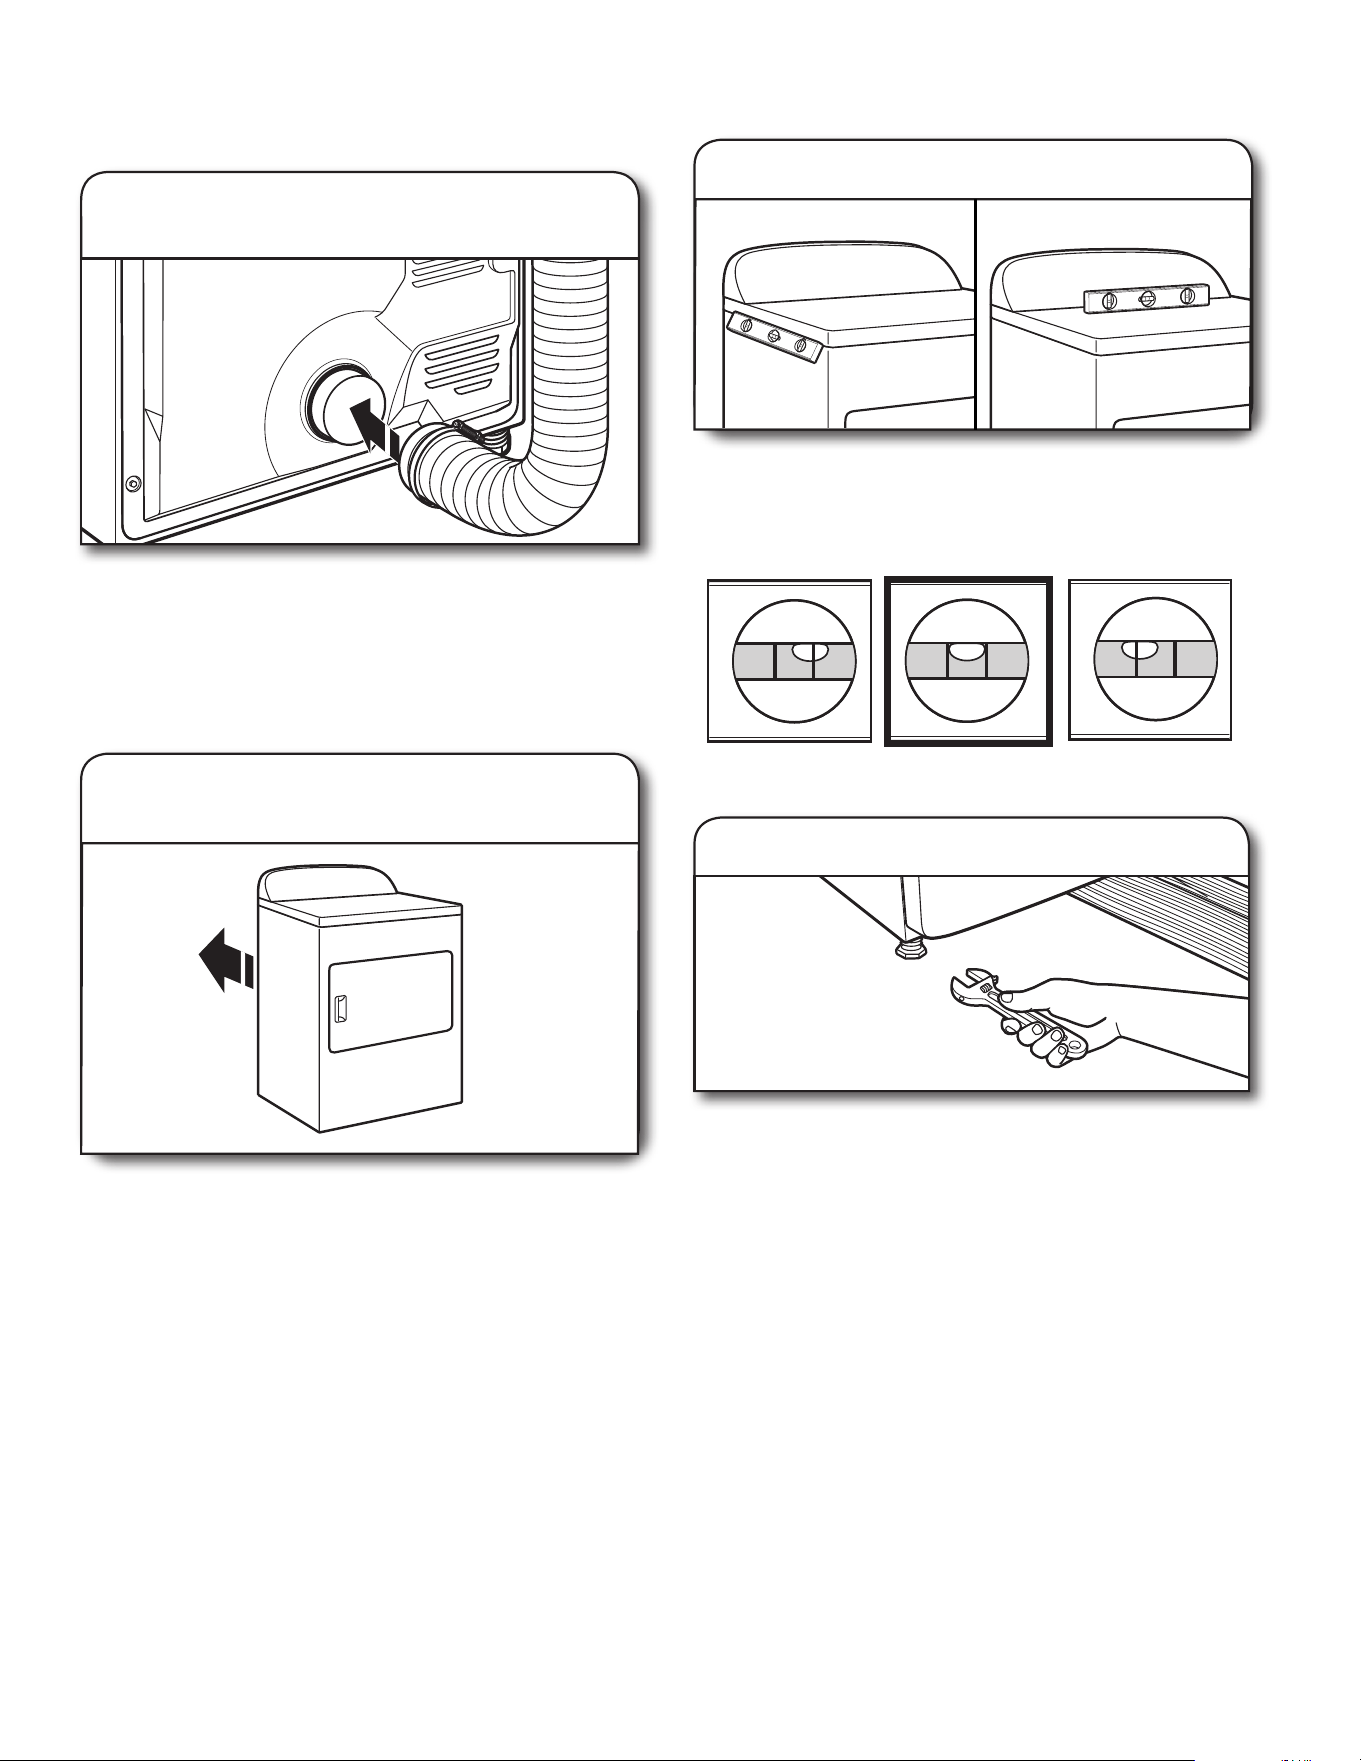
44
CONEXIÓN DEL DUCTO
DE ESCAPE
Usando una abrazadera de 4" (102 mm), conecte el ducto
de escape a la salida de aire en la secadora. Si se conecta
a un ducto de escape existente, asegúrese de que el mismo
esté limpio. El ducto de escape debe encajar sobre la salida
de aire de la secadora y dentro de la capota de ventilación.
Cerciórese de que el ducto de escape esté asegurado a la
capota de ventilación con una abrazadera de 4" (102 mm).
2. Traslade la secadora hacia
su ubicación nal
Traslade la secadora hacia su ubicación nal. Evite aplastar
o retorcer el ducto de escape.
1. Conecte el ducto de escape a la salida
de escape
NIVELACIÓN DE LA SECADORA
No está nivelada NIVELADA No está nivelada
Revise la nivelación de la secadora de lado a lado. Repita
el procedimiento de adelante hacia atrás.
NOTA: La secadora debe estar nivelada para que el sistema
de detección de humedad funcione correctamente.
2. Regule las patas niveladoras
Si la secadora no está nivelada, levántela colocando un
bloque de madera debajo de la misma. Use una llave de
tuercas para regular las patas hacia arriba o hacia abajo
y revise nuevamente si está nivelada.
1. Nivele la secadora

45
LISTA DE CONTROL DE LA
INSTALACIÓN TERMINADA
■ Verique que todas las piezas estén ahora instaladas. Si hay
alguna pieza extra, vuelva a revisar todos los pasos para ver
qué se omitió.
■ Verique que tenga todas las herramientas.
■ Deshágase de todos los materiales de embalaje o recíclelos.
■ Revise la ubicación nal de la secadora. Asegúrese de que
el ducto de escape no esté aplastado ni retorcido.
■ Verique que la secadora esté nivelada. Vea “Nivelación
de la secadora”.
■ Quite la película que está en la consola y cualquier cinta
adhesiva que haya quedado en la secadora.
■ Limpie el interior del tambor de la secadora meticulosamente
con un paño húmedo para quitar residuos de polvo.
■ Lea “Uso de la secadora” en el “Manual de uso y cuidado”.
Modelos eléctricos:
■ Para una instalación con cable de suministro eléctrico,
enchufe en un contacto con descarga a tierra. Para una
instalación con cableado directo, encienda el suministro
eléctrico.
Modelos a gas:
■ Verique que el suministro de gas esté abierto.
■ Revise si hay fugas.
Solamente para los modelos con vapor:
■ Verique que los grifos de agua estén abiertos.
■ Revise si hay fugas alrededor del conector en “Y”, del grifo
y de las mangueras.
Todos los modelos:
■ Seleccione un ciclo de Timed Dry (Secado programado) con
calor y ponga la secadora en marcha. No seleccione el ajuste
de temperatura de Air Only (Sólo aire).
Si la secadora no funciona, revise lo siguiente:
• Que los controles estén jados en una posición
de funcionamiento “On” (Encendido).
• Que el botón de encendido se haya mantenido
presionado durante 3 segundos.
• Que la secadora esté enchufada en un contacto
y/o a un suministro de energía eléctrica.
• Que el fusible de la casa esté intacto y ajustado,
o que no se haya disparado el cortacircuitos.
• Que la puerta de la secadora esté cerrada.
Esta secadora hace funcionar automáticamente una rutina
de diagnóstico de instalación al comienzo del primer ciclo.
Si usted recibe un código L2, puede ser que haya un problema
con el suministro de energía de la casa, lo que evita que se
encienda el calentador de la secadora. Vea “Solución de
problemas”.
NOTA: Podrá notar un olor cuando la secadora se calienta por
primera vez. Este olor es común cuando se usa por primera vez
el elemento calefactor. El olor desaparecerá.
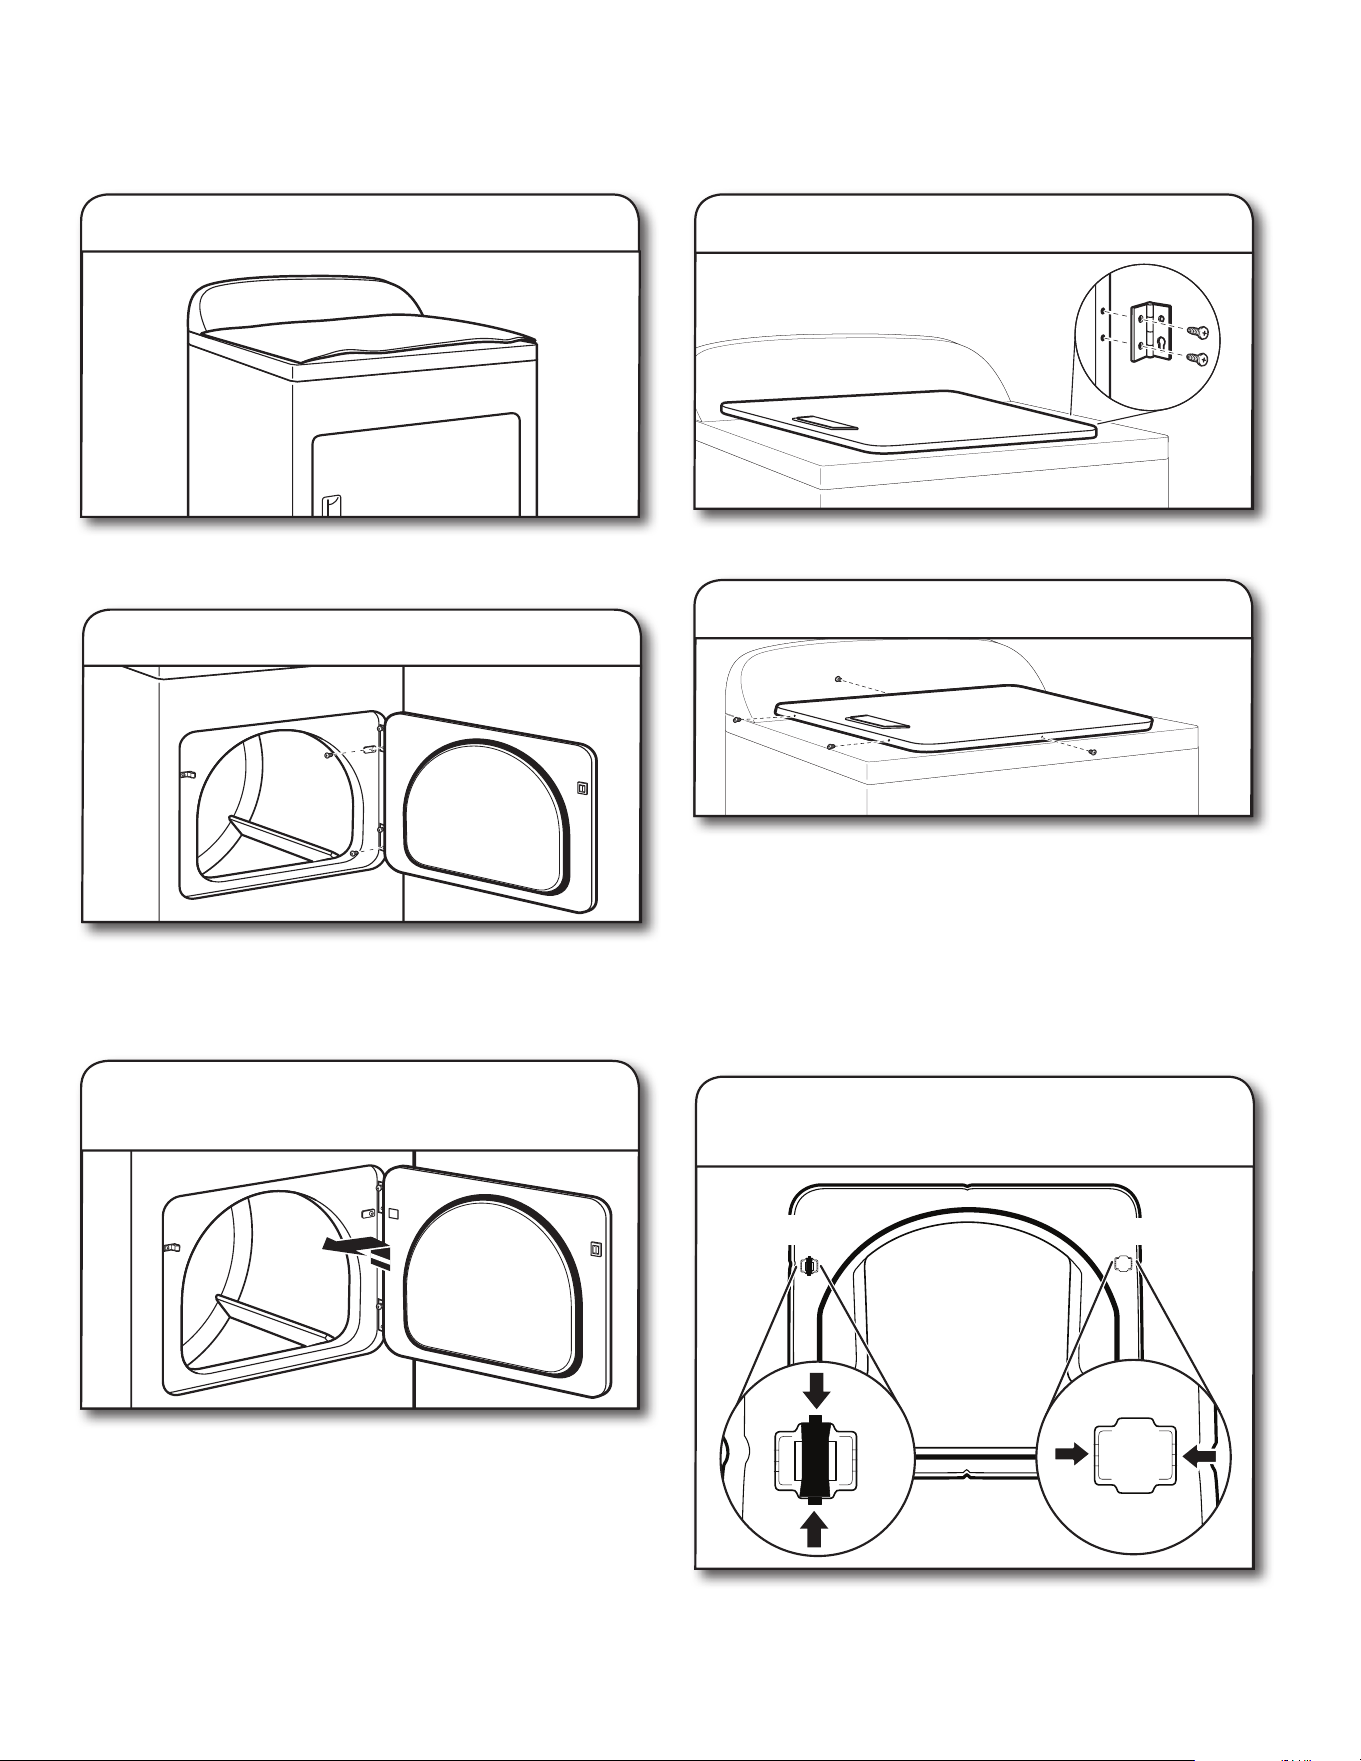
46
CAMBIO DEL SENTIDO DE ABERTURA
DE LA PUERTA (OPCIONAL)
NOTA: Un destornillador imantado es útil.
Coloque una toalla encima de la secadora para evitar dañar
la supercie.
1. Coloque una toalla sobre la secadora
2. Quite los tornillos de la parte inferior
Abra la puerta de la secadora. Extraiga los tornillos inferiores
de las bisagras del lado de la carcasa de la secadora. Aoje
(no extraiga) los tornillos superiores de las bisagras del lado
de la carcasa de la secadora.
Levante la puerta hasta que los tornillos superiores de la
carcasa estén en la parte grande de la ranura de la bisagra.
Jale la puerta hacia adelante para separarla de los tornillos.
Coloque la puerta (con el lado de la manija hacia arriba)
encima de la secadora. Extraiga los tornillos superiores
de la carcasa de la secadora.
3. Levante y quite la puerta de los tornillos
de la parte superior
Quite los tornillos de la parte superior, inferior y lateral
de la puerta (4 tornillos) que mantienen juntas la puerta
interior y la exterior. Sosteniendo la puerta sobre la toalla
encima de la secadora, sujete los lados de la puerta exterior
y levántela para separarla de la puerta interior. Deje a un
lado la puerta exterior.
NOTA: No haga palanca con un cuchillo para masilla o
un destornillador. No jale el sello de la puerta ni los seguros
de plástico de la puerta.
5. Quite los tornillos de la puerta
Quite el seguro, el bisel y el tapón de la parte interior
de la puerta interior apretando y jalándolos/empujándolos.
Coloque el seguro, el bisel y el tapón de la puerta en los
lados opuestos a los que se encontraban.
Tapón
Seguro y bisel
6. Cambie de lugar el seguro,
bisel y tapón de la puerta
4. Quite los tornillos de las bisagras
Quite los tornillos que unen las bisagras con la puerta.
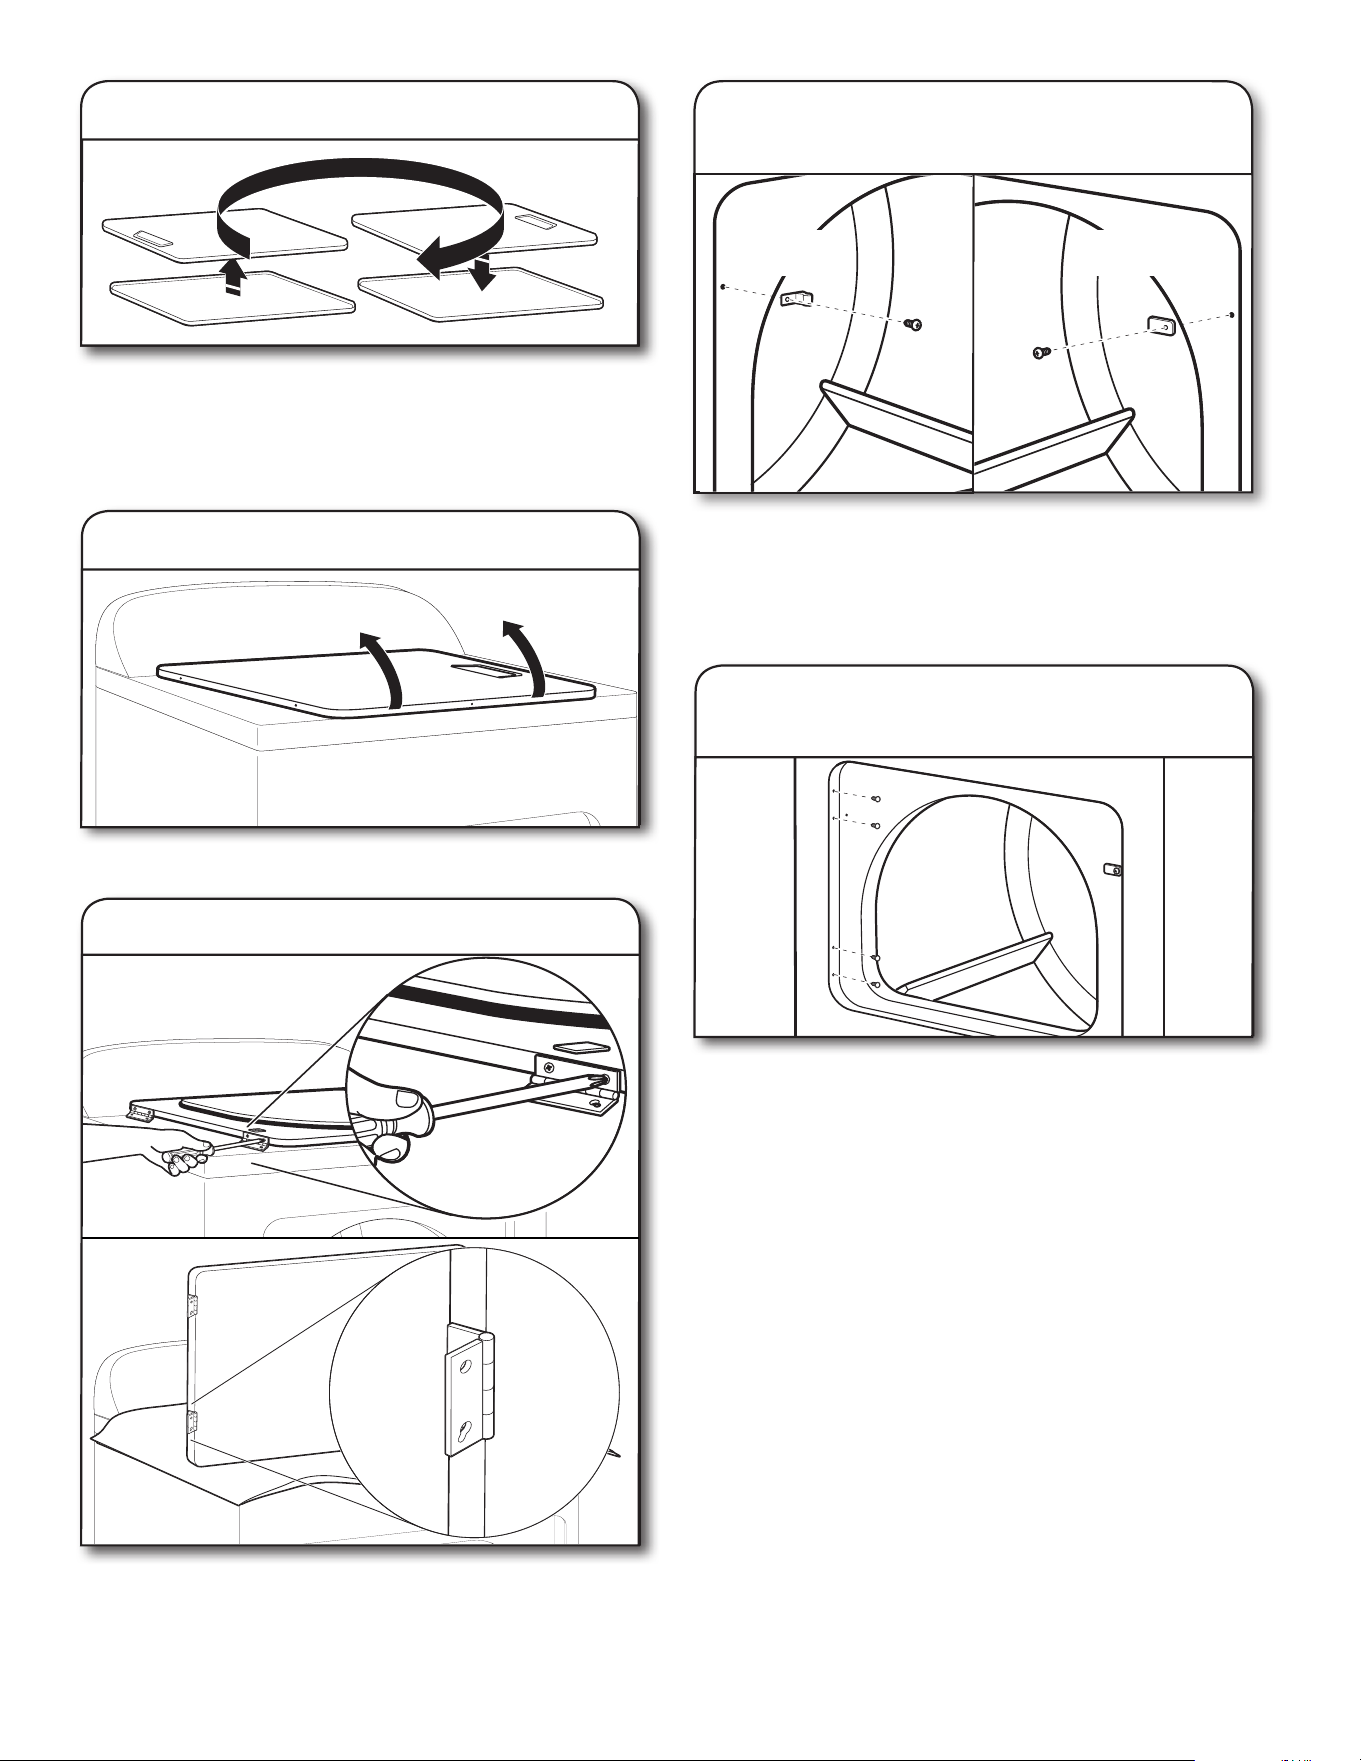
47
7. Gire la puerta exterior
Gire la puerta exterior 180° y colóquela de nuevo sobre
la puerta interior. Vuelva a sujetar el panel exterior al
panel interior de la puerta, de modo que la manija quede
en el lado en donde recién se han quitado las bisagras.
Inserte los 4 tornillos de la puerta.
8. Dé vuelta la puerta
Dé vuelta la puerta de modo que la manija quede hacia abajo.
9. Sujete las bisagras de la puerta
Vuelva a sujetar las bisagras de la puerta a la puerta
de la secadora, de manera que el oricio más grande
quede en la parte inferior de la bisagra.
Use un destornillador pequeño de hoja plana para quitar
cuidadosamente 4 tapones de los oricios de las bisagras
en el lado izquierdo de la carcasa de la secadora. Mueva
los tapones de los oricios de la bisagra al lado opuesto
de la carcasa de la secadora.
11. Quite y transera los tapones
de los oricios de la bisagra
Saque el tope de la puerta y el tapón del tope de la puerta
del gabinete de la secadora. Inserte el tope de la puerta en
el oricio del tapón del tope de la puerta y asegúrelo con un
tornillo. Inserte el tapón del tope de la puerta en el oricio
del tope original y asegúrelo con un tornillo.
10. Quite el tope de la puerta y
el tapón del tope de la puerta
Tapón del tope
de la puerta
Tope de
la puerta
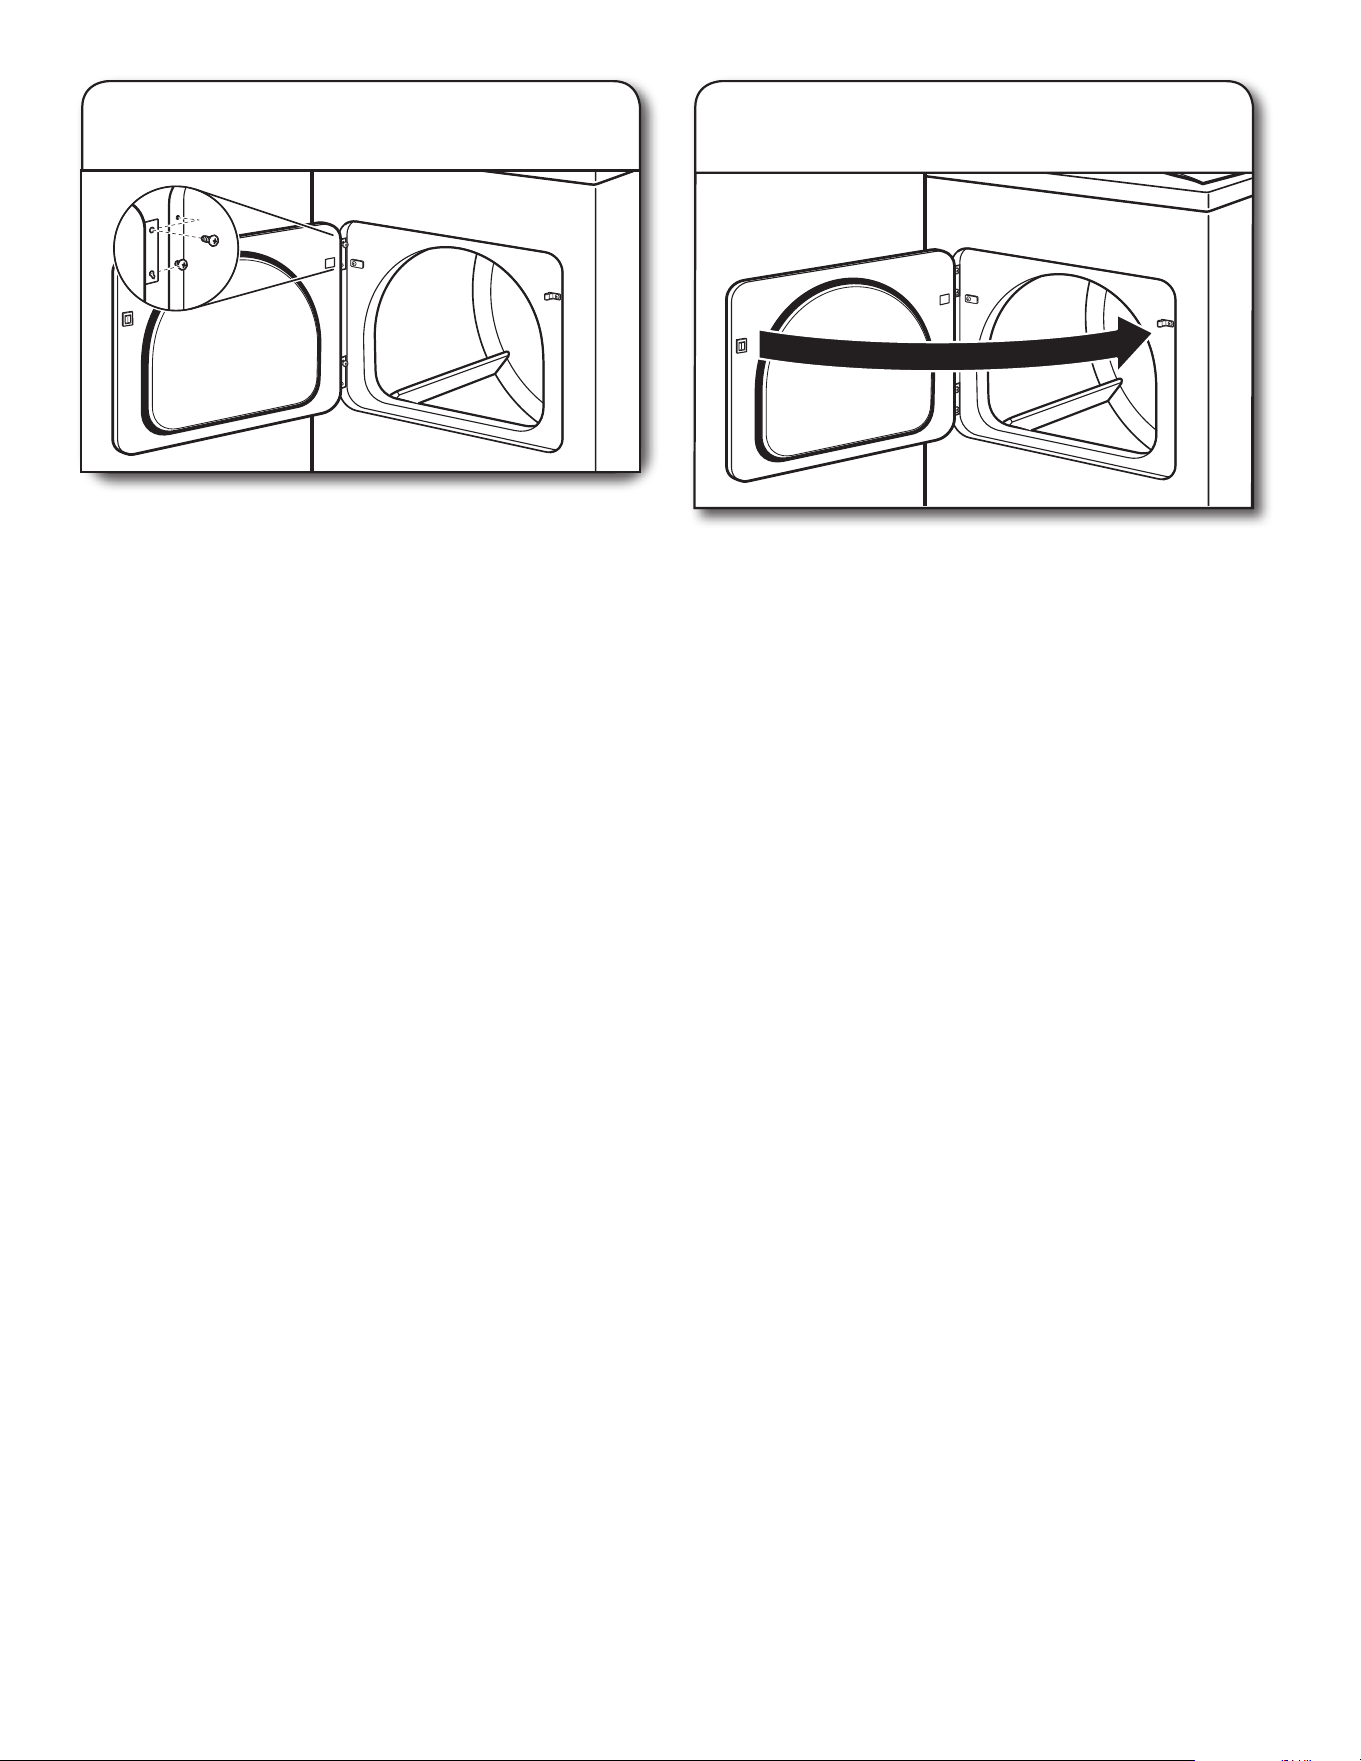
48
12. Inserte los tornillos en los oricios
de la carcasa de la secadora
NOTA: Puede ser que necesite la ayuda de dos personas
para instalar la puerta.
Introduzca los tornillos en los oricios inferiores del lado
izquierdo de la carcasa de la secadora. Atorníllelos por
la mitad. Coloque la puerta de tal forma que el extremo
grande de la ranura de la bisagra esté sobre los tornillos.
Deslice la puerta hacia arriba para que los tornillos estén
en la parte de abajo de las ranuras. Apriete los tornillos.
Introduzca y apriete los tornillos superiores en las bisagras.
Cierre la puerta y asegúrese de que el tope de la misma esté
alineado con el seguro de la puerta. Si es necesario, deslice
el seguro de la puerta hacia la izquierda o derecha dentro
de la ranura a n de ajustar la alineación.
13. Revise el alineamiento del tope
de la puerta
SOLUCIÓN DE PROBLEMAS
Consulte “Solución de problemas” en el Manual de uso
y cuidado para evitar posiblemente el costo de una visita
de servicio técnico.
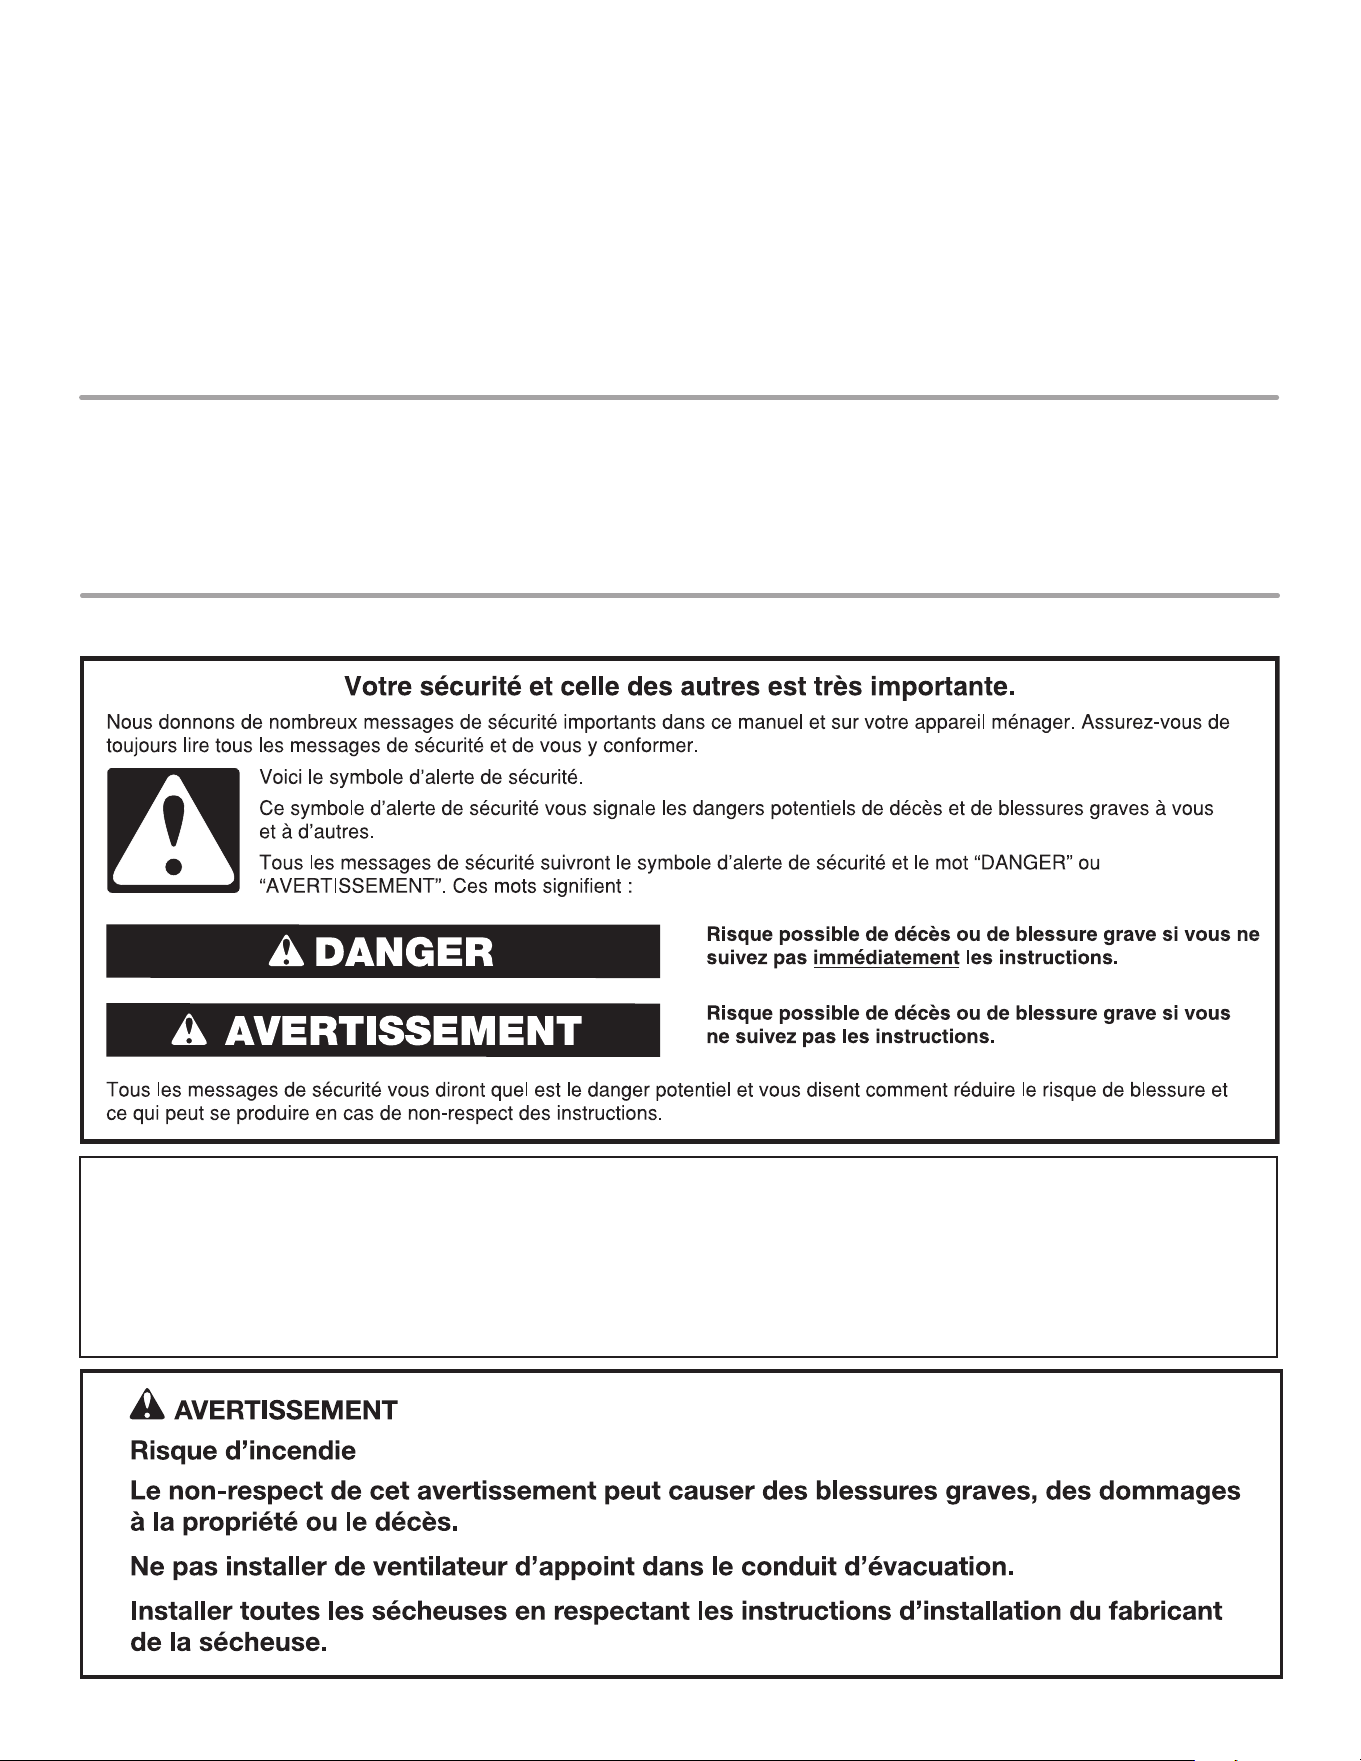
49
SÉCURITÉ DE LA SÉCHEUSE
Date d’achat : ____________________________________
Date d’installation : _______________________________
Installateur : _____________________________________
Numéro de modèle : ______________________________
Numéro de série : _________________________________
NOTES CONCERNANT L’INSTALLATION
Dans l’État du Massachusetts, les instructions d’installation suivantes sont applicables :
■
Les travaux d’installation et réparation doivent être exécutés par un plombier ou tuyauteur qualifié ou licencié, ou par le
personnel qualifié d’une entreprise licenciée par l’État du Massachusetts.
■ Remplacer par des dispositifs de fermeture acceptables : Les robinets de gaz et robinets à bille installés pour l'utilisation
devraient être indiqués.
■ Si un conduit de raccordement flexible est utilisé, sa longueur ne doit pas dépasser 4 pi (121,9 cm).
Table des matières
SÉCURITÉ DE LA SÉCHEUSE ........................................... 49
EXIGENCES D’INSTALLATION ......................................... 51
Outillage et pièces .................................................... 51
EXIGENCES D’EMPLACEMENT ........................................52
RACCORDEMENT DE LA SÉCHEUSE ÉLECTRIQUE –
CANADA UNIQUEMENT ................................................ 54
RACCORDEMENT ÉLECTRIQUE DE LA SÉCHEUSE
À GAZ – ÉTATS-UNIS ET CANADA .................................55
INSTALLATION DES PIEDS DE NIVELLEMENT ................ 57
RACCORDEMENT AU GAZ – ÉTATS-UNIS ET CANADA ... 57
L’ÉVACUATION ................................................................58
Exigences concernant l’évacuation ............................58
Planication des circuits de conduits ..........................59
Installation du système d’évacuation ........................ 60
RACCORDEMENT DES TUYAUX D’ALIMENTATION ........ 60
RACCORDEMENT DU SYSTÈME D’ÉVACUATION ............ 62
ÉTABLIR L’APLOMB DE LA SÉCHEUSE.............................62
ACHEVER L’INSTALLATION LISTE DE VÉRIFICATION .....63
INVERSION DU SENS D’OUVERTURE
DE LA PORTE (FACULTATIF) ...........................................64
DÉPANNAGE .................................................................. 66
ASSISTANCE OU SERVICE ..................... Couverture arrière
50
IMPORTANT : L'installation du gaz doit se conformer aux codes locaux, ou en l'absence de codes locaux, au code d'installation
du gaz naturel ou du propane, CSA B149.1.
La sécheuse doit être électriquement reliée à la terre conformément aux codes locaux, ou en l'absence de codes locaux, au Code
canadien de l'électricité, partie 1, CSA C22.1.
– Ne pas entreposer ou utiliser de l’essence ou d’autres vapeurs ou liquides inammables
à proximité de cet appareil ou de tout autre appareil électroménager.
– QUE FAIRE DANS LE CAS D’UNE ODEUR DE GAZ :
•
Ne pas tenter d’allumer un appareil.
•
Ne pas toucher à un commutateur électrique; ne pas utiliser le téléphone se trouvant
sur les lieux.
•
Évacuer tous les gens de la pièce, de l’édice ou du quartier.
•
Appeler immédiatement le fournisseur de gaz d’un téléphone voisin. Suivre ses
instructions.
•
À défaut de joindre votre fournisseur de gaz, appeler les pompiers.
– L’installation et l’entretien doivent être effectués par un installateur qualié, une agence
de service ou le fournisseur de gaz.
AVERTISSEMENT :
RISQUE D
’
INCENDIE OU D
’
EXPLOSION
Le non-respect des avertissements de sécurité peut causer des dommages à la propriété,
des blessures graves, voire la mort.
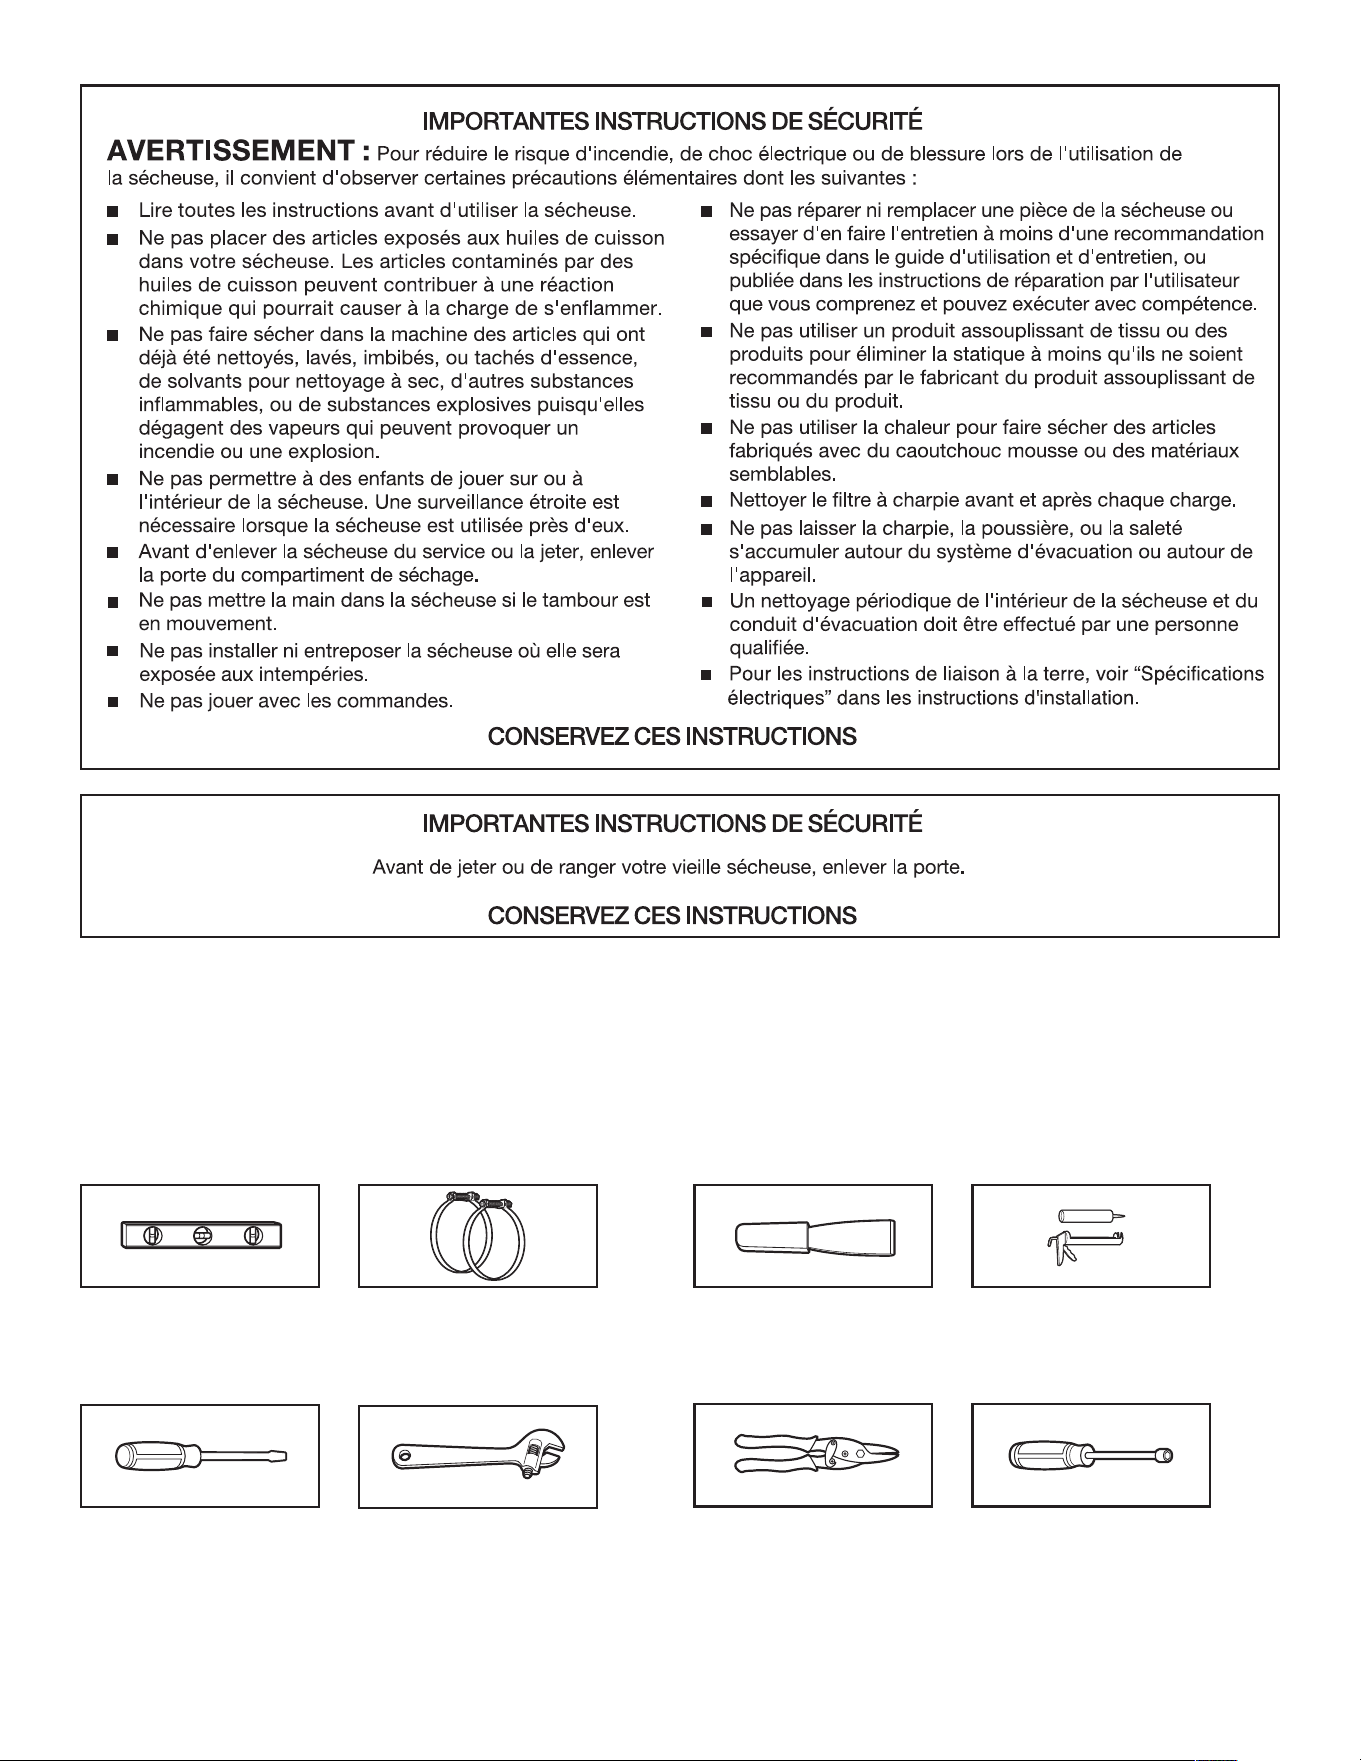
51
EXIGENCES D’INSTALLATION
OUTILLAGE ET PIÈCES
Rassembler les outils et pièces nécessaires avant d’entreprendre l’installation. Lire et observer les instructions fournies avec chacun
des outils de la liste ci-dessous.
Outils nécessaires à toutes les installations :
Niveau
Tournevis à lame plate
Clé à molette avec ouverture
jusqu’à 1" (25 mm) ou clé à
douille hexagonale
Pistolet à calfeutrage et
composé de calfeutrage
(pour l’installation d’un
nouveau conduit d’évacuation)
Brides de conduit
Couteau à mastic
en plastique
Cisaille de ferblantier
(pour l’installation d’un
nouveau conduit)
Tourne-écrou de 1/4"
(6 mm) (recommandé)
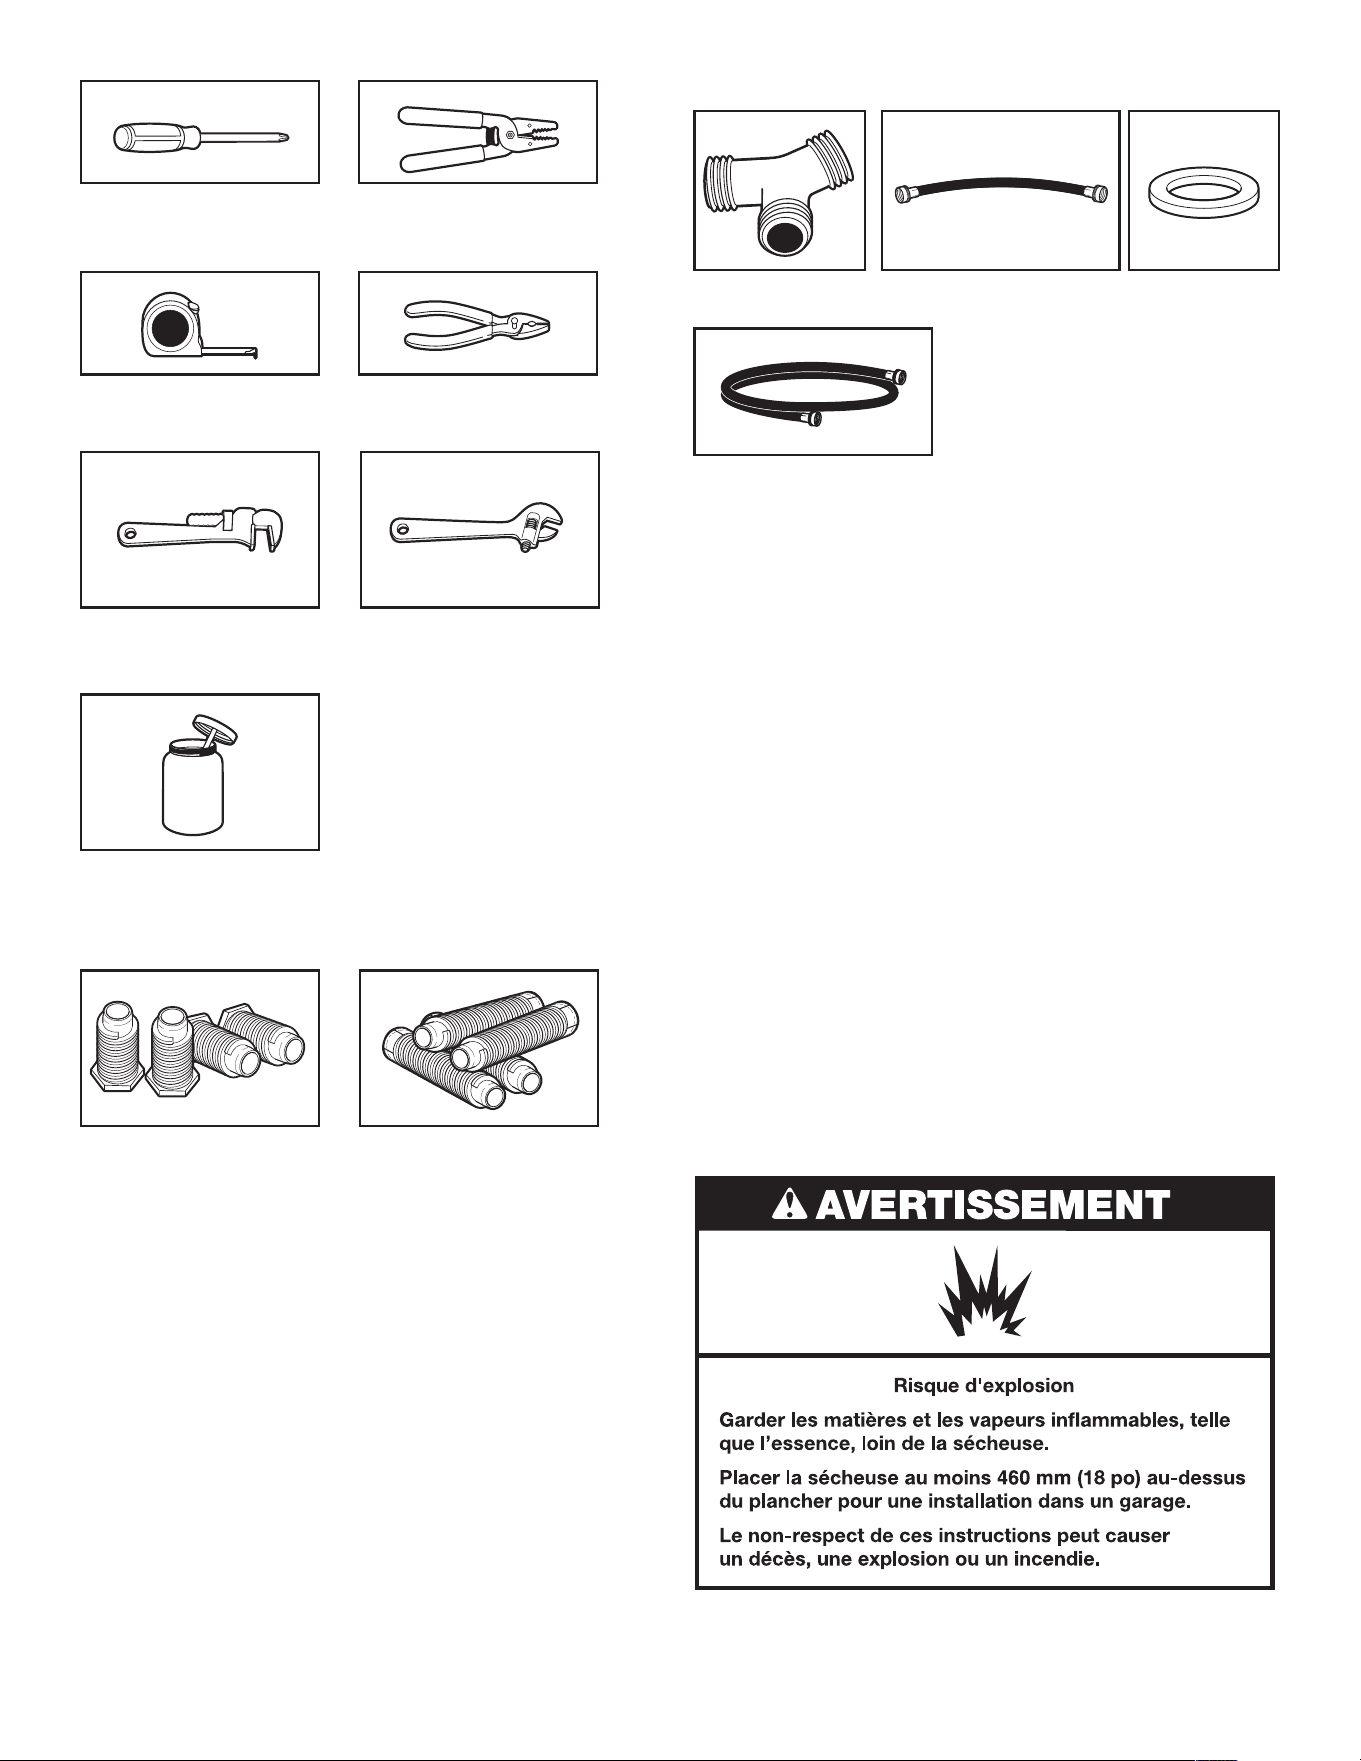
52
Pièces fournies (tous les modèles) :
Composé d’étanchéité des
raccords letés – résistant
au gaz propane
Pieds de nivellement (4)
(Longueur et l'apparence des pieds peuvent varier selon le
modèle).
Pièces nécessaires (modèles vapeur) :
Connecteur en “Y”
Tuyau d’alimentation
court
Tuyau d’arrivée
Rondelle en
caoutchouc
Retirer le sachet de pièces du tambour de la sécheuse. Vérier
que toutes les pièces sont présentes.
Outils nécessaires pour les installations à gaz :
Clé à tuyau de 8" (203 mm)
ou 10" (254 mm)
Clé à mollette de 8" (203 mm)
ou 10" (254 mm)
(pour le raccordement au gaz)
En cas d’utilisation d’un câble d’alimentation
électrique :
Utiliser un ensemble de câble d’alimentation électrique
homologué UL marqué pour utilisation avec les sécheuses
à vêtements. L’ensemble doit contenir :
■ Un câble d’alimentation électrique homologué UL de
30 ampères, 120/240 volts minimum, et qui doit supporter
une température minimum de 140 ºF (60 ºC). Le cordon doit
être de type SRD ou SRDT et mesurer au moins 4 pi (1,22 m)
de long. Les ls raccordés à la sécheuse doivent se terminer
par des cosses rondes ou à fourche à pointes relevées.
■ Un serre-câble (homologation UL).
Pièces nécessaires : (Non fourni avec la sécheuse)
Consulter les codes locaux. Vérier l’alimentation électrique
et le circuit d’évacuation existants. Voir “Installations électriques”
et “Exigences concernant l’évacuation” avant d’acheter les pièces.
Les installations pour maison mobile nécessitent un système
d’évacuation en métal disponible chez le marchand chez qui
vous avez acheté votre sécheuse. Pour plus d’informations,
composer le 1-800-469-4663.
Matériel facultatif : (Non fourni avec la sécheuse)
Consulter le “Guide d’utilisation et d’entretien” pour plus
d’informations sur les accessoires disponibles qui conviennent
à votre sécheuse.
EXIGENCES D’EMPLACEMENT
Il vous faudra :
■ Un emplacement permettant une évacuation appropriée.
Voir “Exigences concernant l’évacuation”.
ou
Tournevis Phillips n° 2 Cisaille de ferblantier
(pour l’installation
d’un nouveau conduit)
Mètre-ruban Pince
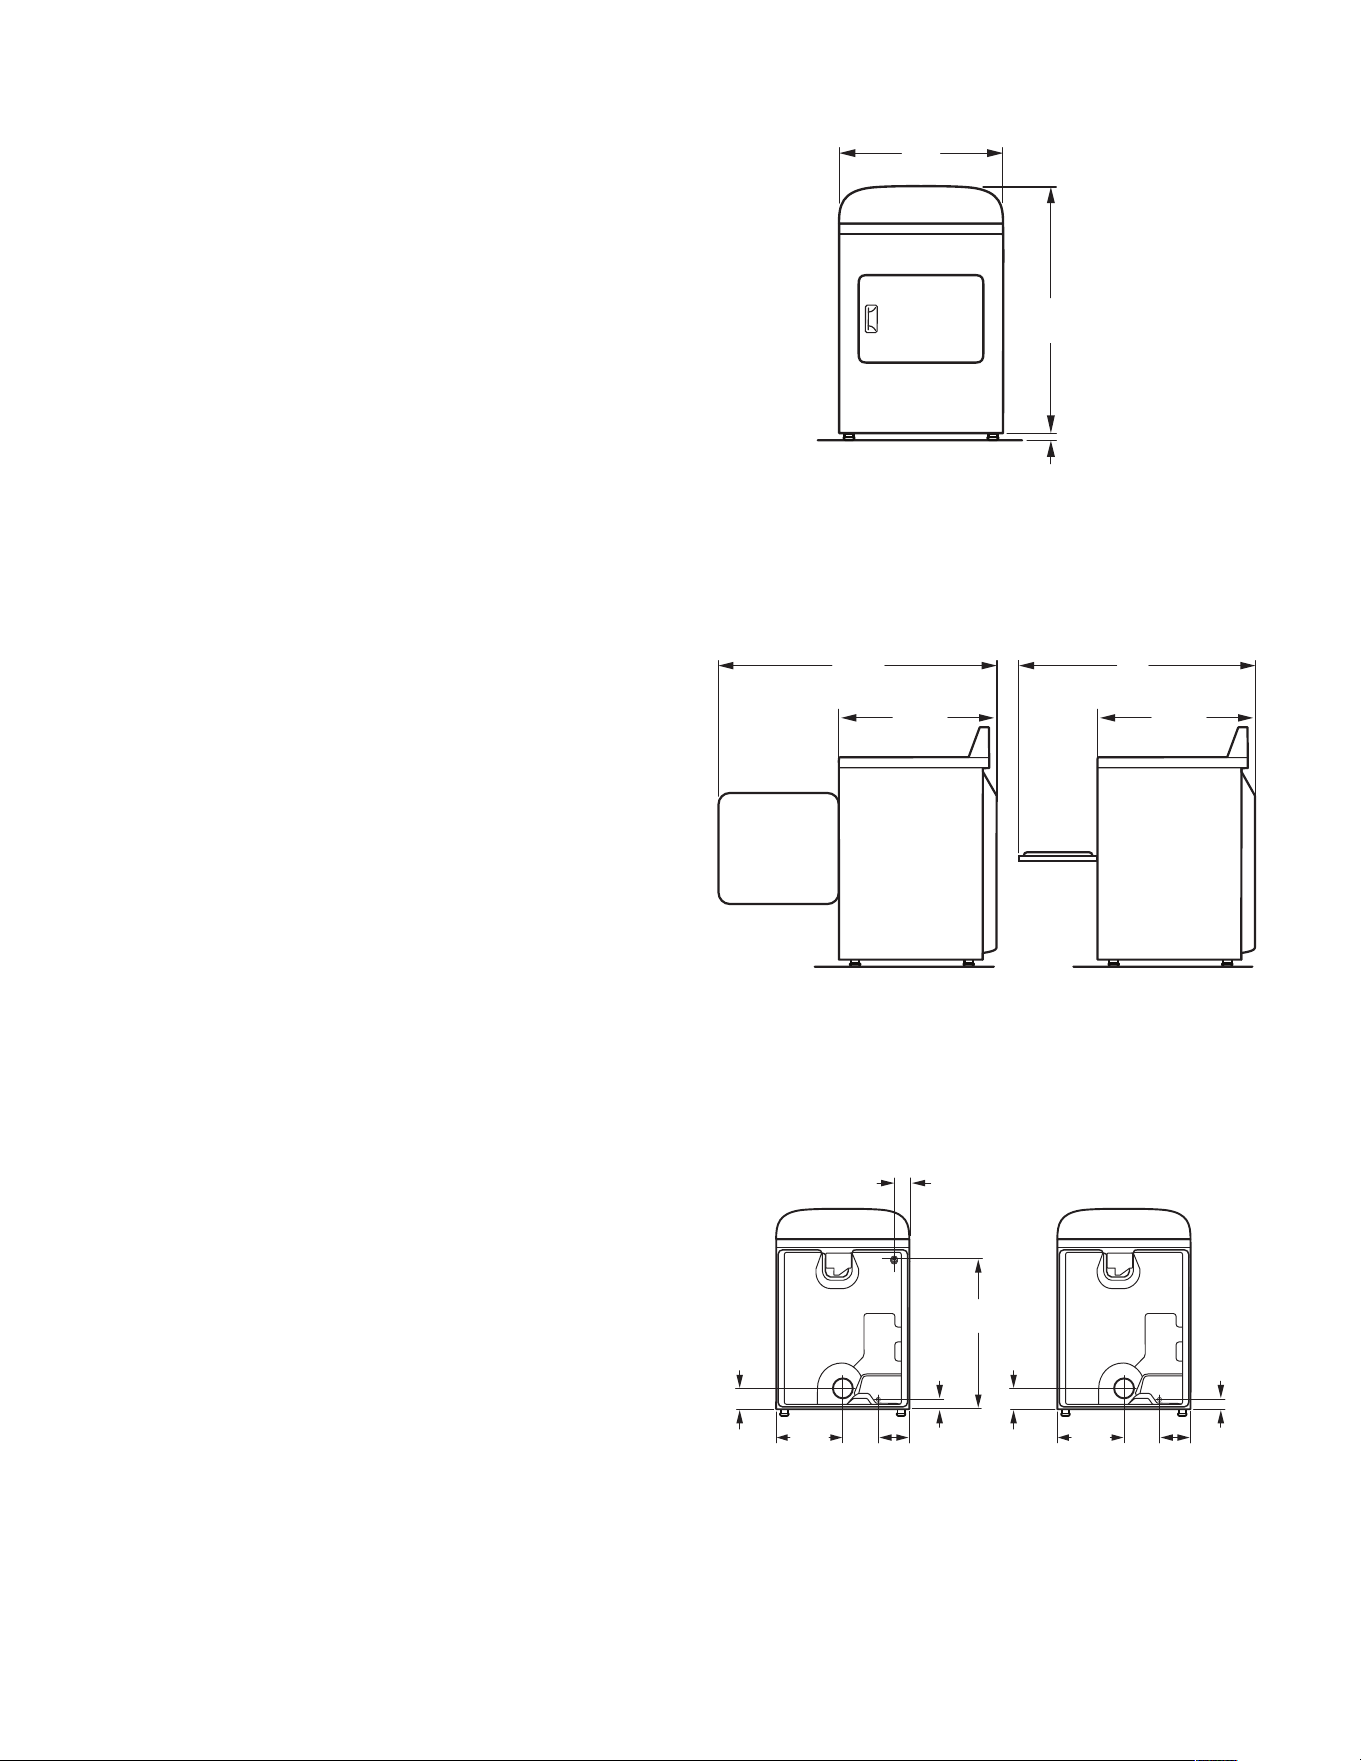
53
■ Un circuit distinct de 15 ou 20 A est requis pour les sécheuses
à gaz et un circuit distinct de 30 A est requis pour les sécheuses
électriques.
■ Si on utilise un cordon d’alimentation, une prise électrique reliée
à la terre située à 2 pi (610 mm) maximum des deux côtés de
la sécheuse. de la sécheuse. Voir “Spécications électriques”.
■ Le plancher doit pouvoir soutenir le poids de la sécheuse
de 200 lb (90,7 kg). Tenir également compte du poids des
appareils voisins.
■ Un plancher de niveau avec une pente maximale de
1" (25 mm) sous l’ensemble de la sécheuse. Si l’inclinaison est
supérieure à 1" (25 mm), les vêtements peuvent ne pas culbuter
convenablement et les programmes de détection automatiques
peuvent ne pas fonctionner correctement.
■ Pour une installation dans un garage, placer la sécheuse
au moins 18" (460 mm) au-dessus du plancher.
■ Modèles avec génération de vapeur uniquement : Des robinets
d'eau froide situés à 4 pi (1,2 m) maximum des valves de
remplissage, et une pression d'eau de 20 à 100 lb/po
2
(137,9
à 689,6 kPa). Il est possible d’utiliser l’entrée d’eau de votre
laveuse en achetant les pièces nécessaires indiquées dans la
section “Pièces nécessaires”.
■ Si l’on réside dans une région où l’eau est dure, l’emploi
d’un adoucisseur d’eau est recommandé pour contrôler
l’accumulation de tartre dans le circuit d’eau de la
sécheuse. Avec le temps, l’accumulation de tartre peut
obstruer diérentes parties du circuit d’eau, ce qui réduit la
performance du produit. Une accumulation excessive de tartre
peut entraîner la nécessité de remplacer ou de réparer certains
composants.
IMPORTANT : Ne pas installer, remiser ou faire fonctionner la
sécheuse à un emplacement où elle sera exposée à de l’eau, des
intempéries ou à des températures inférieures à 45°F (7°C). À des
températures inférieures, la sécheuse pourrait ne pas s’arrêter à la
n des programmes de détection automatique, ce qui entraînerait
le prolongement du temps de séchage.
REMARQUE : Aucun autre appareil consommant un combustible
ne doit être installé dans le même placard qu'une sécheuse.
DIMENSIONS DE LA SÉCHEUSE
DISTANCES DE DÉGAGEMENT À RESPECTER
POUR L’INSTALLATION
Pour chaque configuration, on peut éventuellement laisser
davantage de dégagement pour faciliter l’installation et
l’entretien; des distances de séparation pour les appareils
ménagers voisins et des dégagements pour les murs, les portes et
le plancher. L’espacement doit être assez grand pour permettre
d’ouvrir complètement la porte. Ajouter un espace supplémentaire
tout autour de la sécheuse pour réduire le transfert de bruit. Si
l’on installe une porte de placard ou une porte à persiennes,
des ouvertures d'aération au sommet et au bas de la porte sont
nécessaires.
Vérifier les spécifications des codes. Certains codes limitent ou
interdisent l’installation des sécheuses dans un garage, un placard,
une résidence mobile ou une chambre à coucher. Contacter
l’inspecteur en bâtiments local.
Vue frontale
50
3
/4"
(1289 mm)
42"
(1067 mm)
28
1
/4"
(717 mm)
28
1
/4"
(717 mm)
REMARQUE : La hauteur minimale des pieds de nivellement
doivent être de 1/2" (13 mm), ou pour correspondre à la hauteur
de la laveuse qui l’accompagne.
Vue latérale
29"
(737 mm)
40
7
/8"
(1038 mm)
1
/2"
(13 mm)
A B
Vue arrière
14
1
/
2
"
(368 mm)
4
3
/4"
(121 mm)
9
1
/4"
(235 mm)
1
1
/4"
(32 mm)
14
1
/
2
"
(368 mm)
4
3
/4"
(121 mm)
9
1
/4"
(235 mm)
1
1
/4"
(32 mm)
30
1
/4"
(768 mm)
4"
(101 mm)
Avec vapeur Sans vapeur
A. Porte à grande ouverture sur le côté
B. Porte abattante à grande ouverture
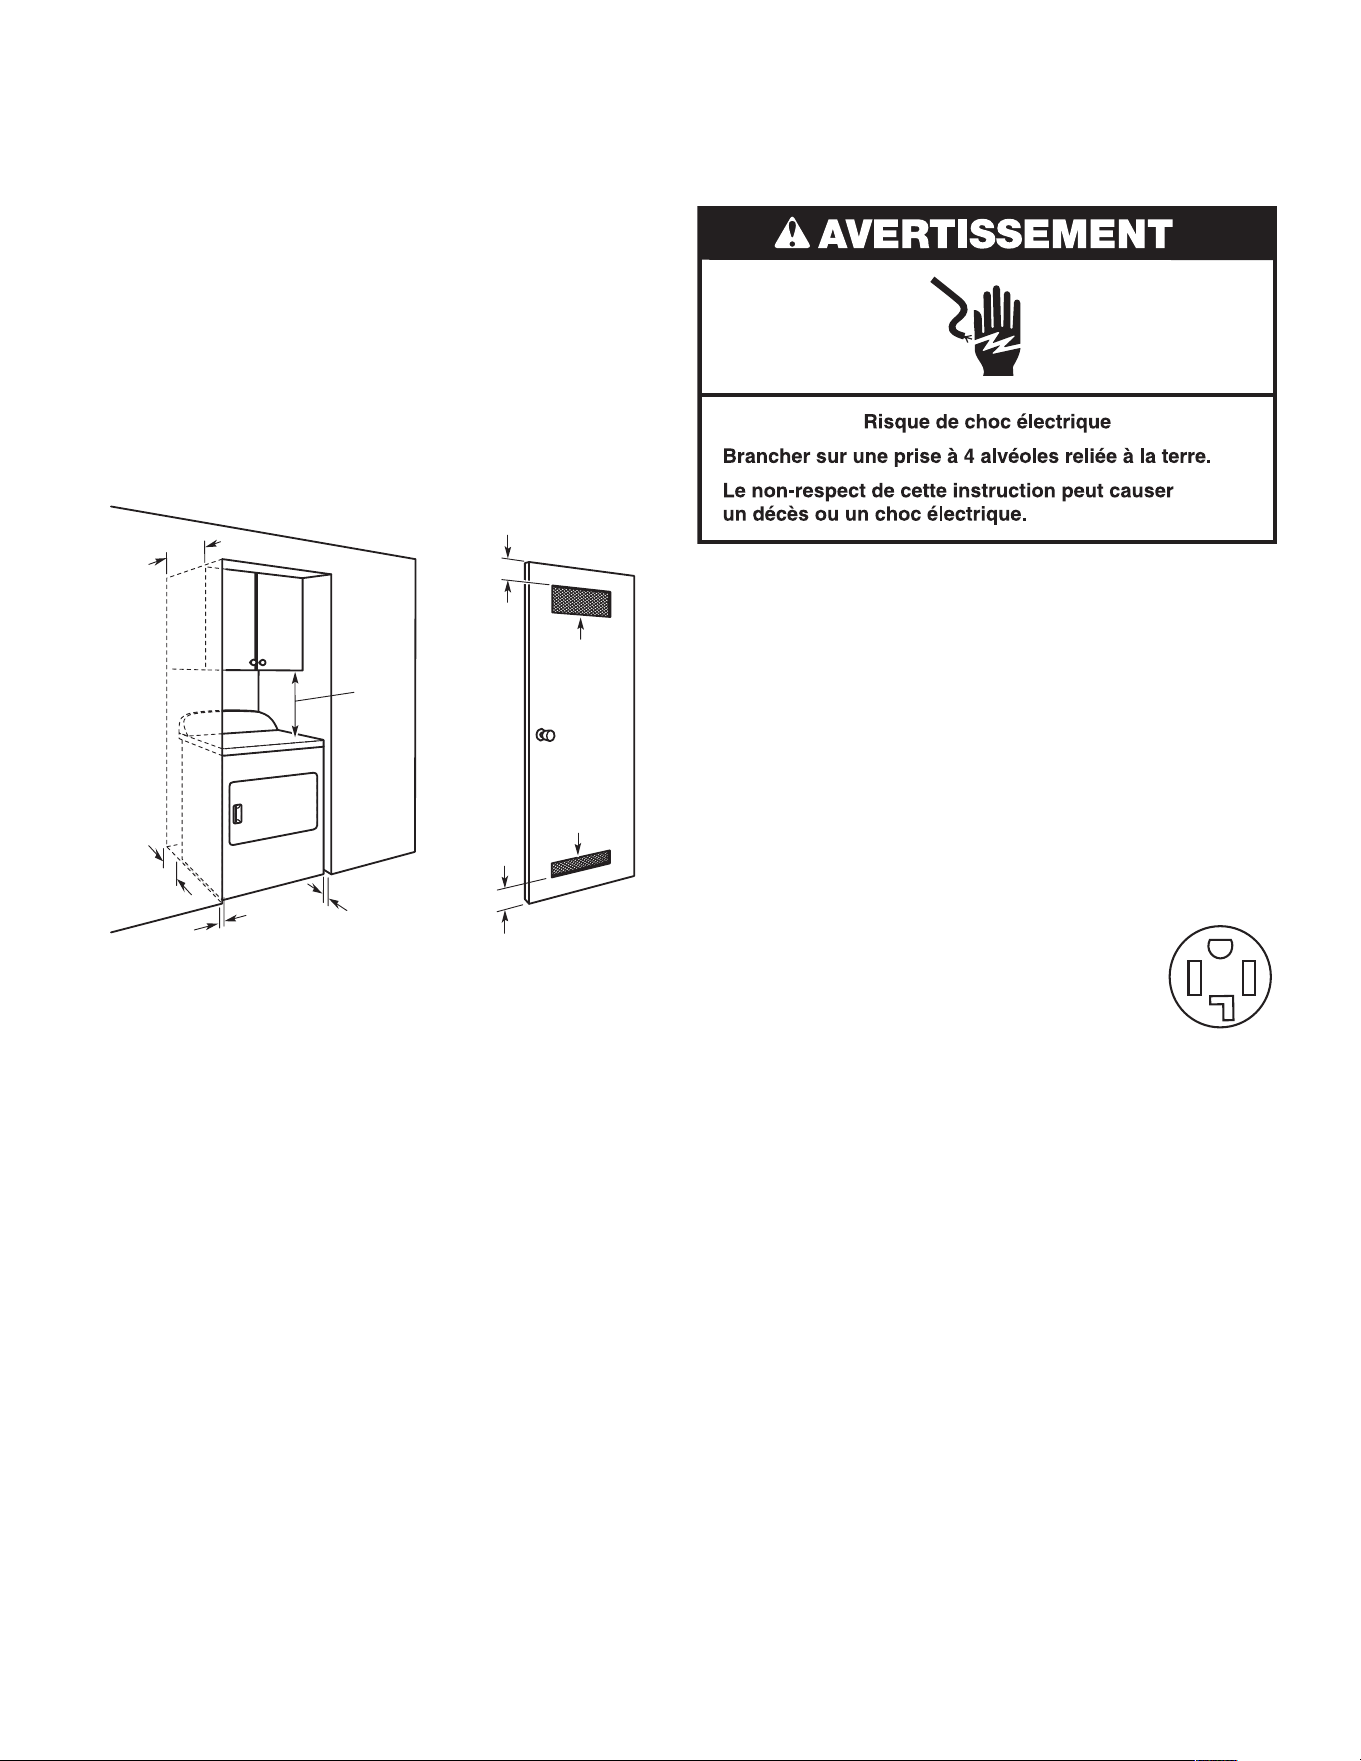
54
Installation dans une résidence mobile – Exigences
supplémentaires :
Cette sécheuse peut être installée dans une maison mobile.
L’installation doit se conformer aux critères de la Manufactured
Home Construction and Safety Standard, Titre 24 CFR, partie
3280 (anciennement Federal Standard for Mobile Home
Construction and Safety, Titre 24 HUD, partie 280) ou de la
Norme CAN/CSA-Z240MH.
Espacement pour une installation dans
un encastrement ou dans un placard
Les dimensions indiquées sont pour l'espacement minimum permis.
■ Prévoir davantage d’espace pour faciliter l’installation
et l’entretien.
■ Un espace supplémentaire peut être requis pour les moulures
de porte et de plancher et pour les plinthes.
■ Un espace supplémentaire de 1" (25 mm) de tous les côtés de
la sécheuse est recommandé pour réduire le transfert du bruit.
■ Pour installation dans un placard avec porte, on doit prévoir
des ouvertures minimales d’entrée d’air en haut et en bas
de la porte. Les portes à claire-voie orant des ouvertures
équivalentes de passage de l’air sont acceptables.
■ Il faut aussi prendre en compte l’espace requis entre les
appareils voisins.
Dégagement minimum/recommandé
6"/0"
(152 mm/
0 mm)
14" max
(356 mm)
1"/0"
(25 mm/0 mm)
1"/1"
(25 mm/25 mm)
18"/18"
(457 mm/
457 mm)
3"/3"
(76 mm/
76mm)
3"/3"
(76 mm/
76mm)
48"
2
/48"
2
(310 cm
2/
310 cm
2
)
24"
2/
24"
2
(155 cm
2/
155 cm
2
)
RACCORDEMENT DE LA SÉCHEUSE
ÉLECTRIQUE – CANADA UNIQUEMENT
SPÉCIFICATIONS ÉLECTRIQUES
C’est à l’utilisateur qu’incombe la responsabilité de :
■ Contacter un électricien qualié.
■ S’assurer que le raccordement électrique est adéquat
et conforme à la dernière édition du Canadian Electrical Code,
C22.1, et à tous les codes et règlements locaux
en vigueur. Pour obtenir un exemplaire des normes des codes
ci-dessus, contacter : Canadian Standards Association, 178
Rexdale Blvd., Toronto, ON M9W 1R3 CANADA.
■ L’appareil doit être alimenté uniquement par un circuit
monophasé de 120/240 V, CA uniquement, 60 Hz à 4 ls, sur
un circuit séparé de 30 ampères, protégé par fusible aux deux
extrémités de la ligne. On recommande d’utiliser un fusible ou
un disjoncteur temporisé. On recommande également que cet
appareil soit alimenté par un circuit indépendant.
■ Cette sécheuse est équipée d’un cordon électrique
homologué UL et/ou par la CSA International
à introduire dans une prise murale standard
14-30R. Le cordon mesure 5 pi (1,52 m). Veiller
à ce que la prise murale se trouve à proximité
de l’emplacement dénitif de la sécheuse.
En cas d’utilisation d’un cordon de rechange, il est
recommandé d’utiliser le cordon d’alimentation de
rechange – pièce numéro 9831317.
Pour plus d’informations, composer le 1-800-469-4663.
Autres critères à respecter pour une installation
en résidence mobile :
Toutes les sécheuses :
■ Un système d’évacuation en métal est disponible à l’achat
chez votre revendeur. Pour plus d’informations, composer le
1-800-469-4663.
■ Il faut prendre des dispositions spéciales dans les résidences
mobiles pour l’apport d’air de l’extérieur dans la sécheuse.
Les ouvertures (telle qu’une fenêtre à proximité) devraient être
au moins deux fois plus grandes que l’ouverture de décharge
de la sécheuse.
Pour les installations en résidence mobile avec sécheuse
à gaz :
■ Il est possible de commander un ensemble d’ancrage
au sol pour installation en résidence mobile, pièce numéro
W10432680. Pour plus d’informations, composer le
1-800-469-4663.
Prise à 4 ls
(14-30R)
Distances d’espacement à respecter
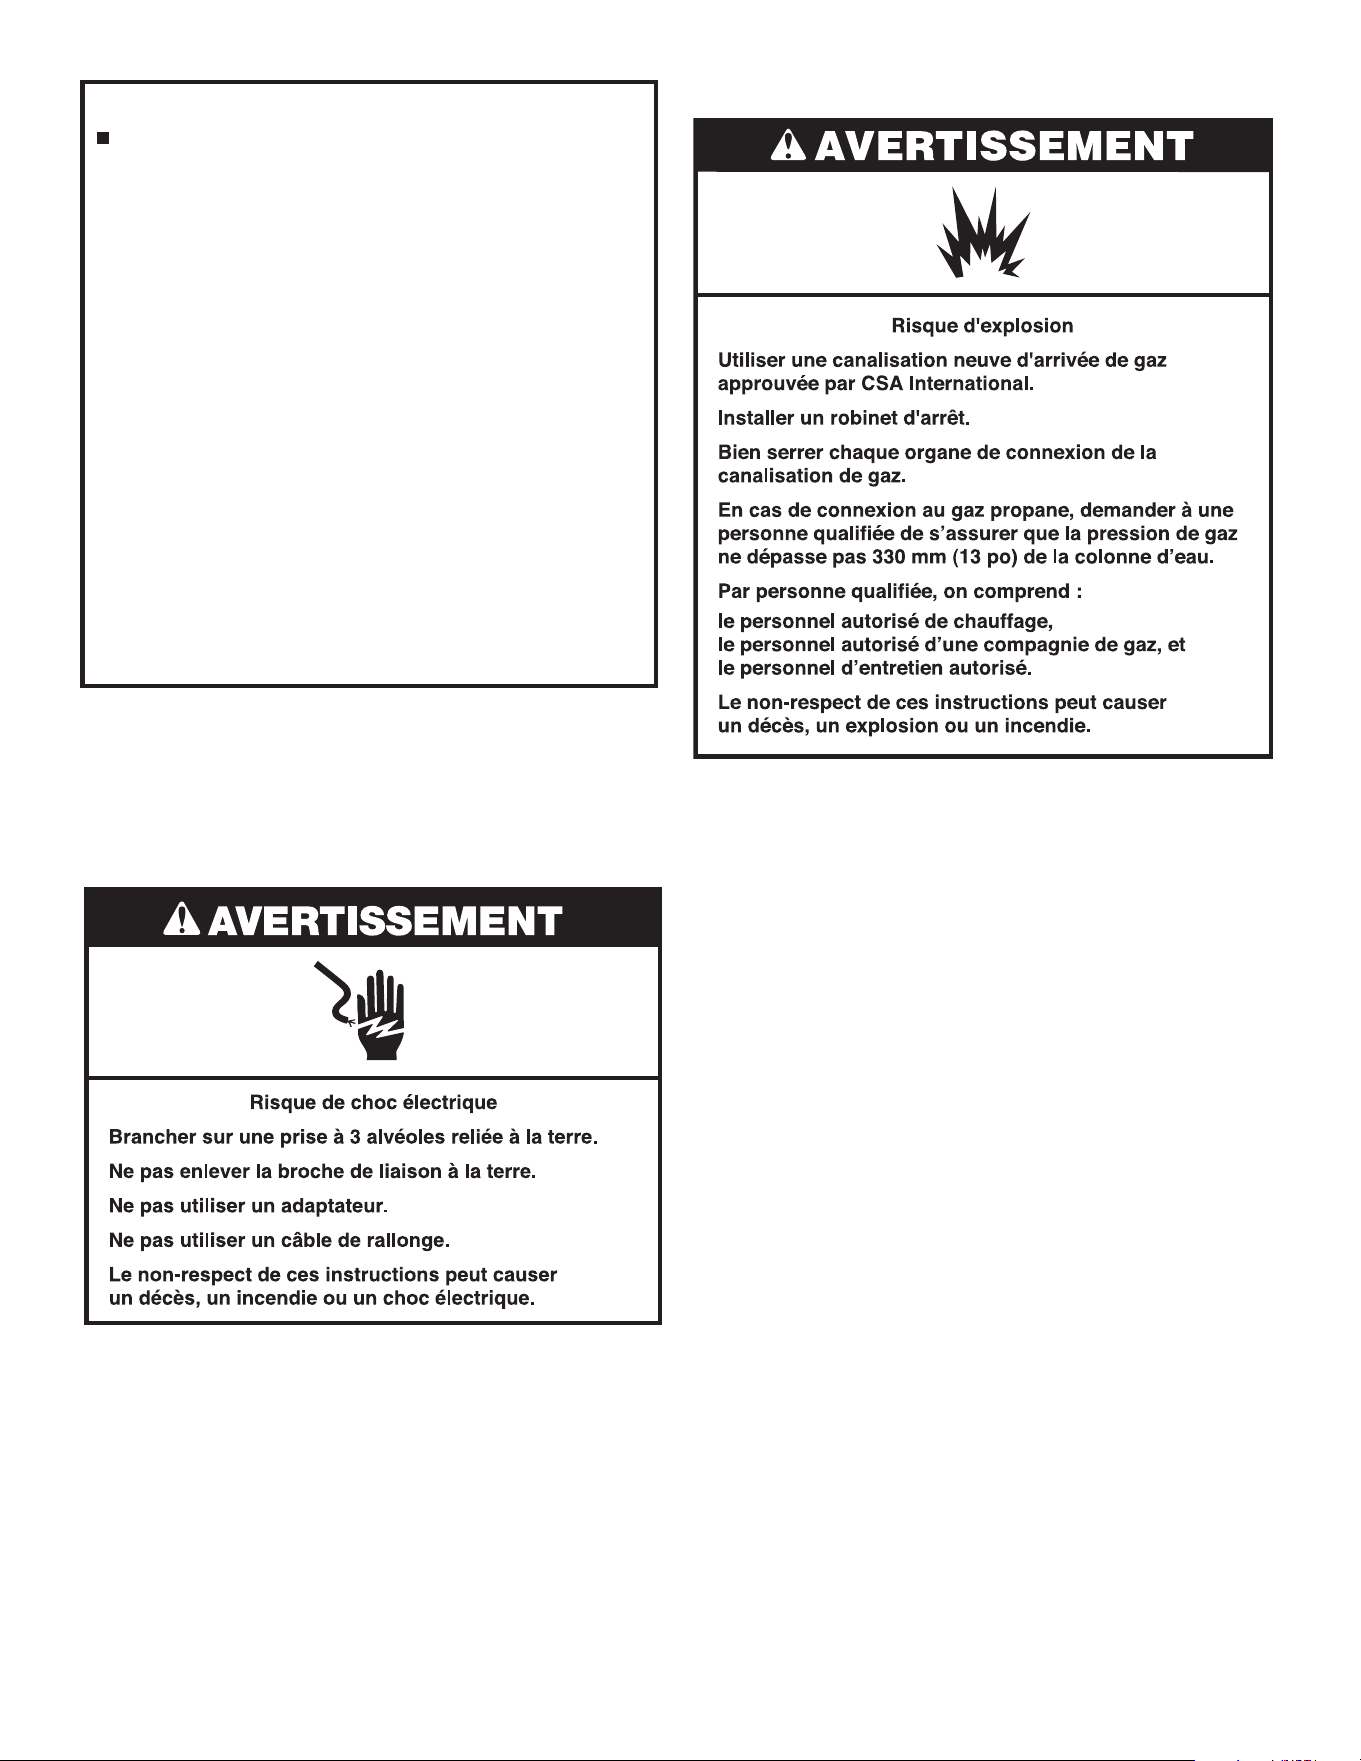
55
Pour une sécheuse reliée à la terre et connectée par
un cordon :
Cette sécheuse doit être reliée à la terre. En cas de mauvais
fonctionnement ou de panne, la liaison à la terre réduira le
risque de choc électrique en offrant au courant électrique un
acheminement d'évacuation de moindre résistance. Cette
sécheuse est alimentée par un cordon électrique comportant
un conducteur relié à la terre et une che de branchement
munie d'une broche de liaison à la terre. La che doit être
branchée sur une prise appropriée qui est bien installée et
reliée à la terre conformément à tous les codes et règlements
locaux.
INSTRUCTIONS DE LIAISON À LA TERRE
CONSERVEZ CES INSTRUCTIONS
AVERTISSEMENT :
Le raccordement incorrect de
cet appareil au conducteur de liaison à la terre peut susciter
un risque de choc électrique. En cas de doute quant à la
qualité de liaison à la terre de la sécheuse, consulter un
électricien ou un technicien ou un personnel qualié. Ne pas
modier la che de branchement fournie avec la sécheuse;
si la che ne correspond pas à la conguration de la prise de
courant, demander à un électricien qualié d'installer une
prise de courant appropriée.
RACCORDEMENT ÉLECTRIQUE
DE LA SÉCHEUSE À GAZ –
ÉTATS-UNIS ET CANADA
SPÉCIFICATIONS ÉLECTRIQUES
■ Une source d’alimentation de 120 V, 60 Hz, CA uniquement,
de 15 ou 20 ampères et protégée par fusible est nécessaire.
On recommande d’utiliser un fusible ou un disjoncteur
temporisé. Il est également recommandé de raccorder
l’appareil sur un circuit distinct exclusif à cet appareil.
SPÉCIFICATIONS DE L’ALIMENTATION EN GAZ
TYPE DE GAZ
Gaz naturel :
Cette sécheuse est équipée pour une alimentation au gaz naturel.
Elle est homologuée par UL pour l’alimentation au gaz propane,
avec conversion appropriée.
■ Cette sécheuse doit être équipée du brûleur convenable,
correspondant au gaz spécique qui alimente l’habitation.
L’information sur le brûleur se trouve sur la plaque
signalétique dans le logement de la porte de la sécheuse.
Si ces renseignements ne correspondent pas au type de gaz
disponible, contacter votre revendeur ou composer le
1-800-469-4663.
Conversion pour l’alimentation au propane :
IMPORTANT : Un technicien qualié doit eectuer la conversion.
Ne pas entreprendre de convertir la sécheuse dans le cas d’une
utilisation avec un gaz diérent de celui indiqué sur la plaque
signalétique sans d’abord consulter la compagnie de gaz.
CANALISATION DE GAZ
Option 1 (méthode recommandée)
Raccord à gaz en acier inoxydable flexible :
■ Si les codes locaux le permettent, utiliser un raccord neuf
en acier inoxydable souple (conception homologuée par
l’American Gas Association ou par CSA International) pour
raccorder la sécheuse à la canalisation rigide d’alimentation
en gaz. Selon le besoin, utiliser un coude et un adaptateur de
3/8" x tuyau NPT de 3/8" entre le raccord de gaz exible
et la canalisation de gaz de la sécheuse, pour éviter toute
déformation.
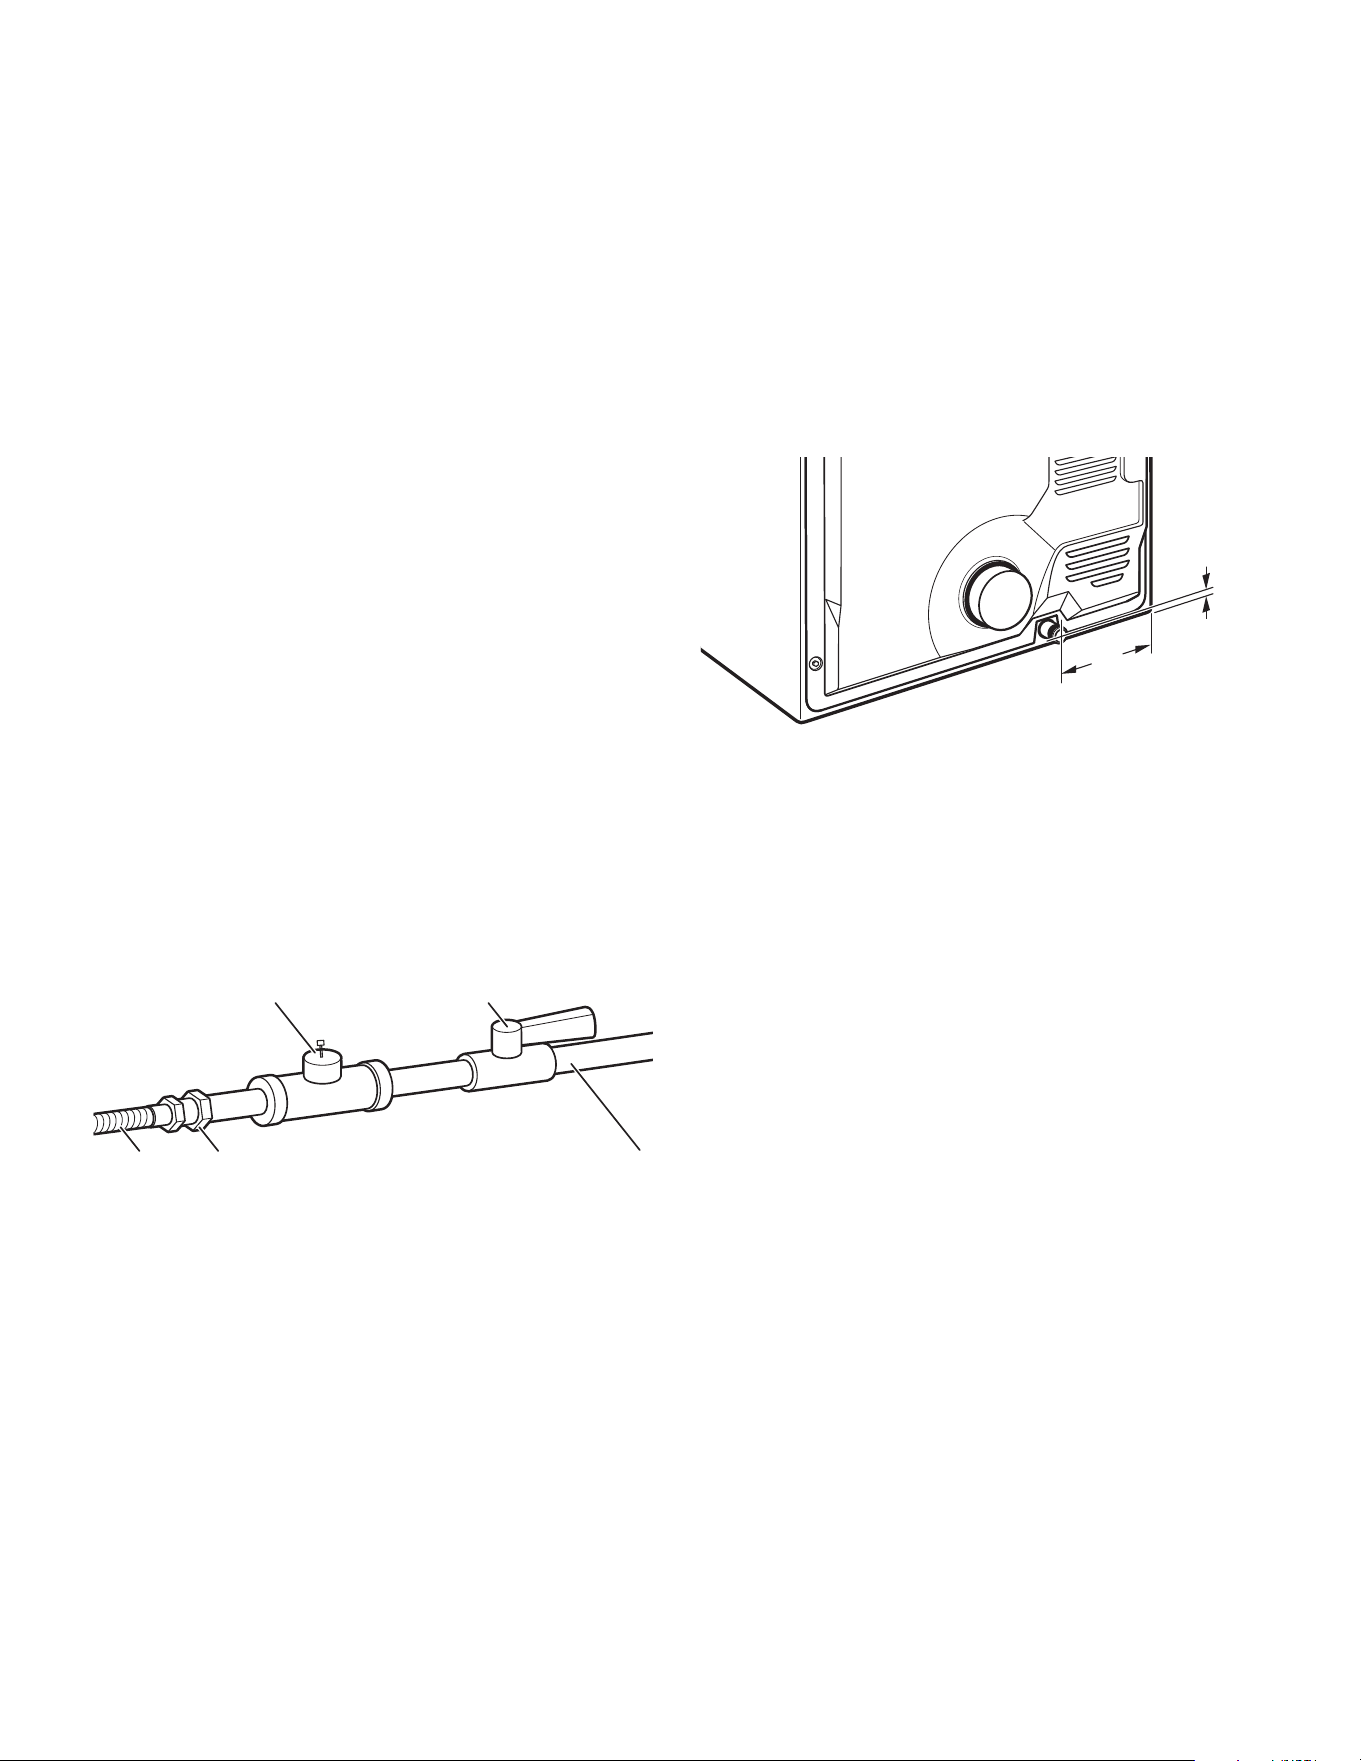
56
†®TEFLON est une marque déposée de Chemours.
E
BA
D
C
Conduit NPT de la sécheuse de 3/8"
REMARQUE : Pour une installation dans un garage, prévoir 18"
(460 mm) de plus à partir du sol pour la hauteur de la canalisation
d'arrivée de gaz.
9
1
/
4
"
(235 mm)
1
1
/4"
(32 mm)
SPÉCIFICATIONS DU RACCORDEMENT
DE L’ALIMENTATION EN GAZ
■ Utiliser un coude et un adaptateur NPT de 3/8" x 3/8" entre
le connecteur de gaz exible et la conduite de gaz de la
sécheuse, tel que nécessaire pour éviter le pincement.
■ Utiliser uniquement un composé d’étanchéité des tuyauteries.
Ne pas utiliser de ruban TEFLON
®
.
■ Cette sécheuse doit être raccordée à la canalisation
d’alimentation en gaz à l’aide d’un connecteur de gaz
exible homologué qui respecte les normes applicables
aux connecteurs utilisés avec des appareils ménagers à gaz,
ANSI Z21.24 ou CSA 6.10.
Option 2 (méthode alternative)
Conduit d’aluminium ou de cuivre approuvé :
■ La canalisation doit comprendre un connecteur obturé
(letage NPT de 1/8" ou plus) accessible pour le raccordement
de l’instrument de mesure immédiatement en amont de la
connexion d’alimentation en gaz de la sécheuse.
■ On recommande un tuyau IPS de 1/2".
■ Pour les longueurs inférieures à 20 pi (6,1 m), on peut
utiliser des conduits approuvés en aluminium ou en cuivre
de 3/8" dans la mesure où les codes locaux et le fournisseur
de gaz l’autorisent.
■ Pour le gaz naturel, ne pas utiliser de conduits en cuivre.
■ Pour les longueurs supérieures à 20 pi (6,1 m), on peut utiliser
des conduits plus gros et un adaptateur de calibre diérent.
■ Si la sécheuse a été convertie pour une utilisation au propane,
on peut utiliser un conduit en cuivre pour propane compatible
de 3/8". Si la longueur totale de la canalisation d’alimentation
en gaz est supérieure à 20 pi (6,1 m), utiliser un conduit de
taille supérieure.
REMARQUE : On doit utiliser un composé d’étanchéité pour
tuyauteries résistant à l’action du gaz propane. Ne pas utiliser
de ruban TEFLON
®†
.
■ Robinet d’arrêt nécessaire.
Aux É.-U. :
Un robinet d’arrêt individuel manuel doit être installé à six (6)
pi (1,8 m) maximum de la sécheuse, conformément au National
Fuel Gas Code, ANSI Z223.1. L’emplacement doit être facile à
atteindre pour ouvrir et fermer la sécheuse.
Au Canada :
Un robinet d’arrêt individuel doit être installé conformément
au Code B149.1 relatif à l’installation du gaz naturel et du
propane. Il est recommandé d’installer un robinet d’arrêt
individuel manuel à six (6) pi (1,8 m) maximum de la sécheuse.
L’emplacement doit être facilement accessible pour l’ouverture
et la fermeture.
SPÉCIFICATIONS DE L’ALIMENTATION DU BRÛLEUR
Altitudes supérieures à 2 000 pi (610 m) :
■ Si la sécheuse doit être utilisée à une altitude supérieure à
2 000 pi (610 m), on doit réduire le débit thermique du brûleur
indiqué sur la plaque signalétique de 4 % pour chaque tranche
de 1 000 pi (305 m) d’augmentation de l’altitude.
Épreuve sous pression de l’alimentation en gaz
■ La sécheuse doit être déconnectée du système de canalisations
d’alimentation en gaz lors de tout test de pression à des
pressions plus élevées que ½ lb/po².
CANALISATION DE GAZ DE LA SÉCHEUSE
■ La canalisation d’arrivée de gaz sortant depuis l’arrière
de la sécheuse est dotée d’un letage mâle de 3/8".
A. Raccord flexible de gaz de 3/8"
B. Adaptateur entre le conduit et le joint conique de 3/8"
C. Connecteur obturé (filetage NPT de 1/8" ou plus)
D. Canalisation d’alimentation en gaz (filetage NPT de 1/2")
E. Robinet d’arrêt du gaz
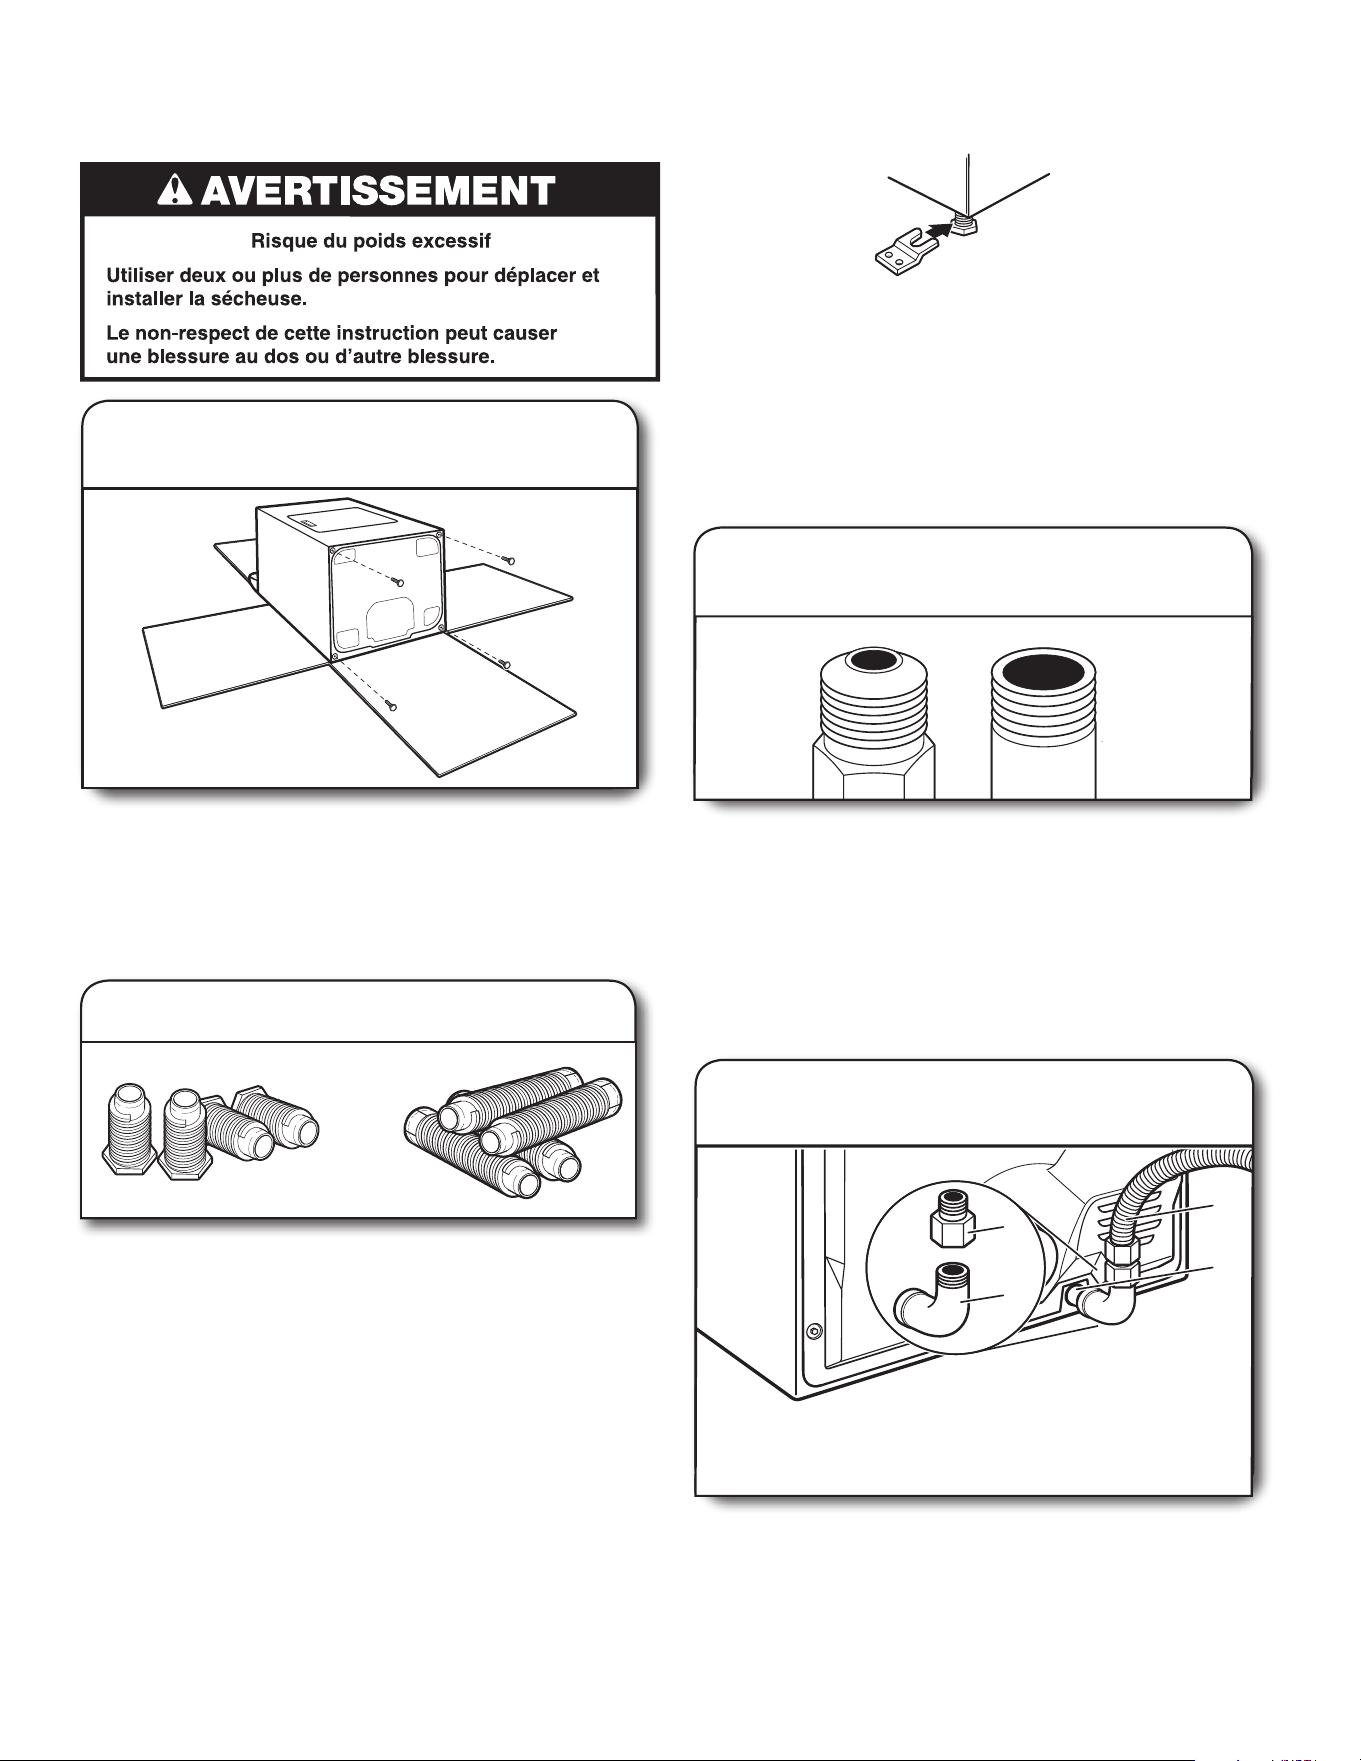
57
Pour ne pas endommager le plancher, utiliser un grand
morceau de carton découpé dans l’emballage de la
sécheuse; le placer sous tout le bord arrière de la sécheuse.
Saisir fermement la sécheuse par la caisse (non par le
panneau de commande) et allonger avec précaution
la sécheuse sur le carton.
INSTALLATION DES PIEDS
DE NIVELLEMENT
2. Visser dans les pieds de nivellement
À l’aide d’une clé et d’un mètre-ruban, visser les pieds
dans les trous pour pieds de nivellement jusqu’à ce que le bas
de chaque pied se trouve à environ 1/2" (13 mm) du bas de
la sécheuse (pour correspondre à la hauteur de la laveuse qui
l’accompagne).
À présent, redresser la sécheuse et la placer sur ses pieds.
Faire glisser la sécheuse jusqu’à ce qu’elle se trouve à
proximité de son emplacement nal. Laisser susamment
d’espace pour connecter le conduit d’évacuation.
1. Préparer la sécheuse pour
les pieds de nivellement
Pour utilisation en résidence mobile
Les sécheuses à gaz doivent être solidement xées
au plancher.
Les installations en résidence mobile nécessitent un ensemble
d’ancrage au sol pour installation en résidence mobile. Pour
le processus de commande, composer le 1-800-469-4663.
1. Raccorder l’alimentation en gaz
à la sécheuse
Retirer le capuchon rouge de la canalisation de gaz. À l’aide
d’une clé pour serrer, raccorder l’alimentation en gaz à la
sécheuse. Utiliser un composé d’étanchéité des tuyauteries
sur tous les letages des raccords mâles non coniques. Si on
utilise un conduit métallique souple, veiller à ce qu’il ne soit
pas pincé.
REMARQUE : Pour les raccordements au propane, on doit
utiliser un composé d’étanchéité résistant à l’action du
propane. Ne pas utiliser de ruban TEFLON
®
.
RACCORDEMENT AU GAZ –
ÉTATS-UNIS ET CANADA
A
B
Raccord mâle
non conique
Raccord mâle
conique
2. Planier la connexion
des raccords de tuyauterie
On doit utiliser une combinaison de raccords de tuyauterie
pour raccorder la sécheuse à l’alimentation en gaz existante.
L’illustration présente un raccordement recommandé.
Le raccordement peut varier selon le type, la taille et
l’emplacement de la canalisation d’alimentation.
A
B
D
C
A. Raccord exible de gaz de 3/8"
B. Conduit de la sécheuse
de 3/8"
C. Coude de 3/8" par 3/8"
D. Adaptateur entre le conduit
et le joint conique de 3/8"
ou
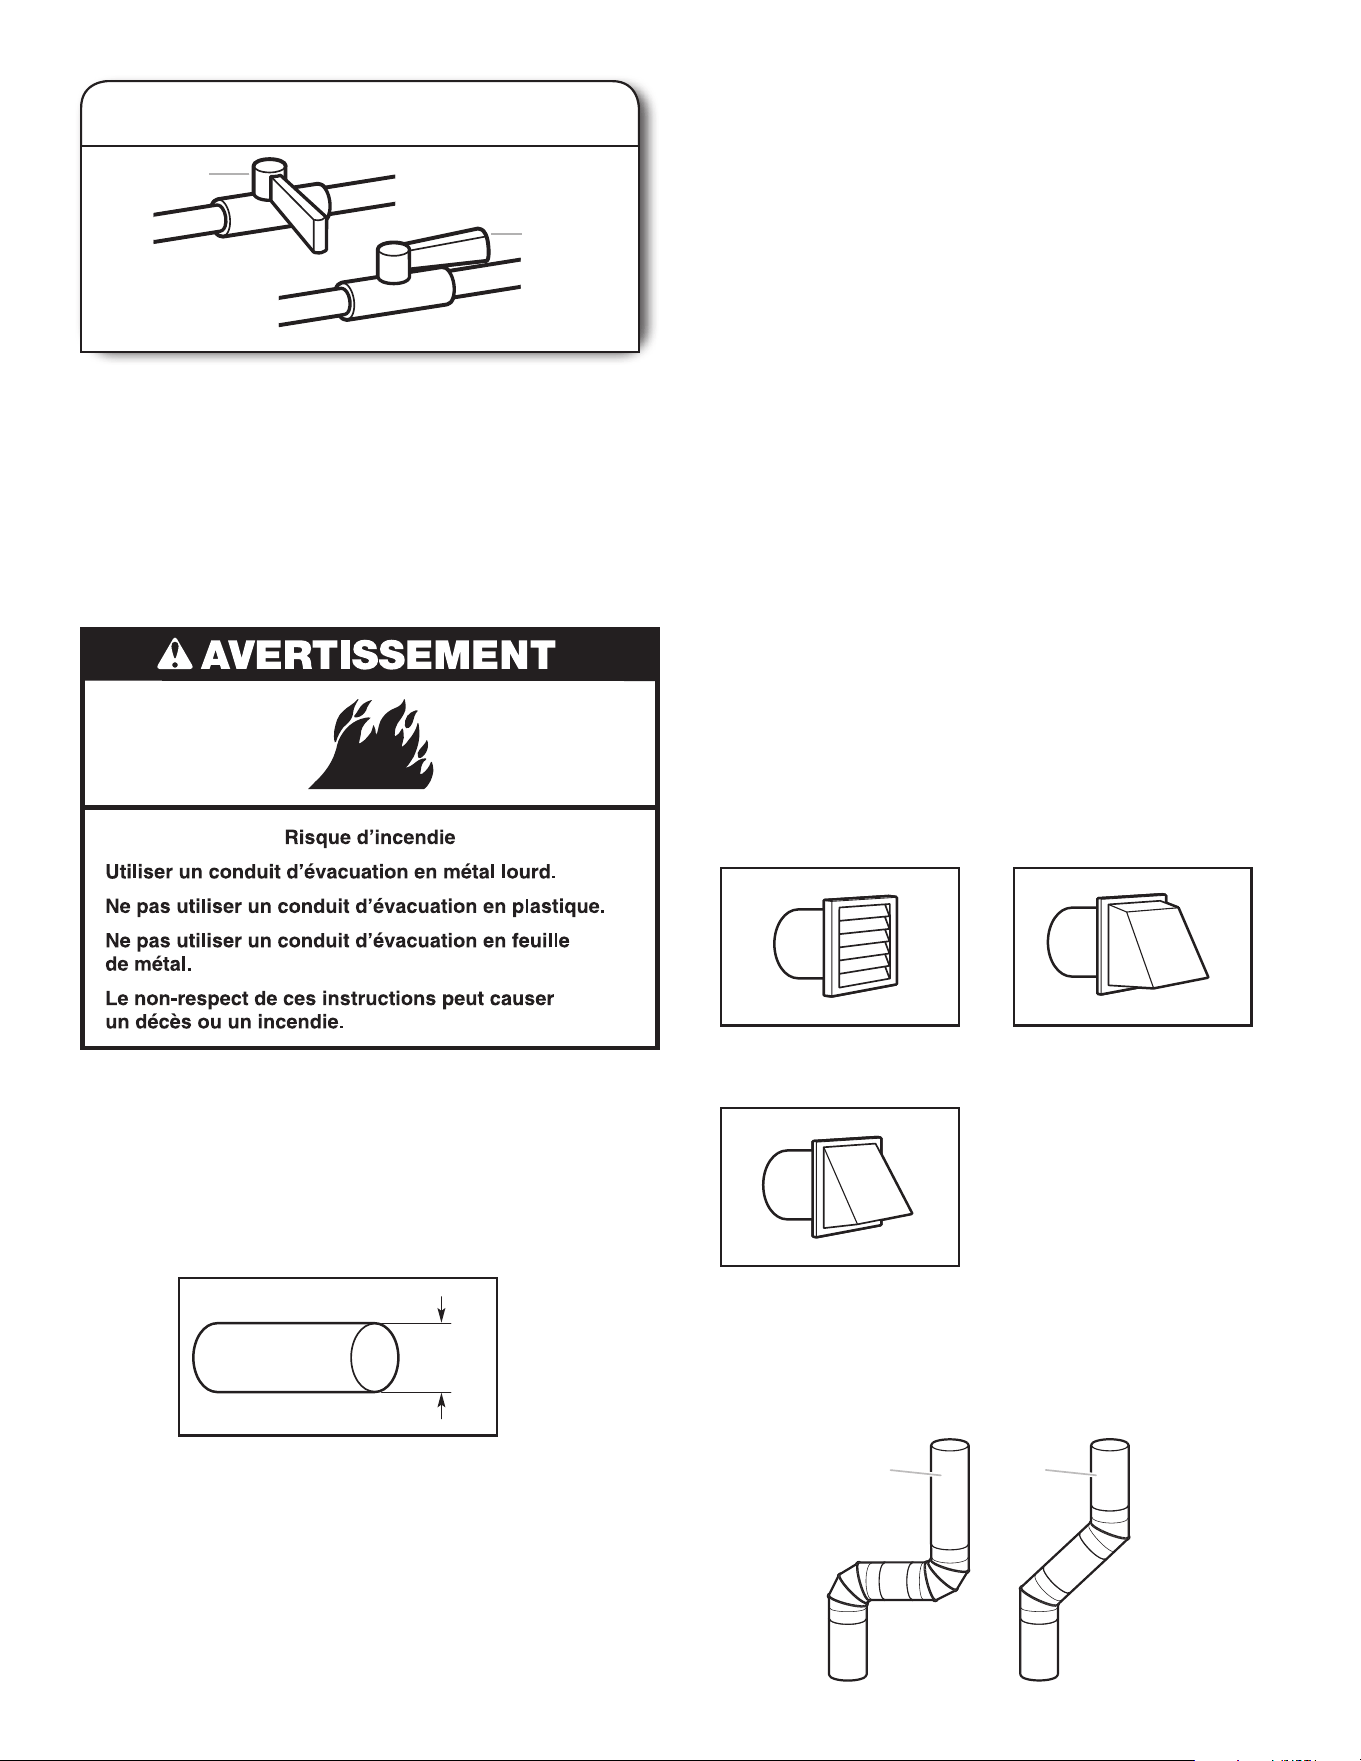
58
Exigences concernant l’évacuation
AVERTISSEMENT : Pour réduire le risque d’incendie,
cette sécheuse doit EVACUER L’AIR A L’EXTERIEUR.
IMPORTANT : Observer les dispositions de tous les codes et
règlements en vigueur. Le conduit d’évacuation de la sécheuse
ne doit pas être raccordé à une évacuation de gaz, une cheminée,
un mur, un plafond, un grenier, un vide sanitaire ou un vide
de construction. Seul un conduit d’évacuation métallique rigide
ou souple doit être utilisé pour le système d’évacuation.
L’ÉVACUATION
■ Utiliser uniquement un conduit d’évacuation en métal lourd
de 4" (102 mm) et des brides de serrage.
■ Ne pas utiliser de conduit de plastique ou de métal très mince.
4"
(102 mm)
Conduit d’évacuation en métal lourd de 4" (102 mm)
3. Robinet d’arrêt du gaz ouvert
Ouvrir le robinet d’arrêt de la canalisation d’alimentation;
le robinet est ouvert lorsque la manette est parallèle à la
canalisation de gaz. Vérier ensuite tous les raccordements
en les badigeonnant d’une solution de détection des fuites
non corrosive approuvée. L’apparition de bulles indique la
présence d’une fuite. Veiller à éliminer toute fuite détectée.
A
B
Robinet
ouvert
Robinet fermé
Clapet à persiennes
Bon
Clapet incliné
Clapet de type boîte
Mieux
Clapets d’évacuation :
Coudes :
Styles recommandés :
Styles recommandés :
■ Les coudes à 45° permettent une meilleure circulation de l’air
que les coudes à 90°.
■ Doit se trouver à au moins 12" (305 mm) du plancher ou
de tout objet susceptible d’obstruer l’ouverture d’évacuation
(tels des eurs, des pierres, des buissons ou de la neige).
Style acceptable :
Conduit métallique rigide :
■ Recommandé pour une performance de séchage idéale an
d’éviter tout écrasement ou déformation.
Conduit métallique exible : (Acceptable uniquement
si son accès reste facile pour le nettoyage)
■ Doit être entièrement déployé et soutenu à l’emplacement
d’installation nal de la sécheuse.
■ Enlever tout excès de conduit exible pour éviter tout
aaissement et déformation susceptible de réduire la capacité
d’évacuation et le rendement.
■ Ne pas installer le conduit métallique exible dans des cavités
fermées de mur, plafonds ou planchers.
■ La longueur totale ne doit pas dépasser 7
3
/
4
ft. (2,4 m).
■ La longueur du conduit métallique d’évacuation souple utilisé
doit être prise en compte lors de la conception de l’ensemble
du circuit d’évacuation, tel qu’indiqué dans le “Tableau des
systèmes d’évacuation”.
REMARQUE : Lors de l’utilisation d’un système d’évacuation
existant, nettoyer et éliminer la charpie sur toute la longueur
du système, et veiller à ce que le clapet d’évacuation ne soit
pas obstrué par de la charpie. Remplacer tout conduit de
plastique ou en aluminium par un conduit métallique rigide
ou souple. Consulter à nouveau le tableau des systèmes
d’évacuations et modier le système d’évacuation existant
au besoin pour obtenir un meilleur séchage.
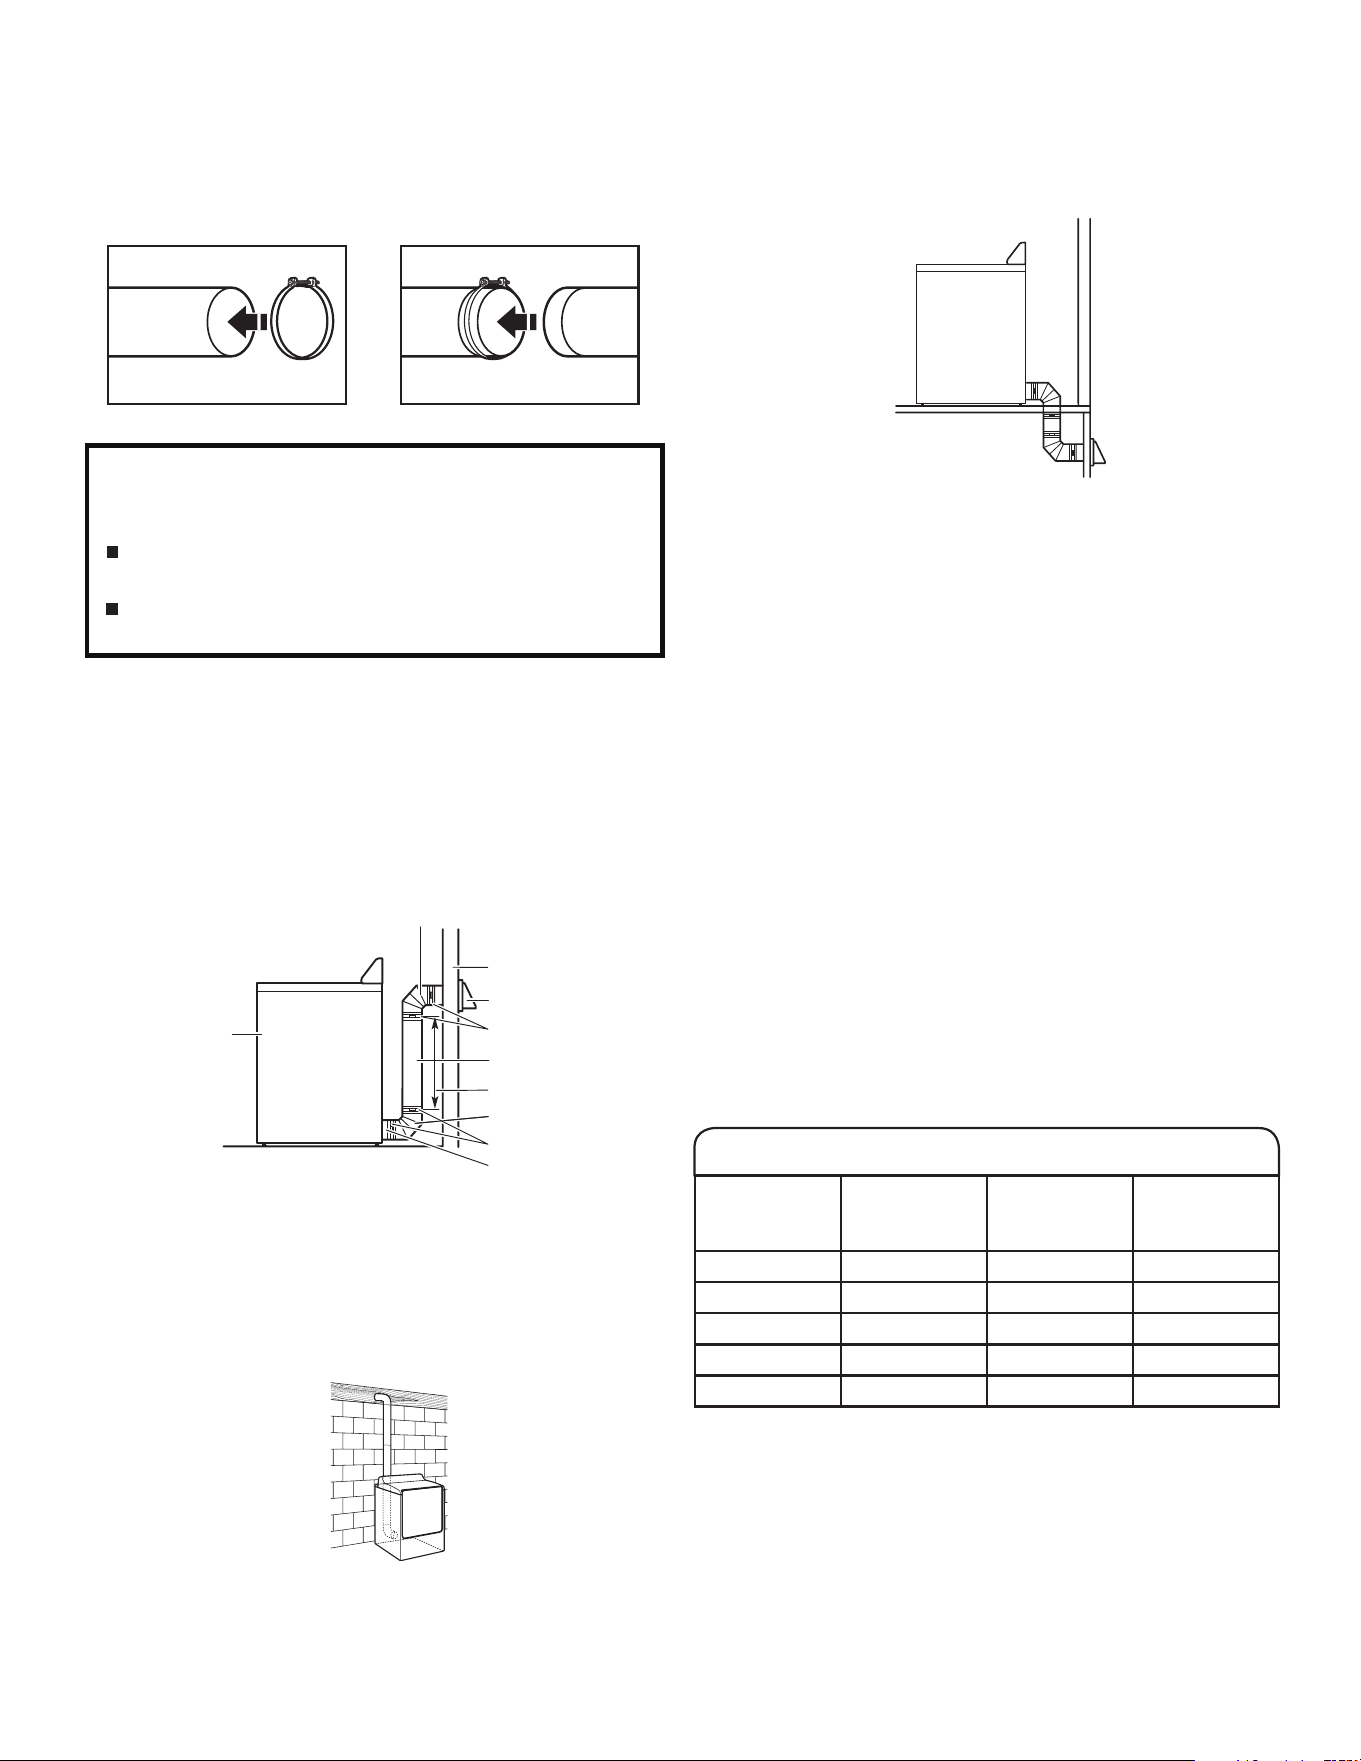
59
Planication des circuits de conduits
Installations d’évacuation recommandées
Les installations typiques consistent à acheminer le conduit
d’évacuation à l’arrière de la sécheuse. D’autres installations
sont possibles.
A. Sécheuse
B. Raccord coudé
C. Mur
D. Clapet d’évacuation
E. Brides
F. Conduit d’évacuation métallique
rigide ou souple
G. Longueur de conduit d’évacuation
nécessaire pour le raccordement
des coudes
H. Bouche de décharge
Brides de serrage :
■ Utiliser des brides pour sceller tous les joints.
■ Le conduit d’évacuation ne doit pas être raccordé ou xé avec
des vis ou tout autre dispositif de serrage qui se prolongerait
à l’intérieur du conduit et retiendrait la charpie. Ne pas utiliser
de ruban adhésif pour conduit.
Une mauvaise évacuation de l'air peut causer de
l'humidité et une accumulation de charpie à l'intérieur de
la maison, ce qui peut provoquer :
Dommages par l'humidité aux boiseries, meubles, peinture,
papier-peint, tapis, etc.
Problèmes de nettoyage dans la maison et problèmes
de santé.
Le matériel d’évacuation peut être acheté auprès de votre
revendeur ou en composant le 1-800-469-4663.
B
B
C
D
E
E
F
G
H
A
Dispositions spéciales pour les installations
en résidence mobile :
Le système d’évacuation doit être solidement xé à une section
non combustible de la structure de la résidence mobile et ne doit
pas se terminer en dessous de la résidence mobile. Acheminer
le conduit d’évacuation vers l’extérieur.
Installation du système d’évacuation en résidence mobile
Déterminer l’itinéraire d’acheminement du conduit :
■ Choisir l’itinéraire d’acheminement vers l’extérieur qui sera
le plus direct et le plus rectiligne.
■ Planier l’installation de façon à introduire un nombre minimal
de coudes et de changements de direction.
■ Si des coudes ou changements de direction sont utilisés, prévoir
autant d’espace que possible.
■ Plier le conduit graduellement pour éviter de le déformer.
■ Utiliser le moins possible de changements de direction à 90°.
Installation avec acheminement standard
du conduit d’évacuation par l’arrière
Déterminer la longueur du conduit et le nombre
de coudes nécessaires pour une performance
optimale de séchage :
■ Utiliser le tableau des systèmes d’évacuation suivant
pour déterminer le type de matériel d’évacuation et
les combinaisons de hotte acceptables.
REMARQUE : Ne pas utiliser de conduits de longueur supérieure
à la valeur spéciée dans le tableau des systèmes d’évacuation.
Si la longueur du circuit est supérieure à la valeur spéciée dans
le tableau, on observera :
■ Un cycle de vie réduit de la sécheuse.
■ Une réduction du rendement, avec temps de séchage plus longs
et une plus grande consommation d’énergie.
Nombre de
coudes à 90°
Type de
conduit
d’évacuation
Clapets de
type boîte/à
persiennes
Clapets
inclinés
0 Métallique rigide 64 pi (20 m) 58 pi (17,7 m)
1 Métallique rigide 54 pi (16,5 m) 48 pi (14,6 m)
2 Métallique rigide 44 pi (13,4 m) 38 pi (11,6 m)
3 Métallique rigide 35 pi (10,7 m) 29 pi (8,8 m)
4 Métallique rigide 27 pi (8,2 m) 21 pi (6,4 m)
Tableau des systèmes d’évacuation
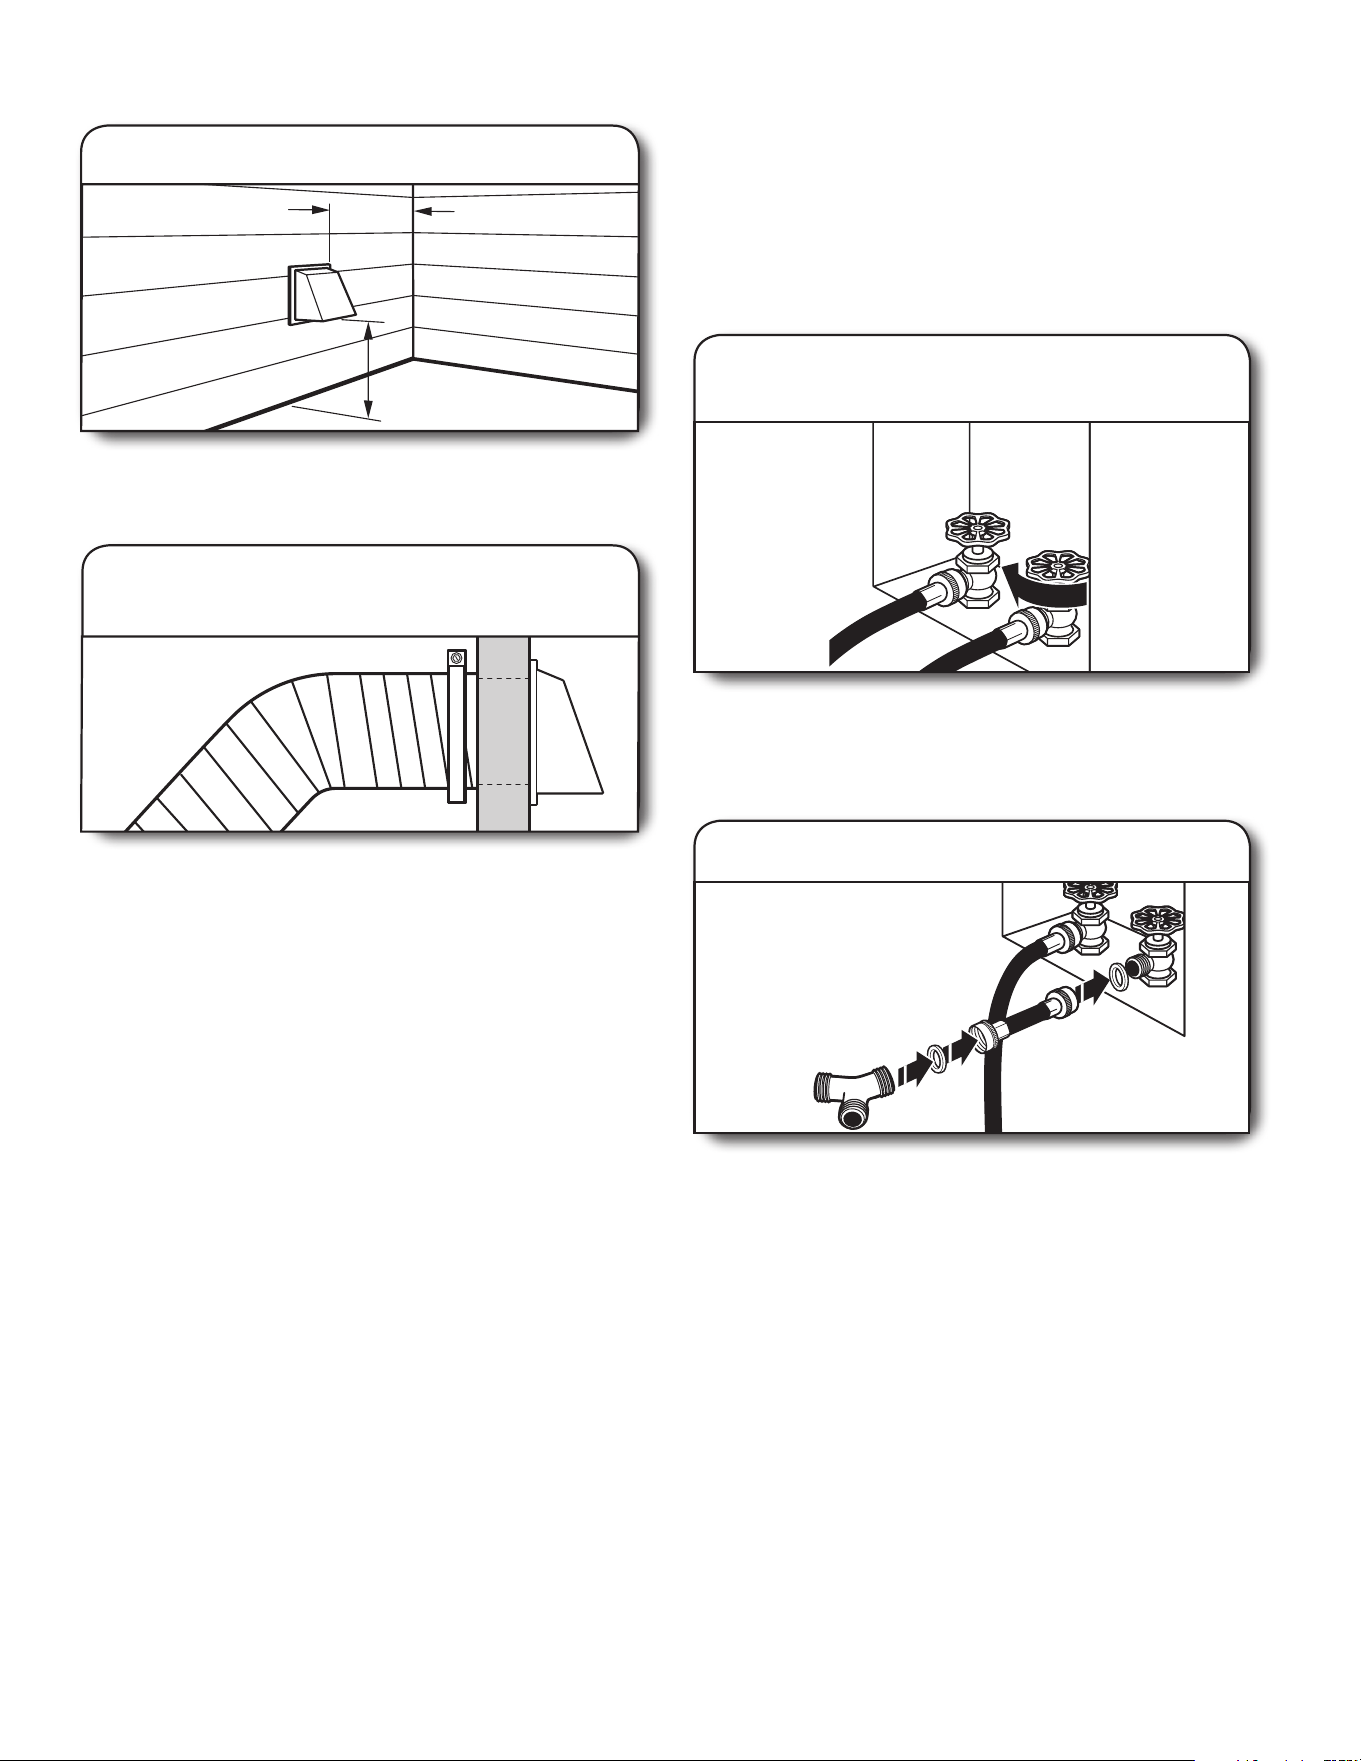
60
INSTALLATION DU SYSTÈME D’ÉVACUATION
12" min.
(305 mm)
12" min.
(305 mm)
1. Installer le clapet d’évacuation
Installer le clapet d’évacuation et utiliser un composé de
calfeutrage pour calfeutrer le côté extérieur de l’ouverture
murale autour du clapet d’évacuation.
2. Raccordement du conduit d’évacuation
au clapet
Le conduit doit être placé par dessus le clapet d’évacuation.
Fixer ensemble le conduit et le clapet avec une bride de
4" (102 mm). Acheminer le conduit jusqu’à l’emplacement
de la sécheuse en utilisant le chemin le plus rectiligne possible.
Éviter les changements de direction à 90º. Utiliser des brides
pour sceller tous les joints. Ne pas utiliser de ruban adhésif
pour conduit, de vis ou autres dispositifs de xation qui se
prolongeraient à l’intérieur du conduit pour xer le conduit
d’évacuation; ceux-ci pourraient retenir la charpie.
RACCORDEMENT DES
TUYAUX D’ALIMENTATION
Pour les modèles à fonctionnement sans vapeur, passer
directement à la section “Raccordement du système
d’évacuation”.
La sécheuse doit être connectée au robinet d’eau froide
à l’aide des nouveaux tuyaux d’alimentation. Ne pas utiliser
de tuyaux usagés.
Fermer le robinet d’eau froide et ôter le tuyau d’alimentation
de la laveuse.
Retirer l’ancienne rondelle de caoutchouc du tuyau d’arrivée
d’eau et la remplacer par une rondelle de caoutchouc neuve.
1. Fermer l’eau froide; retirer et remplacer
la rondelle de caoutchouc
2. Fixer le tuyau court et le raccord en “Y”
Fixer le tuyau d’alimentation de 2 pi (0,6 m) au robinet
d’eau froide. Visser le raccord à la main pour qu’il repose
sur le robinet. Fixer le raccord en “Y” à l’extrémité du tuyau
d’alimentation de 2 pi (0,6 m). Visser le raccord à la main
jusqu’à ce qu’il repose sur le raccord.
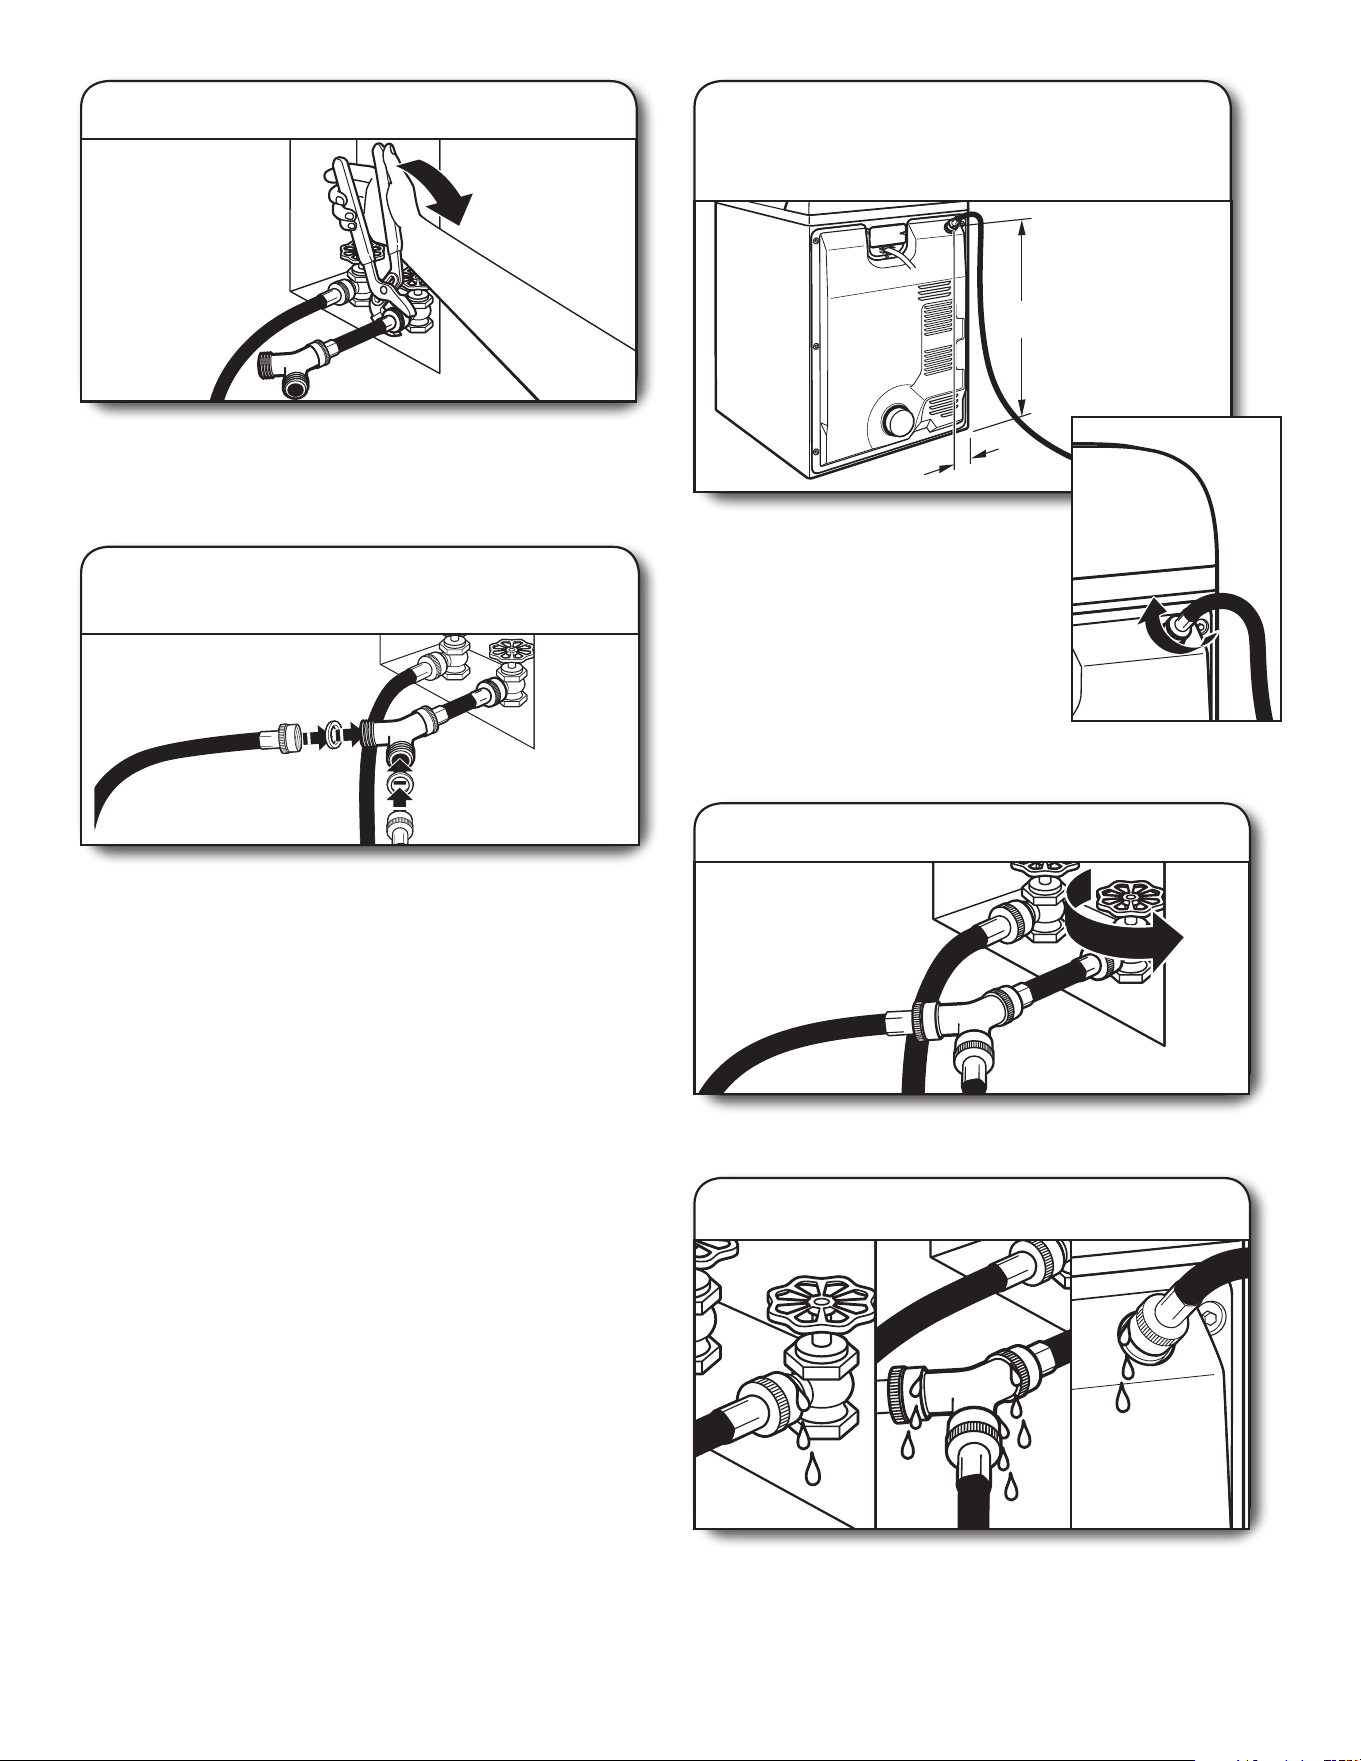
61
3. Serrer les raccords
Terminer le serrage des raccords de deux tiers de tour
supplémentaire avec une pince.
REMARQUE : Ne pas serrer excessivement. Le raccord risque
d’être endommagé.
4. Fixer le long tuyau au raccord
en “Y” et serrer les raccords
Fixer une extrémité du tuyau d’alimentation de la sécheuse de
5 pi (1,5 m) au connecteur en “Y”. Fixer le tuyau d’alimentation
en eau froide de la laveuse à l’autre extrémité du raccord en
“Y”. Visser le raccord à la main jusqu’à ce qu’il repose sur le
raccord. Terminer le serrage des raccords de deux tiers de tour
supplémentaire avec une pince.
REMARQUE : Ne pas serrer excessivement. Le raccord risque
d’être endommagé.
5. Fixer le long tuyau à l’électrovanne
de remplissage de la sécheuse et
serrer les raccords
7. Recherche de fuites
Vérier qu’il n’y a pas de fuites autour du raccord en “Y”,
du robinet et des tuyaux.
6. Ouvrir le robinet d’eau froide
Vérier que le robinet d’eau est ouvert.
4"
(101 mm)
30
1
/4"
(768 mm)
Fixer l'autre extrémité du long tuyau
à l’électrovanne de remplissage située
au sommet du panneau arrière de la
sécheuse. Serrer les vis des raccords
à la main jusqu’à ce qu’ils soient
positionnés sur le connecteur
d’électrovanne. À l’aide d’une pince,
serrer à nouveau les raccords avec
deux tiers de tour supplémentaires.
REMARQUE : Ne pas serrer excessivement.
Cela pourrait endommager les raccords.
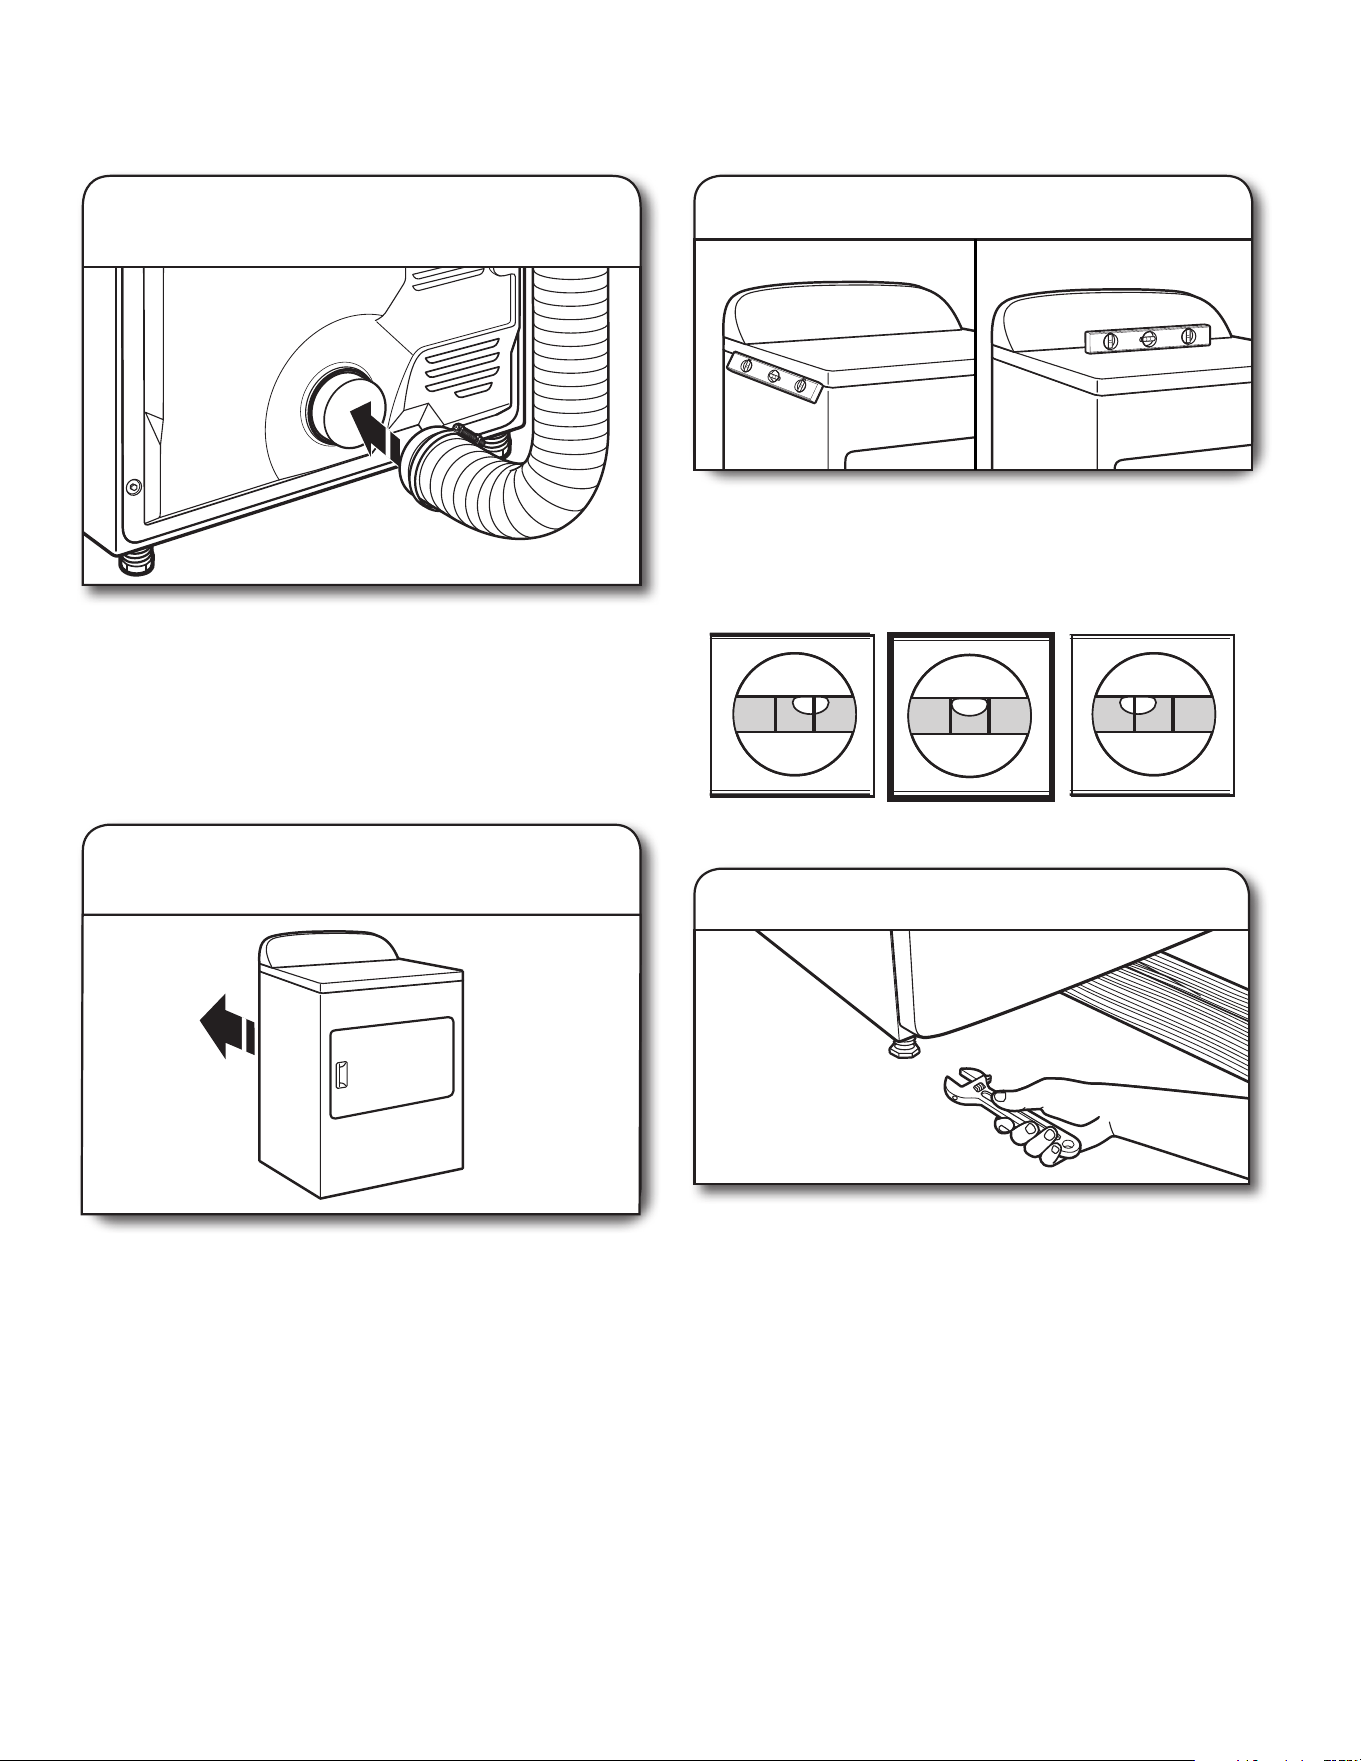
62
ÉTABLIR L’APLOMB
DE LA SÉCHEUSE
1. Réglage de l’aplomb de la sécheuse
Pas d’aplomb D’APLOMB Pas d’aplomb
Vérier l’aplomb de la sécheuse dans le sens transversal.
Répéter l’opération dans le sens avant-arrière.
REMARQUE : La sécheuse doit être d’aplomb pour que
le système de détection d’humidité fonctionne correctement.
2. Ajuster les pieds de nivellement
Si la sécheuse n’est pas d’aplomb, la relever à l’aide d’un bloc
de bois. Utiliser une clé pour ajuster les pieds vers le haut ou
vers le bas, et vérifier à nouveau si elle est d’aplomb.
RACCORDEMENT DU SYSTÈME
D’ÉVACUATION
À l’aide d’une bride de xation de 4" (102 mm), relier le conduit
d’évacuation à la bouche d’évacuation dans la sécheuse. Si
l’on réalise le raccordement au conduit d’évacuation existant,
s’assurer que celui-ci est propre. Le conduit d’évacuation doit
être xé par-dessus la bouche d’évacuation de la sécheuse et
à l’intérieur du clapet d’évacuation. S’assurer que le conduit
d’évacuation est xé au clapet d’évacuation à l’aide d’une bride
de xation de 4" (102 mm).
Placer la sécheuse à son emplacement nal. Éviter d’écraser
ou de déformer le conduit d’évacuation.
1. Raccorder le conduit d’évacuation
à la bouche d’évacuation
2. Placer la sécheuse à son
emplacement nal

63
ACHEVER L’INSTALLATION LISTE
DE VÉRIFICATION
■ Vérier que toutes les pièces sont maintenant installées.
S’il reste une pièce, passer en revue les diérentes étapes
pour découvrir laquelle aurait été oubliée.
■ Vérier la présence de tous les outils.
■ Jeter/recycler tous les matériaux d’emballage.
■ Vérier l’emplacement dénitif de la sécheuse. S’assurer
que le conduit d’évacuation n’est pas écrasé ou déformé.
■ Vérier que la sécheuse est d’aplomb. Voir “Réglage
de l’aplomb de la sécheuse”.
■ Ôter la pellicule de la console et tout ruban adhésif
resté sur la sécheuse.
■ Essuyer soigneusement l’intérieur du tambour
de la sécheuse avec un chion humide pour éliminer
toute trace de poussière.
■ Lire la section “Utilisation de la sécheuse” dans le “Guide
d’utilisation et d’entretien”.
Modèles électriques :
■ Pour une installation avec cordon d'alimentation, brancher sur
une prise reliée à la terre. Pour une installation à raccordement
direct, mettre l'appareil sous tension.
Modèles à gaz :
■ S’assurer que l’alimentation en gaz est ouverte.
■ Vérier qu’il n’y a pas de fuites.
Modèles avec génération de vapeur uniquement :
■ Vérier que les robinets d'eau sont ouverts.
■ Vérier qu’il n’y a pas de fuites autour du raccord en “Y”,
du robinet et des tuyaux.
Tous les modèles :
■ Sélectionner un programme de séchage minuté avec chaleur
et mettre la sécheuse en marche. Ne pas sélectionner le
réglage de température Air Only (air seulement).
Si la sécheuse ne démarre pas, vérier ce qui suit :
• Les commandes sont réglées à la position de marche
ou sur “On” (marche).
• On a appuyé sur le bouton Start (mise en marche) en
maintenant la pression pendant 3 secondes.
• La sécheuse est branchée dans une prise reliée à la terre
et/ou l’alimentation électrique est connectée.
• Le fusible du domicile est intact et serré; le disjoncteur
n’est pas déclenché.
• La porte de la sécheuse est fermée.
Cette sécheuse démarre automatiquement une procédure
de diagnostic au début du premier programme.
Si l’on reçoit un code L2, il y a peut-être un problème au
niveau de l’alimentation électrique du domicile empêchant
l’élément chauant de la sécheuse de se mettre en marche.
Voir “Dépannage”.
REMARQUE : Il est possible que la sécheuse dégage une certaine
odeur lorsqu’elle chaue pour la première fois. Cette odeur est
normale lorsque l’élément chauant est utilisé pour la première
fois. L’odeur disparaîtra.
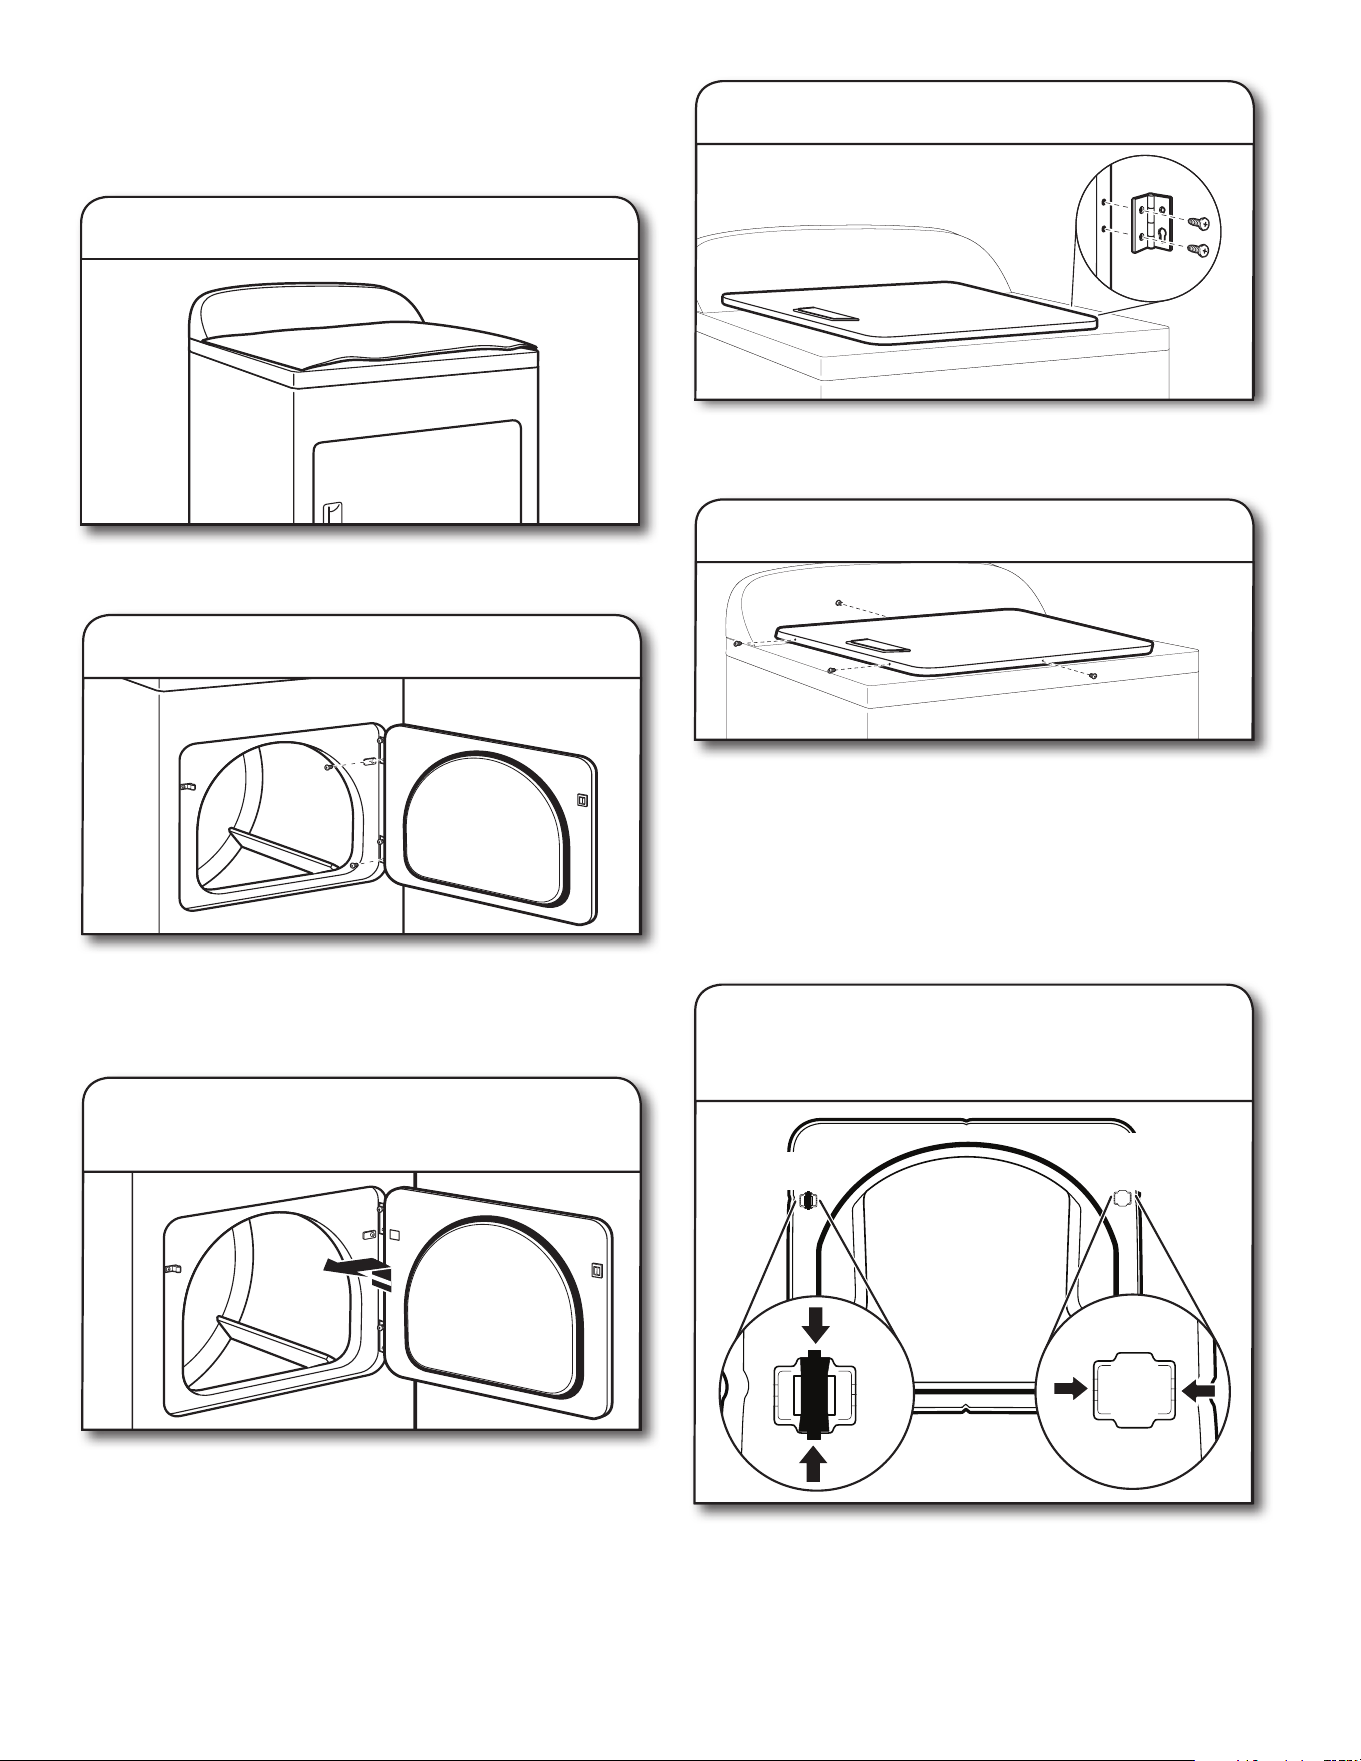
64
INVERSION DU SENS D’OUVERTURE
DE LA PORTE (FACULTATIF)
REMARQUE : Un tournevis aimanté serait utile.
Placer une serviette sur le dessus de la sécheuse pour éviter
d’endommager la surface.
1. Placer une serviette sur la sécheuse
2. Ôter les vis inférieures
Ouvrir la porte de la sécheuse. Ôter les vis inférieures de la
portion des charnières attachée à la caisse de la sécheuse.
Desserrer (ne pas retirer) les vis supérieures de la portion des
charnières attachée à la caisse de la sécheuse.
Soulever la porte jusqu’à ce que les vis supérieures situées
dans la caisse de la sécheuse se trouvent dans la partie
évasée de l’encoche de charnière. Tirer la porte vers l’avant
pour la dégager des vis. Placer la porte (côté poignée vers
le haut) sur la sécheuse. Retirer les vis supérieures de la
caisse de la sécheuse.
3. Soulever la porte pour la dégager
des vis supérieures
Retirer les vis du sommet, du bas et du côté de la porte (4 vis)
qui tiennent ensemble la porte interne et la porte externe. Tout
en maintenant la porte sur la serviette et sur la sécheuse, saisir
les côtés de la porte externe et la soulever pour la séparer de
la porte interne. Mettre de côté la porte externe.
REMARQUE : Ne pas utiliser de couteau à mastic ou de
tournevis pour séparer les portes. Ne pas tirer sur le joint
ou les pitons de retenue en plastique de la porte.
5. Ôter les vis du panneau de porte
Retirer la gâche de porte, le boîtier et le bouchon d’obturation
du côté intérieur de la porte interne en serrant les côtés puis
en tirant/repoussant ces éléments. Placer la gâche de porte,
le boîtier et le bouchon d’obturation de la porte sur le côté
opposé à leur position précédente.
Bouchon
d’obturation
de la porte
Gâche et
boîtier
6. Inversion du côté d’installation de
la gâche, du boîtier et du bouchon
d’obturation de la porte
4. Ôter les vis des charnières
Retirer les vis xant les charnières à la porte.
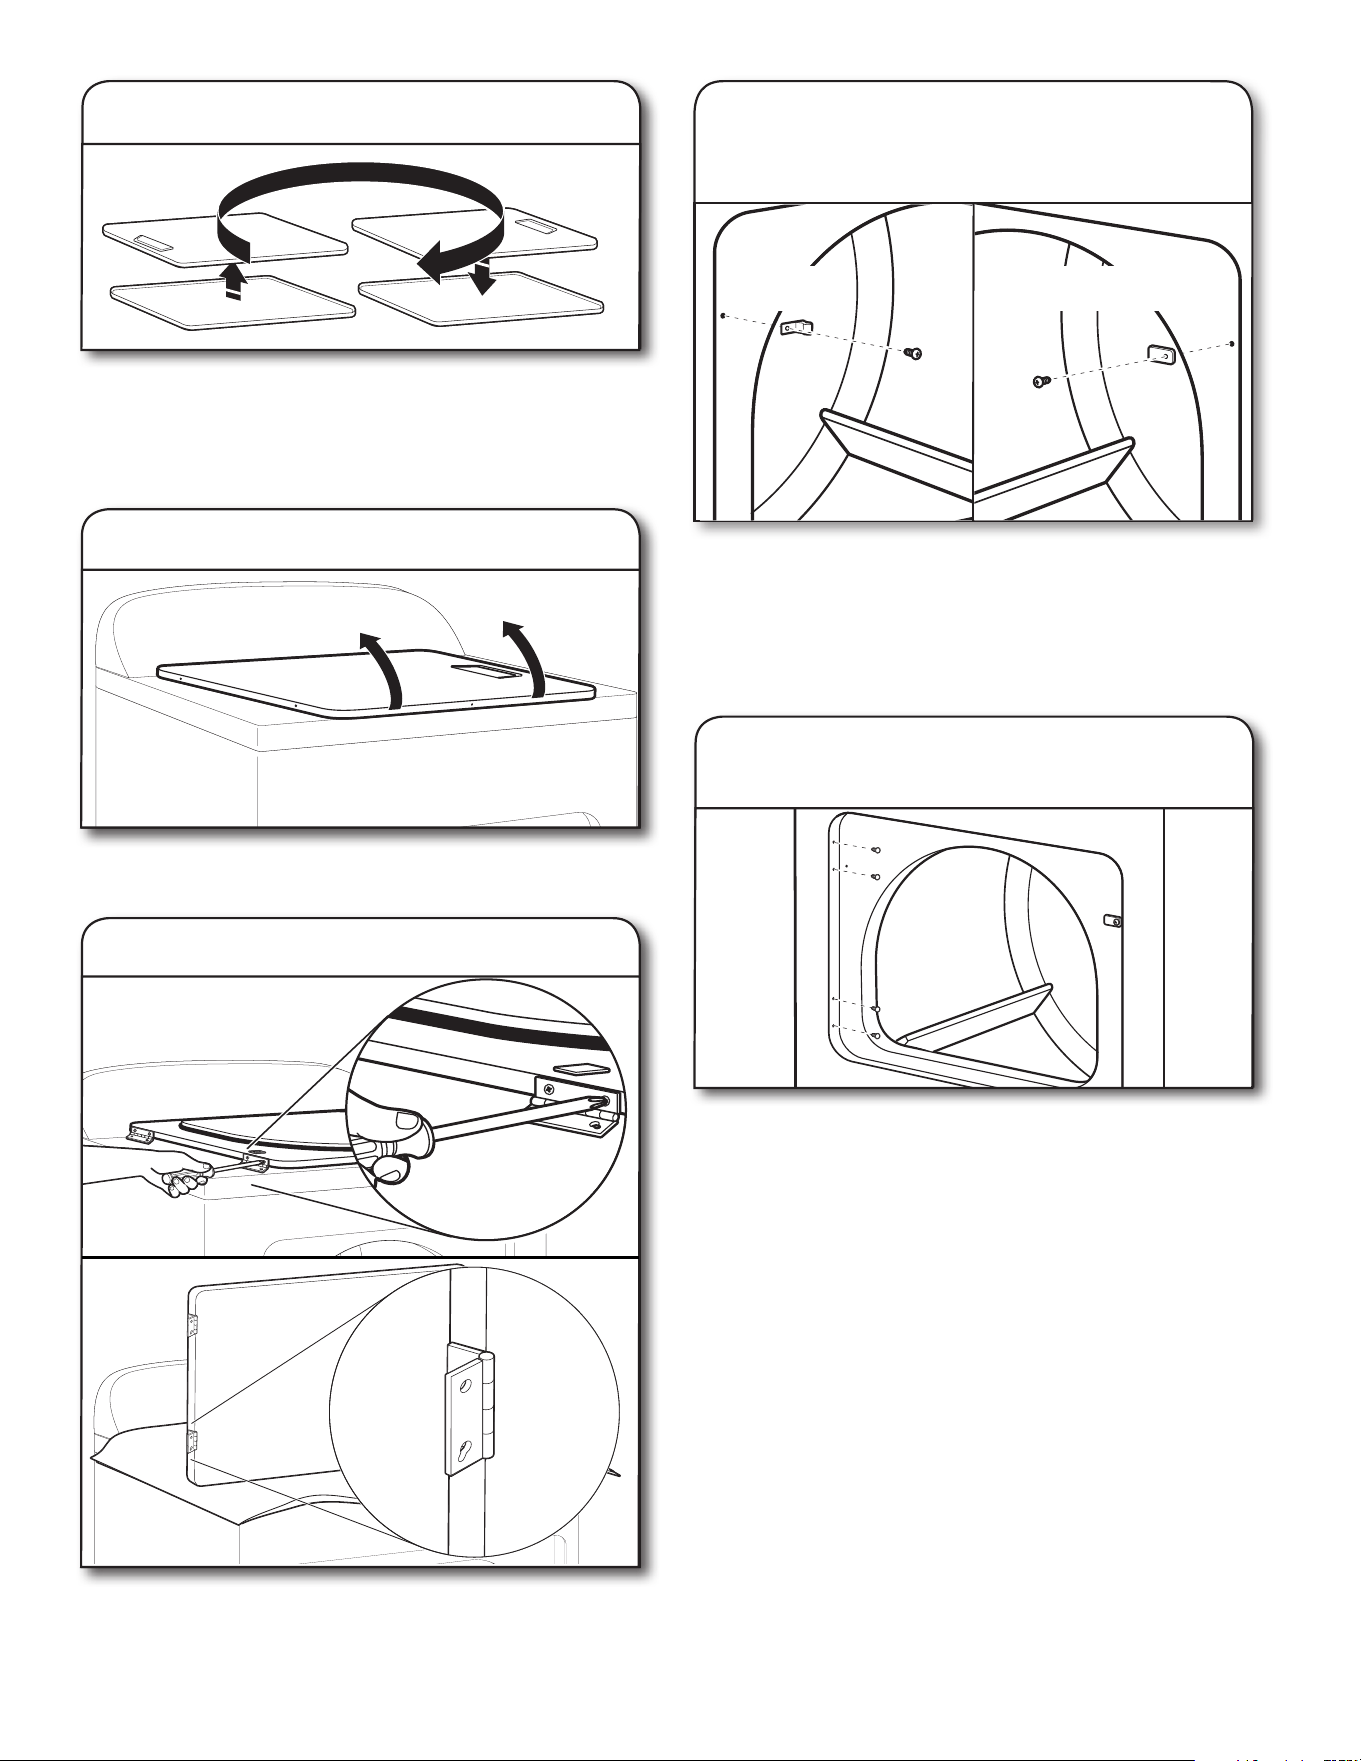
65
7. Faire pivoter la porte externe
Faire pivoter la porte externe de 180° puis la replacer sur la
porte interne. Fixer à nouveau le panneau de porte externe
sur le panneau de porte interne de façon à ce que la poignée
se trouve du côté où les charnières viennent d’être retirées.
Insérer les 4 vis de porte.
8. Retourner la porte
Retourner la porte de façon à ce que la poignée soit orientée
vers le bas.
9. Fixer les charnières de porte
Réinstaller les charnières de porte sur la porte de la sécheuse
de façon à ce que le trou le plus gros se trouve dans la partie
inférieure de la charnière.
Utiliser un petit tournevis à lame plate pour retirer avec
précaution les 4 bouchons d’obturation du côté gauche
de la caisse de la sécheuse. Transférer les bouchons
d’obturation dans les trous de charnière du côté opposé
de la caisse de la sécheuse.
11. Retirer les bouchons d’obturation
de charnière et les transférer
Retirer le piton de retenue de la porte et le bouchon
d’obturation de piton de la porte de la caisse de la sécheuse.
Insérer le piton de retenue de la porte dans le trou du bouchon
d’obturation de piton de la porte et xer avec une vis. Insérer
le bouchon d’obturation de piton de la porte dans le trou
d’origine de piton de la porte et xer avec une vis.
10. Retirer le piton de retenue
de la porte et le bouchon d’obturation
de piton de la porte
Bouchon d’obturation
de piton de la porte
Piton de retenue
de la porte
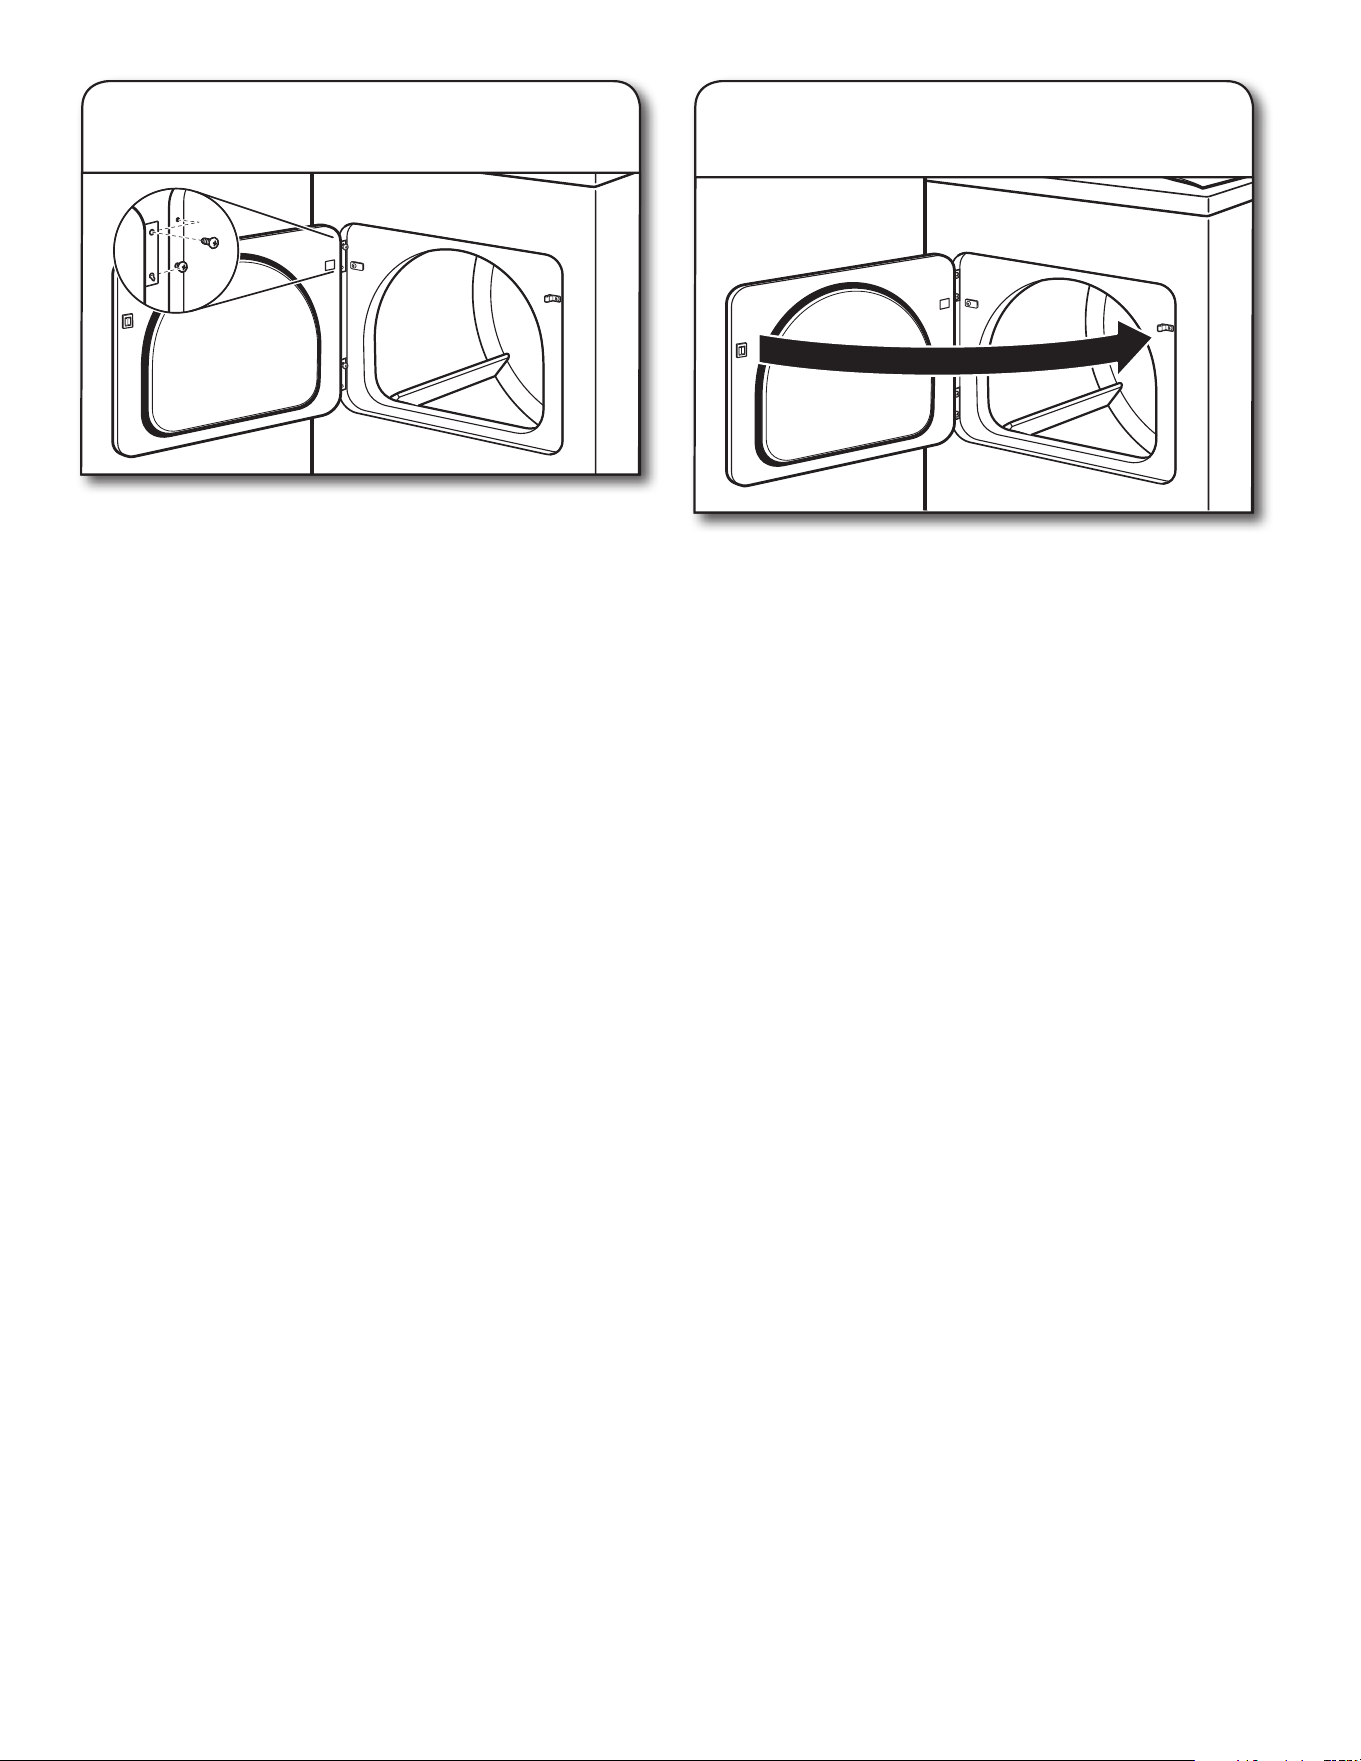
66
12. Insérer les vis dans les trous
de charnière de la caisse de la sécheuse
REMARQUE : Il faudra peut-être deux personnes
pour réinstaller la porte.
Insérer les vis dans les trous inférieurs du côté gauche
de la caisse de la sécheuse. Serrer les vis à moitié. Positionner
la porte de façon à ce que le côté large de l’encoche de la
charnière de porte se trouve au-dessus des vis. Faire glisser la
porte vers le haut de façon à ce que les vis se trouvent au fond
des encoches. Resserrer les vis. Insérer les vis supérieures dans
les charnières et les serrer.
Fermer la porte et vérier que le piton de la porte est aligné
avec le piton de retenue de la porte. Au besoin, faire glisser la
gâche de la porte vers la gauche ou vers la droite à l’intérieur
de l’encoche pour régler l’alignement.
13. Contrôler l’alignement
du piton de la porte
DÉPANNAGE
Voir “Dépannage” dans le Guide d’utilisation et d’entretien
pour tenter d’éviter le coût d’une intervention de réparation.

67
NOTES
W11101350A
©2017 Sears Brands, LLC
03/17
Kenmore ®
Customer Care Hotline
To schedule repair service or order parts
Para pedir servicio o ordenar piezas
1-844-553-6667
www. kenmore. com
For service in Canada Au Canada pour service
1-800-469-4663
®