Loading ...
Loading ...
Loading ...
24
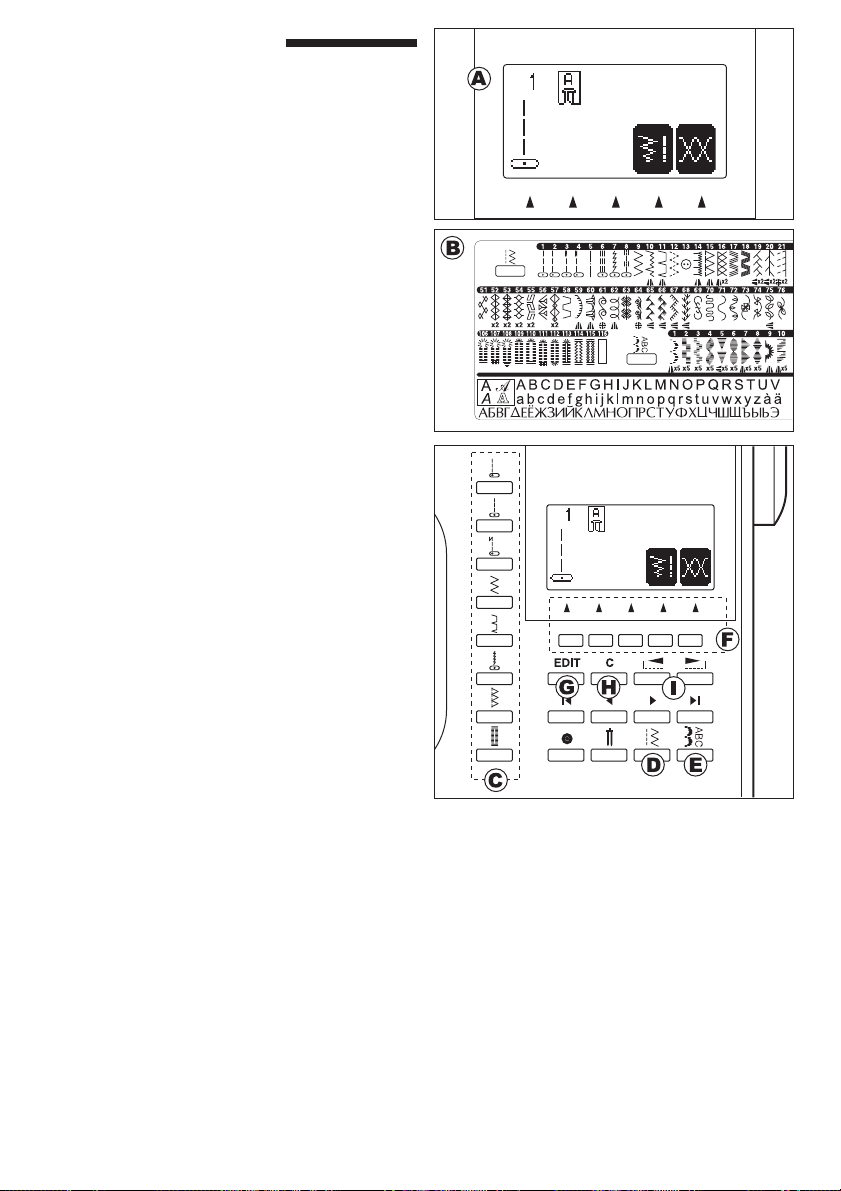
CONTROL PANEL
When you turn on the power, machine will select the
straight stitch and indicate information of stitch on
the L.C.D.
A. L.C.D. DISPLAY
Stitch information is indicated on this display.
According to the pattern or mode, information will
be changed.
B. PATTERN CHART
Pattern chart is located inside of the top cover.
All patterns and letters of this machine are indicated
on this chart.
They are separated: Utility stitch and Decorative &
Letter stitch.
C. DIRECT STITCH SELECTION BUTTONS
By pressing these buttons, you can select basic
utility stitch patterns directly.
D. UTILITY STITCH BUTTON
By pressing this button, you may select a utility
stitch pattern.
FOR SELECTING AND SETTING OF UTILITY
STITCHES, SEE PAGE 44.
E. DECORATIVE & LETTER STITCH
BUTTON
By pressing this button, you can select decorative &
letter stitch patterns.
These patterns and letters are combined easily by
selecting each pattern.
FOR SELECTING AND SETTING OF
DECORATIVE & LETTER STITCH, SEE PAGE 88.
F. FUNCTION BUTTONS
Functions of these buttons are changed by selected
stitch pattern and mode.
G. EDIT BUTTON
When selecting decorative & letter stitch, you can
change the setting of each pattern by pressing this
button.
H. CLEAR BUTTON
UTILITY STITCH SEWING
If you changed the setting (mirror/reverse,
elongation, stitch width, length and thread tension)
of utility stitch pattern, you can return to preset
setting by pressing this button.
DECORATIVE & LETTER STITCH SEWING
By pressing this button, you can delete one
combined stitch pattern or all stitch patterns.
I. SCROLL BUTTONS
During stitch pattern selection, 5 patterns or letters
will scroll up or down by pressing these buttons.
Loading ...
Loading ...
Loading ...