Owner’s Manual & User’s Guide
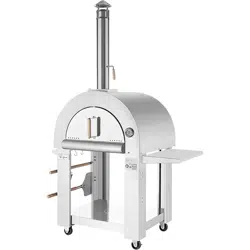
Item: WOOD FIRED PIZZA OVEN
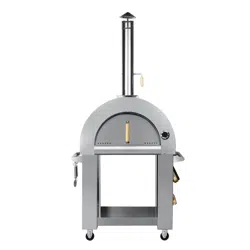
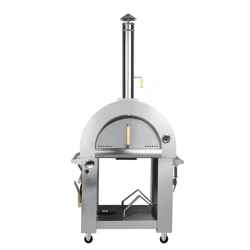
Model:EMPV-PG01 EMPV-PG05 EMPV-PG06
WARNING:
Read and understand instructions prior to assembly and use.
Place the Outdoor Oven on a non-combustible surface before use.
Always use cooking utensils (peels, brushes and cookware) suitable for wood-fired cooking.
The outdoor oven has to be installed on a secure level ba se prior to use;
The recommendation that the barbecue shall be heated up and the fuel kept red hot for at least 30 min
prior to the first cooking on the barbecue;
DO NOT OVERHEAT OVEN: Extreme heat ca
n permanently damage the Outdoor Oven. Bring the Outdoor
Oven up to temp slowly. Start with a small fire in the center. Once established, move the fire to the LEFT
side of the oven. Add smal l amounts of wood until the Outdoor Oven reaches even, high heat. A goo d
temperature for pi zza baking is when the Cooking Stone is 620ÛF~650ÛF.
NEVER USE CHEMICAL FUEL STARTERS: Only use small kindling and newspaper to help start your fire.
Starting fluids a nd other fire starters can foul the c
ooking surface and permanently damage the Outdoor
Oven.
Do not cook before the fuel has a coating of ash
NEVER USE CHEMICAL CLEANERS: Only clean a cool oven. Only use a metal bri stle brush or a damp cloth to
clean the Cooking Stone.
WARNING! Do not use spirit or petrol for lighting or re-lighting!
WARNING! Keep children and pets away
WARNING! This barbecue will become very hot, do not move it during operation.Use only firelighters
complying to EN 1860-3!
WARNING! Do not use indo
ors!
Do not use the barbecue in a confined and/or habitable space e.g. houses, tents, caravans, motor homes,
boats. Danger of carbon monoxide poisoning fatality
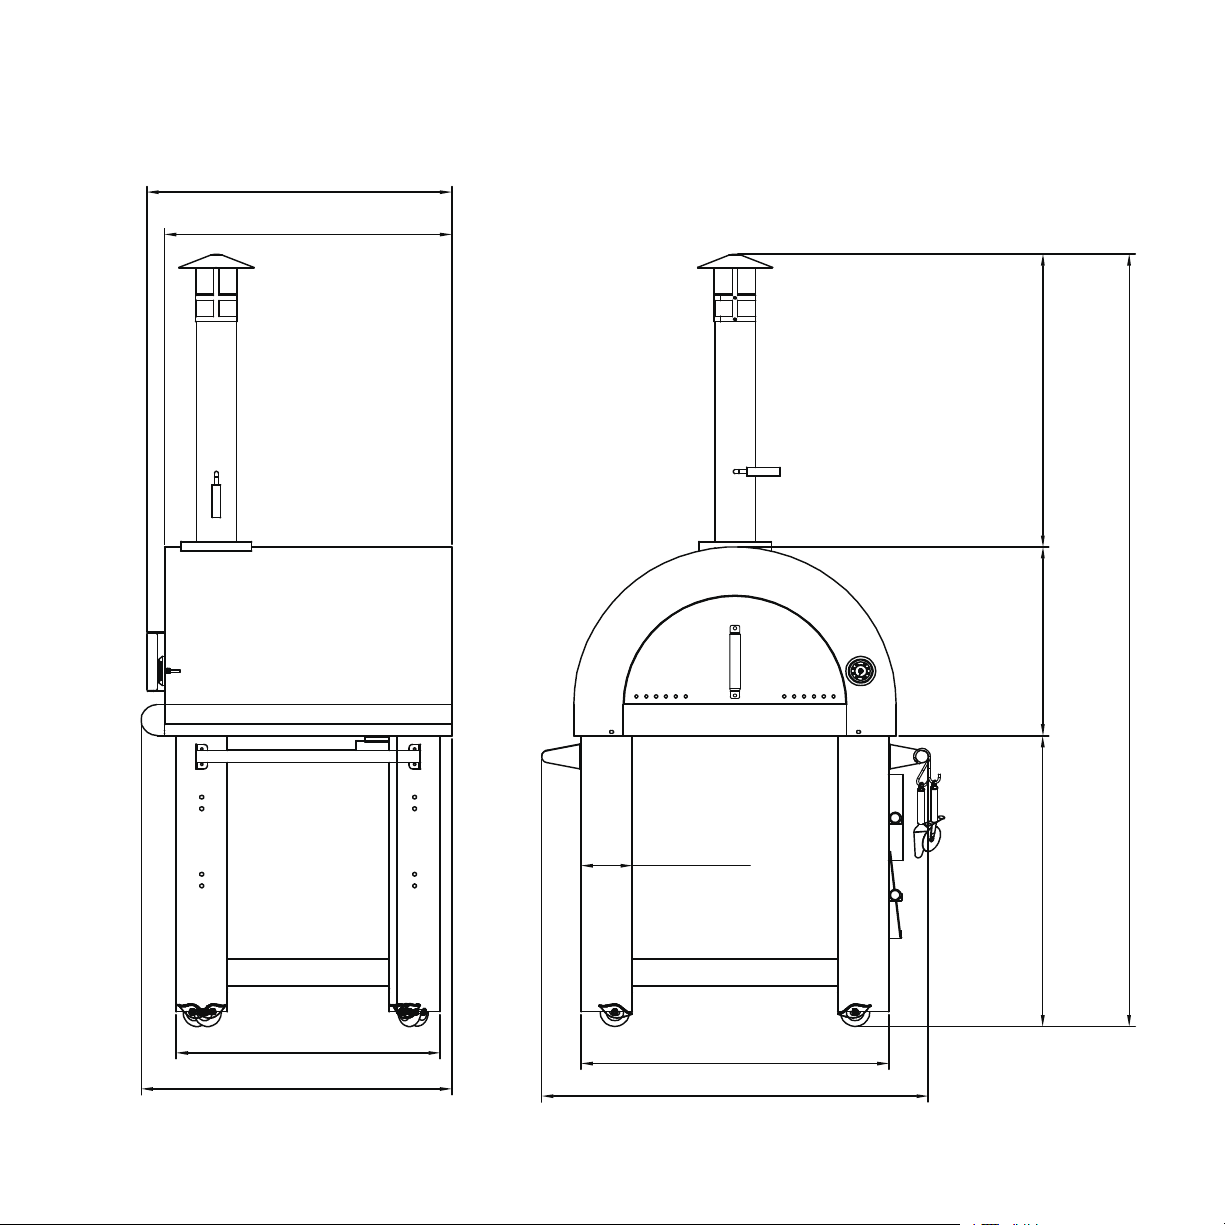
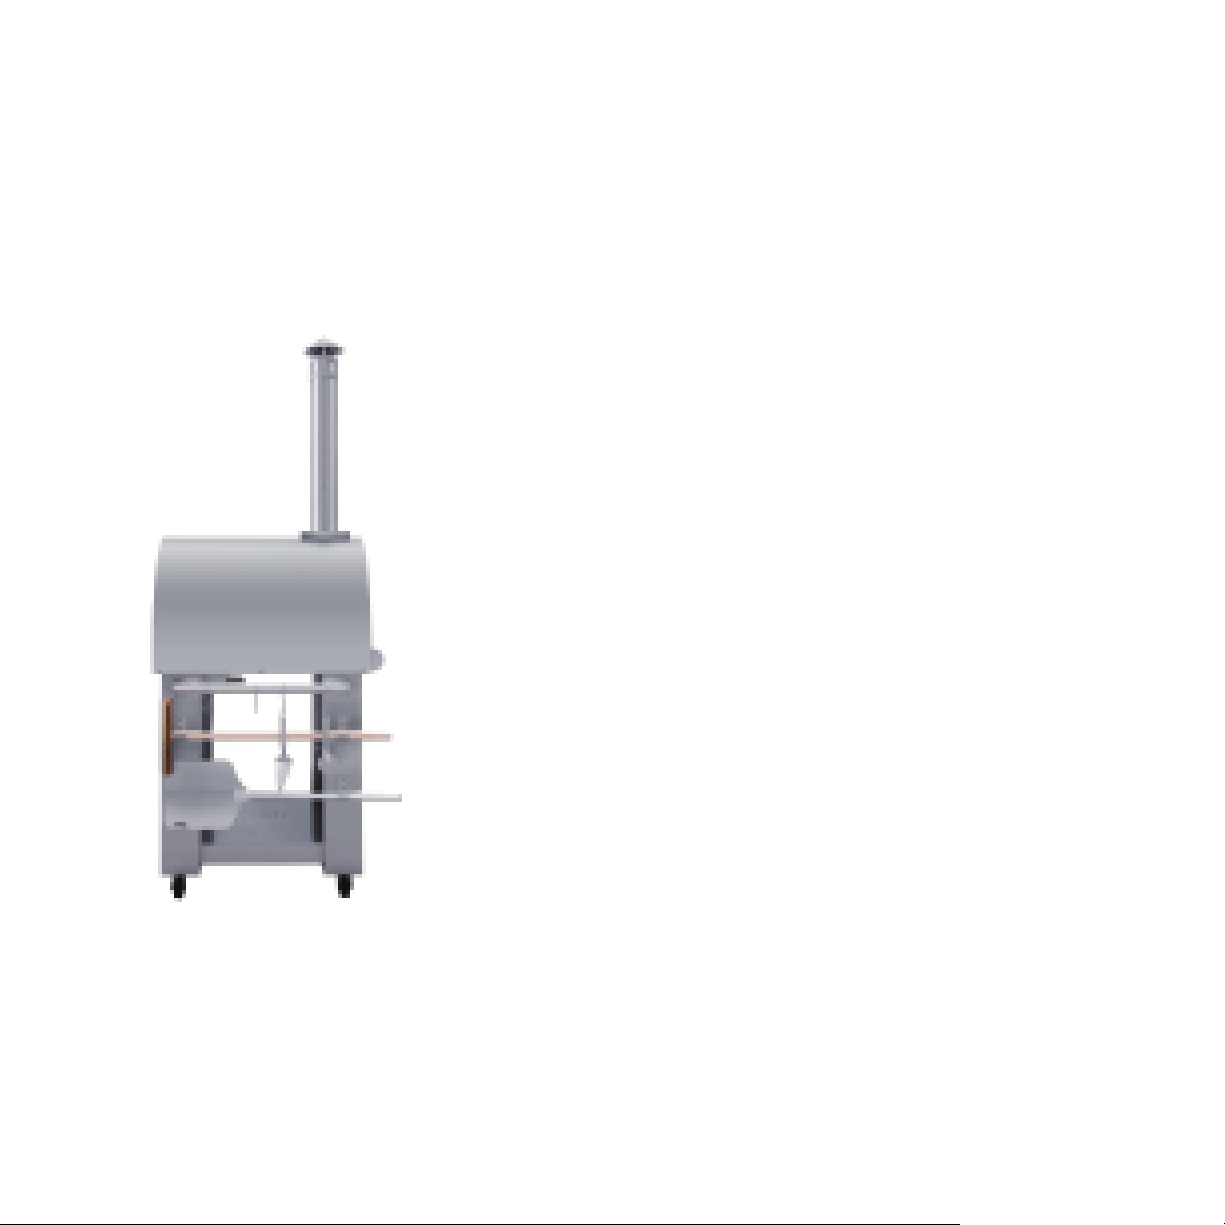
30.4''
28.6''
26.4''
31''
5.1''
30.7''
38.6''
19.3'' 29.9''29.7''
78.8''
EMPV-PG01/EMPV-PG06
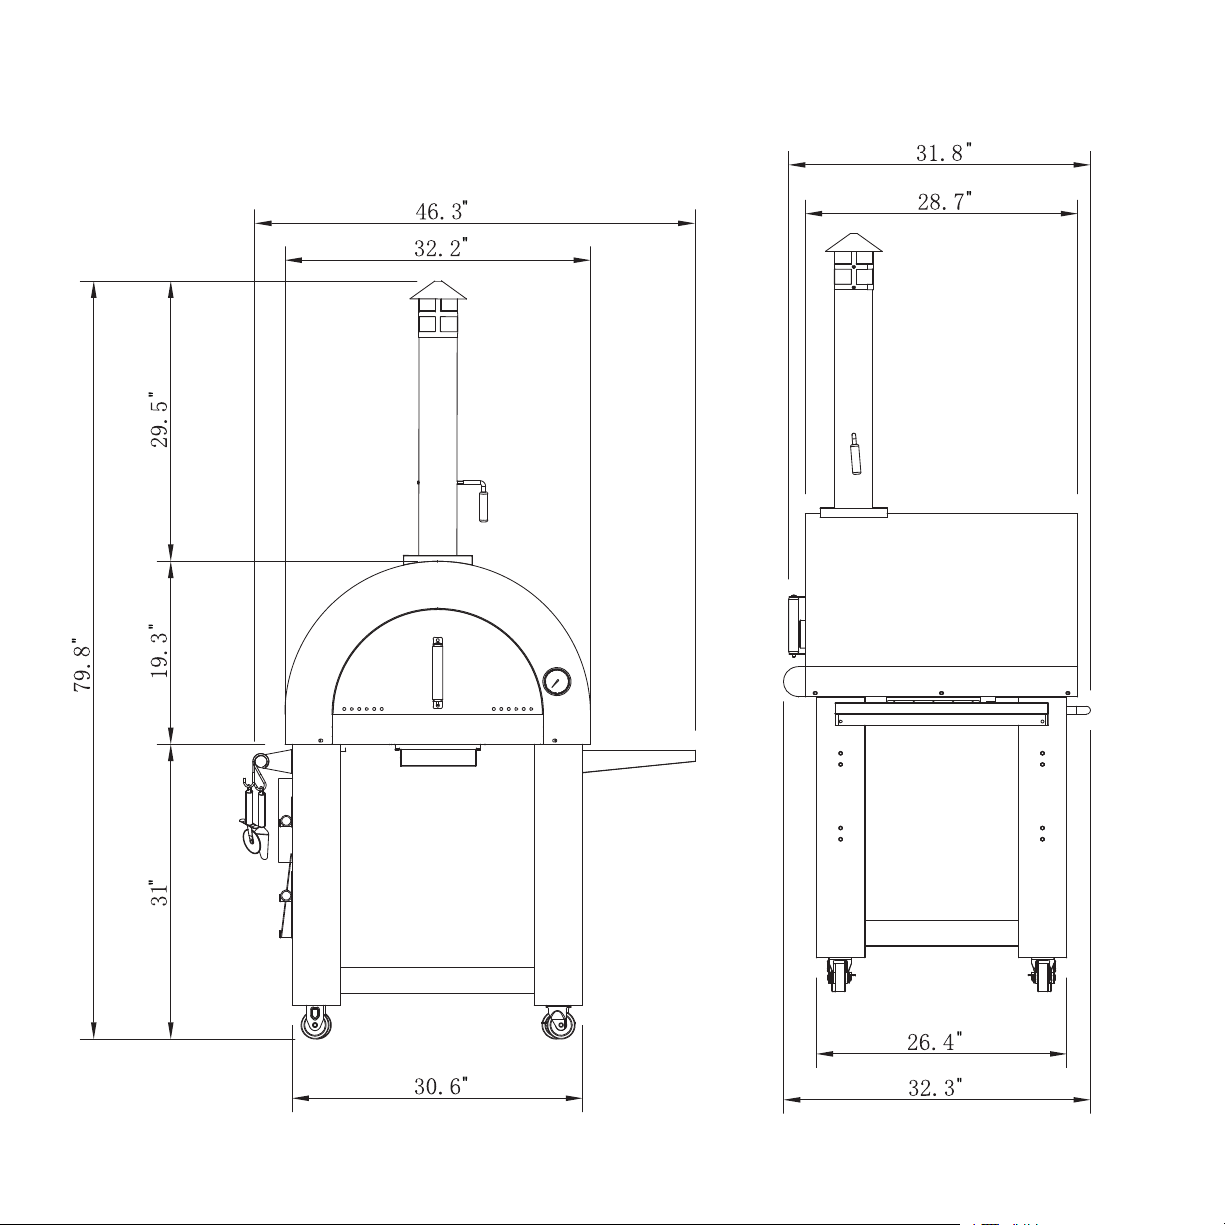
EMPV-PG05
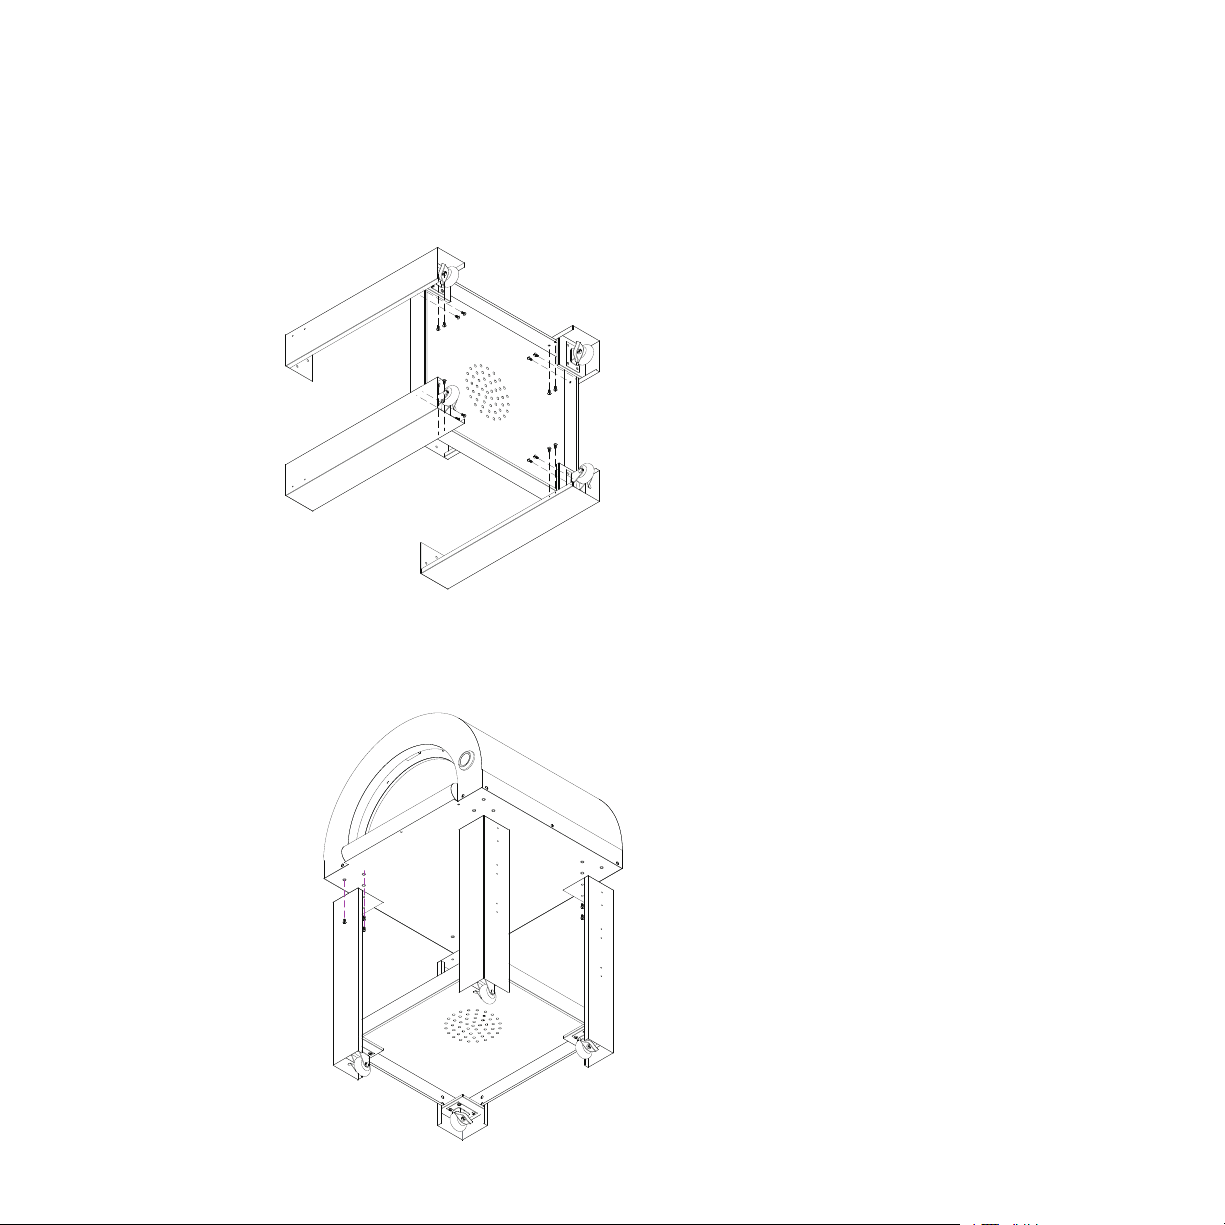
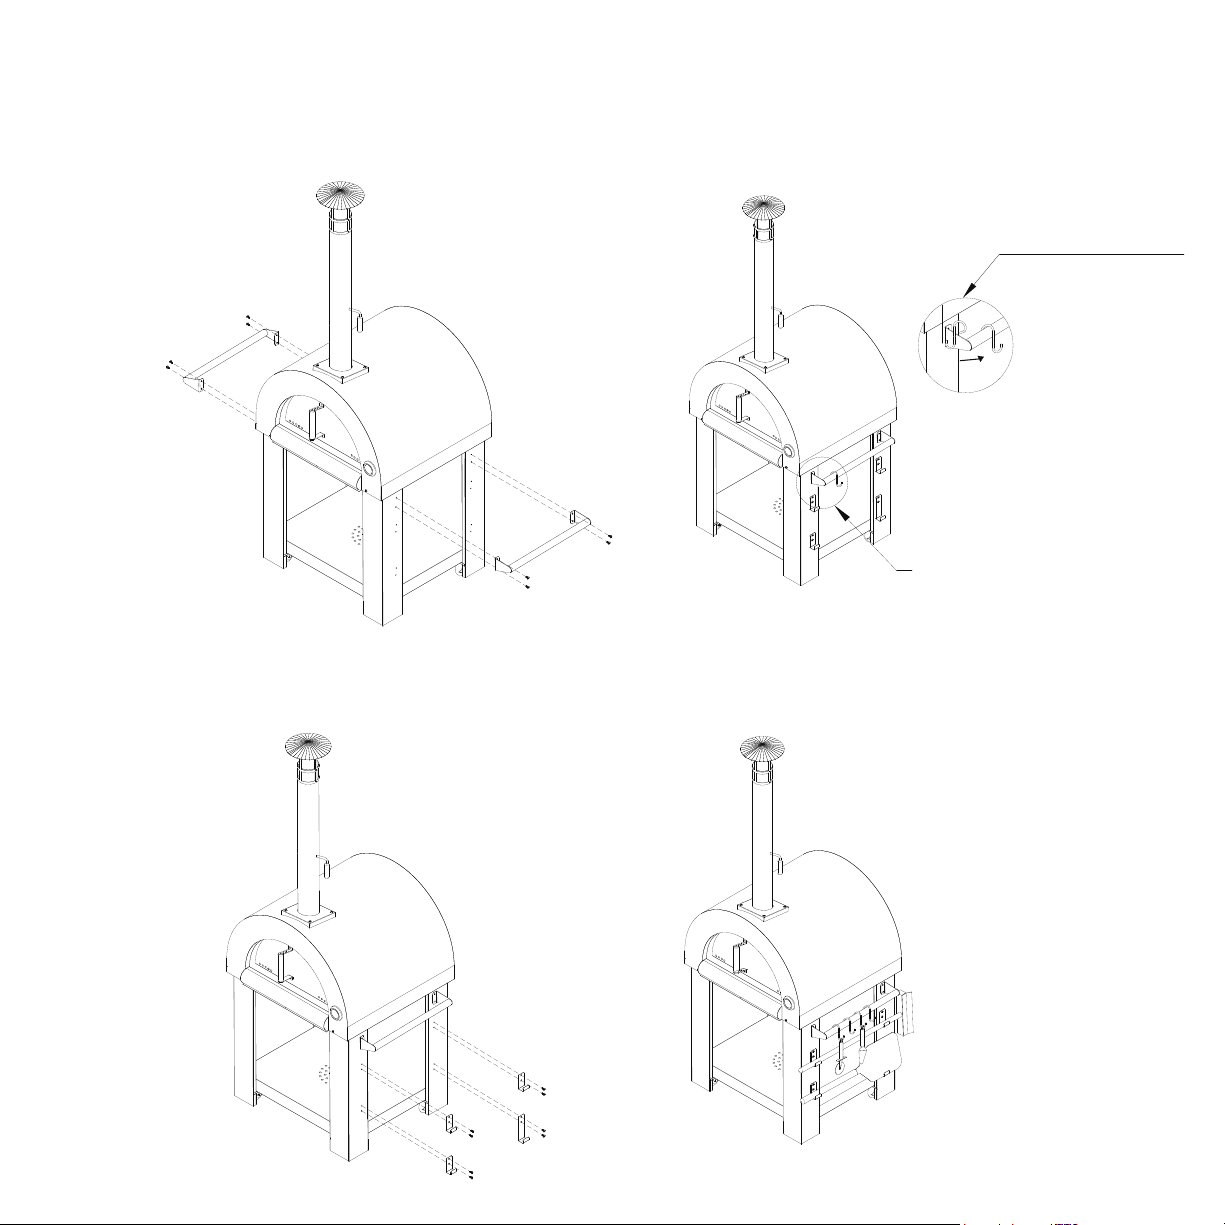
Assembled your oven first with followed step:
1/. Bottom shelf installment with 16pcs of 1/4” *15mm screws
2/. Fasten legs on the oven body with 12pcs o f 1/4”*15mm screws
3/. Ash support installment with 4pcs of 1/4”*15mm screws
4/. Installed the ash box on the oven bottom
a
View a magnified
Detail a:
Noted the position of ash support,
the outside as details picture
Oil gathering box card slots
Oil gathering box around stents card buckle
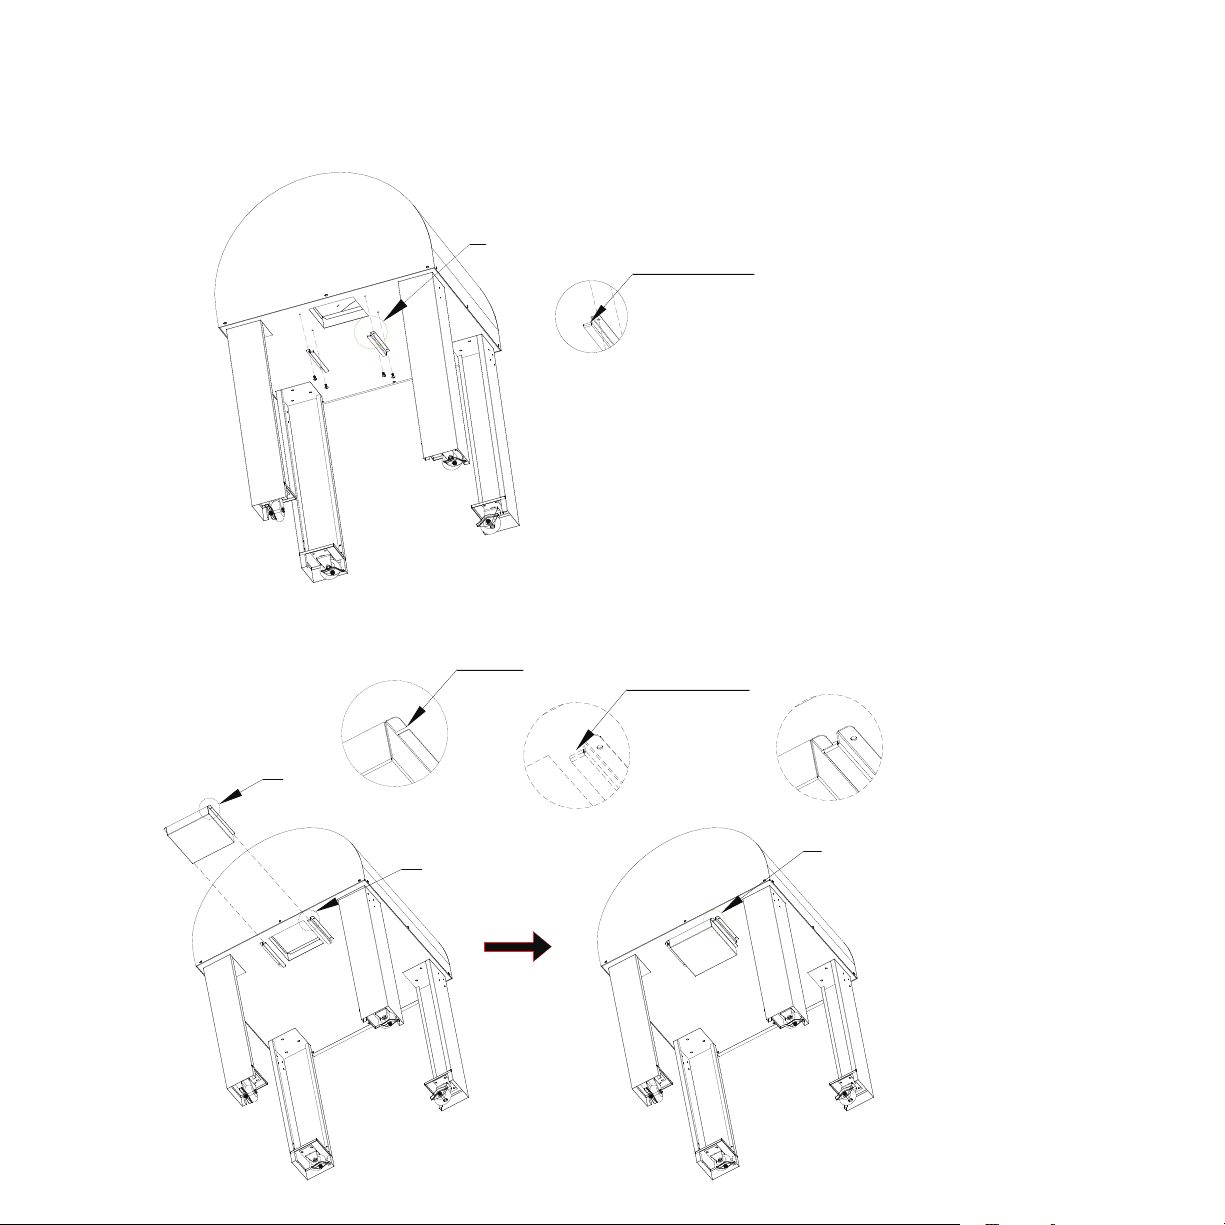
b
a
c
View a magnified
Magnified view b
View c amplification
5/. Installed the door handle with each 2 pcs of
1/4”*15mm screws + insulation mat + flat washer +
spring washer + 1/4” bolts
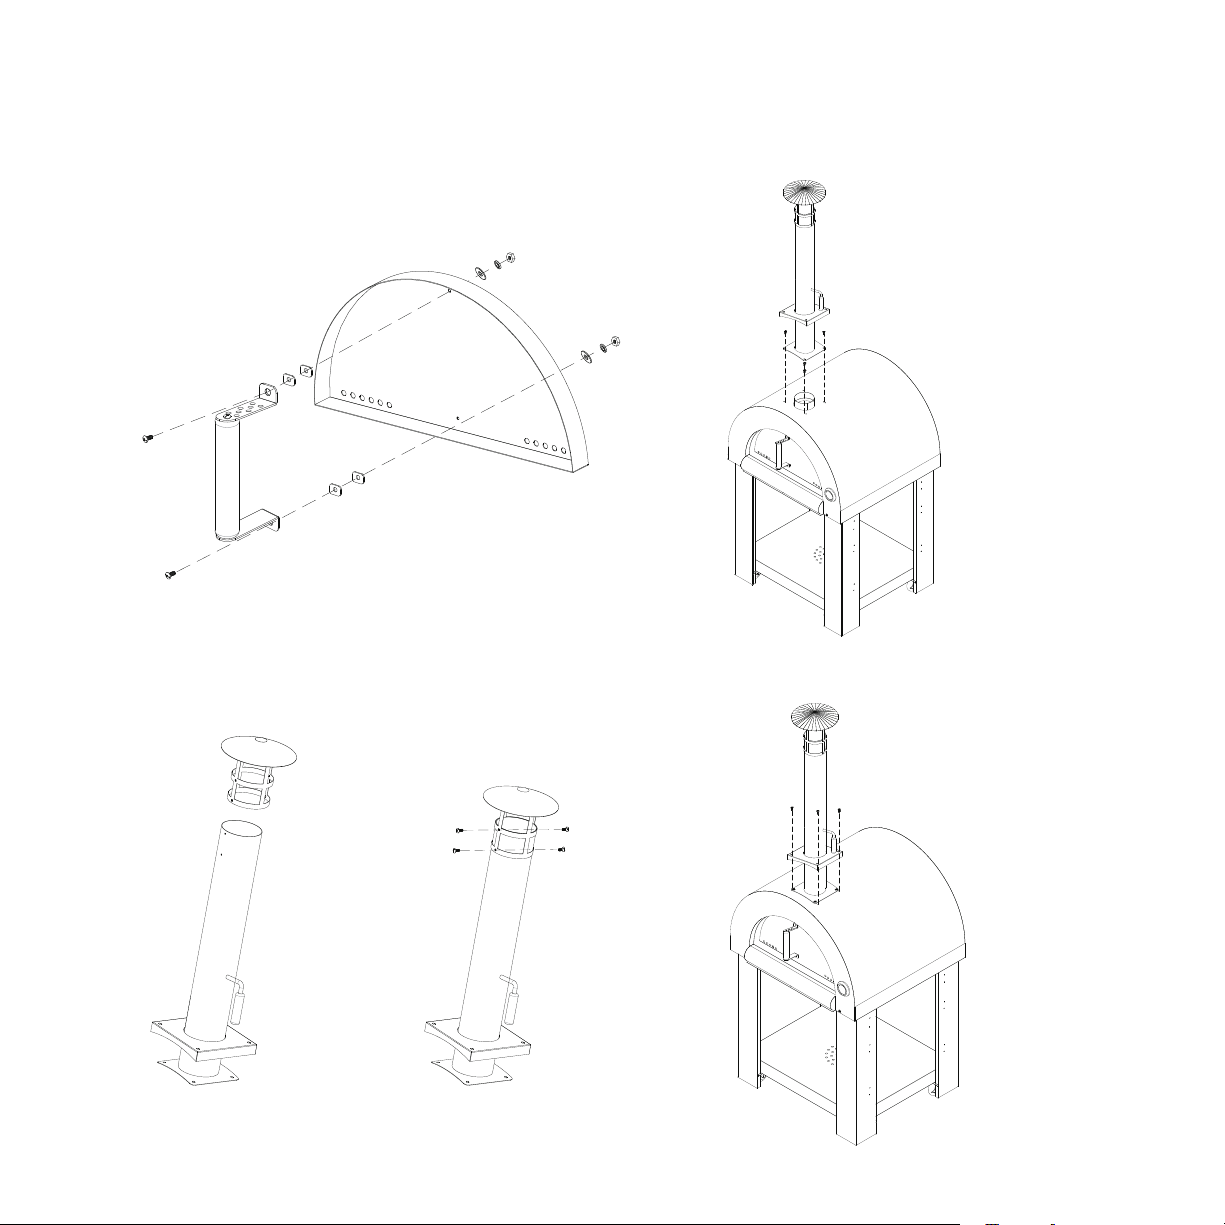
6/. Installed chimney cap with 4pcs of 5/32
”
*10mm
screws
7/. Installed Chimney with 4pcs of 1/4”*15mm
screws
8/. Installed chimney box with 4pcs o f 1/4” 30mm
screws
9/. Installed left and right handle with 8pcs of
1/4”*15mm screws
10/. Installed 3pcs of hooks 1 and 1pc of hooks
with 8pcs of 1/4”*15mm screws
11/. Hanged 4pcs of “S” hooks on the handle
12/. Put the parts as followed
Details a: hanged the hooks from side
a
View a magnified
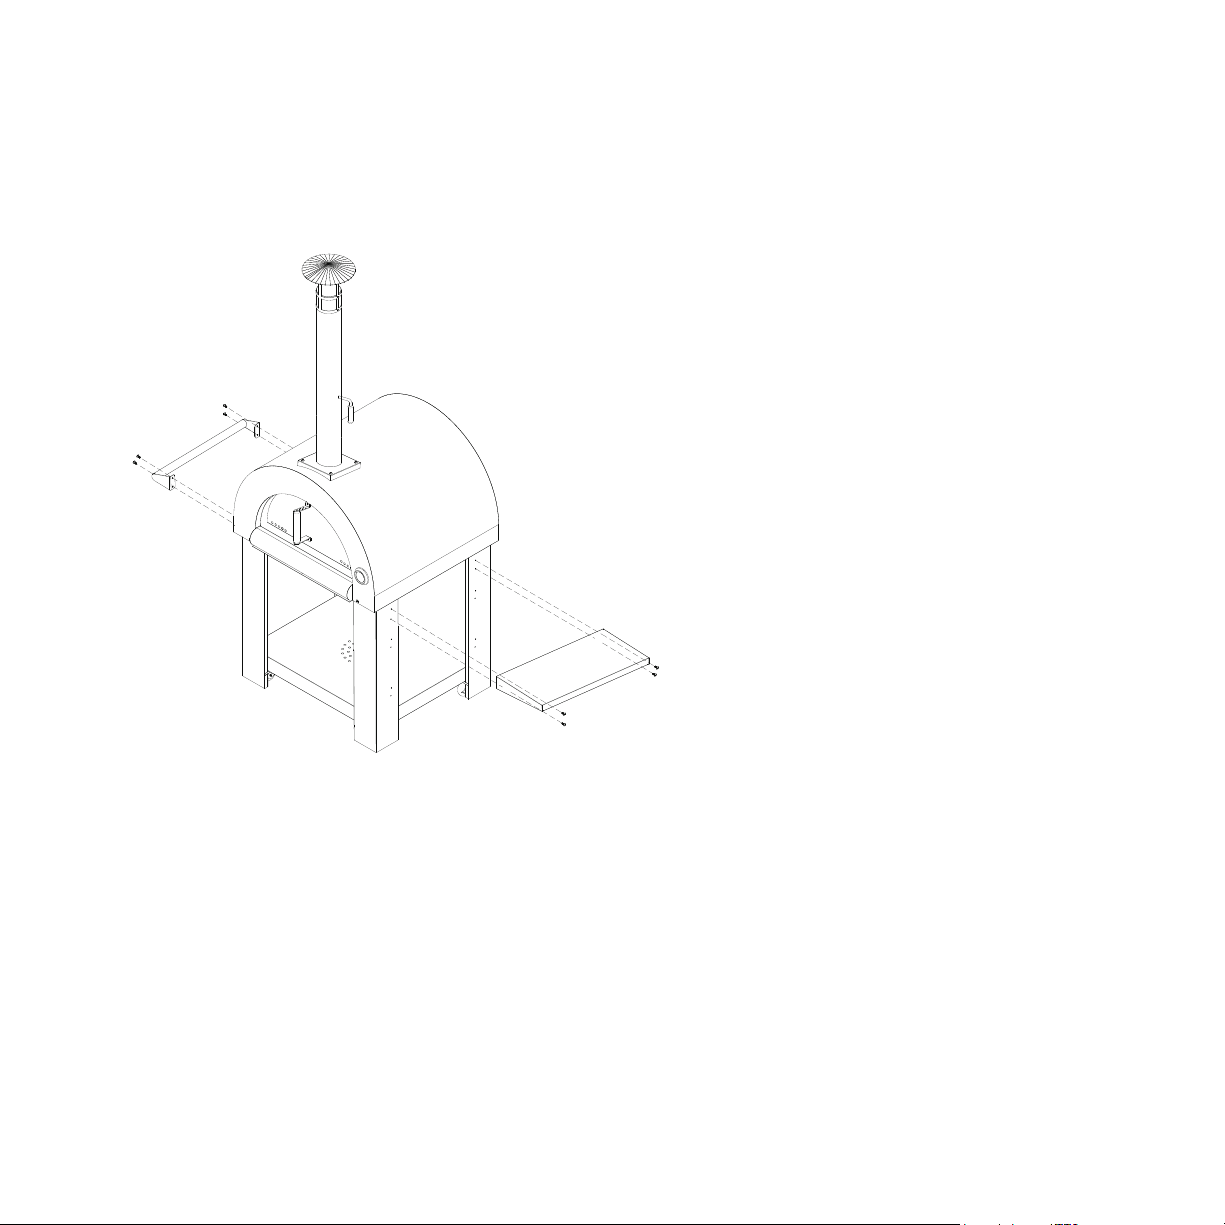
Assembly for
Pizza oven with side panel
Installed handle and side table as sho wed.
*Both left and right side can mount side table.

Getting started
CarefullyunpackyourWood-fired
Outdoor Oven, it’s not too heavy,
but use two people to lift it out of
the box. Be sure to place the
Outdoor Oven on a noncom-
bustible stand, such as the Kitchen
Wood box/Stand kit with gran i te top.
Remove all the protective film and
discard. Assemble the pizza o ven
according to the instruction. Hint:
Season the Outdoor Oven prior to
use. Bur n two or more times, allow
the thermometer to reach 650 °F
and l et the fire die out.
The art and science of
wood-fired cooking
Cooking in your Outdoor Oven is
much like using the oven in your
home. You will quickly learn how to
regulate t he temperature, use
different woods for flavor, and be
amazed at how good the food tastes.
Anyone can bake delicious pizza and
bread, roast meat and vegetables,
grill fish and seafood, and create
mouthwatering desserts.
The Cooking Stone and Dome of your
Outdoor Oven give off radiant heat
from all sides, creating a natural
convection t
hat bakes everything to
perfection, while the fire on the side
brings out a unique crisp and smoky
taste. Any variety of oven-safe metal,
ceramic or glass pan can be used to
cook in your Outdoor Oven.
Warning: Keep ovenware away
from flame and don’t use in
temperatures over 650°F. Always
read and follow ovenwar e
manufacturers usage instructions.
Choosing your wood
Use only dry hardwood such as oak
and beech. Avoid resinous wood such
as pine or spruce. Never use t reated
lumber.
Below is some information on
different hardwoods most common
in outd oor coo king. Hint: if the
wood produces a lot of black
smoke, it is generally an indicatio n
you are us i ng the wrong type of
wood.
Firing up your oven
Your Outdoor Oven will bring years
of enjoyment and countless delicious
dishes once you have mastered the
art of building and maintaining a fire
that creates an evenly distributed,
high-temperature Cooking Stone.
Hint: Invest in a laser thermometer
to show you the exact temp inside
your Outdoor Oven.
Start the fire in the Outdoor Oven
approximately one hour before
cooking. Split wo od into small
pieces about 10" long by 1/2 " thick.
Themaximum loading is3.5KG.Using
kindling and news
paper, start a
match lit fire in the center of the
Cooking Stone. Contin ue to feed
the fire with two or thr ee larger
pieces until it becomes well
established. At this point, put the
fire to the left side of the Outdoor
Oven us i ng the Ash Sweep. Hint: it
doesn
’
t take much wood to bring
the Oven to 650
°
F on the
thermometer.
Close the Outdoor Oven door, vented
enough to keep the flame burning,
and continue to add wood as needed.
The flame will reach the top of the
dome and curve around to the other
side; this is normal, just make sure the
flames don’t come out of the Outdoor
Oven opening. The goal is for th
e
Cooking Stone and Dome to absorb
the heat.
Once the thermometer reaches
between 620°F-650°F you are ready
to start cooking.

Get cooking
High Temperature Cooking: When the Oven Stone is between 620°F-650°F,you are at a perfect temperatur e
to cook pizza. Pizzas are placed with the 11.5" Square Peel on the Cooking Stone and take less than 3
minutes. Reme mber to ro tate the pizza, with the 8.5" Round Peel, to ensure even coo king. Hint: A great trick
to check if your pizza crust is fully baked, is to lift your pizza (while cooking) with the 8.5" Round Pee l . If the
pizza fo l ds over the sides of the peel, the cru
st i s not fully coo ked.
Medium Temperature Cooking: When the Cooking Stone is between 450°F-600°F, you are at a good temperature
to roast meat, vegetables, fish and seafood.
Depending on the dish, you may want to cover it initially to allow it to cook fully before removing the cover for
browning. You w ill also want to rotate the pans and roasts, alternating the side facing the fire.
Low Temperature Cooking: When the Cooking Stone is between 325
°
F-425
°
F, you are at a good temper
ature
for baking breads, pies and desserts. Generally this is easiest to do after all of your cooking is complete, and by
removing all the embers from the Outdoor Oven. Keep in mind that the Outdoor Oven will have to be pre- heated
well in order to retain e no ugh heat for cooking without fire. So make sure the Cooking Stone is 500°F or higher for
at least 15 minutes before removing all the embers.
H
int: Always wear barbecue mitts when cooking or adjusting t he vents as well as w hen using a chimney starter.
When preparing food, adjusting the vents, placing wood and using the thermometer or lid always wear
barbecue mitts. Please use grill gloves(heat protected), the grill gloves must be in accordance with the
directive 89/686/EEC(for example: performance level 2 for resistant for contact heat,( in accordance to DIN EN
407))
Cleaning the oven
Once the Outdoor Oven is cold, use t he 11.5" Square Peel and the Ash Sweep to brush the Cooking Stone to
remove all th
e ash and debris. Never extinguish the fire with water. Never use chemical cleaners. If you wish to
clean the surface of your Cooking Stone, a damp cloth works best.
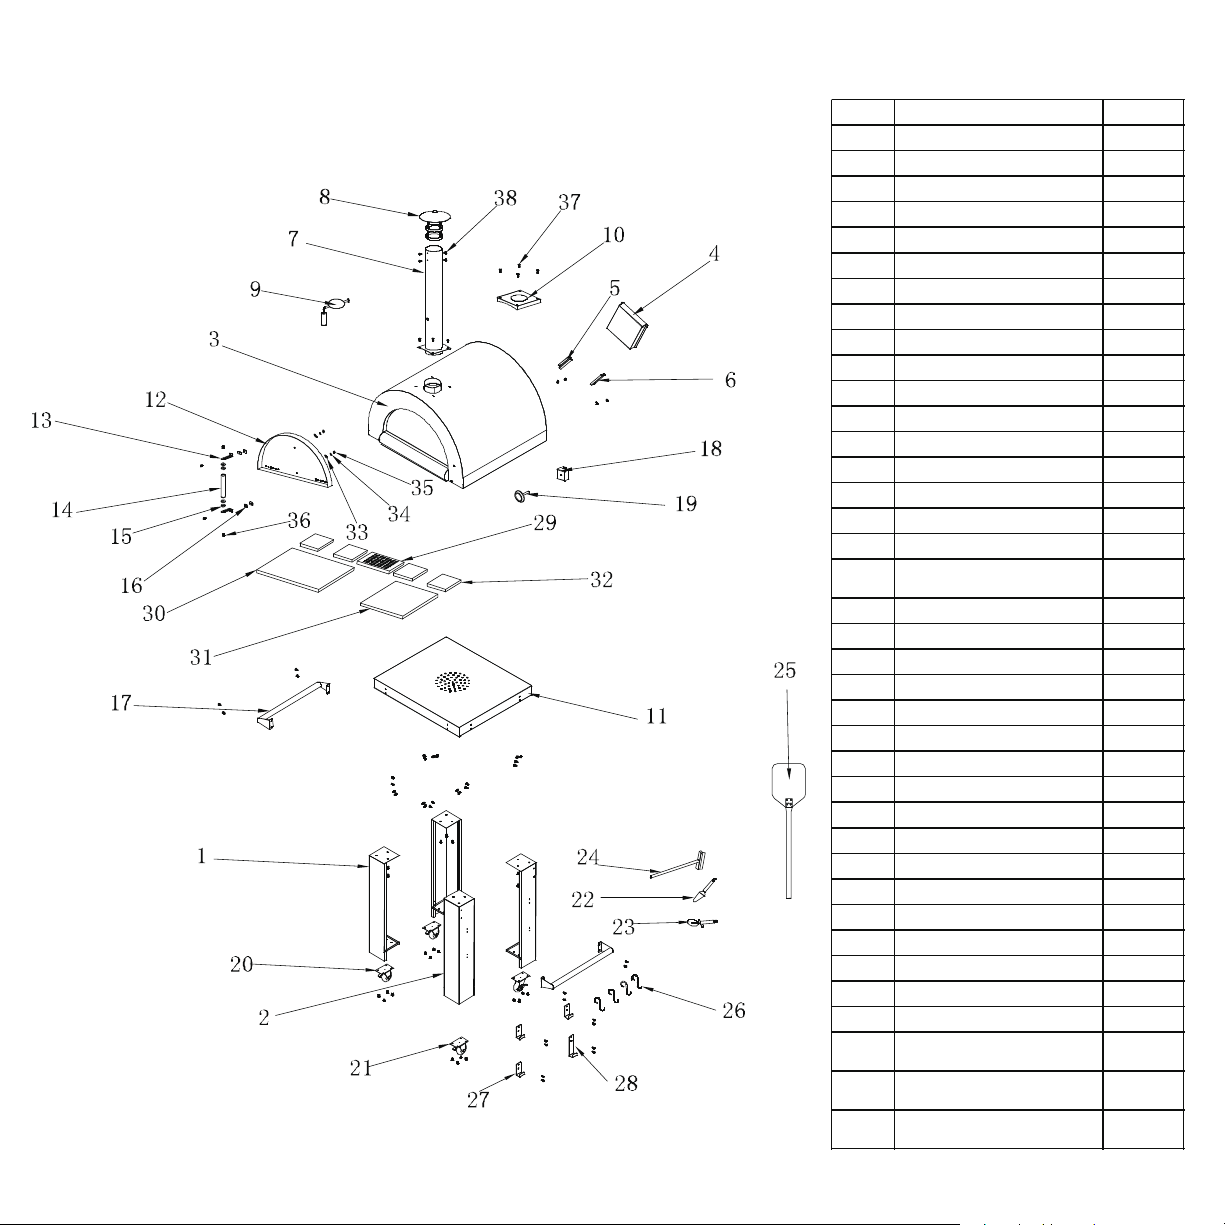
Model:EMPV-PG01 EMPV-PG06
Explosive view and parts list
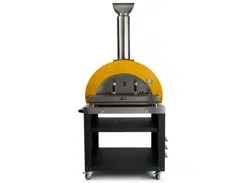
For Model Pizza Oven/Painted Pizza Oven
No. Part name Qty /Set
1 Lef t leg assembly
2 Right leg assembly
3 Furnace components
4 Oil receiv ing box assembly
5 Oil pan f eet 1
6 Oil pan f eet 2
7 Chimney assembly
8 Chimney top assembly
9 Throttle handle
10 Chimney decorativ e panel
11 Strengthen the bottom plate
12 Door panel assembly
13 Handle mounting piece
14 Door handle
15 Mica sheet 1
16 Mica sheet 2
17 Handle assembly
18
Temperature control meter
bracket
19 thermometer
20 Directional wheel
21 Activ ities with brake wheels
22 Pizza Shov el
23 Pizza round knif e
24 Pizza Sweeper
25 Big shov el
26 S penalty hook
27 Hook I
28 Hook 2
29 Net cov er
30 Cordierite Ref ractory Brick I
31 Cordierite ref ractory brick 2
32 Cordierite ref ractory brick 3
33 1/4" f lat washer
34 1/4" spring pad
35 1/4" hex nut
36
Cross big f lat head machine
wire 1/4"*15MM
37
Cross big f lat head machine
wire 1/4"*35MM
38
Cross big f lat head machine
wire 5/32*10MM
2
2
2
4
4
2
2
2
4
3
4
2
2
2
52
4
4
1
1
1
1
1
1
1
1
1
1
1
1
1
1
1
1
1
1
1
1
l
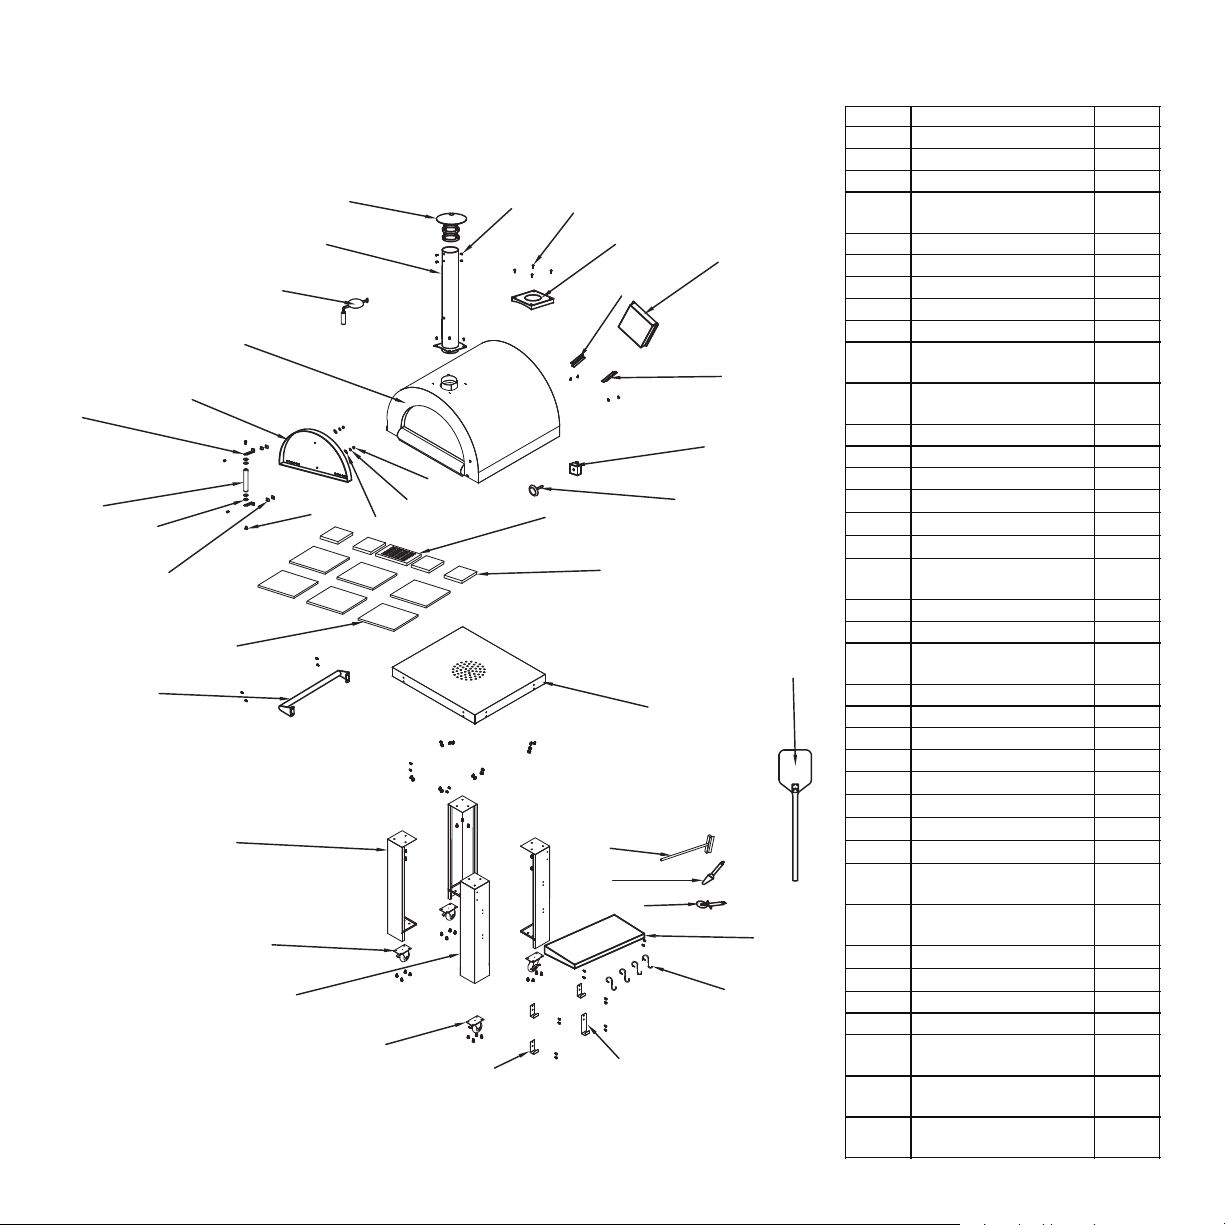
Model:EMPV-PG05
For Pizza oven with side panel
7
3
1
2
1
4
1
7
1
2
2
1
2
7
2
6
1
1
2
0
4
6
5
8
9
1
0
1
3
1
8
1
9
2
2
2
3
2
4
2
5
2
8
2
9
3
0
3
1
1
5
1
6
3
3
3
4
3
5
3
6
3
7
3
8
3
2
No.
Part name
QTY/Set
1 Left leg assembly 2
2 Right leg assembly 2
3 Furnace components 1
4
Oil receiving box
assembly
1
5 Oil pan feet 1
6 Oil pan feet 1
7 Chimney assembly 1
8 Chimney top assembly 1
9 Air door handle 1
10
Chimney decorative
panel
1
11
Strengthen the bottom
plate
1
12 Door panel assembly 1
13 Handle mounting piece 2
14 Door handle 1
15 Mica sheet 1 4
16 Mica sheet 2 4
17 Handle assembly 1
18
Temperature control
meter bracket
1
19 thermometer 1
20 Directional wheel 2
21
Activities with brake
wheels
2
22 Pizza Shovel 1
23 Pizza round knife 1
24 Pizza Sweeper 1
25 Big shovel 1
26 S hook 4
27 Hook 1 3
28 Hook 2 1
29 Net cover 1
30
Cordierite refractory brick
2
6
31
Cordierite refractory brick
3
4
32 Side stage welding parts 1
33 1/4" flat washer 2
34 1/4" spring pad 2
35 1/4" hex nut 2
36
Cross large flat head
machine wire 1/4"*15MM
52
37
Cross large flat head
machine wire 1/4*35
4
38
Cross flat head screws
(5/32*10mm)
4
Accessories
Oven Toolkit
•
Large squared peel has a 9
”
x 11" head and a 30.5" reach.
•
Small, 2.6" dia. peel has stainless handle, stay-cool stainless grip with unique
sliding handle feature.
•
9.8 x 2" W oven brush has brass bristles, wood handle with a 30" reach.
•
4.7”*2.3” pizza-shovel have stainless handle with a 9.6” reach.
•
4pcs oĬooks to hanged on the small peel and pizza-shovel

warranty applies to products purchased and located in the United States.
Products purchased or located outside this area are excluded. The warranty
does not apply to damage resulting from abuse, accident, natural disaster,
loss of electrical power to the product for any reason, alteration, outdoor
use, improper installation, and improper operation, repair or service of the
product by anyone other than an authorized Empava, service agency or
representative.
Some states do not allow limitations on how long implied warranty lasts, so
the above limitation may not apply to your implied warranty.
All repair labor and cost of replacement parts found to be defective due to
material and workmanship. Service must be provided by a Empava
Authorized Service Agency during normal working hours.
1. Service to repair or replace consumable parts. Consumable parts are not
included in the warranty coverage.
2. Repairs to parts or systems resulting from unauthorized modifications made
to the appliance.
3. Expenses for travel and transportation for product service if your cooktop is
located in a remote area where service by an authorized Empava servicer is not
available.
1). Serial number that have been removed, altered or cannot be readily
determined;
2). Product that has been transferred from its original owner to another party or
outside the USA or Canada;
3). Rust on the interior or exterior of the unit;
4). Products purchased “as-is” are not covered by this warranty;
5). Products used in a commercial setting;
Warranty

Warranty
6). Service calls which do not involve malfunction or defects in materials or workmanship, or in accordance with the
provided instructions;
). Surcharges including, but not limited to, any after-hour, weekend, or holiday service calls, tolls, ferry trip charges, or mileage
expense for service calls to remote areas, including Hawaii, Alaska and Canada;
). Damages to the finish of appliance or home incurred during installation, including but not limited to floors,
cabinets, walls, etc.;
). Damages caused by: services performed by unauthorized service companies; use of parts other than genuine Empava parts or
parts obtained from persons other than authorized service companies; or external causes such as abuse, misuse, inadequate power
supply, accidents, fires,or acts of God;
The warranty applies to appliances purchased and used for personal, family or household purposes only. It does not cover appli-
ances used for commercial applications.
Should the appliance be sold by the original purchaser during the warranty period, warranty shall extend to the new owner until
the expiration date of the original purchaser warranty period.
Warranty and Product Registration
Empava is not responsible for incidental or consequential damages. Under no circumstances will Empava's liability exceed
the cost that you paid for the product. Some states do not allow the exclusion or limitation of incidental or consequential
damages, so the above limitations or exclusion may not apply to you.
This warranty gives you specific legal rights, and you may also have other rights that vary from state to state. Whenever
you call our customer service at 1-888-682-8882 (Empava cooktop) for technical information and parts sales in the
United States or to request service for your appliance, please have your complete model number
Note: You must provide proof of purchase and installation date for in-warranty service.
Online Warranty Registration
You can register to activate your product warranty online to receive full benefit of Empava warranty service at www.empa-
va.com
Please rest assured that under no conditions will Empava
sell your name or any of the information your provide to us. We are very
grateful that you have chosen Empava products for your home.