Loading ...
Loading ...
Loading ...
32
SERVICIO Y AJUSTES
ADVERTENCIA: Para evitar lesiónes serias,
antes de dar calquier servico o de hacer ajustes:
1. Suelte la barra de control y pare el motor.
2. Asegúrese que la cuchilla y que todas las
partes movibles se hayan detenido comple-
tamente.
3. Desconecte el alambre de la bujía y pón-
galo en donde no pueda entrar en contacto
con ésta.
SEGADORA
PARA AJUSTAR LA ALTURA DE CORTE
Vea “PARA AJUSTAR LA ALTURA DE CORTE”
en la sección de Operación de este manual.
DESVIADOR TRASERO
Se proporciona un desviador trasero, adjunto
entre las ruedas traseras de su segadora, para
reducir a un mínimo la posibilidad que objetos
sean lanzados hacia afuera de la parte trasera
de la segadora, en la posición en donde se
encuentra el operador. Si se daña el desviador
debe cambiarse.
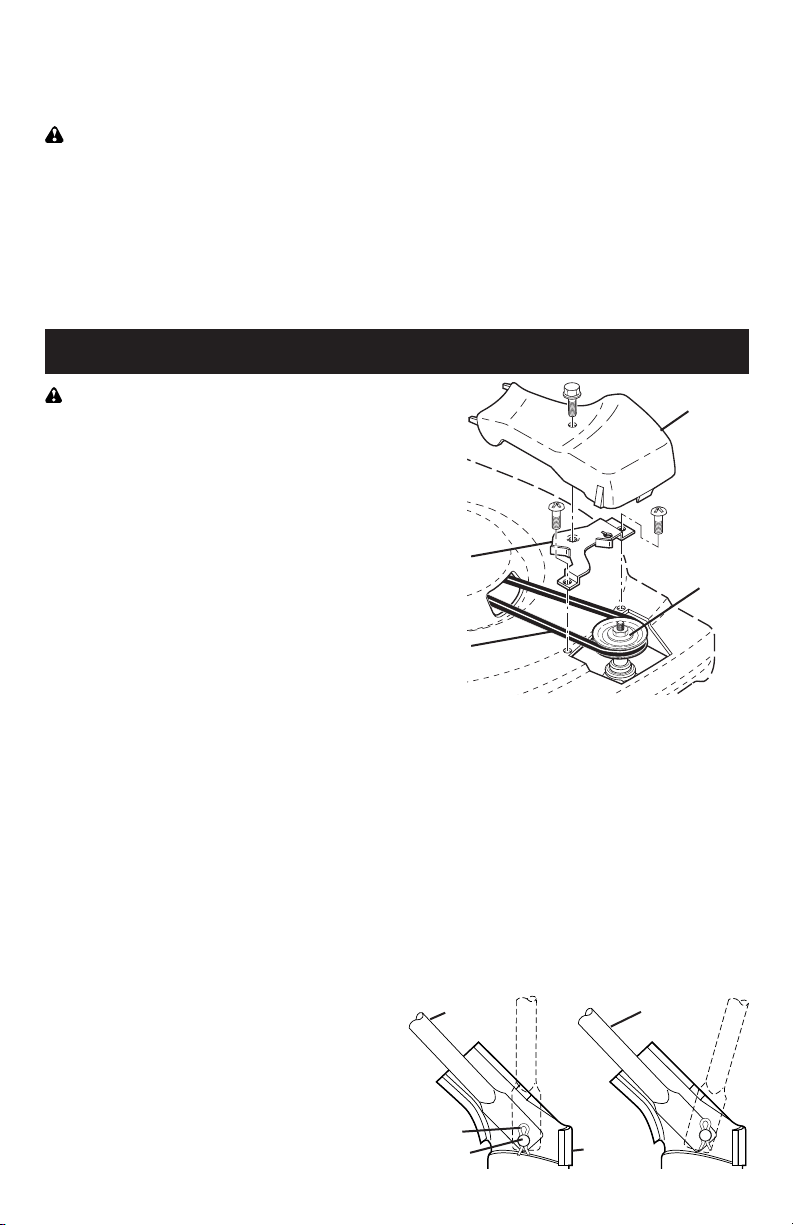
PARA REMOVER LA CORREA DE IMPULSIÓN
1. Remueva la cubierta de la impulsión y
fijador de la correa.
2. Remueva la correa empujando hacia abajo
en la polea de la caja de engranajes.
3. Haga descansar la segadora en su lado
con el filtro de aire y el carburador mirando
hacia arriba.
4. Remueva la cuchilla y la defensa en contra
del desperdicio.
5. Remueva la correa de la polea del motor en
el cigueñal.
PARA CAMBIAR LA CORREA DE IMPULSIÓN
1. Instale la correa nueva en la polea del motor.
2. Reinstale la defensa en contra del desperdi-
cio y la cuchilla.
3. Vuelva el cortacéspedes a la posición vertical.
4. Instale la correa nueva en la polea de la
caja de engranajes.
5. Reinstale la fijador de la correa y cubierta
de la impulsión.
NOTA: Siempre use la correa aprobada por la
fábrica para asegurarse que calce y dure.
Posición
para segar
Posición
para segar
POSICIÓN ALTAPOSICIÓN BAJA
Puntal
del mango
Clavija
de
horquilla
Clavija de
montaje
LIMPIEZA
IMPORTANTE: Para obtener el mejor rendimineto,
mantenga la caja de la segadora sin acumulacion
de cesped y basura. Limpie la parte de abajo de
su segadora despues de cada uso.
PRECAUCIÓN: Desconecte el alambre de
la bujía y póngalo en donde no pueda entrar en
contacto con ésta.
• Haga descansar la segadora en su lado.
Asegúrese que el filtro de aire y que el carbu-
rador queden mirando hacia arriba. Limpie la
parte inferior de su segadora raspándola para
remover la acumulación de césped y basura.
• Limpie el motor a menudo para evitar que
se acumule la basura. Un motor tapado fun-
ciona más caliente y se acorta su duración.
• Mantenga las superficies pulidas y las rue-
das sin gasolina, aceite, etc.
• No recomendamos el uso de una manguera
de jardín para limpiar la segadora a menos
que el sistema eléctrico, el silenciador, el
filtro de aire y el carburador estén tapados
para evitar que les entre el agua. El agua en
el motor puede acortar la duración de éste.
LIMPIE DEBAJO DE LA CUBIERTA DE LA
IMPULSIÓN
Limpie debajo de la cubierta de la impulsión por
lo menos dos veces cada temporada. Raspe de-
bajo de la cubierta con un cuchillo para masilla
o con una herramienta parecida, para remover
toda acumulación de césped o basura en la parte
inferior de la cubierta de la impulsión.
PARA AJUSTAR EL MANGO
El mango puede ser montado a una posición
alta o baja. Los agujeros de montaje en el
mango inferior están fuera del centro para
levantar y bajar el mango.
1. Remueva el mango superior y conexióne(s) el
asegurar él (los) cable(s) al mango inferior.
2. Remueva las clavijas de horquilla de la
clavija de montaje del puntal del mango.
3. Apreite el mango inferior hacia dentro para
removerlo de las clavijas de montaje.
4. Gire el mango inferior por encima para
levantar o bajar el mango.
5. Vuelva a montar las clavijas de horquilla por
encima de las clavijas de montaje.
6. Vuelva a montar el mango superior y todas
las partes removidas del mango inferior.
Correa
Cubierta de la
impulsion
EMPUJAR
HACIA
ABAJO
Fijador de
la correa
13
LAWN MOWER
Always observe safety rules when per-
form ing any main te nance.
TIRES
• Keep tires free of gasoline, oil, or insect
control chemi cals which can harm rubber.
• Avoid stumps, stones, deep ruts, sharp
objects and other hazards that may
cause tire damage.
DRIVE WHEELS
Check front drive wheels each time be fore
you mow to be sure they move freely.
The wheels not turning freely means trash,
grass cuttings, etc. are in the drive wheel area
and must be cleaned to free drive wheels.
If necessary to clean the drive wheels, be
sure to clean both front wheels.
1. Remove hubcaps, locknuts & washers.
2. Remove wheels from wheel ad just ers.
3. Remove any trash or grass cuttings
from inside the dust cover, pinion and/
or drive wheel gear teeth.
4. Put wheels back in place.
NOTE: If after cleaning, the drive wheels
do not turn freely, contact a Sears or other
qualified service center.
BLADE CARE
For best results, blade must be kept sharp.
Re place a bent or dam aged blade.
CAUTION: Use only a replacement blade
approved by the manufacturer of your mower.
Using a blade not approved by the manu-
facturer of your mower is hazardous, could
damage your mower and void your warranty.
TO REMOVE BLADE
1. Disconnect spark plug wire from spark
plug and place wire where it cannot
come in contact with plug.
2. Turn lawn mower on its side. Make
sure air filter and carburetor are up.
3. Use a wood block between blade and
mower hous ing to prevent blade from
turning when re mov ing blade bolt.
NOTE: Protect your hands with gloves
and/or wrap blade with heavy cloth.
4. Remove blade bolt by turning counter-
clockwise.
5. Remove blade & attaching hard ware
(bolt, lock wash er & hardened wash er).
TO REPLACE BLADE
1. Position blade on the blade adapter
aligning the two (2) holes in the blade
with the raised lugs on the adapter.
2. Be sure the trailing edge of blade (oppo-
site sharp edge) is up toward the engine.
3. Install the blade bolt with the lock
washer and hardened washer into
blade adapter and crankshaft.
4. Use block of wood between blade and
lawn mower housing and tighten the
blade bolt, turning clockwise.
• The recommended tightening torque is
35-40 ft. lbs.
IMPORTANT: Blade bolt is heat treated.
If bolt needs replacing, replace only with
approved bolt shown in the Repair Parts
section of this manual.
TO SHARPEN BLADE
NOTE: We do not recommend sharp en ing
the blade - but if you do, be sure the blade
is balanced. Care should be taken to keep
the blade balanced. An un bal anced blade will
cause eventual damage to mower or engine.
• The blade can be sharp ened with a file
or on a grinding wheel. Do not attempt
to sharpen while on the mower.
• To check blade balance, drive a nail into
a beam or wall. Leave about one inch of
the straight nail ex posed. Place center
hole of blade over the head of the nail.
If blade is balanced, it should remain in
a horizontal position. If either end of the
blade moves downward, sharpen the
heavy end until the blade is balanced.
GRASS CATCHER
• The grass catcher may be hosed with
water, but must be dry when used.
• Check your grass catcher often for dam-
age or de te ri o ra tion. Through normal
use it will wear. If catcher needs replac-
ing, replace only with ap proved replace-
ment catcher shown in the Repair Parts
section of this manual. Give the lawn
mower model number when ordering.
GEAR CASE
• To keep your drive system working
properly, the gear case and area around
the drive should be kept clean and free
of trash build-up. Clean under the drive
cover twice a season.
• The gear case is filled with lubricant to the
proper level at the factory. The only time
the lubricant needs attention is if service
has been performed on the gear case.
• If lubricant is required, use only Elf Mul-
tis EP00. Do not substitute.
Blade
bolt
Crankshaft
keyway
Hardened
washer
Lockwasher
Blade adapter Key
Blade
Trailing edge
Crankshaft
Loading ...
Loading ...
Loading ...