READ AND SAVE THESE iNSTRUCTiONS
Operator's Manual
®
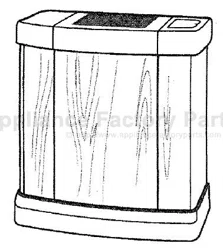
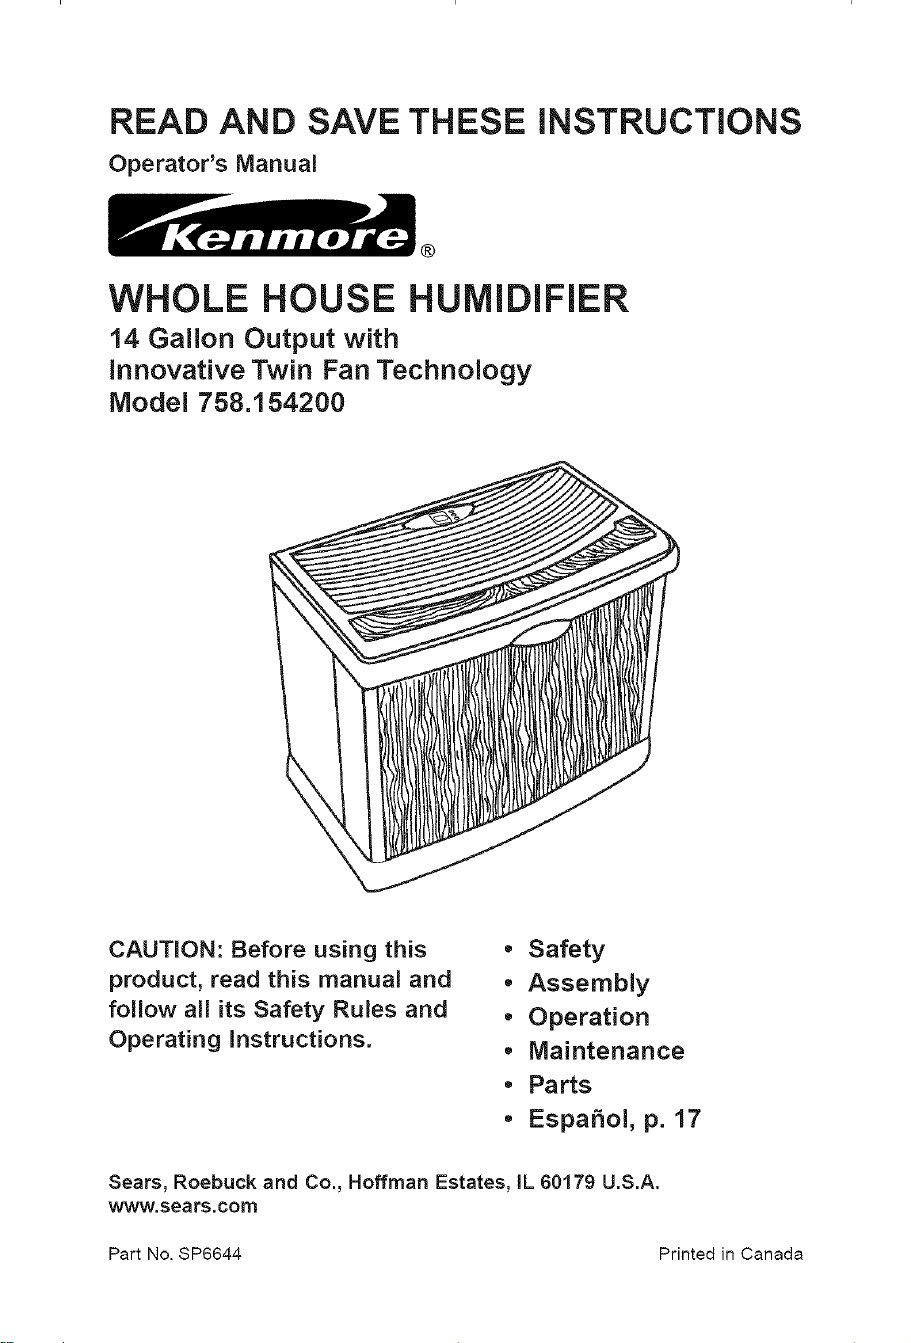
WHOLE HOUSE HUMIDIFIER
14 Gallon Output with
innovative Twin Fan Technology
Model 758.154200
CAUTION: Before using this
product, read this manual and
follow all its Safety Rules and
Operating instructions.
• Safety
• Assembly
• Operation
• Maintenance
• Parts
• EspaSol, p. 17
Sears, Roebuck and Co., Hoffman Estates, IL 60179 U.S.A.
www.sears.com
Part No. $P6644 Printed in Canada
_!_ONEYEAR FULL WARRANTY ON KENMORE HUMIDIFIER "_!
if any part of this humidifier fails due to a defect in material or workmanship
within one year from the date of purchase, or if the humidifier motor fails due
to a defect in material or workmanship during the second year from the date
of purchase, RETURN THE HUMIDIFIER TO THE NEAREST SEARS PARTS &
REPAIR CENTER, and it will be repaired free of charge. This warranty does not
include humidifier filters, which are expendable parts that can wear out from
normal use in less than one year.This warranty gives you specific legal rights,
and you may also have other rights which vary from state to state.
Sears, Roebuck and Co., Dept. 817WA, Hoffman Estates, IL 60179
GENERAL SAFETY
Safety Signal Words 4.
DANGER: means if the safety information 5.
is not followed someone will be seriously
injured or killed. 6.
WARNING: means if the safety
information is not followed someone
could be seriously injured or killed. 7.
CAUTION: means if the safety
information is not followed someone may 8.
be injured.
1. To reduce the risk of fire or shock
hazard, plug humidifier directly into a
120V, A.C. electrical outlet. Do not use
extension cords.
2. Keep the electric cord out of traffic
areas. To reduce the risk of fire
hazard, never put the electric cord
under rugs, near heat registers,
radiators, stoves or heaters.
3. Always unplug the humidifier before
moving it, before cleaning, or
whenever the humidifier is not in
service.
INSTRUCTIONS
Keep the humidifier clean.
Do not put foreign objects inside the
humidifier.
Do not allow to be used as a toy.
Close attention is necessary when
used by or near children.
Never use your humidifier while any
part is missing or damaged in any
manner.
To reduce the risk of electrical
hazard or damage to humidifier, do
not tilt, jolt or tip humidifier while unit
is running.
9. To reduce the risk of damage to
humidifier, unplug when not in use.
10. To reduce the risk of accidental
electrical shock, do not touch the
cord or controls with wet hands.
11. Note the warning label shown below.
WARNING: To reduce risk of fire,
electric shock, or injury always unplug
before servicing or cleaning.
Table of Contents
Warranty Information ............................... 2
General Safety Instructions ..................... 2
To Save A Service Call ........................... 3
Know Your Humidifier .............................. 3
How Your Humidifier Works ..................... 4
Assembly ................................................. 4
Location Instructions .............................. 5
Operating Tips for Best Performance ...... 5
Electrical Hook-Up .................................. 6
Water Fill .............................................. 6-7
Operating Humidifier Controls ............ 8-9
Using Your Humidifier ......................... 9-10
Replacement and Care of Filters.....11-12
Cleaning and Maintenance .............. 12-13
Troubleshooting .................................... 14
Repair Parts ..................................... 15-16
To Save A Service Call
Check the following if your humidifier is
not operating.
1. Is power cord attached to outlet?
2. Is there electrical power to outlet?
3. Is airflow control in operating position?
4. Is humidity control set high enough?
5. Is the cabinet sitting on a level
surface?
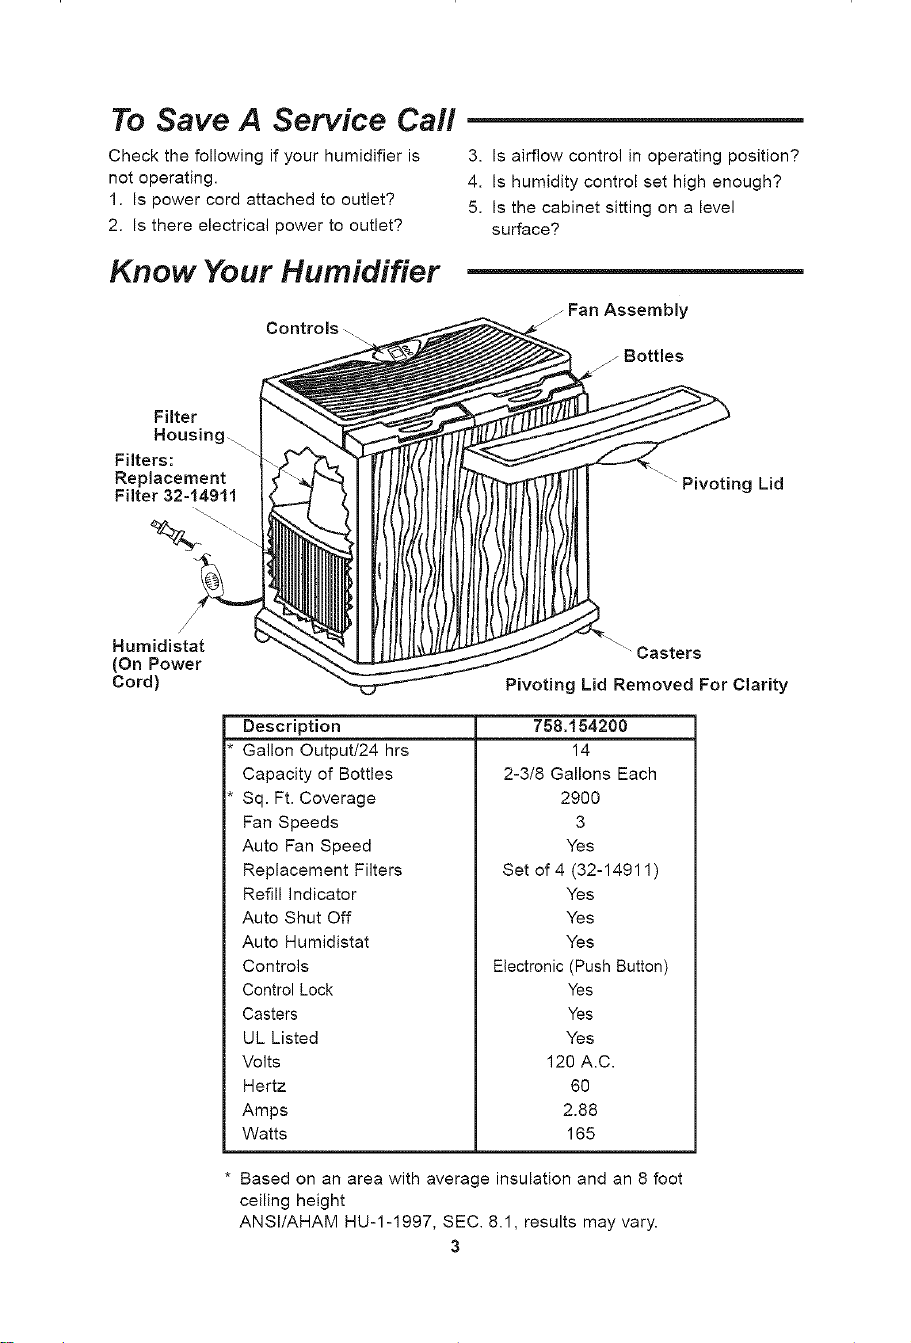
Know Your Humidifier
Controls
zj Fan Assembly
Filter
Housing..
Filters:
Replacement
Filter 32=14911
4z__ _\--..
" Pivoting Lid
Humidistat
(On Power
Cord)
Description
Gallon Output/24 hrs
Capacity of Bottles
Sq. Ft. Coverage
Fan Speeds
Auto Fan Speed
Replacement Filters
Refill Indicator
Auto Shut Off
Auto Humidistat
Controls
Casters
Pivoting Lid Removed For Clarity
758.154200
14
2-3/8 Gallons Each
2900
3
Yes
Set of 4 (32-14911)
Yes
Yes
Yes
Electronic (Push Button)
Control Lock
Casters
UL Listed
Volts
Hertz
Amps
Watts
Yes
Yes
Yes
120 A.C.
6O
2.88
165
Based on an area with average insulation and an 8 foot
ceiling height
ANSI/AHAM HU-1-1997, SEC. 8.1, results may vary.
3
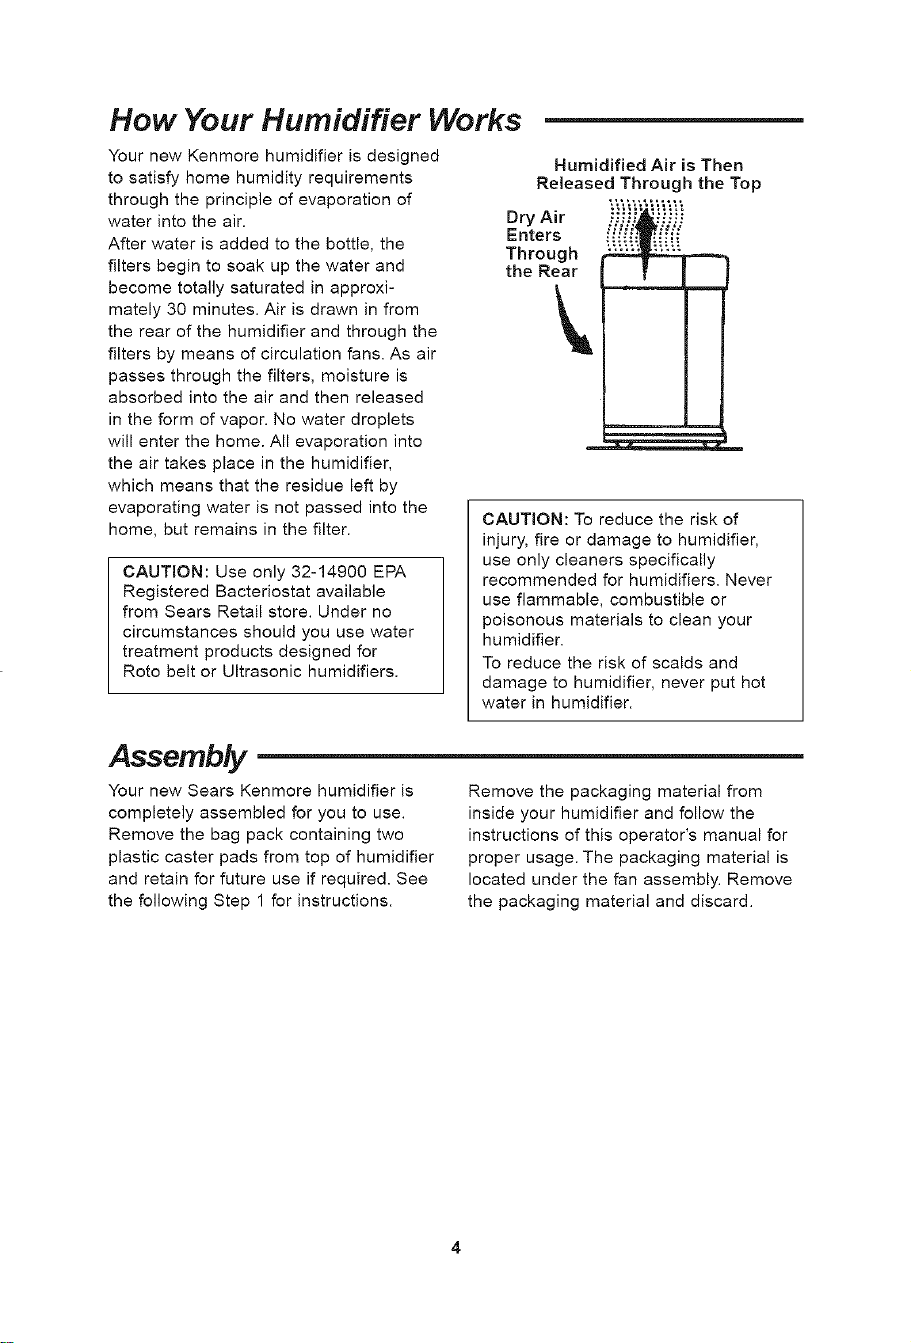
How Your Humidifier Works
Your new Kenmore humidifier is designed
to satisfy home humidity requirements
through the principle of evaporation of
water into the air.
After water is added to the bottle, the
filters begin to soak up the water and
become totally saturated in approxi-
mately 30 minutes. Air is drawn in from
the rear of the humidifier and through the
filters by means of circulation fans. As air
passes through the filters, moisture is
absorbed into the air and then released
in the form of vapor. No water droplets
will enter the home. All evaporation into
the air takes place in the humidifier,
which means that the residue left by
evaporating water is not passed into the
home, but remains in the filter.
CAUTION: Use only 32-14900 EPA
Registered Bacteriostat available
from Sears Retail store. Under no
circumstances should you use water
treatment products designed for
Roto belt or Ultrasonic humidifiers.
Humidified Air is Then
Released Through the Top
Dry Air _.."_ii"'_i_ii
Enters
Through
the Rear
CAUTION: To reduce the risk of
injury, fire or damage to humidifier,
use only cleaners specifically
recommended for humidifiers. Never
use flammable, combustible or
poisonous materials to clean your
humidifier.
To reduce the risk of scalds and
damage to humidifier, never put hot
water in humidifier.
Assembly
Your new Sears Kenmore humidifier is
completely assembled for you to use.
Remove the bag pack containing two
plastic caster pads from top of humidifier
and retain for future use if required. See
the following Step 1 for instructions.
Remove the packaging material from
inside your humidifier and follow the
instructions of this operator's manual for
proper usage. The packaging material is
located under the fan assembly. Remove
the packaging material and discard.
Location Instructions
WARNING: For your own safety, do
not use humidifier if any parts are
damaged or missing.
Step 1:
Place humidifier on a flat level surface in
an area of your house where humidity is
needed most, or in an area which would
likely result in moist air being circulated
throughout the house, such as near a
cold air return.
Placing the unit level is very important if
the humidifier is located on carpeting.
NOTE: The 14 gallon humidifier contains
water bottles. The weight of the bottles in
the front of the cabinet may cause the
front casters to sink deeper into the
carpet. If this happens, the water level
will be higher towards the front of the
humidifier, and lower towards the back.
The water level float (located at the rear
of the cabinet) may not sense the water
so the flashing "F" will be displayed and
the unit will not energize. If this happens,
the unit will need to be leveled in order
for the humidifier to be energized. To level
the humidifier when located on carpet,
place the included caster pads under the
front two casters of the humidifier only.
NOTE: Due to release of cool, moist air
from humidifier, it is best to direct air
away from home thermostat and hot air
registers. It is best to position humidifier
next to an inside wall. Hot air registers
and cold air from outside walls can affect
the efficiencies of the controls. Unit
should not be placed where warm air
from a hot air register blows directly on
unit.
Moist air (humidity) produced will
disperse into the whole house, but area
closest to the unit will have the highest
humidity. If the unit is positioned close to
a window, condensation may form on the
window pane. If this is not appropriate
the unit should be repositioned in another
location.
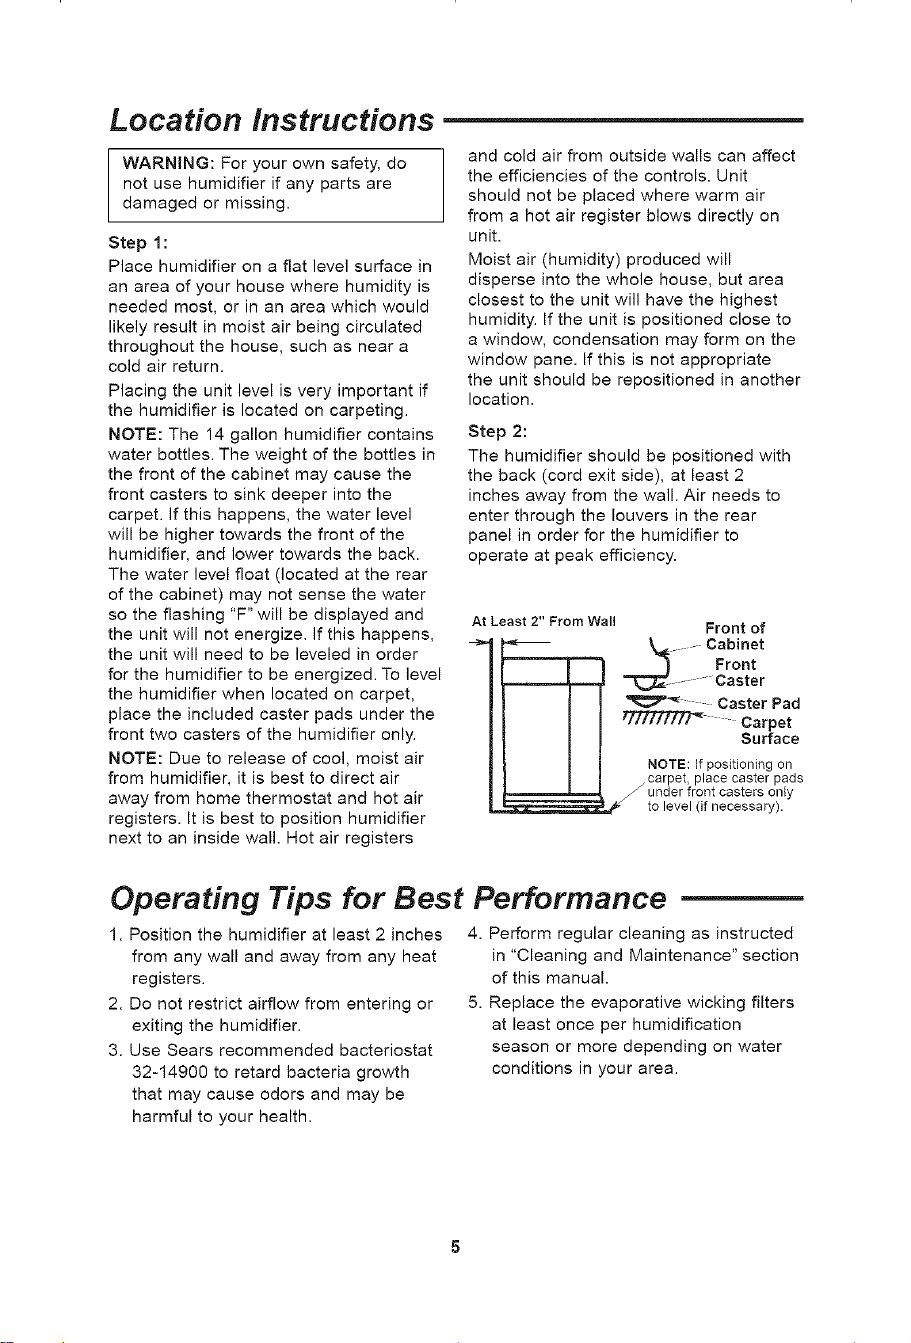
Step 2:
The humidifier should be positioned with
the back (cord exit side), at least 2
inches away from the wall. Air needs to
enter through the louvers in the rear
panel in order for the humidifier to
operate at peak efficiency.
At Least 2" From Wall
Front of
._ ....... Cabinet
Front
...... -Caster
Caster Pad
tffffffZTf_ Carpet
Surface
NOTE: If positioning on
_ carpet, place caster pads
under front casters only
to level (if necessary).
Operating Tips for Best Performance
1. Position the humidifier at least 2 inches
from any wall and away from any heat
registers.
2. Do not restrict airflow from entering or
exiting the humidifier.
3. Use Sears recommended bacteriostat
32-14900 to retard bacteria growth
that may cause odors and may be
harmful to your health.
4. Perform regular cleaning as instructed
in "Cleaning and Maintenance" section
of this manual.
5. Replace the evaporative wicking filters
at least once per humidification
season or more depending on water
conditions in your area.
Electrical Hook-Up
Locate nearest 120V A.C. wall socket in
the location desired, preferably on inside
wall. With the humidifier in the desired
location, route the electrical cord safely
so no one will trip or upset the humidifier.
Plug in the electrical cord.
WARNING: To reduce the risk of fire
or shock hazard, humidifier should
be plugged into a 120V A.C. outlet.
Do not use extension cords.
To reduce the risk of electrical shock, this
humidifier has a polarized plug (one
blade is wider than the other). This plug
will fit in a polarized outlet only one way.
If the plug does not fit fully in the outlet,
reverse plug. If it still does not fit, contact
a qualified electrician to install the proper
outlet. Do not change the plug in any way.
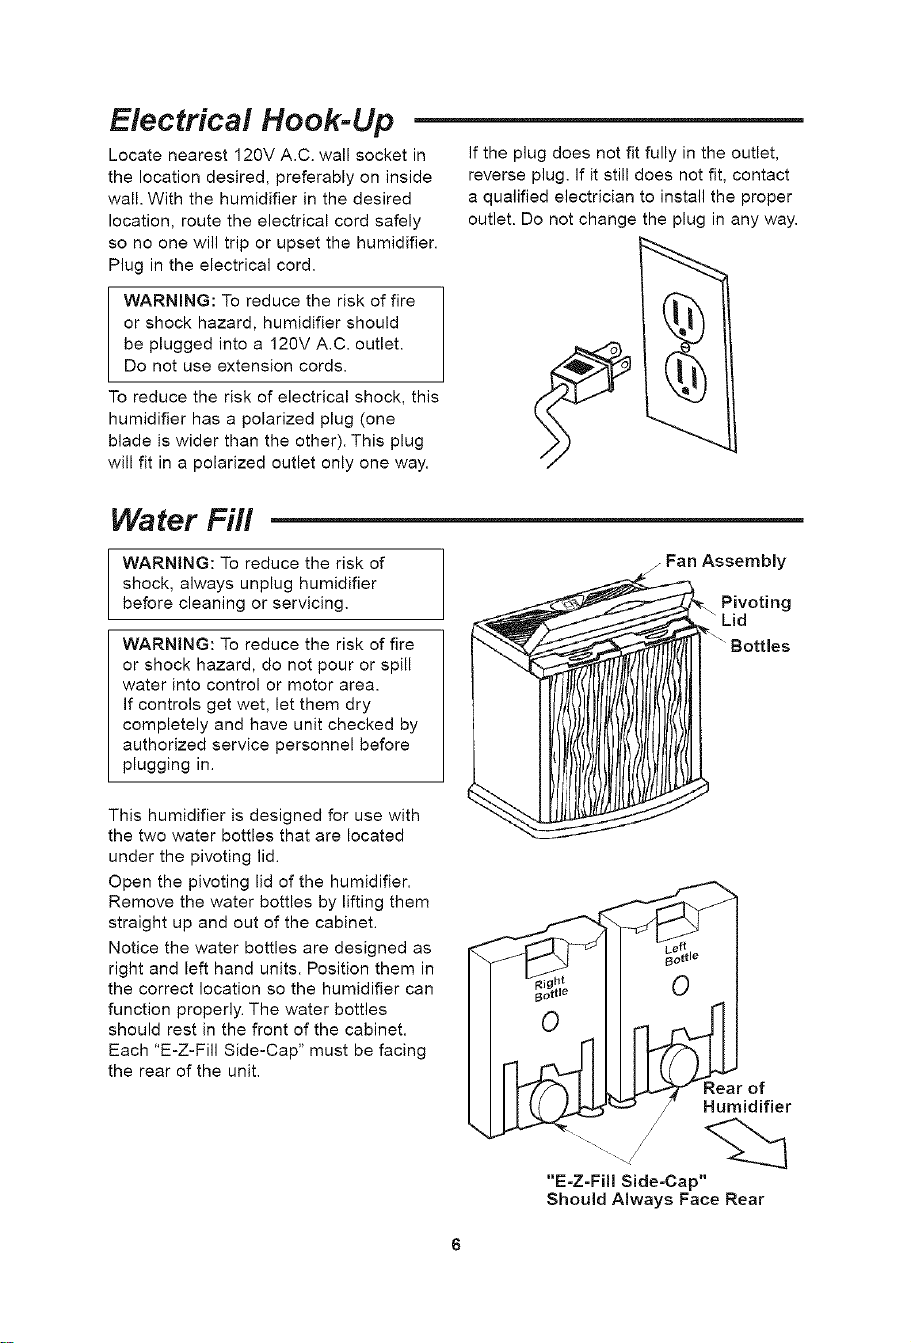
Water Fill
WARNING: To reduce the risk of
shock, always unplug humidifier
before cleaning or servicing.
WARNING: To reduce the risk of fire
or shock hazard, do not pour or spill
water into control or motor area.
If controls get wet, let them dry
completely and have unit checked by
authorized service personnel before
plugging in.
This humidifier is designed for use with
the two water bottles that are located
under the pivoting lid.
Open the pivoting lid of the humidifier.
Remove the water bottles by lifting them
straight up and out of the cabinet.
Notice the water bottles are designed as
right and left hand units. Position them in
the correct location so the humidifier can
function properly. The water bottles
should rest in the front of the cabinet.
Each "E-Z-Fill Side-Cap" must be facing
the rear of the unit.
/ Fan Assembly
. Pivoting
Lid
"E-Z=Fi!l Side-Cap"
Should Always Face Rear
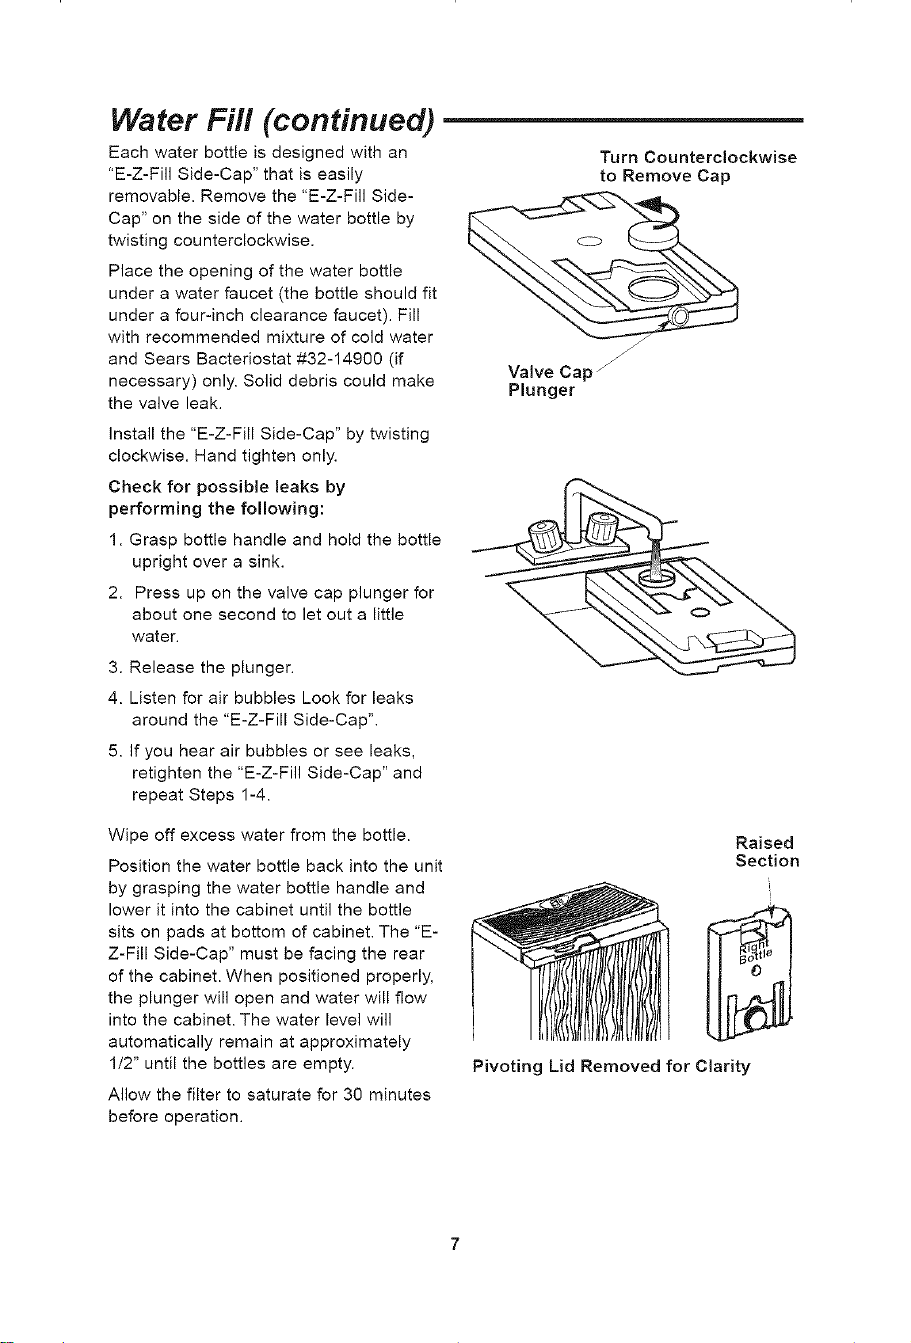
Water Fill (continued)
Each water bottle is designed with an
"E-Z-Fill Side-Cap" that is easily
removable. Remove the "E-Z-Fill Side-
Cap" on the side of the water bottle by
twisting counterclockwise.
Place the opening of the water bottle
under a water faucet (the bottle should fit
under a four-inch clearance faucet). Fill
with recommended mixture of cold water
and Sears Bacteriostat #32-14900 (if
necessary) only. Solid debris could make
the valve leak.
Turn Counterclockwise
to Remove Cap
Install the "E-Z-Fill Side-Cap" by twisting
clockwise. Hand tighten only.
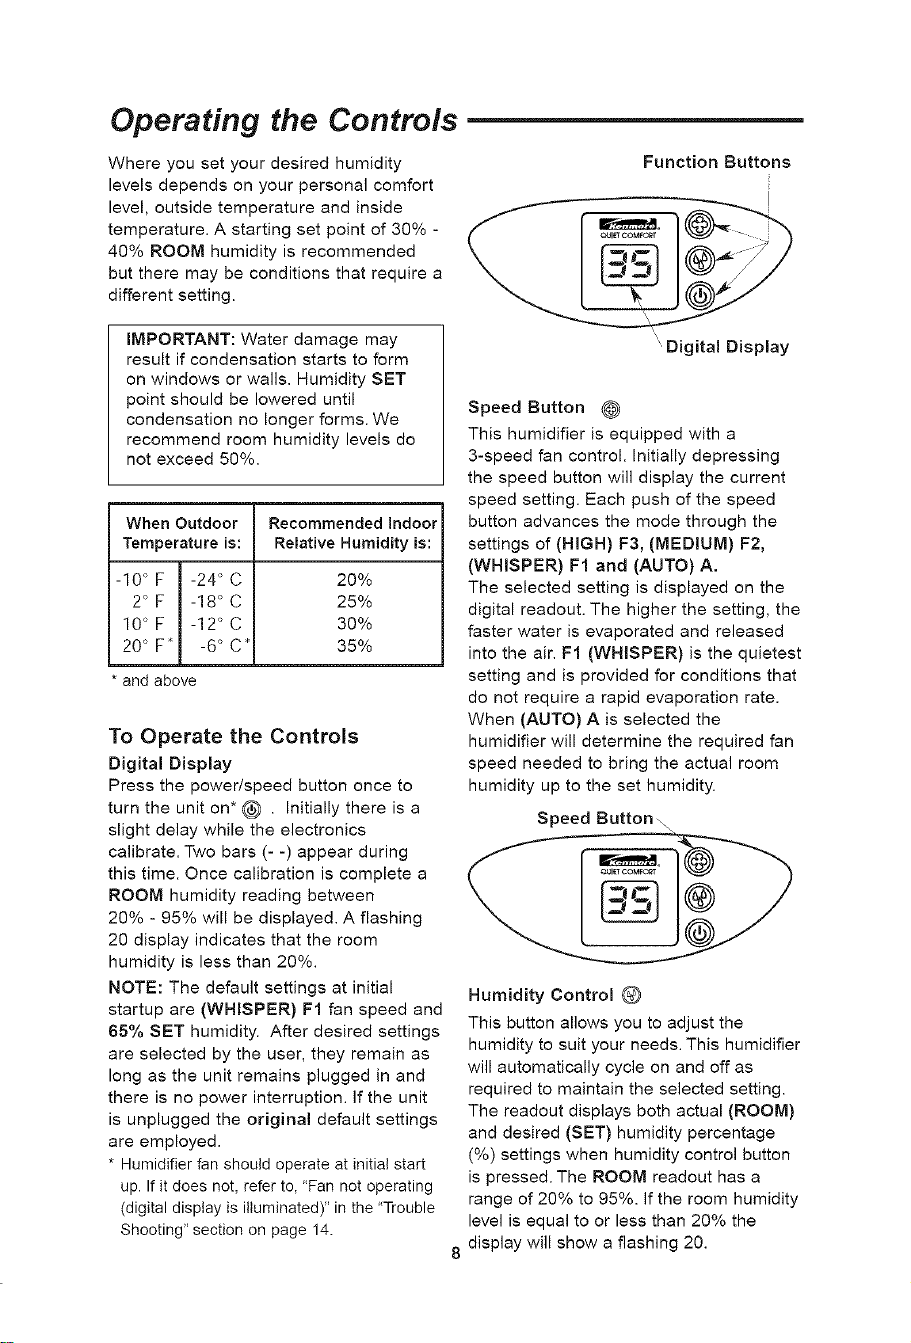
Check for possible leaks by
performing the following:
1. Grasp bottle handle and hold the bottle
upright over a sink.
2. Press up on the valve cap plunger for
about one second to let out a little
water.
3. Release the plunger.
4. Listen for air bubbles Look for leaks
around the "E-Z-Fill Side-Cap".
5. If you hear air bubbles or see leaks,
retighten the "E-Z-Fill Side-Cap" and
repeat Steps 1-4.
Valve Cap _
Plunger
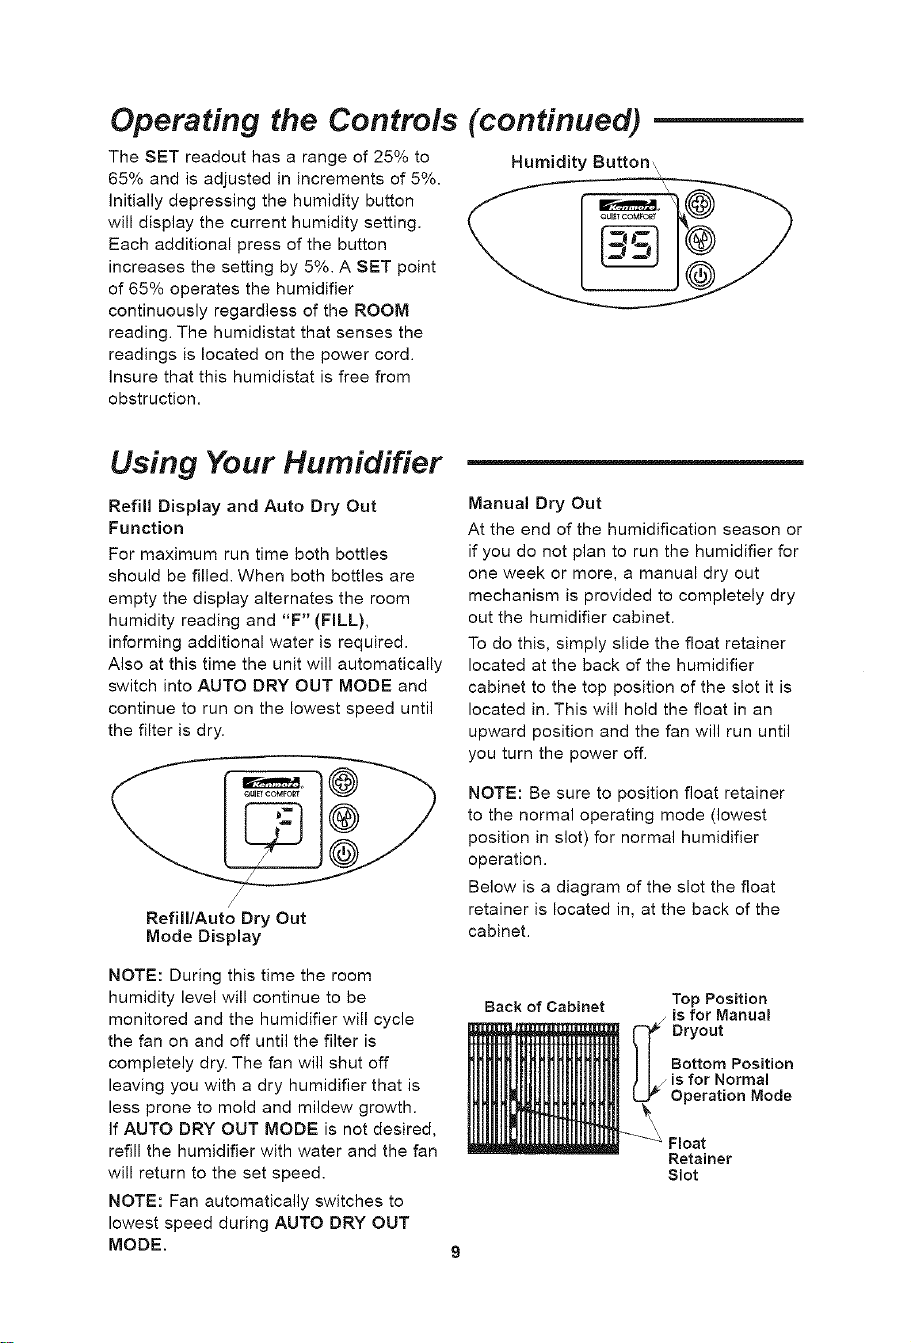
Wipe off excess water from the bottle.
Position the water bottle back into the unit
by grasping the water bottle handle and
lower it into the cabinet until the bottle
sits on pads at bottom of cabinet. The "E-
Z-Fill Side-Cap" must be facing the rear
of the cabinet. When positioned properly,
the plunger will open and water will flow
into the cabinet. The water level will
automatically remain at approximately
1/2" until the bottles are empty.
Allow the filter to saturate for 30 minutes
before operation.
Raised
Section
Pivoting Lid Removed for Clarity
Operating the Controls
Where you set your desired humidity
levels depends on your personal comfort
level, outside temperature and inside
temperature. A starting set point of 30% -
40% ROOM humidity is recommended
but there may be conditions that require a
different setting.
IMPORTANT: Water damage may
result if condensation starts to form
on windows or walls. Humidity SET
point should be lowered until
condensation no longer forms. We
recommend room humidity levels do
not exceed 50%.
When Outdoor Recommended Indoor
Temperature is: Relative Humidity is:
-10°F -24 °C 20%
2° F -18 ° C 25%
10° F -12 ° C 30%
20° F_ -6 ° C_ 35%
* and above
To Operate the Controls
Digital Display
Press the power/speed button once to
turn the unit on* _ . Initially there is a
slight delay while the electronics
calibrate. Two bars (- -) appear during
this time. Once calibration is complete a
ROOM humidity reading between
20% - 95% will be displayed. A flashing
20 display indicates that the room
humidity is less than 20%.
NOTE: The default settings at initial
startup are (WHISPER) FI fan speed and
65% SET humidity. After desired settings
are selected by the user, they remain as
long as the unit remains plugged in and
there is no power interruption. If the unit
is unplugged the original default settings
are employed.
* Humidifier fan should operate at initial start
up. If it does not, refer to, "Fan not operating
(digital display is illuminated)" in the "Trouble
Shooting" section on page 14.
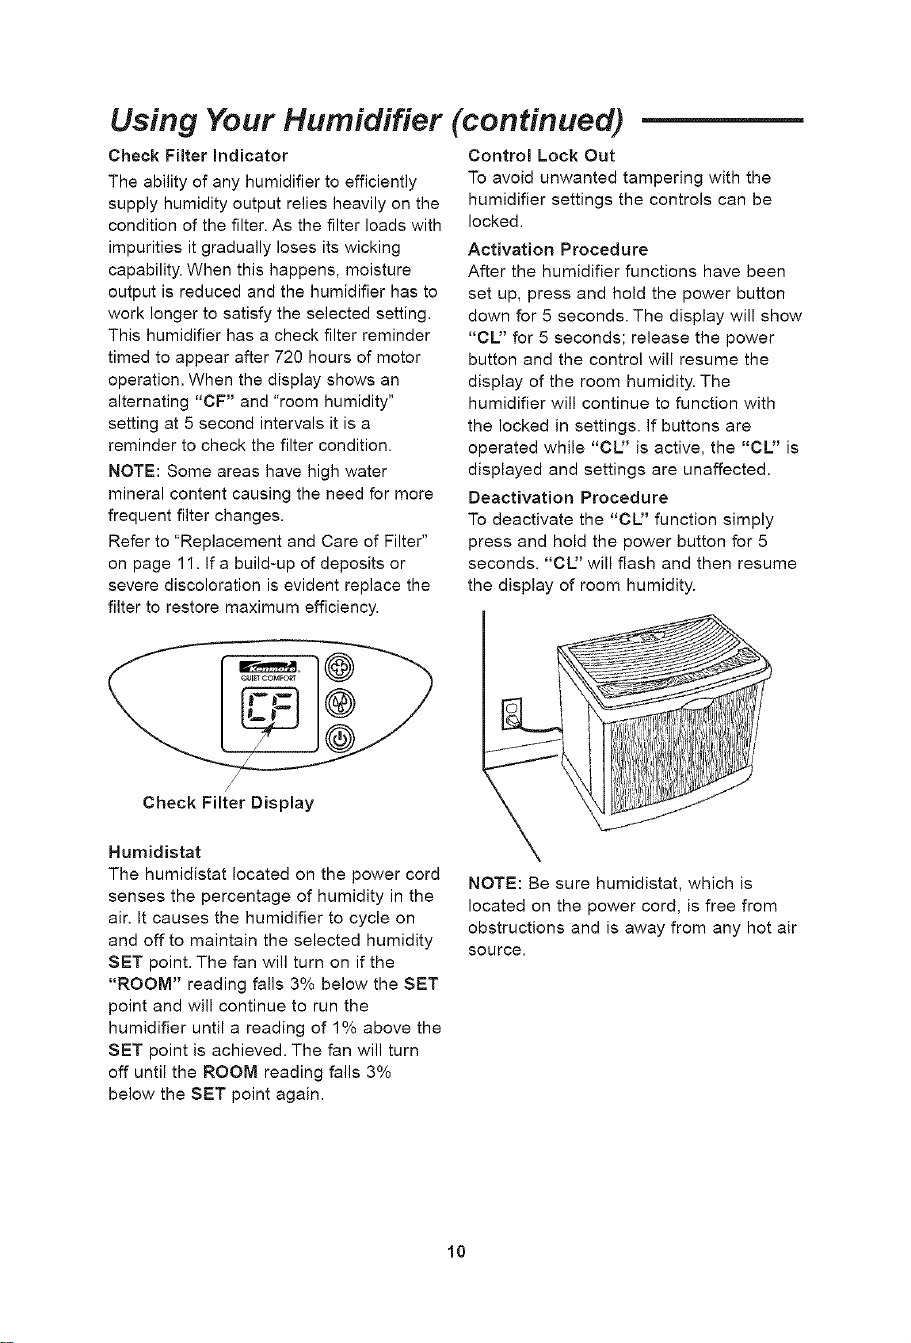
Function Buttons
' Digital Display
Speed Button @
This humidifier is equipped with a
3-speed fan control. Initially depressing
the speed button will display the current
speed setting. Each push of the speed
button advances the mode through the
settings of (HIGH) F3, (MEDIUM) F2,
(WHISPER) FI and (AUTO) A.
The selected setting is displayed on the
digital readout. The higher the setting, the
faster water is evaporated and released
into the air. FI (WHISPER) is the quietest
setting and is provided for conditions that
do not require a rapid evaporation rate.
When (AUTO) A is selected the
humidifier will determine the required fan
speed needed to bring the actual room
humidity up to the set humidity.
Speed Button\
\
Humidity Control O
This button allows you to adjust the
humidity to suit your needs. This humidifier
will automatically cycle on and off as
required to maintain the selected setting.
The readout displays both actual (ROOM)
and desired (SET) humidity percentage
(%) settings when humidity control button
is pressed. The ROOM readout has a
range of 20% to 95%. If the room humidity
level is equal to or less than 20% the
display will show a flashing 20.
Operating the Controls
The SET readout has a range of 25% to
65% and is adjusted in increments of 5%.
initially depressing the humidity button
will display the current humidity setting.
Each additional press of the button
increases the setting by 5%. A SET point
of 65% operates the humidifier
continuously regardless of the ROOM
reading. The humidistat that senses the
readings is located on the power cord.
Insure that this humidistat is free from
obstruction.
(continued)
Humidity Button,,
Using Your Humidifier
Refill Display and Auto Dry Out
Function
For maximum run time both bottles
should be filled. When both bottles are
empty the display alternates the room
humidity reading and "F" (FILL),
informing additional water is required.
Also at this time the unit will automatically
switch into AUTO DRY OUT MODE and
continue to run on the lowest speed until
the filter is dry.
__ QUlE_COMFO_
Refill/Auto Dry Out
Mode Display
NOTE: During this time the room
humidity level will continue to be
monitored and the humidifier will cycle
the fan on and off until the filter is
completely dry. The fan will shut off
leaving you with a dry humidifier that is
less prone to mold and mildew growth.
if AUTO DRY OUT MODE is not desired,
refill the humidifier with water and the fan
will return to the set speed.
NOTE: Fan automatically switches to
lowest speed during AUTO DRY OUT
MODE.
Manual Dry Out
At the end of the humidification season or
if you do not plan to run the humidifier for
one week or more, a manual dry out
mechanism is provided to completely dry
out the humidifier cabinet.
To do this, simply slide the float retainer
located at the back of the humidifier
cabinet to the top position of the slot it is
located in. This will hold the float in an
upward position and the fan will run until
you turn the power off.
NOTE: Be sure to position float retainer
to the normal operating mode (lowest
position in slot) for normal humidifier
operation.
Below is a diagram of the slot the float
retainer is located in, at the back of the
cabinet.
Back of Cabinet
Top Position
is for Manual
Dryout
Bottom Position
J is for Normal
Operation Mode
Float
Retainer
Slot
Using Your Humidifier (continued)
Check Filter Indicator
The ability of any humidifier to efficiently
supply humidity output relies heavily on the
condition of the filter. As the filter loads with
impurities it gradually loses its wicking
capability. When this happens, moisture
output is reduced and the humidifier has to
work longer to satisfy the selected setting.
This humidifier has a check filter reminder
timed to appear after 720 hours of motor
operation. When the display shows an
alternating "CF" and "room humidity"
setting at 5 second intervals it is a
reminder to check the filter condition.
NOTE: Some areas have high water
mineral content causing the need for more
frequent filter changes.
Refer to "Replacement and Care of Filter"
on page 1I. If a build-up of deposits or
severe discoloration is evident replace the
filter to restore maximum efficiency.
Control Lock Out
To avoid unwanted tampering with the
humidifier settings the controls can be
locked.
Activation Procedure
After the humidifier functions have been
set up, press and hold the power button
down for 5 seconds. The display will show
"CL" for 5 seconds; release the power
button and the control will resume the
display of the room humidity. The
humidifier will continue to function with
the locked in settings. If buttons are
operated while "CL" is active, the "CL" is
displayed and settings are unaffected.
Deactivation Procedure
To deactivate the "CL" function simply
press and hold the power button for 5
seconds. "CU' will flash and then resume
the display of room humidity.
Check Filter Display
Humidistat
The humidistat located on the power cord
senses the percentage of humidity in the
air. It causes the humidifier to cycle on
and off to maintain the selected humidity
SET point. The fan will turn on if the
"ROOM" reading falls 3% below the SET
point and will continue to run the
humidifier until a reading of 1% above the
SET point is achieved. The fan will turn
off until the ROOM reading falls 3%
below the SET point again.
NOTE: Be sure humidistat, which is
located on the power cord, is free from
obstructions and is away from any hot air
source.
10
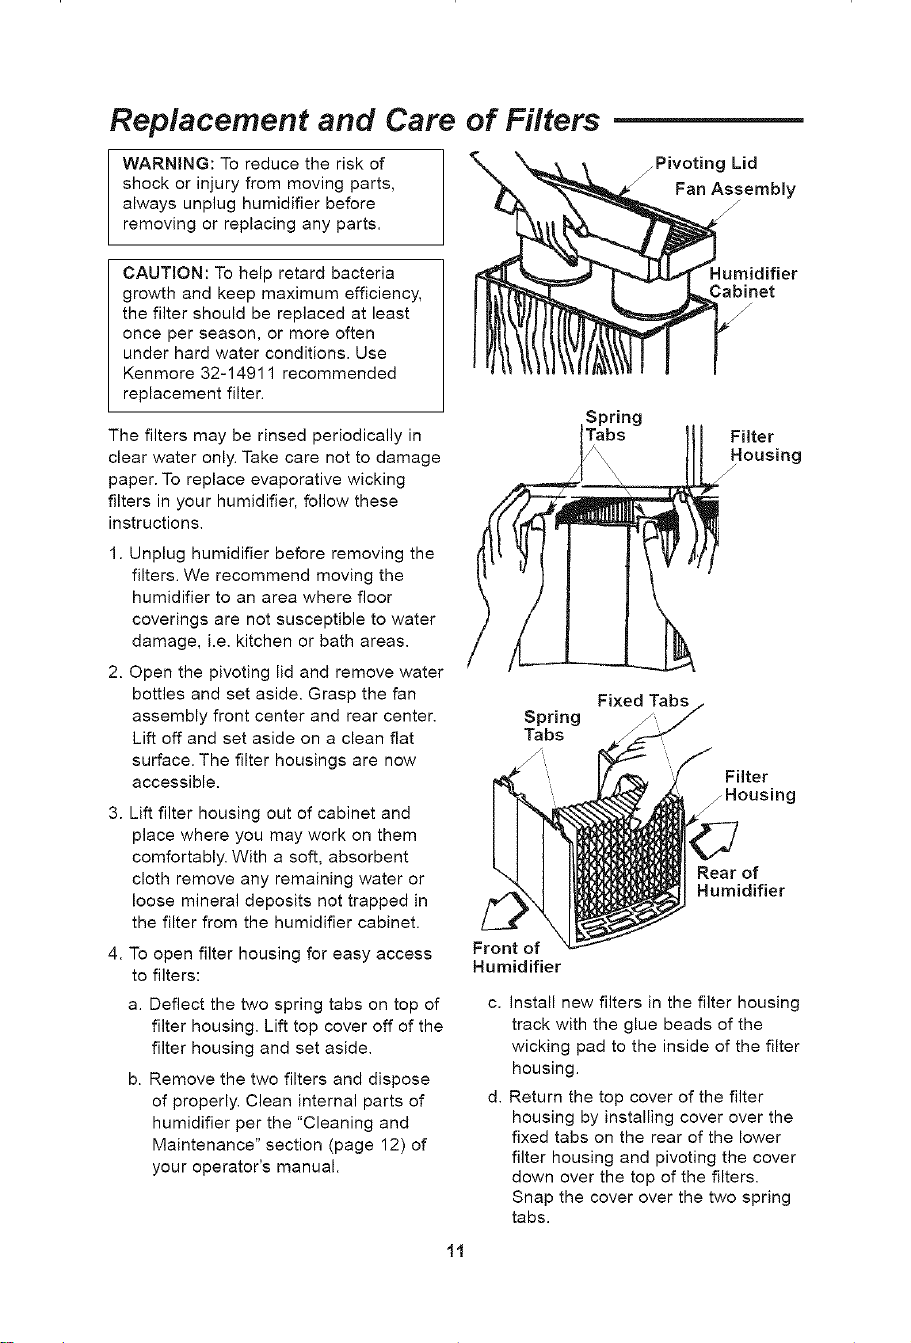
Replacement and Care of Filters
WARNING: To reduce the risk of
shock or injury from moving parts,
always unplug humidifier before
removing or replacing any parts.
jPivoting Lid
Fan Assembly
CAUTION: To help retard bacteria
growth and keep maximum efficiency,
the filter should be replaced at least
once per season, or more often
under hard water conditions. Use
Kenmore 32-14911 recommended
replacement filter.
The filters may be rinsed periodically in
clear water only. Take care not to damage
paper. To replace evaporative wicking
filters in your humidifier, follow these
instructions.
1. Unplug humidifier before removing the
filters. We recommend moving the
humidifier to an area where floor
coverings are not susceptible to water
damage, i.e. kitchen or bath areas.
2. Open the pivoting lid and remove water
bottles and set aside. Grasp the fan
assembly front center and rear center.
Lift off and set aside on a clean flat
surface. The filter housings are now
accessible.
3. Lift filter housing out of cabinet and
place where you may work on them
comfortably. With a soft, absorbent
cloth remove any remaining water or
loose mineral deposits not trapped in
the filter from the humidifier cabinet.
4. To open filter housing for easy access
to filters:
a. Deflect the two spring tabs on top of
filter housing. Lift top cover off of the
filter housing and set aside.
b. Remove the two filters and dispose
of properly. Clean internal parts of
humidifier per the "Cleaning and
Maintenance" section (page 12) of
your operator's manual.
Humidifier
J
J
Spring
Tabs Filter
Housing
Fixed Tabs
Front of
Humidifier
Install new filters in the filter housing
track with the glue beads of the
wicking pad to the inside of the filter
housing.
Return the top cover of the filter
housing by installing cover over the
fixed tabs on the rear of the lower
filter housing and pivoting the cover
down over the top of the filters.
Snap the cover over the two spring
tabs.
li
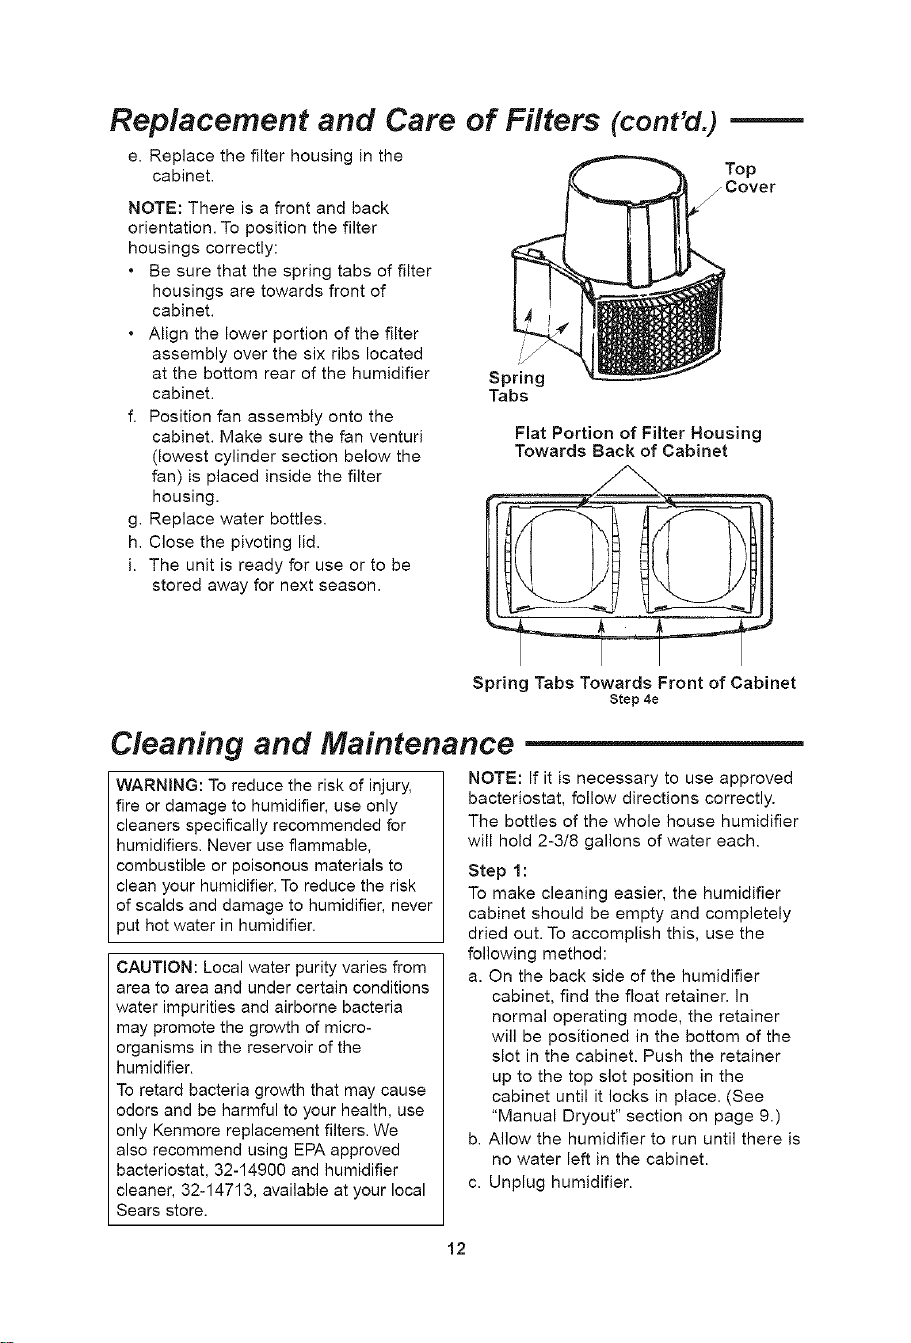
Replacement and Care of Filters (cont'd.)
e. Replace the filter housing in the
cabinet.
NOTE: There is a front and back
orientation. To position the filter
housings correctly:
• Be sure that the spring tabs of filter
housings are towards front of
cabinet.
• Align the lower portion of the filter
assembly over the six ribs located
at the bottom rear of the humidifier
cabinet.
f. Position fan assembly onto the
cabinet. Make sure the fan venturi
(lowest cylinder section below the
fan) is placed inside the filter
housing.
g. Replace water bottles.
h. Close the pivoting lid.
i. The unit is ready for use or to be
stored away for next season.
Top
j Cover
Spring
Tabs
Flat Portion of Filter Housing
Towards Back of Cabinet
Spring Tabs Towards Front of Cabinet
Step 4e
Cleaning and Maintenance
WARNING: To reduce the risk of injury,
fire or damage to humidifier, use only
cleaners specifically recommended for
humidifiers. Never use flammable,
combustible or poisonous materials to
clean your humidifier. To reduce the risk
of scalds and damage to humidifier, never
put hot water in humidifier.
CAUTION: Local water purity varies from
area to area and under certain conditions
water impurities and airborne bacteria
may promote the growth of micro-
organisms in the reservoir of the
humidifier.
To retard bacteria growth that may cause
odors and be harmful to your health, use
only Kenmore replacement filters. We
also recommend using EPA approved
bacteriostat, 32-14900 and humidifier
cleaner, 32-14713, available at your local
Sears store.
NOTE: If it is necessary to use approved
bacteriostat, follow directions correctly.
The bottles of the whole house humidifier
will hold 2-3/8 gallons of water each.
Step 1:
To make cleaning easier, the humidifier
cabinet should be empty and completely
dried out. To accomplish this, use the
following method:
a. On the back side of the humidifier
cabinet, find the float retainer. In
normal operating mode, the retainer
will be positioned in the bottom of the
slot in the cabinet. Push the retainer
up to the top slot position in the
cabinet until it locks in place. (See
"Manual Dryout" section on page 9.)
b. Allow the humidifier to run until there is
no water left in the cabinet.
c. Unplug humidifier.
12
Cleaning and Maintenance (cont'd.)
WARNING: To reduce the risk of shock,
always unplug humidifier before cleaning
or servicing. If humidifier is not unplugged,
fan could start after housing is removed.
Step 2:
To Remove Parts
a. Open the pivoting lid and remove water
bottles and set aside. Grasp the fan
assembly front center and rear center.
Lift off and set aside on a clean flat
surface. The filter housings are now
accessible.
b. Before removing the internal parts of
the humidifier cabinet, we recommend
moving the humidifier to an area
where floor covers are not susceptible
to water damage, i.e.; kitchen or bath
area. Lift the filter housing assemblies
out of the cabinet and set to the side.
c. Remove the water level float from the
humidifier cabinet by pinching the float
retainer to release it from the cabinet.
The cabinet should be empty before
cleaning. The cabinet consists of the
lower areas of the humidifier where
the filters are during normal operation
time.
d. Empty cabinet of any remaining water.
e. Proceed to "Bi-Weekly Maintenance" or
"End of Season Maintenance".
f. Remove old filters and dispose of
properly as described on pages 11-12.
Step 3:
Install new filters (purchase the correct
evaporative wicking filter pads 32-14911
for your humidifier) into the location
where the old filters were positioned.
Install the filter housings with the new
filters into the correct location. Reinstall
the water level float.
NOTE: Float retainer should be
positioned in normal operating mode.
Assure that it is positioned in the bottom
of the slot in the back of the cabinet (See
page 9 for diagram of slot).
Position the fan assembly on top of the
cabinet and return the humidifier to the
desired location for use.
Refill humidifier bottles with fresh cool
water and return them to the cabinet.
Plug the unit into a 120 volt A.C. power
outlet and set the controls per the
"Operating Humidifier Controls" section
(page 8) of this manual.
Bi-Weekly Maintenance
Removing Scale
1. Fill the reservoir with water and
add one 8 oz. cup of undiluted
white vinegar. Let solution stay for
20 minutes.
2. Clean all interior surfaces with soft
brush. Dampen soft cloth with
undiluted white vinegar and wipe
out reservoir to remove scale.
3. Rinse thoroughly with clean warm
water to remove scale and cleaning
solution before disinfecting the
reservoir.
Disinfecting Humidifier
Cabinet and Water Bottles
1. Fill humidifier cabinet with 1
teaspoon chlorine bleach in 1
gallon of water. Let solution stay for
20 minutes, carefully swishing
every few minutes. Wet all surfaces
normally exposed to water.
2. Empty humidifier cabinet after 20
minutes. Rinse with water until
bleach smell is gone. Allow unit to
dry out completely.
Water bottles should be cleaned in
the same manner.
of Season Maintenance
Follow "Bi-Weekly Maintenance"
instructions at end of humidification
season.
Remove and throw away filters.
Let humidifier dry completely before
storing. Do not store with water inside
cabinet or water bottles.
Store in cool, dry location.
Install a new filters in clean humidifier
before next season begins.
"Bi-Weekly Maintenance" procedure is
also recommended if you do not plan
to run the humidifier for one week or
more.
3.
End
1.
2.
3.
4.
5.
6.
13
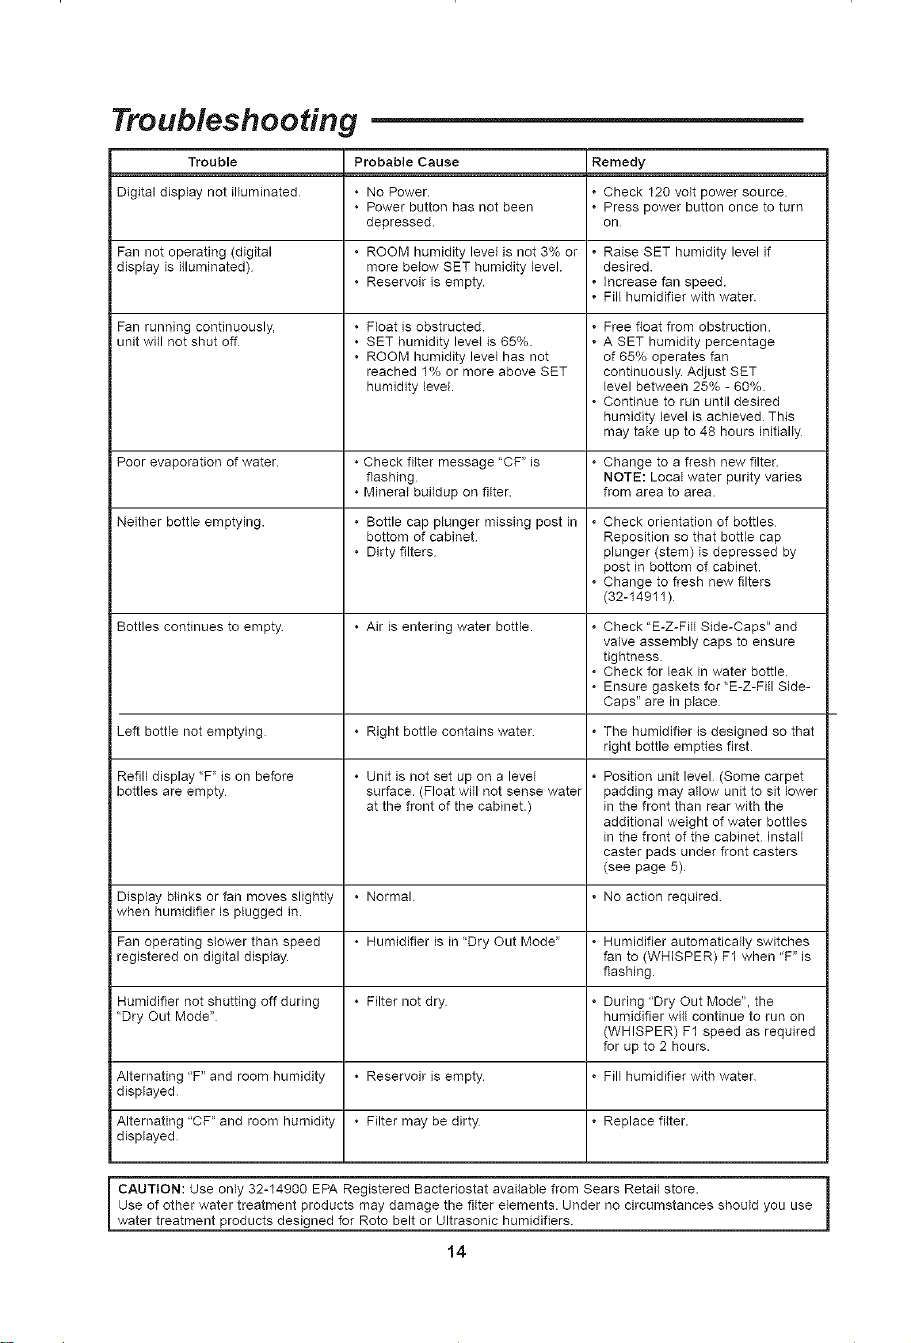
Troubleshooting
Trouble Probable Cause Remedy
Digital display not illuminated • No Power. • Check 120 volt power source
• Power button has not been • Press power button once to turn
depressed, on
Fan not operating (digital • ROOM humidity level is not 3% or • Raise SET humidity level if
display is illuminated) more below SET humidity level, desired
• Reservoir is empty. • Increase fan speed.
• Fill humidifier with water
i Fan running continuously,
unit will not shut off
• Float is obstructed.
• SET humidity level is 65%.
• ROOM humidity level has not
reached 1% or more above SET
humidity level.
• Free float from obstruction
• A SET humidity percentage
of 65% operates fan
continuously. Adjust SET
level between 25% - 60%.
• Continue to run until desired
humidity level is achieved This
may take up to 48 hours initially
Poor evaporation of water. ° Check filter message "CF" is • Change to a fresh new filter
flashing NOTE: Local water purity varies
° Mineral buildup on filter, from area to area.
Neither bottle emptying. ° Bottle cap plunger missing post in • Check orientation of bottles
bottom of cabinet Reposition so that bottle cap
° Dirty filters plunger (stem) is depressed by
post in bottom of cabinet.
• Change to fresh new filters
(32-14911)
Bottles continues to empty ° Air is entering water bottle. • Check "E-Z-FHi Side-Caps" and
valve assembly caps to ensure
tightness
• Check for leak in water bottle
• Ensure gaskets for"E-Z-Fi{I Side-
Caps" are in place
Left bottle not emptying ° Right bottle contains water • The humidifier is designed so that
right bottle empties first
Refill display "F" is on before ° Unit is not set up on a level • Position unit level (Some carpet
bottles are empty surface. (Float will not sense water padding may allow unit to sit lower
at the front of the cabinet.) in the front than rear with the
additional weight of water bottles
in the front of the cabinet Install
caster pads under front casters
(see page 5)
Display blinks or fan moves slightly • Normal • No action required
when humidifier is plugged in.
Fan operating slower than speed • Humidifier is in "Dry Out Mode" • Humidifier automatically switches
registered on digital display, fan to (WHISPER) F1 when "F" is
flashing
Humidifier not shutting off during • Filter not dry • During "Dry Out Mode", the
"Dry Out Mode" humidifier will continue to run on
(WHISPER) F1 speed as required
for up to 2 hours.
Alternating "F" and room humidity • Reservoir is empty. • Fill humidifier with water
displayed
Alternating "CF" and room humidity • Filter may be dirty • Replace filter.
displayed
CAUTION: Use only 32-14900 EPA Registered Bactebostat available from Sears Retail store.
Use of other water treatment products may damage the filter elements. Under no circumstances should you use
water treatment products designed for Roto belt or Ultrasonic humidifiers.
14
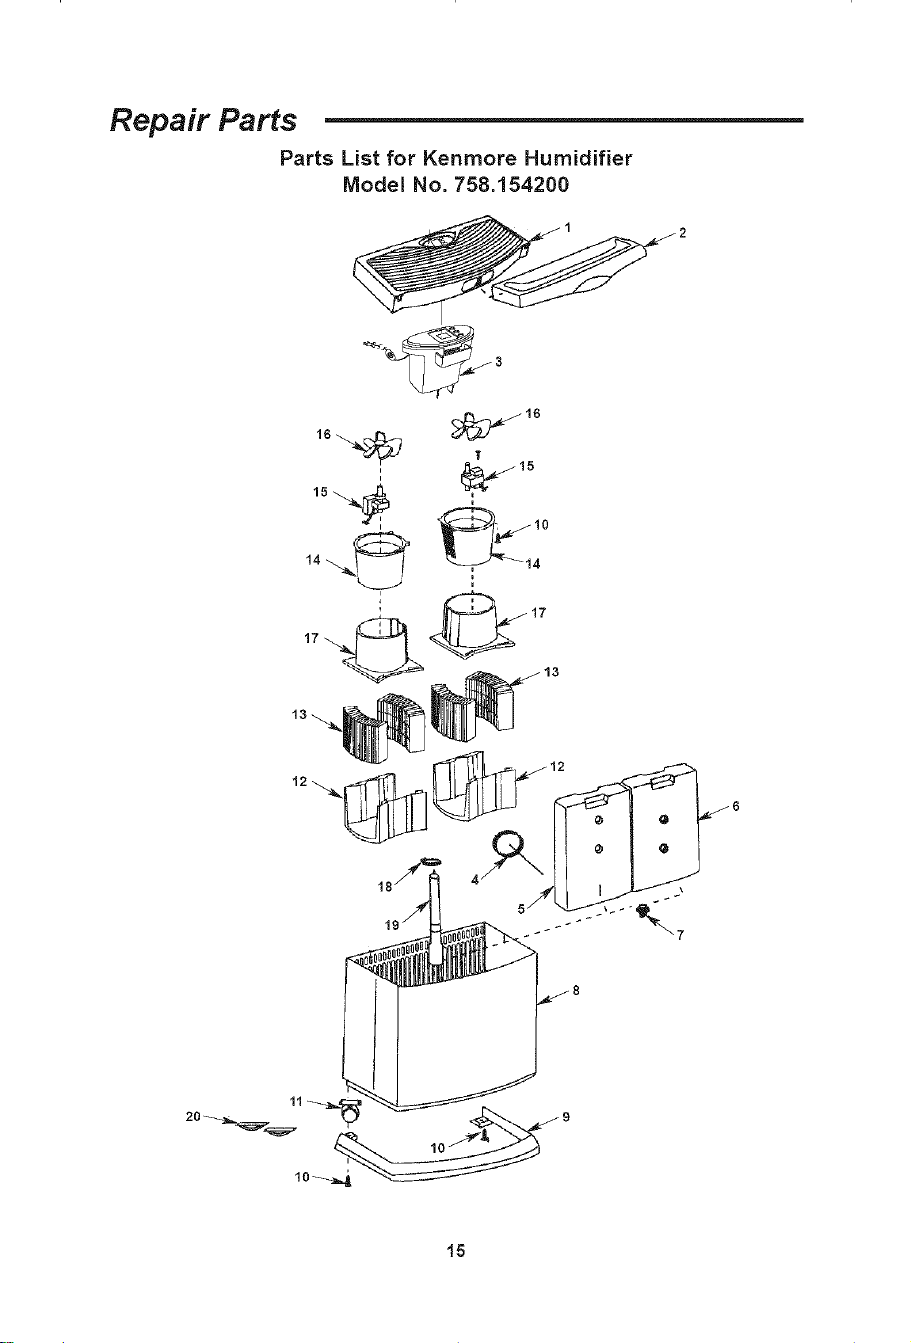
Repair Parts
Parts List for Kenmore Humidifier
Model No. 758.154200
II _15
15
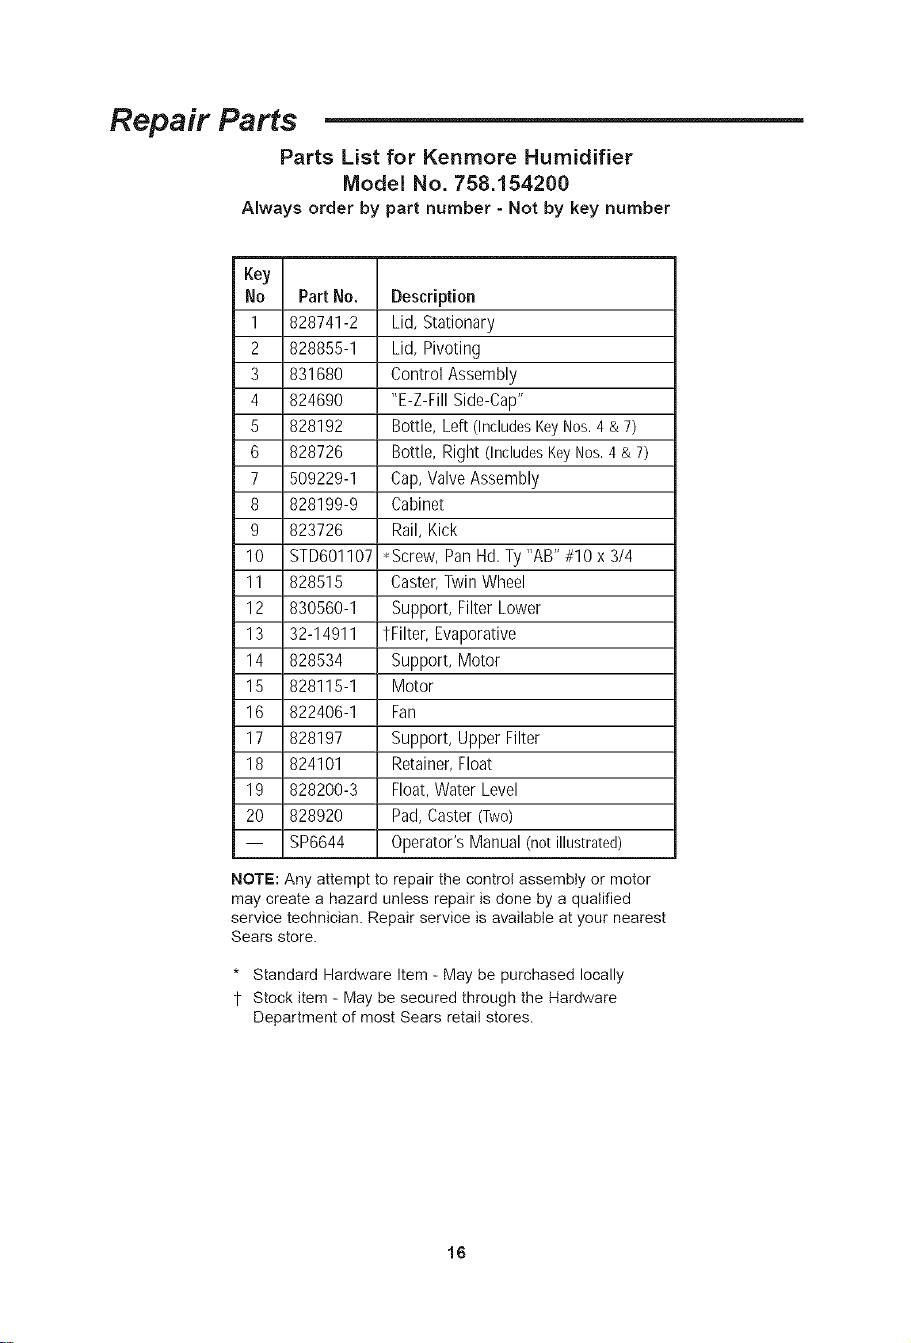
Repair Parts
Parts List for Kenmore Humidifier
Model No. 758.154200
Always order by part number - Not by key number
Key
No Part No. Description
1 828741-2 Lid, Stationary
2 828855-1 Lid, Pivoting
3 831680 Control Assembly
4 824690 "E-Z-Fill Side-Cap"
5 828192 Bottle, Left (IncludesKeyNos.4& 7)
6 828726 Bottle, Right (IncludesKeyNos.4 & 7)
7 509229-1 Cap,Valve Assembly
8 828199-9 Cabinet
9 823726 Rail, Kick
10 STD601107 • Screw,Pan Hd.Ty "AB" #10 x 3/4
11 828515 Caster,Twin Wheel
12 830560-1 Support, Filter Lower
13 32-14911 tFilter, Evaporative
14 828534 Support, Motor
15 828115-1 Motor
16 822406-1 Fan
17 828197 Support, Upper Filter
18 824101 Retainer,Float
19 828200-3 Float,Water Level
20 828920 Pad,Caster(Two)
-- SP6644 Operator's Manual(notillustrated)
NOTE: Any attempt to repair the control assembly or motor
may create a hazard unless repair is done by a qualified
service technician. Repair service is available at your nearest
Sears store.
* Standard Hardware Item - May be purchased locally
1- Stock item - May be secured through the Hardware
Department of most Sears retail stores.
16
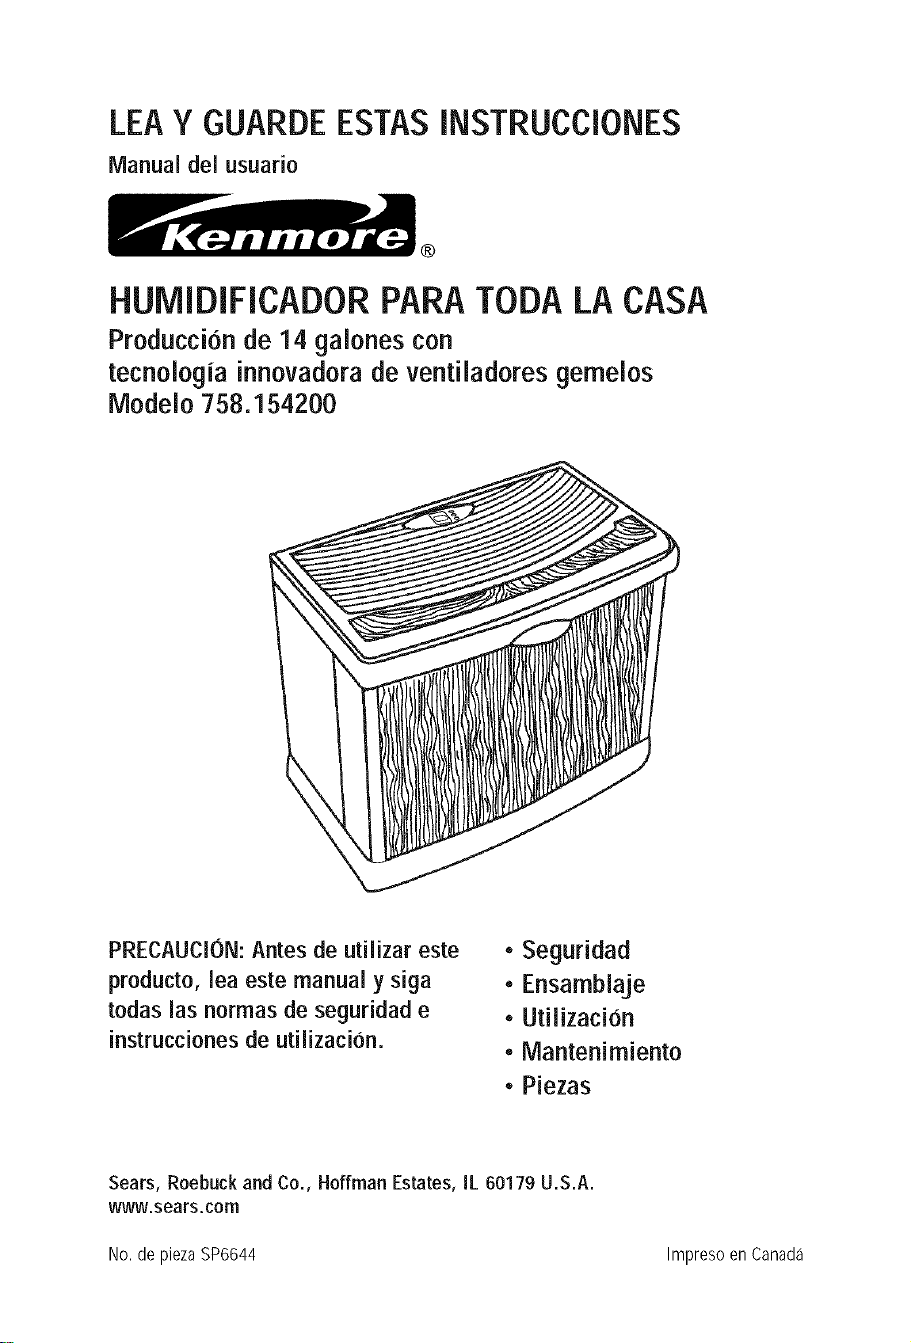
LEAY GUARDE ESTAS INSTRUCCIONES
IVlanualdel usuario
®
HUMIDIFICADOR PARA TODA LA CASA
Produccionde 14 galonescon
tecnoiogiainnovadorade ventiiadoresgemeios
Modeio 758.154200
PRECAUCION: Antesde utilizareste
producto,leaestemanual y siga
todaslasnormas de seguridade
instruccionesde utilizaci0n.
• Seguridad
• Ensambiaje
• Utilizacion
• Mantenirniento
• Piezas
Sears,Roebuckand Co.,HoffmanEstates,IL60179U.S.A.
www.sears.com
No. de piezaSP6644 Impreso en Canada
_"GARANTiA COMPLETA DE UN ANO PARA EL HUMIDIFICADORKENMORE "_II
Si cualquier pieza de estehumidificador falla debido a un defecto de material o de fabricacion
dentro del plazo de un ano a part# de la fecha de compra, o si el motor del humidificador falla
debido a un defecto de material o de fabrieaci6n durante el segundoano a partir de la fecha de
compra, DEVUELVAELHUMIDIFICADORAL CENTRODEPIEZASY REPARACl0NDE SEARSMAs
CERCANO y sera reparado sin ningun cargo. Esta garantfa no induye los filtros del
humidificador, que son piezas pereeederas que se pueden desgastar por causa del uso normaJ
en menos de un ano. Estagarantia le confiere a usted derechos legales especificos yes posible
que usted tambien tenga otros dereehos que varian de un estado a otto.
Sears, Roebuck and Co., Dept. 817WA, Hoffman Estates, IL 60179
INSTRUCCIONESGENERALESDE SEGURIDAD
Palabras de senal de seguridad
PELIGRO: Significa que si no se sigue la
informacion de seguridad, alguien resultara
lesionadogravementeo morir&
ADVERTENCIA:Significa que si no se sigue la
informaciondeseguridad,alguienpodria resultar
lesionadogravementeo morir.
PRECAUCION:Significa que si no se sigue la
informacion de seguridad, alguien pudiera
resultarlesionado.
1. Parareducirelriesgo depeligrode incendioo
descargas electricas, enchufe el humidi-
ficador directamenteen un tomacorrientede
120V C.A.No usecordonesde extension.
2. Mantenga el cable electrico alejado de las
zonas de trafico. Para reducir el riesgo de
peligro de incendio, no ponga nunca el
cordon electricodebajode alfombrasni cerca
de salidas de calor, radiadores de calor,
estufasde cocinao calentadores.
3. Desenchufesiempre el humidificador antes
de trasladarlo, antesde limpiarlo o siempre
queno este enservicio.
4. Mantengalimpio el humidificador.
5. No ponga objetos extrarhos dentro del
humidificador.
6. Nodeje que elhumidificadorseusecomo un
juguete. Esnecesarioprestar muchaatencion
cuando elhumidificador seausadopor nirhos
o cercade ellos.
7. No utilice nunca el humidificador mientras
alguna piezafalte o estedafiada decualquier
manera.
8. Parareducir el riesgo de peligro eledrico o
danos al humidificador,no incline, sacudani
vuelque el humidificador mientras la unidad
este enmarch&
9. Para reducir el riesgo de danos al humi-
dificador, desenchdelo cuando no este en
USO.
10. Parareducirel riesgode descargaseleetrieas
aceidentales,no toque el cable de alimenta-
cion ni los controles con las manos mojadas.
11. Fijeseen la etiqueta de advertenciaque se
muestraa continuacion.
ADVERTENCIA:Parareducirel riesgodeincendio,
descargas electricas o lesiones, desenchufe
siempreel humidificadorantesdehacerleservicio
deajustesy reparacioneso limpiarlo.
indice
Informacion de garantia ...............................18
Instrucciones generales de seguridad .........18
Paraahorrarse unaIlamadade servicio .......19
Familiaricesecon el humidificador ..............19
Comofunciona el humidificador ................. 20
Ensamblaje....................................................20
Instrucciones de ubicacion ..........................21
Consejosde utilizacion para Iograr
el mejor rendimiento.................................21
Conexionelectrica ...................................... 22
Llenadocon agua ...................................22-23
Utilizacion de los controles
del humidificador ................................24-25
Utilizacion del humidificador ...................25-26
Reemplazoy cuidado de los filtros ........27-28
Limpieza y mantenimiento ......................28-29
Resolucion de problemas ............................30
Piezasde repuesto .................................31-32
18
Para ahorrarse una Ilamada de servicio
Compruebe Io siguiente si el humidificador no
funciona.
1. &Estael cabledealimentacionconectadoa un
tomacorriente?
2. _,Hayalimentacionelectricaaltomacorriente?
3. gEsta el control del flujo de aire en la
posiciOnde funcionamiento?
4. gEsta el control de humedad ajustado a un
nivelIo suficientementealto?
5. gEsta el gabinete ubicado sobre una
superficie nivelada?
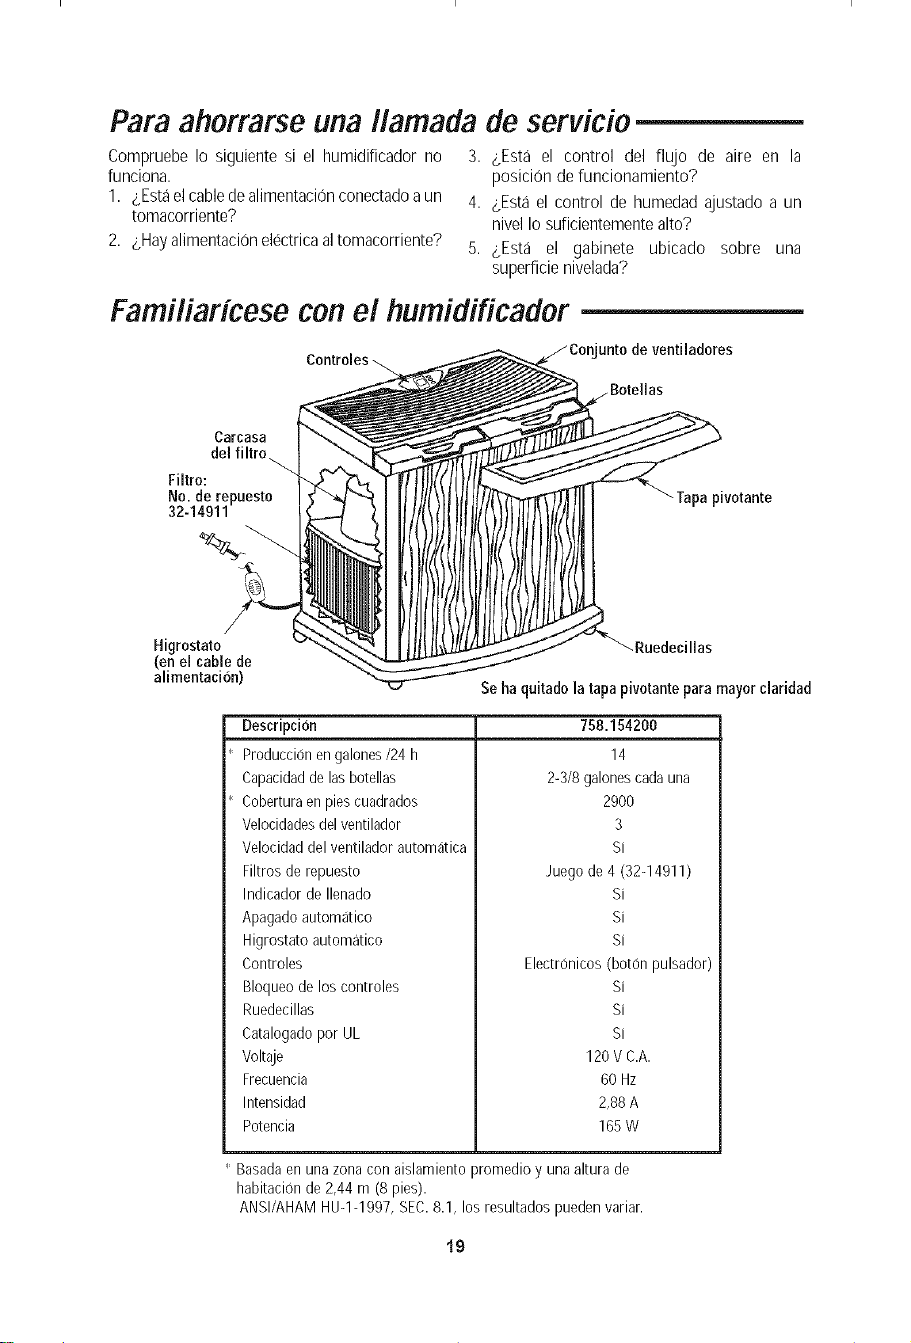
Familiaricese con el humidificador
unto de ventiladeres
Carcasa
del filtro_
Filtro:
No. de repueste
32-14911
Tapa pivotante
Higrestato
(en el cable de
alimentacion)
_Ruedecillas
Seha quitado la tapa pivotante para mayor claridad
Descripci6n
Produccion engalones/24 h
Capacidadde las botellas
Coberturaen piescuadrados
Velocidadesdel ventilador
Veloeidad del ventilador automatica
Filtros de repuesto
Indicador de Ilenado
Apagado automatico
Higrostato automatieo
Controles
758.154200
14
2-3/8 galonescada una
2900
3
Si
Juego de 4 (32-14911)
Si
Si
Si
Eleetr0nicos (boron pulsador)
Bloqueo de los controles
Ruedeeillas
Catalogadopor UL
Voltaje
Frecuencia
Intensidad
Poteneia
Si
Si
Si
120 VC.A.
60 Hz
2,88 A
165 W
Basadaen unazona con aislamiento promedio y una altura de
habitacion de 2,44 m (8 pies).
ANSI/AHAM HUqq997, SEC.8.1, los resultados pueden variar.
19
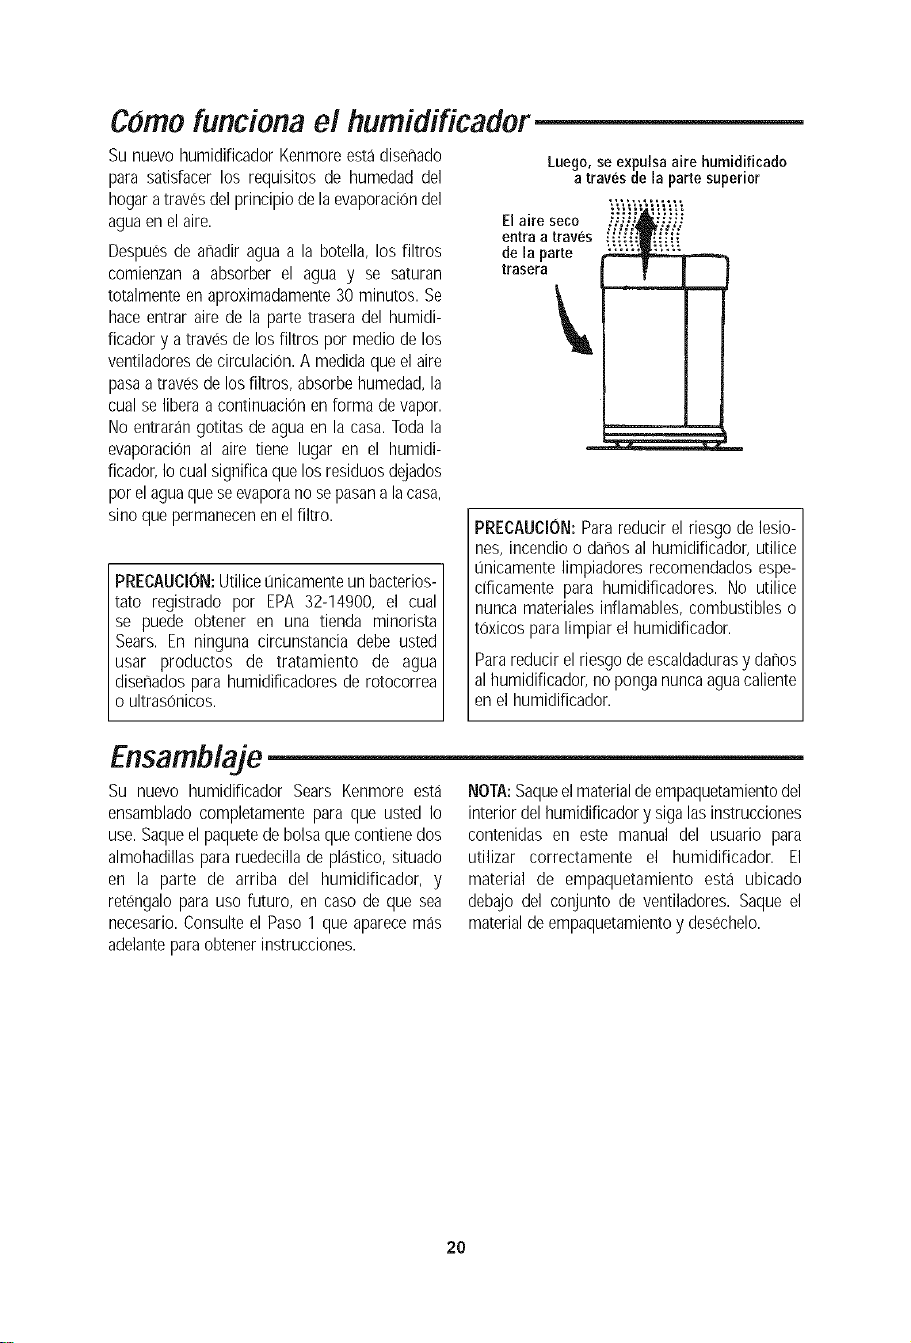
Como funciona el humidificador
Su nuevo humidificador Kenmoreesta diseflado
para satisfacer los requisitos de humedad del
hogaratravesdelprincipio dela evaporaciOndel
aguaenel aire.
Despuesde anadir agua a la botella, los filtros
comienzan a absorber el agua y se saturan
totalmenteen aproximadamente30 minutos. Se
haceentrar airede la parte trasera del humidi-
ficador y a travesde los filtros por medio de los
ventiladoresdecirculacion. A medidaque el aire
pasaatravesde los filtros, absorbehumedad,la
cual seliberaa continuacionen forma de vapor.
No entrarangotitas de agua en la casa. Todala
evaporaciOnal aire tiene lugar en el humidi-
ficador,Iocualsignifica quelos residuosdejados
porel aguaquese evaporano sepasana lacasa,
sino que permanecenen elfiltro.
PRECAUCION:Utilicet_nicamenteun bacterios-
tato registrado por EPA 32-14900, el cual
se puede obtener en una tienda minorista
Sears. En ninguna circunstancia debe usted
usar productos de tratamiento de agua
disenadospara humidificadoresde rotocorrea
o ultrasonicos.
Luego,seexpulsaairehumidificado
atravesde la parlesuperior
a rese o Vi@i"'@i
entraa traves _.."_[[i_
dela parte
trasera
PRECAUCION:Parareducir el riesgo de lesio-
nes, incendioo darhosal humidificador, utilice
unicamente limpiadores recomendadosespe-
cificamente para humidificadores. No utilice
nunca materialesinflamables, combustibles o
tOxicosparalimpiar el humidificador.
Parareducir el riesgode escaldadurasy danos
al humidificador,no ponga nuncaaguacaliente
en el humidificador.
Ensamblaje
Su nuevo humidificador Sears Kenmore esta
ensambladocompletamente para que usted Io
use. Saqueelpaquetede bolsaque contienedos
almohadillaspara ruedecillade plastico, situado
en la parte de arriba del humidificador, y
retengalopara uso futuro, en caso de que sea
necesario.Consulteel Paso1 que aparecemas
adelanteparaobtener instrucciones.
NOTA:Saqueelmaterialde empaquetamientodel
interiordel humidificadory sigalasinstrucciones
contenidas en este manual del usuario para
utilizar correctamente el humidificador. El
material de empaquetamiento esta ubicado
debajo del conjunto de ventiladores. Saque el
materialdeempaquetamientoy desechelo.
2O
Instrucciones de ubicacion
ADVERTENCIA:Para su propia seguridad, no
utilice el humidificador si alguna pieza esta
darhadao falta.
Paso 1:
Coloqueel humidificadoren unasuperficie plana
y nivelada,en un areade su casadonde masse
necesite la humedad o en un area en la que
probablementeseharacircular aire humedopor
toda la casa, como por ejemplo cerca de un
retornode airefrio.
La colocacion de la unidad de modo que este
niveladaes muy importante si el humidificador
estaubicado sobreuna alfombra.
NOTA:El humidificador de 14 galones contiene
botellas de agua. El peso de las botellas en la
parte delanteradel gabinetepuedehacerquelas
ruedecillas delanterasse hundan mas profun-
damenteen laalfombra. Si esto sucede,el nivel
deaguaseramas alto hacialapartedelanteradel
humidificador y mas bajo hacia la partetrasera.
Es posible que el flotador del nivel de agua
(ubicado en la parte trasera del gabinete) no
detecteel agua, por Io que se mostrara una "F"
parpadeantey la unidad no se activara.Si esto
sucede,seranecesarionivelarla unidad paraque
el humidificadorseactive.Paranivelarel humidi-
ficador cuandoesteubicadosobreunaalfombra,
coloquelasalmohadillaspararuedecillaincluidas
debajo de las dos ruedecillas delanteras del
humidificadorsolamente.
NOTA:Debidoaque el humidificadorexpulsaaire
frio y humedo, Io mejor es dirigir el aire alejan-
dolo del termostato de la casay las salidas de
airecaliente.Lo mejor es posicionarel humidifi-
cadorjunto a una paredinterior. Las salidas de
aire caliente y el aire fifo procedente de las
paredesexteriorespuedenafectarlas eficiencias
delos controles.Launidadno sedebecolocaren
lugares dondeel aire templado de una salida de
airecalientesople directamentehaciaella.
El aire hL_medo(la humedad)quese producese
dispersara por toda la casa, pero el area mas
proximaa launidadtendra la humedadmas alta.
Si la unidad esta posicionadacerca deuna ven-
tana,es posibleque seforme condensacionenel
vidrio dela ventana.Si esto no esapropiado,se
debereposicionarlaunidad en otraubicaciOn.
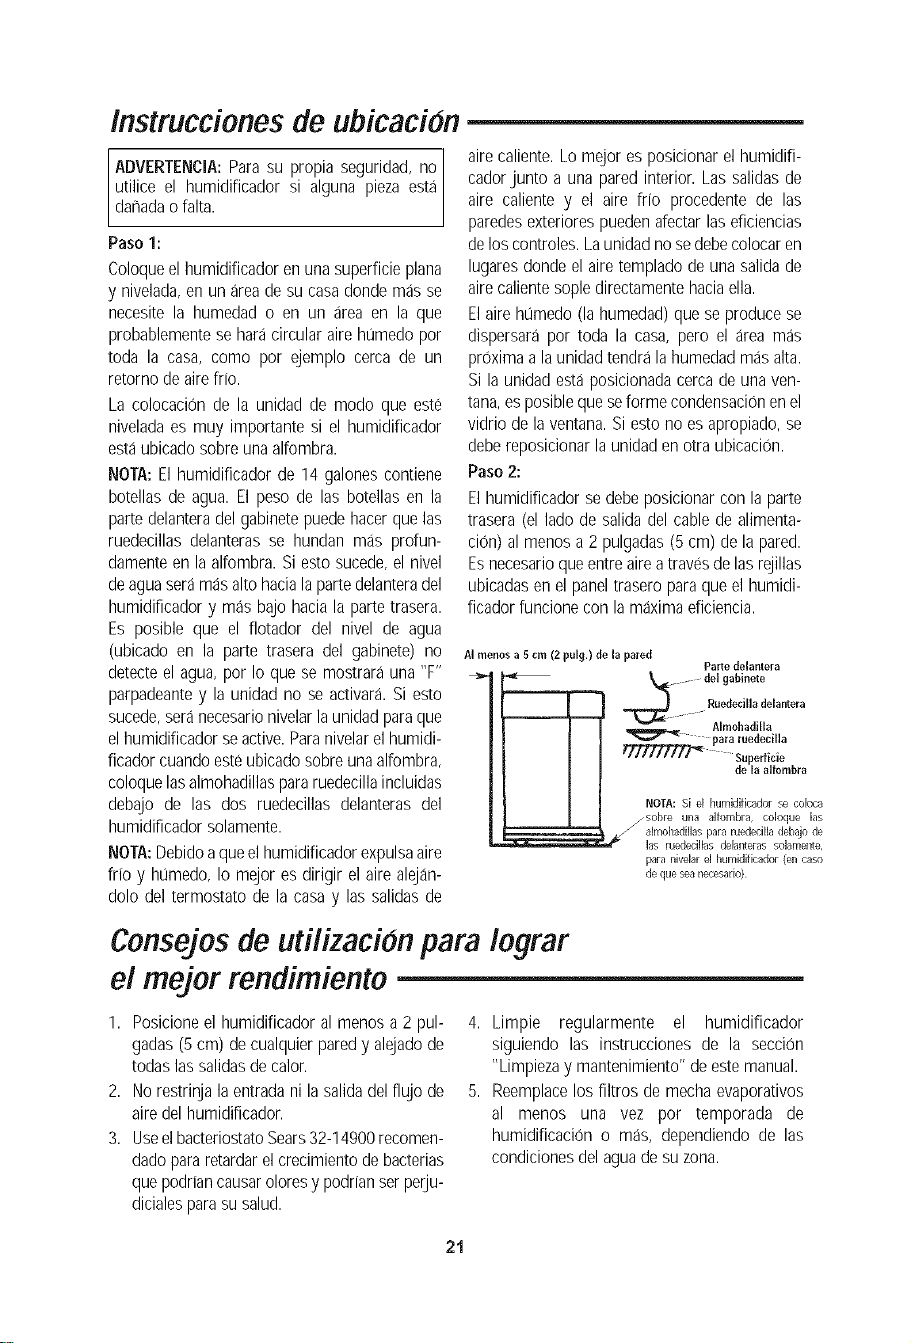
Paso 2:
El humidificador se debeposicionar con la parte
trasera (el lado de salida del cable de alimenta-
ciOn)al menos a2 pulgadas(5 cm) de la pared.
Esnecesarioque entreaire atravesdelas rejillas
ubicadasen el paneltrasero paraque el humidi-
ficador funcionecon lamaximaeficiencia.
AI rnenos a 5 cm (Z pulg.) de la pared
Parte delanlera
Almohadilla
para ruedecilla
NOTA: S[ el humidificador qe co[oca
/sobre una alfombra, coloque las
/
almohadillas para ruedecilla debajo de
las ruedecillas de[anteras solamente,
para nivelar el humidificador (en caso
de que _,eanecesar[o)
Conse#osde utilizacion para Iograr
el me#or rendimiento
1. Posicioneel humidificadoral menos a2 pul-
gadas(5 cm) de cualquierparedy alejadode
todas las salidasdecalor.
2. No restrinjala entrada ni lasalidadelflujo de
airedelhumidificador.
3. Useel bacteriostatoSears32-14900recomen-
dadopararetardarel crecimientode bacterias
quepodriancausaroloresy podrianser perju-
dicialesparasu salud.
4. Limpie regularmente el humidificador
siguiendo las instrucciones de la seccion
"Limpiezay mantenimiento"de estemanual.
5. Reemplacelos filtros de mechaevaporativos
al menos una vez por temporada de
humidificacion o mas, dependiendo de las
condicionesdel aguade su zona.
21
Conexion electrica
Localiceel tomacorrientede paredde 120V C.A.
mas cercanoenla ubicaciondeseada,preferible-
mente en una pared interior. Con el humi-
dificador en la ubicacion deseada, dirija el
cordonelectrico demodo seguro paraque nadie
tropiece con el ni desajuste el humidificador.
Enchufeel cordon electrico.
Si el enchufe no entra completamente en el
tomacorriente, invierta el enchufe. Si sigue sin
entrar, pongase en contacto con un electricista
calificadoparaque instale eltomacorriente apro-
piado. Nocambieel enchufede ningunmodo.
ADVERTENCIA: Para reducir el riesgo de
peligro de incendio o descargaselectricas, el
humidificador debe enchufarse en un toma-
corriente de 120V C.A.No utilicecordones de
extension.
Para reducir el riesgo de descargaselectricas,
este humidificador tiene un enchufe polarizado
(un terminal es mas ancho que el otro). Este
enchufeentrara de un solo modo en un toma-
corrientepolarizado.
Llenado conagua
ADVERTENCIA: Para reducir el riesgo de
descargas electricas, desenchufe siempre el
humidificador antes de limpiarlo o hacerle
servicio de ajustesy reparaciones.
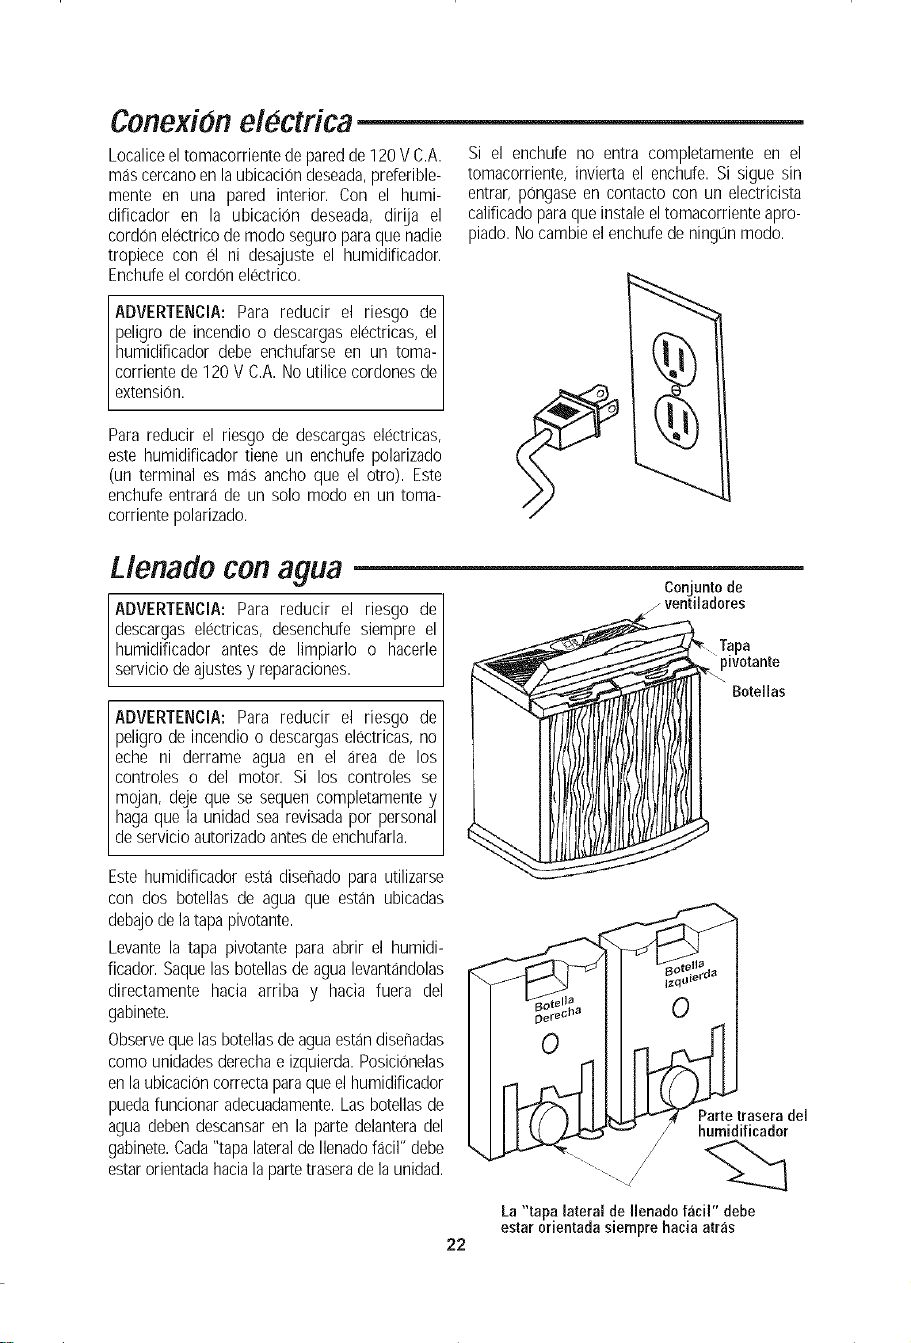
Conjunto de
z ventiladores
ADVERTENCIA: Para reducir el riesgo de
peligro de incendio o descargaselectricas, no
eche ni derrame agua en el area de los
controles o del motor. Si los controles se
mojan, deje que se sequen completamentey
hagaque la unidad sea revisadapor personal
de servicio autorizadoantesdeenchufarla.
3a
Bote[ias
Este humidificador esta disenado para utilizarse
con dos botellas de agua que estan ubicadas
debajodela tapapivotante.
Levantela tapa pivotante para abrir el humidi-
ficador. Saquelasbotellasde agualevantandolas
directamente hacia arriba y hacia fuera del
gabinete.
Observequelas botellasdeaguaestandisenadas
como unidadesderechae izquierda.Posicionelas
enla ubicacioncorrectaparaqueel humidificador
puedafuncionar adecuadamente.Las botellasde
agua deben descansaren la parte delanteradel
gabinete.Cada"tapa lateralde Ilenadofacil" debe
estarorientadahaciala partetraseradela unidad.
22
traserade
La"tapa lateralde I[enadofacil" debe
estarorientadasiemprehaciaarras
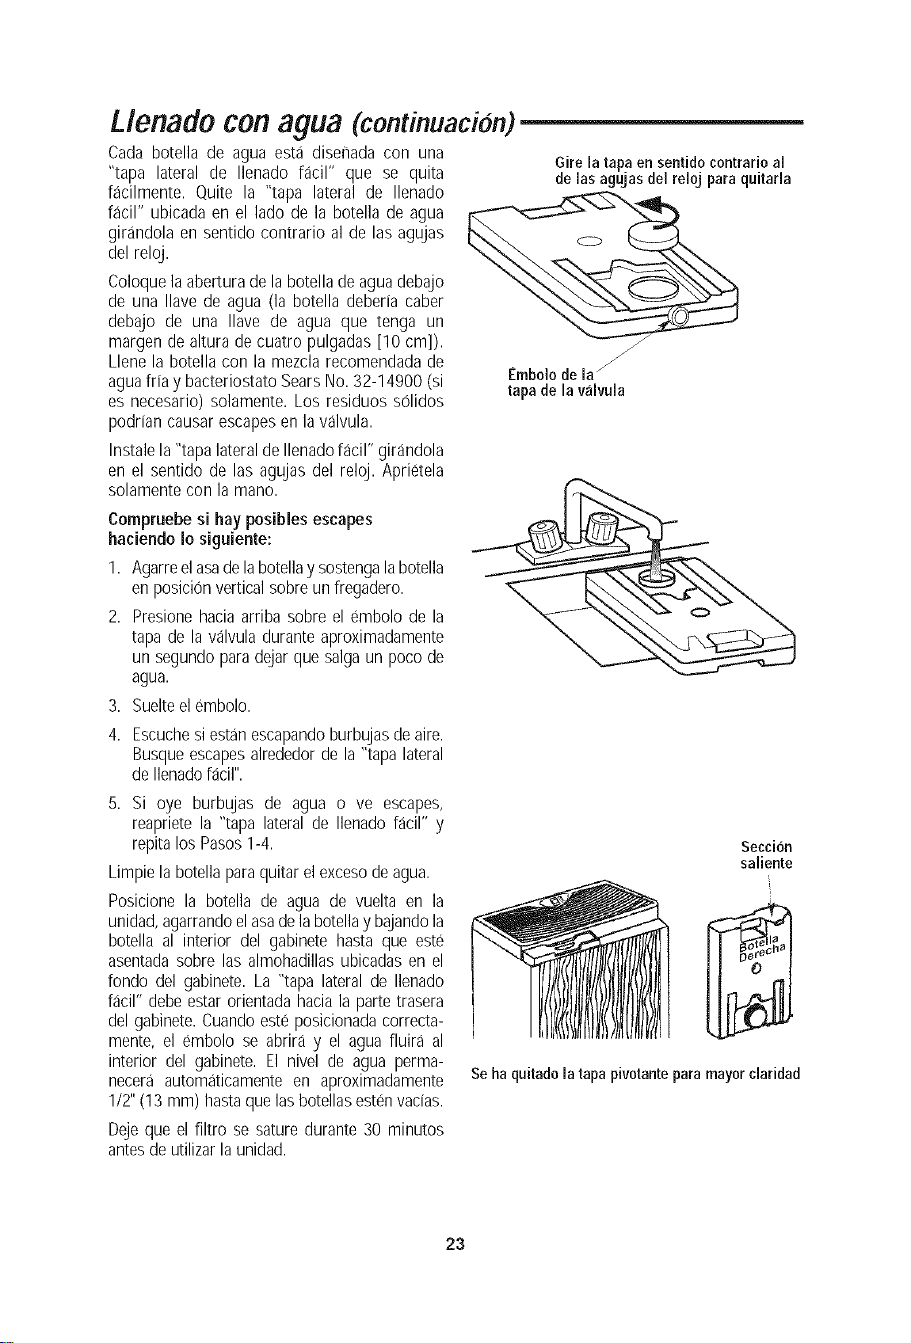
Llenado con agua (continuacion)
Cada botella de agua esta disenada con una
"tapa lateral de Ilenado facil" que se quita
facilmente. Quite la "tapa lateral de Ilenado
facil" ubicada en el lado de la botella de agua
girandola en sentido contrario al de las agujas
del reloj.
Coloquela aberturade la botellade aguadebajo
de una Ilave de agua (la botella deberia caber
debajo de una Ilave de agua que tenga un
margen de altura de cuatro pulgadas[10 cm]).
Llene la botella con la mezcla recomendadade
aguafria y bacteriostatoSears No.32-14900 (si
es necesario) solamente. Los residuos solidos
podrian causar escapesen la valvula.
Instalela"tapa lateralde Ilenadofacil" girandola
en el sentido de las agujas del reloj. Aprietela
solamente con la mano.
Gire la tapaen sentidocontrarioal
delas agujasdelreloj paraquitarla
Embolodela_
tapade la valvula
Compruebe si hay posibles escapes
haciendoIo siguiente:
I. Agarreel asade labotellay sostengalabotella
en posicionvertical sobreun ffegadero.
2. Presionehacia arriba sobre el embolo de la
tapa de la valvula duranteaproximadamente
un segundopara@jar quesalga un poco de
agua.
3. Suelteel embolo.
4. Escuchesi estanescapandoburbujasdeaire.
Busque escapesalrededorde la "tapa lateral
de Ilenadofacil".
5. Si oye burbujas de agua o ve escapes,
reapriete la "tapa lateral de Ilenado f;_cil" y
repita losPasos1-4.
Limpie la botellaparaquitar elexcesodeagua.
Posicione la botella de agua de vuelta en la
unidad,agarrandoelasadela botellay bajandola
botella al interior del gabinete hasta que este
asentadasobre las almohadillasubicadas en el
fondo del gabinete. La "tapa lateral de Ilenado
facil" debe estar orientadahacia la partetrasera
del gabinete.Cuandoeste posicionadacorrecta-
mente, el embolo se abrira y el agua fluira al
interior del gabinete. El nivel de agua perma-
necera automaticamente en aproximadamente
1/2" (13 mm) hastaque las botellasestenvadas.
Dejeque el filtro se sature durante 30 minutos
antesde utilizar la unidad.
Secci6n
saliente
Seha quitado la tapa pivotante para mayor claridad
23
Utilizacion de los controles
El punto en el que usted ajuste los niveles de
humedaddeseadosdependede sunivelde con-
fort personal, latemperatura exteriory latempe-
ratura interior.Serecomiendaun punto deajuste
inicial de humedadAMBIENTEdel 30 al 40 por
ciento, pero puede haber situaciones que
requieranun ajustedistinto.
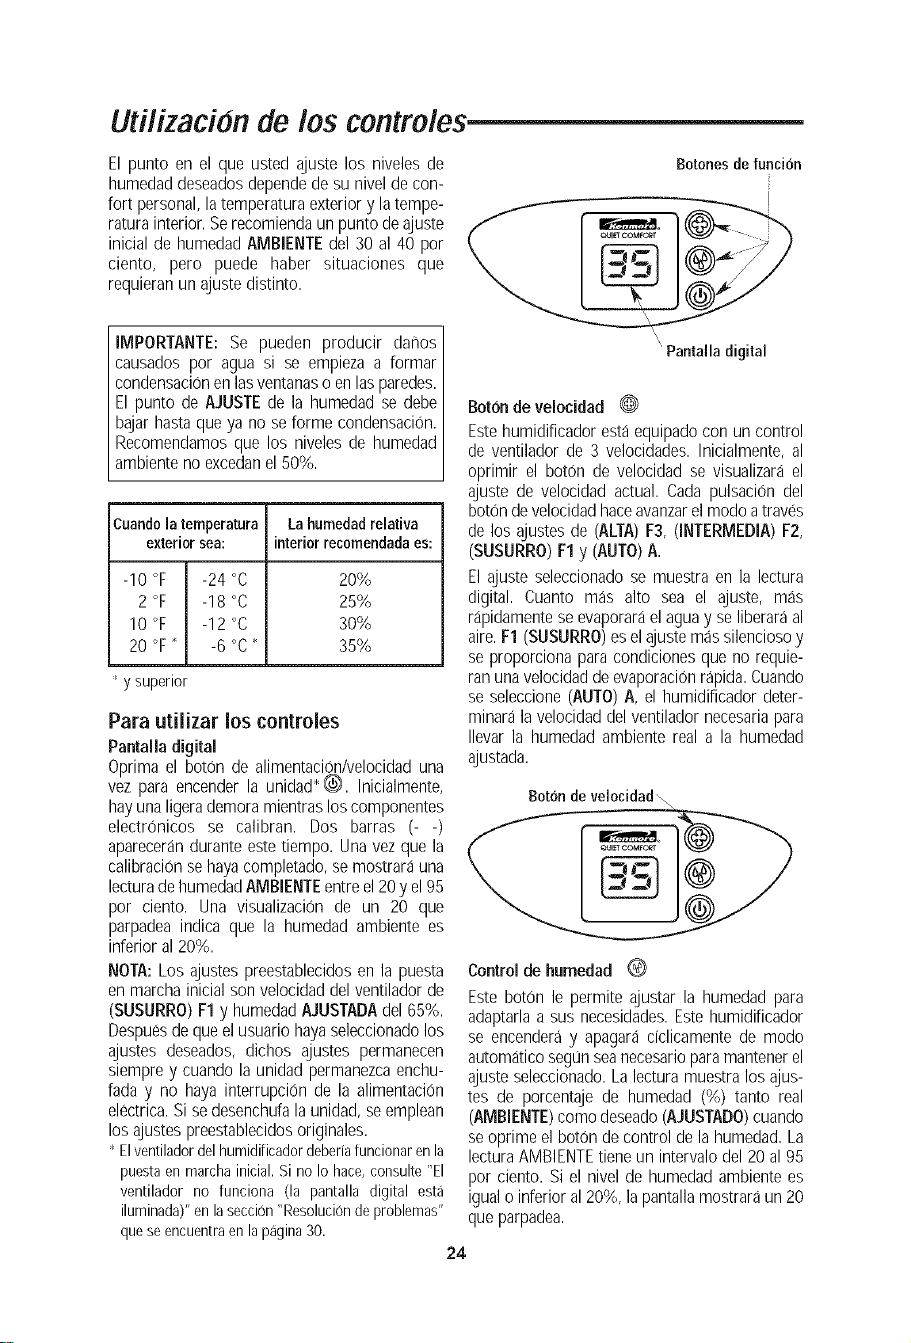
Botonesdefuncion
IMPORTANTE: Se pueden producir dar_os
causados por agua si se empieza a formar
condensaciOnenlasventanaso en lasparedes.
El punto de AJUSTEde la humedad se debe
bajarhastaque ya no se forme condensacion.
Recomendamosque los niveles de humedad
ambienteno excedanel50%.
Cuandola temperatura Lahumedadrelativa
exteriorsea: interiorrecomendadaes:
-10 °F -24 °C 20%
2 °F -18 °C 25%
10 °F -12 °C 30%
20 °F" -6 °C" 35%
' y superior
Para utilizar los centroles
Pantalla digital
Oprima el boron de alimentaciOn/velocidaduna
vez para encender la unidad_(_. Inicialmente,
hayuna ligerademora mientraslos componentes
electrOnicos se calibran. Dos barras (- -)
aparecerandurante estetiempo. Unavez que la
calibracionse hayacompletado,se mostrarauna
lecturadehumedadAMBIENTEentre el20y el95
por ciento. Una visualizaci0n de un 20 que
parpadea indica que la humedad ambiente es
inferior al 20%.
NOTA:Los ajustes preestablecidosen la puesta
en marchainicial son velocidaddelventiladorde
(SUSURRO)F1 y humedadAJUSTADAdel 65%.
Despuesdequeel usuario hayaseleccionadolos
ajustes deseados, dichos ajustes permanecen
siemprey cuando launidad permanezcaenchu-
fada y no haya interrupci0n de la alimentaci0n
electrica.Si sedesenchufala unidad, seemplean
los ajustespreestablecidosoriginales.
' Elventiladordelhumidifieadordeberiafuneionarenla
puestaen marchainieial.Si noIo hace,eonsulte"El
ventilador no funciona (la pantalla digital esta
iluminada)"enlaseccion"Resoluciondeproblemas"
queseeneuentraenlapagina30.
\
"Pantalla digital
Boronde velocidad 0
Estehumidificador estaequipadocon un control
de ventilador de 3 velocidades.Inicialmente, al
oprimir el boton de velocidad se visualizara el
ajuste de velocidad actual. Cada pulsaciOndel
borondevelocidadhaceavanzarelmodoatraves
de los ajustes de (ALTA)F3, (INTERMEDIA)F2,
(SUSURRO)F1y (AUTO)A.
El ajuste seleccionadose muestra en la lectura
digital. Cuanto mas alto sea el ajuste, mas
rapidamenteseevaporarael aguay seliberaraal
aire.F1 (SUSURRO)esel ajustemas silenciosoy
se proporciona para condiciones queno requie-
ranuna velocidadde evaporacionrapida.Cuando
se seleccione(AUTO)A, el humidificador deter-
minarala velocidaddelventilador necesariapara
Ilevar la humedad ambiente real a la humedad
ajustada.
Botondeveloeidad\
Control de humedad 0
Este boton le permite ajustar la humedad para
adaptarlaa sus necesidades.Estehumidificador
se encenderay apagara dclicamente de modo
autom_Jticoseg0nseanecesarioparamantenerel
ajusteseleccionado.Lalectura muestralos ajus-
tes de porcentaje de humedad (%) tanto real
(AMBIENTE)comodeseado(AJUSTADO)cuando
seoprime el boronde control de la humedad.La
lecturaAMBIENTEtieneun intervalodel 20 al95
por ciento. Si el nivel de humedad ambientees
igualo inferior al20%, la pantallamostraraun 20
queparpadea.
24
Utilizacion de los controles (continuacion)
La lecturadeAJUSTEtiene un intervalodel 25 al
65 por ciento y seajustaen incrementosde 5%.
AIoprimir inicialmente el boronde humedad,se
visualizara el ajuste de humedad actual. Cada
pulsacion adicionaldel boron aumenta el ajuste
en un 5%. Un punto de AJUSTEdel 65% hace
funcionar continuamente el humidiFicador,inde-
pendientemente de la lectura AIVIBIENTE.El
higrostato quedetecta las lecturas esta ubicado
en el cable de alimentacion. Asegt_resede que
estehigrostato este libre deobstrucciones.
Borondehumedad,,,
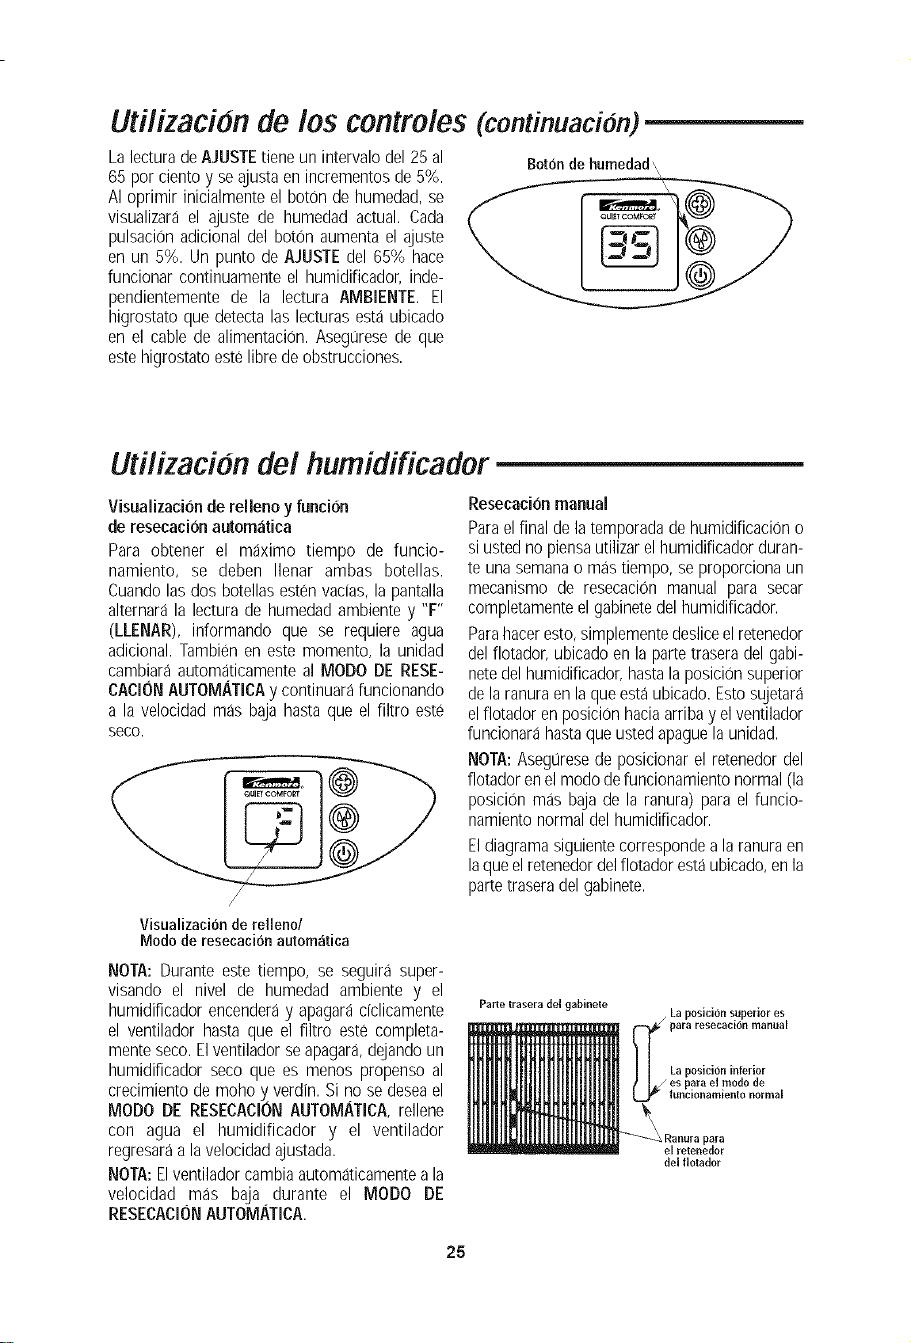
Utflizacidn del humidificador
Visualizacion de relleno y funcion
de resecacion automatica
Para obtener el maximo tiempo de funcio-
namiento, se deben Ilenar ambas botellas.
Cuandolas dos botellasestenvacias, la pantalla
alternarala lectura de humedadambientey "F"
(LLENAR), informando que se requiere agua
adicional.Tambien en este momento, la unidad
cambiara automaticamenteal MODO DE RESE-
CAOIONAUTOMATIOAy continuarafuncionando
a la velocidad mas baja hastaque el filtro este
seco.
Visualizacionderelleno/
Modode resecacionautomatica
NOTA:Durante este tiempo, se seguira super-
visando el nivel de humedad ambiente y el
humidiFicadorencenderay apagaradclicamente
el ventilador hasta que el Filtro este completa-
mente seco.Elventiladorseapagar& dejandoun
humidificador seco que es menos propenso al
crecimiento demoho y verdin. Si no se deseael
MODO DE RESECACIONAUTOMATICA,rellene
con agua el humidificador y el ventilador
regresaraa lavelocidadajustada.
NOTA:Elventiladorcambiaautomaticamenteala
velocidad mas baja durante el MODO DE
RESECACIONAUTOMATICA.
Resecaci6nmanual
Parael final dela temporadade humidificacion o
si ustedno piensautilizarel humidificadorduran-
te una semanao mas tiempo,se proporciona un
mecanismo de resecaciOnmanual para secar
completamenteel gabinetedel humidificador.
Parahaceresto,simplementedesliceelretenedor
delflotador, ubicado enla partetrasera del gabi-
notedelhumidificador,hastala posiciOnsuperior
de laranura en laque estaubicado. Estosujetara
elflotador enposiciOnhaciaarribay el ventilador
funcionarahastaqueusted@aguela unidad.
NOTA:AsegL_resede posicionarel retenedor del
flotadorenel modo defuncionamientonormal (la
posicion mas baja de la ranura) para el funcio-
namientonormal delhumidificador.
Eldiagramasiguientecorrespondea la ranuraen
laque el retenedordelflotador estaubicado,enla
partetraseradel gabinete.
Parle lrasera del gal_inele
La position superior es
para resecacion manual
La posici6n inferior
es para el modo de
|uncionamiento normal
Kanura para
el relenedor
del flolador
25
Utilizacion del humidificador (continuacion)
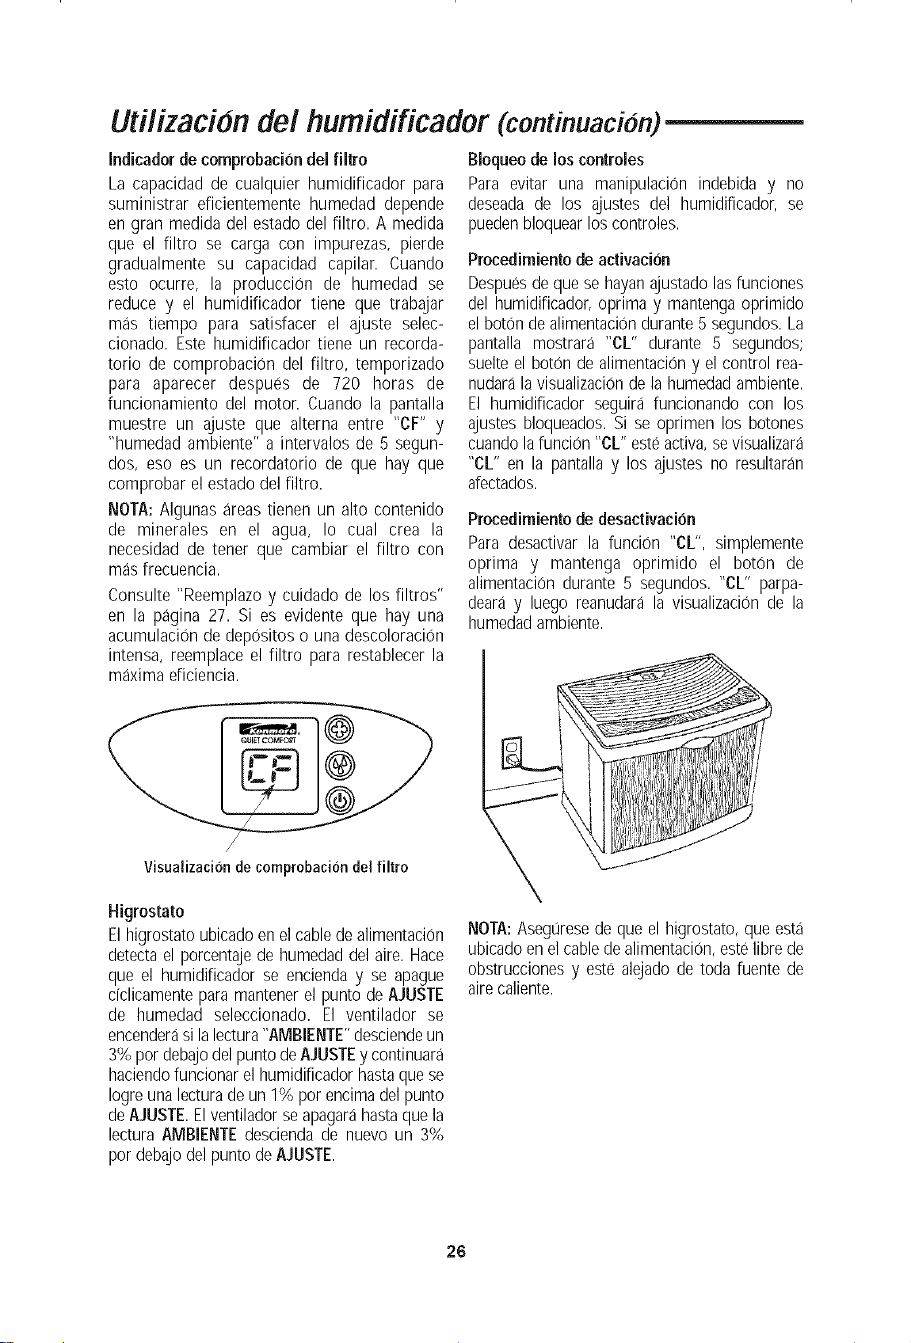
Indicadorde comprobaci6n del filtro
La capacidad de cualquier humidificador para
suministrar eficientemente humedad depende
en gran medida del estado del filtro. A medida
que el filtro se carga con impurezas, pierde
gradualmente su capacidad capilar. Cuando
esto ocurre, la producci0n de humedad se
reduce y el humidificador tiene que trabajar
mas tiempo para satisfacer el ajuste selec-
cionado. Este humidificador tiene un recorda-
torio de comprobacion del filtro, temporizado
para aparecer despues de 720 horas de
funcionamiento del motor. Cuando la pantalla
muestre un ajuste que alterna entre "CF" y
"humedad ambiente" a intervalos de 5 segun-
dos, eso es un recordatorio de que hay que
comprobar el estado delfiltro.
NOTA: Algunas areas tienen un alto contenido
de minerales en el agua, Io cual crea la
necesidad de tener que cambiar el filtro con
mas frecuencia.
Consulte "Reemplazo y cuidado de los filtros"
en la pagina 27. Si es evidente que hay una
acumulaci0n de depositos o una descoloraciOn
intensa, reemplace el filtro para restablecer la
maxima eficiencia.
Visualizacion de comprobaci6n del filtro
Higrostato
El higrostato ubicadoenel cabledealimentacion
detectael porcentajede humedaddel aire. Hace
que el humidificador se encienda y se apague
dclicamente para mantenerel punto de AJUSTE
de humedad seleccionado. El ventilador se
encenderasi lalectura"AMBIENTE"desciendeun
3% pordebajodelpunto deAJUSTEy continuara
haciendofuncionarel humidificadorhastaquese
Iogre unalectura deun 1% por encimadelpunto
deAJUSTE.Elventiladorseapagarahastaque la
lectura AMBIENTEdesciendade nuevo un 3%
por debajodelpunto de AJUSTE.
Bloqueode los controles
Para evitar una manipulaci6n indebida y no
deseada de los ajustes del humidificador, se
puedenbloquearlos controles.
Procedimiento de activacion
Despuesde quese hayanajustado lasfunciones
del humidificador, oprima y mantengaoprimido
el boton de alimentaciondurante5 segundos.La
pantalla mostrara "CL" durante 5 segundos;
suelteel boton de alimentaci0ny el control rea-
nudarala visualizacionde la humedadambiente.
El humidificador seguira funcionando con los
ajustes bloqueados.Si se oprimen los botones
cuando lafuncion "CL" esteactiva,sevisualizara
"CL" en la pantallay los ajustes no resultaran
afectados.
Procedimiento dedesactivacion
Para desactivar la funcion "eL", simplemente
optima y mantenga oprimido el boton de
alimentaci0n durante 5 segundos. "CL" parpa-
deara y luego reanudara la visualizacion de la
humedadambiente.
NOTA:AsegL]resede que el higrostato,que esta
ubicadoen el cabledealimentacion,estelibre de
obstruccionesy este alejadode toda fuente de
airecaliente.
26
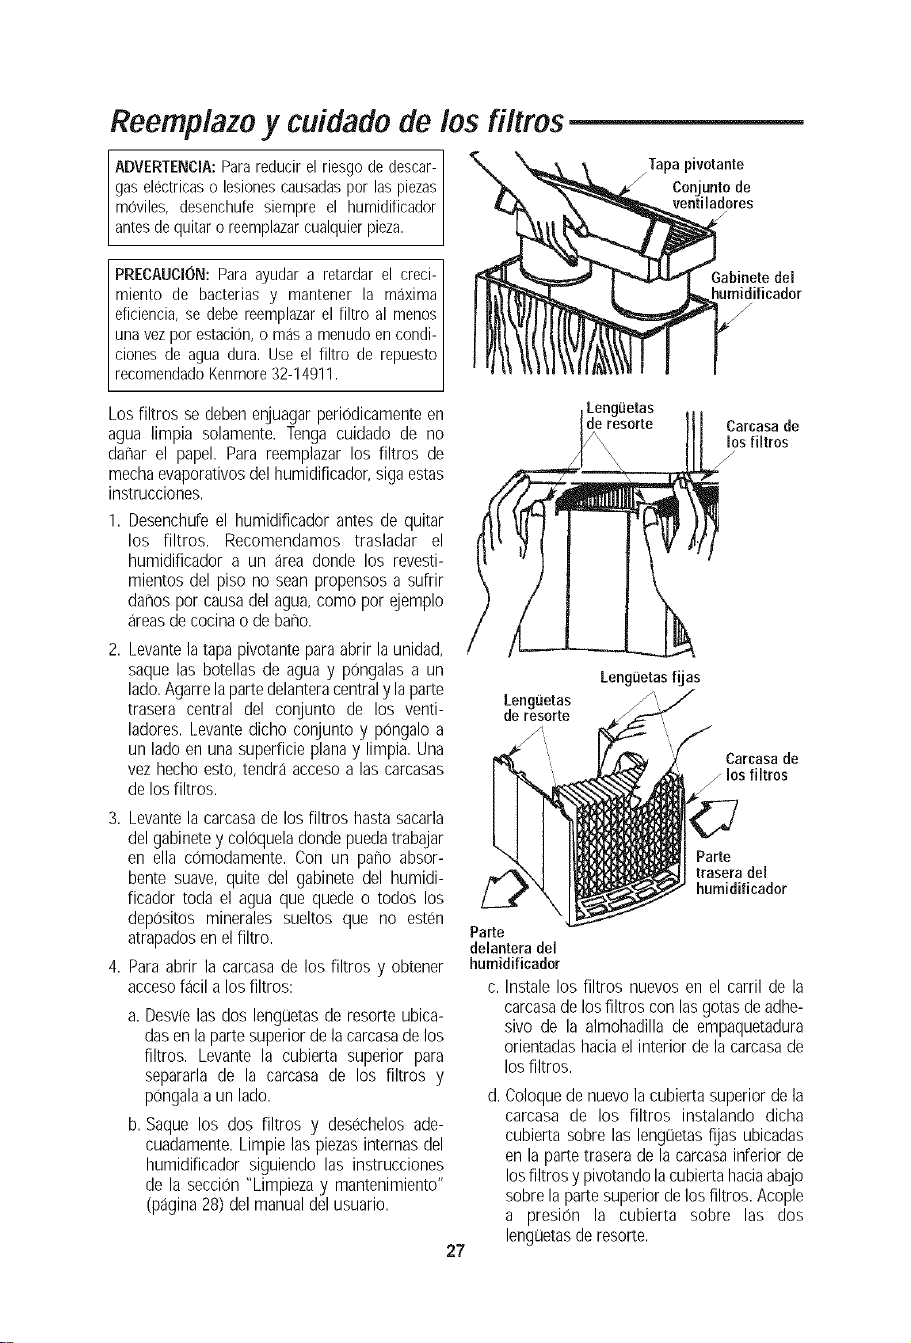
Reemplazo y cuidado de los filtros
ADVERTENCmA:Parareducirel riesgodedescar-
gas electricaso lesionescausadaspor las piezas
moviles, desenchufesiempre el humidificador
antesdequitaroreemplazarcualquierpieza.
Tapapivotante
conjunto de
ventiladores
PRECAUCION:Paraayudara retardar el creci-
miento de bacterias y mantener la maxima
eficiencia,se debereemplazarel filtro al menos
unavezporestacion,o masa menudoencondi-
ciones de agua dura. Use el filtro de repuesto
recomendadoKenmore32-14911.
Los filtros se deben enjuagarperiodicamenteen
agua limpia solamente. Tenga cuidado de no
darharel papel. Para reemplazar los filtros de
mechaevaporativosdel humidificador,sigaestas
instrucciones.
1. Desenchufeel humidificador antes de quitar
los filtros. Recomendamos trasladar el
humidificador a un area donde los revesti-
mientos del piso no sean propensosa suffir
darhospor causadel agua,como por ejemplo
areasde cocina ode bar_o.
2. Levantela tapa pivotantepara abrir launidad,
saque las botellas de agua y pongalasa un
lado.Agarrelapartedelanteracentraly la parte
trasera central del conjunto de los venti-
ladores. Levantedicho conjunto y pongalo a
un lado enuna superficie planay limpia. Una
vez hecho esto,tendra accesoalas carcasas
de losfiltros.
3. Levantela carcasade los filtros hastasacarla
delgabinetey coloqueladonde puedatrabajar
en ella comodamente. Con un pano absor-
bente suave, quite del gabinete del humidi-
ficador toda el agua que quede o todos los
depositos minerales sueltos que no esten
atrapadosen elfiltro.
4. Para abrir la carcasade los filtros y obtener
accesofacil alos filtros:
a. Desvielas dos lenguetasde resorte ubica-
dasen la partesuperior dela carcasade los
filtros. Levante la cubierta superior para
separarla de la carcasa de los filtros y
pongalaa un lado.
b. Saque los dos filtros y desechelos ade-
cuadamente.Limpielas piezasinternasdel
humidificador siguiendo las instrucciones
de la secciOn"Limpieza y mantenimiento"
(pagina28)del manualdel usuario.
27
Lenguetas
de resorte
Parte
delantera del
humidificador
Lenguetas
de resorte Carcasa de
los filtros
/
LengiJetas fijas
Carcasa de
los filtros
Parte
trasera del
humidificador
c. Instalelos filtros nuevos en el carril de la
carcasade losfiltros con lasgotasde adhe-
sivo de la almohadilla de empaquetadura
orientadashacia elinterior de la carcasade
los filtros.
d. Coloquede nuevola cubiertasuperiorde la
carcasa de los filtros instalando dicha
cubiertasobre las lengOetasfijas ubicadas
en laparte traserade la carcasainferior de
losfiltros y pivotandola cubiertahaciaabajo
sobrela parte superiorde los filtros. Acople
a presiOn la cubierta sobre las dos
lenguetasderesorte.
Reemplazo y cuidado de los filtros (continuacion)
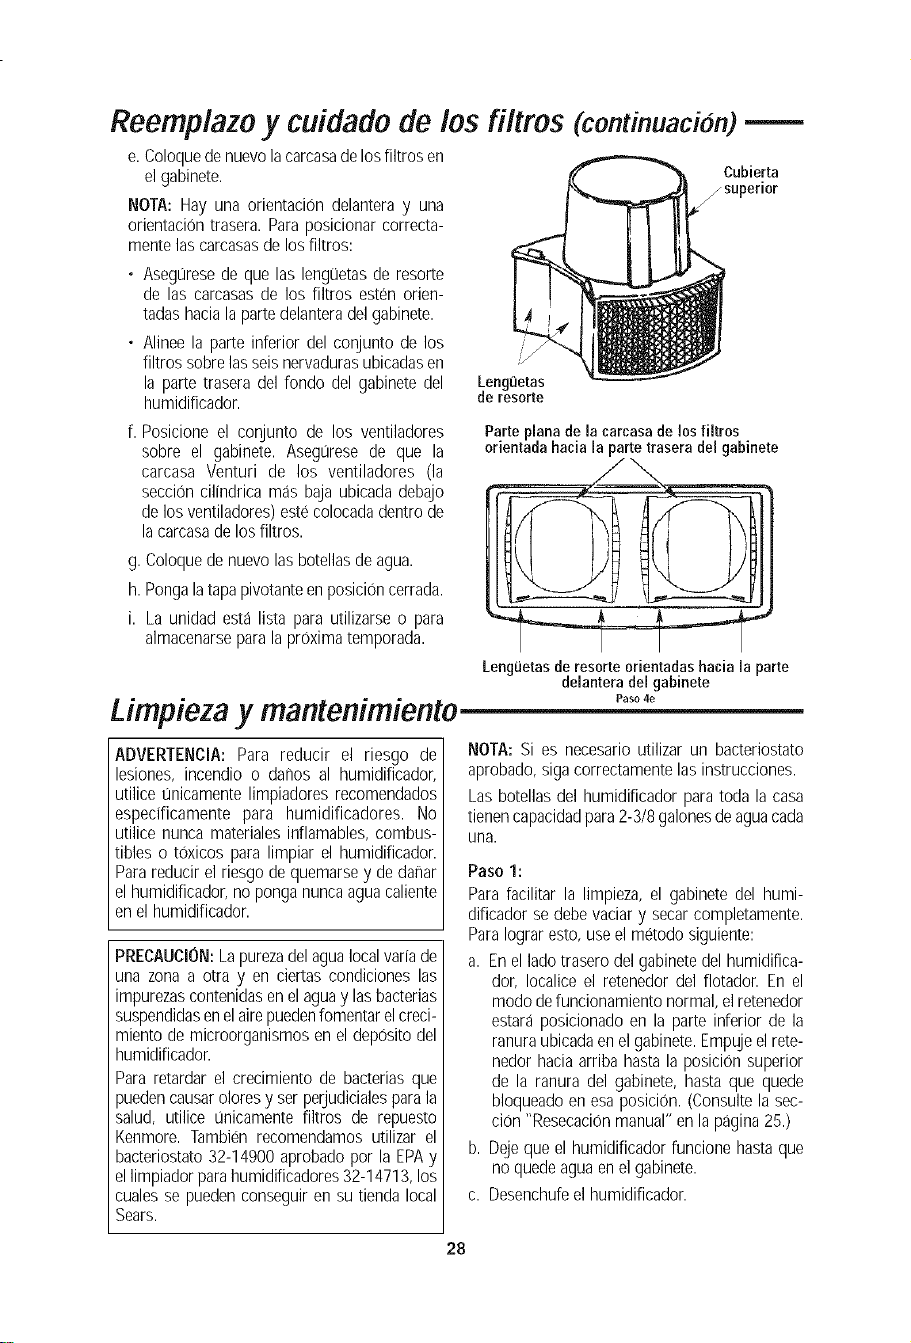
e.Coloquedenuevolacarcasadelos filtros en
el gabinete.
NOTA:Hay una orientacion delanteray una
orientacion trasera. Paraposicionar correcta-
mente lascarcasasde los filtros:
• Aseguresede que las lengL3etasde resorte
de las carcasasde los filtros esten orien-
tadashaciala parte delanteradel gabinete.
• Alinee la parte inferior del conjunto de los
filtros sobrelas seisnervadurasubicadasen
la partetrasera del fondo del gabinete del
humidificador.
f. Posicione el conjunto de los ventiladores
sobre el gabinete. Asegurese de que la
carcasa Venturi de los ventiladores (la
seccion cilindrica m_Jsbaja ubicada debajo
delos ventiladores)estecolocadadentrode
la carcasade losfiltros.
g. Coloquede nuevolas botellasde agua.
h. PongalatapapivotanteenposiciOncerrada.
i. La unidad esta lista para utilizarse o para
almacenarseparala prOximatemporada.
Cubierta
/superior
Lenguetas
de resorte
Parte plana de la carcasa de los filtros
orientada haeia la parte trasera del gabinete
Lenguetasde resorte orientadashacia la parte
delantera de[ gabinete
Limpieza y mantenimiento Paso,e
ADVERTENClA: Para reducir el riesgo de
lesiones, incendio o dafios al humidificador,
utilice unicamentelimpiadores recomendados
especificamente para humidificadores. No
utilice nunca materiales inflamables,combus-
tibles o toxicos para limpiar el humidificador.
Parareducir el riesgode quemarsey de dafiar
el humidificador,no ponga nuncaaguacaliente
en elhumidificador.
PRECAUCION:Lapurezadelagualocalvariade
una zonaa otra y en ciertas condiciones las
impurezascontenidasen el aguay las baderias
suspendidasenelairepuedenfomentarelcreci-
miento de microorganismosen el deposito del
humidificador.
Para retardar el crecimiento de bacterias que
)uedencausaroloresy ser perjudicialesparala
salud, utilice L_nicamentefiltros de repuesto
Kenmore. Tambien recomendamos utilizar el
bacteriostato32-14900 aprobadopor la EPAy
el limpiadorparahumidificadores32-14713, los
cuales se puedenconseguir en su tienda local
Sears.
NOTA:Si es necesarioutilizar un bacteriostato
aprobado,sigacorrectamentelas instrucciones.
Las botellasdel humidificador para toda la casa
tienencapacidadpara2-3/8 galonesde aguacada
una.
Paso 1:
Para facilitar la limpieza,el gabinete del humi-
dificador se debevaciar y secarcompletamente.
ParaIograresto,useel metodosiguiente:
a. Enel ladotrasero delgabinetedel humidifica-
dor, Iocalice el retenedor del flotador. En el
modo defuncionamientonormal,el retenedor
estara posicionado en la parte inferior de la
ranuraubicadaenel gabinete.Empujeelrete-
nedor haciaarriba hastala posiciOnsuperior
de la ranura del gabinete, hastaque quede
bloqueadoen esa posicion. (Consultelasec-
cion "Resecacionmanual"en la pagina25.)
b. Dejeque el humidificador funcione hastaque
no quedeaguaenel gabinete.
c. Desenchufeel humidificador.
28
Limpieza y mantenimiento (continuacidn)
ADVERTENCIA:Parareducir el riesgo de des-
cargaselectricas,desenchufesiempreel humi-
dificador antes de limpiarlo o hacerle servicio
de ajustes y reparaciones.Si el humidificador
no estadesenchufado,el ventilador podria po-
nerseen marchadespuesdequitar lacarcasa.
Paso 2:
Para quitar las piezas
a. Levante la tapa pivotante para abrir el
humidificador, saque las botellas de agua y
pOngalasa un lado. Agarre laparte delantera
central y la parte trasera central del conjunto
de los ventiladores. Levantedicho conjunto y
pongalo a un lado en una superficie plana y
limpia. Unavezhechoesto, setendraaccesoa
las carcasasdelos filtros.
b. Antesdequitar las piezasinternasdelgabinete
del humidificador,recomendamostrasladarel
humidificador a un area donde los revesti-
mientos del piso no sean propensosa sufrir
danos por causadel agua,como por ejemplo
un area de cocina o de bano. Levante los
conjuntos de las carcasasde los filtros hasta
sacarlosdelgabinetey pongalosa un lado.
c. Saqueelflotador delnivelde aguadelgabinete
del humidificador comprimiendo el retenedor
del flotador para soltarlo del gabinete. El
gabinetedebeestarvado antesdelimpiarlo. El
gabinete consiste en las areas inferiores del
humidificador donde estanlos filtros durante
el tiempo defuncionamientonormal.
d. Vacieel gabinetehastaque no quedenadade
agua.
e. Vayaa "Mantenimientocadados semanas" o
"Mantenimiento definal detemporada".
f. quite losfiltros viejosy desechelosapropiada-
mente de la manera que se describe en las
paginas27-28.
Paso 3:
Instale los filtros nuevos (compre las almoha-
dillas de filtro de mecha evaporativo correctas
32-14911 para su humidificador) en la ubica-
cion donde estaban posicionados los filtros
viejos. Instalelas carcasasde losfiltros con los
filtros nuevos en la ubicaciOn correcta. Rein-
stale elflotador del nivel de agua.
NOTA:El retenedor del flotador se debe posi-
cionar en el modo de funcionamiento normal.
Asegurese de que este posicionado en la parte
inferior de laranura ubicada en la parte trasera
del gabinete (veael diagrama de la ranura que
apareceen la pagina 25).
Posicioneel conjunto delos ventiladoressobreel
gabinete y devuelva el humidificador a la
ubicaciondeseadaparautilizarlo. 29
Rellene las botellas del humidificador con agua
limpia y ffia y pOngalasde nuevoen el gabinete.
Enchufela unidad en un tomacorrientede 120 V
C.A. y ajuste los controles siguiendo las
instrucciones de la secciOn"UtilizaciOnde los
controlesdel humidificador" (pagina24) de este
manual.
Mantenimiento cada dos semanas
Remocion de costra
I. Lleneel deposito conaguay armadaunataza
de 236 ml (8 onzas) de vinagre blanco sin
diluir. Dejequela solucion permanezcaenel
deposito durante20 minutos.
2. Limpie todas las superficies interiores con
un cepillo blando. Humedezca un pano
suavecon vinagre blanco sin diluir y limpie
el depositoparaquitar la costra.
3. Enjuague a fondo el deposito con agua
templada limpia para quitar la costra y la
soluciOnlimpiadora antesde desinfectar el
deposito.
Desinfecci6n del gabinete del
humidificador y las botellas de agua
1. Llene el gabinete del humidificador con 1
cucharadita de blanqueador de cloro en
1 galon de agua. Deje que la soluciOn
permanezcaen la basedurante 20 minutos,
agitandola cuidadosamente cada pocos
minutos. Moje todas las superficies que
normalmenteestenexpuestasa agua.
2. Vacie el gabinete del humidificador des-
pugs de 20 minutos. Enjuaguelocon agua
hasta que el olor a blanqueador haya
desaparecido.Dejeque la unidad se seque
completamente.
3. Las botellasdeagua sedeben limpiarde la
misma manera.
Mantenimiento de final de temporada
1. Siga las instrucciones de "Mantenimiento
cadados semanas" al final de la temporada
de humidificaciOn.
2. Saquey tire los filtros.
3. Dejeque el humidificador se sequecomple-
tamenteantesdeguardarlo.No Ioguardecon
aguadentro del gabineteo de las botellasde
agua.
4. Guardeel humidificadoren un lugarfresco y
seco.
5. Instale un filtro nuevo en el humidificador
limpio antes de que comience la proxima
temporada.
6. El procedimiento de "Mantenimiento cada
dos semanas" tambien se recomienda si
usted no piensa utilizar el humidificador
durante unasemanao mas.
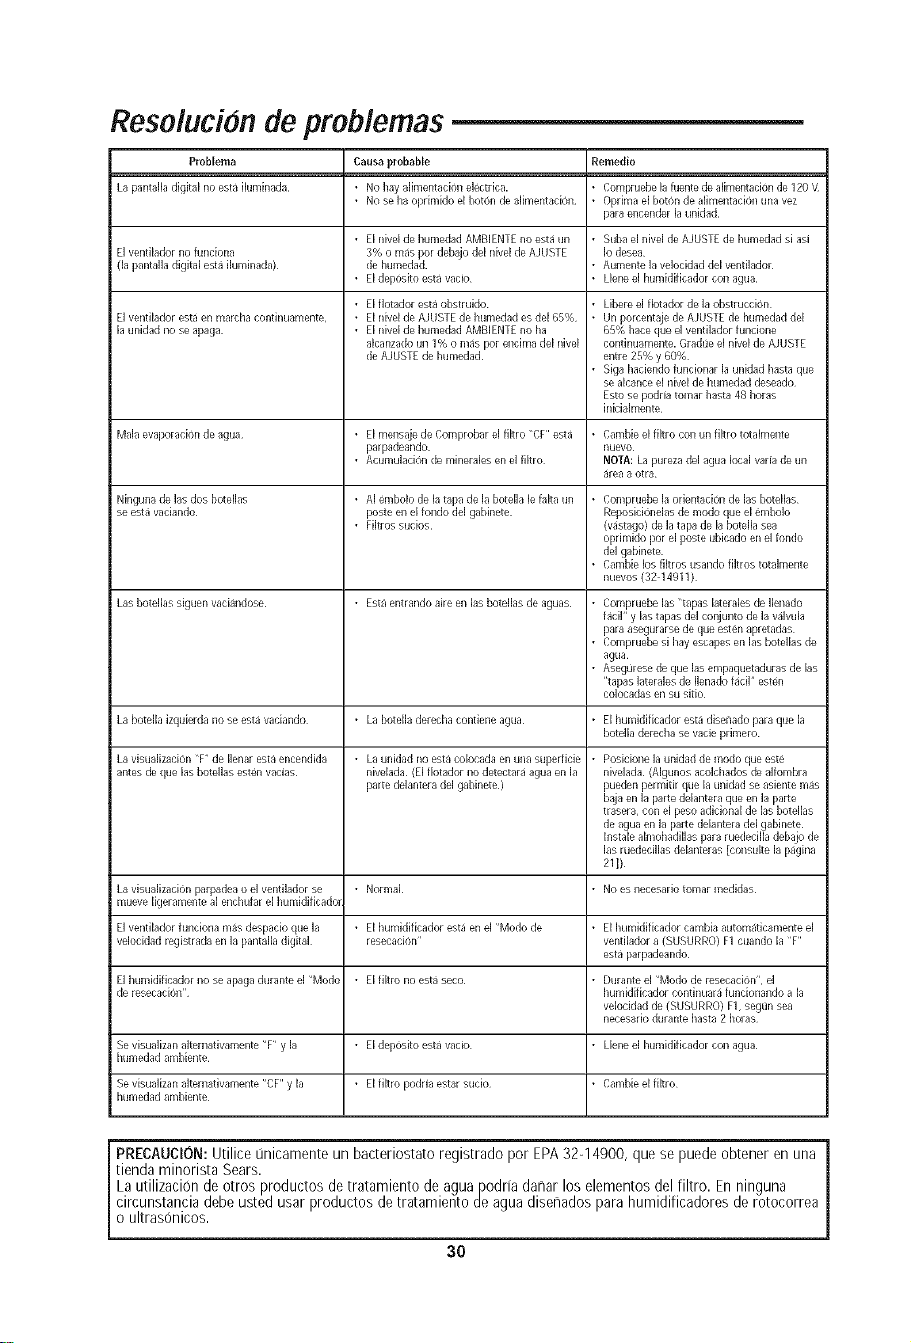
Resolucion de problemas
Problema Causa probable Remedio
La pantalla digital no esta iluminada • No hay aiimentadon electrica. • Compruebe la fuente de alimentacion de 120 \t
• No se ha oprimido el boron de alimentacion • Oprima el boron de alimentadon una vez
paraencender la unidad
• El rlivel de humedad AMBIENTE rio esta un • Suba el nivel de AJUSTE de humedad si asJ
El ventilador no funciona 3% o mas por debajo del nivel de AJNSTE Io desea
([a pantalla digital esta iluminada) de humedad. • Aumente la velocidad de[venfilador
• EidepositoestavacJo • Lieneel humidfficadorconagua
• El flotador esta obstruido • Libere el fiotador de la obstrucci6rl
El ventilador esta en marcha contbluamente, • El nivel de AJNSTEde humedad es de[ 65% • Un porcentaje de AJUSTE de humedad del
la unidad no se apaga • El nivel de humedad AMBIENTE no ha 65% hace que el ventilador fundone
aicanzado un 1% o mas pot endma del nivel continuamente. Gradlie el nivel de AJNSTE
de AJUSTE de humedad entre 25% y 60%
• Siga hadendo funcionar la unidad basra que
se alcance el nivel de humedad deseado
Estose podda to€hat basra 48 horas
blidalmente
Mala evaporacion de agua • EI mensaje de Comprobar el fiitro "CF' esta • Cambie el fiitro con un fiitro totaimente
parpadeando, nuevo
• Acumulacion de minerales en el fikro NOTA: La pureza del agua local varia de un
areaa otra
Ninguna de las dos botellas • AI embolo de la tapa de la bote[la lefaita un • Compruebe laorientation de las botellas
se esta vadando poste en el fondo del gabinete Reposicionelas de modo que el embolo
• Filtros sucios Nastago) de la tapa de la botelia sea
oprimido por el poste ubicado en el rondo
del gabinete.
• Cambie los fikros usando filtros totalmente
nuevos (32 14911)
i Las _ote as slguen vaclandose • Esta entrando aire en las botellas de aguas • Compruebe las "tapas laterales de lienado
facil" y las tapas del conjunto de la valvula
paraasegurarse de que esten apretadas
• Compruebe si hay escapes en las botelias de
agua
• Asegurese de que las empaquetaduras de las
"tapas laterales de Ilenado facil" esten
colocadas en su sifio
La botelia izquierda no se esta vaciando • La bote[la derecha contiene agua • El humidificador esta disenado para que la
botelia derecha se vacie primero
La visualizacion 'T" de Ilenar esta encendida • La unidad no esta colocada en una superfide • Posicione la unidad de modo que este
antes de que las botellas esten vacias nive[ada (Elfiotador no detectara agua en la nivelada (Algunos acolchados de alfombra
parte delantera del gabinete ) pueden permitir que la unidad se asiente mas
baja en la parte delantera que en la parte
trasera, con el peso adicional de las botelias
de agua en la [taRe delantera del gabinete
[nstale aimohadiilas para ruededlia debajo de
las ruedecillas de[anteras [consuke la pagina
21])
La visualization parpadea o el ventilador se • Normal • No es necesario tomar medidas
mueve ligeramente al enchufar el humidificador
I Elventiladorfundonamasdespacioquela • Eihumidificadorestaenel"Modode • Eihumidificadorcambiaautomaticamenteel
velocidad registrada en la pantalia digital resecadon" ventilador a (SUSURRO) F1 cuando la "F"
esta parpadeando
i El humkJificador no se apaga durante el "Modo • El fikro no esta seco • Durante el "Modo de resecacion", el
de resecacioiP' humidificador contbluara fundonando a la
velocidad de (SUSURRO) F1,seg[in sea
necesario durante basra 2 horas
Se visualizan altemativamente "F' yla • Eideposito esta vado • Lieneel humidificador con agua
humedad ambiente
Se visualizan altemativamente "CF" y la • El fikro podrJaestar sucio • Cambie elfiitro
humedad ambiente
PRECAUCION:Utilice [inicamente un bacteriostato registrado por EPA32-14900, que se puede obtener en una
tienda minorista Sears.
La utilizacion de otros productos detratamiento de aguapodria danar los elementos del filtro. Enninguna
circunstancia debe usted usar productos detratamiento deagua disenados para humidificadores derotocorrea
o ultrasonicos.
30
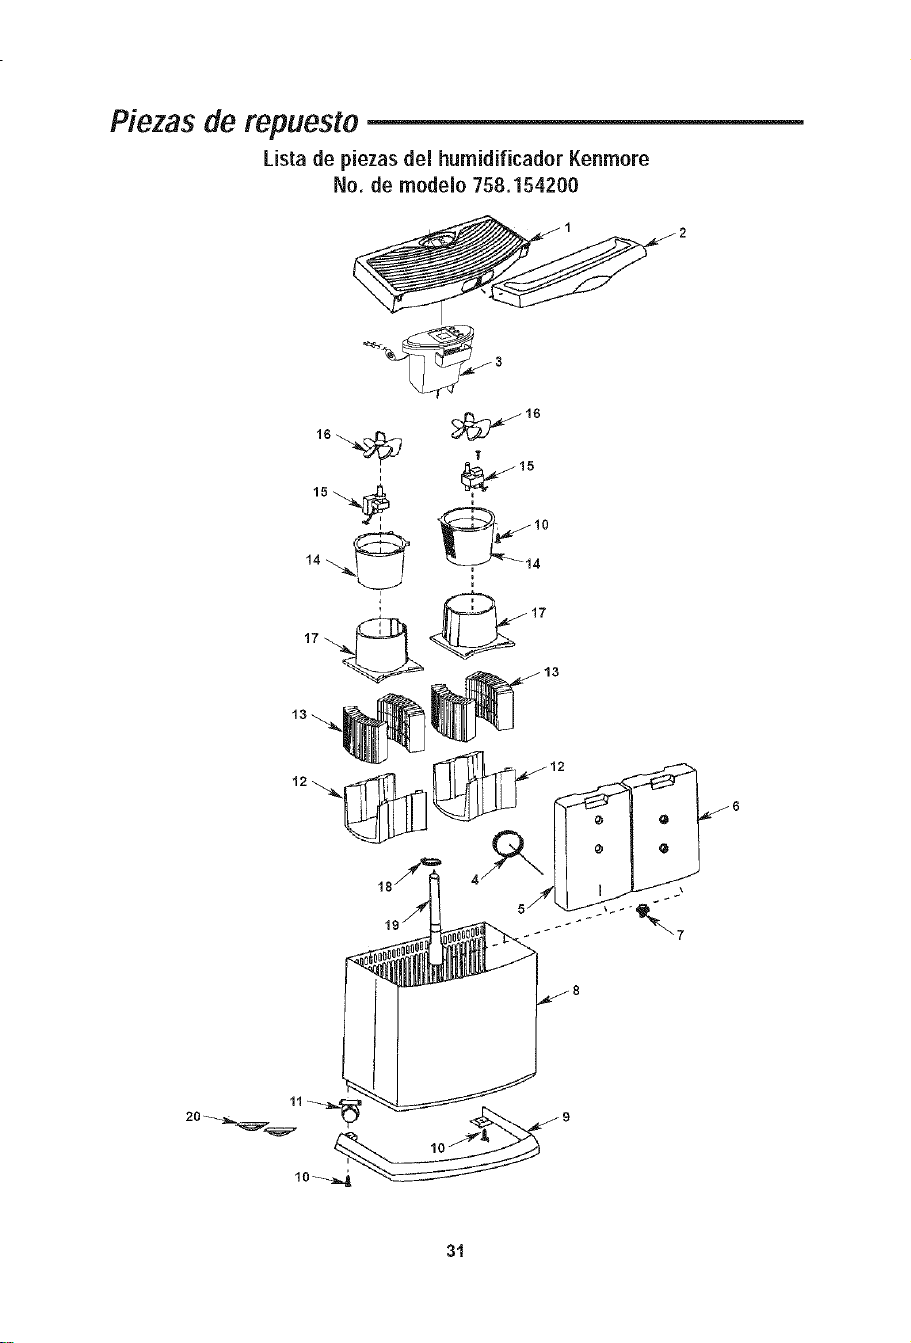
Piezasde repuesto
Lista de piezas del humidificador Kenmore
No. de modelo 758.154200
II _15
31
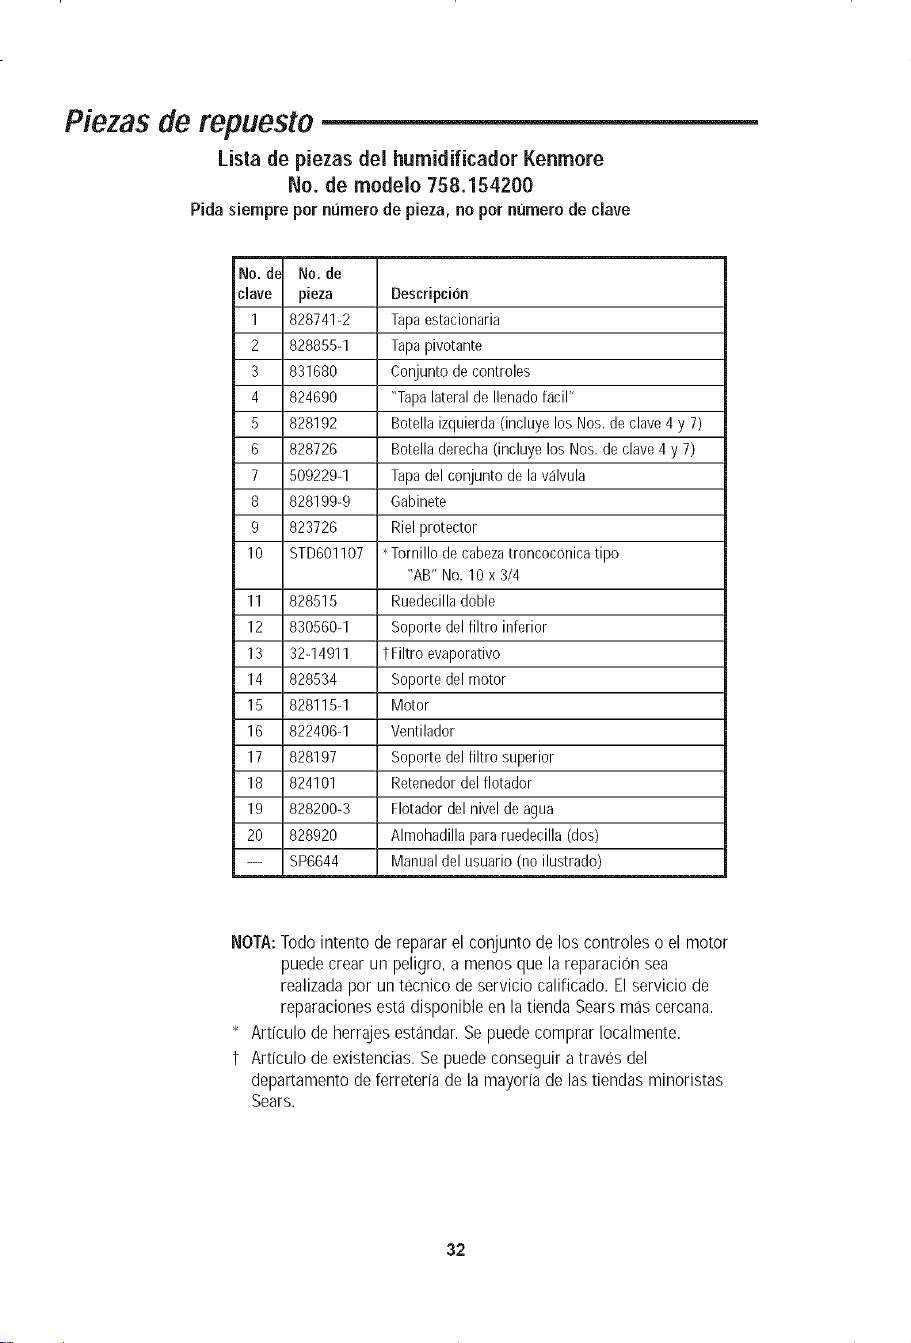
Piezas de repuesto
Lista de piezas dei humidificador Kenmore
No. de modelo 758.154200
Pida siempre pot numero de pieza, no pot numero de dave
No. de No. de
clave pieza Deseripcion
1 828741-2 Tapaestacionaria
2 828855-1 Tapapivotante
3 831680 Conjunto de eontroles
4 824690 "Tapalateral de Ilenadofacil"
5 828192 Botella izquierda (ineluye los Nos. de clave 4 y 7)
6 828726 Botella derecha (incluye los Nos. de clave 4 y 7)
7 509229-1 Tapadel conjunto de la valvula
8 828199-9 Gabinete
9 823726 Riel protector
10 8TD601107 ' Tornillo de cabezatroncoconica tipo
"AB" No. 10 x 3/4
11 828515 Ruedecilladoble
12 830560-1 Soporte del filtro inferior
13 32-14911 t Filtro evaporativo
14 828534 Soporte del motor
15 828115-1 Motor
16 822406-1 Ventilador
17 828197 Soporte del filtro superior
18 824101 Retenedordel flotador
19 828200-3 Flotador del nivel de agua
20 828920 Almohadilla para ruedecilla (dos)
-- 8P6644 Manual del usuario (no ilustrado)
NOTA:Todo intento de reparar el conjunto de los controles o el motor
puedecrear un peligro, a menos que la reparaci0n sea
realizadapor un tecnico de servicio calificado. El servicio de
reparaciones esta disponible en latienda Searsmas cercana.
* Articulo de herrajesestandar.Sepuede comprar Iocalmente.
t Articulo de existencias. Se puedeconseguir atraves del
departamento de ferreteria de la mayoria de las tiendas minoristas
Sears.
32
Notes / Notas
33

Notes / Notas
34

Notes / Notas
35
Your Home
For repair - in your home - of all major brand appliances,
lawn and garden equipment, or heating and cooling systems,
no matter who made it, no matter who sold it!
For the replacement parts, accessories and
owner's manuals that you need to do-it-yourself.
For Sears professional installation of home appliances
and items like garage door openers and water heaters.
1-800-4-MY-HOME _' Anytime, day or night
(1-800-489-4663) (U.S.A. and Canada)
www.sears.com www.sears.ca
Our Home
For repair of carry-in products like vacuums, lawn equipment,
and electronics, call or go on-line for the nearest
Sears Parts and Repair Center.
1-800-488-1222 Anytime, day or night (U.S.A. only)
www.sears.eom
To purchase a protection agreement (U.S.A.) or
maintenance agreement (Canada) on a product serviced by Sears:
1-800-827-6655 (U.S.A.) 1-800-361-6665 (Canada)
Para pedir servicio de reparaci6n a
domicilio, y para ordenar piezas:
1-888-SU-HOGAR sM
(1-888-784-6427)
Au Canada pour service en fran£ais:
1-800-LE-FOYER M°
(1-800-533-6937)
"i iiiii!ii!ii!ii!ii!ii!ii!ii!ii!ii!ii!ii!ii!ii!ili!:!i
'iiiiiiiiiiiiii_ii
iiiiiiiiiiiiiiiii
iiiiiiiiiiiiiiiii
iiiiiiiiiiiiiiiii
iiiiiiiiiiiiiiiii
iiiiiiiiiiiiiiiii
iiiiiiiiiiiiiiiii
iiiiiiiiiiiiiiiii
iiiiiiiiiiiiiiiii
iiiiiiiiiiiiiiiii
iiiiiiiiiiiiiiiii
iiiiiiiiiiiiiiiii
iiiiiiiiiiiiiiiii
iiiiiiiiiiiiiiiii
iiiiiiiiiiiiiiiii
iiiiiiiiiiiiiiiii
iiiiiiiiiiiiiiiii
iiiiiiiiiiiiiiiii
iiiiiiiiiiiiiiiii
iiiiiiiiiiiiiiiii
iiiiiiiiiiiiiiiii
iiiiiiiiiiiiiiiii
iiiiiiiiiiiiiiiii
iiiiiiiiiiiiiiiii
iiiiiiiiiiiiiiiii
iiiiiiiiiiiiiiiii
iiiiiiiiiiiiiiiii
iiiiiiiiiiiiiiiii
iiiiiiiiiiiiiiiii
iiiiiiiiiiiiiiiii
iiiiiiiiiiiiiiiii
iiiiiiiiiiiiiiiii
iiiiiiiiiiiiiiiii
iiiiiiiiiiiiiiiii
iiiiiiiiiiiiiiiii
iiiiiiiiiiiiiiiii
iiiiiiiiiiiiiiiii
iiiiiiiiiiiiiiiii
iiiiiiiiiiiiiiiii
iiiiiiiiiiiiiiiii
iiiiiiiiiiiiiiiii
iiiiiiiiiiiiiiiii
iiiiiiiiiiiiiiiii
iiiiiiiiiiiiiiiii
iiiiiiiiiiiiiiiii
iiiiiiiiiiiiiiiii
@ Sears, Roebuck and Co.
® Registered Trademark / TMTrademark / s_Service Mark of Sears, Roebuck and Co.
® Marca Registrada / TMMarca de Fabrica / s_qMarca de Servicio de Sears, Roebuck and Co.
McMarque de commerce / MDMarque deposee de Sears, Roebuck and Co.
Part No. SP6644 Form No. SP6644 Printed in Canada 05/06