User Gudie hOmeLabs HME020390N Tabletop
- In the event this product malfunctions or customer believes it is defective. the customer should contact Customer Service and retain the defective product pending further instructions.
- Defective product should be clearly marked or stored where it cannot be used again by mistake. Failure to retain the product may impede hOme’s ability to correct any legitimate problem and may limit the extent to which hOme may provide recourse.
Congratulations
- Don’t forget to register your product at homelabs.com/reg
- Although greatly appreciated. product registration is not
• READ AND SAVE THESE INSTRUCTIONS.
• Always disconnect the appliance before any cleaning or maintenance.
• CAUTION: Place the appliance and connected cord WELL so that the appliance is not likely to be
• CAUTION: Do not overfill or clean the appliance and remove the heating element portion of the
• Do not use abrasive solvent to clean any part of the appliance.
• If the supply cord is damaged. it must be replaced by the manufacturer. its service agent. or
• This appliance may be operated by children ages 8 and up and by people with limited physical.
• The appliance should always be placed on a firm. flat. waterproof surface out of reach of patients.
• Allow the appliance to cool down before assembling. dismantling. and prior to cleaning.
• Before connecting the appliance to a wall socket. ensure that the local electrical current matches
• Do not immerse the device into water or other liquid.
• The appliance should not be left unattended in a closed room. Leave room door partly open. Do not
• The appliance should always be unplugged and emptied when not in operation or while being
• Do not operate the appliance without water. Turn off and unplug unit when water tank is empty.
• Appliance requires regular cleaning. Refer to and follow cleaning instructions.
• Do not operate outdoors. This appliance is intended for indoor residential use only.
• Do not attempt to repair or adjust any electrical or mechanical functions on this appliance. Doing
• Do not place in direct sunlight. high-temperature areas. near computers. or sensitive electronic
• Do not add any medications into mist outlet. base. or water tank.
Important Safety Instructions
- SAVE THESE INSTRUCTIONS
- For Household Use Only
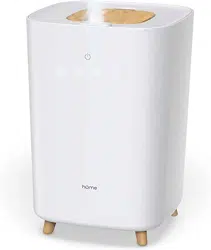
- Understanding Your Humidifier
- Accessories
- Diffuser Pad × 5 Power Cable Filter Brush
- Install the Float Pad to Control Water Flow
- Float pad is a controller of water flow from water tank on ultrasonic chip. Insert the float pad into 1 and press securely into the slot of 2.
Main Body
- Power Button Touch Panel Timer Indicator Sleep Indicator Spraying Indicator Water Level Indicator
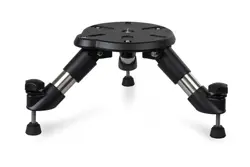
- Position the appliance
- Place the Ultrasonic Humidifier on an elevated surface (i.e. a table) around 23.6 in height as the below figure shows.
Fill water
- Remove water tank cover and fill the tank with water. Make sure the water level does not exceed
- After running for a period of time. remember to refill water to ensure constant operation.
Error warnings:
- If the buzzer beeps twice. the water tank is taken out from the device during operation. When
- Water-shortage warning: The red LED light will flash 5 times. the buzzer will beep 5 times. and
- Full-water warning: The four white LED lights will flash 5 times. the buzzer will beep 5 times. and the
Add aroma
- Take out the aroma tray. add 2-3 drops of essential oils to the diffuser pad. and insert the aroma tray back into the unit. Install the water tank cover. the top cover of the humidifier. the filter. and the filter cover.
Nozzle
- Diffuser pad
- Aroma tray
- The convex point must be put outward to align with the dented point on the unit during installation.
- Operating Instructions
- Operating Instructions
- Power on / off
• Connect the power cable to the back of the humidifier
• To power on the humidifier. tap the power button. The
• To power off the humidifier. tap the power button.
Adjusting mist output
- If you notice water collecting around the machine. lower mist output. Tap the spraying button to cycle among low. medium. and high speed.
- Recommended speed for different areas:
- Low speed: Under 10 m2
- Medium speed: 10–19 m2
- High speed: 20–25 m2
Set the timer
- The default mode is no timer. Tap the timer button repeatedly to cycle among no timer or 2. 4. or 6 hours.
- Check below figure to know which timer option you have chosen if you forget how many times you have tapped.
- No timer 2 hours 4 hours 6 hours
Sleep mode
- Tap the sleep button to access sleep mode.
- To exit sleep mode. touch the sleep button. To exit sleep mode. tap the sleep button.
Drain water
- Pour out water as below figure shows.
- Use a cotton swab to clean the ultrasonic chip
- Low Med High
Cleaning and Maintenance
• Always disconnect the device before any cleaning or maintenance.
• Drain the water out of the device.
• Place the device parts at ventilating place to dry completely.
• Clean the device regularly to ensure good performance.
• Do not wash any components of this humidifier in the dishwasher.
• Do not store with water inside the base or water tank.
Replace the filter
- Remove the filter grill and set aside. Pull out old filter. replace with a new one. and place the filter grill back on top.
- Handle Buckle
PROBLEMS SOLUTIONS
- “My device is on but it’s not producing enough mist.”
- Check to see if there is enough water in the tank. Fill with cool water.
- Make sure your device is placed on a level surface.
- “My device is not producing any mist at all.”
- The water level where the ultrasonic chip is located is too high. Take out the water tank. pour the water out. clean the silicon inside the water tank. and check to make sure the float is not reversed.
- If there is no red light alarm. no mist after turning on the unit. please contact customer service as your ultrasonic chip might be broken.
- “There’s water accumulating on the top cover of my device.”
- Refer to the “Add aroma” section and make sure your nozzle is not on backwards.
- Look at the surrounding area to make sure there is nothing blocking the nozzle.
- Make sure your diffuser pad is correctly installed by referring to the “Add aroma” section.
- Monitor your humidity levels. High-environmental humidity will accelerate water condensation.
- “There’s water on the floor near my device.”
- Look at the surrounding area to make sure there is nothing blocking the nozzle.
- Monitor your humidity levels. High-environmental humidity will accelerate water condensation.
- Make sure your device is not placed in a corner or small area on the highest setting. For enclosed spaces without air-conditioning. control the times to avoid excessive humidity.
- “There’s water-shortage alarm.”
- Check to see if there is enough water in the tank. Fill with cool water.
- Open up your device and see if your float is installed in the correct direction.
- If the alarm continues without cause. please contact customer service.
Troubleshooting
- The hOme warranty covers all costs related to restoring the proven defective product through repair or replacement of any defective part and necessary labor so that it conforms to its original specifications. A replacement product may be provided instead of repairing a defective product. hOme
- A receipt indicating the purchase date is required for any claim. so please keep all receipts in a safe place. We recommend that you register your product on our website. homelabs.com/reg.
- Although greatly appreciated. the product registration is not required to activate any warranty and product registration does not eliminate the need for the original proof of purchase.
- The warranty becomes void if attempts at repair are made by non-authorized third parties and/or if spare parts. other than those provided by hOme. are used. You may also arrange for service after the warranty expires at an additional cost.
- These are our general terms for warranty service. but we always urge our customers to reach out to us with any issue. regardless of warranty terms. If you have an issue with a hOme product. please contact us at 1-800-898-3002. and we will do our best to resolve it for you.
- This warranty gives you specific legal rights. and you may have other legal rights which vary from state to state. country to country or province to province. The customer may assert any such rights at their sole discretion.