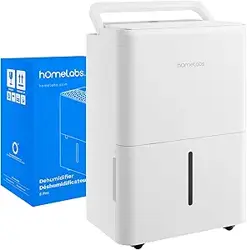
Dehumidier
40 and 50 Pint
HME020279N
HME020371N
Thank you for purchasing our appliance. Please be sure to read the entirety of
this user manual carefully prior to using this appliance. If you have any questions
regarding the use of this product, please call 1 (800) 898-3002.


TABLE OF CONTENTS
Important Safety Instructions ...............6
Installation ..................................................9
Operating Instructions........................... 12
Cleaning and Maintenance ................... 16
Troubleshooting ...................................... 17
Warranty ....................................................19
Manufacturing Info .................................19
Warning .....................................................19
Contact Us ................................................19

In the event this product malfunctions, or you believe it is
defective, please contact Customer Service at homelabs.com/
chat, 1 (800) 898-3002 or [email protected] and hold onto
the defective product (pending further instruction). A defective
product should be clearly marked or stored where it cannot
be used by mistake. Failure to keep the product in its original
quality from the time of receipt may impede hOme™’s ability
to correct any legitimate problem and may limit the extent to
which hOme™ may provide recourse.
BEFORE FIRST USE:
To prevent any internal damage, it is very important to keep
refrigeration units (like this one) upright throughout their journey.
Please leave it standing upright and outside the box for 24 HOURS
before plugging it in.

on bringing home your new appliance!
Cong ratulations
Don’t forget to register your product at homelabs.com/reg
for updates, coupons, and other relevant information.
Although greatly appreciated, product registration is not
required to activate any warranty.

6
• This appliance is not intended for use by persons (including children) with reduced physical, sensory
or mental capabilities, or lack of experience and knowledge, unless they have been given supervision
or instruction concerning use of the appliance by a person responsible for their safety.
• Children should be supervised to ensure that they do not play with the appliance.
• If the supply cord is damaged, it must be replaced by the manufacturer, its service agent or similarly
qualied persons in order to avoid a hazard.
• Disconnect the appliance from its power source during any maintaining or cleaning.
• The appliance shall be installed in accordance with national wiring regulations.
• Check the nameplate for the type of refrigerant gas used in your appliance.
• Specic information regarding appliances with refrigerant gas.
R410A, R134a, R290 is a refrigerant that complies with European ecological standards; nevertheless, it
is recommended not to pierce the cooling circuit of the machine. At the end of its useful life, deliver
the appliance to a special waste collection centre for disposal.
• This hermetically sealed system contains uorinated greenhouse gases.
• ENVIRONMENTAL INFORMATION: This unit contains uorinated greenhouse gases covered by the
Kyoto Protocol.
• The maintenance and disposal operations must be carried out by qualied personnel only. GWP
(Global Warming Potential): R410A: 2088, R134a: 1430, R290: 3.
• Do not use this unit for functions other than those described in this instruction manual.
• Make sure the plug is plugged rmly and completely into the outlet. It can result in the risk of
electric shock or re.
• Do not plug other appliances into the same outlet, it can result in the risk of electric shock.
• Do not disassemble or modify the appliance or the power cord, it can result in the risk of electric
shock or re. All other services should be referred to a qualied technician.
• Do not place the power cord or appliance near a heater, radiator, or other heat source. It can result
in the risk of electric shock or re.
• This unit is equipped with a cord that has a earthed wire connected to an earthed pin or grounding
tab. The plug must be plugged into a socket that is properly installed and earthed. Do not under any
circumstances cut or remove the earthed pin or grounding tab from this plug.
• The unit should be used or stored in such a way that it is protected from moisture e.g. condensation,
splashed water, etc.
• Always transport your appliance in a vertical position and place it on a stable, level surface during
use. If the unit is transported laying on its side, it should be put upright and left unplugged for 6
hours before use.
• Always use the switch on the control panel or remote control to turn the unit off. Do not start or
stop operation by plugging in or unplugging the power cord. It can result in the risk of electric shock.
• Do not touch the buttons on the control panel with wet or damp ngers.
• Do not use hazardous chemicals to clean the unit. To prevent damage to the surface nish, use only
a soft cloth to clean the appliance. Do not use wax, thinner, or a strong detergent. Do not use the
unit in the presence of inammable substance or vapor such as alcohol, insecticides, gasoline, etc.
• If the appliance makes unusual sounds or emits smoke or an unusual odor, unplug it immediately.
• Do not clean the unit with water. Water can enter the unit and damage the insulation, creating a
shock hazard. If water enters the unit, unplug it immediately and contact the Customer Service.
• Two or more people are required to lift and install the unit.
• Install the appliance on a sturdy, level oor capable of supporting up to 110lbs. Installation on a weak
or uneven oor can result in the risk of property damage and personal injury.
FCC Statement
Important Safety Instructions

7
Important Safety Instructions
This equipment has been tested and found to comply with the limits for a Class B digital device, pursuant
to part 15 of the FCC Rules. These limits are designed to provide reasonable protection against harmful
interference in a residential installation. This equipment generates, uses and can radiate radio frequency
energy and, if not installed and used in accordance with the instructions, may cause harmful interference
to radio communications. However, there is no guarantee that interference will not occur in a particular
installation. If this equipment does cause harmful interference to radio or television reception, which
can be determined by turning the equipment off and on, the user is encouraged to try to correct the
interference by one or more of the following measures:
• Reorient or relocate the receiving antenna.
• Increase the separation between the equipment and receiver.
• Connect the equipment into an outlet on a circuit different from that to which the receiver is
connected.
• Consult the dealer or an experienced radio/TV technician for help.
MODIFICATION: Any changes or modications not expressly approved by the grantee of this device could
void the user’s authority to operate the device.
This device complies with part 15 of the FCC Rules. Operation is subject to the following two conditions:
(1) This device may not cause harmful interference, and (2) this device must accept any interference
received, including interference that may cause undesired operation.
IMPORTANT - GROUNDING METHOD
This product is equipped with a power supply cord that has a three-pronged grounded plug. The plug must
be plugged into a mating grounding type receptacle in accordance with the National Electrical Code and
applicable local codes and ordinances. If the circuit does not have a grounding type receptacle, it is the
responsibility and obligation of the customer to exchange the existing receptacle in accordance with the
National Electrical Code and applicable local codes and ordinances. The third ground prong should not,
under any circumstances, be cut or removed. Never use the cord, the plug or the appliance when they
show any sign of damage. Do not use your appliance with an extension cord unless it has been checked
and tested by a qualied electrical supplier. Improper connection of the grounding plug can result in risk of
re, electric shock and/or injury to persons associated with the appliance. Check with a qualied service
representative if in doubt that the appliance is properly grounded.
ELECTRICAL CONNECTIONS
Before plugging the appliance into the mains socket, check that:
• The main power supply corresponds to the value indicated on the rating plate on the back of the
appliance.
• The power socket and electrical circuit are adequate for the appliance.
• The main socket matches the plug. If no, replace the plug.
• The main socket is adequately earthed. Failure to follow these important safety instructions absolves
the manufacturer of all liability.

8
Important Safety Instructions
SOME NOTIONS ON HUMIDITY
• Air always contains a certain amount of water in the form of vapor. This determines the level of
humidity in an atmosphere. The capacity of the air to hold water vapor increases with temperature.
This is why in our home, as soon as the temperature decreases, the vapor contained in the air
condenses, as is evident on the colder surfaces in the room, such as the windows, walls etc. The
purpose of a dehumidier is to remove the excess moisture from the air, avoiding the damage caused
by condensation.
• Experts have established that the optimum environmental conditions for our well being and for the
home are obtained between 40% and 60% relative humidity. With very low temperatures, you are
recommended to heat the room even minimally. This considerably increases the dehumidifying power
of the appliance. With heating, the condensation formed by the water vapor on windows and other
cold surfaces evaporates into the air to be collected by the dehumidier. Air leaving the dehumidier
is usually about 33.8°F-35.6°F warmer than room temperature.
SAVE THESE INSTRUCTIONS
For Household Use Only
9
Installation
Note: All the illustrations in this manual are for explanatory purposes only. Your appliance may be slightly
different.
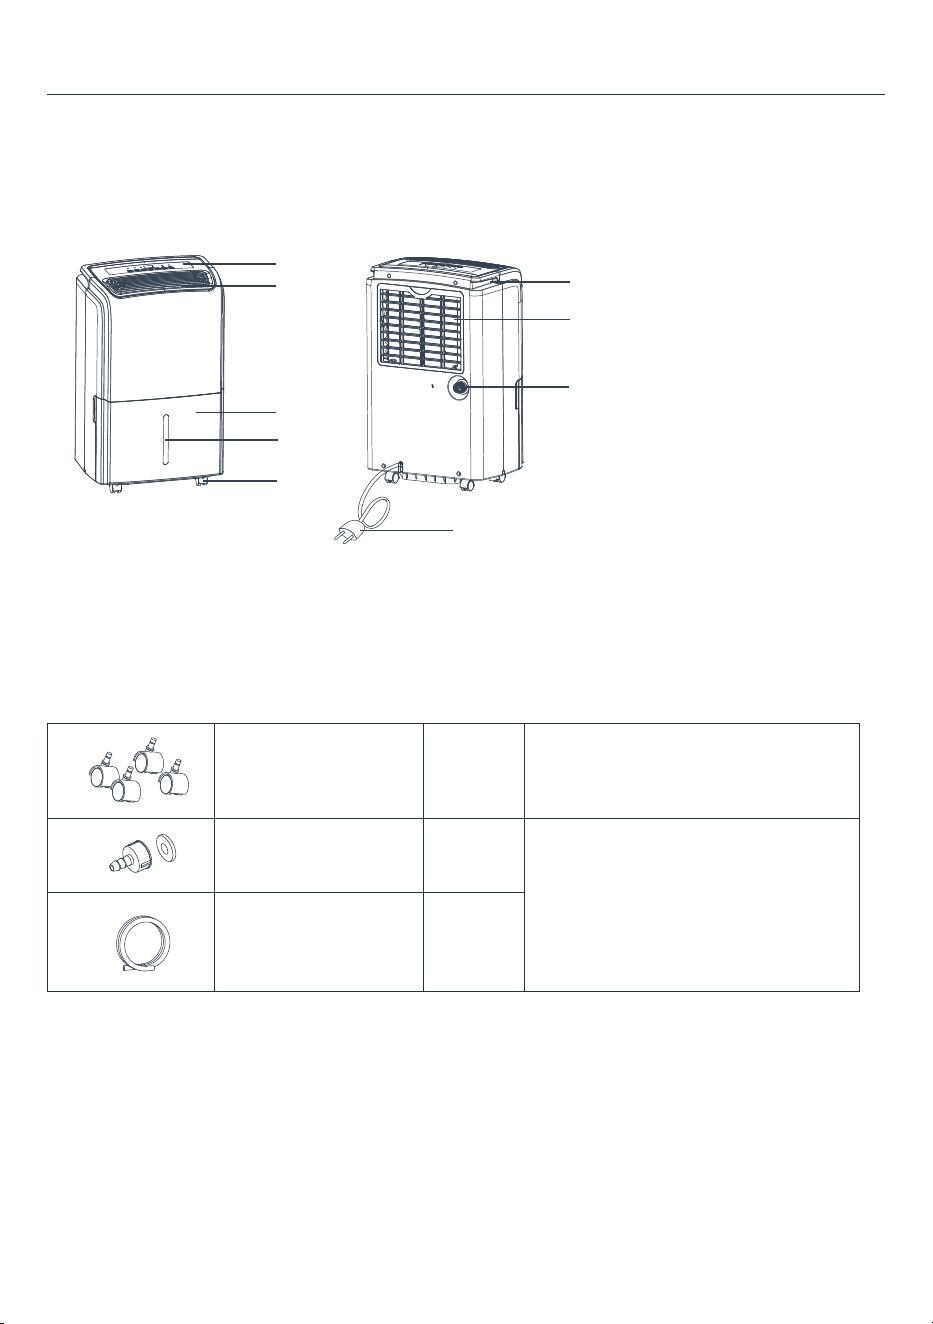
Component Description
1
2
3
4
5
6
7
8
9
Accessories
Note:
• Some accessory is not in the packing, please nd it in the bucket.
• Be sure all accessories are removed from the packing and bucket before use.
Casters 4 pcs
The casters may have been installed
on the appliance, if so, there have no
casters in the accessories.
Pump drain connector 1 set
Only supply for pump model .
Pump drain pipe
(about 5m, 16.4 feet)
1 set
1. Control panel
2. Air outlet
3. Bucket
4. Water level view window
5. Casters
6. Handle
7. Air intake lter
8. Drainage holes
9. Power cord
10
Installation
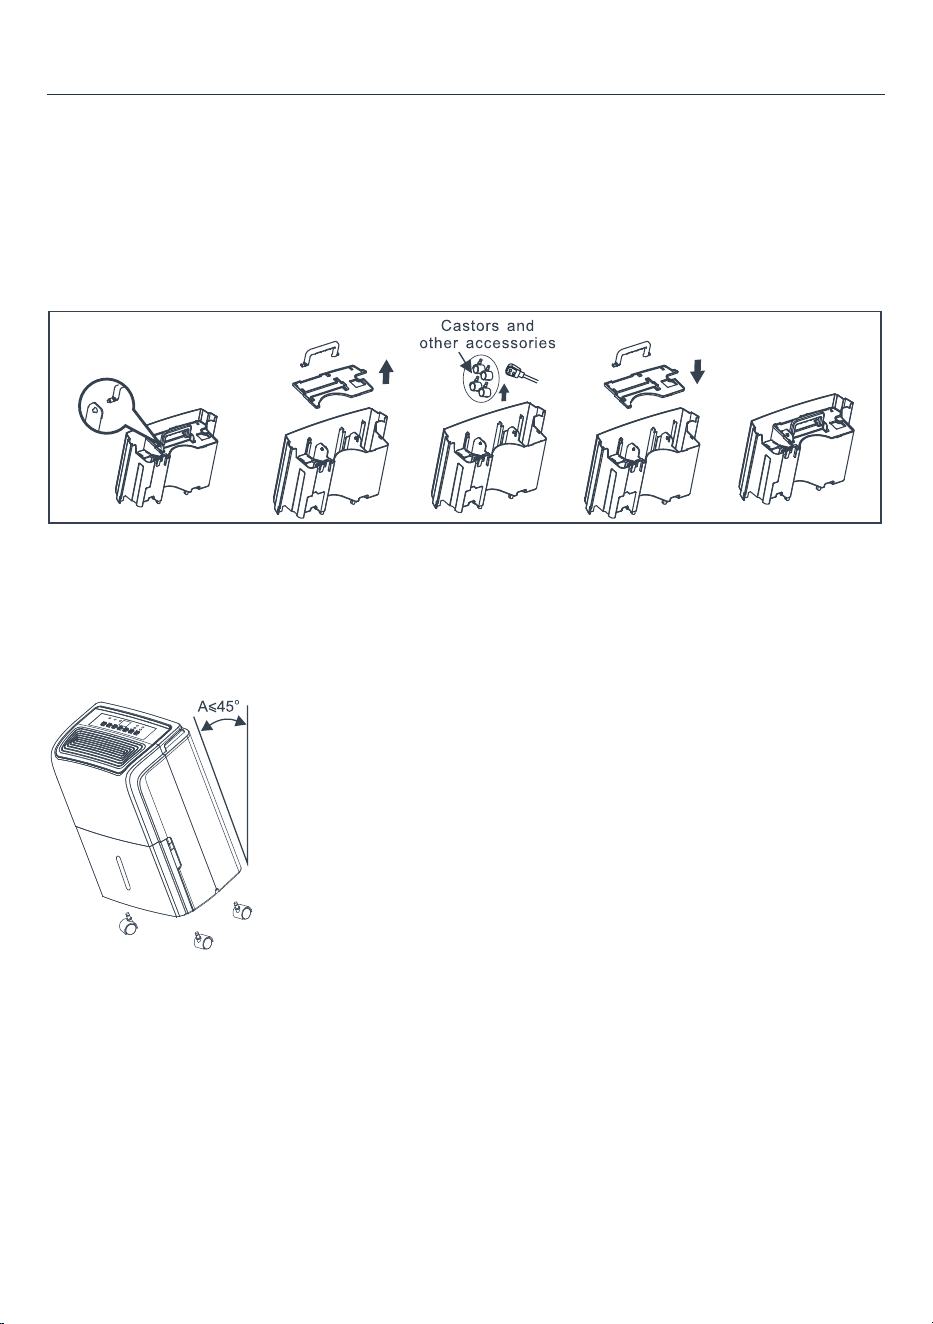
Take out accessories from bucket
The accessories are stored in the bucket during transportation. Before use, remove the accessories from
the bucket.
- Remove the bucket from the unit.
- Rotate the handle to the position like below gure and remove the handle.
- Open the bucket cover and take out the power plug and other accessories.
- Replace the bucket cover and handle, then put back the bucket into the unit correctly.
Install the casters
Tilt the unit less than 45° and forcibly insert the casters. Make sure the plate of the casters is ush against
the bottom of the unit.
If the casters have been installed to the appliance, skip this step.
11
Installation
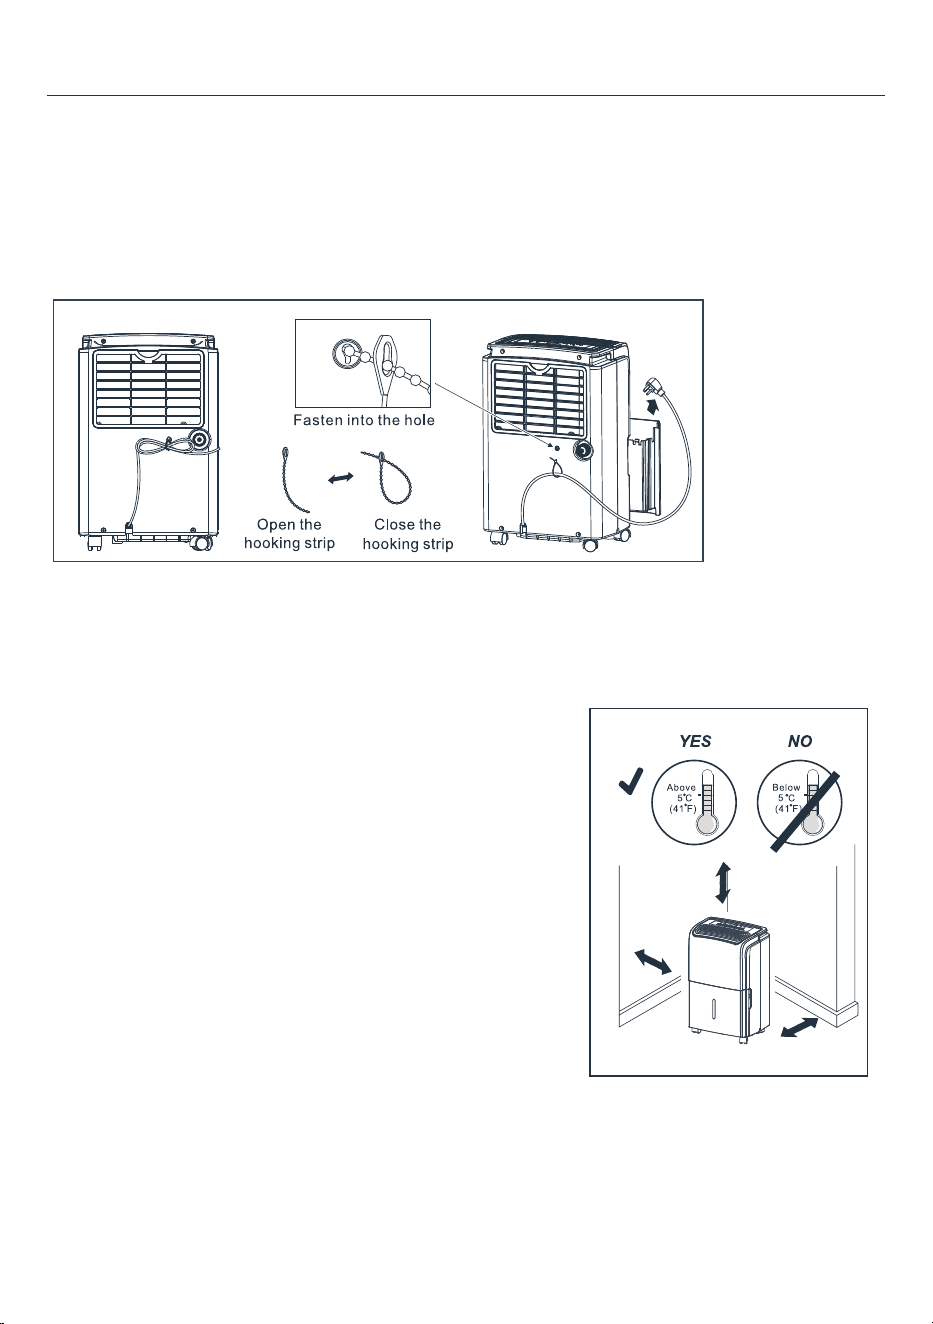
Use the hooking strip
When you use dehumidier, open the hooking strip at the back of the dehumidier to tie up the power
cord.
When you do not use the dehumidier, power cord can also be tied up by hooking strip again and fasten
into the hole.
Note: Hooking strip can be used repeatedly. Do not throw it away.
Place the unit
The unit operating in a basement will have little or no effect in drying out an adjacent enclosed storage
area, such as a closet, unless there is adequate circulation of air in and out of this area.
1. This appliance is intended for indoor use only. Do not use
outdoors.
2. Place the appliance on a smooth, level oor surface that is
strong enough to support the unit with a full bucket of water.
3. Allow at least 18 inches distance around and above the unit
to ensure efciency.
4. Place the appliance in an area where the temperature will not
fall below 41°F.
5. Use the dehumidier in cooking, laundry, bathing and dish-
washing areas that have excessive moisture.
6. Place the dehumidier away from a clothes dryer.
7. Use the dehumidier in a basement to help prevent moisture
damage.
8. The dehumidier must be operated in an enclosed area.
Close all doors, windows and other outside openings to the
room.
9. Do not block the air inlet or outlet of the appliance. Reduced
air ow will result in poor performance and could damage
theunit.
18in
18in
18in

12
Operating Instructions
CONTROL PANEL
1 2 3 4
5 6 78
ABCDEF G
POWERTIMERPUMP DECREASEINCREASE
FILTER
Clean Turbo Pump
RH% Lock
Timer
Full
Cont.
TURBO
1. Clean Filter indicator A. On/Off button
2. Turbo indicator B. Timer button
3. Display screen C. Decrease button
4. Lock indicator D. Increase button
5. Timer indicator E. Fan Speed button
6. Full bucket indicator F. Filter Reset button
7. Continuous indicator G. Pump button
8. Pump indicator
Power on
Insert the plug in the socket, the unit goes to stand-by, and the screen display as the g shown:
On / Off Buon
Press this button to turn on or shut down the unit.
Decrease / Increase buon
• Press INCREASE / DECREASE button to select the indoor humidity level you expect to achieve. You
can also use the two button to set a timer.
• The humidity adjustable range is 35%RH-80%RH. The screen will display the setting humidity and
turn to display the ambient humidity after a few seconds.
• If the ambient humidity is lower than setting humidity, the compressor will stop running. After a few
minutes, the fan will stop running.
• Press the DECREASE button until “ ” is displayed on the screen. The "Cont." will light up, then the
unit will run continuously.
Turbo buon
Press the TURBO button to select the high speed or low speed of fan. When high speed is selected, the
TURBO indicator will light up.
13
Operating Instructions
Timer buon
This timer can be used to delay the appliance start-up or shutdown, this avoids wasting electricity by
optimizing operating periods.
• Programming start-up
1. Turn on the appliance, choose the mode you want, for example Dehumidify mode, high fan speed.
Turn off the appliance.
2. Press the TIMER button, the screen starts to ash, press the UP/DOWN button to adjust the set time
from 0.5-24 hours.
3. In 5 seconds if there is no operation, the timer will be activated. The TIMER indicator lights up.
4. To cancel the timer, press the TIMER button again. When canceled, the TIMER indicator will light off.
• Programming shut down
1. When the appliance is running, press the TIMER button. The screen starts to ash.
2. Press the UP/DOWN button to adjust the set time from 0.5-24 hours.
3. In 5 seconds if there is no operation, the timer will be activated. The TIMER indicator lights up.
4. To cancel the timer, press the TIMER button again. When canceled, the TIMER indicator will light off.
Child-lock
• Lock the control panel to prevent someone from changing the settings accidentally.
• To lock the control panel, press and hold the TIMER button for 3 seconds. When nished, the LOCK
indicator will light up.
• To unlock the control panel, press and hold the TIMER button for 3 seconds.
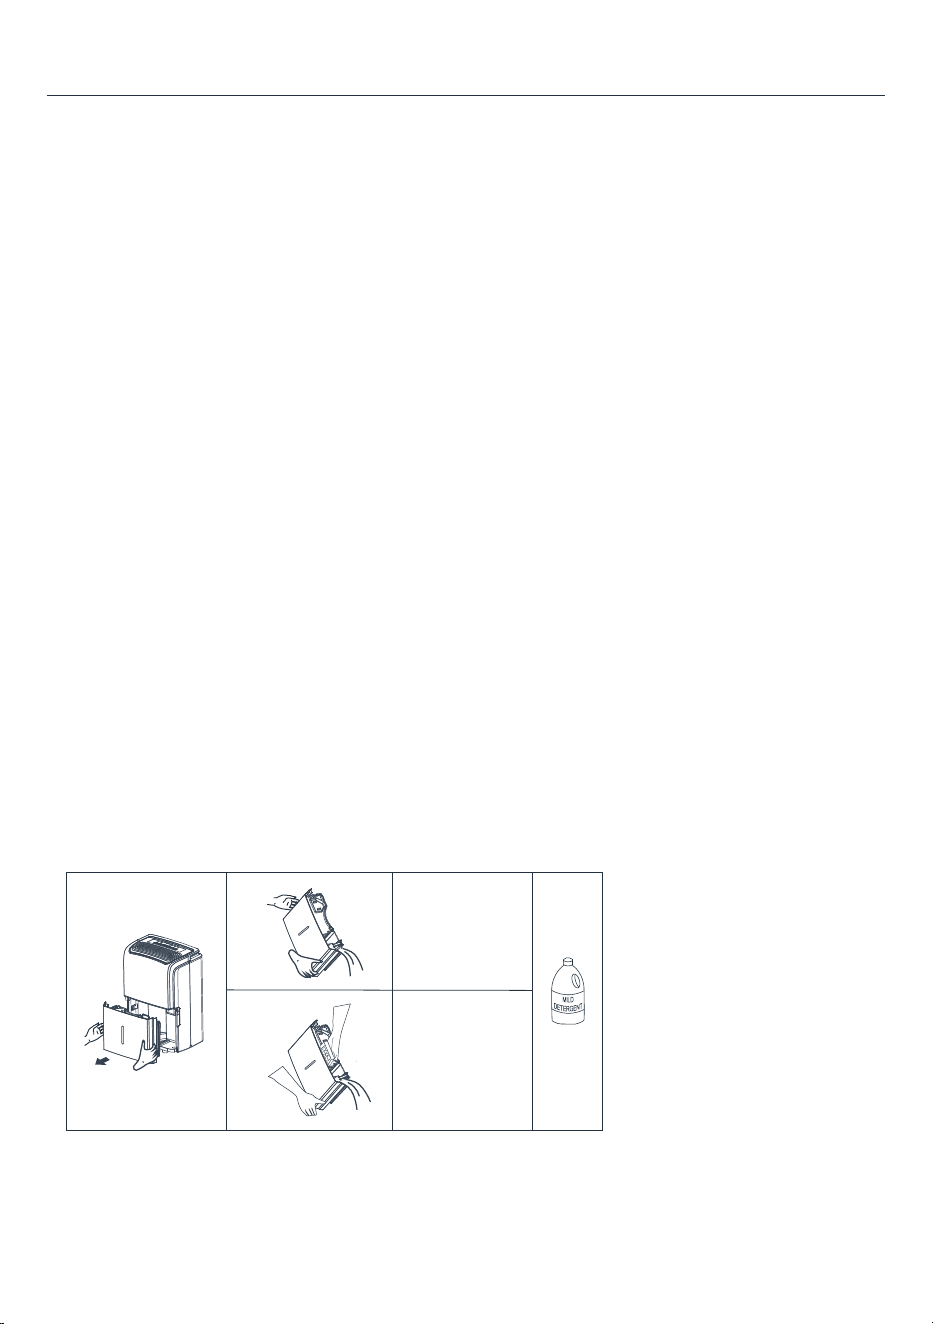
Alarm of full bucket
- When the bucket is full, the compressor will shut off, and the fan will stop after a few minutes. The unit
will beep and the Full BUCKET indicator starts ashing.
- The bucket should be cleaned every week to prevent the growth of mould, mildew and bacteria. Use a
mild detergent to clean the bucket.
- Dry the bucket completely and place it back inside unit.
The bucket
without
handle
The bucket
with handle
14
Operating Instructions
Note:
• Hold the bucket with both hands when emptying the bucket.
• The unit will not run again until the bucket is emptied and properly placed back inside the unit.
• When the bucket is full or removed from the unit, the compressor will turn off but the fan will
continue to run for a few minutes. This is completely normal. The unit will not be removing moisture
from the air at this time.
• During operation, it is normal for the unit to exhaust warm air from the top of the unit.
Caution:
Do not place the bucket on the oor when it is full as the bottom of the bucket is uneven and may spill water.
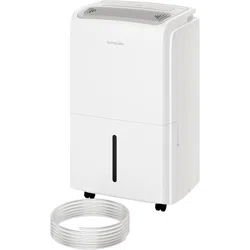
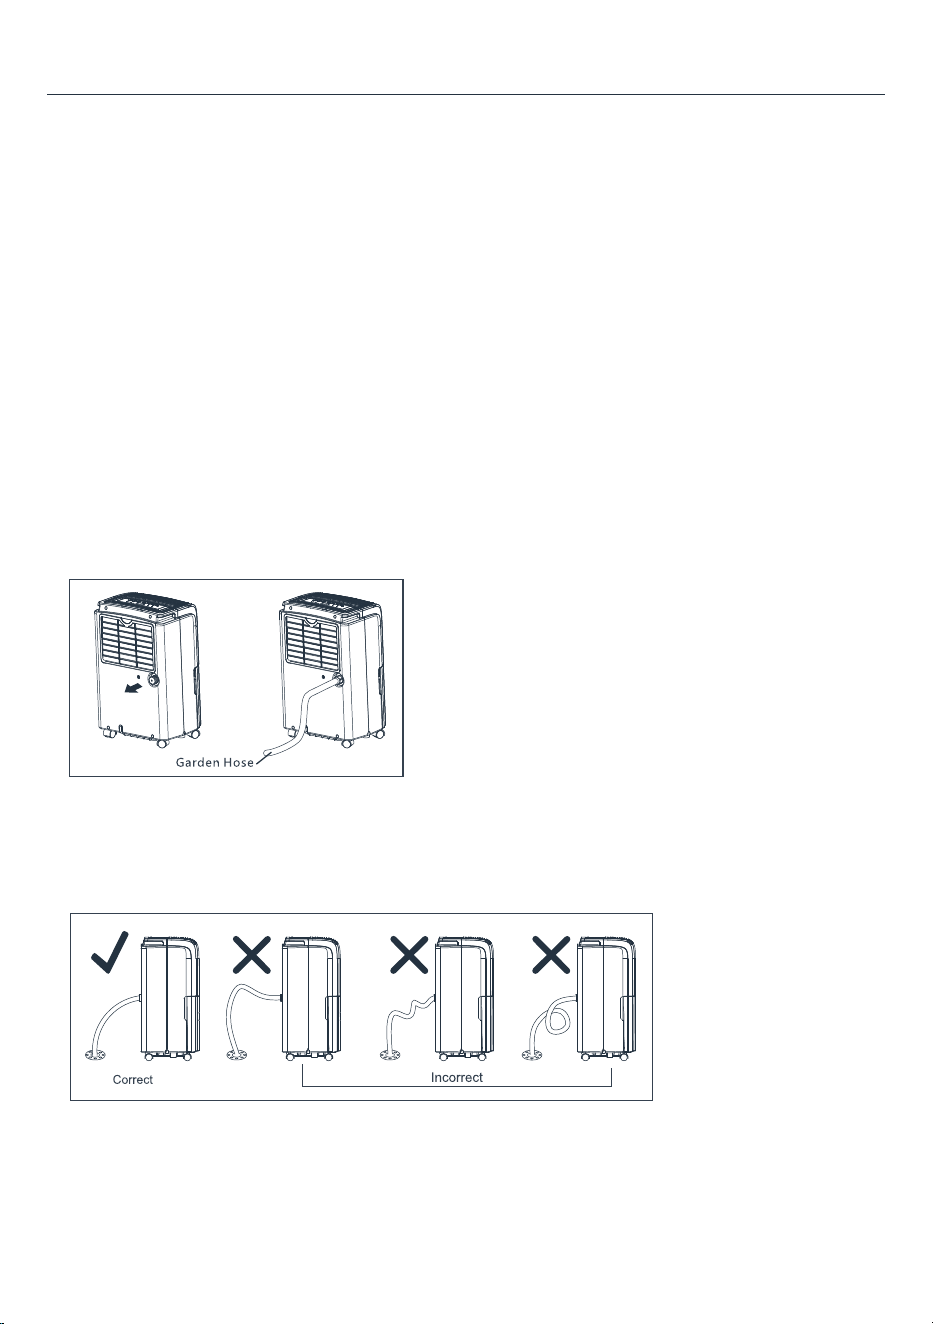
Continuous drain
Connect the drain pipe on the back of unit, the unit can continuous run without cleaning the bucket.
1. Put the unit on level oor, unscrew the cap on the back of unit.
2. Install the drain connector and the gasket.
3. Install the garden hose (which has an outer diameter of 1.0625 inches and a pitch of 11.5 TPI) to the
unit. Make sure the connection is tight and there is no leaking.
4. Press POWER button to run the unit.
Note:
• If no need for continuous drain, install the cap on the drain hole on the back of the unit, then the
water will ow into the bucket.
• If the drain pipe is installed incorrectly, the water cannot drain from the pipe.
Note:
• Make sure the unit is put on level ground and the drain pipe is installed correctly, otherwise the
bucket will be full of water, and the unit stop run.
• Make sure the bucket is installed correctly.
15
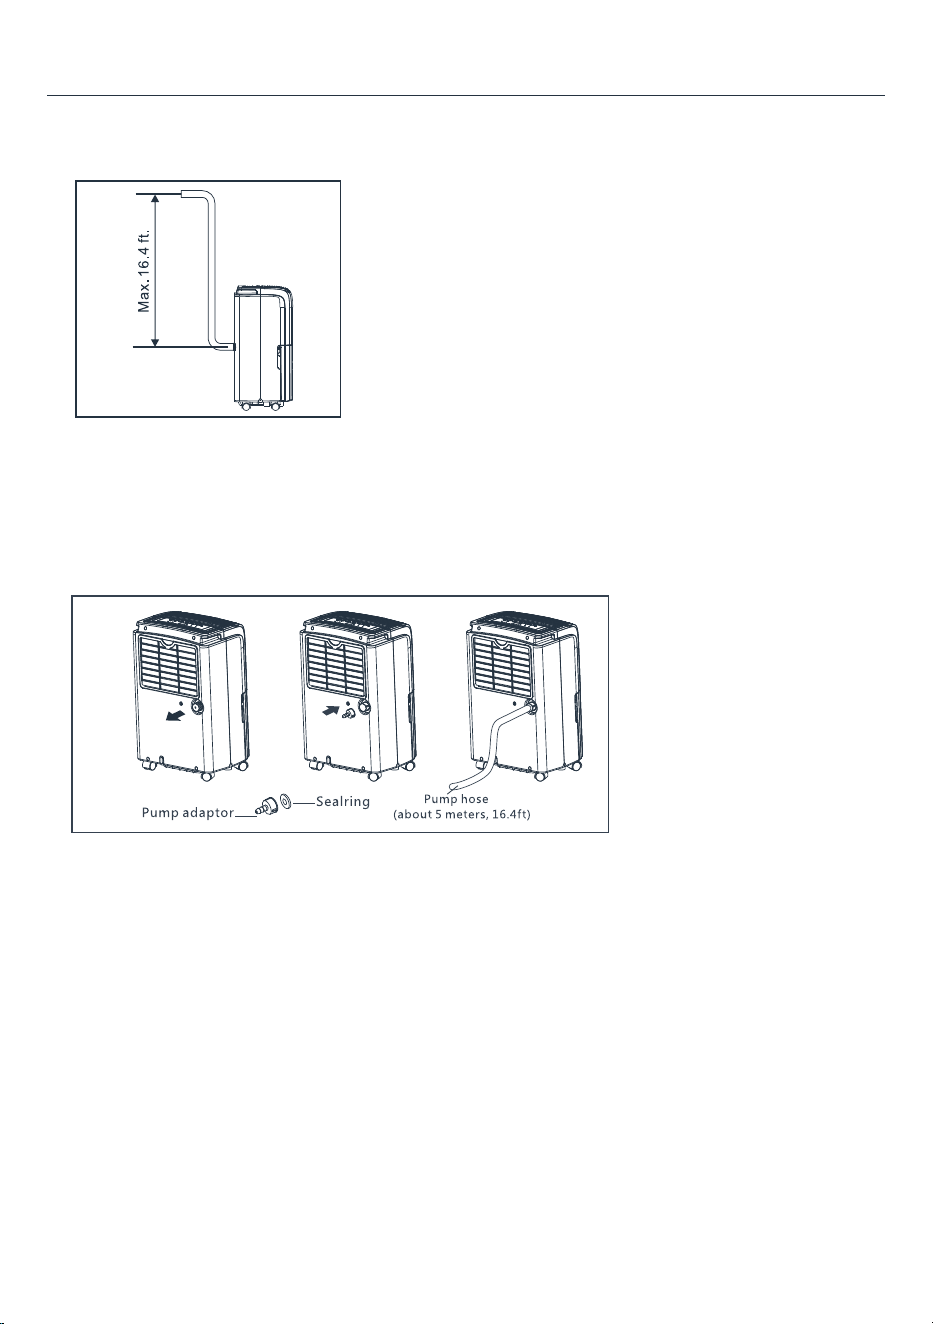
Operating Instructions
Pump drain
The max. height of pump drainage is about 16.4 feet. Take below steps to start the Pump drain.
1. Connect the pump 16.4 feet drain pipe to the back of the unit.
2. Put the unit on level oor. Unscrew the cap on the back of the unit.
3. Install the pump adapter and the gasket.
4. Install the drain pipe to the drain connector.
5. Press the POWER button to run the unit, and then press the PUMP button to start the pump drain
function. The PUMP indicator will light up.
Note:
• After the pump is activated, water will not run out of the drain hose right away as there is a small,
internal tank which must be lled rst.
• Make sure there are no kinks or knots in the drain hose.
AUTOMATIC DEFROST
When frost builds up on the evaporator coils, the compressor will cycle off and the fan will continue to run
until the frost disappears. When the coils are completely defrosted, the compressor or fan (depending on
the model) will automatically restart. The unit start to dehumidify the room.
16
Cleaning and Maintenance
Before any cleaning or maintenance, turn off the appliance and unplug it from the wall socket.
• Wipe the cabinet of the unit with a slightly damp cloth and then dry it naturally or wipe it dry.
• Never wash the unit with water, it could be dangerous.
• Never use petrol, alcohol or solvents to clean the unit.
• Never spray insecticide liquids or similar to the unit.
• Clean the bucket with water every two weeks.
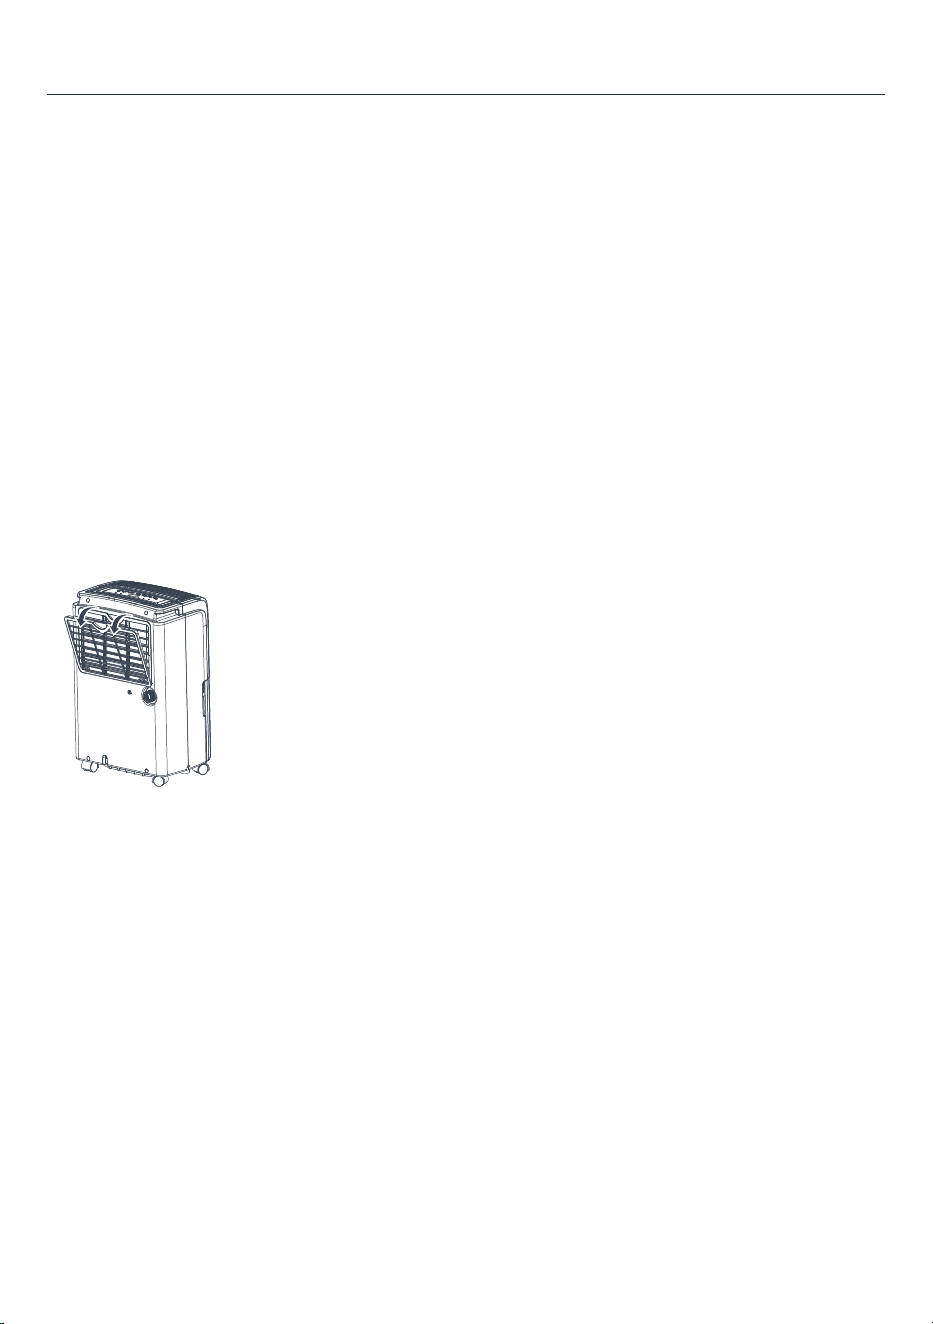
CLEANING THE FILTER
• To keep your appliance working efciently, clean the lter every week of operation.
• When the lter needs to be cleaned, the Clean indicator will light up (after 250hours of use). Remove
the lter from the back of the unit.
• Remove the lter refer to below picture.
• Use a vacuum cleaner to remove dust from the lter. If the lter is very dirty, immerse it in warm
water and rinse it a number of times. The water temperature should not be higher than 104°F. After
washing, leave the lter to dry.
• Once the lter drys completely, place the lter back in the unit and press the FILTER button to reset
the Clean indicator.
Caution:
• Do not operate the appliance without the lter in place.
• When removing or re-installing the lter, be careful to avoid possible cuts, and do not contact the
metal parts of the appliance, which will result in personal injury.
END OF SEASON OPERATIONS
- Unplug the unit from the outlet, empty the bucket and remove the drain cap.
- Run off all water left inside the appliance. When all the water has been drained, put the cap back in place.
- Clean the lter and dry it thoroughly before putting back.
- Cover the appliance to avoid dust accumulation.
- Store the appliance upright in a dry location.
START OF SEASON CHECKS
Make sure the power cable and plug are undamaged and the earth system is efcient. Follow the
installation instructions precisely.
17
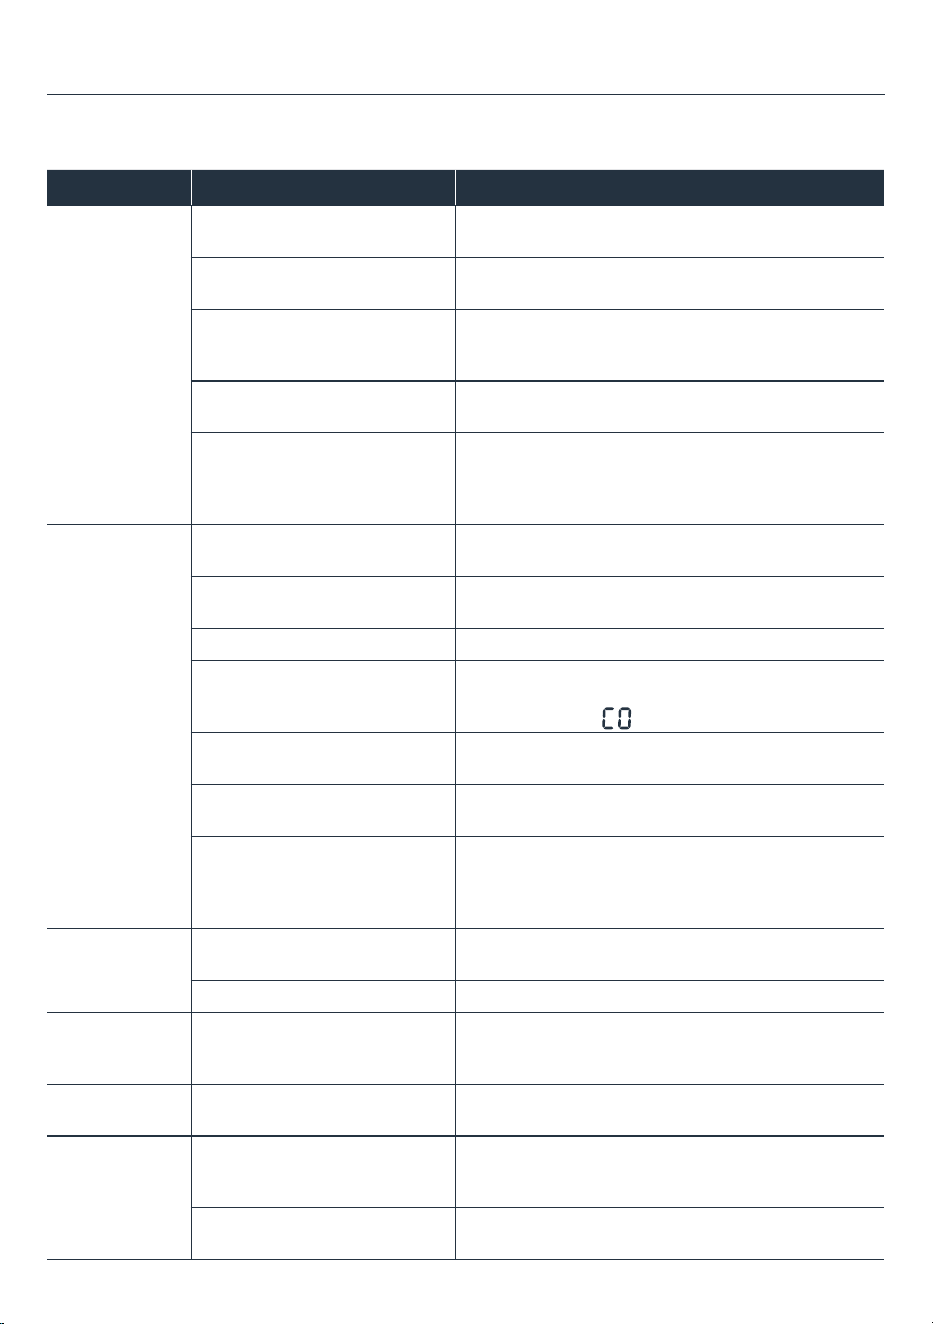
Troubleshooting
Occasionally, you may encounter some problems that are of a minor nature and a service call may not be
necessary. Use this troubleshooting guide to identify possible problems you may be experiencing.
Problem Possible Causes Solutions
Dehumidier
does not start.
The dehumidier is unplugged. Make sure the dehumidier's plug is pushed
completely into the outlet.
The fuse is blown/circuit
breaker is tripped.
Check the house fuse/circuit breaker box and
replace the fuse or reset the circuit breaker.
Dehumidier has reached its
present level or the bucket is
full.
Change to a lower setting; Empty the water bucket
and replace it properly.
Bucket is not in the proper
position.
The bucket must be in place and securely seated
for the dehumidier to operate.
Power Failure. There is a protective time delay (up to 3 min.) to
prevent the compressor from overloading. For this
reason, the unit may not start work immediately,
but delay 3 min when power is resumed.
Dehumidier
does not dry
the air as it
should.
Not enough time allowed for
unit to remove moisture.
When rst installed, allow at least 24 hours to
maintain the desired dryness.
Airow is restricted. Make sure there are no curtains, blinds or furniture
block the front or back of the dehumidier.
Dirty lter. Clean the lter.
The Humidity Control may not
be set low enough.
For drier air, press the DECREASE button to lower
the percent humidity desired in the room, or set the
dehumidier to “ ” for maximum dehumidifying.
Doors and windows may not
be closed tightly.
Check that all doors, windows, and other openings
are securely closed.
Clothes dryer may be blowing
moist air into the room.
Install the dehumidier away from the dryer. The
dryer should be vented outside.
Room temperature is too low. Moisture removal is best at higher room
temperatures. Lower room temperatures will reduce
the moisture removal rate. This model is designed
to operate at temperatures above 41°F.
Dehumidier
runs too long.
The area is too large. The capacity of the appliance can not meet the area
of the room.
Doors and windows are open. Close the door and window.
Frost appears
on heat-
exchanger.
The dehumidier run recently
or the room temperature is
too low.
It is normal, frost usually disappear in 60 min.
Fan noise The air is passing through the
appliance.
This is normal.
Water on the
oor
The drain connection may be
aging or loose.
Check and replace the drain connection parts. And
check if the drain connection and the appliance is
placed level.
The drain pipe is connected,
but the water is not drained.
If use the bucket, remove the drain pipe and put back
the drain cover; or install the drain pipe correctly.

18
If the following error code appears, contact the after-sales service department for inspection and repair.
Code Description Possible Causes Solutions
EH Humidity sensor
failure
Humidity sensor is damaged. Contact customer service center.
E1 Temperature
sensor failure
Temperature sensor is damaged. Contact customer service center.
E2
E3 Gas leakage Ambient temperature is too high. Move the appliance to cooler
place.
E3 appears many times. Contact customer service center.
P1 Bucket pull out The bucket isn’t in proper position. Re-install the bucket and place it
in proper position.
E5 Pump failure Didn't install the pump drainage kit
before starting pump function.
Install the pump drainage kit
before starting pump function
Users use non-standard drainage
pipes.
Use the original pipe.
The drain cover is not tightened. Tighten the cover.
The rubber washer is missing. Re-install the washer in cover.
Poor connection between drain pipe
and drain cover.
Check the connection of pipe and
drain cover.
Drain hose is blocked or longer than
16.4 feet.
Plug off and clean the drain hose
or replace with a new one.
Follow Pump drain section to
lower the drain hose.
Note:
• If “E3” appears, check weather the ambient temperature range is below 89.6°F. If the ambient
temperature is over 89.6°F, place the unit into the place below 89.6°F for two hours before running
the dehumidier again.
• Start the unit, if the “E3” appears again in 2 hours, contact the service center.
Troubleshooting

19
hOme™ offers a limited one-year warranty (“warranty period”) on all of our products purchased new
and unused from hOme Technologies, LLC or an authorized reseller, with an original proof of purchase
and where a defect has arisen, wholly or substantially, as a result of faulty manufacture, parts, or
workmanship during the one-year warranty period. The warranty does not apply where damage is caused
by other factors, including but without limitation to: (a) normal wear and tear; (b) abuse, mishandling,
accident, or failure to follow operating instructions; (c) exposure to liquid or inltration of foreign particles;
(d) servicing or modications of the product other than by hOme™; (e) commercial or non-household use.
The hOme™ warranty covers all costs related to restoring the proven defective product through repair or
replacement of any defective part and necessary labor so that it conforms to its original specications.
A replacement product may be provided instead of repairing a defective product. hOme™’s exclusive
obligation under this warranty is limited to such repair or replacement.
A receipt indicating the purchase date is required for any claim, so please keep all receipts in a safe
place. We recommend that you register your product on our website: homelabs.com/reg. Although greatly
appreciated, the product registration is not required to activate any warranty and product registration
does not eliminate the need for the original proof of purchase. The warranty becomes void if attempts
at repair are made by non-authorized third parties and/or if spare parts, other than those provided by
hOme™, are used. You may also arrange for service after the warranty expires at an additional cost.
These are our general terms for warranty service, but we always urge our customers to reach out to us
with any issue, regardless of warranty terms. If you have an issue with a hOme™ product, please contact
us at 1 (800) 898-3002, and we will do our best to resolve it for you.
This warranty gives you specic legal rights, and you may have other legal rights which vary from state to
state, country to country, or province to province. The customer may assert any such rights at their sole
discretion.
HME020279N HME020371N
Warranty
Manufacturing Info
This manual is to be used with all items with the model number
SKU# : HME020279N HME020371N
Rated voltage/Frequency: 115V~ 60Hz; Operating condition: 41°F~90°F / 30%RH ~ 90%RH
Keep all plastic bags away from children.
Warning
Contact Us
homelabs.com/chat
1 (800) 898-3002 [email protected]
CHAT W ITH U S
CALL U S
EMAIL US

© 2020 hOmeLabs LLC
37 East 18 Street, 7th Floor
New York, NY 10003
For household
Use Only
1 (800) 898-3002
homelabs.com/help
All rights reserved, hOme
TM
. Printed in China.