Owner 's Manual for Weber 35400001
Table of Contents
- Welcome to Weber
- Important Safety Information
- The Weber Promise
- Product Features
- GENESIS Features
- Hign Performance Grilling
- Getting Started
- Important Information about LP Gas
- Gas Connections
- LP Tank Installation & Leak Checking
- Refilling or Replacing an LP Tank
- Operation
- The Very First Time You Grill
- Every Time You Grill
- Igniting the Grill
- Using the sear zone
- Igniting the Side Burner
- Tips and Hints
- The Flame - Direct or Indirect
- Discover What Your Grates Can Do
- Grilling Do's and Don'ts
- Real Smoke Flavor
- Extra on the Side
- More Cooking Space
- Grilling at Night
- Product Care
- Cleaning and Maintenance
- Troubleshooting
- Grilling Guide
- Replacement Parts
Operation
The Very First Time You Grill
Perform an Initial Burn-Off
Heat the grill on the highest setting, with the lid closed, for at least 20 minutes prior to grilling for the first time.
Every Time You Grill
Meal-to-Meal Maintenance
The Meal-To-Meal Maintenance plan includes the following simple, yet important, steps that should always be performed prior to grilling.
Check for Grease
Your grill was built with a grease management system that funnels grease away from food and into a disposable container. As you cook, grease is channeled down the slide-out grease tray and into a disposable drip tray that lines the catch pan. This system should be cleaned each and every time you grill to prevent fires.
1. Confirm that the grill is off and cool.
2. Open the doors.
3. Access the slide-out grease tray by pulling the tray towards you until it stops (A). Remove excess grease with a plastic scraper. Scrape the grease down through the openning in the grease tray, into the catch pan below.
4. Remove the catch pan (B). Check for excessive amounts of grease in the disposable drip pan that lines the catch pan. Discard disposable drip pan when necessary and replace with a new one.
5. Reinstall all components.
Inspect the Hose
Routine inspection of the hose is necessary.
1. Confirm that the grill is off and cool.
2. Check hose for any signs of cracking, abrasions, or cuts (C). If the hose is found to be damaged in any way, do not use the grill.
Preheat the Grill
Preheating the grill is critical to successful grilling. Preheating helps to prevent food from sticking to the grate and gets the grate hot enough to sear properly. It also burns off residue of a previously cooked meal.
1. Open the grill lid.
2. Ignite your grill according to the ignition instructions in this Owner's Manual.
3. Close lid.
4. Preheat the grill with all burners on the start/high position for 15 minutes (D).
Clean the Cooking Grate
After preheating, any bits of food or debris left over from previous use will be easier to remove. Cleaned grates will also prevent your next meal from sticking.
1. Brush the grates with a stainless steel bristle grill brush immediately after preheating (E) .
DANGER: Do not line the slide-out grease tray or cookbox with aluminum foil.
DANGER: Check the slide-out grease tray and catch pan for grease build-up before each use. Remove excess grease to avoid a grease fire.
WARNING: Use caution when removing catch pan and disposing of hot grease.
WARNING: Use heat-resistant barbecue mitts or gloves when operating grill.
WARNING: Grill brushes should be checked for loose bristles and excessive wear on a regular basis. Replace brush if any loose bristles are found on cooking grates or brush. WEBER recommends purchasing a new stainless steel bristle grill brush at the beginning of every spring.
WARNING: If the hose is found to be damaged in any way, do not use the grill. Replace using only WEBER authorized replacement hose.
WARNING: Keep ventilation openings around tank clear and free of debris.
Igniting the Grill
Using the Electronic Ignition System to Ignite the Grill
Each control knob operates an individual burner, and each burner ignites independently. Ignite the burners starting from left to right. All burners should be lit for preheating, however, all burners do not have to be lit while grilling.
1) Open the grill lid (A).
2) Check that all burner control knobs are in the off position. Check by pushing in and turning knobs clockwise (B).
Note: It is important that all burner control knobs are in the off position before turning on the LP tank. If they are not, the flow limiting device built into the regulator will activate, limiting the flow of gas from the LP tank.
3) Turn the LP tank on by slowly turning the tank valve counterclockwise; wait 60 seconds (C).
Note: It is important that the LP tank is turned on slowly. If it is opened too quickly, the flow limiting device built into the regulator will activate, limiting the flow of gas from the LP tank.
4) Begin with the burner furthest to the left. Push the burner control knob in and turn it counterclockwise to the start/high position (D).
5) Push and hold the electronic ignition button (E). You will hear it ticking.
6) Check that the burner is lit by looking through the cooking grates and through the half-circle cutout in the FLAVORIZER bar.
7) If the burner does not ignite, turn burner control knob to the off position and wait five minutes to allow the gas to clear before attempting to light the burner again.
8) If the burner ignites, repeat steps 4 through 6 to light the remaining burners. Should the burners fail to ignite using the electronic ignition, refer to the TROUBLESHOOTING section. There you will find instructions on igniting the grill with a match to help determine the exact problem.
To Extinguish Burners
1) Push each burner control knob in and then turn clockwise all the way to the off position.
2) Turn gas supply off at the LP tank.
Using the sear zone
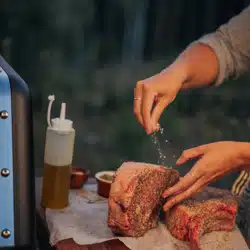
Searing is a direct grilling technique used on meats, such as steak, poultry parts, fish and chops. Searing browns the surface of the food at a high temperature. By searing both sides of the meat, you caramelize the food surface, creating a more desirable flavor. Ignition of the sear burner is the same as ignition of a main burner, each burner ignites independently.
1) Open the lid and ignite all of the burners, including the sear burner. Refer to USING THE ELECTRONIC IGNITION SYSTEM TO IGNITE THE GRILL.
2) Preheat the grill with the lid closed and with all burners on the start/high position for 15 minutes.
3) After preheating, leave the sear burner control knob and the adjacent burner control knobs in the start/high position (A). The sear burner works in tandem with adjacent burners (B). The remaining burner(s) can be turned to off or low.
4) Place meat directly over the sear zone and close lid. Sear each side anywhere from one to four minutes (C), depending on the type and thickness of meat. Once searing is complete, the meat can be moved to moderate heat over and cooked to your desired doneness.
Note: Always cook with the lid closed to achieve maximum heat and to avoid flare-ups. As you gain experience using the sear zone we encourage you to experiment with different searing times to find the results that work best for your taste.
To Extinguish Burners
1) Push each burner control knob in and then turn clockwise all the way to the off position.
2) Turn gas supply off.
Igniting the Side Burner
Using the Electronic Ignition to Ignite the Side Burner
If one or more of the main burners on your grill are already lit and you would like to ignite the side burner, skip to step 3. If none of the main burners are lit and you are only using the side burner, start with step 1.
1) Check that the side burner control knob is in the off position. Check by pushing in and turning knob clockwise (A). Also check that all main burner control knobs are in the off position.
Note: It is important that all burner control knobs are in the off position before turning on the LP tank. If they are not, the flow limiting device built into the regulator will activate, limiting the flow of gas from the LP tank.
2) Turn the LP tank on by slowly turning the tank valve counterclockwise; wait 60 seconds.
Note: It is important that the LP tank is turned on slowly. If it is opened too quickly, the flow limiting device built into the regulator will activate, limiting the flow of gas from the LP tank.
3) Open the side burner lid (B) .
4) Push in and turn side burner control knob counterclockwise to start/high position (C)
5) Push and hold in the electronic ignition button (D). You will hear the igniter clicking. Check that the side burner is lit. The side burner flame may be difficult to see on a bright sunny day.
6) Once side burner is ignited, continue turning the knob counterclockwise until you reach the desired position.
7) If the side burner does not ignite within 4 seconds, turn side burner control knob to the off position and wait five minutes to allow the gas to clear before attempting to light the burner again. Should the side burner fail to ignite using the electronic ignition, refer to the TROUBLESHOOTING section. There you will find instructions on igniting the side burner with a match to help determine the exact problem.
To Extinguish Side Burner
1) Push side burner control knob in and then turn clockwise all the way to the off position.
2) Turn gas supply off at the LP tank.