1
www.KALORIK.com
211104
ROBOT VACUUM R1
ROBOT ASPIRADOR R1
EN……....2
ES….......33

2
www.KALORIK.com
211104
THANK YOU
Thank you for choosing HUVI!
We hope you’re delighted with your HUVI. If you are, we’d love it if
you’d shout it from the rooftops, tell your friends or leave us a review.
We’d love to hear from you, so tag @kalorik on social media to share.
REGISTER YOUR PURCHASE
To register your product, simply complete the included form, visit
Kalorik.com/register or scan the QR code below.
TECHNICAL SPECIFICATIONS
Model
RVC 50229 BK
Working Voltage
14.4 DC
Battery
14.4V Li-ion, 3200mAh
Adapter Input
100-240V ~ 50/60 Hz, 0.6A
Adapter Output
19V DC, 1.0A
Max Run Time
110 minutes
Max Suction Power
2600 Pa

3
www.KALORIK.com
211104
CONTENTS
PARTS ................................................................................................................ 5
IMPORTANT SAFEGUARDS ............................................................................... 7
KNOW YOUR HUVI ........................................................................................... 8
BEFORE THE FIRST USE .................................................................................... 10
CONNECTING TO THE HUVI APP ................................................................... 12
To Connect Using Bluetooth ……………………………..…………..….……. 13
To Connect in EZ Mode ……………………………………………..…………. 14
To Connect in AP Mode ….……………………………………..…………….. 14
Connecting with Amazon Alexa……………………………..………….…… 15
Connecting with Google Home……………………………………………… 16
USING YOUR HUVI – HOME & POWER BUTTONS .......................................... 17
USING YOUR HUVI – APP CONTROLS ........................................................... 17
AUTO CLEANING ……………………………….…………………………….…. 17
WALL FOLLOW ……………………………………………………………..……. 18
SPOT ….………………………………………………………….……..…..……... 18
MANUAL CONTROL ………………………………………….…….…...…….… 18
CHARGING ………………………………………………….…………………… 18
SUCTION POWER ………………………………………….…..…………..……. 18
UV FUNCTION …………………………………………….……………..………. 19
ION FUNCTION ….……………………………………….……….….………….. 19

4
www.KALORIK.com
211104
SCHEDULING CLEANINGS …………………………………….…….……….… 19
AUTOMATION ……………………………………………..…………….……..… 19
AROMA DIFFUSER .......................................................................................... 21
CLEANING AND MAINTENANCE .................................................................. 22
CLEANING THE DUST BIN …………………………….….……………………... 22
CLEANING THE FILTERS ………………………………………..…..……………. 23
CLEANING THE SENSORS ….…………………………………………….….….. 24
CLEANING THE ROLLER BRUSH & SUCTION INTAKE ………………..……… 24
CLEAING THE SIDE BRUSHES …………………………………………………… 25
REPLACING THE BATTERY ………………………………………………………. 25
AVAILABLE ACCESSORIES ............................................................................. 26
TROUBLESHOOTING ....................................................................................... 28
WARRANTY ..................................................................................................... 31
5
www.KALORIK.com
211104
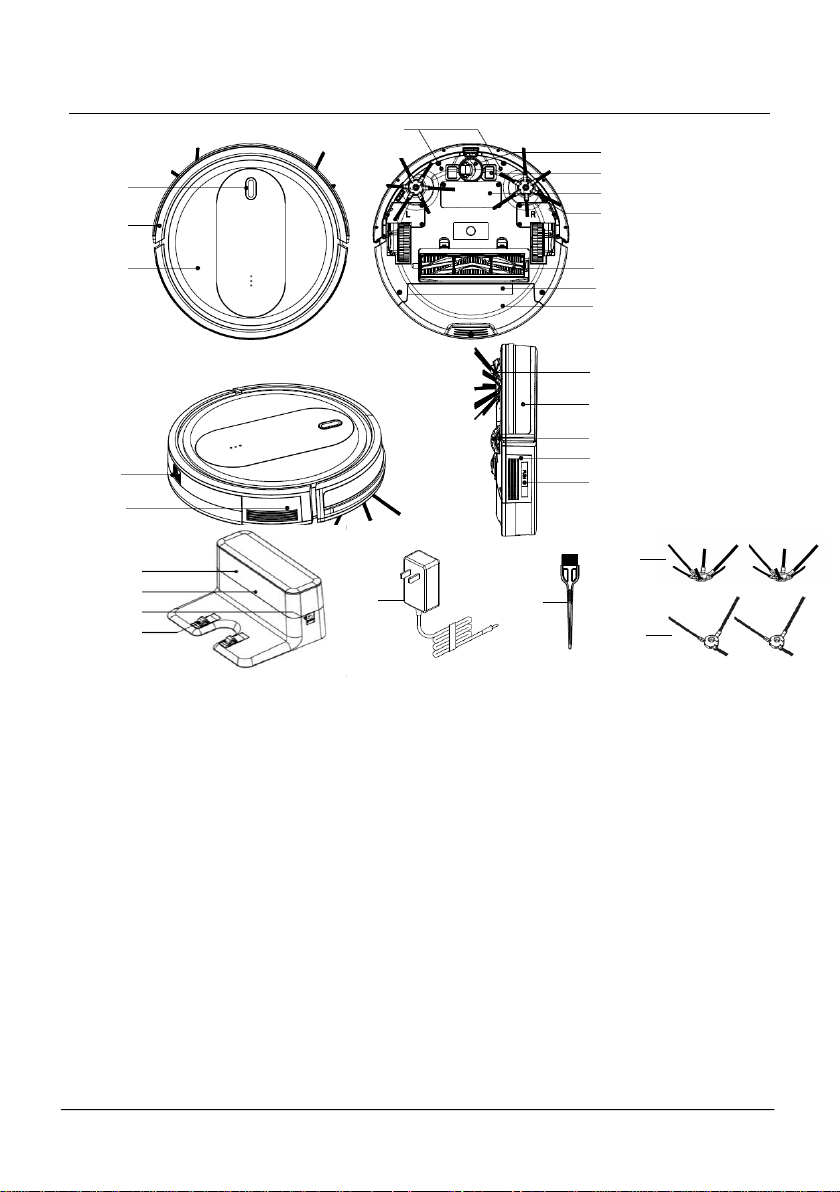
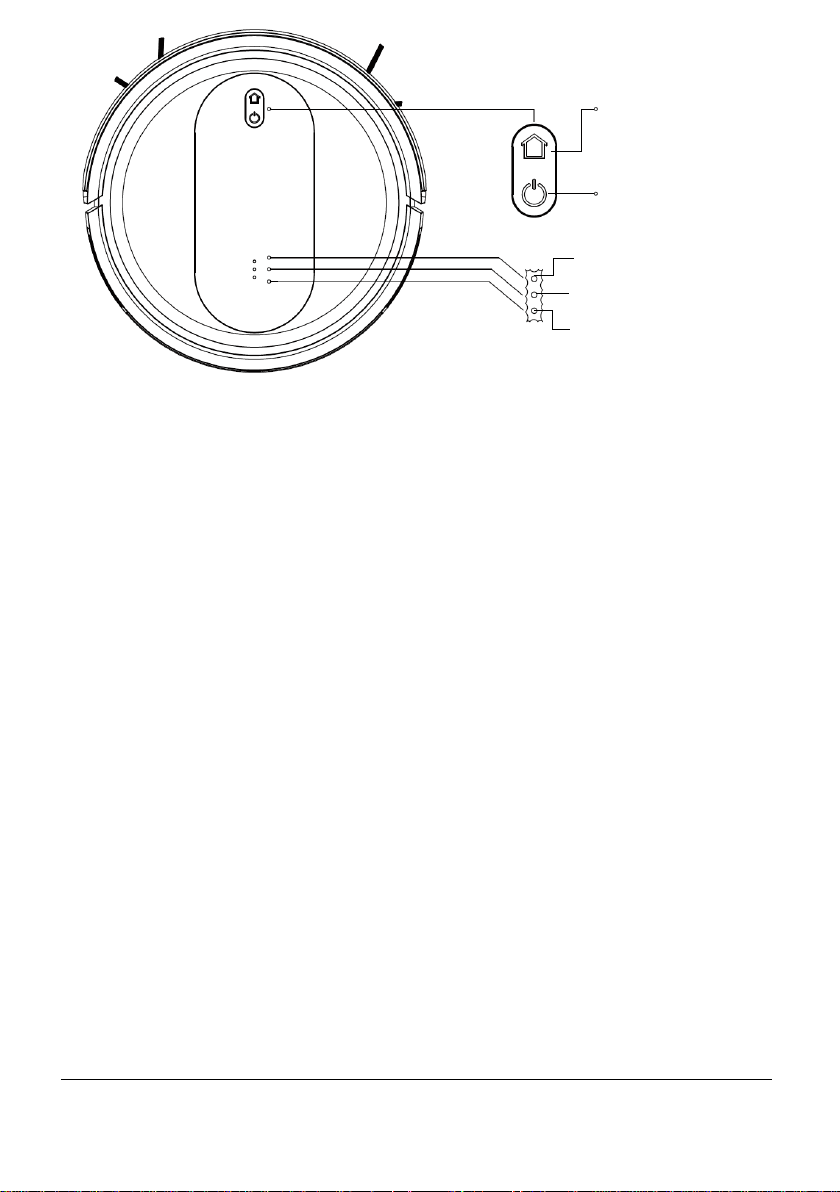
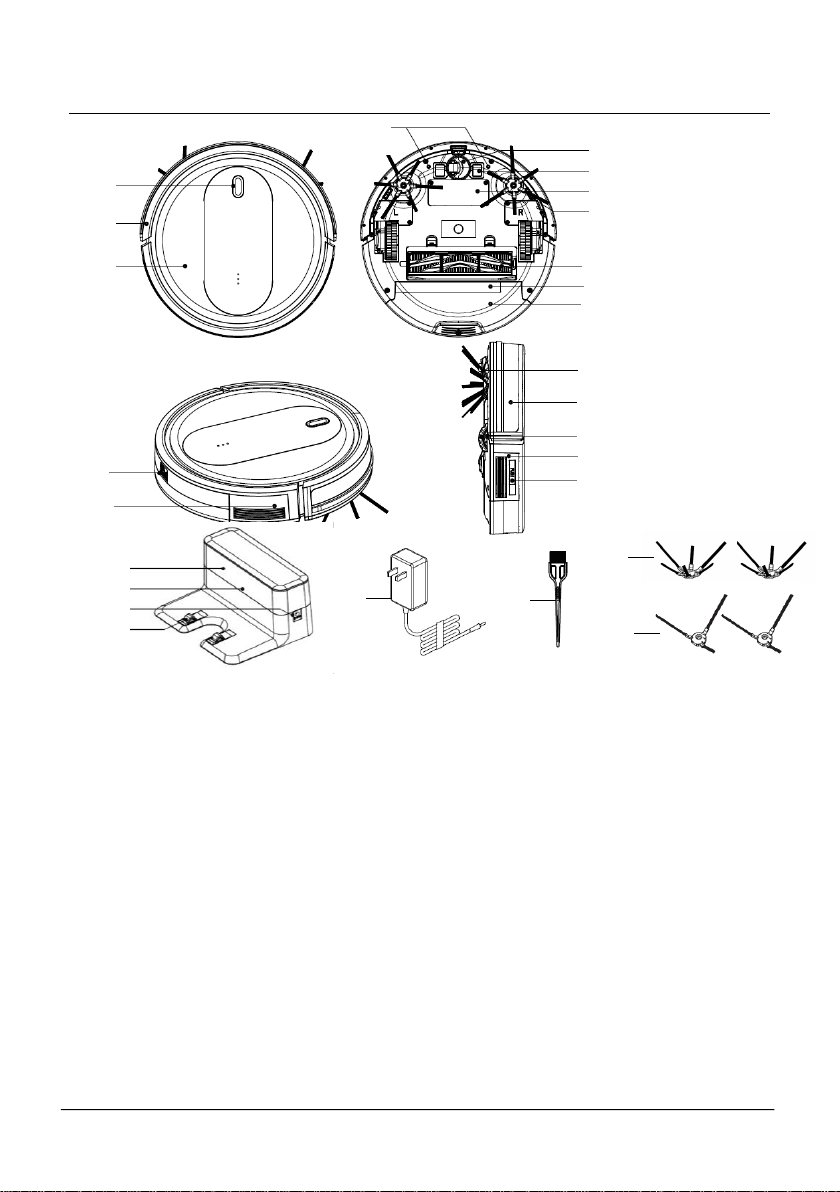
PARTS
1. HOME & POWER buttons
2. Front bumper
3. Main body
4. Front wheel
5. Charging contacts
6. Battery cover
7. Ground sensor
8. Roller brush and suction intake
9. UV-C lamps (inside dust
bin)/LED lights (outside bottom
of dust bin)
10. Dust bin
11. Virtual wall sensors
12. Dust bin latch
13. Side brush
14. Front signal receiver
15. Side wheel
16. Speaker
17. Bipolar ion generator
18. Aroma diffuser compartment
19. Signal sensor
20. Indicator power light for base
21. Socket for adapter
22. Charging pins
23. Adapter
24. Cleaning brush
25. 6-arm side brushes
26. 3-arm side brushes
1
2
3
4
5
6
7
8
9
10
11
12
16
18
13
14
15
17
23
24
19
20
21
22
25
26
6
www.KALORIK.com
211104
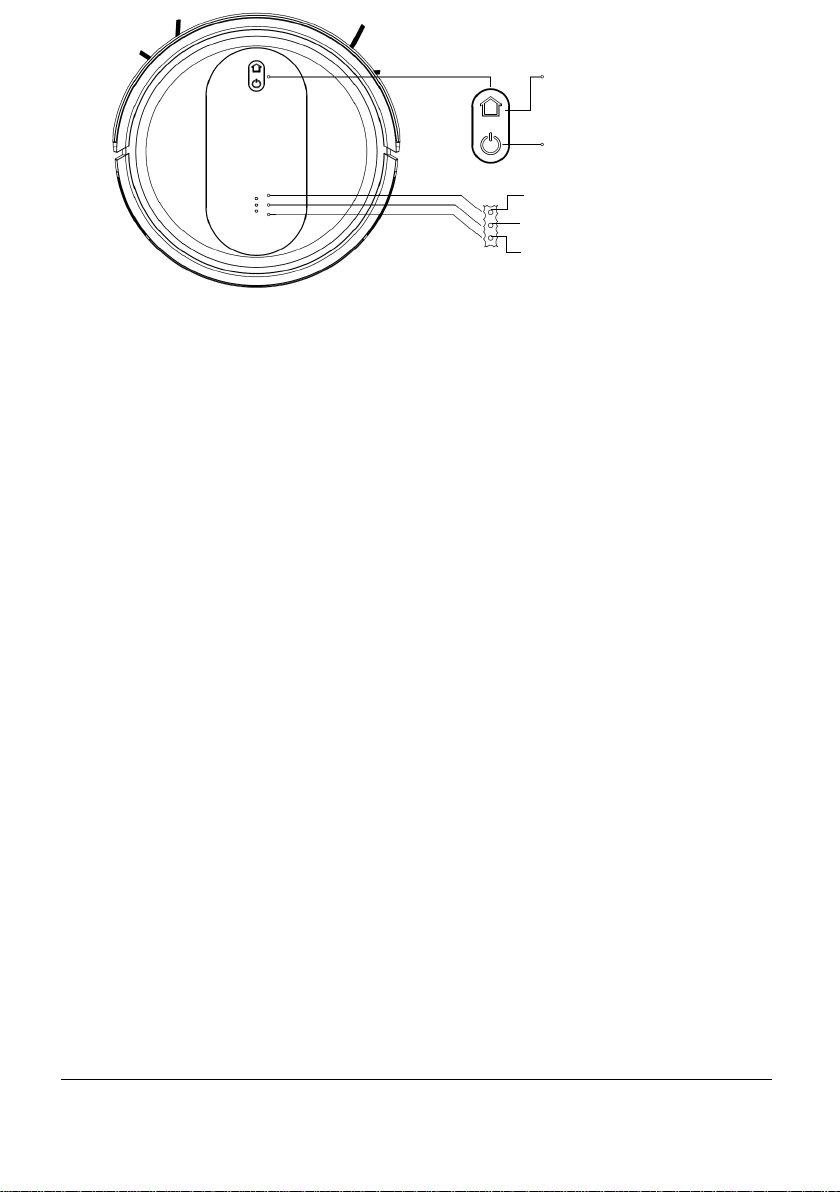
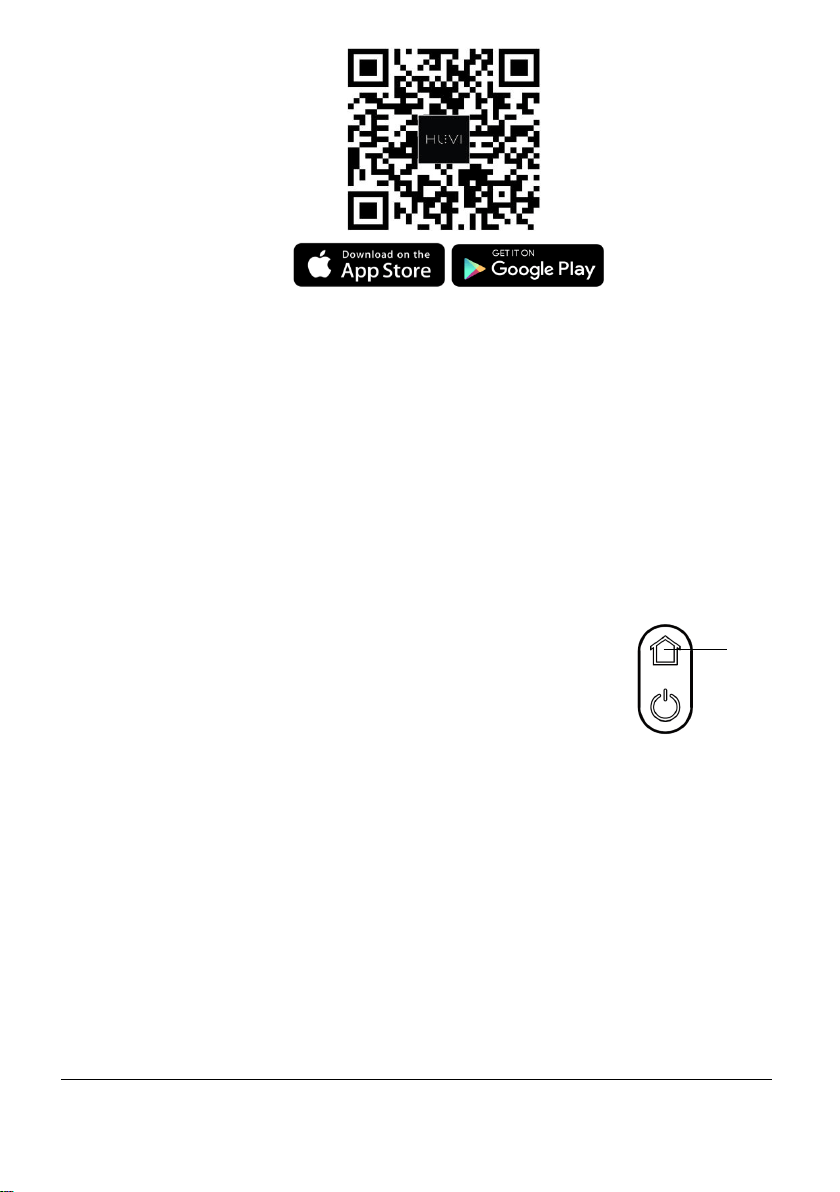
POWER BUTTON
• Press and hold for 3-5 seconds to power on/off
• Short press to start/pause cleaning
• Flashing blue: Standby mode
• Solid blue: HUVI is running
HOME BUTTON
• Short press to send HUVI to recharge. Flashes white when charging.
• Long press to connect HUVI to your WiFi network. Flashes blue while
connecting. See CONNECTING TO THE HUVI APP section for more
details.
ION INDICATOR
• Lights up when the ion function is on. Turns off when ion function is
off.
UV INDICATOR
• Lights up when the UV function is on. Turns off when UV function is
off.
HEPA INDICATOR
• Flashes as a reminder to empty the dust bin and to clean the filters.
HOME
Button
POWER
Button
UV Indicator
Ion Indicator
HEPA Indicator

7
www.KALORIK.com
211104
IMPORTANT SAFEGUARDS
When using electrical appliances, basic safety precautions should always be
followed, including the following:
1. Read all instructions before use.
2. This device can be used by children aged 8 years and up, persons with
reduced physical, sensory, or mental capabilities, and persons with lack
of experience and knowledge, if they have been given supervision or
instruction concerning use of this device in a safe way and understand
the hazards involved.
3. Cleaning and maintenance shall not be performed by children without
adult supervision.
4. This device is only to be used with the power supply unit provided.
5. For the purposes of recharging the battery, use only the detachable
power supply unit that came with this device.
6. The battery must be removed from the device before the device is
disposed of. To remove the battery, unscrew the battery cover using a
screwdriver. Remove the battery by disconnecting the quick
connector.
7. The used battery should be placed in a sealed plastic bag and
disposed of safely according to local environmental regulations.
8. The external flexible cable or cord of the power supply unit cannot be
replaced. If the cord is damaged, the power supply unit shall be
disposed of.
9. This device is for indoor use only.
10. This device is not a toy. Do not sit or stand on this device. Small children
and pets should be supervised when this device is operating.
11. Store and operate this device in room temperature environments only.
12. Clean with a cloth dampened with water only.
13. Do not use this device to pick up anything that is burning or smoking.
14. Do not use this device to pick up bleach, paint, or chemicals spills, or
anything wet.
15. Before using this device, pick up objects like clothing and loose paper.
Lift up cords for blinds or curtains, and move power cords and fragile
objects out of the way. If this device passes over a power cord and
drags it, an object could be pulled off a table or shelf.
16. If the room to be cleaned has a balcony, a physical barrier should be
used to prevent access to the balcony and to ensure safe operation.
17. Do not place anything on top of this device.

8
www.KALORIK.com
211104
18. Be aware that this device moves around on its own. Take care when
walking in the area where this device is operating to avoid stepping on
it.
19. Do not operate this device in areas with exposed electrical outlets on
the floor.
20. Do not attempt to alter the electronics of this device or the integrated
charging base. There are no user-serviceable parts inside.
21. Do not use this device on an unfinished, unsealed, waxed or rough
floor. It may result in damage to the floor and this device. Use only on
hard floor surfaces or low-pile carpet.
22. This device has been designed to be used on floors without scratching
them. We still recommend that you test this device on a small area of
the room to be cleaned to ensure no scratches are made before
cleaning the whole room.
23. Check the dustbin regularly for signs of damage. Do not use HUVI with
a damaged or broken dustbin. If any signs of damage, look for
immediate replacement. Some discoloration is normal with regular use.
SAVE THESE INSTRUCTIONS
HOUSEHOLD USE ONLY
KNOW YOUR HUVI
HUVI combines one-of-a-kind advanced cleaning technology with the
convenient hands-off automation of a robot vacuum. Harnessing the
power of UV-C disinfection, medical grade HEPA 13 filtration, and bipolar
ionization, HUVI provides a high-level, multi-stage cleaning experience. The
vacuum provides Auto, Spot, Wall Follow, and Manual Mode settings along
with adjustable suction power. Use the app to control, automate, and map
the vacuum cleaning process. HUVI also features a built-in aroma diffuser
that mists your home with refreshing fragrance as it cleans, with option to
turn the diffuser on and off.
UV FUNCTION
HUVI features UV-C lights in the dustbin that disinfect the contents inside. UV
(or ultraviolet) disinfection works by breaking down the chemical bonds
and scrambling the DNA structure of microorganisms, making them unable
to multiply. The UV-C light’s strategic location inside the dust bin increases
9
www.KALORIK.com
211104
the amount of time the UV-C light has to destroy contaminants, preventing
pathogens from reentering the air when emptying the dustbin.
HEPA FILTER
HUVI features an H13 medical-grade HEPA filter. A normal HEPA-standard
filter removes at least 99.97% of airborne particles with a size of 0.3 microns
(µm). Beyond this, HEPA filters are further classified by their level. A filter’s
HEPA level indicates its effectiveness removing all particles that are 0.2 µm
in diameter.
“True HEPA” filters on the market (H10-
H12 grade filters) only trap 85-99.5% of
all particles that are 0.2 µm in
diameter. A HEPA H13 filter, like the one
in HUVI, traps 99.95% of such particles.
They are within the highest tier of HEPA
and are considered medical-grade
quality, being utilized in hospitals,
operating rooms and more.
BIPOLAR IONIZATION
HUVI features a bipolar ionization system. Conventional air ionizers
generate negative ions to remove pollutants from the air. HUVI uses a
newer, more advanced form of ionization that works by emitting a blend of
positively and negatively charged ions. These ions of opposite charges
attach to pollutants in the air, breaking down their chemical bonds. Bipolar
ionization is used in hospitals, assisted living facilities, and more, for its
effective air purification.
AROMA DIFFUSER
HUVI features a built-in aroma diffuser. Simply place a few drops of the
aroma included with HUVI, or any essential oil of your choosing, on the
aroma pad and load it inside HUVI. While HUVI runs, the aroma is dispersed
into the air, misting your home with soothing fragrance. Since the HUVI’s
diffuser works while it is moving, the aroma disperses wherever HUVI goes,
expanding the range of coverage compared to a standard, stationary
diffuser.
HEPA Grade
Filtration Efficiency
H14
99.995%
H13
99.95%
H12
99.5%
H11
95%
H10
85%
10
www.KALORIK.com
211104
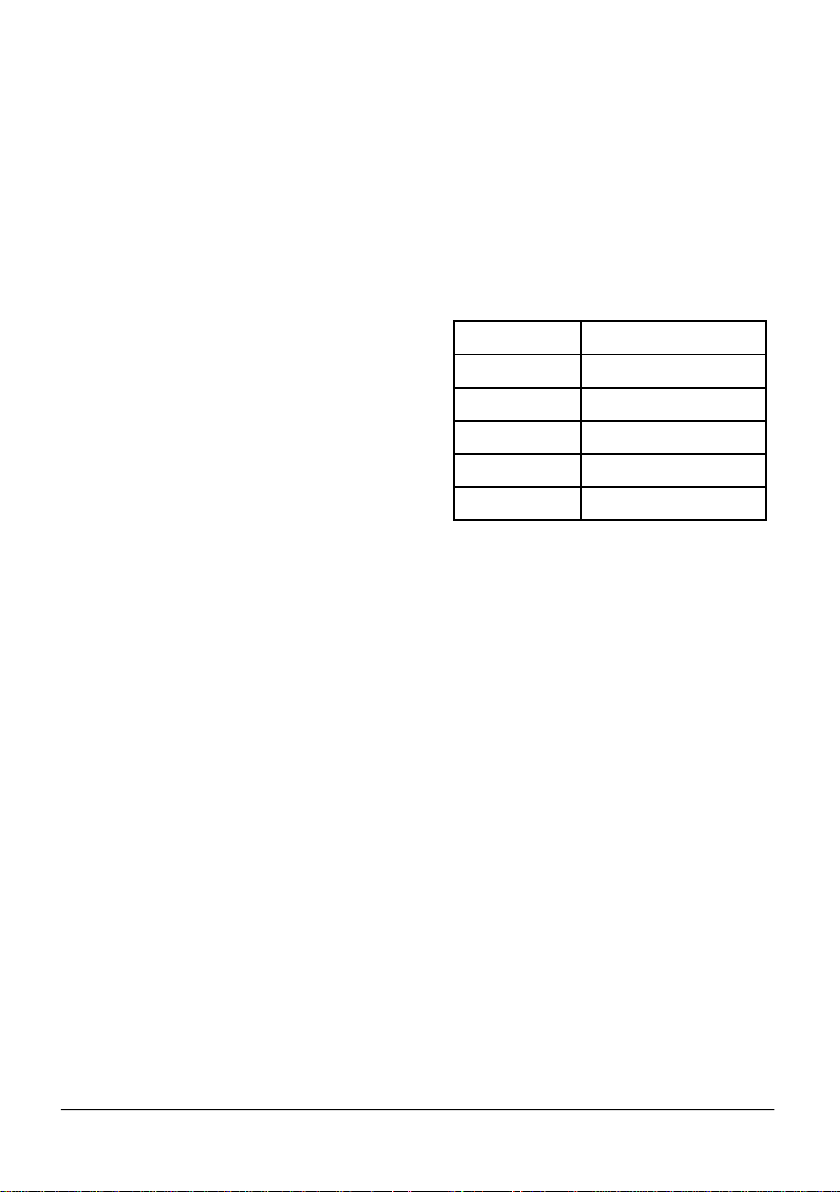
BEFORE THE FIRST USE
• Place charging dock indoors, on a hard-leveled surface, and against a
wall.
• Place the charging dock in an open area, leaving at least 4 feet/1.5m
in the front of the charging dock and 1.5ft/0.5m feet on each side.
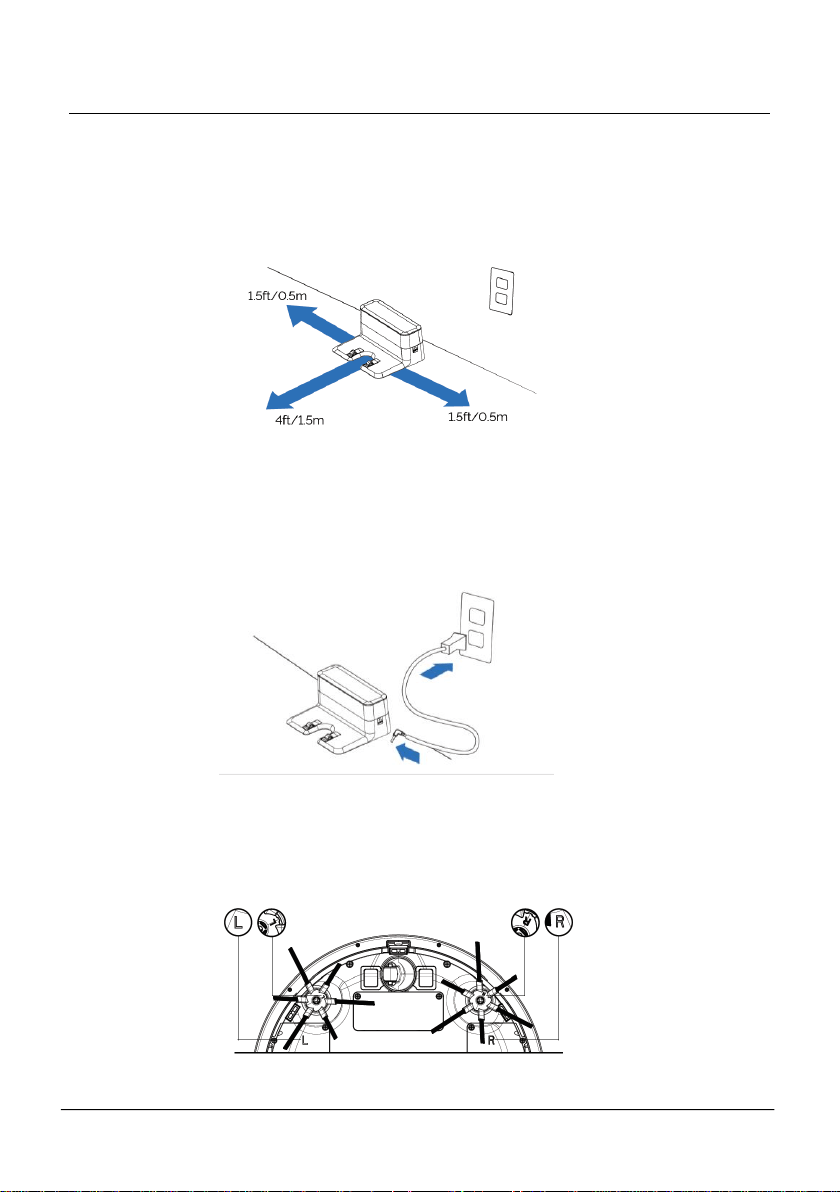
• Plug the power cord into the charging station, then into the outlet.
• Place the remaining cord behind the charging dock to prevent it from
getting in the way of HUVI as it cleans. NOTE: Always keep the charging
base plugged in, otherwise the vacuum will not automatically return to
it.
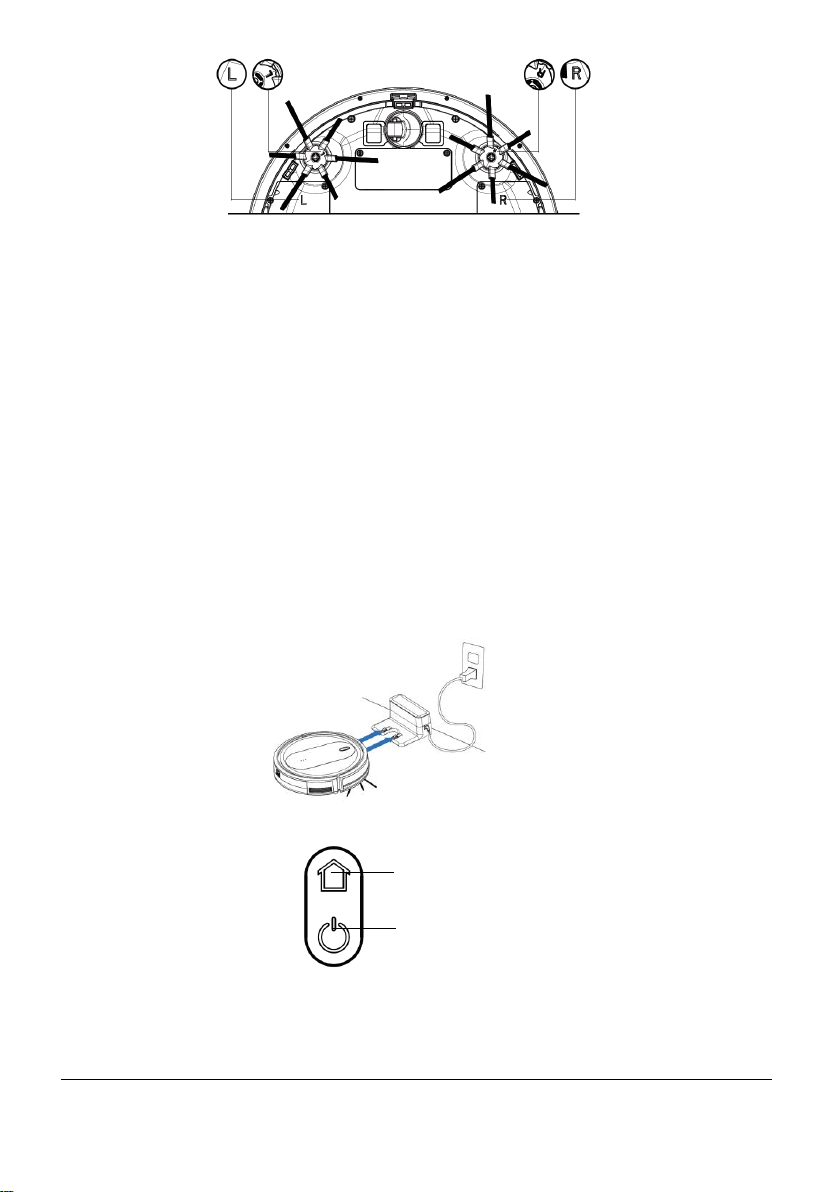
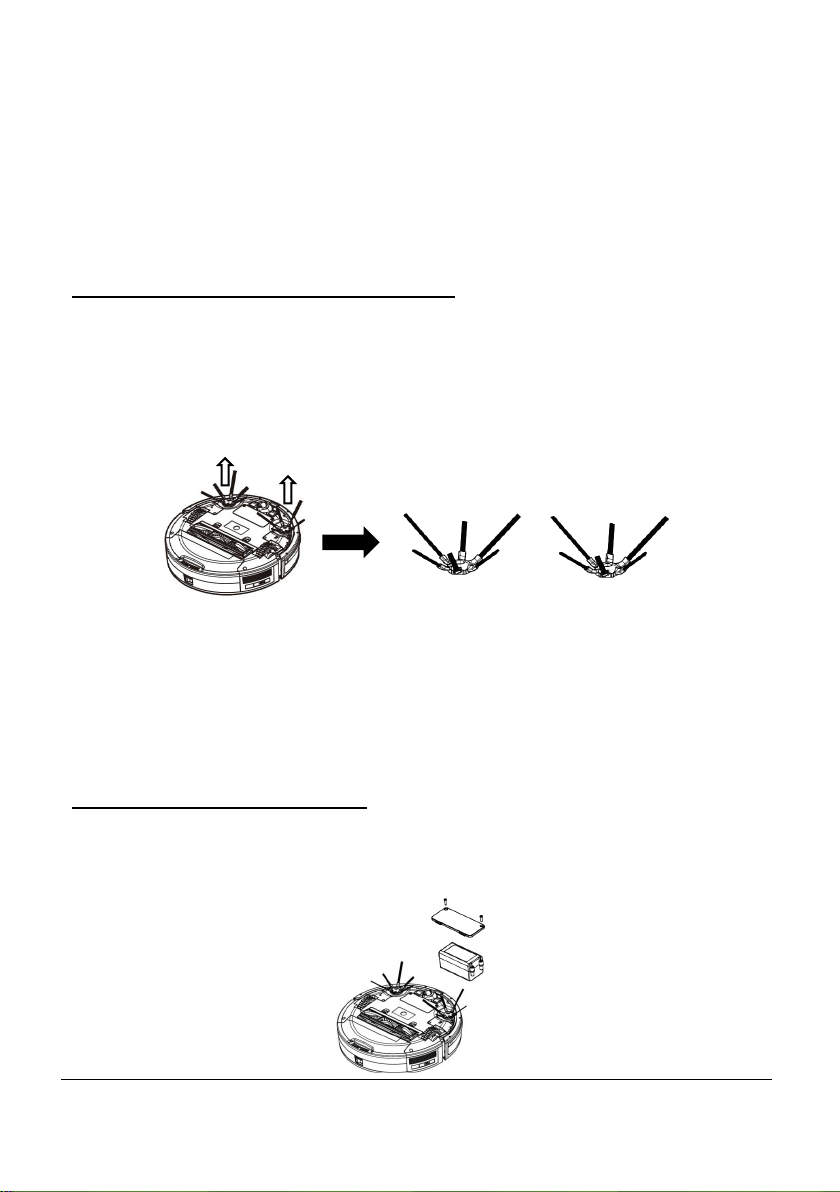
• Remove the foam inserts beside the bumper.
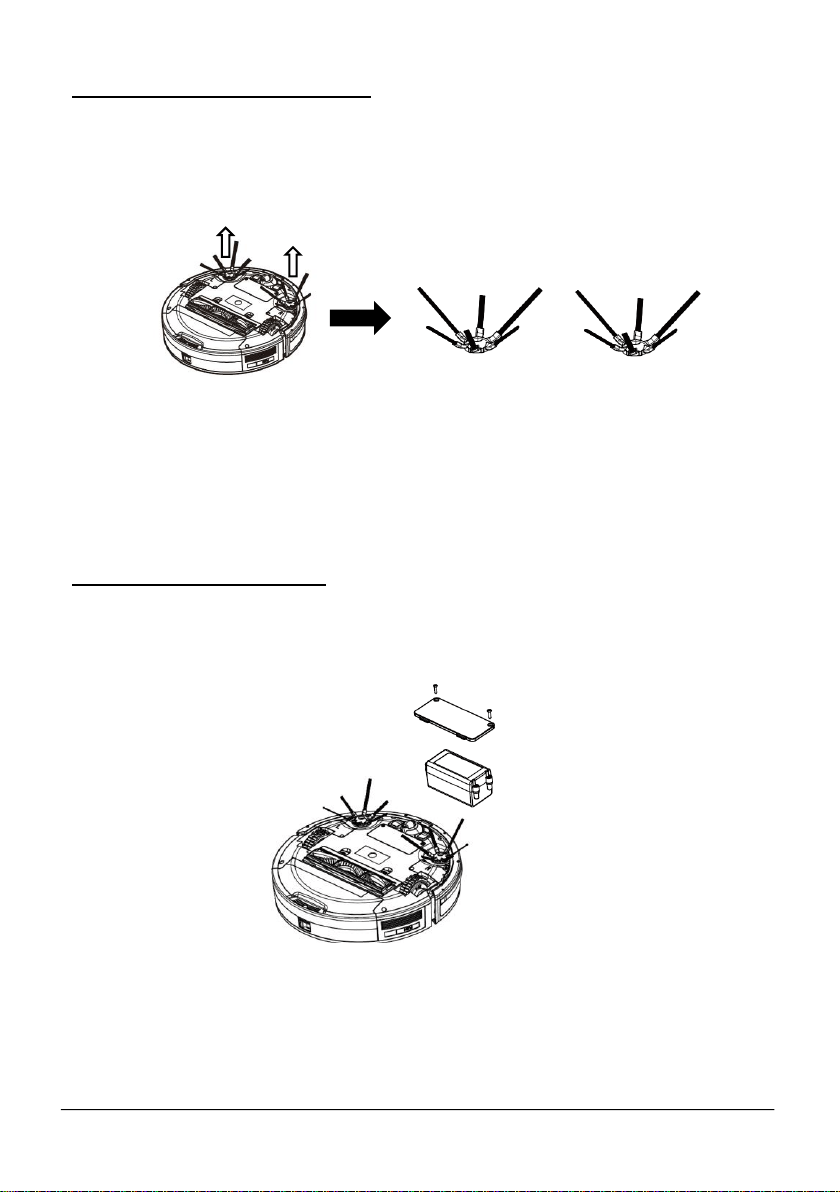
• Attach the side brushes to the bottom of HUVI by pressing the brush into
each slot until it clicks. Make sure to match the letter on the brush with
the letter on HUVI.
11
www.KALORIK.com
211104
NOTE: HUVI is suitable for hardwood floors, tile, low pile carpet/rugs. HUVI
includes 2 unique sets of side arm brushes, each designed to tackle
different floor types and handle any room in your home.
― 6-ARM SET: designed for hard floors and whole-room carpeting,
permanently fixed onto the floor. The six-arm design provides more
lifting power for dust and hair, providing more efficient deep
cleaning on these surfaces.
― 3-ARM SET: The 3-Arm Set is designed for homes with small or light
rugs. The three-arm design makes it easier for HUVI to climb over
these surfaces and move freely across the floor. It is recommended
to use this set to avoid HUVI getting stuck on the sides of your
carpets or from moving your rugs around while cleaning.
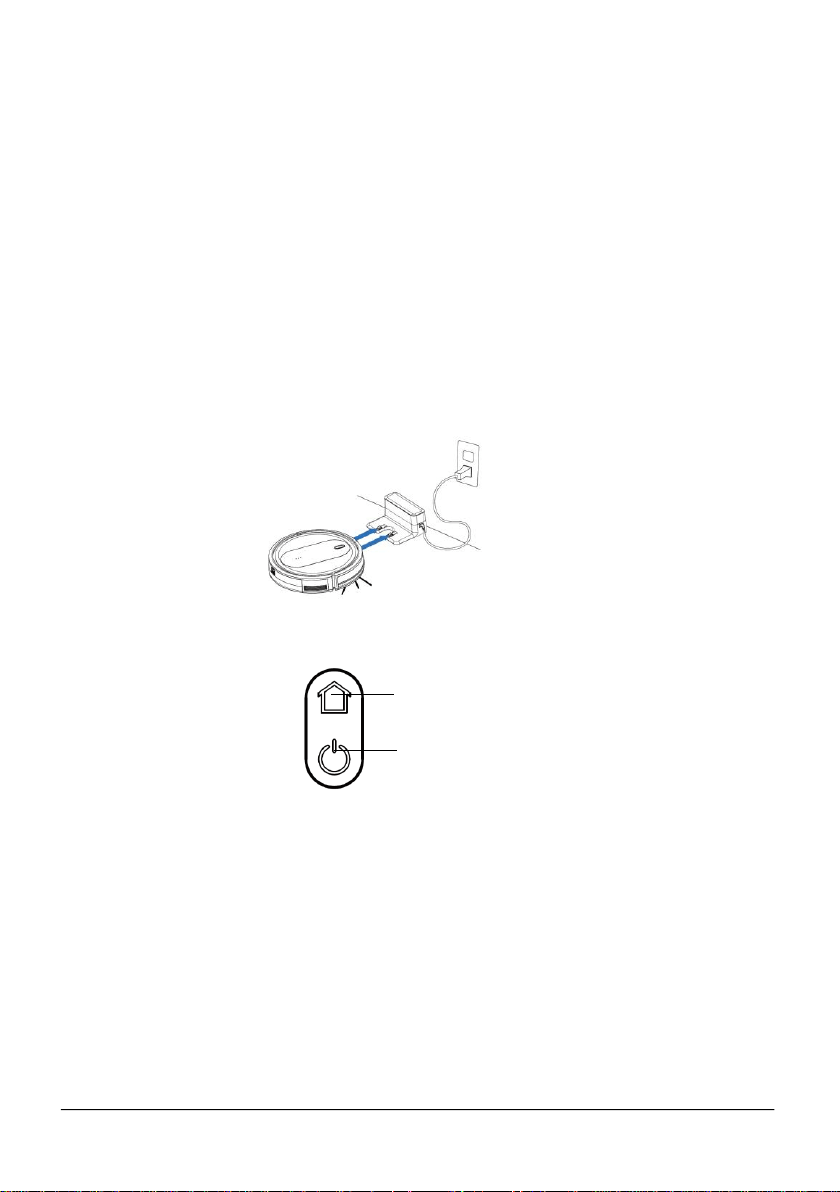
• Place HUVI on the charging station by lining up the metal charging
contacts.
• Turn on your HUVI by pressing and holding the power button for 3-5
seconds.
• When successfully powered on, the power button lights up in blue.
• Allow HUVI to charge on the base. While charging, the indicator lights
on the POWER & HOME buttons flashes white. Once fully charged, the
lights stop flashing.
• Download the HUVI App and follow the instructions for complete set-
up. See CONNECTING TO THE HUVI APP section in this manual for more
information.
NOTE:
― Make sure HUVI is close to your WiFi router when connecting to the
HUVI app for the first time.
HOME BUTTON
POWER BUTTON

12
www.KALORIK.com
211104
― For best results, make sure that your floor is free of any obstructions.
Remove any power cords and small objects from the floor that may
interfere with HUVI.
― Fold any tasseled edges of area rugs underneath to prevent
tangling.
― Place physical barriers in front of fireplaces or any other areas that
could damage HUVI.
― Keep HUVI away from spaces lower than 3.57 in. / 8 cm to prevent it
from getting stuck. If necessary, place physical barriers to block
problem areas.
― HUVI may climb on top of objects less than 0.63 in. / 16 mm tall.
Remove these objects if possible.
CONNECTING TO THE HUVI APP
• Before starting, make sure that:
― HUVI is fully charged, turned on, and close to your wireless router.
― Your smart device is connected to a WiFi network.
― The 2.4 GHz signal is enabled on your wireless router.
IMPORTANT: HUVI will only connect to the router through the 2.4 GHz signal!
• Download the HUVI app by using your smart device’s camera to scan
the QR code (Fig. A), or by searching for the app on your smart
device’s app store.
• Once the download is complete, open the app on your smart device.
Follow the onscreen instructions to create your account.
Fig. A
13
www.KALORIK.com
211104
There are 3 ways to connect HUVI to the app:
‒ Bluetooth assisted (default, recommended): Uses the Bluetooth on
your smart device to help connect to your WiFi.
‒ EZ Mode: Uses your home WiFi network to communicate between
your smart device and HUVI.
‒ AP Mode: Uses HUVI’s built in WiFi to communicate between your
smart device and HUVI.
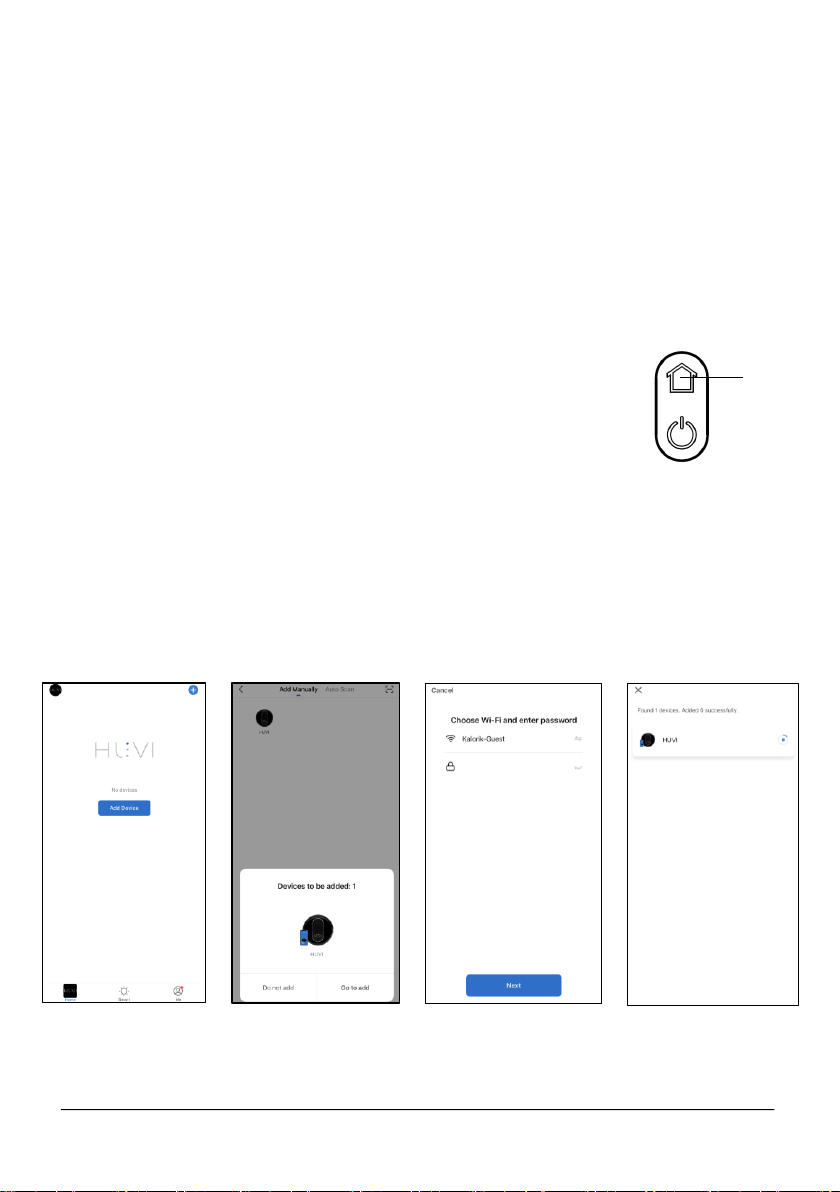
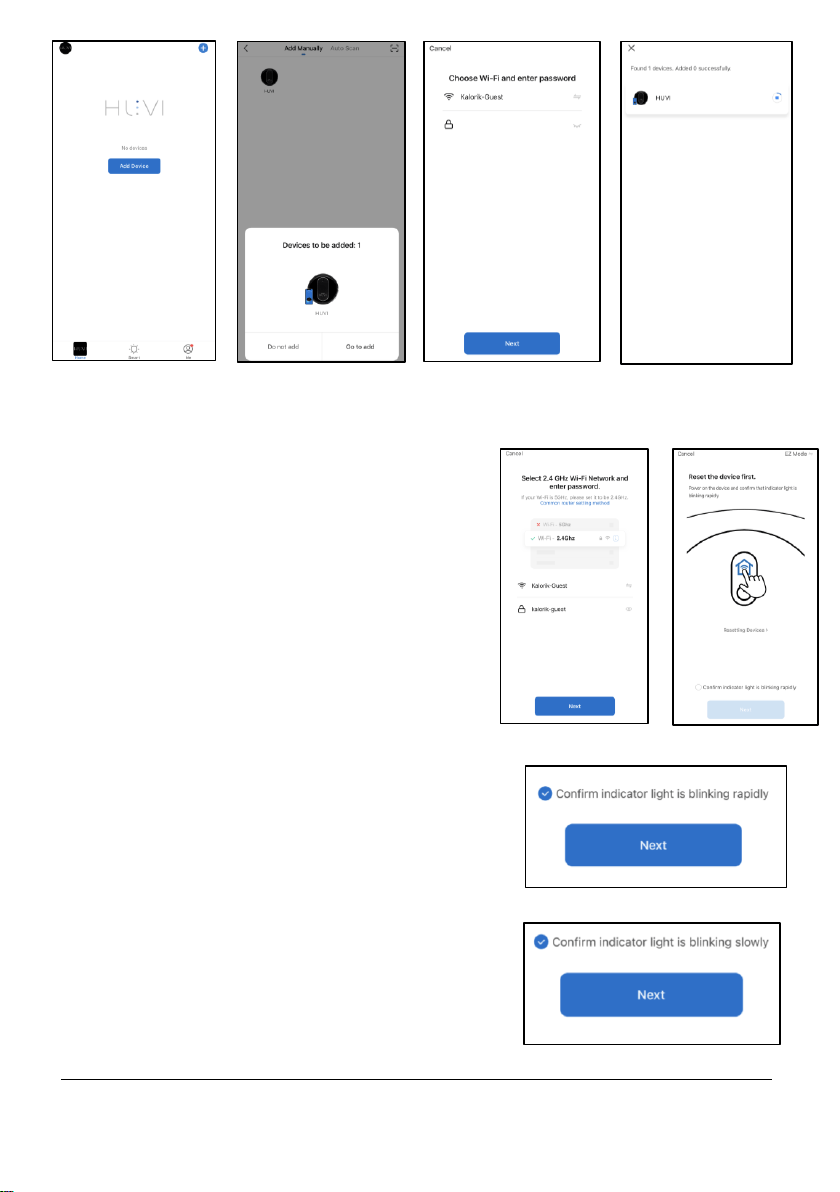
To connect using Bluetooth (default, recommended):
• Make sure the Bluetooth on your smart device is
switched on.
• Press and hold the HOME button on top of HUVI (Fig.
B) until the HOME button light turns light blue and
begins to flash while HUVI says “connecting to
network”.
• In the app, press “Add Device” in the center of the
screen (Fig. C), then select the “Go to add” (Fig. D).
• Input your WiFi information, then select “Next” (Fig. E).
• Wait about 30 seconds while HUVI connects to the app (Fig. F).
• Once the connection is successful, select “Next” to complete.
• Your HUVI can now be controlled through the app.
Fig. C
Fig. B
HOME
BUTTON
Fig. D
Fig. E
Fig. F
14
www.KALORIK.com
211104
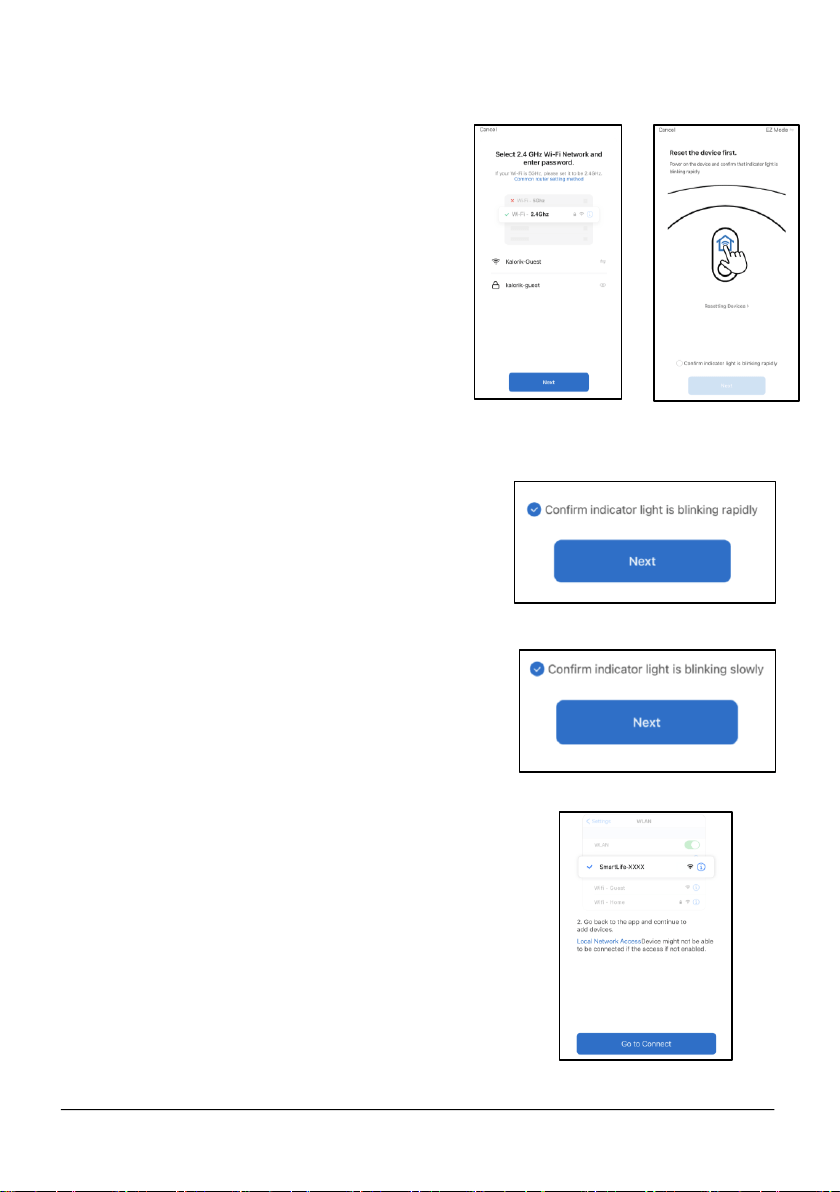
To connect in EZ Mode (if Bluetooth is unsuccessful or not possible):
• Make sure the Bluetooth on your
smart device is off.
• Select “Add Device” (Fig. C), then
select the HUVI icon.
• Follow the instructions to input your
WiFi information (Fig. G), then
select “Next”.
• Make sure “EZ Mode” is selected
in the upper right corner (Fig. H).
• Press and hold the HOME button
on top of HUVI (Fig. B) until the
HOME button light turns light blue
and begins to flash rapidly while
HUVI says “connecting to
network”.
• Check off the small circle to the left
of the text that says "Confirm the
indicator is blinking rapidly", then
press "Next" (Fig. I).
• The app will show "Adding device..." as
the device connects.
• Once successful, you can name your
HUVI. Select “Done” in the app to
complete.
• Your HUVI can now be controlled
through the HUVI app.
To connect in AP Mode (if Bluetooth & EZ mode
connection are unsuccessful or not possible):
• Make sure the Bluetooth on your smart
device is off.
• Select “Add Device” (Fig. C), then select
the HUVI icon.
• Follow the instructions to input your WiFi
information (Fig. G), then select “Next”.
• Make sure “AP Mode” is selected in the
upper right corner (Fig. H).
Fig. G
Fig. H
Fig. J
Fig. K
Fig. I
15
www.KALORIK.com
211104
• Press and hold the HOME button on top of
HUVI (Fig. B) until the HOME button light turns
light blue and begins to flash slowly while HUVI
says “connecting to network”.
• Press the small circle in front of "Confirm the
indicator is blinking slowly" to select, then press
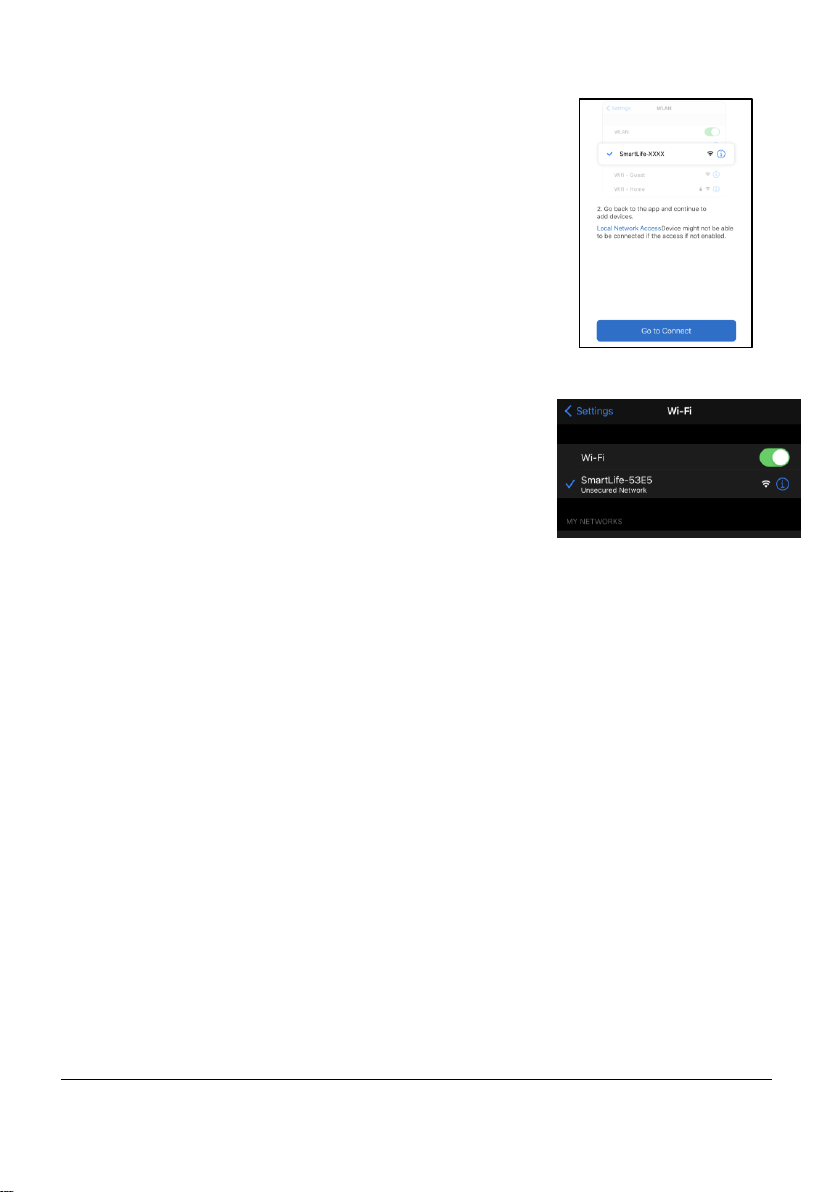
"Next" (Fig. J).
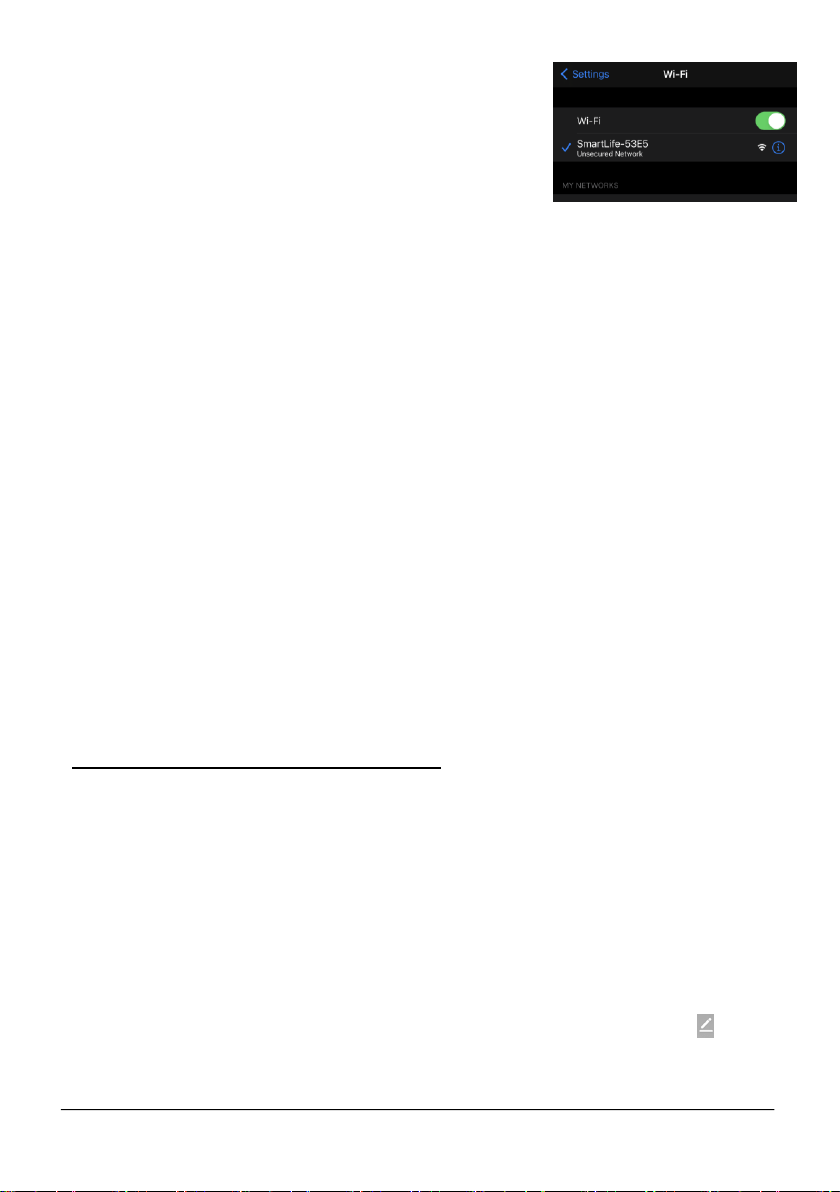
• Select "Go to Connect" in the app interface (Fig. K)
• You will be taken to the WiFi settings on your smart device. Wait for
the HUVI’s WiFi hotspot to appear, then connect your smart device
to the HUVI’s WiFi hotspot (Fig. L)
• On your smart device, return to the app. The app will show "Adding
device..." as the device connects.
• Once successful, you will be able to name your HUVI. Select “Done”
in the app to complete.
• Your HUVI can now be controlled through the HUVI app.
NOTE: If you cannot connect to WiFi using the connection methods above,
try the following before connecting again.
― Restart your smart device
― Reboot HUVI. Press and hold the power button for 3 seconds to
turn off. Wait 10 seconds, the press and hold the power button for
3 seconds again to turn back on.
― Reboot your router by unplugging the router for 30 seconds, then
reconnecting. Allow the router a few minutes to reboot.
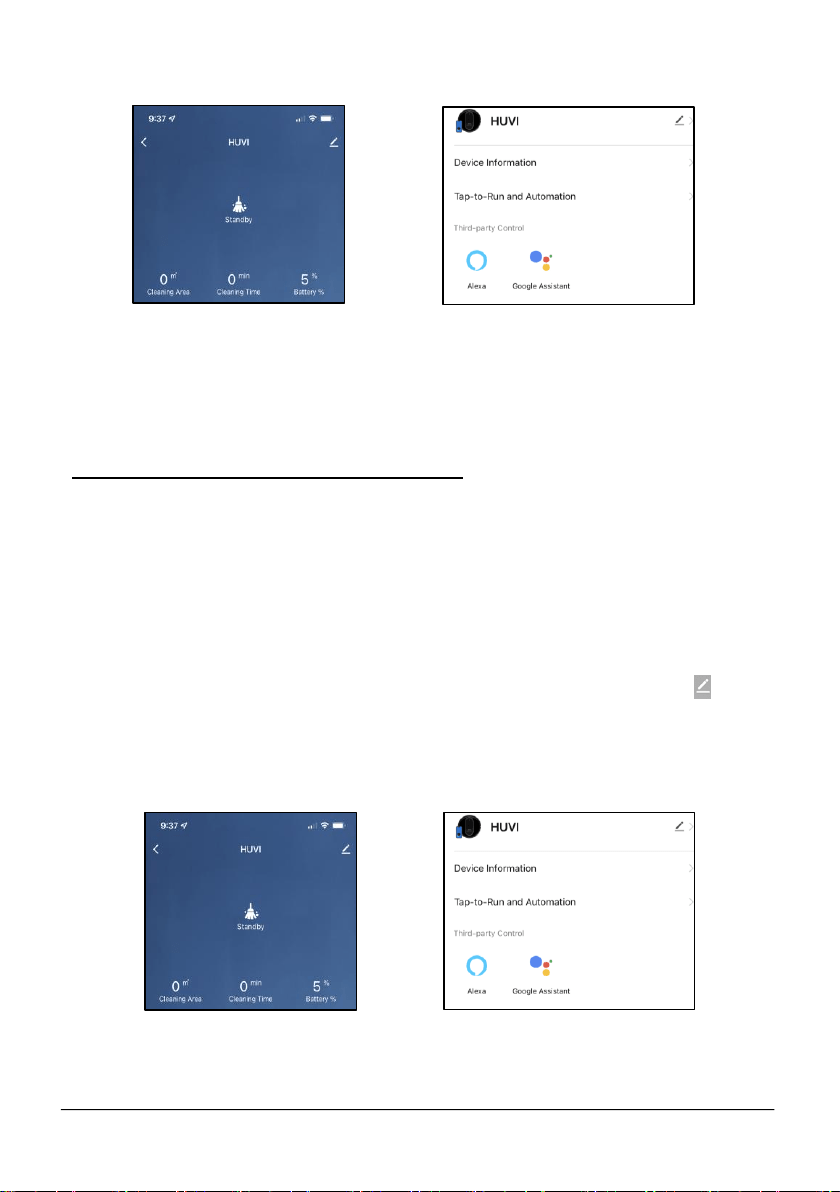
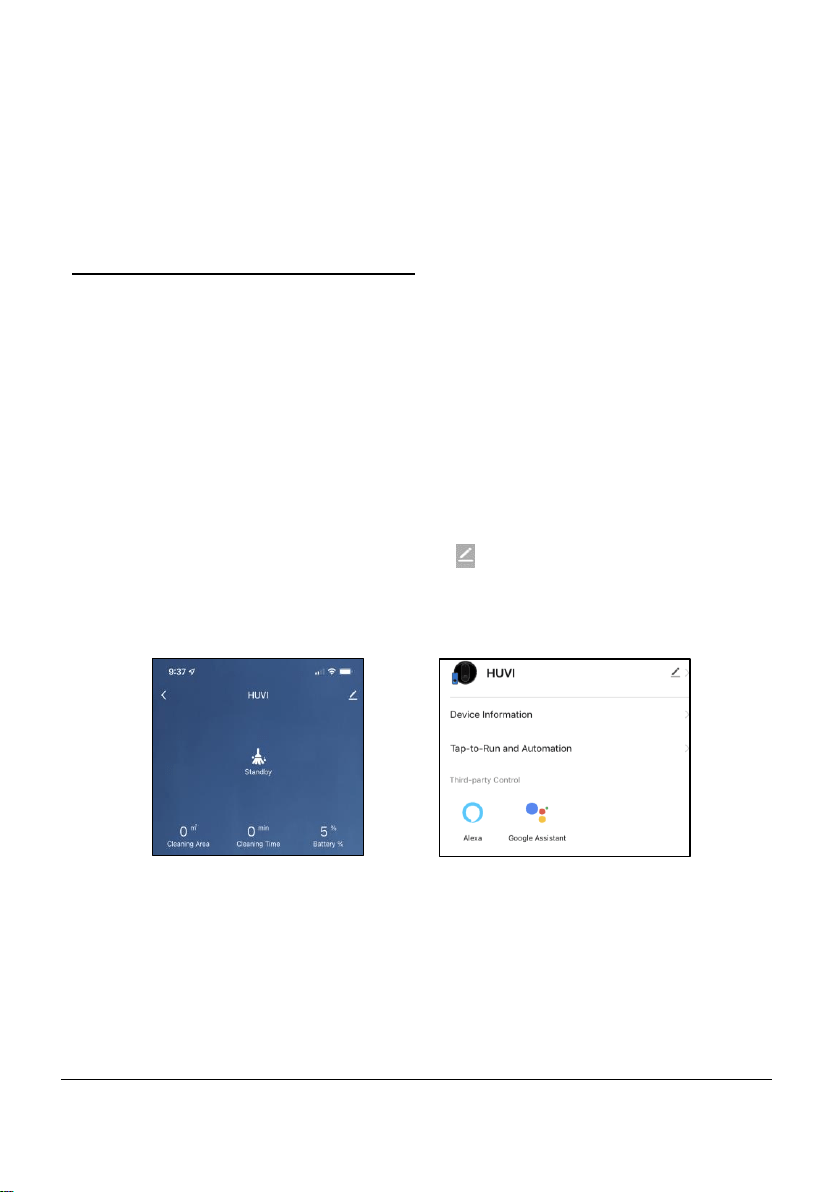
Connecting with Amazon Alexa
HUVI is compatible with Amazon Echo’s Alexa. Follow the steps below to
connect:
1. Make sure your Amazon Echo (or compatible smart speaker/appliance)
is set up and that the Amazon Alexa app is downloaded and connected
to your Amazon Echo.
2. Make sure you have downloaded and successfully connected HUVI to
the HUVI app. Make sure it is connected to the same WiFi signal as the
Alexa app.
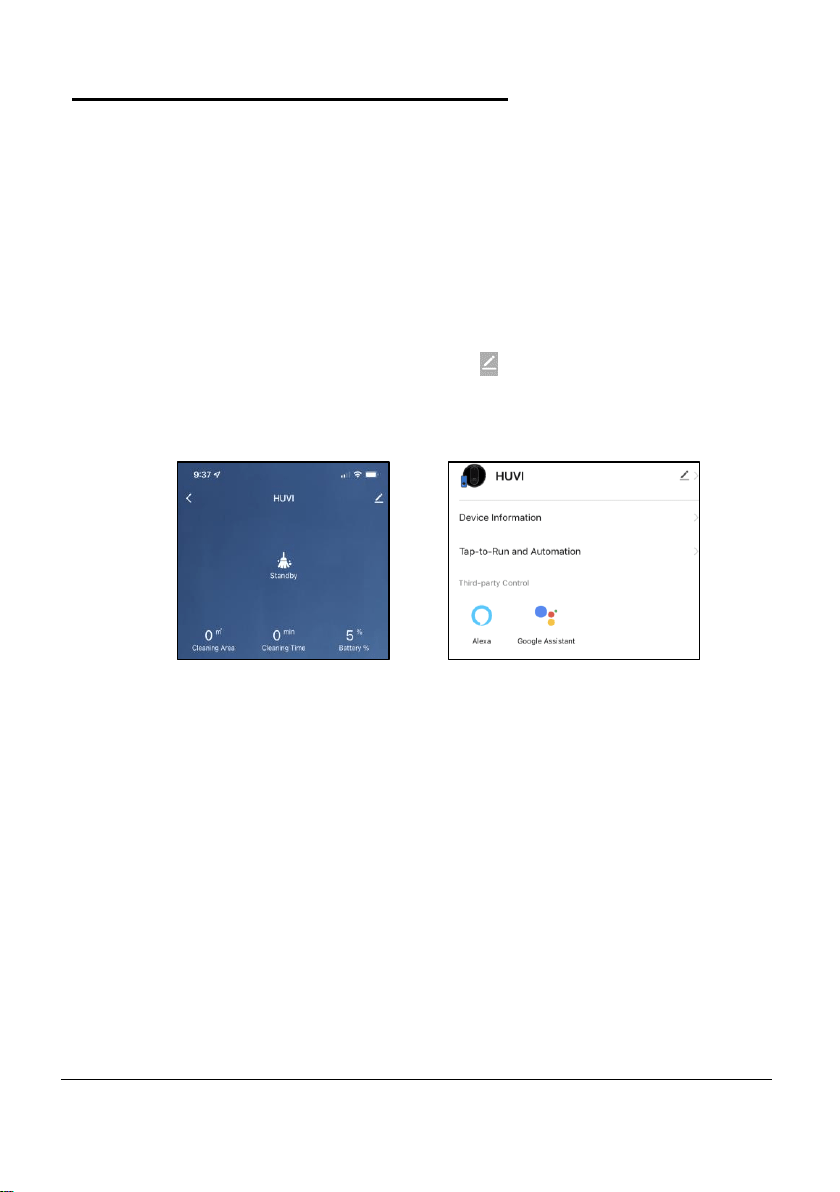
3. In the HUVI app, go to the HUVI’s control screen and select the icon
in the upper right corner (Fig. M).
Fig. L
16
www.KALORIK.com
211104
4. Select the “Alexa” icon and follow the instructions to connect (Fig. N).
NOTE: The name of your HUVI will be the same as the name set in the HUVI
app. If you change the device's name on the HUVI app, your Echo must re-
discover it.
Connecting with Google Assistant
HUVI is compatible with Google Home. Follow the steps below to connect:
1. Make sure your Google Home is set up and that the Google Home app is
downloaded and connected to your Google Home device.
2. Make sure you have downloaded the HUVI app and successfully
connected HUVI. Make sure it is connected to the same WiFi signal as
the Google Home app.
3. In the HUVI app, go to the HUVI’s control screen and select the icon
in the upper right corner (Fig. M).
4. Select the “Google Assistant” icon and follow the instructions to connect
(Fig. N).
Fig. M
Fig. N
Fig. M
Fig. N
17
www.KALORIK.com
211104
NOTE:
― All the account information must match your HUVI app account
information to successfully link.
― If you change the device's name on the HUVI app, your Google
Home must re-discover it.
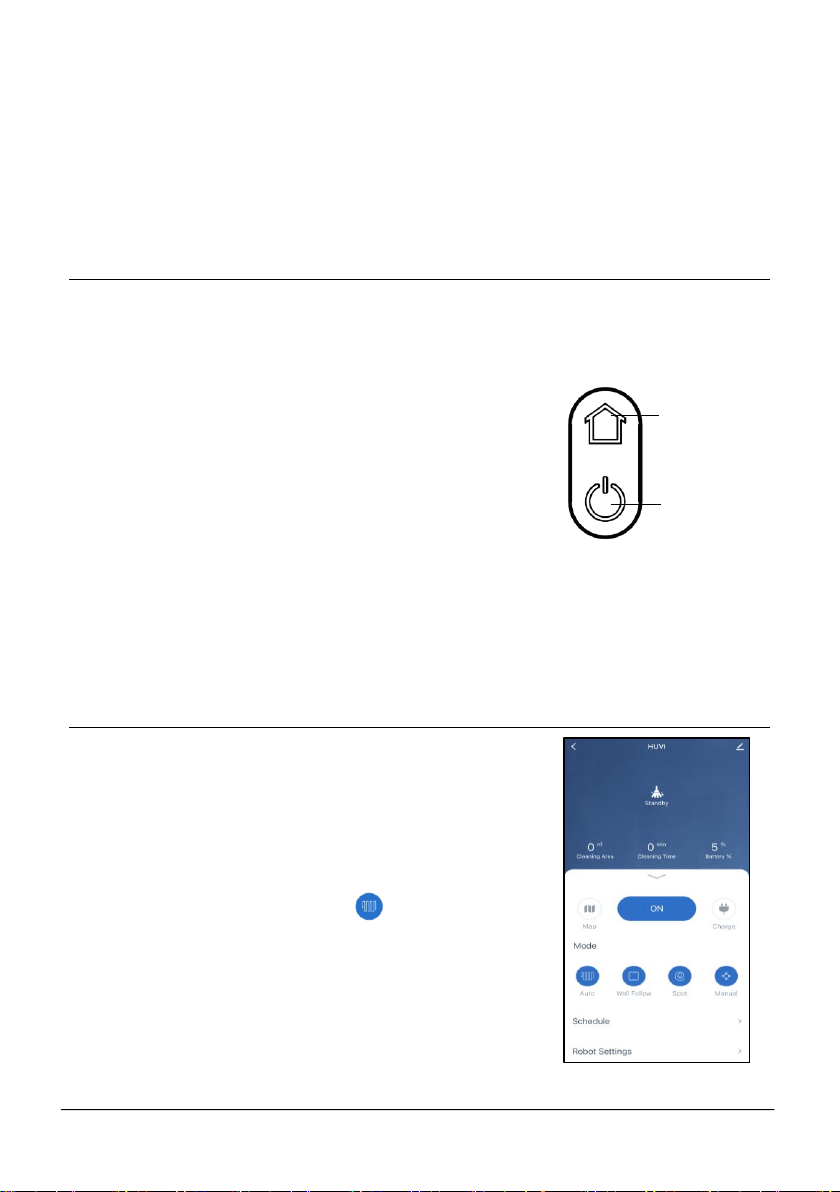
USING YOUR HUVI – HOME & POWER BUTTONS
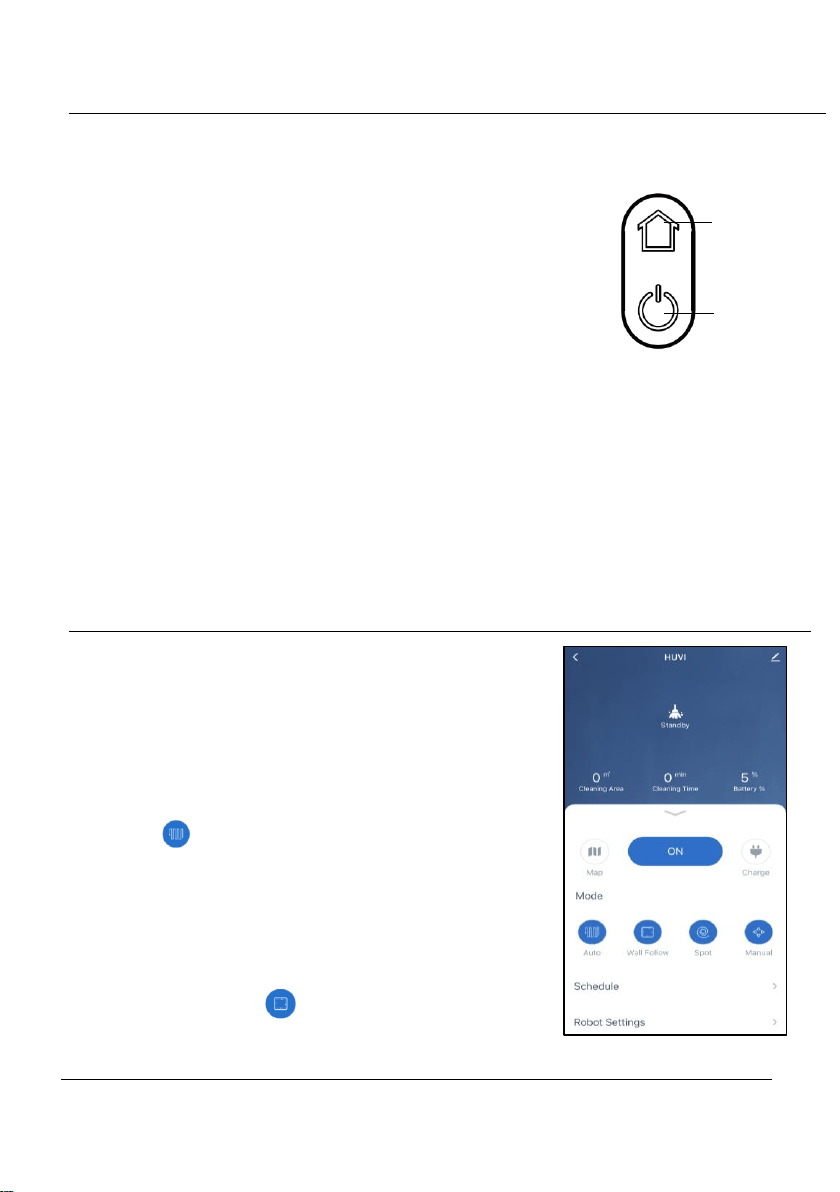
HUVI can be directed to clean and recharge by using the POWER and
HOME buttons located on the top of HUVI.
HOME Button
• Tap once to send HUVI to the charging base.
• Hold for 3-5 seconds to toggle between HUVI
WiFi connection modes*.
POWER Button
• Hold for 3-5 seconds to power HUVI on/off.
• Tap once to Start / Pause / Resume HUVI’s Smart Cleaning function
*see CONNECTING TO THE HUVI APP section for connection details.
USING YOUR HUVI – APP CONTROLS
To get the most out of HUVI, make sure you have
downloaded and connected HUVI to the app
(see CONNECTING TO THE HUVI APP section)
before starting.
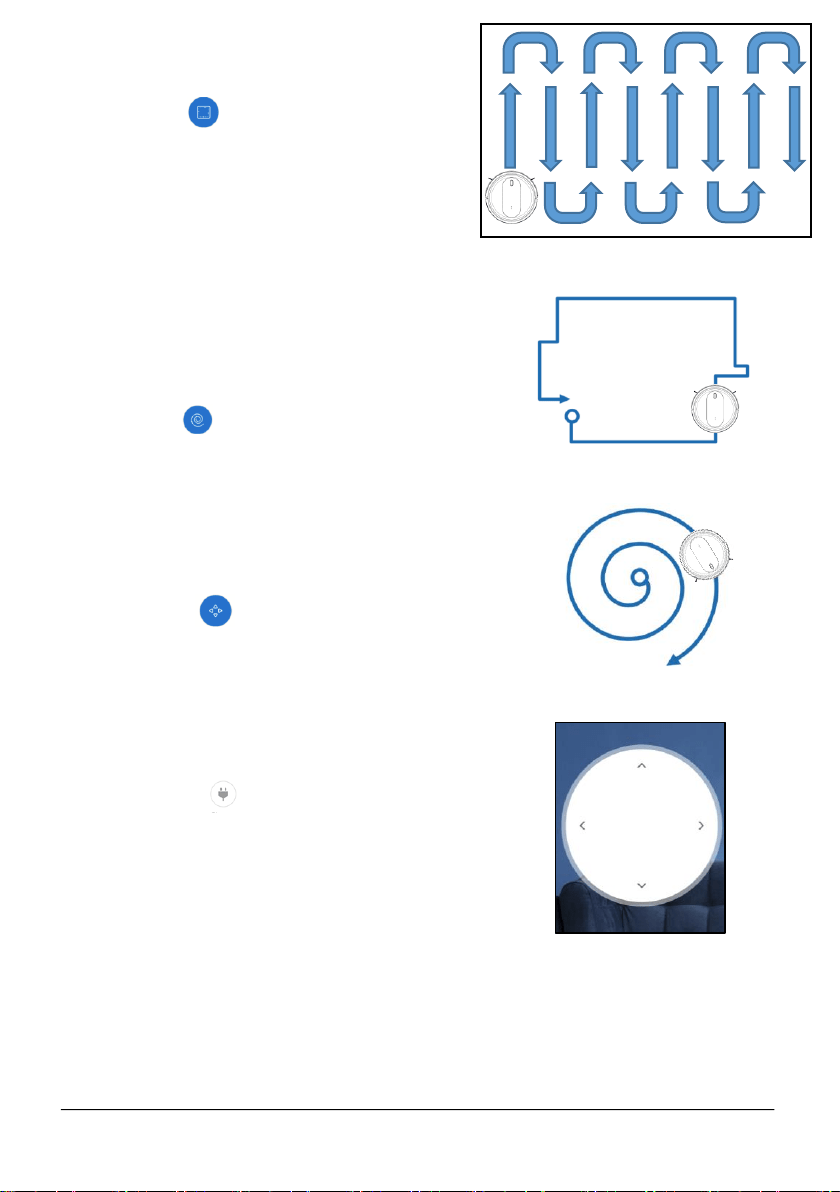
AUTO CLEANING
• In the HUVI app, select the icon (Fig. A).
• After selected, press the ON button to start.
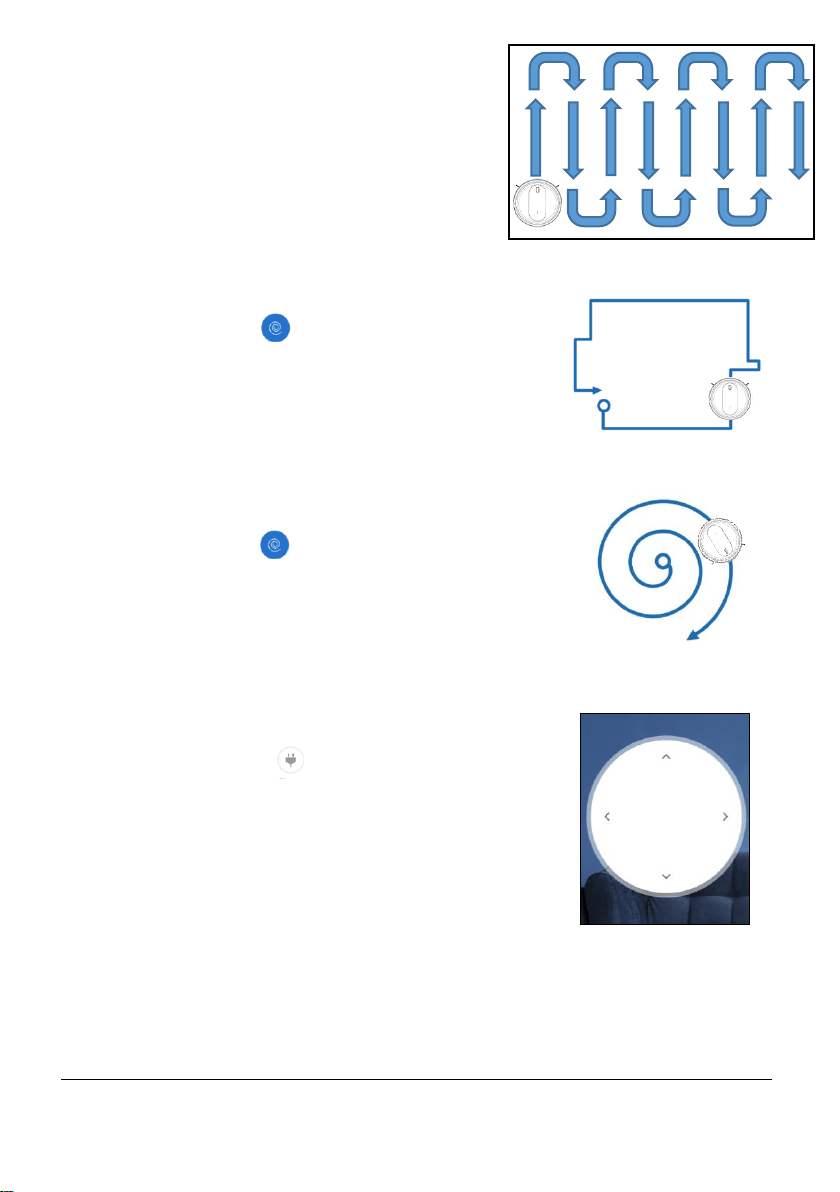
• In Auto mode, HUVI navigates and clean your
floor automatically (see pathing on Fig. B).
Fig. A
HOME BUTTON
POWER BUTTON
18
www.KALORIK.com
211104
WALL FOLLOW
• Press the icon to select Wall
Follow mode (Fig. A).
• After selecting, press the ON button
to start
• In Wall Follow mode, the vacuum
reduces its speed when it detects a
wall and then follows the wall to
ensure the edge is cleaned
thoroughly (Fig. C).
SPOT
• Place HUVI by the area you wish to
spot clean.
• Press the icon to select Spot mode.
• After selected, press the ON button to
start.
• In Spot Clean mode, the HUVI moves
in an outward spiral, cleaning the floor
in expanding circles (Fig. D).
MANUAL CONTROL
• Select the icon to select Manual
control (Fig. A)
• Press and hold the arrow buttons on
the app to direct the HUVI (Fig. E).
• In Manual Control mode, you will be
able to direct the HUVI yourself.
CHARGING
• Select the icon (Fig. A) to direct the
HUVI back to the charging base.
• HUVI will also automatically return to the
charging base when it is low on battery
while HUVI is running.
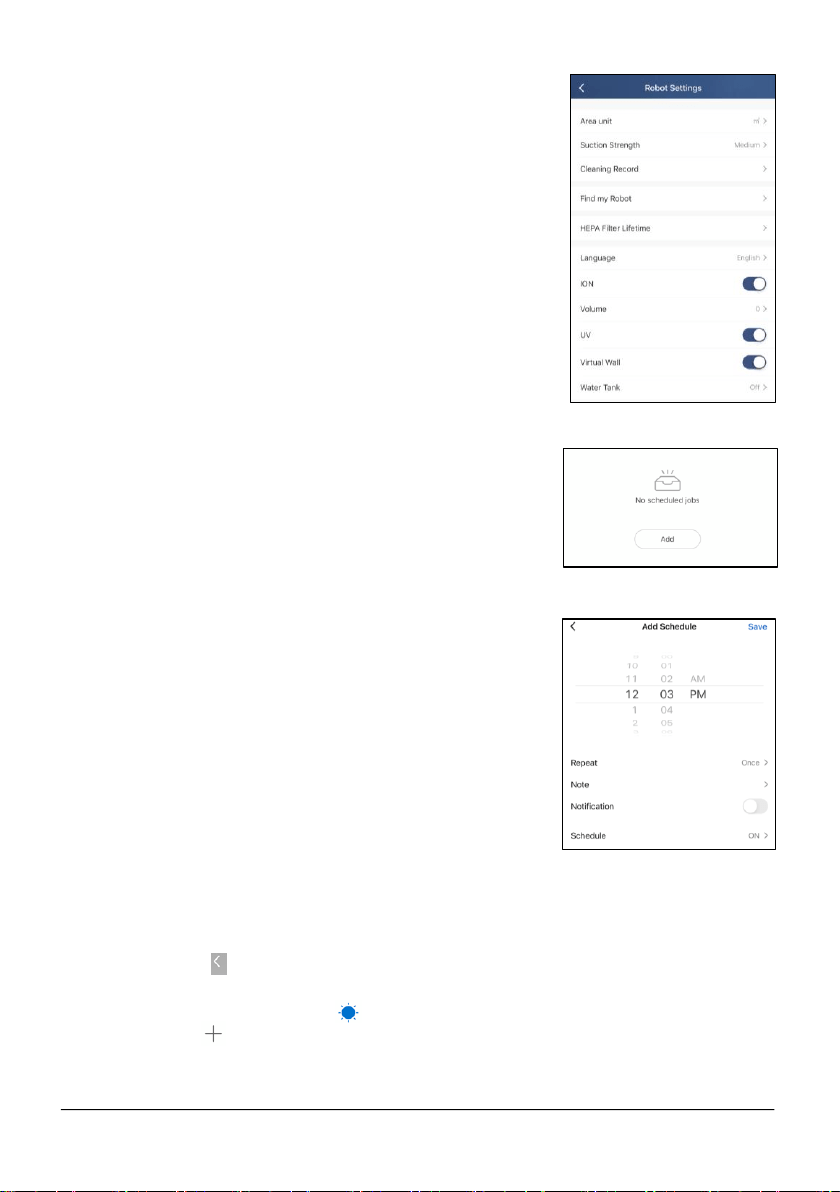
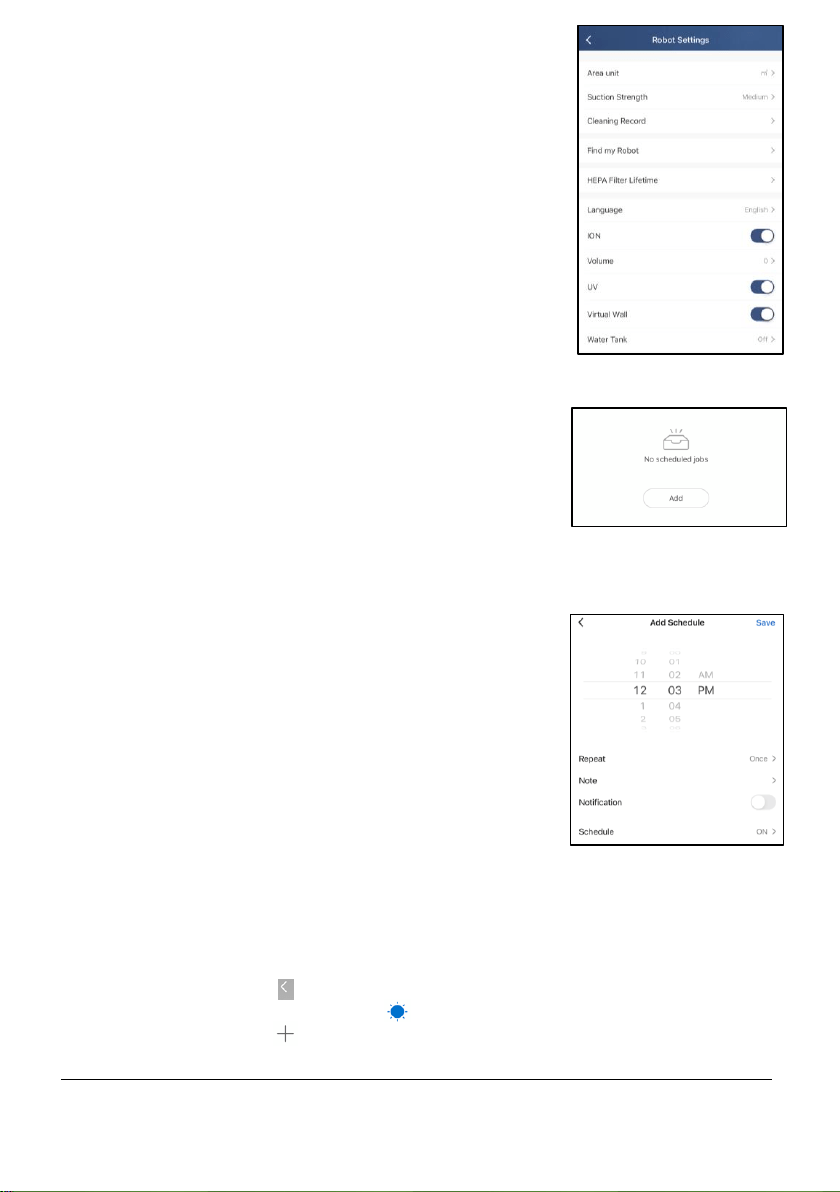
SUCTION POWER
• HUVI has 4 suction power settings: Low,
Medium, High, and Max.
• To select between HUVI’s suction power
settings, select “Robot Settings” (Fig. A)
Fig. E
Fig. B
Fig. C
Fig. D
19
www.KALORIK.com
211104
while HUVI is in use, then select “Suction
Strength” to choose between the
settings (Fig. F).
NOTE:
― The suction setting can be changed
during any of the other operating
functions.
― The more powerful the setting the
more battery power that will be
used.
UV FUNCTION
• Select “Robot Settings” (Fig. A), then
select “UV” to toggle the UV function on
or off (Fig. F).
• By default, this function is enabled when
first powering on the product.
ION FUNCTION
• Select “Robot Settings” (Fig. A), then select
“ION” to toggle the ion function on or off (Fig.
F).
• By default, this function is enabled when first
powering on the product.
SCHEDULE CLEANINGS
• Select “Schedule” (Fig. A), then select “Add”
to select the time and parameters (Fig. G).
• Select the parameters for the cleaning
schedule, then select “Save” in the upper right
corner (Fig. H).
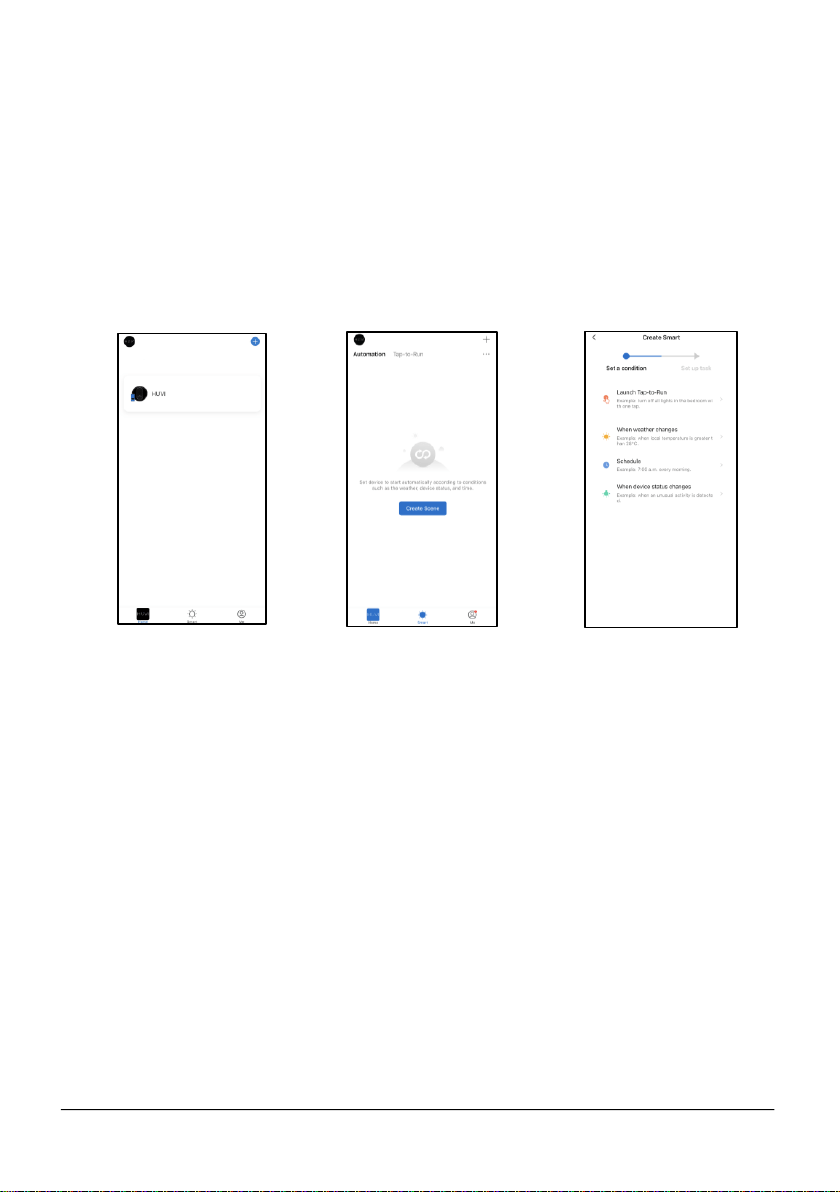
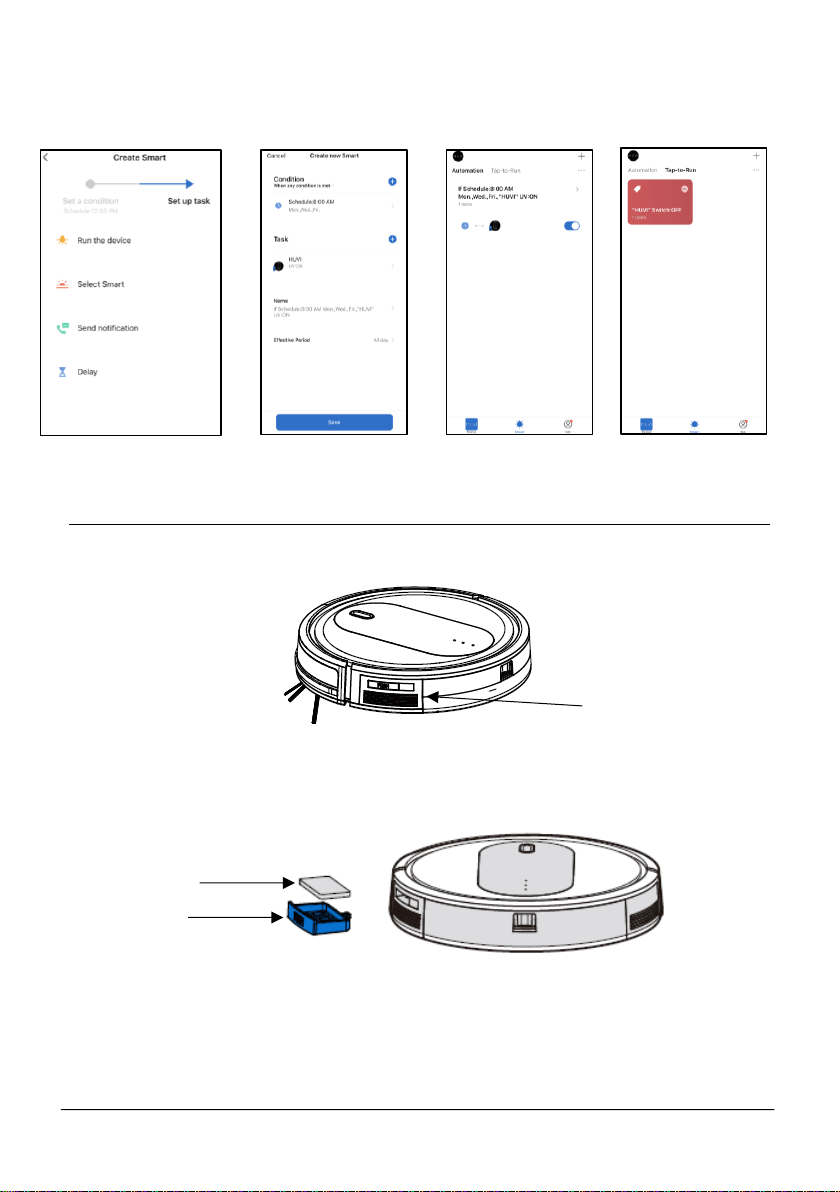
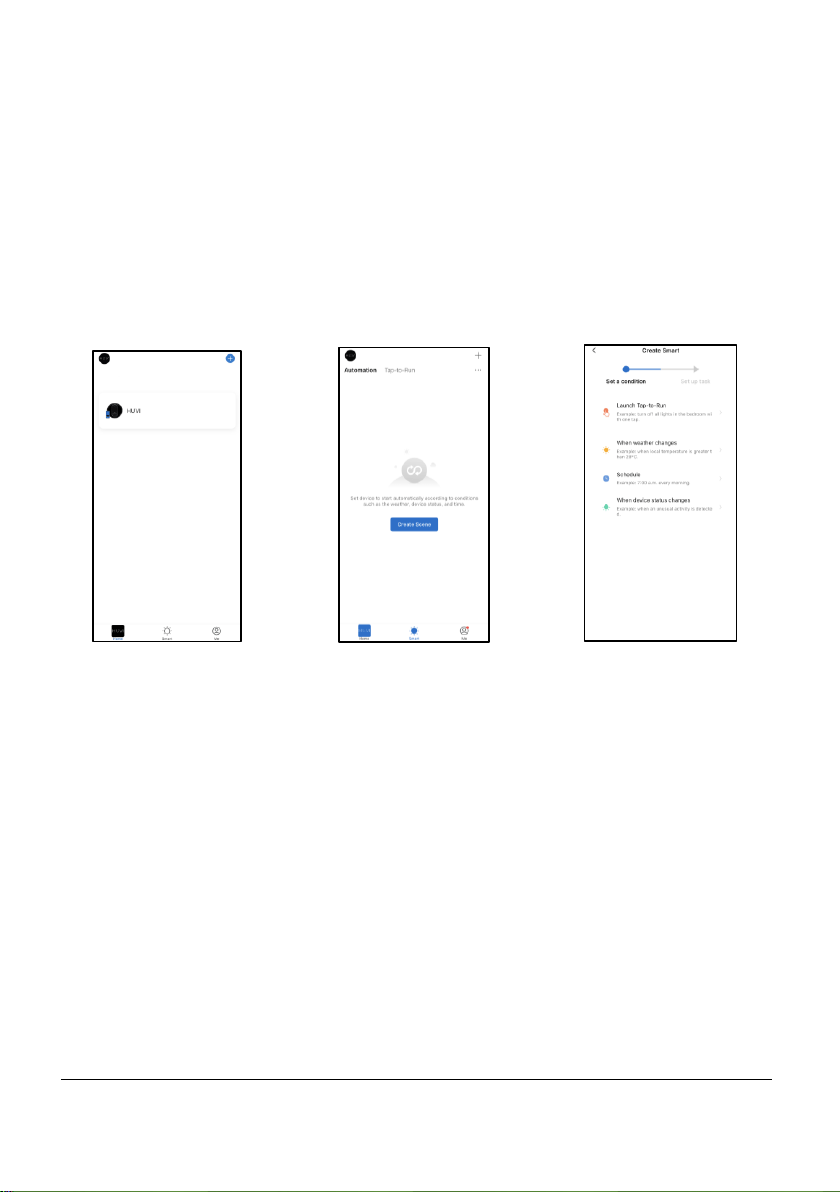
AUTOMATION
• Using the “Automation” function, you can set
HUVI to run automatically according to the
parameters you select in the HUVI app.
• Select the icon (Fig. A) to access the HUVI
app Home Screen (Fig. I).
• Select the “Smart” icon ( ) on the bottom of the screen.
• Select the icon in the upper right (Fig. J).
Fig. F
Fig. G
Fig. H
20
www.KALORIK.com
211104
• Set the condition you wish HUVI to run under (Fig. K).
― “Launch Tap-to-Run” allows you to set commands for HUVI
which HUVI will follow with one touch on the app.
― “When weather changes” allows you to set commands for
HUVI, depending on the weather.
― “Schedule” allows you to set a schedule for HUVI to perform
specific tasks.
― “When the device status changes” allows you to set
commands for HUVI, depending on HUVI’s status. For example,
you can direct HUVI to return to the charging base depending
on the filter life.
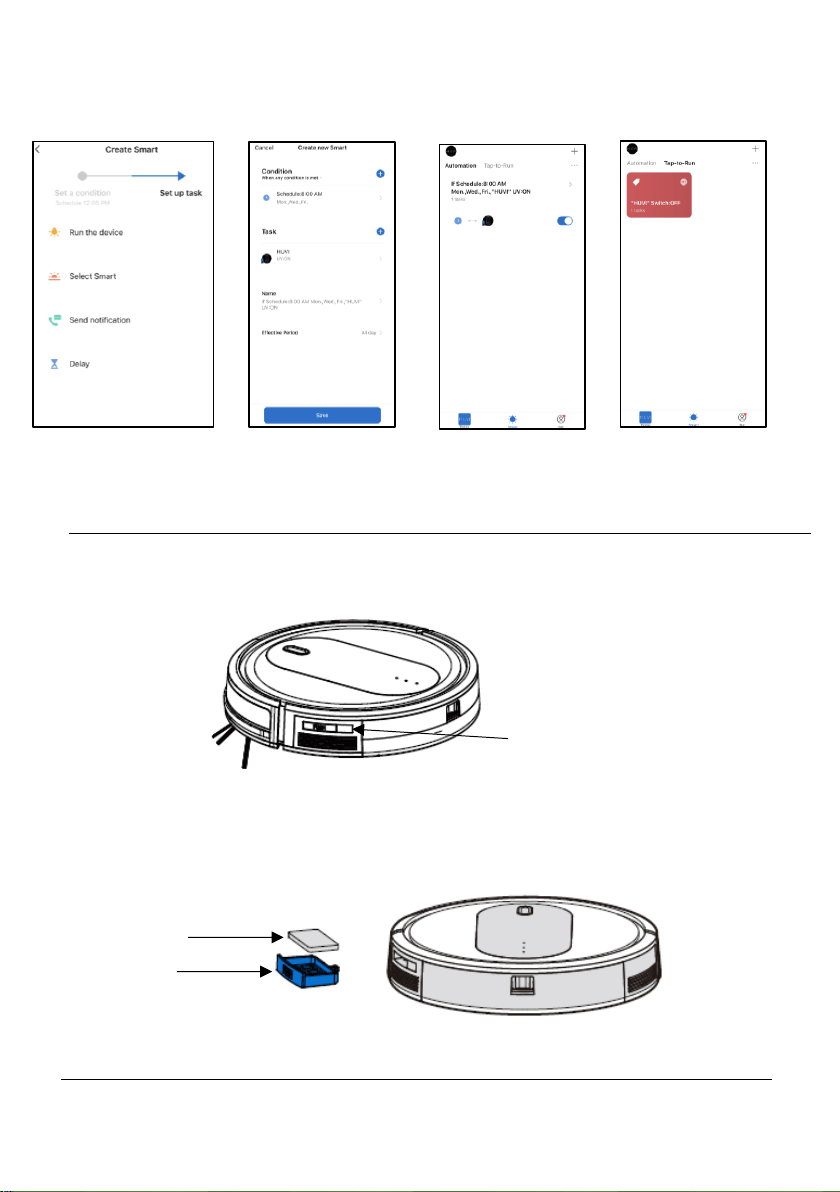
• After setting a condition, select a task for HUVI (Fig. L) and follow the
onscreen instructions.
o “Run the device” allows you to select which HUVI functions
to enable when automating.
o “Select Smart” allows you to select an Automation or Tap-to-
Launch that you have previously created.
o “Send notification” will send a notification to your smart
device when the condition you set is met.
o “Delay” allows you to delay the start of the automation by a
specific amount of time.
• After setting a task, you can add further conditions/tasks to your
automation if you desire. When ready, select “Save” to finalize (Fig.
M).
NOTE: Once created, “Automations” can be found by selecting
“Automations” in the Smart Screen (Fig. N). “Tap-to-Run” commands
Fig. I
Fig. J
Fig. K
21
www.KALORIK.com
211104
can be found by selecting “Tap-to Run” section in the Smart Screen (Fig.
O).
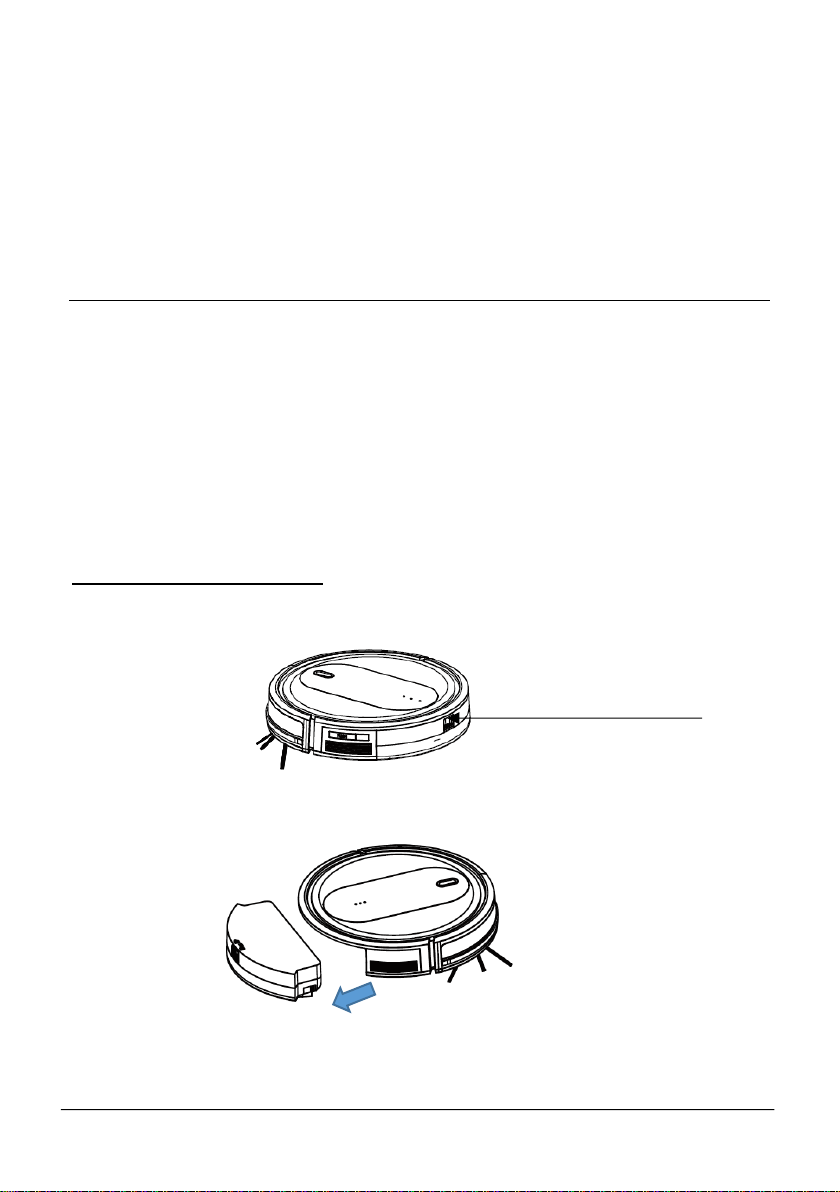
AROMA DIFFUSER
HUVI has an aroma diffuser compartment, located above the vent on the
side of the vacuum.
• To access the aroma diffuser compartment, push down on the
compartment until it softly clicks and opens. Remove the tray and
pad inside.
• Once the aroma diffuser compartment is released, place a few
drops of the aroma included with HUVI or an essential oil of your
choice on the pad within.
Aroma diffuser
compartment
Pad
Tray
Fig. L
Fig. M
Fig. N
Fig. O
22
www.KALORIK.com
211104
• Place the pad inside of the tray, then reinsert the tray into the aroma
diffuser compartment until it clicks in place.
• The diffuser will disperse the aroma whenever the HUVI is running, until
the oil is used up.
NOTE: Do not reuse or clean pads. A fresh pad should be used
whenever oil needs to be replenished.
CLEANING AND MAINTENANCE
Follow these instructions to clean and maintain HUVI.
NOTE:
‒ Before cleaning, always power down HUVI and disconnect the
charging base.
‒ Never immerse any electrical part of the product in water or other
liquids. Never place under running water.
‒ Never use solvents or abrasive materials. Never use metallic or
sharp cleaning tools.
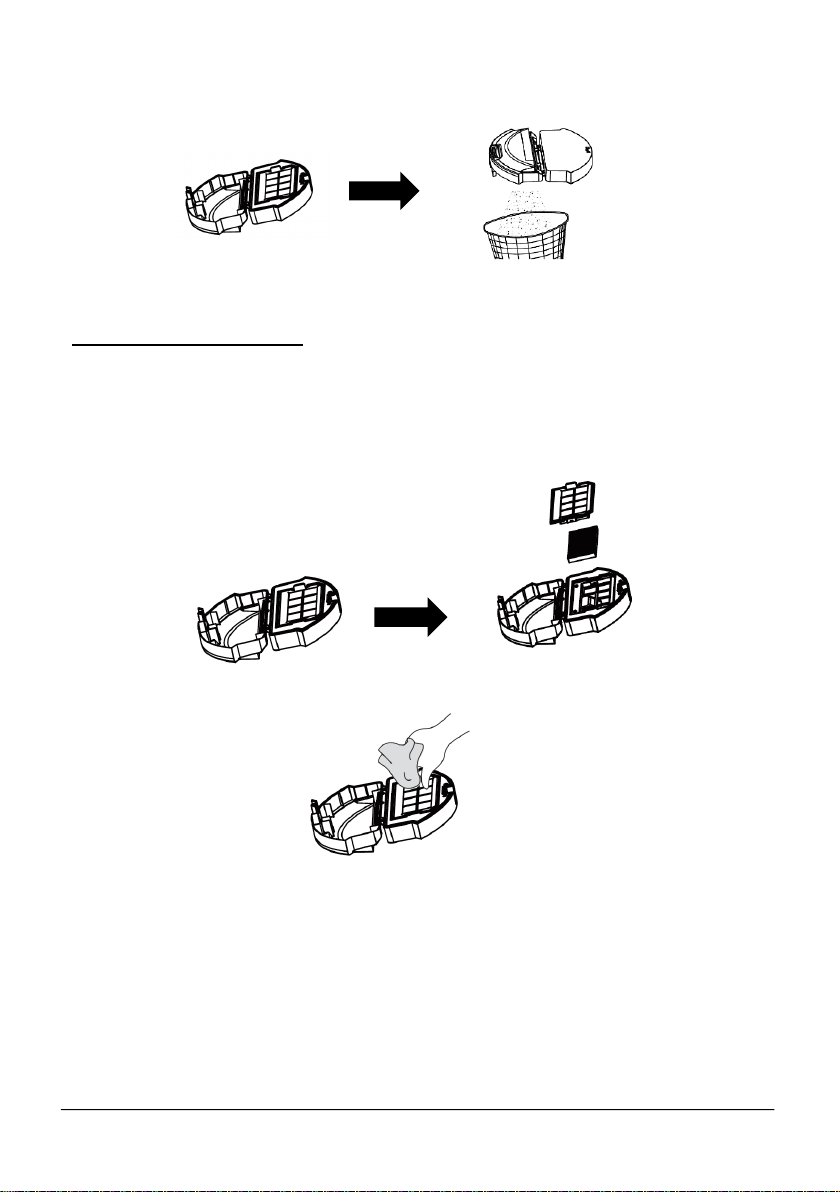
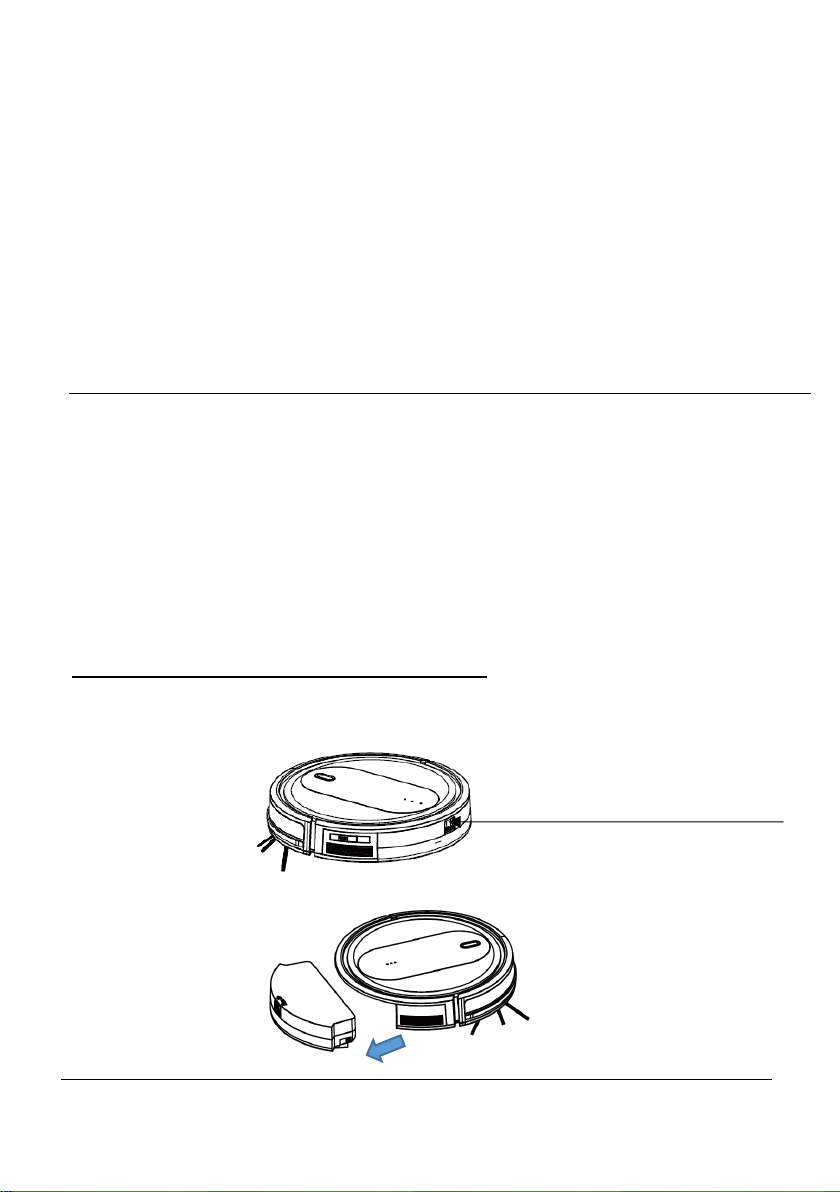
CLEANING THE DUST BIN
• Press the dust bin release button.
• After pressing the release button, pull the dust bin out.
Push down to release
23
www.KALORIK.com
211104
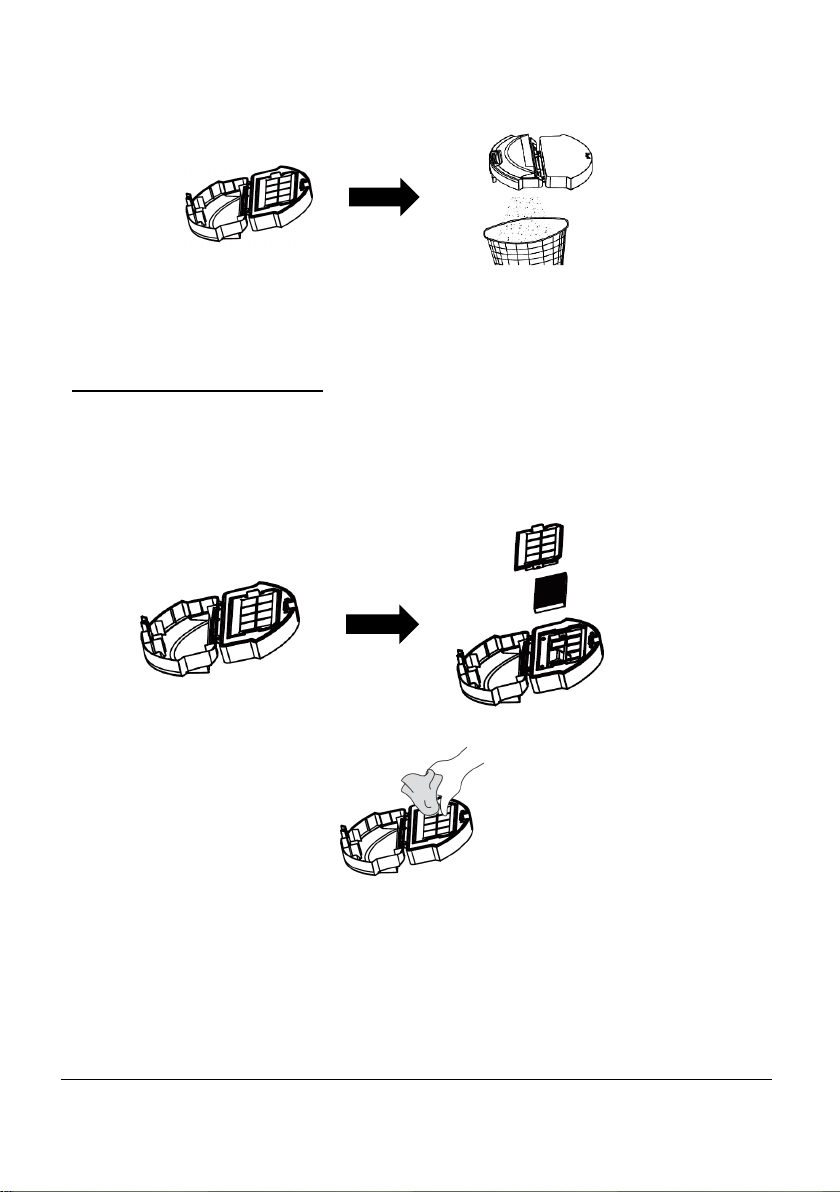
• Open the dust bin by pulling the sides apart gently but firmly. Dispose of
the contents in the dust bin.
NOTE: Some discoloration of the dust bin is normal with regular use.
CLEANING THE FILTERS
For optimal performance, clean the filters after a week of regular use.
Follow the instructions below to clean the filters.
• Open the dust bin and remove the HEPA filter and copper filter
components.
• Clean the dust bin and filters with the included cleaning brush or by
hand.
• Put the filters back together in the dust bin, then reinsert the dust bin
into your HUVI.
NOTE: It is not recommended to clean the HEPA filter under running water
or get it wet.
24
www.KALORIK.com
211104
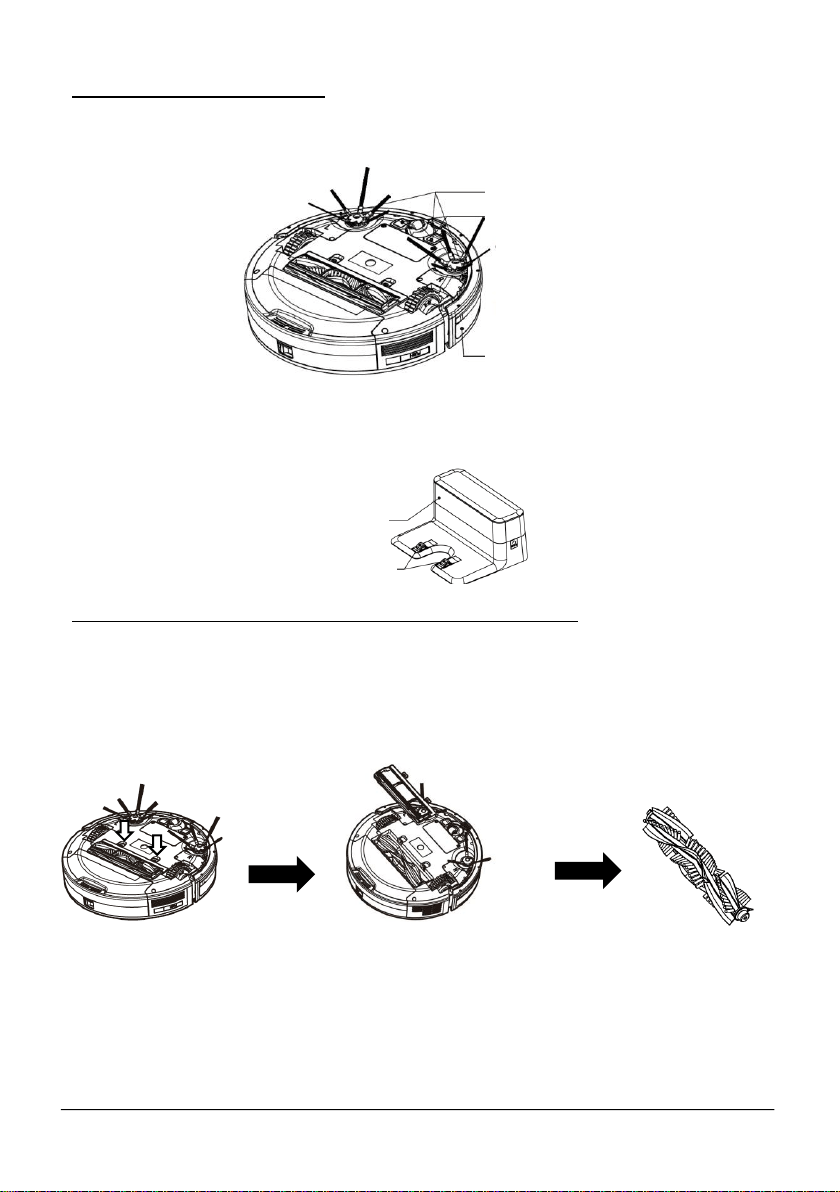
CLEANING THE SENSORS
• Use a soft cloth to gently wipe the front sensor, floor sensors, and
charging contacts.
• Use a soft cloth to clean the signal sensor and charging pins on the
charging base.
CLEANING THE ROLLER BRUSH & SUCTION INTAKE
For optimal performance, clean the roller brush after a week of regular use.
Follow the instructions below to clean the roller brush.
• Push the two release tabs to unlock the sweep guard. Lift the roller
brush to remove.
• Clean the roller brush as well as the suction intake with the provided
cleaning tool or by hand to remove any debris or obstructions.
• Reinstall the roller brush by inserting the fixed protruding end first so that
the brush clicks into place.
• Reattach the sweep guard. Press down to snap it into place.
Floor sensors
Charging contacts
Front sensor
Signal sensor
Charging pins
25
www.KALORIK.com
211104
CLEANING THE SIDE BRUSHES
For optimal performance, clean the side brushes after a month of regular
use. Follow the instructions below to clean the side brushes.
• Remove the side brushes from the vacuum.
• Carefully remove any debris wrapped between the main unit and the
side brushes.
• Use a cloth dampened with warm water to remove any dust from the
brushes or to gently reshape them.
NOTE: the side brushes may slightly deform with regular use.
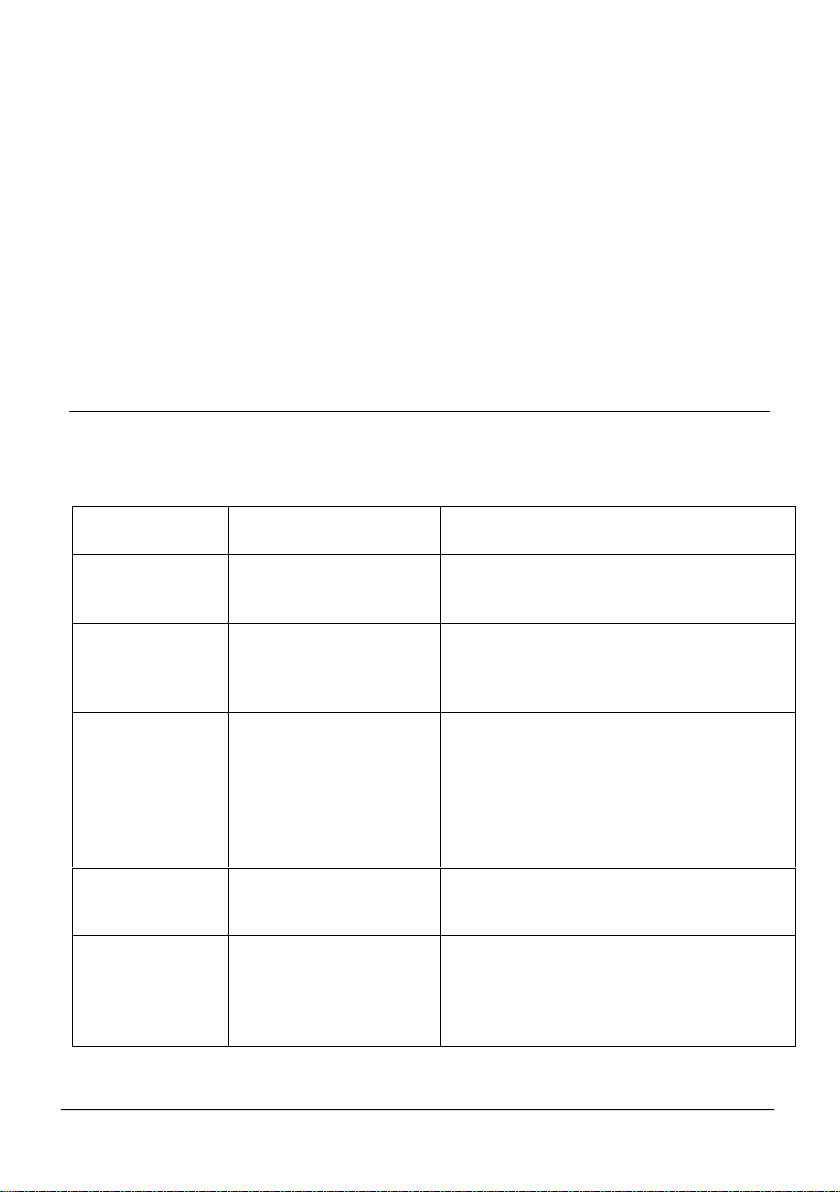
REPLACING THE BATTERY
• Use a screwdriver to remove the screws from the battery cover under
HUVI. Remove the battery from the compartment.
• Disconnect the battery from the connector, then fully remove the
battery.
26
www.KALORIK.com
211104
• Install the new battery. Make sure the battery is attached to the
connectors.
• Attach the battery cover back in place.
NOTE:
― Do not use batteries other than those specified by the
manufacturer to avoid damage to the machine.
― Fully charge the new battery before use.
― Please recycle the replaced battery in an environmentally friendly
way to avoid pollution.
AVAILABLE ACCESSORIES
Enhance your HUVI experience with the accessories outlined in this section.
Visit kalorik.com/products/HUVI for more information.
ITEM NUMBER
KIT
INCLUDES
RVC 50229 -
VCP 51004
HydroPower Mop Set
• Water Tank
• 2 Mopping Pads
• Plastic Drip Mat
RVC 50229 -
VCS 51005
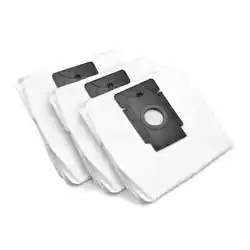
Touchless AutoClean
Set
• Self-Cleaning Station
• 3 Dust Bags
• Remote Control
• Virtual Wall Strip
RVC 50229 -
VCP 51006
Deluxe Power Clean
Set
• Water Tank
• 2 Mopping Pads
• Plastic Drip Mat
• Self-Cleaning Station
• 3 Dust Bags
• Remote Control
• Virtual Wall Strip
RVC 50229 -
VCP 51007
Filter Replacement
Set
• 6 HEPA Filters
• 6 Copper Filters
• 20 Aroma Pads
RVC 50229 -
VCP 51008
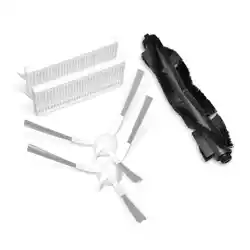
Complete Refresh Set
(6-Arm Side Brushes)
• 2 HEPA Filters
• 2 Copper Filters
• 2 Sets of 6-Arm Side Brushes
(Left & Right Brushes)
• 20 Aroma Pads
27
www.KALORIK.com
211104
• Roller Brush and Sweep
Guard
• 2 Cleaning Brushes
RVC 50229 -
VCP 51446
Complete Refresh Set
(3-Arm Side Brushes)
• 2 HEPA Filters
• 2 Copper Filters
• 2 Sets of 3-Arm Side Brushes
(Left & Right Brushes)
• 20 Aroma Pads
• Roller Brush and Sweep
Guard
• 2 Cleaning Brushes
ITEM NUMBER
ACCESSORY
RVC 50229 - VCP 51009
Replacement Dust Bags - 6 Pack
RVC 50229 - VCP 51010
Replacement Dust Bags - 12 Pack
RVC 50229 - VCP 51011
Aroma Pads – 20 Pack
RVC 50229 - VCP 51012
Virtual Wall Strip
RVC 50229 - VCP 51013
2 Pack 6-Arm Side Brushes (Left & Right Brushes)
RVC 50229 - VCP 51445
2 Pack 3-Arm Side Brushes (Left & Right Brushes)
RVC 50229 - VCP 51014
Replacement Filters – 3 Pack (3 HEPA + 3 Copper
Filters)
RVC 50229 - VCP 51016
Roller Brush + Sweep Guard
RVC 50229 - VCS 51017
HUVI Home Base (with adapter)
RVC 50229 - VCP 51018
Replacement Battery
RVC 50229 - VCS 51019
Self-Cleaning Station
RVC 50229 - VCP 51020
Mopping Pads – 2 Pack
RVC 50229 - VCP 51015
Replacement Filters – 6 Pack (6 HEPA + 6 Copper
Filters)

28
www.KALORIK.com
211104
TROUBLESHOOTING
No.
Problem
Possible Cause
Solution
1
HUVI is not
charging.
HUVI is not switched on.
Switch on HUVI.
HUVI has not properly
connected to the
charging base.
Make sure HUVI’s charging
contacts have connected to
the charging base’s pins.
The battery is
discharged.
Re-activate the battery. To do
so, switch HUVI on. Place HUVI
on the charging station by
hand, then remove after
charging for 3 minutes.
Repeat 3 times, then charge
normally.
2
HUVI
cannot
return to
the
charging
base.
The charging base is not
placed correctly.
Refer to the BEFORE THE FIRST
USE section of this manual for
correct placement.
3
HUVI gets
stuck while
running
and stops
operating.
HUVI has been
obstructed by
something on the floor
(cords, curtains, carpet
fringes, etc.)
HUVI will try to free itself. If
unsuccessful, remove the
obstacles by hand and
restart.
4
HUVI
returns to
the
charging
base
before it
has
finished
cleaning.
When the battery is low,
HUVI automatically
returns to the charging
base to recharge.
This is normal, no action
needed.
Working time van vary
depending on the floor
surface, room
complexity, and
cleaning mode selected
This behavior is normal, no
action needed.
29
www.KALORIK.com
211104
5
HUVI does
not clean
at the
scheduled
time.
Schedule function has
been cancelled.
Use the HUVI app to schedule
specific cleaning times.
HUVI has finished the
scheduled cleaning.
This behavior is normal, no
action needed.
HUVI is switched off.
Switch on HUVI.
HUVI’s battery is low
Keep HUVI switched on and
connected to the charging
station. Make sure the battery
is fully charged before
operating.
The roller brush/suction
intake is blocked and/or
there is debris
obstructing its
components.
Turn off HUVI and clean the
dust bin. Clean the roller
brush, side brushes, and
suction intake as outlined in
the CLEANING AND
MAITENANCE section.
6
HUVI does
not clean
the entire
area.
There are obstructions
on the floor blocking the
HUVI from cleaning.
Remove any obstructions and
small objects from the area
before HUVI starts cleaning.
7
HUVI is not
able to
connect
to your
home WiFi
network.
Incorrect WiFi username
or password.
Enter the correct WiFi
username and password.
HUVI is not within range
of the WiFi signal.
Make sure HUVI is within range
of your WiFi signal.
Network connection
was started before HUVI
was ready.
Refer to CONNECTING TO THE
HUVI APP section for
connection instructions. Make
sure the HUVI’s indicator is
flashing when connecting
through the app. Make sure
you are connecting to the 2.4
GHz signal.

30
www.KALORIK.com
211104
If additional assistance is needed, please contact our Customer Assistance
at 1-888-525-6745.
Your smart device’s
operating system needs
to be updated.
Update your smart device’s
operating system.
Your devices need to be
rebooted.
Restart your smart device,
reboot HUVI, and restart your
router before connecting
again.

31
www.KALORIK.com
211104
WARRANTY
We suggest that you complete and return the enclosed Product
Registration Card promptly to facilitate verification of the date of
original purchase. However, return of the Product Registration Card is
not a condition of these warranties. You can also fill out this warranty
card online, at the following address: www.KALORIK.com
This KALORIK product is warranted in the U.S.A. and in Canada for 1
year from the date of purchase against defects in material and
workmanship. This warranty is not transferable. Keep the original sales
receipt. Proof of purchase is required to obtain warranty performance.
During this period, if the KALORIK product, upon inspection by KALORIK,
is proven defective, it will be repaired or replaced, at Kalorik’s option,
without charge to the customer. If a replacement product is sent, it will
carry the remaining warranty of the original product.
This warranty does not apply to any defect arising from a buyer's or
user's misuse of the product, negligence, failure to follow KALORIK
instructions noted in the user’s manual, use on current or voltage other
than that stamped on the product, wear and tear, alteration or repair
not authorized by KALORIK, or use for commercial purposes. There is no
warranty for glass parts, glass containers, filter basket, blades and
agitators, accessories outlined in this manual, and accessories in
general. There is also no warranty for parts lost by the user.
ANY WARRANTY OF MERCHANTABILITY OR FITNESS WITH RESPECT TO THIS
PRODUCT IS ALSO LIMITED TO THE ONE YEAR LIMITED WARRANTY
PERIOD.
Some states do not allow limitation on how long an implied warranty
lasts or do not allow the exclusion of incidental or consequential
damages, so the above limitations may not apply to you. This warranty
gives you specific legal rights, and you may also have other rights
which vary from state to state.
If the appliance should become defective within the warranty period
and more than 30 days after date of purchase, do not return the
appliance to the store: often, our Customer Service Representatives
can help solve the problem without having the product serviced. If

32
www.KALORIK.com
211104
servicing is needed, a Representative can confirm whether the product
is under warranty and direct you to the nearest service location.
If this is the case, bring the product, or send it, postage prepaid by the
user (all Kalorik customers are responsible for the initial shipment back
to the warranty center), along with proof of purchase and a return
authorization number indicated on the outer package, given by our
Customer Service Representatives. Send to the authorized KALORIK
Service Center (please visit our website at www.KALORIK.com or call
our Customer Service Department for the address of our authorized
KALORIK Service Center).
When sending the product, please include a letter explaining the
nature of the claimed defect.
If you have additional questions, please call our Customer Service
Department (please see below for complete contact information),
Monday through Thursday from 9:00am - 5:00pm (EST) and Friday from
9:00am - 4:00pm (EST). Please note hours are subject to change.
If you would like to write, please send your letter to:
KALORIK Customer Service Department
Team International Group of America Inc.
16175 NW 49th Avenue
Miami Gardens, FL 33014 USA
Or call:
Toll Free: +1 888-521-TEAM / +1 888-KALORIK
Only letters can be accepted at this address above. Shipments and
packages that do not have a return authorization number will be
refused.
33
www.KALORIK.com
211104
GRACIAS
Gracias por elegir el horno freidora de aire Kalorik MAXX.
Esperamos que esté encantado con su MAXX. Si es así, nos encantaría
que lo gritara desde los tejados, se lo dijera a sus amigos o nos dejara
una reseña. Nos encantaría saber qué ha estado cocinando, así que
etiquete a @kalorik en las redes sociales con sus obras maestras
culinarias.
REGISTRE SU COMPRA
Para registrar su producto, simplemente complete el formulario
incluido, visite Kalorik.com/register o escanee el código QR a
continuación
ESPECIFICACIONES TÉCNICAS
Modelo
RVC 50229 BK
Voltaje
14.4V DC
Batería
14.4V Li-ion, 3200mAh
Adaptador Input
100-240V ~ 50/60 Hz, 0.6A
Adaptador Output
19V DC, 1.0A
Max Run Time
110 minutes
Poder de succión
máximo
2600 Pa

34
www.KALORIK.com
211104
CONTENIDO
PARTES ............................................................................................................ 36
MEDIDAS IMPORTANTES DE SEGURIDAD ...................................................... 38
CONOZCA SU HUVI ....................................................................................... 39
ANTES DEL PRIEMR USO ................................................................................. 41
CONEXIÓN A LA APLICACIÓN HUVI ........................................................... 43
Para conectarse usando la conexión Bluetooth …………………...……. 44
Para conectarse en modo EZ ……….…………………..…………..…….…. 45
Para conectarse en modo AP …..…………………..…………………...….. 46
Conexión con Amazon Alexa…………………..……..……………………… 47
Conexión con el Asistente de Google………………..…..………………… 48
USANDO SU HUVI – BOTONES DE HOME Y POWER ..................................... 49
USANDO HUVI – CONTROLES DE LA APLICACIÓN ..................................... 49
LIMPIEZA AUTO …………………………….….…………………………………. 49
SEGUIMIENTO DE PARED ………………………………………………....……. 49
LOCALIZADO ….………………….…………..……….……..…………...……... 49
CONTROL MANUAL ………………………………….…….…………...…….… 50
CARGANDO ……………………………………….……………………..……… 50
PODER DE SUCCIÓN …………….……………….…..………..…………….…. 50
FUNCIÓN UV ………….…..…………………….……………………………….. 51
FUNCIÓN ION ….…………………………….…….…….….…………….…….. 51
LIMPIEZAS PROGRAMADAS ………………….………….……………….….… 51

35
www.KALORIK.com
211104
AUTOMATIZACIÓN ……………………………..……….………………….....… 51
DIFUSOR DE AROMA. ..................................................................................... 53
LIMPIEZA Y MANTENIMIENTO ........................................................................ 54
LIMPIANDO EL CONTENEDOR DE POLVO …………………….……….…... 54
LIMPIANDO LOS FILTROS …………………..…………..………………..….…. 55
LIMPIANDO LOS SENSORES ….…………………….………………………..... 56
LIMPIAR EL CEIPLLO GIRATORIO Y LA ENTRADA DE SUCCIÓN……….…. 56
LIMPIANDO LOS CEPILLOS LATERALES ………………..……………….….… 57
REEMPLAZANDO LA BATERÍA …………………….…………….…………..…. 57
ACCESORIOS DISPONIBLES ........................................................................... 58
SOLUCIÓN DE PROBLEMAS ........................................................................... 62
GARANTÍA ...................................................................................................... 63
36
www.KALORIK.com
211104
PARTES
1. Botón de INICIO & ENCENDIDO
2. Parachoques delantero
3. Cuerpo
4. Rueda de enfrente
5. Contactos de carga
6. Tapa de la batería
7. Sensor de tierra
8. Cepillo giratorio y aspiración
9. Lámparas UV-C (contenedor de
polvo interior) / luces LED (fondo
exterior del contenedor de polvo)
10. Contenedor de polvo
11. Sensores de pared virtual
12. Pestillo del contenedor de polvo
13. Cepillo lateral
14. Receptor de señal frontal
15. Rueda lateral
16. Ponente
17. Generador de iones bipolar
18. Compartimento difusor de aroma
19. Sensor de señal
20. Luz indicadora de encendido
21. Toma para adaptador
22. Pines de carga
23. Adaptador
24. Cepillo de limpieza
25. Cepillos laterales de 6 brazos
26. Cepillos laterales de 3 brazos
1
2
3
4
5
6
7
8
9
10
11
12
16
18
13
14
15
17
23
24
19
20
21
22
25
26
37
www.KALORIK.com
211104
BOTÓN DE ENCENDIDO
• Presione durante 3-5 segundos para encender/apagar
• Presione brevemente para iniciar/pausar
• Azul intermitente: modo de espera
• Azul fijo: HUVI está
BOTÓN DE INICIO
• Presione brevemente para enviar HUVI para recargar. Parpadea
en blanco mientras se carga.
• Mantenga pulsado para conectar HUVI a su red Wifi. Parpadea en
azul mientras se conecta. Consulte la sección CONEXIÓN A LA
APLICACIÓN HUVI para obtener más información.
INDICADOR ION
• Se ilumina cuando la función de iones está activada. Se apaga
cuando se apaga la función de iones.
INDICADOR UV
• Se ilumina cuando la función UV está activada. Se apaga cuando
la función UV está apagada.
INDICADOR HEPA
• Parpadea para recordarle que vacíe el contenedor de polvo y
limpie los filtros.
Botón de
INICIO
Botón de
ENCENDIDO
Indicador
Indicador
Indicador HEPA

38
www.KALORIK.com
211104
MEDIDAS IMPORTANTES DE SEGURIDAD
Al usar dispositivos eléctricos, siempre se deben seguir las precauciones básicas
de seguridad, incluidas las siguientes:
1. Lea todas las instrucciones antes de usar.
2. Este dispositivo puede ser utilizado por niños de 8 años o más, así como por
personas con capacidades físicas, sensoriales o mentales reducidas o sin
experiencia si están bajo supervisión o han recibido instrucciones sobre el
uso de este dispositivo de manera segura y comprenden las posibles
peligros.
3. No permita que los niños limpien o mantengan este aparato sin la
supervisión de un adulto.
4. Utilice este dispositivo únicamente con la fuente de alimentación
suministrada.
5. Para recargar la batería, utilice únicamente la fuente de alimentación
extraíble proporcionada.
6. Asegúrese de quitar la batería antes de deshacerse de este dispositivo.
Para quitar la batería, desenrosque la tapa de la batería con un
destornillador. Retire la batería desenchufando el conector.
7. La batería usada debe colocarse en una bolsa de plástico sellada y
desecharse de manera segura de acuerdo con las regulaciones
ambientales locales.
8. El cable flexible externo o el cable de alimentación no se pueden
reemplazar; si el cable está dañado, deseche la fuente de alimentación.
9. Este aparato está diseñado para uso en interiores únicamente.
10. Este dispositivo no es un juguete. No se siente ni se pare sobre este
dispositivo. Supervise a los niños pequeños y las mascotas cuando este
aparato esté en uso.
11. Almacene y use este dispositivo solo en ambientes a temperatura
ambiente.
12. Limpie este aparato únicamente con un paño humedecido en agua.
13. No utilice este aparato para recoger nada que se esté quemando o
humeando.
14. No use este dispositivo para recoger derrames de lejía, pintura, productos
químicos o cualquier cosa mojada.
15. Antes de usar este aparato, recoja artículos como ropa y restos de papel.
Levante los cables de las persianas / cortinas y los cables de alimentación y
retire los artículos frágiles. Si este aparato arrastra un cable de
alimentación, puede provocar la caída de un objeto de los muebles.

39
www.KALORIK.com
211104
16. Si la habitación a limpiar tiene balcón, use una barrera física para evitar
que la unidad acceda al balcón.
17. No coloque nada encima de este aparato.
18. Este dispositivo se mueve solo, tenga cuidado al caminar en el área donde
este dispositivo está funcionando para evitar pisarlo.
19. No use este aparato en pisos con enchufes eléctricos expuestos.
20. No intente modificar los componentes electrónicos o la base de carga de
este dispositivo. No hay piezas reparables por el usuario en este dispositivo.
21. Evite usar este electrodoméstico en pisos sin terminar, sin sellar, encerados o
rugosos ya que esto puede dañar el electrodoméstico y el piso. Úselo solo
en superficies duras o alfombras de pelo corto.
22. Este aparato ha sido diseñado para no rayar el suelo. Le recomendamos
que pruebe este dispositivo en un área pequeña de la habitación a limpiar
para asegurarse de que no raye el piso de ninguna manera antes de
limpiar toda la habitación.
23. Compruebe periódicamente si el depósito de polvo está dañado. No
utilice el HUVI si su contenedor de polvo está dañado. Si hay algún signo de
daño, reemplácelo de inmediato. El uso regular puede causar cierta
decoloración, esto es normal.
GUARDE ESTAS INSTRUCCIONES
SOLO PARA USO DOMÉSTICO
CONOZCA SU HUVI
HUVI combina una tecnología de limpieza avanzada única con la comodidad
de la limpieza automática con manos libres de un robot aspirador. Con el
poder desinfectante de las luces UV-C, la filtración HEPA 13 de grado médico y
la ionización bipolar, HUVI ofrece una limpieza de varios pasos de alto nivel.
Esta aspiradora ofrece configuraciones de limpieza automática, dirigida, de
seguimiento de pared y manual, e incluso le permite ajustar la potencia de
succión. Utilice la aplicación para controlar, automatizar y mapear la ruta de
succión.
HUVI también tiene un difusor de aroma incorporado, lo que lo hace capaz de
funcionar como un difusor de aroma móvil.

40
www.KALORIK.com
211104
FUNCION UV
HUVI tiene luces UV-C dentro del contenedor de polvo que se utilizan para
desinfectar su contenido. La desinfección UV (o ultravioleta) actúa rompiendo
los enlaces químicos, interrumpiendo la síntesis de ADN de los microorganismos
y evitando que se multipliquen. La luz UV-C de HUVI está dentro del
contenedor de polvo, lo que le da a la luz más tiempo para destruir los
contaminantes y evita que los patógenos vuelvan a ingresar al aire cuando se
vacía el contenedor de polvo.
FILTRO HEPA
HUVI tiene un filtro HEPA H13 de grado médico. Un filtro HEPA estándar normal
elimina al menos el 99,97% de las partículas en el aire con un tamaño de 0,3
micrones (µm). Más allá de eso, los filtros HEPA se clasifican por su nivel. El nivel
HEPA de un filtro indica su eficacia para eliminar todas las partículas de 0,2
µm de diámetro.
Los filtros “True HEPA” del mercado
(grados H10 a H12) atrapan solo del 85 al
99,5% de todas las partículas de 0,2 µm de
diámetro. Los filtros HEPA H13, como el de
HUVI, atrapan el 99,95% de estas
partículas. Se encuentran entre los niveles
más altos de HEPA y se consideran de
grado médico, se utilizan en hospitales,
quirófanos y más.
IONIZACIÓN BIPOLAR
HUVI tiene un sistema de ionización bipolar. Los ionizadores de aire
convencionales generan iones negativos para eliminar los contaminantes del
aire. HUVI, por otro lado, utiliza una forma de ionización más avanzada y
reciente que funciona emitiendo una mezcla de iones cargados positiva y
negativamente. Estos iones de carga eléctrica opuesta se adhieren a los
contaminantes del aire, inactivando bacterias y virus al romper los enlaces
químicos que forman su estructura molecular.
La ionización bipolar se utiliza en hospitales, centros de vida asistida y más para
purificar el aire de manera eficaz.
HEPA
Eficiencia de filtración
H14
99.995%
H13
99.95%
H12
99.5%
H11
95%
H10
85%

41
www.KALORIK.com
211104
DIFUSOR DE AROMA
HUVI tiene un difusor de aroma integrado. Simplemente coloque unas gotas
del aroma incluido con su HUVI o aceite esencial de su elección en la
almohadilla de aroma y colóquelo dentro de HUVI. Mientras HUVI está
funcionando, el aroma se dispersará en el aire, llenándolo con su aroma. A
medida que el difusor HUVI funciona mientras HUVI se está moviendo, los
aromas se dispersarán donde se mueva HUVI, lo que le permitirá tener un
campo de dispersión más grande que un difusor estacionario convencional.
ANTES DEL PRIEMR USO
• Coloque la estación de carga en el interior sobre una superficie dura y
nivelada y contra una pared.
• Coloque la estación de carga en un lugar abierto, con al menos 1,5 m
delante de la estación de carga y 0,5 m a cada lado.
• Enchufe el cable de alimentación en la estación de carga y luego en el
tomacorriente de la pared.
• Coloque el cable restante detrás de la estación de carga para evitar
interferencias con HUVI mientras está limpiando. NOTA: Mantenga siempre
la base de carga enchufada, de lo contrario, la aspiradora no regresará
automáticamente a ella.
• Retire los trozos de espuma de los lados del parachoques.
• Coloque los cepillos laterales debajo del HUVI presionando los cepillos en
cada ranura hasta que hagan clic. Asegúrese de que la letra (L o R) de
cada pincel coincida con la letra escrita en HUVI.
42
www.KALORIK.com
211104
NOTA: HUVI es adecuada para pisos de madera, losas y alfombras de pelo
bajo. HUVI incluye 2 juegos únicos de cepillos de laterales, cada uno diseñado
para hacer frente a diferentes tipos de piso y manejar cualquier cuarto de su
hogar.
― JUEGO DE 6 BRAZOS: El juego de 6 brazos está diseñado para pisos
duros y alfombras de toda la habitación, fija permanentemente al piso.
El diseño de seis brazos proporciona más fuerza para levantar el polvo y
el pelo, proporcionando una limpieza profunda más eficiente en estas
superficies.
― JUEGO DE 3 BRAZOS: El juego de 3 brazos está diseñado para hogares
con alfombras pequeñas o ligeras. El diseño de tres brazos facilita que
HUVI trepe por estas superficies y mueva libremente por el suelo. Se
recomienda utilizar este juego para evitar que HUVI se quede atascado
en los lados de sus alfombras o mueva sus alfombras mientras limpia.
• Coloque HUVI en la estación de carga alineando los contactos de carga
metálicos.
• • Encienda HUVI presionando el botón de POWER durante 3-5 segundos.
• Cuando se enciende correctamente, el botón de ENCENDIDO se iluminará
en azul.
BOTÓN de INICIO
BOTÓN de ENCENDIDO

43
www.KALORIK.com
211104
• Deje que HUVI se recargue en la base de carga. Durante la carga, las
luces de los botones POWER y HOME parpadean en blanco. Cuando está
completamente cargada, las luces dejan de parpadear.
• Descargue la aplicación HUVI y siga las instrucciones para completar la
instalación. Consulte la sección CONECTARSE A LA APLICACIÓN HUVI de
esta manual para obtener más información.
NOTA:
― Asegúrese de que HUVI esté cerca de su enrutador Wifi cuando se
conecte a la APLICACIÓN HUVI por primera vez.
― Asegúrese de despejar el piso de cualquier obstrucción para obtener
mejores resultados. Quite todos los cables y elementos pequeños del
piso que puedan interferir con HUVI.
― Doblar los flecos de las alfombras para evitar que se enreden.
― Colocar barreras físicas frente a las chimeneas o cualquier otro lugar
que pudiera dañar el HUVI.
― Mantenga el HUVI alejado de espacios de menos de 8 cm / 3,57 pulg.
Para evitar que se atasque. Si es necesario, coloque barreras físicas
para bloquear las áreas problemáticas.
― HUVI puede trepar objetos de menos de 0,63 pulgadas / 16 mm de
altura. Retire estos elementos si es posible.
CONEXIÓN A LA APLICACIÓN HUVI
• Antes de empezar asegúrese de:
― HUVI está completamente cargado, encendido y cerca de su
enrutador Wifi.
― Su teléfono inteligente está conectado a una red Wifi.
― La señal de 2.4 GHz está activada en su enrutador Wifi.
IMPORTANTE: ¡HUVI solo se conectará al enrutador a través de la señal de
2.4GHz!
• Descargue la aplicación HUVI usando la cámara de su teléfono
inteligente para escanear el código QR (Fig. A), o buscando la aplicación
en la tienda de aplicaciones de su teléfono inteligente.
• Una vez que se complete la descarga, abra la aplicación en su teléfono
inteligente y siga las instrucciones en pantalla para crear su cuenta
44
www.KALORIK.com
211104
Hay 3 formas de conectarse a HUVI a través de la aplicación:
‒ Asistido por Bluetooth (predeterminado, recomendado): utiliza la
conexión Bluetooth de su teléfono inteligente para conectarse a WiFi.
‒ Modo EZ: utiliza su red WiFi directamente para comunicarse entre HUVI
y la aplicación.
‒ Modo AP: se conecta a HUVI usando el Wifi integrado de HUVI.
Para conectarse usando la conexión Bluetooth (opción predeterminada,
recomendada):
• Asegúrese de que la conexión Bluetooth de su
teléfono inteligente esté encendida.
• Mantenga presionado el botón de INICIO de HUVI
(Fig. B) hasta que el LED se vuelva azul claro y
comience a parpadear mientras HUVI dice
"conectando a la red".
• En la aplicación, presione "Agregar dispositivo" en el
centro de la pantalla (Fig. C) y luego seleccione "Ir a
agregar" (Fig. D).
• Ingrese su información de WiFi, luego seleccione “Siguiente” (Fig. E).
• Espere 30 segundos mientras HUVI se conecta (Fig. F).
• Una vez establecida la conexión, seleccione "Siguiente" para finalizar.
• Su HUVI ahora puede ser controlado por la aplicación
Fig. A
Fig. B
BOTÓN de
INICIO
45
www.KALORIK.com
211104
Fig. C
Fig. D
Fig. E
Para conectarse en modo EZ (si falla la conexión de Bluetooth)
• Asegúrese de que la conexión
bluetooth de su teléfono inteligente esté
apagada.
• Seleccione "Agregar dispositivo" (Fig. C),
luego seleccione el icono HUVI.
• Siga las instrucciones para ingresar la
información de su WiFi (Fig. G), luego
presione “Siguiente”.
• Asegúrese de que esté seleccionado
“Modo EZ” (Fig. H).
• Mantenga presionado el botón de
INICIO de HUVI (Fig.B) hasta que el LED
se vuelva azul claro y comience a
parpadear rápidamente mientras HUVI
dice "conectando a la red".
• Presione el círculo pequeño frente a
“Confirme que el indicador
parpadea rápidamente” para
seleccionarlo, luego presione
“Siguiente” (Fig. I).
• La aplicación mostrará "Agregando
dispositivo ...".
Fig. G
Fig. H
Fig. J
Fig. I
Fig. F
46
www.KALORIK.com
211104
• Una vez que tenga éxito, puede nombrar
su HUVI. Seleccione "Listo" en la
aplicación para finalizar.
• Su HUVI ahora se puede controlar desde
la aplicación HUVI.
Para conectarse en modo AP (si fallan las
conexiones de Bluetooth y modo EZ):
• Asegúrese de que la conexión Bluetooth
de su teléfono inteligente esté apagada.
• Seleccione "Agregar dispositivo" (Fig. C),
luego seleccione el icono HUVI.
• Siga las instrucciones para ingresar la
información de su WiFi (Fig. G), luego
seleccione “Siguiente”.
• Asegúrese de seleccionar el modo AP
("Modo AP") (Fig. H).
• Mantenga presionado el botón de INICIO
en HUVI (Fig. B) hasta que el indicador en
el botón INICIO se vuelva azul claro y
comience a parpadear lentamente
mientras HUVI dice "conectando a la red".
• Presione el círculo pequeño frente a "Confirme que el indicador
parpadea lentamente" para seleccionarlo, luego presione "Siguiente"
(Fig. J).
• Seleccione "Ir a conectar" en la aplicación (Fig. K).
• Se le redirigirá a la configuración de Wifi de su teléfono inteligente.
Espere a que aparezca el punto de acceso WiFi HUVI, luego conéctese
a él (Fig. L).
• En su teléfono inteligente, regrese a la aplicación. La aplicación
mostrará "Agregando dispositivo ..." mientras el dispositivo se conecta.
• Una vez que tenga éxito, podrá nombrar su HUVI. Seleccione "Listo" en la
aplicación para finalizar.
• Ahora puede controlar HUVI a través de la aplicación HUVI.
NOTA: Si no puede conectarse a WiFi, pruebe las instrucciones a
continuación antes de volver a conectarse.
- Reinicie su teléfono inteligente.
Fig. K
Fig. L
47
www.KALORIK.com
211104
- Reinicie HUVI. Presione el botón de ENCENDIDO durante 3 segundos
consecutivos para apagarlo. Espere 10 segundos y vuelva a presionar el
botón de ENCENDIDO durante 3 segundos para volver a encenderlo.
- Reinicie su enrutador desenchufando el enrutador durante 30 segundos
antes de volver a conectarlo. Dele a su enrutador unos minutos antes de
intentar volver a conectarte.
Conexión con Amazon Alexa
HUVI es compatible con Alexa Echo de Amazon. Siga los pasos a
continuación para iniciar sesión:
1. Asegúrese de que su Amazon Echo (o altavoz / dispositivo inteligente
compatible) esté configurado y que la aplicación Amazon Alexa esté
descargada y conectada a Amazon Echo.
2. Asegúrese de que la aplicación HUVI esté descargada y que HUVI se
haya conectado correctamente a ella. HUVI y Amazon Alexa deben
estar conectados a la misma red WiFi.
3. En la aplicación HUVI, vaya a la pantalla de control HUVI y seleccione el
icono en la esquina superior derecha . (Fig M).
4. Seleccione el icono "Alexa" y siga las instrucciones para conectarse (Fig
N).
NOTA: El nombre de su HUVI será el mismo que el definido en la aplicación
HUVI. Si cambia el nombre del dispositivo en la aplicación HUVI, su Echo
debería redescubrirlo.
Fig. M
Fig. N
48
www.KALORIK.com
211104
Conexión con el Asistente de Google
HUVI es compatible con Google Home. Siga los pasos para conectarse:
1. Asegúrese de que su Google Home esté configurado y que la aplicación
Google Home esté descargada y conectada a su dispositivo Google
Home.
2. Asegúrese de haber descargado la aplicación HUVI y conectado
correctamente HUVI. Asegúrese de que esté conectado a la misma señal
WiFi que la aplicación Google Home.
3. En la aplicación HUVI, vaya a la pantalla de control de HUVI y seleccione
el icono en la esquina superior derecha (Fig. M).
4. Seleccione el icono "Asistente de Google" y siga las instrucciones para
conectarse (Fig. N).
NOTA:
― Toda la información de la cuenta debe coincidir con la información
de la cuenta en la aplicación HUVI para vincularse correctamente.
― Si cambia el nombre del dispositivo en la aplicación HUVI, su Google
Home debe redescubrir el robot aspirador.
Fig. M
Fig. N
49
www.KALORIK.com
211104
INICIO
ENCENDIDO
USANDO SU HUVI – BOTONES DE HOME Y POWER
Dirija el HUVI para limpiar o recargar usando los botones de ENCENDIDO e
INICIO ubicados en la parte superior del HUVI.
Botón de INICIO
• Presione una vez para enviar a HUVI a la base
de carga.
• Presione durante 3 a 5 segundos consecutivos
para elegir entre los modos de conexión WiFi de HUVI*
Botón de ENCENDIDO
• Presione durante 3 a 5 segundos consecutivos para encender/apagar
HUVI.
• Presione una vez para iniciar/pausar/reanudar la función de limpieza
inteligente de HUVI.
*vea CONECTANDOSE A LA APLICACION DE HUVI para más detalles.
USANDO HUVI – CONTROLES DE LA APLICACIÓN
Para aprovechar al máximo HUVI, asegúrese
de haber descargado y conectado HUVI a la
aplicación (consulte la sección CONEXIÓN A
LA APLICACIÓN HUVI) antes de comenzar.
LIMPIEZA AUTO
• Dentro de la aplicación, seleccione el
ícono (Fig. A).
• Después de seleccionarlo, presiona ON
para comenzar.
• En AUTO, HUVI navega y limpia su piso
automáticamente. (Fig. B).
SEGUIMIENTO DE PARED
• Presione el ícono para seleccionar el
modo de seguimiento de pared (Fig. A).
Fig. A
50
www.KALORIK.com
211104
• Después de seleccionarlo, presiona ON
para comenzar.
• En este modo la aspiradora reduce su
velocidad cuando detecta la pared y
después sigue su borde asegurando la
limpieza de todos los bordes. (Fig. C).
LOCALIZADO
• Posicione su HUVI en el área que desea
limpiar.
• Presione el ícono para seleccionar el
modo de localizado.
• Después de seleccionarlo, presiona ON
para comenzar.
• En este modo, HUVI se mueve en un
espiral, limpiando en círculos y
expandiéndose. (Fig. D).
CONTROL MANUAL
• Presione el ícono para seleccionar el
control manual (Fig. A)
• Deje presionadas las flechas en la
dirección en la que desee dirigir su HUVI
(Fig. E).
• El control manual le permite dirigir su HUVI a
usted mismo.
CARGANDO
• Presione el ícono para dirigir su HUVI de
regreso a la base de carga (Fig. A).
• HUVI también regresara automáticamente a
la base de carga cuando este limpiando y
baja en batería.
PODER DE SUCCIÓN
• HUVI tiene 4 configuraciones de succión de
succión: Baja, Media, Alta y Máx.
• Para seleccionar entre las configuraciones
de poder de succión de HUVI, seleccione
"Configuración del robot" (Fig. A) mientras
Fig. E
Fig. B
Fig. C
Fig. D
51
www.KALORIK.com
211104
HUVI está en uso, luego seleccione "Succión"
para elegir entre las configuraciones (Fig. F).
NOTA:
― El ajuste de succión se puede cambiar
durante cualquiera de las otras funciones
operativas.
― Cuanto más potente sea el ajuste, más
batería se utilizará.
FUNCIÓN UV
• Seleccione “Configuración del robot” (Fig.
A), luego seleccione “UV” para activar o
desactivar la función UV (Fig. F).
• Esta función está habilitada cuando se
enciende el producto por primera vez de
forma predeterminada.
FUNCIÓN ION
• Seleccione “Configuración del robot” (Fig.
A), luego seleccione “ION” para activar o
desactivar la función de iones (Fig. F).
• De forma predeterminada, esta función está
habilitada cuando se enciende el producto
por primera vez.
LIMPIEZAS PROGRAMADAS
• Seleccione “Programar” (Fig. A), luego
seleccione “Agregar” para seleccionar la
hora y los parámetros (Fig. G).
• Seleccione los parámetros para el programa
de limpieza, luego seleccione "Guardar" en
la esquina superior derecha (Fig. H).
AUTOMATIZACIÓN
• Con la función “Automatización”, puede configurar su HUVI para que
funcione automáticamente de acuerdo a los parámetros que
seleccione en la aplicación.
• Presione el ícono (Fig. A) para acceder a la página de Home (Fig. I).
• Presione el ícono de “Smart” ( ) al fondo de la pantalla.
• Presione el ícono en la parte superior derecha (Fig. J).
Fig. F
Fig. G
Fig. H
52
www.KALORIK.com
211104
Fig. K
• Set the condition you wish HUVI to run under (Fig. K).
― "Launch Tap-to-Run" le permite configurar comandos para HUVI
que HUVI seguirá con un toque en la aplicación.
― "Cuando cambia el clima" le permite configurar comandos para
HUVI, dependiendo del clima.
― “Programa" le permite establecer un programa para que HUVI
realice tareas específicas.
― "Cuando cambia el estado del dispositivo" le permite configurar
comandos para HUVI, dependiendo del estado de HUVI. Por
ejemplo, puede indicarle a HUVI que regrese a la base de carga
dependiendo de la vida útil del filtro.
• Después de establecer una condición, seleccione una tarea para
HUVI (Fig. L) y siga las instrucciones en pantalla.
• “Ejecutar el dispositivo” le permite seleccionar qué funciones HUVI
habilitar al automatizar.
• “Select smart” le permite seleccionar una Automatización o Tap-to-
Launch que haya creado previamente.
• "Enviar notificación" enviará una notificación a su dispositivo
inteligente cuando se cumpla la condición que estableció.
• “Delay”(Retrasar) le permite retrasar el inicio de la automatización
por una cantidad de tiempo específica.
• Después de configurar una tarea, puede agregar más condiciones /
tareas a su automatización si lo desea. Cuando esté listo, seleccione
"Guardar" para finalizar (Fig. M).
NOTA: Una vez creadas, las “Automatizaciones” se pueden encontrar
seleccionando “Automatizaciones” en la pantalla inteligente (Fig. N).
Fig. I
Fig. J
53
www.KALORIK.com
211104
Los comandos "Tap-to-Run" se pueden encontrar seleccionando la sección
"Tap-to-Run" en la pantalla inteligente (Fig. O).
DIFUSOR DE AROMA
HUVI tiene un compartimento difusor de aroma, ubicado sobre el respiradero
en el costado de la aspiradora.
• Para acceder al compartimiento del difusor de aroma, presione el
compartimiento hacia abajo hasta que haga clic y se abra
suavemente. Retire la bandeja y la almohadilla del interior.
Almohadilla
Bandeja
Compartimiento difusor
de Aroma
Fig. L
Fig. M
Fig. N
Fig. O
54
www.KALORIK.com
211104
• Una vez que se suelte el compartimento del difusor de aroma, coloque
unas gotas del aroma incluido con HUVI o un aceite esencial de su
elección en la almohadilla interior.
• Coloque la almohadilla dentro de la bandeja, luego vuelva a insertar la
bandeja en el compartimiento del difusor de aroma hasta que encaje
en su lugar.
• El difusor dispersará el aroma siempre que HUVI esté funcionando, hasta
que se agote el aceite.
NOTA: No reutilice ni limpie las almohadillas. Se debe usar una almohadilla
nueva siempre que sea necesario reponer aceite.
LIMPIEZA Y MANTENIMIENTO
Siga estas instrucciones para limpiar y mantener HUVI.
NOTA:
‒ Antes de limpiar, siempre apague el HUVI y desconecte la base de
carga.
‒ Nunca sumerja ninguna parte eléctrica del producto en agua u otros
líquidos. Nunca lo coloque debajo del agua corriente.
‒ No utilice nunca disolventes o materiales abrasivos. Nunca use
herramientas de limpieza metálicas o afiladas.
LIMPIANDO EL CONTENEDOR DE POLVO
Presione el botón de liberación del contenedor de polvo.
• Después de presionar el botón, extraiga el contenedor de polvo.
Presione hacia abajo para soltar
55
www.KALORIK.com
211104
• Abra el contenedor de polvo separando los lados suavemente pero con
firmeza. Desechar el contenido en el contenedor de polvo.
NOTA: Es normal que se produzca una cierta decoloración del contenedor de
polvo con el uso regular.
LIMPIANDO LOS FILTROS
Para un rendimiento óptimo, limpie los filtros después de una semana de uso
regular. Siga las instrucciones a continuación para limpiar los filtros.
• Abra el contenedor de polvo y retire el filtro HEPA y los componentes del filtro
de cobre.
• Limpiar el contenedor de polvo y los filtros con el cepillo de limpieza o con
la mano.
• Vuelva a colocar los filtros en el contenedor de polvo, vuelva a insertar el
contenedor de polvo en su HUVI.
NOTA: No se recomienda limpiar el filtro HEPA con agua corriente ni mojarlo.

56
www.KALORIK.com
211104
LIMPIANDO LOS SENSORES
• Utilice un paño suave para limpiar suavemente el sensor frontal, los sensores
de suelo y los contactos de carga.
• Use un paño suave para limpiar el sensor de señal y los pines de carga en
la base de carga.
LIMPIAR EL CEIPLLO GIRATORIO Y LA ENTRADA DE SUCCIÓN
Para un rendimiento óptimo, limpie el cepillo giratorio después de una semana
de uso regular. Siga las instrucciones a continuación para limpiar el cepillo
giratorio.
• Empuje las dos pestañas para desbloquear la protección de barrido.
Levante el cepillo giratorio para quitarlo.
Sensores del piso
Contactos de
carga
Sensor frontal
Sensor de señal
Pines de carga
57
www.KALORIK.com
211104
• Limpie el cepillo giratorio y la entrada de succión con la herramienta de
limpieza suministrada o con la mano para eliminar cualquier residuo u
obstrucción.
• Vuelva a instalar el cepillo giratorio insertando primero el extremo
sobresaliente fijo para que el cepillo encaje en su lugar.
• Vuelva a colocar el protector de barrido. Presione hacia abajo para
encajarlo en su lugar.
LIMPIANDO LOS CEPILLOS LATERALES
Para un rendimiento óptimo, limpie los cepillos laterales después de un mes de
uso regular. Siga las instrucciones a continuación para limpiar los cepillos
laterales.
• Retire los cepillos laterales de la aspiradora.
• Retire con cuidado cualquier residuo envuelto entre la unidad principal y
los cepillos laterales.
• Utilice un paño humedecido con agua tibia para quitar el polvo de los
cepillos o remodelarlos suavemente.
NOTA: los cepillos laterales pueden deformarse levemente con el uso regular.
REEMPLAZANDO LA BATERÍA
• Utilice un destornillador para quitar los tornillos de la tapa de la batería
debajo de HUVI. Retire la batería del compartimento.

58
www.KALORIK.com
211104
• Desconecte la batería del conector y luego extráigala por completo.
• Instale la batería nueva. Asegúrese de que la batería esté conectada a los
conectores.
• Vuelva a colocar la tapa de la batería en su lugar.
NOTA:
― No utilice baterías distintas a las especificadas por el fabricante para
evitar daños en la máquina.
― Cargue completamente la batería nueva antes de usarla.
― Recicle la batería reemplazada de forma respetuosa con el medio
ambiente para evitar la contaminación.
ACCESORIOS DISPONIBLES
Mejore su experiencia HUVI con los accesorios descritos en esta sección. Visite
kalorik.com/products/HUVI para obtener más información.
MODELO
KIT
INCLUYE
RVC 50229 -
VCP 51004
Juego de mopa
HydroPower
• Tanque de agua
• 2 almohadillas para
trapear
• Alfombrilla de plástico
para goteo
RVC 50229 -
VCS 51005
Juego de limpieza
automática sin contacto
• Estacion de autolimpieza
• 3 bolsas de polvo
• Control remote Virtual
• Tira de pared
RVC 50229 -
VCP 51006
Juego Deluxe de
limpieza
• Tanque de agua
• 2 almohadillas para
trapear
• Alfombrilla de plástico
para goteo
• Estacion de autolimpieza
• 3 bolsas de polvo
• Control remote Virtual
• Tira de pared
RVC 50229 -
VCP 51007
Juego de reemplazo de
filtros
• 6 filtros HEPA
• 6 filtros de cobre
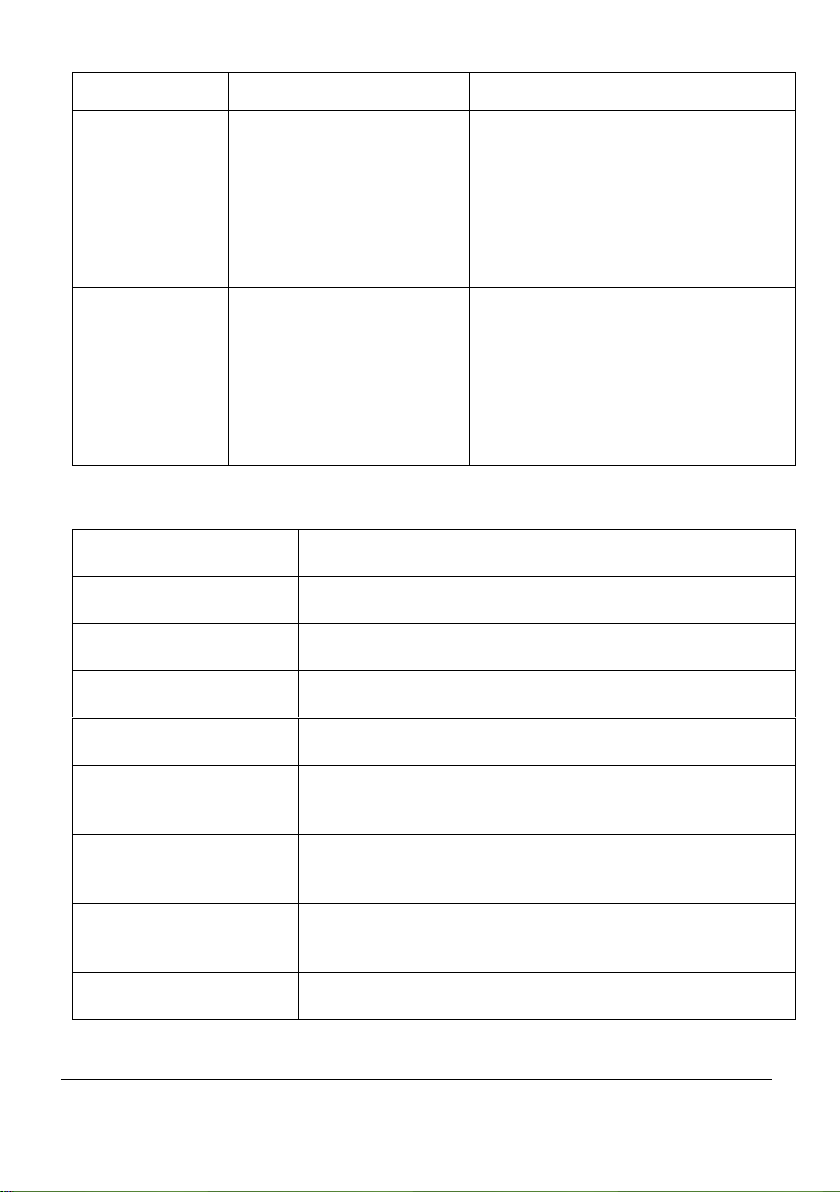
59
www.KALORIK.com
211104
• 20 Almohadillas de Aroma
RVC 50229 -
VCP 51008
Juego complete para
refrescar
• 2 filtros HEPA
• 2 filtros de cobre
• 2 juegos de cepillos
laterales de 6 brazos
(derecho e izquierdo)
• Cepillo giratorio y guardia
de barrido.
• 2 cepillos de limpieza
RVC 50229 -
VCP 51446
Juego complete para
refrescar
• 2 filtros HEPA
• 2 filtros de cobre
• 2 juegos de cepillos
laterales de 3 brazos
(derecho e izquierdo)
• Cepillo giratorio y guardia
de barrido.
• 2 cepillos de limpieza
MODELO
ACCESORIO
RVC 50229 - VCP 51009
Bolsas para polvo de repuesto – Paquete de 6
RVC 50229 - VCP 51010
Bolsas para polvo de repuesto – Paquete de 12
RVC 50229 - VCP 51011
Almohadillas aromáticas – Paquete de 20
RVC 50229 - VCP 51012
Tira de pared virtual
RVC 50229 - VCP 51013
2 juegos de cepillos laterales de 6 brazos (cepillos
izquierdo y derecho)
RVC 50229 - VCP 51445
2 juegos de cepillos laterales de 3 brazos (cepillos
izquierdo y derecho)
RVC 50229 - VCP 51014
Filtros de repuesto - Paquete de 3 (3 HEPA + 3 filtros de
cobre)
RVC 50229 - VCP 51016
Cepillo de rodillo + protector de barrido

60
www.KALORIK.com
211104
RVC 50229 - VCS 51017
Home Base HUVI (con adaptador)
RVC 50229 - VCP 51018
Batería de repuesto
RVC 50229 - VCS 51019
Estación de autolimpieza
RVC 50229 - VCP 51020
Almohadillas de microfibra – Paquete de 2
RVC 50229 - VCP 51015
Filtros de repuesto - Paquete de 6 (6 HEPA + 6 filtros de
cobre)
SOLUCIÓN DE PROBLEMAS
No.
Problema
Causa
Solución
1
HUVI no está
cargando.
HUVI no está encendido
Encienda HUVI.
HUVI no se ha
conectado a la base de
carga.
Asegúrese de que los
contactos de carga de HUVI
se hayan conectado a los
pines de la base de carga.
La batería esta
descargada
Reactive la batería. Para
hacerlo, encienda HUVI.
Coloque HUVI en la estación
de carga con la mano, luego
retírelo después de cargarlo
durante 3 minutos. Repita 3
veces, luego cargue
normalmente.
2
HUVI no
puede
regresar a la
base de
carga.
La base de carga no
está colocada
correctamente.
Consulte la sección ANTES DEL
PRIMER USO de este manual
para conocer la ubicación
correcta. .

61
www.KALORIK.com
211104
3
HUVI se
atasca y
deja de
funcionar.
HUVI ha sido obstruido
por algo en el piso
(cordones, cortinas,
flecos de alfombra, etc.)
HUVI intentará liberarse. Si no
tiene éxito, retire los obstáculos
con la mano y reinicie.
4
HUVI vuelve
a la base de
carga antes
de que haya
terminado
de limpiar.
Cuando la batería está
baja, HUVI regresa
automáticamente a la
base de carga para
recargarse.
Este comportamiento es
normal, no es necesario
realizar ninguna acción. .
El tiempo de trabajo de
la camioneta varía según
la superficie del piso, la
complejidad de la
habitación y el modo de
limpieza seleccionado
Este comportamiento es
normal, no es necesario
realizar ninguna acción.
5
HUVI no
limpia a la
hora
programada.
Se canceló la función de
programación.
Utilice la aplicación HUVI para
programar horarios de limpieza
específicos.
HUVI ha finalizado la
limpieza programada.
Este comportamiento es
normal, no es necesario
realizar ninguna acción.
HUVI está apagado.
Encienda HUVI.
La batería del HUVI está
baja
Keep HUVI switched on and
connected to the charging
station. Make sure the battery
is fully charged before
operating.
El cepillo giratorio / la
entrada de succión está
bloqueado y / o hay
suciedad obstruyendo
sus componentes.
Apague HUVI y limpie el
contenedor de polvo. Limpie el
cepillo giratorio, los cepillos
laterales y la entrada de
succión como se describe en
la sección LIMPIEZA Y
MANTENIMIENTO.
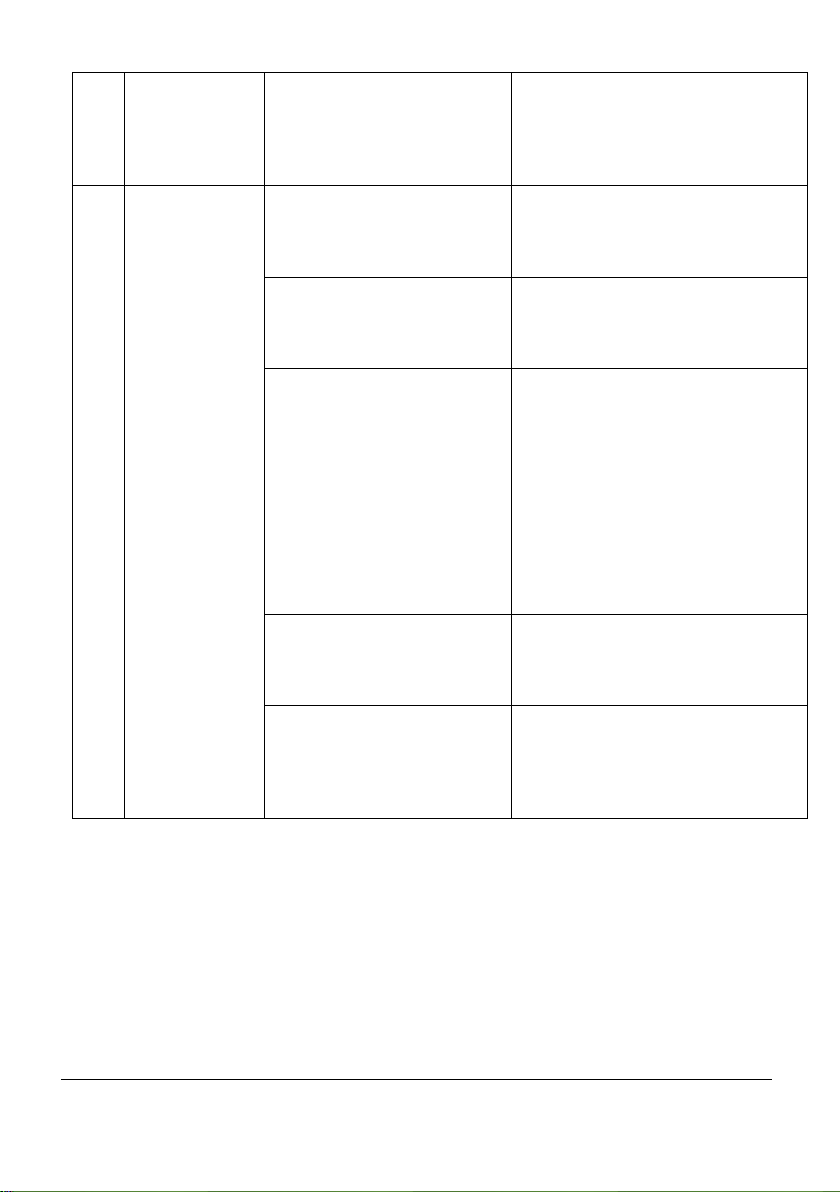
62
www.KALORIK.com
211104
Si necesita ayuda adicional, comuníquese con nuestro Servicio de atención al
cliente al 1-888-525-6745.
6
HUVI no
limpia toda
el área .
Hay obstrucciones en el
piso que impiden la
limpieza del HUVI. .
Retire cualquier obstrucción y
objetos pequeños del área
antes de que HUVI comience
a limpiar.
7
HUVI no
puede
conectarse a
la red WiFi de
su hogar .
Nombre de usuario o
contraseña de WiFi
incorrectos.
Ingrese el nombre de usuario y
la contraseña de WiFi
correctos.
HUVI no está dentro del
alcance de la señal WiFi.
Asegúrese de que HUVI esté
dentro del alcance de su señal
WiFi.
La conexión de red se
inició antes de que HUVI
estuviera listo.
Consulte la sección CONEXIÓN
A LA APLICACIÓN HUVI para
obtener instrucciones de
conexión. Asegúrese de que el
indicador de HUVI esté
parpadeando cuando se
conecte a través de la
aplicación. Asegúrese de
conectarse a la señal de 2,4
GHz.
El sistema operativo de su
dispositivo inteligente
debe actualizarse .
Actualiza el sistema operativo
de tu dispositivo inteligente.
Es necesario reiniciar sus
dispositivos.
Reinicie su dispositivo
inteligente, reinicie HUVI y
reinicie su enrutador antes de
conectarse nuevamente.

63
www.KALORIK.com
211104
GARANTÍA
Le sugerimos complete y nos envíen la Tarjeta de Registro de Producto adjunta
de inmediato para facilitar la verificación de la fecha de compra original. Sin
embargo, la devolución de la Tarjeta de Registro del Producto no es una
condición de estas garantías. También puede completar esta tarjeta de
garantía en línea en la dirección siguiente: www.KALORIK.com
Este producto KALORIK está garantizado en los Estados Unidos y Canadá
durante 1 año a partir de la fecha de compra contra los defectos materiales y
de fabricación. Esta garantía no es transferible. Conserve la prueba de compra
original. Se exige una prueba de compra para obtener la aplicación de la
garantía.
Durante este período, si el producto KALORIK después de una inspección por
parte de KALORIK, se manifiesta defectuoso, será reparado o remplazado,
según lo que decida KALORIK, sin gastos para el consumidor. Si se envía un
producto de remplazo, se aplicará la garantía que queda del producto
original.
Esta garantía no se aplica a los defectos que surja del mal uso del producto
por parte del comprador o usuario, negligencia incumplimiento del manual de
instrucciones KALORIK, uso con corriente o voltaje que no sea el estampado en
el producto, desgaste, alteración o reparación no autorizada por Kalorik, o
utilizar con fines comerciales. No hay garantía para piezas de vidrio, recipientes
de vidrio, canasta de filtro, cuchillas y agitadores. Tampoco hay garantía por
las piezas perdidas por el usuario.
CUALQUIR GARANTÍA DE COMERCIABILIDAD O APTITUD CON RESPECTO A ESTE
PRODUCTO TAMBIÉN ESTÁ LIMITADA A EL PERÍODO DE GARANTÍA LIMITADA DE
UN AÑO.
Algunos estados no permiten la limitación de a la duración de la garantía
implícita o no permiten la exclusión de daños incidentales o consecuentes, por
lo que es posible que las limitaciones anteriores no se apliquen a usted. Esta
garantía de derechos legales específicos, y también puede tener otros
derechos que varían de un estado a otro.

64
www.KALORIK.com
211104
Si el electrodoméstico tiene algún defecto dentro del período de garantía y
más de 30 días después de la fecha de compra, no devuelva el
electrodoméstico a la tienda donde le compró: a menudo, nuestro Servicio al
Cliente puede confirme si el producto está en garantía y lo dirigirá al centro de
servicio más cercano
Si fuera el caso, traiga el producto (o envíelo, correctamente franqueado) con
la prueba de compra que mencione el número de autorización de devolución
indicado por nuestro Servicio al Cliente, al servicio post-venta KALORIK más
próximo. (Visite nuestra web www.KALORIK.com o llame al Servicio al
Consumidor para obtener la dirección del Servicio post-venta KALORIK
exclusivo más próximo).
Al enviar el producto, incluya una carta que explique el defecto reclamado.
Si tiene preguntas adicionales, por favor llame al Servicio al Cliente (véase
abajo para los datos completos), de lunes a jueves, de las 9:00 a las 17:00 (EST),
y el viernes de las 9:00 a las 16:00 (EST). Note que las horas pueden ser
modificadas.
Si quiere escribirnos, puede hacerlo a la dirección siguiente:
KALORIK Servicio al Consumidor
Team International Group of America Inc.
16175 NW 49
th
Avenue
Miami Gardens, FL 33014 USA
O llame gratuitamente (U.S.A.) al +1 888-521-TEAM / +1 888-KALORIK
Las cartas se aceptan solo en la dirección anteriormente mencionada. Los
envíos y paquetes que no tengan número de autorización de devolución serán
rechazados.

65
www.KALORIK.com
211104

66
www.KALORIK.com
211104

67
www.KALORIK.com
211104

68
www.KALORIK.com
211104
RVC 50229 BK
For questions please contact:
Para preguntas contacte a:
KALORIK Customer Service / Servicio al Cliente
Team International Group of America Inc.
16175 NW 49th Avenue
Miami Gardens, FL 33014 USA
Toll Free / Numero Gratiuto:
+1 888-521-TEAM / +1 888-KALORIK
www.KALORIK.com
User manual content and recipes courtesy of Team International Group – Do not reproduce
without consent of the authors - All rights reserved.
Contenido del manual del usuario y recetas cortesía de Team International Group- No
reproducir sin el consentimiento de los autores- Todos los derechos reservados.