Please read this user manual carefully before using your device.
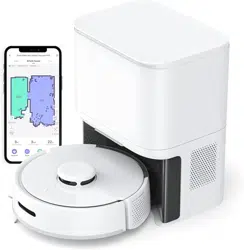
Mini Robot Vacuum K11+
User Manual
www.switch-bot.com
V1.2-2407

Contents
Thank you for choosing SwitchBot!
This manual will guide you through a comprehensive understanding and quick installation of this product, and provide important
information on product usage and maintenance to help you achieve the best product experience.
If you have any questions during use, please call the service hotline or contact the official email. SwitchBot technical support experts
will answer your questions.
Setup and Troubleshooting: support.switch-bot.com
Customer Support: [email protected]
Scannen Sie den QR-Code, um die deutsche Version unseres Benutzerhandbuchs zu erhalten.
Scannez le code QR pour obtenir notre manuel d'utilisation en version française.
Escanee el código QR para obtener la versión en español de nuestro manual de usuario.
Scan de QR code voor de Nederlandse versie van onze gebruikershandleiding.
Scansionate il codice QR per ottenere la versione italiana del nostro manuale d'uso.
https://www.switch-bot.com/pages/switchbot-user-manual
User Manual
Product Overview
List of Components ----------------------------------------------------------- 01
Preparing for Use
Decluttering --------------------------------------------------------------------- 05
Placing the Auto-empty Station ---------------------------------------- 06
Preparing Your Robot ------------------------------------------------------- 07
Instructions for Use
Connecting to Our App ----------------------------------------------------- 08
Starting Your Robot ---------------------------------------------------------- 09
Pausing Your Robot ---------------------------------------------------------- 10
Recharging ---------------------------------------------------------------------- 11
Hibernation --------------------------------------------------------------------- 11
Do Not Disturb Mode -------------------------------------------------------- 11
Child Lock ------------------------------------------------------------------------ 11
Restoring Factory Settings ----------------------------------------------- 11
Care and Maintenance
Cleaning the Bin and Filter ------------------------------------------------ 12
Cleaning the Mopping Pad Plate --------------------------------------- 14
Cleaning the Side Brush ---------------------------------------------------- 14
Cleaning the Front Caster Wheel --------------------------------------- 15
Cleaning the Multi-Surface Rubber Brush ------------------------- 15
Cleaning Sensors and Charging Contacts -------------------------- 16
Replacing the Dust Bag ----------------------------------------------------- 16
Troubleshooting
Common Issues ---------------------------------------------------------------- 17
LED Indicator Light Status ------------------------------------------------ 19
Network Reconfiguration ------------------------------------------------- 20
Firmware Upgrades ---------------------------------------------------------- 20
Specifications ------------------------------------------------------------------- 20
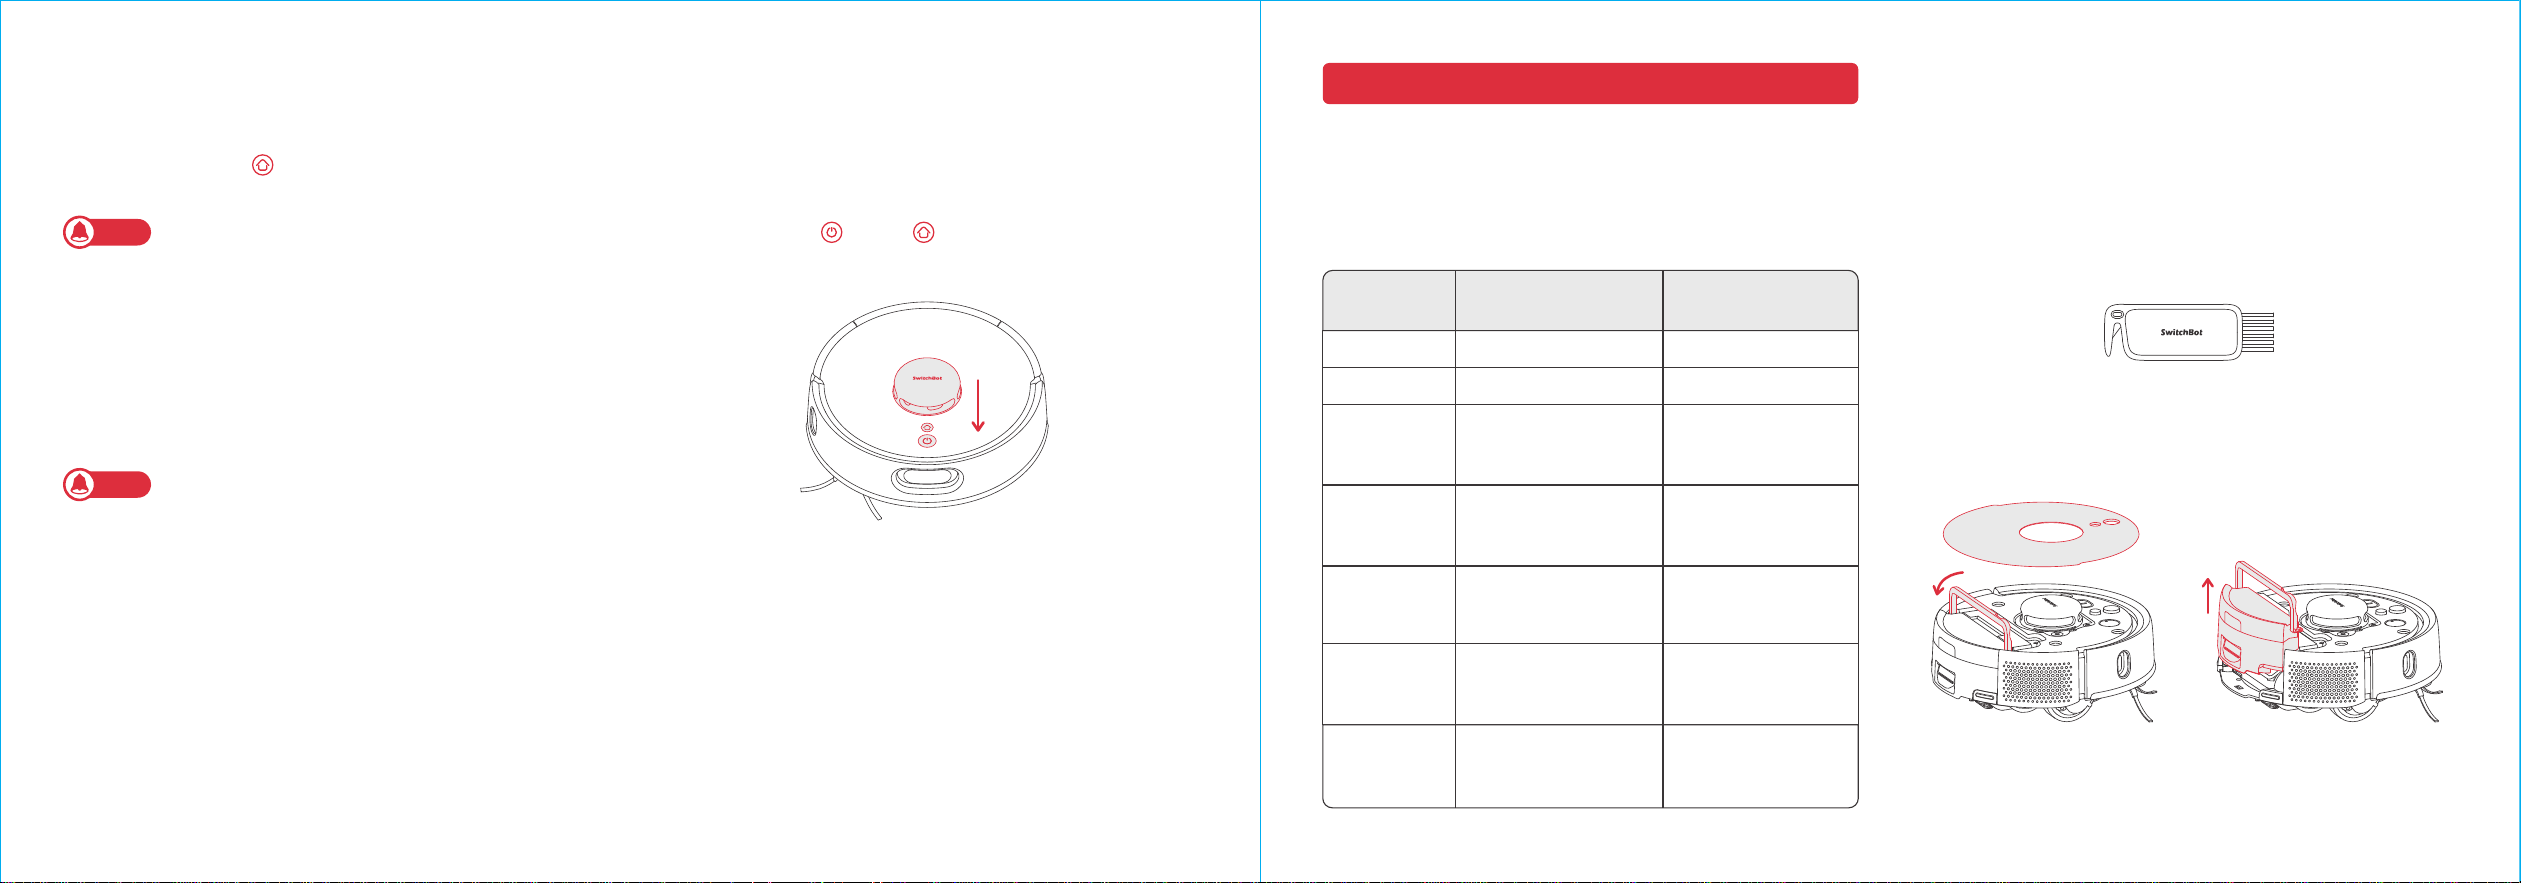
01 02
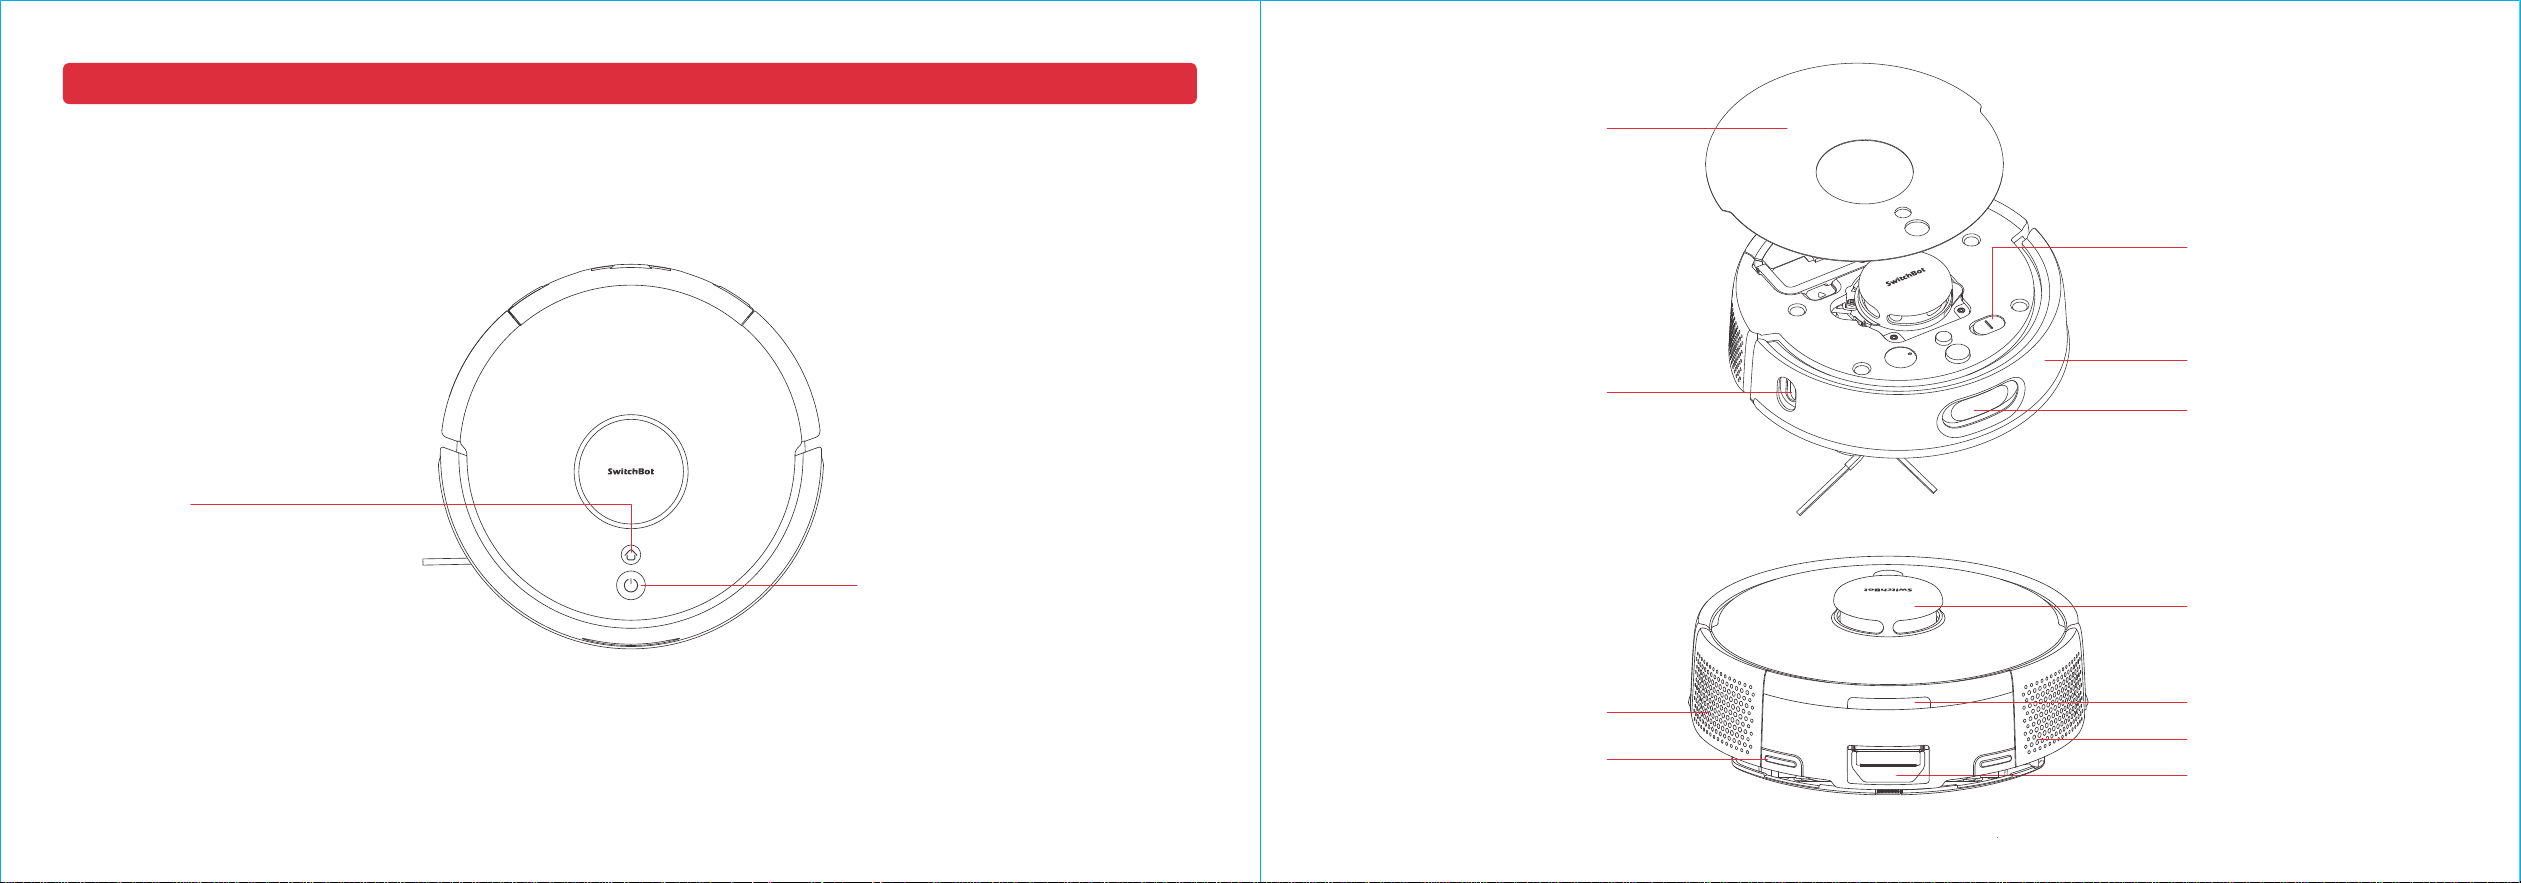
Air Vent
Back Docking Sensor
LDS Laser Radar
Speaker
Dust Port
Charging Contacts
Clean Button
・Long press to turn on/off
・Short press to start/pause cleaning
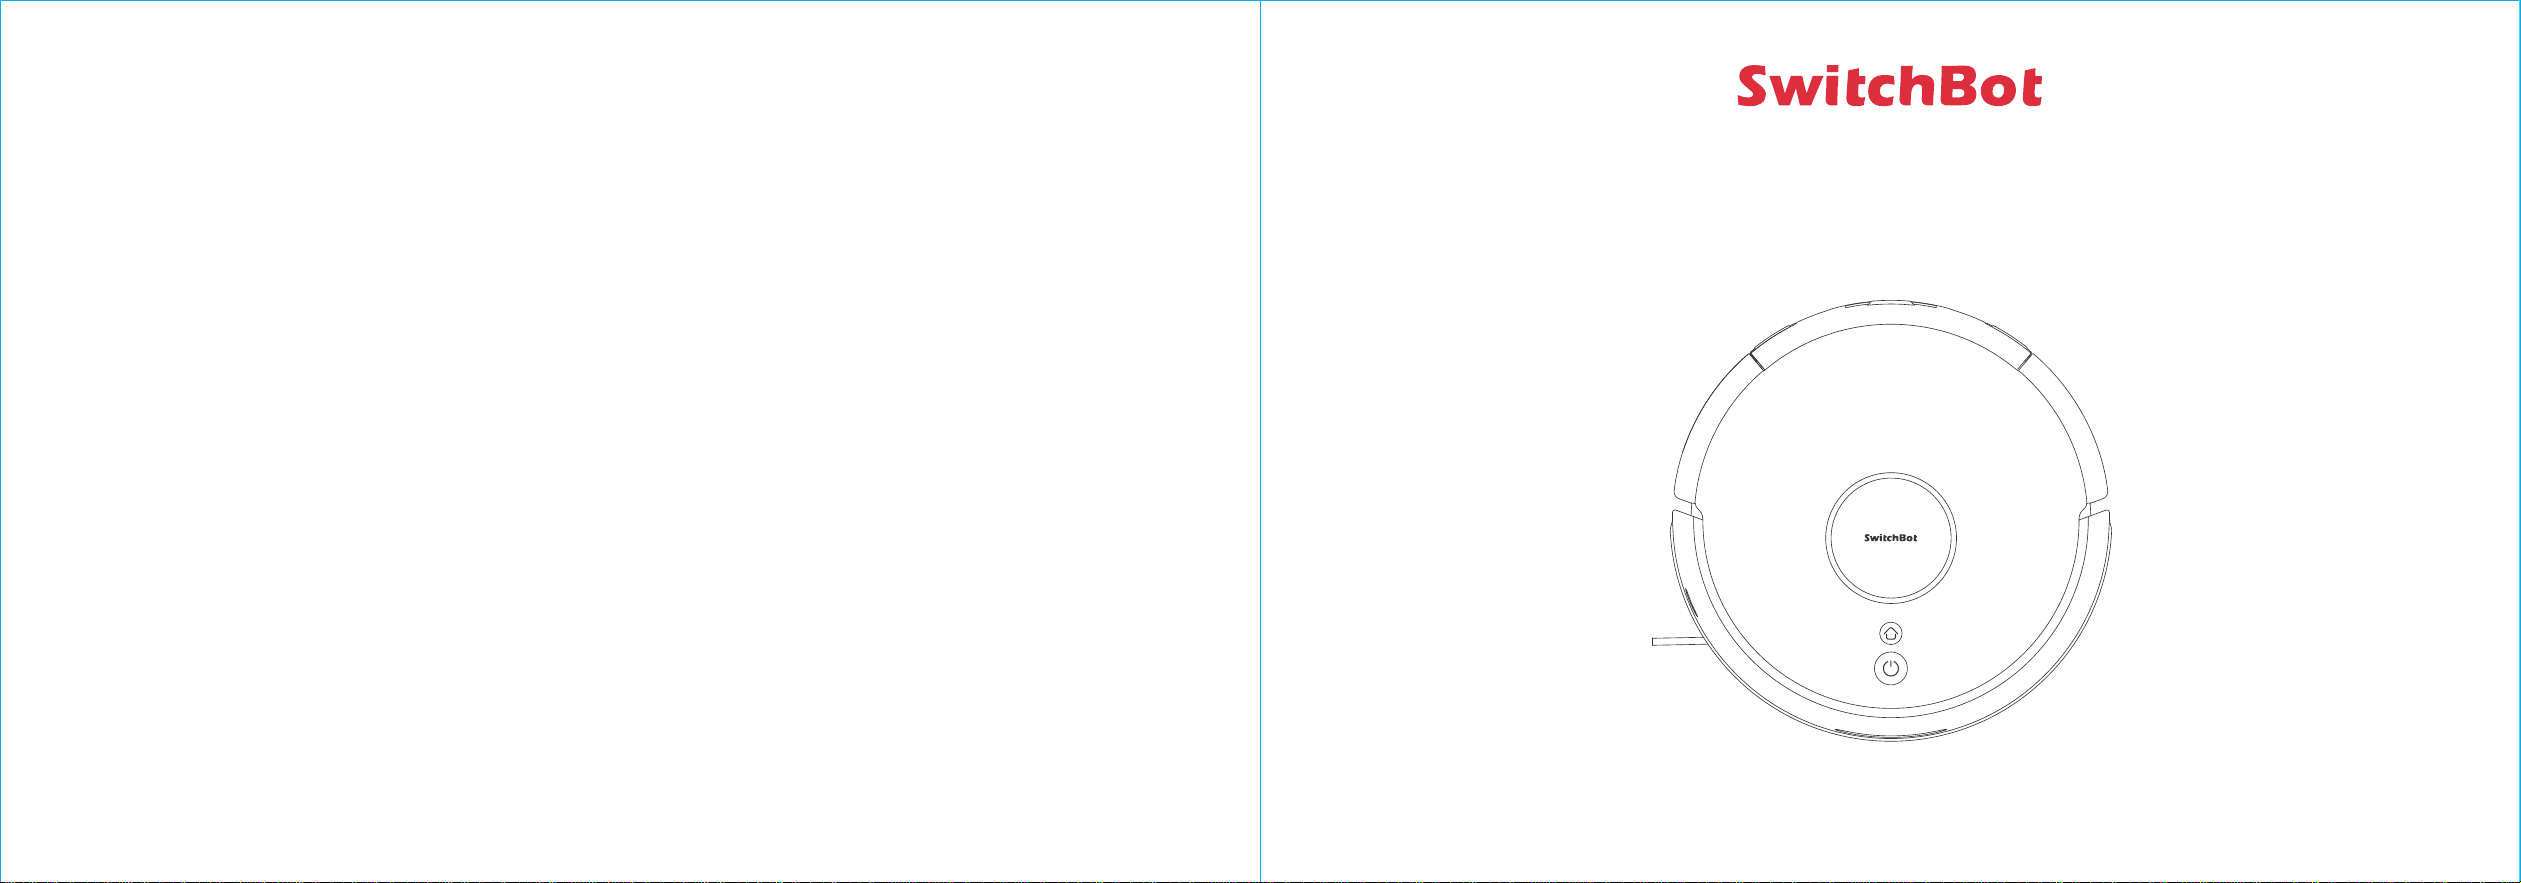
List of Components
Home Button
・Short press to recharge/
pause recharging
Robot
Robot Top View
Product Overview
Faceplate (Detachable)
Front Docking Sensor
Bumper
Power Switch
"|" - power on
"O" - power off
Wall Follow Sensor
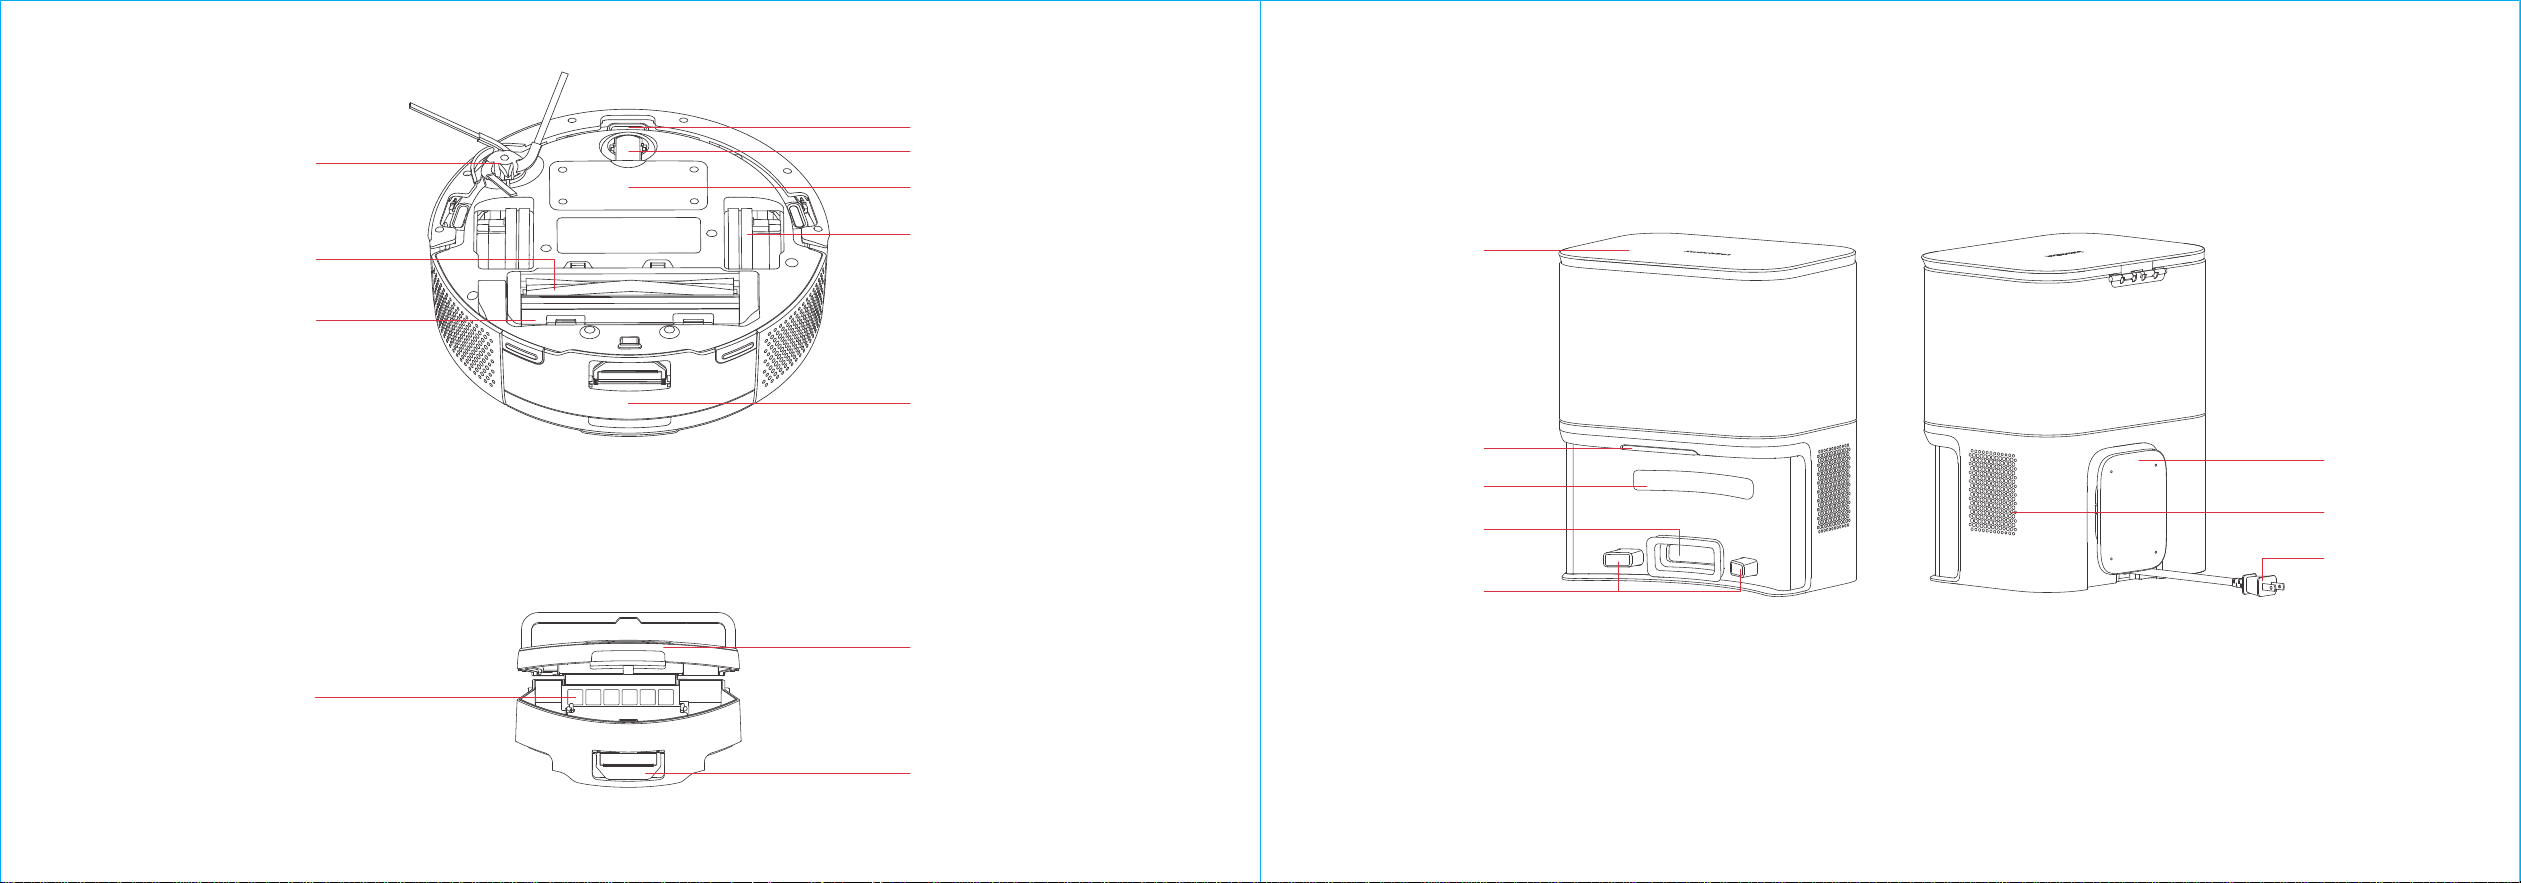
03 04
Robot Bottom View
Dustbin
Dustbin (Detachable)
Auto-empty Station
Front View
Canister Lid
LED Indicator
Charging Contacts
Back View
Cord Wrap
Power Cord
Docking Target
Debris Evacuation
Port
Exhaust Vent
Cliff Sensor
Main Wheels
Dust Port
Bin Cover
Dustbin Filter
Front Caster Wheel (Detachable)
Battery Cover (Detachable)
Side Brush (Detachable)
Anti-Tangle Rubber Brush
(Detachable)
Brush Frame (Detachable)
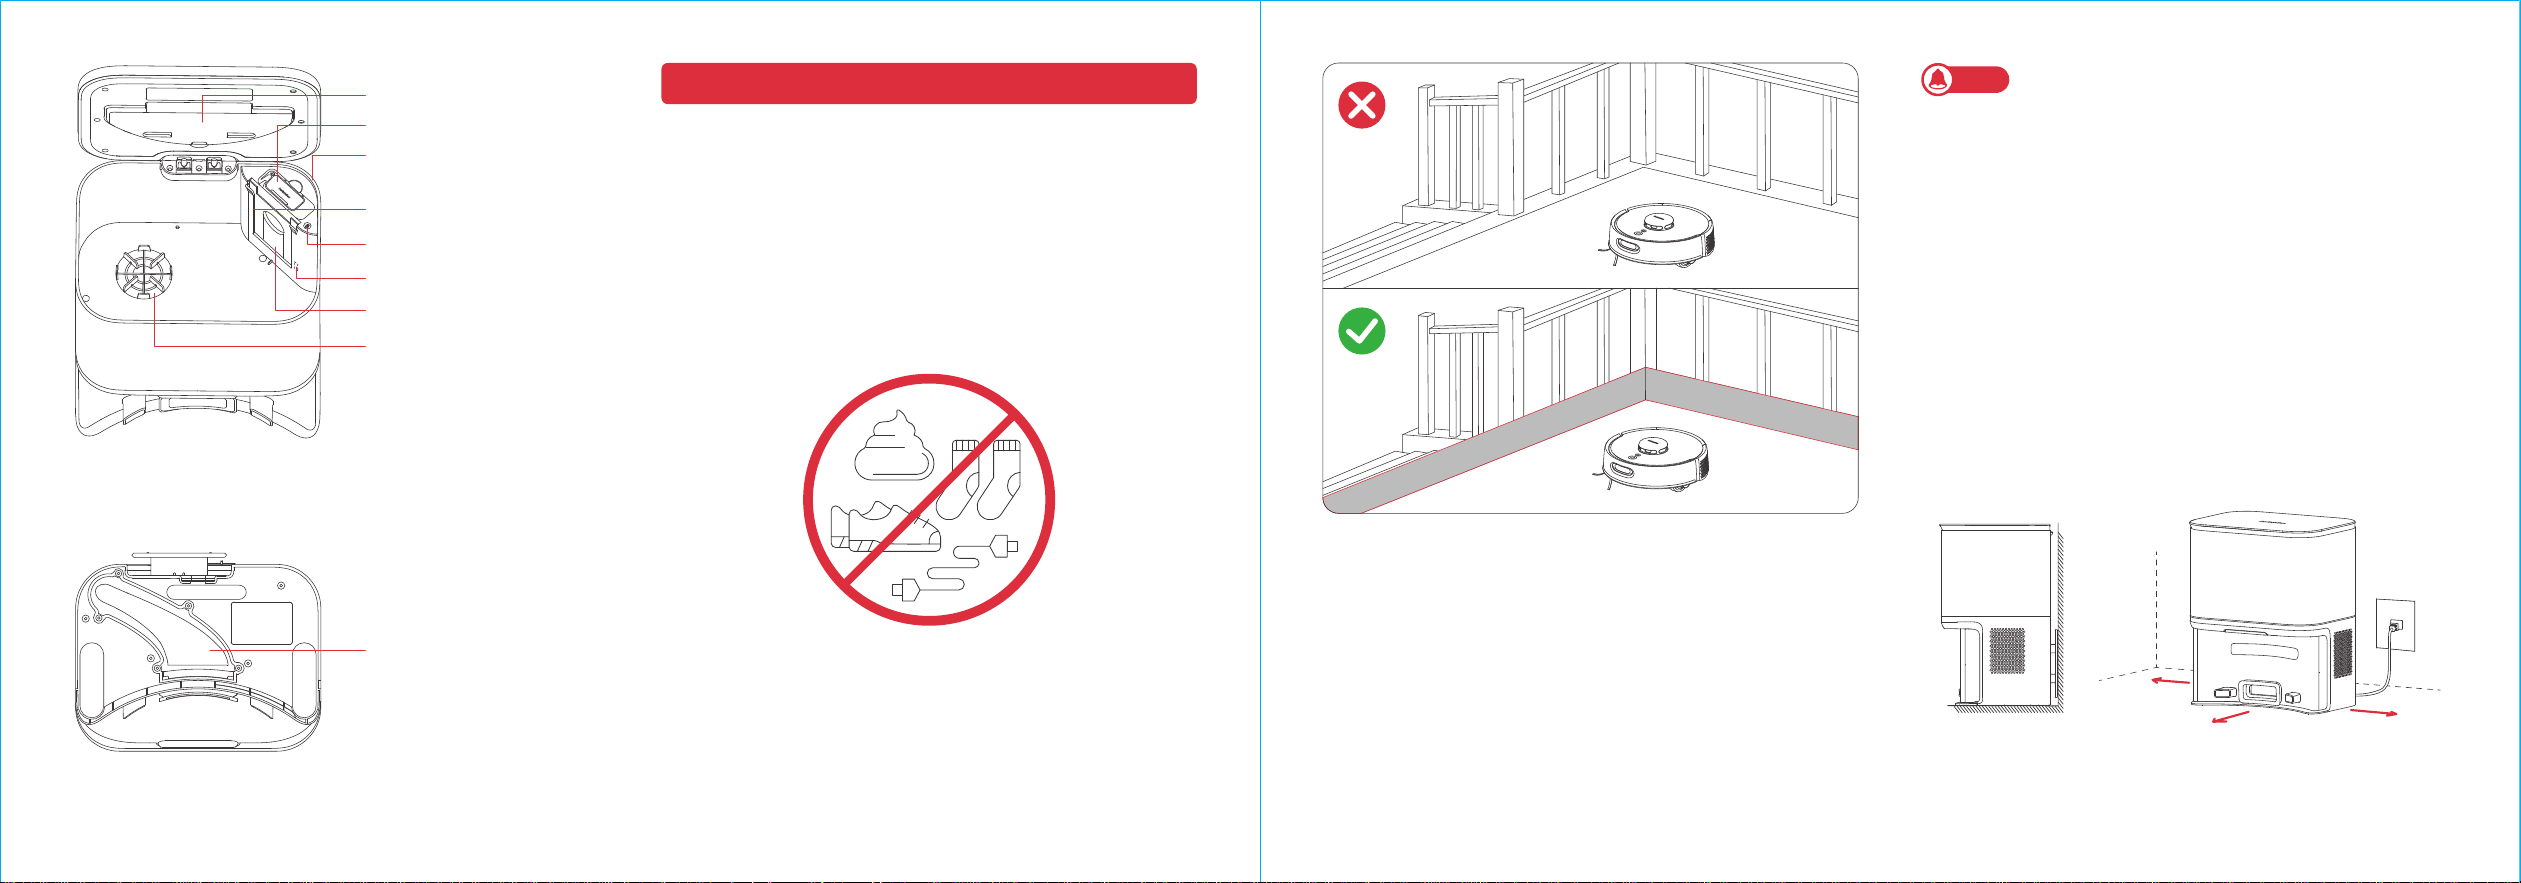
05 06
Bottom View
0.5 m (1.6 ft.)
1 m (3.3 ft.)
0.5 m (1.6 ft.)
1. Place the Auto-empty Station on a hard, level surface (such as
a floor or ceramic tile) against a wall, ensuring there is at least
1 m (3.3 ft.) of space in front and above, and 0.5 m (1.6 ft.) on
both sides. Make sure the location has a good Wi-Fi signal to
provide a better network connection and app user experience.
2. Plug the Auto-empty Station into an outlet, ensure the indicator
light turns on, and store any excess cable in the Cord Wrap.
Placing the Auto-empty Station
Before starting the robot, please check the floor and clean up any
scattered items such as wires, socks, slippers, children's toys, etc.
to improve the efficiency of the robot. Clear the floor of hard or
sharp objects (e.g., nails, glass), and move away items that are
fragile, valuable, or potentially dangerous to avoid being caught,
tangled, or knocked over by the robot, causing personal injury or
property damage.
Before cleaning, please use a physical barrier to avoid areas where
robot may fall or get stuck, ensuring the safety and smooth
operation of your robot.
Open the doors of the rooms to be cleaned, arrange the furniture
neatly, and try to clear a largest cleaning space.
Please avoid standing in front of your robot, doorways, or narrow
passages in case your robot cannot detect the area to be cleaned.
1. When using the robot for the first time, follow it throughout its whole
cleaning route and watch for potential problems. This will help you
identify and resolve minor issues, ensuring a more efficient cleaning
process in the future.
2. If the robot gets stuck under low furniture, you can try the following
solutions:
① Block the bottom of the furniture;
② Set a virtual wall in the app to prevent the robot from entering;
③ If possible, raise the furniture slightly.
Top View
Mopping Pad Plate Clip
Debris Evacuation Tube
Blower Cover
Lid Open/Close Sensor
(Invisible)
Cleaning Tool
Bag Guide Rails
Bluetooth Reset Button
Bag Presence Sensor
Debris Evacuation Tube
Preparing for Use
Decluttering
Note
07 08
• The power cord may be dragged by the robot if hanging on the ground,
causing the Auto-empty Station to move or disconnect from power.
• The indicator light on the Auto-empty Station will stay on when powered,
and turn off when the robot is charging.
• If there is an issue with the Auto-empty Station, the indicator light will turn
red and stay on as a reminder.
• Make sure to place the Auto-empty Station on a level indoor surface, away
from open flames, heat sources, water, narrow spaces, or areas where the
robot may fall.
• Placing the Auto-empty Station on non-hard surfaces (such as carpets, mats,
etc.) poses a risk of tipping over, and the robot may not be able to leave
the Auto-empty Station properly.
• Do not place the Auto-empty Station under direct sunlight or block its
signal emitter area with any objects, as this may prevent the robot from
returning automatically.
• Please maintain the Auto-empty Station according to the maintenance
instructions and avoid using wet cloths or wipes for cleaning.
Removing the protective foam strips
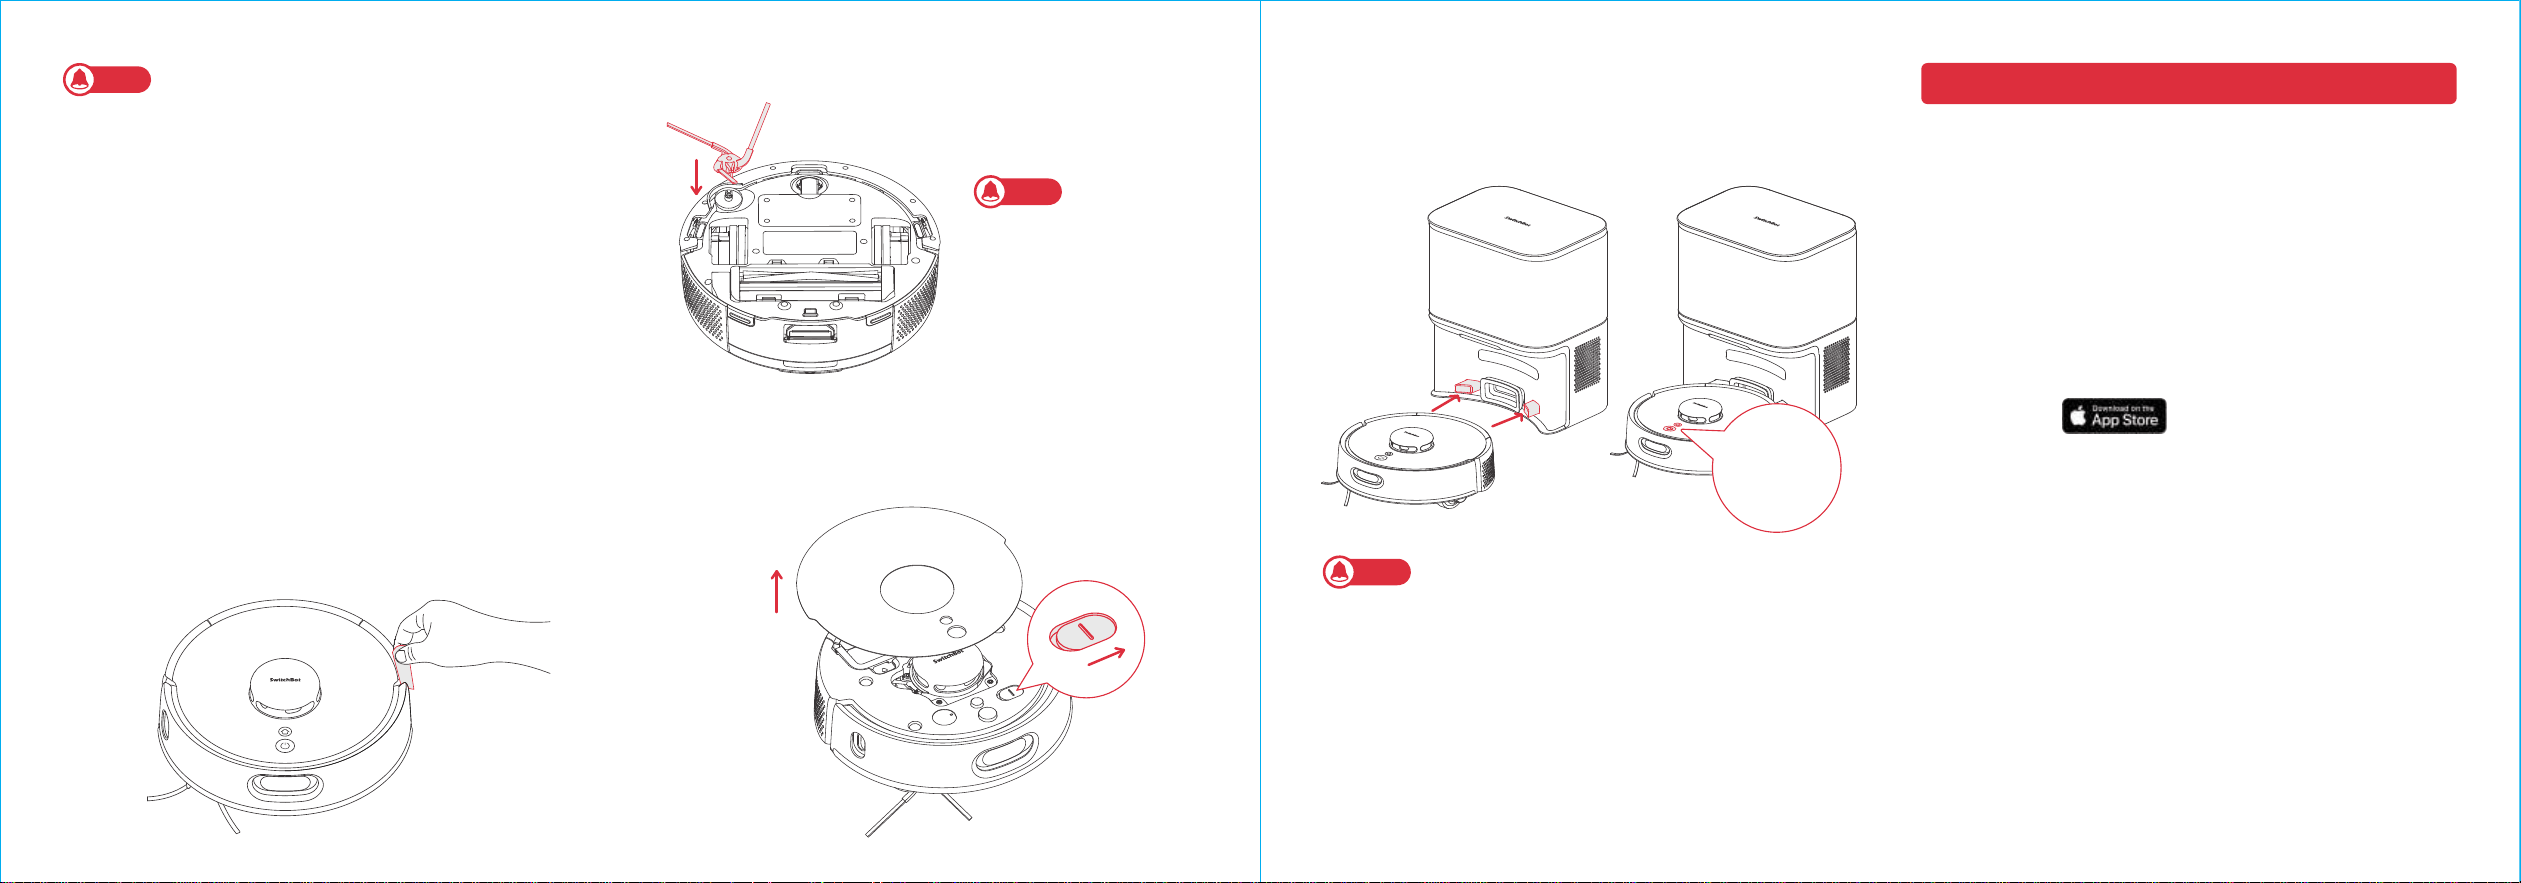
Preparing Your Robot
1. Remove the faceplate as shown in the picture, and turn on the
Power Switch. "I" means powered on, and "O" means powered
off.
Powering on and charging
When you hear a clicking
sound, it means the Side
Brush has been properly
installed.
Installing the Side Brush
1. Download the SwitchBot app to experience more personalized
settings and a better user experience.
You will need:
• A smartphone or tablet using Bluetooth 4.2 or later.
• The latest version of our app, downloadable via the Apple App
Store or Google Play Store.
• A SwitchBot account, you can register via our app or sign in to
your account directly if you already have one.
2. Open our app, tap the "+" icon at the right-hand corner of the
home page, select Add Device.
3. Find the device icon and select, follow the instructions to add
your device.
Instructions for Use
Connecting to Our App
2.Wait for the indicator light on your robot to turn on, then
manually dock your robot to the Auto-empty Station to charge,
as shown in the picture. You will hear the voice prompt
"Charging".
Before the initial use of the robot, it's advised to charge it for 3 to 4 hours.
If it fails to turn on, it may be due to low battery. Please dock the robot
directly to the Auto-empty Station.
White
Battery ≥ 15%
Orange
Battery < 15%
Note
Note
Note
iOS 14.0+ Android OS 5.0+
❶
❷
Press any button on your robot to stop it while working. When
paused, tap the button to resume the previous cleaning task,
tap the button to finish the task, and your robot will return to
the Auto-empty Station to recharge.
9:41
Living room ×1
Bedroom ×1
Balcony ×1
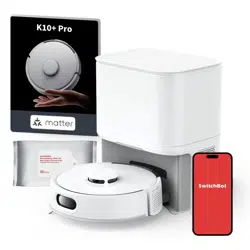
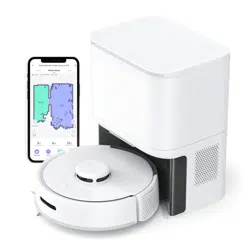
SwitchBot K10+ Pro
Room AreaWhole house
Tatami room ×1
Adjust area
9:41
Bedroom ×1
Living room ×1
Tatami room ×1
Balcony ×1
SwitchBot K10+ Pro
Room AreaWhole house
SwitchBot K10+ Pro
Room AreaWhole house
9:41
No-go zone
No-mop zone No-go zone Virtual walls
Bedroom ×1
Living room ×1
Tatami room ×1
Balcony ×1
9:41
Mini Robot Vacuum K10+ Pro
My Home
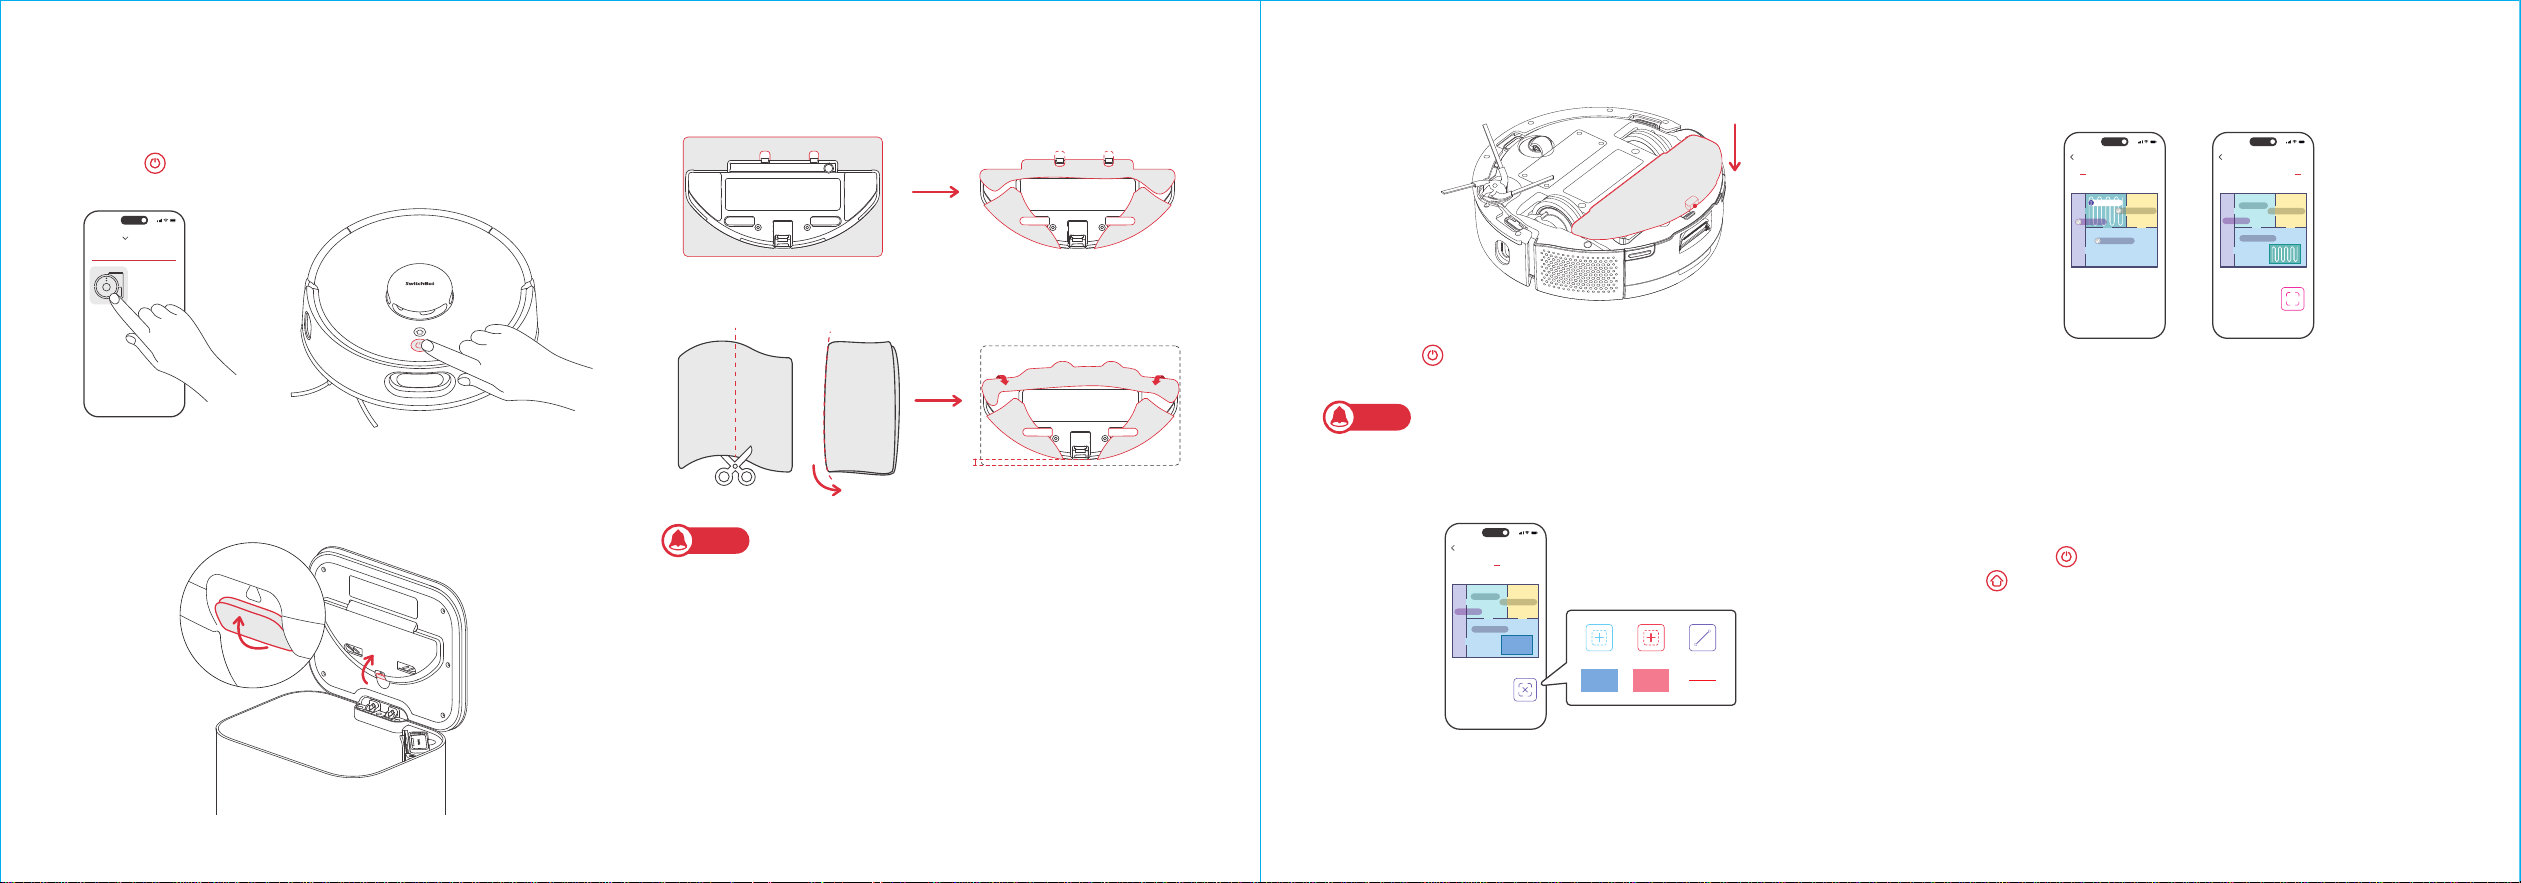
09 10
4. Press the button to start mopping, or control via our app.
② The mopping cloth will become dry after 20 or 30 minutes of use. It is
recommended to only mop designated rooms or areas set in the app.
③ The dry mopping cloth can still wipe away some dust or hair, but it is not
as effective as when it's wet. Please replace the dry mopping cloth in time
when mopping.
Pausing Your Robot
Press the button to start cleaning, or control via our app.
Vacuuming
1. Open the Canister Lid and take the mopping pad plate off.
3. Cover the mopping pad plate on the Multi-Surface Rubber Brush.2. Attach a mopping cloth to the mopping pad plate.
Option 1: Use the original mopping cloth
Option 2: Use a common mopping cloth
Dimensions of a common mopping cloth is usually approx. 30 × 20 cm
(11.8 × 7.9 in.), while your robot's mopping pad plate is compatible with
20 × 15 cm (7.9 × 5.9 in.) cloth. If you use a common mopping cloth, fold or
cut it in half before attaching to the mopping pad plate.
Mopping
Starting Your Robot
1 cm
(0.4 in.)
Note
Note
① Set no-go zones in the app so your robot won't mop and wet areas like
carpets.
11 12
After finishing a cleaning task, your robot will automatically return
to the Auto-empty Station to recharge. To manually send it back
to recharge, press the button on your robot. The indicator
light will be pulsing when charging.
If the robot cannot find the Auto-empty Station, it will automatically return
to the starting position. Please manually dock it to the Auto-empty Station
for charging.
Recharging
If your robot is not operated for more than 10 minutes, it will
automatically enter hibernation. Press any button to wake it up.
Hibernation
The default setting for this mode is from 22:00 to 08:00, and you
can modify or disable this function via our app. During the Do Not
Disturb period, device button lights will stay off, and your robot
will not automatically resume cleaning or play voice prompts.
Do Not Disturb Mode
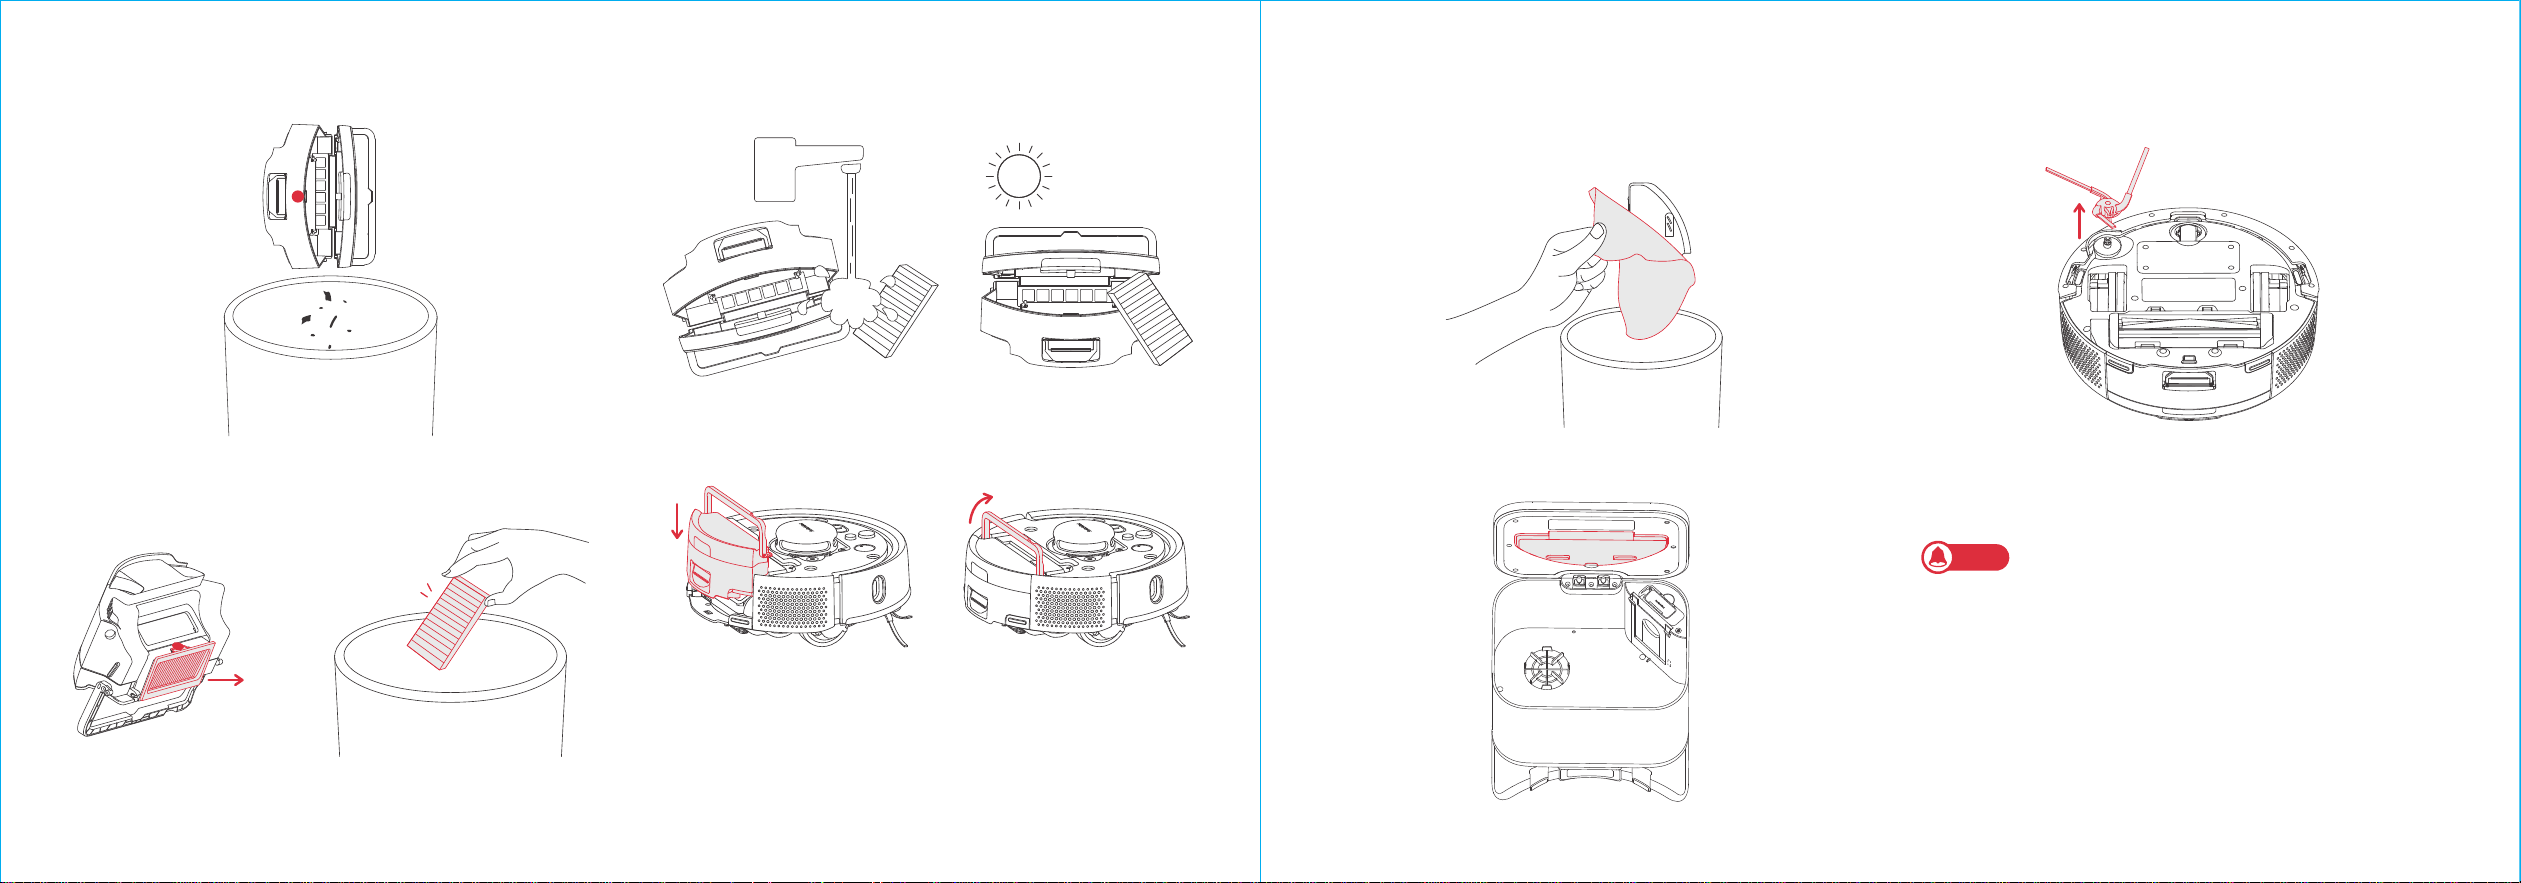
1. Open the faceplate and remove bin.
Cleaning the Bin and Filter
You can use the Child Lock function in our app to lock the robot
buttons. You can remove this function via our app.
Child Lock
Press and hold the button, button, and Laser Radar for 6s
at the same time until you hear the voice prompt.
Restoring Factory Settings
Replacement frequency may vary. Parts should be replaced if visible
wear appears.
If you need to purchase accessory kits, please visit authorized
channels or our official website www.switch-bot.com
Find the cleaning tool in the Auto-empty Station.
Daily Maintenance (Robot)
Note
Note
The robot will not enter hibernation while charging.
Care and Maintenance
To keep your robot running at peak performance, perform the
procedures on the following pages.
If you notice the robot picking up less debris from your floor, empty
the bin, clean the brushes, and clean or replace the filter if needed.
Replace the dust bag in time when it is full.
Clean once a month.
Clean more if your
pet sheds a lot.
Clean once a month.
Clean more if your
pet sheds a lot.
Multi-Surface
Rubber
Brush
Clean once a month.
Clean more if your
pet sheds a lot.
Every 12 months
Every 12 months
Every 12 months
Front Caster
Wheel
Side Brush
Wash bin as needed
Filter
Every 2 or
3 months
Clean once a month
or when prompted
by the app
Cliff Sensor
Clean once a month
or when prompted
by the app
Part Care Frequency
Replacement
Frequency
Dust Bag
Bin
Every 70 days
13 14
2. Press the red area (marked in the picture) to open and empty
the bin.
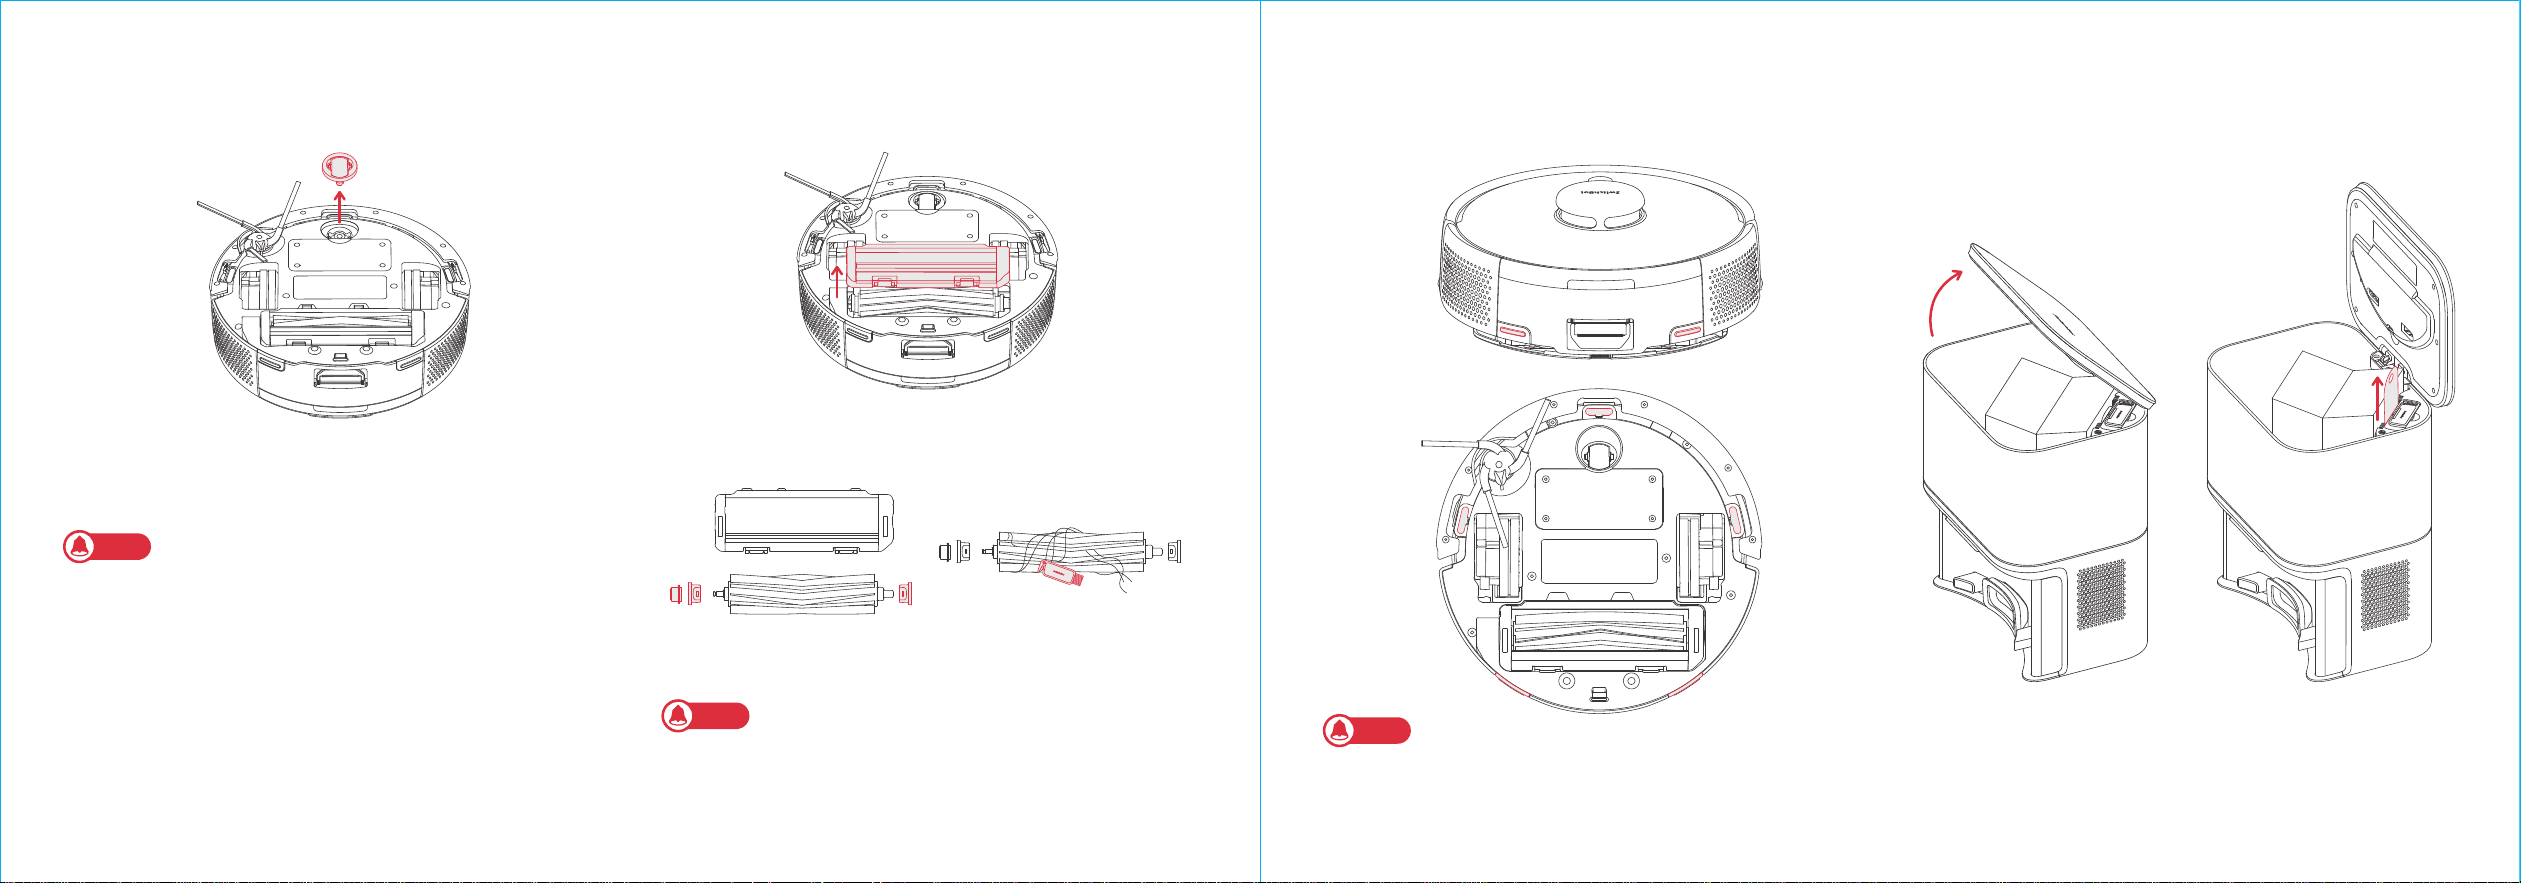
2. Remove any hair or debris and replace the brush.
3. Align and reinstall the brush.
1. Pull to remove the Side Brush.
Cleaning the Side Brush
1. Remove the mopping pad plate and throw away the disposable
mopping cloth. Wash the pad plate with water.
Cleaning the Mopping Pad Plate
2. Place the Mopping Pad Plate back in the Canister Lid.
5. Reinstall the filter and bin back in the robot.
3. Remove the filter and tap to clean it.
4. Rinse the bin and filter using warm water and completely dry
them.
Note
Replace the Side Brush once every year.
24h
15 16
1. Pull firmly on the front wheel to remove it from the robot.
2. Remove any debris from inside the wheel cavity.
3. Reinstall the wheel. Make sure the wheel clicks into place.
Cleaning the Front Caster Wheel
Note
Replace the Front Caster Wheel once every year.
2. Remove and clean hair and debris from the brush caps. Remove
hair from the brush.
3. Reinstall the brush caps into place.
1. Remove the brush frame and lift the brush from the left side.
Cleaning the Multi-Surface Rubber Brush
Wipe sensors and charging contacts with a clean, dry cloth.
Cleaning Sensors and Charging Contacts
1. Lift up on the canister lid to open.
2. Pull up on the hard paper card to remove the bag from the
canister.
Replacing the Dust Bag
Note
Note
Replace the Multi-Surface Rubber Brush every 12 months.
Do not spray cleaning solution or water onto the sensors, sensor openings
or charging contacts.
17 18
Common Issues
Troubleshooting
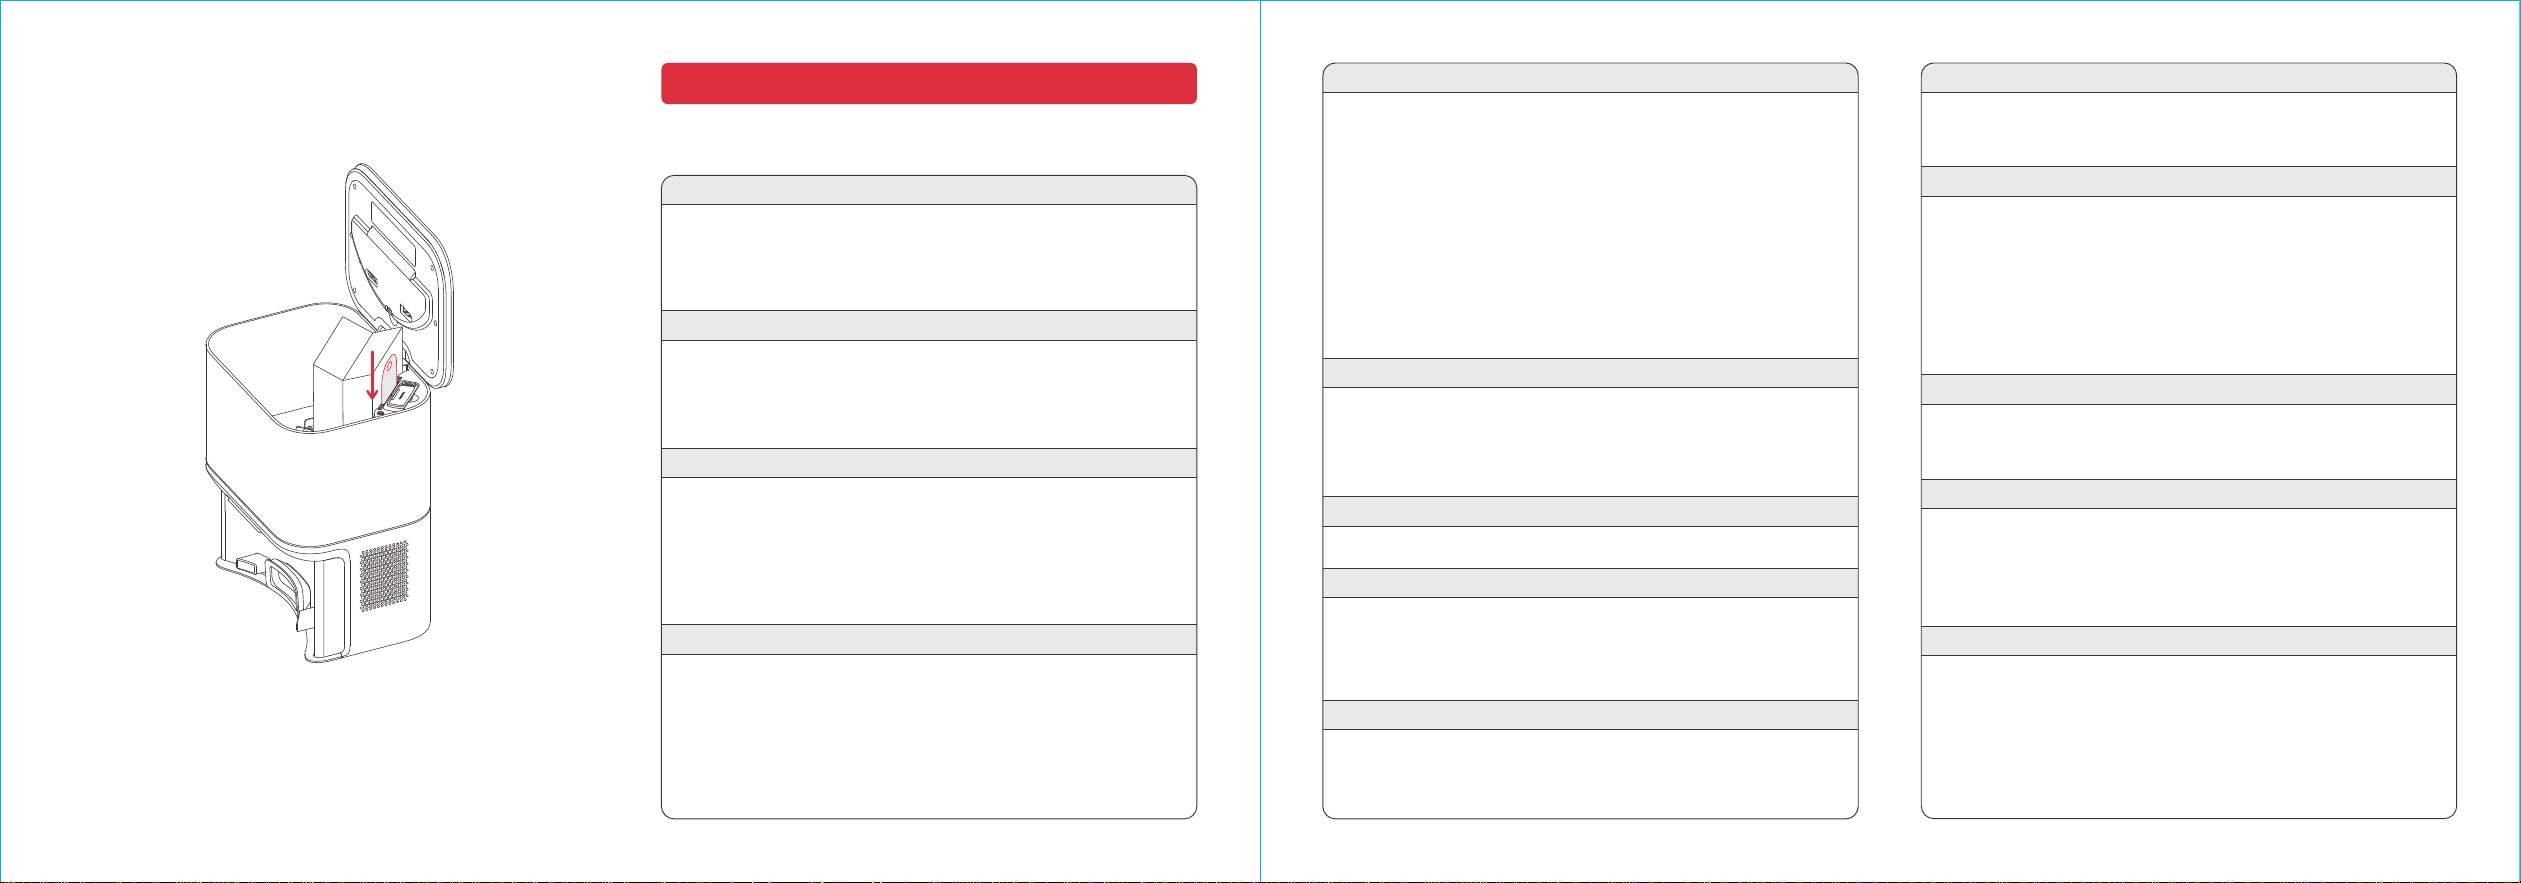
3. Discard the used bag.
4. Install a new bag, sliding the card into the guide rails. Press
down on the lid, making sure it is completely closed.
Unable to power on
• The battery level is low. Put the robot on the charging station and
charge it before use.
• The ambient temperature is too low or too high. Only use the robot
within the range of 4°C to 40°C (39°F to 104°F).
• The Auto-empty Station is not powered, please make sure both ends
of the power cord are plugged in properly.
• Poor contact, please clean the charging contacts on the Auto-empty
Station and the robot.
• Incorrect Wi-Fi password, please enter the correct Wi-Fi password.
• Switch to a 2.4GHz network for pairing, as 5GHz networks and
enterprise routers are not supported.
• Keep the robot within a range with good Wi-Fi signal strength.
• The robot may not be in the ready-to-configure state, exit the app and
re-enter, then follow the pairing steps to try again.
• The robot needs to start mapping from the Auto-empty Station, it is
recommended to use the Fast Mapping feature.
• Do not move the robot during the first mapping process to avoid
locating failure.
• If the robot does not return to the Auto-empty Station after completing
the first mapping task, check and remove any obstacles on the
ground.
Unable to charge
Network connection failure
Unable to create partition map in the app
Cannot locate the Auto-empty Station, unable to return
• The Auto-empty Station is powered off or the robot was moved.
• The charging route is blocked, such as by a closed door.
• Too many obstacles near the Auto-empty Station, please place it in
an open area.
• After moving the robot, it will relocate itself. If locating fails, it will
generate a new map. If the Auto-empty Station is too far away, it may
not be able to recharge, please manually dock the robot back to the
Auto-empty Station to charge.
• Wipe the signal emission area of the Auto-empty Station in case there
is dust or dirt.
• Gently wipe the Front Docking Sensor of the robot with a soft, dry
cloth and keep the lens clean and unobstructed.
• The robot takes about 6 hours to charge from low to full battery.
• In high or low-temperature environments, the robot will automatically
reduce charging speed to extend battery life.
• The charging contact area may be dirty, please wipe it with a dry cloth.
Slow charging speed
• Please turn off and restart the robot.
Abnormal behavior
Side Brush fell off
• Please reinstall the Side Brush, making sure to hear a "click" to indicate
it is in place.
• The Side Brush may have fallen off due to tangled wires. Please clear
wires on the floor before use.
Ground not cleaned up
• The dustbin is full. Please empty it.
• The filter may be clogged with dust. Please check and clean as necessary.
• The filter is not dry after cleaning. Please let it air dry before using.
Dust leaked while working
• Remove the Anti-Tangle Rubber Brush and dustbin, and clear any debris
near the Anti-Tangle Rubber Brush.
Loud operating noise
• The dustbin is full. Please empty it.
• Hard objects may be tangled in the Anti-Tangle Rubber Brush and
dustbin. Please check and clean as necessary.
• The Side Brush and Anti-Tangle Rubber Brush may be tangled with
debris. Please check and clean as necessary.
• You can lower the suction power of the robot to Quiet or Low if
necessary.
Abnormal sound emitted while moving
• Rotate and press the wheels to check for any debris tangled or stuck.
Clean the debris or contact customer service if the issue persists.
Random movement path
• Loose wires, slippers, and other objects on the floor may affect the
robot's normal operation. Please tidy up before use.
• Working on wet and slippery floors may cause the wheels to slip. Please
manually wipe or air dry the floor before using.
Stopped due to being stuck
• The robot may be stuck under furniture of a similar height. Consider
raising the furniture, manually blocking or using our app to set a virtual
wall to avoid the area.
• Check the corresponding area for any wires, curtains, or carpet edges
that may be tangled with or obstructing the robot. Manually remove
any obstructions for smooth operation.
2019
Specifications
Mini Robot Vacuum K10+ Pro
Material: ABS Size: 248 × 248 × 92 mm (9.8 × 9.8 × 3.6 in.)
Weight: Approx. 2.3 kg (81.1 oz.) Rated Power: 30 W
Battery Voltage: 14.4 V Battery Capacity: 3200 mAh
Operating Temperature: 0 ℃ to 30 ℃ (32 ℉ to 86 ℉)
Connectivity: 2.4 GHz Wi-Fi, Bluetooth 4.2 or later
System Requirements: iOS 14.0+, Android OS 5.0+
Auto-empty Station
Size: 220 × 180 × 250 mm
Rated Input: 24 V 1 A Rated Power (Charging): 30 W
Rated Power (Emptying Dust): 650 W
• The cleaning will only start when the remaining battery is more than 20%.
Scheduled cleaning not performed
LED Indicator on the Auto-empty Station stays orange
• The dust bag is not in position. Please check and install it correctly.
• The dust bag is full. Please check and replace with a new dust bag.
• The canister lid of the Auto-empty Station is not closed. Please check
and close it tightly.
Didn't empty dust after returning
• The robot will not empty dust during the Do Not Disturb time period.
• Please check if the dust bag is full. Replace the dust bag in a timely
manner, preferably every 1 to 2 months.
• If the dust bag is not full, check for blockages in the Debris Evacuation
Port and the bottom Debris Evacuation Tube of the Auto-empty Station.
Remove any blockages before using.
• When the robot's battery is depleted, it will automatically shut down.
Note: If the robot cannot be charged by the Auto-empty Station, the possible cause
is that the Auto-empty Station is not connected to power or there is poor contact
between the robot and the Auto-empty Station. Please check if the power supply is
connected properly.
Ongoing cleaning task interrupted
Missed cleaning some rooms
• Please ensure all room doors are fully opened.
• Check if there is a doorsill higher than 1.8 cm (0.7 in.) at the entrance
of the room.
• If the entrance is slippery, causing the robot to skid and malfunction,
it is recommended to manually clean up the water on the floor.
Frequently entered No-go Zones or passed Virtual Walls
• Check the app to see if the current map is abnormal. You can restore
the map in Maps via our app.
• When setting virtual walls or No-go Zones, adjust the boundaries
according to the home environment, making sure to include areas
where the robot may get stuck (such as sunken steps, furniture
bottoms, etc.).
Didn't resume cleaning after being fully charged
• Make sure the robot is not in Do Not Disturb mode, as it will not resume
cleaning in this mode.
• If the robot is manually carried to the Auto-empty Station or is sent to
the Auto-empty Station by pressing the button, it will not resume
cleaning after being fully charged.
Slowly Flashing White The robot is charging.
Blinking White The robot is ready to configure Wi-Fi.
Solid Orange Low battery.
Blinking Orange
The robot has run out of power or an error
occured.
Solid White
The robot is fully charged or cleaning
properly.
LED Indicator Light Descriptions
LED Indicator Light Status
In order to improve user experience, we will regularly release
firmware updates to introduce new functions and solve any
software defects that may occur during usage. When a new
firmware version is available, we will send an upgrade notification
to your account via our app. When upgrading, please make sure
your product has sufficient battery or stay powered on and make
sure your smartphone is within range to prevent interference.
Firmware Upgrades
Press and hold the and buttons for 3 seconds to reconfigure
your Wi-Fi network.
Network Reconfiguration
文件名称: K11+-合规声明-六合一-2502
材质和工艺: 80g书写纸+单色印刷 折页
版本号:
V1.0-2502
设计师:WYY
成品尺寸:140mm×200mm
完成时间:2025/02/21
更改内容:
备注:修改参数
蓝色线框不印刷,此页表格不印刷
K=90
SwitchBot Robot Vacuum K11+
REGULATORY INFORMATION
To comply with RF exposure requirements, a minimum separation distance of 20 cm must be
maintained between the user’s body and the device, including the antenna. Use only the supplied
or an approved antenna. This device in compliance with the essential requirements and other
relevant provisions of directive 2014/53/EU. All essential radio test suites have been carried out.
CE DOC
Hereby, Woan Technology (Shenzhen) Co., Ltd. declares that the radio equipment type
W3003100/W3001000 is in compliance with Directive 2014/53/EU. The full text of the EU
declaration of conformity is available at the following internet address:
support.switch-bot.com
This product can be used in EU member states and UK.
Manufacturer: Woan Technology (Shenzhen) Co., Ltd.
Address: Room 1101, Qiancheng Commercial Center, No. 5 Haicheng Road, Mabu Community,
Xixiang Subdistrict, Bao'an District, Shenzhen, Guangdong, P.R.China, 518100
CE representative: XDH Tech
Address: 2 Rue Coysevox Bureau 3, Lyon, France
Operation frequency (Max power)
Wi-Fi: 2412 MHz to 2472 MHz (< 20 dBm)
BLE: 2402 MHz to 2480 MHz (< 10 dBm)
Operation temperature: 0 °C to 40 °C (39 °F to 104 °F)
CE Warning
This device complies with Part 15 of the FCC Rules. Operation is subject to the following two
conditions:
(1) This device may not cause harmful interference.
(2) This device must accept any interference received, including interference that may cause
undesired operation.
NOTE: This equipment has been tested and found to comply with the limits for a Class B digital
device, pursuant to part 15 of the FCC Rules. These limits are designed to provide reasonable
protection against harmful interference in a residential installation.
This equipment generates uses and can radiate radio frequency energy and, if not installed and
used in accordance with the instructions, may cause harmful interference to radio communications.
However, there is no guarantee that interference will not occur in a particular installation. If
this equipment does cause harmful interference to radio or television reception, which can be
determined by turning the equipment off and on, the user is encouraged to try to correct the
interference by one or more of the following measures:
FCC Warning
Invisible laser radiation
Laser energy --Exposure near aperture may cause burns
Wavelength: 775 nm-800 nm
Output power: 3.3 V0.24 A
Frequency: 6Hz
Pulse duration: 3s
Laser of the vacuum cleaner complies with the standard for Class I laser products of EN
50689:2021 & EN 60825-1:2014+A11:2021.
CE-Warnung
CLASS 1 CONSUMER LASER PRODUCT
- Reorient or relocate the receiving antenna.
- Increase the separation between the equipment and receiver.
- Connect the equipment into an outlet on a circuit different from that to which the receiver is
connected.
- Consult the dealer or an experienced radio/TV technician for help.
NOTE: The manufacturer is not responsible for any radio or TV interference caused by unauthorized
modifications to this equipment. Such modifications could void the user’s authority to operate the
equipment.
FCC Radiation Exposure Statement
This equipment complies with FCC radiation exposure limits set forth for an uncontrolled
environment. This equipment should be installed and operated with minimum distance 20 cm
between the radiator & your body.
Um die Anforderungen an die HF-Exposition zu erfüllen, muss ein Mindestabstand von 20 cm
zwischen dem Körper des Benutzers und dem Gerät, einschließlich der Antenne, eingehalten
werden. Verwenden Sie nur die mitgelieferte oder eine zugelassene Antenne. Dieses Gerät
entspricht den grundlegenden Anforderungen und anderen relevanten Bestimmungen der
Richtlinie 2014/53/EU. Alle wesentlichen Funktestreihen wurden durchgeführt.
CE-DOC
Hiermit erklärt Woan Technology (Shenzhen) Co., Ltd. dass die Funkanlage (des Typs
W3003100/W3001000) mit der Richtlinie 2014/53/EU übereinstimmt. Der vollständige
Text der EU-Konformitätserklärung ist unter der folgenden Internetadresse
verfügbar: support.switch-bot.com
Dieses Produkt kann in den EU-Mitgliedsstaaten und in Großbritannien verwendet werden.
Om te voldoen aan de RF-blootstellingsvereisten, moet een minimale afstand van 20 cm worden
aangehouden tussen het lichaam van de gebruiker en het apparaat, inclusief de antenne. Gebruik
alleen de meegeleverde of een goedgekeurde antenne. Dit apparaat voldoet aan de essentiële
eisen en andere relevante bepalingen van richtlijn 2014/53/EU. Alle essentiële radiotestreeksen
zijn uitgevoerd.
CE DOC
Hierbij verklaart Woan Technology (Shenzhen) Co., Ltd. dat de radiouitrusting van het type
(W3003100/W3001000) voldoet aan Richtlijn 2014/53/EU. De volledige tekst van de
EU-verklaring van conformiteit is beschikbaar op het volgende internetadres:
support.switch-bot.com
Dit product kan worden gebruikt in EU-lidstaten en het Verenigd Koninkrijk.
Fabrikant: Woan Technology (Shenzhen) Co., Ltd.
Adres: Kamer 1101, Qiancheng Commercial Center, Nr. 5 Haicheng Road, Mabu Community,
Xixiang Subdistrict, Bao'an District, Shenzhen, Guangdong, V.R. China, 518100
CE-vertegenwoordiger: XDH Tech
Adres: 2 Rue Coysevox Bureau 3, Lyon, Frankrijk
Bedrijfsfrequentie (Maximaal vermogen)
Wi-Fi: 2412 MHz tot 2472 MHz (<20 dBm)
BLE: 2402 MHz tot 2480 MHz (<10 dBm)
Bedrijfstemperatuur: 0 tot 40 ℃
CE Waarschuwing
V1.0-2408
Para cumplir con los requisitos de exposición a RF, se debe mantener una distancia mínima de
separación de 20 cm entre el cuerpo del usuario y el dispositivo, incluyendo la antena. Utilice
solo la antena suministrada o una aprobada. Este dispositivo cumple con los requisitos esenciales
y otras disposiciones relevantes de la directiva 2014/53/UE. Se han llevado a cabo todas las pruebas
de radio esenciales.
DOC CE
Por la presente, Woan Technology (Shenzhen) Co., Ltd. declara que el equipo de radio (tipo
W3003100/W3001000) cumple con la Directiva 2014/53/UE. El texto completo de la
declaración de conformidad de la UE está disponible en la siguiente dirección de internet:
support.switch-bot.com
Advertencia CE
Hersteller: Woan Technology (Shenzhen) Co., Ltd.
Adresse: Raum 1101, Qiancheng Commercial Center, Nr. 5 Haicheng Road, Mabu Community,
Xixiang Subdistrict, Bao'an District, Shenzhen, Guangdong, P.R.China, 518100
CE-Vertreter: XDH Tech
Anschrift: 2 Rue Coysevox Bureau 3, Lyon, Frankreich
Betriebsfrequenz (maximale Leistung)
Wi-Fi: 2412 MHz bis 2472 MHz (<20 dBm)
BLE: 2402 MHz bis 2480 MHz (<10 dBm)
Betriebstemperatur: 0 ℃ bis 40 ℃
Pour respecter les exigences en matière d'exposition aux radiofréquences, une distance de
séparation minimale de 20 cm doit être maintenue entre le corps de l'utilisateur et l'appareil,
y compris l'antenne. N'utilisez que l'antenne fournie ou une antenne approuvée. Cet appareil
est conforme aux exigences essentielles et aux autres dispositions pertinentes de la directive
2014/53/UE. Toutes les suites de tests radio essentiels ont été effectuées.
CE DOC
Par la présente, Woan Technology (Shenzhen) Co, Ltd déclare que le type d'équipement radio
(W3003100/W3001000) est conforme à la directive 2014/53/UE. Le texte intégral de la
déclaration de conformité UE est disponible à l'adresse internet suivante :
support.switch-bot.com.
Ce produit peut être utilisé dans les États membres de l'UE et au Royaume-Uni.
Fabricant : Woan Technology (Shenzhen) Co, Ltd.
Adresse : Appartement 1101, Centre Commercial de Qiancheng, No. 5 de la route de Haicheng,
Communauté de Mabu, Sub-district de Xixiang, District de Bao'an, Shenzhen, Guangdong,
République populaire de Chine, 518100
Représentant CE : XDH Tech
Adresse : 2 Rue Coysevox Bureau 3, Lyon, France
Fréquence de fonctionnement (Puissance maximale)
Wi-Fi : 2412 MHz à 2472 MHz (<20 dBm)
BLE : 2402 MHz à 2480 MHz (<10 dBm)
Température de fonctionnement : 0 à 40 ℃
Avertissement CE
Per rispettare i requisiti di esposizione alle radiofrequenze, è necessario mantenere una distanza
minima di 20 cm tra il corpo dell'utente e il dispositivo, compresa l'antenna. Utilizza esclusivamente
l'antenna in dotazione o un'antenna approvata. Questo dispositivo è conforme ai requisiti essenziali
e alle altre disposizioni pertinenti della direttiva 2014/53/UE. Sono state eseguite tutte le suite
di test radio essenziali.
DOC CE
Con la presente, Woan Technology (Shenzhen) Co., Ltd. dichiara che il tipo di apparecchiatura radio
(W3003100/W3001000) è conforme alla Direttiva 2014/53/UE. Il testo completo della dichiarazione
di conformità UE è disponibile al seguente indirizzo internet: support.switch-bot.com
Avvertenza di CE
Questo prodotto può essere utilizzato negli Stati membri dell'UE e nel Regno Unito.
Produttore: Woan Technology (Shenzhen) Co., Ltd.
Indirizzo: Room 1101, Qiancheng Commercial Center, No. 5 Haicheng Road, Mabu Community,
Xixiang Subdrict, Bao'an District, Shenzhen, Guangdong, P.R.China, 518100
Rappresentante CE: XDH Tech
Indirizzo: 2 Rue Coysevox Bureau 3, Lione, Francia
Frequenza di funzionamento (potenza massima)
Wi-Fi: da 2412 MHz a 2472 MHz (<20 dBm)
BLE: da 2402 MHz a 2480 MHz (<10 dBm)
Temperatura di funzionamento: da 0 a 40 ℃
Este producto puede ser utilizado en los estados miembros de la UE y el Reino Unido.
Fabricante: Woan Technology (Shenzhen) Co., Ltd.
Dirección: Sala 1101, Centro Comercial Qiancheng, No. 5 Haicheng Road, Comunidad Mabu,
Subdistrito Xixiang, Distrito Bao'an, Shenzhen, Guangdong, P.R.China, 518100
Representante CE: XDH Tech
Dirección: 2 Rue Coysevox Bureau 3, Lyon, Francia
Frecuencia de Operación (Potencia máxima)
Wi-Fi: 2412 MHz a 2472 MHz (<20 dBm)
BLE: 2402 MHz a 2480 MHz (<10 dBm)
Temperatura de operación: 0 a 40 ℃