
A B C D E F
1
1
2
3
4
5
6
7
8
9
10
11
12
13
2
3 4
5 6
7 8
9 10
11 12
13 14
15 16
17 18
19 20
21
22

en
7
Table of contents
1 Safety ............................................8
1.1 General information....................8
1.2 Intended use...............................8
1.3 Restriction on user group...........9
1.4 Safety instructions ......................9
2 Avoiding material damage.........12
3 Environmental protection and
saving energy.............................12
3.1 Disposing of packaging ...........12
4 Unpacking and checking ...........12
4.1 Unpacking the appliance
and parts ..................................12
4.2 Contents of package................12
4.3 Setting up appliance ................13
5 Familiarising yourself with
your appliance............................13
5.1 Appliance .................................13
5.2 Rotary switch............................13
5.3 Swivel arm ................................13
5.4 Drives .......................................14
5.5 Tools.........................................14
5.6 Parked position ........................14
6 Before using for the first time ...15
6.1 Preparing the appliance ...........15
7 Basic operation ..........................15
7.1 Cable length .............................15
7.2 Moving the swivel arm .............15
7.3 Inserting bowl ...........................15
7.4 Removing bowl.........................15
7.5 Inserting tools...........................15
7.6 Removing tools ........................16
7.7 Attaching bowl lid.....................16
7.8 Removing bowl lid....................16
7.9 Processing................................16
7.10 Drive cover .............................17
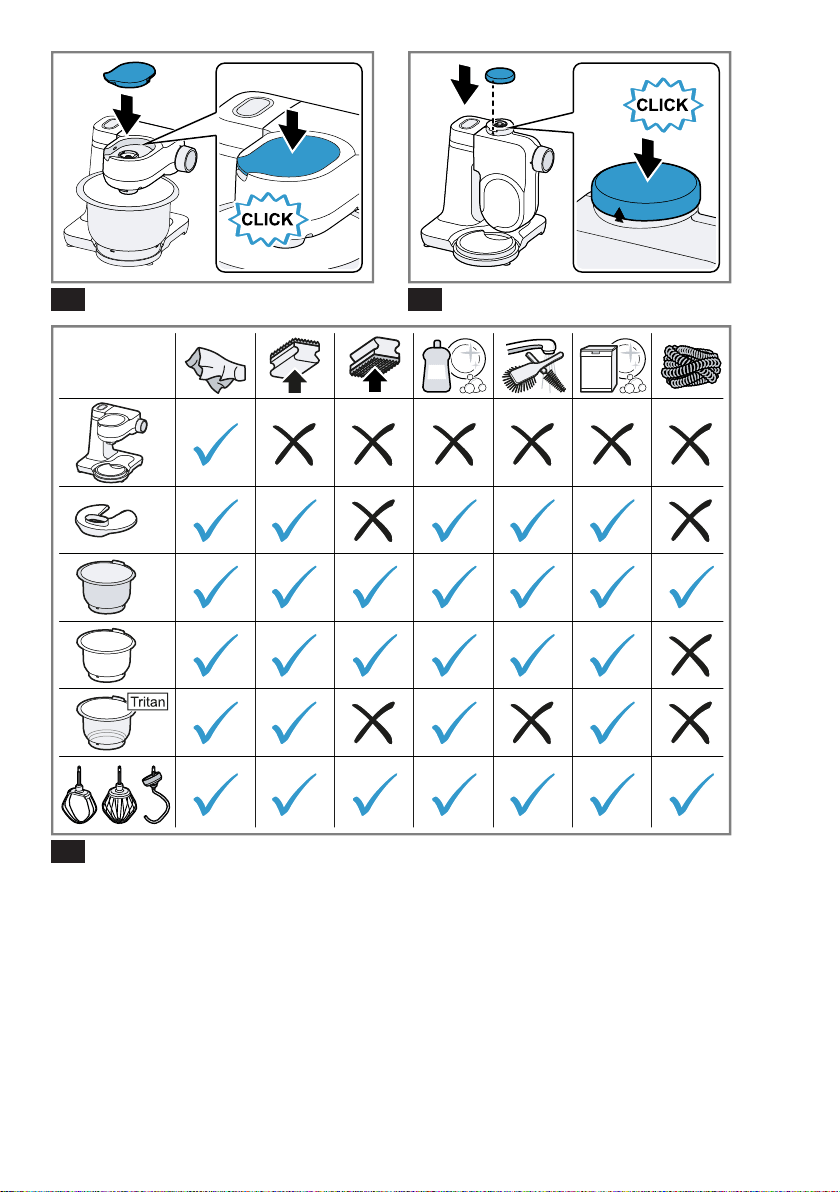
8 Cleaning and servicing ..............17
8.1 Cleaning products ....................17
8.2 Overview of cleaning................18
9 Special accessories ...................18
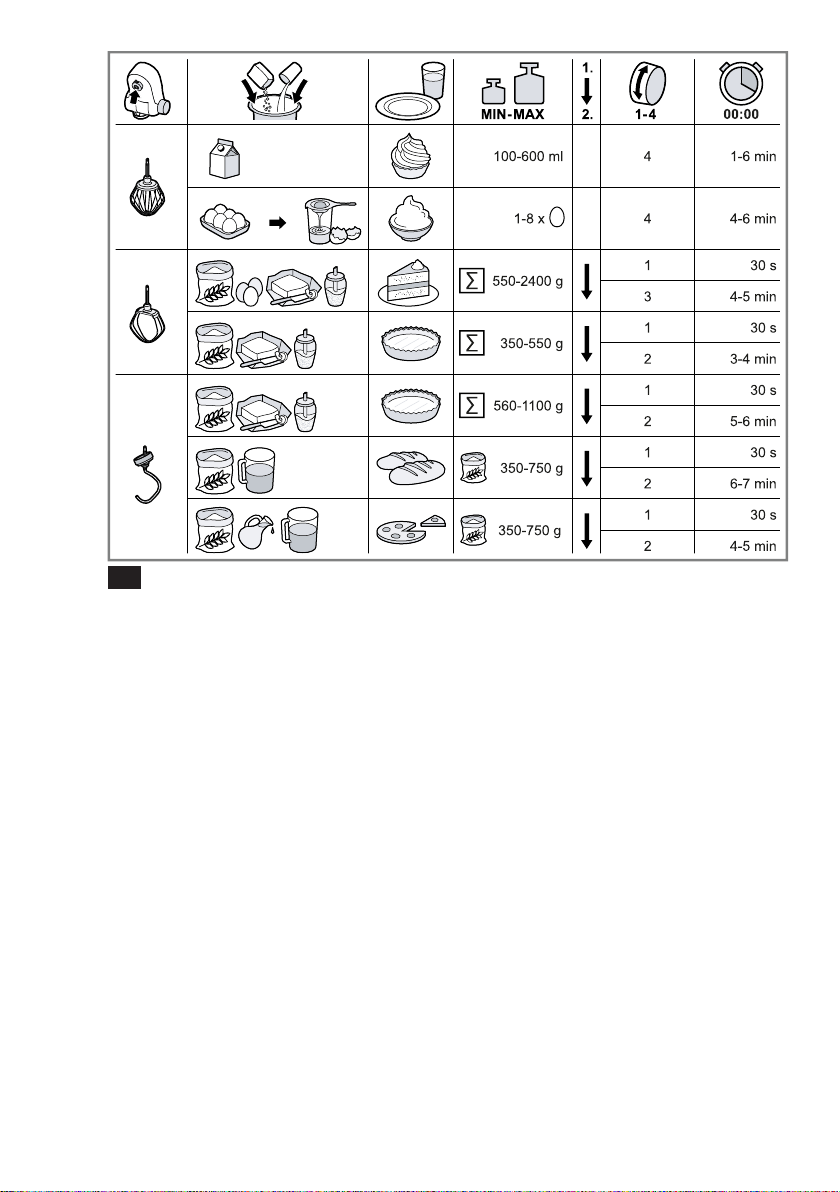
10 Application examples ..............18
10.1 Sample recipe ........................18
11 Troubleshooting.......................20
12 Disposal....................................21
12.1 Disposing of old appliance ....21
13 Customer Service.....................21
13.1 Product number (E-Nr.) and
production number (FD).........21
13.2 Warranty conditions................21

en Safety
8
1 Safety
Please read the safety information to ensure that you use the ap-
pliance safely.
1.1 General information
¡ Read this instruction manual carefully. Only this will ensure you
use the appliance safely and efficiently.
¡ Please note the additional instructions when using supplied or
optionally available accessories.
¡ Keep the instruction manual and the product information safe
for future reference or for the next owner.
¡ Check the appliance after unpacking it. Do not connect the ap-
pliance if it has been damaged in transit.
1.2 Intended use
Please read the information on intended use to ensure that you
use the appliance correctly and safely.
Only use this appliance:
¡ With genuine parts and accessories.
¡ For additional applications described in the instructions for ac-
cessories that are optional or come with the appliance.
¡ For mixing, kneading and beating food.
¡ Under supervision.
¡ In private households and in enclosed spaces in a domestic en-
vironment at room temperature.
¡ for normal processing quantities and for normal processing
times for domestic use.
¡ Up to an altitude of max. 2000m above sea level.
Disconnect the appliance from the power supply when:
¡ are not using the appliance.
¡ the appliance is unattended.
¡ assembling the appliance.
¡ taking the appliance apart.
¡ cleaning the appliance.

Safety en
9
¡ approaching rotating parts.
¡ Change tools.
¡ confronted with a fault.
1.3 Restriction on user group
Avoid risks to children and vulnerable persons.
This appliance can be used by persons with reduced physical,
sensory or mental capabilities or a lack of experience and/or
knowledge if they have been given supervision or instruction con-
cerning use of the appliance in a safe way and if they understand
the hazards involved.
Children must not play with the appliance.
Cleaning and user maintenance must not be performed by chil-
dren.
The appliance must not be used by children. Keep children away
from the appliance and power cable.
1.4 Safety instructions
Observe the safety instructions.
WARNING‒Risk of electric shock!
If the appliance or the power cord is damaged, this is dangerous.
▶
Never operate a damaged appliance.
▶
Never operate an appliance with a cracked or fractured surface.
▶
Never pull on the power cord to unplug the appliance. Always
unplug the appliance at the mains.
▶
If the appliance or the power cord is damaged, immediately un-
plug the power cord or switch off the fuse in the fuse box.
▶
Call Customer Service. →Page21
▶
Repairs to the appliance should only be carried out by trained
specialist staff.
Improper installation is dangerous.
▶
Connect and operate the appliance only in accordance with the
specifications on the rating plate.
Incorrect repairs are dangerous.
▶
Repairs to the appliance should only be carried out by trained
specialist staff.

en Safety
10
▶
Only use genuine spare parts when repairing the appliance.
▶
If the power cord of this appliance is damaged, it must be re-
placed by the manufacturer, the manufacturer's Customer Ser-
vice or a similarly qualified person in order to prevent any risk.
An ingress of moisture can cause an electric shock.
▶
Never immerse the appliance or the power cord in water or
clean in the dishwasher.
▶
Only use the appliance in enclosed spaces.
▶
Never expose the appliance to intense heat or humidity.
▶
Do not use steam- or high-pressure cleaners to clean the appli-
ance.
If the insulation of the power cord is damaged, this is dangerous.
▶
Never let the power cord come into contact with hot appliance
parts or heat sources.
▶
Never let the power cord come into contact with sharp points or
edges.
▶
Never kink, crush or modify the power cord.
WARNING‒Risk of fire!
Intense heat may cause the appliance and tools to catch fire.
▶
Never place the appliance on or near hot surfaces.
WARNING‒Risk of injury!
Rotating drives, tools or accessory parts may cause injury.
▶
Keep hands, hair, clothing and utensils away from rotating parts.
▶
Only attach and remove tools and accessories once the drive
has stopped and you have unplugged the appliance.
▶
Before changing tools or cleaning the appliance, switch off and
disconnect it from the mains.
▶
Only use the tools when the bowl is inserted, the lid is fitted and
the drive covers are in place.
▶
Switch on the appliance only if all preparations are complete
and the swivel arm is engaged in the position described.
▶
Never open the swivel arm during processing.
▶
Never leave the appliance switched on if the power supply is in-
terrupted. The appliance will automatically start up again follow-
ing the interruption in the power supply.

Safety en
11
Operating the appliance with damaged parts may result in injury.
▶
Parts which show cracks or other damage or do not fit correctly
must be replaced with genuine spare parts.
WARNING‒Risk of crushing!
Your hands and fingers could get caught.
▶
Do not reach into the bowl when lowering the swivel arm.
WARNING‒Risk of suffocation!
Children may put packaging material over their heads or wrap
themselves up in it and suffocate.
▶
Keep packaging material away from children.
▶
Do not let children play with packaging material.
Children may breathe in or swallow small parts, causing them to
suffocate.
▶
Keep small parts away from children.
▶
Do not let children play with small parts.
WARNING‒Risk of harm to health!
Soiling on surfaces may be harmful to health.
▶
Follow the cleaning instructions.
▶
Clean surfaces which come in contact with food before each
use.

en Avoiding material damage
12
Avoiding material damage
2 Avoiding material dam-
age
Avoiding material damage
ATTENTION!
Improper use may cause material
damage.
▶
Never use different drives at the
same time.
▶
Never operate the appliance
longer than necessary.
▶
Do not operate the appliance at
no-load.
▶
Never use genuine parts and ac-
cessories for other appliances.
▶
Observe the maximum processing
quantities.
▶
Do not use the bowl to store ob-
jects which do not belong to it.
During operation warm exhaust air
escapes from the vent grille at the
rear. If this is blocked, it may cause
the appliance to overheat.
▶
Set up the appliance at a sufficient
distance from walls, easily dam-
aged surfaces and other appli-
ances.
Environmental protection and saving energy
3 Environmental protec-
tion and saving energy
Environmental protection and saving energy
Help protect the environment by us-
ing your appliance in a way that con-
serves resources and by disposing of
reusable materials properly.
3.1 Disposing of packaging
The packaging materials are environ-
mentally compatible and can be re-
cycled.
▶
Sort the individual components by
type and dispose of them separ-
ately.
Information about current disposal
methods are available from your
specialist dealer or local authority.
Unpacking and checking
4 Unpacking and check-
ing
Unpacking and checking
Find out here what you need to note
when unpacking the appliance.
4.1 Unpacking the appliance
and parts
1. Take the appliance out of the
packaging.
2. Take all other parts and the ac-
companying documents out of the
packaging and place them to
hand.
3. Remove any packaging material.
4. Remove any stickers or film.
4.2 Contents of package
After unpacking all parts, check for
any damage in transit and complete-
ness of the delivery.
Note:The appliance comes with ad-
ditional accessories depending on its
features. See the instructions for the
accessories to discover the further
contents of the package.
→Fig.
1
A
Base unit with mixing bowl
B
Lid with integrated filling shaft
C
Stirrer
D
Whisk
E
Kneading hook
F
Accompanying documents
Familiarising yourself with your appliance en
13
4.3 Setting up appliance
WARNING
Risk of fire!
Intense heat may cause the appli-
ance and tools to catch fire.
▶
Never place the appliance on or
near hot surfaces.
ATTENTION!
During operation warm exhaust air
escapes from the vent grille at the
rear. If this is blocked, it may cause
the appliance to overheat.
▶
Set up the appliance at a sufficient
distance from walls, easily dam-
aged surfaces and other appli-
ances.
1. Place the appliance on a stable,
level, clean and flat work surface.
2. Pull the power cable out to the re-
quired length.
→"Cable length", Page15
Do not insert the mains plug.
Familiarising yourself with your appliance
5 Familiarising yourself
with your appliance
Familiarising yourself with your appliance
5.1 Appliance
You can find an overview of the parts
of your appliance here.
→Fig.
2
1
Mixing bowl
2
Lid with integrated filling shaft
3
Release button for swivel arm
4
Swivel arm
5
Rotary switch
6
Protective cover for drive 2
7
Drive 2
8
Protective cover for drive 3
9
Drive 3
10
Vent grille
11
Main drive
12
Cord store
13
Recess for bowl
5.2 Rotary switch
The rotary switch is used to start and
stop processing and select the
speed.
Symbol Function
Stop processing.
Process ingredients at low
speed.
Process ingredients at
maximum speed.
Move the drive to the
parked position.
5.3 Swivel arm
The swivel arm can be adjusted and
fixed in different positions.
If the release button is pressed, the
swivel arm can be moved to the re-
quired position.
→"Moving the swivel arm", Page15
Swivel arm positions
You can find an overview of the posi-
tions of the swivel arm here.
Posi-
tion
Use
Posi-
tion1
Swivel arm is closed.
¡ Process ingredients with
tools.
en Familiarising yourself with your appliance
14
Posi-
tion
Use
¡ Use accessory on drive
2, e.g. Continuous-feed
shredder
Posi-
tion2
Swivel arm is open.
¡ Insert or remove bowl.
¡ Insert or remove tool.
¡ Add the ingredients to
the bowl.
Posi-
tion3
¡ Use accessory on main
drive, e.g. Meat mincer.
¡ Use accessory on drive
3, e.g. Blender attach-
ment.
5.4 Drives
Your appliance is equipped with dif-
ferent drives, which are specially de-
signed for its tools and accessories.
Note:Drives 2 and 3 come with pro-
tective covers.
→"Drive cover", Page17
Overview of drives
You can find an overview of the
drives and their purposes here.
Drive Use
Drive1 For the tools.
Drive1 For accessories, e.g.
meat mincer
Drive2 For accessories, e.g.
¡ Continuous-feed
shredder
¡ Citrus press
Drive3 For accessories, e.g.
Blender attachment
Drive Use
5.5 Tools
You can find out everything you need
to know about the different tools
here.
Overview of tools
Use the appropriate tool depending
on use.
Tool Use
Kneading hook
¡ Knead dough, e.g. yeast
dough, bread dough,
pizza dough, pasta
dough, pastry dough.
¡ Fold ingredients into the
dough, e.g. seeds.
Stirrer
¡ Mix dough, e.g. cake
mixture, fruit flan.
¡ Fold ingredients into the
dough, e.g. raisins,
chocolate chips.
Whisk
¡ Beat whipped egg
whites and cream (at
least 30% fat).
¡ Mix light dough, e.g.
sponge mixture.
5.6 Parked position
Your appliance is equipped with a
manual parked position.
Note:The swivel arm will only open
or close with the inserted tool when
the drive is located in the correct
parked position.

Before using for the first time en
15
Moving the drive to the parked
position
Requirement:The rotary switch is
set to
.
▶
Set the rotary switch to
and hold.
a The drive slowly moves until the
correct parked position is reached.
Note:If the drive does not move, the
correct parked position has already
been reached.
Before using for the first time
6 Before using for the
first time
Before using for the first time
Prepare the appliance for use.
6.1 Preparing the appliance
1. Press the release button and raise
the swivel arm until it engages.
→"Moving the swivel arm",
Page15
2. Lift and remove the bowl.
→"Removing bowl", Page15
3. Clean all parts that come into con-
tact with food before using for the
first time.
→"Cleaning and servicing",
Page17
4. Put the cleaned and dried parts
out ready for use.
Basic operation
7 Basic operation
Basic operation
7.1 Cable length
Adjust the length of the power cable
to your needs.
Adjusting cable length via cable
storage compartment
1. Pull the power cable out to the re-
quired length.
2. To shorten the cable, push it into
the cable storage compartment.
7.2 Moving the swivel arm
1. Press the release button and raise
the swivel arm until it engages.
→Fig.
3
a The swivel arm is fixed in posi-
tion2.
2. Press the release button and move
the swivel arm down until it en-
gages in the vertical position.
→Fig.
4
a The swivel arm is fixed in posi-
tion3.
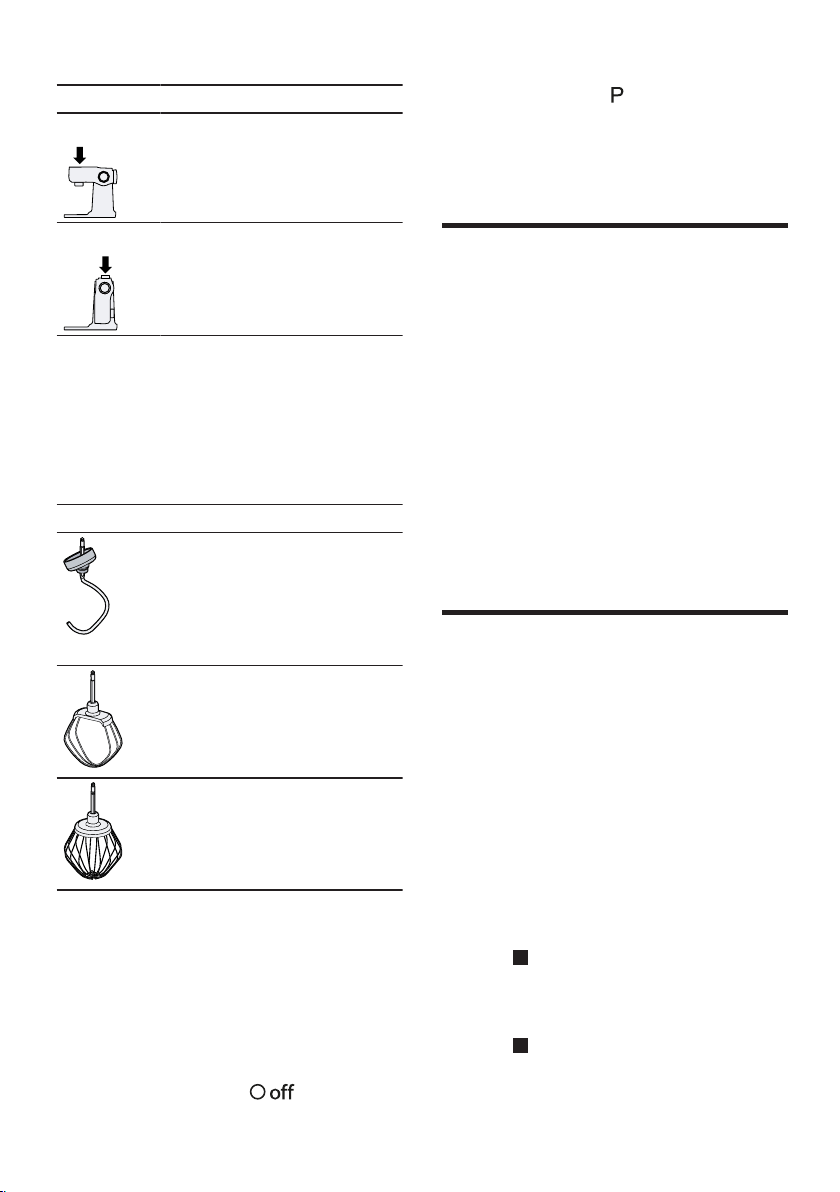
7.3 Inserting bowl
▶
Place the bowl in the base unit.
→Fig.
5
The bowl must be positioned
straight and firm on the base unit.
7.4 Removing bowl
▶
Lift and remove the bowl.
→Fig.
6
7.5 Inserting tools
Requirement:The drive is in the
parked position.
→"Moving the drive to the parked
position", Page15
1. Select the tool required.
→"Overview of tools", Page14
2. Press the tool into the main drive
until it engages.
→Fig.
7
en Basic operation
16
3. To insert the kneading hook:
‒ Insert the kneading hook with
the protective cap fitted in the
main drive.
‒ Turn the protective cap until the
kneading hook engages fully.
→Fig.
8
The protective cap must cover
the main drive completely.
7.6 Removing tools
▶
Pull the tool completely out of the
drive.
→Fig.
9
7.7 Attaching bowl lid
Requirements
¡ The required tool is used here.
¡ The bowl has been inserted.
¡ The swivel arm is closed.
1. Press the release button, raise the
swivel arm slightly and hold in
place.
→Fig.
10
2. Lift the lid slightly at the front, slide
fully onto the bowl and set down.
→Fig.
11
The filling shaft must face towards
the front.
3. Push the swivel arm down until it
engages.
→Fig.
12
7.8 Removing bowl lid
1. Press the release button, raise the
swivel arm slightly and hold in
place.
2. Lift the lid slightly at the front and
pull it out towards the front.
3. Push the swivel arm up until it en-
gages.
7.9 Processing
You can find out everything you need
to know about processing food here.
Recommended speeds
Observe the recommended speeds
for optimum results.
Setting Use
1-2 Stir in and mix ingredients.
1-2 Knead heavy dough, e.g.
yeast dough.
3-4 Beat and stir ingredients,
e.g. whipped cream.
Processing ingredients with tools
WARNING
Risk of injury!
Rotating drives, tools or accessory
parts may cause injury.
▶
Keep hands, hair, clothing and
utensils away from rotating parts.
▶
Only attach and remove tools and
accessories once the drive has
stopped and you have unplugged
the appliance.
▶
Before changing tools or cleaning
the appliance, switch off and dis-
connect it from the mains.
▶
Only use the tools when the bowl
is inserted, the lid is fitted and the
drive covers are in place.
▶
Switch on the appliance only if all
preparations are complete and the
swivel arm is engaged in the posi-
tion described.
▶
Never open the swivel arm during
processing.
▶
Never leave the appliance
switched on if the power supply is
interrupted. The appliance will
automatically start up again follow-
ing the interruption in the power
supply.
Cleaning and servicing en
17
Requirements
¡ The bowl has been inserted.
¡ The required tool is inserted.
1. Add the ingredients to the bowl.
2. Press the release button and push
the swivel arm down until it en-
gages.
3. Insert the mains plug.
4. Set the rotary switch to the re-
quired speed.
→Fig.
13
5. Process the ingredients until you
achieve the required result.
6. Set the rotary switch to
.
→Fig.
14
Wait until the appliance stops.
7. Set the rotary switch to
and hold.
→Fig.
15
a The drive slowly moves until the
correct parked position is reached.
8. Unplug the mains plug.
Tips
¡ You can change the speed at any
time during processing or interrupt
processing.
¡ Clean all parts immediately after
use so that residues do not dry on.
Adding more ingredients
1. To add ingredients during pro-
cessing, use the filling shaft in the
lid.
→Fig.
16
2. To add large quantities, set the
rotary switch to .
Wait until the appliance stops.
3. Set the rotary switch to and hold.
→Fig.
15
a The drive slowly moves until the
correct parked position is reached.
4. Remove the bowl lid.
→"Removing bowl lid", Page16
5. Add the ingredients to the bowl.
6. Attach the bowl lid.
→"Attaching bowl lid", Page16
7. Process the ingredients until you
achieve the required result.
7.10 Drive cover
Remove the protective cover to use
accessories on drive 2 or 3.
Removing drive cover
1. Lift the protective cover of drive 2
by the side lug and remove.
→Fig.
17
2. Pull up the protective cover for
drive3 and remove.
→Fig.
18
Fitting drive cover
1. Position the protective cover for
the drive2 and press in place
firmly.
→Fig.
19
2. Position the protective cover for
the drive3 and press in place
firmly.
→Fig.
20
Markings and must match
up.
Note:Always close unused drives
with the protective covers.
Cleaning and servicing
8 Cleaning and servicing
Cleaning and servicing
To keep your appliance working effi-
ciently for a long time, it is important
to clean and maintain it carefully.
8.1 Cleaning products
Find out here which cleaning
products are suitable for your appli-
ance.

en Special accessories
18
ATTENTION!
Using unsuitable cleaning agents or
incorrect cleaning may damage the
appliance.
▶
Do not use cleaning agents con-
taining alcohol or spirits.
▶
Do not use sharp, pointed or metal
objects.
▶
Do not use abrasive cloths or
cleaning agents.
▶
Only clean the transparent bowl
made of Tritan with a detergent
solution and a soft cloth or
sponge.
8.2 Overview of cleaning
You can find an overview of how to
best clean the appliance and the
other parts here.
→Fig.
21
Tip:When processing food such as
carrots, plastic parts may become
discoloured. Remove discolouration
with a soft cloth and a few drops of
cooking oil.
Special accessories
9 Special accessories
Special accessories
You can buy accessories from the
after-sales service, from specialist re-
tailers or online. Only use genuine
accessories as these have been spe-
cifically designed for your appliance.
Accessories vary from one appliance
to another. When purchasing ac-
cessories, always quote the exact
product number (E no.) of your appli-
ance. →Page21
You can find out which accessories
are available for your appliance in
our catalogue, in the online shop or
from our after-sales service.
www.bosch-home.com
Application examples
10 Application examples
Application examples
Observe the comments and figures
in the table.
→Fig.
22
Tip:You can find more application
examples and recipes for your home
appliance online. www.bosch-
home.com
Select your country site under the
menu item "Find your local website"
and search for your model using the
search field. It is best to enter the E-
Nr. (model type number) of your ap-
pliance. This can be found on the rat-
ing plate. After you have selected
your model from the results list, your
digital manual will be displayed under
"Manuals and Documents" together
with additional content.
10.1 Sample recipe
You can find a sample recipe that has been specially developed for your appli-
ance here.
Recipe Ingredients Processing
Heavy fruit cake ¡ 3eggs
¡ 135g sugar
¡ 135g margarine
¡ 255g flour
¡ 10g baking powder
¡ 150g currants
¡ Insert stirring whisk.
¡ Add all ingredients ex-
cept the dried fruit.
¡ Process for
30seconds at set-
ting1.

Application examples en
19
Recipe Ingredients Processing
¡ 150g mixed dried
fruit
Note:Process max. 2
times the quantity at the
same time.
¡ Then process for
3-5minutes at set-
ting3.
¡ Select setting1.
¡ Add the dried fruit
within the next
30-60seconds.
en Troubleshooting
20
Troubleshooting
11 Troubleshooting
Troubleshooting
You can rectify minor faults on your appliance yourself. Read the troubleshoot-
ing information before contacting after-sales service. This will avoid unneces-
sary costs.
WARNING
Risk of electric shock!
Incorrect repairs are dangerous.
▶
Repairs to the appliance should only be carried out by trained specialist
staff.
▶
Only use genuine spare parts when repairing the appliance.
▶
If the power cord of this appliance is damaged, it must be replaced by the
manufacturer, the manufacturer's Customer Service or a similarly qualified
person in order to prevent any risk.
Fault Cause and troubleshooting
The appliance is not
working.
The mains plug of the power cord is not plugged in.
▶
Connect the appliance to the power supply.
The circuit breaker is faulty.
▶
Check the circuit breaker in the fuse box.
There has been a power cut.
▶
Check whether the lighting in your kitchen or other
appliances are working.
The swivel arm cannot
be opened or closed
because the tool is
jammed in the bowl.
Drive is not in the parked position.
1. Set the rotary switch to .
2. When the swivel arm is open, remove the tool and
close the swivel arm.
3. Set the rotary switch to
and hold it in this position.
a The drive slowly moves until the correct parked po-
sition is reached.
Disposal en
21
Disposal
12 Disposal
Disposal
Find out here how to dispose of old
appliances correctly.
12.1 Disposing of old appli-
ance
Valuable raw materials can be re-
used by recycling.
1. Unplug the appliance from the
mains.
2. Cut through the power cord.
3. Dispose of the appliance in an en-
vironmentally friendly manner.
This appliance is la-
belled in accordance
with European Directive
2012/19/EU concerning
used electrical and elec-
tronic appliances (waste
electrical and electronic
equipment - WEEE).
The guideline determ-
ines the framework for
the return and recycling
of used appliances as
applicable throughout
the EU.
Customer Service
13 Customer Service
Customer Service
If you have any queries, are unable to
rectify faults on the appliance your-
self or if your appliance needs to be
repaired, contact Customer Service.
Function-relevant genuine spare parts
according to the corresponding Eco-
design Order can be obtained from
Customer Service for a period of at
least 7 years from the date on which
your appliance was placed on the
market within the European Eco-
nomic Area.
Note:Under the terms of the manu-
facturer's warranty the use of Cus-
tomer Service is free of charge.
Detailed information on the warranty
period and terms of warranty in your
country is available from our after-
sales service, your retailer or on our
website.
If you contact Customer Service, you
will require the product number (E-
Nr.) and the production number (FD)
of your appliance.
The contact details for Customer Ser-
vice can be found in the Customer
Service directory at the end of the
manual or on our website.
13.1 Product number (E-Nr.)
and production number
(FD)
You can find the product number (E-
Nr.) and the production number (FD)
on the appliance's rating plate.
Make a note of your appliance's de-
tails and the Customer Service tele-
phone number to find them again
quickly.
13.2 Warranty conditions
You can make warranty claims for
your appliance under the following
conditions.
The guarantee conditions for this ap-
pliance are as defined by our repres-
entative in the country in which it is
sold. Details regarding these condi-
tions can be obtained from the dealer
from whom the appliance was pur-
chased. The bill of sale or receipt
must be produced when making any
claim under the terms of this guaran-
tee.

ms
22
Kandungan
1 Keselamatan...............................23
1.1 Maklumat umum.......................23
1.2 Penggunaan mengikut
peraturan ..................................23
1.3 Pembatasan kumpulan
pengguna .................................24
1.4 Arahan keselamatan ................24
2 Elakkan kerosakan harta
benda ..........................................27
3 Perlindungan dan
pemeliharaan alam sekitar ........27
3.1 Lupuskan pembungkusan........27
4 Buka pembungkusan dan
periksa ........................................27
4.1 Buka pembungkusan peranti
dan komponen .........................27
4.2 Penghantaran ...........................27
4.3 Pasangkan peranti ...................28
5 Pengenalan.................................28
5.1 Peranti ......................................28
5.2 Suis putar .................................28
5.3 Pemutar lengan ........................28
5.4 Pemacu ....................................29
5.5 Alatan .......................................29
5.6 Kedudukan tempat letak ..........30
6 Sebelum penggunaan kali
pertama.......................................30
6.1 Sediakan peranti ......................30
7 Operasi asas...............................30
7.1 Panjang kabel...........................30
7.2 Gerak pemutar lengan .............30
7.3 Masukkan mangkuk .................31
7.4 Tanggalkan mangkuk...............31
7.5 Masukkan alat ..........................31
7.6 Keluarkan alat...........................31
7.7 Masukkan penutup mangkuk...31
7.8 Tanggalkan penutup
mangkuk...................................31
7.9 Pemprosesan ...........................31
7.10 Penutup pemacu ....................33
8 Pembersihan dan penjagaan.....33
8.1 Agen pembersih.......................33
8.2 Gambaran keseluruhan
pembersihan ............................33
9 Aksesori pilihan .........................34
10 Contoh penggunaan ................34
10.1 Contoh resipi ..........................34
11 Selesaikan gangguan ..............35
12 Pelupusan.................................36
12.1 Lupuskan peranti lama...........36
13 Khidmat pelanggan..................36
13.1 Nombor produk (No. E)
dan nombor pengeluaran
(FD) ........................................36
13.2 Syarat jaminan........................36

Keselamatan ms
23
1 Keselamatan
Sila perhatikan maklumat untuk keselamatan untuk memastikan
peranti digunakan secara selamat.
1.1 Maklumat umum
¡ Baca panduan ini dengan teliti. Hanya dengan itu anda boleh
menggunakan peranti ini dengan selamat dan cekap.
¡ Perhatikan panduan tambahan untuk penggunaan aksesori
yang dibekalkan atau aksesori pilihan.
¡ Simpan panduan dan juga maklumat produk untuk penggunaan
atau pengguna seterusnya.
¡ Periksa peranti selepas keluarkan daripada bungkusan. Jangan
sambung peranti jika terdapat kerosakan semasa
penghantaran.
1.2 Penggunaan mengikut peraturan
Untuk menggunakan peranti dengan selamat dan betul,
perhatikan panduan penggunaan mengikut peraturan.
Gunakan peranti hanya:
¡ dengan alat ganti dan aksesori tulen.
¡ untuk penggunaan tambahan seperti yang diterangkan dalam
panduan aksesori yang dibekalkan atau pilihan.
¡ untuk mengadun, menguli dan memukul makanan.
¡ di bawah pengawasan.
¡ dalam rumah persendirian dan dalam kawasan persekitaran
rumah yang tertutup dengan suhu bilik.
¡ untuk kuantiti dan masa pemprosesan di rumah yang biasa.
¡ sehingga ketinggian 2000m dari paras laut.
Nyahsambungkan peranti daripada bekalan elektrik, jika anda:
¡ tidak menggunakan peranti.
¡ tidak mengawasi peranti.
¡ memasang peranti.
¡ menyahpasang peranti.
¡ membersih peranti.

ms Keselamatan
24
¡ mendekati komponen yang berputar.
¡ menukar alat.
¡ menghadapi masalah.
1.3 Pembatasan kumpulan pengguna
Elakkan risiko terhadap kanak-kanak dan orang yang terancam.
Peranti ini boleh digunakan oleh orang yang mempunyai
kekurangan keupayaan fizikal, deria atau mental atau kurangnya
pengalaman dan/atau pengetahuan jika mereka telah diselia atau
dilatih mengikut keselamatan peranti ini dan memahami kesan
bahayanya.
Kanak-kanak tidak dibenarkan bermain dengan peranti ini.
Pembersihan dan penyelenggaraan pengguna tidak boleh
dilakukan oleh kanak-kanak.
Kanak-kanak tidak dibenarkan untuk menggunakan peranti ini.
Jauhkan kanak-kanak daripada peranti dan kabel penyambungan.
1.4 Arahan keselamatan
Perhatikan arahan keselamatan.
AMARAN‒Risiko kejutan elektrik!
Peranti atau kabel kuasa yang rosak boleh mendatangkan
bahaya.
▶
Jangan sesekali kendalikan peranti yang rosak.
▶
Jangan sesekali mengendalikan peranti dengan permukaan
yang retak atau pecah.
▶
Jangan sesekali menarik kabel kuasa untuk memisahkan
peranti dengan bekalan elektrik. Sentiasa tanggalkan palam
kabel kuasa.
▶
Tanggalkan palam kabel kuasa dengan segera atau matikan
fius di kotak fius jika peranti atau kabel kuasa rosak.
▶
Hubungi khidmat pelanggan. →Halaman36
▶
Hanya pengendali yang berkelayakan boleh melakukan
pembaikan pada peranti.
Pemasangan yang tidak mengikut peraturan adalah berbahaya.
▶
Sambungkan dan kendalikan peranti hanya mengikut spesifikasi
pada label.

Keselamatan ms
25
Pembaikan yang tidak betul adalah berbahaya.
▶
Hanya pengendali yang berkelayakan boleh melakukan
pembaikan pada peranti.
▶
Hanya alat ganti tulen dibenarkan untuk pembaikan peranti.
▶
Untuk mengelakkan kecederaan, kabel kuasa peranti rosak
mestilah digantikan oleh pengeluar atau khidmat pelanggannya
atau orang yang sama kelayakannya.
Kelembapan yang masuk boleh menyebabkan renjatan elektrik.
▶
Jangan sesekali mencelup peranti atau kabel kuasa ke dalam
air atau memasukkannya ke dalam mesin pencuci pinggan.
▶
Gunakan peranti hanya dalam ruang tertutup.
▶
Jangan sesekali dedahkan peranti pada panas dan
kelembapan melampau.
▶
Jangan gunakan pembersih wap atau pencuci bertekanan tinggi
untuk membersihkan peranti.
Penebat pada kabel kuasa yang rosak boleh mendatangkan
bahaya.
▶
Jangan sesekali dekatkan kabel kuasa dengan komponen
peranti yang panas atau dengan sumber panas.
▶
Jangan sesekali dekatkan kabel kuasa dengan bucu atau pada
sudut tajam.
▶
Jangan sesekali melipat, menekan atau mengubah kabel kuasa.
AMARAN‒Risiko kebakaran!
Panas yang melampau boleh membakar peranti dan alat.
▶
Jangan sesekali meletakkan peranti di atas atau berhampiran
permukaan yang panas.
AMARAN‒Risiko kecederaan!
Pemacu, alat atau bahagian aksesori yang berputar boleh
menyebabkan kecederaan.
▶
Jauhkan tangan, rambut, pakaian dan perkakas lain daripada
kompoenn yang berputar.
▶
Hanya pasang dan tanggalkan alat dan aksesori semasa
pemacu berhenti dan peranti tidak terpasang.
▶
Sebelum menukar atau membersihkan alat, matikan peranti dan
putuskan daripada bekalan kuasa.

ms Keselamatan
26
▶
Kendalikan alat hanya dengan mangkuk yang dimasukkan,
penutup yang dipasang dan penutup pelindung pemacu yang
dipasang.
▶
Hidupkan peranti hanya apabila semua persiapan selesai dan
lengan putar dikunci pada kedudukan yang dijelaskan.
▶
Jangan sesekali membuka lengan putar semasa proses.
▶
Jangan sesekali biarkan peranti dihidupkan semasa bekalan
kuasa terganggu. Peranti akan dimulakan semula secara
automatik setelah bekalan kuasa terganggu.
Kendalikan peranti dengan komponen yang rosak boleh
menyebabkan kecederaan.
▶
Komponen yang retak atau rosak atau tidak dipasang dengan
betul diganti dengan alat ganti yang tulen.
AMARAN‒Risiko penghancuran!
Tangan dan jari boleh terkepit.
▶
Semasa menurunkan lengan putar, jangan pegang di dalam
mangkuk.
AMARAN‒Risiko kelemasan!
Kanak-kanak boleh menarik bahan pembungkusan ke atas kepala
atau membungkus diri di dalamnya dan lemas.
▶
Jauhkan bahan pembungkusan daripada kanak-kanak.
▶
Jangan biarkan kanak-kanak bermain dengan bahan
pembungkusan.
Kanak-kanak boleh menghidu atau menelan komponen kecil dan
menyebabkan lemas.
▶
Jauhkan komponen kecil daripada kanak-kanak.
▶
Jangan biarkan kanak-kanak bermain dengan komponen kecil.
AMARAN‒Risiko bahaya kepada kesihatan!
Kotoran pada permukaan boleh membahayakan kesihatan.
▶
Patuhi arahan pembersihan.
▶
Bersihkan permukaan yang bersentuhan dengan makanan
sebelum setiap penggunaan.

Elakkan kerosakan harta benda ms
27
Elakkan kerosakan harta benda
2 Elakkan kerosakan
harta benda
Elakkan kerosakan harta benda
PERHATIAN!
Penggunaan yang tidak betul boleh
menyebabkan kerosakan harta
benda.
▶
Jangan sesekali menggunakan
pemacu yang berbeza pada masa
yang sama.
▶
Jangan sesekali mengendalikan
peranti lebih lama daripada yang
diperlukan.
▶
Jangan mengendalikan peranti
dalam keadaan tanpa beban.
▶
Jangan sekali-kali menggunakan
alat ganti dan aksesori tulen untuk
peranti lain.
▶
Perhatikan kuantiti pemprosesan
maksimum.
▶
Jangan simpan benda asing di
dalam mangkuk.
Semasa operasi, udara buangan
hangat keluar dari bahagian
belakang gril udara buangan. Udara
buangan yang tersekat boleh
menyebabkan peranti terlalu panas.
▶
Pasangkan peranti pada jarak
yang mencukupi dari dinding,
permukaan dan peranti sensitif.
Perlindungan dan pemeliharaan alam sekitar
3 Perlindungan dan
pemeliharaan alam
sekitar
Perlindungan dan pemeliharaan alam sekitar
Lindungi alam sekitar dengan
menggunakan peranti secara
berjimat dan lupuskan bahan-bahan
kitar semula dengan betul.
3.1 Lupuskan pembungkusan
Bahan pembungkusan adalah mesra
alam dan boleh digunakan semula.
▶
Lupuskan setiap komponen secara
berasingan mengikut
kepelbagaian.
Maklumat mengenai kaedah
pelupusan terkini boleh didapati
daripada pengedar anda dan juga
pentadbir perbandaran atau
bandar anda.
Buka pembungkusan dan periksa
4 Buka pembungkusan
dan periksa
Buka pembungkusan dan periksa
Anda ketahui di sini perkara yang
perlu diperhatikan semasa membuka
pembungkusan.
4.1 Buka pembungkusan
peranti dan komponen
1. Keluarkan peranti daripada
bungkusan.
2. Keluarkan semua komponen lain
dan dokumen yang disertakan dari
bungkusan dan sediakan.
3. Tanggalkan bahan pembungkusan
yang sedia ada.
4. Tanggalkan pelekat dan kerajang
yang sedia ada.
4.2 Penghantaran
Periksa kerosakan semasa
penghantaran pada semua
komponen dan kelengkapan
penghantaran selepas membuka
pembungkusan.
Nota:Bergantung pada peralatan,
peranti ini dibekalkan dengan
aksesori tambahan. Punggah skop
penghantaran tambahan bag
aksesori pilihan.
→Raj.
1
A
Peranti asas dengan
mangkuk adun
ms Pengenalan
28
B
Penutup dengan aci
pengisian bersepadu
C
Pengacau
D
Pemukul
E
Cangkuk penguli
F
Dokumen yang disertakan
4.3 Pasangkan peranti
AMARAN
Risiko kebakaran!
Panas yang melampau boleh
membakar peranti dan alat.
▶
Jangan sesekali meletakkan
peranti di atas atau berhampiran
permukaan yang panas.
PERHATIAN!
Semasa operasi, udara buangan
hangat keluar dari bahagian
belakang gril udara buangan. Udara
buangan yang tersekat boleh
menyebabkan peranti terlalu panas.
▶
Pasangkan peranti pada jarak
yang mencukupi dari dinding,
permukaan dan peranti sensitif.
1. Letakkan peranti di atas
permukaan kerja yang stabil, rata,
bersih dan licin.
2. Tarik keluar kabel kuasa mengikut
panjang yang diperlukan.
→"Panjang kabel", Halaman30
Jangan pasangkan palam kuasa.
Pengenalan
5 Pengenalan
Pengenalan
5.1 Peranti
Di sini, terdapat gambaran
keseluruhan komponen peranti anda.
→Raj.
2
1
Mangkuk adun
2
Penutup dengan aci
pengisian bersepadu
3
Butang pembuka kunci untuk
lengan berayun
4
Pemutar lengan
5
Suis putar
6
Penutup pelindung untuk
pemanduan 2
7
Pemacu 2
8
Penutup pelindung untuk
pemanduan 3
9
Pemacu 3
10
Gril ekzos
11
Pemacu utama
12
Penyimpanan kabel
13
Lekuk untuk mangkuk
5.2 Suis putar
Gunakan suis putar untuk
memulakan dan menghentikan
proses dan pilih kelajuan.
Simbol Fungsi
Hentikan proses.
Proses bahan pada
kelajuan rendah.
Proses bahan pada
kelajuan paling tinggi.
Gerakan pemacu pada
kedudukan tempat letak
5.3 Pemutar lengan
Pemutar lengan boleh disesuaikan
dan dipasang dalam pelbagai
kedudukan.
Pengenalan ms
29
Apabila butang pelepas ditekan,
pemutar lengan dapat ditukarkan ke
posisi yang diinginkan.
→"Gerak pemutar lengan",
Halaman30
Kedudukan pemutar lengan
Berikut adalah gambaran
keseluruhan pemutar lengan.
Kedudu
kan
Penggunaan
Kedudu
kan 1
Pemutar lengan telah
ditutup.
¡ Memproses bahan
dengan alat.
¡ Gunakan aksesori 2
pada pemacu, contoh.
Pecincang berterusan
Kedudu
kan 2
Pemutar lengan telah
dibuka.
¡ Letak atau tanggal
mangkuk.
¡ Masukkan atau
keluarkan alat.
¡ Tuangkan bahan ke
dalam mangkuk.
Kedudu
kan 3
¡ Gunakan aksesori pada
pemacu utama, contoh.
Pengisar.
¡ Gunakan aksesori 3
pada pemacu, contoh.
Lekapan pengadun
5.4 Pemacu
Peranti anda dilengkapi dengan
pemacu yang berbeza yang
disesuaikan dengan alat dan
aksesori.
Nota:Pemacu dan ditutup dengan
penutup pelindung 23
→"Penutup pemacu", Halaman33
Gambaran keseluruhan pemacu
Di sini anda akan mendapat
gambaran keseluruhan pemacu dan
tujuannya.
Pemacu Penggunaan
Pemacu
1
Untuk alat.
Pemacu
1
Untuk aksesori,
contohnya pengisar
daging
Pemacu
2
Untuk alat, contoh
¡ Pecincang berterusan
¡ Penekan sitrus
Pemacu
3
Untuk alat, contoh
Lekapan pengadun
5.5 Alatan
Di sini anda dapat mengetahui
perkara penting mengenai pelbagai
alat.
Gambaran alat
Gunakan alat yang sesuai
bergantung pada aplikasinya.
Perlata
n
Penggunaan
Cangkuk penguli
¡ Uli adunan, contohnya
adunan yis, adunan roti,
adunan piza, adunan
mi, adunan pastri.
¡ Gaul bahan dalam
adunan, contohnya biji-
bijian.
ms Sebelum penggunaan kali pertama
30
Perlata
n
Penggunaan
Pengacau
¡ Kacau adunan,
contohnya adunan kek,
kek buah.
¡ Gaul bahan dalam
adunan, contohnya
kismis, cip coklat.
Pemukul
¡ Pukul putih telur dan
krim (sekurang-
kurangnya 30%
kandungan lemak).
¡ Campurkan adunan
ringan, contohnya
adunan biskut.
5.6 Kedudukan tempat letak
Peranti anda dilengkapi dengan
kedudukan tempat letak.
Nota:Dengan alat yang disisipkan,
lengan putar hanya dapat dibuka
atau ditutup jika pemacu berada di
posisi parkir yang betul.
Gerakan pemacu pada kedudukan
tempat letak
Keperluan:Suis putar berdiri
.
▶
Setkan suis putar ke
dan
kekalkan.
a Pemacu bergerak perlahan
sehingga kedudukan tempat letak
kereta yang betul dicapai.
Nota:Sekiranya pemacu tidak
bergerak, kedudukan tempat letak
kereta yang betul sudah dapat
dicapai.
Sebelum penggunaan kali pertama
6 Sebelum penggunaan
kali pertama
Sebelum penggunaan kali pertama
Sediakan peranti untuk penggunaan.
6.1 Sediakan peranti
1. Tekan butang pelepas dan tekan
lengan pemutar hingga terkunci
pada tempatnya.
→"Gerak pemutar lengan",
Halaman30
2. Tekan dan punggah mangkuk.
→"Tanggalkan mangkuk.",
Halaman31
3. Bersihkan semua komponen yang
bersentuhan dengan makanan
sebelum penggunaan pertama.
→"Pembersihan dan penjagaan",
Halaman33
4. Sediakan komponen yang
dibersihkan dan dikeringkan untuk
digunakan.
Operasi asas
7 Operasi asas
Operasi asas
7.1 Panjang kabel
Tetapkan panjang kabel kuasa
mengikut keperluan anda.
Tetapkan panjang kabel dengan
ruang penyimpanan kabel
1. Tarik keluar kabel kuasa sehingga
panjang yang dikehendaki.
2. Untuk memendekkan panjang
kabel, tolak kabel ke dalam ruang
penyimpanan kabel.
7.2 Gerak pemutar lengan
1. Tekan butang pelepas dan tekan
lengan pemutar hingga terkunci
pada tempatnya.
→Raj.
3
a Lengan putar dipasang pada
kedudukannya 2.

Operasi asas ms
31
2. Tekan butang pelepas dan
gerakkan pemutar lengan ke
bawah sehingga terkunci pada
kedudukan menegak.
→Raj.
4
a Lengan putar dipasang pada
kedudukannya 3.
7.3 Masukkan mangkuk
▶
Letakkan mangkuk di peranti asas.
→Raj.
5
Mangkuk mesti berada dalam
keadaan tegak dan tetap pada unit
asas.
7.4 Tanggalkan mangkuk.
▶
Tekan dan punggah mangkuk.
→Raj.
6
7.5 Masukkan alat
Keperluan:Pemacu berada di
kedudukan taman.
→"Gerakan pemacu pada
kedudukan tempat letak",
Halaman30
1. Pilih alat yang anda perlukan.
→"Gambaran alat", Halaman29
2. Tolak alat ke pemacu utama
sehingga terpasang pada
tempatnya.
→Raj.
7
3. Untuk memasukkan cangkuk doh:
‒ Masukkan cangkuk doh dengan
penutup pelindung yang
terpasang ke pemacu utama.
‒ Putar penutup pelindung
sehingga cangkuk doh dapat
dilekatkan sepenuhnya.
→Raj.
8
Penutup pelindung mesti
menutupi pemacu utama
sepenuhnya.
7.6 Keluarkan alat.
▶
Tarik alat sepenuhnya keluar dari
pemacu.
→Raj.
9
7.7 Masukkan penutup
mangkuk
Keperluan
¡ Alat yang dikehendaki
dimasukkan.
¡ Mangkuk dibuka.
¡ Lengan putar telah ditutup.
1. Tekan butang pelepas, angkat
lengan putar sedikit dan tahan.
→Raj.
10
2. Angkat penutup dengan perlahan
di bahagian depan, luncurkan
sepenuhnya ke mangkuk dan
letakkan ke bawah.
→Raj.
11
Salur pengisian mesti menghala ke
depan.
3. Tekan pemutar lengan ke bawah
sehingga terkunci pada tempatnya.
→Raj.
12
7.8 Tanggalkan penutup
mangkuk
1. Tekan butang pelepas, angkat
lengan putar sedikit dan tahan.
2. Angkat penutup sedikit di
bahagian depan dan tarik ke arah
depan.
3. Tekan pemutar lengan ke atas
sehingga terkunci pada tempatnya.
7.9 Pemprosesan
Di sini anda dapat mengetahui
keperluan penting untuk memproses
makanan.
Cadangan kelajuan
Ikuti cadangan kelajuan untuk hasil
terbaik.
ms Operasi asas
32
Tetapa
n
Penggunaan
1-2 Kacau dan campurkan
bahan.
1-2 Uli doh berat, contohnya
adunan yis.
3-4 Pukul dan kacau bahan,
contohnya krim putar.
Memproses bahan dengan alat.
AMARAN
Risiko kecederaan!
Pemacu, alat atau bahagian aksesori
yang berputar boleh menyebabkan
kecederaan.
▶
Jauhkan tangan, rambut, pakaian
dan perkakas lain daripada
kompoenn yang berputar.
▶
Hanya pasang dan tanggalkan alat
dan aksesori semasa pemacu
berhenti dan peranti tidak
terpasang.
▶
Sebelum menukar atau
membersihkan alat, matikan
peranti dan putuskan daripada
bekalan kuasa.
▶
Kendalikan alat hanya dengan
mangkuk yang dimasukkan,
penutup yang dipasang dan
penutup pelindung pemacu yang
dipasang.
▶
Hidupkan peranti hanya apabila
semua persiapan selesai dan
lengan putar dikunci pada
kedudukan yang dijelaskan.
▶
Jangan sesekali membuka lengan
putar semasa proses.
▶
Jangan sesekali biarkan peranti
dihidupkan semasa bekalan kuasa
terganggu. Peranti akan dimulakan
semula secara automatik setelah
bekalan kuasa terganggu.
Keperluan
¡ Mangkuk dibuka.
¡ Alat yang diperlukan akan
dimasukkan.
1. Tuangkan bahan ke dalam
mangkuk.
2. Tekan butang pelepas dan tekan
lengan putar ke bawah hingga
terkunci pada tempatnya.
3. Pasangkan palam kuasa.
4. Tetapkan suis putar ke kelajuan
yang dikehendaki.
→Raj.
13
5. Proses bahan sehingga hasil yang
diinginkan tercapai.
6. Tetapkan suis putar ke
.
→Raj.
14
Tunggu perkakas berhenti.
7. Setkan suis putar ke
dan
kekalkan.
→Raj.
15
a Pemacu bergerak perlahan
sehingga kedudukan tempat letak
kereta yang betul dicapai.
8. Tanggalkan plag.
Petua
¡ Anda boleh mengubah kelajuan
atau menghentikan sementara
proses semasa memproses.
¡ Bersihkan semua bahagian sebaik
sahaja digunakan sehingga sisa
tidak kering.
Isi semula bahan
1. Semasa pemprosesan, isi bahan
melalui corong tiub pada penutup.
→Raj.
16
2. Untuk mengisi semula dengan
jumlah yang lebih besar, tetapkan
suis putar ke .
Tunggu perkakas berhenti.

Pembersihan dan penjagaan ms
33
3. Setkan suis putar ke dan
kekalkan.
→Raj.
15
a Pemacu bergerak perlahan
sehingga kedudukan tempat letak
kereta yang betul dicapai.
4. Tanggalkan penutup mangkuk.
→"Tanggalkan penutup mangkuk",
Halaman31
5. Tuangkan bahan ke dalam
mangkuk.
6. Masukkan penutup mangkuk.
→"Masukkan penutup mangkuk",
Halaman31
7. Proses bahan sehingga hasil yang
diinginkan tercapai.
7.10 Penutup pemacu
Tanggalkan penutup pelindung untuk
meletakkan aksesori pada pemacu2
atau 3 untuk gunaan.
Tanggalkan penutup pelindung
pemacu
1. Angkat dan lepaskan penutup
pelindung dari pemacu 2 atau dari
tab di sebelahnya.
→Raj.
17
2. Tarik penutup pelindung untuk
pemacu dan lepaskan.3
→Raj.
18
Pasang penutup pelindung
pemacu
1. Pasang penutup pelindung
pemacu atau dan tekan ke
tempatnya.2
→Raj.
19
2. Pasang penutup pelindung
pemacu atau dan tekan ke
tempatnya.3
→Raj.
20
Penandaan dan mesti
diselaraskan.
Nota:Sentiasa tutup pemacu yang
tidak digunakan dengan penutup
pelindung.
Pembersihan dan penjagaan
8 Pembersihan dan
penjagaan
Pembersihan dan penjagaan
Bersih dan jaga dengan teliti supaya
peranti anda kekal berfungsi untuk
jangka masa yang lama.
8.1 Agen pembersih
Ketahui agen pembersih yang sesuai
untuk peranti anda.
PERHATIAN!
Agen pembersih yang tidak sesuai
atau pembersihan yang tidak betul
boleh merosakkan peranti.
▶
Jangan gunakan agen pembersih
yang mengandungi alkohol.
▶
Jangan gunakan objek tajam,
berbucu atau logam.
▶
Jangan gunakan kain atau agen
pembersih yang melelas.
▶
Hanya bersihkan mangkuk Tritan
dengan air sabun dan kain lembut
atau span.
8.2 Gambaran keseluruhan
pembersihan
Di sini anda akan mendapat
gambaran keseluruhan cara terbaik
untuk membersihkan peranti dan
bahagian lain.
→Raj.
21
Petua:Perubahan warna boleh
berlaku pada bahagian plastik,
contoh semasa memproses lobak
merah. Keluarkan perubahan warna
dengan kain lembut dan beberapa
titisan minyak masak.

ms Aksesori pilihan
34
Aksesori pilihan
9 Aksesori pilihan
Aksesori pilihan
Aksesori pilihan boleh dibeli melalui
khidmat pelanggan, di kedai pakar
atau di laman web. Gunakan
aksesori tulen sahaja kerana
aksesori ini telah dipadankan dengan
peralatan anda sebetul-
betulnya.Verwenden Sie nur
Originalzubehör, da dieses genau auf
Ihr Gerät abgestimmt ist.
Aksesori adalah khusus mengikut
peralatan. Sentiasa nyatakan label
peralatan (E-Nr.) anda yang betul
semasa pembelian. →Halaman36
Aksesori manakah yang tersedia
untuk peralatan anda boleh didapati
dalam katalog kami, di kedai dalam
talian atau melalui khidmat
pelanggan.
www.bosch-home.com
Contoh penggunaan
10 Contoh penggunaan
Contoh penggunaan
Perhatikan maklumat dan nilai dalam
jadual.
→Raj.
22
Petua:Anda boleh mendapatkan
contoh penggunaan dan resipi yang
lain untuk peranti rumah anda.
www.bosch-home.com
Pilih "Find your local website" laman
negara anda di bawah item menu
dan cari model anda melalui medan
carian. Yang terbaik adalah dengan
memasukkan no. E (nombor jenis
model) peranti rumah anda. Nombor
ini terdapat pada label. Selepas anda
telah memilih model anda daripada
senarai hasil, arahan pengendalian
digital anda dengan kandungan
tambahan akan dipaparkan dalam
bahagian "Arahan pengendalian /
dokumen penting".
10.1 Contoh resipi
Di sini, anda akan menemui contoh resipi yang telah dicipta khas untuk peranti
anda.
Resipi Bahan Pemprosesan
Kek buah berat ¡ 3Telur
¡ 135g Gula
¡ 135g Marjerin
¡ 255g Tepung
¡ 10g Serbuk penaik
¡ 150g Kismis
¡ 150g campuran
buah-buahan kering
Nota:Proses 2-jumlah
lipatan maksimum pada
masa yang sama.
¡ Tetapkan pengacau.
¡ Masukkan semua
bahan kecuali buah-
buahan kering.
¡ 30Saat Memproses1
ke atas tahap.
¡ Kemudian 3-5Minit
memproses3 pada
tahap.
¡ Tetapkan 1 tahap.
¡ Tambahkan buah-
buahan kering
30-60Saat dalam.
Selesaikan gangguan ms
35
Selesaikan gangguan
11 Selesaikan gangguan
Selesaikan gangguan
Gangguan kecil pada peranti anda boleh diselesaikan oleh anda sendiri.
Gunakan maklumat untuk penyelesaian gangguan sebelum anda menghubungi
khidmat pelanggan. Dengan ini, anda dapat mengelakkan kos yang tidak perlu.
AMARAN
Risiko kejutan elektrik!
Pembaikan yang tidak betul adalah berbahaya.
▶
Hanya pengendali yang berkelayakan boleh melakukan pembaikan pada
peranti.
▶
Hanya alat ganti tulen dibenarkan untuk pembaikan peranti.
▶
Untuk mengelakkan kecederaan, kabel kuasa peranti rosak mestilah
digantikan oleh pengeluar atau khidmat pelanggannya atau orang yang
sama kelayakannya.
Kerosakan Sebab dan pencarisilapan
Peranti tidak
berfungsi.
Palam pada kabel kuasa tidak dipasang.
▶
Sambungkan peranti pada bekalan elektrik.
Fius rosak.
▶
Periksa fius di dalam kotak fius.
Bekalan elektrik terganggu.
▶
Periksa sama ada lampu bilik atau peranti lain di
dalam bilik berfungsi.
Lengan pemutar tidak
dapat dibuka atau
ditutup kerana alat itu
tersangkut di
mangkuk.
Penggerak tidak berada pada kedudukan tempat
letak.
1. Tetapkan suis putar ke .
2. Apabila lengan pemutar terbuka, lepaskan alat dan
tutup lengan putar.
3. Tetapkan suis putar ke
dan tahan suis putar pada
kedudukan ini.
a Pemacu bergerak perlahan sehingga kedudukan
tempat letak kereta yang betul dicapai.
ms Pelupusan
36
Pelupusan
12 Pelupusan
Pelupusan
Ketahui di sini cara anda melupuskan
peranti lama dengan betul.
12.1 Lupuskan peranti lama
Melalui pelupusan mesra alam,
bahan mentah yang bernilai boleh
digunakan semula.
1. Tanggalkan palam kabel kuasa.
2. Pisahkan kabel kuasa.
3. Lupuskan peranti secara mesra
alam.
Alat ini bersesuaian
dengan garis panduan
Eropa 2012/19/EU
tentang alat-alat tua
elektrik dan elektronik
(waste electrical and
electronic equipment -
WEEE).
Garis panduan tersebut
memberi rangka rujukan
yang berlaku di seluruh
Eropa untuk penerimaan
balik dan penggunaan
alat-alat tua.
Khidmat pelanggan
13 Khidmat pelanggan
Khidmat pelanggan
Hubungi khidmat pelanggan kami
jika anda mempunyai soalan,
gangguan pada peranti tidak boleh
diselesaikan sendiri atau hendak
membaiki peranti.
Alat ganti tulen sama fungsi mengikut
Peraturan Reka Bentuk Eko yang
berkaitan boleh didapati daripada
khidmat pelanggan kami untuk
tempoh sekurang-kurangnya 7 tahun
selepas peranti anda berada di
pasaran dalam kawasan ekonomi
Eropah.
Nota:Penggunaan khidmat
pelanggan adalah percuma mengikut
syarat jaminan pengilang.
Maklumat terperinci mengenai masa
jaminan dan syarat jaminan di negara
anda boleh didapati melalui khidmat
pelanggan kami, pengedar anda atau
di laman web kami.
Jika anda berhubung dengan
khidmat pelanggan, anda
memerlukan nombor produk (No. E)
dan nombor pengeluaran (FD)
peranti anda.
Maklumat hubungan khidmat
pelanggan boleh didapati dalam
mana-mana panduan khidmat
pelanggan pada hujung panduan
atau pada laman sesawang kami.
13.1 Nombor produk (No. E)
dan nombor
pengeluaran (FD)
Nombor produk (No. E) dan nombor
pengeluaran (FD) boleh didapati
pada label peranti.
Anda boleh mencatat maklumat
untuk mencari semula maklumat
peranti anda dan nombor telefon
khidmat pelanggan dengan cepat.
13.2 Syarat jaminan
Anda berhak mendapat jaminan
untuk peranti anda sesuai dengan
syarat berikut.
Syarat-syarat jaminan untuk perkakas
ini adalah seperti yang ditakrifkan
oleh wakil kami di negara tempat ia
dijual. Butir-butir tentang syarat-syarat
ini boleh didapati daripada wakil
penjual tempat perkakas dibeli. Bil
jualan atau resit mestilah ditunjukkan
apabila anda hendak membuat apa-
apa tuntutan di bawah terma-terma
jaminan ini.

zh-tw
37
目錄
1
安全性
..........................................38
1.1 一般提示說明 ............................38
1.2 使用須知 ...................................38
1.3 用戶限制 ...................................38
1.4 重要安全須知 ............................39
2
避免財物損失
...............................41
3
環境保護和節省能源
.....................41
3.1 廢棄包材處理 ............................41
4
拆封和檢查
...................................41
4.1 拆開裝置和部件.........................41
4.2 產品清單 ...................................41
4.3 安裝機器 ...................................41
5
深入瞭解
......................................42
5.1 機器 ..........................................42
5.2 旋轉開關 ...................................42
5.3 旋轉臂.......................................42
5.4 傳動器.......................................42
5.5 工具 ..........................................43
5.6 歸位功能 ...................................43
6
第一次
使用前
..............................43
6.1 準備機器 ...................................43
7
基本操作
......................................43
7.1 電線長度 ...................................43
7.2 移動旋轉臂................................43
7.3 插入攪拌碗................................44
7.4 取下攪拌碗................................44
7.5 插入工具 ...................................44
7.6 取下工具 ...................................44
7.7 蓋上攪拌碗蓋 ............................44
7.8 取下攪拌碗蓋 ............................44
7.9 處理方式 ...................................44
7.10 傳動器保護蓋 ..........................45
8
清潔和保養
...................................45
8.1 清潔劑.......................................45
8.2 清潔一覽 ...................................45
9
特殊配件
......................................46
10
應用實例
....................................46
10.1 範例食譜 .................................46
11
排除故障
....................................47
12
廢棄處理
....................................48
12.1 舊電器處理..............................48
13
客戶服務
....................................48
13.1 產品編號 (E-Nr.) 和生產編號
(FD) ........................................48
13.2 保固條件 .................................48

zh-tw 安全性
38
1
安全性
請注意有關安全的資訊,以確保設備的使用安全。
1.1
一般提示說明
¡ 請仔細閱讀本說明書。唯有如此才能安全有效率地使用本裝置。
¡ 使用隨附或選購的配件時,也請注意另附的說明書。
¡ 請妥善保管本說明書和產品資訊,以備日後查閱或提供給下一位使
用者。
¡ 拆開包裝後,請檢查本裝置。如本裝置於運送途中受損,切勿安
裝。
1.2
使用須知
為安全且正確使用本裝置,請注意使用須知中所提供的提示說明。
使用本機時應符合以下要件:
¡ 僅能搭配原廠零組件和配件使用。
¡ 用於隨附/選購配件之說明書中所述及的其他用途。
¡ 用於攪拌、揉捏、打發食材。
¡ 監督之下。
¡ 僅限私人家庭和室溫下的居家環境室內區域。
¡ 使用時間及食材處理量應符合一般家用需求。
¡ 最高可在海拔 2000公尺以下使用
以下情況時,請將裝置與電源斷開:
¡ 請勿使用本裝置。
¡ 不必在旁監看本裝置的運作。
¡ 組裝本裝置。
¡ 拆卸機器。
¡ 清潔裝置。
¡ 靠近旋轉中的零件。
¡ 更換工具。
¡ 處理故障。
1.3
用戶限制
避免孩童及容易發生危險情況的人士受到危害。

安全性 zh-tw
39
凡身體、感官或智力有缺陷之人士及缺乏相關經驗和╱或知識之人
士,應在負責安全使用電器的人員的監督或指導下,瞭解使用電器可
能帶來的危險後,方能使用本電器。
請勿讓孩童將本機當成玩具玩耍。
孩童不得進行清潔及保養的工作。
本電器不得由孩童進行操作。請確保孩童遠離本電器及電源線。
1.4
重要安全須知
請注意重要安全須知。
警告
‒
觸電風險
!
電器損壞或電源線損壞時可能發生危險。
▶
請勿操作受損的電器。
▶
切勿操作表面有裂缝或破損的電器。
▶
請勿拉扯電源線切斷電器電源。拔除電源線時,務必從插頭部位拉
起。
▶
若電器或電源線損壞,請立即拔除電源線插頭或關閉保險絲盒的保
險絲。
▶
請聯絡客戶服務。 →
頁次
48
▶
唯有合格的專業人員方可維修電器。
安裝不當可能導致危險。
▶
僅限按規格銘板所提供之資訊連接並運行本電器。
維修不當可能發生危險。
▶
唯有合格的專業人員方可維修電器。
▶
僅限使用原廠零件來維修電器。
▶
若本電器的電源線損壞,必須交由製造商或其客戶服務或具有類似
資格的專業人員進行更換,以避免發生危險。
濕氣滲入可能會導致觸電。
▶
切勿將本電器或電源線浸泡在水裡或放入洗碗機洗滌。
▶
本電器僅限於室內使用。
▶
切勿將本電器置於高溫或潮濕處。
▶
請勿使用蒸氣清潔機、高壓清潔機清潔本電器。
電源線絕緣層若損壞可能發生危險。
▶
請勿將電源線靠近發熱的電器零件或熱源。
▶
請勿將電源線靠近鋒利的尖銳處或邊緣。
▶
切勿彎折、擠壓或更改電源線。

zh-tw 安全性
40
警告
‒
火災風險
!
熾熱的高溫可能使本電器和工具燃燒。
▶
請勿將本電器置於高溫表面上或附近。
警告
‒
受傷風險
!
旋轉的驅動器、工具或配件可能造成人員受傷。
▶
雙手、頭髮、衣物及其他用品應保持遠離旋轉的部件。
▶
僅於驅動器完全靜止,且裝置的電源插頭拔掉時,才能安裝和取下
工具和配件。
▶
更換或清潔工具前,請關閉裝置,並拔掉電源。
▶
只有在攪拌盆已插入、蓋子已裝上及驅動器保護蓋已蓋上的情況
下,才能使用工具。
▶
完成所有準備作業,且旋轉臂已卡止在所述位置上時,才可啟動本
裝置。
▶
處理運行期間,不得打開旋轉臂。
▶
電源中斷時,請勿啟動本裝置。電源中斷恢復電力後,本裝置會自
動重新啟動。
本裝置若在部件受損的情況下運行,可能導致人員受傷。
▶
部件若有裂痕或其他損壞情形或未正確安裝,請用原廠備件更換。
警告
‒
壓傷風險
!
手部和手指可能會被夾住。
▶
放下旋轉臂時,請勿將手伸入盆中。
警告
‒
窒息風險
!
孩童有可能用包材將頭部套住或將自己纏住而造成窒息。
▶
請確保孩童遠離包材。
▶
請勿讓孩童玩耍包材。
孩童可能會吸入或吞食小型零件而造成窒息。
▶
請確保孩童遠離小型零件。
▶
切勿讓孩童玩小型零件。
警告
‒
危害健康的風險
!
表面上的髒污可能會危及健康。
▶
請遵守清潔提示說明。
▶
每次使用前,請務必清潔會接觸到食材的表面。
避免財物損失 zh-tw
41
避免財物損失
2
避免財物損失
避免財物損失
注意!
不當使用可能導致財物損失。
▶
切勿同時使用不同的驅動器。
▶
操作本裝置的時間視需求而定,切勿
超時運作。
▶
本裝置切勿空轉。
▶
請勿將原廠部件和原廠附件用於其他
裝置。
▶
請注意最大處理量。
▶
盆內請勿存放異物。
使用期間,後方的排氣網格會排出高溫
廢氣。廢氣若無法排出,可能導致裝置
過熱。
▶
本裝置架設處應與牆面、敏感表面以
及其他裝置保持足夠的距離。
環境保護和節省能源
3
環境保護和節省能源
環境保護和節省能源
以節省能源的方式使用設備,並妥善處
理可重複使用的材料來保護環境。
3.1
廢棄包材處理
包材符合環保要求且可回收。
▶
請分類處理各組件。
關於現行廢棄物處理的相關資訊,請
向經銷商及當地或市政管理單位查
詢。
拆封和檢查
4
拆封和檢查
拆封和檢查
請於此處了解拆封時的注意事項。
4.1
拆開裝置和部件
1. 將裝置從包裝箱取出。
2. 將所有其他部件和隨機文件從包裝箱
取出,並仔細檢查。
3. 去除包裝材料。
4. 拆除貼紙和封膜。
4.2
產品清單
拆開包裝後,請檢查所有零件是否於運
送途中受損以及交付的產品是否齊全。
注意事項:
其他的隨附配件將視您的型
號而定。有關額外的產品清單,請參閱
配件說明書。
→圖
1
A
主機(含攪拌碗)
B
蓋子(含整合式進料管)
C
攪拌槳
D
打蛋器
E
攪麵勾
F
隨機文件
4.3
安裝機器
警告
火災風險
!
熾熱的高溫可能使本電器和工具燃燒。
▶
請勿將本電器置於高溫表面上或附
近。
注意!
使用期間,後方的排氣網格會排出高溫
廢氣。廢氣若無法排出,可能導致裝置
過熱。
▶
本裝置架設處應與牆面、敏感表面以
及其他裝置保持足夠的距離。
1. 請將本裝置放置在穩固、平面、乾淨
且光滑的的工作平台上。
2. 將電線拉到需要的長度。
→
「電線長度」
,
頁次
43
請勿插入電源插頭。

zh-tw 深入瞭解
42
深入瞭解
5
深入瞭解
深入瞭解
5.1
機器
可在此查看電器相關組件一覽。
→圖
2
1
攪拌碗
2
蓋子(含整合式進料管)
3
旋轉臂釋放按鈕
4
旋轉臂
5
旋轉開關
6
傳動器 2 保護蓋
7
傳動器 2
8
傳動器 3 保護蓋
9
傳動器 3
10
排氣格柵
11
主傳動器
12
電線收納室
13
攪拌碗凹槽
5.2
旋轉開關
使用旋轉開關啟動和停止運行,請選擇
速度。
符號 功能
停止處理程序。
以低速處理配料。
以高速處理配料。
傳動器歸位。
5.3
旋轉臂
旋轉臂可以進行調節並固定在各個位置
上。
若按下釋放按鈕,旋轉臂可移動到所需
位置。
→
「移動旋轉臂」
,
頁次
43
旋轉臂位置
可在此查看旋轉臂位置一覽。
位置 用途
位置1 旋轉臂已關上。
¡ 用工具處理配料。
¡ 使用傳動器 2 上的配
件,如 多功能食物處理
器
位置2 旋轉臂已打開。
¡ 插入或取下攪拌碗。
¡ 插入或取下工具。
¡ 將配料添加至攪拌碗內。
位置3 ¡ 使用主傳動器上的配件,
如 絞肉器。
¡ 使用傳動器 3 上的配
件,如 攪拌機器皿。
5.4
傳動器
您的機器配備專門針對工具和配件量身
定制的各種傳動器。
注意事項:
用保護蓋蓋住傳動器 2 和
3。
→
「傳動器保護蓋」
,
頁次
45
傳動器一覽
可在此查看傳動器及其用途一覽。
傳動器 用途
傳動器1 提供工具使用。
傳動器1 提供配件使用,如絞肉器
第一次 使用前 zh-tw
43
傳動器 用途
傳動器2 提供配件使用,如
¡ 多功能食物處理器
¡ 柑橘水果榨汁器
傳動器3 提供配件使用,如 攪拌機
器皿
5.5
工具
在此處可以查看有關各種工具的基本說
明。
工具一覽
根據用途使用適當的工具。
工具 用途
攪麵勾
¡ 揉麵團,例如:發酵麵
團、麵包麵團、披薩皮、
麵條麵團、餅乾麵團。
¡ 將配料拌入麵團,例如:
各種種子。
攪拌槳
¡ 攪拌麵團,例如:蛋糕麵
團、水果蛋糕。
¡ 將配料拌入麵團,例如:
葡萄乾、巧克力碎片。
打蛋器
¡ 蛋白霜和鮮奶油(至少含
油脂 30%)。
¡ 攪拌鬆軟麵團,如海綿蛋
糕麵團。
5.6
歸位功能
您的機器配備手動歸位功能。
注意事項:
在插入工具的情況下,只有
在傳動器正確歸位時,才能打開或合上
旋轉臂。
傳動器歸位
要求:
旋轉開關位於 上。
▶
將旋轉開關調至
段固定不動。
a 傳動器會緩慢移動,直到正確歸位。
注意事項:
若傳動器未移動,則表示已
正確歸位。
第一次 使用前
6
第一次
使用前
第一次 使用前
準備使用本電器。
6.1
準備機器
1. 按下釋放按鈕,然後將旋轉臂提起,
直至其卡入到位。
→
「移動旋轉臂」
,
頁次
43
2. 抬起並取下攪拌碗。
→
「取下攪拌碗」
,
頁次
44
3. 第一次使用前,請先徹底清潔所有會
與食材接觸的部件。
→
「清潔和保養」
,
頁次
45
4. 準備好已清潔和乾燥的部件,以利於
使用。
基本操作
7
基本操作
基本操作
7.1
電線長度
根據需求調整電源電線的長度。
利用電線收納盒調整電線長度
1. 拉出所需長度的電源電線。
2. 若要縮短電線長度,將電線推入電線
收納盒內。
7.2
移動旋轉臂
1. 按下釋放按鈕,然後將旋轉臂提起,
直至其卡入到位。
→圖
3
a 旋轉臂已固定在位置2 上。
2. 按下釋放按鈕,然後向下移動旋轉
臂,直至其鎖定在垂直位置上。
→圖
4
a 旋轉臂已固定在位置3 上。
zh-tw 基本操作
44
7.3
插入攪拌碗
▶
將攪拌碗放在主機上。
→圖
5
攪拌碗必須平直固定在電器本體上。
7.4
取下攪拌碗
▶
抬起並取下攪拌碗。
→圖
6
7.5
插入工具
要求:
傳動器已歸位。
→
「傳動器歸位」
,
頁次
43
1. 選擇所需的工具。
→
「工具一覽」
,
頁次
43
2. 將工具壓入主傳動器內,直至其卡入
到位。
→圖
7
3. 麵團勾的插入方式:
‒ 將麵團勾連同保護蓋插入主傳動器
內。
‒ 轉動保護蓋,直至麵團勾完全卡入
到位。
→圖
8
保護罩 必須完全覆蓋主傳動器。
7.6
取下工具
▶
將工具從傳動器中整個拉出。
→圖
9
7.7
蓋上攪拌碗蓋
要求
¡ 所需的工具已插入。
¡ 攪拌碗已插入。
¡ 旋轉臂已關上。
1. 按下釋放按鈕,將旋轉臂稍微提起並
加以固定。
→圖
10
2. 稍微提起攪拌碗蓋前部,將其完全推
到攪拌碗上,然後蓋下。
→圖
11
進料管必須指向前方。
3. 將旋轉臂向下壓,直至其卡入到位。
→圖
12
7.8
取下攪拌碗蓋
1. 按下釋放按鈕,將旋轉臂稍微提起並
加以固定。
2. 稍微向上提起攪拌碗蓋,然後將其往
前拉出。
3. 向上推旋轉臂,直至其卡入到位。
7.9
處理方式
可在此查看處理方式的基本說明。
速度建議
請注意速度建議,以獲得最佳效果。
設定 用途
1-2 攪拌和混合配料。
1-2 揉捏大型麵團,例如:發酵
麵團。
3-4 打發和攪拌配料,例如:鮮
奶油。
用工具處理配料
警告
受傷風險
!
旋轉的驅動器、工具或配件可能造成人
員受傷。
▶
雙手、頭髮、衣物及其他用品應保持
遠離旋轉的部件。
▶
僅於驅動器完全靜止,且裝置的電源
插頭拔掉時,才能安裝和取下工具和
配件。
▶
更換或清潔工具前,請關閉裝置,並
拔掉電源。
▶
只有在攪拌盆已插入、蓋子已裝上及
驅動器保護蓋已蓋上的情況下,才能
使用工具。
▶
完成所有準備作業,且旋轉臂已卡止
在所述位置上時,才可啟動本裝置。
▶
處理運行期間,不得打開旋轉臂。
▶
電源中斷時,請勿啟動本裝置。電源
中斷恢復電力後,本裝置會自動重新
啟動。
清潔和保養 zh-tw
45
要求
¡ 攪拌碗已插入。
¡ 所需的工具已插入。
1. 將配料添加至攪拌碗內。
2. 按下釋放按鈕,然後將旋轉臂向下
壓,直至其卡入到位。
3. 插上電源插頭。
4. 將旋轉開關調至所需的速度。
→圖
13
5. 將配料處理至所需程度。
6. 將旋轉開關調至
。
→圖
14
等到本機完全停止運行。
7. 將旋轉開關調至
段固定不動。
→圖
15
a 傳動器會緩慢移動,直到正確歸位。
8. 拔除電源插頭。
建議
¡ 可在處理期間變更速度或中斷處理程
序。
¡ 使用後應立即清潔所有零件,以免殘
留物變乾。
續加配料
1. 處理期間將配料添加到蓋上的進料管
內。
→圖
16
2. 如需續加大量食材,請將旋轉開關調
至 。
等到本機完全停止運行。
3. 將旋轉開關調至 段固定不動。
→圖
15
a 傳動器會緩慢移動,直到正確歸位。
4. 將攪拌碗蓋取下。
→
「取下攪拌碗蓋」
,
頁次
44
5. 將配料添加至攪拌碗內。
6. 將攪拌碗蓋蓋上。
→
「蓋上攪拌碗蓋」
,
頁次
44
7. 將配料處理至所需程度。
7.10
傳動器保護蓋
如需使用傳動器 2 或 3 上的配件,應
取下保護蓋。
取下傳動器保護蓋
1. 將側面固定鎖上的傳動器 2 保護蓋
抬起並將其取下。
→圖
17
2. 將傳動器3 保護蓋向上拉並將其取
下。
→圖
18
安裝傳動器保護蓋
1. 蓋上並壓緊傳動器2 保護蓋。
→圖
19
2. 蓋上並壓緊傳動器3 保護蓋。
→圖
20
標記 和 必須彼此對齊。
注意事項:
務必用保護蓋蓋住未使用的
傳動器。
清潔和保養
8
清潔和保養
清潔和保養
為了讓電器長時間保持功能順暢,請仔
細進行清潔和保養。
8.1
清潔劑
可在此查看適用於清潔裝置的清潔劑。
注意!
使用不合適的清潔劑或不當清潔可能造
成裝置損壞。
▶
請勿使任何含酒精或苯的清潔劑。
▶
不能使用尖銳、鋒利或金屬物體。
▶
請勿使用摩擦型布或清潔劑。
▶
僅限使用洗滌液和軟布或海綿清潔透
明的 Tritan 耐熱攪拌盆。
8.2
清潔一覽
可在此查看本機及其他零件最佳清潔方
式一覽。
→圖
21
提示:
塑膠零件可能會變色,如處理胡
蘿蔔的情況下。用軟布和幾滴食用油即
可清除變色。

zh-tw 特殊配件
46
特殊配件
9
特殊配件
特殊配件
可向客戶服務、專業經銷商或線上購買
配件。請僅使用原廠配件,因其完全搭
配您的機器。
配件將視機器而定。購買時,請務必提
供機器確切的標記(E-Nr.)。 →
頁次
48
請在我們的型錄、線上商店或向客戶服
務查看適用於您機器的配件。
www.bosch-home.com
應用實例
10
應用實例
應用實例
請注意表格中的說明和數值。
→圖
22
提示:
線上可找到本家電的其他應用實
例和食譜。www.bosch-home.com
請在「Find your local website」功能
表選項下方選擇您的國家網頁,並透過
搜尋欄尋找您的機型。最好能輸入電器
的E編號(型號編號)。該編號可在規
格銘板上找到。從結果清單上選出機型
後,「使用說明書/重要文件」區域便
會為您顯示數位使用說明書和其他附加
內容。
10.1
範例食譜
此處可查看專為本電器開發的範例食譜。
食譜 配料 處理方式
磅蛋糕 ¡ 3個雞蛋
¡ 135g 糖
¡ 135g 人造奶油
¡ 255g 麵粉
¡ 10g 泡打粉
¡ 150g 醋栗
¡ 150g 綜合果乾
注意事項:
最多可一次處
理 2倍的量。
¡ 插入攪拌槳。
¡ 倒入所有配料(果乾除
外)。
¡ 選擇1 段處理 30秒。
¡ 然後選擇3 段處理
3-5分鐘。
¡ 調至1 段。
¡ 在 30-60秒 之內添加
果乾。
排除故障 zh-tw
47
排除故障
11
排除故障
排除故障
機器上發生的輕微故障,大多可以自行解決。聯絡客戶服務之前,請先利用故障排
除資訊嘗試自行解決問題。此舉可避免不必要的開銷。
警告
觸電風險
!
維修不當可能發生危險。
▶
唯有合格的專業人員方可維修電器。
▶
僅限使用原廠零件來維修電器。
▶
若本電器的電源線損壞,必須交由製造商或其客戶服務或具有類似資格的專業人
員進行更換,以避免發生危險。
故障 原因及疑難排解
電器故障。 電源線的插頭未插入。
▶
將電器連接電源。
保險絲損壞。
▶
檢查保險絲盒中的保險絲。
電源發生故障。
▶
檢查室內照明或其他室內電器是否正常運作。
由於工具卡在攪拌碗
上,因此無法打開或關
閉旋轉臂。
傳動器未位於停駐位置。
1. 將旋轉開關調至
。
2. 旋轉臂若已打開,請取出工具,並關上旋轉臂。
3. 將旋轉開關調至
,並將旋轉開關固定在此位置上。
a 傳動器會緩慢移動,直到正確歸位。

zh-tw 廢棄處理
48
廢棄處理
12
廢棄處理
廢棄處理
可在此了解如何妥善處理舊電器。
12.1
舊電器處理
舊電器在經由合乎環保的標準處理後,
可以回收有價值的原材料。
1. 拔除電源線插頭。
2. 剪斷電源線。
3. 請以環保的方式處理本機。
本機已根據歐盟法令
2012/19/EU 關於電氣和
電子設備之規定(報廢電
子電氣設備,WEEE)進
行了標記。
該法令是在全歐盟範圍內
有關廢棄設備回收處理和
再生利用的有效法律依
據。
客戶服務
13
客戶服務
客戶服務
若有任何疑問,無法自行排除電器故障
或需要維修服務,請聯絡本公司的客戶
服務。
按照相關的生態設計條例,在電器於歐
洲經濟區上市後,可向本公司的客戶服
務購買功能相關的原廠備件,銷售時間
至少將持續 7 年。
注意事項:
按原廠保固條款,客戶服務
為免費提供使用。
有關您所在國家╱地區的保固期和保固
條款的詳細資訊,請向本公司的客戶服
務、經銷商或本公司網站查詢。
聯絡客戶服務時,需要提供電器的產品
編號 (E-Nr.) 和生產編號 (FD) 。
請在本說明書的最後一頁或前往本公司
的網站查看客戶服務的聯絡資訊。
13.1
產品編號
(E-Nr.)
和生產編
號
(FD)
可在電器的規格銘板上查看產品編號
(E-Nr.) 和生產編號 (FD) 。
如需快速重複查看電器資料和客戶服務
電話號碼,可將資料加以記錄。
13.2
保固條件
您可根據以下條件主張裝置的保固權
益。
本電器的保修條款由銷售所在國家的代
表機構來制定。填寫並寄回隨電器附帶
的保卡紙本或至下方官網登錄註冊商
品,即可享有2年保固,保固條件請參
照本公司公開資訊。
www.bosch-home.com.tw/mybosch


¡
¡
¡
¡
¡
¡
¡
¡
¡
¡
¡
¡
¡
¡
¡
¡
¡
¡
¡

▶
▶
▶
▶
▶
→
▶
▶
▶
▶
▶
▶
▶
▶
▶
▶
▶
▶
▶
▶
▶
▶
▶
▶
▶
▶
▶
▶
▶
▶
▶
▶
▶
▶

▶
▶
▶
▶
▶
▶
▶
▶
1.
2.
3.
4.
→
1
A
B
C
D
E
F
▶
▶
1.
2.
→
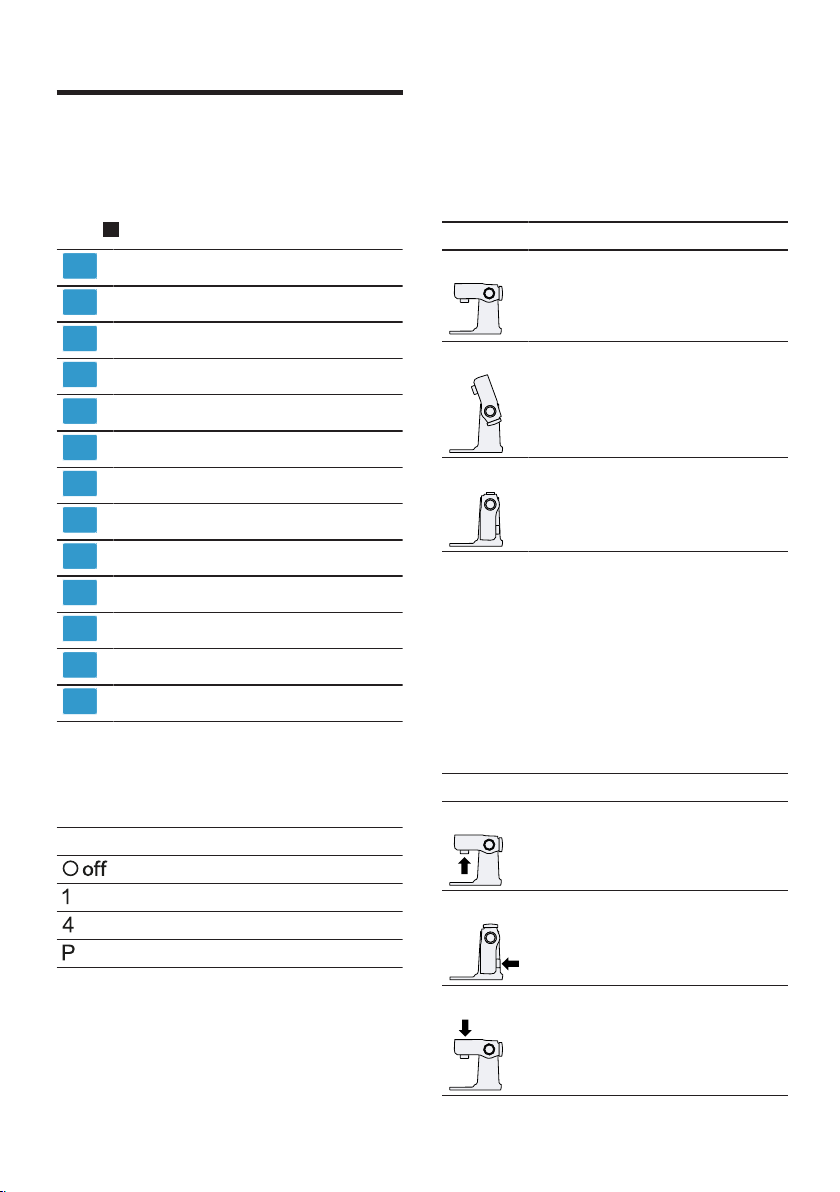
→
2
1
2
3
4
5
6
7
8
9
10
11
12
13
→
¡
¡
¡
¡
¡
¡
¡
→
¡
¡

¡
¡
¡
¡
¡
¡
▶
a
1.
→
2.
→
3.
→
4.
1.
2.
1.
→
3
a
2.
→
4
a
▶
→
5
▶
→
6
→
1.
→
2.
→
7
3.
‒
‒
→
8
▶
→
9
¡
¡
¡
1.
→
10
2.
→
11
3.
→
12
1.
2.
3.
▶
▶
▶
▶
▶
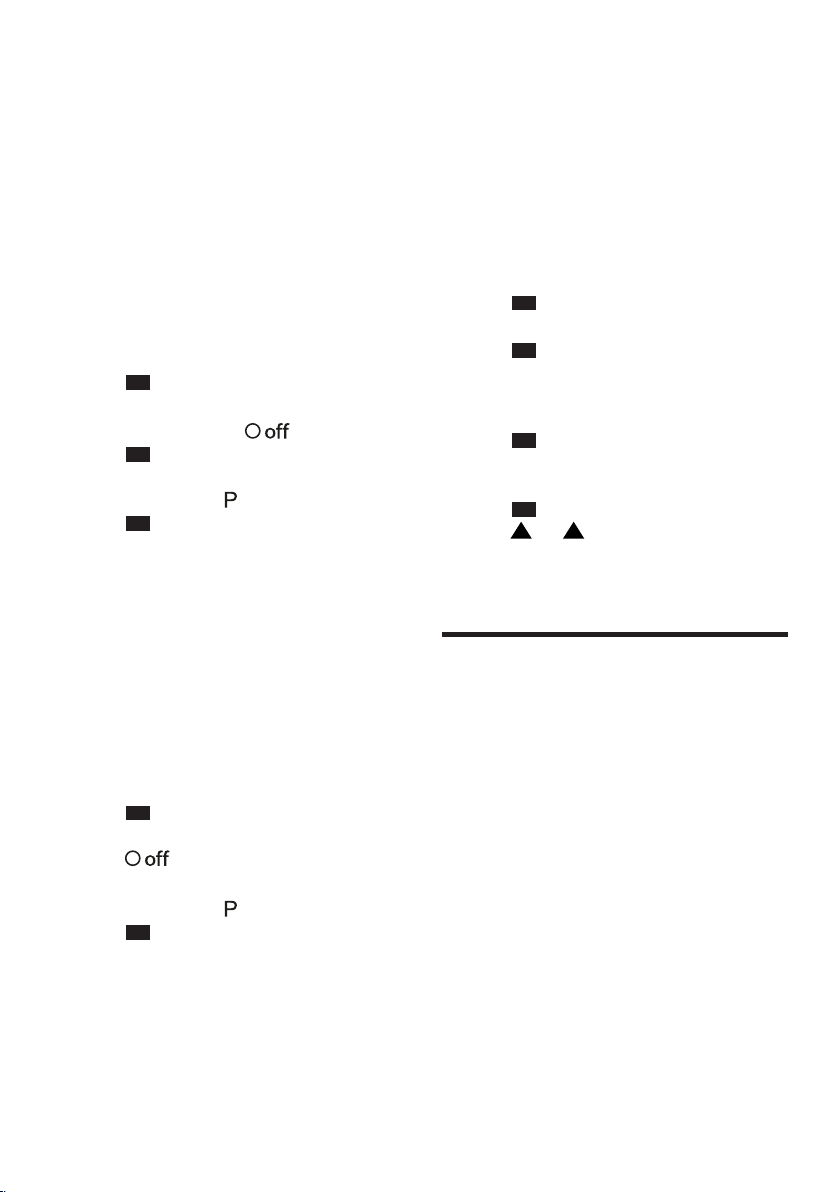
▶
▶
¡
¡
1.
2.
3.
4.
→
13
5.
6.
→
14
7.
→
15
a
8.
¡
¡
1.
→
16
2.
3.
→
15
a
4.
→
5.
6.
→
7.
1.
→
17
2.
→
18
1.
→
19
2.
→
20
▶
▶
▶
▶

→
21
→
→
22
¡
¡
¡
¡
¡
¡
¡
¡
¡
¡
¡
¡
¡
▶
▶
▶
▶
▶
▶
1.
2.
3.
a
1.
2.
3.


¡
¡
¡
¡
¡
¡
¡
¡
¡
¡
¡
¡
¡
¡
¡
¡
¡

¡
¡
◀
◀
◀
◀
◀
←
◀
◀
◀
◀

◀
◀
◀
◀
◀
◀
◀
◀
◀
◀
◀
◀
◀
◀
◀
◀

◀
◀
◀
◀
◀
◀
◀
◀
◀
◀
◀
◀
◀
◀
◀
◀
1.
2.
3.
4.
←
1
A
B
C
D
E
F
◀
◀
1.
2.
←
←
2
1
2
3
4
5
6
7
8
9
10
11
12
13
←
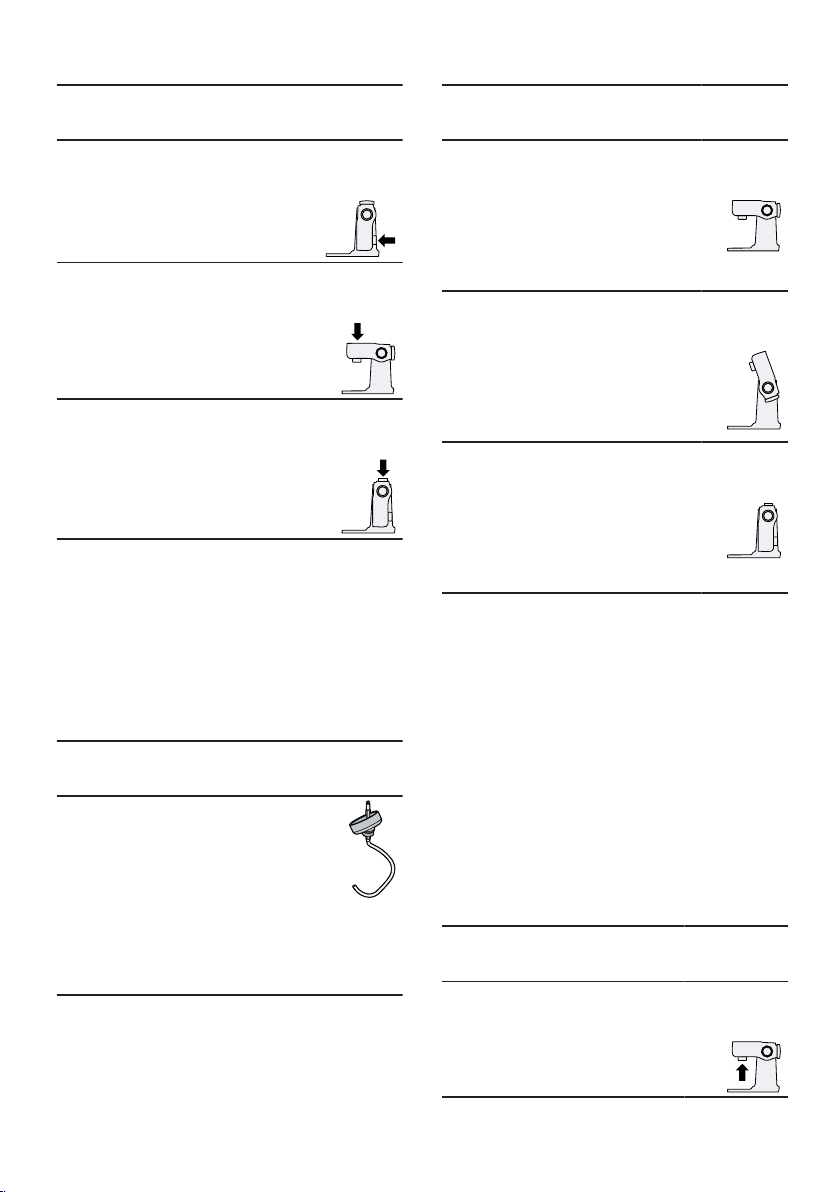
¡
¡
¡
¡
¡
¡
¡
←
¡
¡
¡
¡

¡
¡
¡
¡
◀
a
1.
←
2.
←
3.
←
4.
1.
2.
1.
←
3
a
2.
←
4
a

◀
←
5
◀
←
6
←
1.
←
2.
←
7
3.
‒
‒
←
8
◀
←
9
¡
¡
¡
1.
←
10
2.
←
11
3.
←
12
1.
2.
3.
◀
◀
◀
◀
◀
◀
◀
¡
¡
1.
2.
3.
4.
←
13
5.
6.
←
14
7.
←
15
a
8.
¡
¡
1.
←
16
2.
3.
←
15
a
4.
←
5.

6.
←
7.
1.
←
17
2.
←
18
1.
←
19
2.
←
20
◀
◀
◀
◀
←
21
←

←
22
¡
¡
¡
¡
¡
¡
¡
¡
¡
¡
¡
¡
¡
◀
◀
◀
◀
◀
◀
1.
2.
3.
a
1.
2.
3.


Service world-wide
77
Service world-wide
Service world-
wide
Service world-wide
Central Service Contacts
AE
United Arab Emirates,
BSH Home Appliances FZE
Round About 13, Plot Nr MO-0532A
Jebel Ali Free Zone - Dubai
Tel.: 04 881 4401*
mailto:[email protected]
www.bosch-home.com/ae
*Sun-Thu 8am to 5pm (exclude public
holidays)
AU
Australia
BSH Home Appliances Pty. Ltd.
Gate 1, 1555 Centre Road
Clayton, Victoria 3168
Tel.: 1300 369 744*
mailto:[email protected]
www.bosch-home.com.au
*Mon-Fri 24 hours
BH
Bahrain,
Khalaifat Est.
BLD 898, R 533, TASHAN 405
Manama
Tel.: 01 740 05 53*
mailto:[email protected]
*Sat-Thu 7am to 5pm (exclude public
holidays)
CN
China, 中国
BSH Home Appliances Service Jiangsu
Co. Ltd.
19F, Jinling Asia Pacific Tower, No.2
Hanzhong Road, Gulou District
210005 Nanjing, Jiangsu Province
Service Tel.: 400 8855 888*
mailto:[email protected]
www.bosch-home.cn
*phone rate depends on the network
used
GB
Great Britain
BSH Home Appliances Ltd.
Grand Union House, Old Wolverton
Road, Wolverton
Milton Keynes MK12 5PT
To arrange an engineer visit, to order
spare parts and accessories or for
product advice please visit www.bosch-
home.co.uk Or call Tel.: 0344 892
8979*
*Calls are charged at the basic rate,
please check with your telephone ser-
vice provider for exact charges.
HK
Hong Kong, 香港
BSH Home Appliances Limited
香港新界荃灣青山公路388號中染
大廈23樓07室 Unit 07, 23/F, CDW
Building, 388 Castle Peak Road
Tsuen Wan, New Territories, Hong Kong
Tel.: 2626 9655 (HK)
Toll free 0800 863 (Macao)
mailto:[email protected]
www.bosch-home.com.hk
IE
Republic of Ireland
BSH Home Appliances Ltd.
M50 Business Park, Ballymount Road
Upper, Walkinstown
Dublin 12
To arrange an engineer visit, to order
spare parts and accessories or for
product advice please call Tel.: 01450
2655*
www.bosch-home.ie
*Calls are charged at the basic rate,
please check with your telephone ser-
vice provider for exact charges
JO
Jordan,
Diab Qawasmi & Sons Co.
Khaled Ben Al-Waleed Street, Jabal Al
Hussein (11121)
P.O. Box 212292, Amman
Tel.: 06 465 8505, -2650
Tel.: 79 110 3430
mailto:[email protected]
LB
Lebanon,
Teheni, Hana & Co.
Boulevard Dora 4043 Beyrouth, P.O. Box
90449
Jdeideh 1202 2040
Tel.: 01 255 211
mailto:[email protected]
MT
Malta
Oxford House Ltd.
Notabile Road
Mriehel BKR 14
Tel.: 021 442 334
www.oxfordhouse.com.mt
NZ
New Zealand
BSH Home Appliances Ltd.
Level 3, Air NZ Building, Smales Farm
Business Park, 74 Taharoto Road, Taka-
puna
Auckland 0622
Tel.: 0800 245 700*
mailto:[email protected]
www.bosch-home.co.nz
*Mon-Fri 8.30am to 5pm (exclude public
holidays)
SA
Kingdom Saudi Arabia,
Abdul Latif Jameel Electronics and Air-
conditioning Co. Ltd.
BOSCH Service centre, Kilo 5 Old
Makkah Road (Next to Toyota), Jamiah
Dist., P.O. Box 7997
Jeddah 21472
Tel.: 800 127 9999
mailto:[email protected]
www.aljelectronics.com.sa
*Sat-Thu 8am to 11pm (exclude public
holidays)
SG
Singapore, 新加坡
BSH Home Appliances Pte. Ltd.
38C Jalan Pemimpin, #01-01
Singapore 577180
Tel.: 6751 5000*
mailto:[email protected]
www.bosch-home.com.sg
*Mon-Fri 9am to 6pm, Sat: 9am to 1pm
(exclude public holidays)
TW
Taiwan, 台灣
我們期盼您不斷的鼓勵與指導,
任何咨詢或服務需求, 歡迎洽詢
客服專線
BSH Home Appliances Private Limited
台北市內湖區洲子街80號11樓
11F., No.80, Zhouzi St., Neihu Dist.
Taipei City 11493
Tel.: 0800 368 888
mailto:[email protected]
www.bosch-home.com.tw
ZA
South Africa
BSH Home Appliances (Pty) Ltd.
96 Fifteenth Road, Randjespark
1685 Midrand - Johannesburg
Tel.: 086 002 6724
mailto:[email protected]
mailto:[email protected]
www.bosch-home.com/za


Thank you for buying a
Bosch Home Appliance!
Register your new device on MyBosch now and profit directly from:
•Expert tips & tricks for your appliance
•Warranty extension options
•Discounts for accessories & spare-parts
•Digital manual and all appliance data at hand
•Easy access to Bosch Home Appliances Service
Free and easy registration – also on mobile phones:
www.bosch-home.com/welcome
Looking for help?
You'll find it here.
Expert advice for your Bosch home appliances, help with problems
or a repair from Bosch experts.
Find out everything about the many ways Bosch can support you:
www.bosch-home.com/service
Contact data of all countries are listed in the attached service direct-
ory.
*8001214130*
8001214130 (010212)
en, ms, zh-tw, zh, ar
Robert Bosch Hausgeräte GmbH
Carl-Wery-Straße 34
81739 München
GERMANY
www.bosch-home.com
Valid within Great Britain:
Imported to Great Britain by
BSH Home Appliances Ltd.
Grand Union House
Old Wolverton Road
Wolverton, Milton Keynes
MK12 5PT
United Kingdom


