Loading ...
Loading ...
Loading ...
ENGLISH
8
COMPONENTS FIG. A
Intended Use
This circular saw is design for do-it-yourself, wood-
cuttingapplications.
WARNING: Do not cut any metals, masonry, glass,
tile or plastic with this saw. A dull blade will cause
slow, inefficient cutting overload on the saw motor,
excessive splintering, and could increase the possibility
ofkickback.
Wall Mounting
Some CRAFTSMAN chargers are designed to be wall
mountable or to sit upright on a table or work surface.
If wall mounting, locate the charger within reach of
an electrical outlet, and away from a corner or other
obstructions which may impede air flow. Use the back
of the charger as a template for the location of the
mounting screws on the wall. Mount the charger securely
using drywall screws (purchased separately) at least 1”
(25.4mm) long, with a screw head diameter of 0.28–0.35”
(7–9mm), screwed into wood to an optimal depth leaving
approximately 7/32” (5.5 mm) of the screw exposed. Align
the slots on the back of the charger with the exposed
screws and fully engage them in theslots.
NOTE: Do not attempt to mount CMCB101 charger under a
bench ortable.
NOTE: Only mount CMCB101 charger with the charging
lights pointed upward toward theceiling.
VersaTrack™
WARNING: Do not charge batteries while charger is
hung onTrackwall.
CRAFTSMAN chargers, except the CMCB101, can
be stored on CRAFTSMAN VersaTrack™ Trackwall.
Hooks and accessories are sold separately. Please
refer to the VersaTrack™ Trackwall accessory sheet for
furtherinformation.
NOTE: The CMCB101 charger is not CRAFTSMAN
VersaTrack™ Trackwallcompatible.
SAVE THESE INSTRUCTIONS FOR
FUTURE USE
ASSEMBLY AND ADJUSTMENTS
WARNING: To reduce the risk of serious personal
injury, turn unit off and remove the battery pack
before making any adjustments or removing/
installing attachments or accessories. An
accidental start-up can causeinjury.
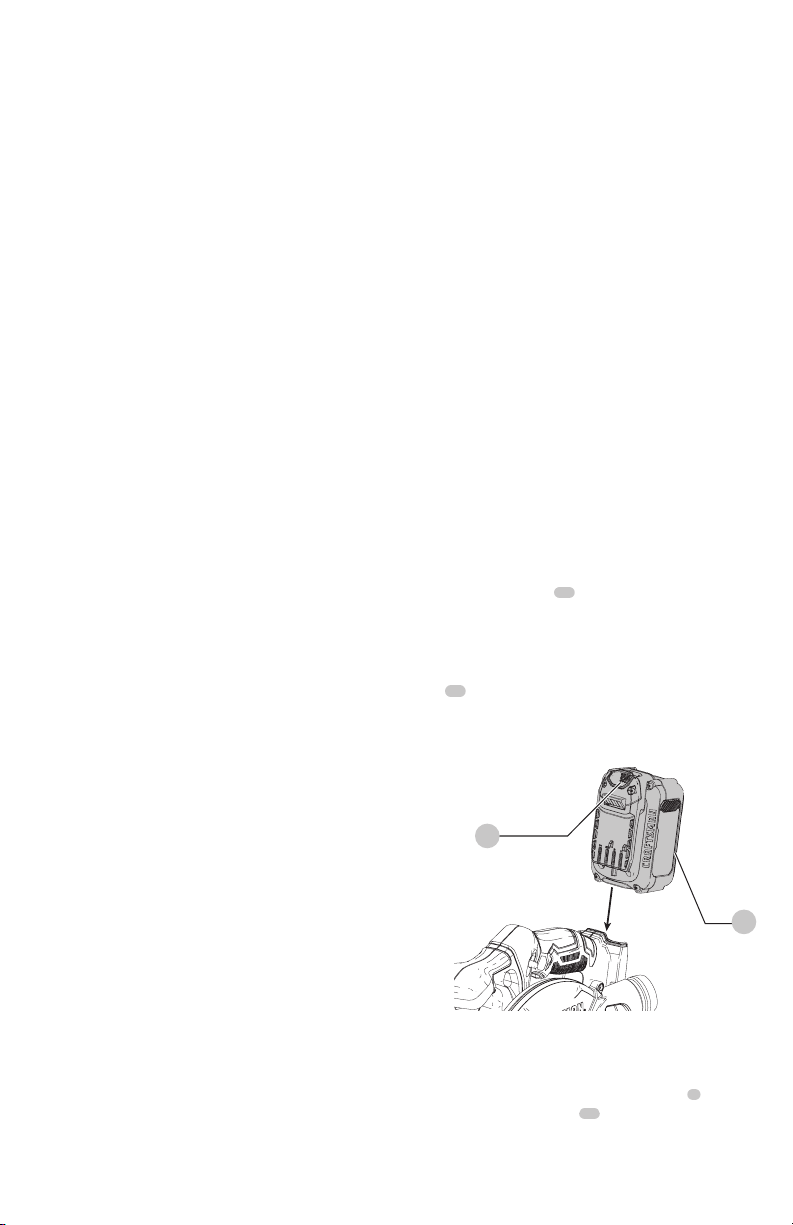
Installing and Removing the Battery Pack
(Fig. B)
NOTE: For best results, make sure your battery pack is
fullycharged.
To install the battery pack
15
into the tool handle, align the
battery pack with the rails inside the tool’s handle and slide
it into the handle until the battery pack is firmly seated in
the tool and ensure that it does notdisengage.
To remove the battery pack from the tool, press the release
button
16
and firmly pull the battery pack out of the tool
handle. Insert it into the charger as described in the charger
section of thismanual.
Fig.B
15
16
Attaching and Removing the Blade (Fig. C)
1. Retract lower guard and assemble saw blade
6
and
outer blade clamp washer
11
as shown in FigureC.
5. Foreign materials of a conductive nature such as, but
not limited to, grinding dust, metal chips, steel wool,
aluminum foil, or any buildup of metallic particles
should be kept away from charger cavities. Always
unplug the charger from the power supply when there
is no battery pack in the cavity. Unplug the charger
before attempting toclean.
6. Do not freeze or immerse the charger in water or any
otherliquid.
Charger Cleaning Instructions
WARNING: Shock hazard. Disconnect the charger
from the AC outlet before cleaning. Dirt and grease
may be removed from the exterior of the charger using
a cloth or soft non-metallic brush. Do not use water or
any cleaningsolutions.
WARNING: To reduce the risk of injury, always
remove battery from saw before any of the following
adjustmentoperations.
• DO NOT use any abrasivewheels.
• Use only blades designed for woodcutting.
WARNING: Cutting sap coated wood, and
other materials may cause melted substances to
accumulate on the blade tips and the body of the saw
blade, increasing the risk of the blade overheating and
binding whilecutting.
DO NOT use under wet conditions or in presence of
flammable liquids orgases.
DO NOT let children come into contact with the tool.
Supervision is required when inexperienced operators use
thistool.
Loading ...
Loading ...
Loading ...