Form No, B/09/04 Pat1 No, 8113P454 60
Care & Cleaning ............................................ 19-22
Sdf-CHean Oven
CHeaningProcedures
Maintenance ......................................................... 23
Oven Whdow
Oven Light
Troubleshooting ............................................ 24-25
Warranty & Service .............................................. 27
Guide d'utilisation et d'entretien ...................... 28
Gu_a de Use y Cuidado ....................................... 56
@2004 Mavtag Appliances Sales Co. Litho U,S,A,
installer: Please leave this manual with this appliance.
Consumer: Please read and keep this manual fol future
reference. Keep sales receipt and or canceled checkas proof
of purchase.
Modal Numbeu
Serial Numbet
Date of Purchase
To ensure proper and safe operation: Appliance must
be properly installed and grounded by a qualified techni-
cian. Do not attempt to adjust, repair, service, or replace
any part of your appliance unless it is specifically recom-
mended in this guide. All other servicing should be
referred to a qualified servicer.
Always disconnect power to appliance before servicing.
Amana Customer Assistance
1-800-843-0304 USA
1_866-587-2002 Canada
hternet: hnp:/!www.amana.com
In ourcontinui rig effortto improve [he quality and performance
of our cooking products, it may be necessaryto make changes
1othe appliance without revising this guide.
For senfice i#fermatie#, see page 27.
Warning and Important Safety Instructions appearing in
this guide are not meant to cover all possible conditions
and situations that may occur. Common sense, caution,
and care must be exercised when installing, maintaining,
or operating the appliance.
Always contact your dealer, distributor, service agent, or
manufacturer about problems or conditions you do not
understand.
Recognize Safety Symboms, Words, Labels
WARNING- Hazards or unsafe p[actices which
COULD resu!t in severe personal injury or death.
CAUTUON" Hazards or unsafe practices which
COULD resu!t in minor persona! injury,
Read and follow ai[ instructions before using this
appliance to prevent the potential risk of fire, electric
shock, personal injury or damage to the appliance as a
result of improper usage of the appliance. Use appliance
only for its intended purpose as described in this guide.
o FOLLOWALL iNSTALLATiON
WARNING: TO reduce risk of
tippiug of the appliance from
abnormal usage or by excessive
loading of the oven door, the appliance must
be secured by a properly installed anti4ip
To check if device is properly installed, look underneath
range with a flashlight to make sure one of the rear
leveling legs is properly engaged in the bracket slot. The
anti-tip device secures the rear leveling leg to the floor
when properly engaged. You should check this anytime
the range has been moved.
To Prevent Fire or Smoke
Be sure all packing materials are removed from the
appliance before operating it.
Keep area around appliance clear and free from combus-
tible materials. Flammable materials should not be stored
in an oven.
Many plastics are vulnerable to heat. Keep plastics away
from parts of the appliance that may become warm or
hot.
To prevent grease fires, do not let cooking grease or other
flammable materials accumulate in or near the appliance.
In Case of Fire
Use dry chemical or foam-type extinguisher or baking
soda to smother fire or flame. Never use water on a
grease fire.
1. Turn off appliance to avoid spreading the flame.
2. NEVER pick up or move a flaming pan.
3. Smother fire or flame by closing the oven door.
Child Safety
above an appJJance, Children cJjmbing On the appliance
sedous!y injured,
NEVER leave children alone or unsupervised near the
appliance when it is in use or is still hot. Children should
never be allowed to sit or stand on any part of the appli-
ance as they could be injured or burned.
Children must be taught that the appliance and utensils in
it can be hot. Let hot utensils cool in a safe place, out of
reach of small children. Children should be taught that an
appliance is not a toy. Children should not be allowed to
play with controls or other parts of the appliance.
About Your Appliance
NEVER use an app!!ance as a step to teach cabinets
tean!ng Or sitting On the door, may resu!t in p0ssib!e
tipping of the appliance, breakage of door, and serious
injuries,
To prevent potential hazard to the user and damage to the
appliance, do not use appliance as a space heater to heat
or warm a room. Also, do not use the oven as a storage
area for food or cooking utensils.
Do not obstruct the flow of air by blocking the oven vent.
DO NOT TOUCH HEATING ELEMENTS OR iNTERiOR
SURFACES OF OVEN. Heating elements may be hot even
though they are dark in color, interior surfaces of any
oven become hot enough to cause burns. During and
after use, do not touch, or let clothing or other flammable
materials contact heating elements or interior surfaces of
oven until they have had sufficient time to cool. Other
surfaces of the appliance may become hot enough to
cause burns - among these surfaces are: oven vent
opening and surface near this opening, oven door,
window of oven door.
Do not touch a hot oven light bulb with a damp cloth as
the bulb could break Should the bulb break, disconnect
power to the appliance before removing bulb to avoid
electrical shock
NEVER use aluminum foil to cover an oven rack or oven
bottom. Misuse could result in risk of electric shock, fire,
or damage to the appliance. Use foil only as directed in
this guide.
Cooking Safety
Never heat an unopened food container in the oven.
Pressure build-up may cause container to burst resulting
in serious personal injury or damage to the appliance.
Use dry, sturdy potholders. Damp potholders may cause
burns from steam. Dish towels or other substitutes should
never be used as potholders because they can trail across
hot elements and ignite or get caught on appliance parts.
Wear proper apparel. Loose fitting or long hanging-
sleeved apparel should not be worn while cooking. Cloth-
ing may ignite and cause burns if garment comes in
contact with heating elements.
Always place oven racks in the desired positions while
oven is cool. Slide oven rack out to add or remove food,
using dry, sturdy potholders. Always avoid reaching into
the oven to add or remove food. If a rack must be moved
while hot, use a dry potholder. Do not let potholder contact
hot element in oven.
Use racks only in the oven in which they were shipped/
purchased.
Use care when opening the oven door. Let hot air or steam
escape before removing or replacing food.
PREPARED FOOD WARNUNG: Follow food
manufacturer's instructions. If a plastic frozen food con-
tainer and/or its cover distorts, warps, or is otherwise
damaged during cooking, immediately discard the food
and its container. The food could be contaminated.
Do not allow aluminum foil or meat probe to contact
heating element.
Always turn off all controls when cooking is completed.
Utensim Safety
Follow the manufacturer's directions when using oven
cooking bags.
This appliance has been tested for safe performance
using conventional cookware. Do not use any devices or
accessories that are not specifically recommended in this
guide. Do not use add-on oven convection systems. The
use of devices or accessories that are not expressly
recommended in this guide can create serious safety
hazards, result in performance problems, and reduce the
life of the components of the appliance.
If pan is smaller than element, a poRion of the element
will be exposed to direct contact and could ignite clothing
or potholder.
Only certain types of glass, glass/ceramic, ceramic,
earthenware, or other glazed utensils are suitable for
cooktop or oven service without breaking due to the
sudden change in temperature. Follow utensil
manufacturer's instructions when using glass.
Turn pan handle toward center of cooktop, not out into
the room or over another surface element. This reduces
the risk of burns, ignition of flammable materials, or
spillage if pan is accidently bumped or reached by small
children.
Deep Fat Fryers
Use extreme caution when moving the grease pan or
disposing of hot grease. Allow grease to cool before
attempting to move pan.
Ventilating Hoods
Clean range hood and filters frequently to prevent grease
or other flammable materials from accumulating on hood
or filter and to avoid grease fires.
When flaming foods under the hood, turn the fan on.
Cleaning Safety
Clean cooktop with caution. Turn off all controls and wait
for appliance pars to cool before touching or cleaning.
Clean with caution. Use care to avoid steam burns if a wet
sponge or cloth is used to wipe spills on a hot surface.
Some cleaners can produce noxious fumes if applied to a
hot surface.
Clean only pars listed in this guide.
Self-Clean Oven
NEVER leave surface units unattended especially when
using high heal An unattended boilover could cause
smoking and a greasy spillover can cause a fire.
This appliance is equipped with different size surface
elements. Select pans with flat bottoms large enough to
cover elemenL Fitting pan size to element will improve
cooking efficiency.
GLASS_CERAMUC SURFACE: NEVER cook on broken
cooktop. If cooktop should break, cleaning solutions and
spillovers may penetrate the broken cooktop and create a
risk of electric shock Contact a qualified technician
immediately.
utensils, etc. in the oven during the self-clean cycle,
Do not clean door gaskeL The door gasket is essential for
a good seal Care should be taken not to rub, damage, or
move the gaskeL
Do not use oven cleaners or oven liners of any kind in or
around any par of the self-clean oven.
Before self-cleaning the oven, remove broiler pan, oven
racks and other utensils, and wipe off excessive spillovers
to prevent excessive smoke or flare ups.
3
l pottant Safety Notice and
The California Safe Drinking Water and Toxic Enforce-
ment Act of 1986 (Proposition 65} requires the Governor
of California to publish a list of substances known to the
State of California to cause cancer or reproductive harm,
and requires businesses to warn customers of potential
exposures to such substances.
Users of this appliance are hereby warned that when the
oven is engaged in the self-clean cycle, there may be
some low-level exposure to some of the listed sub-
stances, including carbon monoxide. Exposure to these
substances can be minimized by properly venting the
oven to the outdoors by opening the window's and/or
door in the room where the appliance is located during
the self-clean cycle.
UMPORTANT NOTUCE REGARDUNG PET BURDS: Never
keep pet birds in the kitchen or in rooms where the
fumes from the kitchen could reach. Birds have a very
sensitive respiratory system. Fumes released during an
oven self-cleaning cycle may be harmful or fatal to birds.
Fumes released due to overheated cooking oil, fat,
margarine and overheated non-stick cookware may be
equafly harmful
Save These instructions for Future Reference
,
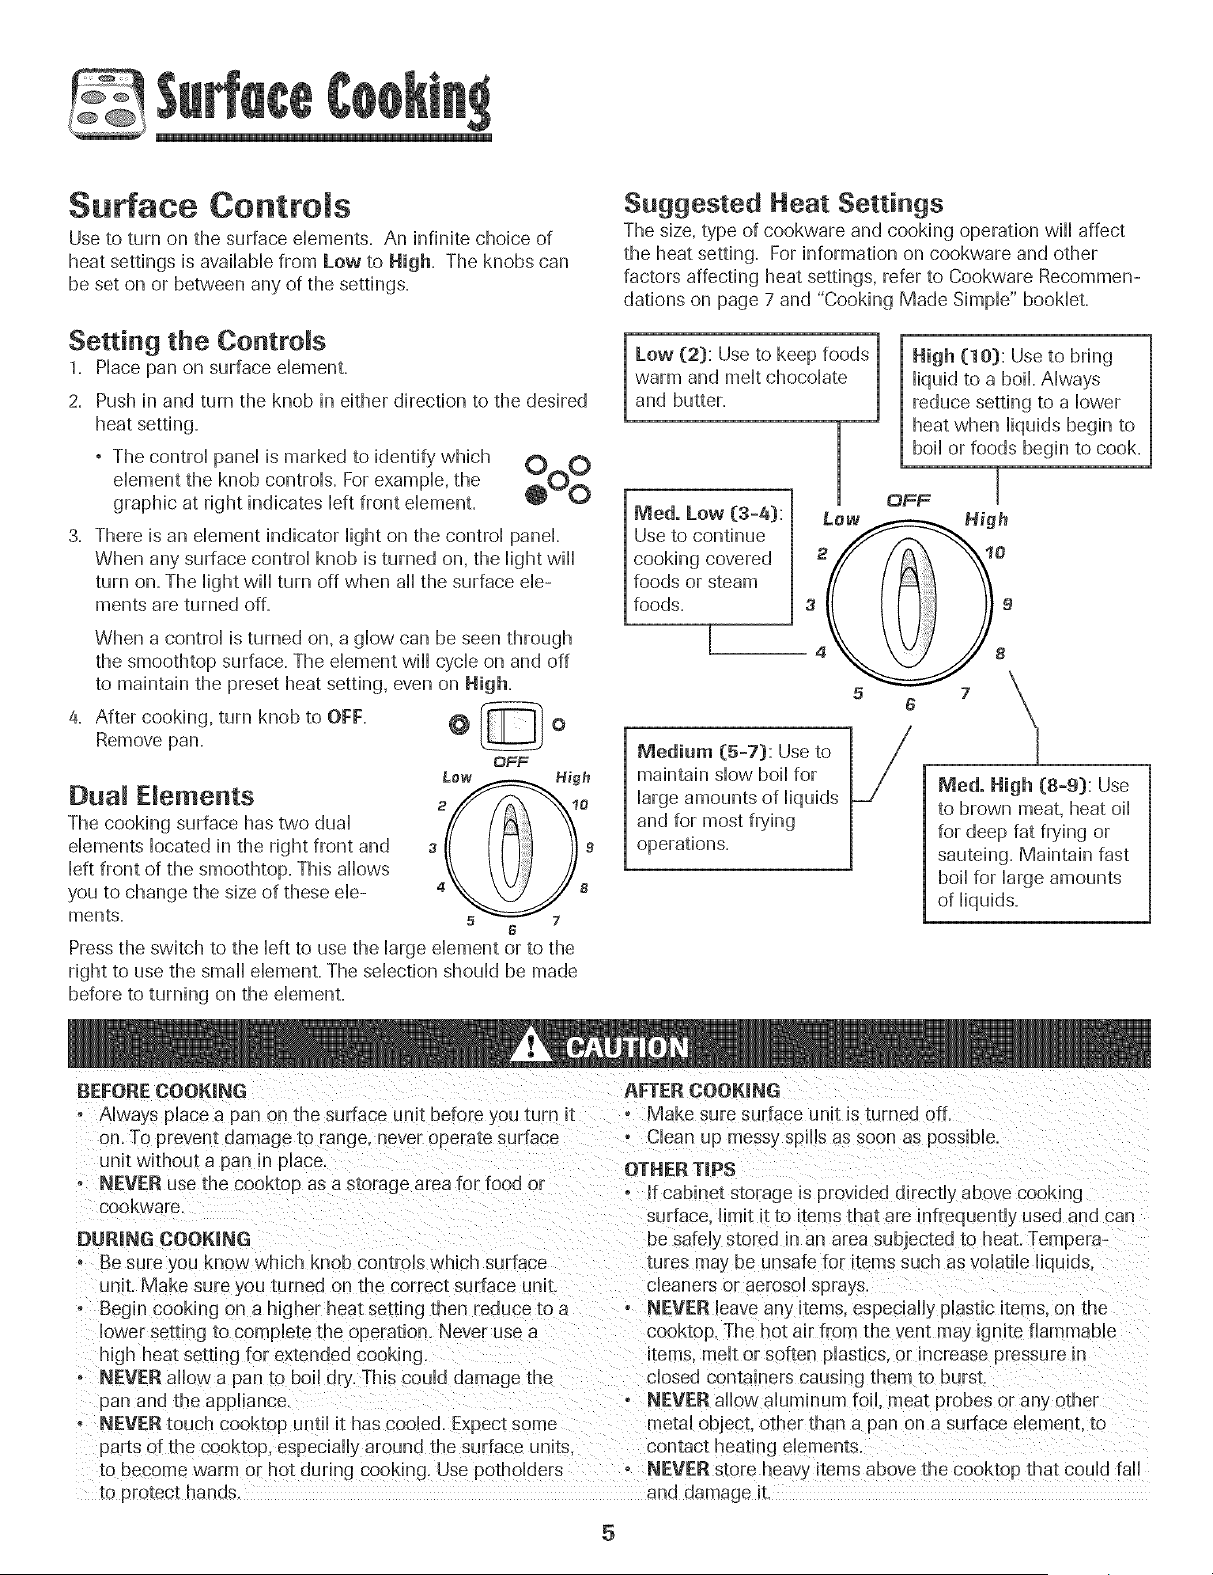
Surface Conttoms
Use to turn on the surface eiements. An infinite choice of
heat settings is avaflabie from Lew to High. The knobs can
be set on or between any of the settings.
Setting the Controls
1. Piace pan on surface eiemenL
2. Push in and turn the knob in either direction to the desired
heat setting.
° The control panel is marked to identify which O O
eiement the knob controis. For exampie, the _O_,
graphic at right indicates Heftfront dement.
_ v
3. There is an element indicator light on the control panel
When any surface control knob is turned on, the light wiii
turn on. The light wiii turn off when aii the surface ele-
ments are turned off.
Dua Emements
The cooking surface has two duai
dements iocated in the right front and
Heftfront of the smoothtop. This dhows
you to change the size of these erie-
merits.
When a control is turned on, a glow can be seen through
the smoothtop surface. The dement will cycle on and off
to maintain the preset heat setting, even on High.
4. After cooking, turn knob to OFF. _ _ O
Remove pan.
0FF
o
5 7
6
Press the switch to the left to use the large dement or to the
right to use the small element. The selection should be made
before to turning on the element.
Suggested Heat Settings
The size, type of cookware and cooking operation will affect
the heat setting. For information on cookware and other
factors affecting heat settings, refer to Cookware Recommen-
dations on page 7 and "Cooking Made Simple" bookleL
m
Low (2}: Use to keep foods m
warm and melt chocolate
1
and butter.
I
Ned. Low (3-4}:
Use to continue
cooking covered
foods or steam
foods.
[
Low
3 4
5
Nediurn (5°7}: Use to
maintain slow boil for
large amounts of liquids
and for most frying
operations.
High (10}: Use to bring
liquid to a boil Always
reduce setting to a lower
heat when liquids begin to
boil or foods begin to cook.
OFF
!
N
igh
Ned. High (8=9}: Use
to brown meat, heat oil
for deep fat frying or
sauteing. Maintain fast
boil for large amounts
of liquids.
BEFORECOOKING
- Always place a pan on the surface unit before you turn it
on, To prevent damage to range, never operate surface
Jnit without a pan in place,
. NEVER use the cooktop as a storage area for food or
cookware,
DUR|NG COOK|NG
o Be sure you know which knob controls which sL rface
unit. Make sure }ou turned on the correct surface unit.
• Begin cooking on a higheu heat setting then reduce to a
lower setting to compbte the operation, Never use a
high heat setting for extended cooking.
, NEVER aIHowa pan to boiHdry, This could damage the
pan and the appliance.
- NEVERtouch cooktop until it has cooled, Expect some
parts o| the cooktop, especially around the surface units
to become warm or hot during cooking. Use potholders
_oprotect hands,
AFTER COOK|NG
Make sure surface unit is turned off,
o Clean up messy spills as soon as possible,
OTHERT|PS
°tf cabinet storage is provided directly above cooking
surface, limit it to items that are infrequently used and can
be satehystored in an area subjected to heat. Tempera-
tures may be unsafe for items such as volatile liquids.
cleaners or aerosol sprays
- NEVER leave an} items, especiaIHypHasticitems, on the
cooktop. The hot air flom the vent may igpite flammable
items, melt or soften plastics, or increase pressu re in
closed containers causing them to burst.
o NEVER allow aluminum foi meat probes or an} other
metal object, other than a pan on a surface element, to
contact heating elements.
NEVER store heav} items above the cooktop that could fall
and damage it.
5
,
S oothtop Surface
Smoothtop Surface Notes:
, Cooktop may emit mightsmoke and odor the first few
times the cook,top is used. This is normal
, Smoothtop cooktops retain heat for a period of time
after the element is turned off. Turn the dements off
a few minutes before food is compieteiy cooked and use
the retained heat to compiete cooking. When the hot
surface Hightturns off, the cooling area will] be coo]
enough to touch. Because of the way they retain heat, the
smoothtop dements will] not respond to changes in
settings as qubk,Hyas coi] eiements.
° In the event of a potenda] boiiover, remove the pan from
the cooking surface.
, Never attempt to miftthe cooktopo
° The smoothtop surface may appear discoiored when it is
hot. This is norma] and will] disappear when the surface
coois.
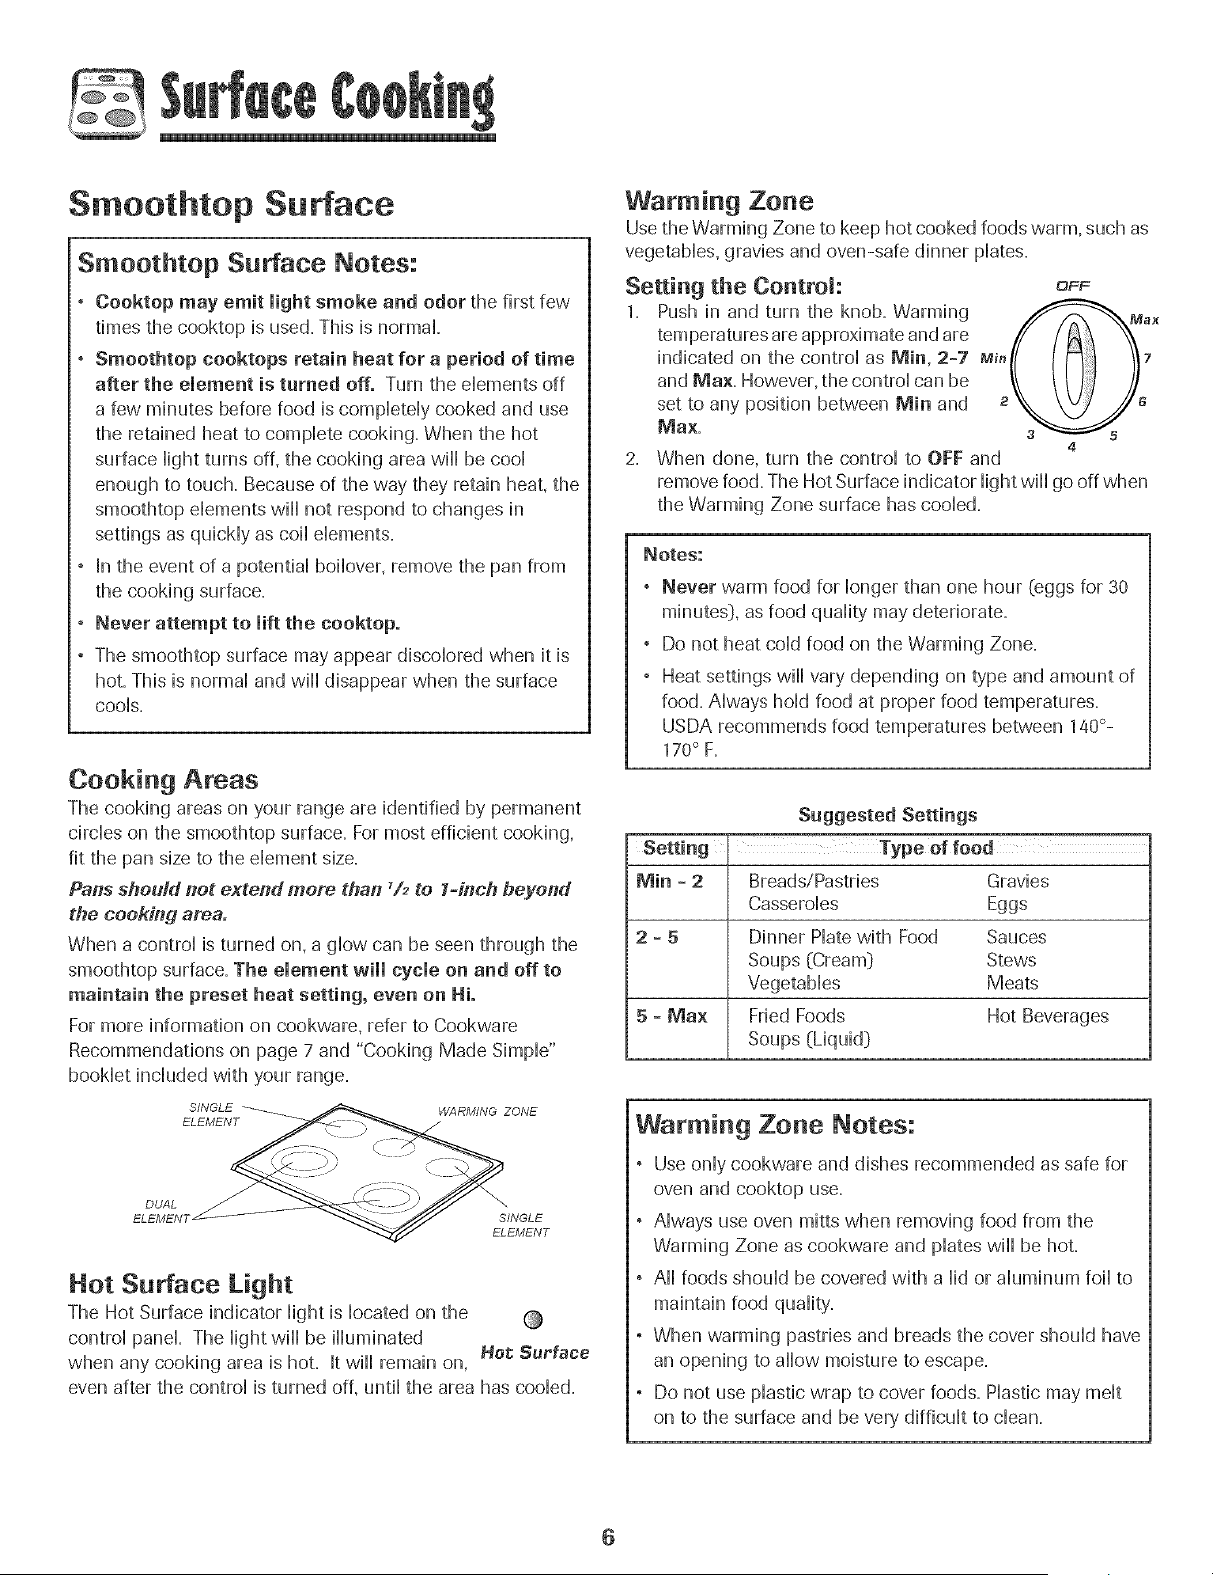
Cooking Areas
The cooking areas on your range are identified by permanent
circies on the smoothtop surface. For most efficient cooking,
fit the pan size to the dement size.
Pans should not extend more than ,/2 to t-inch beyond
the cooking area.
When a controi is turned on, agiow can be seen through the
smoothtop surface. The element will cycle on and off to
maintain the preset heat setting, even on Hi.
For more information on cook,ware, refer to Cook,ware
Recommendations on page 7 and "Cooking Made Simpie"
book,iet inciuded with your range.
SINGLE WARMING ZONE
ELEMENT
DUAL
ELEMENT SINGLE
ELEMENT
Hot Surface Light
The Hot Surface indicator Hightis iocated on the
controi panel The Hightwiii be iiiuminated
Hef_ Surface
when any cooking area is hot. It wiii remain on,
even after the controi is turned off, untii the area has cooied.
Warming Zone
Usethe Warming Zone to keep hot cooked foods warm, such as
vegetabies, gravies and oven-safe dinner piates.
Setting the Control:
OFF
1. Push in and turn the knob. Warming _Max
temperatures are approximate and are
indicated on the controi as Min, 2-7 Mi, 7and Ma×. However, the controi can be
set to any position between Min and a _ ,_
Ma×=
4
2. When done, turn the controi to OFF and
remove food. The Hot Surface indicator Hightwiii go off when
the Warming Zone surface has cooied.
Notes:
, Never warm food for Mongerthan one hour [eggs for 30
minutes}, as food quaiity may deteriorate.
° Do not heat coid food on the Warming Zone.
° Heat settings wiii vary depending on type and amount of
food. Aiways hoid food at proper food temperatures.
USDA recommends food temperatures between 1aO°-
170° F.
Suggested Settings
Setting Type of feed
Min = 2 Breads/Pastries Gravies
Casseroies Eggs
2 = 5 Dinner Piate with Food Sauces
Soups (Cream} Stews
Vegetabies Meats
5 - Ma× Fried Foods Hot Beverages
Soups (Liquid}
Warming Zone Notes:
° Use oniy cook,warn and dishes recommended as safe for
oven and cook,top use.
° Aiways use oven mitts when removing food from the
Warming Zone as cook,ware and piates wiii be hot.
° AHHfoods shouid be covered with a Hidor aiuminum foii to
maintain food quality.
° When warming pastries and breads the cover should have
an opening to allow moisture to escape.
, Do not use plastic wrap to cover foods. Plastic may melt
on to the surface and be very difficuit to clean.
6
Tips to Protect the
Smoothtop Surface
C_ea_ing (see page 21 for more information}
, Before first use, clean the cooktop.
, Clean your cooktop daily or after each use. This wiii keep
your cooktop looking good and can prevent damage.
, if a spillover occurs while cooking, immediately clean the
spill from the cooking area while it is hot to prevent a tough
cleaning chore later. Using extreme care, wipe spill with a
clean dry,towel
° Do not allow spills to remain on the cooking area or the
cooktop trim for a long period of time.
° Never use abrasive cleansing powders or scouring pads
which wiii scratch the cooktop.
° Never use chlorine bleach, ammonia or other cleansers not
specifically recommended for use on glass-ceramic.
To Prevent Marks & Scratches
, Do not use glass pans. They may scratch the surface.
, Never place a trivet or wok ring between the surface and
pan. These items can mark or etch the top.
, Do not slide aluminum pans across a hot surface. The pans
may leave marks which need to be removed promptly. (See
Cleaning, page 20.}
, Make sure the surface and the pan bottom are clean before
turning on to prevent scratches.
, To prevent scratching or damage to the glass-ceramic top,
do not leave sugar, salt or fats on the cooking area. Wipe
the cooktop surface with a clean cloth or paper towel
before using.
, Never slide heavy metal pans across the surface since
these may scratch.
To Prevent Stains
, Never use a soiled dish cloth or sponge to clean the
cooktop surface. A film will remain which may cause stains
on the cooking surface after the area is heated.
° Continuously cooking on a soiled surface may/will result in
a permanent stain.
To Prevent Other Damage
° Do not allow plastic, sugar or foods with high sugar content
to melt onto the hot cooktop. Should this happen, clean
immediately. (See Cleaning, page 21.}
° Never let a pan boil dry as this will damage the surface and
pan.
° Never use cooktop as a work surface or cutting board.
° Never cook food directly on the surface.
° Do not use a small pan on a large element. Not only does
this waste energy, but it can also result in spillovers burning
onto the cooking area which requires extra cleaning.
° Do not use non-fiat specialty items that are oversized or
uneven such as round bottom woks, rippled bottom and/or
oversized canners and griddles.
° Do not use foil or foil-type containers. Foil may melt onto
the glass, if metal melts on the cooktop, do not use. Call an
authorized Amana Servicer.
! ....
Cookware Recommendations
Using the right cookware can prevent many proMems, such
as food taking bnger to cook or achieving inconsistent
resuits, Proper pans will reduce cooking times, use Hess
energy, and cook food more eveniy,
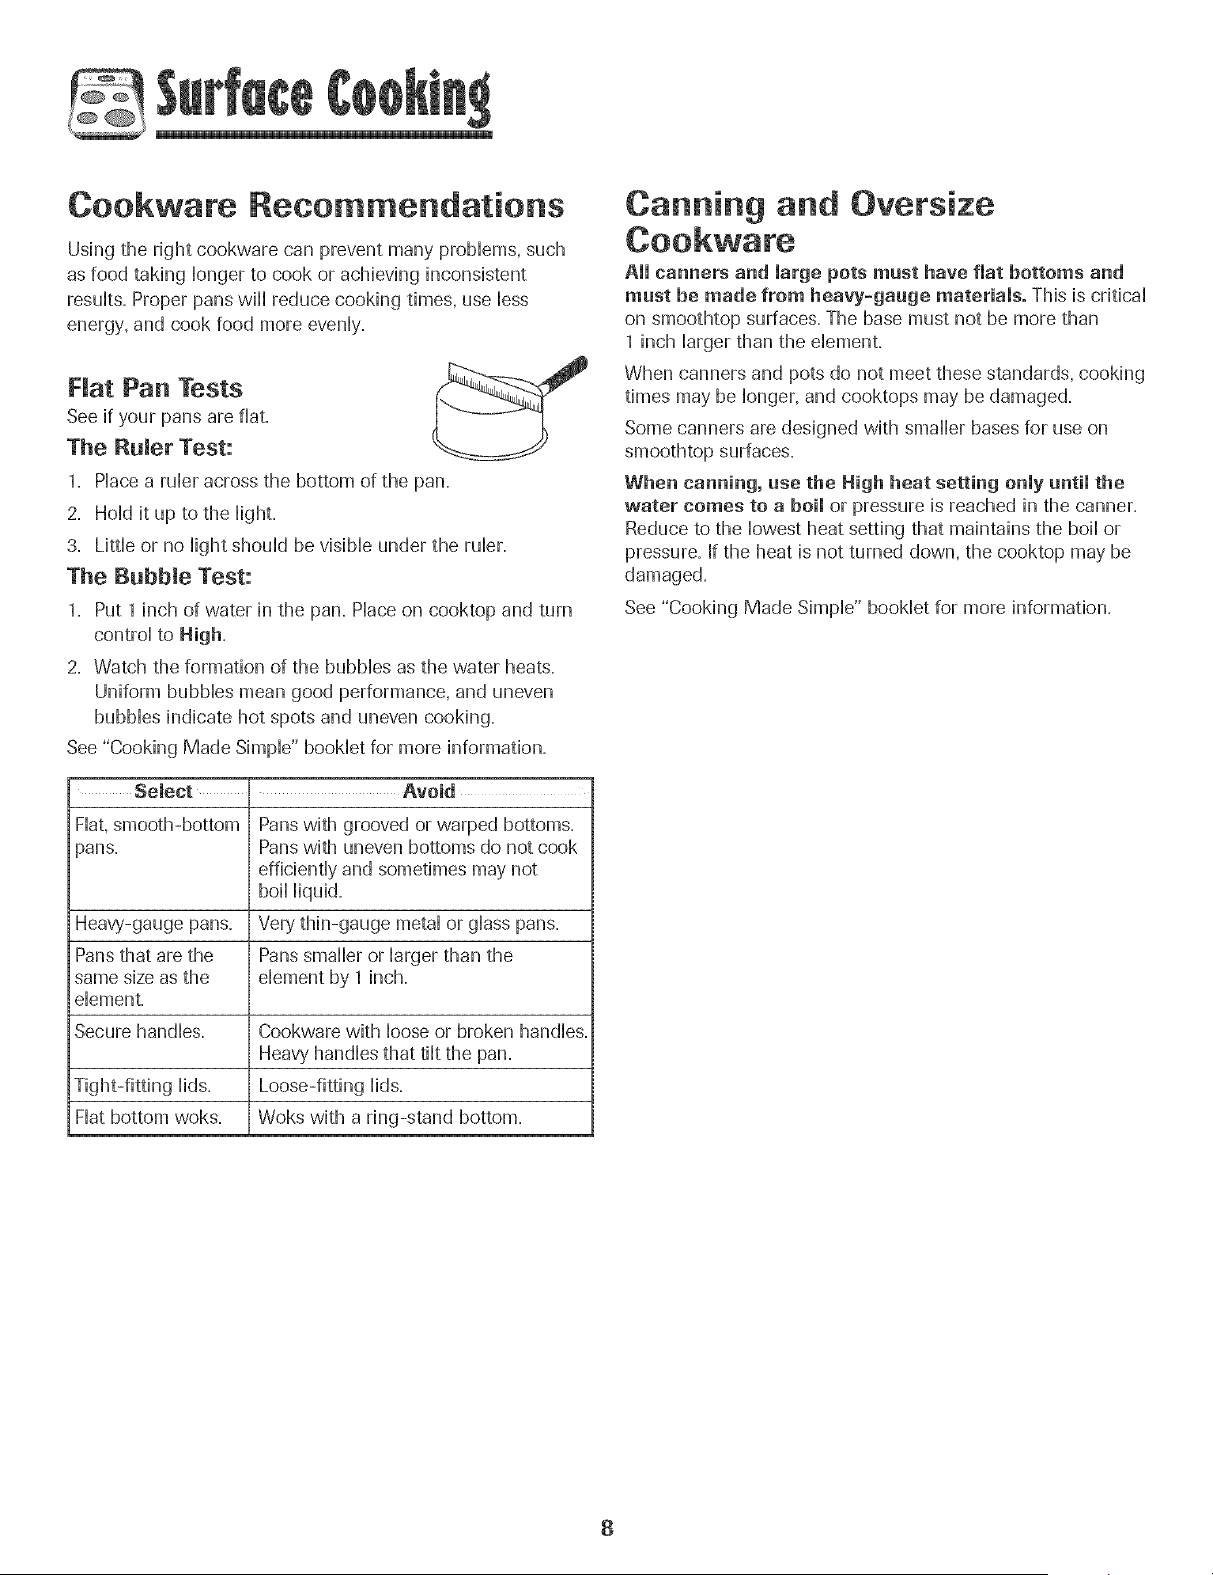
Nat Pan Tests
See if your pans are fiat,
The Rumor Test:
1, Hace a rubr across the bottom of the pan,
2, Hoid it up to the Hight,
3, Litde or no Hightshouid be vbiMe under the rubr,
The Babble Test:
1, Put 1 inch of water in the pan, Pbce on cooktop and turn
controi to High,
2, Watch the formation of the bubMes as the water heats,
Uniform bubbbs mean good performance, and uneven
bubMes indicate hot spots and uneven cooking,
See "Cooking Made Simpb" bookbt for more information,
Select Avoid
Flat,smooth-bottom Pans with grooved or warped bottoms,
pans, Pans with uneven bottoms do not cook
efficiently and sometimes may not
Heavy-gauge pans, Very thin-gauge metal or glass pans,
Pansthat are the Pans smaller or larger than the
same size as the element by 1 inch,
dement.
Secure handles. Cookware with loose or broken handles.
Heavy'handles that tilt the pan.
Loose-fitting lids.
Hat bottom woks. Woks with a ring-stand bottom.
Canning and Oversize
All canners and large pots must have flat bottoms and
must be made from heavy-gauge materials° This is critical
on smoothtop surfaces, The base must not be more than
1 inch larger than the dement,
When canners and pots do not meet these standards, cooking
times may be longer, and cooktops may be damaged,
Some canners are designed with smalbr bases for use on
smoothtop surfaces,
When canning, use the High heat setting only until the
water comes to a boil or pressure is reached in the canner,
Reduce to the lowest heat setting that maintains the boil or
pressure, If the heat is not turned down, the cooktop may be
damaged,
See "Cooking Made Simpb" booklet for more information,
Contro Pane
\
\
\
\
\
A B
Bake
\
\ Broil
\ Cook&
\\ HoUd Clean Favorite
\
E F G
Kaep
Clock Warm
H 1 J
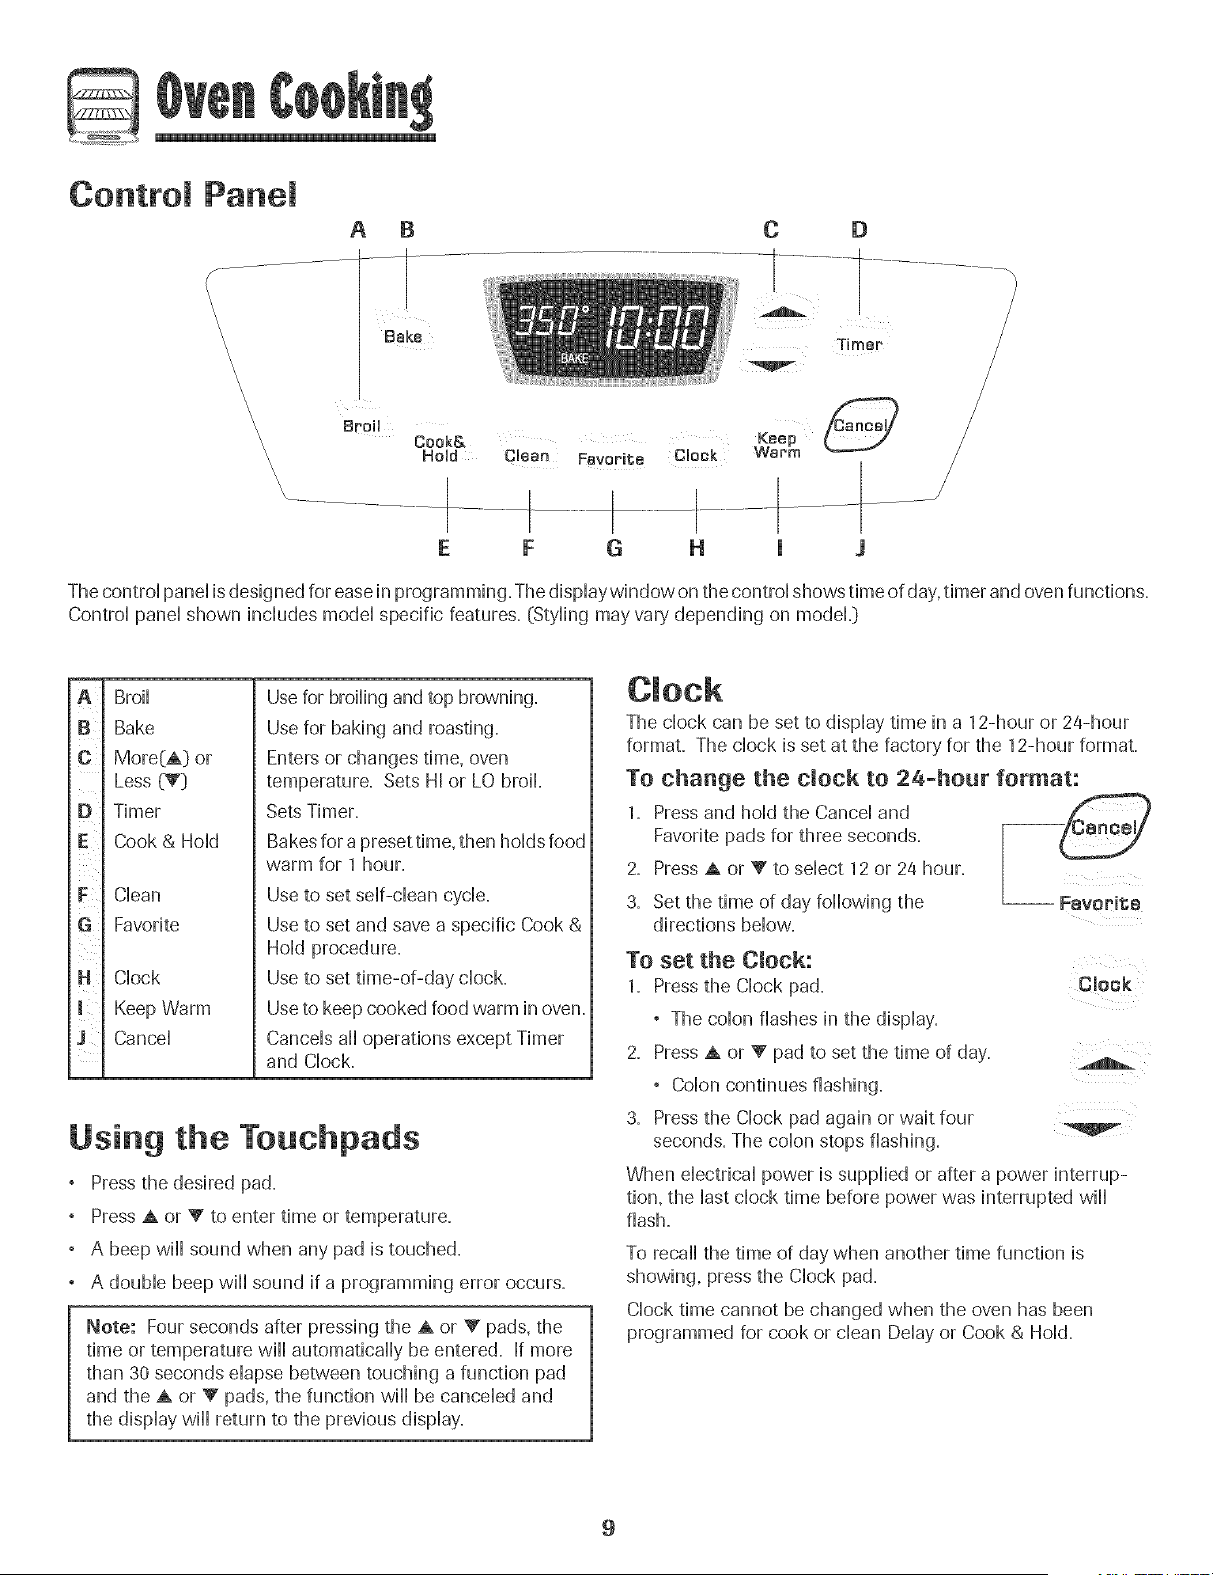
The controi pand is designed for ease in programming, The dispiaywindow on the controi shows time of day,timer and oven functions,
Controi pand shown includes modal specific features, (Styiing may vary depending on modeL}
A
B
D
G_
!ii i_
;i I
H
m
Broii
Bake
More(A} or
Less _}
Timer
Cook & Hold
Clean
Favorite
Clock
Keep Warm
Cancel
Use for broiling and top browning.
Use for baking and roasting.
Enters or changes time, oven
temperature. Sets HI or LO broil.
Sets Timer.
Bakes for a preset time, then holds food
warm for 1 hour.
Use to set self-clean cycle.
Use to set and save a specific Cook &
Hold procedure.
Use to set time-of-day clock.
Use to keep cooked food warm in oven,
Cancels all operations except Timer
and Clock.
Using the Touchpads
Pressthe desired pad.
Press A or V to enter time or temperature,
° A beep will sound when any pad is touched,
° A double beep will sound if a programming error occurs,
Note: Four seconds after pressing the A or _' pads, the
time or temperature will automatically be entered, If more
than 30 seconds elapse between touching a function pad
and the A or V pads, the function will be canceled and
the display will return to the previous display.
The clock can be set to display time in a 12-hour or 2a-hour
format. The clock is set at the factory for the 12-hour format.
To change the clock to 2a-hour format:
1. Press and hold the Cancel and
Favorite pads for three seconds,
2. Press A or V to select 12 or 24 hour,
3. Set the time of day following the -- FavoNt8
directions below.
To set the Clock:
1, Press the Clock pad, Clock
° The colon flashes in the display,
2, Press A or V" pad to set the time of day,
° Colon continues flashing,
3, Press the Clock pad again or wait four
seconds, The colon stops flashing,
When electrical power is supplied or after a power interrup-
tion, the last clock time before power was interrupted will
flash.
To recall the time of day when another time function is
showing, press the Clock pad.
Clock time cannot be changed when the oven has been
programmed for cook or clean Delay or Cook & Hold.
9
To cancel the Clock dispmay:
If you do not want the time of day to dispHay:
Press and hoHdthe CanceHand CHockpads for three seconds.
The time of day wiHHdisappear from the dispHay
When the chock dispHayis cancelled, press the CHockpad to
briefly dispHaythe time of day.
To restore the Clock display:
Press and hoHdthe CanceHand CHock
pads for three seconds. The time of day
wiHHreappear in the dispHay.
-- cmock
The timer can be set from one minute (0:011)up to 99 hours
and 59 minutes (99:591).
The timer can be used independentHy of any other oven
activity'. It can aHsobe set whiHeanother oven function is
operating.
The Timer does not controHthe oven. It only controHsa
beeper.
To set the Timer:
1. Press the Timer pad.
° 0:00 Hightsin the dispHay.
° The coHonwiHHflash.
2.
Timer
Press the A or V pad untiHthe
correct time appears in the dispHay.
° The coHonwiHHcontinue to flash.
A
3. Press Timer pad again or wait four seconds.
° The coHoncontinues flashing and the time begins
counting down.
° The Hastminute of the timer countdown wiHHbe dispHayed
as seconds.
4. At the end of the set time, one Hongbeep wiHHsound.
To cancel the Timer:
1. Press and hoHdthe Timer pad for three seconds.
OR
2. Press the Timer pad and set the time to 0:00.
Locking the Control
and Oven Door
The touch pad controls and oven door can be Hockedfor
safety, cHeaning,or to prevent unwanted use. They wiHHnot
function when Hocked.
If the oven is currentHy in use, the controHsand door cannot be
Hocked.
The current time of day wiHHremain in the dispHaywhen the
controHsare Hocked.
To lock:
Press and hoHdthe Cancel and Cook &
HoHdpads for three seconds. (Press the
CanceHpad first.]
LOCK flashes in the dispHay.
To unlock:
Press and hoHdthe CanceHand Cook & HoHdpads for three
seconds. (Press the CanceHpad first._
LOCK disappears from the dispHay.
Cook&
HoHd
Fault Codes
BAKE or LOCK may flash rapidHyin the dispHayto aHertyou if
there is an error or a probHem=If BAKE or LOCK flash in the
dispHay,press CanceHpad= If BAKE or LOCK continue to flash,
disconnect power to the appHiance=Wait a few minutes, and
then reconnect power= If the flashing stiHHcontinues, discon-
nect power to the appHiance and caHHan authorized servicer.
10
To set Bake:
Press the Bake pad.
Bake
° BAKEwill flash.
° 000 will Hightin the dispiay.
2. Sdect the oven temperature. The oven tempera-
ture can be set from 170° to 550°. Pressor press
and hold the A or V pads.
, 350 ° will[ Hightwhen either pad is first pressed.
. Press the A pad to increase the temperature.
. Press the _' pad to decrease the temperature.
3. Press Bake pad again or wait four seconds.
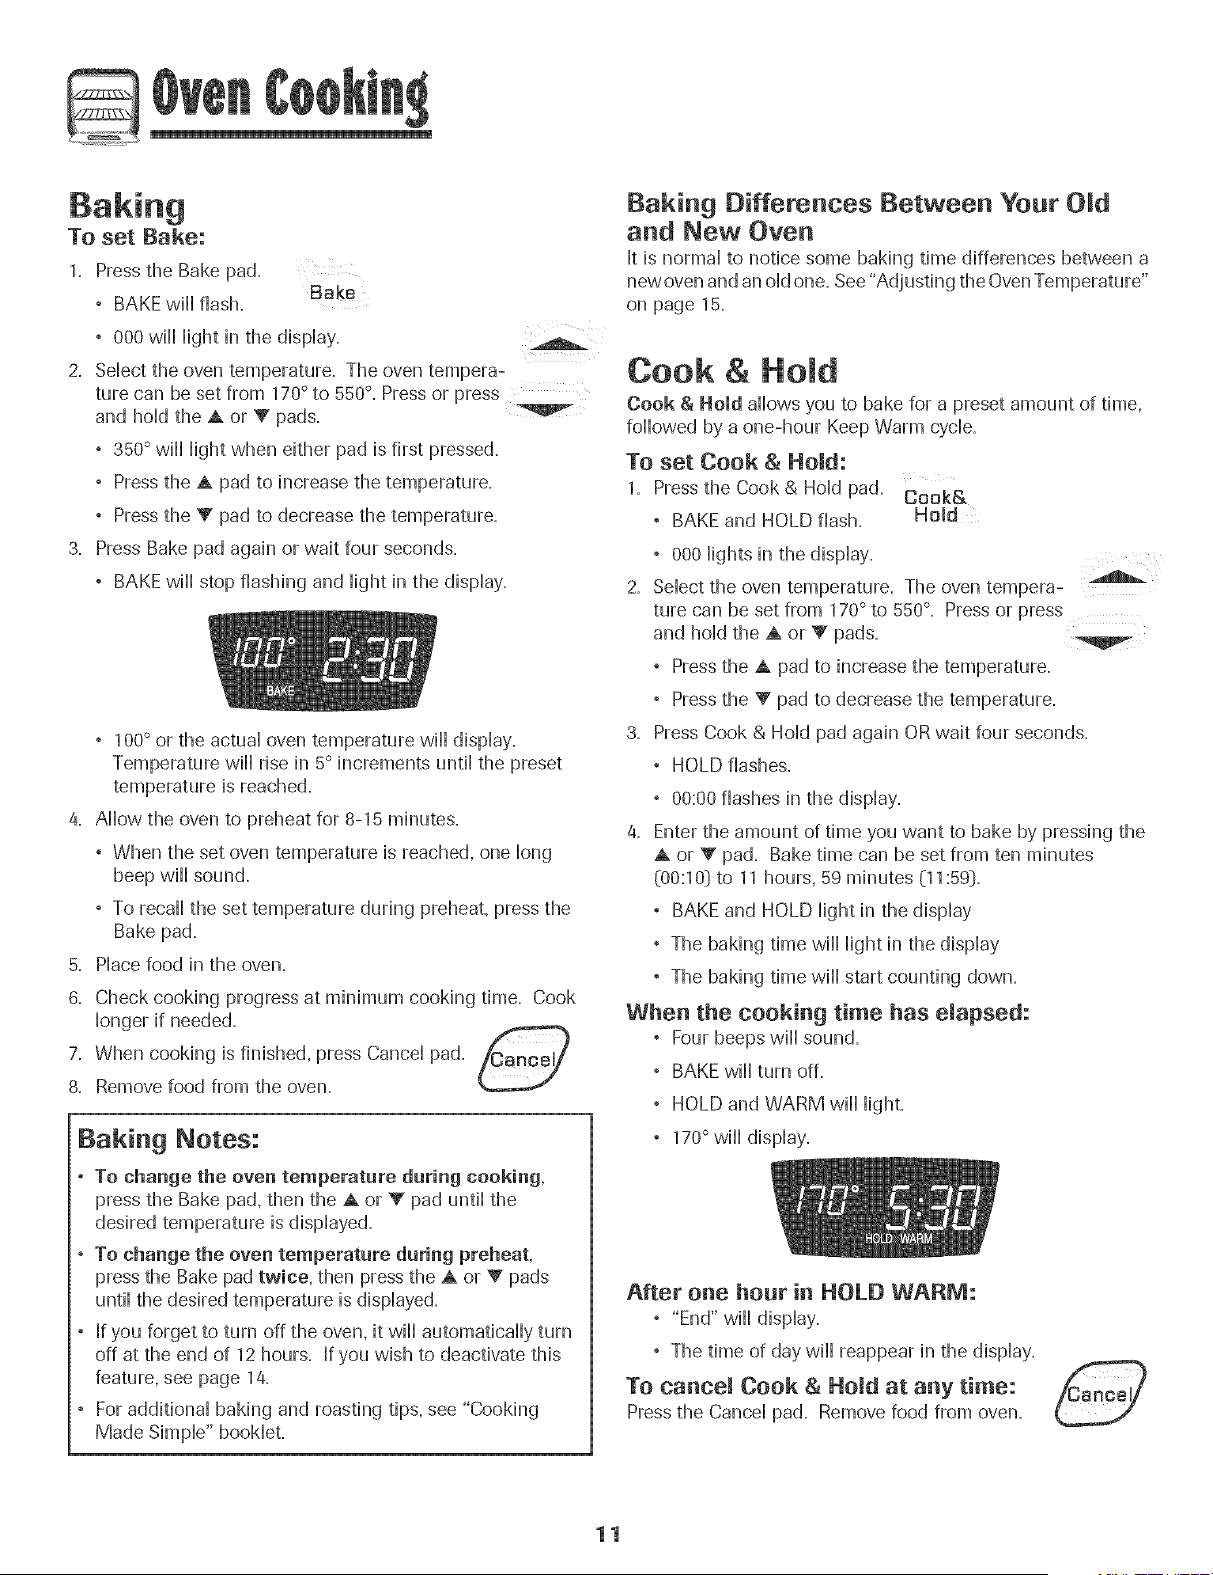
° BAKEwiii stop flashing and light in the display.
, 100° or the actual oven temperature will display.
Temperature will rise in 5° increments until the preset
temperature is reached.
4. Allow the oven to preheat for 8-15 minutes.
° When the set oven temperature is reached, one long
beep will sound.
° To recall the set temperature during preheat, press the
Bake pad.
5. Place food in the oven.
8. Check cooking progress at minimum cooking time. Cook
longer if needed.
7. When cooking is finished, press Cancel pad. fCanoe 7
8. Remove food from the oven.
Baking Notes:
° To change the oven temperature daring cooking,
press the Bake pad, then the A or V pad until the
desired temperature is displayed.
, To change the oven temperature daring preheat,
press the Bake pad twice, then press the A or V pads
until the desired temperature is displayed.
, If you forget to turn off the oven, it will automatically turn
off at the end of 12 hours. If you wish to deactivate this
feature, see page 14.
° For additional baking and roasting tips, see "Cooking
Made Simple" bookleL
Baking Differences Between Your OJd
and New Oven
Jtis normal to notice some baking time differences between a
new oven and an old one. See "Adjusting the OvenTemperature"
on page 15.
Cook & He d
Cook & Hold allows you to bake for a preset amount of time,
followed by a one-hour Keep Warm cycle.
To set Cook & HoJd:
1. Press the Cook & Hold pad. Cook&
° BAKE and HOLD flash. Hold
° 000 lights in the display.
2. Select the oven temperature. The oven tempera-
ture can be set from 170° to 550°. Press or press
and hold the A or _' pads.
, Pressthe A pad to increase the temperature.
, Pressthe V pad to decrease the temperature.
3. Press Cook & Hold pad again OR wait four seconds.
, HOLD flashes.
, 00:00 flashes in the display.
4. Enter the amount of time you want to bake by pressing the
A or V pad. Bake time can be set from ten minutes
(00:10} to 11 hours, 59 minutes (11:59}.
, BAKE and HOLD light in the display
, The baking time wiii iight in the display
, The baking time wiii start counting down.
When the cooking time has elapsed:
° Four beeps wiii sound.
° BAKE will turn off.
° HOLD and WARM will lighL
° 170°will display.
A
After one hour in HOLD WARM:
, "End" wiii display.
° The time of day wiii reappear in the display.
To cancel Cook & Hold at any time:
Press the Cancel pad, Remove food from oven,
11
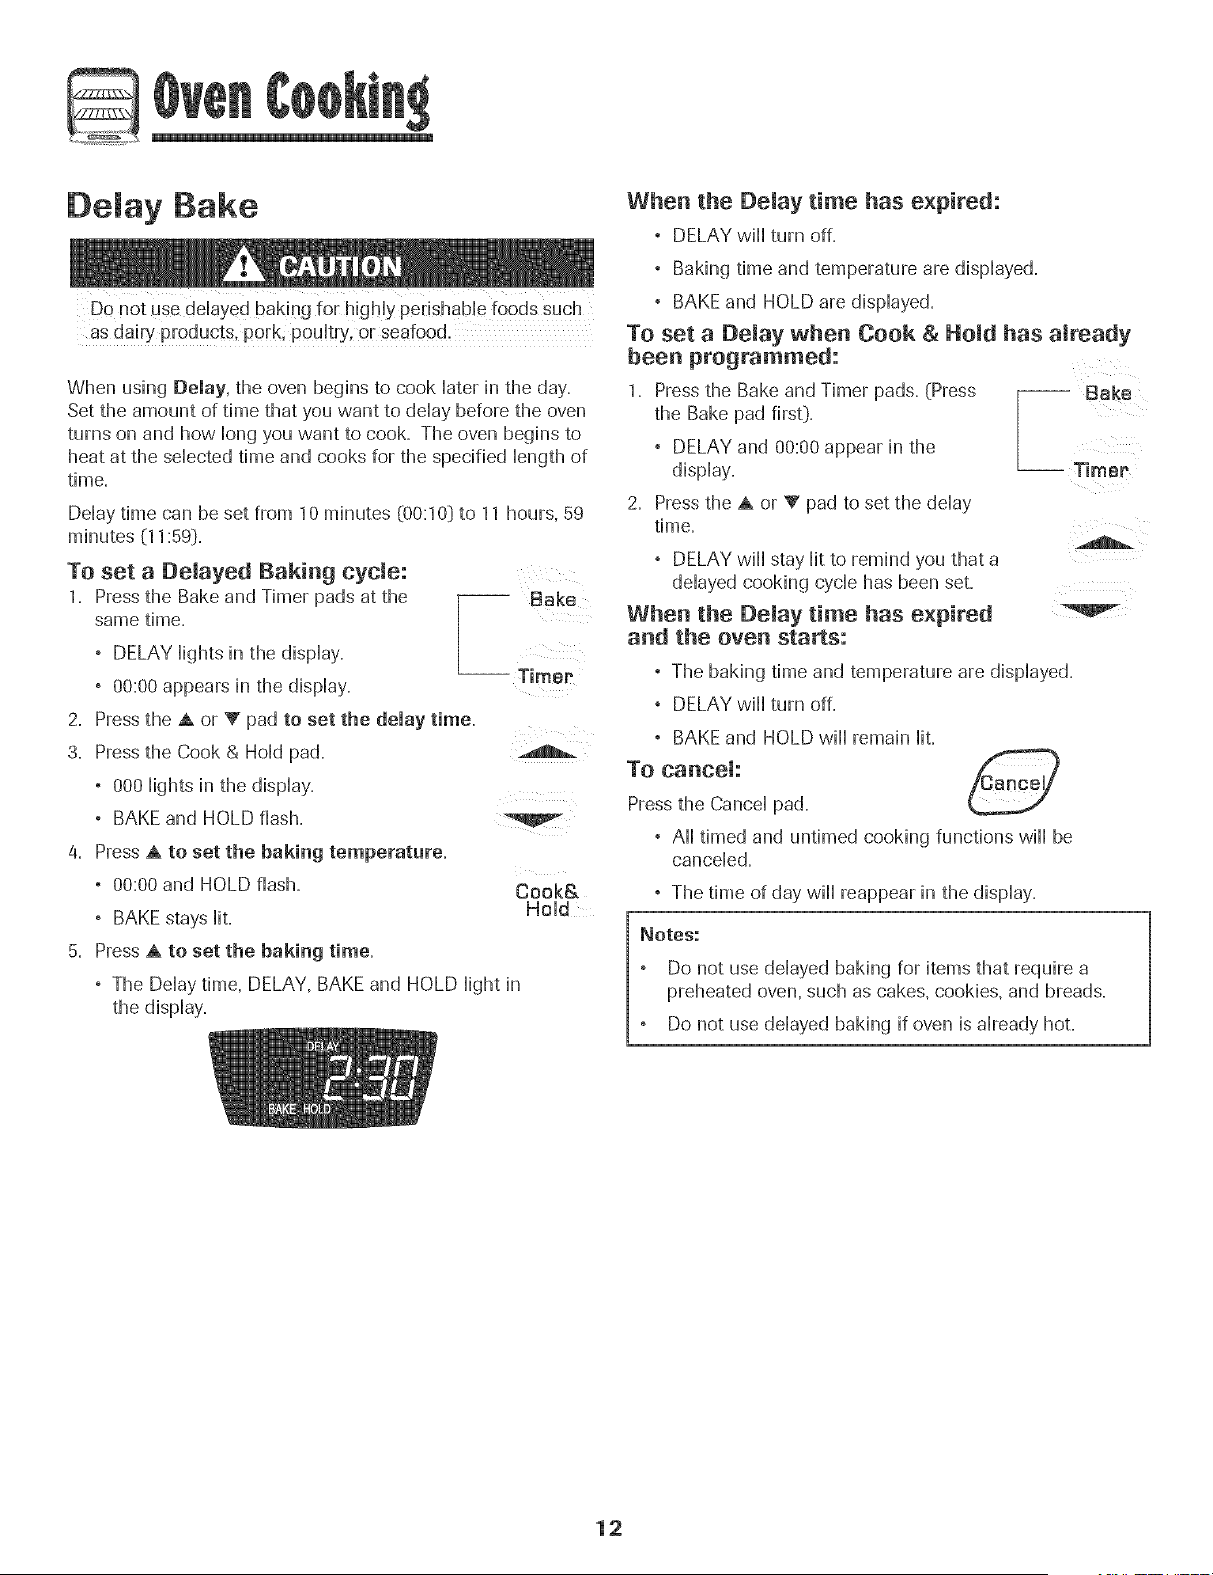
De ay Bake
Do not USedeUayedbaking for higMy perishaMe foods such
as dairy products, pork; poultry, or seafood.
When using Belay, the oven begins to cook Haterin the day.
Set the amount of time that you want to dday before the oven
turns on and how Hongyou want to cook. The oven begins to
heat at the sdected time and cooks for the specified Hengthof
time.
Delay time can be set from 10 minutes (00:10} to 11 hours, 59
minutes _11:59}.
To set a Delayed Baking eycme:
1. Press the Bake and Timer pads at the -- Bake
same time.
° DELAY Hightsin the dispHay.
° 00:00 appears in the dispHay. -- TimeP
2. Press the A or _' pad to set the delay time.
3. Pressthe Cook & HoHdpad.
° 000 Hightsin the dispHay.
° BAKEand HOLD flash.
4. Press A to set the baking temperature.
° 00:00 and HOLD flash. Cook&
, BAKEstays Hit. Hold
5. Press A to set the baking time.
, The Delay time, DELAY, BAKE and HOLD light in
the display.
When the Delay time has expired:
° DELAY will turn off.
° Baking time and temperature are displayed.
° BAKE and HOLD are displayed.
To set a Demaywhen Cook & Hold has already
been programmed:
1. Press the Bake and Timer pads. _Press
the Bake pad first:).
° DELAY and 00:00 appear in the
display.
Press the A or V pad to set the delay
time.
, DELAY will stay lit to remind you that a
When the Delay time has expired
and the oven starts:
L Bak
delayed cooking cycle has been set.
° The baking time and temperature are displayed.
° DELAY will turn off.
° BAKE and HOLD will remain lit.
To cancel:
Pressthe Cancel pad.
° All timed and untimed cooking functions will be
canceled.
, The time of day will reappear in the display.
Notes:
Do not use delayed baking for items that require a
preheated oven, such as cakes, cookies, and breads.
Do not use delayed baking if oven is already hot.
12
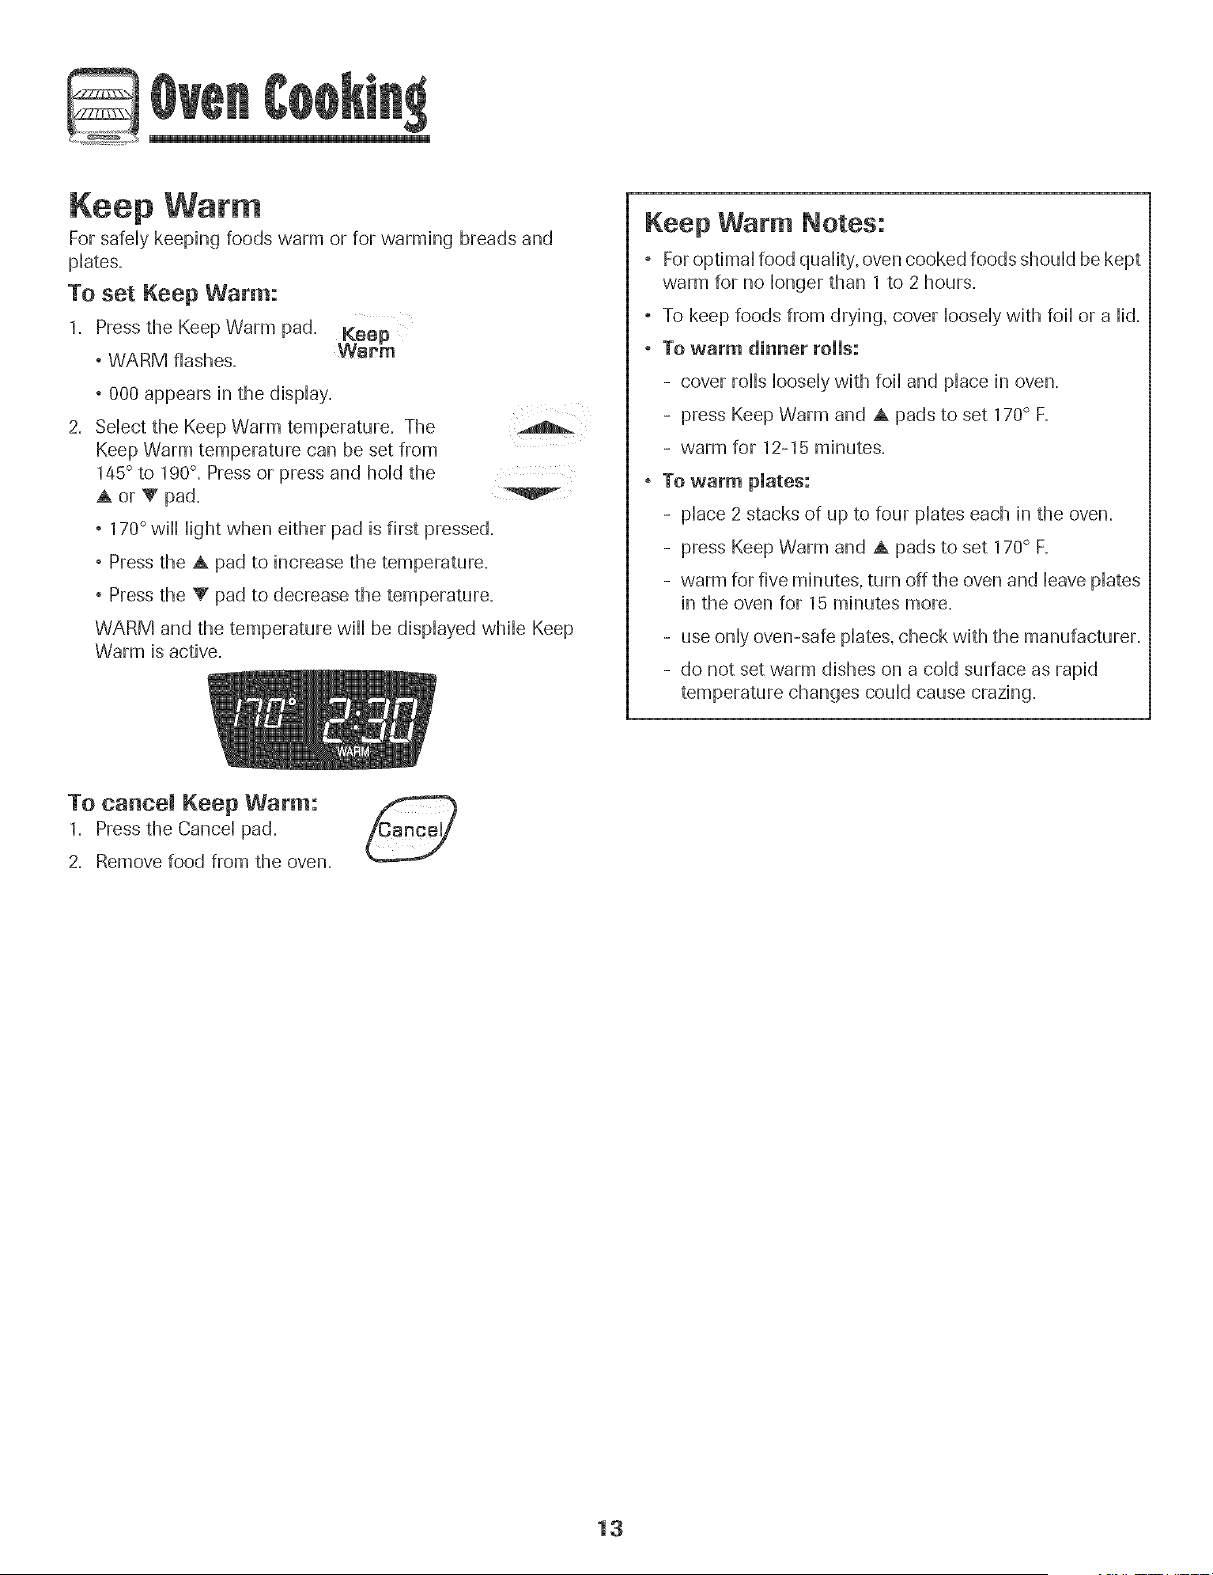
Keep Warm
For safdy keephg foods warm or for warmhg breads and
pHates.
To set Keep Warm:
1. Press the Keep Warm pad. ,Keep
, WARM flashes, vverm
,000 appears in the dispHay.
2. Sdect the Keep Warm temperature. The
Keep Warm temperature can be set from
145° to 190°- Press or press and hoHdthe
° 170° wifl Hightwhen either pad is first pressed.
° Pressthe A pad to increase the temperature.
° Pressthe V pad to decrease the temperature.
WARM and the temperature will be dispHayedwhiHe Keep
Warm is active.
Keep Warm Notes:
, Foroptimal food quality, oven cooked foods should be kept
warm for no longer than 1 to 2 hours.
, To keep foods from drying, cover loosely with foil or a lid.
, To warm dinner rolls:
- cover rolls loosely with foil and place in oven.
- press Keep Warm and A pads to set 170° F.
- warm for 12-15 minutes.
, To warm pmates:
- place 2 stacks of up to four plates each in the oven.
- press Keep Warm and A pads to set 170° F.
- warm for five minutes, turn off the oven and leave plates
in the oven for 15 minutes more.
- use only oven-safe plates, check with the manufacturer.
- do not set warm dishes on a cold surface as rapid
temperature changes could cause crazing.
To canoe! Keep Warm:
1. Press the Cancel pad.
2. Remove food from the oven.
13
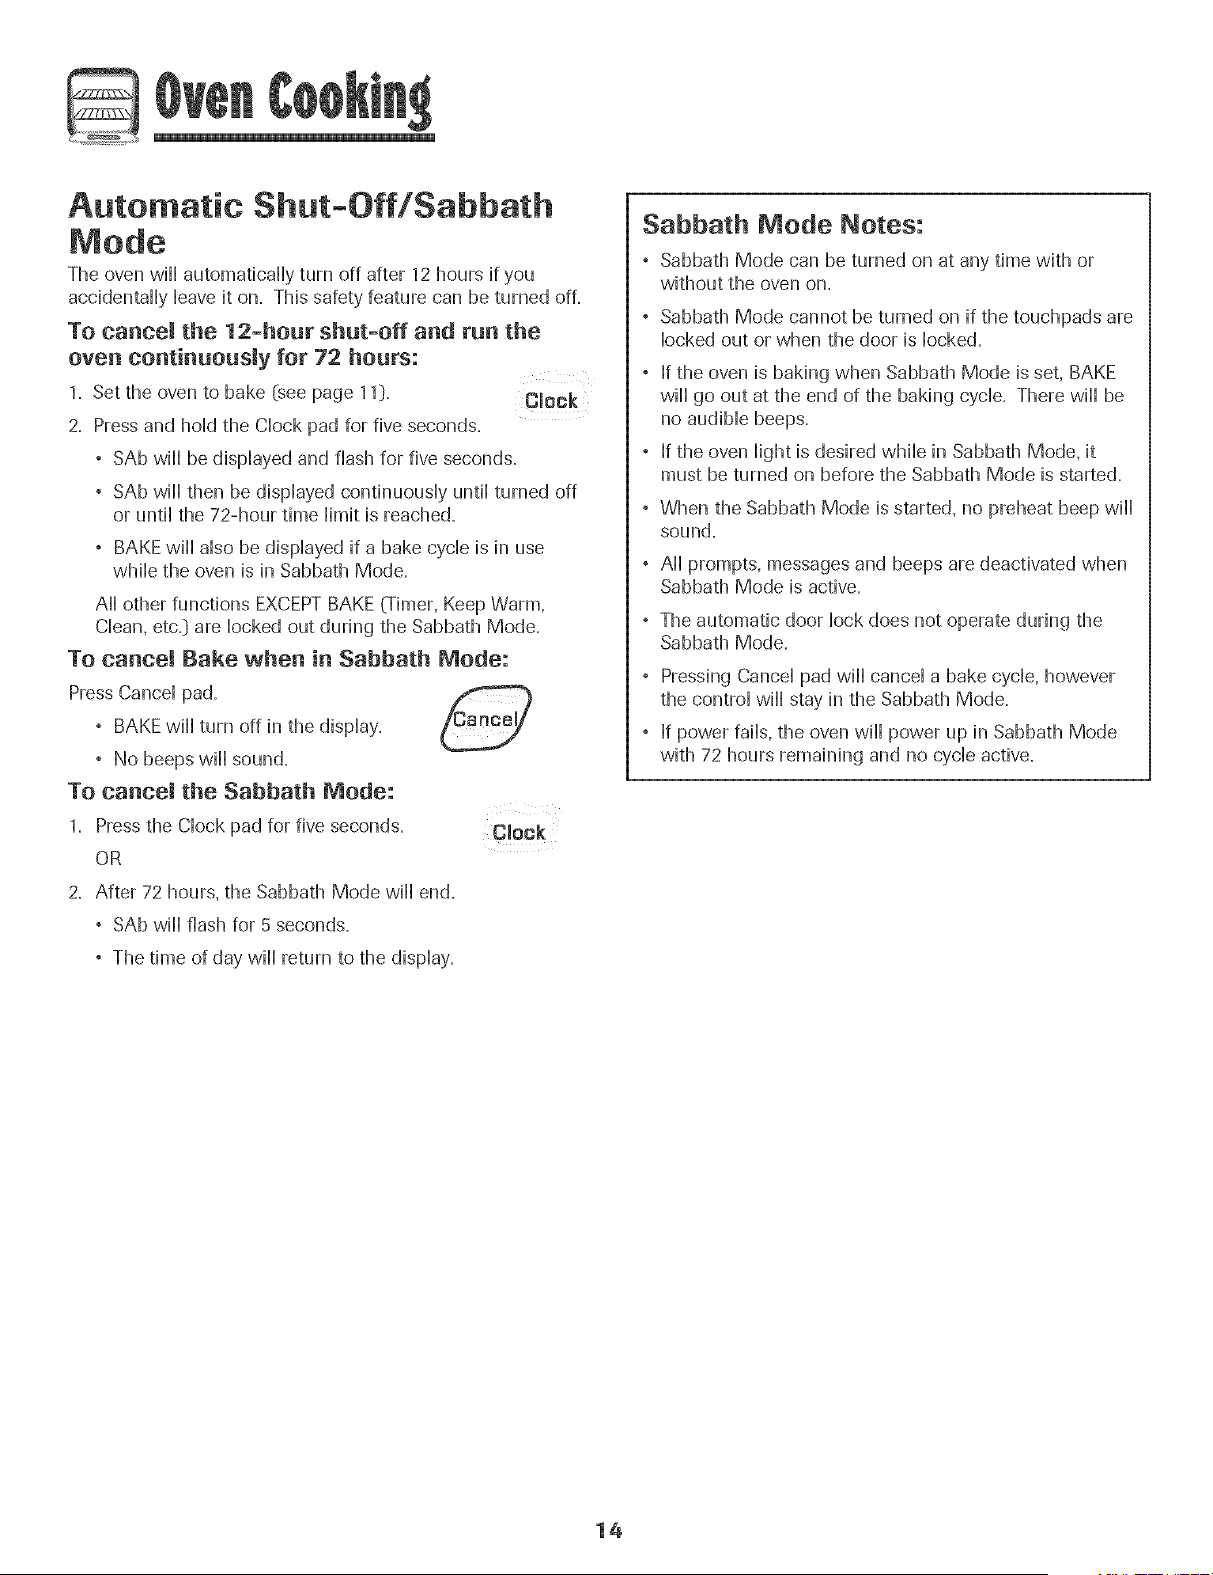
Automatic Shut-Off/Sabbath
Mode
The oven will automatically turn off after 12 hours if you
accidentally Heaveit on. This safety feature can be turned off.
TO cancel the 12-hour shut-off and run the
oven continuously for 72 hours:
1. Set the oven to bake _seepage 11]. OJock
2= Press and hoHdthe CHockpad for five seconds.
° SAb will be dispHayedand flash for five seconds.
° SAb will then be dispHayedcontinuousHy untiHturned off
or until the 72-hour time limit is reached.
, BAKE will also be displayed if a bake cycle is in use
while the oven is in Sabbath Mode.
All other functions EXCEPTBAKE (Timer, Keep Warm,
Clean, etc.:}are locked out during the Sabbath Mode.
To cancel Bake when in Sabbath Mode:
Press Cancel pad.
, BAKE will turn off in the display.
, No beeps will sound.
TO cancel the Sabbath Mode:
1= Press the Clock pad for five seconds.
OR
Clock
2. After 72 hours, the Sabbath Mode will end.
, SAb will flash for 5 seconds.
, The time of day will return to the display.
Sabbath Mode Notes:
° Sabbath Mode can be turned on at any time with or
without the oven on.
° Sabbath Mode cannot be turned on if the touchpads are
locked out or when the door is locked.
If the oven is baking when Sabbath Mode is set, BAKE
will go out at the end of the baking cycle. There will be
no audible beeps.
If the oven light is desired while in Sabbath Mode, it
must be turned on before the Sabbath Mode is started.
When the Sabbath Mode is started, no preheat beep will
sound.
All prompts, messages and beeps are deactivated when
Sabbath Mode is active.
The automatic door lock does not operate during the
Sabbath Mode.
Pressing Cancel pad will cancel a bake cycle, however
the control will stay in the Sabbath Mode.
If power fails, the oven will power up in Sabbath Mode
with 72 hours remaining and no cycle active.
14
G
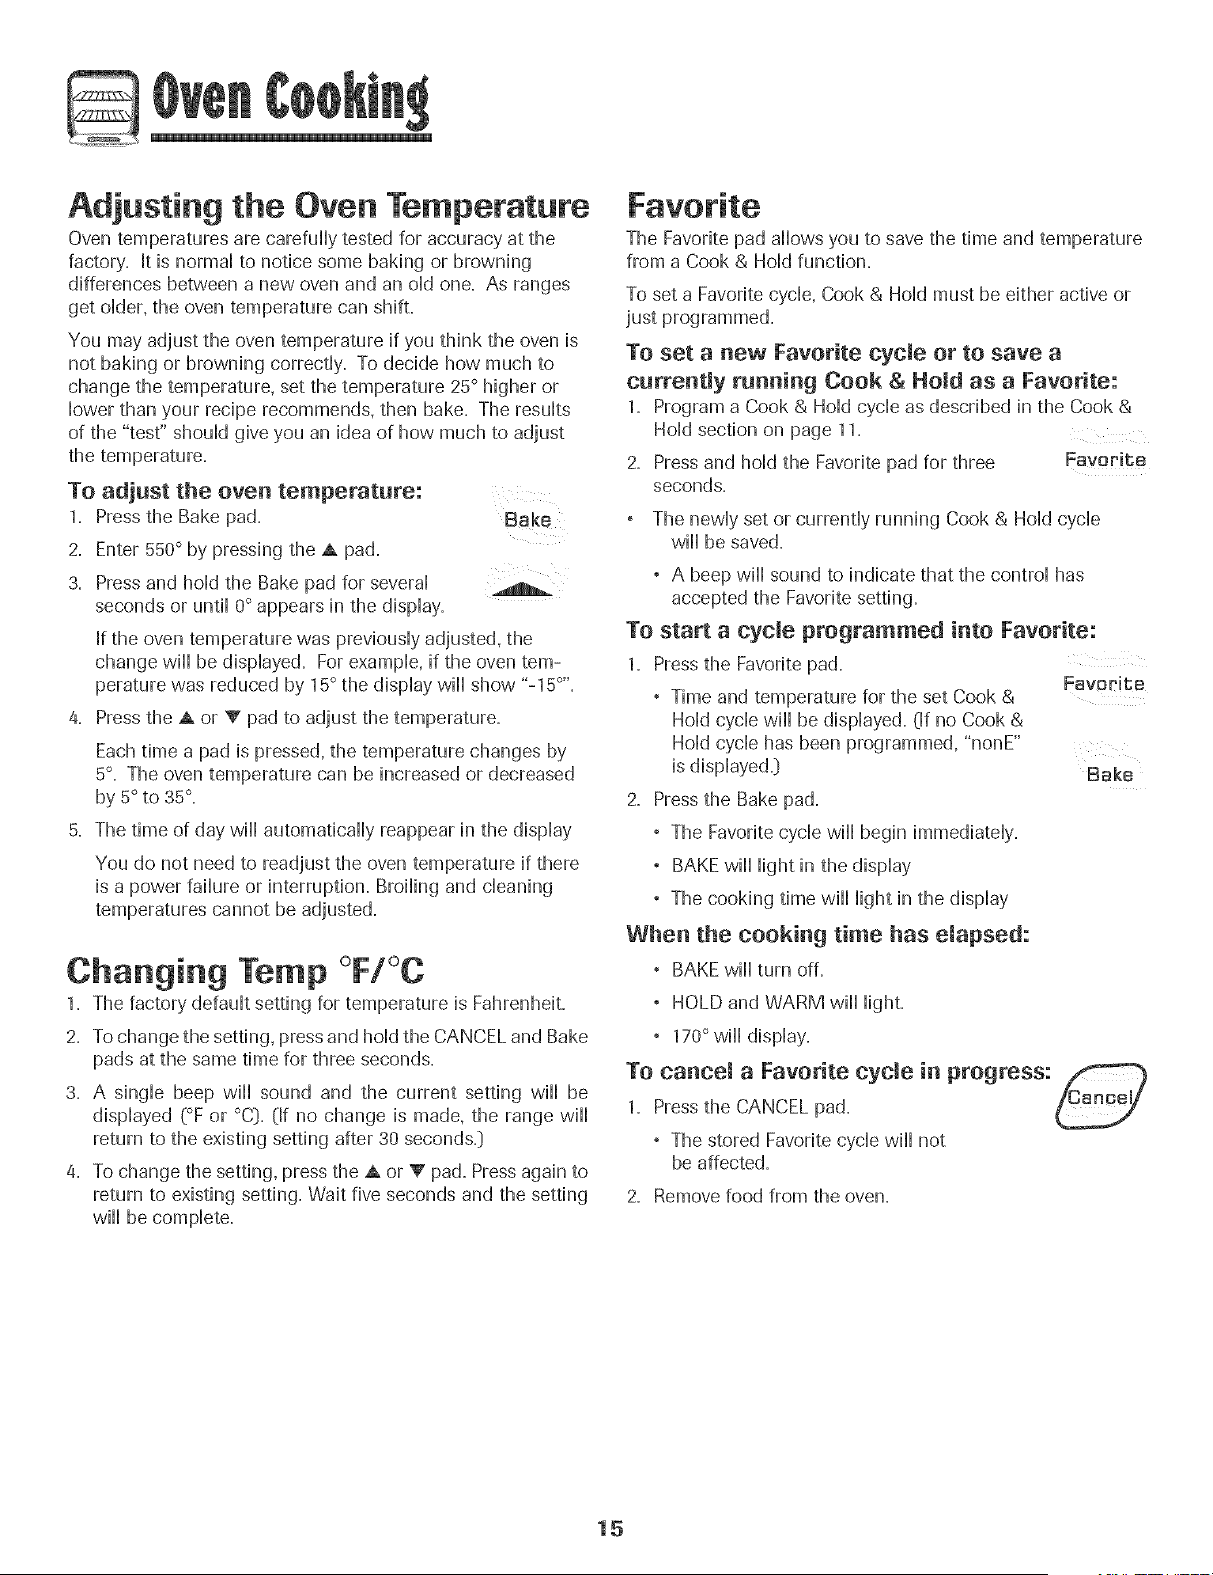
Adjusting the Oven Temperature
Oven temperatures are carefully tested for accuracy at the
factory. It is normal to notice some baking or browning
differences between a new oven and an oid one. As ranges
get oider, the oven temperature can shift.
You may adjust the oven temperature if you think the oven is
not baking or browning correcdy. To decide how much to
change the temperature, set the temperature 25° higher or
bwer than your recipe recommends, then bake. The resuits
of the "test" shouM give you an idea of how much to adjust
the temperature.
TO adjust the oven temperature:
1. Press the Bake pad. Bake
2. Enter 550° by pressing the A pad.
3. Press and hold the Bake pad for several
seconds or until 0° appears in the display.
If the oven temperature was previously adjusted, the
change wiii be displayed. For example, if the oven tem-
perature was reduced by 15° the display wiii show "-15°".
4. Press the A or _' pad to adjust the temperature.
Each time a pad is pressed, the temperature changes by
5°. The oven temperature can be increased or decreased
by 5° to 35°.
5. The time of day will automatically reappear in the display
You do not need to readjust the oven temperature if there
is a power failure or interruption. Broiling and cleaning
temperatures cannot be adjusted.
Changing Temp °F/°C
1. The factory default setting for temperature is Fahrenheit.
2. To change the setting, press and hold the CANCEL and Bake
pads at the same time for three seconds.
3. A single beep will sound and the current setting will be
displayed (°F or °C}. (If no change is made, the range will
return to the existing setting after 30 seconds.}
4. To change the setting, press the A or V pad. Press again to
return to existing setting. Wait five seconds and the setting
will be complete.
The Favorite pad aiiows you to save the time and temperature
from a Cook & Hold function.
To set a Favorite cycle, Cook & Hold must be either active or
just programmed.
To set a uew Favorite cyeme or to save a
eurreuUy ruuuiug Cook & Hold as a Favorite:
1. Program a Cook & Hold cycle as described in the Cook &
Hold section on page 11.
2. Press and hold the Favorite pad for three Favorite
seconds.
° The newly set or currently running Cook & Hold cycle
wiii be saved.
, A beep will sound to indicate that the control has
accepted the Favorite setting.
To start a cycle programmed iuto Favorite:
1. Press the Favorite pad.
, Time and temperature for the set Cook &
Hold cycle wiii be displayed. (If no Cook &
Hold cycle has been programmed, "nonE"
is displayed.}
2. Press the Bake pad.
Favorite
Bake
° The Favorite cycle wiii begin immediately.
° BAKE wiii light in the display
° The cooking time wiii light in the display
Wheu the eookiug time has elapsed:
° BAKE wiii turn off.
° HOLD and WARM wiii light.
° 170°will display.
To cancel a Favorite eyde iu progress:_
1. Press the CANCEL pad.
° The stored Favorite cycle wiii not
be affected.
2. Remove food from the oven.
15
To set Broil:
1. To begin, press the Broii pad.
Broil
, BROIL flashes
, SEt is dispiayed
2. Press the A pad to set HI broii or press the V pad to set
LO broil.
, HI or LO wiiI be displayed.
,Seiect HI broii (550° F} for normai broiiing. Seiect
LO broii (450° F} for How-temperature broiiing of ionger
cooking foods such as pouitry.
3. After four seconds, the oven wiii start.
, BROIL wiii remain iit
4. For optimum browning, preheat broil element for 3-4
minutes before adding food.
5. Place food in the oven. Leave oven door open about four
inches (the first stop}.
6. Turn meat once about halfway through cooking.
7. When food is cooked, press the Cancel pad.
Remove food and broiler pan from the oven.
° The time of day wiii reappear in the display.
Broil Notes:
, For best results when broiling, use a pan designed for
broiling.
, Expect broil times to increase and browning to be
slightly lighter if appliance is installed on a 208-volt
circuit.
, HI is used for most broiling. Use LO broil when broiling
longer cooking foods. The lower temperature allows
food to cook to the well done stage without excessive
browning.
. To change the oven temperatare during broiling,
press the BroiHpad and then press the A or V pad to
switch between LO and HI broil
, Broil times may be longer when the lower broiling temp-
erature is selected.
, Most foods should be turned halfway through broiling
time.
, For additional broiling tips and temperatures, refer to
the "Cooking Made Simple" booklet.
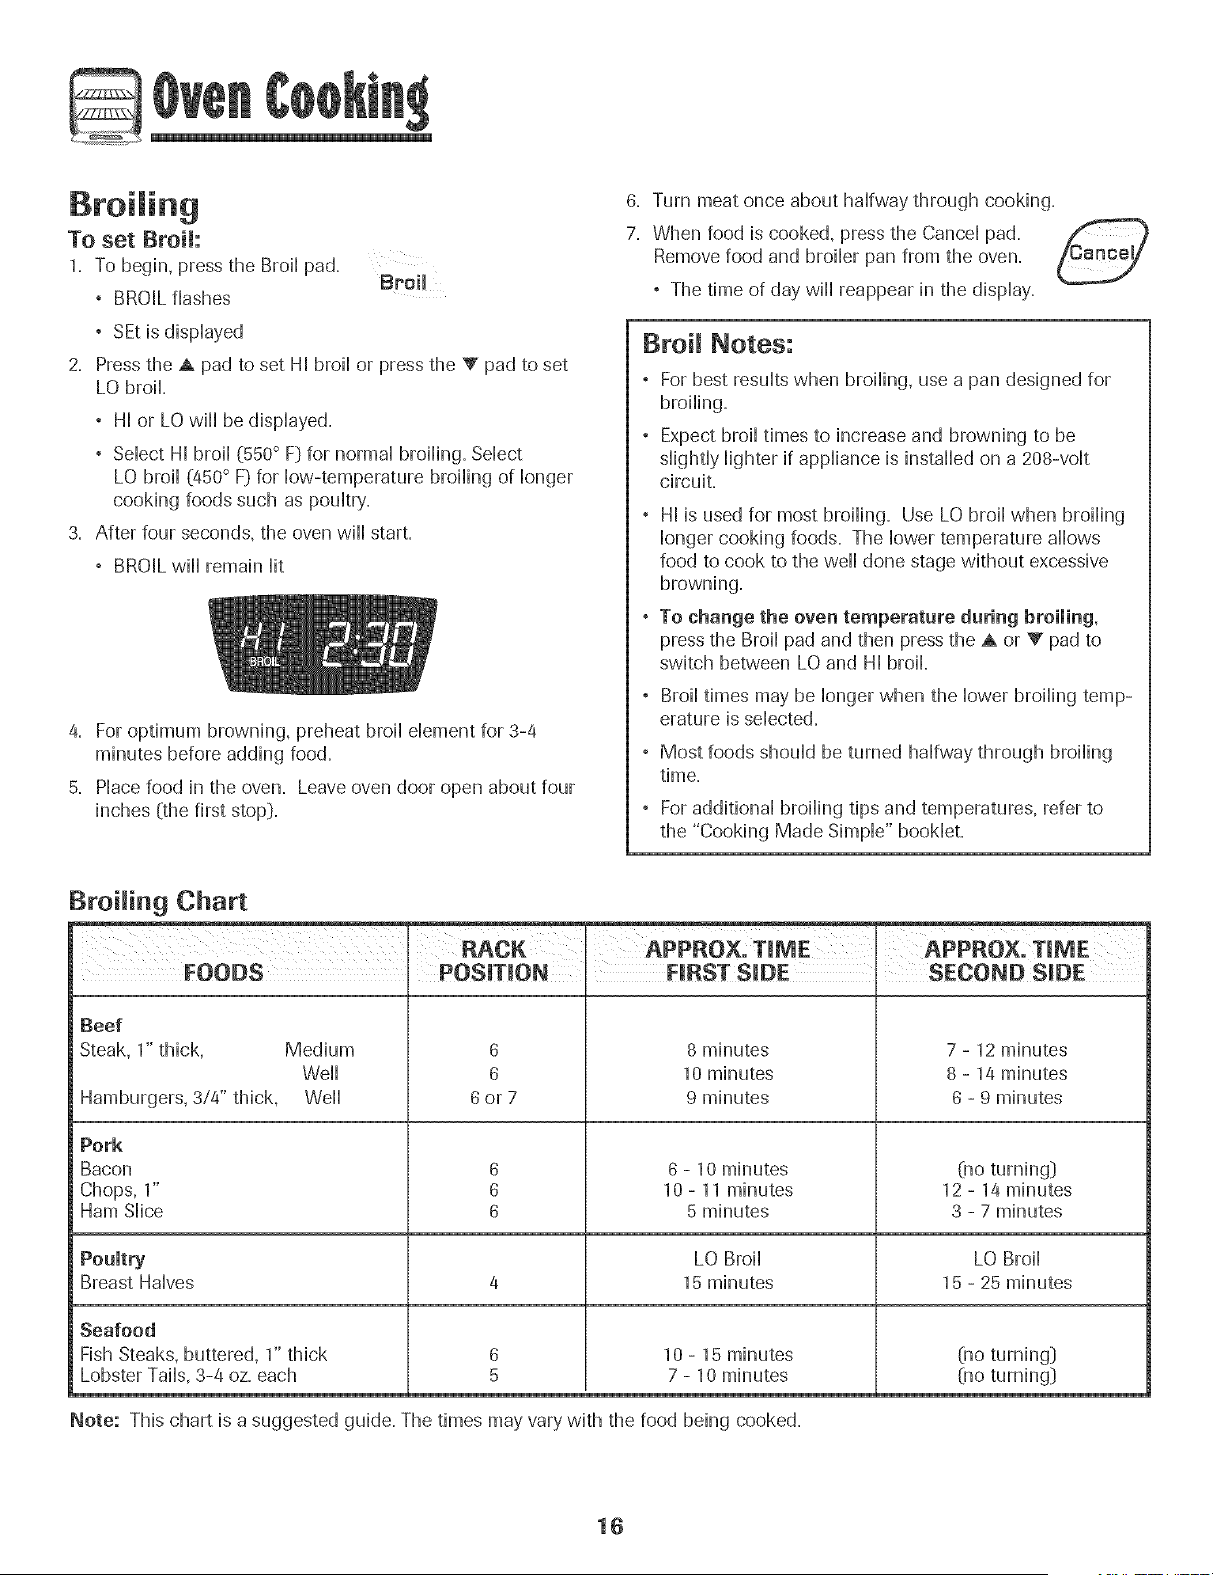
Broiling Chart
P_CK APPROX+
FOODS POS{T{ON i
Beef
Steak, 1" thick, Medium
Weii
Hamburgers, 3/4" thick, Well
Pork
Bacon
Chops, 1"
Ham Slice
Poultry
Breast Halves
Seafood
Fish Steaks, buttered, 1" thick
Lobster Tails, 3-4 oz. each
6
6
6or7
8 minutes
10 minutes
9 minutes
6 - 10 minutes
10 - 11 minutes
5 minutes
APPRO×!
, SECOND S_DE
7 - 12 minutes
8 - 14 minutes
6 - 9 minutes
6
6
6
LO Broil
15 minutes
10 - 15 minutes
7 - 10 minutes
Note: This chart is a suggested guide. The times may vary with the food being cooked.
(no turning}
12 - 14 minutes
3 - 7 minutes
LO Broil
15 - 25 minutes
(no turning}
(rio turning}
16
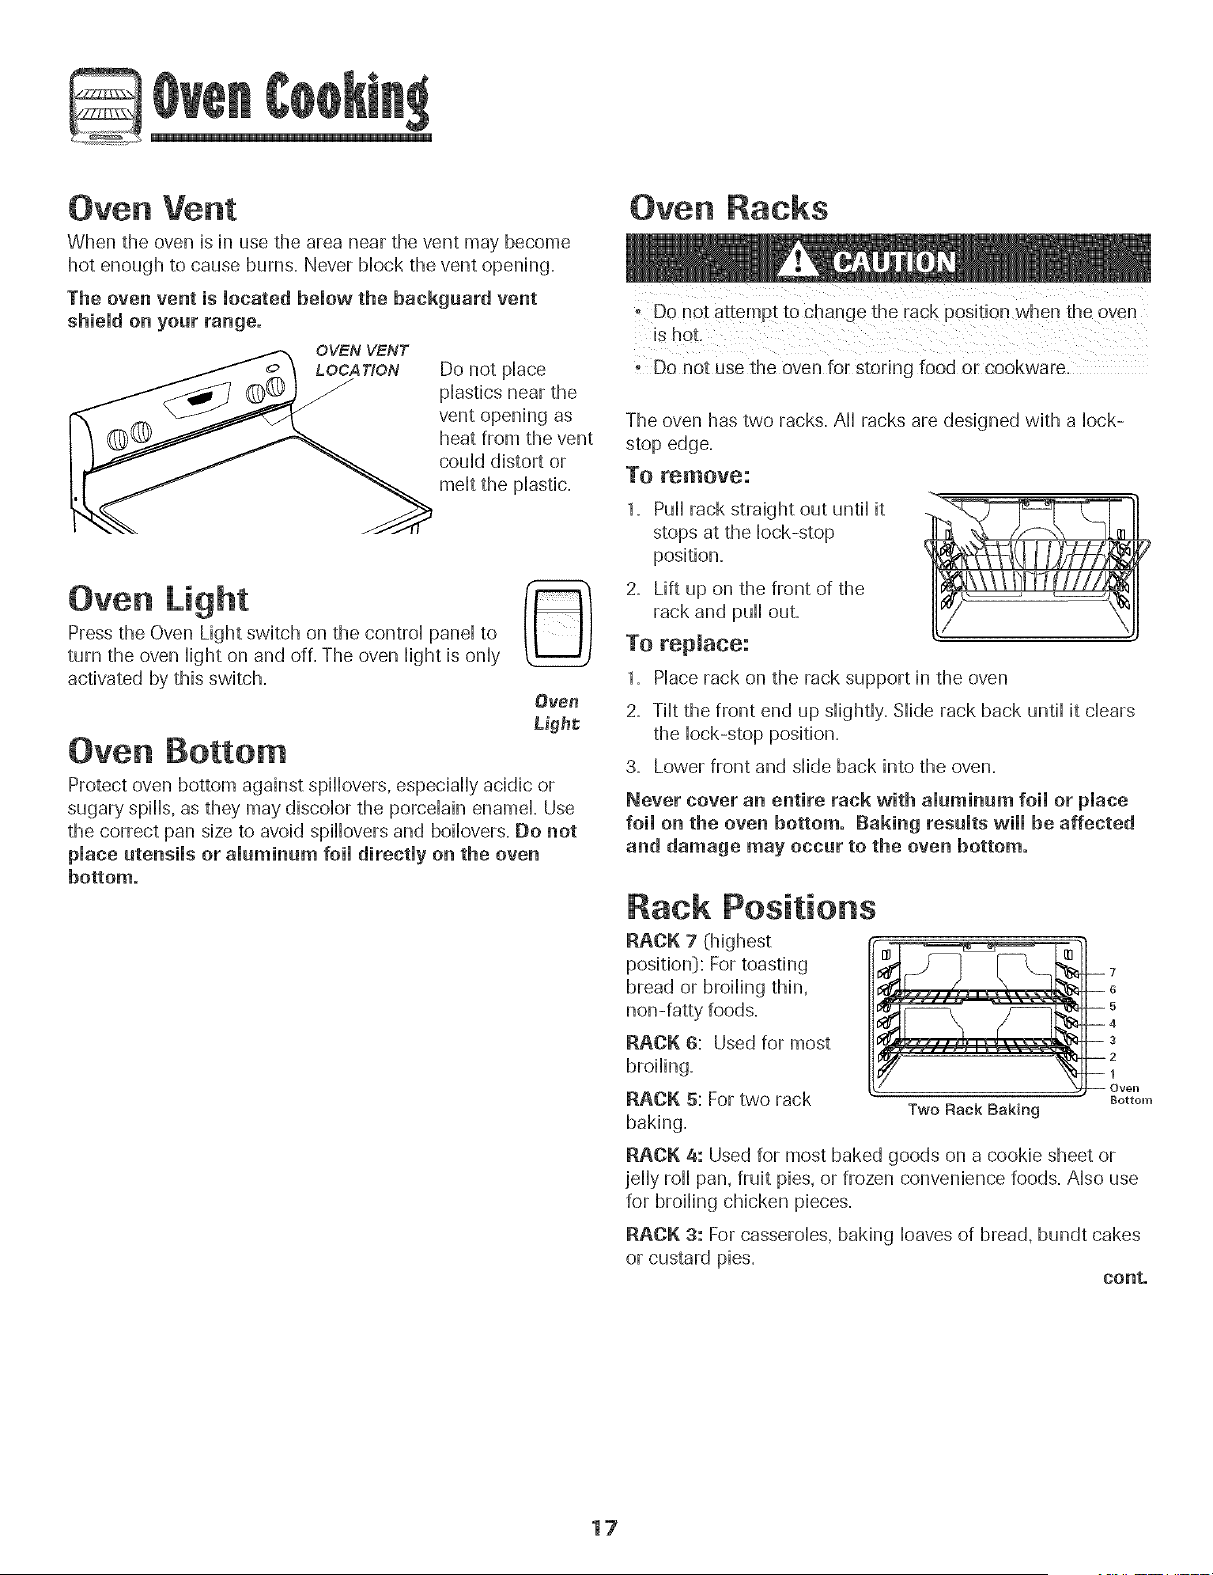
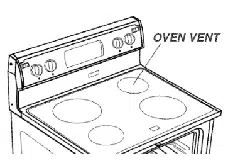
Oven Vent
When the oven is in use the area near the vent may become
hot enough to cause burns. Never Mock the vent opening.
The oven vent is located below the backgaard vent
shield on your range.
OVEN ENT
TION
Do not piace
piasdcs near the
vent opening as
heat from the vent
couid distort or
me,it the piasdc=
Oven Light
Press the Oven Light switch on the controi panei to
turn the oven Highton and off=The oven Hightis oniy
activated by this switch.
Oven Bottom
©
Oven
Light
Protect oven bottom against spHbvers, espedafly acidic or
sugary spills, as they may discolor the porcelain enamel. Use
the correct pan size to avoid spillovers and boilovers. Do not
place utensils or aluminum foil directly on the oven
bottom.
Oven Racks
i Do not use the oven for storing food or cookware.
The oven has two racks. All racks are designed with a lock-
1. Pull rack straight out until it
stops at the lock-stop
position.
2. Lift up on the front of the
rack and pull out.
To replace:
1. Place rack on the rack support in the oven
2. Tilt the front end up slightly. Slide rack back until it clears
the lock-stop position.
3. Lower front and slide back into the oven.
Never cover an entire rack with aluminum foil or place
foil on the oven bottom. Baking results will be affected
and damage may occur to the oven bottom.
Rack Positions
RACK 7 {highest
position}: For toasting
bread or broiling thin,
non-fatty foods.
RACK 6: Used for most
broiling.
RACK 5: For two rack
baking.
HiE
Oven
Bottom
Two Rack Baking
RACK 4: Used for most baked goods on a cookie sheet or
jelly roll pan, fruit pies, or frozen convenience foods. Also use
for broiling chicken pieces.
RACK S: For casseroles, baking loaves of bread, bundt cakes
or custard pies.
conto
17
RACK 2: Used for roasting smaHHcuts of meat, frozen pies,
dessert souffles or angeHfood cake. AHsouse for two rack
baking.
RACK 1: Used for roasting Hargecuts of meat and pouHtry.
Oven Bottom: PHaceoven rack on
raised sides of oven bottom. Use for
additionaHspace when cooking Harge
oven meaHs.
MULTIPLE RACK COOKING: Two
rack: Use rack positions 2 and 5.
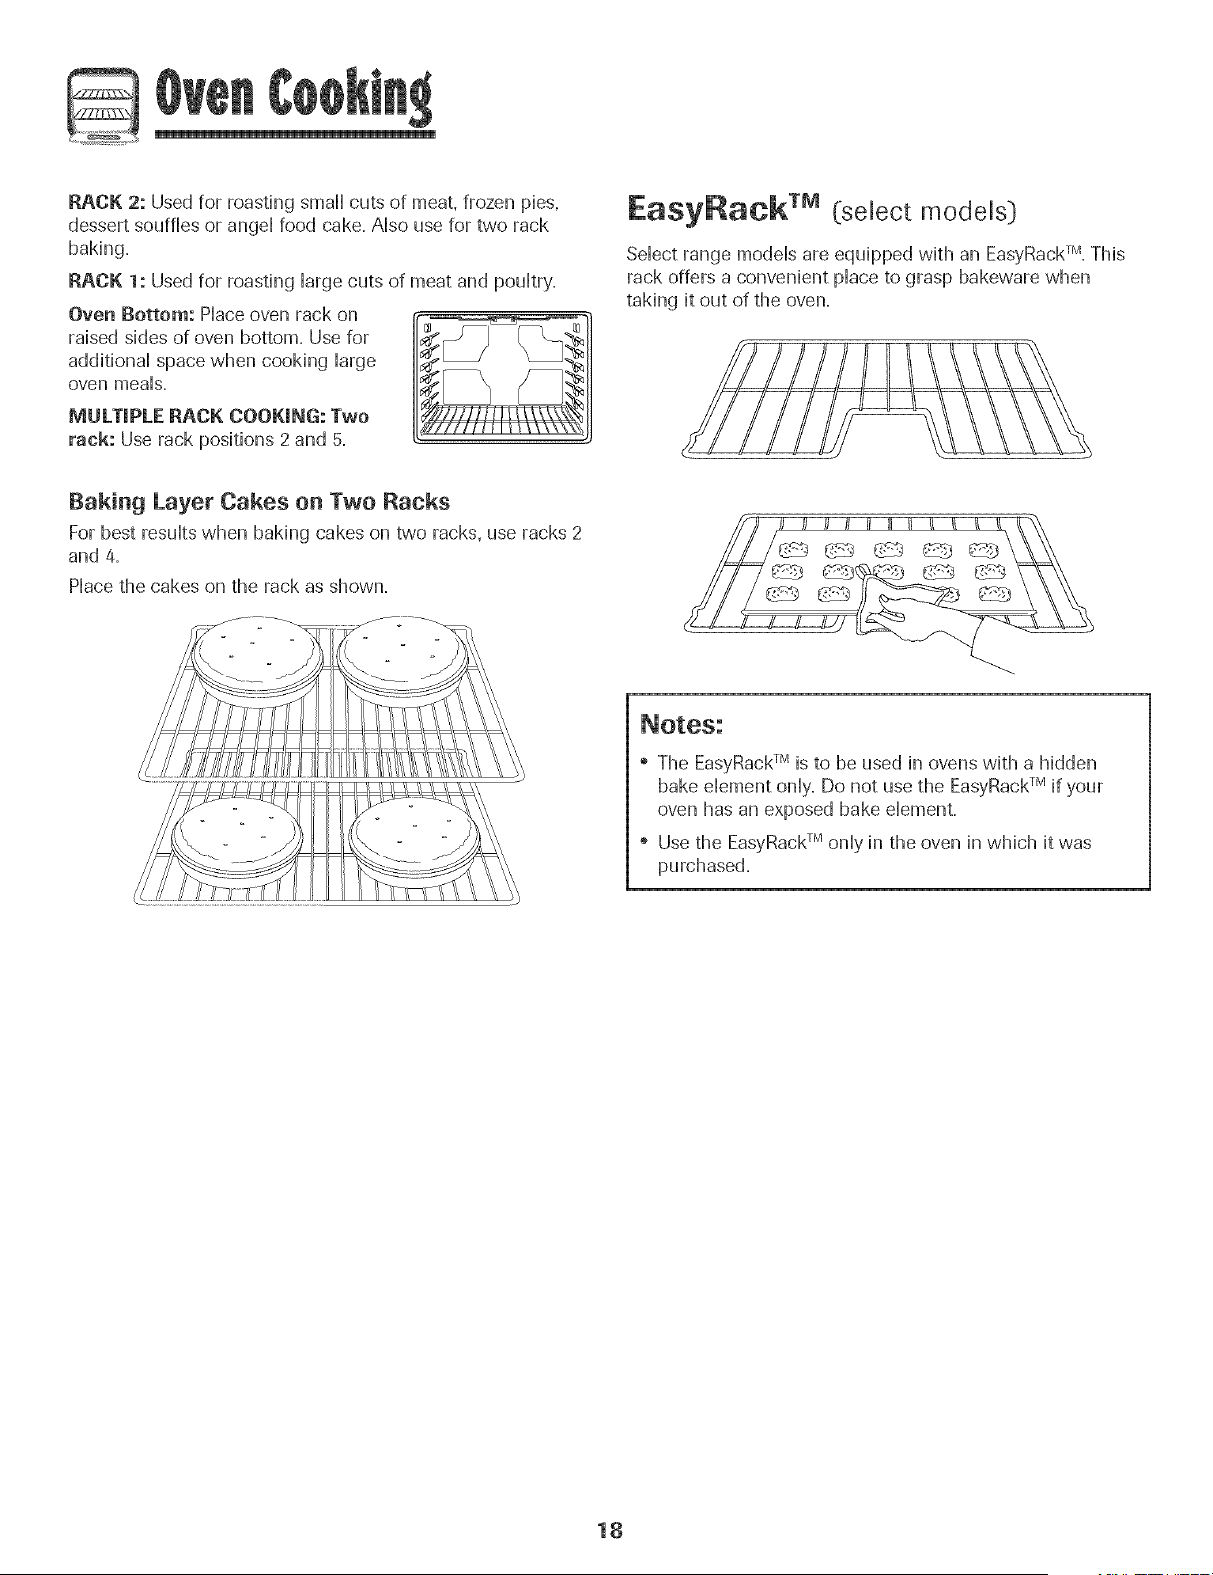
Baking Layer Cakes on Two Racks
For best resuHtswhen baking cakes on two racks, use racks 2
and 4.
PHacethe cakes on the rack as shown.
EasyRack TM (select models)
SeHectrange modeHsare equipped with an EasyRackT_LThis
rack offers a convenient pHaceto grasp bakeware when
taking it out of the oven.
The EasyRackTM is to be used in ovens with a hidden
bake dement onHy.Do not use the EasyRackTM if your
oven has an exposed bake dement.
Use the EasyRackTM onHyin the oven in which it was
purchased.
18

5
Seff-C ean Oven
o _t is normal for parts of the range to become hot during a
• To arevent damage to oven door. do not attempt to open
the door when LOCK is displayed.
• Avoid touching cooktop, door window or oven vent area
during a clean cycle.
• Do not use commercial oven cleaners on the oven finish
or around any sart of the oven. They will damage the
finish or parts.
The self-clean cycle uses above-normal cooking temperatures
to automatically clean the oven interior.
It is normal for flare-ups, smoking, or flaming to occur during
cleaning if the oven is heavily soiled. It is better to clean the
oven regularly rather than to wait until there is a heavy build-
up of soil in the oven.
During the cleaning process, the kitchen should be well
ventilated to get rid of normal odors associated with cleaning.
Before Se f-Cmeaning
1. Turn off the oven light before cleaning. The light may burn
out during the clean cycle.
2. Remove broiler pan, all pans, and oven racks from the
oven. The oven racks will discolor and may not slide easily
after a self-clean cycle if they are not removed.
3. Clean oven frame, door frame, area outside of gasket, and
around the opening in the door gasket with a nonabrasive
cleaner such as Bon Ami* or detergent and water. The
self-cleaning process does not clean these areas. They
should be cleaned to prevent soil from baking on during
the clean cycle. (The gasket is the
seal around the oven door and
window.} ".
4. To prevent damage, do not dean or
rub the gasket around the oven
door. The gasket is designed to
seal in heat during the clean cycle.
5. Wipe up excess grease or spillovers from the oven bottom.
This prevents excessive smoking, flare-ups or flaming
during the clean cycle.
6. Wipe up sugary and acidic spillovers such as sweet
potatoes, tomato, or milk-based sauces. Porcelain enamel
is acid-resistant, not acid-proofi The porcelain finish may
discolor if acidic spills are not wiped up before a self-clean
cycle.
To set Self-Clean:
Note: Oven temperature must be below 400° F to program 1a clean cycle.
i
1. Close the oven door.
Clean
2. Press the Cban pad.
, CLEAN flashes in the display.
Press the A or V pad.
° MEd (Medium soil, 3 hours} is displayed.
If the door is not closed, beeps wiii sound
and "door" wiii display. If the door is not closed within a5
seconds, the self-cleaning operation wiii be canceled and
the display wiii return to the time of day.
Press the A or V pad to scroii through the
self-cleaning settings.
HVy (Heavy Soil, 4 hours}
MEd (Medium soil, 3 hours}
MTE ( Light Soil, 2 hours}
Choosing the soil level of the oven automatically programs
the self-cleaning time.
After four seconds, the oven wiii start cleaning.
° The cleaning time wiii start counting down in the display.
° LOCK wiii appear in the display.
° CLEAN wiii appear in the display.
-- Clean
3.
To Delay a Semf-CJean Cyde:
1. Press the Clean and Timer pads.
, DELAY and 00:00 wiii appear in the
display.
2. Press the A or Y" pad to set the amount of time you want
to delay the cycle. The delay time can be set from ten
minutes (00:10} to 11 hours, 59 minutes (11:59}.
3. Press the Clean pad.
, CLEAN wiii flash.
4. Press the A or V" pad.
, MEd (Medium soil, 3 hours} is displayed.
conto
* Brand names for cleaning products are registered trademarks of the respective manufacturers.
19

5. PresstheA orV padtoscrollthroughthesdf-cbaning
settings+
HVy(HeavySoft+4hours]
MEd(Mediumsoft,3hours]
LITE(LightSoft,2hours]
Choosingthesoftbvd oftheovenautomaticallyprograms
thesdf-cbaningtime.
6. Afterfourseconds,CLEAN,DELAYandLOCKwfliappear
inthedispiaytoshowthattheovenissetforaddayed
dean operation. The deiay time is dispiayed.
During the Serf+Clean Cycle
When LOCK shows hi the dispiay, the door cannot be opened+
To prevent damage to the door, do not force the door open
when LOCK is displayed,
Smoke aad Smeffs
You may see some smoke and smell an odor the first few
times the oven is cleaned. This is normal and will lessen in
time+
Smoke may also occur if the oven is heavily soiled or if a
broiler pan was left in the oven.
Sounds
As the oven heats, you may hear sounds of metal parts
expanding and contracting. This is normal and will not
damage the oven.
Jf the oven has already been set for a dean
cycle and you wish to set a delay:
1. Press the Clean and Timer pads, (Press -- Clean
the Clean pad first]
° DELAY flashes+
° 00:00 will appear in the display.
2. Press the A or T pad to set the amount of time you want
to delay the cycb.
After four seconds, CLEAN, DELAY and LOCK will appear
in the display to show that the oven is set for a delayed
clean operation. The delay time is displayed.
When the Seif-CJean cycle starts:
° DELAY will turn off.
° The clean time wiii appear in the display.
To cance! the Seif-OJean cycle:
Press the Cancel pad.
° All words disappear from the display.
° All functions are canceled.
° The time of day appears in the display.
After Serf+Cleaning
About one hour after the end of the self-dean cycle, LOCK
will turn off. The door can then be opened.
Some soil may leave a light gray, powdery ash. Remove
it with a damp cloth. If soil remains after wiping, that means
the clean cycle was not long enough. The soil will be re-
moved during the next clean cycle.
if oven racks were left in the oven and do not slide
smoothly after a clean cycle, wipe racks and rack supports
with a small amount of vegetable oil to make them easier to
move.
Fine lines may appear in the porcelain becaase it went
through heating and cooling+ This is normal and will not
affect performance+
A white discoloration may appear after cleaning if acidic
or sugary foods were not wiped up before the self=clean
cycle, This discoloration is normal and will not affect perfor-
mance.
° If the oven door is left open, "door" wiii flash in the
display and a signal will beep until the door is closed
and the Clean pad is pressed again.
° If more than five seconds elapse between pressing the
Clean pad and the A or V pads, the program will
automatically return to the previous display.
, The oven door will be damaged if the oven door is
forced to open when LOCK is still displayed.
2O
Cleaning Procedures
Brand names are registered trademarks of the
respective manufacturers.
-!f a part is remove& be sure it is correct!y replace& _ To order call 1-877-232-8771 USA and
1-800-688-8408 Canada.
PART PROOE[Z_U }:{E
PorceHainenamd is gHassfused on metaHand may crack or chip with misuse. It is acid resistant, not acid
Cooktop - proof. AH spiHovers,especially acidic or sugary spiHovers,shouHdbe wiped up immediately with a dry cloth.
Porcelain Enamel ° When cool, wash with soapy water, rinse and dry.
, Never wipe off a warm or hot surface with a damp cloth. This may cause cracking or chipping.
, Never use oven cleaners, abrasive or caustic cleaning agents on exterior finish of range.
Broiler Pan and Never cover insert with ahtminum foil as this prevents the fat from draining to the pan below.
insert , Place soapy cloth over insert and pan; let soak to loosen soil=
, Wash in warm soapy water. Use scouring pad to remove stubborn soil.
, Broiler pan and insert can be cleaned in dishwasher.
Clock and , To activate "Control Lock" for cleaning, see page 10.
Control Pad , Wipe with a damp cloth and dry,.Do not use abrasive cleaning agents as they may scratch the surface.
Area ° Glass cleaners may be used if sprayed on a cloth first. 00 NOTspray directly on eentrolpad and
display area.
Control Knobs , Remove knobs in the OFF position by pulling forward.
, Wash, rinse and dry. Do [lot use abrasive cleaning agents as they may scratch the finish.
, Turn on each element to be sure the knobs have been correctly replaced.
Cooktop - Never use oven cleaners, chlorine bleach, ammonia or glass cleaners with ammonia. NOTE: Ca#
Glass-Ceramic an authorized servicer if the glass=ceramic top should crack, break or if metal or aluminum foil
should melt on the cooktop.
, Allow the eooktop to cool before cleaning=
, General - Clean cooktop after each use,or when needed, with a damp paper towel and Cooktop Cleaning
Creme_(Part No. 20000001:)_*-Then, buff with a clean dry,cloth.
NO TE:Permanent stains will deve/op ff so//is a//owed to cook on by repeated/y using the eooktop when soiled.
, Heavy Boils or Metal Marks - Dampen a "scratchless" or "never scratch" scrubber sponge. Apply
Cooktop Cleaning Creme_ (Part No. 20000001:)_ and scrub to remove as much soil as possible. Apply a
thin layer of the creme over the soil, cover with a damp paper towel and let stand 30 to 45 minutes (2-3
hours for very,heavy soil:). Keep moist by covering the paper towel with plastic wrap. Scrub again, then
buff with a clean dry cloth.
NOTE: Only use a CLEAN,DAMP "scratchless" pad that is safe for non-stick cookware. Thepattern and glass
will be damaged ff the pad is not damp, ff the pad is soiled, or ff another type of pad is used.
, Barned-on or Crusty Boils - Scrub with a "scratchless" or "never scratch" scouring pad and Cooktop
Cleaning Creme_-
21

Oven Window
and Door - Glass
, Avoid using excessive amounts of water which may seep under or behind giass causing staining.
, Wash with soap and water. Rinse with dear water and dry. Giass cieaner can be used if sprayed on acioth
first.
, Do not use abrasive materiais such as scouring pads,steei wooi or powdered cieaners as theywiii scratch
gHass.
Oven mnterior , FoHHowinstructions on pages 19-20 to set a seHf-cHeancycHe.
Oven Racks
Stainless Steel
(seHect modems}
Storage Drawer_
Side Panels -
Painted Enamel
Ciean with soapy water=
Remove stubborn soii with cieansing powder or soap-tiffed scouring pad=Rinse and dry=
Rackswiii permanentiy discoior and may not siide smoothiy if Heftin the oven during a seif-ciean operation.
If this occurs, wipe the rack edge and rack support with a smaii amount of vegetabie oii to restore ease
of movement, then wipe off excess oil
° DO NOT USE ANY CLEANING PRODUCT CONTAINING CHLORINE BLEACH.
° DO NOT USEABRASIVE OR ORANGE CLEANERS.
° ALWAYS WIPE WITH THE GRAIN WHEN CLEANINO.
° Daily Cleaning/Light Soil -- Wipe with one of the foiiowing - soapy water, white vinegar/water soiution,
Formuia a09 Giass and Surface Cieaner* or a simiiar giass cieaner- using a sponge or soft cioth= Rinse
and dry=To poiish and heip prevent fingerprints, foiiow with Stainiess Steei Magic Spray (Part No=
20000008}_*.
° Moderate/Heavy soim-- Wipe with one of the foIHowing - Bon Ami, Smart Cleanser, or Soft Scrub* -
using a damp sponge or soft cloth. Rinse and dry. Stubborn soils may be removed with a damp multi-
purpose Scotch-Brite* pad; rub evenly with the grain. Rinse and dry. To restore luster and remove streaks,
foIHowwith StainHessSteel Magic Spray*.
, Diseomoration -- Using a damp sponge or soft cloth, wipe with Cameo Stainless Steel CleaneP. Rinse
immediately and dry. To remove streaks and restore luster, follow with Stainless Steel Magic Spray*.
When cool, wash with warm soapy water, rinse and dry. Never wipe a warm or hot surface with a damp
cloth as this may damage the surface and may cause a steam burn.
For stubborn soil, use mildly abrasive cleaning agents such as baking soda paste or Bon Ami.* Do not use
abrasive, caustic or harsh cleaning agents such as steel wool pads or oven cleaners. These products will
scratch or permanently damage the surface.
NOTE: Use a dry towel or cloth to wipe up spills, especially addie or sugary spills. Surface may
discolor or dutl if soil is not immediately removed. This is espec@lly important for white surfaces.
* Brand names for cleaning products are registered trademarks of the respective manufactureus.
** To order direct, carl 1_877_232_6771 USA and 1_800_688_8/408Canada.
22
Oven Door
DO not PUaceexcessive weight on o[ stand on an open
oven door. This couM Causethe range to tip over, break
the d00r, 0r k_Jurethe USeh
Note: The oven door on a new range may feei "spongy"
when it is dosed. This is normal and will decrease with use.
To replace:
1. Fit the ends of the drawer giides into the raib h) the range.
2. Lift up the front of the drawer and gendy push hl to the
first stop position.
3. Lift drawer up again and push until drawer is closed.
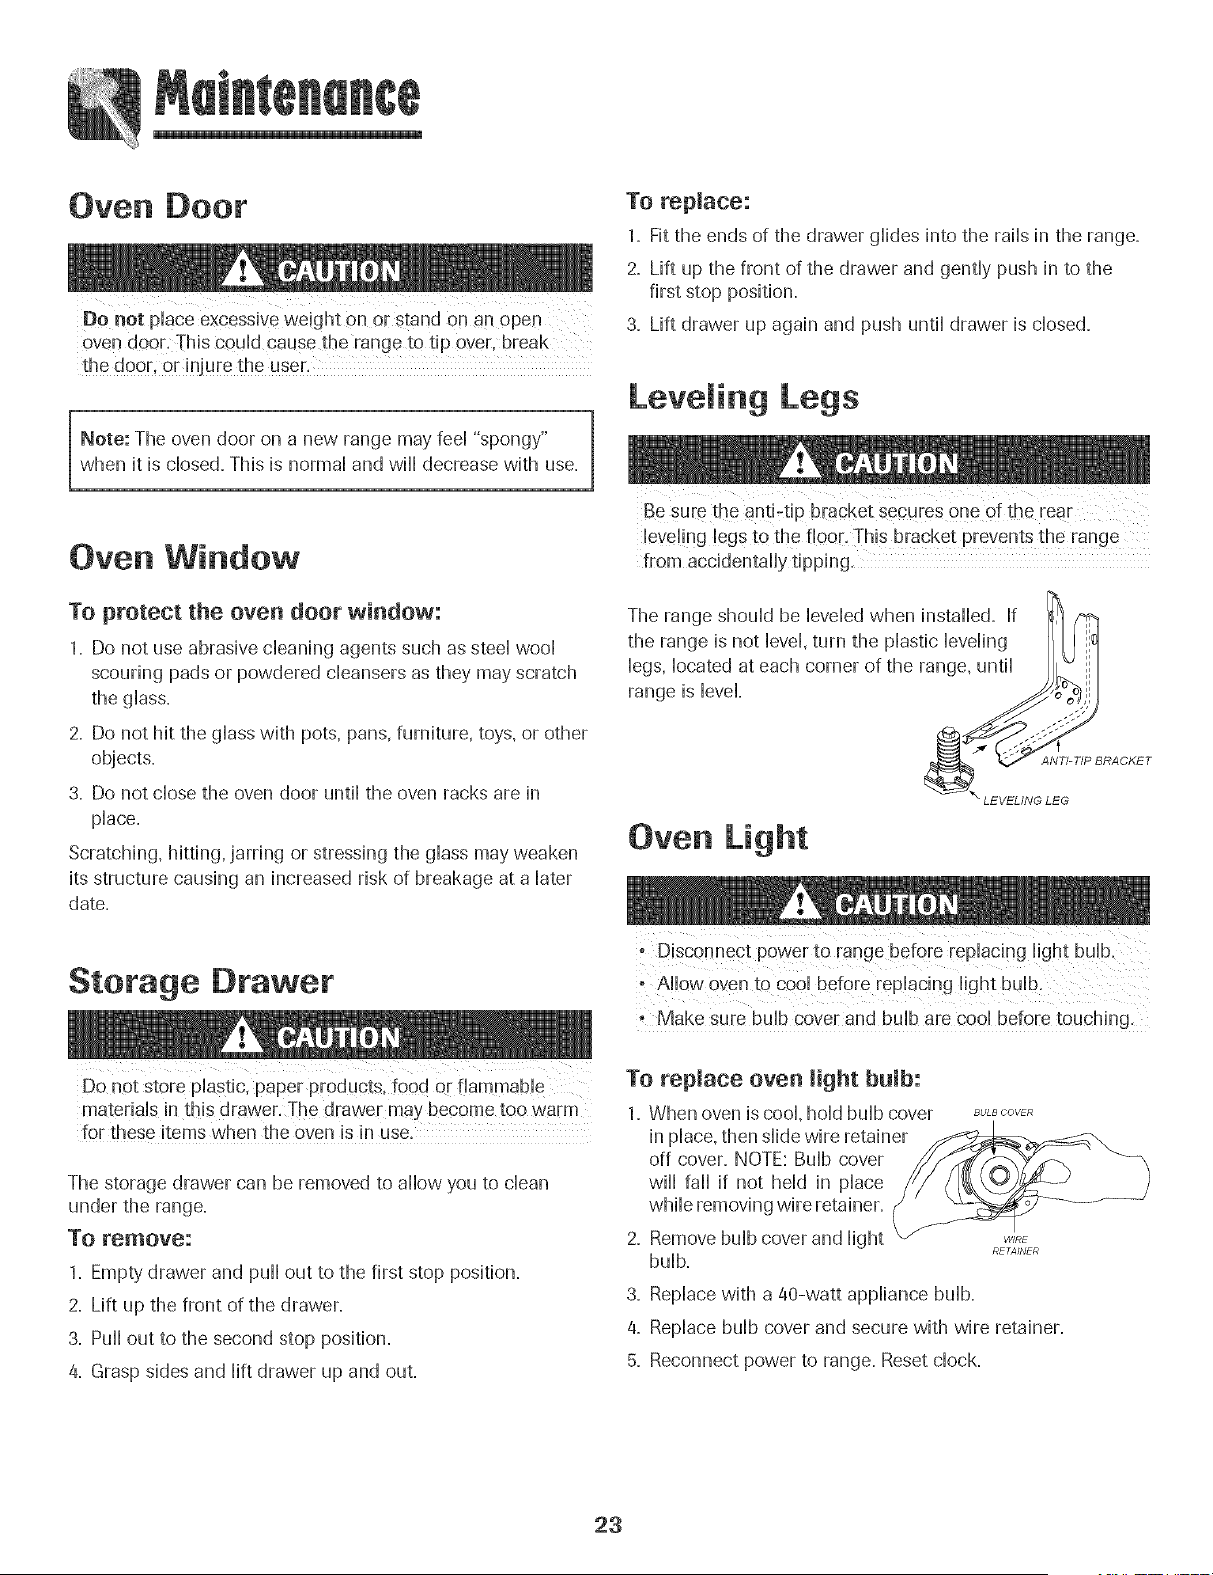
Leve ing Legs
Oven Window
To protect the oven door window:
1. Do riot use abrasive cbaning agents such as steel wool
scouring pads or powdered cbansers as they may scratch
the glass.
2. Do not hit the glass with pots, pans, furniture, toys, or other
objects.
3. Do not close the oven door until the oven racks are in
place.
Scratching, hitting, jarring or stressing the glass may weaken
its structure causing an increased risk of breakage at a later
date.
Storage Drawer
Do not store plastic, paper products, food or flammable
materials in this drawer. The drawer may become too warm
for these items when the oven is in use.
The storage drawer can be removed to allow you to clean
To remove:
1. Empty drawer and pull out to the first stop position.
2. Lift up the front of the drawer.
3. Pull out to the second stop position.
4. Grasp sides and lift drawer up and out.
!eye!!ng !egs to the floor. This bracket prevents the range
from accidentally tipping,
Oven Light
• Disconnect power to range befor e replacing light bulb,
- Make sure bulb cover and bu!b are cool before touching,
To replace oven light bulb:
1. When oven is cool, hold bulb cover _u__,own
in place, then slide wire retainer
off cover. NOTE: Bulb cover
wiii fail if not held in place
while removing wire retainer. (-
\
2. Remove bulb cover and light
RETAINER
bulb.
3. Replace with a 40-watt appliance bulb.
4. Replace bulb cover and secure with wire retainer.
5. Reconnect power to range. Reset clock.
23
i
m
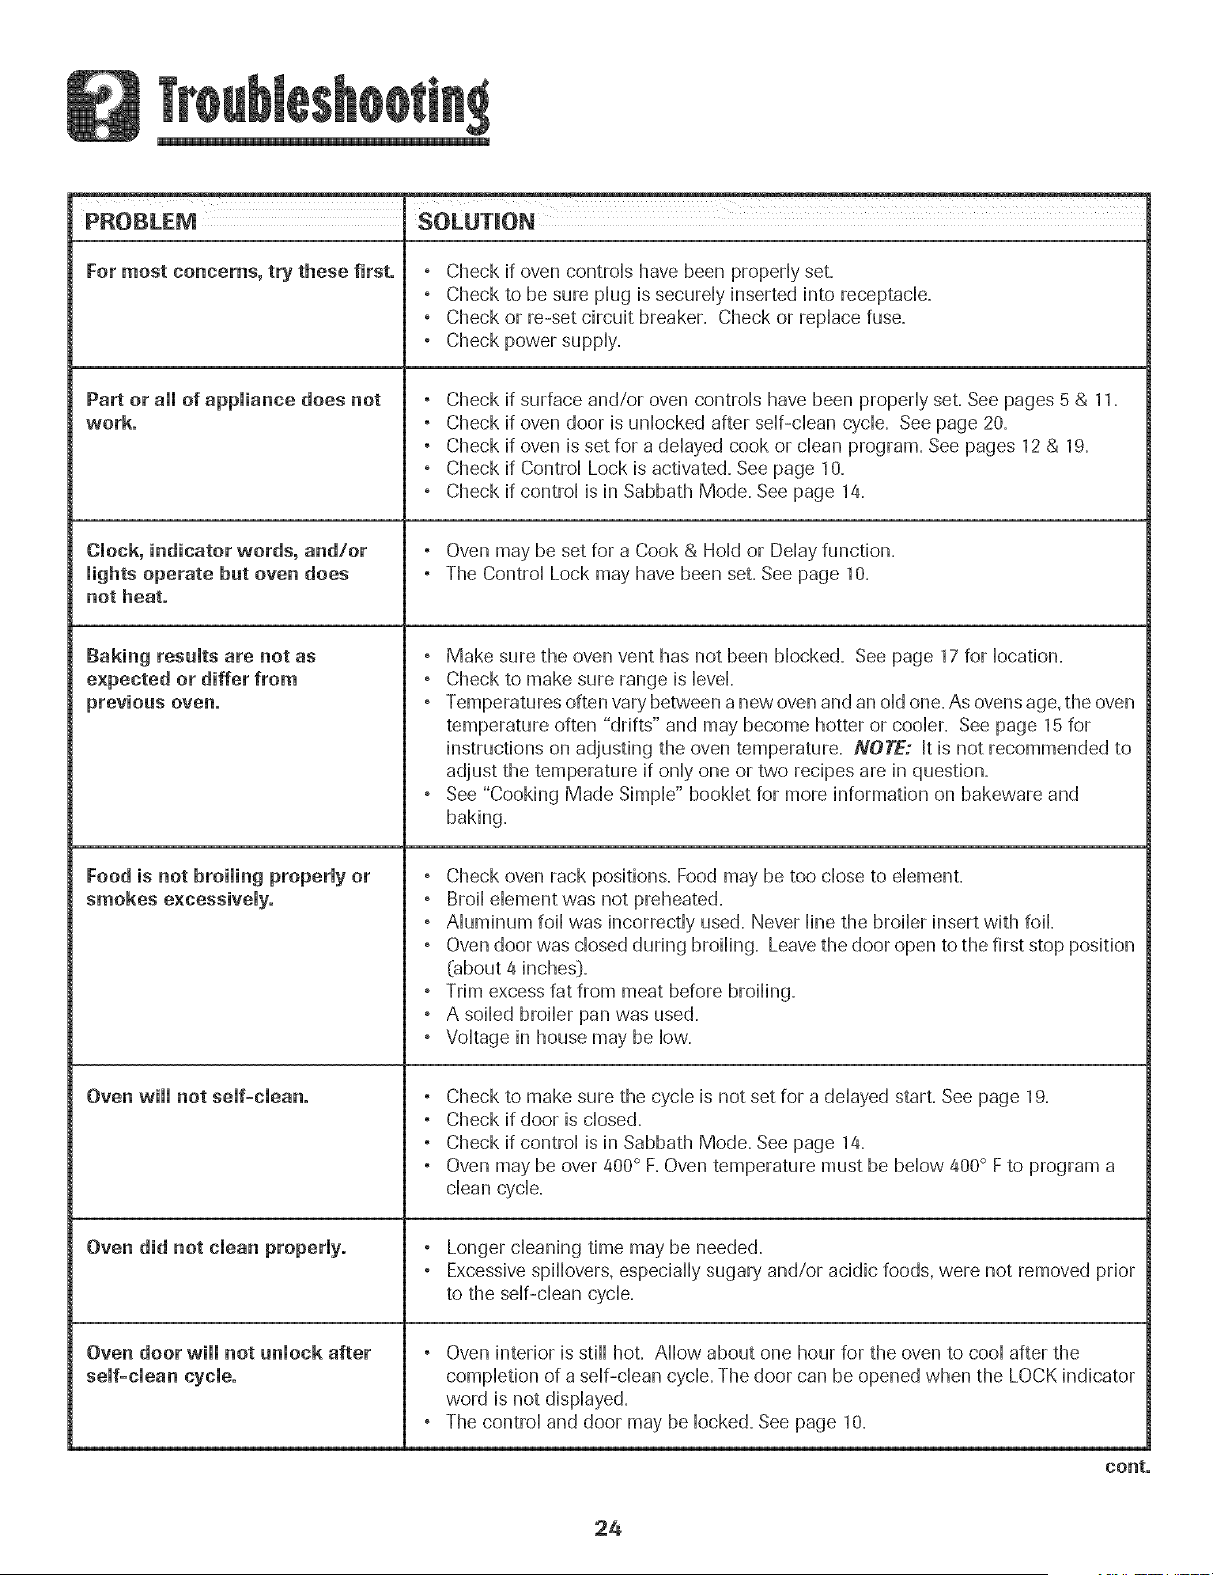
PROBLEM
For most concerns, try these first. , Check if oven controb have been propedy set.
° Check to be sure piug is secureiy inserted into receptacb.
° Check or re-set circuit breaker. Check or repiace fuse.
° Check power suppiy.
Part or all of appliance does not , Check if surface and/or oven controb have been propedy set. See pages 5 & 11.
work. ° Check if oven door is unbcked after sdf-cban cycb. See page 20.
° Check if oven is set for a deiayed cook or dean program. See pages 12 & 19.
° Check if Controi Lock is activated. See page 10.
° Check if controi is in Sabbath Mode. See page 14.
Clock, indicator words, and/or ° Oven may be set for a Cook & HoHdOFDeiay function.
lights operate but oven does , The Controi Lock may have been set. See page 10.
not heat.
Baking results are not as ° Make sure the oven vent has not been Mocked. See page 17 for bcadon.
expected or differ from , Check to make sure range is level.
previous oven. , Temperatures often vary between a new oven and an old one. As ovensage, the oven
temperature often "drifts" and may become hotter or cooler. See page 15for
instructions on adjusting the oven temperature. NOTE; It is not recommended to
adjust the temperature if only one or two recipes are in question.
° See "Cooking Made Simple" booklet for more information on bakewam and
baking.
Food is not broiling properly or , Check oven rack positions. Food may be too close to element.
smokes excessively. , Broil element was not preheated.
° Aluminum foil was incorrectly used. Never line the broiler insert with foil.
° Oven door was closed during broiling. Leave the door open to the first stop position
(about 4 inches[}.
° Trim excess fat from meat before broiling.
° A soiled broiler pan was used.
° Voltage in house may be low.
Oven will not self-clean. , Check to make sure the cycle is not set for a delayed start. See page 19.
° Check if door is closed.
° Check if control is in Sabbath Mode. See page 14.
° Oven may be over 400° F. Oven temperature must be below 400° F to program a
clean cycle.
Oven did not clean properly. ° Longer cleaning time may be needed.
° Excessive spillovers, especially sugary and/or acidic foods, were not removed prior
to the self-dean cycb.
Oven door will not unlock after ° Oven interior is stiff hot. Allow about one hour for the oven to cool after the
self-clean cycle, completion of a self-clean cycle. The door can be opened when the LOCK indicator
word is not displayed.
° The control and door may be locked. See page 10.
cont.
24
i
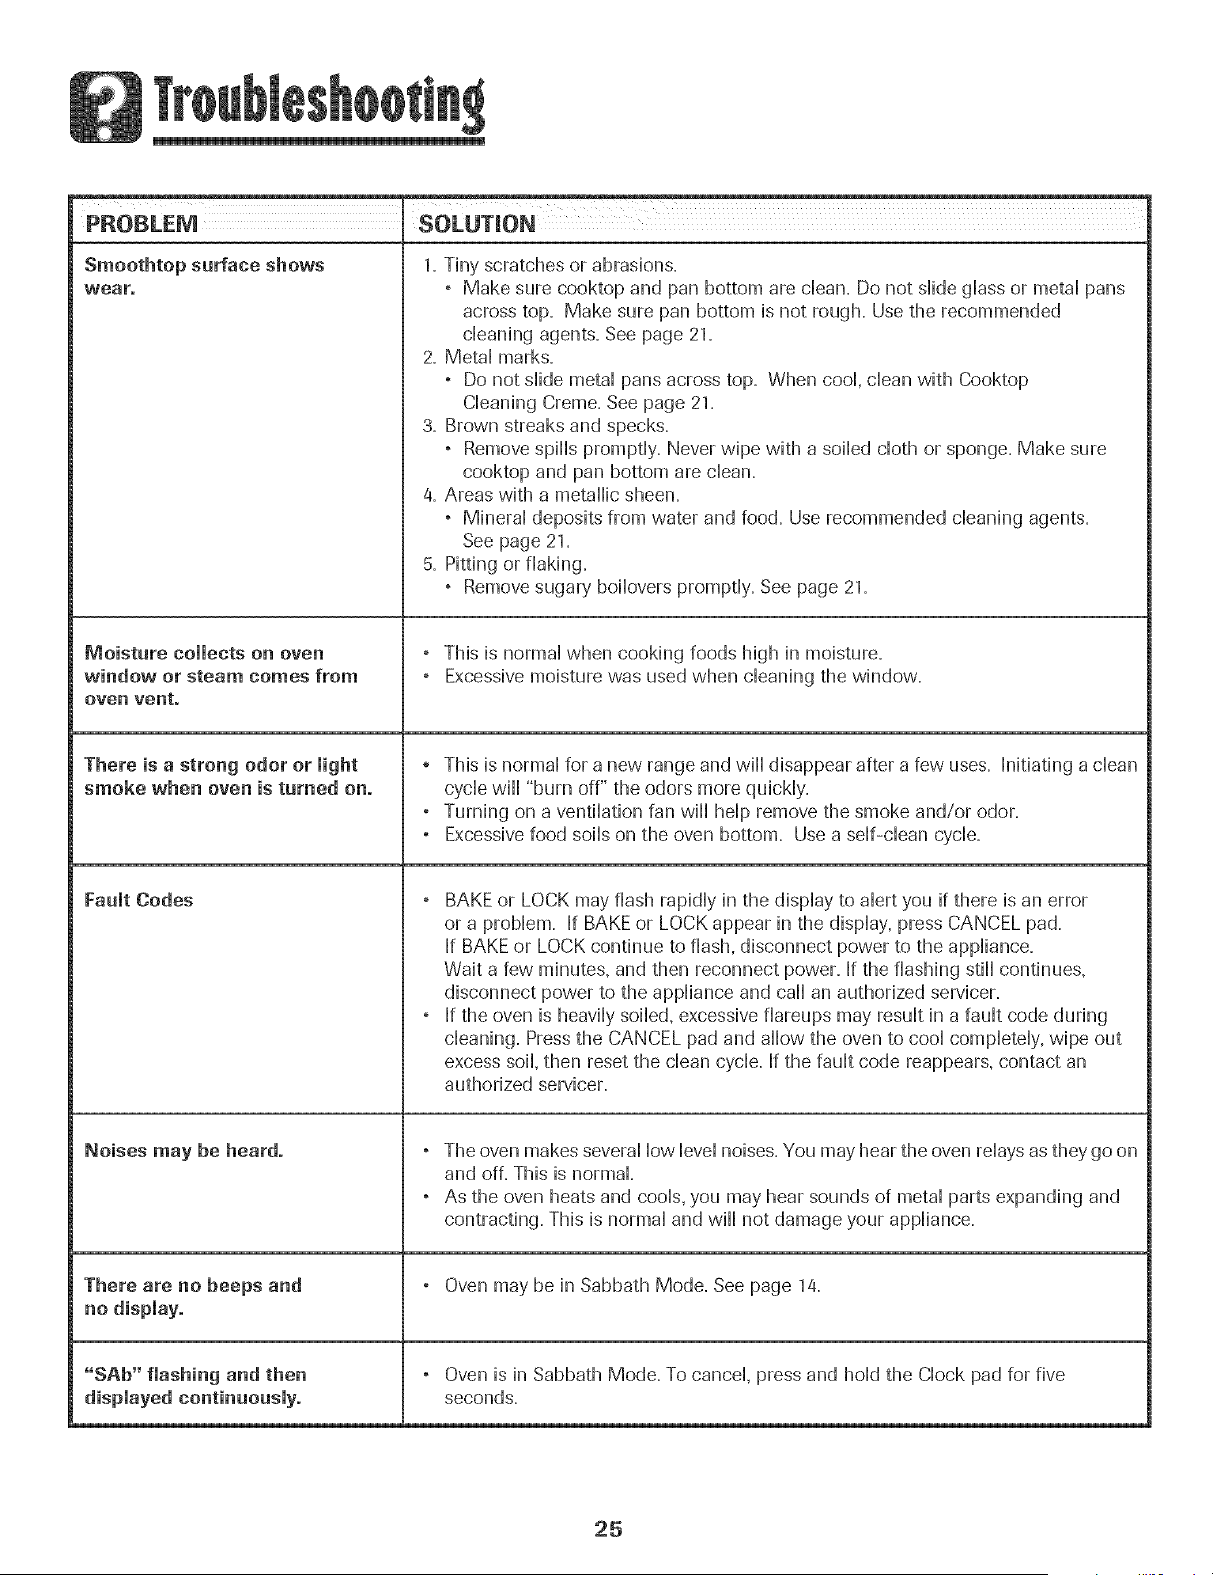
PROBLEM SOLUTmON
Smoothtop surface shows
wear.
Moisture commectson oven
window or steam comes from
oven vent.
There is a strong odor or might
smoke when oven is turned on.
FaumtCodes
Noises may be heard.
There are no beeps and
"SAb" fmashing and then
1. Tiny scratches or abrasions.
° Make sure cooktop and pan bottom are clean. Do not slide glass or metal pans
across top. Make sure pan bottom is not rough= Use the recommended
cleaning agents= See page 21.
2. Metal marks.
° Do not slide metal pans across top. When cool, clean with Cooktop
Cleaning Creme= See page 21.
3. Brown streaks and specks=
° Remove spills promptly. Never wipe with a soiled cloth or sponge= Make sure
cooktop and pan bottom are clean.
a. Areas with a metallic sheen=
, Mineral deposits from water and food= Use recommended cleaning agents=
See page 21.
5. Pitting or flaking.
, Remove sugary boilovers promptly. See page 21.
° This is normal when cooking foods high in moisture.
, Excessive moisture was used when cleaning the window.
o This is normal for a new range and wiii disappear after a few uses. Initiating a clean
cycle wiii "burn off" the odors more quickly.
, Turning on a ventilation fan wiii help remove the smoke and/or odor.
, Excessive food soils on the oven bottom= Use a self-clean cycle.
° BAKE or LOCK may flash rapidly in the display to alert you if there is an error
or a problem, if BAKE or LOCK appear in the display, press CANCEL pad.
If BAKE or LOCK continue to flash, disconnect power to the appliance.
Wait a few minutes, and then reconnect power. If the flashing still continues,
disconnect power to the appliance and call an authorized servicer.
, If the oven is heavily soiled, excessive flareups may result in a fault code during
cleaning. Press the CANCEL pad and allow the oven to cool completely, wipe out
excess soil, then reset the clean cycle. If the fault code reappears, contact an
authorized servicer.
° The oven makes several low level noises. You may hear the oven relays as they go on
and off. This is normal
, As the oven heats and cools, you may hear sounds of metal parts expanding and
contracting. This is normal and wiii not damage your appliance.
, Oven may be in Sabbath Mode= See page 14.
° Oven is in Sabbath Mode. To cancel, press and hold the Ciock pad for five
seconds.
25

+
26
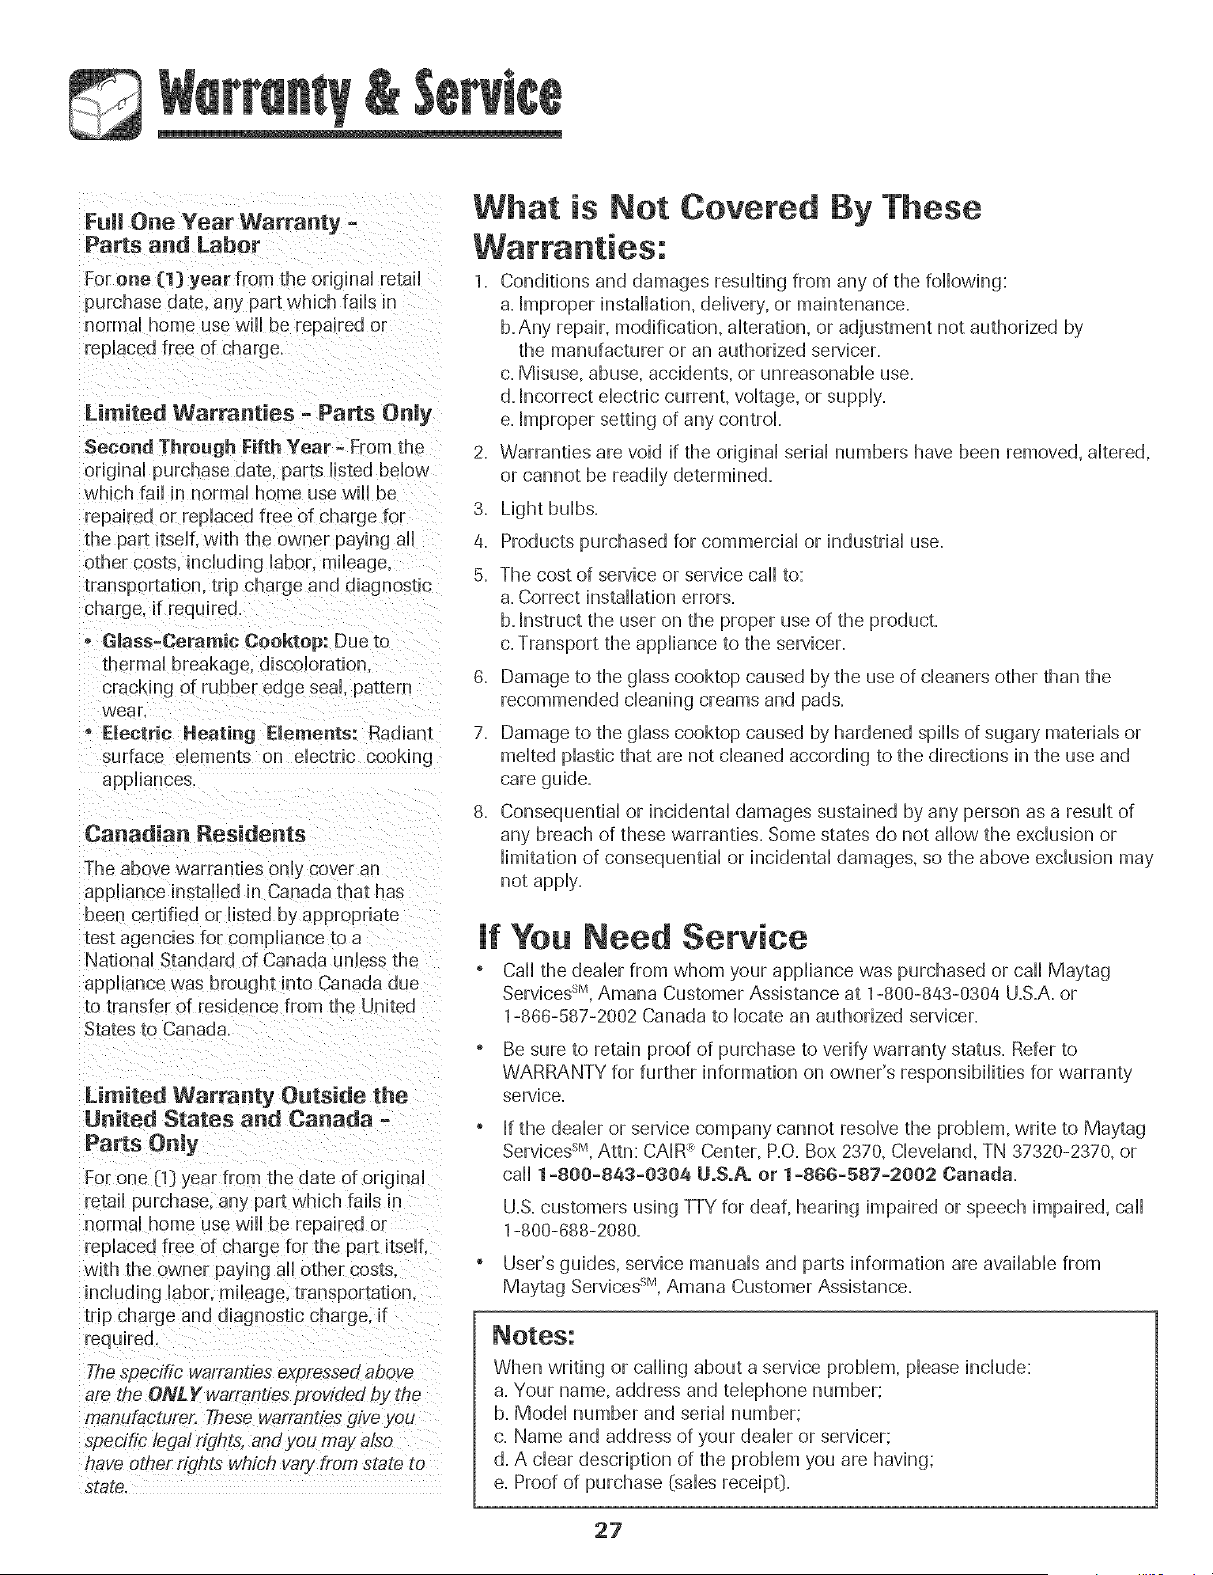
Fuji One Year Warranty -
Parts and Labor
For one (1} year from the orig_nai retail
purchase date. any part which fails in
normal home use will be repaired or
replaced free of charge
Limited Warranties - Par_s Only
Second Through Fifth Year = From the
original purchase date. parts listed below
which fail in normal home use wiii be
repaired or replaced free of charge for
the part itself, with the owner paying aii
other costs, including labor, mileage,
transportation, tr p charge and diagnostic
, Glass-Ceramic Ceektep: Due to
thermal breakage, discoloration.
cracking of rubber edge seal, pattern
wear.
Electric Heating Dements: Radiant
surface elements on electric cooking
appliances
Canadian Residents
The above warranties oni} cover an
appliance installed in Canada that has
been certified or listed by appropriate
test agencies for compliance to a
National Standard of Canada unless the
appliance was brought into Canada due
to transfer of residence from the United
States to Canada.
Limited Warranty Outside the
United States and Canada =
Parts Only
For one (1) year from the date of original
retail purchase, any part which fails in
normal home use will be repaired or
replaced free of charge for the part itself.
with the owner paying all other costs.
including labor, mileage, transportation.
trip charge and diagnostic charge, if
required
The specLr/c warranties expressed above
am the ONLY walrTantles provided by rise
manufacture_, These wafTantles give you
spedfic legal ffghts, and you may also
have other r_hts which vary trom state to
state.
What is Not Covered By These
1. Conditions and damages resulting from any of the following:
a. Improper installation, delivery, or maintenance.
b. Any repair, modification, alteration, or adjustment not authorized by
the manufacturer or an authorized servicer.
c. Misuse, abuse, accidents, or unreasonable use.
d. Incorrect electric current, voltage, or supply.
e. Improper setting of any control
2. Warranties are void if the original serial numbers have been removed, altered,
or cannot be readily determined.
3. Light bulbs.
4. Products purchased for commercial or industrial use.
5. The cost of service or service caii to:
a. Correct installation errors.
b. Instruct the user on the proper use of the product.
c. Transport the appliance to the servicer.
8. Damage to the glass cooktop caused by the use of cleaners other than the
recommended cleaning creams and pads.
7. Damage to the glass cooktop caused by hardened spills of sugary materials or
melted plastic that are not cleaned according to the directions in the use and
care guide.
8. Consequential or incidental damages sustained by any person as a result of
any breach of these warranties. Some states do not allow the exclusion or
limitation of consequential or incidental damages, so the above exclusion may
not apply.
If You Need Service
Call the dealer from whom your appliance was purchased or call Maytag
Services sM,Amana Customer Assistance at 1-888-843-0384 U.S.A. or
1-888-587-2082 Canada to locate an authorized servicer.
Be sure to retain proof of purchase to verify warranty status. Refer to
WARRANTY for further information on owner's responsibilities for warranty
service.
If the dealer or service company cannot resolve the problem, write to May'tag
Services sM,Attn: CAIRe Center, P.O. Box 2378, Cleveland, TN 37320-2370, or
call 1-800-843-0304 UoSoA. or 1-866-587-2002 Canada.
U.S. customers using TTY for deaf, hearing impaired or speech impaired, caii
1-800-888-2088.
User's guides, service manuals and parts information are available from
SM
Maytag Services' , Amana Customer Assistance.
When writing or calling about a service problem, please include:
a. Your name, address and telephone number;
b. Model number and serial number;
c. Name and address of your dealer or servicer;
d. A clear description of the problem you are having;
e. Proof of purchase (sales receipt}.
27
Cuisini_re electrique _ cow.andes
Easy Touch 700 - dessus lisse
instructions de s6curit6 importautes ................ 29-32
Cuissou sur la surface .......................................... 33-36
Commandes de Hasurface de cuisson
Surface 8 dessus Hisse
Centre de r6chauffage
Cuissou daus le four ............................................. 32-46
Cuisson courante
Cuisson et maintien
Cuisson et maintien diff6r6s
Maintien au chaud
Favori
Cuisson au gril
Grilles du four
Nettoyage ................................................................47-50
Four autonettoyant
M6thodes de nettoyage
Eutretieu .......................................................................... 51
Hublot du four
Lampe du four
Recherche des pauues ..........................................52-53
Garautie et service aprSs-veute ................................55
Guia de Use y Cuidado ................................................56
JnstaJJateur: Remettezce guide au proprJetaJre,
Consommateur : Veuilbz lire le guide et Jeconserverpour-
consultationulterieure.Conservezla tactured'achat ou le cheque
encalssecommepreuvede J'achat.
Numerode rnodeJe
Numerode sene
Date d'achat
Si vous avez des questions, veuillez nous appeJer :
Sewice a la client@lede Amana
1-800-843-0304 E.-U.
1-866--587-2002Canada
Rnternet: http:/iwww.amana.com
Dons b cadre de nos pratiques d'amelioration constan[e ue la
qualit6 et de la performance de nos produits de cuisson, des
modifications de rappareH qui ne sont pas mentlonnees dab ce
guide on[ pu 6tre introduites.
Reportez_veus _ /a pade 55 pour plus d'ilJfermatiet_s
cencemai_t te service apres-vegte.
que pourrait susciter une utiiisation incorrecte de rappareii,
Utiiiser rappareii uniquement pour ies fonctions prevues,
d@rites darts ce guide,
Pour one utilisation adequate et en s4curit_, ii faut que
rappareil soit convenablement install6 par un technicien
quaiifie, et relic a ia terre, Ne pas regier, r@arer ni rempiacer
un composant, a moins que ceia ne soit sp@ifiquement
recommande darts ce guide, Toute autre reparation doit etre
effectuee par un technicien quaiifie,
Toujours d@rancher rappareii avant d'y faire de rentretien,
, TOUTE CUMSINIEREPEUT BASCULER
ET PRGVOQUER DES BLESSURESo
ANTIBASCULEMENT F
(;E17E CUISmNIERE.
, RESPECTER TOUTES LES JNSTRUC.
TmON$n,DiNSTALLATiON.
risque de bascu!ement de I'appareiI _ I'eccasien
d'une utilisatien anormale ou d'un ehargement
e×eeSSif de maperte du four, il fau t que la bride
antibaseulement soit convenablement install4e.
Les instructions de securite importantes et los paragraphes
_avertissement_de ce guide ne sont pas destines a couvrir
toutes los conditions et situations qui pourraient se presenter,
li faut faire preuve de bon sons, de prudence et de soin iors de
rinstallation, de rentretien ou du fonctionnement de rappareil,
Toujours prendre contact avec le detaillant, le distributeur,
ragent de service apres-vente ou ie fabricant darts ie cas de
probiemes ou de conditions qui ne seraient pas comprises,
Reconnoitre Ues tiquettes, paragraphes et
symboUessur Uasecurit
AVERTiSSE_ENT _ Dange[s ou pratiques dangereuses qu!
moEt.
ATTENTION, Dangers ou pratiques dangereuses qui
POURRAIENTresuker en des blessures mineures,
Lire toutes los instructions avant d'utiliser cot appareil;
observer toutes ies instructions pour eiiminer ies risques
d'incendie, choc eiectrique, dommages materiels et corporeis
Utiliser une lampe torche pour determiner sila bride
antibasculement est convenablement installee sous la
cuisiniere : run des pieds arriere de reglage de raplomb doit
etre convenablement engage dans la fente de la bride,
Lorsque la cuisiniere est convenablement calee, la bride
antibasculement immobilise le pied arriere contre le sol,
Verifier la parfaite immobilisation de la cuisiniere par la bride
apres ehaque d@lacement de la cuisiniere,
Po r viter i ce die des
dommages par la
S'assurer que tous los materiaux de conditionnement sont
retires de rappareii avant de ie mettre en marche,
Garder ies materiaux combustibles bien eioignes de rappareii,
Ne pas ranger de materiaux inflammables darts un four,
De nombreux types de plastique sont affectes par la chaleur,
Garder ies piastiques eioignes des pieces de rappareii pouvant
devenir chaudes,
Pour emp@her qu'un feu de graisse nese d@lare, @iter toute
accumulation de graisse ou autres matieres inflammables
dons rappareii ou au voisinage,
29
En cas d'incendie
Utiliser du bicarbonate de soude ou un extincteur a poudre
chimique ou a mousse pour dtouffer [es fiammes, Ne jamais
utiliser d'eau pour dteindre de [a graisse enfiammde,
1, [nterrompre ['dimentation electrique de ['apparei[ pour
minimiser [a propagation des fiammes,
2, NE JAMAmS saisir ou deplacer un ustensile de cuisine
enfiamme,
3, Fermer [a porte du four pour 6touffer [es fiammes,
Securit pour [es enfants
Ne pas utiiiser cet appareil pour chauffer ou pour garder
chaude une piece, sinon des dommages a i'appareii pourraient
s'ensuivre et ceia pourrait etre dangereux pour I'utiiisateur,
Aussi, ne pas utiiiser ie four pour ranger des ailments ou des
ustensiies de cuisine,
Ne pas bioquer ou obstruer I'event du four,
NE JAMAIS TOUCHERLES ELEMENTSCHAUFFANTS NI LES
PAROIS INTERIEURESDU FOUR, Les elements chauffants
peuvent etre brQiants meme s'iis ne sont plus rouges, Les
surfaces interieures du four peuvent atteindre une
temperature suffisamment eievee pour infiiger des brOiures,
Pendant et apres usage, ne pas toucher les elements
chauffants ni ies parois interieures du four et eviter ieur
contact avec des vetements ou autres materiaux inflammables
avant qu'iis n'aient eu le temps de refroidir suffisamment,
D'autres surfaces peuvent egaiement atteindre une
temperature suffisamment eievee pour bru_ier:ie ouverture
d'event et le surface avoisinante, ainsi que le porte et le hubiot
de four,
sublr de graves biessures. Ne pas toucher i'ampouie du four brQiante avec un chiffon
humide car eiie pourrait se briser, Si tel est ie cas, debrancher
NE JA[V[AiS [a[sserdes enfants seu[s ou sans supervision
[orsque ['apparel[ est en service ou encore chaud, Ne jama[s
[a[sser un enfant s'asseo[r ou se ten[r sur une pattie
queiconque de i'appareii, li pourrait se biesser ou se brQier,
[Iest important d'enseigner aux enfants que I'appareil et les
ustensiies places dedans peuvent etre chauds, Laisser refroidir
les ustensiies en un lieu sQr,hors d'atteinte des enfants, [Iest
important d'enseigner aux enfants qu'un appareii menager
n'est pas un jouet, et qu'iis ne doivent toucher aucune
commande ou autre composant de I'appareil,
Famiiiarisation avec ['apparei[
NE JAMA[S ut[[[ser un apparel[ comme escabeau pour
atte4ndre [es armoires se trouvant au-dessus. Le mau_ais
emp[o[ de porte d'appare[[ comme par exemp[e en tant
qu'escabeau. [e fait de s'appu) er ou de s'asseoir sur [a porte.
peuvent entrdner le renversement de ['appare[I, casser [a
porte et gravement blesser.
['apparei[ avant de retirer ['ampoule pour eviter une decharge
electrique,
N[: JAMAmS gamir la sole du four ou une grille du four avec
de la feuille d'aluminium, Ceci pourrait susciter un risque de
decharge electrique ou d'incendie, ou une deterioration de
I'appareil, Utiliser de la feuille d'aluminium uniquement selon
les instructions de ce guide,
Cuisson et s curit
NE JAMAiS faire chauffer un recipient non ouvert darts [e
four, L'accumulation de pression darts le recipient pourrait
provoquer son eclatement et de graves dommages materiels
ou corporels,
Utiliser des maniques robustes et seches, Des maniques
humides peuvent provoquer la formation de vapeur bru_lante,
Ne jamais utiliser un torchon a vaisselle ou autre article textile
la place de maniques; un tel article pourrait trainer sur un
element et s'enfiammer, ou accrocher un ustensile ou un
composant de I'appareil,
Porter un vetement approprie, Eviter de porter des vetements
amples ou a Iongues manches pendant I'utilisation de
I'appareil, IIs peuvent prendre feu si le vetement entre en
contact avec un element de cuisson brQlant,
3O
Placer toujours [es grilles a [a position appropriee darts [e four
[orsque [e four est froid. Faire couiisser [a grille vers ['exterieur
avant d'ajouter ou eniever un plat; utiiiser pour ceia une
manique robuste et seche. Eviter d'introduire [a main darts [e
four pour y placer ou retirer un plat. S'i[ est n@essaire de
d@iacer une grille [orsqu'eiie est chaude, utiiiser une manique
seche. Ne pas toucher un element chaud avec une manique.
N'utiiiser [es grilles que darts [e four darts [eque[ eiies ont 6te
achetees/expediees.
Ouvrir toujours [a porte du four tres prudemment. Laisser ['air
chaud ou [a vapeur s'@happer avant de retirer ou d'introduire
un plat.
AVERTiSSEMENT - METS PR[:PAR[:S : Respecter [es
instructions du fabricant. Si [e contenant ou [e couverde en
piastique d'un mets surgeie se ddorme ou est endommage
durant [a cuisson, jeter immediatement le recipient et son
contenu. Les aliments pourraient etre contamines.
Ne pas permettre le contact de papier d'aluminium ou de la
sonde a viande avec les elements chauffants.
Toujours eteindre toutes les commandes une fob la cuisson
terminee.
matiere inflammable ou renversement (un jeune enfant
pourrait saisir et renverser un ustensile dont le manche est
oriente vers I'exterieuO.
Tabme de cuisson
NE JAMAiS laisser un element de surface allume sans
surveillance, particulierement avec chauffage ebve. Le
@bordement du contenu de I'ustensile pourrait provoquer la
generation de fumee abondante et I'infiammation de la
graisse.
Cet appareil comporte des elements chauffants de differentes
tailles. Utiliser toujours un ustensib a fond plat, de taille
suffisante pour qu'il puisse recouvrir completement [element.
Pour optimiser I'efficacite, choisir un ustensile de meme taille
que ['element.
SURFACE EN VITROCCRAMIQUE : Ne JAMAIS utiliser une
table de cuisson cassee ou felee: bs solutions de nettoyage et
renversements pourraient penetrer dans la table de cuisson en
entranant un risque de d@harge ebctrique. Prendre
immediatement contact avec un technicien qualifi&
Ustensi es et securit
Appliquer bs instructions du fabricant Iors de Femploi d'un
sachet pour cuisson au four,
La securite de fonctionnement de cet appareil a ete testee
Faide d'ustensibs de cuisine traditionneb, Ne pas utiliser un
ustensib ou accessoire qui n'est pas sp@ifiquement
recommande darts ce guide. Ne pas utiliser de systeme de
convection additionnel. L'utilisation d'un dispositif ou
accessoire qui n'est pas expressement recommande darts ce
guide peut degrader la securite de Fappareil ou sa perfor-
mance, ou reduire la Iongevite des composants.
Si un ustensib est plus petit que I'element utilise, une partie
de I'element chauffant est exposee et peut provoquer
Finfiammation d'un vetement ou des maniques.
Seub certains materiaux en verre, vitroceramique, ceramique,
gres, ou certains ustensibs vitrifies/emailles peuvent etre
utilises sur la table de cuisson ou darts b four sans risque de
bris sous Feffet du choc thermique. Observer bs instructions
du fabricant Iors de Futilisation d'un ustensib en verre.
Orienter la poignee de chaque ustensib vers b centre de la
table de cuisson et non vers Fexterieur ou vers un autre
element; ceci reduira b risque de brQlure, inflammation de
Exercer une prudence extreme Iors du d@lacement du
recipient de graisse ou Iors de I'elimination de graisse chaude,
Laisser la graisse refroidir avant de deplacer I'ustensile,
Hottes d'e×traction
Nettoyer frequemment bs filtres et la hotte de la cuisiniere
pour emp@her la graisse ou d'autres produits inflammables
de s'accumubr sur bs filtres ou la hotte en provoquant des
feux de graisse.
Pour fiamber des aliments sous ia hotte, mettre ie ventiiateur
en rnarche.
Nettoyage et securit6
Nettoyer prudemment la table de cuisson. Arreter toutes bs
commandes et attendre b refroidissement de tous bs
composants avant de bs toucher ou d'entreprendre b
nettoyage. Nettoyer [appareil avec precaution. Travailbr
prudemment pour eviter des brQlures par la vapeur en cas
d'utiiisation d'un chiffon ou d'une @onge humide iors de
i'eiimination d'un produit renverse sur une surface chaude.
31

Certainsproduitsdenettoyagepeuventgenererdesvapeurs
nodvesIorsqu'onlesappliquesurunesurfacechaude,
Nettoyeruniquementlespiecesmentionneesdartsceguide,
Four autonettoyant
!echddte, etc, dans Uefour lots de Pautonettoyage,
Ne pas nettoyer ie joint de porte; ie joint joue un rOie essentiei
quant a I'etancheite, Ne pas frotter, endommager ou deplacer
lejoint,
Ne pas utiiiser de produits de nettoyage pour four ou enduits
de four, darts ie four autonettoyant ou sur ies zones voisines,
,gvant d'executer une operation d'autonettoyage, retirer la
lechefrite, les grilles du four et les autres ustensiles, et eliminer
par essuyage tout exces de residus renverses pour eviter ia
formation de fumee ou i'infiammation de ces residus,
Avertissement et avis
important pour la securit6
La Ioi califomienne _ Safe Drinking Water and Toxic Enforce-
ment Act >>de 1986 {proposition 65_}stipule la publication par
ie gouverneur de ia Caiifornie d'une iiste de substances que
i'etat de Caiifomie considere comme cancerigenes ou
dangereuses pour ie systeme reproducteur, et impose aux
entreprises commerciaies i'obiigation de signaler aieurs
clients ies risques d'exposition a de teiies substances,
Nous informons ies utiiisateurs de cet appareii que iors d'une
operation d'autonettoyage, iis peuvent etre exposes a une
faible concentration de certaines substances figurant darts la
iiste mentionnee ci-dessus, dont ie monoxyde de carbone,
Pour minimiser i'exposition, veiiier ace que ia piece o8 se
trouve ie four soit convenabiement aeree durant une operation
d'autonettoyage par i'ouverture d'une fenetre ou d'une porte,
AViS iMPOflTANT - OISEAU× FAMILIEflS : Les oiseaux ont
un systeme respiratoire tres sensible, Ne pas garder un oiseau
familier darts la cuisine ou darts une piece oeil pourrait etre
expose aux fumees, Les fumees emises durant une operation
d'autonettoyage peuvent etre dangereuses ou mortelles pour
un oiseau, de meme gue les fumees emises Iors du chauffage
excessif de graisse, huile, margarine, et du chauffage excessif
darts un ustensile a revetement antiadhesif,
Conserver ces instructions pout consultation ult tieute
32
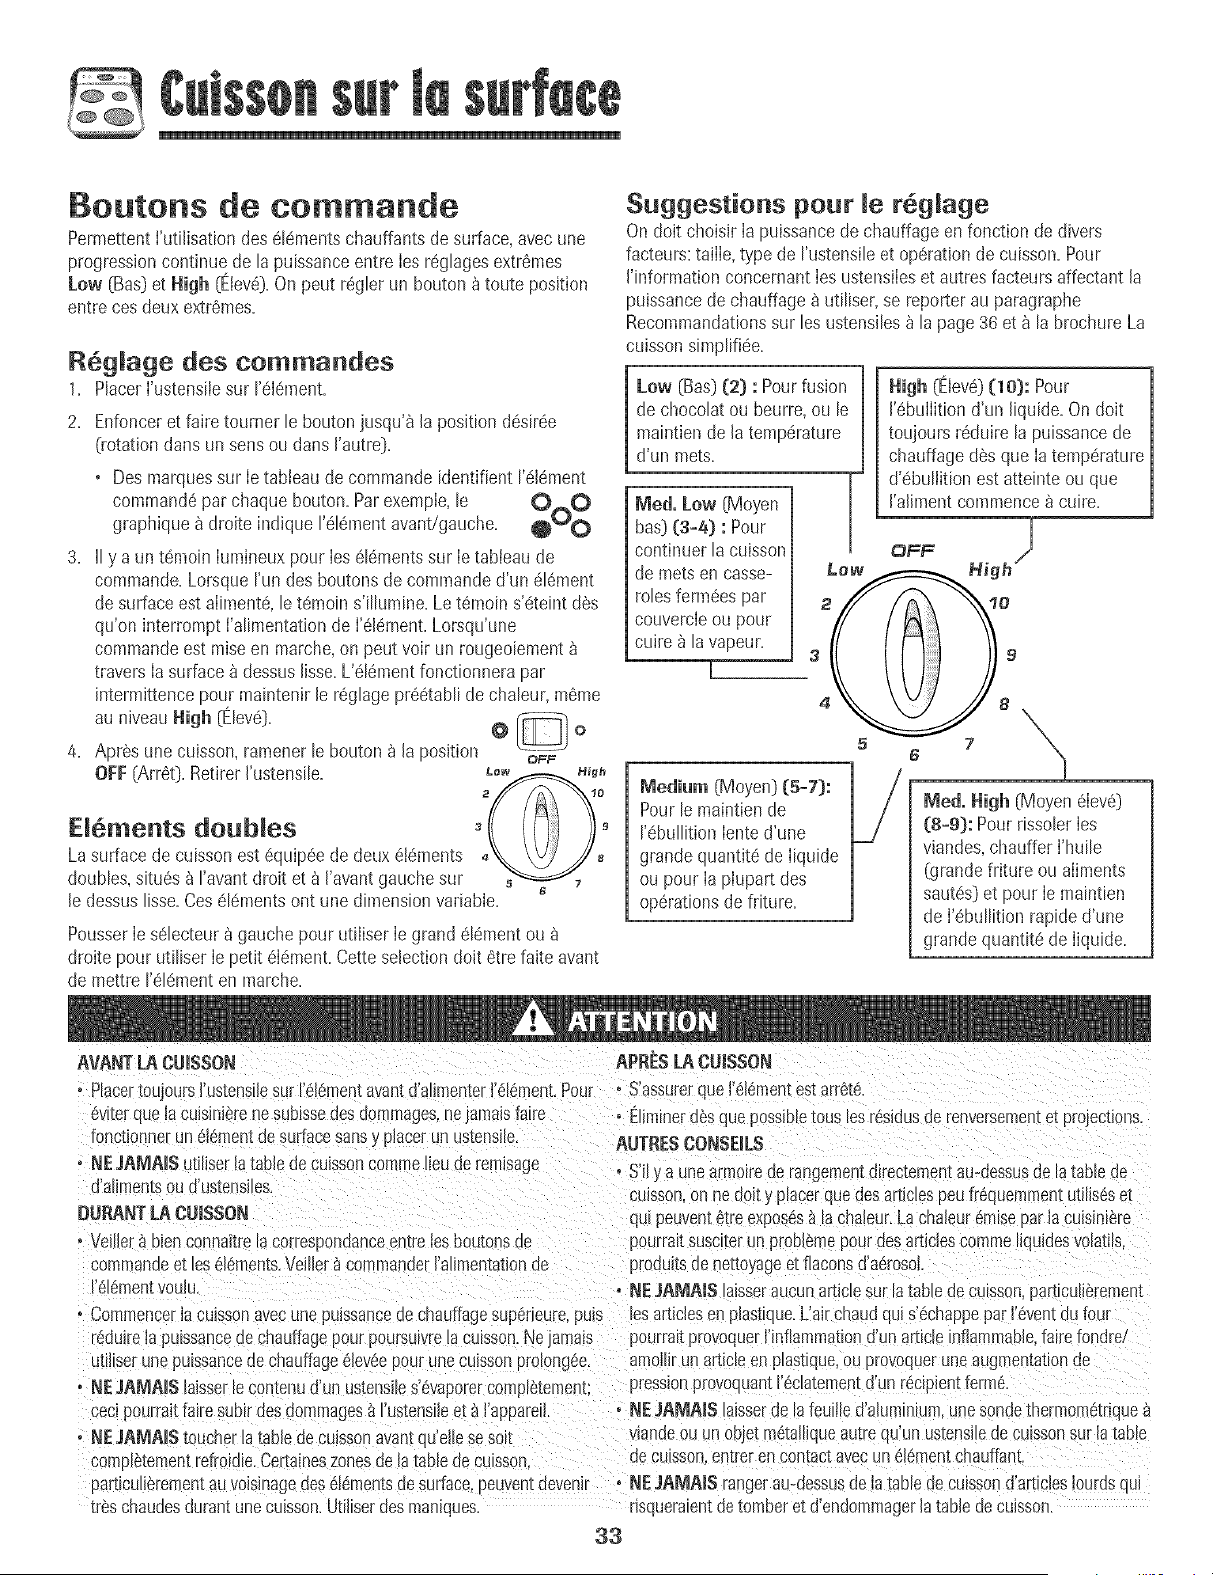
Beutens de commando
Permettenti'utflisationdes elementschauffants desurface,avecune
progressioncontinue de la puissanceentre Iesr6glagesextr6mes
Low (Bas]et High (Etev6]+Onpeut r6glerun bouton_ toute posKion
entre cesdeuxextremes.
R691a9 e des commandos
1. PlacerI'ustensiiesur 1'616mont.
2. Enfonceret faire tourner le boutonjusqu'_ la position d6sir6e
0rotationdartsun sensou dartsJ'autre].
o Des marquessur Ietableau de commandeidentifient 1'61@ment
command6parchaque bouton.Parexemple,le vvO O
graphique_ droite indique r616mentavant/gauche. @O O
3. II y a un t6moin Iumineuxpour Ies616mentssur Ie tableaude
commando.LorsqueI'un desboutonsde commanded'un 616ment
de surfaceest aliment&le t6moins'illumine.Le t6moin s'@teintdes
qu'on interrompt I'alimentationde I'61ement.Lorsqu'une
commandoest raiseen marche,on peut voir un rougeoiement
traversIa surface_ dessusHsse.L'el6mentfonctionnera par
intermittencepour maintenirJer6glagepr6etablide chaleur,m6me
au niveauNigh [EIev6].
4. Apr_s unecuisson,rarnenerrebouton_ [aposition OFF
OFFlAir#t]. Retirer['ustensile. L_+ _+gh
3 9
EI6ments doubles
Lasurface decuissonest 6quip#e de deux #!6ments + 8
doubles,situ6s _ ravant droit et _ I'avantgauchesur
le dessuslisse.Ces616mentsant unedimensionvariabie.
PousserIe s@lecteurbgauche pour ut[liserIe grand 616mentou
droite pour util[serIe petit 616ment.Cetteselectiondoit #tre fake avant
de mettre r61@menten marche.
Suggestions pour Je r6glage
Ondolt choisirIa puissancede chauffage enfonction de divers
facteurs:tailIe,type de I'ustensileet op@ratJonde cuisson.Pour
J'hlformatim_concemantlos ustensiJeset autres facteurs affectant Ja
puissancede chauffage_ ut[liser,se reporterau paragraphe
Recommandationssur losustensJles_ la page 36 et _ la brochureLa
cuissonsimplifiee.
Low (Bas](2) : Pourfusion
de chocolatou beurre,ou le
maintiende Jatemp6rature
d'un mets.
Meal, Low [Moyen
bas] (3-4) : Pour
continuerla cuisson
de metsen casse-
roles ferm6espar
couvercieou pour
cuire _ la vapeur.
[
Nigh (Eleva] (10}: Pour
['ebullition d'un [iquide. On dolt
toujours r6duire la puissance de
chauffage des qua Ia temperature
d'#bullition est atteinte ou que
I'aliment commence _ cuire.
_F'F_ N_gbJ
_edi_m (Moyen] (5+7):
Pourle maintiende
r#bullition Iented'une
grandequantit_ de Iiquide
ou pourIa piupart des
oparationsdefriture.
5 7
6
_ed, Nigh (Moyenaleva]
(8+9): Pour rissoler Ies
viandes,chauffer I'huile
(grandefriture ou aliments
sautes]et pour Ie maintien
de I'#bullition rapided'une
grandequantite de Iiquide.
AVANTLA CUISSON APRE$LA CUISSON
• Placer_oujoursI'ustensi+esurI'_+_men_avan[d'a+men-letI'_l_lTlent.Pour , S'assJre_.lueI'_!#mentestarr_t&
eviler [Ue la cuislniere ne suDisse fJes or mmages, fie jamais faire
[onct+onnerun_i_mentdesurfacesans'+p+acerunustens+te
, NE_A_AIS ut+t+sertatablede c{Jissoncomne tleuderam+sage
d'alimenBoud'ustensies.
DUR&NT[A CUBSON
+ Ve+ller_ biencanna+iremcorresponuanceon[relesboutonsme
commanaee_lea_+_ments.Ve+ller_ commander+'alh_entat+onme
r_l_mentyou+u.
+ Cam+rmncerla cu+ssonavecunepuassancedechauffagesupeneure,puis
o EHminerdasquaposs+bletouslesr6sldusde renvememente[ project+ons.
AUTRESCONSEILS
, S'ity a unearmoireaarangementdirectemen-_au+dessusaemable {_e
cu+sson,onnedo+ty pacer quedesarticlespeufr6quemmentut+t+sese-[
qm peuvent_treexposesatacha+eur.Lachaleur8raisepar+acum+nmre
pourrm_susc_[erun probtemepourdesart+ctescomae iauidesvotatils.
produ+tsdene[_oyageetflaconsd'a_roso_
, NEJANIAIShisseraucunart+ctesur lamumdecaisson,pancul+eremem
losart+oresen pms[_que.L'airchaudquis'_chappeparI'eventdLfou
r_duirelapumsancedechauffagepourpoursu_vremculsson.Ne ama+s pourraltprovoquerI'inflammauond'unarticleinflammable,fairefondre/
u[Hiseruue pumsancede chauffage e+eveep( r une cu+ssonpro_ongee.
o NEJA_AIS laisserle contenu d'un ustens+les'6vaporer compm[emem:
cec+oourrait faire subir des dommages _ I'u{+tensi+eet _ I'appare++.
, NE JA_AiS toucher I_ table de cu+ssona,,an-{qu'e+lese so
comp _temen[ refrok]le. Certaineszonesde la ladle ae culsson.
partlcut+erementau vo+s+nagedes _l_men[sde surface, nel vent devenir
tres ehaudes auran[ une cu+sson.Utiliser des maniques.
amollirunarticleen pmsEIque,ou provoqueruneaugmenta[tonde
press+onp_o_cquantI'_ciatem_r[d'un rec_p+entterm6.
, NEJA_AIS hisserde la feuitNd'a+urniniJm.unes(ndethermom6trique
v+andeou unobjetm6taltiqueau[requ'unustensilemecumsonsur latable
ueculsson,eater encomac[avecunelementchauffant.
• NEJAIVIAISral+getau-eessusde Iamu_emeculssond'art[ciesIourdsqu+
nsoueralentdetomberetd'endommagerlatabledecu]sson
33

Surface dessus lisse
Remarques sur surface dessus
isse :
oLors des premieres_Jtilisationsde Ia tabIe de cuisson,cello-el
peat 8mettre an pea de fumSe et des odears=Ceciest
normal=
oLossurfaces _ dessus lisse eonsewent la ehaieur pendant
an certain temps apr_s m'e×tinctionde m'_m_ment.Eteindre
les 616meritsquelquesminutesavantq(le la nourriture nesoit
tout b fait cuiteet utiliser Iachaleur restantepour terminer la
cuisson.Lorsque levoyantde surfacechaudes'6teint, on peut
toucher Iasurface de cuissonsans danger.En raisonde la fagon
dont les el6mentsd'une surface b dessusIisseretiennentla
chaleur,ceux-ci ne r6pondrontpas auxchangementsde r6glage
aussirapidementque des 616mentsen spirale.
oAu cas o8 Ie contenu d'un ustensilerisquede deborder,retirer
I'ustensiIede lasurface de cuisson.
oNe jamais essayer de soulever la sudace de caisson.
oLa surface_ dessuslissepeut sembIerd6color6eIorsqu'elleeat
trSschaude=Ceci est normalet disparait une fais que la surface
refroidiL
Zones de cuisson
Leszonesdecuissonde lacuisini_resont repr6sent6espar des
cercIespermanentssur lasurface _ dessuslisse=Pour une efficacit6
maximum,utiliser une zonede cuissondont le diam_tre convient
I'ustensile=
Le r6cipient ne dolt pas d6passer la zone de euisson de plus de
12 _ 25 mm (1/2 _ I pe).
Lorsqu'unecommandoest raiseen marche,on peat voir un
rougeoiement_ travers Iasurface b dessuslisse.['@l_ment
fonetionnera en intermittence pour maintenir mer6gmage
pr_tabii de chaieur, mSme au niveaa Hi (Emev6:lo
Pourobtenir plus informationss[Jrles LJstensilesde cuisine,se
reporter _ la page 36 au paragrapheRecommandationssur les
ustensiIesdecuisineet 8 la brochure Lacuissonsimplifi6e,incluse
avecla cuisiniSre.
ELEMENT CENTRE DE RE:CHAUFFAGE
SIMPLE
ELEMENT
SIMPLE
_-L_:MENT
DOUBLE
Voyant de s rface cha de
Levoyantde surfacechaude eatsitue sur le tableau
de commande.II s'allumeraIorsqu'unesurfacede He_ Sue'face
cuisson,quetIequ'elle soit, serachaude.II restera
allure&memoapr6sextinctionde la commande,jusqu'b ce que la
zone ait refroidL
Centre de t ,cha ffage
Utiliserle centrede r_chauffagepour maintenirtiSdesdes aiiments
cuits,comme 18gumes,sauceset assiettes-dinersaliant aufour.
Regiage de la comma_de : OF_
1. Appuyersur le boutonet Ie tourner.Les __
temperaturesde r_chauffagesont
approximativeset indiqu_espar _i_, 2- _, 77 et _a×. Cependant,Ia commandopeut
_tre r_gI_e_toute positionsitu_e entre _ _ _
lVli_ et _a×.
4
2. LorsqueI'opSrationde rSchauffageeat
termin_e,mettreIa commandeb O_:_:et rotifer Ia nourriture. Le
voyantdesurface chaudes'eteindra Iorsquelasurface du centre
de r_chauffageaura refroidL
Ne jamais rechaufferd'alimentspendant plus d'une heure(les
oeufs,pour30 minutes_,la qualit_ des alimentsrisquantde se
d6t_riorer.
o Ne pasr_chauffer desailmentsfroids sur Ie centre de r_chauffage.
o Lesr_glagesde chaleur varierontselon Ie type et la qualit_
d'aliments.Conservertouiours les alimentsauxtemperatures
apprapriees.L'USDArecommandeque los tempSraturessoient
situ_esentre 60 et 75 °C(140et 170°F).
_giages sugg_r_s
_glage Type d'aliment
_in - 2 Pains/p_tisseries Saucesde viande
Platsmiiot_s Oeufs
2 - 5 Viandes Assiette-dineravecnourriture
Soupes(cr_mes_ Sauces
RagoUts L_gumes
5 - _ax Aliments flits Boissonschaudes
Soupes[Iiquides]
Remarq es centre de r cha f ge :
N'utiliser qua desplats et des ustensilesrecommand_spour
I'utilisation sur surfacede cuissonet enfour.
Seservirtoujours de gantsisolantspour retirer Ia nourriture du
centrede r6chauffage.Losustensileset assiettesseront en effet
tr6s chauds.
TouteIa nourrituredoit #tre recouverted'un couvercleou d'une
feuille d'aluminium pour preserversa qualit8 alimentaire.
PourrSchaufferdes p_tisserieset des pains,laissertouiours une
ouvertureau niveaudu couverclepour permettre_ I'humidit_de
s'_chapper.
Ne pas utiliser de pelliculeplastiquepour recouvrirIesaliments.
Le phstique pourraitfondre sur la surfaceet il serait trSs difficiie
de I'enlever.
34
Conseils de protection de la
surface dessus lisse
N@ttoyag@ (plus d'informations _ ia page 49}
, Avant des'en servir [a premi6refois, nettoyer[a table de cuisson.
, Nettoyer[atamede cuissonchaquejour ou apr6schaque
utitisation.Cesmesurespr6serveronti'apparencede [a tame de
cuissonet 6viterontqu'eNenes'abTme.
, Encas de renversementlots de cuisson,nettoyer imm6diatement
te produit renvers6sur ta surfacede cuissonpendant qu'elle est
encorechaudeafin d'6viter un plus grand nettoyagepar la suite.
Userdeprudence,essuyer[esrenversementsavec un [inge propre
et sec.
, Ne pas [aisser[es produits renvers6ssur lasurface de cuissonou
sur [a garniture de la table de cuisson pendantune Ionguedur6e.
, Ne jamais utiliser de poudrede nettoyageabrasiveou de tampons
r6curerqui raieraientlasurface.
, Ne jamais utiliser dejavellisant,ammoniaqueou autrespraduits
de nettoyagenon sp6cifiquepaentrecommand6spour la
vitroc6ramique.
Pour 6viter tea marques et lea rayures
, Ne pas utiliserde casserolesenverre.Ellespourraientrayer la
surface.
+ Ne jamais utiliser de supportm6talliqueou anneaude wok entre
un recipientet lasurface de cuisson.Cesobjets peuvent marquer
ou rayerIa surface.
, Ne pasfaire glisser de r6cipientsm6talIiquessur lasurface de
cuissonbKJlante.IIs pourraient Iaisserdes marquesqui devrant
6tre nettoy6esimm6diatement.07airNettoyage,page 49.}
, Veillerace que le fond des r6cipientset Ia zone decuissonsoient
propresavantd'allumer1'616ment,afin d'6viter les rayures.
, Pouremp6cherque lasurface de cuissonen vitroc6mmiquenese
trouve ray6eou abim6e+nepas y Iaisserdesucre, deseIou de
graisse.Prendrerhabitude d'essuyerlasurfacede cuissonavec un
lingopropre ou un essuie-toutavantde I'utiliser.
, Ne jamais faire gtisserde r6cipients m6talliques6paissur la
surface au risquede la rayer.
Pour 6viter lea taches
, Ne jamaia utiliserde lingo ou d'6pongesale pour nettoyerIa
surface de cuisson.IIs laisseraientunfilm, ce qui pourrait d6colorer
lasurface decuisson Iorsqu'e+Ieest utilis6e.
, UutiIisat+oncontinued'une surface de cuissonsaliepout entratner
I'apparitionde tachespermanentes.
Pour 6v+ter d'autres dommages
, Ne pas Iaisserfondre de plastique,desucre ni d'alimentsrichesen
sucre sur la table de cuisson.Si cela se produisaitacciden-
tellement,nettoyerimm6diatement.07airNettoyage,page 49.}
, Ne jamais hisser le contenud'une casserolebouilIirjusqu'_ ce
qu'elIe soitvide car celapourrait abimer la surfacede cuissonet la
casserale.
, Ne jamaia utiliserla table de cuissoncommesurfacede travailou
comme pIanche_ d6couper.
, Ne jamais cuire d'alimentsdirectementsur la table de cuisson,
sans recipient.
, Nejamais utiliser un petit r6cipientsur un grand 616ment.Non
seulementiI y a g$chis d'6nergie maisil peut en r6suIterdes
projectionsqui vont brCJlersur lasurface de cuissonet devront6tre
nettoy6es.
, Ne pas utiIiserdes r6cipientssp_ciauxnon plats qui seraienttrap
grands ou _ fond in6gaIcommeles woks _ fond rand, los plaques
chauffantesou r6cipientsde grandetailIe _ fond onduI6.
, Ne pas utiIiserde r6cipientsen aluminium.L'aluminium risquede
fandre sur le verre.Si Ie m6taifond sur IatabIe de cuisson, ne pas
I'utiliser.Appelerun r6parateuragr66 Amana.
35
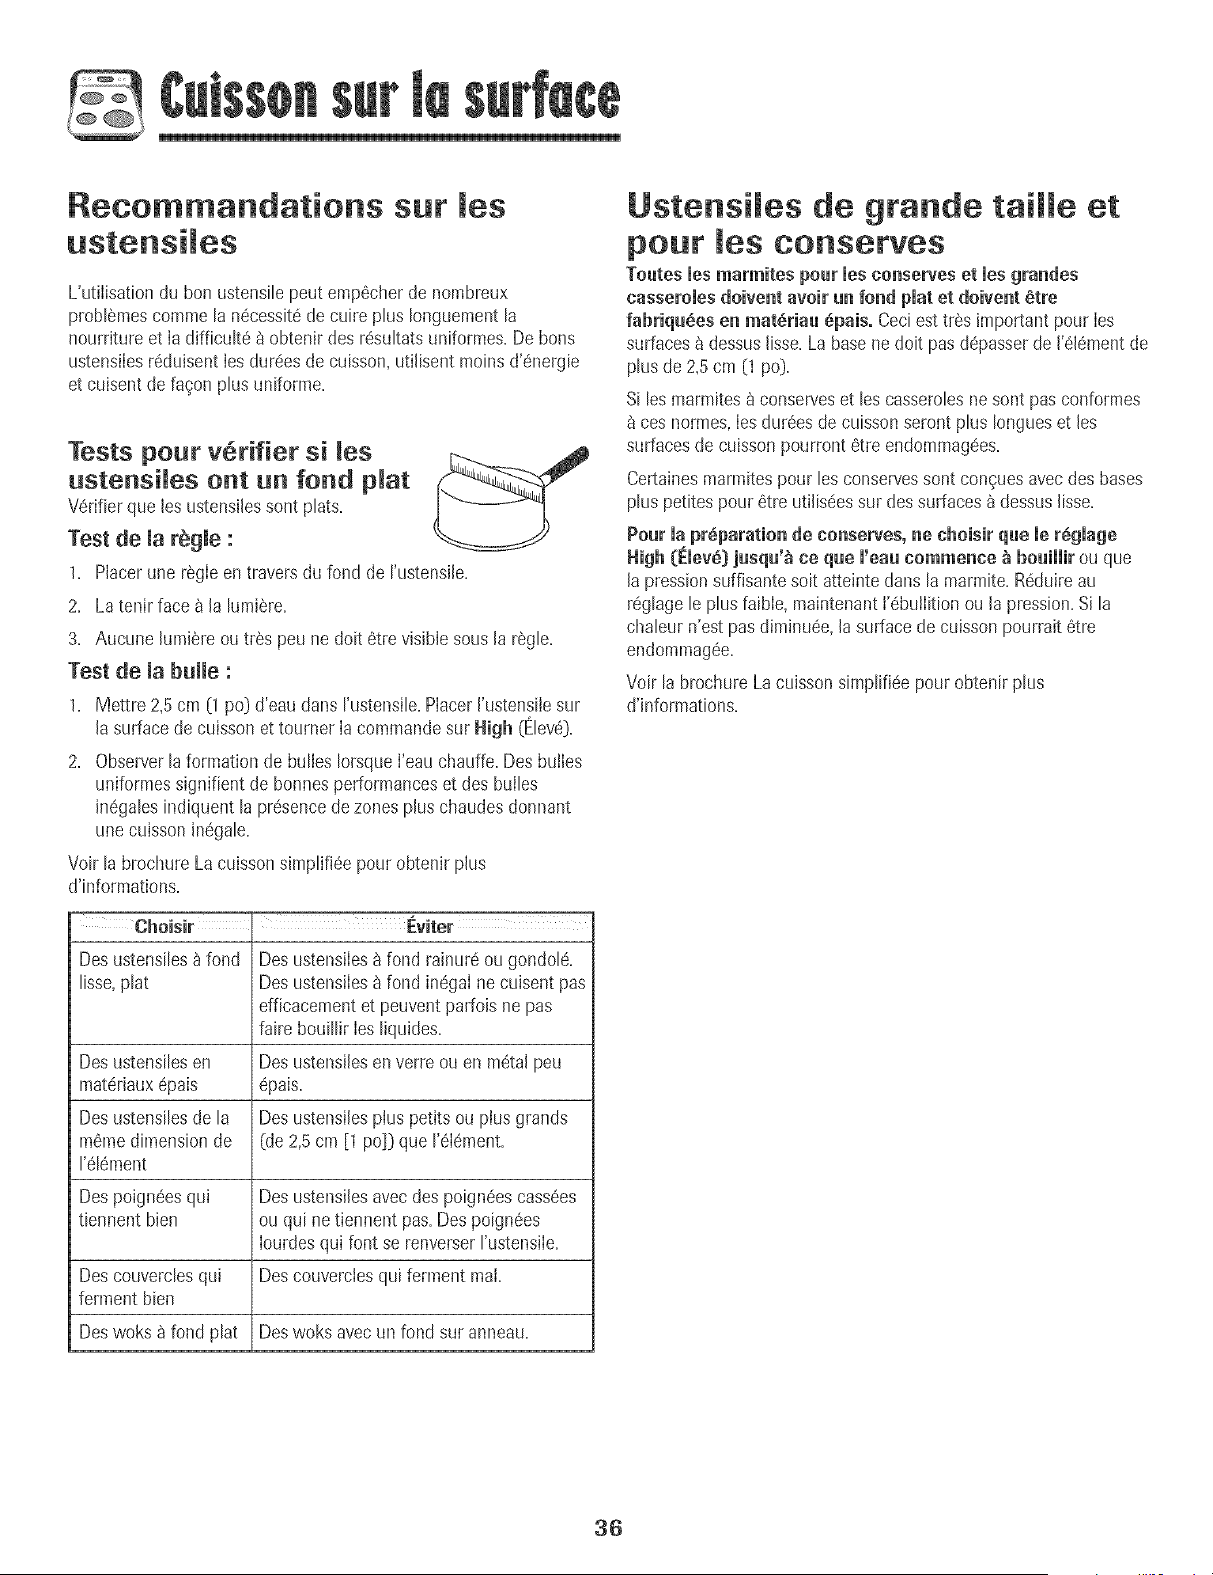
Recommandations sur
L'utilisationdu bonustensilepeut emp6cher de nombreux
probl6mescommela n6cessit6de cuire plus Ionguementla
nourriture et Iadifficuke _ obtenir des resultatsuniformes.De bons
ustens+Iesr6duisentiesdureesde cuisson,utilisent moinsd'energie
et cuisent de fa_onplus uniforme.
Tests pour v6rifier si _es
ustensHes ont un fond p_at
Verifier que les ustensilessont plats.
Test de maregme:
1. Placerune r_gleen traversdu fond de rustensile.
2. La tenir face _ la lumiSre.
3. Aucune lumiere outrSs peu ne doit etre visible sous la regle.
Test de mabumme:
1+ Mettre 2,5cm (1po) d'eau dans rustensile+PlacerI'ustensilesur
lasurfacede cuisson et tourner Ia commandesur High CEleve)+
2+ Observerla formationde bullesIorsque i'eau chauffe+Desbulles
uniformess+gnifientde bonnesperformanceset des buIles
inegalesindiquent la presencede zonesplus chaudesdonnant
unecuissoninegale+
Voir la brochureLacuissonsimplifi6e pour obtenir plus
d'informations+
Eviter
Desustensiles_ fond Des ustensiles_ fond rainure ou gondole.
lisse,plat Desustens+Ies_ fond inegaInecuisent pas
efficacementet peuventparfois nepas
faire bouillir Iesliquides.
Desustensilesen Desustensilesenverre ou en metal peu
materiauxepais epais.
Desustensilesde la Desustens+lespius petits ou p+usgrands
memedimensionde (de2,5cm [1 po]) que 1'6Iement.
I'elSment
Despoigneesqui Desustensilesavecdes poigneescass6es
tiennent bien ou qui netiennent pas.DespoignSes
Iourdesqui font se renverserrustens+Ie+
Descouverclesqui Descouverclesqui ferment mai+
ferment bien
Deswoks _ fond plat Des woks avec un fond sur anneau+
Ustensimes de grande tai e et
pour ruesconserves
Toutesruesmarmites peer ruesconserves et ruesgrandes
casseroles doivent avoir un fond plat et doivent _tre
fahriqu_es en mat_riau 6pals. Ceciest tr6s +mportantpourIes
surfaces_ dessuslisse+Labasene doit pasdepasserde 1'61ementde
plus de 2+5cm {1 po}+
Si lesmarmitesa conserveset les casserolesne sont pas conformes
cesnormes,Iesdur6esde cuissonseront plus Iongueset les
surfacesde cuissonpourront etre endommagees+
Certainesmarmitespour les conservessont conguesavecdes bases
plus petites pour 6tre utiliseessur dessurfaces a dessuslisse+
Pour la pr6parationde conserves, ne ehoisir que le r_giage
High (Elev_) j_sq_'_ ee q_e l'ea_ comme_ce _ be_illir ou que
la pressionsuffisantesoit atteinte clansla marmite+Reduireau
reglagele plus faibIe,maintenanti'ebuiIition ou la pression+Si la
chaleur n'est pasdiminuee,lasurface de cuissonpourrait 8tre
endommag6e.
Voir la brochureLacuisson simplifieepour obtenir plus
d'informations+
36

Tableau de commande
A
\
\
\
\
\
\
\
\
\
\
\
\
\
\
\
B
Bake
Broil
Cook&
Hold C leSn Favorite Clock
I
E
C 0
1
Timer
F G H
Keep
Warm
1 J
Letableaude commandeestcongu pour facilKer Ia programmation.Lafen6tre d'affichageindiqueI'heure,bs fonctionsavecminutedeet
fonctions du four.Letableau de commanderepr6sent6comprend caract6ristiquessp6cifiquesau modSb. (Le style peut varierselon le
modSle.)
A
B
C ¸
ii!!
D
ii! !
j
Gril
Cuissoncourante
A (Plus]ou
_' [Moins)
IV1inuterie
Cuissonet
maintien
Nettoyage
Favori
Horloge
Maintienau
chaud
Annulet
S'utilisepourlacuissonau gril et lerissolage
surpattiesup6rieure.
S'utilisepourlacuissoncouranteet le
rbtissage.
S'utiIisepourentrerou changerla dur6e,la
temp6raturedu four. Etabiit Ie gril
temp6ratureELEVEEou BASSE
Programmela minuterie.
Pourcuirependantunedur6epr6etablie,avec
maintienauchaudpendantuneheure.
S'utilisepourprogrammerle cycle
d'autonettoyage.
S'utilisepourprogrammeret sauvegarderune
m_thodeparticuli6redecuissonet maintien.
S'utilisepourprogrammerI'heuredujour.
S'utilisepourmaintenirauchauddansle four
lesalimentscuits.
Annuletouteslesop6rationssaufminuterieet
hor!oge.
Utilisation des touches
• Appuyer sur la touche d6sir6e+
. Appuyersur Iatouche A [Plus]ou _' (Moins] pour entrerla dur6e ou
latemparature+
• Un hip retentit IorsqueI'onappuie sur unetouche+
• Un doublehip retentit encas d'erreur deprogrammation+
Remarque: Quatresecondesapr_savoirappuy6sur Ies
touches A ou _', Ia dur6eou la temp6raturesera automatique-
mententr#e+Si plus de 30 secondess'6coulententre lapression
sur unetouche de fonction sur lestouches A ou _', la fonction
seraannul6eet I'afficheur reviendra_ I'affichagepr6c6dent+
L'horlogepeut 6tre programm6epour afficher Ia dur6e dans un
format de 12ou 24heures.L'horloge estprogramm6een usine pour
un format de 12 heures.
Changement de l'hodoge _ un format de 24 heures :
1. Appuyersur IestouchesCancel
(Annub0 et Favorite(Favod]et maintenir
la pressionpendanttrois secondes.
2. Appuyersur la touche A ou _" pour
programmerun format de 12ou 24 heures.
3. ProgrammerI'heureen suivantles instruc-
tions donn6esen dessous.
R691a9e de l'horioge
1. Appuyersur la touche Clock (Horloge].
o Ledeux pointsciignotent _ I'afficheur.
2. Appuyersur Iatouche A ou T pour
programmerI'heuredu jour.
o Deuxpointscontinuent _ clignoter.
-- Favoritm
Clock
Appuyer _ nouveau sur la touche Clock ou
attendre quatre secondes. Le deux points
cessent le clignotent.
suite.,,
37
Lorsquele courant61ectriquearriveou apr_s une interruption de
courant,la derniSreheureavantI'interruptionde courant va
clignoter.
PourrappelerI'heuredujour Iorsqu'uneautre fonction de dur6e
s'affiche,appuyersur la touche Clock.
L'heure de I'horlogenepout 6tre chang6eIorsquele four a 6t6
programm6pour unecuisson ou un nettoyagediff6r6 ou pour la
fonction de cuissonet maintien.
Annumation de faff]chage de m'heure :
Si I'onne desire pasraffichage de I'heuredu iour:
Appuyersur lestouches Cancel(Annule0 et
Clock (Horloge)et ies maintenirainsi pendant
trois secondes.L'heuredu jour disparait de
['afficheur.
LorsqueI'affichagede I'heureest annul6,
appuyersur Ia touche Clock pour afficher
bri@vementI'heuredu ]our.
R6affichage de fheure :
Appuyersur lostouches CanceIet Clocket los maintenirainsi
pendanttrois secondes.L'heuredu iour r6apparait_ I'afficheur.
La minuterie pout 6tre programm_e de une minute [0:01) jusqu'_
99 heures et 59 minutes (99:59).
La minuterie pout 6tre utilisee ind_pendamment de toute autre
activit6 du four. Elle pout 6tre aussi programm6e alors qu'une autre
fonction du four est en cours d'utilisation.
La minuterienecommandopas le four. Elle ne sert qu'_ 6mettredes
hips.
Programmation de maminuterie :
1. Appuyer sur Jatouche Timer[Minuterie). Timer
o 0:00ciignote _ I'afficheur.
o Losdeux pointsclignotent.
2. Appuyer sur iatouche A ou _F]usqu'_ ce _Je
J'heure]uste paraisse_ J'afficheur. --_q_v
o Losdeux pointscontinuent _ clignoter.
3. Appuyer _ nouveausur la touche Timer ou attendre quatre
secondes.
o Losdeux pointscontinuent _ clignoter et le d6comptede la
dur6ecommence.
o Laderni_reminutedu d6comptesera affich6esous forme de
secondes.
4. _, la fin de ladur6e programm6e,un hip long retentit.
Annumation de maminuterie :
1. Appuyersur la toucheTimer et la maintenirainsi pendant trois
secondes.
OU
2. Appuyersur la touche Timer et r6gIerrheure _ 0:00.
Verroui age des cow.andes
et de porte four
La porte du four et Iestouchespeuvent_tre verrouilIeespour des
raisonsde s6curit_,nettoyageou pour emp_chertoute utilisation
non souhait@e.ElIesnepourmnt 8tre utilis6essi ellessont
verrouilI6es.
Si lefour esten cours d'utilisation,les commandeset la porte ne
peuventetre verrouilI@es.
L'heure actuelIedu iour restera_ I'afficheur Iorsqueloscommandes
serontverrouilI6es.
Verreui_age :
Appuyersur lostouches Cancetet Cook&
Hoid [Cuissonet maintien)et Iesmaintenir
ainsi pendanttrois secondes.(Appuyer
d'abord sur latouche CanceL) Cook&
-- Hold
• Le mot LOCK{VERROUiLLAGE}
clignote _ rafficheur.
D_verroui_age :
Appuyersur lestouches Cancelet Cook&Hoid et los maintenirainsi
pendanttrois secondes.(Appuyerd'abord sur JatoucheCanceL}
• Le mot LOCKdisparaitde I'afficheur.
Codes d'anoma ie
Los rootsBAKE(CUISSONCOURANTEDou LOCK[VERROUILLAGEI)
peuventciignoter rapidementb i'afficheurpour pr6veniren cas
d'erreur ou de probl_me.Si tel est ie cas,appuyersur la touche
Cancel Siies rootsBAKEou LOCKcontinuent b ciignoter,
d6brancherI'appareil.Attendrequelques minutes,puis rebrancher
I'appareil.Si I'un des roots continue b ciignoter,d6brancherI'appareil
et prendrecontact avec un r@parateurautoris6.
38

@
Cuisson courante
Pregrammation de macuissen ceurante :
1. Appuyer sur la touche Bake{Cuissoncourant@.
o Lemot BAKE(CUBSONCOURANTE[}c@note. Bake
o 000c%note _ I'afficheur.
2. %lectionner la temperaturedu four. La
temperaturepeut etre programm@de 75_ 290°C
(170_ 550°F[}.Appuyer unelois sur Ia touche
a, ou _' ou appuyersur la touche A ou _' et la
maintenirainsi.
o 175° [350°[}s'allumeIorsque I'onappuie la premierefob sur
rune des touches.
o Appuyer sur Ia touche a, pour augmenterla temperature.
o Appuyer sur la touche _' pour diminuer Iatemperature.
3. Appuyer _ nouveausur la touche Bakeou attendre quatre
secondes.
o Lemot BAKEs'arr6tede clignoter et s'a!lume_ I'afficheur.
o 38° (100°[}ou la temp6raturer@Ib du four sera affbh@. La
temperatureaugmenterapar intervaiiede 3 °C (5°F[}iusqu'_ ce
que latemperaturepr@rogramm@soitatteinte.
4. Laisserle four pr@haufferpendant 8 _ 15 minutes.
o LorsqueIatemp6raturepregramm@pour le four est atteinte,
un hip long retentit.
o Pourrappelerla temperatureprogramm@pendant le
pr@hauffage,appuyersur la touche Bake.
5. Placerla nourriture dartsIe four.
6. V6rifier I'avancementde la cuisson_ la dur@ minimab de
cuisson.Cuire plus Iongtempsau besoin.
Remarques sur la cuisson courante
au four :
oPour changer la temperature du four pendantla euisson,
appuyersur Iatouche Bake,puis sur la touche A ou 'V' jusqu'_
ce que I'on obtienne latemp6ratured6sir@.
oPour changer ia temperature du four io_sd_ p_cha_ffage,
appuyerde_× lois sur la touche Bake,puis sur latouche _ ou
_" iusqu'_ ce que latempSratured_sirSesoit affich@.
oSI I'onoublie d'arrSterle four, iI s'arreteraautomatiquement
apres 12heures.Si I'ondSsiredSsactivercette fonction,voir
page42.
oPourdes conseilssupplSmentairessur lacuissoncouranteet le
rOtissage,voir la brochure La cuissonsimplifiSe.
7. LorsqueIacuisson estterrain@, appuyersur
latouche Cancel(Annule0.
8. RetirerIa nourriture du four.
Diff reaces de caissoa eatre I'aaciea
fear et le ao vea
IIest normal de remarquerquelquesdiff6rencesclansla dur@ de
cuissonentre un four neuf et un four ancien.Voir Ajustement de la
temperaturedu four & la page 43.
C isso et mai tie
Lafonction c_isso_ et mai_tie_ permetde cuire pendant une
dur@ pred_terpain@,suivb par un cycb de maintien au chaud
d'une heure.
Progra_atio_ de Ia fo_ctio_ c_isso_ et _ai_tie_ :
1. Appuyersur la toucheCook& Hold (Cuissonet Cook&
maintien[}. Hold
• Lesroots BAKE{CUBSON[}et HOLD
(MAINTIEN[}clignotent
• 000 s'alIumea I'afficheur.
2. S6tectionnerlatemp6raturedu four. La
temperaturepeut 6tre programm@de 75a 290 °C
070 a 550°F[}.Appuyerune fob sur la touche a,
ou _' ou appuyersur la touche_ ou T et la
maintenirainsi.
• Appuyer sur la touche a, pour augmenterla temperature.
• Appuyer sur la touche _' pour diminuer la temperature.
3. Appuyer _ nouveausur la touche Cook & Hold OU attendre
quatre secondes.
• Le mot HOLDclignote.
• 00:00clignote _ I'afficheur.
4. Entrerla dur@ pendant laquelIeI'on d6sireque la cuissonait Iieu
en appuyantsur Iestouches A ouT. La dur@ de cuissonpeut
6tre programm@de dix minutes (00:10[}_ 11 heures,59 minutes
(11:59[}.
• Lesroots BAKEet HOLDs'allument _ I'afficheur.
• La dur6e de cuissons'alIume_ I'afficheur.
• La dur6e de cuissoncommencele comptea rebours.
Lorsq_e la dur6e de cuisso_ s'est _.coul_.e :
• O,uatre hips retentissent
• Le mot BAKEs'6teint.
• Lesroots HOLDet WARM (CHAUD[}s'allument.
• 75° 070°} parait _ I'afficheur.
39

Aprbs une heure de MAiNTIEN AU CHAUD :
o Lemot End(Fin}s'affiche.
o L'heuredu ]our reapparaft_ I'afficheur.
Annumation de mafonction cnisson et maintien _ tout
moment :
Appuyersur tatouche Cancel[Annule0. Retirerla
nourriture du four.
Cuisson diff r e
Ne pas utiliser la cuissondiff6r.#,epourdes denr6estr@
p6dssabbscomme los produits laitiers,le porc.la volaiileou les
fruits de mer.
AvecIa fonction dif[_r_e, Ie four se met b cuire olustard darts Ia
journ_e. Programmerla dur@ d'attente@sir@ avan{{_uele four
ne se mottoen marcheet la dur@ decuisson d6sir6e.Lefour
commence_ chauffer_ I'heures61ectionn@et cuit }our m duree
sp6cifi6e.
La dur@ d'attente peut 6tre programm@ de 10 minutes (00:10) a
11 heures, 59 minutes [11:59].
Programmation d'un cycle de cuisson courante
differSe :
1. Appuyer sur IestouchesBake (Cuisson
courante}et Timer (Minuterie}en m6me
temps.
o Lemot DELAY(ATTENTE}s'alhme
I'afficheur.
-- Bake
-- TimeP
o 00:00clignote_ I'afficheur.
2. Appuyer sur la touche A ou _' pour programmer
madur_e d'attente.
AIorsque le mot DELAYcHgnotetou]ours :
3. Appuyer sur la touche Cook & Hold (Cuissonet
maintien}.
o 000s'allume _ I'afficheur.
o LesrootsBAKE(CUISSONCOURANTE}et
HOLD(MAINTIEN} clignotent.
Book&
Hold
4. Appuyer sur A pour #rogrammer la temperature de cuisson°
o 00:00 et le mot HOLD clignotent.
o Lemot BAKEresteallure6.
5. Appuyersur A pour programmer la durSe de cuissen,
• La dur@ d'attente, les rootsDELAY,BAKEet HOLDs'allument
I'afficheur.
Lorsque maduree d'attente s'est 8coum6e :
• Le mot DELAYs'6teJnt.
• La dur6e de cuissonet la temperatureseraaffich@.
• Losroots BAKEet HOLDsent affich@.
Po_r programmer _n temps d'attente _orsq_e _a
fonction cnisson et maintien a dej_ et_
programmee :
1. Appuyersur Iestouches Bakeet Timer.
{Appuyerd'abord sur la toucheBake.}
• Le mot DELAY(ATTENTE}et 00:00
parait _ I'afficheur.
L Bake
2. Appuyersur ia touche A ou T pour programmer
ladur@ d'attente.
o Lemot DELAYreste aJium@pour rappebr qu'un
cycb de cuissondiffer@ a 6t6 programm&
Lorsq_e ia d_ree d'atteate s'est
_con_ee et qne _efont se met en marche :
• La dur6e de cuissonet la temperatureseraaffich@.
• Le mot DELAYs'6teint.
o LosrootsBAKEet HOLDrestealhm@.
Annu_ation :
Appuyersur latouche Cancel(Annule0.
• Toutesles fonctionsde cuissonminut@ et
non minut@seront annuI@s.
• L'heuredu jour r6apparait_ ['afficheur.
_emarq_es :
Ne pas uti[iserIa cuissondiffer@ pour des articles qui
n6cessitentque le four soit pr@hauffe,commebs g_teaux,
los petits biscuits et les pains.
Ne pas utiliser [e cycle de cuissonet maintiendiff6r6s sile
four est d6j8chaud.
40
Maintien au chaud
Pourmainten+rau chaud(Jarlsle four desatiments cuits et chauds
ou pour r6chaufferpains et assiettes.
Programmation du maintien au chaud :
Keep
1+ Appuyer sur ta touche KeepWarm [Maintien au Warm
chaud)+
, Le mot WARM (CHAUD)c@note+
, 000parait 8 I'afficheur+
2+ %tectionner la temp6raturede maintienau chaud+
CeIle-cipeut 8tre r6gl_e de 63_ 90 °C[145
190°F)+Appuyer unelois sur la touche A ou _'
ou appuyersur latouche a, ou Vet la maintenir
ainsi+
, 75° (170°) s'allume Iorsqueron appuiela
premierefois sur I'unedestouches.
, Appuyer sur Ia touche A pour augmenterla temperature.
, Appuyer sur la touche T pour diminuer Iatemperature.
Lemot WARM [CHAUD)et ta temp6ratureseront affich6s
pendantque la fonction maintien au chaud estactive.
AnnumatiOn du maintien au chaud :
1+ Appuyer sur la toucheCancel[Annu+e0+
2+ Retirerla nourriture du four.
Remarques sur Uafonction maintien au
chaud :
+ Pourobtenir des qualitesalimentaireset nutritivesoptimales,
lesalimentscults aufour ne doiventpas 6tre gard6sau chaud
plus de 1_ 2 heures.
• Pouremp6cher Iesaliments dedess6cher,Iesrecouvrirde
papier aluminium,sans serrer,ou d'un couvercle.
+ Pour r6chuuffer des petits pains :
- recouvrirIespetits pains de papieraluminiumsansserrer et
les placerau four.
- appuyersur Iestouches KeepWarmet A pour
programmer75°C (170°F).
- r6chaufferpendant 12_ 15 minutes+
+ Pour r6chauffer des assiettes :
- pJacerdeuxpiles de quatre assiettesmaximumdans Jefour.
- appuyersur Iestouches KeepWarmet a, pour
programmer75°C (170°F}+
- r6chaufferpendantcinq minutes,arr6ter Iefour et laisserles
assiettesau four pendant encore15 minutes+
- n'utiliser quedes assiettespouvantaller au four, _ v6rifier
avecle fabricant.
- nepas poserdes assiettesti6dessur une surfacefroide, les
changementsrapidesde temp6raturepouvantcasser
I'assietteou lafend+ller+
41
Arr t autornatique/Mode
Lefour s'arr6teautomatiquementapres 12heuress'il a 6tO
accidentelIementIaissden mar@e.Cettecaract6ristiquede s@urit6
peut 6tre arr6t@.
Pour annuler l'arr_t 12 heures et faire fonctionner me
four en continu pendant 72 heures :
1. Programmerb four pour une cuissoncourante[voir page39}.
2. Appuyer sur la touche Clock [Horloge)et la
maintenirainsipendant cinq secondes. C!ook
o SAbsera affich6 et clignoterapendant cinq secondes.
o SAbsera ensuiteaffich6 en continu jusqu'_ ce qu'on rarr6te ou
jusqu'_ ce que la dur@ limitede 72heuressoit atteinte.
o Lemot BAKE(CUBSONCOURANTE}sera aussi affich6si un
cyclede cuissoncouranteesten coursalors que lefour est en
modesabbat.
Toutes lesautresfonctions (Minutede,Maintien au chaud, Nettoyage,
etc.}sont verrouill6es,sauf BAKE,pendantle mode sabbat.
Anuulation de la cuissou couraute alors que le four
est eu mode sabbat :
Appuyersur latouche Cancel(Annub0.
o Lemot BAKEs'6teint_ raffbheur.
o Aucun hip sonorene retentit.
Auuulatiou du mode sabbat :
1. Appuyer sur la toucheClock pendantcinc
OU
secondes. Clock
2. Apr6s 72 heures, le mode sabbat se termine.
o SAb clignote pendant cinq secondes.
o L'heure du iour revient _ I'afficheur.
Remarques sur Uemode sabbat :
• Le modesabbat peut 6tre mis en marche_ tout moment,que
lefour soit en marcheou non.
• Le modesabbat ne peut pas 6tre misen marchesiles
commandessontverrouill@sou Iaporte verrouilIQe.
• Si Ie four esten mode cuissonIorsqueIe modesabbat est
programm6,Ie mot BAKE(CUISSONCOURANTE)s'6teint _ la
fin du cycle de cuisson. II n'y auraaucun signal sonoreaudible.
• S[I'6clairagedu four estsouhait6pendantIe modesabbat,la
lampedewa 6treallumQeavantquele mode sabbatne d6bute.
• Lorsquele modesabbata d@aarr6,aucun bip de pr@hauffage
ne retentit.
• Tous bs messageset les bipssont d@activ@Iorsquele mode
sabbatest actif.
• Le verrouillageautomatiquede la porte ne fonctionne pas
pendant le modesabbat.
° SiI'on @pub sur latouche Cancel,un cycle decuisson
couranteau four seraannul6. Cependant,le programmateur
resteraen modesabbat.
• Apr@ unepannede courant,le four revient en modesabbat
avec72 heuresrestanteset aucuncycle actiE
42
Ajustement de la temp6rature
du four
La pr6cisiondes temp6raturesdu four a 6t6 soigneusementv6rifi6e
I'usine.II est normalde remarquerquelquesdiff6rencesdans Ia
cuissonentre un four neuf et un four ancien.Au fur et _ mesureque
les cuisinieressent moins neuves,Ia temp6raturedu four peut varier.
II estposs+bied'ajusterla temp6raturedu four si Fenpensequa Ie
four necuit pasou ne rissolepas correctement.Pour d6ciderde
I'ajustement_ apporter,r6gIer le four _ une temp6raturede 15 °C
(25°F)plus 6iev6eou plus bassequa la temp(!ratureindiquQedans
la recette,puis faire cuire Ia pr6paration.Lesr6suItatsdu _+test >>de
cuissondoiventdonnerune id6edu hombrede degr6sduquel la
temp6raturedoit 6tre ajust6e.
Ajustement de la temperature du feur :
1. Appuyer sur la touche Bake(Cuissoncourante]. Bake
2. Entrer285 °C(550°F]en appuyantsur la touche a,
3. Appuyer sur la touche Bakeet la maintenir ainsi
pendantplusieurssecondesoujusqu'_ ce que 0°
paraisse_ rafficheur.
Si latemp6raturedu four a 6t6 pr6c6demmentajust6e,le
changementsaraaffich6. Parexemple,si la temp6raturedu four
a 6t6 r6duitede 8 °C 05 °F},I'afficheurind+quera-8° (-15°].
4. Appuyer sur la touche a, ou _' pour ajusterla temperature.
,_,chaquelois qua I'onappuie sur une touche, Iatemp6rature
change de3 °C(5 °F}.Latemp6raturedu four peut 6tre
augment6eou diminu6ede 3 _ 20 °C(5 _ 35°F}.
5. L'heuredu jour r6apparakautomatiquement_ rafficheur.
II n'est pas n6cessairede r6ajusterla temp6raturedu four en cas
de panneou d'interruption de courant.Lestemp6raturesde
cuissonau gril et de nettoyagene peuvent6tre ajust#es.
Changement de la
temp6rature °F/°C
1. Le r6glage par ddaut de I'usine pour latemp6ratureest en
Fahrenheit.
2. Pourmodifier ce r6gIage,appuyersur lestouches CANCELet
Bakesimultan6paentet maintener-lesenfonc6espendant trois
secondes.
3. Un bip retentit et le r_glage courant [°Fou °C] parait _ I'afficheur.
(Sivous nefakes pas de changement,la cuisiniereretoumeau
r6glageexistantapres30 secondes.]
4. Pourmodifier le r_glage,appuyersur latouch_ a, ou _'. Appuyer
nouveausur Ia touche pour retournerau r_giageexistant.
Attender cinq secondeset le reglagesara dfectuS.
Latouche Favorite(favori] permet de sauvegarderIa durSeet la
temperatured'une fonction de cuissonet maintien.
Pourprogrammerun cycle Favori,une fonction de cuissonet
maintiendoit 8tre activeou tout juste programm6e.
Pregrammatio_ d'_ _e_veau cycle faveri e_
sa_vegarde d'_ cycle e_ coors de cuisse_ et
mai_tie_ comme favori :
1. Programmerun cyclede cuissonet maintiencommeil est dScrit
lasection Cuissonet maintien _ la page39.
2. Appuyersur Ia toucheFavoriteet la maintenir
ainsi pendanttrois secondes. Favorite
• Le cyclecuisson et maintien nouvellementprogramm_ou en
cours defonctionnementserasauvegard_.
• Un hip sonoraretentit pour indiquer que lescommandesont
acceptQle r6glagefavori.
D_marrage d'_ cycle pregramm_ da_s faveri :
1+ Appuyersur Ia touche Favorite+
• La dur_e et la temp#raturedu cycleprogramm_
de cuissonet maintienserontaffichees(si aucun Favorit;a
cycle de cuissonet maintien n'a #t_ programme,
<_nonE>>sara affichS].
2. Appuyersur Ia toucheBake. Bake
• Le cyclefavori commenceimm6diatement.
• Le mot BAKE(CUISSONCOURANTE}s'allume _ I'afficheur.
• La dur6e de cu+ssons'alhme a I'afficheur.
Lersq_e la d_ree de c_issen s'est eceulee :
• Le mot BAKEs'_teint.
• Lesroots HOLD (MAINTIEN]et WARM (CHAUD]s'alhment.
• 75° (170°] parait _ I'afficheur.
A_latie_ d'_ cycle faveri e_ coors :
1. Appuyersur Ia touche CANCEL(ANNULER}.
• Le cyclefavorJsauvega_J6ne sara pas affectS.
2. RetirerJanourriture du four.
43
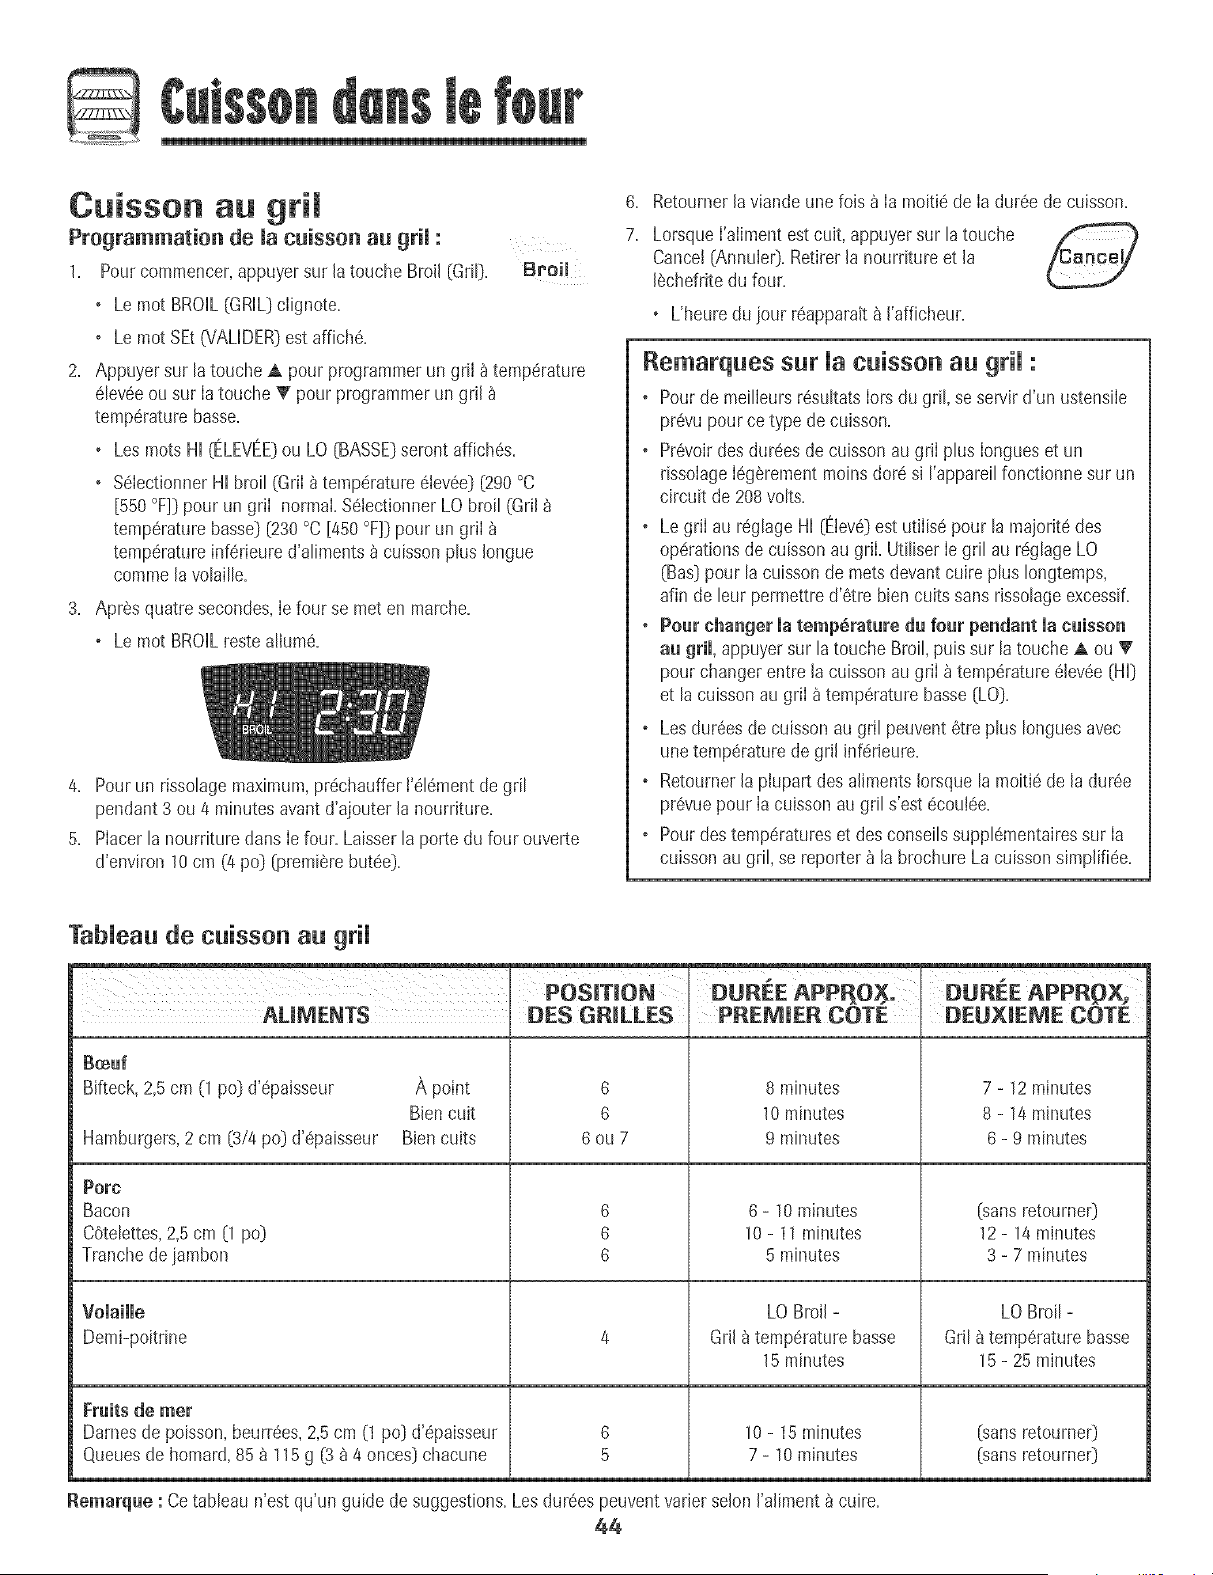
Cuisson au gril
Programmation de la cuisson au gril :
1= Pourcommencer,appuyersur latouche Broil (Gril)= Broil
, Le mot BROK CGRIL)clignote+
, Le mot SEt(VALIDERDest affich6+
2+ Appuyer sur la touche A pour programmerun griI _ temperature
61ev6eou sur ia toucheT pour programmerun gril
temp6raturebasse+
, Lesroots HI [ELEVEE)ou LO (BASSE)serontaffich6s+
, %iectionner HI broil (Grii _ temperature61ev6eD[290°C
[550°F]) pour un griI normal. %iectJonnerLO broil (Gril
temp6raturebasse)[230°C [450 °F]Dpour un griI
temp6ratureinferieure d'aliments_ cuissonplus Iongue
commelavolaille+
3= AprSsquatre secondes,ie four se met en marche+
, Le mot BROILrestealIum6+
4+ Pourun rissolagemaximum,pr_chaufferF616mentde gril
pendant3 ou 4 minutesavantd'ajouter la nourrJture+
5+ Piacerlanourdture darts ie four. Laisser la porte du four ouverte
d'environ 10cm (4 pod[premiere but6eD+
6. Retournerla viande une foisa Ia moiti6 de Ia dur6ede cuisson.
7. LorsqueI'alimentest cult, appuyersur la touche
Cancel[AnnulerD.Retirerla nourriture et la
I6chefritedu four.
, L'heure dujour r6apparait_ J'afficheur.
Remarques sur Uacuisson au grH :
. Pourde meilIeursr6sultatsIorsdu gril, se servir d'un ustensiie
pr6wJpour ce type de cuisson.
, Pr6voirdes dur6esde cuissonau grii plus iongueset un
rissolagei6g_rementmoinsdot6 si I'appareilfonctionne sur un
circuit de 208 volts.
, Le griI au r6glage Hi [E+ev6}est utilisepour la majoritedes
op6rat+onsde cuissonau griLUtiliser ie gril au r6glage LO
(Bas}pour la cuissonde metsdevantcore plus Iongtemps,
afin de leur permettred'6tre bien cots sansrJssolageexcessif.
, Pour changer mutemp4ruture du four pendant maeuisson
au gril, appuyersur latouche Broil,puis sur la touche A ou T
pourchanger entre la cuissonau grii _ temp6rature61ev6e{HID
et lacuissonau grii atemp6raturebasse[LO}.
, LesdurSesde cuissonau gril peuvent6tre plus Ionguesavec
unetemp6raturede gril inf6rJeure.
, Retournerla plupart des alimentsIorsque la moiti6 de la dur6e
pr6vuepour ia cuissonaugril s'est6coui6e.
, Pourdes temperatureset des conseilssuppl6mentairessur ia
cuissonaugril, se reportera la brochure La cuissonsimpli%e.
TabUeau de cuisson au grH
ALINENTS DES GNJLLES
Be_uf
Bifteck, 2,5cm (1 podd'epaisseur A point 6
Biencot 6
Hamburgers,2 cm [3/4 podd'6paisseur Biencots 6 ou 7
DUREE APPRO_+ DU_EE APP_
DEUXIEME COTE
8 minutes
10 minutes
9 minutes
7 - 12 minutes
8 - 14 minutes
6 - 9 minutes
Pot'c
Bacon
COtelettes,2,5cm [1 pod
Tranchedejambon
Voiaiiie
Demi-poitrine
Fruits de met
Darnesde poisson,beurr6es,2,5 cm [1 podd'6paisseur
Queuesde homard, 85 _ 115g [3 a 4 onces)chacune
6
6
6
6
5
6 - 10 minutes
10 - 11 minutes
5 minutes
LOBroil -
Gril_ temp_lature basse
15minutes
10 - 15 minutes
7 - 10 minutes
[sans retourneO
12 - 14 minutes
3 - 7 minutes
LOBroil -
Gril_ temp6raturebasse
15- 25 minutes
[sans retourneO
[sans retourner)
Remurque : Cetableau n'est qu'un guidede suggestions.Lesdur6espeuvent varJerseJonJ'aJiment_ core.

1
Event du four
LorsqueIe four fonctionne, les surfacesvoisinesde I'6ventpeuvent
devenirassezchaudespourentrainer des brOlures.Ne iamais bloquer
1'6vent.
USventest situs sous meproteetear d'_vent da dosseret, sar ma
cuisini_re. _ EVENT
/ ._, \ DU FOUR
__ O(LLg_ _ Ne pas mettre de
I_ _ X_s_J_ plastiquespr6sde
I r6vent,laohaleur
I _ / _ pouvantIes ddormer
EcJamrage du four
Appuyersur lecommutateurd'6clairagedu four situ6
sur le tableaude commandepour allumerou 6teindre
la lampe.Lalampede four estactiv6epar
I'interrupteurseulement. Oven
Light
Sole du four
Protegerlasole des produits renverses,en particulier acidesou
sucr6s,ceux-ci pouvantd6colorer1'6mailvitrifi& Utiliserdes
ustensilesde Ia bonnedimensionpour 6viter que los produitsnese
renversentou passentpar-dessusrustensileen bouillant. Ne pas
placer d'ustensiles ou de feuille d'aluminium direetement sur ia
sole du four.
GriJJes du four
t Nepas tentel de changerla POSitiondes gd!le_!orsque le four
est Chau&
, Ne Pasrangerde nourdtureou d'ustensi!edans lefour,
Lefour comporte deuxgrilIesavec,pour chacune,un dispositif de
calage.
E×traction :
1. Tirer la grille en lignedroite
jusqu'_ ce qu'e!les'arr6te _ la
positiondecalage.
2. SouieverIagrille _ I'avantpour
pouvoirI'extraire.
R6installation :
1. PlacerIa grille sur lossupportsclansle four.
2. SouleverI6g6rementI'avant.Faireglisserla grillevers I'arriereau-
del_ de la positionde calage.
3. Abaisser la grille et la faire glisserdarts le four.
Ne jamais couvrir la totalit6 d'une grille de papier d'aluminium
ni mettre d'amuminiumsur masole du four. Cema_e do_erait
pas de bo_s r_s_mtatsda_s maeuisso_ de g_tea_× et masole
PositioBs des griJJes
Grille 7 ([apositionplus
haute) : Pourfaire grii[er du
pain ou passerau gri[ des
alimentsminceset non gras.
Grille 6 : Utilis_epour [a
maiorit_des operationsde
cuissonau griL
Grille 5 : Pourla cuissonsur
deux grilles.
So_e
Cuisson sur deu× grilles
Grille _,: Pour Ia plupart des cuissonsde p_tisseriessur une tOle
biscuitsou un moule_ g_teaufoul& destartes aux fruits ou mets
surgeles.Utilis_eaussi pour passerau gril des morceauxde poulet.
Grille 3 : PourIesplats miiot6s,cuissonde michesde pain,savarins
ou tartes a la cr6me.
s_ite ooo
45
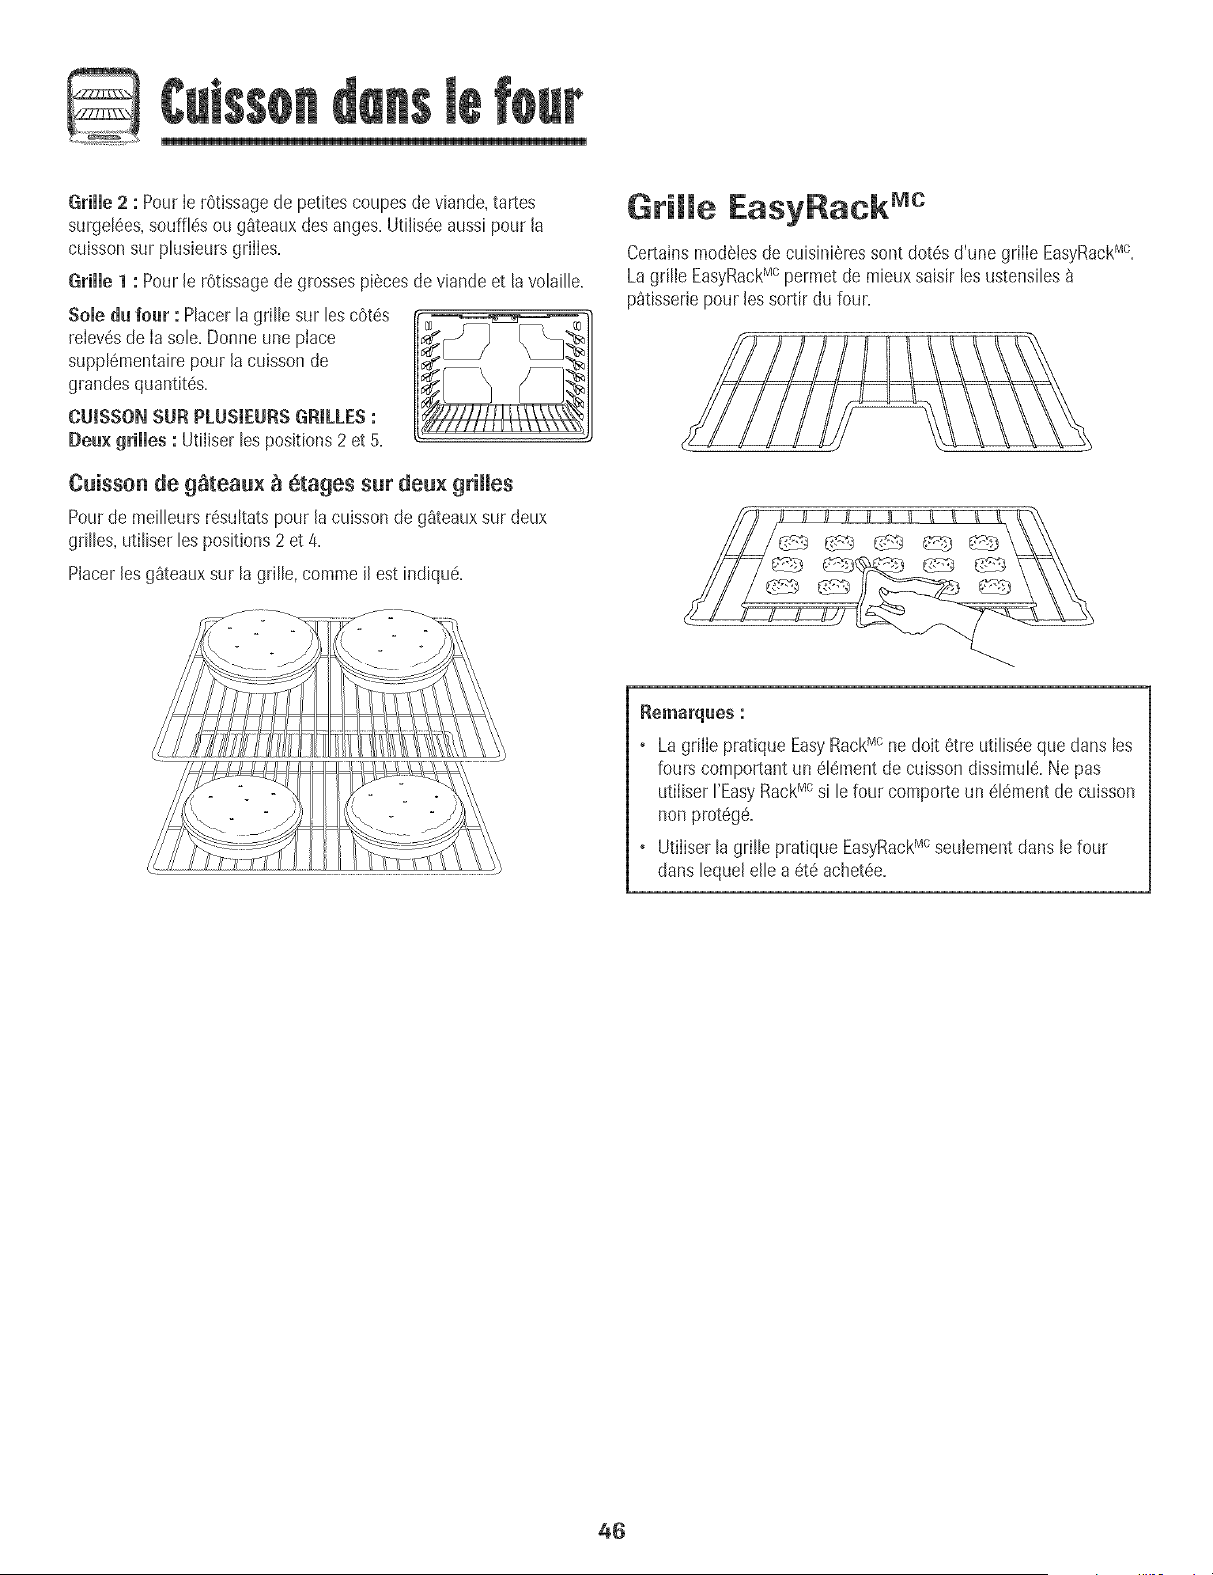
Grille 2 : Pourie rOtissagede petites coupesde viande,tares
surgel6es,souffles ou g_teauxdes anges.Utilis6eaussipour la
cuissonsur plusieurs griIIes.
Grille 1 : Pourle r6tissagedegrossespiecesde viandeet la vola[lle.
Sole du four : Placerla grille sur lescOt6s
relev6sde lasole.Donne une place
suppl6mentairepour la cuisson de
grandesquantit6s.
CUISSONSUR PLUSIEURSGRILLES:
Deu× grilles : Utiliser lespositions2 et 5.
[L JJ
Cuisson de g_teau× _ etages sur deu× grilles
Pourde meilleursr6sultatspour lacuissonde g_teauxsur deux
grilles,utiliserles positions2 et 4.
PlacerlesgQteauxsur la grille, commeil estindiqu6.
Grille EasyRack Mc
Certainsmod6tesdecuisiniSressont dot6s d'une griiie EasyRackMC.
Lagrille EasyRackMcpermet de mieuxsaisir lesustensiles
p_tisseriepour les sortir du four.
• La grille pratique EasyRackMcnedolt 6tre utilis6e que dans les
fours comportantun 61ementde cuissondissimule.Ne pas
utiliserI'EasyRackMcsi le four comporteun 616paentde cuisson
nonprot6g_.
• Utiiiserla grille pratique EasyRackMcseulementdans le four
dans lequelelle a 6t6 achet6e.
46

Four autonettoyant
o li estnormal que cerlamespieces de la cuisinieredewennent
tres chaudesIorsdun :',yclede nettoyage.
o Pourevtter que la portedu tour ne subissedes dommages,ne
pastenter ae I'ouvrir Iorsquele mot LOCKUERROUULLAGE)es_
ws_bIesur rafficheur.
o Eviterde toucher laporte,le hublcEet la zonede 1'eventdu four
Iorsdun cycled'autonettoyage.
Ne pas utfliserde nettoyantpour tour du commercesur le tim
ou tour ou sur tout autre composantdu four. Ceh abtmeraitle
fini ou [escomposantsou tour.
Le cycled'autonettoyageutilise destemperaturessuperieures_ Ia
normalepour assurerle nettoyageautomatiquede la totalite du four.
Si lefour esttres sale,il estnormal qu'on observelaformation de
fumeeou de flammesdurant Ienettoyage.Nettoyerlefour
intervallesreguliersplutOtqued'attendre une accumulation
importantede residus.
Durant le processusd'autonettoyage,il convient de bienaerer la
cuisinepour eliminer lesodeurs normalementCruisesdurant le
nettoyage.
Avant I'autonettoyage
1= Eteindrela Iampedu four avant le nettoya% Eilerisqueraitsinon,
de gdller=
2. Enleverla lechefrite,tousles plats et IesgriIles du four. Les grilIes
risquentdese decoIoreret de ne plus glisseraussi bienapresun
cycle d'autonettoyagesi on ne lesenIevepas.
3. Nettoyerle cadre du four, Iecadre de Ia porte,Iazone _ rexterieur
du joint et autour de I'ouverturedans lejoint de Ia porte,_ I'aide
d'un produit de nettoyagenonabrasif commeBon Ami* ou d'eau
additionneede detergent.Leprocessusd'autonettoyagene
nettoiepasceszones.Ellesdoivent etre nettoyeespour empecher
lasaletede s'incrusterpendant Ie cyclede nettoyage.(Lejoint
assureI'etancheiteautour de la porte et du hublot du feuL)
4. Pourempechertout dommage,ne pas
nettoyerni frotter leioint qui se trouve
autour de Ia porte du four. Ceioint est
co%u pour eviterles pertes de chaleur
pendantle cycle d'autonettoyage.
5. EliminerIesresidusde graisseou de
produitsrenversessur la sole avant le
nettoyage.Ceciempechela formationde flammesou defumee
durant le nettoyage.
6. Essuyerles residussucreset acides,comme Iespatatesdouces,
Iatomate ou Ies sauces_ basede Iait.La porcelainevitrifiee
possedeunecertaine resistanceaux composesacides,maisqui
n'est pas Iimitee.Etlepeut se decolorersi les residusacidesou
sucresnesent pas enlevesavant de commencerI'autonettoyage.
Programmation de l'autonettoyage :
Remarque :La temperaturedu four doit etre situeeen dessous
de 205°C (400°F)pour programmerun cycle d'autonettoyage.
1. Fermerla porte du four.
OJean
2. Appuyersur JatoucheClean {Nettoyage).
• Le mot CLEAN{NETrOYAGE}clignote _ J'afficheur.
3. Appuyersur Jatouche A ou T.
• MEd [Moyen) (Saletemoyenne,3 heures)
est affiche.
Si la porte n'est pas fermee,des hips retentissent
et le mot _{door>>(porte) parait _ I'afficheur.Sila
porte n'est pasfermeedans les 45secondes,
I'operationd'autonettoyageest annuIeeet I'afficheur
revient_ rheuredu iour.
4. Appuyersulta touche A ou _' pour voir defiler
lesdifferents reglagesde I'autonettoyage.
HVyO-ressale) [Saleteepaisse,4 heures)
MEd [Moyen) [Saletemoyenne,3 heures)
LITE(Lege0 (SaleteIegere,2 heures)
Lechoixdu niveaudesaletedu four programme
automatiquementla dureedu cycle d'autonettoyage.
5. Apres quatre secondes,le four commence le nettoya%
• La duree de nettoyagecommenceJedecompte_ i'afficheur.
• Le mot LOCK(VERROUILLAGE)parait _ rafficheuL
o Lemot CLEANparait _ J'afficheur.
Demarrage differ_ d'un cycJe d'autonetteyage :
1. Appuyersur lestouches Cleanet Timer [Minuterie).
• Le mot DELAY[ATTENTE)et 00:00para_t -- Clean
I'afficheur.
2. Appuyersul Ia toucheA ou T pour -- Timer
programmerIadureed'attente avantque ne
commenceIe cycle.Ladureed'attente peut etre
proglammeede 10minutes [00:10]_ 11 heures
et 59 minutes(11:59}.
*Lesnomsde marquedes produits de nettoyagesont des marquesdeposeesdes differents fab_icants.
47
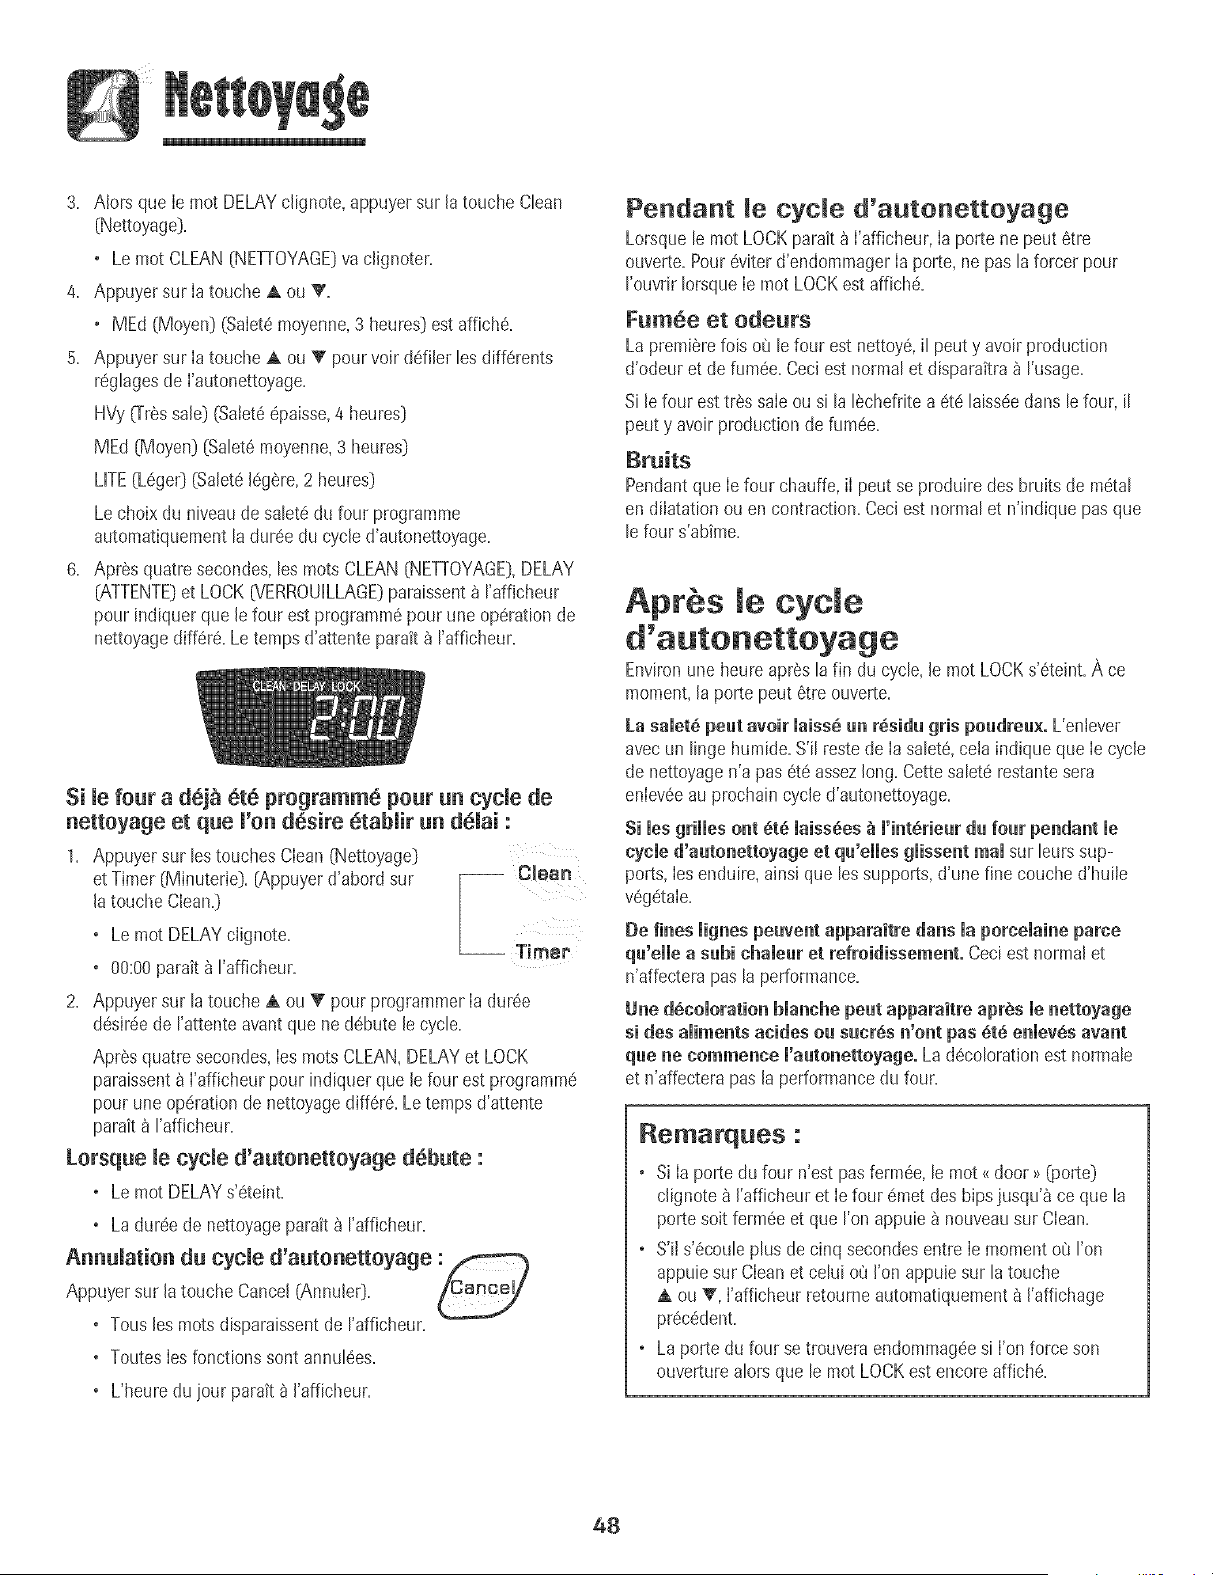
3. AJorsque Ie mot DELAYcJignote,appuyersur Jatouche Clean
(Nettoyage].
• Le mot CLEAN(NETTOYAGE]va clJgnoter.
4. Appuyersur Ia touche a, ou _'.
• MEd [Moyen] (Salet6moyenne,3 heures] est affiche.
5. Appuyer sur Ia touche A ou _ pour voir ddJJerles differents
reglagesde I'autonettoyage.
HVy(Tressale] [SaJeteepaisse,4 heures]
MEd (Moyen] [Salete moyenne,3 heures]
LITE(Leger}(SaJeteleg@re,2 heures]
Lechoix du niveaude saletedu four programme
automatiquementladuree du cycled'autonettoyage.
6. Apr@squatre secondes,les roots CLEAN[NETTOYAGE],DELAY
[ATTENTE]et LOCK6/ERROUILLAGE]paraissent_ I'afficheur
pour indiquerque Jefour est programmepour une operationde
nettoyagediffere. Le temps d'attente parait_ I'afficheur.
Si le four a dejh @teprogramme pour un cycle de
nettoyage et que l'on desire etablir un delai :
1. Appuyersur lestouches Clean (Nettoyage)
et Timer (Minuterie). (Appuyerd'abord sur 1 Ole+nmep
to++c,++
o Le mot DELAYclignote.
L_
o 00:00parak _ I'afficheur.
2. Appuyersur la touche A ou _r pour programmerIa duree
desireede I'attenteavantque ne debute Jecycle.
Apres quatresecondes,IesrootsCLEAN,DELAYet LOCK
paraissent_ I'afficheurpour indiquer que Jefour est programme
pour une operationde nettoyagediffere. Letemps d'attente
parait _ I'affJcheur.
Lersque le cycle d'auteaetteyage debute :
o Le mot DELAYs'eteint.
o La dureede nettoyageparait _ I'afficheur.
Annulation du cycle d'autonettoyage :_
Appuy er sur la tOUche cancel _in n[jlerl}" _ L_ i_€_
o Touslearootsdisparaissentde I'afficheur.
o ToutesIesfonctionssont annul@es.
o L'heure du four parait _ J'afficheur.
Pendant le cycle d'autonettoyage
Lorsquele motLOCKparait_ I'afficheur,Ia porte ne peut etre
ouverte.Poureviterd'endommagerIa porte,ne pas la forcer pour
I'ouvrirIorsqueIe mot LOCKestaffiche.
Fum6e et odeurs
Lapremierelois o_ lefour est nettoye,il peuty avoir production
d'odeur et de fumee.Ceci est normal et dispara_tra_ I'usage.
Si lefour est tressale ou si la 16chefritea ete laisseedans lefour, il
peut y avoir production de fumee.
Bruits
Pendantque Iefour chauffe,iI peut se produiredes bruits de metal
en dilatation ouen contraction=Ceci est normalet n'Jndiquepas que
lefour s'abtme=
AprSs le cycle
Environ une heure apr@sla fin du cycle, Jemot LOCK s'eteint= A ce
moment, Japorte peut 6tre ouverte=
La saiet6 peut avoir iaiss_ un r_sidu gris peudreu×. L'enJever
avec un linge humide. S'il reste de Ia salete, ceJa indique que Ie cycle
de nettoyage n'a pas ete assez long. Cette salete restante sera
enlevee au prochain cycle d'autonettoyage.
Si les grilles ont dtd laissdes _ l'interieur du four pendant le
cycle d'autonetteyage et qu'eiies giissent real sur leurs sup-
ports, Ies enduire, aJnsJque les supports, d'une fine couche d'huiJe
vegetaJe.
Oe fines mignespeuvent apparaitre darts la poreemaine parce
qu'eiie a subi chaieur et refreidissement. Ceci est normal et
n'affectera pas la performance.
Une decemoratien blanche peut apparaitre apres le nettoyage
si des amiments acides eu sucres n'ent pas 6t_ enmev_.savant
que ne commence l'a_tonetteyage. La deceleration est normale
et n'affectera pas la performance du four.
_@marque5 :
o Si Ia portedu four n'est pasfermee,le mot <<door>__oorte_
clignote8 J'afficheuret Iefour emet desbips jusqu'_ ce que la
porte soit fermee et que I'on appuie_ nouveausur Clean.
o S'iJs'ecouleplus decinq secondesentre Ie momento8 I'on
appuiesur Cleanet celui o_'JI'on appuJesur latouche
ou _', l'afficheur retourneautomat[quement_ J'affichage
precedent.
o La porte du four se trouveraendommageesi I'onforce son
ouverturealors que le mot LOCKestencore affiche.
48
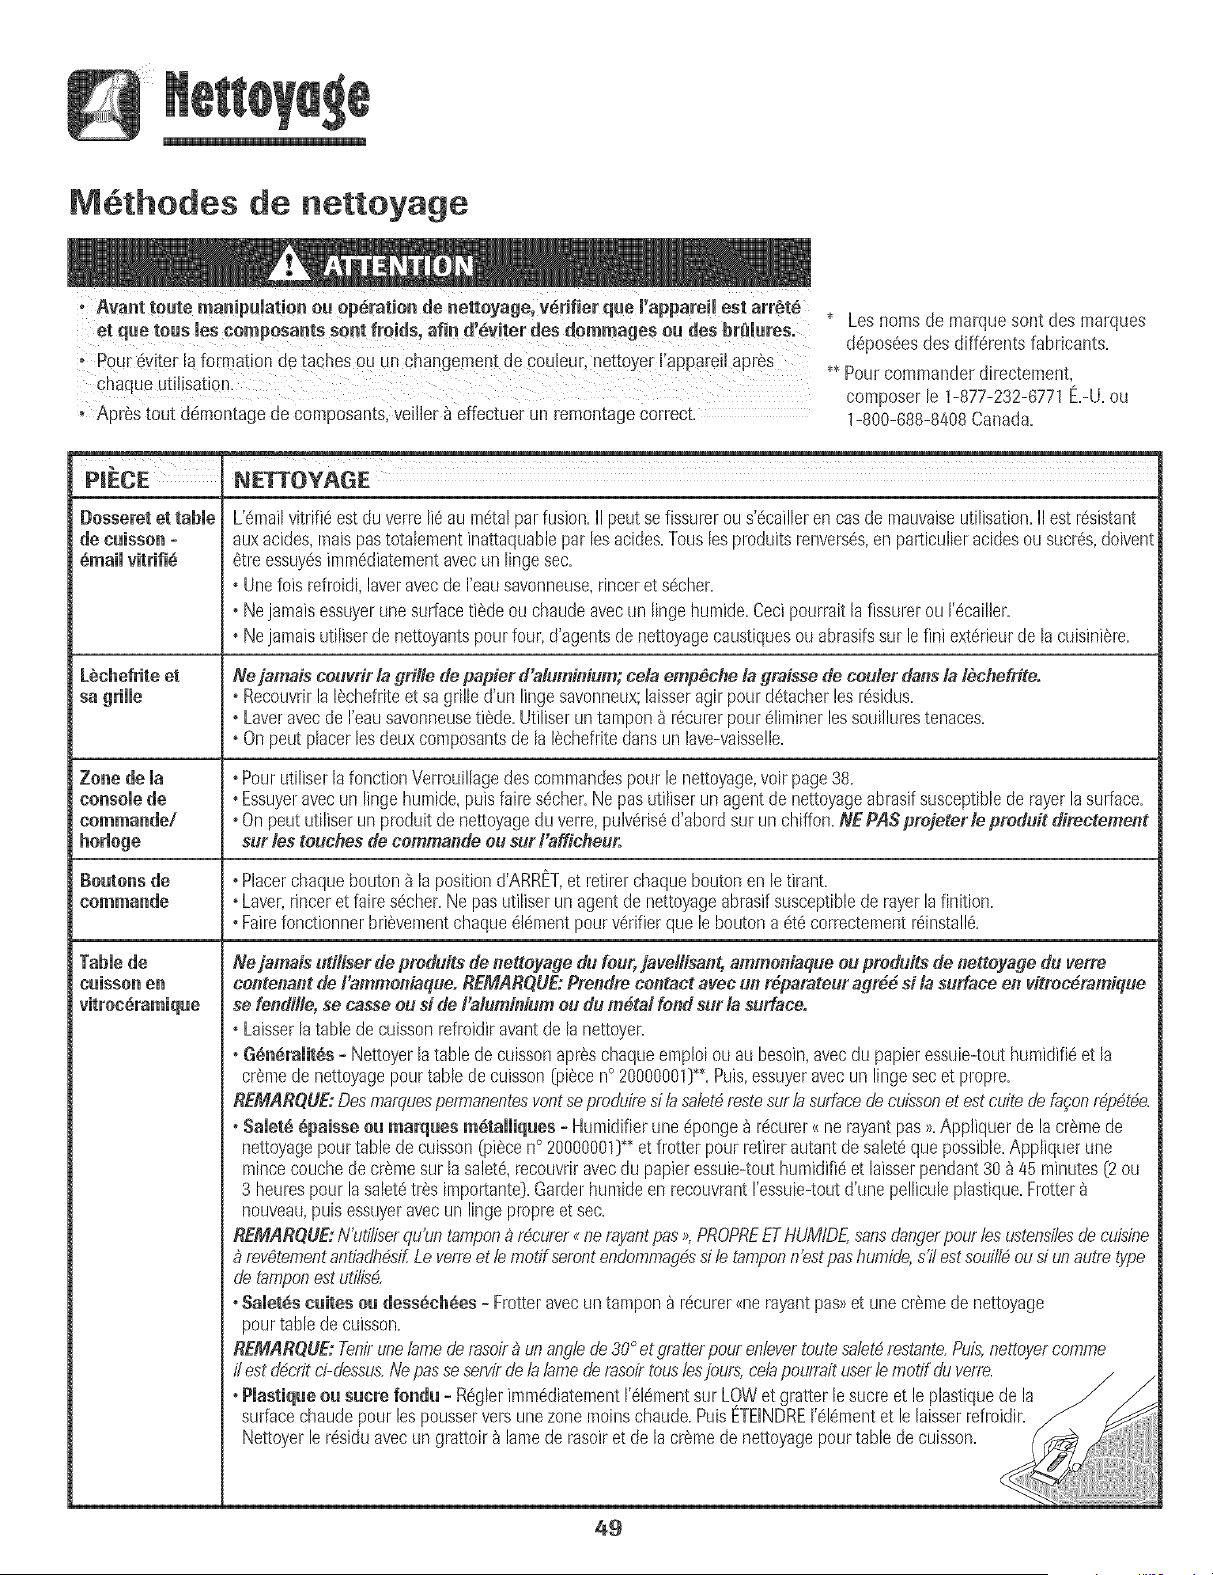
M6thodes de nettoyage
* Avant toute manipulation ou op@ation de nettoyage,v@ifier que m,appareimest arr+t_
+ Pour_viter[a fo_rnationde taches 0u unchangementde CoujeuBnettoyer ['appareiiapr_s
+ AprSstout d6rnontagede cornposants,veiller _ effectuerun remontagecorrect.
* Losnomsde marquesont des marques
d@os6esdes diff6rentsfabricants+
** Pourcommanderdirecternent,
corrlposer[e 1-877-232-6771E+-U+ou
1-800-688-8408Canada.
B
PIECE BJET1FOYAGE
Desseret et tame L'6rnailvitrifi6estduverreIJ_au rn_talpa! fusion=II poutsefissurerou s'6caillerencasde rnauvaiseutilJsation=IIestr6sistant
de euisson - auxacides,rnaispastotaiernentinattaquablepar losacides+Touslesproduitsrenvers6s,en particulieracidesou sucres,doivent
_maii vitrifi_ 6treessuy6sirnrnddiaternentavecun lingo sec.
° Unefois refroidi,laveravecde I'eausavonneuse,dnceret s6cher+
°Ne jarnaisessuyerune surfaceti6deou chaudeavecun lingo humide+Cecipourraitla fissurerou 1'6cailler+
° Nejarnaisutiliserdenettoyantspour four,d'agentsde nettoyagecaustiquesou abrasifssur le fini ext6deurde lacuisiniBre+
L_ehefrite et Nejamais ceuvrir lagri#e de papier d'ak_minium;cela emp_cfle ta dmisse de couler dansla I_cflefrite.
sa grille • Recouvdrla [@chefliteet sa grilled'un lingosavonneux;laisseragil pout d6tacherlosr6sidus+
° Laveravecde I'eausavonneusetilde+ Utiliserun tampon_ r@curerpour 61irninerlessouillurestenaces+
° Onpeut placerlos deuxcornposantsde la I@cheffitedartsun lave-vaisse!le+
Zone de ia • Pourutiliserla fonctionVerrouillagedes cornrnandespourle nettoyage,voirpage38+
console de ° Essuyeravecun lingohumide,puisfaires6cher.Nepas utiliserunagentdenettoyageabrasifsusceptiblederayerlasurface.
commando/ +Onpoututiliserun produitdenettoyagedu verre,pulw!ds_!d'abordsur unchiffon+NEPASprojeterte produit dlrectement
horJege sur tes touches de eommande ou sur I'affiefleur.
Beutons tie ° Placerchaquebouton_ lapositiond',&RRET,et retirerchaqueboutonen le tirant=
commando ° Laver,finceret faires6cher.Ne pasutiliserunagentde nettoyageabrasifsusceptiblede rayerla finition+
+Fairefonctionnerb@vernentchaque@16rnentpourw!dfierque le boutona6t@correcternentr@install@+
TaMede Nejalnais udHserde produitsde nettoyage dufour,javellJsant,ammoniaque ouproduits de nettoyage du verre
cuisson en contenant de I'ammoniaque. REMARQUE:Prendre contact avecun r+pamteur agr4_ si I_ surface en vJtroe_ramique
se fendi#e, se easse eu si de I alumJnk_mou du m_tal fond sur la surface.
° Laisserla tablede cuissonrefroidiravantde la nettoyer=
° G_raiitds - Nettoyerlatable de cuissonapr6schaqueernploiou au besoin,avecdu papieressuie-touthurnidifidet la
cr@rnedenettoyagepourtable decuisson(piScen° 20000001]+++Puis,essuyeravecun lingesec et propre+
REMARQUE;Desmatquespermanentesvontsepmduiresib sabt4tastesurb su,@eedeeuissonet estcuitedefa_on,,gp4_ge.
, Samet__paisse o_ ma_es mdtammiq_es- Humidifierune@onge_ r6curer<_nerayantpas>>.Appliquerde la cr6rnede
nettoyagepour tablede cuisson(pi6ceno20000001}++et frotterpour retirerautantde salet6que possible.Appliquerune
mincecouchedecr_rnesur la salet_,recouvdravecdu papieressuie-touthurnidifi6et hisser pendant30_ 45 minutes[2 ou
3 heurespour la salet6tr_s irnportante}.Garderhurnideen recouvrantI'essuie-toutd'unepelliculeplastique.Rotter
nouveau,puisessuyeravecun lingopropreet sec.
REMARQUE:N'uti,,'iserqu'untampona r#eurer_ nerayantpas_*,PROPREETHUMfDE,sansdanderpourle.sustens,@sde cuisine
rev_tementandad.h4sifLe verreet b motifsemntendommag4ssi te tamponno,stpashumide,s'il estsoui/?4ou siun autretype
de tamponestut_;@4
+Sametdscaites ea dess_eh_es- Frotteravecuntampon_ r6curer<<nerayantpas>>et une cr6rnedenettoyage
pourtable decuisson+
REMARQUE:Tenirunefamederasoir_ un andb de 30°et _mtterpouron/evertoutesalat4restante.Puis,nettoyereomme
_;est d_eritei-dessus.Nepassesen/_delalamede,rasoirtoustesjours,celapou,'faituser/emotif abverre.
49
PIECE NETTOYAGE
Hubmetet pone • Eviterd'utilisertrop d'eau,quirisqueraitdes'infiltmr sousouderrierele verreet detacher.
du four en verre • Laverb reauet au savon.Rinceravecde reau propreet s_cher.Un produitde nettoyagedu verrepeut6tre utilis6enle
vaporisantd'abordsur unlinge.
• Nepasutiliserde produitsabrasifscommetamponsb r6curer,lained'acierouproduitde nettoyageen poudrequi
risqueraientderayerleverre.
int_rieur du feur • Ex6cuterlesinstructionspr6sent6esauxpages47-48pour I'autonettoyagedufour.
Grillesdu feur • Nettoyeravecde reausavonneuse.
• Eliminerlessouillurestenacesavecune poudrede nettoyageouun tampon _ r6curersavonneux.Rinceret faire sdcher.
• Si lesgrillessonthiss6esdartsle four pendantlecycled'autonettoyage,e!lesseddcolorentet peuventneplustr_s bien
glisser.Si celaseproduit,enduirele bord desgrilleset le supportdes grillesd'une finecouched'huilev_g6tale,puisessuyer
I'exc_dent.
(certainsmod_lesD
Tiroirde
peite_ paBneau×
iatSrau×=
6maimpeinte
• NE PASUTILISERDEPRODUESDE HETTOYAGECONTENANTDU JAVELUSANZ
• HE PASUTILISERDENETTOYANTS_ ORANGE_ OUABRASIFSo
• TOUJOURSESSUYERDANS LE SENSDELA TEXTUREDE L'ACIERLORSDU NETTOYAGE.
• Nettoyage jeumamier/salet6i6g_re =Essuyeravecrun des produitssuivants:eausavonneuse,vinaigreblanc/eau,produit
denettoyagepourverreet surfaceFormula409_ ou un produitsemblablepour verre- avecun lingesoupleet u[le _ponge.
Rinceret s6cher.Pourpoliret enleverles marquesde doigts,faire suivrepar unevaporisationde MagicSpraypouracier
inoxydable(pi6cen° 20OOOOO8)_-
• Salet_ mod_rde/6paisse - Essuyeravecrun desproduitssuivants:BonAmi_,SmartCleanse€ouSoftScrub_- 9 raide d'un
lingesoupleoud'une _pongehumide.Rinceret sdcher.Lestachesrebellespeuvent_treenlev_esavecun tampon multi-
usagesScotch-Brite_ humidi% Rotter uniformdmentdansle sensdu mdtaLRinceret sdcher.Pourredonnerdu lustreet
retirerlesrayures,fairesuivrepar une vaporisationde MagicSpraypour acierinoxydable_-
• Ddceloratie._- A I'aided'unedpongehumidifi_eou d'un lingesouple,essuyer9 I'aidedu nettoyantCameopouracier
inoxydable_-Rincerimmddiatementet s6cher.Pourenleverlesmarqueset redonnerdu lustre,faire suiw_epar unevaporisation
deMagicSpraypour acierinoxydable_-
• Unefois lespi6cesrefroidies,laverb I'eausavonneuseti6de,rinceret s_cher.Nejamaisessuyelune surfaceti6de ouchaude
avecun lingehumide,cecipouvantendommagerh surfaceet entrainerunehe,lure par lavapeur.
• Pourlestachesrebelles,utiliserdesagentsdenettoyageI_gSrementabrasifscomrnelap_te au bicarbonatede soudeou Bon
AmR Nepasutiliserd'agentsde nettoyageabrasifs,caustiquesou 6nergiquescommelesnettoyantspourfour ou les
tamponsen lained'acier.Cesproduitsraieraientou endommageraientdefa_onpermanentela surface.
REMARQUE: UtHiserun tinge ou un terche# sec pour essuyer /espreduits renvers6s, surtout s'i_ssent acides ou
sucres.La surface peurt_it se d6coiorer ou se temir si ia s'a_et6_'6tait pas imm6diatement e_ev6e. Ceciest
f.,articu/i_reme_timportant darts/e cas de surfaces bia#cheso
Lesnomsde marquesont des marquesdepos_esdes differentsfabricants.
_ Pourcommanderdirectement,composerle 1-877-232-6771E.-U.ou 1-800-688-8408Canada.
50
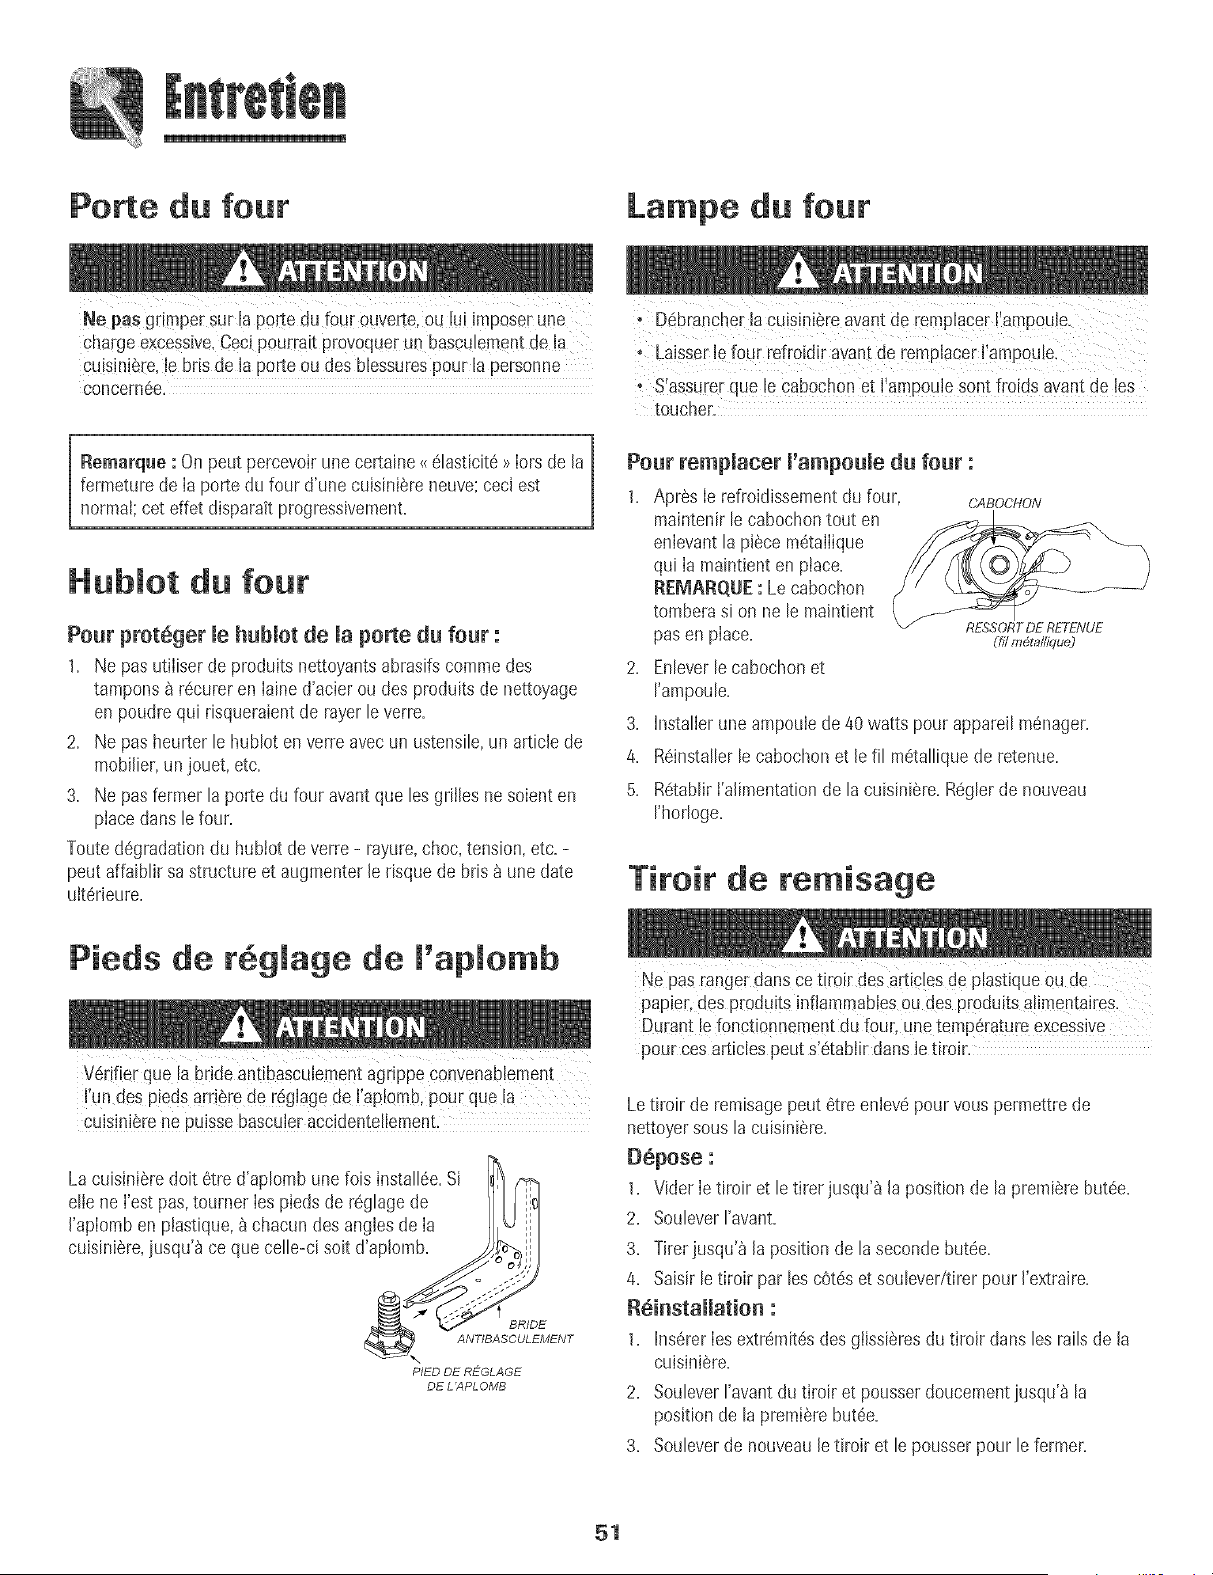
Porte du four
Ne _as grirnpersurB Portedu fouroUverte,ou luiimpQsQrune
Lampe du four
charge excessive,Ceeipourmit provoqueruQbasculementde !a
Cu!sini_[e,Jebris de Japorte ou des Messurespour la personne
concern6e.
Remarque : On peut percevoir une certaine <<61asticitQ>>Iors de la
fermeture de Ia porte du four d'une cuisiniere neuve; ceci est
normal; cet effet disparait progressJvement,
Hublot du four
Pour prot6ger le hublot de la porte du four :
1. Ne pas utiIiserde pro@its nettoyantsabrasifscommedes
tampons 8 r6cureren Iained'acierou des produitsde nettoyage
en poudrequi risqueraientde rayerleverre.
2. Ne pas heurter le hublot en verreavec un ustensib, un article de
mobilier,unjouet, etc.
3. Ne pas fermer la porte du four avantque bs griJlesne soient en
piacedans lefour.
Toute@gradation du hublot de verre - rayure,choc,tension,etc. -
peut affaiblir sa structure et augmenter le risque de bris _ une date
ult6rJeure.
' D_brancherla cuJsJniSreavant de rempBcer I'ampouJe.
, Laisserle four re[roidir avantde remPlacer!iampoule,
• f
S assurerque !e Cabochon et ! amP0Ubsontfr0!@ avant de Jes
touche[.
Pour remplacer l'ampoule du four :
1. Apres Ie refroidissementdu four, CABOeHO,V
maintenirb cabochontout en
enbvant la pJ@cem6talIique
qui Ia maintienten piace.
REMARQUE:Le cabochon
tomberasi on ne le maJntient
pas en place.
2. Enleverlecabochonet
['apapou[e.
3. Installerune ampouIede 40 watts pour appareilm6nager.
4. R6installerlecabochonet lefil m6talliquede retenue.
5. R6tablirt'alimentationde lacuisini6re.R_glerde nouveau
I'horloge.
RESSORT DE RETENUE
(h7m#.tallique)
Tiroir de remisage
Pieds de r6glage de l'aplomb
V6Fifierque la brideantibasculementagrippe convenablement
fUn des piedsard6rede r6g!agede I'aplernb,pour que la
CUiSiniSrene lauissebascuieraccidentelleraent.
La cuisini6redoit 6tre d'aplombune fois install@.Si
elle neI'est pas,tourner Iespieds de r6glagede I _
I'aplomben plastique,_ chacun des anglesde Ia
cuisinl6re,iusqu'_ ce que ce[[e-cisoit d'apJopab. L JJ
PIED DE REGLAGE
DE L 'APLOMB
Ne pas rangerdans ce tir0ir des artic!esdep!astiqueou de {
papier, des p[oduits inflammablesou des pro@its alimentaims.
Durant !efonctiQnnemeutdu f0u[_une temR6ratureexcessive
pour cesarticbs peut s!6tablirdans b tiroir.
Letiroir de remisagepeut 6tre enlev6 pour vous permettrede
nettoyersousla cuisini6re.
D6pose :
1. Vider Ietiroir et le tirer jusqu'_ la positionde lapremiere but6e.
2. Soubver I'avant.
3. Tirerjusqu'a la positionde lasecondebut@.
4. Saisir letiroir par les cOt@et soubver/tirer pour I'extraire.
R6iustallatiou :
1. Ins6rerIes extra, it@ des gibsi6resdu tiroir clansles rails de la
cuisini_re.
2. Soubver I'avantdu tiroir et pousserdoucementiusqu'_ la
positionde la premierebutte.
3. Soubver de nouveaule tiroir et lepousserpour lefermeL
51
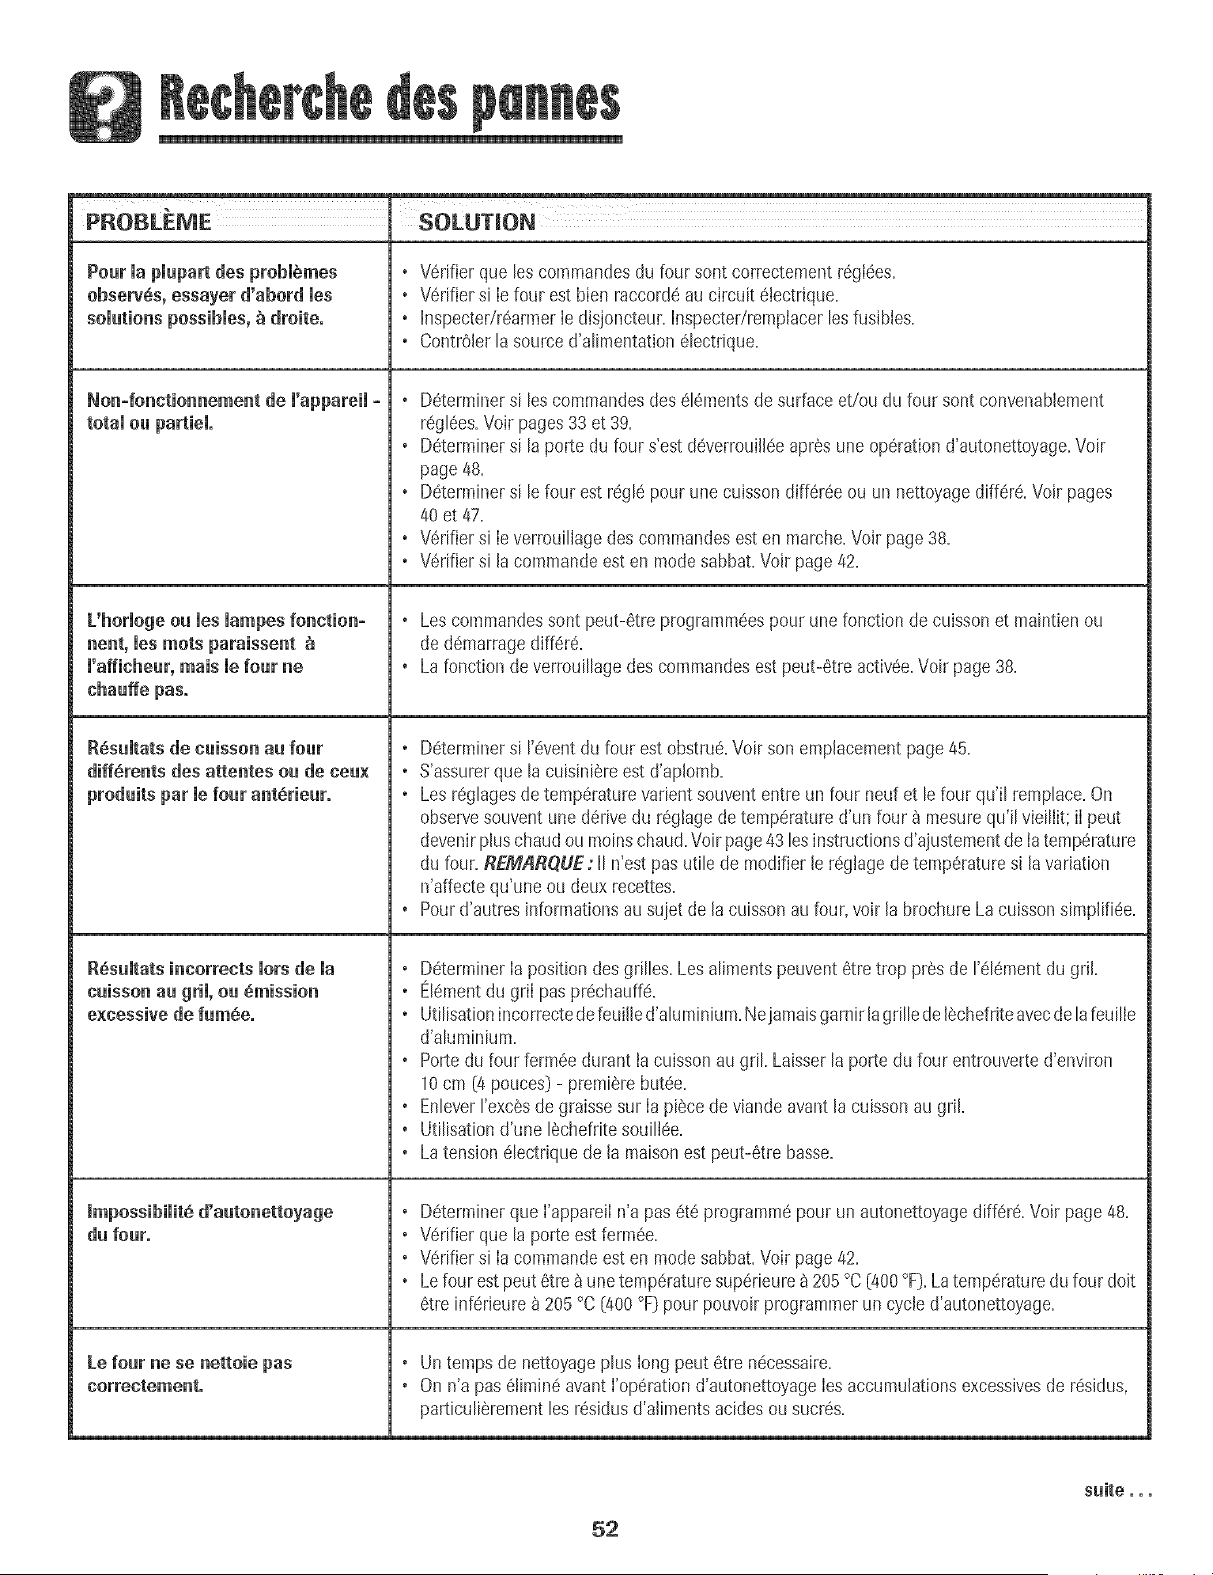
PP,OBLEME $DLUTION
Pour mapmupartdesprobmemes + V6rifier que les commandesdu four sent correctementr6gl6es.
observ6s, essayer d'abord mes o V6rifier si Iefour est bien raccordeau circuit 6tectrique+
solutions possibles, _ droiteo o hspecter/r6armer Ie disjoncteunhspecter/remplacer lesfusJbles+
o ContrOlerla sourced'alimentation61ectrique+
Non+fonctionnement de l'appareil + o D6terminersi les commandesdes 616mentsde surface et!ou du four sentcmwenablement
total ou partieL r6glees+Voir pages33et 39+
o Determinersi la porte du four s'estdeverrouill6eapres une operationd'autonettoyage+Voir
page48+
o Determinersi le four est regle pour une cuissond+ff6r6eou un nettoyagediffere+Voir pages
40et 47+
o Verifier si Ieverrouillagedes commandesest en marche+Voir page38+
o Verifier si lacommandeest en modesabbat+Voir page42+
Uhorloge oa les lampes fonction+ o Lescommandessent peut-etre programmeespour une fonction de cuissonet maintien ou
nent, ruesroots paraissent _ de d6marragediff6r6.
l'affichear, mais le fear ne . La fonction de verrouillagedes commandesest peut-etre activee+Voir page 38+
R6saltats de caisson au fear o Determinersi revent du four est obstrue+Voir son emplacementpage45+
diff6rents des attentes oa de ceax o S'assurerque la cuisiniere est d'aplomb+
prodaits par le fear ant6riearo o Les reglagesde temp6raturevadent souvententre un four neuf et le four qu'il remplace.On
observesouvent unederivedu r6glagede temperatured'un four _ mesurequ'il vieilJit;iI peut
devenirplus chaudou moinschaud.Voir page 43 lesinstructionsd'ajustementde Iatemp6rature
du four.REMARQUE: II n'est pas utile de modifierJer6gJagede temp6raturesi Javariation
Waffectequ'une ou deux recettes.
o Pourd'autres informationsau sujet de Jacuissonaufour, voir JabrochureLa cuissonsimplifi@e.
R6saltats incorrects lots de la o DeterminerIa positiondesgrilles. Les alimentspeuventetretrop pros de rel_ment du griL
caisson aa gril, oa 6mission o Elementdu griI pas prechauff6+
excessive de fam6eo o Utilisationincorrectedefeuilled'aluminium+Nejamaisgarnirlagrilledelechefriteavecde la feuille
d'aluminium.
o Portedu four fermeedurant tacuissonau gril. Laisserla porte du four entrouverted'environ
10cm (4pouces}- premierebutee.
o Enleverrexc6sde graissesur Ia piecede viandeavantla cuissonau griL
o Utilisationd'une 16chefritesouiHee.
+ Latensionelectriquede la maisonest peut-etre basse.
Impossibiiit_ d'aatonettoyage + Determinerque l'appareil n'a paset6 programm_pour unautonettoyagediffere.Voir page48.
da foaro o Verifier que la porte estferm6e+
o Verifier si Iacommandeest en modesabbat+Voir page42+
o Lefour est peut 8tre& unetemp6raturesup6rieure&205°C [/tOO°F)+Latemperaturedu four doit
8tre inferJeure_ 205 °C [/tOO°F] pour pouvoir programmerun cycled'autonettoyage+
Le fear ne se nettoie pas + Un tempsde nettoyageplus long peut 8tre n_cessaire+
correctemenL + On n'a pas 6JimJn_avant J'op6rat[ond'autonettoyageJesaccumulationsexcessJvesde resJdus,
particuli@rementles r6sJdusd'alimentsacides ou sucres+
52
saite o..
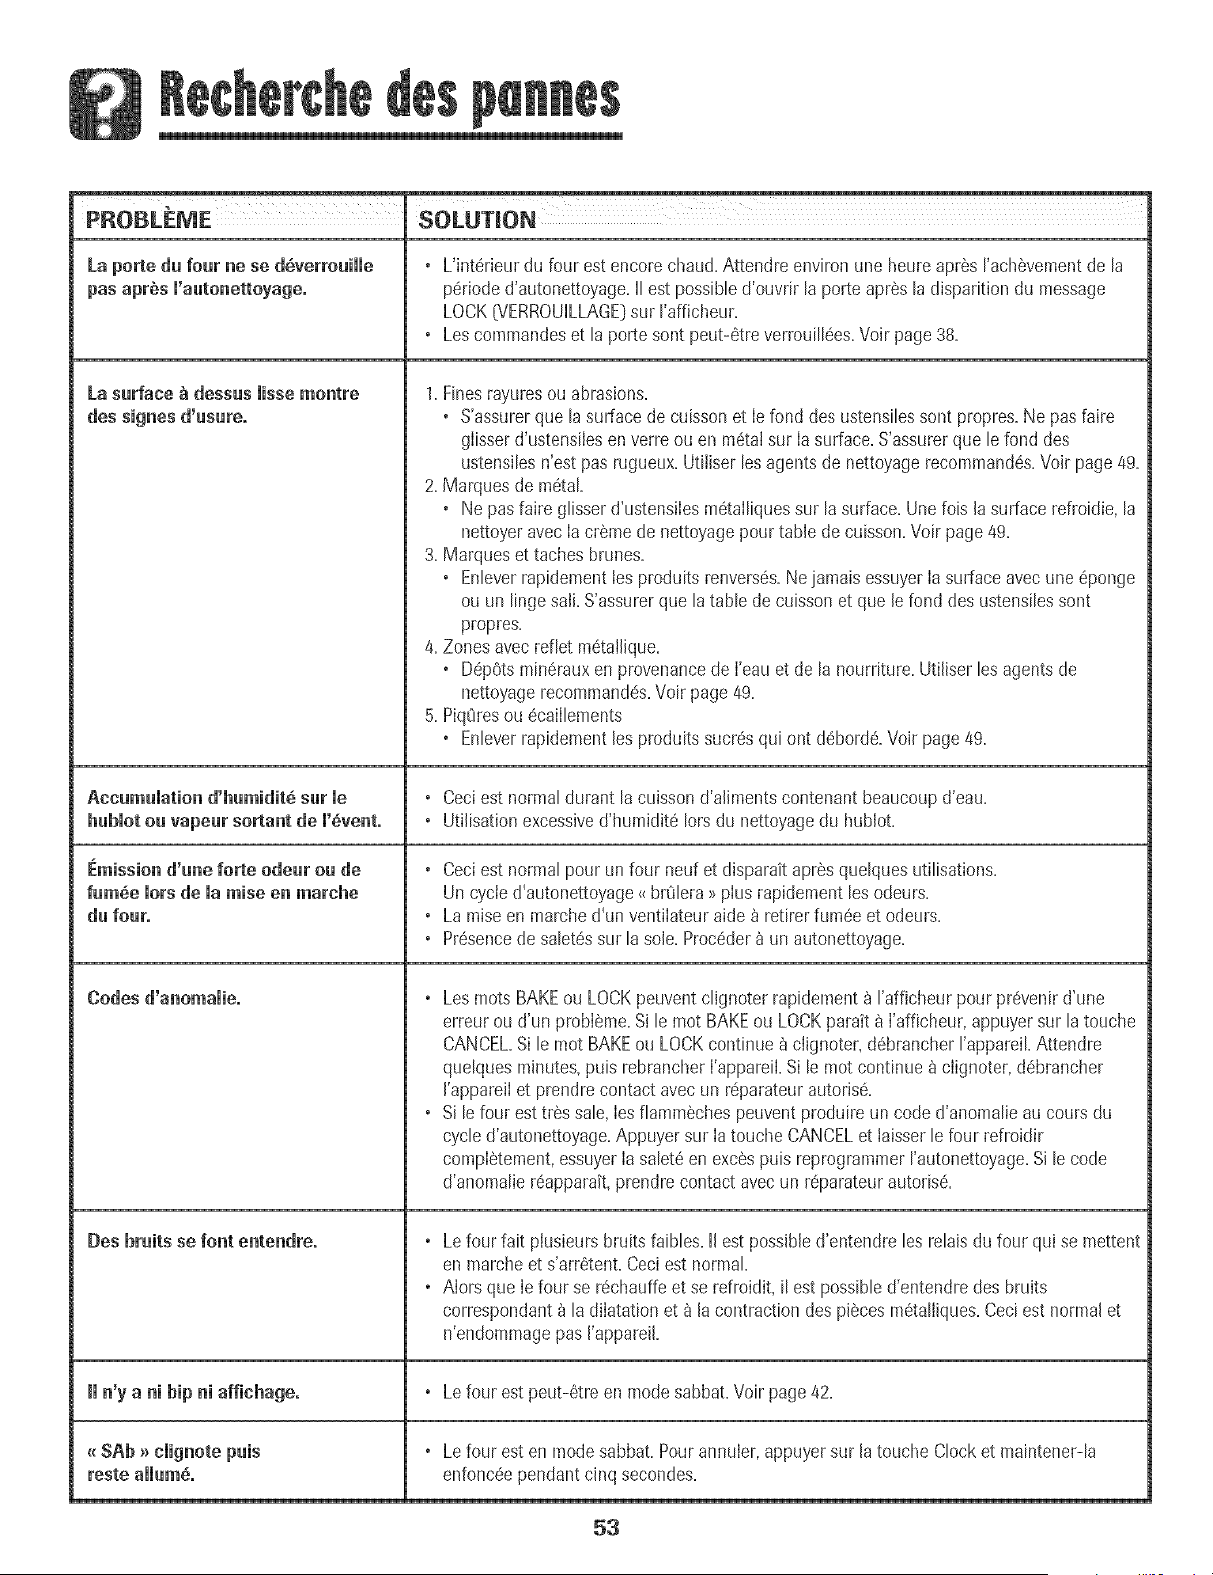
!
PROBLEME SOLUTION
La poAe du four ne se d_verrouiiie
La surface_ dessus missemontre
des signes d'usure.
Accumumationd'humidit6 sur me
hubmotou vapeurso,ant de m'_wnL
Emission d'uneforte odeur ou de o
fum_e [orsde [a raise en marche
du four. °
®
Codes d'anomaiie.
Des bruits se font entendre.
Imn'y a ni hip ni affichage.
_ $f_b _ cmignote puis
reste ammum_.
o L'interieur du four est encorechaud=Attendre environ une heureapres I'achSvementde la
perioded'autonettoyage=II estpossibled'ouvrir la porte apres la disparition du message
LOCK(VERROUILLAGE_sur I'afficheur=
o Les commandeset la porte sont peut-etreverrouillees=Voir page38=
1.Finesrayuresou abrasions.
o S'assurerque la surface de cuissonet Iefond des ustensilessont propres=Ne pasfaire
gIisserd'ustensiiesen verreou en metalsur Ia surface=S'assurerque le fond des
ustensilesn'est pas rugueux=Utiliser les agentsde nettoyagerecommandes=Voir page49=
2=Marquesde metal
o Ne pas faire glisserd'ustensiIesmetaIliquessur la surface=Unelois la surfacerefroidie, la
nettoyeravecIa cr6me de nettoyagepour table de cuisson=Voirpage49=
3=Marqueset taches brunes=
o Enleverrapidementies produits renverses=Nejamais essuyerIa surfaceavecune eponge
ou un lingesail S'assurerque latable decuisson et que le fond des ustensilessont
propres=
4=Zonesavecrefiet metailique=
o DepOtsminerauxen provenancede I'eauet de la nourriture=Utiliser les agentsde
nettoyagerecommandes=Voir page49=
5=PiqOresou ecaiIlements
o Enleverrapidementles produits sucresqui ont deborde=Voir page 49=
Ceciest normaldurant lacuissond'alimentscontenant beaucoupd'eau=
Utilisationexcessived'humidite Iorsdu nettoyagedu hublot=
Ceciest normalpour un four neuf et disparaitapres quelquesutilisations=
Un cycled'autonettoyage<<brCJlera7>pius rapidement lesodeurs=
La raiseen marched'un ventiIateuraide _ retirerfumee et odeurs=
Presencede saletessur la sole=Proceder& un autonettoyage=
o Les rootsBAKEou LOCKpeuventclignoter rapidernent_ I'afficheur pour prevenird'une
erreurou d'un probIeme=Si le mot BAKEou LOCKparait _ I'afficheur,appuyersur latouche
CANCEL=Si le mot BAKEou LOCKcontinue _ ciignoter,debrancherI'appareiLAttendre
quelquesminutes,puis rebrancherI'appareiLSi le mot continue & clignoter, debrancher
I'appareiIet prendrecontact avecun reparateurautorise=
o Si lefour esttrSssale,Iesfiamm6chespeuventproduireun code d'anomalieau cours du
cycle d'autonettoyage=Appuyer sur Ia touche CANCELet iaisserle four refroidir
compIetement,essuyerIasalet6 en excespuis reprogrammerI'autonettoyage=Si le code
d'anomaliereapparatt,prendre contact avecun reparateurautorise=
o Lefour fait piusieursbluits faibles=II estpossibled'entendre les relaisdu four qui se mettent
en marcheet s'arr6tent=Ceciest normal
o AIorsque Iefour se rechauffeet se refroidit, i! est possibled'entendredes bruits
correspondant_ la diIatation et _ la contraction des pieces metaliiques=Ceci est normalet
n'endommagepas I'appareiL
o Lefour est peut-6treen mode sabbaLVoir page42=
o Lefour est en modesabbat=Pour annuier,appuyersur la touche Clocket maintener-la
enfonceependant cinq secondes=
53

54
Garantie complete d'une annee -
Pieces at main-d'oeuvre
Durantune perioded'un (1: an _compter de la
date de I'acnal initial au detail toute piecequLse
revebrait ddectueuse dans des sonditions
normalesd'usage menagersera r@areeou
remplac@gratuitemen_
Garanties limitees - Pieces
seuJement
De madeuxi_me _ Jacinqui_me annie - A
cornF[erde Jadatede J'achatinitial au detail, bs
piecesde la listecbdessousqul se reveleraient
ddectueuses dab desconditions normales
d'usagemenagerseron___pareesou remplacees
]ratu_ternent{piecesseubment[ b propdetare
devraassumertousles autres trab. y compns
frais de main-d'oeuvre,de uep_acemenLde
_ransporLde kiJometrageet de diagnostic,lecas
echeant
• Surface de cuisueneu vitree_ramique: Pa
surtede bdstherm_que.@coloration.fissura
tion du jointen caoutchoucsur b reborn),usure
des motifs.
, EI6mentsehauffants 61ectriques: Elements
de surfaceradianLssur les appaoeiBde cu_sson
electngues.
P,esidents canadiens
Lesgarantiesci-dessuscouvrentun appare_l
installeau Canada.seuJements'il a ete agreepar
lesagencesde test habiJitees[verificationde la
conformite_ une norme natlonaledu Canada),
saut si !'appareila ete introduit au Canada
occasiond'un changementde residencedes
Etats-Unbvers le Canada
Garantie mimitee hers des Etats-Unis
et du Canada = Pieces seulement
Pendan{une perioded'un 0} an _ compeerde la
date de I'achatinitial au detail,toute piecequl se
reveleraitddectueuse dans des conditions
normalesd'usagemenagersera r@areeou
rempJaceegratuitement[piece seulement);le
proprietaioedevra assumer_ouslesautrestrais, y
compns [raisde main-d'oeuvre,de d@lacemem.
de [ransport.de kilome[ragee[ ue diagnostic, le
cas ech@nt.
Lesgarantiessp_cffiquesfbrmu/@scl-dessussonr
/esSEULESque b fabricanraccorde.Ces
garantiesrods conf_rentdes"dmitsjuridiques
specifiqueset vouspouvezddalementjoui/
d'autresdroits,variablesd'un _tat_ /'autre.d'une
/gFOVliSCe U Ul?e au[Ye.
Ne sent pas couverts par ces
garanties ."
1. Lesdommagesou derangementsdus _:
a. Miseen service,Iivraisonou entretieneffectu@ incorrectement.
b.Toutereparation,modification,alterationet tout reglagenonautoris@par
Iefabricant ou parun prestatairede sewice aprUs-venteagree.
c. Accidents,mauvaiseutilisation ou usageabusifou deraisonnable.
d. Alimentationetectrique[tension,intensit@incorrecte.
e. RegBgeincorrect d'une commande.
2. Lesgarantbs ne peuvent 6tre honor@ssi ies num@osde seried'origine ont ete
enlev@,modi%s ou ne sent pas facilementIisibles.
3. Ampoules.
4. Appareils achet@aux fins d'usagecommercialou industdeI.
5. Lesfrais de visite d'un prestatairedeserviceou de serviceapres-venteencourus
pour les raisonssuivantes:
a. Correctiond'erreursde raiseen service.
b. initiation de I'utilisateur_ I'emploi de I'appareil.
c.Transportde rappareil aux Iocauxdu prestatairede service.
6. Lesdommagesde la table de cuissonen verre causespar I'utilisationde
nettoyantsautresque les cr_meset tamponsde nettoyagerecommandes.
7. Lesdommagesde la table de cuissonen verre causespar desproduitssucres ou
du plastiquefundu qui ont durci parcequ'ils n'ont pasete nettoy@
conform@r_entaux instructionsdonn@s dans Ieguide d'utilisation et d'entretien.
8. Dommagessecondairesou indirectssubispar toute personnesuite au non-
respectde cesgaranties.Ce_ainsetats ou provincesne permettentpas
I'exclusionou Ia limitation desdommagessecondairesou indirects;par
consequentbs limitationsou exclusionsci-dessuspeuventne pass'appliquer
votre cas.
Si J'iBterveBtioB d' B r parate r est
• Contacter le detailIant chez qui I'appareiI a ete achet& ou contacter Maytag
ServicesSM/service _Ia clienteb de Amana au 1-800-843-0304 aux E.-U. ou
1-866-587-2002 au Canada, pour obtenir les coordonn@s d'une agence de service
agreee.
• Veiller a conservel la facture d'achat pourjustifier de la validite de la garantie.
Pour d'autres informations en ce qui conceme les responsabilites du pruprietaire
l'egard du service sous garantie, voir le texte de la GARANTIE.
• Si le detaillant ou I'agence de service apres-vente ne peut resoudre le probl_me,
ecrire a Maytag ServicessM,attention : CAIR_ Center, P.O. Box 2370, Cleveland, TN
37320-2370 ou telephoner au 1-800-UaS-OS0_ au× E.-U. o_ 1-8_6-587-2002
au Canada.
• Les guides d'utilisation, les manuels de service et les renseignements sur bs
pieces sent disponibbs aupr@ de Maytag Servbes sM,service _ la clientele de
Amana.
_ematq_es :
Lots detout contactconcemantun problSme,fournir I'hffurmationsuivante:
a. Nora,adresseet numeoede tel@hone du client;
b. Numerode mo@b et num@ode sedede I'appareil;
c. Nora et adressedu detailIantou de I'agencede service:
d. Descriptionclairedu problemeobserve;
e. Preuved'achat (facturedevente).
55
Estufa EJectrica con ControJ 'Easy Touch' 700 - Cubierta Lisa
[nstrucciones [mportantes
sobre Seguridad .....................................................57-60
Cocinando en Ja Estufa ......................................... 61-64
Controies
Cubiertas Lisas
Area CaHentadora
Cocinando en e[ Homo ......................................... 65-74
Homeado
'Cook & HoHd'
'Cook & HoHd'Diferido
Mantener CaHiente
Favorito
Asar a HaParriHa
ParriHasdd Homo
Cuidado y Limpieza ............................................... 75-78
Homo Auto[impiante
Procedimientos de Limpieza
Mantenimiento .............................................................. 79
Luz dd Homo
Ventana dd Homo
Locaiizaci6n y Soiuci6n
de Aveffas ................................................................80-81
Garantia y Servicio .......................................................83
mnstalador:Potfavordeje estaguiajumo con e_
emc[roaom6stico.
Censuraidor: Porfavorleay conserveesta gula parareferencia
futura Conserveel recibo de compray/o e[ c[_equecancemdo
como comproDan[ede compra.
Ntimerode [\Iode_o
Numerode Sene
Fechade Compra
Sitbne pmguntas.Ilamea:
Amana Cus[omerAssistance
1-800-B43-0304E.E.U.u.
1-866-587-2002Canad4
(LunesaViernes.8:00a.m.a 8:00p.m.Hora del Estel
Internet:http://www.amana.com
Ennuestrocontmuo af4n de mejorarla ca[idady rendimientode
nues[roselectrodom@tmos,puedeque seanecesariomodifmar
el ebctrodom@t[cosin actualizaresta gufa.
Para i#fermaciS# sebre set_dcie,vet pbg#_a83.
Lea y siga todas las instracciones antes de usar este
electrodom_stico para evitar el riesgo potencial de incendio,
choque el@trico, bsi6n personal o da_o al ebctrodom6stico
como resultado de su uso inapropiado. Utilice este
ebctrodomestico sohmente para el prop6sito que ha sido
destinado segun se describe en esta guia.
Para asegurar funcionamiento correcto y seguro: El
ebctrodom6stico debe ser instdado debidamente y puesto a
tierra por un t@nico cdificado. No intente ajustar, reparar,
prestar servicio o reemphzar ninguna pieza de este producto
a menos que sea espedficamente recomendado en esta guia.
Todas hs reparaciones deben ser redizadas por un tecnico
cdificado.
Siempre desenchufe el ebctrodom6stico antes de efectuar
alguna reparaci6n.
TODAS LAS ESTUFAS SE PUE[
o SmGATODAS LAS mNSTRUCCIONES
DE mNSTALACION
Las advertencias e mstrucciones umportantes sobre seguridad
que aparecen en esta guia no estan destinadas a cubrir todas
las posibbs circunstancias y situaciones que puedan ocurrir,
Se debe ejercer sentido comQn, precauciOn y cuidado cuando
instab, redice mantenimiento o haga funcionar el artefacto,
Siempre pOngase en contacto con su distribuidor, agente de
servicio o fabricante si surgen probbmas o situaciones que
usted no comprenda,
Reconozca Ros simbo}os, advertencias,
etiquetas de seguridad
ADVERTENCmA- Peligro o pr_cticas no seguras que
PODRIAN causar bsi6n personal grave o mortal
PODRJANcausar lesi6n personal menos grave,
electrodom#stico a causa de use aaorma[ o debido a
peSOexcesive en la puerta del homo, es necesar[o
asegurarlo mediante un dispositivo antivuelco
debidameate instalade.
Para verificar si el dispositivo est_ debidamente instalado, mire
debajo de ia estufa con una iinterna para asegurarse de que
uno de los tornillos niveladores traseros este debidamente
enganchado en la ranura del soporte, El dispositivo antivuelco
asegura el tornillo nivelador trasero al piso cuando est_
debidamente enganchado, Esto debe verificarse carla vez
que la estufa sea movida,
Para Evitar en ncendio o
Da o Caasado per Ha o
Asegurese de que se hayan retirado todos los materiabs de
empaque del ebctrodomestieo antes de su uso,
No coloque materiabs combustibles cerca del
ebctrodom6stieo, No se deben guardar en el homo
materiabs infiamabbs, Muchos plasticos son afectados por el
57
caior, Mantenga los pidsdcos abjados de hs piezas deI
ebctrodom6stbo que se pueden entibiar o cabntar,
Para evitar incendios de grasa, no permita acumuiad6n de
grasa de cocinar o de otros materiabs infiamabbs en eI homo
o en su cercan[a,
En Case de lncendie
Use un extinguidor con producto quimbo seco o deI tipo
espuma o bicarbonate para apagar eI incendio o las llamas,
Nunca use agua en un incendio de grasa,
1, Apague eI homo para evitar que la llama se disperse,
2, NUNCA bvante o mueva una sartdn en llamas,
3, Apague eI fuego o la IBma cerrando la puerta del homo,
Seguridad para los Ni es
NUNCA a!macene art!cu!os de inheres para los niIios en los
armarios que est_n sobre !a estufa Q en el protector tmser0
estufa para alcanzar taies artiCUl0Spueden leSiQnarse
seriamente,
NUNCA deje a los nixies solos o sin supervisi6n cuando el
homo estd en use o cuando est6 caliente. No se debe nunca
permitir que los nixies se sienten o se paren en ninguna pieza
del electrodomdstico pues se pueden lesionar o quemar.
Se les debe ense_ar a los nixies que el electrodomdstico y los
utensilios que estan en el pueden estar calientes. Deje enfriar
los utensilios calientes en un lugar seguro, fuera del alcance
de los nixies. Se les debe ense_iara los nixies que un
eiectrodomestico no es un juguete y que no deben jugar con
los controles u otras piezas del artefacto.
lnstruccienes Generates
NUNCA use un eiectrodom6stico come un peidano para
aicanzar los armanos superiores. El use incorrecto de la
puerta del electrodom6stico tabs come pisar sobre ella.
apoyarse o sentarse en la puerta puede resultar en que el
electrodomestico se vuelque, se rompa la puerta y se
causen lesiones graves.
Para evitar posibles riesgos para el usuario y da_io al
electrodom6stico, no use este producto come una estufa para
calentar o entibiar una habitaci6n. Adem_s no use el homo
come un lugar para guardar alimentos o utensilios de cocina.
No obstruya la circulaci6n del aire bloqueando el respiradero
dei homo.
NO TOQUE LOS ELEMENTOSCALEFACTORESNI LAS
SUPERFICIESINTERIORESDEL HORNO, Los eiementos
calefactores pueden estar calientes aLin cuando su color sea
obscure, Las superficies interiores de cuaiquier homo se
calientan Io suficiente come para causar quemaduras,
Durante y despues dei use, no toque ni permita que ias ropas
u otros materiales inflamables entrenen contacto con los
eiementos caiefactores o ias superficies interiores dei homo
hasta que no se hayan enfriado, Otras superficies que pueden
estar calientes incluyen la cubierta, la superficie que est_in
dirigidas hacia ia cubierta, ei respiradero dei homo, ia
superficie cercana a ia abertura dei respiradero, ia puerta dei
homo y ias areas que ias rodean, y ia ventaniiia dei homo,
No toque un foco caiiente dei homo con un pdio h8medo
pues se puede quebrar, Si ei foco se quiebra, desenchufe ei
eiectrodom6stico antes de sacar ei foco para evitar sufrir un
cheque ei6ctrico,
NUNCA use papei de aiuminio para cubrir ias parriiias dei
homo ni el panel inferior del homo. El use incorrecto puede
resultar en un riesgo de cheque eldctrico, incendio o da_io al
electrodomestico. Use papel de aluminio solamente come se
indica en esta guia.
Seguridad amCecinar
Nunca caliente un contenedor de alimento cerrado en el
homo, La acumuiaci6n de presi6n puede reventar ei
contenedor causando una lesi6n personal grave o daSo al
eiectrodom6stico,
58
Use tomaoihs secos y gruesos, Los tomaoiBs hLimedos
pueden causar quemaduras por vapor, No se deben usar
todias de secar los piatos ni otros sustitutos en vez de los
tomaoiias porque eiios pueden pasar sobre los ebmentos
caiientes y prenderse fuego o pueden quedar atrapados en hs
pbzas deI ebctrodomestbo,
Use vestimentas apropiadas, Las ropas sueitas o ropas con
mangas largas sueitas no se deben usar cuando se est_
cocinando, La ropa se puede prender fuego y causar
quemaduras si entra en contacto con los ebmentos
cabfactores,
Siempre coioque ias parriiias dei homo en ias posiciones
deseadas cuando el homo este frio, Deslice la parrilla del
homo hacia afuera para agregar o retirar alimento usando
tomaollas secos y gruesos, Siempre evite colocar o retirar
alimento del homo sin sacar la parrilla hacia afuera, Si una
parrilla debe ser movida cuando este caliente, use un
tomaollas seco, No deje que el tomaolla entre en contacto
con el elemento caliente del homo,
Use las parrillas solamente en el homo en que fueron
enviadas/compradas,
Tenga cuidado cuando abra la puerta del homo, Primero deje
que salga el aire o vapor caliente antes de sacar o volver a
colocar el alimento en el homo,
ADVEflTENCIA SOBflE ALIMENTOS PflEPAflADOS: Siga
las instrucciones del fabricante del alimento, Si un contenedor
de aiimento congeiado de pi_istico y/o su tapa se deform&
comba o de otra manera se da_ia durante la cocci6n,
inmediatamente descarte el alimento y su contenedor, El
alimento puede estar contaminado,
No permita que el papel de aluminio o la sonda de la came
toque el elemento calefactor,
Siempre apague todos los controles cuando haya terminado
de cocinar,
Seguridad sobre Use
de Utensi ios
Siga las instrucciones del fabricante cuando use bolsas para
cocinar en el homo,
El rendimiento y funcionamiento seguro de este
electrodom6stico ha sido comprobado usando utensilios de
cocina tradicionales, No use ningSn dispositivo o accesorio
que no haya sido espedficamente recomendado en esta guia,
No use sistemas de convecci6n agregables a hornos, El uso
de dispositivos o accesorios que no sean expresamente
recomendados en esta guia puede crear peiigros graves de
seguridad, afectar el rendimiento y reducir la vida 8tii de los
componentes de este electrodom6stico,
Si el utensilio es m_is pequdio que el elemento, una porci6n
del elemento quedar_ expuesta y puede encender la ropa o un
tomaollas,
Solamente ciertos tipos de utensilios de vidrio, vidrio cer_imico,
cer_mica, gres u otros utensilios vidriados son convenientes
para cocinar en la superficie o en el homo sin quebrarse
debido al repentino cambio de temperatura, Siga las
instrucciones del fabricante del utensilio cuando use vidrio,
Gire los mangos de los utensilios hacia el centro de la
cubierta, no hacia la habitaci6n ni sobre otro elemento
superior, Esto reduce el riesgo de quemaduras, encendido de
materiales inflamables o derrames si el utensilio es tocado
accidentalmente o alcanzado por ni_ios pequdios,
NUNCA deje los eiementos superiores sin supervisi6n,
especialmente cuando esta usando los ajustes de calor altos,
Un derrame sin recibir la debida atenci6n puede causar humo
y un derrame de grasa puede causar un incendio,
Este electrodom6stico tiene diferentes tama_ios de elementos
superiores, Seleccione utensilios que tengan bases planas Io
suficientemente grandes para cubrir el elemento, La relaci6n
adecuada entre el utensilio y el elemento mejorara la
eficiencia al cocinar,
CUBIERTA DE VIDRlO CERAMICO: NUNCA cocine sobre
una cubierta quebrada, Si ia cubierta de ia estufa se quiebra,
los agentes de limpieza y los derrames pueden penetrar y
crear un riesgo de choque el6ctrico, P6ngase en contacto con
un tecnico calificado inmediatamente,
Freidoras
Use extremo cuidado cuando mueva la olla con aceite o
descarte ia grasa caiiente, Deje que ia grasa se enfrie antes
de intentar mover ia oiia,
Campanas de Venti aci6n
Limpie con frecuencia ia campana y los fiitros a fin de evitar
que se acumuie en eiios grasa u otros materiaies inflamabies y
para evitar incendios de grasa,
Cuando prepare alimentos flameados debajo de la campana,
encienda ei ventiiador,
59
Seguridad en [a Li pieza
Limpie con cuidado [a cubierta, Apague todos los controIes y
espere que se enfrien hs piezas de[ eIectrodomestico antes de
tocarIas o [impiarIas, Limpie con cuidado, Tenga cuidado
para evitar quemaduras de vapor si usa una esponja o un
paso mojado para [impiar los derrames en una superfide
caIiente. AIgunos [impiadores pueden produdr vapores
nodvos cuando se apIican en una superfide caIiente,
Limpie soIamente hs piezas indicadas en esta guia,
Homo Auto[impiante
c0dna, etC. en e[ homo durante e[ c[do de autoHmp[eza_
No [impie [a junta de [a puerta, La junta de [a puerta es
esencial para obtener un buen sello, Se debe tener cuidado
de no frotar, da_ar ni mover la junta,
No use limpiadores de homo ni forros de homo de ning(Jn tipo
alrededor ni en ninguna parte del homo autolimpiante,
Antes del ciclo de autolimpieza del homo, retire la asadera, las
parrillas del homo y otros utensilios y limpie cualquier derrame
para evitar humo excesivo o Ilamaradas,
Aviso y Advertencia
[mpertante Sobre Seguridad
La Propuesta 65 de la Ley de 1986 del Estado de California
Sobre Seguridad y Contaminaci6n del Agua Potable (California
Safe Drinking Water and Toxic Enforcement Act of 1986Dexige
que el Gobernador de California publique una lista de las
sustancias que segOn el estado de California causan c_ncer o
da_o al sistema reproductivo y exige que las empresas
adviertan a sus clientes sobre la exposici6n potencial a tales
sustancias,
Se advierte a los usuarios de este e[ectrodomdstico que cuando
el homo estd funcionando en el ciclo de autolimpieza, puede
haber exposici6n de bajo nivel a algunas de las sustancias
indicadas en la lista, incluyendo mon6xido de carbono, La
exposici6n a estas sustancias puede set reducida a un minimo
ventilando el homo al exterior en forma adecuada, abriendo las
ventanas yio la puerta en la habitaci6n en donde est,1 ubicado
el electrodom6stico durante el cido de autolimpieza,
AVISO iMPORTANTE RESPECTO A LOS PAJAROS
DOMESTiCOS: Nunca mantenga [os p_jaros en [a coc[na o en
las habitaciones donde puedan Ilegar los humos de la cocina,
Los pajaros tienen un sistema respirator[o muy sensitivo, Los
humos producidos durante el ciclo de autolimpieza del homo
pueden ser periudiciales o mortales para los p_jaros, Los
humos que despide el aceite de cocina recalentado, la grasa,
margarina y los utensilios antiadherentes recalentados pueden
tambi6n ser perjudicia[es,
Conserve estas [nstrucciones para Referencia Futura
60
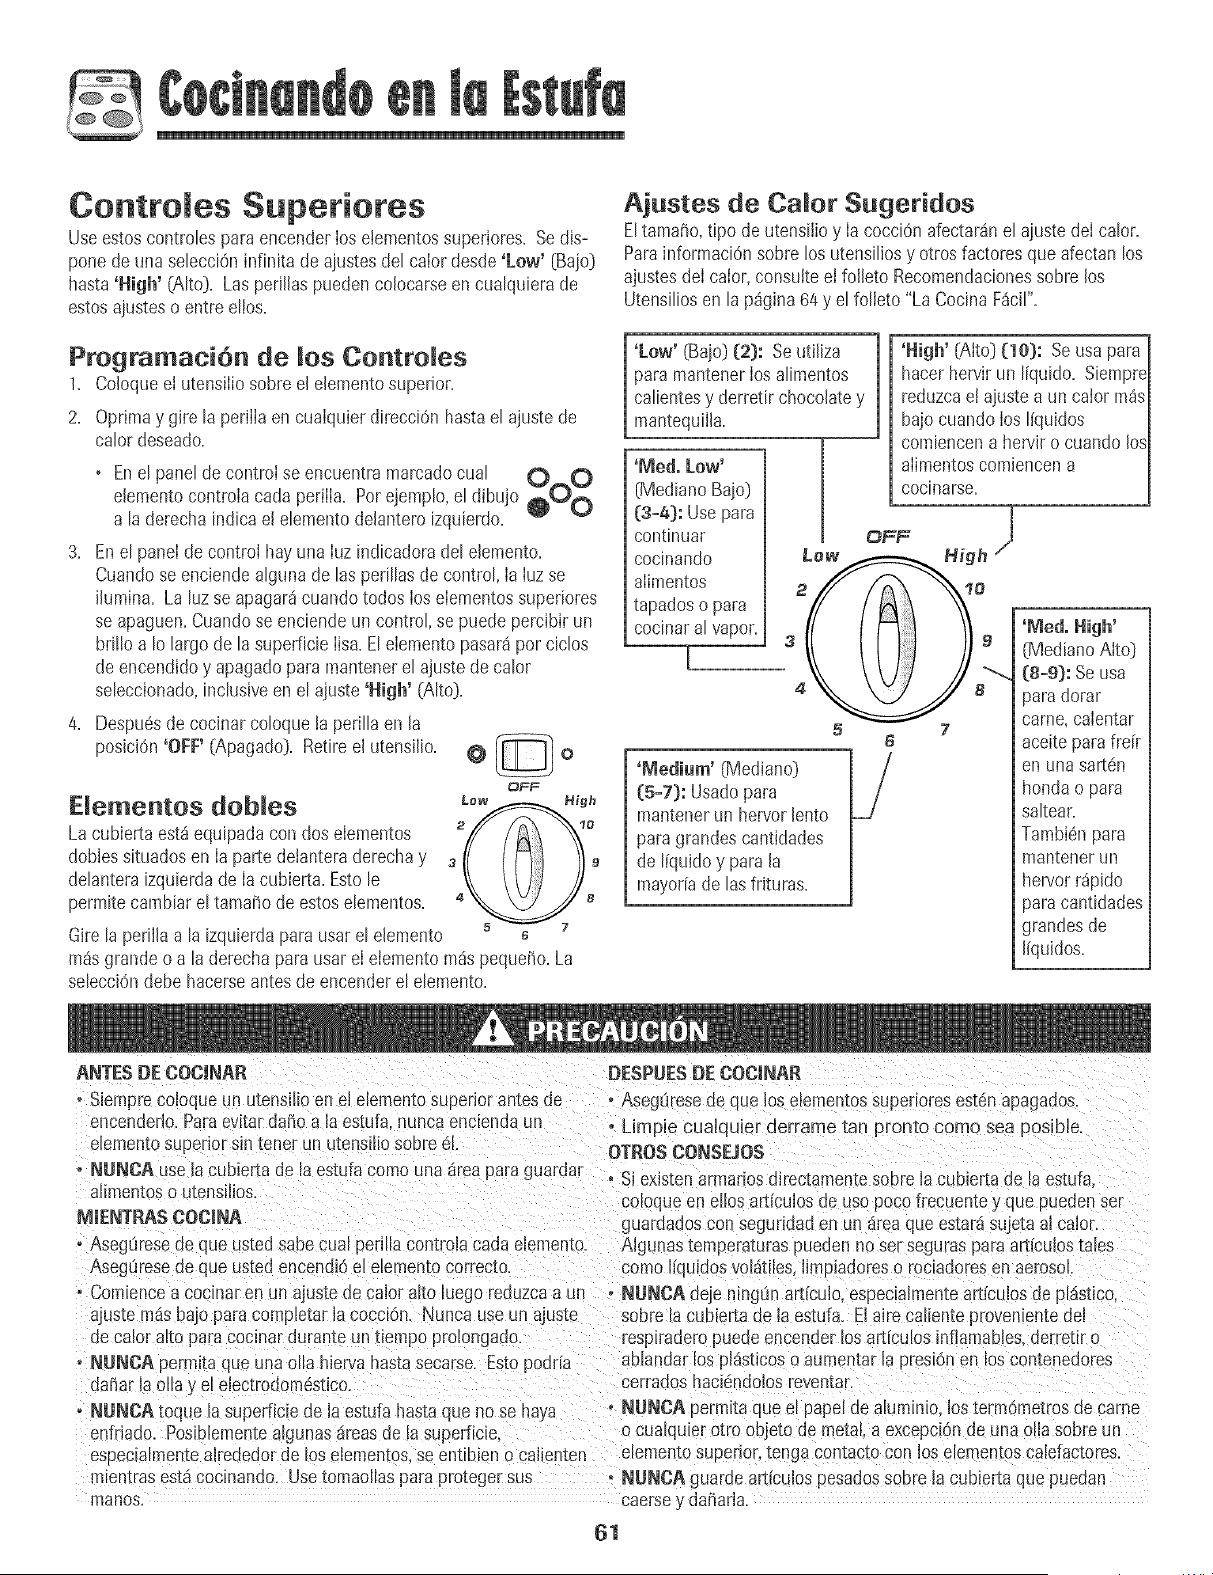
@
Controles Superiotes
Useestoscontrobs paraencenderIosetementossuperiores. Sedis-
ponede una sebcci@ infinita deajustesdel caIordesde'Low' {Bajo}
hasta'High' CAIto}.Las perillaspueden colocarseen cualquierade
estosajusteso entre elios.
Pregramad6n de Contro es
1. Coloqueei utensiIiosobte el elementosuperior+
2. Oprimay gire la perillaen cualquier direcciOnhasta el ajustede
calor deseado.
Dementos dobles
La cubiertaest_equipadacon dos ebmentos
dobbs situadosen Ia parte detanteraderechay
delanteraizquierdade Iacubierta. Estob
permitecambiarel tamariode estoselementos.
Girela perillaa la izquierdapara usarel elemento
o Enel paneldecontroi se encuentra marcadocual 0 0
elementocontrolacada perilIa. Porejemplo,el dibujo O0
a laderecha indica el elementodelanteroizquierdo.
3. Enel panel de controi hayuna Iuz indicadoradel elemento.
Cuandose enciendealguna de las perillasde control, Ia Iuzse
ihmina. La luzse apagar_cuando todos los elementossuperiores
se apaguen.Cuandose enciendeun control,se puede percibir un
bri!!oa Io largo de la superficie lisa.Elelementopasar8por ciclos
de encendidoy apagadopara mantenerel ajuste de calor
seleccionado,inclusiveen el ajuste'High' (Alto}.
4. Despu@de cocinarcoloque+aperilla en la
posbiOn'OFF' (Apagado}. Retireel utensilio. @ [_ o
t,3FF
Lew High
5 7
m_sgrandeo a la derechaparausar eI eiementom@pequ@o. La
selecci6ndebehacerseantesde encenderel elemento.
Ajustes de Ca or Sugetidos
EltamaSo,tipo de utensHioy IacocciOnafectar_nel ajustedeI calor,
ParainformaciOnsobre los utensiliosy otros factores que afectan los
ajustesde[ caior,consuiteel fo[bto Recomendacionessobre los
Utensiliosen la p_gina64y el folieto "La CocinaF_cir'.
'Low' {Bajo}(2}: Se uti[iza
paramantenerlos alimentos
calbntes y derretir chocolatey
mantequii[a.
'iVied. Low'
{MedianoBajo)
(:3+a}:Usepara
continuar
cocinando Lew
alimentos _(
tapadoso para
cocinaralvapor.
[ 3+
5
'Medium' {Mediano}
(5+7}: Usadopara
mantenerun hervorlento
paragrandescantidades
de I[quidoy para la
mayor[ade las frituras.
OFF
6
'High' {Alto} (le): Se usa para
hacerhervir un liquido. Siempre
reduzcae! ajuste a un caior m_s
bajocuandolos I[quidos
comiencena hervir o cuando los
alimentoscomiencena
cocinarse.
High /
7
'Meal. High'
(MedianoAlto}
(8o9): Seusa
paradorar
came, calentar
aceiteparafrdr
en un8 sart_n
hondao para
saltear.
Tambi@ para
mantenerun
hen/orr@ido
paracantidades
grandes de
I[quidos.
ANTES BECOCINAR DESPUESBE COCINAR
+Siemprecoioque un u[enslllo en el elememosuperiorantes de +Asegqreseue que los elementossuperioresesten apagados.
encender_o.Paraevitarda_o a +aestufa,nuncaencbnda un o Limpie cualquier derrame [an pronto como sea posibb.
ebmento superiors+ntenet un itensiliosobre 6I OTROSCONSEJOS
+ NUNCA use la cubiertade B estufacomo unaareapara guardar • Si ex+stenarmariosdirectamentesourela cubiertade Ia estufa+
aiimentoso u[enslllos, coloque en ellosarticulos de uso pocofrecuentey que puedenser
MIENTPJ_SCOCINA guardadoscon segundaden un _reaque estar_sujetaal calor.
+Aseguresede que usted _abecual per+llacontroB cada elemento. Algunastempera[uraspueden no sel seguraspara art[culostales
Aseguresede que ustedencend+Oel ebmento correcto, comoIiquidosvol_itiles,Hmpiadoreso rocmdoresen aerosol
- Combncea cocmaren un ajustede calor alto Bego reuuzcaa un - NUNCA dejenmglin art[culo,especialmenteart[cuios de pl_ist+co.
ajustem@ bajopara compbtar ia cocci0n. Nuncause un ajuste sobre/a cubier[a ae la estufa. El aire caliente provenientedel
de calor alto para coc+narduranteun tiempo prolongado, resplraderopueueencender los alxiculos+nflamables.derret_ro
, NUNCA permlta que una olla h+ervahastasecarse. Estopodria ablandarlos pBstbos oaumentarla presiOnen loscontenedores
da[mria oHay el electrodomdstico, cerrauoshacl6ndolosreventar.
• NUNCA toque la supediciede +aestufa hastaque no se haya , NUNCA permLtaque el papel de aluminio, los te++nOmetrosde came
_nfriauo. Posiblementeafgunasareasde la superficie, ocuatquier otro objeto de metal a excepciOnde unao!la sobreun
especmlmentealrededor de los ebmentos,se entlb_eno cal+enten elememosuper+oRtenga conmc[ocon los elementoscalefactores.
m_en[rasesta cocinando. Usetomaollaspara pro[egersus - N[JNOAguardeart{cubs pesadossobrela cub+ertaque puedan
manos, caersey da_arla.
61

Cubiertas Lisas
Notas sobre [as cubiertas lisas:
o La cubierta de maestufa puede emitir un poco de humo y
omer_aprimeravez que se uti[iz& Estoes normal
oLas cubiertas misasretienen emcamorpot un cierto periodo
despe6s qee se ha apagado maestefa. Apaguelos etementos
unos pocosminutos antesde que Ios alimentosest@
completamentecocinadosy use et caior restantepara compbtar
la cocci@. Cuando[a Iuzdesuperficb caiientese apaga [vera
continuaciOn},e[ _readon@ se cocinaestar_fr[a ai tacto.
Debido a Ia maneraen que retienen e[caIor, loseIementos[isos
no responder_ntan r@idamentea los cambiosen losajustes
como Iosebmentos espirales.
oEncasode un posible derrame,retireel utensiIiode [acubbrta
de la estuf&
oNunea trate de mevantarmacubierta.
oLa superficb lisapuedeversedescoioridacuando est_ ca[iente.
Estoes normaly desaparecer8cuando Iasuperficiese enfr[e.
Dementos Superiores
Los eIementossuperioresensu estufaest_nidentificadosper
drcuIos permanentesen [a supefficie Iisa. Paracoc[narde manera
m_seficiente,use un utensi[ioque seadel mismotamaSoque e[
e[ePaento.
Los ute#sgios no debe# extenderse robsall# de f2 a 25 mm
(1/2 a f pulgada) del tama#e del eleme#te.
Cuandose enciendeun control,se puede vet un respIandora trav6s
de la superficb lisa.Ememementopasar_ pot cicmosde encendido
y apagado para mantener el ajuste de calor semeecionado,aen
en emajuste'Hi' (#,It@,
ParamayorinformaciOnsobre los utensiliosconsuIte[a secciOn
Recomendacionessobre IosUtensiIiosen Ia p%ina 64y el folbto
"La Cocina F_cii"que se incluyecon su estuf&
ELEMENTO
SENCILLO _ AREA CALENTADORA
/
ELEMENTO
ELEMENTO
DOBLE
Luz lndicadora de Superficie Caliente
La [_Jzindicadorade superficb calbnte seencuentraen el panelde
control. La[uzse iIuminar8cuando cuaIquierade los ebmentos
superioresest6caIiente.Permanecer_encendida
a_ndespu@de que e[ controlsea apagado,hasta
queel arease hayaenfriado. Net: Surface
Area Calentadora
Useel _reacaientadoraparamantenercaIientesIosalimentosya
cocinados,tal comoverduras,salsasy platosde servirresistentesal
homo.
OFF
Ajuste del control:
1, Oprimay gire [aperilla. Lastemperaturas
de calentamientoson aproximadasy _"
est_nindicadasen e[ controI como 'Min'
(Min.} 2W y 'Max' (M_x.}.Sin embargo, a
el control puedeco[ocarseen cualquier s
posici6nentre 'Min' y 'Ma×'.
2.
M_x
Y
6
5
4
Cuandohayaterminado,gireel contlo[ a Ia posiciOn'OFF'. La [uz
indicadorade superficb caliente se apagar_ cuando se haya
enfriado [asuperficb del _rea calentadora.
_OtaS:
o Nunca calientealimentosdurante ross de una hora (los huevos
durante30 minutos},puesse puede deteriorar la calidad del
alimento.
o No calbnte alimentos frFosen el _rea calentadora.
o Losaiustesvariar_independbndo de! %0 y cantidadde
alimento.Siempremantengael alimento alas temperaturas
apropiadasdel alimento.El USDA recomiendatemperaturas
entre 60° - 75° C (140° - 170° F}para los alimentos.
Ajustes Sugeridos
Ajuste Tipe de Aliraente
Min = 2 Panes/PasteIitos Salsas
Cacemlas Huevos
2 = 5 Carries Platodesewir con comida
Sopas(Crema} SaIsas
Estofados Verduras
5 = _ax Alimentos fntos Bebidascalbntes
Sopas(L[quido}
Notas sobre el rea calentadora:
o UsesoIamenteutensiIiosy piatosrecomendadosespecificamente
para usaren e[ horno yen Ia cubiertaIisa,
o Siempreuseguantesparae[ horno cuando retire los aIimentos
de[ _reacabntadora pues los utensiliosy los platesestar_n
calientes.
o Todoslos alimentosdeben cubnrse con una tapa o con pape[de
aIuminiopara mantenerIacalidad de los aIimentos.
o Cuandose calientan pastelitosy panes [atapa debe tenet una
abertura para@jar saIirIa humedad.
o No useenvolturade pl_sticoparatapar los aIimentos.E[ pI_stico
se puedederretir en [a superficb y set muy difici[ de limpiar.
62
Consejos para proteger la
¢ubierta lisa
Umpieza (ver p_gina 77 para mayor informaciOn])
, Antes de usarpor primeravez,[[mpie [acub[eRa.
, L[mpie[acubiertadiadamenteo despu6sde cadauso. Esto [a
mantendr_con una buenaapadenciay puede ev[tarque se dafie.
, S[ se produce un derramecuandoest6 coc[nando,[impie[o
[nmed[atamentede [acubierta cuando6staest6calientepara
ev[taruna [[mp[ezaross difici[ despu6s. Tengamucho cu[dado,
[imp[eel derramecon una toa[[a secay limp[a.
, No deje que los derramespermanezcansobre [a cub[eRao sobre
[a mo[durade [a cubierta por un per[odode t[empo proiongado.
, Blmlca use po[vosde [impiezaabrasivosni esponjasde restregar
quepuedanrayar [acubierta.
, Nmlcu use blanqueadora basede c[oro,amon[acon[ otros
limp[adoresque no hayansido especificamenterecomendados
parausar en el vidr[o cer_m[co.
Para evitar mareas y rayaduras
, No use utensiliosdevidrio+ Puedenrayar [asuperficie+
, Blmlcu co[oqueunsoporte o un aro de wok entre [a cubierta y el
utensiiio+Estosart[culos pueden marcar o rayarla cubierta+
, No deslice utensiiiosde aluminioa trav6sde una cubiertacaliente+
Los utensi[iospuedendejar marcasquedebenset [impiadas
inmediatamente.[Vet Limpieza,p_gina77.)
, Asegtiresede que la cubierta y [a parte inferior de[ utensilioest6n
limpiasantes deencender[a estufa a fin deevitar rayaduras.
, Paraevitarlas rayaduraso dai_oa [a cubiertade viddo cer_mico,
nodeje azticar,sal o grasassobre los elementos. Limpie [a
cubiertacon un pa_o [impio o con toallasde papelantesde usar[a.
, Blmlcu deslice utensiliosde metal pesadosa trav6sde [a cubierta
puespueden rayarla.
Para evitar [as manehas
, Blmlea use un pai_oo unaesponjasuciapara [[mpiar[a cubierta
de [aestufa+Esto puede dejar una pei[cuiaque puedemancharla
cubierta despu6squeel _rease calienta+
, Si se contin0a cocinando sobreuna superficiesuciase puede/
podr_pmducir una manchapermanente+
Para evitar otros daffos
, No deje queen [a cubiertacaiientese derritan pl_sticos,azticaro
alimentoscon alto contenidode az_icar+Si esto sucede,limpie
inmediatamente+(Vet Limpieza,p_gina77+)
, Bluneadejeque una olla hiervahasta quedar seca puesesto
dafiar_ lasuperficiey e[ utensiiio+
+ Nunea use la cubierta como una superficie de trabajo ni
como unatabla decortar+
+ BJmlca cocine alimentos directamente sobre [a cubierta,
, No use un utensiliopequefio en un eiementogrande. Estono s01o
desperdiciaenergiasino que tambi6npuedenproducirsederrames
calientessobre [a cubierta los cualesrequierenlimpiezaadicionai.
, No use utensiliosespecialesque no sean pianos,detamaiio mayor
o desnJveladostal como la parte inferior redondade [oswoks, con
rondos acanaladosy/o parrilJasy ollasde gran tamafio para
prepararconservas.
, No use aluminio n+contenedoresde pape[de aiuminio. El
aluminio se puede derretir en [a cubierta de vidrio cer4mico.Siel
metalse derrite en la cubierta+no use la estufa. Llame aun
t6cnico autorizadode Amana.
63
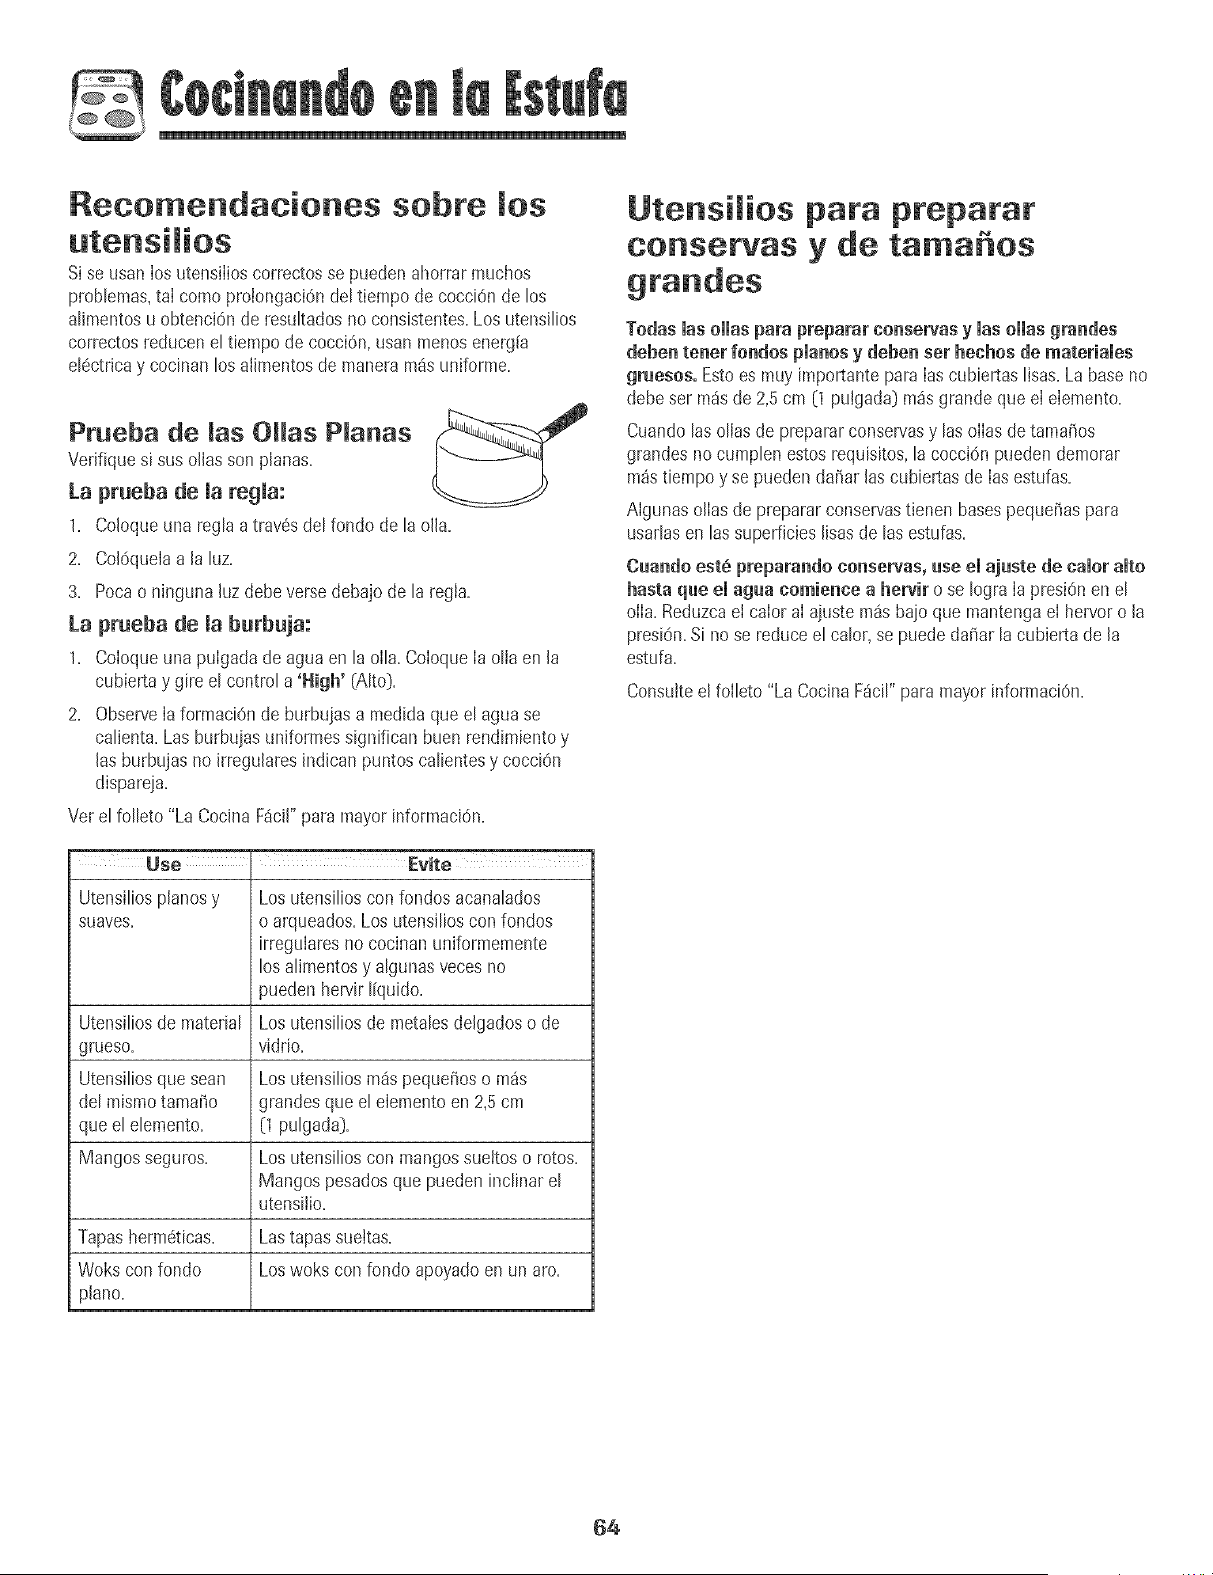
Recomendaciones sobre los
Sise usan los utensilioscorrectosse pueden ahorrar muchos
proNemas,taIcomo proiongaci6ndeltiempo de cocciOnde los
alimentosu obtenci6nde resultadosno consistentes.Losutensilios
correctosreducenel tiernpode cocci6n,usanmenosenerg[a
el6ctricay cocinanlos alimentosde maneram_s unifarme.
Ptueba de las Ollas Planas
Verifique si sus ollasson planas.
La prueba de la regla:
1. Coloqueuna reglaa trav6sdel fondo de la olla.
2. Col6quelaa la luz.
3. Pocao ningunahz debeversedebajode la regla.
La prueba de la burbuja:
1. Coloqueuna pulgadade aguaen la olla. ColoqueIa olla en la
cubiertay gire el contrala 'High' (Alto].
2. ObserveIa formaciOnde burbujasa medidaque el aguase
calienta. Lasburbujasuniformessignifican buen rendimientoy
las burbujasno irregularesindicanpuntoscalientesy cocciOn
dispareja.
Ver el falleto "La Cocina F_cil"para mayorinformaci6n.
Use , Evite
Utensiliospianosy Los utensilioscon rondosacanalados
suaves, o arqueados.Los utensilioscon fondos
irregularesno cocinanuniformemente
los alimentosy algunasvecesno
puedenhewir liquido.
Utensiliosde material Los utensiliosde metalesdelgadoso de
grueso, viddo.
Utensiliosque sean Los utensiliosm_spequeiioso m_s
del mismotama_o grandesque el elementoen 2,5cm
que el elemento. (1pulgada].
Mangosseguros. Los utensilioscon mangossuettoso rotos.
Mangospesadosque puedeninclinar el
utensilio.
Tapasherm6ticas. Lastapassuettas.
Wokscon fondo Loswoks con rondoapoyadoen un aro.
piano.
Utensilios para preparar
conservas y de tama os
Todaslas ollas para preparar conservas y las elias grandes
deben tenet rondos pianos y deben set hechos de mateHales
graesos, Estoes muy importantepara Ias cubiertaslisas.La baseno
debeser m_sde 2,5cm 0 pulgada] m_s grandeque el elemento.
Cuandolas ollasde preparar conservasy lasolIas de tamatios
grandesno cumplenestosrequisitos,la cocci6n pueden demorar
m_stiempoy se pueden da_ar lascubiertas de Iasestufas.
Algunasollas de prepararconservastienen basespequei)aspara
usarlasen las superficieslisas de las estufas.
Caamtoest6 preparando conservas,use el ajaste de calor alto
basra qae el agaa comience a hervir o se Iogra Ia presiOnen el
olIa=Reduzcaei calor aI ajustem_sbajo que mantengael hervoro la
presiOn=Si nose reduceel calor,se puede daSarla cubierta de la
estufa=
Consulteelfolleto "La Cocina F_cil"paramayorinformaciOn.
64
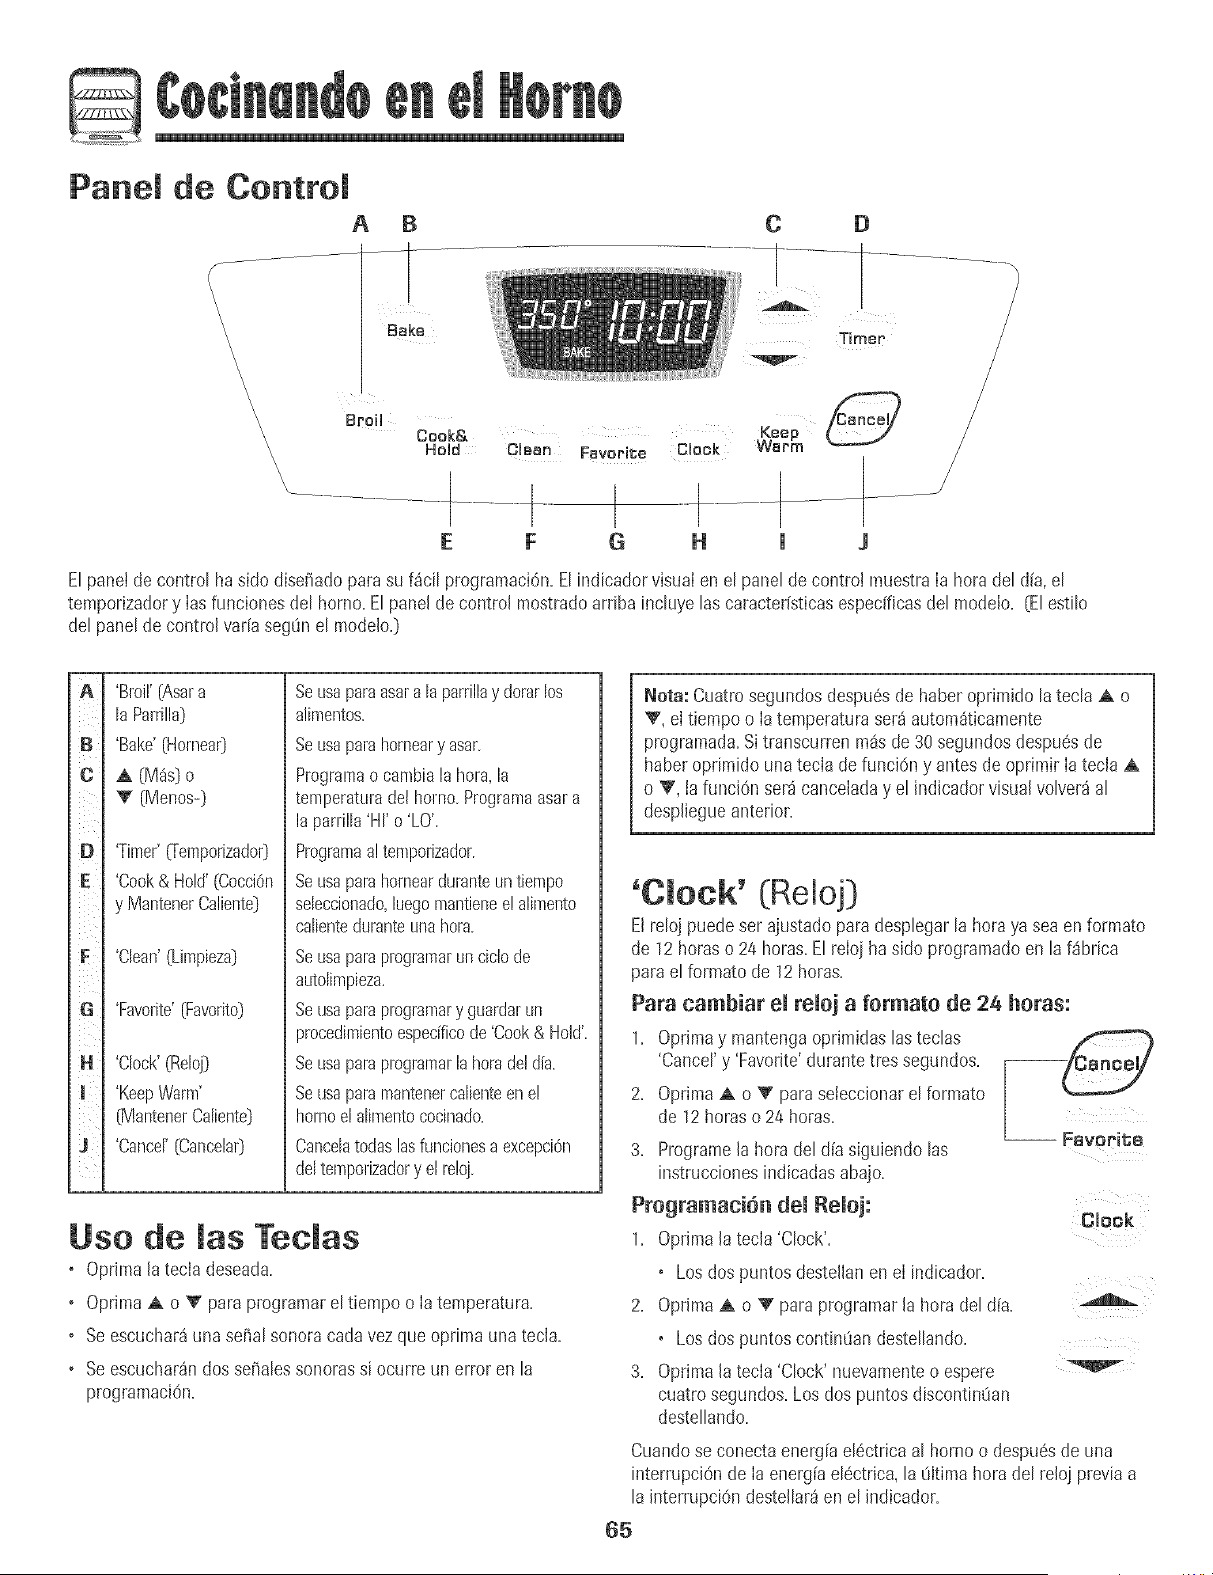
Panel de Control
A
\
\
\
\
\
B
Bake
C D
Timer
\
\
Cook&
\\\ Hold CUBan Favorite Clock
\
\
" t t
E F G H
Keep
Warm
1 J
E[panelde controt ha sido dise_adopara su f_ci[ programaci6n.E[indicadorvisual en e[ parle[de control muestraIa hora de[ dia,e[
temporizadory Iasfuncionesdet horno.Etparle[de control mostradoarribainctuyetascaracterfsticasespedficasdet mode[o. (Etestito
de[ panelde control varia seg_nel modelo.)
A
il i
B!
C ¸
iii?
ID
G
H
m
J
'Broil'(Asara
laParr+lla)
'Bake'(Hornea0
A (M_s)o
V (Menos-)
'Timer'_emporizador}
'Cook& Hold'(CocciOn
y MantenerCaliente]
'Clean' (Limpieza)
'Favorite'(Favorito)
'Clock'(Reloj)
'KeepWarm'
(MantenerCaliente_
'Cancel'(Cancela0
Seusaparaasara la parrillay dorarlos
alimentos.
Seusaparahomeary asar.
Programao cambialahora,la
temperaturadethorno.Programaasara
laparrilla'HI' o 'LO'.
Programaa!temporizador.
Seusaparahornearduranteun tiempo
seleccionado,luegomantienee!alimento
calienteduranteunahora.
Seusaparaprogramaruncictode
autolirnpieza.
Seusaparaprogramary guardarun
procedimientoespecificode'Cook& Hold'.
Seusaparaprogramarlahoradeldia.
Seusaparamantenercalienteene!
hornoelalimentococinado.
Cancehtodaslasfuncionesaexcepci6n
deltemporizadory el reloj.
Use de masTedas
+ Oprimala tecIa deseada.
o OprimaA o V paraprogramareltiempo o Ia temperatura.
o Seescuchar_unasei]al sonoracarlavez qua optima una tecla.
o Seescuchar_ndos se_alessonoras si ocurre un error en la
programaciOn.
Nora: Cuatm segundosdespu6sde haberoprimido la tecla A o
V, eltiempo o Ia temperaturaser_autom_ticamente
programada.Sitranscurrenm_sde 30segundosdespu6sde
haberoprimido unatecla de funci6n y antes deoprimir Iatecla A
o V, ta funciOnser_canceladay el indicadorvisualvolver_al
despliegueanterior.
'Cmock' (Reloj)
El relojpuedeser ajustado para desplegarla hora ya seaen formato
de 12horaso 24 horas.Elreloj hasido programadoen la f_brica
parael formato de 12 horas.
Para cambiar eI reioj a formate de 24 betas:
1. Opnmay mantengaoprimidaslas teclas
'Cancel'y 'Favorite'durantetres segundos.
2. Optima A o V para seteccionarel formato
de 12horaso 24 horas.
3. Programe[a hora de[ dia siguiendolas
hlstruccionesindicadasabajo.
Progmmaci6n deI Reioj:
Clock
1. Oprh_ala tecla 'Clock'.
+ Losdos puntos destellanen eI indicador.
2. Oprh_aA o _' para programarla hora del alia.
+ Losdos puntos contintian destellando.
3. Optima la tecla 'Clock' nuevamenteo espere
cuatrosegundos.Los dos puntosdiscontint_an
destellando.
Cuandose conectaenerg[ael6ctricaal homo o despudsde una
interrupciOnde Ia energ[ael6ctrica,la 0Itima horadel reloj previaa
la interrupciOndestellar_en el indicador.
65
Paradesplegarla horadet d{a cuando el indicadorest6 mostrando
otra funci6n de tiempo, oprima tatecta 'Crock'.
La horadet retoj no puedeser cambiadacuandoet hornoha sido
programadopara 'DetayCook','Ctean'o 'Cook& HoW.
Para canceiar el despiiegue de[ reioj:
Si nodeseaque el indicadorvisuatmuestre tahora del dfa:
Oprimay mantengaopdmida [asteclas
'Cancel'y 'Clock' durantetres segundos.La
horadel d{adesaparecerdde[ indicador.
Cuandose cancelael desplieguedel reloj,
optima latecla 'Clock' para desp[egar
brevemente[a hora del d{a.
Para restaurar el despiiegue de[ reioj:
Optimay mantengaopdmkJalasteelas'Cancel'y 'Clock'durante
tres segundos+La horadel dia reaparecer_en el indicador+
__ Clock
'Timer' (TemporizadoO
EltempoHzadorpuedeser programadode un minuto [0:01] hasta99
horasy 59minutos [99:59]+
Eltemporizadorpuedeset usado independientementedecua[quier
otra actividaddel homo+Adem_spuedeset programadocuando otra
funciOndel homo est6en funcionamiento+
EltemporJzadorno controlael homo+Solamentecontrolauna serial
So[_or8=
Para programar el temporizador:
1+ Optima la tecla 'Timer' _Temporizador]+ Timer
o '0:00'desteHaen el hldicadorvisual
o Losdos puntosdesteliar4n+
2+ OprimaIatecla A o V hastaque el tiempo
correcto aparezcaen el Jndicadorvisual+
o Losdos puntoscontinOandestellando+
3+ Optimanuevamentela tecla 'Timer'o esperecuatrosegundos+
o Losdos puntoscontinOandesteJlandoy comienzala cuenta
regresivadel tiempo+
o ElOltimominutode Ia cuenta regresivadel temporizadorse
desplegar4ensegundos+
4+ AI finaJdeJtiempo programado,se escuchar4una se_alsonora
Jarga+
Para canceiar ei temporizador:
1+ Optimay mantengaoprimida la tecla 'Timer'durantetres
segundos=
U
A
V
2. Oprima [a tec[a 'Timer' y co[oque [a hora a 0:00.
Bloqueo de los Controles y de
la Puerta dem Homo
Eltecladoy la puertadel homo puedenset bloqueadospara
seguddad,[impiezao evitarel uso no autorizado.No funcionar_n
cuandoest6n bloqueados.
Siel hornoest_en uso,los controiesni [a puerta puedenMoquearse.
La horaactuaIdel d[a permanecer_en el indicador cuando los
controlesest6nbioqueados+
Para bmoquear:
Optimay mantengaoprimidasIastecIas
'Cance!'y 'Cook & Hold'durante tres
segundos+[Optima pdmero la tecla 'Cancerj
'LOCK'destellaenel indicadorvisual+
Cook&
-- Hold
Para desbioquear:
Optimay mantengaoprimidas[astec[as 'Cancel'y 'Cook& HoW
durantetres segundos.(Optima primero la tecla'CanceR}
'LOCK'desaparecedel indicadorvisual
C6digos de Ettores
'BAKE'o 'LOCK'pueden destellarr_pidamentepara advertide que
hay un error o un probiema.Si 'BAKE'o 'LOCK'desteilanen el
indicadorvisual,optima le tecla'Cancel'+Si'BAKE'o 'LOCK'
continOandestellando,desconectelacorrienteel6ctdca haciaeJ
artefacto.Espereunos pocos minutosy vueJvaa conectar la
corrienteel6ctrica.Si IaspalabrasaOncontin_andestelJando,
desconecteIacordenteel6ctrica haciael artefactoy Jlamea un
t@cnicodeservicioautoHzado.
66
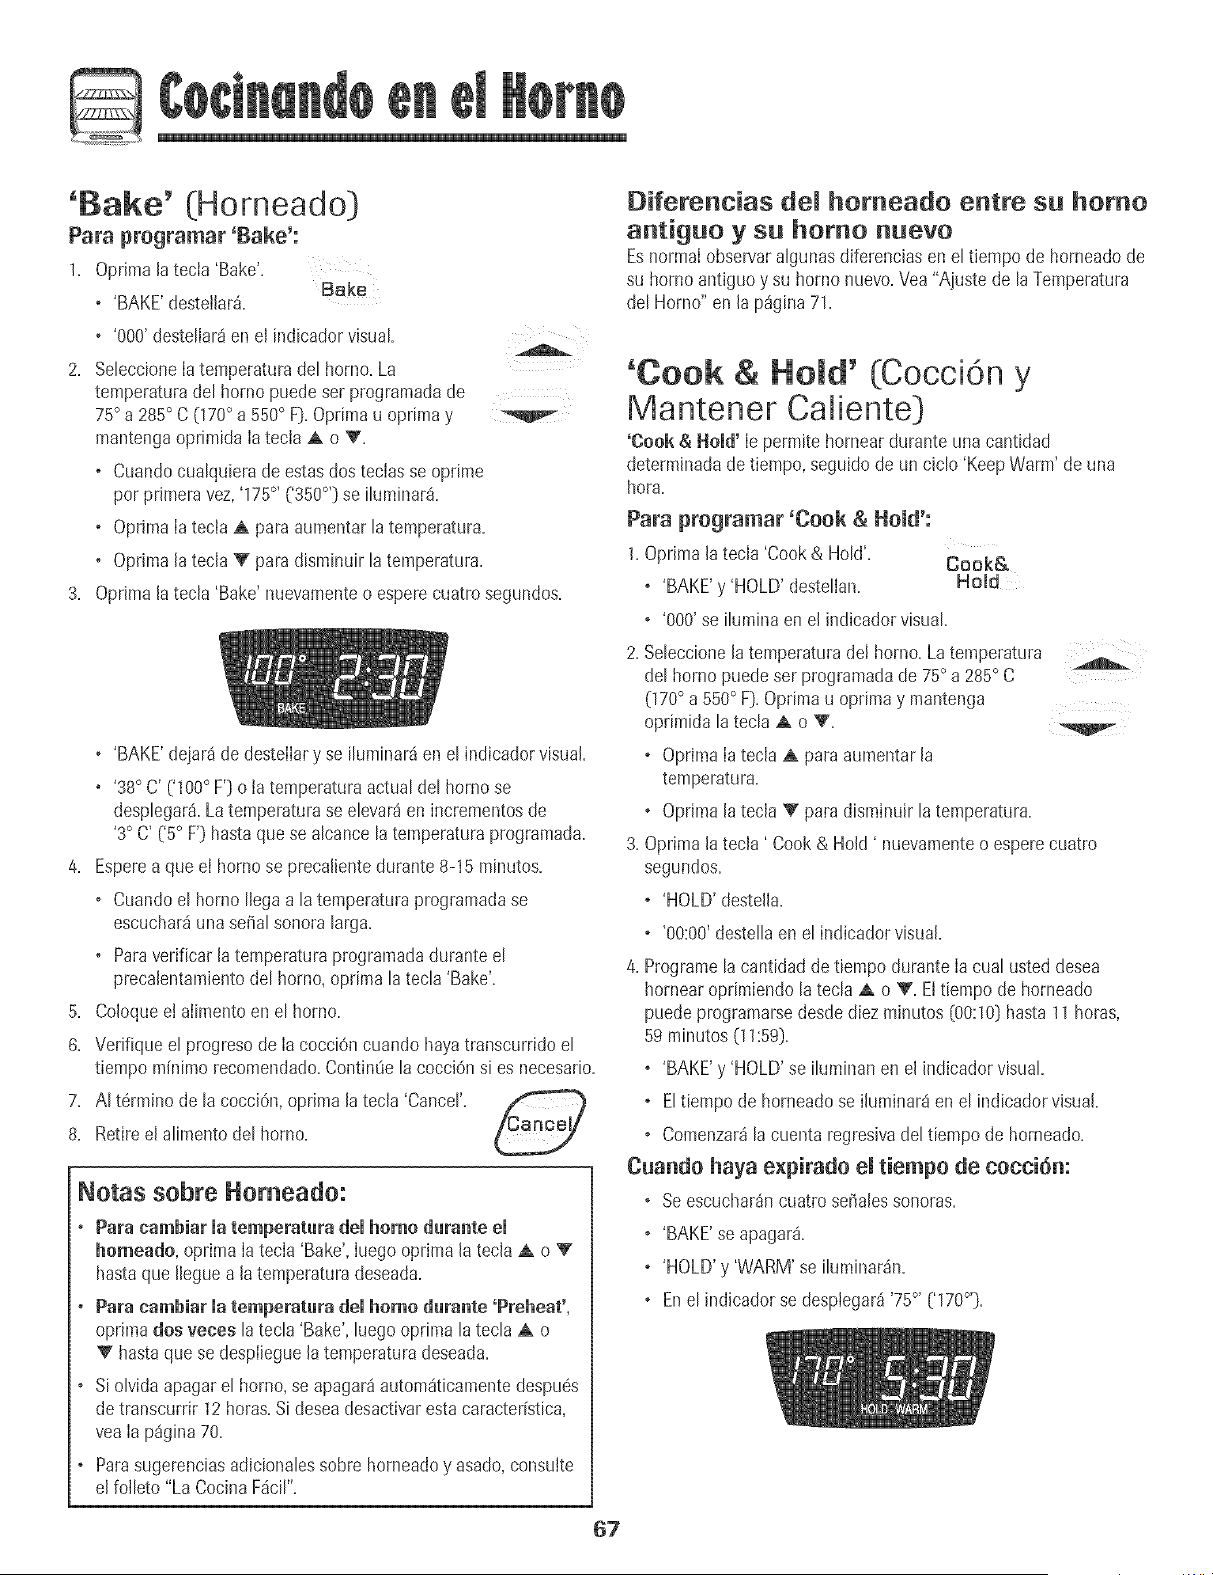
'Bake' (Horneado]
Para programar 'Bake':
1. Oprimala tecIa 'Bake'+
Bake
o 'BAKE'destetlar_.
o '000'destellar_en el indicadorvisual.
2. Se[eccioneIatemperaturade[ homo. La
temperaturadel borne puedeser programadade
75° a 285° C (170° a 550° F[.Opdmau oprima y
mantengaoprimida Iatecla A o V.
o Cuandocualquierade estasdos teclasse oprime
per primeravez,'175°, ('350°'] se iluminar_.
+ Oprh_aIatecla A para aumentar la temperatura.
o OprhTlala tecla V para disminuir la temperatura.
3. Oprimala tecla 'Bake' nuevamenteo esperecuatrosegundos.
o 'BAKE'dejar_ de destelIary se iluminaraen el indicadorvisual.
° '38° C' ('100° F'] ota temperaturaactualdel homo se
desplegar_.Latemperaturaseelevar_en incrementosde
'3° C' ('5° F'}hastaquase alcance la temperaturaprogramada.
4. Esperea qua el bornese precalientedurante8-15 minutes.
o Cuandoel borneHegaa latemperaturaprogramadase
escuchar_unasepal sonoralarga.
o Paraverificarla temperaturaprogramadadurante el
precalentamientodel horno,optima latecla 'Bake'.
5. Coloquee! alimentoen el homo.
6. Verifique el progresode IacocciOncuando hayatranscurridoel
tiempo minimorecomendado.ContinQela cocci6nsi es necesario.
7. AI t6rmino de la cocciOn,oprimala tecla 'Cancer.
8. Retireel alimento del homo.
Notas sobre Homeado:
• Para cambiar matemperature damhomo dumnte em
homeado, oprimaIa tecla 'Bake',Iuegooprima la teclaA o V"
hastaqua lleguea latemperaturadeseada.
• Para eambiar ia tempemtura dei homo durante 'Preheat',
oprimados veees la tecla 'Bake',luego oprima latecla A o
V hastaquase desplieguelatemperaturadeseada.
o Si olvida apagarel homo, seapagar_ autom_ticamentedespu6s
detranscurrir 12horas.Si deseadesactivarestacaracter[stica,
yea Ia p%ina 70
o Parasugerenciasadicionalessobre homeadoy asado,consulte
elfoIleto "La Cocina F_cil".
Diferenc+as de_ homeado entre su homo
antiguo y su homo nuevo
Esnormal observaralgunasdiferenciasen el tiempo de horneadode
su homo antiguoy su homo nuevo.Vea "Ajustede la Temperatura
del Horno" en la pSgina71.
'Cook & Hemal' (Cocci6n y
Mantener Caiiente]
'Cook & Hold' Ie permitehorneardurante una cantidad
determinadadetiempo, seguidode un ciclo 'KeepWarm' de una
hera.
Para programar 'Cook & Herod':
1.Oprimala tecla 'Cook& Hold'. Cook&
o 'BAKE'y 'HOLD'destellan. Hold
o '000'se iluminaen el indicador visual
2. Seleccionela temperaturadel homo. La temperatura
del homo puede ser programadade 75° a 285° C
(170° a 550° F]. Optimau optima y mantenga
oprimida latecla A o V.
o OprimaIa tecla A para aumentar la
temperatura.
o Oprimala tecla V paradisminuir la temperatura.
3. Oprimala tecla ' Cook& Hold ' nuevamenteo esperecuatro
segundos.
o 'HOLD'destella.
o '00:00'destellaenel indicadorvisual.
4. Programela cantidad de tiempodurante Ia cual usteddesea
hornearoprimiendola tecla A o V. El tiempo de horneado
puedeprogramarsedesdediez minutes [00:10] hasta 11 betas,
59 minutes(11:59].
o 'BAKE'y 'HOLD'se iluminan en el indicadorvisual.
o Eltiempode horneadose ihminar8 en el indicadorvisual.
o Comenzar_la cuenta regresivadel tiempo de homeado.
Cuando haya e×pirado el tiempo de cocci6n:
o Seescuchar_ncuatroseSalessonoras.
o 'BAKE'se apagar&
o 'HOLD'y 'WARM'se iluminar_n.
. En el indicadorse desplegar_'75°' ('170°'].
67
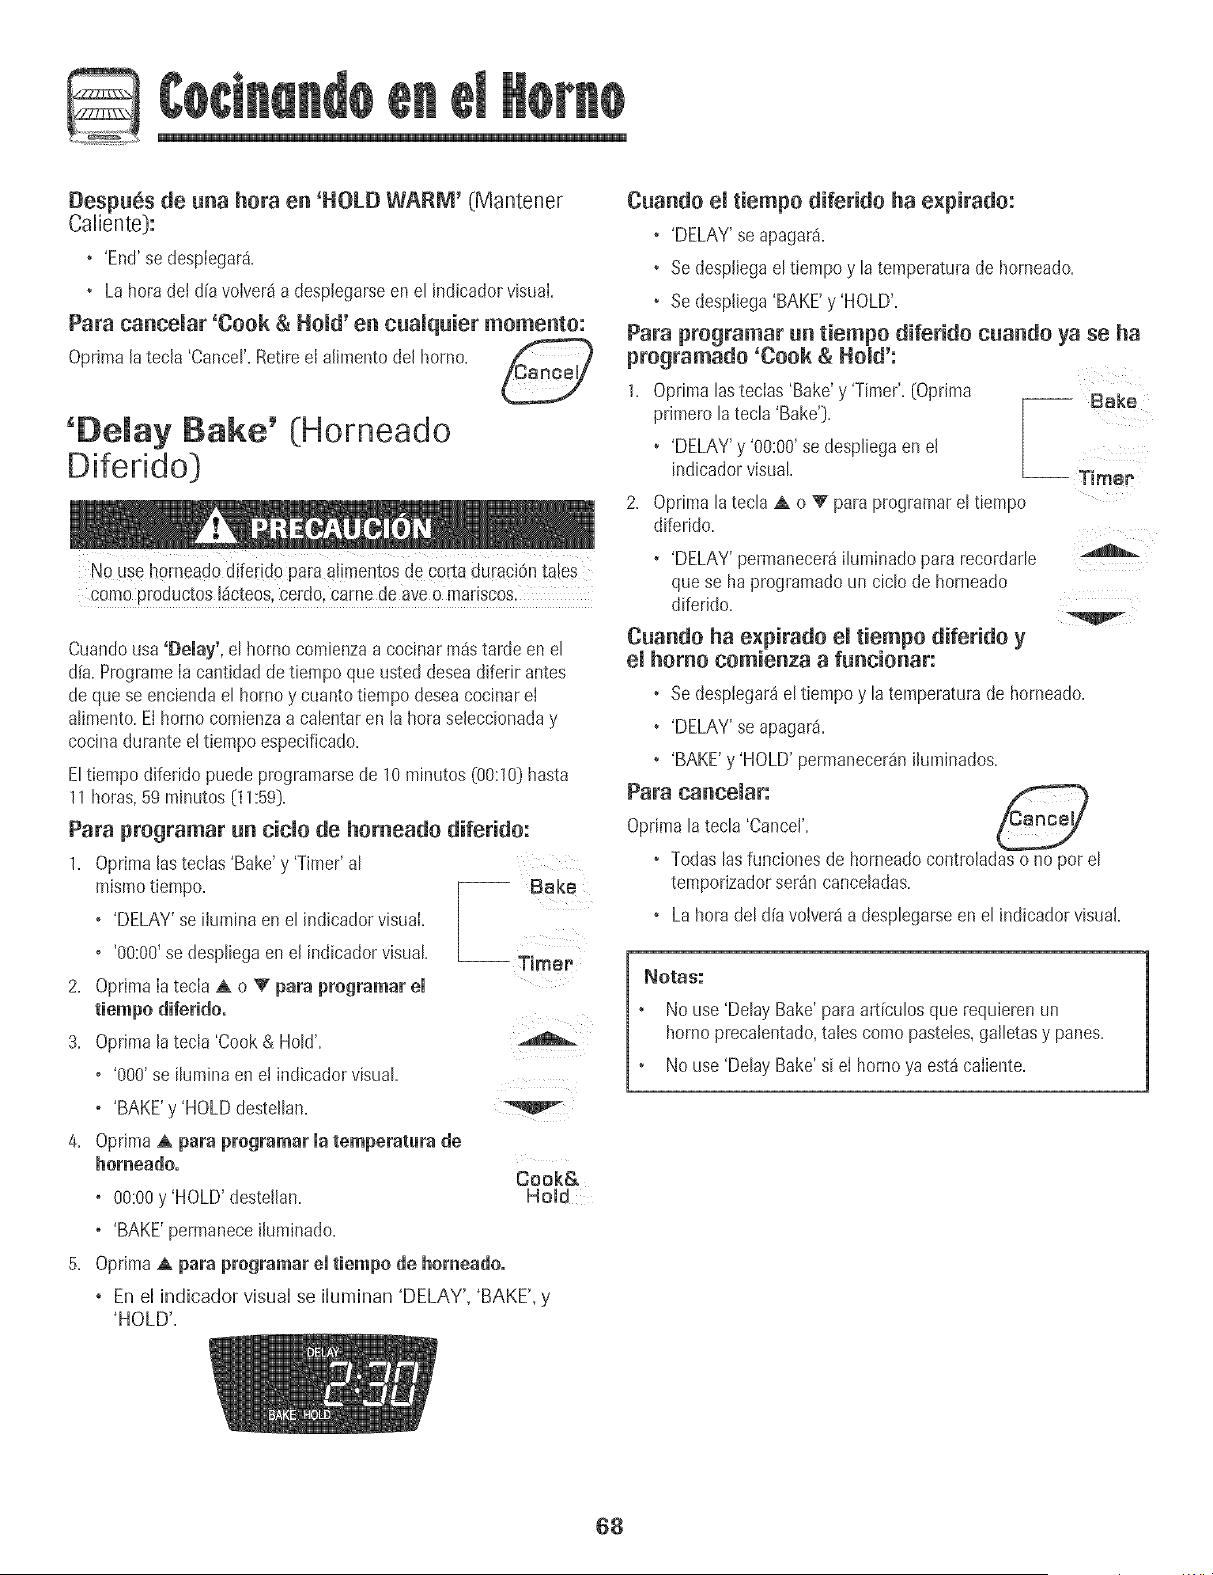
Despues de una hora en 'HOLD WARM' (Mantener
Caliente):
° 'End'se desplegar&
• La hora deJdiavolver_a desplegarseen et indicadorvisual.
Para cancemar 'Cook & Hemal'en cnamqnier memento:
Oprimala tecla 'Cancer Retireel alimentodel homo, C_a ncey)
'Demay Bake' (Horneado
Difeddo]
No useh0meado d[fedd0para aHmentosde c0rta durac!Ontales
comaproductos I_cteos,cerdo,came de aveo madscos.
Cuandousa 'Delay', et homo comienzaa cocinar m_s tarde en el
d[a.ProgrameIa cantidad de tiempo que usteddeseadifedr antes
de quase enciendael horno y cuantotiempo deseacocinarel
alimento.Elhomo comienzaa calentaren la hora seleccionaday
cocinadurante eltiempo especificado.
Eltiempo diferido puede programarsede 10 minutos(00:10}hasta
11horas,59minutos (11:59).
Para programar un tide de homeado diferido:
1. Oprimalasteclas 'Bake'y 'Timer'al
mismotiempo. -- Bake
o 'DELAY'se iiuminaen el indicadorvisual.
o '00:00'se despliegaen el indicadorvisual
2. OprimaIatecla _&o 'V' para programar el
tiempo diferido°
3. Oprimala tecla 'Cook & Hold'.
o '000'se ilumina en e! indicadorvisual
o 'BAKE'y 'HOLDdestellan.
4. OprimaA para programar matemperatura de
hameadoo
Cook&
o 00:00y'HOLD' destellan, Hold
o 'BAKE'permaneceiJuminado.
5. OprimaA para pragramar emtiempo de homeadoo
, En el indicador visual se iluminan 'DELAY', 'BAKE', y
'HOLD'.
-- Timer
Cnando emtiempo diferido ha expirado:
• 'DELAY'se apagar&
• Se despliegael tiempo y la temperaturade homeado.
• Se despliega'BAKE'y 'HOLD'.
Para programar nn tiempo diferido cnando ya se ha
programatic 'Cook & Hold':
1. Optima lasteclas 'Bake' y 'Timer'.(Oprima
primero la tecla 'Bake'). -- Bake
• 'DELAY'y '00:00'se despliegaenel
indicadorvisual -- Timer'
2. Opnma latecla A o V" para programarel tiempo
diferido.
• 'DELAY'permanecer4iluminadopara recordarle
que se ha programadoun ciclode horneado
diferido,
Cnando ha expirado emtiempo diferido y
emhomo comienza a fnncionar:
• Se desplegar_el tiempoy la temperaturade horneado.
• 'DELAY'se apagar&
• 'BAKE'y 'HOLD' permanecer_nihminados.
Para cancelar:
Optimala tecla 'Cancel'.
• Todas lasfuncionesde horneadocontroladaso no par el
temporizadorsaran canceladas.
• La hora del dia volver4a desplegarseen el indicadorvisual.
NOtaS:
No use 'DelayBake'paraart[culosqua requierenun
hornoprecalentado,tales coma pasteles,galletasy panes.
No use 'DelayBake'si eI homo ya est_caiiente.
68

'Keep Warm' (Mantener
Caliente]
ParamantenercaIientesen forma segura alimentoscatienteso para
catentarpanesy piatos+
Para programar 'Keep Warm':
1. OprimaIatecla 'KeepWarm'. Keep
_8pm
o 'WARM'destefla.
o '000'se desptiegaen el indicadorvisual.
2. SeteccioneIatemperaturade 'KeepWarm'.La
temperaturapara 'KeepWarm'puedeser
programadade63° a 90° C 045 ° a 190° F}.
Oprimau oprimay mantengaoprimida la tec]a A
OV,
o Cuandocualquierade estasdos tecJasse oprime por primera
vez+'75°' ('WO°'] se ituminar_+
+ OptimaIatecia A para aumentar la temperatura+
o Optima[atecia 'V' para disminuirla temperatura+
'WARM'y Iatemperaturase despiegar_nen eI indicador cuando
el ciclo'Keep Warm' est6 activo.
Para oaBoe[ar 'Keep Warm':
1. Oprima[atecla 'Cancer
2. Retireel aIimentodel homo.
Notas sobre 'Keep Warm':
+ Paraca[idad6ptima de losaIimentos,losalimentoscoc[nados
en e[ homo debenser mantenkJosca[ientespor no m_sde 1 a
2 horas.
o Paraevitar que losa[imentosse sequen,cObralos[evemente
con papelde ahminio o unatapa.
+ Para caientar paneciiios:
- cubra [evementelos paneci[Ioscon pape[de a[uminio y
coIOqueIosen e[ homo=
- oprima 'KeepWarm' y [atecIa A para programar
75° C (]70° F].
- ca[ientedurante 12a 15minutos+
o Para calentar plates:
- co[oque 2 pHasde cuatro p[atos carla una en e[ homo+
- oprima 'Keep Warm' y [a tecIa A para programar
75° C []70 ° F].
- caiiente los pIatos dumnte cinco minutos, apague e[ homo y
deje los pIatos en e[ horno durante 15 mhlutos m_s.
- use solamente pIatos resistentes a[ homo, verifique con e[
fabricante.
- nocoloque los ptatoscalientessobreuna superficiefria
pues e[ cambio r_pido de temperaturapuede causarfisuras
superficia[es.
69
Cierre Autem tieo/Mode
E(homo se apagar4 autom4ticamentedespuesde 12 horassi usted [o
deiaaccidentaimenteencendido. Estacaracteffsticade segurJdad
puedeset desactivada.
Para eaneelar el cierre autem_tiee de 12 heras y
dejar que el home funciene centinuamente durante
72 heras:
I, Programeel horno para hornear (verp4gina 67],
2. Oprimay mantengaoprimida [a tec[a 'Clock' C[emk
durante cinco segundos.
o 'SAb'se desplegar_y deste[lar4durante cinco segundos.
o 'SAb'se desplegar_continuamentehastaque se desactiveo
hastaque transcurrael limite de 72betas.
o 'BAKE'tambi6n se desp[egar4s[se est4 usandoun cic[o de
horneadocuandoel borneest4 en Mode Sab4tico.
Todaslasotrasfunciones EXOEPTO'BAKE'('Timer','KeepWarm',
'Clean',etc.] est_n b[oqueadasduranteel Mode Sab4tico.
Para canoe(at 'Bake' cuande e( Mode Sab_tiee
est_ active:
OprJma[a tec[a 'Cancer
o 'BAKE'se apagar4en e(indicadorvisual
o No se oir4 ningunaseffalsonora.
Para canee[ar e( Mode Sab_tice:
1. Oprima[atec[a 'CLOCK'durante cincosegundos. Clock
O
2. Despuesde 72horas,el Mode Sab4ticoterminar&
o 'SAb'deste[[ar4durante 5 segundos.
o Lahera de[dia reaparecer4en e[ indicadorvisual
Notas Sobre eJ Mode Sab_tico:
• El Mode Sabaiticopuedeser activadoen cua[quier memento,
est6o no ei borneencendido.
• El Mode Sab4ticonopuedeser activadosi lastec[as est4n
bloqueadaso cuando la puertaest_ bloqueada.
• Si el borne est4 horneandocuando el Mode Sab4ticoes
programado, 'BAKE'se apagar_al final de[ cic[o de horneado.
No se emitir_n seffa[essonoras.
Sise deseala luz det heine durante et Mode Sab_tico,6sta
debeser encendidaantesde que comienceel Mode Sab4tico.
Cuandocomienzael Mode Sab4tico,no se emitir4 [aseffa[
sonorade precalentamiento.
Cuandoel Mode Sab4ticoest_active,todos los avisos,
mensajesy seffalessonorasest_n desactivadas.
Elbloqueoautom4ticode lapuerta no funciona durante el
Mode Sab_tico.
Sioprime [atecia 'Cancel'se canceiardun cic[o 'Bake',sin
embargoet centre[ permanecerden Mode Sab4tico.
Sifaiia [a corriente ei6ctrica,cuando vueIvalaenerg[aet homo
se activar4en Mode Sab4ticocon 72 betas restantesy ningOn
cic[o active.
7O
Ajuste de la temperatura del
La exactitudde IastemperaturasdeI homo es cuidadosamente
probadaen B f_brica. Esnormal notar algunadiferenciaentre la
temperaturade homeado, entre un homo nuevoy un borne antigua.
Conel correrdel tbmpo, la temperaturadel homo puedecambiar.
UstedpuedeajustarIa temperaturadel homo, si consideraqua su
borne noest_ horneandoo dorandoenfarina correcta. Paradecidir
cuantodebe cambiar Ia temperatura,programeB temperaturadel
homo a 15° C (25° F} m_salta o m_s baja qua latemperatura
indicadaen sus recetas,luego hornee. Los resultadosde Ia
"prueba" pueden darle una idea de cuantoajustar la temperatura.
Ajuste de matemperatura dam homo:
1. OprimaIatecla 'Bake'. Bake
2. Programe550° oprimbndo Iatecla A.
3. Opr+may mantengaoprimida Ia tecla 'Bake'
durante variessegundoso hastaqua0°
aparezcaen el indicadorvisual
Si latemperaturade! homo ha side previamenteajustada,el
cambio aparecer_en el indicadorvisual Perejemplo,si la
temperaturadel homo rue reducidaen 8° C 05 ° F} el ind+cador
mostrar_'- 8°' ('-15°'}.
4. OprimaIatecla A o V para ajustarlatemperatura.
Carlavezque se oprimeuna tecla, Iatemperaturacambiaen
3° C (5° F}. Latemperaturade+homo puedeser aumentadao
d+sminuidaen 3° a 20° C (5° a 35° F}.
5. La hera del dia reaparecer_autom_ticamenteen el indicador
visual.
No necesitareajustarIa temperaturadel homo si hayuna falla o
interrupci6nde energiaeI@trica. Lastemperaturasde asara la
parrillay limpbza no puedenser ajustadas.
Cambio de la temperatura
de °F/°C
1. El ajuste de fSbrica de la medidadetemperaturaes Fahrenheit.
2. Paracambiarel ajuste,optima y mantengaoprimidaslastecIas
'CANCEL'{Anula0 y 'Bake' (Hornea0al mismotiempo durante
tres segundos.
3. Escuchar_unaseiial sonorayet ajusteactual (°Fo °C} se
desplegar_en Ia pantalla. {Si no se realizan+ngOncambio,Ia
estufa regresar_al ajuste actual despu6sde 30 segundos}.
4. Paracambiarel ajuste,oprima Ia tecla A o V. Opr[mala
nuevamentepara regresaraI ajusteanterior.Esperecinco
segundosy el ajusteseguardar&
'Favorite' (Favorite)
Latecla 'Favorite'le permite guardar en memoriael tiepapoy la
temperaturadeun chic 'Cook& HoW.
Paraprogramarun cicIo favorite, debe estar activao recbntemente
programadaunafunciOnde 'Cook& Hold'.
Para programar url nuevo aide Favorite o para
guardar oomo Favorite un ciclo 'Cook & Hold' que
est6 en progreso:
1. Programeunciclo de 'Cook & Hokl' comese describe en la
secci6n'Cook & HoW en la p%ina 67.
2. Oprimay mantengaoprimida la tecla'Favorite' Favorite
durante tressegundos.
+ Elciclo'Cook & HoW recientementeprogramaticoen
progresoser_ guardadoen memoria.
+ Seoir_ unaserial sonorapara ind+carque el control ha
aceptadoel ajuste'Favorite'.
Para comenzar un title programatic como Favorite:
1. Optima la tecla 'Favorite'+
• Se desplegar_el tiempoy la temperaturapara FavoPite
el ciclo 'Cook & Hold' programatic (si no hay
ciclo 'Cook & Hold' programatic,en el indicador
visualse desplegar_'nonE'.} Bake
2. Optima la tecla 'Bake'.
• El ciclo Favoritecomenzar_inmediatamente.
• 'BAKE'se iluminar_en el indicador visual
+ Eltiepapode cocci6nse iluminar_ien el indicadorvisual.
Cuando ha expirado el tiempo de cocci6n:
• 'BAKE'se apagari
• Se iluminarSn'HOLD'y 'WARM'.
+ Enel indicadorse desplegar_'75°' ('170°'}.
Para canceiar un cido favorite en progreso:
1. Optima la tecia 'CANCEL'.
• El ciclo favorite guardadoen memoriano
set4 afectado.
2. Retireel alimento del homo.
71
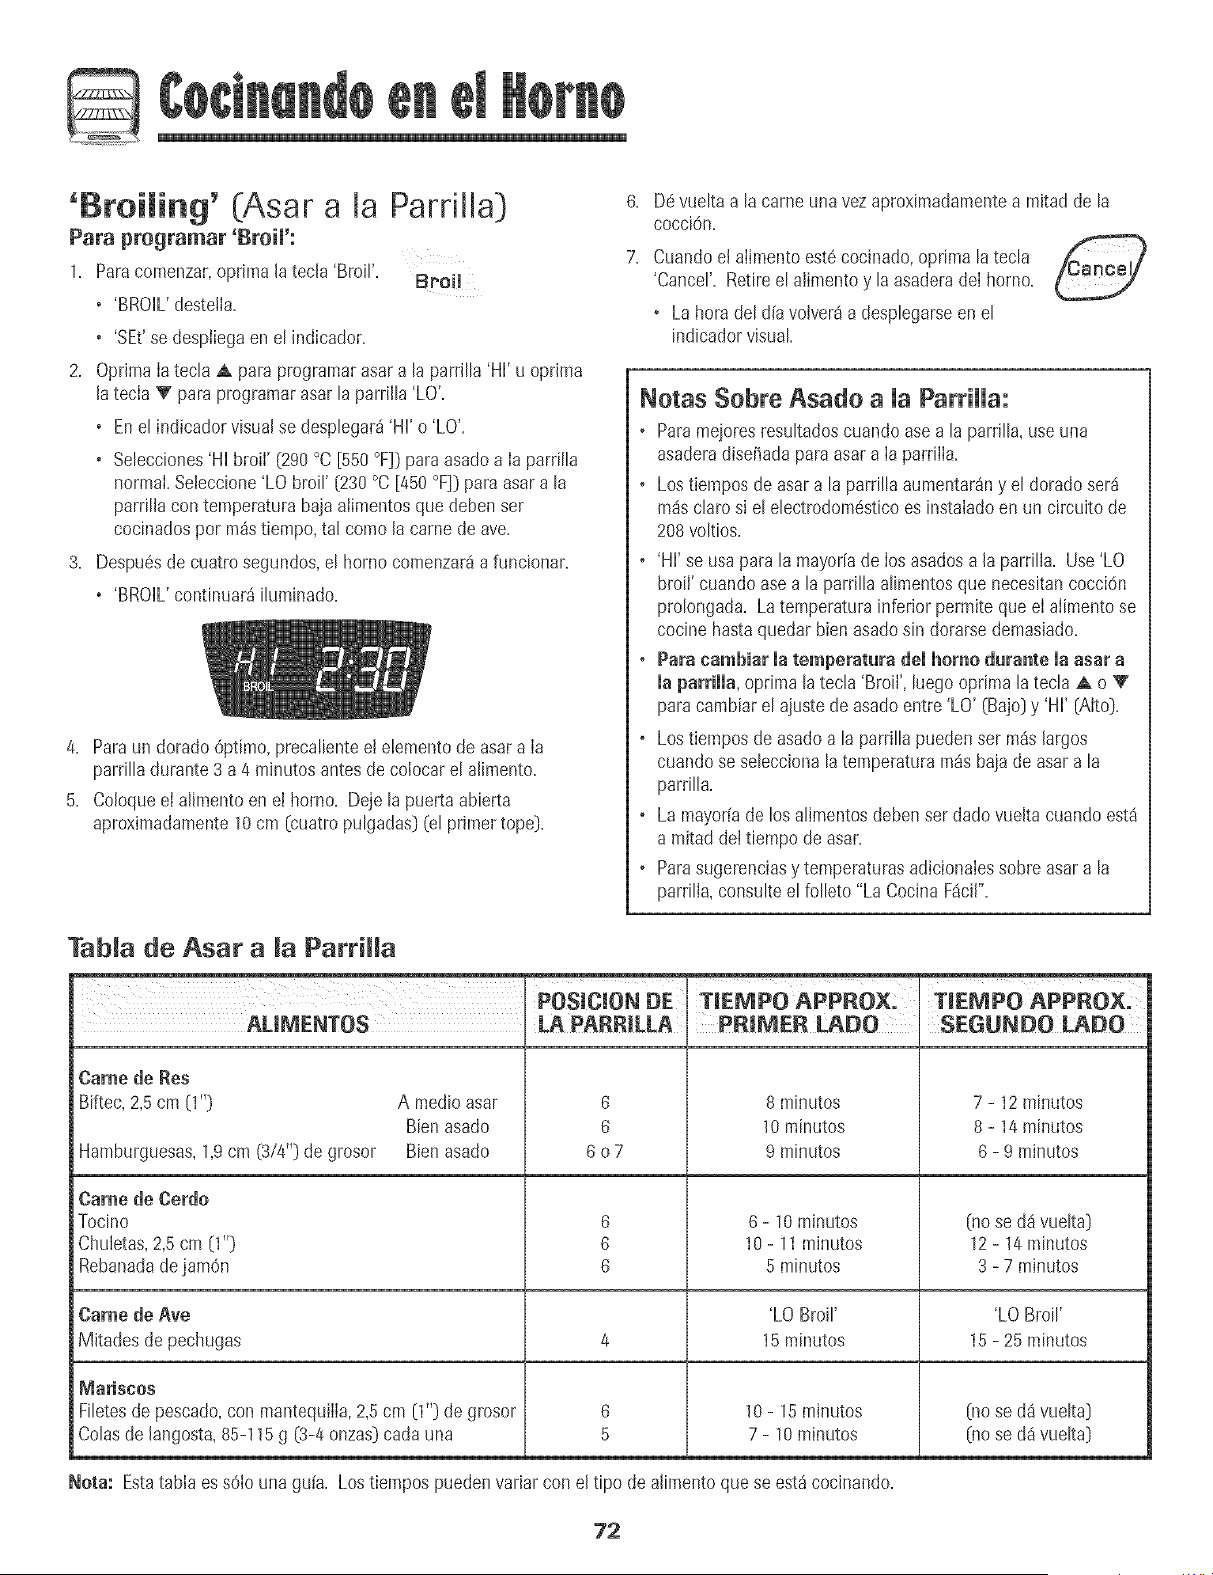
@
'[}roiming' (Asar a [a Pardlia)
Para programar 'Broi[':
1+ Paracomenzar,optima la tecla'Broil'+
Broil
o 'BROIL'destelia+
o 'SEt'se despliegaen el indicador.
2. Oprima[ateda A paraprogramarasar a [a parrilh 'HVu oprima
latecia V para pmgramarasar [aparrilh 'LO'.
o Enel ind+cadorvisualse desplegar_'HI' o 'LO'.
o Selecciones'HI broil' (290°C [550°F]) paraasadoa [a parrilla
normal.Seieccione'LO broff (230 °C[450 °F]) para asara la
parriliacon temperaturabajaaiimentosque deben ser
cocinadospor pa_stiempo,tal como la camede ave.
3. Despu6sde cuatrosegundos,el horno comenzar_a funcionar.
o 'BROIL'continuar_ iIuminado.
4. Para un dorado 6ptimo,precaliente e!elemento de asara la
parriJJadurante3 a 4 minutos antes de co[ocareJaJJmento.
5. Co[oqueel alJmentoen el horno. Deje Japuerta abierta
apreximadamente10cm (cuatm puJgadas}(eJprimer tope).
6. D6vueJtaa Jacame una vez aproximadapaentea mJtadde Ja
cocci6n.
7. Cuandoel aiimento est6 cocinado,oprima JatecJa r/___,,,,o,)
'Cancer RetireeJaJimentoy Jaasaderade[ homo.
+ LahoradeJd[a voiver4a despJegarseen eJ
indicadorvisual
Notas Sebre Asade a Ja ParriHa:
o Paramejoresresultadoscuando asea JaparrJJJa,useuna
asaderadisefiadaparaasar a [a parriJia.
o Los tJemposde asara JaparriJJaaumentar4ny eJdorado ser4
m4scJarosi eJeJectrodopa6sticoes instaladoen un circuito de
208voItios.
o 'Hi' se usapara Jamayoffade los asadosa la parrilla. Use'LO
broil' cuando asea JaparrJJJaaJimentosque necesitancocci6n
proJongada.Latemperaturainferior permite queel aiimento se
cocine hastaquedar bienasadosin dorarsedemasJado.
+ Para carom}Jarmatemperatura demhomo duramltemaasar a
maparrimma,optima la tech 'Broil', luegooprima la tecIa A o V
paracambiarel ajustede asadoentre 'LO' (Bajo)y 'HI' (Alto).
o Los tiemposde asadoa la parr[IIapuedenser m_slargos
cuando se seIeccionala temperaturapa_sbajade asara la
parri[[a.
o La mayoffade los aNmentosdeben ser dadovue[tacuando est_
a mitad de[t[empo de asar,
o Parasugerenciasy temperaturasadicionaiessobre asara [a
parriIia,consuIteel foIIeto"La Cocina F_c[l".
Tab[a de Asar a [a Parr[Ha
ALIME@TGS
Came de Res
Biftec, 2,5 cpa (1")
Hamburguesas,1,9cm (3/4") degrosor
A medioasar
Bienasado
Bienasado
Came de Cerdo
Tocino
Chuietas,2,5 cm (1")
Rebanadade jamOn
Pos+c+om+mmPoAPPROx.TmmPOAPPROX.
6
6
6o7
6
G
6
PRIMER LADO
8 minutos
10minutos
9 minutos
6 - 10minutos
10- 11minutos
5 minutos
S£GUNDO LADO
7-12 minutos
8-14 minutos
6- 9 minutos
(no se d_ vue[ta)
12 - 14 minutos
3 - 7 minutos
Came de Ave 'LO Broil' 'LO Broil'
Mitades de pechugas 4 15minutos 15- 25 minutos
6
5
M;_riscos
Fi[etesde pescado,con mantequiiia,2,5cm (1") degrosor
Colasde [angosta,85-115g (3-4onzas)cada una
10 - 15 minutos
7 - 10 minutos
(no se d_ vue[ta)
(no se d_ vue[ta)
Nora: Estatabla es sO[ouna guia+Lostiempos puedenvariar con e(tipo de a[imentoque se est_cocinando+
72
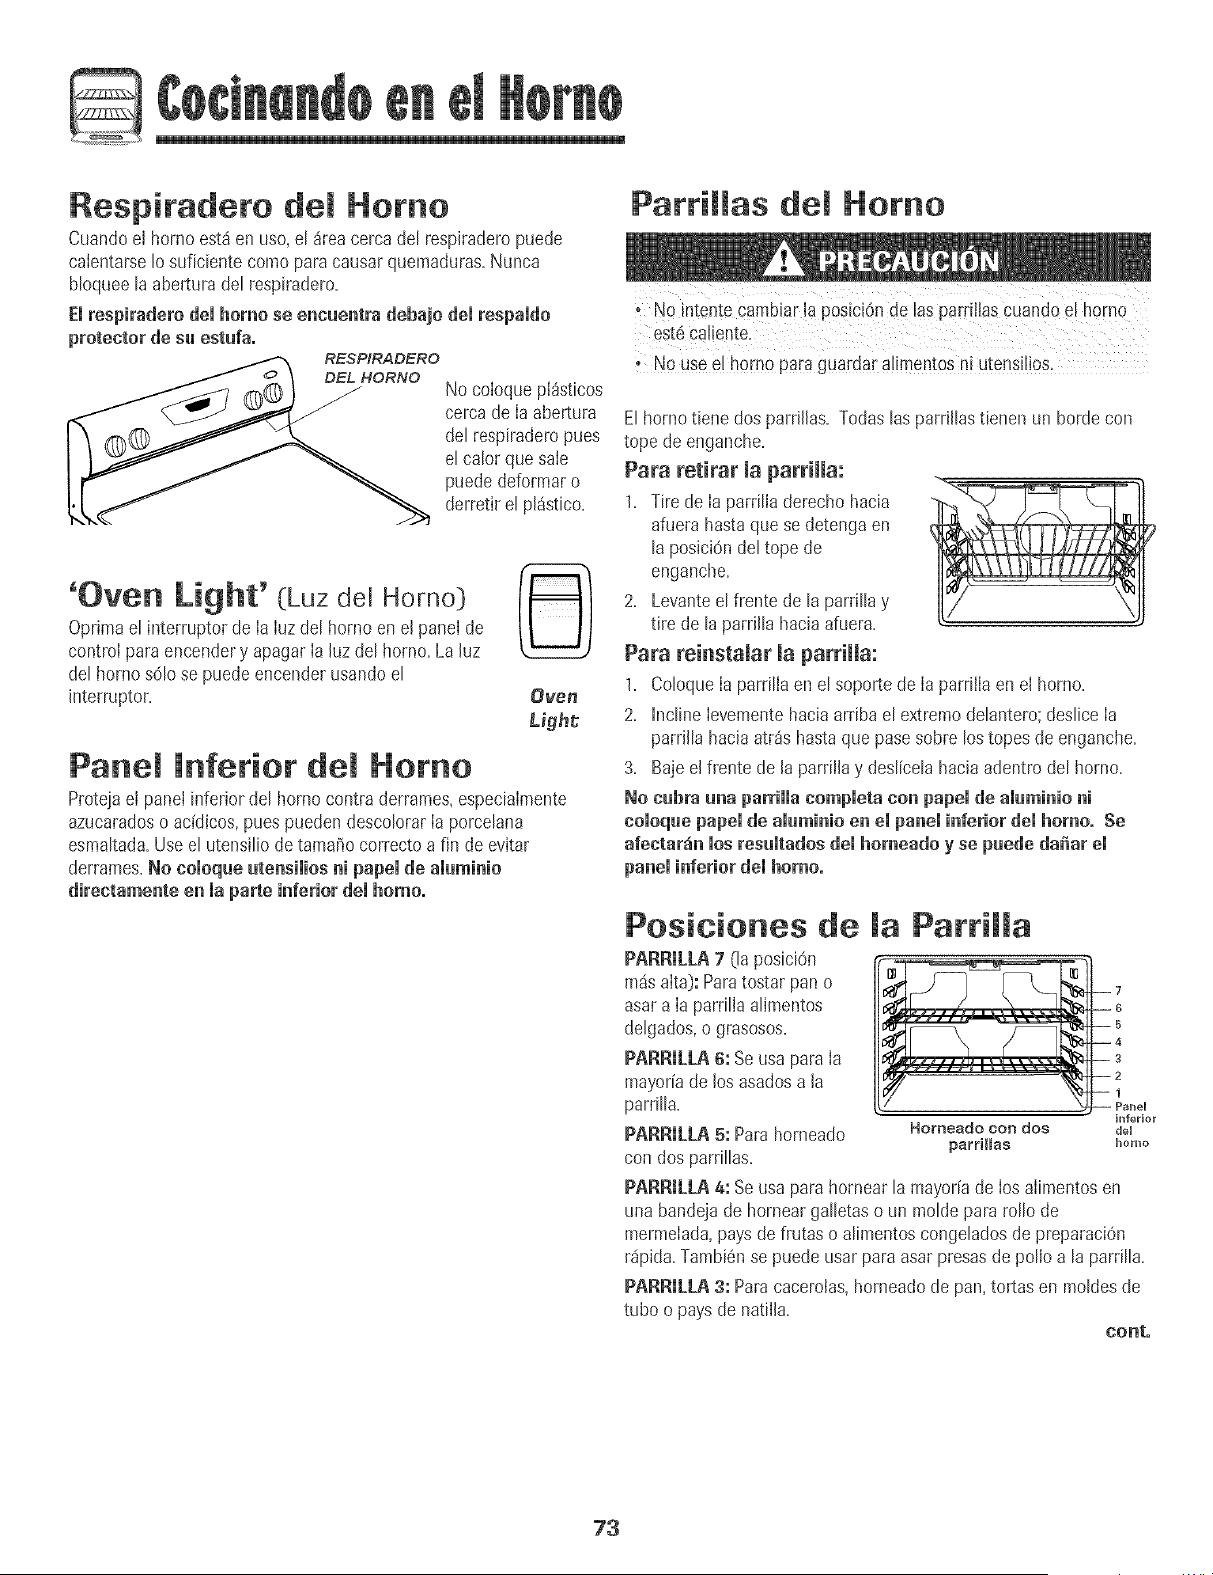
Respiradero de[ Homo
Cuandoel borneest_en use,el _reacerca de[ respiraderopuede
caientarse1osuficientecome paracausarquemaduras=Nunca
Noquee [a aberturade[ respiradero=
Emrespiradero demhomo se encuentra debajo demrespamdo
protector de su estufao
RESP/RADERO
No coloquepI_sticos
cercade [a abertura
del respiraderopues
el caIorque sale
puededeformar o
derretir el pi_stico=
'Oven Light' (Luz de[ Homo}Oprimae[ interrupter de [a [uzde[ borneen el panel de
centre[ paraencendery apagar la [uz del homo. La[uz
del homo s01ose puedeencenderusandoel
interrupter. Oven
Mght
Pane[ inferior de[ Homo
Proteiaei panei inferior del borne contraderrames,especiaimente
azucaradoso acidicos, puespueden descolorar[a porcelana
esmaItada.Use e[ utensiIiodetamaiio correcto a fin de evitar
derrames.No cemequeutensimiosni papnmde amuminie
directamente en la parte inferiordei home,
Parrimmas de[ Homo
t NOintentecambiar!a p0siciOnde [as parrfliascuando e[ homo
estdcaliente.
, NOusee[ homo para guardar a!!ment0s!!1utensilio&
E[hornotiene dos parrfl[as=Todas[asparri[[astienen un borde con
tope de enganche=
Para retirar [a parrimma:
1. Tire de la parri[iaderecho hacia
afuera hastaque se detengaen
[aposiciOnde[ tope de
enganche=
2= Levanteel frente de la parriIh y
tire de la parrflIahacia afuer&
Para reinstamar [a parriHa:
1= Coloque[a parriIIaen el soporte de [a parrilia en el homo.
2= hlcIine[evementehaciaarriba el extremedeIantero;desIice[a
parrflIahaciaatr_s hastaque pasesobre lostopes de enganche=
3= Bajeel frente de la parrfllay desIiceIahaciaadentro del homo.
No cabra aria parriiia cempmetacon papei de aiuminie ni
oomoqaepapemde aiuminio en el paneminferior demhome° Se
afectar_in mosresamtadosdemhomeade y se paede da_ar em
panel inferior dei homo°
Posiciones de [a Parrimma
PARR&LA7 [la posiciOn
m_isalta):Paratostar pano
asara [a parri[iaa[imentos
de[gados,o grasosos=
PARR[LLA_: Seusa para [a
mayoffade los asadosa [a
parri[[a=
PARR[LLA5: Parahorneado
con dos parri[[as=
Panel
inferior
Horneado con dos deu
parri[las homo
PARRtL[A 4: Se usa para hornear [a mayoffa de los alimentos en
una bandeja de hornear gaIIetas o un moIde para folio de
mermelada, pays de frutas o aIimentos congeIados de preparaciOn
rdpida. Tambi6n se puede usar para asar presas de polio a [a parriIIa.
PARRiL[A 3: Para cacemlas, homeado de pan, tortas en moIdes de
tubo o pays de natii[a.
conto
73
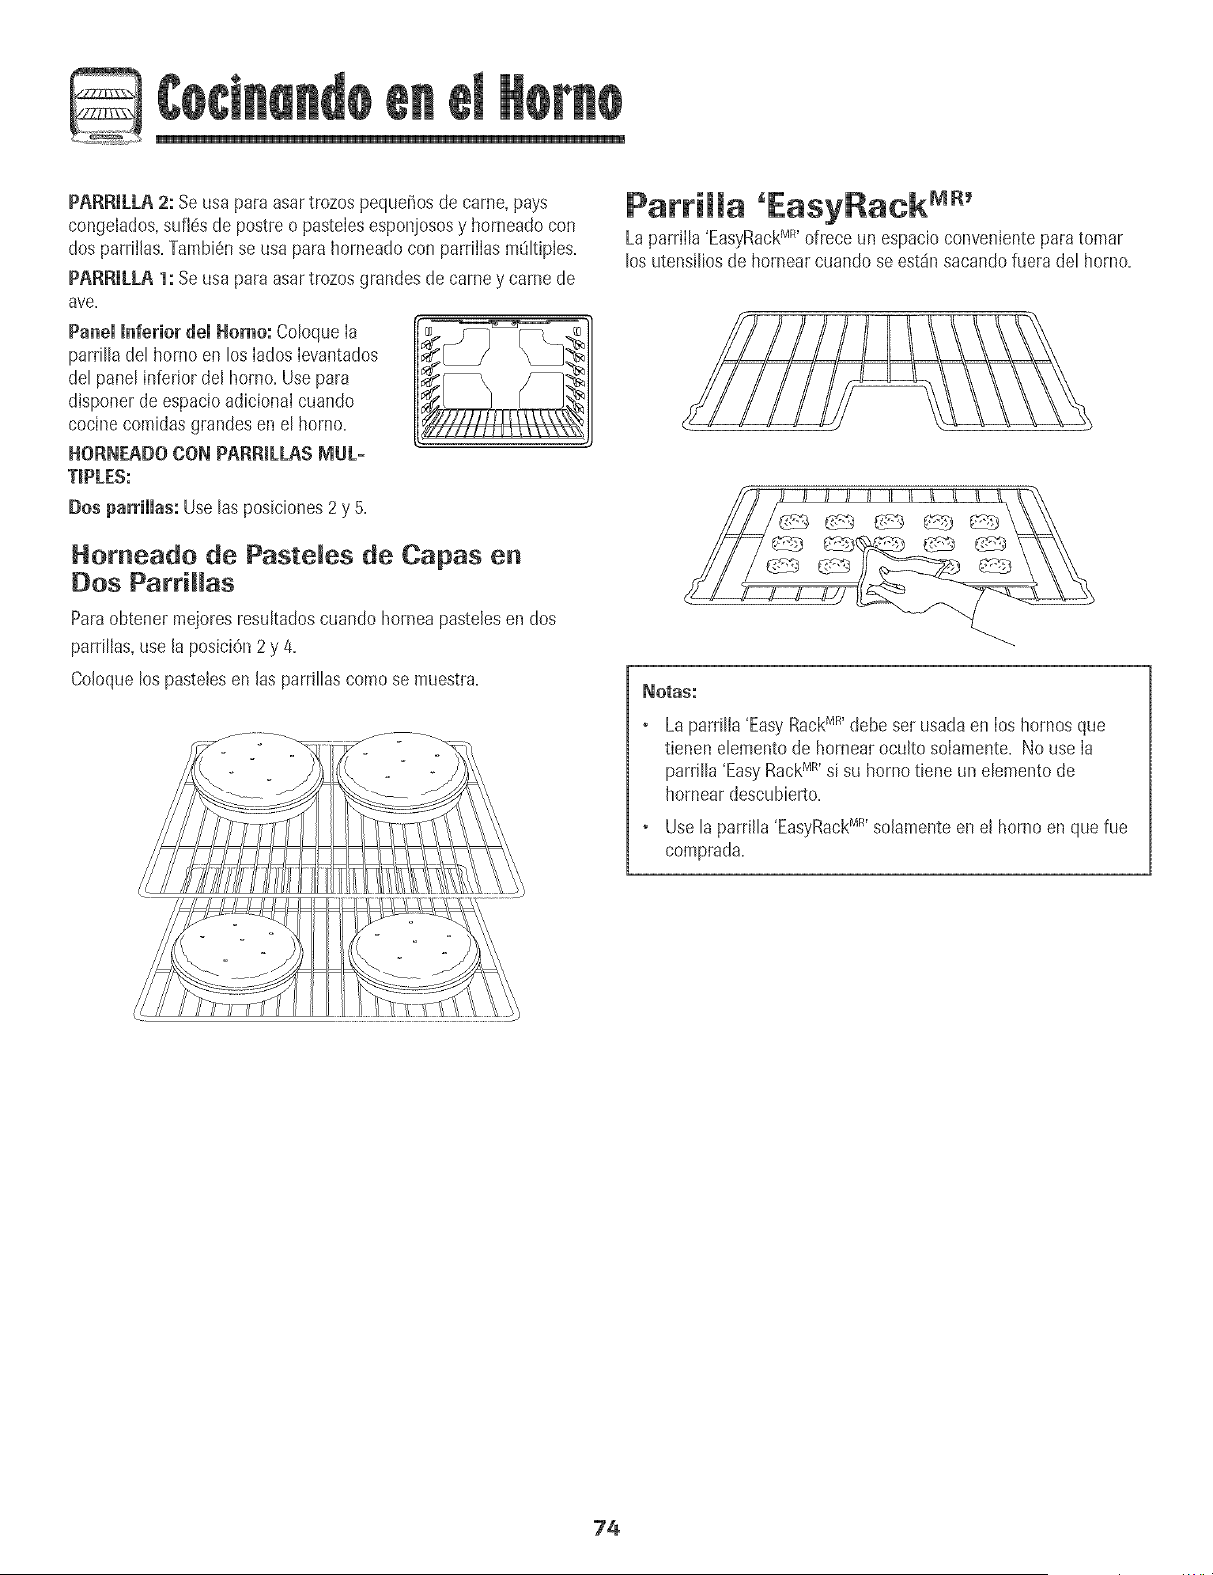
PARRtLLA 2: Seusa para asartrozos pequeriosde came,pays
congelados,sufl6s de postreo pasteIesesponjososy horneado con
dos parriilas.Tambi6nse usa parahorneadocon parrilIasmtiltipIes.
PARRILLA 1: Seusa para asartrozos grandesde came y came de
ave,
Panel Inferior del Homo: ColoqueIa
parrilB del homo en los IadosIevantados
del panelinferior del homo+Usepara
disponerde espacioadicional cuando
cocinecomidasgrandesen el homo+
HORNEADOCON PARRILLASMUL-
T+PLES:
Dos parrillas: Uselasposiciones2y 5.
Homeado de Pasteles de Capas en
Dos Parr+Has
Paraobtenei mejoresresultadoscuandohorneapastelesen dos
parrillas,use la posiciOn2 y 4.
Coloquelos pastelesen las parrillas como se muestra.
Parrilla 'EasyRack mR'
LaparriIla'EasyRackMR'ofrece un espacio convenienteparatomar
los utensiliosde hornear cuando seest_nsacandofuera del homo+
I/T--I/ # l/ l/ II II II I/ // !/ /L_\
_OtaS,"
+ La parri[la'EasyRackMR'debe set usadaen [oshornosque
tienen elementode hornearoculto soiamente. No use [a
parrilla 'EasyRackMR'si su homo tiene un elemento de
horneardescubierto.
+ Usela parrilla 'EasyRackMR'so[amenteenel homo en querue
comprada.
?4
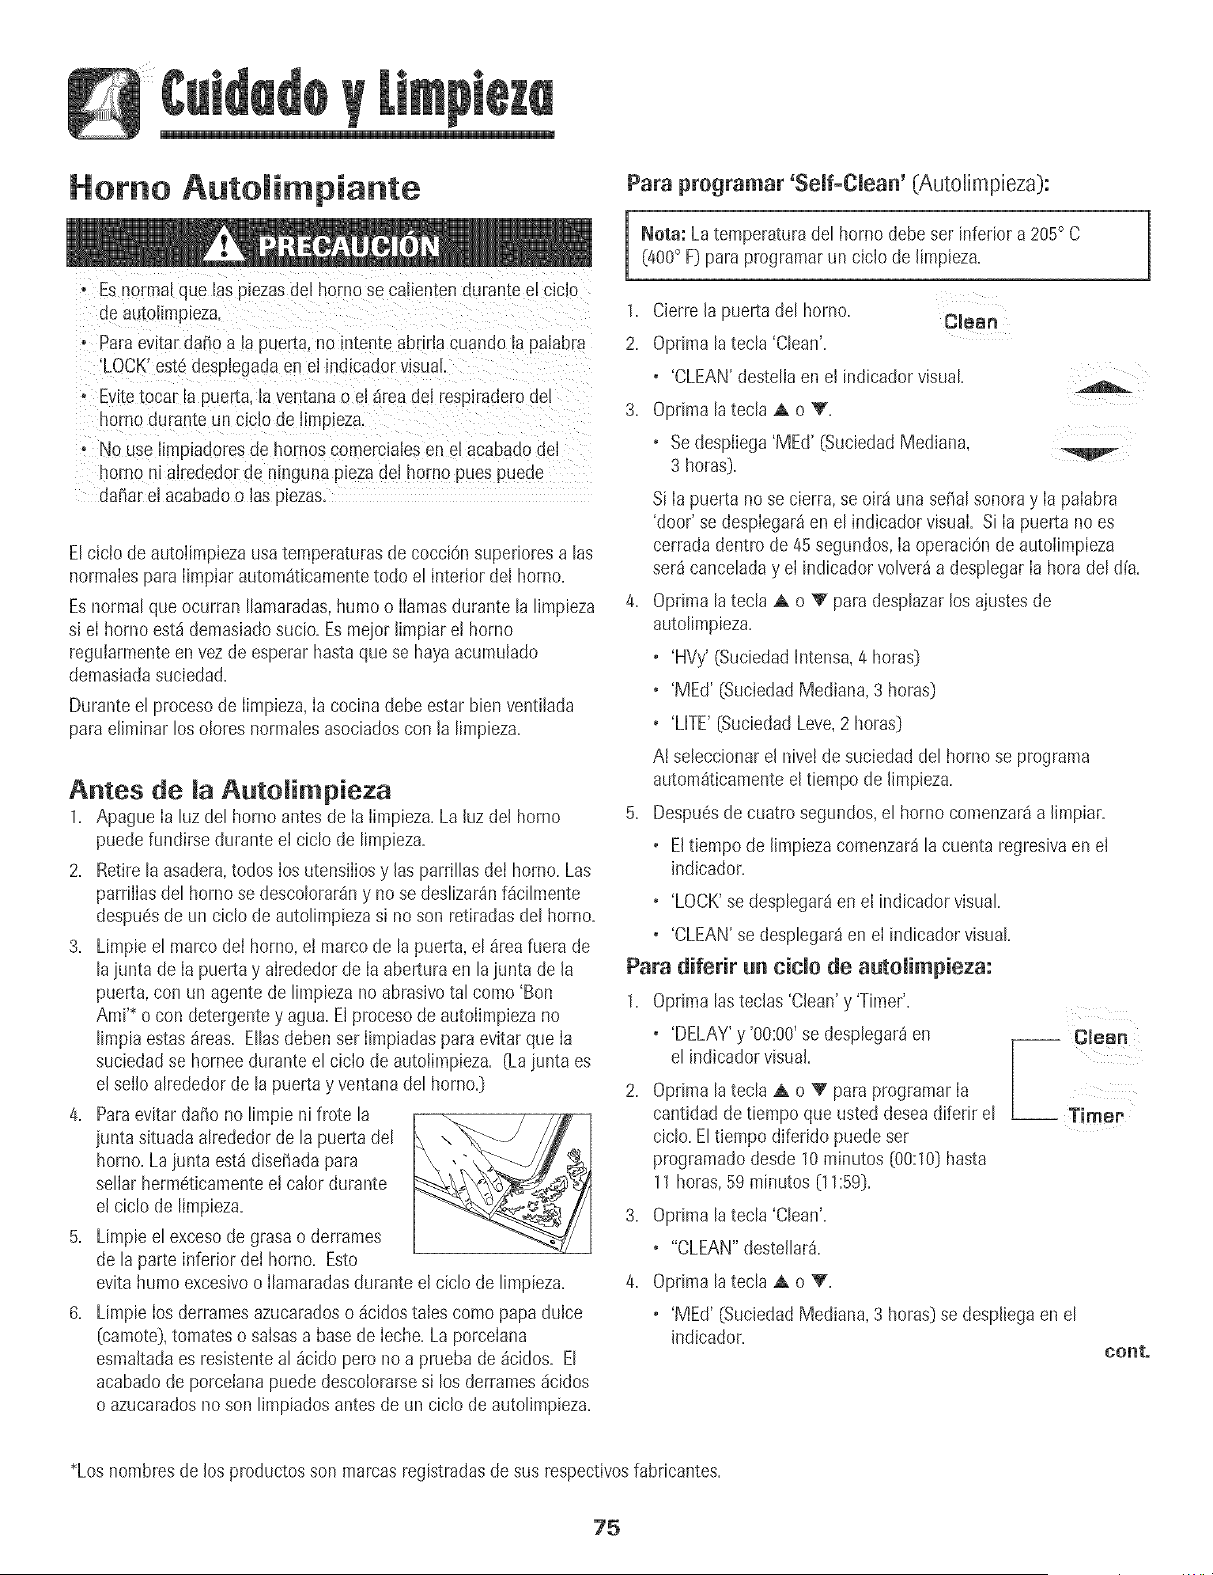
Homo Autolimpiante
, Esnormal que las p+ezasdel homo se calienten durameel ciclo
de autoiimpleza.
, _ara evitardai_}oa la puerta, no intenteab+r+acuando lapalabra
'LOCK'estddesplegadaen el indicadorvisual
, Evitetocar la 3uerta.laventanao e+area del resp+raderod6
homo duranteun c+clode limp+eza.
, No use limgiadoresde homos comercialesen el acabadodel
homo nLa+rededorde ninguna pLezade+homo puespueue
da_ar elacabadoo las p_ezas.
Elcicio de autolimpiezausa temperaturasde cocciOnsuperioresa Bs
normaIesparaIimpiarautom_ticamentetodo el interior del homo+
Es normalque ocurran Ilamaradas,humo o IIamasdurante la limpieza
si eI homo estd demasiadosucio. Esmejor limpiar e! homo
regularmenteen vezdeesperarhastaque se hayaacumulado
demasiadasuciedad.
Duranteel procesode Iimpieza,Ia cocina debe estar bien ventilada
para eliminarlos olores normalesasociadoscon la limpieza.
Antes de NaAutoN+mpieza
1. Apague ia luz del hornoantesde ia iimpieza.La hz del homo
puedefundirse durante el ciclo de limpieza.
2. Retire la asadera,todos ios utensiiiosy las parriIBs dei homo+Las
parriliasdel hornose descolorardny no se deslizar_nf_cilmente
despu@de un ciclo deautolimpiezasi no son retiradasdel homo+
3. Limpie el marcodel horno,e! marco de la puerta,el areafuera de
lajunta de la puertay alrededorde laabertura en la junta de la
puerta,con un agentede limpbza noabrasivotal como 'Bon
Ami'+o con detergentey agua.EIprocesode autoiimpiezano
limpia estasareas+Eliasdebenser iimpiadasparaevitarque ia
suciedadse horneedurante el cicio de autolimpieza. (Lajunta es
el sefloalrededorde la puertay ventanadel homo+}
4. Paraevitar dat_ono limpie ni frote la
junta situadaalrededorde la puerta del -,,
horno.Lajunta est_dis@ada para
sellar hermdticamenteel calor durante
el ciclo de limpieza.
5. Limpb elexcesode grasao derrames
de la parte inferior det horno. Esto
evitahumo excesivoo Ilamaradasdurante el ciclode limpieza.
6. Limpie Iosderramesazucaradoso dcidostales como papa dulce
[camote},tomateso salsasa basede Ieche.Laporcelana
esmaltadaes resistenteal _cido perono a pruebade _cidos. El
acabadode porcetanapuededescolorarsesi los derramesdcidos
o azucaradosno son limpiadosantesde un ciclo de autolimpieza.
Para programar 'Self-Clean' (Autolimpieza):
I Nora: La temperaturadel homo debe ser inferior a 205° C(400° F}para programarun ciclo de limpbza.
1, Cbrre [a puerta de[ homo.
Clean
2. Optima [atec[a 'Clean'.
+ 'CLEAN'desteliaen e[ [ndbador visual
3. Optima la tecla _&o V.
+ Sedespiiega'MEd' (Sucbdad Mediana,
3 horas}.
Si Ia puerta no se cierra,se oir_ una sepalsonoray Ia paIabra
'door' se despIegar_en el indicador visual Si Ia puerta no es
cerradadentro de 45 segundos,Ia operaciOnde autoiimpieza
ser_ canceladay eI indicadorvolver_a desplegarIa horadel dia.
4. Opnma latecla A o V para desplazarlos ajustesde
autolimpieza.
+ 'HVy' (Suciedadintensa,4 horas}
+ 'MEd' (SuciedadMediana,3 horas}
+ 'LiTE' {SuciedadLeve,2 horas}
A! seleccionarel nive!de suciedad del horno se programa
autom_ticamenteel tiempode limpieza.
5. Despudsde cuatro segundos,el homo comenzar_a limpiar.
+ Elt+empode limpbza comenzar_lacuenta regresivaen el
indicador.
+ 'LOCK'se desplegar_en el indicadorvisual
+ 'CLEAN'se desplegar_en eI indicador visual
Para diferir un ciclo de antoiimpieza:
1. Optima Bs teclas 'Clean'y 'Timer'+
+ 'DELAY'y '00:00'se desplegar_en
el [ndicadorvisual
2. Opnma latecla A o V pare programarIa
cantidadde tiempoque usteddeseadiferir el
ciclo. Eltbmpo difendo puedeser
programadodesde10minutos {00:10}hasta
11horas,59minutos {11:59}.
3. Oprima latecla 'Clean'.
+ "CLEAN"destellar_.
4. Optima la tecla _&o V.
• 'MEd' (SuciedadMediana,3 horas}se desplbga en el
indicador.
conto
+Loshombresde los productosson marcasregistradasdesus respectivosfabricantes.
75
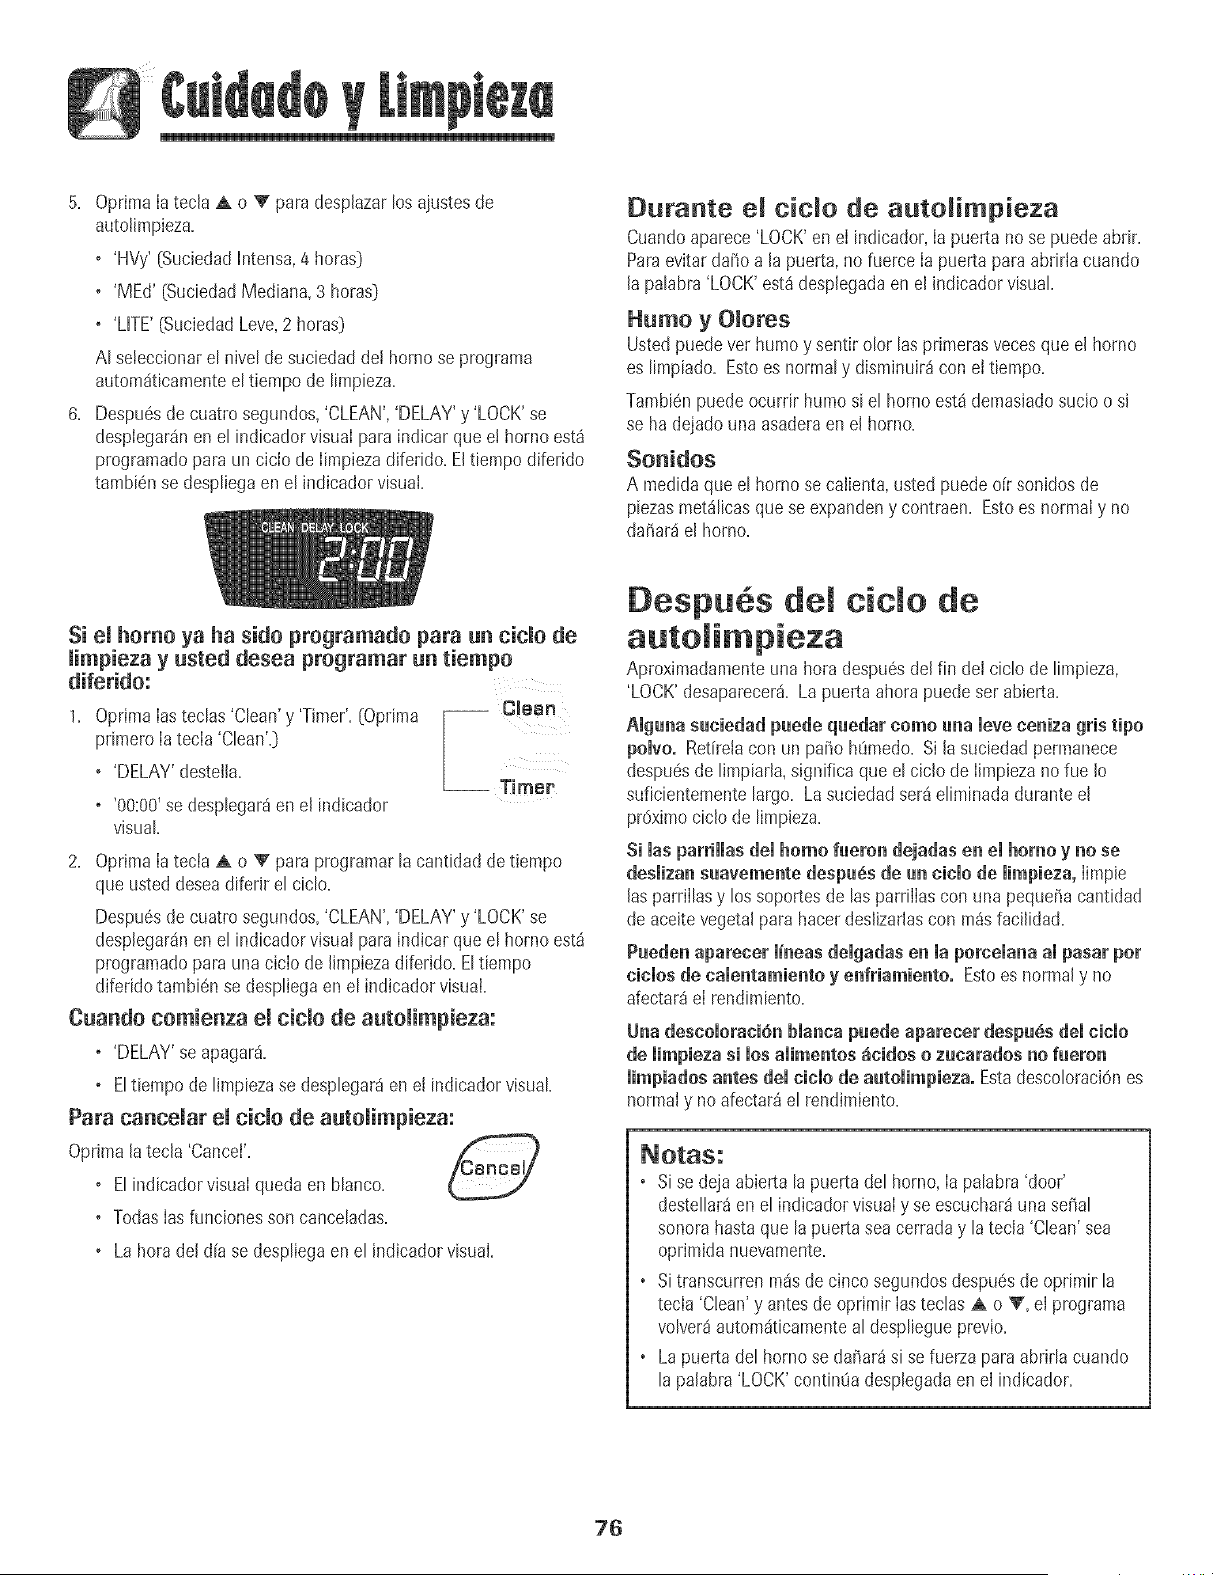
5+ Optima[atec[a A o V para desp[azarlosajustesde
autoJimpieza+
o 'HVy'[SuciedadHntensa,4 betas)
o 'MEd' [SuciedadMediana+3 horasD
o 'LHTE'(SuciedadLeve,2 betas)
At seleccionaret nivet de suciedadde[ homo se pragrama
autom_ticamenteet tiempo de timpieza+
6+ Despu6sde cuatro segundos,'CLEAN','DELAY'y 'LOCK'se
desplegar_nen e[ indicadorvisua[ paraind+carque e[ borneest_
programadopara un cic[o de [impiezadiferido+Eltiempo d+ferido
tambi6nse despliegaen e[ [ndicadorvisual
Durante e[ cic[o de auto[impieza
Cuandoaparece'LOCK'ene[ indicador,[a puerta no se puedeabrir+
Paraevitarda_oa [a puerta,no fuerce [a puertapara abrirlacuando
[a palabra'LOCK'est_ desp[egadaen el [rid+cadetvisual
Humo y Oiores
Ustedpuedever humoy sentir olor las primerasvecesque el homo
es limpiado+Estoes normaly disminuir_con el tiempo+
Tambienpuedeocurrir humosi el homo est_ demasiadosuc[oo si
se ha dejado una asaderaen el homo+
Sonidos
A medidaque el homo secalienta,usted puedeo[r sonidos de
piezasmet_[icasquese expandeny contraen+Estoes norma[y no
dahar_el homo+
Si e[ homo ya ha side programado para un cic[o de
[[mpieza y usted desea programar un tiempo
diferido:
1+ Optima [astec[as 'Clean'y 'Timer'+[Optima -- Cleon
'DELAY'destei[a+
o '00:00'se desp[egar_en e[ [nd[cador
visual
2. Oprima[atecia A o V para programarla cantidaddetiempo
que usteddeseadiferir el ciclo.
Despu6sde cuatro segundos,'CLEAN','DELAY'y 'LOCK'se
desp[egar_nen e[ indicadorvisual para indicar que el homo est_
programadopara unacic[o de [impiezadiferido.Eltiempo
d+feridotambien sedespliegaen el indicadorvisual
Cuando comienza el tide de autoiimpieza:
o 'DELAY'se apagar&
o Eltiempo de limpiezase desplegar_en et indicadorvisual
Para canceiar e[ cicio de autoiimpieza:
Oprima[a tec[a 'Cancel'. _+)
o Elindicadorvisua[quedaen blanco.
o Todas[asfuncionesson canceladas.
o Lahera de[d[a se despliegaen el ind+cadorvisual+
Despu s de[ cic[o de
automimpieza
Aproximadamenteunahera despu6sde[fin de[ ciclo de limpieza,
'LOCK'desaparecer& Lapuerta ahora puede set abierta+
Amgunasuciedad puede quedar come aria mereconizagris ripe
pomvo.Retiretacon un paso h_medo+Si la suciedadpermanece
despu6sde limpiar[a,significa que el cic[ode [[mp[ezano fue [o
suficientemente[argo. Lasuciedadser_e[iminada durantee[
pr6ximocic[o de limp[eza+
si masparrimmasdemhomo faeron dejadasen emhomo y no se
desmizansaavemente despa_s de an c+cmode mimpieza,[imp[e
[asparriilasy los soportesde lasparrilias con una peque_acantidad
de ace[tevegetalpara hacerdesl[zarlascon m_s facilidad+
Pueden aparecer m+neasdemgadason maporcemanaampasar per
cicmosde camentamientoy enfriamiento. Estoes normaly no
afectar_e[ rendimiento+
Una descomomc+6nbma_capuede aparecer despuSs _emc_cmo
do mimpiezaa[ mosamime_tos_cMos o zucarados _o fueron
mimpiadosa_tes _emcicmede autemimpieza.Estadescolorac[Ones
normaly no afectar_el rendimiento+
o Si se deja abierta la puertadel borne,[a palabra 'door'
destellar_enel indicadorvisua[y se escuchar_una se5al
sonora hastaque [apuerta seacerraday la tec[a'Clean'sea
oprimidanuevamente+
o Si transcurrenm_sde cincosegundosdespu6sde opdmir la
tecia 'Clean'y antesde opr+mir[asteclas A o V, e[ programa
volver_autom_ticamenteal despliegueprevio+
o Lapuerta del borne se da_ar_si se fuerza para abrirla cuando
la pa[abra'LOCK'continua desp[egadaen e[ indicador+
?6
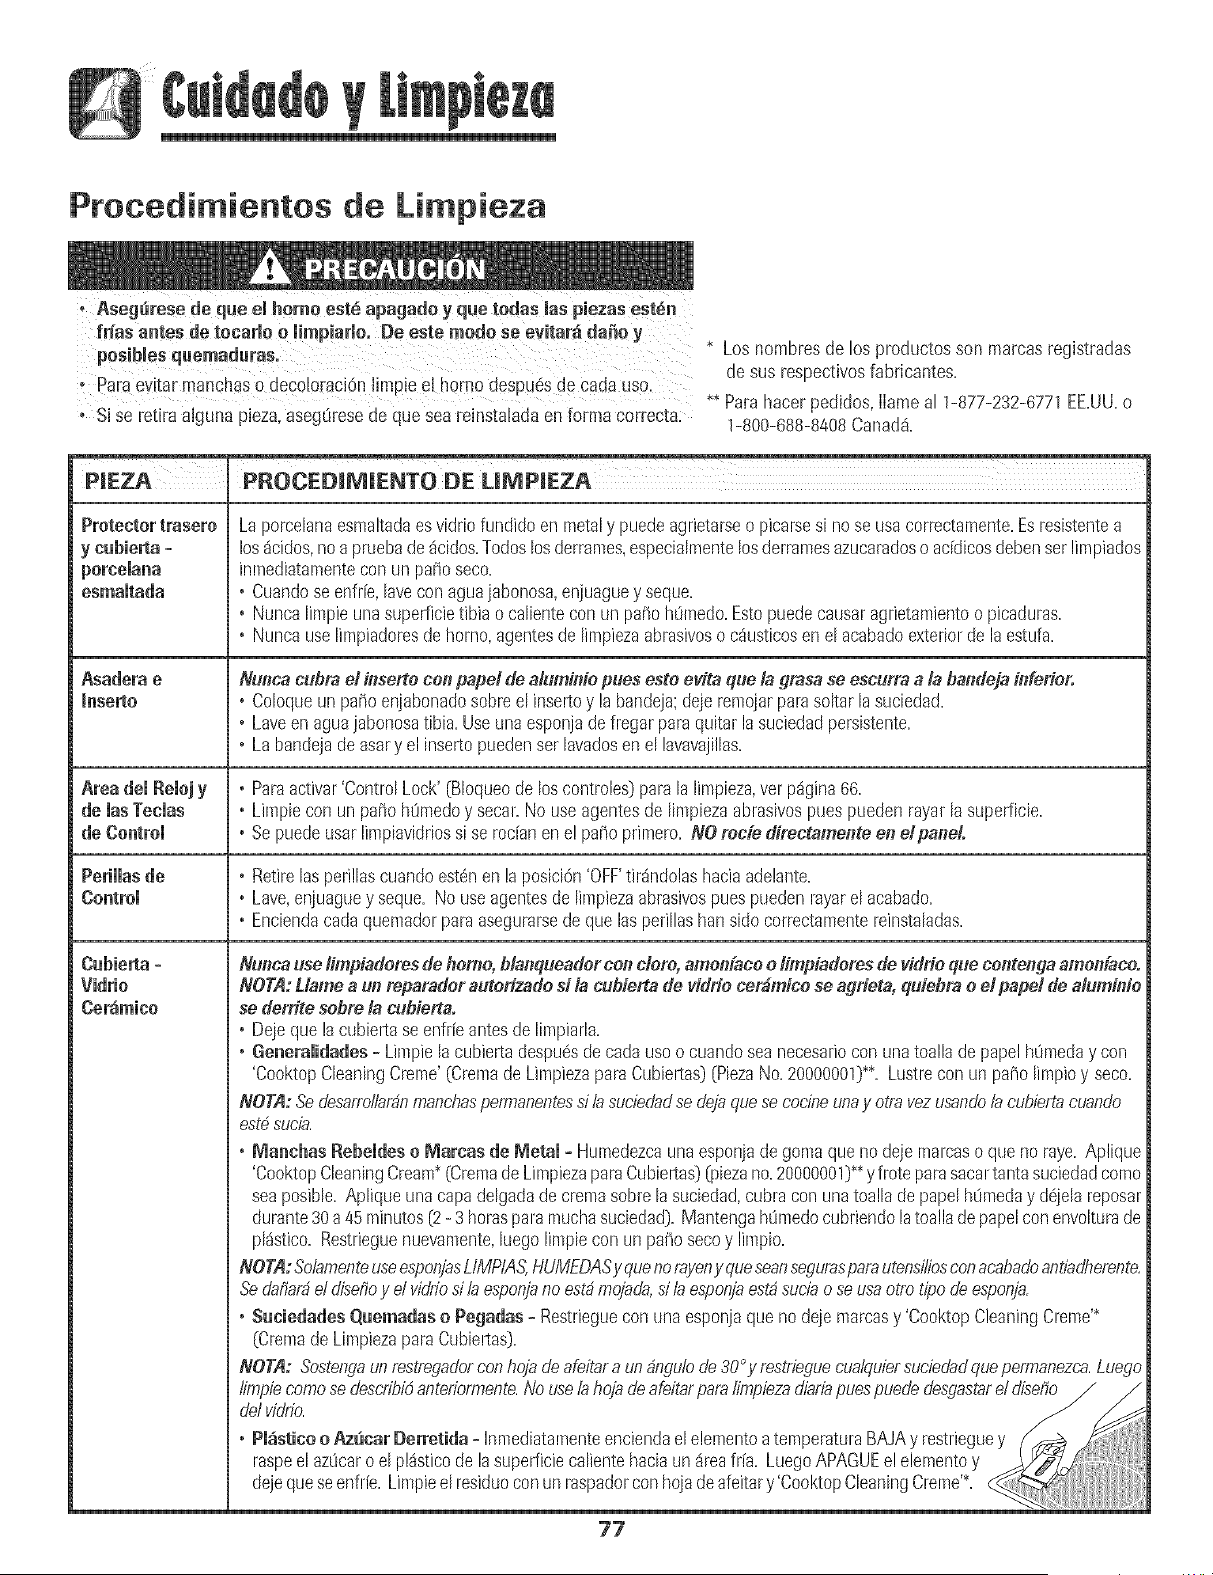
Procedi ientos de Limpieza
Ases resedes.e elhomo spas.doyq.etodaslaspie=aseSt n
fr_asantes de tecarie o limp!ario. De este mode se evitar_ da_e y
* Losnombresde los productosson marcasresistradas
desus respectivosfabricantes=
Parsevitar manchaso decolotaciOnJirnpieel homo desPuesde Cads_Js0.
** Parshscer pedidos,IIsmeal 1-877-232-6771EEULI=o
, Si se retira aJgunapieza,aseg_resede que sea reinstaladaenforrna correcta: 1-800-688-8408Canad&
PmEZA P.OCED M E.TODEUMPmEZA
Protector trasero
esmaitada
Asadera e
Inserts
Area del Relnj y
de lasTecias
de Cnntrol
Cnbie_ta=
Vidrie
Ce_micn
Ls porcelansesrnaltsdses vidriofundidoenmetaly puedeagrietarseo picarsesi no seusacorrectamente=Esresistentes
los_cidos,nos pruebsde_cidos=Todoslosderrsmes,especislmentelosderrsmesszucsradoso addicosdebensetlimpiados
inmedistamenteconun paiio seco=
° Cuandose enfr[e,lavecon sguajsbonoss,enjusguey seque=
° NuncsIimpieunasuperficietibia o calientecon un pa5ohOmedo=Estopuedecausaragrietsmientoo picaduras=
° NuncsuseIimpiadoresde homo, sgentesdeIimpiezaabrasiveso c_usticosen el acabsdoexteriorde la estufa=
Nlmca cubm el &serto con papal de a/umioie puns esto evita que la ymsa se escurra a & baadeja &ferio_
• Coloqueun paiioenjabonadosobreelinsertsy la bandeja;dejeremojarparssokarlasuciedsd=
• Laveenagusjabonosatibia=Useuns esponjsdefregsr parsquitar Issuciedadpersistente=
• La bandejade sssry el insertspuedensetIsvsdosen el !svsvsjillss=
• Parsactivar'ControlLock' [BIoqueode loscontroles}pars la limpieza,vet p_gina66.
, Limpiecon un paiiohOmedoy secsr=No useagentesde limpiezsabrasivespuespuedenrayarIssuperficie=
, Sepuedeussrlimpisvidriossi se redanene! paiio primero. NO mcie directamenta ea dpand.
• Retirelasperillsscuandoest_nenlaposici6n'OFF'tir_ndo!ashaciaadelante.
, Lave,enjuaguey seque.No useagentesde limpiezaabrasivespunspuedenrsysrelacsbsdo.
, Enciendscadsquemsdorpars asegursrsedeque Issperillashartside correctsmentereinstslsdss.
Nwlca use limpiaderes dehomo, blaaqueadorcon dote, amol_[acoetimpiadoms de vidde que conteogaamonface.
NOTA:Uame a ua reparader auterizade si la cuhierta de ddde cot#mice se adders, quiehra o e/ papel de ahHninio
se derrite sebm ]a cebiertao
• Dejeque !s cubiertsseenflie antesdelimpiarls=
° Generalidades - Limpielacubiertadespu6sdecadsuseo cusndoseanecesariocon unatoalls de papelhOmedsy con
'CooktopCleaningCreme'(Cremsde LimpiezaparsCubiertss}[PiezsNo.20000001}**.Lustrecon un patiolimpioy seco.
NOTA:Sedesa,,ro_;_ardnmanchaspermanentesd b sudedadse dejasuese cocineunay otravezusando/acublertacuando
est_ social.
• Ma_chas Rebeldes n l_aroas de Metal - Humedezcsunaesponjsde gemsqueno dejemalcaso que no rsye=Aplique
'CooktopCleaningCream*(CremadeLimpiezapsraCubie_tss}($}iezano=20000001}'*yfroteparssscartants suciedadcome
seaposible=Aplique unscapsdelgsdadecremssobrela suciedsd,cubracon unatoalh depapel hOmedsy d6jelsreposar
dursnte30a45minutes[2- 3 betasparsmuchssuciedad}=MantengahOmedocubriendolatoallsdepspelconenvolturade
pl_stico=Restrieguenuevsmente,luegolimpieconun patiosecoy limpio=
NOTA:So,,'amenteuseesponjasLIMPIAS,HUMEDASysuenorayony sueseansegurasparsutensWiosconacabadoantiadherenta
Sedaflar_d disefioy d vidriod b esponjanoest_mojada,sita esponjaest_suds o seusaotto ripede espot_;a.
• Sncie_a_es Qnema_as o Pesa_as =Restriegueconuns esponjsque no deje msrcssy 'CooktopCleaningCreme'*
(OremsdeLimpiezaparsCubie!tsg.
NOTA: Sostengaunredresadorconhojade af_tar aun dng,uinde30°y restrieguecuatsuiersuciedadsuepermanezca.Lunge
77
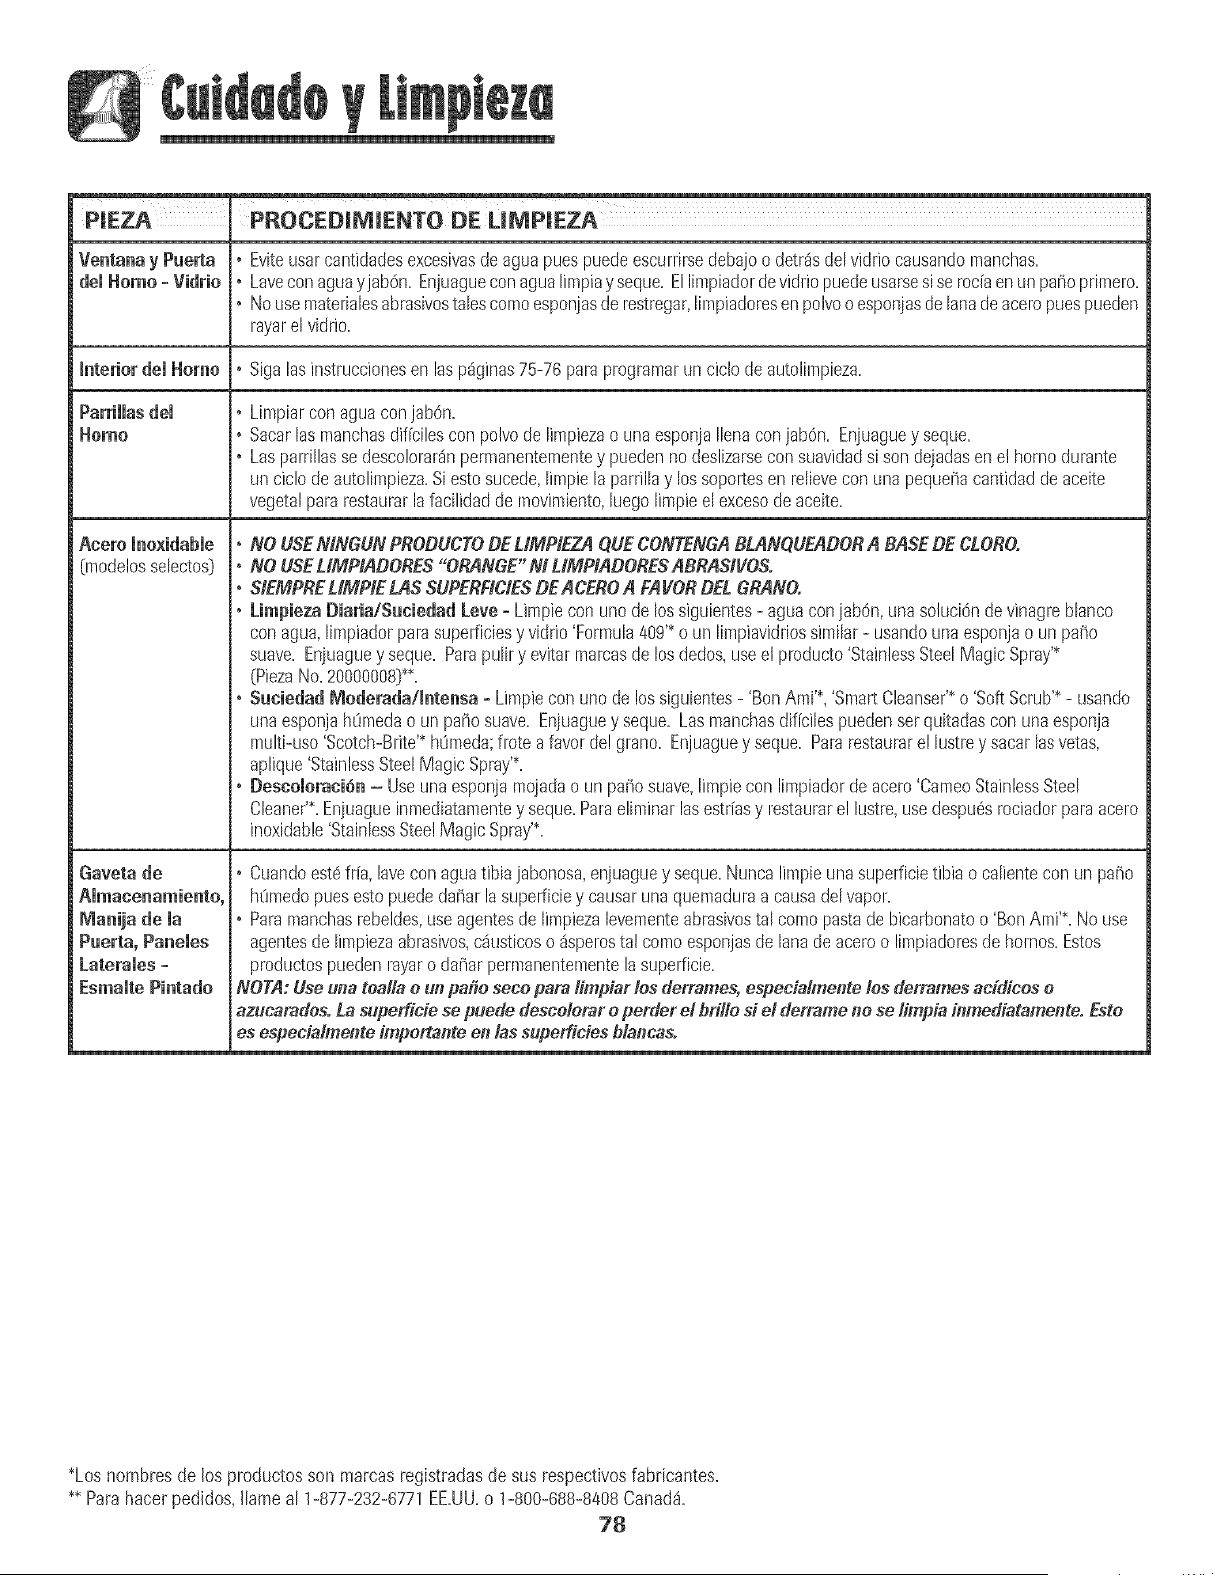
PJEZA I PROCEDIM_ENTO DE LIMPIEZA
• Eviteusarcantidadesexcesivasde aguapuespuedeescurrirsedebajoodetr_sdelvidriocausandomanchas.
del Homo - Vidrio ° Laveconaguayjab6n. Enjuagueconagualimpiay seque.Ellimpiadordevidriopuedeusarsesiseroc[aenunpaNoprimero.
,° Nousematerialesabrasivostalescomoesponjasde restregar,limpiadoresenpolvooesponjasdelanadeaceropuespueden
rayarelvidrio.
Interior del Home ° Sigalasinstruccionesen lasp_ginas75-76 parsprogramarun ciclodeautolimpieza.
Parrillasdel • Limpiarcon aguaconjab0n.
Homo ,, Sacarlasmanchasdiffcilescon polvode limpiezao unaesponjaliensconjab6n. Enjuaguey seque.
,° Lasparrillasse desco!orar_npermanentementey puedenno deslizarsecon suavidadsi son dejadasene! homodurante
uncic!ode autolimpieza.Siestosucede,Iimpiela parrillay lossoportesen relieveconunapequeiiacantidaddeaceite
vegetalparsrestaurarlafacilidadde movimiento,luegoIimpieelexcesode aceite.
Acero lnexidabie
[modelosseleetos)
Gaveta de
Manila de ma
Puerta, Panemes
Laterames-
Esmaite Pintado
j. NO USENINGUNPRODUCTODEMMPIEZA QUECONTENGABLANQUEADORA BASEDE CLORO.
° NO USEMMPIADORES"ORANGE"NI LIMHADORESABRASIVOSo
,, StEMPRELIMFIE LAS SUPERFICIESDEACEROA FAVORDELGRANOo
,, Limpieza Diaria/Suciedad Love =Limpiecon uno de lossiguientes- aguaconjab0n,unasoluciOndevinagrebhnco
conagua,limpiadorparssuperficiesy viddo'Formula409'_oun limpiavidriossimilar- usandouna esponjaoun pai_o
suave. Enjuaguey seque. Parspuliry evitarmamasde losdodos,useel producto'StainlessSteelMagicSpray'_
(PiezaNo.20OOOOO8)_*.
,° Suciedad Moderada/Intensa - Limpiecon uric delossiguientes- 'BonAmi'*,'SmartCleanser'_o 'SoftScrub'" - usando
unaesponjah0medaoun pasosuave.Enjuaguey seque.Lasmanchasdificilespuedenserquitadasconunaesponja
multi-uso'Scotch-Brite'_h0meda;frote afavordel grano. Enjuaguey seque.Parsrestaurarel lustrey sacarlasvetas,
aplique'StainlessSteelMagicSpray'S.
,° Descoloraci6n - Useunaesponjamojadaoun paiio suave,limpiecon limpiadorde acero'CameoStainlessSteel
Cleaner'S.Enjuagueinmediatamentey seque.Parseliminarlasestrfasy restaurarel lustre,usedespu_srociadorpars acero
inoxidable'StainlessSteelMagicSpray'S.
,, Cuandoest6frfa,laveconaguatibia jabonosa,enjuaguey seque=Nuncalimpieuna superficietibia o calientecon unpatio
hOmedopuesestopuededaiiar la superficiey causarunaquemaduraa causadelvapor.
,Para manchasrebeldes,useagentesde limpiezalevementeabrasivestal comopastade bicarbonatoo 'BonAmi'*.No use
agentesdeIimpiezaabrasivos,c_usticoso_sperostai comoesponjasde lanadeaceroo lirnpiadoresde homos.Estos
productospuedenrayaro daiiarperraanenteraentela superficie.
NOTA:Useona toal/a oun patio secopara fimpiar los derrames, especialmente los derrames ac(dicos o
azucarados.La supefficie se puede descotorar operder el britlosi el derrame no se limpia imnediatamente. Esto
es espeda/me_te importante en /assoperfides blar_caso
*Losnombresde lus productosson marcasregistradasde sus respectivosfabricantes.
** Parshacer pedidos,Ilameal 1-877-232-6771EEULI.o 1-800-688-8408Canada.
78

Puerta del Homo
No Co!oque Peso excesivo ni se pare en la puerta de[ horn0, Esto
pedda hacer vo[car [a estuf& quebrar la puerta 0 [esJonara[
usuarJo.
Nora: La puerta de[ homo en unaestufa nuevapuede sentirse
"esponjosa"cuando se cierra. Estoes normaly disminuir4con e[
USO.
Ventana del Homo
Para proteger [a ventana de [a pueHa de[ homo:
1. No use agentesde Hmpiezaabrasivostabs comoesponjasde
restregarde lanade aceroo Hmpiadoresen polvo pues eHos
puedenrayarelvidrio.
2. No goipeeel vJddocon ollas, sartenes,muebies,juguetes u otros
obietos.
3. No cierre la puertadel homo hastaque [asparrJilasdel homo no
estenen su lugar.
Ai goipear,rayar,hacervJbraro esforzarel vidrio puededebilitar su
estructuracausandoun mayorriesgode mtura en unafecha
posterior.
Gaveta de Almacenam
materiaiesinflamabiesen esta gavet& La gaveta puede
calentarsedemasiadoparaestosarticulos cuando se est4 usando
e[ homo.
La gavetade aimacenamientopuedeset retiradaparaque usted
pueda[impiar debaiode [a estufa.
Para sacar :
1. Vade [a gavetay des[icelahaciaafuera hasta[a primeraposiciOn
tope.
2. Levante[aparte deIanterade [a gavet&
3. Tireia hasta[asegundaposbi6n de tope.
4. Sujete los [adosy [evante[a gavetapara retirar[a.
Para voiver a co[ocar:
1. Insertelos extremosde [ascorrederasde [a gavetaen los rie[es
de [a estufa.
2. LevanteIa partedeiantela de [a gavetay suavementeempt_jeiaa
laprimera posici6n de tope.
3. Levante[agaveta nuevamentey empOjelahasta que quede
compietamentecerrada.
Torrdiios Niveiadores
Venfique si e!Sop0rteantk,'ueJcoest,1asegurandoa! pJsouno de
los t0mi!!0SniveladoEestraser0s. Esteseporteevita que B estufa
Sevueique accidenta!mente,
Laestufa debeset niveladacuandose instai& Si [a I_//
estufa noest_ nivelada,gire los torniIIosniveIadores III I _]
de pi4sticoubicadosencada esquinade [a estufa
_\ ANTIVUELCO
TORNILLO NIVELADOR
Luz de[ Homo
° Desconecte[a energiaeJ@tricahacJa[a estutaantes de
reempIazare[ foco.
o Dejeque e[ homo se enfrie aptes ae reempiazare[foco.
• AsegOresede que [a cubiertade[ foco y el foco est6nfrios
antesde tocarios.
Para reemplazar el foco de[ homo:
1. Cuandoel homo este fifo. s_/e[e a [apa ae [a bombii[aensu
[ugar,[uegodes[icee[ retch de alambrefuera de [acubbrta.
NOTA: Lacubiertade [a bombilia se caerasi noes sujeta en su
[ugarcuando est_sacandoe[ ret6n de aiambre.
2. Saque [a cubiertade[foco y e[foco.
CUBIERTA DE
3. Co[oqueun foco de 40 watts para L4SOMB/LLA
e[ectrodom6sticos.
4. Vueivaa colocar [a cubierta
de [a bombiliay asegOreia
con el ret@ dealambre.
5. Vue[vaa enchufar [a estufa. _ RETFNDEALAMBRE
WJeivaa colocar la hora
correct&
79
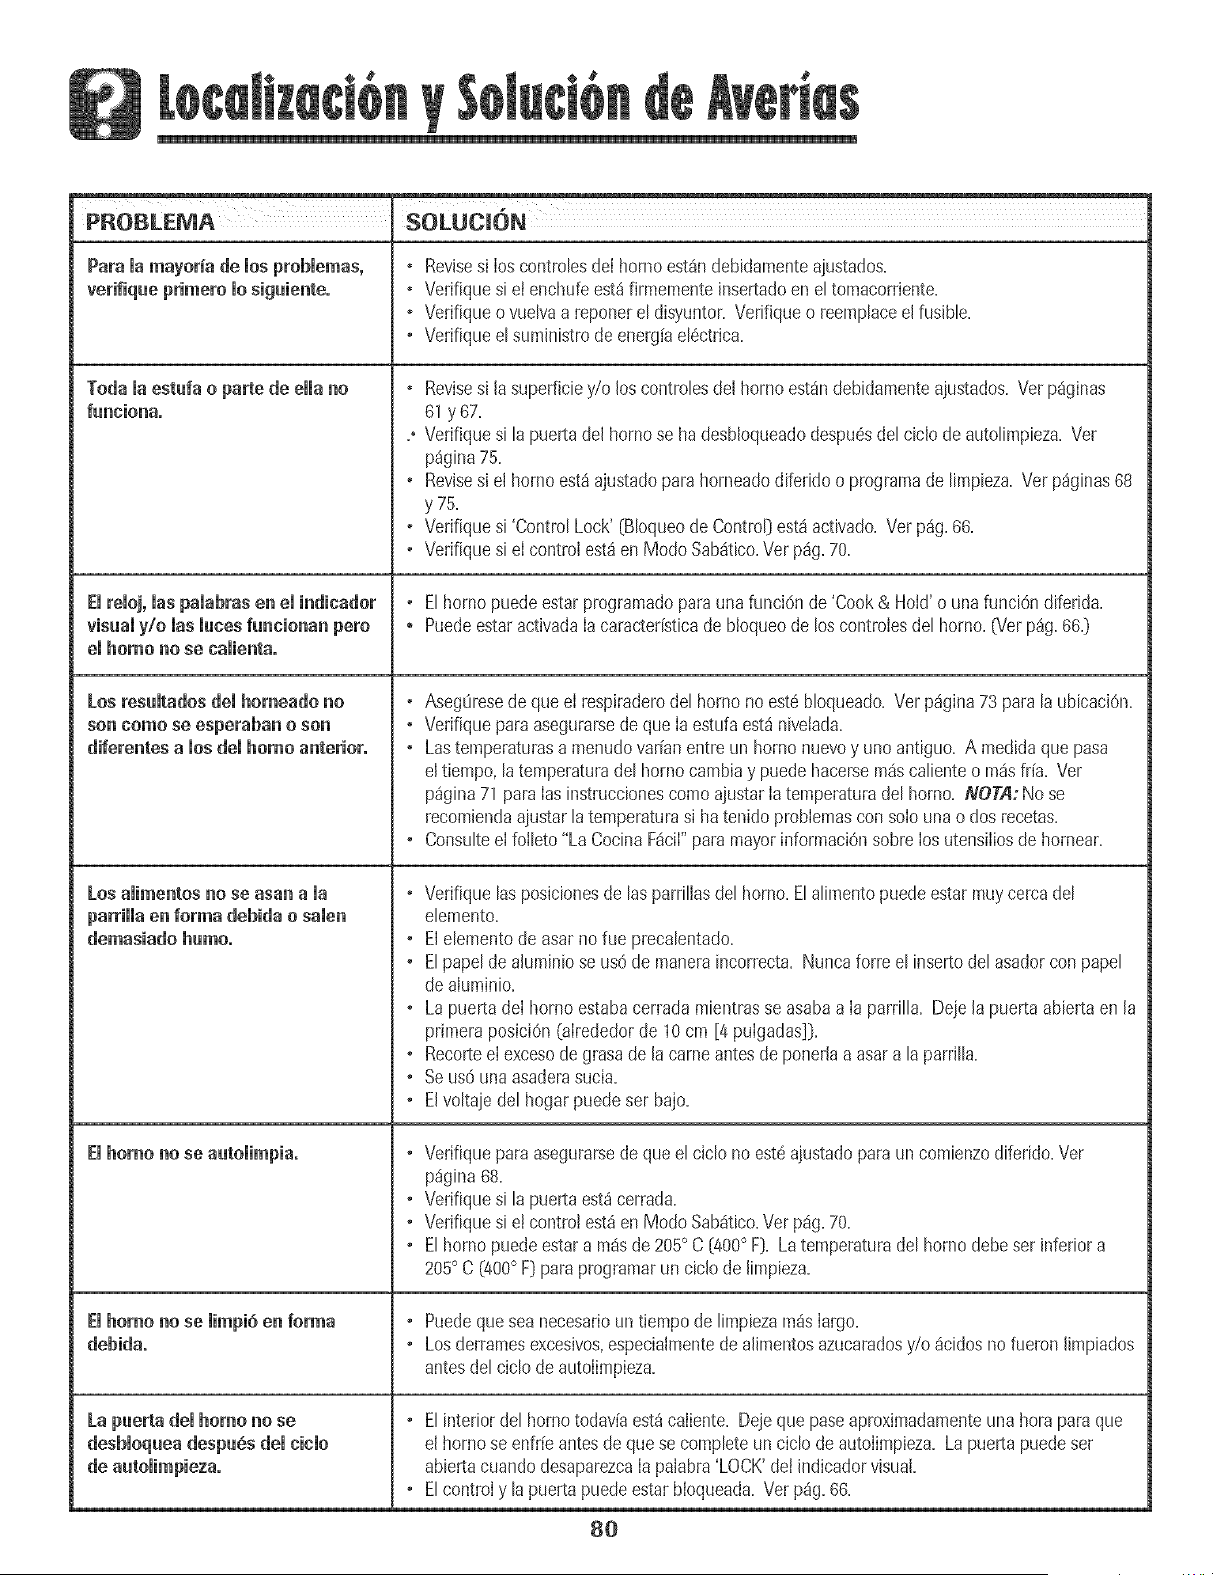
PROBLEMA' SOWC 6N
Para mamayor_a de mosprobmemas, • Revisesi Ioscontrolesdei homo est_ndebidamenteajustados.
verifiqae primero mosigaienteo • Verifiquesi etenchufeest_ firalementeinsertadoen eltomacorriente.
o Verifiqueo vuelvaa reponerel disyuntor. Verifiqueo reemphceel fusible.
• Verifiqueel suministrodeenerg[ael6ctrica.
Toda la estufa o parte de ella no •
faacioaa.
El reioj, ias paiabras en el indieador
visaamy/o masmacesfancionan pete
el homo no se caiienta,
Losresamtadosdemhomeado no
son como se esperaban o son
diferentes a mosdemhomo anterior.
Los aiimentos no se asan a ia
parrimmaen forma debida o samen
demasiado hamo.
Emhomono seaatomimpia.
Emhomono se mimpi6enforma
debida°
La paerta demhomo no se
desbmoqaeadespa6s demeiemo
Revisesi lasuperficiey/o loscontmlesdel homo estandebidamenteajustados.Vet p_ginas
61y 67.
Verifiquesi lapuertadel horno se hadesbloqueadodespu6sdelciclo deautolimpieza.Vet
p_gina75.
Revisesi el homo esta ajustadopara horneadodiferidoo programade limpieza.Ver p_ginas68
y 75.
Verifiquesi 'ControlLock' (BIoqueode Control[est_activado.Vet p_g.66.
Verifiquesi eIcontrolest_en Modo Sab_tico.Verp_g.70.
Elhornopuedeestarprogramadoparauna funci6nde'Cook& Hold'o unafunci6ndiferida.
PuedeestaractivadaIa caracterFsticade bloqueode loscontroiesdel horno.(Ver p_g.66.]
• AsegOresede que el respiraderodel homo no est6 bloqueado.Ver p_gina73 paralaubicaciOn.
• Verifiqueparaasegurarsede queIa estufaest_ nivetada.
• Lastemperaturasa menudovar[anentreun horno nuevoy uno antiguo. A medidaque pasa
eItiempo, la temperaturadel homo cambiay puedehacersem_scalienteo m_sif[a. Ver
pagina71 paraIasinstmccionescomo ajustarIatemperaturadel horno. NOTA:No se
recomiendaajustarla temperaturasi ha tenido problemascon solouna o dos recetas.
• Consulteel folleto"LaCocinaF_ciI"paramayorinformaciOnsobrelos utensiliosde hornear.
• Verifiquelasposicionesde las parrillasdel homo,Elalimentopuedeestarmuycemadel
elemento.
• El elementode asar nofue precalentado.
• El papel de aluminiose us6de maneraincorrecta. Nuncaforre el insertodel asadorcon papel
de aiuminio.
• La puertadeI homo estabacerradamientrasse asabaa Ia parrilla. Dejela puerta abiertaen la
primera posici6n{aIrededorde 10cm [4 puIgadas]}.
• RecorteeIexcesode grasade la carneantesde ponerlaa asara la parrilla.
• Se us6una asaderasucia.
• El voltaje del hogar puede ser bajo.
• Verifiqueparaasegurarsede queel ciclo noest6ajustadoparaun comienzodiferido.Ver
p_gina68.
• Verifiquesi lapuertaest_cerrada.
• Verifiquesi e!contro!est_enModo Sab_itico.Verp_g.70.
• El horno puede estara m_sde 205° C [400° F}. La temperaturadelhorno debe ser inferiora
205° C (400° F} para pmgramaran ciclo de limpieza.
Puedequeseanecesarioun tiempo de limpiezam_slargo.
Losderramesexcesivos,especialmentede alimentosazucaradosy/o _cidosno fueronlimpiados
antesdelciclode autoiimpieza.
• El interiordel homo todav[aest_caliente. Dejeque paseaproximadamenteuna horn pare que
el homo se enfr[eantesde que se completean ciclode autolimpieza.Lapuerta puedeset
abiertacuandodesaparezcaIapalabra'LOCK'detindicadorvisual.
• El control y la puertapuedeestar bioqueada.Ver p_g. 66.
8O
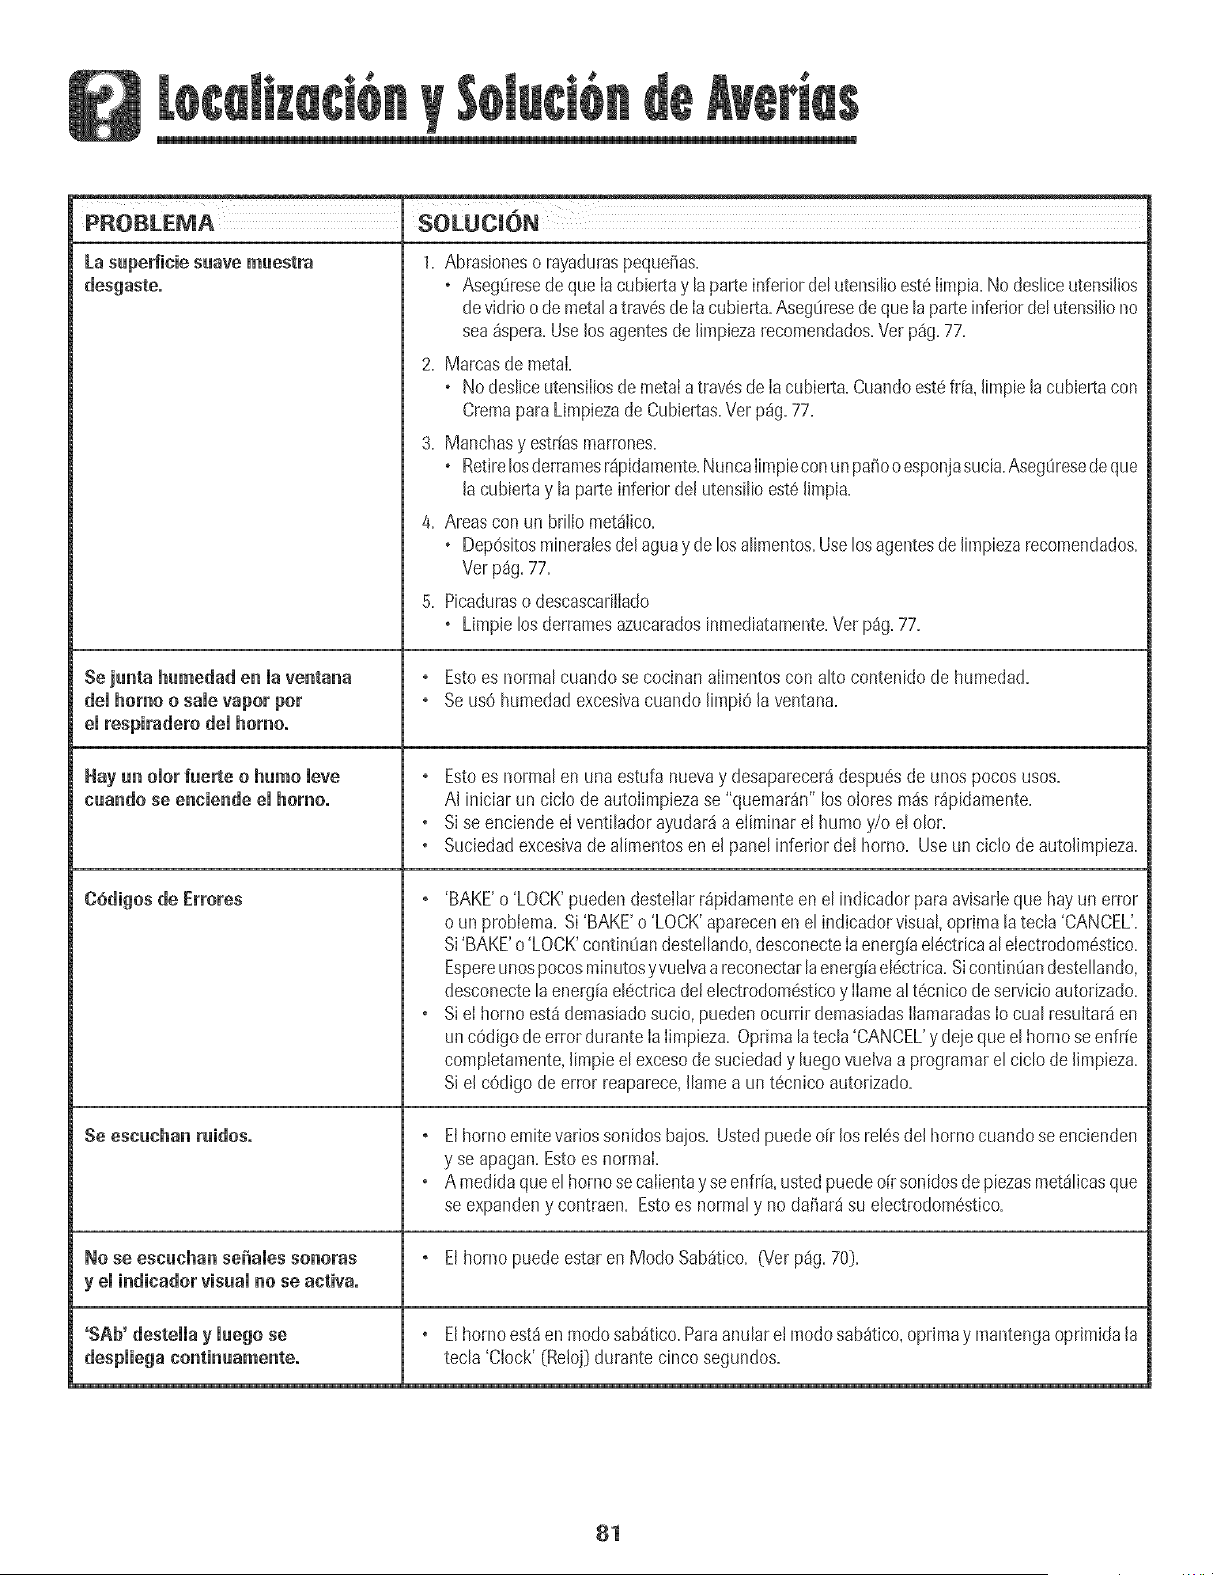
PP,OBLEMA SOLUCmON
La superficie suave muestm
desgaste.
Sejunta humedaden maventana
demhomo o samevaporpot
d respiraderodemhomo.
Hayunomorfuerte o humo mere
cuando se enciende emhomo°
CSdigos de Errores
Se escuchan ruidos.
1. Abmsioneso myadumspequei_as.
o Aseg_imsedeque Iacubiertay la parte inferiordelutensilioest6Iimpia.No desliceutensilios
devidrioo demetalatrav6sde Iacubierta.AsegOresedequelaparteinferiordelutensiliono
sea_spera.Uselosagentesdelimpiezarecomendados.Vet p_g.77.
2. Marcasde metal.
o No desliceutensiliosde metalatrav6sde Iacubierta.Cuandoest6fr[a,limpiela cubiertacon
CremaparaLimpiezadeCubiertas.Verp_g.77.
3. Manchasy estdasmarrones.
o RetirelosderramesrSpidamente.NuncaIimpieconunpdio oesponjasucia.AsegOresedeque
la cubiertay laparte inferiordel utensilioest6limpia.
4. Areascon un brillo met_lico.
o Dep6sitosmineralesdelaguay de losalimentos.Uselosagentesde limpiezarecomendados.
Ver p_g.77.
5. Picaduraso descascarilIado
o Limpielos derramesazucaradosinmediatamente.Vet p_g.77.
° Estoes normal cuandose cocinan alimentoscon alto contenidode humedad.
° Se us0 humedadexcesivacuando limpi6 la ventana.
° Estoes normal en una estufa nuevay desaparecer_despu6sde unospocosusos.
A1iniciar un cicio deautolimpiezase "quemar_n" los oloresm_s r_pidamente.
o Sise enciendeel ventilador ayudar_a eliminar el humo y/o el clot.
o Suciedadexcesivade alimentosen el panelinferior del horno. Use unciclo de autolimpieza.
° 'BAKE'o 'LOCK'pueden destellarr_pidamenteenel indicador para avisarleque hayun error
o un problema.Si'BAKE'o 'LOCK'aparecenen el indicadorvisual,oprimala tecla'CANCEL'.
Si'BAKE'o 'LOCK'continOandestellando,desconecteIaenerg[ae!6ctricaalelectrodom6stico.
Espereunospocosminutosyvuelvaa reconectarlaenerg[ael6ctrica. SicontinOandestellando,
desconectelaenerg[ael6ctricadetelectrodom6sticoy Ilameal t_,cnicode servicioautorizado.
o Siel homo est_ demasiadosucio,pueden ocurrir demasiadasIlamaradasIo cual resultar_en
unc6digo deerror durante IaIimpieza.Optima la tecla 'CANCEL'y deiequeel hornose enfr[e
completamente,limpie elexcesode suciedady luegovuelvaa programarel ciclo de limpieza.
Siel c6digo de error reaparece,Ilamea un t6cnico autorizado.
° El horno emitevariossonidosbaios. Ustedpuedeo[r los rel6sdel homo cuandose encienden
y se apagan.Estoes normal.
o A medidaque el homosecaiienta yse enfr[a,ustedpuededr sonidosdepiezasmetSIicasque
se expandeny contraen. Estoes normaly no dariar_su electrodom6stico.
No se escuchan seiiales sonoras , El horno puede estar en Modo Sab_tico. 07erpSg.70).
y el indinadorvisuamno se antiva.
'SAb' destella y luego se
¢[espliega continuamente.
o Elhomoest_enmodosab_tico.Paraanu[arel modosab_tico,oprimay mantengaoprimida[a
tecla 'Clock'(Re[oj}durante cinco segundos.
81

82
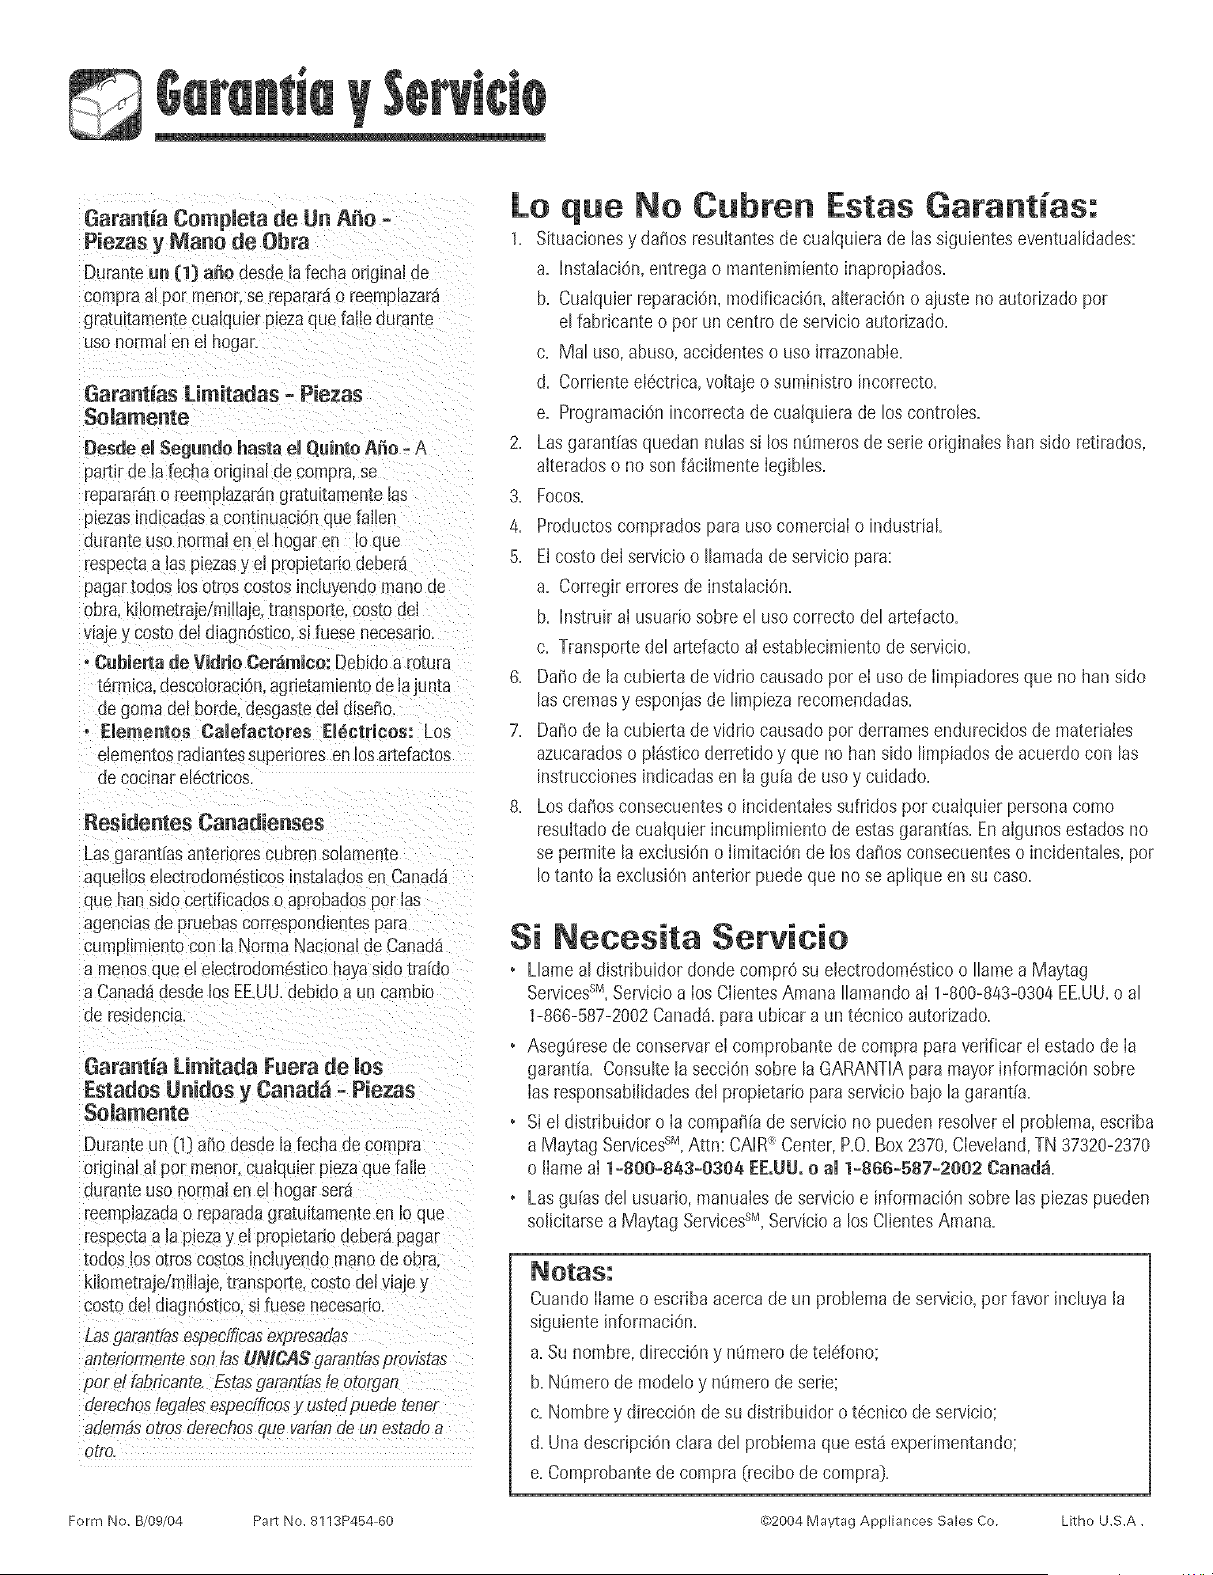
B
Garantia Completa de Un A_o
Piezas y Mano de Obra
Duranteun (1) a_o desde afecha original de
compraa_por menor:se repararao reemplazar_
gratul:amentecualquiel plezaquefalie durante
usonormalen el hogan
Garantias Limitadas - Piezas
Solamente
Desde el Seguedo hasta el QuietoA_o =A
partlrde la fechaoeginalde compra,se
repararano reemplazarangratu}tamentelas
p_ezas_ndLcadasacontinuaci6nque fallen
ouranteusonormal€1el nogaren _oque
respecmalas piezasy el propietariodeber_
pagartodoslos otroscostos]ncluyenoomanoue
obr& kilometraje!millaje,transpor[e,cos[odel
viajey costodeldiagnOstico,si fllese necesarlo.
oCabiertade Vidrio Cer_mico:Debidoa mtura
[6rmica.descoloracion,agrietaefientode lajunta
_e gomadel horde,desgastedeldiseSo.
- Elemeetos Calefaetores El_etrieos: Los
eiemen[osradiantessu__edoresenlosartefactos
de eoemarel6ctricos.
Residentes Canadienses
LasgaraetiasanterioresCUDrensolamente
aqueiloselectrodom_sticosinstaladosen Canada
quehansido certificadoso aprobadospor las
agenciasdepruebascorrespondientespa[a
cumpl_m_entocon la Noeea NacionaldeCanada
a menosquee! electrodomesticoha}a sIdotra[dc,
aCanadadesdelos EEUU.aebidoa un cambio
de resldencla.
Garant[a Limitada Fuera de los
Estados Unities y Canad_ - Piezas
Solamente
Duran[eun (1) ai_odesdela fecha de compra
originat alpot menor:cualqulerplezaque [alle
auran[euso normalen el hogarsera
reemplazadao reparauagratuitamenteen Io que
respecmala piezay el propietadedeber_pagar
todos losotroscostosincluyendomanode obra,
kilome_rajdmillaje,[ransporte,costodelviajey
costooeldiagn(Sstico,si fuesenecesario.
Las.qaraetiase,_peefficase;_presadas
aeteriormeetesonlas UMCAS garaetfaspmvistas
Dotd fabricaete.Estasgarantfas/e otorcJae
dereches/ega/eses#ecfficosy ustedpuede tone!
_dembsoLrosdereehoseuevaffaedeueestadoa
otto.
Lo que No Cubren Estas Gara t as:
1= Situacionesy dat_osresultantesde cualquierade lassiguienteseventualidades:
a. InstalaciOn,entregao mantenimientoinapropiados.
b. Cuaiquierreparaci6n,modificaciOn,alteraciOno ajusteno autorizadopot
el fabricanteo por un centrode servicioautorizado.
c. Mal uso,abuso,accidenteso uso irrazonable.
d. Cordenteelectric& voltaje o suministro incorrecto.
e. ProgramaciOnincorrectade cualquierade los controles.
2. Lasgarant[asquedan nulassi los nOmerosde serieoriginales hartsido retirados,
alteradoso no son f_cilmente Iegibles.
3, Focos.
4= Productoscompradospara uso comerciaio industrial
5= Elcosto dei servicio o Ilamadadeservicio para:
a=Corregirerroresde instalaci6n=
b=h]struir aI usuariosobre el uso correctodel artefacto=
c= Transportedel artefactoal establecimientode servicio=
& Da_o de la cubierta de vidrio causadopor ei usode iimpiadoresque no han sido
las cremasy esponiasde limpiezarecomendadas=
7= Daiio de lacubierta de vidrio causadopor derramesendurecidosde materiaies
azucaradoso pl_sticoderretidoy que no han sido limpiadosde acuerdocon las
instruccionesindicadasen la gu[ade uso y cuidado=
& Losda_os consecuenteso incidentaiessufridos pot cuaiquier personacomo
resultadode cualquier incumplimientode estasgarant[as=Enaigunosestadosno
se permitela exciusi6no iimitaci0nde iosdat_osconsecuenteso incidentales,por
Io tanto la exclusionanterior puedeque no se aplique en su caso=
Si Necesita Servicio
• Llameal distribuidor donde comprOsu electrodom_sticoo Ilamea Maytag
ServicessM,Servioioa IosCIientesAmana IlamandoaI 1-800-843-0304EEUU=o al
1-866-587-2002Canad& paraubicar a un t6cnico autorizado=
• AsegOresede conservareI comprobantede compra para verificar el estadode Ia
garantia. Consultela secciOnsobre laGARANTIAparamayorinformaciOnsobre
Iasresponsabilidadesdel propietariopara servicio baiola garant[a.
• Si el distribuidoro Ia compa_[ade servicio no puedenresolverel probiema,escdba
a MaytagServicessM,Attn: CAIR"_Center,P.O.Box2370,CIeveland,TN37320-2370
o JJameai 1-800-843-0304 EE.UU.o ai 1-866-587-2802 CacaO&
• Lasguias del usuario,manualesdeservicioe informaciOnsobre las piezaspueden
solicitarsea MaytagServicessr_,Servicioa los ClientesAmana.
CuandoIlameo escribaacercade un problemadeservJcio,pot favor JncluyaJa
siguiente JnformaciOn=
a=Su hombre,direcciOny n[imerode teIdono;
b=NOmerode modeloy nQmerodeserie;
c=Nombrey direcci0nde su distribuidor ot_cnico de servicio;
d=Una descripci6nclara del probiemaque est_ experimentando;
e=Comprobantede compra (recibode compra)=
Form No. B/09/04 Pa_l: No. 8113P454 60 ¢52004 Maytag Appliances Sales Co. Litho U.S.A.