WXF02915 Page 1 / 3
ASSEMBLY
1. From the access hole in the back of the fountain, locate the built-in water tube and light cable. Firmly attach the short
cable on the pump to the light cable.
2. Attach the pump to the water tube. Place the pump inside the fountain and run the power cord out the access hole.
TIP: Familiarize yourself with the pump. Water ow is controlled by a switch on the front of the pump. Moving the switch
to (+) increases water ow, (-) decreases water ow.
3. Firmly attach the AC adapter to power cord.
4. Place the solar lamp onto the top of the fountain. Refer to solar panel operation, page 2.
5. Hang the welcome sign on the sign post chains.
6. Use a bucket or watering can to ll the fountain with enough clean water to keep the pump fully submerged during
operation, approximately 1.25" below the edge of the basin.
7. Plug the power cord into a properly grounded GFCI outlet.
Thank you for choosing Sunnydaze Decor. We stand behind our brand and the quality of the items we sell.
Replacement parts or products will be sent at our discretion within the 1-year warranty period. Proof of purchase, with
the date of purchase as well as photos of the merchandise defect, must be provided. Photos are used to determine
the cause of defects and for future quality control. Register your warranty at https://tiny.cc/SunnydazeWarranty
If you have any questions, comments or concerns, feel free to contact us by phone at 833-982-1977, by email:
customerservice@sunnydazedecor.com, or via our contact us page at https://tiny.cc/SunnydazeContact
Purchase Date: / / Order/Customer Reference Number:
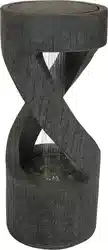
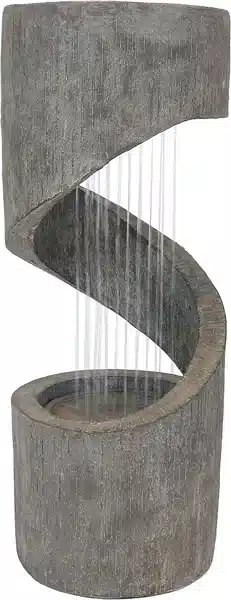
CHILDREN PLAYING AT FAUCET
OUTDOOR WATER FOUNTAIN
WITH SOLAR LAMP POST
WNC-375
Read the assembly instructions carefully and follow the care instructions. Keep this manual for future reference.
Select a smooth, level surface to place the fountain.
Assemble components on a soft, clean surface to avoid scratching or damaging the nish.
NOTE: The water tubing is built into the fountain.
Take care when handling the water tube; detaching
the water tube from the fountain will damage the
fountain and void the product warranty.
Inspect packaging to ensure all
parts are accounted for before
disposing of packing materials.
Note: When rst used, there may be air trapped in the pump. It may take several minutes for trapped air to escape, allowing water to ow.
11/2022
1
2
3
4
5
6
Parts Qty.
Fountain 1
Solar Lamp 1
Welcome Sign 1
Electric Submersible Pump 1
AC Adapter 1
7
Rattling noise inside the fountain? Due to the casting
process, there may be loose pieces of the casting material inside the
fountain. Simply remove loose casting material before use.

WXF04882 Page 2 / 3 11/2022
Clean the solar panel
from time to time
Do NOT place the solar
panel in shaded areas
Do NOT charge the solar
panel behind glass
Choosing the Right Location
• Select an outdoor location where the solar panel will receive at least 6-8 hours of full, direct sunlight each day. Ensure
the solar panel does not become shaded by trees, shrubs, or buildings throughout the day, as this will influence the
battery's charge and shorten the working time at night.
• Avoid locations with nighttime light sources nearby, such as street or porch lights. When the light detecting sensor
receives too much ambient light, the solar lamp will not illuminate.
Solar Lamp Operation
Switch the power button on top of the lamp to the 'ON' position.
First Time Use: The solar lamp will require at least 8 hours of full, direct sunlight to fully charge the battery. Make sure
the unit is turned 'ON' while charging. If there is insucient time to charge for a full 8 hours, turn the solar panel o and
wait until the following day to nish charging.
As long as the battery has a sucient charge, the lamp will illuminate when it gets dark.
How Solar Lights Work
During the day, the solar panel converts solar energy into electricity and stores it in the rechargeable battery. At night,
the light turns on automatically via a light detecting sensor built into the unit. How long the light illuminates will depend
upon the location of the light, weather conditions, and how much direct sunlight the solar panel is exposed to. Ensure
the power is switched to 'ON' while charging.
Solar Lamp Troubleshooting
• Ensure the power button is turned to the 'ON' position.
• This product is designed to only illuminate at night. Make sure the light sensor is not receiving too much ambient light.
• If the light only works for a short time, attempt a 'Boost Charge':
- Turn the power 'ON' and let it charge in full, direct sunlight for at least 8 hours.
- Turn the power 'OFF' at night to conserve the battery.
- Repeat this process for 2-3 days. If the unit still does not work, the battery may need replacing.
The solar panel is glued to the solar lamp. Removing the solar panel may damage the unit.
Additionally, removing the solar panel from the unit will automatically void the product warranty.
SOLAR LAMP
Solar Lamp Use & Care
• For outdoor use only.
• Keep away from children.
• Do not submerge in water.
• Keep the solar panel clean by gently wiping it with a soft, damp cloth. Clean solar panels will absorb more sunlight.
• Never use chemicals or abrasive materials to clean the lantern or solar panel.
• Store in a dry, warm, indoor location during inclement weather and freezing temperatures.
• Do not allow the unit to freeze. Freezing temperatures will damage the internal components.
• To help prolong the life of the battery, ensure it is fully charged before storing. Turn the unit off before storing it.
Removing the battery during storage is recommended.

WXF04882 Page 3 / 3 11/2022
• Ensure the pump is fully submerged under the water. If water is not flowing within several moments of the power cord
being plugged in, the pump may have air bubbles trapped in it, which can prevent water from circulating properly and/
or may cause excess pump noise. Simply unplug the power supply for a few moments and plug it back in.
• If water is still not flowing, inspect the pump and tubing for obstructions.
• Check the flow control on the body of the pump, it may need to be adjusted to achieve the desired water flow rate.
• Pump noise can be caused by trapped air, low water level, or the pump being too close to the sides of the fountain.
Check the pump. Try moving the pump and/or adding water to help reduce pump noise.
• Soft surfaces may cause the fountain to become unbalanced. A large stepping stone or paving stone (not included) is
recommended to help ensure the fountain remains evenly balanced.
• If the LED light ring is not working, ensure the cables are fully connected and the seal is adequately tightened (do not over-
tighten). Ensure connector ends are completely dry before connecting and plugging the power cord back into an outlet.
• Check to make sure the power outlet is working; consult a certified electrician if in doubt about electrical connections.
Fountain Troubleshooting
Any modication to the product or failure to follow recommended care will void the product warranty.
IMPORTANT SAFETY INFORMATION
• For outdoor use only.
• Keep fountain out of reach of children and pets.
• Make sure the power cord is away from traffic areas.
• Keep power cord away from all heat sources. Do not use electrical cords in areas with high temperatures.
• Check the water level frequently to ensure the pump remains fully submerged; never allow the pump to run dry as it will burn
out the motor.
• Always unplug the power supply before cleaning and maintaining the fountain and the recirculating pump.
• Always empty and store the fountain and pump indoors during freezing weather.
• For outdoor use only. Some splashing is normal; adjust the flow rate on the pump to reach desired flow rate.
• Some climates and weather conditions increase water evaporation, requiring water to be added more frequently.
Frequently check water levels during high temperatures, windy conditions, and after long-term exposure to direct
sunlight to ensure the pump does not run dry. Never allow the pump to run dry as it will burn out the motor.
• Only use water in this fountain. Distilled water will help prevent mineral buildup but is not required. Tap water is okay
to use, but avoid heavily chlorinated water as it may damage the fountain and the pump.
• Periodically change the water to keep the water, fountain, and pump clean. Remove scale and buildup regularly.
DO NOT use harmful additives such as bleach, chlorine, etc.
DO NOT use anything that is abrasive to scrub the fountain.
DO NOT use a pressure washer to clean the fountain.
• Always unplug the power supply before cleaning and maintaining the fountain and the recirculating pump. Take care
when handling the pump; only pick it up by the body of the pump, never the power cord.
• During freezing weather, drain the fountain, disconnect the pump and store indoors; allowing ice to form may damage
the fountain in such ways as, but not limited to, fountain cracking and/or permanent pump damage.
• Over time, the finish may gradually mellow in color due to sun exposure; this is part of the natural aging process and
is not cause for return.
Fountain Care & Maintenance
If you continue to experience problems, have issues with assembly, or the product was damaged during shipping,
please contact our customer service team through one of the methods mentioned at the top of page 1.
Please have the item number and order information ready to expedite response time.
WARNING:
Manufacturer and seller expressly disclaim any and all liability from personal injury, property damage or loss, whether direct or
indirect, or incidental, resulting from the incorrect attachment, improper use, inadequate maintenance, or neglect of this product.