
LARGE TIERED BALL
OUTDOOR FOUNTAIN
FC-73803
Read the assembly instructions carefully and follow the care instructions.
Keep these instructions for future reference.
Select a smooth, level surface to place the fountain.
73803 Page 1 / 2
Purchase Date: / / Order/Customer Reference Number:
Thank you for choosing Sunnydaze Decor. We stand behind our brand and the quality of the items we sell.
Replacement parts or products will be sent at our discretion within the 1-year warranty period. Proof of purchase, with
the date of purchase as well as photos of the merchandise defect, must be provided. Photos are used to determine
the cause of defects and for future quality control. Register your warranty at https://tiny.cc/SunnydazeWarranty
If you have any questions, comments or concerns, feel free to contact us by phone at 888-881-4668, by email:
customerser vice@nethealthshops.com, or via our contact us page at ht tps://tiny.cc/SunnydazeContact
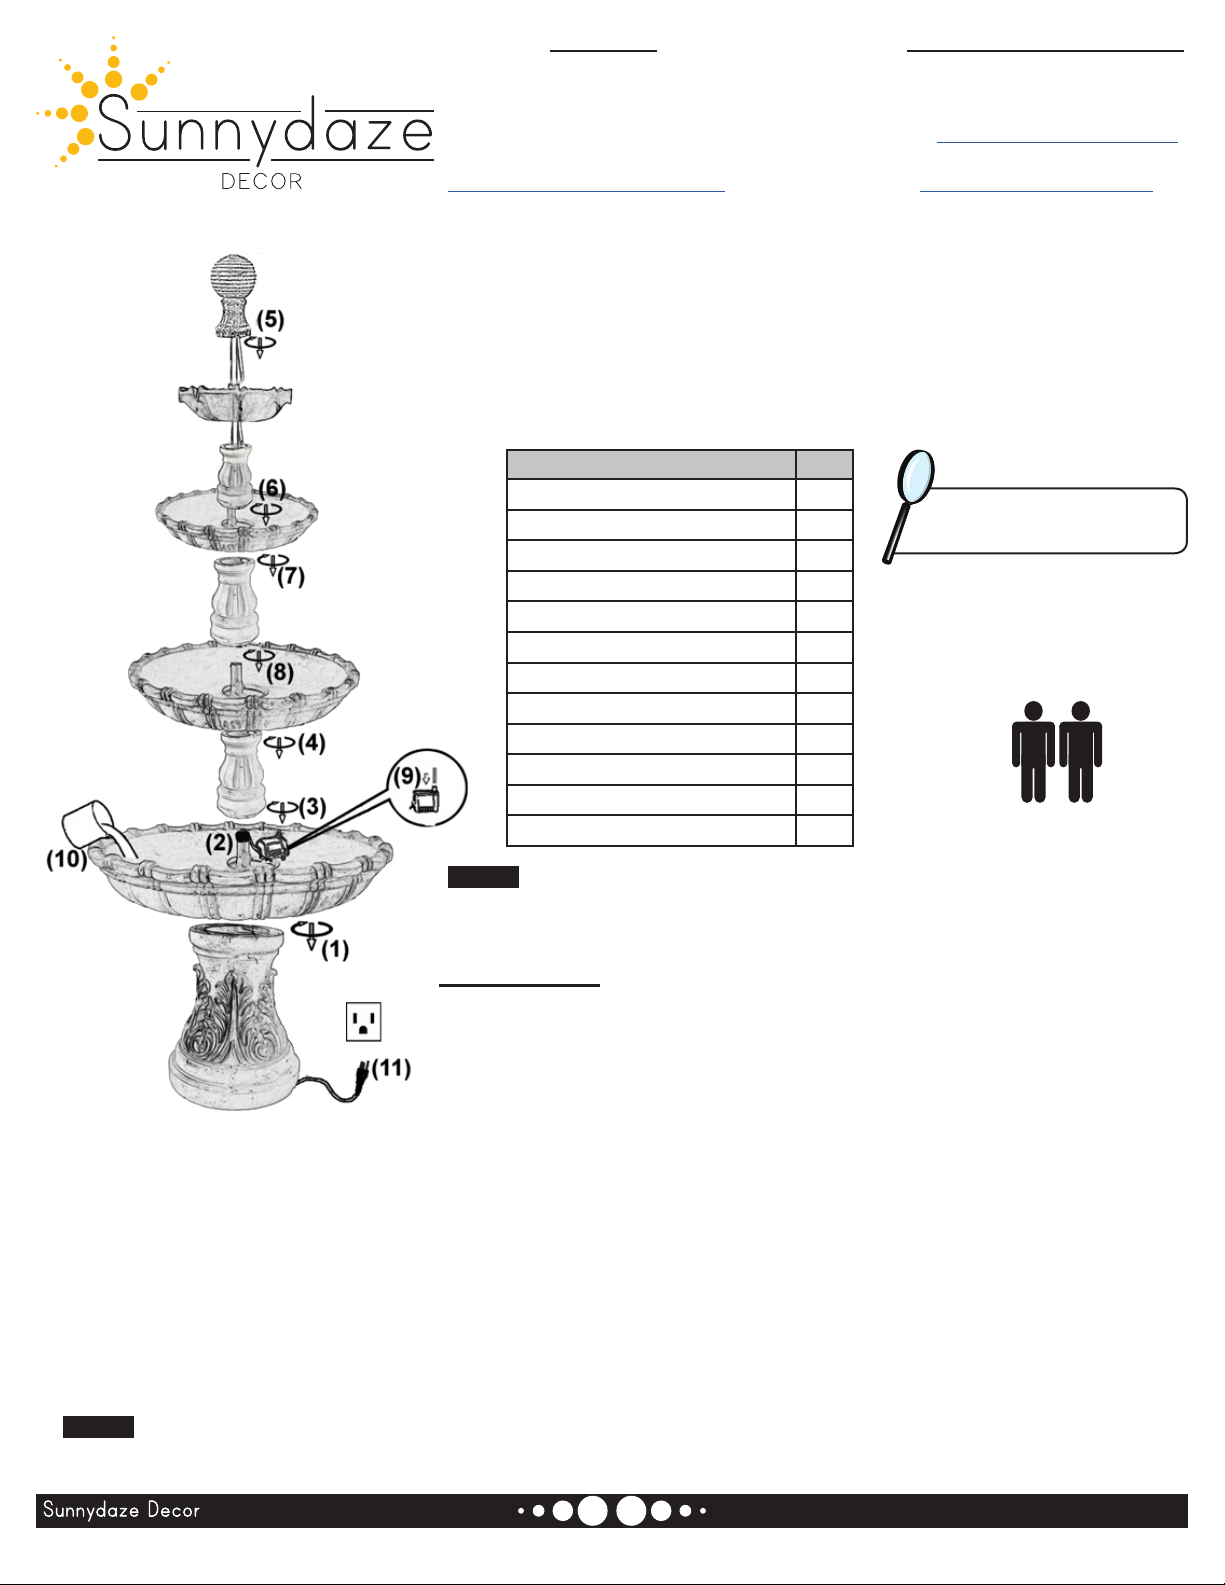
Inspect packaging to ensure all
parts are accounted for before
disposing of packing materials.
Fountain Topper 1
Top Tier 1
Small Column
Second Tier 1
Middle Column 1
Third Tier 1
Bottom Column 1
Basin Tier 1
Pedestal 1
Electric Submersible Pump 1
EVA Stopple 1
Pump Access Cover 1
2-PERSON ASSEMBLY
RECOMMENDED
ASSEMBLY
1. Place the Basin Tier onto the Pedestal and twist to lock into place.
2. Run the pump power cord through the tube in the Basin Tier and
pedestal. With the power cord in the middle of the EVA Stopple, push
the stopple into the top of the tube in the Basin Tier. Pull the power
cord out through the groove on the bottom of the pedestal.
3. Ensuring the pump is touching the bottom of the Basin Tier, Place the Bottom Column onto the Basin Tier
and twist to lock into place.
4. Place the Third Tier onto the Bottom Column and twist to lock in place.
5. Run both of the tubes that are attached to the Fountain Topper through the Top Tier, making sure the tubes
do not kink. Twist the topper onto the Top Tier to lock the pieces together.
6. Run both tubes through the Small Column and twist onto the Top Tier to lock into place. Continue running
the tubes through the Second Tier and twist to lock in place.
7. Feed both tubes through the Middle Column. Twist the middle column onto the Second Tier to lock in place.
NOTE:
The smaller tube is designed to hang freely (unattached) inside the fountain, within this section of
the fountain.
06/2020
NOTE:
The water tubing is built into the fountain topper. Take care when handling the water tube;
detaching the water tube from the fountain will damage the fountain and void the product warranty.
8. Ensuring the large water tube remains straight, place the assembled top components onto the Third Tier
and twist to lock into place.
9. From the pump access panel in the Bottom Column, locate the water tube and rmly attach it to the Electric
Submersible Pump. Slide the Pump Access Cover over the opening in the Basin Tier.
10. Fill the fountain with enough water to keep the pump fully submerged during operation, approximately 24 gallons.
NOTE:
As water pumps up from the basin, it will ll the upper tiers. Fill the tiers with water before using
the pump.
11. Plug the power cord into a properly grounded GFCI outlet.
73850 Page 2 / 2
IMPORTANT INFORMATION
USE & CARE
• For outdoor use only.
• Some splashing is normal; adjust the flow rate on the pump if the water rate is too high.
• Check the water level frequently to ensure the pump remains fully submerged; never allow the pump to run dry as
it will burn out the motor.
• Only use water in this fountain. Distilled water will help prevent mineral buildup but is not required, avoid heavily
chlorinated water as it may damage the fountain or pump.
• Periodically change the water to keep the fountain and pump clean. Remove scale and buildup regularly.
DO NOT use harmful additives such as bleach, chlorine, etc.
DO NOT use a pressure washer or abrasive materials to wash the fountain.
• Always shut off the power supply before cleaning and maintaining the fountain and the recirculating pump.
• Take care when handling the pump; only pick it up by the body of the pump, never by the power cord.
• During freezing weather, drain the fountain, disconnect the pump and store indoors; allowing ice to form may
damage the fountain in such ways as, but not limited to, the fountain cracking, and/or permanent pump damage.
TROUBLESHOOTING
• Ensure that the pump is fully submerged and add water if necessary.
• If water is not flowing within several moments of the fountain being plugged in, the pump may have trapped air
which can prevent water from circulating properly. Simply unplug the power supply for a few moments and plug it
back in. Also check the pump and tubing for obstructions.
• If water is not flowing or water is splashing, check the flow control on the body of the pump; it may need to be
adjusted to achieve the desired flow rate.
• Ensure the fountain is on a smooth, level surface. Soft surfaces may cause the fountain to become unbalanced.
• Add thin, plastic shims between tiers to level out water flow.
• Make sure the adapter cable is fully connected to the pump power cable.
• Make sure the power outlet is working; if in doubt about electrical connections, consult a certified electrician.
Note: When rst used, there may be air in the pump. It may take several minutes for trapped air to escape, allowing water to ow.
You may need to add more water as the pump begins to circulate water through the fountain.
06/2020
WARNING!
Manufacturer and seller expressly disclaim any and all liability from personal injury, property damage
inadequate maintenance, or neglect of this product.