User Manual Kenmore 79574033411 Elite refrigerator
REFRIGERATOR WARRANTY
Kenmore Elite Limited Warranty
When this appliance is installed, operated and maintained according to all supplied instructions,the following warranty coverage applies. To arrange for warranty service, call ]-800-4-MY-HOME® (]-800-469-4663).
- One Year Limited Warranty on Appliance
For one year from the date of purchase, free repair will be provided if any non-consumable part of this appliance fails due to defects in material or workmanship. If the appliance is ever used for other than private family purposes, this coverage applies for only 90 days from the purchase date, and is void in Canada.
- Five Year Limited Warranty on Sealed System
For five years from the date of purchase, the sealed refrigerant system of this appliance is warranted against any defects in material or workmanship. New system components will be supplied for defective ones free of charge. You are responsible for the labor cost of component installation after the first year from the date of purchase. If the appliance is ever used for other than private family purposes, this coverage applies for only one year from the purchase date, and is void in Canada.
- Ten Year Limited Warranty on Linear Compressor
For ten years from the date of purchase, the linear compressor of this appliance is warranted against any defects in material or workmanship. A new linear compressor will be supplied free of charge. You are responsible for the labor cost of installation after the first year from the date of purchase. If the appliance is ever used for other than private household purposes, this coverage applies for only two years from the purchase date, and is void in Canada.
This warranty covers only defects in material and workmanship, and will NOT pay for:
- Consumable parts that can wear out from normal use, including but not limited to filters, belts, light bulbs, and bags.
- A service technician to instructthe user in correct product installation, operation or maintenance.
- A service technician to clean or maintain this product.
- Damage to or failure of this product if it is not installed, operated or maintained according to all instructions supplied with the product.
- Damage to or failure of this product resulting from accident, abuse, misuse or use for other than its intended purpose.
- Damage to or failure of this product caused by the use of detergents, cleaners, chemicals or utensils other than those recommended in all instructionssupplied with the product.
- Damage to or failure of parts or systems resulting from unauthorized modifications made to this product.
Disclaimer of implied warranties; limitation of remedies
Customer's sole and exclusive remedy under this limited warranty shall be product repair as provided herein. Implied warranties, including warranties of merchantability or fitness for a particular purpose, are limited to one year or the shortest period allowed by law. Sears shall not be liable for incidental or consequential damages. Some states and provinces do not allow the exclusion or limitation of incidental or consequential damages, or limitation on the duration of implied warranties of merchantability or fitness, so these exclusions or limitations may not apply to you.
This warranty applies only while this appliance is used in the United States or Canada*. This warranty gives you specific legal rights, and you may also have other rights which vary from state to state.
* In Canada, in-home repair service is not available in all areas, nor will this warranty cover user or servicer travel and transportation expenses if this product is located in a remote area (as defined by Sears Canada Inc.) where an authorized servicer is not available.
CARE AND CLEANING
GENERAL CLEANING TIPS
- Unplug refrigerator or disconnect power.
- Remove all removable parts, such as shelves, crispers, etc. Refer to sections in Using Your Refrigerator for removal instructions.
- Use a clean sponge or soft cloth and a mild detergent in warm water. Do not use abrasive or harsh cleaners.
- Hand wash, rinse and dry all surfaces thoroughly.
- Plug in refrigerator or reconnect power.
EXTERIOR
Waxing external painted metal surfaces helps provide rust protection. Do not wax plastic parts. Wax painted metal surfaces at least twice a year using appliance wax (or auto paste wax). Apply wax with a clean, soft cloth.
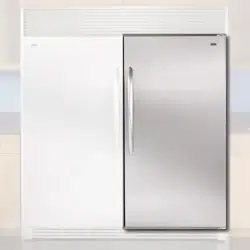
For products with a stainless steel exterior, use a clean sponge or soft cloth and a mild detergent in warm water. Do not use abrasive or harsh cleaners. Dry thoroughly with a soft cloth
INSIDE WALLS (allow freezer to warm up so the cloth will not slick)
To help remove odors, you can wash the inside of the refrigerator with a mixture of baking soda and warm water. Mix 2 tablespoons of baking soda to 1 quart of water (26 g soda to 1 liter water.) Be sure the baking soda is completely dissolved so it does not scratch the surfaces of the refrigerator.
CAUTION: While cleaning the inside, do not spray water.
DOOR LINERS AND GASKETS
Use a clean sponge or soft cloth and a mild detergent in warm water. Do not use cleaning waxes, concentrated detergents, bleaches, or cleaners containing petroleum on plastic refrigerator parts.
PLASTIC PARTS (Covers and Panels)
Use a clean sponge or soft cloth and a mild detergent in warm water. Do not use window sprays, abrasive cleansers, or flammable fluids. These can scratch or damage the material.
CONDENSER COILS
Use a vacuum cleaner with an attachment to clean the condenser cover and vents. Do not remove the panel covering the condenser coil area.
LIGHT BULB REPLACEMENT
NOTE: The refrigerator and freezer compartment lights have LED interior lighting, and service should be performed by a qualified technician.
POWER INTERRUPTIONS
- if the power will be out for 24 hours or less, keep all refrigerator doors closed to help foods stay cold and frozen.
- if the power will be out for more than 24 hours, remove all frozen food and store it in a frozen food locker.
WHEN YOU GO ON VACATION
if you choose to leave the refrigerator on while you are away, follow these steps to prepare your refrigerator before you leave.
- Use up any perishables and freeze other items.
- Turn off the icemaker and empty the ice bin.
if you choose to turn the refrigerator off before you leave, follow these steps.
- Remove all food from the refrigerator.
- Depending on your model, set the thermostat controt refrigerator control) to OFF. See the Setting the Controls section.
- Clean the refrigerator, wipe it and dry well.
- Tape rubber or wood blocks to the tops of both doors to prop them open far enough for air to get in. This stops odor and mold from building up
WHEN YOU MOVE
When you are moving your refrigerator to a new home, follow these steps to prepare it for the move.
- Remove all food from the refrigerator and pack all frozen food in dry ice.
- Unplug the refrigerator.
- Clean, wipe and dry thoroughly.
- Take out all removable parts, wrap them well and tape them together so they do not shift and rattle during the move. Refer to the Using your Refrigerator section for removable instructions.
- Depending on the model, raise the front of the refrigerator so it rolls easier OR screw in the leveling legs all the way so they do not scrape the floor. See the Door Closing section.
- Tape the doors shut and tape the power cord to the refrigerator cabinet.
When you get to your new home, put everything back and refer to the Refrigerator Installation section for preparation instructions.
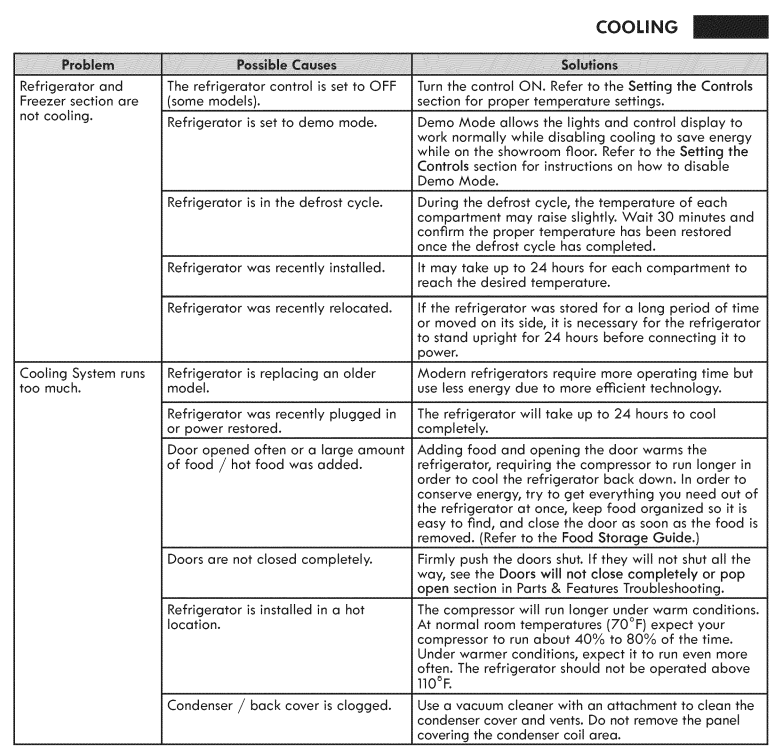
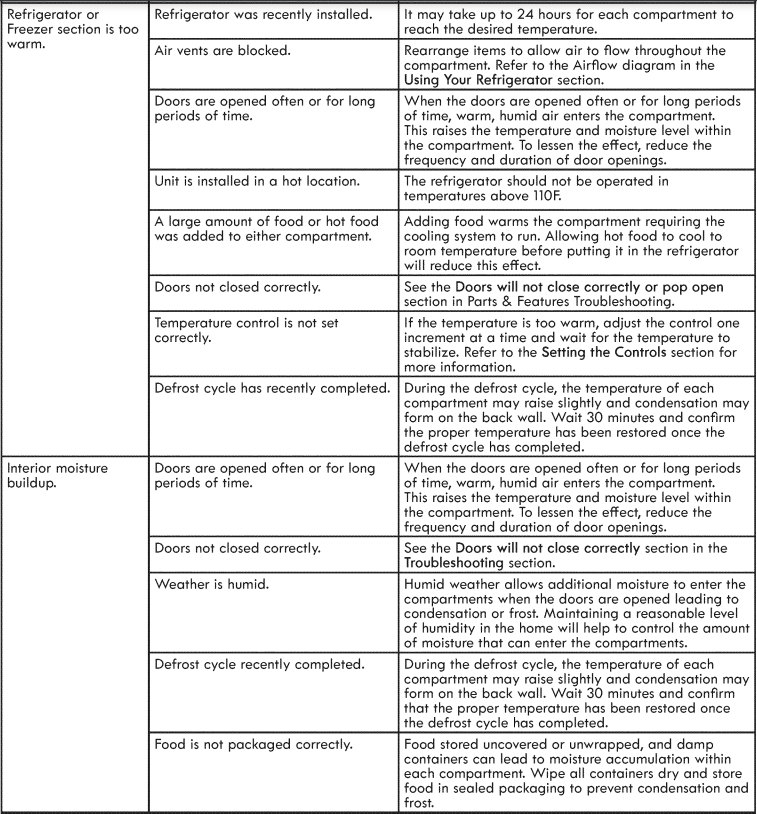
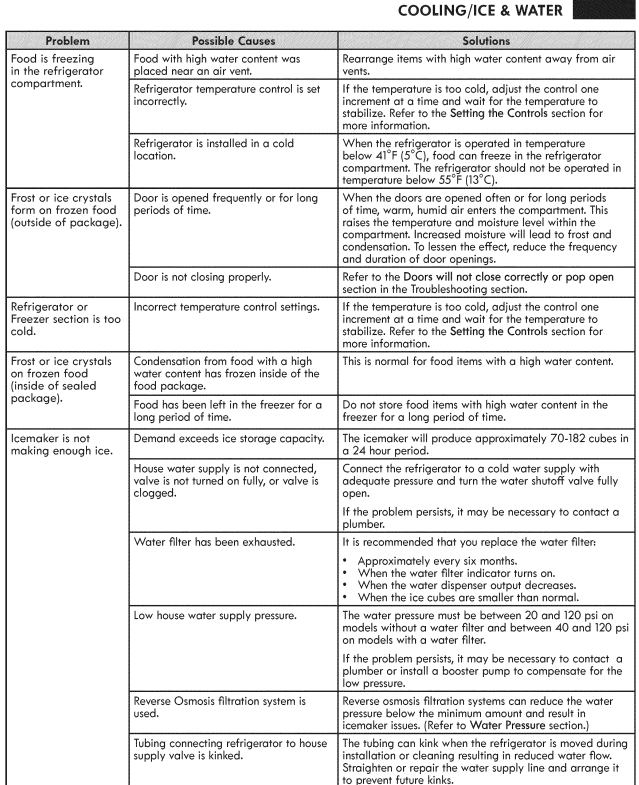
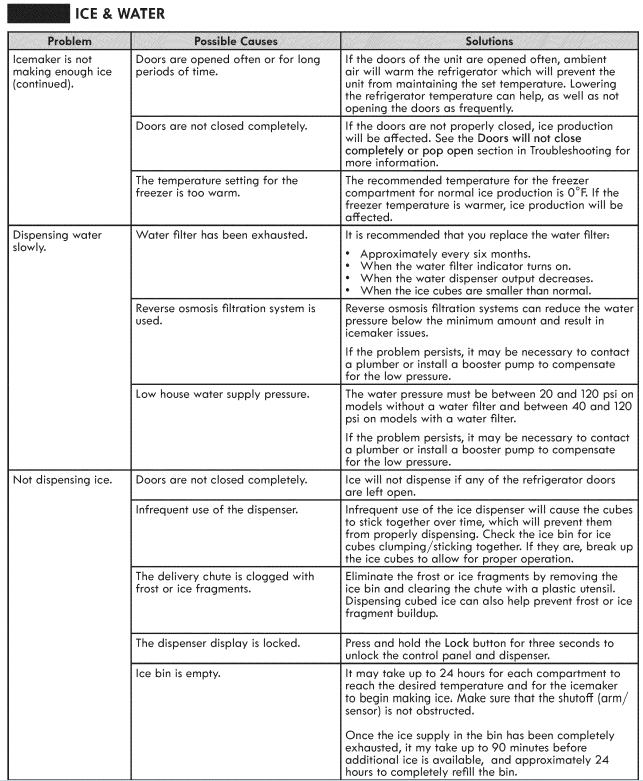
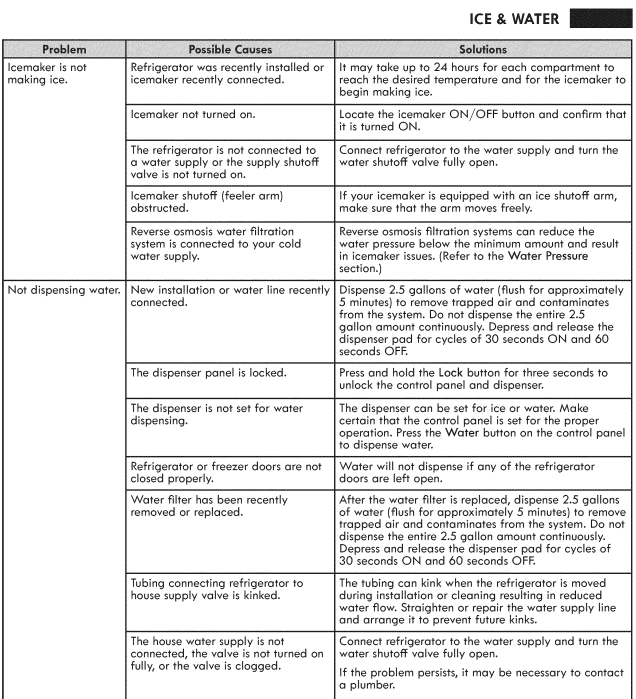
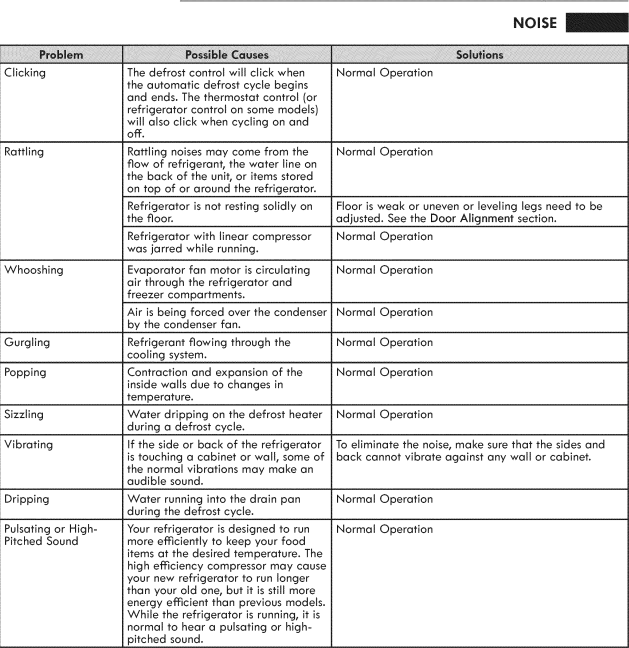
TROUBLESHOOTING GUIDE
Before conducting troubleshooting, make sure that the following basic requirements are met:
| Service Flow | 0.5 gpm (1.9 lpm) |
| Water Supply | Potable Water |
| Water Pressure | 20-120 psi (138 - 827 kPa) |
|
Operating Ambient Temperature Limits |
55*F-110*F |
| Electrical Ratings | 115 Volts, 60 Hz, AC only, and fused at 15 or 20 amperes. |

CONNECTING THE WATER LINE
BEFORE YOU BEGIN
This water line installation is not covered by the refrigerator warranty. Follow these instructions carefully to minimize the risk of expensive water damage.
Water hammer (water banging in the pipes) in house plumbing can cause damage to refrigerator parts and can lead to water leakage or flooding. Catt a qualified plumber to correct water hammer before installing the water supply line to the refrigerator.
WATER PRESSURE
A cold water supply. The water pressure must be between 20 and 120 psi. If the refrigerator is installed in an area with low water pressure (below 20 psi), you can install a booster pump to compensate for the low pressure.
if a reverse osmosis water filtraflon system is connected to your cold water supply, this water line installation is not covered by the refrigerator warranty. Follow the following instructions carefully to minimize the risk of expensive water damage.
if a reverse osmosis water Nltraflon system is connected to your cold water supply, the water pressure to the reverse osmosis system needs to be a minimum of 40 to 60 psi (276-414 kPa or 2.8-4.2 kgf/cm 2, less than 2.0-3.0 sec. to fill a cup of 7 oz or 198 cc capacity).
If the water pressure from the reverse osmosis system is Jess than 20 psi or 138 kPa or 1.4 kgf/cm 2 (takes more than 4.0 sec to fill a cup of 7 oz or 198 cc capacity):
- Check to see if the sediment filter in the reverse osmosis system is blocked. Replace the filter if necessary.
- Allow the storage tank on the reverse osmosis system to refill after heavy usage.
- If the issue concerning water pressure from reverse osmosis remains, call a licensed, qualified plumber.
- All installations must be in accordance with local plumbing code requirements.
WHAT YOU WILL NEED
- Copper Tubing, 1/4 in. outer diameter, to connect the refrigerator to the water supply. Be sure both ends of the tubing are cut square
- To determine how much tubing you need: measure the distance from the water valve on the back of the refrigerator to the water supply pipe. Then, add 8 feet (2.4 m). Be sure there is sufficient extra tubing (about 8 feet [2.4 m] coiled into 3 turns of about 10 in. [25 cm] diameter) to allow the refrigerator to move out from the wall after installation.
- Power drill
- ½in. or adjustable wrench.
- Flat blade and Philllps head screwdriver
- Two ¼ in. outer diameter compression nuts and 2 ferrules (sleeves) to connect the copper tubing to the shutoff valve and the refrigerator water valve.
- If your existing copper water line has a flared fitting at the end, you will need an adapter (available at plumbing supply stores) to connect the water line to the refrigerator OR you can cut off the flared fitting with a tube cutter and then use a compression fitting.
- Shutoff valve to connect to the cold water llne. The shutoff valve should have a water inlet with a minimum inside diameter of s/32 in. at the point of connection to the COLD WATER LINE. Saddle-type shutoff valves are included in many water supply kits. Before purchasing, make sure a saddle-type valve complies with your local plumbing codes.
INSTALLATiON INSTRUCTIONS
Instatl the shutoff valve on the nearest frequently used drinking water line.
1. SHUT OFF THE MAIN WATER SUPPLY
Turn on the nearest faucet to relieve the pressure on the line.
2. CHOOSE THE VALVE LOCATION
Choose a location for the valve that is easily accessible, it is best to connect into the side of a vertical water pipe. When it is necessary to connect into a horizontai water pipe, make the connection to the top or side, rather than at the bottom, to avoid drawing off any sediment from the water pipe. 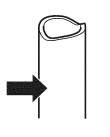
3. DRILL THE HOLE FOR THE VALVE
Drill a I/4 in. hole in the water pipe using a sharp bit. Remove any burrs resulting from drilling the hole in the pipe. Be careful not to allow water to drain into the drill. Failure to drill a 1/4 in. hole may result in reduced ice production or smaller cubes.
NOTE: The hookup line cannot be white, plastic tubing. Licensed plumbers must use only copper tubing (NDA tubing #49595 or #49599) or Cross Link Polyethylene (PEX) tubing.
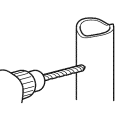
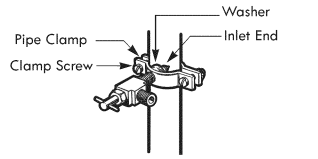
4. FASTEN THE SHUTOFF VALVE
Fasten the shutoff valve to the cold water pipe with the pipe clamp.
NOTE: Commonwealth of Massachusetts Plumbing Codes 248CMR shall be adhered to. Saddle valves are illegat and use is not permitted in Massachusetts. Consult with your licensed plumber.
5. TIGHTEN THE PiPE CLAMP
Tighten the clamp screws until the sealing washer begins to swell.
NOTE: Do not overfighten damp or you may crush the tubing.
6. ROUTE THE TUBING
Route the tubing between the cold water line and the refrigerator.
Route the tubing through a hole drilled in the wall or floor (behind the refrigerator or adjacent base cabinet) as close to the wall as possible.
NOTE: Be sure there is sufficient extra tubing (about 8 feet coiled into 3 turns of about 10 in. diameter) to allow the refrigerator to move out from the wall after installation.
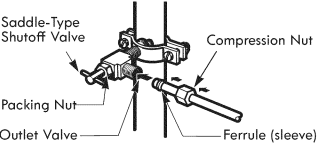
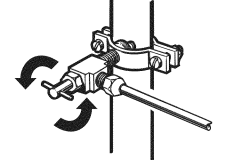
7. CONNECT THE TUBING TO THE VALVE
Place the compression nut and ferrule (sleeve) for copper tubing onto the end of the tubing and connect it to the shutoff valve. Make sure the tubing is fully inserted into the valve. Tighten the compression nut securely.
NOTE: Commonwealth of Massachusetts Plumbing Codes 248CMR shall be adhered to. Saddle valves are illegal and their use is not permitted in Massachusetts. Consult with your licensed plumber
8. FLUSH OUT THE TUBING
Turn the main water supply on and flush out the tubing until the water is clear. Shut the water off at the water valve after about one quart of water has been flushed through the tubing.
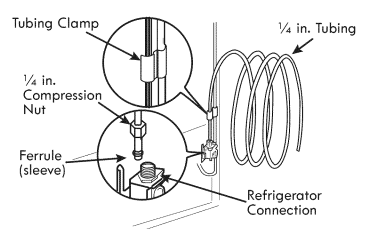
9. CONNECT THE TUBING TO THE REFRIGERATOR
- Remove the plastic flexible cap from the water valve.
- Place the compression nut and ferrule (sleeve) onto the end of the tubing as shown.
- Insert the end of the copper tubing into the connection as far as possible. While holding the tubing, tighten the fitting.
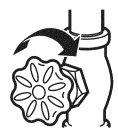
10.TURN THE WATER ON AT THE SHUTOFF VALVE
Tighten any connections that leak
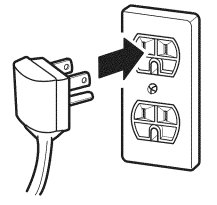
11. PLUG IN THE REFRIGERATOR
Arrange the coil of tubing so that it does not vibrate against the back of the refrigerator or against the wall. Push the refrigerator back to the wall.
12. START THE ICEMAKER
Turn the icemaker ON at the control panel. The icemaker will not begin to operate until it reaches its operating temperature of 15°F (-9°C) or below. It will then begin operation automatically if the icemaker button has been turned ON