®
MICROWAVE OVEN
Use and Care Guide
HORNO DE MICROONDAS
Manual de uso y cuidado
Models/Modelos 721.63252
721.63259
Sears, Roebuck and Co., Hoffman Estates, IL 60179 U.S.A.
P/No.: 3828W5A3381 www.sears.com
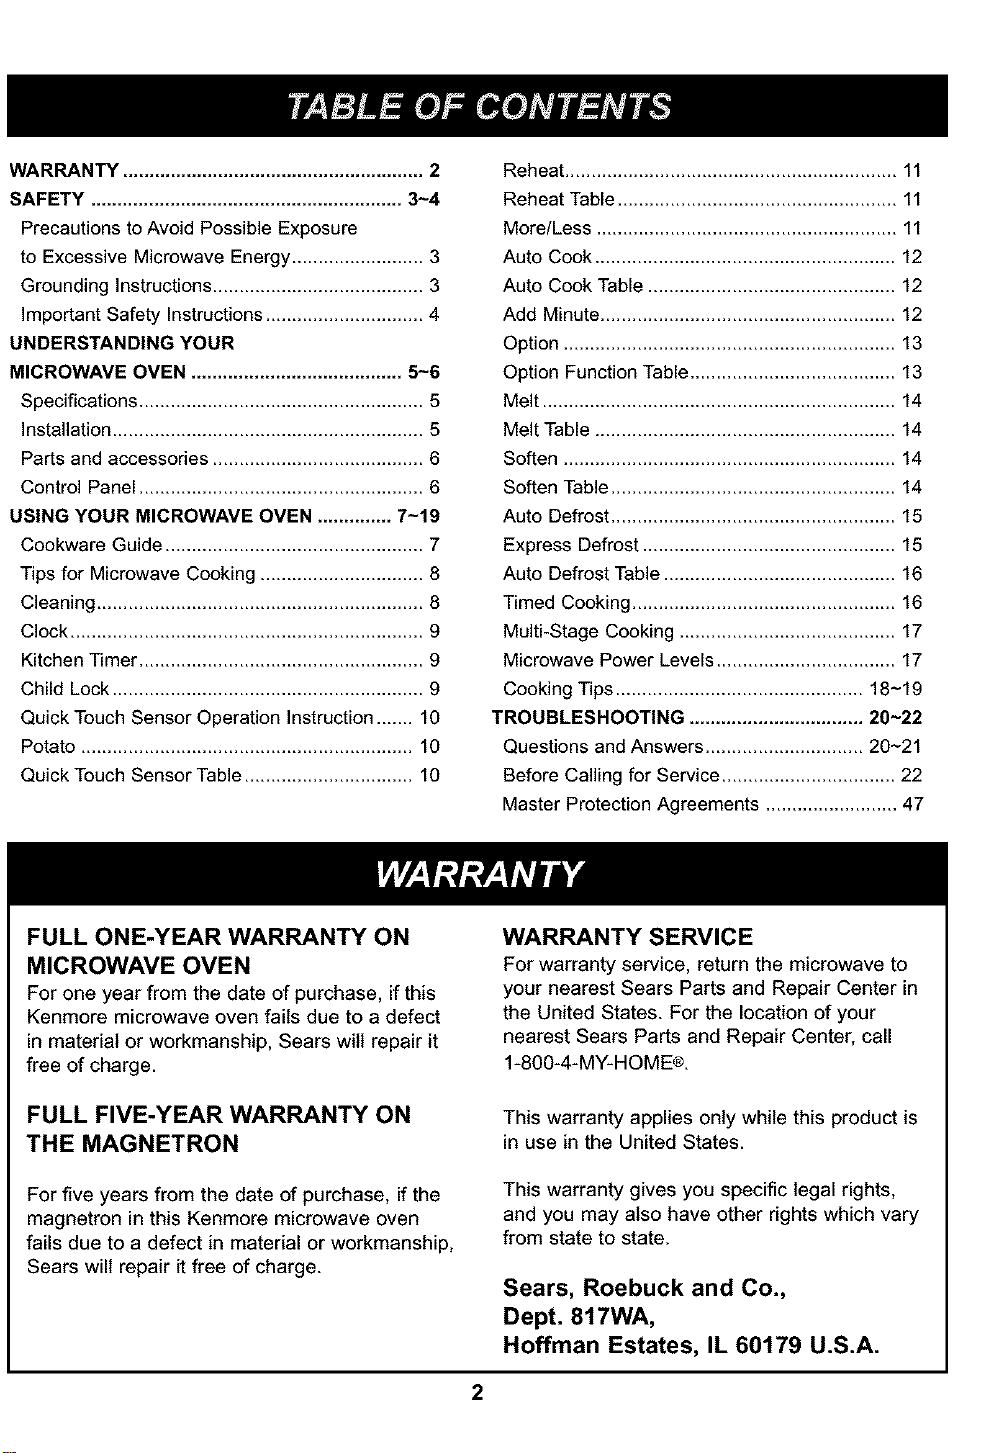
WARRANTY ......................................................... 2
SAFETY ........................................................... 3-4
PrecautionstoAvoid Possible Exposure
to Excessive Microwave Energy ......................... 3
Grounding Instructions ........................................ 3
Important Safety Instructions .............................. 4
UNDERSTANDING YOUR
MICROWAVE OVEN ........................................ 5-6
Specifications ...................................................... 5
Installation ........................................................... 5
Parts and accessories ........................................ 6
Control Panel ...................................................... 6
USING YOUR MICROWAVE OVEN .............. 7-19
Cookware Guide ................................................. 7
Tips for Microwave Cooking ............................... 8
Cleaning .............................................................. 8
Clock ................................................................... 9
Kitchen Timer ...................................................... 9
Child Lock ........................................................... 9
Quick Touch Sensor Operation Instruction ....... 10
Potato ............................................................... 10
Quick Touch Sensor Table................................ 10
Reheat............................................................... 11
Reheat Table ..................................................... 11
More/Less ......................................................... 11
Auto Cook ......................................................... 12
Auto Cook Table ............................................... 12
Add Minute ........................................................ 12
Option ............................................................... 13
Option Function Table....................................... 13
Melt ................................................................... 14
Melt Table ......................................................... 14
Soften ............................................................... 14
Soften Table ...................................................... 14
Auto Defrost ...................................................... 15
Express Defrost ................................................ 15
Auto Defrost Table ............................................ 16
Timed Cooking .................................................. 16
Multi-Stage Cooking ......................................... 17
Microwave Power Levels .................................. 17
Cooking Tips ............................................... 18-19
TROUBLESHOOTING ................................. 20-22
Questions and Answers .............................. 20-21
Before Calling for Service ................................. 22
Master Protection Agreements ......................... 47
FULL ONE-YEAR WARRANTY ON
MICROWAVE OVEN
For one year from the date of purchase, if this
Kenmore microwave oven fails due to a defect
in material or workmanship, Sears will repair it
free of charge.
WARRANTY SERVICE
For warranty service, return the microwave to
your nearest Sears Parts and Repair Center in
the United States. For the location of your
nearest Sears Parts and Repair Center, call
1-800-4-MY-HOME®.
FULL FIVE-YEAR WARRANTY ON
THE MAGNETRON
This warranty applies only while this product is
in use in the United States.
For five years from the date of purchase, if the
magnetron in this Kenmore microwave oven
fails due to a defect in material or workmanship,
Sears will repair it free of charge.
This warranty gives you specific legal rights,
and you may also have other rights which vary
from state to state.
Sears, Roebuck and Co.,
Dept. 817WA,
Hoffman Estates, IL 60179 U.S.A.
2
PRECAUTIONS TO AVOID POSSIBLE EXPOSURE
TO EXCESSIVE MICROWAVE ENERGY
• DO NOT attempt to operate this oven with
the door open, since open-door operation
can result in harmful exposure to microwave
energy. It is important not to defeat or
tamper with the safety interlocks.
• DO NOT operate the oven if it is damaged.
It is particularly important that the oven door
close properly and that there is no damage to
the:
1. door (bent)
2. hinges and latches (broken or loosened)
3. door seals and sealing surfaces.
• DO NOT place any object between the oven
front face and the door, or allow soil or
cleaner residue to accumulate on sealing
surfaces.
• THE OVEN should not be adjusted or
repaired by anyone except properly qualified
service personnel.
GROUNDING INSTRUCTIONS
This appliance must be grounded! If an electrical
short circuit occurs, grounding reduces the risk of
electric shock by providing an escape wire for the
electric current. This appliance is equipped with a
cord having a grounding wire with a grounding plug.
Put the plug into an outlet that is properly installed
and grounded.
/ WARNING
If you use the grounding plug improperly, you risk electric shock.
Ask a qualified electrician or the Sears Service
Department if you do not understand the grounding
instructions or if you wonder whether the appliance is
properly grounded.
This appliance has a short power supply cord to reduce
the risk of anyone's tripping over or becoming
entangled in the cord. You may use an extension cord if
you are careful.
If you use an extension cord, be sure that:
• The extension cord has the same electrical rating as
the appliance.
• The marked rating of the extension cord shall be
equal to or greater than the electrical rating of
the appliance.
• The extension cord is a grounding-type 3-wire cord.
• The extension cord does not drape over a
countertop or tabletop, where it can be pulled on
by children or tripped over accidentally.
• The electrical cord is dry and not pinched or
crushed in any way.
NOTE: This oven draws 13.8 amperes at 120 Volts, 60 Hz.
3

IMPORTANT SAFETY INSTRUCTIONS
The safety instructions below will tell you how to use your microwave oven to avoid harm to yourself or damage to your oven.
WARNING - To reduce the risk of burns, electric shock, fire, injury to persons, or exposure to excessive
microwave energy:
1. Read all the instructions before using your
microwave oven.
2. Donot allow children to usethis oven without close
supervisionl
3. Read andfollow the specific PRECAUTIONS TO AVOID
POSSIBLE EXPOSURE TO EXCESSIVE MICROWAVE
ENERGY found on page 3.
4. Donot tamper with the built- in safety switches on
the oven door! The oven has several boiit-insafety
switches tomake sure thepower isoffwhenthe door is
open.
5.When cleaning the door and the surfaces that touch
the door, useonly mild, nonabrasive soaps or
detergents and a sponge or soft cloth.
6. Ifyour oven is dropped or damaged, have it thoroughly
chocked bya qualified service technician before using it
again.
7.To avoid a fire hazard:
a) Do not severely overcookfoods. It cancausea fire in
the oven.
b) Do not use recycled paper products in your oven.
They can contain particles thatcan cause arcing or may
ignite.
c} Do notovercook potatoes.Overcooking could cause
a fire.
d) Do notstore combustible items (bread, cookies, etc.)
in the oven, because iflightning strikes the power lines,
it maycause the oven to turn ON.
e) Do not use wire twist-ties in the oven. Besure to
remove them before placingthe item inthe oven.
f) Do not usethe cavityfor storage purposes. Do not
leave paper products, cooking utensils, or food in the
cavity when not in use.
8. Ifa fire should start:
a) Keepthe oven door closed.
b) Turnthe oven off.
c) Disconnect the power cord or shut off the
power atthe fuse or circuit breaker panel.
9. Do not use this oven for commercial purposes. This
microwave is made for household use only.
10. Installor locate this appliance in accordance with the
providedinstallation instructions.
11.To avoid electric shock:
a) This appliance must be grounded! Connect itonlyto
a properlygroundedoutlet.(See the Grounding
instructions on page 3.)
b) Do notoperate this appliance if it hasa damaged
cord or plug, if it is not workingproperly,or if it has
been damaged or dropped.
c) Do notimmerse the electricalcord or plug in water.
d) Keep the cord awayfrom heated surfaces.
e) This appliance should be serviced only byqualified
service personnel.
12. Liquids such aswater, coffee, or tea areable to be
overheated beyond the boiling pointwithout appearing to
be boiling due to surface tension of the liquid. Visible
bubbling or boiling when the container is removed from
the microwave oven is not always present. This could
result in veryhot liquidssuddenly boiling overwhen a
spoon or other utensil is inserted intothe liquid.Toreduce
the dsk of injuryto persons; 1) Do notoverheat the liquid.
2) Stirthe liquidboth before and halfway through heating
it. 3) Do not use straight-sided containerswith narrow
necks. 4) Alter heating, allow the containerto stand in the
microwave oven for a shorttime before removing the
container. 5) Use extreme carewhen inserting aspoon or
other utensil intothe container.
13. Keep the glass tray and the turntable roller rest in the
oven when you arecooking.
14. Do not use the oven outdoors. Do not storethe oven
outdoors. Do not usethis product near water.
- for example, near a kitchen sink, in awet basement,
near aswimming pool, or similar location.
15. Do not cover or block any openings in the oven.
16. Do not runthe microwave oven empty.
17. Do not letthe cord hang overthe edge of atable or
counter.
18. Do not heat glass turntable excessively.
- Do not cook bacon directly on the glass turntable.
- Do not allowthe greyfilm on special microwave cooking
packages to touchthe glass turntable.Put the package
on a microwave-safe dish.
- Keep a browning dish at least _6 inch above the glass
turntable. Ifyou use the browning dish incerroctly,you
could break the glass turntable.
19. Be careful not to chip or scratch the edges ofthe
turntable.Chips or scratches may cause the turntable to
break dudng use.
20. Some produce such aswhole eggs andsealed
containers * forexample, closed glassjars are able to
explode and should not be heated in this oven.
SAVE THESE INSTRUCTIONS!
4
SPECIFICATIONS
Power Supply 120V AC, 60 Hz
Rated Power Consumption 1650W
Microwave Output *1200W
Rated Current 13.8A
Overall Dimensions(WxHxD) 21 7/8"x12 V2"x17 %"
Oven Cavity Dimensions(WxHxD) 14 W_"x9 5/8"x15 5/8"
Capacity of Oven Cavity 1.2 cu.ft
*IEC 60705 RATING STANDARD
Specifications subject to change without prior notice.
INSTALLATION
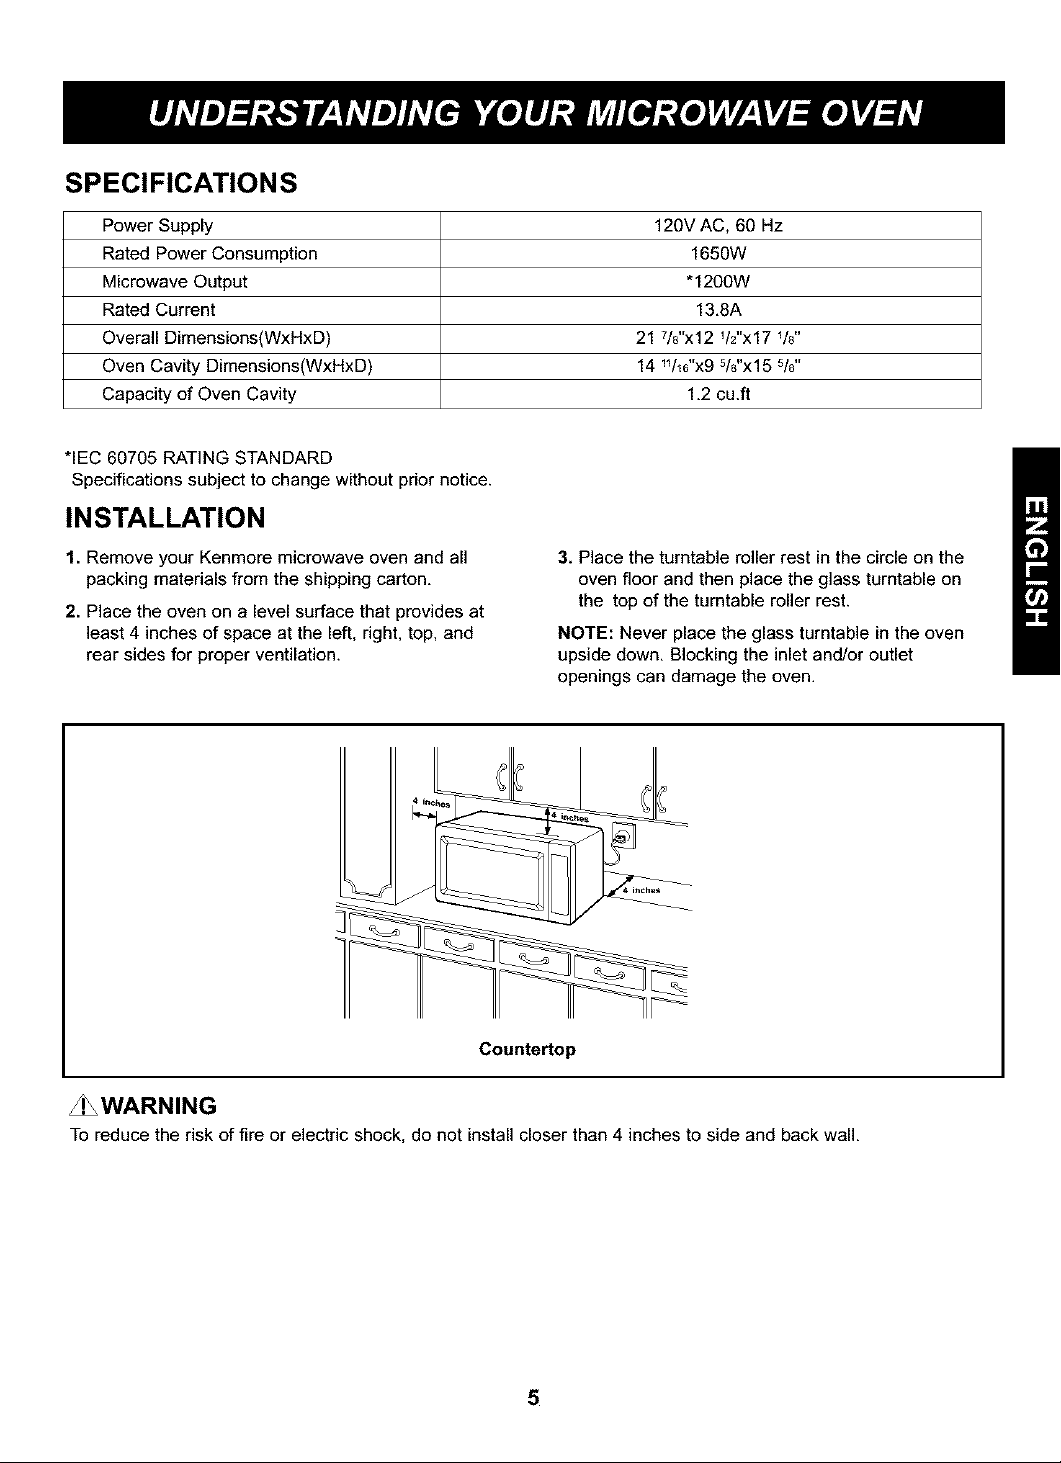
1. Remove your Kenmore microwave oven and all
packing materials from the shipping carton.
2. Place the oven on a level surface that provides at
least 4 inches of space at the left, right, top, and
rear sides for proper ventilation.
3. Place the turntable roller rest in the circle on the
oven floor and then place the glass turntable on
the top of the turntable roller rest.
NOTE: Never place the glass turntable in the oven
upside down. Blocking the inlet and/or outlet
openings can damage the oven.
Countertop
_WARNING
To reduce the risk of fire or electric shock, do not install closer than 4 inches to side and back wall.
5
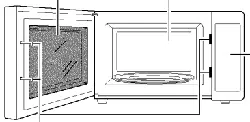
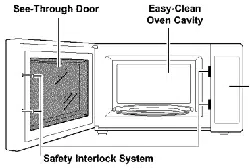
PARTS AND ACCESSORIES
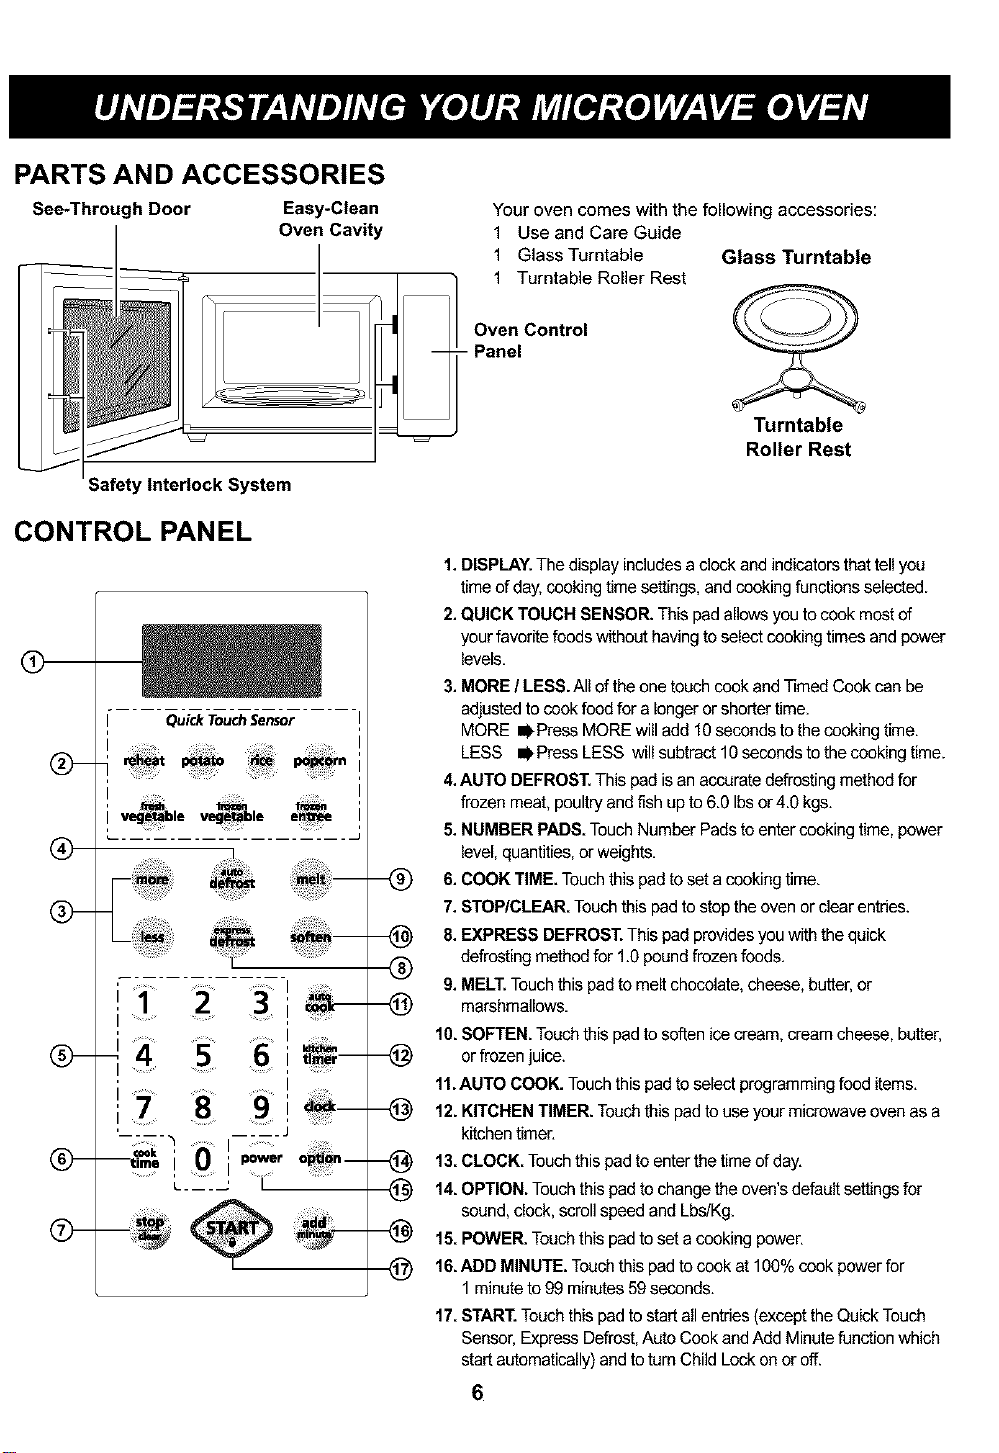
See*Through Door Easy-Clean
Oven Cavity
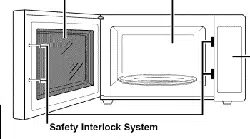
Safety Interlock System
Oven Control
-- - Panel
Your oven comes with the following accessories:
1 Use and Care Guide
1 Glass Turntable Glass Turntable
1 Turntable Roller Rest
Turntable
Roller Rest
CONTROLPANEL
@-
®
@-
@-
QuickTouchSensor
_t
.....................
J .....4 ....5 6
' .....7 8 9 a_
i
--time I ...... .....
i power
L____ I
-@
-@
®
-@
-@
-@
-@
@
-@
@
1.DISPLAY.The display includes aclock and indicators that tell you
time of day, cooking time settings, and cooking functions selected.
2. QUICK TOUCH SENSOR. This pad allows you to cook most of
your favorite foods without havingto select cooking times and power
levels.
3.MORE / LESS. All of the one touch cook and Timed Cook can be
adjusted to cook food for a longer or shorter time.
MORE m,Press MORE will add 10seconds to the cooking time.
LESS _ Press LESS will subtract 10 seconds to the cooking time.
4. AUTO DEFROST.This pad isan accurate defrosting methodfor
frozen meat, poultry andfish up to 6.0 Ibsor 4.0 kgs.
5.NUMBER PADS. TouchNumber Pads to enter cooking time, power
level, quantities,or weights.
6. COOK TIME.Touch this pad to set a cookingtime.
7. STOP/CLEAR. Touch this pad to stop the oven or clear entries.
8. EXPRESS DEFROST. This pad provides you withthe quick
defrosting method for 1.0 poundfrozenfoods.
9. MELT.Touch this pad to melt chocolate, cheese, butter,or
marshmallows.
10. SOFTEN. Touchthis pad to soften ice cream, cream cheese, butter,
or frozen juice.
11.AUTO COOK. Touchthis pad toselect programmingfood items.
12. KITCHEN TIMER. Touch this pad to use your microwave oven asa
kitchen timer.
13. CLOCK. Touch this pad to enter the time of day.
14. OPTION. Touchthis pad to changethe oven's default settingsfor
sound, clock, scroll speed and Lbs/Kg.
15. POWER. Touchthis pad to set a cooking power.
16. ADD MINUTE. Touch this padto cook at 100% cook powerfor
1minute to 99 minutes 59 seconds.
17. START.Touchthis pad to startall entries (except the Quick Touch
Sensor, Express Defrost, Auto Cook andAdd Minute function which
start automatically) and to turn Child Lockon or off.
6
COOKWARE GUIDE
Most heat-resistant, non-metallic cookware is safe for use in your microwave oven. However, to test cookware
before using, follow these steps:
1. Place the empty cookware in the microwave oven.
2. Measure 1 cup of water in a glass measuring cup and place it in the oven beside the cookware.
3. Microwave on 100% power for 1 minute. If the dish is warm, it should not be used for microwave cooking.
USE DO NOT USE
Ovenproof Glass
• Glass treated for use in high-intensity heat
includes utility dishes, bread dishes, pie plates, cake
plates, liquid measuring cups, casseroles, and bowls
without metallic trim
China
• Bowls, cups, serving plates, and platters without
metallic trim can be used in your oven.
Plastic
• When using plastic wrap as a cover, make sure that
the dish is deep enough so the plastic wrap does not
touch the food. As the food heats, it may melt the
plastic wrap wherever the wrap touches the food.
• Place plastic wrap loosely over the top of the dish
and secure it by pressing the wrap to the sides of
the dish.
• Vent by turning back one corner of the plastic wrap.
This will allow excess steam to escape.
• Use plastic dishes, cups, semi-rigid freezer
containers, and plastic bags only for short time
cooking. Use these with care because the
plastic may soften from the heat of the food.
Paper
• Microwave-safe paper towels, waxed paper, paper
napkins, and paper plates with no metallic trim or
design can be used in your oven.
• Refer to the manufacturer's label for use of any
paper product in the microwave oven.
Metal Utensils
• Metal shields food from microwave energy and
produces uneven cooking. Avoid metal skewers,
thermometers, or foil trays.
• Metal utensils can cause arcing, which is a
discharge of electric current. Arcing can damage
your microwave oven.
Metal Decoration
• Do not use metal-trimmed or metal-banded
dinnerware, casserole dishes, etc
Centura TM Tableware
• The Coming Company recommends that you
de not use Centura tableware and some Corelle TM
closed-handle cups for microwave
cooking
Aluminum Foil
• Avoid large sheets of aluminum foil because
they hinder cooking and may cause arcing.
• Use small pieces of foil to shield poultry legs
and wings.
• Keep all aluminum foil at least 1 inch from the walls
and door of the oven.
Wood
• Wooden bowls, boards, and baskets will dry out and
may split or crack when you use them in the
microwave oven.
Tightly Closed Containers
• Tightly closed cookware can explode Be sure
to leave an opening for steam to escape from
covered cookware
Brown Paper
• Avoid using brown paper bags They absorb
heat and could burn
Metal Twist-Ties
• Always remove metal twist-ties as they can become
hot and cause a fire.
7
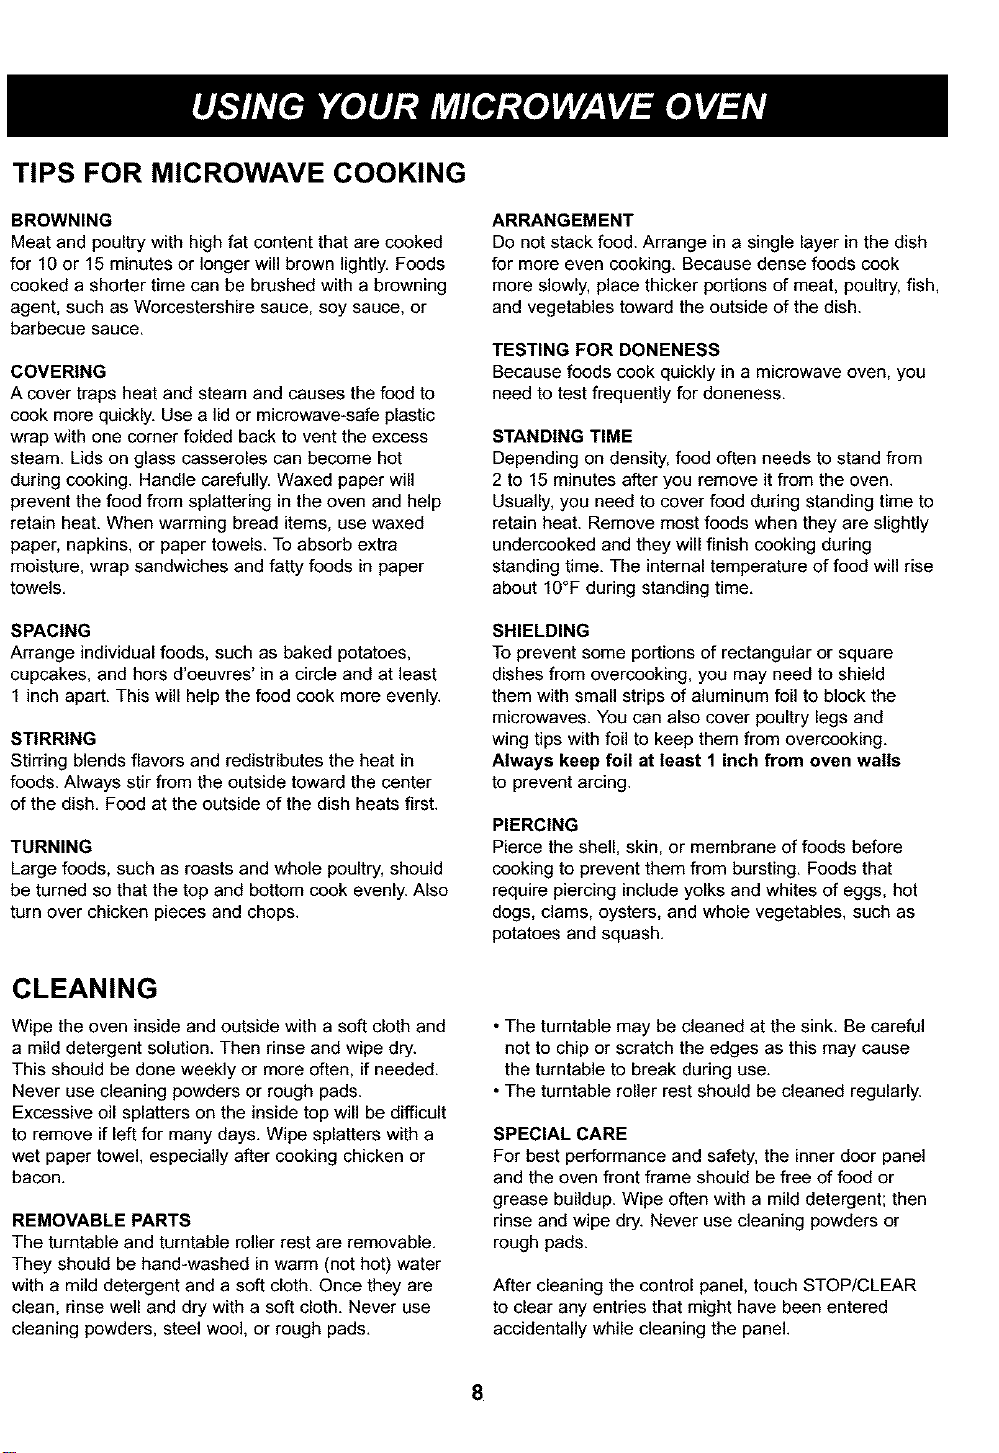
TIPS FOR MICROWAVE COOKING
BROWNING
Meat and poultry with high fat content that are cooked
for 10 or 15 minutes or longer will brown lightly. Foods
cooked a shorter time can be brushed with a browning
agent, such as Worcestershire sauce, soy sauce, or
barbecue sauce.
COVERING
A cover traps heat and steam and causes the food to
cook more quickly. Use a lid or microwave-safe plastic
wrap with one corner folded back to vent the excess
steam. Lids on glass casseroles can become hot
during cooking. Handle carefully. Waxed paper will
prevent the food from splattering in the oven and help
retain heat. When warming bread items, use waxed
paper, napkins, or paper towels. To absorb extra
moisture, wrap sandwiches and fatty foods in paper
towels.
SPACING
Arrange individual foods, such as baked potatoes,
cupcakes, and hors d'oeuvres' in a circle and at least
1 inch apart. This will help the food cook more evenly.
STIRRING
Stirring blends flavors and redistributes the heat in
foods. Always stir from the outside toward the center
of the dish. Food at the outside of the dish heats first.
TURNING
Large foods, such as roasts and whole poultry, should
be turned so that the top and bottom cook evenly. Also
turn over chicken pieces and chops.
ARRANGEMENT
Do not stack food. Arrange in a single layer in the dish
for more even cooking. Because dense foods cook
more slowly, place thicker portions of meat, poultry, fish,
and vegetables toward the outside of the dish.
TESTING FOR DONENESS
Because foods cook quickly in a microwave oven, you
need to test frequently for doneness.
STANDING TIME
Depending on density, food often needs to stand from
2 to 15 minutes after you remove it from the oven.
Usually, you need to cover food during standing time to
retain heat. Remove most foods when they are slightly
underceoked and they will finish cooking during
standing time. The internal temperature of food will rise
about 10°F during standing time.
SHIELDING
To prevent some portions of rectangular or square
dishes from overceoking, you may need to shield
them with small strips of aluminum foil to block the
microwaves. You can also cover poultry legs and
wing tips with foil to keep them from overcooking.
Always keep foil at least 1 inch from oven walls
to prevent arcing,
PIERCING
Pierce the shell, skin, or membrane of foods before
cooking to prevent them from bursting. Foods that
require piercing include yolks and whites of eggs, hot
dogs, clams, oysters, and whole vegetables, such as
potatoes and squash.
CLEANING
Wipe the oven inside and outside with a soft cloth and
a mild detergent solution. Then rinse and wipe dry.
This should be done weekly or more often, if needed.
Never use cleaning powders or rough pads.
Excessive oil splatters on the inside top will be difficult
to remove if left for many days. Wipe splatters with a
wet paper towel, especially after cooking chicken or
bacon.
REMOVABLE PARTS
The turntable and turntable roller rest are removable.
They should be hand-washed in warm (not hot) water
with a mild detergent and a soft cloth. Once they are
clean, rinse well and dry with a soft cloth. Never use
cleaning powders, steel wool, or rough pads.
• The turntable may be cleaned at the sink. Be careful
not to chip or scratch the edges as this may cause
the turntable to break during use.
• The turntable roller rest should be cleaned regularly.
SPECIAL CARE
For best performance and safety, the inner door panel
and the oven front frame should be free of food or
grease buildup. Wipe often with a mild detergent; then
rinse and wipe dry. Never use cleaning powders or
rough pads.
After cleaning the control panel, touch STOP/CLEAR
to clear any entries that might have been entered
accidentally while cleaning the panel.
8
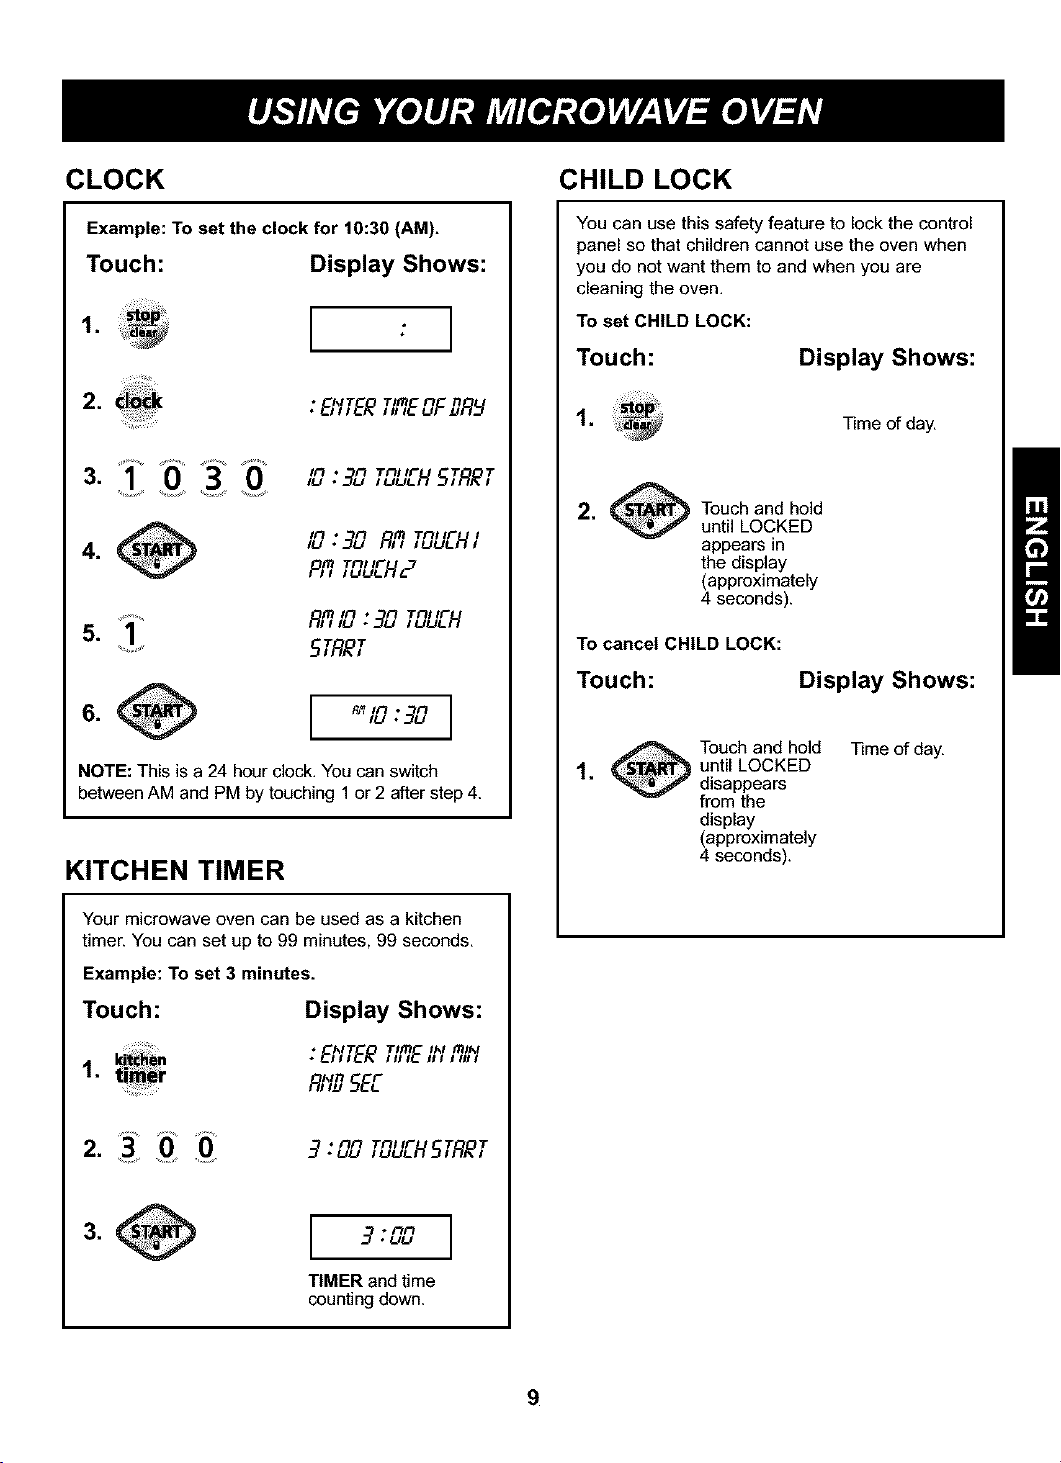
CLOCK
Example: To set the clock for 10:30 (AM).
Touch: Display Shows:
, I ' I
, • 14IT Tim FI 1"1
•B,,EE ,,,/E,.;F.,,R_
3. O' 0
II'l • 1_ T_II IF T T
,_ •30 ,_H 5,_gE,
IFI • FI [R T_II IF I
IU * --_L,_ RII IUUL_"/I
plml TFH IF,uuU-12
Atl IFI T_II IF
_,,u :30 ,uuLH
5. 1
5TRET
NOTE: This is a 24 hour clock. You can switch
between AM and PM by touching 1 or 2 after step 4.
KITCHEN TIMER
Your microwave oven can be used as a kitchen
timer. You can set up to 99 minutes, 99 seconds.
Example: To set 3 minutes.
Touch: Display Shows:
: EhlTEETItlE/hlfil/'l
1.
R,"IDSEE
,HILD LOCK
You can use this safety feature to lock the control
panel so that children cannot use the oven when
you do not want them to and when you are
cleaning the oven.
To set CHILD LOCK:
Touch:
Display Shows:
,
]]me of day.
A
2. CSTART_ Touch and hold
until LOCKED
appears in
the display
(approximately
4 seconds).
To cancel CHILD LOCK:
Touch: Display Shows:
,
_ ouch and hold
until LOCKED
disappears
from the
display
(approximately
4 seconds).
]]me of day.
• I'll'l T_II IF T T
,
I 3" nn I
°UU
TIMER and time
counting down.
9
QUICK TOUCH SENSOR
OPERATION INSTRUCTION
Sensor touch cooking provides exciting new features
to make microwaving easier. Sensor menu with all the
popular food choices, helps you to reheat perfectly
because it has been pre-programmed and can tell how
long to reheat food items.
Categories:
Reheat, Potato, Rice
Popcorn, Fresh Vegetable
Frozen Vegetable, Frozen Entree
For most Quick Touch Sensor Cooking programs, a table
with specific food examples and cooking instructions is
provided in the next a few pages.
• The Sensor Touch system works by detecting a build-up
of vapor.
• Make sure the door remains closed.
• Once the vapor is detected, two beeps will sound.
• Opening the door or touching the STOP/CLEAR pad
before the vapor is detected will abort the process. The
oven will stop.
• Before using Quick Touch Sensor, make sure the exterior
of the reheating container and the interior of the oven are
dry, to assure the best results.
• Room temperature should not exceed 95°F.
• Oven should be plugged in at least 5 minutes before
sensor cooking.
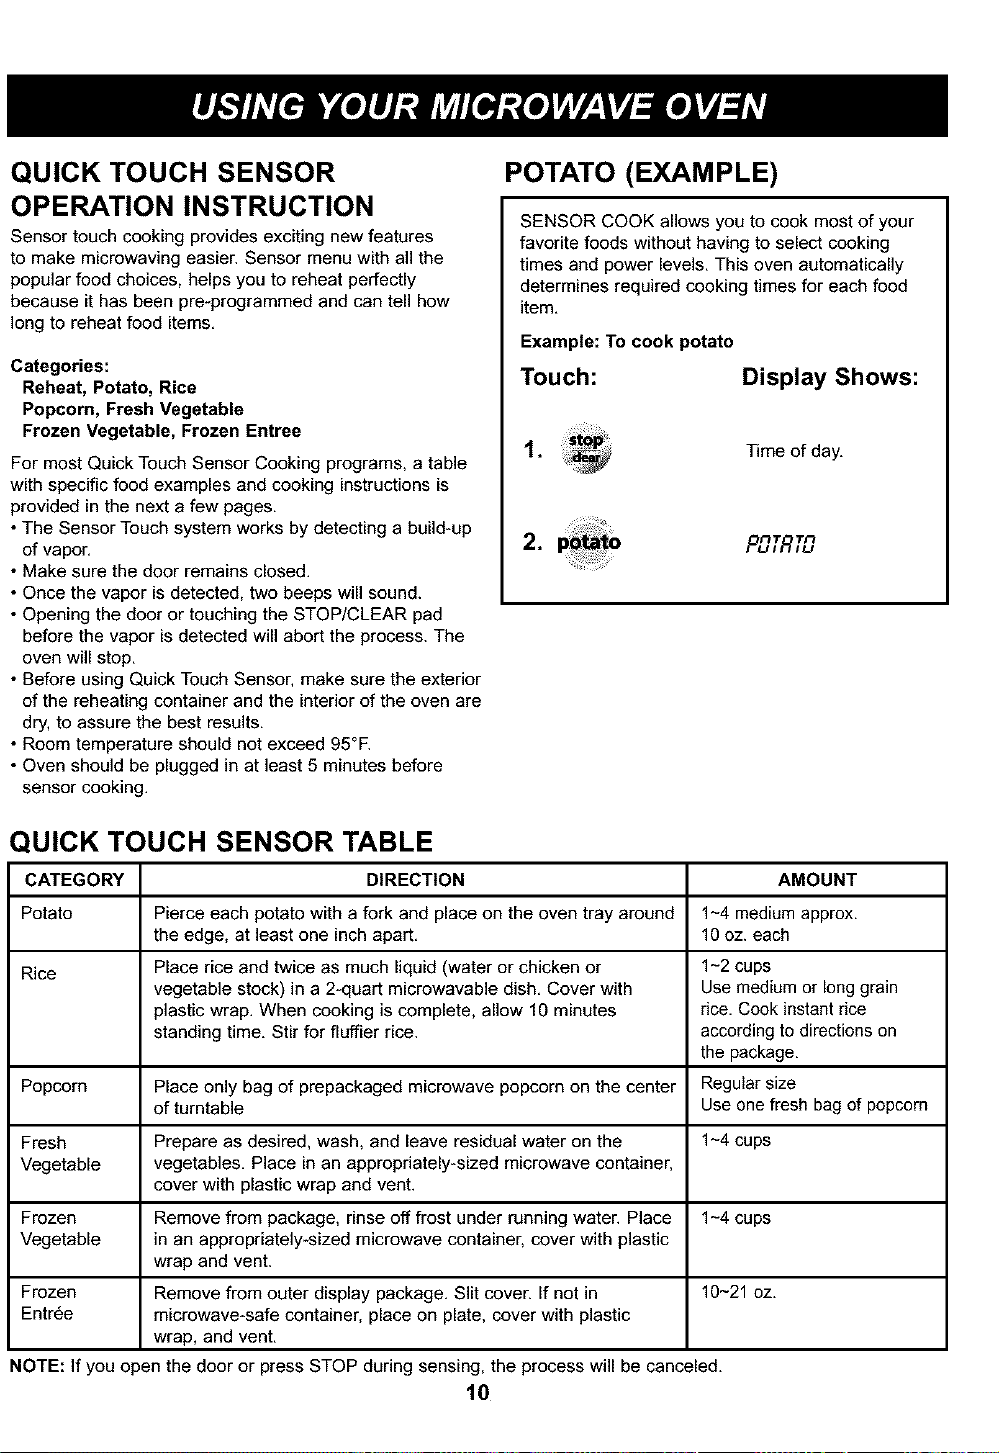
POTATO (EXAMPLE)
SENSOR COOK allows you to cook most of your
favorite foods without having to select cooking
times and power levels. This oven automatically
determines required cooking times for each food
item.
Example: To cook potato
Touch: Display Shows:
,
Time of day.
2, PO,;q,u
QUICK TOUCH SENSOR TABLE
CATEGORY DIRECTION AMOUNT
Potato Pierce each potato with a fork and place on the oven tray around 1-4 medium approx.
the edge, at least one inch apart. 10 oz. each
Rice Place rice and twice as much liquid (water or chicken or 1-2 cups
vegetable stock) in a 2-quart microwavable dish. Cover with Use medium or long grain
plastic wrap. When cooking is complete, allow 10 minutes rice. Cook instant rice
standing time. Stir for fluffier rice. according to directions on
the package.
Popcorn Place only bag of prepackaged microwave popcorn on the center Regular size
of turntable Use one fresh bag of popcorn
Fresh Prepare as desired, wash, and leave residual water on the 1-4 cups
Vegetable vegetables. Place in an appropriately-sized microwave container,
cover with plastic wrap and vent.
Frozen Remove from package, rinse off frost under running water. Place 1-4 cups
Vegetable in an appropriately-sized microwave container, cover with plastic
wrap and vent.
Frozen Remove from outer display package. Slit cover. If not in 10-21 oz.
Entr6e microwave-safe container, place on plate, cover with plastic
wrap, and vent.
NOTE: If you open the door or press STOP during sensing, the processwill be canceled,
10
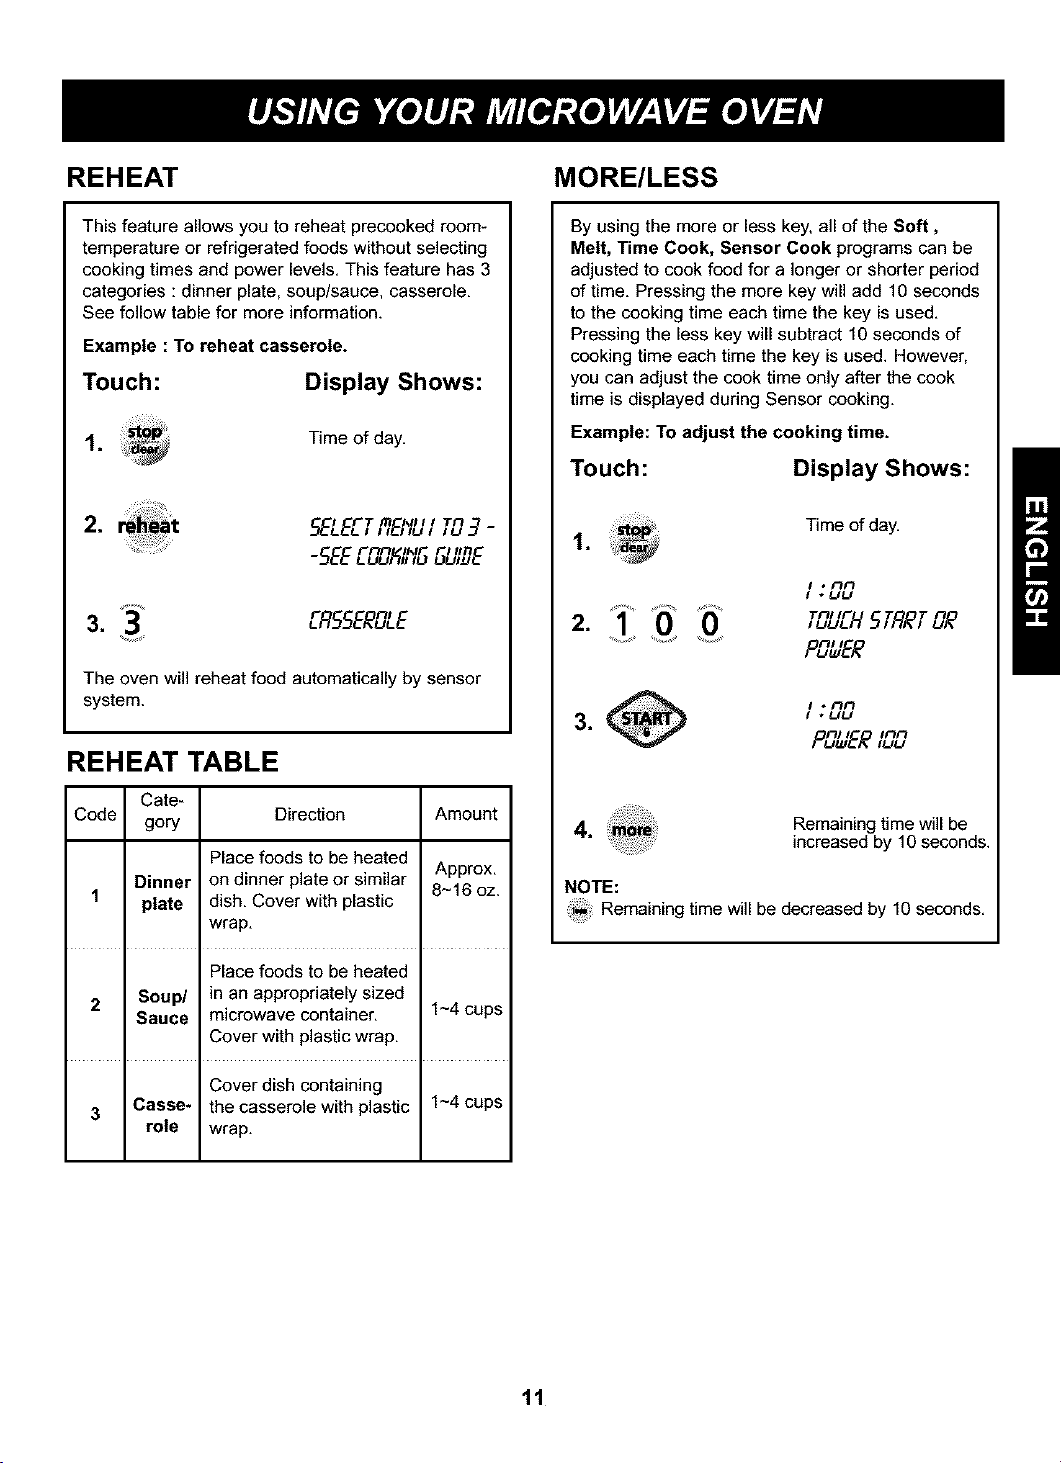
REHEAT
This feature allows you to reheat precooked room-
temperature or refrigerated foods without selecting
cooking times and power levels. This feature has 3
categories : dinner plate, soup/sauce, casserole.
See follow table for more information.
Example : To reheat casserole.
Touch:
Display Shows:
Time of day.
,
$ rT l_l I_lll l T_/
5ELE_, ,,_ ,u, ,u -q-
rnn t_lr rt II1"1
-SEE_.uuff_,,o ou,_E
3. _3' ER55EE3LE
The oven will reheat food automatically by sensor
system.
REHEAT TABLE
Care-
Code Direction
gory
Place foods to be heated
Dinner on dinner plate or similar
plate dish. Cover with plastic
wrap.
Amount
Approx.
8-16 oz.
Place foods to be heated
2 Soup/ in an appropriately sized
Sauce microwave container. 1~4 cups
Cover with plastic wrap.
Cover dish containing
3 Casse* the casserole with plastic 1~4 cups
role wrap.
MORE/LESS
By using the more or less key, all of the Soft,
Melt, Time Cook, Sensor Cook programs can be
adjusted to cook food for a longer or shorter period
of time. Pressing the more key will add 10 seconds
to the cooking time each time the key is used.
Pressing the less key will subtract 10 seconds of
cooking time each time the key is used. However,
you can adjust the cook time only after the cook
time is displayed during Sensor cooking.
Example: To adjust the cooking time.
Touch:
Display Shows:
Time of day.
I .nn
I *UU
2. ,uuJ'l 5,RE, UE
Pun_,EE
I ,nn
, I * UU
nl I inn
P_w'ER,uu
4.
Remaining time willbe
increased by 10 seconds.
NOTE:
Remaining time will be decreased by 10 seconds.
11
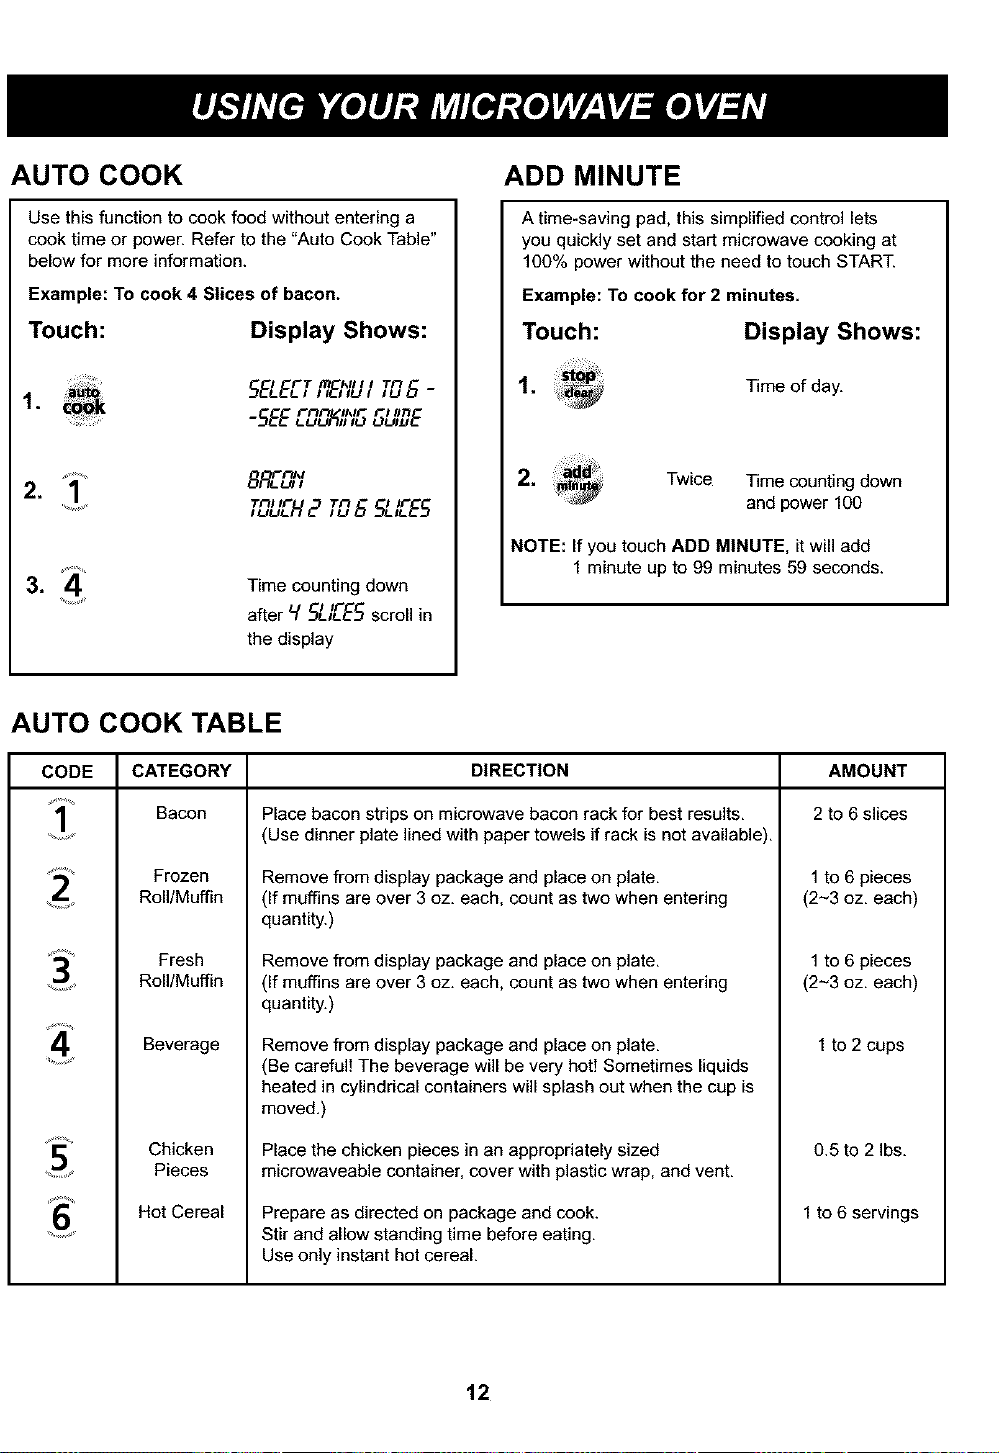
AUTO COOK
Use this function to cook food without entering a
cook time or power. Refer to the "Auto Cook Table"
below for more information.
Example: To cook 4 Slices of bacon.
Touch:
Display Shows:
,
I FT m I_llll
5ELE[, ,TB,u, TO6-
i'i3 I_,li"i'l#17
-SEELJO_,,oo_,_E
...... 8RE_'
2. 1
TF_I IF
..... ,_H 2 TO6 5L/EE5
3. 4 Time counting down
....... after V 5LICE5 scroll in
the display
ADD MINUTE
A time-saving pad, this simplified control lets
you quickly set and start microwave cooking at
100% power without the need to touch START.
Example: To cook for 2 minutes.
Touch:
Display Shows:
,
Time of day.
2. _,,i Twice Time counting down
' _ and power 100
NOTE: If you touch ADD MINUTE, it will add
1 minute up to 99 minutes 59 seconds.
AUTO COOK TABLE
CODE DIRECTION
1
4
CATEGORY
Bacon
Frozen
Roll/Muffin
Fresh
Roll/Muffin
Beverage
Chicken
Pieces
Hot Cereal
Place bacon strips on microwave bacon rack for best results.
(Use dinner plate lined with paper towels if rack is not available).
Remove from display package and place on plate.
(If muffins are over 3 oz. each, count as two when entering
quantity.)
Remove from display package and place on plate.
(If muffins are over 3 oz. each, count as two when entering
quantity.)
Remove from display package and place on plate.
(Be careful! The beverage will be very hot! Sometimes liquids
heated in cylindrical containers will splash out when the cup is
moved.)
Place the chicken pieces in an appropriately sized
microwaveable container, cover with plastic wrap, and vent.
Prepare as directed on package and cook.
Stir and allow standing time before eating.
Use only instant hot cereal.
AMOUNT
2 to 6 slices
1 to 6 pieces
(2~3 oz, each)
1 to 6 pieces
(2~3 oz, each)
1to 2 cups
0.5 to 2 Ibs.
1to 6 servings
12

OPTION
OPTION provides four modes which make using your microwave oven quite handy. You can select
SOUND ON/OFF, CLOCK ON/OFF, SCROLL SPEED and LBS/KG.
Example: To turn off Sound of beeper
Touch: Display Shows:
1. ;_ Time of day.
2, Four modes show in
the display.
.......... t_l tM_ r_t T_l tr t
3. 1 5#u,i.u,i,,_,_._,
..... OFFTDurH?
t_l tM_
£%,,,, OFF
Time of day.
NOTE: To turn beep sound back on, repeat steps
1-3 then touch number 1.
Example: To select Kg unit:
Touch: Display Shows:
1, _ Time of day.
2. option Four modes show in
the display.
L85 ,_u.H,_"r,
3. 4
r Tf'_I ir
4.
Time of day.
NOTE: To change to LBS, repeat steps 1~3 then
touch number 1
OPTION FUNCTION TABLE
NUMBER OPTION NUMBER RESULT
........ 1 Sound On
1 SOUND ON / OFF
.... 2 Sound Off
1 Clock On
CLOCK ON / OFF
.... 2 ClockOff
1 Slowspeed
'3 SCROLL SPEED 2 Normal speed
3 Fast speed
....... 1 Lbs
4 LBS / KG
........ 2 Kg
NOTE: When the power cord is first plugged in, the default settings are Sound On, Clock On, Normal Speed and
LBS.
13
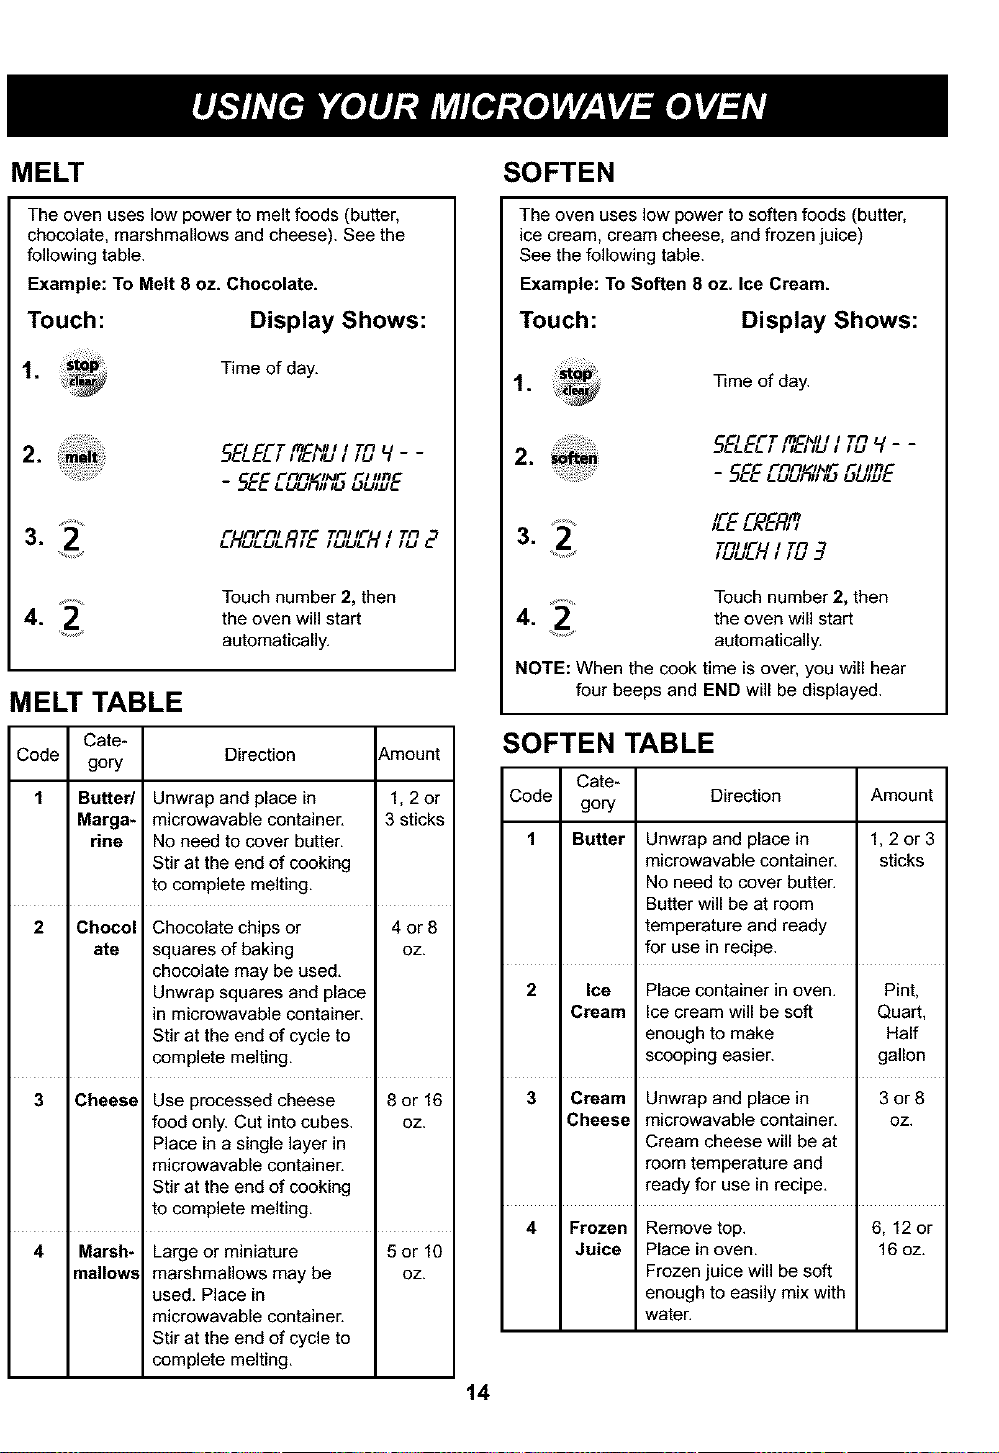
MEEt
SOFTEN
The oven uses low power to melt foods (butter,
chocolate, marshmallows and cheese). See the
following table.
Example: To Melt 8 oz. Chocolate.
Touch:
Display Shows:
, Time of day.
,
3. 2
4. 2
I FT ITi ,_Itl I TI'I
5ELE[_,,",EJ_, ,_,_l- -
rl'l_ I,M_ rl flit
- SEE_,_,N,,o ou,_E
r nrnl 1" Tnl IF l
Touch number 2, then
the oven will start
automatically.
MELT TABLE
Cate-
Code Direction Amount
gory
1 Butter/ Unwrap and place in 1, 2 or
Marga- microwavable container. 3 sticks
rine No need to cover butter.
Stir at the end of cooking
to complete melting.
2 Chocol Chocolate chips or 4 or 8
ate squares of baking oz.
chocolate may be used.
Unwrap squares and place
in microwavable container.
Stir at the end of cycle to
complete melting.
3 Cheese Use processed cheese 8 or 16
food only. Cut into cubes, oz.
Place in a single layer in
microwavable container.
Stir at the end of cooking
to complete melting.
4 Marsh- Large or miniature 5 or 10
mallow_ marshmallows may be oz.
used. Place in
microwavable container.
Stir at the end of cycle to
complete melting.
The oven uses low power to soften foods (butter,
ice cream, cream cheese, and frozen juice)
See the following table.
Example: To Soften 8 oz. Ice Cream.
Touch:
Display Shows:
1. ,meofday
2.
I FTf# MII I
5ELEL,,Tb,u , _9 q - -
rnn ,',_ rl lift
- SEE_N, ,oou,_E
_2" IF" r IT_
3. ,2 EREF_,
Tnl IF I Tn
..... IUUI-'_, IU 3
......... Touch number 2, then
4. 2 the oven will start
automatically.
NOTE: When the cook time is over, you will hear
four beeps and END will be displayed.
SOFTEN TABLE
Cate-
gory
Butter
Code Direction Amount
1 Unwrap and place in 1, 2 or 3
microwavabie container, sticks
No need to cover butter.
Butter will be at room
temperature and ready
for use in recipe.
2 Ice Place container in oven. Pint,
Cream Ice cream will be soft Quart,
enough to make Half
scooping easier, gallon
3 Cream Unwrap and place in 3 or 8
Cheese microwavable container, oz.
Cream cheese will be at
room temperature and
ready for use in recipe.
4 Frozen Remove top. 6, 12 or
Juice Place in oven. 16 oz.
Frozen juice will be soft
enough to easily mix with
water.
14
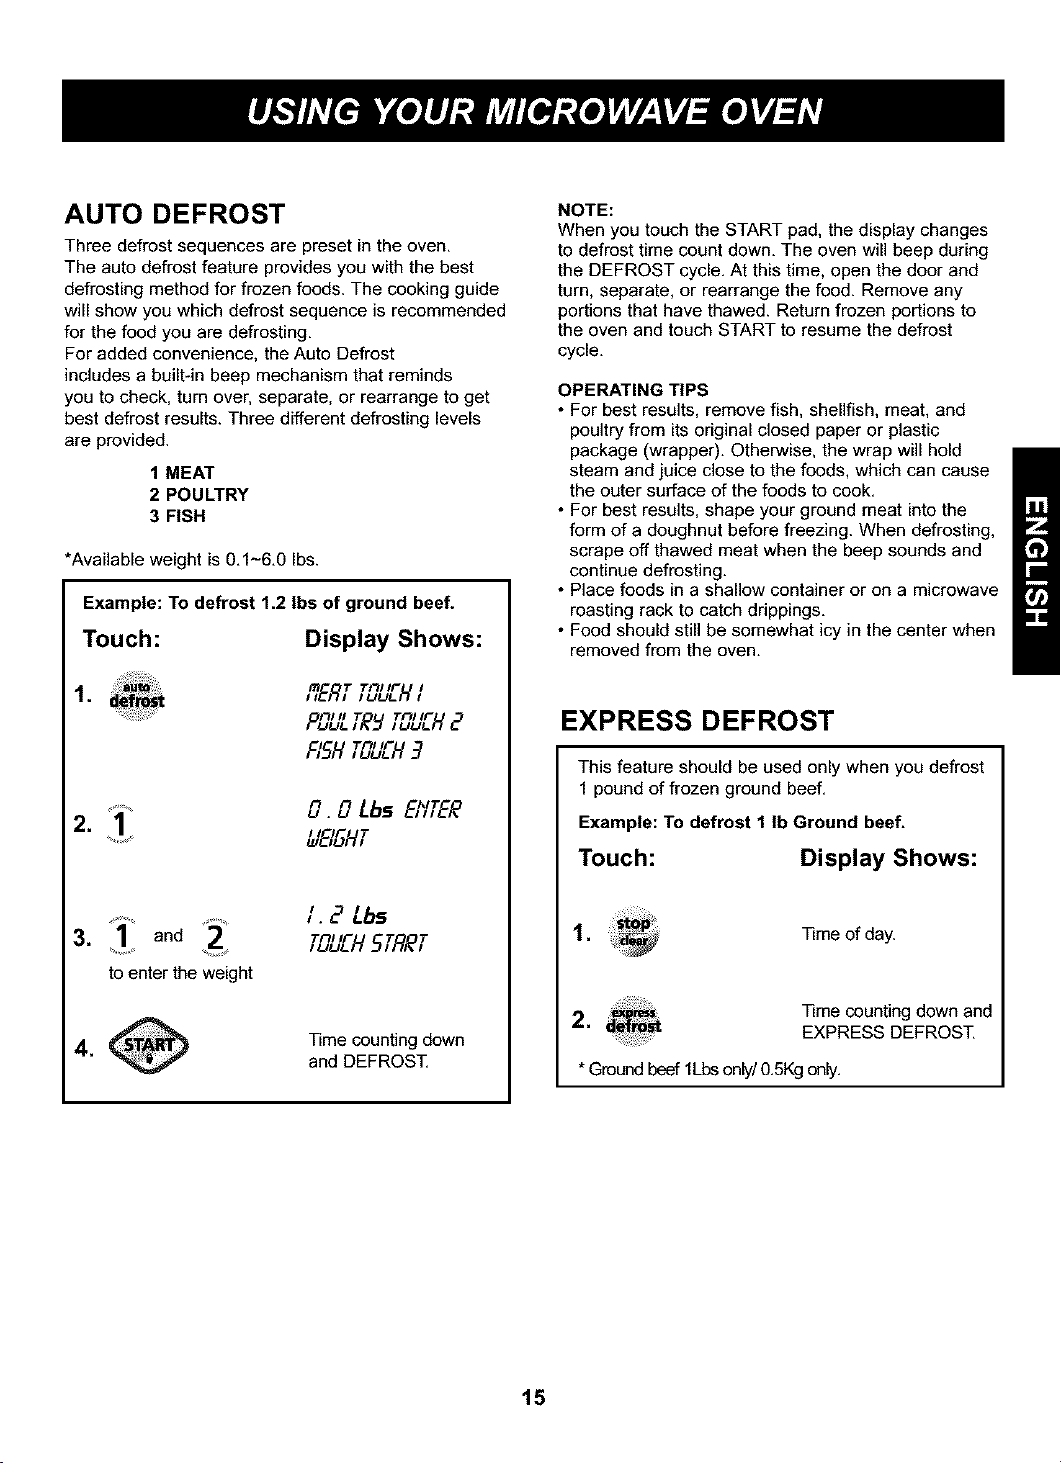
AUTO DEFROST
Three defrost sequences are preset in the oven.
The auto defrost feature provides you with the best
defrosting method for frozen foods. The cooking guide
will show you which defrost sequence is recommended
for the food you are defrosting.
For added convenience, the Auto Defrost
includes a built-in beep mechanism that reminds
you to check, turn over, separate, or rearrange to get
best defrost results. Three different defrosting levels
are provided.
1 MEAT
2 POULTRY
3 FISH
*Available weight is 0.1-6.0 Ibs.
Example: To defrost 1.2 Ibs of ground beef.
Touch: Display Shows:
,
_ERT_n,,r ,I UUL}'_ t
nl II T Tnl IF
P,_,'R_ ,_l ?
Till IF
n n Lbs EMTER
U.U
2.
......_ l.E/_qHT
' ? LbsI *
3. 1 and ,uuLHS,_7_o
Tnl IF T T
to enter the weight
A
_._"$T,_,_ Time counting down
4.
and DEFROST.
NOTE:
When you touch the START pad, the display changes
to defrost time count down. The oven will beep during
the DEFROST cycle. At this time, open the door and
turn, separate, or rearrange the food. Remove any
portions that have thawed. Return frozen portions to
the oven and touch START to resume the defrost
cycle.
OPERATING TIPS
• For best results, remove fish, shellfish, meat, and
poultry from its original closed paper or plastic
package (wrapper). Otherwise, the wrap will hold
steam and juice close to the foods, which can cause
the outer surface of the foods to cook.
• For best results, shape your ground meat into the
form of a doughnut before freezing. When defrosting.
scrape off thawed meat when the beep sounds and
continue defrosting.
• Place foods in a shallow container or on a microwave
roasting rack to catch drippings.
• Food should still be somewhat icy in the center when
removed from the oven.
EXPRESS DEFROST
This feature should be used only when you defrost
1 pound of frozen ground beef.
Example: To defrost 1 Ib Ground beef.
Touch: Display Shows:
1. _ Time of day.
2. a_
Time counting down and
EXPRESS DEFROST.
* Ground beef 1Lbs only/0.5Kg only.
15

AUTO DEFROST TABLE
Category Food to be Defrosted
Beef
Ground beef, Round steak,
Cubes for stew, Tenderloin steak,
_-._ Pot roast, Rib roast, Rump roast,
] Chuck roast, Hamburger patty
_,."_ Lamb
MEAT Chops (1-inch thick), Rolled roast
Pork
Chops ( ½-inch thick), Hot dogs,
Spareribs, Country-style ribs.
Rolled roast, Sausage
Veal
Cutlets (1 lb., ½-inch thick)
Poultry
Whole (under 4 Ibs.), Cut-up, Breasts
',...... (boneless)
POULTRY Cornish Hens
Whole
Turkey
Breast
Steaks/Chops
Round beef steak, Tenderloin steak
Lamb chops (1-inch thick)
Pork chops (½-inch thick)
,J
Veal cutlets (1 Ibs, ½-inch thick)
FISH Fish
Fillets, Whole Steaks
Shellfish
Crab meat, Lobster tails, Shrimp,
Scallops
TIMED COOKING
This feature lets you program a specific cook time
and power. For best results, there are 10 power
level settings in addition to HIGH power (100%).
Refer to the "Microwave Power Level Table" on
page 17 for more information.
NOTE: If you do not select a power level, the oven
will automatically cook at HIGH (100%) power,
Example: To cook for 5 minutes, 30 seconds
at 80% power.
Touch:
cook
1. time
Display Shows:
_IT FF_F_ II_lr Tim
. B,,EE _JK_,,o ,,,,E
..........b
2. 5
• n TFII IF T T
5.3,.g ,,_,,_,,_IIS,RR,
n nl I
urEPO_EE
3. power
• n kit nl I
5.3,.qEn,ERPC,_,ER
I If I I IU IULEVEL, Tn ,n
4.8
, n nll
5 30 P_,,,,ER
sun Tnl IF,o,J-I 5"fRR'f
,
Time counting down
and POWER 80.
When the first stage is over, you will hear two
short tones as the oven begins the second
cook stage.
16
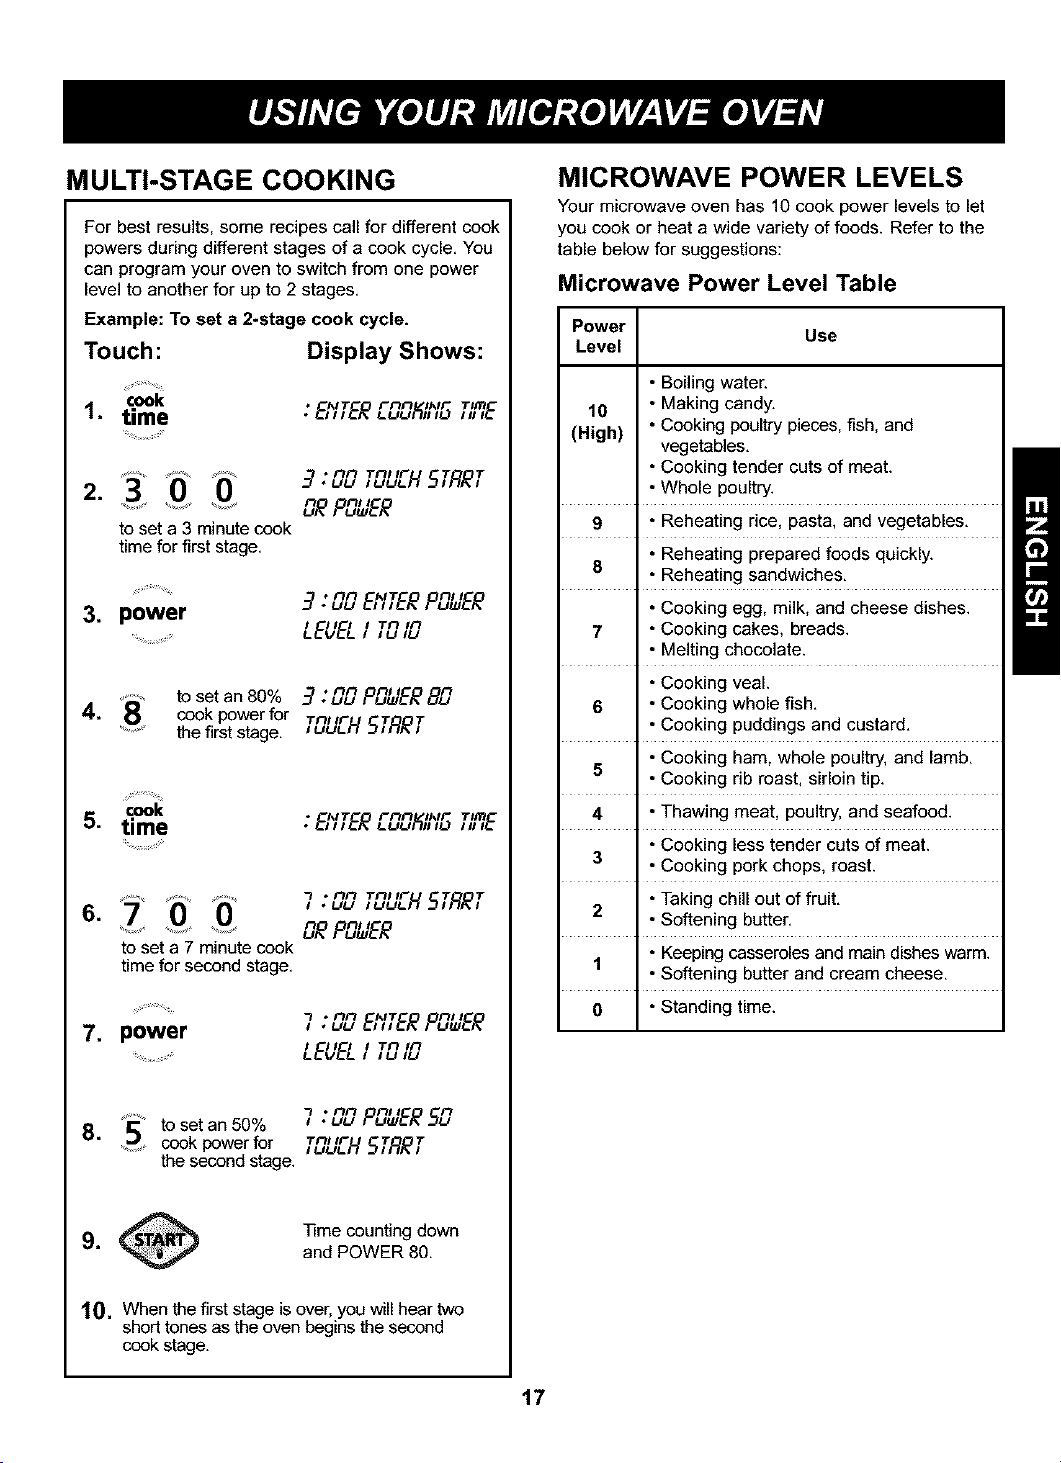
MULTI-STAGE COOKING
For best results, some recipes call for different cook
powers during different stages of a cook cycle. You
can program your oven to switch from one power
level to another for up to 2 stages.
Example: To set a 2-stage cook cycle.
Touch:
Display Shows:
cook
1. time
to set a 3 minute cook
time for first stage.
• nn Tnl IF T T
n nl I
uR PO_EE
• nn I_IT nl I
................. 3. _ E_,,ERP&.EE
3. power
I CI4rCIll l I Tn in
....................... LCVCL I
IU IU
• nn nl I n
_, to set an 80% 3. uu P_w_/_ 8_
4.
t$ cook power for Tnssr T T
......... the first stage, luuLHSIR_I
cook
time
• kit rnn SklE TII_
to set a 7 minute cook
time for second stage.
* UU Tnl IF T T
n nl I
_R PC,_EE
"_ . nn kit nl I
, •_ B,,E# PC,_EE
7. power
I III S
L 'Z'l`r£',CVCL Tn in
IU IU
"_ • nn nsI n
. ..... , •_,.,PC;=EI?50
8. 5 to set an 50% Tn, lr T T
.....• cook power for luuL_SiR_l
the second stage.
]1me counting down
and POWER 80.
10. When the first stage is over, you will hear two
short tones as the oven begins the second
cook stage.
MICROWAVE POWER LEVELS
Your microwave oven has 10 cook power levels to let
you cook or heat a wide variety of foods. Refer to the
table below for suggestions:
Microwave Power Level Table
Power Use
Level
• Boiling water.
10 • Making candy.
(High) • Cooking poultry pieces, fish, and
vegetables.
• Cooking tender cuts of meat.
• Whole poultry.
9 • Reheating rice, pasta, and vegetables.
• Reheating prepared foods quickly.
8 • Reheating sandwiches.
• Cooking egg, milk, and cheese dishes.
7 • Cooking cakes, breads.
• Melting chocolate.
• Cooking veal.
6 • Cooking whole fish.
• Cooking puddings and custard.
5 • Cooking ham, whole poultry, and lamb.
• Cooking rib roast, sirloin tip.
4 • Thawing meat, poultry, and seafood.
• Cooking less tender cuts of meat.
3 • Cooking pork chops, roast.
2 • Taking chill out of fruit.
• Softening butter.
1 • Keeping casseroles and main dishes warm.
• Softening butter and cream cheese.
0 • Standing time,
17
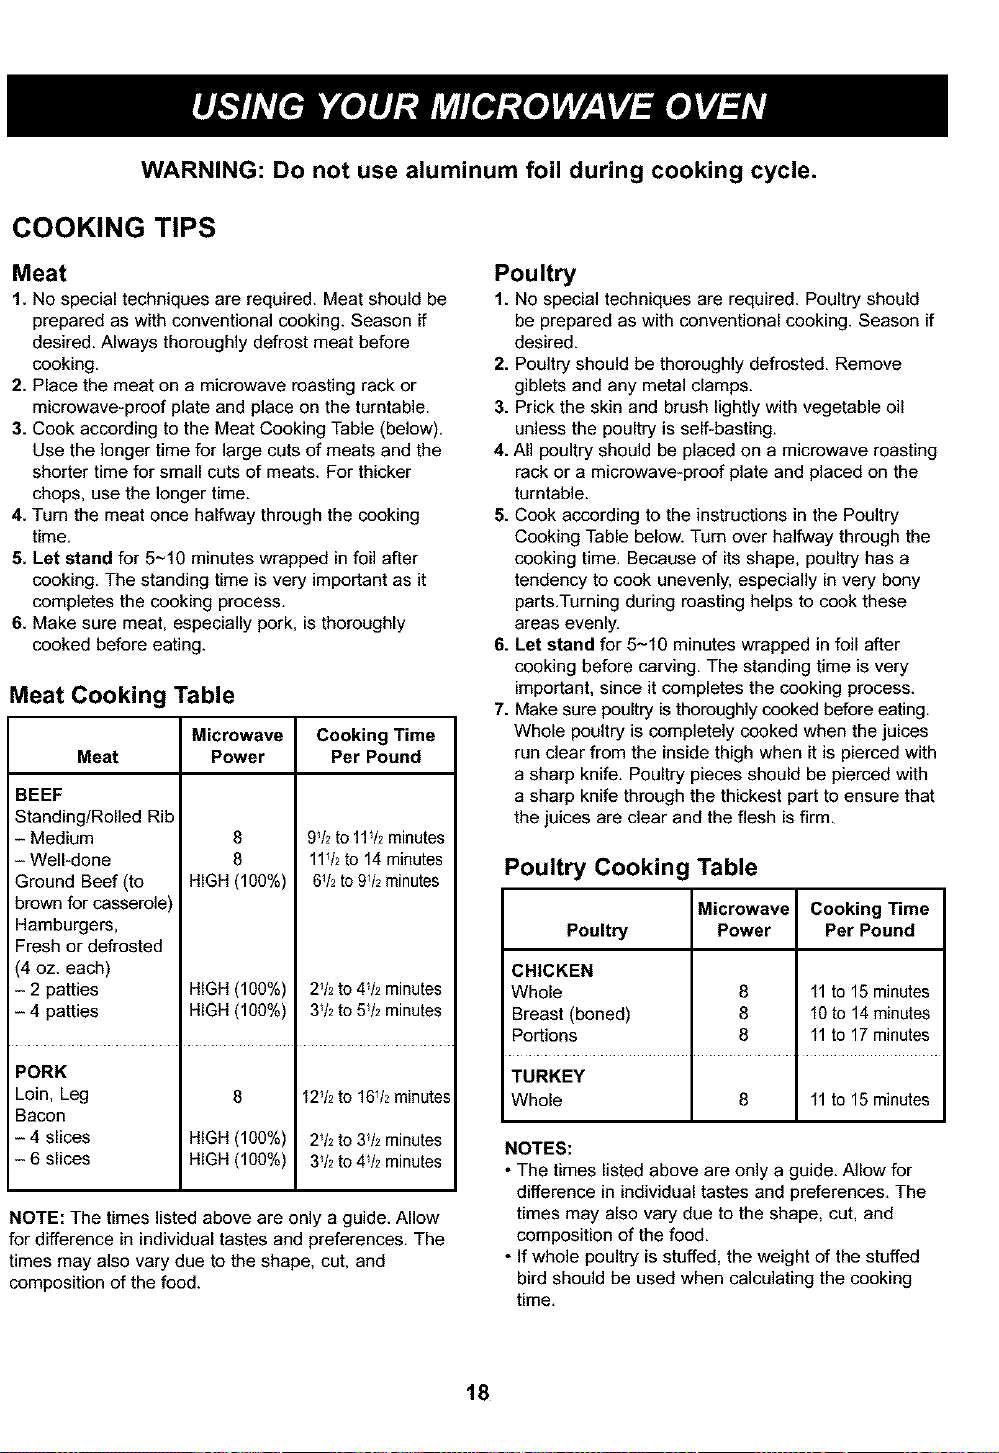
WARNING: Do not use aluminum foil during cooking cycle.
COOKING TIPS
Meat
1. No special techniques are required. Meat should be
prepared as with conventional cooking. Season if
desired. Always thoroughly defrost meat before
cooking.
2. Place the meat on a microwave roasting rack or
microwave-proof plate and place on the turntable.
3. Cook according to the Meat Cooking Table (below).
Use the longer time for large cuts of meats and the
shorter time for small cuts of meats. For thicker
chops, use the longer time.
4. Turn the meat once halfway through the cooking
time.
5. Let stand for 5~10 minutes wrapped in foil after
cooking. The standing time is very important as it
completes the cooking process.
6. Make sure meat, especially pork, is thoroughly
cooked before eating.
Meat Cooking Table
Meat
BEEF
Standing/Rolled Rib
- Medium
- Well-done
Ground Beef (to
brown for casserole)
Hamburgers,
Fresh or defrosted
(4 oz. each)
- 2 patties
- 4 patties
Microwave Cooking Time
Power Per Pound
8 9V2to 11_hminutes
8 11V2to 14 minutes
HIGH (100%) 6V2to9V2minutes
HIGH (100%) 2V2to 4V2minutes
HIGH (100%) 3_hto 5_hminutes
PORK
Loin, Leg 8 12V2to 16Vzminutes
Bacon
- 4 slices HIGH (100%) 2_hto 3_hminutes
- 6 slices HIGH (100%) 3_hto 4_hminutes
NOTE: The times listed above are only a guide. Allow
for difference in individual tastes and preferences. The
times may also vary due to the shape, cut, and
composition of the food.
Poultry
1. No special techniques are required. Poultry should
be prepared as with conventional cooking. Season if
desired.
2. Poultry should be thoroughly defrosted. Remove
giblets and any metal clamps.
3. Prick the skin and brush lightly with vegetable oil
unless the poultry is self-basting.
4. All poultry should be placed on a microwave roasting
rack or a microwave-proof plate and placed on the
turntable.
5. Cook according to the instructions in the Poultry
Cooking Table below. Turn over halfway through the
cooking time. Because of its shape, poultry has a
tendency to cook unevenly, especially in very bony
parts.Turning during roasting helps to cook these
areas evenly.
6. Let stand for 5~10 minutes wrapped in foil after
cooking before carving. The standing time is very
important, since it completes the cooking process.
7. Make sure poultry is thoroughly cooked before eating.
Whole poultry is completely cooked when the juices
run clear from the inside thigh when it is pierced with
a sharp knife. Poultry pieces should be pierced with
a sharp knife through the thickest part to ensure that
the juices are clear and the flesh is firm.
Poultry Cooking Table
Microwave Cooking Time
Poultry Power Per Pound
CHICKEN
Whole
Breast (boned)
Portions
8
8
8
11to 15 minutes
10 to 14 minutes
11to 17 minutes
TURKEY
Whole 8 11to 15 minutes
NOTES:
• The times listed above are only a guide. Allow for
difference in individual tastes and preferences. The
times may also vary due to the shape, cut, and
composition of the food.
• If whole poultry is stuffed, the weight of the stuffed
bird should be used when calculating the cooking
time.
18

COOKING TIPS (continued)
Fish
1. Arrange fish in a large shallow non-metallic dish or
casserole.
2. Cover with pierced microwave plastic wrap or
casserole lid.
3. Place the dish on the turntable.
4. Cook according to the instructions in the Fresh Fish
Cooking Table below. Flakes of butter can be added
to the fish if desired.
5. Let stand as directed in the Cooking Table before
serving.
6. After standing time, check to see that the fish is
thoroughly cooked. The fish should be opaque and
flake easily.
Fresh Fish Cooking Table
Microwave Cooking Time Standing
Fish Power Per Pound Butter Time
Fish Fillets HIGH 4_h to 8 minutes Add 15 to 30 ml (1 to 2 tbsp lemon juice) 2 to 3 minutes
Whole Mackerel, HIGH 4V2to 8 minutes - 3 to 4 minutes
Cleaned and Prepared
Whole Trout, HIGH 5V2to 9 minutes - 3 to 4 minutes
Cleaned and Prepared
Salmon Steaks HIGH 5_h to 8 minutes Add 15 to 30 ml (1 to 2 tbsp lemon juice) 3 to 4 minutes
19
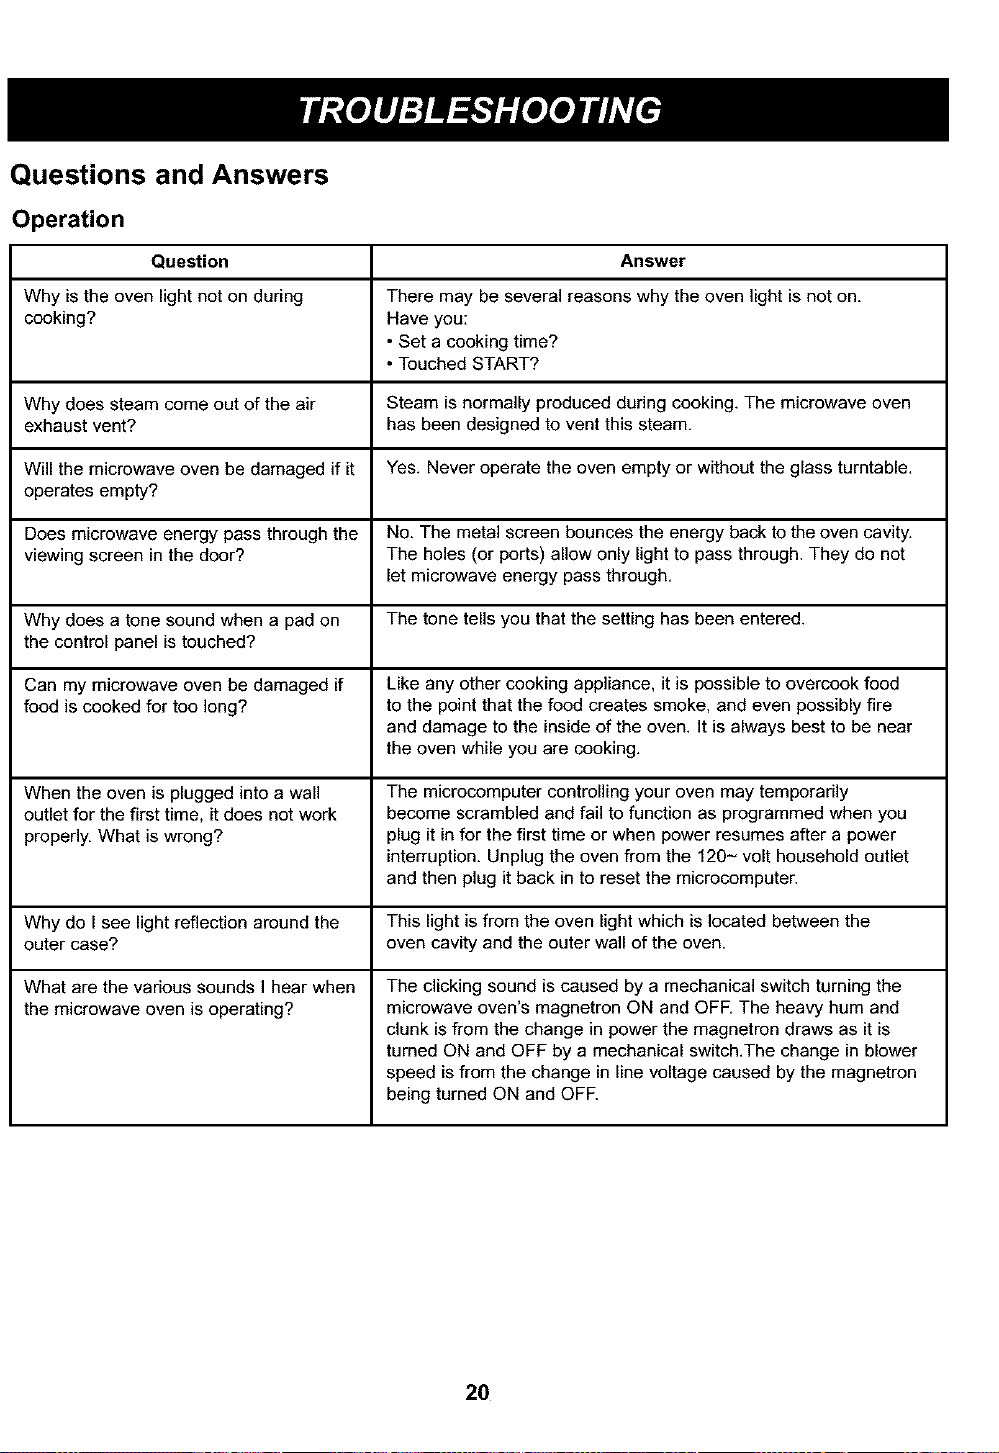
Questions and Answers
Operation
Question Answer
Why is the oven light not on during There may be several reasons why the oven light is not on.
cooking? Have you:
• Set a cooking time?
• Touched START?
Why does steam come out of the air Steam is normally produced during cooking. The microwave oven
exhaust vent? has been designed to vent this steam.
Will the microwave oven be damaged if it Yes. Never operate the oven empty or without the glass turntable.
operates empty?
Does microwave energy pass through the No. The metal screen bounces the energy back to the oven cavity.
viewing screen in the door? The holes (or ports) allow only light to pass through. They do not
let microwave energy pass through.
Why does a tone sound when a pad on The tone tells you that the setting has been entered.
the control panel is touched?
Can my microwave oven be damaged if Like any other cooking appliance, it is possible to overcook food
food is cooked for too long? to the point that the food creates smoke, and even possibly fire
and damage to the inside of the oven. It is always best to be near
the oven while you are cooking.
When the oven is plugged into a wall The microcomputer controlling your oven may temporarily
outlet for the first time, it does not work become scrambled and fail to function as programmed when you
properly. What is wrong? plug it in for the first time or when power resumes after a power
interruption. Unplug the oven from the 120- volt household outlet
and then plug it back in to reset the microcomputer.
Why do I see light reflection around the This light is from the oven light which is located between the
outer case? oven cavity and the outer wall of the oven.
What are the various sounds I hear when The clicking sound is caused by a mechanical switch turning the
the microwave oven is operating? microwave oven's magnetron ON and OFF. The heavy hum and
clunk is from the change in power the magnetron draws as it is
turned ON and OFF by a mechanical switch.The change in blower
speed is from the change in line voltage caused by the magnetron
being turned ON and OFE
2O
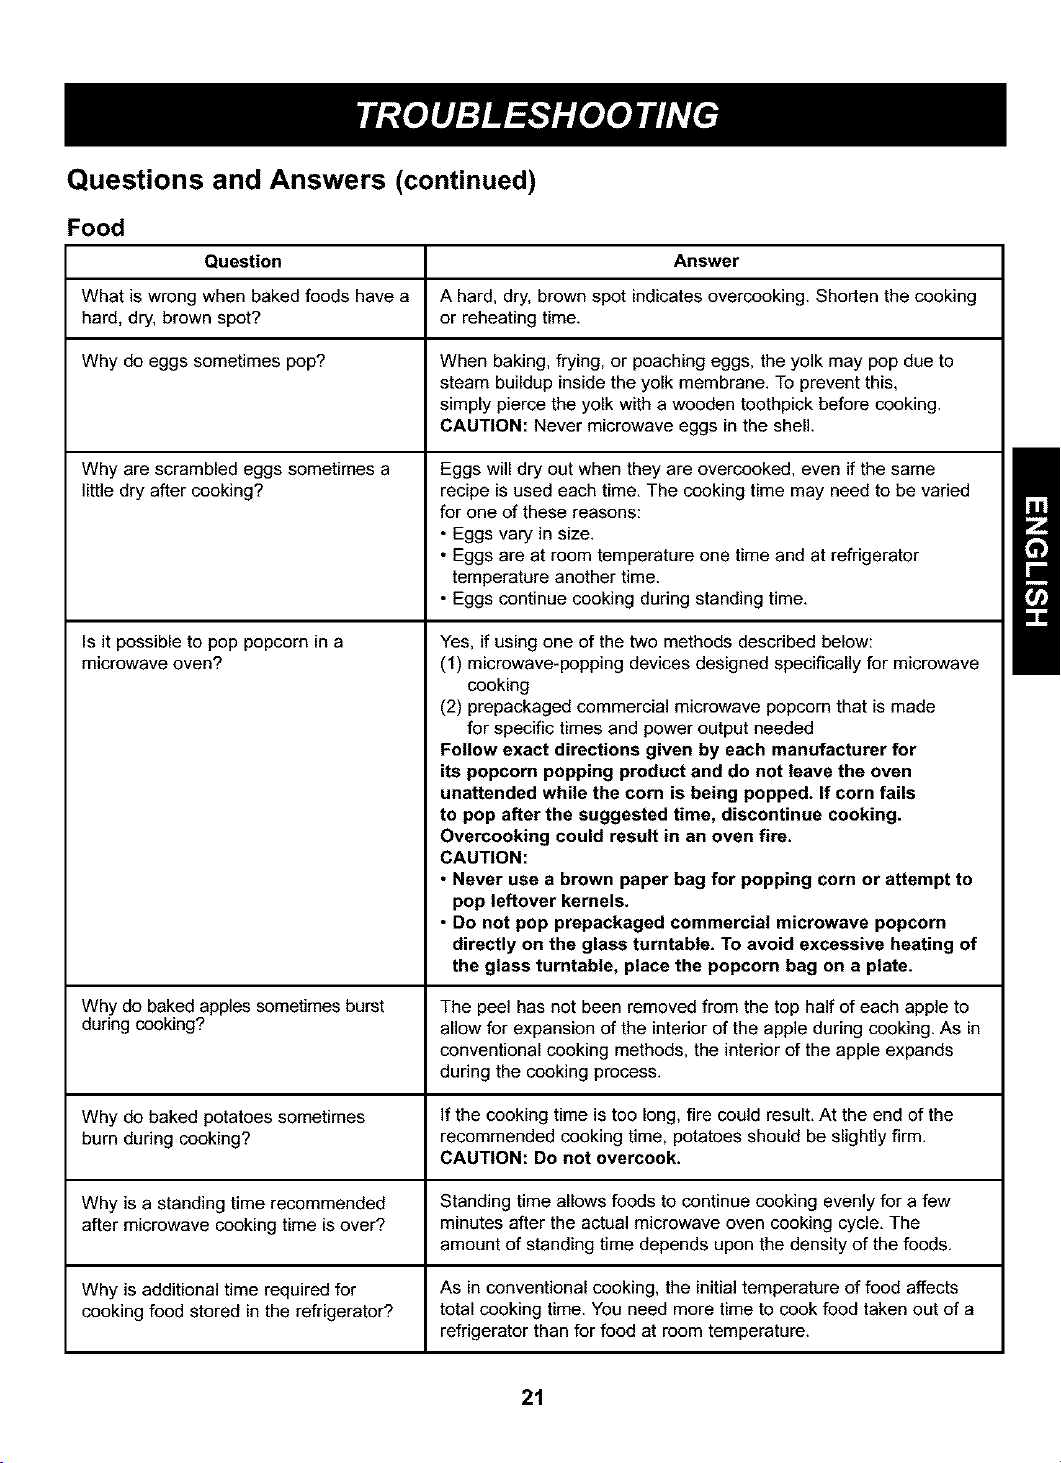
Questions and Answers (continued)
Food
Question Answer
What is wrong when baked foods have a A hard, dry, brown spot indicates overcooking. Shorten the cooking
hard, dry, brown spot? or reheating time.
Why do eggs sometimes pop? When baking, frying, or poaching eggs, the yolk may pop due to
steam buildup inside the yolk membrane. To prevent this,
simply pierce the yolk with a wooden toothpick before cooking.
CAUTION: Never microwave eggs in the shell.
Why are scrambled eggs sometimes a
little dry after cooking?
Is it possible to pop popcorn in a
microwave oven?
Eggs will dry out when they are overcooked, even if the same
recipe is used each time. The cooking time may need to be varied
for one of these reasons:
• Eggs vary in size.
• Eggs are at room temperature one time and at refrigerator
temperature another time.
• Eggs continue cooking during standing time.
Yes, if using one of the two methods described below:
(1) microwave-popping devices designed specifically for microwave
cooking
(2) prepackaged commercial microwave popcorn that is made
for specific times and power output needed
Follow exact directions given by each manufacturer for
its popcorn popping product and do not leave the oven
unattended while the corn is being popped. If corn fails
to pop after the suggested time, discontinue cooking.
Overcooking could result in an oven fire.
CAUTION:
• Never use a brown paper bag for popping corn or attempt to
pop leftover kernels.
• Do not pop prepackaged commercial microwave popcorn
directly on the glass turntable. To avoid excessive heating of
the glass turntable, place the popcorn bag on a plate.
Why do baked apples sometimes burst The peel has not been removed from the top half of each apple to
during cooking? allow for expansion of the interior of the apple during cooking. As in
conventional cooking methods, the interior of the apple expands
during the cooking process.
Why do baked potatoes sometimes If the cooking time is too long, fire could result. At the end of the
burn during cooking? recommended cooking time, potatoes should be slightly firm.
CAUTION: Do not overcook.
Why is a standing time recommended Standing time allows foods to continue cooking evenly for a few
after microwave cooking time is over? minutes after the actual microwave oven cooking cycle. The
amount of standing time depends upon the density of the foods.
Why is additional time required for As in conventional cooking, the initial temperature of food affects
cooking food stored in the refrigerator? total cooking time. You need more time to cook food taken out of a
refrigerator than for food at room temperature.
21

BEFORE CALLING FOR SERVICE
You can often correct operating problems yourself. If your microwave oven fails to work properly, locate the
operating problem in the list below and try the solutions listed for each problem.
If the microwave oven still does not work properly, contact the nearest Sears Authorized Service Center.
Sears Authorized Service Centers are fully equipped to handle your service requirements.
Problem Possible Causes
Oven does not start • Is the power cord plugged in?
• Is the door closed?
• Is the cooking time set?
Arcing or sparking • Are you using approved cookware?
• Is the oven empty?
Incorrect time of day • Have you tried to reset the time of day?
Unevenly cooked foods • Are you using approved cookware?
• Is the glass turntable in the oven?
• Did you turn or stir the food while it was cooking?
• Were the foods completely defrosted?
• Was the time/cooking power level correct?
Overcooked foods • Was the time/cooking power level correct?
Undercooked foods • Are you using approved cookware?
• Were the foods completely defrosted?
• Was the time/cooking power level correct?
• Are the ventilation ports clear?
improper defrosting • Are you using approved cookware?
• Was the time/cooking power level correct?
• Did you turn or stir the food during the defrosting cycle?
FEDERAL COMMUNICATIONS COMMISSION RADIO FREQUENCY INTERFERENCE
STATEMENT (U.S.A. ONLY)
WARNING:
This equipment generates and uses ISM frequency
energy and if not installed and used properly, that is in
strict accordance with the manufacturer's instructions,
may cause interference to radio and television
reception. It has been type tested and found to comply
with limits for ISM Equipment pursuant to part 18 of
FCC Rules, which are designed to provide reasonable
protection against such interference in a residential
installation.
However, there is no guarantee that interference will
not occur in a particular installation. If this equipment
does cause interference to radio or television
reception, which can be determined by turning the
equipment off and on, the user is encouraged to try to
correct the interference by one or more of the
following:
• Reorient the receiving antenna of the radio or
television,
• Relocate the Microwave Oven with respect to the
receiver,
• Move the microwave oven away from the receiven
• Plug the microwave oven into a different outlet so
that the microwave oven and the receiver are on
different branch circuits,
The manufacturer is not responsible for any radio
or TV interference caused by unauthorized
modification to this microwave oven. It is the
responsibility of the user to correct such interference.
22

23
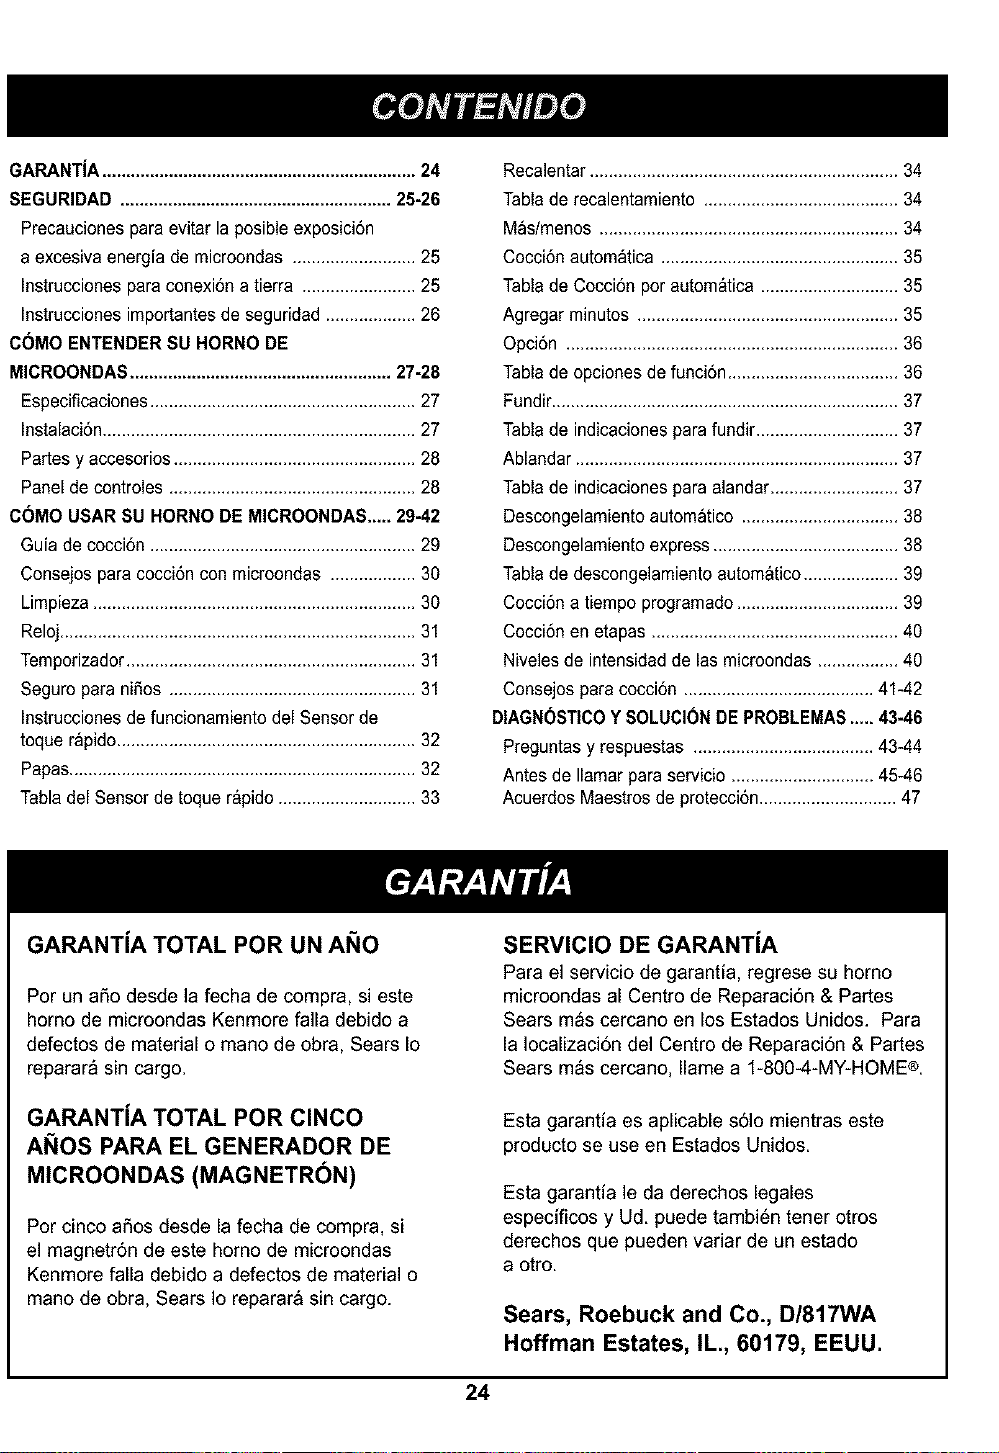
GARANTJA..................................................................24
SEGURIDAD .........................................................25-26
Precaucionesparaevitarlaposibleexposici6n
a excesivaenergia de microondas ..........................25
Instruccionespara conexiona tierra ........................25
Instruccionesimportantesde seguridad...................26
C6MO ENTENDERSU HORNODE
MICROONDAS.......................................................27-28
Especificaciones........................................................27
Instalaci6n..................................................................27
Partesy accesorios...................................................28
Panelde controles....................................................28
C6MO USARSU HORNODE MICROONDAS.....2942
Guia de coccion........................................................29
Consejospara cocci6ncon microondas ..................30
Limpieza....................................................................30
Reloj...........................................................................31
Temporizador.............................................................31
Seguropara ni_os ....................................................31
Instruccionesde funeionamientodel Sensorde
toquerapido...............................................................32
Papas.........................................................................32
Tabladel Sensorde toquerapido.............................33
Recalentar.................................................................34
Tablade recalentamiento .........................................34
M_s/menos...............................................................34
Cocci6nautomatica..................................................35
Tablade Coccionpor automatica.............................35
Agregarminutos .......................................................35
Opci6n ......................................................................36
Tablade opcionesde funci6n....................................36
Fundir.........................................................................37
Tablade indicacionespara fundir..............................37
Ablandar....................................................................37
Tablade indicacionespara alandar...........................37
Descongelamientoautom_tico .................................38
Descongelamientoexpress.......................................38
Tablade descongelamientoautom_tico....................39
Cocci6na tiempo programado..................................39
Cocci6nen etapas ....................................................40
Nivelesde intensidadde lasmicroondas.................40
Consejosparacoccion ........................................41-42
DIAGN(_STICOY SOLUCIONDEPROBLEMAS.,...43-46
Preguntasy respuestas ......................................43-44
Antes de Ilamarparaservicio ..............................4546
AcuerdosMaestrosde proteccidn.............................47
GARANTJA TOTAL POR UN ANO
Per un aSo desde la fecha de compra, si este
horno de microondas Kenmore falla debido a
defectos de material o mano de obra, Sears Io
reparara sin cargo.
GARANTJA TOTAL POR ClNCO
ANOS PARA EL GENERADOR DE
MICROONDAS (MAGNETR(_N)
Por cinco a_os desde la fecha de compra, si
el magnetrdn de este homo de microondas
Kenmore falla debido a defectos de material o
mano de obra, Sears Io reparara sin cargo.
SERVIClO DE GARANTJA
Para el servicio de garantia, regrese su homo
microondas al Centro de Reparacidn & Partes
Sears mas cercano en los Estados Unidos. Para
la Iocalizacidn del Centro de Reparacidn & Partes
Sears mas cercano, Ilame a 1-8004-MY-HOME®.
Esta garantia es aplicable s61omientras este
producto se use en Estados Unidos.
Esta garantia le da derechos legales
especificos y Ud. puede tambi6n tener otros
derechos que pueden variar de un estado
a otto.
Sears, Roebuck and Co., D/817WA
Hoffman Estates, IL., 60179, EEUU.
24
PRECAUCIONES PARA EVITAR LA POSIBLE
EXPOSICION A EXCESIVA ENERGiA DE
MICROONDAS...
• No intente operar este horno con la puerta abierta, ya que esto puede resultar en exposici6n
nociva a la energia de microondas. Es importante no forzar la traba de seguddad.
• No use el homo si est_ dahado. Es particularmente importante que la puerta del homo cierre
bien y que no haya dahos en:
1. la puerta (torcida)
2. bisagras y seguros (rotos o flojos)
3. sellado de la puerta y superficies de sellado.
• No ponga ningen objeto entre la cara frontal del homo y la puerta y no permita que se acu-
mule polvo o residuos de limpiadores sobre las superficies de setlado.
• El homo no debe set ajustado o reparado per nadie, excepto personal de servicio calificado.
INSTRUCCIONES PARA CONEXION A TIERRA
Este aparato electrodom6stico debe ser conectado a tierra, Si hay un corto circuito, la conexi6n a tierra
reduce el riesgo de electrocuci6n proveyendo un cable de escape para la cerriente el6ctrica, Este aparato
electrodom6stico est_ equipado con un cable que tiene un alambre para conexi6n a tierra con un enchufe
de conexi6n a tierra,
Ponga el enchufe en un tomacorriente que est6 correctamente instalado y conectado a tierra,
PRECAUClON
Si Ud. usa el enchufe con conexibn a tierra en forma indebida, corre el riesgo de electrocutarse.
Consulte con un electricista calificado o con el Departamento de Servicios de Sears si Ud, no
entiende las instrucciones para hacer la conexi6n a tierra o si quiere saber si el aparato electrodom6stico
est_ correctamente conectado a tierra,
Este electrodom6stico tiene un cable corto para reducir el riesgo de que alguien se tropiece o enrede
con el cable, Sea cuidadoso si usa un cable de extensi6n,
Si Ud. usa un cable de extensi6n asegt_rese de Io siguiente:
• la extensi6n debe ser para el mismo voltaje que el
electrodom6stico,
• el voltaje que figura en el cable de extensi6n debe ser
igual o mayor que el del electrodom6stico,
• el cable de extensi6n debe tener enchufe de tres
clavijas para conexi6n a tierra,
• el cable de extensi6n no debe colgar de una mesa o
de la cubierta de un gabinete donde un niSo pueda
tirar del mismo o se pueda tropezar con 61,
• el cable debe estar sece y no estar pellizcado o
aplastado en ningQn lugar,
NOTA: Este horno usa 13,8 amperios a 120 Voltios, 6OHz
25
INSTRUCCIONES IMPORTANTES DE SEGURIDAD
Las instrucciones de seguridad de m_s abajo le informar_n sobre como usar su homo de microondas para
evitarle lastimarse o daSar a su horno.
ADVERTENCIA- Para reducir el riesgo de quemaduras, descarga el6ctrica, incendio, lesiones a
personas o exposici6n a energia excesiva de microondas:
1.Leatodas lasinstrucciones antede usarsuhomode
microondas.
2.iNo permitaa losni_osusareste hornosinsuvigilancial
3.LeaysigaestasPRECAUCIONESESPECIFICASPAPA
EVITARque se encuentranenla p_gina25
4. iNo fuerce interruptores de saguridad incorporados sabre
lapuertadel homol El homotieoevariosinter_pteres
incorporadosparaasegurarseque la energ[aest&apagada
cuandoseabre la puerta.
5.Cuandolimpie la puertay las superficiesque tocan a las
puertas,usatan solojabones suave&no abrasivoso
detergentesy unaesponjao un pasosuave.
6.Sisuhomo sa hacaidoo da_ado, h_galocontrolarafondo
peront6cnicode servido calificadoantesde usarlo
nuevamente.
7.Paraevitar riesgosde incendios:
a) Nococineexcesivamentelosalimentos. Puedecausarun
incendieen el homo.
b)Nouse productosde papelrecicladoen su homo.
Puedencontenerparticulasquesueltenchispasose
incendien.
c) Nosobrecocinelas papas.Cocinardemasiadopuede
causarincendio.
d)No almacene elementos combustibles (pan,galletas,etc.)
en el homo, porquesiun rayogolpealaslineasde energia,
puedecausarqueel homose enciend&
e) No usaataduras retorcidas de alambre en el homo,
Asegt_resede quitadasantesdecolocarelelementoen el
homo.
f) Nousael interior del homo paraalmacenamiento, No deje
productosde papel,utensiliosdecocina,o comidaen interior
cuando no Iouse.
8.Sise iniciaun incendio:
a) Mantengael homocerrado.
b)Apague el homo.
c) Desconecteel cableo cierrelaenergiaen elfusibleo
paneldeldisyuntor.
9.Nouseestehomopara prop6sitoscomerciales.Este
microondasest_ hechotansolopara usede lacasa.
10. Icetaleocoloqueeste artefactoconformealas instrucciones
de instalaci6npro_4stas.
11.Paraevitar descargael6ctrica:
a) iEsteartefactodebesar conectadoa masalCon6ctelo
solamenteauntomacordenteconectadoa mas& (Yealas
Instrucciones para conectara masaen lap&gina25.)
b)No hagafuncionaresteartefactositieneunenchufeoun
cabledaSado,sino est&funcionandocorrectamente,osiha
caido o estropeado.
c) Nosumerjaelcable de alimentaci6n el_ctrica oel
enchufeenagua.
d)Mantengaelcablelejos de superficiescalentadas.
e) Elservicioparaesteartefactodebeser hechosolamentepor
personalcalificado.
12.Los liqu[doscomeagua,caf6,ot6 puedenser
sobrecalentadosm&sall_del puntodeebullid6n sinestar
hirviendoaparerfiementedebido a latensi6nsuperficialdel
liqu[do.Nosiempreest_presenteel burbujeovisiblecuando
el recipientesesacadelhomo demicroondas.Estopuede
causarqueliquidosmuy calientesse vuelquen
reperfiinamentecuandose introduceuna cucharau otro
utensilioenel liquido.Pararedudr el riesgede ]esionesalas
personas;1) Nosobrecalientelosliquidos. 2) Revuelvael
liqu[doantescomoy amitaddelcalentamiento.3)No use
redpientesde ladosrectosconcuellceangostos.4) Despu6s
de calentar,deje queel redpientequede enel homode
micrnondasporuntiempocortoantesdesaceflo.5)Tenga
muchecuidadocuando inserteunacucharauotro utensilio
dentrodelcontenedor.
13.Deje descansarlabandejade vidrb y el rodillode labandeja
giratoria,en elhomocuando est6cecinando.
14.No use elhomo ala intemperie.Noguardeelhomo ala
intemperie.No useeste productocercadelagua.
- Perejemplo,cercade unapiletade cocina,enon s6tano
ht3medo,cercade unapiletade natad6n,o ubicad6nsimilar.
15. Nocubrao trabeningunaaberturadel home.
16. Noponga a funcbnar el homode microondasestandovacio.
17.No dejeel cablecelgandosobreel bordede una mesao
mostrador.
18. Nocalierfieexcesivamentelabandejagiratoriade vidfio.
- No cocinetocinedirectamentesobre la bandejagiratofia.
- No permitaquela pelicolagrisde lospaquetesespeciales
paracocinade microondastoquen la bandejagiratofia.
Pongael paquetesobreun plateaptoparamicrnondas.
- Mantengaun platodoradorporIomenosa 3/16pulgadaspor
encimade labandejagiratoriade vidrio.Si usa
incerrectamenteel platodorador,podria romperla bandeja
giratoriade vidrio.
19.Tengacuidadode noastillaro raspariceberdesde la bandeja
giratori&Astillaso rasponespuedencausarque la bandeja
giratoriade vidriosequiebreduranteel uso..
20.Algunosproductostalescomehuevosenterosy envases
sellados,porejemplojarras cerradasde v[drb, pueden
explotary nodeben sercalentadoseneste homo.
iGUARDE ESTAS INSTRUCCIONES!
26
ESPECIFICACIONES
Suministro de electricidad 120 V AC, 60 Hz
Consumo de electricidad estimada 1650 W
Producd6n de microondas "1200 W
Corriente estimada 13.8 A
Dimensiones totales (Ancho x alto x profundidad) 217/8" x 12VZ' x 17V8"
Dimensiones de la cavidad del horno (A x a x p) 14W_6"x 9s/8" x 155/8"
Capacidad de la cavidad del homo 1,2 pie ct]bico
*IEC 60705 EST_,NDAR DE REGIMEN DE TRABAJO
Especificaciones sujetas a cambios sin aviso previo.
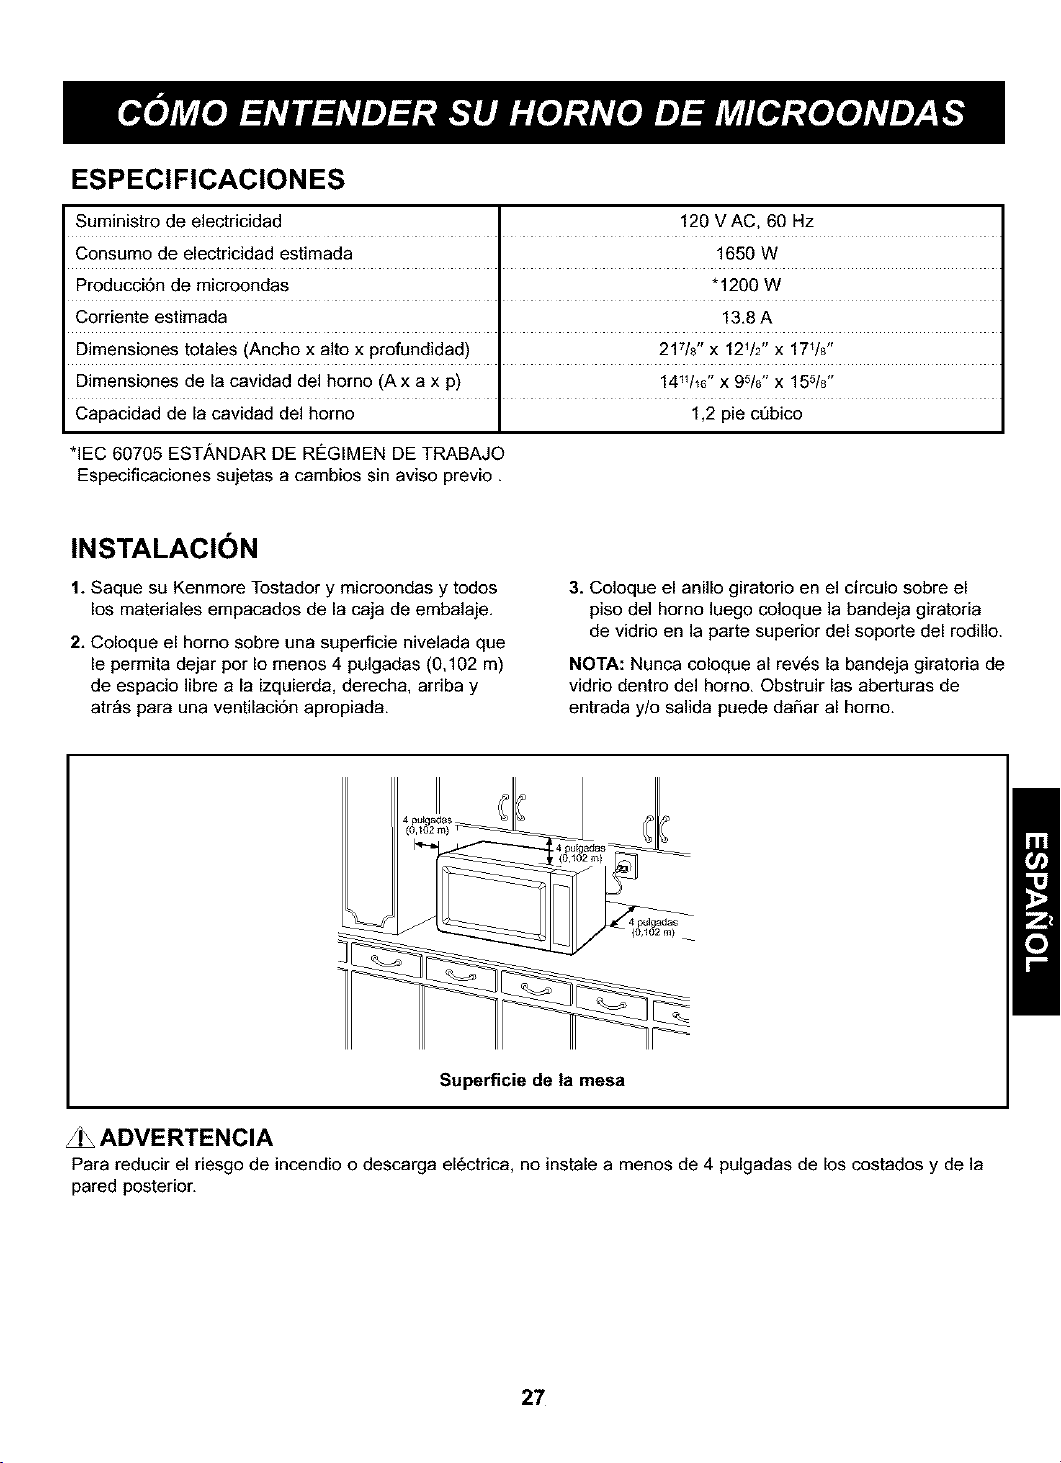
INSTALACI )N
1. Saque su Kenmore Tostador y microondas y todos
los materiales empacados de la caja de embalaje.
2. Coloque el homo sobre una superficie nivelada que
le permita dejar por Io menos 4 pulgadas (0,102 m)
de espacio libre a la izquierda, derecha, arriba y
atr_s para una ventilad6n apropiada.
3. Coloque el anillo giratorio en el circulo sobre el
piso del homo luego coloque la bandeja giratoria
de vidrio en la parte superior del soporte del rodillo.
NOTA: Nunca coloque al rev6s la bandeja giratoria de
vidrio dentro del homo. Obstruir las aberturas de
entrada y/o salida puede daSar al horno.
Superficie de la mesa
Z_ ADVERTENCIA
Para reducir el riesgo de incendio o descarga el6ctrica, no instale a menos de 4 pulgadas de los costados y de la
pared posterior.
27
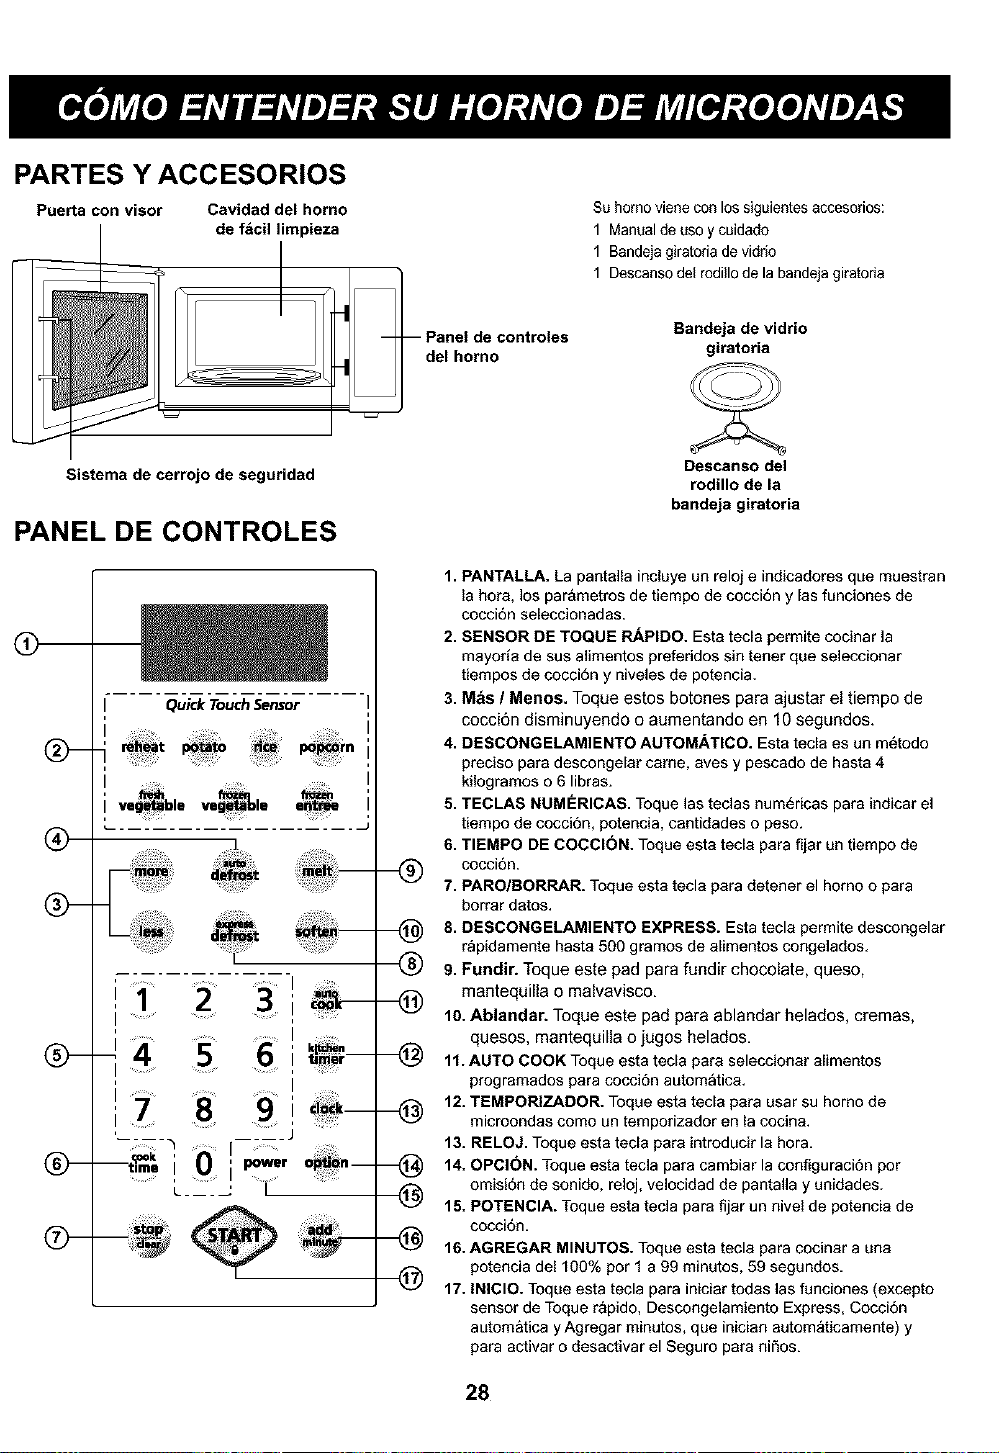
PARTES Y ACCESORIOS
Puerta con visor Cavidad del homo
de f&cil limpieza
Su homo viene con los siguientes sccesorios:
1 Manual de uso y cuidado
1 Bsndsjs girstoria devidrio
1 Descanso del rodillo de la bandeja giratoda
Panel de ¢ontroles Bandeja de vidrio
del homo giratoria
Sistema de cerrojo de seguridad
PANEL DE CONTROLES
Q-
Quick TouchSensor
,'- _ ...........
!1
I
=
I ........
4 5 .....
___
7 ......8 9
'--7_-5 ------
, I
L___-- I
Descanso del
rodillo de la
bandeja giratoria
1. PANTALLA. La pantalla incluye un reloj e indicadores que muestran
la hora, los parametros de tiempo de cocci6n y las funciones de
cocci6n seleccionadas.
2. SENSOR DE TOQUE R/_PIDO. Esta tecla pemlite cocinar la
mayoria de sus alimentos preferidos sin tenet que seleccionar
tiempos de cocci6n y niveles de potencia.
3. M_S / Menos. Toque estos botones para ajustar el tiempo de
cocciSn disminuyendo o aumentando en 10 segundos.
4. DESGONGELAMIENTO AUTOM.L_TICO. Esta tecla es un m_todo
precise para descongelar came, aves y pescado de hasta 4
kilogramos o 6 libras.
5. TEGLAS NUMERICAS. Toque las teclas num_ricas para indicar el
tiempo de cocci6n, potencia, cantidades o peso.
6. TIEMPO DE COCCI(_N. Toque esta tecla para fijar un tiempo de
coccidn.
7. PARO/BORRAR. Toque esta tecla para detener el horno o para
borrar datos.
8. DESCONGELAMIENTO EXPRESS. Esta tecla permite descongelar
r_pidamente hasta 500 gramos de alimentos congelados.
9. Fundir. Toque este pad para fundir chocolate, queso,
_) mantequilla o malvavisco.
10. Ablandar. Toque este pad para ablandar helados, cremas,
quesos, mantequilla o jugos helados.
11. AUTO COOK Toque esta tecla para seleccionar alimentos
programados para cocci6n automatica.
12. TEMPORIZADOR. Toque esta tecla para usar su homo de
microondas como un temporizador en la cocina.
13. RELOJ. Toque esta tecla para introducir la hora.
_) 14. OPGI_)N. Toque esta tecla para cambiar la configuraci6n pot
omisi6n de sonido, reloj, velocidad de pantalla y unidades.
(_ 15. POTENClA. Toque esta tecla para fijar un nivel de potencia de
cocci6n,
_(_ 16. AGREGAR MINUTOS. Toque esta tecla para cocinar a una
potencia de1100% per 1 a 99 minutes, 59 segundos.
(_ 17. INICIO. Toque esta tecla para iniciar todas las funciones (excepto
sensor de Toque r_pido, Descongelamiento Express, Cocci6n
automatica y Agregar minutos, que inician autom_ticamente) y
para activar o desactivar el Seguro para niSos.
28
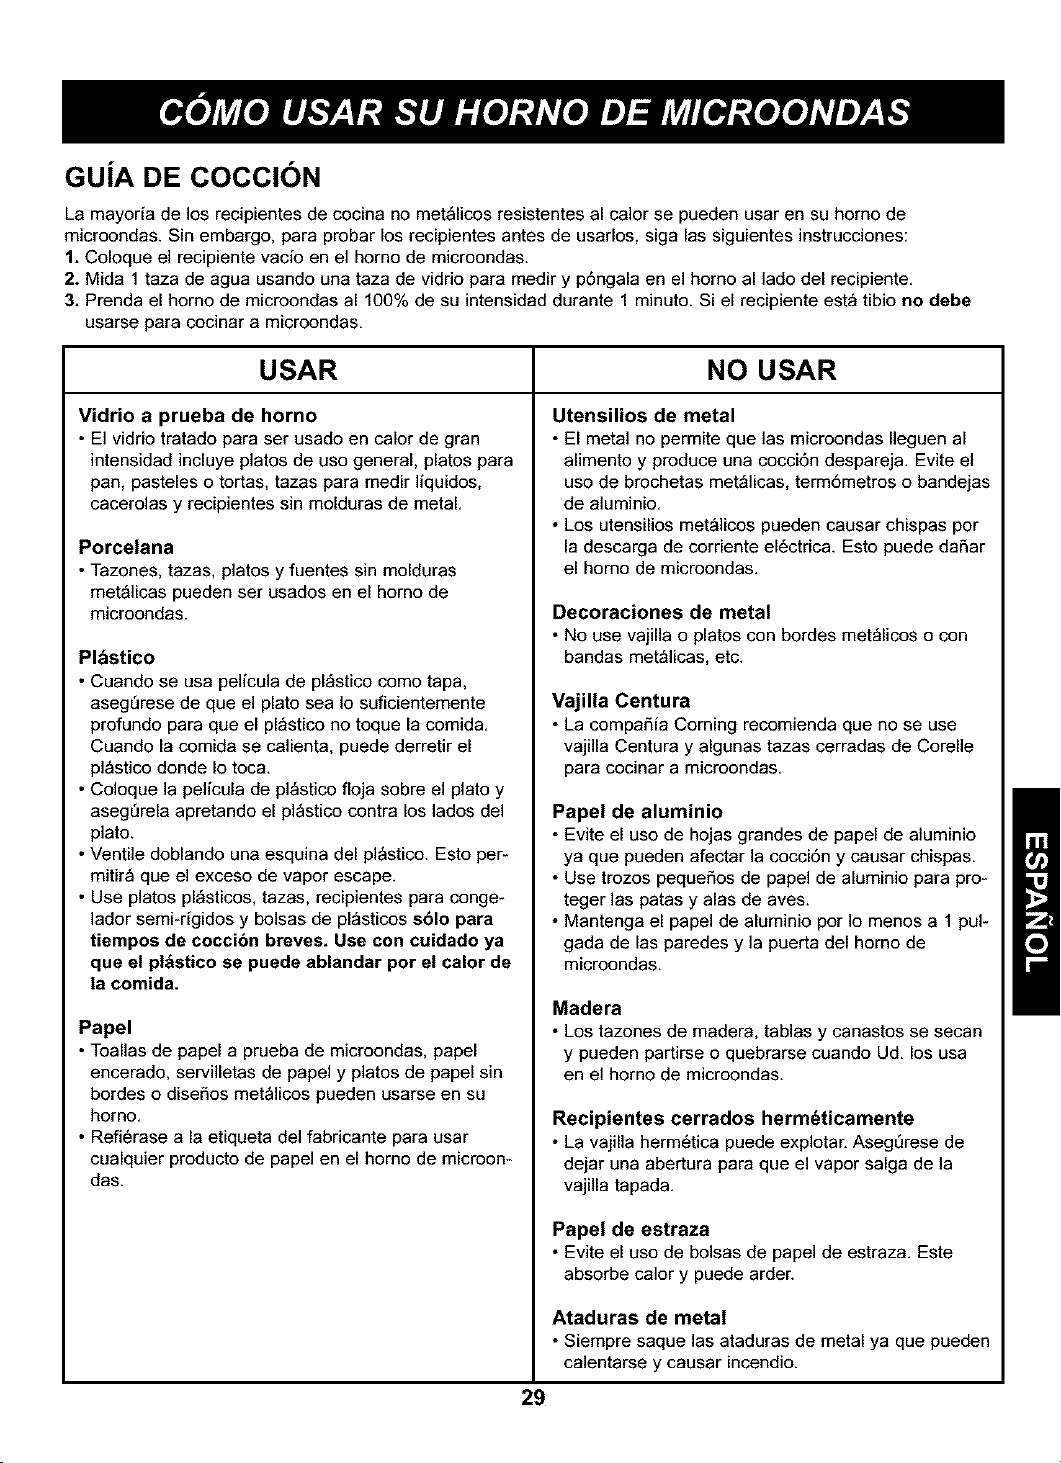
GU[A DE COCCI6N
La mayoria de los recipientes de cocina no met_licos resistentes al calor se pueden usar en su homo de
microondas Sin embargo, para probar los recipientes antes de usarlos, siga las siguientes instrucciones:
1. Coloque el recipiente vacio en el homo de microondas
2. Mida 1 taza de agua usando una taza de vidrio para medir y p6ngala en el homo al lado del recipiente
3. Prenda el homo de microondas al 100% de su intensidad durante 1 minuto Si el recipiente est_ tibio no debe
usarse para cocinar a microondas
USAR NO USAR
Vidrio a prueba de horno
• El vidrio tratado para ser usado en calor de gran
intensidad incluye platos de uso general, platos para
pan, pasteles o tortas, tazas para medir liquidos,
cacerolas y recipientes sin molduras de metal
Porcelana
• Tazones, tazas, platos y fuentes sin molduras
met_licas pueden ser usados en el horno de
microondas
Plbstico
• Cuando se usa pelicula de pl_stico como tapa,
asegerese de que el plato sea Io suficientemente
profundo para que el pl_stico no toque la comida
Cuando la comida se calienta, puede derretir el
pl_stico donde Io toca
• Coloque la pelicula de pl_stico floja sobre el plato y
aseg_rela apretando el pl_stico contra los lados del
plato
• Ventile doblando una esquina del pl_stico Esto per-
mitir_ que el exceso de vapor escape
• Use platos pl_sticos, tazas, recipientes para conge-
]ador semi-rigidos y bolsas de pl_sticos s61o para
tiempos de cocci6n breves. Use con cuidado ya
que el pl&stico se puede ablandar pot el calor de
la comida.
Papel
• Toaflas de papel a prueba de microondas, papel
encerado, servilletas de papel y platos de papel sin
bordes o diseSos met_licos pueden usarse en su
homo
• Refi6rase a la etiqueta del fabricante para usar
cualquier producto de papel en el homo de microon-
das
Utensilios de metal
• El metal no permite que ]as microondas fleguen al
alimento y produce una cocci6n despareja Evite el
uso de brochetas met_licas, term6metros o bandejas
de aluminio
• Los utensilios met_licos pueden causar chispas por
la descarga de corriente el6ctrica Esto puede daSar
el homo de microondas
Decoraciones de metal
• No use vajilla o platos con bordes met_licos o con
bandas met_licas, etc
Vajilla Centura
• La compaSia Coming recomienda que no se use
vajilla Centura y algunas tazas cerradas de Corefle
para cocinar a microondas
Papel de aluminio
• Evite el uso de hojas grandes de papel de aluminio
ya que pueden afectar la cocci6n y causar chispas
• Use trozos pequeSos de papel de aluminio para pro-
teger las patas y alas de aves
• Mantenga el papel de aluminio por Io menos a 1 pul-
gada de las paredes y la puerta del homo de
microondas
Madera
• Los tazones de madera, tablas y canastos se secan
y pueden partirse o quebrarse cuando Ud los usa
en el homo de microondas
Recipientes cerrados herm_ticamente
• La vajilla herm6tica puede explotan Aseg_rese de
dejar una abertura para que el vapor salga de la
vajilla tapada
Papel de estraza
• Evite el uso de bolsas de papel de estraza, Este
absorbe calor y puede arden
Ataduras de metal
• Siempre saque las ataduras de metal ya que pueden
calentarse y causar incendio
29
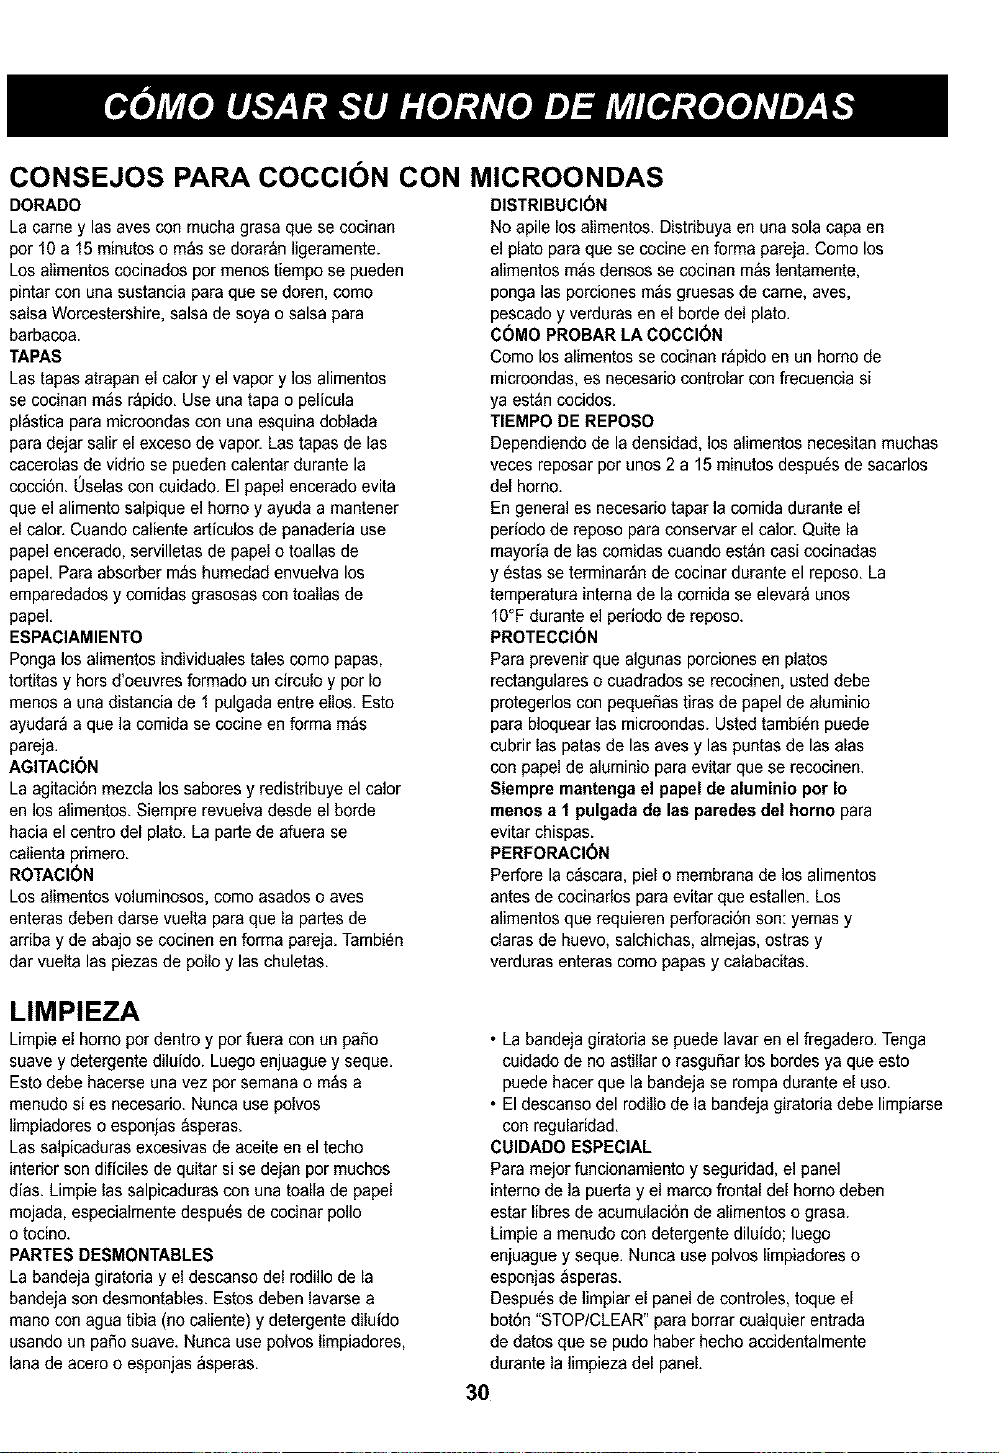
CONSEJOS PARA COCCI )N CON MICROONDAS
DORADO
La came y las ayes con mucha grasa que $e cocinan
por f0 a 15 minutos o m_s se dorar&n ligeramente.
Los alimentos cocinados por menos tiempo se pueden
pintar con una sustancia para que se doren, como
salsa Worcestershire, salsa de soya o salsa para
barbacoa.
TAPAS
Las tapas atrapan el calory el vapor y los alimentos
se cocinan m_s r_pido. Use una tapa o pelicula
pl_stica para microondas con una esquina doblada
para dejar salir el exceso de vapor. Las tapas de las
cacerolas de vidrio se pueden calentar durante la
cocci6n. 0selas con cuidado. El papel encerado evita
que el alimento salpique el homo y ayuda a mantener
el calor. Cuando caliente artfculos de panaderia use
papel encerado, servilletas de papel o toallas de
papeL Para absorber m_s humedad envuelva los
emparedados y comidas grasosas con toallas de
papeL
ESPACIAMIENTO
Ponga los alimentos individualestales como papas,
tortitas y hers d'oeuvres formado un circulo y por Io
menos a una distancia de 1 pulgada entre ellos. Esto
ayudar_ a que la comida se cocine en forma m_s
pareja.
AGITAClON
La agitaci6n mezcla los sabores y redistribuye el calor
en los afimentos. Siempre revuelva desde el horde
hacia el centro del plato. La parte de afoera se
calienta primero.
ROTACI6N
Los alimentos voluminosos, come asados o ayes
enteras deben darse vuelta para que la partes de
arriba y de abajo se cocinen en forma pareja. Tambi6n
dar vuelta las piezas de polio y las chuletas.
LIMPIEZA
Limpieel homo por dentro y por fuera con un paso
suave y detergente diluido. Luego enjuague y seque.
Esto debe hacerse una vez por semana o m_s a
menudo si es necesado. Nunca use polvos
limpiadores o esponjas &speras.
Las salpicaduras excesivas de aceite en el techo
interior son dificiles de quitar si se dejan por muchos
dias. Limpie las salpicaduras con una toalla de papel
mojada, especialmente despu_s de cocinar polio
o tocino.
PARTES DESMONTABLES
LabandejagiratoriayeldescansodelrodiIIode la
bandeja son desmontables. Estos deben lavarse a
mano con agua tibia (no caliente) y detergente diluido
usando un paso suave. Nunca use polvos limpiadores,
lana de acero o esponjas _speras.
DISTRIBUCI(_N
No apile los alimentos. Distribuya en una sola capa en
el plato para que se cocine en forma pareja. Come los
alimentos m_s densos se cocinan m&s lentamente,
ponga las porciones m_s gruesas de came, aves,
pescado y verduras en el borde del plato.
C(_MO PROBAR LA COCCI(_N
Como los alimentos se cocinan r_pidoen un homo de
microondas, es necesar[o controlar con frecuencia s[
ya est&ncocidos.
TIEMPO DE REPOSO
Dependiendo de la densidad, los alimentos necesitan muchas
veces reposar por unos 2 a 15 minutes despu6s de sacaflos
del homo.
En general es necesar[o tapar ]a comida durante el
periodo de reposo para conservar el calor. Quite la
mayoria de tas comidas cuando est_n casi cocinadas
y 6stas se terminar_n de cocinar durante el reposo. La
temperatura internade la comida se elevar& unos
f0°F durante el periodo de repose.
PROTECCI(_N
Para prevenir que algunas porciones en piatos
rectangulares o cuadrados se recocinen, usted debe
protegerlos con pequeSas tiras de papel de aluminio
para bloquear las microondas. Usted tambi6n puede
cubrir las paras de las aves y las puntas de las alas
con papelde aluminio para evitar que se recocinen.
Siempre mantenga el papel de aluminio pot Io
menos a 1 pulgada de las paredes del homo para
evitar chispas.
PERFORACI_)N
Perfore la c_scara, piel o membrana de losalimentos
antes de cocinarlos para evitar que estallen. Los
alimentos que requieren pedoraci6n son: yemas y
claras de huevo, salchichas, almejas, ostras y
verduras enteras como papas y calabacitas.
• La bandeja giratoria se puede lavar en el fregadero. Tenga
cuidado de no astillar o rasguSar los bordes ya que esto
puede hacer que la bandejase rompa durante el uso.
• El descanso del rodillo de la bandeja giratoria debe limpiarse
con regularidad.
CUIDADO ESPECIAL
Para mejor funcionamiento y seguddad, el panel
[ntemo de ]a puerta y el marco frontal del homo deben
estar fibresde acumulaci6n de alimentos o grasa.
Limpie a menudo con detergente diluido; luego
enjuague y seque. Nunca use polvos [impiadores o
esponjas _speras.
Despu6s de limpiarel panel de controles, toque el
bot6n "STOP/CLEAR" para borrar cualquier entrada
de datos que se pudo haber hecho accidentalmente
durante la limpieza del panel.
3O
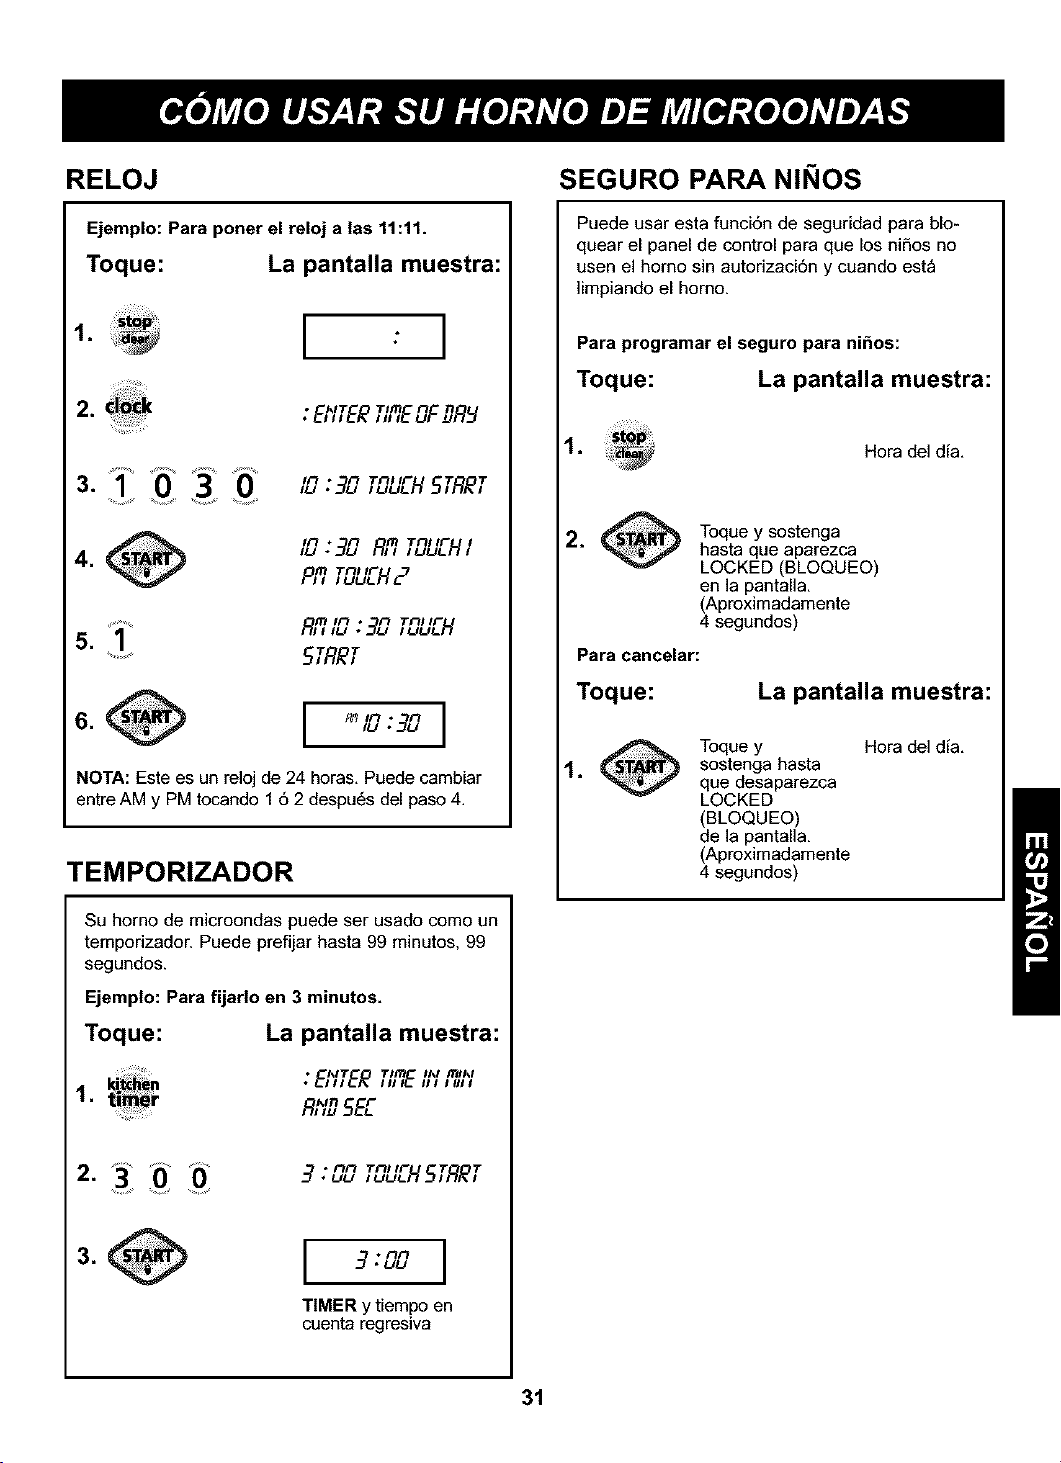
RELOJ
Ejemplo: Para poner el reloj a las 11:11.
Toque: La pantalla muestra:
5. 1
I : I
• F,IT Tim _1 )'1
•B,,E_ ,, ,EdF_R_
II'l • f'_ Ttll IF T T
I1"1 • I'1 Ttll IF I
,_ .90 t7,9,_u_FI,
P,9 TOb_H
I'R 11"1 • I'1 Ttll IF
F_,,_ .90 ,_J-I
5TRRT
I I
NOTA: Este es un reloj de 24 horas, Puede cambiar
entre AM y PM tocando 1 6 2 despu6s del paso 4.
TEMPORIZADOR
Su homo de microondas puede ser usado como un
temporizador. Puede prefijar hasta 99 minutos, 99
segundos.
Ejemplo: Para fijarlo en 3 minutos.
Toque: La pantalla muestra:
Tlln IAI JT_IAI
:EMTE[?,,TE,, ,,,,
1.
AI_ r
SEGURO PARA NINOS
Puede usar esta funci6n de seguridad para blo-
quear el panel de control para que los nifios no
usen el homo sin autorizaci6n y cuando est_
]impiando el horno.
Para programar el seguro para ni_os:
Toque: La pantalla muestra:
,
Hora del dia,
Toque y sostenga
hasta que aparezca
LOCKED (BLOQUEO)
en la pantalla,
(Aproximadamente
4 segundos)
Para cancelar:
Toque: La pantalla muestra:
,
Toque y
sostenga hasta
que desaparezca
LOCKED
(BLOQUEO)
de la pantalla,
(Aproximadamente
4 segundos)
Hora del dia,
3" ii01 Oi ,nn rnltr r r
2, 3. uu ÁuuJ-15,R_,
TIMER y tiempo en
cuenta regresiva
31
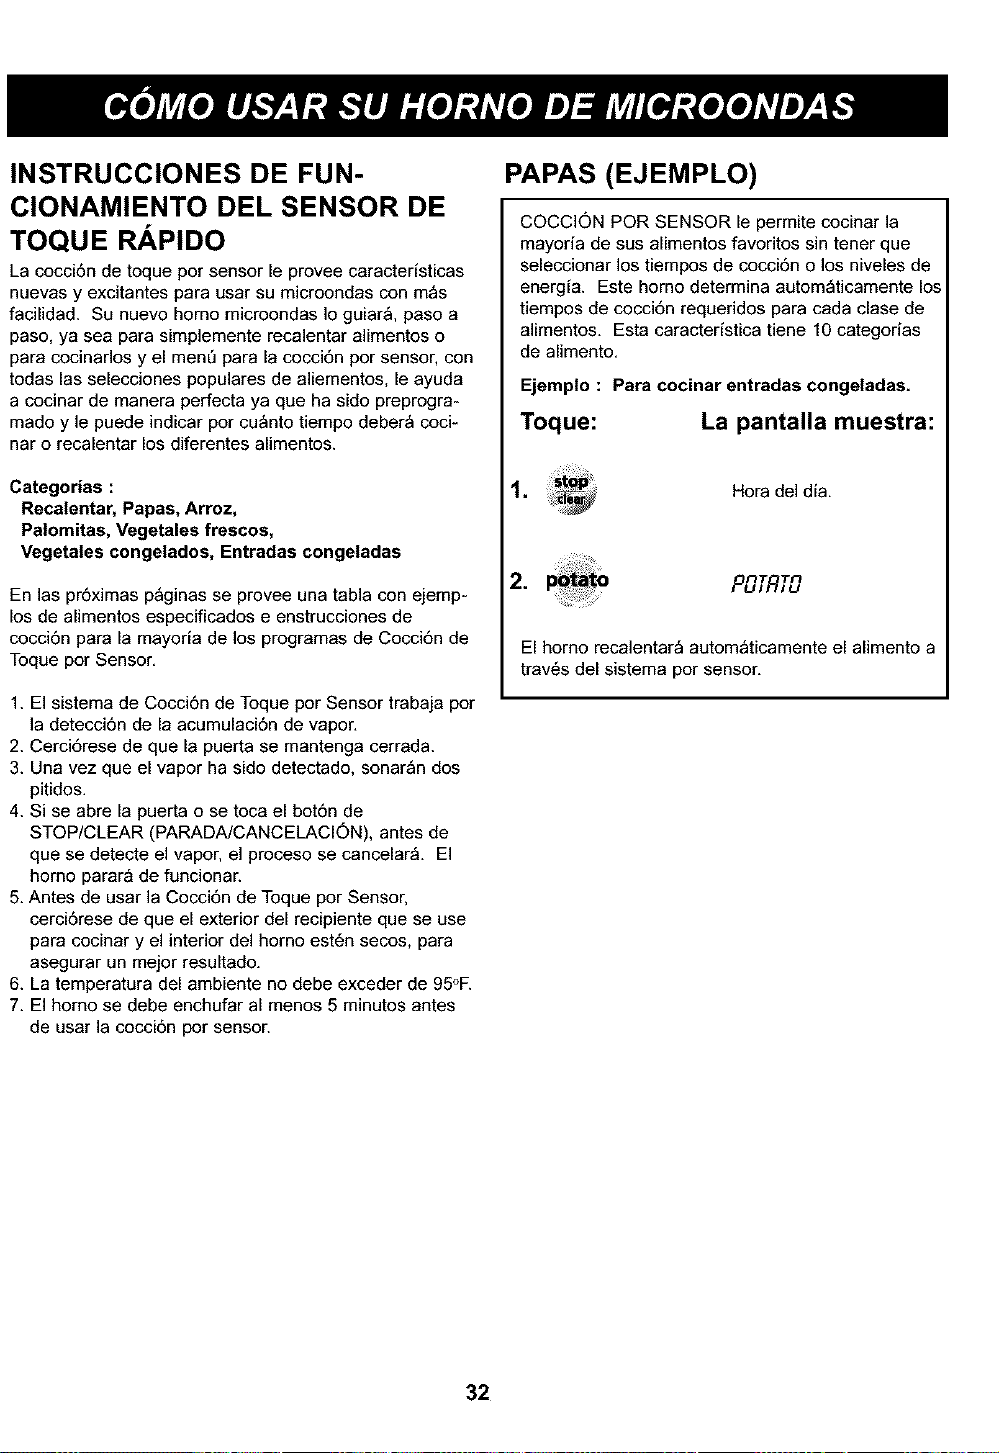
INSTRUCCIONES DE FUN-
CIONAMIENTO DEL SENSOR DE
TOQUE RAPIDO
La cocci6n de toque por sensor ie provee caracteristicas
nuevas y excitantes para usar su microondas con m_s
facilidad. Su nuevo homo microondas Io guiar& paso a
paso, ya sea para simplemente recalentar alimentos o
para cocinados y el mend para la cocci6n por sensor, con
todas las selecciones populares de aliementos, le ayuda
a cocinar de manera perfecta ya que ha sido preprogra-
mado y le puede indicar por cu_nto tiempo deber_ cock
nar o recalentar los diferentes alimentos.
Categorias :
Recalentar, Papas, Arroz,
Palomitas, Vegetales frescos,
Vegetales congelados, Entradas congeladas
En las pr6ximas p_ginas se provee una tabla con ejemp-
los de alimentos especificados e enstrucciones de
cocci6n para la mayoria de los programas de Cocci6n de
Toque por Sensor.
1. El sistema de Cocci6n de Toque por Sensor trabaja por
]a detecci6n de la acumulaci6n de vapor.
2. Cerci6rese de que ia puerta se mantenga cerrada.
3. Una vez que el vapor ha sido detectado, sonar_n dos
pitidos.
4. Si se abre ia puerta o se toca el bot6n de
STOP/CLEAR (PARADA/CANCELACi_)N), antes de
que se detecte el vapor, el proceso se cancelar& El
homo parar_ de funcionar.
5. Antes de usar la Cocci6n de Toque por Sensor,
cerci6rese de que el exterior del recipiente que se use
para cocinar y el interior del homo est6n secos, para
asegurar un mejor resuitado.
6. La temperatura del ambiente no debe exceder de 95°E
7. El homo se debe enchufar al menos 5 minutos antes
de usar la cocci6n por sensoE
PAPAS (EJEMPLO)
COCCION POR SENSOR ie permite cocinar la
mayoria de sus alimentos favoritos sin tener que
seleccionar los tiempos de cocci6n o los niveles de
energia. Este homo determina autom_ticamente los
tiempos de cocci6n requeridos para cada clase de
alimentos. Esta caracteristica tiene 10 categorias
de alimento.
Ejemplo : Para cocinar entradas congeladas.
Toque: La pantalla muestra:
Hora del dia.
2, Pfi,fl, u
El homo recalentar_ autom_ticamente el alimento a
trav6s del sistema por sensor,
32
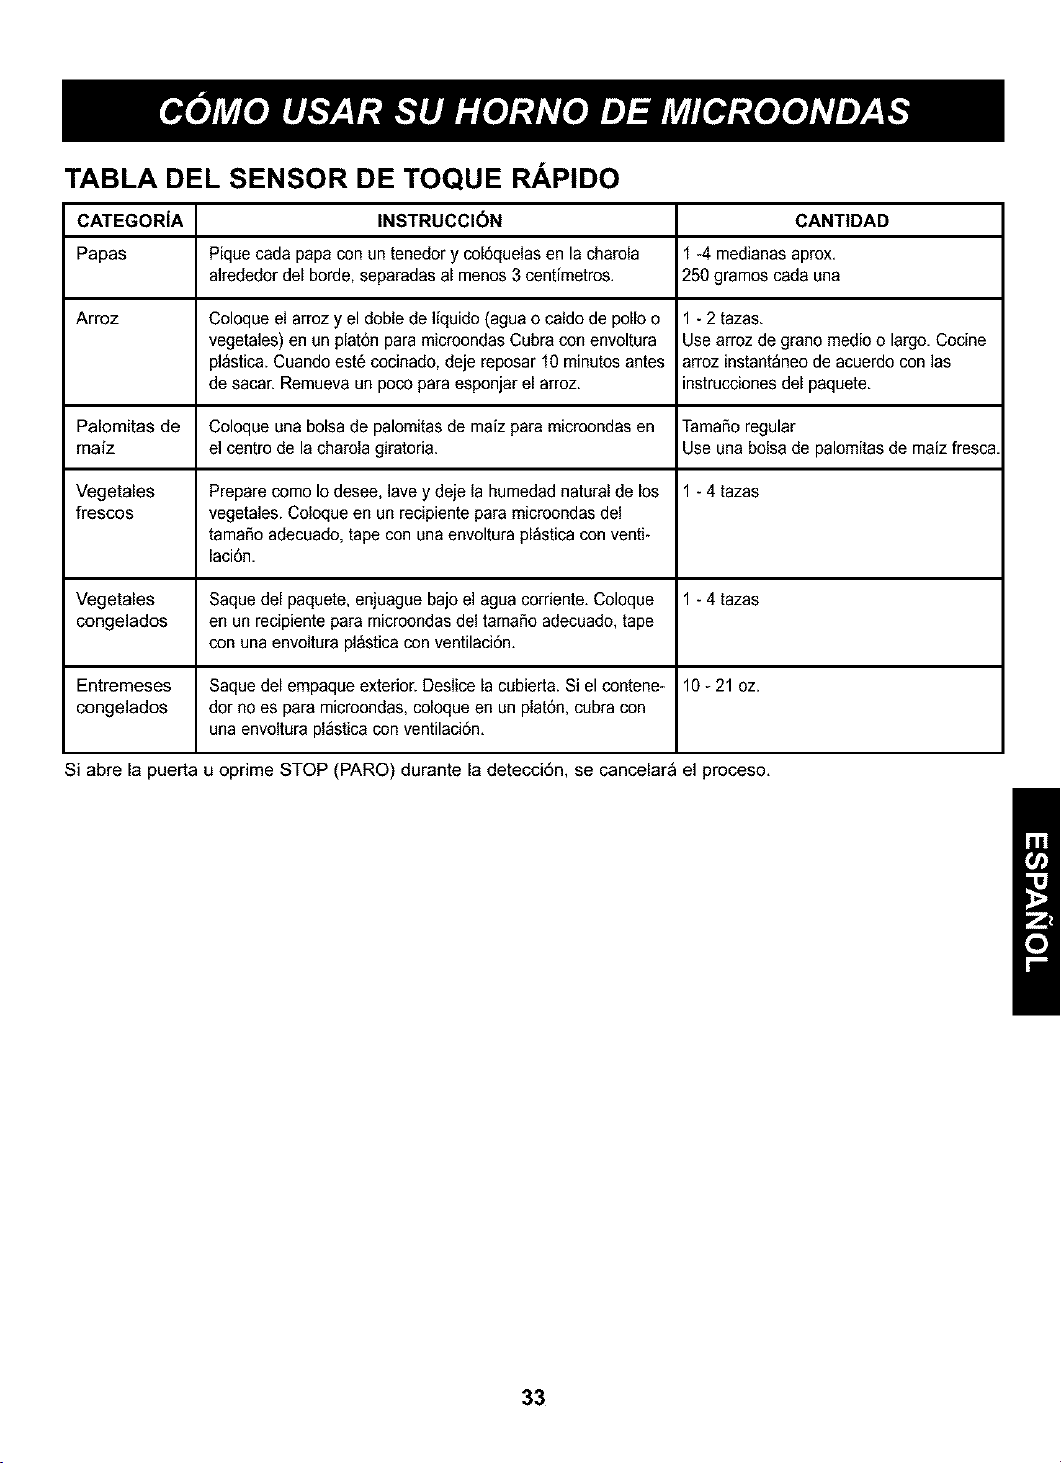
TABLA DEL SENSOR DE TOQUE RAPIDO
CATEGORiA INSTRUCCI_N CANT|DAD
Papas Pique cada papa con un tenedor y col6quelas en la charola 1 -4 medianas aprox.
alrededor del borde, separadas al menos 3 centfmetros. 250 gramos cada una
Arroz Coloque el arroz y el doble de liquido (agua o caldo de polio o 1 - 2 tazas.
vegetales) en un plat6n para microondas Cubra con envoltura Use arroz de grano medio o largo. Cocine
pl_stica. Cuando est6 cocinado, deje reposar 10 minutos antes arroz instant_neo de acuerdo con las
de sacar. Remueva un poco para esponjar el arroz, instrucciones del paquete.
Palomitas de Coloque una bolsa de palomitas de maiz para microondas en TamaSo regular
maiz el centro de la charola giratoria. Use una bolsa de palomitas de maiz fresca
Vegetales Prepare come Iodesee, lave y deje la humedad natural de los 1 - 4 tazas
frescos vegetales. Coloque en un recipiente para microondas del
tamaSo adecuado, tape con una envoltura pl_stica con venti-
[aci6n.
Vegetales Saque del paquete, enjuague bajo el agua corriente. Coloque 1 - 4 tazas
congelados en un recipiente para microondas del tamaSo adecuado, tape
con una envoltura pl&sticacon ventilaci6n.
Entremeses Saque del empaque exterior. Deslice la cubierta. Si el contene- 10 - 21 oz.
congelados dor no es para microondas, coloque en un plat6n, cubra con
una envoltura pl_stica con ventilaciSn.
Si abre la puerta u oprime STOP (PARO) durante la detecci6n, se cancelar_ el proceso.
33
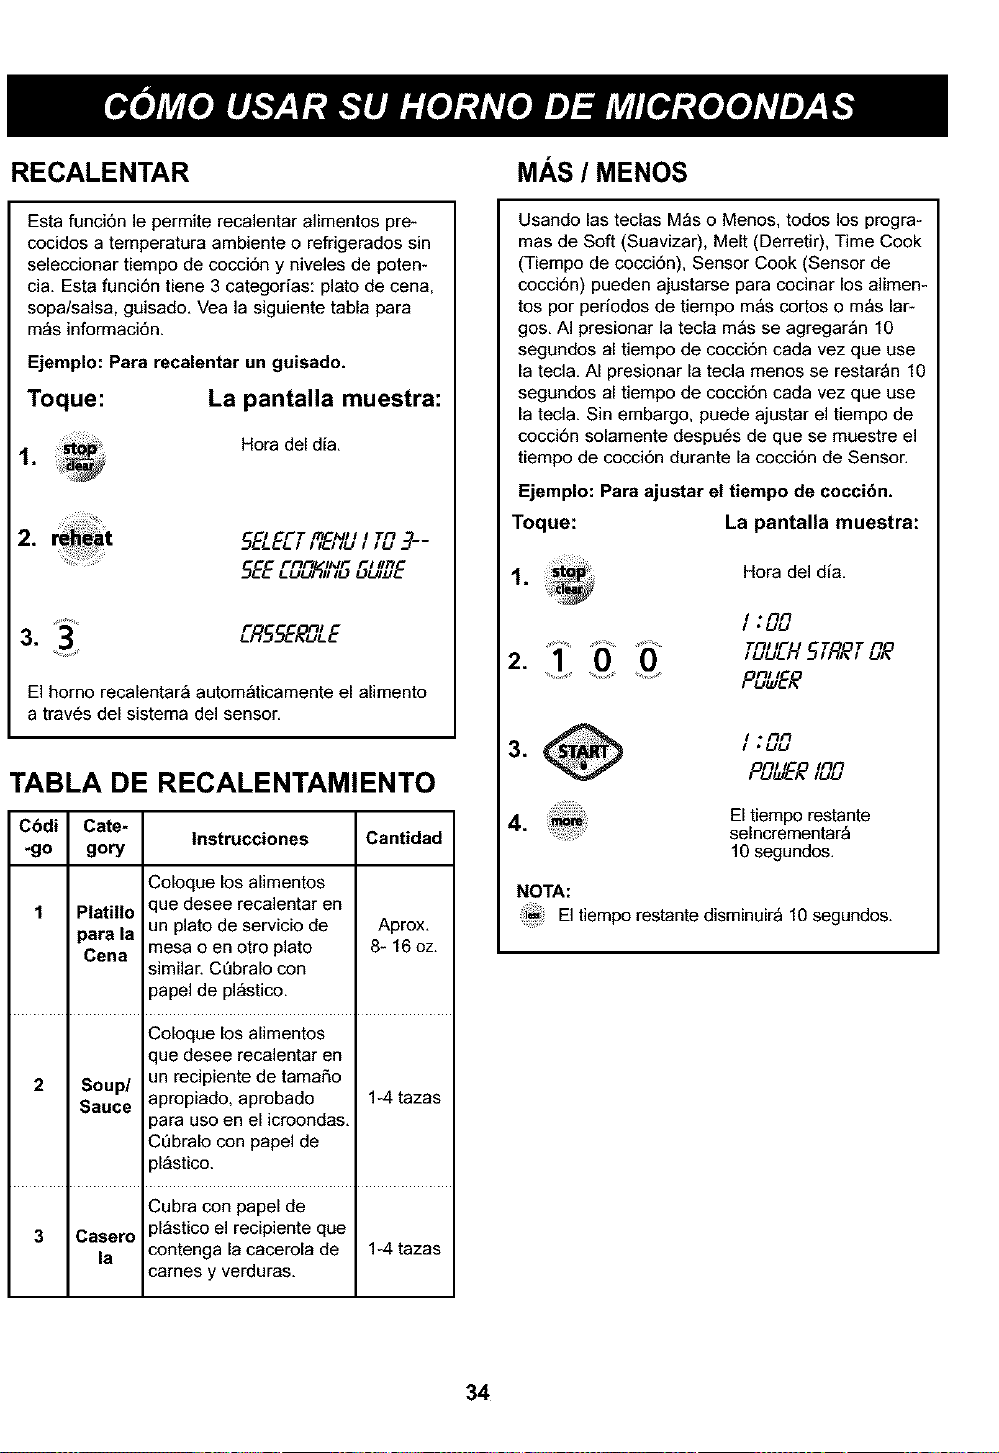
RECALENTAR
Esta funci6n le permite recalentar alimentos pre-
cocidos a temperatura ambiente o refrigerados sin
seleccionar tiempo de cocci6n y niveles de poten-
cia. Esta funci6n tiene 3 categorias: plato de cena,
sopa/salsa, guisado. Vea la siguiente tabla para
m_s informaci6n.
Ejemplo: Para recalentar un guisado.
Toque: La pantalla muestra:
Hora del dia.
2,
I FT m MII I
5ELEL,,7_,_ , TO-q--
FnF_, INF FI I/n
3. 13 ER55EEOLE
El homo recalentar_ autom_ticamente el alimento
a trav6s del sistema del sensor.
TABLA DE RECALENTAMIENTO
Cbdi Cate-
-go gory
Instrucciones Cantidad
Coloque los alimentos
1 Platillo que desee recalentar en
un plato de servicio de Aprox.
para la
Cena mesa o en otto plato 8- 16 oz.
similan CQbralo con
papel de pl_stico.
Coloque los alimentos
que desee recalentar en
2 Soup/ un recipiente de tama_o
Sauce apropiado, aprobado 1-4 tazas
para uso en el icroondas.
CQbralo con papel de
pl_stico.
Cubra con papel de
3 Casero pl_stico el recipiente que
la contenga la cacerola de 1-4 tazas
cames y verduras.
MAS/MENOS
Usando las teclas M_s o Menos, todos los progra-
mas de Soft (Suavizar), Melt (Derretir), Time Cook
(Tiempo de cocci6n), Sensor Cook (Sensor de
cocci6n) pueden ajustarse para cocinar los alimen-
tos por periodos de tiempo m_s cortos o m_s lar-
gos. AI presionar la tecla m_s se agregar_n 10
segundos al tiempo de cocci6n cada vez que use
la ted& AI presionar la tecla menos se restar_n 10
segundos al tiempo de cocci6n cada vez que use
la tecla. Sin embargo, puede ajustar el tiempo de
cocci6n solamente despu6s de que se muestre el
tiempo de cocci6n durante la cocci6n de Sensor.
Ejemplo: Para ajustar el tiempo de cocci6n.
Toque: La pantalla muestra:
Hora del dia.
I -nn
I *UU
1_ _ O TnI IF T T n
2. ,uuJ-I 5,RE, UE
..... PO_EE
° nn
3. I .uu
nl I inn
4, El tiempo restante
selncrementar_
10 segundos.
NOTA:
El tiempo restante disminuir_ 10 segundos.
34

COCCI_)N AUTOMATICA
Use esta funci6n para cocinar alimentos sin necesi-
dad de fijar el tiempo de cocci6n o la intensidad.
Para m_s informaci6n lea la "Tabla de cocci6n por
autom_tica" que se muestra a continuaci6n.
Ejemplo : Para cocinar 4 tajadas de tocineta.
Toque: La pantalla muestra:
.
I FT ITI ,_!II I TFI
5ELED ,7_ , ,_ 6--
Fnn IAIF FI lift
2. BREunM
Till IF TFI I IF
......... ,_u__H2 ,_ 5 5L,_E5
3. 4 El tiempo correr_ al
', contra-reloj despu6s de
que Y 5L]EE5 aparezca
en la pantalia.
AGREGAR MINUTOS
Tecla de ahorro de tiempo. Este control simplificado
le permite fijar e iniciarr&pidamente la cocci6n a
una potencia de 100% sin necesidad de tocar INICIO.
Ejemplo : Para cocinar pot 2 minutos.
Toque: La pantalla muestra:
Hora del dia.
Dos Cuenta regresiva
2.
_"_ veces y potencia 100,
NOTA: Si toque AGREGAR MINUTO, se agrega
desde 1 minuto hasta 99 rain 59 segundos.
TABLA DE COCCION POR AUTOMATICA
Cbdigo DIRECTION Cantidad
2-6 rebanadas
1
2
4
Categoda
Tocino
Panecillos
Congelados/
Molletes
Panecillos
Frescos/Molletes
Bebidas
Pedazos de
Polio Hot Cereal
Cereal Caliente
Para obtener un mejor resultado, coloque las tiras de tocino en la
parrilla para tocino del microondas. (Si la parrilla no est_ disponible,
use un plato de servicio de mesa, revestido de toallas de papel).
S_quelos del envase y col6quelos en un plato. (Si los molletes
)esan m_s de 3 oz cada uno, cuente cada uno como dos cuando
vaya a registrar la cantidad).
S_quelos del envase y col6quelos en un plato. (Si los molletes
)esan m_s de 3 oz cada uno, cuente cada uno como dos cuando
vaya a registrar la cantidad).
S_quelos del envase y col6quelos en un plato. (Tenga mucho
cuidado! Las bedidas se pondr_n muy calientes! Algunas veces, los
liquidos que se calientan en recipients cilindricos, salpicar_n
cuando se mueva la taza).
Coloque los pedazos de polio en un recipiente de tamaSo
apropiado, aprobado para uso en el microondas, c0bralo con papel
de pl_stico y deje un respiradero.
Prep_relo segt_n las instrucciones del paquete y cocinelo.
Revu61valo y d6jelo reposar antes de comedo. Use solamente
cereal caliente instant_neo.
1-6 pedazos
(2-3 onzascada uno)
1-6 pedazos
(2-3 onzascada uno)
1-2tazas
0,5-2,0 Ibs.
1-6porciones
35
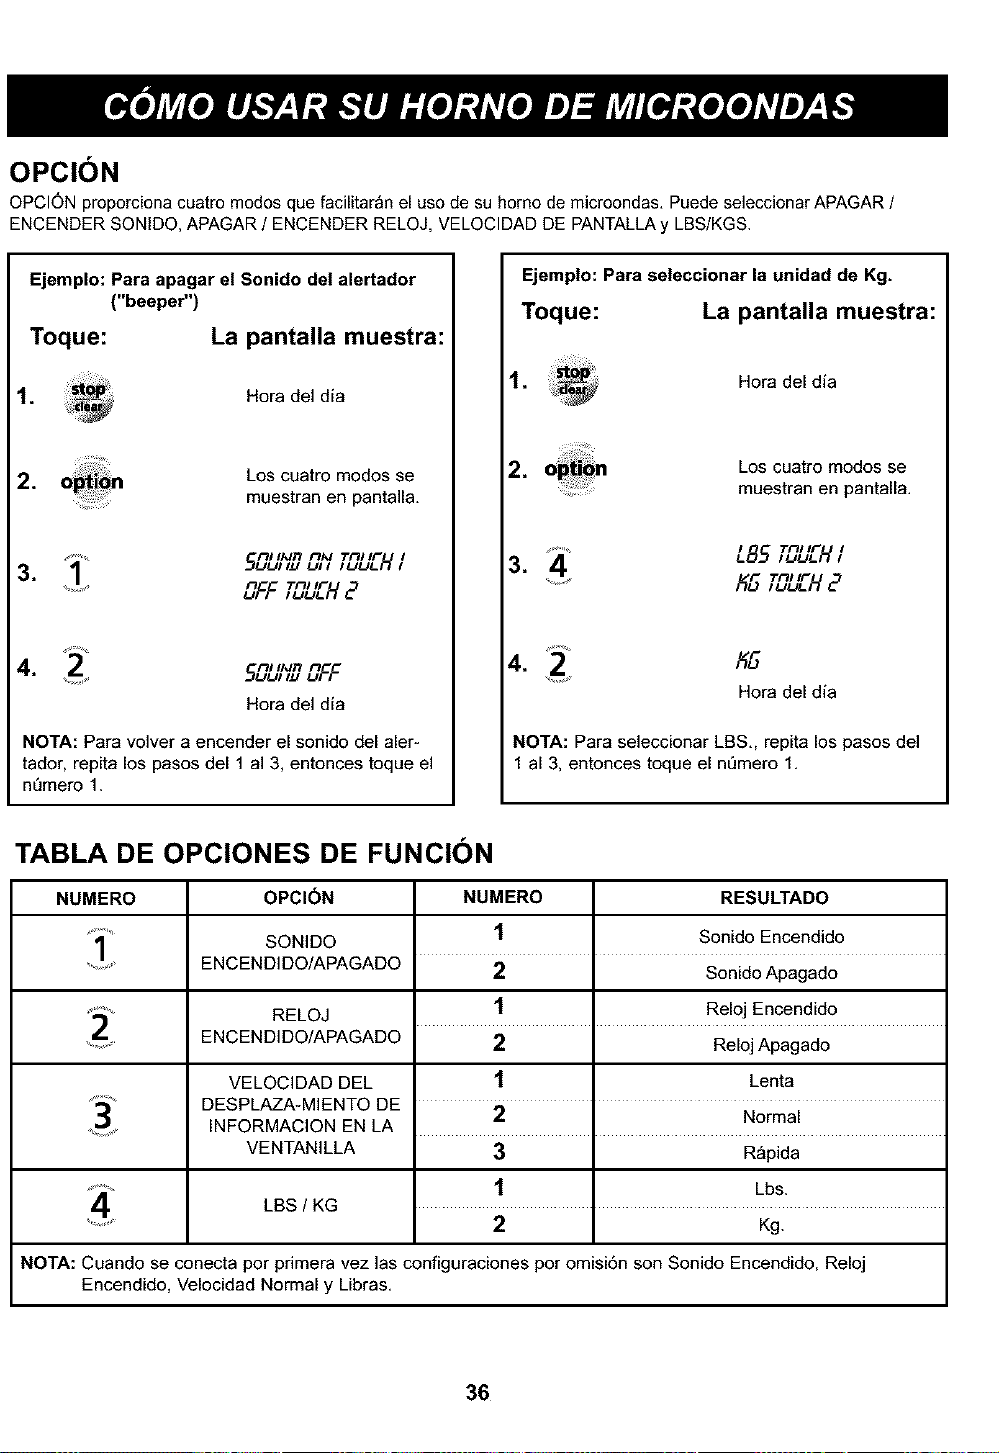
OPCION
OPCION proporciona cuatro modes que facilitaran el use de su home de micreendas. Puede seleccionar APAGAR /
ENCENDER SONIDO, APAGAR / ENGENDER RELOJ, VELOCIDAD DE PANTALLA y LBS/KGS.
Ejemplo: Para apagar el Sonido de! alertador
("beeper")
Toque: La pantalla muestra:
Hera del dia
2,
Los cuatro modes se
muestran en pantalla.
Fit Ildn ElM Till IF I
3. 5_UIILI UII IUUL'_I
n Till IF
_FF ,_H E
nl lldn n
4. 5C,u,.J uFF
Hora del dia
NOTA: Para volver a encender el sonido del aler-
tador, repita los pasos del 1 al 3, entonces toque el
nQmero 1.
Ejemp!o: Para se!eccionar la unidad de Kg.
Toque: La pantalla muestra:
1, Hera del dia
2. o_t_n
Los cuatro modes se
muestran en pantalla.
..... L_5 ITn"'*FuuL"_ It
3. 4
Tnl IF
4. _
Hera del dia
NOTA: Para seleccionar LBS., repita los pasos del
1 al 3. entonces toque el nQmero 1.
TABLA DE OPCIONES DE FUNCION
NUMERO OPCI_N NUMERO RESULTADO
1 Sonido Encendido
1 SONIDO
....... ENCENDIDO/APAGADO 2 Sonido Apagado
RELOJ 1 Reloj Encendido
......... ENCENDIDO/APAGADO 2 Reloj Apagado
VELOCIDAD DEL 1 Lenta
_3_ DESPLAZA-MIENTO DE 2 N0rmai
, INFORMACION EN LA
VENTANILLA 3 R_pida
...... 1 Lbs.
4 LBS / KG
............. 2 Kg.
NOTA: Cuando se conecta per primera vez las configuraciones per omisi6n son Sonido Encendido, Reloj
Encendido, Velocidad Normal y Libras.
36
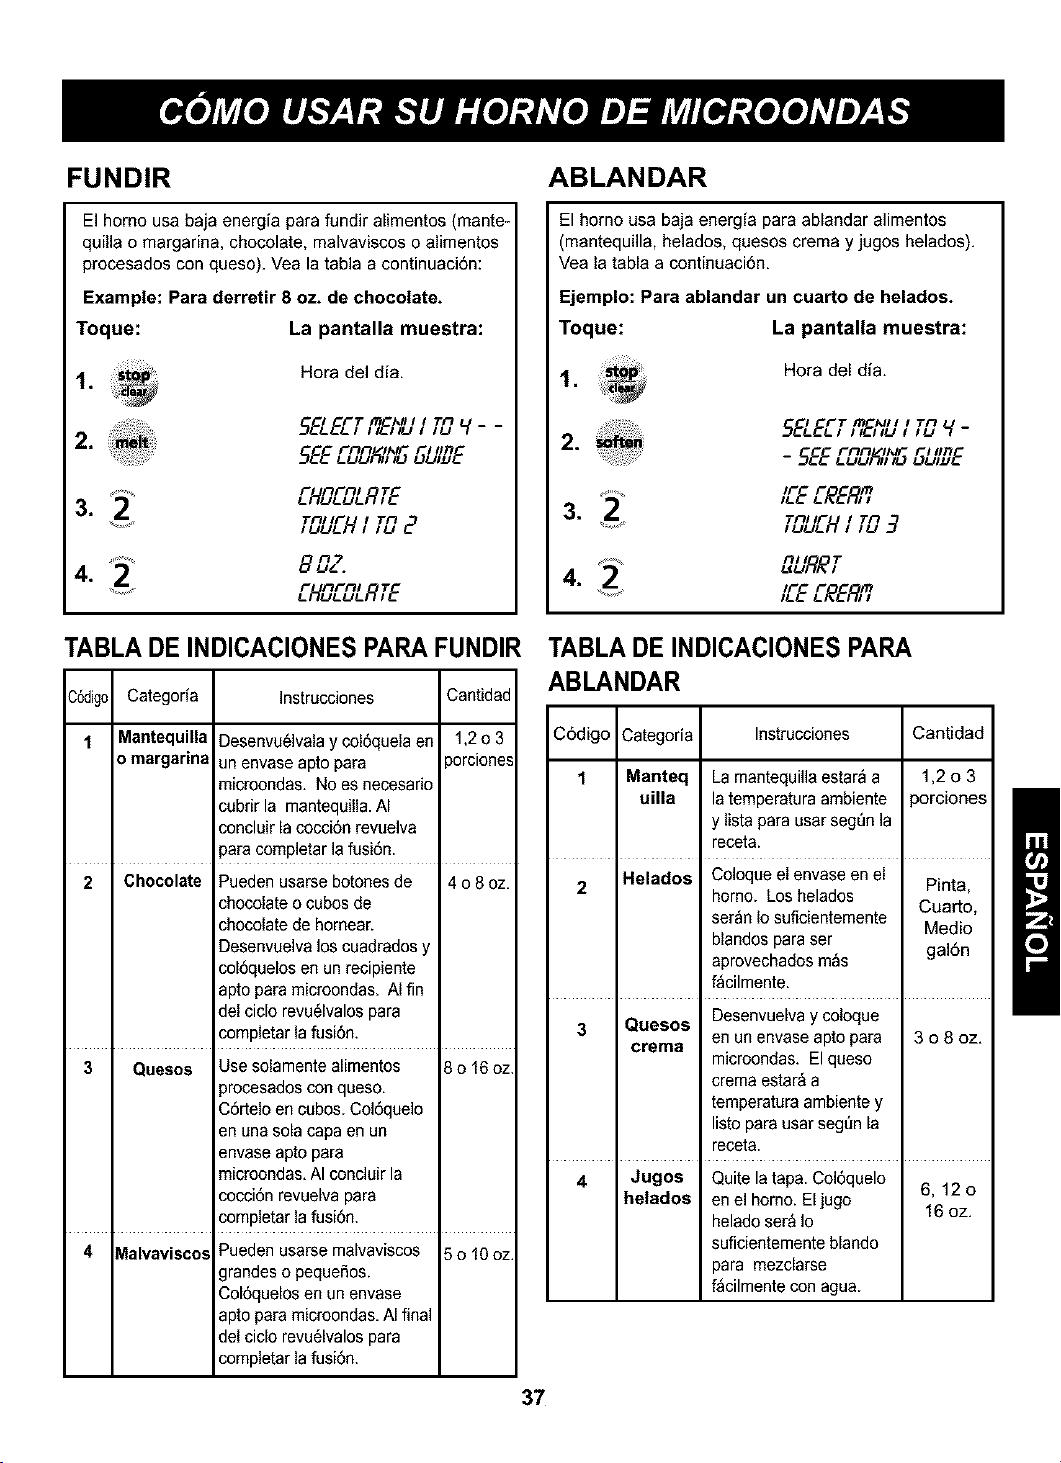
FUNDIR
El homo usa baja energia para fundir alimentos (mante-
quilla o margarina, chocolate, malvaviscos o alimentos
procesados con queso). Vea la tabla a continuaci6n:
Example: Para derretir 8 oz. de chocolate.
Toque: La pantalla muestra:
1,
Hora del alia.
2.
3,
4. 2 _
} I-Tin ,_111
inn ,',_ I'l IIn
5EE_N, ,oou,_E
F nFnl T
TnJ IF I
,_u_H, TO E
8 0Z.
F nFnl T
ABLANDAR
El horno usa baja energia para ablandar alimentos
(mantequilla, helados, quesos crema y jugos helados).
Vea la tabla a continuaci6n.
Ejemplo: Para ablandar un cuarto de helados.
Toque: La pantalla muestra:
1. !ii
Hora del dia.
I I'T m ,%11; I TEl
5ELE,_,,",EJ,u, ,_, _-
Fnn ,',_ I'l IIn
- SEE_._,_,_,,o ou,_,E
IF F m
,.E .'#EE_,
" Tnl IF I
,_u_H , TO--7
4. '.... _u'RE,
IF" F m
..... ,.E .'#EE_,
TABLADEINDICACIONESPARAFUNDIR
C6digo Categoria Instrucciones Canfidad
1 Mantequilla Desenvu61valay col6quela en 1,2 o 3
o margarina un envase apto para _orciones
microondas. No es necesario
cubrir la mantequilla. AI
concluir la cocci6n revuelva
paracompletar la fusi6n.
2 Chocolate Pueden usarse botones de 4 o 8 oz.
chocolate o cubes de
chocolate de hornear.
Desenvuelva los cuadrados y
col6quelos en un recipiente
apto paramicroondas. AI fin
del ciclo revu61valospara
completar la fusi6n.
3 Quesos Use solamente alimentos 8 o 16 oz.
_rocesadoscon queso.
C6rtelo en cubos.Col6quelo
en una sola capa en un
envase apto para
microondas. AIconcluir la
cocci6n revuelva para
completar la fusi6n.
4 Malvavisco... Pueden usarse malvaviscos 5 o 10 oz.
Irandeso pequeSos.
Col6quelos en un envase
apto paramicroondas. AIfinal
del ciclo revu61valospara
completar la fusi6n.
TABLADE INDICACIONESPARA
ABLANDAR
C6digo Categoria Instrucciones Cantidad
1 Manteq La mantequilla estar_ a 1,2 o 3
uilla latemperatura ambiente porciones
y lista para usar seg0n la
receta.
2 Helados Coloque el envase en el Pinta,
horno. Los helados
ser_n Iosuficientemente Cuarto,
Medio
blandos para ser
aprovechados m_s gal6n
f_cilmente.
3 Quesos Desenvuelva ycoloque
crema en un envase apto para 3 o 8 oz.
microondas. El queso
crema estar& a
temperatura ambiente y
listo para usar seg0n la
receta.
4 Jugos Quite la tapa. Col6quelo 6, 12 o
helados en el horno. Eljugo 16 oz.
helado ser&1o
suficientemente blando
para mezdarse
f_cilmente con agua.
37
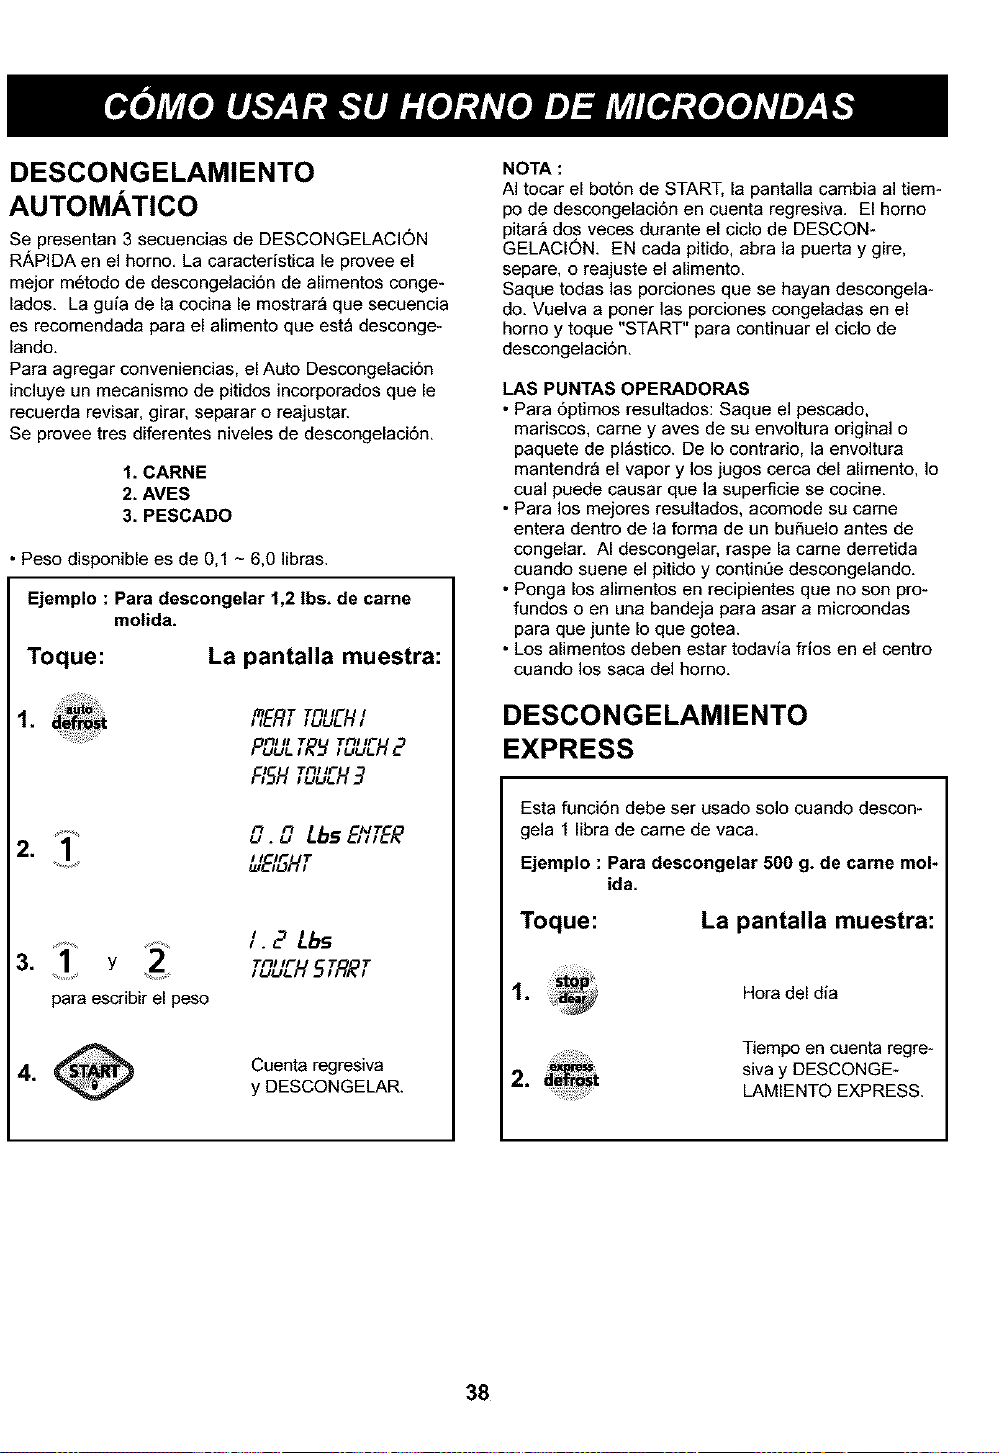
DESCONGELAMIENTO
AUTOMATICO
Se presentan 3 secuencias de DESCONGELACION
R/_,PIDAen el horno. La caracteristica le provee el
mejor m6todo de descongelaci6n de alimentos conge-
lados. La guia de la cocina le mostrar_ que secuencia
es recomendada para el alimento que est_ desconge-
lando.
Para agregar conveniencias, el Auto Descongelaci6n
incluye un mecanismo de pitidos incorporados que le
recuerda revisar, girar, separar o reajustar.
Se provee tres diferentes niveles de descongelaci6n.
1. CARNE
2. AVES
3. PESCADO
• Peso disponible es de 0,1 - 6,0 libras.
Ejemplo : Para descongelar 1,2 Ibs. de carrie
molida.
Toque: La pantalla muestra:
.
m T Till IF I
,,rER, IULILH,
I_1 II T TIll IF
I TIll IF
F_SH,uuLH3
n n Lbs 6_/TER
U.U
2. ........ &_'_HT
' E Lbs
Till IF T T
3, Y ,uuLHS,RE,
para escribir el peso
A
_#_zrA.=_t_ Cuenta regresiva
4.
y DESCONGELAR.
NOTA :
AI tocar el bot6n de START, la pantalla cambia al tiem-
po de descongelaci6n en cuenta regresiva. El homo
pitar_ dos veces durante el ciclo de DESCON-
GELAClON. EN cada pitido, abra la puerta y gire,
separe, o reajuste el alimento.
Saque todas las porciones que se hayan descongela-
do. Vuelva a porter las porciones congeladas en el
homo y toque "START" para continuar el ciclo de
descongelaci6n.
LAS PUNTAS OPERADORAS
• Para 6ptimos resultados: Saque el pescado,
mariscos, came y aves de su envoltura original o
paquete de pl_stico. De Io contrario, la envoltura
mantendr_ el vapor y los jugos cerca del alimento, Io
cual puede causar que la superficie se cocine.
• Para los mejores resultados, acomode su came
entera dentro de la forma de un buSuelo antes de
congelar. AI descongelar, raspe la came derretida
cuando suene el pitido y continue descongelando.
• Ponga los alimentos en recipientes que no son pro-
fundos o en una bandeja para asar a microondas
para que junte Io que gotea.
• Los alimentos deben estar todavia frios en el centro
cuando los saca del homo.
DESCONGELAMIENTO
EXPRESS
Esta funci6n debe ser usado solo cuando descon-
gela 1 libra de came de vaca.
Ejemplo : Para descongelar 500 g. de came mol-
ida.
Toque: La pantalla muestra:
. Hora del dia
2. de_m_t
Tiempo en cuenta regre-
siva y DESCONGE-
LAMIENTO EXPRESS.
38
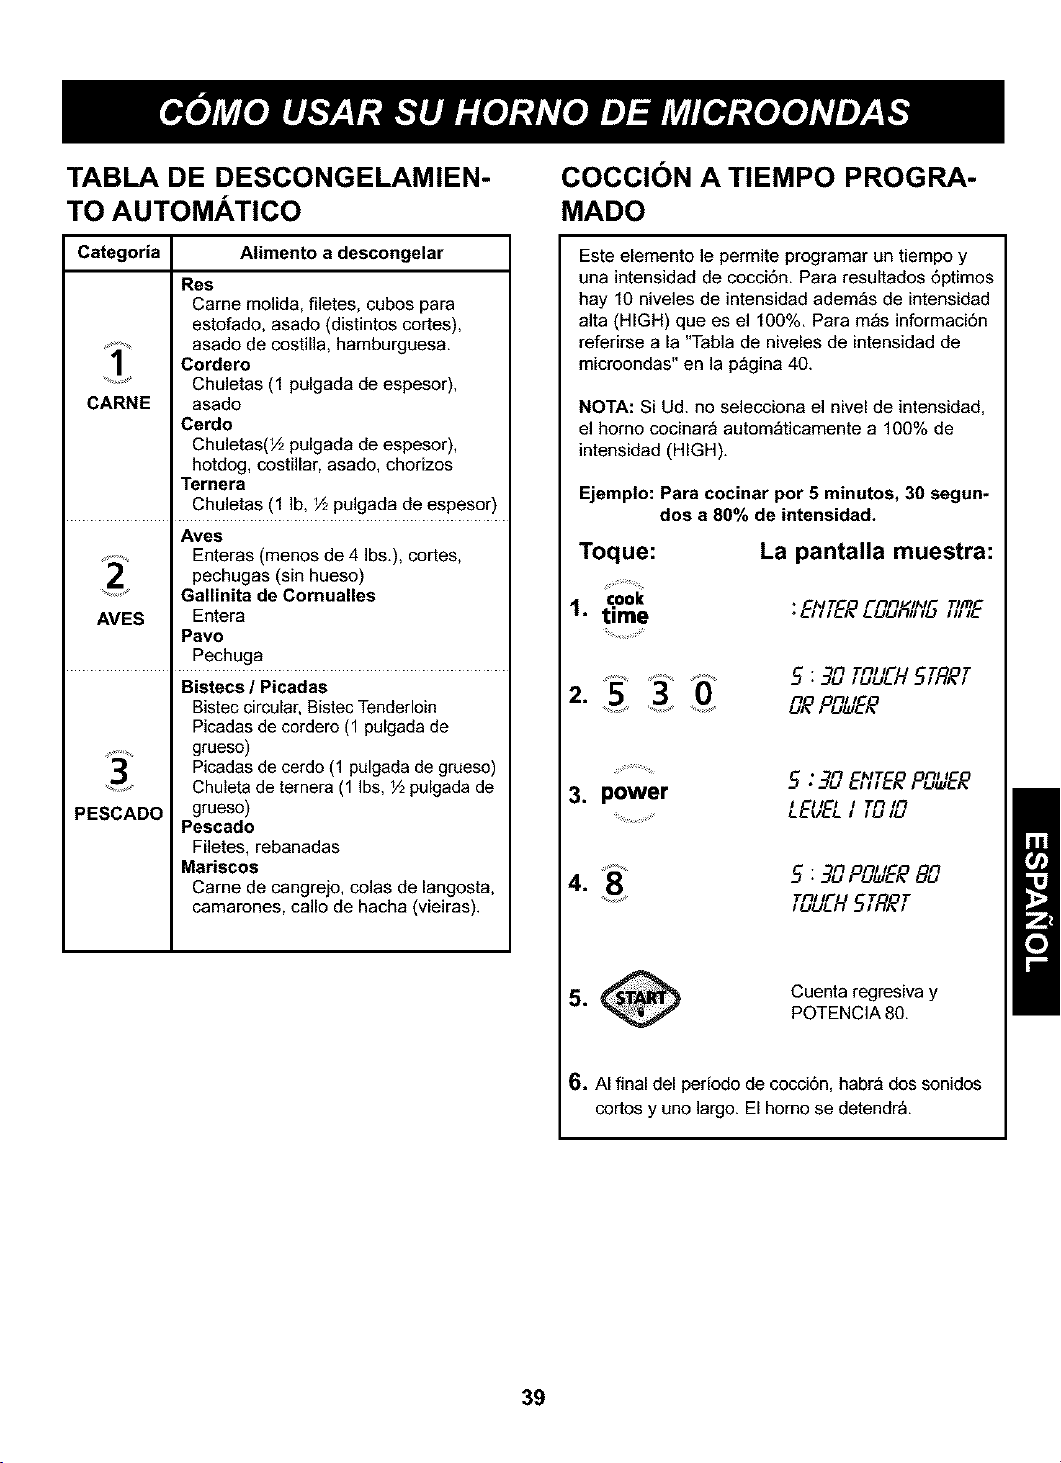
TABLA DE DESCONGELAMIEN-
TO AUTOMATICO
Categoria Alimento a descongelar
Res
Came molida, filetes, cubos para
estofado, asado (distintos cortes),
asado de costilla, hamburguesa.
]
Cordero
...... Chuletas (1 pulgada de espesor),
CARNE asado
Cerdo
Chuletas(½ pulgada de espesor),
hotdog, costillar, asado, chorizos
Ternera
Chuletas (1 Ib, ½ pulgada de espesor)
Ayes
Enteras (menos de 4 Ibs.), cortes,
pechugas (sin hueso)
Gallinita de Comualles
AMES Entera
Pavo
Pechuga
Bistecs / Picadas
Bistec circular, Bistec Tenderloin
Picadas de cordero (1 pulgada de
grueso)
Picadas de cerdo (1 pulgada de grueso)
Chuleta de ternera (1 Ibs, ½ pulgada de
PESCADO grueso)
Pescado
Filetes, rebanadas
Mariscos
Carne de cangrejo, colas de langosta,
camarones, callo de hacha (vieiras).
COCCI6N A TIEMPO PROGRA-
MADO
Este elemento le permite programar un tiempo y
una intensidad de cocci6n. Para resultados 6ptimos
hay 10 niveles de intensidad adem_s de intensidad
alta (HIGH) que es el 100%. Para m_s informaci6n
referirse a la "Tabla de niveles de intensidad de
microondas" en la p_gina 40.
NOTA: Si Ud. no selecciona el nivel de intensidad,
el homo cocinar_ autom_ticamente a 100% de
intensidad (HIGH).
Ejemplo: Para cocinar por 5 minutos, 30 segun-
dos a 80% de intensidad.
Toque:
cook
1. time
La pantalla muestra:
* AJ'r Fnn I,MF Tim
oEJ,,ER_,,o ,,,E
..........£ 0
2. S
• n Tnl IF T T
5.9,g,,,u,H S,FIR,
n nl I
JR PC,_,EB
• n hit nl I
................ 5 ._qOE_,,ERPC,_,ER
3. power
I I I I I Tn in
LEveL t Iu tu
n n/I n
4. 8 5 . 30 P_,,/ER 80
Tnl IF T T
...... ,_H 5,_qR,
Cuenta regresiva y
POTENCIA 80.
6. AI final del periodo de cocci6n, habr_ dos sonidos
cortos y uno largo. El horno se detendr_.
39
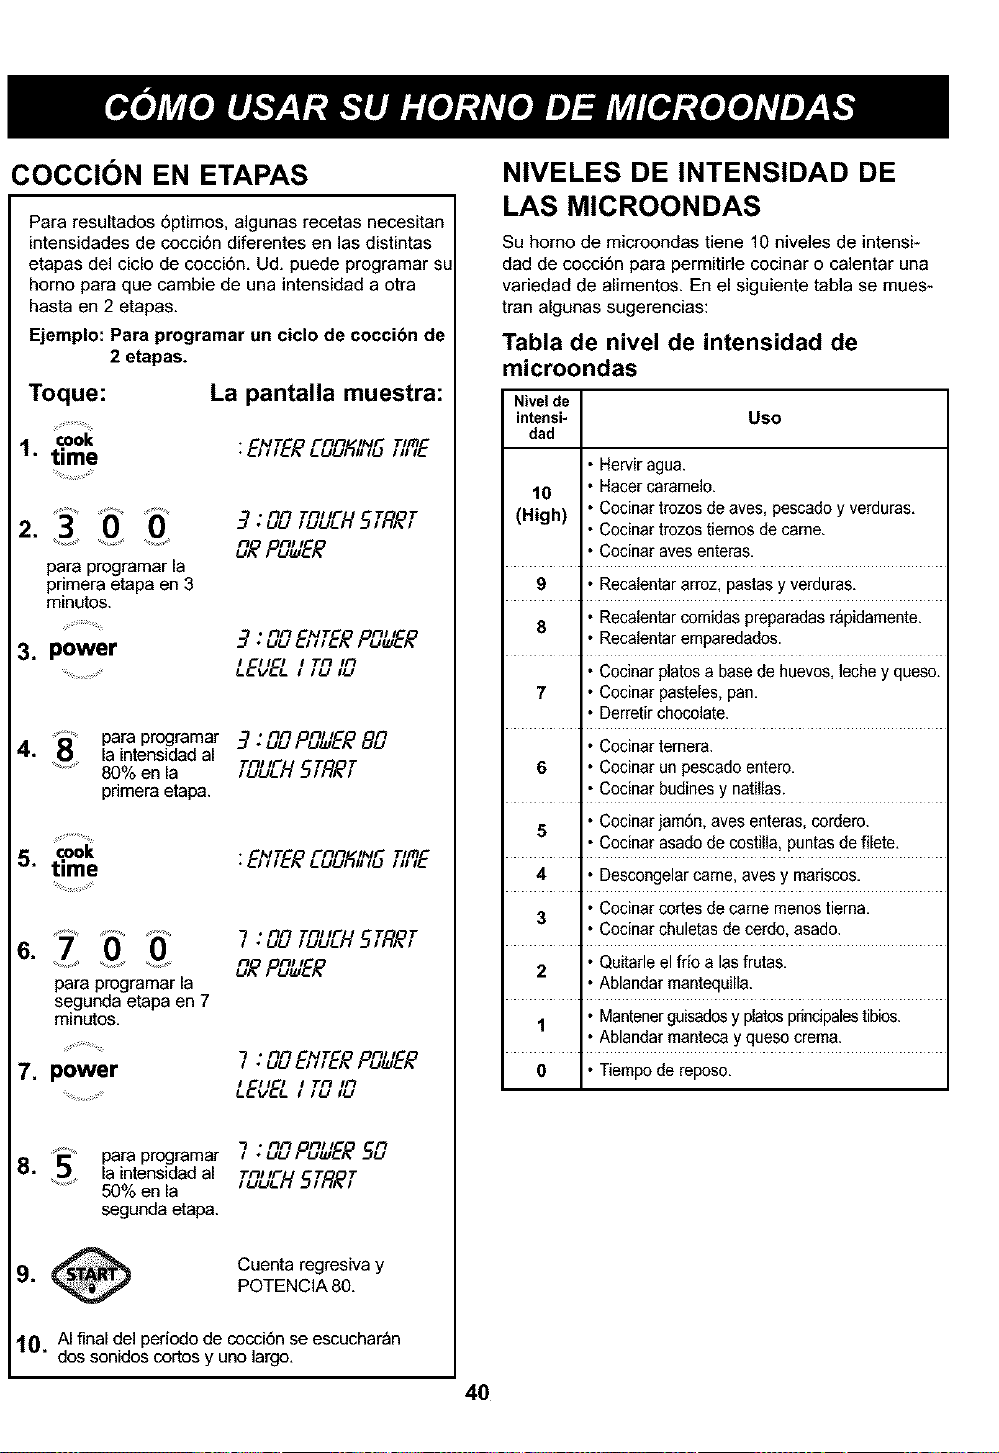
COCCI_)N EN ETAPAS
Para resultados 6ptimos, algunas recetas necesitan
intensidades de cocci6n diferentes en las distintas
etapas del ciclo de cocci6n. Ud. puede programar SL
horno para que cambie de una intensidad a otra
hasta en 2 etapas•
Ejemplo: Para programar un ciclo de coccibn de
2 etapas.
Toque:
cook
1. time
La pantalla muestra:
• AJT F*nn INf" Tim
.Eh,EE_J, ,v ,,,,E
311 b .nn Tni,r T T
2. 3. uu ,uuLH 5,RR,
n nl I
...... JR PC,_,EB
para programar la
pnmera etapa en 3
minutos.
• nn MT nl I
9. uu EJ,,ERPC,_ER
3. power
I I I } I Tn in
........................ ,.EVEL, 1,_,u
811 para programar4. la intensidad al
80% en la
primera etapa.
5. cook
time
• nn n/I n
3. uu P&.'ER8,g
Tnl IF T T
,_u_H5,RR,
• ,_'r rnn IMr TIITI
0 4 O_ ,nnTnllF T T
6.
_ n nl I
.............JR PC,_,EB
para programar la
segunda etapa en 7
minutos,
• nn MT nl I
7 •uu5,,ER PE,.;ER
7. power
I I I I I Tn In
.................... _.E_EL, ,_ ,_
para programar
8. 5 la intensidad al
50% en la
segunda etapa.
• nn n/I n
7 •_ PC,_ER5E_
Tnl IF T T
,_u_H 5,RR,
Cuenta regresiva y
POTENCIA 80.
10. AI final del periodo de cocci6n se escuchar_n
dos sonidos cortos y uno largo,
NIVELES DE INTENSIDAD DE
LAS MICROONDAS
Su homo de microondas tiene 10 niveles de intensi-
dad de cocci6n para permitide cocinar o calentar una
variedad de alimentos. En el siguiente tabla se mues-
tran algunas sugerencias:
Tabla de nivel de intensidad de
microondas
Nivel de
intensi- USO
dad
Herviragua.
10 Hater caramelo,
(High) Cocinar trozos de aves, pescado y verduras.
Cocinar trozos tiemos de came.
Cocinar ayes enteras.
9 Recalentararroz, pastasy verduras.
8 Recalentarcornidas preparadas r&pidamente.
Recalentaremparedados.
Cocinar platos a base de huevos, leche y queso.
7 Cocinar pasteles, pan.
Derretirchocolate•
Cocinar ternera.
6 Cocinar un pescado entero.
Cocinar budines y natillas.
5 Cocinar jam6n, ayes enteras, cordero.
Cocinar asado de costilla, puntas de filete.
4 Descongelarcame, aves y mariscos.
Cocinar cortes de came menostiema.
3
Cocinar chuletas de cerdo, asado.
2 Quitarle el frio alas frutas.
Ablandar mantequilla.
1 Mantenerguisadosy platesprincipalestibios.
Ablandar mantecay queso crema.
0 Tiempo de reposo,
4O

PRECAUCI6N: No use papel de aluminio durante el ciclo de coccibn.
CONSEJOS PARA COCCI )N
Carne
1. No se requieren t6cnicas especiales. La came debe
preparase en la forma convencional para cocinar.
Agregue condimentos si Io desea. Siempre descon-
gele la came totalmente antes de cocinar.
2. Ponga la came en una bandeja para asar a microon-
das o un plato especial para microondas y ponga
6ste sobre la bandeja giratoria.
3. Cocine de acuerdo a la "Tabla para cocinar cames"
(a continuaci6n). Use el tiempo m_s largo para
cames grandes y los tiempos m_s cortos para
cames m_s pequeSas. Para chuletas gruesas use el
tiempo m_s largo.
4. D6 vuelta la came una vez en la mitad del tiempo de
cocci6n.
5. Deje reposar per 5-10 minutos envuelta en papel de
aluminio despu6s de cocinar. El tiempo de reposo es
muy importante para que se complete el proceso de
cocci6n.
6. Aseg_rese de que la came, especialmente de cerdo,
est6 completamente cocinada antes de comerla.
Tabla para cocinar carnes
Intensidad de Tiempo de
microondas coccibn per libra
8 9v2a11V2minutos
8 11V2a 14 minutes
"HIGH"(100%) 61/2a91/2minutos
Corte
RES
Costillas
- Medio cecida
- Bien cecida
Came molida
(para guisados),
hamburguesas,
frescas o
descongeladas
(4 oz C/U)
- 2 hamburguesa "HIGH"(100%) 2V2a 4V2minutos
- 4 hamburguesas "HIGH"(100%) 3V2a 5V2minutos
CERDO
Lomo, pata, tocino 8 12V2a 16V2minutes
- 4 Ionjas "HIGH"(100%) 21/2a 3V2minutos
- 6 Ionjas "HIGH"(100%) 3V2a 4V2minutos
NOTA: Los tiempos listados en la tabla son s61o una
guia. Considere algunas diferencias de acuerdo al
gusto y preferencias individuales. Los tiempos
tambi6n pueden variar con la form& corte y
composici6n de los alimentos.
Aves
1. No se requieren t6cnicas especiales. Las ayes
deben preparase en la forma convencional para
cecinar. Agregue condimentos si Io desea.
2. Las aves deben estar completamente desconge-
]adas. Saque las menudencias y las abrazaderas de
metal.
3. Pique la piel y pase aceite vegetal con un pincel a
menos que el ave est6 previamente marinada.
4. Todas las cames de ave deben cocinarse en una
bandeja para asar a microondas o en un plato espe-
cial para microondas y luego puesto sobre la bande-
ja giratoria.
5. Cocine de acuerdo alas instrucciones de la "Tabla
para cocinar aves" que se muestra a continuaci6n.
D6 vuelta cuando est_ a medio cecinar. Debido a su
form& las aves tienden a cocinarse en forma des-
pareja, especialmente las partes huesudas. AI darlas
vuelta durante la cocci6n estas partes se cocinan en
forma m_s pareja.
6. Deje reposar por 5-10 minutos envuelta en papel de
aluminio antes de sacar la carne. El tiempo de
repose es muy importante para completar la cocci6n.
7. Asegt_rese de que las aves est_n bien cocidas antes
de comedas. Las aves enteras est_n completamente
cecidas cuando los jugos salen claros desde adentro
del muslo al pincharlo con un cuchillo. Los trozos de
ave deben picarse con un cuchillo en ]a parte m_s
gruesa para asegurar que los jugos son claros y la
came es firme.
Tabla para cocinar aves
Ave
POLLO
Entero
Pechuga (con hueso)
Porciones
Intensidad de Tiempo de
microondas coccibn por
libra
8 11a 15 minutos
8 10 a 14 minutes
8 11a 17 minutos
PAVO
Entero 8 11a 15 minutos
NOTAS:
• Los tiempos listados en ]a tabla son s61ouna guia.
Considere algunas diferencias de acuerdo al gusto y
preferencias individuales. Los tiempos tambi6n
pueden variar con la form& corte y composici6n de
los alimentos.
• Si se rellena un ave entera, el peso del ave rellena
se debe considerar para calcular el tiempo de
cocci6n.
41
I
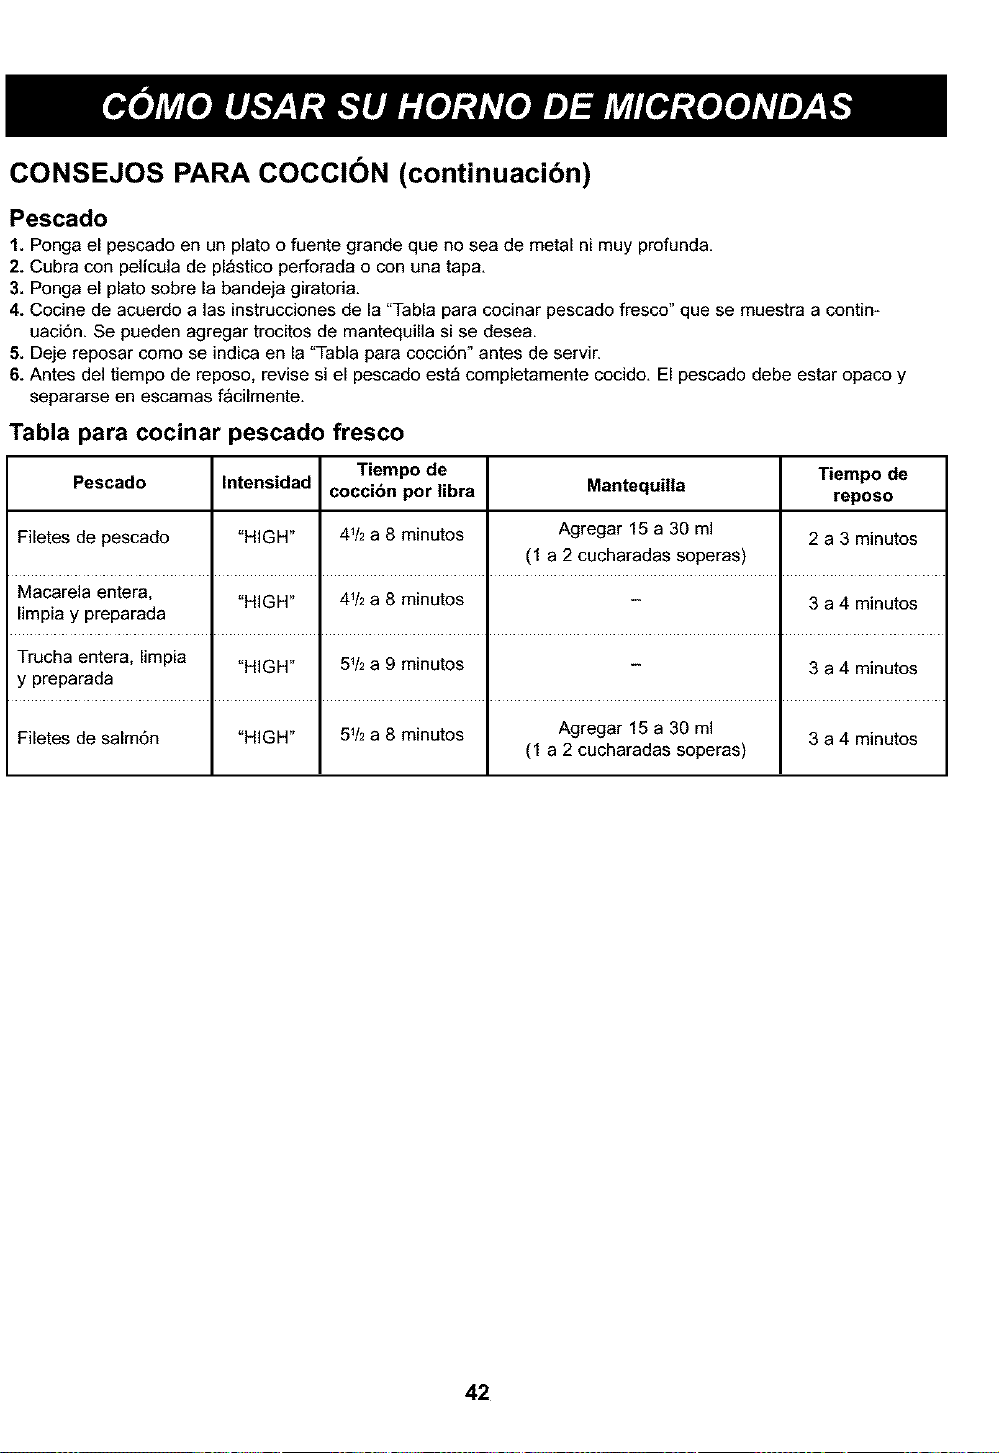
CONSEJOS PARA COCCI6N (continuacibn)
Pescado
1. Ponga el pescado en un plato o fuente grande que no sea de metal ni muy profunda.
2. Cubra con pelicula de pl_stico perforada o con una tap&
3. Ponga el plato sobre la bandeja giratoria.
4. Cocine de acuerdo alas instrucciones de la "Tabla para cocinar pescado fresco" que se muestra a contin-
uaciSn. Se pueden agregar trocitos de mantequilla si se desea.
5. Deje reposar como se indica en la "Tabla para cocciSn" antes de servir.
6. Antes del tiempo de reposo, revise si el pescado est_ completamente cocido. El pescado debe estar opaco y
separarse en escamas f_cilmente.
Tabla para cocinar pescado fresco
Tiempo de Tiempo de
Pescado Intensidad coccibn por libra Mantequilla
reposo
Filetes de pescado "HIGH" 4_/2a 8 minutos Agregar 15 a 30 ml 2 a 3 minutos
(1 a 2 cucharadas soperas)
Macarela enter& "HIGH" 4_/2a 8 minutos - 3 a 4 minutos
limpia y preparada
Trucha enter& limpia "HIGH" 5_/2a 9 minutos - 3 a 4 minutos
y preparada
Filetes de salm6n "HIGH" 5_/2a 8 minutos Agregar 15 a 30 ml 3 a 4 minutos
(1 a 2 cucharadas soperas)
42
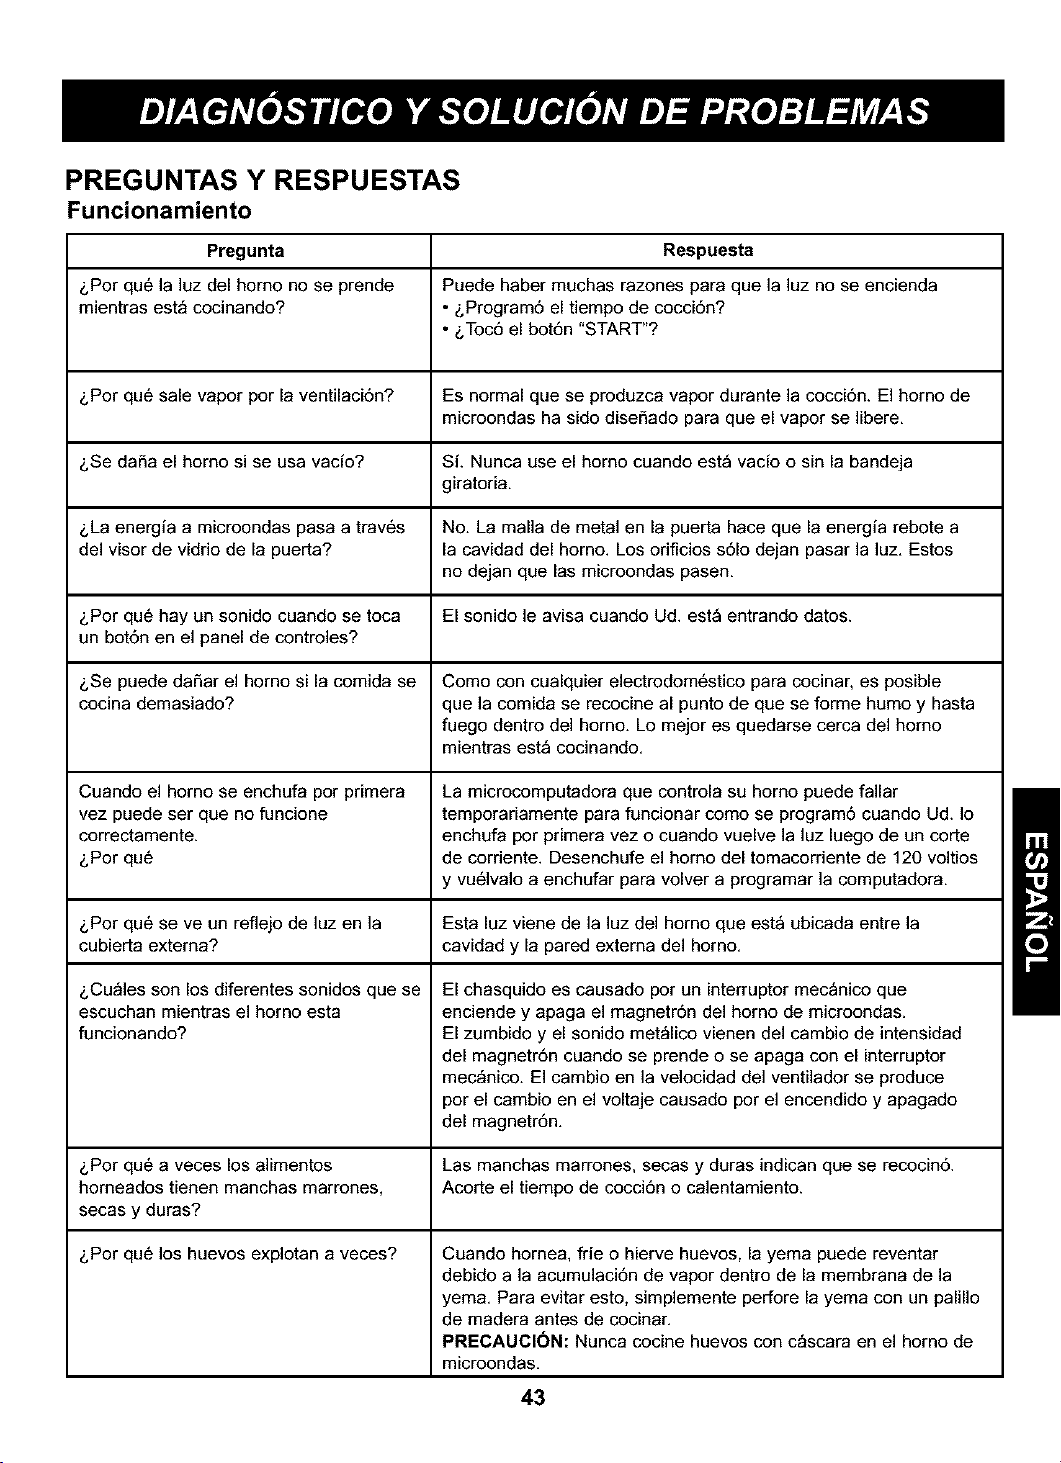
PREGUNTAS Y RESPUESTAS
Funcionamiento
Pregunta
&Por qu6 la ]uz del homo no se prende
mientras est_ cocinando?
&Por qu6 sale vapor por la ventilaci6n?
&Se daSa el homo si se usa vacio?
&La energia a microondas pasa a trav6s
del visor de vidrio de la puerta?
&Por qu6 hay un sonido cuando se toca
un bot6n en el panel de controles?
&Se puede daSar el homo si la comida se
cocina demasiado?
Cuando el horno se enchufa por primera
vez puede ser que no funcione
correctamente.
&Por qu6
&Por qu6 se ve un reflejo de luz en la
cubierta extema?
&Curies son los diferentes sonidos que se
escuchan mientras el horno esta
funcionando?
&Por qu6 a veces los alimentos
homeados tienen manchas marrones,
secas y duras?
&Por qu6 los huevos explotan a veces?
Respuesta
Puede haber muchas razones para que la luz no se encienda
• &Program6 el tiempo de cocci6n?
• &Toc6 el bot6n "START"?
Es normal que se produzca vapor durante la cocci6n. El homo de
microondas ha sido diseSado para que el vapor se libere,
Si. Nunca use el homo cuando est_ vacio o sin la bandeja
giratoria,
No. La malla de metal en la puerta hace que la energia rebote a
la cavidad del horno. Los orificios s61o dejan pasar la luz, Estos
no dejan que las microondas pasen,
El sonido le avisa cuando Ud. est_ entrando datos.
Como con cualquier electrodom6stico para cocinar, es posible
que la comida se recocine al punto de que se forme humo y hasta
fuego dentro del horno. Lo mejor es quedarse cerca del homo
mientras est_ cocinando.
La microcomputadora que controla su homo puede fallar
temporariamente para funcionar como se program6 cuando Ud. Io
enchufa por primera vez o cuando vuelve la luz luego de un corte
de corriente. Desenchufe el homo del tomacorriente de 120 voltios
y vu6lvalo a enchufar para volver a programar la computadora.
Esta luz viene de la luz del homo que est_ ubicada entre la
cavidad y la pared extema del homo.
El chasquido es causado por un interruptor mec_nico que
enciende y apaga el magnetr6n del homo de microondas.
El zumbido y el sonido met_lico vienen del cambio de intensidad
del magnetr6n cuando se prende o se apaga con el interruptor
mec_nico. El cambio en la velocidad del ventilador se produce
por el cambio en el voltaje causado por el encendido y apagado
del magnetr6n.
Las manchas marrones, secas y duras indican que se recocin6.
Acorte el tiempo de cocci6n o calentamiento.
Cuando home& fde o hierve huevos, la yema puede reventar
debido a la acumulaci6n de vapor dentro de la membrana de la
yema. Para evitar esto, simplemente perfore la yema con un palillo
de madera antes de cocinar.
PRECAUCI(3N: Nunca cocine huevos con c_scara en el homo de
microondas.
43

PREGUNTAS Y RESPUESTAS (continuacibn)
Alimentos
Pregunta
6Por qu6 los huevos revueitos a veces
est_n un poco secos despu6s de
cocinar?
6Se pueden hacer palomitas de mafz en
el homo de microondas?
&Por qu6 a veces las manzanas asadas
revientan durante la cocci6n?
&Por qu6 a veces las papas asadas se
queman durante la cocci6n?
6Por qu6 se recomienda un tiempo de
reposo despu6s de cocinar con
microondas?
6Por qu6 se requiere tiempo adicional
para cocinar alimentos guardados en el
refrigerador?
Respuesta
Los huevos se secan si est_n recocidos aunque use siempre
la misma receta. El tiempo de cocci6n puede variar por las
siguientes razones:
• Los huevos vadan de tamaSo.
• Los huevos est_n a temperatura ambiente algunas veces y otras
veces est_n refrigerados.
• Los huevos se siguen cocinando durante el tiempo de reposo.
Sf, si se usa uno de los siguientes m6todos:
(1) Dispositivos para hacer palomitas especfficos para microondas.
(2) Bolsas de mafz para palomitas especiales para microondas que
est_n preparadas para tiempos de cocci6n e intensidad
especfficos.
Siga las instrucciones exactas dadas pot cada fabricante
para su producto y no deje el horno descuidado mientras el
maiz se estb cocinando. Si el maiz no explota despuds del
tiempo indicado, deje de cocinar. Si se recocina se puede
prender fuego.
PRECAUCI6N:
• Nunca use bolsas de papel de estraza para hacer patomitas
de maiz o intente hacer saltar los granos de maiz que han
quedado sin reventar.
• No ponga el maiz para palomitas pre-empaquetado directa-
mente sobre la bandeja giratoria. Para evitar sobrecalen*
tamiento de la bandeja giratoria, ponga la bolsa sobre un
plato.
La c_scara no se ha quitado de la parte superior de cada
manzana para permitir la expansi6n del interior de la fruta
mientras se cocina. Como en los m6todos convencionales de
cocci6n, el interior de la manzana se expande durante el proceso
de cocci6n.
Si se cocina per mucho tiempo se pueden incendiar. AI final del
tiempo de cocci6n recomendado, las papas deberfan estar
relativamente firmes.
PRECAUCI(_N: no cocinar en exceso.
El tiempo de reposo permite que los alimentos se cocinen en
forma pareja por unos minutos despu6s del ciclo de cocci6n con
microondas. El tiempo de reposo depende de la densidad de los
alimentos.
En cocina convencional, la temperatura inicial de los alimentos
afecta el tiempo total de cocci6n. Ud. necesita m_s tiempo para
cocinar alimentos sacados del refrigerador que para alimentos
que est_n a temperatura ambiente.
44
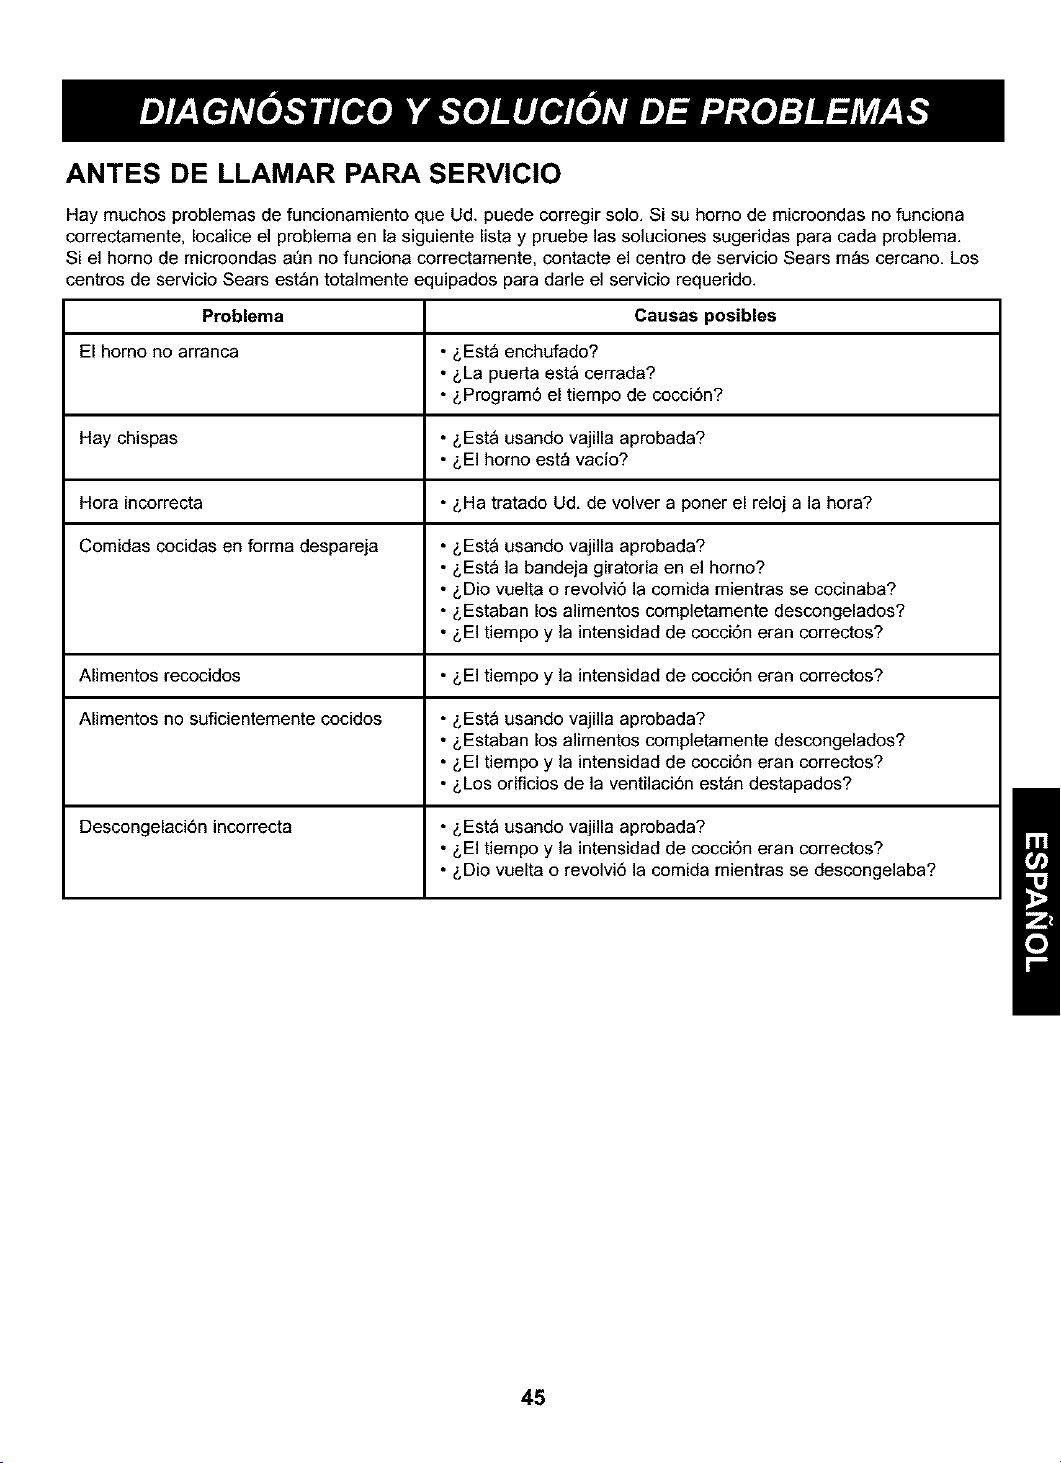
ANTES DE LLAMAR PARA SERVICIO
Hay muchos problemas de funcionamiento que Ud. puede corregir solo. Si su horno de microondas no funciona
correctamente, Iocalice el problema en la siguiente lista y pruebe las soluciones sugeridas para cada problema.
Si el homo de microondas aDn no funciona correctamente, contacte el centro de servicio Sears m_s cercano. Los
centros de servicio Sears est_n totalmente equipados para dade el servicio requerido.
Problema Causas posibles
El homo no arranca • &Est_ enchufado?
• &La puerta est_ cerrada?
• &Program6 el tiempo de cocci6n?
Hay chispas • &Est_ usando vajilla aprobada?
• &El homo est_ vacio?
Hora incorrecta • &Ha tratado Ud. de volver a porter el reloj a la hora?
Comidas cocidas en forma despareja • &Est_ usando vajilla aprobada?
• &Est_ la bandeja giratoria en el homo?
• &Dio vuelta o revolvi6 la comida mientras se cocinaba?
• &Estaban los alimentos completamente descongelados?
• &El tiempo y la intensidad de cocci6n eran correctos?
Alimentos recocidos • &El tiempo y la intensidad de cocci6n eran correctos?
Alimentos no suficientemente cocidos • &Est_ usando vajilla aprobada?
• &Estaban los alimentos completamente descongelados?
• &El tiempo y la intensidad de cocci6n eran correctos?
• &Los orificios de la ventilaci6n est_n destapados?
Descongelaci6n incorrecta • &Est_ usando vajilla aprobada?
• &El tiempo y la intensidad de cocci6n eran correctos?
• &Dio vuelta o revolvi6 la comida mientras se descongelaba?
45
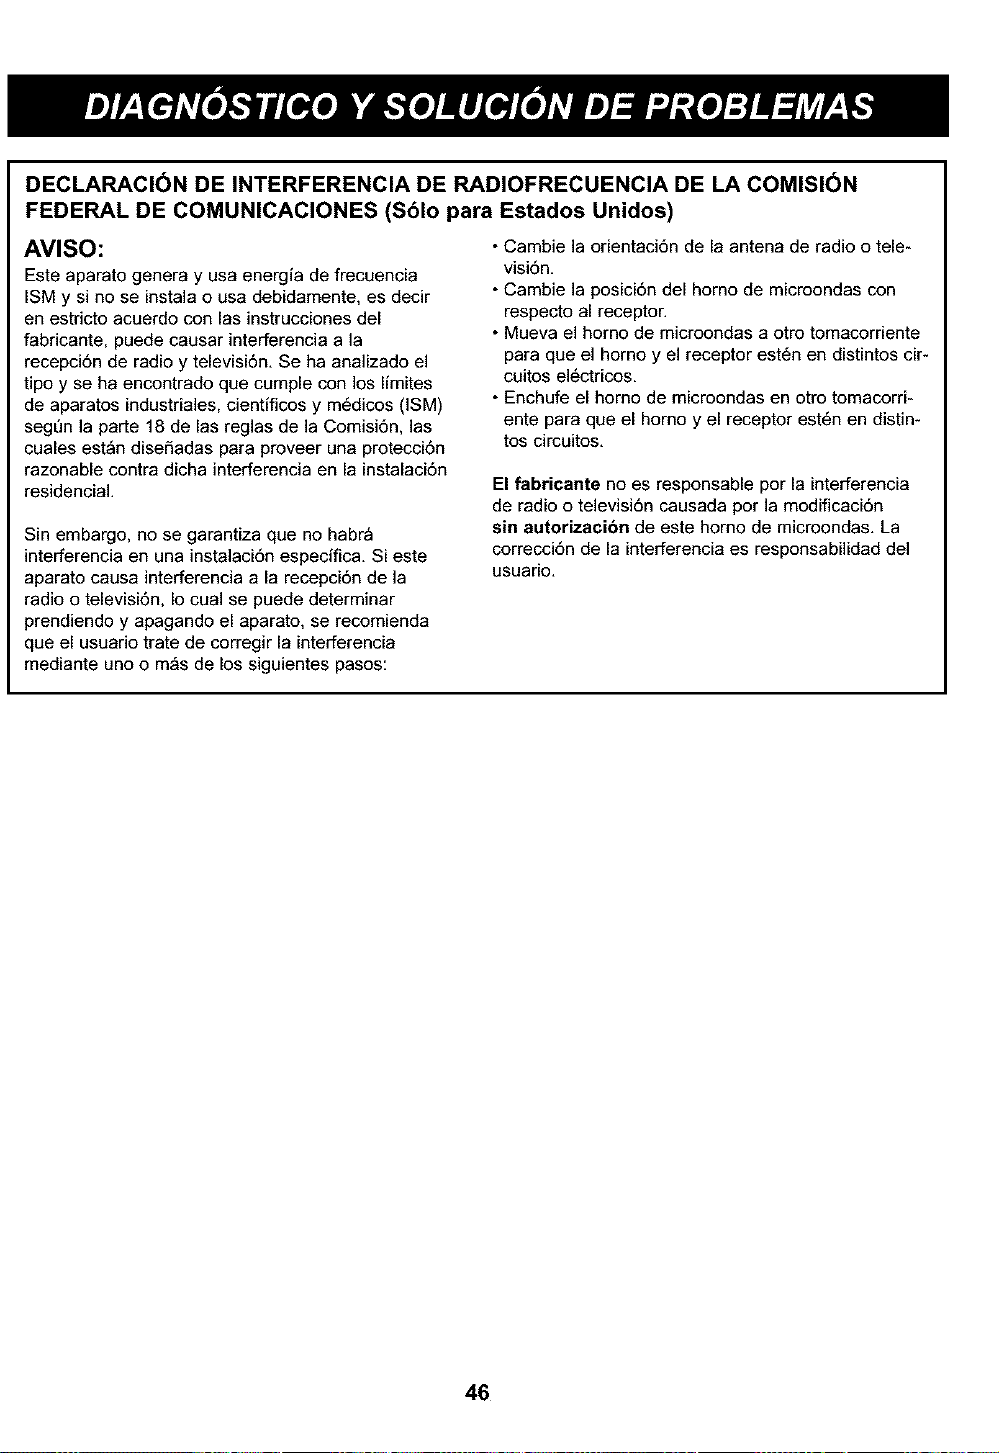
DECLARACI6N DE INTERFERENCIA DE RADIOFRECUENCIA DE LA COMISI6N
FEDERAL DE COMUNICACIONES (Sblo para Estados Unidos)
AVISO:
Este aparato genera y usa energfa de frecuencia
ISM y si no se instala o usa debidamente, es decir
en estricto acuerdo con las instrucciones del
fabricante, puede causar interferencia a la
recepci6n de radio y televisi6n Se ha analizado el
tipo y se ha encontrado que cumple con los limites
de aparatos industriales, cientificos y m6dicos (ISM)
segDn la parte 18 de las reglas de la Comisi6n, las
cuales est_n disefiadas para proveer una protecci6n
razonable contra dicha interferencia en la instalaci6n
residencial
Sin embargo, no se garantiza que no habr_
interferencia en una instalaci6n especifica Si este
aparato causa interferencia a la recepci6n de la
radio o televisi6n, Io cual se puede determinar
prendiendo y apagando el aparato, se recomienda
que el usuario trate de corregir la interferencia
mediante uno o m_s de los siguientes pasos:
• Cambie la orientaci6n de la antena de radio o tele-
visi6n
• Cambie la posici6n del homo de microondas con
respecto al receptoE
• Mueva el homo de microondas a otro tomacorriente
para que el homo y el receptor est6n en distintos cir-
cuitos el6ctricos
• Enchufe el homo de microondas en otro tomacorri-
ente para que el homo y el receptor est6n en distin-
tos circuitos
El fabricante no es responsable por la interferencia
de radio o televisi6n causada por la modificaci6n
sin autorizacibn de este homo de microondas, La
correcci6n de la interferencia es responsabilidad del
usuario,
46
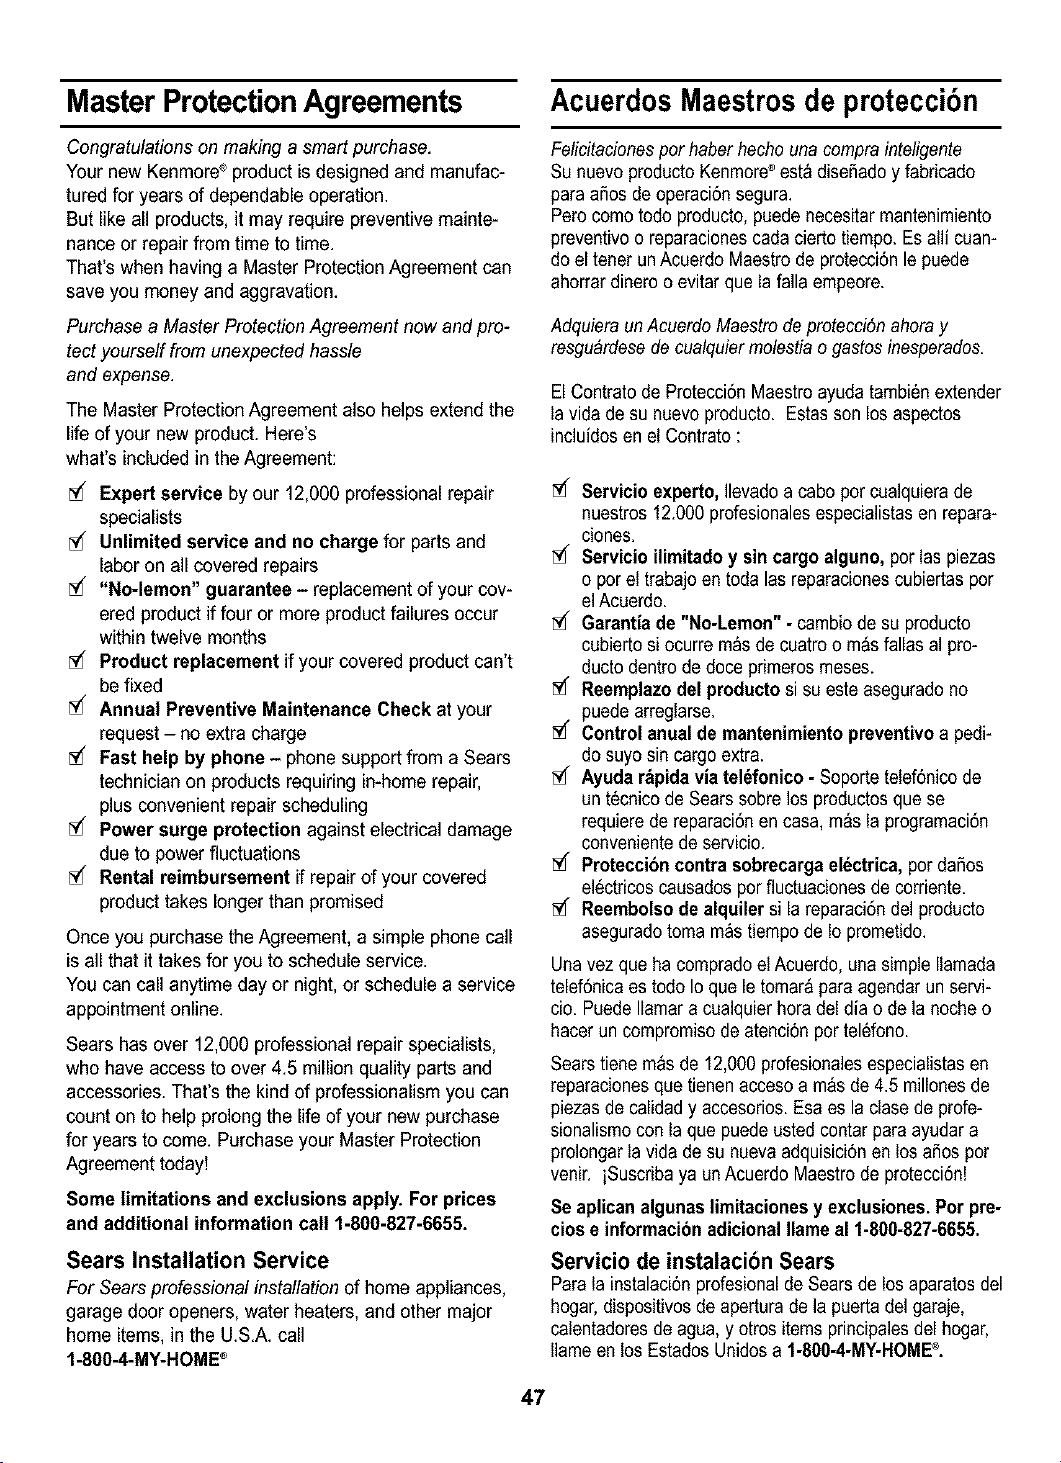
Master ProtectionAgreements
Congratulations on making a smart purchase.
Your new Kenmore®product isdesigned and manufac-
tured for years of dependable operation.
But like all products, it may require preventive mainte-
nance or repair from time to time.
That's when having a Master ProtectionAgreement can
save you money and aggravation.
Purchase a Master ProtectionAgreement now and pro-
tect yourself from unexpected hassle
and expense.
The Master ProtectionAgreement also helps extend the
life of your new product. Here's
what's included in the Agreement:
5( Expert service by our 12,000 professional repair
specialists
Unlimited service and no charge for parts and
labor on allcoveredrepairs
"No-lemon" guarantee - replacement ofyour cov-
ered productif four or more productfailures occur
withintwelvemonths
Product replacement if your coveredproductcan't
befixed
5( Annual Preventive Maintenance Check at your
request - no extracharge
5( Fast help by phone - phonesupport from a Sears
technician on products requiring in-homerepair,
plus convenient repair scheduling
5( Power surge protection against electrical damage
due to power fluctuations
5( Rental reimbursement if repair of your covered
product takes longer than promised
Once you purchase the Agreement, a simple phone call
isall that it takesfor you to schedule service.
You can call anytime day or night, or schedule a service
appointment online.
Sears has over 12,000 professional repair specialists,
who have access to over 4.5 million quality parts and
accessories. That's the kind of professionalism you can
count on to help prolong the lifeof your new purchase
for years to come. Purchase your Master Protection
Agreement today!
Some limitations and exclusions apply. For prices
and additional information call 1-800-827-6655.
Sears Installation Service
For Sears professional installation of home appliances,
garage door openers, water heaters, and other major
home items,in the U.S.A. call
1-800-4-MY-HOME_
AcuerdosMaestrosdeproteccibn
Felicitacionespar haberhechouna comprainteligente
Su nuevoproductoKenmore_est_ diseSadoy fabricado
paraaSosdeoperaci6nsegura.
Perocomotodo producto,puedenecesitarmantenimiento
preventivoo reparacionescadaciertotiempo.Esalll cuan-
do el tenerunAcuerdoMaestrode protecci6nle puede
ahorrardineroo evitar que la fallaempeore.
AdquieraunAcuerdoMaestrodeprotecciSnahera y
resguardesede cualquiermolestiao gastosinesperados.
El Contratode Protecci6nMaestroayudatambi6nextender
la vidade su nuevoproducto. Estasson losaspectos
incluldosen el Contrato:
5( Servicioexperto,Ilevadoa cabo porcualquierade
nuestros12.000profesionalesespedalistas en repara-
ciones.
5( Servicioilimitado y sin cargoalguno, por las piezas
o porel trabajoen toda lasreparacionescubiertaspor
el Acuerdo.
5( Garantia de "No-Lemon" - cambiode su producto
cubiertosi ocurrem_sde cuatroo m&sfallas al pro-
ducto dentrode doce primerosmeses.
5( Reemplazodel producto si sueste aseguradono
puede arreglarse.
5( Control anual de mantenimiento preventivo a pedi-
do suyo sincargoextra.
5( Ayuda r_pida via tel6fonico -Soportetelef6nicode
un t6cnicode Searssobrelosproductosque se
requierede reparaci6nen casa,m_s la programaci6n
convenientede servido.
5( Protecci6n contrasobrecargael6ctrica, por daSos
el_ctricoscausadospot fluctuacionesde corriente.
5( Reembolsodealquiler si la reparaciSndel producto
aseguradotoma mastiempode Ioprometido.
Unavez que ha compradoel Acuerdo,unasimple Ilamada
telefSnicaestodo Ioque le tomar¶agendarun servi-
do. PuedeIlamara cualquierhoradel dla o de la nocheo
hacerun compromisode atend6n portel_fono.
Searstiene m_sde 12,000profesionalesespecialistasen
reparacionesque tienenaccesoa m&sde 4.5millonesde
piezasde calidady accesorios.Esaes la clasede profe-
sionalismocon la que puedeusted contarparaayudara
prolongarla vida de su nuevaadquisici6nen los aSospor
venir, iSuscribaya unAcuerdoMaestrode protecci6nt
Se aplicanalgunaslimitacionesy exclusiones.Por pre-
ciose informaci6nadicionalIlameal 1-800-827-6655.
Servicio de instalaci6n Sears
Parala instalad6n profesionaldeSearsde losaparatosdel
hogar,dispositivosde aperturade la puertadel garaje,
calentadoresde agua,y otrositemsprindpalesdel hogar,
Ilameen los EstadosUnidosa 1-800-4-MY-HOME_.
47

Your Home
For repair- in your home- of all major brand appliances,
lawn and garden equipment, or heating and coolingsystems,
no matter who made it, no matter who sold it!
For the replacement parts, accessories and
owner's manuals that you need to do-it-yourself.
For Sears professional installation of home appliances
E/At/RS
8M
®RegisteredTrademark/ Trademark/ ServiceMark ofSeam,Roebuckand Co.
®Mama Regis_rada/1a Marcade F6bdca/ SMMamade Serviciode Sears, Roebuckand Co. Part No. 3828WSA3381
MC MD
Marquede commerce/ Marqued6pos_ede Sears, RoebuckandCo. © Sears, RoebuckandCo.