Loading ...
Loading ...
Loading ...
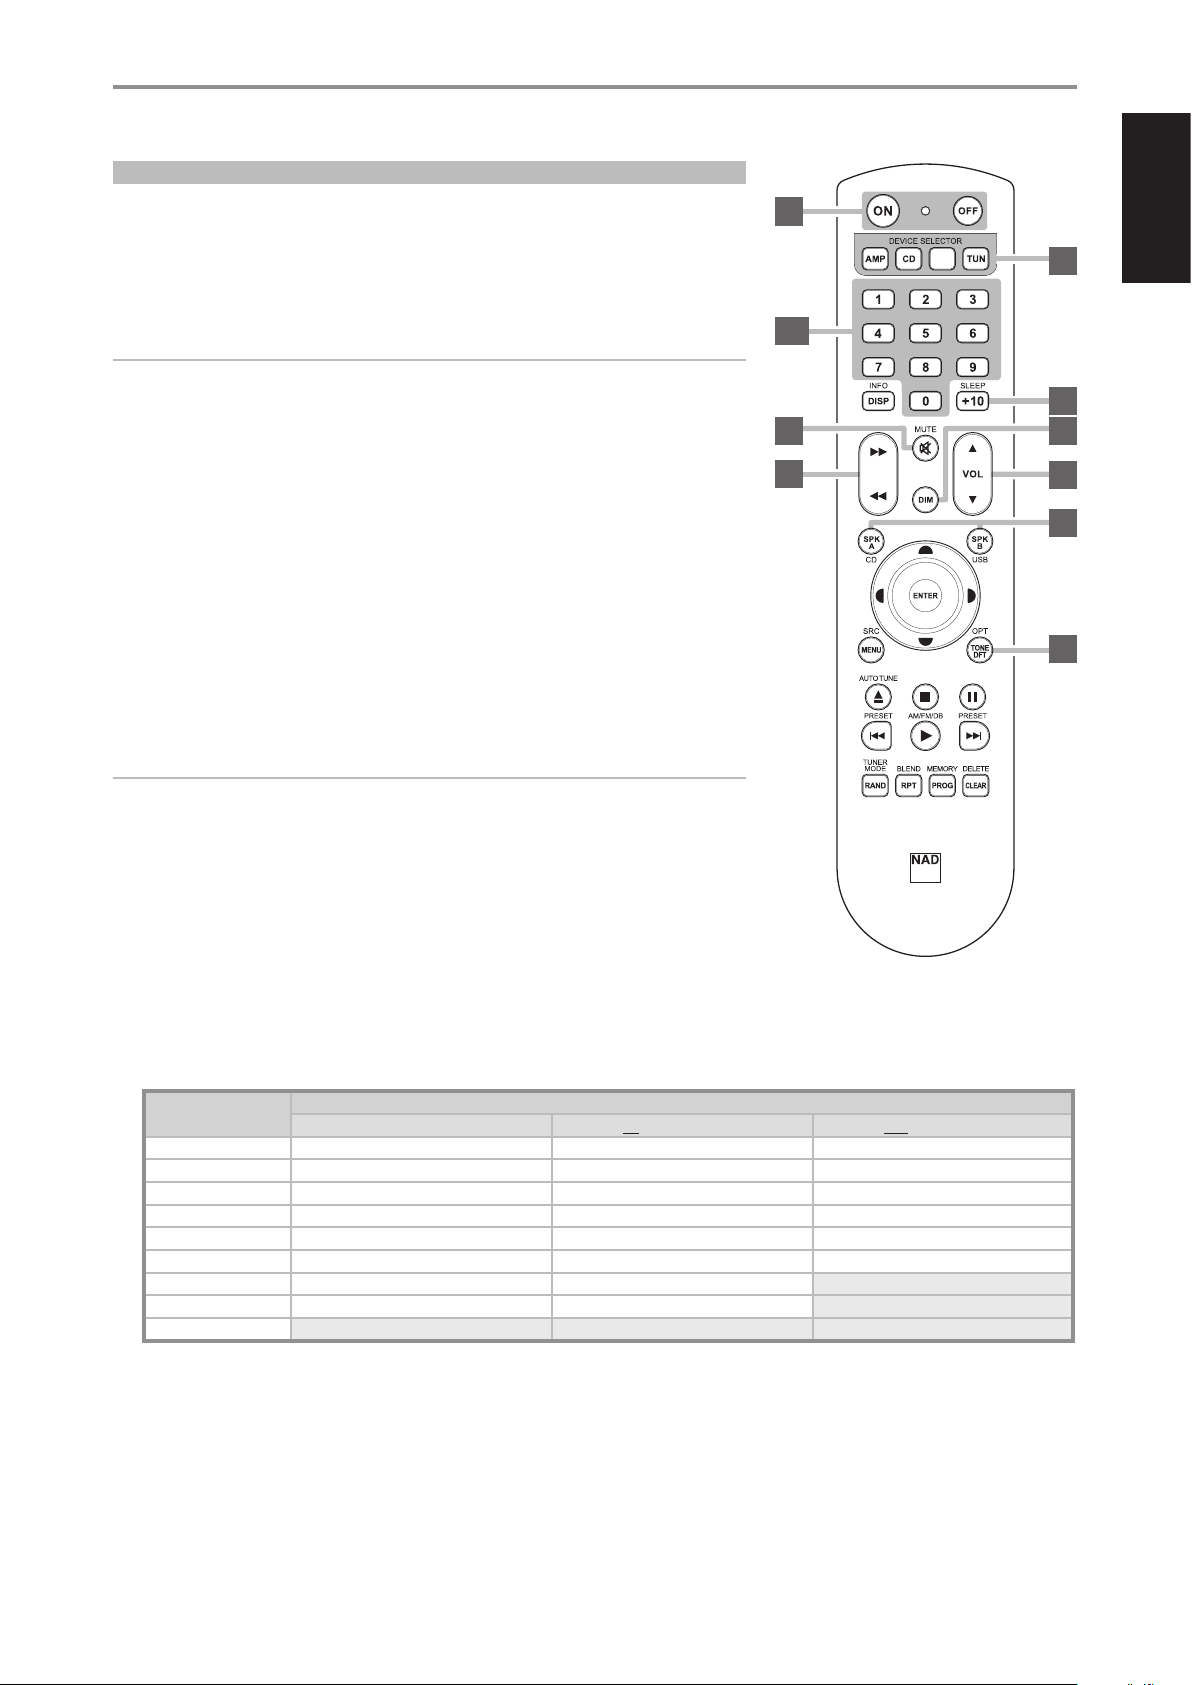
USING THE SR 9 REMOTE CONTROL
The SR 9 remote control handset handles the key functions of the C 368 as well as other NAD Stereo
Receivers, Integrated Ampliers and Preampliers. It has additional controls to remotely operate NAD CD
Players, AM/FM Tuners and dedicated AM/FM/DAB Tuners. It will operate up to a distance of 23ft (7m).
Alkaline batteries are recommended for maximum operating life. Two AA batteries should be tted in the
battery compartment at the rear of the Remote Control handset. When replacing batteries, check that they
have been put in the right way round, as indicated on the base of the battery compartment.
NOTE
The remote control handset supplied with the C 368 is of a universal NAD type, designed to operate
several NAD models. Some buttons are applicable only to specic NAD models. Contact your dealer
or NAD audio specialist for assistance.
1 POWER ON & OFF: The SR 9 remote has a separate ON and OFF button. Press the ON button
to switch the unit from Standby to operating mode. Press the OFF button to switch the unit to
Standby mode.
2 DEVICE SELECTOR: A Device Selector button determines only what component the SR 9 will
command; it does not perform any function on the C 368. Press desired Device Selector button
for the applicable buttons to be directed to a “page” of commands relevant to the selected device.
Upon selecting a Device, you can now press the corresponding SR 9 control buttons applicable for
the selected Device.
3 INPUT SELECTORS: Refer to the corresponding labels printed on the remote control faceplate
and their respective assigned buttons to make use of these functions. Set the DEVICE SELECTOR to
“AMP” in order to gain access to these buttons.
IMPORTANT NOTE
• There are 9 maximum Sources with discrete IR codes and they are mapped out to SR 9 input selector
buttons 1 – 9. C368 does not have USB input, hence, BT Source selector originally assigned to input
selector “9/BT” will move over and replace input selector “USB/8”. Input selector “8” in AMP mode will
now correspond to Bluetooth source while input selector “9” will be unassigned. Refer to example below.
• If you installed the optional MDC BluOS or MDC HDM 2 module, the unassigned input selector
“9” button will be allocated to “BluOS” or “HDMI 1” source (refer to “MDC BluOS or MDC HDM 2
installed” column below).
• If you installed both optional MDC HDM 2 and MDC BluOS modules, you have to disable two or
more Sources to accommodate the corresponding Sources from both modules. Refer to the item
about “ENABLED” under “USING THE C 368” for guidance on how to enable/disable Sources.
• Under “MDC BluOS and MDC HDM 2 installed” column below, OPT 2, COAX 2 and PHONO were disabled
to make way for HDMI 1, HDMI 2 and HDMI 3. It is your prerogative which Sources to disable so that de-
sired Sources from installed MDC modules can be allocated and selectable from the SR 9 remote control.
SR 9 CONTROL BUTTON
(AMP MODE)
FUNCTION (Corresponds to Source number)
C368 Default Settings MDC BluOS OR MDC HDM 2 installed MDC BluOS AND MDC HDM 2 installed
1 OPT 1 OPT 1 OPT 1
2 OPT 2 OPT 2 COAX 1
3 COAX 1 COAX 1 LINE 1
4 COAX 2 COAX 2 LINE 2
5 PHONO PHONO Bluetooth
6 LINE 1 LINE 1 BluOS
7 LINE 2 LINE 2 HDMI 1
8 Bluetooth Bluetooth HDMI 2
9 Unassigned BluOS (or HDMI 1) HDMI 3
4 NUMERIC KEYS: The numeric keys allow for direct input of tracks for CD players, and direct
channel/preset access for tuners and receivers.
5 SLEEP: Switch o specic NAD Receiver or Tuner models after a preset number of minutes. This
button control does not apply to C 368.
6 MUTE: Press the [MUTE] button to temporarily switch OFF the sound to the speakers and
headphones. MUTE mode is indicated by the Standby LED indicator ashing for NAD Integrated
Ampliers or “Mute” shown in the VFD of NAD Receivers. For C 368, “Mute” is shown in the display.
Press MUTE again to restore sound. Adjusting the volume level via the SR9 or the front panel
volume knob will automatically release the mute function.
IDENTIFICATION OF CONTROLS
SR 9 REMOTE CONTROL
SR 9
OPT 1 OPT 2 COAX 1
COAX 2 PHONO LINE 1
LINE 2 USB BT
BLS
SCAN
TUNE
SOURCE
SCAN
TUNE
SOURCE
SCAN
TUNE
SOURCE
SCAN
TUNE
SOURCE
2
8
9
10
1
3, 4
6
7
5
11
9
ENGLISHFRANÇAISESPAÑOLITALIANODEUTSCHNEDERLANDSSVENSKAРУССКИЙ
Loading ...
Loading ...
Loading ...